

Page 1

DocuColor 5252 Digital Color Press
While You’re Waiting for your Trainer
En attendant le formateur
Mientras espera a su instructor
Enquanto você por seu instrutor
Page 2

©2003 Xerox Corporation. All rights reserved.
Copyright protection claimed includes all forms and matters of copyrightable
material and information now allowed by statutory or judicial law or hereinafter
granted, including without limitation, material generated from the software programs that are displayed on the screen such as styles, templates, icons, screen
displays, looks, etc.
®
, The Document Company®, the digital X®, and all Xerox product names
Xerox
and product numbers mentioned in this publication are registered trademarks of
Xerox Corporation.
Xerox Canada is a licensee of all the trademarks. Other company brands and
product names may be trademarks or registered trademarks of their respective
companies and are also
acknowledged.
Changes are periodically made to this document. Technical updates will be included in subsequent editions.
Printed in the United States of America.
©2003 Xerox Corporation. Todos los derechos reservados.
La protección de derechos reservados reclamada incluye todos los materiales
e información de derechos reservados amparados por la ley estatutaria o judicial en la actualidad o en el futuro, incluyendo sin limitación, materiales generados por los programas de software que aparecen en la pantalla tal como estilos,
plantillas, iconos, pantallas, imágenes, etc.
®
Xerox
, The Document Company®, el logotipo de la X® digital y todos los nombres y números de productos Xerox mencionados en esta publicación son marcas re-gistradas de Xerox Corporation.
Xerox Canada tiene licencia de todas las marcas registradas. Otras marcas y
nombres de productos pueden ser marcas comerciales o registradas de sus
compañías respectivas, y también se reconocen.
Este documento se revisa y cambia periódicamente. Las actualizaciones técnicas se incluirán en ediciones subsecuentes.
Impreso en los Estados Unidos de América.
©2003 Xerox Corporation. Tous droits réservés.
La protection des droits de reproduction s’applique à l’ensemble des informations et documents prévus aux termes de la loi, quels que soient leur forme et
leur contenu, y compris aux données générées par le slogiciels et qui s’affichent
à l’écran (profils, pictogrammes, écrans etc.).
®
Xerox
, le X® stylisé, ainsi que les numéros et les noms de produits Xerox
mentionnés dans cette publication sont des marques déposées deXerox
Corporation.
Xerox Canada détient les permis d’utilisation de ces marques. Les autres
marques et noms de produits d’autres sociétés peuvent être des marques
commerciales ou déposées de leurs sociétés respectives et sont également
reconnus .
Le présent document est régulièrement modifié. Les mises à jour techniques et
les corrections typographiques seront apportées dans les éditions ultérieures.
Imprimé aux Etats Unis d’Amérique
©2003 by Xerox Corporation. Todos os direitos reservados.
A proteção de copyright aqui reclamada inclui todas as formas e assuntos de
material e informações suscetíveis de registro de direitos autorais e como tal
atualmente previstos estatutária ou juridicamente, ou que o venham a ser no
futuro, incluindo - sem restrições - o material gerado por todo e qualquer
software indicado na tela, tal como estilos, padrões de ícones, representações
de tela, aspectos etc.
®
, The Document Company, o X® digital e todos os produtos Xerox
Xerox
mencionados nesta publicação são marcas da Xerox Corporation. Nomes de
produtos e marcas de outras companhias também são reconhecidos.
A Xerox Canada é uma licenciada de todas as marcas. As marcas e nomes de
produto de outras empresas podem ser marcas comerciais ou registradas de
suas respectivas empresas e são também reconhecidos como tal.
Este documento é atualizado periodicamente. Quaisquer alterações técnicas
ou correções tipográficas serão incluídas nas próximas edições.
Page 3

Introduction
Busy, busy, busy!
We know you are busy, and if you need to get jobs completed before your Xerox trainer can
show you all of the great things you can do with your new digital press, this book is just what
you need to get started.
For specific information on using the DocuColor 5252, always refer to the Operator
Manual.
Here’s what you’ll learn by reading this booklet:
• We’ll give you a brief overview of your new press showing you where
key components are located.
• Tell you what your responsibilities are as the Operator, or the System
Administrator.
• Provide basic information on how to run jobs on the machine, including
making a copy.
• Where to go inside the machine to clear paper jams.
Let’s get started!
1
Page 4

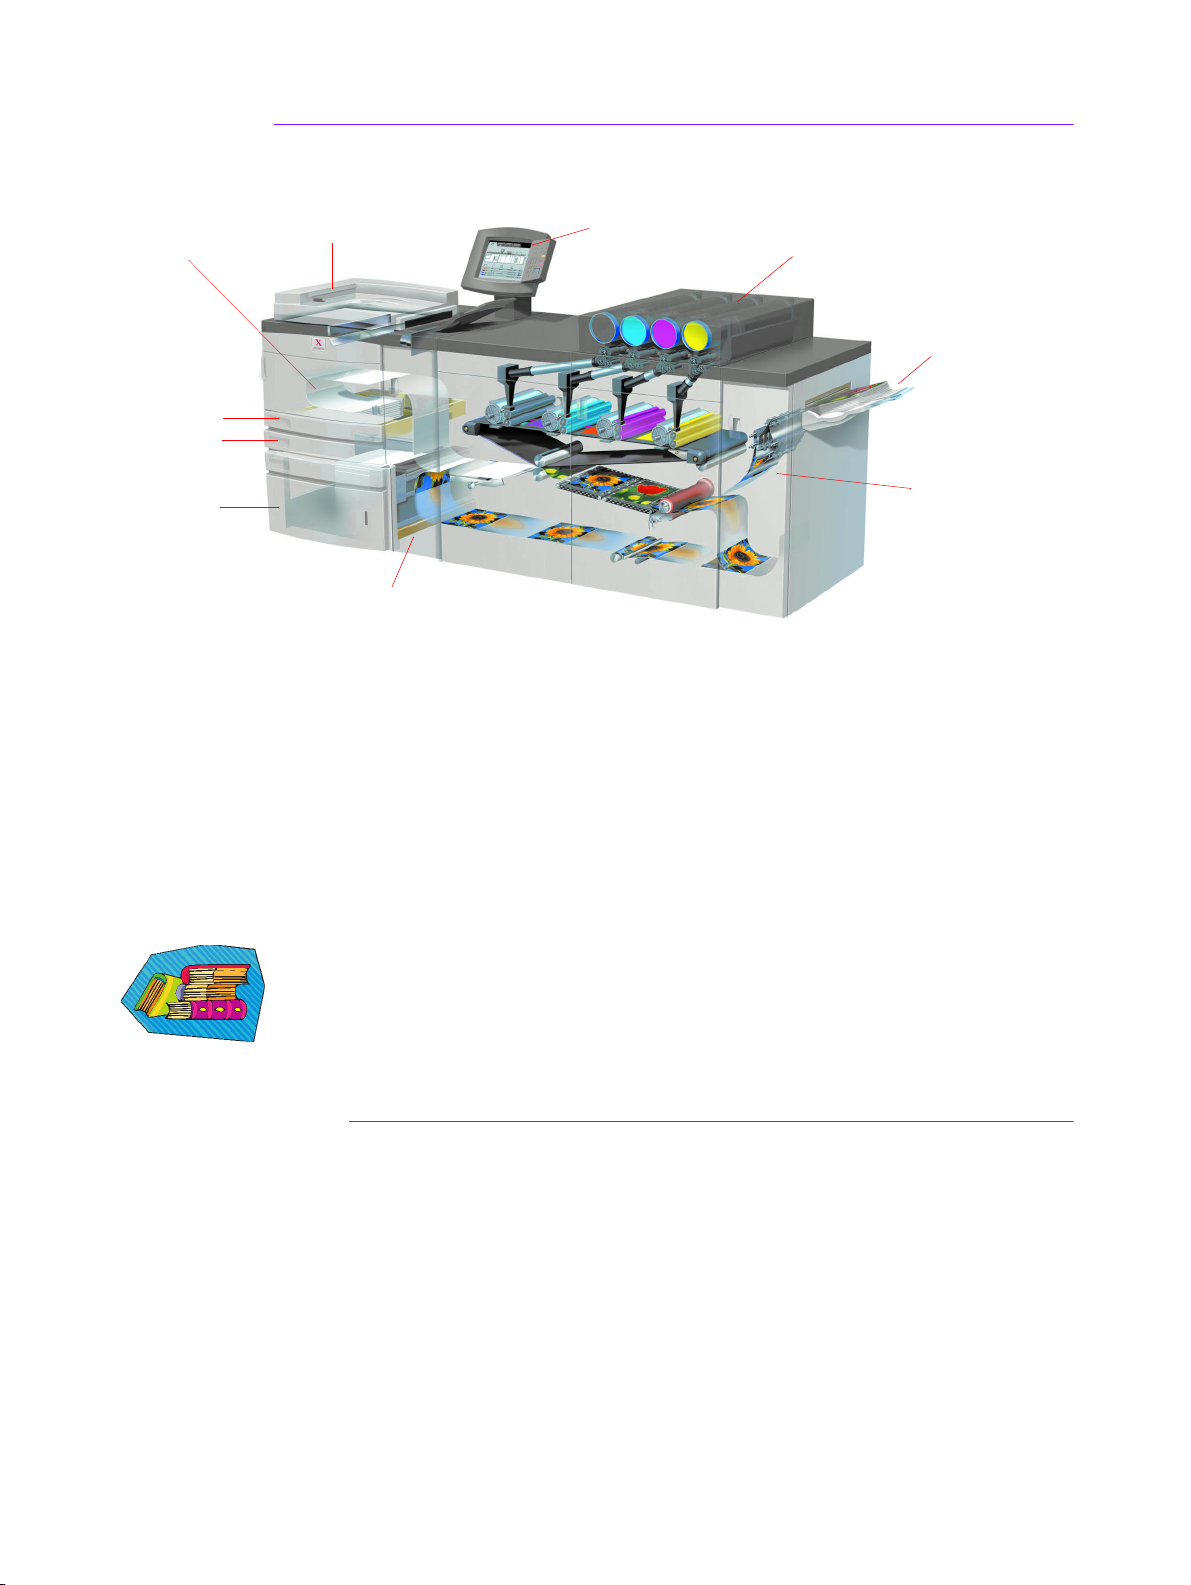
Meet the DocuColor 5252!
U
Dupl
T
pper
Transport
Door
Tray 1
Tray 2
Tray 3
ex Document Feeder
and Scanner
Transport Module
ouch Screen
Control Panel
Dry Ink/Toner
cartridges
Offset Catch
Tray
Exit Module with
paper decurlers
The cut-away view above identifies modules of the basic configuration of the digital press and
shows the paper path from the trays through the printing area to the Offset Catch Tray. Notice
that paper feeds from the right side of Tray 3, and from the left side of Trays 1 and 2. Optional
equipment that you may have includes High Capacity Stacker, Enhanced High Capacity
Stacker, and a High Capacity Stacker/Stapler.
We recommend you read the Overview chapter of the Operator Manual to become better
acquainted with using the Control Panel and Touch Screen.
Installation and Setup
Your Xerox representative installed all the digital press modules and the color server
ordered with your press and, along with your System Administrator, installed print
drivers on at least one workstation connected to the network. A test job was sent to
the press to ensure all connections were working correctly.
2
Page 5
Documentation
Supporting documentation is available in Adobe pdf format on the CD enclosed in the
Customer Information Packet that came with your press. We recommend you follow
the printing recommendations in the packet letter, and keep all the documentation in
the 3-ring binder provided.
The CD contains files of the following documents:
• Operator Manual – includes information on operating the digital
press, the Scanner and Duplexing Automatic Document Feeder, the
Enhanced High Capacity Stacker, the High Capacity Stacker and the High
Capacity Stacker/Stapler.
• System Administration Guide – provides details on how to set up and
change passwords and default settings in the Tools Mode, as well as
how to use the Auditron Mode.
• Color Materials Usage Guide – a generic book that provides
interesting and important facts for you to know regarding paper, its
properties, correct storage procedures, and what you can expect from
different types of paper. The information in this handy book applies to
paper usage in all Xerox color printers.
Color Server
The color server links the press with networked workstations (PCs, Macs or Unix).
You may have one of several different color servers sold for use with the digital
presses
Supporting documentation for using your color server is included on a CD shipped
with the unit. You, or your System Administrator, should print these manuals,
Release Notes, etc. after installation has been completed. Keep these manuals handy
to learn how to use the color server features to obtain high quality color prints.
Your Xerox representative installed the color server and worked with your System
Administrator to install the print drivers on one workstation. Your System
Administrator can now install the print drivers on as many workstations as the color
server system allows. Information required to install the print drivers is contained in
one of the color server manuals.
You can send jobs and set the print parameters from your workstation or, with some
from the color server itself. Refer to the color server documentation for detailed
information on how to send and control jobs sent to the digital press.
3
Page 6

What’s Your Job?
If You’re the Operator:
You’re the person who runs the press every day (or night). If you have the optional
scanner connected, you can program jobs using the many features available on the digital
press Touch Screen.
You may also be responsible for a few simple maintenance tasks and will probably clear
any paper jams that may occur. You could also be responsible for maintaining adequate
supplies of a variety of paper stocks and a few consumable products used by the press,
such as dry ink/toner and fuser oil.
Refer to the Maintenance chapter in the Operator Manual for more information on
maintenance procedures and ordering supplies.
If You’re the System Administrator:
As the SA, you’ll set up any required passwords on the digital press and change default
settings in the Tools Mode to suit the requirements of your business. You’re also
responsible for installing print drivers on user workstations. Refer to the Color Server
documentation for the number of workstations that can be connected.
Refer to the Tools chapter in the System Administration Guide for detailed information on
setting defaults and passwords.
4
Page 7
A Few Quick Tips
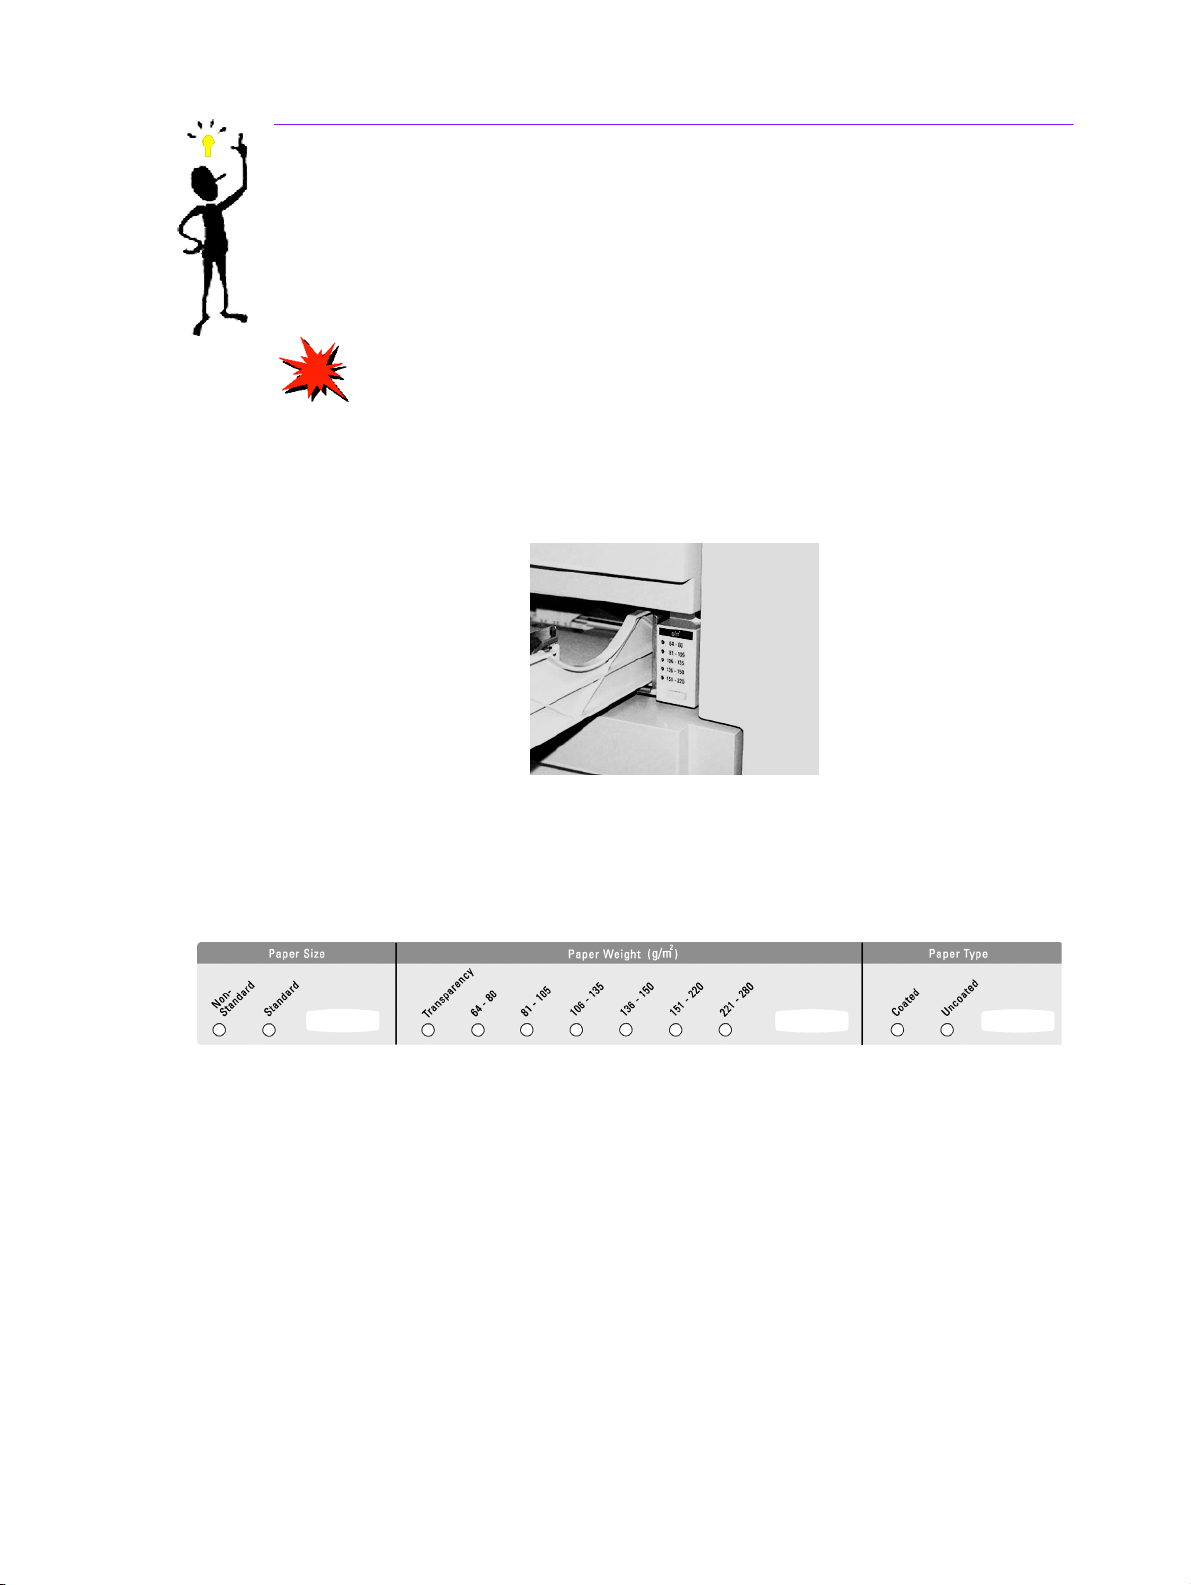
Before using the digital press, there are a few things you need to know:
1 You can load a wide variety of paper sizes and weights into Paper Trays 1, 2, and 3,
ranging from 8.0 x 10” to 12.6 x 17.7” (Short Edge Feed, SEF), A4 and A3 to SRA3 (SEF).
Acceptable weight ranges are from 64 to 280 g/m2.
IMPORTANT: After loading paper into any of the trays, you must select the
weight of the paper loaded on the Weight Indicator located at the paper tray. For
trays 1 and 2, the weight indicator is on the frame of the press, at the right side of
each tray. For Tray 3, the indicator is on the top front of the tray. This indicator also
enables you to select the Type and Size of paper loaded into this tray.
Weight Indicator for Trays 1 and 2
Weight Indicator for Trays 3
5
Page 8

2 The Duplexing Automatic Document Feeder (DADF) can be loaded with up to 50 sheets
of either the same size or mixed sizes of papers with weights ranging from 64 to
128 g/m
Control Panel to delete any programming from a previous job.
Refer to Chapter 4, Paper and Paper Trays, in the Operator Manual for more detailed
information on using various papers and other materials in the DocuColor 5252. For
detailed information about paper guidelines refer to the Color Materials User Guide and
the Recommended Materials List. The Recommended Materials List is a downloadable
file on www.xerox.com. Use the search parameters for your digital press name and follow the path until you reach the files that can be downloaded.
2
. When using the DADF, be sure to press the Clear All (or AC) button on the
3 Transparencies can be run only from Tray 3. Use only the transparencies listed in the
Recommended Materials List, and load them with the paper stripe facing down with the
striped edge as the leading
edge (at the right side of the tray).
6
Page 9
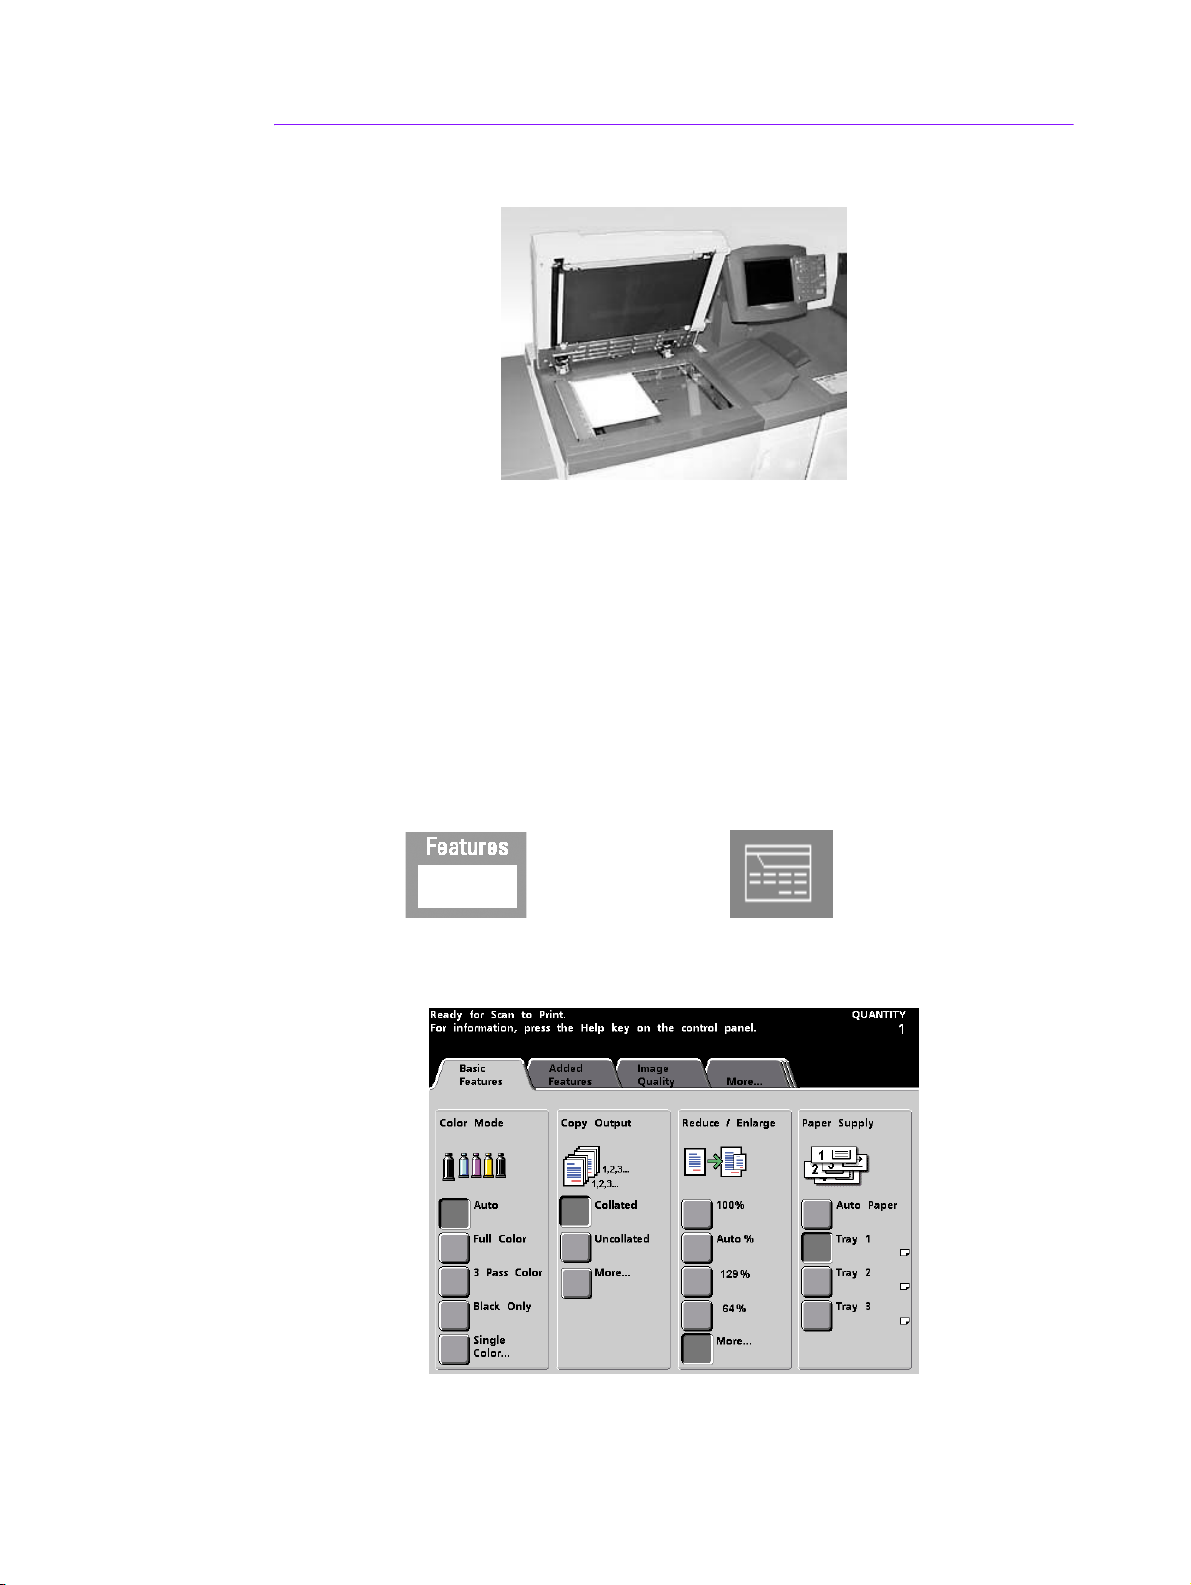
Using the Scanner on the DocuColor 5252
If your digital press has the optional Duplex Automatic Document Feeder (DADF) and Scanner
shown above, you can start making prints from scanned originals immediately. You can scan
mixed sizes of sheets up to 11x17”/A3 at 400 dpi. The DADF has a maximum capacity of 50
sheets of 24 lb. (90 g\m2) paper.
1 Press the Features button on the Control Panel and the Basic Features screen shown
below displays on the Touch Screen.
English Button International Button
7
Page 10
2 Select any of the options on the Basic Features screen, or touch the Added Features,
Image Quality, or More… tab for even more options to apply to your prints. Most
screens have simple instructions advising you how to use a particular option. If you don’t
find the information you need, refer to the Scanner chapter of the Operator Manual for
details on using each of the options available on these screens.
3 Place your original on the glass in the same orientation as the paper will be loaded.
4 Load the paper and be sure to select the correct paper weight (and type/size, if
appropriate) from the Weight Indicator located at the paper tray being used.
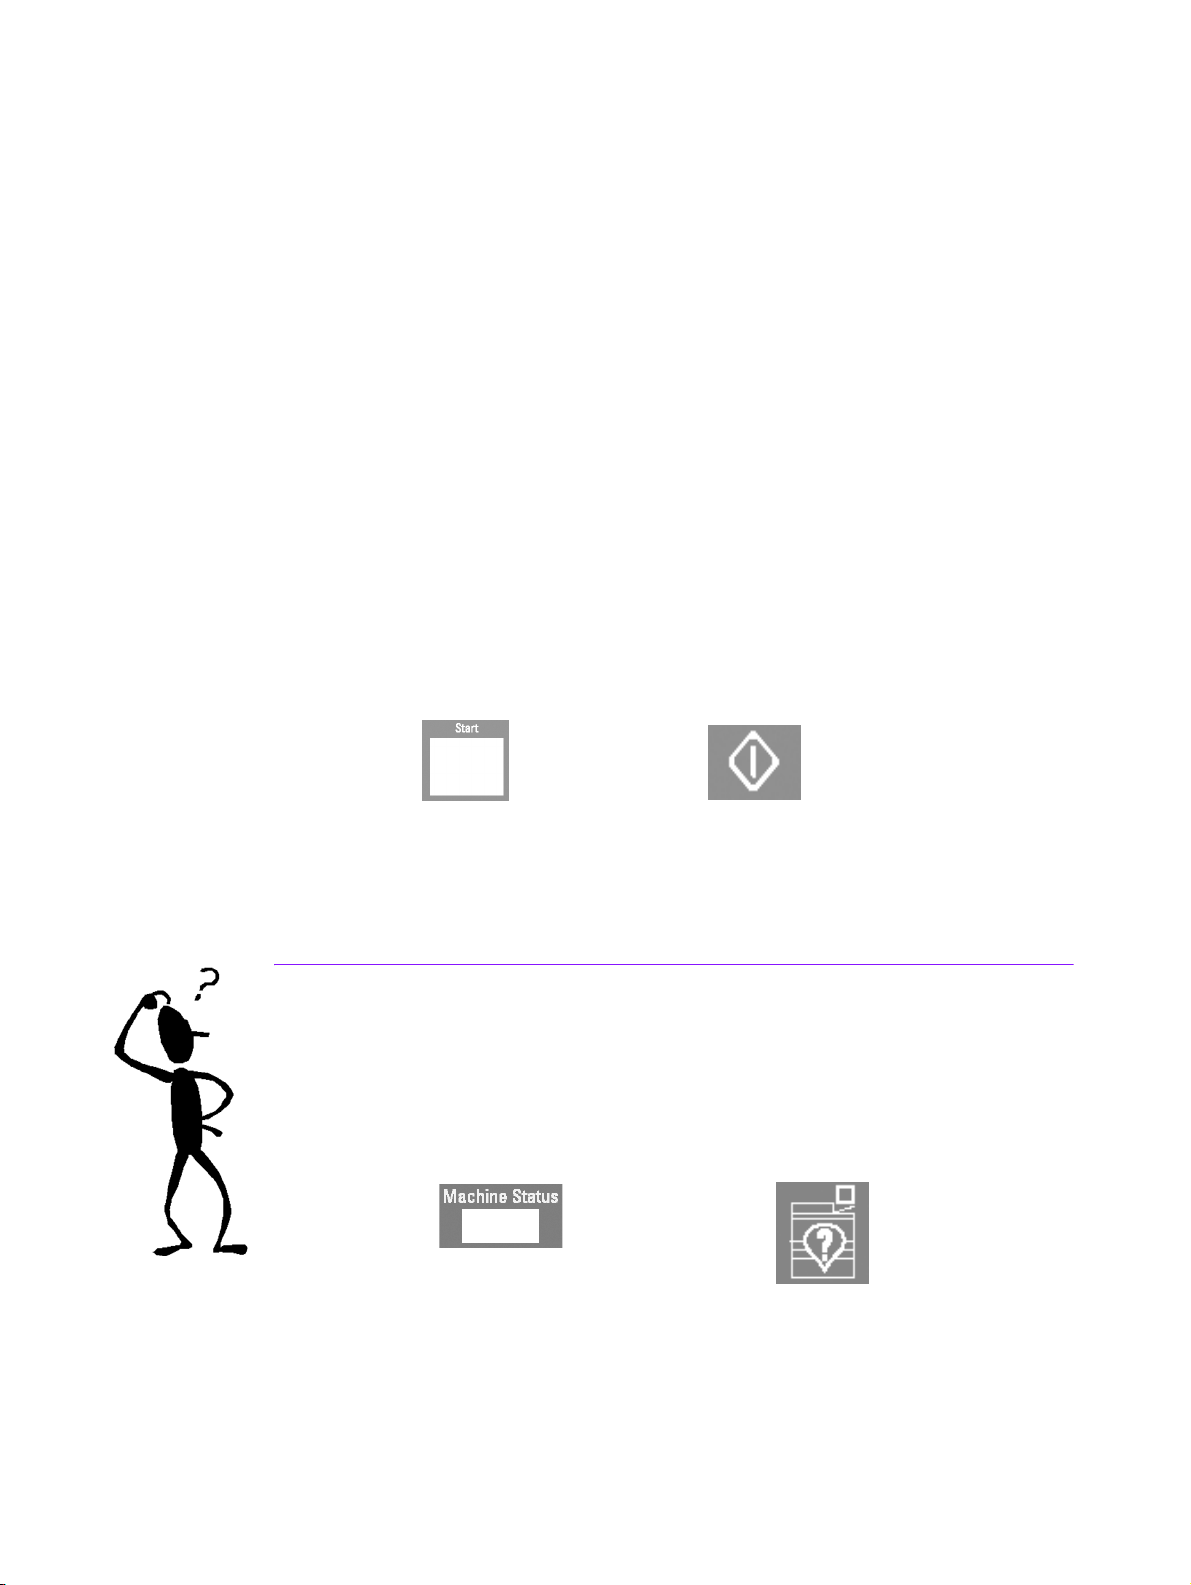
5 Use the keypad on the Control Panel to enter the quantity to be printed and press the
Start button.
English Button International Button
Questions?
Your Xerox customer support center will be happy to help!
You can locate the telephone number for the support center in your area by pressing the
Machine Status button on the Control Panel. The screen will display the number.
English Button International Button
8
Page 11
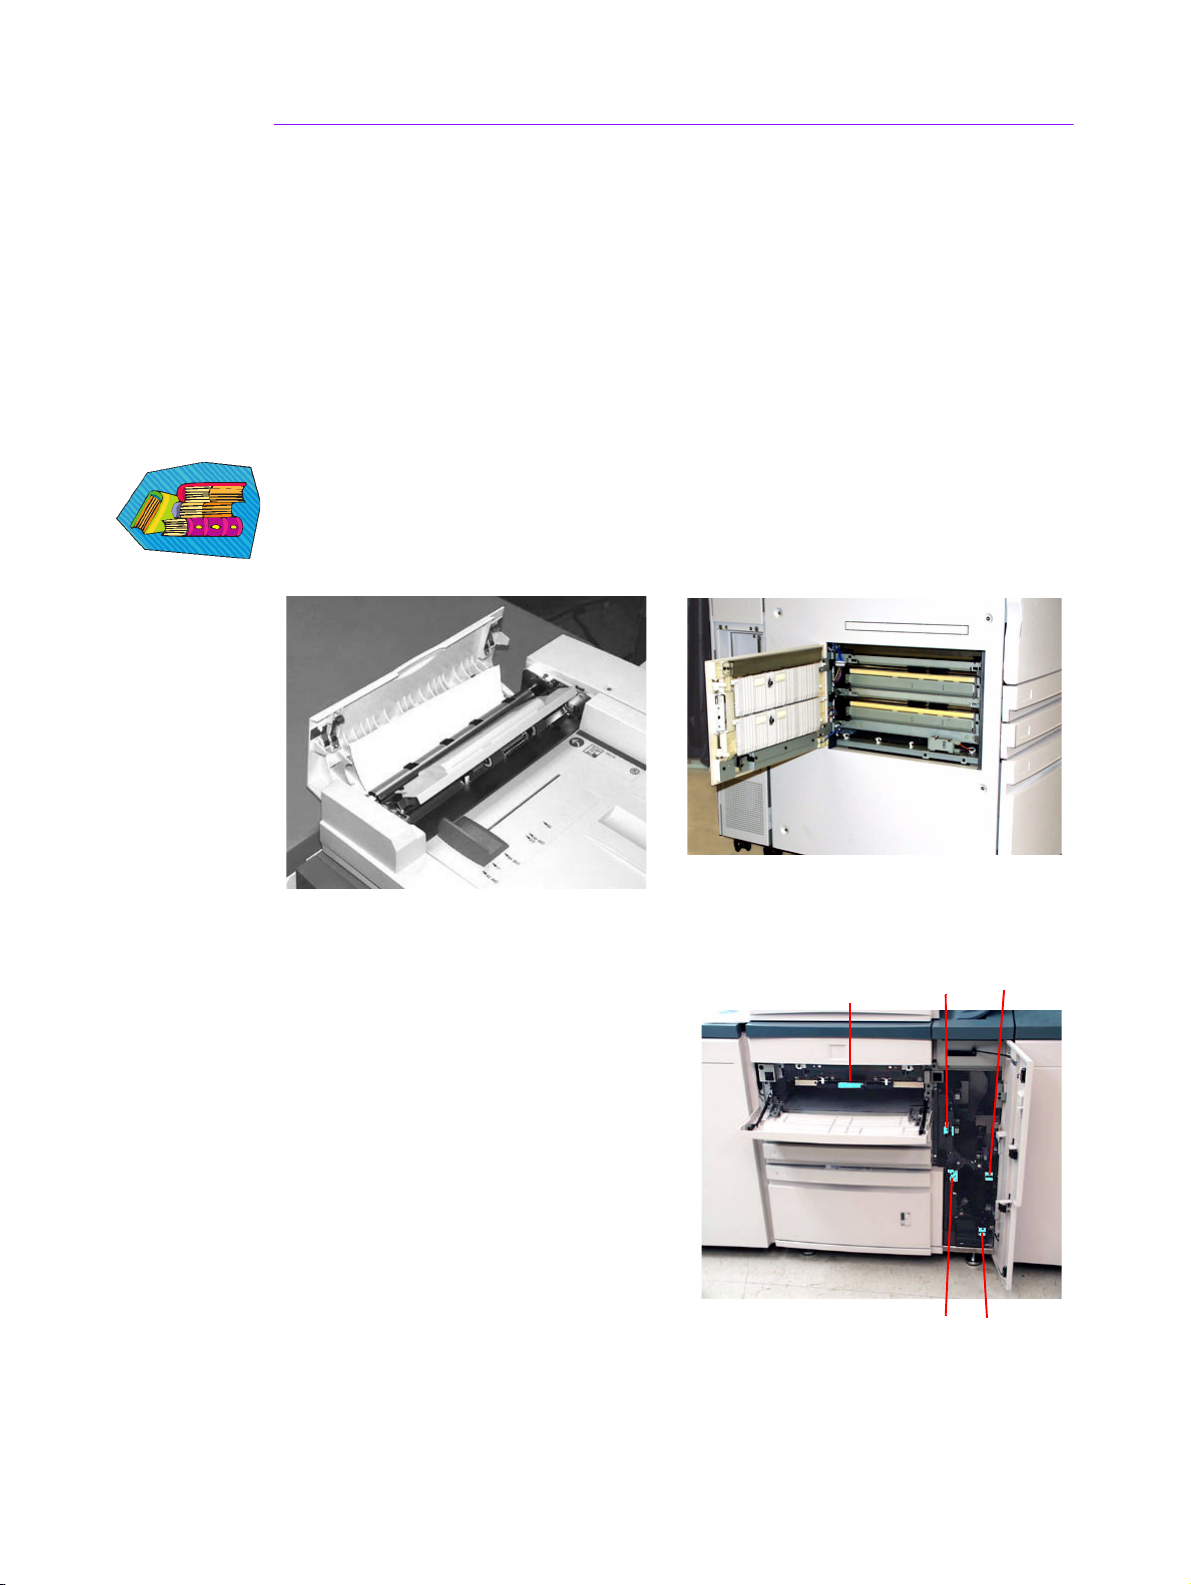
Clearing Paper Jams
Paper jams happen occasionally and can be taken care of easily. The Touch Screen will
display an animated image of where the jam is located and give you instructions on how to
clear the jam. Some areas in the machine also have labels that show you how to clear a jam.
Areas where jams may occur are in the Duplexing Automatic Document Feeder (DADF), the
Left Door of the press, the Upper Door area, the Transport Module, the Transfer Drawer
behind the front doors, and the Exit Module. Pictures of these areas are shown in this section
to help you locate them easily. More information can be found in the Problem Solving chapter
of the Operator Manual.
If you have the optional Enhanced High Capacity Stacker, High Capacity Stacker, or High
Capacity Stacker/Stapler connected to your DocuColor 5252, please refer to the Accessories
chapter of the Operator Manual for instructions on clearing jams.
Jam in DADF Left Door of Press, Area 1
Upper Door
Clearance Area 2
Upper Door, Area 2 and
Transport Module, Areas 3 and 7
3a
7b
3b
7a
9
Page 12
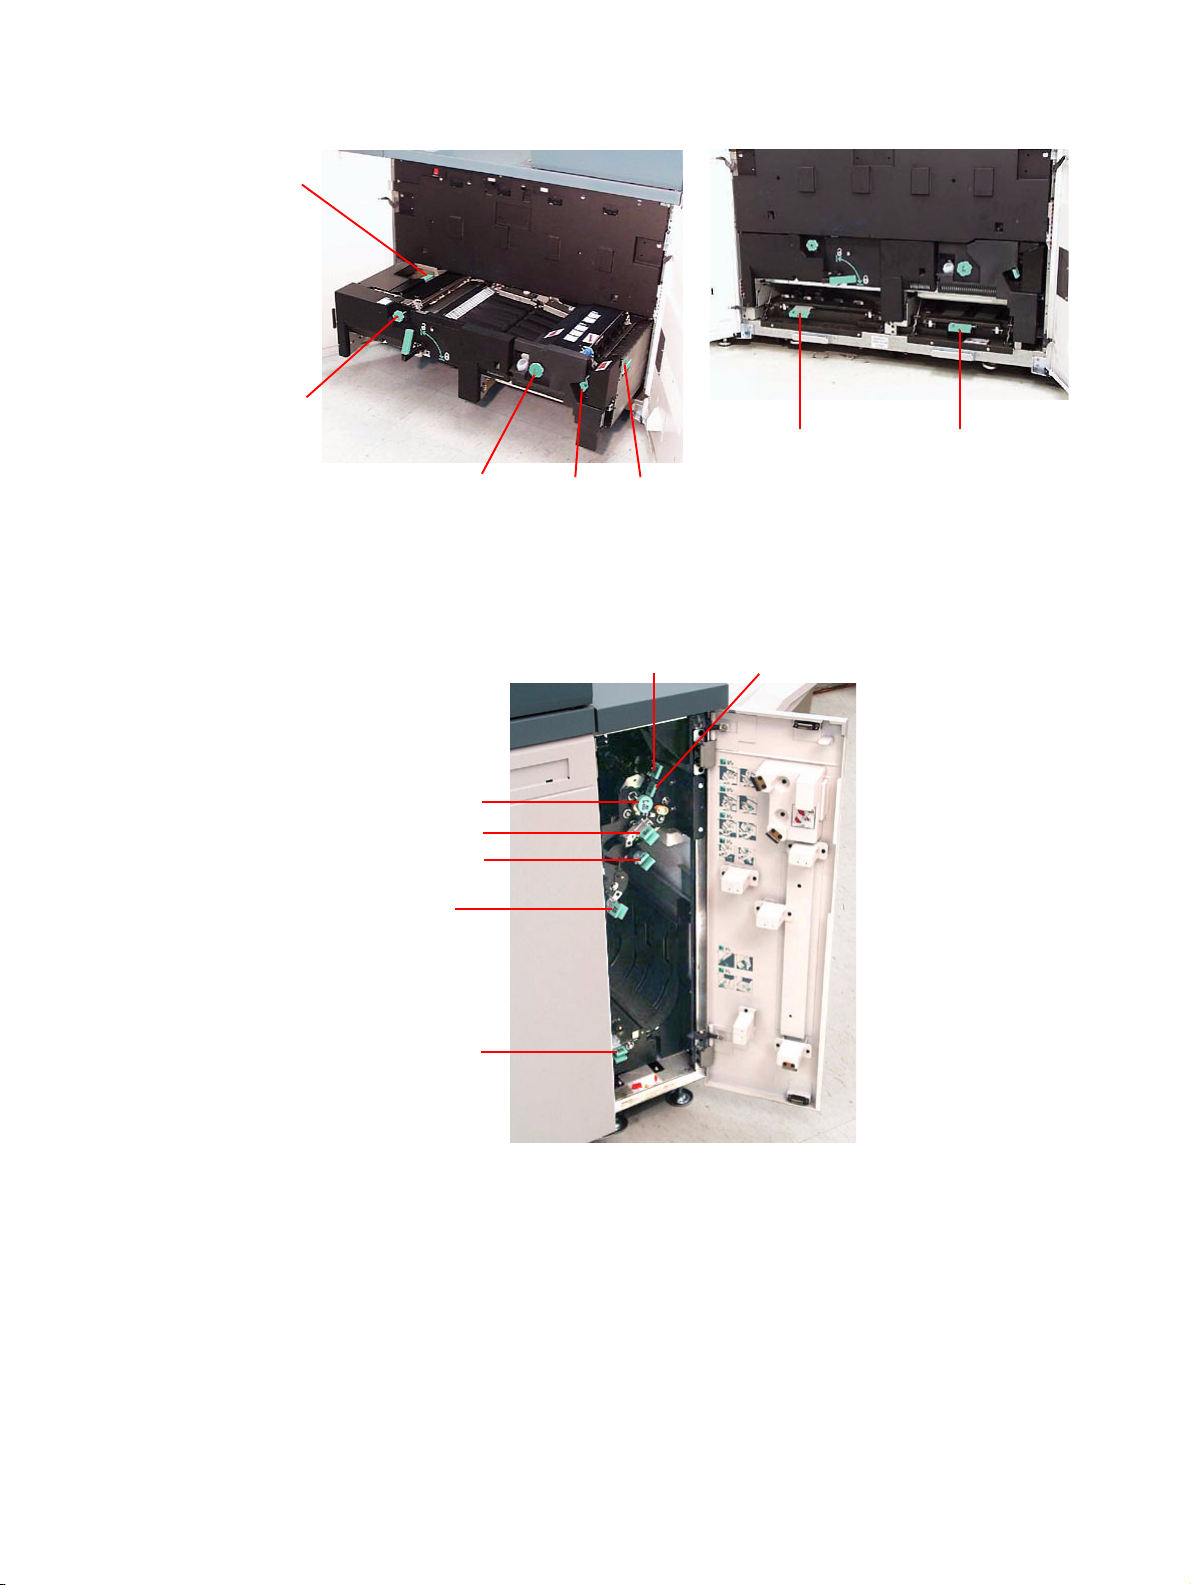
4a
4b
65
4d4e
4c
Transfer Drawer Behind the Front Doors
Areas 4a-e, Drawer Open Areas 5 and 6, Drawer Closed
8a 8b
8e
8c
8d
8f
8g
Exit Module, Areas 8a-g
10
Page 13

Ready to Print!
We hope that this brief introduction to the DocuColor 5252 will give you enough information
to get started using your new press!
If you have any questions, ask your local Xerox representative, or call your customer support
center.
11
Page 14

12
Page 15

Introduction
Occupé, occupé, occupé !
Nous savons que vous êtes occupés et si vous devez terminer des travaux avant que votre
formateur Xerox ne vienne vous présenter tout ce que vous pourrez réaliser avec votre
nouvelle Presse numérique, ce guide arrive à propos pour que vous puissiez vous lancer.
Pour obtenir les informations spécifiques concernant l’utilisation de la DocuColor 5252,
reportez-vous toujours au Guide de l’opérateur.
En parcourant ce guide :
• Nous présenterons brièvement votre nouvelle presse, en vous indiquant
où sont situés les éléments clés.
• Nous vous indiquerons quelles sont vos responsabilités, en tant
qu’opérateur ou responsable système.
• Nous vous fournirons les informations de base pour lancer des travaux
sur la machine, y compris le lancement d’une copie.
• Nous vous indiquerons où aller dans la machine pour dégager un
incident papier.
Commençons !
13
Page 16
Faites connaissance avec la DocuColor 5252 !
Porte du
transport
supérieur
Magasin 1
Magasin 2
Magasin 3
Chargeur automatique de
document recto verso et scanner
Module de transport
Panneau de commande
Écran tactile
Cartouches de toner
Bac à décalage
Module réception
avec détuileur
La coupe schématique ci-dessus identifie les modules de la configuration standard de la
Presse numérique et indique le circuit papier des magasins, en passant par la zone
d’impression, jusqu’au bac à décalage. Notez que le papier est alimenté du côté droit du
magasin 3 et du côté gauche des magasins 1 et 2. L’équipement en option dont vous disposez
peut comporter un récepteur grande capacité, un récepteur grande capacité amélioré et une
agrafeuse/récepteur grande capacité.
Nous vous recommandons de lire le chapitre Présentation du Guide de l’opérateur pour mieux
vous familiariser avec le panneau de commande et l’écran tactile.
Installation et configuration
Votre interlocuteur Xerox a installé tous les modules et le serveur couleur que vous
avez commandés avec votre presse et, avec l’aide du responsable système, a installé
les pilotes d’impression sur au moins un poste de travail connecté au réseau. La
presse a été mise à l’essai pour vérifier le fonctionnement correct de toutes les
connexions.
14
Page 17

Documentation
Une documentation de support est disponible sous format .pdf d’Adobe sur le CD
inclus dans l’Ensemble d’information client qui a été fourni avec la Presse. Nous vous
conseillons de suivre les recommandations d’impression indiquées sur la lettre et de
garder toute la documentation dans le classeur 3 trous fourni.
Le CD contient les fichiers et la documentation suivants :
• Guide de l’opérateur – inclut les informations de fonctionnement de
la Presse numérique, du scanner et du chargeur automatique de
documents recto verso, du récepteur grande capacité avancé, du
récepteur grande capacité et de l’agrafeuse/récepteur grande capacité.
• Guide du Responsable – détaille comment configurer et changer les
mots de passe et les réglages par défaut dans le mode Outils et
comment utiliser le mode Auditron.
• Guide d’utilisation des supports pour l’impression couleur – est
un manuel générique qui fournit des informations intéressantes
concernant les supports, leurs propriétés, les procédures d’entreposage
appropriées et le comportement des différents types de supports. Ce
guide pratique couvre l’utilisation des supports pour l’ensemble des
imprimantes couleur Xerox.
Serveur couleur
Le serveur couleur relie la presse aux postes de travail en réseau (PC, Mac ou Unix).
Différents serveurs couleur sont vendus pour une utilisation avec la Presse
numérique.
La documentation de support pour l’utilisation du serveur couleur est incluse sur un
CD envoyé avec l’unité. Vous même, ou votre responsable système devriez imprimer
ces manuels, ces notes de publication, etc. lorsque l’installation est terminée.
Conservez ces manuels à portée de main pour savoir comment utiliser les fonctions
du serveur couleur afin d’obtenir des impressions couleur de haute qualité.
Votre interlocuteur Xerox a installé le serveur couleur et a travaillé avec votre
responsable système pour installer les pilotes d’impression sur un poste de travail. Il
peut, à présent, installer les pilotes d’impression sur autant de postes de travail que
le système du serveur couleur le permet. Les informations requises pour installer les
pilotes d’impression sont contenues dans l’un des manuels relatif au serveur couleur.
Vous pouvez envoyer des travaux et définir les paramètres d’impression pour votre
poste de travail ou, avec certains, à partir du serveur couleur. Reportez-vous à la
documentation du serveur couleur pour obtenir des informations détaillées
concernant l’envoi et le contrôle de travaux lancés sur la Presse numérique.
15
Page 18

Quelle est votre tâche ?
Si vous êtes un opérateur :
Vous êtes la personne qui supervise quotidiennement le fonctionnement de la presse. Si
le scanner en option est connecté, vous pouvez programmer des travaux au moyen de
nombreuses fonctions disponibles sur l’écran tactile de la Presse numérique.
Vous pouvez également être responsable de simples tâches de maintenance et
probablement de l’élimination des incidents papier éventuels ; de l’inventaire des divers
supports et de certains des consommables utilisés par la presse comme le toner et l’huile
de four.
Reportez-vous au chapitre Maintenance du Guide de l’opérateur pour obtenir plus
d’informations relatives aux procédures de maintenance et à la commande de
consommables.
Si vous êtes le responsable système :
En tant que responsable, vous devrez définir les mots de passe sur la Presse numérique
et changer les réglages par défaut dans le mode Outils, en fonction des besoins précis de
votre entreprise. Vous serez également responsable de l’installation des pilotes
d’imprimante sur les postes de travail des utilisateurs. Reportez-vous à la documentation
du RIP pour savoir quel est le nombre de postes de travail qui peuvent être connectés.
Reportez-vous au chapitre Outils du Guide du Responsable pour obtenir des informations
détaillées quant aux réglages par défaut et aux mots de passe.
16
Page 19

Quelques conseils pratiques
Avant d’utiliser la Presse numérique, voici quelques points à connaître :
1 Vous pouvez placer une variété de formats et grammages dans les magasins 1, 2 et 3,
allant de 8 x 10 à 12,6 x 17,7 (Départ petit côté, DPC), A4 et A3 à SRA3 (DPC). Les plages
de grammages acceptables vont de 64 à 280 g/m2.
IMPORTANT : Après avoir placé le papier dans l’un des magasins, vous devez
sélectionner le grammage du papier sur l’indicateur de grammage du magasin.
Pour les magasins 1 et 2, l’indicateur de grammage se trouve sur l’armature de la
presse, sur le côté droit de chaque magasin. Pour le magasin 3, l’indicateur se
trouve à l’avant, au-dessus du magasin. Cet indicateur permet également de
sélectionner le type et le format papier placé dans ce magasin.
Indicateur de grammage pour les magasins 1 et 2
Indicateur de grammage pour le magasin 3
17
Page 20

2 Il est possible de placer jusqu’à 50 feuilles de même format ou de formats mixtes avec
2
des grammages de 64 à 128 g/m
verso. Lors de l’utilisation du chargeur, sélectionnez le bouton Effacer tout (ou AC) sur
le panneau de commande pour effacer toute programmation d’un précédent travail.
Reportez-vous au chapitre 4, Supports et magasins, du Guide de l’opérateur pour obtenir
plus d’informations concernant l’utilisation de divers supports et autres matériaux avec la
DocuColor 5252. Pour des informations détaillées sur l’utilisation des supports, reportezvous au Guide d’utilisation des matériaux couleur ainsi qu’à la Liste des matériaux
recommandés qui peut être téléchargée depuis www.xerox.com. Utilisez les
paramètres de recherche pour le nom de la Presse numérique et suivez le chemin pour
accéder aux fichiers téléchargeables.
dans le chargeur automatique de documents recto
3 Les transparents peuvent être lancés uniquement à partir du magasin 3. Utilisez des
transparents listés dans la Liste des matériaux recommandés et placez-les avec la bande
papier face dessous, avec le bord rayé au bord d’attaque (sur le côté droit du magasin).
18
Page 21

Utilisation du scanner sur la DocuColor 5252
Si votre Presse numérique possède le chargeur automatique de document recto verso en
option et le scanner indiqué ci-dessus, vous pouvez réaliser des documents numérisés
immédiatement. Vous pouvez numériser des feuilles de formats mixtes jusqu’à 11x17/A3, à
une résolution de 400 dpi. Le chargeur a une capacité maximum de 50 feuilles de papier
90 g\m2 (24 lb).
1 Appuyez sur la touche Fonctions du panneau de commande et l’écran Fonctions
standard indiqué ci-après s’affiche sur l’écran tactile.
Bouton en anglais
Bouton avec
symbole international
19
Page 22

2 Sélectionnez l’une des options sur l’écran Fonctions standard ou touchez l’onglet
Autres fonctions, Qualité image ou Suite… pour obtenir encore plus d’options à
appliquer à vos impressions. La plupart des écrans donnent des instructions simples sur
les options à utiliser en particulier. Si vous ne trouvez pas l’information souhaitée,
reportez-vous au chapitre Scanner du Guide de l’opérateur pour obtenir des détails quant
à l’utilisation des options disponibles sur ces écrans.
3 Placez le document sur la glace d’exposition, dans la même orientation que le papier à
placer.
4 Placez le papier et vérifiez d’avoir sélectionné le grammage approprié (et le type/format,
si adéquat) à partir de l’indicateur de grammage situé sur le magasin utilisé.
5 Utilisez le clavier du panneau de commande pour entrer la quantité à imprimer et appuyez
sur le bouton Démarrer.
Bouton en anglais Bouton avec symbole international
Questions ?
Le Centre Service Xerox sera ravis de vous aider.
Le numéro de téléphone du Centre Services pour votre région apparaît après sélection du
bouton État machine sur le panneau de commande. L’écran affiche le numéro.
Bouton en anglais
Bouton avec symbole international
20
Page 23

Dégagement d’incident
Un incident papier peut se produire occasionnellement et peut être facilement rétabli. L’écran
tactile affiche l’endroit où l’incident s’est produit et les instructions pour le dégager. Certaines
zones de la machine possèdent aussi des étiquettes indiquant comment dégager un incident.
Les zones de production d’incident sont le chargeur automatique de documents recto verso,
la porte gauche, la zone de la porte supérieure, le module de transport, le tiroir de transfert
derrière les portes avant et le module récepteur. Les images de ces zones sont indiquées dans
cette section pour pouvoir les situer facilement. D’autres informations se trouvent dans le
chapitre Résolution d’incident du Guide de l’opérateur.
Si un récepteur grande capacité amélioré, un récepteur grande capacité ou une agrafeuse/
récepteur grande capacité sont connectés à la DocuColor 5252, reportez-vous au chapitre
Accessoires du Guide de l’opérateur pour consulter les instructions relatives au degagement
d’un incident.
Incident dans le chargeur Porte gauche de la presse, zone 1
Porte supérieure – Zone de
dégagement 2
7b
Porte supérieure, zone 2 et
module de transport, zones 3 et 7
3a
3b
7a
21
Page 24

4a
4b
65
4e
4d
4c
Tiroir de transfert derrière les portes avant
Zones 4a-e, tiroir ouvert Zones 5 et 6, tiroir fermé
8a 8b
8e
8c
8d
8f
8g
Module récepteur, zones 8a-g
22
Page 25

Vous êtes prêt à imprimer !
Nous espérons que cette introduction succincte à la DocuColor 5252 vous donnera
suffisamment d’informations pour commencer à utiliser votre nouvelle presse !
Pour toute question, contacter votre interlocuteur local Xerox ou le Centre Services Xerox.
23
Page 26

24
Page 27

Introducción
¡Ocupado, ocupado, ocupado!
Sabemos que está ocupado, y si necesita completar trabajos antes de que el entrenador de
Xerox pueda mostrarle todas las cosas maravillosas que puede hacer con su nueva impresora
digital, este libro es justo lo que necesitaba para poder comenzar.
Para obtener información específica sobre el uso de la DocuColor 5252, consulte el Manual
del Operador.
Lo que aprenderá al leer este folleto:
• Le ofreceremos una descripción general breve de su nueva impresora en
donde se muestra la localización de los componentes principales.
• Le informaremos cuáles son sus responsabilidades como operador o
como administrador del sistema.
• Le proporcionaremos información básica sobre cómo ejecutar los
trabajos en la máquina, incluyendo la realización de copias.
• Le indicaremos qué parte interna de la máquina debe comprobar para
despejar atascos de papel.
¡Comencemos!
25
Page 28

Puerta de
Ali
transporte
superior
Bandeja 1
Bandeja 2
Le presentamos la DocuColor 5252!
mentador auto. de originales a 2
Pantalla táctil
Panel de control
Cartuchos de tóner
Bandeja
receptora de
clasificación
Bandeja 3
con reductor de curvatura
Módulo de salida
Módulo de transporte
Esta ilustración en secciones identifica los módulos en la configuración básica de la
impresora digital y muestra el recorrido del papel desde las bandejas, a través del área de
impresión, a la bandeja receptora de clasificación. Observe que el papel se alimenta desde
el lado derecho de la bandeja 3 y desde el lado izquierdo de las bandejas 1 y 2. El equipo
opcional que puede tener incluye apilador de alta capacidad, apilador de alta capacidad
mejorado y la grapadora/apilador de alta capacidad.
Sugerimos que lea el capítulo Descripción general del Manual del Operador para
familiarizarse con el uso del panel de control o la pantalla táctil.
Instalación y configuración
El técnico de Xerox instaló todos los módulos de la impresora digital y el servidor de
color pedido con la impresora y, junto con el administrador del sistema, instaló los
controladores de impresión en al menos una estación de trabajo conectada a la red.
Un trabajo de prueba fue enviado a la impresora para asegurarse de que todas las
conexiones funcionan correctamente.
26
Page 29

Documentación
La documentación de apoyo está disponible en formato Adobe.pdf en el CD que se
incluye en el Paquete de información del cliente que recibió con su impresora. Se
sugiere que siga las recomendaciones para impresión en la carta del paquete, y que
mantenga toda la documentación en la carpeta de tres anillos que se le proporciona.
El CD contiene archivos de los siguientes documentos:
• Manual del Operador– incluye información sobre el funcionamiento de
la impresora digital, el escáner y el alimentador automático a dos caras,
apilador de alta capacidad mejorado, el apilador de alta capacidad y la
grapadora/apilador de alta capacidad.
• Guía de Administración del Sistema – proporciona detalles sobre
cómo ajustar y cambiar las claves y los ajustes prefijados en el modo
Herramientas, así como información sobre el uso del Modo de Auditrón.
• Guía de utilización de materiales para color – un libro genérico que
porporciona información importante e interesante que debe saber con
respecto al papel, sus propiedades, los procedimientos correctos para el
almacenamiento y qué debe esperar de cada uno de los diferentes tipos
de papel. La información que se presenta en este libro práctico se aplica
al uso del papel en todas las impresoras en color Xerox.
Servidor de color
El servidor de color conecta la impresora con estaciones de trabajo conectadas a la
red (PCs, Macs o Unix). Puede tener uno de varios servidores de color diferentes que
se venden para el uso con las impresoras digitales de la serie impresoras digitales.
La documentación de apoyo para el uso del servidor de color está incluida en el CD
se envió con la unidad. Usted, o el administrador del sistema, debe imprimir estos
manuales, Notas de la versión, etc., una vez que se completa la instalación.
Mantenga estos manuales a mano para obtener información acerca de cómo utilizar
las funciones del servidor de color para obtener impresiones en color de alta calidad.
El técnico de Xerox instaló el servidor de color y trabajó con el administrador del
sistema para instalar los controladores de impresión en la estación de trabajo. El
administrador del sistema puede ahora instalar los controladores de impresión en
tantas estaciones de trabajo como lo permita el sistema de servidor de color. La
información necesaria para la instalación de los controladores de impresión se
encuentra en uno de los manuales del servidor de color.
Puede enviar trabajos y ajustar los parámetros de impresión desde su estación de
trabajo o, con el servidor de coloro mismo. Consulte la documentación del servidor
de color para obtener información detallada sobre cómo enviar y controlar los
trabajos enviados a la impresora digital.
27
Page 30

¿Cuál es su trabajo?
Si usted es el operador:
Es la persona que opera la impresora todos los días (o noches). Si tiene el escáner opcional instalado, puede programar trabajos usando las diferentes funciones disponibles a
través de la pantalla táctil de la impresora digital.
También puede llegar a ser responsable de realizar algunas tareas de mantenimiento
simples, y probablemente pueda despejar atascos de papel que puedan producirse. También puede ser responsable de mantener suministros suficientes de una variedad de tipos
de papel y ciertos materiales de consumo utilizados por la impresora, tales como el tóner
o aceite del fusor.
Consulte el capítulo Mantenimiento del Manual del Operador para más información
sobre los procedimientos de mantenimiento y el pedido de materiales de consumo.
Si usted es el administrador del sistema:
Como administrador del sistema, programará las claves necesarias en la impresora digital y cambiará los ajustes prefijados en el Modo Herramientas para satisfacer los requisitos de su negocio. También es responsable de la instalación de los controladores de
impresión en las estaciones de trabajo de los usuarios. Consulte la documentación del
RIP para información sobre el número de estaciones de trabajo que se pueden conectar.
Consulte el capítulo Herramientas de la Guía de Administración del Sistema para obtener
información detallada sobre cómo programar los ajustes prefijados y las claves.
28
Page 31

Algunas sugerencias rápidas
Antes de usar la impresora digital, hay algunas cosas que necesita saber:
1 Puede cargar una amplia variedad de tamaños y pesos de papel en las bandejas de papel
1, 2 y 3, desde 8.0 x 10 pulgadas a 12.6 x 17.7 pulgadas (alimentación por el borde corto,
ABC), A4 y A3 a SRA3 (ABC). Los pesos de papel aceptados son de 64 a 280 g/m2.
IMPORTANTE: Una vez que carga papel en cualquiera de las bandejas, debe
seleccionar el peso del papel cargado en el indicador de pesos, localizado en la
bandeja del papel. En las bandejas 1 y 2, el indicador de peso se encuentra en el
bastidor de la impresora, en el lado derecho de cada bandeja. En la bandeja 3, el
indicador se encuentra en la parte superior delantera de la bandeja. Este indicador
también le permite seleccionar el tipo y el tamaño del papel cargado en la bandeja.
Indicador de peso para las bandejas 1 y 2
Indicador de peso de papel para la bandeja 3
29
Page 32

2 El alimentador automático de originales a dos caras (DADF) puede cargarse con hasta 50
hojas del mismo tamaño o diferentes tamaños de papel, con pesos desde 64 a 128 g/m
Al usar el DADF, asegúrese de pulsar el botón AC (Borrar todo) en el panel de control
para borrar toda la programación del trabajo anterior.
Consulte el capítulo 4 del Manual del Operador, Papel y bandejas de papel, para obtener
información detallada sobre el uso de diferentes papeles y otros tipos de materiales en la
DocuColor 5252. Para infomación detallada sobre las directrices del papel consulte Color
Materials User Guide (Guía de utilización de materiales para color) y Recommended
Materials List (Lista de materiales sugeridos). The Recommended Materials List (Lista de
materiales sugeridos) s un archivo que puede descargarse de www.xerox.com
parámetros de búsqueda para el nombre de su impresora digital y y siga la ruta hasta
que llegue a los archivos que pueden ser descargados.
2
. Use los
3 Las transparencias pueden utilizarse solamente desde la Bandeja 3. Utilice solamente
las transparencias sugeridas en la lista de materiales sugeridos y cárguelas con la tira de
papel cara abajo, con el borde de la tira como borde de avance (en el lado derecho de la
bandeja).
.
30
Page 33

Uso del escáner de la DocuColor 5252
Si su impresora digital tiene un alimentador automático de originales a dos caras (DADF) y el
escáner que se muestra en la figura de arriba, puede comenzar a hacer impresiones utilizando
originales escaneados inmediatamente. Puede escanear hojas de diferentes tamaños hasta
11x17 pulg./A3 a una resolución de 400 ppp. El DADF tiene una capacidad máxima de 50
hojas de papel de 24 libras (90 g\m2).
1 Pulse el botón Features (Funciones) en el panel de control y la pantalla táctil mostrará
la pantalla Funciones básicas que se muestra abajo.
Botón en Inglés
Símbolo
del botón internacional
31
Page 34

2 Seleccione cualquiera de las opciones de la pantalla Funciones básicas, o toque la
ficha Otras funciones, Calidad de imagen o Más... para disponer de más opciones
para aplicar a las impresiones. La mayoría de las pantallas muestran instrucciones simples sobre cómo utilizar una opción en particular. Si no encuentra la información que
necesita, consulte el capítulo Escáner del Manual del Operador para obtener detalles
sobre el uso de cada una de las opciones disponibles en estas pantallas.
3 Coloque el original en el cristal de exposición en la misma orientación en que cargará el
papel.
4 Cargue el papel y asegúrese de seleccionar el peso correcto del papel (y tipo/tamaño, si
es necesario) a través del indicador de pesos localizado en la bandeja de papel que está
utilizando.
5 Use el teclado del panel de control para introducir la cantidad que desea imprimir y pulse
el botón Start (Impresión).
Botón en Inglés
¿Preguntas?
El Centro de Asistencia al cliente de Xerox estará a su disposición para ofrecerle ayuda.
Puede obtener el número de teléfono del centro de asistencia de su área pulsando el botón
Machine Status (Estado de la máquina) del panel de control. La pantalla mostrará el
número.
Símbolo del botón internacional
Botón en Inglés
Símbolo del botón internacional
32
Page 35

Despeje de atascos de papel
Los atascos de papel suceden ocasionalmente, y pueden despejarse fácilmente. La pantalla
táctil le mostrará una imagen animada de la localización del atasco y le proporcionará
instrucciones para despejarlo. Algunas áreas de la máquina también tienen etiquetas que le
muestran cómo despejar un atasco.
Las áreas en donde pueden ocurrir atascos son el alimentador automático de originales a dos
caras (DADF), la puerta izquierda de la impresora, el área de la puerta superior, el módulo de
transporte, el módulo de transferencia detrás de las puertas delanteras y el módulo de salida.
En esta sección se proporcionan figuras de estas áreas con el propósito de ayudarlo a
localizarlas con facilidad. Puede encontrar más información en el capítulo Solución de
problemas del Manual del Operador.
Si tiene el apilador de alta capacidad mejorado opcional, el apilador de alta capacidad o la
grapadora/apilador de alta capacidad conectada a la DocuColor 5252, consulte el capítulo
Accesorios del Manual del Operador para obtener instrucciones sobre cómo despejar atascos.
Atasco en el AAD2 Puerta izquierda de la impresora, Área 1
Puerta superior
Área de despeje 2
7b
3a
3b
7a
P u e r t a s u p e r i o r , Á r e a 2 y m ó d u l o d e
transporte, Áreas 3 y 7
33
Page 36

4a
4b
65
4d4e
4c
Módulo de transferencia detrás de las puertas delanteras
Áreas 4a-e, módulo abierto Áreas 5 y 6, módulo cerrado
8a 8b
8e
8c
8d
8f
8g
Módulo de salida, Áreas 8a-g
34
Page 37

¡Listo para imprimir!
Esperamos que esta introducción breve a la DocuColor 5252 le proporcione información
suficiente para que pueda comenzar a utilizar su nueva impresora
Si tiene preguntas, consulte al proveedor de Xerox local, o llame al Centro de Asistencia al
Cliente.
35
Page 38

36
Page 39

Introdução
Ocupado, ocupado!
Sabemos que você é ocupado e, se precisar terminar alguns trabalhos antes de o instrutor da
Xerox mostrar tudo o que poderá fazer com a sua nova impressora digital, este livreto é
exatamente o que você precisa para começar.
Para obter informações específicas sobre como usar a DocuColor 5252, consulte sempre o
Manual do Operador.
O que este livreto contém:
• Uma breve visão geral da nova impressora, mostrando onde estão os
principais componentes.
• Esclarecimentos sobre as suas responsabilidades como operador ou
administrador do sistema.
• Instruções básicas sobre como executar trabalhos na máquina, inclusive
sobre como fazer uma cópia.
• Os locais do interior da máquina onde se pode eliminar atolamentos de
papel.
Vamos começar!
37
Page 40

Conheça a DocuColor 5252!
P
Ali
Tela de Sel
orta do
Transporte
Superior
Bandeja 1
Bandeja 2
Bandeja 3
mentador de Originais
Frente e Verso e Scanner
Módulo de Transporte
Toque/Painel de
Controle
eção por
Cartuchos de
Toner
Bandeja
Coletora
Módulo de Saída
com eliminadores
de curvatura do
papel
A ilustração acima identifica os módulos da configuração básica da impressora digital e
mostra o trajeto do papel das bandejas, passando pela área de impressão, até a Bandeja
Coletora. Observe que o papel é alimentado do lado direito da Bandeja 3 e do lado esquerdo
das Bandejas 1 e 2. Os equipamentos opcionais que podem estar disponíveis são o
Empilhador de Alta Capacidade, o Empilhador de Alta Capacidade Aperfeiçoado e o
Grampeador/Empilhador de Alta Capacidade.
Recomendamos a leitura do capítulo Visão geral do Manual do Operador para que você
conheça melhor o uso do Painel de Controle e da Tela de Seleção por Toque.
Instalação e configuração
O representante Xerox instalou todos os módulos da impressora digital e o servidor
de cor solicitado com a impressora e, junto com o administrador do sistema, instalou
os drivers de impressão em pelo menos uma estação de trabalho conectada à rede.
Um teste foi enviado à impressora para garantir que todas as conexões estivessem
funcionando corretamente.
38
Page 41

Documentação
A documentação de suporte está disponível em formato Adobe pdf no CD incluso no
Pacote de Informações ao Cliente que acompanha a impressora. Recomendamos que
as diretrizes de impressão contidas na carta ao cliente do pacote sejam seguidas e
que toda a documentação seja mantida na pasta de 3 furos fornecida.
O CD contém arquivos dos seguintes documentos:
• Manual do Operador – contém informações sobre a operação da
impressora digital, Scanner, Alimentador Automático de Originais Frente
e Verso, Empilhador de Alta Capacidade, Empilhador de Alta
Capacidade Aperfeiçoado e Grampeador/Empilhador de Alta
Capacidade.
• Guia do Administrador do Sistema – fornece detalhes sobre como
configurar e alterar senhas e configurações padrão no Modo de
Recursos e sobre como usar o Modo do Auditron.
• Guia de Utilização de Materiais de Trabalhos em Cores – um livro
genérico que fornece fatos interessantes e importantes sobre o papel,
suas propriedades, os procedimentos corretos de armazenamento e o
que se pode esperar dos diferentes tipos de papel. As informações
contidas aqui se aplicam ao uso do papel em todas as impressoras em
cores da Xerox.
Servidor de cor
O servidor de cor vincula a impressora às estações de trabalho em rede (PCs, Macs
ou Unix). Com as impressoras digitais, você pode utilizar um dos diversos servidores
de cor vendidos no mercado.
A documentação de suporte para utilização do servidor de cor é incluída no CD
fornecido com a unidade. Você, ou o administrador do sistema, deve imprimir esses
manuais, Notas de versão etc., após a instalação ter sido concluída. Mantenha esses
manuais à mão para aprender mais sobre os recursos do servidor de cor e obter
impressões em cores de ótima qualidade
O representante Xerox instalou o servidor de cor e, junto com o administrador do
sistema, instalou os drivers de impressão em uma estação de trabalho. Agora o
administrador do sistema pode instalar os drivers de impressão em quantas
impressoras o sistema do servidor de cor permitir. As informações exigidas para
instalação dos drivers de impressão estão contidas em um dos manuais do servidor
de cor.
Você pode enviar trabalhos e configurar os parâmetros de impressão pela estação de
trabalho ou, para alguns, pelo servidor de cor. Consulte a documentação do servidor
de cor para obter informações detalhadas sobre como enviar e controlar trabalhos
enviados à impressora digital.
39
Page 42

Qual é o seu trabalho?
Se você for o operador:
Você é quem opera a impressora todos os dias (ou noites). Se o scanner opcional estiver
conectado, você poderá programar trabalhos usando as várias funções disponíveis na
Tela de Seleção por Toque da impressora digital.
Você também poderá ficar responsável por algumas tarefas simples de manutenção e
provavelmente irá eliminar os atolamentos de papel que vierem a ocorrer. Você também
poderá cuidar da manutenção adequada do estoque de papéis variados e de alguns
produtos de consumo usados pela impressora, como toner e óleo do fusor.
Consulte o capítulo Manutenção do Manual do Operador para obter mais informações
sobre os procedimentos de manutenção e a solicitação de produtos de consumo.
Se você for o administrador do sistema:
Como administrador, você irá configurar quaisquer senhas necessárias na impressora
digital e alterar as configurações padrão no Modo de Recursos de acordo com os
requisitos de seus negócios. Você também é o responsável pela instalação dos drivers de
impressão nas estações de trabalho do usuário. Consulte a documentação do RIP para
saber a quantidade de estações de trabalho que podem ser conectadas.
Consulte o capítulo Modo de recursos no Guia do Administrador do Sistema para obter
informações detalhadas sobre a configuração de padrões e senhas.
40
Page 43

Algumas dicas rápidas
Antes de usar a impressora digital, você precisará saber o seguinte:
1 As Bandejas 1, 2 e 3 aceitam papéis de diversos tamanhos e gramaturas, que variam de
8,0” x 10” a 12,6” x 17,7” (Alimentação pela Borda Curta, ABC), A4 e A3 a SRA3 (ABC).
A gramatura aceitável varia de 64 a 280 g/m2.
IMPORTANTE:Depois de colocar papel em qualquer uma das bandejas, você tem
que selecionar a gramatura do papel carregado no Indicador de peso, localizado na
bandeja do papel. Nas Bandejas 1 e 2, o indicador de peso fica no frame da
impressora, à direita de cada bandeja. Na Bandeja 3, o indicador fica na parte
superior dianteira da bandeja. Esse indicador também permite a seleção do tipo e
tamanho do papel carregado nessa bandeja.
Indicador de peso das Bandejas 1 e 2
Indicador de tipo/peso do papel da Bandeja 3
41
Page 44

2 O Alimentador Automático de Originais Frente e Verso (AAOFV) pode conter até 50 folhas
do mesmo tamanho ou de tamanhos diferentes, com gramaturas variando de 64 a
128 g/m
Controle para excluir a programação do trabalho anterior.
Consulte o Capítulo 4, Papel e bandejas do papel, do Manual do Operador para obter
informações mais detalhadas sobre o uso de vários papéis e outros materiais na
DocuColor 5252. Para obter informações detalhadas sobre o uso de papéis, consulte o
Guia de Utilização de Materiais de Trabalhos em Cores e o Recommended Materials List
(Lista de Materiais Recomendados). O Recommended Materials List pode ser obtido por
download no site da Xerox na web em: www.xerox.com. Utilize os parâmetros de
pesquisa para a nome de sua impressora digital e siga o caminho até chegar aos arquivos
que podem ser obtidos por download.
2
. Quando usar o AAOFV, pressione o botão Limpar Tudo (ou C) no Painel de
3 Transparências somente podem ser processadas da Bandeja 3. Use apenas as
transparências relacionadas na lista Recommended Materials List e coloque-as com a
tira de papel voltada para baixo
direito da bandeja).
com a borda listrada como a borda de ataque (no lado
42
Page 45

Uso do scanner na DocuColor 5252
Se a impressora digital possuir o Alimentador Automático de Originais Frente e Verso
(AAOFV) e o Scanner, mostrado acima, você pode começar imediatamente a gerar impressões
com base em originais digitalizados. Você pode digitalizar folhas de tamanhos diferentes de
até 11”x17”/A3 a 400 dpi. O AAOFV possui capacidade máxima de 50 folhas de papel de
90 g\m2.
1 Pressione o botão Funções no Painel de Controle e a tela Funções Básicas, mostrada
abaixo, será exibida na Tela de Seleção por Toque.
Botão em inglês
Botão com símbolo internacional
43
Page 46

2 Selecione as opções na tela Funções Básicas, ou toque na guia Funções Adicionais,
Qualidade de Imagem, ou Mais... para ver mais opções a serem aplicadas às
impressões. A maioria das telas possui instruções simples sobre como usar uma opção
específica. Se não encontrar as informações de que precisa, consulte o capítulo Scanner
do Manual do Operador para obter detalhes sobre o uso de cada opção disponível nessas
telas.
3 Coloque o original no vidro na mesma orientação do papel na bandeja.
4 Coloque o papel e certifique-se de selecionar a gramatura correta (e tipo/tamanho, se for
o caso) no Indicador de peso, localizado na Bandeja do Papel em uso.
5 Use o teclado no Painel de Controle para inserir a quantidade de impressões e pressione
o botão Iniciar.
Botão em inglês
Alguma dúvida?
A Xerox ficará feliz em ajudá-lo!
Se precisar, ligue para a Xerox. O número de telefone da filial Xerox mais próxima também
pode ser localizado pressionando-se o botão Status da Máquina no Painel de Controle.
A tela exibirá o número.
Botão com símbolo internacional
Botão em inglês
Botão com símbolo internacional
44
Page 47

Eliminação de atolamentos de papel
De vez em quando acontecem atolamentos de papel; eles podem ser facilmente eliminados.
A Tela de Seleção por Toque irá exibir uma imagem animada de onde ocorreu o atolamento
e fornecer instruções sobre como eliminá-lo. Algumas áreas dentro da máquina também
contêm etiquetas para mostrar como eliminar o atolamento.
As áreas onde os atolamentos podem ocorrer são: o Alimentador Automático de Originais
Frente e Verso (AAOFV), a Porta Esquerda da impressora, a área da Porta Superior, o Módulo
de Transporte, a Gaveta de Transferência atrás das portas dianteiras, e o Módulo de Saída.
As fotos dessas áreas são exibidas nesta seção para ajudá-lo a localizá-las facilmente. Mais
informações podem ser encontradas no capítulo Solução de problemas do Manual do
Operador.
Se houver um Empilhador de Alta Capacidade Aperfeiçoado opcional, Empilhador de Alta
Capacidade ou Grampeador/Empilhador de Alta Capacidade conectado à DocuColor 5252,
consulte o capítulo Acessórios do Manual do Operador para obter instruções sobre como
eliminar atolamentos.
Porta esquerda da impressora, Área 1
Atolamento no AAOFV
Área da Porta Superior, Área 2 e Módulo de
Transporte, Áreas 3 e 7
Porta Superior
Área 2 de eliminação
de atolamentos
3a
3b
7b 7a
45
Page 48

4a
4b
65
4d4e
4c
Gaveta de Transferência atrás das Portas Dianteiras
Áreas 4a-e, Gaveta aberta Áreas 5 e 6, Gaveta fechada
8a 8b
8e
8c
8d
8f
8g
Módulo de Saída, Áreas 8a-g
46
Page 49

Tudo pronto para imprimir!
Esperamos que esta rápida apresentação sobre a DocuColor 5252 tenha lhe fornecido
informações suficientes para você começar a usar sua nova impressora!
Se tiver alguma dúvida, pergunte ao representante local Xerox ou ligue para a filial Xerox
mais próxima.
47
Page 50

48
Page 51

Page 52

Xerox Corporation
Global Knowledge and Language Services
800 Phillips Road
Webster, New York 14580-9791
USA
08-2003
701P40702
 Loading...