


DocuColor 5252
Digital Color Press
System Administration Guide
August 2003
701P40701

©
Copyright 2003 by Xerox Corporation. All Rights Reserved.
Copyright protection claimed includes all forms and matters of copyrighted material and information now allowed by statutory or judicial law or
hereinafter granted, including without limitation, material generated from the software programs that are displayed on the screen such as styles,
templates, icons, screen displays, looks, etc.
®
XEROX
, The Document Company®, The stylized X, and all Xerox product names and product numbers mentioned in this publication are
trademarks of XEROX CORPORATION.
Other company brands and product names may be trademarks or registered trademarks of the respective companies and are also
acknowledged.
Changes are periodically made to this document. Technical updates will be included in subsequent editions.
Printed in the U.S.A.

Table of Contents
Table of Contents
Introduction 1-1
Conventions . . . . . . . . . . . . . . . . . . . . . . . . . . . . . . . . . . . . . . . 1-1
Symbols . . . . . . . . . . . . . . . . . . . . . . . . . . . . . . . . . . . . . . . 1-1
Writing style conventions . . . . . . . . . . . . . . . . . . . . . . . . . . 1-2
Electrical safety. . . . . . . . . . . . . . . . . . . . . . . . . . . . . . . . . . . . . 1-3
Disconnect device. . . . . . . . . . . . . . . . . . . . . . . . . . . . . . . . 1-4
Laser safety . . . . . . . . . . . . . . . . . . . . . . . . . . . . . . . . . . . . . . . 1-4
Maintenance safety. . . . . . . . . . . . . . . . . . . . . . . . . . . . . . . . . . 1-5
Operational safety. . . . . . . . . . . . . . . . . . . . . . . . . . . . . . . . . . . 1-6
Ozone safety. . . . . . . . . . . . . . . . . . . . . . . . . . . . . . . . . . . . . . . 1-7
Notices . . . . . . . . . . . . . . . . . . . . . . . . . . . . . . . . . . . . . . . . . . . 1-7
Radio frequency emissions. . . . . . . . . . . . . . . . . . . . . . . . . 1-7
FCC in the USA . . . . . . . . . . . . . . . . . . . . . . . . . . . . . . 1-7
In Canada . . . . . . . . . . . . . . . . . . . . . . . . . . . . . . . . . . . . . . 1-8
Safety extra low voltage approval . . . . . . . . . . . . . . . . . . . . 1-8
Certifications in Europe . . . . . . . . . . . . . . . . . . . . . . . . . 1-8
It’s illegal in the USA . . . . . . . . . . . . . . . . . . . . . . . . . . . . . . . . . 1-9
It’s illegal in Canada . . . . . . . . . . . . . . . . . . . . . . . . . . . . . . . . 1-11
Environmental notices for the USA . . . . . . . . . . . . . . . . . . . . . 1-12
Environmental notices for Canada . . . . . . . . . . . . . . . . . . . . . 1-13
Product recycling and disposal. . . . . . . . . . . . . . . . . . . . . . . . 1-13
Table of Contents
Tools Mode 2-1
Overview . . . . . . . . . . . . . . . . . . . . . . . . . . . . . . . . . . . . . . . . . . 2-1
Entering and exiting Tools Mode. . . . . . . . . . . . . . . . . . . . . . . . 2-1
Entering Tools Mode . . . . . . . . . . . . . . . . . . . . . . . . . . . . . . 2-2
Navigating in Tools Mode . . . . . . . . . . . . . . . . . . . . . . . . . . . . . 2-4
Machine Defaults and Feature Defaults . . . . . . . . . . . . . . . . . . 2-5
Machine Defaults 1 . . . . . . . . . . . . . . . . . . . . . . . . . . . . . . . . . . 2-8
Initial Screen . . . . . . . . . . . . . . . . . . . . . . . . . . . . . . . . . . . . 2-9
Auto Color Calibration . . . . . . . . . . . . . . . . . . . . . . . . . . . . 2-12
What to know about screening . . . . . . . . . . . . . . . . . . 2-12
Run Calibration . . . . . . . . . . . . . . . . . . . . . . . . . . . . . . 2-15
Check Gradation . . . . . . . . . . . . . . . . . . . . . . . . . . . . . 2-17
Manual Adjust . . . . . . . . . . . . . . . . . . . . . . . . . . . . . . . 2-19
DocuColor 5252 System Administration Guide
i

Table of Contents
Tray Priority. . . . . . . . . . . . . . . . . . . . . . . . . . . . . . . . . . . . 2-21
System Timers . . . . . . . . . . . . . . . . . . . . . . . . . . . . . . . . . 2-22
Power Saver . . . . . . . . . . . . . . . . . . . . . . . . . . . . . . . . 2-22
Screen Saver . . . . . . . . . . . . . . . . . . . . . . . . . . . . . . . 2-24
Job Spacing . . . . . . . . . . . . . . . . . . . . . . . . . . . . . . . . 2-25
Tools Off . . . . . . . . . . . . . . . . . . . . . . . . . . . . . . . . . . . 2-26
Auto Resume Scan . . . . . . . . . . . . . . . . . . . . . . . . . . . 2-27
Auto Resume Print . . . . . . . . . . . . . . . . . . . . . . . . . . . 2-28
Auto Resume Stop . . . . . . . . . . . . . . . . . . . . . . . . . . . 2-29
Auto Resume Hold . . . . . . . . . . . . . . . . . . . . . . . . . . . 2-30
Auditron Mode Off . . . . . . . . . . . . . . . . . . . . . . . . . . . . 2-31
Job Complete . . . . . . . . . . . . . . . . . . . . . . . . . . . . . . . 2-32
Job Program Incomplete. . . . . . . . . . . . . . . . . . . . . . . 2-33
Audio Tones . . . . . . . . . . . . . . . . . . . . . . . . . . . . . . . . . . . 2-34
Productivity Setting. . . . . . . . . . . . . . . . . . . . . . . . . . . . . . 2-35
Auto Tray Switching . . . . . . . . . . . . . . . . . . . . . . . . . . . . . 2-36
Transparency Size . . . . . . . . . . . . . . . . . . . . . . . . . . . . . . 2-38
Set Date & Time . . . . . . . . . . . . . . . . . . . . . . . . . . . . . . . . 2-39
Setting the Date . . . . . . . . . . . . . . . . . . . . . . . . . . . . . 2-39
Setting the Time . . . . . . . . . . . . . . . . . . . . . . . . . . . . . 2-40
Dual Language . . . . . . . . . . . . . . . . . . . . . . . . . . . . . . . . . 2-41
Non-Standard Paper Size . . . . . . . . . . . . . . . . . . . . . . . . . 2-42
Oversize Settings . . . . . . . . . . . . . . . . . . . . . . . . . . . . . . . 2-43
Machine Defaults 2 . . . . . . . . . . . . . . . . . . . . . . . . . . . . . . . . . 2-44
Paper Registration Adjustment. . . . . . . . . . . . . . . . . . . . . 2-45
100% Adjust . . . . . . . . . . . . . . . . . . . . . . . . . . . . . . . . . . . 2-50
Special Tray . . . . . . . . . . . . . . . . . . . . . . . . . . . . . . . . . . . 2-51
Additional Originals. . . . . . . . . . . . . . . . . . . . . . . . . . . . . . 2-52
Stored Program Access . . . . . . . . . . . . . . . . . . . . . . . . . . 2-53
Auto Recognition . . . . . . . . . . . . . . . . . . . . . . . . . . . . . . . 2-54
Reduce/Enlarge Presets. . . . . . . . . . . . . . . . . . . . . . . . . . 2-57
Photo Reproduction Level . . . . . . . . . . . . . . . . . . . . . . . . 2-59
Color Adjust & Registration. . . . . . . . . . . . . . . . . . . . . . . . 2-60
Auto Rotation . . . . . . . . . . . . . . . . . . . . . . . . . . . . . . . . . . 2-62
Maximum Scan to Print Quantity . . . . . . . . . . . . . . . . . . . 2-65
Decurler Setup . . . . . . . . . . . . . . . . . . . . . . . . . . . . . . . . . 2-66
Decurler Specifications . . . . . . . . . . . . . . . . . . . . . . . . 2-67
Feature Defaults 1 . . . . . . . . . . . . . . . . . . . . . . . . . . . . . . . . . 2-70
Color Mode . . . . . . . . . . . . . . . . . . . . . . . . . . . . . . . . . . . . 2-71
Paper Supply . . . . . . . . . . . . . . . . . . . . . . . . . . . . . . . . . . 2-72
Edge/Center Erase . . . . . . . . . . . . . . . . . . . . . . . . . . . . . . 2-73
Turning Off Edge Erase . . . . . . . . . . . . . . . . . . . . . . . 2-73
Border Erase. . . . . . . . . . . . . . . . . . . . . . . . . . . . . . . . 2-74
ii
DocuColor 5252 System Administration Guide

Table of Contents
Edge Center Erase . . . . . . . . . . . . . . . . . . . . . . . . . . . 2-75
Color Shift . . . . . . . . . . . . . . . . . . . . . . . . . . . . . . . . . . . . . 2-76
Output . . . . . . . . . . . . . . . . . . . . . . . . . . . . . . . . . . . . . . . . 2-77
Without a Finishing Device . . . . . . . . . . . . . . . . . . . . . 2-77
Using a High Capacity Stacker or Enhanced High Capacity
Stacker . . . . . . . . . . . . . . . . . . . . . . . . . . . . . . . . . . . . 2-78
Using a High Capacity Stacker Stapler . . . . . . . . . . . . 2-80
2 Sided Output . . . . . . . . . . . . . . . . . . . . . . . . . . . . . . . . . 2-82
Original Type. . . . . . . . . . . . . . . . . . . . . . . . . . . . . . . . . . . 2-85
Chroma . . . . . . . . . . . . . . . . . . . . . . . . . . . . . . . . . . . . . . . 2-88
Reduce/Enlarge . . . . . . . . . . . . . . . . . . . . . . . . . . . . . . . . 2-89
100% or Auto . . . . . . . . . . . . . . . . . . . . . . . . . . . . . . . 2-89
Preset/Variable . . . . . . . . . . . . . . . . . . . . . . . . . . . . . . 2-90
Image Shift . . . . . . . . . . . . . . . . . . . . . . . . . . . . . . . . . . . . 2-91
Color Balance . . . . . . . . . . . . . . . . . . . . . . . . . . . . . . . . . . 2-95
Lighten/Darken . . . . . . . . . . . . . . . . . . . . . . . . . . . . . . . . . 2-96
Feature Defaults 2 . . . . . . . . . . . . . . . . . . . . . . . . . . . . . . . . . 2-97
Sharpness. . . . . . . . . . . . . . . . . . . . . . . . . . . . . . . . . . . . . 2-98
Table of Contents
Auditron 3-1
Overview . . . . . . . . . . . . . . . . . . . . . . . . . . . . . . . . . . . . . . . . . . 3-1
Authentication. . . . . . . . . . . . . . . . . . . . . . . . . . . . . . . . . . . . . . 3-2
Initialization . . . . . . . . . . . . . . . . . . . . . . . . . . . . . . . . . . . . . . . . 3-4
Create/Modify User Accounts. . . . . . . . . . . . . . . . . . . . . . . . . . 3-6
Creating a User Account. . . . . . . . . . . . . . . . . . . . . . . . . . . 3-7
Modifying a User Account . . . . . . . . . . . . . . . . . . . . . . . . . . 3-9
Changing the Tools Mode Password . . . . . . . . . . . . . . . . 3-10
Creating a Password for the Auditron Mode. . . . . . . . . . . 3-11
Review User Accounts . . . . . . . . . . . . . . . . . . . . . . . . . . . . . . 3-13
Review General Accounts . . . . . . . . . . . . . . . . . . . . . . . . . . . 3-15
Review Printer Job Account . . . . . . . . . . . . . . . . . . . . . . . . . . 3-17
Review Service Prints Account. . . . . . . . . . . . . . . . . . . . . . . . 3-18
DocuColor 5252 System Administration Guide
iii

Table of Contents
iv
DocuColor 5252 System Administration Guide

Conventions
Symbols
1. Introduction
This chapter discusses:
• the type of conventions and writing styles used in this manual
• safety requirements
• radio frequency emissions
• legal notices
• environmental and recycling requirements
1 Introduction
Caution: This symbol is used to alert operators to an operating
procedure, practice, or condition that, if not strictly observed,
might result in safety hazards to personnel or damage to the
equipment, software or that the loss of data may result
Warning: This symbol is used to alert operators to an operating
procedure, practice, or condition that, if not strictly observed, can
result in bodily injury.
Warning: This symbol identifies an area on the machine that is
HOT and may cause burn injuries.
DocuColor 5252 System Administration Guide 11
1-1

Introduction
Warning: This symbol indicates a laser is being used in the
machine and alerts you to refer to the appropriate safety
information.
Key point: This symbol identifies information that is being
emphasized and is important for you to remember.
The 1 2 3... symbol indicates the beginning of a task or work
process which must be completed.
Note: This symbol calls your attention to information that is
helpful, but not essential to complete a procedure or task.
Writing style conventions
• Bold type indicates the name of a button to press or touch.
• Underlining
• Italic type is used for the text associated with symbols such as
Cautions, Notes, Key Points, etc. to visually bring the
information to your attention.
• Italic type is also used to indicate names, such as the name of
a chapter, or the name of a screen.
• Procedures direct you to press
Panel, and touch
• Text referring to illustrations or screen samples precedes
image.
is used to emphasize a word or term.
buttons located on the Control
buttons located on the Touch Screen.
the
1-2
DocuColor 5252 System Administration Guide

Electrical safety
Introduction
This Xerox digital press and the recommended supplies have
been designed and tested to meet strict safety requirements.
Attention to the following notes will ensure the continued safe
operation of your digital press.
• Use only the power cord supplied with this equipment.
• Plug the power cord directly into a correctly grounded
electrical outlet. Do not use an extension cord. If you do not
know whether or not an outlet is grounded, consult a qualified
electrician.
1 Introduction
• Do not use a ground adapter plug to connect this equipment to
an electrical outlet that lacks a ground connection terminal.
Warning: You may get a severe electrical shock if the outlet is
not correctly grounded.
• Do not place the press where people may step on or trip on
the power cord. Do not place objects on the power cord.
• Do not override or disable electrical or mechanical interlocks.
• Do not obstruct the ventilation openings. These openings are
provided to prevent overheating of the machine.
Warning: Never push objects of any kind into slots or openings
on this equipment. Making a contact with a voltage point or
shorting out a part could result in fire or electrical shock.
• If any of the following conditions occur, immediately switch off
the power to the machine and disconnect the power cord from
the electrical outlet. Call an authorized Xerox service
representative to correct the problem.
– The machine emits unusual noises or odors.
– The power cord is damaged or frayed.
– A wall panel circuit breaker, fuse, or other safety device
has been tripped.
– Liquid is spilled into the press.
– The machine is exposed to water.
– Any part of the machine is damaged.
DocuColor 5252 System Administration Guide
1-3
Introduction
Disconnect device
Laser safety
The power cable is the disconnect device for this equipment. It is
attached to the back of the machine as a plug-in device. To
remove all electrical power from the machine, disconnect the
power cable from the electrical outlet.
This product complies with safety standards and is certified as a
Class I Laser product under the US Department of Health and
Human Services (DHSS) Radiation Performance Standard
according to the Radiation Control for Health and Safety Act of
1968. This product does not emit hazardous laser radiation.
Caution: Use of controls or adjustments or performance of
procedures other than those specified herein may result in
hazardous exposure to laser light.
Since radiation emitted inside this product is completely confined
within the protective housing and external covers, the laser beam
cannot escape from the machine during any phase of the user
operation.
The Center for Devices and Radiological Health (CRDH) of the US
Food and Drug Administration implemented regulations for laser
products on August 1, 1976. These regulations apply to laser
products marketed in the United States. The label on the machine
indicates compliance with CDRH regulations and must be
attached to laser products marketed in the United States.
This product contains laser warning labels. These labels are
intended for use by XEROX Service Representatives and are
placed on or near panels or shields that require special tools for
removal. Do not remove any of these panels. There are no
operator serviceable areas inside these covers.
1-4
DocuColor 5252 System Administration Guide

Maintenance safety
Introduction
• Do not attempt any maintenance procedure that is not
specifically described in the documentation that is supplied
with your press.
• Do not use aerosol cleaners. The use of supplies that are not
approved may cause poor performance of the press, and
could create a dangerous condition.
• Use the supplies and cleaning materials only as directed in
this manual. Keep all of these materials out of the reach of
children.
1 Introduction
• Do not remove the covers or guards that are fastened with
screws. There are no parts behind these covers that you can
maintain or service.
Do not perform any maintenance procedures unless you have
been trained to do them by a Xerox representative, or unless a
procedure is specifically described in one of the manuals included
with your press.
DocuColor 5252 System Administration Guide
1-5

Introduction
Operational safety
Your Xerox equipment and supplies were designed and tested to
meet strict safety requirements. These include safety agency
examination, approval, and compliance with established
environmental standards.
Your attention to the following safety guidelines will help ensure
the continued safe operation of your digital press:
• Use the materials and supplies specifically designed for your
digital press. The use of unsuitable materials may result in
poor performance of the machine and possibly a hazardous
situation.
• Follow all warnings and instructions that are marked on or
supplied with the machine.
• Place the machine in a room that provides adequate space for
ventilation and servicing.
• Place the machine on a level, solid surface (not on a thick pile
carpet) that has adequate strength to support the weight of the
machine.
• Do not attempt to move the machine. A leveling device that
was lowered when your machine was installed may damage
the carpet or floor.
• Do not set up the machine near a heat source.
• Do not set up the machine in direct sunlight.
• Do not set up the machine in line with the cold air flow from an
air conditioning system.
• Do not place containers of coffee or other liquid on the
machine.
• Do not block or cover the slots and openings on the machine.
Without adequate ventilation, the machine may overheat.
• Do not attempt to override any electrical or mechanical
interlock devices.
Warning: Be careful when working in areas identified with this
warning symbol. These areas may be very hot and could cause
personal injury.
If you need any additional safety information concerning the
machine or materials, contact your Xerox representative.
1-6
DocuColor 5252 System Administration Guide

Ozone safety
Notices
Radio frequency emissions
Introduction
This product produces ozone during normal operation. The ozone
is heavier than air, and the quantity is dependent on print volume.
Providing the correct environmental parameters, as specified in
the Xerox installation procedures, ensures that concentration
levels meet safe limits.
If you need additional information about ozone, request the Xerox
publication, OZONE, 600P83222, by calling 1-800-828-6571 in
the USA. For a French language version, call 1-800-828-6571 in
the USA, then press 2.
1 Introduction
FCC in the USA
This equipment has been tested and found to comply with the
limits for a Class A digital device, pursuant to Part 15 of the
Federal Communications Commission Rules. These limits are
designed to provide reasonable protection against harmful
interference when the equipment is operated in a commercial
environment. This equipment generates, uses, and can radiate
radio frequency energy and, if not installed and used in
accordance with the instruction manual, may cause harmful
interference to radio communications. Operation of this equipment
in a residential area is likely to cause harmful interference in which
case the user will be required to correct the interference at his/her
own expense.
Changes or modifications to this equipment not specifically
approved by the Xerox Corporation may void the user’s authority
to operate this equipment.
Shielded cables must be used with this equipment to maintain
compliance with FCC regulations.
DocuColor 5252 System Administration Guide
1-7
Introduction
In Canada
Safety extra low voltage approval
ICES-003
This Class "A" digital apparatus complies with Canadian ICES-
003.
Warning: Shielded interface cables must be used with this
equipment to maintain compliance with Canadian Regulations.
This Xerox digital press is in compliance with various
governmental agencies and national safety regulations. All system
ports meet the Safety Extra Low Voltage (SELV) circuits for
connection to customer-owned devices and networks. Additions of
customer-owned or third-party accessories that are attached to
the press must meet or exceed the requirements previously listed.
All modules that require external connection must be installed per
the installation procedure.
Certifications in Europe
The CE marking that is applied to this product symbolizes Xerox
Europe’s Declaration of Conformity with the following applicable
Directives of the European Union as of the dates indicated:
January 1, 1995: - Council Directive 73/23/EEC amended by
Council Directive 93/68/EEC, approximation of the laws of the
member states related to low voltage equipment.
January 1, 1996: - Council Directive 89/336/EEC, approximation
of the laws of the member states related to electromagnetic
compatibility.
Changes or modifications to this equipment not specifically
approved by Xerox Europe may void the user’s authority to
operate the equipment.
Shielded cables must be used with this equipment to maintain
compliance with the EMC Directive 89/336/EEC.
This equipment is not primarily intended for use in a domestic
environment.
A full declaration defining the relevant Directives and referenced
standards can be obtained from your Xerox Europe
representative.
1-8
DocuColor 5252 System Administration Guide

It’s illegal in the USA
Introduction
Warning: In order to allow this equipment to operate in proximity
to Industrial, Scientific and Medical (ISM) equipment, the external
radiation from ISM equipment may have to be limited or special
mitigation measures taken.
Warning: This is a Class A product. In a domestic environment,
this product may cause radio interference, in which case the user
may be required to take adequate measures.
1 Introduction
Congress, by statute, has forbidden the reproduction of the
following subjects under certain circumstances. Penalties of fine
or imprisonment may be imposed on those guilty of making such
reproductions.
1. Obligations or Securities of the United States Government,
such as:
Certificates of Indebtedness National Bank Currency
Coupons from Bonds Federal Reserve Bank Notes
Silver Certificates Gold Certificates
United States Bonds Treasury Notes
Federal Reserve Notes Fractional Notes
Certificates of Deposit Paper Money
Bonds and Obligations of certain agencies of the government,
such as
FHA, etc.
Bonds. (U.S. Savings Bonds may be photographed only for
publicity purposes in connection with the campaign for the sale
of such bonds.)
DocuColor 5252 System Administration Guide
1-9

Introduction
Internal Revenue Stamps. (If it is necessary to reproduce a
legal document on which there is a canceled revenue stamp,
this may be done provided the reproduction of the document is
performed for lawful purposes.)
Postage Stamps, canceled or uncanceled. (For philatelic
purposes, Postage Stamps may be photographed, provided
the reproduction is in black and white and is less than 75% or
more than 150% of the linear dimensions of the original.)
Postal Money Orders.
Bills, Checks, or Drafts of money drawn by or upon authorized
officers of the United States.
Stamps and other representatives of value, of whatever
denomination, which have been or may be issued under any
Act of Congress.
2. Adjusted Compensation Certificates for Veterans of the World
Wars.
3. Obligations or Securities of any Foreign Government, Bank, or
Corporation.
4. Copyrighted material, unless permission of the copyright
owner has been obtained or the reproduction falls within the
“fair use” or library reproduction rights provisions of the
copyright law. Further information of these provisions may be
obtained from the Copyright Office, Library of Congress,
Washington, D.C. 20559. Ask for Circular R21.
5. Certificates of Citizenship or Naturalization. (Foreign
Naturalization Certificates may be photographed.)
6. Passports. (Foreign Passports may be photographed.)
7. Immigration Papers.
8. Draft Registration Cards.
1-10
DocuColor 5252 System Administration Guide

Introduction
9. Selective Service Induction Papers that bear any of the
following Registrant’s information:
Earnings or Income Dependency Status
Court Record Previous military service
Physical or mental condition
Exception: United States military discharge certificates may be
photographed.
10. Badges, Identification Cards, Passes, or Insignia carried by
military personnel, or by members of the various Federal
Departments, such as FBI, Treasury, etc. (unless photograph
is ordered by the head of such department or bureau.)
Reproducing the following is also prohibited in certain states:
Automobile Licenses - Drivers’ Licenses - Automobile
Certificates of Title.
The above list is not all inclusive, and no liability is assumed for its
completeness or accuracy. In case of doubt, consult your attorney.
1 Introduction
It’s illegal in Canada
Parliament, by statute, has forbidden the reproduction of the
following subjects under certain circumstances. Penalties of fines
or imprisonment may be imposed on those guilty of making such
copies.
1. Current bank notes or current paper money.
2. Obligations or securities of a government or bank.
3. Exchequer bill paper or revenue paper.
4. The public seal of Canada or of a province, or the seal of a
public body or authority in Canada, or of a court of law.
5. Proclamations, orders, regulations or appointments, or notices
thereof (with intent to falsely cause same to purport to have
been printed by the Queen’s Printer for Canada, or the
equivalent printer for a province).
DocuColor 5252 System Administration Guide
1-11
Introduction
6. Marks, brands, seals, wrappers or designs used by or on
behalf of the Government of Canada or of a province, the
government of a state other than Canada or a department,
board, Commission or agency established by the Government
of Canada or of a province or of a government of a state other
than Canada.
7. Impressed or adhesive stamps used for the purpose of
revenue by the Government of Canada or of a province or by
the government of a state other than Canada.
8. Documents, registers or records kept by public officials
charged with the duty of making or issuing certified copies
thereof, where the reproduction falsely purports to be a
certified copy thereof.
9. Copyrighted material or trademarks of any manner or kind
without the consent of the copyright or trademark owner.
The above list is provided for your convenience and assistance,
but it is not all inclusive, and no liability is assumed for its
completeness or accuracy. In case of doubt, consult your solicitor.
Environmental notices for the USA
As an ENERGY STAR® partner, Xerox Corporation has
determined that (the basic configuration of) this product meets the
ENERGY STAR guidelines for energy efficiency.
The ENERGY STAR and ENERGY START MARK are registered
United States trademarks.
The ENERGY STAR Office Equipment Program is a team effort
between U.S., European Union and Japanese governments and
the office equipment industry to promote energy-efficient copiers,
printers, fax, multifunction machines, personal computers, and
monitors. Reducing product energy consumption helps combat
smog, acid rain and long-term changes to the climate by
decreasing the emissions that result from generating electricity.
Xerox ENERGY STAR equipment is preset at the factory to enter
a “low power” state and/or shut off completely after a specified
period of use. These energy-saving features can reduce product
energy consumption in half when compared to conventional
equipment.
1-12
DocuColor 5252 System Administration Guide

Environmental notices for Canada
Terra Choice Environmental Services, Inc. of Canada has verified
that this Xerox product conforms to all applicable Environmental
Choice EcoLogo requirements for minimized impact to the
environment.
As a participant in the Environmental Choice program, Xerox
Corporation has determined that this digital press model meets
the Environmental Choice guidelines for energy efficiency.
Environment Canada established the Environmental Choice
program in 1988 to help consumers identify environmentally
responsible products and services. Copier, printer, digital press,
and fax products must meet energy efficiency and emissions
criteria, and exhibit compatibility with recycled supplies. Currently,
Environmental Choice has more than 1600 approved products
and 140 licensees. Xerox has been a leader in offering EcoLogo
approved products. In 1996, Xerox became the first company
licensed to use the Environmental Choice EcoLogo for its copiers,
printers, and fax machines.
Introduction
1 Introduction
Product recycling and disposal
Xerox operates a worldwide equipment takeback and reuse/
recycle program. Contact your Xerox sales representative to
determine whether this Xerox product is part of the program. For
more information about Xerox environmental programs, visit
www.xerox.com (refer to the “About Xerox” section).
If your product is not part of the Xerox program and you are
managing its disposal, please note that the product may contain
lead, mercury and other materials whose disposal may be
regulated due to environmental considerations. For recycling and
disposal information, contact your local authorities. In the United
States, you may also refer to the Electronic Industries Alliance
web site at www.eiae.org
.
DocuColor 5252 System Administration Guide
1-13

Introduction
1-14
DocuColor 5252 System Administration Guide

Overview
2. Tools Mode
Key point: Some features or options described in this chapter
may not display or be selectable depending on the configuration of
your machine.
The Tools Mode enables you to establish the default settings for
your digital press, with or without a scanner, to fit your individual
requirements. You can change the settings for a variety of
features, such as the initial screen to display when the press is
powered on, the language to display on the Touch Screen, special
paper sizes that can be used in certain Paper Trays, timers, audio
tone controls, default settings for scanner features, image quality
settings, and more.
2 Tools Mode
Entering and exiting Tools Mode
Key points:
• If you attempt to access the Tools Mode while a job is printing,
access to the screens will be delayed until the job completes
printing.
• Jobs will queue, but will not print while the Tools Mode is
active.
• You cannot access the Tools Mode if the digital press is in a
Fault condition.
• You cannot access the Tools Mode if the Pause key on the
Control Panel has been pressed to halt a job. When the job
that was stopped has been completed, Tools Mode may be
accessed.
DocuColor 5252 System Administration Guide 12
2-1
Too ls Mo de
Entering Tools Mode
Use the following procedure to enter the Tools Mode:
1 Press the Access button on the Control Panel. The Access
Password Screen appears.
2 Use the keypad to enter the Tools Mode password. The default
password is five 1s (11111). For security reasons, only asterisks
are displayed on the screen.
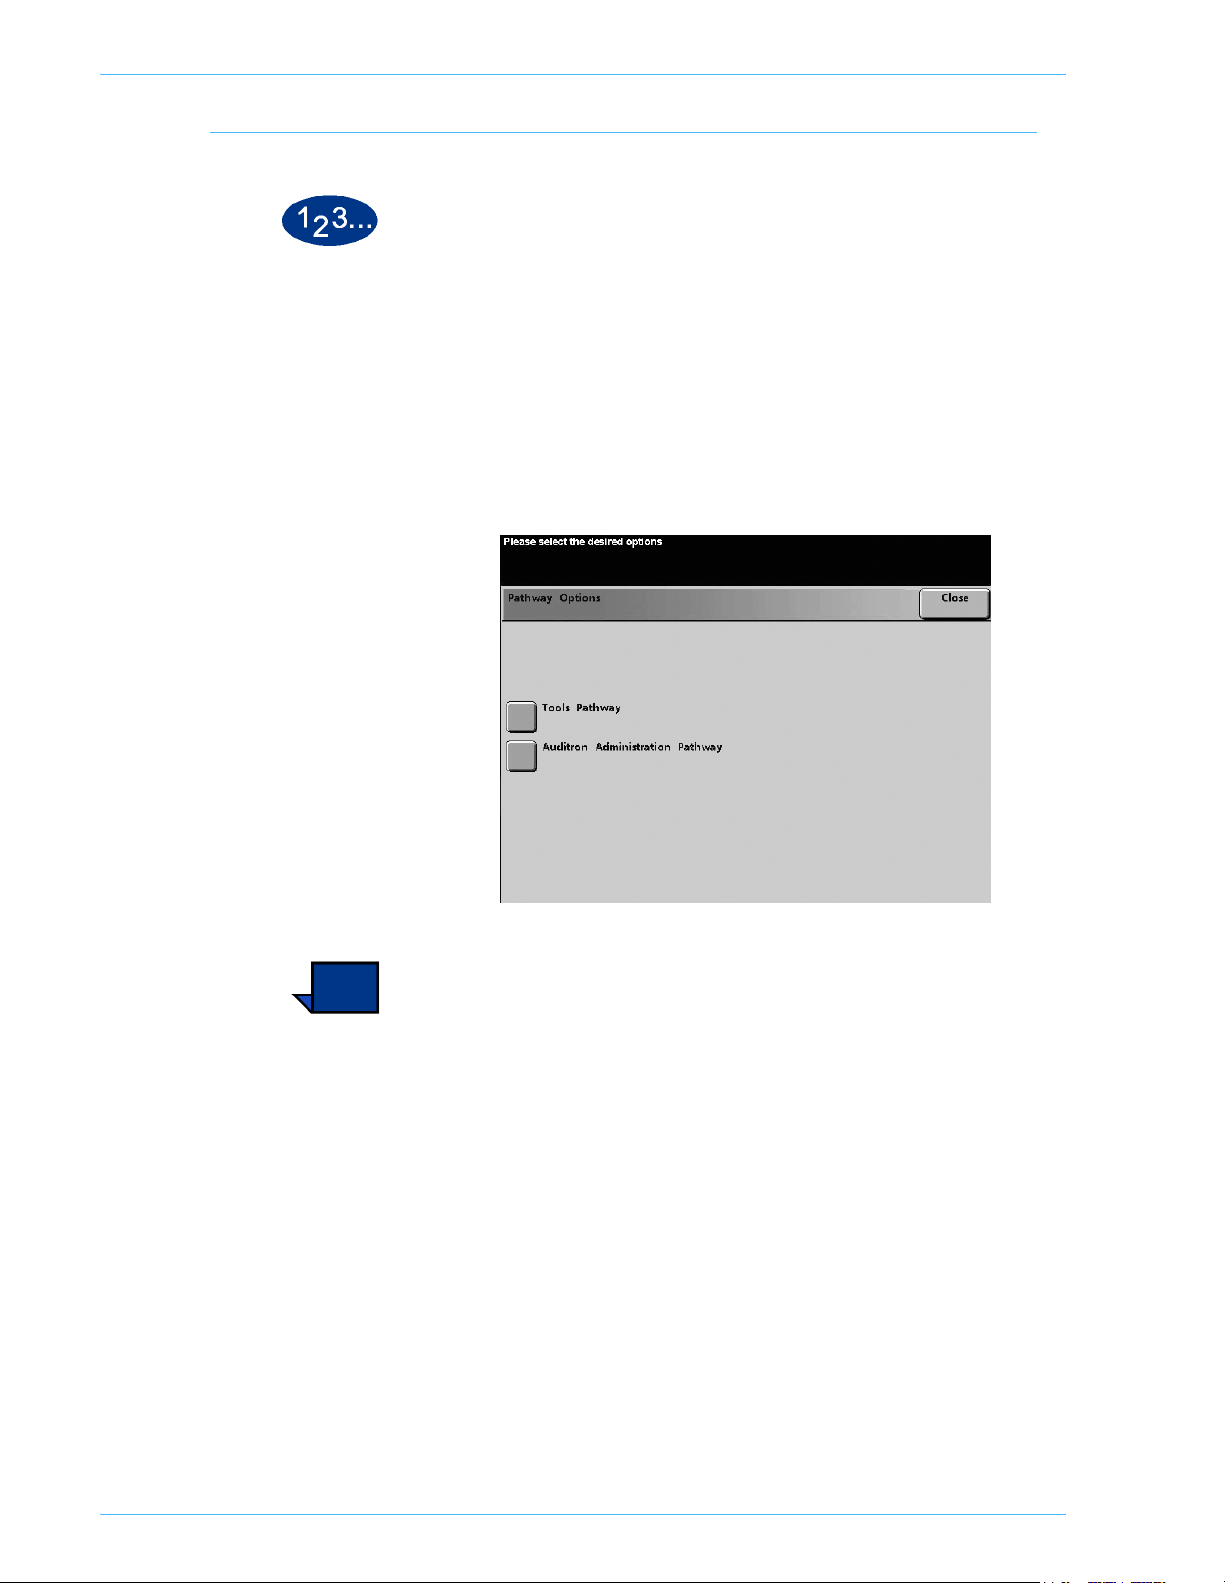
3 Touch the Enter button on the screen. The Pathway Options
screen appears:
2-2
Note: It is recommended that you change the Tools password as
soon as possible after installing the digital press to prevent
unauthorized access to the Tools Mode. The procedure for
changing the password is in the next chapter.
4 Touch the Tools Pathway button on the screen.
DocuColor 5252 System Administration Guide
The Machine Defaults 1 screen appears.
Tools Mode
Note: The options shown on the above screen may vary
depending on whether a scanner is or is not attached to the digital
press.
Note: The Productivity Setting is not available.
5 Touch the Exit Tools button to exit the Tools Mode.
2 Tools Mode
DocuColor 5252 System Administration Guide
2-3
Too ls Mo de
Navigating in Tools Mode
The following table provides tells you how to navigate in Tools
Mode by pressing or touching keys or buttons.
Key or Button Result
Tab s Allows you to view the options available on that
screen.
Enter Saves any changes you made on the screen.
System Default Returns the settings on the screen to the factory
default settings.
Close Closes the screen and returns the system to the
previous screen.
Off Deactivates the feature.
Reset Returns the settings on the screen to the settings
that were in effect when the screen opened.
Cancel Cancels the changes made on the screen.
Exit Tools Exits the Tools Mode.
Note: Changes made to features in the Tools Mode take effect
when you exit Tools Mode.
2-4
DocuColor 5252 System Administration Guide
Machine Defaults and Feature Defaults
Note 1: All the available options are discussed in this section,
including the scanner options.
Tools Mode
Note 2: The Feature Defaults 1 and 2 screens do not
Scanner is not
section.
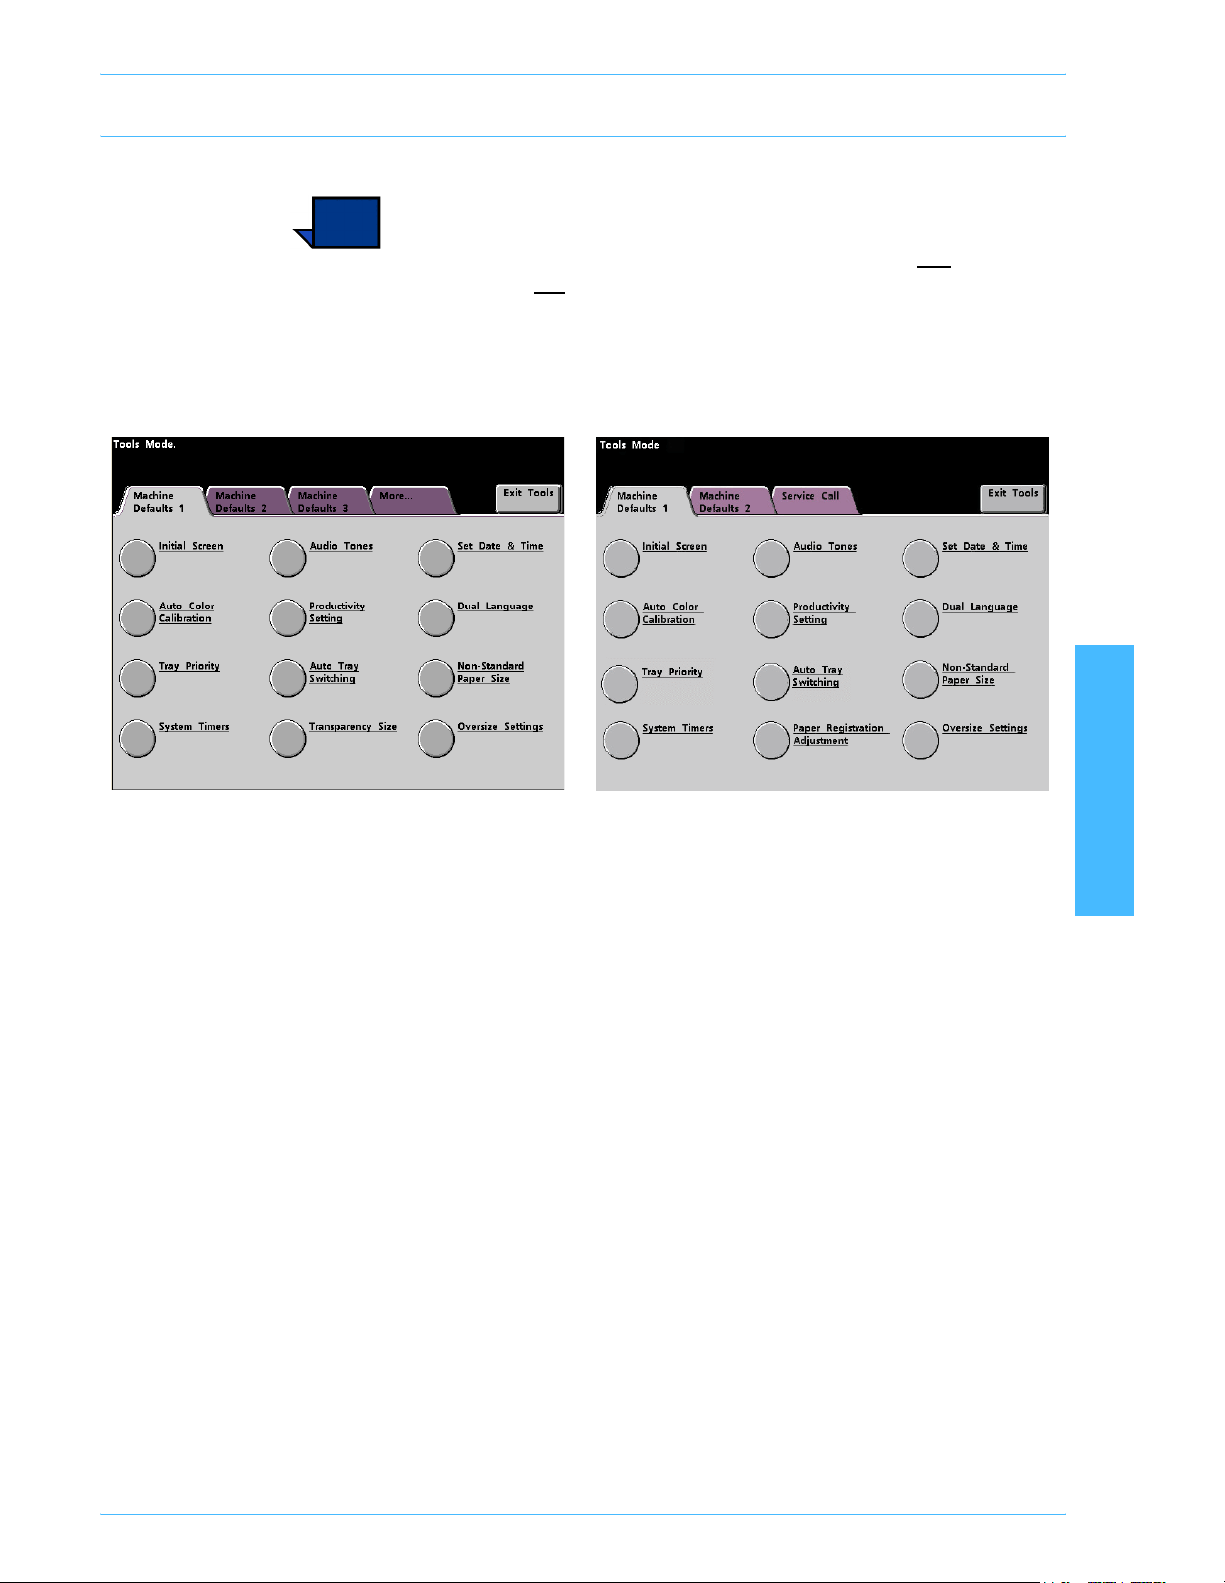
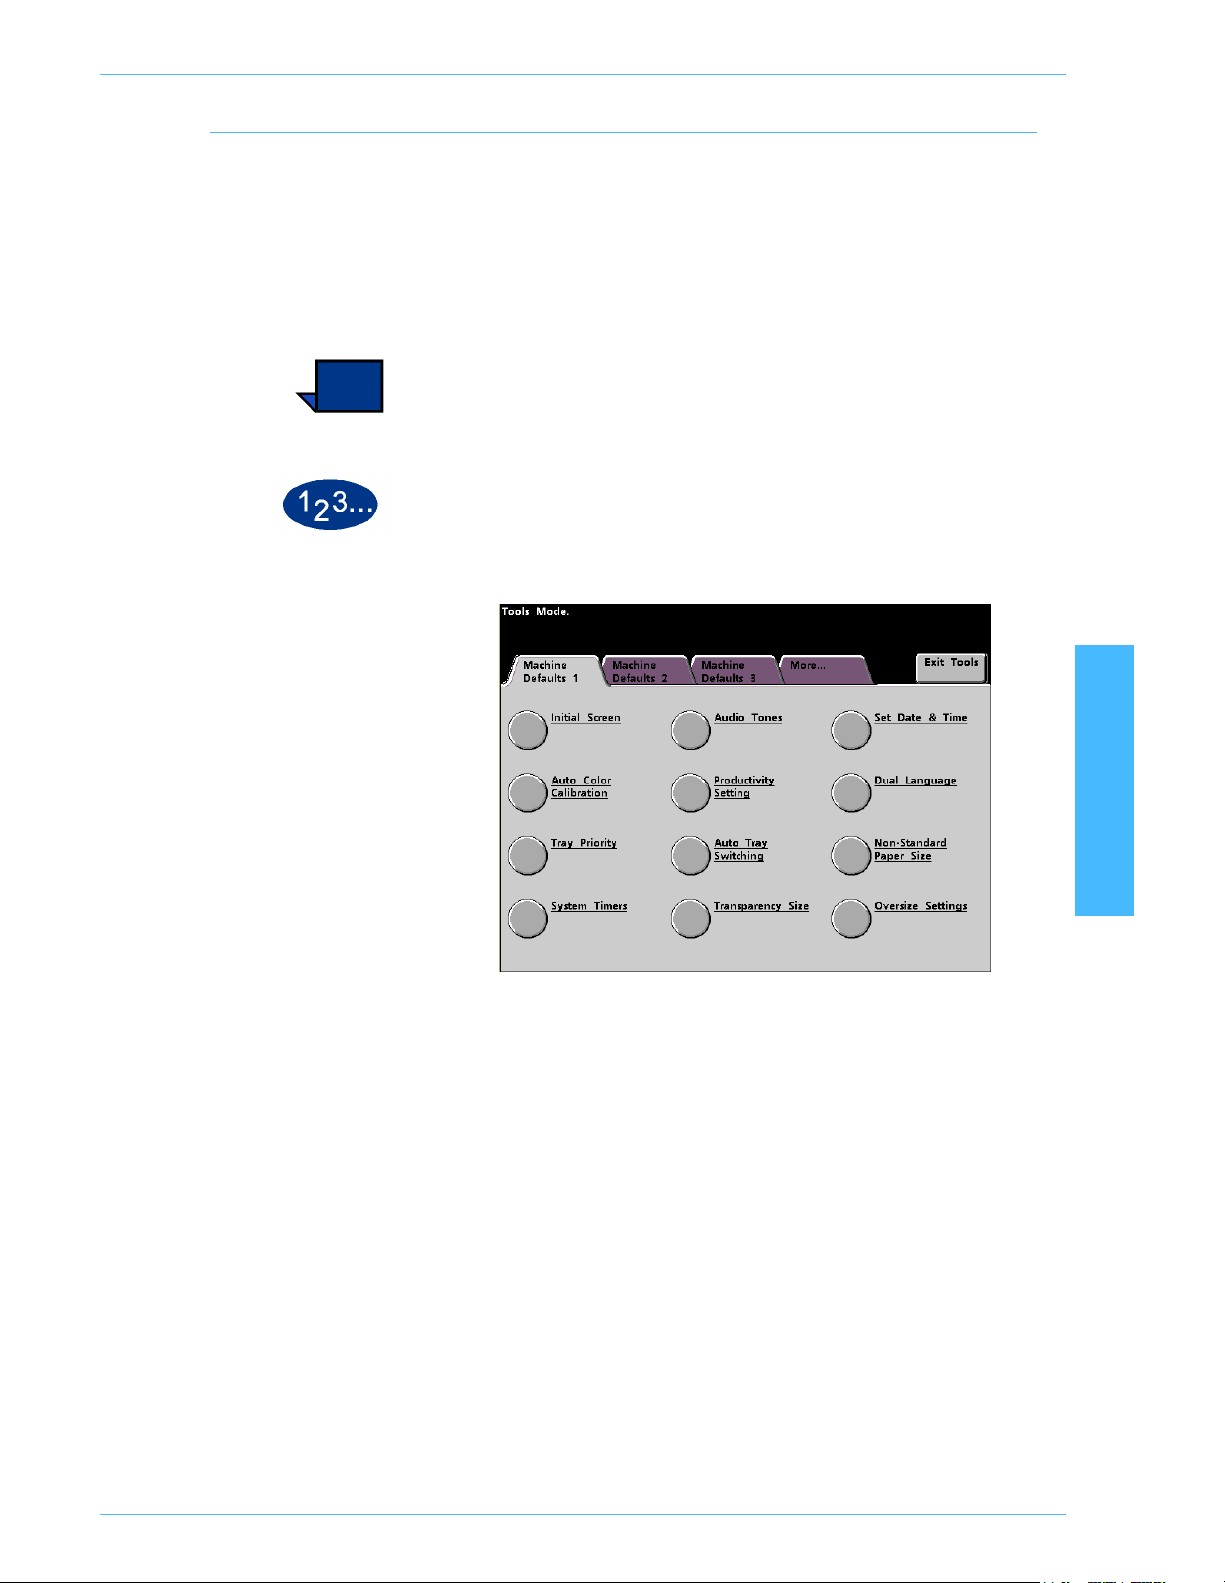
Machine Defaults 1 screen:
With an optional Scanner
display if a
connected. Again, all options are discussed in this
2 Tools Mode
Without an optional Scanner
• With a Scanner connected, three Machine Defaults screens
are available for changing the default settings.
Two Feature Defaults screens are available by touching the
More... tab.
• Without a Scanner connected, two Machine Defaults screens
are available.
DocuColor 5252 System Administration Guide
2-5
Too ls Mo de
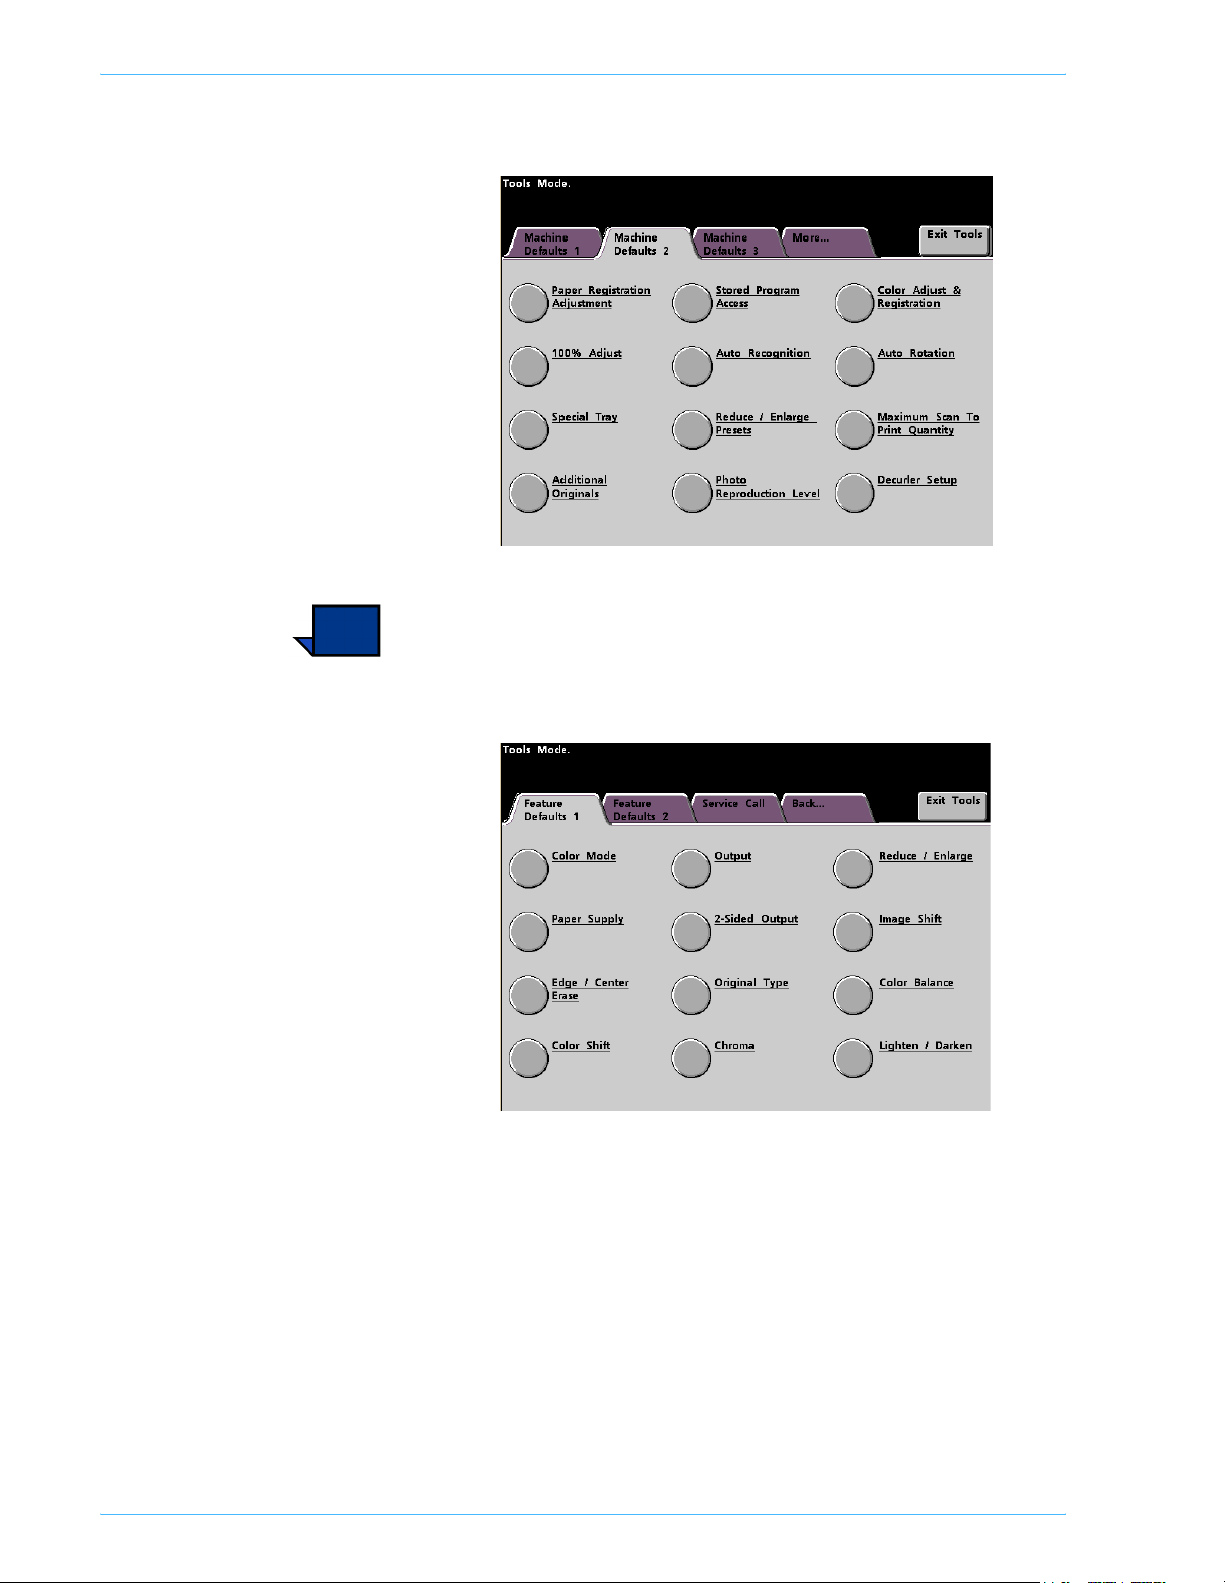
The Machine Defaults 2 screen is illustrated in the following
figure.
Note: The Machine Defaults 3 tab is used for Asset Manager
updates.
The Feature Defaults 1 screen is illustrated in the following figure.
2-6
DocuColor 5252 System Administration Guide

Tools Mode
The Feature Defaults 2 screen is illustrated in the following figure.
Note: The Service Call feature is not yet available.
The following procedures provide step-by-step instructions for
changing the settings for the options shown on the previous
screens.
2 Tools Mode
DocuColor 5252 System Administration Guide
2-7
Too ls Mo de
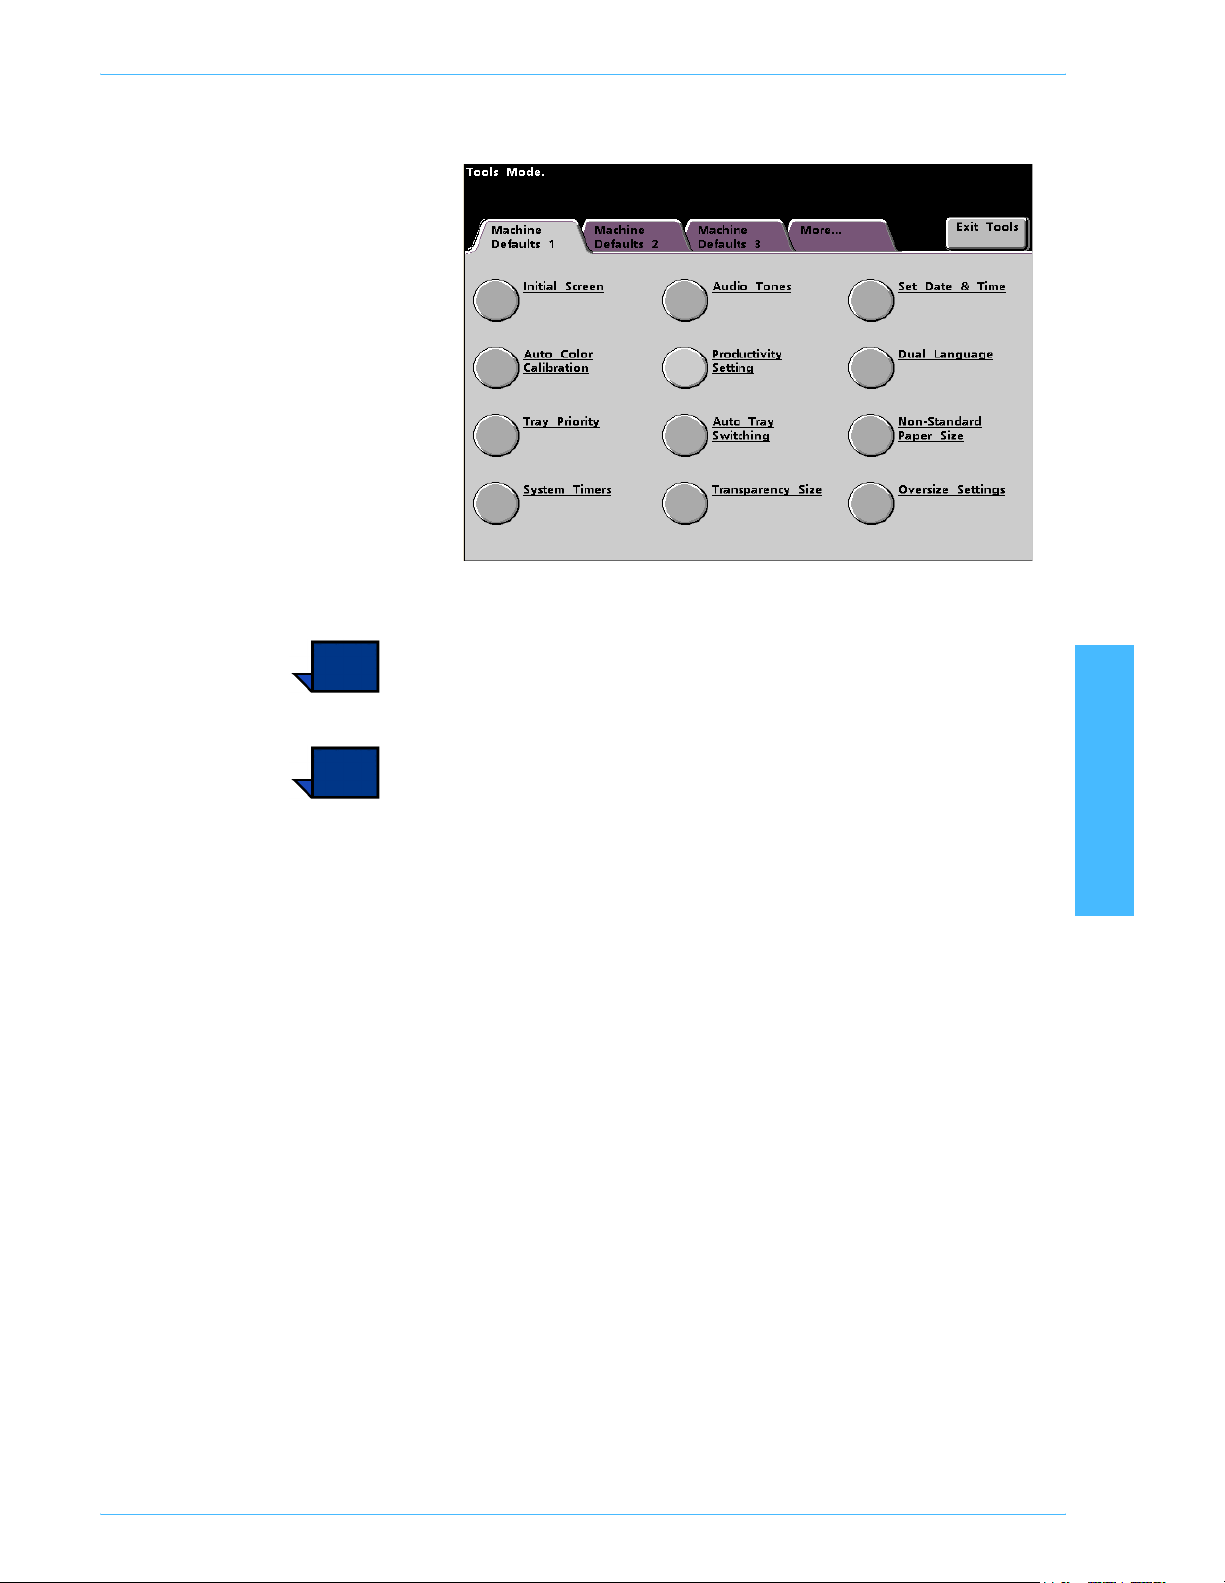
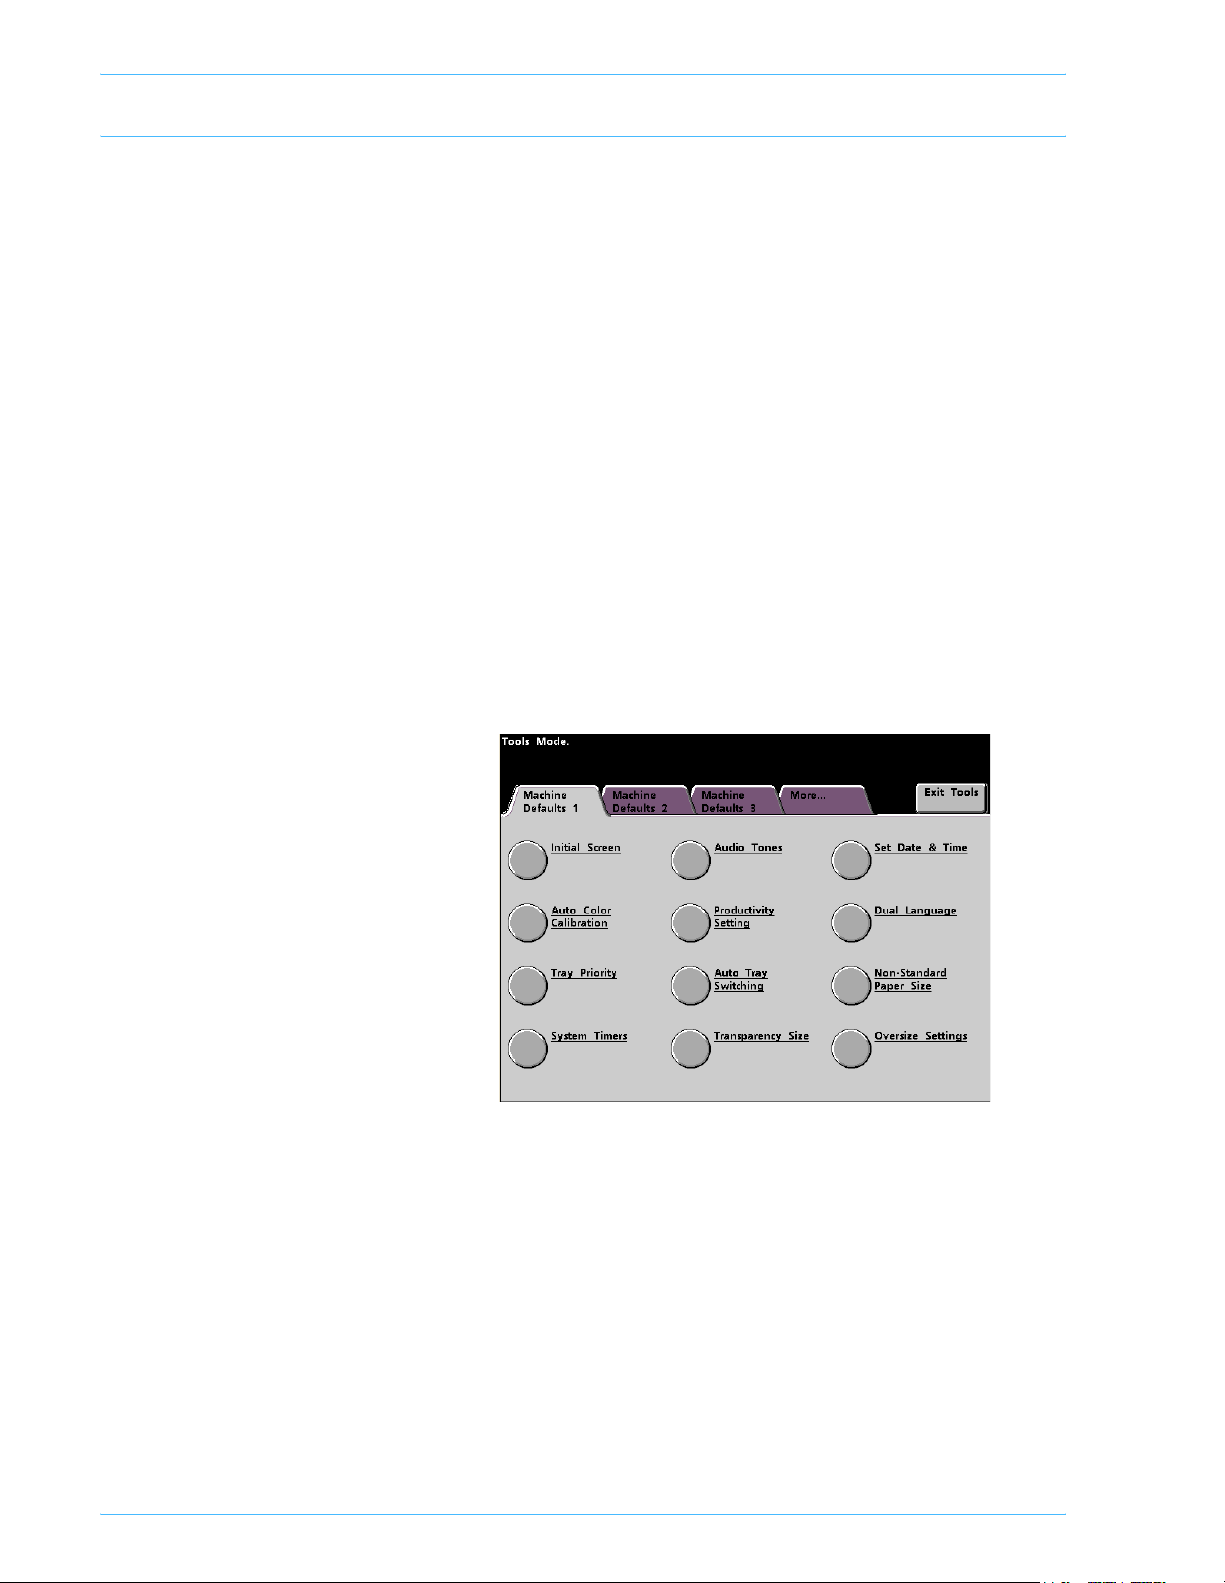
Machine Defaults 1
This section describes the features available to you through the
Machine Defaults 1 screen. You can access the following
DocuColor features through the Machine Defaults 1 screen:
• Initial Screen
• Auto Color Calibration
•Tray Priority
•System Timers
• Audio Tones
• Productivity Setting (not available)
• Auto Tray Switching
• Transparency (displays only with a Scanner)
•Set Date & Time
• Dual Language
• Non-Standard Paper Size
•Oversize Settings
Touch the Machine Defaults 1 tab.
2-8
DocuColor 5252 System Administration Guide
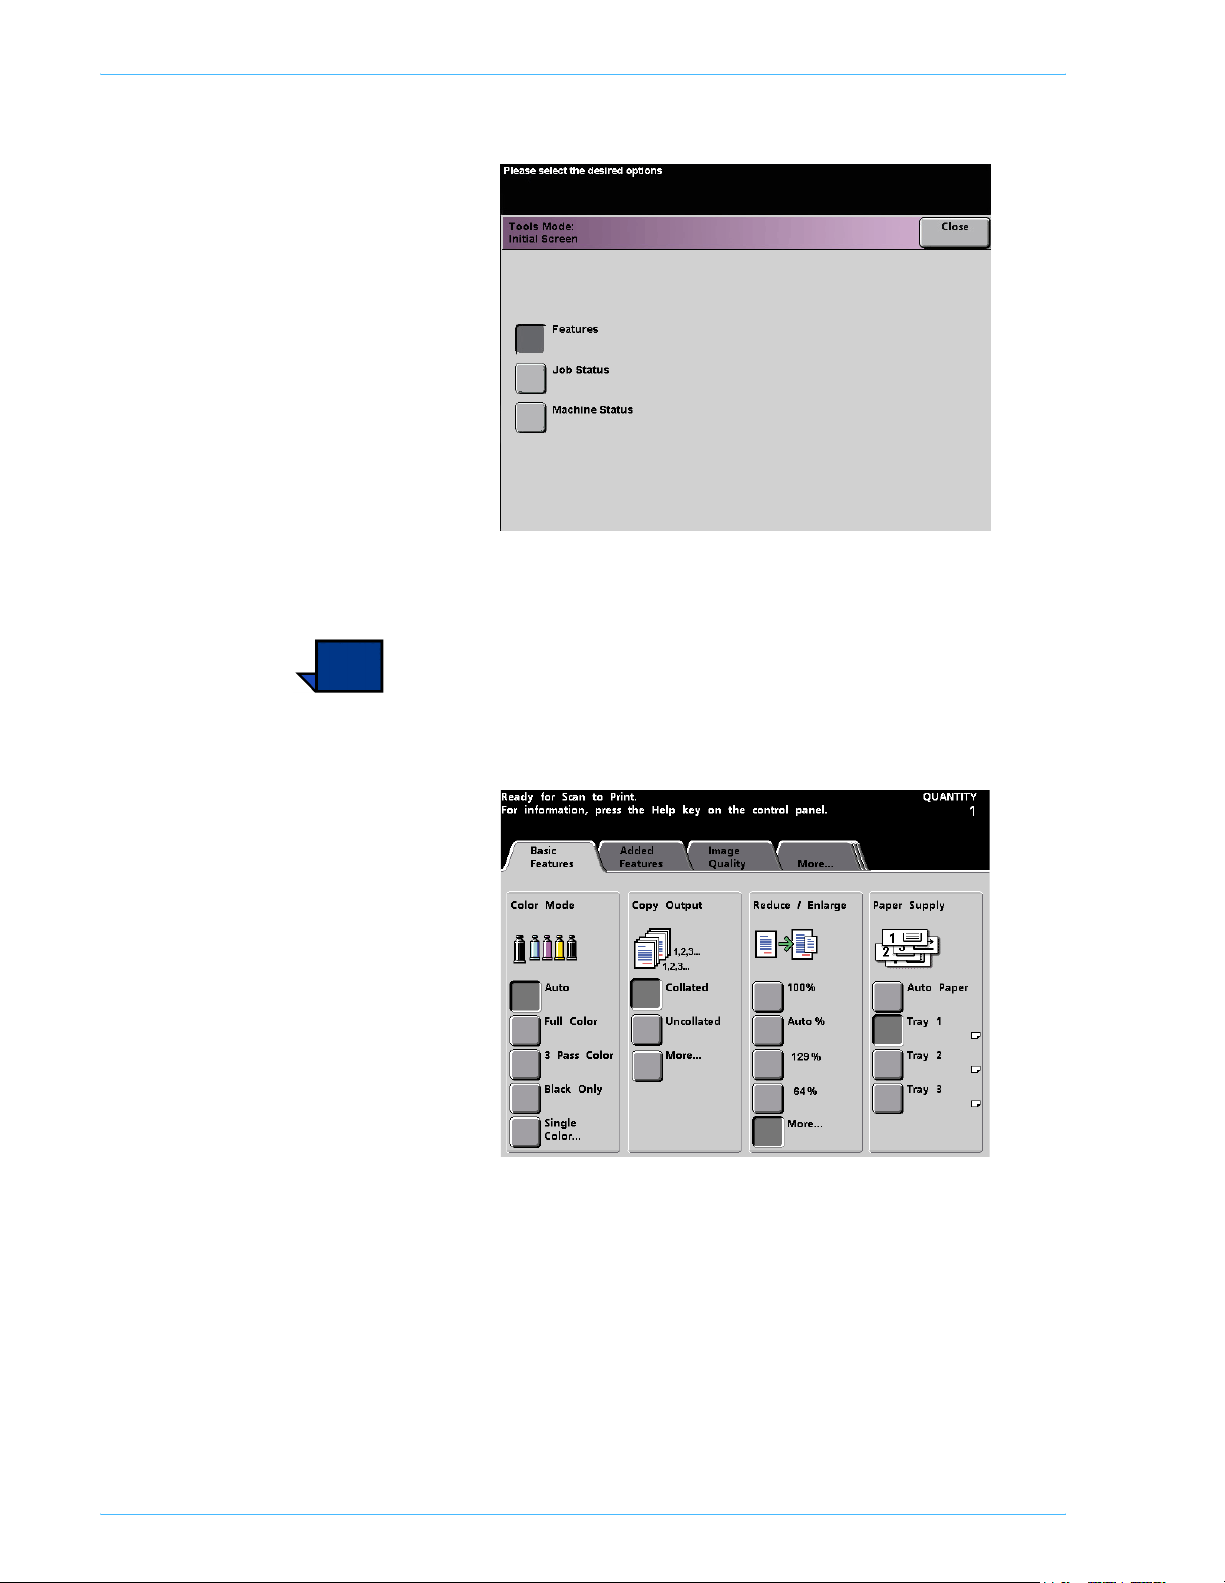
Initial Screen
Tools Mode
From this screen, select the default screen when the digital press
is powered on. You can choose from three screens:
• Features
• Job Status
• Machine Status
Note: The Basic Features screen is the factory default setting.
1 Tou ch t h e Initial Screen button.
2 Tools Mode
DocuColor 5252 System Administration Guide
2-9
Too ls Mo de
The Initial Screen screen appears.
2 Touch the Features, Job Status or Machine Status button.
Note: Refer to the digital press Operator Manual (see page 5-1)
for information regarding the various Scanner features.
If you leave the setting at the Features screen, the following
screen appears when the machine is powered on. This screen
displays the Basic Features tab for scan to print jobs.
2-10
DocuColor 5252 System Administration Guide
Tools Mode
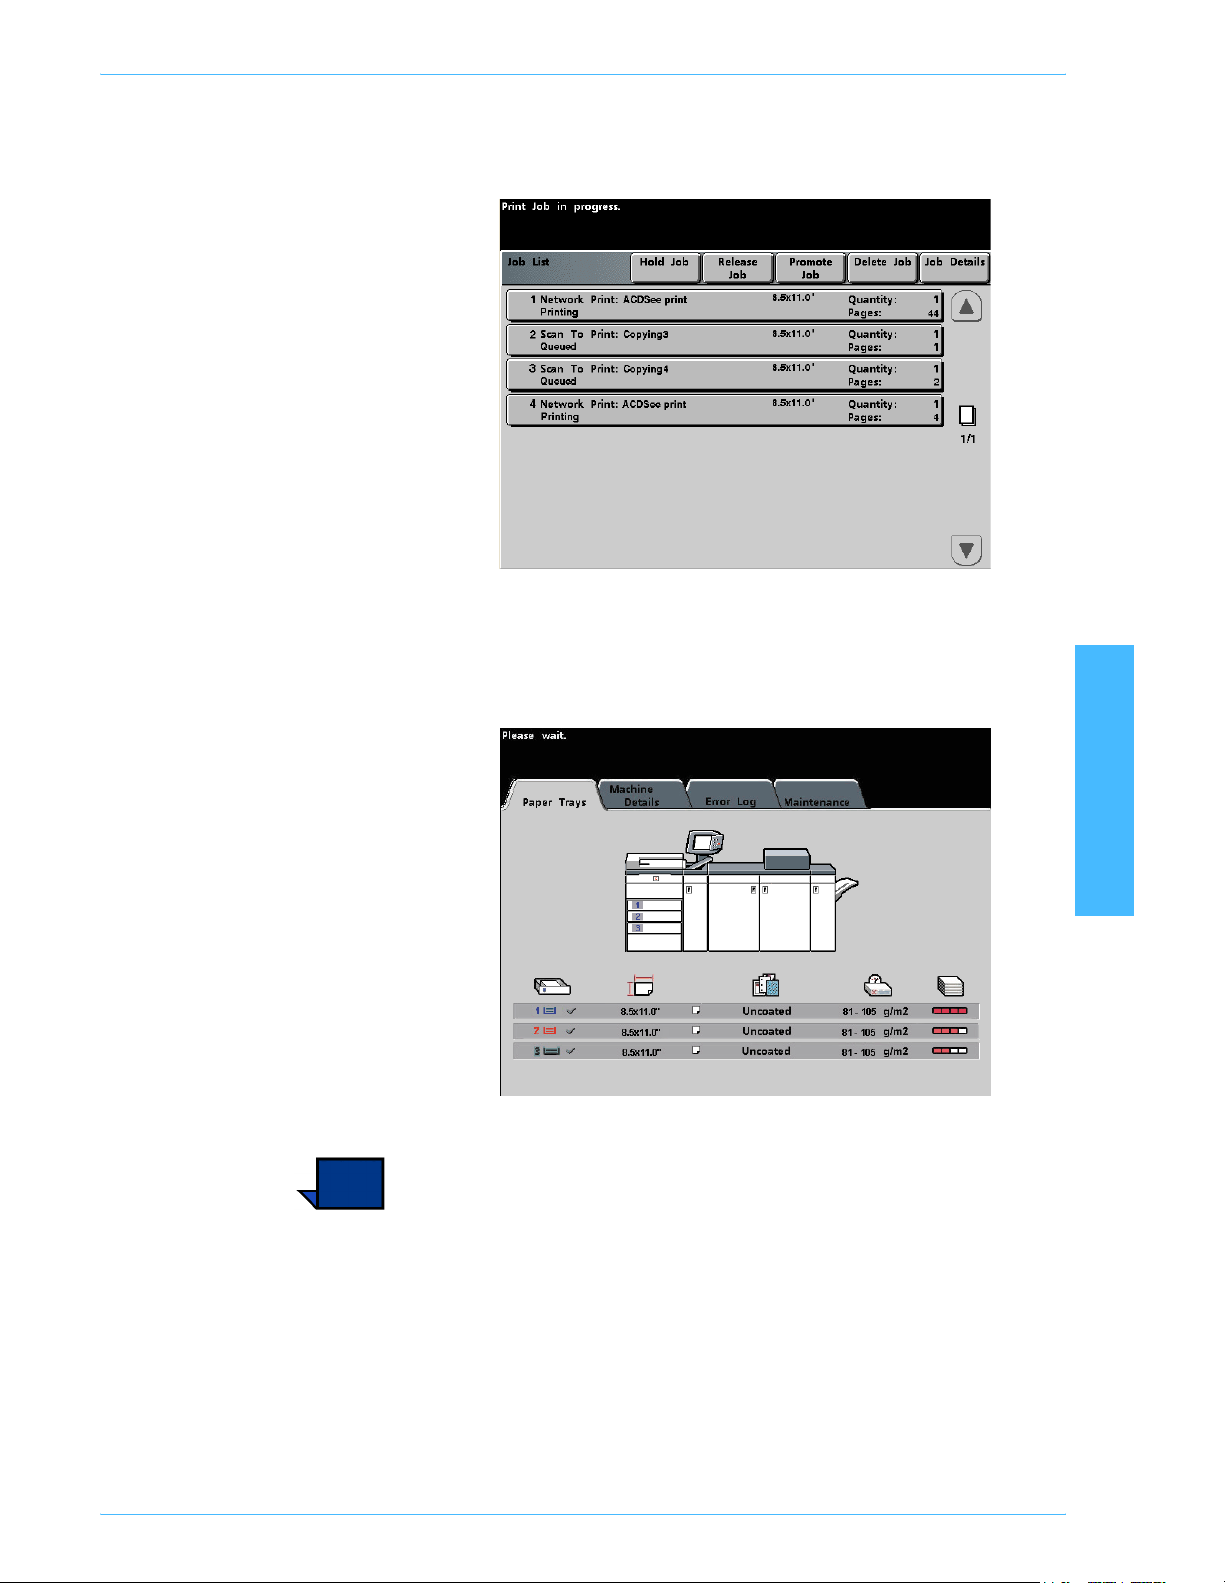
If you change the default setting to the Job Status screen, the
screen below appears when the machine is powered on. This
screen displays all the jobs currently queued for printing.
If you change the default setting to the Machine Status screen, the
following screen appears when the machine is powered on. The
appearance of your Machine Status screen depends on the
accessories you have connected.
2 Tools Mode
Note: Refer to the digital press Operator Manual (see page 3-22)
for more information about the Machine Status screen.
DocuColor 5252 System Administration Guide
2-11

Too ls Mo de
Auto Color Calibration
Key point 1: The digital press Color Calibration procedure does
not affect the quality of print jobs sent through your color server. It
is for scan to print jobs only.
The digital press has a number of monitoring sensors, as well as
feedback and control mechanisms, that are designed to enhance
overall calibration stability. Image quality is also automatically
adjusted periodically during operation to keep the calibration as
close as possible to the initial setup conditions.
The color server connected to your digital press also has
calibration procedures that you can use for network jobs.
Key point 2: Calibration targets can be printed only on A4 or
letter sized paper. Ensure that your digital press has A4 or Letter
paper loaded in one of the paper trays.
Key point 3: You should be skilled in color science and
calibration procedures before attempting to use the options
available on these screens.
What to know about screening
The digital press with scanner uses an advanced proprietary
screening technology to produce the colors, pictures, tints, and
shades required to produce high-quality prints.
PG is an abbreviation for Pattern Generator. The R in 200R refers
to Rotated Line screen, and the C in 200C and 15C refers to
Cluster Dot screen.
2-12
DocuColor 5252 System Administration Guide

Tools Mode
The five screening methods and what you should remember about
each are described in the following table.
Screening
Method
150C (LPI
Cluster Dot)
200C (LPI
Cluster Dot)
200R (LPI
Rotated Line
screen)
What to Remember
Provides better coverage on rough paper
Larger dot provides better color stability
Reduces black and other solid color mottle
Provides better black coverage due to black toner
granularity
Dot size is better for impressions containing tints,
highlights, and pastels
Most suitable for pages requirement careful control
of highlights
Poorest performance on text
Produces fine rosettes that can better emulate
offset lithography.
May leave jaggies on text (fonts)
Better for creating smooth gradients with minimum
contouring
Best for graphics and images
Switch to the 200R screen if banding occurs
The angle is fixed and cannot be adjusted
Has vertical screening for black, which is better for
text and line art.
Switch to the 200C screen if banding occurs.
Best all-purpose screen.
2 Tools Mode
300 LPI Line
screen
600 LPI Line
screen
Generally considered a special use screen.
Better edges on colored text with fewer jaggies.
Poor color stability due to small size of dot.
The entire color gamut must be reproduced in twomicron area.
Least color stability due to small size of dot.
Not recommended for most workflows.
Used primarily for testing.
The color server uses information from the PostScript job and the
software print driver to determine which screen is used for a
particular job.
DocuColor 5252 System Administration Guide
2-13

Too ls Mo de
To access the calibration procedures:
1 Touch the Auto Color Calibration button from the Machine
Defaults 1 screen. The Auto Color Calibration screen appears.
2 From this screen, you can perform the following tasks:
• Run Calibration
• Check Gradation
• Manual Adjust
Key point: Touch the Reset button on the Auto Color Calibration
screen to return any settings you changed to their last saved
values. Once you exit Tools Mode, any changes you have made
are set.
Refer to the following procedures for detailed information
regarding each option displayed on this screen.
2-14
DocuColor 5252 System Administration Guide

Tools Mode
Run Calibration
Use the Run Calibration feature if it is visually obvious that the
gray balance on your scan to print jobs is not correct. During the
Run Calibration procedure, the digital press creates a Look Up
Table by reading the 12 Toner Density Patches that print out. The
digital press then compares those readings to the factory-set
target values and makes the necessary adjustments to bring the
values within the target range.
Note: PG is an abbreviation for Pattern Generator. The R in
200R indicates Rotated Line screen, and the C in 200C and 150C
indicates Cluster Dot screen.
1 Touch the Run Calibration button on the Auto Color Calibration
screen to begin the calibration process. The Run Calibration
screen appears.
2 Tools Mode
DocuColor 5252 System Administration Guide
2-15

Too ls Mo de
2 Do one of the following:
• Touch the 300 PG button to calibrate the 300 Line screens
(200R, 200C, and 150C screens). Use this option only if you
have noticed a problem with halftone screening.
• Touch the 600 PG button to calibrate the 600 Line screen. Use
this option only if you have noticed a problem with the gray
scale on text.
• Touch the 300 PG & 600 PG button to calibrate all the
screens.
3 Press the Start button on the Control Panel. The calibration
process starts and color patch prints are printed.
2-16
DocuColor 5252 System Administration Guide

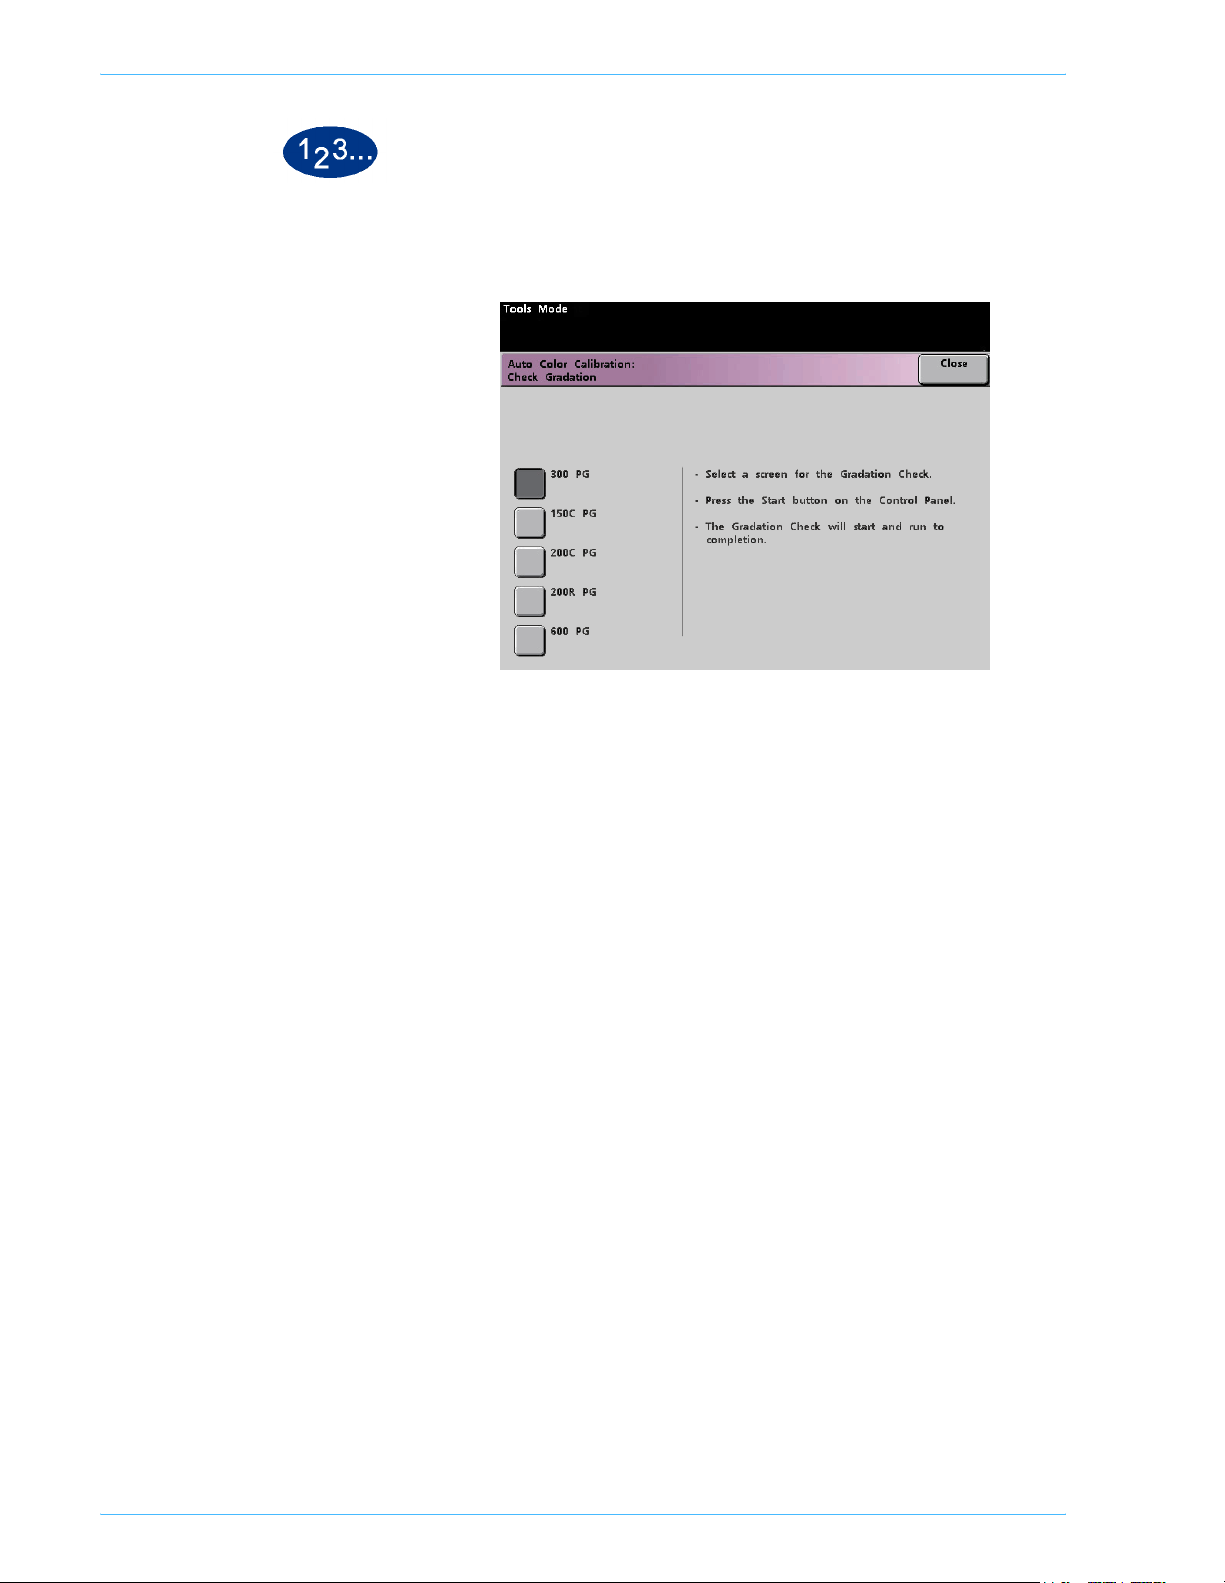
Check Gradation
The Check Gradation feature allows you to print gradated color
patch prints for each line screen on the digital press. These
gradated color patch prints are used to verify that the dry ink/toner
densities for CMYK and Grey balance are correct. If you are
dissatisfied with the appearance of any color on the print, you can
manually adjust the dry ink/toner densities for Cyan, Magenta,
Yellow, and Black using the Manual Adjust feature. It is
recommended that you begin your calibration by calibrating the
300 PG screen first. This is the basic line screen that is used, and
all other line screens are calibrated against the 300 PG screen.
Use this feature daily and compare the output of gradated color
patches to the color patch prints from the previous day. Under
normal operating conditions, there should be no difference
between them. Automatic sensors and control mechanisms in the
digital press with scanner should maintain consistent calibration.
If there is an obvious visual difference between two days’ color
patches, run the calibration process on the color server, then run
this gradation process again.
Tools Mode
2 Tools Mode
DocuColor 5252 System Administration Guide
2-17
Too ls Mo de
1 Touch the Check Gradation button on the Auto Color Calibration
screen to begin the process. The Check Gradation screen
appears.
2 Touch the button for the screen for which you want to check the
gradation.
3 Press the Start button on the Control Panel. The gradation check
process starts and gradated color patch prints are printed.
4 Repeat the process for each screen for which you want to check
the gradation.
2-18
DocuColor 5252 System Administration Guide

Tools Mode
Manual Adjust
The Manual Adjust feature enables you to modify each color
(CMYK) for Low, Mid, and High densities. You can also modify the
same settings for the highlight values of each screen.
Key point: Manual Adjust should be used only by an expert in
color science. Any changes made on this screen remain in effect
for all future scanned jobs, until it is changed again.
1 Touch the Manual Adjust button on the Auto Color Calibration
screen. The Manual Adjust screen appears.
The value displayed for each setting, 128, is the mid point
between 0 and 255. Entering a lower number produces a lighter
color. Entering a higher number produces a darker color. If you
make any changes, run test prints to evaluate the output prints.
2 Tools Mode
DocuColor 5252 System Administration Guide
2-19

Too ls Mo de
2 Follow the directions on the screen and touch the button for the
value you wish to adjust.
3 Touch the up or down arrow buttons until the value you want is
displayed in the field above the arrow buttons.
Key point: You should not adjust the value more than 5 counts
at a time.
4 Touch the Enter button on the screen.
5 Repeat steps 2, 3, and 4 to enter other new values.
6 Press the Start button on the Control Panel to enter the new
values into the system.
Key point: It is recommended that you run the Check Gradation
procedure for the screening type that you are adjusting. Do a
before and after comparison to verify your changes.
2-20
DocuColor 5252 System Administration Guide

Tray Priority
Tools Mode
The Tray Priority feature allows you to select priorities for each
paper tray. If the Auto Tray Switching feature is enabled, and each
paper tray contains the same size and weight paper, the digital
press feeds paper from the paper tray set at Priority 1. If there is
no paper in the Priority 1 paper tray, the Priority 2 paper tray is
automatically selected, and so on.
1 Touch the Tray Priority button on the Machine Defaults 1 screen.
T he Tray Priority screen appears.
2 Touch the desired Priority button in the Priority column.
3 Touch the button for the Paper Tray that will have that priority. The
number of the selected Paper Tray appears next to that Priority
button.
4 Repeat this procedure for each Priority. You will not be able to set
the same Paper Tray at more than one Priority at a time.
5 Touch the Close button to return to the Machine Defaults 1
screen. You will not be able to touch the Close button until you
have set Paper Trays for each Priority.
2 Tools Mode
DocuColor 5252 System Administration Guide
2-21
Too ls Mo de
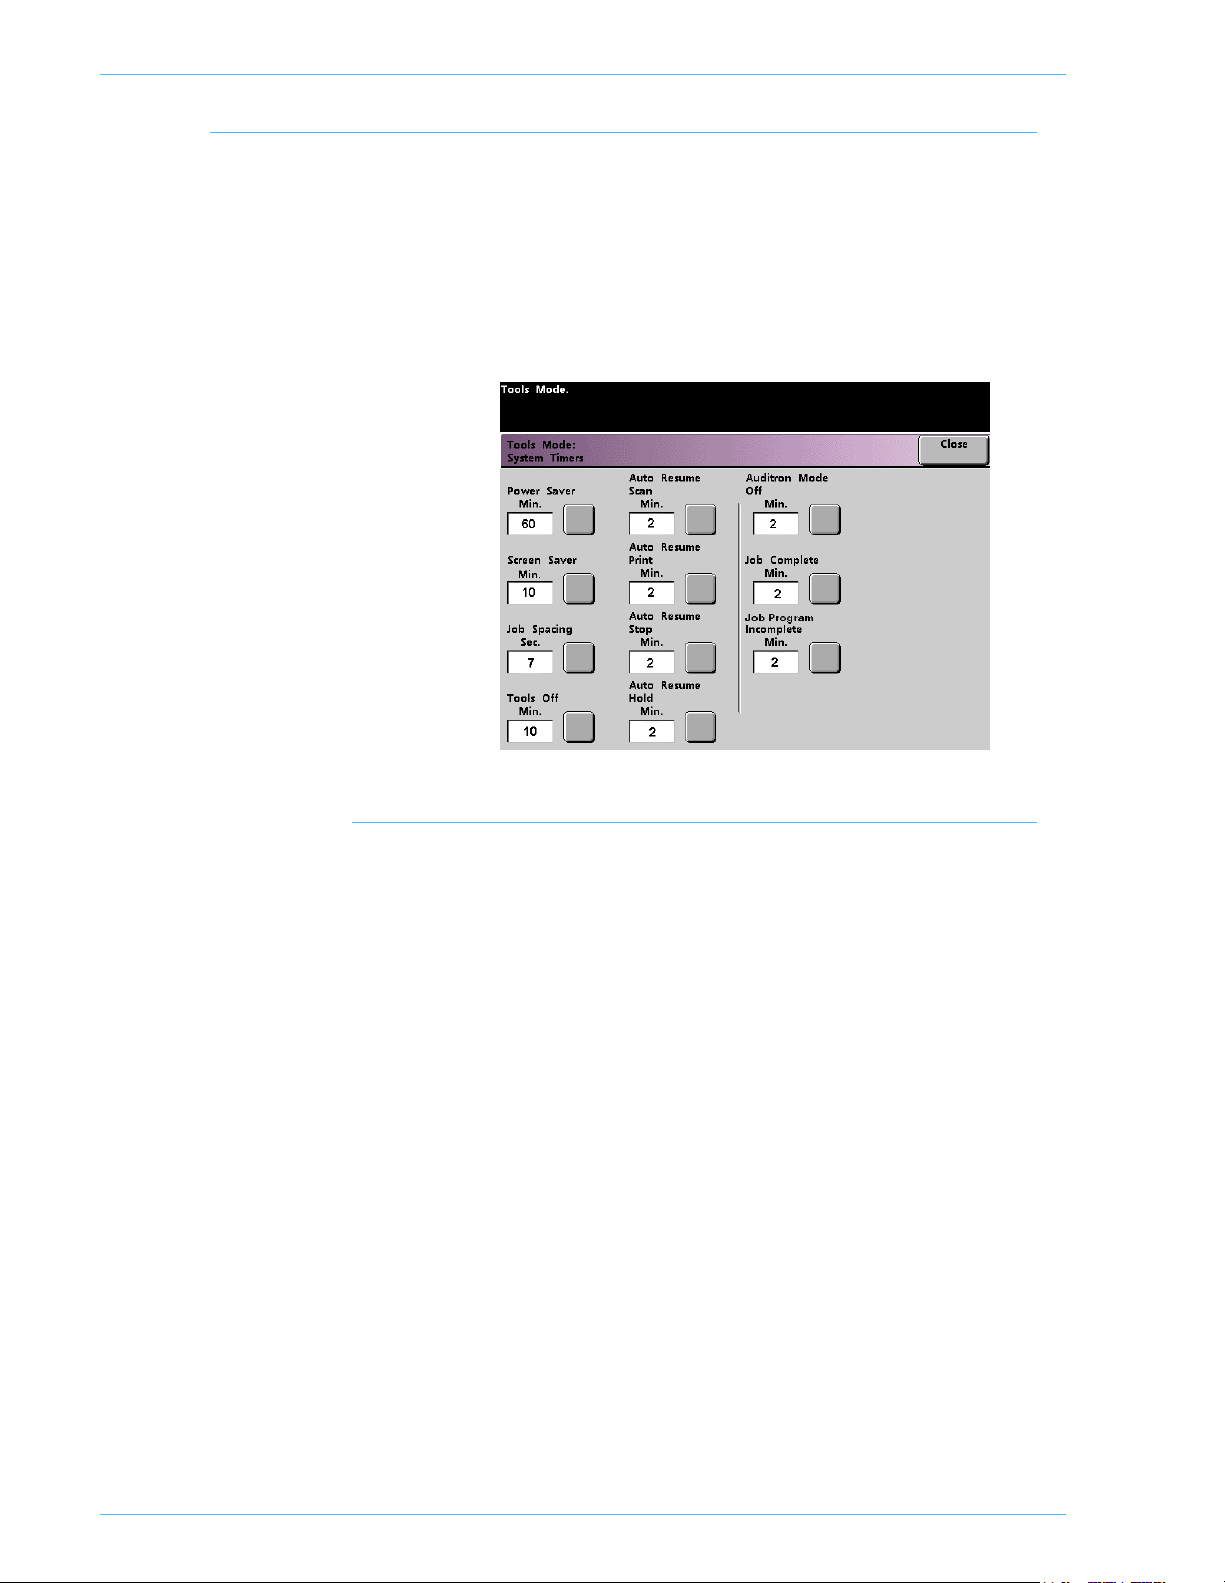
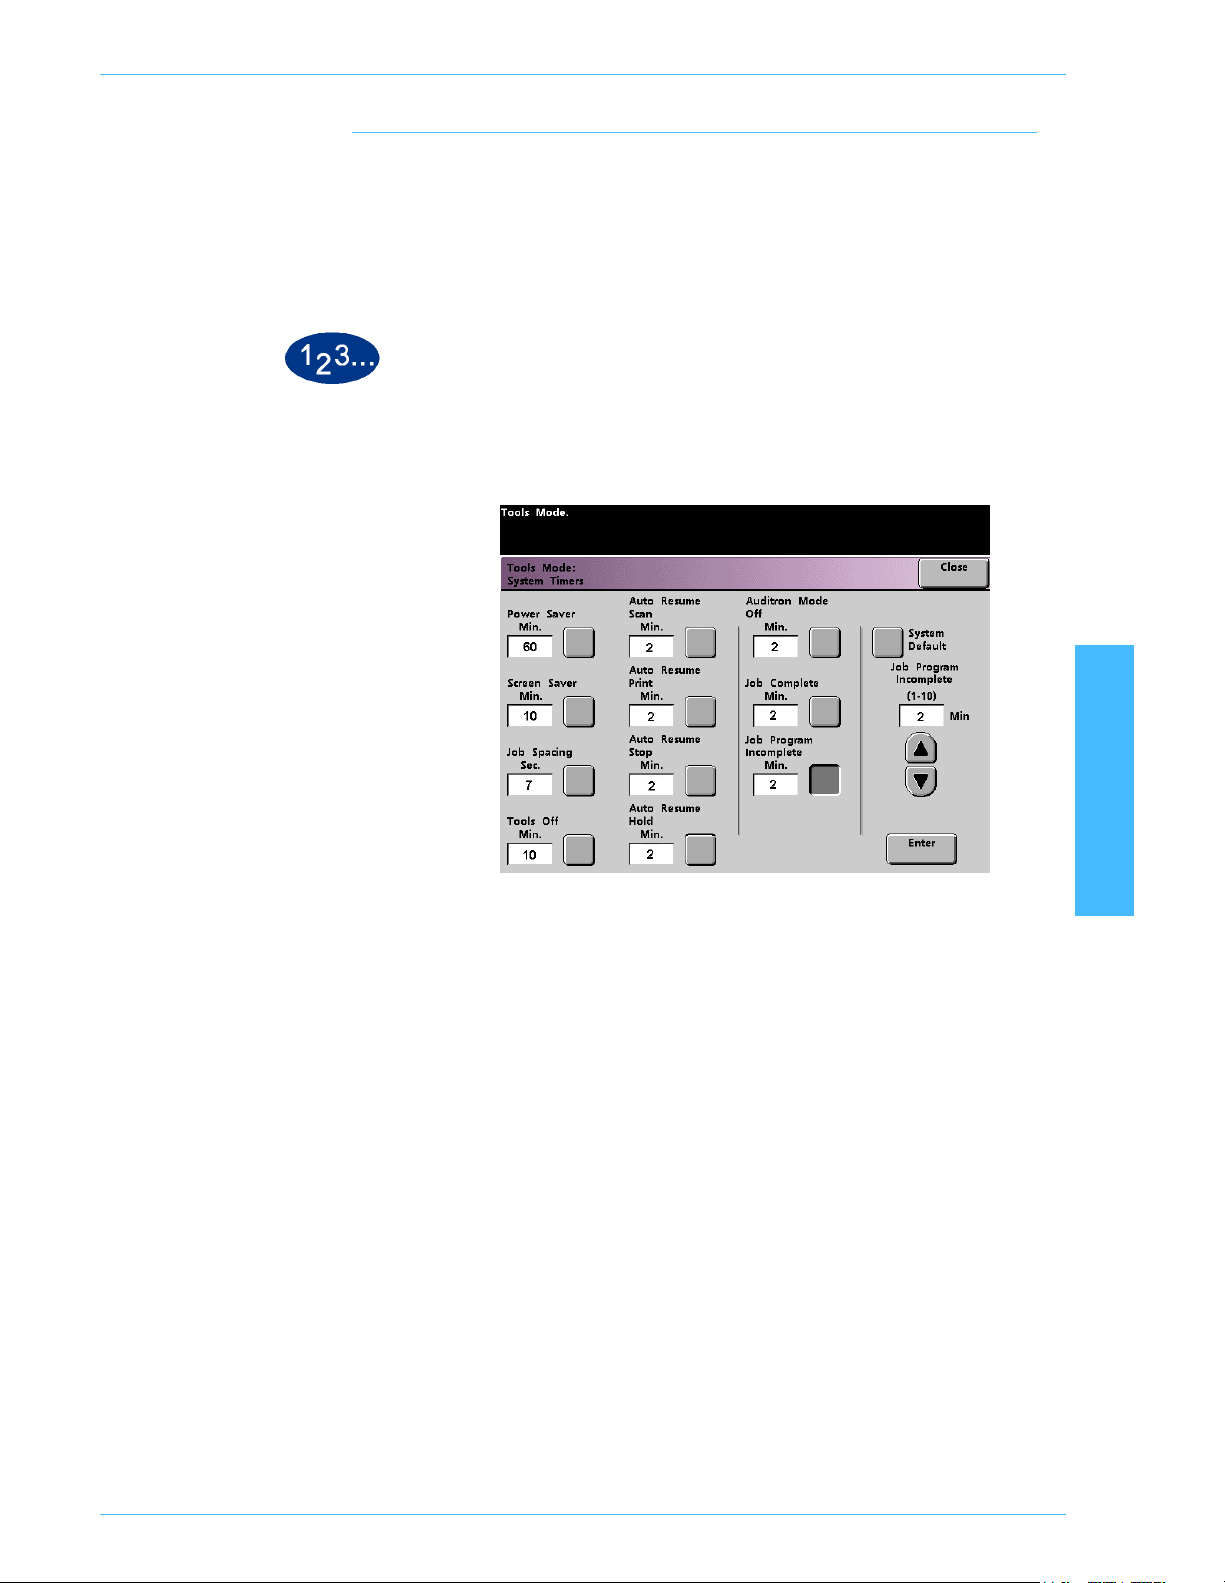
System Timers
The System Timers feature allows you to change the factory
default settings for the timers in the digital press.
To access the various timers, touch the System Timers button on
the Machine Defaults 1 screen.
The System Timers screen appears. From this screen you can
view the time currently set for each of the timers, and select the
one you want to change.
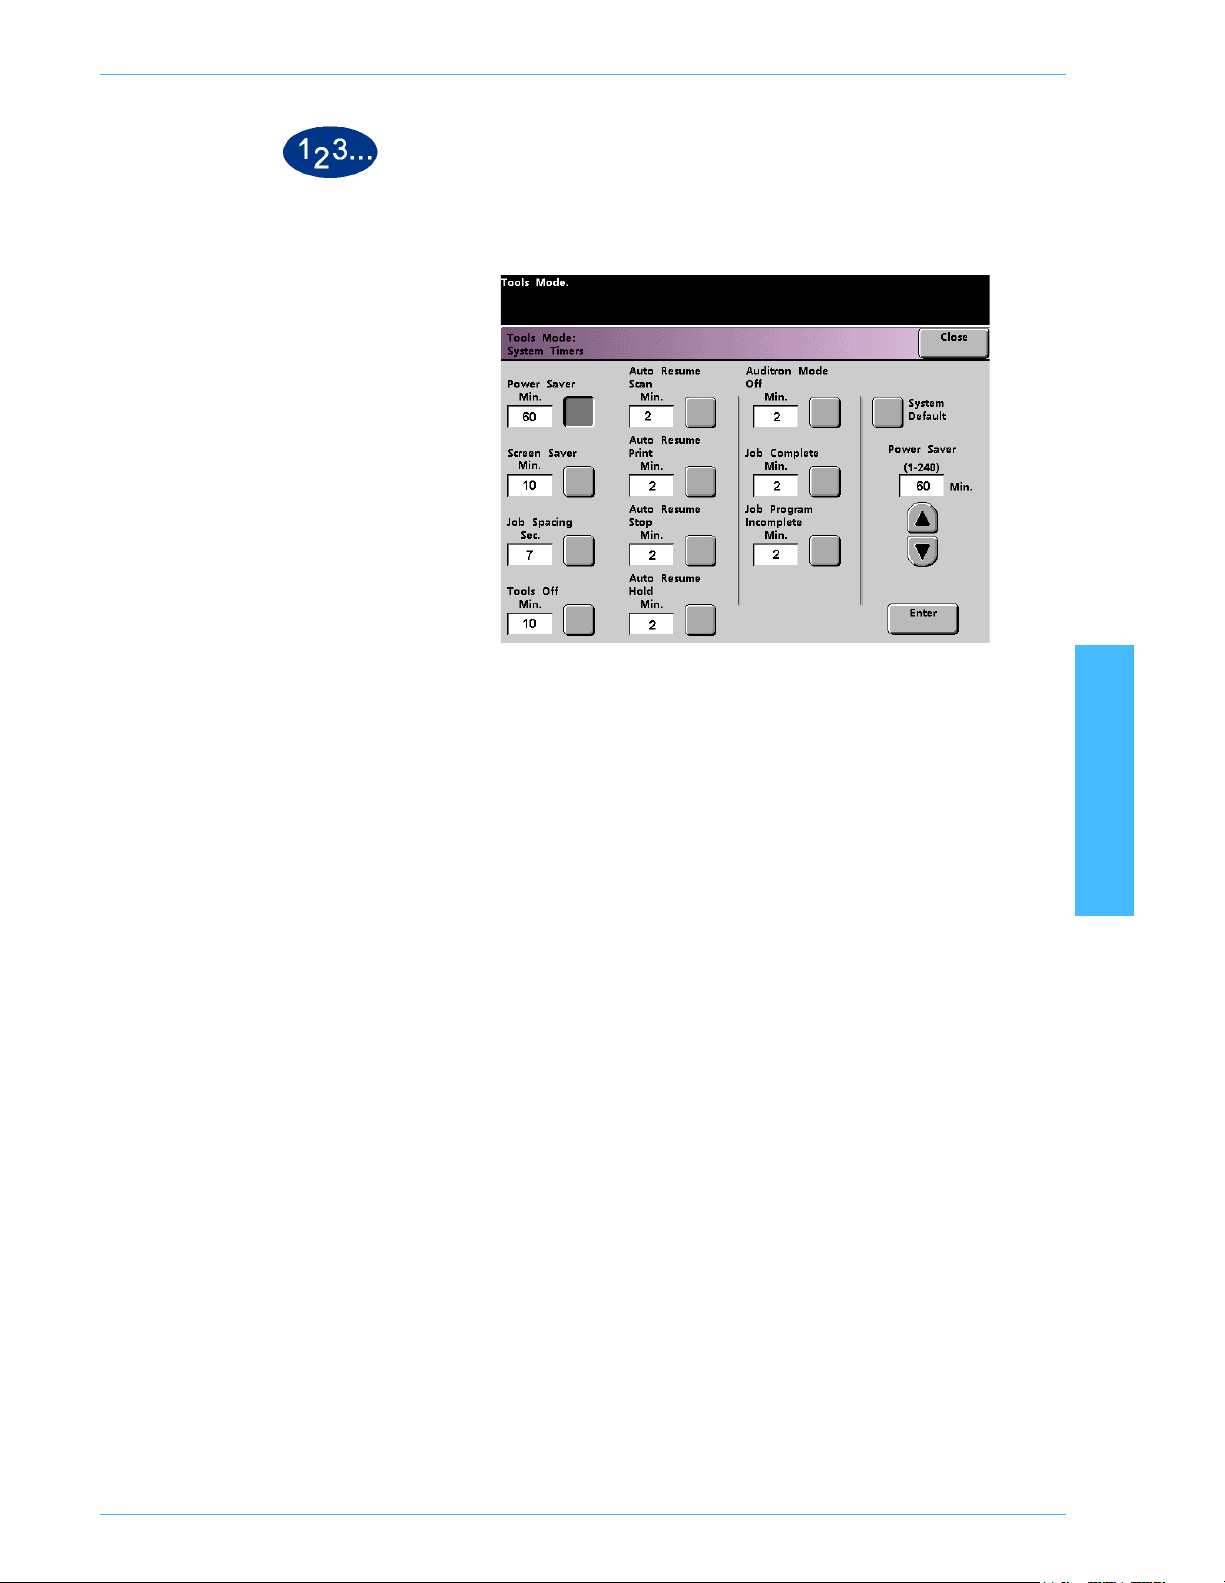
Power Saver
Use this feature to set the time that elapses until the digital press
with scanner enters a reduced power consumption mode. This
timer is activated when all print jobs have been completed and
there are no jobs in the job queue.
The digital press with scanner exits the Power Saver mode when
a job is sent to be printed.
2-22
DocuColor 5252 System Administration Guide
Tools Mode
1 Touch the Power Saver button on the System Timers screen. The
Power Saver screen appears.
2 Use the up or down arrow buttons to change the time. The range
available is 1 to 240 minutes.
To use the system default time of 60 minutes, touch the System
Default button.
3 Touch the Enter button on the screen to enter the new time into
the system.
4 Touch the Close button to return to the Machine Defaults 1
screen, or select another timer to change.
2 Tools Mode
DocuColor 5252 System Administration Guide
2-23

Too ls Mo de
Screen Saver
The Screen Saver feature allows you to protect the screen from
being damaged with permanent marks if the digital press with
scanner is idle for a period of time.
1 Touch the Screen Saver button on the System Timers screen.
The Screen Saver screen appears.
2 Use the up or down arrow buttons to change the time. The range
available is 10 to 60 minutes.
To use the system default time of 10 minutes, touch the System
Default button.
3 Touch the Enter button on the screen to enter the new time into
the system.
4 Touch the Close button to return to the Machine Defaults 1
screen, or select another timer to change.
2-24
DocuColor 5252 System Administration Guide

Tools Mode
Job Spacing
Use the Job Spacing feature when there are multiple jobs queued
and you would like to allow 7 seconds to unload prints from a
finishing device before the next job starts printing.
1 Touch the Job Spacing button on the System Timers screen. The
Job Spacing screen appears.
2 Touch the 7 Seconds button to enable the feature or touch the Off
button to disable the feature.
3 Touch the Close button to return to the Machine Defaults 1
screen, or select another timer to change.
2 Tools Mode
DocuColor 5252 System Administration Guide
2-25

Too ls Mo de
Tool s Of f
Use the Tools Off feature to have the digital press with scanner
automatically return to the printing or scanning mode when no
action has been taken on the Tools Mode screens after the set
amount of time.
Key point: Jobs sent over a network will queue but will not print
while the Tools Mode is active.
1 Touch the Tools Off button on the System Timers screen. The
Tools Off screen appears.
2-26
2 Use the up or down arrow buttons to change the time. The range
available is 10 to 60 minutes.
To use the system default time of 10 minutes, touch the System
Default button.
3 Touch the Enter button on the screen to enter the new time into
the system.
4 Touch the Close button to return to the Machine Defaults 1
screen, or select another timer to change.
DocuColor 5252 System Administration Guide

Tools Mode
Auto Resume Scan
Use the Auto Resume feature to restart a copy job automatically
after a fault is cleared and a scanned job is waiting for user
instruction, or to restart a copy job waiting for user instruction after
the Job Interrupt button on the Control Panel has been pressed.
1 Touch the Auto Resume Scan button on the System Timers
screen. The Auto Resume Scan screen appears.
2 Use the up or down arrow buttons to change the time. The range
available is 1 to 10 minutes.
To use the system default time of 2 minutes, touch the System
Default button.
3 Touch the Enter button on the screen to enter the new time into
the system.
4 Touch the Close button to return to the Machine Defaults 1
screen, or select another timer to change.
2 Tools Mode
DocuColor 5252 System Administration Guide
2-27

Too ls Mo de
Auto Resume Print
Use the Auto Resume Print feature to restart a job automatically
after a fault is cleared and a job received over the network is
waiting for user instruction, or to restart a job waiting for user
instruction after the Interrupt button on the Control Panel has been
pressed.
1 Touch the Auto Resume Print button on the System Timers
screen. The Auto Resume Print screen appears.
2 Use the up or down arrow buttons to change the time. The range
available is 1 to 10 minutes.
To use the system default time of 2 minutes, touch the System
Default button.
3 Touch the Enter button on the screen to enter the new time into
the system.
4 Touch the Close button to return to the Machine Defaults 1
screen, or select another timer to change.
2-28
DocuColor 5252 System Administration Guide

Tools Mode
Auto Resume Stop
Use the Auto Resume Stop feature to restart a job automatically
after the Pause button on the Control Panel is pressed and the job
is waiting for user instruction.
1 Touch the Auto Resume Stop button on the System Timers
screen. The Auto Resume Stop screen appears.
2 Use the up or down arrow buttons to change the time. The range
available is 1 to 10 minutes.
To use the system default time of 2 minutes, touch the System
Default button.
3 Touch the Enter button on the screen to enter the new time into
the system.
4 Touch the Close button to return to the Machine Defaults 1
screen, or select another timer to change.
2 Tools Mode
DocuColor 5252 System Administration Guide
2-29

Too ls Mo de
Auto Resume Hold
Use the Auto Resume Hold feature to automatically proceed to
print the next job in the queue if the job currently printing is waiting
for user instruction to clear a certain type of fault.
1 Touch the Auto Resume Hold button on the System Timers
screen. The Auto Resume Hold screen appears.
2 Use the up or down arrow buttons to change the time. The range
available is 1 to 10 minutes.
To use the system default time of 2 minutes, touch the System
Default button.
3 Touch the Enter button on the screen to enter the new time into
the system.
4 Touch the Close button to return to the Machine Defaults 1
screen, or select another timer to change.
2-30
DocuColor 5252 System Administration Guide
Tools Mode
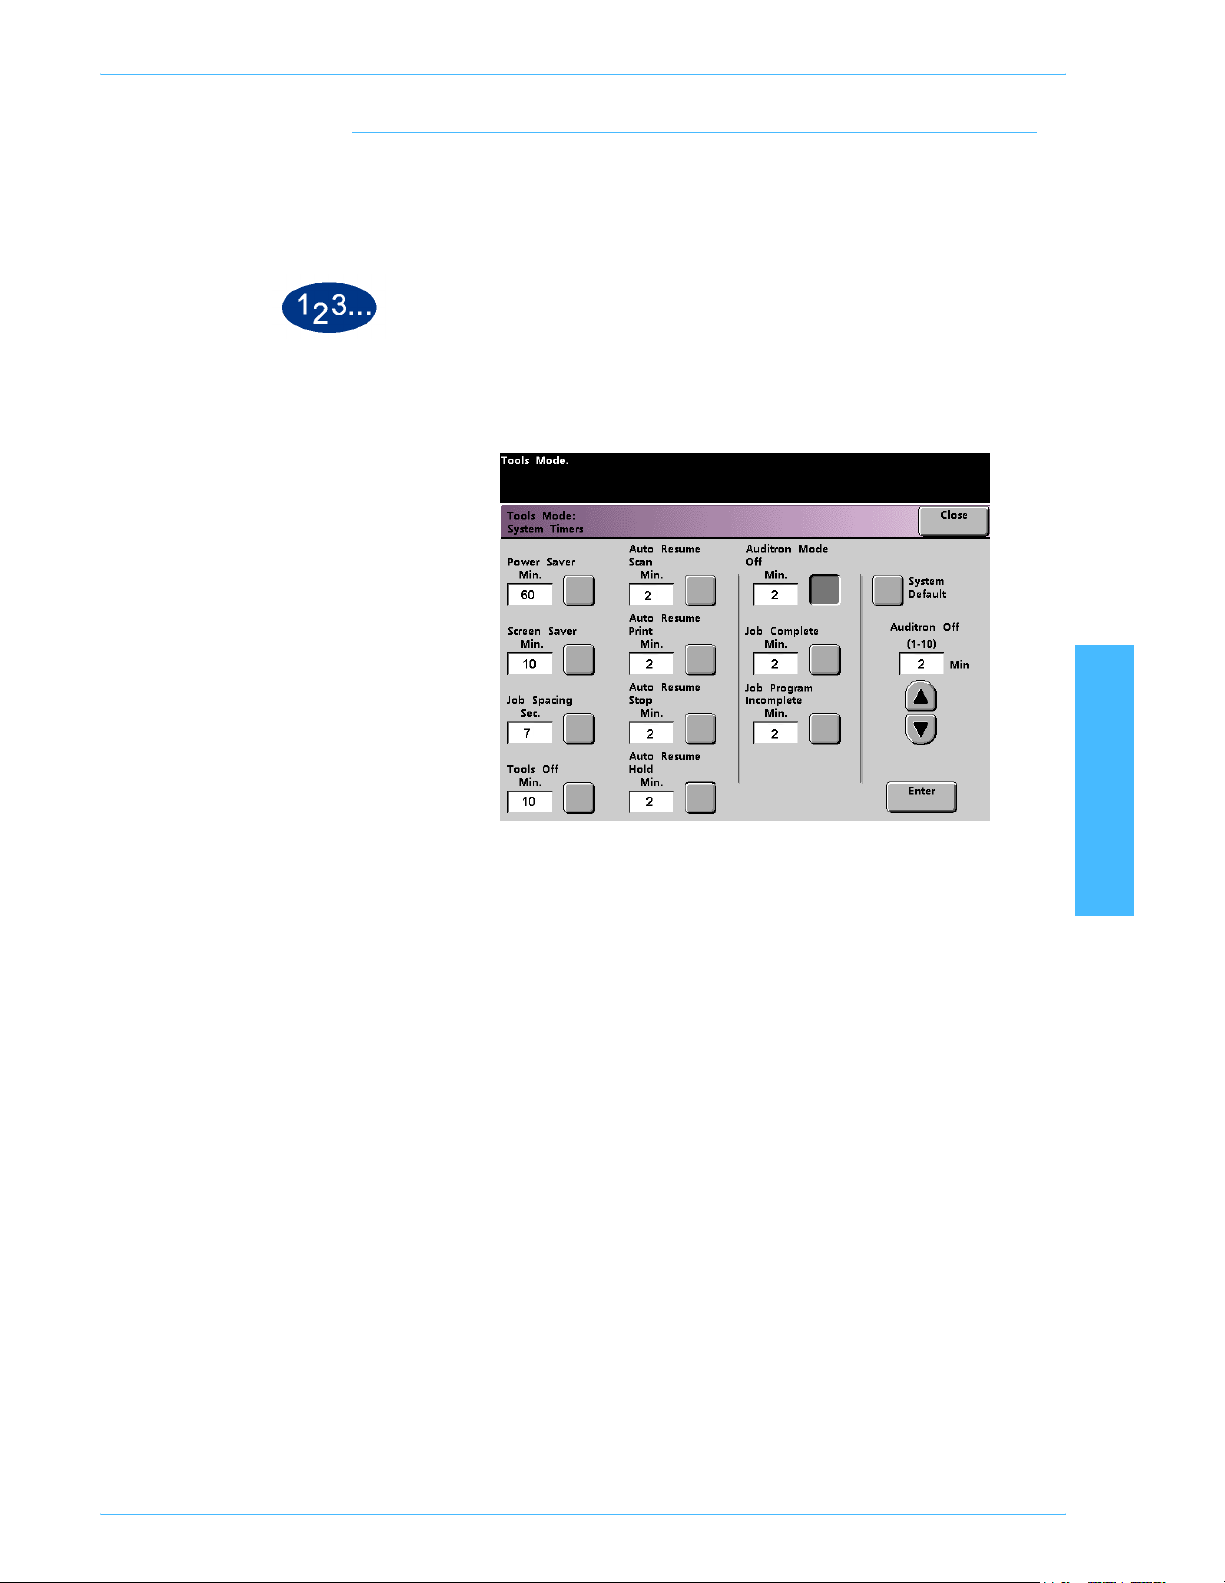
Auditron Mode Off
Use the Auditron Mode Off feature to set the time that it takes the
digital press to return to the initial Password screen after the
cessation of user activity while in Auditron Mode.
1 Touch the Auditron Mode Off button on the System Timers
screen. The Auditron Mode Off screen appears.
2 Use the up or down arrow buttons to change the time. The range
available is 1 to 10 minutes.
To use the system default time of 2 minutes, touch the System
Default button.
3 Touch the Enter button on the screen to enter the new time into
the system.
4 Touch the Close button to return to the Machine Defaults 1
screen, or select another timer to change.
2 Tools Mode
DocuColor 5252 System Administration Guide
2-31

Too ls Mo de
Job Complete
The Job Complete feature determines when the digital press
returns to the system default settings after a scanned job with
programmed settings is complete. If a user has completed a job
and failed to return the system settings to their default values by
pressing the Clear All button on the Control Panel, the machine
automatically restore the default settings after the amount of time
set in the Job Complete screen.
1 Touch the Job Complete button on the System Timers screen.
The Job Complete screen appears.
2-32
2 Use the up or down arrow buttons to change the time. The range
available is 1 to 10 minutes.
To use the system default time of 2 minutes, touch the System
Default button.
3 Touch the Enter button on the screen to enter the new time into
the system.
4 Touch the Close button to return to the Machine Defaults 1
screen, or select another timer to change.
DocuColor 5252 System Administration Guide
Tools Mode
Job Program Incomplete
The Job Program Incomplete feature allows users to set the time
that it takes the digital press to return to the default feature
settings after features buttons have been selected to program a
job, but the job has not been started and no user activity has
occurred for the amount of time selected.
1 Touch the Job Program Incomplete button on the System Timers
screen. The Job Program Incomplete screen appears.
2 Use the up or down arrow buttons to change the time. The range
available is 1 to 10 minutes.
To use the system default time of 2 minutes, touch the System
Default button.
3 Touch the Enter button on the screen to enter the new time into
the system.
4 Touch the Close button to return to the Machine Defaults 1
screen.
2 Tools Mode
DocuColor 5252 System Administration Guide
2-33

Too ls Mo de
Audio Tones
There are three types of audio tones that can be activated on the
digital press with scanner, as shown in the following table.
Tone What the Tone Indicates
Attention Tone An unselectable button has been touched.
Button Selection Tone A selectable button has been touched.
Fault Tone The press is in a fault condition and cannot continue printing.
Each of these tones can be deactivated or set to Soft, Normal, or
Loud. The factory default setting is Normal.
1 Touch the Audio Tones button on the Machine Defaults 1 screen.
The Audio Tones screen appears.
2 Touch the button for the desired volume setting for each tone. To
deactivate a tone, touch the Off button for that tone.
3 Touch the Reset button to restore the factory default setting for the
three tones.
2-34
4 Touch the Close button to return to the Machine Defaults 1
screen.
DocuColor 5252 System Administration Guide

Productivity Setting
Substrate
Min (mm) Max (mm)
Tools Mode
The following table displays the productivity speeds for various
substrates. The Productivity Setting is not accessible and can not
be changed.
Paper Size
Simplex Duplex
64 - 80 g/m
81 - 105 g/m
106 - 135 g/m
136 - 150 g/m
2
210.0 216.0 45 ppm 22.5 ppm
216.1 432.0 30 ppm 15 ppm
432.1 458.0 22.5 ppm 11.25 ppm
458.1 488.0 22.5 ppm -
2
182.0 216.0 52.5 ppm 22.5 ppm
216.1 297.0 45 ppm 22.5 ppm
297.1 458.0 30 ppm 15 ppm
458.1 488.0 22.5 ppm -
2
182.0 216.0 30 ppm 15 ppm
2 Tools Mode
216.1 297.0 22.5 ppm 11.25 ppm
396.1 458.1 15 ppm 7.5 ppm
458.1 488.0 15 ppm -
2
182.0 216.0 30 ppm 15 ppm
216.1 396.0 22.5 ppm 11.25 ppm
396.1 458.1 15 ppm 7.5 ppm
458.1 488.0 15 ppm -
151 - 220 g/m
2
182.0 280.0 22.5 ppm 11.25 ppm
280.1 432.0 15 ppm 7.5 ppm
432.1 458.0 7.5 ppm 3.75 ppm
458.1 488.0 7.5 ppm -
221 - 280 g/m
2
182.0 280.0 22.5 ppm -
280.1 432.0 15 ppm -
432.1 458.0 7.5 ppm -
Transparency 210.0 216.0 22.5 ppm -
216.1 488.0 - -
DocuColor 5252 System Administration Guide
2-35

Too ls Mo de
Auto Tray Switching
This feature allows you to set the default settings for the Auto Tray
Switching, Auto Paper Selection, and the Inhibited Tray options.
Default Setting What the Default Does
Auto Tray Switching Allows the digital press to automatically select another paper tray,
containing the appropriate paper, if the selected paper tray
becomes unusable
Auto Paper Selection Allows the digital press to automatically select the appropriate
paper size for the job being processed, without a specific paper
tray being selected
Inhibited Tray Allows you to select a specific paper tray, or trays, that you want
the digital press to bypass, regardless of the Tray Priority settings
1 Touch the Auto Tray Switching button on the Machine Defaults 1
screen. The Auto Tray Switching screen appears.
2 Touch the Enable or Disable button for the Auto Tray Switching
option.
2-36
DocuColor 5252 System Administration Guide

Tools Mode
3 Touch the Enable or Disable button for the Auto Paper Selection
option.
4 To instruct the digital press to bypass one or more of the paper
trays, touch the desired Paper Tray button in the Inhibited Tray
column.
To deselect a paper tray, touch that Paper Tray button again.
To return the settings to the last saved values, touch the Reset
button.
5 Touch the Close button to return to the Machine Defaults 1
screen.
2 Tools Mode
DocuColor 5252 System Administration Guide
2-37
Too ls Mo de
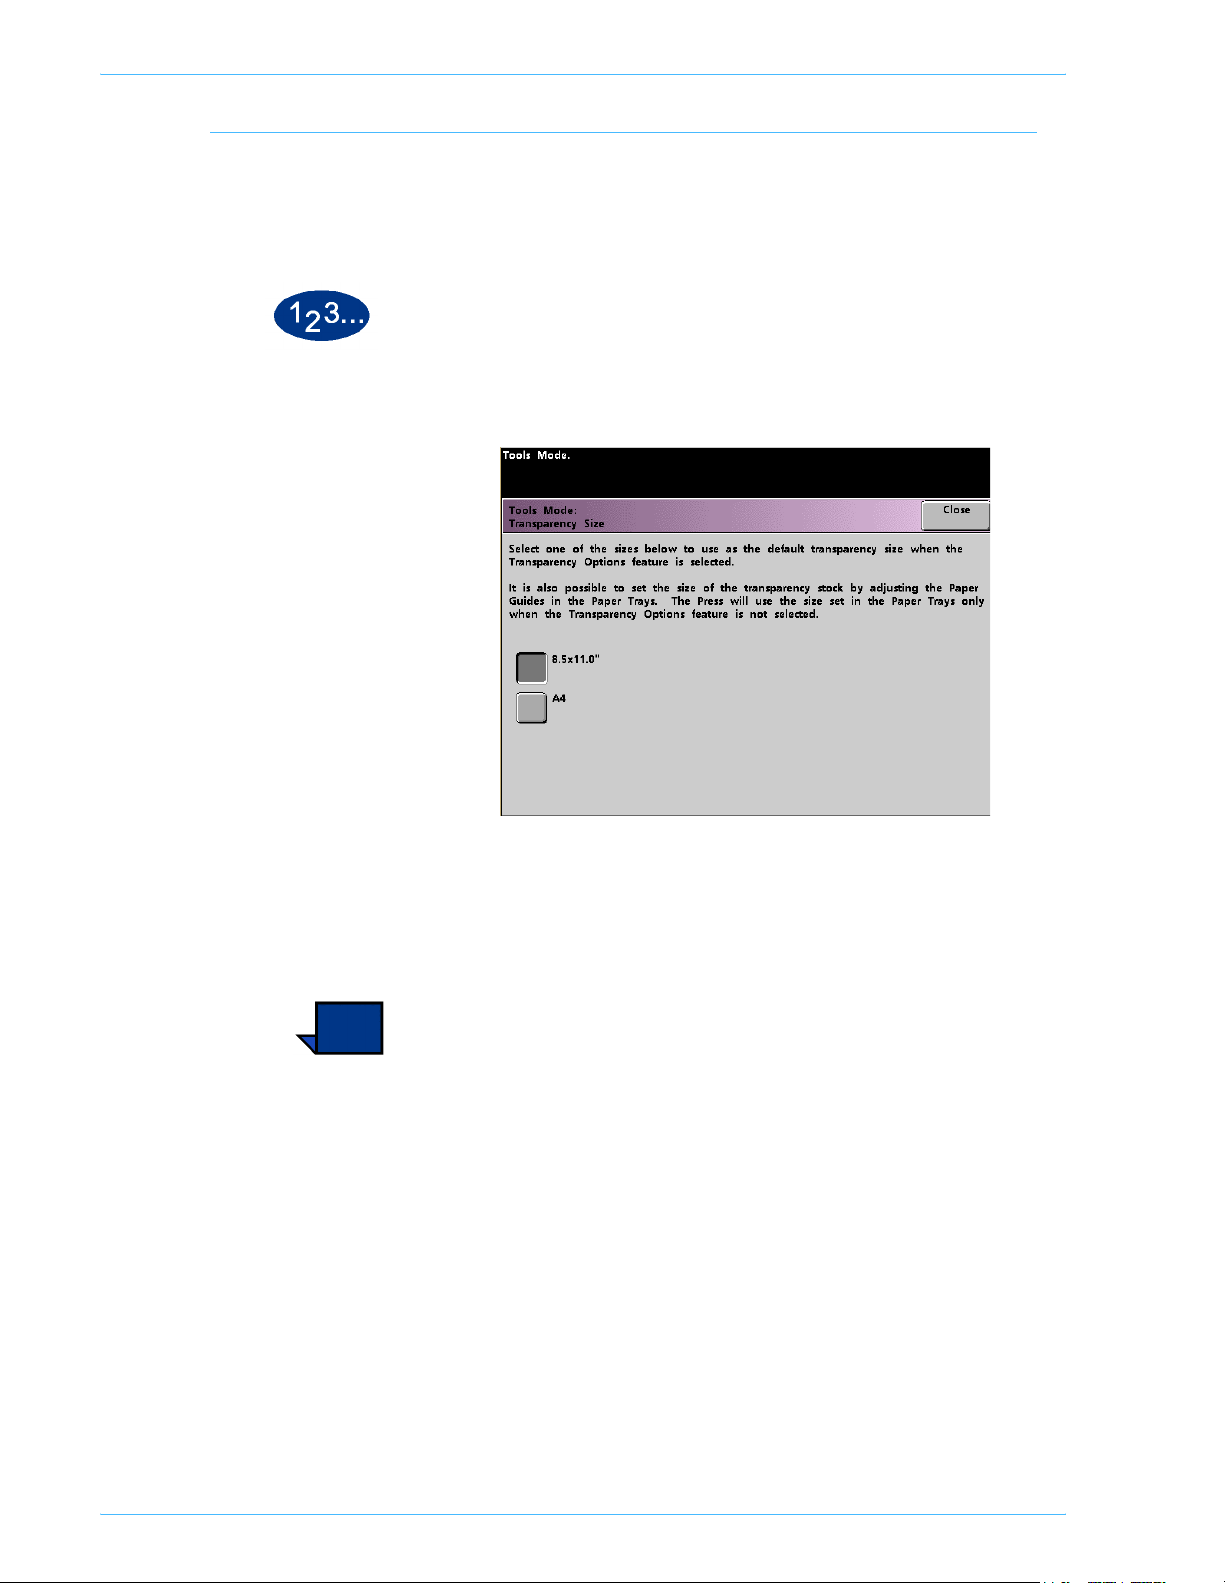
Transparency Size
Use the Transparency Size button to change the default size for
printing on transparencies. Your options are 8.5 x 11.0 inch and
8.3 x 11.7 inch (or A4).
1 Touch the Transparency Size button on the Machine Defaults 1
screen. The Transparency Size screen appears.
2 Select one of the sizes displayed for the default transparency size.
3 Touch the Close button to return to the Machine Defaults 1
screen.
Note: You can also set the transparency size by adjusting paper
guides in the paper trays. The machine uses the size defined by
the paper tray guides only if the Transparency Options feature is
not selected.
2-38
DocuColor 5252 System Administration Guide

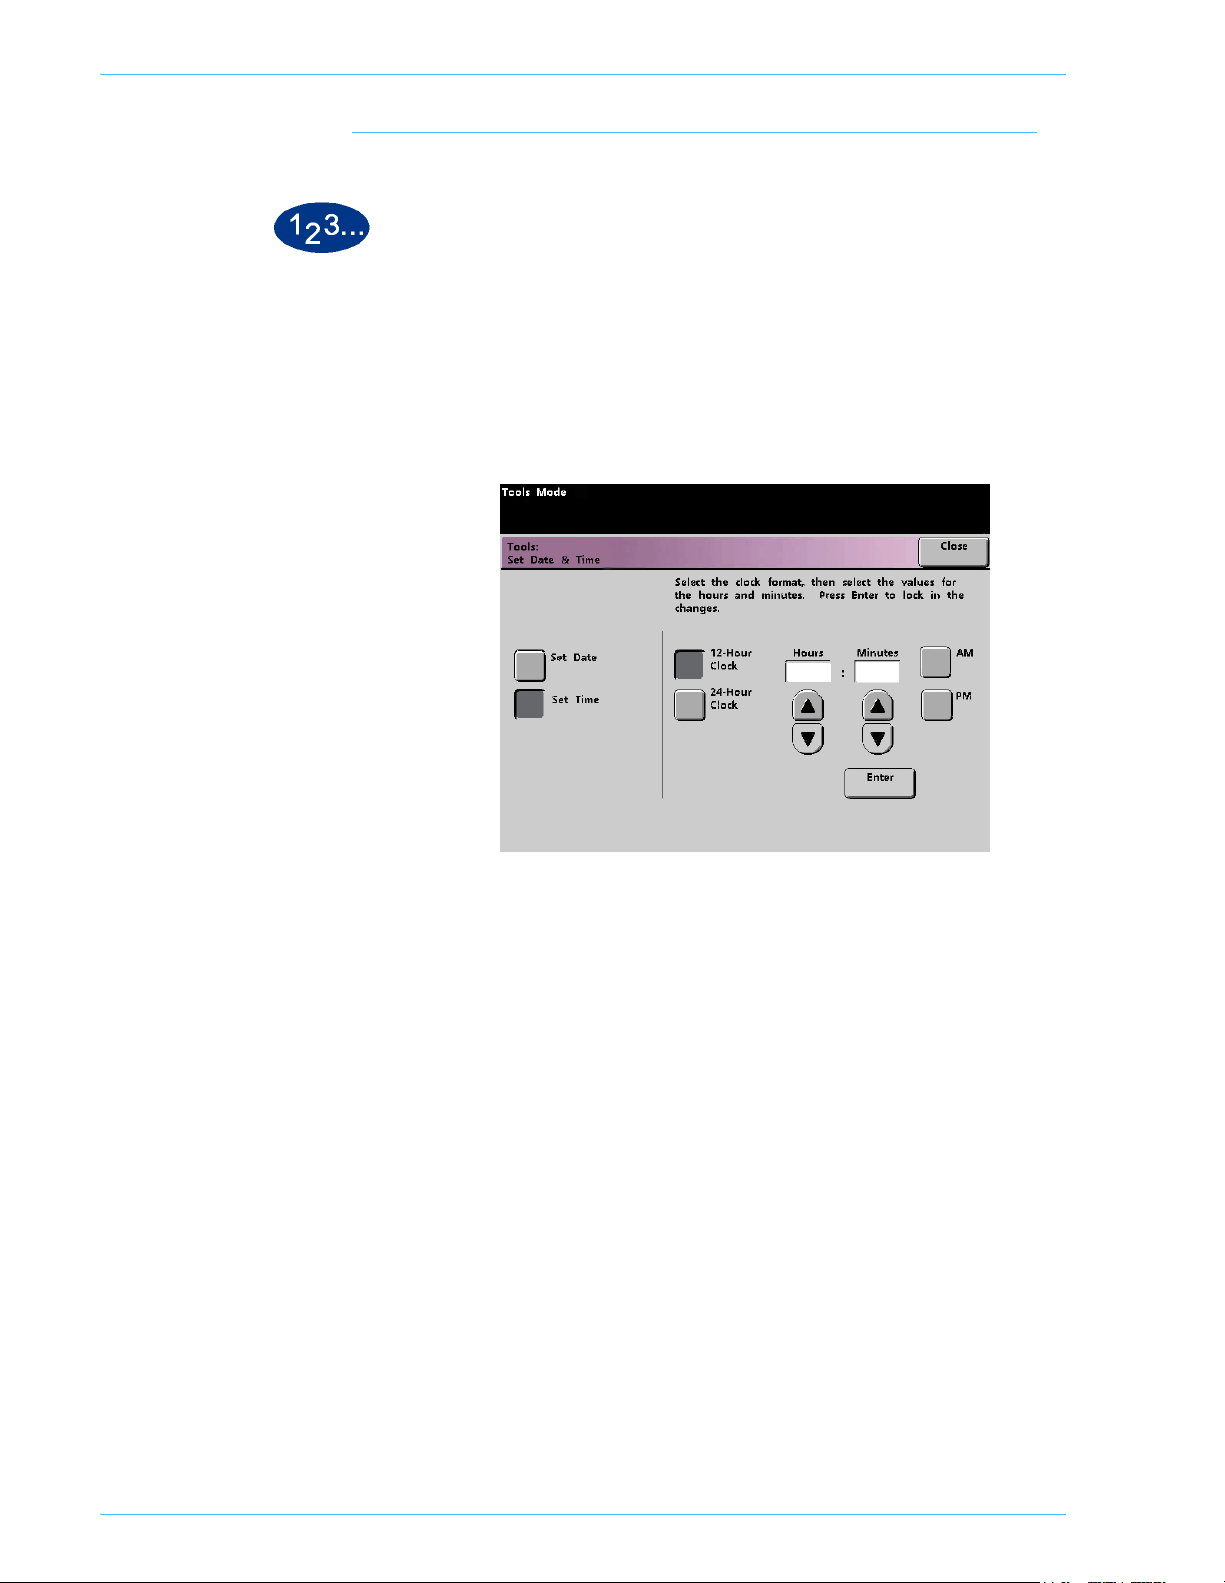
Set Date & Time
Setting the Date
1 Touch the Set Date & Time button on the Machine Defaults 1
Tools Mode
Use the Set Date & Time feature to set the date and time for the
system. The date and time is displayed on the Error Log screen
and on the Date and Time screens.
screen. The Set Date and Time screen appears with the Set Date
button selected and options for setting the date displayed on the
right.
2 Select the date format you wish to use.
3 Use the up or down arrow buttons to enter the correct year, month,
and day.
4 Touch the Enter button on the screen to save your selections.
The next time you enter the Tools Mode, the date that you set is
displayed.
2 Tools Mode
DocuColor 5252 System Administration Guide
2-39
Too ls Mo de
Setting the Time
1 Touch the Set Date & Time button on the Machine Defaults 1
screen. The Set Date and Time screen appears with the Set Date
button selected and options for setting the date displayed on the
right.
2 Touch the Set Time button. Options for setting the time appear in
the Set Time screen.
3 Touch the 12 Hour Clock or the 24 Hour Clock button.
4 Use the up or down arrow buttons to set the correct hour and
minutes.
If you selected the 12 Hour Clock, touch the AM or PM button.
5 Touch the Enter button on the screen to save your selections.
The next time you enter the Tools Mode, the time that you set will
be displayed.
6 Touch the Close button to return to the Machine Defaults 1
screen.
2-40
DocuColor 5252 System Administration Guide
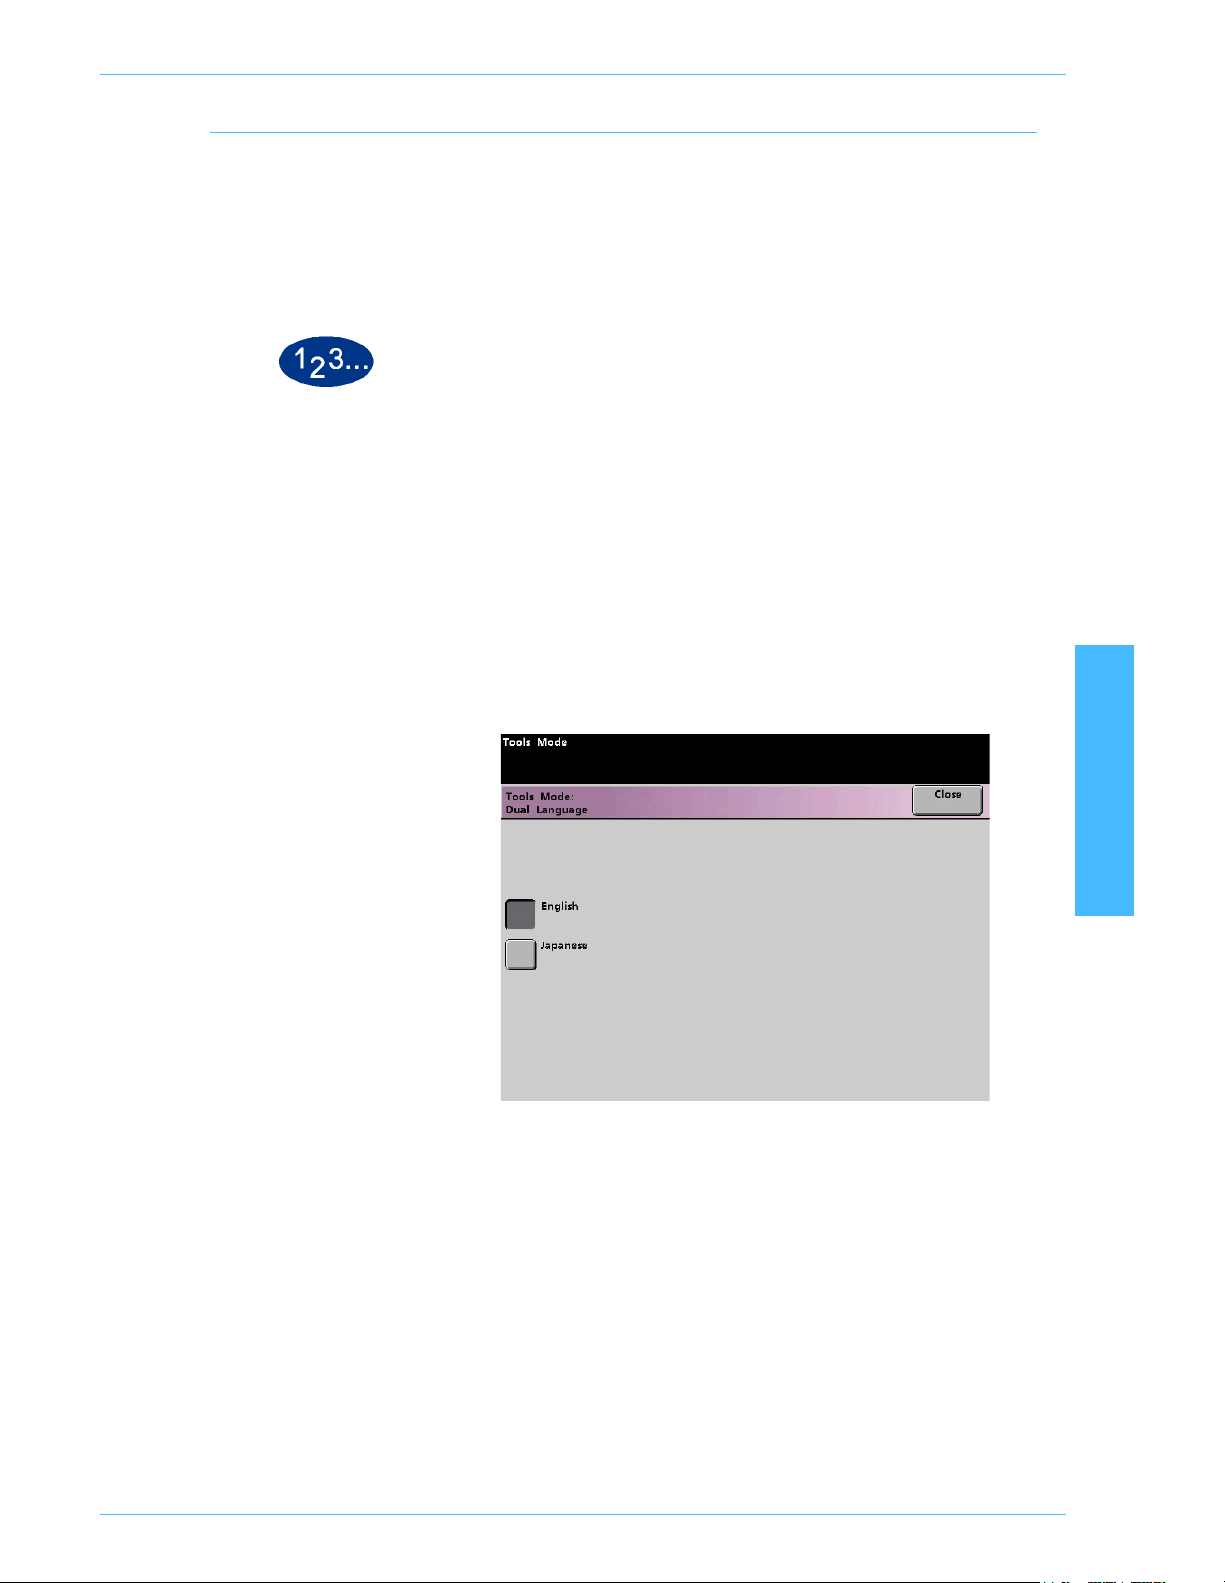
Dual Language
Tools Mode
This feature enables you to set one of two available languages as
the default for the Touch Screen. When your digital press was
installed, your Xerox service representative loaded onto your
system your choice of two languages that you can choose from to
be displayed on the Touch Screen.
1 Touch the Dual Language button on the Machine Defaults 1
screen.
2 Touch the button for the default language you want to appear on
the Touch Screen.
After exiting the Tools Mode, you can switch the Touch Screen
to the other language by pressing the Dual Language button
on the Control Panel.
3 Touch the Close button to return to the Machine Defaults 1
screen.
2 Tools Mode
DocuColor 5252 System Administration Guide
2-41
Too ls Mo de
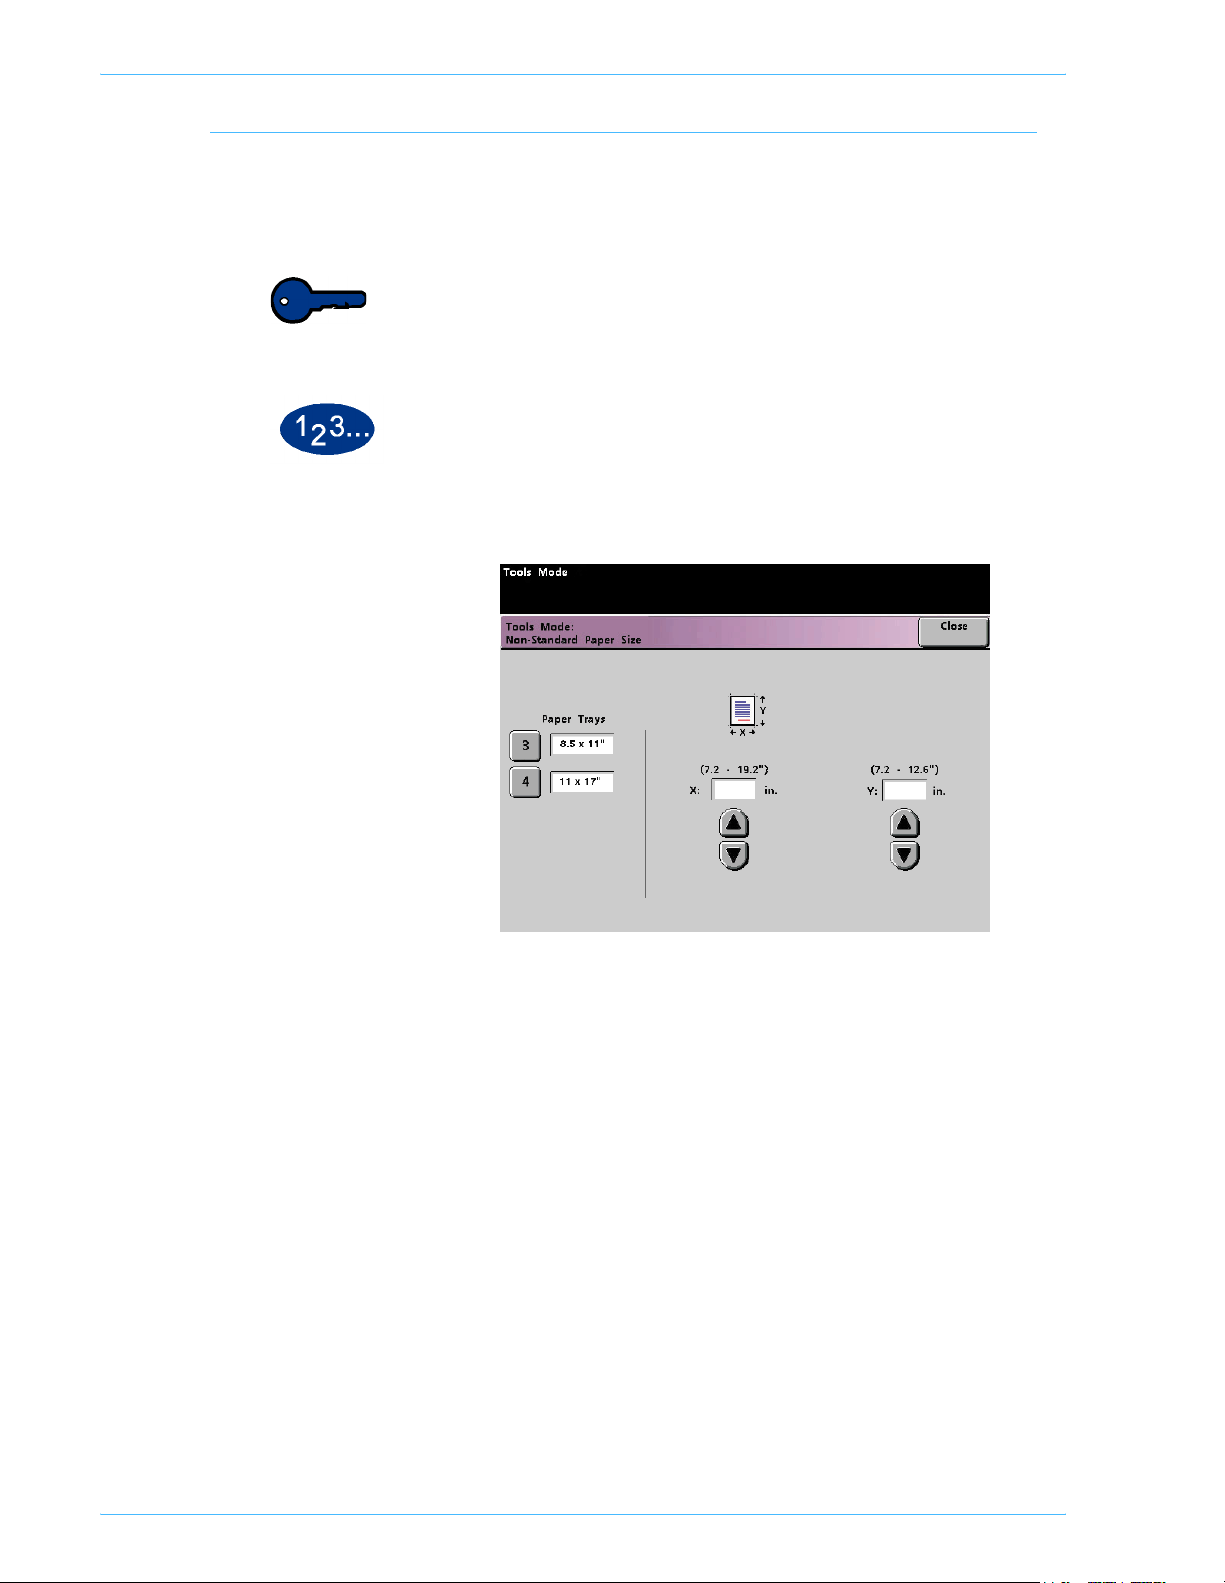
Non-Standard Paper Size
You can run non-standard sized paper from Tray 3 by entering the
paper size on the Non-Standard Paper Size screen for the tray
being used.
Key point: Be sure to select Non-Standard Size on the top front
of the tray, and use the Paper Weight Indicator at the right side of
the tray to select the paper weight being used.
1 Touch the Non-Standard Size Paper button on the Machine
Defaults 1 screen. The Non-Standard Paper Size screen appears.
2-42
2 Touch the desired Paper Tray button on the Non-Standard Paper
Size screen.
3 Use the up or down arrow buttons on the screen to enter the X
and Y dimensions of the paper being used in the tray. The
dimensions shown on the screen above the X and Y boxes
indicate the minimum and maximum sizes you can enter.
4 Touch the Close button to return to the Machine Defaults 1
screen.
5 To use these settings, exit the Tools Mode and ensure that Non-
Standard Size has been selected on the top/front of the tray.
DocuColor 5252 System Administration Guide
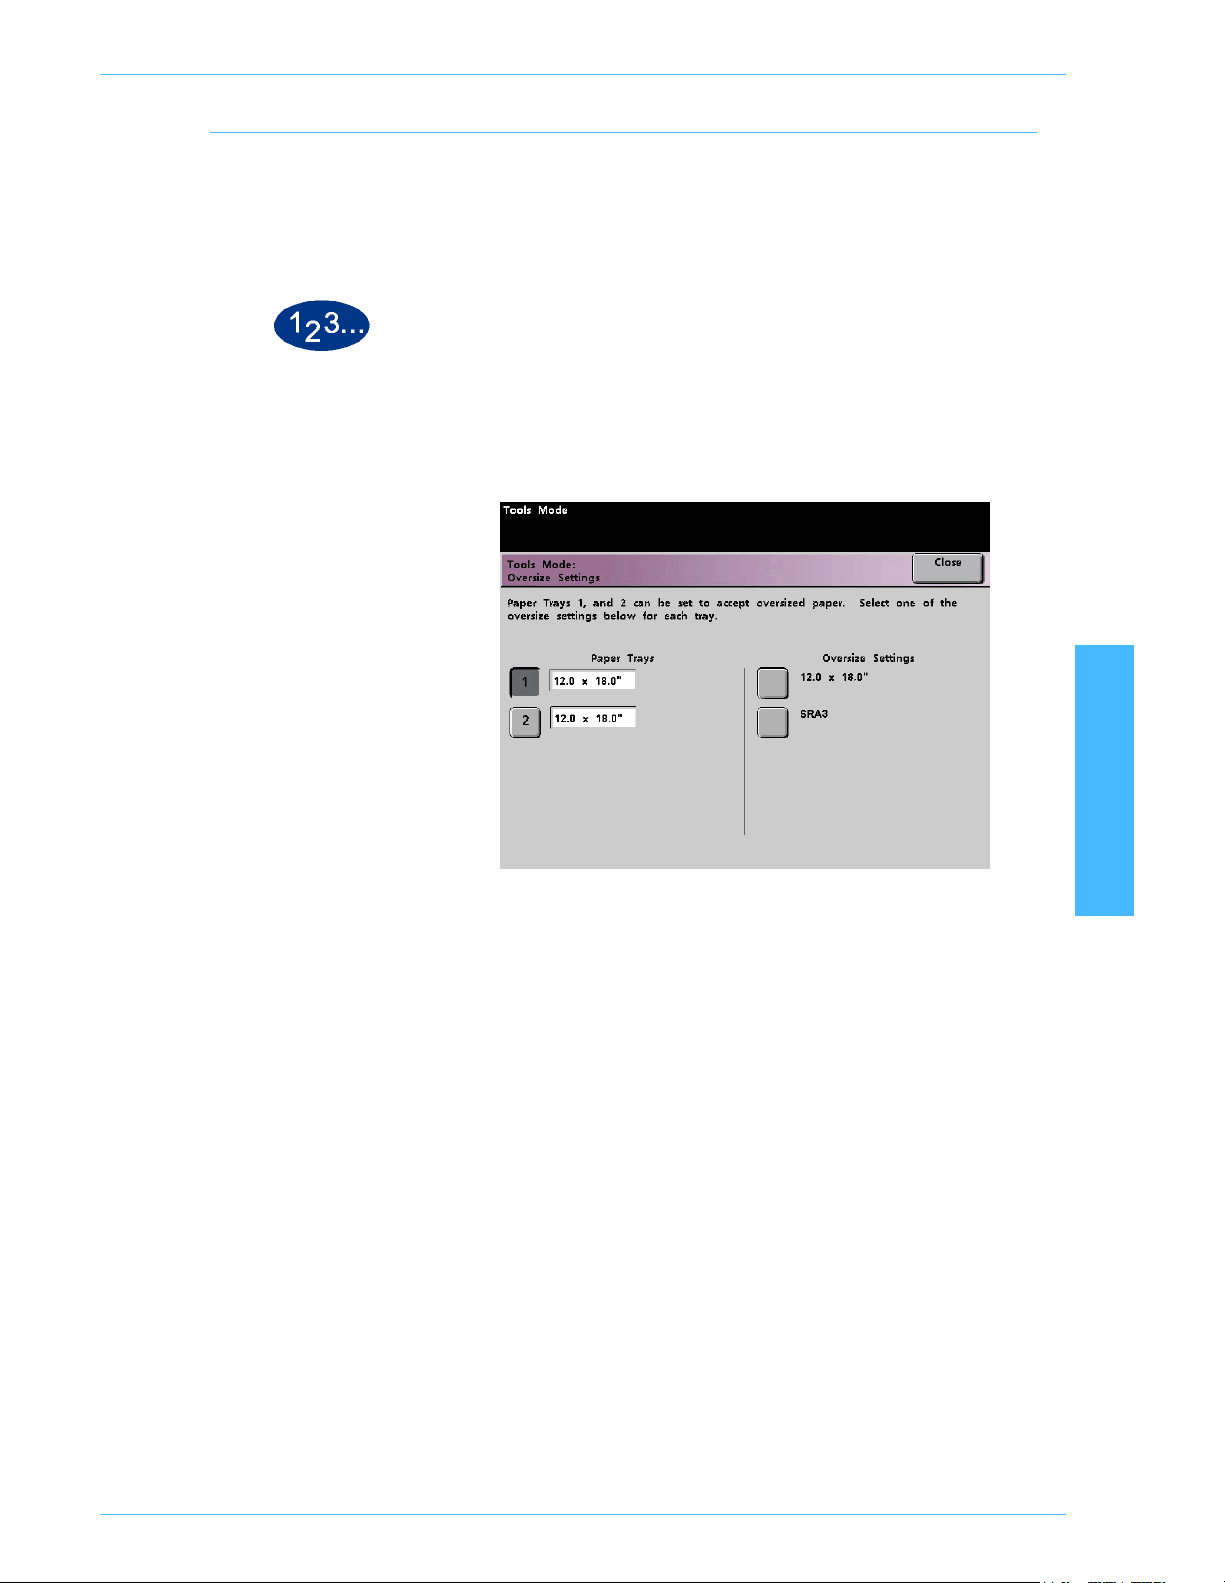
Oversize Settings
1 Touch the Oversize Settings button on the Machine Defaults 1
Tools Mode
You can use Trays 1 and 2 to run 12 x 18 inch or SRA3 (12.6 x
17.7 inch, 320 x 450 mm) paper by having your Xerox
representative remove the side paper guide on the paper tray,
then selecting the tray and the paper size on this screen.
screen. The Oversize Settings screen appears.
2 Touch the Tray 1 or Tray 2 button on the Oversize Settings
screen.
3 Touch the button for the oversize paper you want to run in the tray.
4 Touch the Close button to return to the Machine Defaults 1
screen.
5 To use these settings, exit the Tools Mode and run the job from the
tray programmed.
2 Tools Mode
DocuColor 5252 System Administration Guide
2-43

Too ls Mo de
Machine Defaults 2
This section describes the features available to you through the
Machine Defaults 2 screen. You can access the following
DocuColor features through the Machine Defaults 2 screen:
• Paper Registration Adjustment
• 100% Adjust
• Special Tray
• Additional Originals
• Stored Program Access
• Auto Recognition
• Reduce/Enlarge Presets
• Photo Reproduction Level
• Color Adjust & Registration
• Auto Rotation
• Maximum Scan To Print Quantity
• Decurler Setup
Select the Machine Defaults 2 tab, and the Machine Defaults 2
screen appears.
2-44
DocuColor 5252 System Administration Guide
Paper Registration Adjustment
Use the Paper Registration Adjustment feature when running
duplex jobs to adjust the image position if the registration is not
correct.
Image adjustment may be necessary for a couple of reasons:
• Paper is not always the exact same size. It may vary slightly,
with differences of plus or minus 1mm, causing the image to
be misregistered. To reduce the possibility of size differences,
it is recommend that you use paper from the same lot when
running duplex jobs.
• During the fusing process, the heat and pressure applied to
the paper causes the paper to stretch. If the images on sides
one and two are the same size, the stretching of the paper will
cause the image on side one to be slightly larger than the
image on side two.
Some color server manufacturers have a paper registration
feature that you can also use to adjust the position of the image on
the paper. Refer to the documentation that came with your color
server.
Use the following procedure to adjust for side one/side two
registration problems:
Tools Mode
2 Tools Mode
1 Prepare the image, or images, by noting a reference point on side
one, or by placing registration marks at the image border. You can
use a reference point within the image or at the corner of the
image.
Key point: Remember that the digital press does not print bleed
edge images.
DocuColor 5252 System Administration Guide
2-45

Too ls Mo de
2 Output 10 duplex prints and compare the registration mark or
reference point on side one to side two. Discard the first few
prints, as inconsistency tends to be greater with these images. If
there is misregistration, continue with this procedure.
3 Measure the distance between the registration point and the edge
of the paper on both the lead edge (Y) of the paper and the side
edge (X).
Refer to the Measuring Misregistration figure below. The solid line
registration marks indicate the reference point on side one. The
dotted lines indicate the reference point on side two.
Paper Feeding
Direction in the
Lead Edge
of paper
Side Edge
of paper
Misalignment of
reference point on side 1
to side 2 (X)
Misalignment of reference
point on side one to side 2 (Y)
2-46
DocuColor 5252 System Administration Guide

Tools Mode
4 Access Tools Mode and touch the Paper Registration
Adjustment button on the Machine Defaults 2 screen. The Paper
Registration Adjustment screen appears.
5 Select either the Side 1 or Side 2 button to adjust the registration.
Key point: Use the Oversize Paper Offset button only for papers
larger than long edge feed, 8.5x11 inch or A4 paper. Refer to Step
8 if using this option.
6 On the next screen, select the tray from which the paper is
feeding.
2 Tools Mode
DocuColor 5252 System Administration Guide
2-47

Too ls Mo de
7 Use the up or down arrow buttons to enter the amount of
adjustment for either edge or both edges.
Key point 1: Remember that the Lead Edge Registration
adjustment is the feeding edge, or Y direction. The Side Edge
Registration adjustment is the front to back, or X, direction.
Key point 2: If the reference point on side two is closer to the
edge of the paper compared to the reference point on side one,
enter a plus figure. If the reference point on side two is further from
the edge of the paper compared to side one, enter a minus figure.
Key point 3: EXAMPLE: If the measurement is 1.2mm closer to
the edge of the paper, enter +1.2mm.
8 If you selected the Oversize Paper Offset button to adjust the
registration on paper larger than 8.5x11 inch or A4 LEF, the
following screen appears.
2-48
DocuColor 5252 System Administration Guide

Tools Mode
9 Touch the Offset Level 1, 2, 3, or 4 button to adjust the position of
the paper as it feeds. Refer to the following table for the
adjustments made for each Offset Level.
Paper
Size
310mm 10.0mm 10.0mm 10.0mm 10.0mm
311mm 9.5mm 9.5mm 9.5mm 9.5mm
312mm 9.0mm 9.0mm 9.0mm 9.0mm
313mm 8.5mm 8.5mm 8.5mm 8.5mm
314mm 8.0mm 8.0mm 8.0mm 8.0mm
315mm 7.5mm 7.5mm 7.5mm 8.0mm
316mm 7.0mm 7.0mm 7.0mm 8.0mm
317mm 6.5mm 6.5mm 7.0mm 8.0mm
318mm 6.0mm 6.0mm 7.0mm 8.0mm
319mm 5.5mm 6.0mm 7.0mm 8.0mm
320mm 5.0mm 6.0mm 7.0mm 8.0mm
Level 1 Level 2 Level 3 Level 4
2 Tools Mode
DocuColor 5252 System Administration Guide
2-49

Too ls Mo de
100% Adjust
Use the 100% Adjust feature to fine tune the 100% magnification
value on your digital press with scanner. The available adjustment
range is from 98.0% to 102.0%.
1 Touch the 100% Adjust button on the Machine Defaults 2 screen.
The 100% Adjust screen appears.
2 Use the up or down arrow buttons to set the desired percentage
for the x value. The available range is 98.0% to 102.0%.
3 Use the up or down arrow buttons to set the desired percentage
for the y value. The available range is 98.0% to 102.0%.
4 Touch the Close button to return to the Machine Defaults 2
screen.
2-50
DocuColor 5252 System Administration Guide

Special Tray
Tools Mode
Use the Special Tray feature to select a default tray that holds
special materials for each of the following features:
• Covers
• Inserts
• Transparency Dividers
• Booklet Creation
Note: For more information on Covers, Inserts, Transparency
Dividers, and Booklet Creation, please see the digital press
Operator Manual (see pages 5-87, 5-88, 5-92, 5-96, and 5-
99).
1 Touch the Special Tray button on the Machine Defaults 2 screen.
The Special Tray screen appears.
2 Select the tray to which you want the machine to default when
printing on special materials.
Note: If you select Transparency Dividers, Tray 3 becomes
unavailable.
2 Tools Mode
3 Touch the Close button to return to the Machine Defaults 2
screen.
DocuColor 5252 System Administration Guide
2-51

Too ls Mo de
Additional Originals
Use the Additional Originals feature to scan, into one job,
documents that have different programming requirements, or
documents that must be scanned from different input areas. The
original documents may be scanned using the Platen Glass, the
DADF, or a combination of both.
The following are examples of jobs that require the use of
Additional Originals:
• The job contains too many pages to be placed on the
document handler at one time.
• The job contains documents that must be programmed
separately for any of the following reasons:
– The input documents are of different sizes, types, or color
settings.
– The output requires different size, type, or color stocks.
– There are image quality requirements on some pages.
1 Touch the Additional Originals button on the Machine Defaults 2
screen. The Additional Originals screen appears.
2 Touch the On or Off button.
3 Touch the Close button to return to the Machine Defaults 2
screen.
2-52
DocuColor 5252 System Administration Guide

Stored Program Access
Use the Stored Program Access feature to specify whether you
want users to be able to store and recall jobs, or to just recall jobs.
1 Touch the Stored Program Access button on the Machine
Defaults 2 screen. The Stored Program Access screen appears.
Tools Mode
2 Touch the button for Store and Recall or Recall Only.
3 Touch the Close button to return to the Machine Defaults 2
screen.
2 Tools Mode
DocuColor 5252 System Administration Guide
2-53
Too ls Mo de
Auto Recognition
The Auto Recognition feature allows you to define the range for
recognition between Text: Photo and Black & White: Color content
in a scanned original by setting the default to favor the type of
documents that are scanned most frequently. Each option allows
you to select from five levels of discrimination, which are
described in the following table.
Content Type Levels
Text: Photo Level 5: Use this setting when scanned originals contain more Photo than
Tex t
Level 3: Use this setting when scanned originals contain equal amounts of
Text and Photo
Level 1: Use this setting when scanned originals contain more Text than
Photo
Black & White:
Color
Level 5: Use this setting if you wish the digital press to discriminate more
toward Color than Black & White scan to print images.
Level 3: Use this setting if you wish the digital press to discriminate equally
between Color and Black & White scan to print images.
Level 1: Use this setting if you wish the digital press to discriminate more
toward Black & White than Color scan to print images.
2-54
DocuColor 5252 System Administration Guide
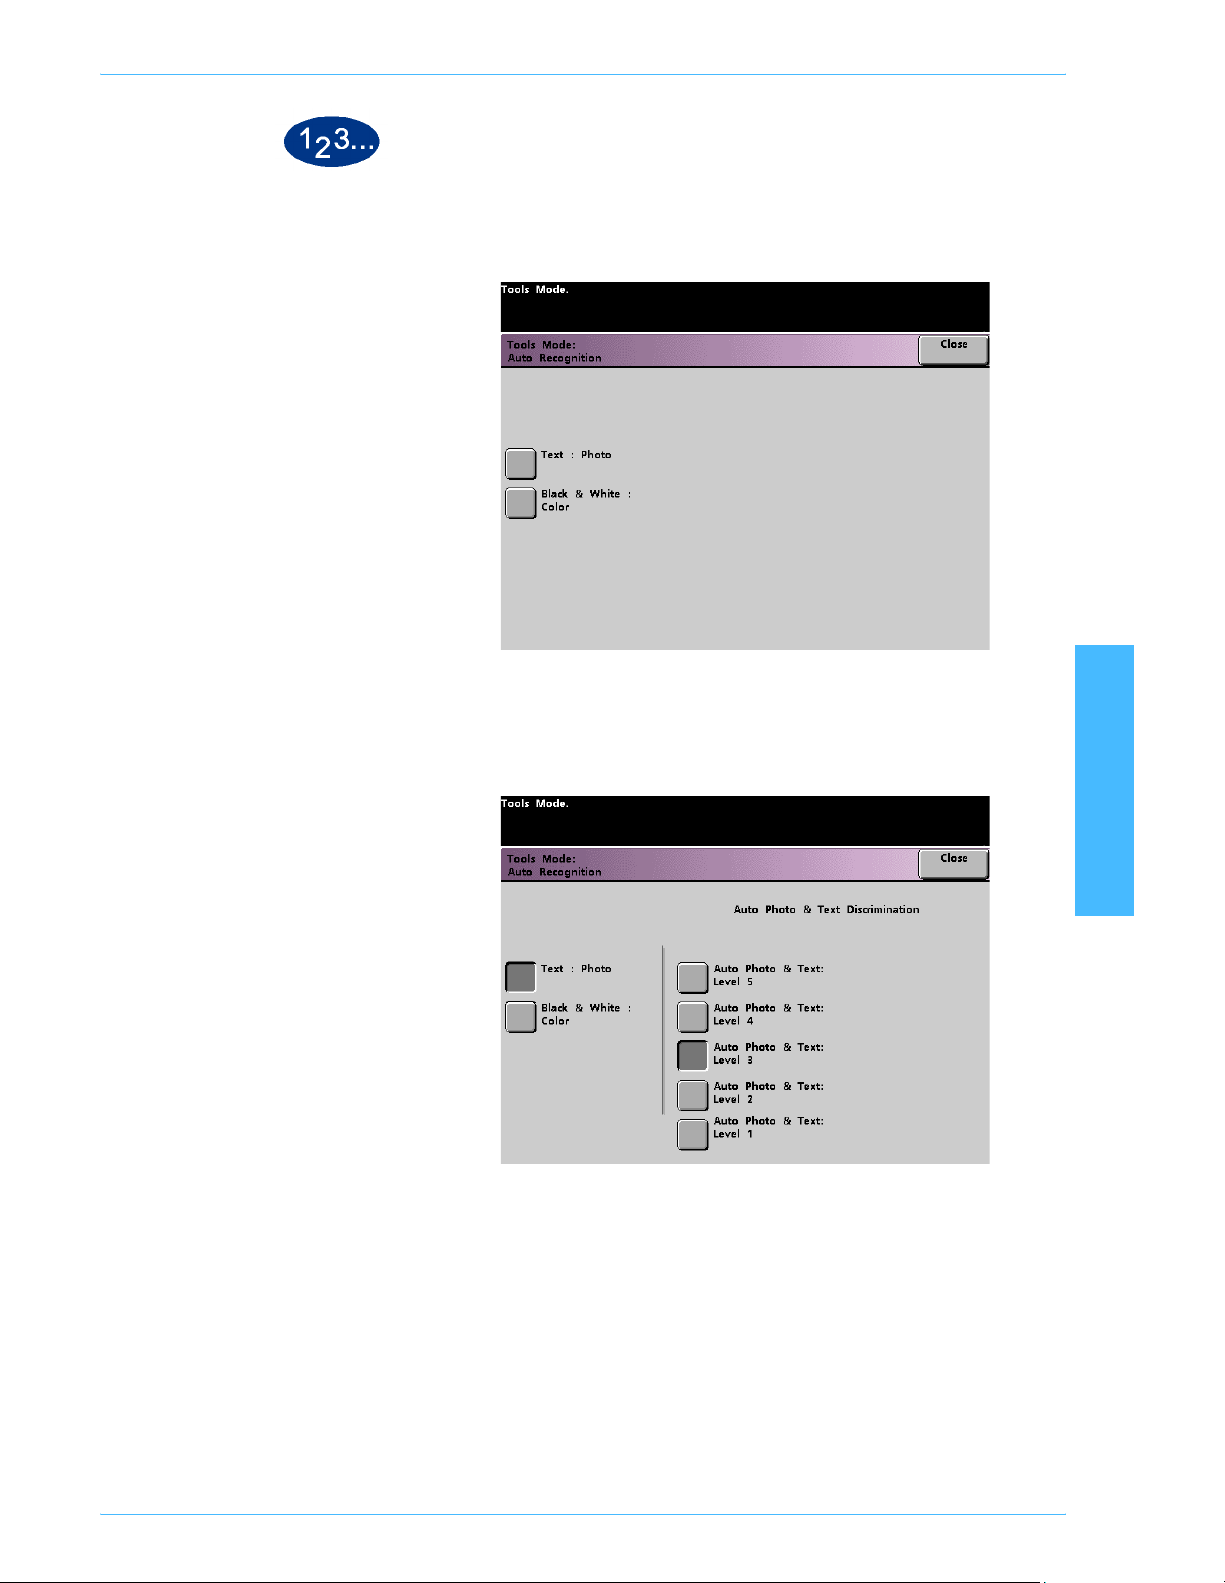
Tools Mode
1 Touch the Auto Recognition button on the Machine Defaults 2
screen. The Auto Recognition screen appears.
2 Touch the Text: Photo or Black & White: Color button. Auto
Photo & Text levels appear to the right of the Auto Recognition
screen.
2 Tools Mode
DocuColor 5252 System Administration Guide
2-55

Too ls Mo de
3 Touch the button for the desired level on the popup screen. The
available levels are 1 to 5.
4 Touch the Close button to return to the Machine Defaults 2
screen.
2-56
DocuColor 5252 System Administration Guide
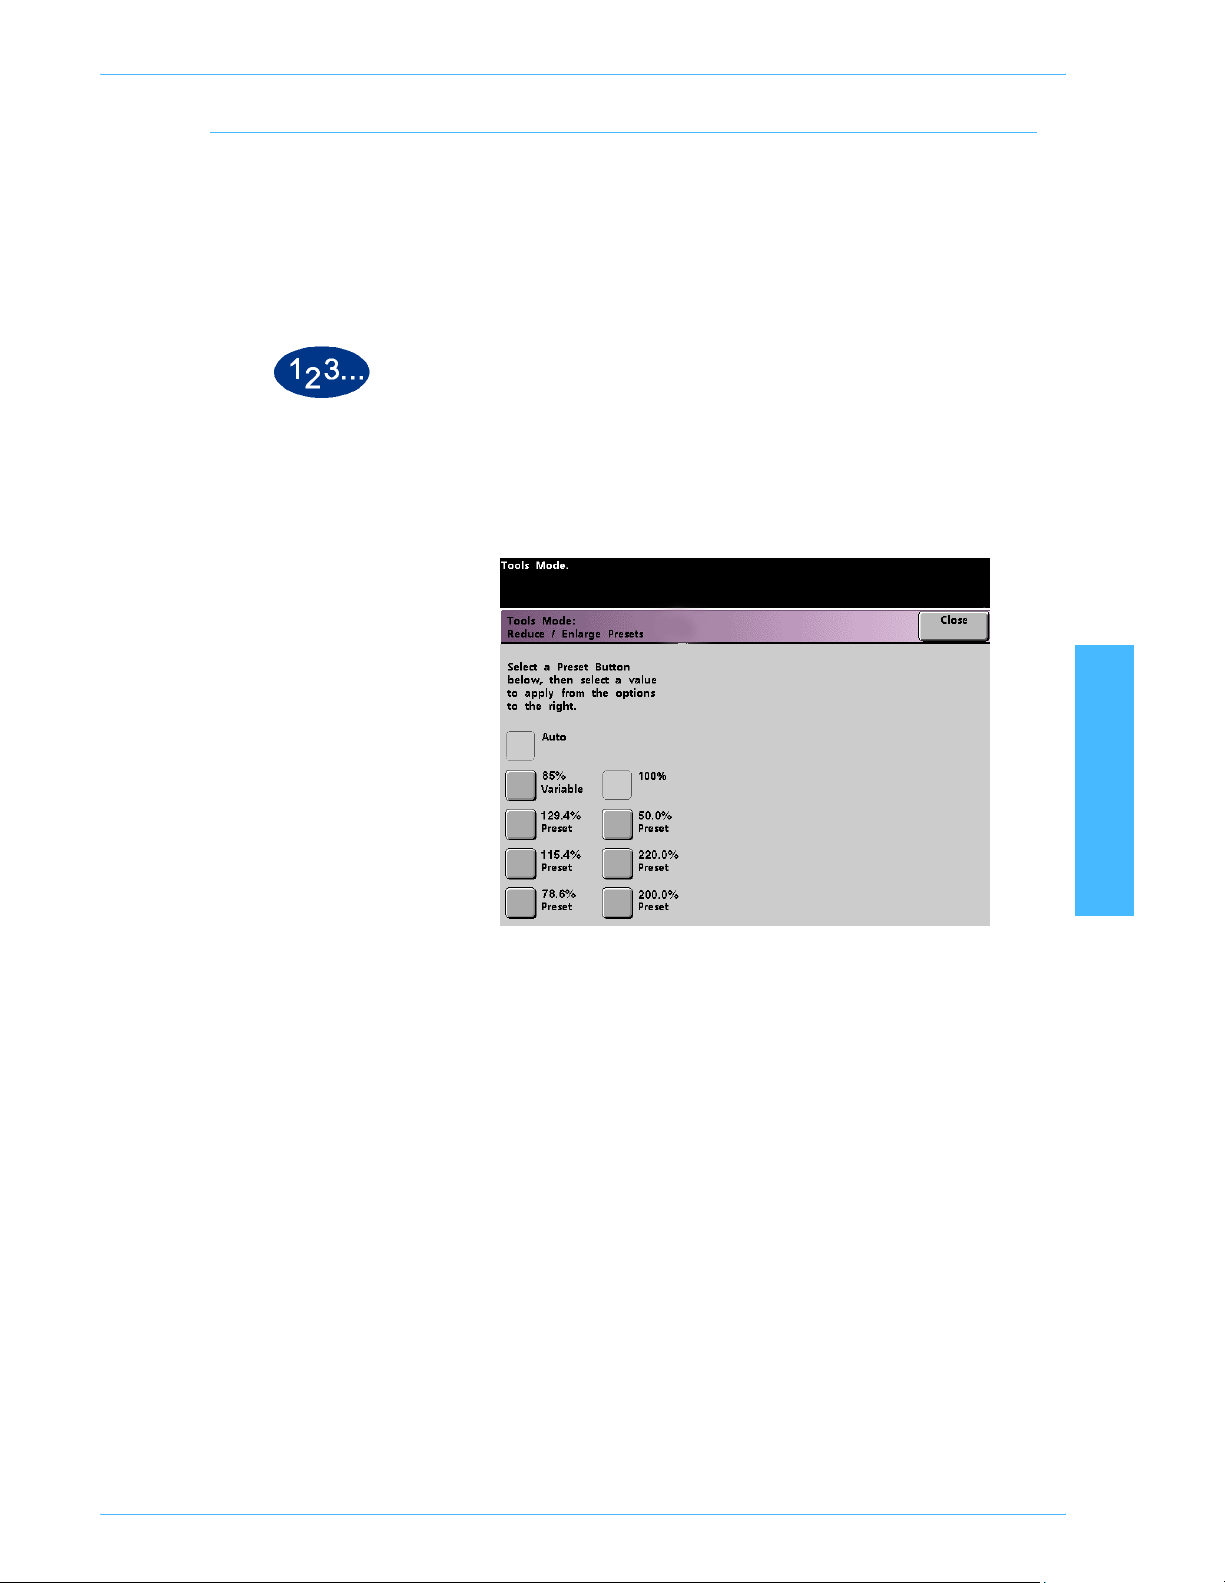
Reduce/Enlarge Presets
Use the Reduce/Enlarge Presets feature to change the factory set
default values for the preset reduce and enlarge percentages that
are available for the Reduce/Enlarge feature. The percentages
can be changed to one of the available fixed magnifications, or
you can change the variable preset percentages to whatever
percentage between 25% and 400% you desire.
1 Touch the Reduce/Enlarge Presets button on the Machine
Defaults 2 screen. The Reduce/Enlarge Presets screen appears.
Tools Mode
2 Tools Mode
DocuColor 5252 System Administration Guide
2-57
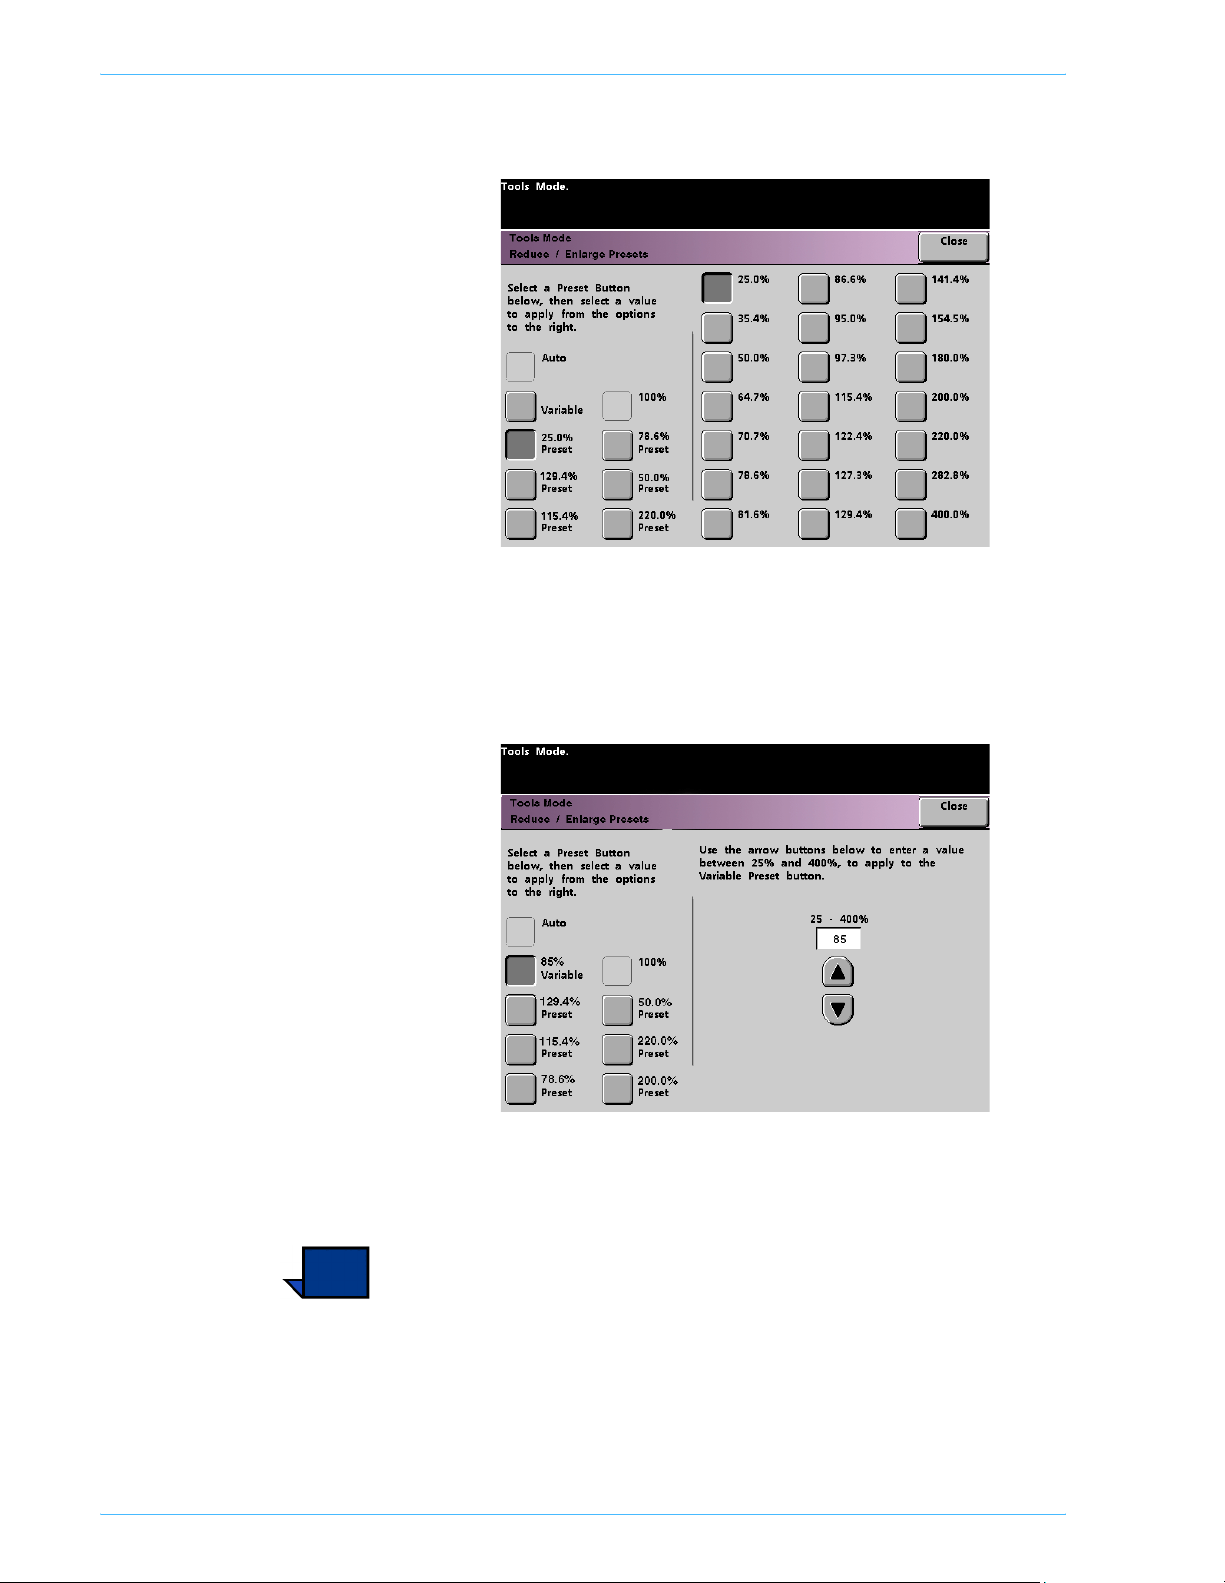
Too ls Mo de
2 Touch the button for the desired Preset percentage. Preset values
appear on the Reduce/Enlarge Presets screen.
To change the preset value shown on these buttons, touch the
desired fixed percentage button from the above screen.
3 If you select the Variable preset, use the up or down arrow
buttons, shown on the popup screen on the next page, to enter the
desired percent value. The available range is 25% to 400%.
4 Touch the Close button to return to the Machine Defaults 2
screen.
2-58
Note: The percentages shown on the above screen may vary
depending on your market area.
DocuColor 5252 System Administration Guide
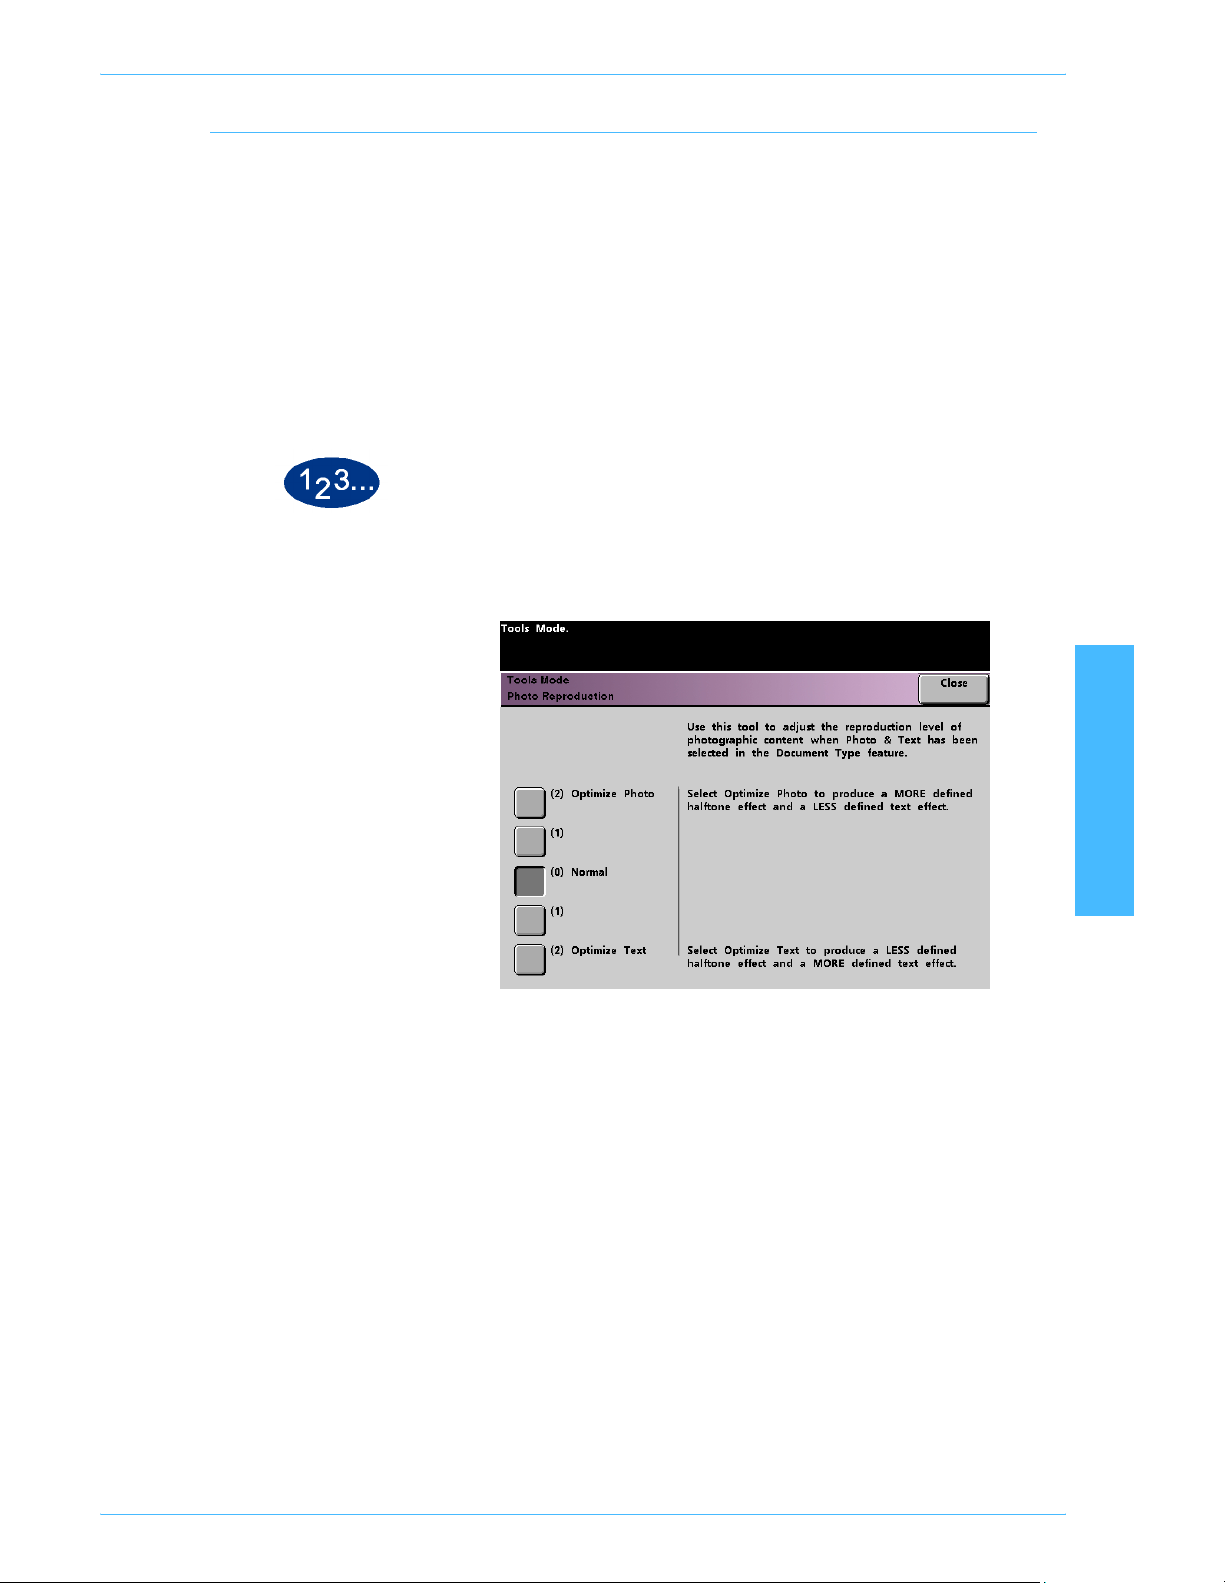
Photo Reproduction Level
Use the Photo Reproduction Level feature to adjust the
reproduction level on your digital press with scanner. Each
reproduction level varies in the definition of halftone effect and text
effect. Select a default level that represents the type of image that
is most frequently scanned.
Optimize Photo adjusts for a more defined halftone effect and a
less defined text effect.
Optimize Text adjusts for a less defined halftone effect and a
more defined text effect.
1 Touch the Photo Reproduction Level button on the Machine
Defaults 2 screen. The Photo Reproduction screen appears.
Tools Mode
2 Touch the button for the desired reproduction level.
3 Touch the Close button to return to the Machine Defaults 2
screen.
2 Tools Mode
DocuColor 5252 System Administration Guide
2-59
Too ls Mo de
Color Adjust & Registration
The Color Adjust & Registration feature allows you to define the
29 default colors that are available on the Basic Features screen,
in the Single Color Option. The color selection available on the
Single Color Palette screen can be changed by adjusting the
density of Cyan, Magenta, and Yellow. The table below lists the
factory default settings for each color. They are organized
according to the order in which the buttons appear on the Color
Adjust & Registration screen.
Color
No.
1 0 0 10 9 100 51 0 17 51 14 34 25 3 64 58
2 2 48 100 10 100 32 22 18 6 3 20 26 30 32 0
3 0 100 63 11 100 6 54 19 20 34 12 27 49 21 8
4 6 100 0 12 83 0 100 20 0 0 0 28 37 22 0
5 27 100 0 13 49 4 100 21 34 5 0 29 65 100 21
6 50 80 0 14 15 8 100 22 30 3 27
7 59 70 0 15 99 50 99 23 2 35 23
8 70 62 13 16 14 3 15 24 32 34 5
C M Y
Color
No.
C M Y
Color
No.
C M Y
Color
No.
C M Y
2-60
DocuColor 5252 System Administration Guide

Tools Mode
1 Touch the Color Adjust & Registration button on the Machine
Defaults 2 screen. The Color Adjust & Registration screen
appears.
2 Touch the desired color button to display the default setting.
3 Use the up or down arrow buttons to adjust the values for Cyan,
Magenta, and Yellow. The available range is 0 to 100%.
4 Touch the Close button to return to the Machine Defaults 2
screen.
2 Tools Mode
DocuColor 5252 System Administration Guide
2-61

Too ls Mo de
Auto Rotation
The Auto Rotation feature allows you to turn on automatic rotation.
Auto Rotation rotates the original image so it is in the same
orientation as the selected output paper. This feature, if it is turned
on, is useful in correcting any inconsistencies in image orientation.
The following options are available on this screen:
Details - select the paper selection method:
• Auto Paper Selection (APS) & Auto R/E (Reduce/Enlarge)
• APS & Tray Select & Auto R/E
Confirm Settings - confirm the settings you have chosen.
• Auto R/E - You are prompted to confirm the rotation if
Auto% is selected under Reduce/Enlarge on the Basic
Features screen.
• Tray Select - You are prompted to confirm the rotation if
you have selected a specific paper tray on the Basic
Features screen. This appears on the Auto Rotation
screen only if you have selected APS & Tray Select & Auto
R/E.
Note: Depending on your software version, the Auto Paper
Selection option may not be enabled. In this case, the Auto
Rotation feature ignores Auto Paper Selection. The Auto Rotation
feature does work for Auto Reduce/Enlarge and Tray Select with
all versions of software.
2-62
DocuColor 5252 System Administration Guide

Tools Mode
1 Touch the Auto Rotation button on the Machine Defaults 2
screen. The Auto Rotation screen appears.
2 Touch the On or Off button.
2 Tools Mode
DocuColor 5252 System Administration Guide
2-63
Too ls Mo de
3 If you selected On, touch the button for either APS & Auto R/E or
APS & Tray Select & Auto R/E on the popup screen. See the
screen above for the Auto Rotation screen with APS & Auto R/E
screen button selected. See the screen below for the Auto
Rotation screen with APS & Tray Select & Auto R/E selected.
4 Touch the On or Off button in the lower-right corner of the screen
to confirm your settings for either selection.
The Tray Select confirmation buttons appear only if you have
selected APS & Tray Select & Auto R/E.
5 Touch the Close button to return to the Machine Defaults 2
screen.
2-64
DocuColor 5252 System Administration Guide
Maximum Scan to Print Quantity
Use the Maximum Scan to Print Quantity feature to set a limit on
the number of copies that can be run for a single scan to print job.
1 Touch the Maximum Scan to Print Quantity button on the
Machine Defaults 2 screen. The Maximum Scan to Print Quantity
screen appears.
Tools Mode
2 Use the numeric keypad to enter the desired maximum number of
prints. 9999 is the maximum value that can be set.
3 To return the value to its last saved value, touch the Reset button.
4 Touch the Close button to return to the Machine Defaults 2
screen.
2 Tools Mode
DocuColor 5252 System Administration Guide
2-65

Too ls Mo de
Decurler Setup
Use the Decurler Setup feature to compensate for paper curl in
your prints.
Paper curl is caused by many variables:
• The manufacturer’s brand of paper and the manufacturing lot.
• The weight of the paper, and if it is coated or uncoated.
• The amount of dry ink/toner and the area being covered on a
sheet. The heavier the coverage, the greater the tendency to
curl.
• The atmospheric conditions of the room where the paper is
stored.
• The atmospheric conditions of the room where the digital
press with scanner is located.
• The heat generated during the fusing processes.
The digital press is equipped with an automatic curl control system
that uses the variables listed above to determine the amount of
pressure needed at different Decurlers to reduce the curl.
Key point: If you notice that output prints have too much curl,
first try flipping over the stack of paper in the paper tray being
used. You can also try running the job from a different tray. If curl is
still a problem, refer to the tables below for your market area to
change the default Decurler settings.
2-66
DocuColor 5252 System Administration Guide
Decurler Specifications
The Decurler has both top and bottom adjustment arms that apply
pressure to the paper based on the selections made on the
Decurler Setup screen. The degree of pressure is applied
independently to the top and bottom Decurler arms.
Paper Types A, B, and C, shown in the following table, are the
parameters established for how papers interact with the digital
press. Refer to the Recommended Materials List for the
recommended settings for grades of paper. Variability from one lot
of paper to another may require selecting a different Decurler
setting.
Tools Mode
Paper Weights
64 - 80 g/m
2
81 - 105 g/m
106 - 135 g/m
136 - 150 g/m
151 - 220 g/m
221 - 280 g/m
Tray 1 Tray 2 Tray 3
Uncoated
Tra y 3
Coated
A A A A
2
2
2
A A A B
B B B A
A A A A
2 Tools Mode
2
2
A A A A
N/A N/A A A
DocuColor 5252 System Administration Guide
2-67
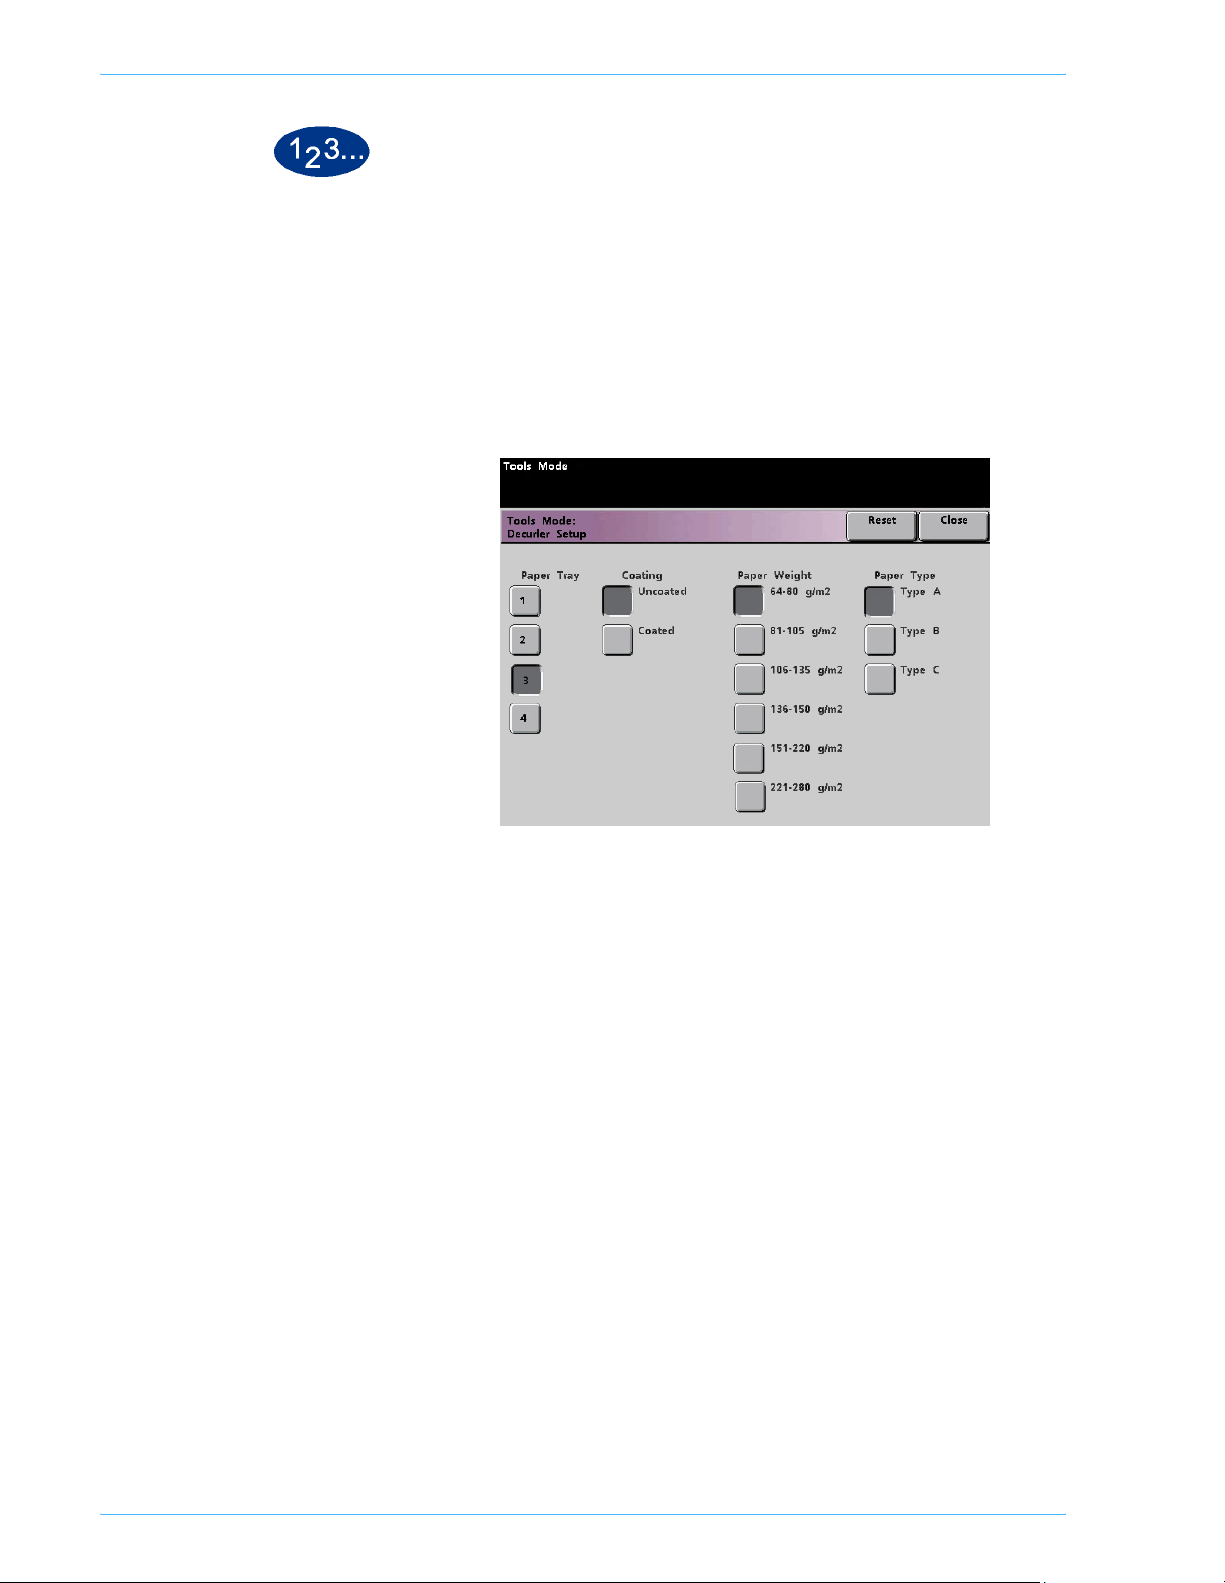
Too ls Mo de
1 Load the Paper Tray with the paper you wish to use for a job.
Make the correct paper weight selections on the tray for the paper
being used and run a few test prints. If there is too much curl,
proceed to step 2.
2 On the Machine Defaults 2 screen, touch the Decurler Setup
button. The Decurler Setup screen appears.
2-68
DocuColor 5252 System Administration Guide

Tools Mode
3 When a Paper Tray on the screen is selected, the default
selections for Paper Weight and Paper Type are automatically
selected. Touch the number of the Paper Tray from which the
paper is feeding.
The button for 221 - 280 g/m
2
displays only for Tray 3.
4 If there is still too much paper curl after trying the tips in the Key
Point on the previous page, follow the remaining steps in this
procedure.
Key point: Paper Tray 3 accepts paper weights from 64 to 280
2
g/m
. If you select Paper Tray 3, buttons for Uncoated and
Coated are displayed under the Coating heading.
You may select from any of the displayed paper weights; 64 to 220
2
, and either coated or uncoated paper. Select the correct
g/m
paper type if other than Paper Type A. Refer to the tables shown
previously in this section for the default settings for various market
areas.
5 Touch the Close button to save your selections and return to the
Machine Defaults 2 screen. Exit the Tools Mode and run a few test
prints to determine if the curl was reduced to a satisfactory level.
If curl is still excessive, access the Tools Mode again and try
another Paper Type setting. If you are not successful in reducing
the curl, call your Xerox service representative.
6 Touch the Reset button on the Decurler Setup screen to return to
the settings established when you first accessed the screen.
2 Tools Mode
DocuColor 5252 System Administration Guide
2-69
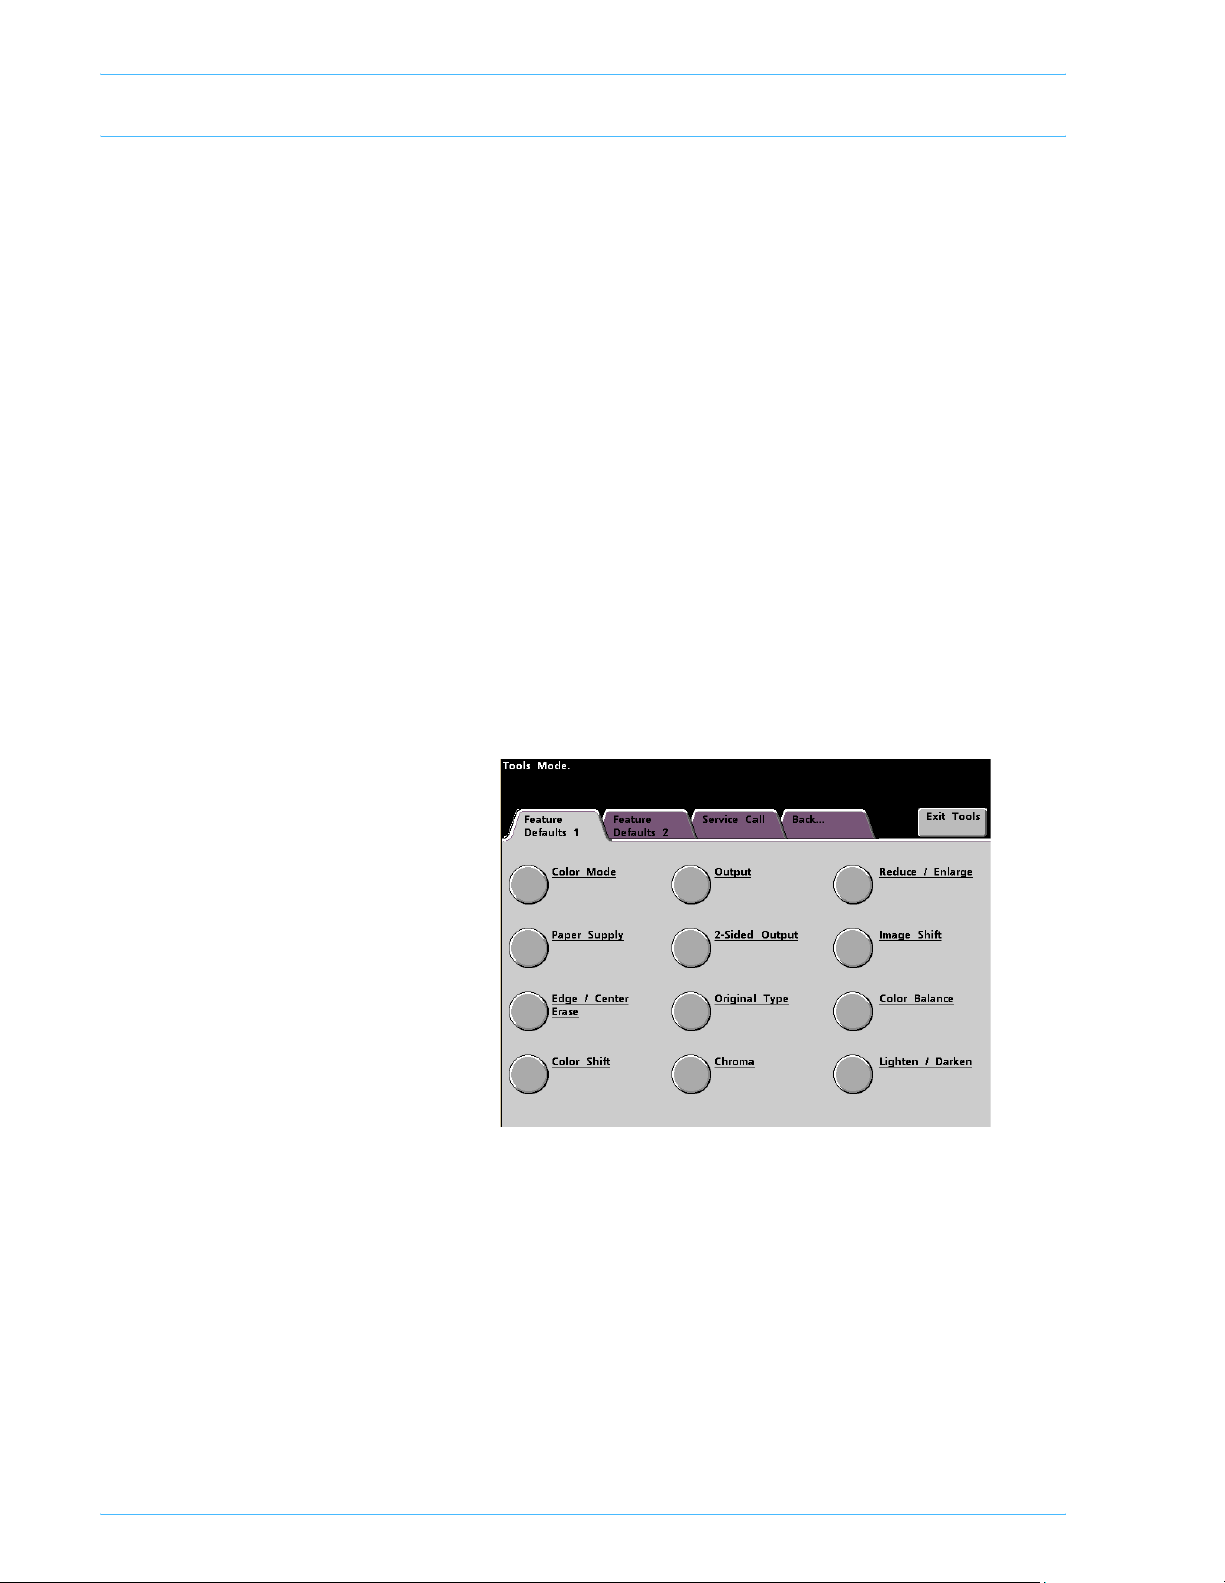
Too ls Mo de
Feature Defaults 1
This section describes the features available to you through the
Feature Defaults 1 screen. You can access the following
DocuColor features through the Feature Defaults 1 screen:
• Color Mode
• Paper Supply
• Edge/Center Erase
• Color Shift
• Output
• 2-Sided Output
• Original Type
• Chroma
• Reduce/Enlarge
• Image Shift
• Color Balance
• Lighten/Darken
Select the Feature Defaults 1 tab, and the Features Defaults 1
screen appears.
2-70
DocuColor 5252 System Administration Guide

Color Mode
Tools Mode
The Color Mode feature allows you to set the default on the Basic
Features screen to Auto, Full Color (using Black, Yellow, Cyan,
and Magenta), 3 Pass Color (using Yellow, Cyan, and Magenta),
or Black. Selecting Auto enables the digital press to determine the
color mode to use based on its scan of the original document.
1 Touch the More... tab in the Tools Mode screen.
2 Touch the Feature Defaults 1 tab.
3 Touch the Color Mode button. The Color Mode screen appears.
4 Touch the Auto, Full Color, 3 Pass Color, or Black button.
5 Touch the Close button to return to the Feature Defaults 1 screen.
2 Tools Mode
DocuColor 5252 System Administration Guide
2-71

Too ls Mo de
Paper Supply
The Paper Supply feature allows you to designate the default
paper tray for your digital press.
1 Touch the More... tab in the Tools Mode screen.
2 Touch the Feature Defaults 1 tab.
3 Touch the Paper Supply button. The Paper Supply screen
appears.
4 Touch the button for the paper tray you would like to use as your
default paper tray.
5 Touch the Close button to return to the Feature Defaults 1 screen.
2-72
DocuColor 5252 System Administration Guide
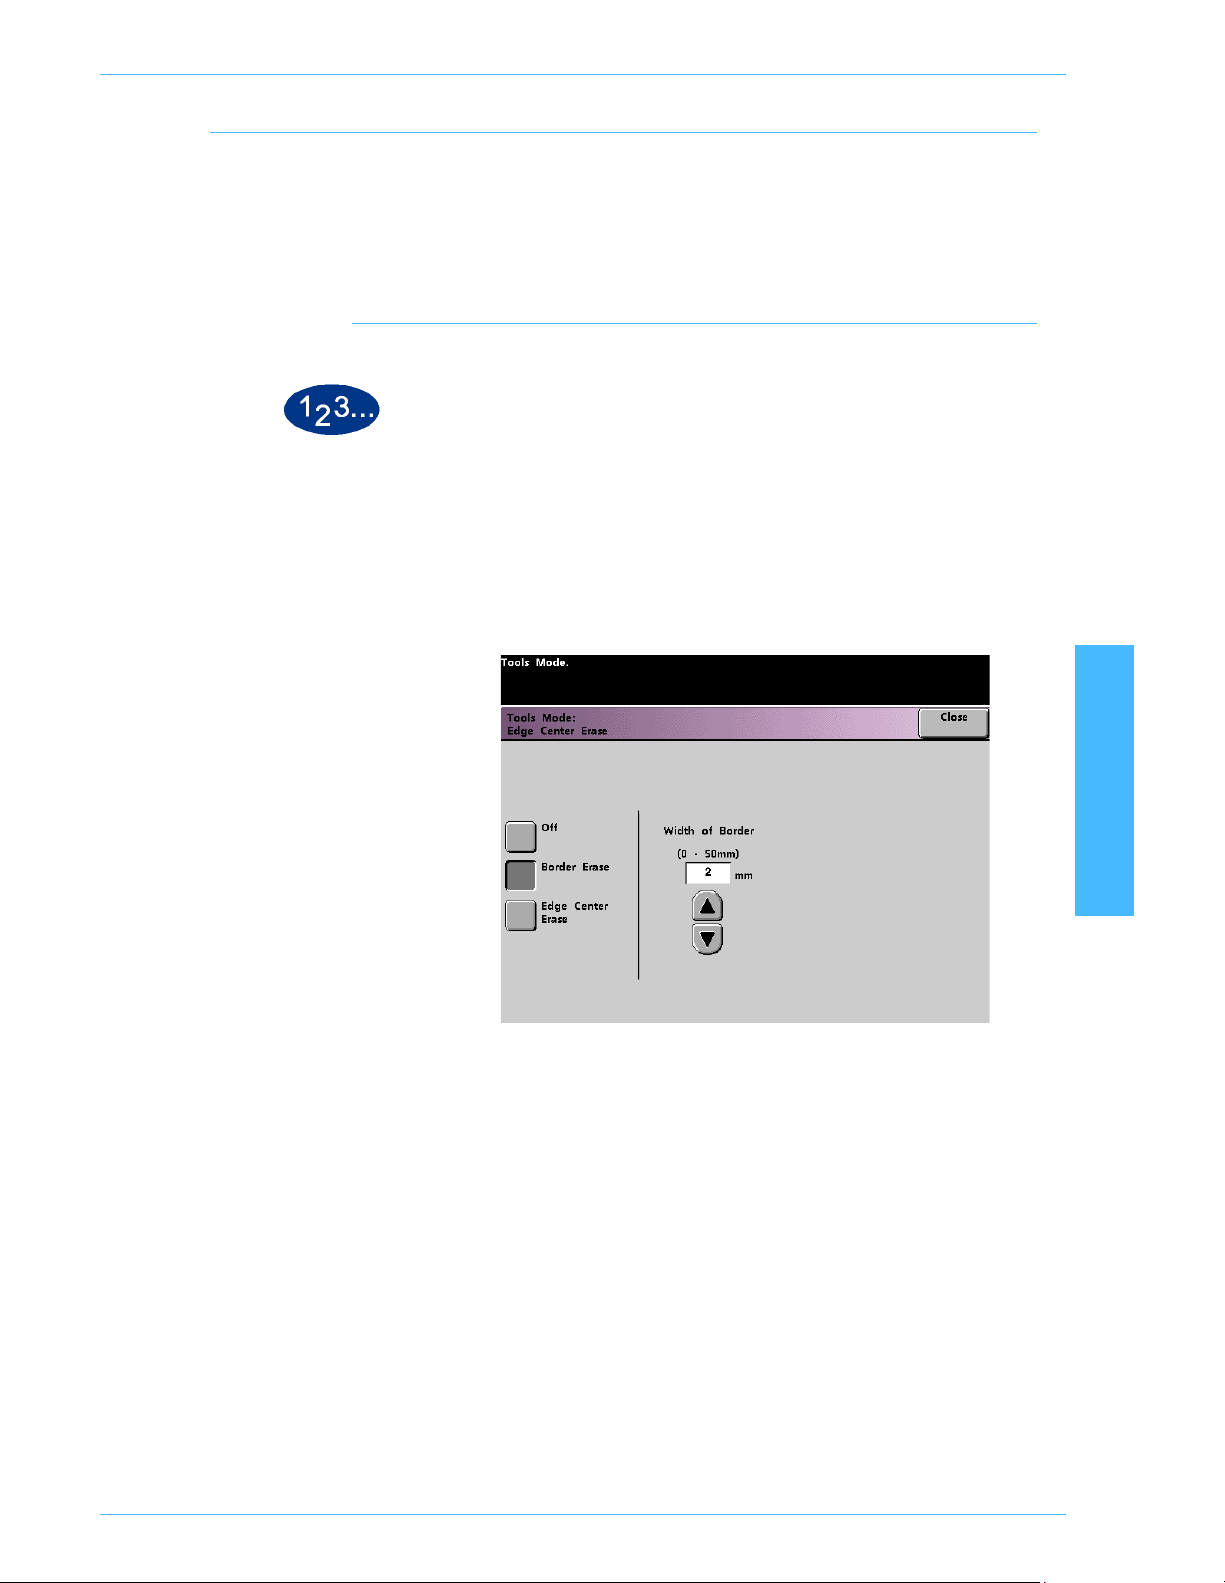
Edge/Center Erase
Turning Off Edge Erase
1 Touch the More... tab in the Tools Mode screen.
2 Touch the Feature Defaults 1 tab.
3 Touch the Edge/Center Erase button. The Edge Center Erase
Tools Mode
This feature allows you to set the default values for the Border
Erase and the Edge Center Erase options, or to turn off Edge
Erase. When you are making 2-sided copies, Edge Erase is
applied to both sides of the output.
screen appears.
4 Touch the Off button.
5 Touch the Close button to return to the Feature Defaults 1 screen.
2 Tools Mode
DocuColor 5252 System Administration Guide
2-73

Too ls Mo de
Border Erase
The Border Erase feature allows you to select the desired amount
of the image to be erased on all four edges of the scan to print
output. Erasing borders eliminates the shadows that are caused
by the document edges during the scanning process.
1 Touch the More... tab in the Tools Mode screen.
2 Touch the Feature Defaults 1 tab.
3 Touch the Edge/Center Erase button. The Edge Center Erase
screen appears.
4 Touch the Border Erase button. Border Erase options appear on
the right side of the screen.
2-74
5 Use the up or down arrow buttons to select the desired amount of
image to be erased on the borders of the print. The range
available is 0 to 50mm.
6 Touch the Close button to return to the Feature Defaults 1 screen.
DocuColor 5252 System Administration Guide
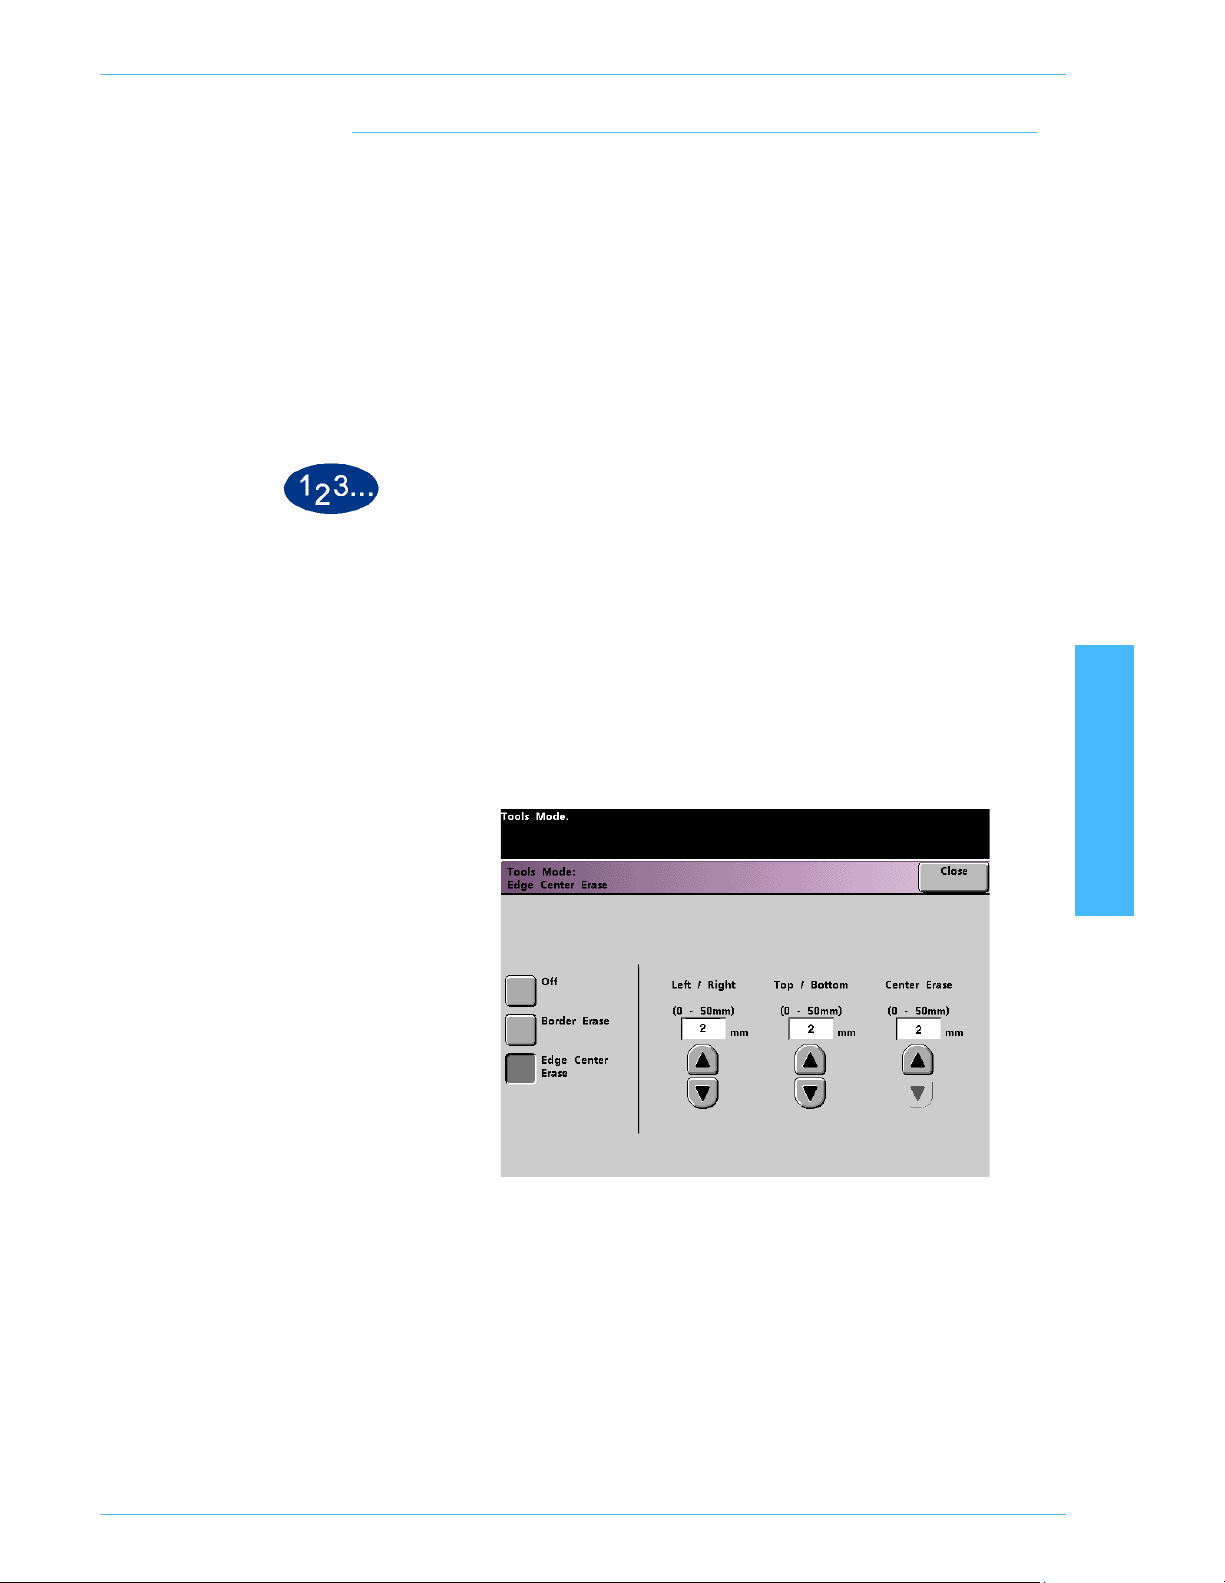
Edge Center Erase
The Edge Center Erase feature allows you to independently select
the amount of the image you want to erase from the edges of the
document. Users who do not want to select Edge Erase values for
all four edges of their document at the same time are able to
select the Left/Right and Top/Bottom values independently of each
other. The Center Erase option allows you to select the desired
amount of the image to be erased from the Center of the
document. This is useful for erasing the shadows that appear
when you are scanning two facing pages of a bound document, for
example.
1 Touch the More... tab in the Tools Mode screen.
2 Touch the Feature Defaults 1 tab.
Tools Mode
3 Touch the Edge/Center Erase button. The Edge Center Erase
screen appears.
4 Touch the Edge Center Erase button. Edge Center Erase options
appear on the right side of the screen.
5 Use the up or down arrow buttons to select the desired amount of
image to be erased from Left to Right, Top to Bottom, and the
Center of the copy. The available range for each 0 to 50mm.
2 Tools Mode
6 Touch the Close button to return to the Feature Defaults 1 screen.
DocuColor 5252 System Administration Guide
2-75

Too ls Mo de
Color Shift
The Color Shift feature allows you to shift the output color of your
digital press.
If you select a shift toward red, the red colors shift toward the
yellow hue, the green colors toward the cyan hue, and the blue
colors toward the magenta hue. The upper bar shifts toward the
left. The picture changes to demonstrate the effect of the color
shift. All colors in between these original colors also shift in the
same direction.
If you select a shift toward blue, the red colors shift toward the
magenta hue, the blue colors toward the cyan hue, and the green
colors toward the yellow hue. The upper bar shifts toward the
right. The picture changes to demonstrate the affect of the color
shift. Again, all colors in between these original document colors
also shift in the same direction.
1 Touch the More... tab in the Tools Mode screen.
2 Touch the Feature Defaults 1 tab.
3 Touch the Color Shift button. The Color Shift screen appears.
4 Use the right or left arrow buttons to select the desired value. The
available range is -2 to 2.
2-76
5 Touch the Close button to return to the Feature Defaults 1 screen.
DocuColor 5252 System Administration Guide
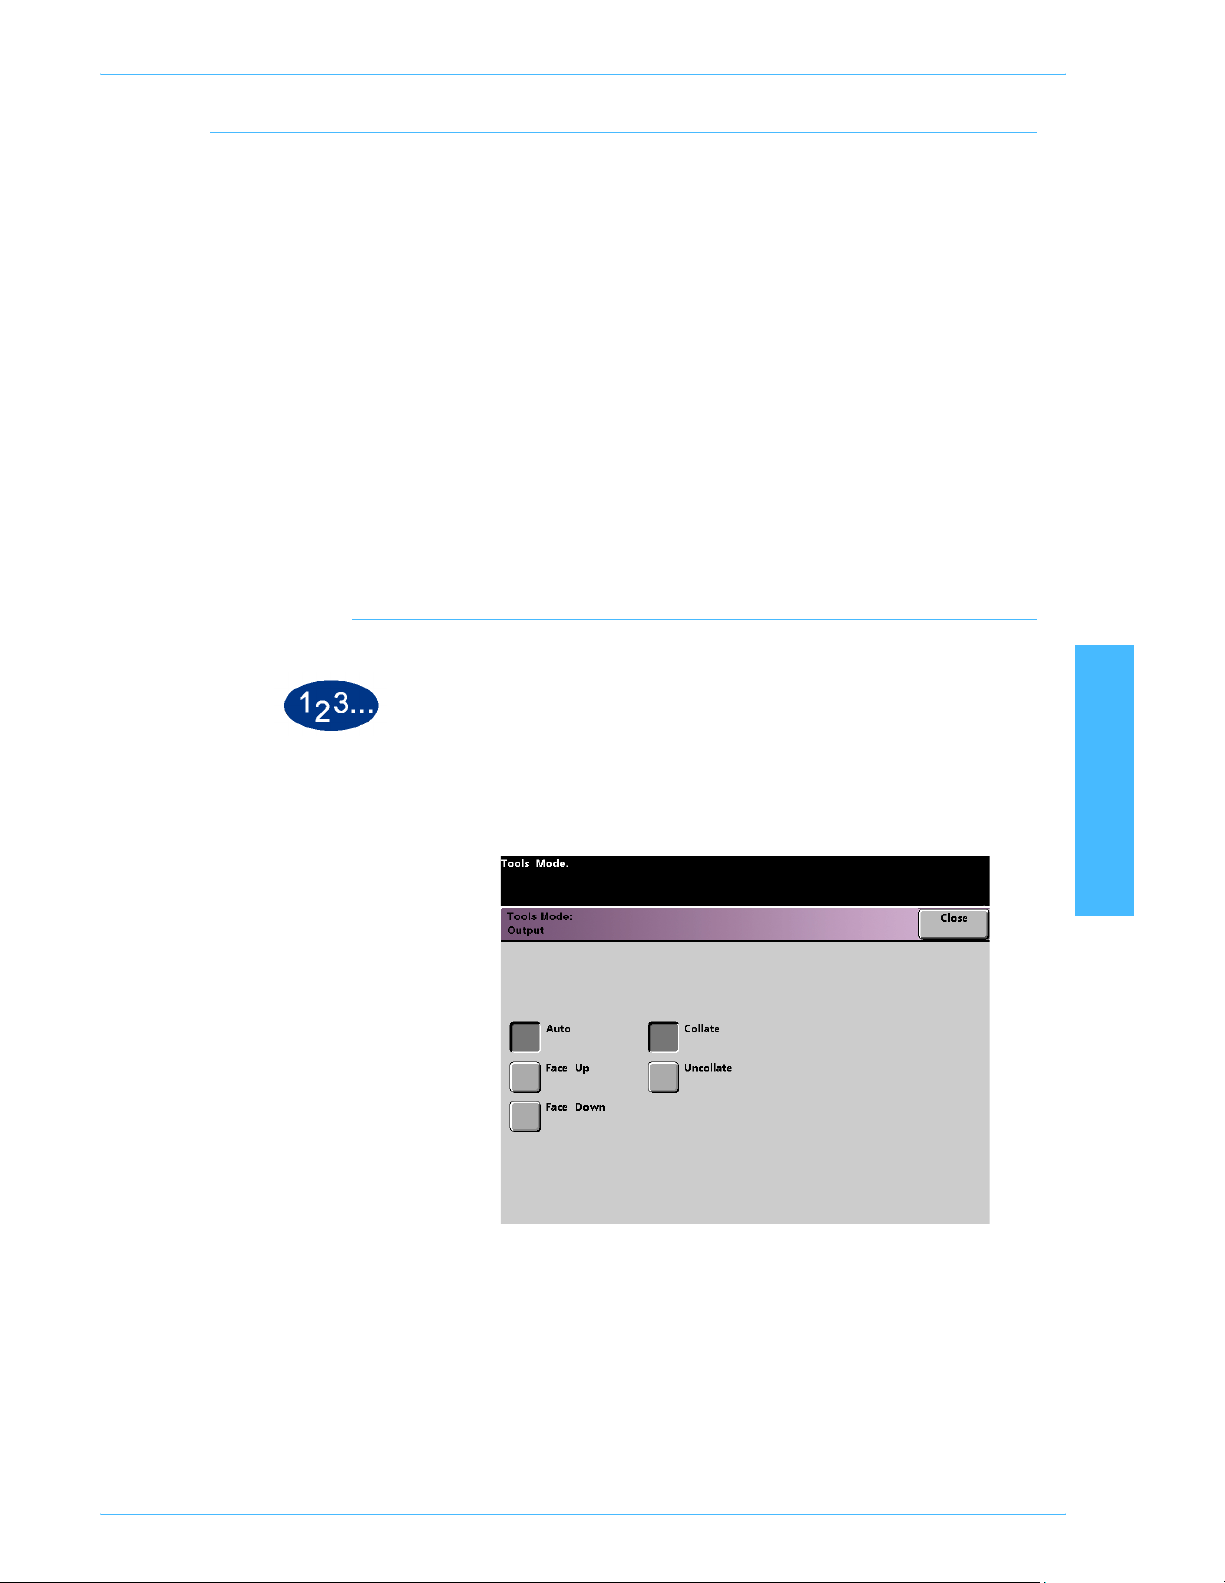
Output
Tools Mode
The Output feature allows you to set the default settings that
display on the Output option on the Basic Features screen. You
may select Auto, Face Up, Face Down, Collated, or Uncollated.
Selecting Auto enables the digital press to determine the copy
output based on the scan of the original document. If Auto is
selected, the output from both DADF and the Platen Glass will be
Face Up. If you have a High Capacity Stacker, an Enhanced High
Capacity Stacker or a High Capacity Stacker Stapler connected to
your digital press, you can select which output tray to send your
prints to, and whether or not to separate your printed sets. You
may choose these options independently.
This section provides instructions for using the Output feature
without a finishing device, with a high capacity stacker, with a
enhanced high capacity stacker and with a high capacity stacker
stapler.
Without a Finishing Device
1 Touch the Output button on the Feature Defaults 1 screen. The
Output screen appears.
2 Tools Mode
2 Touch the Auto, Face Up, or Face Down button.
3 Touch the Collate or Uncollate button.
4 Touch the Close button to return to the Feature Defaults 1 screen.
DocuColor 5252 System Administration Guide
2-77

Too ls Mo de
Using a High Capacity Stacker or Enhanced High Capacity
Stacker
1 Touch the Output button on the Feature Defaults 1 screen. The
Output screen opens.
2 Touch the Auto, Face Up, or Face Down button.
3 Touch the Collate or Uncollate button.
2-78
DocuColor 5252 System Administration Guide

Tools Mode
4 Touch the Stacker button. The Stacker screen appears.
5 To send output to the Stacker Tray, touch the Stacker Tray button
on the popup screen. To send output to the Top Tray, touch the
Top Tray button.
6 If you selected Stacker Tray, touch the Offset button to have the
printer automatically separate your sets. Touch the No Offset
button if you do not want your sets separated.
7 Touch the Close button to return to the Feature Defaults 1 screen.
2 Tools Mode
DocuColor 5252 System Administration Guide
2-79

Too ls Mo de
Using a High Capacity Stacker Stapler
1 Touch the Output button on the Feature Defaults 1 screen. The
Output screen appears.
2 Touch the Auto, Face Up, or Face Down button.
3 Touch the Collate or Uncollate button.
2-80
DocuColor 5252 System Administration Guide
 Loading...