


QuickConnect Guide
English (EN)
Français (FR)
Italiano (IT)
Deutsch (DE)
Español (ES)
Português (BP)
Nederlands (NL)
Svensk (SL)
Norsk (NO)
Suomi (FI)
Dansk (DA)
653-00562A
CXP3535 Color Server
version 1.0
www.creo.com

QuickCon nect_3535.book Page 2 Monday, August 4, 2003 1:05 PM

QuickCon nect_3535.book Page 3 Monday, August 4, 2003 1:05 PM
CXP3535 Color Server
version 1.0
Quick Connect Guide
English (EN)
Français (FR)
Italiano (IT)
Deutsch (DE)
Español (ES)
Português (BP)
Nederlands (NL)
Svenska (SV)
Norsk (NO)
Suomi (FI)
Dansk (DA)

QuickCon nect_3535.book Page 4 Monday, August 4, 2003 1:05 PM

QuickCon nect_3535.book Page i Monday, Augu st 4, 2 003 1:05 PM
Copyright
Copyright © 2003 Creo Inc. All rights reserved.
No copying, distribution, publication, modification, or incorporation of this document, in whole or part, is
permitted without the express written permission of Creo. In the event of any permitted copying, distribution,
publication, modification, or incorporation of this document, no changes in or deletion of author attribution,
trademark legend, or copyright notice shall be made.
No part of this document may be reproduced, stored in a retrieval system, published, used for commercial
exploitation, or transmitted, in any form by any means, electronic, mechanical, photocopying, recording, or
otherwise, without the express written permission of Creo Inc.
This document is also distributed in Adobe Systems Incorporated's PDF (Portable Document Format). You may
reproduce the document from the PDF file for internal use. Copies produced from the PDF file must be
reproduced in whole.
. . . . . . . . . . . . . . . . . . . . . . . . . . . . . . . . . . . . . . . . . . . . . . . . . . . . . . . . . . . . . . . . . . . . . . . . . . . . . . . . . . . . . . . . . . . . . . . . . . . .
Trademarks
The Creo wordmark, Creo logo, and the names of the Creo products and services referred to in this document are
trademarks of Creo Inc.
Adobe, Acrobat, and the Acrobat logo are registered trademarks of Adobe Systems Incorporated, and are
registered in the U.S. Patents and Trademark Office and may be registered in other jurisdictions.
Apple, AppleTalk, AppleShare, EtherTalk, LocalTalk, Macintosh, and LaserWriter are trademarks of Apple
Computer, Inc.
Microsoft, Windows, Windows 2000, and Windows NT are trademarks or registered trademarks of Microsoft
Corp.
Xerox is a registered trademark of Xerox Corp.
Other brand or product names are the trademarks or registered trademarks of their respective owners.
. . . . . . . . . . . . . . . . . . . . . . . . . . . . . . . . . . . . . . . . . . . . . . . . . . . . . . . . . . . . . . . . . . . . . . . . . . . . . . . . . . . . . . . . . . . . . . . . . . . .
FCC Compliance
The Creo equipment referred to in this document complies with the requirements in Part 15 of FCC Rules for a
Class A computing device. Operation of the Creo equipment in a residential area may cause unacceptable
interference to radio and TV reception, requiring the operator to take whatever steps are necessary to correct the
interference.
. . . . . . . . . . . . . . . . . . . . . . . . . . . . . . . . . . . . . . . . . . . . . . . . . . . . . . . . . . . . . . . . . . . . . . . . . . . . . . . . . . . . . . . . . . . . . . . . . . . .
Limitation of Liability
The product, software or services are being provided on an "as is" and "as available" basis. Except as may be stated
specifically in your contract, Creo Inc. expressly disclaims all warranties of any kind, whether express or implied,
including, but not limited to, any implied warranties of merchantability, fitness for a particular purpose and non infringement.
You understand and agree that Creo Inc. shall not be liable for any direct, indirect, incidental, special,
consequential or exemplary damages, including but not limited to, damages for loss of profits, goodwill, use, data
or other intangible losses (even if Creo has been advised of the possibility of such damages), resulting from: (i)
the use or the inability to use the product or software; (ii) the cost of procurement of substitute goods and
services resulting from any products, goods, data, software, information or services purchased; (iii) unauthorized
access to or alteration of your products, software or data; (iv) statements or conduct of any third party; (v) any
other matter relating to the product, software, or services.

QuickCon nect_3535.book Page ii Monday, August 4, 2003 1:05 PM
The text and drawings herein are for illustration and reference only. The specifications on which they are based
are subject to change. Creo Inc. may, at any time and without notice, make changes to this document. Creo Inc.,
for itself and on behalf of its subsidiaries, assumes no liability for technical or editorial errors or omissions made
herein, and shall not be liable for incidental, consequential, indirect, or special damages, including, without
limitation, loss of use, loss or alteration of data, delays, or lost profits or savings arising from the use of this
document.
.. . . . . . . . . . . . . . . . . . . . . . . . . . . . . . . . . . . . . . . . . . . . . . . . . . . . . . . . . . . . . . . . . . . . . . . . . . . . . . . . . . . . . . . . . . . . . . . . . . . .
Patents
This product is covered by one or more of the following U.S. patents:
RE37,376
4,558,302
4,743,091
4,992,864
5,049,901
5,079,721
5,103,407
5,111,308
5,113,249
5,122,871
5,124,547
5,132,723
5,150,225
5,153,769
5,155,782
5,157,516
5,208,818
5,208,888
5,247,174
5,249,067
5,283,140
5,291,273
5,323,248
.. . . . . . . . . . . . . . . . . . . . . . . . . . . . . . . . . . . . . . . . . . . . . . . . . . . . . . . . . . . . . . . . . . . . . . . . . . . . . . . . . . . . . . . . . . . . . . . . . . . .
Creo Inc.
3700 Gilmore Way
Burnaby, B.C., Canada
V5G 4M1
Tel: 1-604-451-2700
Fax: 1-604-437-9891
http://www.creo.com
653-00562A
Revised August 2003
5,325,217
5,339,176
5,343,059
5,355,446
5,359,451
5,359,458
5,367,360
5,384,648
5,384,899
5,412,491
5,412,737
5,420,702
5,420,722
5,459,505
5,473,733
5,481,379
5,488,906
5,497,252
5,508,828
5,509,561
5,517,359
5,519,852
5,526,143
5,532,728
5,561,691
5,568,595
5,576,754
5,579,115
5,592,309
5,594,556
5,600,448
5,608,822
5,615,282
5,625,766
5,636,330
5,649,220
5,650,076
5,652,804
5,680,129
5,691,823
5,691,828
5,696,393
5,699,174
5,699,740
5,708,736
5,713,287
5,742,743
5,764,374
5,764,381
5,771,794
5,785,309
5,813,346
5,818,498
5,854,883
5,861,904
5,861,992
5,875,288
5,894,342
5,900,981
5,934,196
5,942,137
5,946,426
5,947,028
5,958,647
5,966,504
5,969,872
5,973,801
5,986,819
5,995,475
5,996,499
5,998,067
6,003,442
6,014,471
6,016,752
6,031,932
6,043,865
6,060,208
6,063,528
6,063,546
6,072,518
6,090,529
6,096,461
6,098,544
6,107,011
6,112,663
6,115,056
6,121,996
6,130,702
6,134,393
6,136,509
6,137,580
6,147,789
6,158,345
6,159,659
6,164,637
6,180,325
6,181,362
6,181,439
6,186,068
6,189,452
6,191,882
6,204,874
6,208,369
6,214,276
6,217,965
6,260,482
6,266,080
6,266,134
6,267,054
6,268,948
6,283,589
6,295,076
6,299,572
6,318,266
6,352,816
6,353,216
6,366,339
6,371,026
6,377,739
6,387,597
6,396,422
6,396,618
6,407,849
6,414,755
6,422,801
6,435,091
6,441,914
6,450,092
6,456,396
6,476,931
6,477,955
6,509,903

QuickCon nect_3535.book Page 2 Monday, August 4, 2003 1:05 PM
CXP3535 Color Server – Quick Connect Guide 2
Contents
Quick Connect Guide – English (EN) ....................................................................... 1
Quick Connect Guide – Français (FR) .................................................................... 11
Quick Connect Guide – Italiano (IT) ...................................................................... 21
Quick Connect Guide – Deutsch (DE) .................................................................... 31
Quick Connect Guide – Español (ES) ..................................................................... 41
Quick Connect Guide – Português (BP) ................................................................. 51
Quick Connect Guide – Nederlands (NL) .............................................................. 61
Quick Connect Guide – Svenska (SV) .................................................................... 72
Quick Connect Guide – Norsk (NO) ....................................................................... 81
Quick Connect Guide – Suomi (FI) ......................................................................... 91
Quick Connect Guide – Dansk (DA) ..................................................................... 101

QuickCon nect_3535.book Page 3 Monday, August 4, 2003 1:05 PM
3 CXP3535 Color Server Quick Connect Guide
QuickCon nect_3535.book Page 1 Monday, August 4, 2003 1:05 PM
Quick Connect Guide 1
Quick Connect Guide – English (EN)
How to Use this Guide
This guide assists you with setting up the network and system
configuration settings for your CXP3535 Color Server. In addition, this
guide provides steps for sett ing up a network printer on the Macintosh and
Windows client workstations.
The CXP3535 Color Server was designed to connect to most net works
with minimal changes.
Ste p 1 descri bes the sequence for powering up the CXP3535 Color
Server . Steps 2 to 5 provide instruc tions on how to setup and conf iure the
CXP3535 Color Server on the network.
English (EN)
Important: A Network Administrat or is required in order to ensure that the
CXP3535 Color Server is configured properly on the network. The
Network Administrator must supply the appropriate TCP/IP setti ngs (IP
Address, subnet mask, gateway address or DHCP settin gs).
For more detailed information and procedures refer to the
CXP3535 Color Server Technical Manual (Creo p/n: 653-00541A) or the
CXP3535 User Guide (Creo p/n: 653-00561A).
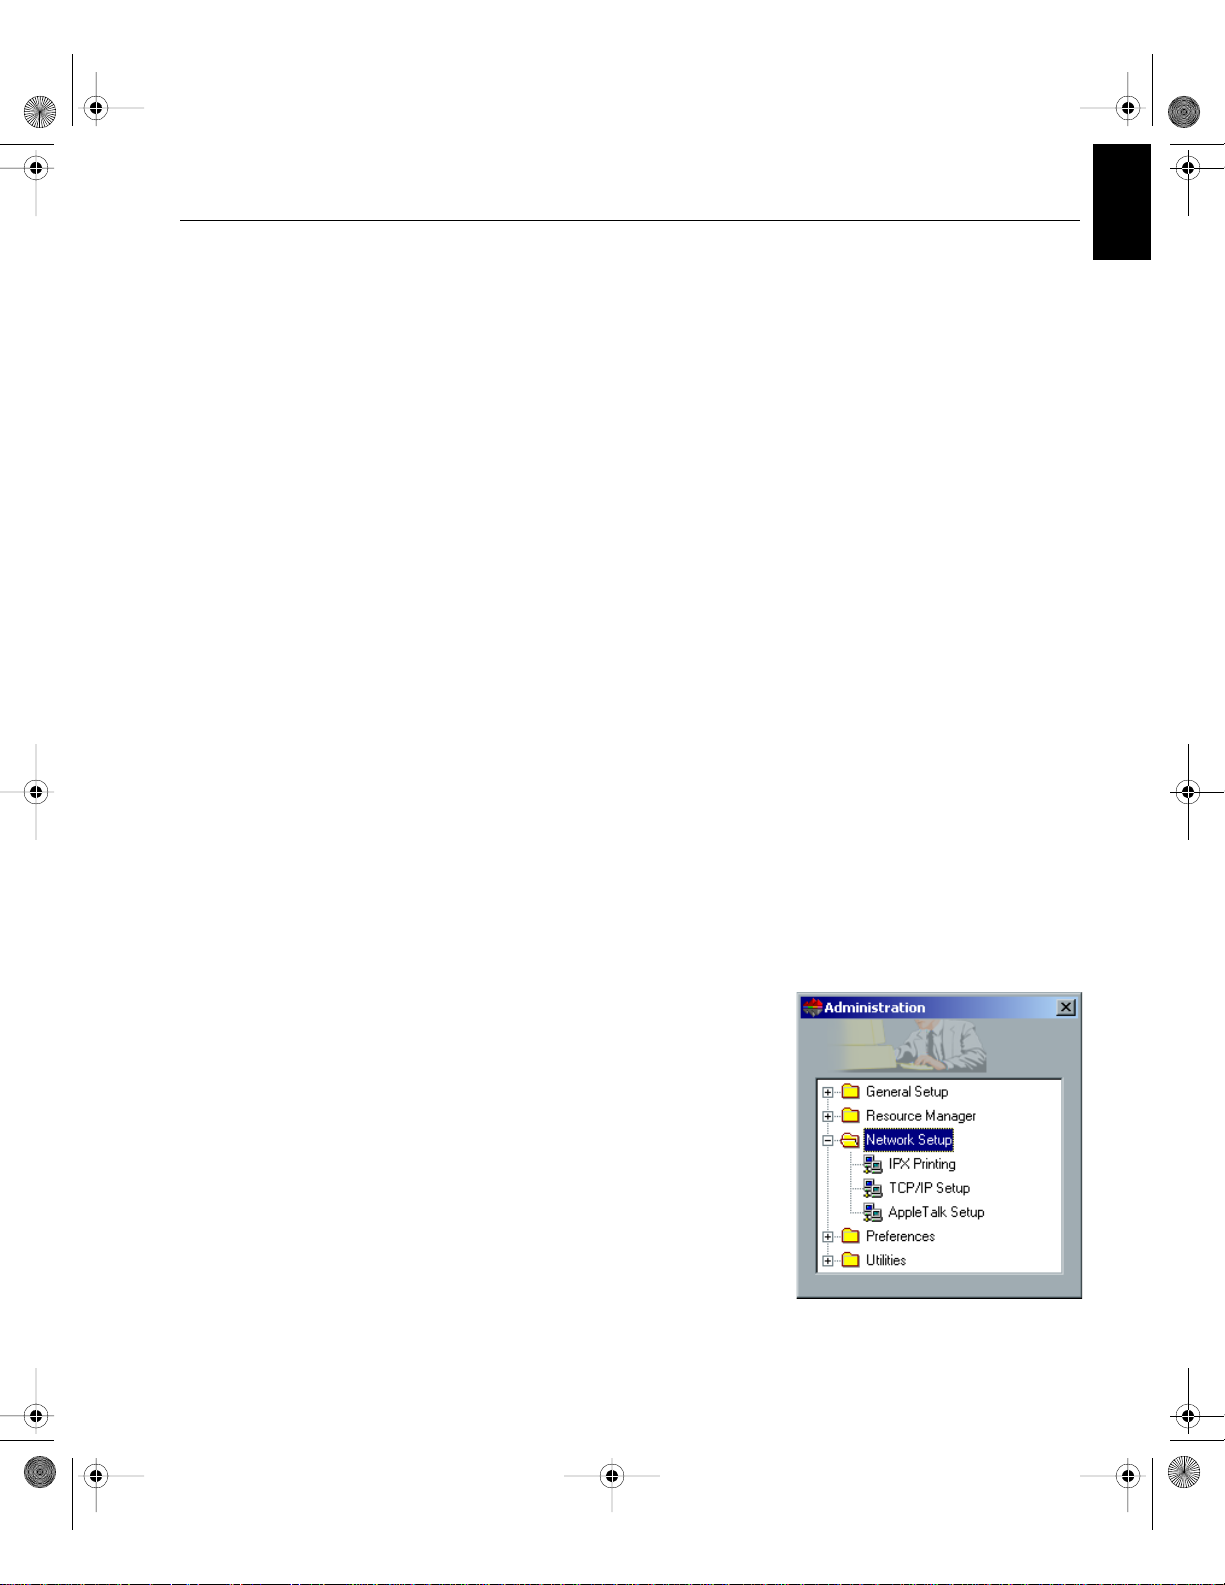
Configurin g t he CXP353 5 C ol or Se rver
The first time co nfiguration and setup is
performed during initi al i nstall of the
application software. After the
application software is installed and the
CXP3535 Color Server and Xerox
DocuColor 3535 is switched on, the
Configuration Wizard automat ically
appears.
You can also access these settings in
the Administration window in the
CXP3535 Color Server workspace.

r
QuickCon nect_3535.book Page 2 Monday, August 4, 2003 1:05 PM
2 Quick Connect Guide
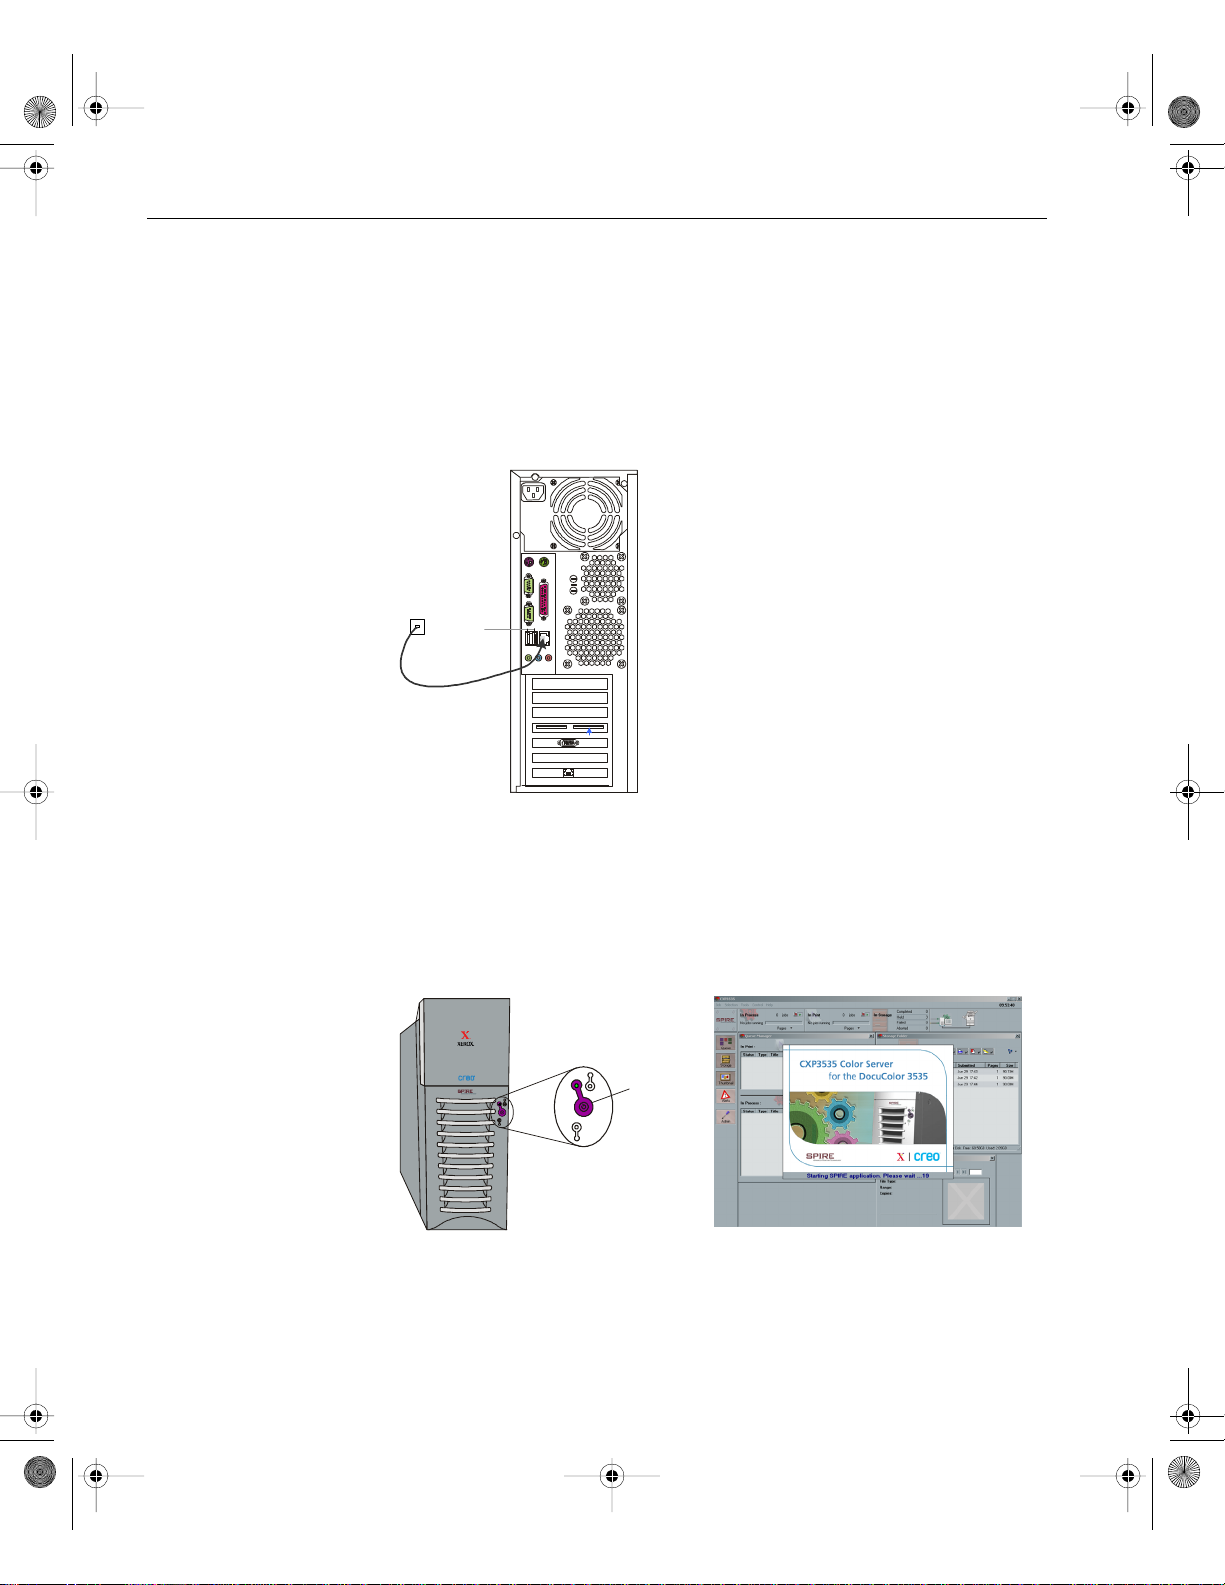
Step 1: Powering up the CXP3535 Color Server
Connecting the network cable
Important: Make sure that the customer has connected a network cable
to the ethernet port (10/ 100/1000) on th e CXP3535 Color Serv er and then
the cable connected to a network port, hub or router .
CXP3535 Color Serve
Ethernet to
network
(10/100/1000)
N
E
T
Powering up the CXP3535 Co lor Server
Important: The CXP3535 Color Server must be powered up and the
CXP3535 application window appears on the monitor befor e powering up
the Xerox DocuColor 3535 Printer.
Press the power control button to turn the CXP3535 Color Server ON.
DDI-1DD
SC
AN
I-2
Power
control
button

QuickCon nect_3535.book Page 3 Monday, August 4, 2003 1:05 PM
Quick Connect Guide 3
S t e p 2: De fa ul t System and Net w ork Se tt in gs
Note: If you need to change any of the default settings refer to the CXP3535
Color Server Technical Manual (Creo p/n: 653-00541A) or the CXP3535 User
Guide (Creo p/n: 653- 005 61A).
System & Network Settings
Following are the default system and network set ti ngs.
Parameter Default Setting
Language English
Hostname CXP3535 (the hostname is taken from the Computer Name
Workgroup Workgroup
Date and Time: US & Canada
Measurement Units Millimeters
IP Address Enable DHCP: Yes
AppleTalk Zone Enabled, Zone: Automatically detected
English (EN)
you typed dur ing the Windows 2000 Profe ssional i nst allati on
- refer to the CXP3535 Technical Manual for more details).
Protoc ols and Services Instal led
Following are the default protoc ols and services installed on the system.
Parameter Default Setting
Client for Microsoft Networks: Enabled
File and Printe r Sharing for Microsoft Networks: Enabled
NWLink IPX/SPX/NetBios Compatible Transport Protocol: Enabled
NWLink BetBIOS Enabled
Network Monitor Dr i ve r : Enabled
NetBEUI Protocol: Enabled
DLC Protocol: Enabled
AppleTalk Protocol: Enabled
Internet Protocol (TCP/IP): Enabled: DHCP Y es
Network Virtual Printers - Print Queues
Following are the default virt ual printers which are available from the
Macintosh and PC clients.
Network Virt ual Printers - Print Queues <hostname>_ProcessPrint
<hostname>_ProcessStore
<hostname>_SpoolStore

QuickCon nect_3535.book Page 4 Monday, August 4, 2003 1:05 PM
4 Quick Connect Guide
Step 3: Network Setup
TCP/IP Setup
The following should only be performed if you need t o change the default
settings (refer to Step 2 for the default settings).
1. In the CXP3535 Color Server Workspace, click Admin.
2.
Double click Network Setup > TCP/IP Setup.
3. Select Use the following IP Address.
4. Ty pe the new IP address, Subnet mask and Default gateway
(according to the Network Administrator).
5. If required enter the DNS server addr esses (accordi ng to the Network
Administrator).
6. Click OK > OK.
7. When prompted to restart your computer click Yes.
AppleTalk Setup
The following should only be performed if you need t o change the default
settings (refer to Step 2 for the default settings).
1. In the CXP3535 Color Server Workspace, click Admin.
2.
Double click Network Setup > AppleTalk Setup.
3. Select the required zone from the This system will appear in zone
drop-down menu.
4. Click OK > OK.

QuickCon nect_3535.book Page 5 Monday, August 4, 2003 1:05 PM
Quick Connect Guide 5
IPX & Novell Client Setup
Note: For more detailed informa tion refer to the CXP3535 Color Se rv er
Technical Manual (Creo p/n: 653-00541A) or the CXP3535 User Guide (Creo
p/n: 653-00561A).
The following procedures are rel evant for those customers who have a
Novell network running IPX protocol .
Installing the Novell Client on the CXP3535 Color Server
1. Close the CXP3535 workspace and application.
2.
Close all other open applications.
3. On the Windows desktop, click Start and follow the path,
CXP3535>CXP3535 Tools>Novell Client Installation.
4. Click Install and then click Reboot.
Configuring the Novell Client on the CXP3535 Color Server
1. After the system reboots, the Novel l Setup w in dow appears.
2.
Ty pe the Tree Name. If you do not know the name, click Browse and
then double click the appropriate Tree Name.
English (EN)
3. Type the Context Name. If you do not know the name, click Browse
and then double click the appropriate Context Name.
4. Click OK. The CXP3535 Workspace appears.
Step 4: View & Print the System Configuration
Viewing the System Configuration
1. In the CXP3535 Color Server Workspace, click Admin.
2.
Double click Utilities > View Configuration.
3. The network and sys tem c onfigurat ion of yo ur CXP3535 Color Ser ver
is displayed.
Printing the System Configuration
1. In the View Configuration window click Print.
2.
Select the ProcessPrint printer and then click Print.
3. The CXP3535 System Configuration is printed.
4. Click Close to close the View Configuration window and then close
the Administration window.

QuickCon nect_3535.book Page 6 Monday, August 4, 2003 1:05 PM
6 Quick Connect Guide
Step 5: Printing from a Macintosh or Windows Computer
Note: For more detailed information refer to the CXP3535 User Guide
(Creo p/n: 653-00561A).
Setting up a Printer in Windows 9.x/NT/ME/2000/XP (smb)
1. Click the Start button, point to Set tings, and click Printers (Windows 9.x/
NT/ME/2000) or Printers & Faxes (Windows XP).
Double click on Add Printer and then click Next.
2.
3. Select Network Printer and then click Next.
4. Browse the network to your CXP3535 Color Server, then double click
on the server name. A list of printers is displayed.
5. Select one of the network published printers, for
example.,ProcessPrint and then click OK.
6. Select whether you want this to be the default printer, and then click
Next.
7. Click Finish to complete the setu p .
Setting up a TCP/IP Printer in Windows ME/2000/XP
The following items must be inst all ed and conf igure d on the Windows ME/
2000/XP computer before you begin:
• TCP/IP Protocol
• Latest Adobe PS printer driver (located in the shared d:\utilities folder on the
CXP3535 Color Server or you can download from the Adobe website at
www.adobe.com)
• CXP3535 PPD (the PPD is located in the shared d:\utilities\PPD folder on the
CXP3535 Color Server)
Defining the TCP/IP Printer Port
1. From the Start menu on the Windows desktop, select Setting s > Pr in te rs
and Faxes (Windows XP) or Printers (Window s 9. x/ N T/ME/2000).
In the Printer and Faxes window, from the File menu, select Server
2.
properties.
3. Select the Port tab, and then click the Add Port button.
4. From the list of Available Printer Ports, select Standard TCP/IP
Port, and then click the New Port button.
5. Click Next.

QuickCon nect_3535.book Page 7 Monday, August 4, 2003 1:05 PM
Quick Connect Guide 7
6. Type the exact name of the CXP3535 Color Server (this box is case-
sensitive) in the Printer Name or IP Address box.
7. Ty pe a name for the print er that you will be able to identify on your
comp ut er in the Port Name box.
8. Click Next.
9. Select Custom in the Device Type option, and then cl ick Settings.
10. Select the following options:
• Protocol: LPR
• LPR Settings:
- Queue Name: type the exact name of the network printer you want to
print to (for example., CXP1_ProcessPrint).
- LPR Byte Counting Enabled: selected.
11. Click OK > Next and then Finish.
12. Click Close in the Printer Ports window .
13. Click Close in the Printer Server Properties window.
The next step is to setup the TCP/IP port for printing usi ng the
Adobe Printer Driver.
English (EN)
Setting up a TCP/IP Printer using Adobe PostScript Printer
Driver
Note: For more detailed information refer to the CXP3535 User Guide
(Creo p/n: 653-00561A).
1. Start the Adobe PostScript Printer Driver application .
Follow the steps in the wizard, when prompted In th e Prin ter
2.
Connection Type window, select It is directly connect to your
computer (Local Printer), and then click Next.
3. Select the Standard TCP/IP port you defined earlier, for example,
CXP1_ProcessPrint LPR, and then click Next.
4. Select the CXP3535 Color Server PPD: CXP3535.ppd.
5. Follow through the rest of the steps in the wizard and then click
Finish.

QuickCon nect_3535.book Page 8 Monday, August 4, 2003 1:05 PM
8 Quick Connect Guide
Setting up a TCP/IP Printer in Windows NT 4.0
The following items must be installed and configured on the Windows NT
4.0 computer before you begin:
• TCP/IP Protocol
• Mi crosof t TCP/IP Printing Service
• Latest Adobe PS printer driver (located in the shared d:\utilities folder on the
CXP3535 Color Server or you can download from the Adobe website at
www.adobe.com)
• CXP3535 PPD (the PPD is located in the shared d:\utilities\PPD folder on the
CXP3535 Color Server)
Defining the TCP/IP Printer Port
1. From the Start menu on the Windows desktop, select Settings>Printers.
2.
In the Printer window, from the File menu, select Server Properties.
3. Select the Port tab, and then click the Add Port button.
4. From the list of Available Ports, select LPR Port, and click the New
Port button.
5. Type the exact name of the CXP3535 Color Server (this box is case-
sensitive) in the Name or address of server proving lpd: box.
6. Type the exact name of the printer you want to print to.
7. Click OK > Close and then OK in the Pri nt Serv er Pr operti es window.
The next step is to setup the TCP/IP port for printing usi ng the
Adobe Printer Driver.
Setting up a TCP/IP Printer using Adobe PostScript Printer
Driver
Note: For more detailed information refer to the CXP3535 User Guide
(Creo p/n: 653-00561A).
1. Start the Adobe PostScript Printer Driver applica tion .
Follow the steps in the wizard, when prompted In t he Printer
2.
Connection Type window, select It is directly connect to your
computer (Local Printer), and then click Next.
3. Select the Standard TCP/IP port you defined earlier, for example,
CXP1_ProcessPrint LPR, and then click Next.
4. Select the CXP3535 Color Server PPD: CXP3535.ppd.
5. Follow through the rest of the steps in the wizard and when you are
done click Finish.

QuickCon nect_3535.book Page 9 Monday, August 4, 2003 1:05 PM
Quick Connect Guide 9
Setting up a Printer on a Macintosh (OS 9.0 or higher)
Before setting up one of the CXP3535 Color Server network print ers, you
need to first install the CXP3535 PPD. To install the CXP_3535.ppd,
connect via Apple Share to your CXP3535 Color Serve r, login as guest and
from the Utilities f older copy the CXP_3535.ppd to the Print er Descripti ons
folder in the Mac’s System Fol der.
To setup a printer on your Macintosh:
1. From the Ap ple menu, sel ec t Cho ose r.
2.
Select LaserWrite r and browse the network to your CXP3535 Color
Server.
3. Select one of the CXP3535 Color Server network printers, for
example, ProcessPrint and then cli ck Create. The CXP_3535 .ppd i s
automatically setup on your Macintosh.
Setting up a Printer on a Macintosh (OS X - 10.1.2 or higher) - LPR (IP) or AppleTalk
Before setting up one of the CXP3535 Color Server network print ers, you
need to first install the CXP3535 PPD. To install the CXP_3535.ppd,
connect via Apple Share to your CXP3535 Color Serve r, login as guest and
from the Utilities folder copy the CXP_3535.ppd to your Macintosh hard
disk.
English (EN)
1. From the Go menu, select Appl ications.
2.
Open the Utilities folder and then double click on the Print Center
icon.
3. Click the Add Printer button.
4. Select between either AppleTalk or LPR Printer using IP.
5. Browse to the CXP3535 network printer (or if you are definin g an LPR
printer enter the CXP3535 IP Address or hostname and the exac t
name of the printer you wish to print to, i.e., CXP1_ProcessPrint).
6. Open the Printer Model pop-up menu and select Other.
7. Browse to the folder to which you copied the CXP3535.ppd and
select it.
8. Click the Choose button t o assign the CXP3535.ppd to the selected
network printer.
9. Click the Add button to add th e new printer to the printer list.

QuickCon nect_3535.book Page 10 Monday, August 4, 2003 1:05 PM
10 Quick Connect Guide
Setting up a Novell printer in Windows (9.x/ME/NT/2000/XP)
Important: Novell printing is only availabl e at sit es which have a Novell Prin ter
Server installed and configu re d fo r use with th e C XP35 35 C ol or Server. For
more detailed informat ion refer to the CX P3535 User Guide
(Creo p/n: 653-00561A).
The following items must be installed and configured in Windows before
you begin:
• IPX Protocol
• Client Service for Netware
• Novell Client installed on the CXP3535 Color Server (refer to Step 3 of this
guide for more details).
1. From the Start menu, select Settings > Printers
2.
Double click Add printer.
3. Follow the wizard and select Network printer.
4. Browse the NetWare or Compatible Network for the CXP3535
Color Serv e r o r a Nov e ll P ri nt e r S e rv e r.
5. Select the printer you wish to print to and then configure it with the
CXP3535 printer.
6. Continue to follow t he step s t hrough th e wizard a nd th en clic k Finish.
QuickCon nect_3535.book Page 11 Monday, August 4, 2003 1:05 PM
Guide simplifié de connexion 11
Guide simplifié de connexion – Français (FR)
Comment utiliser ce gui de
Ce guide vous guidera lors de la configuration du réseau et des réglages
du système, pour votre CXP3535 Color Server. En plus, ce guide se
décompose en étapes, q ui vous permettr ont de configurer une imprimante
réseau sur des postes de travail clients Windows et Macintosh.
Le CXP3535 Color Server a été conçu, afin qu'il pui sse se connecter à la
plupart des réseaux, avec un mini mum de chang eme nts.
L'étape 1 vous présente le système par déf aut et les réglages du réseau .
Les étapes 2 à 7 donnent les instruct ions sur la manière de modifier ces
réglages, afin qu'ils correspondent à l'environnement des clients.
Important : un administrateur réseau est requis pour garantir que le
CXP3535 Color Server soit configuré proprement sur le réseau.
L'administrateur réseau doit fournir les réglages TCP/IP appropriés
(réglages de l'adresse IP, du masque de sous-réseau, de l'adresse de la
passerelle ou du DHCP).
Pour de plus amples informations et procédur es, veuillez vous référer au
Manuel technique du CXP3535 Color Server (Creo p/n : 653-00541A) ou
au Guide d'utilisation du CXP3535 (Creo p/n : 653-00561A-FR).
Français (FR )
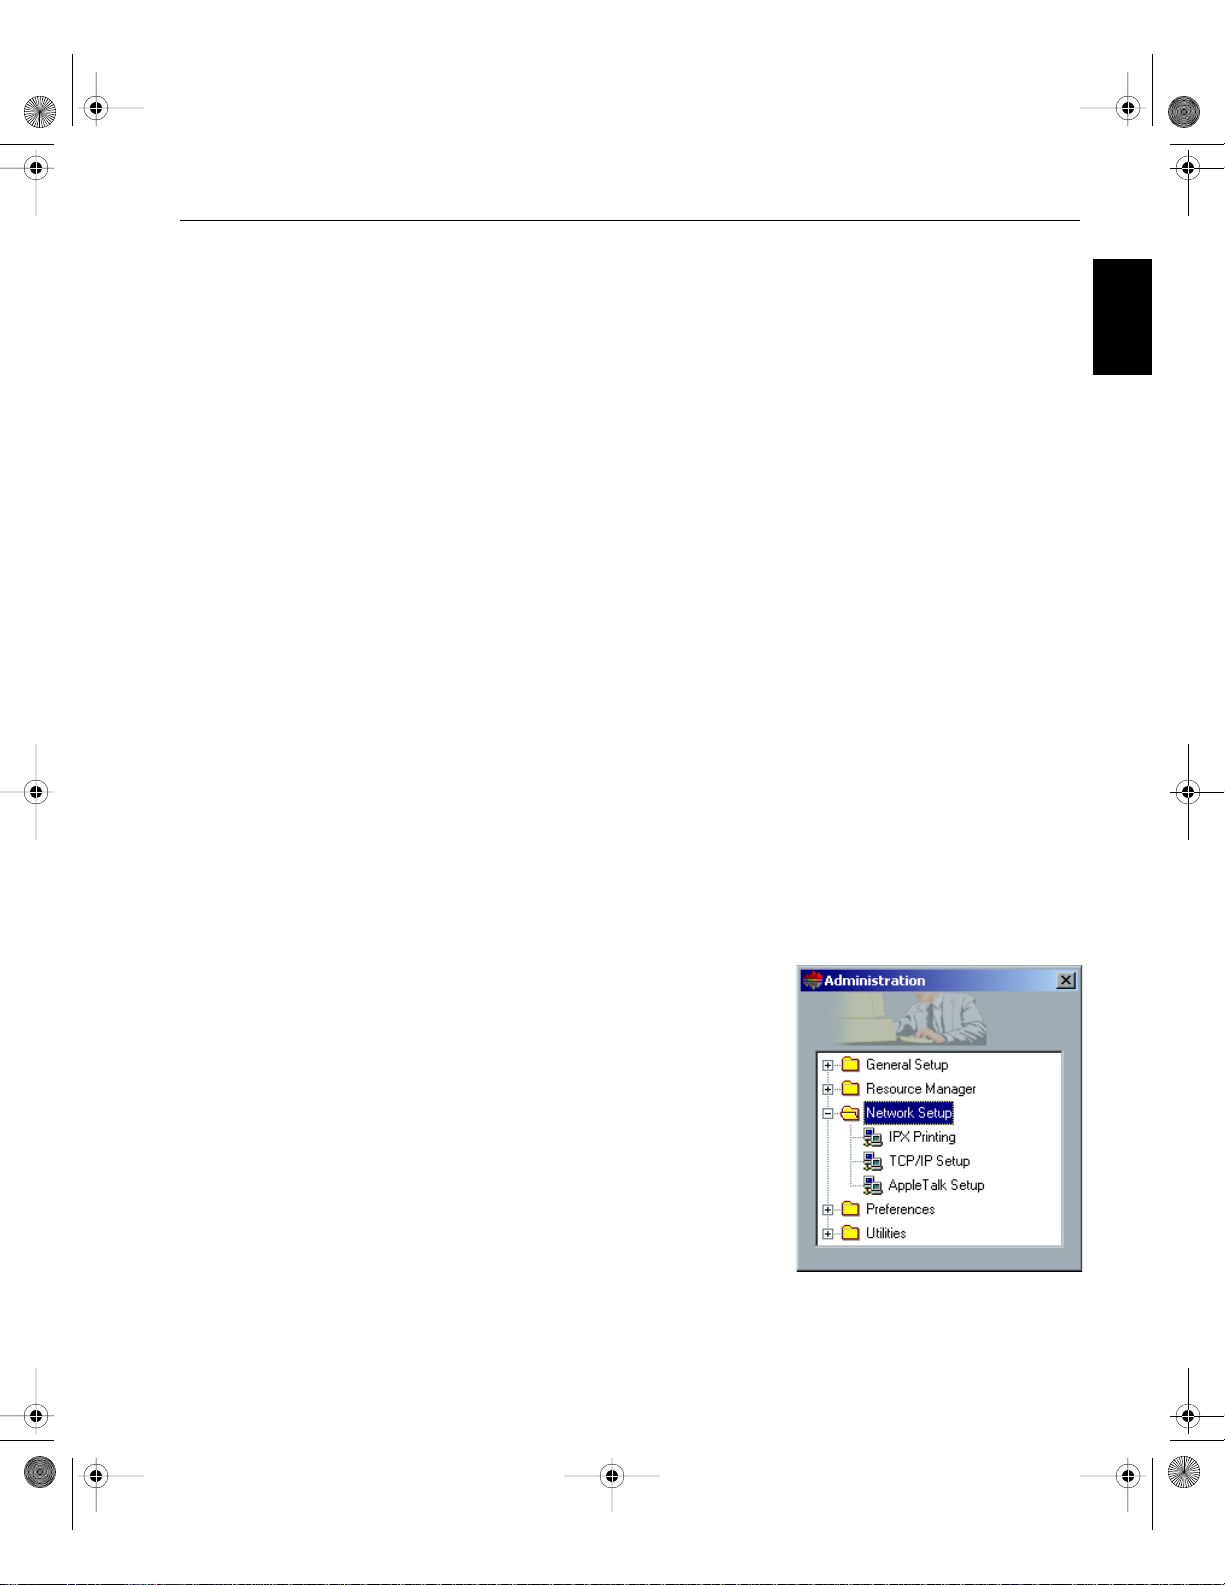
Configuration du CXP3535 Color Server
La première configuration & le premier
réglage sont effectués lors de
l'installati on in it ia le du lo g ic ie l d e
l'application. Une fois que le logi ciel de
l'application est installé et que le
CXP3535 Color Server et la Xerox
DocuColor 3535 sont allumés,
l'assistant de confi guration apparaît
automatiquement.
Vous pouvez également accéder à ces
réglages dans la fenêtre Aministration
de l'espace de travail du CXP3535
Color Serv e r.
r
QuickCon nect_3535.book Page 12 Monday, August 4, 2003 1:05 PM
12 Guide simplifié de connexion
Etape 1 : mise sous tension du CXP3535 Color Server
Connexion du câble réseau
Important : vérifiez que le client a bien connecté un câble réseau sur le
port Ethernet (10/100/1000 ) du CXP3535 Color Server et que ce câble est
également connecté à un por t réseau, un répéteur mult iport ou un r out eur.
CXP3535 Color Serve
Ethernet to
network
(10/100/1000)
N
E
T
DDI-1DD
SC
AN
I-2
Mise sous tension du CXP3535 Color Server
Important : le CXP3535 Color Server doit être mis sous tensi on et la
fenêtre de l'application du CXP3535 apparaîtra sur le moniteur.
Appuyez sur l'interrupteur pour allumer (ON) le CXP3535 Color Server.
Power
control
button

QuickCon nect_3535.book Page 13 Monday, August 4, 2003 1:05 PM
Guide simplifié de connexion 13
Etape 2 : régla ges du rése au et d u systèm e p ar dé f aut
Remarque : si vous avez besoin de changer n'importe quel réglage par
défaut, référez-vous au Manuel technique du CXP3535 Color Server (Creo p/
n: 653-00541A) ou au G uide d'utilisation du CXP3535 (Cre o p/n : 65 300561A-FR).
Réglages du réseau & du système
Vous trouverez ci-après le système par défaut et les réglages du réseau.
Paramètre Réglage par défaut
Langue Français
Hostname CXP3535 (le nom d'hôte est pris du nom de l'ordinateur que
vous avez entré, au cours de l'installation de Windows 2000
Professional - référez-vous au Manuel technique du
CXP3535, pour plus de détails).
Workgroup Workgroup
Date et Heure : USA & Canada
Unités de mesure Millimeters
IP Address Enable DHCP: Yes
AppleTalk Zone Enab led , Zo ne : Au to m a ti ca l ly dete c te d
Protocoles et services installés
Vous trouverez ci-après les protocoles et services par défaut installés sur
le système.
Français (FR )
Paramètre Réglage par défaut
Client for Microsoft Networks: Enabled
File and Printe r Sharing for Microsoft Networks: Enabled
NWLink IPX/SPX/NetBios Compatible Transport Protocol: Enabled
Network Monitor Printer Driver: Enabled
NetBEUI Protocol: Enabled
DLC Protocol: Enabled
AppleTalk: Enabled
Internet Protocol: Enabled: DHCP Yes
Imprimantes virtuelles du réseau - Files d'attente d'impression
Vous trouver ez ci-apr ès le s impri mantes vir tuell es p ar défaut , dispon ibles
à partir des clients PC et Macintosh.
Imprimantes virtuelles du réseau - Fi l es d'attente
d'impression
<nomduserveur>_ProcessPrint
<nomduserveur>_ProcessStore
<nomduserveur>_SpoolStore

QuickCon nect_3535.book Page 14 Monday, August 4, 2003 1:05 PM
14 Guide simplifié de connexion
Etape 3 : configuration du réseau
Configuration TCP/IP
Vous devez exécuter c e qui suit, seulement s'il es t nécessair e de changer
les paramètres par défaut (se référer à l'étape 2 pour les réglages par
défaut).
1. Dans l'espace de travail du CXP3535 Color Server, cli quez sur
Admin.
2. Double-cliquez sur Network Setup > TCP/IP Setup.
3. Sélectionnez Use the following IP Address.
4. Entrez la nouvelle IP address, le nouveau Subnet Mas k et l a nouvell e
Default Gateway (selon l'administrateur du réseau).
5. Si requis, entrez les adres ses du serveur DNS (selon l'ad minist rat eur
du réseau).
6. Cliquez sur OK > OK.
7. Lorsque vous êtes invité à redé marrer votre ordinateur, cliquez sur
Yes.
Configuration Apple Talk
Vous devez exécuter c e qui suit, seulement s'il es t nécessair e de changer
les paramètres par défaut (se référer à l'étape 2 pour les réglages par
défaut).
1. Dans l'espace de travail du CXP3535 Color Server, cli quez sur
Admin.
2. Double-cliquez sur Network Setup > AppleTalk Setup.
3. Sélectionnez la zone requise, à partir du menu contextuel This
system will appear in zone.
4. Cliquez sur OK > OK.
Configuration IPX & du client Novell
Remarque : p our de plus amples informations, veuillez vous référer au
Manuel technique du CXP3535 Color Server (Creo p/n : 653 -00541A) ou au,
Guide d'utilisation du CXP3535 (Creo p/n : 653-00561A-FR).
Les procédures suivantes sont seulement appropriées pour les clients
possédant un réseau Novell exécutant le protocole IPX.

QuickCon nect_3535.book Page 15 Monday, August 4, 2003 1:05 PM
Guide simplifié de connexion 15
Installation du Novell Client sur le CXP3535 Color Server
1. Fermez l'espace de travail et l'application du CXP3535.
2. Fermez toutes les applicati ons ouvertes.
3. Sur le bureau de Windows, cliquez sur Start et suivez le chemin,
CXP3535 > CXP3535 Tools > Novell Client Installation.
4. Cliquez sur Install puis cliquez sur Reboot.
Configuration du Novell Client sur le CXP3535 Color Server
1. Une fois que le système redémarre, la fenêtre Novell Setup apparaît.
2. Entrez le nom de l'arborescence dans le champ Tree Name. Si vous
n'en connaissez pas le nom, cliquez sur Naviguer puis, doublecliquez sur le Tree Name approprié.
3. Entrez le nom du contexte dans le champ Context Name. Si vous
n'en connaissez pas le nom, cliquez sur Naviguer puis, doublecliquez sur le Context Name approprié.
4. Cliquez sur OK. L'espace de travail du CXP3535 apparaît.
Etape 4 : visua lisa tion & imp res sio n de la co nf igura ti on du syst ème
Français (FR )
Visualisation de la configuration du système
1. Dans l'espace de travail du CXP3535 Color Server, cliquez sur
Admin.
2. Double-cliquez sur Utilitaires > Afficher la configuration.
3. La configuration système et réseau de votre CXP3535 Color Server
s'affiche.
Impression de la configuration du système
1. Dans la fenêtre Afficher la conf iguration, cliquez sur Imprimer.
2. Sélectionnez l'impri ma nte ProcessPrint, puis cliquez sur Imprimer.
3. La configuration systèm e du CXP3535 s'imprime.
4. Cliquez sur Fermer pour fermer la fenêtre Afficher la configuration,
puis fermez la fenêtre Administration.

QuickCon nect_3535.book Page 16 Monday, August 4, 2003 1:05 PM
16 Guide simplifié de connexion
Etape 5 : impr ession à partir d'un ordinateur Macintosh ou Windows
Remarque : pour de plus a mpl es in for mati ons, ve uill ez vous r éfé rer a u Gui de
d'utilisation du CXP3535 Colo r Serve r (Creo p/n : 653-00561A-FR).
Config uration d'une imp r imante dans Windows ME/200 0/XP (smb)
1. Cliquez sur le bouton Start, pointe z su r Settings, puis cliquez sur
Printers.
2. Double-cliquez sur Add Printer, puis cli quez sur Next.
3. Sélectionnez Network Printer Server et cli quez sur Next.
4. Naviguez sur le réseau jusqu'au CXP3535 Color Server, puis double-
cliquez sur le nom du serveur. Une liste d’imprimant es s'affiche.
5. Sélectionnez l'une des impri ma ntes publiées sur le réseau, par
exemple ProcessPrint, puis cl iquez sur OK.
6. Choisissez si vous souhait ez qu'el le soi t l'imp rimante p ar défaut , puis
cliquez sur Next.
7. Cliquez sur Finish pour terminer la configurat ion.
Configuration d'une imprimante TCP/IP dans Windows ME/2000/XP
Les éléments suivants doivent être installés et configurés sur l'ordinateur
Windows ME/2000/XP avant de commencer :
• TCP/IP Protocol
• Le dernier pilote d'imprimante de Adobe PS (situé dans le dossier partagé
d:\utilities du CXP3535 Color Server, ou que vous pouvez télécharger à partir
du site web d'Adobe, à savoir : www.adobe.com).
• CXP3535 PPD (le PPD se trouve dans le dossier partagé d:\utilities\PPD sur
le CXP3535 Color Server).
Définition du port imprimante TCP/IP
1. Dans le menu Start, sur le bureau de Windows, sélect ionnez
Settings > Printers and Faxes.
2. Dans la fenêtre Print er and Faxe s, à p artir du menu File, sélect ionnez
Server properties.
3. Sélectionnez l’onglet Port, puis cliquez sur le bouton Add Port.
4. Dans la liste Avail able Pri nter Ports, sél ecti onnez Standard TCP/IP
Port et cliquez sur le bouton New Port.
5. Cliquez sur Next.

QuickCon nect_3535.book Page 17 Monday, August 4, 2003 1:05 PM
Guide simplifié de connexion 17
6. Entrez le nom exact du CXP3535 Color Server (ce champ est
sensible à la casse), dans le champ Printer Name or IP Address.
7. Saisissez un nom pour l'imprimante, que vous pourrez identifier sur
votre ordinateur, dans le champ Port Name.
8. Cliquez sur Next.
9. Sélectionnez Custom dans l'option Device Type, puis cliquez sur
Settings.
10. Sélectionnez les options sui vantes :
• Protocol: LPR
• LPR Settings:
- Queue Name: entrez le nom exact de l'imprimante réseau sur laquelle
vous souhaitez imprimer (par exemple : CXP1_ProcessPrint).
- LPR Byte Counting Enabled: sélectionné.
11. Cliquez sur OK > Next, puis cliquez sur Finish.
12. Cliquez sur Close dans la fenêtre Printer Ports.
13. Cliquez sur Close dans la boîte de dialogue Print Server Properties.
L'étape suivante concerne la configuration du port TCP/IP pour
l'impression à l'aide de Adobe Printer Driver.
Configuration d'une imprimante TCP/IP, à l'aide de Adobe
Printer Driver.
Remarque : pour de plus a mpl es in for mati ons, ve uill ez vous r éfé rer a u Gui de
d'utilisation du CXP3535 Colo r Serve r (Creo p/n : 653-00561A-FR).
Français (FR )
1.
Démarrez l'application Adobe PostScr ipt Printer Driver.
2. Suivez les étapes de l'assistant ; lorsque vous y serez invité,
sélectionnez, dans la fenêt re Printer Connection Type, It is directly
connect to your computer (Local Printer), puis cliquez sur Next.
3. Sélectionnez le port TCP/IP standard que vous avez défini
précédemment, par exempl e : CXP1_ProcessPrint LPR, puis cliquez
sur Next.
4. Sélectionnez le CXP3535 Color Server PPD : CXP3535.ppd.
5. Suivez le reste des étapes de l'assistant et lorsque vous aurez
terminé, cliquez sur Finish.

QuickCon nect_3535.book Page 18 Monday, August 4, 2003 1:05 PM
18 Guide simplifié de connexion
Configuration d'une imprimante TCP/IP dans Windows NT 4.0
Les éléments suivants doivent être installés et configurés sur l'ordinateur
Windows NT 4.0 avant de commencer :
• TCP/IP Protocol
• Mi crosof t TCP/IP Printing Service
• Le dernier pilote d'imprimante de Adobe PS (situé dans le dossier partagé
d:\utilities du CXP3535 Color Server, ou que vous pouvez télécharger à partir
du site web d'Adobe, à savoir : www.adobe.com).
• CXP3535 PPD (le PPD se trouve dans le dossier partagé d:\utilities\PPD sur
le CXP3535 Color Server).
Définition du port imprimante TCP/IP
1. Dans le menu Start sur le bureau de Windows, sélectionnez
Settings > Printers.
2. Dans la fenêtre Printer, à partir du menu File, sélectionnez Server
Properties.
3. Sélectionnez l’onglet Port, puis cliquez sur le bouton Add Port.
4. Dans la liste des Available Printer Ports, sélectionn ez LPR Port et
cliquez sur le bouton New Port.
5. Entrez le nom exact du CXP3535 Color Server (ce champ est
sensible à la casse), dans le champ Name or addres s of server
proving lpd:.
6. Entrez le nom exact de l'imprimante sur laque ll e vous souhaitez
imprimer.
7. Cliquez sur OK > Close, puis sur OK, dans la fenêtre Print Server
Properties.
L'étape suivante concerne la configuration du port TCP/IP, pour
l'impression à l'aide de Adobe Printer Driver.
Configuration d'une imprimante TCP/IP, à l'aide de Adobe
Printer Driver
Remarque : pour de plus a mpl es in for mati ons, ve uill ez vous r éfé rer a u Gui de
d'utilisation du CXP3535 Colo r Serve r (Creo p/n : 653-00561A-FR).
1.
Démarrez l'application Adobe PostScr ipt Printer Driver.
2. Suivez les étapes de l'assistant ; lorsque vous y serez invité,
sélectionnez, dans la fenêt re Printer Connection Type , It is directly
connect to your computer (Local Printer), puis cliquez sur Next.

QuickCon nect_3535.book Page 19 Monday, August 4, 2003 1:05 PM
Guide simplifié de connexion 19
3. Sélectionnez le port TCP/IP standard que vous avez défini
précédemment, par exempl e : CXP1_ProcessPrint LPR, puis cliquez
sur Next.
4. Sélectionnez le CXP3535 Color Server PPD : CXP3535.ppd.
5. Suivez le reste des étapes de l'assistant et lorsque vous aurez
terminé, cliquez sur Finish.
Configuration d'une imprimante sur un Macintosh (OS 9)
Avant de configurer une des imprimantes réseau du CXP3535 Color
Server, il tout d'abord nécessaire d'installer le CXP3535 PPD. Pour
installer le CXP_3535.ppd, connectez-vous comme Guest, via
AppleShare, et, à p artir du dossier Uti lities, copiez CXP_3535. ppd dans le
dossier Printer Descr iptions du Mac’s System Folder.
Pour configurer une imprimante sur votre Macintosh :
1. A partir du menu Apple, sélecti onnez Chooser.
2. Sélectionnez LaserWriter et naviguez sur le réseau jusqu'au
CXP3535 Color Server.
3. Sélectionnez l'une des impri ma ntes réseau du CXP3535 Color
Server, par exemple ProcessPrint, puis cliquez sur Create. Le
CXP_3535.ppd est automatiquement configuré et réglé sur votre
Macintosh.
Français (FR )
Configuration d'une imprimante sur un Macintosh (OS X) - LPR (IP) ou AppleTalk
Avant de configurer une des imprimantes réseau du CXP3535 Color
Server, il est tout d'abord nécessaire d'installer le CXP3535 PPD. Pour
installer le CXP_3535.ppd, connectez-vous comme Guest, via
AppleShare, au CXP3535 Color Server et, à par ti r du dossier Utilities,
copiez CXP_3535.ppd sur le disque dur du Macintosh (notez son
emplacement pour la procédure ci-dessous).
1. Dans le menu Go, sélectionnez Applications.
2. Ouvrez le dossier Utilities puis double-cliquez sur l'icône Print
Center.
3. Cliquez sur le bouton Add Printer.
4. Sélectionnez soit AppleTalk soit LPR Printer using IP.
5. Naviguez jusqu'à l'imprimante réseau du CXP353 (ou si vous
définissez une im primante LPR, entrez l'IP Ad ress ou l e Hostname du
CXP3535, ainsi que le nom exact de l'imprimante sur laquel le vous
souhaitez imprimer, par exemple CXP1_ProcessPrint).

QuickCon nect_3535.book Page 20 Monday, August 4, 2003 1:05 PM
20 Guide simplifié de connexion
6. Ouvrez le menu contextuel Printer Model et sélectionnez Other.
7. Naviguez vers le dossier sur lequel vous avez copié le CXP3535.ppd
et sélectionnez-le.
8. Cliquez sur le bouton Choose pour assigner le CXP3535.ppd à
l'imprimante réseau sélectionnée.
9. Cliquez sur le bouton Add pour ajouter la nouvelle imprimante dans
la liste des imprimantes.
Configuration d'une imprimante Novell dans Windows (NT/2000/XP)
Pour de plus amples informations, veuillez vous référer au Guide d'utilisation
du CXP3535 Color Server (C reo p/n : 653-0 0561A-FR).
Les éléments suivants doivent être insta ll és et configurés dans Windows,
avant de commencer :
• IPX Protocol
• Client Service for Netware
• Nove ll C lient i nst allé sur le CXP3 535 Color S er ver (r éfér ez-vo us à l' ét ape 3 de
ce guide, pour plus de détails).
1. Dans le menu Start, sélectionnez Settings > Printers.
2. Double-cliquez sur Add printer.
3. Suivez les étapes de l'assistant et sélectionnez Network printer.
4. Naviguez sur le NetWare or Co mpatible Network jusqu' au
CXP3535 Color Server ou vers un Novell Print e r Server.
5. Sélectionnez l'impri ma nte sur laquelle vous voulez imprimer, puis
configurez-la avec l'imprimante CXP3535.
6. Continuez à suivre les étapes de l'assistant, puis cliquez sur Finish,
une fois que vous aurez terminé.
QuickCon nect_3535.book Page 21 Monday, August 4, 2003 1:05 PM
Guida alla connessione rapida 21
Guida alla connessione rapida – Italiano (IT)
Come usare que s to ma nu ale
Questo manuale vi assisterà nell'install azione della rete e le impostazioni
di configurazione del sistema per il CXP3535 Color Server. In aggiunta,
questo manuale provvede i passi per l'installazione di una stampante di
rete su workstation client Macintosh e Windows.
Il CXP3535 Color Server è stato progettato per connettersi con minimi
cambiamenti alla maggior parte delle reti.
Il passo 1 provve de il s istema di def ault e le impost azioni di ret e. I p assi da
2 a 7 provvedono istruzioni su come modificare queste impostazioni per
conformarle all'ambiente dei clienti.
Importante: Un amministratore di rete è necessar io per assicurare che il
CXP3535 Color Server sia configurato in rete correttamente.
L'amministratore di rete deve fornire le impostazioni adeguate TCP/IP (IP
address, subnet mask, indiri zzo gateway o impostazioni DHCP).
Italiano (IT)
Per maggiori informazioni dettagliate e procedure riferitevi al CXP3535
Color Server Technical Manual (Creo num. catalogo 653-00541A) o
Manuale dell’utente CXP3535 (Creo num. catalogo 653-00561A-IT).
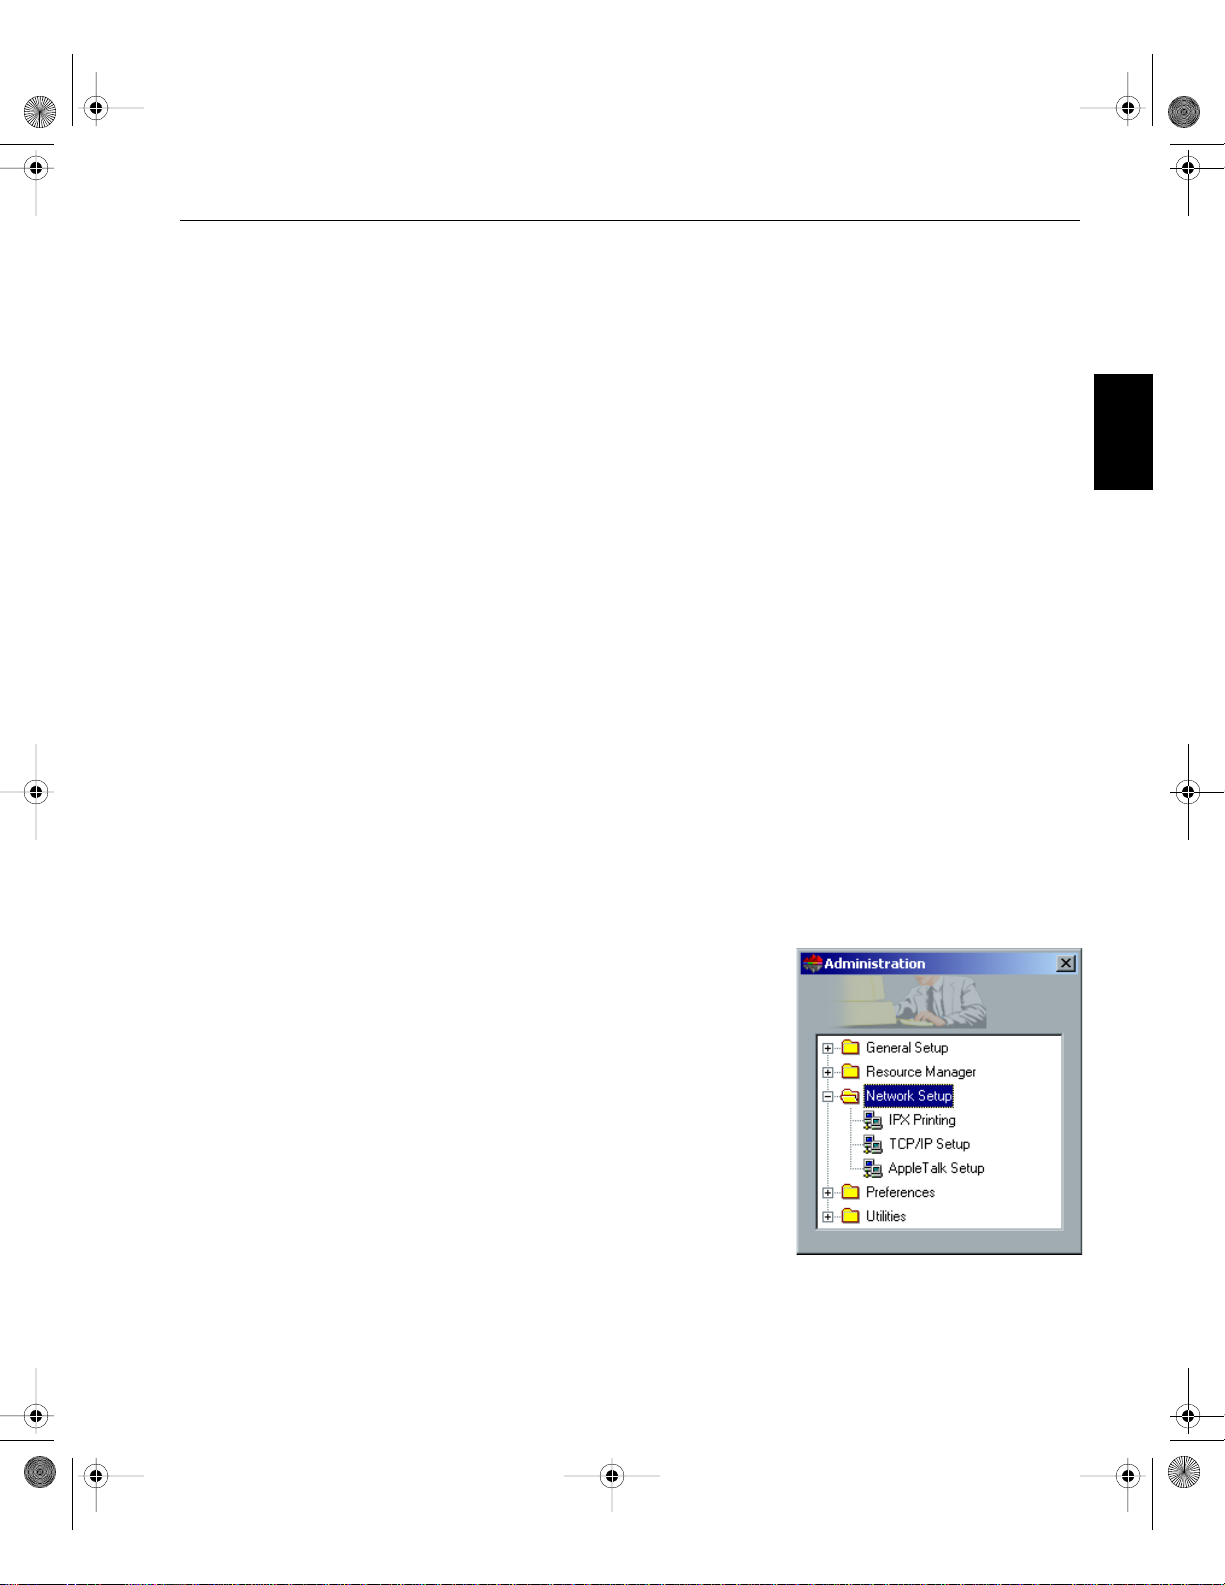
Configurare il CXP3535 C olor Serv er
La configurazione prima volta & i l setup
vengono eseguite all'installazione
iniziale del software dell'applicazione.
Dopo che il software dell'appli cazione è
installato e i CXP3535 Color Server e
Xerox DocuColor 3535 sono accesi,
apparirà automaticamente il wizar d di
configurazione.
Potete accedere anche a queste
impostazioni nella finestra
Amministrazione dello spazio di lavoro
CXP3535 Color Server.

r
QuickCon nect_3535.book Page 22 Monday, August 4, 2003 1:05 PM
22 Guida alla connessione rapida
Passo 1: Accendere il CXP3535 Color Server
Connettere il cavo di rete
Importante: Assicuratevi che il cliente abbi a coll egato un cav o di r ete al la
porta ethernet (10/100/1000) sul CXP3535 Color Server e quindi il cavo
sia collegato alla porta di rete, hub o router.
CXP3535 Color Serve
Ethernet to
network
(10/100/1000)
Accendere il CXP3535 Color Server
Importante: Il CXP3535 Color Server deve essere acceso e la sua
finestra di applicazione apparirà sul monitor.
Premete il pulsante per accendere il CXP3535 Color Server .
N
E
T
DDI-1DD
SC
AN
I-2
Power
control
button

QuickCon nect_3535.book Page 23 Monday, August 4, 2003 1:05 PM
Guida alla connessione rapida 23
Passo 2: Sistem a di def ault e im po stazioni di re te
Nota: Se dovete cambiare qualunque delle impostazioni di default riferitevi al
CXP3535 Color Server T echnical Manual (Creo num. catalogo 653-00541A) o
CXP3535 User Guide (Cr eo num. catalogo 653-00561A- I T).
Impost azioni di sistema & rete
I seguenti sono il sistema di default e le impostazioni di rete.
Parametro Impostazioni di default
Lingua Italiano
Hostname CXP3535 (il nome host è preso dal nome computer che avete
Workgroup Workgroup
Data e ora Italia
Unità di misura: Millimetri
IP Address Enable DHCP: Yes
AppleTal k Zone Enabled, Zone: Automatical l y detected
Italiano (IT)
digitato durante l'installazione di Windows 2000 Professi onal riferitevi al C XP3535 Technic al Manual per maggiori informazioni).
Protocolli e servizi installati
I seguenti sono i protocolli di defaul t e i servizi installati sul sistema.
Parametro Impostazioni di default
Client for Microsoft Networks: Enabled
File and Printe r Sharing for Microsoft Networks: Enabled
NWLink IPX/SPX/NetBios Compatible Transport Protocol: Enabled
Network Monitor Printer Driver: Enabled
NetBEUI Protocol: Enabled
DLC Protocol: Enabled
AppleTalk: Enabled
Internet Protocol: Enabled: DHCP Yes
Stampanti di rete virtuali - Code stampa
Le seguenti sono le stamp anti virtuali di default disponibi li per client
Macintosh e PC.
Network Virt ual Printers - Print Queues <servername>_ProcessPrint
<servername>_ProcessStore
<servername>_SpoolStore

QuickCon nect_3535.book Page 24 Monday, August 4, 2003 1:05 PM
24 Guida alla connessione rapida
Passo 3: Impostazioni di rete
Impostazioni TCP/IP
I seguenti dovrebbero esser e eseguiti solo se dovete cambiare le
impostazioni di default (riferitevi al Passo 2 per il default).
1. Nello spazio di lavoro CXP3535 Color Server cliccate Ammin.
2. Fate doppio clic su Impostazioni di rete > Impostazioni TCP/IP.
3. Selezionate Use the following IP Address.
4. Digitate il nuovo indirizzo IP, subnet mask e gateway di default
(secondo l'amministratore di rete).
5. Se necessario inserite gli indirizzi del server DNS (secondo
l'amministratore di rete).
6. Cliccate su OK > OK.
7. Cliccate su Yes quando sarete richiesti di riavviare il computer.
Impostazioni AppleTalk
I seguenti dovrebbero esser e eseguiti solo se dovete cambiare le
impostazioni di default (riferitevi al Passo 2 per il default).
1. Nello spazio di lavoro CXP3535 Color Server cliccate su Ammin.
2. Fate doppio clic su Impostazioni di rete > Impostazioni AppleTalk.
3. Selezionate la necessaria zona nel menu a comparsa: This system
will appear in zone.
4. Cliccate su OK> OK.

QuickCon nect_3535.book Page 25 Monday, August 4, 2003 1:05 PM
Guida alla connessione rapida 25
Impostazioni IPX & client Novell
Nota: Per maggiori informazioni dettagliate riferitevi al CXP3535 Color Server
Technical Manual (Creo num . c atalogo 653- 00541A) o Manuale dell’u te nt e
CXP3535 (Creo num. catalog o 653-00561A-IT).
Le seguenti procedure sono rilevanti solo per i clienti la cui ret e No vell
opera con il protocollo IPX.
Installare client Novell sul CXP3535 Color Server
1. Chiudete l’applicazione e lo sp azio di lavoro CXP3535 Color Server.
2. Chiudete tutte le altre applicazioni aperte.
3. Sul desktop di Windows, cliccat e su Start e seguite il percorso
CXP3535 > CXP3535 Tools > Novell Client Installation.
4. Cliccate su Install e quindi su Reboot.
Configurare client Novell sul CXP3535 Color Server
1. Dopo il riavvio del sistema, apparirà la finestra I mpo stazioni Novell.
2. Digitate il Nome Tree. Se non conoscete il nome, cliccate su Sfoglia
e quindi fate doppio clic sull'appropriato Nome Tree.
3. Digitate il Nome Context. Se non conoscete il nome, cli ccate su
Sfoglia e quindi fate doppio clic sull'appropriato Nome Context.
4. Cliccate su OK. Appar ir à lo spazio di lavoro CXP3535.
Passo 4: Visualizzare e stampare la configurazione di sistema
Italiano (IT)
Visualizzare la configurazione di sistema
1. Nello spazio di lavoro CXP3535 Color Server cliccate Ammin.
2. Fate doppio clic su Utility > Visualizza configurazione.
3. Sono visualizzate la rete e la configurazione di sistema del CXP3535
Color Serv e r.
Stampare la configurazione di sistema
1. Nella finestra Visualizza configurazione cliccate su Stampa.
2. Selezionate la stampante ProcessPrint e quindi cli ccate su Stampa.
3. La configurazione di sistema del CXP3535 è stampata.
4. Cliccate su Chiudi per chiudere la finestra Visual izza configurazione
e quindi chiudete la finestra Amministrazione.

QuickCon nect_3535.book Page 26 Monday, August 4, 2003 1:05 PM
26 Guida alla connessione rapida
Passo 5: Stampare da un Macintosh o computer Windows
Nota: Per maggiori informazioni dettagliate riferitevi al Manuale dell’utente
CXP3535 (Creo num. catalog o 653-00561A-IT).
Impostare una stampante in Windows ME/2000/XP (smb)
1. Cliccate sul pul sante St art, andate su Settings e cliccate su Printers.
2. Fate doppio clic su Add Printer e cliccate quindi su Next.
3. Selezionate Network Printer Server e cliccate quindi su Next.
4. Sfogliate la rete per il CXP3535 Color Server e qui ndi fate doppio cl ic
sul nome del server. Apparirà un elenco delle stampanti.
5. Selezionate una delle stampanti pubblicate in rete, per esempi o
ProcessPrint, e quindi cliccate su OK.
6. Selezionatela se volete che sia la st ampante di default e quindi
cliccate su Next.
7. Cliccate su Finish per completare la configurazione.
Impostare una stampante TCP/IP in Windows ME/2000/XP
Prima di iniziare devono essere installati e configurati i seguenti elementi
sul computer Windows ME/2000/XP:
• Protocollo TCP/IP
• Il driver stampante Adobe PS più aggiornato (che si trova nella cartella
condivisa D:\utilit ies sul CXP 3535 Color S erver, altrimen ti potete scar icarla dal
sito Adobe all'indirizzo www.adobe.com)
• CXP3535 PPD (il PPD si trova nella cartella condivisa D:\utilities\PPD sul
CXP3535 Color Server)
Definire la porta stampante TCP/IP
1. Nel menu Start sul desktop di Windows selezionate Settings >
Printers and Faxes.
2. Nella finestra Printer and Faxes, nel menu File selezionate Server
properties.
3. Selezionate la scheda Port e quindi cli ccate sul pulsante Add Port.
4. Nell'elenco Available Printer Ports selezionate Standard TCP/IP
Port e quindi cliccate sul pulsant e New Port.
5. Cliccate su Next.

QuickCon nect_3535.book Page 27 Monday, August 4, 2003 1:05 PM
Guida alla connessione rapida 27
6. Digitate il nome esatto del CXP3535 Color Server (questa casella
distingue fra maiuscole e minus cole) nella casella Printer Nam e or
IP Address.
7. Nella casella Port Name digitate un nome per la stampante che
sarete in grado di identificare sul computer.
8. Cliccate su Next.
9. Selezionate Custom nell' opzione Device Type e quindi cliccate su
Settings.
10. Selezionate le seguenti opzioni:
• Protocol: LPR
• LPR Settings:
- Queue Name: digitate il nome esatto delle stampante di rete che volete
utilizzare (ad esempio CXP1_ProcessPrint).
- LPR Byte Counting Enabled: selezionato.
11. Cliccate su OK > Next e quindi cliccate su Finish.
12. Cliccate su Close nella finestra Printer Ports.
13. Cliccate su Close nella finestra Print Server Properties.
Italiano (IT)
Il passo successivo verte sull'impostazione della porta TCP/IP per
stampare usan do il dri ver stampante Adobe.
Impostare una stampante TC/IP usando il driver stampante
Adobe PostScript
Nota: Per maggiori informazioni dettagliate riferitevi al Manuale dell’utente
CXP3535 (Creo num. catalog o 653-00561A-IT).
1.
Avviate il driver stampante Adobe PostScript.
2. Seguite i passi nel wizard; quando richiesti, nella finestra Printer
Connection Type selezionate It is directl y connected to your
computer (Local Printer) e quindi cliccate su Next.
3. Selezionate la porta st andard TCP/IP definita in precedenza, per
esempio: CXP1_ProcessPrint LPR, e quindi cliccate su Next.
4. Selezionate il PPD del CXP3535 Color Server: CXP3535.ppd.
5. Proseguite il rest o dei passi nel wizard e quando avete finito, cliccate
su Finish.

QuickCon nect_3535.book Page 28 Monday, August 4, 2003 1:05 PM
28 Guida alla connessione rapida
Impostare una stampante TCP/IP in Windows NT 4.0
Prima di iniziare si devono installare e configurare i seguenti el ementi sul
computer Windows 4.0:
• Protocollo TCP/IP
• Servizio di stampa Microsoft TCP/IP
• Il driver stampante Adobe PS più aggiornato (che si trova nella cartella
condivisa D:\utilitie s sul C XP35 35 Color S erver al trim enti po tete sca ri car la dal
sito Adobe all'indirizzo www.adobe.com)
• CXP3535 PPD (il PPD si trova nella cartella condivisa D:\utilities\PPD sul
CXP3535 Color Server)
Definire la porta stampante TCP/IP
1. Nel menu Start sul desktop di Windows, selezionate Settings >
Printers.
2. Nella finestra Printer, dal menu File, selezionate Server Properties.
3. Selezionate la scheda Port e quindi cli ccate sul pulsante Add Port.
4. Nell'elenco Available Printer Ports, selezionate LPR Port e cliccate
sul pulsante New Port.
5. Digitate il nome esatto del CXP3535 Color Server (questa casella
distingue fra maiuscole e minuscol e) nella casella Name or address
of server proving lpd:.
6. Digitate il nome esatto della stampante che volete utilizzare.
7. Cliccate su OK > Close e quindi su OK nella finestra Print Server
Properties.
Il passo successivo verte sull'impostazione della porta TCP/IP per
stampare usan do il dri ver stampante Adobe.
Impostare una stampante TC/IP usando il driver Adobe
PostScript
Nota: Per maggiori informazioni dettagliate riferitevi al Manuale dell’utente
CXP3535 (Creo num. catalog o 653-00561A-IT).
Avviate il driver stampante Adobe PostScript.
1.
2. Seguite i passi nel wizard; quando richiesti, nel la finestra Printer
Connection Type selezionate It is directl y connected to your
computer (Local Printer) e quindi cliccate su Next.
3. Selezionate la porta st andard TCP/IP definita in precedenza, per
esempio: CXP1_ProcessPrint LPR, e quindi cliccate su Next.
4. Selezionate il PPD del CXP3535 Color Server: CXP3535.ppd.
5. Proseguite il rest o dei passi nel wizard e quando avete finito, cliccate
su Finish.

QuickCon nect_3535.book Page 29 Monday, August 4, 2003 1:05 PM
Guida alla connessione rapida 29
Impostare una stampante su Macintosh (OS 9)
Prima di impostare una delle st ampa nti di rete del CXP3535 Color Server
dovete installare CXP3535 PPD. Per installare il CXP_3535.ppd,
connettetevi tramit e AppleShare al CXP3535 Color Server , accedete
come guest, e copiate dalla cartella Utilities CXP_3535.ppd sulla cartella
Printer Descriptions nella cartella di sistema del Macintosh.
Per installare una stampante sul vostro Macintosh:
1. Dal menu Apple selezionate Chooser.
2. Selezionate LaserWr ite e sfogliate la rete per il CXP3535 Color
Server.
3. Selezionate una delle sta mp anti di rete CXP3535 Color Server., ad
esempio ProcessPrint e quindi clic cate su Create. Il CXP_3535.ppd è
automaticamente configurato e installato sul Macintosh.
Impostare una stampante su un Macintosh (OS X) - LPR (IP) o AppleTalk
Prima di impostare una delle stampanti di rete del CXP3535 Color Server,
dovete prima install are CXP3535 PPD. Per i nstallare il CXP_3535.ppd,
connettetevi tramit e AppleShare al CXP3535 Color Server , accedete
come guest, e copiate dalla cartell a Uti li ties CXP_3535.ppd sul hard disk
(sfogliate per la posizione per eseguire la procedura seguente).
Italiano (IT)
1. Nel menu Go selezionate Applications.
2. Aprite la cartella Utilit ies e fate doppio clic sull'icona Print Center.
3. Cliccate sul pulsante Add Printer.
4. Selezionate uno delle due: AppleTalk o LPR Printe r using I P.
5. Sfogliate per la stamp ante di rete CXP3535 (oppure se state
definendo una stampant e LPR, inserite l'indirizzo IP del CXP3535 o
nome host e l'esatto nome della stampante che volete utilizzare, ad
esempio CXP1_ProcessPrint).
6. Aprite il menu a comparsa Printer Model e selezionate Other.
7. Sfogliate per la cartella nel la quale avete copiato il CXP3535.ppd e
selezionatelo.
8. Cliccate sul pulsante Choose per assegnare il CXP3535.ppd al la
stampante di rete selezionata.
9. Cliccate sul pulsante Add per aggiungere la nuova stampante
all'elenco di stamp anti.

QuickCon nect_3535.book Page 30 Monday, August 4, 2003 1:05 PM
30 Guida alla connessione rapida
Impostare una stampante in Windows (NT/2000/XP)
Per maggiori informazioni dettagliate riferitevi al Manuale dell’utente CXP3535
(Creo num. catalogo 653-00561A-IT).
I seguenti elementi devono essere installati e configurat i i n Windows
prima di iniziare:
• IPX Protocol
• Client Service for Netware
• Novell Client installato sul CXP3535 Color Server (riferitevi al Passo 3 di
questa guida per maggiori dettagli).
1. Nel menu Start sul desktop di Windows, selezionate Settings >
Printers.
2. Fate doppio clic su Add printer.
3. Proseguite nel wizard e selezionate la stampante di Network.
4. Sfogliate per NetW are or Compa tible Network per i l CXP3535 Color
Server o un Novell Printer Server.
5. Selezionate la stamp ante che volete utilizzare e quin di conf iguratela
con la stampante CXP3535.
6. Continuate a seguire i passi del wiz ard e quindi cliccate su Finish
quando avete finito.

QuickCon nect_3535.book Page 31 Monday, August 4, 2003 1:05 PM
Schnellverbindungs-Handbuch 31
Schnellverbindungs-Handbuch – Deutsch (DE)
Wie dieses Ha nd bu ch zu benu tze n is t
Dieses Handbuch hilft Ihnen bei der Einrichtung der Netzwerk- und
Systemkonfigurations-Einstellungen für Ihren CXP3535 Color Server .
Außerdem zeigt dieses Handbuch Schritte zur Einrichtung eines
Netzdruckers auf Macintosh- und Windows-Client-Arbeitsstationen.
Der CXP3535 Color Server wurde so entworfen, dass er mit minimalen
Änderungen an die meisten Netzwerke angeschlossen werden kann.
Schritt 1 gibt das Standard-System und die Netzeinstellungen an. Die
Schritte 2 bis 7 liefern Anleitungen, wie diese Einstellungen zur
Anpassung an die Kundenumgebung zu modifizieren sind.
Wichtig: Sie brauchen einen Netzwerk-Admi nistrator, um sich erzustell en,
dass der CXP3535 Color Server richtig auf dem Netzwerk konfiguriert
wird. Der Netzwerk-Administ rator muss die geeigneten TCP/IPEinstellungen li efern (IP-Adresse, Subnet-Maske, Gat eway-Adresse oder
DHCP-Einstellungen).
Deutsch (DE)
Ausführlichere Inform ationen und V erfahren finden Sie im CXP3535 Color
Server Technical Manual (Creo Teilnummer: 653-00541A) oder CXP3535
Benutzerhandbuch (Creo Teilnummer: 653-00561A-DE).
Den CXP3535 Color Server konfigurieren
Die erste Konfiguration & Einrichtu ng
werden bei der anfänglichen Inst allation
der Anwendungs-Software ausgeführt.
Nachdem die Anwendungs-Software
installiert ist und der CXP3535 Color
Server und Xerox DocuColor 3535
eingeschaltet sind, er scheint
automatisch der KonfigurationsAssistent.
Auf diese Einstellungen können Sie
auch im Fenster Verwaltung des
CXP3535 Color Server-Arbeitsbereichs
zugreifen.

r
QuickCon nect_3535.book Page 32 Monday, August 4, 2003 1:05 PM
32 Schnellverbindungs-Handbuch
Schritt 1: De n CX P35 35 Co lo r Serv e r ein sch al te n
Das Netzkabel anschließen
Wichtig: Stellen Sie sicher, dass der Kunde ein Netzkabel mit dem
Ethernet-Anschluss (10/100/1000) an den CXP3535 Color Server
angeschlossen, und da ss er dieses Kabel dann mit einem Netzans chluss,
Hub oder Router verbunden hat.
CXP3535 Color Serve
Ethernet to
network
(10/100/1000)
Den CXP3535 Color Server einschalten
Wichtig: Der CXP3535 Color Server muss eingeschaltet werden, dann
erscheint das Fenster der CXP3535-Anwendung auf dem Monitor.
Ste llen Sie den Stromschalt er auf ON, um den CXP3535 Color Server
einzuschalten.
N
E
T
DDI-1DD
SC
AN
I-2
Power
control
button

QuickCon nect_3535.book Page 33 Monday, August 4, 2003 1:05 PM
Schnellverbindungs-Handbuch 33
Schritt 2: Standardsystem und N et zei nst e llung en
Hinweis: Wenn Sie irgend eine der Standardeinstellungen ändern m üssen,
sehen Sie im CXP353 5 C olor Serv er Technical Manual (Creo Teilnummer:
653-00541A) oder dem CXP3535 Benutzerhandbuch (Creo Teilnummer: 65300561A-DE) nach.
System- & Netzeinstellungen
Das St andard-System und die Netzeinstell ungen sind wie folgt:
Art Standardeinstellung
Sprache English
Hostname CXP3535 (der Hostname wird dem Computer-Name n
Workgroup Workgroup
Datum und Zeit: Vereinigte Staaten und Kanada
Maßeinheiten Millimeter
IP Address Enable DHCP: Yes
AppleTalk Zone Enabled, Zone: Automatically detected
Protokolle und installierte Dienste
Die auf dem System installiert en Standard-Protokolle und Dienste sind
wie folgt:
Art Standardeinstellung
Client for Microsoft Networks: Enabled
File and Printe r Sharing for Microsoft Networks: Enabled
NWLink IPX/SPX/NetBios Compatible Transport Protocol: Enabled
Network Monitor Printer Driver: Enabled
NetBEUI Protocol: Enabled
DLC Protocol: Enabled
AppleTalk: Enabled
Internet Protocol: Enabled: DHCP Yes
Deutsch (DE)
entnommen, den Sie während der Installation von Windows
2000 Professi onal einge geb en hab en - weit ere Einzel hei ten
finden Sie im CXP 3535 Technical Manual).
Virtuelle Netzdrucker - Druckwartesch langen
Die aus Macintosh- und PC-Clients verfügbaren standardmäßigen
virtuellen Drucker sind wie folgt:
Virtuell e N e t zdrucker - D r uckwarteschlangen <Servername>_ProcessPrint
<Servername>_ProcessStore
<Servername>_SpoolStore

QuickCon nect_3535.book Page 34 Monday, August 4, 2003 1:05 PM
34 Schnellverbindungs-Handbuch
Schritt 3: Netzwerk-Einrichtung
TCP/IP-Einrichtung
Die folgenden Handlungen sollten nur ausgeführt werden, wenn Sie die
St andard-Einstellungen ändern müssen (sehen Sie bezüglich des
Standards unter Schritt 2 nach).
1. Klicken Sie im CXP3535 Color Server-Arbeitsbereich auf
Verwaltung.
2.
Machen Si e eine n D op pe lk li ck au f
Einstellungen.
3. Wählen Sie Use the following IP Address.
4. Geben Sie die neue IP-Adresse, die Teilnetz-Maske und den
Standard-Gateway ein (entsprechend dem Netzverwalter).
5. Wenn erforderlich, geben Sie die DNS-Server-Adressen ein
(entsprechend dem Netzver walter).
6. Klicken Sie auf OK > OK.
Netzwerkeinstellungen
>
TCP/IP -
7. Wenn Sie aufgefordert werden, Ihren Computer erneut zu starten,
klicken Sie auf Yes.
AppleTalk-Einrichtung
Die folgenden Handlungen sollte nur ausgeführt werden, wenn Sie die
St andard-Einstellungen ändern müssen (nehmen Sie Bezug auf Schritt 2
für den S tandard).
1. Klicken Sie im CXP3535 Color Server-Arbeitsbereich auf
Verwaltung.
2. Machen Sie einen Doppelklick auf Network Setup > AppleTalk
Setup.
3. Wählen Sie die gewünschte Zone a us dem Abrollmenü This system
will appear in zone.
4. Klicken Sie auf OK > OK.
IPX & Novell Client-Einrichtung
Hinweis: Ausführlichere Informationen finden Sie im CXP3535 Color Server
Technical Manual (Creo Teilnummer: 653-00541A) oder CXP3535 Benutzerhandbuch (Creo Teilnummer: 653-00561A-DE) .

QuickCon nect_3535.book Page 35 Monday, August 4, 2003 1:05 PM
Schnellverbindungs-Handbuch 35
Die folgenden Verfahren sind für diejenigen Kunden relevant, die ein
Novell-Netzwerk haben, welches das IPX-Protokoll benutzt.
Den Novell Client auf dem CXP3535 Color Server installieren
1. Schließen Sie den Arbeitsbereich und die Anwendung von CXP3535.
2. Schließen Sie alle anderen offenen Anwendungen.
3. Auf dem Windows-Desktop klicken Sie auf Start und folgen Sie dem
Pfad CXP3535 > CXP3535 Tools > Novell Client Installa t io n .
4. Klicken Sie auf Install und dann auf Reboot.
Den Novell Client auf dem CXP3535 Color Server
konfigurieren
1. Nach einem Neustart des Systems erschei nt das Fenster Novell
Setup .
2. Tippen Sie denTree Name (Baumnamen) ein. Wenn Sie den Namen
nicht wissen, klicken Sie auf Browse und machen Sie dann einen
Doppelklick auf den geeigneten Tree Name.
3. Geben Sie den Context Name ein. Wenn Sie den Namen nicht
wissen, klicken Sie auf Browse und machen Sie dann einen
Doppelklick auf den geeigneten Context Name.
4. Klicken Sie auf OK. Der CXP3535-Arbeitsbereich erscheint.
Deutsch (DE)
Schritt 4: Die System kon f igu rat io n anse he n un d d ruck en
Die Systemkonfiguration ansehen
1. Klicken Sie im CXP3535 Color Server-Arbeitsbereich auf
Verwaltung.
2. Machen Sie einen Doppelklick auf Dienstprogramme >
Konfiguration anzeigen.
3. Die Netzwerk- und Systemkonfigu ratio n Ihres CXP3535 Col or Server
wird angezeigt.
Die Systemkonfiguration drucken
1. Klicken Sie im Fenster Konfiguration ansehen auf Drucken.
2. Wählen Sie den ProcessPrint-Drucker und klicken Sie dann auf
Drucken.
3. Die CXP3535-Systemkonfiguration wir d gedruckt.

QuickCon nect_3535.book Page 36 Monday, August 4, 2003 1:05 PM
36 Schnellverbindungs-Handbuch
4. Klicken Sie auf Schließen, um das Fenster Konfiguration anzeigen
zu schließen, und schließen Sie dann das Fens ter Verwaltun g.
Schritt 5: Von einem Macintosh- ode r Win do ws-C o mp uter au s
drucken
Hinweis: Ausführlicher e In form at ionen finden Sie im CXP3535
Benutzerhandbu ch ( Cre o Teilnummer: 653-00561A-DE) .
Einen Drucker in Windows ME/2000/XP (smb) einrichten
1. Klicken Sie auf die Schaltfl äche St art, gehen Sie zu Settings und
klicken Sie auf Printers.
2. Doppelklicken Sie auf Add Printer und klicken Sie dann auf Next.
3. Wählen Sie Network Printer Server und klicken Sie dann auf Next.
4. Durchsuchen Sie das Netzwerk bis zu Ihrem CXP3535 Color Server
und machen Sie dann einen Doppel klick auf den Server-Na men. Eine
Liste von Druckern wird angezeigt .
5. Wählen Sie einen der im Netzwerk veröffentlichen Drucker, z.B.
ProcessPrint, und klicken Sie dann auf OK.
6. Bestimmen Sie, ob Sie diesen Drucker als Standard-Drucker
wünschen, und klicken Sie dann auf Next.
7. Klicken Sie auf Finish, um die Einrichtung abzuschließen.
Einen TCP/IP-Drucker in Windows ME/2000/XP einrichten
Die folgenden Elemente müssen auf dem Windows ME/2000/XPComputer installiert und konfiguriert werden, bevor Sie beginnen:
• TCP/IP-Protokoll
• Der neueste Adobe PS-Druckertreiber (der sich im gemeinsam benutzten
Ordner d:\utilities auf dem CXP3535 Color Server befindet; andernfalls
können Sie ihn von der Adobe Website bei www.adobe.com herunterladen)
• CXP3535 PPD (die PPD befindet sich im gemeinsam benutzten Ordner
d:\utilities\PPD auf dem CXP3535 Color Server)

QuickCon nect_3535.book Page 37 Monday, August 4, 2003 1:05 PM
Schnellverbindungs-Handbuch 37
Den TCP/IP-Druckeranschluss definieren
1. Wählen Sie aus dem Menü Start auf dem Windows-Desktop die
Optionsreihe Settings > Printers and Faxes.
2. Wählen Sie im Fenster Printer and Faxes aus dem Menü File die
Option Server properties
3. Wählen Sie das Register Port und klicken Sie dann auf die
Schaltfläche Add Port.
4. Wählen Sie aus der Liste Available Printer Ports die Option
Standa rd TCP/I P Port und klicken Sie dann auf die Schaltfläche
New Port.
5. Klicken Sie auf Next.
6. Geben Sie den genauen Namen des CXP3535 Color Server (dieses
Feld unterscheidet zwischen Groß- und Kleinbuchstaben) im Feld
Printer Name or IP Address ein.
7. Geben Sie einen Namen für den Drucker ein, den Sie auf Ihrem
Computer im Feld Port Name erkennen können.
8. Klicken Sie auf Next.
9. Wählen Sie Custom in der Option Dev ice Type und klicken Sie dann
auf Settings.
10. Wählen Sie die folgenden Optionen.
• Protocol: LPR
• LPR Settings:
- Queue Name: Geben Sie den genauen Namen des Netzdruckers ein,
zu dem Sie etwas übertragen möchten (z.B. CXP1_ProcessPr int ).
- LPR Byte Counting Enabled: ausgewählt.
11. Klicken Sie auf OK > Next und dann auf Finish.
12. Klicken Sie auf Close im Fenster Printer Ports.
13. Klicken Sie auf Close im Fenster Printer Server Properties.
Der nächste Schritt ist es, den TCP/IP-Anschluss zum Drucken unter
Verwendung des Adobe-Druckertreibers einzurichten.
Deutsch (DE)
Einen TCP/IP-Drucker unter Verwendung des Adobe
PostScript-Druckertreibers einrichten
Hinweis: Ausführlicher e In form at ionen finden Sie im CXP3535
Benutzerhandbu ch ( Cre o Teilnummer: 653-00561A-DE) .
1.
St arten Sie die Adobe PostScript-Druckertreiber-Anwendung.

QuickCon nect_3535.book Page 38 Monday, August 4, 2003 1:05 PM
38 Schnellverbindungs-Handbuch
2. Befolgen Sie die Schritte im Wizard; wenn Sie im Fenster Printer
Connection Type aufgefordert werden, wählen Sie It is directly
connected to your computer (Local Printer) und klicken Sie dann
auf Next.
3. Wählen Sie den standardmäßigen TCP/IP-Anschluss, den Sie früher
bereits definiert haben, zum Beispiel CXP1_ProcessPrint LPR, und
klicken Sie dann auf Next.
4. Wählen Sie CXP3535 Color Server PPD: CXP3535.ppd.
5. Befolgen Sie die übrigen Schritte im Wizard und klicken Sie auf
Finish, wenn Sie damit fertig sind.
Einen TCP/IP-Drucker in Windows NT 4.0 einrichten
Die folgenden Elemente müssen auf dem Windows NT 4.0-Computer
installiert und konfiguriert werden, bevor Sie beginnen:
• TCP/IP-Protokoll
• Mi crosof t TCP/IP Printing Service
• Der neueste Adobe PS-Druckertreiber (der sich im gemeinsam benutzten
Ordner d:\utilities auf dem CXP3535 Color Server befindet; andernfalls
können Sie ihn von der Adobe Website bei www.adobe.com herunterladen)
• CXP3535 PPD (die PPD befindet sich im gemeinsam benutzten Ordner
d:\utilities\PPD auf dem CXP3535 Color Server)
Den TCP/IP-Druckeranschluss definieren
1. Wählen Sie aus dem Menü Start auf dem Windows-Desktop die
Optionsreihe Settings > Printers.
2. Wählen Sie im Fenster Pr inter aus dem Menü File die Option Server
Properties.
3. Wählen Sie das Register Port und klicken Sie dann auf die
Schaltfläche Add Port.
4. Wählen Sie aus der Liste Available Ports die Option LPR Port und
klicken Sie auf die Schaltfläche New Port.
5. Geben Sie im Feld Name or a ddress of serve r provin g lp d: (di es es
Feld unterscheidet zwischen Groß- und Kleinbuchstaben) den
genauen Namen des CXP3535 Color Servers ein.
6. Geben Sie den genauen Namen des Druckers ein, zu dem Sie etwas
übertragen möchten.
7. Klicken Sie auf OK > Close und d ann auf OK im Fenster Print Server
Properties.
Der nächste Schritt ist es, den TCP/IP-Anschluss unter Verwendung des
Adobe-Druckertreibers zum Drucken einzurichten.

QuickCon nect_3535.book Page 39 Monday, August 4, 2003 1:05 PM
Schnellverbindungs-Handbuch 39
Einen TCP/IP-Drucker unter Verwendung des Adobe
PostScript-Druckertreibers einrichten
Hinweis: Ausführlicher e In form at ionen finden Sie im CXP3535
Benutzerhandbu ch ( Cre o Teilnummer: 653-00561A-DE) .
1.
St arten Sie die Adobe PostScript-Druckertreiber-Anwendung.
2. Befolgen Sie die Schritte im Wizard; wenn Sie im Fenster Printer
Connection Type dazu aufgefordert werden, wählen Sie It is directly
connected to your computer (Local Printer) und klicken Sie dann
auf Next.
3. Wählen Sie den standa rdmäßigen TCP/IP-A nschluss, den Si e bereit s
zuvor definiert haben, zum Beispiel CXP1_ProcessPrint LPR, und
klicken Sie dann auf Next.
4. Wählen Sie CXP3535 Color Server PPD: CXP3535.ppd.
5. Befolgen Sie die übrigen Schritte im Wizard und klicken Sie auf
Finish, wenn Sie damit fertig sind.
Deutsch (DE)
Einen Drucker auf einem Macintosh (OS 9) einrichten
Bevor Sie einen CXP3535 Color Server-Netzdrucker einrichten, müssen
Sie erst die CXP3535 PPD installieren. Um die CXP_3535.ppd zu
installieren, erstellen Sie eine Verbindung über AppleShare zu Ihrem
CXP3535 Color Server, melden Si e sich al s Guest (Gast ) an und kopi eren
Sie vom Ordner Utilities die CXP_3535.ppd zum Ordner Printer
Descriptions im Systemordner des Macintosh.
Um einen Drucker auf Ihrem Macintosh einzurichten:
1. Wählen Sie aus dem Menü Apple die Option Chooser.
2. Wählen Sie LaserWriter und durchsuchen Sie das Netzwerk bis zu
ihrem CXP3535 Color Server.
3. Wählen Sie einen der Netzdrucker des CXP3535 Color Server, z.B.
ProcessPrint, und klicken Sie dann auf Create. Die CXP_3535.ppd
wird automatisch konfiguriert und auf Ihrem Macintosh eingerichtet.
Einen Drucker auf einem Macintosh (OS X) - LPR (IP) oder AppleTalk einrichten
Bevor Sie einen CXP3535 Color Server-Netzdrucker einrichten, müssen
Sie erst die CXP3535 PPD installieren. Um die CXP_3535.ppd zu
installieren, erstellen Sie eine Verbindung über AppleShare zu Ihrem
CXP3535 Color Server, melden Si e sich al s Guest (Gast ) an und kopi eren
Sie vom Ordner Utiliti es die CXP_353 5.ppd auf Ihre Maci ntosh- Festpl atte
(durchsuchen Sie, bis Sie zu der Stelle für das unten aufgeführte
Ver fahren kommen).

QuickCon nect_3535.book Page 40 Monday, August 4, 2003 1:05 PM
40 Schnellverbindungs-Handbuch
1. Wählen Sie aus dem Menü Go die Option Applications.
2. Öffnen Sie den Ordner Utilities und machen Sie dann einen
Doppelklick auf das Piktogramm Print Center.
3. Klicken Sie auf die Schaltfl äche Add Prin ter.
4. Wählen Sie entweder AppleTalk oder LPR Printer using IP.
5. Durchsuchen Sie bis zum CXP3535-Netzdrucker (oder geben Sie,
wenn Sie einen LPR-Drucker definier en, die IP-Adresse des
CXP3535 oder den Hostnamen und den genauen Namen des
Druckers ein, zu dem Sie etwas übertragen möchten, z.B.
CXP1_ProcessPrint).
6. Klicken Sie auf das Popup-Menü Printer Model und wählen Sie
Other.
7. Durchsuchen Sie bis zum Ordner, zu dem Sie CXP3535.ppd kopiert
haben, und wählen Sie diesen.
8. Klicken Sie auf die Schaltfl äche Choose, um die CXP3535.ppd dem
ausgewählten Netzdrucker zuzuweisen.
9. Klicken Sie auf die Schaltfl äche Add, um den neuen Drucker zur
Druckerliste hinzuzufügen.
Einen Novell-Drucker in Windows ( NT/2000/X P) einr ichten
Ausführlichere Informat ionen finden Sie im CXP3535 Benutzerhandbuch
(Creo Teil nummer: 653-00561A-DE).
Die folgenden Elemente müssen in Windows installiert und konfiguriert
werden, bevor Sie beginnen:
• IPX Protocol
• Client Service for Netware
• Novell Client, installiert auf dem CXP3535 Color Server (nehmen Sie Bezug
auf Schritt 3 dieses Handbuchs, um weitere Einzelheiten zu erhalten).
1. Wählen Sie aus dem Menü Start die Optionsreihe Settings >
Printers.
2. Machen Sie einen Doppelklick auf Add printer.
3. Folgen Sie dem Assistenten und wählen Sie den Network-Drucker.
4. Durchsuchen Sie NetWare or Compatible Network bis zum
CXP3535 Color Server oder bis zu einem Novell Printer Server .
5. Wählen Sie den Drucker, zu dem Sie etwas über tragen möchten , und
konfigurieren Sie ihn mit dem CXP3535-Druck er.
6. Befolgen Sie weiter die Schritte durch den Assi stenten und klicken
Sie auf Finish, wenn Sie damit fertig sind.

QuickCon nect_3535.book Page 41 Monday, August 4, 2003 1:05 PM
Guía de conexión rápida 41
Guía de conexión rápida – Español (ES)
Cómo utiliza r esta guía
Esta guía le ayuda a establ ecer la c onfiguración de la red y del sistema d e
su CXP3535 Color Server. Además, esta guía proporci ona los p asos par a
configurar una impresora de red en est a ciones de trabajo clientes
Macintosh y Windows.
El CXP3535 Color Server fue diseñado para conectarse a la mayoría de
las redes con cambios mínimos .
El paso 1 proporciona los parámetros predeterminados del sistema y la
red. Los pasos 2 a 7 of recen i nst ruccio nes acerca del pro cedimiento p ar a
modificar estos parámetros para que correspondan al ent orno del cliente.
Importante: Se requiere un Administrador de Red para garantizar que el
CXP3535 Color Server es configura do correctamente en la red. El
Administrador de Red debe suministrar los parámetros de TCP/IP
adecuados (dirección IP, máscara de subred, dirección de la puerta de
enlace o parámetros de DHCP).
Español (ES)
Para información y procedimientos más det allados consulte CXP3535
Color Server Technical Manual (n/p de Creo: 653-00541A) o Guía del
Usuario de CXP3535 (n/p de Creo: 653-00561A-ES).
Configuración del CXP3535 Color Server
La primera configuración se real iza
durante la inst alación inicial del software
de aplicación. Después que se ha
instalado el software de aplicación y se
ha encendido el CXP3535 Color Serve r
y la Xerox DocuColor 3535, aparece
automáticamente el Asistente de
configuración.
Se puede acceder también a estos
parámetros en la ventana
Administración en el espacio de trabajo
del CXP3535 Color Server.

r
QuickCon nect_3535.book Page 42 Monday, August 4, 2003 1:05 PM
42 Guía de conexión rápida
Paso 1: Encendido del CXP3535 Color Server
Conexión del cable de red
Importante: Compruebe que el cliente ha conectado un cable de red al
puerto ethernet (10/100/1000) en el CXP3535 Color Server y luego el
cable conectado a un puerto, concentrador o encaminador de red.
CXP3535 Color Serve
Ethernet to
network
(10/100/1000)
Encendido del CXP3535 Color Server
Importante: El CXP3535 Color Server se debe encender y la ventana de
la aplicación CXP3535 aparece en el monitor.
Pulse el botón de control de alimentación para encender el CXP3535
Color Serv e r.
N
E
T
DDI-1DD
SC
AN
I-2
Power
control
button

QuickCon nect_3535.book Page 43 Monday, August 4, 2003 1:05 PM
Guía de conexión rápida 43
Paso 2: Parámetros predeterminados del sistema y la red
Nota: Si es necesario cambiar cualquiera de los parámetros predeterminados consulte C XP3535 Color Server Technical Manual (n/p de Creo:
653-00541A) o Guía del Usuario de CXP3535 (n/p de Creo: 653-00561A-ES).
Parámetros del sistema y de la red
A continuación s e listan los parámetros predeterminados del sistema y la
red.
Parámetro Configuración predeterminada
Idioma English
Hostname CXP3535 (el nombre de host se toma del parámetro de
Workgroup Workgroup
Fecha y hora: US & Canada
Unidades de medida Millimeters
IP Address Enable DHCP: Y es
AppleTalk Zone Enabled, Zone: Automatically detected
Computer Name que se escribió durante la instalación de
Windows 2000 Profe ssi onal - consulte CXP 3535 Technical
Manual para mayores detalles).
Español (ES)
Protocolos y servicios instalados
A continuación se lista n los protocolos y servicios predeter minados
instalados en el sistema.
Parámetro Configuración
Client for Microsoft Networks: Enabled
File and Printe r Sharing for Microsoft Networks: Enabled
NWLink IPX/SPX/NetBios Compatible Transport Protocol: Enabled
Network Monitor Printer Driver: Enabled
NetBEUI Protocol: Enabled
DLC Protocol: Enabled
AppleTalk: Enabled
Internet Protocol: Enabled: DHCP Yes
Impresoras virtuales de la red - Colas de impresión
A continuación se listan las impresoras virtuales predeterminadas que
están disponibles desde cli entes Macintosh y PC.
Impresoras virtuales de la red - Colas de impresión <nombredelservidor>_ProcessPrint
predeterminada
<nombredelservidor>_ProcessStore
<nombredelservidor>_SpoolStore

QuickCon nect_3535.book Page 44 Monday, August 4, 2003 1:05 PM
44 Guía de conexión rápida
Paso 3: Configuración de red
Configuración de TCP/IP
Lo siguiente se debe ejecut ar sólo si es necesari o cambiar los parámetros
predeterminados (consulte el paso 2 para los valores predeterminados).
1. En el espacio de trabajo del CXP3535 Color Server, haga clic en
Admin.
2. Haga doble clic en Configuración de red > Configuración de
TCP/IP.
3. Seleccione Use the following IP Address.
4. Escriba la nueva dirección IP, máscara de subred y la puerta de
enlace predeterminada (s egún la información proporcionad a por el
administrador del sistema).
5. Si es necesario, introduzca la dirección del servidor DNS (según la
información proporcionada por el administrador del sistema).
6. Haga clic en OK > OK.
7. Cuando se le sugiere reiniciar el ordenador, haga clic en Yes.
Configuración de AppleTalk
Lo siguiente se debe ejecut ar sólo si es necesari o cambiar los parámetros
predeterminados (consulte el paso 2 para los valores predeterminados).
1. En el espacio de trabajo del CXP3535 Color Server, haga clic en
Admin.
2. Haga doble clic en Configuración de red > Configuración de
AppleTalk.
3. Seleccione la zona requerida del menú desplegable This system
will appear in zone.
4. Haga clic en OK > OK.
Configuración de IPX y de cliente de Novell
Nota: Para información más detallada consulte CXP3535 Color Server
T echnical Manual (n/p de Creo: 653-00541A) o Guía del Usuario de CXP3535
(n/p de Creo: 653-00561A-ES).
Los procedimientos a cont inuaci ón son p ert inentes p ara aq uellos cli entes
que tienen una red Novell que ejecuta el prot ocolo IPX.

QuickCon nect_3535.book Page 45 Monday, August 4, 2003 1:05 PM
Guía de conexión rápida 45
Instalación del cliente de Novell en el CXP3535 Color Server
1. Cierre el espacio de trabajo y la apl icación del CXP3535.
2. Cierre todas las demás aplicaci ones que estén abiertas.
3. En el escritorio de Windows, haga clic en Start y siga la ruta,
CXP3535 > CXP3535 Tools > Novell Client Installation.
4. Haga clic en Install y después haga clic en Reboot.
Configuración del cliente de Novell en el CXP3535 Color
Server
1. Después que se reinicia el si stema, aparece la vent ana Configuración
de Novell.
2. Escriba el Nombre de Tree. Si no sabe el nombr e, haga cl ic en
Examinar y después haga doble clic en el Nombre de Tree
adecuado.
3. Escriba el Nombre de Context. Si no sabe el nombre, haga clic en
Examinar y después haga doble clic en el Nombre de Context
adecuado.
Español (ES)
4. Haga clic en OK. Aparece el espacio de trabajo del CXP3535.
Paso 4: Visu al iza ció n e im pre sió n de la config ur ac ión d el si ste ma
Visualización de la configuración del sistema
1. En el espacio de trabajo del CXP3535 Color Server, haga clic en
Admin.
2. Haga doble clic en Utilitarios > Visualizar configuración.
3. Si visualiza la configuración de red y del sistema de su CXP3535
Color Serv e r.
Impresión de la configuración del sistema
1. En la ventana Visual izar configuración haga clic en Imprimir.
2. Seleccione la impresora ProcessPrint y después haga clic en
Imprimir.
3. Se imprime la configuración del sistema CXP3535.
4. Haga clic en Cerrar para cerrar la vent ana Visualizar confi guración y
después cierre la vent ana Admini stración.

QuickCon nect_3535.book Page 46 Monday, August 4, 2003 1:05 PM
46 Guía de conexión rápida
Paso 5: Impresión desde un ordenador Macintosh o Windows
Nota: Para información más detallada consulte Guía del Usuario de
CXP3535 (n/p de Creo: 653- 00561A-ES).
Configuración de una impresora en Windows ME/2000/XP (smb)
1. Haga clic en el botón Start, sitúe el cursor en Settings, y haga clic en
Printers.
2. Haga doble clic en Add Printer y después haga clic en Next.
3. Seleccione Network Pri nter Server y después haga clic en Next.
4. Diríjase en la red a su CXP3535 Color Server , y haga doble cli c en el
nombre del servidor. Aparece una list a de impresoras.
5. Seleccione una de las impresoras publ icadas de la red, por ejemplo,
ProcessPrint y haga entonces cli c en OK.
6. Seleccione si desea que está sea la impresora predeterminada, y
después haga clic en Next.
7. Haga clic en Finish para completar la configuración.
Configuración de una impresora TCP/IP en Windows ME/2000/XP
Antes de comenzar , s e debe instal ar y config urar los siguie ntes elementos
en el ordenador Windows ME/2000/XP:
• Protocolo TCP/IP
• El úl timo contr olador de i mpresora Adobe PS (que se encue ntra e n la car pet a
compartida d:\utilities en el CXP3535 Color Server o se puede cargar por
teleproceso desde el sitio web de Adobe en www.adobe.com)
• PPD de CXP3535 PPD (el PPD se encuentra en la carpeta compartida
d:\utilities\PPD en el CXP3535 Color Server)
Definición del puerto de impresora TCP/IP
1. Del menú Start en el escritorio de Windows, seleccione Settings >
Printers and Faxes.
2. En la ventana Printer and Faxe s, del menú File, seleccione Server
properties.
3. Seleccione la ficha Port, y luego haga clic en el botón Add Port.
4. De la lista de Available Printer Ports, seleccione Standard TCP/IP
Port, y luego haga clic en el botón New Port.
5. Haga clic en Next.

QuickCon nect_3535.book Page 47 Monday, August 4, 2003 1:05 PM
Guía de conexión rápida 47
6. Escriba el nombre exacto del CXP3535 Color Server (este cuadro
detecta mayúsculas y minúsculas), en el cuadro Printer Name or IP
Address:
7. Escriba un nombre para la impresora que podrá identifica r en su
ordenador en el cuadro Port Name.
8. Haga clic en Next.
9. Seleccione Custom en la opción Device Type, y luego haga clic en
Settings.
10. Seleccione las siguientes opciones:
• Protocol: LPR
• LPR Settings:
- Queue Name: e scriba el nomb re exacto de la impr esora de red a la cual
desea imprimir (por ejemplo, CXP1_ProcessPrint).
- LPR Byte Counting Enabled: seleccionado.
11. Haga clic en OK > Next y luego en Finish.
12. Haga clic en Close en la ventana Printe r Ports.
13. Haga clic en Close en la ventana Printer Server Properties.
Español (ES)
El siguiente paso es configu rar el puer to TCP/I P para la impresión
utilizando Adobe Printer Driver (Controlador de impresora de Adobe).
Configuración de una impresora TCP/IP Printer utilizando
Adobe PostScript Printer Driver
Nota: Para información más detallada consulte Guía del Usuario de
CXP3535 (n/p de Creo: 653- 00561A-ES).
1.
Inicie la aplicación Adobe PostScript Printer Driver.
2. Siga los pasos en el asistente, cuando se le indique en la ventana
Printer Connection Type, seleccione It is dir ectly connect to your
computer (Local Printer), y después haga clic en Next.
3. Seleccione el puerto TCP/IP estánd ar que se defi nió previamente,
por ejemplo, CXP1_ProcessPrint LPR, y después haga clic en Next.
4. Seleccione el PPD del CXP3535 Color Server: CXP3535.ppd.
5. Siga el resto de los pasos en el asistente y al terminar haga clic en
Finish.

QuickCon nect_3535.book Page 48 Monday, August 4, 2003 1:05 PM
48 Guía de conexión rápida
Configuración de una impresora TCP/IP en Windows NT 4.00
Antes de comenzar , s e debe instal ar y config urar los siguie ntes elementos
en el ordenador Windows NT 4.0:
• Protocolo TCP/IP
• Servicio de impresión TCP/IP de Microsoft
• El úl timo contr olador de i mpresora Adobe PS (que se encue ntra e n la car pet a
compartida d:\utilities en el CXP3535 Color Server o se puede cargar por
teleproceso desde el sitio web de Adobe en www.adobe.com)
• PPD de CXP3535 PPD (el PPD se encuentra en la carpeta compartida
d:\utilities\PPD en el CXP3535 Color Server)
Definición del puerto de impresora TCP/IP
1. Del menú Start en el escritorio de Windows, seleccione Settings >
Printers.
2. En la ventana Printer, del menú File, seleccione Server Properties.
3. Seleccione la ficha Port, y luego haga clic en el botón Add Port.
4. De la lista de Available Ports, seleccione LPR Port, y haga c lic en el
botón New Port.
5. Escriba el nombre exacto del CXP3535 Color Server (este cuadro
detecta mayúsculas y minúsculas), en el cuadro Name or address
of server proving lpd:
6. Escriba el nombre exacto de la impresora a la cual desea imprimir.
7. Haga clic en OK > Close y luego en OK en la ventana Print Server
Properties.
El siguiente paso es configu rar el puer to TCP/I P para la impresión
utilizando Adobe Printer Driver (Controlador de impresora de Adobe).
Configuración de una impresora TCP/IP Printer utilizando
Adobe PostScript Printer Driver
Nota: Para información más detallada consulte Guía del Usuario de
CXP3535 (n/p de Creo: 653- 00561A-ES).
Inicie la aplicación Adobe PostScript Printer Driver.
1.
2. Siga los pasos en el asistente, cuando se le indique en la ventana
Printer Connection Type, seleccione It is dir ectly connect to your
computer (Local Printer), y después haga clic en Next.
3. Seleccione el puerto TCP/IP estánd ar que se defi nió previamente,
por ejemplo, CXP1_ProcessPrint LPR, y después haga clic en Next.
4. Seleccione el PPD del CXP3535 Color Server: CXP3535.ppd.
5. Siga el resto de los pasos en el asistente y al terminar haga clic en
Finish.

QuickCon nect_3535.book Page 49 Monday, August 4, 2003 1:05 PM
Guía de conexión rápida 49
Configuración de una impresora en un Macintosh (OS 9)
Antes de configurar una de las impresoras de red del CXP3535 Color
Server, se debe instalar primero el PPD del CXP3535. Para instalar
CXP_3535.ppd, conéctese a través de AppleShare a su CXP3535 Color
Server, inicie la sesión como Guest y desde la carpeta Utilities copie
CXP_3535.ppd a la carpeta Printer Descriptions en System Folder del
Mac.
Para configurar una impresora en su Macintosh:
1. Del menú Apple, seleccione Chooser.
2. Seleccione LaserWriter y diríjase en la red a su CXP3535 Color
Server.
3. Seleccione una de las impresoras de red del CXP3535 Color Server,
por ejemplo, ProcessPrint y desp ués haga clic en Create.
CXP_3535.ppd se configura e instala automáticamente en su
Macintosh.
Español (ES)
Configuración de una impresora en un Macintosh (OS X) - LPR (IP) o AppleTalk
Antes de configurar una de las impresoras de red del CXP3535 Color
Server, se debe instalar primero el PPD del CXP3535. Para instalar
CXP_3535.ppd, conéctese a través de AppleShare a su CXP3535 Color
Server, inicie la sesión como Guest y desde la carpeta Utilities copie
CXP_3535.ppd al disco duro de l Macintosh. (Dir íjase a la ubicaci ón según
el procedimiento a continuación).
1. En el menú Go seleccione Applications.
2. Abra la carpeta Utilities y haga doble clic en el icono Print Center.
3. Haga clic en el botón Add Printer.
4. Seleccione AppleTalk o LPR Pri nter using IP.
5. Diríjase a la impresora de red CXP3535 (o si se está definiendo una
impresora LPR introduzca la dirección IP o el nombre de host del
CXP3535 IP y el nombre exacto de la impresora a la que desea
imprimir, por ejemplo, CXP1_ProcessPrint).
6. Abra el menú emergente Printer Model y seleccione Other.
7. Diríjase a la carpeta a la cual ha copi ado el CXP3535. ppd y
selecciónelo.
8. Haga clic en el botón Choose para asignar el CXP3535.ppd a la
impresora de red seleccionada.
9. Haga clic en el botón Add para agregar la nueva i mp resora a la lista
de impresoras.

QuickCon nect_3535.book Page 50 Monday, August 4, 2003 1:05 PM
50 Guía de conexión rápida
Configuración de una impresora Novell en Windows (NT/2000/XP)
Para información más detallada consulte Guía del Usuario de CXP3535 (n/p
de Creo: 653-00561 A-E S).
Antes de comenzar , s e debe instal ar y config urar los siguie ntes elementos
en Windows:
• Protocolo IPX
• Servicio de cliente para Netware
• Cliente de Novell instalado en el CXP3535 Color Server (consulte el Paso 3
de esta guía para mayores detalles).
1. Del menú Start, seleccione Settings > Printers
2. Haga doble clic en Add Printer.
3. Siga las instrucciones del asistente y seleccione la impresora de
Red.
4. Diríjase en NetWare or Compatible Network al CXP3535 Color
Server o a un Novell Printer Server.
5. Seleccione la impres ora a la cual desea imprimir y conf igúrela con la
impresora del CXP3535.
6. Siga los pasos del asistente y haga clic en Finish al terminar.

QuickCon nect_3535.book Page 51 Monday, August 4, 2003 1:05 PM
Guia de conexão rápida 51
Guia de conexão rápido – Português (BP)
Como utilizar este g uia
Este guia lhe a juda a est abele cer a confi guração da rede e do s istema d o
seu CXP3535 Color Server. Além disso, este guia fornece etapas para a
configuração de uma impre ssora de re de em estações de t rabalho cl iente
Windows e Macintosh.
O CXP3535 Color Server foi projetado para conectar-se à maioria das
redes com alterações mínimas.
A etapa 1 fornece as configurações padrões do sistema e da rede. As
etapas de 2 a 7 fornecem instruções sobre o procedimento de
modificação de tais configurações para que correspondam ao ambiente
do cliente.
Importante: Exige-se um administrador de rede pa ra assegurar que o
CXP3535 Color Server está configurado adequadamente na rede. O
administrador de rede deve f ornecer as confi gurações TCP/IP adequadas
(Endereço IP, máscara de sub-rede, endereço de gateway ou
configurações de DHCP).
Para informações e procedi mentos mais det alhados, consulte o CXP3535
Color Server Technical Manual (n/p de Creo: 653-00541A) ou o Guia do
usuário do CXP3535 (n/p da Creo: 653-00561A-PT).
Configurando o CXP3535 Color Server
A primeira configuraç ão é realizada
durante a instalação inicial do software
da aplicação. Após o software da
aplicação ser instalado e o CXP3535
Color Server e a Xerox DocuColor 3535
serem ligados, o Assistente de
configuração apar ece
automaticamente.
Pode-se também acessar tais
configurações na janela Administração
na área de trabalho do CXP3535 Color
Server.
Português (BP)

r
QuickCon nect_3535.book Page 52 Monday, August 4, 2003 1:05 PM
52 Guia de conexão rápida
Etapa 1: Ativando o CXP3535 Color Server
Conectando o cabo de rede
Importante: Certifique-se de que o cliente conect ou um cab o de rede a
uma porta de ethernet (10/100/1 000) no CXP3535 Color Server e que o
cabo está conectado à rede, a uma port a, a um hub ou a um router.
CXP3535 Color Serve
Ethernet to
network
(10/100/1000)
Ativando o CXP3535 Color Server
Importante: O CXP3535 Color Server deve ser ativado e a janela da
aplicação CXP3535 aparece no monitor.
Pressione o botão ligar/desl igar para ligar o CXP3535 Color Server.
N
E
T
DDI-1DD
SC
AN
I-2
Power
control
button

QuickCon nect_3535.book Page 53 Monday, August 4, 2003 1:05 PM
Guia de conexão rápida 53
Etapa 2: Configurações padrões do sistema e da rede
Nota: Se você deseja m odificar qualquer uma das configurações padrõe s
consulte o CXP3535 Color Server Technical Manual (n/p de C reo : 65300541A) ou o Guia do usuário do CXP3535 (n/p da Creo: 653-00561A-PT).
Configurações do sistema e da rede
A seguir, encontram-se as configurações padrões do sistema e da rede.
Parâmetro Configura ção p a dr ão
Idioma English
Nome do host CXP3535 (o nome do host é retirado do nome do computador
Workgroup Workgroup
Data e Hora: U S & Canada
Unidade de medida: Millimeters
IP Address Enable DHCP: Yes
AppleTal k Zone Enabled, Zone: Automatical l y detected
que digitou du rant e a i nst ala ção do Windo ws 20 00 Pr ofes siona l consulte o CXP3535 Technica l Ma nual para mais detalhes).
Português (BP)
Protocolos e serviços instalados
A seguir encontram-se os protoc olos p adr ões e os serv iç os inst alado s no
sistema.
Parâmetro Configuração padrão
Client for Microsoft Networks: Enabled
File and Printe r Sharing for Microsoft Networks: Enabled
NWLink IPX/SPX/NetBios Compatible Transport Protocol: Enabled
Network Monitor Printer Driver: Enabled
NetBEUI Protocol: Enabled
DLC Protocol: Enabled
AppleTalk: Enabled
Internet Protocol: Enabled: DHCP Yes
Impressoras virtuais de rede - Filas de impressão
A seguir encontram-se as impressoras virtuais disponíveis a partir de
clientes Macintosh e de PC.
Impressoras virtuais de rede - Filas de impressão <nomedoservidor>_ProcessPrint
<nomedoservidor>_ProcessStore
<nomedoservidor>_SpoolStore

QuickCon nect_3535.book Page 54 Monday, August 4, 2003 1:05 PM
54 Guia de conexão rápida
S t e p 3: Co nfig ur a çã o de rede
Configuração de TCP/IP
Deve-se realizar o seguinte soment e se for necessário modificar as
configurações padr ões (consulte a etapa 2 p ara padrão).
1. Na área de trabalho do CXP3535 Color Server, clique em Admin.
2. Clique duas vezes em Configuração de rede > Configuração de
TCP/IP.
3. Selecione Use the following IP Address.
4. Digite o novo endereço IP, a máscara de sub-rede e o gateway
padrão (de acordo com o administrador de rede) .
5. Se exigido, introduza os endereços de DNS (de acordo com o
administrador de rede).
6. Clique em OK > OK.
7. Quando estiver pronto para reiniciar o computador, clique em Yes.
Configuração de Appl eTalk
Deve-se realizar o seguinte soment e se for necessário modificar as
configurações padr ões (consulte a etapa 2 p ara padrão).
1. Na área de trabalho do CXP3535 Color Server, clique em Admin.
2. Clique duas vezes em Configuração de rede > Configuração de
AppleTalk.
3. Selecione a zona exigida a partir do menu This system will appear
in zone.
4. Clique em OK > OK.
Configuração de IPX do cliente Novell
Nota: Para informações mais detalhadas, consulte o CXP3535 Color Server
Technical Manual (n/p de Creo: 653- 00541A) ou o Guia do usuário do
CXP3535 (p/n da Creo: 653- 00561A-PT).
Os procedimentos a seguir são relevantes para os client es que possuem
uma rede Novell executando um protocol o IPX.

QuickCon nect_3535.book Page 55 Monday, August 4, 2003 1:05 PM
Guia de conexão rápida 55
Instalando o cliente Novell no CXP3535 Color Server
1. Feche a estação de trabalho e a aplicação CXP3535.
2. Feche todas as outras aplicações abertas.
3. Na área de trabalho do Windows, clique em Start e siga o percurso,
CXP3535 > CXP3535 Tools > Novell Client Installation.
4. Clique em Install e então em Reboot.
Configurando o cliente Novell no CXP3535 Color Server
1. Após a inicialização do sistema, ap arecerá a janela Novell Setup.
2. Digite o Nome de Tree. Se não souber o nome, clique em Procurar
e então clique duas vezes no Nome de Tree apropriado.
3. Digite o Nome do contexto. Se não souber o nome, clique em
Procurar e então clique duas vezes no Nome do contexto
apropriado.
4. Clique em OK. Aparece a área de trabalho do CXP3535.
Etapa 4: Visualizar e imprimir a configuração do sistema
Visualizando a configuração do sistema
1. Na área de trabalho do CXP3535 Color Server, clique em Admin.
2. Clique duas vezes em Utilitários > Visualizar configuração.
3. A configuração do sistema e da rede do seu CXP3535 Col or Server é
exibida.
Imprimindo a configuração do sistema
1. Na janela Visualizar configuração clique em Imprimir.
2. Selecione a impressora ProcessPrint e então clique em Imprimir.
3. A configuração do sistema CXP3535 é impressa.
4. Clique em Fechar par a fechar a janela Visualiz ar configuração e
então feche a janela Administração.
Português (BP)

QuickCon nect_3535.book Page 56 Monday, August 4, 2003 1:05 PM
56 Guia de conexão rápida
Etapa 5: Imprimindo a partir de um Macintosh ou Windows
Nota: Para informações mais detalhadas, cons ul te o Gu ia do usu ário do
CXP3535 Color Server (n /p da Creo : 65 3- 00561A-PT).
Configurando uma impressora no Windows ME/2000/XP (smb)
1. Clique no botão Start, aponte para Settings, e clique em Printers.
2. Clique duas vezes em Add Printer e clique em Next.
3. Selecione Network printer Server e clique em Next.
4. Procure seu CXP3535 Color Server na rede e clique duas vezes no
nome do servidor. É exibida uma lista com as impressoras.
5. Selecione uma das impressoras publi cadas na rede, por exemplo,
ProcessPrint e clique em OK.
6. Selecione se deseja que esta seja sua i mp ressora padrão e clique
em Next.
7. Clique em Finish para concluir a conf ig uração.
Configurando uma impressora TCP/IP no Windows ME/2000/XP
Os seguintes itens devem ser instalados e configurados no computador
WindowsME/2000/XP antes de iniciar:
• Protocolo TCP/IP
• O driver da impressora Adobe PS mais moderno (localizado na pasta
d:\utilities compartilhada no CXP3535 Color Server ou você pode baixá-lo a
partir do site da Adobe, www.adobe.com)
• PPD do CXP3535 (o PPD está localizado na pasta d:\utilities\PPD
compartilhada no CXP3535 Color Server)
Definindo a porta TCP/IP da impressora
1. No menu Start da área de trabalho do Windows, selecione
Settings > Printers and Faxes.
2. Na janela Printes and Faxes, no menu File, selecione Server
properties.
3. Selecione a guia Port e clique no botão Add Port.
4. Da lista Available Printer Ports, selecione Standard TCP/IP Port, e
clique no botão New Port.
5. Clique em Next.

QuickCon nect_3535.book Page 57 Monday, August 4, 2003 1:05 PM
Guia de conexão rápida 57
6. Digite o nome do CXP3535 Color Server corret amente (este campo
distingue maiúsculas e minúsculas), no campo Printer Name or IP
Address.
7. Digite um nome para a impressora que será cap az de ident ificar em
seu computador no quadro Port Name.
8. Clique em Next.
9. Selecione Custom na opção Device Type, e clique em Settings.
10. Selecione as seguintes opções:
• Protocol: LPR
• LPR Settings:
- Queue Name: digite o nome exato da impressora de rede onde deseja
imprimir (por exemplo, CXP1_ProcessPrint).
- LPR Byte Counting Enabled: selecionado.
11. Clique em OK > Next e então em Finish.
12. Clique em Close na janela Printer Ports.
13. Clique em Close na janela Printer Server Properties.
A próxima etapa é conf igur ar a porta TCP/IP para a impres são utilizando
o Adobe Printer Driver.
Português (BP)
Configurando uma impressora TCP/IP utilizando o driver da
impressora Adobe PostScript
Nota: Para informações mais detalhadas, cons ul te o Gu ia do usu ário do
CXP3535 Color Server (n/p da Creo: 653-00561A-PT).
1.
Inicie a aplicação do driver da impressora Post Script.
2. Siga as seguintes etap as no assistente, e na janela Printer
Connection T ype selecio ne It is di rectly connect to your computer
(Local Printer) e cli que em Next.
3. Selecione a porta TCP/IP padrão que definiu anteriormente, por
exemplo, CXP1_ProcessPrint LPR, e clique em Next.
4. Selecione o PPD do CXP3535 Color Server: CXP3535.ppd.
5. Continue com o resto das etap as no assistente e ao terminar, clique
em Finish.

QuickCon nect_3535.book Page 58 Monday, August 4, 2003 1:05 PM
58 Guia de conexão rápida
Configurando uma impressora TCP/IP no NT 4.0
Os seguintes itens devem ser instalados e configurados no computador
Windows NT 4.0 antes de iniciar:
• Protocolo TCP/IP
• Serviço de impressão RCP/IP da Microsoft
• O driver da impressora Adobe PS mais moderno (localizado na pasta
d:\utilities compartilhada no CXP3535 Color Server ou você pode baixá-lo a
partir do site da Adobe, www.adobe.com)
• PPD do CXP3535 (o PPD está localizado na pasta d:\utilities\PPD
compartilhada no CXP3535 Color Server)
Definindo a porta TCP/IP da impressora
1. No menu Start da área de trabalho do Windows, selecione
Settings > Printers.
2. No menu File da janela Printer, selecione Server Properties.
3. Selecione a guia Port e clique no botão Add Port.
4. Da lista A vailabl e Port s, seleci one LPR Port, e cl ique no bot ão New
Port .
5. Digite o nome do CXP3535 Color Server corret amente (este campo
distingue maiúsculas e minúsculas), no campo Name or address of
server proving lpd: .
6. Digite o nome exato da impressora onde deseja imprimir.
7. Clique em OK > Close e então em OK na janela Print Server
Properties.
A próxima etapa é conf igur ar a porta TCP/IP para a impres são utilizando
o driver da impressora Adobe.
Configurando uma impressora TCP/IP utilizando o Adobe
PostCsript Printer Driver
Nota: Para informações mais detalhadas, cons ul te o Gu ia do usu ário do
CXP3535 Color Server (p/n da Creo: 653-00561A-PT).
Inicie a aplicação do driver da impressora Post Script.
1.
2. Siga as seguintes etap as no assistente, e na janela Printer
Connection T ype selecio ne It is di rectly connect to your computer
(Local Printer) e cli que em Next.
3. Selecione a porta TCP/IP padrão que definiu anteriormente, por
exemplo, CXP1_ProcessPrint LPR, e clique em Next.
4. Selecione o PPD do CXP3535 Color Server: CXP3535.ppd.
5. Continue com o resto das etap as no assistente e ao terminar, clique
em Finish.

QuickCon nect_3535.book Page 59 Monday, August 4, 2003 1:05 PM
Guia de conexão rápida 59
Configurando uma impressora no Macintosh (OS 9)
Antes de configurar uma das impressoras de rede do CXP3535 Color
Server, é necessário instalar primeiramente o PPD do CXP3535. Para
instalar o CXP_3535.ppd, conec te-se ao seu CXP3535 Color Server
através do AppleShare, in icie a s essão como guest (c onvidado) e a p arti r
da pasta Utilities copie o CXP_3535.ppd à pasta Printer Descriptions na
pasta System do Mac.
Para configurar uma impressora no seu Macin tosh:
1. No menu Apple, selecione Chooser.
2. Selecione LaserWri te e procure pelo seu CXP3535 Color Server na
rede.
3. Selecione uma das impressoras de rede do CXP3535 Color Server,
por exemplo, ProcessPrint e clique em Create. O CXP_3535.ppd é
automaticamente configurado no seu Macintosh.
Configurando uma impressora em um Macintosh (OS X) - LPR (IP) ou AppleTalk
Antes de configurar uma das impressoras de rede do CXP3535 Color
Server, é necessário instalar primeiramente o PPD do CXP3535. Para
instalar o CXP_3535.ppd, conec te-se ao seu CXP3535 Color Server
através do AppleShare, in icie a s essão como guest (c onvidado) e a p arti r
da pasta Utilities copi e o CXP_3535.ppd no disco rígido do seu Macintosh
(escreva o local para o procedi mento abaixo).
1. No menu Go selecione Applications.
2. Abra a pasta Utilities e clique duas vezes no ícone Print Center.
3. Clique no botão Add Printer.
4. Selecione AppleTalk ou LPR Printer using IP.
5. Procure a impressora de rede CXP3535 (ou se esti ver defi nindo uma
impressora LPR introduza o ender eço IP ou o hostname do
CXP3535 e o nome exato da impressora onde deseja imprimi r , isto é,
CXP1_ProcessPrint).
6. Abra o menu de contexto Printer Model e selecione Other.
7. Vá até a pasta onde copiou o CXP3535.ppd e seleci one-a.
8. Clique no botão Choose para atribuir o CXP3535.p pd à impressora
de rede selecionada.
9. Clique no botão Add para adicionar a nova impressora à li sta de
impressoras.
Português (BP)

QuickCon nect_3535.book Page 60 Monday, August 4, 2003 1:05 PM
60 Guia de conexão rápida
Configurando uma impressora Novell no Windows (NT/2000/XP)
Para informações m ai s detalh adas, consulte o Guia do usuário do CXP3535
Color Server (p/n da Creo: 653- 00561A-PT).
Os seguintes itens devem ser instalados e configurados no Windows
antes de você começar:
• Protocolo IPX
• Serviço de Cliente para Netware
• Cliente Novell instalado no CXP3535 Color Server (consulte a Etapa 3 deste
guia para mais detalhes).
1. No menu Start, selecione Settings > Printers.
2. Clique duas vezes em Add printer.
3. Siga o assistente e selecione a impressora Network printer.
4. Vá até NetWare or Compatible Network para o CXP3535 Color
Server ou um Novell Printer Server.
5. Selecione a impressora onde deseja impr imi r e configure-a com a
impressora do CXP3535.
6. Continue a seguir as etap as do asistente e clique em Finish ao
terminar.

QuickCon nect_3535.book Page 61 Monday, August 4, 2003 1:05 PM
Handleiding voor een snelle aansluiting 61
Handleiding voor een snelle
aansluiting –
Nederlands (NL)
Gebruik van de ze han dle idin g
Deze handleiding is ontworpen om u te begeleiden met de inst allatie van
uw netwerk en systeemconfiguratieinstellingen voor de CXP3535 Color
Server. Deze handleiding bevat ook de benodigde stappen om een netwerkprinter op de Ma cintosh en Win dows cli ëntwerks t ation s te i nstal leren .
De CXP3535 Color Server was ontworpen om de meeste netwer ken met
minimale veranderingen aan te sluiten.
In Stap 1 worden de instellingen voor het standaard systeem en het
netwerk beschreven. In de Stappen 2 tot 7 worden instructies gegeven
hoe deze instellingen aan de werkpla ats van de klant aangepast kunnen
worden.
Belangrijk: een netwerkbeheerder mo et aanwezig zijn om te controleren
dat de CXP3535 Color Server juist op het netwerk is geconfigureerd. De
netwerkbeheerder moet voor de juiste TCP/I P-instellingen (IP-adre s,
subnet masker, gateway adres of DHCP-instellingen) zorgen.
Zie voor meer gede tailleer de infor matie en procedur es de CXP35 35 Color
Server Technical Manual (Creo p/n: 653-00541A) of de CXP3535
Gebruikershandleiding (Creo p/n: 653-00561A-NL).
Nederlands (NL)
De CXP3535 Colo r Ser v er co nf ig ure ren
In de eerste configuratie en installatie
wordt de toepassi ngssoftware geïnstalleerd. Nadat de t oepassi ngs soft ware
is geïnstalleerd en de CXP3535 Color
Server en Xerox DocuColor 3535 is
ingeschakeld zal automatis ch de
Configuratie wizard verschijnen.
Deze instellingen kunnen ook in het
venster Beheer van de CXP3535 Color
Server werkruimte worden geopend.

r
QuickCon nect_3535.book Page 62 Monday, August 4, 2003 1:05 PM
62 Handleiding voor een snelle aansluiting
St ap 1: de CXP3535 Color Server aanzetten
De netwerkkabel aansluiten
Belangrijk: controleer dat de klant een netwerkkabel met de ethernetpoort (10/100/1000) en de CXP3535 Color Server heeft aangesloten
en dat de kabel aan een netwerkpoort, hub of router is aangesloten.
CXP3535 Color Serve
Ethernet to
network
(10/100/1000)
De CXP3535 Color Server aanzetten
Belangrijk: als de CXP3535 Color Server wordt aangesloten zal het
CXP3535 toepassingsvenster op het beeldscherm verschijnen.
Druk op de vermogenschakelaar om de CXP3535 Color Server AAN te
zetten.
N
E
T
DDI-1DD
SC
AN
I-2
Power
control
button

QuickCon nect_3535.book Page 63 Monday, August 4, 2003 1:05 PM
Handleiding voor een snelle aansluiting 63
S tap 2: st an daard syst ee m en netw erk ins te lli ng en
Opmerking: als u standaardinstellingen mo et vera nderen verwijzen wij u
voor meer gedetailleer de i nf ormatie en procedures naa r de CXP3535 Color
Server Technical Manual (Creo p/n: 653-00541A) of de CXP3535 Gebruikershandleiding (Creo p/ n: 653- 00561A-NL).
Systeem- en netwerkinstellingen
Hieronder volgen de inste ll ingen voor het standaard systeem en het
netwerk.
Parameter Standaardinstelling
Taal English
Hostname CXP3535 (de hos tname wo rd t van d e Co mputer Name overge nome n
Workgroup Workgroup
Datum en Ti j d: US & Canada
Maateenheden Millimeters
IP Address Enable DHCP: Yes
AppleTalk Zone Enabled, Zone: Automati ca l l y de te cte d
die tijdens de ins tallatie van Windows 2000 Professional is getypt zie het CXP3535 Technical Manual voor meer deta i ls).
Protocols en de geïnstalleerde services
Hieronder volgen de instell ingen voor de standaard protocols en de
geïnstalleerde services op het systeem.
Parameter Standaardinstelling
Client for Microsoft Networks: Enabled
File and Printe r Sharing for Microsoft Networks: Enabled
NWLink IPX/SPX/NetBios Compatible Transport Protocol: Enabled
Network Monitor Printer Driver: Enabled
NetBEUI Protocol: Enabled
DLC Protocol: Enabled
AppleTalk: Enabled
Internet Protocol: Enabled: DHCP Yes
Netwerk virtuele printers - printerwachtrijen
Hieronder volgen de st andaard vi rtuele pri nters die v oor de Macint osh- en
PC clients beschikb aar zijn.
Netwerk virtuele printers - printer wachtrijen <servernaam>_ProcessPrint
Nederlands (NL)
<servernaam>_ProcessStore
<servernaam>_SpoolStore

QuickCon nect_3535.book Page 64 Monday, August 4, 2003 1:05 PM
64 Handleiding voor een snelle aansluiting
St ap 3: netwerkinstallatie
TCP/IP-installatie
Onderstaande stappen moeten alleen worden uitgevoerd als de
standaard instellingen moeten worden veranderd (zie Stap 2 voor
standaard).
1. Klik in de werkruimte van CXP3535 Color Server op Beheer.
2. Dubbelklik op Netwerkinstellingen > TCP/IP-instellingen.
3. Selecteer Use the following IP Address.
4. Ty p het nieuwe IP-adres, Subne tmasker en Defau lt gateway (volgens
de informatie van de netwerkbeheerder).
5. Definieer, indien dit nodig is, de DNS server adressen (volgens de
informatie van de netwerkbeheerder).
6. Klik op OK > OK.
7. Klik op Yes als de promt verschijnt om de computer opnieuw te
AppleTalk instal l at ie
Onderstaande stappen moeten alleen worden uitgevoerd als de
standaard instellingen moeten worden veranderd (zie Stap 2 voor
standaard).
1. Klik in de werkruimte van CXP3535 Color Server op Beheer.
2. Dubbelklik op Netwerkinstellingen > AppleTalk Setup.
3. Selecteer de gewenste zone van het vervolgkeuze menu This
4. Klik op OK > OK.
IPX & Novell Client installatie
Opmerking: zie voor meer gedetailleerde informatie de CXP3535 Color
Server Technical Manual (Creo p/n: 653-00541A) of de CXP3535 Gebruikershandleiding (Creo p/ n: 653- 00561A-NL).
De volgende procedures zijn all een relevant voor de gebruikers die een
Novell netwerk hebben dat met het IPX protocol word t uitgevoerd.
starten.
system will appear in zone.

QuickCon nect_3535.book Page 65 Monday, August 4, 2003 1:05 PM
Handleiding voor een snelle aansluiting 65
De Novell Client op de CXP3535 Color Server installeren
1. Sluit de CXP3535 werkruimte en de toepass ing.
2. Sluit alle andere toepassingen.
3. Klik vanuit het Windows bureaublad op Start en volg het pad
CXP3535 > CXP3535 Tools > Novell Client Installation.
4. Klik op Install en vervolgens op Reboot.
De Novell Client op de CXP3535 Color Server configureren
1. Nadat het systeem opnieuw start verschijnt het venster Novell Setup.
2. Typ de Tree Name. Als u de naam niet kent klikt u op Bladeren en
dubbelklik op de juiste Tree Name.
3. Typ de Context Name. Als u de naam niet kent klikt u op Bladeren
en dubbelklik op de juiste Context Name.
4. Klik op OK. De CXP3535 werkruimte verschijnt.
S tap 4: de syst ee mco nf ig ura ti e be kij ken en afdr u kken
De systeemconfiguratie bekijken
1. Klik in de werkruimte van CXP3535 Color Server op Beheer.
2. Dubbelklik op Hulpprogramma's > C o n figuratie b e k ijken.
3. De netwerk en de systeemconfig uratie van de CXP3535 Color Ser ver
wordt hier weergegeven.
De systeemconfiguratie afdrukken
1. Dubbelklik in het venster Configuratie weergeven op Afdrukken.
2. Selecteer de printer ProcessPrint en klik op Afdrukken.
3. De CXP3535 systeemconfiguratie is afgedrukt.
4. Klik op Sluiten om het venster Configuratie weergave te sluiten en
sluit het venster Beheer.
Nederlands (NL)

QuickCon nect_3535.book Page 66 Monday, August 4, 2003 1:05 PM
66 Handleiding voor een snelle aansluiting
St ap 5: vanuit een Macintosh of Windows computer afdrukken
Opmerking: zie voor meer gedetailleerde informatie de CXP3535
Gebruikershan dl eidi ng ( C reo p/n : 653-00561A-NL).
Een printer in Windows ME/2000/XP (smb) installeren
1. Klik op de knop Start, wijs Settings aan en klik op Printers.
2. Dubbelklik op Add Printer en klik vervol gens op Next.
3. Selecteer Network Printer Server en klik op Next.
4. Blader door het netwerk naar de CXP3535 Col or Server en dubbelklik
op de naam van de server. Een lijst printers verschijnt.
5. Selecteer één van de netwerkprinters, bijvoorbeeld ProcessPrint en
klik op OK.
6. Selecteer de mogelijkheid om deze printer als standaard print er in te
stellen en klik op Next.
7. Klik op Finish om de installatie te voltooien.
Een TCP/IP Printer in Windows ME/2000/XP installeren
Voor dat u begint moeten de volgende items op de Windows ME/2000/XP
computer worden geïnstalleerd en geconfigureerd:
• TCP/IP Protocol
• De laatste Adobe PS printerdriver (de locatie is in de gedeelde d:\utilities map
op de CXP3535 Color Server of kan worden gedownload van de Adobe
website bij www.adobe.com)
• CXP3535 PPD (de locatie van de PPD is in de gedeelde d:\utilities\PPD map
op de CXP3535 Color Server)
De TCP/IP Printer-poort definiëren
1. Selecteer vanuit het menu Start van het Windows-bureaublad
Settings > Printers and Faxes.
2. Selecteer in het venster Printers and Faxes van het menu File,
Server properties.
3. Selecteer het tabblad Port en klik op de knop Add Port.
4. Selecteer van de lijst van Available Printer Ports, Standard TCP/IP
Port en klik op de knop New Port.
5. Klik op Next.

QuickCon nect_3535.book Page 67 Monday, August 4, 2003 1:05 PM
Handleiding voor een snelle aansluiting 67
6. Ty p de jui ste naam van de CXP3535 Color Server (dit veld is
hoofdlettergevoeli g), in het vakje Printer Name or IP Address.
7. Typ een naam voor de printer die vanuit uw computer kan worden
herkend, in het vakje Port Name.
8. Klik op Next.
9. Selecteer Custom in de optie Device Type en klik op Settings.
10. Selecteer de gewenste opties.
• Protocol: LPR
• LPR Settings:
- Queue Name: typ de juiste naam van de netwerkprinter waarnaar u wilt
afdrukken (e.g., CXP1_ProcessPrint).
- LPR Byte Counting Enabled: geselecteerd.
11. Klik op OK > Next en daarn a op Finish.
12. Klik op Close om het venster Printer Ports te sluiten.
13. Klik op Close in het venster Print Server Properties.
In de volgende stap wordt de TCP/IP- poort met de Adobe Printer Driver
geïnstalleerd.
Een TCP/IP Printer met de Adobe PostScript Printer Driver
installeren
Opmerking: zie voor meer gedetailleerde informatie de CXP3535
Gebruikershan dl eidi ng ( C reo p/n : 653-00561A-NL).
1.
St art de Adobe PostScript Printer Driver to epassing.
2. Vol g de stappen van de wizard, als in het venster Pri n ter Connection
Ty pe wordt geprompt selecteert u It is directly connected to your
computer (Local Printer) en klik op Next.
3. Selecteer the Standard TCP/IP poor t di e u eerder heeft gedefinieerd,
bijvoorbeeld, CXP1_Process Pri nt LPR, en klik op Next.
4. Selecteer de CXP3535 Color Server PPD: CXP3535.ppd.
5. Ver volg met de resterende wizard stap pen en kli k op Finish als de
procedure is voltooid.
Nederlands (NL)

QuickCon nect_3535.book Page 68 Monday, August 4, 2003 1:05 PM
68 Handleiding voor een snelle aansluiting
Een TCP/IP Printer in Windows NT 4.0 installeren
Voor dat u begint moeten de volgende items worden geïnstalleerd en
geconfigureerd op de Windows NT 4.0 computer:
• TCP/IP Protocol
• Mi crosof t TCP/IP Printing Service
• De laatste Adobe PS printerdriver (de locatie is in de gedeelde d:\utilities map
op de CXP3535 Color Server of kan worden gedownload van de Adobe
website bij www.adobe.com)
• CXP3535 PPD (de locatie van de PPD is in de gedeelde d:\utilities\PPD map
op de CXP3535 Color Server)
De TCP/IP Printer-poort definiëren
1. Selecteer vanuit het menu Start van het Windows bureaublad
Settings > Printers.
2. Selecteer in het venster Printer, van het menu File, Server
Properties (server-eigenschappen).
3. Selecteer het tabblad Port en klik op de knop Add Port.
4. Selecteer van de lijst van Available Printer Ports, LPR Port en klik
op de knop New Port.
5. Ty p de jui ste naam van de CXP3535 Color Server (dit veld is
hoofdlettergevoeli g), in het vakje Name or address of server
proving lpd:
6. Typ de juiste naam van de printer waarnaar u wilt afdrukken.
7. Klik op OK > Close en op OK in het venster Print Server Properties.
In de volgende stap wordt de TCP/IP- poort met de Adobe Printer Driver
geïnstalleerd.
Een TCP/IP Printer met de Adobe PostScript Printer Driver
installeren
Opmerking: zie voor meer gedetailleerde informatie de CXP3535
Gebruikershan dl eidi ng ( C reo p/n : 653-00561A-NL).
1.
St art de Adobe PostScript Printer Driver to epassing.
2. Vol g de stappen van de wizard, als in het venster Pri n ter Connection
Ty pe wordt geprompt selecteert u It is directly connected to your
computer (Local Printer) en klik op Next.
3. Selecteer the Standard TCP/IP poor t di e u eerder heeft gedefinieerd,
bijvoorbeeld, CXP1_Process Pri nt LPR, en klik op Next.
4. Selecteer de CXP3535 Color Server PPD: CXP3535.ppd.
5. Ver volg met de resterende wizard stap pen en kli k op Finish als de
procedure is voltooid.

QuickCon nect_3535.book Page 69 Monday, August 4, 2003 1:05 PM
Handleiding voor een snelle aansluiting 69
Een printer op een Macintosh (OS 9) installeren
Voor dat een van de de CXP3535 Color Server netwerkprinte rs worden
ingesteld moet eerst de CXP3535 PPD worden geïnstalleerd. Om de
CXP_3535.ppd te installeren, sluit u via AppleShare met de CXP3535
Color Server aan, met als aanmelding Guest en kopieer van de map
Utilities de CXP_3535.ppd naar de map Printer Descr ipt ions in de Mac’s
System Folder .
Om een printer op de Macintosh te installeren:
1. Selecteer van het menu Apple, Chooser.
2. Selecteer LaserWri ter en blader door het netwerk naar de CXP3535
Color Serv e r.
3. Selecteer een van de netwerkprint ers van de CXP3535 Color Server,
bijvoorbeeld, ProcessPrint en klik op Create. De CXP_3535.ppd
wordt automatisch op de Macintosh geconfigureerd en geïnstalleerd.
Een printer op een Macintosh (OS X) - LPR (IP) of AppleTalk installeren
Voordat een van de CXP3535 Color Server netwerkprinters wordt
ingesteld moet eerst de CXP3535 PPD worden geïnstalleerd. Om de
CXP_3535.ppd te installeren, sluit u via AppleShare met de CXP3535
Color Server aan, met als aanmelding Guest en kopieer van de map
Utilities de CXP_353 5.ppd naar de harde schij f van Macintosh (note er de
locatie zodat deze in onderst aande procedure kan worden gebruikt).
1. Selecteer van het menu Go, Applications.
2. Open de map Utilities en dubbelklik op het pictogram Print Center.
3. Klik op de knop Add Printer.
4. Selecteer tussen AppleTalk of LPR Printer using IP.
5. Blader naar de CXP3535 netwerkprinter (of als u een LPR printer
definieert typt u het adres of hostnaam van de CXP3535 IP en de
juiste naam van de printer waarnaar u wil t afdrukken, bijvoorbeeld
CXP1_ProcessPrint).
6. Klik op het Printer Model vervolgkeuzemenu en selecteer Other.
7. Blader naar de map waarin u de CXP3535.ppd heeft gekopieerd en
selecteer de map.
8. Klik op knop Choose om de CXP3535.ppd aan de geselecteerde
netwerkprinter toe te wijzen.
Nederlands (NL)
9. Klik op de knop Add om de nieuwe printer aan de printerli jst toe te
voegen.

QuickCon nect_3535.book Page 70 Monday, August 4, 2003 1:05 PM
70 Handleiding voor een snelle aansluiting
Een Novell printer in Windows (NT/2000/XP) installeren
Zie voor meer gedetaille er de info rmatie de CXP3535 Gebr ui kershandleiding
(Creo p/n: 653-00561A-NL).
Voordat u begint moeten de volgende items in Windows worden
geïnstalleerd en geconfigureerd:
• IPX Protocol
• Client Service for Netware
• De Novell Client moet op de CXP3535 Color Server zijn geïnstalleerd (zie
Stap 3 van deze handleiding voor meer details).
1. Selecteer van het menu Start, Settings > Printers.
2. Dubbelklik op Add printer.
3. Voer de volgende stappen van de wizard uit en selecteer Network
printer.
4. Blader de NetWare of Compatible Network voor de CXP3535 Color
Server of een Novell Printer Server.
5. Selecteer de printer waarnaar u wilt afdrukken en configureer deze
met de CXP3535 printer.
6. Ver volg met de resterende wizard stap pen en kli k op Finish als de
procedure is voltooid.

QuickCon nect_3535.book Page 71 Monday, August 4, 2003 1:05 PM
Handbok för snabbanslutning 71
Handbok för snabbanslutning – Svenska (SV)
Hur du använ der ha nd boken
Den här handboken hjälper dig med att sätta upp nätverk och systemkonfiguration för CXP3535 Color Server. Dessutom ger handboken
stegvisa instruktioner för hur du installerar en nätverksprinter på
Macintosh och Windows kundarbetsstationer.
The CXP3535 Color Ser ver ä r utf ormad för at t kun na a nslut as t ill d e fl esta
nätverk med endast minimala ändringar.
Ste g 1 beskriver de st andardiser ade system- och nätv erksinstä llningarna.
Ste g 2 til l 7 ger instruktioner om hur du ändrar dessa instäl lningar för att
passa till kundmiljön.
Viktigt: En nätverksadministratör behövs för att kontrollera att CXP3535
Color Server är korrekt konfigurerad på nätverket. En Nätverksadministratör måste tillhandahålla passande TCP/IP-i nställningar (IP-adress,
subnet mask, gateway-adress eller DHCP-inställningar).
För mer information v.g. se CXP3535 Color Server Technical Manual
(Creo artikelnummer: 653-00541A) eller CXP3535 User Guide (Creo
artikelnummer: 653-00561A) .
Konfigur era CXP3 535 C ol or Se r ver
Konfigurering utförs efter det att
programvaran installerats. Efter
programvaran har installerats och
CXP3535 Color Server och Xerox
DocuColor 3535 är påslagen visas
Configuration Wizard (konf igurationsguiden) automatiskt.
Du kan också komma åt inställningarna
från fönstret Administration i arbetsytan
iiCXP3535 Color Server.
Svenska (SV)

r
QuickCon nect_3535.book Page 72 Monday, August 4, 2003 1:05 PM
72 Handbok för snabbanslutning
Seg 1: Starta CXP3535 Color Server
Ansluta nätverkskabeln
Viktigt: Kontrollera att kunden har anslutit en nätverkskabel till Ethernetporten (10/100/1000) på CXP3535 Color Ser ver och att kabeln är ansl uten
till en nätverksport, Hub eller Router.
CXP3535 Color Serve
St arta CXP3535 Color Server
Viktigt: När CXP3535 Color Server har startat s ska CXP3535programfönstret visas på skärmen.
Tryck på påslagni ngsknappen för att sätta på CXP3535 Color Server.
Ethernet to
network
(10/100/1000)
N
E
T
DDI-1DD
SC
AN
I-2
Power
control
button

QuickCon nect_3535.book Page 73 Monday, August 4, 2003 1:05 PM
Handbok för snabbanslutning 73
S t e g 2: Standardinstäl lning ar för system oc h nä tv er k
Obs! Om du behöver ändra någon av standardinställningarna hänvisar vi till
CXP3535 Color Server Technical Manual (Creo artikelnummer: 653-00541A)
eller CXP3535 User Guide (Creo artikelnummer: 653-00561A).
System- och nätverksinställningar
Nedan beskrivs standardinställningar för system och nätverk.
Parameter Standardinställningar
Language English
Hostname CXP3535 (Hostname är taget från det C omputer Name du
Workgroup Workgroup
Date and Time: US & Canada
Measurement Units Millimeters
IP Address Enable DHCP: Yes
AppleTalk Zone Enabled, Zone: Automatically detected
skrev in under installationen av Win dow s 2000 Profess i onal
- för mer information v.g. se CXP 3535 Technical Manual ).
Installerad Protokoll (bearbetningsstandard) och Services
Nedan listas de standardinställnin gar för protokoll och service som är
installerade på systemet.
Parameter Standardinställningar
Client for Microsoft Networks: Enabled
File and Printe r Sharing for Microsoft Networks: Enabled
NWLink IPX/SPX/NetBios Compatible Transport Protocol: Enabled
Network Monitor Printer Driver: Enabled
NetBEUI Protocol: Enabled
DLC Protocol: Enabled
AppleTalk: Enabled
Internet Protocol: Enabled DHCP Yes
Virtuella nätverksskrivare - utskriftsköer
Nedan listas de sta ndard virtuella skrivare som finns ti llgängliga från
Macintosh- och PC-klienter.
Virtuella nätverksskrivare - utskriftsköer <servername>_ProcessPrint
Svenska (SV)
<servername>_ProcessPrint
<servername>_SpoolStore

QuickCon nect_3535.book Page 74 Monday, August 4, 2003 1:05 PM
74 Handbok för snabbanslutning
S te g 3: Nätv erks ins tä lln ing
Inställning av TCP/IP
Följande bör endast utföras om du behöver än dra standar dinställ ningarna
(se Steg 2 för standard).
1. I arbetsytan i CXP3535 Color Server, klicka Admin.
2. Dubbelklicka på Network Setup > TCP/IP Setup.
3. Välj Use the following IP Address.
4. Skriv ny IP-adress, nätma sk och standard-gateway (enligt Nätverks-
administratören).
5. Om det krävs så skriv in DNS serve r-adres ser (enli gt Nätverksadmi ni-
stratören).
6. Klicka OK > OK.
7. När du uppmanas att omstarta din dator klicka Yes.
Inställning av AppleTalk
Följande bör endast utföras om du behöver än dra standar dinställ ningarna
(se Steg 2 för standard).
1. I arbetsytan i CXP3535 Color Server, klicka Admin.
2. Dubbelklicka på Network Setup > AppleTalk Setup.
3. Välj önskad zone från den nedrul lning sbar a menyn This System will
appear in zone.
4. Klicka OK > OK.
IPX & Novell-klientkonfigurering
Obs! För mer information v.g. se CXP3535 Color Server Technical Manual
(Creo artikelnumme r: 653-00541A) eller CXP353 5 U ser G ui de ( C reo
artikelnummer: 65 3- 00561A).
Följande procedurer är relevant a för de kund er som har ett Novell -nätverk
som använder IPX protokoll.
Installera Novell Client på CXP3535 Color Server
1. Stäng arbetsytan och programmet CXP3535.
2. Stäng alla andra öppna program.

QuickCon nect_3535.book Page 75 Monday, August 4, 2003 1:05 PM
Handbok för snabbanslutning 75
3. På Windows-skrivbordet , klicka Start och följ sökvägen CXP3535 >
CXP3535 Tools > Novell Client Installation.
4. Klicka Install och klicka sedan Reboot.
Konfigurera Novell Client på CXP3535 Color Server
1. Efter systeme t har omstartats visas fönstret Novell Setup.
2. Skriv in namnet på Tree i fältet Tree N ame. Om du inte känner till
namnet så klicka på Browse och dubbelklicka sedan på det
passande Tree N ame.
3. Skriv in namnet på Context in fältet Context Name. Om du inte
känner till namnet så klicka på Browse och dubbelklicka sedan på
det passande Context Name.
4. Klicka OK. CXP35 35-arbetsyta n visas.
Steg 4: Visa och skriv ut systemkonfigurationen
Visa systemkonfigurationen
1. I arbetsytan i CXP3535 Color Server, klicka Admin.
2. Dubbelklicka Utilities > View Configuration.
3. Nätverks- och systemkonfigurationen på din CXP3535 Color Server
visas.
Skriva ut systemkonfigurationen
1. I fönstret View Configuration klicka Print.
2. Välj skrivaren ProcessPrint och klicka sedan Print.
3. Systemkonfigurationen f ör CXP3535 skrivs ut.
4. Klicka Close för att stänga fönstret View Configurati on och sedan
stänga fönstret Administration.
Svenska (SV)

QuickCon nect_3535.book Page 76 Monday, August 4, 2003 1:05 PM
76 Handbok för snabbanslutning
Steg 5: Skriva ut från en Macintosh eller Windows-dator
Obs! För mer information v.g. se CXP3535 User Guide (Creo artikelnummer:
653-00561A).
Sätta upp en skrivare i Windows ME/2000/XP (smb)
1. Klicka knappen Start, peka på Settings, och klicka Printers.
2. Dubbelklicka på Add Printer och klicka sedan Next.
3. Välj Network Printer Server och klicka sedan Next.
4. Bläddra igenom nätverket till din CXP3535 Color Server och
dubbelklicka sedan på servernamnet. En lista med skrivare visas.
5. Välj en av näteverksskrivarna, exempelvis ProcessPrint och klicka
sedan på OK.
6. Välj om du vill att denna skrivaren ska vara standardskrivare eller ej
och klicka sedan Next.
7. Klicka Finish när du är klar.
Sätta upp en TCP/IP-skrivare i Windows ME/2000/XP
Följande måste instal leras och konfi gure ras på en Windows ME/ 2000/XPdator innan du börjar.
• TCP/IP Protocol
• Senaste Adobe PS-drivrutin (lokaliserad i den delade mappen d:\utilities på
CXP3535 Color Server, eller också kan du hämta den från Adobe website på
www.adobe.com)
• CXP3535 PPD (PPD är lokaliserad i den delade mappen d:\utilities\PPD på
CXP3535 Color Server)
Definiera TCP/IP-skrivarporten
1. Från menyn Start på Windows-skrivbordet välj Settings > Printers
and Faxes.
2. I fönstret Printer and Faxes f rån menyn File, välj Server properties.
3. Välj fliken Port och klicka sedan knappen Add Port.
4. Från listan Available Printer Ports, välj Standard TCP/IP Port, och
klicka sedan knappen New Port
5. Klicka på Next.
6. Skriv in det exakta namnet på CXP3535 Color Server (denna ruta är
versalkänslig) i rutan Printer Name or IP Address.

QuickCon nect_3535.book Page 77 Monday, August 4, 2003 1:05 PM
Handbok för snabbanslutning 77
7. Skriv in ett namn på skrivaren, som du sedan kan identifiera på din
dator, in rutan Port Name.
8. Klicka på Next.
9. Välj Custom i alter n at iv e t Device Type och klicka sedan Settings.
10. Välj följande alternativ:
• Protocol: LPR
• LPR Settings:
- Queue Name: skriv in det exakta namnet på den nätve rksskrivaren som
du vill använda (exempelvis CXP1_ProcessPrint).
- LPR Byte Counting Enabled: vald.
11. Klicka OK > Next och sedan Finish.
12. Klicka Close i fönstret Printer Ports.
13. Klicka Close i fönstre t Printer Server Propert ies.
Nästa steg är att sätta upp TCP/IP-skrivarporten med hjälp av Adobe
Printer Driver (Adobe drivrutin) drivrutinen.
Sätta upp en TCP/IP-skrivare med hjälp av Adobe PostScrip
Printer Driver
Obs! För mer information v.g. se CXP3535 User Guide (Creo artikelnummer:
653-00561A).
1.
St arta programmet Adobe PostScript Printer Driver.
2. Följ stegen i guiden, när en uppmaning visas i fönstret Printer
Connection Type, välj It is directly connect to your compute r
(Local Printer), och kl icka sedan Next.
3. Välj den standard TCP/IP-por t du definierade tidigare, exempelvis
CXP1_ProcessPrint LPR, och klicka sedan Next.
4. Välj CXP3535 Color Server PPD: CXP3535.ppd.
5. Gå igenom resten av stegen i guiden och när du är färdig klicka
Finish.
Svenska (SV)

QuickCon nect_3535.book Page 78 Monday, August 4, 2003 1:05 PM
78 Handbok för snabbanslutning
Sätta upp en TCP/IP-skrivare i Windows NT 4.0
Följande måste installeras och konfigureras på Windows NT 4.0-datorn
innan du börjar:
• TCP/IP Protocol
• Mi crosof t TCP/IP Printing Service
• Senaste Adobe PS-drivrutin (lokaliserad i den delade mappen d:\utilities på
CXP3535 Color Server, eller också kan du hämta den från Adobe website på
www.adobe.com)
• CXP3535 PPD (PPD är lokaliserad i den delade mappen d:\utilities\PPD på
CXP3535 Color Server)
Definiera TCP/IP-skrivarporten
1. Från menyn Start på Windows-skrivbordet välj Settings > Printers.
2. Från menyn File i fönstret Printer, välj Server proper ties.
3. Välj fliken Port och klicka sedan knappen Add Port.
4. Från listan A vailable Port s, välj LPR Port, och klicka sedan knappen
New Port.
5. Skriv in det exakta namnet på CXP3535 Color Server (denna ruta är
versalkänslig) i rutan Name or address of server proving lpd:.
6. Skriv in det exakta namnet på den skri vare som du vill använda.
7. Klick OK > Close och sedan OK i fönstret Print Server Properties.
Nästa steg är att sätta upp TCP/IP-skrivarporten med hjälp av Adobe
Printer Driver.
Sätta upp en TCP/IP-skrivarport med hjälp av Adobe
PostScript Printer Driver
Obs! För mer information v.g. se CXP3535 User Guide (Creo artikelnummer:
653-00561A).
1.
St arta programmet Adobe PostScript Printer Driver.
2. Följ stegen i guiden, när en uppmaning visas i fönstret Printer
Connection Type, välj It is directly connect to your compute r
(Local Printer), och kl icka sedan Next.
3. Välj den standard TCP/IP-por t du definierat tidigare, exempelvis
CXP1_ProcessPrint LPR, och klicka sedan Next.
4. Välj CXP3535 Color Server PPD: CXP3535.ppd.
5. Gå igenom resten av stegen i guiden och när du är klar klicka Finish.

QuickCon nect_3535.book Page 79 Monday, August 4, 2003 1:05 PM
Handbok för snabbanslutning 79
Sätta upp en skrivare på en Macintosh (OS 9)
Innan du inställer en CXP3535 Color Serve r-nätverksskrivare måste du
först installera P3535 PPD. För att installera CXP_3535.ppd, anslut via
AppleShare till din CXP3535 Color Server, logga in som gäst och från
mappen Utilities kopiera filen CXP_3535.ppd till mappen Printer
Descr ip t ions i Ma c’s S ystem Fo l der.
sätta upp en skrivare på Macintosh:
1. Från menyn Apple välj Chooser.
2. Välj LaserWriter och bläddra igenom nätverket till s du kommer till din
CXP3535 Color Server.
3. Välj en nätverksskrivare av typ CXP3535 Color Server, exempelvis
ProcessPrint och klicka sedan Create. The CXP_3535.ppd
konfigureras automatiskt på din Macintosh.
Sätta upp en skrivare på en Macintosh (OS X) - LPR (IP) eller AppleTalk
Innan du sätter upp en a v CXP3535 Color Server -n ätverks skriv are måste
du först installera P3535 PPD. För att installera CXP_3535.ppd,
Appositions till din CXP3535 Color Server via Appl eShare, logga in som
gäst och från mappen Utilities kopiera filen CXP_3535.ppd till din
Macintosh hårddisk (bläddra till denna plats enligt nedanst ående
procedurer).
1. Från menyn Go, välj Applications.
2. Öppna mappen Utilities och dubbelklicka på ikonen Print Center.
3. Klicka på knappen Add Printer.
4. Välj mellan antingen AppleTalk eller LPR Printer using IP.
5. Bläddra till nätverksskrivaren CXP3535 (eller om du definierar en
LPR-skrivare så skriv in CXP3535 IP- adress eller värdnamn och det
exakta namnet på skrivaren som du vil l använda, exempelvis
CXP1_ProcessPrint).
6. Öppna popup-menyn Pr int er Model och välj Other.
7. Bläddra fram till mappen som du kopierat fi len CXP3535.ppd till och
markera den.
8. Klicka knappen Choose för att tilldela CXP3535.ppd-filen till den
valda nätverksskri varen.
9. Klicka knappen Add för att lägga till den nya skrivaren i listan.
Svenska (SV)

QuickCon nect_3535.book Page 80 Monday, August 4, 2003 1:05 PM
80 Handbok för snabbanslutning
Sätta upp en skrivare i Windows (NT/2000/XP)
För mer information v.g. se CXP3535 User Guide (Creo artikelnummer: 65300561A).
Följande måste installeras och konfigureras i Windows innan du börjar:
• IPX Protocol
• Client Service for Netware
• Nove ll Clie nt inst all e rad på CX P 3535 Color Ser ver (för me r i nfo rma tion v.g. se
steg 3 i denna handbok).
1. Från menyn Start, väl j Settings > Printers
2. Dubbelklicka Add printer.
3. Följ guiden och välj Nätverks-skrivare.
4. Bläddra igenom NetWare or Compatible Network till CXP3535
Color Server eller en Novell Printer Server.
5. Välj den printer du vill använde och konfigurera den sedan med
CXP3535-skrivaren.
6. Fortsätt att följa stegen i guiden och klicka Finish när du är färdig .

QuickCon nect_3535.book Page 81 Monday, August 4, 2003 1:05 PM
Hurtigoppkoblingsguide 81
Hurtigoppkoblingsguide – Norsk (NO)
Hvordan du br u ker de nn e g uid en
Denne guiden hjelper deg med å sette opp nettverket og systemkonfigurasjon for din CXP3535 Color Server. I tillegg har guiden trinnvise
veiledninger for oppsett av nettverksskriver på Macintosh- og Windowsklientmaskiner.
CXP3535 Color Server ble designet for til kobling til de fl este nettverk med
minimale endringer.
Trinn 1 angir standard system- og nettverksinnstillinger. Trinn 2 til 7 angir
instruksjoner om hvordan disse innstillingene kan endres for tilpasning til
kundens miljø.
Viktig: Det er påkrevd med en nettverksadministrator for å sikre at
CXP3535 Color Server konfigureres riktig på nettverket. Nettverksadministratoren må fremskaffe de riktige TCP/IP-innstillingene (IPadresse, nettverksmas ke, gateway-adresse eller DHCP-innstillinger).
For mer detaljert informasjon og prosedyrer, se i CXP3535 Color Server
Technical Manual (Creo p/n: 653-00541A) eller CXP3535 User Guide
(Creo p/n: 653-00561A).
Konfigurering av CXP3535 Color Server
Konfigurering og opp sett utføres første
gang ved første installasjon av
applikasjonsprogramvaren. Etter at
programvaren er installert, og når
CXP3535 Color Server og Xerox
DocuColor 3535 er slått på, vil
konfigurasjonsve ivi seren automatisk
komme frem.
Du kan også få tilgang til disse
innstillingene i Administr ati on-vinduet
på arbeidsområdet for CXP3535 Color
Servers.
Norsk (NO)

r
QuickCon nect_3535.book Page 82 Monday, August 4, 2003 1:05 PM
82 Hurtigoppkoblingsguide
Trinn 1: Starte CXP3535 Color Server
Tilkobling av nettverkskabel
Viktig: Kontroller at kunden har koblet en nettverkskabel til ethernetporten (10/100/1000) på CXP3535 Color Ser ver , og at kabelen er koblet til
en nettverksport, hub eller ruter.
CXP3535 Color Serve
St arte CXP3535 Color Server
Viktig: CXP3535 Color Server må startes opp, og CXP3535applikasjonsvinduet kommer frem på skjermen.
Trykk på av/på- knappen for å slå PÅ CXP3535 Color Server.
Ethernet to
network
(10/100/1000)
N
E
T
DDI-1DD
SC
AN
I-2
Power
control
button

QuickCon nect_3535.book Page 83 Monday, August 4, 2003 1:05 PM
Hurtigoppkoblingsguide 83
Trinn 2: Standard system- og nettverksinnstillinger
Merk: Hvis du må endre noen av standardinnstillingene, må du se i CXP3535
Color Server Technical Manual (Creo p/n: 653-00541A) eller CXP3535 User
Guide (Creo p/n: 653- 005 61A).
System- og nettverksinnstillinger
Det følgende er standard system- og nettverksinnstillinger.
Parameter Standardinnstillinger
Språk English
Vertsnavn CXP3535 (vertsnavnet tas fra maskinnav net som du la inn
Arbeidsgruppe Workgroup
Dato og tid: US & Canada
Måleenheter Millimeters
IP-adresse Enable DHCP: Yes
AppleTalk Zone Enabled, Zone: Automatically detected
under instal l asjonen av Windows 2000 Professional – se i
CXP3535 Technical Manual for flere detaljer).
Protokoller og tjenester som er installert
Det følgende er standardprotokoller og -tjenester som er install ert på
systemet.
Parameter Standardinnstillinger
Klient for Micr osoft-nettverk : Enabled
Deling av filer og skrivere i Microsoft-nettver k: Enabled
NWLink IPX/SPX/NetBios-kompatibel transportprotokoll: Enabled
Skriverdriver for Network Monitor Enabled
NetBEUI-protokoll: Enabled
DLC-protokoll: Enabled
AppleTalk: Enabled
Internettprotokoll: Enabled DHCP Yes
Virtuelle skrivere i nettverket – utskriftskøer
Det følgende er standard virtuelle skrivere som er tilgjengelige fra
Macintosh- og PC-klientene.
Virtuelle skrivere i nettverket – utskriftskøer <servernavn>_ProcessPrint
Norsk (NO)
<servernavn>_ProcessStore
<servernavn>_SpoolStore

QuickCon nect_3535.book Page 84 Monday, August 4, 2003 1:05 PM
84 Hurtigoppkoblingsguide
Trinn 3: Nettverksoppsett
TCP/IP-oppsett
Det følgende skal kun utf øres hvis du må endr e standardi nnstilli ngene (se
trinn 2 for standardverdier).
1. Klikk på Admin på arbeidsområdet for CXP3535 Color Server.
2. Dobbeltklikk på Network Setup > TCP/IP Setup.
3. Velg Use the following IP Address (Bruk følgende IP-adresse).
4. Legg inn ny IP-adresse, nettverksmaske og standard gateway (ifølge
nettverksadministrator).
5. Om nødvendig skal du legge inn DNS-serveradresser (ifølge
nettverksadministrator).
6. Klikk på OK > OK.
7. Når du blir bedt om å starte maskinen på nytt, klikker du på Yes (Ja).
Oppsett av AppleTalk
Det følgende skal kun utf øres hvis du må endr e standardi nnstilli ngene (se
trinn 2 for standardverdier).
1. Klikk på Admin på arbeidsområdet for CXP3535 Color Server.
2. Dobbeltklikk på Network Setup > AppleTalk Setup.
3. Vel g ønsket sone fra rullegardinmenyen This syst em will appear in
zone (Dette systemet vil vises i sone).
4. Klikk på OK > OK.
Oppsett av IPX og Novell Client
Merk: For mer detaljert informasjon og prosedyrer, se i CXP3535 Color
Server Technical Manual (Creo p/n : 653-0 0541A) eller CXP3535 User Guide
(Creo p/n: 653-00561A).
De følgende prosedyrer er relevante for kunder som har Novell-nettver k
som kjører med IPX-protokoll.
Installere Novell Client på CXP3535 Color Server
1. Lukk arbeidsområdet for CXP3535 og applikasjon.
2. Lukk alle andre åpne applikasjoner.

QuickCon nect_3535.book Page 85 Monday, August 4, 2003 1:05 PM
Hurtigoppkoblingsguide 85
3. På Windows-skrivebordet kli kker du på Start og følger banen
CXP3535 > CXP3535 Tools > Novell Client Installation (Verktøy >
Novell Client-installasjon).
4. Klikk på Install (Installer), og klikk deretter Reboot (Start maskinen
på nytt).
Konfigurere Novell Client på CXP3535 Color Server
1. Når maskinen har starte t på nytt vil Novell Setup-vinduet vises.
2. Legg inn Tree Name (Trenavn). Hvis du ikke vet navnet, klikker du
på Browse (Søk) og dobbeltklikker deretter på det aktuelle Tree
Name.
3. Legg inn Context Name (Ko nte kstnavn). H vis du ikke vet navnet ,
klikker du på Browse og dobbeltklikker deretter på det aktuelle
Context Name.
4. Klikk på OK. Arbeidsområdet for CXP3535 kommer frem.
Trinn 4: Vise og skrive ut systemkonfigurasjonen
Vise systemkonfigurasjonen
1. Klikk på Admin på arbeidsområdet for CXP3535 Color Server.
2. Dobbeltklikk på Utilities > View Configuration (Programmer > Vis
konfigurasjon).
3. Nettverks- og systemkonfigurasjonen for din CXP3535 Color Server
vises.
Skrive ut systemkonfigurasjonen
1. I vinduet View Configuration klikker du på Print.
2. Vel g skriveren ProcessPrint og klikk på Print.
3. Systemkonfigurasjonen for CXP3535 skrives ut.
4. Klikk på Close for å lukke View Configuration-vinduet, og lukk
deretter Administration-vinduet.
Norsk (NO)

QuickCon nect_3535.book Page 86 Monday, August 4, 2003 1:05 PM
86 Hurtigoppkoblingsguide
Trinn 5: Skrive ut fra Macintosh- eller Windows-maskin
Merk: For mer detaljert informasjon, se i CXP3535 User Guide (Creo p/n:
653-00561A).
Oppsett av skriver i Windows ME/2000/XP (smb)
1. Klikk på Start, gå til Kontrollpanel og klikk på Skrivere.
2. Dobbeltklikk på Legg til skriver, og klikk på Neste.
3. Velg Nettverksskriver, og klikk på Neste.
4. Søk på nettverket til du finner CXP3535 Color Serv er, og dobbeltkli kk
på servernavnet. En liste over skrivere blir vist.
5. Vel g en av skriverne på nettverket, f.eks . ProcessPrint, og klikk på
OK.
6. Vel g om den skal være standardskriver eller ikke, og klikk på Neste.
7. Klikk på Fullfør for å fullføre oppsettet.
Oppsett av TCP/IP-skriver i Windows ME/2000/XP
Det følgende må installeres og konfigureres på maskiner med Windows
ME/2000/XP før du starter:
• TCP/IP-protokoll
• Siste versjon av Adobe PS skriverdriver (ligger i den delte mappen d:\utilities
på CXP3535 Color Server, eller du kan laste den ned fra Adobes nettsted på
www.adobe.com)
• CXP3535 PPD (PPD ligger i den delte mappen d:\utilities\PPD på CXP3535
Color Server)
Definere TCP/IP-skriverporten
1. Fra Start-menyen på Windows-skrivebordet skal du velge
Kontrollpanel > Skrivere og telefakser.
2. I vinduet Skrivere og telefakser går du til Fil-menyen og velger
Serveregenskaper.
3. Vel g kategorien Porter og klikk på Legg til port.
4. Fra listen med Tilgjengelige porttyper velger du Standa rd TCP/I P
Port, og klikker på knappen Ny port.
5. Klikk på Neste.

QuickCon nect_3535.book Page 87 Monday, August 4, 2003 1:05 PM
Hurtigoppkoblingsguide 87
6. Skriv inn det nøyaktige navnet på CXP3535 Color Server (denne
boksen skiller mellom store/små boks taver) i boksen Skrivernavn
eller IP-adresse.
7. Skriv inn et navn på skri veren, som du vil fi nne igjen på dat amaskinen
din i boksen Portnavn.
8. Klikk på Neste.
9. Velg Egendefinert som valg av Enhetstype, og klikk deretter på
Innstillinger.
10. Vel g føl gende alternativer:
• Protokoll: LPR
• LPR-innstillinger:
- Kønavn: skriv inn det nøyaktige navnet på nettverksskriveren som du
ønkser å skrive til (f.eks., CXP1_ProcessPrint).
- Byte-telling for LPR aktivert: skal være valgt.
11. Klikk på OK > Neste og så Fullfør.
12. Klikk på Lukk i Skriverporter-vinduet.
13. Klikk på Lukk i vinduet Egenskaper for utskriftsserver.
Neste trinn er oppsett av TCP/IP-porten for utskrift med Adobe Printer
Driver.
Oppsett av TCP/IP-skriver som bruker Adobe PostScript
skriverdriver
Merk: For mer detaljert informasjon, se i CXP3535 User Guide (Creo p/n:
653-00561A).
1.
St art Adobe PostScript skriverdriveren.
2. Følg trinnene i veiviseren, og når du får beskjed om det i vinduet
Printer Connection Type skal du velge It is directly connect to your
computer (Local Printer), og så klikke på Next.
3. Vel g den standard TCP/IP-porten du definerte tidligere, for eksempel
CXP1_ProcessPrint LPR, og klikk på Next.
4. Velg CXP3535 Color Server PPD: CXP3535.ppd.
5. Følg resten av trinnene i veiviseren, og når du er ferdig klikker du på
Finish.
Norsk (NO)

QuickCon nect_3535.book Page 88 Monday, August 4, 2003 1:05 PM
88 Hurtigoppkoblingsguide
Oppsett av TCP/IP-skriver i Windows NT 4.0
Det følgende må installeres og konfigureres på maskiner med Windows
NT 4.0 før du starter:
• TCP/IP-protokoll
• Mi crosof t TCP/IP Printing Service
• Siste versjon av Adobe PS skriverdriver (ligger i den delte mappen d:\utilities
på CXP3535 Color Server, eller du kan laste den ned fra Adobes nettsted på
www.adobe.com)
• CXP3535 PPD (PPD ligger i den delte mappen d:\utilities\PPD på CXP3535
Color Server)
Definere TCP/IP-skriverporten
1. Fra Start-menyen på Windows-skrivebordet skal du velge
Kontrollpanel > Skrivere.
2. I skrivervinduet går du til Fil-menyen og velger Serveregenskaper.
3. Vel g kategorien Porter og klikk på Legg til port.
4. Fra listen med Tilgjengelige porter velger du LPR Port, og klikker
på knappen Ny port.
5. Skriv inn det nøyaktige navnet på CXP3535 Color Server (denne
boksen skiller mellom store/små boks taver) i boksen Navn eller
adresse til serveren som sørger for LPD. .
6. Skriv inn nøyaktig navn på skriveren som du ønsker å skrive til.
7. Klikk på OK > Lukk og så OK i vinduet Egenskaper for
utskriftsserver.
Neste trinn er oppsett av TCP/IP-porten for utskrif t med Adobe Prin ter
Driver.
Oppsett av TCP/IP-skriver som bruker Adobe PostScript
skriverdriver
Merk: For mer detaljert informasjon, se i CXP3535 User Guide (Creo p/n:
653-00561A).
1.
St art Adobe PostScript skriverdr iveren.
2. Følg trinnene i veiviseren, og når du får beskjed om det i vinduet
Printer Connection Type skal du velge It is directly connect to your
computer (Local Printer), og så klikke på Next.
3. Vel g den standard TCP/IP-porten du definerte tidligere, for eksempel
CXP1_ProcessPrint LPR, og klikk på Next.
4. Velg CXP3535 Color Server PPD: CXP3535.ppd.
5. Følg resten av trinnene i veiviseren, og når du er ferdig klikker du på
Finish.

QuickCon nect_3535.book Page 89 Monday, August 4, 2003 1:05 PM
Hurtigoppkoblingsguide 89
Oppsett av skriver på Macintosh (OS 9)
Før du foretar oppsett for en av nettverksskriverne i CXP3535 Color
Server må du først installere CXP3535 PPD. For å installere
CXP_3535.ppd bruker du AppleShare for å koble deg til din CXP3535
Color Server, logg deg inn som gjest og fra Utilities-mappen skal du
kopiere CXP_3535.ppd til mappen Skriveropplysninger i Mac-ens
System-mappe.
Oppsett av skriver på din Macintosh:
1. Fra Apple-menyen velger du Velger.
2. Vel g LaserWriter og søk gjennom nettverket til din CXP3535 Color
Server.
3. Velg en av nettverksskriverne på CXP3535 Color Server, f.eks.
ProcessPrint, og klikk på Opprett. CXP_3535.ppd blir konfigurert og
satt opp automatisk på din Macintosh.
Oppsett av skriver på Macintosh (OS X) – LPR (IP) eller AppleTalk
Før du foretar oppsett for en av nettverksskriverne i CXP3535 Color
Server må du først installere CXP3535 PPD. For å installere
CXP_3535.ppd bruker du AppleShare for å koble deg til din CXP3535
Color Server, logg deg inn som gjest og fra Utilities-mappen skal du
kopiere CXP_3535.ppd til harddisken på din Macintosh (skriv til en
lokasjon som du skal bruke i prosedyren nedenfor).
1. Fra Gå til-menyen velger du Programmer.
2. Åpne Utilities-mappen og dobbeltklikk på Utskrifssenter-ikonet.
3. Klikk på knappen Legg til skriver.
4. Vel g enten AppleTalk eller LPR-skriver bruker IP.
5. Søk deg frem til CXP3535 nett verksskriver (eller hvis du definerer en
LPR-skriver; legg inn CXP3535 IP-adresse eller vertsnavn, og det
nøyaktige navnet på skriveren som du vil skrive til, f.eks.
CXP1_ProcessPrint).
6. Åpne rullegardinmenyen Skrivermodell og velg Annen.
7. Søk deg frem til mappen som du kopierte CXP3535.ppd til, og velg
den.
8. Klikk på Velg-knappen for å tilordne CXP3535.ppd til den valgte
nettverksskriveren.
Norsk (NO)
9. Klikk på Legg til-knappen for å legge til den nye skriveren i
skriverlisten.

QuickCon nect_3535.book Page 90 Monday, August 4, 2003 1:05 PM
90 Hurtigoppkoblingsguide
Oppsett av Novell-skriver i Windows (NT/2000/XP)
For mer detaljert informasjon, se i CXP3 535 Us er Gu ide (Cr eo p/ n: 65300561A).
Det følgende må være installert og konfigurert i Windows for du starter:
• IPX-protokoll
• Client Service for Netware
• Novell Client installert på CXP3535 Color Server (se i trinn 3 i denne guiden
for flere detaljer).
1. Fra Start-menyen skal du velge Kontrollpanel > Skrivere
2. Dobbeltklikk på Legg til skriver.
3. Følg veiviseren og velg Nettverksskriver.
4. Søk i NetWare eller kom patibelt nettverk etter CXP3535 Color
Server eller en Novell skriverserver.
5. Vel g skriveren du ønsker å skrive til, og konfigurer den med
CXP3535-skriveren.
6. Fortsett å følge veiviserens trinn, og klikk på Fullfør når du er ferdig.

QuickCon nect_3535.book Page 91 Monday, August 4, 2003 1:05 PM
Pikakytkentäopas 91
Pikakytkentäopas – Suomi (FI)
Tämän oppaan käyttäminen
Tässä oppaassa annetaan ohjeita CXP3535-väripalvelimen verkko- ja
järjestelmäasetust en määritt ämiseen. Lis äksi oppaas sa kerrot aan, kuin ka
verkkotulosti n määri tetään Macintosh- ja Windows-työasemiin.
CXP3535-väripalvelin on suunniteltu kytkettäväksi useimpiin verkkoihin
ilman suuria muutoksia.
Vaiheessa 1 kuvataan oletusarvoiset järjestelmä- ja verkkoasetukset.
V aiheet 2 - 7 s is ältävät oh jeit a näiden aset usten muut tami seen asiakkaa n
ympäristöä vastaaviksi.
Tärkeää: Verkonvalvojaa tarvitaan varmistamaan, että CXP3535väripalvelim en verkkoasetukset määritetään oikein. Verkonvalvojan on
annettava tarvittavat TCP/IP-asetukset (IP-osoite, ali verkon peite ja
yhdyskäytävän osoi te tai DHCP-asetukset).
Lisätietoja ja ohjeita on CXP3535-väripalvelimen teknisessä oppaassa
(Creo-osanumero 653-00541A) tai CXP3535-käyttöoppaassa (Creoosanumero 653-00561A).
CXP3535-väripalvelimen asetusten määrittäminen
Asetukset määritetään ensimmäistä
kertaa sovellusohjelmiston asennuksen
yhteydessä. Kun sovellusohjelmisto on
asennettu ja CXP3535-väripalvelimeen
ja Xerox DocuColor 3535 -laitteeseen
on kytketty virta, asetusten ohjattu
määritystoiminto käynnistyy
automaattisesti.
Näitä asetuksia voi tarkastella ja
muuttaa myös CXP3535-väri palvelimen
työtilan Administration-ikkunan kautta.
Suomi (FI)

r
QuickCon nect_3535.book Page 92 Monday, August 4, 2003 1:05 PM
92 Pikakytkentäopas
Vaihe 1 : C XP353 5- vär ip al v el imen käyn nis tä minen
Verkkokaapelin kyt keminen
Tärkeää: Varmista, että verkkokaapelin toinen pää on kytket ty CXP3535väripalvelimen Ethernet-porttiin (10/100/1000) ja toinen verkkoporttiin,
keskittimeen tai reitittimeen.
CXP3535 Color Serve
Ethernet to
network
(10/100/1000)
N
E
T
DDI-1DD
CXP3535-väripalvelimen käynnistäminen
Tärkeää: CXP3535-väripalvelimeen on kytkettävä virta, jotta CXP3535sovellusikkuna tulee näyt töön.
Kytke virta CXP3535-väripalvelimeen p a inamalla laitteen virtapainiketta.
I-2
SC
AN
Power
control
button
 Loading...