

Page 1

Technical Manual
English
653-00541A
CXP3535 Color Server for
the DocuColor 3535
Version 1.0
Draft
www.creo.com
Page 2

This page is intentionally blank.
Page 3

Copyright
Trademarks
Copyright © 2003 Creo Inc. All rights reserved.
No copying, distribution, publication, modification, or incorporation of this document, in whole or part, is
permitted without the express written permission of Creo. In the event of any permitted copying, distribution,
publication, modification, or incorporation of this document, no changes in or deletion of author attribution,
trademark legend, or copyright notice shall be made.
No part of this document may be reproduced, stored in a retrieval system, published, used for commercial
exploitation, or transmitted, in any form by any means, electronic, mechanical, photocopying, recording, or
otherwise, without the express written permission of Creo Inc.
This document is also distributed in Adobe Systems Incorporated's PDF (Portable Document Format). You may
reproduce the document from the PDF file for internal use. Copies produced from the PDF file must be
reproduced in whole.
. . . . . . . . . . . . . . . . . . . . . . . . . . . . . . . . . . . . . . . . . . . . . . . . . . . . . . . . . . . . . . . . . . . . . . . . . . . . . . . . . . . . . . . . . . . . . . . . . . . .
The Creo wordmark, Creo logo, and the names of the Creo products and services referred to in this document are
trademarks of Creo Inc.
Adobe, Acrobat, and the Acrobat logo are registered trademarks of Adobe Systems Incorporated, and are
registered in the U.S. Patents and Trademark Office and may be registered in other jurisdictions.
Apple, AppleTalk, AppleShare, EtherTalk, LocalTalk, Macintosh, and LaserWriter are trademarks of Apple
Computer, Inc.
Microsoft, Windows, Windows 2000, and Windows NT are trademarks or registered trademarks of Microsoft
Corp.
Xerox is a registered trademark of Xerox Corp.
Other brand or product names are the trademarks or registered trademarks of their respective owners.
. . . . . . . . . . . . . . . . . . . . . . . . . . . . . . . . . . . . . . . . . . . . . . . . . . . . . . . . . . . . . . . . . . . . . . . . . . . . . . . . . . . . . . . . . . . . . . . . . . . .
FCC Compliance
The Creo equipment referred to in this document complies with the requirements in Part 15 of FCC Rules for a
Class A computing device. Operation of the Creo equipment in a residential area may cause unacceptable
interference to radio and TV reception, requiring the operator to take whatever steps are necessary to correct the
interference.
. . . . . . . . . . . . . . . . . . . . . . . . . . . . . . . . . . . . . . . . . . . . . . . . . . . . . . . . . . . . . . . . . . . . . . . . . . . . . . . . . . . . . . . . . . . . . . . . . . . .
Limitation of Liability
The product, software or services are being provided on an "as is" and "as available" basis. Except as may be stated
specifically in your contract, Creo Inc. expressly disclaims all warranties of any kind, whether express or implied,
including, but not limited to, any implied warranties of merchantability, fitness for a particular purpose and noninfringement.
You understand and agree that Creo Inc. shall not be liable for any direct, indirect, incidental, special,
consequential or exemplary damages, including but not limited to, damages for loss of profits, goodwill, use, data
or other intangible losses (even if Creo has been advised of the possibility of such damages), resulting from: (i)
the use or the inability to use the product or software; (ii) the cost of procurement of substitute goods and
services resulting from any products, goods, data, software, information or services purchased; (iii) unauthorized
access to or alteration of your products, software or data; (iv) statements or conduct of any third party; (v) any
other matter relating to the product, software, or services.
CXP3535 Color Server for the DocuColor 3535 Technical Manual
Page 4

Patents
The text and drawings herein are for illustration and reference only. The specifications on which they are based
are subject to change. Creo Inc. may, at any time and without notice, make changes to this document. Creo Inc.,
for itself and on behalf of its subsidiaries, assumes no liability for technical or editorial errors or omissions made
herein, and shall not be liable for incidental, consequential, indirect, or special damages, including, without
limitation, loss of use, loss or alteration of data, delays, or lost profits or savings arising from the use of this
document.
.. . . . . . . . . . . . . . . . . . . . . . . . . . . . . . . . . . . . . . . . . . . . . . . . . . . . . . . . . . . . . . . . . . . . . . . . . . . . . . . . . . . . . . . . . . . . . . . . . . . .
This product is covered by one or more of the following U.S. patents:
RE37,376
4,558,302
4,743,091
4,992,864
5,049,901
5,079,721
5,103,407
5,111,308
5,113,249
5,122,871
5,124,547
5,132,723
5,150,225
5,153,769
5,155,782
5,157,516
5,208,818
5,208,888
5,247,174
5,249,067
5,283,140
5,291,273
5,323,248
.. . . . . . . . . . . . . . . . . . . . . . . . . . . . . . . . . . . . . . . . . . . . . . . . . . . . . . . . . . . . . . . . . . . . . . . . . . . . . . . . . . . . . . . . . . . . . . . . . . . .
Creo Inc.
3700 Gilmore Way
Burnaby, B.C., Canada
V5G 4M1
Tel: 1-604-451-2700
Fax: 1-604-437-9891
http://www.creo.com
<<653-00541A>>
Revised August 2003
5,325,217
5,339,176
5,343,059
5,355,446
5,359,451
5,359,458
5,367,360
5,384,648
5,384,899
5,412,491
5,412,737
5,420,702
5,420,722
5,459,505
5,473,733
5,481,379
5,488,906
5,497,252
5,508,828
5,509,561
5,517,359
5,519,852
5,526,143
5,532,728
5,561,691
5,568,595
5,576,754
5,579,115
5,592,309
5,594,556
5,600,448
5,608,822
5,615,282
5,625,766
5,636,330
5,649,220
5,650,076
5,652,804
5,680,129
5,691,823
5,691,828
5,696,393
5,699,174
5,699,740
5,708,736
5,713,287
5,742,743
5,764,374
5,764,381
5,771,794
5,785,309
5,813,346
5,818,498
5,854,883
5,861,904
5,861,992
5,875,288
5,894,342
5,900,981
5,934,196
5,942,137
5,946,426
5,947,028
5,958,647
5,966,504
5,969,872
5,973,801
5,986,819
5,995,475
5,996,499
5,998,067
6,003,442
6,014,471
6,016,752
6,031,932
6,043,865
6,060,208
6,063,528
6,063,546
6,072,518
6,090,529
6,096,461
6,098,544
6,107,011
6,112,663
6,115,056
6,121,996
6,130,702
6,134,393
6,136,509
6,137,580
6,147,789
6,158,345
6,159,659
6,164,637
6,180,325
6,181,362
6,181,439
6,186,068
6,189,452
6,191,882
6,204,874
6,208,369
6,214,276
6,217,965
6,260,482
6,266,080
6,266,134
6,267,054
6,268,948
6,283,589
6,295,076
6,299,572
6,318,266
6,352,816
6,353,216
6,366,339
6,371,026
6,377,739
6,387,597
6,396,422
6,396,618
6,407,849
6,414,755
6,422,801
6,435,091
6,441,914
6,450,092
6,456,396
6,476,931
6,477,955
6,509,903
CXP3535 Color Server for the DocuColor 3535 Technical Manual
Page 5

Environment Management System (EMS)
EMS Overview
Creo is committed to the Environment Management System (EMS) and according to this policy, we are
obliged to keep customers and service engineers informed about the principles of handling company
products, while emphasizing on the environmental conservation.
The Triple-R principles are:
Reduce, Reuse and Recycle.
Any item that can be recycled should be recycled and any item that can be reused should be reused in
order to reduce the quantities of landfill that are sent to the local municipalities.
Recycling
Items such as: Paper, Plastic, Electronic Parts, Glass – should be sent for recycling, after usage.
Packaging Materials
Packaging Materials will be kept at the customer’s premises. If these should be disposed of, they should
be sent to a plant for recycling of the Paper, Cartons and Wood.
End of Product Life span
The product should be sent for recycling to a recognized company in each country.
CXP3535 Color Server for the DocuColor 3535 Technical Manual
Page 6

This page is intentionally blank.
Page 7

Contents
Using This Manual 1
Safety Information (Multilingual) 5
1 First Time Setup and Configuration 17
1.1 Hardware Installation Procedures ................................................................................................... 18
1.1.1 Unpacking the System Components .................................................................................... 18
1.1.2 Before Unpacking................................................................................................................ 18
1.1.3 Unpacking Instructions ........................................................................................................ 19
1.1.4 Connecting the CXP3535 Color Server System Cables ........................................................ 19
1.1.5 Front Panel LEDs and Controls ............................................................................................. 22
1.1.6 Turning on the CXP3535 Color Server ................................................................................. 23
1.2 Installing the Windows 2000 Professional Operating System .......................................................... 24
1.3 Installing the Creo Application Software ........................................................................................ 25
1.4 Configuration Wizard (First Time Software Setup) .......................................................................... 28
1.4.1 Choosing the Configuration Type ........................................................................................ 28
1.4.2 Setting the Language .......................................................................................................... 29
1.4.3 Configuring the Host Name................................................................................................. 30
1.4.4 Setting the Date and Time ................................................................................................... 33
1.4.5 Setting the Default Measurement Units ............................................................................... 35
1.4.6 Configuring the IP Address .................................................................................................. 36
1.4.7 Configuring the Apple Talk Zone ......................................................................................... 38
1.4.8 Completing the Configuration............................................................................................. 40
1.4.9 Changing the Operator Name and Password ....................................................................... 43
1.4.10 Installing and Configuring Novell Client for Spire ................................................................. 44
1.4.11 Configuring the McAfee VirusScan ...................................................................................... 49
1.4.12 Importing a File and Performing a Test Print......................................................................... 56
1.4.13 Shutting Down and Turning Off .......................................................................................... 57
2 Software Reinstallation and Configuration 59
2.1 Overview ....................................................................................................................................... 60
2.2 Reinstalling the Operating System.................................................................................................. 62
2.3 Reinstalling the Creo Application ................................................................................................... 64
2.4 The Configuration Wizard (If Configuration Backup is Available) .................................................... 68
2.4.1 Restoring the Backed Up Configuration ............................................................................... 68
2.4.2 Restoring the Factory Defaults Configuration....................................................................... 73
2.5 The Configuration Wizard (If Recovery Fails or is Unavailable)......................................................... 76
2.5.1 Choosing the Configuration Type ........................................................................................ 76
2.5.2 Setting the Language .......................................................................................................... 77
2.5.3 Configuring the Host Name................................................................................................. 78
2.5.4 Setting the Date and Time ................................................................................................... 81
CXP3535 Color Server for the DocuColor 3535 Technical Manual
Page 8

vi Contents
2.5.5 Setting the Default Measurement Units ............................................................................... 83
2.5.6 Configuring the IP Address.................................................................................................. 84
2.5.7 Configuring the Apple Talk Zone......................................................................................... 86
2.5.8 Completing the Configuration............................................................................................. 88
2.5.9 Changing the Operator Name and Password ....................................................................... 91
2.5.10 Installing and Configuring Novell Client for Spire ................................................................. 92
2.5.11 Configuring the McAfee VirusScan...................................................................................... 97
2.5.12 Importing a File and Performing a Test Print ...................................................................... 104
2.5.13 Shutting Down and Turning Off ........................................................................................ 104
3 Diagnostics and Troubleshooting 105
3.1 Platform Diagnostics.................................................................................................................... 106
3.1.1 Using the BIOS Configuration/Setup Utility Program .......................................................... 106
3.1.2 Diagnostic Tools Overview................................................................................................. 111
3.1.3 POST (Power-On Self Test)................................................................................................. 112
3.1.4 Monitor Problems.............................................................................................................. 122
3.1.5 Memory Problems ............................................................................................................. 122
3.1.6 Diagnostic Programs and Error Messages........................................................................... 123
3.1.7 Viewing the Test Log......................................................................................................... 127
3.1.8 Power Checkout................................................................................................................ 128
3.1.9 Temperature Checkout...................................................................................................... 128
3.1.10 Troubleshooting the Ethernet Controller............................................................................ 129
3.2 Creo Hardware Diagnostics Application ....................................................................................... 130
3.2.1 Activating the Diagnostics Utility ....................................................................................... 131
3.2.2 The Diagnostics Window ................................................................................................... 132
3.2.3 Main Menu Options .......................................................................................................... 133
3.2.4 Board Diagnostics.............................................................................................................. 136
3.2.5 Hardware and Other Components Testing......................................................................... 137
3.2.6 Performing a Diagnostic Test ............................................................................................. 137
3.3 Troubleshooting .......................................................................................................................... 140
3.3.1 Error Messages.................................................................................................................. 144
3.3.2 Collecting Data Log Files ................................................................................................... 146
3.3.3 Formatting the Image Disk ................................................................................................ 148
4 Hardware Maintenance and Repairs 151
4.1 System Components.................................................................................................................... 152
4.2 Spare Parts List ............................................................................................................................ 154
4.3 Before You Begin ........................................................................................................................ 156
4.3.1 System Reliability Considerations ....................................................................................... 156
4.4 Working with Covers................................................................................................................... 157
4.4.1 Removing the Side Cover .................................................................................................. 157
4.4.2 Returning the Side Cover................................................................................................... 158
4.4.3 Removing and Returning the Frame Support Bracket ......................................................... 159
4.4.4 Removing and Rotating the Stabilizing Feet ....................................................................... 160
4.4.5 Removing and Returning the Bezel .................................................................................... 162
CXP3535 Color Server for the DocuColor 3535 Technical Manual
Page 9

Contents vii
4.4.6 Removing and Returning the Handle Assembly .................................................................. 163
4.4.7 Removing and Returning the Bezel Release Latch............................................................... 164
4.4.8 Removing and Returning the Top/Side Cover ..................................................................... 165
4.4.9 Removing and Returning the Adapter Retainers................................................................. 167
4.5 Working with Boards (Adapters) .................................................................................................. 168
4.5.1 Visual Inspection................................................................................................................ 169
4.5.2 Removing and Replacing the FusionXL Board..................................................................... 170
4.5.3 Removing and Replacing the FusionXL Board Memory Modules......................................... 173
4.5.4 Removing and Replacing the System Board Memory Module ............................................. 174
4.5.5 Removing and Replacing a CPU ......................................................................................... 176
4.5.6 Removing and Replacing the Battery.................................................................................. 178
4.5.7 Configuring the Computer BIOS ........................................................................................ 180
4.5.8 Removing and Replacing the Extender Board ..................................................................... 181
4.5.9 Removing and Replacing the System Board........................................................................ 184
4.6 Removing and Replacing Floppy Disk and CD-ROM Drives ........................................................... 187
4.6.1 Floppy Disk Drive ............................................................................................................... 187
4.6.2 CD-ROM Drive................................................................................................................... 188
4.7 Replacing Hard Disk Drives........................................................................................................... 189
4.8 Removing and Replacing the Power Supply.................................................................................. 191
4.9 Removing and Replacing the Rear Fan ......................................................................................... 192
A Specifications and Standards 195
A.1 Environmental Requirements ....................................................................................................... 196
A.2 Specifications............................................................................................................................... 196
A.3 Operating Environment................................................................................................................ 197
A.3.1 Energy Consumption ......................................................................................................... 197
A.3.2 Acoustics........................................................................................................................... 197
A.3.3 Temperature and Relative Humidity ................................................................................... 197
A.3.4 Electrical (Color Server and Monitor).................................................................................. 198
A.4 Standards .................................................................................................................................... 198
A.4.1 Safety Agency Approvals ................................................................................................... 198
A.4.2 CB Report.......................................................................................................................... 198
A.4.3 EMC Requirements............................................................................................................ 199
B Installing a Token Ring (Optional) 201
B.1 Token Ring Installation (Optional) ................................................................................................ 202
B.1.1 Installing a Token Ring Board:............................................................................................ 202
B.1.2 Confirming that the Token Ring Driver is Installed.............................................................. 203
B.1.3 Configuring the Token Ring Adapter ................................................................................. 204
CXP3535 Color Server for the DocuColor 3535 Technical Manual
Page 10

This page is intentionally blank.
Page 11

Using This Manual
Who Should Use This Manual .............................................................2
Conventions Used in This Manual .......................................................3
For More Information..........................................................................4
CXP3535 Color Server for the DocuColor 3535 Technical Manual
Page 12

2 Using This Manual
Who Should Use This Manual
This manual is intended for use by Xerox representatives, including
installation and service personnel (see the table below), using or
administering the CXP3535 Color Server for the Xerox DocuColor3535
printer, Version 1.0. This manual is designed to accompany the
representative during all stages of installation and servicing.
The CXP3535 Color Server is installed and serviced exclusively by specially
trained and certified technicians.
The table below illustrates which chapters are relevant to the service
representative, analyst, and system administrator.
Technical Manual
Chapter
Chapter 1, First Time
Setup and
Configuration
Chapter 2, Software
Reinstallation and
Configuration
Chapter 3, Diagnostics
and Troubleshooting
Chapter 4, Hardware
Maintenance and
Repairs
This manual assumes that:
Service
Representative
999
99
9
Analyst System
Administrator
9
• All the hardware, software, and network components of your Creo
system are installed, configured, and operating correctly.
• Files submitted to the Creo system are free of common errors usually
resolved during preflight, such as missing fonts and PostScript errors.
<DRAFT- CXP3535 Color Server for the DocuColor 3535 Technical Manual>
Page 13

Conventions Used in This Manual 3
Conventions Used in This Manual
This section describes the terminology and symbols used in this manual.
Terminology
Clear
Click
Doubleclick
Enter
Point
Press
Right-click
Place the mouse pointer over the check box for the
specified option, and click the left mouse button so
that the X or check mark is removed from the check
box.
Place the mouse pointer over the specified option or
button and press and release the left mouse button.
Place the mouse pointer over the specified option or
button and quickly press and release the left mouse
button twice.
Type the information and press the ENTER or RETURN
key.
Position the mouse pointer over a submenu or menu
command. For example, point to the
File menu.
Press the specified key or key combination on your
keyboard. For example, press
CTRL+ALT+DEL.
Place the mouse pointer over an area of the
application window. Then press and release the right
mouse button to display the shortcut menu. For more
information about using shortcut menus, see your
Windows documentation.
Select
Place the mouse pointer over the check box for the
specified option, then click the left mouse button so
that an X or check mark appears in the check box.
Or:
Place the mouse pointer over the specified box or
button. Then click the left mouse button.
Ty pe
CXP3535 Color Server for the DocuColor 3535 Technical Manual
Type the information. Do not press the ENTER or
RETURN key.
Page 14
4 Using This Manual
Symbols
DANGER: This symbol indicates an imminently hazardous situation,
which, if not avoided, will result in death or serious injury. This does not
alert you to a property damage accident unless personal injury risks are
associated with the accident.
WARNING: This symbol indicates a potentially hazardous situation, which, if not
avoided, could result in death or serious injury. This does not alert you to a
property damage accident unless personal injury risks are associated with the
accident.
CAUTION: This symbol indicates a potentially hazardous situation, which, if
not avoided, may result in minor or moderate injury. This may also alert you to
unsafe practices or potential property-damage-only accidents.
Attention: This symbol alerts you to things that may cause loss of data or
damage to your computer hardware.
Important: This symbol indicates things that may cause process delays or
reduce functionality, reliability, or quality.
Note: A note provides additional information that you may need to consider.
For More Information
The reference symbol tells you that related information on the topic is available
in another Creo document.
Visit Creo at www.creo.com for documentation, training courses,
downloads, and service and support contacts.
<DRAFT- CXP3535 Color Server for the DocuColor 3535 Technical Manual>
Page 15

Safety Information
(Multilingual)
Safety Precaution Symbols...................................................................6
Safety Precautions...............................................................................9
Medidas Preventivas de Seguridad.....................................................11
Mesures de sécurité ..........................................................................12
Precauzioni di Sicurezza ....................................................................13
Veiligheidsmaatregelen .....................................................................14
Precauções de segurança ..................................................................15
<DRAFT- CXP3535 Color Server for the DocuColor 3535 Technical Manual>
Page 16

6
Safety Precaution Symbols
DANGER: This symbol indicates an imminently hazardous situation,
which, if not avoided, will result in death or serious injury. This does not
alert you to a property damage accident unless personal injury risks are
associated with the accident.
GEFAHR: Dies zeigt eine unmittelbar bevorstehende gefährliche
Situation an, die, wenn sie nicht vermieden wird, zum Tode oder zu
ernsten Verletzungen führt. Dies warnt Sie nur dann vor einem Unfall
mit Eigentumsschaden, wenn persönliche Verletzungsrisiken damit
verbunden sind.
PELIGRO: Esto indica una situación inminentemente peligrosa, que, si no
se evita, puede provocar la muerte o serias lesiones. Esto no le advierte
de la posibilidad de accidentes con daño a la propiedad a no ser que
hayan riesgos de heridas asociados.
DANGER: Ce symbole indique une situation dangereuse qui provoquera
des blessures graves voire mortelles. Il n'indique pas la possibilité de
dommage au matériel à moins qu'il y ait des risques de blessure
associés.
PERICOLO: Questo simbolo indica una situazione pericolosa che, se non
evitata, potrebbe causare la morte o ferite gravi. Non si è allertati per un
incidente di danni materiali a meno che i rischi di ferita personale siano
associati all'incidente.
GEVAAR: U wordt gewaarschuwd een mogelijk gevaarlijke actie niet uit
te voeren, die als deze niet wordt vermeden, kan resulteren in overlijden
of serieus letsel. Deze waarschuwing geldt niet voor beschadiging aan
de apparatuur, mits persoonlijk letsel is verbonden aan het uitvoeren
van deze gevaarlijke actie.
PERIGO: Isto indica uma situação iminentemente perigosa que, se não
evitada, irá resultar em morte ou sérios ferimentos. Isto não lhe alerta
sobre um acidente de danos em propriedade a menos que riscos de
danos pessoais estiverem associados com o acidente.
CXP3535 Color Server for the DocuColor 3535 Technical Manual
Page 17

Safety Precaution Symbols 7
WARNING: This symbol indicates a potentially hazardous situation, which, if not
avoided, could result in death or serious injury. This does not alert you to a
property damage accident unless personal injury risks are associated with the
accident.
WARNUNG: Dies zeigt eine potentiell gefährliche Situation an, die, wenn sie
nicht vermieden wird, zum Tode oder zu ernsten Verletzungen führt. Dies warnt
Sie nur dann vor einem Unfall mit Eigentumsschaden, wenn persönliche
Verletzungsrisiken damit verbunden sind.
ADVERTENCIA: Esto indica una situación inminentemente peligrosa, que, si no
se evita, puede provocar la muerte o serias lesiones. Esto no le advierte de la
posibilidad de accidentes con daño a la propiedad a no ser que hayan riesgos de
heridas asociados.
AVERTISSEMENT: Ce symbole indique une situation dangereuse qui pourrait
provoquer des blessures graves voire mortelles. Il n'indique pas la possibilité de
dommage au matériel à moins qu'il y ait des risques de blessure associés.
AVVERTIMENTO: Questo simbolo indica una situazione potenzialmente
pericolosa che, se non evitata, potrebbe causare la morte o ferite gravi. Non si è
allertati per un incidente di danni materiali a meno che i rischi di ferita personale
siano associati all'incidente.
WAARSCHUWING: U wordt gewaarschuwd een mogelijk gevaarlijke actie niet
uit te voeren, die als deze niet wordt vermeden, kan resulteren in overlijden of
serieus letsel. Deze waarschuwing geldt niet voor beschadiging aan de
apparatuur, mits persoonlijk letsel is verbonden aan het uitvoeren van deze
gevaarlijke actie.
AVISO: Isto indica uma situação potencialmente perigosa que, se não evitada,
pode resultar em morte ou sérios ferimentos. Isto não lhe alerta sobre um
acidente de danos em propriedade a menos que riscos de danos pessoais
estiverem associados com o acidente.
CXP3535 Color Server for the DocuColor 3535 Technical Manual
Page 18

8
CAUTION: This symbol indicates a potentially hazardous situation, which, if
not avoided, may result in minor or moderate injury. This may also alert you to
unsafe practices or potential property-damage-only accidents.
VORSICHT: Dies zeigt eine unmittelbare bevorstehende gefährliche Situation
an, die, wenn sie nicht vermieden wird, zum Tode oder zu ernsten Verletzungen
führt. Dies warnt Sie auch vor gefährlichen Gewohnheiten oder potentiellen
Unfällen mit nur Eigentumsschaden.
CUIDADO: Esto indica una situación inminentemente peligrosa, que, si no se
evita, puede provocar la muerte o serias lesiones. Este le puede advertir
también de prácticas no seguras o accidentes con posibilidad de daño sólo a la
propiedad.
ATTENTION: Ce symbole indique une situation dangereuse qui pourrait
provoquer des blessures mineures. Il peut également indiquer une pratique
hasardeuse ou un dommage éventuel au matériel.
PRECAUZIONE: Questo simbolo indica una situazione potenzialmente
pericolosa che, se non evitata, può causare piccole o moderate ferite. Si
potrebbe anche essere allertati su procedure non sicure o potenziali incidenti per
soli danni materiali.
VOORZICHTIG: U wordt gewaarschuwd een mogelijk gevaarlijke actie niet uit
te voeren, die als deze niet wordt vermeden, kan resulteren in ondergeschikt of
gematigd letsel. Dit kan ook een waarschuwing zijn voor onveilige handelingen
of handelingen die alleen mogelijke beschadigingen van eigendommen kunnen
veroorzaken.
CUIDADO: Isto indica uma situação potencialmente perigosa que, se não
evitada, pode resultar em ferimentos mínimos ou moderados. Isto pode
também alertá-lo com relação a práticas inseguras ou acidentes relacionados
somente a danos em propriedade.
CXP3535 Color Server for the DocuColor 3535 Technical Manual
Page 19

Safety Precautions 9
Safety Precautions
The following sections contain safety information regarding avoiding
personal injury, before and while servicing the CXP3535 Color Server.
General Safety
Follow these rules to ensure general safety:
• Lift up the CXP3535 Color Server using the handle and not using the
front panel. Lifting it up using the front panel may result in major
injury.
• Before opening the CXP3535 Color Server covers, ensure that the unit has
been switched off.
Switching off, only the ON/OFF power button, will leave some circuits
energized. For complete disconnection from the supply, the main
power cable must also be disconnected from the power source.
Battery Replacement
Static Electricity
• Only qualified service personnel should replace the battery.
• Handle and dispose of the used batteries according to Lithium battery
manufacturer’s instructions.
When handling static-sensitive electrical devices (such as: electronic
boards, disk drives, or memory modules):
• Use a field service grounding kit (chain, mat, and wrist strap).
• After removing the component from the system or from its protective
wrapper, place it on a grounded anti-static mat and not on a carpet or
any other unshielded surface.
• After removing a board from a station, store it in an anti-static bag.
CXP3535 Color Server for the DocuColor 3535 Technical Manual
Page 20

10
Sicherheitsmaßnahmen
Die folgenden Abschnitte enthalten Sicherheitsinformationen zur
Vermeidung von persönlichen Verletzungen vor und während der
Wartung des CXP3535 Color Server.
Allgemeine Sicherheit
Befolgen Sie diese Regeln, um allgemeine Sicherheit zu
gewährleisten:
• Heben Sie den CXP3535 Color Server nur am Griff hoch und
berühren Sie nicht die Frontblende. Wenn Sie ihn an der Vorderblende
hochheben, kann dies zu schweren Verletzungen führen.
• Bevor Sie die Schutzabdeckung des CXP3535 Color Server öffnen,
stellen Sie sicher, dass die Einheit ausgeschaltet wurde.
Wenn Sie das Gerät nur mit der ON/OFF-Schalttaste ausschalten,
bleiben einige Stromkreise aktiviert. Um eine vollständige Trennung
von der Stromversorgung zu erreichen, muss der Hauptlastschalter von
der Stromquelle getrennt sein.
Batterieaustausch
• Die Batterie sollte nur von qualifiziertem Kundendienstpersonal
ausgetauscht werden.
• Handhaben und entsorgen Sie die verbrauchten Batterien
entsprechend den Anweisungen des Lithiumbatterie-Herstellers.
Reibungselektrizität
Beim Umgang mit statik-empfindlichen elektrischen Geräten (wie z.B.:
elektronische Karten, Plattenlaufwerke oder Speichermodule):
• Benutzen Sie einen Erdungsmontagesatz für den Außendienst (Kette,
Matte und Manschetten).
• Nach dem Entfernen des Teils aus dem System oder aus seiner
Schutzhülle stellen Sie es auf eine geerdete anti-statische Matte und
nicht auf einen Teppich oder auf andere ungeschützte Oberflächen.
• Nachdem Sie die Steckkarte aus einer Station entfernt haben,
bewahren Sie sie in einer anti-statischen Tüte auf.
CXP3535 Color Server for the DocuColor 3535 Technical Manual
Page 21

Medidas Preventivas de Seguridad 11
Medidas Preventivas de Seguridad
Las secciones a continuación contienen información de seguridad para
evitar lesiones, antes y durante la prestación de servicio de mantenimiento
y reparaciones del CXP3535 Color Server.
Seguridad General
Siga las siguientes reglas para garantizar la seguridad general:
• Levante el CXP3535 Color Server utilizando el mango y no el panel
frontal. Al levantarlo utilizando el panel frontal se pueden ocasionar
serias lesiones.
• Antes de abrir las cubiertas del CXP3535 Color Server, asegúrese de que
la unidad ha sido apagada.
Si se apaga utilizando el botón ON/OFF solamente, algunos circuitos
permanecen activados. Para una desconexión completa del suministro
de energía, el cable de alimentación principal se debe desconectar de la
fuente de alimentación.
Sustitución de la batería
• Sólo un ingeniero de mantenimiento y reparaciones debe reemplazar la
batería.
• Manipule y deshágase de las baterías usadas de acuerdo a las
instrucciones del fabricante de la batería de litio.
Electricidad estática
Cuando se manejan dispositivos eléctricos sensibles a electricidad estática
(como por ejemplo: placas electrónicas, unidades de disco, o módulos de
memoria):
• Use un kit de puesta a tierra para reparaciones y mantenimiento en
terreno (cadena, felpudo y banda de muñeca).
• Después de sacar el componente del sistema o de su lugar de envoltura
de protección, colóquelo en un felpudo antiestático puesto a tierra y no
en una alfombra o cualquier otra superficie no protegida.
• Después de sacar una placa de una estación, almacénela en una bolsa
antiestática.
CXP3535 Color Server for the DocuColor 3535 Technical Manual
Page 22

12
Mesures de sécurité
Les sections suivantes contiennent des informations sur les mesures de
sécurité à prendre pour éviter les blessures personnelles, avant et pendant
l'entretien du CXP3535 Color Server.
Mesures générales de sécurité
Suivez ces règles pour garantir une sécurité générale :
• Soulevez le CXP3535 Color Server par la poignée et non par le
panneau frontal. L'utilisation du panneau frontal pour soulever le
dispositif peut entraîner des blessures graves.
• Avant d'ouvrir les couvercles du CXP3535 Color Server, vérifiez que
l'unité a été éteinte.
Si vous ne mettez hors tension que l'interrupteur ON/OFF, certains
circuits resteront sous tension. Pour une déconnexion totale de
l'alimentation en courant, le câble d'alimentation principale doit aussi
être déconnecté du bloc d'alimentation.
Remplacement de la batterie
• Le remplacement de la batterie est une opération réservée au personnel
de service qualifié.
• Manipulez et jetez les batteries utilisées selon les instructions du
fabriquant de batterie au Lithium.
Electricité statique
Lors de la manipulation des périphériques électriques sensibles à l'énergie
statique (tels que : les cartes électroniques, les lecteurs de disque ou les
barrettes de mémoire) :
• Utilisez une trousse de mise à terre (une chaîne, une carpette et un
bracelet anti-statique).
• Après avoir enlevé le composant du système ou de son emballage de
protection, placez-le sur une carpette anti-statique mise à la terre et
non sur une carpette ou sur n'importe quelle autre surface non
protégée.
• Après l'enlèvement d'une carte d'un poste, conservez-la dans un
emballage anti-statique.
CXP3535 Color Server for the DocuColor 3535 Technical Manual
Page 23

Precauzioni di Sicurezza 13
Precauzioni di Sicurezza
Le seguenti sezioni contengono informazioni di sicurezza riguardanti
l'evitamento di lesioni personali, prima e durante l'uso del CXP3535 Color
Server.
Sicurezza generale
Seguite queste istruzioni per assicurare la sicurezza generale:
• Alzate il CXP3535 Color Server usando la maniglia e non usando il
panello frontale. Alzandolo usando il panello frontale potrebbe causare
una grave lesione.
• Prima di aprire la copertura del CXP3535 Color Server, assicuratevi che
l'unità sia stata spenta.
Spegnendo l'unità, solo il pulsante ON/OFF lasciera qualche circuito
alimentato. Per arrivare a una sconnessione completa dalle fonti di
alimentazione, il cavo di alimentazione principale deve essere staccato
dal connettore di alimentazione.
Sostituzione della Batteria
• La batteria dovrebbe essere cambiata solo dal personale di assistenza
qualificato.
• Disfatevi delle batterie usate a seconda delle istruzioni del fabbricante
riguardanti batterie Lithium.
Elettricità Statica
Quando gestite dispositivi di sensitività elettro-statica (come: schede
elettroniche, dischi rigidi o moduli di memoria):
• Usate un campo di servizio di attrezzatura messa a terra (catena,
stuoia, cinghia da polso).
• Dopo avere rimosso il componente dal sistema o dal cartoccio
protettivo, mettetela su una stuoia anti-statica a terra e non su un
tappeto o ogni altra superficie non protetta.
• Dopo avere rimosso una scheda dalla stazione, custoditela in una borsa
anti-statica.
CXP3535 Color Server for the DocuColor 3535 Technical Manual
Page 24

14
Veiligheidsmaatregelen
In de volgende secties worden veiligheidsmaatregelen behandeld om
persoonlijk letselt voor en tijdens het bedienen van de CXP3535 Color
Server te voorkomen.
Algemene veiligheid
Volg onderstaande regels op om uw algemene veiligheid te
verzekeren:
• Gebruik het handvat om de CXP3535 Color Server op te tillen, en niet
het voorpaneel. Wanneer u het voorpaneel gebruikt bij het optillen kan
dit resulteren in ernstig letsel.
• Zorg ervoor dat de CXP3535 Color Server is uitgeschakeld voordat u de
deksels opent.
Wanneer u alleen de ON/OFF schakelaar uitschakeld zullen bepaalde
electriciteitscircuits geactiveerd blijven. Om de stroomtoevoer volledig
af te sluiten moet de electriciteitskabel uit het stopkontact zijn.
De batterij vervangen
• De batterij mag alleen door bevoegd servicepersoneel worden
vervangen.
• Volg de instructies van de fabrikant op voor het vervangen en het
wegwerpen van gebruikte lithium batterijen.
Statische electriciteit
Wanneer u met electrisch statisch geladen onderdelen omgaat (zoals:
electronische kaarten, harde schijven of geheugenmodi):
• Gebruik een onderhoudsaardingpakket (ketting, mat, en een
polsbandje).
• Nadat u het onderdeel van het systeem verwijderd of uit zijn
beschermend omhulsel neemt, plaatst u dit op een geaarde antistatische mat en niet op een vloerkleed of enig andere onbeschermde
oppervlakte.
• Nadat u een kaart van een station heeft verwijderd plaatst u deze in een
anti-statisch zak.
CXP3535 Color Server for the DocuColor 3535 Technical Manual
Page 25

Precauções de segurança 15
Precauções de segurança
As seguintes sessões contêm informações de segurança com respeito a
como evitar feridas corporais, antes e no decorrer do uso do CXP3535
Color Server.
Segurança geral
Siga as seguintes regras para assegurar uma segurança geral:
• Levante o CXP3535 Color Server usando o cabo e não o painel frontal.
Ao levantá-lo através do painel frontal pode causar sérios danos.
• Antes de abrir as tampas do CXP3535 Color Server, certifique-se de que
a unidade foi desligada.
Ao desligar somente com o botão ON/OFF fará com que alguns
circuitos sejam ativados. Para uma desconexão completa da fonte de
alimentação, o cabo de alimentação principal também deve ser
desconectado da fonte de alimentação.
Troca de bateria
• A bateria deve ser substituída somente por uma equipe de serviço
qualificada.
• Manipule e jogue fora as baterias usadas de acordo com as instruções
do fabricante de baterias de Lítio.
Eletricidade estática
Ao lidar com dispositivos sensíveis à energia estática (como: placas
eletrônicas, unidades de disco ou módulos de memória):
• Utilize um kit de aterramento de serviço (cadeia, esteira e faixa de
pulso).
• Após a remoção do componente do sistema ou do seu invólucro de
proteção, coloque-o em uma esteira anti-estática e não em um tapete
ou qualquer outra superfície desprotegida.
• Após remover uma placa de uma estação, armazene-a em uma bolsa
anti-estática.
CXP3535 Color Server for the DocuColor 3535 Technical Manual
Page 26

This page is intentionally blank.
Page 27

First Time Setup and
Configuration
Hardware Installation Procedures.......................................................18
Installing the Windows 2000 Professional Operating System .............24
Installing the Creo Application Software............................................25
Configuration Wizard (First Time Software Setup) .............................28
CXP3535 Color Server for the DocuColor 3535 Technical Manual
Page 28
18 Chapter 1 – First Time Setup and Configuration
1.1 Hardware Installation Procedures
Important: Installation must be performed only by authorized service
personnel.
1.1.1 Unpacking the System Components
The following sections will lead you through procedures for unpacking,
and correct placement of the CXP3535 Color Server.
1.1.2 Before Unpacking
Place the shipping package as close as possible to the final installation site.
Before unpacking the CXP3535 Color Server, make sure that the
unpacking site is large enough to allow easy maneuvering.
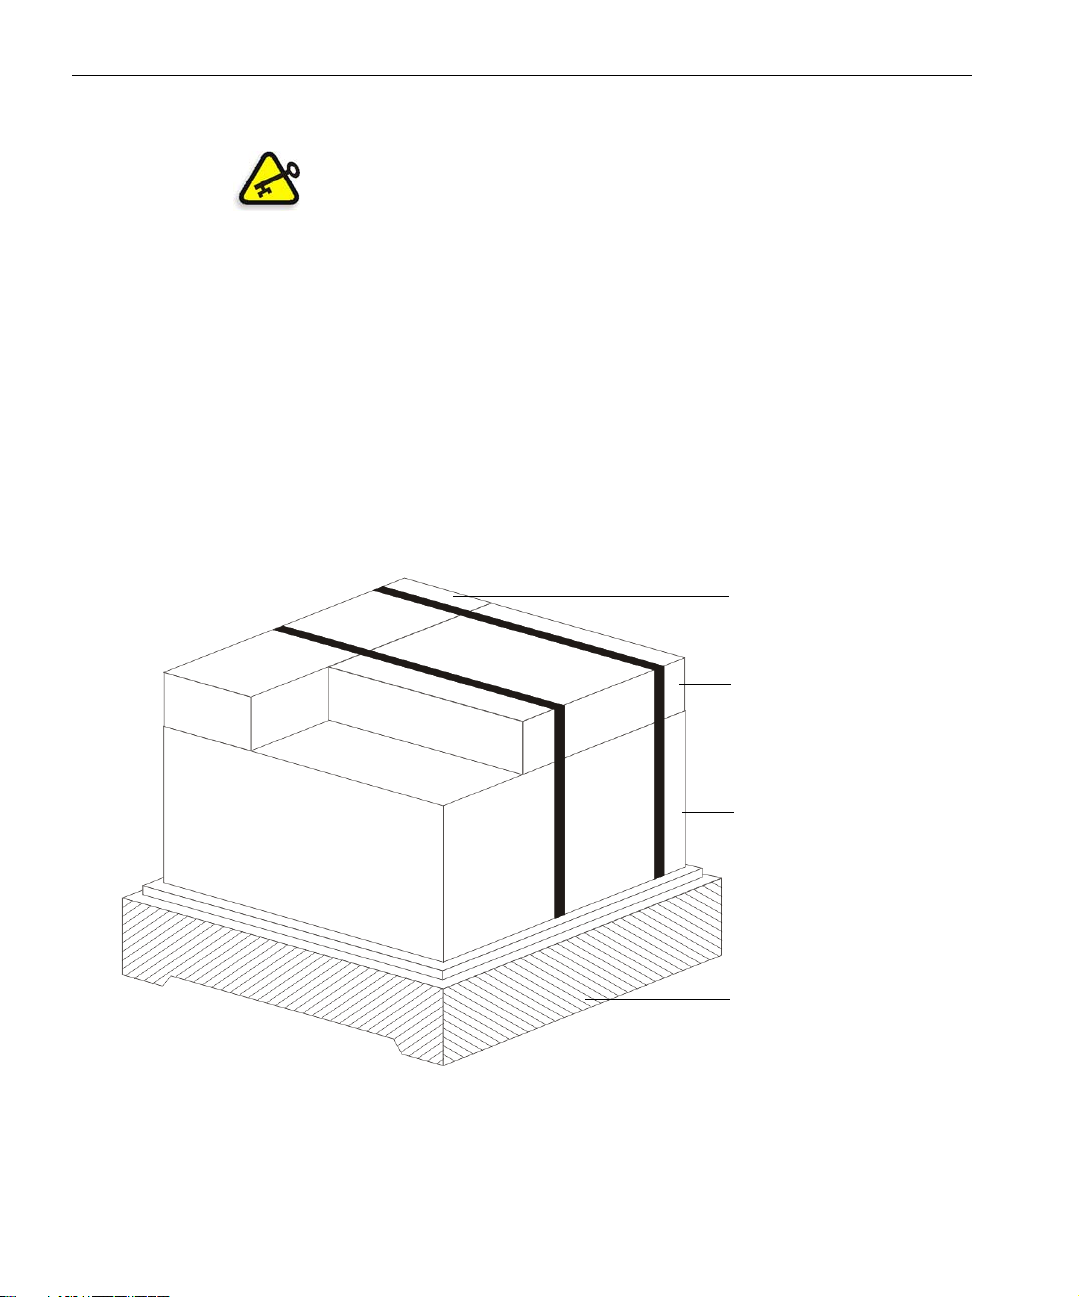
Unpacking Diagram
Box 1 - Accessories
Box 2 - Monitor
Box 3 - CXP3535 Color Server
4 - Pallet
Figure 1: Unpacking the CXP3535 Color Server
CXP3535 Color Server for the DocuColor 3535 Technical Manual
Page 29
Hardware Installation Procedures 19
1.1.3 Unpacking Instructions
To unpack the CXP3535 Color Server:
1. Cut the three plastic bands that secure the outer carton (not shown) to
the pallet (4)
Caution: Take care before cutting the bands. They are tight and spring
apart when cut.
2.
Open the upper flaps of the outer carton and lift it up and off the
pallet.
3. Cut the two plastic bands that secure the three boxes to the pallet.
Caution: Take care before cutting the bands. They are tight and spring
apart when cut.
4. Remove the three boxes (1), (2), and (3) from the pallet (4). Open the
boxes and remove the contents.
.
1.1.4 Connecting the CXP3535 Color Server System Cables
Figure 2 on page 21 shows the input/output connectors (ports) on the rear
of the CXP3535 Color Server.
To connect the CXP3535 Color Server cables:
Note: The AC power connection should be performed according to the Xerox
Installation and Planning Guide.
WARNING: Before connecting the CXP3535 Color Server to the AC power
socket, see Safety Information (Multilingual) on page 5.
CXP3535 Color Server for the DocuColor 3535 Technical Manual
Page 30

20 Chapter 1 – First Time Setup and Configuration
1. Connect the monitor, keyboard, mouse, scanner, X-RiteColor®
DTP34L Quickcal Densitometer, monitor, and network cable to the
CXP3535 Color Server as follows:
Port Device
Mouse Mouse (PS2)
Keyboard Keyboard (PS2)
Serial 1 X-RiteColor DTP34L Quickcal
Densitometer
Serial 2 Optional
Parallel Optional
USB Optional
Ethernet (NET) 10/100/1000 Cable
DDI 1 Printer DDI 1
DDI 2 Printer DDI 2
VGA (Video Graphic Adapter) Monitor
LAN (SCAN) Printer scanner
2. Connect the two printer cables (68 to 80 pin) from the DocuColor
3535 printer ports (DDI 1 and DDI 2) to the CXP3535 Color Server
ports DDI 1 (C, K) and DDI 2 (Y, M).
3. Connect the leakage interupter wiring (GFI) to the AC power socket
at the rear of the CXP3535 Color Server.
4. Connect one end of the AC power cable (P/N 117N01113) to the
unused end of the GFI wiring cable connector.
5. Connect the opposite end of the AC power cable to an AC power
outlet.
CXP3535 Color Server for the DocuColor 3535 Technical Manual
Page 31

Hardware Installation Procedures 21
6. Connect the AC power cable from the monitor to an AC power outlet.
Important: Do not switch the DocuColor 3535 printer on.
You will be instructed, during the software installation procedure, when to
switch on the printer.
Figure 2: External rear connections
Figure 3: X-RiteColor DTP34L Quickcal Densitometer
CXP3535 Color Server for the DocuColor 3535 Technical Manual
Page 32

22 Chapter 1 – First Time Setup and Configuration
1.1.5 Front Panel LEDs and Controls
This section identifies the LEDs and controls on the front of your CXP3535
Color Server.
X
Power-on LED
creo
SPIRE
At rear of
server
Figure 4: Front panel controls and indicators
Power-on LED
: When the server is connected to an AC power source, the
Ethernet speed
1 Gbps LED
Ethernet transmit/
receive activity LED
Disk activity
Disk activity
(Image disk)
LED
LED
Power
control
button
System
error
LED
server is in standby mode, and the power-on LED flashes to indicate this
status. The light turns a steady green when the server is on and the
operating system is running.
Disk activity (image disk) LED: The light flashes when the controller is
accessing a IDE device (image disk).
Power control button: Press this button to manually turn the CXP3535
Color Server on or off.
System error LED: An amber light turns on when a system error has
occurred. An amber error light on the interior of the CXP3535 Color
Server, adjacent to the faulty component, also switches on, to further
isolate the error. For more information, see Troubleshooting on page 140.
CXP3535 Color Server for the DocuColor 3535 Technical Manual
Page 33

Hardware Installation Procedures 23
Ethernet speed 1 Gbps LED: When this LED, on the ethernet connector, is
lit, it indicates that the ethernet network speed is 1 Gbps. When this LED is
off, it indicates that the ethernet network speed is 10 Mbps or 100 Mbps.
Ethernet transmit/receive activity LED: When this LED on the ethernet
connector is lit, it indicates that there is activity between the server and the
network.
1.1.6 Turning on the CXP3535 Color Server
Before connecting the CXP3535 Color Server to an AC power source
review the Safety Information (Multilingual) on page 5.
To turn on the CXP3535 Color Server:
1. Connect the monitor’s AC power cable to an AC power source and
switch on the monitor.
2. Connect the server’s AC power cable to an AC power source.
3. Wait 20 seconds before pressing the power control button on the
CXP3535 Color Server (see Front panel controls and indicators on
page 22). The ON/OFF LED on the front panel illuminates a steady
green.
After the system boot-up is complete, the Windows Desktop appears.
Important: Do not switch on the DocuColor 3535 printer.
You will be instructed, during the software installation procedure, when to
switch the printer on.
4. If a power failure occurs while the server is turned on, the server will
restart automatically when power is restored.
To turn off the CXP3535 Color Server:
1. We recommend that you perform an orderly shutdown of the
operating system before turning off the server.
2. Press the power control button to turn off the server.
3. Disconnect the AC power cable from the AC power source.
WARNING: Switching off only the ON/OFF power button will leave some
circuits energized. For complete disconnection from the supply, the main AC
power cable must also be disconnected from the AC power source.
CXP3535 Color Server for the DocuColor 3535 Technical Manual
Page 34

24 Chapter 1 – First Time Setup and Configuration
1.2 Installing the Windows 2000 Professional Operating System
1. Tur n on th e s er ver.
2. Insert CD-ROM #1 into the CD-ROM drive.
3. Wait until the PC DOS Start Up Menu appears.
The following choices are available:
Creo Software Complete Overwrite Installation
Creo Software Preservation Installation (System Partition
Overwrite)
DOS prompt
4. Use the arrows to select Creo Software Complete Overwrite
Installation
The system starts copying the files.
After a few minutes, you are prompted to remove the CD-ROM from
the CD-ROM drive and reboot.
5. Press CTRL+ALT+DEL to reboot.
The system copies files and reboots.
and press ENTER.
6. When the Windows 2000 Professional Setup screen appears, type the
25-digit Product Key, that comes with the Windows 2000 Professional
manual, and click
7. In the Computer Name and Administrator Password screen, type the
Next.
name for the CXP3535 Color Server, for example CXP3535.
Important:
In the administrator name and password area, use the default settings.
If required, you can change the operator name and password, but only at
the end of the installation process (see If you want to change the operator
name and password: on page 43).
8. Click Next.
The installation process begins.
9. At the end of the installation, the system reboots a number of times,
and the SPIRE Application splash screen appears, and you are asked to
insert the Application Software CD-ROM #2 into the CD-ROM drive.
Proceed to Installing the Creo Application Software on page 25.
CXP3535 Color Server for the DocuColor 3535 Technical Manual
Page 35

Installing the Creo Application Software 25
1.3 Installing the Creo Application Software
1. Insert CD-ROM #2 into the CD-ROM drive, and close the
CD-ROM drive.
Note: Wait for the LED on the CD-ROM drive to stop blinking before
proceeding.
2. In the SPIRE Application splash screen, click Start.
The Adobe Acrobat setup begins. After the Adobe Acrobat setup is
complete, the CXP3535 Color Server installation starts and the
following window appears.
Important:
If you have not connected the CXP3535 Color Server to the DocuColor
3535 printer, do so now (see Connecting the CXP3535 Color Server
System Cables on page 19).
Do not switch the DocuColor 3535 printer on.
3. Click Yes .
The system restarts automatically.
CXP3535 Color Server for the DocuColor 3535 Technical Manual
Page 36

26 Chapter 1 – First Time Setup and Configuration
The following SPIRE Application splash screen and VBScript message
appear.
4. Remove CD-ROM #2 from the CD-ROM drive.
5. In the VBScript message, click OK.
CXP3535 Color Server for the DocuColor 3535 Technical Manual
Page 37

Installing the Creo Application Software 27
Once the formatting is complete, the Spire workspace appears.
6. Switch the DocuColor 3535 printer on.
The CXP3535 Color Server automatically submits a test page file, the
DocuColor 3535 printer prints the page, and the Configuration
Wizard window appears.
7. Yo u h av e c o mp l et e d Installing the Creo Application Software.
Proceed to Configuration Wizard (First Time Software Setup) on
page 28.
CXP3535 Color Server for the DocuColor 3535 Technical Manual
Page 38

28 Chapter 1 – First Time Setup and Configuration
1.4 Configuration Wizard (First Time Software Setup)
First time setup is performed after first time installation of the application
software. After the application software is installed, the DocuColor 3535
printer is switched on, and the Configuration Wizard automatically
appears.
1.4.1 Choosing the Configuration Type
¾ Ve r if y t h at First time Configuration of system settings is selected and
Next.
click
CXP3535 Color Server for the DocuColor 3535 Technical Manual
Page 39

Configuration Wizard (First Time Software Setup) 29
1.4.2 Setting the Language
¾ Select the required interface language and click Next.
CXP3535 Color Server for the DocuColor 3535 Technical Manual
Page 40

30 Chapter 1 – First Time Setup and Configuration
1.4.3 Configuring the Host Name
The CXP3535 Color Server contains a default Computer Name
(Hostname) preset by the factory. Check with your System Administrator
in order to change the computer name.
Note: The Hostname is taken from the computer name you typed during the
Windows 2000 Professional Fast Installation, see Installing the Windows 2000
Professional Operating System on page 24.
1. Verify that the correct host name appears and click Next.
Otherwise, click the
CXP3535 Color Server for the DocuColor 3535 Technical Manual
Change button.
Page 41

Configuration Wizard (First Time Software Setup) 31
The System Properties dialog box appears.
2. Click the Properties button.
CXP3535 Color Server for the DocuColor 3535 Technical Manual
Page 42

32 Chapter 1 – First Time Setup and Configuration
The following window appears.
3. In the Computer name box, type the new name for the computer. If
you would like to change the
Workgroup or the Domain in which your
computer appears, type the new name in the corresponding area and
click
OK.
Note: Do not change the Workgroup or Domain unless instructed. If you are
changing the Domain/Workgroup, verify that you have the user name and
password for the Domain/Workgroup.
A message appears to inform you that changes will take effect only
after reboot.
4. Click OK.
5. In the System Properties dialog box, click OK.
6. Click Next to continue.
Note: When prompted to restart your computer, click No, (you will be
prompted at the end of the Configuration Wizard to restart your system).
CXP3535 Color Server for the DocuColor 3535 Technical Manual
Page 43

Configuration Wizard (First Time Software Setup) 33
1.4.4 Setting the Date and Time
1. Verify that the Date and Time are set correctly and click Next.
Otherwise, click the
CXP3535 Color Server for the DocuColor 3535 Technical Manual
Change button.
Page 44

34 Chapter 1 – First Time Setup and Configuration
The Date/Time Properties dialog box appears.
2. Set the date and time correctly, and select the Time Zone tab.
3. Select the time zone required and click OK.
4.
In the Date and Time window, click Next.
CXP3535 Color Server for the DocuColor 3535 Technical Manual
Page 45

Configuration Wizard (First Time Software Setup) 35
1.4.5 Setting the Default Measurement Units
¾ Select the required default measurement unit and click Next.
CXP3535 Color Server for the DocuColor 3535 Technical Manual
Page 46

36 Chapter 1 – First Time Setup and Configuration
1.4.6 Configuring the IP Address
1. Verify that the displayed Enable DHCP setting is correct and click Next.
2. If you wish to change the IP Address, click the Change button.
The Local Area Connection 3 Properties dialog box, followed by the
Internet Protocol (TCP/IP) Properties dialog box appears.
CXP3535 Color Server for the DocuColor 3535 Technical Manual
Page 47

Configuration Wizard (First Time Software Setup) 37
3. In Internet Protocol (TCP/IP) Properties dialog box, select Use the
following IP Address.
4.
Typ e th e new IP address, Subnet mask and Default gateway (if
applicable).
Note: The Spire Color Server is set to DHCP server configuration by default
after an operating system reinstall.
For more details on how to get the IP or DHCP (also subnet mask and
default gateway) information, refer to the Xerox Installation and Planning
Guide.
5. Click OK.
Note: If prompted to restart your computer, click No. You will be prompted
at the end of the Configuration Wizard to restart your system.
6.
In the the Local Area Connection 3 Properties dialog box, click OK.
7. In the IP Address window, click Next.
CXP3535 Color Server for the DocuColor 3535 Technical Manual
Page 48

38 Chapter 1 – First Time Setup and Configuration
1.4.7 Configuring the Apple Talk Zone
This option enables you to change the AppleTalk network zone in which
your CXP3535 Color Server appears.
Note: This option only applies to networks that contain Macintosh computers.
1. Verify that the displayed Apple Talk zone is correct and click Next.
Otherwise, click the
CXP3535 Color Server for the DocuColor 3535 Technical Manual
Change button.
Page 49

Configuration Wizard (First Time Software Setup) 39
The Local Area Connection 3 Properties dialog box appears, followed
by the Apple Talk Protocol Properties dialog box.
2. From the This system will appear in zone drop-down menu, select
the required zone, and click
3. In the Local Area Connection 3 Properties dialog box, click OK.
4. In the Apple Talk Zone window, click Next.
CXP3535 Color Server for the DocuColor 3535 Technical Manual
OK.
Page 50

40 Chapter 1 – First Time Setup and Configuration
1.4.8 Completing the Configuration
After the installation is complete, the View Configuration window
appears.
1. We recommend that you print the Configuration Server Report. The
report is a useful record of the configuration settings, which you could
refer to whenever required.
Click the
CXP3535 Color Server for the DocuColor 3535 Technical Manual
Print button.
Page 51

Configuration Wizard (First Time Software Setup) 41
2. Click Close.
3. To complete the first time setup, click Finish.
The configuration settings are automatically backed up. When the
backup is complete, the following message appears.
4. Click OK.
The CXP3535 Color Server workspace appears on your screen.
5. If you made any changes to the configuration, these changes will only
take effect if the CXP3535 Color Server is shut down and then
restarted.
Close the CXP3535 Color Server application.
6. Close any other open applications and from the Windows desktop
follow the path
CXP3535 Color Server for the DocuColor 3535 Technical Manual
Start>Shut Down.
Page 52

42 Chapter 1 – First Time Setup and Configuration
7. Restart the computer.
After restart, the SPIRE Application splash screen appears.
8. The CXP3535 Color Server application is automatically loaded and
launched.
CXP3535 Color Server for the DocuColor 3535 Technical Manual
Page 53

Configuration Wizard (First Time Software Setup) 43
1.4.9 Changing the Operator Name and Password
1. If you want to change the operator name and password:
a. On the Windows desktop, right-click My Computer and select
Manage.
b. Expand the Local Users and Groups tree, and select Users.
c. Select Operator. Right-click and select Properties.
d. Type the Full name and click OK.
2. If you want to change the operator password:
a. On the Windows desktop, right-click My Computer and select
Manage.
b. Expand the Local Users and Groups tree, and select Users.
c. Select Operator. Right-click and select Set Password.
d.
Type the new password and confirm the new password.
e. Click OK.
3. If any error messages appear, see System Error Messages on page 145
for descriptions and actions to be taken.
4. You can now install Novell network (if required, see Installing and
Configuring Novell Client for Spire on page 44), McAfee antivirus
(if required, see Configuring the McAfee VirusScan on page 49), and
then proceed to Importing a File and Performing a Test Print on
page 56.
CXP3535 Color Server for the DocuColor 3535 Technical Manual
Page 54

44 Chapter 1 – First Time Setup and Configuration
1.4.10 Installing and Configuring Novell Client for Spire
The following procedures are only relevant for those customers who have
a Novell network running IPX protocol. If you do not have this type of
network, proceed to Importing a File and Performing a Test Print on
page 56.
Note: Further information about configuring the connection between the
CXP3535 Color Server and a Novell NDS server, in a Novell working environment,
is provided in the CXP3535 Color Server Printing Guide.
Installing Novell Client for Spire
1. Close the Spire workspace and the Spire application.
2. Close all other applications.
3. On the Windows desktop, click Start and follow the path,
CXP3535>CXP3535 Tools>Novell Client Installation.
CXP3535 Color Server for the DocuColor 3535 Technical Manual
Page 55

Configuration Wizard (First Time Software Setup) 45
The following window appears.
4. Click Install.
5. Click Reboot.
6. Yo u h av e c o mp l et e d Installing Novell Client for Spire. Proceed to
Configuring Novell Client for Spire on page 46.
CXP3535 Color Server for the DocuColor 3535 Technical Manual
Page 56

46 Chapter 1 – First Time Setup and Configuration
Configuring Novell Client for Spire
1. After the system reboots, the Novell Setup window appears.
2. Typ e th e Tree Name.
3. If you do not know the name, click Browse.
CXP3535 Color Server for the DocuColor 3535 Technical Manual
Page 57

Configuration Wizard (First Time Software Setup) 47
4. Double-click the appropriate Tree N ame.
The Tree Name appears in the Novell Setup window.
5. Typ e th e Context Name.
6. If you do not know the name, click Browse.
7. Double-click the appropriate Context Name.
The Context Name appears in the Novell Setup window.
8. Click OK.
The Spire workspace appears.
9. Yo u h av e c o mp l et e d Installing Novell Client for Spire. Proceed to
Importing a File and Performing a Test Print on page 56.
CXP3535 Color Server for the DocuColor 3535 Technical Manual
Page 58

48 Chapter 1 – First Time Setup and Configuration
Uninstalling Novell Client for Spire
Uninstall Novell Client for Spire if you no longer operate a Novell network
running IPX protocol.
1. Close the Spire workspace and the Spire application.
2. Close all other applications.
3. Right-click My Network Places and select Properties.
4. Right-click Local Area Connection and select Properties.
5. Clear the Novell for Client for Windows check box.
6. Make sure that Novell for Client for Windows is selected, and click the
Uninstall button.
7. Click Yes twice.
The CXP3535 Color Server reboots.
Yo u h av e c o mp l et e d Uninstalling Novell Client for Spire.
CXP3535 Color Server for the DocuColor 3535 Technical Manual
Page 59

Configuration Wizard (First Time Software Setup) 49
1.4.11 Configuring the McAfee VirusScan
It is highly recommended to install virus protection. The current Creo
recommended virus protection software is McAfee VirusScan.
Important: Running the McAfee VirusScan could slow down the process time
and effect the overall performance of the CXP3535 Color Server.
Note: We recommend that you close all applications before installing and
configuring the McAfee VirusScan.
After installing the McAfee VirusScan, perform the following
configuration procedures.
1. Right-click the VShield icon in the Windows Taskbar and follow the
Properties>System Scan.
path,
CXP3535 Color Server for the DocuColor 3535 Technical Manual
Page 60

50 Chapter 1 – First Time Setup and Configuration
The following window appears.
2. Clear the check mark in the Outbound files check box and select the
Exclusion tab.
CXP3535 Color Server for the DocuColor 3535 Technical Manual
Page 61

Configuration Wizard (First Time Software Setup) 51
The following window appears.
3. Click the Add button.
4. Ty pe D:\Jobs in the File or folder to exclude area, and click OK.
CXP3535 Color Server for the DocuColor 3535 Technical Manual
Page 62

52 Chapter 1 – First Time Setup and Configuration
The following window appears.
5. Select the Action tab.
CXP3535 Color Server for the DocuColor 3535 Technical Manual
Page 63

Configuration Wizard (First Time Software Setup) 53
The following window appears.
6. In the Possible actions area, clear the check marks in the Delete File,
Move File, and Exclude File check boxes.
CXP3535 Color Server for the DocuColor 3535 Technical Manual
Page 64

54 Chapter 1 – First Time Setup and Configuration
7. In the When a virus is found area, open the Prompt for user action
menu, and select
Clean infected files.
8. Click Apply>OK and close the System Scan Properties window.
9. Open the VirusScan console by following the path,
Programs>Network Associates>VirusScan Console.
CXP3535 Color Server for the DocuColor 3535 Technical Manual
Page 65

Configuration Wizard (First Time Software Setup) 55
The following window appears.
10. Double-click AutoUpdate.
11. Select the Schedule tab.
12. Select the Enable check box and in the Run area select Daily.
Start at time chosen should be after printing hours, but before
The
the CXP3535 Color Server is turned off for the day.
13. Yo u h av e co mp l e t e d Configuring the McAfee VirusScan.
CXP3535 Color Server for the DocuColor 3535 Technical Manual
Page 66

56 Chapter 1 – First Time Setup and Configuration
1.4.12 Importing a File and Performing a Test Print
1. From the Job menu select Import Job.
2. Locate the ATF_A3.PS at:
D:\Sample_files\Color_files\ATF Europe (A4 or A3)\ATF_A3.PS,
or locate the ATF_tab.PS at:
D:\Sample_files\Color_files\ATF US (Letter or Tabloid)\ATF _ tab. PS.
3. Double-click on the file to add it to the list for importing.
4. Select Virtual Printer: ProcessPrint.
5. Click Submit.
The file is processed, printed, and sent to the Storage Folder.
Note: If the job is not printed or is waiting in the print queue, check that the
finishing device is set properly in the Job Parameters window, Finishing tab.
1.4.13 Shutting Down and Turning Off
1. In the CXP3535 Color Server workspace, from the Job menu select
Exit.
The CXP3535 Color Server workspace closes and you return to the
Windows desktop.
Note: This procedure aborts jobs that are being RIPed or printed.
2. To confirm that the CXP3535 Color Server application has closed,
check that the Creo icon has disappeared from the desktop taskbar.
Before shutdown
After shutdown
3. In the Windows environment, select Start>Shut Down.
4. When the Windows shutdown is complete, the CXP3535 Color Server
shuts down, the power LED on the front panel switches to Stand-By
mode and is illuminated in orange.
CXP3535 Color Server for the DocuColor 3535 Technical Manual
Page 67

Software
Reinstallation and
Configuration
Overview ..........................................................................................60
Reinstalling the Operating System .....................................................62
Reinstalling the Creo Application.......................................................64
The Configuration Wizard (If Configuration Backup is Available) .......68
The Configuration Wizard (If Recovery Fails or is Unavailable)............76
CXP3535 Color Server for the DocuColor 3535 Technical Manual
Page 68

60 Chapter 2 – Software Reinstallation and Configuration
2.1 Overview
This chapter describes the two methods of reinstalling your CXP3535
Color Server software by complete overwrite or by system partition. It
describes how to install the Windows 2000 Professional operating system,
the Creo Software Application, and to configure the system using the
Configuration Wizard.
Notes:
System Partition Overwrite should be performed when the Windows 2000
Professional operating system is corrupt and needs to be reinstalled.
Complete Overwrite should be performed only when installing a new operating
system.
The CXP3535 Color Server is delivered to the customer site preloaded with
the following software and configuration:
• Windows 2000 Professional
• MS Service Pack 3.0
• Internet Explorer 6.0
• CXP3535 Color Server Software Application version 1.0 for the
DocuColor 3535
• Adobe Acrobat 5.0
• Ultimate InSpire Software
• Network Parameters (hostname, IP address, network services and
protocols)
It may, however, become necessary, for example after a system crash, to
reinstall the system at the customer’s site.
The reinstallation is mostly unattended. User interaction is needed only for
entering the OS license number and the computer hostname, for rebooting
the computer when requested, for inserting the final application CD-ROM
and for the Configuration Wizard.
The reinstallation of the system requires two CD-ROMs:
• CD-ROM #1 (Windows 2000 Professional Fast Install)
• CD-ROM #2 (CXP3535 Color Server version 1.0 for the DocuColor
3535 Application Software)
CXP3535 Color Server for the DocuColor 3535 Technical Manual
Page 69

Overview 61
The following table outlines the CXP3535 Color Server disk configuration:
Disk 0
Disk 1
C:
Windows 2000 Professional
software
Creo application
Image storage
D:
Spool files
Shared files
Output directory files
Apr high res files
SpireFtp folder
SpireOnWeb folder
Notes:
To enable the restoration of customer settings, back up the CXP3535 Color
Server configuration, before loading the operating system.
We recommend that you back up your configuration to an external device in
case the system crashes.
Determine whether VIPP or any other Xerox/Creo supported application is
loaded on the CXP3535 Color Server. Such applications have to be reloaded
after the reinstallation is completed.
There are two methods of reinstalling the system:
• Creo Software Complete Overwrite Installation:
This procedure replaces the entire system disk, operating system
partition, Creo application, and user partition (partitions C: and D:).
A complete overwrite should be performed only when you are
upgrading the operating system.
Note: This option deletes all the files stored on partitions C: and D:. Make
sure to back up any important customer files before selecting this option.
• Creo Software Preservation Installation (System Partition Overwrite):
This procedure replaces only the operating system (partition C:). You
should perform System Partition Overwrite when the Windows 2000
Professional operating system is corrupt and needs to be reinstalled.
CXP3535 Color Server for the DocuColor 3535 Technical Manual
Page 70

62 Chapter 2 – Software Reinstallation and Configuration
2.2 Reinstalling the Operating System
Important:
Before reinstalling verify that the DocuColor 3535 printer is switched off. You
will be instructed, at a later stage, when to switch the printer on.
The following information is available:
• CD-ROM software pack
• Computer name (for example CXP3535)
• TCP/IP information
• Windows 2000 Professional OEM product ID number
• Gateway, WINS address, and DNS information
• Required AppleTalk zone
• IPX information
For more details, refer to the Xerox Installation and Planning Guide.
To reinstall the Windows 2000 Professional operating system:
Note: If you are already logged on your system and the CXP3535 Color Server
workspace is open, exit the workspace and proceed to step 2.
1. Tur n o n yo ur c om p ut er.
2. Insert CD-ROM #1 (Windows 2000 Fast Install) in the
CD-ROM drive.
3. Wait until the PC DOS Start Up Menu appears.
The following choices are available:
• Creo Software Complete Overwrite Installation
• Creo Software Preservation Installation (System Partition
Overwrite)
• DOS prompt
CXP3535 Color Server for the DocuColor 3535 Technical Manual
Page 71

Reinstalling the Operating System 63
4. Use the keyboard arrows to select Creo Software Complete Overwrite
Installation
Note: If the Norton Ghost® License Agreement Warning appears, select OK
to mark the drives as usable by Norton Ghost.
The warning will only appear if you have installed a new IDE hard disk.
and press ENTER.
The system starts copying the files.
After a few minutes, you are prompted to remove the CD-ROM from
the CD-ROM drive and reboot.
5. Press CTRL+ALT+DEL to reboot.
The system copies files and reboots.
6. When the Windows 2000 Professional Setup screen appears type the
25-digit Product Key, that comes with the Windows 2000 Professional
manual, and click
Next.
7. In the Computer Name and Administrator Password screen, type the
name for the CXP3535 Color Server, for example CXP3535.
Important:
In the administrator name and password area, use the default settings.
If required, you can change the operator name and password, but only at
the end of the installation process (see Changing the Operator Name and
Password on page 91).
8. Click Next.
The installation process begins.
9. At the end of the installation, the system reboots a number of times.
You are asked to insert the Application Software CD-ROM. Insert
CD-ROM #2 into the CD-ROM drive.
10. Proceed to Reinstalling the Creo Application on page 64.
CXP3535 Color Server for the DocuColor 3535 Technical Manual
Page 72

64 Chapter 2 – Software Reinstallation and Configuration
2.3 Reinstalling the Creo Application
To reinstall the Creo application:
1. After inserting the Application Software CD-ROM, close the CD-
ROM Drive.
Note: Wait for the LED on the CD-ROM drive to stop blinking before
proceeding.
2. In the SPIRE Application splash screen, click Start.
The Adobe Acrobat setup begins. After the Adobe Acrobat setup is
complete, the CXP3535 Color Server installation starts and the
following window appears.
3. Click Yes.
The system restarts automatically.
CXP3535 Color Server for the DocuColor 3535 Technical Manual
Page 73

Reinstalling the Creo Application 65
The following SPIRE Application splash screen and VBScript message
appear.
4. Remove CD-ROM #2 from the CD-ROM drive.
5. In the VBScript message, click OK.
CXP3535 Color Server for the DocuColor 3535 Technical Manual
Page 74

66 Chapter 2 – Software Reinstallation and Configuration
Once the formatting is complete, the Spire workspace appears.
6. Switch the DocuColor 3535 printer on.
CXP3535 Color Server for the DocuColor 3535 Technical Manual
Page 75

Reinstalling the Creo Application 67
The CXP3535 Color Server automatically submits a test page file, the
DocuColor 3535 printer prints the page, and the Configuration
Wizard window, similar to the following illustration, appears.
7. Yo u h av e c o mp l et e d Reinstalling the Creo Application, proceed to the
following step (step 8).
8. Once the Configuration Wizard appears, you are required to choose
from one of three configuration options.
• If configuration recovery information is available, proceed to The
Configuration Wizard (If Configuration Backup is Available) on
page 68.
• If there is no back up and the system configuration must be done
manually, proceed to The Configuration Wizard (If Recovery Fails or
is Unavailable) on page 76.
• If you want to use the factory set defaults, proceed to Restoring the
Factory Defaults Configuration on page 73.
CXP3535 Color Server for the DocuColor 3535 Technical Manual
Page 76

68 Chapter 2 – Software Reinstallation and Configuration
2.4 The Configuration Wizard (If Configuration Backup is
Available)
The CXP3535 Color Server Configuration Wizard automatically appears
after the installation is complete. Follow the steps of the wizard to complete
the CXP3535 Color Server configuration recovery.
Note: If you receive the message Error in default configuration,
click OK, and perform the procedures in The Configuration Wizard (If Recovery
Fails or is Unavailable) on page 76.
Select the way you want to configure the system.
• If you select Restore system configuration then you will be able to
restore the configuration that you backed up to an external device (see
the following procedure Restoring the Backed Up Configuration).
• If you select Use factory defaults then you will be able to restore the
default factory-set configuration (see Restoring the Factory Defaults
Configuration on page 73).
2.4.1 Restoring the Backed Up Configuration
1. Select Restore system configuration and click Next.
CXP3535 Color Server for the DocuColor 3535 Technical Manual
Page 77

The Configuration Wizard (If Configuration Backup is Available) 69
The following window appears.
2. If you would like to restore the default configuration, select Default
Configuration
3. If you received the message Error in default configuration, or
.
if you want to use a different configuration file than the default,
choose
4. Locate the required configuration file and then click OK.
CXP3535 Color Server for the DocuColor 3535 Technical Manual
Select Configuration and click Browse.
Page 78

70 Chapter 2 – Software Reinstallation and Configuration
5. Click the Start Recovery button.
6. By default, all categories are selected. If you do not want to restore
certain categories, clear the required selections.
Note: When restoring the configuration, all the custom tables/sets will be
added to the system. This includes imported user-defined imposition
templates, new virtual printers, downloaded fonts etc.
7. Click OK.
8. Click OK.
9. In the Configuration Wizard Recovery window, click Next.
CXP3535 Color Server for the DocuColor 3535 Technical Manual
Page 79

The Configuration Wizard (If Configuration Backup is Available) 71
The View Configuration window appears.
10. We recommend that you print the Configuration Server Report. The
report is a useful record of the configuration settings, which you could
refer to whenever required.
Click the
11. Click Close.
CXP3535 Color Server for the DocuColor 3535 Technical Manual
Print button.
Page 80

72 Chapter 2 – Software Reinstallation and Configuration
The following window appears.
12. Click Finish.
The CXP3535 Color Server Application workspace appears on your
screen.
13. If you made any changes to the configuration, these changes will only
take effect if the CXP3535 Color Server is turned off and then
restarted.
Close all open applications and from the
Shut Down.
select
14. To restart the CXP3535 Color Server, select Restart and click OK.
Start menu,
Yo u h av e c o mp l et e d Restoring the Backed Up Configuration.
CXP3535 Color Server for the DocuColor 3535 Technical Manual
Page 81

The Configuration Wizard (If Configuration Backup is Available) 73
2.4.2 Restoring the Factory Defaults Configuration
1. Select Use factory defaults and click Next.
CXP3535 Color Server for the DocuColor 3535 Technical Manual
Page 82

74 Chapter 2 – Software Reinstallation and Configuration
The default factory-set configuration is restored, and the View
Configuration window appears.
2. We recommend that you print the Configuration Server Report. The
report is a useful record of the configuration settings, which you could
refer to whenever required.
Click the
3. Click Close.
CXP3535 Color Server for the DocuColor 3535 Technical Manual
Print button.
Page 83

The Configuration Wizard (If Configuration Backup is Available) 75
The following window appears.
4. Click Finish.
The CXP3535 Color Server Application workspace appears on your
screen. You have completed Restoring the Factory Defaults
Configuration.
CXP3535 Color Server for the DocuColor 3535 Technical Manual
Page 84

76 Chapter 2 – Software Reinstallation and Configuration
2.5 The Configuration Wizard (If Recovery Fails or is
Unavailable)
If there is no backup configuration in your system, you need to perform
the following steps to configure your system.
2.5.1 Choosing the Configuration Type
¾ Ve r if y t h at First time Configuration of system settings is selected and
click
Next.
CXP3535 Color Server for the DocuColor 3535 Technical Manual
Page 85

The Configuration Wizard (If Recovery Fails or is Unavailable) 77
2.5.2 Setting the Language
¾ Select the required interface language and click Next.
CXP3535 Color Server for the DocuColor 3535 Technical Manual
Page 86

78 Chapter 2 – Software Reinstallation and Configuration
2.5.3 Configuring the Host Name
The CXP3535 Color Server contains a default Computer Name
(Hostname) preset by the factory. Check with your System Administrator
in order to change the computer name.
Note: The Hostname is taken from the computer name you typed during the
Windows 2000 Professional Fast Installation, see Reinstalling the Operating
System on page 62.
1. Verify that the correct host name appears and click Next.
Otherwise, click the
CXP3535 Color Server for the DocuColor 3535 Technical Manual
Change button.
Page 87

The Configuration Wizard (If Recovery Fails or is Unavailable) 79
The System Properties dialog box appears.
2. Click the Properties button.
CXP3535 Color Server for the DocuColor 3535 Technical Manual
Page 88

80 Chapter 2 – Software Reinstallation and Configuration
The following window appears.
3. In the Computer name box, type the new name for the computer. If
you would like to change the
Workgroup or the Domain in which your
computer appears, type the new name in the corresponding area and
click
OK.
Note: Do not change the Workgroup or Domain unless instructed. If you are
changing the Domain/Workgroup, verify that you have the user name and
password for the Domain/Workgroup.
A message appears to inform you that changes will take effect only
after reboot.
4. Click OK.
5. In the System Properties dialog box, click OK.
6. Click Next to continue.
Note: When prompted to restart your computer, click No, (since you are be
prompted at the end of the Configuration Wizard to restart your system.
CXP3535 Color Server for the DocuColor 3535 Technical Manual
Page 89

The Configuration Wizard (If Recovery Fails or is Unavailable) 81
2.5.4 Setting the Date and Time
1. Check that the Date and Time are set correctly and click Next.
Otherwise, click the
CXP3535 Color Server for the DocuColor 3535 Technical Manual
Change button.
Page 90

82 Chapter 2 – Software Reinstallation and Configuration
The Date/Time Properties dialog box appears.
2. Set the date and time correctly, and select the Time Zone tab.
3. Select the time zone required and click OK.
4.
In the Date and Time window, click Next.
CXP3535 Color Server for the DocuColor 3535 Technical Manual
Page 91

The Configuration Wizard (If Recovery Fails or is Unavailable) 83
2.5.5 Setting the Default Measurement Units
¾ Select the required default measurement unit and click Next.
CXP3535 Color Server for the DocuColor 3535 Technical Manual
Page 92

84 Chapter 2 – Software Reinstallation and Configuration
2.5.6 Configuring the IP Address
1. Verify that the displayed Enable DHCP setting is correct and click Next.
2. If you wish to change the IP Address, click the Change button.
The Local Area Connection 3 Properties dialog box, followed by the
Internet Protocol (TCP/IP) Properties dialog box appears.
CXP3535 Color Server for the DocuColor 3535 Technical Manual
Page 93

The Configuration Wizard (If Recovery Fails or is Unavailable) 85
3. In Internet Protocol (TCP/IP) Properties dialog box, select Use the
following IP Address
.
4. Typ e th e new IP address, Subnet mask and Default gateway (if
applicable).
Note: The Spire Color Server is set to DHCP server configuration by default
after an operating system reinstall.
For more details on how to get the IP or DHCP (also subnet mask and
default gateway) information, refer to the Xerox Installation and Planning
Guide.
5. Click OK.
Note: If prompted to restart your computer, click No. You will be prompted
at the end of the Configuration Wizard to restart your system.
6.
In the the Local Area Connection 3 Properties dialog box, click OK.
7. In the IP Address window, click Next to continue.
CXP3535 Color Server for the DocuColor 3535 Technical Manual
Page 94

86 Chapter 2 – Software Reinstallation and Configuration
2.5.7 Configuring the Apple Talk Zone
This option enables you to change the AppleTalk network zone in which
your CXP3535 Color Server appears.
Note: This option only applies to networks that contain Macintosh computers.
1. Verify that the displayed Apple Talk zone is correct and click Next.
Otherwise, click the
CXP3535 Color Server for the DocuColor 3535 Technical Manual
Change button.
Page 95

The Configuration Wizard (If Recovery Fails or is Unavailable) 87
The Local Area Connection 3 Properties dialog box appears, followed
by the Apple Talk Protocol Properties dialog box.
2. From the This system will appear in zone drop-down menu, select
the required zone and click
3. In the Local Area Connection 3 Properties dialog box, click OK.
4. In the Apple Talk Zone window, click Next.
CXP3535 Color Server for the DocuColor 3535 Technical Manual
OK.
Page 96

88 Chapter 2 – Software Reinstallation and Configuration
2.5.8 Completing the Configuration
After the installation is complete, the View Configuration window
appears.
1. We recommend that you print the Configuration Server Report. The
report is a useful record of the configuration settings, which you could
refer to whenever required.
Click the
CXP3535 Color Server for the DocuColor 3535 Technical Manual
Print button.
Page 97

The Configuration Wizard (If Recovery Fails or is Unavailable) 89
2. Click Close.
3. To complete the first time setup, click Finish.
The configuration settings are automatically backed up. When the
backup is complete, the following message appears.
4. Click OK.
The CXP3535 Color Server workspace appears on your screen.
5. If you made any changes to the configuration, these changes will only
take effect if the CXP3535 Color Server is turned off and then
restarted.
Close the CXP3535 Color Server application.
6. Close any other open applications and from the Windows desktop
follow the path
CXP3535 Color Server for the DocuColor 3535 Technical Manual
Start>Shut Down.
Page 98

90 Chapter 2 – Software Reinstallation and Configuration
7. Restart the computer.
After restart, the SPIRE Application splash screen appears.
8. The CXP3535 Color Server application is automatically loaded and
launched. You have completed The Configuration Wizard (If Recovery
Fails or is Unavailable).
9. You can now install Novell network (if required, see Installing and
Configuring Novell Client for Spire on page 92), McAfee antivirus
(if required, see Configuring the McAfee VirusScan on page 97), and
then proceed to Importing a File and Performing a Test Print on
page 104.
CXP3535 Color Server for the DocuColor 3535 Technical Manual
Page 99

The Configuration Wizard (If Recovery Fails or is Unavailable) 91
2.5.9 Changing the Operator Name and Password
1. If you want to change the operator name and password:
a. On the Windows desktop, right-click My Computer and select
Manage.
b. Expand the Local Users and Groups tree, and select Users.
c. Select Operator. Right-click and select Properties.
d. Type the Full name and click OK.
2. If you want to change the operator password:
a. On the Windows desktop, right-click My Computer and select
Manage.
b. Expand the Local Users and Groups tree, and select Users.
c. Select Operator. Right-click and select Set Password.
d.
Type the new password and confirm the new password.
e. Click OK.
3. If any error messages appear, see Error Messages on page 144 for
descriptions and actions to be taken.
4. You can now install Novell network (if required, see Installing and
Configuring Novell Client for Spire on page 92), McAfee antivirus
(if required, see Configuring the McAfee VirusScan on page 97), and
then proceed to Importing a File and Performing a Test Print on
page 104.
CXP3535 Color Server for the DocuColor 3535 Technical Manual
Page 100

92 Chapter 2 – Software Reinstallation and Configuration
2.5.10 Installing and Configuring Novell Client for Spire
The following procedures are only relevant for those customers who have
a Novell network running IPX protocol. If you do not have this type of
network, proceed to Importing a File and Performing a Test Print on
page 104.
Note: Further information about configuring the connection between the
CXP3535 Color Server and a Novell NDS server, in a Novell working environment,
is provided in the CXP3535 Color Server Printing Guide.
Installing Novell Client for Spire
1. Close the Spire workspace and the Spire application.
2. Close all other applications.
3. On the Windows desktop, click Start and follow the path,
CXP3535>CXP3535 Tools>Novell Client Installation.
CXP3535 Color Server for the DocuColor 3535 Technical Manual
 Loading...