

Page 1
Installing the Fiery software
for Windows and Macintosh
13
The User Software CD includes software installers for Fiery Link. Fiery
utility software is supported on Windows 95/98, Windows 2000,
Windows NT 4.0 and Macintosh and must be separately installed on
each user workstation.
Fiery Link is supported only over TCP/IP.
Because the server is part of the printer unit, most references in this chapter
are simply to the printer.
Installing the Fiery Link software
Before you begin the installation for Fiery Link, determine the following:
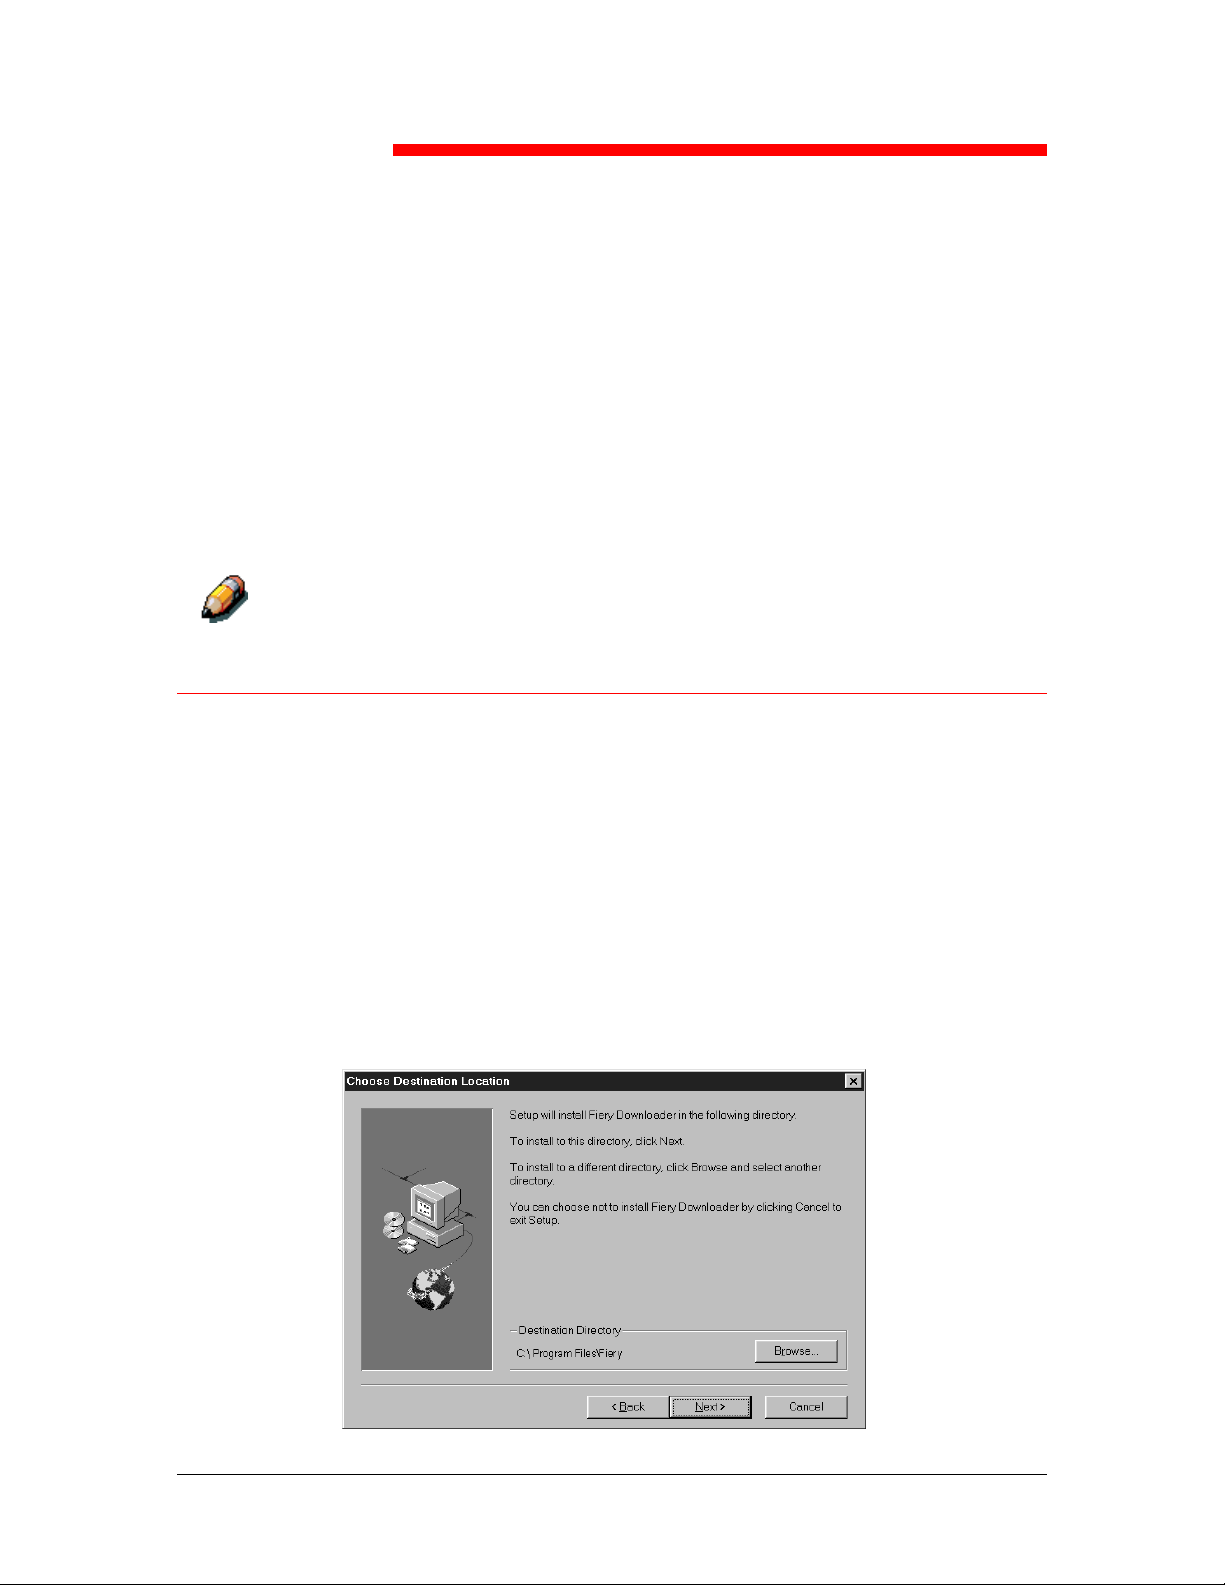
• The location of the utility on the hard disk. By default, the installer
places Fiery Link in the Programs\Fiery folder.
• The name of the utility folder in the Windows\Start Menu\ Programs
folder. By default, the installer names the folder Fiery.
1. Insert the User Software CD in your CD-ROM drive. Open the
CD-ROM drive icon.
2. Double-click Fiery Link and the Setup.exe file.
3. Follow the instructions in the Setup dialog boxes to complete
installation.
Xerox DocuColor 2006
13–1
Page 2

13. Installing the Fiery software for Windows and Macintosh
Ensure you complete the following:
• Read the Setup program introduction.
• Read the license agreement.
• Specify a hard disk location for the installed utility software.
• Specify a folder name for the software located on the
Programs menu. By default, the folder name is Fiery.
• Acknowledge that the software installation is complete.
Using the software for the first time
Before you can use the newly installed software, configure the
connection to the printer.
Configuring a connection for Fiery Link for Windows and Macintosh OS
You can use Fiery Link to monitor the status of Fiery servers and view
information about the print jobs sent to them.
When you select the Edit Fiery List button, all Fiery servers on the
local subnet are displayed in the Available Fierys list in the My Fiery
List dialog box. You can specify which printer servers to connect to and
monitor from this dialog box. If the printer is not in your local subnet,
you can use Fiery Link options to manually configure a connection, or
you can perform an advanced search to locate and connect to printer
servers anywhere on the network. The following procedures describe
locating and connecting to a Printer server using manual and
advanced search methods.
Fiery Link is supported only over TCP/IP.
13–2
Xerox DocuColor 2006
Page 3
13. Installing the Fiery software for Windows and Macintosh
Configuring the connection to Fiery servers in a local subnet
1. Double-click the Fiery Link icon.
A warning that no Fierys are configured is displayed.
2. Select OK.
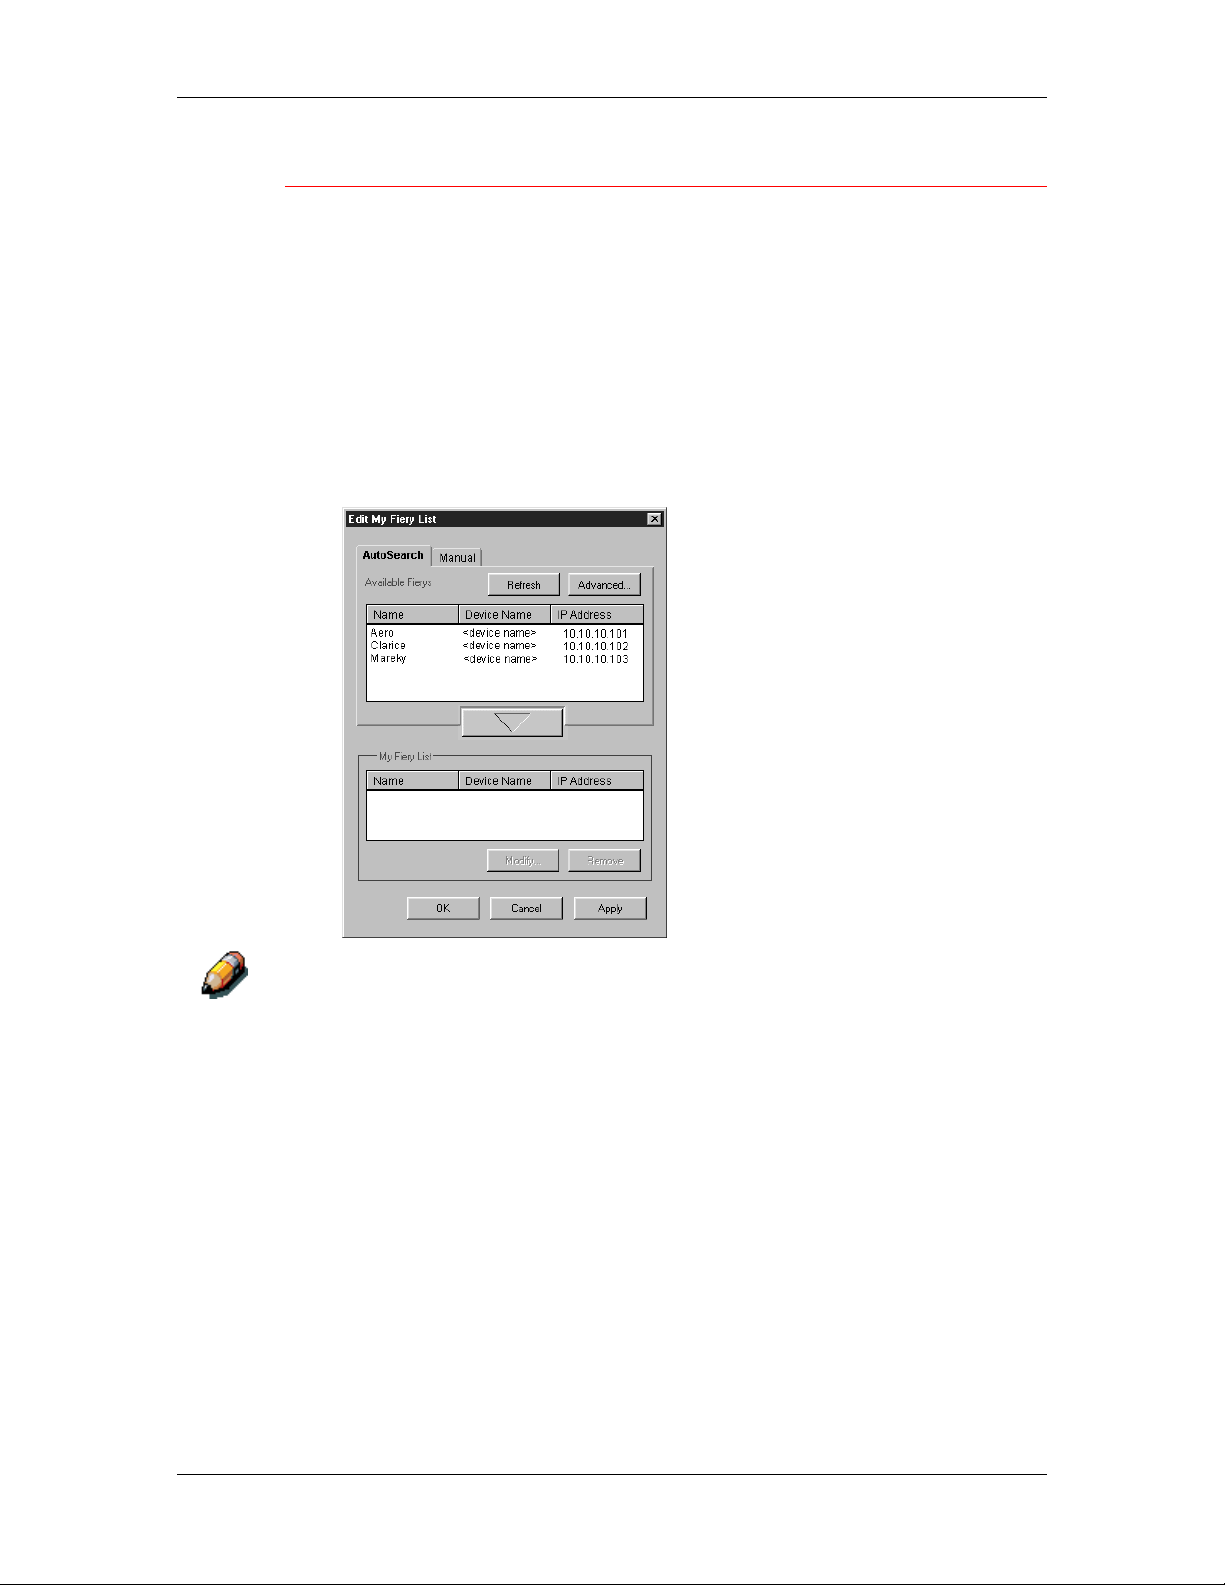
The Edit My Printer List dialogue box opens and all the servers
found in the local subnet are displayed in the Available Fierys
area of the dialog box. If the printer is located on a different
subnet, an Error dialog box is displayed. Select OK to dismiss the
dialogue box and perform the Advanced IP search or Advanced
Subnet search.
Only servers that support Fiery Link are displayed in the Available Fierys
area.
Xerox DocuColor 2006
13–3
Page 4

13. Installing the Fiery software for Windows and Macintosh
3. To add a server to the My Fiery List select the server and select
the arrow button.
The server is displayed in the My Fiery List. Repeat this step for
each server you would like to add to the My Fiery List.
4. Select Apply to accept the changes to the My Fiery List.
5. Select OK.
Manually configuring the connection to Fiery printers
1. Select the Manual tab.
13–4
Xerox DocuColor 2006
Page 5
13. Installing the Fiery software for Windows and Macintosh
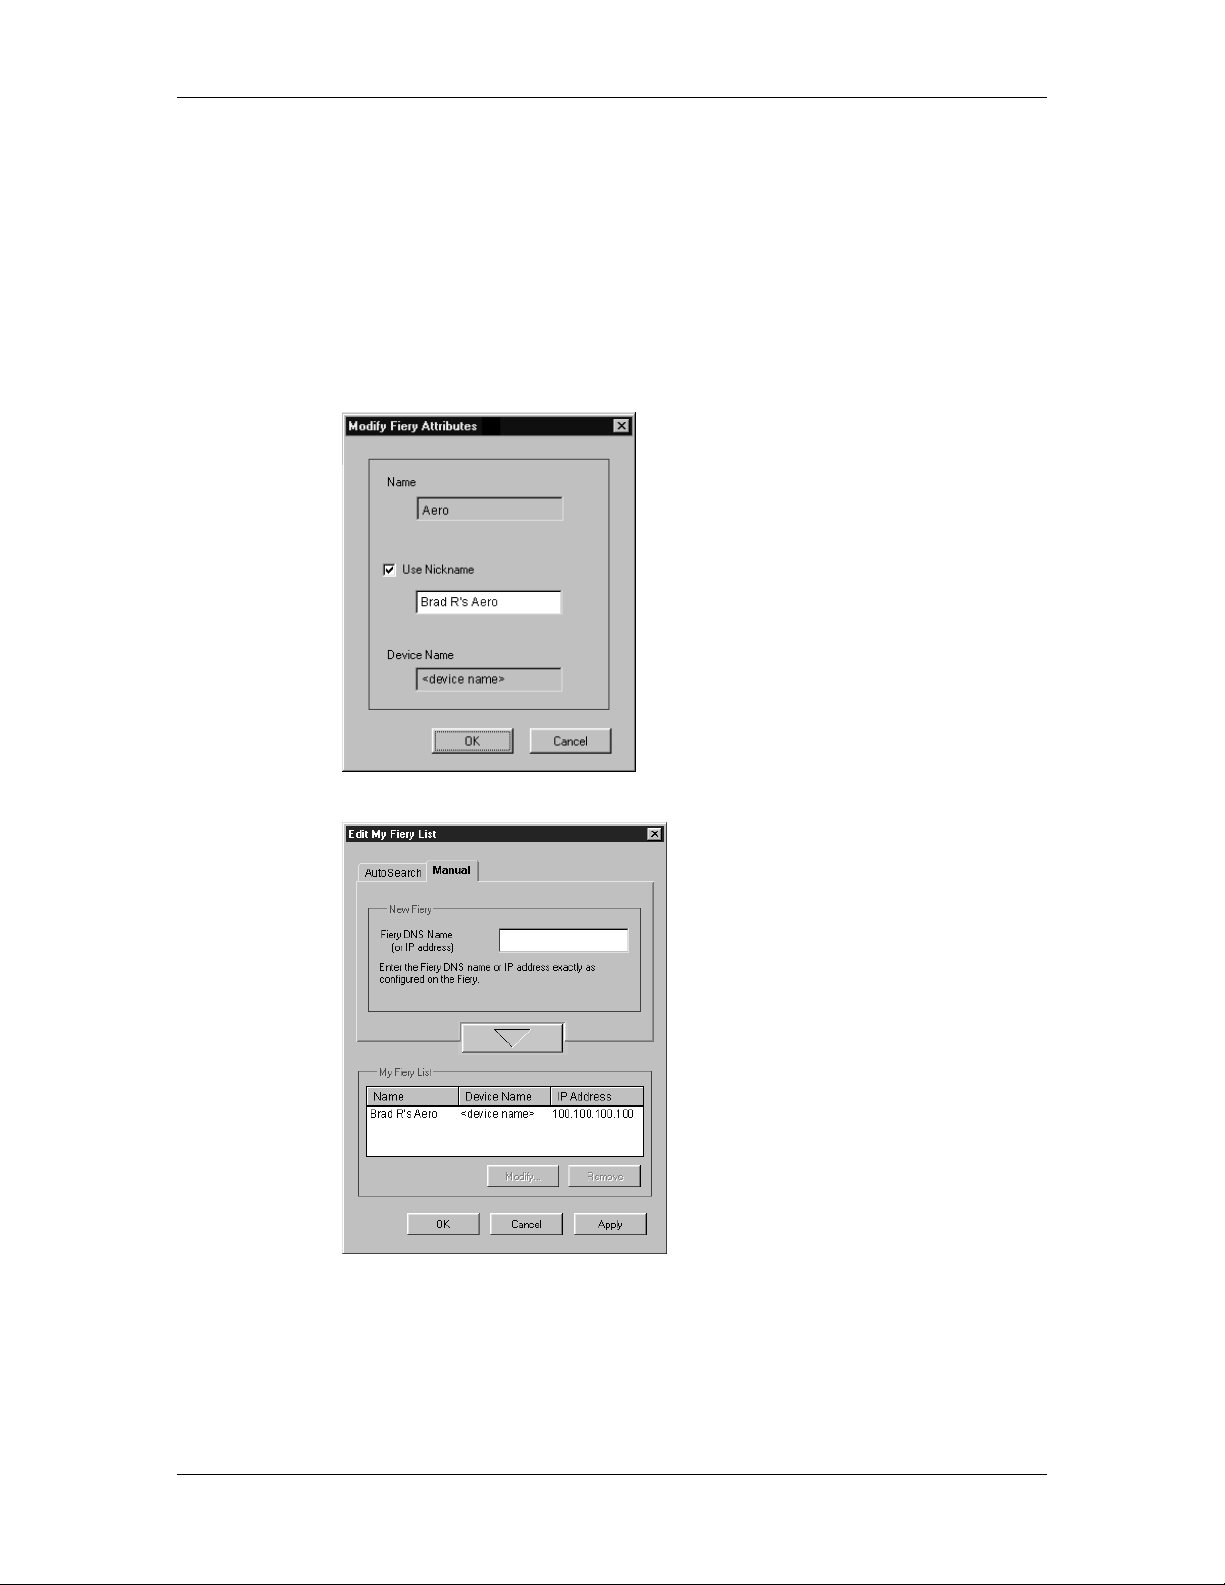
2. Enter the DNS name or IP address of the printer and select the
arrow button.
After the arrow button is selected, Fiery Link checks for the
specified server. If the server is found, it is displayed in the My
Fiery List. If it is not found, an error message is displayed.
3. To give the server a nickname, select it in the My Fiery List and
select Modify.
4. Select Use Nickname and enter a nickname for the printer.
5. Select OK.
6. Select Apply to accept the changes to My Fiery List.
7. Select OK.
Xerox DocuColor 2006
13–5
Page 6
13. Installing the Fiery software for Windows and Macintosh
Configuring the connection for Fiery Link using an Advanced IP search
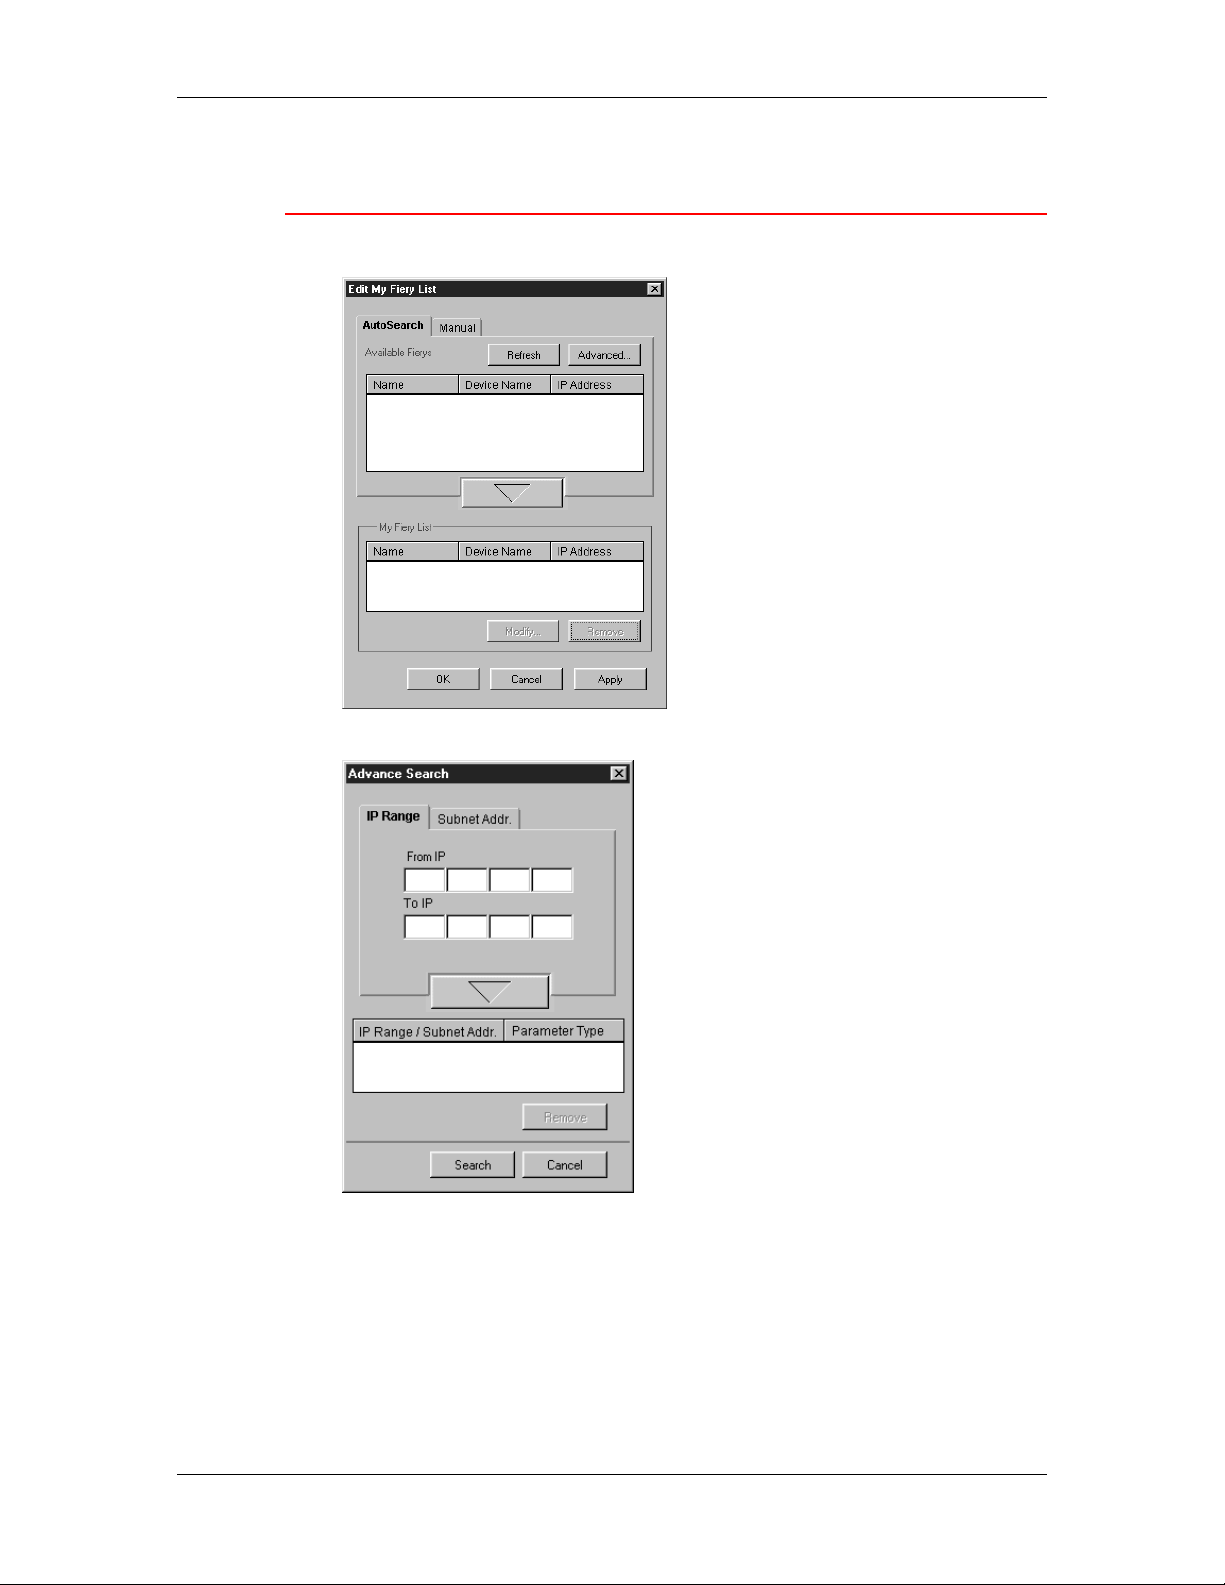
1. Select the AutoSearch tab.
2. Select the Advanced button.
13–6
Xerox DocuColor 2006
Page 7

13. Installing the Fiery software for Windows and Macintosh
3. To find all printers within an IP address range, enter an IP
Address in the From IP field and an IP address in the To IP
field. Select the arrow button.
Repeat this step for each IP address range you would like to
search. To remove an IP address range from the list, select the
range in the IP Range/Subnet Addr Window and select the
Remove button.
You can also search for the printer using a range of subnet
values. For more information, refer to the section Configuring the
connection for Fiery Link using an advanced subnet search.
Xerox DocuColor 2006
13–7
Page 8

13. Installing the Fiery software for Windows and Macintosh
4. Select Search.
When the search is complete, all found printers are displayed in
the Available Fierys area of the dialog box.
If the printer was not found and you would like to repeat the
search with the same parameters, select Refresh.
Only printers that support Fiery Link are displayed in the Available Fierys
area.
5. To add a printer to the My Fiery List, select the printer and the
arrow button.
The printer is displayed in the My Fiery List. Repeat this step for
each printer you want to add to the My Fiery List.
13–8
Xerox DocuColor 2006
Page 9

13. Installing the Fiery software for Windows and Macintosh
6. Select Apply to accept the changes to the My Fiery List.
7. Select OK.
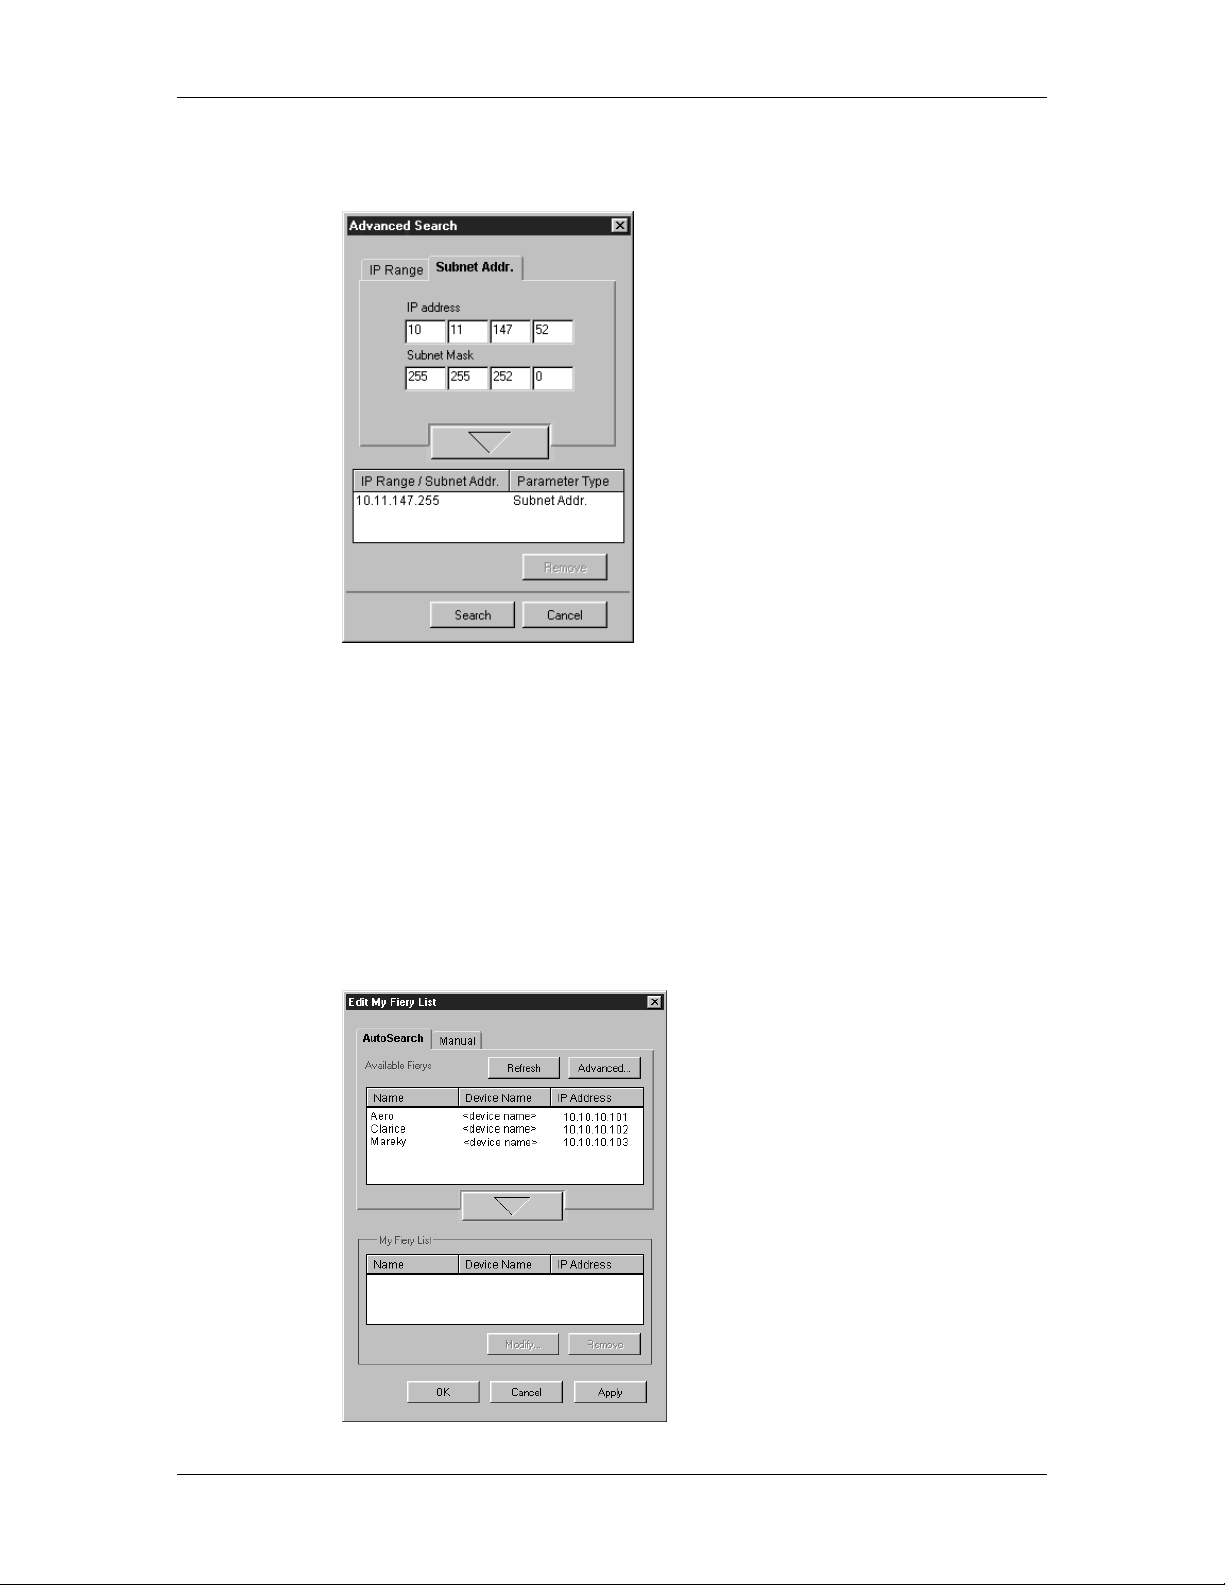
Configuring the connection for Fiery Link using an Advanced Subnet search
1. Select the AutoSearch tab.
2. Select the Advanced button and the Subnet Addr tab.
Xerox DocuColor 2006
13–9
Page 10
13. Installing the Fiery software for Windows and Macintosh
3. Enter the IP Address and subnet to search. Select the arrow
button.
The IP address and subnet to be searched are displayed in the IP
range/Subnet Addr list. Repeat this step for each IP address and
subnet you would like to search.
To remove a subnet value from the list, select the value and
select the Remove button.
4. Select Search.
When the search is complete, all found printers are displayed in
the Available Fierys area of the dialog box.
If the printer was not found and you would like to search again
using the same parameters, select Refresh.
13–10
Xerox DocuColor 2006
Page 11

13. Installing the Fiery software for Windows and Macintosh
Only printers that support Fiery Link are displayed in the Available Fierys
area.
5. To add a printer to the My Fiery List, select the printer and select
the arrow button.
The printer is displayed in the My Fiery List. Repeat this step for
each printer you want to add to the My Fiery List.
6. Select Apply to accept the changes to the My Fiery List.
7. Select OK.
Xerox DocuColor 2006
13–11
Page 12
13. Installing the Fiery software for Windows and Macintosh
Installing ColorWise Pro Tools for Windows and Macintosh OS
Configuring a connection for ColorWise Pro Tools
Use the following procedure to configure a connection for ColorWise
Pro Tools.
1. Print the Configuration page from the Printer Control Panel and
note the IP address of the printer.
You can also set up a Domain Name Server (DNS) for the IP
address of the printer. Refer to the Windows system
documentation for information.
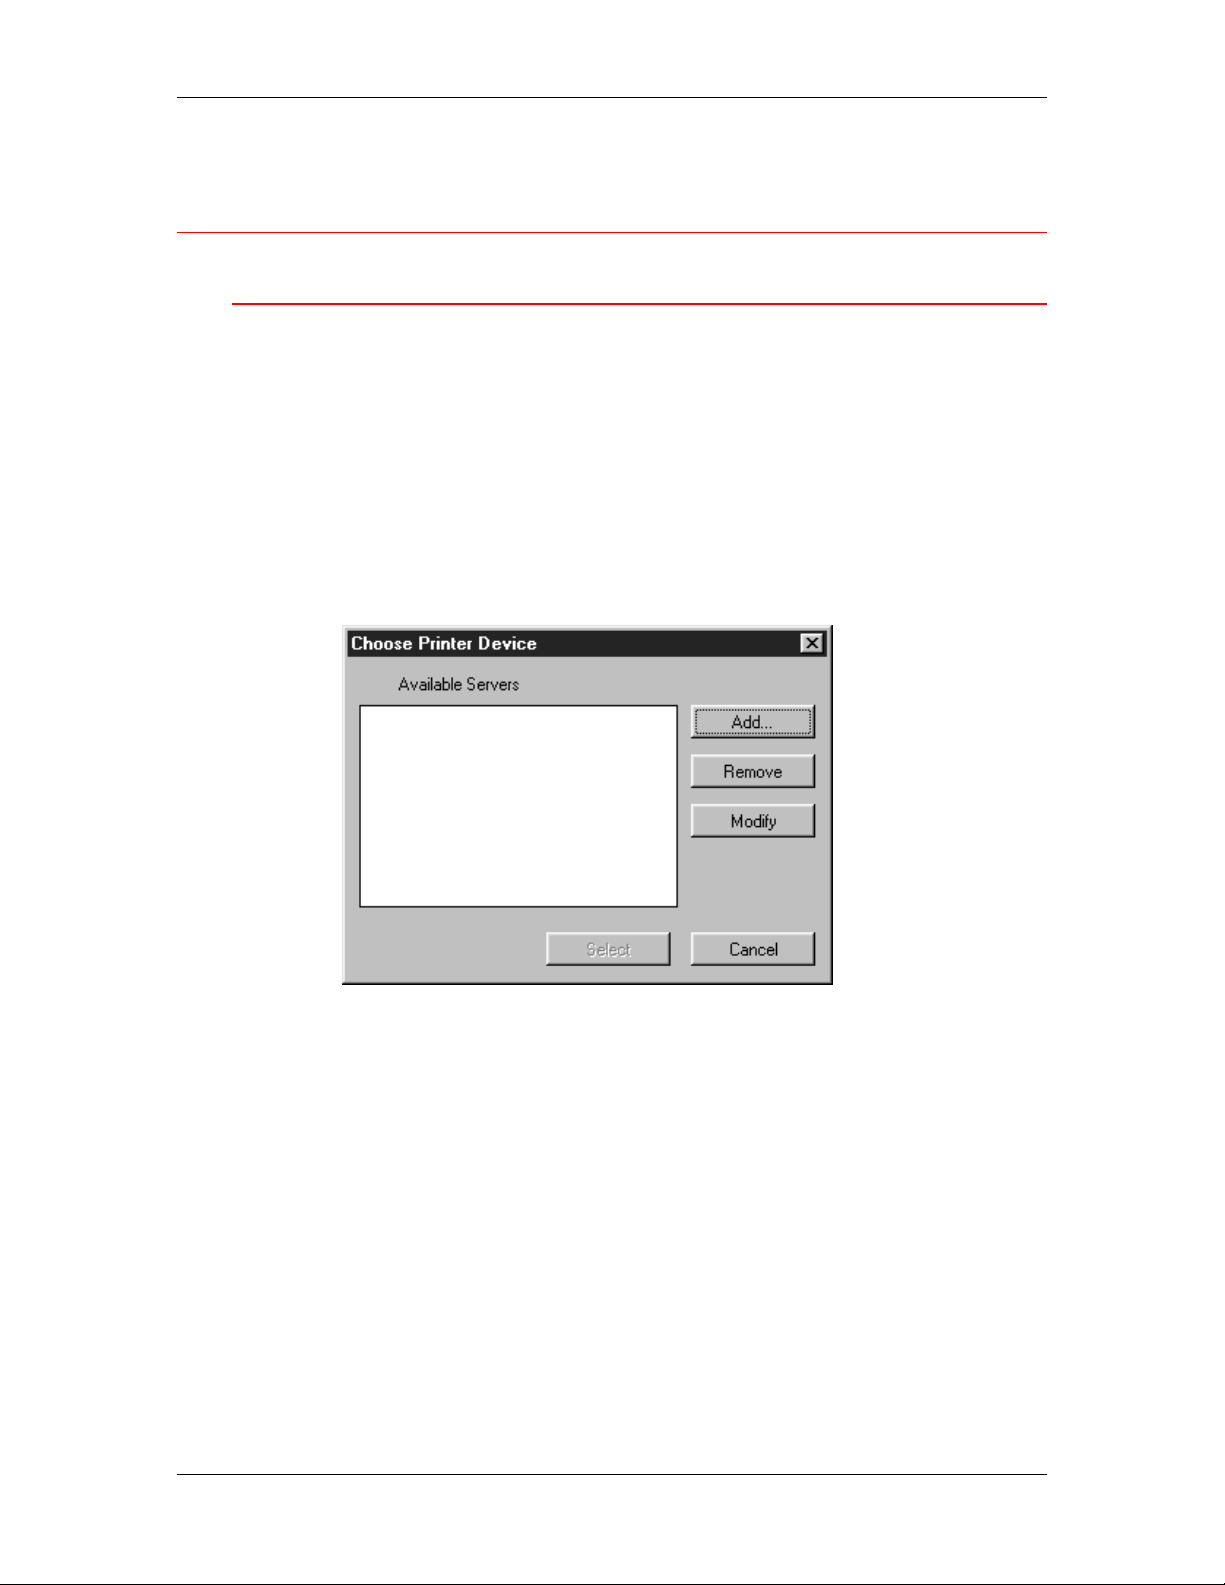
2. Double-click the ColorWise Pro Tools icon to display the Choose
Printer Device dialog box.
13–12
Xerox DocuColor 2006
Page 13
13. Installing the Fiery software for Windows and Macintosh
3. If you have previously configured a connection to the printer, you
are ready to use ColorWise Pro tools. If you have not configured
a connection, select Add.
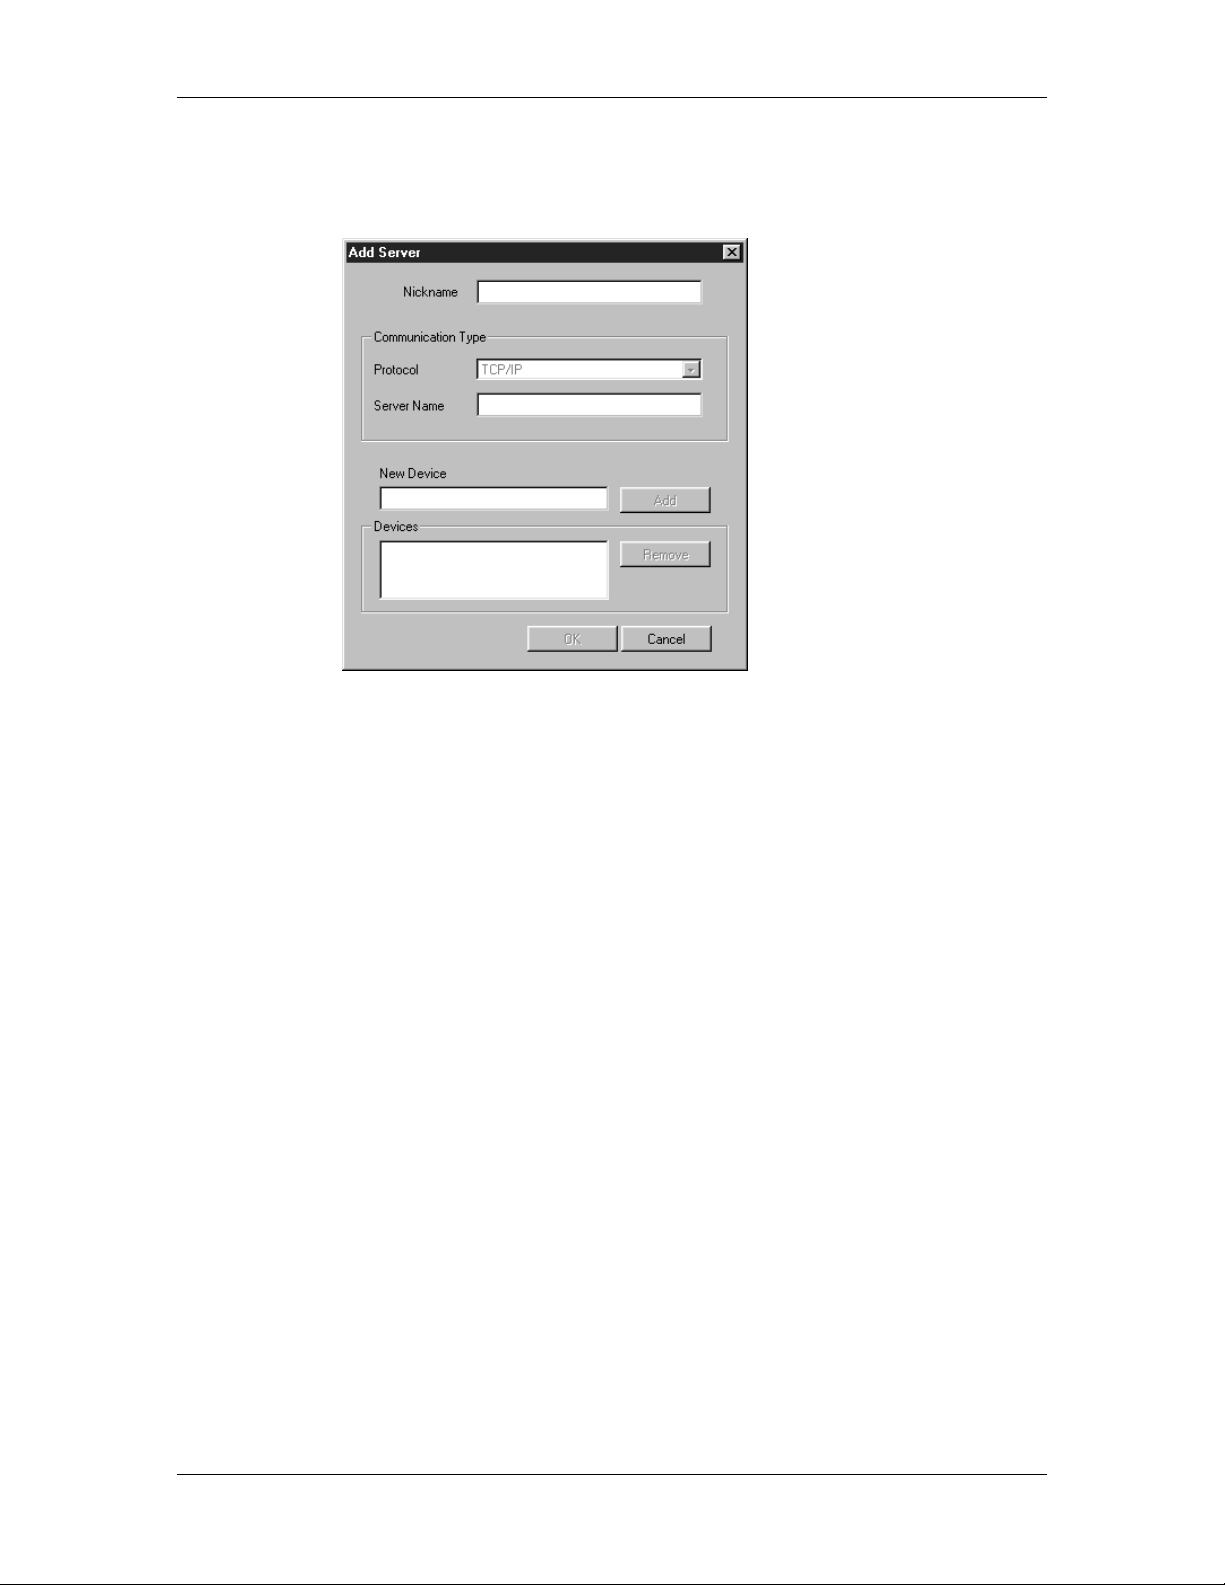
4. Enter the appropriate information for the printer.
• Nickname—Enter a name for the printer. This name can be
any name you wish; it does not have to match the actual
printer name.
The nickname cannot contain any of the following seven
characters: [ ] _ ” ’ <space> <tab>
• Protocol—Select the type of network protocol (TCP/IP) you
are using from the drop-down list.
• Server Name—Enter the IP address (or DNS name) of the
printer.
• New Device—Enter DC2006
5. After you have added all the information, select Add.
Xerox DocuColor 2006
13–13
Page 14

13. Installing the Fiery software for Windows and Macintosh
6. With the device name selected in the Devices list, select OK.
The printer is displayed in the list of available servers. The first
line of the entry displays the nickname you gave the printer,
followed by the protocol you selected. The second line displays
the device name.
7. With the device name selected in the list of Available Servers,
select the Select button to begin using the software.
Modifying the configuration
Edit the configuration whenever there is any change to your printer or
network, such as a Printer Name or IP Address. First, change the
specific Printer Setup information before configuring the connection.
1. To edit information for a printer in the list of available servers,
select the printer by its nickname and select Modify.
2. Edit information in the Modify Server Settings dialog box, as
necessary, and select OK when finished.
3. To add a new printer to the list of available servers, select Add.
Configure the printer in the Add New Server dialog box as
outlined in the previous procedure Configuring a connection for
ColorWise Pro Tools.
4. To remove a printer, select the printer by its nickname and select
Remove.
13–14
Xerox DocuColor 2006
Page 15

13. Installing the Fiery software for Windows and Macintosh
Downloading Installers with Fiery WebTools
Fiery WebTools allow you to manage your printer remotely from the
Internet or intranet for your company. The Fiery WebTools software
has its own home page from which you can select from a variety of
functions, including Status, WebSpooler, WebLink, Installer, Web
Downloader, WebSetup and Font Manager.
Setting up Fiery WebTools
In order for network users to access and use Fiery WebTools, you
need to set certain printer options in Network Setup and Printer Setup.
You also must prepare each user workstation to communicate with the
printer over the Internet or intranet.
Setting up Fiery WebTools on the printer
1. In Network Setup>Port Setup>Ethernet Port Setup, set Enable
Ethernet to Yes.
2. In Network Setup>TCP/IP Ethernet Setup, set Enable TCP/IP
to Yes.
3. In Network Setup>Network Service Setup>Web Services
Setup, set Enable Web Services to Yes.
4. Exit Network Setup and select OK to save changes.
5. Exit Printer Setup and select OK to save changes.
Xerox DocuColor 2006
13–15
Page 16

13. Installing the Fiery software for Windows and Macintosh
Setting up Client Workstations to use Fiery WebTools
1. Enable TCP/IP networking.
2. Ensure that the workstation has a valid, unique IP address.
3. Ensure that the workstation is installed with one of the following
Internet browsers:
• Windows 95/98, Windows 2000 and Windows NT 4.0: Either
Netscape Communicator v 4.5 or later or Microsoft Internet
Explorer v4.0.1 and SP1 or later
• Mac OS: Netscape Communicator v 4.5 or later or Microsoft
Internet Explorer v4.0.1 or later with Java enabled
Netscape and Microsoft continue to release frequent updates to their
browsers. As support cannot be guaranteed for all versions, use the versions
specified above for best results.
4. Ensure that Java is enabled in your browser.
13–16
Xerox DocuColor 2006
 Loading...