

Page 1

19
After you have performed initial Setup (Server Setup, Network Setup,
and Printer Setup) from the Control Panel, users with access privileges
can complete or change most Setup options from a Windows computer
using the Fiery WebSetup WebTool.
Accessing Setup
Remote Setup is performed from a Windows computer using Fiery
WebSetup.
Some Setup options cannot be accessed from remote Setup; use the
Printer Control Panel instead.
To use Fiery WebSetup, you must enter the Administrator password.
This is set either from the Printer Control Panel or Fiery WebSetup.
Performing the setup from WebSetup
Fiery WebSetup is supported for Windows 95/98, Windows 2000, and
Windows NT4.0 workstations only.
Xerox DocuColor 2006
19–1
Page 2
19. Performing the setup from WebSetup
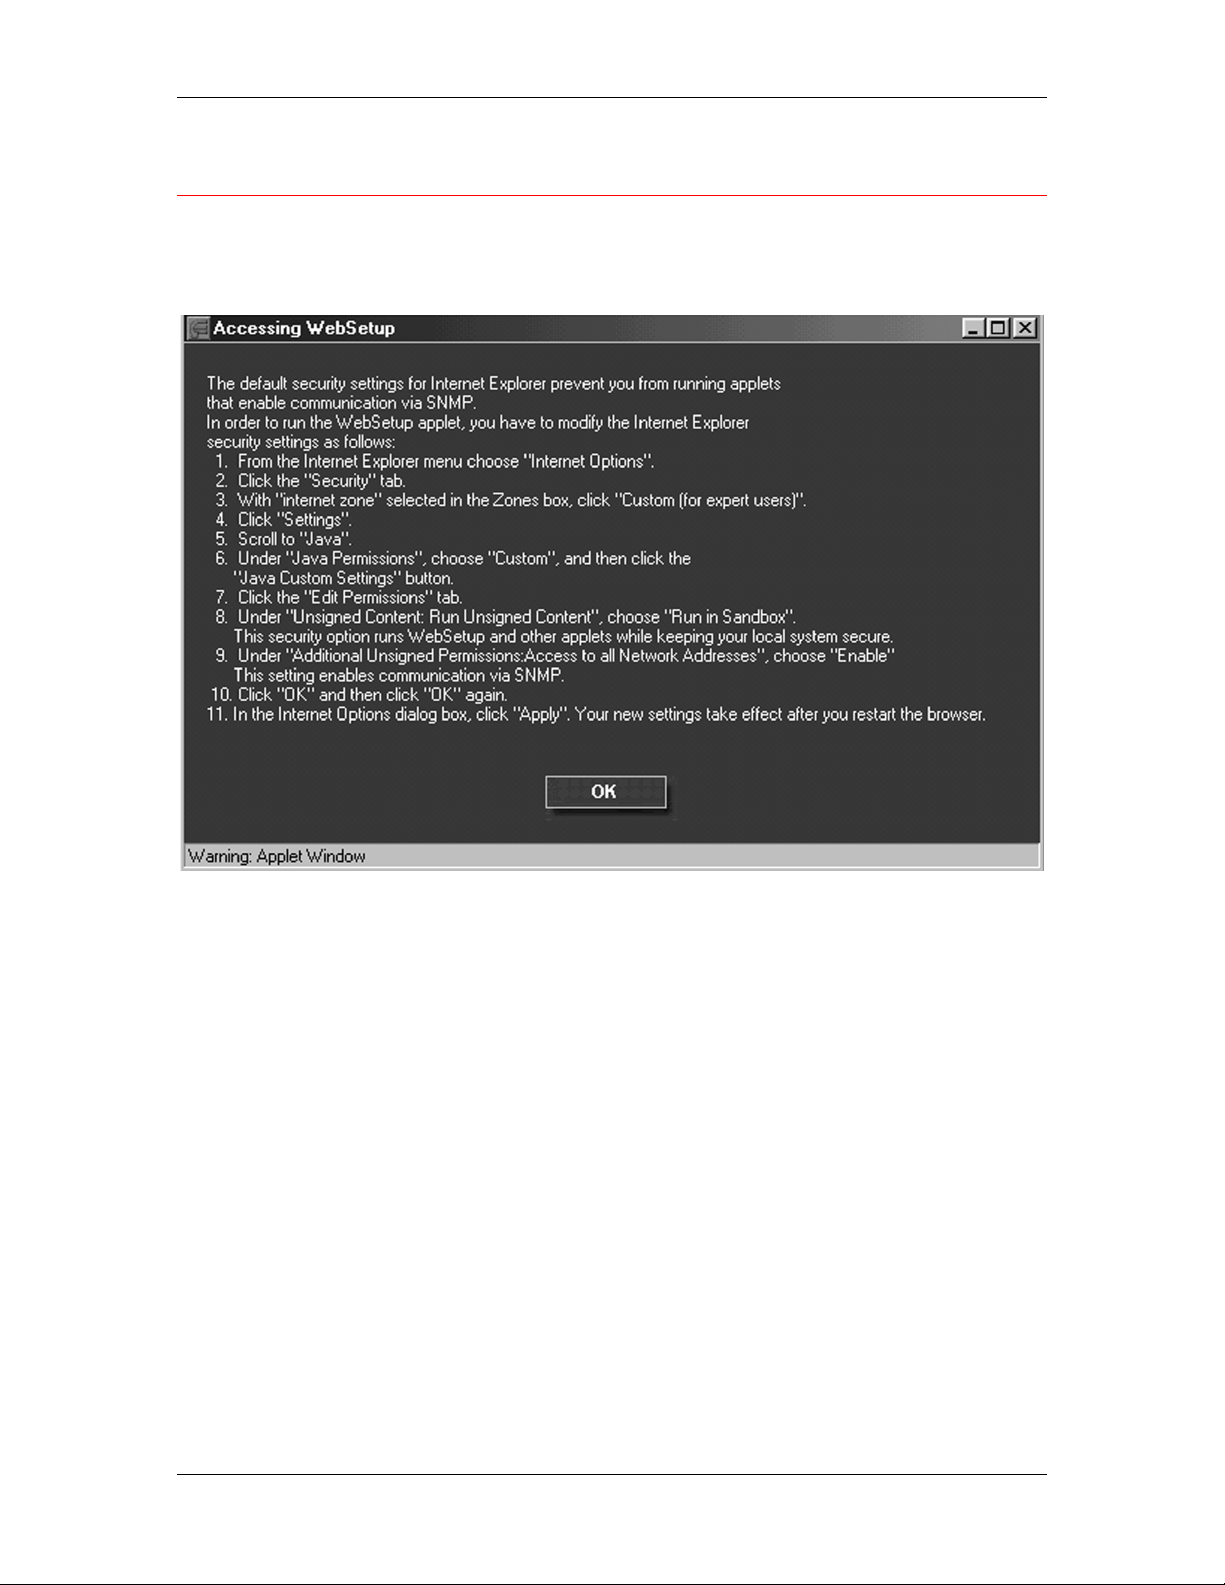
Enabling Java services
When you access WebSetup for the first time, the Accessing
WebSetup screen may display, indicating Java is not enabled. Follow
the instructions on the screen to enable Java services.
19–2
Xerox DocuColor 2006
Page 3

Accessing Fiery WebSetup
1. Start your Internet browser application.
2. Enter the IP address of the printer in the URL line of the browser.
This information is available from your system administrator.
3. Log in as the Administrator.
The DocuColor 2006 welcome page displays. The individual Fiery
WebTools are listed on the left.
4. Select the WebSetup button.
19. Performing the setup from WebSetup
Xerox DocuColor 2006
19–3
Page 4
19. Performing the setup from WebSetup
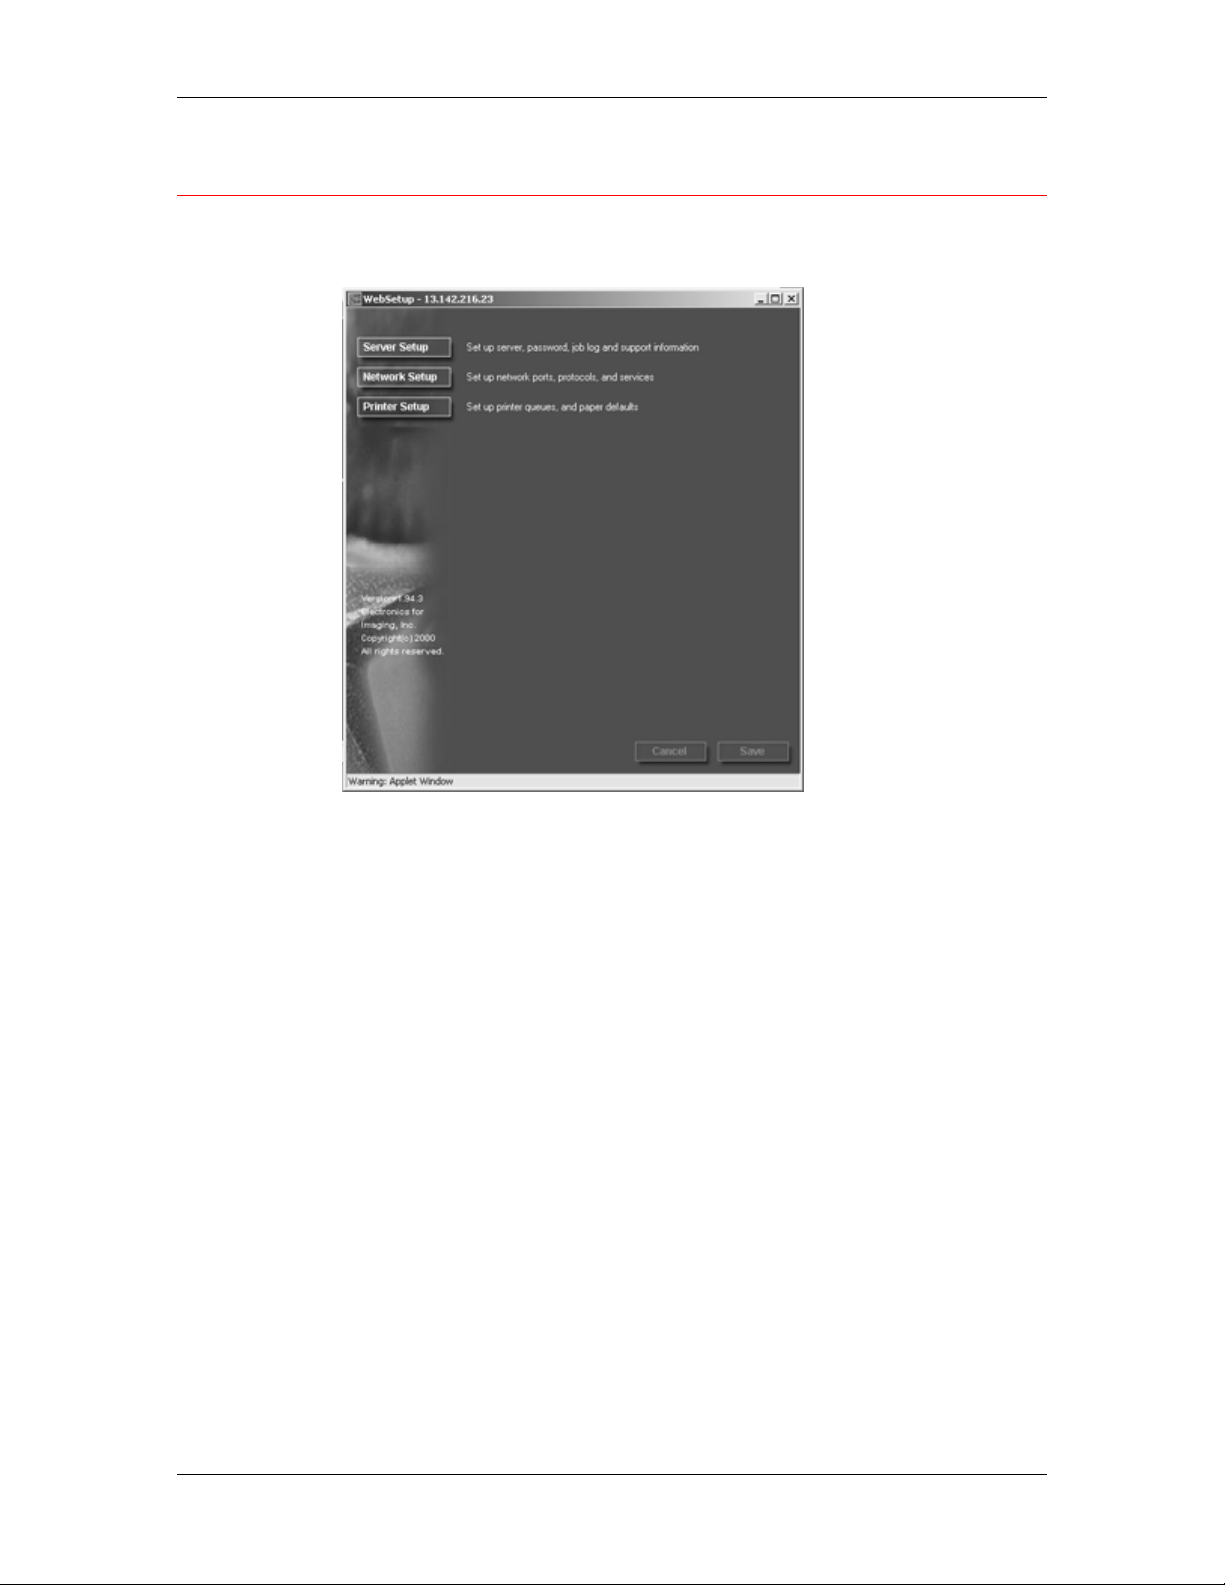
General Setup options
Regardless of how you access Setup remotely, the following
window is displayed.
You may select from the following categories of options:
• Server Setup
• Network Setup
• Printer Setup
Refer to the sections that follow for more details.
If you change a Setup option, the Cancel and Save buttons flash
when you select a different Setup category. You must select Save
or Cancel before you can proceed to another Setup Category or
exit Fiery WebSetup. If necessary, the system will display a
prompt to reboot the server to apply the changes.
19–4
Xerox DocuColor 2006
Page 5
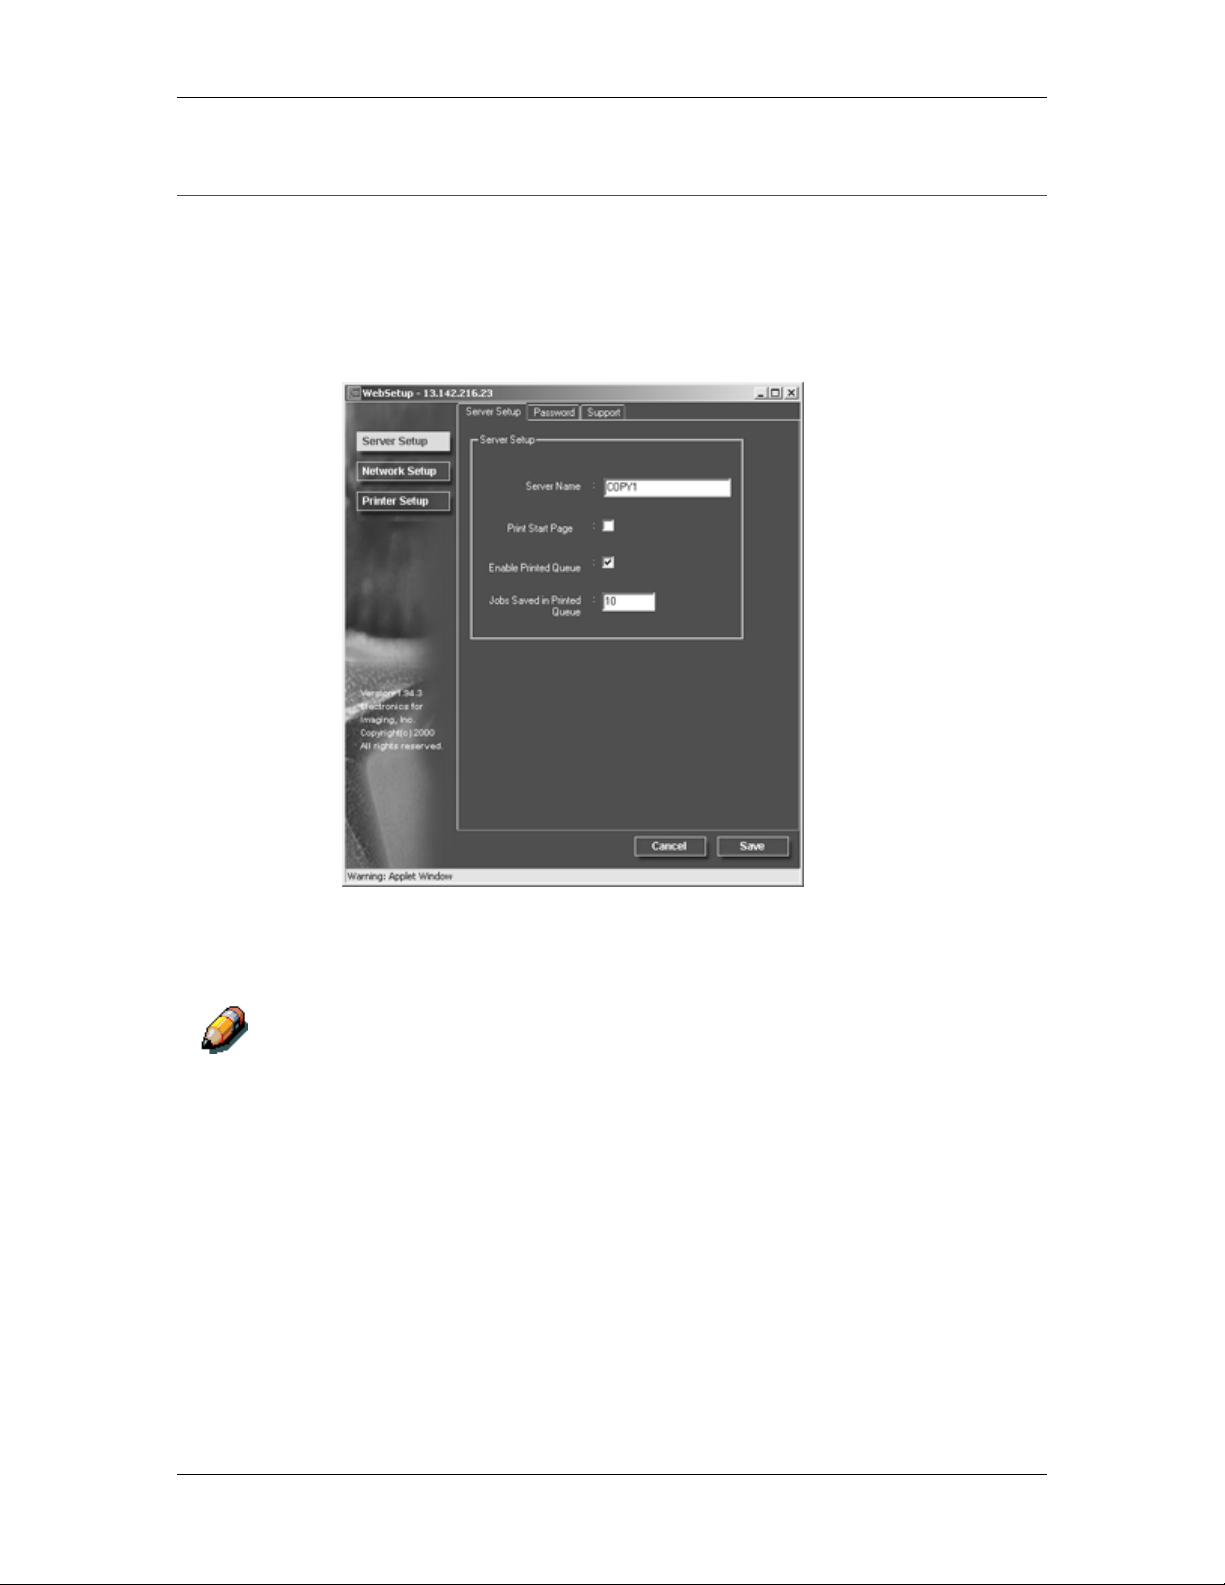
Server Setup
In Server Setup, you can specify server settings; set, change or
remove server passwords; and specify job log page size and support
options.
1. Select the Server Setup button from the WebSetup screen to
display the Server Setup tabs.
19. Performing the setup from WebSetup
Perform the following:
a. Specify a default Server Name. This is the name that
Do not use the Device name (DocuColor 2006) as the server name. If you
have more than one server, be sure to assign them different names.
Windows NT 4.0 does not support two computers with the same name in the
same workgroup or domain.
b. Select the Print Start Page check box to print a start page
Xerox DocuColor 2006
displays in the Chooser on an AppleTalk network.
each time the printer is restarted. The Start Page lists server
name, current date and time, amount of installed memory,
last calibration date, network protocols enabled, and print
connections published. To deselect the option, ensure there
is no check mark in the box (default).
19–5
Page 6
19. Performing the setup from WebSetup
c. Select the Enable Printed Queue check box to create a
storage location on the hard drive of the printer for the most
recent print jobs. When this option is enabled (default), users
with Administrator privileges can use the WebSpooler to
reprint jobs in the printed queue without sending those jobs
again. To deselect the option, ensure there is no check mark
in the box. If not enabled, jobs are deleted immediately after
they are printed.
d. In the Jobs Saved in Printed Queue text field, enter the
number of jobs (from 1—99) to be saved in the Printed
Queue. Jobs in the printed queue take up space on the hard
disk.
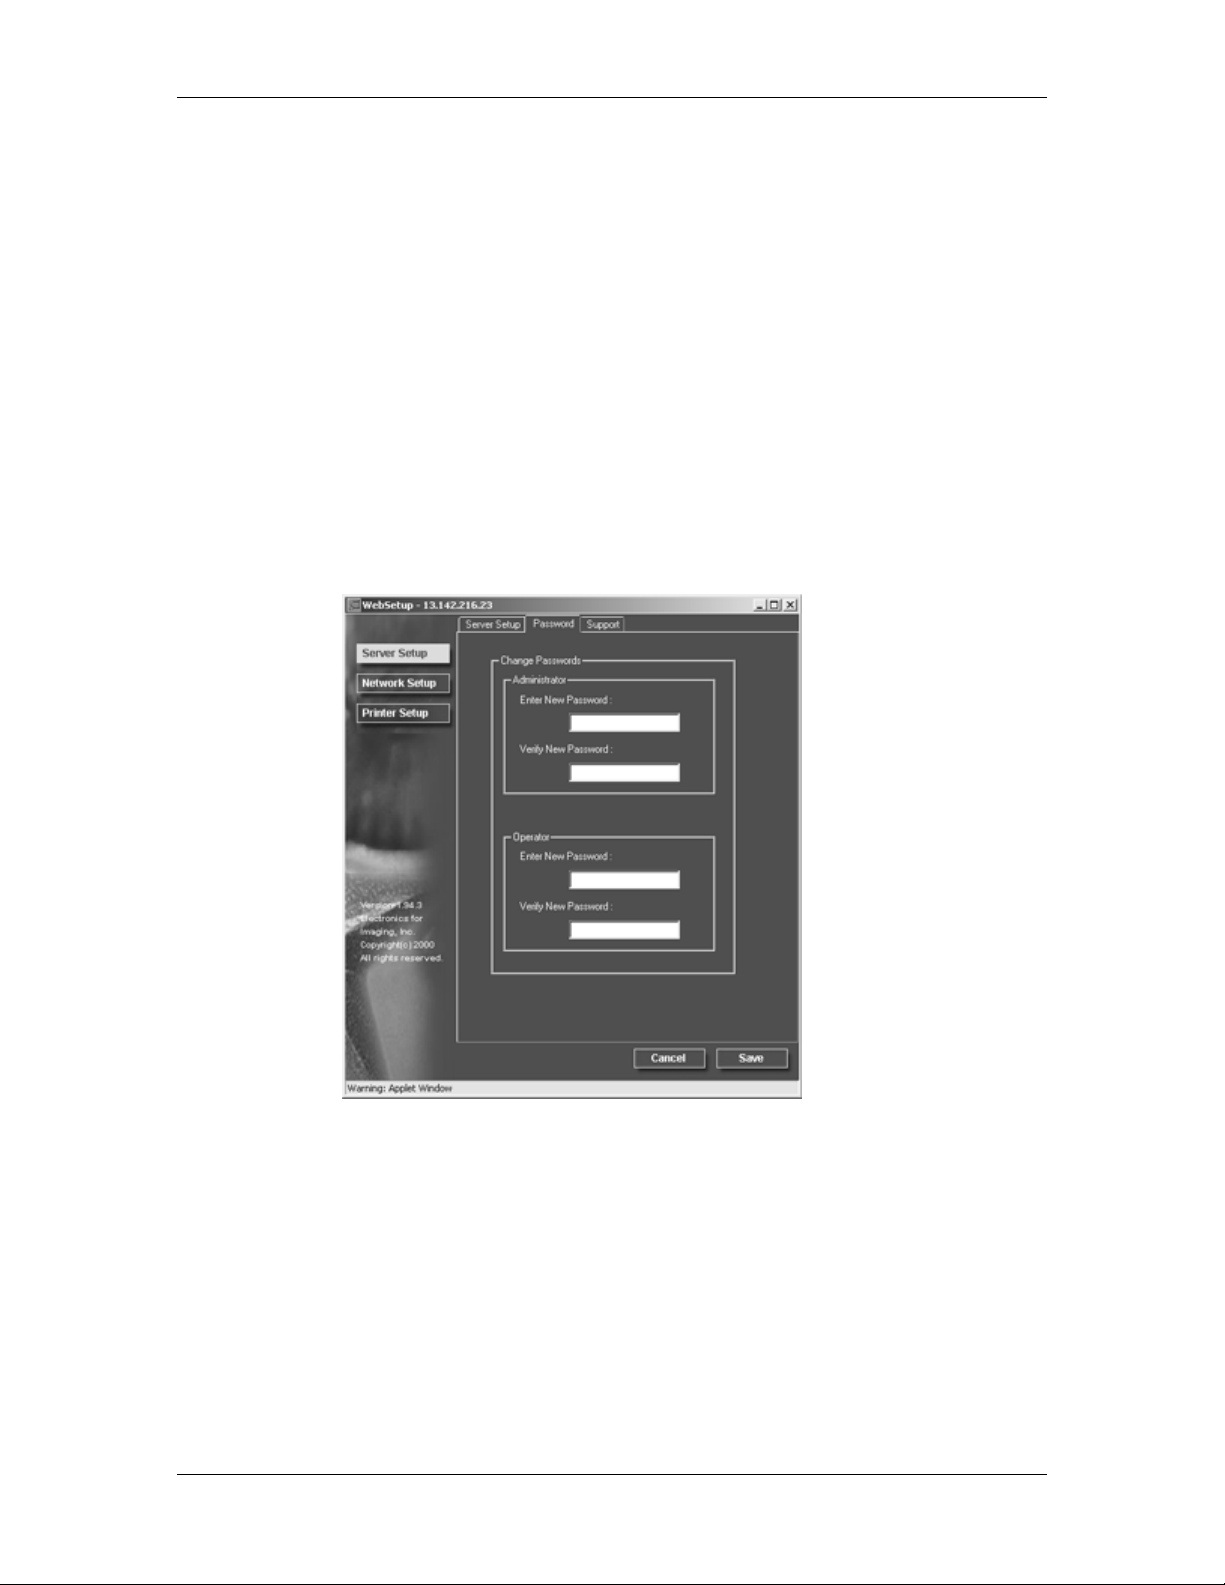
2. Select the Password tab from the Server Setup tab and perform
the following in either the Administrator or Operator box, as is
appropriate.
19–6
Entries are limited to 19 characters. The Administrator password
controls access to Setup privileges and all operator privileges.
Operator passwords control access to job management functions
through the job management tools.
Xerox DocuColor 2006
Page 7
19. Performing the setup from WebSetup
If you do not set passwords, all users will have access to setup
functions (including setting passwords) and job control. It is
strongly recommended that you set at least an administrator
password to protect the server from unauthorized changes to
setup.
a. Type an administrator password in the Enter New
Password text box.
b. Type the same password in the Verify New Password text
box. The new password is in effect until you change it again.
Write down the password and store it in a secure place. If the
password is lost or forgotten, system software will have to be
reinstalled.
To remove a password, delete the asterisks (*) in both the Enter
New Password and the Verify New Password fields.
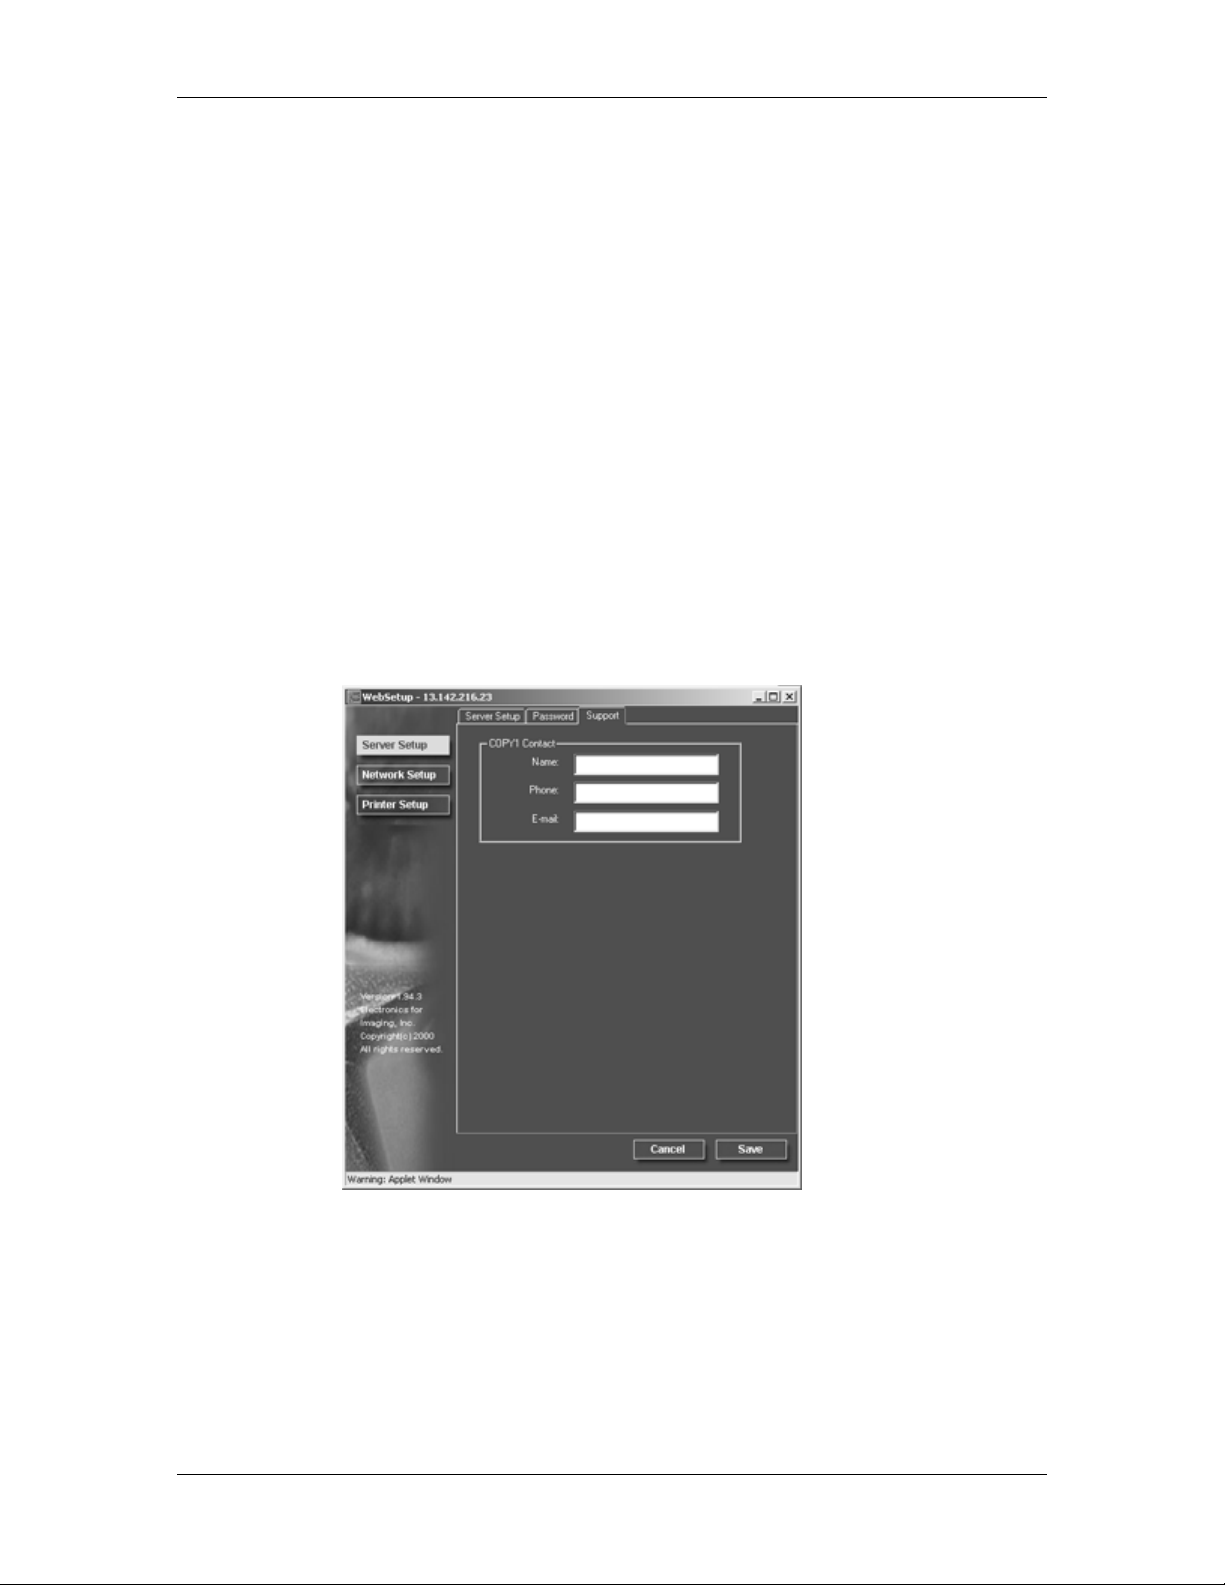
3. Select the Support tab from the Server Setup tab and type in the
relevant names, phone numbers, and e-mail addresses for your
internal support personnel. Entries are limited to 18 characters.
Xerox DocuColor 2006
19–7
Page 8

19. Performing the setup from WebSetup
Network Setup
Network Setup configures the printer to receive print jobs over the
networks that are used at your site. If the printer is configured to
enable more than one protocol, it automatically switches to the correct
protocol when it receives a print job. When the parallel port and one or
two network ports are enabled, print jobs can be received over all ports
at the same time.
You can view and specify the following network settings in Network
Setup:
Adapters and ports—View currently configured network adapters and
port settings.
From local Setup only, the installed network boards are displayed.
You cannot change this information. From remote Setup, you can
enable Ethernet or Token Ring. You can also enable the parallel
port, regardless of the network type you use.
Protocols—including AppleTalk, IPX/SPX and TCP/IP.
Print Services—including LPD printing (TCP/IP), NetWare printing
(PServer), Windows print sharing (SMB), HTTP support (WWW),
and Port 9100 printing.
Once you enter IP addresses, the server will store them, even if you
later disable TCP/IP. If you need to assign the printer IP address to
another drive, set the address to a null address.
In Network Setup, you can specify settings on the following tabs: Port,
Protocol1, Protocol2, Service1, and Service2.
19–8
Xerox DocuColor 2006
Page 9
19. Performing the setup from WebSetup
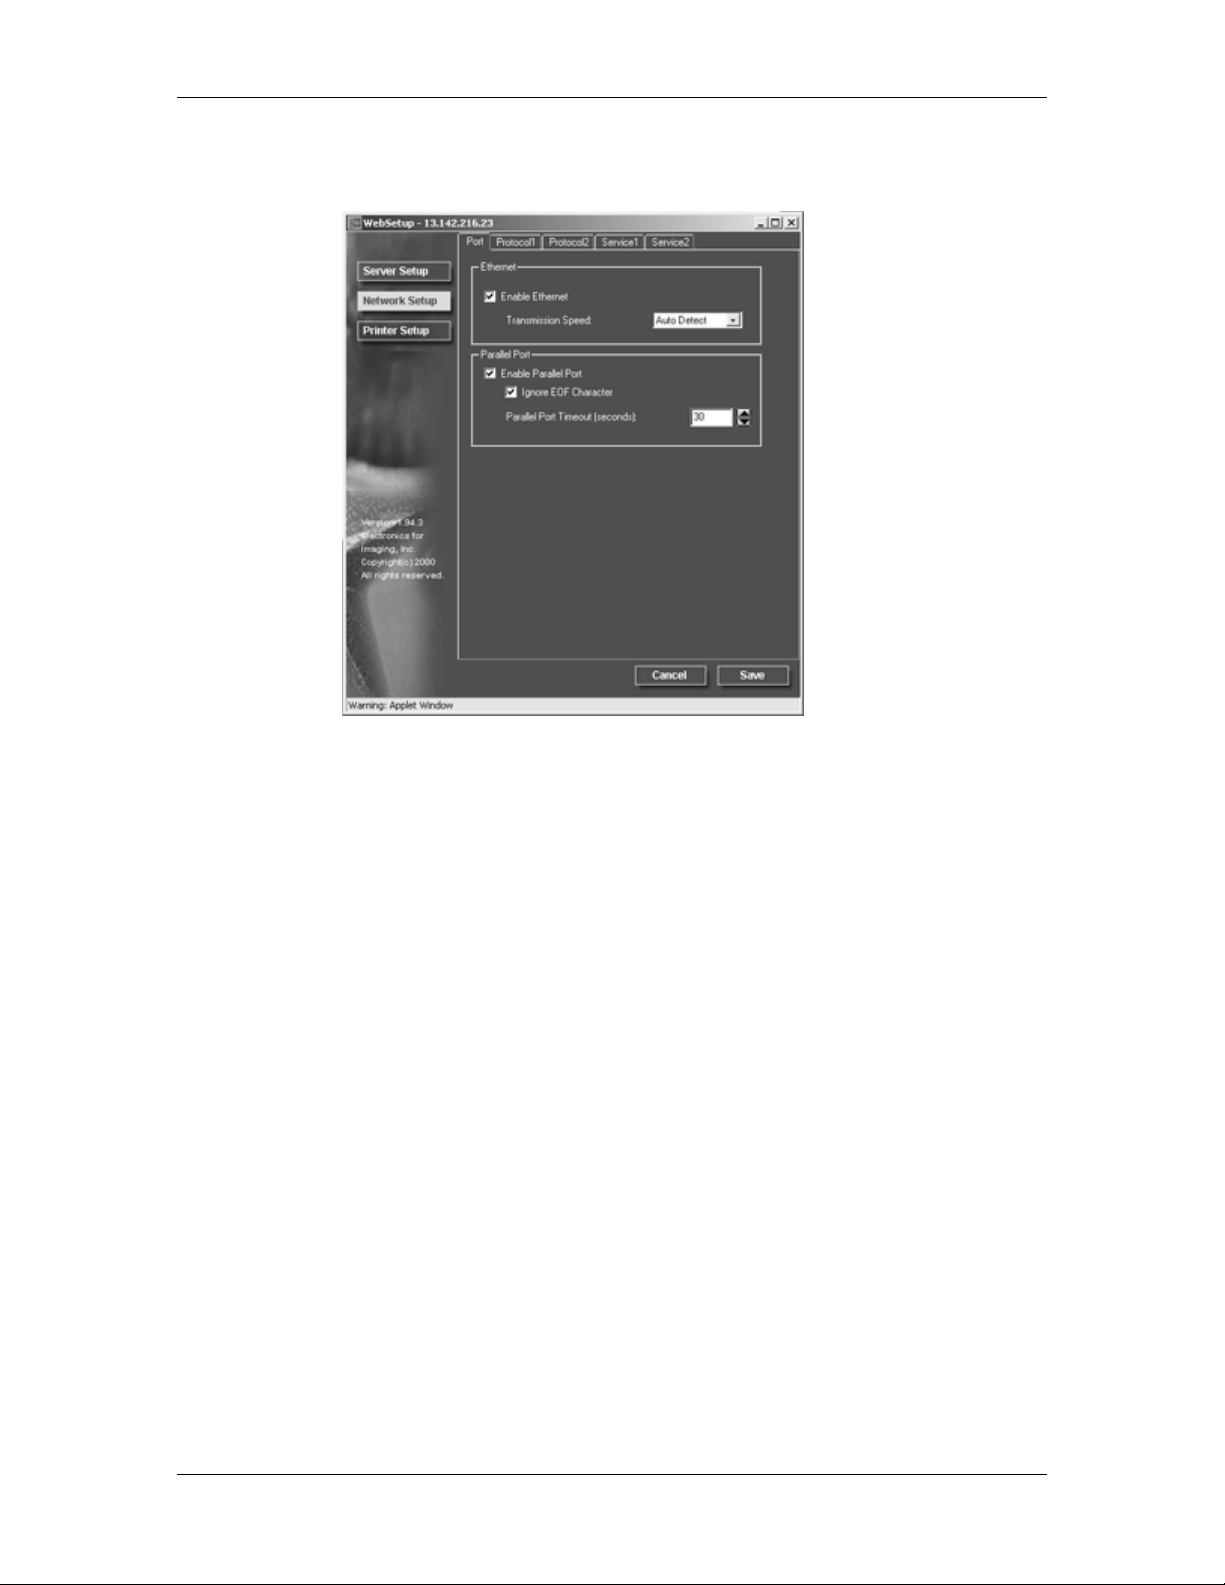
1. Select the Network Setup button from the WebSetup screen to
display the Network Setup tabs.
2. If it is not already displayed, select the Port tab and perform the
following:
a. Select the Enable Ethernet check box if the printer is to be
connected to an Ethernet network. If this box is selected, the
Transmission Speed option is enabled and the TCP/IP
Ethernet options listed under the Protocol1 tab are enabled.
Select a Transmission Speed from the drop down box.
Select Auto Detect if your network environment is mixed, or
select the speed (10 Mbps or 100 Mbps) of the network to
which the printer is attached. Changing the speed requires
rebooting the server.
To deselect the option, ensure there is no check mark in the
box.
Xerox DocuColor 2006
19–9
Page 10

19. Performing the setup from WebSetup
b. Select the Enable Parallel Port check box if you want to
print though the parallel port. This option enables you to
connect a single Windows workstation to the parallel port
and print directly to the printer. Enabling this option does not
conflict with Ethernet or Token Ring communication to the
printer. If this box is selected, the Ignore EOF Character and
Parallel Port timeout fields are enabled.
Select the Ignore EOF Character check box to direct the
printer to ignore end-of-file (EOF) messages and use the
Parallel Port timeout value to determine when the end of the
file has been reached. This option is required to print
PostScript files in binary (not ASCII) format. Under normal
circumstances, the box should not be checked.
To deselect the option (default), ensure there is no check
mark in the box.
From the Parallel Port timeout drop down box, select the
timeout interval in number of seconds (5-60). Until the
parallel port job times out, the server cannot receive new
jobs through the parallel port. The server can, however,
continue receiving network print jobs.
To deselect the option (default), ensure there is no check
mark in the box.
19–10
Xerox DocuColor 2006
Page 11

19. Performing the setup from WebSetup
3. If you have an Ethernet or Token Ring network, select the
Protocol1 tab from the Network Setup tabs. In this tab, you can
specify the protocols used to send jobs to the printer.
Unlike remote Setup, local Setup does not provide separate
settings to enable a protocol and to configure it. For example,
remote Setup has two setting for AppleTalk: one to enable
AppleTalk and the other to set the AppleTalk zone. Local Setup,
offers only the setting for the AppleTalk zone. By default, the
AppleTalk, IPX/SPX, and TCP/IP protocols are installed and
enabled. You can verify a protocol is enabled in the Bindings tab
of the Network Control Panel.
Depending on your network configuration, perform one of the
following:
• Step 4 if you have an Ethernet network.
• Step 5 if you have a Token Ring network.
• Step 6 if you have an AppleTalk network.
• Step 7 if you have an IPX/SPX frame type.
Xerox DocuColor 2006
19–11
Page 12

19. Performing the setup from WebSetup
4. Select the Enable on Ethernet check box if you have a TCP/IP
network connected to the printer over Ethernet cabling. If the
check box is selected, the IP Auto and IP Static radio buttons and
the Gateway address fields are enabled.
a. Select the IP Auto radio button to enable the system to find
an IP address. Select the appropriate protocol (DHCP,
BOOTP, RARP) to be used from the enabled Select Protocol
drop down box. The printer reboots when you save your
changes and exit Setup. Allow the printer to complete its
reboot and return to Idle mode before printing a configuration
page or proceeding with any other operation.
b. To set a specific address, select the IP Static radio button to
enable the IP Address and Subnet Mask fields and perform
the following:
Enter the DocuColor 2006 unique IP address for Ethernet in
the IP Address text boxes (default address used for network
checking is 127.000.000.001). The values in each field are
limited to a range of 0-255.
19–12
Xerox DocuColor 2006
Page 13

19. Performing the setup from WebSetup
Enter one of the following values in the Subnet Mask text
boxes:
• 255.0.0.0 if the IP address starts with a number less
than 128
• 255.255.0.0 if the IP address starts with a number in
the range of 128—191
• 255.255.255.0 if the IP address starts with a number
greater than 191 (network defined)
Confirm the Subnet Mask setting with your system
administrator before proceeding. In some cases the required
setting may be different from those listed.
If your TCP/IP network has a gateway and you expect users
outside the gateway to print to the printer using TCP/IP,
perform one of the following:
• Select the IP Auto radio button to enable the system to
find an IP Gateway address to use.
• Select the IP Static radio button and type the address
in the Gateway text boxes (the default address is
127.000.000.001).
In Remote Setup, Token Ring information displays even if you have not
enabled Token Ring.
Xerox DocuColor 2006
19–13
Page 14

19. Performing the setup from WebSetup
5. Select the Enable on Token Ring check box if you have a
Token Ring network connected to the printer over Ethernet
cabling. If the check box is selected, the IP Auto and IP Static
radio buttons are enabled.
a. Select the IP Auto radio button to enable the system to find
an IP address. Select the appropriate protocol to be used
from the enabled Select Protocol drop down box.
b. To set a specific address, select the IP Static radio button to
enable the IP Address and Subnet Mask fields and perform
the following:
Enter the DocuColor 2006 unique IP address for Ethernet in
the IP Address text boxes (default address used for network
checking is 127.000.000.001). The values in each field are
limited to a range of 0-255.
Enter one of the following values in the Subnet Mask text
boxes:
• 255.0.0.0 if the IP address starts with a number less
than 128
• 255.255.0.0 if the IP address starts with a number in
the range of 128—191
• 255.255.255.0 if the IP address starts with a number
greater than 191 (network defined)
19–14
Xerox DocuColor 2006
Page 15

19. Performing the setup from WebSetup
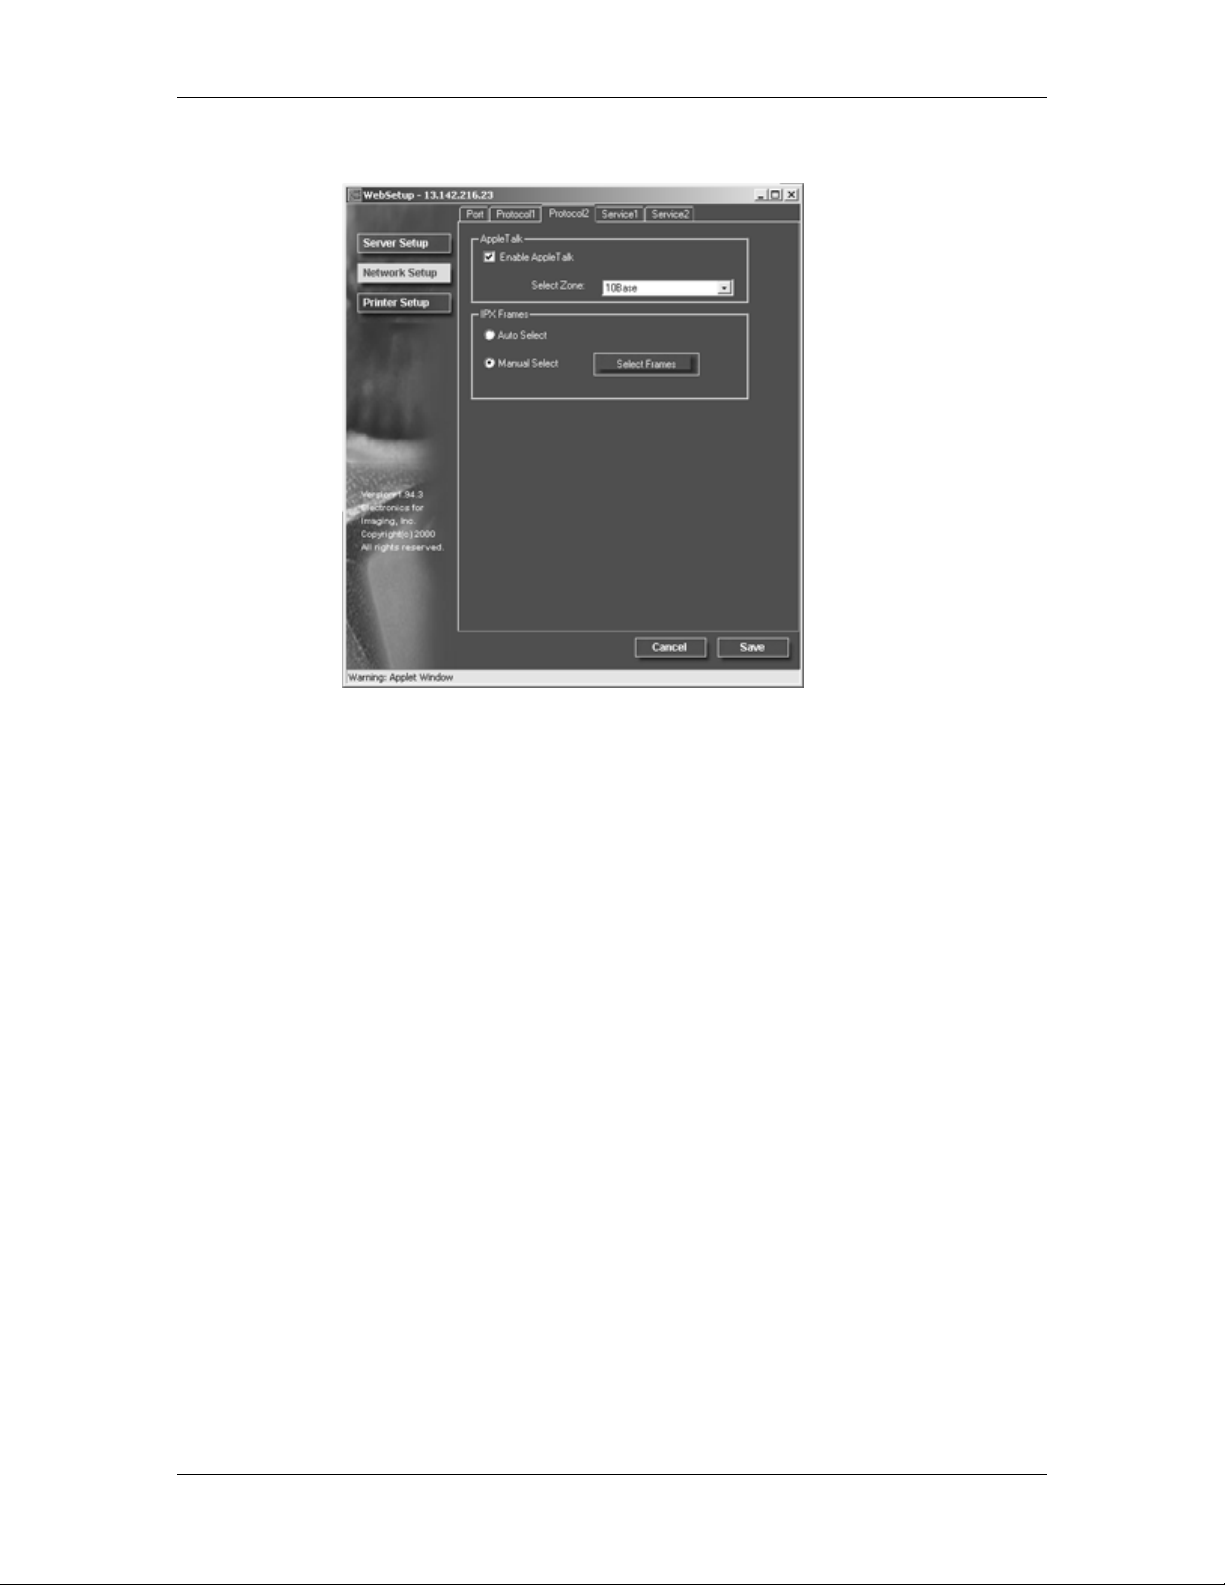
6. If you have an AppleTalk network, select the Protocol2 tab from
the Network Setup tabs. In this tab, you can specify the AppleTalk
protocols used to send jobs to the printer.
a. In the AppleTalk box, select the Enable AppleTalk check
box.
b. From the Select Zone drop down box, select the AppleTalk
zone in which you want the printer to display. If there is only
one zone, the printer is assigned to that zone automatically.
If you cannot find an AppleTalk zone, your network may
have no defined zones or the network cable is not
connected.
Xerox DocuColor 2006
19–15
Page 16
19. Performing the setup from WebSetup
7. If you have an IPX/SPX frame type, select the Protocol 2 tab.
In the IPX Frames box, perform one of the following:
a. Select the Auto Frames radio button to enable the server to
select the appropriate frame to use with NetWare.
b. Select the Manual Select radio button to add an IPX frame
type. From the Select Frames drop down list, select the
frame type and the Add button. The selected frame type will
be added to list. To remove a frame type, select the frame
type and the Remove button.
19–16
Xerox DocuColor 2006
Page 17

19. Performing the setup from WebSetup
8. To specify the Novell NetWare (PServer) options, select the
Service1 tab from the Network Setup tabs.
a. When the server is connected to a Novell network, select the
Enable PServer mode check box to enable the options on
this tab.
To enable PServer mode, an IPX frame type must be selected using the
Select Frames button on the Network Services Protocol 2 tab.
b. From the PServer Poll Interval drop down box, select how
often (in seconds) the Novell Print server should poll the
network for new print jobs. The polling interval is limited to a
range of 0-3600 seconds.
c. If your network uses NetWare 3.x or NetWare 4.x in bindery
emulation mode, select the Bindery Setup button. The
Bindery Setup button launches a Novell Setup dialog box
from which you can select the group of servers that the print
server will poll for print jobs.
From the Bindery Setup… drop down list, select a server to
add to the polling list and the Add button. The server will be
added to the Selected Servers list. To remove a server,
select the server name and the Remove button.
Xerox DocuColor 2006
19–17
Page 18

19. Performing the setup from WebSetup
In initial setup, the printer was connected to the network and an NDS
directory tree with a printer, print server and one or more print queue objects.
You can make any changes to that setup through WebSetup. To modify
NDS Setup, you may need permission to browse the NDS tree. If access to
the Print Server is restricted, you will need a login password. Only one NDS
tree can be connected.
d. Select the Enable NDS checkbox. You can now log in and
navigate an existing NDS tree.
The system administrator must create print queues in the
NDS Tree associated with the selected Print Server. The
Print Queues names must correspond with the published
direct, print, or hold queues. The server will not accept print
jobs from a print queue whose name does not correspond to
an available server queue.
e. Select the Change Trees button. Because you can only
have one NDS tree, select the current NDS tree and select
Remove. Select the new NDS tree and select Add.
From the Change Trees drop down list, select the tree from
the Available Trees list and the Add button. Only one tree
may be added at a time. The selected tree name will be
added to list with the tree name, printer server name, and
print queue root listed in both the NDS Configuration section
of the dialog and the in the NDS Configuration section under
the Service tab. To remove a tree, select the tree and the
Remove button.
19–18
Xerox DocuColor 2006
Page 19

19. Performing the setup from WebSetup
9. To specify the Windows Printing Service (SMB) options, select
the Service2 tab from the Network Setup tabs.
Broadcasts from SMB devices cannot be routed beyond their
original network segment without a WINS name server. Setting up
the WINS name server is outside the scope of this
documentation. To find out if a name server is available, contact
your system administrator.
Use all uppercase letters in the following fields.
a. To enable Windows clients to print to the Hold, Print, and
Direct queues, select the Enable Windows Printing
Service check box to enable the options on this tab.
TCP/IP must be configured on the Windows client workstation and the print
server.
b. Type the name (up to 15 characters) that enables you to
access the server on the network in the Server Name text
box.
Xerox DocuColor 2006
19–19
Page 20

19. Performing the setup from WebSetup
c. Type relevant information (up to 15 characters) about the
server in the Comment text box.
d. Type the network domain or workgroup (up to 15 characters)
of the server in the Domain or Workgroup text box.
e. Perform one of the following:
• If you are using Ethernet or Token Ring, check the Auto
IP radio button.
• If you are using a WINS Server, enter the WINS Server
IP address in the IP Address text boxes
19–20
Xerox DocuColor 2006
Page 21
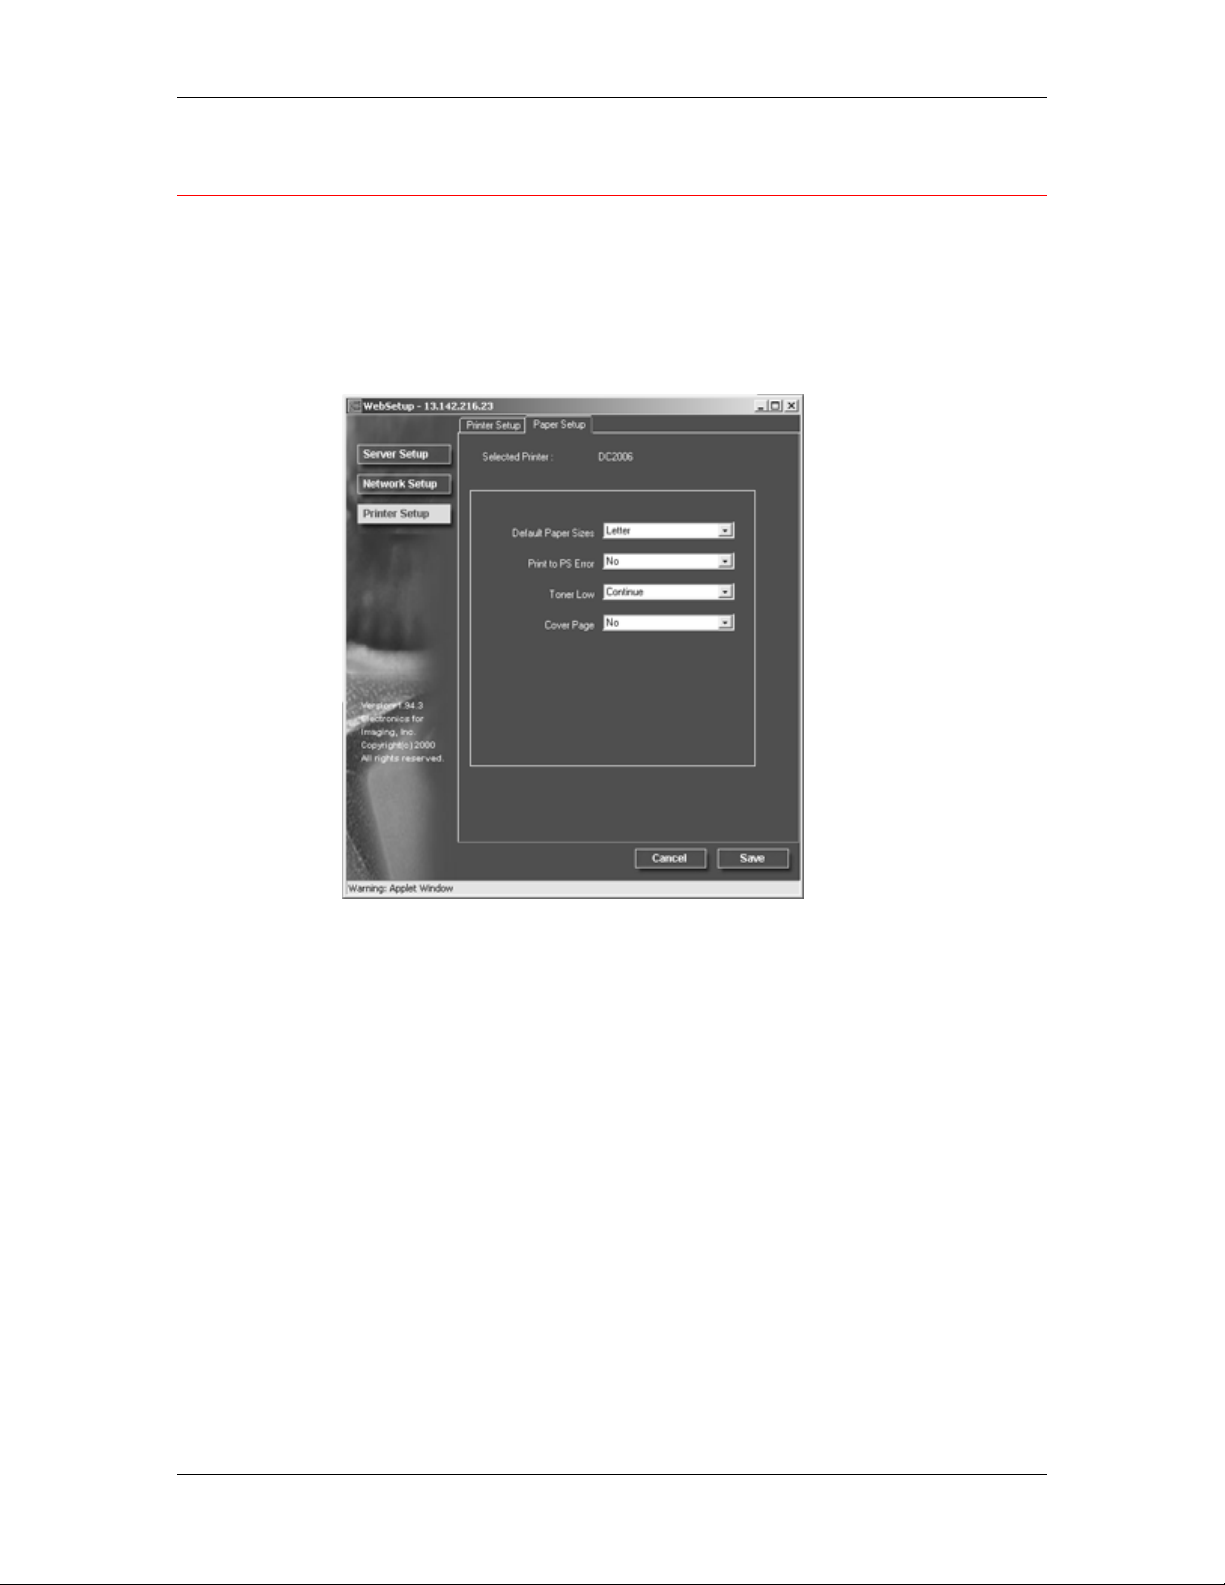
Printer Setup
Use the Printer Setup to specify the printer default page description
language (pdl), paper size, and ability to print when Dry Ink is low. You
can also set options for PostScript and PCL printing.
1. Select the Printer Setup button from the WebSetup screen.
2. Select the Paper Setup tab to specify PostScript printing options.
19. Performing the setup from WebSetup
Xerox DocuColor 2006
19–21
Page 22

19. Performing the setup from WebSetup
a. Select the Default Paper Size from the Default Paper Sizes
drop-down box to specify the kind of paper to use for printing
standard jobs.
b. Select Yes or No in the Print to PS Error drop down box.
Select Yes to print the portion of the job that was processed
before the error occurred along with the error message or
the PostScript code if no image data was processed to that
point. This information can be useful in troubleshooting
PostScript files that will not print. Select No to cancel the job
entirely whenever a PostScript error is encountered. The
processed portion of the job and the PostScript error
information is stored on the printer. You can view the job and
the error information using the job management tools.
c. Select Continue or Stop in the Toner Low drop down box.
(Continue is the default.) Specify the behavior of the printer
when the Dry Ink (Toner) is low. Select Continue to print
until there is no more Dry Ink or Stop to cease printing
immediately until the Dry Ink has been replaced.
d. Select No or Yes in the Cover Page drop down box. When
Yes is selected, each job is printed with a cover page that
includes the name of the user who sent the job, the
document name, the server, the time the job was printed, the
number of pages printed, and the status of the job. If a
PostScript error occurs and the Print to PS Error option is set
to Yes, the PS error message replaces the job status.
19–22
Xerox DocuColor 2006
Page 23

19. Performing the setup from WebSetup
The following option available only when printing from Windows computers;
it is not available in Remote Setup.
3. Select the Printer Setup tab to specify PCL printing options. Find
PCL Setup under the printer name in the directory tree.
For each of the following, select the desired option icon in the tree
and the desired default value in the box that displays below the
tree.
a. Select the Paper Size from the drop down box.
b. Select Portrait or Landscape from the Default Orientation
drop down box. Select Portrait to orient printing across the
short edge of the page or Landscape to orient printing
across the long edge of the page.
c. Use the scroll box to specify the Form Length or lines of
text (5-128) to print on each page. The default length is 60.
The form length varies according to the orientation of the paper.
d. Use the scroll box to specify the default Font Size in Points
of a proportionally scalable font (4.00 to 999.75). The point
size is significant to a quarter of a point. The default is 12.00.
e. Use the scroll box to specify the Font Pitch or number of
fixed-space PCL characters (.44-99.99) per horizontal inch
to print. The pitch value can be specified to two decimal
places. The default is 10.00.
f. Select a PCL Symbol Set to print from the drop down box. A
symbol set is specific to a font and is generally designed for
a single application. For a complete list of available PCL
Symbol Sets and their corresponding font numbers, refer to
the Fonts List.
Xerox DocuColor 2006
19–23
Page 24

19. Performing the setup from WebSetup
g. Select Internal or Softfont (Internal) from the Font Source
drop down box. Internal fonts are built into printer memory
and are listed on the PCL font list. Soft fonts are fonts that
have been downloaded to the printer.
h. Use the scroll box to specify the Font Number to print. The
default is 0. For a complete list of available PCL fonts and
their corresponding font numbers, refer to the Fonts List.
i. Select a Paper Size for System Pages to set the size of a
print area on the paper, not the size of the paper itself.
System pages are printed from the Printer Control Panel.
Exiting Setup
After you have finished specifying Setup options, select OK and
close the Setup dialog box. You are notified that the server must
be restarted for the new settings to take effect and given the
choice to reboot now or later.
After you have completed Setup and rebooted the server for the
first time, install user software for printing on remote workstations.
Refer to the chapter Installing user software that is appropriate to
your system. To confirm the network connection and your Setup,
print a test job from a remote workstation.
19–24
Xerox DocuColor 2006
 Loading...