

Page 1

22
The following copy features are available on the DocuColor 2006
copier/printer:
• Reduce/ Enlarge options
• Paper Supply options
• Original Type options
• Lighten/Darken options
• Quality Adjustment
• Advanced Features
This chapter provides detailed information about using each of these features.
Reduce/Enlarge
Copy Features
The Reduce/Enlarge feature allows you to increase or decrease the size of
the original image onto your copy output. Selecting a Reduce/Enlarge
percentage on the Copier Control Panel specifies a desired change in the
original image size.
The following Reduce/Enlarge options are available on your DocuColor 2006
copier/printer:
• 100 % - The copy image will be the same size as the original image.
• Auto % - The DocuColor 2006 copier/printer automatically detects
original document size. After you select your desired paper output size,
the copier/printer reduces or enlarges the image to fit onto the output
paper.
Xerox DocuColor 2006
22–1
Page 2
22. Copy Features
• Preset % - The Preset % settings are shown on the Copier Control
Panel. The copier/printer automatically determines output size based on
the selected reduction or enlargement percentage.
The following tables list the Preset % options available on the DocuColor
2006 and how each percentage affects certain paper sizes.
Percentage Paper Sizes
64% 11 in x 17 in ➙ 8.5 in x 11 in
78% 8.5 in x 14 in ➙ 8.5 in x 11 in
129% 8.5 in x 11 in ➙ 11 in x 17 in
154% 5.5 in x 8.5 in ➙ 8.5 in x 14 in
200% 5.5 in x 8.5 in ➙ 11 in x 17 in
Percentage Paper Sizes
70 % A3 ➙ A4
81% B4 ➙ A4
86% A3 ➙ B4; A4 ➙ B5
115% B4 ➙ A3; B5 ➙ A4
141% B5 ➙ B4
U.S. Preset % options International Preset % options
• Manual % options- The Zoom Arrow Buttons allow you to set a manual
zoom percentage between 25% and 400%. The manual zoom
percentage displays on the Copier Screen.
Using the Reduce/Enlarge feature
Follow these steps to make a copy using the Reduce/Enlarge feature:
1. If the DocuColor 2006 is in printer mode, press the Copy button to enter
copy mode.
22–2
2. Press the Clear All button to restore default settings.
3. Position the original on the Document Glass or in the Document Feeder.
For information on positioning documents on the Document Glass or using
the Document Feeder, go to the Basic Copying chapter.
Xerox DocuColor 2006
Page 3
22. Copy Features
4. Perform one of the following:
• Use the Reduce/Enlarge Arrow buttons to select 100 % to produce
a copy that is the same size as the original document.
• Use the Reduce/Enlarge Arrow buttons to select Auto%.
• Use the Reduce/Enlarge Arrow buttons to select a Preset %
reduce/enlarge setting.
• Use the Zoom Arrow Buttons to select a Manual % reduction or
enlargement percentage.
You can enter any percent between 25 % and 400 %.
5. If you selected Auto %, select a desired Paper Supply.
You cannot use the Auto Paper Supply feature with the Auto %
Reduce/Enlarge option. You must select a specific paper supply when using
the Auto % Reduce/Enlarge option. Information on the Paper Supply feature
is provided in the next section.
You cannot select an Enlarge value greater than 100% when Auto Paper
selected. You must select a paper size.
6. Select the desired number of copies using the Numeric Keypad.
7. Press the Start button.
Xerox DocuColor 2006
22–3
Page 4
22. Copy Features
Paper Supply
The Paper Supply feature allows you to select the desired paper for your
copies.
The following Paper Supply options are available on the DocuColor 2006:
• Auto – The copier/printer automatically determines original size and the
appropriate paper supply. The copier/printer then pulls the appropriate
copy stock from paper tray 1, 2, or 3.
• Paper Trays 1, 2, and 3 – This Paper Supply option allows you to select
a paper tray loaded with the desired output size.
Selecting Paper Tray 1, 2, or 3 along with the Auto % reduce/enlarge option
prompts the DocuColor 2006 to fit the original image on the desired output
paper size. More information on using the Reduce/Enlarge feature is
provided at the beginning of this chapter.
• Bypass Tray – This option allows you load your desired output paper
into the Bypass Tray. Use this method when copying original documents
onto transparencies, labels, envelopes, postcards and other
unconventional paper stocks.
More information on using the Bypass Tray is provided later in this chapter.
Using Paper Trays 1, 2, and 3
Use the following procedure to make a copy using the paper trays 1, 2, or 3:
For instructions on loading paper trays 1, 2, or 3, go to the “Setting Up the
DocuColor 2006” chapter.
1. If the DocuColor 2006 is in printer mode, press the Copy button to enter
copy mode.
2. Press the Clear All button to restore all default settings.
3. Position the original on the Document Glass or in the Document Feeder.
For more information on positioning original documents, go to the “Basic
Copying” chapter.
22–4
Xerox DocuColor 2006
Page 5
22. Copy Features
4. Use the Paper Supply Arrow Buttons to select one of the following:
• Auto
You cannot use the Auto Paper Supply feature with the Auto %
Reduce/Enlarge option. You must select a specific reduce/enlarge
percentage. Information on the Reduce/Enlarge feature is provided at the
beginning of this chapter.
• Tray 1
• Tray 2
• Tray 3
If paper is not loaded in the paper tray, the message “Add Paper to Tray X”
is displayed on the Copier Screen, where “X” is the selected tray. For
information on loading the paper tray, go to the “Loading paper in the paper
trays” procedure in the “Setting up the DocuColor 2006” chapter.
5. Select your desired number of copies using the Numeric Keypad.
6. Press the Start button.
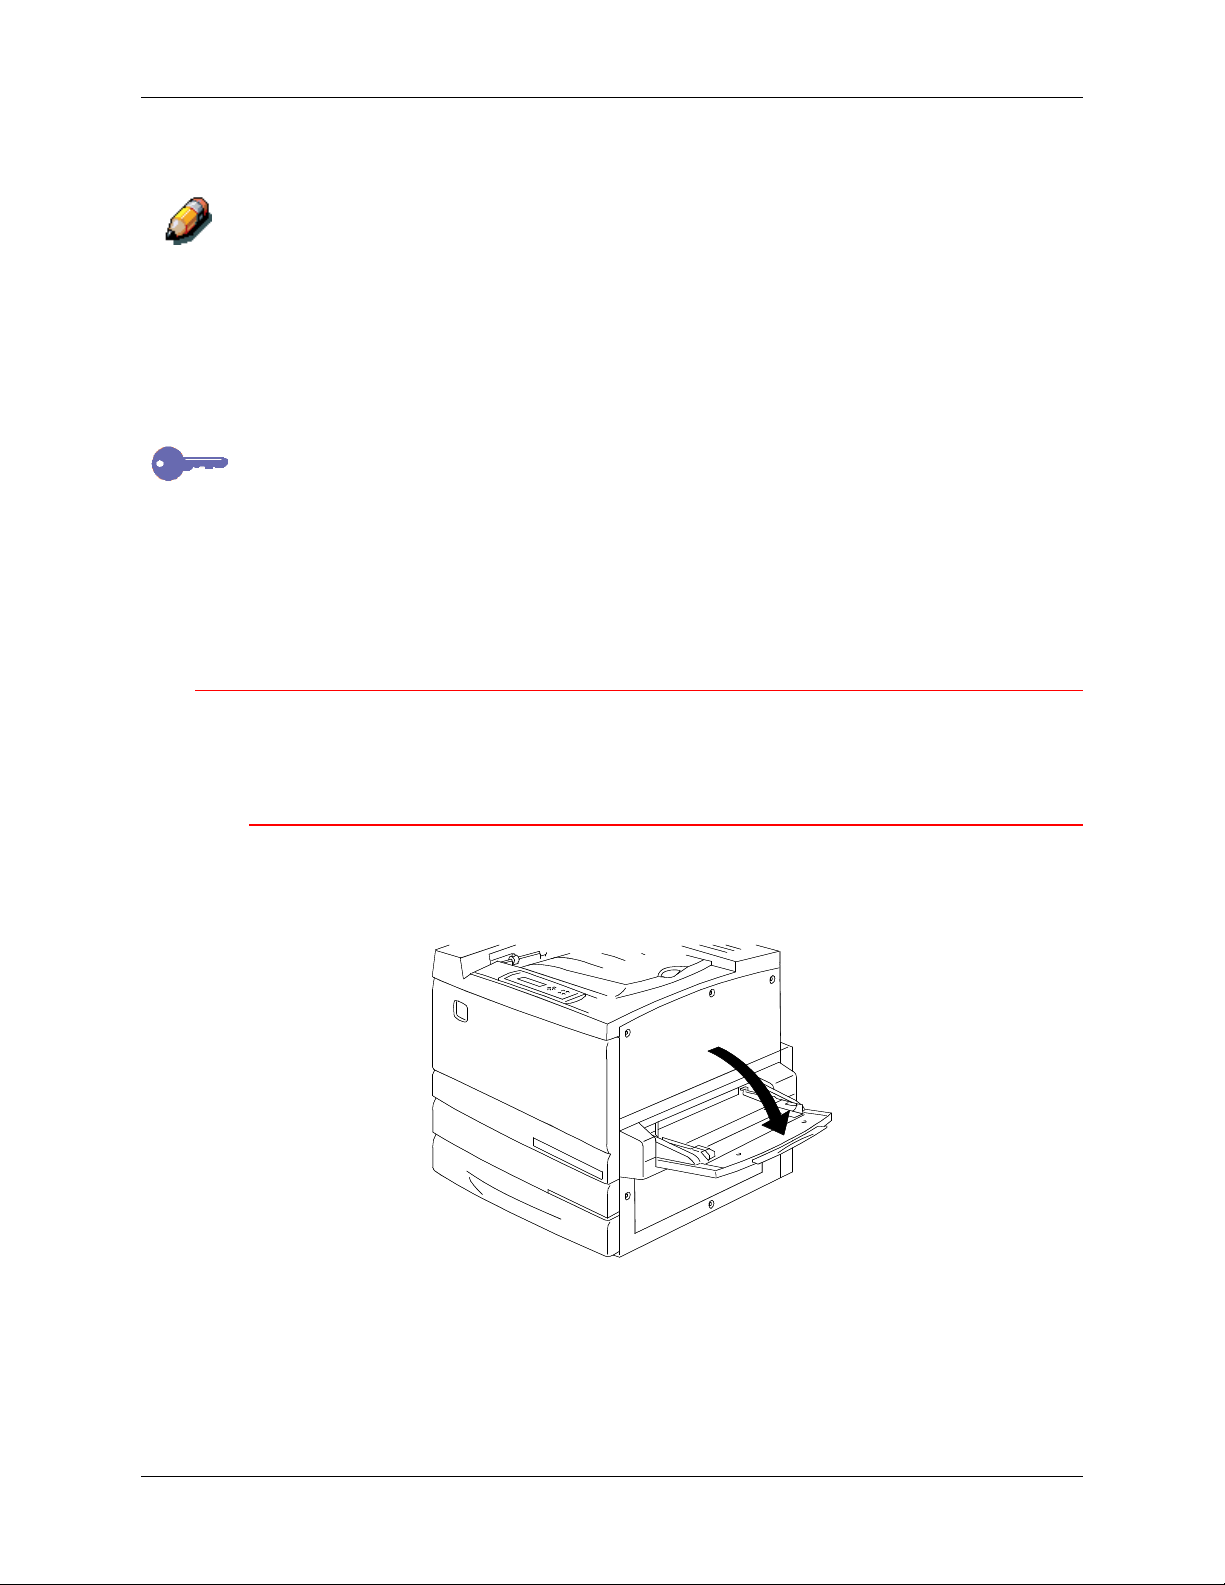
Using the Bypass Tray
Use the Bypass Tray to copy onto unconventional paper sizes or weights,
such as postcards, transparencies or envelopes.
Loading the Bypass Tray
Use the following procedure to load the Bypass Tray:
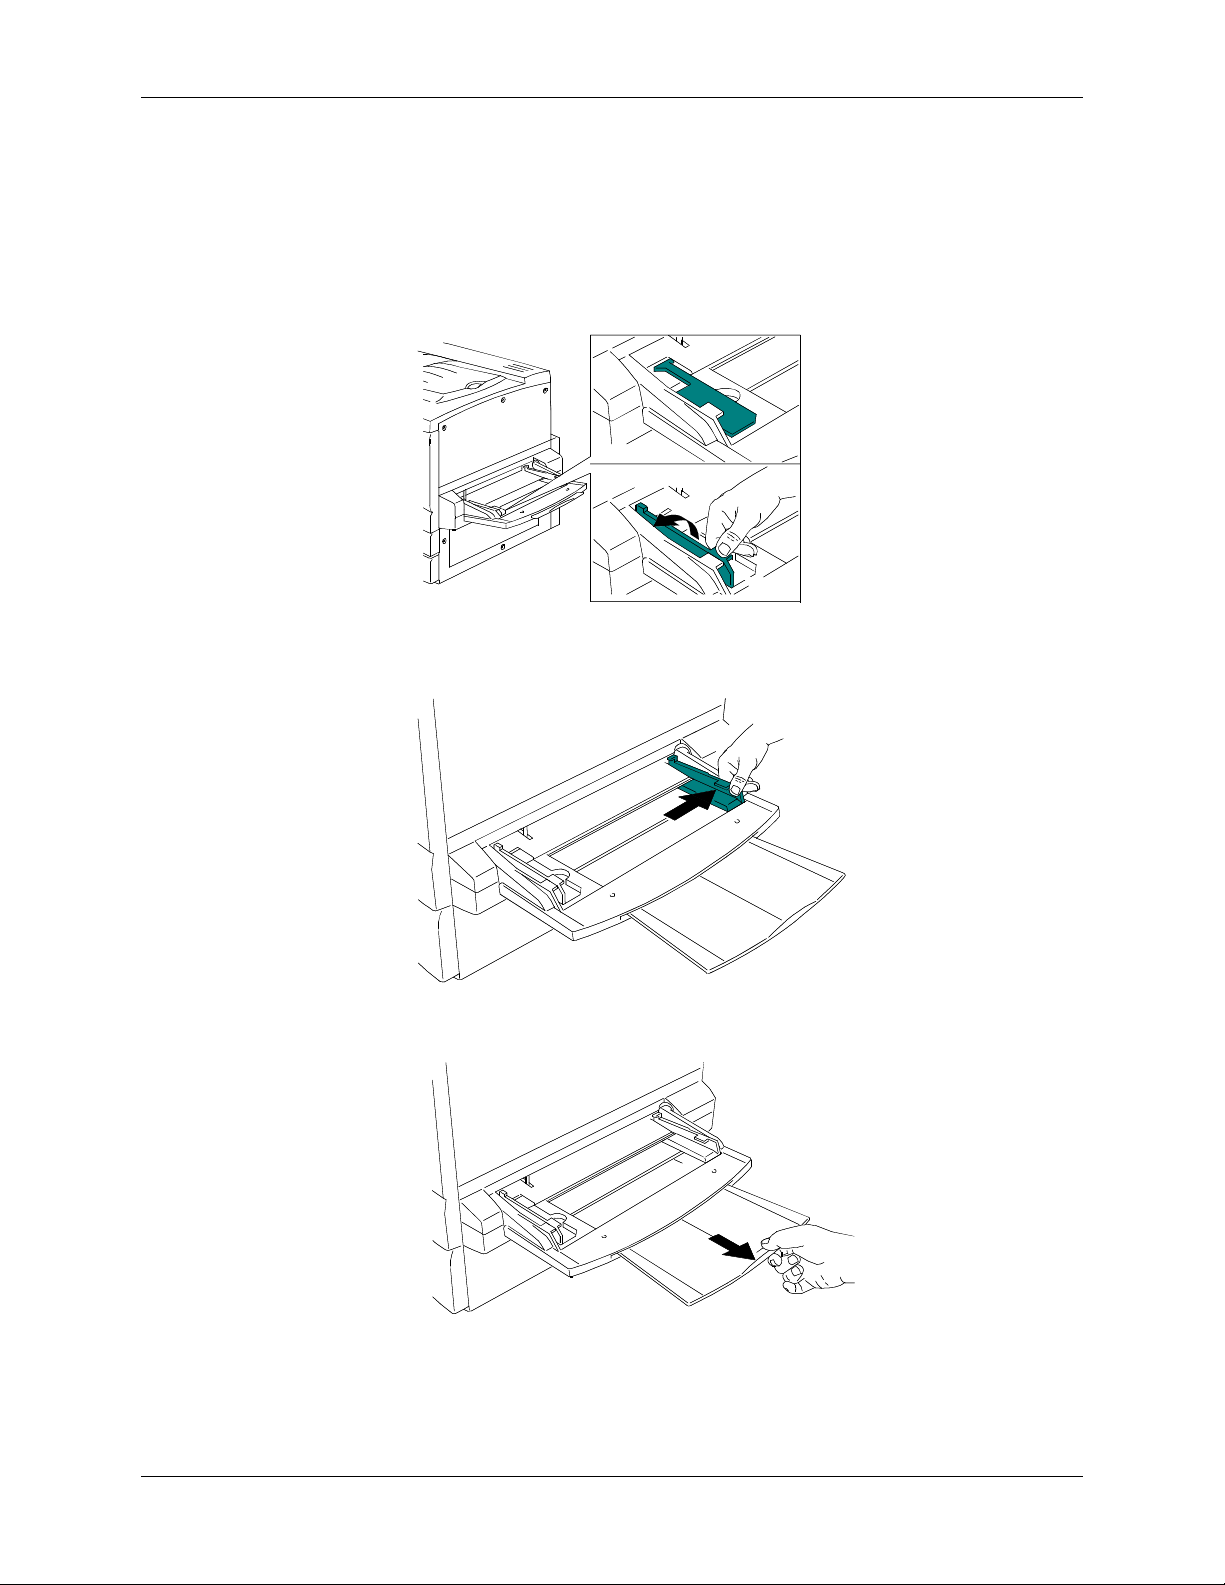
1. Lower the Bypass Tray.
0302500A-WOL
Xerox DocuColor 2006
22–5
Page 6
22. Copy Features
2. Perform one of the following:
• If loading A3 oversize paper, ensure that the blue-green, left-hand
paper guide is lowered and snapped into place.
• If loading any other size paper, lift the blue-green, left-hand paper
guide.
0302501A -WOL
3. Slide the right-hand paper guide all the way to the right.
0302502A-WOL
4. If you are printing on longer paper, pull out the Tray Extender.
22–6
0302503A -WOL
Xerox DocuColor 2006
Page 7
22. Copy Features
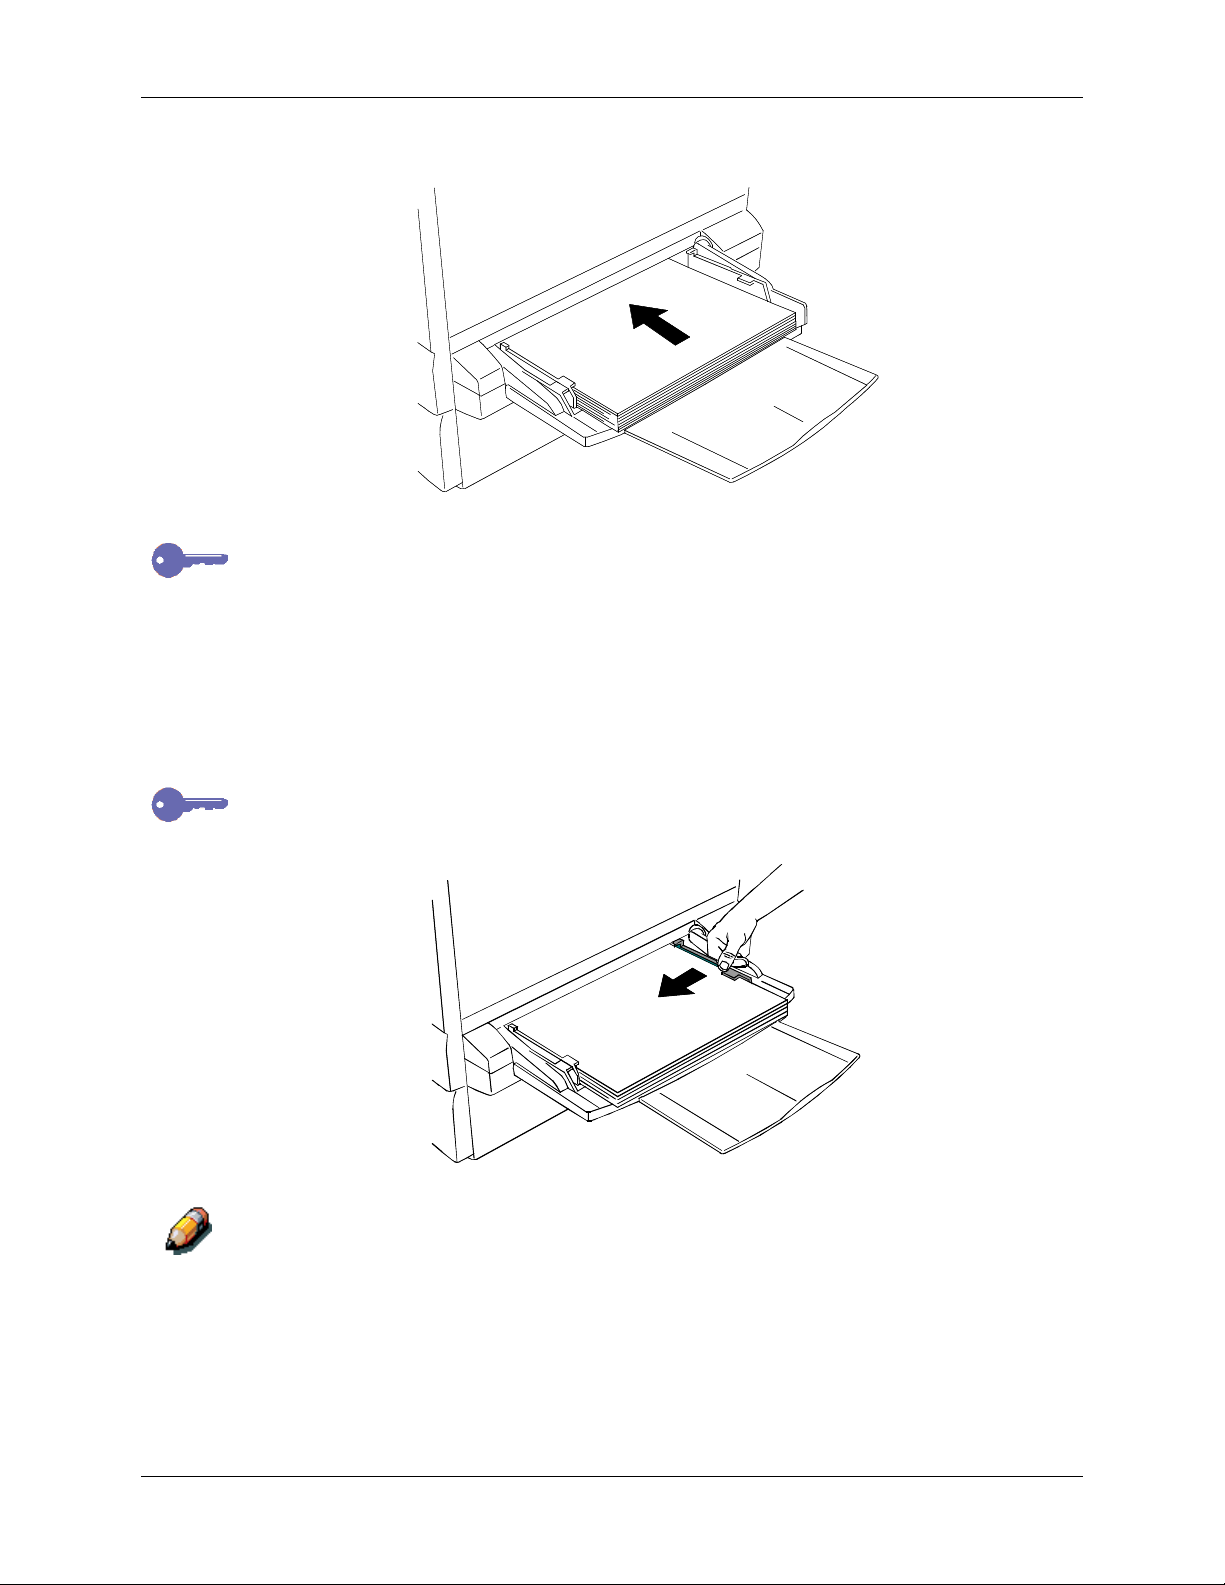
5. Insert your paper stock into the Bypass Tray. Place the left-hand edge of
the paper stock against the left-hand paper guide.
0302504B-WOL
Follow these guidelines to help minimize paper jams in the Bypass Tray:
• Do not use paper that is folded, creased or curled.
• Do not load more sheets than can fit easily under the paper
guide tab.
• Whenever possible, load paper for long edge feed.
6. Slide the right-hand paper guide to fit against your paper stock.
Pushing the paper guide to tightly against the paper stock can cause a paper
jam.
030250 5A -WOL
When paper stock is first loaded in the Bypass Tray, the Bypass Tray paper
selection screen automatically is displayed on the Copier Screen. For further
directions on using the Bypass Tray, go to the “Making a Copy Using the
Bypass Tray” procedure.
Xerox DocuColor 2006
22–7
Page 8
22. Copy Features
Loading Transparencies into the Bypass Tray
Transparencies can be fed only from the Bypass Tray or optional
Transparency Tray that goes into Tray 1 position. Use only the transparencies
specified in the DocuColor 2006 Recommended Materials List.
Leaving transparencies in the Bypass Tray can cause static build up, which
can cause a jam. Be sure to remove the transparencies when the job is
complete.
Use the following procedure to load transparencies into the Bypass Tray:
1. Fan the transparency sheets a few at a time to separate them and
2. Insert transparencies into the Bypass Tray until they are touching the
prevent static.
feeding slot. Slide the right-hand paper guide against the transparency
stack.
0302514A-WOL
22–8
Xerox DocuColor 2006
Page 9

22. Copy Features
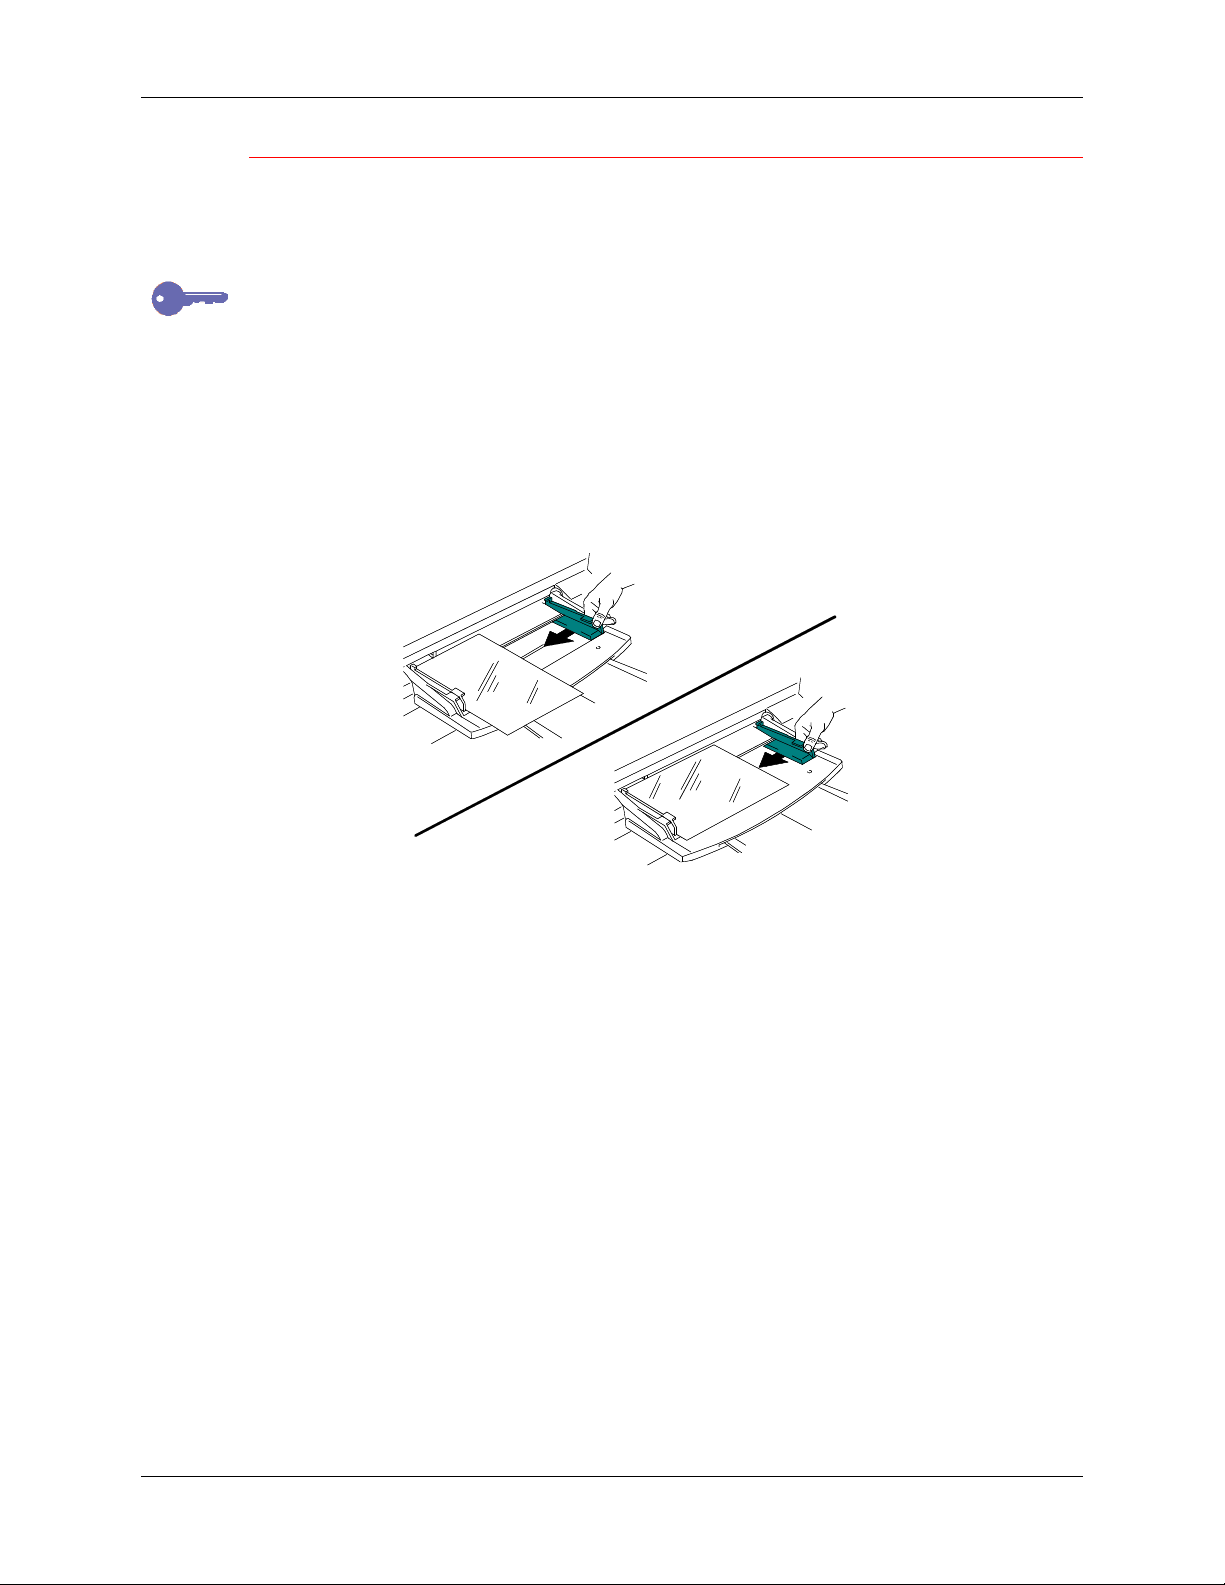
Loading Postcards into the Bypass Tray
Postcards must be fed through the Bypass Tray.
When printing on the back of pre-printed postcards, make sure that the
postcard is not bent. To avoid paper jams, flatten every bend by hand before
printing.
Use the following procedure to load postcards into the Bypass Tray:
1. Load a postcard into the Bypass Tray with the copy side face up.
2. Adjust the paper guides to fit snuggly against the postcard stack.
0302507A-WOL
Use the Reduce/Enlarge feature to copy larger images onto a postcard.
Xerox DocuColor 2006
22–9
Page 10

22. Copy Features
Loading Envelopes in the Bypass Tray
All envelopes must be fed through the Bypass Tray. Open the flap and insert
the envelope, one at a time, into the Bypass Tray as shown below.
Follow these guidelines when printing onto envelopes to help minimize
potential jams and other problems:
0302508A -W O L
• Do not use envelopes that have tape seals. If you are using
an envelope with a glue seal, make sure it is dry before use.
• Only use landscape (horizontal) type envelopes (more than
90 mm wide, and more than 143 mm long with the flap
open). Portrait (vertical) type envelopes may not be used.
• Insert envelopes with the flap facing out and the glue side
down.
• Poor quality envelopes may crease, and may not print
properly.
22–10
Xerox DocuColor 2006
Page 11

22. Copy Features
Making a Copy Using the Bypass Tray
Use the following procedure to make a copy using the Bypass Tray:
1. If the DocuColor 2006 is in printer mode, press the Copy button to enter
copy mode.
2. Press the Clear All button to restore default settings.
3. Position the originals on the Document Glass or in the Document
Feeder.
For more information on positioning originals on the Document Glass or
using the Document Feeder, go to the Basic Copying feature.
4. Use the Paper Supply buttons to select the Bypass Tray. The Bypass
Tray Selection screen is displayed on the Copier Screen.
5. Use the Arrow Buttons to select one of the following:
• Side 1 if you are printing onto one of the following paper types and
the paper is not printed on:
• Plain
• Transparency
• Label
• Postcard (Pcard)
• Coated
• Glossy
• Thick
• Side 2 if you are printing onto one of the following paper types and
the paper has already been printed on.
• Plain
• Postcard (Pcard)
• Coated
• Glossy
• Thick
Use the Side 2 option to create a 2-Sided copy manually.
Xerox DocuColor 2006
22–11
Page 12

22. Copy Features
WARNING
Feeding paper into the Bypass tray that has been printed on one side from
another copier can damage the DocuColor 2006 because of the differences
in dry ink temperature and chemical specifications. It is recommended that
you create manual, 2-Sided copies using paper printed on by the DocuColor
2006 only.
6. Press the Select button. Paper Size selection is displayed on the Copier
7. Use the Arrow Buttons to highlight the paper size loaded in the Bypass
8. Press the Select button. The Main Menu is displayed on the Copier
9. Enter the desired number of copies using the Numeric Keypad.
10. Press the Start button.
Screen.
Tray.
Screen. The Bypass Tray, along with your selected copy stock, will
display under the Paper Supply option.
Color Mode
The Color Mode feature allows you to define color specifications for your copy
output.
The following Color Mode options are available on the DocuColor 2006
copier/printer:
• Auto – The copier/printer automatically detects if the original is color or
• Black – The copier/printer uses only black dry ink to create the copy.
black and white.
Documents that are detected as color are copied in Text/Photo mode.
Documents that are detected as black and white are copied in Text
mode.
The following original type options are available in Black color mode:
• Text – Use this setting when the original is black and white and
contains only text.
• Text/Photo – Use this setting when the original is black and white
and contains both text and printed photographs.
• Photograph – Use this setting when the original is a black and white
photograph.
22–12
Xerox DocuColor 2006
Page 13

22. Copy Features
• Color - The copier/printer will use all dry ink cartridges for full color copy
output. The following original type options are available in Full color
mode:
• Text/Photo – Use this setting when the original consists of color text
and photographs or color text and a photo from a magazine or
newspaper.
• Printed Photo – Use this setting when the original is a photograph
from a magazine or a newspaper.
• Photograph – Use this setting when the original document is an
original photograph (negative films, developed photographs), not a
printed photograph.
• 2 Color – Use this setting to produce two color output; black and one of
the following:
• Red
• Green
• Blue
• Yellow
• Purple
• Brown
• Yellow Green
• Light Blue
• Pink
Xerox DocuColor 2006
22–13
Page 14

22. Copy Features
Using the Color Mode feature
Follow these steps to make a copy using the Color Mode feature:
1. If the DocuColor 2006 is in printer mode, press the Copy button to enter
copy mode.
2. Press the Clear All button to restore default settings.
3. Position the original on the Document Glass or in the Document Feeder.
For more information on positioning originals on the Document Glass and
using the Document Feeder, go to the Basic Copying section.
4. Press the Color Mode button. Color Mode selection is displayed on the
Copier Screen.
5. Use the Arrow Buttons to select one of the following:
• Auto
• Black
• Color
• 2 Color
6. Press the Select button.
7. If you selected Auto Color Mode, skip to step 8. If you selected Black
Color Mode, Full Color Mode or 2 Color Mode, perform one of the
following:
• For Black Color Mode, use the Arrow Buttons to select the original
type as Text, Text/Photo or Photograph.
• For Full color Mode, use the Arrow Buttons to select the original
type as Text/Photo, Print photo or Photograph.
• For 2 Color Mode, use the Arrow Buttons to select the color you
want to print with black, Red, Green, Blue, Yellow, Purple, Brown,
Yellow Green, Light Blue, or Pink.
8. Press the Select button. Copy Mode selection is displayed on the Copier
Screen
9. Press the Exit button. The Main Menu is displayed on the Copier
Screen. Your Color Mode setting displays on the main screen.
10. Enter your desired number of copies using the Numeric Keypad.
22–14
11. Press the Start button.
Xerox DocuColor 2006
Page 15

Lighten/Darken
The Lighten/Darken feature enables you to adjust the overall density of the
copy output. This feature offers an Auto Contrast option as well as five
lighten/darken levels.
When the Auto option is selected, the copier/printer automatically determines
the density of the original. The copier/printer then adjusts the density levels of
the copy output to optimize image quality.
Using the Lighten/Darken feature
Follow these steps to make a copy using the Lighten/Darken feature:
1. If the DocuColor 2006 is in printer mode, press the Copy button to enter
copy mode.
2. Press the Clear All button to restore default settings.
3. Position the original on the Document Glass or in the Document
Feeder.
22. Copy Features
For more information on positioning originals on the Document Glass and on
the Document Feeder, go to the Basic Copying chapter.
4. Press the Lighten/Darken button. Copy Density selection is displayed
on the Copier Screen.
5. Perform one of the following actions:
• Use the up arrow button to go from Auto mode to manual mode
density selection.
• Use the right and left arrow buttons to select one of the fine copy
densities between Dark and Light in manual mode.
• Use the down arrow button to return to Auto mode from manual
mode selection.
6. Press the Select button. The Copier Screen returns to the main menu.
7. Enter your desired number of copies using the Numeric Keypad.
8. Press the Start button.
Xerox DocuColor 2006
22–15
Page 16

22. Copy Features
Quality Adjustment
The Quality Adjustment feature allows you to adjust the following features:
• Sharpness – to adjust the line sharpness of your copy output.
For detail use a darker line sharpness. For softness use a lighter line
sharpness.
• Color Level – to adjust the amount of color in the copy output.
• Background Mask – to keep undesired images printed on the back of an
original from appearing on the copy output.
The Background Suppression option is useful for copying newspaper and/or
magazine articles because it keeps the print on the back of the page from
appearing on the copy output.
Using the Sharpness option
Follow these steps to make a copy using the Sharpness option:
1. If the DocuColor 2006 is in printer mode, press the Copy button to enter
copy mode.
2. Press the Clear All button to restore default settings.
3. Position the original on the Document Glass or in the Document Feeder.
For more information on positioning originals on the Document Glass and
using the Document Feeder, go to the Basic Copying chapter.
4. Press the Quality Adjustment button. Quality Adjustment selection is
displayed on the Copier Screen.
5. Use the Arrow Buttons to highlight the Sharpness option.
6. Press the Select button. Sharpness selection is displayed on the Copier
Screen.
7. Use the Arrow Buttons to highlight a sharpness level between Lighter
and Darker.
A lighter sharpness level produces softer lines. A heavier sharpness level
produces more distinct lines.
22–16
Xerox DocuColor 2006
Page 17

22. Copy Features
8. Press the Select button. Quality Adjustment selection is displayed on
the Copier Screen.
9. Press the Exit button. The Main Screen is displayed on the Copier
Screen.
10. Enter your desired number of copies using the Numeric Keypad.
11. Press the Start button.
Using the Color Level option
Follow these steps to make a copy using the Color Level option:
1. If the DocuColor 2006 is in printer mode, press the Copy button to enter
copy mode.
2. Press the Clear All button to restore default settings.
3. Position the original on the Document Glass or in the Document Feeder.
For more information on positioning originals on the Document Glass and
using the Document Feeder, go to the Basic Copying chapter.
4. Press the Quality Adjustment button. Quality Adjustment selection is
displayed on the Copier Screen.
5. Use the Arrow Buttons to highlight the Color Level option.
6. Press the Select button. Color Level selection is displayed on the Copier
Screen.
7. Use the Arrow Buttons to highlight a color level between Lighter and
Darker.
A lighter color level produces pale, weak colors. A heavier color level
produces brighter, stronger colors.
8. Press the Select button. Quality Adjustment selection is displayed on
the Copier Screen.
9. Press the Exit button. The Main Screen is displayed on the Copier
Screen.
10. Enter your desired number of copies using the Numeric Keypad.
11. Press the Start button.
Xerox DocuColor 2006
22–17
Page 18

22. Copy Features
Using the Background Mask option
Follow these steps to make a copy using the Background Mask option:
1. If the DocuColor 2006 is in printer mode, press the Copy button to enter
copy mode.
2. Press the Clear All button to restore default settings.
3. Position the original on the Document Glass or in the Document Feeder.
For more information on positioning originals on the Document Glass and
using the Document Feeder, go to the Basic Copying chapter.
4. Press the Quality Adjustment button. Quality Adjustment selection is
displayed on the Copier Screen.
5. Use the Arrow Buttons to highlight the Background Mask option.
6. Press the Select button. Background Mask selection is displayed on the
Copier Screen.
7. Use the Arrow Buttons to highlight On to activate the background
suppression or to highlight Off to turn the background suppression off.
8. Press the Select button. Quality Adjustment selection is displayed on
the Copier Screen.
9. Press the Exit button. The Main Screen is displayed on the Copier
Screen.
10. Enter your desired number of copies using the Numeric Keypad.
11. Press the Start button.
22–18
Xerox DocuColor 2006
Page 19

Advanced Features
The Advanced Features option includes the following:
• Output – to change the tray that your copies output to. The option can be
set to either the Exit Tray, the left-hand side output tray, or the Top Tray,
the tray above the printer where print jobs are output.
• If the Sorter/Stacker option is attached, there are other output selections
available. Refer to the section Determining Output with the optional
Sorter/Stacker for additional information.
• Erase – to set an erase value from 0 — 50 mm for the following
dimensions on your copy output:
• Horizontal
• Vertical
• Center
The DocuColor 2006 copier/printer automatically creates a 4 mm border on
every copy. This is not an erase feature and can not be deleted.
22. Copy Features
• 2-Sided – to produce double sided output, output with images on both
the front and back sides, from single sided input. The following
orientation options are available for the 2-Sided feature:
• Portrait – to have to images flip along the long edge of the output.
• Landscape – to have the images flip along the short edge of the
output.
• 2 Up – to copy two images onto a single page. The following image
positions are available for the 2 Up feature:
• ON (L➙R) – to position the images in order from left to right.
• ON (R➙L) – to position the images in order from right to left.
You can not use the 2 Up feature with the following:
• 2-Sided option
• Auto Paper Supply option
• Auto Reduce/Enlarge option
The 2-Sided feature and the 2 Up feature are available only if you have a
Document Feeder.
Xerox DocuColor 2006
22–19
Page 20

22. Copy Features
Using the Output option
Use the following procedure to make a copy using the Output option:
1. If the DocuColor 2006 is in printer mode, press the Copy button to enter
copy mode.
2. Press the Clear All button to restore default settings.
3. Position the original on the Document Glass or in the Document Feeder.
For more information on position originals on the Document Glass and using
the Document Feeder, go to the Basic Copying chapter.
4. Press the Advanced Features button. Advanced Features selection is
displayed on the Copier Screen.
5. Use the Arrow Buttons to highlight the Output option.
6. Press the Select button. Output Destination selection is displayed on the
Copier screen.
7. Use the Arrow Buttons to highlight one of the following:
• Exit Tray to direct output to the printer side output tray.
• Top Tray to direct output to the printer top output tray.
• Sort/Stack selections if option is enabled. Refer to the section
Determining Output with the optional Sorter/Stacker.
8. Press the Select button. Advanced Features selection is displayed on
the Copier Screen.
9. Press the Exit button. The Main Screen is displayed on the Copier
Screen.
10. Enter your desired number of copies using the Numeric Keypad.
11. Press the Start button.
22–20
Xerox DocuColor 2006
Page 21

22. Copy Features
Determining Output with the optional Sorter/Stacker
The Sorter/Stacker functions are available to copy jobs only. Full
functionality is available only when the optional Automatic Document Feeder
is installed
1. Select the Copy button on the copier control panel to enter Copy Mode.
2. Select the Advanced Features button.
3. Select the Output option.
4. Select one of the following options:
12 x 18 (A3 OV) paper cannot be sent to the Sorter/Stacker.
• Exit Tray (default): Up to 100 output pages can be delivered to the
top output bin without sorting.
Example: Three copies of a single-sided three-page job will be
delivered in the order 3-3-3, 2-2-2, 1-1-1, with page 1 on top.
• High Cap: Up to 500 sheets can be stacked in the sorter’s bottom
high capacity bin without sorting. A message displays when the
high cap bin is full.
Example: One hundred copies of a single-sided three-page job will
be delivered so that 100 copies of page 3 are output first, followed
by 100 copies of page 2, then 100 copies of page 1, with page 1 on
top.
Only Plain paper jobs may be sorted or stacked. Transparencies, Thick,
Postcard or other special stock may be sent to the Exit Tray or High Cap bin.
• Sort (by set): Up to 30 sheets are sorted into a maximum of 10
sets and delivered to the sorting bins.
Example: Three copies of a single-sided three-page job will be
delivered in 3-2-1 order to each of the top three bins (page 3 is
copied first and placed in the bottom of the stack). The final order
will appear as 1-2-3, with page 1 on top.
• Stack (by page): Up to 30 sheets of the same page (up to 10
pages) can be delivered to each of the 10 sorting bins. If more than
10 pages are in the set, all extra copies will be sent to the High Cap
bin.
Example: Three copies of a single-sided three-page job will be
delivered with all copies of page three sent to bin 3, all copies of
page 2 sent to bin 2 and all copies of page 1 sent to the top bin.
5. Press Select, then Exit to continue programming the job.
6. After the job completes, select the Clear All button to return the settings
to the default.
Xerox DocuColor 2006
22–21
Page 22

22. Copy Features
Using the Erase option
Use the following procedure to make a copy using the Output option:
1. If the DocuColor 2006 is in printer mode, press the Copy button to enter
copy mode.
2. Press the Clear All button to restore default settings.
3. Position the original on the Document Glass or in the Document Feeder.
For more information on positioning originals on the Document Glass and
using the Document Feeder, go to the Basic Copying chapter.
4. Press the Advanced Features button. Advanced Features selection is
displayed on the Copier Screen.
5. Use the Arrow Buttons to highlight the Erase option.
6. Press the Select button. Erase selection is displayed on the Copier
screen.
7. Use the Arrow Buttons to highlight one of the following:
• On to turn the Erase feature on.
• Off to turn the Erase feature off.
8. Press the Select button. One of the following happens:
• If you selected Off, Advanced Features selections will redisplay on
the Copier Screen. Skip to step 10.
• If you selected On, Erase value selection is displayed on the Copier
Screen. Use the Arrow Buttons to highlight an erase dimension.
Use the Numeric Keypad to enter an erase value between 0 mm
and 50 mm.
Horizontal
If you enter an incorrect value, press the Clear (C) button to delete it.
22–22
Xerox DocuColor 2006
Page 23

22. Copy Features
9. Press the Select button. Advanced Features selection is displayed on
the Copier Screen.
10. Press the Exit button. The Main Screen is displayed on the Copier
Screen.
11. Enter your desired number of copies using the Numeric Keypad.
12. Press the Start button.
If you enter two values and wish to change the first, you must first exit and
then return before making the desired change.
Using the 2-Sided feature
Use the following procedure to make a copy using the 2-Sided feature:
1. If the DocuColor 2006 is in printer mode, press the Copy button to enter
copy mode.
2. Press the Clear All button to restore default settings.
3. Position the originals in the Document Feeder.
You must use the Document Feeder to create a 2-Sided copy. For more
information on positioning originals in the Document Feeder, go to the Basic
Copying chapter.
4. Press the Advanced Features button. Advanced Features selection is
displayed on the Copier Screen.
5. Use the Arrow Buttons to highlight the 2-Sided option.
6. Press the Select button. 2-Sided selection is displayed on the Copier
Screen.
Xerox DocuColor 2006
22–23
Page 24

22. Copy Features
7. Use the Arrow Buttons to highlight one of the following:
The Copier Screen displays an error message if the 2 Up feature is on when
you try to switch the 2-Sided feature on. For information on using the 2 Up
feature, see “Using the 2 Up feature.”
8. Press the Select button. One of the following happens:
• Off to turn the 2-Sided feature off.
• Long Edge Binding to flip the images along the long edge of the
output. This option prints the top of the long edge side 1 image on
the same edge of the page as the top of the side 2 image. For
Portrait documents, this creates a book effect. For Landscape
documents, this creates a landscape effect.
• Short Edge Binding to flip the images along the short edge of the
output. This option prints the top of the side 1 short edge image on
the opposite edge of the page from the top of the side 2 image. For
Portrait documents, this creates a calendar effect. For Landscape
documents, this creates a book effect.
• If you selected Off, Advanced Features selection is displayed on
the Copier Screen. Skip to step 12.
• If you selected Portrait or Landscape, Page Count is displayed on
the Copier Screen.
9. Using the Arrow Buttons, select one of the following:
• Number – to manually enter the number of originals.
• Auto Count – to have the copier detect the number of originals.
Skip to step 12.
10. Using the Numeric Keypad, enter the number of originals loaded in the
Document Feeder.
11. Press the Select button. 2-Sided selection is displayed on the Copier
Screen.
12. Press the Exit button. The Main Screen is displayed on the Copier
Screen.
13. Enter your desired number of copies using the Numeric Keypad.
14. Press the Start button.
22–24
Xerox DocuColor 2006
Page 25

22. Copy Features
Using the 2 Up option
Use the following procedure to make a copy using the 2 Up feature:
1. If the DocuColor 2006 is in printer mode, press the Copy button to enter
copy mode.
2. Press the Clear All button to restore default settings.
3. Position the originals in the Document Feeder with the long edge of the
paper entering the Document Feeder first (Long Edge Feed).
You must use the Document Feeder to create a 2 Up copy. For more
information on positioning originals in the Document Feeder, go to the Basic
Copying chapter.
4. Select the Paper Supply and the % R/E required. Several common sizes
are listed below. Use the Zoom feature to determine the best reduction
for other sizes.
Original Desired 2-Up output Reduction
8.5 x 11 in. Portrait 8.5 x 11 in. Landscape 64%
8.5 x 11 in. Portrait 11 x 17 in. Landscape 100%
8.5 x 11 in. Portrait 11 x 14 in. Landscape 75%
A4 Portrait A4 Landscape 70%
A4 Portrait B4 Landscape 86%
A4 Portrait A3 Landscape 100%
5. Load paper into the paper tray by placing the short edge of the paper to
feed into the machine first (Short Edge Feed).
6. Press the Advanced Features button to display the Advanced Features
selections on the Copier Screen.
7. Use the arrow buttons to highlight the 2 Up option.
8. Press the Select button to display the 2 Up selection on the Copier
Screen.
Xerox DocuColor 2006
22–25
Page 26

22. Copy Features
9. Use the Arrow Buttons to select one of the following:
The copier Screen displays an error message if the 2-Sided feature is on
when you try to switch on the 2 Up feature. For information on using the 2Sided feature, go to the “Using the 2-Sided feature” section.
10. Press the Select button.
11. Using the Arrow Buttons, select one of the following:
• No to turn the 2 Up feature off.
• Yes (L→R) to turn the 2 Up feature on, and position the images
from left to right.
• Yes (R→L) to turn the 2 Up feature on, and position the images
from right to left.
• If you selected Off, Advanced Features selection is displayed on
the Copier Screen. Skip to step 14.
• If you selected Yes (L→R) or Yes (R→L), Page Count selection is
displayed on the Copier Screen.
• Number – to manually enter the number of originals.
• Auto Count – to have the copier detect the number of originals.
Skip to step 12.
12. Using the Numeric Keypad, enter the number of originals loaded in the
Document Feeder.
13. Press the Select button. 2 Up selection is displayed on the Copier
Screen.
14. Press the Exit button. Advance Features selection is displayed on the
Copier Screen.
15. Press the Exit button to return to the Main Screen.
16. Enter the desired number of copies using the Numeric Keypad.
17. Press the Start button.
The Copier Screen displays an error message of the Reduce/Enlarge feature
is set at Auto or if the Paper Supply feature is set at Auto. For information on
using the Reduce/Enlarge feature go to the “Using the Reduce/Enlarge
feature” section. For information on using the Paper Supply feature go to the
“Using the Paper Supply feature” section.
22–26
Xerox DocuColor 2006
 Loading...