

Page 1
24
The following list shows the types of problems identified in this chapter:
• Jam clearance
• Copy/print quality problems
• Power problems
• Printer error messages
• Printer error codes
• Scanner error messages
Avoiding paper jams
The following conditions cause jams in the Printer.
Problem Solving
• The paper guides in the paper tray are not adjusted to the size of the
paper. Refer to the Loading paper in the Paper Tray procedure in the
Setting up the DocuColor 2006 section.
• The Automatic Document Feeder (ADF) document guides are not
adjusted to the size of the documents. Refer to the Automatic Document
Feeder information in the Setting up the DocuColor 2006 section.
• Transparencies are incorrectly loaded in the Bypass Tray. Refer to the
Loading Transparencies into the Bypass Tray procedure.
• Paper not recommended is used. Refer to the Recommended Materials
List.
• Whenever possible, load paper to feed long edge first.
CAUTION
DO NOT open the Duplex Tray unless directed to do so from the Printer
Control Panel. Opening the Duplex Tray at any other time could create a
paper jam.
Xerox DocuColor 2006 24-1
Page 2
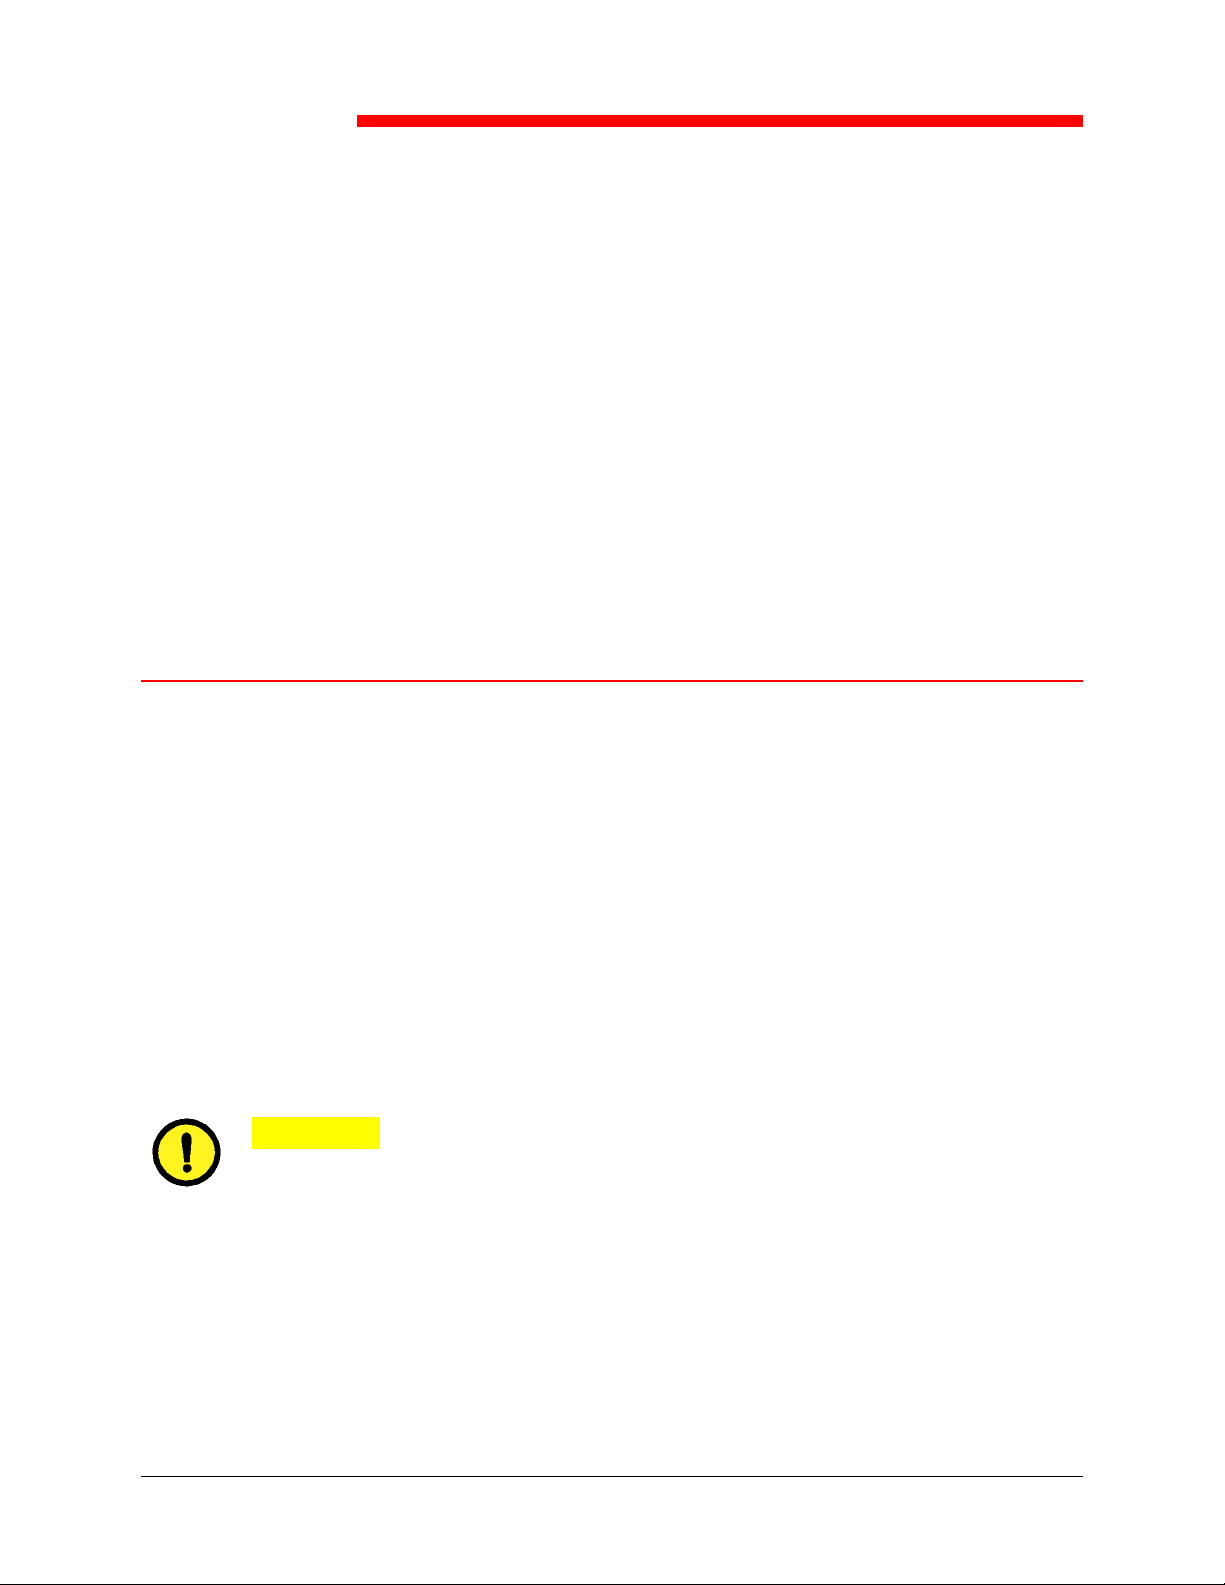
24. Problem Solving Clearing paper jams
Printer jam clearance areas
A
D
Area 1: Bypass Tray and Bypass Transport
Area 2: Paper Feed Area from Paper Tray 1 or the Duplex Tray, when
installed.
Area 3: Paper Feed Area from the 2 Tray Module, when installed.
Area 4: Top Left-hand Cover
Area 5: Upper Inverter, if installed. Also provides access to the Fuser area.
Area 6: Lower Inverter, if installed
A: Duplex Tray, if installed
B: Paper Tray 1
C: Paper Tray 3, in the 2 Tray Module
D: Paper Tray 2, in the 2 Tray Module
C
B
301069a
24-2 Xerox DocuColor 2006
Page 3
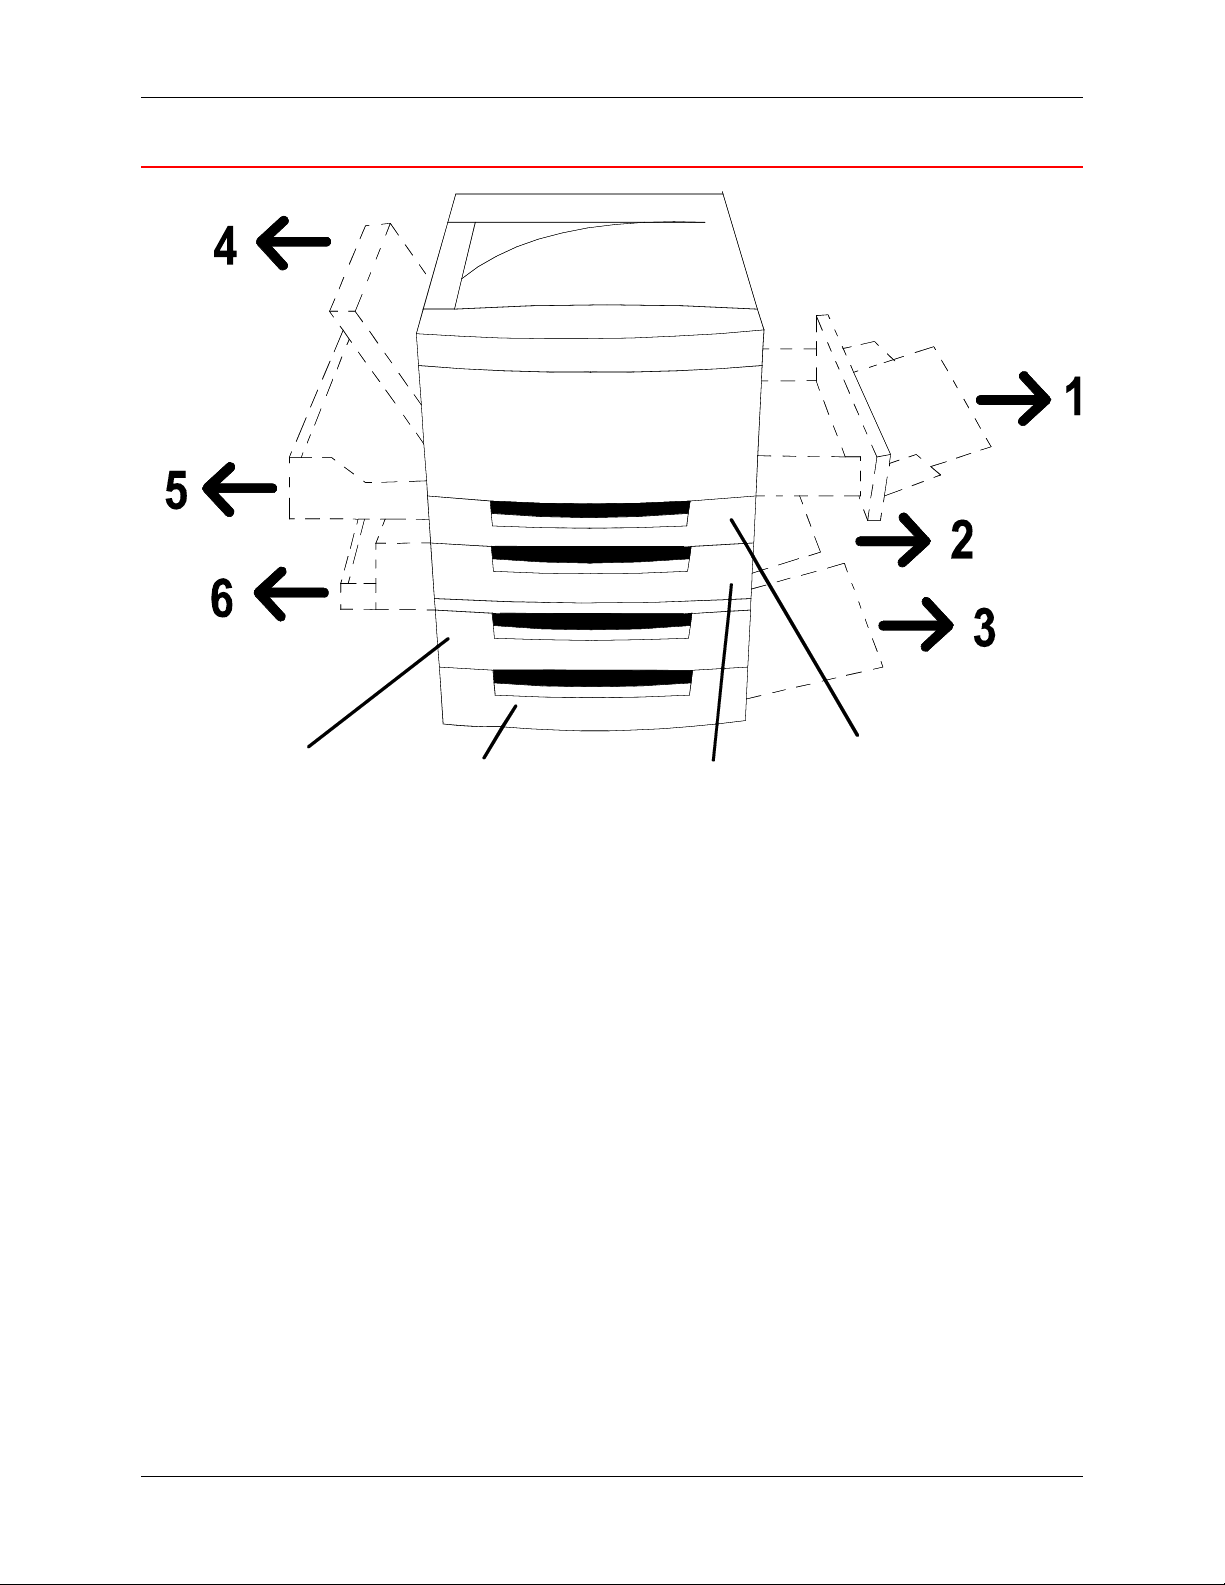
Clearing paper jams 24. Problem Solving
Document Feeder jam clearance area
301270a
Lift to open the left-hand Document Feeder cover.
Xerox DocuColor 2006
24-3
Page 4

24. Problem Solving Clearing paper jams
24-4 Xerox DocuColor 2006
Page 5
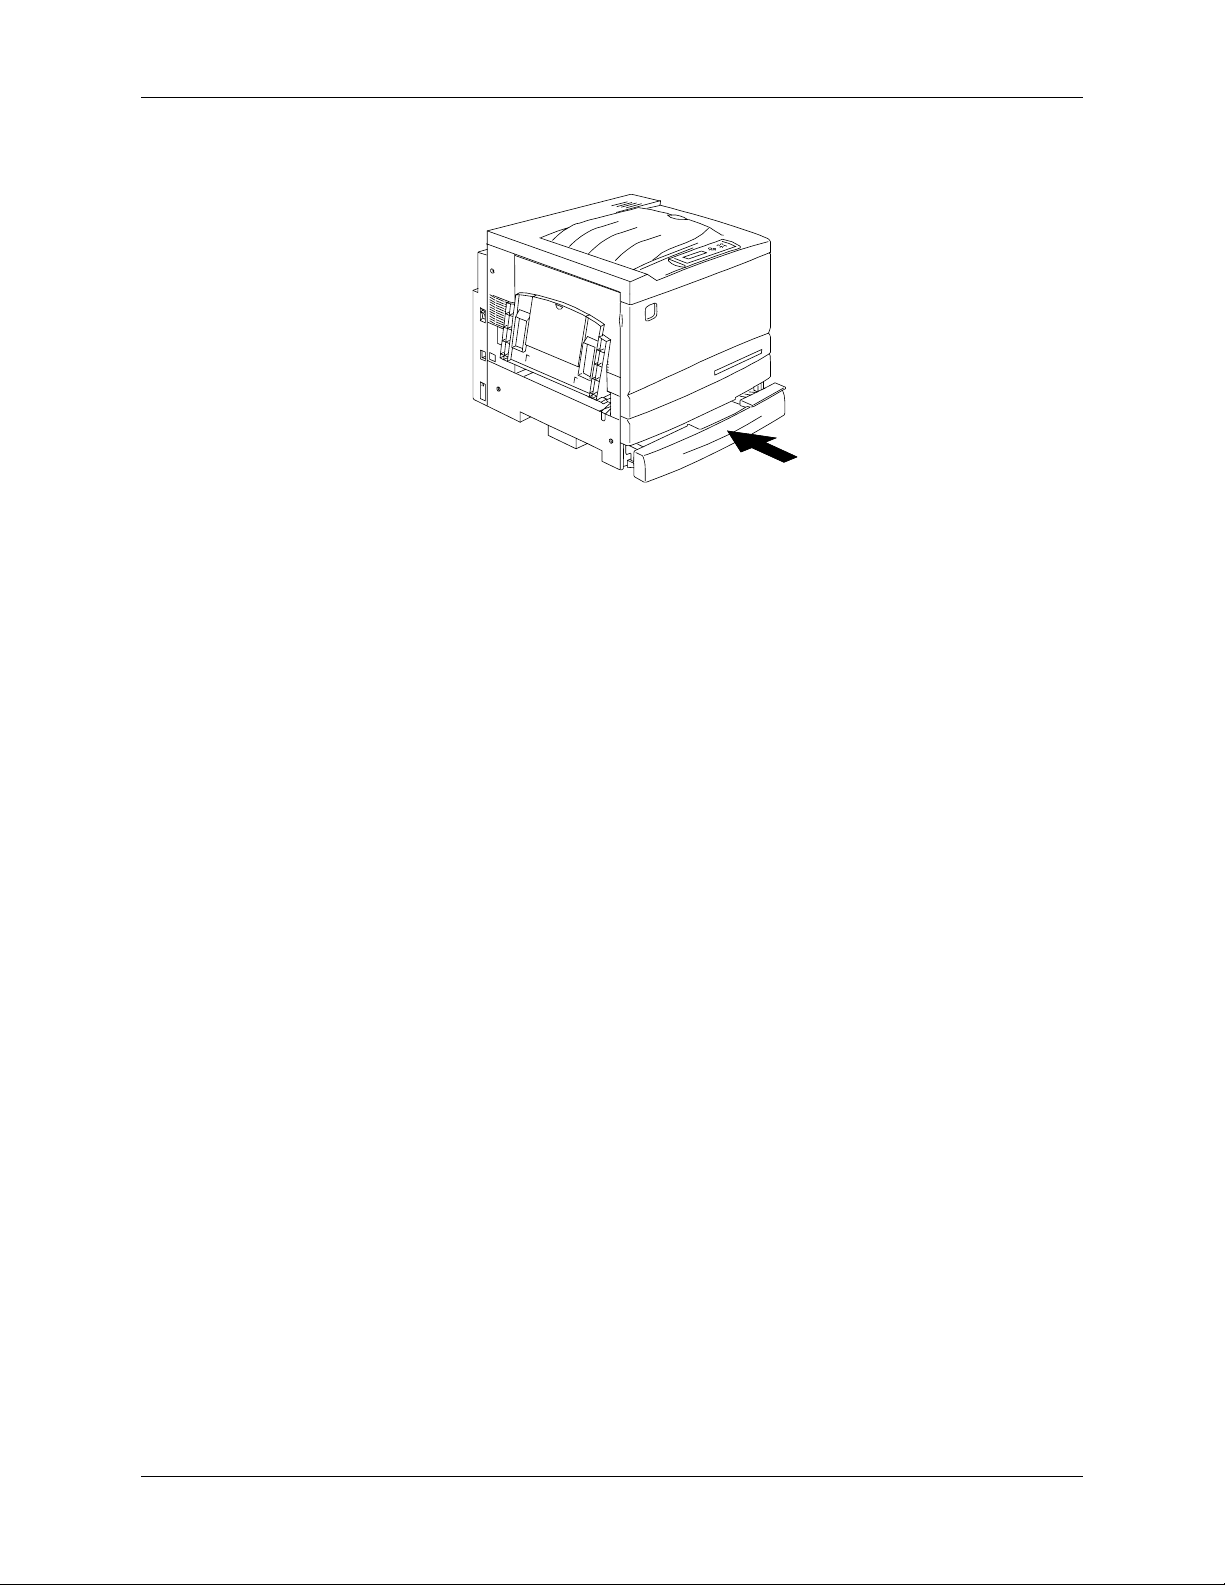
Clearing a Paper Tray jam 24. Problem Solving
Clearing a Paper Tray jam
Perform this procedure when the message CHECK LOADING OF TRAY X (1,
2, or 3) is displayed on the Control Panel.
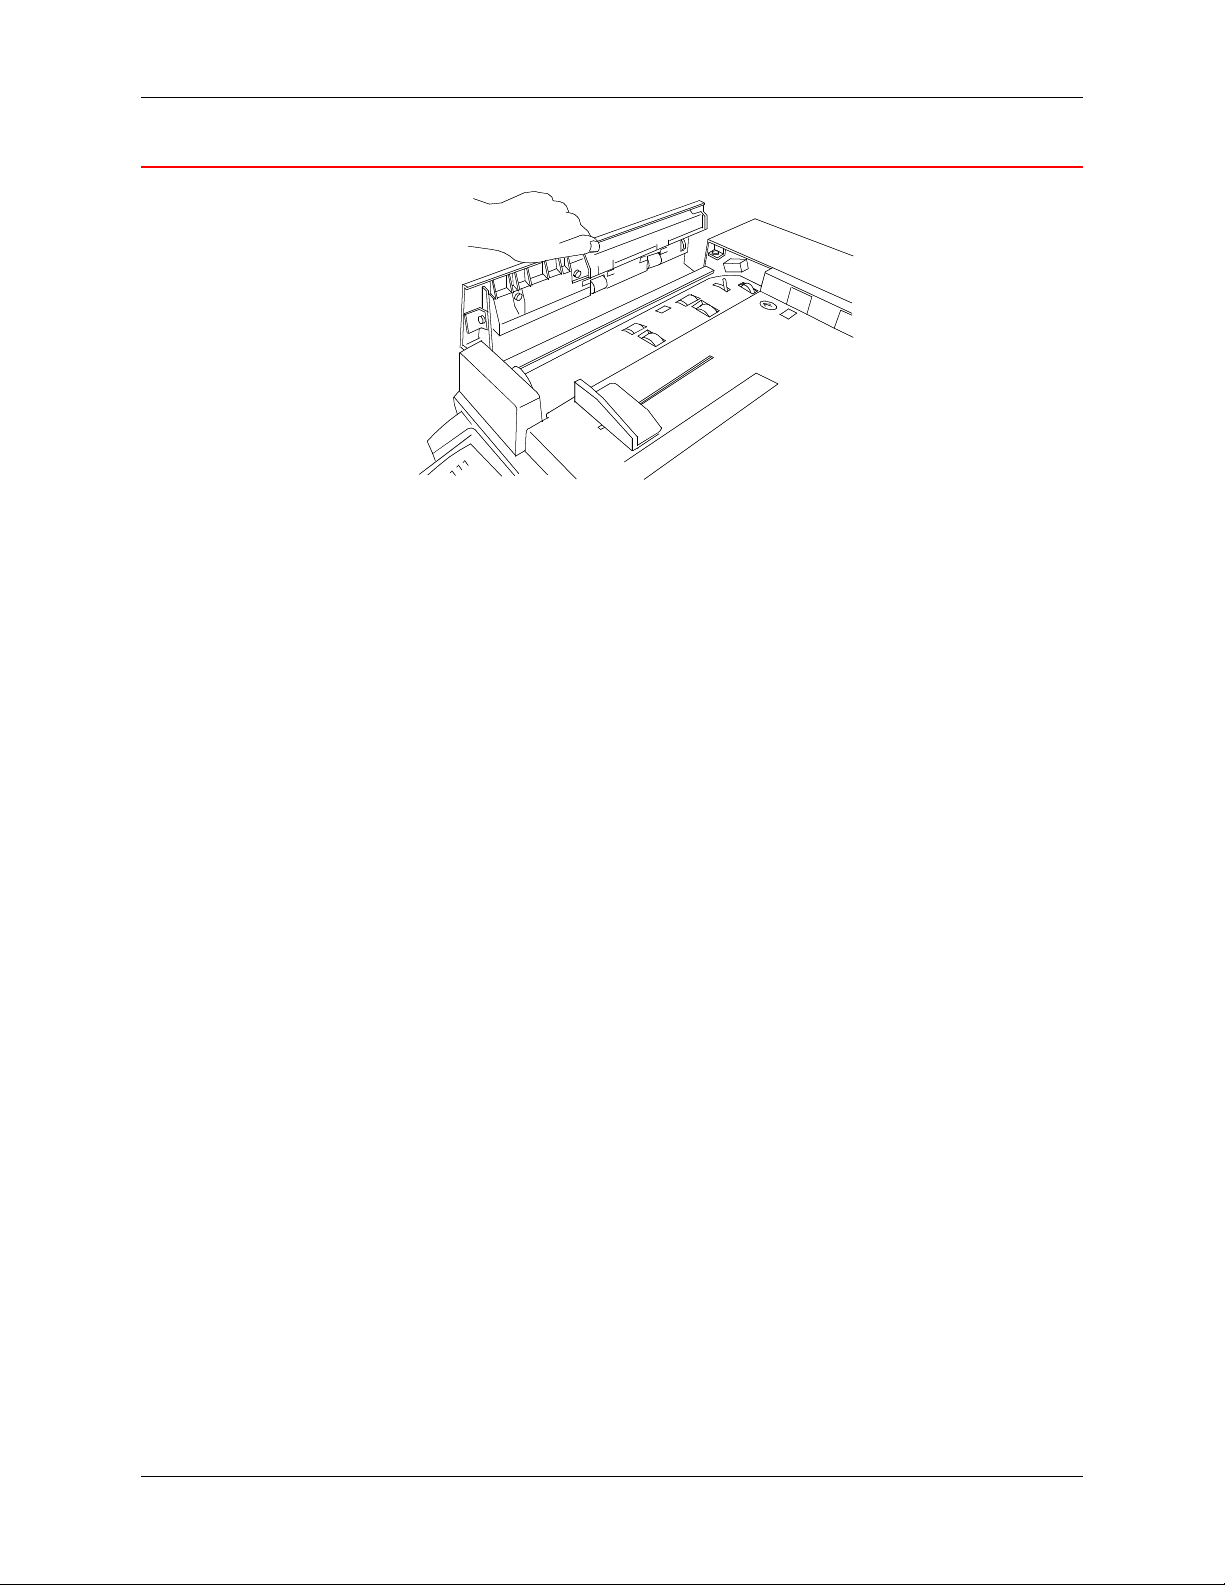
1. Slowly open the paper tray all the way. Remove the jammed paper and
any paper that is creased or torn. Ensure that there are no pieces of
torn paper remaining in the tray.
301087
2. Remove the paper stack from the tray, and fluff the edges. Replace the
stock.
3. Ensure that the stack is flush on all four sides.
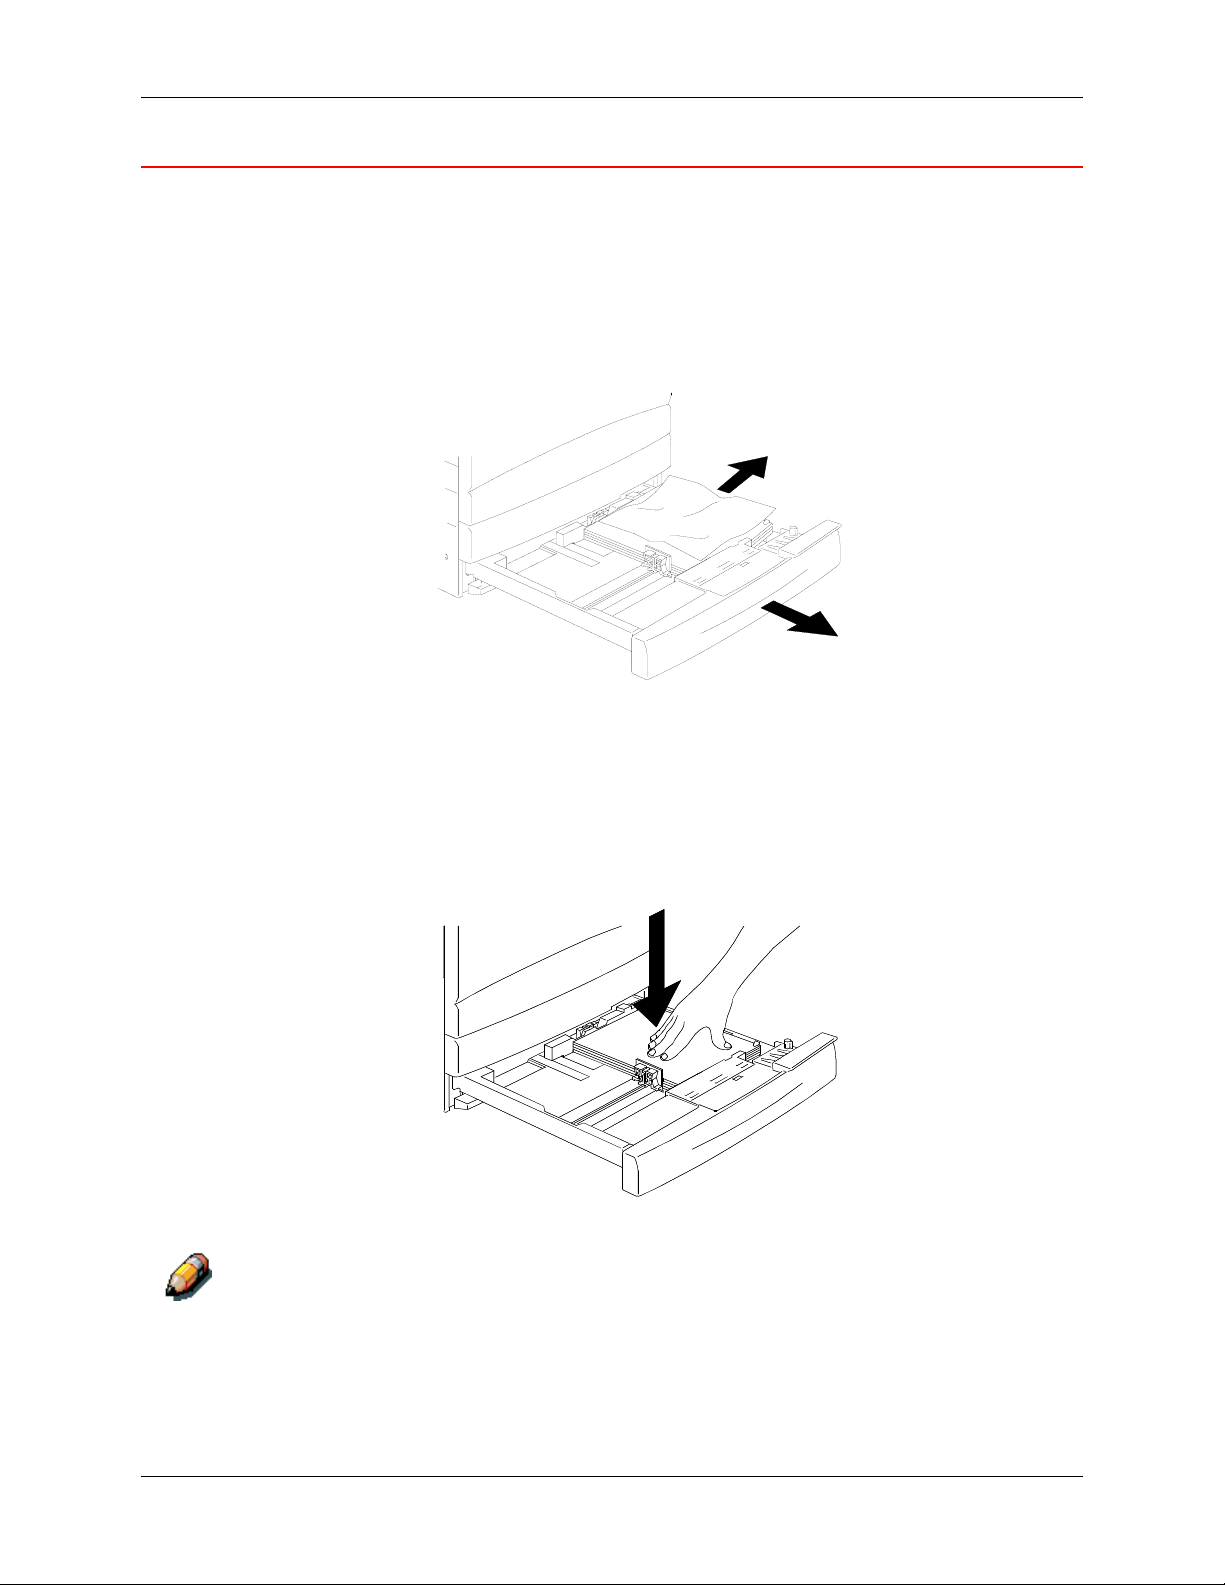
4. If this is Paper Tray 1, press down on the paper stack until the metal
plate on the bottom of the tray latches into place.
301145
It is not necessary to perform step 4 on Paper Tray 2 and Paper Tray 3, if
installed.
Xerox DocuColor 2006 24-5
Page 6
24. Problem Solving Clearing a Paper Tray jam
5. Firmly close the paper tray.
301065b
6. Try running the job again.
7. If the problem still exists, open the tray and turn the stack of paper over.
8. Firmly close the paper tray.
24-6 Xerox DocuColor 2006
Page 7
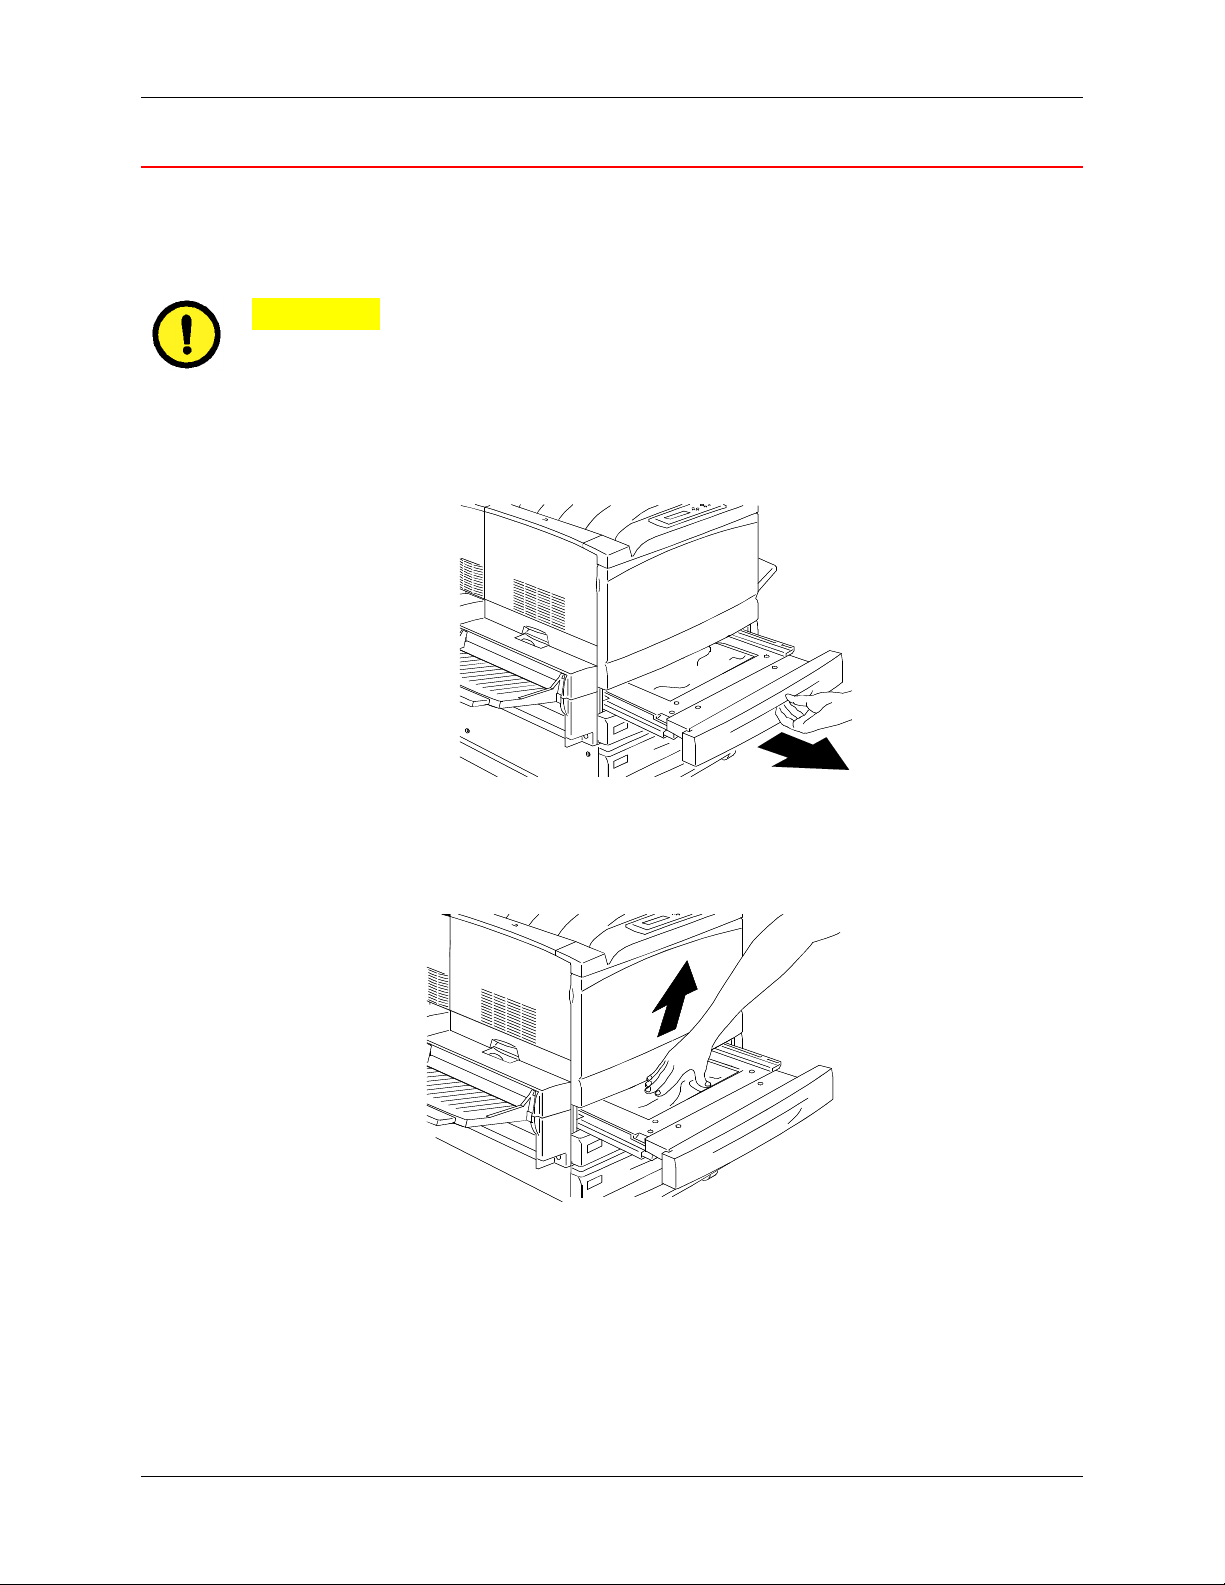
Clearing a Duplex Tray jam 24. Problem Solving
Clearing a Duplex Tray jam
Perform this procedure only when the message Clear Duplex Tray jam is
displayed on the Control Panel.
CAUTION
DO NOT open the Duplex Tray unless directed to do so from the Printer
Control Panel. Opening the Duplex Tray at any other time could create a
paper jam.
1. Slowly open the Duplex Tray all the way.
0
301266A
-WOL
t
2. Remove the jammed paper and any paper that is creased or torn.
Ensure that there are no pieces of torn paper remaining in the tray.
t301267a
Xerox DocuColor 2006 24-7
Page 8
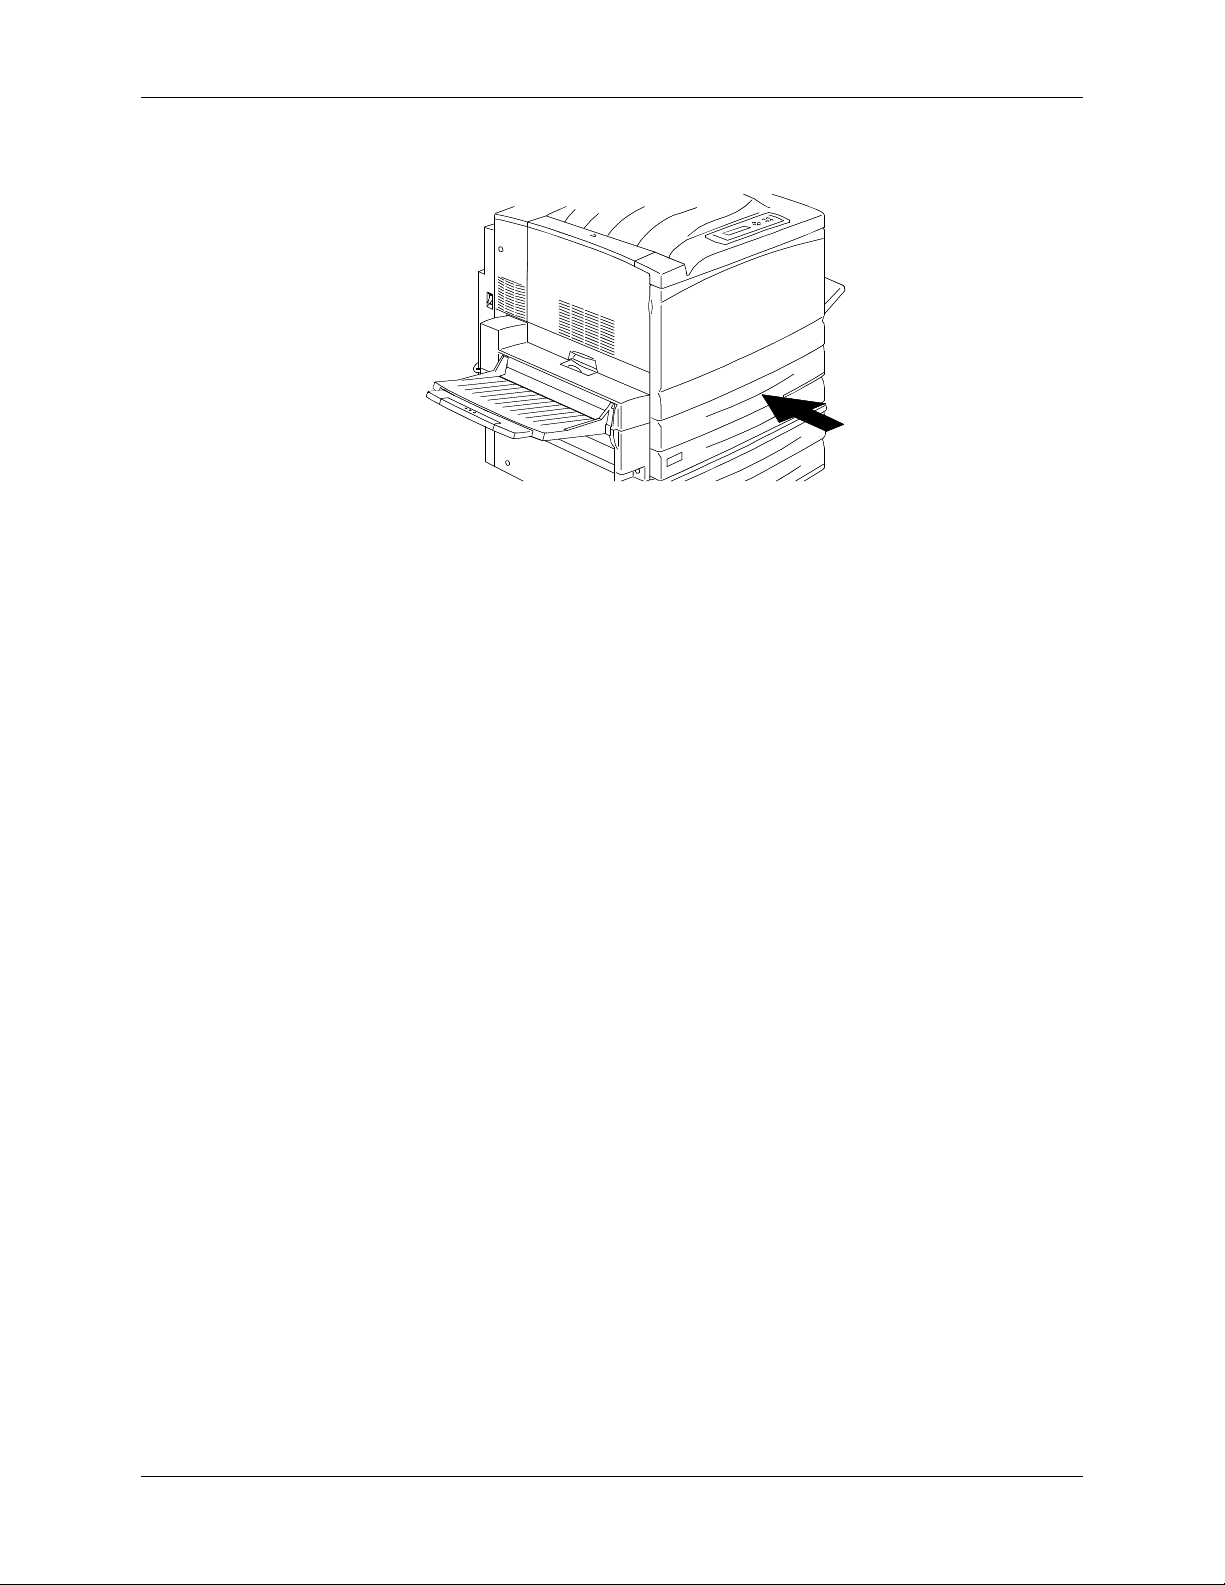
24. Problem Solving Clearing a Duplex Tray jam
3. Firmly close the Duplex Tray.
301268a
24-8 Xerox DocuColor 2006
Page 9
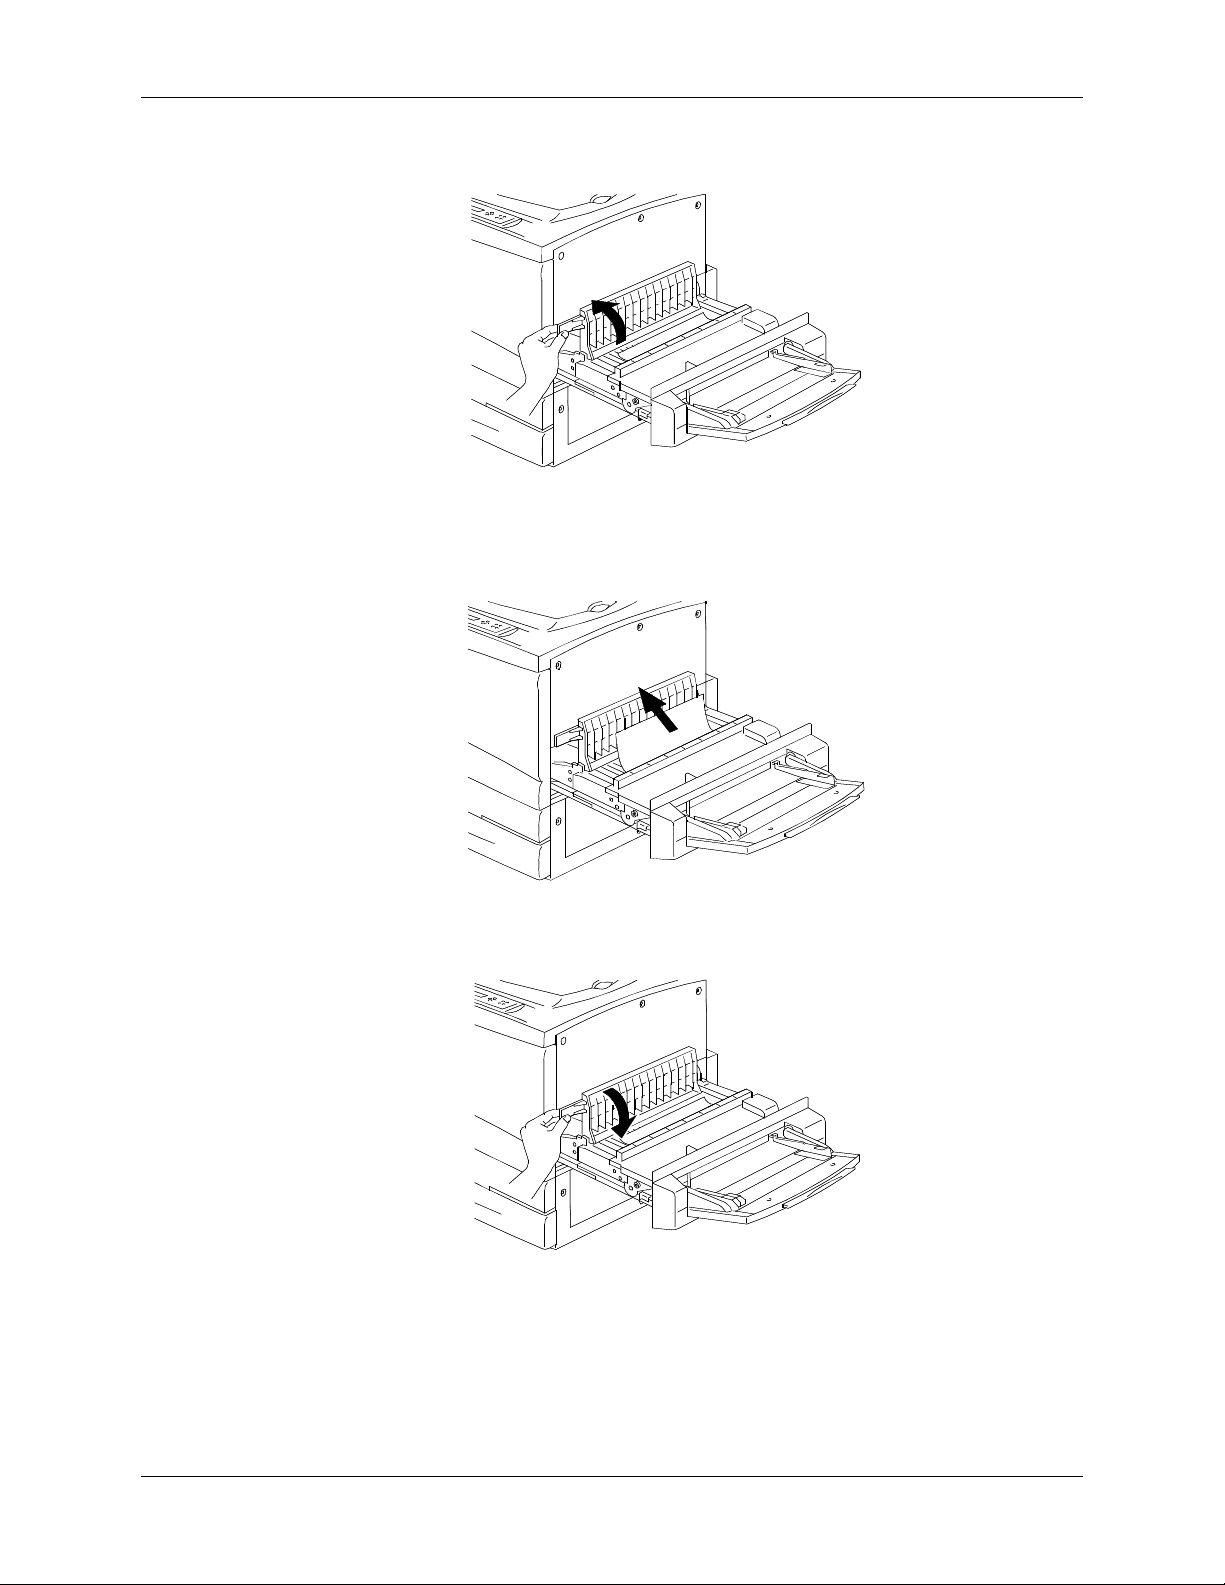
Clearing Area 1 jams 24. Problem Solving
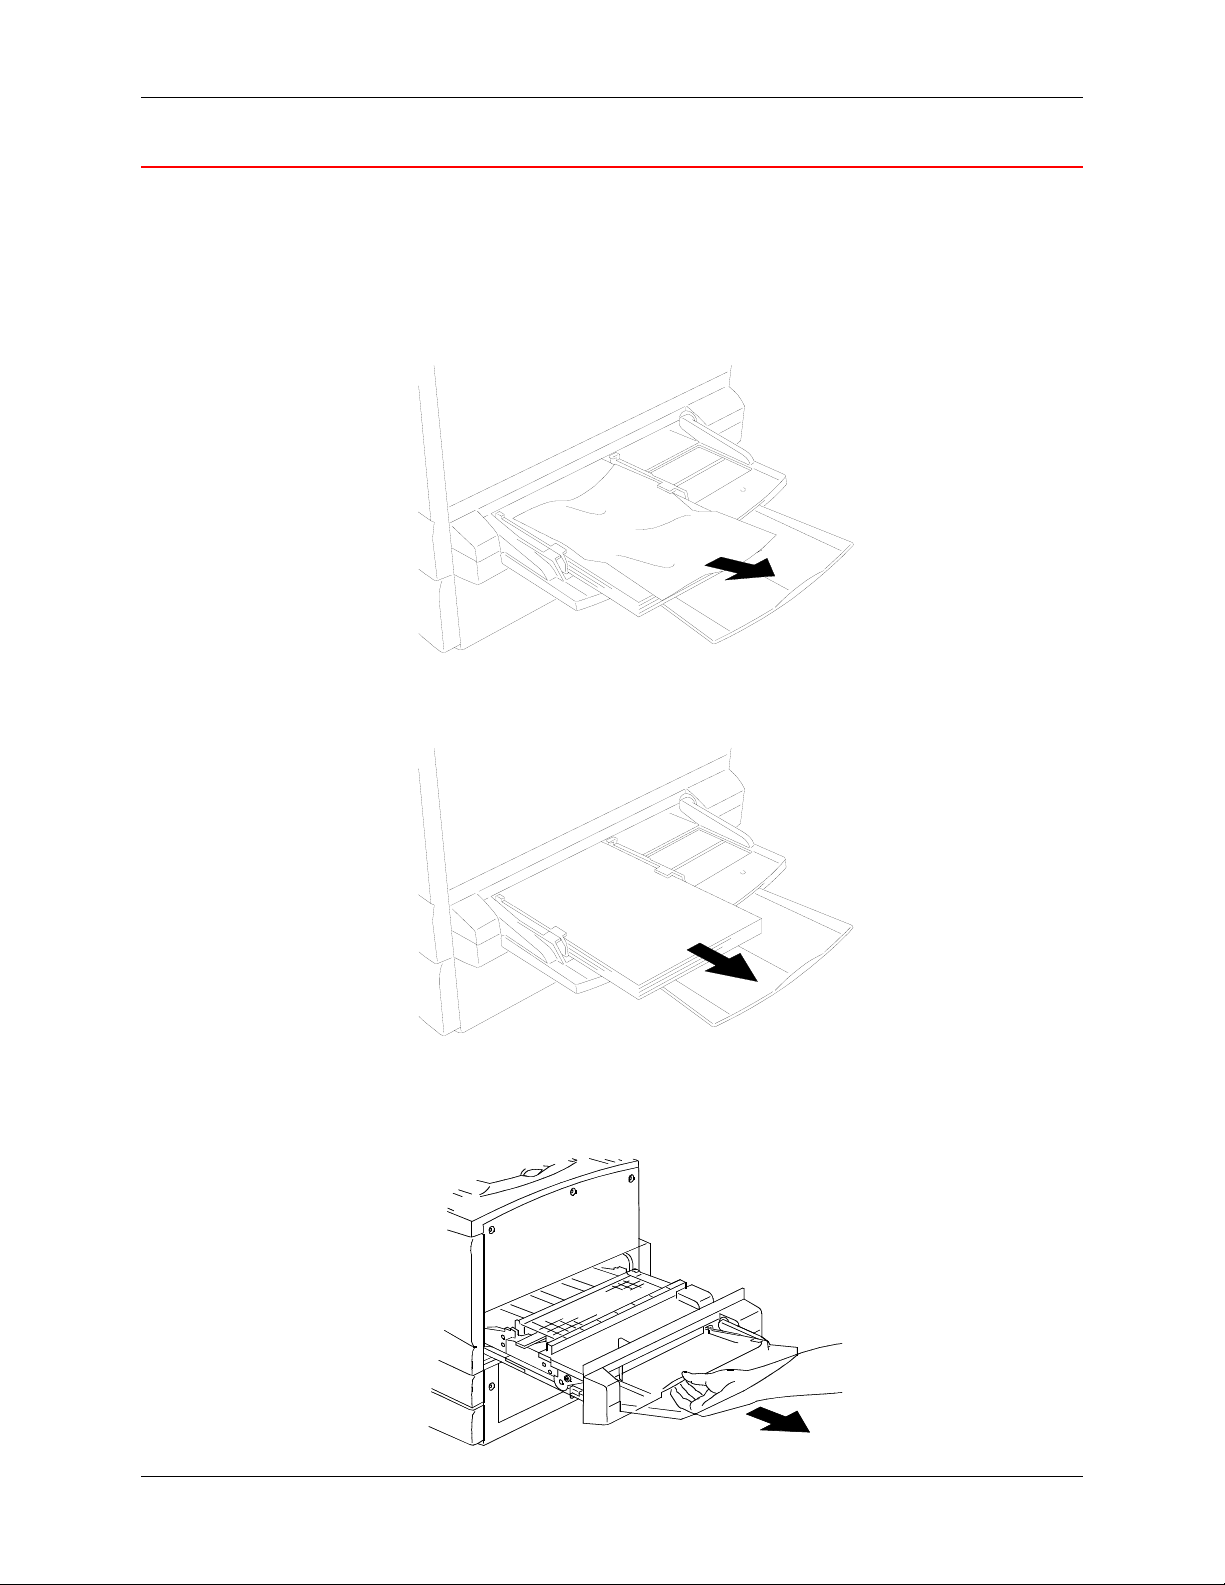
Clearing Area 1 jams
Perform this procedure when the message Clear Jam in Area 1 is displayed
on the Control Panel.
1. Remove any jammed or torn paper or other stock from Area 1, Bypass
Tray. Ensure that there are no pieces of torn stock remaining in the tray.
301088a
2. Remove any stock loaded in the Bypass Tray.
301089a
3. In order to access a jam in the transport, pull the Bypass Tray all the
way out of the Pinter.
301090a
Xerox DocuColor 2006 24-9
Page 10
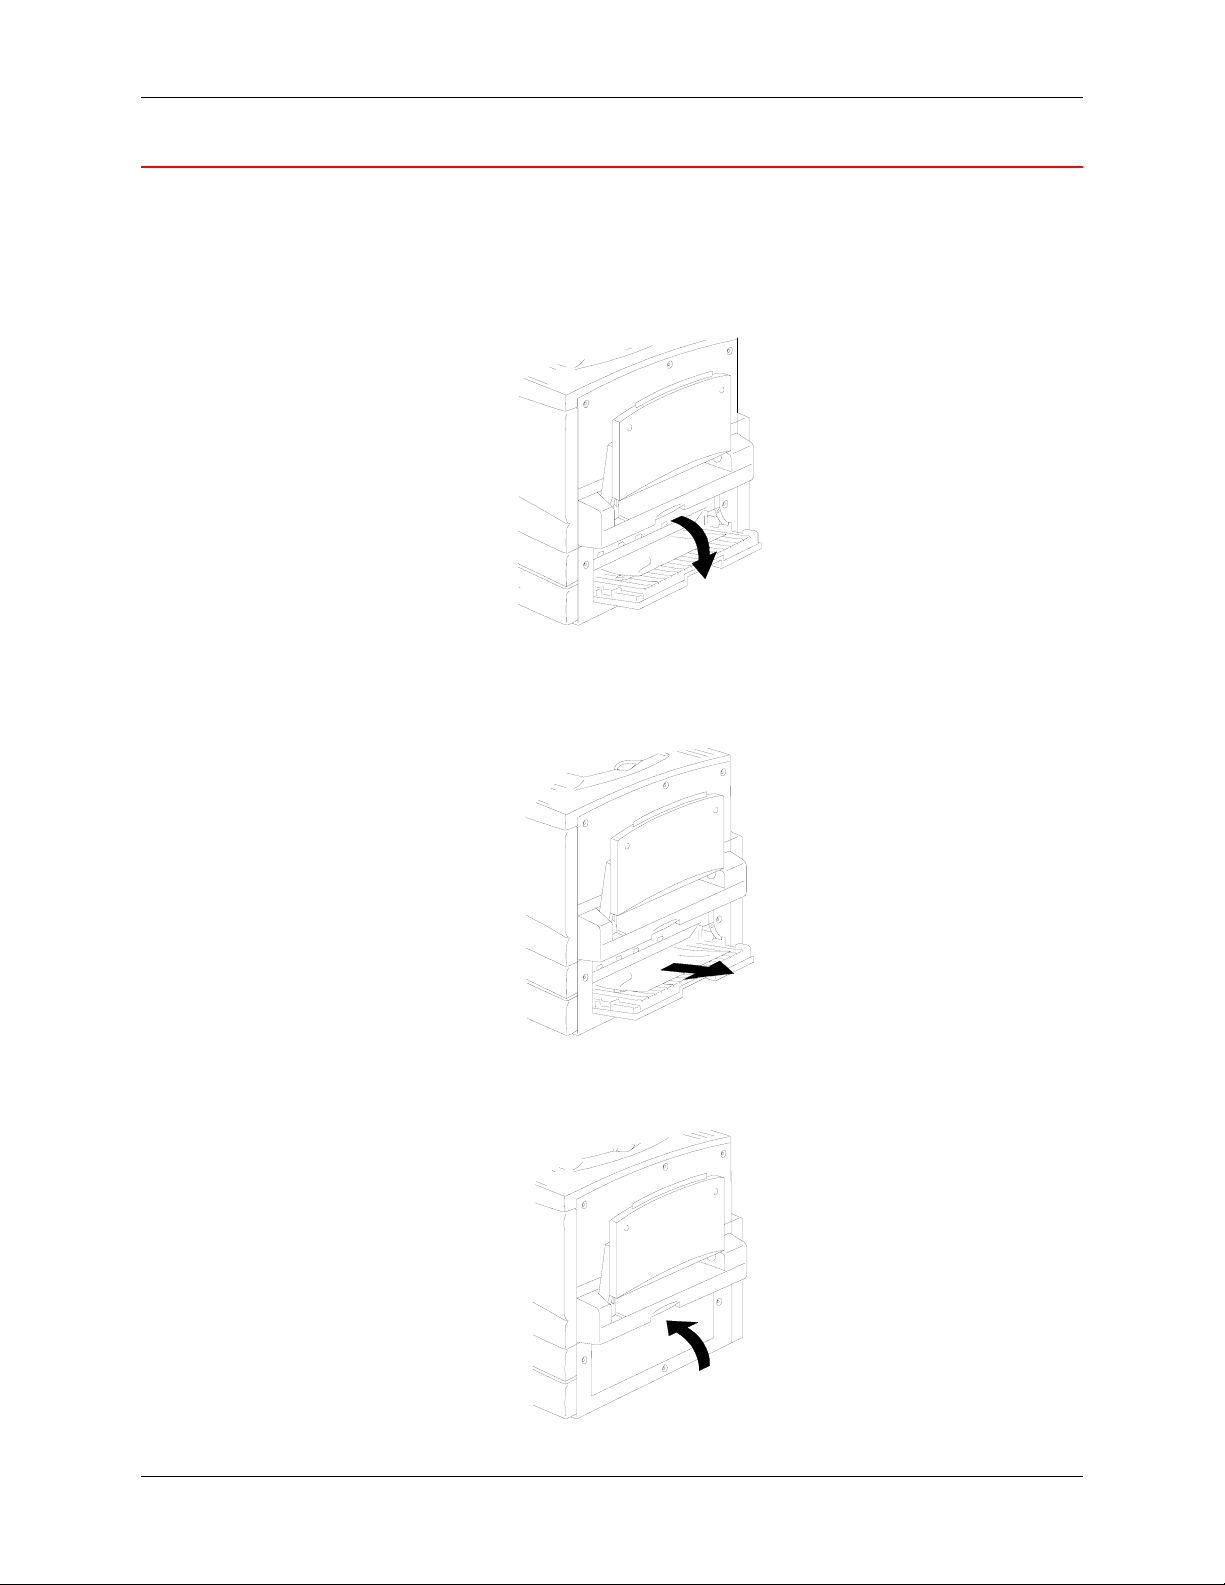
24. Problem Solving Clearing Area 1 jams
4. Lift the transport cover using the handle as shown.
0301091A-WOL
5. Remove any jammed or torn paper as shown below. Ensure that there
are no pieces of torn paper remaining in the transport.
6. Close the transport cover.
0301092A -WOL
0301093B-WOL
24-10 Xerox DocuColor 2006
Page 11

Clearing Area 1 jams 24. Problem Solving
7. Close the Bypass Tray transport.
0301084A-W O L
8. Reload the Bypass Tray with the desired stock and ensure that the width
guide is adjusted to the size of the stock.
0301095A-WOL
Xerox DocuColor 2006 24-11
Page 12

24. Problem Solving Clearing Area 1 jams
24-12 Xerox DocuColor 2006
Page 13
Clearing Area 2 jams 24. Problem Solving
Clearing Area 2 jams
Perform this procedure when the message Clear Jam in Area 2 is displayed
on the Control Panel.
1. Lower the Area 2 access cover.
301096
2. Remove any jammed or torn stock from Area 2. Ensure that there are
no pieces of torn stock remaining in the area.
301097
3. Close the access cover.
301082
Xerox DocuColor 2006 24-13
Page 14

24. Problem Solving Clearing Area 2 jams
24-14 Xerox DocuColor 2006
Page 15
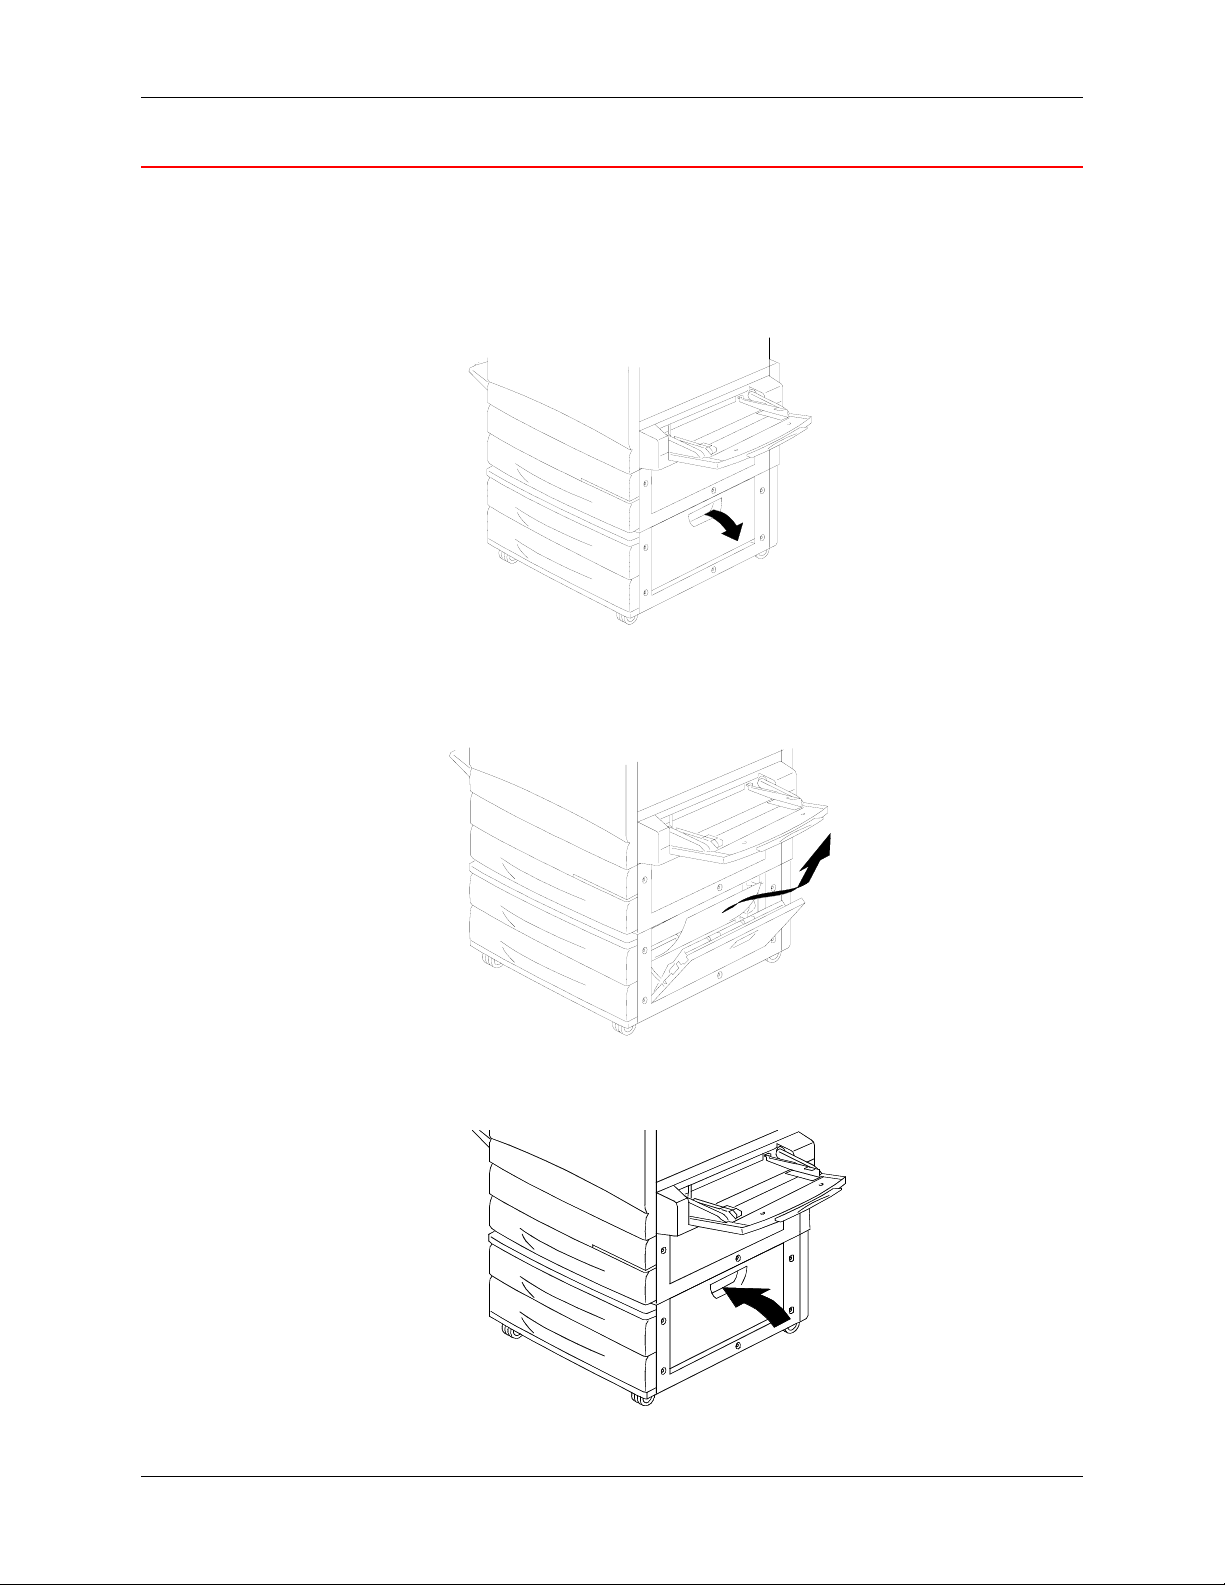
Clearing Area 3 jams 24. Problem Solving
Clearing Area 3 jams
Perform this procedure when the message Clear Jam in Area 3 is displayed
on the Control Panel.
1. Open the Area 3 access door.
301099
2. Remove any jammed or torn paper as shown below. Ensure that there
are no pieces of torn paper remaining in the feed area.
301100
3. Close the access door.
0301200A-
Xerox DocuColor 2006 24-15
WOL
Page 16

24. Problem Solving Clearing Area 3 jams
24-16 Xerox DocuColor 2006
Page 17
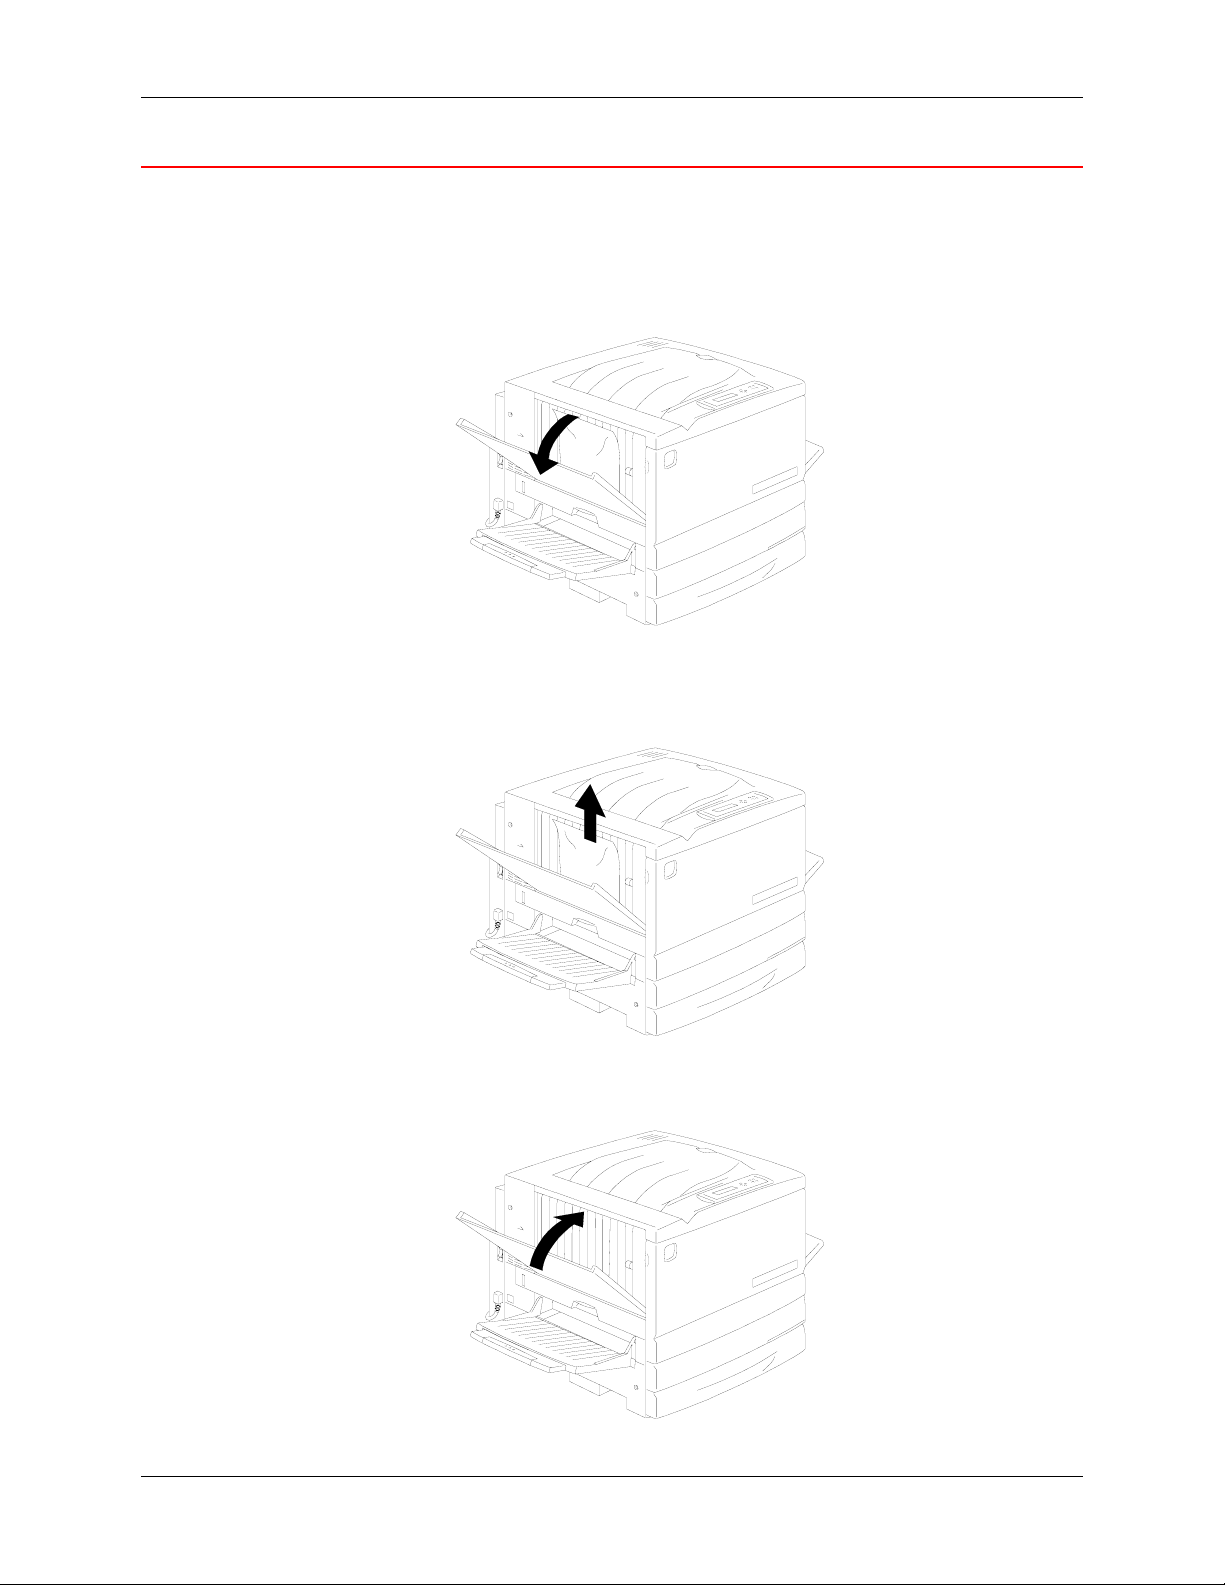
Clearing Area 4 jams 24. Problem Solving
Clearing Area 4 jams
Perform this procedure when the message Clear Jam in Area 4 is displayed
on the Control Panel.
1. Open the Area 4 cover.
301201
2. Remove the jammed paper. If the paper is torn ensure that there are no
pieces of torn paper remaining in the Printer.
301103
3. Close the Top Left-hand Cover.
301104
Xerox DocuColor 2006 24-17
Page 18

24. Problem Solving Clearing Area 4 jams
24-18 Xerox DocuColor 2006
Page 19

Clearing Area 5 jams 24. Problem Solving
Clearing Area 5 jams
Perform one of the following procedures when the message Clear Jam in
Area 5 is displayed on the Control Panel.
• If you do not have the Duplex Tray option installed perform the Clearing
the Fuser Area procedure below.
• If you have the Duplex Tray option installed, go to the Clearing the
Upper Inverter procedure.
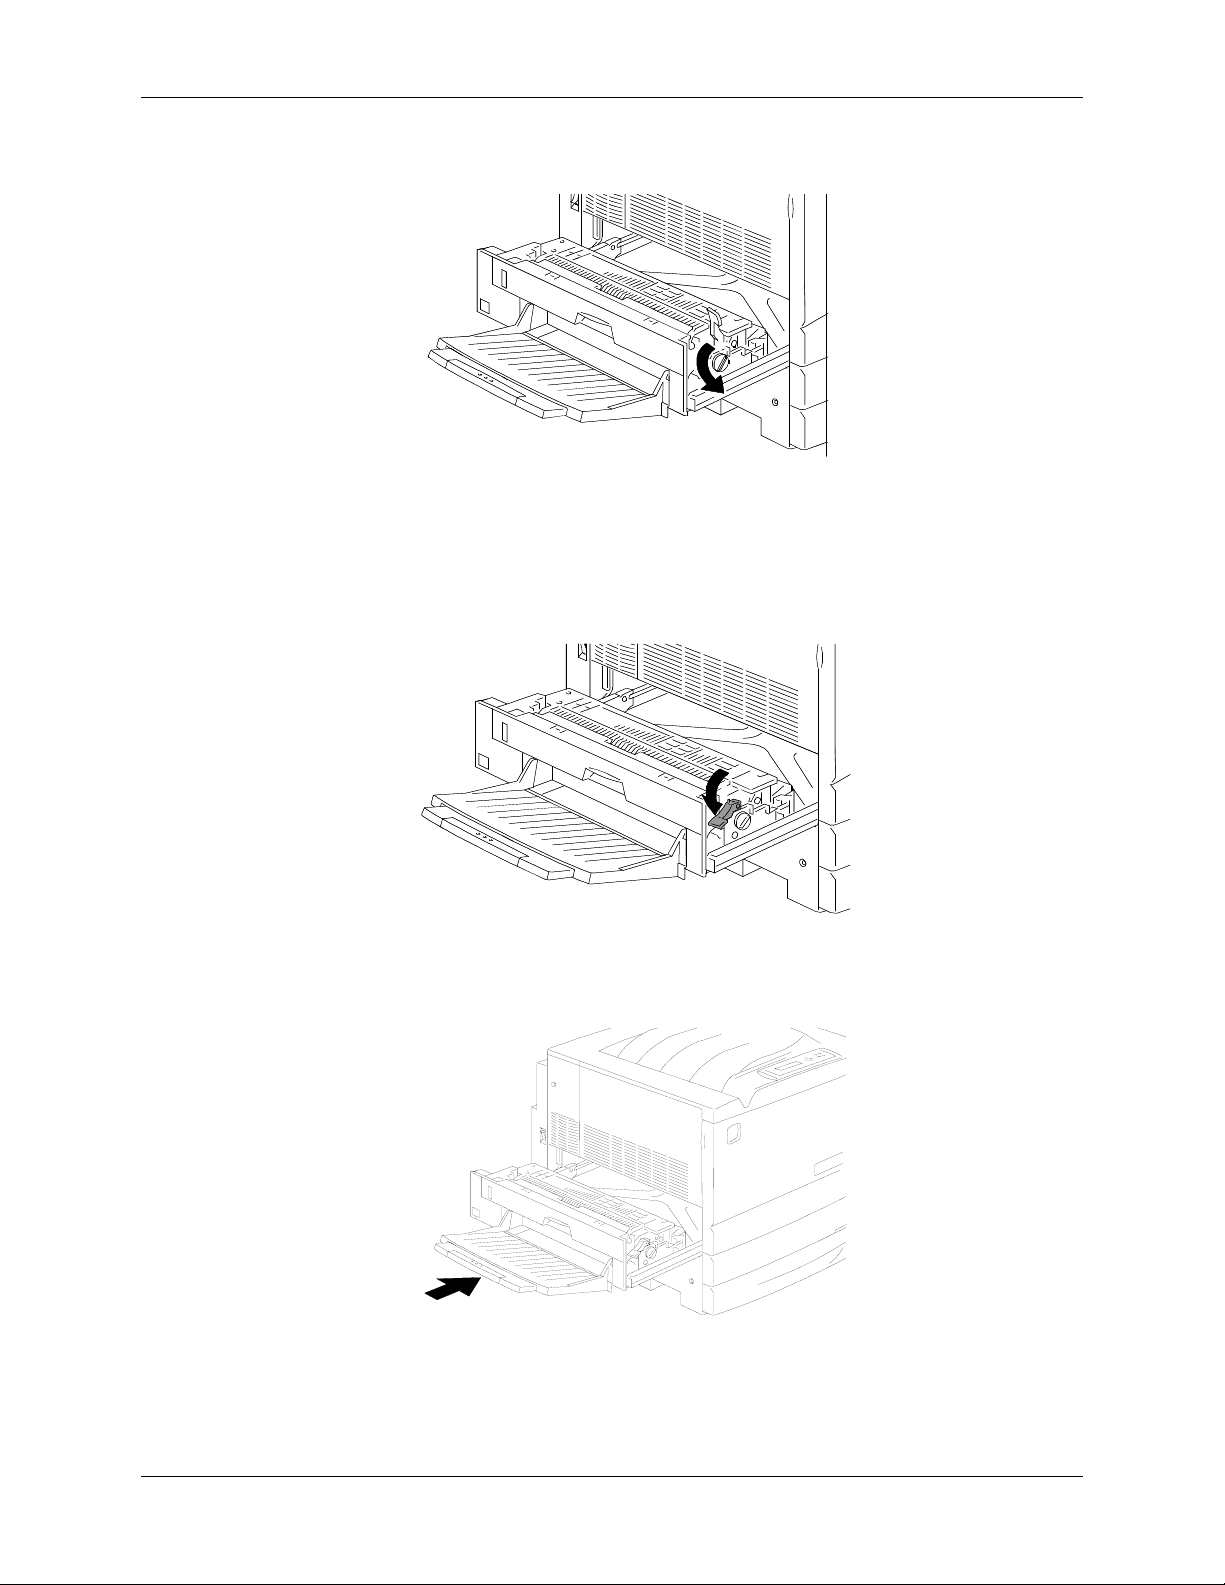
Clearing the Fuser Area
1. In order to access Area 5, pull open the Fuser Area access cover.
301105a
WARNING
The Fuser may be hot. Use care when reaching into the Fuser area.
2. To release any paper, lift the green lever as shown, and gently pull the
paper in the direction of the arrow.
301106a
Xerox DocuColor 2006 24-19
Page 20
24. Problem Solving Clearing Area 5 jams
3. If the paper is not visible, turn the green knob in the direction shown.
0301107A-
WOL
301107a
4. Ensure that there are no pieces of torn paper remaining in the Fuser
Area.
5. Return the green handle to the original position.
030
1257A-WOL
301257a
Firmly close the Fuser Area.
301114a
24-20 Xerox DocuColor 2006
Page 21

Clearing Area 5 jams 24. Problem Solving
Clearing the Upper Inverter
1. In order to access Area 5, pull open the Upper Inverter.
301260
2. To release any paper, lift the green lever, and gently pull the paper in
the direction of the arrow. If the paper is not visible, turn the green knob
in the direction of the arrow.
0301115A -W O L
Xerox DocuColor 2006 24-21
Page 22

24. Problem Solving Clearing Area 5 jams
3. Open the small, clear, cover and ensure that all the paper and paper bits
are removed.
0
301109A-WOL
a. If paper is visible under the clear cover, hold the cover open and
push the paper toward the paper exit with your fingers.
030
1110A-WOL
24-22 Xerox DocuColor 2006
Page 23

Clearing Area 5 jams 24. Problem Solving
b. Pull the paper in the direction of the arrow shown below.
0301111A-WOL
c. If paper is only partially visible under the cover, check under the
tray for access to the paper.
d. Pull the paper down and remove.
0301112A-W O L
Xerox DocuColor 2006 24-23
Page 24

24. Problem Solving Clearing Area 5 jams
4. Close the small clear cover and move the green lever to the lower
position.
0
301113A-W
OL
301113a
5. Firmly close the Upper Inverter.
30164
24-24 Xerox DocuColor 2006
Page 25

Clearing Area 6 jams 24. Problem Solving
Clearing Area 6 jams
Perform this procedure when the message Clear Jam in Area 6 is displayed
on the Control Panel.
1. In order to access Area 6, open the Lower Inverter cover.
301127a
2. Remove the jammed paper. Ensure that there are no pieces of torn
paper remaining in the Lower Inverter.
301116a
3. Close the Lower Inverter cover.
301117a
Xerox DocuColor 2006 24-25
Page 26

24. Problem Solving Clearing Area 6 jams
Clearing jams in the Sorter/Stacker
1. Read the messages that display on the copier and printer control panels.
2. Slide the Sorter/Stacker to the left away from the DocuColor 2006.
3. Lift the Jam Clearance Cover.
4. Lift the green handle and gently remove any sheets that are jammed in
the output area.
5. Close the Jam Clearance Cover.
6. Continue to follow the messages that display in the copier and printer
control panels and clear any additional jams that have occurred in the
DocuColor 2006.
24-26 Xerox DocuColor 2006
Page 27

Copy/print quality problems 24. Problem Solving
Copy/print quality problems
If the problem still exists after following the instructions in this table, call your
supplier or Xerox for service.
Description Possible Cause Action
Faded print/copy Printer out of adjustment
Go to Adjusting the color in
this section.
The Copy/print Cartridge is
old or damaged.
Go to Replacing the
supplies in the
Maintenance section.
If only some colors are
faded, a Dry Ink Cartridge
is old or damaged.
Stray black dots, or white
dots in solid black or color
The Document Glass is
dirty
areas
Vertical streaks The drum in the Copy/Print
Cartridge is old or
damaged.
Go to Replacing the Dry
Ink Cartridges in the
Maintenance section.
Go to the Cleaning
procedures in the
Maintenance section.
Go to Replacing the
Copy/Print Cartridge in the
Maintenance section.
Horizontal streaks Dirt in the paper path Clean the document glass,
and make 50 blank copies.
If the problem still exists,
call for service.
Repeating defect The drum in the Copy/Print
Cartridge is old or
damaged.
Dry Ink smears when
The Fuser is not operating. Call for service.
Go to Replacing the
Copy/Print Cartridge in the
Maintenance section.
touched
Black pages The Copy/print Cartridge is
old or damaged.
Go to Replacing the
Copy/Print Cartridge in the
Maintenance section.
Xerox DocuColor 2006 24-27
Page 28

24. Problem Solving Copy/print quality problems
Blank pages Sheets of paper are
sticking together.
The Low Dry Ink message
is display on the Control
Panel.
The Copy/print Cartridge is
old or damaged.
Vertical blanks The Copy/print Cartridge is
old or damaged.
Image is slanted The paper guides in the
paper tray are not in the
appropriate position.
Remove the paper stack
from the paper tray. Fan
the corners of the stack,
and replace it in the Paper
Tray.
Go to Replacing the Dry
Ink Cartridges in the
Maintenance section.
Go to Replacing the
Copy/Print Cartridge in the
Maintenance section.
Go to Replacing the
Copy/Print Cartridge in the
Maintenance section.
Open the paper tray and
adjust the paper guides to
the size of the paper. For
more information, go to the
Loading the paper in the
Paper Tray procedure in
the Setting up the
DocuColor 2006 section.
The color is too light or too
dark.
If a Document Feeder is
installed, the Feeder
document guides may not
be in the appropriate
positions.
Color is out of adjustment.
Adjust the Feeder
document guides to the
size of the paper. For
more information, go to the
Document Feeder
procedure in the
Accessories section.
Go to the Adjusting the
color procedure in this
section.
24-28 Xerox DocuColor 2006
Page 29

Adjusting the color 24. Problem Solving
Adjusting the printer color
Perform this procedure if you have color problems such as insufficient
amounts of one or more colors, or excessive amounts of one or more colors.
If a message to replace a Dry Ink Color Cartridge is displayed on the Printer
Control Panel, replace the cartridge BEFORE performing this adjustment.
VisualCal
There are three parts to the VisualCal adjustment. Do not skip any steps or
perform any part out of sequence.
If you wish to stop the VisualCal adjustment, you may press the Cancel
button at any time. Pressing the Cancel button returns the menu to READY.
1. Print Limits Page
1. Ensure that READY is displayed on the Printer Control Panel. Any error,
low toner, or paper messages will result in a printing warning to abort
calibration.
2. Press the Menu button repeatedly until VISUALCAL is displayed.
3. Press the Item/Enter button. PRINT LIMITS YES is displayed on the
Control Panel screen.
4. Press the Item/Enter button. PRINTING LIMITS PAGE is displayed and
after a few moments, the page is delivered to the Printer Output Tray.
5. Under your normal lighting, study the Black Start row.
a. Select the left-most circle that you can distinguish from the
background and draw a circle around it.
View the page at an angle for the best results.
b. Select the left-most circle that you can distinguish from the
background on the next row, Black End, and draw a circle around it.
c. If you cannot see any circle in the row, write 9 next to the row.
d. If you see all the circles in a row, write 0 next to the row.
Xerox DocuColor 2006 24-29
Page 30

24. Problem Solving Adjusting the color
6. Repeat step 5 for each for the color rows, drawing circles around your
preferred selections or recording a 9 or a 0 next to the row.
7. For the 30% Match row, hold the sheet at arms length. Select the circle
that best matches the background and draw a circle around it.
8. BLACK START 4 is displayed on the Printer Control Panel. Press the
up and down arrows button to enter the number that corresponds to the
value that you selected on the first row.
Pressing the up arrow button increases the number displayed. Pressing the
down arrow button decreases the number.
a. When the desired number is displayed, press the Item/Enter
button. BLACK END 4 appears on the Control Panel.
b. Use the up and down arrow buttons to enter the number that
corresponds to the value that you selected on the next row.
c. Press the Item/Enter button. CYAN START 4 appears on the
Control Panel.
9. Repeat step 8 for each of the color rows and for the 30% Match row.
If you entered a 9 or a 0 for any row, VisualCal will generate another Print
Limits Page containing the adjustments from your previous selections.
Perform step 8 again until you are able to select circles within the desired 1
to 8 range.
10. When all the values are entered and accepted by VisualCal, PRINT
GRAYS YES is displayed on the Control Panel.
24-30 Xerox DocuColor 2006
Page 31

Adjusting the color 24. Problem Solving
2. Gray Balance Page
1. Press the Item/Enter button. The PRINTING GRAY BALANCE PAGE is
displayed, and after a moment the page is delivered the Printer Output
Tray.
a. Select the color patch that is most like the gray that surrounds the
color patches.
b. Circle your selection.
2. BEST PATCH (ROW) is displayed on the Printer Control Panel. Use the
up and down arrow buttons to enter the number of the row that
corresponds to your circled selection.
3. Press the Item/Enter button and perform one of the following steps:
• If you enter any number other than 0, BEST PATCH (COL) appears
on the Control Panel.
a. Use the up and down arrow buttons to select the letter or
name of the column that corresponds to your circled selection.
b. Press the Item/Enter button. PRINTING GRAY BALANCE
PAGE is displayed, and after a moment the page is delivered
the Printer Output Tray.
c. Select the color patch that is most like the gray, and perform
steps 2 and 3 again.
• If you enter 0, PRINT COLOR TEST YES appears on the Control
Panel.
a. Press the Item/Enter button and, after a moment, the
Comparison Page is delivered to the output tray.
b. Go to part 3 Comparison Page.
Xerox DocuColor 2006 24-31
Page 32

24. Problem Solving Adjusting the color
3. Comparison Page
The Comparison Page allows you to see the changes you that made during
the VisualCal adjustment. On the page are four rows of color photographs.
The first row and the third row show the color setup before you selected
VisualCal. Row two and row four show the color setup after the VisualCal
adjustment was completed. Now you must decide which setup is preferred.
Perform one of the following steps:
• If you are satisfied with your adjustments press the Item/Enter button.
VISUALCAL appears on the Control Panel.
The system saves your changes and after a moment READY is
displayed.
• If you are not satisfied with your adjustments, press the down arrow
button and ensure that “No” is displayed on the Control Panel.
a. Press the Item/Enter button. APPLY CHANGES DEFAULT
COLOR appears on the Control Panel.
b. Press the Item/Enter button again. The system erases your
adjustments and returns to the color default settings. After a
moment READY is displayed.
To adjust the Scanner Color, refer to the section Auto Color Adjust in the
Tools Mode chapter.
24-32 Xerox DocuColor 2006
Page 33

Printer Error messages 24. Problem Solving
Printer Error messages
If the problem still exists after following the instructions in this table, call your
service support and report the problem.
Message Possible Cause Action
010-317 Call for
Service
There may be an
electrical problem.
Black Ink Low The Black Dry Ink
Cartridge is low.
Check Loading of
[paper tray] in Use
The input document size
does not match the size
of the paper in the
selected tray.
Clear Jam in Area 1 There is a paper jam in
Area 1.
Clear Jam in Area 2 There is a paper jam in
Area 2.
Clear Jam in Area 3 There is a paper jam in
Area 3.
Clear Jam in Area 4 There is a paper jam in
Area 4.
Clear Jam in Area 5 There is a paper jam in
Area 5.
Call your service support and report
the code displayed in the message.
When prompted, replace the Black
Dry Ink Cartridge.
Select Auto Tray.
Adjust the paper tray Width Guide.
Refer to the Area 1 jam clearance
procedure in this chapter.
Refer to the Area 2 jam clearance
procedure in this chapter.
Refer to the Area 3 jam clearance
procedure in this chapter.
Refer to the Area 4 jam clearance
procedure in this chapter.
Refer to the Area 5 jam clearance
procedure in this chapter.
Clear Jam in Area 6 There is a paper jam in
Area 6.
Clear Jam in
Duplex Tray
There is a paper jam in
the Duplex Tray.
Close Area 1 The Area 1 access cover
Refer to the Area 6 jam clearance
procedure in this chapter.
Refer to the Duplex Tray jam
clearance procedure in this chapter.
Close the Area 1 access cover.
is open.
Close Area 2 The Area 2 access cover
Close the Area 2 access cover.
is open.
Close Area 3 The Area 3 access cover
Close the Area 3 access cover.
is open.
Close Area 4 The Area 4 access cover
Close the Area 4 access cover.
is open.
Xerox DocuColor 2006 24-33
Page 34

24. Problem Solving Printer Error messages
Message Possible Cause Action
Close Area 5 The Area 5 access cover
Close the Area 5 access cover.
is open.
Close Duplex Tray The Duplex Tray is
Close the Duplex Tray.
open.
Close Front Cover The Front Cover is open. Close the Front Cover.
Close Paper Tray 1 Paper Tray 1 is open. Close the tray.
Close Paper Tray 2 Paper Tray 2 is open. Close the tray.
Close Paper Tray 3 Paper Tray 3 is open. Close the tray.
Cyan Ink Low The Cyan Dry Ink
Cartridge is low.
Empty Top Tray The Top Output Tray is
full, or contains unusable
When prompted, replace the Cyan
Dry Ink Cartridge.
Remove the copies from the Top
Output Tray.
copies.
Install Black Ink
Cartridge
Install Copy/Print
Cartridge
The Black Dry Ink
Cartridge is empty.
The Copy/Print Cartridge
has failed or reached
Replace the Black Dry Ink Cartridge.
Replace the Copy/Print Cartridge.
end-of-life.
Install Cyan Ink
Cartridge
Install Magenta Ink
Cartridge
Install Waste
Container
Install Waste
Container
Install Yellow Ink
Cartridge
Load [stock size] in
Tray 1
The Cyan Dry Ink
Cartridge is empty
The Magenta Dry Ink
Cartridge is empty
The Waste Container is
not in the Printer, or is
not pushed in all the
way.
The Waste Container is
Full.
The Yellow Dry Ink
Cartridge is empty
Tray 1 is low on the
specified stock.
Replace the Cyan Dry Ink Cartridge.
Replace the Magenta Dry Ink
Cartridge.
Ensure that the Waste Container is
installed and pushed all the way into
the Printer.
Replace the Waste Container.
Replace the Yellow Dry Ink
Cartridge.
Fill the Paper Tray with the
appropriate stock.
24-34 Xerox DocuColor 2006
Page 35

Printer Error messages 24. Problem Solving
Message Possible Cause Action
Load [stock size] in
Tray 2
Load [stock size] in
Tray 3
Load [stock size],
[stock type] in
Tray 2 is low on the
specified stock.
Tray 3 is low on the
specified stock.
The Bypass Tray is
empty.
Bypass Tray
Magenta Ink Low The Magenta Dry Ink
Cartridge is low.
Order Copy/Print
Cartridge
The Copy/Print Cartridge
is approaching end-oflife.
Printer Warning
Abort Calib
Paper or dry ink (toner)
is low prior to starting
Visual Cal.
Printer is warming up.
Reload [stock size]
in Tray 2
Tray 2 is low on the
specified stock.
Fill the Paper Tray with the
appropriate stock.
Fill the Paper Tray with the
appropriate stock.
Fill the Bypass Tray with the
appropriate stock.
When prompted, replace the
Magenta Dry Ink Cartridge.
When prompted, replace the
Copy/Print Cartridge.
Clear all fault messages and wait for
“Ready” message prior to starting
VisualCal.
Refill the Paper Tray with the
appropriate stock.
Reload [stock size]
in Tray 3
Reload [stock size],
[stock type] in
Tray 3 is low on the
specified stock.
The Bypass Tray is
empty.
Bypass Tray
Replace Copy/Print
Cartridge
The Copy/Print Cartridge
has failed.
Yellow Ink Low The Yellow Dry Ink
Cartridge is low.
Refill the Paper Tray with the
appropriate stock.
Refill the Bypass Tray with the
appropriate stock.
Replace Copy/Print Cartridge.
When prompted, replace the Yellow
Dry Ink Cartridge.
Xerox DocuColor 2006 24-35
Page 36

24. Problem Solving Printer Error messages
24-36 Xerox DocuColor 2006
Page 37

Printer Error Codes 24. Problem Solving
Printer Error Codes
An error code may indicate that an electrical or mechanical problem exists in
the Printer. Typical error codes, six digit numbers with a hyphen in the
middle, are followed by the words CALL FOR SERVICE.
If an error code should appear on the Printer Control Panel perform the
following steps:
1. Write down the code number.
2. Switch OFF the Scanner power switch.
3. Wait 20 seconds.
4. Switch ON the Scanner power switch.
• If the problem is resolved, resume printing.
• If the problem is not resolved, call your service representative and
report the error code.
Xerox DocuColor 2006 24-37
Page 38

24. Problem Solving Printer Error Codes
24-38 Xerox DocuColor 2006
Page 39

Scanner Error messages 24. Problem Solving
Scanner Error messages
An error code may indicate that an electrical or mechanical problem exists in
the Scanner. Typical error codes, xx digit numbers, are followed by the words
CALL FOR SERVICE.
If an error code should appear on the Scanner Control Panel perform the
following steps:
1. Write down the code number.
2. Switch OFF the Scanner power switch.
3. Wait 20 seconds.
4. Switch ON the Scanner power switch.
• If the problem is resolved, resume printing or copying.
• If the problem is not resolved, call your service representative and
report the error code.
Xerox DocuColor 2006 24-39
Page 40

24. Problem Solving Scanner Error messages
24-40 Xerox DocuColor 2006
Page 41

Sorter/Stacker Error messages 24. Problem Solving
Sorter/Stacker Messages
Message Cause and solution
A3-Ov is not available with
Sorter. Select top tray.
The paper size selection you made for the job, for
example, 12 x 18 inches, is not valid. Redirect the
job to the printer top tray or change the output paper
size so the job may be sent to the Sorter/Stacker.
Check printer panel and remove
papers.
Follow jam clearance procedures for the
Sorter/Stacker and the DocuColor 2006. For
complete jam clearance procedures for the
DocuColor 2006, refer to the DocuColor 2006 user
documentation CD.
Check Sorter position. The Sorter/Stacker is not in place. Move the unit to
the right, adjacent to the DocuColor 2006.
Clear Jam in Sorter. There is a paper jam in the Sorter/Stacker. Follow
the jam clearance procedures to clear the jam in the
Sorter/Stacker. You may also be instructed to clear
jams from other areas of the copier/printer.
Close Sorter Cover The Sorter Cover is not in place. Ensure that the
cover is completely closed.
Combination of this paper and
Sort or Stack is not available.
The paper selection (size or type) you made for the
job is not valid. Redirect the job to the top tray or
change the paper size or type selection so the job
may be sent to the Sorter/Stacker.
Empty Sorter bins. This message is displayed at the conclusion of every
job sent to the Sorter. It is also displayed when bin
capacity has been reached. Remove the sheets from
the bins and continue copying.
Invalid for High Cap Tray. The selections (such as paper size) you made for the
job are not valid for output to the high capacity bin.
Redirect the job to the top tray or change the
selections so the job may be sent to the high
capacity bin.
Invalid for Sort. The selections (such as paper size) you made for the
job are not valid for sorting. Redirect the job to the
top tray or change the selections so the job may be
sent for sorting.
Xerox DocuColor 2006 24-41
Page 42

24. Problem Solving Sorter/Stacker Error messages
Invalid for Stack. The selections (such as paper size) you made for the
job are not valid for stacking. Redirect the job to the
top tray or change the selections so the job may be
sent for stacking.
Remove papers from High Cap. 500 sheets are in the high capacity bin. Remove the
sheets from the high capacity bin and continue
copying.
Remove papers from Sorter. The capacity of the Exit Tray (bin 1) or other bins has
been reached. Remove the sheets from the bins and
continue copying.
Sort and Stack are selected.
Load originals in Document
Feeder.
The Sorter/Stacker is ready to receive the job. Load
the originals in the Document Feeder and run the
job.
Sorter is available up to 10 sets. The desired number of sets exceeds the sorting limit.
Decrease the number to 10 and run the remaining
sets as part of another job.
Sorter malfunction. A problem has occurred in the Sorter. Examine the
job specifications and any output. Rerun the job, if
possible. If you are unable to proceed, call for
service.
Stack is available up to 30
copies.
The capacity of the output bins (30 sheets of 20 lb/
64 gsm paper) has been exceeded. Remove the
paper from the bins and continue running the job.
Stack is full. Remove papers. Bin capacity has been reached. Remove the sheets
from the bins and continue copying
Stacker is full. Bin capacity has been reached in the high capacity
bin. Remove the sheets from the high capacity bin
and continue copying.
24-42 Xerox DocuColor 2006
Page 43

Network Problem Solving 24. Problem Solving
Network Problem Solving
Because the DocuColor 2006 server is part of the Printer, most references in
this chapter are simply to the Printer. The word server is used to refer to
network servers.
Problems during Setup from the Control Panel
If you have difficulty printing the test page and no message is displayed,
perform the following steps:
1. Check the Printer status.
2. Use the table below to attempt to resolve the problem.
3. Try printing again.
Symptom Possible cause Possible solution
None of the control
panel lights are on.
Nothing is displayed on
the Control Panel
screen.
The data does not light
when a print job is sent
over the network or the
parallel connection, or a
copy job is in progress.
The power switch has
not been switched on.
The power cord is not
securely attached.
There is no power to the
electrical outlet.
The interface cable is
not connected properly.
Either the print driver is
not installed or a server
has not been correctly
set up.
Switch ON the Printer
power switch.
Ensure that the power
cord is securely plugged
into the wall and into the
Printer.
Ensure that the outlet is
switched on.
Ensure that the network
or parallel cable
connector is properly
attached.
Check the settings on the
host server.
Xerox DocuColor 200 6 24-43
Page 44

24. Problem Solving Network Problem Solving
Network Protocol Setup messages
The following table lists the network protocol messages that you may see
during the Network Protocol setup. It also contains the last Setup screen
shown before the message appeared, a descr ipti on o f the probl e m, and any
action required.
Message Setup screen Description and action
No AppleTalk zone
found.
You must first
enable a network
port.
Enable AppleTalk
(Network Protocol
Setup>
AppleTalk Setup)
Protocol Setup or
Service Setup
(Network Setup)
• The Ethernet network cable
is not attached to the
connector on the DocuColor
2006 or the network cable is
not plugged into the hub or
network. If your AppleTalk
network has zones, and you
want to specify a zone for the
Printer, you must connect the
network cable to the
DocuColor 2006 before
performing AppleTalk Setup.
• AppleTalk network does not
have zones. Zones are not
required for printing to the
DocuColor 2006. Press OK
to continue.
Enable at least one network
port (Ethernet or Token Ring) in
Port Setup before beginning
Protocol Setup or Service
Setup.
Invalid frame size Frame Type selection
(Network Protocol
Setup>
IPX>SPX Setup)
Warning IPX
network number is
zero.
Frame Type selection
(Network Protocol
Setup>
IPX>SPX Setup)
The network hub is not
connected to a Novell server
when the DocuColor 2006 tries
to bind.
No other IPX computer can be
found on the network, or the
network hub is not connected
to the network when the
DocuColor 2006 tries to bind.
When this occurs, the netwo r k
number defaults to zero.
Can’t detect Token
Ring hardware.
24-44 Xerox DocuColor 200 6
Frame Type selection
(Network Protocol
The Printer queries the Token
Ring hardware. Either some
Page 45

Network Problem Solving 24. Problem Solving
Message Setup screen Description and action
Token Ring
Hardware not
Setup>
IPX>SPX Setup)
installed or not
functioning.
Can’t autodetect the
Token Ring Setup The Printer is trying to detect
ring speed. No
device on ring.
No NDS trees found. Enable NDS
(Network
Setup>Service
Setup>PServer
Setup>NDS Setup)
Warning! Selecting a
new NDS tree
deletes Bindery
setup.
Select NDS Tree
(Network
Setup>Service
Setup>PServer
Setup>NDS Setup)
components are not installed,
are not installed correctly, or
are not installed in the correct
device. An unsupported Token
Ring board may be in use. Ca ll
for support.
the current ring speed, but it is
the only machine on the Token
Ring network. Connect another
machine to the Token Ring
network before connecting the
DocuColor 2006.
No NDS trees were found on
the Novell network. Ensure that
the frame types on the Printer
are properly configured.
You have previously connected
the DocuColor 2006 to a
different NDS tree. NetWise
supports only a single NDS tree
connection. To avoid a
potential conflict with the
existing tree connection, all
bindery settings will be deleted.
When the m essage Delete
Bindery setup and continue?
appears:
• Select OK and Yes to delete
the current bindery settings.
Reenter the settings in
Bindery Setup.
• Press the Menu key or select
OK and No when the
message appears to avoid
deleting the bindery settings.
Continued…
Repeat NDS Setup without
changing the NDS Tree, or exit
to Bindery Setup to review the
current bindery settings.
Xerox DocuColor 200 6 24-45
Page 46

24. Problem Solving Network Problem Solving
Message Setup screen Description and action
______ is empty. Navigating NDS Tree
(Network
Setup>Service
Setup>PServer
Setup>NDS Setup)
If you plan to use
NDS, set up NDS
before Bindery.
Bindery Setup
(Network Setup>
Service Setup>PServer
Setup> Bindery Setup)
Error. Cannot open
bindery connection
to NDS server.
Select File Server
From List
(Network Setup>
Service Setup>PServer
Setup> Bindery Setup)
No NetWare file
server found.
Select File Server
From List
(Network Setup>
Service Setup>PServer
Setup> Bindery Setup)
The selected container has no
subcontainers or objects
relevant to the current mode of
navigation.
No NDS settings are present.
You are reminded to perform
NDS Setup before Bindery
Setup in case the network
includes both NDS and bindery
servers.
Select this server through NDS
Setup or disable NDS and
select it through bindery.
No file server was found when
the DocuColor 2006 queried
the network to create a list of
supported servers or a list of all
servers.
File Server name not
found. Try again?
No file server is
selected.
Enter First Letters of
Server Name
(Network Setup>
Service Setup>PServer
Setup> Bindery Setup)
View Server List, Edit
Connection
(Network Setup>
Service Setup>PServer
Setup> Bindery Setup)
Check cable connections and
ensure that the NetWare server
is switched on.
No file server with those letters
was found when the DocuColor
2006 queried the network.
Check the name of the
NetWare file server, check
cable connections, and ensure
that the NetWare server is
switched on.
No file server has been added
in Bindery Setup.
All connections Add File Server You have added the maximum
24-46 Xerox DocuColor 200 6
Page 47

Network Problem Solving 24. Problem Solving
Message Setup screen Description and action
used. Remove
server?
No NetWare print
server found.
Novell error code,
followed by a
message.
(Network Setup>
Service Setup>PServer
Setup> Bindery Setup)
Add Server, Enter Your
Login Name, Enter
Your File Server
Password
(Network Setup>
Service Setup>PServer
Setup> Bindery Setup)
Any Bindery Setup
screen
8 bindery servers. You must
disconnect one of those
servers in order to add a
different server.
No print server was found when
the DocuColor 2006 queried
the file server you selected.
You must configure a print
server and a print queue for
every NetWare file server that
will handle DocuColor 2006
print jobs.
Novell NetWare has reported
an error. The Printer Control
Panel reports the error number
and displays a brief message.
For the most common errors, a
screen is displayed, enabling
you to retry the action that
caused the error. If the action
cannot be completed, you are
prompted to notify the Novell
administrator to troubleshoot
the error on the network.
Consult NetWare Administrator
documentation for further
explanation of Novell error
codes.
Xerox DocuColor 200 6 24-47
Page 48

24. Problem Solving Network Problem Solving
Novell problems during Network Setup
In Network Setup, when you are configuring your IPX (Novell) connection, the
DocuColor 2006 queries the network for Novell file servers and trees and
temporarily attaches to them. If a guest login is enabled, it will be used. If not,
you will be prompted to log in from the DocuColo r 2006 Printer Control Panel.
If the selected NetWare file server or tree does not have a guest account, or if
the guest account has expired or has been disabled by the NetWare
supervisor, you will be prompted to notify the IPX (Novell) administrator. In
that case, you or the supervisor may perform one of the following actions:
• Enable a guest account on the NetWare server or tree for the purpose of
setup.
• Log in with a different account. At the log in screen, change the default
name (guest) to supervisor or enter another valid login name. When you
are prompted for a password, enter the correct password for the account
you named.
For any Novell error, ensure that:
• The IPX (Novell) network is connected to the DocuColor 2006. The
NetWare server you are trying to access is running.
• The Novell network has been configured with at least one print server
and queue for the DocuColor 2006.
• You have the appropriate permissions and login information, including
user name and password, if necessary.
• The DocuColor 2006 is configured with the correct frame types for
communication with the desired Novell servers.
24-48 Xerox DocuColor 200 6
Page 49

Network Problem Solving 24. Problem Solving
Novell error messages
Message Cause Suggested action or exit
220
Guest account not
available.
222
Unable to log in to
server.
Password has
expired for login
name.
The guest account,
which you have
selected for initial login,
has expired or has
been disabled by the
NetWare supervisor.
The server has
connected to a file
server, but is unable to
log in to the file server
or print server because
the password has
expired for the login
account name or the
named print server.
• Enable a guest account on
the NetWare server for the
purpose of setup.
• Log in to a different account.
On the log in screen, change
the default name (guest) to
supervisor or enter another
valid login name. When you
are prompted for a password,
enter the correct password
for the account you named.
• Select a different login
account or print server.
• The error screen exits to the
File Server Login screen (if
login to the file server failed)
or NetWare Print Server
screen (if login to Print Server
failed). Press the Menu
button to display the PServer
Setup menu.
252
Unable to log in to
the server.
Login does not
exist.
The server has
connected to a file
server, but is unable to
log in to the server
because the selected
login account does not
Select a different login account.
The error screen exits to the
File Server Login screen.
Pressing the Menu button to
display the PServer Setup
menu.
exist on the file server.
255
Unable to connect
to file server.
File server is down
or out of
connections.
nnn Indicates other network
Xerox DocuColor 200 6 24-49
The Novell file server is
down or out of
connections.
This error occurs while
the server is trying to
connect to the
requested file server.
errors when the
Select a different file server or
try to get someone else to log
off. Pressing the Menu button
to display the PServer Setup
menu
Notify the Novell Administrator
and report the error number.
Page 50

24. Problem Solving Network Problem Solving
Message Cause Suggested action or exit
Notify IPX (Novell)
Administrator
DocuColor 2006 is
already connected to a
file server. Something
unexpected has
happened and the user
generally cannot
recover without the
intervention of the
system administrator.
Error #197 indicates
that you have
exceeded the number
of login attempts
permitted for this
account on the
NetWare file server.
Error #255 usually
indicates a hard failure.
The error screen exits to the
PServer Setup screen.
24-50 Xerox DocuColor 200 6
Page 51

Network Problem Solving 24. Problem Solving
Runtime Printer error messages
For error messages related to canceling jobs and printing, including the Disk
full message and alerts to local media, refer to the sections Job management
error messages and Clearing the Printer.
Users can turn on PostScript error reporting as a print option from Mac OS
applications.
The following table lists the messages, a description of the problem, and
action to take.
Message Description and action
Check power and cable Ensure that the interface cable
between the server and the Printer is
connected, or the Printer may be off.
Printer not found The printer may have a conflicting or
missing name, or address setting. The
required names are:
Cannot connect to Printer
with Fiery utilities
• TCP/IP host name (also known as
the DNS name), which is defined by
your organization. Enter the host
name as the Server Name in Printer
Setup.
• Remote Printer (internal machine)
name. Use either print or hold.
Configure one of the Fiery utilitie s on
each workstation if you change the
DNS name (also known as the TCP/IP
host name of the Printer).
Refer to the Name Table that follows
for the appropriate name to use.
Check the following:
• Printer Setup—the appropriate
network protocol must be enabled,
with the correct parameters (for
example, TCP/IP, the IP address,
etc.) and you must have published
either the Print queue or the Hold
queue.
Continued…
Xerox DocuColor 200 6 24-51
Page 52

24. Problem Solving Network Problem Solving
Message Description and action
• Check these settings quickly by
printing a Configuration page.
At the client workstation, ensure that
the appropriate network prot ocols are
loaded, and that the Windows directory
contains a configured Efinl.ini file.
24-52 Xerox DocuColor 200 6
Page 53

Network Problem Solving 24. Problem Solving
Name Table
In this location: For this item: IPX/SPX
networks:
Server Setup Server Name
option
Windows NT
host name DNS name
Administrator
defines name
hosts file
lpd host nameWindows NT
setup for TCP/IP
Name of Printer
on lpd host
machine
UNIX
rp line print or hold
/etc/printcap file
(BSD)
Solaris lpadmin
queuename
NetWare
print queues
_direct
administration
utility
(must be all
lowercase and in
English)
_print
_hold
TCP/IP
networks
Administrator
defines name
(TCP/IP
hostname)
print or hold
print or hold
dialog box, when
configuring a
New Device Utilities are not
supported over
IPX/SPX.
Printer nameAdd New Server
Fiery utility
Server Name Utilities are not
supported over
IPX/SPX.
Xerox DocuColor 200 6 24-53
DNS name
(TCP/IP host
name)
Page 54

24. Problem Solving Network Problem Solving
Printing problems
On a Windows workstation
Setting up printing on Windows
NT 4.0 Workstations
Reinstalling the Adobe
PostScript Printer Driver on
Windows 95/98 or Windows
2000
Problems with the Fiery utilities
on Windows 95/98, Windows
2000 or Windows NT 4.0
If you have problems installing the Printe r with
Windows NT 4.0, try installing another
PostScript Printer (such as the Apple Laser
Writer II g) and then install the Printer.
Installing another Printer ensures that all files
are properly installed and available.
For additional details, refer to the Windows
NT 4.0 documentation or the Adobe README
file (ReadMeNT.txt) included in the prntdrvr
folder on the User Software CD.
If you are reinstalling the Adobe PostScript
Printer Driver, delete any previous versions
and related files before installing. Search for
and delete all files named Efax.* in the
Windows\System folder.
For additional details, refer to the Adobe
README file (ReadMe9x.doc) included in the
prntdrvr folder on the User Software CD.
1. If you are using Windows 95/98 or
Windows 2000, ensure that IPX/SPX and
TCP/IP networking protocols are enabled.
2. If you are using Windows NT 4.0, ensure
that the TCP/IP networking protocol is
enabled.
3. Ensure that the connection is configured
correctly for your site.
To check the current configuration, launch
a Fiery utility and select Open from the
File menu. Select the Printer and Modify
to see current settings. If the settings are
incorrect, you can change them in this
dialog box.
24-54 Xerox DocuColor 200 6
Page 55

Network Problem Solving 24. Problem Solving
On a Mac OS workstation
Setting up the Printer in the
Chooser
If auto-setup does not work and you are
prompted to select the PPD, select the
appropriate Printer file in your
System:Extensions:Printer Descriptions
folder.
Select DocuColor2006.
Installing screen fonts If you experience problems installing the
PostScript screen fonts from the User
Software CD to the System:Fonts folder,
perform the following.
1. Quit all applications and close all windows.
2. Create a new folder and name it
Uninstalled Fonts. This folder must be
located outside of the System folder.
3. Move fonts that you are not using from the
System:Fonts folder to the Uninstalled
Fonts folder.
4. Install the fonts from the User Software CD
to a folder called CD fonts. Copy the fonts
to the System:Fonts folder.
5. Create aliases to the System:Fonts folder
and the Uninstalled Fonts folder.
6. Place both aliases on the desktop.
7. When necessary, use the aliases to open
both folders and move fonts between
them.
If you have any applications running, you
must quit and relaunch them in order to view
and use the newly installed fonts.
Alternately, you can try combining fonts from
multiple suitcases into a single suitcase.
Xerox DocuColor 200 6 24-55
Page 56

24. Problem Solving Network Problem Solving
General printing problems
If this happens: Try this:
You cannot connect to the
Printer.
Make sure that the Printer is not being
calibrated from the Control Panel.
If the Printer is being calibrated f rom
the Control Panel, you can select it in
the Chooser, but you cannot connect to
it. This ensures that only one person is
calibrating the server at any time and
that print jobs do not use unexpected
calibration.
You cannot select or view one of
the queues.
You cannot connect to the Printer
from a Windows computer with
Have your system administrator enable
the queue in Setup.
Make sure the connection is configured
correctly.
the Fiery utilities.
Printing seems to take too long. Print to a queue instead of to the Direct
connection.
When you print to a queue, the job is
stored on the Printer until it can be
processed and printed. When you print
to the Direct connection, the job cannot
be sent to the Printer until the previous
job is finished processing, so you must
wait longer to use your computer.
One or more Media Type options
are dimmed.
Select a Paper Source that supports
the Media Type you are using.
For information on requirements and
constraints pertaining to special papers
and transparencies, refer to the chapter
Print options.
The DocuColor 2006 does not
respond to a Print command.
• Has someone disconnected the
Printer by selecting Suspend Printing
from the Functions menu?
If the administrator or operator has
selected Suspend Printing on the
Printer Control Panel to interrupt
printing, your print job will not resume
until someone selects Resume
Printing from the Functions menu on
24-56 Xerox DocuColor 200 6
Page 57

Network Problem Solving 24. Problem Solving
the Control Panel.
• Did you select the DocuColor 2006
as the current Printer?
Before printing, you must select the
DocuColor 2006 as the current
Printer from your Windows computer,
Mac OS computer, or UNIX
workstation.
• Make sure that the Printer is
switched on.
Someone may have turned the
Printer off, or the Automatic PowerOff or Power Saver mode function
may have engaged.
• If you are printing over an IPX
(Novell) network, verify through the
PCONSOLE utility that the job was
sent to the Novell queue and that the
queue is being used by the Printer.
Jobs sent to the parallel port do
not print.
• Ensure that the job does not contain
a PostScript error.
Check with the operator, or use Fiery
WebSpooler to check the job status.
A job containing a PostScript error
appears in red.
To obtain information on the
PostScript error, make sure the Print
to PS Error option is set to Yes in
Printer Setup.
• Ask the administrator to increase the
parallel Port Timeout in Seconds
on the Printer Control Panel.
• Ask the administrator to change the
Ignore EOF Character setting on the
Printer Control Panel.
f you are printing in ASCII format
PostScript only, set Ignore EOF
Character to No; if you are printing in
Binary format PostScript, set it to
Yes.
Continued…
Xerox DocuColor 200 6 24-57
Page 58

24. Problem Solving Network Problem Solving
• If you print using the DOS copy
command, make sure to use the /b
option when printing binary files.
• Restart your Windows computer,
enter BIOS setup, and if you have a
BIOS setting for the parallel port,
ensure that it is set to Compatible
mode and not to Bi-Directional, ECP,
EPP, or any other mode.
• If you are using Windows 95/98 or
Windows 2000, open the System
Properties control panel. Select the
Device Manager tab and Ports.
Double-click the parallel port you are
using and ensure that the driver
selected is the standard Printer Port
driver, and not ECP Port, EPP Port,
or any other driver.
You cannot print with Quark
XPress 3.32 using the PSPrinter
8.5.1 driver on a Mac OS
workstation.
For information about changing this
setting, refer to your Windows
documentation.
Remove the file called Balloon Help
from your Quark XPress application
folder and relaunch Quark XPress.
24-58 Xerox DocuColor 200 6
Page 59

Network Problem Solving 24. Problem Solving
Problems with print quality
If this happens: Try this:
Print settings for your job output
do not match the settings you
gave.
You get poor printing results.
Separations do not combine
properly.
Ensure that you did not override the
setting for the job in another place.
For information about options and
overrides, refer to the chapter Print
options.
• Does your application require one of
the DocuColor 2006 Printer
description files?
If you are printing from Adobe
PageMaker, ensu re that the
DocuColor 2006 Printer description
file is installed correctly.
• Ensure the system has been
calibrated.
• Ensure that the file was initially
created as separations.
The registration or colors of an
image are not what you
expected.
• If you are printing separations or a
DCS format file, set the Combine
Separations print option to ON.
With Combine Separations ON, all
four colors will be printed on a single
page; with Combine Separations Off,
four black-and-white pages will print
to simulate four single-color plates.
Ask the operator to print a test page.
The problem may be with the Printer. If
your test page shows that the Printer is
working properly, correct the problem
within your application software. If the
test page is wrong, your Printer may
need to be calibrated or adjusted in
some other way.
Xerox DocuColor 200 6 24-59
Page 60

24. Problem Solving Network Problem Solving
If this happens: Try this:
Your printed file appears too
Adjust the Brightness option.
dark.
Use the Brightness option when
printing from an application to li g hten
your image whenever you print a
PostScript or Encapsulated PostScript
(EPS) file.
Color output is incorrect. Check with the operator or
administrator about the current
calibration information.
The Printer may need recalibration. t.
Color file prints in black and
white.
In the Color Matching dialog box, make
sure that Color/Grayscale or ColorSync
Color Matching or PostScript Color
Matching is selected (not Black and
White).
Ensure that the Color Mode print option
is set to CMYK or Standard
Color/Expert Color (Windows 95/98 or
Windows 2000) and not Grayscale.
Desktop Color Separations
(DCS) format images print
incorrectly.
QuickDraw fill patterns print as
solids.
• Ensure that you selected the correct
options to send separations in the
application Print dialog box.
• Ensure that you have the file for
every layer of separation that you are
printing.
• Set the Combine Separations option
to On.
This combines the high-resolution
files for an image and prints them.
With Combine Separations Off, the
low-resolution master file will print.
Use the Adobe PostScript Printer driver
(or the Apple LaserWriter 8.3 or later
Printer driver.
24-60 Xerox DocuColor 200 6
Page 61

Network Problem Solving 24. Problem Solving
Job Management Problem Solving
This section lists error messages you might see, and provides some
troubleshooting guidelines should a problem arise with the Printer. If you are
unable to resolve a problem after referring to this chapter, contact your
authorized service/support center.
Job management error messages
Error messages can result from problems with the print job, a server, or the
DocuColor 2006. Some of the most common error conditions are listed here.
Message Corrective Action/Additional
Information
Check power & cable Ensure that the Printer is on and all the
cables are secure.
Check scanner power & cable Ensure that the scanner is on. Check
that the cable between the Printer and
the scanner is securely connected.
Communication failure while printing.
Please resubmit job.
Copier busy The DocuColor 2006 has received a
Copier in Energy Save Mode The DocuColor 2006 is in Energy Save
Copier offline The Suspend Printing option has been
Platen Scan in progress The Printer is completing a scan and
Print/Copy Cartrdg. misplaced The print/copy cartridge is not correctly
An Printer error o ccurred. Try printing
the job again.
print job while running a copy job. The
job will print when the copy job has
completed.
Mode. You must wait for the DocuColor
2006 to warm-up before printing.
selected fr om the Functions menu.
Press Resume Printing in the
Functions menu.
will be ready for printing in a few
minutes.
placed in the Printer. Check the
cartridge and reinstall it as necessary.
Print/Copy Cartrdg. type mismatched The print/copy cartridge installed is not
the correct cartridge. Remove the
Xerox DocuColor 200 6 24-61
Page 62

24. Problem Solving Network Problem Solving
Message Corrective Action/Additional
Information
cartridge and check your
documentation for specifications on the
correct cartridge to install.
Printing . . . This is a normal status message
indicating that printing is in progress.
Ready within 1 minute This is a normal status message. The
Printer is warming up. It will be ready
for printing in a minute.
Run setup and enter correct security
key
This message is displayed if your
model requires that you enter a
security code.
Trying to connect
Please wait . . .
An error may have occurre d with the
Printer. Refer to the message panel for
information.
Turn power off
and on.
Switch off the Printer power, wait 20
seconds, and then switch on the
power.
Warming Up . . . This is a normal status message. The
print engine is powering up. It will be
ready for printing in a few minutes.
24-62 Xerox DocuColor 200 6
Page 63

Network Problem Solving 24. Problem Solving
Unexpected printing results
If this happens This is the problem
A cover page is not printed when
you reprint a saved raster job
The job settings are not carried
out as you expected
Cover pages are not printed with saved
raster jobs that have already printed.
If printing from a Mac OS, refer to the
chapter Print options for the table of job
properties and conflicting properties.
If you expected the settings you see in
the Properties window, be aware that
the Copies field does not currently
reflect user settings. The Page Range
is All, and the Scale percent is 100%,
unless they were changed after being
sent for printing.
The job does not print Some printing errors may be displayed
in the Print status bar. When the job is
in the Printed queue, jobs that had a
PostScript error are displayed in a light
red job row. Double-click anywhere in
the row to see the error message.
There are font errors If user-specified non-resident fonts are
not printing correctly in PostScript files
that are downloaded by users, request
that they embed the fonts in the
PostScript file or print directly from their
application. When users print from their
applications, if special fonts are not
downloaded automatically, they should
be downloaded directly to the Printer.
Users can load fonts, provided the
Direct connection is enabled. For more
information, go to the chapter Using the
Fiery WebTools.
Xerox DocuColor 200 6 24-63
Page 64

24. Problem Solving Network Problem Solving
Clearing the Printer
Clearing the Printer is an Administrator option that can be used as a last
resort if a job persists in the system and prevents printing despite attempts to
cancel or delete it. Clearing the Printer deletes all jobs currently saved in any
queue and all locally archived jobs. It also clears the Job Log and the index of
archived jobs.
Before clearing the Printer, export the Job Log if you have not recorded the
information in it. If you can, notify users that you will clear their jobs from the
Printer so they can back them up and resend them when the Printer is back in
operation.
You can clear the Printer from the Control Panel. Refer to the chapter
Performing Setup from the Printer Control Panel.
Users are unable to connect to the DocuColor 2006
If users are unable to connect to the DocuColor 2006, or are unable to find
the DocuColor 2006 from their workstations, the system administrator may
need to check the network connections, and the settings on the servers they
use for printing. If the settings have changed, it may be necessary to
reconfigure the Printer.
For example, if print servers or print queues on a Novell server are renamed
or deleted, or if accounts or permissions are changed, the system
administrator may have to edit the settings or enter new settings in IPX
(Novell) Setup to reflect the new configuration.
Mac OS users may fail to see the DocuColor 2006 if a system administrator
has assigned it to a different zone, or has added zones where previously
there were none.
24-64 Xerox DocuColor 200 6
 Loading...