

Page 1
21
This chapter contains the elements and basic function descriptions of the
DocuColor 2006 Copier Control Panel. Also included in this chapter are
guidelines for placing the DocuColor 2006 in copier mode, positioning the
originals on the Document Glass and in the Document Feeder, and a
procedure for making a basic copy using the copier/printer default settings.
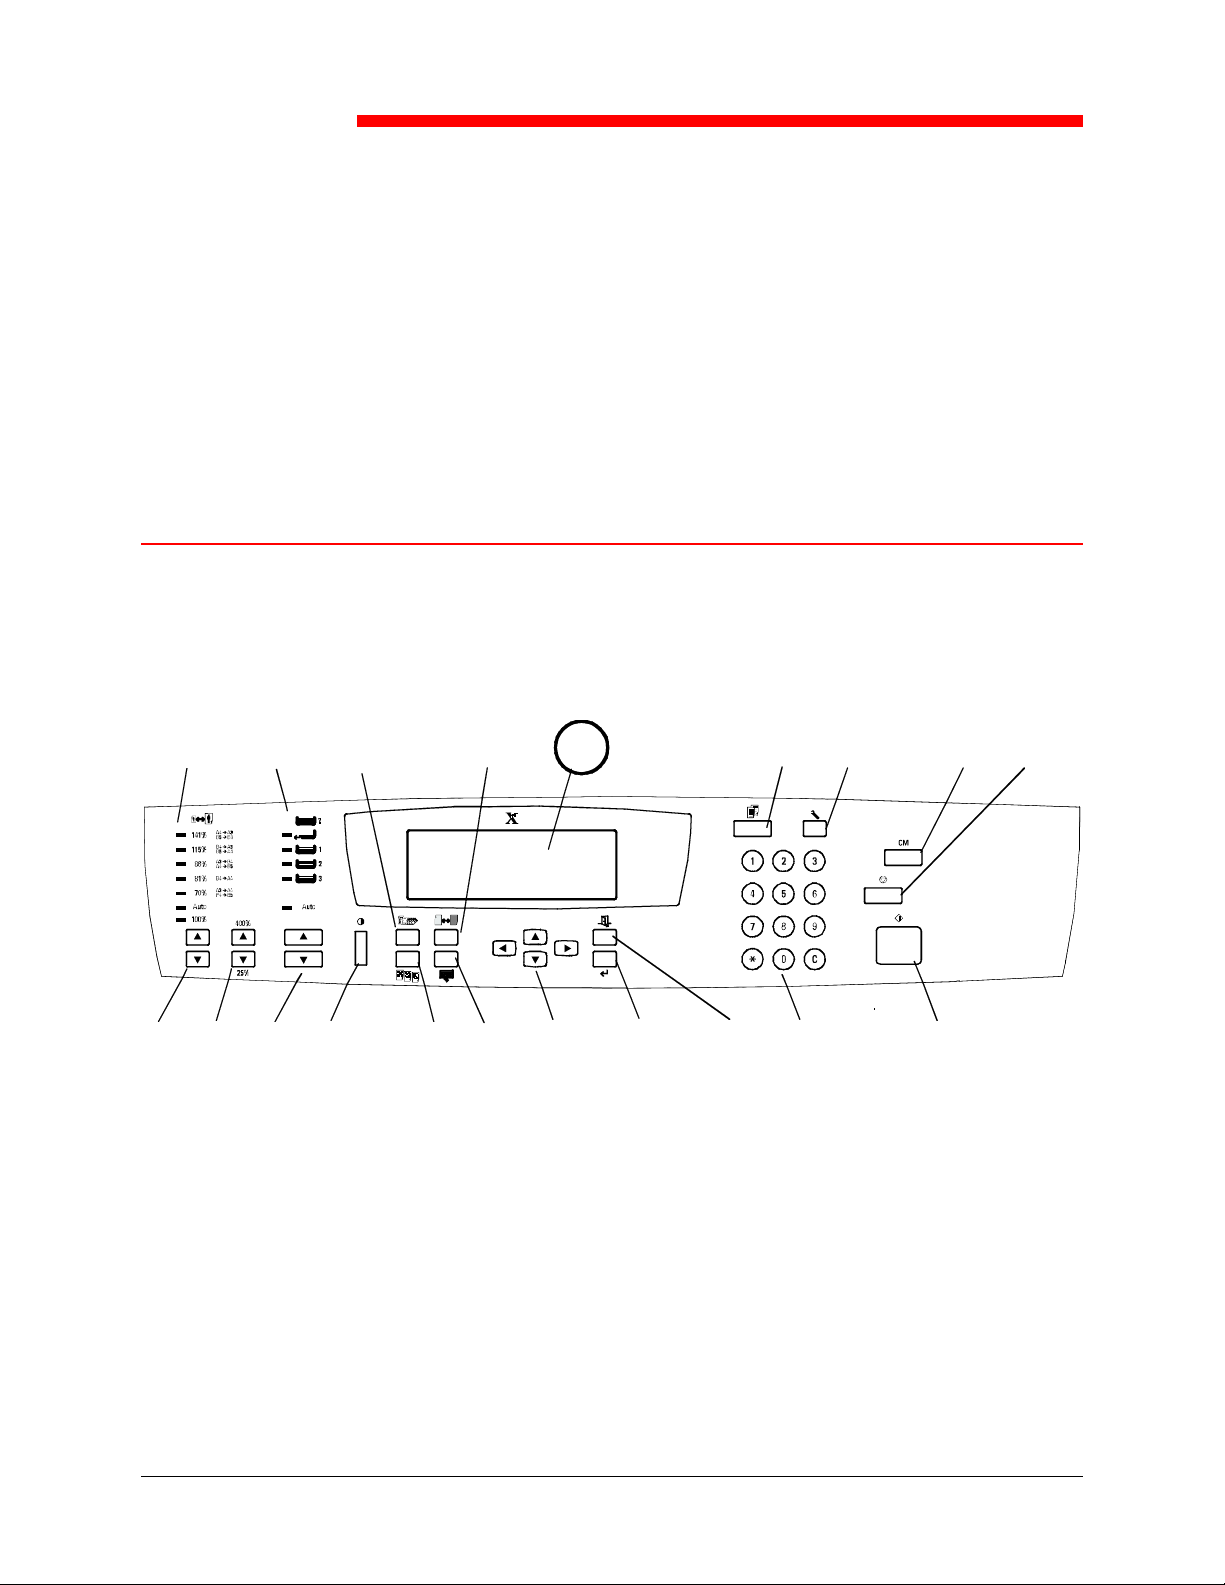
The Copier Control Panel
Use the Copier Control Panel to program the DocuColor 2006 for your copy
jobs.
The following is a list of the various components on the Copier Control Panel
and their functions.
Basic Copying
17
18 19 20 1
1. Copier Screen: The Copier Screen displays programmable features,
available options, and the current settings.
2. Copy: Press the Copy button to change the DocuColor 2006
copier/printer from the On-Line mode to the copy mode.
3. Tools: Press the Tools button to access the Administration features.
4. Clear All: Press the Clear All button to reset the select options to the
default settings.
23 4
78910111213141516
6
0301149A -WOL
5
5. Stop: Press the Stop button to stop the copy operation. You can not
restart a job after you press the Stop button. To complete a job, you
must reprogram the copier/printer settings and reload any uncopied
originals.
Xerox DocuColor 2006
21–1
Page 2

21. Basic Copying
6. Start: Press the Start button to begin a copy job.
7. Numeric Keypad
8. Exit: Press the Exit button to return to the previous screen.
9. Select: Press the Select button to save copy settings other than the
10. Arrow Buttons: Use the Arrow Buttons to highlight a specific setting on
11. Advanced Features: Press the Advanced Features button to access
12. Quality Adjustment: Press the Quality Adjustment button to access the
• Use buttons 0-9 to select the copy quantity, enter personal
passwords, and specify particular feature settings.
• Use the Clear button to reset copy quantity back to 1 or to clear an
incorrect numeric setting.
default settings.
the Copier Screen for a feature.
the advanced features screen in order to specify the Output location, the
Erase, the 2-Sided, and the 2 Up options.
quality adjustment screen in order to change the Sharpness and the
Color Level of the copies.
13. Contrast Dial: Use the Contrast Dial to lighten or darken the Copier
Screen.
14. Paper Supply Arrow Buttons: Use the Paper Supply Arrow Buttons to
select the desired paper tray.
15. Zoom Arrow Buttons: Use the Zoom Arrow Buttons to select a
desired percentage for a reduction or enlargement setting.
16. Reduce/Enlarge Arrow Buttons: Use the Reduce/Enlarge Arrow
Buttons to specify a preset reduction or enlargement setting.
17. Reduce/Enlarge Indicators: The green light next to each option is lit
when it is selected.
18. Paper Supply Indicators: The green light next to a tray is lit when it is
selected.
19. Color Mode Button: Press the Color Mode button to access the color
mode screen.
20. Lighten/Darken Button: Press the Lighten/Darken button to access the
copy density screen and adjust the saturation levels of the copies.
More information on the copy features introduced above is given in the Copy
Features chapter. More information on the Tools option is given in the Tools
Mode chapter.
21–2
Xerox DocuColor 2006
Page 3
Copy Mode
The default setting for the DocuColor 2006 is the printer mode. To make a
copy you must change the copier/printer to the copier mode.
When the DocuColor 2006 copier/printer is in the printer mode, a message
displays in the Copier Screen that says
This message is referring to the Copy button on the Copier Control Panel.
After you press the Copy button, one of the following occurs:
• The Copy Ready message appears on the Copier Control Panel
• If the User Password option is enabled, the Copier Control Panel
21. Basic Copying
To enter Copy Mode press Copy button
indicating that you have successfully entered copy mode. The copier is
ready to begin processing jobs.
prompts you to enter your user password.
Enter your password using the Numeric Keypad. If you enter the wrong
number, press the Clear button.
If your password is correct, the Copy Ready message automatically
appears on the Copier Screen. This indicates that you have
successfully entered copy mode. The copier is ready to begin
processing jobs.
If you entered an incorrect password, the Incorrect Password message
appears and the copier prompts you to enter your password again.
For information on setting up or changing the user password, see the Tools
Mode chapter.
Using the Auto Mode Change feature enables the DocuColor 2006
copier/printer to automatically enter the copy mode when originals are loaded
in the Document Feeder. For more information on the Auto Mode Change
feature, go to the Tools Mode chapter.
Xerox DocuColor 2006
21–3
Page 4

21. Basic Copying
Auto Start
While the Please Wait message appears on the Copier Screen, you cannot
start copy operations. You may, however, program your copy job. Once the
copier/printer has successfully entered copy mode, your copy job will
automatically begin to print.
While the Please Wait message is displayed, position your originals, select
the desired options and press the Start button. The copier/printer continues
to show the Please Wait message until it enters the copy mode.
Once the DocuColor 2006 enters the copy mode, the copy job begins to print.
If you wish to cancel the copy job before it begins, press the Stop button.
The Copier Main Screen
Once the DocuColor 2006 enters the copy mode, the Copier Screen displays
the Main Screen. The message Ready to Copy appears on the Main Screen.
The Main Screen also displays the copy quantity and the settings for the
following features:
• Reduce/Enlarge
• Paper Supply
• Color Mode
When you first enter copy mode, each of these features is programmed at the
factory default setting. Should you make any changes to these settings, the
Main Screen will reflect these changes.
For information on the Reduce/Enlarge feature, the Paper Supply feature and
the Color Mode feature, go to the Copy Features chapter. For information on
changing the default settings for each of these features, go to the Tools Mode
chapter.
To view any changes made to the other features available through the
DocuColor 2006 copier/printer, access the corresponding feature screen. For
information on the available features and for directions on accessing feature
screens, go to the Copy Features screen.
21–4
Xerox DocuColor 2006
Page 5

Positioning the Originals
)
There are two ways to position originals on the DocuColor 2006: on the
Document Glass or in the Document Feeder.
The Document Glass
Perform the following steps to use the Document Glass:
1. Raise the Document Cover or the Document Feeder.
2. Align the original into the rear, left-hand corner of the Document Glass
face down. Place your original in the same orientation that the paper
supply is loaded in your selected paper tray.
For transparency sheets, tracing paper or other types of thin paper, place a
blank, white sheet over the original on the Document Glass.
For information on the Paper Supply feature, see Chapter 24, “Copy Features”.
For information on loading paper into a paper tray, see Chapter 1, “Setting up
the DocuColor 2006”.
21. Basic Copying
Long Edge Feed (LEF
3. Close the Document Cover or the Document Feeder.
CAUTION
When copying a thick document, do not force the document cover down. The
Document Glass may break if under too much pressure.
WARNING
If you must perform a copy operation with the document cover open, do not
look at the scanner light.
The maximum original size that the Document Glass can scan is 11 inch x 17
inch or A3 (297 mm x 420 mm).
If you should try to register an original document larger than the maximum
size on the Document Feeder, the image will be cut off on your copy output.
Xerox DocuColor 2006
Short Edge Feed (SEF)
21–5
Page 6

21. Basic Copying
The DocuColor 2006 detects original sizes in either inches or millimeters. The
table below lists the various paper sizes that the DocuColor 2006 can
automatically detect when configured to inches and to millimeters.
For information on changing the copier configuration between inches and
millimeters, go to the Tools Mode chapter.
You must enter a Paper Supply option for documents that do not fall within
the sizes listed in the table and for documents that are difficult to detect, such
as transparencies and tracing paper. If the copier cannot detect the size of
your original, an error message appears on the Copier Screen. The error
message appears each time you attempt to copy the original until you enter a
specific Paper Supply option.
Inch Configuration Metric Configuration
8.5 in. x 11 in. SEF/LEF B5 SEF/LEF
8.5 in. x 14 in. SEF A4 SEF/LEF
11 in. x 17 in. SEF B4 LEF
A3 SEF
A5 LEF (EU only)
For directions on using the Paper Supply feature, go to the Copy Features
chapter.
21–6
Xerox DocuColor 2006
Page 7

21. Basic Copying
The Document Feeder
The Document Feeder allows you to load up to 30 originals into the DocuColor
2006 for continuous scanning. Each original is scanned individually, beginning
with the bottom sheet.
The Document Feeder is an optional accessory for the DocuColor 2006. For
information on ordering the Document Feeder, go to the Accessories section in
the Getting to Know the DocuColor 2006 chapter.
To use the Document Feeder perform the following steps:
1. Raise the document handler to the right.
2. Place the originals into the Document Feeder face up and in the same
orientation as your selected paper tray.
Xerox DocuColor 2006
21–7
Page 8

21. Basic Copying
3. Gently push the originals into the Document Feeder, as shown below,
To prevent paper jams, ensure that the original documents rest against the
rear edge of the Document Feeder. Make sure that the Document Feeder
light illuminates.
until the Document Feeder light illuminates.
Document
Feeder Light
4. Adjust the Document Guide to gently touch the edges of the originals, as
shown below.
Pushing the Document Guide too tightly against the originals may cause a
Document Feeder jam.
0302512A-WOL
21–8
Xerox DocuColor 2006
Page 9

21. Basic Copying
5. Return the Document Tray to the original position.
0302513A-WOL
6. If you are loading large size originals into the Document Feeder, pull out
the extension tray of the Document Handler.
030251 6A -W O L
CAUTION
Pay attention to the following cautions when using the Document Feeder:
• Do not press on the originals while using the Document Feeder; this
could cause a paper jam.
• Do not let more than 30 sheets stack on the Document Handler. Do not
place any objects on the Document Handler. Both actions could cause a
paper jam.
The Document Feeder accepts all paper sizes between 8.5 inch x 11 inch or
B5 (182 mm x 257 mm) and 11 inch x 17 inch and A3 (297 mm x 420 mm).
The Document Feeder accepts all paper weights between 38 gsm and 128
gsm or between 10 lb. and 34 lb. To copy an original that is not with in these
specifications, you must use the Document Glass.
For specific information on media regulations for the Document Feeder, go to
the Technical Data chapter.
The Document Feeder does not accept jobs with mixed size originals.
Xerox DocuColor 2006
21–9
Page 10

21. Basic Copying
Making a Copy
Perform the following steps to make a copy on the DocuColor 2006:
1. If the copier/printer is in printer mode, press the Copy button.
2. Press the Clear All button to reset all default settings.
The settings for all of the copy features are not displayed on the Main Screen.
Feature settings may be altered from a previous copy job. Press the Clear All
button to ensure that all copy features are on the default settings.
3. Position the originals on the Document Glass or in the Document
Feeder.
4. Select the desired number of copies using the Numeric Keypad. If you
enter the wrong number, press the Clear button.
5. Press the Start button.
For directions on applying additional copy features, go to the Copy Features
chapter.
21–10
Xerox DocuColor 2006
 Loading...