

Xerox ConnectKey for SharePoint Administrator Guide

Version 1.3
March 2015
702P03536
®
Xerox
for SharePoint
ConnectKey
®
Administrator Guide
®

©2015 Xerox Corporation. All rights reserved. XEROX®, XEROX and Design®, and ConnectKey® are trademarks of Xerox Corporation
in the United States and/or other countries.
Microsoft® and Microsoft SharePoint® are registered trademarks of Microsoft Corporation.
All trademarks used herein are the property of their respective owners.
BR1001

Contents
1 Xerox® ConnectKey™ for SharePoint® Administrator Guide ................. 1-1
Purpose of This Document .............................................................................................................................. 1-1
Glossary of Terms ................................................................................................................................................ 1-1
Version Compatibility ......................................................................................................................................... 1-2
2 ConnectKey for SharePoint Configuration and Administration .......... 2-1
Global Settings ...................................................................................................................................................... 2-3
Authentication Settings .................................................................................................................................... 2-4
Configuring Xerox Secure Access to work with ConnectKey for SharePoint ............................ 2-7
Network Setup Overview ....................................................................................................................... 2-7
ConnectKey for SharePoint .................................................................................................................. 2-7
Xerox Secure Access................................................................................................................................. 2-8
Two Factor Authentication ............................................................................................................... 2-10
Configuring Native MFP Authentication ................................................................................................ 2-10
Configuring the MFP with Native Mode Authentication using LDAP, Kerberos, or
SMB authentication .............................................................................................................................. 2-11
Configuring the MFP with Native Mode Authentication using the Device’s Internal
Database.................................................................................................................................................... 2-11
Reject Folder Settings ...................................................................................................................................... 2-11
General Failure Notification Options Settings ..................................................................................... 2-12
Timing Interval Settings ................................................................................................................................. 2-14
Debug Setting ...................................................................................................................................................... 2-14
Retry Setting ......................................................................................................................................................... 2-15
MFD Advanced Settings ................................................................................................................................. 2-15
Web Server Port ...................................................................................................................................... 2-15
To Use SSL ................................................................................................................................................. 2-15
FTP Port ...................................................................................................................................................... 2-15
Adding a Scan to Folder Workflow Button ............................................................................................ 2-16
Creating a Scan to Folder Button on the MFP ......................................................................... 2-16
Adding a SharePoint Workflow Button .................................................................................................... 2-18
SharePoint Routing Options .......................................................................................................................... 2-18
Create a Scan to SharePoint Button on the MFP ................................................................... 2-20
Scan Settings ........................................................................................................................................................ 2-22
Notification Options Settings ....................................................................................................................... 2-24
Scan to My Site
Saving your Work ............................................................................................................................................... 2-26
MFD Summary View ......................................................................................................................................... 2-26
................................................................................................................................................... 2-24
Xerox ConnectKey for SharePoint iii
Administrator Guide

Xerox ConnectKey for SharePoint Administrator Guide
ConnectKey for SharePoint Toolbar Options ........................................................................................ 2-27
3 ConnectKey Service Manager ............................................................................ 3-1
Overview ................................................................................................................................................................... 3-1
General Tab ............................................................................................................................................................ 3-2
Log On Tab .............................................................................................................................................................. 3-3
Service Accounts ................................................................................................................................................... 3-3
Recovery Tab .......................................................................................................................................................... 3-5
4 ConnectKey Status Monitor ............................................................................... 4-1
5 ConnectKey License Manager ........................................................................... 5-1
6 ConnectKey MFP Registration Tool ................................................................. 6-1
Registration of MFPs with the ConnectKey for SharePoint Application .................................... 6-1
Overview of Device Registration ................................................................................................................... 6-2
Setting the Parameters for the Default Registration Group ................................................ 6-2
Adding a Device to the Registration Group ............................................................................................. 6-4
Registering Devices ............................................................................................................................................. 6-5
If a Device has not Been Successfully Registered (Indicated by a Red Icon) ............. 6-6
Adding Multiple Devices through CSV Import to the Registration Group ................................ 6-7
Editing or Removing a Device in the Registration Group ................................................................. 6-9
7 Serial Numbers & Maintenance Contract IDs ............................................. 7-1
8 Software Updates .................................................................................................. 8-1
9 General Administration Items ........................................................................... 9-1
ConnectKey for SharePoint Logs .................................................................................................................. 9-1
Log File Location Details ....................................................................................................................... 9-1
10 Basic Troubleshooting ........................................................................................ 10-1
Troubleshooting Tips ........................................................................................................................................ 10-1
ConnectKey for SharePoint Application Button is not on the MFP or does not
execute........................................................................................................................................................ 10-1
Document did not Reach Its Expected Destination .............................................................. 10-1
No Email Notification has been Sent When a Scan Document Fails to Reach Its
Expected Destination ........................................................................................................................... 10-2
ConnectKey for SharePoint Service will not Start (or Stops Immediately) ................ 10-2
Document did not Convert to the Desired Output Format (PDF, PDF/A, XLS, DOCX)
with Satisfactory Results .................................................................................................................... 10-2
Document Processing Time is Unsatisfactory .......................................................................... 10-2
ConnectKey for SharePoint does not connect to the SPS Server to display a list of
libraries and folders .............................................................................................................................. 10-3
Color Document Output was selected but the output file was black and white ..... 10-3
iv Xerox® ConnectKey for SharePoint
Administrator Guide
1 Xerox® ConnectKey™
for SharePoint®
Administrator Guide
Purpose of This Document
This document provides instruction for the basic configuration and administration of the Xerox®
ConnectKey™ for SharePoint
Administrator for Xerox ConnectKey for SharePoint.
The ConnectKey for SharePoint solution consists of the following software:
• ConnectKey Process Designer (workflow administration user interface)
• Service Manager
• Status Monitor
• License Manager
• Device Registration
®
software solution. The document is intended for use by the System
3
1
Note
The Status Monitor is not available in Canada.
Glossary of Terms
Term/Abbreviation
Administrator
EIP
Authentication
ConnectKey for SharePoint
Configuration File (CFG)
LAN
Xerox ConnectKey for SharePoint 1-1
Administrator Guide
Technical resource supporting, configuring, and maintaining the
ConnectKey for SharePoint software.
Extensible Interface Platform Xerox Platform for multifunctional device
enablement and integration for custom software solutions.
Refers to any method of authentication at the Xerox EIP MFP that is
recognized by the ConnectKey for SharePoint service and that passes the
user’s Window Account.
Xerox Application Solution for scan to folder and SharePoint.
ConnectKey for SharePoint configuration file.
Local Area Network. Used to communicate between Xerox EIP MFPs,
windows services, and servers at a customer location.
Description

Xerox ConnectKey for SharePoint Administrator Guide
Multifunction Device (MFD)
Multifunction Printer (MFP)
Scan User
AutoStore
SMTP
LDAP
SPS
Two factor Authentication
Hardware scanning device running ConnectKey for SharePoint that has
been enabled for document capture.
Any references to devices, multifunction devices, MFDs, printers, and
MFPs should all be treated synonymously.
Refers to the scanning user who will submit Scan jobs from the Xerox EIP
MFP.
ConnectKey for SharePoint is powered by AutoStore™ Imaging
technology from Notable Solutions, Inc.
Simple Mail Transport Protocol is the standard protocol for email
transmission.
Lightweight Directory Access Protocol provides a way to look up email
and user names from Active Directory.
Microsoft SharePoint server
Refers to the process of enabling both Xerox Convenience authentication
followed by a prompt for password.
Version Compatibility
The information in this document applies to Xerox ConnectKey for SharePoint Version 1.2.
1-2 Xerox® ConnectKey for SharePoint
Administrator Guide

2 ConnectKey for
SharePoint
Configuration and
Administration
The ConnectKey for SharePoint administration application is designed to easily create workflow
configurations (CFG). This configuration is for Xerox EIP device registration, document conversion,
and content routing of the document and index metadata to a Microsoft SharePoint or a network
folder destination. From the ConnectKey for SharePoint interface an administrator can create a new
configuration, review or save changes to the details of an existing configuration, or launch additional
tools for the overall application administration of the Xerox distributed capture solution. The
following sections focus on the available workflow configuration options for handling content in this
distributed capture software solution. In addition to this guide, ConnectKey for SharePoint has a builtin help system that will provide additional information.
2
Take the following action to start the ConnectKey for SharePoint application:
From the computer where ConnectKey for SharePoint is installed, click Start > All Programs, select
Xerox, select the ConnectKey Program Group, and then click on “ConnectKey Process Designer”.
Xerox® ConnectKey for SharePoint 2-1
Administrator Guide
ConnectKey for SharePoint Configuration and Administration
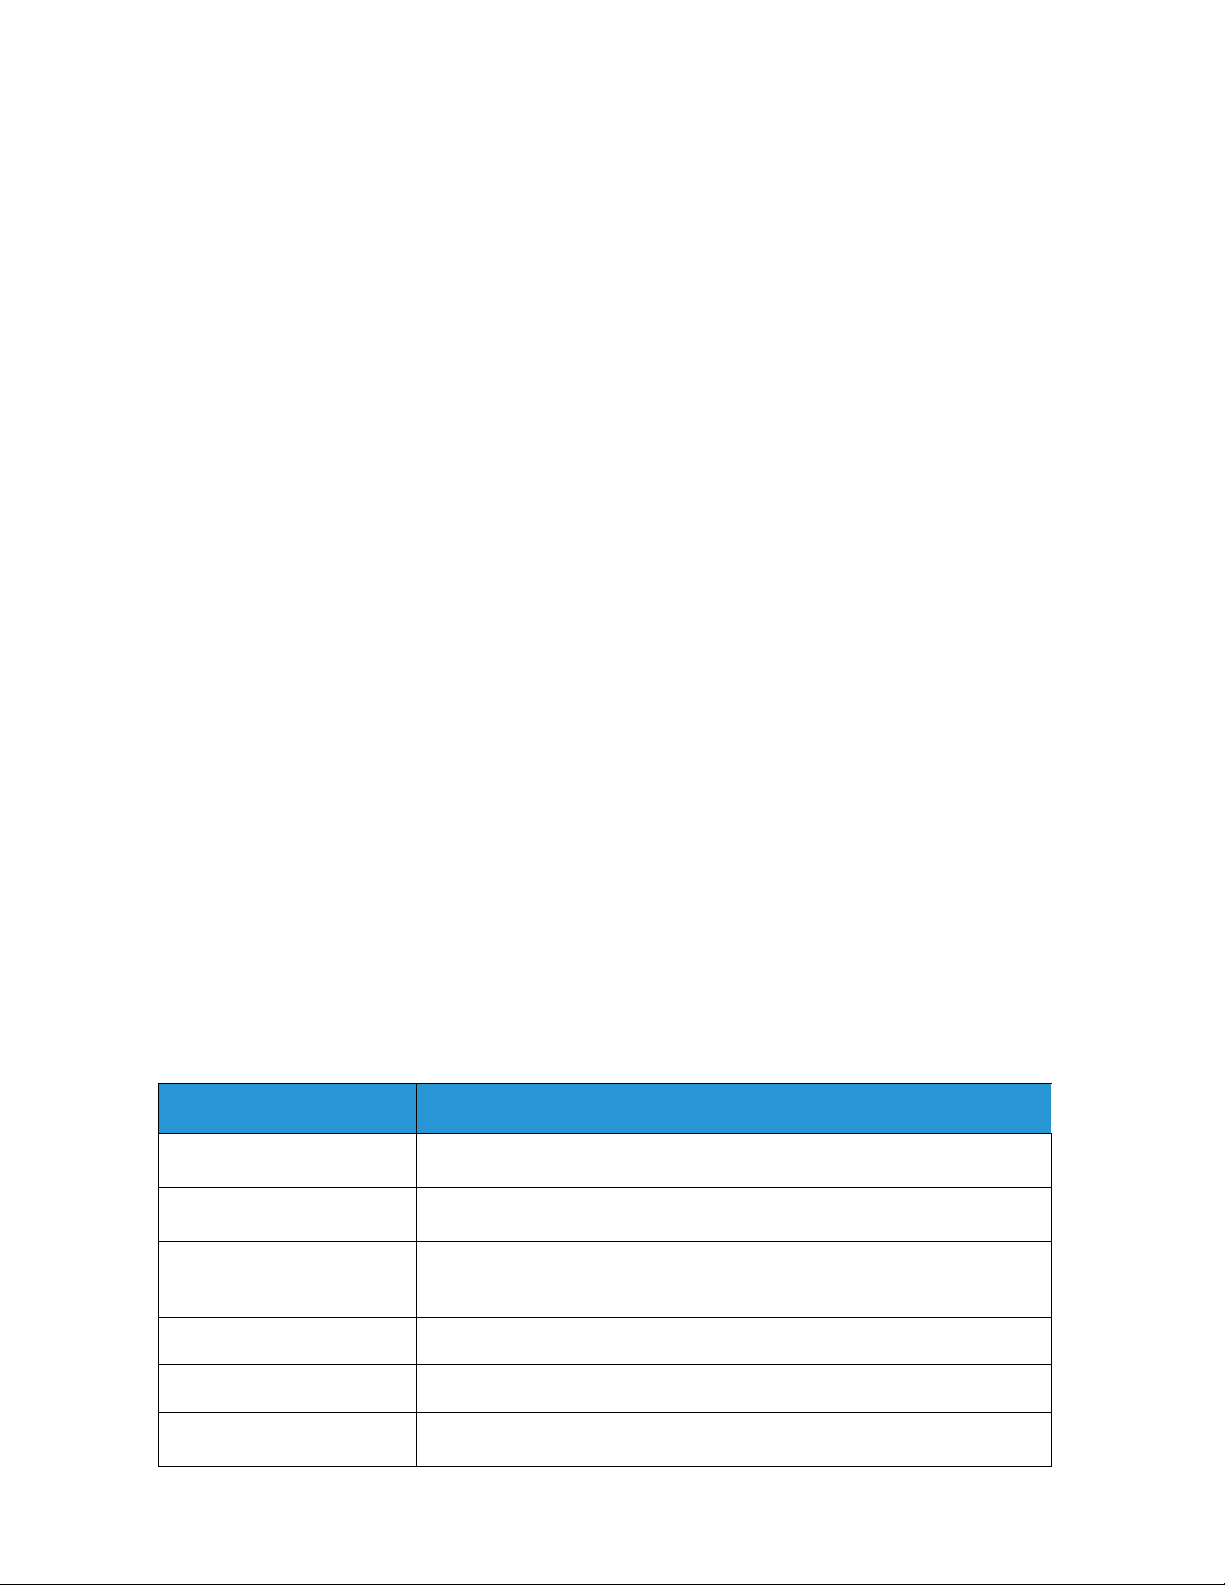
Launching the ConnectKey for SharePoint application presents the administrator with a user friendly
interface to manage the document workflow configuration, additional administrative tools, and some
common features. The common features are available as icons in the menu bar, as well as the File or
Edit menu options.
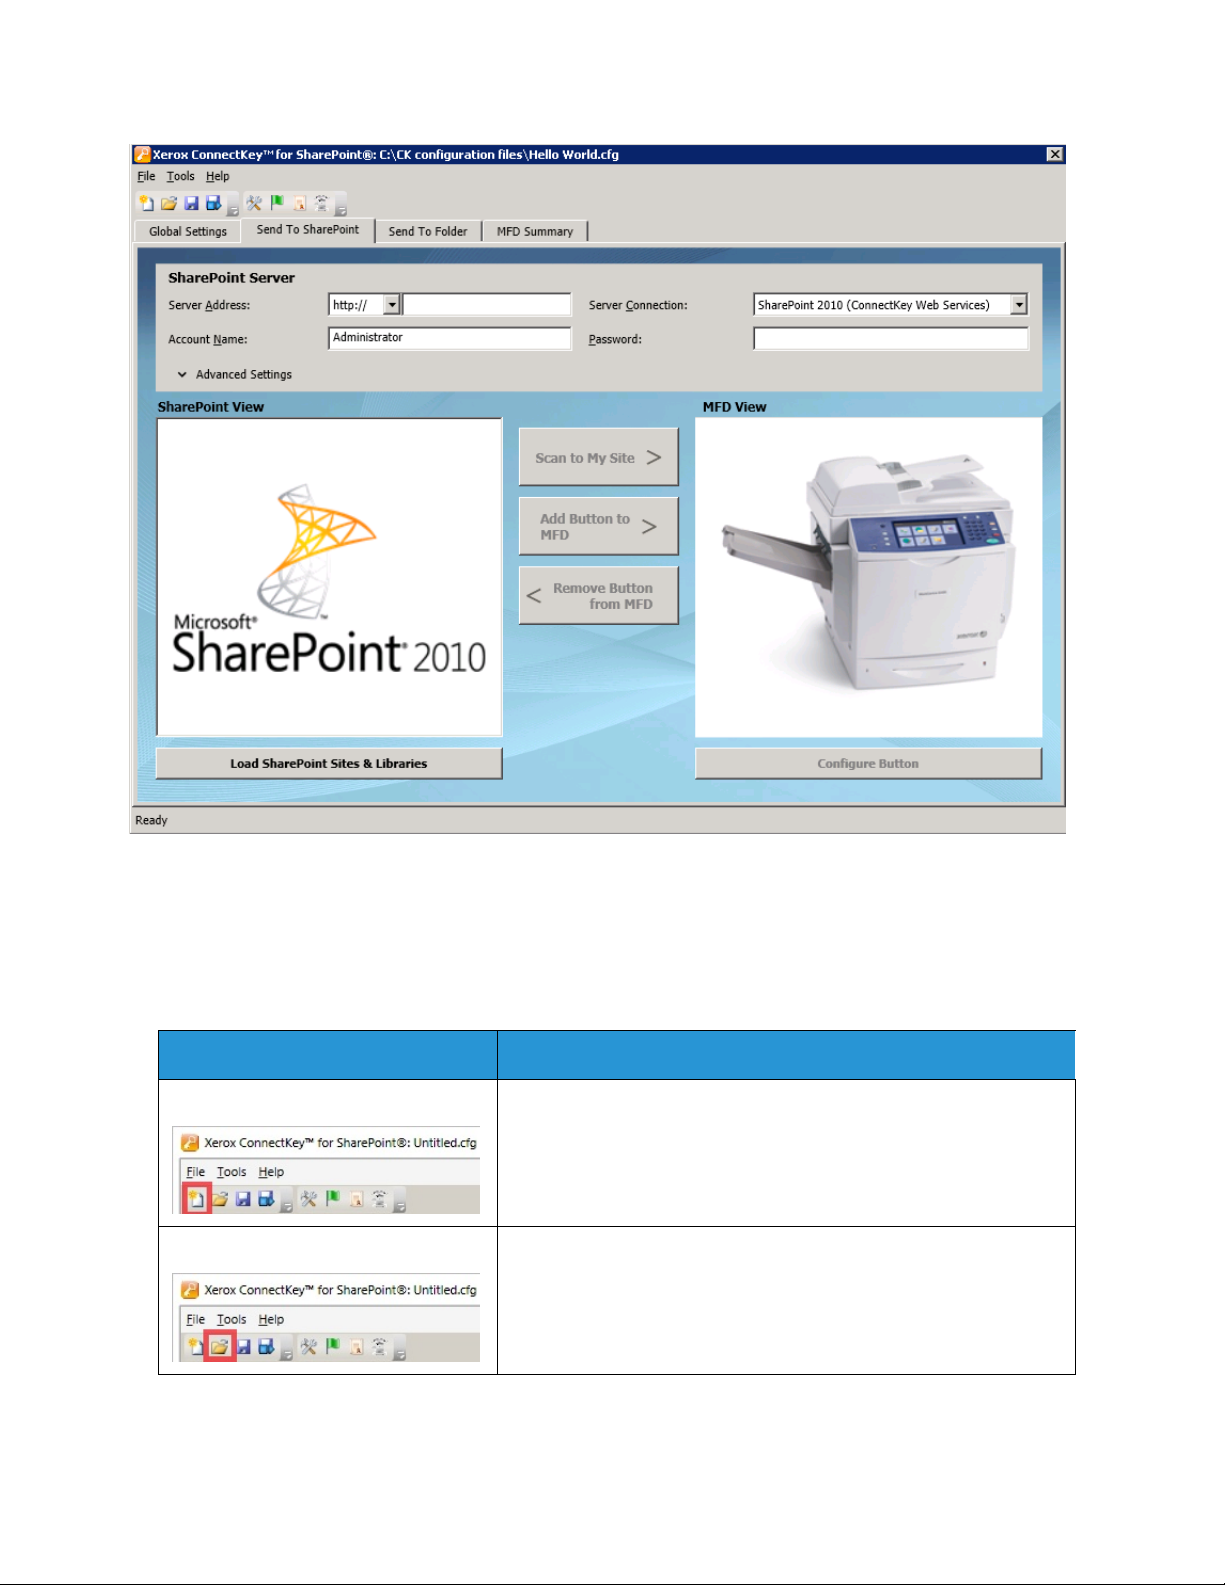
Name/Icon
Create a new configuration file
Open an existing configuration file
File > New (or Ctrl+N)
Creating a new configuration file generates a new CFG file, which
an administrator can save and launch for document processing.
File > Open (or Ctrl+O)
Opening an existing CFG file, which an administrator saved in a
location that is accessible by the ConnectKey for SharePoint
server.
Description
2-2 Xerox® ConnectKey for SharePoint
Administrator Guide
ConnectKey for SharePoint Configuration and Administration
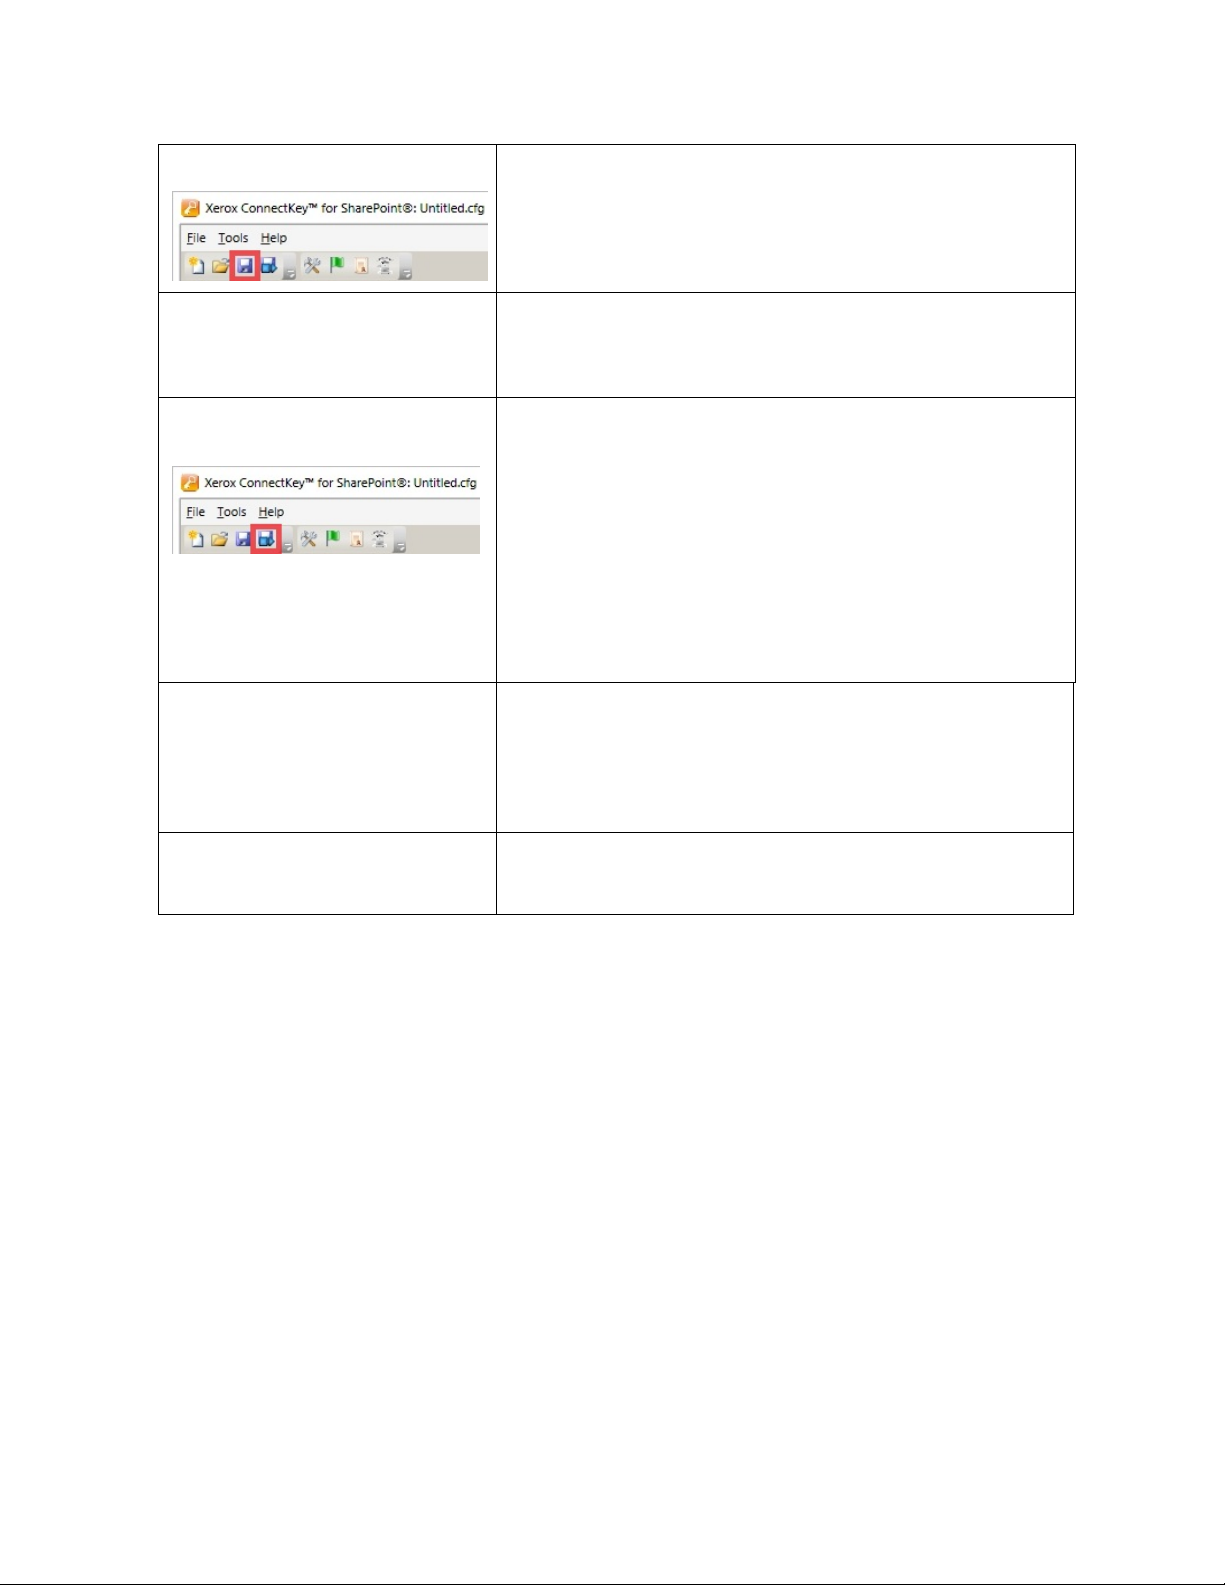
Save the current configuration file
Save as…
(Drop-down menu option under File)
Save and run service with the current
Configuration file
Recent Files
(Drop-down menu option under File)
File > Save (or Ctrl+S)
Saving any changes to the CFG file made in the ConnectKey for
SharePoint application.
File > Save as…
Save as will create (or replace) a CFG file in process or previously
saved.
File > Save and Run
Save and Run stores the changes to the CFG file and restarts the
configured ConnectKey for SharePoint service with the recent
changes to the configuration.
Note
In order for a configuration to deploy to your MFP, you must save
your work and restart the service. This can be done either by
clicking the Save and run option, or by Saving your configuration,
then using the Service Manager to start the service with your new
configuration.
File > Recent Files >
Recent Files will provide quick links to open CFG files, which have
recently been viewed by the ConnectKey for SharePoint
administrator eliminating the need for the admin to browse to the
CFG file through the Open a CFG file option.
Exit
(Drop-down menu option under File)
File > Exit (or Alt+F4)
Closes the ConnectKey for SharePoint administration interface.
The tabbed interface gives administrators access to the configuration of Global Settings, Send to
SharePoint, Send to Folder, and MFD Summary details. The following sections identify the details of
each tabbed section and provide configuration options, which are available for document processing.
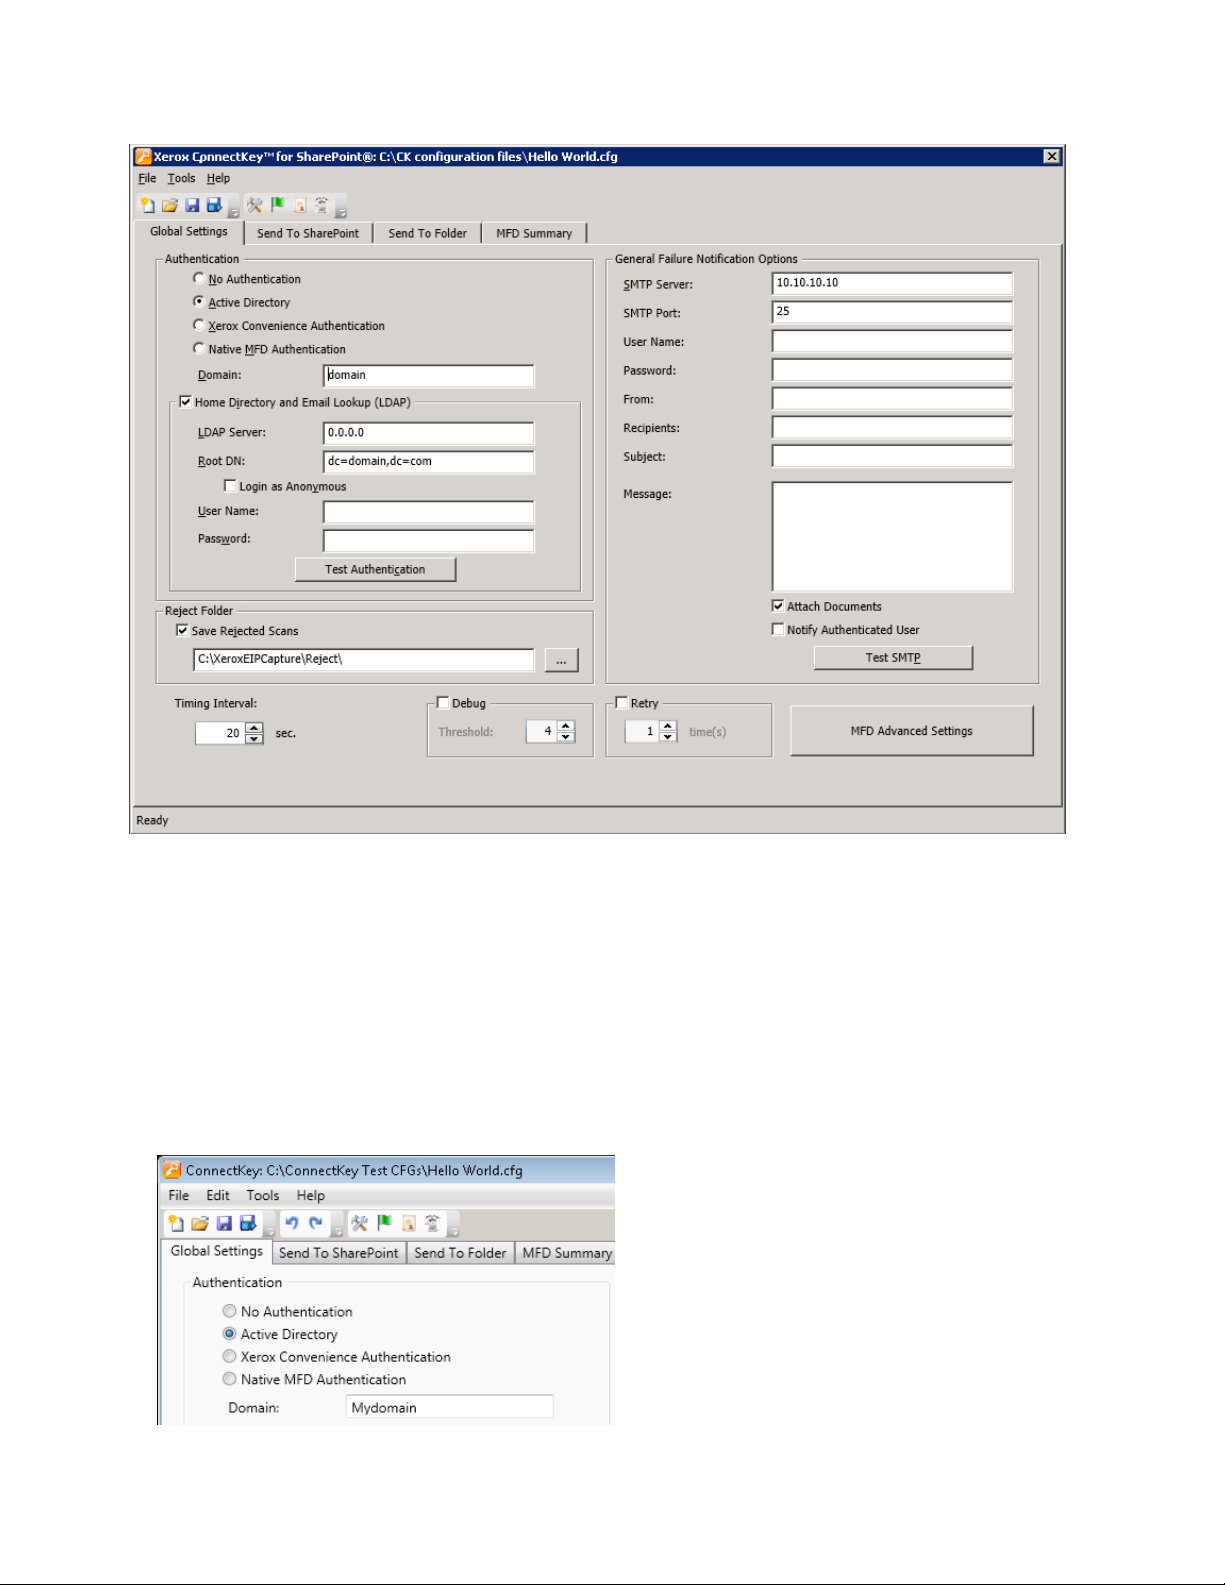
Global Settings
The “Global Settings” tab is positioned as the first configurable tab in the ConnectKey for SharePoint
administrative interface. The general settings entered by a system administrator are global in nature
and once saved are applied to the total solution and configuration file (CFG). To navigate to the
general settings click on the “Global Settings” tab at the top of the ConnectKey Process Designer
application tabbed dialog.
Xerox® ConnectKey for SharePoint 2-3
Administrator Guide
ConnectKey for SharePoint Configuration and Administration
Authentication Settings
The administrator can set up an authentication method to control access by the scan user to
ConnectKey for SharePoint on the MFP. There are four options to choose from, including “no
authentication”. Based on the option designated by an administrator, other configuration options
may be disabled. For example, choosing “no authentication” will disable the option to scan to a user’s
home directory, because that information will not be available.
The following options are available as authentication methods for the workflow configuration:
2-4 Xerox® ConnectKey for SharePoint
Administrator Guide
ConnectKey for SharePoint Configuration and Administration
Name
No authentication
Active Directory
No MFP authentication will be required at the device panel, by scan users,
to gain access to the configured scanning options.
Users are prompted to enter their Active Directory username and
password (LDAP lookup validated) at the MFP prior to accessing the
ConnectKey for SharePoint Scanning options. Selecting this option
requires the Domain field to be populated with the customer’s domain
name for the deployment.
Note
See the Home Directory and Email Lookup (LDAP) configuration settings.
Xerox Convenience
Authentication
Users authenticate using a Xerox authentication method, such as card
swipe, prior to accessing the ConnectKey for SharePoint scanning
options. Refer to the section below, “Configuring Xerox Secure Access to
work with ConnectKey for SharePoint” for more information on
configuring Secure Access. Otherwise, refer to your Convenience
Authentication product specific documentation or refer to the
Convenience Authentication product support for further details on
configuring convenience authentication.
Note
For SharePoint browsing options, two factor authentication is required
Native MFD Authentication
Users authenticate using the native Xerox EIP authentication method
(LDAP) prior to accessing the ConnectKey for SharePoint scanning
options. Refer to the section below on “Configuring Native MFP
Authentication”. Otherwise, refer to your device product specific
documentation or the device product support for further details on
configuring Native MFP Authentication.
Domain
The Domain in which your ConnectKey for SharePoint server is
configured is required for all Authentication options except, No
Authentication.
Description
Xerox® ConnectKey for SharePoint 2-5
Administrator Guide
ConnectKey for SharePoint Configuration and Administration
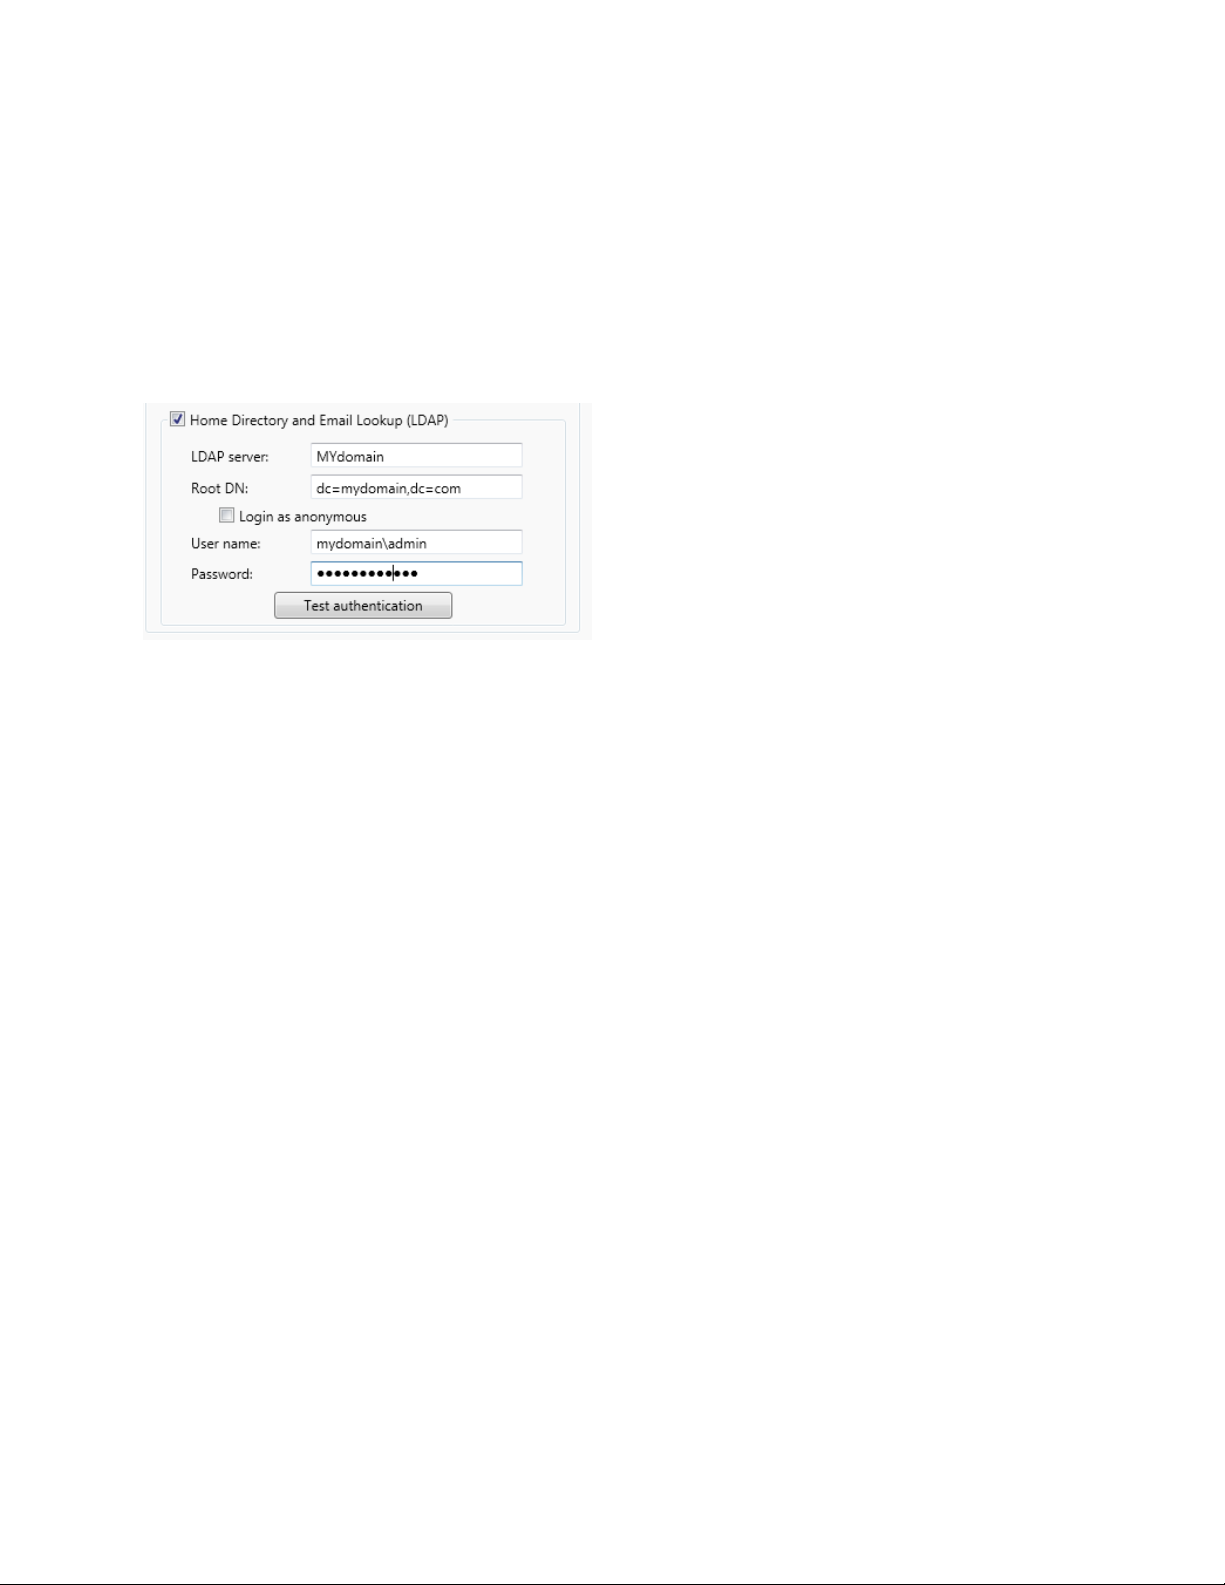
Home Directory and Email Lookup (LDAP)
Settings
While Home Directory and Email (LDAP) Settings are not required for authentication, they must be
configured in order to obtain a scan user’s home directory and email address. Those options will only
be enabled when Home Directory and Email (LDAP) has been configured. For verification, the
administrator can test the LDAP Settings using the test button in the ConnectKey interface.
2-6 Xerox® ConnectKey for SharePoint
Administrator Guide
ConnectKey for SharePoint Configuration and Administration
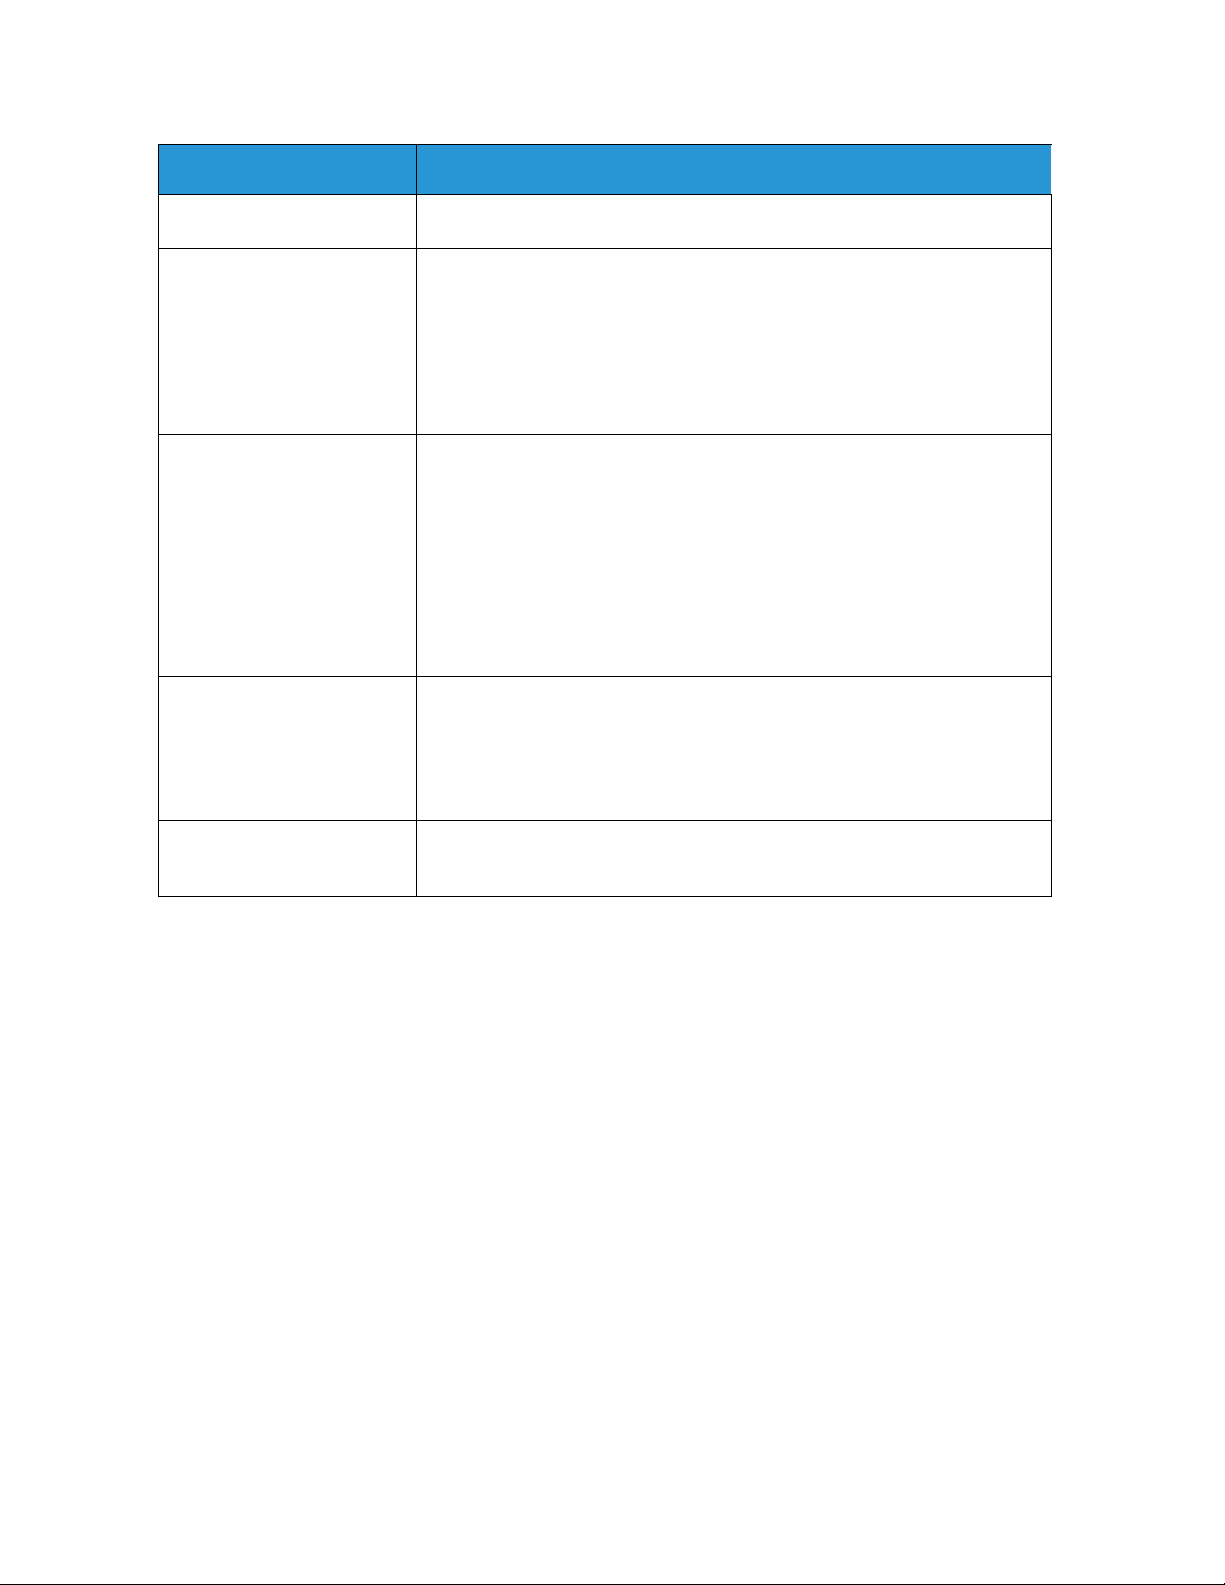
Name
Home Directory and Email
Lookup(LDAP)
LDAP server Identifies the IP address of the Active Directory (LDAP) server in the
Root DN In the Root DN field type the search base where the LDAP Query should
Login as Anonymous Select this option if your LDAP server does not require a secure
User name Unless the target LDAP Server allows anonymous access, ConnectKey for
Password Enter the password for the domain user, which ConnectKey for
Activates the configuration of the LDAP settings, and is required if home
directory and email attributes are desired.
deployment environment. The LDAP Server must be in the same domain
as the computer where ConnectKey for SharePoint is installed.
ConnectKey for SharePoint must be able to communicate with the LDAP
server.
start. For example: DC=Sales, DC=MyCompany, DC=com.
This information should be requested from the network administrator.
connection.
SharePoint requires a domain service account with rights to query the
LDAP Server. Enter the domain user, which will be used to perform the
LDAP Query.
SharePoint will use to perform the Active Directory authentication. (See
User name above).
Description
Test authentication
To test the search settings, enter a domain account name in the field and
click the Test authentication button. This must be a login id such as
jsmith.
Configuring Xerox Secure Access to work with
ConnectKey for SharePoint
This section will show you how to integrate the logins from Xerox Secure Access and ConnectKey for
SharePoint to provide a seamless user experience.
Network Setup Overview
This example has a ConnectKey for SharePoint server installed on the SharePoint server, an Active
Directory server, and a Xerox Secure Access server. These are all on the same domain.
ConnectKey for SharePoint
In the example below, ConnectKey for SharePoint is configured to use Xerox Convenience
Authentication with the ‘ck4sp’ domain.
Xerox® ConnectKey for SharePoint 2-7
Administrator Guide
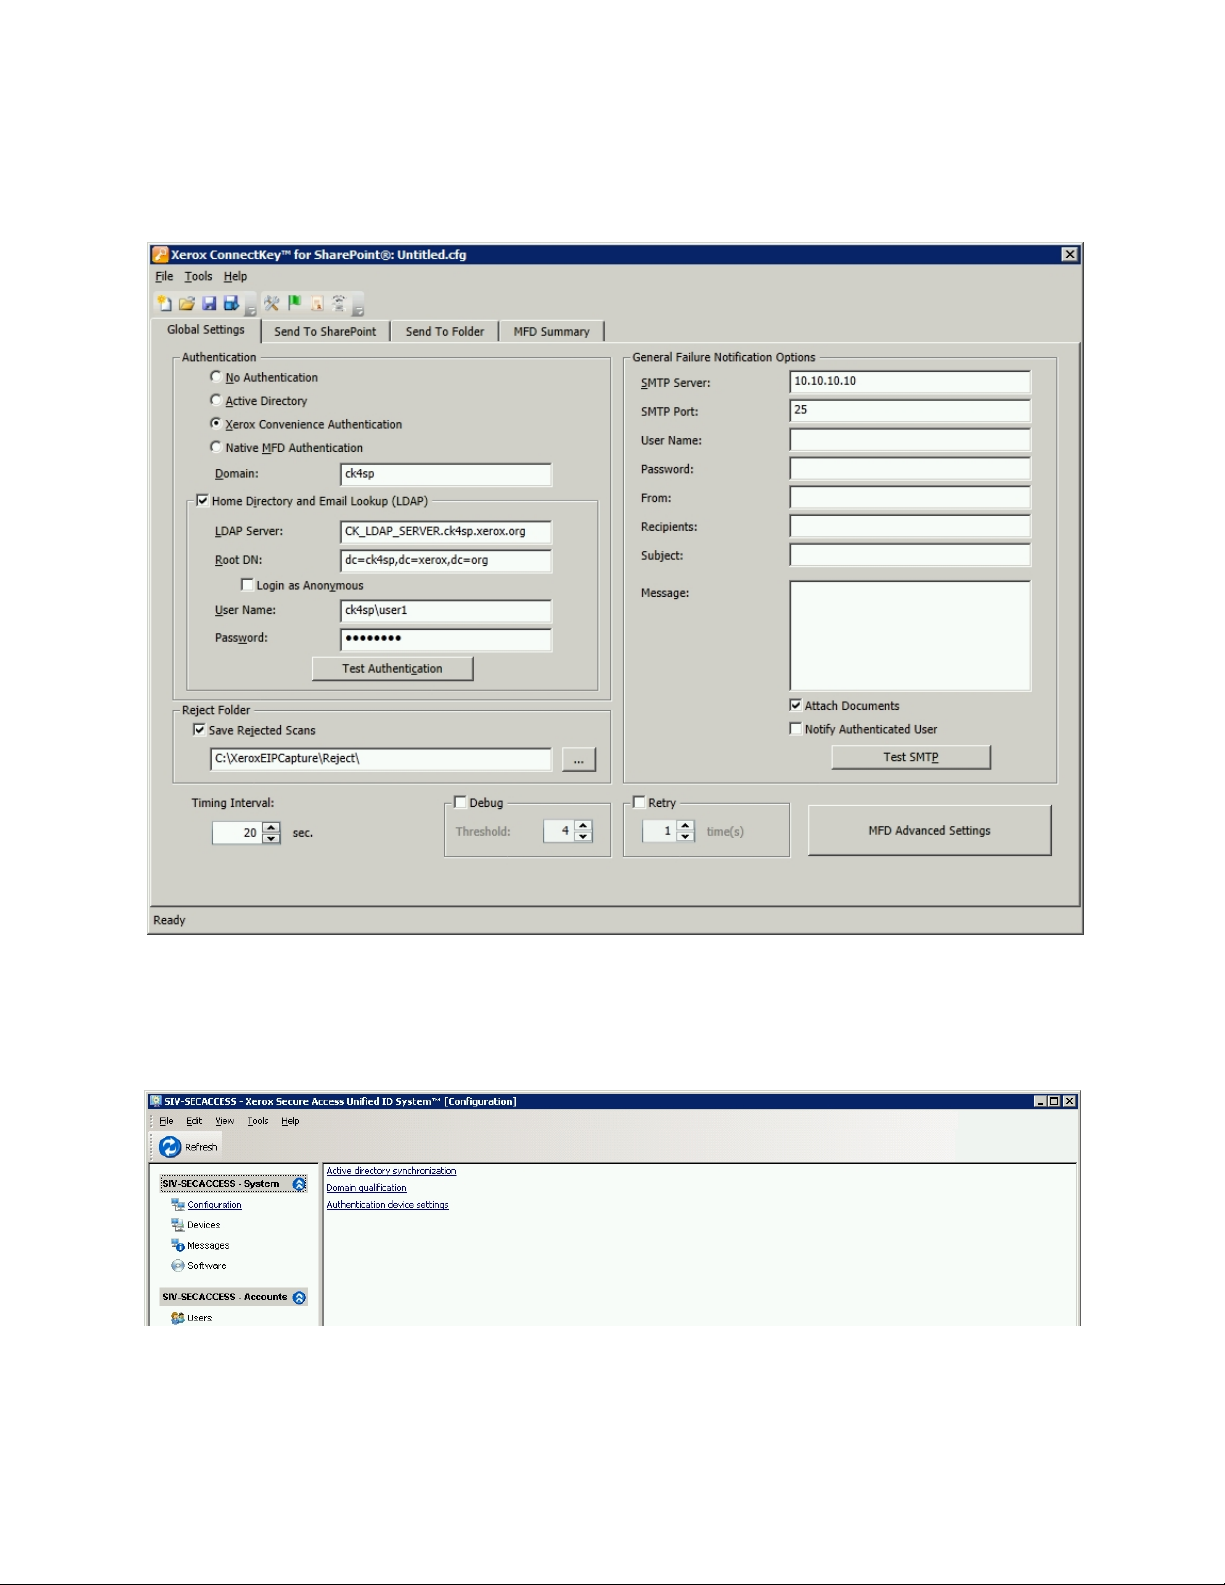
ConnectKey for SharePoint Configuration and Administration
The LDAP server is also configured since it is used to authenticate from the Xerox Secure Access server
and can provide a richer user experience by adding home directories and email lookup to the
application.
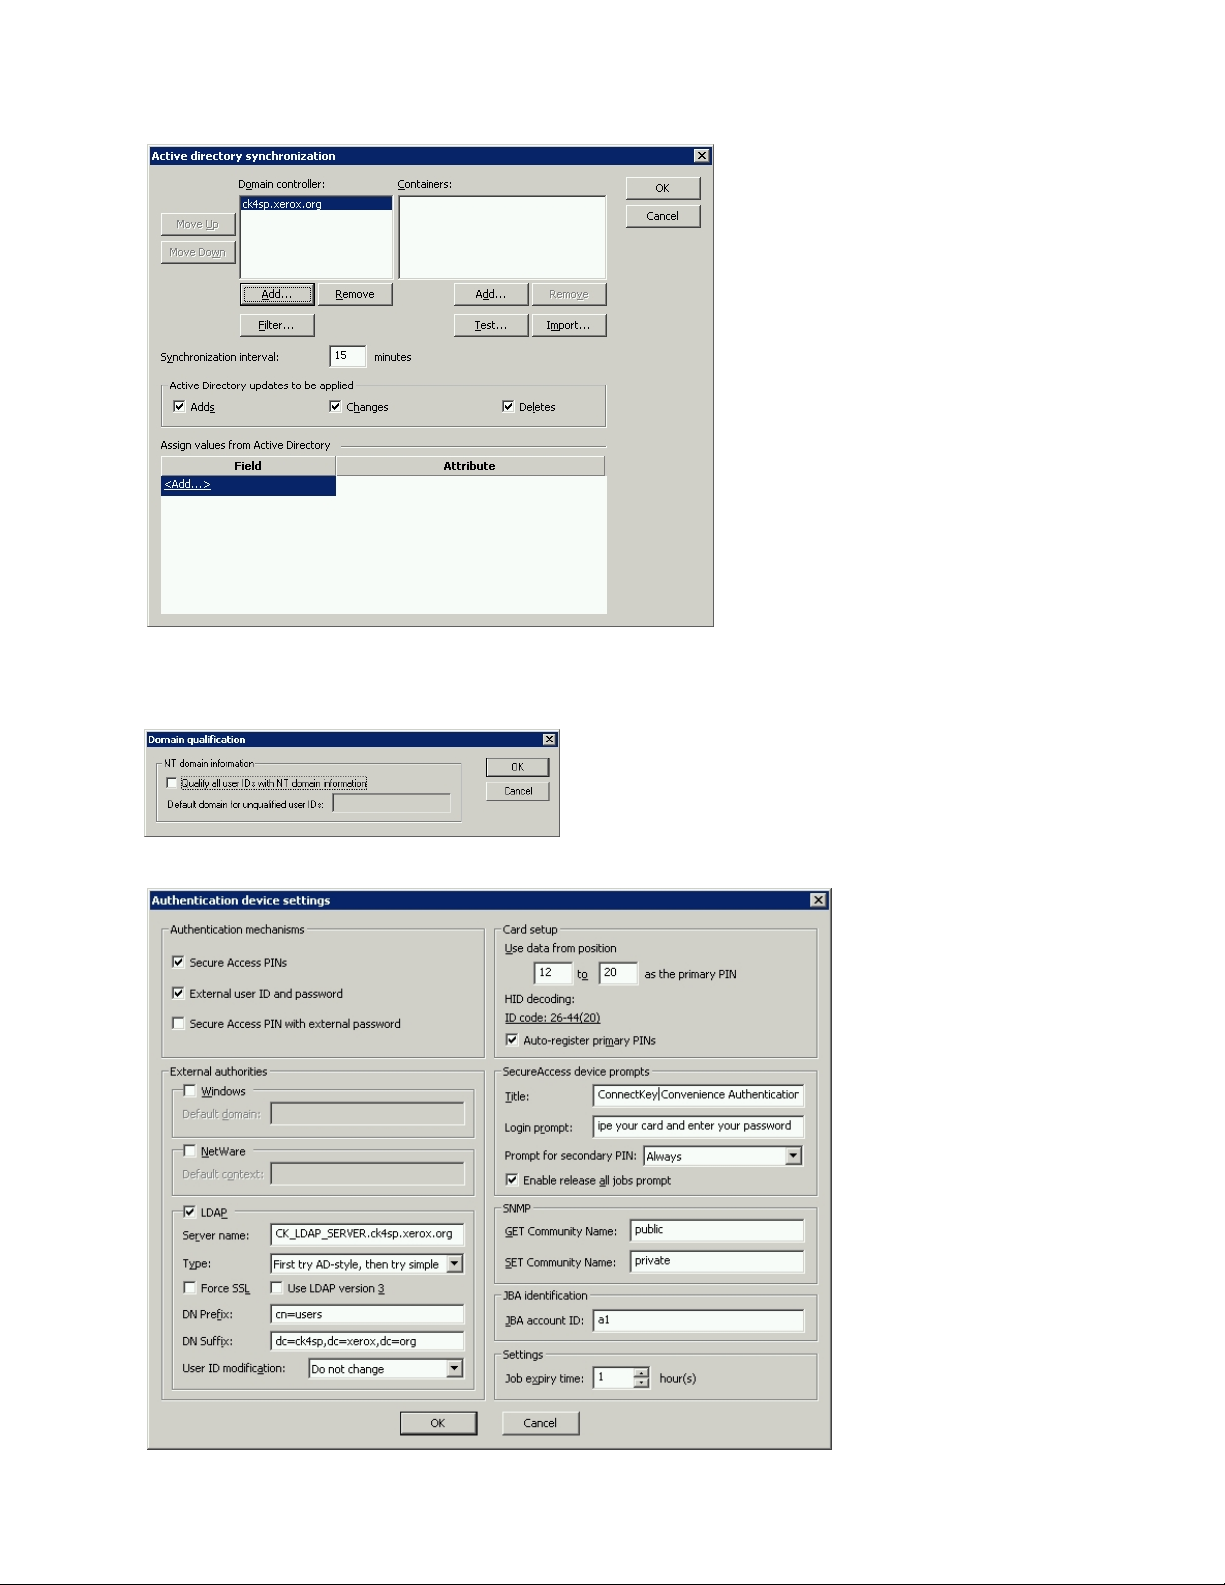
Xerox Secure Access
Xerox Secure Access should be configured to import the users from the Active Directory server. To do
this from the main screen, click on Configuration>Active directory synchronization.
On the active directory synchronization screen, add the Active Directory server, in the example
below this is ck4sp.xerox.org.
2-8 Xerox® ConnectKey for SharePoint
Administrator Guide
ConnectKey for SharePoint Configuration and Administration
Return to the main screen and click on the Domain qualification link, the “Qualify all user IDs with
NT domain information” should not be checked
.
Return to the main screen and click on the Authentication device settings link.
Xerox® ConnectKey for SharePoint 2-9
Administrator Guide

ConnectKey for SharePoint Configuration and Administration
In order for authentication to work with ConnectKey for SharePoint the Xerox Secure Access server
needs to be configured to use External authorities and LDAP. To do this select “External user ID and
password”. In order for swipe cards to work you need to have “Secure Access PINs” selected.
Two Factor Authentication
To enable the ability to browse folders when Xerox Convenience Authentication is enabled, you must
also enable the option to export password. Enabling both Convenience Authentication and the
option to Export Password is also referred to as Two Factor Authentication.
See your device’s System Administrator Guide for “Extensible Interface Platform” for instruction on
how to enable “Export password”. If you do not enable export password, ConnectKey will prompt you
for your username and password when you access the application at the MFP.
To configure Xerox Secure Access to use two factor authentication, follow the instructions for normal
authentication with Xerox Secure Access. Instead of select “External user ID and password” select
“Secure Access PIN with external password” and set the “Prompt for secondary PIN” to always.
Configuring Native MFP Authentication
Native Mode authentication is authentication done on the MFP using LDAP, Kerberos, SMB, or the
device’s internal database. When correctly configured a user will be prompted to log into the MFP when
they walk up to the MFP at a blocking screen, or when they click on the ConnectKey for SharePoint
button by the native mode login.
When incorrectly configured, a user will be prompted not only by the native mode login, but they will
also be prompted by the ConnectKey for SharePoint application.
2-10 Xerox® ConnectKey for SharePoint
Administrator Guide

ConnectKey for SharePoint Configuration and Administration
Configuring the MFP with Native Mode Authentication using LDAP,
Kerberos, or SMB authentication
In order to best use native mode authentication on the MFP using Remote Authentication sources
you need to configure the sources to match the usernames and passwords of your SharePoint or
Windows Network folders.
See your device’s System Administrator Guide for “Setting up Network Authentication” and look for
the subsections for your particular protocol such as “Configuring Authentication Server Settings for
LDAP”, “Configuring Authentication Server Settings for SMB”, or “Configuring Authentication Server
Settings for Kerberos”.
See your device’s System Administrator Guide for “Extensible Interface Platform” for instruction on
how to enable “Export password”. If you do not enable export password, or the credentials do not
match your Active Directory domain, ConnectKey will prompt you for your username and password
when you access the application at the MFP.
Configuring the MFP with Native Mode Authentication using the Device’s
Internal Database
In order to best use native mode authentication on the MFP using Local Authentication you need to
configure the MFP’s internal database with users that match the usernames and passwords of your
SharePoint or Windows Network folders. If the usernames and passwords do not match, ConnectKey
will prompt you for your username and password when you access the application at the MFP.
See your device’s System Administrator Guide for configuring “Local Authentication” and for “Adding
User Information to the Local Database”.
See your device’s System Administrator Guide for “Extensible Interface Platform” for instruction on
how to enable “Export password”. If you do not enable export password, or the credentials do not
match your Active Directory domain, ConnectKey will prompt you for your username and password
when you access the application at the MFP.
Reject Folder Settings
If desired, the “Reject Folder” setting can be enabled and defines the location for storing jobs, which
fail during document processing. It is the system administrator’s responsibility to review rejected
items to take the appropriate corrective actions on these jobs. Refer to the log files to determine any
error messages regarding the failure to take the appropriate corrective action such as a change to the
configuration file (CFG), to identify potential external issues such as no network connectivity to a
route destination, or changes to user credentials being used by the service. The “Reject Folder”
location is typically used in conjunction with the configured notification options on processing
failures. Using notification options will proactively send an email alert when a document fails to route
properly to either folders or SharePoint.
Xerox® ConnectKey for SharePoint 2-11
Administrator Guide
ConnectKey for SharePoint Configuration and Administration
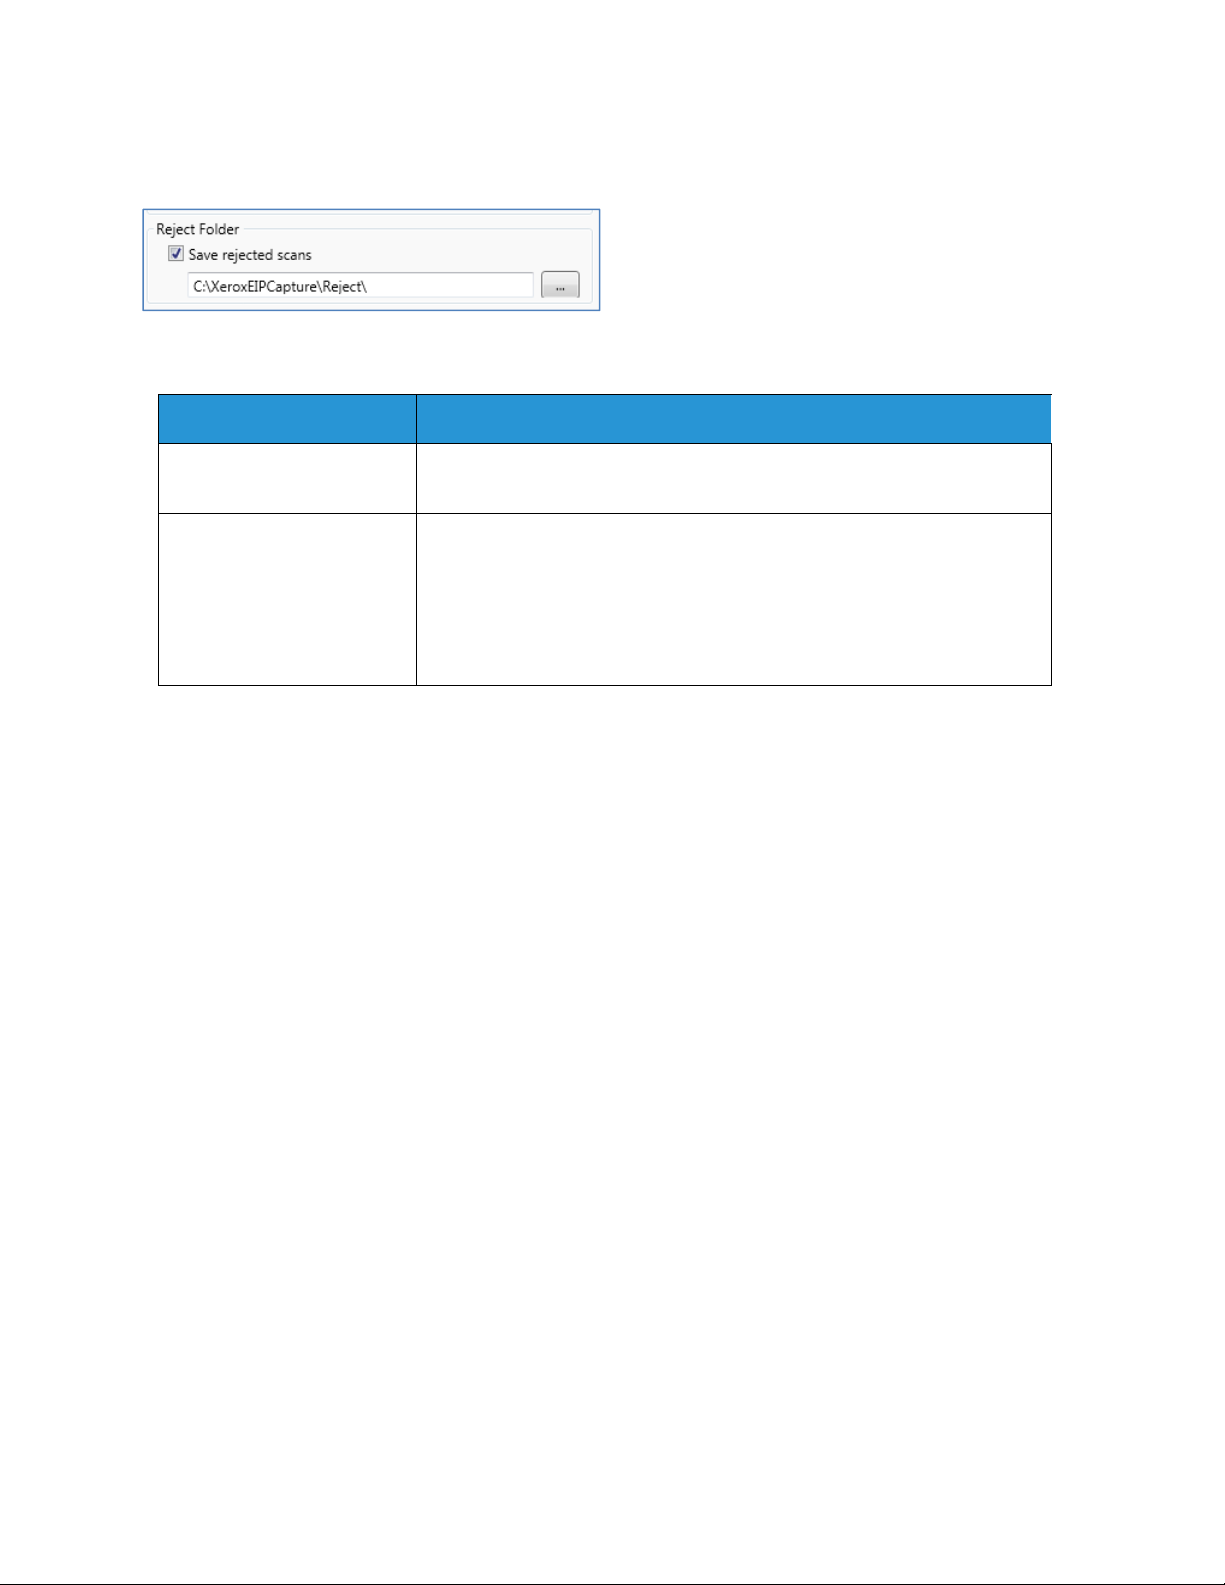
Example configuration of the reject folder:
Name
Save rejected scans Check this box to store the rejected scanned images when the document
scan fails.
Folder path for the storage
of the rejected jobs
Enter a directory to maintain a copy of all that failed to route to the
target destination (folder or SharePoint).
Note
The service account for ConnectKey for SharePoint must have write
permissions to Reject Folder directory. (See the “ConnectKey Service
Manager” section for details).
Description
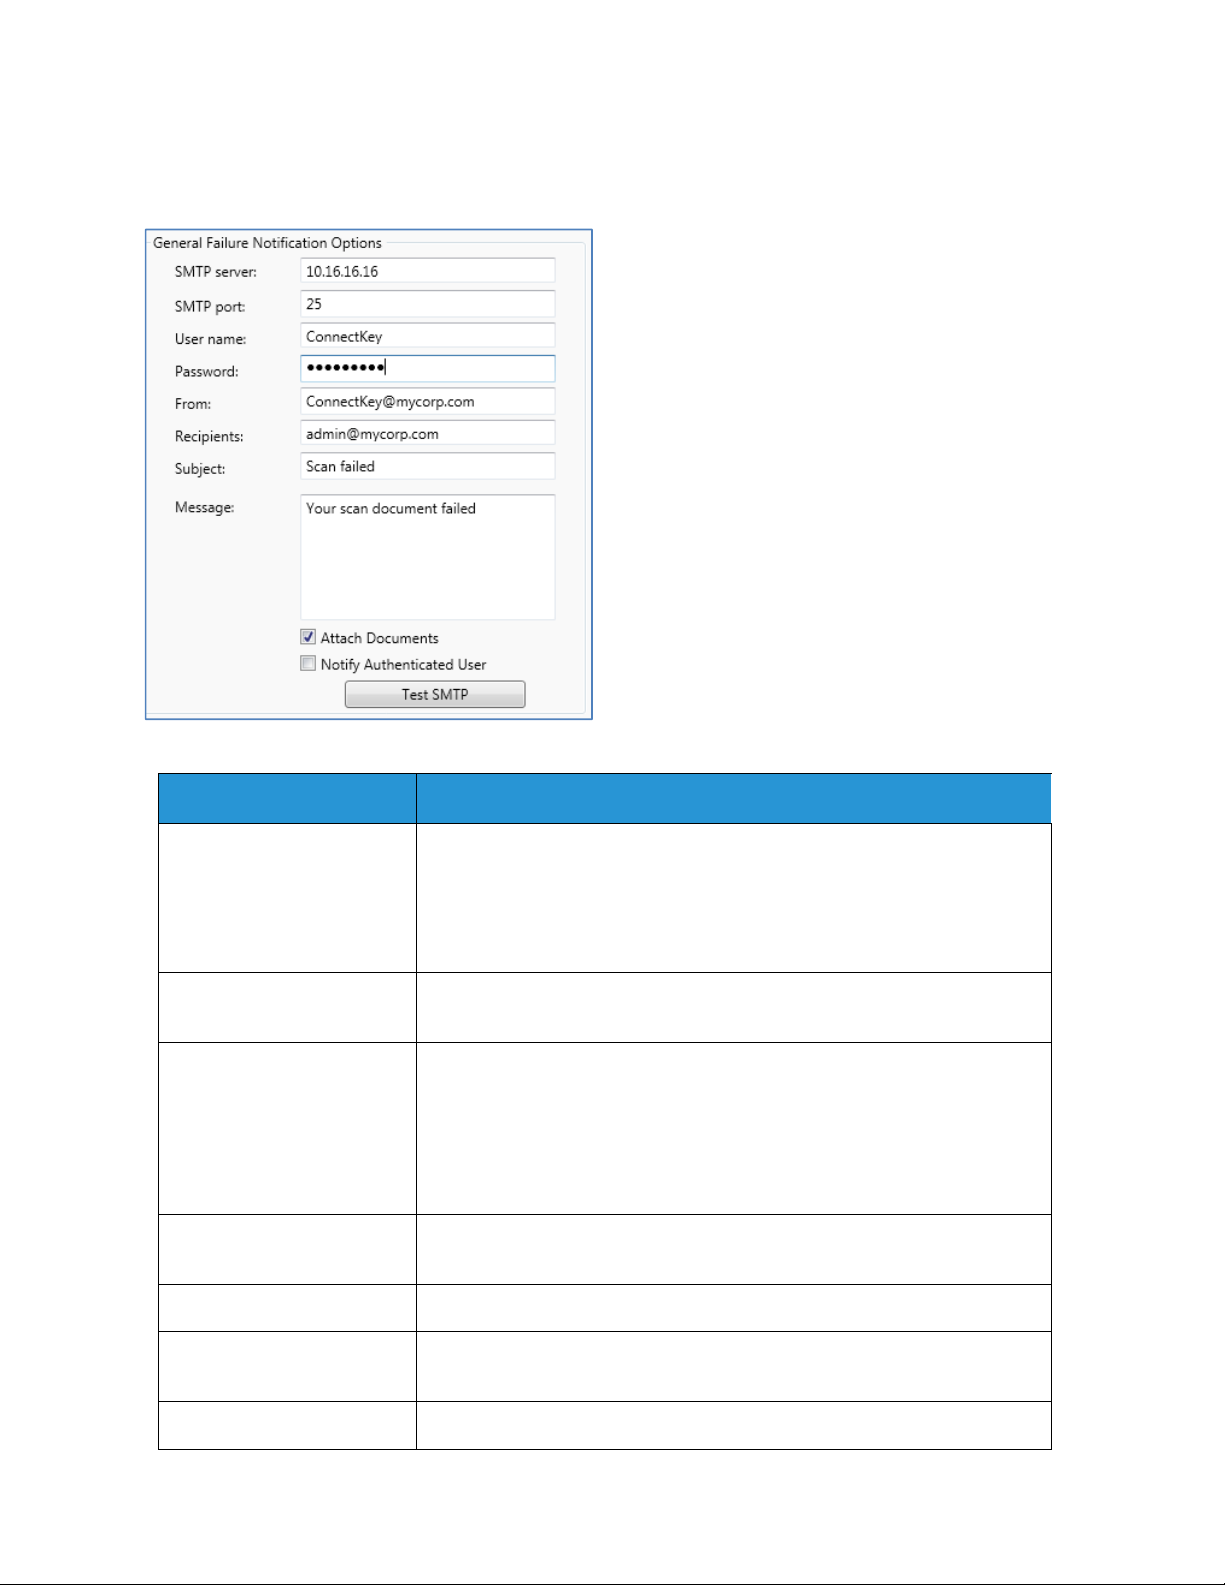
General Failure Notification Options Settings
The “General Failure Notification Options” setting is configured for sending email notifications for
jobs, which fail during scanning. This option requires a SMTP mail relay and the use of a domain user
account. An administrative email recipient(s) or distribution list is typically configured to receive the
email notification. If LDAP Settings have been configured (see “Home Directory and Email (LDAP)
Settings”), the scan user can also receive the notification. Notification Options can also be configured
to attach the scanned image to the automated notification.
2-12 Xerox® ConnectKey for SharePoint
Administrator Guide
ConnectKey for SharePoint Configuration and Administration
The following fields are required for the configuration of notification options for jobs that fail to
reach their intended target destination:
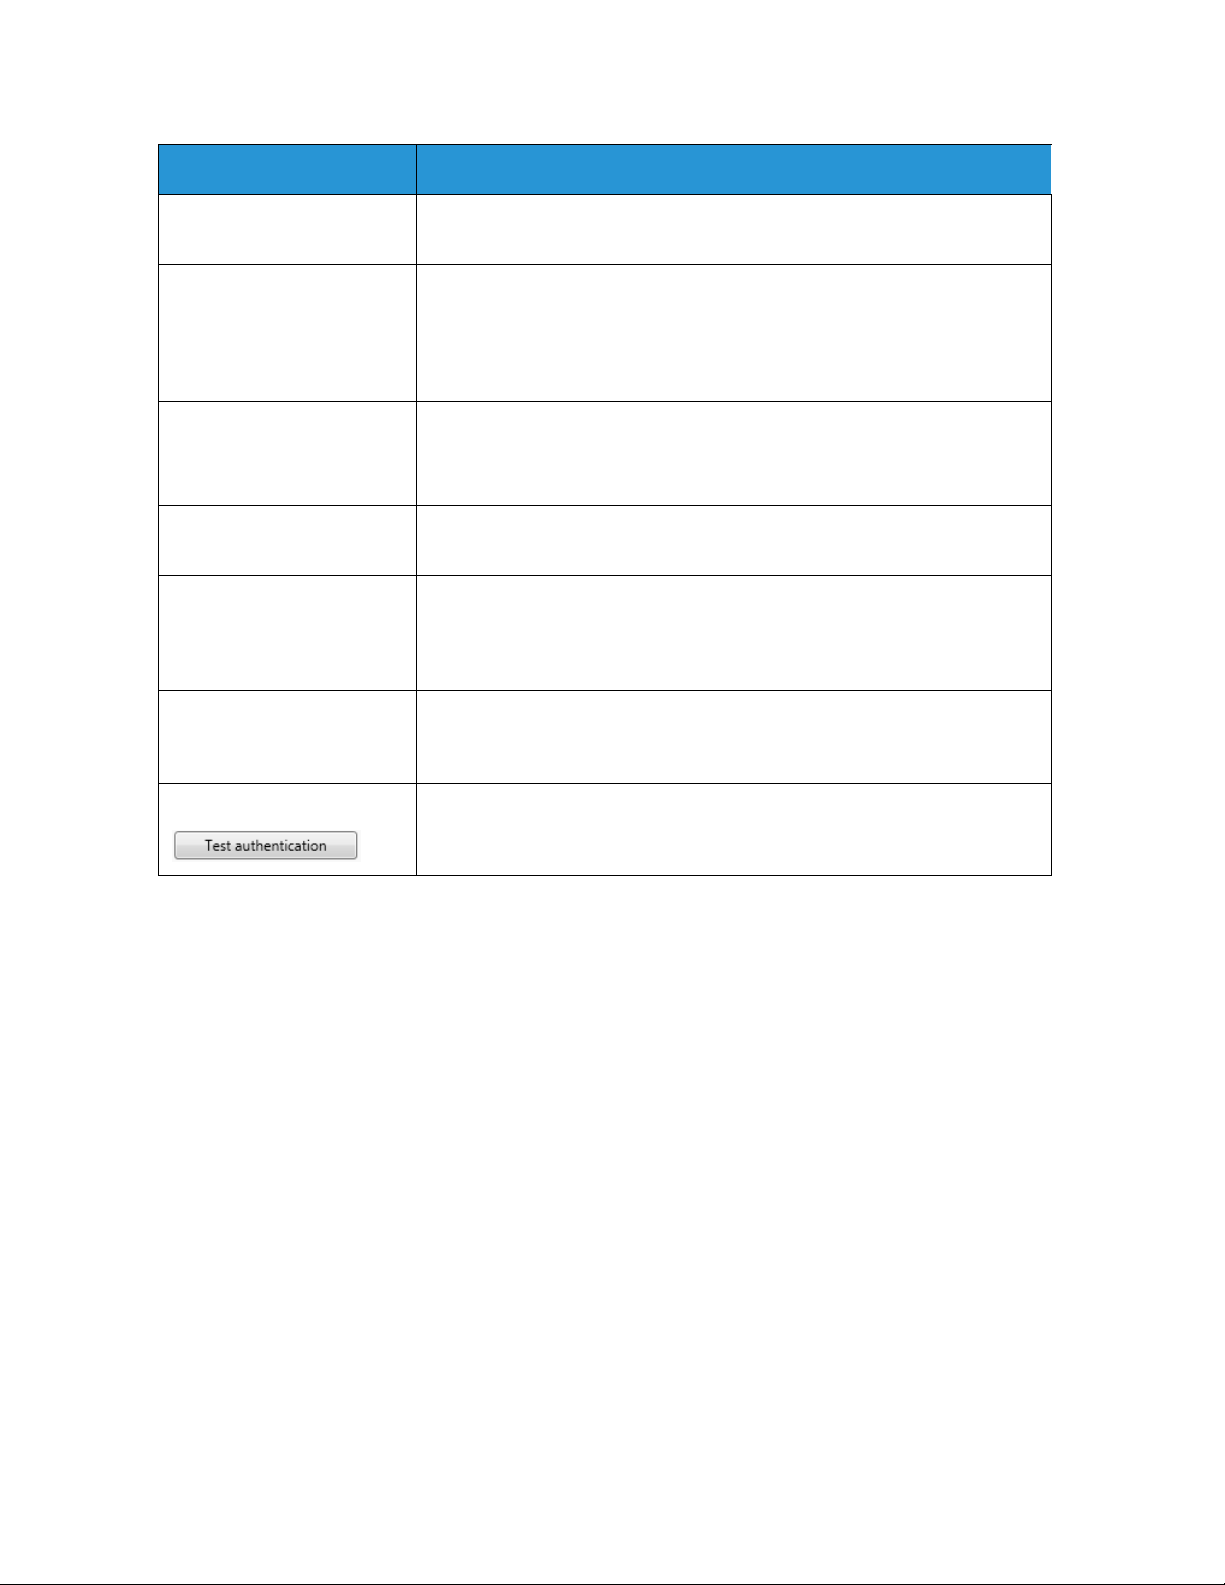
Name
SMTP server Identifies the IP address of the SMTP email relay in the deployment
environment.
The ConnectKey for SharePoint server must be able to communicate
across the network to the identified SMTP server, contact the network
administrator if you cannot communicate with the LDAP server.
SMTP port Identifies the network port number for effective communication to the
SMTP email relay in the deployment environment.
User name Enter the SMTP relay user, which the ConnectKey service will use to
authenticate for email routing.
Note
This user name will not be used as the From address in the automated
notifications unless you enter the same credentials in the From field
below.
Password Enter the password for the SMTP user account, which the ConnectKey
service will use to authenticate for email routing.
From Enter the email address the email notification will be sent from.
Description
Recipients Enter the email addresses or distribution list to receive the failure
notification emails. Addresses should be semicolon separated.
Subject Enter the subject text to appear in the failure notification emails.
Xerox® ConnectKey for SharePoint 2-13
Administrator Guide
ConnectKey for SharePoint Configuration and Administration
Message Enter the message text to appear in the failure notification emails.
Attach Documents Select this option to attach the scanned image to the automated failure
email notification.
Notify Authenticated User Select this option to additionally send the automated failure email
notification to the authenticated user who scanned the document.
Note
This option will be grayed out if the LDAP Settings have not been
configured (see Home Directory and Email (LDAP) Settings).
Test SMTP button
Clicking this button validates the configuration.
Test results will be presented, validating the SMTP relay settings.
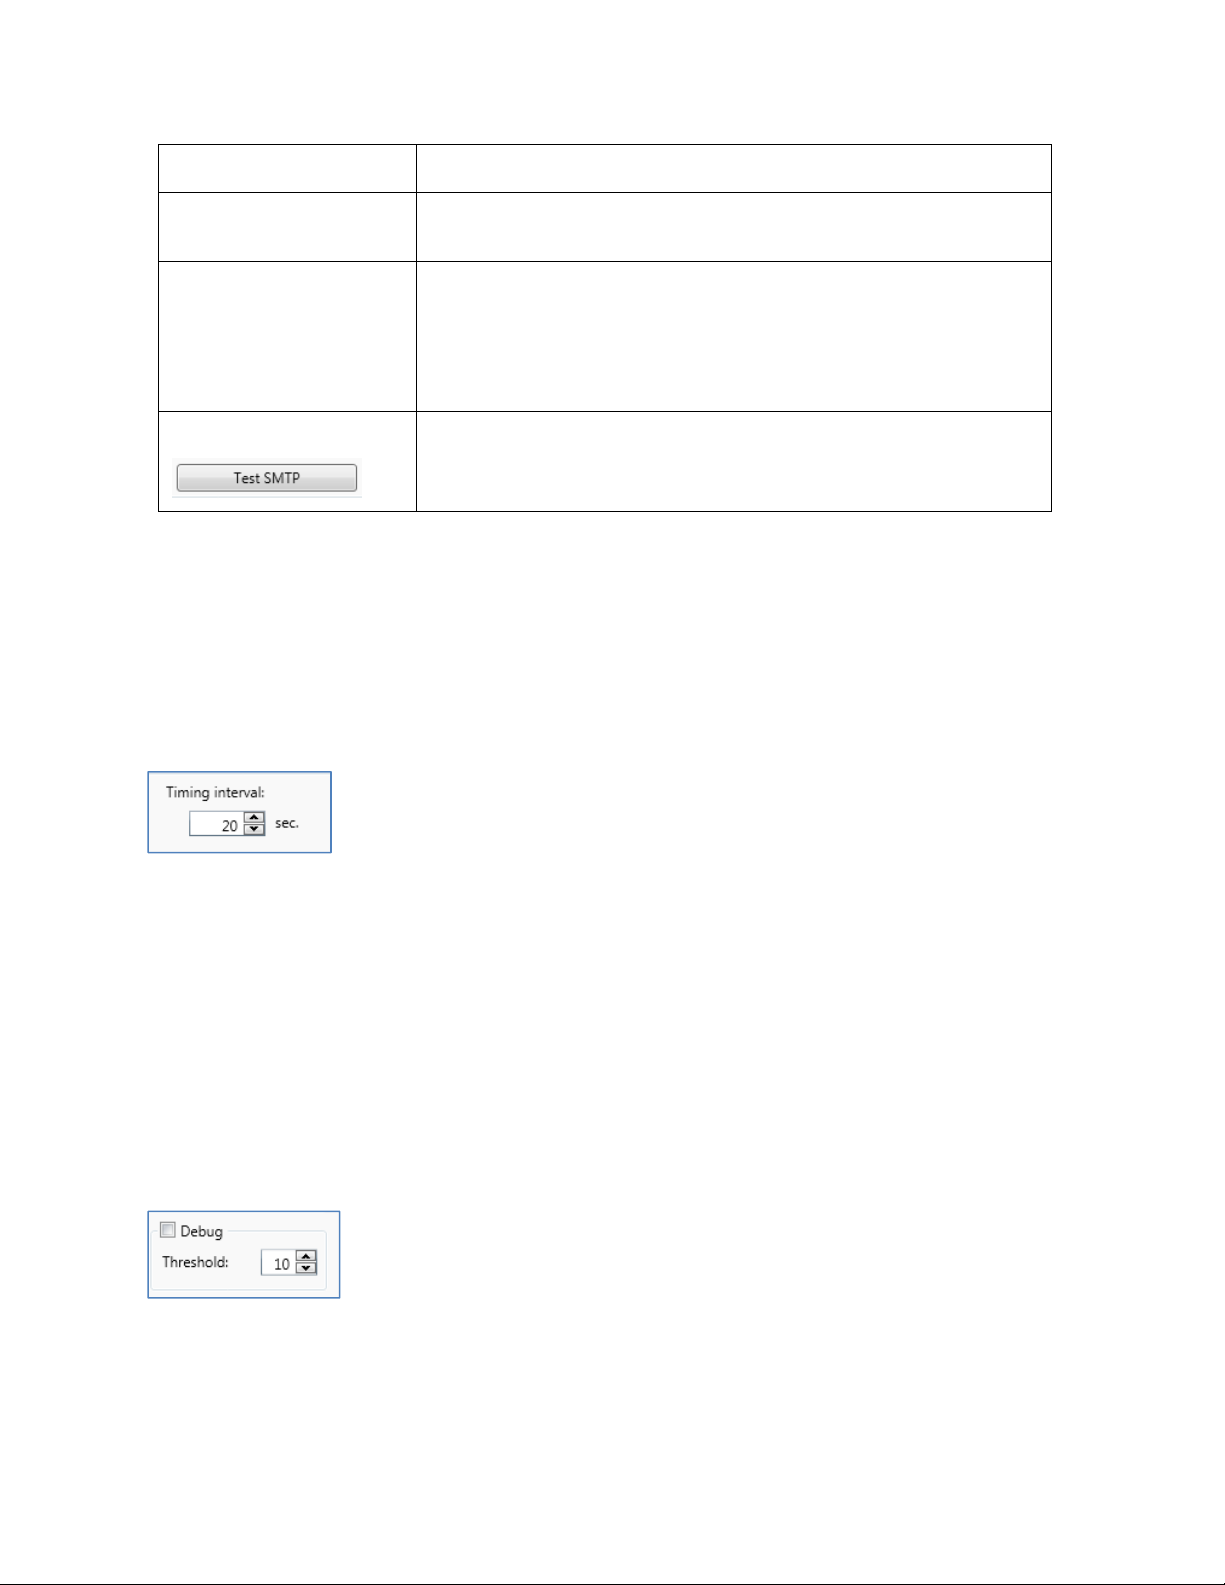
Timing Interval Settings
The “Timing interval” setting is configured in seconds. This determines how frequently ConnectKey for
SharePoint will process the scanned documents. It will not impact the frequency or speed of scanning.
The following field is edited to define the timing interval for the service:
Debug Setting
The “Debug” setting is a toggle setting that can be enabled and can have a granularity level
associated with it. The debug setting controls how much information is displayed in the ConnectKey
Status Monitor and written to the connectkey.log file. This information is used for troubleshooting
purposes and contains a variety of information such as date/time of a scan, network address of the
MFP, user info, and other data, as well as the success or failure of a scan workflow. Increasing the
level from 1 to 10 will increase the amount of information and level of detail for the status
information displayed/written. If the debug setting is disabled, some information will still be
written/displayed, but at the minimum level allowable by ConnectKey for SharePoint.
2-14 Xerox® ConnectKey for SharePoint
Administrator Guide
 Loading...