

Page 1

Xerox Wide Format 721P
Printer
Operator Manual
701P39415 April 2003
Page 2

Page 3

TABLE of CONTENTS
Table of contents
Safety Notes ............................................................................................................................................................. v
EMC Notices ............................................................................................................................................... vii
Australia/New Zealand..........................................................................................................................vii
European Union .................................................................................................................................... vii
Canada ................................................................................................................................................. vii
Japan ................................................................................................................................................... viii
USA...................................................................................................................................................... viii
1. Introduction .................................................................................................................................................1
Organization And Content Of This Manual ...................................................................................................2
Terminology Used In This Manual ................................................................................................................2
Conventions Used In This Manual ................................................................................................................3
2. Specification................................................................................................................................................5
Product Specifications...................................................................................................................................5
Media Specifications .....................................................................................................................................6
Room Space Requirements..........................................................................................................................7
Serial Number Location.................................................................................................................................7
3. Printer Overview..........................................................................................................................................9
Printer Orientation .........................................................................................................................................9
Main Components .......................................................................................................................................10
Operator Panel & Status Display ................................................................................................................13
Media and Toner Status Panel ...................................................................................................................14
Online/Offline ..............................................................................................................................................15
Job Cancel ..................................................................................................................................................16
4. Media ..........................................................................................................................................................17
Adding Media Rolls .....................................................................................................................................17
Loading The Roll Media (Roll 1, 2 & 3) .......................................................................................................18
Loading The Roll Media (Roll 4) .................................................................................................................20
Loading The Roll Media When Printing ......................................................................................................22
Dehumidifier ................................................................................................................................................23
Using Manual Bypass Feed ........................................................................................................................24
5. Care ............................................................................................................................................................25
When The Toner Cartridge Needs Replacement .......................................................................................25
Replacing The Toner Cartridge...................................................................................................................26
Cleaning The Charge Scorotron W ire .........................................................................................................28
Cleaning The LED Print Head .....................................................................................................................29
Cleaning The Printer Surface......................................................................................................................30
Ordering supplies ........................................................................................................................................31
Supply order list ....................................................................................................................................31
Supply order procedure ........................................................................................................................31
6. Problem Solving ........................................................................................................................................33
Media Jams .................................................................................................................................................33
Clearing Media Jam (J-01 & J-02) ........................................................................................................34
Clearing Media Jam (J-03) ...................................................................................................................36
Clearing Media Jam (J-04) ...................................................................................................................38
Clearing Media Jam (J-05) ...................................................................................................................40
Clearing Media Jam (J-11 & J-12) ........................................................................................................41
Clearing Media Jam (J-13 & J-14) ........................................................................................................43
Clearing Media Jam (J-22) ...................................................................................................................44
Error Codes.................................................................................................................................................45
Printer Errors (E-XX).............................................................................................................................45
Door Open Errors (U-XX) .....................................................................................................................46
Thumping Noise in Standby..................................................................................................................46
Image Quality Problem Solving...................................................................................................................47
Xerox Wide Format 721P operator manual
iii
Page 4

TABLE of CONTENTS
7. User Modes ................................................................................................................................................49
User Mode 1 (Test Print) “U1” ..............................................................................................................49
User Mode 2 (Date and Time setting) “U2”...........................................................................................51
User Mode 3 (Low Power Saver Mode) “U3” .......................................................................................53
User Mode 4 (High Power Saver Mode) “U4”.......................................................................................55
User Mode 5 (Media Cut At Power ON) “U5” .......................................................................................57
User Mode 6 (Detack Lamp Control Mode) “U6” ..................................................................................58
User Mode 7 (Attention Beeper Enable Mode) “U7”.............................................................................59
User Mode 8 (Custom Setting Plain Paper) “U8” .................................................................................60
User Mode 9 (Custom Setting Vellum/Tracing Paper) “U9” .................................................................61
User Mode A (Custom Setting Film) “UA” ............................................................................................62
User Mode b (Image Enhancement) “Ub” ............................................................................................63
iv XEROX WIDE FORMAT 721P OPERATOR MANUAL
Page 5

TABLE of CONTENTS
Safety Notes
Your Xerox Wide Format 721P Engineering Printer has been
designed and tested to meet strict safety requirements. These
include safety agency examination and approval and compliance
to established environmental standards.
Please read the following instructions carefully before operating
the Xerox Wide Format 721P Engineering Printer and refer to them
as needed to ensure the continued safe operation of the product.
Follow all warnings and instructions marked on or supplied with the
product.
Unplug the printer from the wall outlet before cleaning the exterior.
Always use materials specifically designated for the Xerox Wide
Format 721P Engineering Printer. Use of other materials may
result in poor performance and could create a hazardous situation.
Do not use aerosol cleaners. Follow the instructions in this
operator manual for the proper cleaning methods.
Never use supplies or cleaning materials for purposes other than
what they were intended. Keep all supplies and materials out of
the reach of children.
Do not use this product near water, wet locations, or outdoors.
This product is equipped with a three-wire, grounding-type plug
(i.e., a plug having a grounding pin). This plug will only fit into a
grounding-type power outlet. This is a safety feature. To avoid the
risk of electric shock, contact your electrician to replace the
receptacle if you are unable to insert the plug into the outlet.
Never use a ground adapter plug to connect the printer to a power
source that lacks a ground connection terminal.
This product should be operated from the type of power source
indicated on the marking label. If you are not sure of the type of
power available, consult your local power company.
The power supply cord is the disconnect device for this equipment.
Make sure that the installation is near the socket outlet and is
easily accessible.
Do not allow anything to rest on the power cord. Do not locate the
printer where someone will step on the cord.
Slots and openings in the cabinet and in the back and bottom of
the printer are provided for ventilation. To ensure reliable
operation of the printer and to protect it from overheating, these
openings should never be placed near a radiator or heat register.
The printer should not be placed in a built-in installation unless
proper ventilation is provided.
Never push objects of any kind into the slots of the printer as they
may touch dangerous voltage points or short out parts that could
result in a risk of fire or electric shock.
Never spill liquid of any kind on the printer.
XEROX WIDE FORMAT 721P PRINTER OPERATOR MANUAL
v
Page 6

INTRODUCTION
Never remove any covers or guards that require a tool for removal.
There are no operator serviceable areas within these covers.
Never attempt any maintenance function that is not specified in
this operator manual.
Never defeat interlock switches. Machines are designed to
prevent operator access to unsafe areas. Covers, guards, and
interlock switches are provided to ensure that the system will not
operate with the covers opened.
Unplug the printer from the wall outlet and refer servicing to
qualified service personnel under the following conditions:
When the power cord is damaged or frayed.
If liquid has been spilled into the product.
If the printer has been exposed to rain or water.
If the printer is producing unusual noises or odors.
If the printer or the cabinet has been damaged.
If you need additional safety information concerning the Xerox
Wide Format 721P Engineering Printer or XEROX supplied
materials, you may call :
Within the United States:
1-800-828-6571 toll free
In other countries:
Please call your local XEROX service office for help.
vi XEROX WIDE FORMAT 721P PRINTER OPERATOR MANUAL
Page 7

EMC Notices
Australia/New Zealand
European Union
INTRODUCTION
Changes or modifications to this equipment not specifically
approved by Fuji XEROX Australia PTA. Limited may void the
user’s authority to operate this equipment.
Shielded cables must be used with this equipment to maintain
compliance with the Radio communications Act 1992.
WARNING
This is a Class A product. In a domestic environment this
product may cause radio interference in which case the user
may be required to take adequate measures.
Changes or modifications to this equipment not specifically
approved by XEROX Europe may void the user’s authority to
operate this equipment.
Canada
Shielded cables must be used with this equipment to maintain
compliance with the EMC Directive (89/336/EEC).
WARNING
In order to allow this equipment to operate in proximity to
Industrial, Scientific and Medical (ISM) equipment, the
external radiation from ISM equipment may have to be limited
or special mitigation measures taken.
This Class "A" digital apparatus complies with Canadian ICES-
0003.
Cet appareil numérique de la classe "A" est conforme à la norme
NMB-003 du Canada.
XEROX WIDE FORMAT 721P PRINTER OPERATOR MANUAL vii
Page 8

INTRODUCTION
Japan
USA
This is a Class A product based on the standard of the Voluntary
Control Council for Interference by Information Technology
Equipment (VCCI). If this equipment is used in a domestic
environment, radio disturbance may arise. When such trouble
occurs, the user may be required to take corrective actions.
Changes or modifications to this equipment not specifically
approved by Fuji XEROX Limited may void the user’s authority to
operate this equipment.
Shielded cables must be used with this equipment to maintain
compliance with the Voluntary Control Council for Interference by
Information Technology Equipment regulations.
This equipment has been tested and found to comply with the
limits for a Class A digital device, pursuant to Part 15 of the FCC
Rules. These limits are designed to provide reasonable protection
against harmful interference when the equipment is operated in a
commercial environment. This equipment generates, uses, and
can radiate radio frequency energy and, if not installed and used in
accordance with the instruction manual, may cause harmful
interference to radio communications. Operation of this equipment
in a residential area is likely to cause harmful interference in which
case the user will be required to correct the interference at his own
expense.
Changes or modifications to this equipment not specifically
approved by the XEROX Corporation may void the user’s authority
to operate this equipment.
Shielded cables must be used with this equipment to maintain
compliance with FCC regulations.
viii XEROX WIDE FORMAT 721P PRINTER OPERATOR MANUAL
Page 9

Introduction
1. Introduction
Congratulations on acquiring your new XEROX Wide Format 721P
Engineering Printer. Team XEROX looks forward to supporting
and helping you to increase your organizational productivity. The
integrated features, ease of operation, and reliability of the XEROX
Wide Format 721P Engineering Printer will allow you to
concentrate on your business and leave the printing to your
XEROX Wide Format 721P Engineering Printer.
This operator manual provides information that you need to
operate the XEROX Wide Format 721P Engineering Printer and
use its features. Your XEROX support group is available to you for
further assistance. Call our experts at the appropriate phone
number listed below.
The following information will be needed when you call XEROX:
Customer Account:
Machine Type: XEROX Wide Format 721P Engineering Printer
Serial Number:
FOR SERVICE ON YOUR Wide Format 721P Engineering
Printer:
North America and Canada: 1-877-937-3627
All Other Countries:
A Customer Service Support Representative will assist you in
keeping your XEROX Wide Format 721P Engineering Printer
operating and, if required, will arrange for a Customer Service
Engineer to inspect your system and restore its performance.
FOR PURCHASE OF OTHER XEROX EQUIPMENT AND
SUPPLIES:
Local Number
A XEROX Sales Representative will assist you in evaluating your
needs for other xerographic equipment that can further increase
your productivity.
XEROX WIDE FORMAT 721P PRINTER OPERATOR MANUAL 1
Page 10

INTRODUCTION
Organization And Content Of This Manual
The XEROX Wide Format 721P OPERATOR MANUAL provides
the information you need to become familiar with the components,
features, operation, and specifications of your printer. It contains
the following chapters:
Chapter 1 Introduction
This chapter shows the organization of this manual as well as the
contents, terminology, and conventions used in this manual.
Chapter 2 Specification
This chapter contains product and media specifications, as well as
space requirements for operation of the printer.
Chapter 3 Printer overview
This chapter shows the orientation of the printer. It illustrates and
describes the main components of the printer and the operator
panel.
Chapter 4 Media
This chapter explains what happens when a media roll empties
and how to load a media roll. It provides the procedure for using
cut sheet media and describes the dehumidifier.
Chapter 5 Care
This chapter contains instructions for replacing the toner cartridge
and cleaning the Charge Scorotron, the LED Head and the Printer
Surface.
Chapter 6 Problem solving
This chapter provides the procedures for clearing jams. It contains
a description of the error codes. For problems you are unable to
resolve by using this manual, it also explains the procedure for
placing a service call.
Chapter 7 User Modes
11 User Modes are described and available to the Operator.
Terminology Used In This Manual
Printer
Whenever the term "printer" appears in this manual, it refers to the
XEROX Wide Format 721P Engineering Printer.
SEF
LEF
2 XEROX WIDE FORMAT 721P PRINTER OPERATOR MANUAL
Short Edge Feed
Long Edge Feed
Page 11

Conventions Used In This Manual
This manual uses the following conventions:
INTRODUCTION
Bold
WARNING: A WARNING indicates an operation, maintenance procedure,
CAUTION: A CAUTION encourages strict compliance with an operation,
NOTE: A NOTE highlights an operating or maintenance procedure, a
Boldface characters in the middle of a text string refer to selections
on the control panel (for example, "press the Enter key").
practice, condition or statement that, if not strictly followed, could
result in personal injury. When included within a procedure,
warnings always precede the step to which they refer.
maintenance procedure, practice, condition or statement to
prevent damage to the equipment. When included within a
procedure, cautions always precede the step to which they refer.
condition or a statement.
XEROX WIDE FORMAT 721P PRINTER OPERATOR MANUAL 3
Page 12

INTRODUCTION
This page is intentionally blank.
4 XEROX WIDE FORMAT 721P PRINTER OPERATOR MANUAL
Page 13
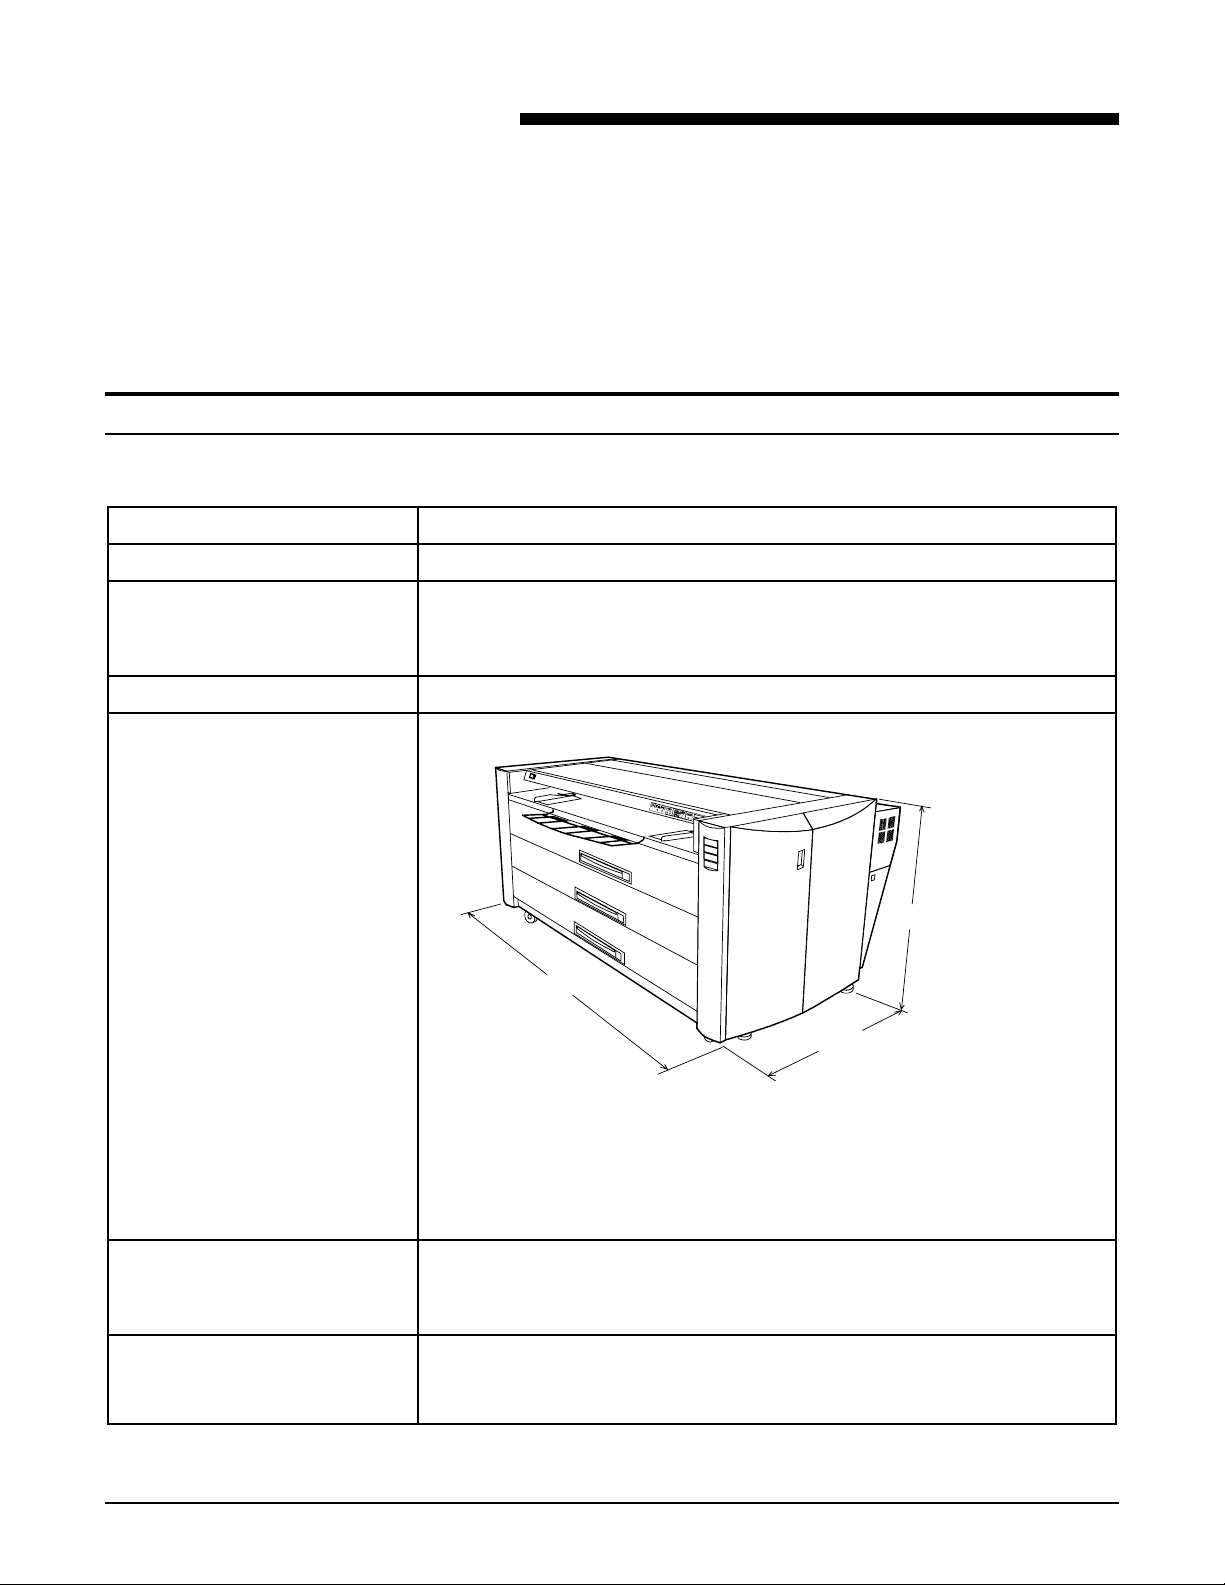
2. Specification
This chapter provides the product and media specifications for the
XEROX Wide Format 721P Engineering Printer. It also provides
the space requirements for normal operation after product
installation.
Product Specifications
Process speed 240mm per second
Resolution 400 dpi
Environmental requirements Minimum: 50° F (10° C) at 20% relative humidity
Maximum: 90.5° F (32.5° C) at 82.5% relative humidity
Maximum elevation: 6,667 feet ( 2000 meters)
Weight 880 lbs. (400 kg)
Dimensions
P
E
P
R
A
E
D
C
K
W
I
E
-
L
E
C
R
N
A
MF
P
1
-
E
X
3
N
A
2
LE
C
4
D1
T
C
U
S
E
I
X
T
E
T
EC
L
D2
P
F
D3
O
C
D
Y
P
D4
T
I
E
NS
Y
M
U
N
E
©
¨
*
N
E
R
TE
T
E
SE
R
34.8 in.
57.1 in.
39.4 in.
Width: 57.1 in. (1,450mm)
Depth: 39.4 in. (1,003mm)
Height: 34.8 in. (884mm)
Audible noise Less than 70db (Printing) (Except impact noise such as cutter working
sound)
Less than 55db (Stand by)
Power consumptionTypical power consumption for US 220-240V @ 20A:
Standby – 900 watts
Operating – 3000 watts
XEROX WIDE FORMAT 721P PRINTER OPERATOR MANUAL 5
Page 14

SPECIFICATION
Media Specifications
Media type Recommended media types:
Bond – 20 lb. (90 gsm)
Vellum/Tracing – 20 lb. (90 gsm)
Film – 4 mil thickness
Media size Roll feed:
Width – 11 to 36 inches ( 279 to 914 mm)
Length – 500 ft ( 175 M)
Roll Diameter– 175mm maximum
Core diameter – 3 inches (76 mm)
Manual Bypass Feed:
Maximum Width – 36 in. (E SEF) 914mm (A0)
Minimum Width - 11 in. (A LEF) 279mm (A4)
Print size Minimum – 11 in. x 8.5 in. (A LEF) (A4)
Maximum – 36 in. x 48 in. (E SEF) (A0)
Maximum Length – 5 times the standard length (6M for 36 “ bond media
only)
6 XEROX WIDE FORMAT 721P PRINTER OPERATOR MANUAL
Page 15
Room Space Requirements
66 in. (1676 mm)
57.1 in.
(1450 mm)
35 in.
(914 mm)
721p
39.4 in.
(1000 mm)
48 in. (1220 mm)
SPECIFICATION
The illustration below shows the space requirements for normal
operation of the printer after installation.
Room Space Requirements
Height – 96 in. (2438 mm)
(minimum)
Width – 157 in. (3988 mm)
Depth – 153.5 in. (3894 mm)
Room Air Change
153.5 in.
(3895 mm)
65 in.
(1651 mm)
Requirements
(for Ozone Dissipation)
Air should be cycled 5 times per
hour (minimum)
157 in. (3988 mm)
Serial Number Location
All North America XEROX Wide Format 721P
Printers start with an LML prefix, followed by
several more digits.
(European XEROX Wide Format 721P Printer
serial numbers are numbers only.)
Please have the serial number available when
calling for XEROX service.
XEROX
SER# LML XXXXXXX
XEROX WIDE FORMAT 721P PRINTER OPERATOR MANUAL 7
Page 16

SPECIFICATION
This page is intentionally blank.
8 XEROX WIDE FORMAT 721P PRINTER OPERATOR MANUAL
Page 17
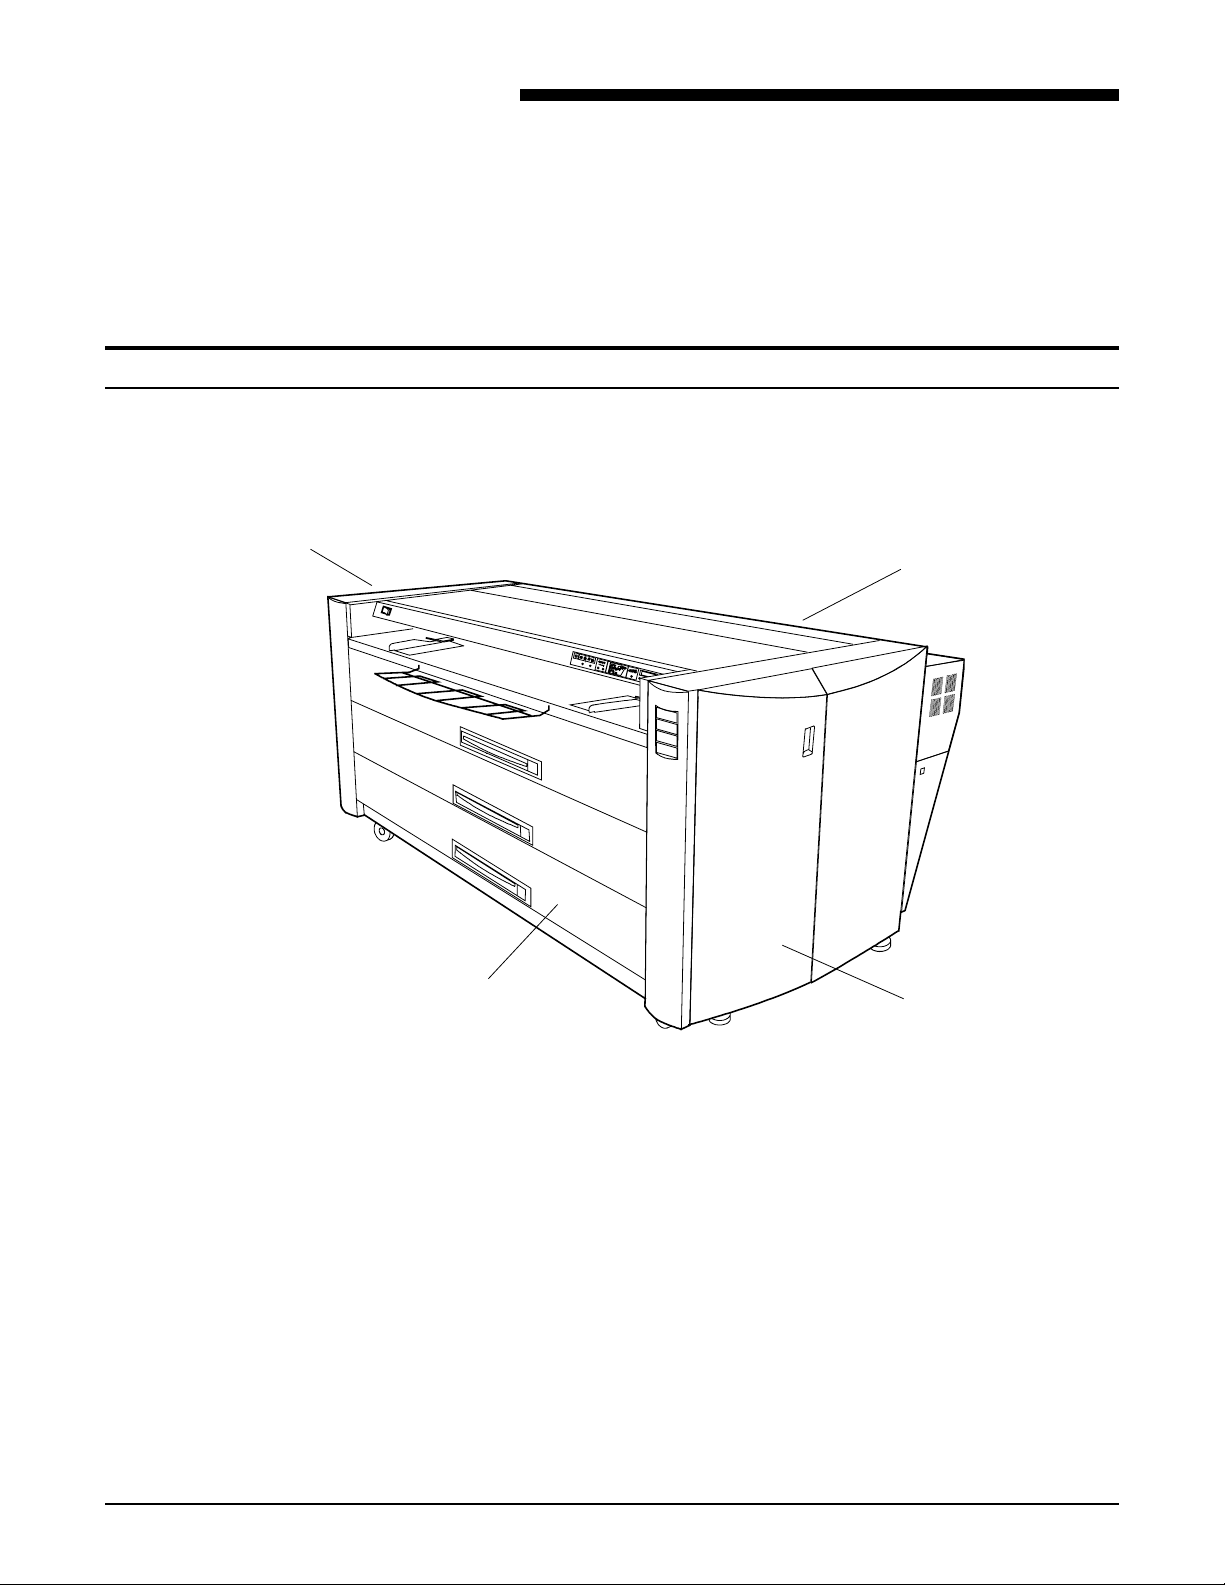
Printer Orientation
3. Printer Overview
This chapter shows the orientation of the printer. It also illustrates
and describes its main components, as well as the elements of the
operator panel.
The illustration below shows the printer orientation. You must be
familiar with this orientation when following the messages in the
message display and the instructions in this guide.
2
3
P
A
P
E
R
D
E
K
C
W
I
R
E
-
C
LE
A
N
MF
E
X
P
-
1
C
LE
A
N
2
3
4
D
1
C
UT
S
E
L
EC
T
E
XI
T
D2
D
3
PF
C
O
P
Y
D4
D
E
NS
I
T
Y
M
EN
U
©
¨
*
N
E
T
E
R
R
E
S
E
T
1
4
1.
2.
3.
4.
Front Side
Left Side
Rear Side
Right Side
XEROX WIDE FORMAT 721P PRINTER OPERATOR MANUAL 9
Page 18
PRINTER OVERVIEW
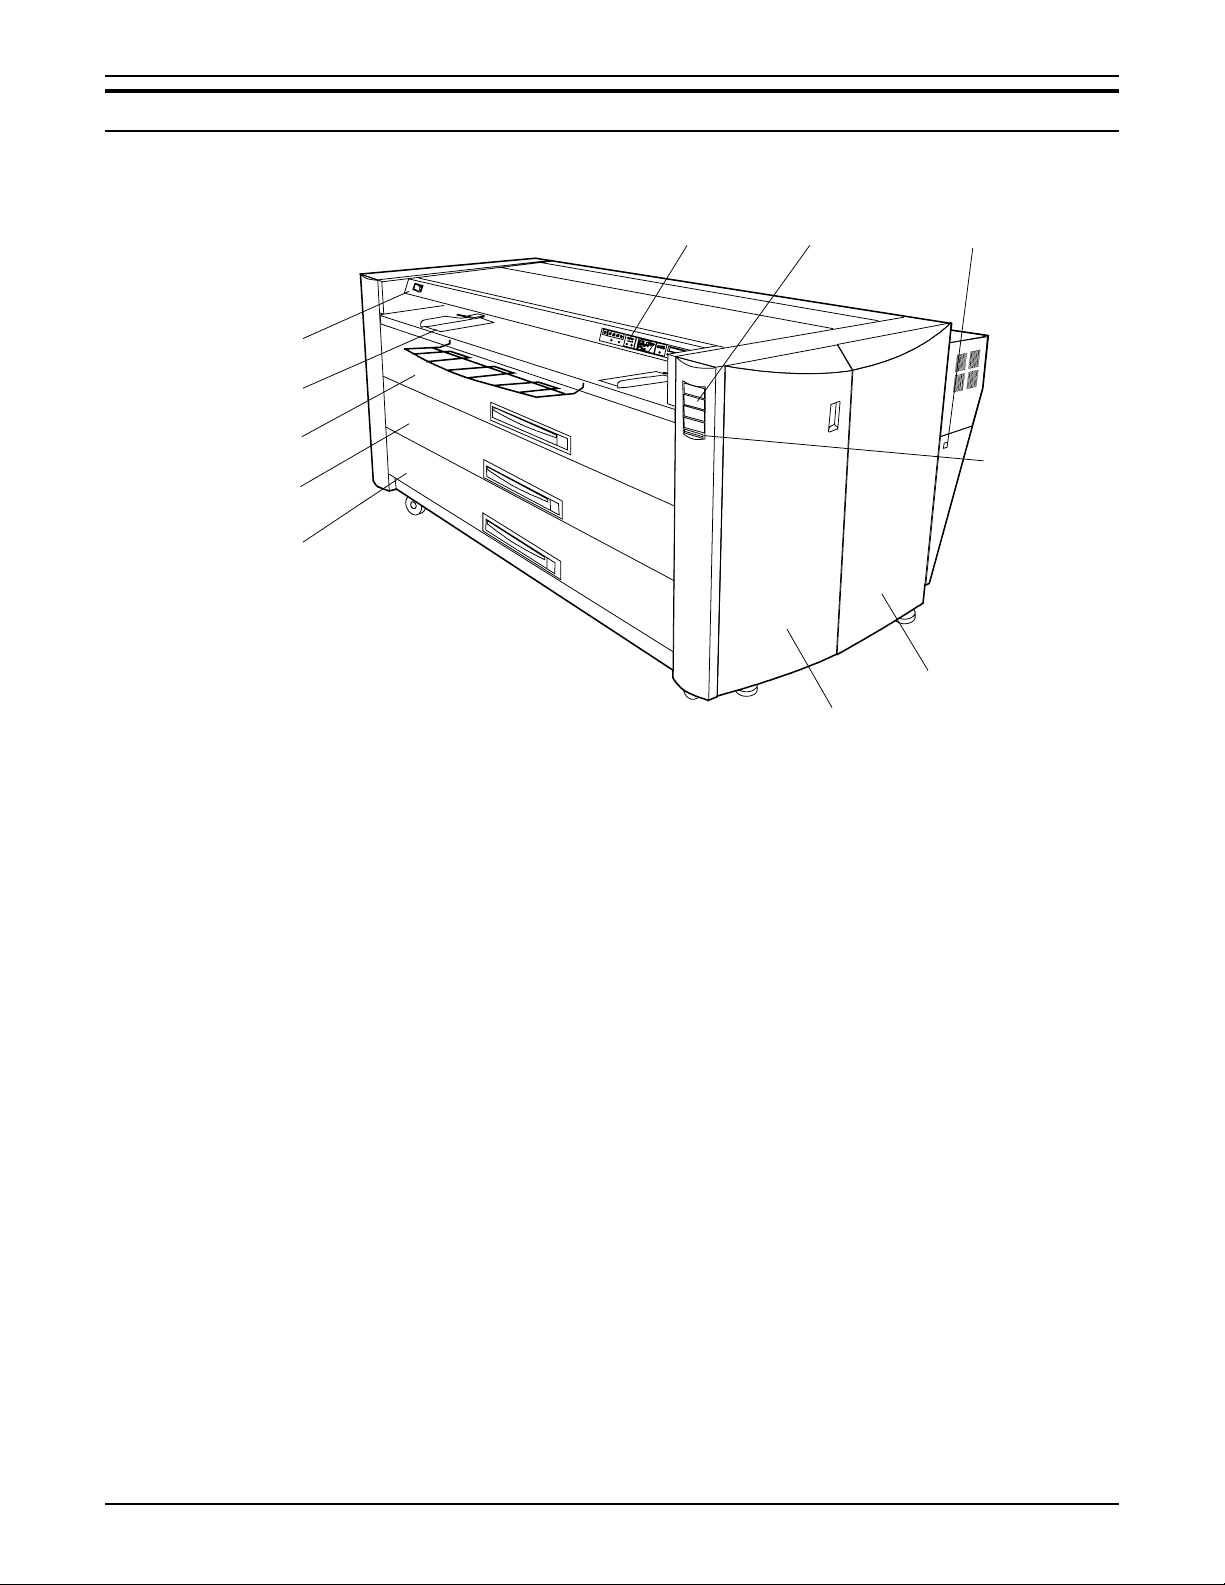
Main Components
Front Side View
10
P
A
R
P
E
D
E
C
K
W
-
E
I
R
A
CL
E
N
MF
P
X
E
1
N
A
LE
-
C
2
3
4
D1
C
UT
S
I
X
E
T
L
EC
T
E
D2
PF
1
D3
C
Y
O
P
NS
E
D
4
D
I
Y
T
M
U
EN
©
¨
*
TE
N
E
R
R
E
S
T
E
9
11
2
3
8
4
5
6
7
1. Power On/Off Switch
2. Media Guide
3. Top Drawer (Roll 1)
4. Middle Drawer (Roll 2)
5. Bottom Drawer
(Roll 3 &4)
6. Right Hand Door
7. Left Hand Door
8. Toner Display Panel
9. Media Display
10. Operator Panel &
Status Display
11.
Controller Switch
Press to switch the printer on and off.
Adjust to size of cut sheet media in manual bypass mode.
Open to load media roll and clear media jams.
Open to load media roll and clear media jams.
Open to load media rolls and clear media jams.
Open to clear media jams.
Open to add toner.
Displays the amount of toner remaining in the toner cartridge.
Shows roll width and selected media.
Operation keys to select a media drawer and other status
indicators.
Press to switch the controller on and off.
10 XEROX WIDE FORMAT 721P PRINTER OPERATOR MANUAL
Page 19
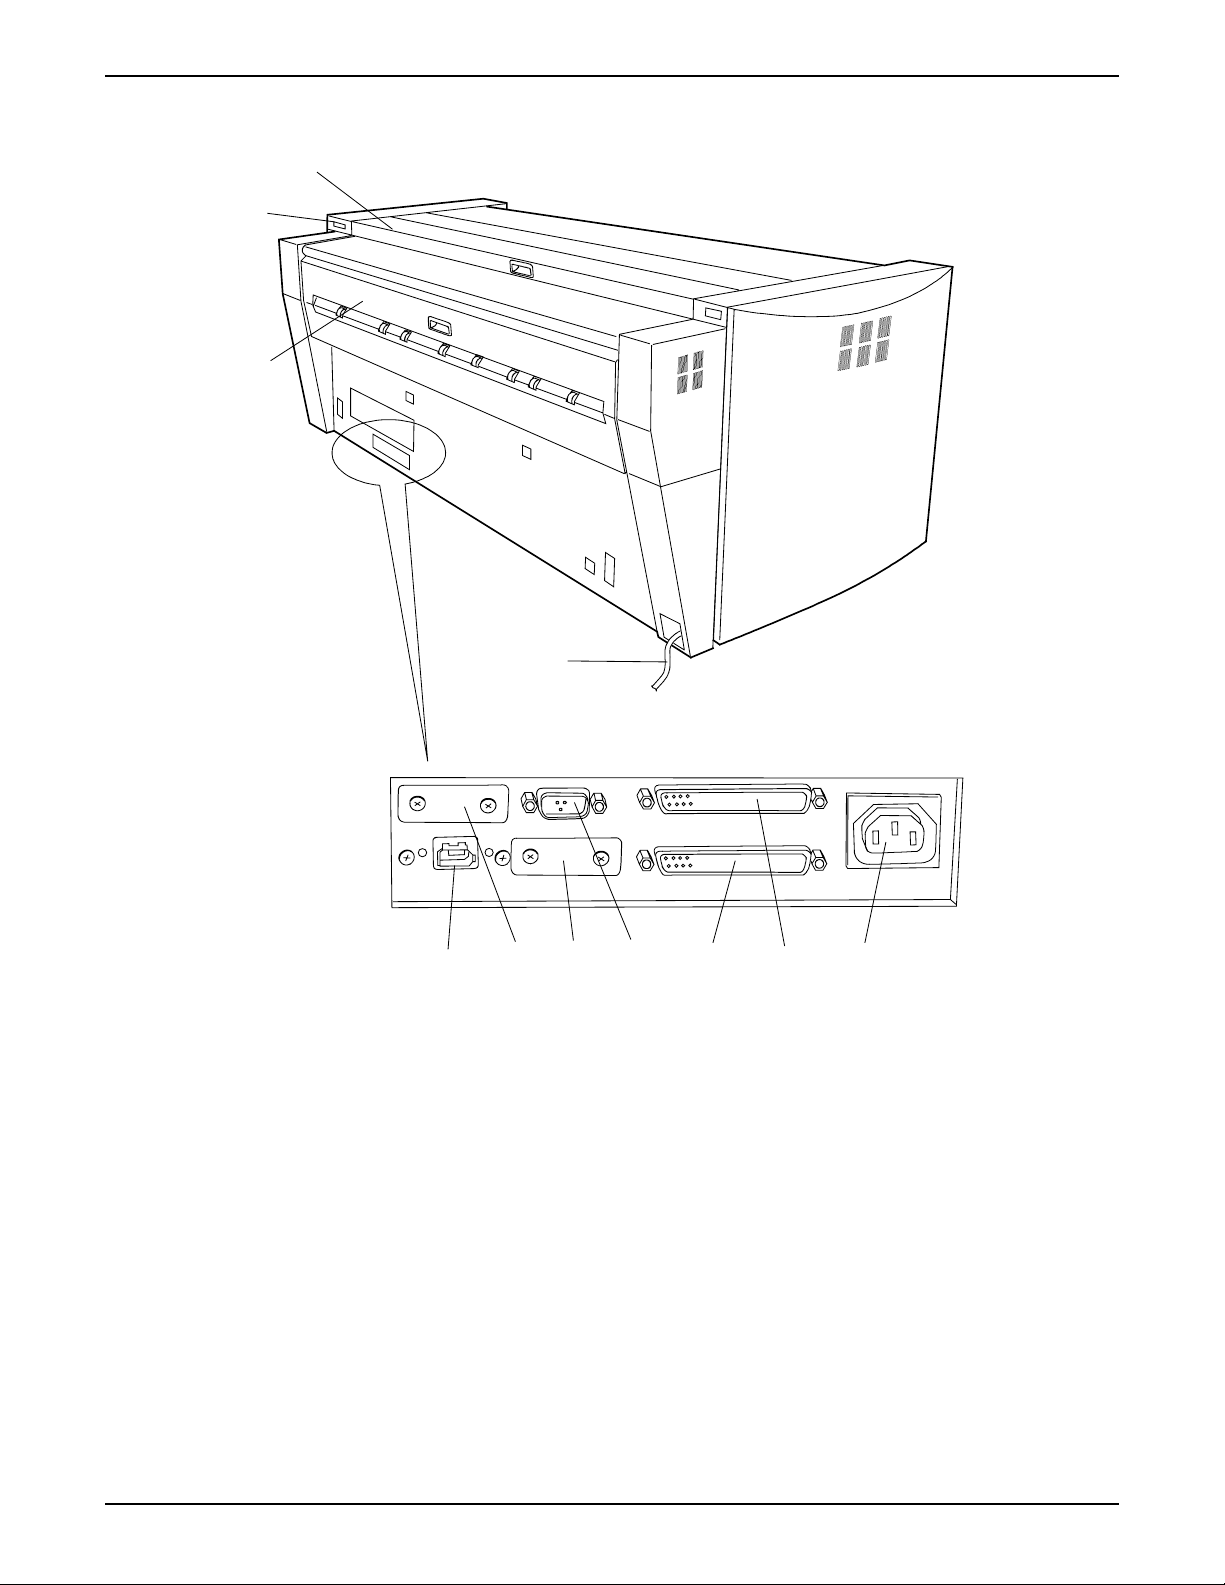
Rear Side View
PRINTER OVERVIEW
1
2
3
FOLDER DIAG. IF- VIII (CH-B)
CONT. ( IEEE1394) COM1 IF-VII I ( CH- A) POWER
11 10 9 8 7 6 5
1. Top Rear Cover
2. I/F Connector for Scanner
(IEEE1394)
3. Exit Cover
4. Power Cord
5. Power (220 VAC)
6. I/F VIII (CH-B)
4
Pull the handle and open to clear media jams.
Connect the cable from scanner here.
Open to clear media jams.
Connect to a suitable power outlet.
Connect the power cable from the controller here.
Connect the Interface Cable from the AccXES Controller here.
(37 pins) (Not Used)
7. I/F VIII (CH-A)
Connect the Interface Cable from the AccXES Controller here.
(37 pins)
8. DIAG
9. COM1
10. FOLDER
11. CONT. (IEEE1394)
XEROX WIDE FORMAT 721P PRINTER OPERATOR MANUAL 11
Service use only.
Not Used
Not Used
Connect the Interface Cable from the AccXES Controller.
Page 20
PRINTER OVERVIEW
Right Side View
1
4
5
3
2
1. Toner Cartridge
2. Media Cutter
3. Cutter Home Indicator
4. Meter A - Billing
6
7
Replace when Status Display indicates that the cartridge is empty.
Turn to cut media during jam clearance.
As the cutter knob is rotated, the cutout color will change from
RED to GREEN when the home position is reached. (DO NOT
rotate counter-clockwise)
Square Counter for billing purposes.
5. Meter B - Service
6. Inner Transport Unit
7. Service Record Cover
12 XEROX WIDE FORMAT 721P PRINTER OPERATOR MANUAL
Linear Counter for service purposes.
Open to clear media jams.
Contains service information.
Page 21
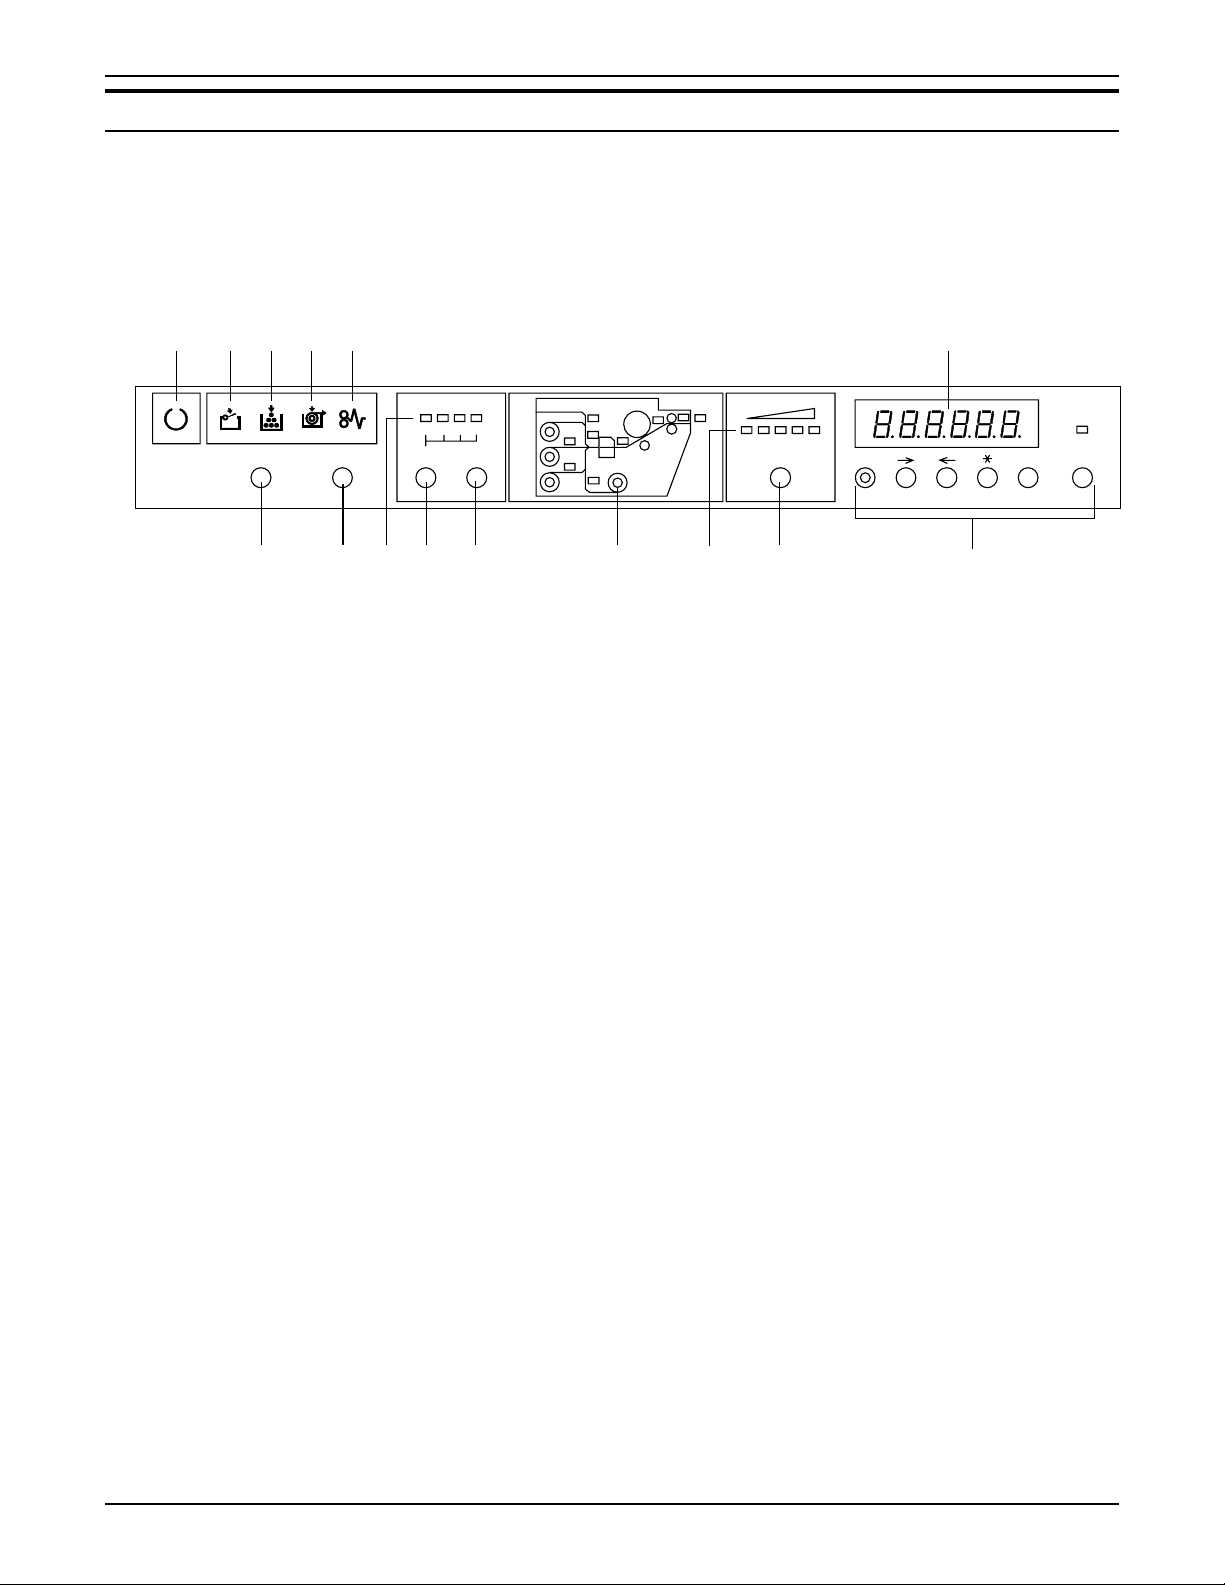
Operator Panel & Status Display
PRINTER OVERVIEW
The operator panel is located on top of the front side of the printer.
It consists of a graphic display, a message display and several
function keys.
1
23
1. Ready Indicator
4
5
Paper Deck
3
2
1
Exp- CleanWire-Clean
6
7
Sele ct
8910 11
Cut
MF
4
D1
D2
D3
D4
Exit
PF
12
Copy Density
13
Menu
15
Ente r Onli ne
14
Flashes when the printer is warming up, and remains on steady
when the printer is ready to operate.
2. Door Open Indicator
This indicator flashes and an error code is displayed when a door
is opened, or the Inner Transport Unit is opened.
3. Toner Empty Indicator
This indicator flashes when the toner level is low.
When the toner supply is empty, the indicator is on steady and no
more prints can be made.
You can replace the Toner cartridge even if the printer is
operating.
4. Media Empty Indicator
This indicator flashes when the selected media roll is depleted.
5. Media Jam Indicator
6. Wire-Clean key
7. Exp-Clean key
8. Media Roll Indicator
9. Select key
10. Cut key
11. Media Jam Location
Indicator
12. Copy Density Indicator
13. Copy Density Key
14. Menu, ®, ¬, *, Enter,
Online
15. Status Display
This indicator flashes when media is jammed in the printer.
The Charge Scorotron Wire is cleaned when this key is pressed.
The Ready Indicator flashes during the cleaning process.
Lens Array of LED Print Head is cleaned when this button is
pressed. Ready Indicator flashes during the cleaning process.
Displays the selected media roll for lead edge cut when the
SELECT key is pressed.
Press this key to select the media roll desired for a lead edge cut.
Press this key to feed and cut 240mm of the lead edge of the
selected roll.
Indicates the location where Jam has occurred.
The selected Print Density level is illuminated.
Use this key to temporarily increase or decrease the image
density.
These keys are used for changing User Modes described in
Chapter 7. The Online Key is also used to place the printer Offline
and Online.
Error Codes, Status Codes and messages are displayed here.
XEROX WIDE FORMAT 721P PRINTER OPERATOR MANUAL 13
Page 22
PRINTER OVERVIEW
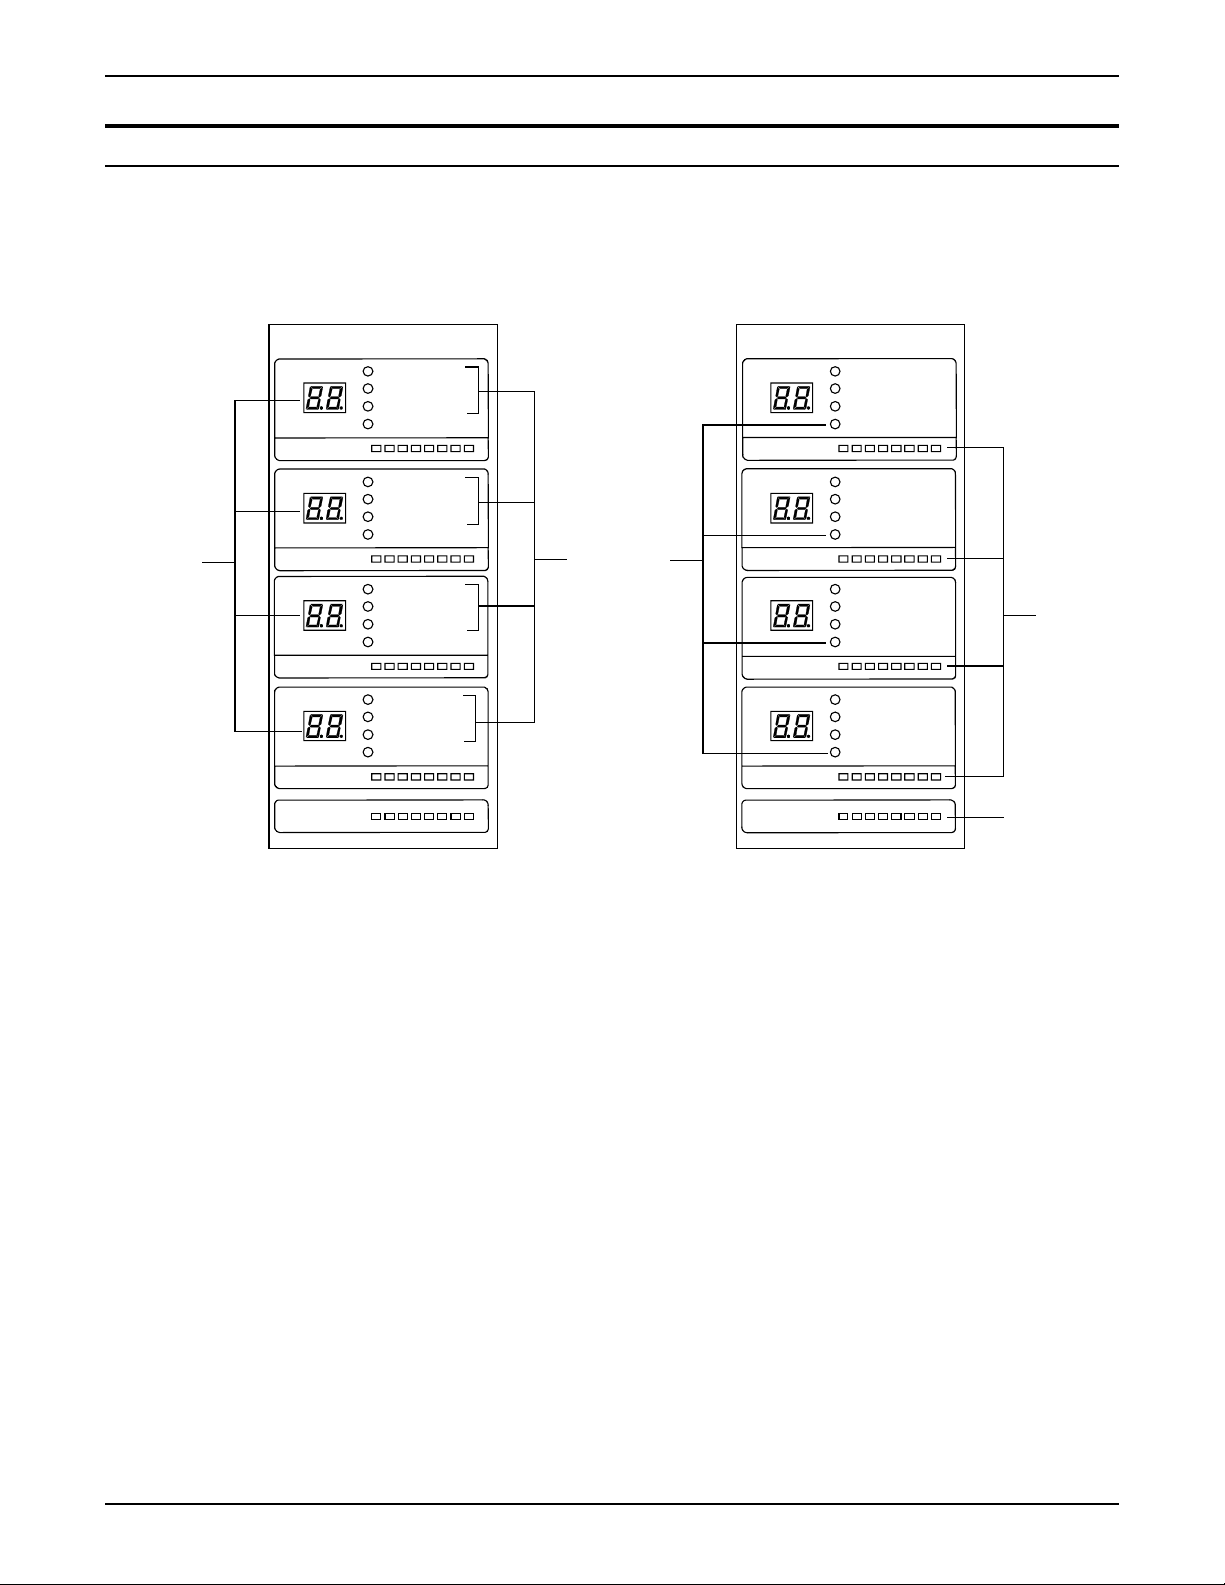
Media and Toner Status Panel
The Media and Toner Panel is located on the front right face of the
printer. It displays the size of the media, the type of the media, the
media in use, and how much media and toner is remaining.
1
Roll Level
2
1
Roll Level
3
Roll Level
4
Roll Level
Toner Level
Plain Paper
Vellum/Tracing
Film
In Use
Plain Paper
Vellum/Tracing
Film
In Use
Plain Paper
Vellum/Tracing
Film
In Use
Plain Paper
Vellum/Tracing
Film
In Use
1
Roll Level
2
2
3
Roll Level
3
Roll Level
4
Roll Level
Toner Level
Plain Paper
Vellum/Tracing
Film
In Use
Plain Paper
Vellum/Tracing
Film
In Use
Plain Paper
Vellum/Tracing
Film
In Use
Plain Paper
Vellum/Tracing
Film
In Use
4
5
1. Roll Size Displays
2. Media Type Indicators
Displays the size of the roll media.
Displays “Plain Paper”, ”Vellum/Tracing” or ”Film” depending on
the media loaded in the drawer.
3. In Use Indicators
Illuminates to indicate that the drawer is “In Use”. Even if the
printer is in the print cycle, you can replace media rolls 1, 3 and 4 if
“In Use” indicator is off. Also, the drawer in use is identified in the
message display as “-dx-” (x being the drawer number).
4. Roll Level Indicators
This indicator displays the remainder of roll media. Lamps will go
off from right to left as the remainder of media diminishes.
5. Toner Level Indicator
This indicator displays the remainder of toner in the toner
cartridge. Lamps will go off from right to left as the remainder of
toner diminishes.
14 XEROX WIDE FORMAT 721P PRINTER OPERATOR MANUAL
Page 23

Online/Offline
1. Press the Online Key to take the printer Offline. The green LED light will go off, the page in
2. To return the printer to the Online Mode, press the Online Key. The green LED will light and
PRINTER OVERVIEW
To take the printer Offline:
process will finish and the printer will enter the Offline Mode. Print jobs are still accepted to
the job queue.
the printer will return to the Online Mode.
Paper Deck
3
2
1
Exp-Cle anWire-Clean
Sele ct
Cut
MF
4
D1
D2
D3
D4
Exit
PF
Copy Densi ty
Menu
Ente r
Online
1
XEROX WIDE FORMAT 721P PRINTER OPERATOR MANUAL 15
Page 24

PRINTER OVERVIEW
Job Cancel
To cancel the job currently printing:
1. Press the Online Key to take the printer Offline.
2. Press and hold the Enter key until the green LED light above
the Online Key flashes three times and three beeps sound.
3. The printer will complete the page in process and the printer
will stop printing. The current job will be canceled.
4. When returned Online, the next job in the job queue will
begin.
5. Repeat the process (Steps 1 – 4) to cancel the next job in
the queue
Paper Deck
3
2
1
Exp-Cle anWire-Clean
Sele ct
Cut
MF
4
D1
D2
D3
D4
Exit
PF
Copy Densi ty
Menu
Ente r
Online
12
16 XEROX WIDE FORMAT 721P PRINTER OPERATOR MANUAL
Page 25

Adding Media Rolls
4. Media
This chapter provides the following information:
· The procedure for loading roll media into the media drawers
· The procedure for bypassing the media drawers and manually
feeding pre-cut sheets into the printer
· An explanation of the dehumidifier feature.
For information about the media sizes and types that the printer
can accommodate, refer to the "Specification" chapter of this
manual.
When roll media in use is empty, the Media Empty Indicator on the
Operation Panel remains on steady.
To load a new roll media, follow the instructions in the "Loading
The Roll Media" sections of this chapter.
Media Empty Indicator
Paper Deck
1
Exp-Cl eanWir e-C lea n
Select
NOTE: Roll sizes 880 mm, 891 mm and 900 mm can be loaded in Media
Drawer 1 only. The printer is set for 900 mm size. To enable
880 mm or 891 mm sizes, contact XEROX Service.
NOTE: B3 media should not be loaded in drawer 1. If B3 media is loaded
in drawer 1, the printer will report the size as either A3 or 11”
media.
2
Cut
D1
D2
D3
MF
4
3
Exit
PF
D4
Copy Density
Menu
Enter Onlin e
XEROX WIDE FORMAT 721P PRINTER OPERATOR MANUAL 17
Page 26

MEDIA
Loading The Roll Media (Roll 1, 2 & 3)
1. Pull the handle and open the desired drawer.
2. Rewind the media remaining on the roll.
NOTE:
Even if it is not necessary to rewind the roll media, rotate the
spindle in the rewind direction. Failure to perform this may cause
the gear at the left end of the spindle to be broken.
3. Hold the roll at both ends and lift the roll out of the drawer.
The spindle must remain parallel when removed.
Failure to keep the spindle parallel may cause the gear at the left
end to break.
4. Press the green lever at the end of the spindle.
5. Slide the spindle out of the media core.
420
728
515
594
841
CAUTION
Slit
Cutter
6. Press the green locking lever and insert the spindle into the
new roll of media.
7. Align the edge of the media with the appropriate width
dimension on the spindle.
NOTE: To ensure that the media roll will not slip on the spindle, lift
420
515
594
728
841
up on the green lever after the roll is in position. This action
provides a positive grip on the media core.
NOTE: To avoid unnecessary strain, load the heaviest roll in the
top drawer and the lightest rolls in the bottom drawer.
8. Hold the roll at both ends and place the roll into the drawer.
9. If the leading edge of the roll media is taped, cut more than
22” (550mm) to eliminate the possibility of glue from the tape
contaminating internal printer components. If the leading edge
is torn, folded, or very ragged, cut the leading edge using a
sharp blade and the slit mounted to the inside of the drawer.
18 XEROX WIDE FORMAT 721P PRINTER OPERATOR MANUAL
Page 27

MEDIA
10. Insert the lead edge of the media between the upper and
lower feed rollers.
11. Rotate the lower roller by hand in order to feed an inch (25
mm) of media between the rollers.
Roll 3 only:
12. Rotate the lower feed roller until the lead edge is visible in the
center of the viewing hole.
Belt
13. Set the switches for the series and type of media you have
loaded, from rear to front:
· Arch. (12”, 18”, 24”, 30”, 36”, rolls) or Ansi. (11”, 17”, 22”, 34"
rolls)….(Rear)
841
· Plain Media
· Vellum
Plain
paper
Tracing
paper
Film
· Film (Front)
NOTE:
14. Ensure that the rubber-tracking belt is underneath the plastic
roller on the right side of the media spindle. If the belt is not
correctly positioned, the printer will indicate an out-of-media
condition.
15. Push in the drawer until it is closed and latched.
16. If the leading edge is not sufficiently square, perform the
automatic initial cut by pressing the [Select] key to select the
appropriate drawer, and then pressing [Cut] key.
Approximately 9.5” (240mm) media will be cut and fed from
the printer.
XEROX WIDE FORMAT 721P PRINTER OPERATOR MANUAL 19
Page 28

MEDIA
Loading The Roll Media (Roll 4)
1. Pull the handle and open drawer 3/4.
Rewind the media remaining on the roll.
NOTE:
Even if it is not necessary to rewind the roll media, rotate the
spindle in the rewind direction. Failure to perform this may cause
the gear at the left end of the spindle to be broken.
2. Hold the roll at both ends and lift the roll out of the drawer.
The spindle must remain parallel when removed.
CAUTION
Failure to keep the spindle parallel may cause the gear at the left
end to break.
3. Press the green lever at the end of the spindle.
4. Slide the spindle out of the media core.
Slit
420
728
515
594
841
5. Press the green locking lever and insert the spindle into the
new roll of media.
6. Align the edge of the media with the appropriate width
dimension on the spindle.
NOTE: To ensure that the media roll will not slip on the spindle, lift
420
515
594
728
841
up on the green lever after the roll is in position. This action
provides a positive grip on the media core.
NOTE: To avoid unnecessary strain, load the heaviest roll in the
top drawer and the lightest rolls in the bottom drawer.
7. Hold the roll at both ends and place the roll into the drawer.
8. If the leading edge of the roll media is taped, cut more than
22” (550mm) to eliminate the possibility of glue from the tape
contaminating internal printer components. If the leading edge
is torn, folded, or very ragged, cut the leading edge using a
sharp blade and the slit mounted to the inside of the drawer.
Cutter
20 XEROX WIDE FORMAT 721P PRINTER OPERATOR MANUAL
Page 29

Knob
MEDIA
9. Insert the lead edge of the media between the upper and
lower feed rollers.
10. Rotate the green knob in order to feed an inch (25 mm) of
media between the feed rollers.
Belt
11. Set the switches for the series and type of media you have
loaded, from rear to front:
· Arch. (12”, 18”, 24”, 30”, 36”, rolls) or Ansi. (11”, 17”, 22”, 34"
841
rolls) (Rear)
· Plain Media
Plain
paper
Tracing
paper
Film
· Vellum
· Film (Front)
NOTE:
12. Ensure that the rubber-tracking belt is underneath the plastic
roller on the right side of the media spindle. If the belt is not
correctly positioned, the printer will indicate an out-of-media
condition.
13. Push the drawer in until it is closed and latched.
14. If the leading edge is not sufficiently square, perform the
automatic Initial Cut by pressing the [Select] key to select the
appropriate drawer, and then pressing [Cut] key.
Approximately 9.5” (240mm) media will be cut and fed from
the printer.
XEROX WIDE FORMAT 721P PRINTER OPERATOR MANUAL 21
Page 30

MEDIA
Loading The Roll Media When Printing
Rolls 1, 3 and 4 may be loaded when the printer is operating. Roll
2 can NOT be loaded when the printer is operating.
First, ensure that the roll is NOT currently being used by observing
that the “In Use” indicator is OFF for the roll to be loaded and the
message display does not indicate that the roll is in use (“-dx-“, x
being the roll number).
Next, follow the Loading Roll Media instructions as normal.
22 XEROX WIDE FORMAT 721P PRINTER OPERATOR MANUAL
Page 31

Dehumidifier
MEDIA
The printer is equipped with media heaters, which, when enabled,
maintain the media at a constant temperature. The heaters
operate at night and in high-humidity conditions in order to avoid
moisture-related problems with the media such as wrinkling and
deletions in the print.
XEROX Service can enable the heaters to operate in one of three
modes:
1. Off all the time
2. Off when printer is switched on. The heaters will continue to
operate when the printer is switched off, as long as the printer
is connected to a live power outlet.
3. On all the time.
If XEROX Service has enabled the media heaters, the heaters can
be switched on or off by the Operator as environmental conditions
change:
Top Rear Cover
Switch
1. Open the Top Rear Cover in order to locate the Dehumidifier
Switch.
2. Set the switch to the correct position for humid or dry
conditions:
· In humid conditions, the dehumidifier switch should be set to
the “1” position.
· In dry conditions, the dehumidifier switch should be set to the
“0” position.
XEROX WIDE FORMAT 721P PRINTER OPERATOR MANUAL 23
Page 32

MEDIA
Using Manual Bypass Feed
When the desired media is not loaded in the printer, you can
bypass the media drawers and manually load cut sheet media into
the printer.
To manually feed cut sheets into the printer:
1. Select the appropriate cut sheet for the print job.
NOTE:
The printer will accept any media type, regardless of the media
type specified. Ensure that the media type is correct or the toner
image may rub off of the print as the printer uses media type to
determine fusing temperature.
Paper Guide
2. Adjust the media guides to the correct size.
3. Feed the cut sheet media squarely into the printer, curl side
down and between the guides. For media 24” or wider, the
printer will pre-feed the sheet into the feeder. For media
smaller than 24”, the printer will feed the media when the print
job starts.
841mm or wider (greater than 24”): 1 sheet only
279mm (11”) to 609mm (24”) width: up to 50 sheets (457mm 18 inch length maximum) fed long edge
NOTE: Install the wire form holder tray for paper larger than
18” (447mm).
4. From the client workstation or the scanner, specify Manual
Feed as the media source.
5. Submit the print job or scan the document.
24 XEROX WIDE FORMAT 721P PRINTER OPERATOR MANUAL
Page 33

5. Care
The printer requires minimum operator maintenance. You will
need to replace the toner cartridge when the cartridge empties.
You also will need to clean the outside surface of the printer when
necessary.
This chapter provides the procedures for performing the required
tasks and for ordering supplies.
When The Toner Cartridge Needs Replacement
When the toner cartridge is empty, the “Toner Empty” indicator on
the Operation Panel flashes.
The printer will continue to operate during a low toner condition.
However, when the “Toner Empty” light remains on continuously,
the printer will not operate.
The toner cartridge can be replaced even when the printer is
operating.
Toner Empty Indicator
Toner Enpty Indicator
Wir e-Cl ean
Exp-Clean
Paper Deck
2
1
Select
To replace the toner cartridge, follow the instructions in the
"Replacing the Toner Cartridge" sections of this chapter.
3
Cut
D1
D2
D3
D4
MF
4
Exit
PF
Copy Density
Menu
Enter
Online
XEROX WIDE FORMAT 721P PRINTER OPERATOR MANUAL 25
Page 34

CARE
Replacing The Toner Cartridge
Toner cartridges are supplied as part of a kit, which contains eight
toner cartridges.
Store the remaining toner cartridges in a cool, dry place until they
are required.
The Toner Cartridge can be replaced when the printer is operating.
CAUTION
The Xerox Wide Format 721P printer has a unique toner supply
system. Use of toner or toner cartridges not specifically designed
for the Xerox Wide Format 721P printer may not produce the same
quality and may cause service problems or damage to the unit.
Such damage will void warranty and maintenance agreements and
may require additional service cost.
1. Open the Left Door.
Status Code U-06 is displayed in the message display.
Left Hand Door
Toner Cartridge
2. Rotate the toner cartridge 180 degrees.
3. Pull down on the left end of the toner supply mechanism and
remove the cartridge.
Toner supply mechanism
26 XEROX WIDE FORMAT 721P PRINTER OPERATOR MANUAL
Page 35

CARE
4. Shake the new cartridge several times in order to prepare the
contents for use and remove the foam band from the cartridge.
DO NOT apply pressure to the center of the cartridge. Toner will
spill from the ends of the cartridge.
5. Install the cartridge into the toner supply mechanism while
keeping the sealed opening on the upper side of the cartridge.
6. Close the toner supply mechanism.
Sealed opening
7. Rotate the toner cartridge 90 degrees as shown to access the
seal, then gently remove the seal by pulling to the left.
NOTE: If the cartridge is in any other position, toner will spill from
the cartridge.
8. Continue to rotate the toner cartridge to it’s full down position.
9. Close the Left Door.
Status Code U-06 will go out.
The Toner Level Display on the front panel will scroll until the
new level is read. Then the new toner level will be displayed.
10. Dispose of the empty cartridge properly by sealing the opening
of the cartridge with tape or put the cartridge in a plastic bag
before discarding.
XEROX WIDE FORMAT 721P PRINTER OPERATOR MANUAL 27
Page 36

CARE
Cleaning The Charge Scorotron Wire
Periodic cleaning of the Charge Scorotron Wire will reduce print
quality problems such as light prints or deletions in the print
caused by accumulation of toner inside the printer.
NOTE: The Wire Cleaning is performed automatically when the
printer is switched on.
Wir e-C lea n
Wi re- Cl ean
Exp-Clean
Paper Deck
2
1
Select
3
Cut
D1
D2
D3
D4
MF
4
Exit
PF
Wire-Clean
Press this key to
clean the Charge Scorotron Wire if there is no message in the
Status Display.
A “-C-“ will be displayed during the cleaning process.
NOTE:
It will take approximately 2 minutes for the cleaning process.
Copy Density
Menu
Enter
Onli ne
28 XEROX WIDE FORMAT 721P PRINTER OPERATOR MANUAL
Page 37

Cleaning The LED Print Head
CARE
Periodic cleaning of the LED Print Head will reduce print quality
problems such as light prints or deletions in the print caused by the
accumulation of toner inside the printer.
NOTE: The LED Print Head Cleaning is performed automatically
when the printer is switched on.
Exp- CleanWire-Clean
Exp- Clean
Paper Deck
2
1
Select
3
Cut
D1
D2
D3
MF
4
Exit
PF
D4
Exp-Clean
Press this key to clean the Lens Array of the LED Print Head if
there is no message in the Status Display.
A “-C-“ will be displayed during the cleaning process.
NOTE:
It will take approximately 2 minutes for the cleaning process.
Copy Density
Menu
Enter Onl ine
XEROX WIDE FORMAT 721P PRINTER OPERATOR MANUAL 29
Page 38

CARE
Cleaning The Printer Surface
As needed, clean the outside surfaces of the printer. Use a clean
cloth dampened with mild soap and water. Do not pour or spray
liquid directly on any part of the printer.
30 XEROX WIDE FORMAT 721P PRINTER OPERATOR MANUAL
Page 39

Ordering supplies
CARE
This section provides information for obtaining supplies for your printer.
Supply order list
The XEROX Wide Format 721P uses the following supplies:
· Toner cartridge
The printer is shipped with eight toner cartridges. When ordering,
use the following part number:
6R1141
Xerox also offers bond paper, vellum/tracing paper, and film in
various sizes, weights, and grades to meet your printing needs.
Supply order procedure
To order supplies for the XEROX Wide Format 721P, call:
North America and Canada: 1-877-937-3627
When ordering supplies, please be prepared to provide the
following information to the sales representative:
· Customer account number: ___________________________
· Machine type: XEROX Wide Format 721P
· Item descriptions/part numbers and quantities required
For more information, follow the Wide Format Solutions link at
WWW.Xerox.Com.
XEROX WIDE FORMAT 721P PRINTER OPERATOR MANUAL 31
Page 40

CARE
This page is intentionally blank.
32 XEROX WIDE FORMAT 721P PRINTER OPERATOR MANUAL
Page 41

Media Jams
6. Problem Solving
This chapter provides information for resolving various problems
that can occur during the operation of the printer. It contains
instructions for clearing media jams and also includes the error
code list. If you are unable to resolve the problem, follow the
procedure for calling for service at the end of this chapter.
When the printer experiences a media jam, the following occur:
· The Media Jam Indicator flashes.
· An error code “J-XX” and Media Jam Location Indicator
flashes.
Paper Jam Indicator
Media Jam Indicator
Wir e-C lea n
J- 0 2
J- 0 3
J- 0 5
J- 0 1
J- 0 4
Exp-Cl ean
J- 1 2
J- 1 1
Paper Deck
2
1
Select
J- 1 4
J- 1 3
Media Jam Location
Paper Jam Location Indicator
MF
4
3
Cut
D1
D2
D3
To clear the jam:
Observe the location of the flashing indicator light on the Media
Jam Location Indicator.
Follow the instructions in this chapter to clear the jam.
Error Code
Error Cord
Exit
PF
D4
Copy Density
Menu
Enter
Onli ne
XEROX WIDE FORMAT 721P PRINTER OPERATOR MANUAL 33
Page 42

PROBLEM SOLVING
Clearing Media Jam (J-01 & J-02)
When a jam J-01 occurs, the media jams while feeding from Roll 1
in the top drawer.
Cutt er
handle
Fuser
Handle
Inner Transport handl e
Down Lock
MF
D1
D2
D3
D4
Exit
PF
Copy Density
Menu
Enter Onl ine
When a jam J-02 occurs, the media jams while feeding from Roll 2
in the middle drawer.
MF
D1
D2
D3
D4
Exit
PF
Copy Density
Menu
Enter Onl ine
1. Open the drawer indicated by the jam code.
2. Open the Right Side Door and turn the Inner Transport
Assembly handle to release the transport. Lower and lock the
transport by engaging the Down Lock.
3. If the media is not cut and the leading edge of the media has
reached the Drum or beyond the Drum, rotate the Cutter
handle to cut the media. Continue rotating the cutter handle
so that the green home position indicator appears in the cut
out.
4. If the leading edge of the media has reached the Fuser Unit,
open the Exit Cover and remove the jammed media by
rotating the Fuser Handle.
Slit
5. Release the Down Lock while holding the handle of Inner
Transport Assembly and lift it up gently until it stops. Then
twist the handle to the left to move the transport to the home
position. Finally, turn the handle to the right to lock the
transport.
6. Manually rewind the roll until the lead edge of the media is free
of the feed rollers.
7. Trim the lead edge of the roll square to remove any torn or
wrinkled media by using the “Slit” if necessary.
Cutter
34 XEROX WIDE FORMAT 721P PRINTER OPERATOR MANUAL
Page 43

PROBLEM SOLVING
8. Insert the lead edge of the media between the upper and
lower feed rollers.
9. Rotate the lower feed roller by hand in order to feed an inch of
media between the feed rollers.
10. Press the [Online] Key to take the printer Offline (LED Off).
11. Push in the drawer until it is closed and latched.
12. If the leading edge is not sufficiently square, perform the
automatic Initial Cut by pressing the [Select] key to select the
appropriate drawer, and then pressing [Cut] key.
Approximately 9.5” (240mm) media will be cut and fed from
the printer.
13. Press the [Online] key to return the printer Online (LED On).
XEROX WIDE FORMAT 721P PRINTER OPERATOR MANUAL 35
Page 44

PROBLEM SOLVING
Clearing Media Jam (J-03)
When a jam J-03 occurs, the media jams while feeding from Roll 3
in the bottom drawer.
Cutt er
handle
Fuser
Handle
Inner Transport handl e
Down Lock
MF
D1
D2
D3
D4
Exit
PF
Copy Density
Menu
Enter Onli ne
1. Open the bottom drawer.
2. Open the Right Side Door and turn the Inner Transport
Assembly handle to release the transport. Lower and lock the
transport by engaging the Down Lock.
3. If the media is not cut and the leading edge of the media has
reached the Drum or beyond the Drum, rotate the Cutter
handle to cut the media. Continue rotating the cutter handle
so that the green home position indicator appears in the cut
out
4. If the leading edge of the media has reached the Fuser Unit,
open the Exit Cover and remove the jammed media by
rotating the Fuser Handle.
5. Release the Down Lock while holding the handle of Inner
Transport Assembly and lift it up gently until it stops. Then
twist the handle to the left to move the transport to the home
position. Finally, turn the handle to the right to lock the
transport.
Slit
6. Manually rewind the roll until the lead edge of the media is free
of the feed rollers.
7. Trim the lead edge of the roll square to remove any torn or
wrinkled media by using the “Slit” if necessary.
Cutter
36 XEROX WIDE FORMAT 721P PRINTER OPERATOR MANUAL
Page 45

PROBLEM SOLVING
8. Insert the lead edge of the media between the upper and
lower feed rollers.
9. Rotate the lower feed roller by hand until the lead edge of the
media is visible in the center of the viewing hole.
10. Press the [Online] Key to take the printer Offline (LED Off).
11. Push in the drawer until it is closed and latched.
12. If the leading edge is not sufficiently square, perform the
automatic Initial Cut by pressing the [Select] key to select the
appropriate drawer, and then pressing [Cut] key.
Approximately 9.5” (240mm) media will be cut and fed from
the printer.
13. Press the [Online] key to return the printer Online (LED On).
XEROX WIDE FORMAT 721P PRINTER OPERATOR MANUAL 37
Page 46

PROBLEM SOLVING
Clearing Media Jam (J-04)
When a jam J-04 occurs, the media jams while feeding from Roll 4
in the bottom drawer.
Cutt er
handle
Fuser
Handle
Inner Transport handl e
Down Lock
MF
D1
D2
D3
D4
Exit
PF
Copy Density
Menu
Enter Onl ine
1. Open the bottom drawer.
2. Open the Right Side Door and turn the Inner Transport
Assembly handle to release the transport. Lower and lock the
transport by engaging the Down Lock.
3. If the media is not cut and the leading edge of the media has
reached the Drum or beyond the Drum, rotate the Cutter
handle to cut the media. Continue rotating the cutter handle
so that the green home position indicator appears in the cut
out.
4. If the leading edge of the media has reached the Fuser Unit,
open the Exit Cover and remove the jammed media by
rotating the Fuser Handle.
5. Release the Down Lock while holding the handle of Inner
Transport Assembly and lift it up gently until it stops. Then
twist the handle to the left to move the transport to the home
position. Finally, turn the handle to the right to lock the
transport.
Slit
6. Manually rewind the roll until the lead edge of the media is free
of the feed rollers.
7. Trim the lead edge of the roll square to remove any torn or
wrinkled media by using the “Slit” if necessary.
Cutter
38 XEROX WIDE FORMAT 721P PRINTER OPERATOR MANUAL
Page 47

Green Knob
PROBLEM SOLVING
8. Insert the lead edge of the media between the upper and
lower feed rollers.
9. Rotate the green knob in the clockwise direction in order to
feed an inch of media between the feed rollers.
10. Press the [Online] Key to take the printer Offline (LED Off).
11. Push in the drawer until it is closed and latched. If the leading
edge is not sufficiently square, perform the automatic Initial
Cut by pressing the [Select] key to select the appropriate
drawer, and then pressing [Cut] key. Approximately 9.5”
(240mm) media will be cut and fed from the printer.
12. Press the [Online] key to return the printer Online (LED On).
XEROX WIDE FORMAT 721P PRINTER OPERATOR MANUAL 39
Page 48

PROBLEM SOLVING
Clearing Media Jam (J-05)
When a jam J-05 occurs, the media jams while feeding from the
Manual Bypass Shelf.
Cutt er
handle
Fuser
Handle
Inner Transport handl e
Down Lock
MF
D1
D2
D3
D4
Exit
PF
Copy Density
Menu
Enter
1. Open the Right Side Door and turn the Inner Transport
Assembly handle to release the transport. Lower and lock the
transport by engaging the Down Lock.
2. If the media is not cut and the leading edge of the media has
reached the Drum or beyond the Drum, rotate the Cutter
handle to cut the media. Continue rotating the cutter handle
so that the green home position indicator appears in the cut
out.
3. If the leading edge of the media has reached the Fuser Unit,
open the Exit Cover and remove the jammed media by
rotating the Fuser Handle.
4. Release the Down Lock while holding the handle of Inner
Transport Assembly and lift it up gently until it stops. Then
twist the handle to the left to move the transport to the home
position. Finally, turn the handle to the right to lock the
transport.
Onlin e
P
R
E
P
A
K
C
E
D
W
-
E
R
I
N
EA
CL
MF
1
X
E
2
AN
E
CL
-
P
3
4
D1
UT
C
S
T
XI
E
T
EC
L
E
D2
PF
D3
Y
P
CO
4
D
Y
IT
NS
E
D
NU
E
M
©
¨
*
N
E
R
TE
T
SE
E
R
5. Pull to open the top drawer, middle drawer, and Manual
Bypass Shelf.
6. Remove any media from the inside of the printer.
7. Close and latch the drawers and Manual Bypass Shelf.
8. Reload the media on the Manual Bypass Shelf, curl side
down.
40 XEROX WIDE FORMAT 721P PRINTER OPERATOR MANUAL
Page 49

Clearing Media Jam (J-11 & J-12)
PROBLEM SOLVING
When a jam J-11 occurs, the media jams on the Inner Transport
Assembly.
Cutt er
handle
Fuser
Handle
Inner Transport handl e
Down Lock
MF
D1
D2
D3
D4
Exit
PF
Copy Density
Menu
Ente r
When a jam J-12 occurs, the media jams underneath the Drum.
MF
D1
D2
D3
D4
Exit
PF
Copy Density
Menu
Enter
1. Open the Right Side Door and turn the Inner Transport
Assembly handle to release the transport. Lower and lock the
transport by engaging the Down Lock.
2. If the media is not cut and the leading edge of the media has
reached the Drum or beyond the Drum, rotate the Cutter
handle to cut the media. Continue rotating the cutter handle
so that the green home position indicator appears in the cut
out.
3. Open the Manual Bypass Shelf, Drawer 1 and Drawer 2 in
order to clear the jammed media.
Onli ne
Onli ne
4. If the leading edge of the media has reached the Fuser Unit,
open the Exit Cover and remove the jammed media by
rotating the Fuser Handle.
5. Release the Down Lock while holding the handle of Inner
Transport Assembly and lift it up gently until it stops. Then
twist the handle to the left to move the transport to the home
position. Finally, turn the handle to the right to lock the
transport.
P
R
E
P
A
K
C
E
D
W
-
E
R
I
N
EA
CL
MF
1
X
E
2
AN
E
CL
-
P
3
4
D1
UT
C
S
T
XI
E
T
EC
L
E
D2
PF
D3
Y
P
CO
4
D
Y
IT
NS
E
D
NU
E
M
©
¨
*
N
E
R
TE
T
SE
E
R
6. Rewind the jammed roll until the lead edge of the media
comes free of the feed rollers.
XEROX WIDE FORMAT 721P PRINTER OPERATOR MANUAL 41
Page 50

PROBLEM SOLVING
Slit
7. Trim the lead edge of the roll square to remove any torn or
wrinkled media by using the “Slit” if necessary.
Cutter
8. Insert the lead edge of the media between the upper and
lower feed rollers and feed an inch of media between the feed
rollers.
9. Roll 3 only: Rotate the lower feed roller by hand until the lead
edge is visible in the center of the viewing hole.
10. Push in the drawer until it is closed and latched.
11. If the leading edge is not sufficiently square, perform the
automatic Initial Cut by pressing the [Select] key to select the
appropriate drawer, and then pressing [Cut] key.
Approximately 9.5” (240mm) media will be cut and fed from
the printer.
42 XEROX WIDE FORMAT 721P PRINTER OPERATOR MANUAL
Page 51

Clearing Media Jam (J-13 & J-14)
PROBLEM SOLVING
When a jam J-13 or J-14 occurs, the media jams in the Fuser
Section.
Cutt er
handle
Fuser
Handle
Inner Transport handl e
Down Lock
MF
D1
D2
D3
D4
MF
D1
D2
D3
D4
Exit
PF
Copy Density
Menu
Ente r
Exit
PF
Copy Density
Menu
Enter
1. Open the Right Side Door and turn the Inner Transport
Assembly handle to release the transport. Lower and lock the
transport by engaging the Down Lock.
2. If the media is not cut and the leading edge of the media has
reached the Drum or beyond the Drum, rotate the Cutter
handle to cut the media. Continue rotating the cutter handle
so that the green home position indicator appears in the
handle cut out.
3. If the leading edge of the media has reached the Fuser Unit,
open the Exit Cover.
Onli ne
Onli ne
WARNING
There are sharp edges on the Separation Fingers that rest against
the drum in the 3 o’clock position. Exercise caution when reaching
for the lead edge of the media.
4. Grasp the lead edge of the media.
5. Rotate the Fuser Handle while pulling on the media.
6. Release the Down Lock while holding the handle of Inner
Transport Assembly and lift it up gently until it stops. Then
twist the handle to the left to move the transport to the home
position. Finally, turn the handle to the right to lock the
transport.
A
P
E
D
R
E
P
K
C
I
W
LE
C
-
E
R
N
A
1
MF
X
E
2
LE
C
-
P
3
N
A
4
1
D
T
U
C
IT
X
E
T
EC
L
E
S
2
D
PF
D3
Y
P
O
C
D4
T
I
NS
E
D
Y
NU
E
M
©
¨
*
R
TE
N
E
E
R
T
SE
6. Open the Manual Bypass Shelf or drawer in order to clear the
jammed media.
7. Rewind the jammed roll until the lead edge of the media
comes free of the feed rollers.
XEROX WIDE FORMAT 721P PRINTER OPERATOR MANUAL 43
Page 52

PROBLEM SOLVING
Slit
8. Trim the lead edge of the roll square to remove any torn or
wrinkled media by using the “Slit” if necessary.
Cutter
9. Insert the lead edge of the media between the upper and
lower feed rollers and feed an inch of media between the feed
rollers.
10. Roll 3 only: Rotate the lower feed roller by hand until the lead
edge is visible in the center of the viewing hole.
11. Press the [Online] Key to take the printer Offline (LED Off).
12. Push in the drawer until it is closed and latched.
13. If the leading edge is not sufficiently square, perform the
automatic Initial Cut by pressing the [Select] key to select the
appropriate drawer, and then pressing [Cut] key.
Approximately 9.5” (240mm) media will be cut and fed from
the printer.
Clearing Media Jam (J-22)
14. Press the [Online] Key to return the printer Online (LED On).
MF
D1
D2
D3
Exit
PF
D4
Copy Densit y
Menu
Ente r
1. Remove the jammed media from the Stacker.
Online
44 XEROX WIDE FORMAT 721P PRINTER OPERATOR MANUAL
Page 53

Error Codes
Printer Errors (E-XX)
PROBLEM SOLVING
When a printer error “E-XX” occurs, follow the instructions below
and check the entire paper path for jams. If the problem cannot be
solved, follow the “Calling For Service” instructions located at the
end of this chapter.
Error Code
MF
D1
D2
D3
D4
Exit
PF
Copy Density
Menu
Enter Online
Error Code Cause Treatment
E-01 There is a problem with the fuser
temperature.
Press power off, then on. If problem still
exists, call for service
.
E-02 The fuser is over-temperature. Press power off, then on. If problem still
exists, call for service
.
E-05 There is a drum motor error. Clear all jams from the printer then press
power off, then on. If problem still exists,
call for service
.
E-06 There is a problem with the printer. Press power off, then on. If problem still
exists, call for service
.
E-07 There is a cutter motor error. Clear all jams from the printer then rotate
the cutter handle so that the green
indicator is in the cutout. Press power off,
then on. If problem still exists, call for
service
.
E-13 There is a paper feed motor error. Clear all jams from the printer then press
power off, then on. If problem still exists,
call for service
.
E-14 There is a fuser motor error. Press power off, then on. If problem still
exists, call for service
.
E-16 There is a wire cleaning motor error. Press power off, then on. Perform the
wire cleaning procedure again. If problem
still exists, call for service
.
E-21 There is a fuser thermostat error. Press power off, then on. If problem still
exists, call for service
.
E-23 There is an LED Head cleaning error. Press power off, then on. Perform the
LED Head cleaning procedure again. If
problem still exists, call for service
.
E-49 There is a developer position motor error. Press power off, then on. If problem still
exists, call for service
XEROX WIDE FORMAT 721P PRINTER OPERATOR MANUAL 45
.
Page 54

PROBLEM SOLVING
Door Open Errors (U-XX)
When the printer experiences a door open error, the following
occurs:
· The Door Open Indicator flashes orange.
· An error code “U-XX” flashes.
· For codes U-04 or U-14, the location of the open door is also
shown by PF or EXIT.
Door Open Indicator
Wire-Clean
Exp- Clean
Paper Deck
2
1
Selec t
PF and Exit Error Cord
3
Cut
D1
D2
D3
D4
MF
4
Exit
PF
Copy Den sity
Error Code
Menu
Error Code Cause Treatment
U-01 The Upper Drawer is open. Open and close the Upper Drawer.
U-02 The Middle Drawer is open. Open and close the Middle Drawer.
U-03 The Lower Drawer is open. Open and close the Lower Drawer.
U-04 The Inner Transport is open. Close the Inner Transport.
Note: When you turn the latch, confirm
that it is locked.
U-06 Left Door is open. Close the Left Door.
U-11 Manual Bypass Shelf is open. Open and close the Manual Bypass Shelf.
U 10 A interlock is open. Reset the Manual Bypass Shelf, Right
Door, Top Rear Cover, Exit Cover
U-12 Right Door is open. Close the Right Side Door.
Enter
Onli ne
U-13 Top Rear Cover is open. Close the Top Rear Cover.
U-14 Exit Cover is open. Close the Exit Cover.
Thumping Noise in Standby
After 30 minutes of no use, the printer will reset the developer
motor and enter an idle state. A loud “thump” noise will be heard
as the motor resets. This is normal.
46 XEROX WIDE FORMAT 721P PRINTER OPERATOR MANUAL
Page 55

Image Quality Problem Solving
Use the chart below as an aid to identifying and solving a variety of
image quality problems.
Problem Cause Solution
Portions of the prints are
deleted
Prints are light overall
Wrinkles on Tracing Paper Media may be too dry
Lines or banding on prints in
the print direction
Light or fuzzy image on film Film characteristic
Trail edge deletions
Media may be damp
The print density is too light
The image LED Print Head
and charge wire may be dirty
The image LED Print Head
may be dirty
Media 1. Check/replace the media
Image too close to trail edge
PROBLEM SOLVING
1. Check/replace the media
2. Ensure media is stored in a bag
3. Enable media heaters.
1. Increase the print density
2. Check toner supply
1. Press the exposure and wire
clean buttons
1. Ensure media is stored in a bag
2. Disable media heaters.
1. Press the exposure clean button
1. Refer to User Mode 6 and
change the detack lamp control
setting
1. Adjust image size away from trail
edge.
2. Increase the trail edge margin
setting using AccXES tools
XEROX WIDE FORMAT 721P PRINTER OPERATOR MANUAL 47
Page 56

PROBLEM SOLVING
This page is intentionally blank
48 XEROX WIDE FORMAT 721P PRINTER OPERATOR MANUAL
Page 57

7. User Modes
This chapter provides information for the 11 User Modes available
on the Xerox Wide Format 721P Printer.
User Mode 1: Test Print
User Mode 2: Date and Time
User Mode 3: Low Power Saver Mode
User Mode 4: High Power Saver Mode
User Mode 5: Media Cut At power on
User Mode 6: Detack Lamp Control Mode
User Mode 7: Attention Beeper Enable
User Mode 8: Custom Setting - Plain Paper
User Mode 9: Custom Setting – Vellum/Tracing Paper
User Mode A: Custom Setting – Film
User Mode b: Image Enhancement
User Mode 1 (Test Print) “U1”
Menu
Menu
Enter Online
Enter
Onli ne
An electronically stored test print can be printed. The pattern of
the test print and the width of the test print are preset and cannot
be changed
1. To enter User Mode 1:
Press the [Menu] Key once when the printer is in the Standby
(idle) Mode. The [Menu] Key lights green and the left side of the
Status Display indicates “U1” flashing.
2. The right side of the Status Display indicates the test print
status.
- - - (on steady): Test print mode is not available, printer warming
000 (on steady): Test print is available.
000 (flashing): Test print in process
XEROX WIDE FORMAT 721P PRINTER OPERATOR MANUAL 49
Page 58

USER MODES
Menu
Enter Online
3. Press the [Enter] Key when “000” on the Status Display is on
steady.
The test print begins and “000” on the Status Display flashes.
Menu
Menu
Menu
Enter
Enter
Enter
Onli ne
When the printer finishes the test print, “000” on the Status Display
stops flashing.
Onli ne
4. Press the [Online] Key to exit the User Mode.
Onli ne
50 XEROX WIDE FORMAT 721P PRINTER OPERATOR MANUAL
Page 59

User Mode 2 (Date and Time setting) “U2”
Enter User Mode 2 to set the correct date and time.
Note: Although there will be no performance problems if the date
and time are incorrect, the printer automatically records the date
and time errors occur. This information can be critical for service
problem solving. It is recommended the date and time be set
correctly.
1. To enter User Mode 2:
Press the [Menu] Key twice when the printer is in the Standby
Menu
Enter Onli ne
Press [Menu] twice
(idle) Mode.
The [Menu] Key lights green and the Status Display indicates “U2.”
flashing on the left side of the display.
USER MODES
Menu
Enter
2. Press the [ <-- ] Key.
Online
C6 appears in the left side of the display and the scrolling seconds
time is displayed in the right side of the display. The seconds can
now be changed.
3. To change the seconds, press [Enter].
The seconds stop scrolling and begin to flash.
4. To change the value, press the [ --> ] Key to increase the
value and [ <-- ] Key to decrease the value.
5. Press [Enter] to store the value.
There are 6 setting locations: C6 - seconds, C5 - minutes, C4 hour, C3 - day, C2 - month, C1 - year, in sequence with each
press of the [ <-- ] Key.
XEROX WIDE FORMAT 721P PRINTER OPERATOR MANUAL 51
Page 60

USER MODES
Menu
Menu
Enter Onl ine
Enter
6. 3) Press the [ <-- ] Key again to view and correct the next
location, C5 – minute.
Repeat the process to change the minutes if required
7. To change the minutes, press [Enter].
The minutes begin to flash.
8. To change the value, press the [ --> ] Key to increase the
value and [ <-- ] Key to decrease the value.
9. Press [Enter] to store the value.
Onli ne
Continue pressing the [ <-- ] Key to scroll to the remainder of the
setting locations and repeat the process until all of the time and
date corrections have been made
Hour
Year
Menu
Min ute
Menu
Month
Second
Day
Enter Online
Enter Onl ine
After the last location has been changed (C1 – year), pressing the
[ <-- ] Key again will display the corrected time.
Example: 12:00 and 30 seconds.
Pressing the [ <-- ] Key again will display the corrected date.
Example 2002, May 31
10. Press the [Online] Key to exit the User Mode.
52 XEROX WIDE FORMAT 721P PRINTER OPERATOR MANUAL
Page 61

User Mode 3 (Low Power Saver Mode) “U3”
If the Low Power Saver Mode is enabled, the printer reduces
power to the Printer Fuser Assembly from 178°C to 100°C after a
predetermined period of inactivity. If the printer does not receive a
print job or copy job for the time selected in this mode the printer
will enter the Low Power Saver Mode to save power consumption.
If a print or copy job is detected by the printer, the printer will then
enter the Warm up Mode prior to the start of the job to heat the
Fuser Assembly to 178°C.
The green LED Light inside of the Menu Button flashes when the
printer is in a power saver mode.
1. To enter User Mode 3:
Menu
Press [Menu] 3 t imes
Enter Online
Press the [Menu] Key 3 times when the printer is in the Standby
(idle) Mode.
USER MODES
Menu
Menu
Enter Onl ine
Enter
Onlin e
The [Menu] Key lights green and the Status Display indicates “U3"
flashing on the left side of the display. The right side of the display
shows the current setting (in minutes).
2. Press [Enter]
The status (on or off) is displayed. If the status is off, Low Power
Saver is disabled.
To change the status, press [Enter] and then the [ --> ] Key or the
[ <-- ] Key.
3. Press [Enter] again for access to the time interval.
The current setting (in minutes) is displayed.
The selectable ranges are 10, 15, 20, 30, 40, 50, 60, 90, 120, 180
and 240 minutes. (Factory default is On and set to 15 minutes)
To change the time, press the [ --> ] Key to increase) and the
[ <-- ] Key to decrease, then press [Enter] to save the data.
XEROX WIDE FORMAT 721P PRINTER OPERATOR MANUAL 53
Page 62

USER MODES
Menu
Menu
Enter Onl ine
Enter Online
4. After you enter the desired time interval, press the [Online]
Key to exit the User Mode.
NOTE: After 30 minutes of no use, the printer will reset the
developer motor and enter an idle state. A loud “thump” noise will
be heard as the motor resets. This is normal.
54 XEROX WIDE FORMAT 721P PRINTER OPERATOR MANUAL
Page 63

User Mode 4 (High Power Saver Mode) “U4”
When the High Power Saver Mode is enabled, the printer switches
off power to the Printer Fuser Assembly after a predetermined time
of inactivity. If the printer does not receive a print job or a copy job
for the time selected in this mode, the printer will enter the High
Power Saver Mode to save power consumption.
The High Power Saver Mode saves more power than the Low
Power Saver Mode and the recovery time is longer.
If a print or copy job is detected by the printer, the printer will then
enter the Warm up Mode prior to the start of the job to heat the
Fuser Assembly to 178°C.
The green LED Light inside of the Menu Button flashes when the
printer is in a power saver mode.
1. To enter User Mode 4:
USER MODES
Menu
Menu
Enter Onl ine
Press [Menu] 4 times
Enter Onli ne
Press the [Menu] Key 4 times when the printer is in the Standby
(idle) Mode.
The [Menu] Key lights green and the Status Display indicates “U4.”
Flashing on the left side of the display. The time interval is shown
on the right side of the display.
NOTE: Factory default is On and set to 90 minutes.
2. Press [Enter]
The status (on or off) is displayed. If the status is off, High Power
Saver is disabled.
To change the status, press [Enter] and then the [ --> ] Key or the
[ <-- ] Key.
Press [Enter] again to gain access to the time interval.
Menu
Enter Onli ne
To change the time, press [ --> ] Key to increase) and [ <-- ] Key to
decrease, then press [Enter] to save the data.
The display value is “minute”, and the selectable ranges are 10,
15, 20, 30, 40, 50, 60, 90, 120, 180 and 240.
XEROX WIDE FORMAT 721P PRINTER OPERATOR MANUAL 55
Page 64

USER MODES
Menu
Enter
3. After you enter the desired time interval, press the [Online]
Key to exit the User Mode.
Onlin e
Menu
Enter
Onli ne
NOTE: After 30 minutes of no use, the printer will reset the
developer motor and enter an idle state. A loud “thump” noise will
be heard as the motor resets. This is normal.
56 XEROX WIDE FORMAT 721P PRINTER OPERATOR MANUAL
Page 65

User Mode 5 (Media Cut At Power ON) “U5”
You can enable an Initial Media Cut at Printer Power On. If this
feature is enabled, the printer will feed and cut 240mm of all roll
media when you switch on the machine.
USER MODES
Menu
Menu
Menu
Enter Online
Press [ Menu] 5 times
Enter Onli ne
Online
Enter
1. Press the [Menu] Key 5 times when the printer is in the
Standby mode.
The [Menu] Key lights green and the Status Display indicates “U5”
flashing in the left side of the display. The current setting (0 or 1)
is displayed on the right side.
Press [Enter].
2. To change the value, press [ --> ] Key to increase) and [ <-- ]
Key to decrease then press [Enter] to save the data.
Menu
Enter
Selectable values are “0” and “1”.
0 is NO initial cut at Power On
1 is an initial cut will be made when the printer is turned On.
NOTE: Factory default is “0”, Off.
Onli ne
3. Press the [Online] Key to exit the User Mode.
XEROX WIDE FORMAT 721P PRINTER OPERATOR MANUAL 57
Page 66

USER MODES
User Mode 6 (Detack Lamp Control Mode) “U6”
If the print quality of prints made on Film media lack sharpness or
have a light overall appearance, a Detack Lamp in the print
process can be switched OFF using Mode 6. This action
increases the amount of Toner transferred to the print.
NOTE: If a higher than normal jam rate is experienced, the Detack
Lamp may have to be switched on again.
1. With the printer in the Standby (idle) condition, press the
[Menu] Key 6 times to enter Mode 6.
Menu
Press [Menu] 6 times
Ente r Onli ne
.
The [Menu] Key lights and the display indicates “U6” on the left
side of the display and the current setting on the right side.
Menu
Menu
Menu
Enter Online
Enter Online
Online
Enter
2. Press [Enter]
3. Press the [ ® or ¬ ] key to change the value to 0 (OFF)
The value in the display will change to 0 (OFF)
The range is 1 – On and 0 - Off
NOTE: Factory default is “0”, Off.
4. Press the [Online] Key to exit the User Mode.
58 XEROX WIDE FORMAT 721P PRINTER OPERATOR MANUAL
Page 67

User Mode 7 (Attention Beeper Enable Mode) “U7”
This mode controls a beeper sound whenever the printer needs
attention, for example out of paper or out of toner.
The beeper will switch off when the situation is corrected. The
beeper can also be temporarily switched off by pressing the * key.
The beeper will sound during an automatic media roll switch. This
is normal.
1. With the printer in the Standby (idle) condition,
press the [Menu] Key 7 times to enter Mode 7.
Online
Menu
Enter
USER MODES
Menu
Menu
Menu
Enter Online
Enter Online
Enter Online
The [Menu] Key lights and the display indicates
“U7”
2. Press [Enter]
3. Press the ® or ¬ key to change the value to 0
(Off)
Beeper ON = 1
Beeper OFF = 0
NOTE: Factory default is “1”, On.
4. Press the [Enter] key to store the value.
5.Press the [Online] Key to exit the User Mode.
XEROX WIDE FORMAT 721P PRINTER OPERATOR MANUAL 59
Page 68

USER MODES
User Mode 8 (Custom Setting Plain Paper) “U8”
This mode switches between the standard setting for plain paper
and the custom setting for plain paper. This feature enables the
Service Representative to custom set the printer for a brand of
media that has different handling characteristics.
NOTE: The custom setting parameters (Fuser Temperature, Fuser
Motor Speed, Lead Edge Registration etc) must first be set by the
Service Representative in order to be effective.
Menu
Menu
Menu
Enter
Enter Online
Enter Online
Online
1) With the printer in the Standby (idle) condition, press the [Menu]
Key 8 times to enter Mode 8.
The [Menu] Key lights and the display indicates “U8”
Press [Enter]
2.) Press the ® or ¬ key to change the value to 1 (ON)
Standard Setting - 0
Custom Setting - 1
3) Press [Enter] key to store the value.
4) Press the [Online] Key to exit the User Mode.
Menu
Enter Online
60 XEROX WIDE FORMAT 721P PRINTER OPERATOR MANUAL
Page 69

User Mode 9 (Custom Setting Vellum/Tracing Paper) “U9”
This mode switches between the standard setting for
vellum/tracing paper and the custom setting for tracing paper. This
feature enables the Service Representative to custom set the
printer for a brand of vellum/tracing paper that has different
handling characteristics.
NOTE: The custom setting parameters (Fuser Temperature, Fuser
Motor Speed, Lead Edge Registration etc) must first be set by the
Service Representative in order to be effective.
USER MODES
Online
Menu
Enter
Key 9 times to enter Mode 9.
The [Menu] Key lights and the display indicates “U9”
1) With the printer in the Standby (idle) condition, press the [Menu]
Menu
Enter Online
Press [Enter]
2.) Press the ® or ¬ key to change the value to 1 (ON)
Menu
Enter Online
Standard Setting - 0
Custom Setting - 1
3) Press [Enter] key to store the value.
Menu
Enter Online
XEROX WIDE FORMAT 721P PRINTER OPERATOR MANUAL 61
4) Press the [Online] Key to exit the User Mode.
Page 70

USER MODES
User Mode A (Custom Setting Film) “UA”
This mode switches between the standard setting for film and the
custom setting for film. This feature enables the Service
Representative to custom set the printer for a brand of film that has
different handling characteristics.
NOTE: The custom setting parameters (Fuser Temperature, Fuser
Motor Speed, Lead Edge Registration etc) must first be set by the
Service Representative in order to be effective.
Menu
Menu
Menu
Enter
Enter Online
Enter Online
Online
1) With the printer in the Standby (idle) condition, press the [Menu]
Key 10 times to enter Mode A.
The [Menu] Key lights and the display indicates “UA”
Press [Enter]
2.) Press the ® or ¬ key to change the value to 1 (ON)
Standard Setting - 0
Custom Setting - 1
3) Press [Enter] key to store the value.
Menu
Enter Online
4) Press the [Online] Key to exit the User Mode.
62 XEROX WIDE FORMAT 721P PRINTER OPERATOR MANUAL
Page 71

User Mode b (Image Enhancement) “Ub”
The Image Enhancement Mode is used to improve reproduction of
gray scale. Increasing the setting of this feature increases the
density of single pixels. There can be, however, a noticeable
overall degradation in gray scale images as the setting is
increased. Experimentation will be required to achieve the correct
balance.
USER MODES
Online
Menu
Enter
Key 11 times to enter Mode b.
The [Menu] Key lights and the display indicates “Ub”
1) With the printer in the Standby (idle) condition, press the [Menu]
Menu
Enter
Onli ne
Press [Enter]
2.) Press the ® or ¬ key to change the value:
0 = No Image Enhancement
Menu
Enter Online
1 = Low Image Enhancement
2 = Medium Image Enhancement
3 = High Image Enhancement
NOTE: Factory default is “0”, No Enhancement
3) Press [Enter] key to store the value.
Menu
XEROX WIDE FORMAT 721P PRINTER OPERATOR MANUAL 63
Enter Online
4) Press the [Online] Key to exit the User Mode.
Page 72

USER MODES
Prepared by:
Xerox Corporation
Global Knowledge & Language Services
800 Phillips Road
Building 845-17S
Webster, New York 14580-9791
USA
©Xerox Corporation 2003. All rights reserved.
Printed in the United States of America
XEROX®, Xerox Wide Format 721P Engineering Printer,
AccXES, and acronym, XEROX, are trademarks of XEROX
CORPORATION.
701P39415 4/2003
64 XEROX WIDE FORMAT 721P PRINTER OPERATOR MANUAL
 Loading...