

Page 1
User Guide
ME3612E4-2
Page 2

© 2006 by Fuji Xerox Co., Ltd. All rights reserved.
Copyright protection claimed includes all forms and matters of copyrighted material and
information now allowed by statutory or judicial law or hereinafter granted, including without
limitations, material generated from the software programs which are displayed on the screen,
such as icons, screen displays, looks etc.
®
Xerox
, The Document Company®, the digital X® and all Xerox products mentioned in this
publication are trademarks of Xerox Corporation. Product names and trademarks of other
companies are hereby acknowledged.
See the About License section for detailed information on licensed products.
The information in this document is correct at the time of publication. Xerox reserves the right
at any time to change the information without notice. Changes and technical updates will be
added in subsequent editions of the documentation. For the latest information go to
www.xerox.com
.
Products Subject To Ordinary Export Regulations
An export of this product is strictly limited in accordance with Laws concerning Foreign
Exchange and Foreign Trade of Japan and/or the export control regulations of the United
States. You must obtain, if you wish to export this product, any appropriate export license from
the Japanese Government or its agency and/or re-export approval from the U.S. Government
or its agency.
Products Subject To Supplementary Export Regulations
An export of this product is strictly limited in accordance with Laws concerning Foreign
Exchange and Foreign Trade of Japan and/or the export control regulations of the United
States. You must obtain, if you know the product is to be used, or was used for development,
manufacturing or use of any mass destructive weapons including nuclear weapon, chemical
weapon or biological weapon because of a dealing document such as legal contract or
information from the importer, any appropriate export license from the Japanese Government
or its agency and/or re-export approval from the U.S. Government or its agency.
Page 3

Table of Contents
1 Before Using the Machine ...................................................................15
Xerox Welcome Center ..........................................................................15
Serial Number....................................................................................15
Languages Displayed on the Touch Screen ..........................................16
Conventions ...........................................................................................16
Related Information Sources..................................................................18
Cautions and Limitations........................................................................18
Safety Notes...........................................................................................18
WARNING - Electrical Safety Information .........................................20
Battery Safety Information .................................................................20
Laser Safety Information....................................................................21
Operational Safety Information..........................................................21
Maintenance Information ...................................................................22
Ozone Safety Information..................................................................22
For Consumables ..............................................................................22
Radio Frequency Emissions..............................................................23
Product Safety Certification ...............................................................23
Regulatory Information...........................................................................23
CE Mark.............................................................................................23
For FAX Function...............................................................................24
Regulatory Information for RFID........................................................26
Environmental Compliance ....................................................................27
USA ...................................................................................................27
Canada ..............................................................................................27
About License.........................................................................................28
Illegal Copies..........................................................................................29
USA ...................................................................................................29
Canada ..............................................................................................30
Other Countries .................................................................................31
Product Recycling and Disposal.............................................................31
USA/Canada......................................................................................31
European Union.................................................................................31
Other Countries .................................................................................32
Xerox WorkCentre 7132 User Guide 3
Page 4

2 Product Overview.................................................................................33
Machine Components ............................................................................33
System Controls.....................................................................................36
Services and Features ...........................................................................37
Power On/Off .........................................................................................38
Powering On......................................................................................38
Powering Off......................................................................................39
Ground Fault Interrupter (GFI) ...............................................................39
Power Saver Modes...............................................................................40
Changing the Default Time Settings ......................................................41
Modes ....................................................................................................42
All Services........................................................................................43
Features ............................................................................................43
Job Status..........................................................................................43
Machine Status..................................................................................43
Job Interrupt...........................................................................................43
Recycled Paper......................................................................................44
3 Copy ......................................................................................................45
Copying Procedure ................................................................................45
1. Load the Documents .....................................................................45
2. Select the Features .......................................................................47
3. Enter the Quantity..........................................................................48
4. Start the Copy Job.........................................................................48
5. Confirm the Copy Job in the Job Status........................................49
Stop the Copy Job.............................................................................49
Copy.......................................................................................................50
Output Color ......................................................................................50
Reduce/Enlarge.................................................................................51
Paper Supply.....................................................................................52
2 Sided Copying ................................................................................53
Copy Output ......................................................................................54
Image Quality.........................................................................................56
Original Type .....................................................................................57
Image Options ...................................................................................58
Image Enhancement .........................................................................58
Color Effects......................................................................................59
Color Balance....................................................................................61
Color Shift..........................................................................................62
Layout Adjustment .................................................................................63
4 Xerox WorkCentre 7132 User Guide
Page 5

Book Copying ....................................................................................63
2 Sided Book Copy............................................................................64
Original Size ......................................................................................65
Edge Erase........................................................................................66
Image Shift.........................................................................................66
Image Rotation ..................................................................................68
Invert Image.......................................................................................69
Original Orientation............................................................................69
Output Format ........................................................................................70
Booklet Creation ................................................................................70
Covers ...............................................................................................72
Transparency Separators ..................................................................73
Multiple-Up.........................................................................................74
Poster ................................................................................................75
Repeat Image ....................................................................................75
Annotation .........................................................................................76
Watermark .........................................................................................77
Preset Repeat Image.........................................................................78
Job Assembly.........................................................................................79
Build Job............................................................................................79
Sample Set ........................................................................................81
Combine Original Sets.......................................................................82
Delete Outside/Delete Inside.............................................................82
4 Fax/Internet Fax....................................................................................85
Country Code for Fax Option .................................................................85
Fax/Internet Fax Procedure....................................................................86
1. Load the Documents......................................................................86
2. Select the Features........................................................................87
3. Specify the Destination..................................................................88
4. Start the Fax/Internet Fax Job .......................................................89
5. Confirm the Fax/Internet Fax Job in the Job Status ......................89
Stop the Fax/Internet Fax Job ...........................................................90
Specifying Fax Destinations...................................................................90
Address Book ....................................................................................91
Speed Dial .........................................................................................91
Keyboard ...........................................................................................92
Cover Note.........................................................................................95
Specifying Internet Fax Destinations......................................................96
Address Book ....................................................................................97
Keyboard ...........................................................................................97
Xerox WorkCentre 7132 User Guide 5
Page 6

iFax Comment ...................................................................................98
General Settings - Fax/Internet Fax.......................................................99
Lighten/Darken ................................................................................100
2 Sided Originals .............................................................................100
Original Type ...................................................................................101
Resolution........................................................................................101
Layout Adjustment - Fax/Internet Fax..................................................102
Original Size ....................................................................................102
Book Scanning ................................................................................103
Reduce/Enlarge...............................................................................104
Transmission Options - Fax .................................................................104
Transmission Report .......................................................................105
Communication Mode......................................................................105
Priority Send/Delayed Start .............................................................106
Send Header ...................................................................................107
Recipient Print Sets.........................................................................108
Multiple-Up ......................................................................................108
Remote Mailbox...............................................................................108
F Code.............................................................................................109
Advanced Fax Features - Fax..............................................................111
Polling..............................................................................................111
Store for Polling...............................................................................112
On-hook (Manual Send/Receive) ....................................................113
Internet Fax Options - Internet Fax ......................................................114
Report/Read Receipts .....................................................................114
iFax Profile.......................................................................................115
Multiple-Up ......................................................................................116
Communication Mode......................................................................116
5 Scan/E-mail.........................................................................................117
Scanning Procedure.............................................................................117
1. Load the Documents ...................................................................118
2. Select the Features .....................................................................118
3. Start the Scan Job.......................................................................119
4. Confirm the Scan Job in the Job Status ......................................120
5. Save the Scanned Data...............................................................120
Stop the Scan Job ...........................................................................121
E-mail...................................................................................................121
Address Book ..................................................................................122
Keyboard .........................................................................................124
Add Me ............................................................................................125
6 Xerox WorkCentre 7132 User Guide
Page 7

Scan to Mailbox....................................................................................125
Network Scanning ................................................................................126
Scan to FTP/SMB.................................................................................127
Transfer Protocol .............................................................................128
Address Book ..................................................................................128
Browse.............................................................................................129
Keyboard .........................................................................................129
General Settings...................................................................................129
Scanning Color ................................................................................130
2 Sided Originals .............................................................................130
Original Type ...................................................................................131
File Format.......................................................................................132
Image Quality .......................................................................................134
Photographs ....................................................................................134
Image Options .................................................................................135
Image Enhancement........................................................................135
Shadow Suppression.......................................................................136
Layout Adjustment................................................................................136
Scan Resolution...............................................................................137
Book Scanning.................................................................................137
Original Size ....................................................................................138
Edge Erase......................................................................................139
Reduce/Enlarge...............................................................................139
Output Format ......................................................................................140
Image Compression.........................................................................140
Read Receipts .................................................................................141
Split Send ........................................................................................141
Document Name/File Name ............................................................141
File Name Conflict ...........................................................................142
Reply To ..........................................................................................142
6 Check Mailbox ....................................................................................143
Check Mailbox......................................................................................143
Document List ......................................................................................144
Printing/Deleting Mailbox Documents..............................................145
Job Flow Settings ............................................................................146
7 Print .....................................................................................................151
Print Driver Features ............................................................................152
Major Features.................................................................................153
Printer Status...................................................................................154
Xerox WorkCentre 7132 User Guide 7
Page 8

Emulation Parameters..........................................................................156
PCL Emulation.................................................................................156
HP-GL/2 Emulation..........................................................................159
PDF Direct Printing..........................................................................163
8 CentreWare Internet Services...........................................................165
Target Computers............................................................................165
Accessing CentreWare Internet Services........................................166
Standard Features - CentreWare Internet Services............................. 166
Interface Options .............................................................................166
Services ...............................................................................................167
Status...................................................................................................168
General............................................................................................168
Paper Trays.....................................................................................169
Components ....................................................................................169
Jobs......................................................................................................170
Active Jobs ......................................................................................171
Job History List................................................................................172
Job Management.............................................................................172
Print/Scan.............................................................................................173
Job Submission ...............................................................................173
Job Templates.................................................................................173
Properties.............................................................................................179
Default User ID and Password ........................................................179
Properties Features.........................................................................180
Support.................................................................................................206
9 Paper and Other Media......................................................................209
Loading Paper......................................................................................209
Preparing Paper for Loading ...........................................................209
Loading the Paper Trays .................................................................209
Bypass Tray (Tray 5).......................................................................211
Tandem Tray Module (TTM)............................................................212
Auto Tray Switching.........................................................................212
Storing and Handling Paper.................................................................213
Supported Paper Sizes and Types ......................................................213
Supported Paper Sizes....................................................................213
Supported Paper Types...................................................................215
10 Setups .................................................................................................219
System Settings Procedure..................................................................219
8 Xerox WorkCentre 7132 User Guide
Page 9

1. Entering the System Settings Mode ............................................219
2. Customizing the Settings.............................................................220
System Settings ...................................................................................220
Common Settings.................................................................................220
Machine Clock/Timers .....................................................................221
Audio Tones.....................................................................................223
Screen/Button Settings....................................................................224
Paper Tray Settings.........................................................................225
Watermark .......................................................................................227
Image Quality Adjustment................................................................228
Reports ............................................................................................231
Maintenance ....................................................................................232
Other Settings..................................................................................233
Copy Mode Settings.............................................................................238
Copy Tab .........................................................................................239
Copy Defaults ..................................................................................239
Copy Control....................................................................................244
Original Size Defaults ......................................................................245
Reduce/Enlarge Presets..................................................................246
Custom Colors.................................................................................247
Annotation - Create Stamps ............................................................247
Network Settings ..................................................................................248
Port Settings ....................................................................................248
Protocol Settings..............................................................................250
Machine’s E-mail Address/Host Name ............................................251
Proxy Server Settings......................................................................252
Outgoing/Incoming E-mail Settings .................................................253
Remote Server/Directory Service ....................................................255
PKI (Public Key) Settings.................................................................259
Other Settings..................................................................................261
Print Mode Settings..............................................................................261
Allocate Memory..............................................................................261
Other Settings..................................................................................264
Scan Mode Settings .............................................................................265
Scan Defaults ..................................................................................266
Scan-to-FTP/SMB Defaults .............................................................268
Original Size Defaults ......................................................................268
Output Size Defaults........................................................................269
Reduce/Enlarge Presets..................................................................269
Other Settings..................................................................................270
Xerox WorkCentre 7132 User Guide 9
Page 10

Fax Mode Settings ...............................................................................271
Screen Defaults...............................................................................271
Fax Defaults ....................................................................................272
Fax Control......................................................................................273
File Destination/Output Destination.................................................276
Reduce/Enlarge Presets..................................................................277
Original Size Defaults......................................................................277
Local Terminal Information..............................................................278
iFax Control .....................................................................................279
E-mail/Internet Fax Settings.................................................................280
E-mail Defaults ................................................................................281
E-mail Control..................................................................................281
Mailbox/Stored Document Settings......................................................283
Mailbox Settings .............................................................................283
Stored Document Settings...............................................................284
Setup Menu..........................................................................................285
Mailbox ............................................................................................285
Job Flow Sheets..............................................................................287
Job Flow Sheet Keywords...............................................................290
Address Book ..................................................................................290
Group Send .....................................................................................294
Comments .......................................................................................295
Paper Size/Type..............................................................................295
System Administrator Settings.............................................................296
System Administrator Login ID........................................................296
System Administrator’s Password...................................................296
Maximum Login Attempts................................................................297
Login Setup/Auditron Administration....................................................297
Create/Check User Accounts ..........................................................298
Account Details................................................................................299
Reset User Accounts.......................................................................299
System Administrator Meter (Copy Jobs)........................................300
User Details Setup...........................................................................301
Charge Print Settings ......................................................................301
Password Entry from Control Panel ................................................302
Login Setup/Auditron Mode.............................................................302
11 Job Status...........................................................................................305
Job Status ............................................................................................305
Current and Pending Jobs ...................................................................306
Completed Jobs ...................................................................................307
10 Xerox WorkCentre 7132 User Guide
Page 11

Stored Documents................................................................................308
Secure Print.....................................................................................308
Sample Print ....................................................................................309
Delayed Print ...................................................................................310
Public Mailbox..................................................................................310
Undelivered Faxes...........................................................................311
12 Machine Status...................................................................................313
Machine Status.....................................................................................313
Machine Information ........................................................................314
Paper Tray.......................................................................................314
Overwrite Hard Disk.........................................................................315
Print Mode .......................................................................................315
Fax Receiving Mode........................................................................318
Billing Meter/Print Report .....................................................................318
Billing Meter.....................................................................................319
Print Report/List...............................................................................319
Automatically Printed Reports/Lists.................................................324
Supplies................................................................................................324
Monitoring Consumables Status......................................................324
Replacing Toner Cartridges.............................................................325
Replacing SMart Kit Consumable Supplies.....................................325
Faults....................................................................................................326
13 Authentication and Auditron Administration ..................................327
Overview of Authentication...................................................................327
Users Controlled by Authentication .................................................327
Types of Authentication ...................................................................328
Functions Controlled by Authentication ...........................................329
Authentication for Job Flow Sheet and Mailbox ...................................330
Job Flow Sheet Types .....................................................................331
Types of Mailboxes..........................................................................336
Linking Job Flow Sheets to Mailboxes.............................................342
Overview of Auditron Administration ....................................................345
Authentication and Auditron Administration.....................................345
Management Features and Services ..............................................345
14 Maintenance........................................................................................353
Ordering Supplies.................................................................................353
Cleaning the Machine...........................................................................353
Control Panel and Touch Screen.....................................................354
Xerox WorkCentre 7132 User Guide 11
Page 12

Document Glass and Document Feeder Glass...............................354
Document Feeder Rollers................................................................354
Replacing Toner Cartridges .................................................................355
Replacing the Black (K) Toner Cartridge.........................................356
Replacing the Color (CMY) Toner Cartridges..................................358
SMart Kit (Customer Replaceable Units) .............................................360
Drum Cartridge................................................................................360
Waste Toner Container and ROS Cleaner......................................363
Second Bias Transfer Roll Unit .......................................................365
Fuser Unit........................................................................................367
Transfer Belt Cleaner ......................................................................369
Loading Staples ...................................................................................373
Loading Staples in the Office Finisher (Optional)............................373
Loading Staples in the Integrated Office Finisher (Optional)...........375
Auto Gradation Adjustment..................................................................377
15 Problem Solving.................................................................................381
Fault Clearance Procedure ..................................................................381
Paper Jams..........................................................................................382
Paper Jams in Cover A....................................................................384
Paper Jams in Cover B....................................................................385
Paper Jams in Cover C ...................................................................387
Paper Jams in Cover E....................................................................387
Paper Jams in Tray 1 and Trays 2, 3 (Optional)..............................388
Paper Jams in the Tandem Tray Module (Optional)........................388
Paper Jams in Tray 5 (Bypass) .......................................................389
Paper Jams in the Duplex Module Cover D ....................................389
Paper Jams in the Office Finisher (Optional)...................................390
Paper Jams in the Integrated Office Finisher (Optional) .................391
Document Feeder Jams.......................................................................392
Stapler Faults.......................................................................................393
Staple Jams in the Office Finisher(Optional)...................................394
Staple Jams in the Integrated Office Finisher(Optional)..................396
Troubleshooting ...................................................................................398
Fault Codes..........................................................................................403
Screen Messages............................................................................430
Xerox Welcome Center........................................................................430
16 Specifications.....................................................................................433
Machine Specifications ........................................................................433
12 Xerox WorkCentre 7132 User Guide
Page 13

Paper Supply........................................................................................435
Paper Output........................................................................................436
Electrical Specifications........................................................................438
Specifications for the Fax Feature........................................................438
17 Glossary..............................................................................................441
Terms Defined......................................................................................441
18 Appendix.............................................................................................449
PostScript Kit Installation......................................................................449
Fax Kit Installation................................................................................450
Removing the Integrated Office Finisher..............................................452
19 Index....................................................................................................453
Xerox WorkCentre 7132 User Guide 13
Page 14

14 Xerox WorkCentre 7132 User Guide
Page 15
1 Before Using the Machine
Welcome to the Xerox family of WorkCentre products.
This User Guide provides detailed information, technical specifications and procedures
for using the integral features of the machine.
Xerox Welcome Center
If you need assistance during or after product installation, visit the Xerox website for
online solutions and support.
http://www.xerox.com/support
If you require further assistance, contact our experts at the Xerox Welcome Center. A
local representative telephone number may have been provided when the product was
installed. For convenience and future reference, please record the telephone number
in the space below.
Welcome Center or local representative telephone number:
#
Xerox US Welcome Center: 1-800-821-2797
Xerox Canada Welcome Center: 1-800-93-XEROX (1-800-939-3769)
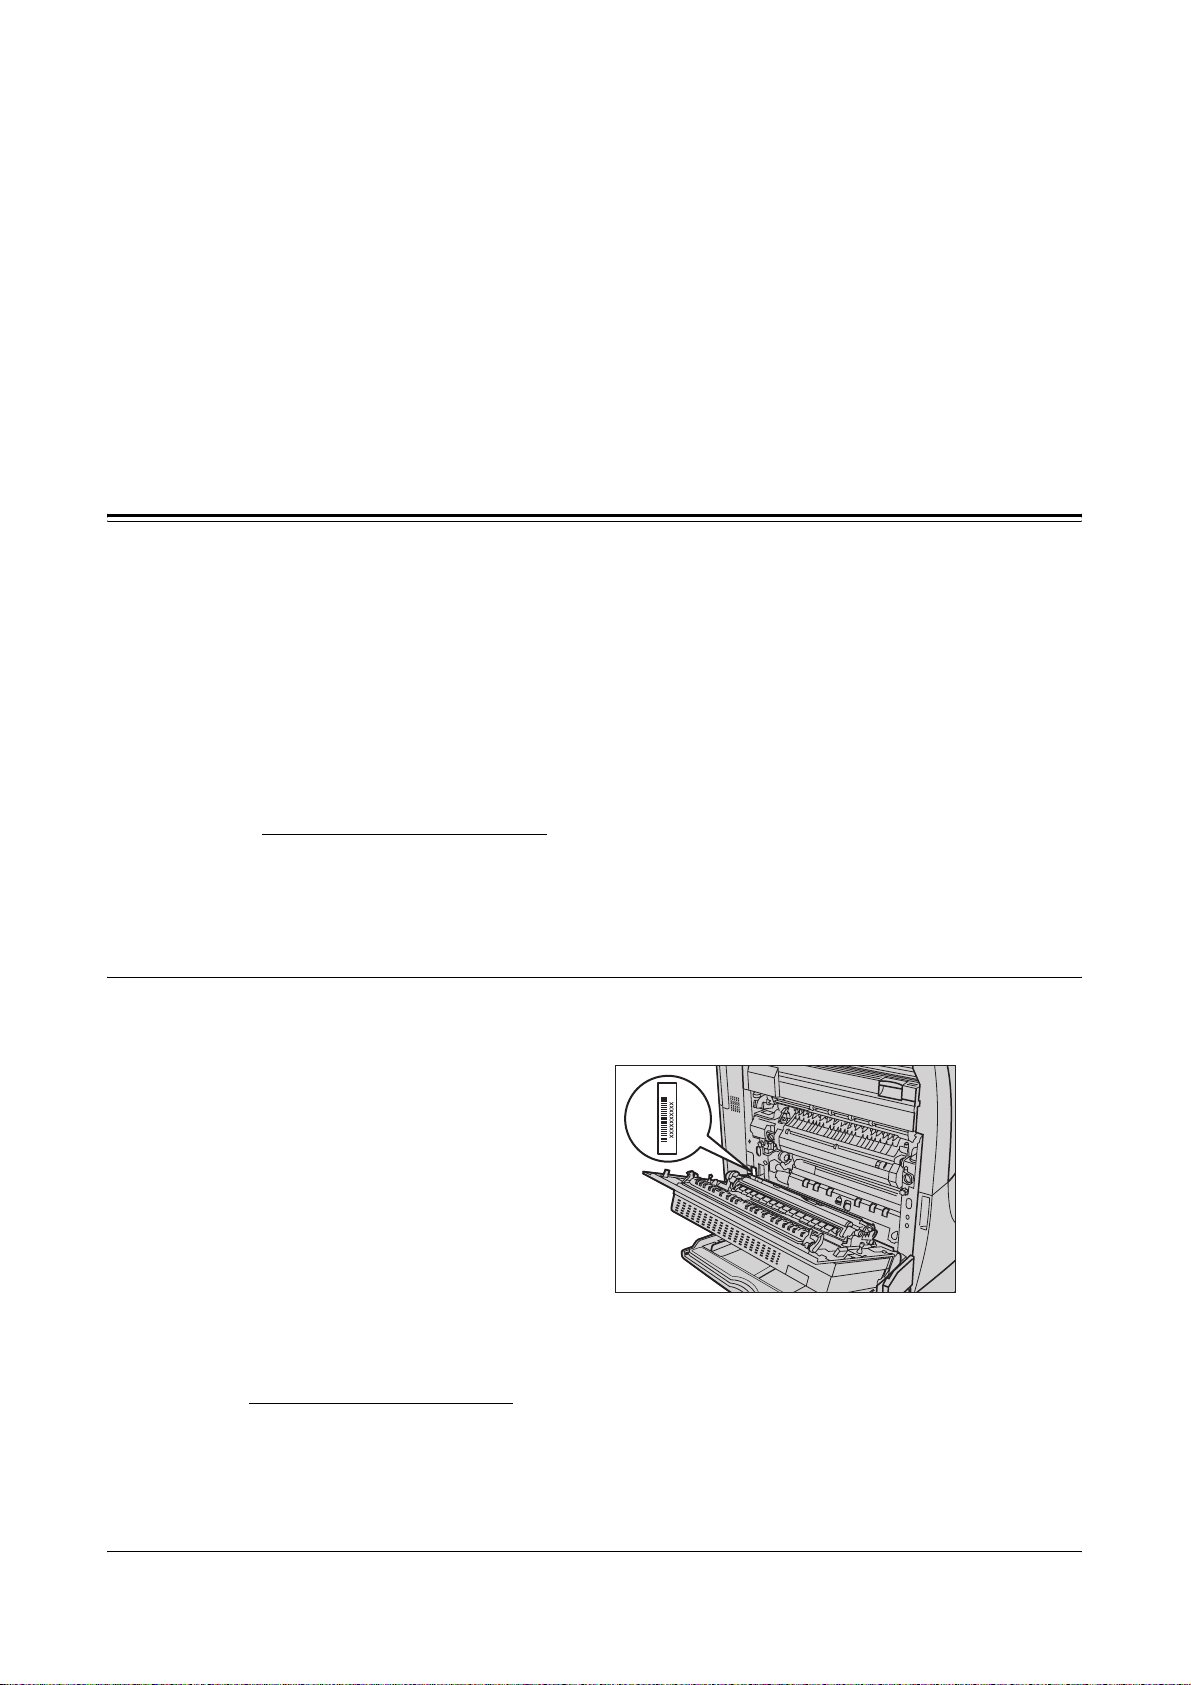
Serial Number
When you call the Welcome Center you will need the serial number which is located on
the left side of the machine behind Cover A, as shown in the diagram.
For your convenience, record the serial number in the space below.
Serial Number:
Keep a record of any error messages. This information helps us solve problems faster.
Xerox WorkCentre 7132 User Guide 15
Page 16

1 Before Using the Machine
Languages Displayed on the Touch Screen
You can change the languages in the following two ways.
To change the language for temporary use, press the <Language> button on the
control panel, then select the required language.
NOTE: The language returns to the default language after rebooting the machine.
To change the default language, enter the System Settings mode, select [Common
Settings], then select [Screen/Button Settings]. In the [Screen/Button Settings] screen,
select the required language as [Default Language]. For more information, refer to
Common Settings on page 220.
Conventions
This section describes the conventions used throughout this User Guide. In this guide,
you will find that some terms are used interchangeably:
• Paper is synonymous with media.
• Document is synonymous with original.
• Xerox WorkCentre 7132 is synonymous with the machine.
Key Operator/System Administrator
Key Operator describes the person who is responsible for hardware maintenance.
System Administrator refers to the person who sets up the network, installs the print
drivers, and manages software.
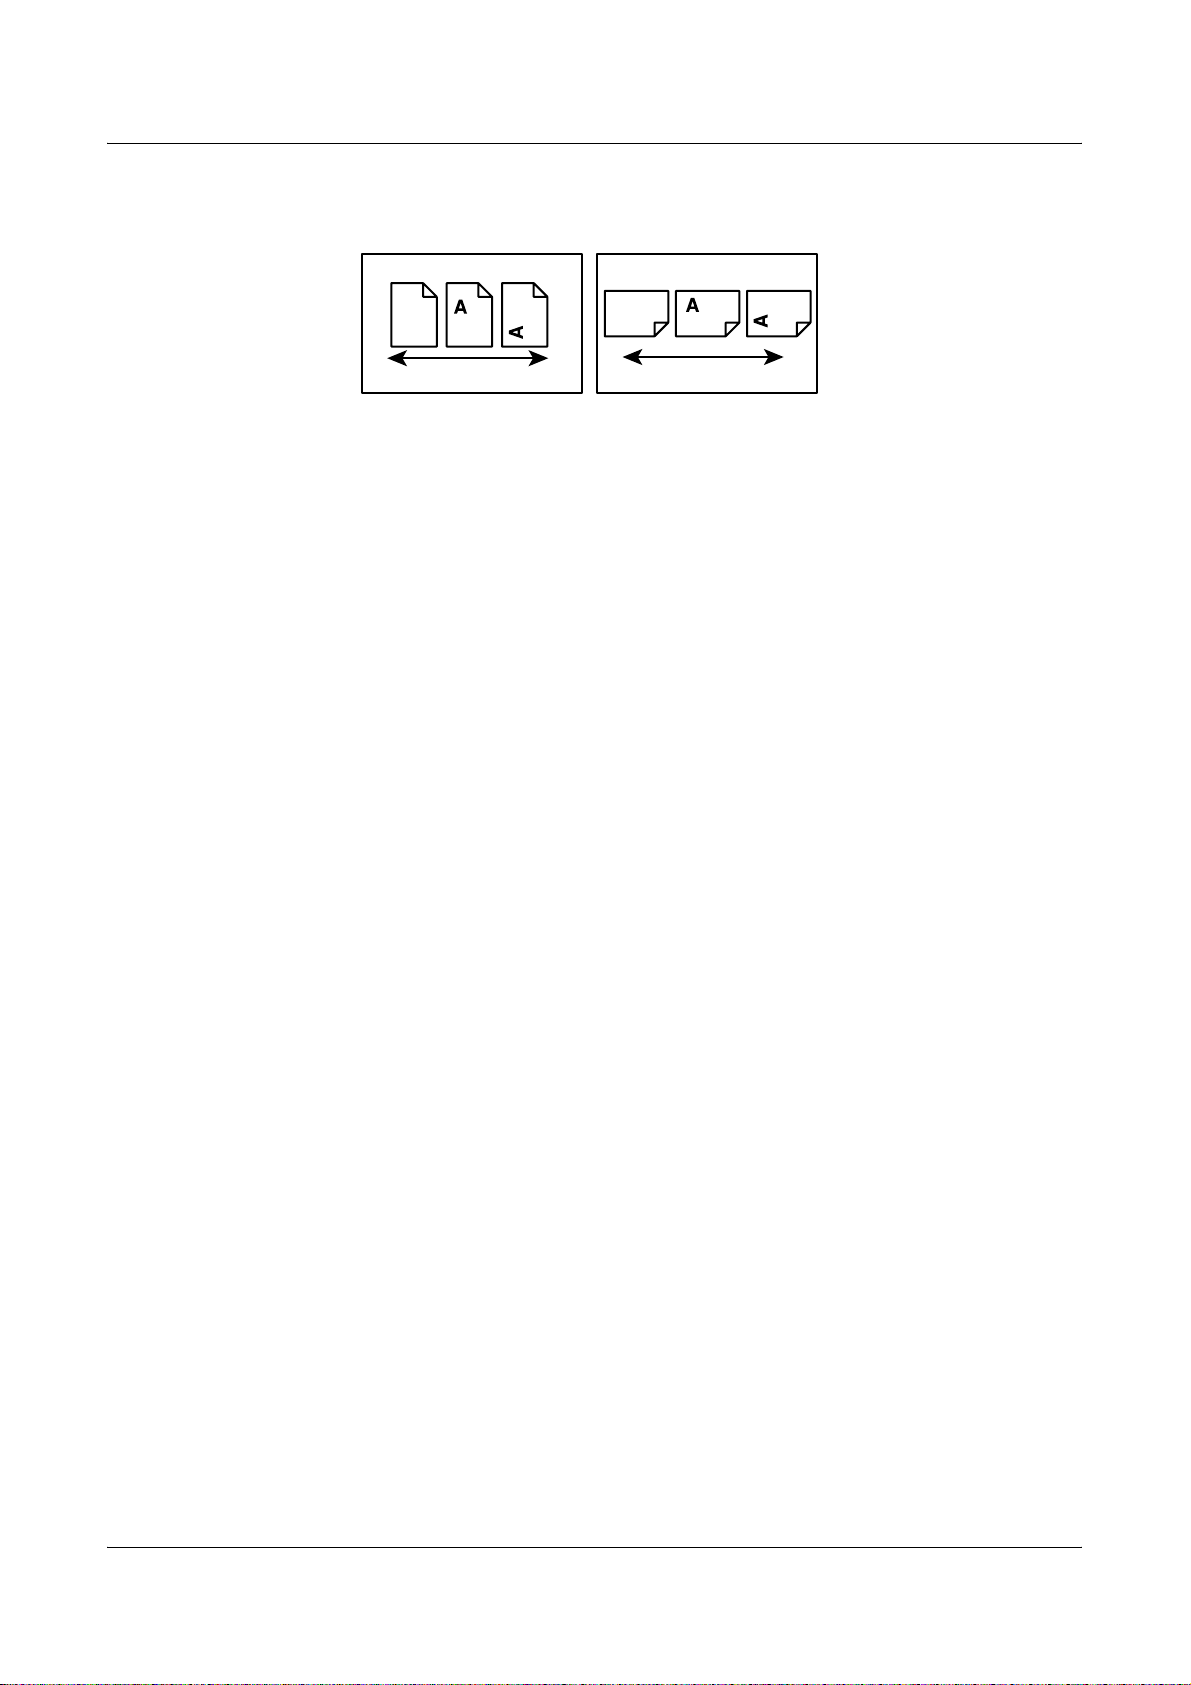
Orientation
Orientation is used to mean the direction of images on the page. When the image is
upright, the paper (or other media) can be either long edge feed or short edge feed.
Long Edge Feed (LEF)
When loading documents long edge feed into the document feeder, load with one of
the long edges facing into the document feeder. The short edges appear at the top and
bottom of the paper, facing the front and back of the document feeder. When loading
paper long edge feed into a paper tray, place the paper with one of the long edges on
the left-hand side and one of the short edges toward the front of the tray.
Short Edge Feed (SEF)
When loading documents short edge feed into the document feeder, load with one of
the short edges facing into the document feeder. The long edges appear on the top and
bottom of the paper, facing the front and back of the document feeder. When loading
paper short edge feed into a paper tray, place the paper with one of the short edges on
the left-hand side and one of the long edges toward the front of the tray.
16 Xerox WorkCentre 7132 User Guide
Page 17
Conventions
Text in [Square Brackets]
Indicate that these are names of the screens, tabs, buttons, features and option
categories on the screen. They are also used when referring to file and folder names
on a PC.
For example:
• Select [Original Type] on the [Image Quality] screen.
• Select [Save].
Text in <Angle Brackets>
LEF Orientation
Paper feed direction
SEF Orientation
Paper feed direction
Indicate that these are names of the hard buttons, numeric or symbol buttons, lights on
the control panel or symbols on the power switch label.
For example:
• Press the <Machine Status> button to display the [Machine Status] screen.
• Press the <C> button on the control panel to clear the suspended job.
Italic Typeface
The Italic typeface is used to indicate references to other sections and chapters.
For example:
• For information on cleaning the document glass, refer to the Maintenance chapter
• Paper Supply – page 52.
Warnings
Warnings are statements that alert you to the possibility of personal harm.
For example:
WARNING: This product must be connected to a protective earth circuit.
on page 353.
Cautions
Cautions are statements that suggest the possibility of mechanical damage as a result
of an action.
Xerox WorkCentre 7132 User Guide 17
Page 18

1 Before Using the Machine
For example:
CAUTION: Use of controls, adjustments or performance of procedures other
than those specified herein may result in hazardous light exposure.
Notes
Notes are statements that provide additional information.
For example:
NOTE: If the document feeder is not fitted to the machine, this feature is not available.
Related Information Sources
The following additional sources of information are available for the machine.
• Xerox WorkCentre 7132 Quick Use Guide
• Xerox WorkCentre 7132 System Administration Guide
• Xerox WorkCentre 7132 Quick Network Setup Guide on the PCL Print Driver CDROM
• The Online Help systems (Print Drivers and CentreWare Utilities)
• The CentreWare Utilities Documentation (HTML)
NOTE: Please note that the screens shown in this User Guide apply to a fully
configured machine and therefore may not exactly represent the configuration being
used.
Cautions and Limitations
This section describes the cautions and limitations to observe when using this machine.
• When moving the machine, hold the middle part of the machine, and not the control
panel or document feeder area. Excessive pressure on the document feeder may
cause machine malfunction.
Safety Notes
Read these safety notes carefully before using this product to make sure you operate
the equipment safely.
Your Xerox product and recommended supplies have been designed and tested to
meet strict safety requirements. These include safety agency approval, and
compliance to established environmental standards. Please read the following
instructions carefully before operating the product and refer to them as needed to
ensure the continued safe operation of your product.
18 Xerox WorkCentre 7132 User Guide
Page 19

The safety and environment testing and performance of this product have been verified
using Xerox materials only.
WARNING: Any unauthorized alteration, which may include the addition of new
functions or connection of external devices, may impact the product
certification. Please contact your authorized Service Provider for more
information.
Warning Markings
All warning instructions marked on or supplied with the product should be followed.
Safety Notes
Warning This WARNING alerts users to areas of the product where there is
the possibility of personal injury.
Warning This WARNING alerts users to areas of the product where there
are heated surfaces, which should not be touched.
Electrical Supply
This product shall be operated from the type of electrical supply indicated on the
product’s data plate label. If you are not sure that your electrical supply meets the
requirements, please consult your local power company for advice.
WARNING: This product must be connected to a protective earth
circuit.
This product is supplied with a plug that has a protective earth pin. This plug
will fit only into an earthed electrical outlet. This is a safety feature. To avoid risk of
electric shock, contact your electrician to replace the electrical outlet if you are unable
to insert the plug into it. Never use an earthed adapter plug to connect the product to
an electrical outlet that lacks an earth connection terminal.
Operator Accessible Areas
This equipment has been designed to restrict operator access to safe areas only.
Operator access to hazardous areas is restricted with covers or guards, which would
require a tool to remove. Never remove these covers or guards.
Maintenance
Any operator product maintenance procedures will be described in the customer
documentation supplied with the product. Do not carry out any maintenance
procedures on this product which are not described in the customer documentation.
Cleaning Your Product
Before cleaning this product, unplug the product from the electrical outlet. Always use
materials specified for this product. The use of other materials may result in poor
Xerox WorkCentre 7132 User Guide 19
Page 20

1 Before Using the Machine
performance and may create a hazardous situation. Do not use aerosol cleaners, they
may be explosive and flammable under certain circumstances.
WARNING - Electrical Safety Information
Z Only use the power cord supplied with the equipment.
Z Plug the power cord directly into a grounded electrical outlet easily accessible. Do
not use an extension cord. If you do not know whether an outlet is grounded, consult
a qualified electrician.
Z This equipment is to be used on a branch circuit that has larger capacity than rated
ampere and voltage of this machine. See data plate on the rear panel for the rated
ampere and voltage of this equipment. If the machine needs to be moved to a
different location, contact a Xerox Service Representative or your authorized local
representative or service support organization.
Z Improper connection of the equipment-grounding conductor can result in an electric
shock.
X Do not place this equipment where people might step on or trip over the power cord.
X Do not place objects on the power cord.
X Do not override or disable electrical or mechanical interlocks.
X Do not obstruct the ventilation openings.
X Never push objects of any kind into slots or openings on the equipment.
Z If any of the following conditions occur, switch off the power to the machine
immediately and disconnect the power cord from the electrical outlet. Call an
authorized local service representative to correct the problem.
– The equipment emits unusual noises or odors.
– The power cord is damaged or frayed.
– A wall panel circuit breaker, fuse, or other safety device has been tripped.
– Liquid has spilled into the equipment.
– The equipment is exposed to water.
– Any part of the equipment is damaged.
Disconnect Device
The power cable is the disconnect device for this equipment. It is attached to the back
of the machine as a plug-in device. To remove all electrical power from the equipment,
disconnect the power cable from the electrical outlet.
Battery Safety Information
CAUTION: Do not replace the Lithium battery.
Risk of explosion if replaced by an incorrect type.
20 Xerox WorkCentre 7132 User Guide
Page 21

Laser Safety Information
CAUTION: Use of controls, adjustments or performance of procedures other
than those specified herein may result in hazardous light exposure.
With specific regard to laser safety, the equipment complies with performance
standards for laser products set by government, national and international agencies as
a Class 1 laser product. It does not emit hazardous light, as the beam is totally enclosed
during all phases of customer operation and maintenance.
Operational Safety Information
To ensure the continued safe operation of your Xerox equipment, follow these safety
guidelines at all times.
Do These:
• Always connect equipment to a correctly grounded power outlet. If in doubt, have
the outlet checked by a qualified electrician.
Z This equipment must be connected to a protective earth circuit.
Safety Notes
This equipment is supplied with a plug that has a protective earth pin. This plug will
fit only into an earthed electrical outlet. This is a safety feature. To avoid risk of
electric shock, contact your electrician to replace the electrical outlet if you are
unable to insert the plug into it. Never use a plug that lacks an earth connection
terminal to connect the product to an electrical outlet.
• Always follow all warnings and instructions that are marked on or supplied with the
equipment.
• Always exercise care when moving or relocating equipment. Please contact your
local Xerox Service Department, or your local support organization to arrange
relocation of the product to a location outside of your building.
• Always locate the equipment in an area that has adequate ventilation, and space for
servicing. See installation instructions for minimum dimensions.
• Always use materials and supplies specifically designed for your Xerox equipment.
Use of unsuitable materials may result in poor performance.
• Always unplug this equipment from the electrical outlet before cleaning.
Do Not Do These:
• Never use a plug that lacks an earth connection terminal to connect the product to
an electrical outlet.
• Never attempt any maintenance procedures that are not specifically described in the
customer documentation.
• This equipment should not be placed in a built-in unit unless proper ventilation is
provided. Please contact your authorized local dealer for further information.
• Never remove covers or guards that are fastened with screws. There are no
operator serviceable areas within these covers.
Xerox WorkCentre 7132 User Guide 21
Page 22

1 Before Using the Machine
• Never locate the equipment near a radiator or any other heat source.
• Never push objects of any kind into the ventilation openings.
• Never override or “cheat” any of the electrical or mechanical interlock devices.
• Never operate the equipment if you notice unusual noises or odors. Disconnect the
power cord from the electrical outlet and contact your local Xerox Service
Representative or Service Provider immediately.
Maintenance Information
Do not attempt any maintenance procedures that are not specifically described in the
customer documentation supplied with your machine.
• Do not use aerosol cleaners. The use of cleaners that are not approved may cause
poor performance of the equipment, and could create a dangerous condition.
• Use supplies and cleaning materials only as directed in the customer
documentation. Keep all these materials out of the reach of children.
• Do not remove covers or guards that are fastened with screws. There are no parts
behind these covers that you can maintain or service.
• Do not perform any maintenance procedures unless you have been trained to do
them by an authorized local dealer or unless a procedure is specifically described in
the customer documentation.
Ozone Safety Information
This product will produce ozone during normal operation. The ozone produced is
heavier than air and is dependent on copy volume. Adhering to the correct
environmental conditions as specified in the installation instructions will ensure that the
concentration levels meet safe limits.
If you need additional information about ozone, please request the Xerox publication
Ozone by calling 1-800-828-6571 in the United States and Canada. In other markets
please contact your Service Provider.
For Consumables
Store all consumables in accordance with the instructions given on the package or
container.
Z Keep all consumables away from the reach of children.
Z Never throw toner, toner cartridges or toner containers into an open flame.
22 Xerox WorkCentre 7132 User Guide
Page 23

Radio Frequency Emissions
United States, Canada, Europe
This equipment has been tested and found to comply with the limits for a class B digital
device, pursuant to Part 15 of the FCC Rules. These limits are designed to provide
reasonable protection against harmful interference in a residential installation. This
equipment generates, uses, and can radiate radio frequency energy and, if not installed
and used in accordance with the instructions, may cause harmful interference to radio
communications. However, there is no guarantee that interference will not occur in a
particular installation. If this equipment does cause harmful interference to radio or
television reception, which can be determined by turning equipment off an on, the user
is encouraged to try to correct the interference by one or more of the following
measures.
• Reorient or relocate the receiving antenna.
• Increase the separation between the equipment and receiver.
• Connect the equipment to an outlet on a circuit different from that to which the
receiver is connected.
Regulatory Information
• Consult the dealer or an experienced radio/TV technician for help.
Changes and modifications to this equipment not specifically approved by Xerox may
void the user’s authority to operate this equipment.
Shielded interface cables must be used with this equipment to maintain compliance
with FCC regulations in the United States.
Product Safety Certification
This product is certified by the following Agency using the Safety standards listed.
Agency Standard
Underwriters Laboratories Inc. UL60950-1 1st (2003) (USA/Canada)
NEMKO IEC60950-1 Edition 1 (2001)
This product was manufactured under a registered ISO9001 Quality system.
Regulatory Information
CE Mark
The CE mark applied to this product symbolizes Xerox’s declaration of conformity with
the following applicable Directives of the European Union as of the dates indicated:
January 1, 1995: Council Directive 72/23/EEC amended by Council directive 93/68/
EEC, approximation of the laws of the member states related to low voltage equipment.
Xerox WorkCentre 7132 User Guide 23
Page 24

1 Before Using the Machine
January 1, 1996: Council directive 89/336/EEC, approximation of the laws of the
member states related to electromagnetic compatibility.
March 9, 1999: Council Directive 99/5/EC, on radio equipment and telecommunications
terminal equipment and the mutual recognition of their conformity.
A full declaration of conformity, defining the relevant directives and referenced
standards, can be obtained from your authorized local dealer.
WARNING: In order to allow this equipment to operate in proximity to Industrial
Scientific and Medical (ISM) equipment, the external radiation from the ISM
equipment may have to be limited or special mitigation measures taken.
WARNING: This is a Class A product. In a domestic environment the product may
cause radio frequency interference, in which case the user may be required to
take adequate measures.
WARNING: Shielded interface cables must be used with this product to maintain
compliance with Council Directive 89/336/EEC.
For FAX Function
USA
FAX Send Header Requirements:
The Telephone Consumer Protection Act of 1991 makes it unlawful for any person to
use a computer or other electronic device, including a FAX machine, to send any
message unless such message clearly contains in a margin at the top or bottom of each
transmitted page or on the first page of the transmission, the date and time it is sent
and an identification of the business or other entity, or other individual sending the
message and the telephone number of the sending machine or such business, other
entity or individual. The telephone number provided may not be a 900 number or any
other number for which charges exceed local or long distance transmission charges.
In order to program this information into your machine, refer to customer
documentation and follow the steps provided.
Data Coupler Information:
This equipment complies with Part 68 of the FCC rules and the requirements adopted
by the Administrative Council for Terminal Attachments (ACTA). On the rear of this
equipment is a label that contains, among other information, a product identifier in the
format US:AAAEQ##TXXXX. If requested, this number must be provided to the
Telephone Company.
A plug and jack used to connect this equipment to the premises wiring and telephone
network must comply with the applicable FCC Part 68 rules and requirements adopted
by the ACTA. A compliant telephone cord and modular plug is provided with this
product. It is designed to be connected to a compatible modular jack that is also
compliant. See installation instructions for details.
24 Xerox WorkCentre 7132 User Guide
Page 25

Regulatory Information
You may safely connect the machine to the following standard modular jack: USOC RJ11C using the compliant telephone line cord (with modular plugs) provided with the
installation kit. See installation instructions for details.
The Ringer Equivalence Number (REN) is used to determine the number of devices
that may be connected to a telephone line. Excessive RENs on a telephone line may
result in the devices not ringing in response to an incoming call. In most but not all
areas, the sum of RENs should not exceed five (5.0). To be certain of the number of
devices that may be connected to a line, as determined by the total RENs, contact the
local Telephone Company. For products approved after July 23, 2001, the REN for this
product is part of the product identifier that has the format US:AAAEQ##TXXXX. The
digits represented by ## are the REN without a decimal point (e.g., 03 is a REN of 0.3).
For earlier products, the REN is separately shown on the label.
If this Xerox equipment causes harm to the telephone network, the Telephone
Company will notify you in advance that temporary discontinuance of service may be
required. But if advance notice is not practical, the Telephone Company will notify the
customer as soon as possible. Also, you will be advised of your right to file a complaint
with the FCC if you believe it is necessary.
The Telephone Company may make changes in its facilities, equipment, operations or
procedures that could affect the operation of the equipment. If this happens, the
Telephone Company will provide advance notice in order for you to make necessary
modifications to maintain uninterrupted service.
CANADA
If trouble is experienced with this Xerox equipment, for repair or warranty information,
please contact the appropriate service center; details of which are displayed either on
the machine or contained within the User Guide. If the equipment is causing harm to
the telephone network, the Telephone Company may request that you disconnect the
equipment until the problem is resolved.
Repairs to the machine should be made only by a Xerox Service Representative or an
authorized Xerox Service Provider. This applies at any time during or after the service
warranty period. If unauthorized repair is performed, the remainder of the warranty
period is null and void. This equipment must not be used on party lines. Connection to
party line service is subject to state tariffs. Contact the state public utility commission,
public service commission or corporation commission for information.
If your office has specially wired alarm equipment connected to the telephone line,
make sure that the installation of this Xerox equipment does not disable your alarm
equipment. If you have questions about what will disable alarm equipment, consult your
Telephone Company or a qualified installer.
This product meets the applicable Industry Canada technical specifications. The
Ringer Equivalence Number (REN) is an indication of the maximum number of devices
allowed to be connected to a telephone interface. The termination on an interface may
consist of any combination of devices subject only to the requirement that the sum of
the RENs of all the devices does not exceed five.
The Canadian REN value of this equipment is 0.1.
Repairs to certified equipment should be made by an authorized Canadian
maintenance facility designated by the supplier. Any repairs or alterations made by the
Xerox WorkCentre 7132 User Guide 25
Page 26

1 Before Using the Machine
user to this equipment, or equipment malfunctions, may give the telecommunications
company cause to request the user to disconnect the equipment.
Users should make sure for their own protection that the electrical ground connections
of the power utility, telephone lines and internal metallic water pipe system, if present,
are connected together. This precaution may be particularly important in rural areas.
CAUTION: Users should not attempt to make such connections themselves, but
should contact the appropriate electric inspection authority or electrician, as
appropriate.
EUROPE
Radio Equipment & Telecommunications Terminal Equipment Directive:
This Xerox product has been self-certified by Xerox for pan-European single terminal
connection to the analogue public switched telephone network (PSTN) in accordance
with Directive 1999/5/EC. The product has been designed to work with the national
PSTNs and compatible PBXs of the following countries:
Austria Germany Luxembourg Sweden
Belgium Greece Netherlands Switzerland
Denmark Iceland Norway United Kingdom
France Ireland Portugal Finland
Italy Spain
In the event of a problem you should contact your authorized local dealer in the first
instance. This product has been tested to and is compliant with TBR21, a specification
for terminal equipment for use on analogue-switched telephone networks in the
European Economic Area. This product provides an user-adjustable setting of the
country code. Refer to the customer documentation for this procedure. Country codes
should be set prior to connecting this product to the network.
NOTE: Although this product can use either loop disconnect (pulse) or DTMF (tone)
signaling, it is recommended that it is set to use DTMF signaling. DTMF signaling
provides reliable and faster call setup.
Modification of this product, connection to external control software or to external
control apparatus not authorized by Xerox, will invalidate its certification.
Regulatory Information for RFID
This product generates 13.56 MHz using an Inductive Loop System as a radio
frequency identification system device (RFID). This system is certified in compliance
with European Council Directive 99/5/EC and applicable local laws or regulations as
applicable.
26 Xerox WorkCentre 7132 User Guide
Page 27
Environmental Compliance
USA
Environmental Compliance
Energy Star
Canada
®
As an ENERGY STAR® partner, Xerox Corporation/Fuji Xerox has determined that the
®
basic configuration of this product meets the ENERGY STAR
guidelines for energy
efficiency.
The ENERGY STAR
®
and ENERGY STAR MARK are registered United States
trademarks.
The ENERGY STAR
®
Office Equipment Program is a team effort between U.S.,
European Union and Japanese governments and the office equipment industry to
promote energy-efficient copiers, printers, fax, multifunction machine, personal
computers, and monitors. Reducing product energy consumption helps combat smog,
acid rain and long-term changes to the climate by decreasing the emissions that result
from generating electricity.
Xerox ENERGY STAR
®
equipment is preset at the factory to enter a “low power” state
and/or shut off completely after a specified period of use. These energy-saving features
can reduce product energy consumption by half when compared to conventional
equipment.
Recovery times from low power mode: 12 sec.
Recommended types of recycled paper: Type 3R91165
Environmental Choice
M
Terra Choice Environmental Services, Inc. of Canada has verified that this product
M
conforms to all applicable Environmental Choice
EcoLogoM requirements for
minimized impact to the environment.
As a participant in the Environmental Choice
determined that this product meets the Environmental Choice
M
program, Xerox Corporation has
M
guidelines for energy
efficiency.
Environment Canada established the Environmental Choice
M
program in 1988 to help
consumers identify environmentally responsible products and services. Copier, printer,
digital press and fax products must meet energy efficiency and emissions criteria, and
M
exhibit compatibility with recycled supplies. Currently, Environmental Choice
has
more than 1600 approved products and 140 licenses. Xerox has been a leader in
offering EcoLogo
Xerox WorkCentre 7132 User Guide 27
M
approved products.
Page 28

1 Before Using the Machine
About License
JPEG Code
Our printer software uses some of the codes defined by the Independent JPEG Group.
Heimdal
Copyright © 2000 Kungliga Tekniska Högskolan (Royal Institute of Technology,
Stockholm, Sweden). All rights reserved.
Redistribution and use in source and binary forms, with or without modification, are
permitted provided that the following conditions are met:
1. Redistributions of source code must retain the above copyright notice, this list of
conditions and the following disclaimer.
2. Redistributions in binary form must reproduce the above copyright notice, this list
of conditions and the following disclaimer in the documentation and/or other
materials provided with the distribution.
3. Neither the name of the Institute nor the names of its contributors may be used to
endorse or promote products derived from this software without specific prior
written permission.
RSA BSAFE
THIS SOFTWARE IS PROVIDED BY THE INSTITUTE AND CONTRIBUTORS “AS IS”
AND ANY EXPRESS OR IMPLIED WARRANTIES, INCLUDING, BUT NOT LIMITED
TO, THE IMPLIED WARRANTIES OF MERCHANTABILITY AND FITNESS FOR A
PARTICULAR PURPOSE ARE DISCLAIMED. IN NO EVENT SHALL THE INSTITUTE
OR CONTRIBUTORS BE LIABLE FOR ANY DIRECT, INDIRECT, INCIDENTAL,
SPECIAL, EXEMPLARY, OR CONSEQUENTIAL DAMAGES (INCLUDING, BUT NOT
LIMITED TO, PROCUREMENT OF SUBSTITUTE GOODS OR SERVICES; LOSS OF
USE, DATA, OR PROFITS; OR BUSINESS INTERRUPTION) HOWEVER CAUSED
AND ON ANY THEORY OF LIABILITY, WHETHER IN CONTRACT, STRICT
LIABILITY, OR TORT (INCLUDING NEGLIGENCE OR OTHERWISE) ARISING IN
ANY WAY OUT OF THE USE OF THIS SOFTWARE, EVEN IF ADVISED OF THE
POSSIBILITY OF SUCH DAMAGE.
This product includes RSA BSAFE encryption software from RSA Security Inc.
28 Xerox WorkCentre 7132 User Guide
Page 29

Illegal Copies
USA
Congress, by statute, has forbidden the reproduction of the following subjects under
certain circumstances. Penalties of fine or imprisonment may be imposed on those
guilty of making such reproductions.
1. Obligations or Securities of the United States Government, such as:
Certificates of Indebtedness National Bank Currency
Coupons from Bonds Federal Reserve Bank Notes
Silver Certificates Gold Certificates
United States Bonds Treasury Notes
Federal Reserve Notes Fractional Notes
Certificates of Deposit Paper Money
Bonds and Obligations of certain agencies of the government, such as FHA, etc.
Illegal Copies
Bonds (U.S. Savings Bonds may be photographed only for publicity purposes in
connection with the campaign for the sale of such bonds.)
Internal Revenue Stamps. If it is necessary to reproduce a legal document on
which there is a canceled revenue stamp, this may be done provided the
reproduction of the document is performed for lawful purposes.
Postage Stamps, canceled or uncanceled. For philatelic purposes, Postage
Stamps may be photographed, provided the reproduction is in black and white and
is less than 75% or more than 150% of the linear dimensions of the original.
Postal Money Orders.
Bills, Checks, or Draft of money drawn by or upon authorized officers of the United
States.
Stamps and other representatives of value, of whatever denomination, which have
been or may be issued under any Act of Congress.
2. Adjusted Compensation Certificates for Veterans of the World Wars.
3. Obligations or Securities of any Foreign Government, Bank, or Corporation.
4. Copyrighted materials, unless permission of the copyright owner has been
obtained or the reproduction falls within the “fair use” or library reproduction rights
provisions of the copyright law. Further information of these provisions may be
obtained from the Copyright Office, Library of Congress, Washington, D.C. 20559.
Ask for Circular R21.
5. Certificates of Citizenship or Naturalization. Foreign Naturalization Certificates
may be photographed.
6. Passports. Foreign Passports may be photographed.
7. Immigration Papers.
8. Draft Registration Cards.
Xerox WorkCentre 7132 User Guide 29
Page 30

1 Before Using the Machine
9. Selective Service Induction Papers that bear any of the following Registrant's
information:
Earnings or Income Dependency Status
Court Record Previous military service
Physical or mental condition
Exception: United States military discharge certificates may be photographed.
10. Badges, Identification Cards, Passes, or Insignia carried by military personnel, or
by members of the various Federal Departments, such as FBI, Treasury, etc.
(unless photograph is ordered by the head of such department or bureau.)
Reproducing the following is also prohibited in certain states:
Automobile Licenses - Drivers’ Licenses - Automobile Certificates of Title.
The above list is not all inclusive, and no liability is assumed for its completeness or
accuracy. In case of doubt, consult your attorney.
Canada
Parliament, by statute, has forbidden the reproduction of the following subjects under
certain circumstances. Penalties of fine or imprisonment may be imposed on those
guilty of making such reproductions.
1. Current bank notes or current paper money.
2. Obligations or securities of a government or bank.
3. Exchequer bill paper or revenue paper.
4. The public seal of Canada or of a province, or the seal of a public body or authority
in Canada, or of a court of law.
5. Proclamations, orders, regulations or appointments, or notices thereof (with intent
to falsely cause same to purport to have been printed by the Queen’s Printer for
Canada, or the equivalent printer for a province).
6. Marks, brands, seals, wrappers or designs used by or on behalf of the Government
of Canada or of a province, the government of a state other than Canada or a
department, board, Commission or agency established by the Government of
Canada or of a province or of a government of a state other than Canada.
7. Impressed or adhesive stamps used for the purpose of revenue by the Government
of Canada or of a province or by the government of a state other than Canada.
8. Documents, registers or records kept by public officials charged with the duty of
making or issuing certified copies thereof, where the copy falsely purports to be a
certified copy thereof.
9. Copyrighted material or trademarks of any manner or kind without the consent of
the copyright or trademark owner.
The above list is provided for your convenience and assistance, but it is not allinclusive, and no liability is assumed for its completeness or accuracy. In case of doubt,
consult your solicitor.
30 Xerox WorkCentre 7132 User Guide
Page 31

Other Countries
Copying certain documents may be illegal in your country. Penalties of fine or
imprisonment may be imposed on those found guilty of making such reproductions.
• Currency notes
• Bank notes and cheques
• Bank and government bonds and securities
• Passports and identification cards
• Copyright material or trademarks without the consent of the owner
• Postage stamps and other negotiable instruments
This list is not inclusive and no liability is assumed for either its completeness or
accuracy. In case of doubt, contact your legal counsel.
Product Recycling and Disposal
Product Recycling and Disposal
If you are managing the disposal of your Xerox product, please note that the product
does not contain lead, mercury and other materials whose disposal may be regulated
due to environmental considerations in certain countries or states. The presence of
lead and mercury is fully consistent with global regulations applicable at the time that
the product was placed on the market.
USA/Canada
Xerox operates an equipment takeback and reuse/recycle program. Contact your
Xerox sales representative (1-800-ASK-XEROX) to determine whether this Xerox
product is part of the program. For more information about Xerox environmental
programs, visit www.xerox.com/environment or for recycling and disposal information,
contact your local authorities. In the United States, you may also refer to the Electronic
Industries Alliance web site: www.eiae.org.
European Union
Application of this symbol on your equipment is confirmation that you
should not dispose of the equipment in the normal household waste
stream.
In accordance with European legislation end of life electrical and electronic equipment
subject to disposal must be segregated from household waste.
Private households within EU Member States may return used electrical and electronic
equipment to designated collection facilities free of charge. Please contact your local
disposal authority for information.
Xerox WorkCentre 7132 User Guide 31
Page 32

1 Before Using the Machine
In some Member States when you purchase new equipment your local retailer may be
required to take back your old equipment free of charge. Please ask your retailer for
information.
Other Countries
Please contact your local waste authorities and request disposal guidance.
32 Xerox WorkCentre 7132 User Guide
Page 33

2 Product Overview
)
This machine is not simply a conventional copier but a digital device capable of
copying, faxing, printing and scanning, depending on the configuration.
The touch screens shown in this manual are from a fully configured machine to cover
all the features.
The content of the touch screens may vary slightly depending on Key Operator settings
and machine configuration. The button names and icons on the control panel also vary
depending on machine configuration. However, machine features described here
remain the same.
For more information on available options not described here, visit the Xerox website
or contact your Xerox Sales Representative.
Machine Components
The following diagrams show the standard and optional components of the machine.
Configuration may vary depending on the model.
Side Tray
Duplex Module
Tray 5 (Bypass Tray)
Tray 1
Tray 2
Tray 3
Document Feeder
(Optional)
Document Glass
(under the Document Feeder
Control Panel
Touch Screen
On / Off Switch
Center Output Tray
(Exit 2 Tray)
Front Cover
Two Tray Module (Optional)
NOTE: Depending on the configuration, the Document Glass Cover is attached
instead of the Document Feeder. Two optional paper trays can be attached.
Xerox WorkCentre 7132 User Guide 33
Page 34

2 Product Overview
Ethernet
USB2.0
Office Finisher
Tray
Office Finisher
(Optional)
Tray 3
Tray 2
Tandem Tray Module (Optional)
Telephone socket
Located at the back of the machine. The telephone socket is used to connect to the fax
kit.
USB 1.1 (Host) Port
Located at the back of the machine. This port is used to connect to the fax kit.
USB 1.1 (Device) Port
Located at the back of the machine. This port is used to connect to a PC for software
update downloads.
USB 2.0 (Device) Port
Located at the back of the machine. This port is used to connect to a local client
computer when the optional printer kit is installed.
100Base-TX/10Base-T Port
Located at the back of the machine. This port is used to connect to a network cable
when the optional printer kit is installed.
Office Finisher
Allows you to staple or sort copies automatically. The Office Finisher Tray can hold
1,000 sheets of 20 lb bond or 80 g/m
34 Xerox WorkCentre 7132 User Guide
2
paper in Letter/A4 size or smaller.
Page 35

Integrated Office Finisher
(Optional)
Staple Cartridge
Machine Components
Integrated Office Finisher
Center Tray
Integrated Office Finisher
Allows you to staple or sort copies automatically. The Integrated Office Finisher Center
Tray can hold 500 sheets of 24 lb bond or 90 g/m
2
paper in Letter/A4 size or smaller.
Duplex Module
Allows you to make double-sided copies. The Duplex Module can be used when paper
is supplied from Tray 1, 2, or 3. For more information, refer to 2 Sided Copying in the
Copy chapter on page 53.
Trays 2 & 3
At the base of the machine, the following optional trays will be available, depending on
the configuration.
• Two Tray Module - Can be added to the standard 1-tray configuration. Each tray can
hold 520 sheets of 20 lb bond or 80 g/m
2
paper.
• Tandem Tray Module - Can be added to the standard 1-tray configuration to provide
high volume paper sources. Tray 2 can hold a maximum of 900 sheets of 20 lb bond
2
or 80 g/m
of 20 lb bond or 80 g/m
paper in Letter or A4 size, long edge feed. Tray 3 can hold 1,200 sheets
2
paper in Letter or A4 size. The Tandem Tray Module is
referred to as “TTM” in this manual.
Tray 5 (Bypass)
Allows you to bypass the standard paper trays to print on different sized paper. The
Bypass Tray can hold 100 sheets of 20 lb bond or 80 g/m
2
paper in sizes ranging from
B6 (SEF) or Envelope Monarch (LEF) to A3 (SEF) or 11 × 17 inch (SEF).
NOTE: Do not place paper with a length less than 140mm in the Bypass Tray, as this
may cause paper jams and potentially damage the inside of the machine.
Xerox WorkCentre 7132 User Guide 35
Page 36

2 Product Overview
System Controls
The following diagram shows the names and functions of the buttons on the control
panel.
1 2
3
4
5
6
7
8
12
13
14
15
16
91011
Button Function
1 <Log In/Out> Displays the log-in screen to enter the [System Administrator
Menu] screen, or when the Authentication feature is enabled. DO
NOT press this button again, after you have logged in. This will
log you out immediately.
2 <Help> This button is non-functional on this machine.
3 <Language> Changes the languages displayed on the touch screen.
NOTE: Certain characters may be garbled when you change
languages.
4 <Power Saver>
(green light)
Indicates whether the machine is in power saver mode. Also
cancels the current power saver mode setting.
5 <Clear All> Resets to the default settings and displays the first screen for the
current pathway.
6 <Interrupt> Temporarily interrupts a job for programming a priority job.
7 <Stop> Suspends or cancels a job depending on the job type. When
multiple jobs are being processed, all the jobs will be suspended
or cancelled. Selecting [Stop] on the [Job Status] screen stops
only the selected job.
8 <Start> Starts or resumes a job.
9 <Speed Dial> Enters speed dial codes.
10 <C> Deletes a numeric value or the last digit entered, and replaces the
current value with a default value. Also cancels suspended jobs.
11 <Dial Pause> Inserts a pause while dialing a fax number.
36 Xerox WorkCentre 7132 User Guide
Page 37

Services and Features
Button Function
12 <*(asterisk)> Indicates the special character used in a fax number and
designates a group code. Also allows you to specify an F Code or
a password.
13 <All Services> Displays the [All Services] screen for selection of all the available
services on the machine.
14 <Features> Returns the display to the previous copy, fax, or scan feature
screen when the [Job Status] screen or [Machine Status] screen is
selected.
15 <Job Status> Displays the [Job Status] screen where you can check the
progress of a job, or display the log and detailed information of
completed jobs.
16 <Machine Status> Displays the [Machine Status] screen where you can check the
machine status, the billing meter, the status of the toner cartridge
or print various reports.
Button names and icons used on the control panel may differ depending on the country
of purchase.
Services and Features
The machine has various features and provides valuable services. The following
description outlines the features and explains the options on the <All Services> screen.
NOTE: The arrangement of icons for the services and features displayed on the
screen can be changed by the Key Operator.
1. Press the <All Services> button
on the control panel.
2. Select the required service.
Copy
Allows you to copy documents in various ways. For example, you can produce output
which has been reduced or enlarged to a different size, or copy two or four independent
documents onto one sheet of paper. For more information, refer to the Copy chapter.
E-mail
Allows you to send scanned documents by e-mail in various ways. For example, you
can set the density for scanning, or specify the file format for saving the documents.
For more information, refer to the Scan/E-mail chapter.
Xerox WorkCentre 7132 User Guide 37
Page 38

2 Product Overview
Fax
Allows you to fax documents in various ways. For example, you can send documents
in a reduced or enlarged format, or specify destinations using the Address Book or
speed dialing features. For more information, refer to the Fax/Internet Fax chapter.
Internet Fax
Allows you to send and receive faxes over the Internet or intranet. Internet Fax
provides reduced cost of transmissions compared to the use of a conventional phone
line. After scanning documents, you can send scanned data by e-mail, and can also
receive scanned data in an e-mail attachment sent from an Internet Fax compatible
machine. For more information, refer to the Fax/Internet Fax chapter.
Network Scanning
Allows you to scan documents, and store them as electronic documents on a file server
on the network by selecting a job template which has various assigned parameters.
You can retrieve the stored electronic documents by accessing the file server from a
PC. For more information, refer to Network Scanning in the Scan/E-mail chapter on
page 126, and Services in the CentreWare Internet Services chapter on page 167.
Scan to FTP/SMB
Allows you to scan and store documents to specified destinations using the FTP or
SMB protocol. For more information, refer to Scan to FTP/SMB in the Scan/E-mail
chapter on page 127.
Scan to Mailbox
Enables the confidential mailbox or polling feature by storing the scanned documents
to private mailboxes. For more information, refer to Scan to Mailbox in the Scan/E-mail
chapter on page 125.
Check Mailbox
Allows you to confirm, print, or delete the documents in a mailbox. It also allows you to
change or release linkage with a job flow sheet, and execute the linked job flow sheets.
For more information, refer to the Check Mailbox chapter.
Power On/Off
Powering On
Ensure that the machine is connected to a suitable power supply and that the power
plug is firmly connected to the electrical outlet.
The machine is ready to make copies a maximum of 42 seconds after powering on
(varies with machine configuration). For more information, refer to Machine
Specifications in the Specifications chapter on page 433.
38 Xerox WorkCentre 7132 User Guide
Page 39
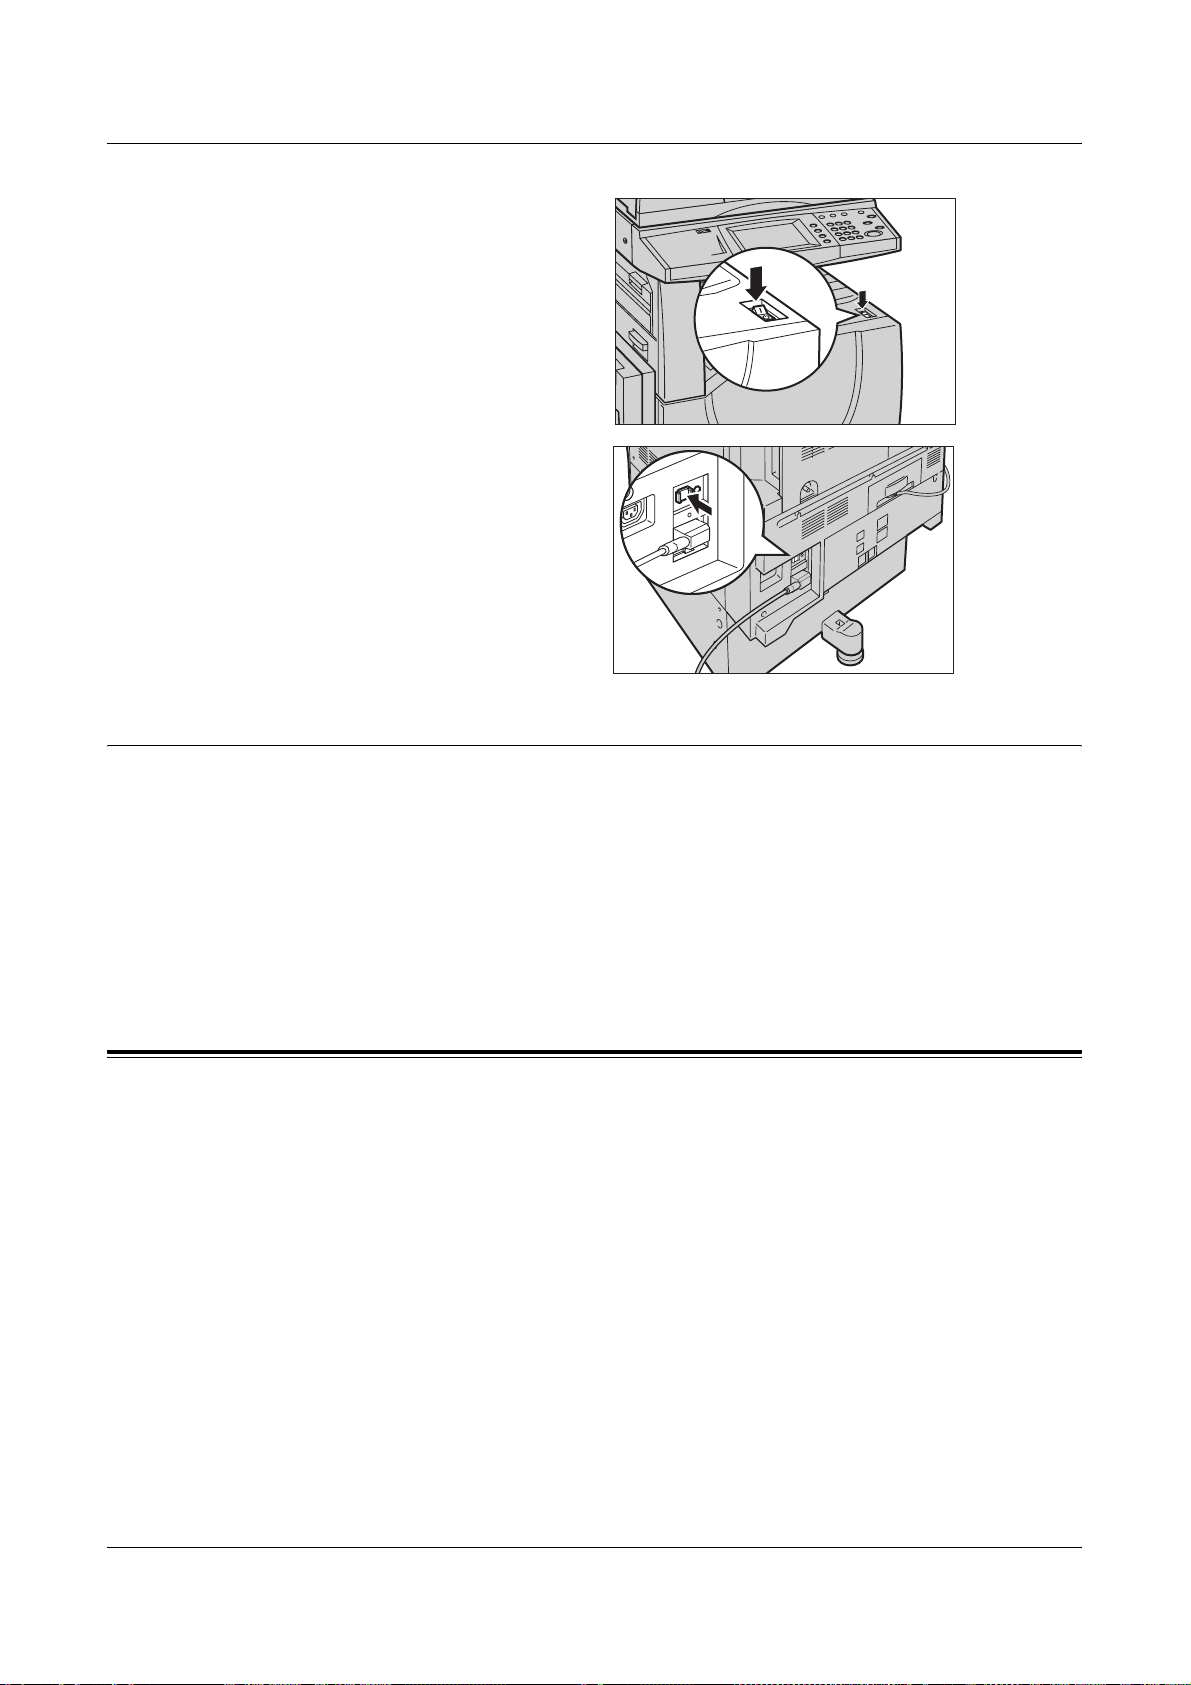
1. Press the power switch to the
<I> position.
NOTE: If the machine does not start
up, check that the RESET button on
the back of the machine is in the
reset position (depressed).
Ground Fault Interrupter (GFI)
Powering Off
Before turning the power off, wait at least 5 seconds after all copy or print jobs have
completely finished.
When you switch off the machine, it remains on for approximately 10 seconds while it
stores files on the hard disk drive and prepares for shutdown. The machine then shuts
down completely.
CAUTION: Wait at least 20 seconds between powering the system on and off.
Failure to do this could cause damage to the hard disk and the machine.
Ground Fault Interrupter (GFI)
If a fault is detected in the power supply to the machine, a Ground Fault Interrupter
(GFI) device on the machine automatically cuts all electrical power. If power is
interrupted, locate the RESET button on the back of the machine. If the GFI has been
triggered, the RESET button will be in the tripped position. To restore power to the
machine, press the RESET button.
Xerox WorkCentre 7132 User Guide 39
Page 40
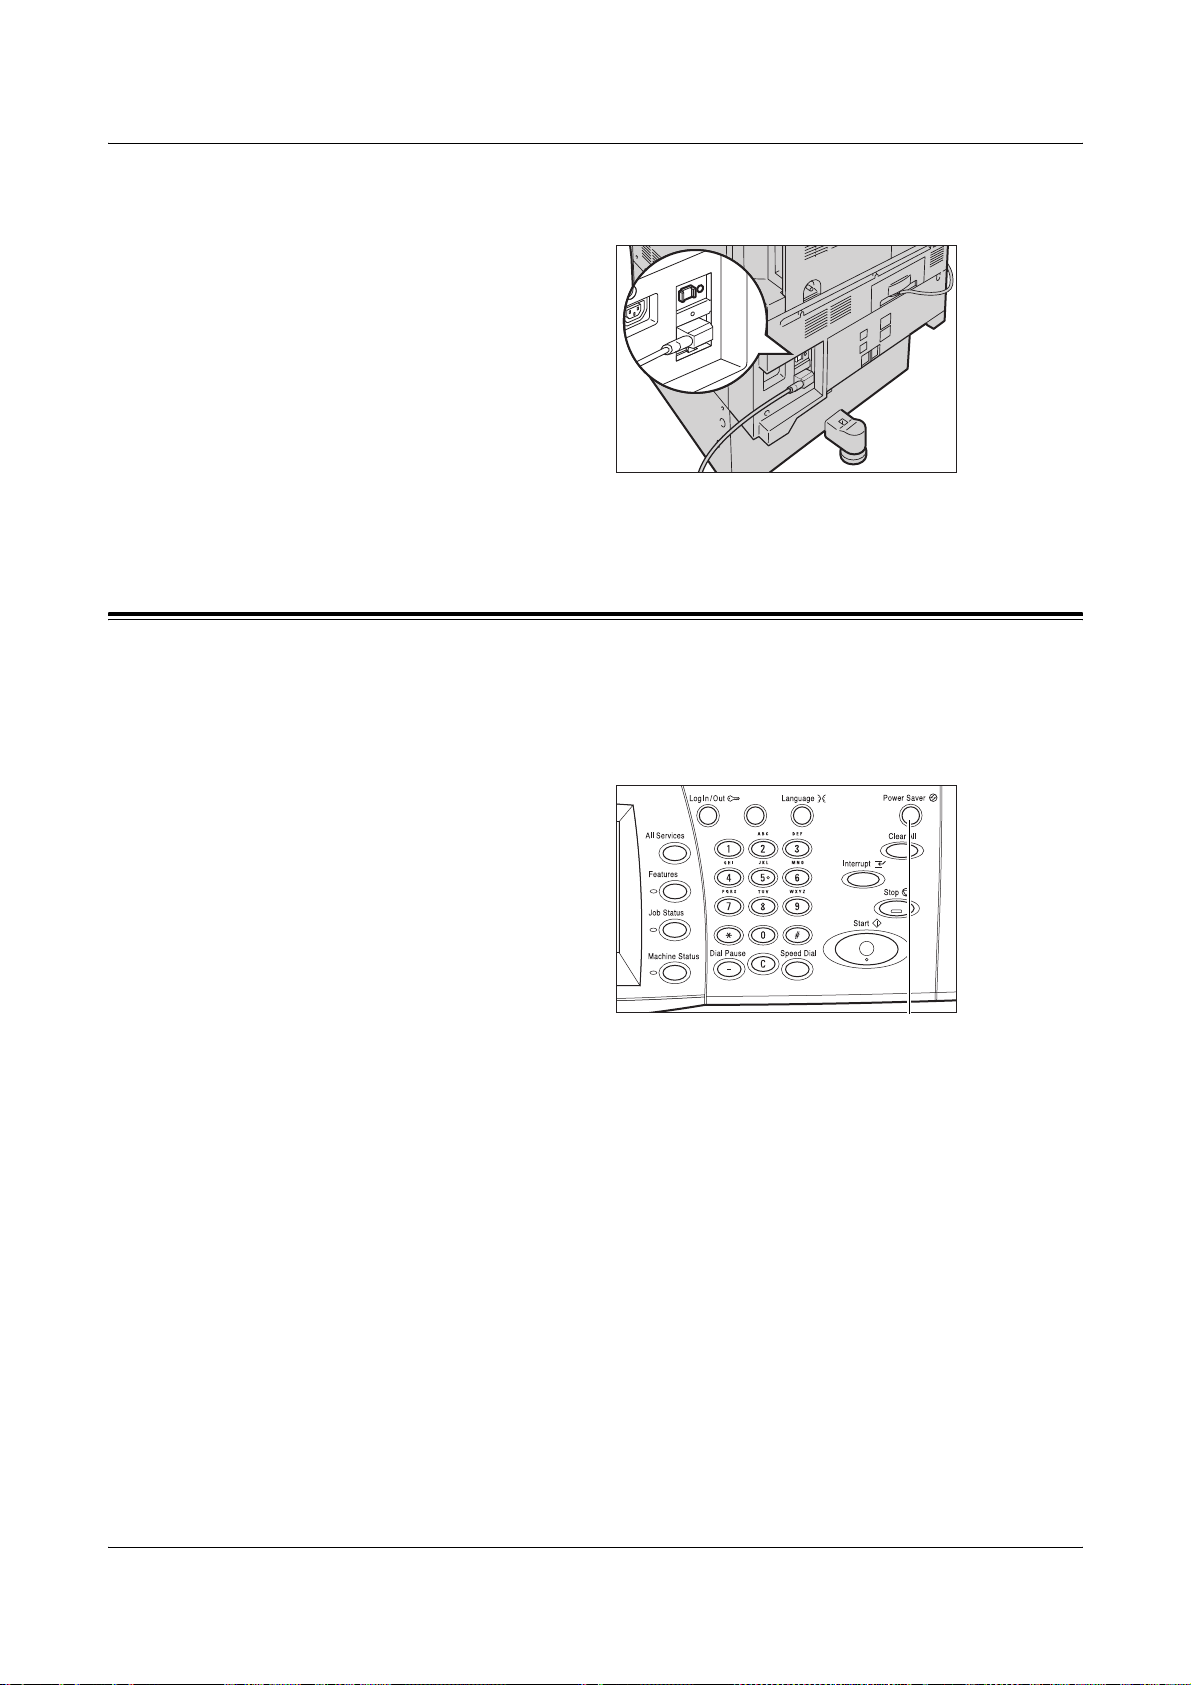
2 Product Overview
Before using the machine, press the TEST button. If the GFI is working properly, the
RESET button should pop up. If it does, press the RESET button.
NOTE: If the RESET button pops back up when you press it, or if power is not
restored by this procedure, contact the Xerox Welcome Center.
Power Saver Modes
The machine has energy saving features that significantly reduce power consumption
during periods of inactivity. The <Power Saver> button is located on the upper-right
portion of the control panel, and lights up when the power saving feature is enabled.
The power saving feature operates in the following modes.
•Low Power Mode
• Sleep Mode
<Power Saver>
light/button
Low Power Mode
The machine automatically switches to the Low Power Mode after a certain period of
time from the last copy, fax, scan, or print operation. In this mode, the touch screen is
turned off, and the Power Saver light is on. The Low Power Mode is cancelled when
the <Power Saver> button on the control panel is pressed, or a fax or print job is
received by the machine. The factory default setting of 15 minutes is customer
changeable within the range of 1 to 240 minutes.
For more information, refer to Auto Power Saver in the Setups chapter on page 222.
Sleep Mode
The machine automatically switches from the Low Power Mode to the Sleep Mode after
a further period of inactivity. The Sleep Mode has a reduced power consumption
compared to Low Power Mode. In this mode, the touch screen is turned off, and the
Power Saver light is on. The Sleep Mode is cancelled when the <Power Saver> button
40 Xerox WorkCentre 7132 User Guide
Page 41
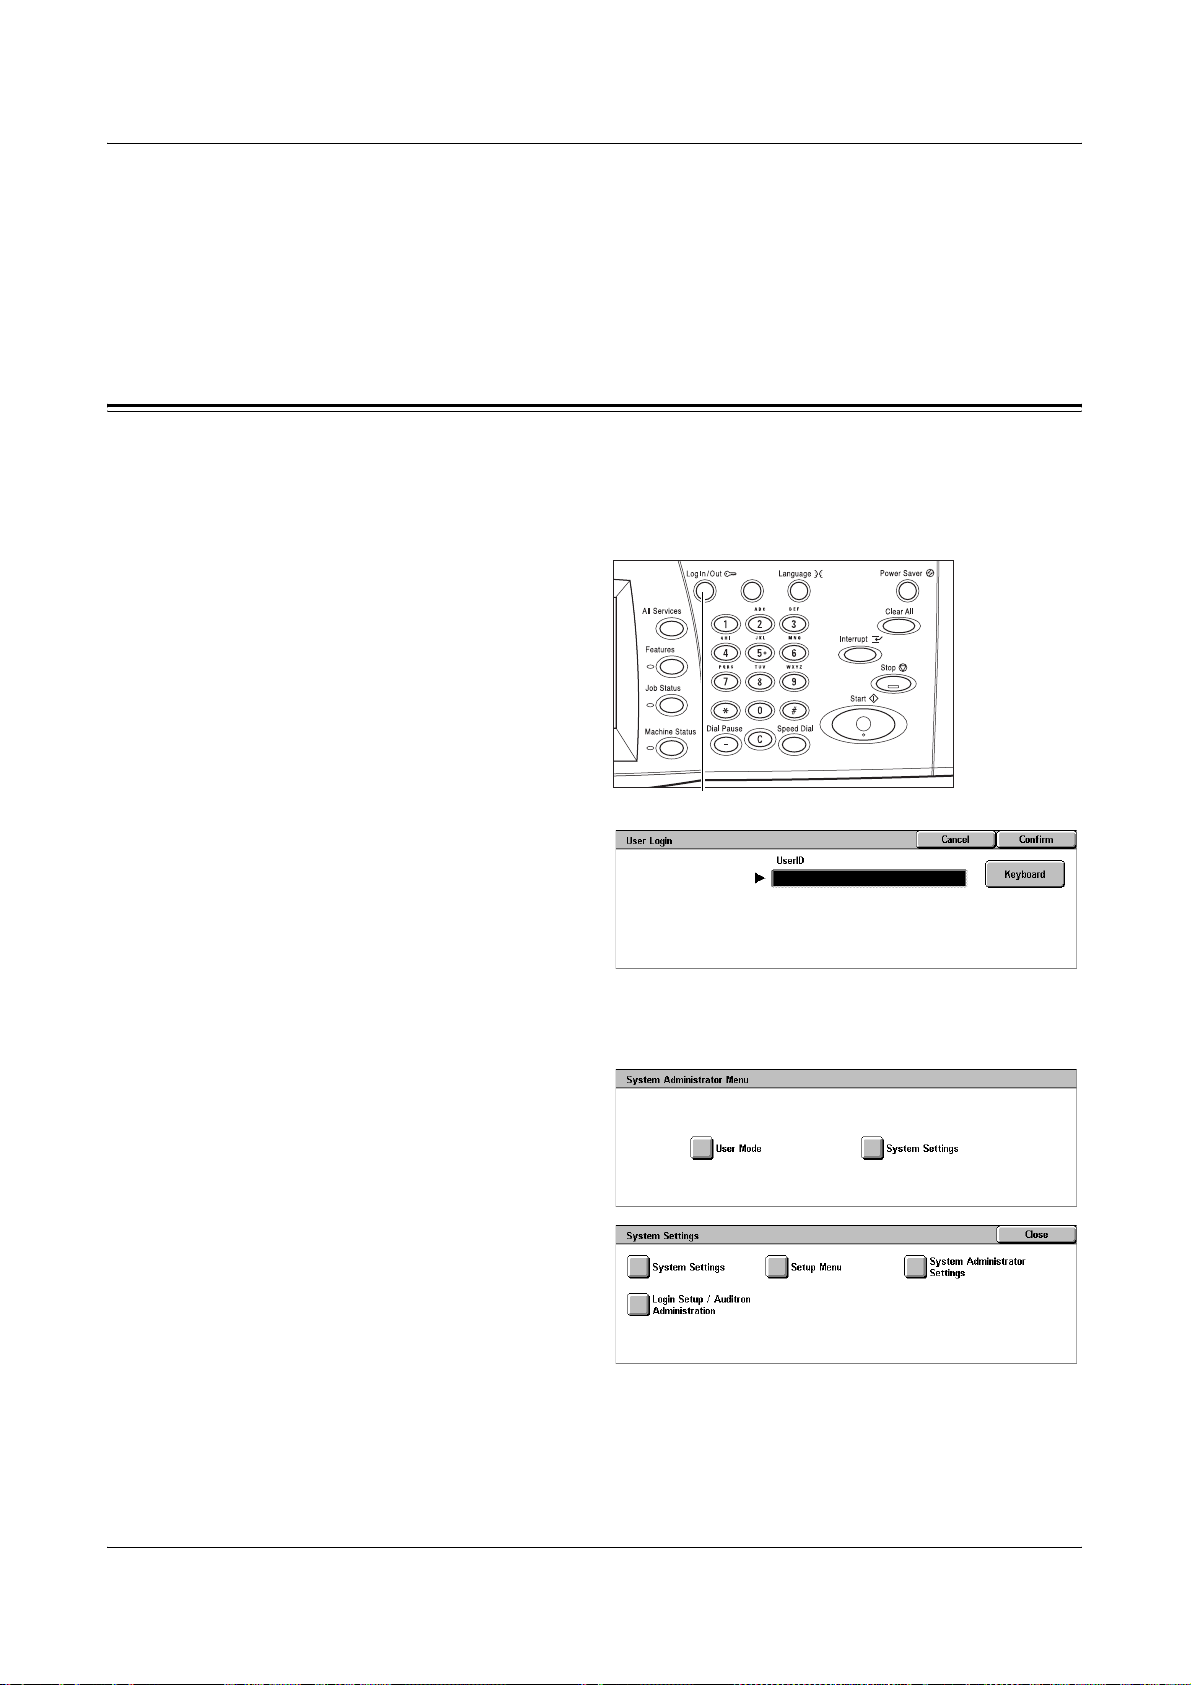
is pressed, or a fax or print job is received by the machine. The factory default setting
of 60 minutes is customer changeable within the range of 1 to 240 minutes, and must
be longer than the Low Power Mode time value. The time specified for entering the
Sleep Mode will be counted from when the machine enters the Low Power Mode.
For more information, refer to Auto Power Saver in the Setups chapter on page 222.
Changing the Default Time Settings
This section describes how to change the default time settings using the Key Operator
access. If you need assistance or more information, contact the Key Operator or refer
to Machine Clock/Timers in the Setups chapter on page 221.
1. Press the <Log In/Out> button
on the control panel.
Changing the Default Time Settings
<Log In/Out> button
2. Enter the Key Operator ID using
the numeric keypad on the
control panel. Select [Confirm]
on the [User Login] screen.
NOTE: The default Key Operator ID
is “11111”. If the Authentication
feature is enabled, you may be required to enter a password. The default password is
“x-admin”. The password is case sensitive.
3. Select [System Settings] on the
[System Administrator Menu]
screen.
4. Select [System Settings] on the
[System Settings] screen.
Xerox WorkCentre 7132 User Guide 41
Page 42

2 Product Overview
5. Select [Common Settings] on
6. Select [Machine Clock/Timers]
7. Select the required option.
8. Select [Change Settings].
9. Change the required setting.
10. Select [Save].
the [System Settings] screen.
on the [Common Settings]
screen.
Use the scroll bars to switch
between screens.
Modes
Use the buttons to access the screens which allow you to select features, monitor the
status of jobs and obtain general information on the machine.
There are four buttons on the machine.
•All Services
• Features
• Job Status
• Machine Status
NOTE: These buttons do not respond when the machine is in the System Settings
mode.
<All Services>
button
<Features>
button
<Job Status>
button
<Machine Status> button
42 Xerox WorkCentre 7132 User Guide
Page 43

All Services
Features
Job Interrupt
Use this button to access all the services available on the machine.
NOTE: The arrangement of service icons displayed on the screen can be changed by
the Key Operator.
1. Press the <All Services> button
on the control panel.
Use this button to go back one previous screen. If you are using the [Job Status] screen
or [Machine Status] screen, press the <Features> button to return to the previous copy,
fax, and scan feature screen. The copy, fax, or scan feature screen does not change,
even if you press this button while you are in one of those screens. In this case, use
the <All Services> button to select the copy, fax, or scan feature.
Job Status
Use this button to check the progress of a job, or display the log and detailed
information of completed jobs. The latest job is displayed at the top of the list. It can
also check, delete, or print stored documents or documents in the public mailbox of the
machine. For more information, refer to the Job Status chapter.
Machine Status
Use this button to check the machine status, the billing meter, the status of the toner
cartridge or print various reports. For more information, refer to the Machine Status
chapter.
Job Interrupt
Use this feature to temporarily suspend the currently processed job to allow an urgent
job to be initiated.
NOTE: The machine identifies a convenient point to interrupt the current job.
Xerox WorkCentre 7132 User Guide 43
Page 44

2 Product Overview
1. Press the <Interrupt> button on
the control panel.
2. Enter the commands for the new
job you require.
3. Press the <Start> button on the
control panel.
4. To restart the interrupted job,
press the <Interrupt> button
again, and press the <Start>
button.
NOTE: Interrupted jobs cannot be promoted, released or deleted in the Print Queue.
Recycled Paper
The use of recycled paper in the machine benefits the environment with no degradation
in performance. Xerox recommends recycled paper with 20% post consumer content
which can be obtained both through Xerox and other office suppliers. Contact your
Xerox representative or go to www.xerox.com for more information on other types of
recycled paper.
<Interrupt> button
44 Xerox WorkCentre 7132 User Guide
Page 45

3Copy
This chapter contains information on the copy screens and the features available.
NOTE: Some of the features described in this chapter are optional, and may not apply
to your machine configuration.
Copying Procedure
This section describes the basic copy procedure. Before making copies on the
machine, confirm what is to be copied and the number of copies required. Follow the
steps below.
1. Load the Documents – page 45
2. Select the Features – page 47
3. Enter the Quantity – page 48
4. Start the Copy Job – page 48
5. Confirm the Copy Job in the Job Status – page 49
Stop the Copy Job – page 49
NOTE: If the Authentication feature is enabled, you may need an account number
before using the machine. To get an account number or for further information, contact
the Key Operator.
1. Load the Documents
Document input areas are as follows.
• Document Feeder for single or multiple documents
• Document Glass for single documents or bound originals
NOTE: The document glass cover will be fitted in the non-document feeder
configuration.
NOTE: The machine automatically detects standard document sizes. The sizes that
can be detected vary depending on the paper size table specified by the Key
Operator. For more information on setting the paper size table, refer to Paper Size
Settings in the Setups chapter on page 234. If the document is of a non-standard size
or not identified as a standard size, the machine will prompt you to check the
document or manually enter the document size. For information on how to enter a
document size manually, refer to Original Size on page 65.
Xerox WorkCentre 7132 User Guide 45
Page 46
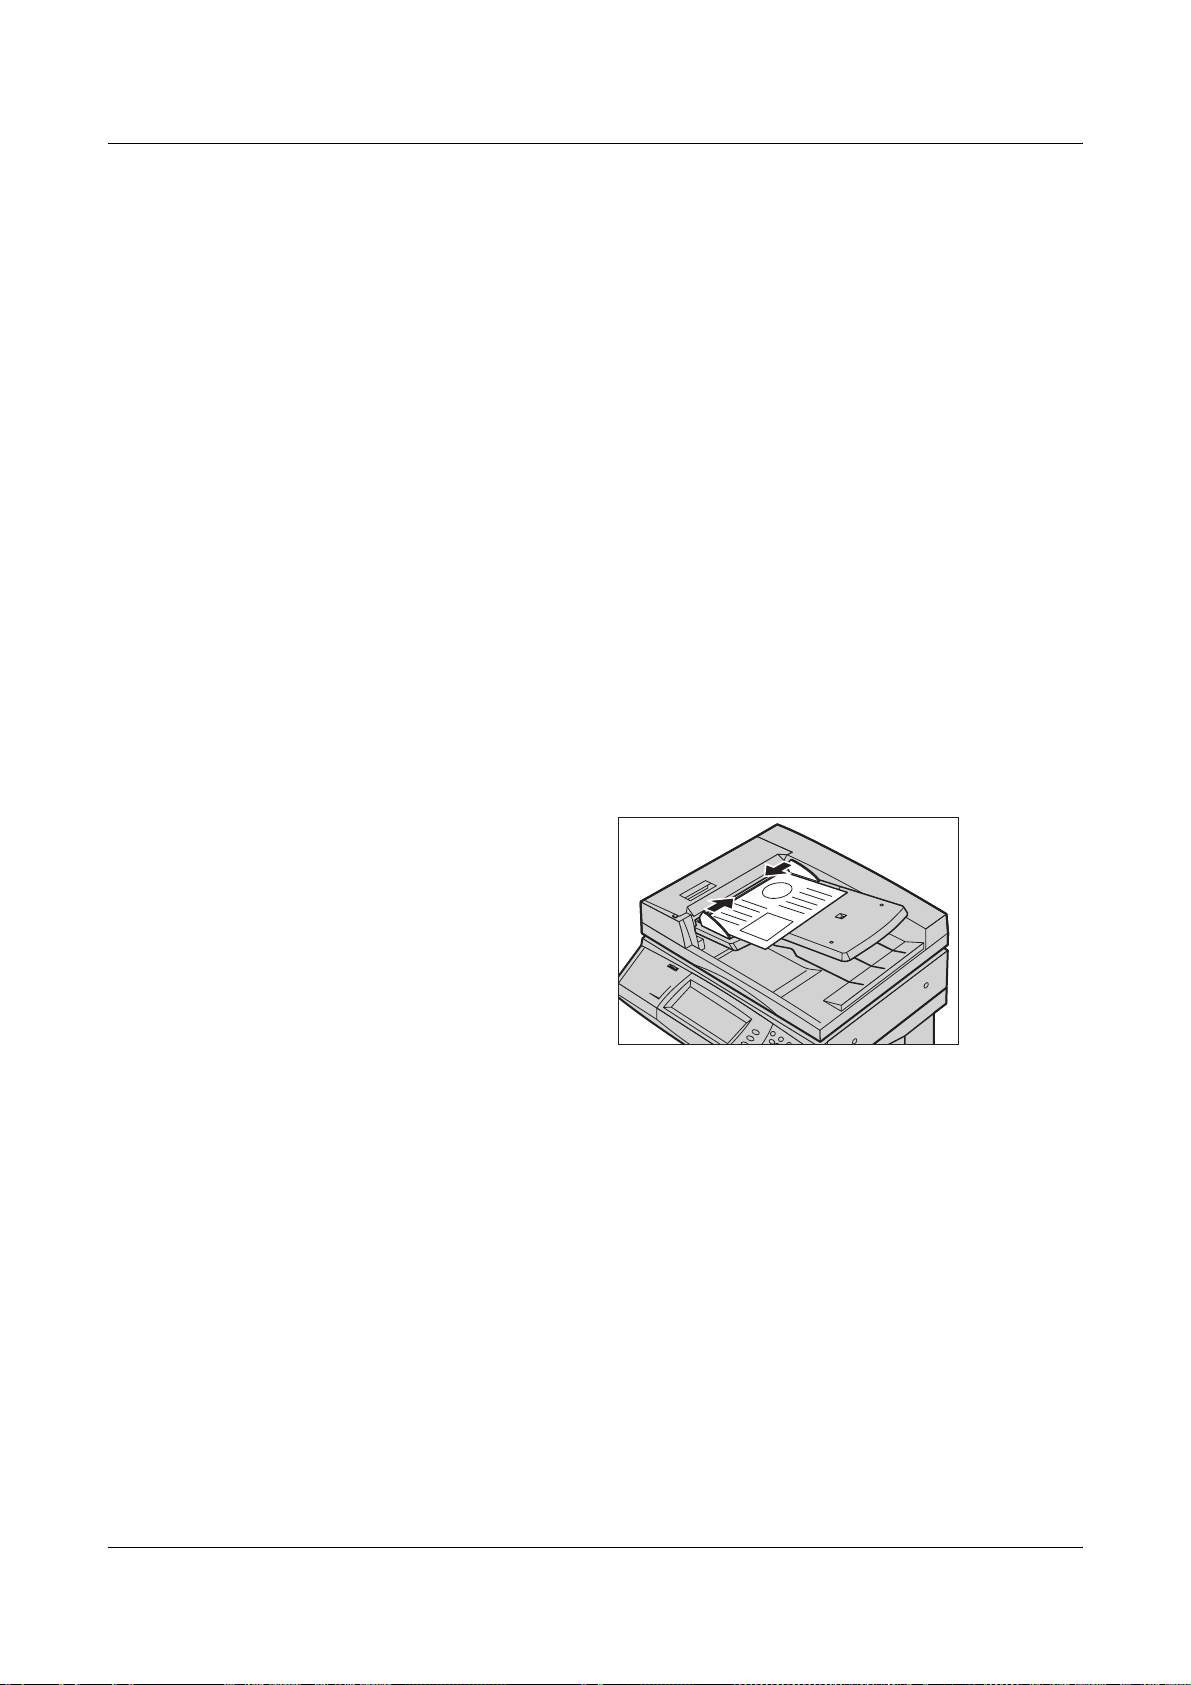
3 Copy
Document Feeder
The document feeder can hold up to 50 sheets of plain paper (16-32 lb bond or 38-
2
128 g/m
). The document can be any size of 125-297 mm (4.9-11.7 inches) for width
and 115-432 mm (4.5-17 inches) for length, and the standard sizes of A5-A3 (5.5" x
8.5" to 11" x 17") SEF. Make sure the documents are in good condition, and remove all
staples or paper clips before loading. The document feeder senses standard sizes, or
you can manually enter a size using the [Layout Adjustment] tab.
For information on how to copy mixed size originals using the document feeder, refer
to Mixed Sized Originals on page 65.
NOTE: To reduce the risk of document feeder jams, use the document glass to copy
folded or creased documents. Replace folded or creased documents with the new
copy.
NOTE: A paper jam may occur when custom sized originals are loaded in the
document feeder and the original size feature is set to [Auto Detect]. In this case,
entering a custom paper size is recommended. For more information, refer to Original
Size on page 65.
The machine is capable of sequentially scanning mixed size documents using the
document feeder. Align the documents against the top corner of the document feeder.
For information on how to copy mixed size originals using the document feeder, refer
to Mixed Sized Originals on page 65.
1. Before loading the documents
into the document feeder,
remove all staples and paper
clips.
2. Insert the documents neatly into
the document feeder, face up.
The first page should be on top
with the headings towards the
back or left of the machine.
3. Place the stack in the middle of the guides aligning the left edge with the
document feeder tray, and position the guides to just touch the edge of the
documents.
When [Auto] is selected in [Paper Supply], the machine automatically selects an
appropriate tray according to the document size. The selected tray, paper size and
orientation in the selected tray are displayed on the screen.
NOTE: This feature is available when the machine finds an appropriate tray. If there is
no appropriate tray, temporarily use manual selection for the tray or use the bypass
tray. For more information on tray selection, refer to Paper Supply on page 52.
46 Xerox WorkCentre 7132 User Guide
Page 47
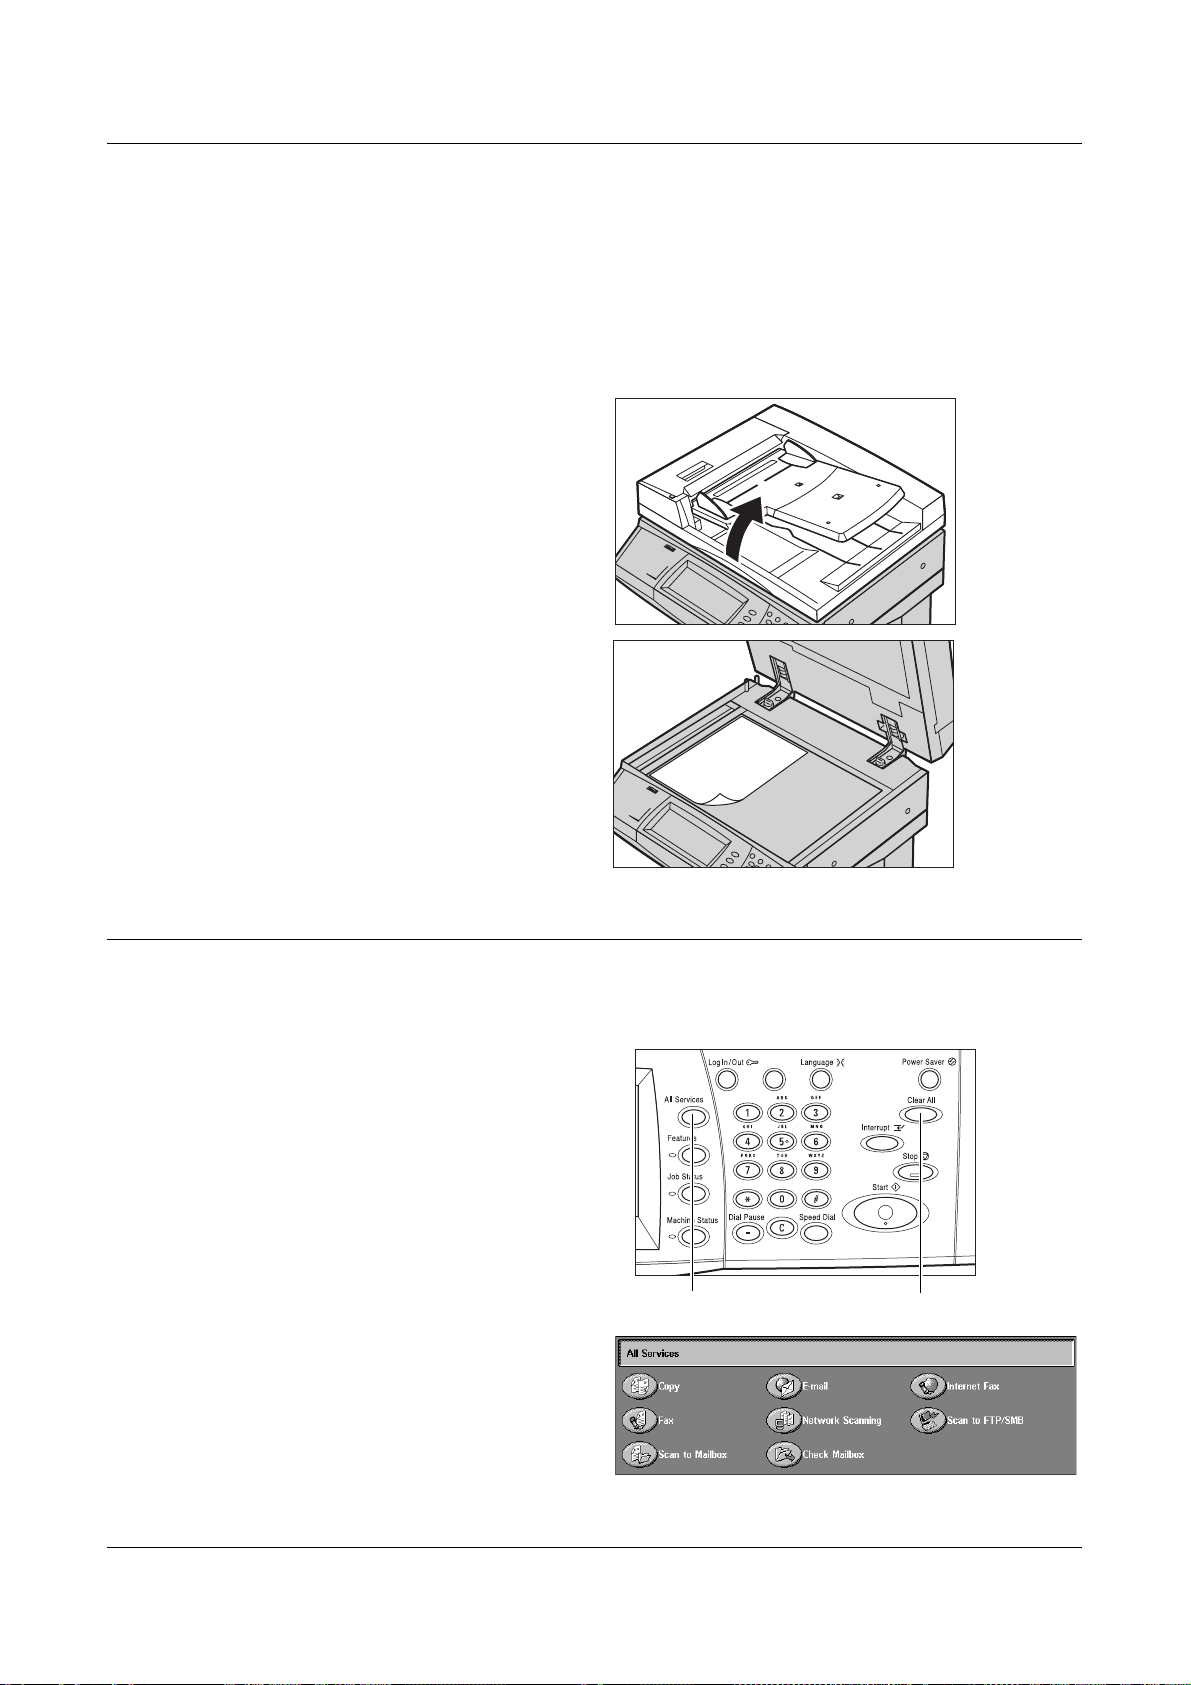
Document Glass
The document glass is used for a single page or bound document up to 297 mm (11.7
inches) for width and up to 432 mm (17 inches) for length.
NOTE: Before you place the document on the document glass, make sure that the
touch screen is ready. If you place the document on the document glass before the
touch screen is ready, the paper size may not be detected correctly.
1. Raise the document feeder or
2. Place the document face down
Copying Procedure
the document glass cover.
on the document glass, aligned
with the tip of the registration
arrow near the top left of the
document glass.
3. Lower the document feeder or
the document glass cover.
2. Select the Features
The features available on the [Copy] screen are those used most often.
NOTE: Only those features relevant to the machine configuration will be available.
1. Press the <All Services> button
on the control panel.
2. Select [Copy] on the
[All Services] screen. Ensure
that the [Copy] tab screen is
displayed.
<Clear All> button<All Services> button
Xerox WorkCentre 7132 User Guide 47
Page 48

3 Copy
NOTE: If the Authentication feature is enabled, you may be required to enter the user
ID and password (if one is set up). If you need assistance, contact the Key Operator.
3. Select the button for the feature required. If [More] is selected, select [Save] to
confirm the selected feature or [Cancel] to return to the previous screen.
If necessary, select one of the tabs, and configure the copy settings. For information on
the individual tabs, refer to the following.
Copy – page 50
Image Quality – page 56
Layout Adjustment – page 63
Output Format – page 70
Job Assembly – page 79
3. Enter the Quantity
The maximum copy quantity is 999.
1. Use the numeric keypad to enter
the number of copies required.
The number entered is
displayed in the upper right
hand corner of the touch screen.
NOTE: To cancel an incorrect entry,
press the <C> button, and enter the
correct quantity.
4. Start the Copy Job
1. Press the <Start> button. Each
document is scanned. The
number of copies remaining is
displayed in the upper right
hand corner of the touch screen.
While copying, if the document feeder or document glass is ready, because the
machine is equipped with the hard disk, you can scan the next document or program
the next job. While the machine is warming up, you can also program the next job.
<C> button
<Start> button
48 Xerox WorkCentre 7132 User Guide
Page 49

5. Confirm the Copy Job in the Job Status
1. Press the <Job Status> button
on the control panel to display
the [Job Status] screen.
The queued copy job will be displayed. If no job is displayed on the touch screen, it may
have already been processed.
For more information, refer to Current and Pending Jobs in the Job Status chapter on
page 306.
Stop the Copy Job
Follow the steps below to manually cancel the activated copy job.
1. Select [Stop] on the touch
screen or press the <Stop>
button on the control panel to
suspend the current copy job.
Copying Procedure
NOTE: Select the <Start> button on
the control panel to resume the
suspended copy job.
2. If required, press <Job Status>
button to display the [Job Status]
screen. To exit the [Job Status]
screen, press the <Features>
button.
3. Press the <C> button on the
control panel to delete the suspended copy job.
<Stop> button
<C> button
Xerox WorkCentre 7132 User Guide 49
Page 50

3 Copy
Copy
This section describes the basic features for a copy job on the [Copy] screen. For
information on the features available, refer to the following.
Output Color – page 50
Reduce/Enlarge – page 51
Paper Supply – page 52
2 Sided Copying – page 53
Copy Output – page 54
1. Press the <All Services> button
on the control panel.
2. Select [Copy] on the touch
screen. Ensure that the [Copy]
tab screen is displayed.
3. Select the required features.
Output Color
This feature allows you to set the output colors to use when copying.
NOTE: Color restrictions can be set to limit the availability of color when copying.
Refer to “Account Limit” on page 299.
1. Select a preset button for the
Auto Detect
Detects the color content in the original document, and makes copies in full color if the
original is a color document, or in black only if the original is a black and white
document.
Color
Copies in full color output using all four colors: cyan, magenta, yellow, and black.
NOTE: If [Dual Color] or [Single Color] is selected on the [Color Effect] screen, that
color setting takes precedence.
[Output Color] feature on the
[Copy] screen.
Black
Copies in black and white output only, regardless of the color content in the original
document.
50 Xerox WorkCentre 7132 User Guide
Page 51

Reduce/Enlarge
This feature allows you to reduce or enlarge copies by a specified ratio within the range
of 25–400%.
1. Select the [Reduce/Enlarge]
feature on the [Copy] screen.
Reduce/Enlarge
Displays the [Reduce/Enlarge] screen.
[Reduce/Enlarge] Screen
Allows you to select or specify the reduction/enlargement ratio for both the width and
length.
1. Select [Reduce/Enlarge] on the
[Copy] screen.
Copy
2. Select the required option.
3. Select [Save].
Preset %
• 100% - Selects output at the same size as the original document.
• Auto % - Automatically reduces/enlarges the image of the document to fit on the
paper size selected.
• Presets - Allows you to select from seven preset enlargement/reduction ratios. The
presets are set up by the Key Operator.
• Copy All - Reduces the image of documents slightly from the selected reduction/
enlargement ratio to copy the complete image onto the paper.
Variable %
Allows you to specify a reduction/enlargement ratio using the screen keypad or the
scroll buttons on the touch screen within the range of 25-400% in 1% increments.
Independent X-Y %
Allows you to specify a reduction/enlargement ratio individually for the width and length
within the range of 25-400% in 1% increments.
• Auto - Automatically specifies the reduction/enlargement ratio individually for the
width and length to fit on the paper.
• Copy All X-Y% - Enables the [Auto] feature, and reduces the image of the document
slightly from the reduction/enlargement ratio to copy the complete image of the
document onto the paper.
Xerox WorkCentre 7132 User Guide 51
Page 52

3 Copy
• XY - Specifies the same ratio adjustment for the width and length at the same time.
NOTE: When [Auto %] is selected, Tray 1 is selected automatically, even if [Auto] is
selected in [Paper Supply].
Paper Supply
The available paper trays are displayed on the touch screen together with the media
size and orientation preset for each tray.
When changing the size or type of media in the tray, the tray must be reprogrammed
by the Key Operator to match the media being loaded. For more information on
reprogramming the tray, contact the Key Operator.
For information on the sizes and types of media supported for the machine, refer to the
Paper and Other Media chapter.
1. Select a preset button or [More]
for the [Paper Supply] feature on
the [Copy] screen.
More
Displays the [Paper Supply] screen.
[Paper Supply] Screen
Allows you to select a paper tray from up to four preset trays, including the bypass tray.
1. Select [More] for the [Paper
Supply] feature on the [Copy]
screen.
2. Select the required option.
3. Select [Save].
Auto
Allows you to select an appropriate tray automatically according to the document size,
amount of reduction or enlargement, and related features settings.
NOTE: When [Auto %] is selected in [Reduce/Enlarge], even if [Auto] is selected in
[Paper Supply], [100%] is selected automatically in [Reduce/Enlarge].
Presets
Allows you to select a paper tray from the three preset trays set up by the Key Operator.
The tray number, paper size, and orientation are also displayed for all trays except
Tray 5.
Bypass
Displays the [Tray 5 (Bypass)] screen.
52 Xerox WorkCentre 7132 User Guide
Page 53

[Tray 5 (Bypass)] Screen
You can temporarily use the bypass tray to load paper that is unavailable from the
preprogrammed trays. Up to a 10 mm or 0.4 inch stack of paper (approximately 95
sheets of 80 g/m
1. Select [Bypass Tray] on the
[Paper Supply] screen.
2. Select the required option.
3. Select [Save].
Paper Size
Displays the [Tray 5 (Bypass) - Paper Size] screen.
• Custom Size - Allows you to specify the width and length of paper size using the
scroll buttons in 1 mm (0.1 inch) increments. The acceptable ranges of paper sizes
are 89-297 mm (3.5-11.7 inches) for width and 99-432 mm (3.9-17.0 inches) for
length.
• Standard Sizes - Displays the preset paper sizes on the touch screen, and allows
you to select the paper size. The presets are set up by the Key Operator.
2
paper) can be loaded into the bypass tray.
Copy
Paper Type
Displays the [Tray 5 (Bypass) - Paper Type] screen. Displays the preset paper types
on the touch screen, and allows you to select the paper type. The presets are set up
by the Key Operator. The setting is temporary only and applies to the current copy job.
2 Sided Copying
This feature allows you to automatically make single or double-sided copies from single
or double-sided documents.
NOTE: Before using the feature, specify the document orientation to indicate top of
the document in [Original Orientation] on the [Layout Adjustment] screen.
NOTE: The double-sided copy option cannot be used with the following paper types:
Transparency, Lightweight, Heavyweight, Labels, cover stock, as well as paper
already printed on one side (i.e., scrap paper).
1. Select a preset button or [More]
for the [2 Sided Copying]
feature on the [Copy] screen.
More
Displays the [2 Sided Copying] screen.
Xerox WorkCentre 7132 User Guide 53
Page 54

3 Copy
[2 Sided Copying] Screen
Allows you to select the 2 sided copying options, document feed direction and original
orientation.
1. Select [More] for the [2 Sided
Copying] feature on the [Copy]
screen.
2. Select the required option.
3. Select [Save].
NOTE: When using the document glass for [1 J 2 Sided] or [2 J 2 Sided], the
machine will display a message when it is ready to scan the next document.
1 J 1 Sided
Makes single-sided copies from single-sided documents.
1 J 2 Sided
Makes double-sided copies from single-sided documents.
2 J 2 Sided
Makes double-sided copies from double-sided documents.
2 J 1 Sided
Makes single-sided copies from double-sided documents
Rotate Side 2
Rotates side 2 of the printouts head to toe.
NOTE: This check box is available for all options except [1 J 1 Sided].
Copy Output
This feature allows you to sort copy outputs. If the optional finisher has been installed,
the stapling feature is also available. You can select the staple position on the copy
output.
NOTE: The features displayed on the screen vary if the finisher is not installed.
NOTE: If the correct size paper is not loaded in the machine when the stapling feature
is applied to a copy or print job, a paper size error may occur while processing the job.
When this happens, the finisher contains the wrong size paper already processed up
to this point. If the machine displays “The paper size/orientation currently loaded in
Tray 5 (Bypass) is different from the setting:” or “The paper size/orientation in Tray X is
different from the selected size. Load xxx” on the touch screen, open the finisher top
cover, and remove the wrong size paper, load the correct size paper in a tray, and
restart the job. If you simply replace the paper in a tray, and resume the job without
removing the processed paper in the finisher, the machine will staple the wrong size
paper still in the finisher, and the correct size paper from the tray together.
54 Xerox WorkCentre 7132 User Guide
Page 55

1. Select a preset button or [More]
for the [Copy Output] feature on
the [Copy] screen.
More
Displays the [Copy Output] Screen.
[Copy Output] Screen
Allows you to select the staple position, sorting method for your output, and specify the
output tray.
1. Select [More] for the [Copy
Output] feature on the [Copy]
screen.
2. Select the required options.
3. Select [Save].
Copy
NOTE: When Integrated Office Finisher is installed, the items displayed on the touch
panel are different from what is shown above.
Staple Position
Select one of the four options displayed to specify the staple position.
• No Staple - No stapled output.
• 1 Staple - One staple is attached on the top left-hand corner of the output.
• 2 Staples (Left) - Two staples are attached along the left-hand edge of the output.
• 2 Staples (Top) - Two staples are attached along the top edge of the output.
NOTE: The [Collated] option and [Finisher Tray] are automatically selected when
stapled output is selected.
NOTE: When Integrated Office Finisher is installed, [2 Staples] will not be displayed.
Collation
• Collated - Delivers the specified number of copy sets in the same order as the
documents. For example, two copies of a three-page document are delivered in the
order 1-2-3, 1-2-3.
Xerox WorkCentre 7132 User Guide 55
Page 56

3 Copy
• Uncollated - Delivers the copies in stacks based on the number of copies required
for each document. For example, two copies of a three-page document are
delivered in the order 1-1, 2-2, 3-3. Stapling is not available when [Uncollated] is
selected.
• With Separators - Delivers the copies in stacks, based on the number of copies
required for each document, with a separator between each stack. Select the [Paper
Supply] button to specify the paper tray containing the separator paper. Stapling is
not available when [With Separators] is selected.
Output Tray
Allows you to select an output tray for the copy job.
Image Quality
This section describes the features used to adjust the quality of the output image. For
more information on the features available, refer to the following.
Original Type – page 57
Image Options – page 58
Image Enhancement – page 58
Color Effects – page 59
Color Balance – page 61
Color Shift – page 62
1. Press the <All Services> button
on the control panel.
2. Select [Copy] on the touch
screen.
3. Select the [Image Quality] tab.
4. Select the required feature.
56 Xerox WorkCentre 7132 User Guide
Page 57

Original Type
This feature allows you to copy at optimum image quality by selecting the type of the
original documents.
1. Select [Original Type] on the
2. Select the required option.
3. Select [Save].
Auto
Automatically selects the type of the original document. The original type settings are
setup by the Key Operator.
Photo & Text
Select this option to copy documents that contain both text and photographs. Text and
photographs are automatically distinguished, and an appropriate quality mode is
selected for individual areas. Select from one of the following options to accurately
reproduce the original image.
Image Quality
[Image Quality] screen.
• Printed Original - Select this option for photo areas when the document is printed
matter, such as a pamphlet.
• Photograph - Select this option when photos have been pasted onto a document.
This prevents the photo from being reproduced with a blueish hue.
• Photocopy - Select this option when the original document is itself a copy made on
a color copier machine. This prevents the colors from being reproduced faintly.
Text
Select this option to copy documents that contain text only, where the text must be
copied crisply. Select from one of the following options to accurately reproduce the
original image.
• Normal Text - Select this option for normal text that requires no enhancement, such
as printed documents.
• Light Text - Select this option for text that requires enhancement, such as
handwritten pencil text.
Photo
Select this option to copy documents that contain photographs only. Select the photo
type in the original document to accurately reproduce the image. The same photo type
options are available as for [Photo & Text].
Map
Select this option to copy documents that have text on colored backgrounds, such as
maps.
Xerox WorkCentre 7132 User Guide 57
Page 58

3 Copy
Image Options
This feature allows you to adjust the brightness, sharpness, and color saturation levels
for copying documents.
1. Select [Image Options] on the
2. Select the required levels.
3. Select [Save].
Lighten/Darken
Allows you to adjust the copy density using seven levels between [Lighten] and
[Darken]. The color copy density increases the nearer the level is to [Darken], and
decreases the nearer the level is to [Lighten].
Sharpness
Allows you to adjust the copy sharpness using five levels between [Sharpen] and
[Soften]. The sharpness of contours increases the nearer the level is to [Sharpen], and
decreases the nearer the level is to [Soften].
[Image Quality] screen.
Saturation
Allows you to adjust the copy color saturation using five levels between [Vivid] and
[Pastel]. The color brightness increases the nearer the level is to [Vivid], and decreases
the nearer the level is to [Pastel].
Image Enhancement
This feature allows you to select background suppression and to adjust the contrast
level either manually or automatically.
1. Select [Image Enhancement] on
the [Image Quality] screen.
2. Select the required options.
3. Select [Save].
Background Suppression
Suppresses background colors on colored paper documents when [Black] is selected
on the [Copy] screen, and suppresses white backgrounds on colored documents when
[Color] is selected on the [Copy] screen.
NOTE: This feature is not available when [Photo] is selected on the [Original Type]
screen.
• No Suppression - Makes copies with background suppression turned OFF.
• Auto Suppression - Automatically suppresses background colors.
58 Xerox WorkCentre 7132 User Guide
Page 59
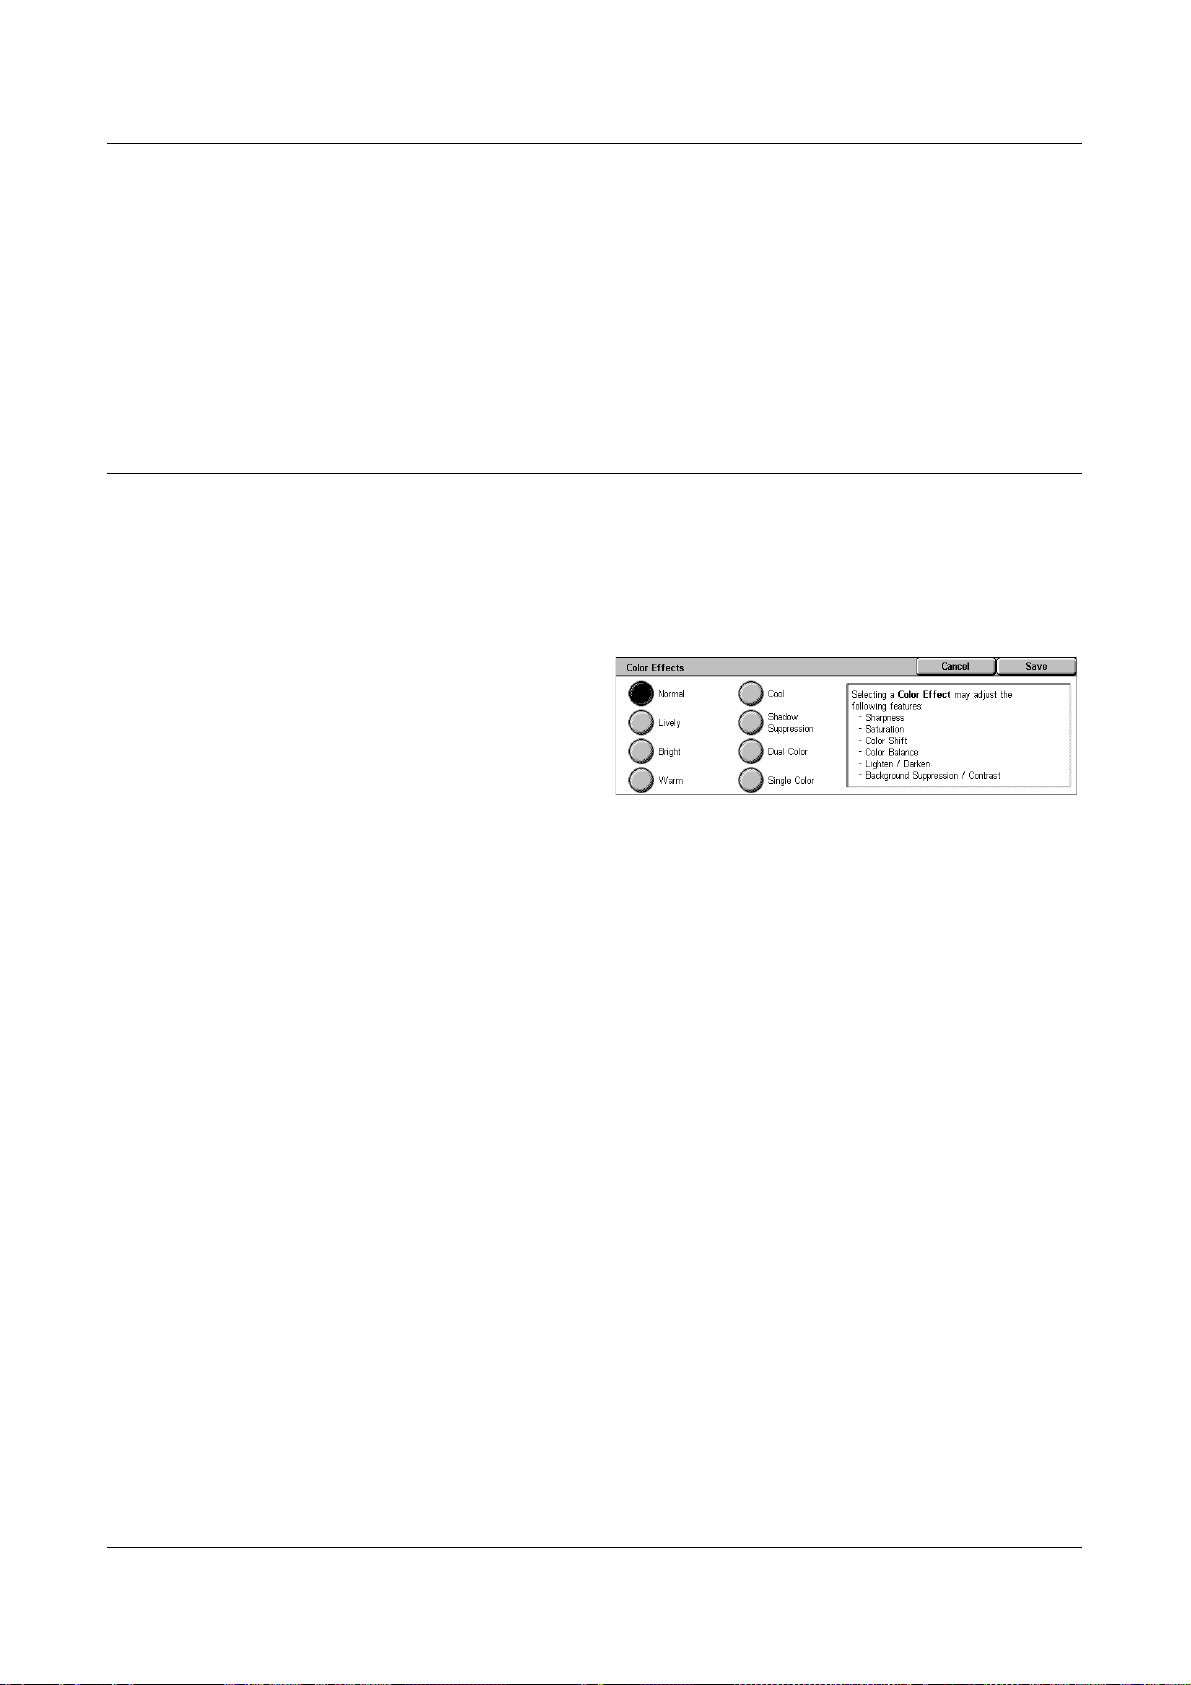
Contrast
Adjusts the contrast of copies.
• Auto Correction - Automatically adjusts the brightness and color settings to enhance
• Manual Contrast - Allows you to adjust the copy output contrast manually using five
Color Effects
This feature allows you to select preset output color effects, or to specify source and
target colors for creating single color or dual color copies.
NOTE: If any of the image quality settings are changed after selecting a preset
(excluding [Single Color] or [Dual Color]) on the [Color Effects] screen, the option on
the [Color Effects] screen is reset.
1. Select [Color Effects] on the
Image Quality
the contrast of the original. This function is only available for documents placed on
the document glass.
levels between [More Contrast] and [Less Contrast].
[Image Quality] screen.
2. Select the required option.
3. Select [Save].
Normal
Makes copies with the [Background Suppression], [Contrast], [Lighten/Darken],
[Sharpness], [Saturation], [Color Shift], and [Color Balance] settings at their defaults.
Lively
Reproduces images with increased color saturation that appear fresher and livelier.
Bright
Reproduces images that appear brighter with enhanced contrast, such as for posters
that are intended to attract people’s attention.
Warm
Reproduces low-density colors as brighter and warmer colors with a more dominant red
content, such as for pinkish skin tones and warmer subdued colors.
Cool
Reproduces blue colors that appear even clearer, such as for water or sky, or to make
subdued colors appear more clearly.
Shadow Suppression
Suppresses the colors present on the reverse side of the original document from being
reproduced in the copy.
Xerox WorkCentre 7132 User Guide 59
Page 60

3 Copy
Dual Color
Separates the document into specified source colors and all other colors, and then
maps them to a specified target area color and a specified non-target area color,
respectively, to create dual-color copies.
• Source Color - Displays the [Source Color] screen.
• Target Area Color - Displays the [Target Area Color] screen.
• Non-target Area Color - Displays the [Non-target Area Color] screen.
Single Color
Specifies a single output color to create single-color copies.
• Color - Displays the [Color] screen.
[Source Color] Screen
Allows you to select the source color(s) that will be replaced by the target area color.
1. Select [Dual Color] on the
[Color Effects] screen.
2. Select [Source Color].
3. Select the required option.
4. Select [Save].
Other than Black
Specifies all colors other than black as the source color setting.
Color
Allows you to select one or more colors from the six fixed colors as the source color
setting.
[Target Area Color] Screen
Allows you to select the target color to replace the source color inside the target area.
You can select from seven fixed and six custom colors. The custom colors are set up
by the Key Operator.
1. Select [Dual Color] on the
[Color Effects] screen.
2. Select [Target Area Color].
3. Select the required option.
4. Select [Save].
60 Xerox WorkCentre 7132 User Guide
Page 61

[Non-target Area Color] Screen
Allows you to select the target color to replace the source color outside the target area.
You can select from the same seven fixed and six custom colors as for the target area.
The custom colors are set up by the Key Operator.
1. Select [Dual Color] on the
[Color Effects] screen.
2. Select [Non-target Area Color].
3. Select the required option.
4. Select [Save].
[Color] Screen
Allows you to select the output color when making single-color copies. You can select
from six fixed and six custom colors. The custom colors are set up by the Key Operator.
1. Select [Single Color] on the
[Color Effects] screen.
Image Quality
2. Select [Color].
3. Select the required option.
4. Select [Save].
Color Balance
This feature allows you to adjust the density level of the four CMYK toner colors (cyan,
magenta, yellow, black) by ±3 levels in three density ranges.
1. Select [Color Balance] on the
2. Set the required options.
3. Select [Save].
Low Density
Allows you to adjust the CMYK color strength for low-density areas.
Medium Density
Allows you to adjust the CMYK color strength for medium-density areas.
[Image Quality] screen.
High Density
Allows you to adjust the CMYK color strength for high-density areas.
Xerox WorkCentre 7132 User Guide 61
Page 62

3 Copy
Color Shift
This feature allows you to adjust the hue of the colors to be reproduced in the copy by
a maximum of two levels in two directions. All colors in the document are shifted by the
same amount.
The color of the original document is represented by the [Before] slider on the [Color
Shift] screen, and the color of the output copy is represented by the [After] slider.
When the [Before] slider shifts to the left, yellows become slightly more reddish, greens
slightly more yellowish, and similarly for all four colors. Conversely, when the [Before]
slider shifts to the right, reds become slightly more yellowish, yellows slightly more
greenish, and similarly for all four colors.
NOTE: This feature is only available when the output color is set to [Auto Detect] or
[Color] in the [Output Color] feature on the [Copy] screen.
1. Select [Color Shift] on the
[Image Quality] screen.
2. Set the required option.
3. Select [Save].
Coolest
Shifts the [Before] color slider two steps to the left.
Cool
Shifts the [Before] color slider one step to the left.
Normal
No color shift is applied.
Warm
Shifts the [Before] color slider one step to the right.
Warmest
Shifts the [Before] color slider two steps to the right.
62 Xerox WorkCentre 7132 User Guide
Page 63

Layout Adjustment
This section describes the layout adjustment features for copying. For more information
on the features available, refer to the following.
Book Copying – page 63
2 Sided Book Copy – page 64
Original Size – page 65
Edge Erase – page 66
Image Shift – page 66
Image Rotation – page 68
Invert Image – page 69
Original Orientation – page 69
1. Press the <All Services> button
on the control panel.
2. Select [Copy] on the touch
screen.
Layout Adjustment
3. Select the [Layout Adjustment]
4. Select the required feature.
Book Copying
This feature allows you to copy facing pages of a bound document in the correct page
sequence using the document glass. The two pages will be copied onto two separate
pages.
1. Select [Book Copying] on the
2. Select the required options.
3. Select [Save].
NOTE: The facing pages of a bound document must be placed in a horizontal
orientation on the document glass.
tab. Use the side tabs to switch
between screens.
[Layout Adjustment] screen.
Off
Disables the feature.
Xerox WorkCentre 7132 User Guide 63
Page 64

3 Copy
Left Page then Right
Copies pages of an open book in the direction from left to right.
• Both Pages - Copies both the left and right pages.
• Left Page Only - Copies the left pages only.
• Right Page Only - Copies the right pages only.
Right Page then Left
Copies pages of an open book in the direction from right to left.
• Both Pages - Copies both the left and right pages.
• Left Page Only - Copies the left pages only.
• Right Page Only - Copies the right pages only.
Top Page then Bottom
Copies pages of an open book in the direction from top to bottom.
• Both Pages - Copies both the top and bottom pages.
• Top Page Only - Copies the top pages only.
• Bottom Page Only - Copies the bottom pages only.
Binding Erase
Erases printing of the center binding area of the book that tends to be shadowed due
to the fold in the pages. Use the scroll buttons to specify the area to be erased from the
center of an open book within the range of 0-50 mm (0.0-2.0 inches) in 1 mm (0.1 inch)
increments.
2 Sided Book Copy
This feature allows you to make double-sided copies in the same order and image
layout as the original bound document, using the document glass. A blank sheet is
automatically inserted as the first page.
1. Select [2 Sided Book Copy] on
the [Layout Adjustment] screen.
2. Select the required options.
3. Select [Save].
NOTE: This feature and the [Book Copying] feature cannot be activated
simultaneously.
Off
Disables the feature.
64 Xerox WorkCentre 7132 User Guide
Page 65

Layout Adjustment
Left Page then Right
Copies both pages of an open book in the direction from left to right.
Right Page then Left
Copies both pages of an open book in the direction from right to left.
Top Page then Bottom
Copies both pages of an open book in the direction from top to bottom.
Start Page & End Page
Displays the [2 Sided Book Copy - Start Page & End Page] screen.
Specifies the start page and the end page for copying. The specified page sides must
be identified using the bound original.
Binding Erase
Erases printing of the center binding area of the book that tends to be shadowed due
to the fold in the pages. Use the scroll buttons to specify the area to be erased from the
center of an open book within the range of 0-50 mm (0.0-2.0 inches) in 1mm (0.1 inch)
increments.
Original Size
This feature allows you to set the size of the document automatically, to select from a
list of preset sizes, or to mix different size documents. If you select a preset size,
documents will be copied according to the specified size regardless of their actual size.
1. Select [Original Size] on the
2. Select the required option.
3. Select [Save].
Auto Detect
Automatically detects the size of standard sized documents.
Manual Size Input
Allows you to select the input size from the 11 preset standard sizes in portrait or
landscape orientations, or select a custom size within the ranges of 15-297 mm (0.6-
11.7 inches) for length and 15-432 mm (0.6-17.0 inches) for width. The presets are set
up by the Key Operator.
Mixed Sized Originals
[Layout Adjustment] screen.
Allows you to copy more than one original size document. The machine senses the
mixed sized originals automatically, and copies each document at the same size as the
originals. Load different size documents, with top left corners aligned, into the
Document Feeder.
Xerox WorkCentre 7132 User Guide 65
Page 66

3 Copy
Edge Erase
NOTE: 5.5 × 8.5" and A5 originals must be loaded in portrait orientation.
NOTE: Confirm that the orientation of the documents and the [Original Orientation]
setting on the [Layout Adjustment] screen are the same.
This feature allows you to erase unwanted marks such as hole punch marks from each
edge of the copy.
NOTE: Make sure that the orientation of the documents and the [Original Orientation]
setting on the [Layout Adjustment] screen are the same.
1. Select [Edge Erase] on the
[Layout Adjustment] screen.
2. Select the required options.
3. Select [Save].
Normal
Image Shift
Allows you to select the amount to be erased from the edge of the documents. Presets
are set up by the Key Operator. If you do not want to erase any edge width, select [Edge
Erase] and select 0.0 using the scroll buttons.
Edge Erase
Allows you to specify the width of the edge to be deleted from the document. Enter the
amount you want to erase from the top, bottom, right, and left margins. Up to 50 mm (2
inches) can be entered.
This feature allows you to change the position of the image on the output copy paper.
NOTE: Make sure that the orientation of the documents and the [Original Orientation]
setting on the [Layout Adjustment] screen are the same.
NOTE: The amount of the image shift depends on the size of paper loaded in the
machine.
NOTE: When [Mixed Sized Originals] is selected, the amount shifted is determined by
the image position of the first sheet, and is applied to all subsequent sheets of the
documents.
1. Select [Image Shift] on the
[Layout Adjustment] screen.
2. Select the required option.
3. Select [Save].
66 Xerox WorkCentre 7132 User Guide
Page 67

No Shift
Disables the feature.
Auto Center
Automatically places the image in the center of the copy paper.
Margin Shift
Moves the image by specified amounts on the copy paper in the Up/Down and Left/
Right directions. You can enter up to 50 mm (2 inches) for both dimensions.
If your machine is configured to perform double-sided copies, you can select the
options below for both Side 1 and Side 2.
• Side 1 - Displays the [Image Shift - Side 1] screen.
• Side 2 - Displays the [Image Shift - Side 2] screen. Refer to the [Image Shift - Side
1] screen for a description of the options available.
• Mirror Shift - Automatically places a mirror image of Side 1 onto Side 2.
[Image Shift - Side 1] Screen
Layout Adjustment
This feature allows you to move the image on Side 1.
1. Select [Margin Shift] on the
[Image Shift] screen.
2. Select [Side 1] to display the
[Image Shift - Side 1] screen.
3. Select the required option.
4. Select [Save].
No Shift
Disables the feature.
Auto Center
Automatically places the image in the center of the paper. You can specify an offset of
up to 50 mm (2 inches) for both dimensions using the scroll buttons.
Corner Shift
Moves the image to the corner of the paper. Select one of eight arrows to specify the
direction for the movement. You can specify an offset of up to 50 mm (2 inches) for both
dimensions using the scroll buttons.
Variable Shift
Moves the image by specified amounts on the paper. You can specify up to 50 mm (2
inches) for both dimensions using the scroll buttons.
Xerox WorkCentre 7132 User Guide 67
Page 68

3 Copy
Image Rotation
This feature allows you to automatically rotate the image to match the orientation of the
paper in the tray.
1. Select [Image Rotation] on the
[Layout Adjustment] screen.
2. Select the required option.
3. Select [Save].
Off
Disables the feature.
Always On
Automatically rotates the image, as required, to fit on the selected copy paper.
On during Auto
Automatically rotates the image, as required, to fit on the selected copy paper. This
feature is available only when [Auto] is selected in the [Paper Supply] feature or [Auto
%] is selected in the [Reduce/Enlarge] feature.
Rotation Direction
Displays the [Image Rotation - Rotation Direction] screen.
[Image Rotation - Rotation Direction] Screen
Allows you to specify the reference edge for image rotation.
1. Select [Rotation Direction]
displayed when selecting
[Always On] or [On during Auto]
on the [Image Rotation] screen.
2. Select the required option.
3. Select [Save].
• Staple Position - Rotates the image to match the stapling edge when originals of
different sizes are placed in the Document Feeder. This option is available only
when the finisher is installed on the machine.
• Portrait Original - Left Edge - Rotates the image to align the top of a landscape
document with the left side of a portrait document.
• Portrait Original - Right Edge - Rotates the image to align the top of a landscape
document with the right side of a portrait document.
68 Xerox WorkCentre 7132 User Guide
Page 69

Invert Image
This feature allows you to mirror the image, and to make negatives of the image on the
copy output.
1. Select [Invert Image] on the
2. Select the required options.
3. Select [Save].
Mirror Image
Allows you to create a mirror image of the document.
• Normal Image - Select this option for normal image output.
• Mirror Image - Creates a mirror image of the original for copy output.
Negative Image
Allows you to create a negative image of the document.
Layout Adjustment
[Layout Adjustment] screen.
• Positive Image - Select this option for normal positive image output.
• Negative Image - Creates a negative image of the original for copy output. When
[Black] is selected as the output color, all the black images on the page are inverted
to white, and all the white images are inverted to black. When [Color] is selected as
the output color, all colors are inverted to their complementary colors.
Original Orientation
This feature allows you to specify the orientation of the documents. The document
orientation must be specified before using the Image Shift, Edge Erase, Multiple-Up,
Repeat Image, Annotation, and Booklet Creation features.
1. Select [Original Orientation] on
the [Layout Adjustment] screen.
2. Select the required option.
3. Select [Save].
Head to Top
Selects the vertical orientation, where the top of the document is orientated towards the
back of the machine.
Head to Left
Selects the horizontal orientation, where the top of the document is orientated towards
the left of the machine.
Xerox WorkCentre 7132 User Guide 69
Page 70

3 Copy
Output Format
This section describes features that enhance the appearance of a copy job. For more
information on the features available, refer to the following.
Booklet Creation – page 70
Covers – page 72
Transparency Separators – page 73
Multiple-Up – page 74
Poster – page 75
Repeat Image – page 75
Annotation – page 76
Watermark – page 77
Preset Repeat Image – page 78
1. Press the <All Services> button
on the control panel.
2. Select [Copy] on the touch
screen.
3. Select the [Output Format] tab.
Use the side tabs to switch
between screens.
4. Select the required feature.
Booklet Creation
This feature allows you to create multi-page booklets from a set of 1 or 2 sided originals.
It reduces and correctly positions each image to produce output, that when folded, will
be ordered to read like a booklet.
NOTE: If the number of document pages is a multiple of four, the booklet will not have
blank pages. Otherwise the extra pages in the book will be blank.
NOTE: This feature is unavailable when [Uncollated] or [With Separators] is selected
in [Copy Output].
1. Select [Booklet Creation] on the
[Output Format] screen.
2. Select the required options.
3. Select [Save].
Off
Disables the feature.
70 Xerox WorkCentre 7132 User Guide
Page 71

Left Bind/Top Bind
Makes a booklet that when folded is bound at the left or top edge.
Binding Shift
Displays the [Booklet Creation - Binding Shift] screen.
Covers
Displays the [Booklet Creation - Covers] screen.
Divide Output
Displays the [Booklet Creation - Divide Output] screen.
Last Page on Back Cover
Uses the last page of the original document as the back cover of the booklet. When
using [Divide Output] to separate booklets, the cover will be the last page of the last
subset.
[Booklet Creation - Binding Shift] Screen
Output Format
Allows you to specify the amount of inside margin in 1 mm (0.1 inch) increments
between 0 to 50 mm (0.0-2.0 inches) using the scroll buttons.
1. Select [Booklet Creation -
Binding Shift] on the [Booklet
Creation] screen.
2. Enter a value using the cursor
keys.
3. Select [Save].
[Booklet Creation - Covers] Screen
Allows you to add a cover sheet to the booklet. When the output is folded in half to make
a booklet, the cover will be on both the front and back.
1. Select [Booklet Creation -
Covers] on the [Booklet
Creation] screen.
2. Select the required option.
3. Select [Save].
Off
Makes a booklet without a cover sheet.
On
Adds a cover sheet to the booklet from the cover stock tray. When selected, the
[Covers] option becomes available.
Xerox WorkCentre 7132 User Guide 71
Page 72

3 Copy
Covers
• Blank Covers - Adds a blank cover to the booklet.
• Printed Covers - Copies the first page of the set of documents onto the cover stock.
Add blank sheets to the set of documents if you want the inside front and back
covers to remain blank.
Paper Tray Settings
Displays the [Booklet Creation - Covers - Paper Tray Settings] screen. Select one of
the presets to specify [Main Body Tray] and [Covers Tray]. The paper loaded in the
trays selected for [Main Body Tray] and [Covers Tray] should be the same size and
orientation. Four presets, including the bypass tray, are available for each, depending
on your machine configuration. For more information on the bypass tray, refer to [Tray
5 (Bypass)] Screen on page 53.
[Booklet Creation - Divide Output] Screen
Allows you to subdivide a large booklet into many booklets.
1. Select [Booklet Creation - Divide
Output] on the [Booklet
Creation] screen.
Covers
2. Select the required option.
3. Select [Save].
Off
Disables the feature.
On
Subdivides the booklet into subsets. Enter the number of sheets in each subset using
the scroll bars or numeric soft keys.
This feature allows you to add a front and/or back cover to a copy job. If [Printed
Covers] on the [Booklet Creation - Covers] screen is selected, the first original will be
the front cover and the last original will be the back cover.
NOTE: If the machine’s memory becomes full while scanning a document with this
feature enabled, follow the instructions on the screen to cancel the job. Delete the
stored documents, or reduce the amount of pages to free some memory and try again.
NOTE: This feature is unavailable when [Uncollated] or [With Separators] is selected
in [Copy Output].
72 Xerox WorkCentre 7132 User Guide
Page 73

Output Format
1. Select [Covers] on the [Output
Format] screen.
2. Select the required options.
3. Select [Save].
No Covers
Disables the feature.
Front Cover Only
Inserts a front cover page before the first page of the document. A different paper type
than the main body pages can be used.
Front & Back Covers
Inserts cover pages before the first page and after the last page of the document. A
different paper type than the main body pages can be used.
Covers
• Blank Covers - Adds a blank cover to the documents.
• Printed Covers - Copies the first and last pages of the documents onto the cover
stock. Add blank sheets to the set of documents if you want the inside front cover
and inside back cover to remain blank.
Paper Tray Settings
Displays the [Covers - Paper Tray Settings] Screen. Select one of the presets to specify
the [Main Body Tray] and [Covers Tray]. The paper loaded in the trays selected for
[Main Body Tray] and [Covers Tray] should be the same size and orientation. Four
presets, including the bypass tray, are available for each, depending on your machine
configuration. For more information on the bypass tray, refer to [Tray 5 (Bypass)]
Screen on page 53.
Transparency Separators
This feature allows you to place blank page separators between documents when
copying onto transparency stock, and to make hard copy sets for handouts. Handouts
can be 1 sided or 2 sided and stapled.
1. Select [Transparency
Separators] on the [Output
Format] screen.
2. Select the required option.
3. Select [Save].
No Separators
Disables the feature.
Xerox WorkCentre 7132 User Guide 73
Page 74

3 Copy
Blank Separators
Places a blank page separator between each transparency sheet. Only one set of
copies is made.
Blank Separators & Handouts
Copies one set of transparencies with blank page separators, and the required number
of sets of paper copies for handouts.
Transparency Set & Handouts
Copies one set of transparencies with no page separators, and the required number of
sets of paper copies for handouts.
Paper Tray Settings
Displays the [Transparency Separators - Paper Tray Settings] Screen. Select one of
the presets to specify the [Transparency Tray] and the [Handouts Tray]. Four presets,
including the bypass tray, are available for each, depending on your machine
configuration. For more information on the bypass tray, refer to [Tray 5 (Bypass)]
Screen on page 53.
Multiple-Up
This feature allows you to copy two, four or eight images onto one sheet of paper. The
machine automatically reduces/enlarges the images as needed to print them on one
page.
1. Select [Multiple-Up] on the
[Output Format] screen.
2. Select the required option.
3. Select [Save].
1 Page Up
Disables the feature.
2 Pages Up
Copies two pages of the document onto one sheet of paper.
4 Pages Up
Copies four pages of the document onto one sheet of paper.
8 Pages Up
Copies eight pages of the document onto one sheet of paper.
Image Order
Sets how to lay out the images on a page. For [4 Pages Up] or [8 Pages Up], you can
select either horizontal rows from left to right or vertical columns from left to right.
74 Xerox WorkCentre 7132 User Guide
Page 75

Poster
Output Format
This feature allows you to divide and enlarge an original document to copy the image
onto multiple sheets of paper. You can then paste them all together to make one large
poster.
NOTE: This feature is unavailable when [Collated] or [Auto Output] is selected.
1. Select [Poster] on the [Output
Format] screen.
2. Select the required option.
3. Select [Save].
NOTE: The machine automatically overlaps partitioned images when copying to allow
for cutting and pasting. The overlap width is set to 10 mm (0.4 inch).
No Posters
Disables the feature.
Output Size
Allows you to select the size of poster you want to make from the presets that are listed
on the touch screen. The machine automatically calculates the magnification, and
decides how many sheets are needed for the job.
Enlargement %
Use the scroll buttons to select the magnification rates for the length and width of a
poster. The range can be set between 100-400% in 1% increments. The machine
automatically decides how many sheets are needed for the job.
Paper Tray Settings
Displays the [Poster - Paper Tray Settings] screen. Select one of the presets on the
screen to specify the tray for the job. Four presets, including the bypass tray, are
available, depending on your machine configuration. For more information on the
bypass tray, refer to [Tray 5 (Bypass)] Screen on page 53.
Repeat Image
This feature allows you to print an original image repeatedly onto one sheet of paper.
1. Select [Repeat Image] on the
[Output Format] screen.
2. Select the required option.
3. Select [Save].
Single Image
Disables the feature.
Xerox WorkCentre 7132 User Guide 75
Page 76
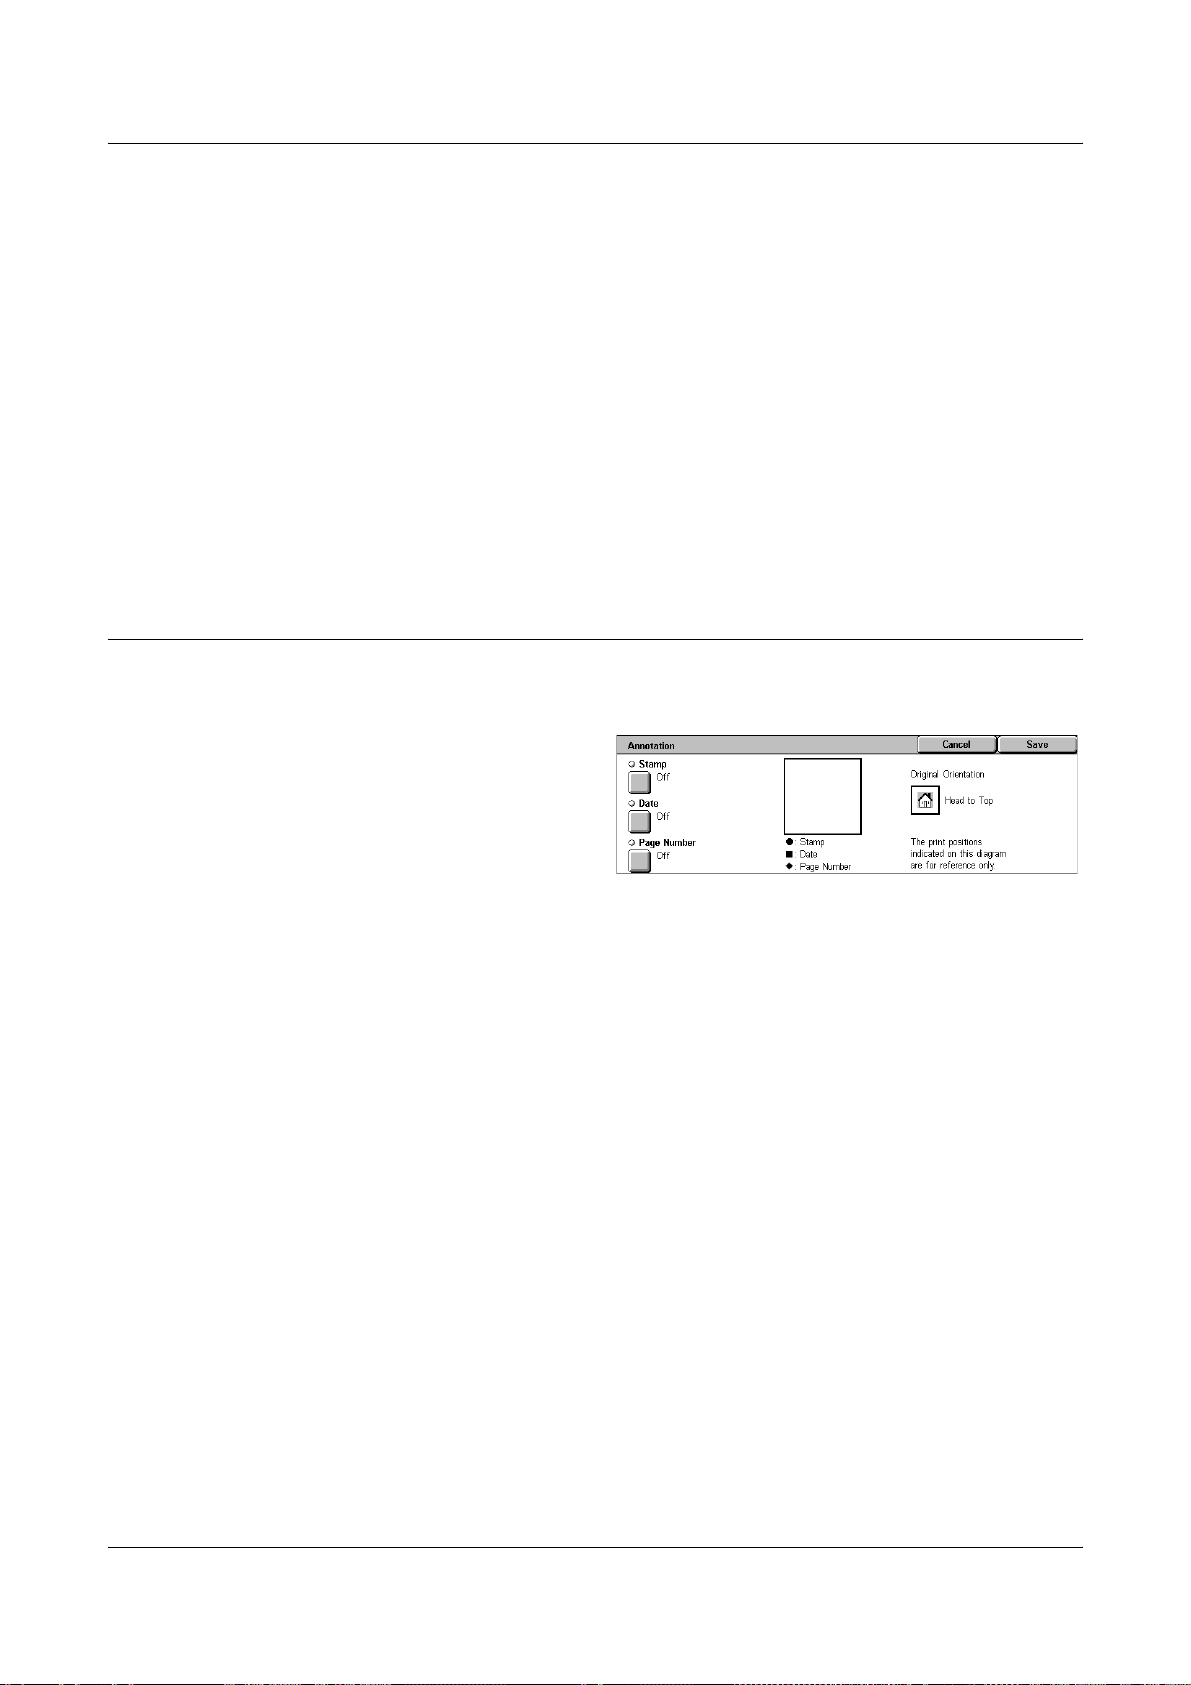
3 Copy
Annotation
Auto Repeat
Automatically calculates the number of times to repeat vertically or horizontally from
document size, stock size, and the enlarge/reduction ratio.
Variable Repeat
Allows you to specify the number of times to repeat the image vertically or horizontally
using the scroll buttons. You can repeat an image between 1 to 23 times vertically, and
between 1 to 33 times horizontally.
Image Layout
• Evenly Spaced - Copies the repeated images equally spaced on the paper.
• Side by Side - Copies the repeated images on the paper with no spaces between
images.
This feature allows you to add the date, page numbers, and a predetermined phrase to
the copy outputs.
1. Select [Annotation] on the
[Output Format] screen.
2. Select the required option.
3. Select [Save].
Stamp
Displays the [Stamp] screen. Use this screen to print a predetermined phrase, such as
‘Confidential’ or ‘Draft’, on the output copies. The following options are available:
• Off - Disables the feature.
• On - Enables the feature.
• Text - Displays the [Stamp - Text] screen. Select the predetermined phrase you wish
to print on the copies.
• Print On - Displays the [Stamp - Print On] screen. Select to print the stamp on the
[First Page Only] or [All pages].
• Position - Displays the [Stamp - Position] screen. Select the position to print the
stamp on each page.
• Other Settings - Displays the [Stamp - Other Settings] screen. Select the font size
from three preset sizes, or specify a size between 6-64 points using the scroll bars.
Select a font color from four preset colors.
Date
Displays the [Date] screen. Use this screen to print the current date on the output
copies. The following options are available:
• Off - Disables the feature.
76 Xerox WorkCentre 7132 User Guide
Page 77

Output Format
• On - Enables the feature.
• Print On - Displays the [Date - Print On] screen. Select to print the date on the [First
Page Only] or [All Pages].
• Position - Displays the [Date - Position] screen. Select the position to print the date
on each page.
• Size - Displays the [Date - Size] screen. Select the font size from three preset sizes
or specify a size between 6-24 points using the scroll bars.
Page Number
Displays the [Page Number] screen. Use this screen to print page numbers on the
output copies. The following options are available.
• Off - Disables the feature.
• On - Enables the feature.
• Style - Displays the [Page Number - Style] screen. Select a style for the page
number. If you select a [1/N, 2/N, 3/N] option, the [N: Total Pages] option displays.
Select [Auto] to enable the machine to count the pages automatically to find the total,
or select [Enter Number] to manually enter the total number of pages between 1 and
999. The number is then printed after the individual page number.
Watermark
• Print On - Displays the [Page Number - Print On] screen. Select pages which require
the page number and specify the start number to use. The options available are [All
Pages], [Enter First Page Number], [Enter Last Page Number], and [Enter First &
Last Page Number].
If you select [All Pages], enter a [Start Number] using the scroll buttons or the
numeric keypad. Select [Include Covers] when you want to print the page number
on the cover page or the divider.
If you select [Enter First Page Number], [Enter Last Page Number], or [Enter First
and Last Page Number], specify the corresponding [Start Page] and/or [End Page],
as appropriate, and [Start Number].
• Position - Displays the [Page Number - Position] screen. Select the position to print
the page number on each page.
• Size - Displays the [Page Number - Size] screen. Select the font size from three
preset sizes or specify a size between 6–24 points using the scroll bars.
This feature allows you to add a watermark beneath the original image of the copy
output. Information such as a control number, predetermined text, date and time, and
the machine serial number can be added.
1. Select [Watermark] on the
[Output Format] screen.
2. Select the required option.
3. Select [Save].
Xerox WorkCentre 7132 User Guide 77
Page 78

3 Copy
Control Number
Prints sequential control numbers on each copy set. The [Watermark - Control Number]
screen is displayed and the following options are available:
• Off - Disables the feature.
• On - Enables the feature. Specify a start number between 1 and 999 using the scroll
bars or numeric soft keys.
Text
Prints one of the predetermined phrases on the copies. The [Watermark - Text] screen
is displayed and the following options are available:
• Off - Disables the feature.
• On - Enables the feature. Select from six predetermined phrases set up by the Key
Operator.
Date & Time
Prints the date and time that the copy job started on each of the copies. The
[Watermark - Date and Time] screen is displayed. Select [On] to enable the feature.
Serial Number
Prints the serial number of the machine on the copies. The [Watermark - Serial
Number] screen is displayed. Select [On] to enable the feature.
Preset Repeat Image
This feature allows you to reduce and repeat the image from an original onto one sheet
of paper. The reduced images can then be cut into multiple sheets.
1. Select [Preset Repeat Image] on
the [Output Format] screen.
2. Select the required option.
3. Select [Save].
Single Image
Disables the feature.
2 images
Places two preset images on one sheet of paper.
4 images
Places four preset images on one sheet of paper.
8 images
Places eight preset images on one sheet of paper.
78 Xerox WorkCentre 7132 User Guide
Page 79

Job Assembly
This section describes the job assembly features. For more information on the features,
refer to the following.
Build Job – page 79
Sample Set – page 81
Combine Original Sets – page 82
Delete Outside/Delete Inside – page 82
1. Press the <All Services> button
on the control panel.
2. Select [Copy] on the touch
screen.
3. Select the [Job Assembly] tab.
Build Job
Job Assembly
This feature allows you to merge individual job sets with different features programmed.
For example, if a job consists of some sections with text and some with photos, you can
select the appropriate settings to be applied to each section, and then print them at one
time. You can also print only one subset of the job prior to printing out the whole
quantity. This will allow you to check the print result, and adjust the settings if
necessary.
1. Select [Build Job] on the [Job
Assembly] screen.
2. Select the required options. Use
the side tabs to switch between
screens.
3. Select [Save].
Off
Disables the feature.
On
Enables the feature. Allows you to select the output features that will be applied to the
entire job.
Copy Output
Displays the [Copy Output] screen.
Xerox WorkCentre 7132 User Guide 79
Page 80

3 Copy
NOTE: When a finisher is not connected, the [Copy Output] screen is displayed, and
an [Auto] is available. When a finisher is connected, the [Copy Output] screen is
displayed and the [Auto] is not available.
• Collation - Delivers the specified number of copy sets in the same order as the
documents. For example, two copies of a three-page document are delivered in the
order 1-2-3, 1-2-3.
• Staple Position - Select one of the options displayed to specify the staple position.
The machine automatically selects [Finisher Tray] as the output destination when a
stapling option is selected.
• Output Tray - Select an output tray for the copy job.
Booklet Creation
Displays the [Booklet Creation] screen for the build job. For more information, refer to
Booklet Creation on page 70.
Covers
Displays the [Covers] screen for the build job. For more information, refer to Covers on
page 72.
Annotation
Displays the [Annotation] screen for the build job. For more information, refer to
Annotation on page 76.
Watermark
Displays the [Watermark] screen for the build job. For more information, refer to
Watermark on page 77.
[Copy Job] Screen
The [Copy Job] screen appears after each job set while the Build Job is being executed.
Stop
Stops the build job in progress. This button is displayed while the job is being built and
printed.
Chapter Start
Displays the [Build Job - Chapter Start/Separators] screen. The following options are
available.
• Off - Disables the feature.
80 Xerox WorkCentre 7132 User Guide
Page 81

Job Assembly
• Chapter Start - Automatically
splits each batch of originals into
chapters, starting on a new page.
Using the [Multiple-Up - New
Page] option sets whether to print
the first page in each stack of
originals on a new page or on the same page as the previous original when the
Multiple-Up feature is selected.
• Separators - Automatically splits
each batch of originals into
chapters with a separator page
between each chapter. Select
[Separators], and specify the tray
containing the blank page
separators. Four presets, including the bypass tray, are available, depending on
your machine configuration. For more information on the bypass tray, refer to [Tray
5 (Bypass)] Screen on page 53.
Change Settings
Sample Set
Allows you to change the settings on the [Copy] screen before scanning the next
section. Press the <Start> button on the control panel to start scanning.
Cancel
Cancels the build job process.
Start
Starts scanning the next section.
This feature allows you to print one set of the job to check the output is correct, prior to
printing the entire job. You can choose whether or not to print more sets after checking
the print result.
1. Select [Sample Set] on the [Job
Assembly] screen.
2. Select the required option.
3. Select [Save].
Off
Disables the feature.
On
Enables the feature. After copying one set, the job is suspended. Select [Start] to copy
the remaining sets or [Stop] to stop the job.
NOTE: Copies produced by [Sample Set] are counted towards the total copy count.
Xerox WorkCentre 7132 User Guide 81
Page 82

3 Copy
Combine Original Sets
This feature allows you to divide lengthy originals into smaller groups that can be
loaded into the document feeder in smaller quantities at a time.
1. Select [Combine Original Sets]
on the [Job Assembly] screen.
2. Select the required option.
3. Select [Save].
Off
Disables the feature.
On
Enables the feature. Select [Next Original] on the screen to process the next group.
Select [Last Original] when all documents have been scanned.
NOTE: Use Build Job if you want to select different features for each group.
Delete Outside/Delete Inside
This feature allows you to delete everything inside or outside a specified area. Up to
three areas can be set.
1. Select [Delete Outside/Delete
Inside] on the [Job Assembly]
screen.
2. Select the required options.
3. Select [Save].
Off
Disables the feature.
Delete Outside
Deletes everything outside the specified areas when copying.
Delete Inside
Deletes everything inside the specified areas when copying.
Area Settings
Allows you to select up to three areas from [Area 1] to [Area 3]. Displays the [Delete
Outside/Delete Inside - Area ×], where × is the number 1 to 3.
Originals
Select the side from which to delete for 2 Sided originals.
82 Xerox WorkCentre 7132 User Guide
Page 83

• Both Sides - Deletes on both sides.
• Side 1 Only - Deletes from Side 1 only.
• Side 2 Only - Deletes from Side 2 only.
[Delete Outside/Delete Inside - Area ×] screen
Allows you to specify the area for the [Delete Outside/Delete Inside] feature. The area
is defined by the rectangle formed between the points X1,Y1 and X2,Y2.
1. Select [Area ×] on the [Delete
Outside/Delete Inside] screen.
2. Enter a value for each
coordinate using the numeric
keypad, and select [Next].
3. Select [Save].
Job Assembly
Xerox WorkCentre 7132 User Guide 83
Page 84

3 Copy
84 Xerox WorkCentre 7132 User Guide
Page 85

4 Fax/Internet Fax
This chapter contains information on the fax screens and the fax features available. In
addition to conventional fax features, the machine offers you a Direct Fax feature and
an Internet Fax feature. Direct Fax allows you to transmit faxes directly from PC clients.
Internet Fax allows you to send scanned images by e-mail over the Internet or intranet.
For more information on Direct Fax, refer to Fax Driver Online Help on the PCL Print
Driver CD-ROM. For more information on Internet Fax, refer to the System
Administration Guide.
NOTE: Some of the features described in this chapter are optional, and may not apply
to your machine configuration.
NOTE: Internet Fax is enabled with the software key provided with the Fax Kit and
Printer Kit.
NOTE: When setting up Fax options, users in European countries and North
American countries may be required to set the country code for the line. Specify the
country referring to the following section.
Country Code for Fax Option
When setting up the Fax option, users in the following countries may be required to set
the country code for the line.
CAUTION: Fax connection approval depends on the country.
USA Canada Brazil Mexixo Argentina
Chile UK Switzerland Norway Denmark
Ireland Austria Finland France Germany
Sweden Belgium Netherlands Italy Portugal
Greece Spain Russia Czech Republic Poland
Hungary Romania Ukraine former Yugoslavian republics
Slovakia Turkey Egypt UAE Saudi Arabia
South Africa India Iceland Luxembourg Bulgaria
Morocco Cyprus Peru
Xerox WorkCentre 7132 User Guide 85
Page 86

4 Fax/Internet Fax
1. Press the <Log In/Out> button on the control panel.
2. Enter the correct user ID using the numeric keypad on the control panel or the
NOTE: The default Key Operator ID is “11111”. If the Authentication feature is
enabled, you may be also required to enter a password. The default password is “xadmin”. To change the default user ID or password, refer to System Administrator
Settings on page 296.
3. Select [System Settings] on the [System Administrator Menu] screen.
4. Select [System Settings] from the [System Settings] screen.
5. Select [Common Settings].
6. Select [Other Settings].
7. Scroll down to and select [Country].
8. Select the required country. After saving the settings, the machine reboots
NOTE: This setting is only available with the Fax option for the countries stated above.
screen keyboard.
automatically.
Fax/Internet Fax Procedure
This section describes the basic procedure for sending faxes and Internet Faxes.
Follow the steps below.
1. Load the Documents – page 86
2. Select the Features – page 87
3. Specify the Destination – page 88
4. Start the Fax/Internet Fax Job – page 89
5. Confirm the Fax/Internet Fax Job in the Job Status – page 89
Stop the Fax/Internet Fax Job – page 90
NOTE: If the Authentication feature is enabled, you may need an account number
before using the machine. To get an account number or for more information, contact
the Key Operator.
NOTE: For information on using Direct Fax from PC clients, refer to Fax Driver Online
Help on the PCL Print Driver CD-ROM.
1. Load the Documents
The following steps explain how to load documents using the document feeder. The
document feeder can hold up to 50 sheets of plain paper (16-32 lb bond or 38-128
2
). When sending a fax, you can scan up to 297 mm (11.7 inches) in width and 600
g/m
mm (23.5 inches) in length (single-sided mode). You can also use the document glass
to send documents if required.
86 Xerox WorkCentre 7132 User Guide
Page 87

Fax/Internet Fax Procedure
This machine is capable of scanning mixed size originals, using the document feeder.
Align the documents against the inner corner of the document feeder; and enable the
Mixed Size Originals feature. For more information, refer to Mixed Sized Originals on
page 103.
NOTE: A paper jam may occur when custom sized originals are loaded in the
document feeder, and the original size feature is set to [Auto Detect]. In this case,
entering a custom paper size is recommended. For more information, refer to Original
Size on page 102.
1. Load documents face up into the
document feeder or face down
on the document glass.
NOTE: The long fax document scan feature has the following limitations.
• Only available when using the document feeder.
• Allows you to scan up to 600 mm (23.62 inches) in length.
• Not available in the double-sided mode.
NOTE: In both single-sided and double-sided modes, scanning a document at its
original size or smaller is recommended. An enlarged image may be cut off during
transmission.
NOTE: When using the document glass, make sure that the touch screen is ready
before placing the document on the document glass. If you place the document on the
document glass before the touch screen is ready, the paper size may not be detected
correctly.
2. Select the Features
The features available on the [Fax] and [Internet Fax] screens are those used most
often.
NOTE: Only those features relevant to the machine configuration will be available.
Xerox WorkCentre 7132 User Guide 87
Page 88

4 Fax/Internet Fax
1. Press the <All Services> button
2. Select [Fax] or [Internet Fax] on
NOTE: If the Authentication feature is enabled, you may be required to enter the user
ID and password (if one is set up). If you need assistance, contact the Key Operator.
on the control panel.
<Clear All> button<All Services> button
the touch screen to display the
corresponding screen.
3. Press the <Clear All> button once on the control panel to cancel any previous
selections.
4. Select the button for the feature required. If [More] is selected, select [Save] to
confirm the selected feature or [Cancel] to return to the previous screen.
If necessary, press one of the tabs and configure the fax/Internet Fax settings. For
information on the individual tabs, refer to the following.
Specifying Fax Destinations – page 90
Specifying Internet Fax Destinations – page 96
General Settings - Fax/Internet Fax – page 99
Layout Adjustment - Fax/Internet Fax – page 102
Transmission Options - Fax – page 104
Advanced Fax Features - Fax – page 111
Internet Fax Options - Internet Fax – page 114
3. Specify the Destination
The following explains how to specify a destination. The machine allows the following
dialing methods (fax numbers or e-mail addresses).
For Fax:
• Using the numeric keypad on the control panel to enter a fax number directly
• Using the [Address Book] feature (refer to Address Book on page 97)
• Using the [Keyboard] feature (refer to Keyboard on page 97)
• Using the <Speed Dial> button on the control panel (refer to Speed Dial on page 91)
For Internet Fax:
88 Xerox WorkCentre 7132 User Guide
Page 89

• Using the [Address Book] feature (refer to Address Book on page 97)
• Using the [Keyboard] feature (refer to Keyboard on page 97)
1. Enter the destination using any
method from the above.
You can send a document to multiple
destinations in a single operation.
If you need to insert a pause in a fax number, for example when using a calling card,
press the <Dial Pause> button. When you dial manually, <Dial Pause> is not required.
You can simply wait for a voice prompt and proceed accordingly. For more information,
refer to Special Characters on page 93.
4. Start the Fax/Internet Fax Job
Fax/Internet Fax Procedure
<Dial Pause>
button
1. Press the <Start> button to send
the documents.
You can select [Next Original]
displayed on the touch panel during
scanning to indicate there are more
original documents to scan. This
allows you to scan several
documents and transmit the data
together as a single job.
While your fax/Internet Fax is being processed, if the document feeder or document
glass is ready, you can scan the next document or program the next job. While the
machine is warming up, you can also program the next job.
5. Confirm the Fax/Internet Fax Job in the Job Status
1. Press the <Job Status> button
on the control panel to display
the [Job Status] screen.
The queued fax/Internet Fax job will
be displayed. If no job is displayed on
the screen, it may have already been
processed.
<Start> button
Untransmitted jobs are displayed on the [Job Status] screen, and are printed in the
[Transmission Report - Undelivered] report.
For more information, refer to Current and Pending Jobs in the Job Status chapter on
page 306.
Xerox WorkCentre 7132 User Guide 89
Page 90

4 Fax/Internet Fax
Stop the Fax/Internet Fax Job
Follow the steps below to manually cancel an activated fax/Internet Fax job.
1. Select [Stop] on the touch
screen or press the <Stop>
button on the control panel to
suspend the fax job while the
document is being scanned.
2. If required, press the <Job
Status> button on the control
panel to display the [Job Status]
screen. To exit the [Job Status]
screen, press the <Features>
button.
<Stop> button
<C> button
3. Press the <C> or <Clear All> button on the control panel to delete the suspended
fax/Internet Fax job still being scanned. To resume the job, select [Start] on the
touch screen or the <Start> button on the control panel.
NOTE: Once the transmission starts, you can stop the job only by selecting [Stop] on
the touch screen. You cannot resume the canceled job after the transmission starts.
Specifying Fax Destinations
This section describes how to specify destinations using the features available on the
[Fax] screen. For more information, refer to the following.
Address Book – page 97
Speed Dial – page 91
Keyboard – page 97
Cover Note – page 95
1. Press the <All Services> button
on the control panel.
2. Select [Fax] on the touch
screen. Select the [Fax] tab, if
not displayed already.
NOTE: You can specify destinations from any tab using the keypad on the control
panel, <Speed Dial>, and [Next Recipient].
NOTE: You can also specify a combined destination without pressing the [Next
Recipient] button, using the keypad on the control panel, <Speed Dial>, and [Address
Book].
90 Xerox WorkCentre 7132 User Guide
Page 91

NOTE: You can remove an entry in the recipient list or view details about each
recipient. Select the recipient on the touch screen to display a pop-up menu, and
select the required option.
Address Book
This feature allows you to quickly look up, and enter the destinations registered for
speed dialing. The destinations in the [Address Book] are listed by the speed dial codes
they are assigned. You can also look up a destination by the index character (a letter
or a number) assigned to the destination when registered for speed dialing. For
information on how to register destinations for speed dialing, refer to Address Book in
the Setups chapter on page 290.
1. Select [Address Book] on the
2. Select the required destinations.
3. Select [Close].
Addresses
Specifying Fax Destinations
[Fax] screen.
Speed Dial
Lists all the fax number destinations registered for speed dialing. You can review the
address list using the scroll buttons.
Letters
Locates a destination by the index letter assigned to it. The following nine tabs are
available: A-C, DEF, GHI, JKL, M-O, P-R, S-U, V-X, YZ.
0–9
Locates a destination by the index number assigned to it.
Group
Locates destinations registered in group codes.
Details
Displays the information stored in the address book for the selected entry.
This feature allows you to select a destination quickly using the 3-digit code assigned
to it. An asterisk (*) on the screen keypad or the control panel can be used to specify
multiple speed dial codes and a pound sign (#) to designate a group code.
Enter this data Results
123 Dials the destination assigned to the speed dial code 123.
12* Dials the speed dial codes 120-129. The asterisk (*) represents all
numbers from 0 to 9.
Xerox WorkCentre 7132 User Guide 91
Page 92

4 Fax/Internet Fax
*** Dials all speed dial codes registered in the machine.
#01 Dials the group code 01. A group code is a speed dial code that can
For information on how to register speed dial codes, refer to Address Book in the
Setups chapter on page 290.
1. Press the <Speed Dial> button.
2. Enter a 3-digit code.
NOTE: If the 3-digit code entered is
correct, the destination is displayed.
If it is incorrect, you are prompted to
re-enter a 3-digit code.
Enter this data Results
contain up to 20 destinations and begins with a pound sign (#). Up to
50 group codes can be registered.
<Speed Dial>
button
Keyboard
This feature allows you to enter text information, such as special character codes and
passwords.
1. Select [Keyboard] on the [Fax]
screen.
2. Select the keys on the screen to
enter the required information.
3. Select [Close].
Standard Characters
Displays number and letter keys on the screen.
More Characters
Displays symbol keys on the screen. For information on using symbols as special
characters in fax numbers, refer to Special Characters on page 93.
Backspace
Deletes the last character entered.
Shift
Switches between uppercase and lowercase letters.
Tone (:)
Switches between pulse dialing and tone dialing.
92 Xerox WorkCentre 7132 User Guide
Page 93

Next Recipient
Sends the document to more than one destination. It allows you to add recipients for
simultaneous transmission. The maximum number of destinations that you can
designate at one time is 200.
Relay Broadcast
This feature allows you to send a document to a remote machine, which then sends the
document to multiple destinations registered in the remote machine for speed dialing.
This can reduce transmission cost when the destinations are out of town or located in
another country because you only need to send the document to the broadcasting
machine.
The remote machine that broadcasts your document to multiple destinations is referred
to as a relay station. You can specify multiple relay stations, or even ask the first station
to relay your document to the secondary relay station, which then broadcasts the
document to other destinations.
The following methods are available for relay broadcasting.
Fax Signals
Specifying Fax Destinations
The machine provides a unique method only for Xerox machines that have the relay
broadcasting feature. Before sending a document, the remote machine that broadcasts
your document needs to be registered as a relay station in a speed dial code on your
machine. For more information on registering relay stations for speed dialing, refer to
Address Book in the Setups chapter on page 290.
DTMF
You can manually enter DTMF codes as part of a fax number to specify a relay station
and destinations that also understand DTMF codes. G3-compatible machines that
allow manual sending can initiate relay broadcasting to the machine. For more
information, refer to Special Characters on page 93.
F Code
Machines that support F Code and relay broadcasting features allow relay
broadcasting operations using F Code. For more information, refer to F Code on
page 109.
Special Characters
You can enter special characters as part of a fax number to perform many functions
when dialing the number. Some characters are used only when auto dialing, such as
“:”, “!”, “/”, “-”, and “=”. Depending on the setup of the telephone and communication
lines, some or all of the following characters can be used.
Character Function Description
- Dial pause (to
pause while
dialing)
Xerox WorkCentre 7132 User Guide 93
Inserts a pause in a fax number, for example when you are
using a calling card. Press the <Dial Pause> button more
than once to enter a longer pause.
Page 94

4 Fax/Internet Fax
Character Function Description
/ Mask data (to
protect
confidential
information)
\ Screen mask Masks the mailbox password on the screen with asterisks
: Pulse-to-tone
switch
’ Speed dial or
group code
< > Communication
line switch
= Dial tone
detection
S Password check
(for remote
machine
identification)
Select [/] before and after entering confidential information
to display as asterisks. This character must be preceded
with “!” to be effective.
(*). Select [
Switches pulse dialing to tone dialing, for example when
using an automated message recording system that
requires tone signals.
Indicates a 3-digit speed dial or group code. Place this
character before and after the code.
Switches communication lines that include parameter data,
where the parameter data include characters “0” to “9” or
“,”. The parameter data must be placed between angle
brackets (“<” and “>”). If G3-3CH is installed, entering
either <1>, <2>, or <4> prior to specifying the fax
destination switches the communication lines.
Suspends dialing until a dial tone is detected.
Use this character to verify that the correct number has
been entered. The machine checks if the password you
entered after “S” matches the fax number of the remote
machine. If the match is confirmed the machine sends the
document.
\] before and after entering a mailbox password.
space Readability
improvement
! Start DTMF code
signaling
$ Wait for DTMF
confirmation
Improves readability by inserting spaces in a telephone
number, for example “1 234 5678” instead of “12345678”.
Pauses regular fax dialing, and starts the DTMF (dual tone
multi-frequency) method for sending documents to
mailboxes on the remote machines.
Wait for a DTMF confirmation signal from the remote
machine and proceed to the next step.
DTMF Method - Examples
The DTMF method uses combinations of special characters to send documents. See
the following examples.
• Remote Mailbox - Sends a document to a mailbox on a remote machine.
Telephone number of
remote machine
!*$ Mailbox number of
remote machine
##\ Mailbox password \##$
• Polling - Retrieves a document stored in a mailbox on a remote machine.
94 Xerox WorkCentre 7132 User Guide
Page 95

Specifying Fax Destinations
Cover Note
Telephone number of
remote machine
!*$ Mailbox number of
remote machine
**\ Mailbox password \##$
• Relay Broadcast - Sends a document to a relay station which in turn sends it to
multiple destinations.
Telephone
number of
remote machine
!*$#\ Relay Send
Number (RSN)
of relay station
\# Speed dial code
for first
destination
# Speed dial code
for second
destination
##$
• Remote Relay Broadcast - Sends a document via multiple relay stations. The last
station broadcasts the document to the specified destinations.
Telephone
number of
remote
machine
!*$#\Relay Send
Number
(RSN) of
primary relay
station
\# Speed dial
code for
secondary
relay station
# Speed dial
code for first
destination
# Speed dial
code for
second
destination
##$
This feature allows you to add a cover sheet to the document containing the following
information: destination name, sender name, fax number, quantity, time and date, and
remarks.
1. Select [Cover Note] on the [Fax]
screen.
2. Select the required option.
Off
Disables the feature.
On
Attaches a [Cover Note]. When you select this option, [Comment] is displayed at the
right side of the screen.
Comment
Displays the [Cover Note - Comment] screen where you can specify the [Recipient’s
Comment] and [Sender’s Comment].
Xerox WorkCentre 7132 User Guide 95
Page 96

4 Fax/Internet Fax
[Cover Note - Comment - Recipient’s Comment] Screen
1. Select [On] on the [Cover Note]
screen.
2. Select [Comment].
3. Select [Recipient’s Comment].
4. Select [On] on the [Cover Note -
Comment - Recipient’s Comment] screen.
5. Select a comment from the comment list using the scroll buttons.
6. Select [Save].
Comment
Allows you to select a comment from the list of comments already registered.
For information on how to register comments, refer to Comments in the Setups
chapter on page 295.
[Cover Note - Comment - Sender’s Comment] Screen
The procedures are the same as the [Cover Note - Comment - Recipient’s Comment]
screen.
Specifying Internet Fax Destinations
This section describes how to specify destinations using the [Internet Fax] features to
send scanned images as e-mail attachments. For more information, refer to the
following.
Address Book – page 97
Keyboard – page 97
iFax Comment – page 98
1. Press the <All Services> button
on the control panel.
2. Select [Internet Fax] on the
touch screen. Select the
[Internet Fax] tab, if not
displayed already.
From
Displays the [Sender’s E-mail] screen with your E-mail return address to be sent with
your Internet Fax.
96 Xerox WorkCentre 7132 User Guide
Page 97
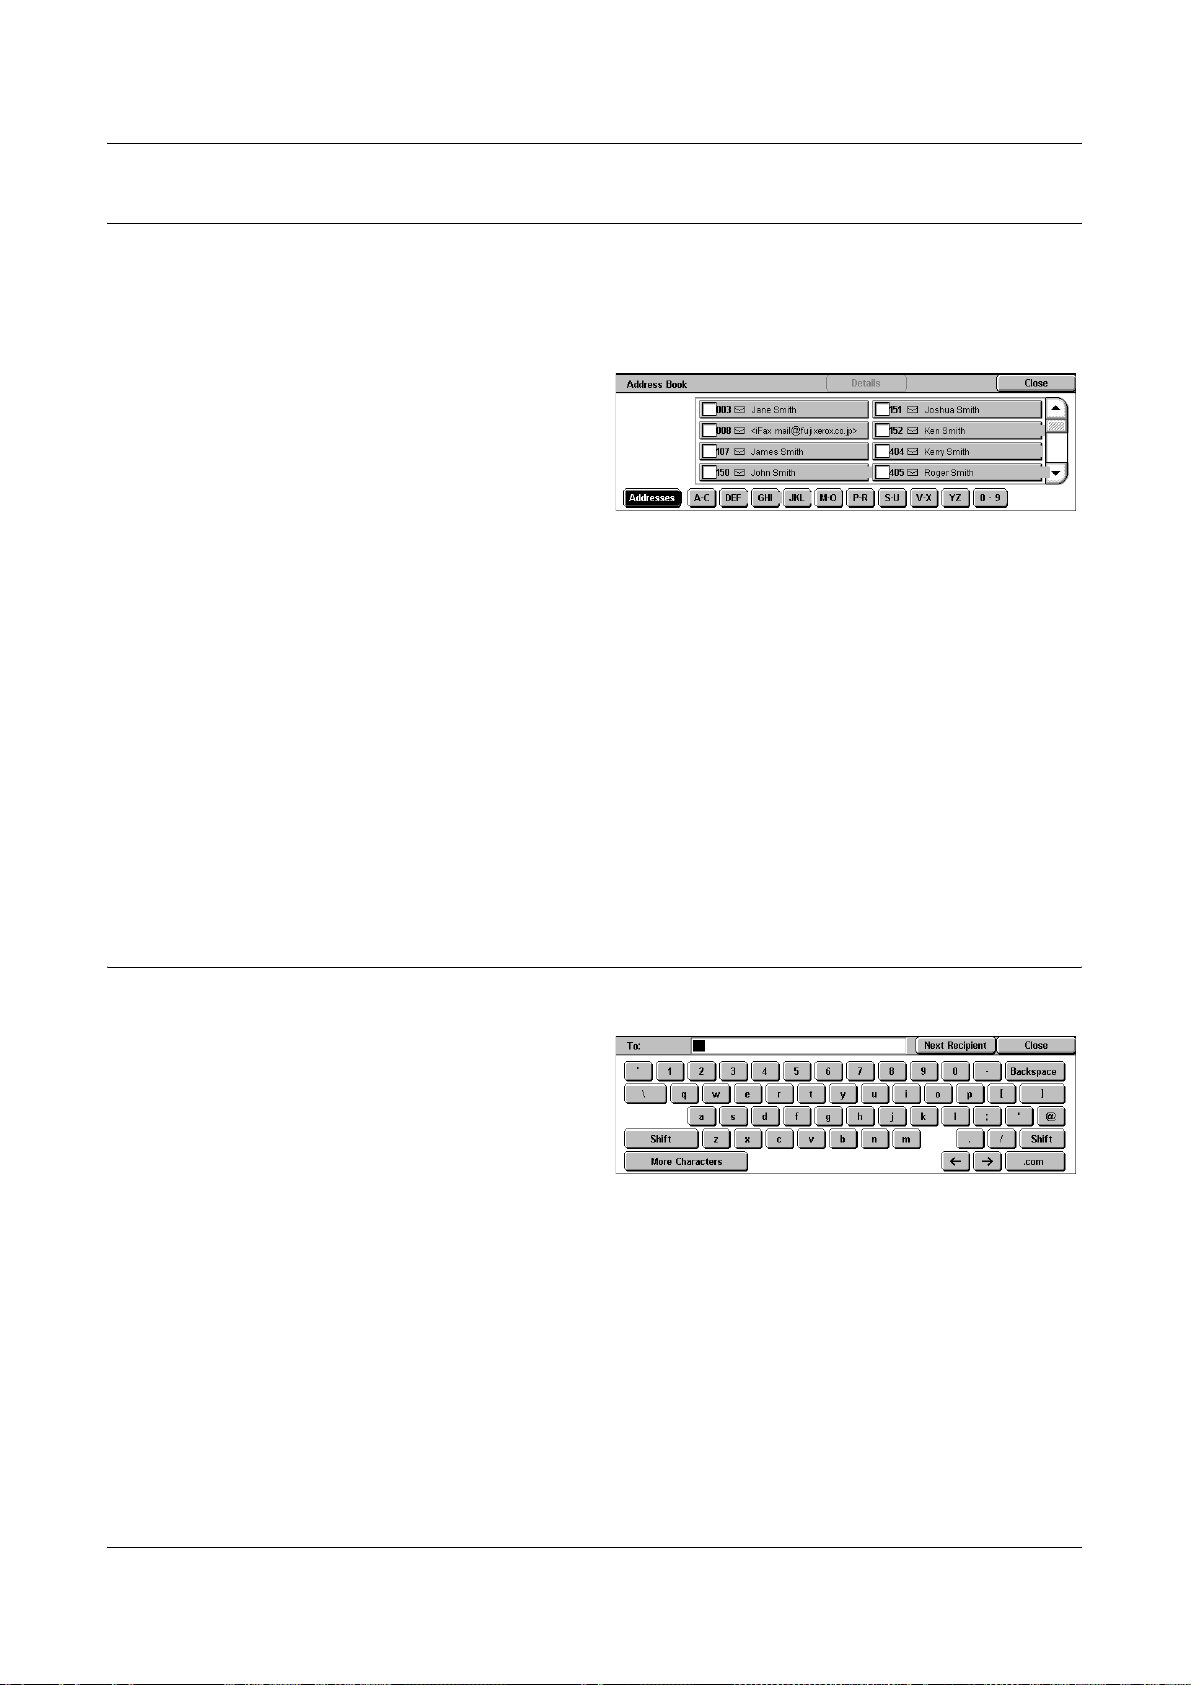
Address Book
This feature allows you to quickly look up and enter the destinations registered in the
address book. You can also look up a destination by the index character (a letter or a
number) assigned to the destination. For information on how to register destinations,
refer to Address Book in the Setups chapter on page 290.
1. Select [Address Book] on the
2. Select the required destination.
3. Select [Close].
Addresses
Lists all the E-mail address destinations registered for speed dialing. You can review
the address list using the scroll buttons.
Letters
Locates a destination by the index letter assigned to it. The following nine tabs are
available: A-C, DEF, GHI, JKL, M-O, P-R, S-U, V-X, YZ.
Specifying Internet Fax Destinations
[Internet Fax] screen.
Keyboard
0–9
Locates a destination by the index number assigned to it.
Details
Displays the information stored in the address book for the selected entry.
This feature allows you to enter text information for the e-mail address.
1. Select [Keyboard] on the
[Internet Fax] screen.
2. Select the keys on the screen to
enter the required information.
3. Select [Close].
Standard Characters
Displays number and letter keys on the screen.
More Characters
Displays symbol keys on the screen. For information on using symbols as special
characters in fax numbers, refer to Special Characters on page 93.
Backspace
Deletes the last character entered.
Xerox WorkCentre 7132 User Guide 97
Page 98

4 Fax/Internet Fax
Shift
Switches between uppercase and lowercase letters.
Next Recipient
Sends the document to more than one destination. It allows you to add recipients for
simultaneous transmission. The maximum number of destinations that you can
designate at one time is 200.
Relay Broadcast
This feature allows you to send a document to a remote machine, which then sends the
document to multiple destinations registered in the remote machine. This can reduce
transmission cost when the destinations are out of town or located in another country
because you only need to send the document to the broadcasting machine.
The remote machine that broadcasts your document to multiple destinations is referred
to as a relay station. You can specify multiple relay stations, or even ask the first station
to relay your document to the secondary relay station, which then broadcasts the
document to other destinations.
You can send an Internet Fax document to an Internet Fax-capable relay station in a
network, which converts the document to a regular fax and broadcasts it to destinations
without an Internet Fax capability.
To send an Internet Fax document for relay broadcasting, specify the relay station's email address as follows.
FAX=1234567890/T33S=777@wcm128.xerox.com
Where:
1234567890: The destination’s fax number
777: The destination’s F Code (if required)
wcm128: The host name of the relay station
xerox.com: The domain where the relay station is hosted
NOTE: To use this feature, the relay station must be set to use an SMTP server to
receive e-mail.
iFax Comment
This feature allows you to add comments to e-mail text. Information such as an
authorized name and address, the number of scanned pages, the scanned size, and
IP Address and serial number of the machine is automatically generated by the system
and also contained in the text.
1. Select [iFax Comment] on the
[Internet Fax] screen.
2. Select the required options.
98 Xerox WorkCentre 7132 User Guide
Page 99

Off
Disables the feature.
On
Attaches the Internet Fax comment. When you select this option, [Comment 1] and
[Comment 2] are displayed at the right side of the screen.
Comment 1
Displays the [iFax Comment 1 (Mail Contents)] screen to specify comments.
Comment 2
Displays the [iFax Comment 2 (Mail Contents)] screen to specify comments.
[iFax Comment 1 (Mail Contents)] Screen
1. Select [On] on the [iFax
Comment] screen.
2. Select [Comment 1].
General Settings - Fax/Internet Fax
3. Select [On] on the [iFax
Comment 1 (Mail Contents)]
screen.
4. Select a comment from the comment list using the scroll buttons.
5. Select [Save].
No. Comment
Allows you to select a comment from the list of comments already registered.
For information on how to register comments, refer to Comments in the Setups
chapter on page 295.
[iFax Comment 2 (Mail Contents)] Screen
The procedures are the same as the [iFax Comment 1 (Mail Contents)] screen.
General Settings - Fax/Internet Fax
This section describes the general image control features for a fax/Internet Fax job. For
information on the features available, refer to the following.
Lighten/Darken – page 100
2 Sided Originals – page 100
Original Type – page 101
Resolution – page 101
Xerox WorkCentre 7132 User Guide 99
Page 100

4 Fax/Internet Fax
1. Press the <All Services> button
on the control panel.
2. Select [Fax] or [Internet Fax] on
the touch screen.
3. Select the [General Settings]
tab.
4. Select the required feature.
Lighten/Darken
This feature allows you to adjust the density of the scanned image using seven levels.
Use the scroll buttons to increase or decrease the darkness.
1. Select a level for the
[Lighten/Darken] feature on the
[General Settings] screen.
2 Sided Originals
This feature allows you to specify whether the documents are single-sided or doublesided, and how documents are to be positioned.
1. Select a preset button or [More]
for the [2 Sided Originals]
feature on the [General
Settings] screen.
More
Displays the [2 Sided Originals] screen.
[2 Sided Originals] Screen
Allows you to select the 2 sided scanning options and document feed direction.
1. Select [More] for the [2 Sided
Originals] feature on the
[General Settings] screen.
2. Select the required option.
3. Select [Save].
1 Sided
Scans single-sided documents.
100 Xerox WorkCentre 7132 User Guide
 Loading...