

Page 1

Xerox 7042 Laser Facsimile
Reference Manual
XEROX
Page 2

Xerox Corporation
Customer and Service Documentation Development
R380-159
P.O. 80x660512
Dallas, TX 75266-0512
®1993 by Xerox Corporation. All rights reserved.
Copyright protection claimed includes all forms and matters of
copyrightable material and information now allowed by
statutory or judicial law or hereinafter granted, including
without limitation, material generated from the software
programs which are displayed on the screen such as icons, screen
displays looks, etc.
Xerox® and all Xerox products mentioned in this publication are
trademarks of Xerox Corporation.
Changes are periodically made to this document. Changes,
technical inaccuracies, and typographic errors will be corrected
in subsequent editions.
Page 3

Notes
Page 4

Quick Reference Guide
This guide is for users familiar with the 7042. It is in the front of the manual for your convenience.
TRANSMIT
1. Load the document.
2.
Dial the telephone number
using one of the methods
below.
Keypad Dialing
3. Dial the number to call.
4.
Press the START key.
One-Touch Dialing
3. Press the one-touch key.
Speed Dialing
3. Press the SPEED DIAL key.
4. Enter the two-digit code.
Group Dialing
3. Press the group key.
Alphabetical Dialing
3. Press the ALPHA DIAL key.
4. Press the keypad number for
the first letter of the name.
5. Press the REDIAL/1 key to
scroll through the entries.
6. Press the START key.
Redialing
3. Press the REDIAL/t key.
RECEIVE
Manual Receive
1. When you receive a call, lift
the handset.
2. If you hear a facsimile tone.
press the START key and
place the handset on the
cradle.
CLEAR JOBS
Print the Pending Jobs Report to
determine the job number.
1. Press the CLEAR key.
2. Press the REDIAL/t key to
scroll through the jobs.
3. Press the START key.
4. Enter the job number.
5. Press the START key.
PRINT REPORTS
1. Press the REPORT key.
2. Press the REDIAL/1 key to
scroll through the reports.
3. Press the START key.
MEMORY FILES
Delete Files in a Mailbox
1.
Press the MEMORY PRINT /
DELETE key.
2.
Press the REDIAL/1 key.
Press the START key.
3.
Enter the file number.
4.
Press the START key.
5.
Enter the mailbox number.
6.
Press the START key.
7.
Print Documents in Memory
1. Press the MEMORY PRINT /
DELETE key.
2. Press the START key twice.
3. Enter the file number.
4. Press the START key.
5. Enter the mailbox number.
6. Press the START key.
Store Documents in Memory
1. Load the document.
2. Press the LOAD MAILBOX
key.
3. Press the START key.
4. Enter the mailbox number.
5. Press the START key.
CLEARING JAMS
MANUAL BROADCAST
1. Load the document.
2. Press the MANUAL
BROADCAST key.
3. Press the one-touch key.
OR
press the SPEED DIAL key
and enter the two-digit code,
OR
use the control panel keypad
to dial the number.
4. Press the START key.
5. Repeat steps 3 and 4 for
each number to call.
6. Press the START.
VI
COPY
Single Copies
1. Load the document.
2. Press the COPY key.
Multiple Copies
1. Load the document.
2. Press the MULTI-COPY key.
3. Enter the number of copies.
4. Press the START key.
Document Jam
1. Open the scanner cover.
2. Remove the document.
3. Close the scanner cover.
Paper Jam
1. Open the printer cover.
2. Remove the developer
assembly.
3. Pull up on the paper feed
release lever and remove the
paper.
4. Install the developer
assembly.
5. Close the printer cover.
Page 5

Quick Reference Guide
PROGRAMMING
User Option List
No. Option
00 Activity report
02 Transmission report
03 Listen to ring
04 Auto answer
05 Auto rev in man mode
06 Man mode rev delay
07 Resolution default
08 Copy resolution
10 Header print
11 Number of redials
15 Secure transmission
16 Junk mail eliminator
19 Delete rev documents
20 Resend on error
21 Dial method
22 Document length
23 Print reduction
24 Calendar format
25 Month indication
26 Receive interval
27 ECM mode
28 Language
29 Clock display
31 Auto reduce copies
Programming User Options
1. Press the PROGRAM key.
2. Press the REDIAL/1 key.
3. Press the START key.
4. Enter the option number from
the User Option List.
5. Use the # (-♦) key to change
the value of the option.
6. Press the START key.
7. Press the STOP key.
Calendar (Date and Time)
1. Press the PROGRAM key.
2. Press the PAUSE/ i key five
times.
3. Press the START key.
4. Enter the date and time.
5. Press the START key.
One-touch keys
1. Press the PROGRAM key.
2. Press the START key.
3. Press a one-touch key.
4. Enter the number to call.
5. Press the START key.
6. Press the PAUSE/ + key.
7. Enter the name.
8. Press the START key.
9. Press the STOP key.
Speed dial codes
1. Press the PROGRAM key.
2. Press the PAUSE/ i key.
3. Press the START key.
4. Press the SPEED DIAL key.
5. Enter the two-digit code.
6. Enter the number to call.
7. Press the START key.
8. Enter the name.
9. Press the START key.
10. Press the STOP key.
Group keys
1. Press the PROGRAM key.
2. Press the PAUSE/ i key twice.
3. Press the START key.
4. Press the group key.
5. Press a one-touch key, or
press the SPEED DIAL key
and enter the two-digit code.
6. Press the START key.
7. Repeat steps 5 and 6 for
each number to call.
8. Press the START key.
9. Enter the name.
10. Press the START key.
11. Press the STOP key.
Terminal ID
1. Press the PROGRAM key.
2. Press the PAUSE/ + key three
times.
3. Press the START key.
4. Enter the ID number.
5. Press the START key.
Logo (ID Name)
1. Press the PROGRAM key.
2. Press the PAUSE/ i key four
times.
3. Press the START key.
4. Enter the logo.
5. Press the START key.
POLL
Poll
1. Remove all documents.
2. Press the POLL/STORE FOR
POLLING key.
3. Dial the number to call.
Store for Polling
1. Load the document.
2. Press the POLL/STORE FOR
POLLING key.
3. Press the START key.
DELAYED START
1. Load the document.
2. Press the DELAYED START
key.
3. Press the START key.
4. Enter the transmit time.
5. Press the START key.
6. Dial the number to call.
VII
Page 6

Notes
vm
Page 7

Table of Contents
Quick Reference Guide ............................................................................................................... v
1-2-3 . . . GO ............................................................................................................................. xiii
How to Use This Manual ................................................................................................... xiii
Organization ................................................................................................................... xiv
Terminology ..................................................................................................................... xv
Text Displays ................................................................................................................... xv
Notes, Cautions, and Warnings ....................................................................................... xvi
Features ................................................................................................................................... i-i
System Overview ........................................................................................................... 1-1
Hardware Features ......................................................................................................... 1-2
Tones ............................................................................................................................ 1-3
Control Panel.................................................................................................................. 1-4
Control Panel Function Keys ............................................................................................ 1-5
JOB STATUS ....................................................................................................... 1-7
RESOLUTION ..................................................................................................... 1-7
HALFTONE ......................................................................................................... 1-8
DIRECT SEND .................................................................................................... 1-8
ALPHA DIAL ........................................................................................................ 1-8
CLEAR ................................................................................................................ 1-9
REDIAL/1 ............................................................................................................ 1-9
PAUSE/4- ............................................................................................................ 1-9
Keypad ................................................................................................................ 1-9
SPEED DIAL....................................................................................................... 1-10
STOP ................................................................................................................ 1-10
START .............................................................................................................. 1-10
COPY ................................................................................................................ 1-10
Access Panel Function Keys ......................................................................................... 1-11
Liquid Crystal Display (LCD) .......................................................................................... 1-13
Standby mode .................................................................................................... 1-13
Communication mode.......................................................................................... 1-13
Program mode ................................................................................................... 1-15
Copy mode ........................................................................................................ 1-15
Control Panel LEDs ...................................................................................................... 1-16
Dual Access ............................................................................................................... 1-16
Copying .................................................................................................................................. 2-1
Load a Document .......................................................................................................... 2-1
Reduction ............................................................................................................ 2-2
Page size ............................................................................................................. 2-2
Resolution ........................................................................................................... 2-2
Halftone
Copy a Document .......................................................................................................... 2-3
Print single copies ................................................................................................. 2-3
Print multiple copies .............................................................................................. 2-4
Programming the Machine ........................................................................................................ 3-i
Calendar (Date and Time) ............................................................................................... 3-1
....
........................................................................................................ 2-3
IX
Page 8

Table of Contents
Logo (ID Name) .............................................................................................................. 3-2
Terminal ID ..................................................................................................................... 3-4
Reduction Rates ............................................................................................................. 3-5
Paper Size...................................................................................................................... 3-5
User Options .................................................................................................................. 3-6
User option descriptions ......................................................................................... 3-7
User option conditions ......................................................................................... 3-10
Set the user options ............................................................................................. 3-12
Programming the Dial Directory .................................................................................................. 4-i
Dial Directory.................................................................................................................. 4-1
One-Touch Keys (01-18) ................................................................................................. 4-3
Full program mode ................................................................................................ 4-3
Program the one-touch keys .................................................................................. 4-4
Clear the one-touch keys ....................................................................................... 4-7
Speed Dial Codes (00-99) ............................................................................................... 4-8
Program a speed dial code .................................................................................... 4-8
Clear a speed dial code ....................................................................................... 4-10
Group Keys (l-VI) .......................................................................................................... 4-11
Program the group keys (l-VI) .............................................................................. 4-11
Add numbers to a group key................................................................................. 4-13
Delete an entry in a group key .............................................................................. 4-15
Delete all entries in a group key ............................................................................ 4-16
Transmitting ............................................................................................................................. 5-1
Load a Document .......................................................................................................... 5-1
Transmission Features .................................................................................................... 5-2
Resolution and halftone.......................................................................................... 5-2
Page headers ...................................................................................................... 5-3
Page count .......................................................................................................... 5-3
ECM mode .......................................................................................................... 5-4
Automatic redialing ................................................................................................ 5-4
Transmissions ................................................................................................................ 5-5
On-hook and off-hook dialing.................................................................................. 5-6
Keypad dialing ..................................................................................................... 5-6
One-touch dialing .................................................................................................. 5-7
Speed dialing ....................................................................................................... 5-7
Alphabetical dialing................................................................................................ 5-8
Group dialing ........................................................................................................ 5-9
Manual broadcast dialing ..................................................................................... 5-10
Cancelling a transmission
Redialing the previous number ............................................................................ 5-11
Direct Send .................................................................................................................. 5-12
Delayed Transmission .................................................................................................. 5-13
Program a delayed transmission .......................................................................... 5-13
Cancel a delayed transmission ............................................................................. 5-14
Security Features ......................................................................................................... 5-14
Password ......................................................................................................... 5-15
Secure mode ..................................................................................................... 5-16
Transmitting to a remote mailbox .......................................................................... 5-17
Secure access mode .......................................................................................... 5-18
...................................................................................
5-11
Page 9

Table of Contents
DTMF ....................................................................................................................... 5-19
DTMF mailbox transmissions
DTMF relay send ............................................................................................. 5-20
Receiving .............................................................................................................................. 6-1
Automatic Reception ..................................................................................................... 6-1
Manual Reception ........................................................................................................ 6-2
Cancelling an incoming Call ........................................................................................... 6-3
Substitute Receive to Memory ....................................................................................... 6-3
Reduction Rates on Documents Received ...................................................................... 6-3
Secure Receive (Junk Mail Eliminator) ............................................................................ 6-4
Power Save Mode ....................................................................................................... 6-4
Polling - Retrieving Remote Documents....................................................................................... 7-i
Polling Capabilities ......................................................................................................... 7-1
Features ............................................................................................................ 7-2
Prepare to be Polled (Polling Standby Mode)
Polling
Send/Poil ..................................................................................................................... 7-4
Mailbox Polling ............................................................................................................... 7-5
Delayed Polling .............................................................................................................. 7-6
Delayed Send/Poll .......................................................................................................... 7-7
Delayed Mailbox Polling................................................................................................... 7-8
DTMF Mailbox Polling .................................................................................................. 7-9
Cancel a Polling Request .............................................................................................. 7-10
...............................................................
............................ ...............................................
..................................................................
■........................................................ 7-3
5-19
7-2
Memory ................................................................................................................................. 8-1
Store a Document in a Memory File.................................................................................. 8-1
Mailboxes ............................................................................................................ 8-1
Store a document in a mailbox ............................................................................... 8-2
Append a document to a mailbox file ....................................................................... 8-3
Transmit a Document from the Memory ............................................................................ 8-4
Receive a Document into the Memory .............................................................................. 8-4
Poll for a Document in a Remote Mailbox ......................................................................... 8-5
Print a Document in the Memory ...................................................................................... 8-5
Print all documents in a mailbox ............................................................................. 8-6
Print a document in a memory file
Delete a Document from a Mailbox
Reports.................................................................................................................................. 9-1
Printing the Reports ........................................................................................................ 9-2
Report Descriptions ........................................................................................................ 9-4
Activity Report ...................................................................................................... 9-4
One Touch Dial Directory .................................................................................... - 9-5
Speed Dial Directory.............................................................................................. 9-6
Directory.............................................................................................................. 9-6
Group Dial Directory .............................................................................................. 9-7
Transmission Report ............................................................................................. 9-8
Pending Jobs List ................................................................................................. 9-9
Memory List ....................................................................................................... 9-10
Options Report .................................................................................................. 9-11
...........................................................................
..................................................................................
8-7
8-8
XI
Page 10

Table of Contents
Broadcast Report ................................................................................................. 9-12
Manual Broadcast List .......................................................................................... 9-13
Manual Broadcast Report ...................................................................................... 9-13
Poll Report ........................................................................................................... 9-14
Mailbox Receipt ................................................................................................... 9-15
Power Failure Report ............................................................................................ 9-16
Maintenance Procedures........................................................................................................... io-i
Error Codes................................................................................................................... 10-3
Support Center .................................................................................................... 10-3
System errors....................................................................................................... 10-4
Error conditions ................................................................................................. 10-5
Printer errors ..................................................................................................... 10-6
Error codes ....................................................................................................... 10-8
Problem Solving Procedures ........................................................................................ 10-11
Clear a recording paper jam................................................................................. 10-11
Clear a document jam ......................................................................................... 10-15
Cleaning Procedures ................................................................................................... 10-16
Clean the developer assembly and the surrounding parts
Clean the charge wire and the laser beam window .............................................. 10-23
Clean other components as needed .................................................................. 10-28
.......................................
10-17
Supplies and Accessories ......................................................................................................... ii-i
Ordering Supplies and Accessories................................................................................. 11-1
Supplies ....................................................................................................................... 11-1
Accessories .................................................................................................................. 11-2
Replacing Supplies ........................................................................................................ 11-3
Load the recording paper in the main paper tray....................................................... 11-3
Load the recording paper in the auxiliary tray ........................................................... 11-5
Replace the toner cartridge ................................................................................... 11-7
Replace the drum unit.......................................................................................... 11-14
Reference ............................................................................................................................. 12-1
Scanner Specifications .................................................................................................. 12-1
Printer Specifications...................................................................................................... 12-1
Network Requirements ................................................................................................ 12-2
Memory ....................................................................................................................... 12-2
Telephone Line ............................................................................................................. 12-2
Power Consumption....................................................................................................... 12-2
Power Supply ............................................................................................................... 12-3
Acoustic Noise .............................................................................................................. 12-3
Space Requirements ..................................................................................................... 12-3
Send Header Requirements............................................................................................ 12-3
Data Coupler Information ............................................................................................... 12-4
Canadian Certification .................................................................................................... 12-6
index................................................................................................................................. Index-1
XII
Page 11

1-2-3 ... GO
The user documentation for the 7042 laser facsimile is designed
for the user to best understand and get the most out of the
machine. Setting up and understanding the machine is as easy
as 1-2-3.
Install the Machine
The XEROX 7042 Laser Facsimile Installation Guide provides
information on the site requirements and instructs how to unpack
and how to install the machine.
Get Started on the Machine
The XEROX 7042 Laser Facsimile Getting Started manual is a
guide to get the user started with the machine. This manual
instructs how to operate the commonly-used features of the
machine. For detailed information about the features and for
information about additional features, refer to the Reference
Manual.
UNDERSTAND THE FEATURES OF THE MACHINE
This document, the XEROX 7042 Laser Facsimile Reference
Manued, provides detailed information on and procedures to use
the 7042 features. Use the reference manual to supplement the
Getting Started manual.
How to Use This Manual
This manual provides information about the XEROX 7042 laser
facsimile. The manual instructs how to program the unit; how to
copy, to transmit, and to receive a document; and how to
maintain the machine. To ensure proper operation, please
become familiar with the contents of this manual before you use
the machine.
XIII
Page 12

1-2-3... CO
Organization
This reference manual contains the following sections:
• Quick Reference Guide — Briefly Instructs how to operate
the commonly-used features of the machine.
• Features — Describes the hardware features of the
machine and provides an overview of how the machine
operates. Also describes the control panel function keys.
• Copying — Instructs how to copy documents.
• Programming the Machine — Includes procedures to
program the calendar, the logo, the terminal ID, and the
user options.
• Programming the Dial Directory — instructs how to
program the one-touch keys, the speed dial codes, and the
group keys.
• Transmitting — Describes the transmission features and
instructs how to transmit a document. The methods to
transmit include the following:
— Control panel keypad dialing
— One-touch, speed dial, alphabetical, group, and
manual broadcast dialing
— Direct send
— Delayed transmission
— Redialing
— Security and mailbox communication
• Receiving — Describes how the machine receives a
document from a remote machine.
• Polling -■ Retrieving Remote Documents — instructs how
to retrieve a document from a remote machine.
• Memory — Describes how to work with the memory files
and includes the following:
— Store documents in the memory
— Transmit a document from the memory
— Receive a document into the memory
— Poll a document in a remote mailbox
— Print a document from the memory
— Delete a file from the memory
XIV
Page 13

Terminology
1-2-3... GO
• Reports — Describes the fields of and instructs how to
print each report.
• Maintenance Procedures — Guides the user through
problem solving and provides a list of error codes. Also
includes procedures to clear a document jam or a paper
jam and to clean the machine.
• Supplies and Accessories — Provides information on and
part numbers for the supplies and optional accessories,
instructs how to replace the supplies.
• Reference — Provides the machine specifications, and
data coupler and Canadian certification information.
When procedures in this manual Instruct you to enter data, press
the keys on the control panel keypad to enter the characters.
When a procedure instructs you to press a specific key, that key
is called out in bold, capital letters. For example, a procedure
step may instruct you to “Press the START key.”
Text displays
Some programming steps instruct you to use the REDIAL/'[ key
or the PAUSE/key to scroll through entries. In most cases,
you can use either key to scroll through the items.
The Liquid Crystal Display (LCD) displays information for the
user. This manual presents information that the LCD displays in
capital letters or a graphic display is provided. The following is
an example of an LCD display:
MAY-05 12:OOP MIOOX
LOAD ORIGINALS
XV
Page 14

1-2-3... CO
The LCD displays several common symbols. The following table
lists the symbols as they are represented in this document and
their meanings. Refer to the Features chapter for more
information on the LCD.
Table 1:
Symbols
Symbol
Î
<>
—
These arrows are shown on the REDIAL/1 key and the
PAUSE/ i key. Use these keys to scroll through the items.
These arrows are shown on the # key and the ★ key. Use
these keys to move across the display.
This symbol represents the START key. The display shows
this symbol with a vertical line in the center.
This symbol represents the column at which the user enters
the data.
Notes, Cautions, and Warnings
This manual uses notes, cautions, and warnings to emphasize
any information the reader needs. Notes contain information that
supplements the text. Notes are emphasized with italics. The
following is an example of a note:
NOTE: Notes contain information that supplements the text.
Meaning
The following are examples of a caution and a warning.
CAUTION
Do not touch the green drum surface. Touching the
drum could lower the print quality.
WARNING
Do not touch the heater unit inside the machine.
The heater unit is extremely hot while the
machine is operating.
XVI
Page 15

Features
System Overview
This chapter provides an overview of how the machine operates
and describes the hardware features of the machine. It also
describes the control panel and defines each of the function
keys on the control panel. The chapter finishes with a
description of what information the LCD provides for each
operating mode.
The machine allows the user to send, to receive, and to copy
documents. When you switch on the power and the system has
warmed up, the machine is in the standby, or idle mode and the
machine is ready to use. When an action completes
successfully, the machine returns to the standby mode and
displays the following on the LCD:
AUG-20 12:OOP M100%
LOAD ORIGINALS
The machine has standard settings and optional features which
allow you to customize the machine. Refer to the Programming
the Machine chapter for information on the items you can
program to customize the machine.
The machine can be left powered on 24 hours a day. While the
machine is powered on, it recharges the internal battery.
The battery retains the options you set if the machine loses
power. However, any documents in the memory are deleted
when the power switch is set to the OFF position or if the
machine loses power.
1-1
Page 16
Features
Hardware Features
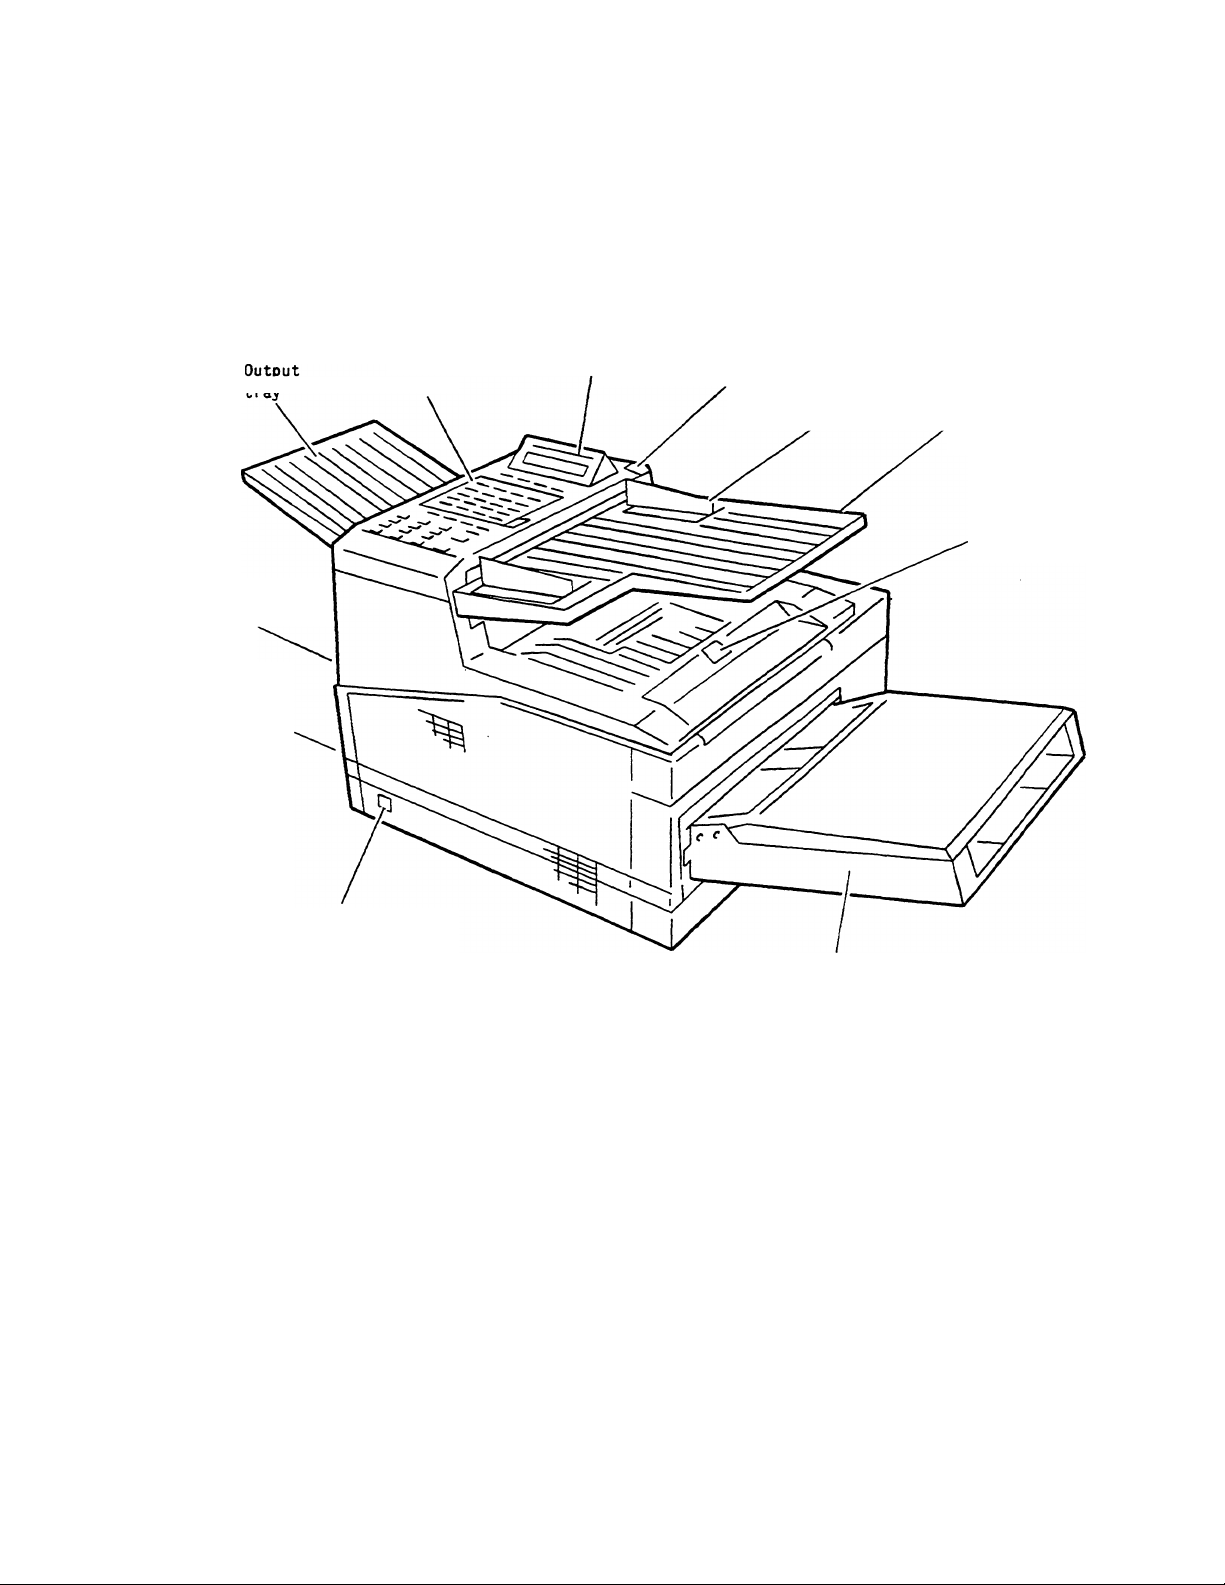
The following figure shows the hardware features of the machine.
Refer to the Mauntenance Procedures chapter for information on
the internal hardware of the machine.
Telephone
connection
AC
power
connection
Power
switch
Control
Panel
LCD
Scanner
cover Document
release Guides
button
Paper
cassette
Input
tray
Printer
cover
release
button
1-2
Page 17

The following lists the hardware features of the machine:
• Output tray — Accumulates the document after the
machine copies or transmits it Includes a tray extender
which turns out to support larger documents.
Control panel — Contains keys to operate the features.
LCD — Displays the current status of the machine.
Scanner cover release button — Releases the scanner
cover.
Document guides — Guide the pages so they do not
skew in the scanner.
Input tray — Provides an area to load documents.
Printer cover release button — Releases the top cover
to access the printer.
Features
Tones
Paper cassette — Supplies cut sheet paper to the
machine.
Power switch — Controls AC power to the machine.
AC power connection — Accepts a grounded AC cord.
Telephone connection — Provides a standard RJ-11C
modular jack for a telephone line from a wall jack.
The machine generates tones to indicate the operational status
of the machine.
Single short tone — A confirmation tone. A short tone sounds
when a key is pressed or when an action completes.
Extended tone — An unsuccessful alarm. An extended tone
(four to five seconds) occurs when a transaction does not
complete normally. The user must perform an action to continue
a process. Refer to the LCD messages for actions to take.
1-3
Page 18
Features
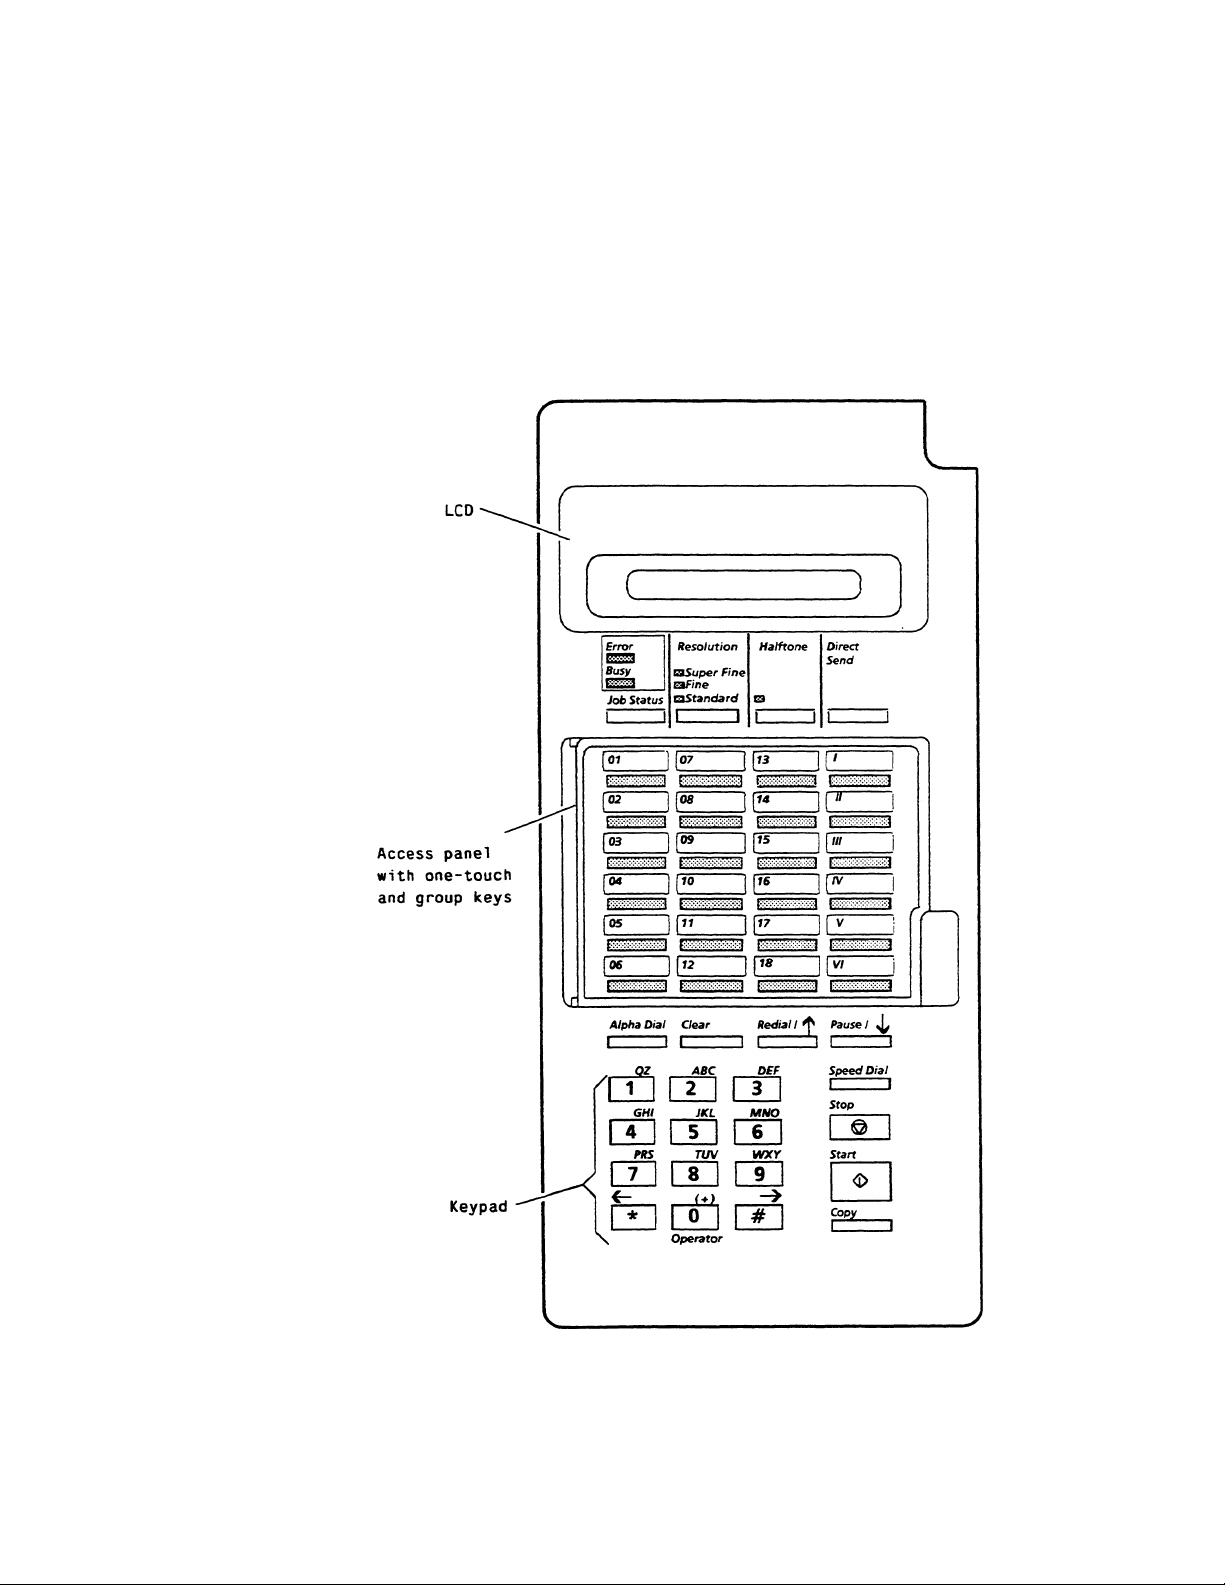
Control Panel
The control panel contains function keys, an alphanumeric
keypad, and an access panel. The control panel function keys
are divided into an upper section and a lower section. The
access panel, when closed, enables 18 one-touch keys (01-18)
and six group dial keys (l-VI). When the access panel is open,
the function keys are enabled. Use the control panel to program
the machine settings and to communicate with a remote
machine. The following figure illustrates the control panel:
\
/
\
/
Control
panel
upper
section
Control
panel
ower
section
7-4
Page 19

Control Panel Function Keys
The following illustrations and tables display and describe the
function keys on the control panel. Refer to the following
sections for more information on the keys.
The following figure shows the keys of the upper section;
Features
Table 1-1: Control Panel
Upper Section
1 1
Direct
Send
_______
1
Error Resolution
Busy
0^3
Job Status
Of
aSuper Fine
Efme
aStandard
1 1 1 1
07
Halftone
Q
1
_______
1
JC
|03
f04
f05
|06
1,09
l|.o
J["
mm mm^
11«
vd.
The following table briefly describes the keys on the control
panel upper section:
Key
Job Status
Displays the status of a communication
occurring as a background job.
m
11«
11«
IP 11''
11«
II"'
1 p
!□ L
.........
mi rii
1 j VI
¿Hr --i
Function
1
______
J
Resolution
Halftone
Direct Send
18 one-touch
keys (01-18)
6 group keys (1VI)
Selects the scanning resolution.
Selects the scanning contrast. Improves
the scanned image of a picture or
photograph.
Used to transmit a document without
scanning the document into a memory file.
Transmits to a number assigned to the one
touch key.
Transmits to a group of numbers assigned
to a group key.
1-5
Page 20
Features
The following figure shows the keys of the control panel lower
section:
The following table briefly describes the keys on the lower
section of the control panel:
Table 1-2: Control Panel
Lower Section
Key
Alpha Dial
Clear Cancels a broadcast operation or
Redial/1
Pause/
Keypad
Speed Dial
Stop
Start
Copy
Enables you to select an alphabetical
entry in the dial directory.
deletes programmed data.
Dials the last number dialed. Also
scrolls through menu items.
Scrolls through menu items. Also
used to add a pause when you dial.
Used to dial a number. Also used to
enter alphanumeric characters.
Transmits to a number you assigned
to a two-digit speed dial code.
Stops an operation or cancels
programming.
Starts a communication or completes
programming.
Begins a single copy operation.
Function
7-6
«- f) and ^ (#)
Moves the cursor to the left or right.
Also scrolls through the option values.
Page 21

JOB STATUS
RESOLUTION
Features
The JOB STATUS key causes the machine to display the status
of a communication that is occurring as a background job. The
message indicates if the machine is dialing, connecting or
communicating with the remote machine. The LCD also displays
the ID of the remote machine, the communication mode, and the
number of pages transmitted or received.
The display appears for a set interval then returns to the standby
display. If you press the JOB STATUS key while the machine is
not executing a background communication, the LCD displays
the message NO JOB IN PROGRESS.
The RESOLUTION key selects the scan mode for copying, for
transmitting, or for storing a document in the memory. For a
normal document set the resolution to STANDARD; for a
document with fine details, set the resolution to FINE or SUPER
FINE. Three LEDs on the control panel indicate the resolution.
The resolution can be changed per page during a transaction.
To select the resolution of the first page, press the RESOLUTION
key before you scan the document. To change the mode for
subsequent pages, press the key while a page is scanning.
If you are copying a document and the Copy Resolution user
option (No. 08) is set to a value, you can not use the
RESOLUTION key to override that value. Refer to the
Programming the Machine chapter for more information on the
user option.
NOTE: If you select the halftone mode, the machine
automatically sets the resolution to FINE.
1-7
Page 22

Features
HALFTONE
The HALFTONE key sets the contrast for copying, for
transmitting, or for storing a document in the memory. When you
select the halftone mode, the machine automatically changes the
resolution setting to FINE. When the machine is in the halftone
mode, the LED above the HALFTONE key is lit.
The halftone mode, like the resolution, can be changed per
page. To select the mode of the first page, press the
HALFTONE key before you scan the document. To change the
mode, you can press the key to switch modes while a page is
scanning; the machine prints the next page with the contrast you
select.
The machine reverts to its default halftone mode, OFF, at the
end of each transaction; this value can not be changed.
DIRECT SEND
ALPHA DIAL
Use the DIRECT SEND key to transmit a document without
scanning the document into the memory. The machine dials the
telephone number, scans the document, then transmits the
image. The machine does not retransmit the document if the
call does not complete successfully.
Use the ALPHA DIAL key to search through the dial directory.
The entries are listed by alphabetical name. You can select a
number to dial based on the name associated with the number.
1-8
Page 23

CLEAR
REDIAL/ t
Features
Use the CLEAR key to delete any operations that are
programmed but have not occurred. You can use this key to
cancel a delayed communication, a broadcast operation, or a
polling operation. This key also allows you to cancel a
transmission that is stored in the memory for a background job.
When you cancel an operation, the machine erases the pending
job. Using the CLEAR key cancels a single transaction; repeat
the procedure to cancel multiple transactions. Use the STOP
key to cancel a direct send communication.
When you program the machine, use the CLEAR key to erase
data or to delete a character you entered.
PAUSE/ ir
Keypad
Use the REDIAL/'[ key to dial the previous number dialed. You
can also use this key to scroll through the menu items, for
example, when you program items or when you set the user
parameters. This key also enters a space when you enter a
telephone number. Refer to the appropriate section for
information on how to use the REDIAL/ I key in each procedure.
Use the PAUSE/ 4- key to scroll through the menu items when
you program items or when you set the user options. This key
also enters a pause when you program the terminal ID number
or when you dial a number. The pause displays as a “ + ”
symbol in the terminal ID number and it displays as a symbol
in a telephone number.
Use the keypad to enter a number when you dial a telephone
number or program the machine. The keypad also enters text
when you program the machine ID name. Refer to the
Programming the Dial Directory chapter and the Transmitting
chapter for more information.
1-9
Page 24

Features
SPEED DIAL
STOP
Use the SPEED DIAL key to assign a two-digit speed dial code to
a telephone number. Press the key and enter a code to dial the
number or to program the code into a group number or a
delayed communication.
The STOP key cancels an operation that is currently executing.
Use the CLEAR key to delete background jobs or pending jobs.
Use the STOP key to stop the following operations:
Transmit a document using the direct send feature
Receive a document
Copy a document
Store a document into the memory
Print a report
Program the machine
START
COPY
Once you press the STOP key, you can not resume the
operation.
The START key is used to complete each process. Other
functions of the START key vary based on the operation and the
telephone line conditions.
The COPY key is used to begin copying a document you loaded
in the ADF. Use this key to create single copies of a document.
Refer to the Copying chapter for information on how to create a
single copy or multiple copies of a document.
1-10
Page 25

Access Panel Function Keys
The machine has an access panel with 18 one-touch dial keys
and six group dial keys for transmissions using one-touch
dialing. When you lift the access panel, you disable the onetouch keys and enable the access panel function keys. The
following figure shows how to enable the access panel function
keys:
J
________I _________1 --------------
Features
1
The following figure shows the function keys under the access
panel;
rT7
Multi Copy Store for Polling
I ~-i I
Load Mailbox Delayed Start
Poll!
--------------
1
I I I I
Memory Security I
Print I Delete Mailbox No.
I ' ~i J
Manual
Broadcast Page Count
I
- - - - - -
~i I ■■ J
Paper Size
Prooram Report
I 1
Une Monitor Service
Power Save
L_:._j
1-11
Page 26

Features
The following table lists the keys under the access panel. The
functions for these keys apply only when the access panel is
open. For information on the functions, refer to the appropriate
procedures.
Table 1-3: Access Panel
Function Keys
Key
Paper size Used to select the recording paper size.
Line Monitor Allows you to audibly monitor the
telephone line during a communication.
The monitor remains on while you press
the key.
Multi Copy
Load Mailbox Stores a document into a memory
Memory
Print/Delete
Manual
Broadcast
Program
Service
Poll/Store for
Polling
Allows you to print several copies of one
document.
mailbox.
Prints or deletes a document in the
memory.
Used to transmit to several machines.
Used to begin programming.
Used by service personnel only.
Used to select a polling method.
Function
Delayed Start
Security/
Mailbox No.
Page Count
Report
Power Save
Used to program a delayed transaction.
Used to program the security or mailbox
transactions.
Defines the total number of pages in a
document. This number prints in the
header of the document as you transmit it.
Used to select reports.
Reduces power consumption when the
machine is in the standby mode.
1-12
Page 27

Liquid Crystal Display (LCD)
The LCD displays the machine status and instructions. The LCD
provides information based on the current operation mode. The
machine has the following operation modes: standby mode,
communication mode, program mode, and copy mode.
Standby mode
When the machine is in the standby mode, the LCD displays the
machine status, a prompt for the next operation, or an error
message. The following information is displayed:
Features
Date and time — The month, day, and time (hour and
minute) are displayed. Set the date display sequence and
the time format with the user options.
Memory capacity — The remaining memory available for
storing documents displays as a percent. If no memory
is used. Ml 00% is displayed.
Communication mode
If a document is stored in each memory file — the
maximum number of files is 96 — the display shows the
message F-FULL.
R — An indicator for reception in memory. When the
machine receives a document into the memory, the LCD
flashes an R in its upper right corner.
Paper size — If no recording paper is loaded, the LCD
displays a prompt to add paper. If the machine has an
optional auxiliary paper tray installed, the LCD displays a
message indicating which tray is empty.
The LCD displays the communication mode status when the
machine is dialing, connecting with, transmitting to, or receiving
from a remote machine. When the machine is in this mode, the
following information is displayed. Press the JOB STATUS key
to display the information for a background communication.
• Communication ready — When you load a document in
the automatic document feeder, the LCD displays
information similar to the standby mode; however, DIAL
OR COPY displays on the lower line of the LCD.
1-13
Page 28

Features
• Job number — The machine assigns a job number to
each document to transmit.
• Dialing — Before the machine dials, the LCD displays
PREPARING TO DIAL. When the machine is dialing a
telephone number, the LCD displays DIALING.
• Connecting — When the machine is connecting with a
remote machine, the LCD displays CONNECTING.
• Transmission or reception — After the machine connects
with a remote machine, the LCD displays whether the
machine is transmitting or receiving a document.
• Communication mode — Based on the line quality and
the capabilities of the remote machine, the machine
selects the most efficient mode to transmit data:
ECM modes
ECM
EMMR
CCITT Group 3 machines with ECM
CCITT Group 3 machines with ECM and
MMR capabilities
Non-ECM modes
G3
Page count — The number of confirmed pages the
machine transmitted or received during the current
communication. The LCD displays Pnn in the upper right
corner of the display, where nn is the page number.
ID name or number of the remote machine — if a user
at a remote machine programmed an ID name or number
for that machine, the LCD displays that information.
Communication error code — The result of an error in a
communication. Refer to the Maintenance chapter for a
list of the codes.
CCITT Group 3 machines without ECM
1-14
Page 29

Program mode
Features
The LCD displays prompts for programming when the machine
is in the program mode. The following information is displayed:
Programming — The LCD displays PROGRAMMING on
the first line.
Item being programmed — The option name, the dial
directory entry, or the settings you are programming.
Operation instructions — The LCD prompts you with
instructions to program an operation. The following table
shows the symbols that the machine uses to prompt you
to enter information:
Table 1-4: Programming
Symbols
Copy mode
Symbol Meaning
These arrows are shown on the REDIAL/1 key
Ir Î
<l>
—
When the machine is in the copy mode, the LCD displays
information about the machine status as the machine prints
single or multiple copies of the document. When in the copy
mode, the following information is displayed:
and the PAUSE/ i key. Use these keys to scroll
through the menu items.
These arrows are shown on the # key and the *
key. Use these keys to move across the
display.
This symbol represents the START key. Use
this key to enter information or select menu
items.
This symbol represents the column at which the
user enters the data.
Single copies
information:
— The LCD displays COPY.
— The page count. The number of pages the machine
copied.
The LCD displays the following
1-15
Page 30

Features
Control Panel LEDs
Multiple copies — The LCD displays the following
information:
— The LCD displays STORING as the machine scans
and stores each page into the memory.
— The copy count. The number of copies the machine
prints.
The control panel has LEDs which indicate the status of the
machine. The control panel has the following LEDs:
• Busy — Blinks when the machine is online.
• Error — Indicates that the machine has a hardware error.
For example, the LED is lit when a cover is open.
• Halftone — Indicates that the halftone mode is enabled.
Dual Access
• Resolution — Three LEDs indicate the resolution.
You can scan documents to the memory during the following
operations: receiving a document to the printer, receiving a
document to the memory, or transmitting a document from the
memory.
These communications are performed as background jobs.
When a background job is in progress, the Busy LED blinks.
Press the Job Status key to access information for a
background communication.
The machine reserves up to 10 transmissions as background
communications. If you enter an 11th transmission, the machine
begins automatic sending.
1-16
Page 31

Copying
Load a Document
This chapter describes how to copy a document. The sections
describe the machine features for copying a document and
instruct how to make single and multiple copies of a document.
Load the documents face-down in the automatic document
feeder (ADF). Adjust the paper guides to the width of the
document so the pages do not skew as they feed through the
scanner. The LCD displays that the machine is ready for you to
dial a number or to copy the document.
The following features are available when you copy a
document:
Reduction
Page size
Resolution
Halftone
2-1
Page 32

Copying
Reduction
Page size
The machine allows you to select whether to copy documents to
the original size or to automatically reduce the document.
Set the Auto Reduce Copy user option (No. 31) to ON to reduce
all copies. The machine determines the reduction based on the
size of the original and the size of the recording paper. If the
image does not fit on one page, the machine divides the image
onto several pages.
If you set the option to OFF, the machine copies all documents
to their original size.
You can load a document that is up to 279 mm (11 in) wide and
up to 1 m (39.37 in) long. If the document length exceeds this
default limit, the machine displays a document jam. Set the
Document Length user option (No. 22) to increase the allowable
length.
Resolution
Documents can be copied with the standard or fine resolution
selected. For a normal document, set the resolution to
STANDARD; for a document with fine details, set the resolution
to FINE.
NOTE: If you select the super fine resolution, the machine prints
the document with a fine resolution.
If the Copy Resolution user option (No. 08) is set, all documents
copy with the same resolution: you can not override the option
for a single transaction. Also, if the option is set to STANDARD,
the machine does not copy in the halftone mode. If the option is
not selected, you can set the resolution for each item you copy.
2-2
Page 33

Halftone
Copy a Document
Copying
Documents can be copied in the halftone mode. When you copy
a normal document, leave the halftone off. To copy photographs
and figures with shading, select the halftone mode. When you
use the halftone mode, the machine automatically selects FINE
for the resolution and applies 64 levels of halftone as it scans the
document.
NOTE: If the Copy Resolution user option (No. 08) is set to
STANDARD, the machine does not copy in the halftone mode.
If the option is set to FINE or NOT SELECTED, you can set the
halftone and the resolution for each document you copy.
The machine can be used to print single or multiple copies of a
document.
Print single copies
To print multiple copies, the machine first stores the document in
the memory then prints the copies. If the memory becomes full
and the machine can not store the document, use the procedure
for printing single copies or delete any unnecessary files from
the memory and begin again.
Use the following procedure to make single copies.
1. Load the document face-down in the ADF.
2. If desired, set the resolution and the halftone.
NOTE: If you set the Copy Resolution user option
(No. 08), you can not override the option. If the option is
set to STANDARD, you also can not set the halftone.
3. Press the COPY key.
2-3
Page 34

Copying
Print multiple copies
When you make multiple copies, the machine automatically
sorts the copies into collated sets. The LCD displays the
number of copies started and the number you requested.
Use the following procedure to print multiple copies:
1. Load the document face-down in the ADF.
If desired, select the resolution and the halftone.
2.
Open the access panel.
3.
4. Press the MULTI COPY key and close the access panel.
The LCD prompts you to enter the number of copies to
print.
5. Enter the two-digit number of copies to print. If you want
less than 10 copies, press 0 as the first digit. The LCD
prompts you to verily the number you entered.
6. Verify the number of copies. To change the number of
copies, press the CLEAR key and reenter the number.
7. Press the START key.
2-4
Page 35

Programming the Machine
This chapter describes the information to program prior to
operating the machine. The sections include procedures to
program the initial settings and the user options.
Calendar (Date and Time)
The machine allows you to set the calendar, which includes the
date and time, with a menu item. The time can display with a
12-hour or a 24-hour format. You can also select how the date
displays.
The time displays with either a 12-hour or 24-hour format. The
Clock Display user option (No. 29) sets how the clock appears
on the LCD. Whether you display in the 12-hour or in the 24hour format, you must enter the hours in the 24-hour format.
The date displays the month as a numeric value or as an
alphabetic value. Set the Month Indication user option (No. 25)
and the Calendar Format user option (No. 24) to determine how
the clock displays. Enter the month as a numeric value and
enter the month, day, and year in the order you set with the user
option.
Use the following procedure to set the date and time:
1. Open the access panel.
2. Press the PROGRAM key and close the access panel.
3. Press the REDIAL/1 key three times to display
CALENDAR.
4. Press the START key. The LCD prompts you to enter the
date and the time.
3-1
Page 36

Programming the Machine
Logo (ID Name)
5. Enter the date and the time (24-hour format) using the
keypad. Use the *(«-) key and the # (-►) key to move the
cursor after each digit.
NOTE: Whether you display in the 12-hour or the 24-hour
format, enter the hours in the 24-hour format. Enter the
month, day, and year in the order you set with the user
options. Enter the numeric value for the month.
6. Press the START key.
The logo, or ID name, identifies your machine to the remote
machine when they communicate. The logo must identify the
person or company that sends the documents. The logo
contains up to 25 alphanumeric characters.
Table 3-1: Character Codes
Each key on the control panel keypad corresponds to numeric
and alphabetic characters. The following table lists the dial keys
and the characters that correspond to each key:
Keypad
Characters Sequentially Accessed With Keys
Number
1
2
3 D
4
5 J
6 M
7
8
9
0
Q
A B
G
P R
T
w
.
z 1
E F
H I
K
N
u
X Y
+
z
q
2
c
3
4
5
L
6
0
7
S
V
8
9
?
-
A
d
9
j
N
p
0
w
0 /
A A
e
h i
k I
0 m
r
t
X
9
f
n
s
V
u
y
★
b c a a ae ^
a
n o
o
u
%
#
& ! ( ) " @ i
When you program the logo, refer to the Character Code Table
for the list of the keys and their corresponding characters. The
logo is not a user programmable option in some countries.
i
3-2
Page 37

Programming the Machine
Use the following procedure to program the logo;
1. Open the access panel.
2. Press the PROGRAM key and close the access panel.
3. Press the PAUSE/i key four times to display LOGO.
4. Press the START key. The LCD prompts you to enter the
logo:
LOGO
-
NAME/O
Complete the following steps to enter the text using the
control panel keypad.
Refer to the Character Code table for the keypad and
character assignments.
a. Press the keypad number that corresponds to the
character you desire. The first character displays.
b. Press the keypad number repeatedly until the correct
character displays.
c. To move to the next position, press the # key.
d. Perform steps a through c for each character in the
name. You can enter up to 25 characters in the
name.
e. Verify the name you entered. To change a
character, use the * («-) key and the # (^) key to
move the cursor to that character. Reenter the
character.
6. Press the START key.
3-3
Page 38

Programming the Machine
Terminal ID
The terminal ID number must identify the telephone number of
the machine or company. The ID prints on each transmitted
page.
If you modify the terminal ID, you must enter the whole number:
you can not change a single digit.
Use the following procedure to program the terminal ID:
1. Open the access panel.
2. Press the PROGRAM key and close the access panel.
3. Press the PAUSE/4^ key three times to display TERMINAL
ID.
4. Press the START key. The LCD prompts you to enter the
ID number;
TERMINAL ID
-
NO./O
NOTE: The LCD on the German models prompts you to
enter a four-digit code.
5. Enter the ID number using the control panel keypad. The
cursor automatically moves to the next position. To enter
the + character, press the PAUSE/ 4- key: to enter a
space, press the REDIAL/1' key. You can enter up to 20
digits.
NOTE: When you enter the first digit, the LCD clears the
previous number.
6. Verify the number you entered. To change the ID
number, repeatedly press the CLEAR key to back up over
and delete the numbers, then reenter the digits.
7. Press the START key to accept the ID number.
3-4
Page 39

Reduction Rates
Paper Size
Programming the Machine
The machine provides the option of reducing an image it
receives. The size of the recording paper and the size of the
image also factor into the reduction rate for a document.
The machine can be set to automatically reduce an image on a
single page. To reduce the documents the machine receives,
set the Print Reduction user option (No. 23) to ON. If the option
is set to OFF, the documents print at their original size.
If the user option is set to ON and the image does not fit on one
page, the machine divides the image into several pages. The
machine determines the reduction rate based on the recording
paper size and the image size. Refer to the User Options
section of this chapter for information on setting the option.
The machine allows you to program the paper size and use
letter or legal size recording paper in the paper cassette.
An optional auxiliary paper tray can be added to the machine to
provide an additional supply of paper or a second choice of
paper size. The auxiliary paper tray comes standard with a
letter size cassette which is not adjustable to legal size. You
may elect to purchase the optional legal size cassette.
Program the paper size to correspond with the size of the
recording paper in each cassette. If your machine has an
auxiliary paper tray, the machine uses the upper cassette as the
first cassette and the auxiliary paper tray as the second
cassette.
Since the auxiliary paper tray comes standard with a letter
cassette, you may elect to load legal size paper in the upper
cassette and letter size paper in the lower cassette.
3-5
Page 40

Programming the Machine
Use the following procedure to program the paper size:
1. Open the access panel.
2. Press the PAPER SIZE key and close the access panel.
3. If your machine has an auxiliary paper tray, complete the
following steps:
a. Use the REDIAL/1 key to toggle between the
cassettes.
NOTE: The first paper cassette is the upper tray.
The second cassette is the lower tray.
b. Press the START key to select the paper cassette.
4. Use the REDIAL/1 key to toggle between the paper sizes.
5. Press the START key to select the paper size.
User Options
The machine allows you to program optional settings, or
parameters, which determine how the machine copies,
transmits, and receives. Two types of parameters are available:
service parameters and user options.
Service parameters are those that only the service personnel
can set.
User options are those the operator can set. The following
sections describe the options, the conditions, and the default
values: the final section instructs how to set the parameters.
3-6
Page 41

User option descriptions
Programming the Machine
The following list briefly describes each user option;
• Activity report (No. 00) — Determines whether the
machine automatically prints an Activity Report after every
32 transactions. If this option is set to OFF, the machine
does not automatically print the report; however, the
report can be printed manually. This option is not
available in some countries.
• Transmission report (No. 02) — Determines whether the
machine automatically prints a Transmission Report after
a transmission. If this option Is set to ON, the machine
prints the report after each transmission. If this option is
set to OFF, the report does not print. If this option is set
to ON ERROR, the report prints only when an error
occurs during a transmission.
• Listen to ring (No. 03) — Determines if the machine
sounds a ring for an incoming call.
• Auto Answer (No. 04) — Determines if the machine
automatically answers incoming calls.
• Auto rev In man mode (No. 05) — Selects whether the
machine automatically answers a call when the machine
is in manual answer mode. This option is not available or
is a service parameter in some countries.
• Man mode rev delay (No. 06) — Determines the number
of rings (2-12) before the machine answers a call when
the machine is in the manual answer mode. This option
is not available in some countries.
• Resolution default (No. 07) — Sets the default resolution
for transmissions.
• Copy resolution (No. 08) — Sets the resolution for
copying.
• Header print (No. 10) — Sets the header location. If the
header is turned OFF or if the logo or terminal ID are not
programmed, you must transmit a cover letter with the
document to identify your machine to the remote user.
This option is not available In some countries.
3-7
Page 42

Programming the Machine
Number of redials (No. 11) — Selects the number of
times the machine tries to redial a number if the line is
busy or if a communication error occurs. Automatic
redialing is subject to regulatory restrictions.
Secure transmission (No. 15) — Determines whether to
transmit all documents in the secure mode. This option is
a service parameter in some countries.
Junk mail eliminator (No. 16) — Determines whether to
receive all documents in the secure mode. This option is
a service parameter in some countries.
Delete rev documents (No. 19) — Determines how to
delete a file after the machine receives a document with a
private mailbox number. The options are to delete the file
after the document is printed or to delete the document
with the file delete feature.
Resend on errors (No. 20) — Determines whether to
retransmit a document from memory if a communication
error occurred when the machine tried to send the
document. The number of times the machine tries to
redial the number is set with the Number of Redials user
option.
Dial method (No. 21) — Selects whether the machine
uses a telephone pulse or a tone when it dials a number.
Document length (No. 22) — Selects the maximum
document page length, 1 m (39.37 in) or 10 m (393.7 in).
If the document exceeds the limit, the machine displays a
document jam.
Print reduction (No. 23) — Determines whether to reduce
all documents that the machine receives.
Calendar format (No. 24) — Selects how the date
displays and prints. The order of the day, month, and
year can be set.
3-8
Page 43

Programming the Machine
• Month indication (No. 25) — Selects how the month
displays. The month can display alphabetically or
numerically.
• Receive interval (No. 26) — Sets the time to wait after the
machine dials four remote machines when you use group
or manual broadcast dialing. This is a service parameter
in some countries.
• ECM mode (No. 27) — Selects whether the machine
transmits a document or receives a facsimile in the Error
Correct Mode (ECM) communication mode.
• Language (No. 28) — Selects the language used in the
LCD and on the reports. All systems are equipped with a
primary language; some countries have secondary
languages.
• Clock display (No. 29) — Selects whether the LCD
displays the time in the 12-hour or the 24-hour format.
The clock must always be set using the 24-hour format.
• Auto reduce copies (No. 31) — Determines if the
machine copies all documents at their original size or if
the machine automatically reduces all documents you
copy.
3-9
Page 44

Programming the Machine
User option conditions
The following table lists the user options In their numeric order.
This Is the order in which they display on the LCD. The table
indicates the conditions and the default value for the options:
Table 3-2: User Options-
Conditions and Default
Values
Number
002
02 Transmission report
03
04
05
062
LCD Message
Activity report
Listen to rings
Auto answer
Auto rev in man mode
Man mode rev delay
07 Resolution default
08
Copy resolution
Conditions
On (default)
Off
On (default)
On error
Off
On (default)
Off
On (default)
Off
On (default)
Off
2-12 times
(6 times = default)
Standard (default)
Fine
Fine (default)
Standard
Not selected
3-70
102
112
Header print
Number of redials
Within data (default)
Above data
Off
0-10 times
(5 = default)
152
162
The table does not include numbers that are not used.
This option is not available or may be a service parameter in some countries.
This value does not display unless the option is valid for the country.
The default value can vary based on the country for the location.
Secure transmission
Junk mail eliminator
Off (delFault)
On
Off (default)
On
Page 45

Programming the Machine
Table 3-2: User OptionsConditions and Default
Values
Number
19
20
21
22
23
24
25
LCD Message
Delete rev documents
Resend on errors
Dial method
Document length
Print reduction
Calendar format
Month indication
Conditions
After print (default)
By file delete
On (default)
Off
Tone (default)
Pulse 10PPS
Pulse 20PPS3
Pulse 16PPS3
1m (default)
10m
On (default)
Off
MM-DD-YY (default)-*
YY-MM-DD
DD-MM-YY
Name (default)
Numeric
262
27
28
29
31
The table does not include numbers that are not used.
This option is not available or may be a service parameter in some countries.
This value does not display unless the option is valid for the country.
The default value can vary based on the country for the location.
Receive interval
ECM mode
Language
Clock display
Auto reduce copies
0-5 minutes
(5 minutes = default)
On (default)
Off
Primary (default)
Secondary (optional)
12 hour (default)^
24 hour
Off (default)
On
3-11
Page 46

Programming the Machine
Set tile user options
Use the following procedure to set the user options before using
the machine. Refer to the User Option Conditions and Default
Values table.
1. Open the access panel.
2. Press the PROGRAM key.
3. Press the REDIAL/ key once to display OPTIONS.
4. Press the START key. The LCD prompts you to enter a
option number.
OPTIONS
OPTION NO.—?
5. Enter the two-digit option number. Refer to the User
Option Conditions and Default Values table for a list of the
option numbers.
t
NOTE: Instead of entering the two-digit number, you can
press the REDIAL/1 key or the PAUSE/ 4- key to scroll
through the options.
6. To change the option value that the LCD displays, press
the * («-) key or the # (^) key.
7. Press the START key to store the value of the option.
8. To change another option, perform steps 5 th rough 7.
9. Press the REPORT key to print the Options Report.
10. Verify the options you set.
11. Press the STOP key and close the access panel.
3-12
Page 47

Programming the Dial Directory
This chapter instructs how to program the dial directory numbers
and names. The procedures include programming the onetouch keys, the speed dial codes, and the group keys.
Dial Directory
The machine can maintain a dial directory of telephone numbers
you frequently dial. The dial directory is a list of telephone
numbers you program for automatic dialing. The dial directory
includes numbers programmed as the one-touch keys and the
speed dial numbers.
The dial directory contains 18 one-touch key locations and 100
(00-99) speed dial locations you can program. Each telephone
number can contain up to 32 digits, spaces, or pauses.
Use the dial directory to save time and reduce the possibility of
dialing a wrong number. Once a telephone number is
programmed in the dial directory, you can easily dial that
number or add that number to a group. Also, if a name is
programmed for a number, you can dial that number by
selecting the name in the directory.
You can enter, modify, and clear a number in the dial directory
at any time. To plan the directory, first identify the locations and
the telephone numbers to program. Print the One-Touch
Directory and the Speed Dial Directory reports to review and to
select a directory location. The Directory provides all the dial
directory entries by name. Once you select a directory location,
enter the changes you desire and print a revised report. Use
the report to verify the names and telephone numbers. Refer to
the Reports chapter for information about the reports.
4-1
Page 48

Programming the Dial Directory
The machine allows you to enter an ID name for any telephone
number you store in the dial directory or as a group key. Each
name must be unique. A name in the dial directory can contain
up to 15 characters. The following table lists the dial keys and
the characters that correspond to each key:
Table 4-1: Character Codes
Keypad
Characters Sequentially Accessed With Keys
Number
1
2 A
3 D E
4
5 J K
6
7
8
9
0
Q
G H
M N
P
T
w X Y 9
1
z
B
R s
U
+
q
c 2 A A
F
3
1 4
L 5
0 6 N O m
7
V
8
w
7
-
d
g
p
u
0
z
c a a se q
/E
9
f
e
i
h
1
k
j
n
r
s
t
X
/ I
V
u
y
*
b
a
n
o
u
#
6
%
& ! ( ) " @ i ¿
When you are in a procedure that requires you to enter a name,
refer to the Character Code table for the keypad and character
assignments. Use the * («-) key and the # (-») key to move the
cursor.
4-2
Page 49

One-Touch Keys (01-18)
One-touch dialing allows you to select a preset key, rather than
enter the telephone number each time. Set up one-touch dialing
for numbers you dial frequently. The machine allows you to
program up to 18 one-touch keys (01-18).
Programming the Dial Directory
Full program mode
* •
As you program the one-touch keys, use the full-program mode
to program the following items for each of the one-touch
numbers. These functions are normally programmed for each
transaction. If you leave the values as NOT FIXED, the machine
uses the options settings or the settings on the control panel.
• Resolution — Selects the resolution for a transmission.
• Security mode — Selects whether to transmit with a
password.
• Mailbox number — Selects whether to transmit a
document to a mailbox.
• International call — Improves the communication quality
for international calls that have frequent communication
errors. Select ON to choose international or long
distance; select OFF for domestic calls or short distance.
• ECM mode — Selects whether to transmit a document in
the ECM mode.
4-3
Page 50

Programming the Dial Directory
Program the one-touch keys
If you use the full-program mode to program a one-touch key,
the following restrictions apply:
• In a group broadcast, the machine uses the resolution
you set for the group. It does not change to the resolution
you programmed with the one-touch key.
• The machine ignores the secure mode if you poll the
number using a one-touch key to dial.
If you are modifying the entry for a one-touch key and press the
STOP key before you press the START key to save the entry, the
machine deletes the new data and retains the current data. If
you are changing the telephone number, you must enter the
complete number, rather than changing a single digit.
Use the following procedure to program the one-touch keys.
1. Open the access panel.
2. Press the PROGRAM key. The LCD displays the
message ONE TOUCH DIAL.
3. Close the access panel and press the START key. The
LCD prompts you to enter or to clear a one-touch key:
ONE TOUCH DIAL
ENTER OT/CLEAR
Press the one-touch key you want to program. The LCD
prompts you to enter the telephone number.
4-4
Page 51

Programming the Dial Directory
5. Enter the telephone number using the control panel
keypad. As you enter the digits, the cursor automatically
moves to the next position. Press the PAUSE/ i key to
enter a pause (displayed as a hyphen).
6. Verify the number you entered. To change a digit, press
the CLEAR key to back up over and delete the numbers,
then reenter the digits.
7. Press the START key. The LCD prompts you to select or
to skip the full-program mode:
FULL PROGRAM
t=SET += CLEAR
To bypass the full-program mode or to delete the settings
for a key you are modifying, press the PAUSE/ 4- key and
continue with step 9. If you are modifying a one-touch
key, the settings return to their default values.
To program the full-program items, complete the
following:
a. Press the REDIAL/1 key to select the full-program
mode. The LCD displays the first full program item.
b. Press the REDIAL/ f key to scroll through the
function codes for the item.
c. To select a code, press the START key.
d. Perform steps b and c for each of the five items in
the full program mode.
NOTE: If you select ON for the mailbox number, the LCD
prompts you to enter a four-digit number. Once you enter
the digits, the LCD prompts you to verify the mailbox
number. Press the START key to continue.
When you complete all the items, the LCD prompts you to
enter the dial directory name for the one-touch key.
4-5
Page 52

Programming the Dial Directory
9. Complete the following steps to enter a name. Refer to
the Character Codes table for the character assignments.
NOTE: Each speed dial and one-touch key must have a
unique name.
a. Press the control panel keypad number that
corresponds to the character you desire. The first
character displays.
b. Press the keypad number repeatedly until the correct
character displays.
c. To move to the next position, press the # (-») key.
d. Perform steps a through c for each character in the
name. You can enter up to 15 characters.
e. Verify the directory name you entered. To change a
character, move the cursor to that character, press
the CLEAR key, and reenter the character.
10. Press the START key to save the entry.
11. Perform steps 4 through 10 for each one-touch key you
want to program.
12. Open the access panel.
13. Press the REPORT key to print the One Touch Dial
Directory.
14. Close the access panel.
15. Verify the one-touch information you entered.
16. Press the STOP key. The machine goes to the standby
mode.
4-6
Page 53

Clear the one-touch keys
Use the following procedure to clear the one-touch keys:
1. Open the access panel.
2. Press the PROGRAM key. The LCD displays the
message ONE TOUCH DIAL
3. Close the access panel and press the START key. The
LCD prompts you to enter or to clear a one-touch key:
ONE TOUCH DIAL
ENTER OT/CLEAR
4. Press the CLEAR key. The LCD prompts you to press the
one-touch key.
5. Press the one-touch key you want to clear. The LCD
displays:
CLEAR OK?
OTOliID name
<>
6. To verify the cancellation, press the START key. To
return to step 4 without canceling a key, press the CLEAR
key.
7. Perform steps 4 through 6 for each one-touch key to
clear.
8. Press the STOP key. The machine goes to the standby
mode.
4-7
Page 54

Programming the Dial Directory
Speed Dial Codes (00-99)
Speed dialing associates two-digit codes with telephone
numbers. To transmit to a speed dial number, you enter a twodigit speed dial code, rather than the telephone number. You
can program up to 100 speed dial codes.
To print the Speed Dial Directory, press the REPORT key after
you select to program a speed dial code. The report contains
data that is current in the dial directory and does not include
data you are entering with the procedure.
Program a speed dial code
The machine allows you to program up to 100 speed dial codes
(00 to 99 in the dial directory). If you change the telephone
number, you must enter the complete number. However, if you
modify a name, you can change single characters in the name.
Use the following procedure to program a speed dial code.
1. Open the access panel.
Press the PROGRAM key.
2.
Press the PAUSE/ 4^ key once to display SPEED DIAL.
3.
4.
Close the access panel and press the START key. The
LCD prompts you to enter or to clear a speed dial code:
SPEED DIAL
ENTER SO/CLEAR
5. Press the SPEED DIAL key. The LCD prompts you to
enter the speed dial code:
ENTER SD No.
SD;
4-8
Page 55

Programming the Dial Directory
6. Enter a two-digit speed dial code using the control panel
keypad. For speed dial codes 00 through 09 you must
enter 0 as the first digit. The LCD prompts you to enter
the telephone number for the directory location.
7. Enter the telephone number using the control panel
keypad.
8. Press the START key. The LCD prompts you to enter a
name.
9. Complete the following steps to enter a name. Refer to
the Character Codes table for the keypad and character
assignments.
NOTE: Each speed dial and one-touch key must have a
unique name.
a. Press the control panel keypad number that
corresponds to the character you desire. The first
character displays.
b. Press the keypad number repeatedly until the correct
character displays.
c. To move to the next position, press the # (i) key.
d. Perform steps a through c for each character in the
name. You can enter up to 15 characters.
e. Verify the name you entered. To change a
character, move the cursor to that character, press
the CLEAR key, and reenter the character.
10. Press the START key to save the entry.
11. Perform steps 5 through 10 for each speed dial code you
want to program.
12. Open the access panel.
13. Press the REPORT key to print the Speed Dial Directory.
14. Close the access panel.
15. Verify the speed dial codes you entered.
16. Press the STOP key. The machine goes to the standby
mode.
4-9
Page 56

Programming the Dial Directory
Clear a speed dial code
Use the following procedure to clear a speed dial code:
1. Open the access panel.
2. Press the PROGRAM key.
3. Press the PAUSE/ 4- key once to display SPEED DIAL.
4. Close the access panel and press the START key. The
LCD prompts you to enter or to clear a speed dial code;
SPEED DIAL
ENTER SO/CLEAR
5. Press the CLEAR key. The LCD prompts you to enter the
speed dial code.
6. Enter the two-digit speed dial code you want to clear. The
LCD displays:
CLEAR OK?
SDOliID name
<>
7. To verify the cancellation, press the START key. To
return to step 5 without clearing the speed dial code,
press the CLEAR key.
8. Perform steps 5 through 7 for each speed dial code you
want to clear.
9. Press the STOP key. The machine goes to the standby
mode.
4-10
Page 57

Group Keys (I-VI)
Program the group keys (l-VI)
Programming the Dial Directory
Group dialing allows you to program one-touch and speed dial
numbers into a group. You can enter up to 50 numbers into a
single group and you can create up to six groups (l-VI). Once
you select a group key to program, you can press the REPORT
key to print the Group Directory for that group.
Use the following procedure to program the group keys.
1. Open the access panel.
2. Press the PROGRAM key.
3. Press the PAUSE/4. key twice to display GROUP DIAL.
4. Close the access panel and press the START key. The
LCD prompts you to enter or to clear a group key:
GROUP DIAL
ENTER GR/CLEAR
5. Press the group key to program. The LCD prompts you
to enter the one-touch or speed dial number you want to
add to the group:
GRn
OT/SD/t TO
6. Press the one-touch key to add to the group.
OR
Press the SPEED DIAL key and enter the speed dial
code.
The LCD prompts you to verify the number you entered.
4-11
Page 58

Programming the Dial Directory
7. Verify the number you entered. To change the number,
press the CLEAR key and reenter the one-touch or speed
dial number.
8. Press the START key.
9. Perform steps 6 through 8 for each number to add. Use
the REDIAL/t key and the PAUSE/4- key to scroll through
the group entries. Verify that the group contains all the
one-touch and speed dial numbers you desire.
10. Press the START key. The LCD prompts you to enter a
name for the group.
11. Complete the following steps to enter a name for the
group. Refer to the Character Codes table for the keypad
and character assignments.
a. Press the control panel keypad number that
corresponds to the character you desire. The first
character displays.
b. Press the keypad number repeatedly until the correct
character displays.
c. To move to the next position, press the # (->) key.
d. Perform steps a through c for each character in the
name. You can enter up to 15 characters.
e. Verify the name you entered. To change a
character, move the cursor to that character, press
the CLEAR key, and reenter the character.
12. Press the START key to save the entry.
13. Perform steps 5 through 11 for each group you want to
program.
14. Open the access panel.
15. Press the REPORT key to print the Group Directory.
16. Close the access panel.
17. Verify the number you entered in the group.
4-12
18. Press the STOP key. The machine goes to the standby
mode.
Page 59

Add numbers to a group key
Programming the Dial Directory
Use the following procedure to add a one-touch number or a
speed dial code to a group key:
1. Open the access panel.
2. Press the PROGRAM key.
3. Press the PAUSE/i key twice to display GROUP DIAL.
Close the access panel and press the START key. The
LCD prompts you to enter or to clear a group:
GROUP DIAL
ENTER GR/CLEAR
5. Press the group key you want to modify. The LCD
displays the first entry in the broadcast group.
6. Press the REDIAL/T key and the PAUSE/4. key to scroll
through the entries in the group. Select the position to
enter the new number.
NOTE: The machine positions the new number before
the entry that the LCD displays. If the group has 50
entries, the machine ignores the new entry.
7. Press the one-touch key to add to the group.
CR
Press the SPEED DIAL key and enter the speed dial code
you want to add to the group.
The LCD prompts you to verify the number you entered.
8. Verify the number you entered. To change the number,
press the CLEAR key and reenter the one-touch or speed
dial number.
4-13
Page 60

Programming the Dial Directory
9. Press the START key.
10. Perform steps 6 through 9 for each number you want to
add to the group.
11. Press the START key. The LCD displays the group
name.
12. Complete the following steps to change the group name
using the dial keys. Refer to the Character Codes table
for the keypad and character assignments.
NOTE: Each speed dial and one-touch key must have a
unique name.
a. Press the control panel keypad number that
corresponds to the character you desire. The first
character displays.
b. Press the keypad number repeatedly until the correct
character displays.
c. To move to the next position, press the # (-^) key.
d. Perform steps a through c for each character in the
name. You can enter up to 15 characters.
e. Verify the group name you entered. To change a
character, move the cursor to that character, press
the CLEAR key, and reenter the character.
13. Press the START key to save the changes to the group.
14. Press the STOP key. The machine goes to the standby
mode.
4-14
Page 61

Delete an entry in a group key
Programming the Dial Directory
Use the following procedure to delete an entry in a group:
1. Open the access panel.
2. Press the PROGRAM key.
3. Press the PAUSE/ ^ key twice to display GROUP DIAL.
4. Close the access panel and press the START key. The
LCD prompts you to enter or to clear a group number:
GROUP DIAL
ENTER GR/CLEAR
5. Press the group key you want to modify. The LCD
displays the first entry in the group.
6. Select the entry to delete from the group. Press the
REDIAL/1 key and the PAUSE/ i key to scroll through the
entries.
7. Press the CLEAR key. The LCD displays:
CLEAR OK?
OTOlrlD name
<>
8. To verify the cancellation, press the START key. To
return to step 6 without clearing the group entry, press the
CLEAR key.
9. Perform steps 6 through 8 for each number to delete from
the group.
10 Press the START key. The LCD displays the group
name.
11. To change the group name, enter the name using the
control panel keypad.
12. Press the START key to save the changes to the group.
13. Press the STOP key. The machine goes to the standby
mode.
4-75
Page 62

Programming the Dial Directory
Delete all entries in a group key
Use the following procedure to delete all entries in a group:
1. Open the access panel.
2. Press the PROGRAM key.
3. Press the PAUSE/1 key twice to display GROUP DIAL.
4. Close the access panel and press the START key. The
LCD prompts you to enter or to clear a group number:
GROUP DIAL
ENTER GR/CLEAR
5. Press the CLEAR key. The LCD prompts you to enter the
group to cancel:
CLEAR GROUP
ENTER GROUP BUTTON
6. Press the group key you want to clear. The LCD
displays:
CLEAR OK? <>
GRn:ID name
7. To verify the cancellation, press the START key. To
return to step 5 without clearing the group entry, press the
CLEAR key.
8. Perform steps 5 through 7 for each group to clear.
9. Press the STOP key. The machine goes to the standby
mode.
4-16
Page 63

Transmitting
Load a Document
This chapter describes how to transmit a document using the
various dialing techniques.
The document input tray holds up to 30 originals. Create a copy
on a copier using bond paper if a document can not feed
through the scanner. Use the copied image to transmit.
Reproduce on bond paper the following types of originals:
Undersized, lightweight, or heavy card stock
Irregularly shaped or damaged pages
Pages that are stapled, pasted up, or bound
Carbon-backed copies
You can load a document that is up to 279 mm (11 in) wide and
1 m (39.37 in) long. If the document length exceeds this default
limit, the LCD displays a document jam. Increase the allowable
length by setting the Document Length user option (No. 22).
Load all documents face-down in the Automatic Document
Feeder (ADF). Adjust the paper guides to the width of the
document so the pages do not skew as they feed through the
scanner. The following figure shows how to load a document:
5-1
Page 64

Transmitting
Transmission Features
Resolution and halftone
The machine provides optional communication features that can
be programmed for each transmission. The following features
may be used during an individual transmission;
Resolution and halftone
Page headers
Page count
ECM mode
Automatic redial
The resolution and halftone can be controlled by keys on the
control panel; the ECM mode and the page header are set with
user options; the page count can be programmed with a key
under the access panel.
Documents can be transmitted with the standard, fine, or super
fine resolution selected. For a normal document, set the
resolution to STANDARD; for a document with fine details, set
the resolution to FINE or SUPER FINE. The machine reverts to
its default resolution at the end of each transaction. Set the
Resolution Default user option (No. 07) to change the default
value.
When you transmit a normal document, leave the halftone off.
To transmit photographs or figures with shading, select the
halftone mode. When you select the halftone mode, the
machine automatically selects FINE for the resolution and
applies 64 levels of halftone as it scans the document.
NOTE: The machine automatically adjusts the contrast to
compensate for light or dark originals.
5-2
Page 65

Page headers
Page count
Transmitting
When the machine transmits a document, it can include a
header with the document. The header information includes the
ID name or number of the machine, the time of the transmission,
the page number, and the page count, if programmed. To
comply with Federal Communications Commission (FCC) rules,
the header must clearly identify the company or person sending
the message including the local name and the telephone
number.
Use the Header Print user option (No.10) to select whether the
header prints above the scanned image or within the scanned
image, or whether the header does not print. This option is not
available in some countries.
The page count feature allows you to print in the header the total
number of pages you are transmitting. The header prints the
page number and the total page count you entered. For
example, the header for the first page of a ten page document
displays 1/10; the second page displays 2/10.
The page count setting is effective for a single transaction; you
must set this value with each transmission. Also, the
communication can complete successfully even if you enter an
incorrect number of pages.
Use the following procedure to set the page count:
1. Open the access panel.
Press the PAGE COUNT key and close the access panel.
2.
Enter a two-digit number for the total number of pages. If
3.
you have less than 10 pages, press 0 as the first digit.
The LCD prompts you to verify the number you entered.
Verify the number that you entered. To change the
4.
number, press the CLEAR key and reenter the number.
5. Press the START key.
5-3
Page 66

Transmitting
ECM mode
Automatic redialing
The machine can transmit documents using the ECM mode.
Use the ECM Mode user option (No. 27) to determine whether
the machine transmits a document in the ECM mode.
During an ECM communication, the machine stores and
transmits a document by section, and monitors the transmit
signals on the telephone line. If the machine detects an error, it
can resend the section of the document that was transmitting
during the error.
The machine redials a number if a communication does not
complete successfully for one of the following reasons:
• The machine detects a busy signal at the remote
machine. The machine enters a redial wait mode then
redials.
• A communication error occurs during a transmission.
The machine transmits the document beginning with the
first page that did not transmit successfully.
The Number of Redials user option (No. 11) determines the
number of times the machine tries to redial a number. This user
option is subject to regulatory restrictions.
5-4
Page 67

Transmissions
Transmitting
Documents can be sent using several dialing methods. You can
use these methods to send a document at a programmed time
or to add security features to the transmission.
A basic transmission includes loading the document, dialing a
number, and transmitting the document image. The dialing
methods include the following:
Control panel keypad dialing
One-touch dialing
Speed dialing
Alphabetical dialing
Group dialing
Manual broadcast dialing
Redialing
Once you enter a number, the machine scans the document and
assigns a job number to the transmission. If the memory
becomes full before the machine completes scanning, the LCD
prompts you to select whether to transmit the scanned pages or
to cancel the operation.
All documents are transmitted as background jobs unless you
use the direct send feature. If no other jobs are pending, the
machine begins dialing. When the line connects, the
transmission begins. You can set the machine to redial up to
ten times if it detects a busy signal.
If a communication error occurs during the transmission and the
document is stored in the memory, the machine resends
beginning with the first page that did not transmit successfully.
When the transmission completes successfully, the machine
disconnects and goes to the standby mode. If the communica
tion does not complete successfully, the LCD displays an error
code until the user presses the STOP key. Refer to the
Maintenemce chapter for a list of the error codes.
If you use the direct send feature, the machine transmits the
document without storing the image in a memory file. If the call
does not complete successfully, the machine does not
retransmit the document.
If the Transmission Report user option (No. 02) is set to ON, the
machine prints a Transmission Report after each transmission
except group and manual broadcast transmissions. To
discontinue printing the report, set the user option to OFF.
5-5
Page 68

Transmitting
On-hook and off-hook dialing
Keypad dialing
The machine allows two modes for dialing: on-hook dialing and
off-hook dialing.
During the standby mode, the machine is in an on-hook mode if
the handset is placed on the cradle. In this mode, you can
select any of the dialing methods: however, in some countries,
one-touch dialing is allowed only with off-hook dialing.
To initiate off-hook dialing, lift the handset from the cradle. If you
lift the handset, dial the number and listen for a facsimile tone,
then press the START key to initiate the transmission. You can
perform all the dialing methods in this mode.
NOTE: The handset is not available in some countries.
Use the following procedure to transmit a document using the
control panel keypad to dial the number:
1. Load the document face-down in the ADF.
2. If desired, select the resolution and the halftone.
3. If desired, set the page count and press the START key.
4. Use the control panel keypad to dial the number.
5. Press the START key. The machine transmits the
document.
5-6
Page 69

One>touch dialing
Transmitting
Use the following procedure to transmit a document using a one-
touch key. To use this function, the one-touch key must be
programmed in the dial directory. Refer to the Programming the
Dial Directory chapter for information on how to program the
one-touch keys.
1. Load the document face-down in the ADF.
2. If desired, select the resolution and the halftone.
NOTE: The resolution may be programmed for the onetouch key.
3. If desired, set the page count and press the START key.
4. Press the one-touch key associated with the number you
want to dial.
Speed dialing
Use the following procedure to transmit documents using a twodigit speed dial code. To use this function, the speed dial code
must be programmed in the dial directory. Refer to
Programming the Died Directory for information on how to
program the codes.
1. Load the document face-down in the ADF.
2. If desired, select the resolution and the halftone.
3. If desired, set the page count and press the START key.
4. Press the SPEED DIAL key.
Enter the two-digit speed dial code associated with the
number you want to dial.
5-7
Page 70

Transmitting
Alphabetical dialing
Alphabetical dialing is similar to using a phone book. Use
alphabetical dialing to locate a number in the dial directory if you
do not know which one-touch key or speed dial code to use.
The alphabetic dialing feature allows you to select a number to
dial based on the dial directory name associated with the
number. To use this function, the name of the remote machine
must be programmed in the dial directory for a one-touch key or
a speed dial code. Refer to the Programming the Dial Directory
chapter for information on how to program a name.
Use the following procedure to transmit a document using
alphabetical dialing:
1. Load the document face-down in the ADF.
2. If desired, select the resolution and the halftone.
3. If desired, set page count and press the START key.
4. Press the ALPHA DIAL key. The LCD prompts you to enter
the Initial letter of the name.
5. Press the keypad number that corresponds to the first
letter of the name you desire (e.g., press the 4 key for
names that begin with G, H, or I). Press the key repeatedly
until the LCD displays an entry with the same first
character as the name.
6. Press the REDIAL/t key to scroll through the entries that
have the same first character.
7. To select an entry that displays, press the START key.
The machine dials the entry you selected.
5-8
Page 71

Group dialing
Transmitting
The machine can send a document from the memory to a group
of numbers. Group dialing transmits a document to several
locations without scanning the document for each location. To
use this function, the numbers must be programmed into a
group. Refer to the Programming the Dial Directory chapter for
information on programming a group.
When the machine begins transmitting the document to a
number in the group, the LCD displays a standby message. If
you display the job status, the LCD displays the dialing code and
the name for the remote machine. If a number is busy, the
machine continues dialing the rest of the numbers before
returning to the busy number.
If the group contains more than four numbers, the machine
pauses after every fourth successful number to receive any
incoming calls. The Receive Interval user option (No. 26)
determines the interval to wait before the machine dials the
additional numbers.
Use the following procedure to transmit a document to a group;
1. Load the document face-down in the ADF.
2. If desired, select the resolution and the halftone.
3. If desired, set the page count and press the START key.
4. Press the group key for the group you want to dial.
When the transaction completes, the machine prints a
Broadcast Report.
5-9
Page 72

Transmitting
Manual broadcast dialing
The machine can send a document to up to 50 numbers you dial
manually. You do not have to have the numbers programmed as
a group for this procedure. Use the control panel keypad, the
one-touch keys, or the speed dial codes to enter the numbers.
When the machine begins transmitting the document, the LCD
displays a standby message. If you display the job status, the
LCD then displays the dialing code and the name for each
machine as it dials that number.
Use the following procedure to transmit a document to several
numbers. Only one manual broadcast can be programmed at a
time.
1. Load the document face-down in the ADF.
2. Open the access panel.
3. If desired, select the resolution and the halftone.
4. If desired, set the page count and press the START key.
5. Press the MANUAL BROADCAST key and close the
access panel. The LCD prompts you to enter a one-touch
key, a speed dial code, or the telephone number using the
control panel keypad.
6. Dial a number you want to call.
7. Verify the number you entered. To change the number,
press the CLEAR key and reenter the number.
8. Press the START key.
9. Perform steps 6 through 8 for each number to add to the
manual broadcast group.
10. Press the REPORT key to print the Manual Broadcast List.
11. Verify the numbers you entered.
12. Press the START key. When the transaction completes,
the machine prints a Manual Broadcast Report.
5-10
Page 73

Cancelling a transmission
Transmitting
The machine allows you to cancel a pending transmission or a
transmission in progress. You must know the job number of a
pending transmission to cancel that transmission. Print a
Memory List to identify the job number.
Use the CLEAR key to cancel a transmission from the memory.
If you use the direct send feature, you must use the STOP key to
end the transmission in progress.
Using the CLEAR key cancels a single transaction; repeat the
procedure to cancel multiple transmissions.
Use the following procedure to cancel a group or manual
broadcast transmission. To quit the cancel operation, press the
STOP key.
1. Press the CLEAR key. The LCD displays the first
programmed transaction.
Redialing the previous number
2. Press the REDIAL/1 key to display TRANSMISSION.
3. Press the START key. The LCD prompts you to enter the
job number.
4. Enter the three-digit job number.
5. Press the START key.
The machine stores in the memory the last number that was
dialed. Use the following procedure to transmit a document to
the last number dialed;
1. Load the document face-down in the ADF.
2. If desired, select the resolution and the halftone.
3. If desired, set the page count and press the START key.
4. Press the REDIAL/1“ key.
5-7 7
Page 74

Transmitting
Direct Send
The direct send feature provides a method to transmit a
document without prescanning that document into the memory.
During a normal transmission, the machine stores the document
in the memory before dialing. When you use the direct send
feature, the machine dials the number, scans the document,
then transmits the document. If the communication does not
complete successfully, the machine can not resend the
information.
Use the following procedure to transmit a document using the
direct send feature:
1. Load the document face-down in the ADF.
2. If desired, select the resolution and the halftone.
3. If desired, set the page count and press the START key.
Press the DIRECT SEND key. The LCD prompts you to
enter the telephone number.
5. Dial the number you want to call. You can use one touch
dialing, speed dialing, or keypad dialing.
6. Press the START key.
5-12
Page 75

Delayed Transmission
Program a delayed transmission
Transmitting
Transmitting a document at a programmed time is known as a
delayed transmission.
You can program up to eight jobs to transmit on a delayed basis.
A job can be a transmission to a single destination, a broadcast
transmission, or a polling operation.
Use delayed transmissions to send documents during hours with
the lowest telephone rates, such as evenings and weekends.
Use the following procedure to program delayed transmission:
1. Load the document face-down in the ADF.
2. If desired, select the resolution and the halftone.
3. Open the access panel.
4. If desired, set the page count and press the START key.
5. Press the DELAYED START key. The LCD displays
DELAYED START MODE.
6. Close the access panel and press the START key. The
LCD prompts you to enter the delayed send time.
7. Enter the time (24-hour format) to transmit. The LCD
prompts you to verify the time to transmit.
8. Press the START key. The LCD prompts you to dial the
telephone number.
9. Dial the number you want to call.
5-13
Page 76

Transmitting
Cancel a delayed transmission
The machine allows you to cancel a delayed transmission. You
must know the job number of the transmission. Print a Memory
List to identify the job number. Use the following procedure to
cancel a delayed transmission:
1. Press the CLEAR key. The LCD displays the first
transaction type.
2. Press the REDIAL/1 key to page through the transaction
types.
3. Press the START key. The LCD prompts you to enter the
job number.
4. Enter the three-digit job number. The LCD prompts you to
verify the number you entered.
Security Features
0
5. Press the START key.
The machine has several security features for transmitting.
These features include the following:
• Secure transmission — Transmit to a 7041/7042 remote
machine with the same password, or identification code,
as on your machine.
• Mailbox communication — Transmits documents on a
confidential basis to a mailbox at a remote machine. Only
a user with the mailbox number can access the
document. The mailbox can be used for a single
transmission or for all transmissions.
• Security access mode — Allows you to control the use of
the machine. Only users with the correct access code
can transmit from the machine.
* •
5-14
Page 77

Password
Transmitting
A password is a four-digit code used in the secure mode. The
machine uses the password when it transmits or receives a
document using the secure mode.
When the secure mode is selected, the machine compares the
password with the password of the remote machine. If the
passwords match, the machine proceeds with the transaction.
If the passwords do not match, the machine cancels the
operation and generates an error code.
NOTE: You can not combine the * or if symbols with other digits
in a password. If you enter **** as the password, the system
automatically matches the password of the remote machine.
Use the following procedure to program a password:
1. Open the access panel.
Press the PROGRAM key and close the access panel.
2.
Press the REDIAL/key twice to display PASSWORD.
3.
Press the START key. The LCD prompts you to enter the
4.
password.
5. Enter the four-digit password. When you enter the first
character, the LCD clears the previous password. The
cursor moves automatically to the next position. The LCD
prompts you to verify the password you entered:
PRESS <>
PASSW0RD=1234
NOTE: Press the CLEAR key to back over digits you
enter. If you do not enter any digits, the machine does
not respond to this key.
6. Verify the password you entered. To change the
password, press the CLEAR key then reenter the four-digit
number.
7. Press the START key.
5-15
Page 78

Transmitting
Secure mode
To transmit a document using the secure mode, the remote unit
must be a 7041/7042 machine. This feature is valid for all the
transmission types (e.g., delayed send, broadcast transmissions,
and direct dial). The secure mode, however, is not available for
polling operations.
When you select a secure transmission, the machine compares
the password you programmed to the password of the remote
unit. If the passwords match, your machine transmits the
document. If the passwords conflict, the communication is
unsuccessful and your machine generates an error code.
To transmit only one document in the secure mode, use the
SECURITY/MAILBOX NO. key to transmit the document. To
transmit all documents in the security mode, set the Secure
Transmission user option (No. 15) to ON. Refer to the
Programming the Machine chapter for information on how to set
the user option.
NOTE: The one-touch keys may be programmed to transmit in
the secure mode. The secure transmission mode does not
affect how the machine receives a document.
Use the following procedure to transmit using the security mode:
1. Load the document face-down in the ADF.
2. Open the access panel.
3. If desired, select the resolution and the halftone.
4. If desired, set the page count and press the START key.
5. Press the SECURITY/MAILBOX NO. key.
6. Press the START key.
7. Press the REDIAL/t key to display SECURITY ON.
8. Close the access panel and press the START key. The
machine goes to the standby mode for you to dial.
9. Dial the number you want to call.
5-16
Page 79

Transmitting to a remote mailbox
Transmitting
To send a document to a remote mailbox, the receiving machine
must be a 7041/7042 machine.
NOTE: The one-touch keys may be programmed to transmit to a
remote mailbox.
Use the following procedure to transmit a document to a remote
mailbox:
1. Select a four-digit mailbox number and communicate the
number to the remote user.
2. Load the document face-down in the ADF.
3. Open the access panel.
4. If desired, select the resolution and the halftone.
5. If desired, set the page count and press the START key.
6. Press the SECURITY/MAILBOX NO. key.
7. Close the access panel and press the PAUSE/4- key to
display MAILBOX No.
8. Press the START key.
9. Press the PAUSE/4- key to display MAILBOX No. ON.
10. Press the START key. The LCD prompts you to enter the
mailbox number.
11. Enter the selected four-digit mailbox number.
12. Verify the mailbox number you entered. To change the
number, press the CLEAR key and reenter the four-digit
number.
13. Press the START key. The machine goes to the standby
mode.
14. Dial the number you want to call.
5-77
Page 80

Transmitting
Secure access mode
The secure access mode, also known as the Telephone Call
Barrier (TCB) is a service parameter that allows you to disable
dialing from the machine. Only users who know the secure
access number can use the machine features that require the
use of the telephone. However, any user can copy a document,
print a report, or program the machine while it is in the secure
access mode.
A service representative must enable or disable the secure
access mode. If the secure access mode is enabled, you must
enter the four-digit secure access number to place the machine
in the standby mode. Once the machine is in the standby mode,
you must begin a process in two minutes or the machine turns
on the barrier. You can use any form of dialing once you enter
the access number. The machine turns on the barrier once you
complete a process.
NOTE: The machine performs any delayed start communication
you programmed before the secure access mode is enabled.
Receive operations and polling operations are not affected by
the secure access mode.
When the machine is in secure access mode, the LCD displays
the following:
OCT-15-92 10:35 MIOOX
ENTER ACCESS NUMBER
Use the following procedure to dial a number when the machine
is in the secure access mode:
1. Enter the four-digit secure access number.
2. Press the START key. The machine goes to the standby
mode.
3. Continue with the procedure you desire.
5-18
Page 81

DTMF
DTMF mailbox transmissions
Transmitting
The DTMF (Dual Tone Multi Frequency) feature provides mailbox
transmissions, and relay send operations with a Xerox 7032/7033
facsimile.
To use the DTMF feature to transmit a document to a mailbox at
a remote 7032/7033 machine, you must know the mailbox
number on that machine.
Use the following procedure to transmit to a mailbox at a Xerox
7032/7033 machine:
1. Load the document to transmit.
2. Perform off-hook dialing to a remote 7032/7033 machine.
You will hear a facsimile tone sequence.
3. After the initial facsimile tone sequence completes, press
the * key. You will hear three confirmation tones.
4. After the confirmation tones complete, enter the three-digit
mailbox number.
5. Press the # key twice.
6. Press the START key.
7. Place the handset on the cradle. The machine transmits
the document.
5-19
Page 82

Transmitting
DTMF relay send
You can use the DTMF feature to relay documents through a
Xerox 7032/7033 machine. The 7032/7033 acts as a hub to
remote machines that are listed in the dial directory of the
machine.
One use of this feature is to transmit a document long distance
to a 7032/7033 machine, which can then transmit the document
to other machines that are not long distance to that machine.
To use the DTMF feature to relay a document to remote
machines, each machine must be listed in the dial directory of
the 7032/7033 machine. You must know each dial directory
location, and you must know an account number, or password,
on the 7032/7033.
Use the following procedure to relay a document through a
Xerox 7032/7033 machine:
1. Load the document to transmit.
2. Perform off-hook dialing to a remote 7032/7033 machine.
You will hear a facsimile tone sequence.
3. After the initial facsimile tone sequence completes, press
the * key. You will hear three confirmation tones.
4. After the confirmation tones complete, press the # key
and enter the four-digit account number.
5. Press the # key and enter the three-digit dial directory
entry for the remote machine. Repeat this step for each
remote machine you want to add to the transmission.
6. Press the # key twice. You will hear three confirmation
tones.
7. Press the START key.
8. Place the handset on the cradle. The machine transmits
the document to the 7032/7033.
5-20
Page 83

Receiving
Automatic Reception
The machine can receive documents automatically or manually.
This chapter describes the features that affect how the machine
receives documents.
The machine automatically answers the telephone when the
machine is in the automatic answer mode. Use the automatic
answer mode if you use a dedicated phone line for the machine.
If you use the phone line for facsimile and voice
communications, you can use the automatic answer mode for
periods such as nights, weekends, and holidays.
Set the Auto Answer user option (No. 04) to ON to select the
automatic answer mode. Set the option to OFF to select the
manual answer mode.
6-1
Page 84

Receiving
Manual Reception
Use the manual receive mode if you have a single line for
facsimile and voice communications during normal business
hours. The manual receive feature enables you to answer all
incoming calls manually. When you answer an incoming call, if
the call Is from a facsimile machine you can transfer the call to
your machine by pressing the START key and placing the
handset on the cradle.
The Auto Rev in Man Mode user option (No. 05) allows you to
determine whether the unit should not answer incoming calls or if
the machine should answer the telephone after a set number of
rings if you do not answer manually. If the Auto Rev in Man
Mode user option (No. 05) is set to OFF and the manual receive
mode is enabled, the machine does not answer any incoming
calls. If you set the option to ON, the machine answers the call
after a predetermined number of rings.
You can set the Man Mode Rev Delay user option (No. 06) to
change the number of rings the machine allows before it
answers a call. You can answer the call at any time before the
machine answers. Refer to the Programming the Machine
chapter for information on the options.
NOTE: The Auto Rev in Man Mode option is not available in
some countries.
Use the following procedure to receive a document manually;
1. When you receive an incoming call, lift the handset.
2. If you hear a facsimile tone, press the START key and
place the handset on the cradle.
NOTE: If you place the handset on the cradle before you
press the START key, the line disconnects.
6-2
Page 85

Cancelling an Incoming Call
To cancel an incoming call, you must know the job number.
Print a Memory List to identify the job number. Use the following
procedure to cancel an incoming call:
1. When you receive an incoming call, press the CLEAR key.
2. Press the REDIAL/1 key to select INCOMING CALL.
3. Press the START key. The LCD prompts you to verify the
cancellation.
4. Press the START key.
Substitute Receive to Memory
Receiving
If the machine receives a document while the printer is not
available, the machine automatically performs a substitute
receive to memory operation. The machine receives a
document into the memory if the paper cassette is empty, the
paper jammed, or the toner is empty. The machine prints the
document automatically when the printer becomes available.
If the memory becomes full while the machine receives a
document, the machine terminates the operation but retains the
pages it received successfully. Once the memory is full, the
machine does not accept additional documents.
Reduction Rates on Documents Received
The machine can be set to automatically reduce an image onto
a single page. Set the Print Reduction user option (No. 23) to
reduce all documents the machine receives. If the option is set
to OFF, the documents print at their original size. If the option is
set to ON and the image does not fit on one page, the machine
divides the image into several pages. Refer to the Programming
the Machine chapter for more information on the user option.
6-3
Page 86

Receiving
Secure Receive (Junk Mail Eliminator)
To receive a document using the secure receive mode, the
remote machine must be a 7041/7042 machine.
When you receive a document in the secure mode, the machine
compares the password you programmed with the password of
the remote machine. If the passwords match, the machine
accepts the document from the remote machine. If the
passwords conflict, the operation is cancelled and the machine
generates an error code.
To receive all documents in the secure mode, set the Junk Mail
Eliminator user option (No. 16) to ON. This option prevents
users from sending junk mail to your machine. Refer to the
Programming the Machine chapter for information on how to set
the user option.
Power Save Mode
The power save mode is a feature which disables the printer and
reduces power consumption. When you use the power save
mode, the machine stores in memory any document it receives.
After the communication completes, the machine enters the
warmup mode, prints the document, then disables the printer.
If the memory is almost full, you can not enter the power save
mode. If the memory becomes full while the machine is
receiving, the machine prints only the pages it received
successfully.
Use the following procedure to enter or to exit from the power
save mode:
1. Open the access panel.
2. Press the POWER SAVE key and close the access panel.
3. Press the REDIAL/ T key to toggle between the power
save on mode and the power save off mode.
4. Press the START key to select the mode.
6-4
Page 87

Polling - Retrieving Remote Documents
This chapter instructs how to retrieve documents from remote
machines. It also instructs how to prepare your machine for a
remote machine to retrieve a document.
Polling Capabilities
The machine allows you to retrieve a document from a remote
machine when you contact that machine. This process is known
as polling. You can also transmit a document to a remote
machine when the machine contacts you. This process is
known as being polled.
The machine has several polling capabilities All polling
operations except the send/poll operation occur as background
jobs. The following table lists the capabilities:
Table 7-1: Polling
Capabilities
Polling
Capabilities
Be polled
Polling Retrieve a document from a remote
Send/Poll
Mailbox Polling Retrieve a document from a mailbox in a
Delayed Polling
Delayed Send/
Poll
Delayed
Mailbox Polling
DTMF Mailbox
Polling
A remote machine retrieves a document
from your machine.
machine.
Send a document and retrieve a document
in one call.
remote machine.
Retrieve a document at a preset time.
Send a document and retrieve a document
in one call at a programmed time.
Retrieve a document at a programmed
time from a mailbox in a remote machine.
Retrieve a document from a mailbox in a
remote Xerox 7032/7033 machine.
Description
7-7
Page 88

Polling - Retrieving Remote Documents
Features
Each polling method prompts you to enter selected features. If
you are storing a document to be polled, you can choose to
transmit in the secure mode. If you are polling, you can poll a
mailbox in the remote machine.
The following procedures instruct you to enter only the options
that their introductions describe. For example, the polling
procedure does not provide a step to enter a mailbox number
since the mailbox polling procedure describes that feature.
Prepare to be Polled (Polling Standby Mode)
Before a remote machine can poll your machine, you must
prepare your machine to be polled. You can program the
machine to delete the document or retain the document after it is
polled. Retain the document to allow several remote users to
poll for the document. Once you store a document, the machine
is in the polling standby mode.
The machine can store one document in the polling standby
mode. For multiple documents, place the documents in
mailboxes and request that the remote user retrieve the
documents from the mailboxes. The remote user must know the
mailbox number to retrieve a document. Contents in a private
mailbox are deleted once the mailbox is polled; documents in a
public mailbox are retained.
Use the following procedure to store a document to be polled:
1. Load the document face-down in the ADF.
2. If desired, select the resolution and the halftone.
3. Open the access panel.
4. If desired, set the page count and the secure mode and
press the START key.
5. Press the POLL/STORE FOR POLLING key.
6. Press the REDIAL/1 key or the PAUSE/ ^ key and close
the access panel.
7-2
Page 89

Polling
Polling- Retrieving Remote Documents
Polling occurs when you request a remote machine to send a
document to your machine. The remote machine you dial must
be ready to be polled and the ADF tray of your machine must be
empty for polling to occur.
Use the following procedure to retrieve a document from a
remote machine or a group of machines. Refer to the Mailbox
Polling procedure if you desire to select the mailbox
communication mode.
1. Check that no documents are loaded in the ADF.
2. Open the access panel.
3. Press the POLL/STORE FOR POLLING key. The LCD
prompts you to select additional features or to dial the
number.
4. Close the access panel and dial the number for the
remote machine.
7-3
Page 90

Polling - Retrieving Remote Documents
Send/Poli
The send/poll feature performs two operations, transmit and poll,
in a single operation. The operation allows you to transmit a
document to a remote machine then poll that machine for a
document. This operation is the only polling operation that does
not occur as a background job.
You can use the send/poll function with only one machine at a
time; you can not use group or broadcast dialing. Also, you can
not use a mailbox number with this method of polling.
Use the following procedure to initiate send/poll with a remote
machine that is in the polling standby mode;
1. Load the document face-down in the ADF.
2. Select the resolution and the halftone.
3. Open the access panel.
4. Press the POLL/STORE FOR POLLING key.
5. Press the REDIAL/1 key once to display SEND/POLL.
NOTE: If a document is stored to be polled, the LCD
prompts you to select features or to dial.
6. Press the START key. The LCD prompts you to select
additional features or to dial the number.
7. If desired, set the page count and the secure mode.
8. Close the access panel and dial the number for the
remote machine. Your machine transmits the document
then retrieves and prints the remote document
automatically.
7-4
Page 91

Mailbox Polling
Polling- Retrieving Remote Documents
Mailbox polling is available only between 7041/7042 machines.
To perform mailbox polling, the remote user must store a
document in a mailbox and inform you of the mailbox number.
When you use mailbox polling, the machine polls the remote
mailbox and prints the document. Refer to the Memory chapter
for information on how to retrieve the document from the mailbox.
Use the following procedure to initiate mailbox polling:
1. Obtain the mailbox number from the remote user.
2. Check that no documents are loaded In the ADF.
3. Open the access panel.
4. Press the POLL/STORE FOR POLUNG key. The LCD
prompts you to select additional features or to dial the
number.
5. Press the SECURITY/MAILBOX NO. key.
6. Press the REDIAL/1 key to display MAILBOX No.
7. Press the START key.
8. Press the REDIAL/1 key to display MAILBOX No ON.
9. Close the access panel and press the START key. The
LCD prompts you to enter the mailbox number.
10. Enter the four-digit mailbox number. The LCD prompts
you to verify the mailbox number.
11. Verify the number. To change the mailbox number, press
the CLEAR key and reenter the number.
12. Press the START key.
13. Dial the number for the remote machine. The machine
retrieves and prints the document.
7-5
Page 92

Polling - Retrieving Remote Documents
Delayed Polling
Delayed polling allows you to program the machine to request a
document at a later time. When you use delayed polling to
retrieve a document, the remote machine must be ready to be
polled.
Use the following procedure to program a delayed polling
transaction;
1. Open the access panel.
2. Press the DELAYED START key and close the access
3. Press the PAUSE/4> key to display POLL.
4. Press the START key. The LCD prompts you for the time
panel.
to poll the remote machine.
5. Enter the time (24-hour format) to retrieve the document.
The LCD prompts you to verify the time to poll.
6. Verify the time to retrieve the document. To change the
time, press the CLEAR key and reenter the time.
7. Press the START key. The LCD prompts you to dial the
telephone number.
8. Dial the number for the remote machine.
9. Verify the telephone number. To change the number,
press the CLEAR key and reenter the number or code.
10. Press the START key.
7-6
Page 93

Delayed Send/Poli
Polling - Retrieving Remote Documents
The machine can transmit a document at a programmed time
then receive a document from the same machine. This
transaction is called delayed send/poll.
You can contact only one remote machine using the delayed
send/poll feature; you can not use group or broadcast dialing.
The machine you dial must be ready to be polled.
Use the following procedure to program a delayed send/poll
transaction:
1. Load the document face-down in the ADF.
2. Open the access panel.
3. Press the DELAYED START key and close the access
panel.
4. Press the REDIAL/t to display SEND/POLL.
5. Press the START key. The LCD prompts you for the time
to poll.
6. Enter the time to contact the remote machine. The LCD
prompts you to verify the time.
7. Verify the time to poll. To change the time, press the
CLEAR key and reenter the time.
8. Press the START key. The LCD prompts you to dial the
number.
9. Dial the number for the remote machine.
10. Verify the telephone number. To change the number,
press the CLEAR key and reenter the number or code.
11. Press the START key.
7-7
Page 94

Polling-Retrieving Remote Documents
Delayed Mailbox Polling
Delayed mailbox polling is available only between 7041/7042
machines. This method of polling occurs when the machine
retrieves a remote document at a programmed time. The
mailbox number you enter must match the remote mailbox
number that is ready to be polled.
Use the following procedure to program a delayed mailbox
polling transaction:
1. Obtain the mailbox number from the remote user.
2. Check that no document is loaded in the ADF.
3. Open the access panel.
4. Press the DELAYED START key.
5. Press the PAUSE/ 4- key once to display POLL.
6. Press the START key. The LCD prompts you for the time
to retrieve the document.
7. Enter the time to retrieve the facsimile. The LCD prompts
you to verify the time.
8. Verify the time to retrieve the document. To change the
time, press the CLEAR key and reenter the time.
9. Press the START key. The LCD prompts you to dial the
number.
10. Press the SECURITY/MAILBOX No. key and close the
access panel.
11. Press the PAUSE/ ^ key to display MAILBOX No.
12. Press the START key.
7-8
Page 95

DTMF Mailbox Polling
Polling - Retrieving Remote Documents
13. Press the PAUSE/ i key to display MAILBOX No. ON.
14. Press the START key. The LCD prompts you to enter the
mailbox number.
15. Enter the four-digit mailbox number. The LCD prompts
you to verify the number.
16. Verify the mailbox number. To change the number, press
the CLEAR key and reenter the four-digit number.
17. Press the START key. The LCD prompts you to dial the
number.
18. Dial the number for the remote machine.
To use the DTMF feature to poll a mailbox on a 7032/7033
machine, you must know the account number, or password, for
the mailbox.
Use the following procedure to poll a mailbox at a Xerox
7032/7033 machine:
1. Perform off-hook dialing to a remote 7032/7033 machine.
You will hear a facsimile tone sequence.
2. After the initial facsimile tone sequence completes, press
the ★ key. You will hear three confirmation tones.
3. After the confirmation tones complete, press the # key.
4. Enter the four-digit account number.
5. Press the ★ key twice.
6. Press the START key.
7. Place the handset on the cradle. The machine retrieves
the document from the remote mailbox.
7-9
Page 96

Polling - Retrieving Remote Documents
Cancel a Polling Request
The polling methods can be cancelled in one of two ways: use
the STOP key or use the CLEAR key. To cancel send/poll
requests, press the STOP key during the communication. Press
the CLEAR key to cancel the programmed polling jobs that are
pending.
Use the following procedure to cancel a polling transaction:
1. Press the CLEAR key. The LCD displays the first
2. Press the REDIAL/^ key to scroll through the transaction
3. Press the START key. The LCD prompts you to enter the
4. Enter the three-digit job number.
transaction type.
types
Job number.
5. Press the START key.
7-10
Page 97

Memory
This chapter instructs how to store a document in the memory,
to print a document from the memory, and to delete a file in the
memory.
Store a Document in a Memory File
The machine stores documents in a memory file for the following
operations:
• Transmissions except direct send transmissions,
including group and manual broadcast transmissions, and
delayed send operations
• Documents the machine received to a mailbox
• Documents you store in a mailbox to be polled
When a document is stored in the memory, the machine assigns
a job number to that document. The machine can store
documents in up to 96 files with up to 99 pages per file. When
the memory contains 96 files, the LCD displays F-FULL.
Mailboxes
The machine cancels a receive operation when the memory is
full. You must delete documents in the memory files before you
can add any new files.
Documents in mailboxes can be received from or polled from
only a remote 7041/7042 machine. Memory files are used when
documents are received to a mailbox or when documents are
scanned locally to a mailbox. Mailboxes can be either private or
public.
A document in a public mailbox remains in the mailbox until it is
deleted by an operator using the file delete feature. A document
in a private mailbox is deleted after the file is accessed with the
correct mailbox number and printed or by using the file delete
feature.
8-1
Page 98

Memory
Store a document in a mailbox
For a mailbox to be polled by a remote 7041/7042 machine, you
must first scan a document into the mailbox. Several documents
can be scanned into the same mailbox; the machine transmits
all documents from the same mailbox in the same telephone
call.
If the document jams in the scanner or if the memory becomes
full while the machine scans the document, the machine deletes
all pages of the document being scanned. Print and delete any
unnecessary files.
Use the following procedure to store a document in the mailbox;
1. Load the document face-down in the ADF.
Open the access panel.
2.
Press the LOAD MAILBOX key and close the access
3.
panel.
Press the REDIAL/'[ key to toggle between the options for
4.
private and public mailboxes.
Press the START key to select the mailbox. The LCD
5.
prompts you to enter the mailbox number.
Enter the four-digit mailbox number. The LCD prompts you
6.
to verify the number.
Verify the mailbox number. To change the number, press
7.
the CLEAR key and reenter the four-digit number.
Press the START key. The machine stores the document
8.
and prints a Mailbox Receipt.
9. Verify the file number on the Mailbox Receipt.
8-2
Page 99

Append a document to a mailbox file
You can append a document to an existing mailbox file. If the
document jams while the machine adds the document to the file,
the new information is deleted and you must begin again.
Use the following procedure to add a document to a mailbox file:
1. Load the document face-down in the ADF.
2. Open the access panel.
3. Press the LOAD MAILBOX key and close the access
4. Press the REDIAL/'[ key to select APPEND FILE.
5. Press the START key. The LCD prompts you to enter the
6. Enter the two-digit file number. The LCD displays:
panel.
file number to which you want to append the document.
APPEND FILE
FILE No.=XX
7. Verify the file number. To change the number, press the
CLEAR key and reenter the two-digit file number.
8. Press the START key. The LCD prompts you to enter the
mailbox number for the file.
9. Enter the four-digit mailbox number. The LCD displays:
APPEND FILE
MAILBOX No.=XXXX
10. Verify the mailbox number. To change the number, press
the CLEAR key and reenter the four-digit number.
11. Press the START key. The machine stores the document
and prints a Mailbox Receipt.
12. Verify the file number on the Mailbox Receipt.
8-3
Page 100

Memory
Transmit a Document from the Memory
The machine scans and stores a document in the memory
before sending the document unless you select the direct send
feature. The machine automatically transmits all group and
manual broadcast transmissions through the memory. The
machine also stores in the memory any document for a delayed
transmission, or for a transmission in the security mode or into a
mailbox.
Refer to the Transmission chapter for more information.
Receive a Document into the Memory
When a remote machine contacts your machine, your machine
can print the document immediately or it can store the
information. The machine receives a document in the memory if
any of the following three conditions exist;
• The printer is not available - The machine performs
substitute receive to memory. Refer to the Receiving
chapter for more information.
• The machine is in the power save mode - Refer to the
Receiving chapter for more information.
• The machine receives a document to a mailbox - Once
the machine receives a document into the memory, the
LCD flashes the letter R in the upper right corner. To
retrieve the document, you must know the mailbox
number.
8-4
 Loading...