

Page 1

Xerox 7024 Facsimile Terminal
User Handbook
XEROX
700P93405
Page 2

Xerox Corporation
Customer and Service
Documentation Development, R380-181
P.O. 80x660512
Dallas, TX 75266-0512
®1991 by Xerox Corporation, All rights reserved.
Copyright protection claimed includes all forms and matters of
copyrightable material and information now allowed by
statutory or judicial law or hereinafter granted, including
without limitation, materia! generated from the software
programs which are displayed on the screen such as icons, screen
displays looks, etc.
Xerox* and ail Xerox products mentioned in this publication are
trademarks of Xerox Corporation.
Changes are periodically made to this document. Changes,
technical inaccuracies, and typographic errors will be corrected
in subsequent editions.
Page 3

Table of contents
Table of contents ............................................................................................ v
How to use this handbook ..................................................................................... ix
Installation
Unpacking and installation ..................................................................................... xi
Space requirements ..................................................................................... xi
Operating environment ............................................................................... xii
Unpacking ................................................................................................... xii
Connecting the terminal ............................................................................. xiii
Installing the trays ...................................................................................... xiv
Loading the paper tray ................................................................................ xv
Advancing the imaging film ........................................................................ xvi
Installing the customer assistance label
Installing the power cord .......................................................................... xviii
Speaker volume control ............................................................................. xix
Handset control volume ............................................................................. xix
Selecting the alternate language
...............................................................
1. Preparing the machine for operation
Getting to know the telecopier
Component locations ........................................................................................... 1-2
Component descriptions
Control panel ....................................................................................................... 1-4
Control panel descriptions ................................................................................... 1-5
Menu table ........................................................................................................... 1-6
Example: To select from the menu table
Set date and ti me
To set date and time (Menu 09, Feature 21) ............................................ 1-8
Local identification number and name/send header
To store local ID number and name (Menu 09, Feature 21)
Set terminal and handset dialling type .............................................................. 1-13
To set terminal dialling type (Menu 09, Feature 17) ............................... 1-13
To set handset dialling type .................................................................... 1-14
Answering modes .............................................................................................. 1-15
Set answering machine ..................................................................................... 1-16
To set answering machine (Menu 09, Feature 11)
To set TAD (telephone answering device) time (Menu 04)
Set second telephone
To set second telephone (Menu 09, Feature 10)
One touch label ................................................................................................. 1-19
Installing the one touch label .................................................................. 1-19
Tones ................................................................................................................ 1-20
Memory ............................................................................................................ 1-21
Receive to memory ................................................................................ 1-21
Memory available ................................................................................... 1-21
Memory full ............................................................................................. 1-22
Switching the power off and on
..............................................
.......................................................................................
............................................................................
.....................................................................................
..............................................................
..................................................
.................................................
................................................ 1-8
.........................................
..................
................................
....................
...................................
1-10
1-10
1-16
1-17
1-18
1-18
1-22
xviii
xix
1-1
1-3
1-6
TELECOPIER 7024 USER HANDBOOK
Page 4

TABLE OF CONTENTS
2. Dialling
Dial directory ....................................................................................................... 2-1
Dialling methods ................................................................................................. 2-19
3. Sending
Selecting contrast and resolution
Sending a document ........................................................................................... 3-2
Secure send mode .............................................................................................. 3-3
Delayed send ...................................................................................................... 3-4
Group send/delayed group send ......................................................................... 3-6
Send secure mail ................................................................................................ 3-8
Relay send ........................................................................................................ 3-10
Job reserved ..................................................................................................... 3-14
Forced 4800 ...................................................................................................... 3-15
Voice Request ................................................................................................... 3-16
Long original ..................................................................................................... 3-17
Store for pol I i ng .............................................................................................. 3-18
Cancel and interrupt procedures
Toplan the dial directory ........................................................................... 2-1
To enter pauses In one touch or speed dial numbers .............................. 2-2
To set one touch keys 01-24 (Menu 05, Feature 1)
To set speed dial numbers (Menu 06, Feature 1)
.................................
....................................
2-2
2-4
To set one touch keys P1-P6 as standard one touch (Menu 10, Feature 1) 2-7
To set program one touch keys (P1-P6) for multi step operations
(Menu 10, Feature 2) .......................................................................... 2-10
To program keys (P1-P6) for delayed send
To program keys (P1-P6) for group send/delayed group send
To program keys (PI-P6) for relay send
...........................................
..........
2-13
.................................................
2-12
2-14
To program keys (P1-P6) for send secure mail ...................................... 2-16
To program keys (P1-P6) for polling/delayed polling
.............................
2-17
To program keys (PI-P6) for multi polling ............................................... 2-18
Tomanually dial for voice contact.............................................................. 2-20
To dial using one-touch numbers ............................................................. 2-20
To dial using speed dial numbers ........................................................... 2-20
Automatic redial ..................................................................................... 2-21
To dial using last number redial
Resolution settings
..................................................................................
.............................................................
.......................................................................
2-21
3-1
3-1
Contrast settings ...................................................................................... 3-1
To send a document ................................................................................. 3-2
To set secure send mode (Menu 01, Feature 2)
To set delayed send (Menu 02, Feature 1)
To set group send/delayed group send (Menu 02, Feature 2)
.....................................
.............................................
................
3-3
3-4
3-6
To set send secure mail (Menu 02, Feature 4) ........................................ 3-8
To set relay send (Menu 02, Feature 3) ................................................. 3-10
To set job reserve ................................................................................... 3-14
To set forced 4800 (Menu 01, Feature 3)
To signal a voice request
.......................................................................
..............................................
3-15
3-16
Toanswera voice request ....................................................................... 3-16
Toset long original (Menu 01, Feature 1)
To set store for polling (Menu 03, Features 3,1)
......................................................................
..............................................
...................................
3-17
3-18
3-20
To i nterru pt a j ob ................................................................................. 3-20
To cancel a job ....................................................................................... 3-20
Erase pending job (Menu 08, Feature 3)
..............................................
3-21
Pending job list (Menu 08, Feature 1) .................................................... 3-22
Erase polling document (Menu 03, Features 3,2) ................................. 3-23
TELECOPIER 7024 USER HANDBOOK
Page 5

4. Copying
Copying a document ........................................................................................... 4-1
Tocopy a document
One copy (no reduction) ........................................................................... 4-2
Copies (auto reduction) ............................................................................ 4-2
Copies (selected reduction)
Copy protect ..:.................................................................................................... 4-4
To set copy protect (Menu 09, Feature 16)
5. Receiving
Receiving a document ........................................................................................ 5-1
To manually receive a document ............................................................. 5-1
To automatically receive a document ...................................................... 5-1
Receive to memory .................................................................................. 5-2
To manually receive a document using a second telephone
To automatically receive using LOAD ORIG: (TEL) answer mode
To automatically receive when an answering machine is connected ... 5-4
Polling/Delayed polling ....................................................................................... 5-5
To set polling/delayed polling (Menu 03, Feature 1)
Multi-polling ........................................................................................................ 5-7
To set multi-polling (Menu 03, Feature 2)
6. Reports
Activity report ..................................................................................................... 6-1
To setup the activity report to print automatically (Menu 09, Feature 12) 6-1
To print the activity report manually (Menu 07, Feature 1)
Options report ..................................................................................................... 6-4
To print the options report (Menu 07, Feature 2)
Dial directory report ............................................................................................ 6-6
To print the dial directory report (Menu 07, Feature 3)
Print pending job list ........................................................................................... 6-9
To printthependingjob list (Menu 08, Feature 1) ................................ 6-9
Confirmation report .......................................................................................... 6-11
To print the confirmation report automatically (Menu 09, Feature 03) 6-11
To print the confirmation report manually
Error message report (Failure report)
Error message report ....................................................................................... 6-15
Memory initialized report .................................................................................. 6-16
Print pending document ................................................................................... 6-17
Print polling document ...................................................................................... 6-18
.................................................................................
.....................................................................
.............................................
...............................
...............................................
.....................
....................................
...........................
..............................................
..............................................................
To print the pending document (Menu 08, Feature 2)
To print document stored for polling (Menu 03, Feature 3,3)
..........................
TABLE OF CONTENTS
4-1
4-3
4-4
..................
...............
.........
5-2
5-3
5-5
5-7
6-2
6-4
6-6
6-12
6-13
6-17
6-18
7. Custom features and settings
Set auto receive time ......................................................................................... 7-1
Set block junk fax ............................................................................................... 7-3
Set contrast default ............................................................................................ 7-4
Set ECM (Error correction mode)
Set halftone ........................................................................................................ 7-6
Set number of redials ........................................................................................ 7-7
TELECOPIER 7024 USER HANDBOOK
To set auto receive time (Menu 09, Feature 02) ..................................... 7-1
To set block junk fax (Menu 09, Feature 14)
To set contrast default (Menu 09, Feature 07)
......................................................................
To set ECM mode (Menu 09, Feature 15) ............................................... 7-5
To set halftone (Menu 09, Feature 05)
Tosetnumberof redials (Menu 09, Feature 18) ....................................... 7-7
..........................................
.......................................
...................................................
7-3
7-4
7-5
7-6
Page 6

TABLE OF CONTENTS
Set number of rings .............................................................................................. 7-8
To set number of rings (Menu 09, Feature 09)
Set polled mode ................................................................................................... 7-9
To set polled mode (Menu 09, Feature 01) ............................................... 7-9
Set receive reduction ......................................................................................... 7-10
To set receive reduction (Menu 09, Feature 13) ..................................... 7-10
Set redial interval ............................................................................................... 7-11
To set redial interval (Menu 09, Feature 19) ........................................... 7-11
Set resolution default ......................................................................................... 7-12
To set resolution default (Menu 09, Feature 06) ..................................... 7-12
Set RS-232 Settings .......................................................................................... 7-13
To print RS-232 settings (Menu 11, Feature 1) ..............................
To set baud rate (Menu 11, Features 2,1)
To set parity (Menu 11, Features 2,2)
To set stop bit (Menu 11, Features 2,3)
To set character length (Menu 11, Features 2,4)
Set scanner width .............................................................................................. 7-18
To set scanner width (Menu 09, Feature 04) .......................................... 7-18
Set time pause ................................................................................................... 7-19
To set number of seconds (Menu 09, Feature 08)
...................................
.........................................
..............................................
.................
.............
.................................... 7-16
...................................
.................................
8. Problem solving
Problem solving process ..................................................................................... 8-1
To request assistance .............................................................................. 8-1
Supplies .................................................................................................... 8-1
Error messages table ............................................................................... 8-2
Error messages table and error codes ..................................................... 8-3
Problem solving table ................................................................................ 8-4
Loading the paper tray .............................................................................. 8-5
Removing a document jam ....................................................................... 8-6
Removing a paper jam .............................................................................. 8-6
Removing a recording paper jam .............................................................. 8-7
Replacing the imaging film ........................................................................ 8-8
Changing the recording paper size
Cleaning the thermal head ...................................................................... 8-12
Cleaning the pressure roller .................................................................. 8-13
Cleaning the rollers and retard pad
........................................................
........................................................
........
7-8
7-13
7-14
7-15
7-17
7-19
8-11
8-14
9. Reference
Specifications ...................................................................................................... 9-1
US: Xerox data coupler information .................................................................... 9-2
Canadian certification .......................................................................................... 9-4
Glossary
Glossary ...................................................................................... Glossary-1
Index
Index .................................................................................................. Index-1
TELECOPIER 7024 USER HANDBOOK
Page 7

How to use this handbook
HOWTO USE THIS HANDBOOK
This user handbook is provided to assist you in the operation of
your Xerox 7024 Facsimile Terminal. Please refer to the user
handbook for the recommended use of the features and other
operator activities.
The 7024 has many features and functions that may be used
individually or combined. Therefore, to ensure proper operation
and optimal utilization of the many features, please become
familiar with the contents of the user handbook before using the
terminal.
The square brackets "[ ]" in a procedure identify the name of a
control panel button. If the procedure states "Press [Select]",
press the Select button.
This handbook is divided into the following sections:
• Installation
This section contains the space requirements, operating
environment, unpacking, installation instructions, and
language selection procedure.
• Section 1 - Preparing the machine for operation
This section provides a description of the control panel and
each feature button. Also included is a description of the
actions needed to setup the terminal for operation such as:
date and time, local number/name, dialling types, optional
answering machine or second telephone connection.
• Section 2-Dialling
This section provides the instructions to setup the dial
directory, group number setup and various dialling options.
• Sections 3,4, S > Sending, Copying and Receiving
These sections contain procedures for all variations of
sending, copying, receiving.
• Section 6 - Reports
This section contains descriptions of the reports available on
the terminal and procedures for printing the reports.
• Section 7 - Custom features and settings
This section provides the procedures and descriptions for
optional user settings and features available on the terminal.
These features are listed in alphabetical order.
TELECOPIER 7024 USER HANDBOOK
Page 8

HOWTO USE THIS HANDBOOK
• Section 8 - Problem solving
This section contains the error codes, supplies information,
cleaning procedures and instructions for installing the paper.
• Section 9 - Reference
This section contains the terminal specifications, data coupler
and Canadian certification information.
• Section 10-index
The index section will allow you to easily access information
in the user handbook. Commonly used names are cross
referenced.
A glossary is included to define some of the terms used In this
manual.
TELECOPIER 7024 USER HANDBOOK
Page 9

Quick Reference Guide
Send
Keypad Dial:
One Touch Dial:
Speed dial:
Redial:
Confirmation Report
_________________________
1. Load originals face down.
2. Dial telephone number
using one of the following
methods;
1. Enter telephone number
and press [Start].
1. Press one touch key.
1. Press [Speed Dial).
2. Enter 2-digit speed dial
number and press [Start].
1. Press [Redial] and [Start].
________
Press [Send Confirm] to verify
each successful transmission.
To print automatically, refer to
Menu 09, Feature 03, Set
Confirm Report.
Receive
Automatic:
1. Terminal answers and
receives document.
Manual:
1. Lift handset and listen for
tones. Remove documents
from ADF.
2. Press [Start] and replace the
handset.
Cancel a Job_________________
Communicating with 1 terminal:
1. Press [Stop].
Communicating with multiple
terminals:
1. Press [Speed Dial] and
[Stop].
2. Cancel pending job from
memory.
Cancel pending job from memory:
1. Print Pending Job List.
2. Erase Pending Job.
Copy
One Copy (No reduction):
Copies (Auto reduction):
Copies (Selected reduction):
_
Group Number Setup________
See Dial Directory.
Group Dial
See Delayed Group Send.
Menu Directory
TO ACCESS MENUS
AND FEATURES:
1.
Press [Menu].
2. Enter menu number
(e.g. press [0], [9] for
User Settings.)
3. Press [Enter].
4. Enter feature number 1 Polling/ 1 Activity Report
(e.g. press [0], [3] for
Set Confirm Report.) 2 Multi-Pol ling
5. Press [Enter].
SEND OPTIONS1
01
1 Long Original Mode
2 Secure Send Mode
3 Forced 4800 Mode
02 SENDOPTIONS2 04 CALL RESPONSE 09 USER SETTINGS
1 Delayed Send
2 Group Send/
Delayed Group Send
3 Relay Send 06 SPEED DIAL SETUP
4 Send Secure Mail
03 POLLING OPTIONS
Delayed Polling
3 Store for Polling
(To select the following
features, see Note.) 2 Print Pending Doc.
1 Store for Polling
2 Erase Polling Doc. 14 Block Junk Fax
3 Print Polling Doc.
Set TAD Time
ONE-TOUCH SETUP
05
One-Touch 1 to 24
Speed Dial 01 to 55 05 Set Halftone
07
PRINT REPORTS
2 Options Report
3 Dial Directory Report 09 Set Number Rings NOTE: To select "t
08
PENDING JOBS
1 Pending Job List 11 Set Ans Machine [Enter] when "3 Store
3 Erase Pending Job
1. Load originals face down.
2. Press [Copy] and [Start].
1. Load originals face down.
2. Press [Copy].
3. Enter number of copies.
4. Press [Start].
1. Load originals face down.
2. Press [Copy].
3. Enter number of copies.
4. Press [Enter].
5. Press [Select] for desired
reduction rate.
6. Press [Start].
01 Set Polled Mode 19 Redial Interval
02 Set Auto Rev. Time 20 Set Date & Time
03 Set Confirm Report 21 Set Local ID/Name
04 Set Scanner Width 10 PROGRAM ONE TOUCH
06 Set Res Default
07 Set Contrast
08 Set Time Pause
10 Set 2nd Telephone
12 Activity Report
13 Set Rev Reduction
15 Set ECM Mode
16 Set Copy Protect
17 Set Dialling Type
Clearing Jams
1. Open the scanner, printer or
left hand cover.
Printer Cover
2. Remove jammed paper.
3. Check paper tray.
4. Close cover.
18 Set # of Redials
1 Enter One Touch
2 Program One Touch
Store for Polling, press
for Polling" is
displayed.
Page 10

Page 11
INSTALLATION
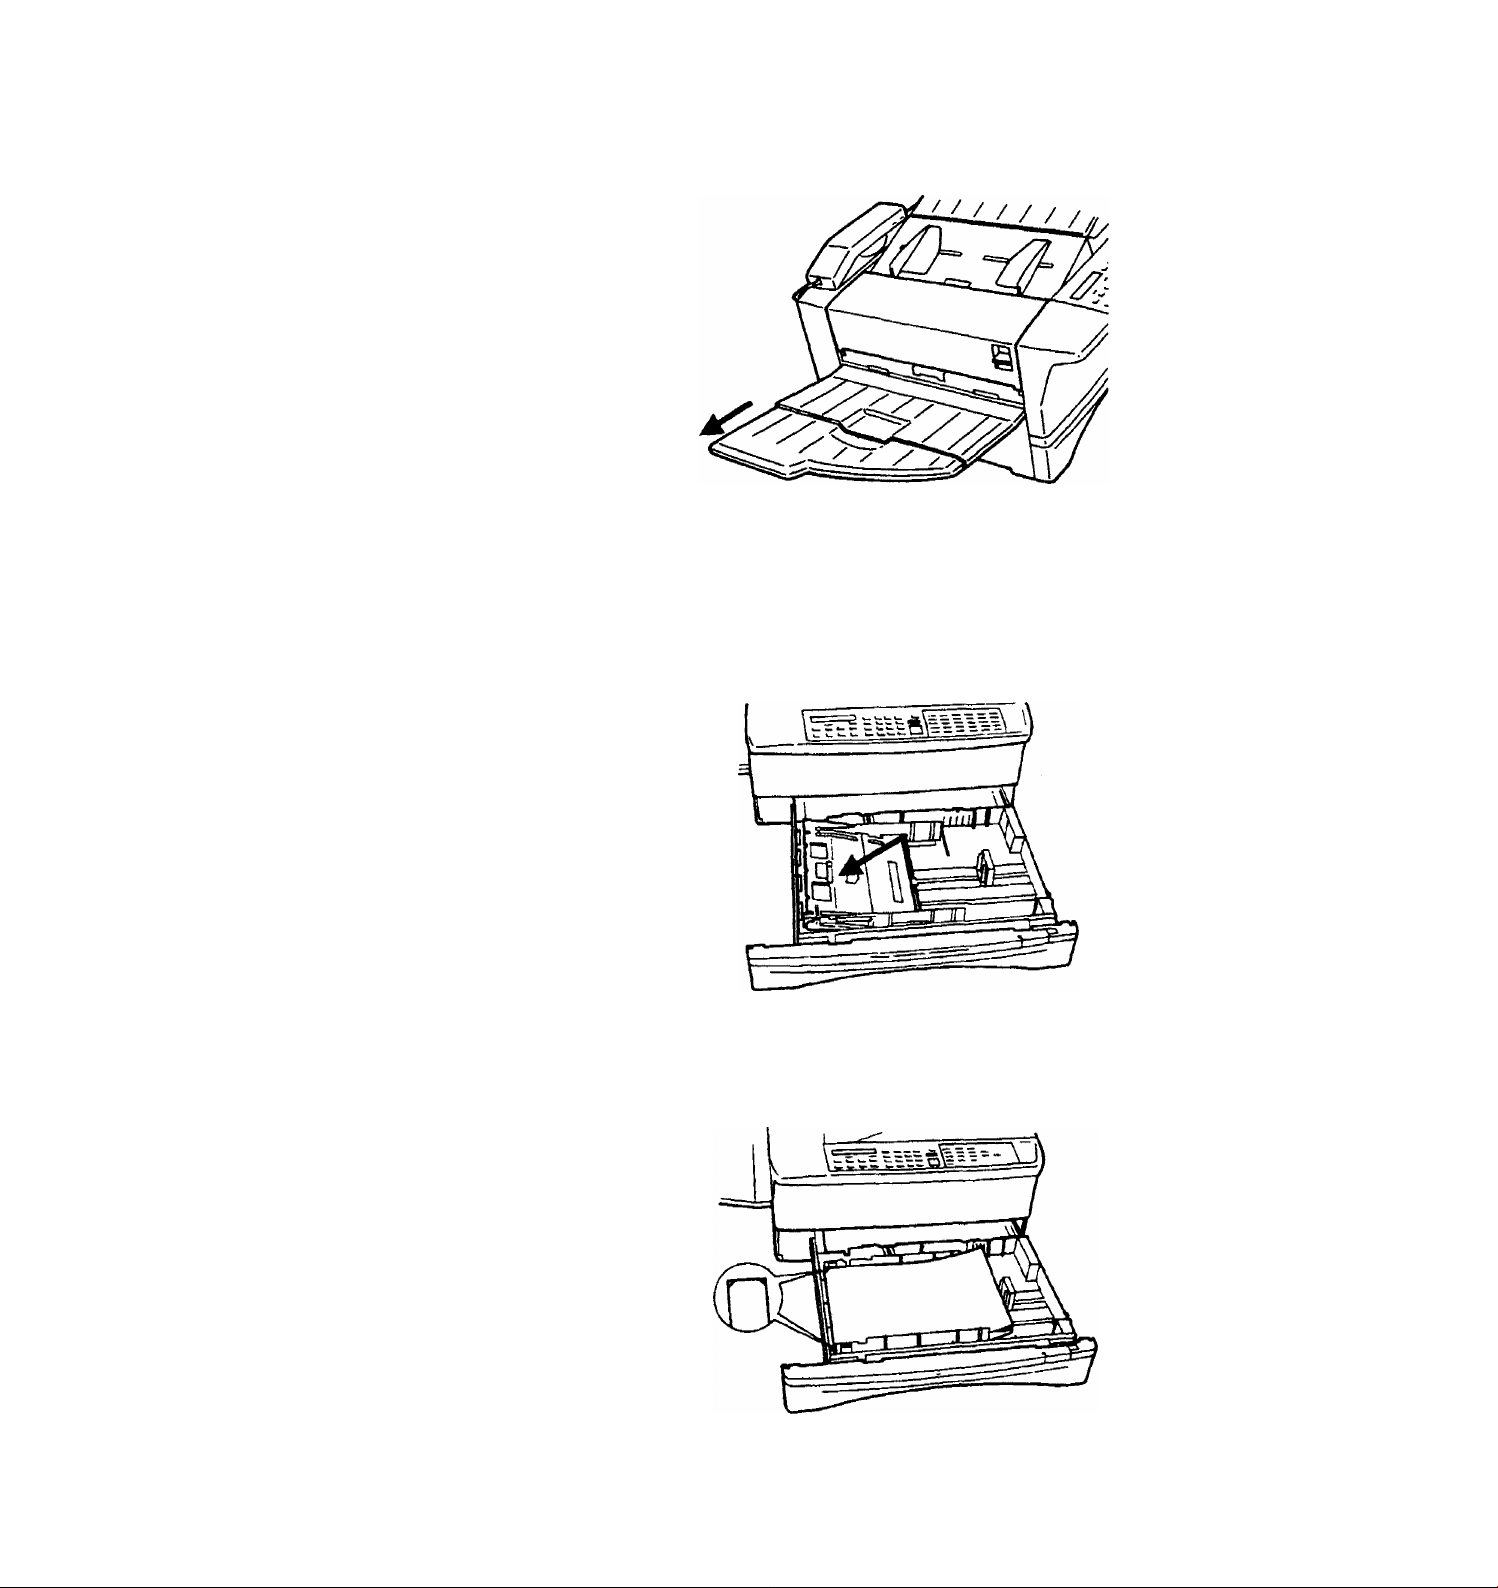
4. Extend the document support tray.
Loading the paper tray
1- Open the paper tray and press the metal plate in the tray
downward until it clicks.
TELECOPIER 7024 USER HANDBOOK
2. Place up to 250 sheets of recording paper under the corner
tabs. Push the paper tray into the terminal.
XV
Page 12
INSTALUnON
Note: The f^per stop should be set for 11 inch paper when it is
received. If necessary, adjust the paper stop to fit 14 inch paper
by squeezing the sides of the paper stop and sliding it to the 14
inch position.
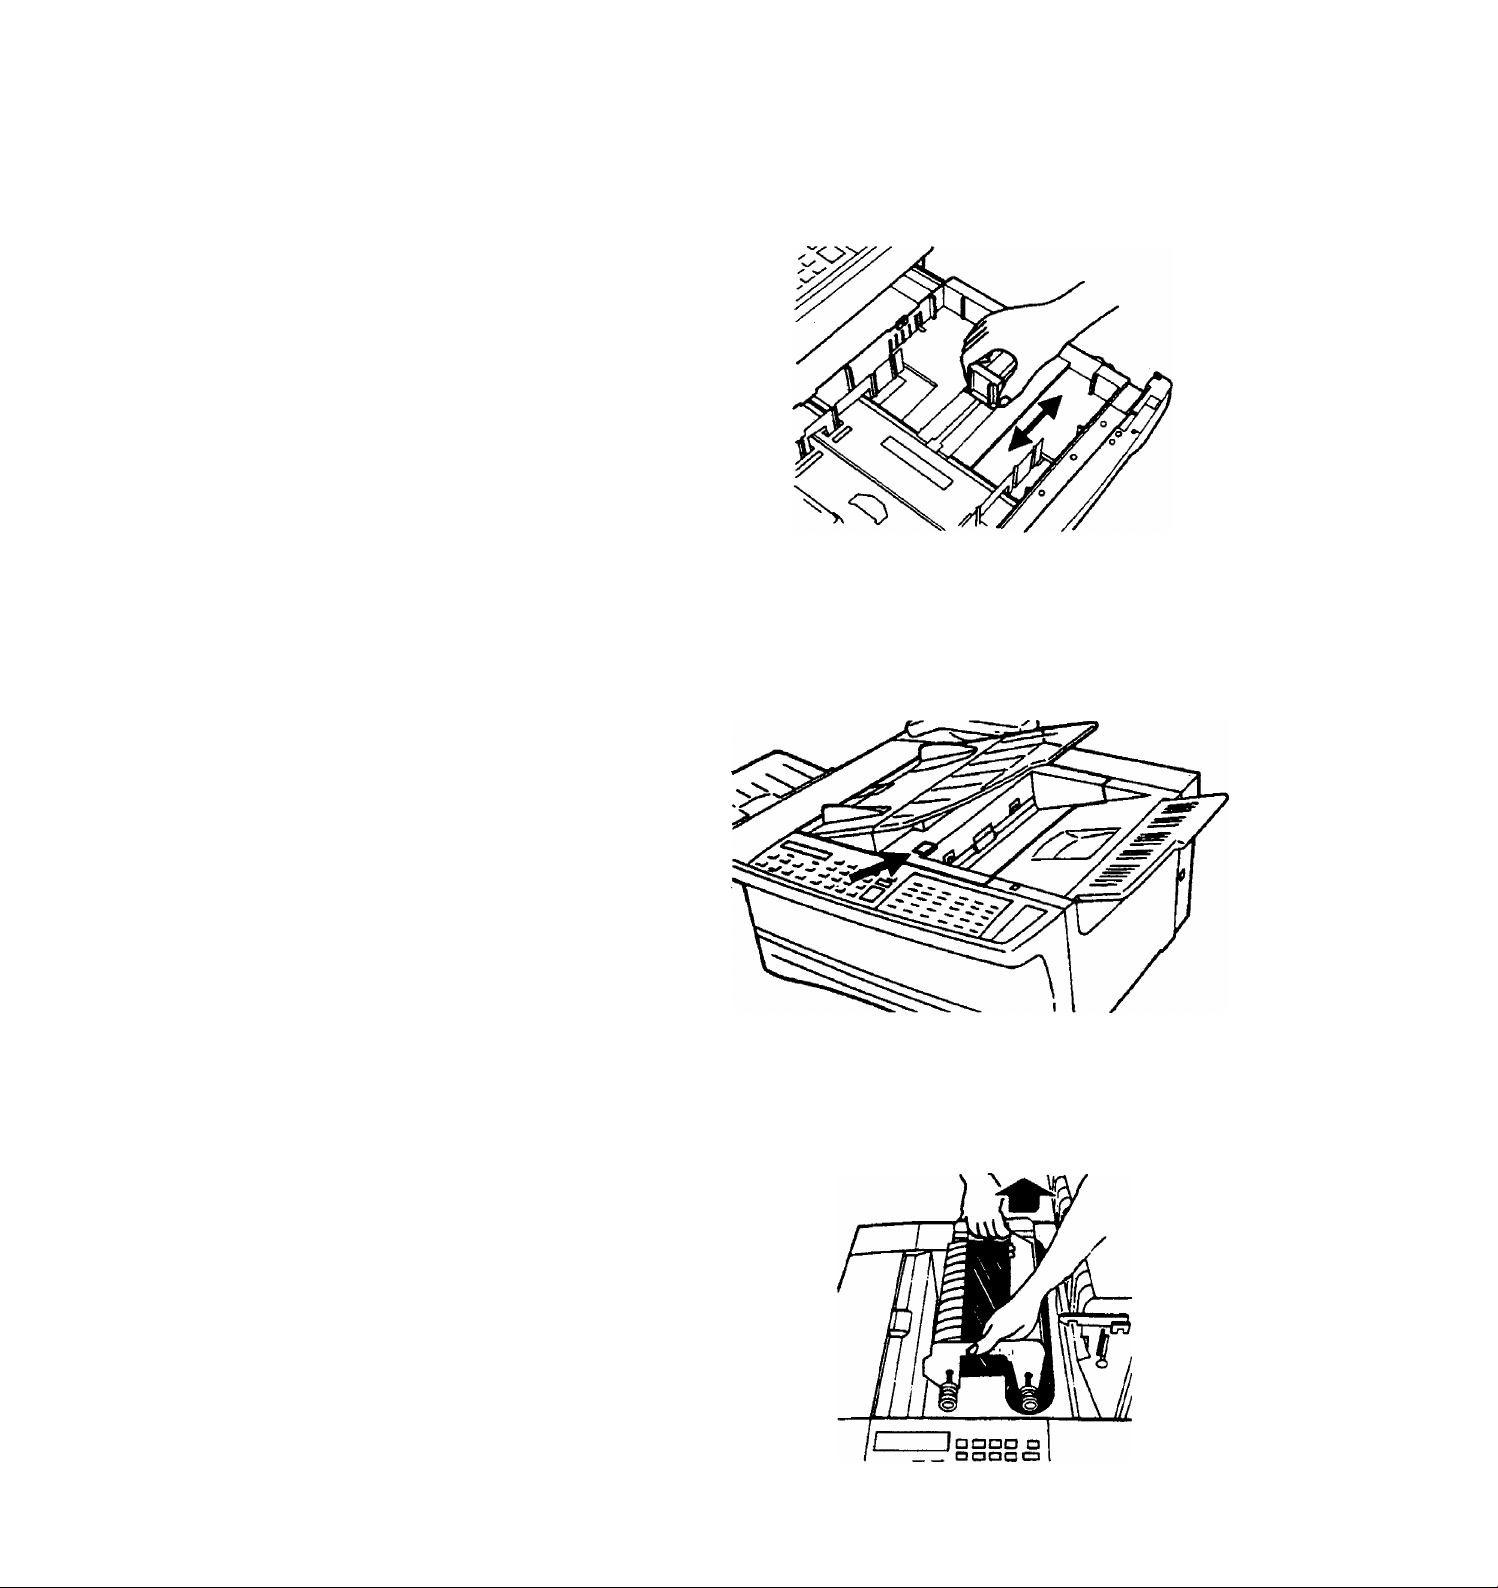
Advancing the imaging film
1. Press down on the printer cover release button and open the
printer cover.
Locate the imaging cartridge. Note: The red spindle is on
the right rear side. Grasp the cartridge by its handles and lift
it up and out of the terminal.
xvi
TELECOPIER 7024 USER HANDBOOK
Page 13
INSTALLATION
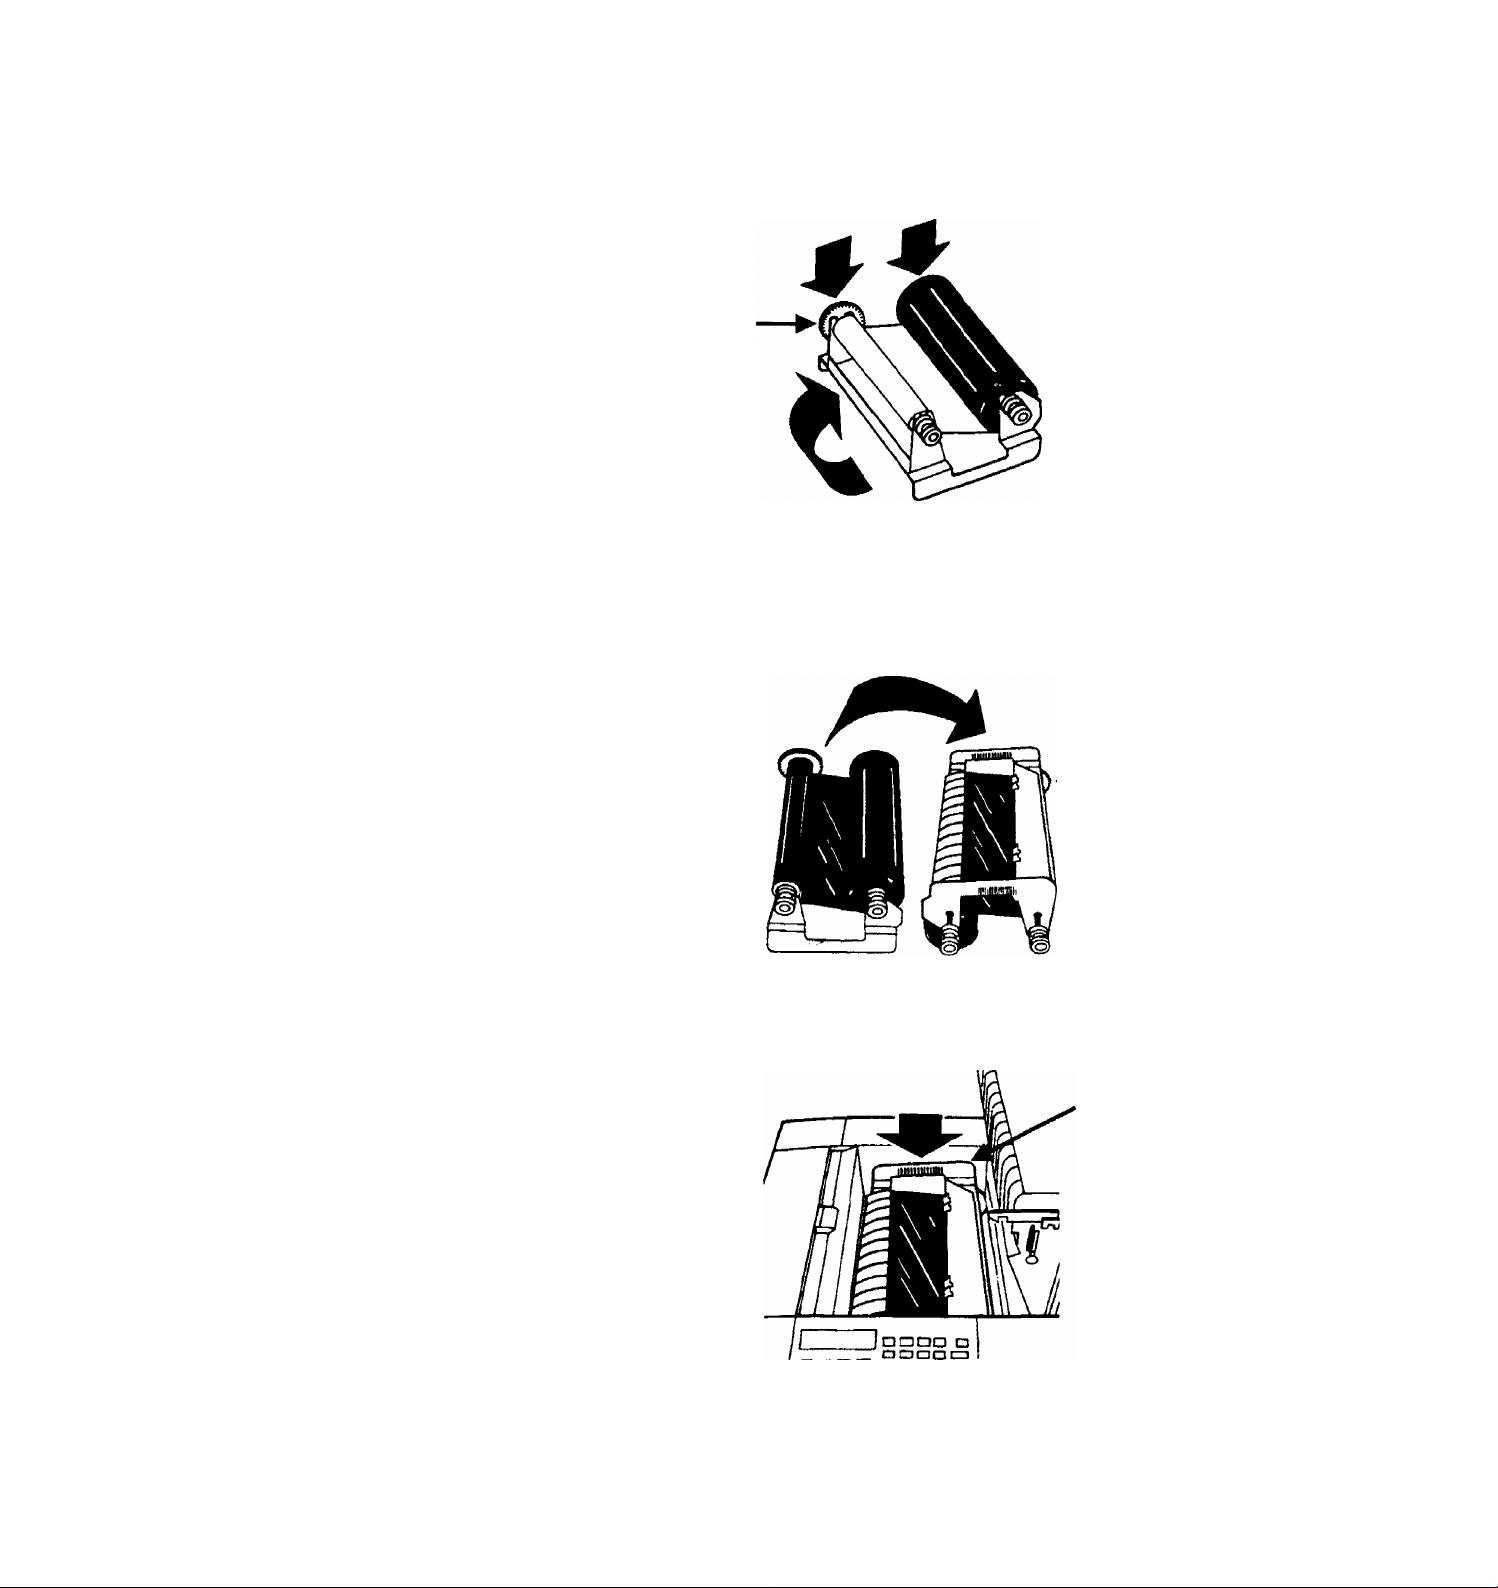
3. Set the cartridge down on a work surface and turn it over.
Make sure the red spindle is on the left rear side. Advance
the blue leader clockwise onto the take-up roll until the
black ink is visible.
Red
Spindle
4. Turn the cartridge over. Make sure the red spindle is on the
right rear smooth side and the blue spindle is on the left rear
ribbed side.
Red
Spindle
5. Grasp the cartridge by its handles and place it into the
terminal. Make sure the red spindle is on the right rear side.
Red
Spindle
TELECOPIER 7024 USER HANDBOOK
6. Close the printer cover and press firmly to close.
xvii
Page 14

INSTAUATiON
Installing the customer assistance label
1.
Record the serial number on the customer assistance label
and in the User Handbook, Section 8, Requesting assistance.
The serial numt>er is located under the printer cover to the
left of the imaging cartridge.
2.
Record the customer support center telephone number on
the customer assistance label. The number is in the User
Handbook, Section 8, Requesting assistance.
Remove the cover backing from the customer assistance label
and place the label on the right rear corner of the terminal.
Installing the power cord
1. Make sure the power switch at the right side of the terminal
is off.
2. Plug one end of the power cord into the connector at the
rear of the term i nal.
xviii
3. Plug the other end of the power cord into the wall outlet.
4. Turn the power switch on.
Note: Do not install the terminal on the same electrical circuit
as an air conditioner, copier machine or other high consumption
electrical appliance. These appliances can cause electrical "draw
downs” when they operate-temporarily reducing the power
available for other equipment on the circuit-and could damage
your terminal.
TELECOPIER 7024 USER HANDBOOK
Page 15
Unpacking and installation
Installation
This section includes genera! information about your terminal
including the installation instructions.
The section contains the following information:
• Space requirements
• Operating environment
• Unpacking
• Connecting the terminal
• Installing the trays
• Advancing the imaging film
• Installing the customer assistance label
• Installing the power cord
• Selecting the alternate language
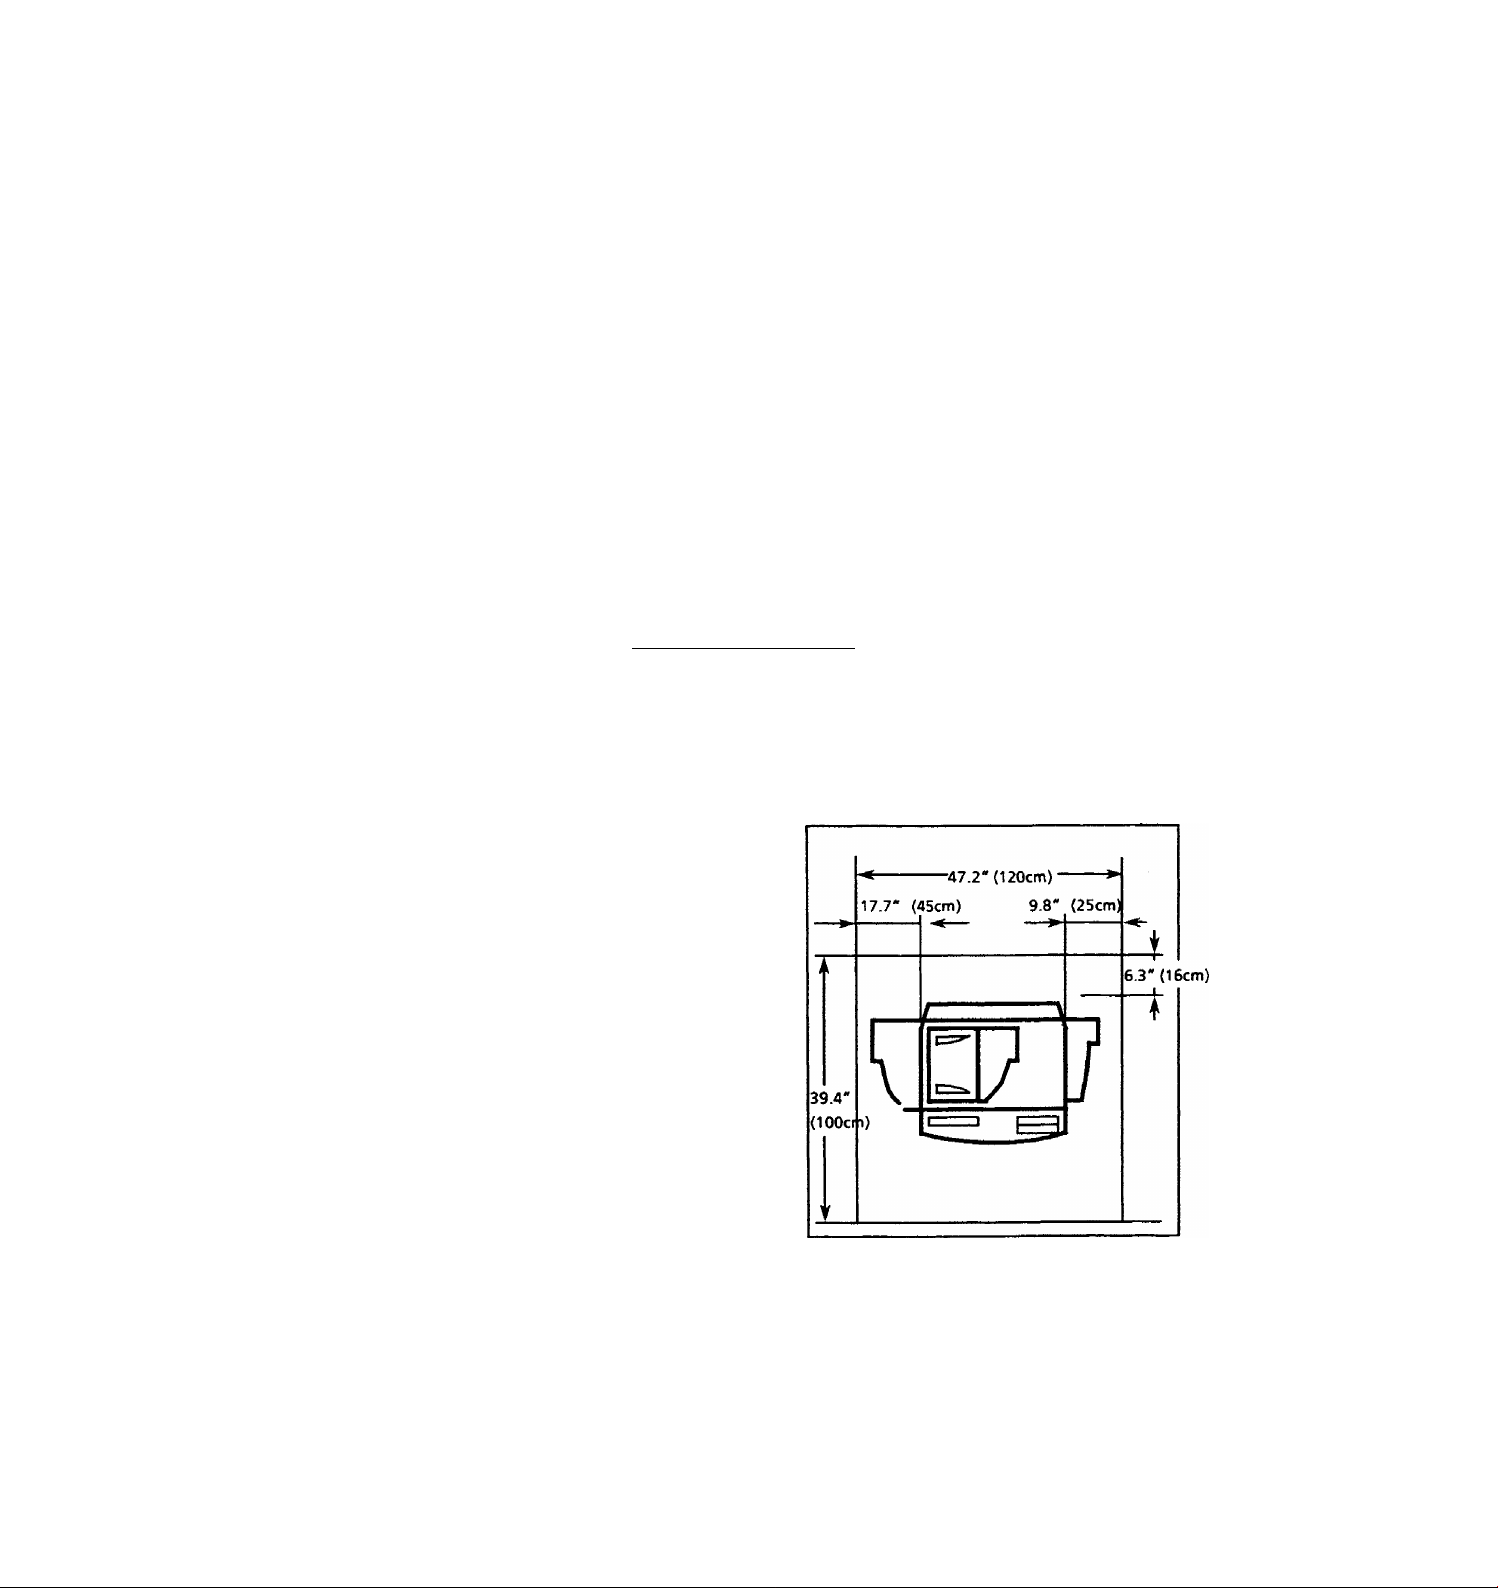
Space requirements______________________________________
The accompanying diagram gives the minimum clearances
required for normal operation, replacement of consumables,
and maintenance.
TELECOPIER 7024 USER HANDBOOK
XI
Page 16

INSTALLATION
Operating Environment
Do not install the terminal in a location that would expose it to
any of the following environmental factors that could create
safety hazards or adversely affect operation.
• Direct sunlight
• Direct air flow from heaters, air conditioners, ventilation
ports, etc.
• Rapid temperature fluctuations-Too rapid heating of a cold
room can cause water vapor to condense onto the paper,
where It then Interferes with image transfer.
• Extreme temperatures or humidity outside the
recommended operating range.
• Ammonia from diazo duplicators, etc.
• Poor ventilation
• Excessive dust or vibration
• Volatile materials
• Curtains or other flammable materials to close to the unit
Unpacking
1. After opening the shipping carton, check for the following
items:
1. User handbook 6.
2. Operator guide
3. Document output tray
4. Document input tray 9. Telephone handset
Xerox paper
5.
2.
Remove the plastic from the terminal and place terminal in
the designated location.
Remove the plastic bag containing the customer assistance
3.
label from the control panel and set aside.
4.
Remove the protective covering from the control panel.
5.
Press the Scanner Release Button (Document Release Knob see Component identification) to open the scanner cover and
remove the vi nyl sheet.
Handset cord
7.
Telephone line cord
8. Power cord
TELECOPIER 7024 USER HANDBOOK
Page 17
INSTALLATION
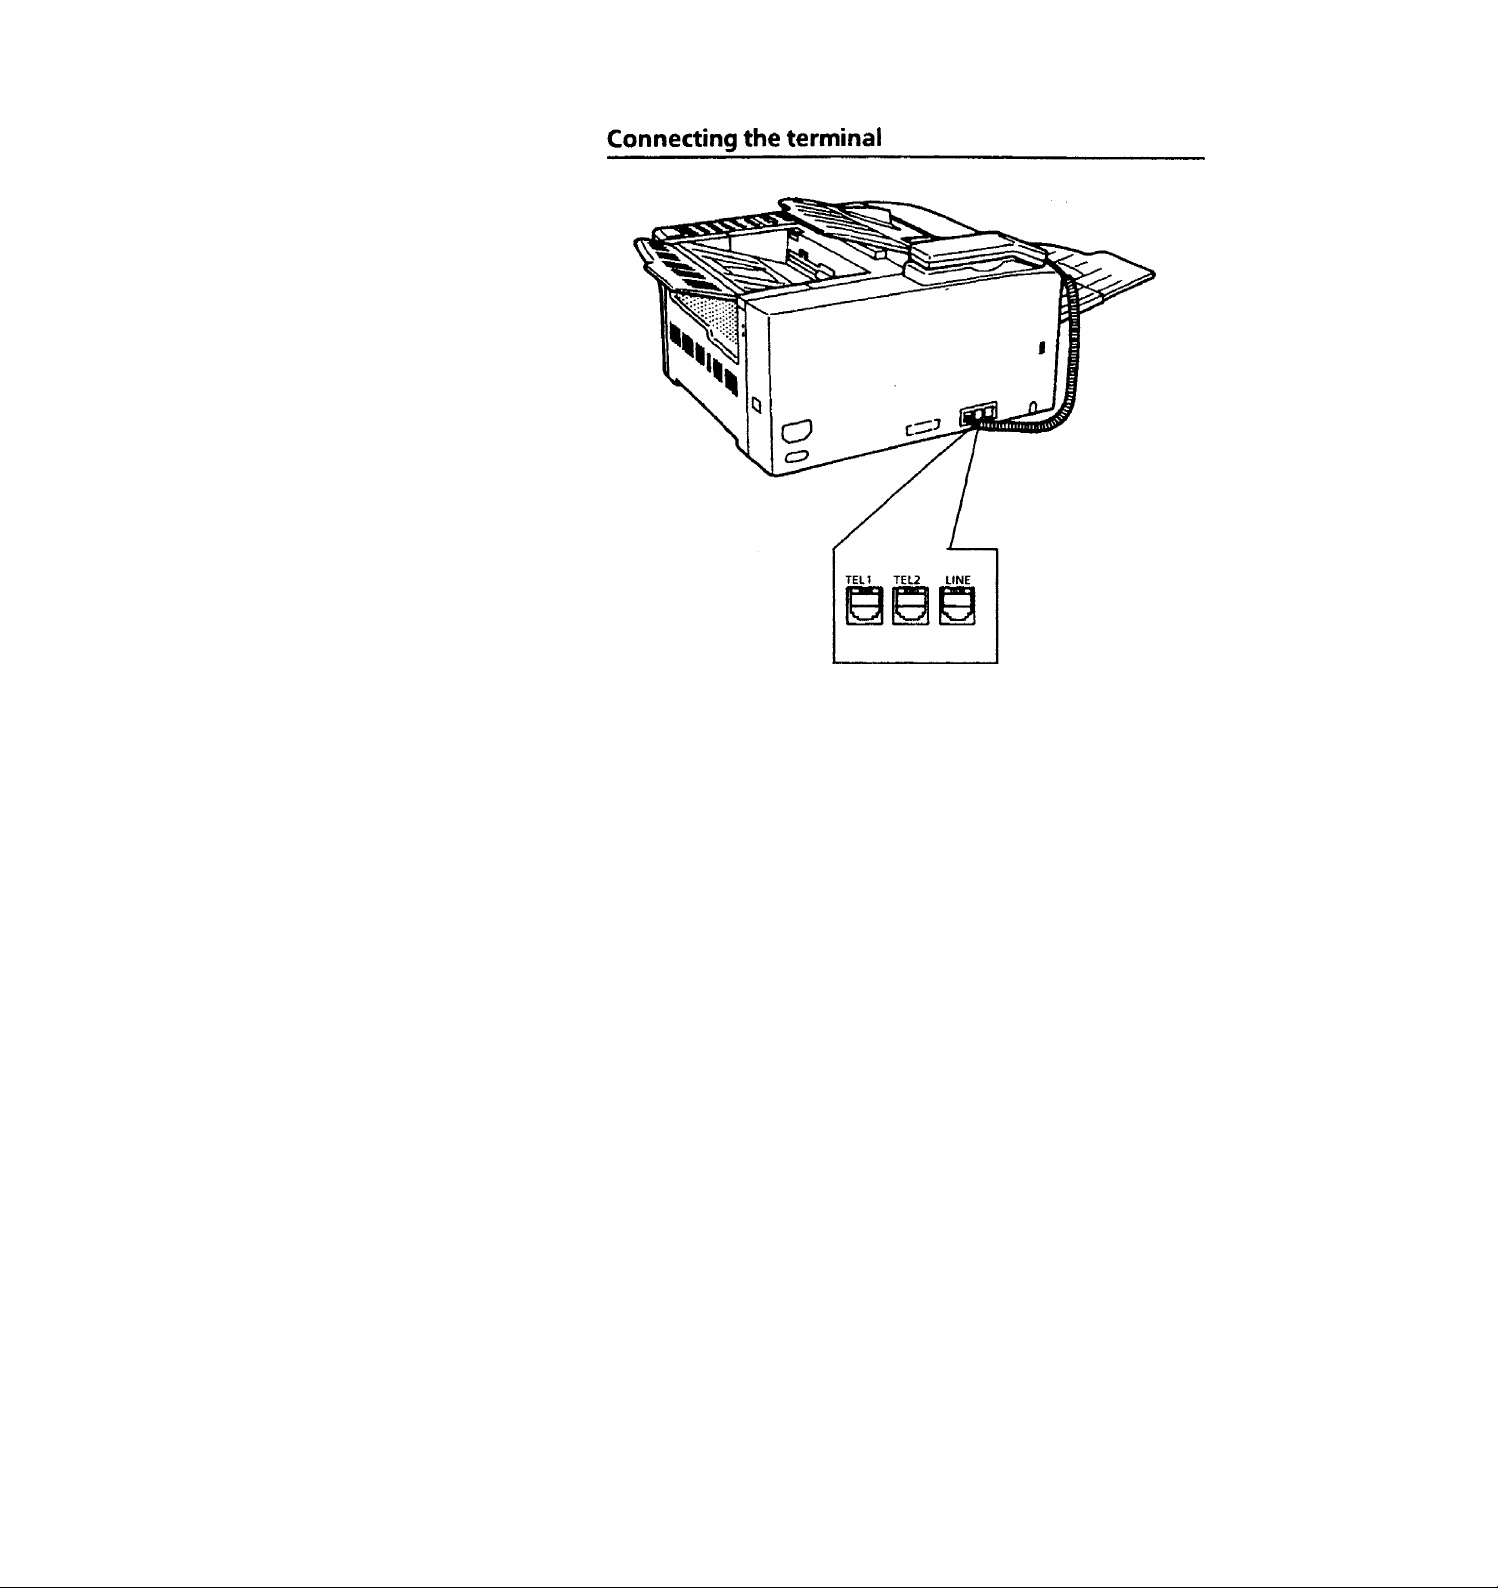
Insert one end of the handset cord into the handset. Insert
1.
the other end of the handset cord into the modular jack
marked TEL1 on the rear of the terminal. Place the handset
on the cradle.
Insert one end of the telephone line cord into the modular
2.
jack marked LINE on the rear of the terminal. Insert the
other end of the telephone line cord into the telephone wall
jack.
3. If you will be using an answering machine or second
telephone with your fax machine, connect the telephone line
cord from that device to the TEL2 jack. Remove the plastic
cover from the TEL2 jack.
Note: If desired, you may connect the answering machine or
second telephone to TEL1 and the handset to TEL2. See SET
SECOND TELEPHONE and SET ANSWERING MACHINE to select
the appropriate settings.
TELECOPIER 7024 USER HANDBOOK
XIII
Page 18
INSTALLATION
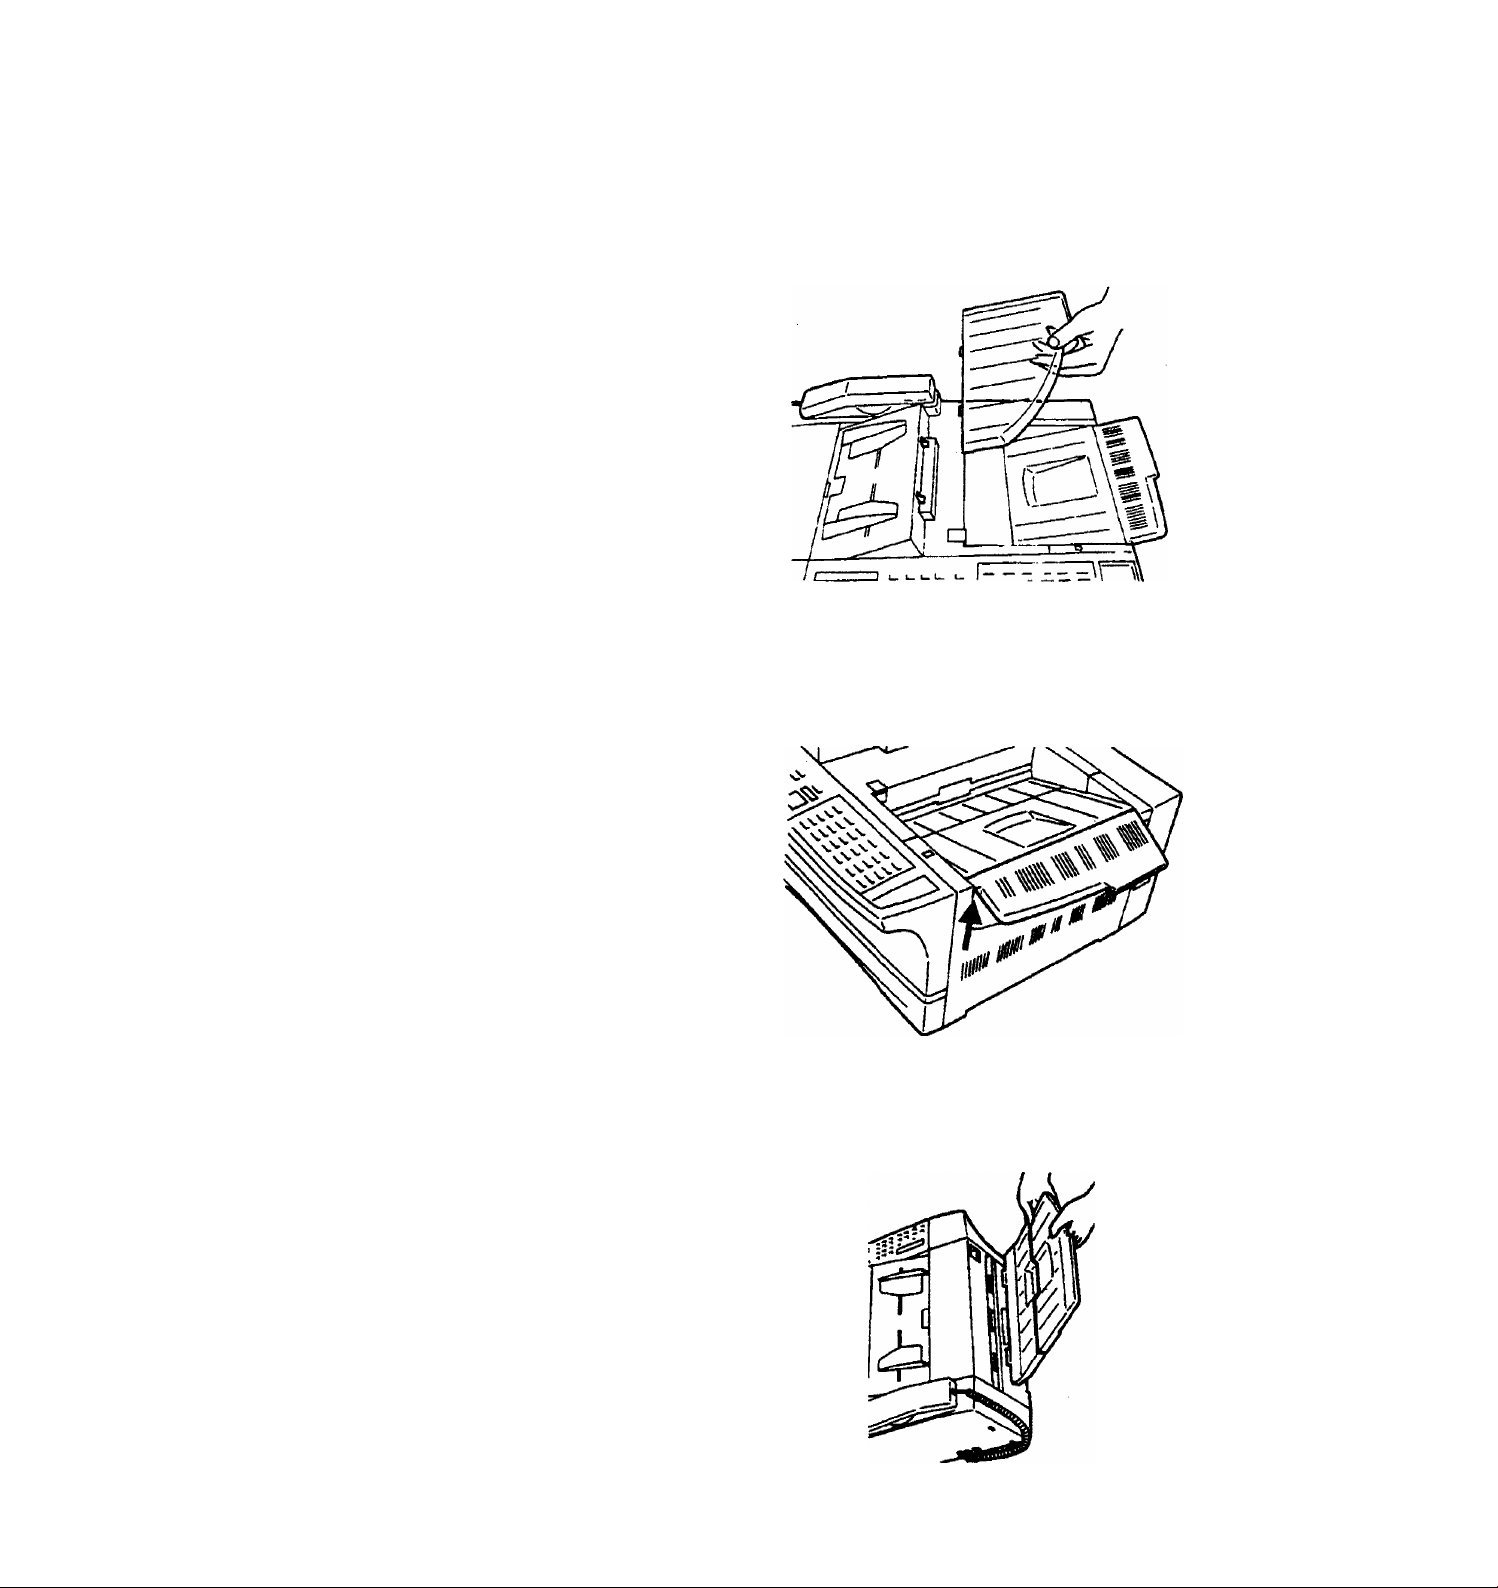
Installing the trays
1. Document input tray - Position the tabs on the tray over the
slots located on top of the terminal. Press the tray down
firmly to secure.
2. Output tray extension (attached to the terminal) - Lift the
tray upward until the tray locks into place. To fold the tray
back into the term Inal, lift and lower slowly.
3. Document output tray-Position the tray vertically. Insert the
tabs into the slots and lower the tray into position.
XIV
TELECOPIER 7024 USER HANDBOOK
Page 19

installation
speaker volume control
The speaker volume control is located on the left rear of the
terminal. Move the control as desired to adjust the volume of
the tones on the terminal.
Handset volume control
1. Move the ringer volume lever to adjust the volume of the
handset.
Xp
1
j
Selecting the alternate language
The 7024 can display and print reports in two languages. Press
[Menu] followed by the pound [#] key to select the alternate
language.
TELECOPIER 7024 USER HANDBOOK
XIX
Page 20

INSTALLATION
Notes
XX
TELECOPIER 7024 USER HANDBOOK
Page 21

Getting to know the telecopier
Preparing the machine for operation
Now that your terminal is installed, you need to become familiar
with the features. This section contains a brief summary and
setup requirements of your Xerox 7024 Facsimile Terminal.
The Xerox 7024 contains an internal data coupler. Its use is
restricted by different regulatory commissions. To comply with
the different regulations, you must read and follow the
instructions listed in the Reference Section of this handbook.
When you switch the power on, your terminal will be In the idle
mode and ready to use. Whenever an action has been
successfully completed or an operation Is not pending, the
terminal will return to the Idle mode and display the following
message in the selected language.
LOAD ORIGINALS
SEP 30'91 10:55
The 7024 is equipped with two languages. The alternate
language can be selected by pressing [Menu] followed by the
pound key [#]. All display messages and reports will be shown in
the selected language.
The terminal may be left powered on 24 hours a day and has a
battery back up system that will retain the user programmed
options In memory for a minimum of 200 hours when no power
is applied to the terminal.
The Automatic Document Feeder (ADF) will feed up to 30 single
sheets of letter or legal size originals. If the number of originals
to be sent or copied exceeds the ADF capacity, these additional
pages may be placed in the ADF after starting the send or copy
operation.
To transmit images from documents smaller than the minimum
size, damaged originals or materials not within the specifications
of this terminal, first create a copy on bond paper. Use the
copied image for your transmission. The following types of
originals should be reproduced on bond paper prior to use in this
terminal: undersized, lightweight, heavy card stock, irregularly
shaped, damaged, stapled, carbon-backed, paste-ups or bound.
Oil wet papers must dry for 30 minutes before using.
An optional setting allows wider than 8.5 inch documents to be
reduced to accommodate the receiving unit. An optional setting
also allows pages longer than 35.4 inches to be transmitted.
The error light will come on and an error message will show in
the display if an error or fault condition occurs. If there is no
obvious problem, press [Stop] and try the operation again. If the
problem continues, consult the Problem Solving Section.
TELECOPIER 7024 USER HANDBOOK
1-1
Page 22
PREPARING THE MACHINE FOR OPERATION
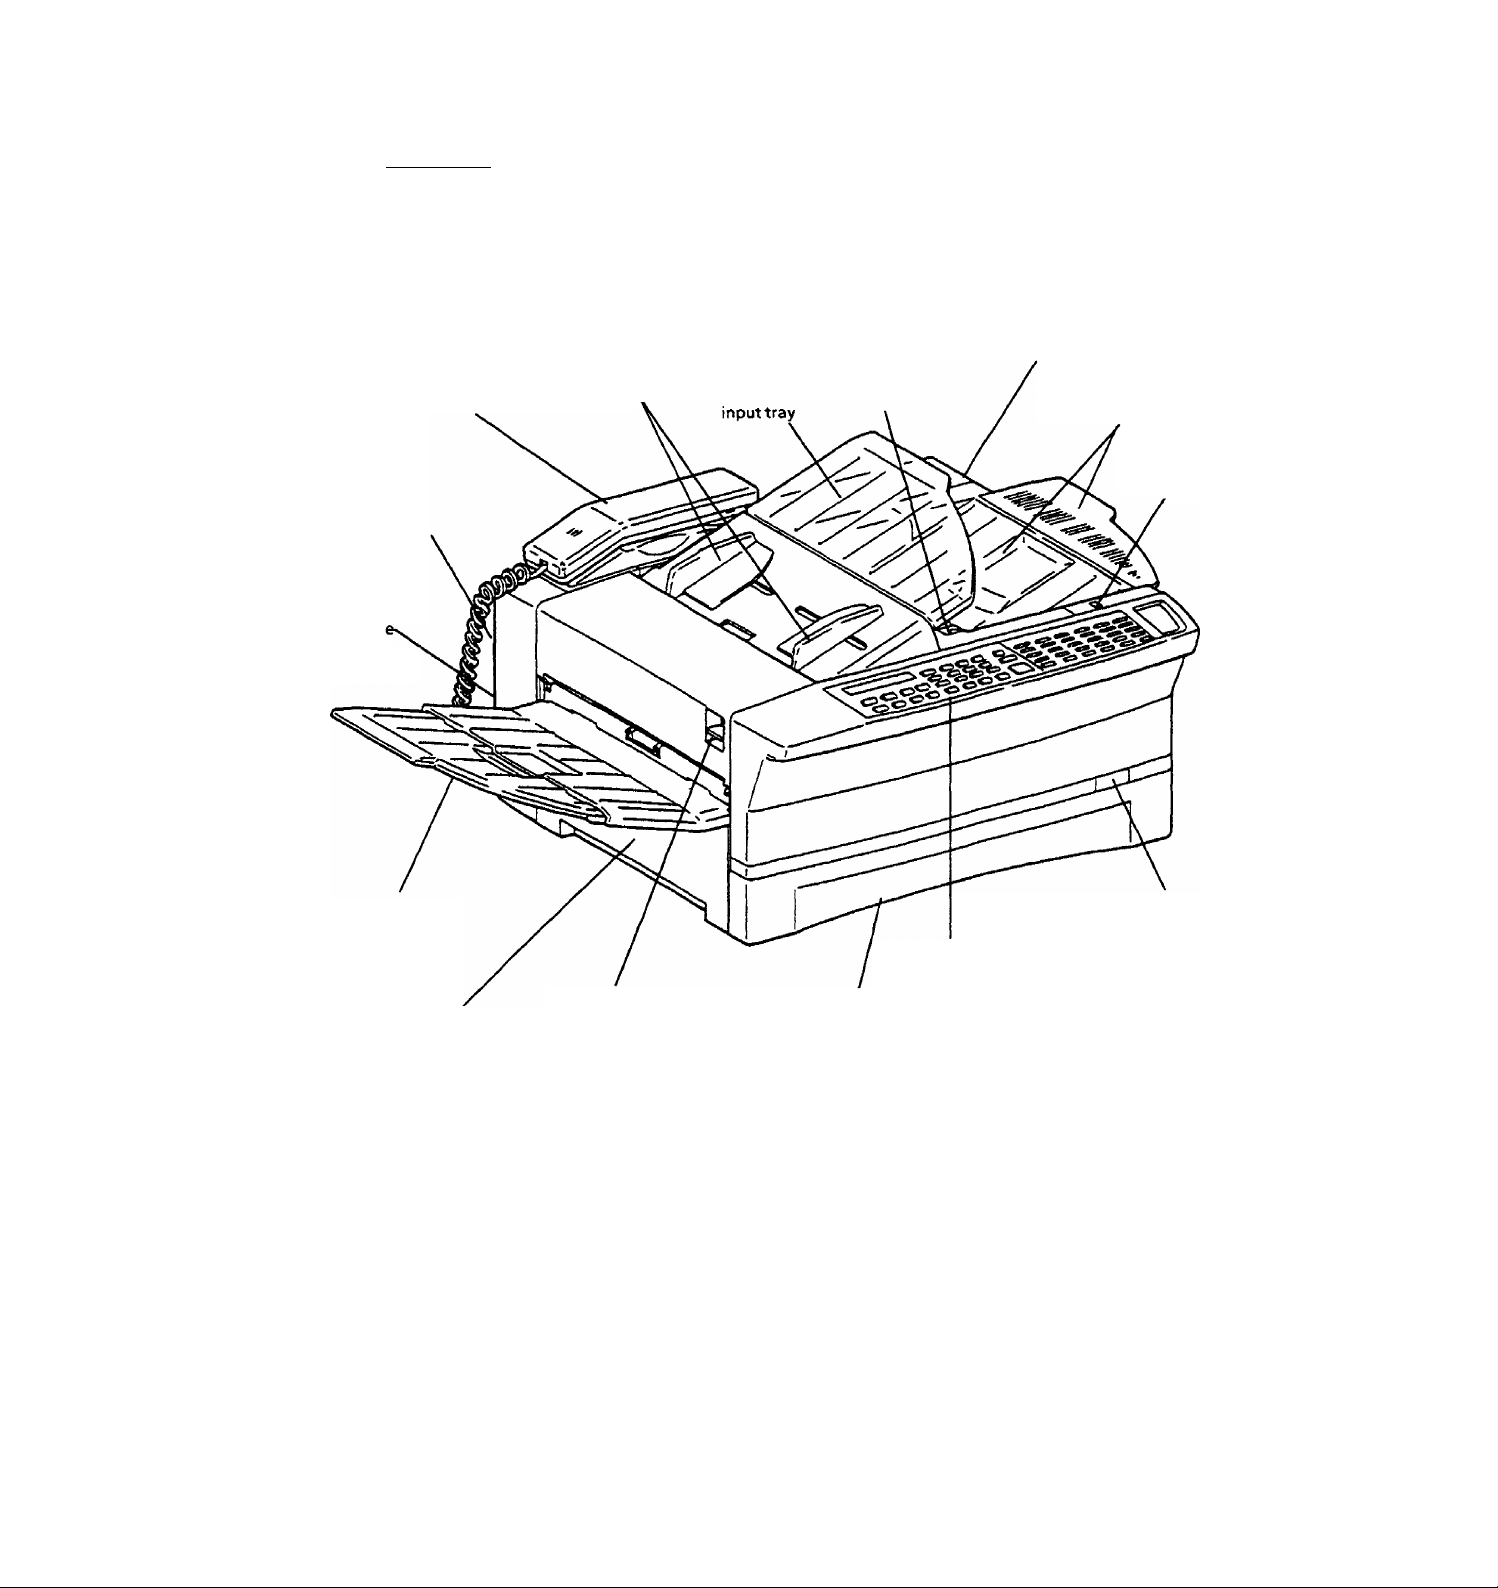
Component locations
3. Handset
2. Telephone
connections
(rear)
1. Speaker
Volum
Control
(rear)
4. Document
guides
5. Document
6. Printer
release
button
7. Power switch/cord
(right rear side)
8. Output tray
extension
9. Imaging film
indicator
15. Document
output tray
14. Left hand cover
10. Page length
indicator
11. Control panel
13.Scanner release button 12. Paper tray assembly
(document release
knob)
1-2
TELECOPIER 7024 USER HANDBOOK
Page 23

lomponent descriptions
PREPARING THE MACHINE FOR OPERATION
This is a brief description of the function of each of the keys,
controls, tones and lights on the terminal.
1. Speaker volume control; Adjusts the volume of the speaker
and tones.
2. Telephone connections: Standard RJ-11C modular jacks.
Line
TELI;
Telephone line from wall jack.
RJ-11C modular jack for telephone
handset.
TEL 2:
RJ-11C modular jack for a secondary
device (telephone or answering
machine) used with the terminal.
Handset :
Document guides:
Provides voice capability.
Adjustable document guides for
varying widths.
5. Document input tray: Provides area to load original
documents.
6. Printer release button; Releases top cover to provide access
to printer area.
7. Power switch/cord: Controls power to the unit. Located
at the right rear corner of the
terminal.
8. Output tray extension; Provides an extended area for long
copies.
9. Imaging film indicator; Visual indication showing status of
imaging film.
10. Indicator (page length): A manual setting provided to
indicate the page length loaded in
the terminal.
11. Control panel:
Contains buttons and lights for
interface with the terminal.
12. Paper tray assembly:
13. Scanner release button
14. Left hand cover:
Suppl ies paper to the termi naI.
Releases the scanner cover.
Provides access to clear a paper jam.
15. Document output tray: Provides area for completed copies
to accumulate.
TELECOPIER 7024 USER HANDBOOK
1-3
Page 24

PREPARING THE MACHINE FOR OPERATION
n
DD
Il I I
‘□ÜO 0
0
fliDiQlD
iliDiD
¡□Ç
HOD
I
1-4
I
ill O ¿D
Control Panel
TELECOPIER 7024 USER HANDBOOK
Page 25

Control panel descriptions
PREPARING THE MACHINE FOR OPERATION
Display; Two lines of information, each line provides 20
characters.
Wide scan: Use to automatically reduce the size of the pages
sent to a remote fax.
Menu; Use to select the appropriate menu and to store
information.
Resolution/Select: Use to select the scanning resolution,
functions and settings within a menu. Also use to display the
number of pending jobs and the amount of memory in use.
Enter: Use to select the features and save the selection of the
displayed feature.
Original/Clear: Use to select the contrast. Also use to clear
information in the display.
Voice request: Use to signal remote operator that voice
communication is desired; also use to enable on-hook dialling.
Manual receive; Use to select the receive mode.
Send confirm: Use to enable the print out of a Send Confirm
Report after a send operation.
Redial; Use to redial the last auto dialled telephone number.
T, ^ keys: Use to move the cursor when selecting the
characters for the local name and number.
- (Dash) Key: Use to insert a dash in telephone numbers and local
identification number to enhance legibility. Also instructs the
terminal to wait for a dial tone when pressed two times.
Tone: Use to change dialling system; tone or pulse.
Pause: Use to enter a pause in the dial sequence when manual
dialling or storing a one touch or speed dial telephone number.
Speed Dial: Use to activate dialling of stored speed dial
numbers.
Error LED: Indicates an error condition.
Copy: Use to select the copy function.
Stop; Use to stop an operation or reset the error LED.
Start: Use to begin an operation.
Terminal keypad: Use as a telephone dialling pad, to access
display menus, menu functions, and to create the dialling
directories.
One touch keys (01-24): Use to program telephone numbers for
one touch dialling of an individual terminal.
Multifunction keys (P1-P6): Use to program telephone numbers
as standard one touch keys and to program multi-step
operations for delayed send, delayed group send, relay send,
send secure mail, delayed polling and multi-polling as program
one touch keys. These six keys can have both the standard one
touch and the program one touch functions assigned at the same
time.
TELECOPIER 7024 USER HANDBOOK
1-5
Page 26

PREPARING THE MACHINE FOR OPERATION
Menu table
The terminal has 11 menus with additional functions (features,
reports, data entry and options.) Each menu may have several
selectable features. The 11 menus are:
1.
Send Options 1
2.
Send Options2
Polling Options
3.
4.
Call Response
5. One-Touch Setup
6.
Speed Dial Setup
7. Print Reports
8. Pending Jobs
9. User Settings
10. Program One-Touch
11. RS-2321
To select the desired menu, press [Menu] and use the keypad to
enter the two digit menu number (01-11). When the desired
menu is displayed, press [Enter] to display the first feature in the
selected menu. To select the desired feature, use the keypad to
enter the two digit feature number. See Menu table for feature
numbers. (Numbers 1-9 must be preceded by 0, i.e. 01,02.)
Example: To select from the menu table
1. Press [Menu] to enter the menu table.
l.SEND OPTIONSl
01-10 SELECT/ENTER
2. Enter the desired menu number (01-11.) Press [0], [9] to
select menu 9.USER SETTINGS in this example.
9.USER SETTINGS
01-10 SELECT/ENTER
3. Press [Enter] to select the first feature within menu 9.
l.SET POLLED MODE
01-21 SELECT/ENTER
Enter the number associated with the desired feature within
menu 9. For example, press [0], [7] to select 7.SET CONTRAST.
7.SET CONTRAST
01-21 SELECT/ENTER
Note: You can manually advance through the menus by
pressing [Menu] one time and [Select] repeatedly until the
desired menu is displayed. You can manually advance through
the features by pressing [Select] repeatedly; or manually step
backward through the menus and features by pressing [Menu]
repeatedly.
1. Menu 11, RS-232, will be displayed only If you have a RS-232 interface board installed in your terminal.
1-6
TELECOPIER 7024 USER HANDBOOK
Page 27
LOAD OSIGIMALS
SEP 30,91 8;00
MENU
IDLE MODE
MENU TABLE
Press [Select] to scroti forward or [Menu] to scroll
backward through the menu titles.
1. SendOptionsI
ENTER
1. Long Original
SELECT
2. Secure Send
Mails,
SELSa
3. Forced 4800
Mode
_______
2. Send Options2
ENTER
t.Defayed Send
SELECT
i.Oelayed Group
3. Polling Options
ENTER
1.Delayed Polling
SELECT
2.Mutti-Polling
4. Call Response
ENTER
r X
X
Set TAD Time
5. One-Touch
ENTER
^ X
One-Touch 01 to
24
___________
6. Speed Dial Setup
ENTER
C
Speed Dial 01 to 55
______
7. Print Reports
1.Activity Report
2.0ptions Report
Send ■
SELECT
3. Relay Send
, ,SELSa
4.Send Secure Mall
.SELECT
3.Store For Polling
ENTER
3.Dial Directory
To select "1 Store for Potting,
press [Enter] when "3 Store for Polling"
is displayed..
1.Store for
Polling.__
SELECT
2.Erase Polling
Doc.
SELEa
3.Print Polling
Doc.
_______
1.
From the idle mode, press {Menu).
To select the desired menu, use one of the following methods:
2.
• Use the keypad to enter the desired menu number {01-11) or;
• Press (Select) to scroll forward or press (Menu) to scroll backward through the menu titles.
When the desired menu is displayed, press {Enter).
3.
4.
To select the desired feature, use one of the following methods:
• Use the keypad to enter the desired feature number or;
• Press {Select! to advance through the features.
When the desired feature is displayed, press (Enter) to set the feature.
ENTER
SELEa
SELEa
8. Pending Jobs
ENTER
1.Pending Job Litt
SELEa
2.Print Pending
Doc.
SELEa SELEa
3.Erase Pending
Job
__________
9. Liter Settingt
ENTER 1 enter ENTER
1.Polled Mode
SELEa
2.Auto Rev, Time
3.Confirm Reporl
4.Scanner Width
S.Halftone
6. Res Default
7.Cort1rast
B.Time Pause
9.Number Rings
10.2nd Telephone
11.Ant. Machine
12.Activity Report
li.Rcv. Reduction
14.BIock Junk Fax
tS.ECM Mode
16.Copy Protect
10. Program
One-Touch
I.One-touch
SELEa
2.Program One
Touch
_______
Pré« [Select]
to advance to
the next feature.
17.Dialling Type
IS.Set # of Redials
19.Redial Interval
11. RS-232
1.RS-232 Print
SELEa
2.RS-232 Settings
ENTER
I.Baud Rate
SELEa
2.Set Parity
SELEa
3.Set Stop Bit
SELEa
4.Char Length
Note: Menu 11 will be displayed only if you havea RS-232 interface board installed in your terminal.
20.Date and Time
21.Local ID/Name
Page 28

PREPARING THE MACHINE FOR OPERATION
Set date and time
This feature allows the date and time to be entered into the
terminal. The time displays in a 24-hour format. The date and
time are saved in memory and a battery provides power when
the AC power is removed.
To set date and time (Menu 09, Feature 20)
1. Press [Menu].
l.SEND OPTIONSl
01-10 SELECT/ENTER
2. Press [0], [9].
9.USER SETTINGS
01-10 SELECT/ENTER
3. Press [Enter].
l.SET POLLED MODE
01-21 SELECT/ENTER
4. Press [2], [0].
20.SET DATE AND TIME
01-21 SELECT/ENTER
5. Press [Enter]. Use the terminal keypad to enter the last two
digits of the current year.
ENTER YEAR
'01 01/01 00:00
6. Press [Enter]. Enter the month.
ENTER MONTH
'91 09/01 00:00
7. Press [Enter]. Enter the day.
ENTER DAY
'91 09/30 00:00
1-8
8. Press [Enter]. Enter the hour in 24-hour format.
ENTER HOUR
'91 09/30 10:00
TELECOPIER 7024 USER HANDBOOK
Page 29

PREPARING THE MACHINE FOR OPERATION
9. Press [Enter], Enter the minute.
ENTER MINUTE
'91 09/30 10:30
10. Press [Enter].
SET DATE AND TIME
COMPLETED
TELECOPIER 7024 USER HANDBOOK
1-9
Page 30

PREPARING THE MACHINE FOR OPERATION
Local identification number and name/send header
The local identification (ID) number and name identify your
terminal to other terminals in the network.
The local ID number can be up to 20 characters and is the
telephone number of the terminal. The local name can be any
alpha/numerical combination up to 20 characters.
If the local ID number and name are entered, a send header
containing the local name, local ID number, date, time,
communication batch # and page numbers will appear at the
top of each page sent to a remote terminal. If the ID number
and name are not entered, the send header will contain the
date, time, communication batch # and the number of pages
only. A sample send header is shown below:
SAMPLE SEND HEADER
To Store local ID number and name (Menu 09, Feature 21)
1. Press [Menu].
l.SEND OPTIONSl
01-10 SELECT/ENTER
2. Press [0], [9].
9.USER SETTINGS
01-10 SELECT/ENTER
3. Press [Enter].
l.SET POLLED MODE
01-21 SELECT/ENTER
4. Press [2], [1].
2l.SET LOCAL ID/NAME
01-21 SELECT/ENTER
1-10
TELECOPIER 7024 USER HANDBOOK
Page 31

5. Press [Enter].
PREPARING THE MACHINE FOR OPERATION
ID;
SELECT/ENTER
If desired number is displayed, press [Select] and go to step 8.
If no number is displayed, press [Enter] and go to step 7.
If an undesired number is displayed, press [Clear] and go to
step 7.
ID:
7- Use keypad to enter the local ID (telephone number). When
the desired local ID has been entered, press [Enter].
NAME:
SELECT/ENTER
8. If desired name is displayed, press [Select] to complete the
procedure.
If no name is displayed, press [Enter] and go to step 9.
If an undesired name is displayed, press [Clear] and go to
step 9.
ABCDEFGHIJ. 00
Space
I
B
A
K L M
V
U
b
a
k 1 m
V
u
1
0
!
"
Use the up and down arrow keys to select the row containing
the desired character. Use the left and right arrow keys to
select the first character of your local name. When the cursor
is positioned under the first desired character, press [Enter]
to store the character and proceed to the next character.
Numbers can be entered using the character code table or
keypad. Press [Clear] to erase a character. The 00 represents
the number of characters entered in the name.
ABCDEFGHIJ. 01
A
J
T
j
9
{ ’ }
*
Space
/
/
-
Display always starts
with first row.
I=l[
Use UP/DOWN arrow
keys to change rows.
Character table
C D E
N
X Y Z
w
d e
c
n
X
w
3 4 S 6
2
< = >
$ %
#
F
P
O
f
o
P
Z +
y
?
&
G
Q
+
g
g
@
H 1
R S
i
h
r s t
-
7
8
I
]
( )
Use LEFT/RIGHT
arrow keys to change
columns.
□
TELECOPIER 7024 USER HANDBOOK
1-11
Page 32

PREPARING THE MACHINE FOR OPERATION
10. Continue using the arrow keys to select the characters for
your local name. Press [Enter] to select each character.
ABCDEFGHIJ.
ABC
03
11. When your local name has been entered, press [Menu].
SET LOCAL ID/NAME
COMPLETED
1-12
TELECOPIER 7024 USER HANDBOOK
Page 33

Set terminal and handset dialling type
PREPARING THE MACHINE FOR OPERATION
The telephone lines require either touch tone or pulse dialling
signals. If you are unsure of the dialling signals required by your
telephone system, call your telecommunication company for
assistance. The switch on the handset and the menu option on
the terminal must be set to meet the telephone system
requirements. Ensure the terminal menu and the handset switch
have the same dial option selected.
There are three dialling settings: TONE, 20PPS (pulse per second'
and 10PPS. The tone setting will satisfy the majority of the
telephone systems.
To set terminal dialling type (Menu 09, Feature 17)
1. Press [Menu].
l.SEND OPTIONSl
01-10 SELECT/ENTER
2. Press [0], [9].
9.USER SETTINGS
01-10 SELECT/ENTER
3. Press [Enter].
l.SET POLLED MODE
01-21 SELECT/ENTER
4. Press [1], [7].
17.SET DIALLING TYPE
01-21 SELECT/ENTER
5. Press [Enter].
DIALLING MODE: TONE
SELECT/ENTER
6. Press [Select] to scroll through the dialling type settings:
TONE, 20PPS or 10PPS.
DIALLING MODE: TONE
SELECT/ENTER
TELECOPIER 7024 USER HANDBOOK
7. Press [Enter] when the desired setting is displayed.
SET DIALLING TYPE
COMPLETED
1-13
Page 34

PREPARING THE MACHINE FOR OPERATION
To set handset dialling type
Move the switch on the handset to the appropriate setting for
the telephone system.
r
• = 20PPS Rotary
• = 10PPS Rotary
J
c I-
T = Tone
1-14
TELECOPIER 7024 USER HANDBOOK
Page 35

Answering modes
PREPARING THE MACHINE FOR OPERATION
There are two basic ways your terminal answers incoming calls;
automatic or manual. There is one manual answer mode and
three automatic answer modes.
Press [Manual Receive] repeatedly until the desired setting is
displayed.
Automatic modes:
• LOAD ORIGINALS - LED is off- Select this setting when you
want the terminal to automatically answer all incoming calls
after the specified number of rings. (See Set number of
rings.)
• LOAD ORIG:(TEL) - Select this setting when you want your
terminal to automatically answer all incoming calls and play
a prerecorded message to all voice callers if no facsimile
tones are detected.
If facsimile tones are detected, your terminal will perform
any facsimile operation.
• LOAD ORIG:(ANS) - Select this setting when you connect an
answering machine to your terminal. (See Set answering
machine.) With proper setup, the answering machine will
automatically answer the incoming call. If the answering
machine is turned off, your terminal will automatically
answer the call after 7 rings.
Any voice callers to your terminal will hear the prerecorded
message on your answering machine. If facsimile tones are
detected, your terminal will perform any facsimile operation.
Manual mode:
• LOAD ORIGINALS - LED is on. Select this setting when you
want to manually answer all incoming calls.
telecopier 7024 USER HANDBOOK
1-15
Page 36

PREPARING THE MACHINE FOR OPERATION
Set answering machine
When you connect a telephone answering machine (TAD) to
your terminal, the guidelines listed below should be followed:^
• Answering machine device: The rings before answer setting
on your answering machine should be set to answer before 7
rings. The terminal will automatically answer the call after 7
rings.
• Jack connection and Set answering machine: The jack
connection of the answering machine and the settings of the
set answering machine feature below should match. The
recommended connection and setting is TEL2.
• Answer mode: The answer mode should be set to LOAD
ORIG: (ANS).
• SET TAD TIME: User specified (see next page.)
To set answering machine (Menu 09, Feature 11)
TEL1
This setting is used when you connect an answering
machine to the TEL1 jack. (See footnote)
TEL2
This setting is used when you connea an answering
machine to the TEL2 jack.
1. Press [Menu] to select the menu table.
l.SEND OPTIONSl
01-10 SELECT/ENTER
2. Press [0], (9] to select menu 9.
9.USER SETTINGS
01-10 SELECT/ENTER
3. Press (Enter] to select the first feature within the menu.
l.SET POLLED MODE
01-21 SELECT/ENTER
4. Press [1], [1] to select SET ANS. MACHINE.
11.SET ANS. MACHINE
01-21 SELECT/ENTER
1. There are two jack selections on your terminal. If desired, the answering machine can be connected to the
TEL1 jack and the handset to the TEL2 jack.
1-16
TELECOPIER 7024 USER HANDBOOK
Page 37

5. Press [Enter].
PREPARING THE MACHINE FOR OPERATION
ANS. MACHINE: TEL2
SELECT/ENTER
6. Press [Select] to select TELI OR TEL2.
ANS. MACHINE: TEL2
SELECT/ENTER
7. Press [Enter] when the desired setting is displayed.
SET ANS. MACHINE
COMPLETED
To set TAD time (telephone answering device)
(Menu 04)________________________________________________
This feature determines how many seconds the terminal should
wait before switching the call from the answering machine to
the terminal for facsimile operations. When there is an incoming
call to the answering machine and the caller is silent or does not
leave a message in the specified time, the call will be switched to
the terminal for facsimile operations.
You can select from 0 to 15 seconds. Entering 0 turns this feature
off.
1. Press [Menu] to select the menu table.
l.SEND OPTIONSl
Ol'lO SELECT/ENTER
2. Press [0], [4] to select menu 4.
4.CALL RESPONSE
01-10 SELECT/ENTER
3. Press [Enter]. Enter a number between 00-15 seconds.
SET TAD TIME
TIME: 00
4. Press [Enter] when the desired setting is entered.
SET TAD TIME
COMPLETED
TELECOPIER 7024 USER HANDBOOK
1-17
Page 38

PREPARING THE MACHINE FOR OPERATION
Set second telephone
If desired, you can connect a second telephone to your terminal.
Follow the guidelines below for proper setting and connection.
• Connect the second telephone to the TEL2 jack. ^
• Select ON in the Set second telephone setting.
If you answer the incoming call using the second telephone
before the terminal answers, you can transfer the call back to the
terminal by pressing [6] two times within 12 seconds. The
terminal will perform the facsimile operation. The second
telephone must be physically connected to the terminal to
perform this operation.
To set second telephone (Menu 09, Feature 10)
1. Press [Menu] to select the menu table.
l.SEND OPTIONSl
01-10 SELECT/ENTER
2. Enter [0], [9] to select menu 09.
9. USER SETTINGS
01-10 SELECT/ENTER
3. Press [Enter] to select the first feature within the menu.
l.SET POLLED MODE
01-21 SELECT/ENTER
4. Enter [1], [0] to select SET 2ND TELEPHONE.
10.SET 2ND TELEPHONE
01-21 SELECT/ENTER
5. Press [Enter].
REMOTE TEL: OFF
SELECT/ENTER
6. Press [Select] to select ON or OFF and press [Enter].
REMOTE TEL: ON
SELECT/ENTER
SET 2ND TELEPHONE
COMPLETED
1. If desired you can connect the second telephone to the TEL1 jack and the handset to the TEL2 jack.
1-18
TELECOPIER 7024 USER HANDBOOK
Page 39

One touch label
PREPARING THE MACHINE FOR OPERATION
A one touch label is provided with your terminal to record your
stored one touch telephone numbers. When you complete the
setup of your dial directory in the next section, use the
procedures below to record your numbers.
installing the one touch label
1. Remove the protective cover from the one touch keys.
2. Remove the one touch label and write the appropriate
telephone numbers on the sheet.
3. Insert the one touch label and the protective cover over the
one touch keys.
TELECOPIER 7024 USER HANDBOOK
1-19
Page 40

PREPARING THE MACHINE FOR OPERATION
Tones
Your terminal generates audible tones to indicate terminal
status. The tones also indicate the acceptance of actions you
perform on the control panel.
One beep
A single beep indicates a valid action as been accepted when a
control panel button is pressed.
Two beeps
A double beep indicates an action has not been accepted. For
example when an incorrect sequence was performed.
Multiple beeps
More than two beeps indicate the machine requires attention.
Refer to the display for corrective action. An example would be
memory full, out of paper or voice request.
1-20
TELECOPIER 7024 USER HANDBOOK
Page 41

Memory
PREPARING THE MACHINE FOR OPERATION
If scan to memory is selected in the feature, the terminal will not
transmit the originals as it scans them, but stores the image,
telephone number, and other data as a stored job in memory.
The originals, therefore, do not block the document tray while
the terminal is waiting to transmit the images - an advantage
that is important when you request transmission after hours,
when telephone rates are lower.
The terminal has a memory capacity equivalent to approximately
sixteen standard size pages for transmission at normal resolution
with ECM turned off. The terminal will store approximately
twelve pages with ECM turned on. Actual memory requirements
vary with such factors as document size, contents and resolution.
The following features can be stored in memory;
• Delayed send
• Delayed group send
• Relay send
• Secure send
• Store for polling
Receive to memory
The terminal automatically receives and stores documents into
memory when the terminal is out of supplies or when a paper
jam occurs.The following displays during the receive operation
if ECM mode is set to OFF:
RECEIVE
MEMORY
STD
The following displays during the receive operation if ECM is set
to ON;
RECEIVE
ECM
STD
The documents will print out from memory after the supplies
have been replaced or the paper jam is cleared.
Memory available
When the terminal is in the idle mode, press [Select] to display
the number of pending jobs and the total percentage of memory
used.
1. Remove originals from ADF. Press [Select] to display the
number of pending jobs.
PENDING JOBS
(01)
1, Under certain conditions, the document will first be received to memory and printed automatically.
TELECOPIER 7024 USER HANDBOOK
1-21
Page 42

preparing the machine for operation
2. Press [Select] a second time to display the percentage of
memory used.
MEMORY IN USE (023%)
_________
3. Press [Stop] to return to the original display.
Memory full
• When memory is full, an alarm sounds and an error message
appears on the display.
MEM FULL SEE MANUAL
ENTER/CLEAR
• If above message is displayed, press [Enter] within one
minute to save ail scanned originals.
Failure to respond within one minute results In the cancellation
of the job and the deletion of scanned originals. An Error
Message Report will be printed out.
Switching the power off and on
When the power is switched off, any document(s) in memory will
be deleted and pending delayed transmissions will be canceled.
The percentage of memory that is currently being used Is
displayed when [Select] is pressed from the idle mode. If any
memory Is used and you need to switch off the power, perform
the following actions to avoid losing the document(s) in
memory.
• if a transmission is pending or a delayed operation has been
setup, the power should not be switched off unless
necessary.
• If an error is displayed, correct the problem according to the
message.
• A Pending Job List can be printed to determine if you need to
print the documents before power is switched off.
• It is not necessary to turn the power off to change the
imaging film.
1-22
TELECOPIER 7024 USER HANDBOOK
Page 43

Dial directory
Dialling
This feature allows 55 speed dial and 30 one touch telephone
numbers to be entered into the terminal for quick telephone
dialling. Each telephone number can be a maximum of 40
characters. A one touch or speed dial number is assigned by the
terminal for each telephone number.
Speed dial - Fifty five telephone numbers and names can be
stored in the speed dial memory and can be accessed by the two
digit speed dial numbers 01-55. The one touch and speed dial
numbers are printed on the Dial directory report.
One touch - Thirty telephone numbers and names can be stored
in the one touch memory and can be accessed by the one touch
numbers 1-24 and P1-P6.
Program one touch - P1-P6 can also be programmed to reduce
multi-step functions to one keystroke.
Group numbers - Five group numbers are available on your
terminal and each one touch and speed dial number can be
entered into one or all five groups in the one touch and speed
dial setup. Group dial is available through Delayed Group Send.
Forced 4800 and secure send can also be setup in the one touch
and speed dial numbers.
A pause can be entered in your telephone numbers when
dialling 9 for an outside line or when using charge code
numbers.
A dash can be entered in your telephone numbers to separate
the digits for easier reading or to insert another pause.
To plan the dial directory
• Identify the telephone numbers you plan to include in the
one touch or speed dial memory.
• Print out a copy of the Dial Directory report. (Reference the
Reports Section.)
• Determine which number from the Dial Directory list (01-24
or P1-P6 for one touch or 01-55 for speed dial) will be
associated with each telephone number.
• Determine which telephone numbers will be included in the
group numbers.
• When all entries have been entered into the terminal, print
out a copy of the numbers and verify that all telephone
numbers and names are correct. Use this list as a reference.
Print out a new copy of the list each time the list is modified.
TELECOPIER 7024 USER HANDBOOK
2-1
Page 44

DIALUNG
To enter pauses in one touch or speed dial numbers
A pause may be included anywhere in the one touch or speed
dial numbers by pressing the pause or dash key.
A pause should be entered whenever a delay is required
between numbers such as when dialling 9 for an outside line or
using charge code numbers.
The dash key should be used for an undetermined delay
between numbers such as waiting for a dial tone when dialling
through a PBX system.
If Pause is pressed, displays.
If dash [ - ] is pressed twice, "!" displays.
To set one touch keys 01-24 (Menu 05, Feature 1)
1. Press [Menu] to select the menu table.
l.SEND OPTIONSl
01-10 SELECT/ENTER
2. Press [0], [5], [Enter].
ONE-TOUCH 01 TO 24
SELECT AND PRESS
3. Press the desired one touch key.
(;01]=NOTHING STORED
SELECT/ENTER
If desired number is displayed, press [Select] and go to step 6.
If NOTHING STORED is displayed, press [Enter] and go to
step 5.
If an undesired number is displayed, press [Clear] and go to
step 5.
[01]=TEL. NUMBER
5. Use the terminal keypad to enter the telephone number (up
to 40 characters). When the telephone number is correct,
press [Enter].
[01]=SET PARAMETERS
SELECT/ENTER
2-2
6. If the Forced 4800 or Secure Send options are not desired,
press [Select] and go to Step 11.
If the Forced 4800 or Secure Send options are desired, press
[Enter].
FORCED 4800: OFF
SELECT/ENTER
TELECOPIER 7024 USER HANDBOOK
Page 45

DIALLING
7. Press [Select] to display the desired setting; ON or OFF.
8. Press [Enter] to store the selected setting.
SECURE SEND: OFF
SELECT/ENTER
9. Press [Select] to display the desired setting; ON or OFF.
10. Press [Enter] to store the selected setting.
[01]=LOCATION ID
SELECT/ENTER
11. If desired name is displayed, press [Select] and go to step 14.
If LOCATION ID is displayed, press [Enter] and go to step 12.
If an undesired name is displayed, press [Clear] and go to
step 12.
12. Enter the remote Location ID (up to 12 alpha/numeric
characters) one character at a time. Use the arrow keys to
move the cursor under the desired character in the character
table or use the numeric keypad to enter numbers. If a
character is being selected from the table, press [Enter] for
each character desired. Enter is not required when entering
numbers from the keypad.
Space
A B
K L M N
V
U
a b c
k 1 m n o
V w X
u
1
0
!
''
ABCDEFGHIJ. 00
Note: The two digit number in the display represents the
number of characters entered.
T
j
t
9
{ }
*
Space
i
/
/
-
Display always starts
with first row.
Use UP/DOWN arrow
keys to change rows.
Character table
C D E
w
X
d
2 3
<
=
#
$
F
P
0
Y Z +
f
e
P
Z
y
4
5
7
>
% &
G
Q
g
q
+
6 7
@
H 1 J
R
S
-
h i
r
5
-
8
I
1
( )
Use LEFT/RIGHT
arrow keys to change
columns.
13. When ail the characters have been selected for the remote
location ID, press [Menu].
TELECOPIER 7024 USER HANDBOOK
[01]=GROUP NUMBER
SELECT/ENTER
2-3
Page 46

DIALLING
14. If desired number is displayed, press [Select] and [Stop] to
return to the idle mode.
If GROUP NUMBER is displayed, press [Enter] and go to
step 15.
if an undesired number is displayed, press [Clear] and go to
step 15.
[01]=GROUP NUMBER
15. Use the terminal keypad to enter the group numbers. The
terminal offers up to five groups, numbered 1 to 5 and each
number can be included in ail five group numbers, if desired.
if entering more than one group number, press [Menu] to
insert a comma between the numbers.
[01]-GROUP NUMBER
1. 3. 4
16. When you have entered ail the group numbers, press [Enter].
ONE-TOUCH 01 TO
SELECT AND PRESS
24
17. Press [Stop] to return to the idle mode.
To set speed dial numbers (Menu 06, Feature 1)
1. Press [Menu] to select the menu table.
l.SENO OPTIONSl
01-10 SELECT/ENTER
2. Press [0], [6], [Enter].
SPEED DIAL 01 TO 55
SELECT AND PRESS
3. Use the terminal keypad to enter the desired speed dial
number between 01-55. Speed dial numbers below 10 must
be preceded by 0.
(01)
2-A
TELECOPIER 7Q24 USER HANDBOOK
Page 47

4. Press [Enter].
DIAUING
(01)=N0THING STORED
SELECT/ENTER
5. If desired number is displayed, press [Select] and go to step 7.
If NOTHING STORED is displayed, press [Enter] and go to
step 6.
If an undesired number is displayed, press [Clear] and go to
step 6.
(01)=TEL. NUMBER
6.
Use the terminal keypad to enter the telephone number (up
to 40 characters). When the telephone number is correct,
press [Enter],
(01)=SET PARAMETERS
7.
If the Forced 4800 or Secure Send options are not desired,
SELECT/ENTER
press [Select] and go to Step 12.
If the Forced 4800 or Secure Send options are desired, press
[Enter]-
FORCED 4800: OFF
SELECT/ENTER
8. Press [Select] to display the desired setting; ON or OFF.
9. Press [Enter] to store the setti ng.
SECURE SEND: OFF
SELECT/ENTER
10. Press [Select] to display the desired setting; ON or OFF.
11. Press [Enter] to store the setting.
(01)=LOCATION ID
SELECT/ENTER
12. if desired name is displayed, press [Select] and go to step 15.
if LOCATION ID is displayed, press [Enter] and goto step 13.
If an undesired name is displayed, press [Clear] and go to
step 13.
TELECOPIER 7024 USER HANDBOOK
2-5
Page 48

DIALLING
13. Enter the remote Location ID (up to 12 alpha/numeric
characters) one character at a time. Use the arrow keys to
move the cursor under the desired character in the character
table or use the numeric keypad to enter numbers. If a
character is being selected from the table, press [Enter] for
each character desired. Enter is not required when entering
numbers from the keypad.
space
l
A B
K L M
U V
a b c
k 1 m
V
u
1
0
;
1
ABCDEFGHIJ.
00
Note: The two digit number in the display represents the
number of characters entered.
Character table
D
C
N
w X Y Z +
d e
n
X
w
3
2
= >
<
$ %
#
F
E
P
O
f
0
P q
Z +
y
4
5 6
?
&
G
Q
g
@ [
H 1
R
h i
r
, -
7
(
S
- /
S
8
]
)
Sp^e
J
T
j
t
/
-
9
}
{
♦
Display always starts
with first row.
Use UP/DOWN arrow
keys to change rows.
Use LEFT/RIGHT
arrow keys to change
columns.
14. When all the characters have been selected for the remote
location ID, press [Menu].
:
(Ot)^GROUP NUMBER
SELECT/ENTER
15. if desired number is displayed, press [Select] and [Stop] to
return to the idle mode.
If GROUP NUMBER is displayed, press [Enter] and go to
step 16.
If an undesired number is displayed, press [Clear] and go to
step 16.
(01)*GROUP NUMBER
16. Use the terminal keypad to enter the group numbers. The
terminal offers up to five groups, numbered 1 to 5.
if entering more than one group number, press [Menu] to
insert a comma between the numbers.
(01)»GROUP NUMBER
1, 3, 4
2-6
TELECOPIER 7024 USER HANDBOOK
Page 49

DIALLING
17. When you have selected all the group numbers, press [Enter].
SPEED DIAL 01 TO 55
SELECT AND PRESS
18. Select the next speed dial number or press [Stop] to return to
the idle mode.
To set one touch keys P1-P6 as standard one touch (Menu 10, Feature 1)
This feature allows six of the one touch keys, PI through P6, to
be used as standard one touch keys and as special program keys
to reduce multi-step operations to a single keystroke. Each key
can be programmed for both functions.
Use the procedures below to set one touch keys, PI through P6,
as standard one touch keys. The procedures to program one
touch keys to reduce multi-step operations are on the following
pages.
1. Press [Menu].
l.SENO OPTIONSl
01-10 SELECT/ENTER
2. Press[1],[0], [Enter].
1.ENTER ONE-TOUCH
1-2 SELECT/ENTER
3. Press [Enter].
PROGRAM KEY PI TO P6
SELECT AND PRESS
4. Press the desired program one touch key [P1-P6]. The
following will be displayed if no number is entered.
[P1]=N0THING STORED
SELECT/ENTER
If desired number is displayed, press [Select] and go to step 7.
If NOTHING STORED is displayed, press [Enter] and go to
step 6.
If an undesired number is displayed, press [Clear] and go to
step 6.
TELECOPIER 7024 USER HANDBOOK
[P1]=TEL. NUMBER
2-7
Page 50

DIALLING
Use the terminal keypad to enter the telephone number (up
to 40 characters). When the telephone number is entered,
press [Enter],
[P1]=SET PARAMETERS
SELECT/ENTER
If the Forced 4800 or Secure Send options are not desired,
press [Select] and go to step 12.
If the Forced 4800 or Secure Send options are desired, press
[Enter].
FORCED 4800: OFF
SELECT/ENTER
8. Press [Select] to display the desired setting; ON or OFF.
9. Press [Enter] to store the setting.
SECURE SEND: OFF
SELECT/ENTER
10. Press [Select] to display the desired setting; ON or OFF.
11. Press [Enter] to store the setting.
[P1]=L0CATI0N ID
SELECT/ENTER
12. If desired name is displayed, press [Select] and go to step 15.
If LOCATION ID is displayed, press [Enter] and go to step 13.
If an undesired name is displayed, press [Clear] and go to
step 13.
Note: The two digit number in the display represents the
number of characters entered.
ABCDEFGHIJ.
00
2-8
TELECOPIER 7024 USER HANDBOOK
Page 51

DIALLING
13. Enter the remote Location ID (up to 12 alpha/numeric
characters) one character at a time. Use the arrow keys to
move the cursor under the desired character in the character
table or use the numeric keypad to enter numbers. If a
character is being selected from the table, press [Enter] for
each character desired. Enter is not required when entering
numbers from the keypad.
Space
I
A B
K
L M
U V
a
b
k 1 m
u V w
0 1
!
Character table
D E F G
C
N
w
X Y
c
d e f
n
X
2
3
=
<
#
$ % &
H 1
P
O
Z
0
P
Z
y
4
5
7
>
R
Q
+
h i
g
r s t
q
+
7 8 9 “
6
@
( 1
( )
S
-
-
Space
I
J
T
/
j
/
}
{
*
Display always starts
with first row.
Use UP/DOWN arrow
keys to change rows.
Use LEFT/RIGHT
arrow keys to change
columns.
14. When all the characters have been selected for the remote
location ID, press [Menu].
[P1]=GR0UP NUMBER
SELECT/ENTER
15. If desired number is displayed, press [Select] and [Stop] to
return to the idle mode.
If GROUP NUMBER is displayed, press [Enter] and go to
step 16.
If an undesired number is displayed, press [Clear] and go to
step 16.
TELECOPIER 7024 USER HANDBOOK
[P1]=GR0UP NUMBER
16. Use the terminal keypad to enter the group numbers for the
one touch key. The terminal offers up to five group
numbers, numbered 1 to 5.
If entering more than one group number, press [Menu] to
separate the numbers with a comma.
[P13=GR0UP NUMBER
1, 3, 4
17. When you have selected all the group numbers, press [Enter].
PROGRAM KEY PI TO P6
SELECT AND PRESS
18. Select the next one-touch key, or press [Stop] to return to the
idle mode.
2-9
Page 52

DIALLING
To set program one touch keys (P1-P6) for multi-step operations (Menu 10, Feature 2)
Program one touch keys, P1-P6, can also be programmed for
multi-step operations. These multi-step operations can be
reduced to a single keystroke. Use the following procedure to
program a P1-P6 key. If the key is programmed for one touch
and program one touch, the number stored can be used for two
different operations.
The following six features can be programmed into the one
touch keys P1-P6: Delayed Send, Group Send/Delayed Group
Send, Relay Send, Send Secure Mail, Polling/Delayed Polling and
Multi-polling.
For example, to transmit reports to several locations everyday,
program a P1-P6 keys for group send/delayed group send to
those locations. The terminal will send to each location with one
keystroke immediately or at the hour selected. The operation
will take place within twenty four hours.
The current settings of Forced 4800, Secure Send mode and Long
Original are automatically stored with the program. The settings
of these features should be considered and changed, if desired,
as you program the P1-P6 keys.
The first 7 steps to program the one touch P1-P6 keys are the
same regardless of the feature you select. The remaining steps
vary based on the feature you have chosen. The first 7 steps
appear below. Steps 8 and beyond for each feature appear on
the following pages under the appropriate name.
1. Press [Menu] to select the menu table.
l.SEND OPTIONSl
01-10 SELECT/ENTER
2. Press [1]. [0], [Enter] to select the feature.
1.ENTER ONE-TOUCH
1-2 SELECT/ENTER
3. Press [2] to select PROGRAM ONE-TOUCH.
2.PROGRAM ONE-TOUCH
1-2 SELECT/ENTER
4. Press [Enter].
PROGRAM KEY PI TO P6
SELECT AND PRESS
2-10
TELECOPIER 7024 USER HANDBOOK
Page 53

5. Press the desired program one touch key [P1-P6].
DIALLING
[P1]=N0THING STORED
SELECT/ENTER
6. if desired feature option is displayed, press [Select] and
return to step 5.
If NOTHING STORED is displayed, press [Enter] and go to
step 7.
If an undesired feature option is displayed, press [Clear] and
go to step 7.
7. Press [Select] to cycle through the 6 available feature
options. When the desired feature is displayed, refer to the
appropriate page.
1.DELAYED SEND
1~6 SELECT/ENTER
2. DELAYED GROUP SEND
1-6 SELECT/ENTER
3. RELAY SEND
1-6 SELECT/ENTER
SEE PAGE 2-12
SEE PAGE 2-13
SEE PAGE 2-14
4. SEND SECURE MAIL
1-6 SELECT/ENTER
5. DELAYED POLLING
1-6 SELECT/ENTER
6. MULTI-POLLING
1-6 SELECT/ENTER
SEE PAGE 2-16
SEE PAGE 2-17
SEE PAGE 2-18
TELECOPIER 7024 USER HANDBOOK
2-11
Page 54

DIALUNG
To program keys (PI -P6) for delayed send
Note: Steps 1 through 7 appear on pages 2-iO and 2~11. For an
explanation of delayed send, see section 3, Sending.
8. Press [Enter] to select DELAYED SEND.
ENTER=USE MEMORY
SELECT/ENTER
If you want the transmission to be from memory, press
[Enter], Transmitting from memory leaves the ADF free for
other transmissions.
If you want the transmission to be from the ADF, press
[Select]. A delayed send job from the ADF ties up the ADF
until the operation Is completed and will be canceled if the
original is removed from the ADF.
DELAYED SEND
NUMBER OF PAGES:
10. For an automatic page count, press [Enter].
Note: If desired, use the keypad to enter the exact number of
pages in your document, including the cover page, before
pressing [Enter]. The terminal compares this number to the
number of pages transmitted.
DELAYED SEND
ENTER FAX NUMBER
11. Use the terminal keypad, one-touch key or speed dial key to
enter the telephone number. Press [Clear] to erase a
character.
DELAYED SEND
555-4545
12. When the telephone number is entered, press [Enter].
DELAYED SEND
START TIME:
14:50
13. if you do not want a specific start time, press [Enter].
If you want a specific start time, enter the desired time in 24
hour format.
• Enter the hour and press [Enter].
• Enter the desired mi ñutes and press [Enter].
DELAYED SEND
COMPLETED
2-12
TELECOPIER 7024 USER HANDBOOK
Page 55

DIALLING
To program keys (P1-P6) for group send/delayed
group send
Note: Steps 1 through 7 appear on pages 2-10 and 2-11. For an
explanation of delayed group send, see section 3, Sending.
8. Press [Enter] toselert DELAYED GROUP SEND.
DELAYED GROUP SEND
NUMBER OF PAGES:
9. For an automatic page count, press [Enter].
Note: If desired, use the keypad to enter the exact number of
pages in your document, including the cover page, before
pressing [Enter]. The terminal compares this number to the
number of pages transmitted.
DELAYED GROUP SEND
ENTER FAX NUMBER
10. Enter the numbers for the delayed group send.
• Up to five one-touch, speed dial or group numbers can
be entered.
• To enter a group number, press the pound [#] key and
enter the group number (1-5.)
• Press [Menu] to separate the numbers with a comma.
• In the example below, one-touch key 1, group #3 and
speed dial number 25 are entered.
DELAYED GROUP SEND
[01], G3. (25)
11. When the numbers are entered, press [Enter].
DELAYED SEND
START TIME: 14:50
12. If you do not want a specific start time, press [Enter].
If you want a specific start time, enter the desired time in 24
hour format.
• Enter the hour and press [Enter].
• Enter the desired minutes and press [Enter].
DELAYED GROUP SEND
COMPLETED
TELECOPIER 7024 USER HANDBOOK
2-13
Page 56

DIALUNG
To program keys (P1-P6) for relay send
Note: Steps 1 through 7 appear on pages 2-10 and 2-11. For an
explanation of relay send, see section 3, Sending.
8. Press [Enter] to select RELAY SEND.
ENTER=USE MEMORY
SELECT/ENTER
9. If you want to transmit the relay send from memory, press
[Enter].
If you want to transmit the document from the ADF, press
[Select].
RELAY SEND
PASSWORD:
10. Use the terminal keypad to enter the two digit password
obtained from the relay station and press [Enter].
ENTER*COPY TO RELAY
SELECT/ENTER
11. Press [Enter] to request a printout at the relay station or
[Select] to suppress the printout.
RELAY SEND
TERM.:
12. Use the numeric keypad to enter the group number(s)
already programmed at the remote relay station. This Is the
groups to which the relay station will retransmit your
document. Up to five groups can be entered. Press [Menu]
after entering each number.
2-14
RELAY SEND
TERM.
13. Press [Enter].
RELAY SEND
NUMBER OF PAGES:
1
TELECOPIER 7024 USER HANDBOOK
Page 57

DIALLING
14. For an automatic page count, press [Enter].
Note: If desired, use the keypad to enter the exact number of
pages in your document, including the cover page, before
pressing [Enter], The terminal compares this number to the
number of pages transmitted.
RELAY SEND
ENTER FAX NUMBER
15. Enter the relay station telephone number using the terminal
keypad, one touch or speed dial.
RELAY SEND
555-4545
16. When the telephone number is entered, press [Enter].
RELAY SEND
START TIME:
14:50
17. If you do not want a specific start ti me, press [Enter].
If you want a specific start time, enter the desired time in 24
hour format.
• Enter the hour and press [Enter].
• Enter the desired minutes and press [Enter].
RELAY SEND
COMPLETED
TELECOPIER 7024 USER HANDBOOK
2-15
Page 58

DIALLING
To program keys (P1-P6) for send secure mail
_________
Note: Steps 1 through 7 appear on pages 2-10 and 2-11. For an
explanation of send secure mail, see section 3, Sending.
8. Press [Enter] to select SEND SECURE MAIL
ENTER=USE MEMORY
SELECT/ENTER
9. If you want to transmit the document from memory, press
[Enter].
If you want to transmit the document from the ADF, press
[Select].
SEND SECURE MAIL
MAILBOX NUMBER:
10. Use the terminal keypad to enter the two digit mail box
number for the remote terminal and press [Enter]. Numbers
0-9 must be preceded by 0.
SEND SECURE MAIL
PASSWORD:
11. Use the terminal keypad to enter the four digit password of
the remote terminal and press [Enter].
SEND SECURE MAIL
NUMBER OF PAGES:
12. For an automatic page count, press [Enter].
Note: If desired, use the keypad to enter the exact number of
pages in your document, including the cover page, before
pressing [Enter], The terminal compares this number to the
number of pages transmitted.
SEND SECURE MAIL
ENTER FAX NUMBER
13. Use the terminal keypad, one-touch key or speed dial key to
enter the telephone number.
SEND SECURE MAIL
555-4545
(continued)
2-16
TELECOPIER 7024 USER HANDBOOK
Page 59

DIALLING
14. When the telephone number is entered, press [Enter].
SEND SECURE MAIL
START TIME: 15:00
15. If you do not want a Specific Start time, press [Enter],
If you want a specific start time, enter the desired time in 24
hour format.
• Enter the hour and press [Enter].
• Enter the desired minutes and press [Enter].
SEND SECURE MAIL
COMPLETED
To program keys (P1-P6) for polling/deiayed polling
Note: Steps 1 through 7 appear on pages 2-10 and 2-11. For an
explanation of delayed polling, see section 5, Receiving.
8. Press [Enter] to select DELAYED POLLING.
DELAYED POLLING
ENTER FAX NUMBER
9. Enter the telephone number of the remote terminal using
the terminal keypad, one touch or speed dial keys. Press
[Clear] to erase a character.
DELAYED POLLING
555-4545
10. When the telephone numbers are entered, press [Enter].
DELAYED POLLING
START TIME:
15:00
11. If you do not want a specific start time, press [Enter].
If you want a specific start time, enter the desired time in 24
hour format.
• Enter the hour and press [Enter].
• Enter the desired minutes and press [Enter].
DELAYED POLLING
COMPLETED
TELECOPIER 7024 USER HANDBOOK
2-17
Page 60

DIALLING
To program keys (P1-P6) for multi-polling
Note: Steps 1 through 7 appear on pages 2~10 and 2-11. For an
explanation of multi-polling, see section 5, Receiving.
8. Press [Enter].
MULTI“POLLING
ENTER FAX NUMBER
9. Enter the telephone numbers of the polling locations.
• Enter up to five one touch, speed dial or group numbers.
• To enter a group number, press the pound [#] key and
enter the group number.
• Press [Menu] between numbers.
• In the example below, one touch key 1, group 3 and
speed dial number 25 are entered.
MULTI-POLLING
[01], G3, (25)
10. When the telephone numbers are entered, press [Enter],
MULTI-POLLING
START TIME:
15:00
11. If you do not want a specific start time, press [Enter].
If you want a specific start time, enter the desired time in 24
hour format.
• Enter the hour and press [Enter].
• Enter the desired minutes and press [Enter].
MULTI-POLLING
COMPLETED
2-18
TELECOPIER 7024 USER HANDBOOK
Page 61

Dialling methods
DIALLING
There are several methods for dialling telephone numbers to
complete a facsimile transmission or have voice contact. These
methods are one touch dialling, speed dialling, redialling and
manual dialling using voice request.i
• Automatic dial from the terminal - Use the terminal keypad
to dial the telephone number and press [Start].
• Manual dial from the handset - Use the handset keypad to
dial the telephone number and press [Start].
• One touch dial - Use the one touch keys on the control panel
to dial any one of the telephone numbers stored in the one
touch directory.
• Speed dial - Press [Speed Dial],
Enter the two digit speed dial
number and press [Start].
• Automatic redial - If the remote terminal is busy, the
terminal will automatically redial the telephone number if
the remote terminal was dialled using manual dial, one
touch or speed dial. The display will flash the following:
DELAY START PENDING
Last number redial - Press [Redial] and [Start] on the control
panel to redial the last automatically dialled number.
In addition to numbers, the following special dialling
characters can be entered in the telephone number.
KEY
[Pause]
[—] (once)
[—] (twice)
DISPLAY PURPOSE
Inserts a pause.
Inserts a hyphen for legibility.
Instructs the terminal to wait for a
dial tone, when dialling out through
a PBX system, for example.
[Tone]
Changes the dialling system from
pulse to tone. This is useful for
accessing voice mail or similar touch
tone activated systems from a
terminal connected to a pulse dial
line.
1. See Delayed Group Send or Relay Send for transmissions to group numbers.
TELECOPIER 7024 USER HANDBOOK
2-19
Page 62

DIALLING
To manually dial for voice contact
1. Lift the handset, wait for a dial tone and enter the telephone
number or press [Voice Request] and use the keypad to enter
the telephone number.
2. Once voice contact has been established, a facsimile
transmission can still be started. Refer to Sending or
Receiving sections.
To dial using one touch numbers
Tediai one touch numbers 01-24
To dial one touch numbers P1-P6:
To dial program one touch numbers P1-P6;
Press the one touch key [01] -[24] programmed for the remote
facsimile.
Load originals, press [Pause], and press the desired [PI] - [P6] key
programmed for the remote facsimile.
Load originals and press the desired program one touch key,
P1-P6, programmed for the remote facsimile.^
During transmission, the display shows remote terminal name or
ID (telephone number) on the first line and the specified/actual
transmission mode on the second line.
See Dial Directory for establishing the directory and assigning
numbers to the one touch keys.
Note: If one touch numbers P1-P6 are programmed for both one
touch and programmable one touch functions^ the one touch
will have priority dialling in all sending and polling features in
the Send Options2 and Polling Options menus.
To dial using speed dial numbers
_______________________
Press [Speed Dial] followed by the two digit speed dial number
programmed for the remote facsimile and [Start].
During transmission, the display shows remote terminal name or
ID (telephone number) on the first line and the specified/actual
transmission mode on the second line. See Dial Directory for
establishing the directory and assigning numbers to the speed
dial keys.
1. The numbers entered in these keys cannot be used in the Sending and Polling features In the Send
Options2and Polling Options menus.
2-20
TELECOPIER 7024 USER HANDBOOK
Page 63

DIALUNG
Automatic redial
Redialling occurs automatically if the remote terminal is busy.
The terminal will hang up, wait for the specified dialling interval
and the display will flash the following:
DELAY START PENDING
If, after the specified number of redial attempts the terminal fails
to connect, the terminal will return to the idle mode.
Refer to SET NUMBER OF REDIALS to select how many times the
terminal will redial a busy number and REDIAL INTERVAL to
select the amount of time between each attempt.
This redial feature is not available for transmissions if the remote
terminal is dialled manually using voice request or telephone
handset.
To dial using last number redial
1. Press [Redial] on the control panel to redial the last
automatically dialled number.
2. Press [Start] to begin the operation.
TELECOPIER 7024 USER HANDBOOK
2-21
Page 64

DIALLING
Notes
2-22
TELECOPIER 7024 USER HANDBOOK
Page 65

Selecting contrast and resolution
Sending
The terminal has five resolution and three contrast settings.
Press [Resolution] and [Original] to cycle through the available
resolution and contrast settings to select the appropriate setting
for your original.
The settings will return to the default settings after the
operation- The default setting for resolution is Standard. The
default setting for contrast is Normal.
Refer to the Custom Features and Settings section for
instructions to change the resolution and contrast default
settings.
Resolution settings
Press [Resolution] to select the appropriate setting for your
original.
• Standard - Select Standard when sending originals with
normal detail size print.
• Fine - Select Fine when sending originals with fine detail such
as small print.
• Super Fine - Select Super Fine when sending originals with
small detail with complex images.
• Halftone - Select Halftone when scanning pictures or other
originals with intermediate shades of gray.
• G2 - Select G2 when sending in Group 2 mode.
Contrast settings
Press [Original] to select the appropriate setting for your
original.
• Normal: Select Normal when scanning originals with normal
contrast.
• Dark: Select Dark when scanning originals with faint
characters.
• Light: Select Light when scanning originals with colored
backgrounds.
TELECOPIER 7024 USER HANDBOOK
3-1
Page 66

SENDING
Sending a document
The terminal will send documents when placed printed side
down in the ADF. Up to 30 sheets of normal weight originals can
be loaded In the ADF at one time. You should manually assist
any long documents to ensure proper feeding.
To send a document
1.
Load the originals in the ADF with the printed side down.
Adjust the document guides to the width of the originals.
2.
Press [Select] to select the resolution. Press [Original] to
select the contrast setting.
DIAL/PRESS COPY
STD NORM
3. Use the terminal keypad, speed dial or one touch to enter
the telephone number for the remote fax. If you enter a
number by mistake, press [Clear] and reenter the number.
DIAL/PRESS COPY
555-9090
4. Press [start], if needed. The terminal will begin dialling and
send the document. Hang up the handset, if used.
TRANSMIT
STD NORM
Note: During the transmission, the remote terminal name or ID
will display on the first line and the transmission mode will
display on the second line.
3-2
TELECOPIER 7024 USER HANDBOOK
Page 67

Secure send mode
SENDING
The Secure send feature has two selections: OFF or ON.
When ON is selected, originals will only be sent to a G3 terminal
with an identification number that matches the last four digits of
the number dialled. If the number does not match the number
you dialled, the transmission will be canceled.
When OFF is selected, all send operations will transmit normally.
To transmit originals in the secure send mode, the remote
terminal must be dialled using the terminal keypad, one touch or
speed dial.
The secure send feature deactivates after each transmission.
To set secure send mode (Menu 01, Feature 2)
1. Press [Menu] to select the menu table.
l.SEND OPTIONSl
01-10 SÊLECT/ENTER
2. Press [Enter]
l.LONG ORIGINAL MODE
1-3 SELECT/ENTER
3. Press [2].
2.SECURE SEND MODE
1-3 SELECT/ENTER
4. Press [Enter].
SECURE SEND: OFF
SELECT/ENTER
5. Press [Select] to select ON or OFF.
SECURE SEND: ON
SELECT/ENTER
6. Press [Enter]. 1
SECURE SEND MODE
COMPLETED
7. Refer to the desired send procedure.
1, The 7024 does not transmit secure originals to a G2 terminal.
TELECOPIER 7024 USER HANDBOOK
3-3
Page 68

SENDING
Delayed send
This feature allows the terminal to be set up for a delayed send
operation up to one month in advance. The terminal can store
up to five delayed dialling jobs at one time. Only one delayed
group send or multi-polling job can be included in the five jobs.
This function may be useful for transmitting documents when
lower telephone rates apply.
Delay Start Pending will display when the terminal is waiting to
perform a delayed operation or redial a busy number.
To set delayed send (Menu 02, Feature 1)
1. Load the original in the ADF with the printed side down.
Press [Select] to select the resolution. Press [Original] to
select the contrast, if desired.
DIAL/PRESS COPY
STD
NORM
2. Press [Menu] to select the menu table.
l.SEND OPTIONSl
01-10 SELECT/ENTER
3. Press [0], [2] to select menu 2.
2.SEND 0PTI0NS2
01-10 SELECT/ENTER
4. Press [Enter] to select delayed send.
1.DELAYED
1-4
SEND
SELECT/ENTER
5. Press [Enter].
ENTER>USE MEMORY
SELECT/ENTER
If you want the transmission to be from memory, press
[Enter]. Transmitting from memory leaves the ADF free for
other transmissions.
If you want the transmission to be from the ADF, press
[Select]. A delayed send job from the ADF ties up the ADF
until the operation is completed and will be canceled if the
original is removed from the ADF.
DELAYED SEND
NUMBER OF PAGES:
1. The original(s) must be loaded in the ADF to access this feature.
3-4
TELECOPIER 7024 USER HANDBOOK
Page 69

SENDING
7. For an automatic page count, press [Enter].
Note: If desired, use the terminal keypad to enter the exact
number of pages in your document, including the cover page
before pressing [Enter]. The terminal compares this number to
the number of pages transmitted.
DELAYED SEND
ENTER FAX NUMBER
8. Use the terminal keypad, one-touch key or speed dial key to
enter the telephone number.
DELAYED SEND
[03], (01)
9. When the telephone number is entered, press [Enter].
DELAYED SEND
ENTER DAY:
02,14:50
10. If you want the operation to start immediately, press [Enter].
If you want a specific start date and time, enter using the
terminal keypad.
• Enter the desired date and press [Enter].
• Enter the hour, in 24 hour format, and press [Enter].
• Enter the desired minutes and press [Enter].
DELAYED SEND
COMPLETED
Note: If you requested transmission from memory, the terminal
will scan the document into memory. If you reach a memory full
condition, an alarm will sound and a memory full message will
be displayed. Press [Enter] within one minute to store all
scanned originals. Any partial page will be deleted. Press [Clear]
to delete all stored originals. Failure to respond within one
minute results in the cancellation of the job and an error
message report will be printed.
If a specific time was entered, the display will flash DELAY START
PENDING.
TELECOPIER 7024 USER HANDBOOK
3-5
Page 70

SENDING
Group send/delayed group send (Ad Hoc)
The delayed group send feature automatically sends documents
from memory to multiple locations (up to 85.) Only one group
send job can be setup.
Delayed group send can be started immediately or delayed for
up to one month to take advantage of lower telephone rates.
The terminal can transmit originals scanned into memory to G3
terminals only.
To set group send/delayed group send (Menu 02,
Feature 2}^
1. Load the originals with the printed side down. Press [Select]
to select the resolution. Press [Original] to select the
contrast, if desired.
DIAL/PRESS COPY
STD NORM
2. Press [Menu].
l.SEND OPTIONSl
01-10 SELECT/ENTER
3. Press [0], [2].
2.SEND 0PTI0NS2
01-10 SELECT/ENTER
4. Press [Enter].
1.DELAYED SEND
1-4 SELECT/ENTER
5. Press [2].
2.DELAYED GROUP SEND
1-4 SELECT/ENTER
6. Press [Enter].
DELAYED GROUP SEND
NUMBER OF PAGES:
The original(s) must be loaded in the ADF to access this feature.
1.
3-6
TELECOPIER 7024 USER HANDBOOK
Page 71

SENDING
7. For an automatic page count, press [Enter].
Note: If desired, use the terminal keypad to enter the exact
number of pages in your document, including the cover page
before pressing [Enter]. The terminal compares this number to
the number of pages transmitted.
DELAYED SEND
ENTER FAX NUMBER
Enter the numbers for the delayed group send. Up to five
one-touch, speed dial or group numbers can be entered. To
enter a group number, press the pound (#) key and the
group number (1-5.) Press [Menu] to separate the numbers
with a comma. In the example below, one-touch key 1,
group 3 and speed dial number 25 are entered.
DELAYED GROUP SEND
[01], G3, (25)
9. When the telephone numbers are entered, press [Enter].
DELAYED GROUP SEND
ENTER DAY: 10,14:55
If you want the operation to start immediately, press [Enter].
10.
If you want a specific start date and time, enter using the
terminal keypad.
• Enter the desired date and press [Enter].
• Enter the hour, in 24 hour format, and press [Enter].
• Enter the desired minutes and press [Enter].
DELAYED GROUP SEND
COMPLETED
Note: If you reach a memory full condition, an alarm will sound
and a memory full message will be displayed. Press [Enter]
within one minute to store all scanned originals. Any partial
page will be deleted. Press [Clear] to delete all stored originals.
Failure to respond within one minute results in cancellation of
the entire job and an error message report will be printed.
If a specific time was entered, the display will flash DELAY START
PENDING.
TELECOPIER 7024 USER HANDBOOK
3-7
Page 72

SENDING
Send secure mail
This feature allows you to send a confidential document to a
specific person. The document is protected with a mailbox
number that you and the recipient must agree on. The remote
terminal stores the document in memory and prints out a
message to advise the recipient that the document has arrived.
The recipient must enter the correct mailbox number to print the
document.
The 3010 Xerox Digital/Copier, 7032 and the 7033 Facsimile
Terminal support this feature.
To set send secure mail (Menu 02, Feature 4)i
1- Load originals with the printed side down. Press [Select] to
select the resolution. Press [Original] to select the contrast.
OIAL/PRESS COPY
STD
NORM
2. Press [Menu].
l.SENO OPTIONSl
01-10 SELECT/ENTER
3. Press [0], [2] to select menu 2.
2.SEND 0PTI0NS2
01-10 SELECT/ENTER
4. Press [Enter].
1.DELAYED SEND
1-4 SELECT/ENTER
5. Press [4].
4.SEND SECURE MAIL
1-4 SELECT/ENTER
6. Press [Enter],
ENTER«USE MEMORY
7. If you want to transmit the document from memory, press
[Enter].
If you want to transmit the document from the ADF, press
[Select].
SEND SECURE MAIL
MAILBOX NUMBER:
1. The original(s) must be loaded in the ADF to access this feature.
3-8
SELECT/ENTER
TELECOPIER 7024 USER HANDBOOK
Page 73

SENDING
8.
Use the terminal keypad to enter the two digit mail box
number for the remote terminal and press {Enter].
SEND SECURE MAIL
PASSWORD:
9.
The password is not necessary for a secure mail transaction.
• If no password is desired, press [Enter].
• If a password is desired, use the terminal keypad to enter
the four digit password of the remote terminal mailbox
and press [Enter],
SEND SECURE MAIL
NUMBER OF PAGES:
10. For an automatic page count, press [Enter].
Note: If desired, use the terminal keypad to enter the exact
number of pages in your document, including the cover page
before pressing [Bnter]. The terminal compares this number to
the number of pages transmitted.
SEND SECURE MAIL
ENTER FAX NUMBER
11, Use the terminal keypad, one-touch key or speed dial key to
enter the telephone number. Press [Clear] to erase a
character.
SEND SECURE MAIL
555-4545
12. When the telephone number is entered, press [Enter].
SEND SECURE MAIL
ENTER DAY: 01,14:55
13. If you want the operation to start immediately, press [Enter],
If you want a specific start date and time, enter using the
terminal keypad.
• Enter the desired date and press [Enter].
• Enter the hour, in 24 hour format, and press [Enter].
• Enter the desired minutes and press [Enter].
SEND SECURE MAIL
COMPLETED
Note: If you requested transmission from memory, the terminal
will scan the document into memory. If you reach a memory full
condition, an alarm will sound and a memory full message will
be displayed. Press [Bnter] within one minute to store all
scanned originals. Any partial page will be deleted. Press [Clear]
to delete all stored originals. Failure to respond within one
minute results in the cancellation of the Job and an error
message report will be printed.
If a specific time was entered, the display will flash DELAY START
PENDING.
TELECOPIER 7024 USER HANDBOOK
3-9
Page 74

SENDING
Relay send
This feature allows your terminal to function as an initiating
station for a relay send transmission.
Relay send allows your terminal to send a document to a Xerox
compatible relay station which can resend that document to one
or more remote terminals. This allows faster distribution to
multiple terminals at lower telephone rates. For example, the
initiating terminal calls the relay station one time at the long
distance rate, and the relay station then calls the destination
stations at the local rates.
Using the relay send feature requires careful coordination
between the relay station and the initiating station. The relay
station must first set up the destination dial directory numbers
for the initiating station.
The relay station must also provide you with a password.
This feature can be programmed to delay transmission up to one
month from the current date.
Basic Networking Concept
To set relay send (Menu 02, Feature 3)i
________________
1. Load the originals with the printed side down. Press [Select]
to select the transmission resolution. Press [Original] to
select the contrast, if desired.
OIAL/PRESS COPY
STD
NORM
1. The original(s) must be loaded in the ADF to access this feature.
3-10
TELECOPIER 7024 USER HANDBOOK
Page 75

2. Press [Menu] to select the menu table.
l.SEND OPTIONSl
1-10 SELECT/ENTER
3. Press [0], [2] to select Menu 02.
2.SEND 0PTI0NS2
1-10 SELECT/ENTER
4. Press [Enter] to select the first feature within the menu.
1.DELAYED SEND
1-4 SELECT/ENTER
5. Press [3] to select relay send.
3.RELAY SEND
1-4 SELECT/ENTER
6. Press [Enter].
SENDING
ENTER=USE MEMORY
SELECT/ENTER
7. If you want to transmit the relay send from memory, press
[Enter].
If you want to transmit the document from the ADF, press
[Select].
RELAY SEND
PASSWORD:
8. Use the terminal keypad to enter your two digit password
obtained from the relay station.
RELAY SEND
PASSWORD:
10
9. Press [Enter].
ENTER=COPY TO RELAY
SELECT/ENTER
TELECOPIER 7024 USER HANDBOOK
3-11
Page 76

SENDING
10. Press [Enter] to request a printout at the relay station or
[Select] to suppress the printout.
RELAY SEND
TERM.:
11. Use the numeric keypad to enter the two digit group
number(s) already programmed at the remote relay station.
The relay station will retransmit your document to these
groups. Up to five groups can be entered. Press [Menu] after
entering each number.
RELAY SEND
TERM. 1
12. When ail the destination group numbers have been entered,
press [Enter].
RELAY SEND
NUMBER OF PAGES;
13. For an automatic page count, press [Enter].
Note: If desired, use the terminal keypad to enter the exact
number of pages in your document, including the cover page
before pressing [Enter]. The terminal compares this number to
the number of pages transmitted.
RELAY SEND
ENTER FAX NUMBER
14. Enter the relay station telephone number using the terminal
keypad, one touch or speed dial- Press [Clear] to erase a
character.
RELAY SEND
555-4545
15. When the telephone number is entered, press [Enter],
RELAY SEND
ENTER DAY
12,10:00
(continued)
3-T2
TELECOPIER 7024 USER HANDBOOK
Page 77

SENDING
16. if you want the operation to Start immediately, press [Enter].
If you want a specific start date and time, enter using the
terminal keypad.
• Enter the desired date and press [Enter].
• Enter the hour, in 24 hour format, and press [Enter].
• Enter the desired minutes and press [Enter].
RELAY SEND
COMPLETED
Note: If you requested transmission from memory, the terminal
will scan the document into memory. If you reach a memory full
condition, press [Enter] within one minute to store all scanned
originals. Any partial page will be deleted. Press [Clear] to
delete all the stored originals. Failure to respond within one
minute results in the cancellation of the job and an error
message report will be printed.
If a specific time was entered, the display will flash DELAY START
PENDING.
TELECOPIER 7024 USER HANDBOOK
3-13
Page 78

SENDING
Job reserved
Job reserve allows you to program the terminal to perform a
subsequent job while the terminal is currently In operation. The
job will automatically execute once the current job completes.
The following restrictions apply when setting up the reserved
job.
• You must dial the remote terminal with a one touch key.
• There can only be one send job.
• The reserve job must use the default settings.
To set job reserve
1. Load the originals face down.
2. Press the one touch key for the remote terminal.
JOB RESERVED
STD
NORM
Note: To cancel a job reserve, remove the originals from the
ADF or press [Stop].
3-u
TELECOPIER 7024 USER HANDBOOK
Page 79

Forced 4800
SENDING
This feature will force any transmission to occur at 4800 Bits Per
Second (BPS) and is used when the remote fax terminal or
telecommunication lines require a slower transmission speed.
When OFF is selected, the terminal will attempt the transmission
at 9600 and, if needed, switch the transmission to a slower rate.
This feature deactivates after each transmission.
To set forced 4800 (Menu 01, Feature 3)
1. Press [Menu] to select the menu table.
l.SEND OPTIONSl
01-10 SELECT/ENTER
2. Press [Enter] to select the first feature within the menu.
l.LONG ORIGINAL MODE
1-3 SELECT/ENTER
3. Press [3] to select forced 4800,
FORCED 4800 MODE
1-3 SELECT/ENTER
4. Press [Enter].
FORCED 4800: OFF
SELECT/ENTER
5. Press [Select] to select OFF or ON.
FORCED 4800: OFF
SELECT/ENTER
6. Press [Enter].
FORCED 4800 MODE
COMPLETED
7. Refer to the desired send feature.
TELECOPIER 7024 USER HANDBOOK
3-15
Page 80

SENDING
Voice Request
The voice request feature allows you to send a voice request tone
to a remote operator. You can also be signaled by the remote
operator if that person wants to establish voice contact.
Both users must perform the appropriate actions to establish
voice request. If either user fails to answer when the voice
request sounds, the call will disconnect.
To signal a voice request
1. Press [Voice Request] during the operation.
VOICE REQUEST
STD
NORM
2. When the remote operator responds, your terminal will emit
a voice request tone.
3. Lift the handset and press [Voice Request] to switch the line
over to the handset.
4. Talk to the remote operator and then replace the handset.
To answer a voice request
1. Your terminal will emit a voice request tone.
2. To answer the voice request, lift the handset and press [Voice
Request] to switch the line over to the handset.
VOICE REQUEST
STD NORM
3. Talk to the remote operator and then replace the handset.
3-16
TELECOPIER 7024 USER HANDBOOK
Page 81

Long original
SENDING
The long original option enables documents longer than 35.4
inches (900mm) to be scanned and transmitted.
There are two options available on the terminal: ON and OFF.
If ON is selected, the length of the document to be scanned can
be unlimited length.
If OFF is selected, the length is limited to 35.4 inches.
The long original feature automatically deactivates after the
transmission.
To set long original (Menu 01, Feature 1)
1. Press [Menu] to select the menu table.
l.SEND OPTIONSl
01-10 SELECT/ENTER
2. Press [Enter] to select long original.
l.LONG original MODE
1-3 SELECT/ENTER
3. Press [Enter].
LONG ORIGINAL; OFF
SELECT/ENTER
4. Press [Select] to select ON or OFF.
LONG ORIGINAL: ON
SELECT/ENTER
5. Press [Enter] when the desired setting is displayed.
LONG ORIGINAL MODE
COMPLETED
6. Refer to the desired send procedure.
TELECOPIER 7024 USER HANDBOOK
3-17
Page 82

SENDING
Store for polling
This feature enables your terminal to perform a send operation
when initiated (polled) by a remote terminal. Polling mode must
be set to FREE or SECURE in the Set Polled Mode for a polling
operation. See Set Polled Mode in Custom Features and Settings.
If SECURE is selected in Set Polled Mode, polling op>erations are
protected with a password. The password must match the last
IFour digits of the remote terminal identification number.
A document can be stored in internal memory or placed in the
ADF to be retrieved by a remote terminal. If the document is
stored in memory, it can be printed for review at any time
without erasing it from memory. See Print Polling Doc. The
terminal also includes a command to delete a document stored
in memory for polling. See Erase Polling Doc.
To set store for polling (Menu 03, Features 3,1)
1. Load the originals in the ADF with the printed side down.
Press [Select] to select the resolution. Press [Original] to
select the contrast, if desired.
2. Press [Menu].
l.SEND OPTIONSI
01-10 SELECT/ENTER
3. Press [0], [3].
3.POLLING OPTIONS
01-10 SELECT/ENTER
4. Press [Enter],
1.DELAYED POLLING
1-3 SELECT/ENTER
5. Press [3].
3.STORE FOR POLLING
1-3 SELECT/ENTER
6. Press [Enter].
3-18
1.STORE FOR POLLING
1-3 SELECT/ENTER
TELECOPIER 7024 USER HANDBOOK
Page 83

SENDING
7. Press {Enter].
ENTER=USE MEMORY
SELECT/ENTER
8. If you want to store the polling document in memory, press
(Enter]. Storing the document in memory leaves the ADF
free for other uses.
If you want to leave the original to be polled in the ADF,
press [Select]. Polling from the ADF ties up the ADF until the
document is retrieved by a remote terminal.
STORE FOR POLLING
NUMBER OF PAGES:
9. For an automatic page count, press [Enter].
Note: If desired, use the terminal keypad to enter the exact
number of pages, including the cover page, in your document
and press [Enter]. The terminal compares this number with the
number of transmitted pages.
STORE FOR POLLING
COMPLETED
Note: If you stored the document in memory, your terminal will
scan the document POLL will display until the polling document
has been retrieved.
If you reach a memory full condition, an alarm will sound and a
memory full message will be displayed. Press [Enter] within one
minute to store all scanned originals. Press [Clear] to delete all
stored originals. Failure to press [Enter] within one minute
results in the cancellation of the job and an error message report
will be printed.
If you left the document in the ADF, your terminal can receive fax
messages as usual and complete delayed commands already in
memory, but cannot be used to scan or copy a document until
the polling document has been retrieved.
TELECOPIER 7024 USER HANDBOOK
3-19
Page 84

SENDING
Cancel and interrupt procedures
The interrupt mode allows you to interrupt a delayed group
send, multi-polling or other operation. You can then perform a
basic send operation or set up another job.
The previous operation will resume at the point it was
interrupted when the second job is completed.
To interrupt a job
During operation, press [Speed Dial] to request an interrupt.
The terminal will complete the current operation and sound
a 10 second alarm.
INTERRUPT
SEP 30'91
3. Set up the second job. When the terminal has completed
your second job, the previous job will resume at the point it
was interrupted.
Note: The interrupt feature does not allow other group
send or multhpolling operations. The new job must be
entered within one minute or the terminal will resume the
first Job automatically and ignore the interrupt request
15:40
Status of the terminal
On line
Waiting for
a delayed
send
or
the next
redial
attempt
To cancel a job____________________________________________
Canceling operations differ for each operation or status of the
terminal. Follow the procedures below to cancel a job.
When communicating
with one remote terminal
Delayed group send
Multi -polling
When the original is
loaded in the ADF
When no original is loaded
in the ADF
• Pending jobs are
stored in memory
Keys to press to cancel a job
stop I
Speed Dial
Stop
[0] [8] [ Enter I [3] I Clear "|
Stop
Erase the pending jobs
in memory Print Job List
1 Menu 1 [01
To identify job number:
[81 .
Enter 1 [31 Clear |
Erase the pending jobs
in memory
3-20
TELECOPIER 7024 USER HANDBOOK
Page 85

SENDING
On line when sending to one remote
On line when sending to multiple remote
terminals (delayed group send,
multi-polling)
Waiting when the original is in the ADF
(waiting for a delayed send or redial):
Waiting when no originals are in the ADF
(pending jobs are stored in memory)
1. Press [Stop].
1. Press [Speed Dial] and [Stop].
2. Erase the pending job in memory. [Menu], [0], [8], [Enter],
[3], [Clear]. See Erase Pending Job.
Note: If you press only the Stop key when sending to
multiple remote terminals, the current job will be stopped
but the terminal will start transmission to the next terminal.
1. Press [Stop] or remove the original from the ADF.
1. Print out the pending job list to determine the job number.
[Menu], [0], [8], [Enter], [Start]. See Print Pending Job.
2. Erase the pending job in memory. [Menu], [0], [8], [Enter],
[3], [Clear]. See Erase Pending Job.
Erase Pending job (Menu 08, Feature 3)
This feature allows you to erase a pending job stored in memory.
You create a pending job when you program an operation to
take place at a later time.’ Print out the Pending Job List to
determine the job number you want to erase.
1. Press [Menu] to select the menu table.
l.SEND OPTIONSl
01-10 SELECT/ENTER
2. Press [0], [8] to select menu 8.
8.PENDING JOBS
01-10 SELECT/ENTER
3. Press [Enter] to select the first feature within the menu.
1.PENDING JOB LIST
1-3 SELECT/START
4. Press [3] to select erase pending job.
3.ERASE PENDING JOB
1-3 SELECT/CLEAR
5. Press [Clear].
ERASE PENDING JOB
JOB NUMBER;
1. See Erase Polling Document to delete a job stored for polling.
TELECOPIER 7024 USER HANDBOOK 3-21
Page 86

SENDING
6. Use the numeric keypad to enter the job number to be
erased.
ERASE PENDING JOB
JOB NUMBER: 1
7. Press [Enter]. The pending job will be erased.
Pending job list (Menu 08, Feature 1)
This feature prints out a list of jobs currently waiting in memory.
The pending job list contains the pending job number, remote
station, start day, time and notes.
Redial jobs from the ADF will be shown as job 0. To delete job,
remove original from the ADF.
1. Press [Menu] to select the menu table.
l.SEND OPTIONSl
01-10 SELECT/ENTER
2. Press [0], [8] to select menu 8.
8.PENDING JOBS
01-10 SELECT/ENTER
3. Press [Enter] to select the first feature within the menu.
1.PENDING JOB LIST
1-3 SELECT/START
4. Press [Start] to begin printing the report.
PENDING JOB LIST
PRINTING
3-22
TELECOPIER 7024 USER HANDBOOK
Page 87

SENDING
Erase polling document (Menu 03, Features 3,2)
This feature allows you to erase a polling document stored in
memory.
1. Press [Menu].
l.SEND OPTIONSl
01*10 SELECT/ENTER
2. Press [0],[3].
3.POLLING OPTIONS
01-10 SELECT/ENTER
3. Press [Enter].
1.DELAYED POLLING
1-3 SELECT/ENTER
4. Press [3].
3.STORE FOR POLLING
1-3 SELECT/ENTER
5. Press [Enter].
1.STORE FOR POLLING
1-3 SELECT/ENTER
6. Press [2].
2.ERASE POLLING DOC.
1-3 SELECT/CLEAR
7. Press [Clear] to erase the document in memory.
ERASE POLLING DOC.
ERASED
TFI FrnPIER 702d USER HANDBOOK 3-23
Page 88

SENDING
Notes
3-24
TELECOPIER 7024 USER HANDBOOK
Page 89

Copying a document
Copying
The terminal can be used as a copier to make single or multiple
full size or reduced copies. The originals are scanned and the
information is stored in memory during the multiple copy
operation.
The selections for the redurtion rates are: AUTO, 100®/o, 97%,
91%, 81% or 75%. The default selection for a single copy is 84%.
The default selection for multiple copies is AUTO. IF AUTO is
selected, the terminal will attempt to reduce the original to fit
on one page. If the original does not fit on one page using the
maximum rate, the originals will be printed at 100% on multiple
pages.
Press [Stop] to cancel the copy operation.
To copy a document
The originals are loaded in the ADF with the printed side down.
You should determine if the document(s) have any special
contrast or resolution requirements.
The [Resolution] button is used to cycle the display through the
available options and select the resolution most appropriate for
the contents of the original. The default is Fine.
B
Selection
Standard Originals with normal size print
Fine
Super Fine
Halftone
G2 Not operational in copy mode.
The [Original] button is used to cycle the display through the
available options and select the contrast most appropriate for
the original. The default is Normal.
Selection
Normal
Dark
Light Originals with colored backgrounds
Originals with small print or other fine
detail
Originals with extremely fine detail
Originals containing photographs
Originals with normal contrast
Originals with faint characters
Originals
Originals
telecopier 7024 USER HANDBOOK
4-1
Page 90

COPYING
One copy (No reduction)
1. Load the originals with the printed side down. Press [Select]
to select the resolution. Press [Original] to select the
contrast, if desired.
2. Press [Copy] and [Start].
COPYING
Copies (Auto reduction)
1. Load the originals with the printed side down. Press [Select]
to select the resolution. Press [Original] to select the
contrast, if desired.
2. Press [Copy].
ENTER # OF COPIES
ENTER/START
3. Use the keypad to enter the number of copies.
ENTER # OF COPIES
1 ENTER/START
4. Press [Start].
COPYING
4-2
TELECOPIER 7024 USER HANDBOOK
Page 91

COPYING
Copies (Selected reduction)
1. Load the originals with the printed side down. Press [Select]
to select the resolution. Press [Original] to select the
contrast, if desired.
2. Press [Copy].
ENTER 0 OF COPIES
ENTER/START
3. Use the keypad to enter the number of copies.
ENTER # OF COPIES
1 ENTER/START
4. To select the reduction rate, press [Enter].
REDUCTION RATE: AUTO
SELECT/START
5. Press [Select] to cycle through the available reduction rates;
AUTO, 100%. 97%, 91 %, 81 % or 75%.
REDUCTION RATE: AUTO
(01) SELECT/START
6. When the desired rate is displayed, press [Start].
COPYING
Note: If the memory overflows, an alarm will sound and a
message will be displayed.
• Pressing [Enter] will store the originals scanned before the
memory overflowed.
• Pressing [Clear] or [Stop] will delete all the stored originals.
• Doing nothing for one minute will store the originals
scanned before the memory overflowed and begin copying.
Any partial page will be deleted.
B
TELECOPIER 7024 USER HANDBOOK
4-3
Page 92

COPYING
Copy protect
This feature allows you to specify whether or not the terminal is
to be available as a copier.
If ON is selected, the terminal can not be used as a copier.
If OFF is selected, the terminal can be used as a copier.
To set copy protect (Menu 09, Feature 16)
1. Press [Menu].
l.SEND OPTIONSl
01-10 SELECT/ENTER
2. Press (01, [9].
9.USER SETTINGS
01-10 SELECT/ENTER
3. Press [Enter].
l.SET POLLED MODE
01-21 SELECT/ENTER
4. Press [11,(6].
16.SET COPY PROTECT
01-21 SELECT/ENTER
5. Press [Enter].
COPY PROTECT: OFF
SELECT/ENTER
6. Press [Select] to select the ON or OFF setti ng.
COPY PROTECT: OFF
SELECT/ENTER
7. Press [Enter] when the desired setting is displayed.
SET COPY PROTECT
COMPLETED
TELECOPIER 7024 USER HANDBOOK
Page 93

Receiving a document
Receiving
The terminal should have a supply of paper before receiving
documents from other facsimile terminals. Reference Answering
Modes in Section 1, Preparing the machine for operation, for a
description of each of the answering modes.
The terminal will automatically receive the documents into
memory if supplies run out or a paper jam occurs. See Memory.
Under other conditions, the document will first be received to
memory and printed automatically.
Voice request can be used to notify the remote user that voice
contact is desired after the transmission.
To manually receive a document
1. Press [Manual Receive] until the LED is on and remove any
originals from the ADF.
LOAD ORIGINALS
SEP 30'9t 10:55
2. When the telephone rings, lift the handset. If documents are
in the ADF, remove them.
TELEPHONE
3. Press the [Start] key when you hear the fax tones indicating
the remote terminal Is ready to send and hang up the
handset.
RECEIVE
STD
4. The terminal will receive and print the incoming document.
To automatically receive a document
__________________
1. Press [Manual Receive] until the LED goes out and following
displays:
LOAD ORIGINALS
SEP 30'91 10:55
TELECOPIER 7024 USER HANDBOOK
5-1
Page 94

RECEIVING
2.
The terminal will automatically answer the telephone after
the specified number of rings. See Number of Rings.
INCOMING CALL
RECEIVE STD
3. The terminal will receive and print the incoming document.
Receive to memory
______________________________________
The terminal automatically receives and stores documents into
memory when the terminal is out of supplies or when a paper
jam occurs. The following displays during the receive operation
if terminals are not communicating in error correct mode.
RECEIVE
MEMORY STD
The following displays during the receive operation if terminals
are communicating in error correct mode:
RECEIVE
ECM STD
The documents will print out from memory after the supplies
have been replaced or the paper jam is cleared.
To manually receive a document using a second
telephone
The Set Second Telephone setting should be set to ON if a second
telephone is connected to your terminal.
The terminal offers a switch back to fax feature if you answer the
telephone with the second telephone handset. Pressing [6] two
times on the second telephone handset within 12 seconds
instructs the terminal to switch the call back to the terminal.
1. When the telephone rings, lift the handset of the second
telephone and listen for the fax tones from the remote
terminal.
5*2
TELEPHONE
TELECOPIER 7024 USER HANDBOOK
Page 95

RECEIVING
2. Press [6] two times on the second telephone to switch the call
to the terminal. When you hear the fax tones, hang up the
handset. The receive operation will begin.
RECEIVE
STD
Note: if you press any key on the control panel of the terminal
before pressing 6 two times, you cannot perform the remote
receive operation.
The second telephone may not switch to the terminal depending
on the situation of the telephone line or the type of second
telephone you have.
To automatically receive a document using LOAD
ORIG: (TEL) answer mode
When you have selected the LOAD ORIG: (TEL) mode and allow
the terminal to answer incoming calls automatically, callers to
your terminal will hear a recorded message:
Hello. If you wish to send a fax, transmit now. If not, check the
number and dial again. Thank you.
If your terminal detects fax tones, the recorded message will not
be played and the terminal will receive the incoming document.
While the message Is being delivered, the handset on the
terminal will ring softly, letting you know your terminal has
answered the telephone line but has not yet attempted
reception. You can pick up the handset at any time during the
10-second message to turn off the voice message and listen to
the incoming call through the handset.
1. Remove any documents from the ADF and press [Manual
Receive] until the following displays:
LOAD ORIG: (TEL)
SEP 30'91 10:55
2. When your telephone rings, you can allow your terminal to
answer automatically and receive the document;
INCOMING CALL
or you can answer the call manually for voice
communication. If you hear fax tones, press [Start] and hang
up the handset to begin the receive operation.
RECEIVE
STD
3. The terminal will receive and print the incoming document.
COMPLETED
TELECOPIER 7024 USER HANDBOOK 5-3
Page 96

RECEIVING
To automatically receive a document when an
answering machine is connected LOAD ORIG: (ANS)
This setting instructs your terminal to allow the answering
machine to answer all calls. You can also answer the calls
manually using the terminal handset.
The terminal offers a setting to automatically switch the call
from the answering machine to the terminal after 0-15 seconds.
(See Set TAD Time.) If the line is quiet (caller does not speak) for
the specified period of time, the call will be switched to the
terminal.
1. Remove any documents from the ADF and press [Manual
Receive] until the following displays:
LOAD ORIG: (ANS)
SEP 30'91 8:00
2. When the telephone rings, the answering machine will
answer. At this time, your terminal will listen for fax tones
and quiet time (0-15 seconds). If your terminal hears either,
it will switch from the answering machine to your terminal
and receive the document. If fax tones are not detected, the
voice message will play. After the voice message completes,
the remote operator can leave a voice message or press
[Start] to begin the send operation.
If for some reason the answering machine does not answer,
your fax will answer the telephone after 7 rings and
automatically receive the document.
The following displays when the terminal receives a
document:
INCOMING CALL
RECEIVE
STD
Note: If the remote operator leaves a message longer than
1 minute, your terminal will not switch from the answering
machine to your fax.
5^
TELECOPIER 7024 USER HANDBOOK
Page 97

Polling/Delayed polling
RECEIVING
Polling is a basic receive operation and allows you to initiate the
sending of a remote document to your terminal up to one month
In advance.
To set polling/delayed polling (Menu 03, Feature 1)
1. Press [Menu].
l.SEND OPTIONSl
01-10 SELECT/ENTER
2. Press [0], [3].
3.POLLING OPTIONS
01-10 SELECT/ENTER
3. Press [Enter],
1.DELAYED POLLING
1-3 SELECT/ENTER
4. Press [Enter] to enter Delayed Polling.
DELAYED POLLING
ENTER FAX NUMBER
5. Dial the number of the remote terminal using manual dial,
one touch dial, or speed dial. Press [Clear] to erase a
character.
DELAYED POLLING
555-4545
6. When the telephone number is entered, press [Enter].
DELAYED POLLING
ENTER DAY: 12,14:55
TELECOPIER 7024 USER HANDBOOK
5-5
Page 98

RECEIVING
7. If you want the operation to start immediately, press [Enter].
If you want a specific start date and time, enter using the
terminal keypad.
• Enter the desired date and press [Enter].
• Enter the hour, in 24 hour format, and press [Enter].
• Enter the desired minutes and press [Enter].
DELAYED POLLING
COMPLETED
S-6
TELECOPIER 7024 USER HANDBOOK
Page 99

Multi-polling
RECEIVING
Multi-polling is used to sequentially poll up to 85 remote
terminals. A terminal in a central sales office, for example, can
be used to poll daily sales figures using the multi-polling feature.
To set multi-pollmg (Menu 03, Feature 2)
1, Press [Menu].
l.SEND OPTIONSl
01-10 SELECT/ENTER
2. Press [0], [3].
3.POLLING OPTIONS
01-10 SELECT/ENTER
3. Press [Enter].
1.DELAYED POLLING
1-3 SELECT/ENTER
4. Press [2].
2.MULTI-POLLING
1-3 SELECT/ENTER
5. Press [Enter].
MULTI-POLLING
ENTER FAX NUMBER
Enter up to five one touch, speed dial or group numbers. To
enter a group number, press the pound (#) key and enter the
group number. Press [Menu] to separate the numbers with
commas. In the example below, one touch key 1, group
number 3 and speed dial number 25 are entered. Press
[Clear] to erase a character.
MULTI-POLLING
[1],G3,(25)
TELECOPIER 7024 USER HANDBOOK
5-7
Page 100

RECEIVING
7. When the telephone number is entered, press [Enter].
MULTI-POLLING
ENTER DAY 12, 10:00
If you want the operation to start immediately, press [Enter].
If you want a specific start date and time, enter using the
terminal keypad.
• Enter the desired date and press [Enter].
• Enter the hour, in 24 hour format, and press [Enter].
• Enter the desired minutes and press [Enter],
MULTI-POLLING
COMPLETED
54
TELECOPIER 7024 USER HANDBOOK
 Loading...