

Page 1

PHASER™ 3400
PERSONAL LASER PRINTER
User Guide
Page 2

Xerox Phaser™ 3400
Personal Laser Printer
User Guide
June 2001
Page 3

Copyright © 2001, Xerox Corporation. All Rights Reserved. Unpublished rights reserved
under the copyright laws of the United States. Contents of this publication may not be
reproduced in any form without permission of Xerox Corporation.
Copyright protection claimed includes all forms of matters of copyrightable materials
and information now allowed by statutory or judicial law or hereinafter granted,
including without limitation, material generated from the software programs which are
displayed on the screen such as styles, templates, icons, screen displays, looks, etc.
Printed in the United States of America.
®
Ethernet
Phaser
Adobe
PostScript
, the stylized X, and XEROX® are registered trademarks of Xerox Corporation.
™ and infoSMART™ are trademarks of Xerox Corporation.
®
, Acrobat®, Acrobat® Reader, Illustrator®, PageMaker®, Photoshop®, and
®
, and ATM® are registered trademarks and Adobe Jenson™, Adobe Brilliant
Screens™ technology, and IntelliSelect™ are trademarks of Adobe Systems Incorporated
or its subsidiaries which may be registered in certain jurisdictions.
®
, LaserWriter®, LocalTalk®, Macintosh®, Mac® OS, AppleTalk®, and TrueType2®
Apple
are registered trademarks, and QuickDraw™ is a trademark of Apple Computer
Incorporated.
EPSON FX-850™ is a trademark of Epson America, Inc.
IBM ProPrinter™ is a trademark of International Business Machines.
Avery™ is a trademark of Avery Dennison Corporation.
®
and HP-GL® are registered trademarks of Hewlett-Packard Corporation.
PCL
®
MS-DOS
and Windows® are registered trademarks of Microsoft Corporation.
The X-Window System™ is a trademart of Massachusetts Institute of Technology.
®
Wingdings™ in TrueType
format is a product of Microsoft Corporation. WingDings is a
trademark of Microsoft Corporation and TrueType is a registered trademark of Apple
Computer, Inc.
®
and NetWare® are registered trademarks of Novell, Incorporated.
Novell
®
, Sun Microsystems®, and Sun Microsystems Computer Corporation® are registered
Sun
trademarks of Sun Microsystems, Incorporated.
®
SPARC
is a registered trademark of SPARC International, Incorporated.
SPARCstation™ is a trademark of SPARC International, Incorporated, licensed
exclusively to Sun Microsystems, Incorporated.
®
is a registered trademark in the US and other countries, licensed exclusively
UNIX
through X/Open Company Limited.
Other marks are trademarks or registered trademarks of the companies with which they
are associated.
ii
Phaser 3400 Personal Laser Printer
Page 4

Contents
Printer Warranty . . . . . . . . . . . . . . . . . . . . . . . . . . . . . . . . . . . v
User safety summary . . . . . . . . . . . . . . . . . . . . . . . . . . . . . . . viii
Printer Parts and Supplies . . . . . . . . . . . . . . . . . . . . . . . . . . . . 1
Control Panel . . . . . . . . . . . . . . . . . . . . . . . . . . . . . . . . . . . . . . . . . . . . . . 2
Supplies and Accessories . . . . . . . . . . . . . . . . . . . . . . . . . . . . . . . . . . . . . . 3
Paper and Print Media. . . . . . . . . . . . . . . . . . . . . . . . . . . . . . . 5
Paper tips . . . . . . . . . . . . . . . . . . . . . . . . . . . . . . . . . . . . . . . . . . . . . . . . . . . 5
Media weights and types . . . . . . . . . . . . . . . . . . . . . . . . . . . . . . . . . . . . . . 5
Supported paper and media sizes . . . . . . . . . . . . . . . . . . . . . . . . . . . . . . 6
Loading Trays . . . . . . . . . . . . . . . . . . . . . . . . . . . . . . . . . . . . . . 7
Loading the standard tray . . . . . . . . . . . . . . . . . . . . . . . . . . . . . . . . . . . . . . 7
Using the Multi-purpose Tray . . . . . . . . . . . . . . . . . . . . . . . . 10
Installing Software . . . . . . . . . . . . . . . . . . . . . . . . . . . . . . . . . 12
Using the Windows installer . . . . . . . . . . . . . . . . . . . . . . . . . . . . . . . . . . . 12
Using the Macintosh installer . . . . . . . . . . . . . . . . . . . . . . . . . . . . . . . . . . 13
Printing . . . . . . . . . . . . . . . . . . . . . . . . . . . . . . . . . . . . . . . . . . 15
Troubleshooting Printing Problems . . . . . . . . . . . . . . . . . . . 16
Paper Jams . . . . . . . . . . . . . . . . . . . . . . . . . . . . . . . . . . . . . . . 18
Jam prevention tips . . . . . . . . . . . . . . . . . . . . . . . . . . . . . . . . . . . . . . . . . . 18
Clearing jams in the exit area . . . . . . . . . . . . . . . . . . . . . . . . . . . . . . . . . . 18
Clearing jams inside the printer . . . . . . . . . . . . . . . . . . . . . . . . . . . . . . . . 21
Clearing jams in the tray area. . . . . . . . . . . . . . . . . . . . . . . . . . . . . . . . . . 22
User Guide
iii
Page 5

Getting Help . . . . . . . . . . . . . . . . . . . . . . . . . . . . . . . . . . . . . 24
Printer CD-ROM . . . . . . . . . . . . . . . . . . . . . . . . . . . . . . . . . . . . . . . . . . . . . 24
Reference Guide . . . . . . . . . . . . . . . . . . . . . . . . . . . . . . . . . . . . . . . . . . . . . 24
Videos . . . . . . . . . . . . . . . . . . . . . . . . . . . . . . . . . . . . . . . . . . . . . . . . . . . . . 25
Windows driver and driver help system . . . . . . . . . . . . . . . . . . . . . . . . . . 25
Xerox web sites . . . . . . . . . . . . . . . . . . . . . . . . . . . . . . . . . . . . . . . . . . . . . . 26
Customer support centers . . . . . . . . . . . . . . . . . . . . . . . . . . . . . . . . . . . . . 27
Printer Specifications . . . . . . . . . . . . . . . . . . . . . . . . . . . . . . 28
iv
Phaser 3400 Personal Laser Printer
Page 6

Printer Warranty
Xerox warrants that the Phaser 3400 Printer will be free from defects in materials and
workmanship for a period of one (1) year from the date of shipment. If the product
proves defective during the warranty period, Xerox, at its option, will:
(1) repair the product by means of telephone support or depot service at no charge for
parts or labor,
(2) replace the product with a comparable product,
(3) replace the product with a remanufactured unit, or
(4) refund the amount paid for the product, less a reasonable allowance for usage, upon
its return.
Under this product warranty, the Customer must notify Xerox or its authorized service
representative of the defect before the expiration of the warranty period. To obtain
service under this warranty, the Customer must first contact Xerox Telephone Support
personnel or that of its authorized service representative. Telephone Support personnel
will work to resolve issues professionally and quickly, however the Customer must
reasonably assist Xerox or its authorized representative.
If telephone support is unsuccessful, Xerox or its authorized service representative will
provide warranty repair at a designated depot site without charge as provided below.
Service is available at a designated service depot(s) in the United States and
■
Canada for products purchased in the United States and Canada.
Inside the European Economic Area, service is available at a designated service
■
depot(s) for products purchased in the EEA.
Outside the US, Canada, & EEA, service is available at a designated service
■
depot(s) in the country of purchase.
Xerox reserves the right to charge for depot service in exceptional cases.
■
A description of the depot process may be obtained from the local Xerox Customer
Support Center or authorized Xerox distributor. Depot service is at Xerox or its
authorized service representative’s sole discretion and is considered an option of last
resort.
If the Customer’s product contains features that enable Xerox or its authorized service
representative to diagnose and repair problems with the product remotely, Xerox may
request that the Customer allow such remote access to the product.
In the maintenance of the product, Xerox may use new or equivalent to new parts or
assemblies for equal or improved quality. All defective parts and assemblies become the
property of Xerox. Xerox, at its option, may request the return of these parts.
User Guide
v
Page 7

Consumables Warranty
Xerox warrants that laser print cartridges will be free from defects in materials and
workmanship for a period of one (1) year from date of installation. All other Customer
Replaceable Consumables (CRCs) will be covered for a period of ninety (90) days
(six (6) months where longer periods are required by law) from the date of installation,
but not more than one (1) year from date of shipment. Under this warranty, the
Customer must notify Xerox or its authorized service representative of the defect before
the expiration of the warranty period. XEROX MAY REQUIRE THAT THE DEFECTIVE
CRC BE RETURNED TO A DESIGNATED XEROX DEPOT OR THE XEROX
REPRESENTATIVE FROM WHICH THE CRC WAS ORIGINALLY PURCHASED. Claims
will be handled according to the current Xerox procedure.
These warranties shall not apply to any defect, failure or damage caused by improper
use or improper or inadequate maintenance and care. Xerox shall not be obligated under
these warranties:
a. to repair damage resulting from attempts by personnel other than Xerox
representatives to install, repair or service the product unless directed by a
Xerox representative;
b. to repair damage, malfunction, or degradation of performance resulting from
improper use or connection to incompatible equipment or memory;
c. to repair damage, malfunction, or degradation of performance caused by the
use of non-Tektronix/Xerox printer supplies or consumables or the use of
Tektronix/Xerox supplies not specified for use with this printer;
d. to repair a product or CRC that has been modified or integrated with other
products when the effect of such modification or integration increases the
time or difficulty of servicing the product or CRC;
e. to perform user maintenance or cleaning or to repair damage, malfunction,
or degradation of performance resulting from failure to perform user
maintenance and cleaning as prescribed in published product materials;
f. to repair damage, malfunction, or degradation of performance resulting from
use of the product in an environment not meeting the operating
specifications set forth in the user manual;
g. to repair this product after the limit of its duty cycle has been reached; all
service thereafter shall be billed on a time and material basis;
h. to replace CRCs that have been refilled, are used up, abused, misused, or
tampered with in any way.
vi
Phaser 3400 Personal Laser Printer
Page 8

THE ABOVE WARRANTIES ARE GIVEN BY XEROX WITH RESPECT TO THIS
PRODUCT AND ITS CUSTOMER REPLACEABLE CONSUMABLES IN LIEU OF ANY
OTHER WARRANTIES, EXPRESS OR IMPLIED. XEROX AND ITS VENDORS
DISCLAIM ANY IMPLIED WARRANTIES OF MERCHANTABILITY OR FITNESS FOR A
PARTICULAR PURPOSE OR ANY SIMILAR STANDARD IMPOSED BY APPLICABLE
LEGISLATION. XEROX'S RESPONSIBILITY TO REPAIR, REPLACE, OR OFFER A
REFUND FOR DEFECTIVE PRODUCTS AND CUSTOMER REPLACEABLE
CONSUMABLES IS THE SOLE AND EXCLUSIVE REMEDY PROVIDED TO THE
CUSTOMER FOR BREACH OF THESE WARRANTIES. XEROX AND ITS VENDORS
WILL NOT BE LIABLE FOR ANY INDIRECT, SPECIAL, INCIDENTAL OR
CONSEQUENTIAL DAMAGES (INCLUDING LOSS OF PROFITS) IRRESPECTIVE OF
WHETHER XEROX OR THE VENDOR HAS ADVANCE NOTICE OF THE POSSIBILITY
OF SUCH DAMAGES.
Some states, provinces, and countries do not allow the exclusion or limitation of
incidental or consequential damages or exclusions or limitations on the duration of
implied warranties or conditions, so the above limitations or exclusions may not apply
to you. This warranty gives you specific legal rights, and you may also have other rights
that vary by state, province, or country.
TO THE EXTENT ALLOWED BY LOCAL LAW, EXCEPT FOR THE OBLIGATIONS
SPECIFICALLY SET FORTH IN THIS WARRANTY STATEMENT, IN NO EVENT
SHALL XEROX AND ITS VENDORS BE LIABLE FOR ANY INDIRECT, SPECIAL,
INCIDENTAL OR CONSEQUENTIAL DAMAGES (INCLUDING LOSS OF PROFITS)
WHETHER BASED ON CONTRACT, TORT, OR ANY OTHER LEGAL THEORY AND
IRRESPECTIVE OF WHETHER XEROX OR THE VENDOR HAS ADVANCE NOTICE OF
THE POSSIBILITY OF SUCH DAMAGES.
For the software warranty, please see the end user license agreement included with the
software.
In certain geographies this product is warranted by Fuji Xerox. This statement of
warranty does not apply in Japan – please refer to the warranty statement provided in
the Japanese user manual for products purchased in Japan.
If you are an Australian consumer, you should be aware that the Trade Practices Act
1974 and equivalent State and Territory legislation (collectively "the Acts") contain
special provisions designed to protect Australian consumers. Nothing in any Fuji Xerox
warranty material excludes or limits the application of any provision of any of the Acts,
where to do so would contravene the Acts or cause any part of this warranty to be void.
In this warranty material, an implied condition or warranty, the exclusion of which from
a contract with a "Consumer" (as defined in the Acts) would contravene any provision of
the Acts or cause any part or all of this warranty to be void, is called a "Non-excludable
Condition." To the full extent permitted by law, Fuji Xerox’s sole and total liability to
the customer for a breach of any Non-excludable Condition (including for any
consequential loss suffered by the customer) is limited, except as otherwise stated
herein, to (at Fuji Xerox’s option) replacing or repairing the goods, or resupplying, or
paying the cost of the resupply of, the services, in respect of which the breach occurred.
Subject to the above, all conditions and warranties which would or might otherwise be
implied in a Consumer contract, whether by operation of statute, inference from
circumstances, industry practice or otherwise, are excluded.
User Guide
vii
Page 9

User safety summary
Operational Safety
Your printer and its supplies were designed and tested to meet strict safety
requirements. These include safety agency examination, approval, and compliance with
established environmental standards.
To ensure the continued safe operation of your printer, follow these safety guidelines at
all times:
Follow warnings and instructions marked on or supplied with the equipment.
■
Use materials and supplies specifically designed for your printer. The use of
■
unsuitable materials may result in poor performance and possibly a hazardous
situation.
Do not attempt any maintenance function that is not specifically described in the
■
printer’s documentation.
Never remove covers or guards that are fastened with screws or require a tool for
■
removal, unless directed to do so in a Xerox approved maintenance kit.
Do not override or disable electrical or mechanical interlocks. Machines are
■
designed to restrict operator access to unsafe areas. Covers, guards and interlock
switches are provided to ensure that the machine will not operate with covers
opened.
Do not operate the printer if you notice unusual noises or odors. Disconnect the
■
power cord from the power source receptacle, and contact the Xerox Customer
Support Center immediately.
This printer should be operated from the type of power source indicated on the
■
marking label. If you are not sure of the type of power available, consult your local
power company.
Use only the power cord supplied with your Phaser 3400 printer.
■
This product is equipped with a 3-wire grounding type plug (e.g., a plug having a
■
third grounding pin). This plug will fit only into a grounding-type power outlet.
This is a safety feature. To avoid risk of electrical shock, contact your electrician to
replace the receptacle if you are unable to insert the plug into the outlet. Never use
a grounding adapter plug to connect the printer to a power source receptacle that
lacks a ground connection terminal.
Plug the power cable directly into a properly grounded electrical outlet. Do not use
■
an extension cord. If you are not sure whether or not an outlet is properly
grounded, consult an electrician.
Your machine is equipped with an energy saving device to conserve power when
■
the machine is not in use. The machine may be left on continuously.
Do not place the printer where people might step or trip on the power cable.
■
Do not place objects on the power cable.
■
Do not place the printer on an unstable cart, stand or table. The printer may fall,
■
causing personal injury or serious damage to the printer.
Do not locate the printer near a radiator or any other heat source.
■
viii
Phaser 3400 Personal Laser Printer
Page 10

Do not use this printer near water, wet locations, or outdoors.
■
Do not obstruct ventilation openings. These openings are provided to prevent
■
overheating of the machine.
Do not push objects into slots and openings on the printer. Contacting a voltage
■
point or shorting out a part might result in electrical shock or fire.
Unplug the printer from the wall outlet before cleaning.
■
Do not use aerosol cleaners. Follow the instructions in the printer documentation
■
for proper cleaning methods.
Never use supplies or cleaning materials for purposes other than what they were
■
intended. Keep all supplies and materials out of reach of children.
Avoid unnecessary handling of the printer cartridge and exposing the print
■
cartridge to light for extended periods of time.
Do not put your hands into the fuser area, located just inside the exit tray area, as
■
you may be burned.
If any of the following conditions occur, turn off the printer’s power immediately,
■
disconnect the power cable from the electrical outlet, and contact your local Xerox
Customer Support Center to correct the problem:
The printer emits unusual odors or makes unusual noises.
■
The power cord is damaged or frayed.
■
Liquid spilled into the printer.
■
Any part of the printer is damaged.
■
The printer is exposed to water.
■
Symbols as marked on the product
Hot surface on or in the printer Use caution
User Guide
ix
Page 11

Printer Parts and Supplies
Front
2
1
4
5
1710-32
1. Top cover 5. Multi-purpose tray
2. Face-down tray (output) 6. Paper tray
3. Control panel 7. Paper-level indicator
4. Serial number
6
3
7
Back
1. Rear cover and rear face-up tray
(output)
2. USB interface connector 5. Power cord connector
3. Parallel interface connector
User Guide
1
2
3
1710-33
4
5
4. Power switch
1
Page 12

Control Panel
1. Error light
1
2
3
4
■ Blinking = Insufficient memory
■ Blinking alternating with the Paper
light blinking = Output tray is full.
■ 2 fast blinks, then off, then 2 fast
blinks, then off, etc. = Toner is
getting low. Replace the laser print
cartridge soon.
■ On = Cover open, cartridge not
installed or not seated properly
5
2. Manual-feed
light
6
■ On with Paper light = Paper jam
■ On with Data light = Ready for a
manual-feed job. Load paper in the
multi-purpose tray and press the
Print button to start the job.
3. Paper light
■ On = Out of paper
■ On with Error light = Paper jam
■ Blinking alternating with the Error
light blinking = Output tray is full.
4. Data light
■ On = Ready to receive data
■ On with Manual-feed light = Ready
for a manual-feed job
■ Slow blink = Receiving data
■ Fast blink = Printing
5. Cancel button
■ To cancel a print job, hold down the
Cancel button until all lights blink,
then release the button.
6. Print button
■ When the Manual-feed light is on
and paper is loaded in the
multi-purpose tray, press the Print
button to feed the paper into the
printer.
■ To print a Configuration Sheet, hold
the Print button until all lights blink,
then release the button.
If all lights are blinking, this indicates a system error. Turn the power off and
then back on to clear. If the problem persists, contact Xerox Customer Support.
2
Phaser 3400 Personal Laser Printer
Page 13

Supplies and Accessories
To order supplies and accessories, contact your local dealer or visit the
Xerox web site:
www.xerox.com/officeprinting/supplies/
Customer-Replaceable Consumables (CRCs)
Item Part Number
High-capacity Laser Print Cartridge
■ Prints approximately 8,000 pages *
Standard Laser Print Cartridge
■ Prints approximately 4,000 pages *
106R00462
106R00461
* Based on 5% coverage on A4/Letter paper
Accessories
Item Size Part Number
Second Paper Tray Assembly
■ Holds up to 550 sheets of paper
■ Adds a second tray, for increased
paper-printing capacity
■ Increases printing versatility and
convenience
A5/A6 Paper Tray
■ Accommodates a variety of paper
sizes, including A5 and A6 paper
as well as A4, Letter, and Legal
■ Holds up to 250 sheets of paper
■ Increases printing versatility and
convenience
Phaser™ 3400 Memory Upgrade
■ Guaranteed performance
■ Faster image processing
■ Phaser 3400 SDRAM memory is
proprietary and is only available
through Xerox
A4/Letter to Legal 097S02716
A6 to Legal 097S02717
16 Mbytes
32 Mbytes
64 Mbytes
097S02718
097S02719
097S02720
User Guide
3
Page 14

Item Size Part Number
Network Interface Card Kit
■ Adds network capability
097S02722
Repackaging Kit 695E98050
4
Phaser 3400 Personal Laser Printer
Page 15

Paper and Print Media
Paper tips
■
Only use the supported paper types, sizes, and weights.
■
Use clean, undamaged paper.
■
Do not use perforated paper.
■
Store the paper on a flat surface, in a relatively low-humidity
environment.
■
Avoid storing paper in such a way as to cause wrinkling, bending,
curling, etc.
■
Do not unwrap paper until you are ready to use it, and rewrap any
paper you are not using.
■
Do not expose paper to direct sunlight.
Media weights and types
Input Source Acceptable Weight Types
Tray 1, Tray 2, or
A5/A6 Tray
16-28 lbs.
(60-105 g/m
)
Plain paper *
Bond
2
Light card stock
Multi-purpose tray 16-43 lbs.
(60-163 g/m
* Can use preprinted, letterhead, or colored paper also
2
)
User Guide
Plain paper *
Bond
Card stock
Labels
Envelopes
Transparencies
5
Page 16

Supported paper and media sizes
Media Size Tray 1 Tray 2
Letter
Legal
Executive
A4
A5
A6
Folio
B5-JIS
B5-ISO
Custom Sizes
Envelopes **
COM-10 *
Monarch *
C5
*
DL *
B5 *
#9 *
Transparencies
Labels
‡ Minimum size: 80 x 148 mm (3.15 x 5.83 in.); maximum size: 215.9 x 355.6 mm (8.5 x 14 in.)
Print single sided only
*
For envelopes, open the rear face-up tray for output.
**
8.5 x 11 in • • • •
8.5 x 14 in • • • •
7.25 x 10.5 in • • • •
210 x 297 mm • • • •
148 x 210 mm • • •
105 x 148 mm • •
8.5 x 13 in • • • •
182 x 257 mm • • • •
176 x 250 mm • • • •
‡
4.1 x 9.5 in
3.8 x 7.5 in
162 x 229 mm
110 x 220 mm
176 x 250 mm
3.875 x 8.875 in
A5/A6
Tray
Multi-purpose
Tray
•
•
•
•
•
•
•
•
•
6
Phaser 3400 Personal Laser Printer
Page 17

Loading Trays
Loading instructions are also located on the labels inside the tray.
Caution
Do not remove a tray while printing; this may cause paper
jams.
For information on loading the optional A5/A6 tray and loading
optional Tray 2, refer to the Phaser 3400 Personal Laser Printer
Reference Manual on the printer CD-ROM.
Loading the standard tray
1. Remove the tray.
1710-03
2. Push the metal (bottom) plate down until it locks into place.
1710-24
User Guide
7
Page 18

3. If necessary, adjust the tray length to match the length of the
paper. Press the metal tab on the back of the tray, then pull the
back of the tray to the desired length.
1710-46
4. Load the paper.
■
Make sure that you place the paper under the corner tab
(left-front corner of the tray) and the tabs at the back of the
tray.
■
Load letterhead face down with the top of the page toward
the front of the tray.
■
Don't load paper above the fill line. Don’t load over 550
sheets.
1710-50
8
Phaser 3400 Personal Laser Printer
Page 19
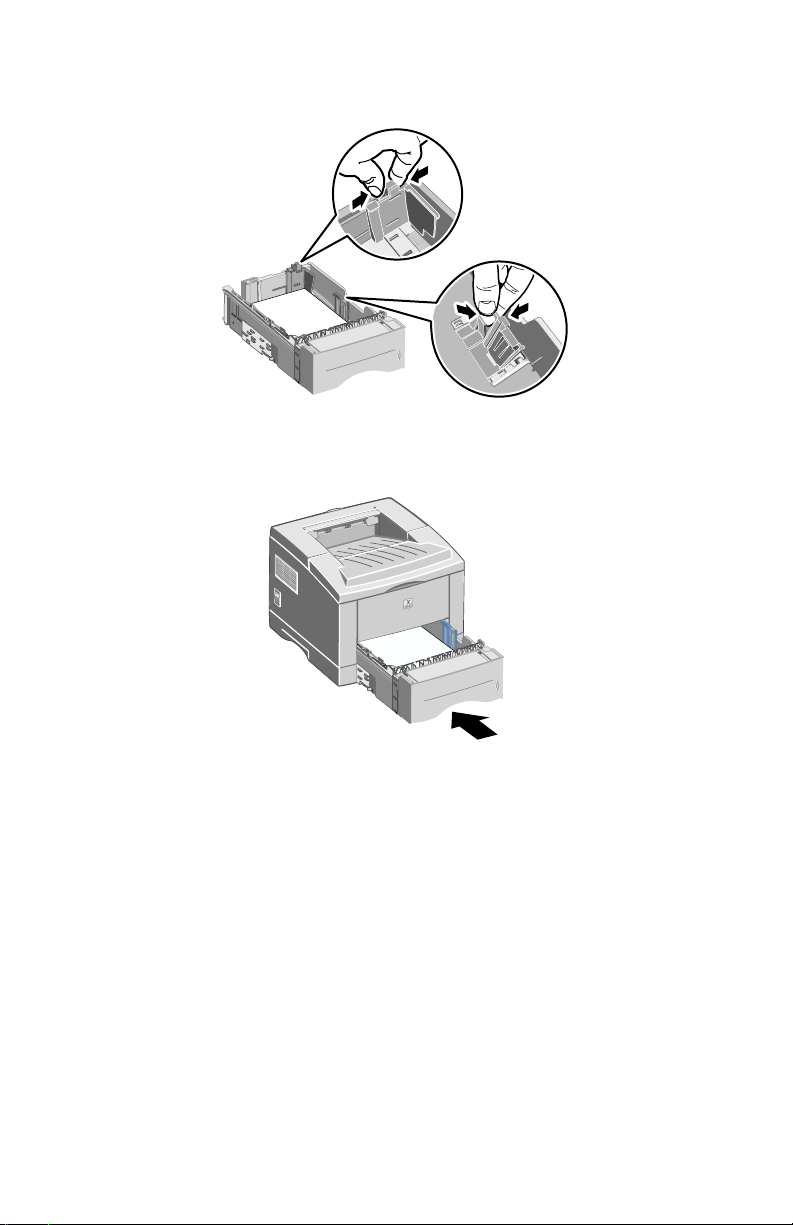
5. If necessary, adjust the side guides to lightly touch the paper.
1710-47
6. Slide the tray back into the printer.
User Guide
1710-51
9
Page 20

Using the Multi-purpose Tray
The multi-purpose tray can be used in either of these ways:
■
Loaded with paper or special media
■
Used to manually feed paper one sheet at a time
Always use the multi-purpose tray to print on special media, such as
envelopes, transparencies, or non-standard paper sizes.
To print two-sided jobs, always use the multi-purpose tray for the
second side; refer to the Phaser 3400 Personal Laser Printer Reference
Manual on the printer CD-ROM for more information.
To use the multi-purpose tray:
1. Open the multi-purpose tray and pull out the tray extension.
1710-29
2. When printing on special media, open the rear face-up tray and
pull out the extension.
1710-31
10
Phaser 3400 Personal Laser Printer
Page 21

3. To load paper in the tray, place the paper against the left edge of
the tray, then slide the width guide against the paper.
1710-30
■
Load letterhead face up with the top of the page entering the
printer first.
■
Don't load paper above the fill line. Don’t load over
100 sheets of paper, 20 transparencies, 25 labels, or
10 regular envelopes.
■
Load envelopes with the flap down.
Caution
Never use envelopes with clasps, snaps, windows, coated
linings, self-stick adhesives, or stamps; they may severely
damage the printer.
4. To use the paper or media loaded in the multi-purpose tray:
a. In the driver, select Multi-purpose Tray as the Paper Source.
b. Print the job.
To manually feed the paper, envelopes, or special media:
a. In the driver, select Manual Feed as the Paper Source.
b. Print the job.
c. When the Manual-feed light and the Data light on the
Control Panel comes on, load one sheet or one envelope and
then press the Print button.
User Guide
11
Page 22

Installing Software
Before sending a job to the printer, you must have the printer driver or
PostScript PPD file installed on your computer.
Using the Windows installer
Use the installer application to automatically install the printer driver
and utility software onto your computer's hard disk.
1. Insert the Phaser 3400 printer's CD-ROM into your computer's
CD-ROM drive.
2. When the CD-ROM automatically runs, click to select your
language. (If you have auto-run turned off, run setup.exe from the
CD-ROM.)
Note
If the computer is connected to the printer by a USB cable
(and you are using Windows 98 or Windows Me), install the
USB Port Driver before you install the driver:
3. To install the USB port driver, click USB Port Driver, follow the
on-screen instructions, reboot when prompted, and then repeat
Steps 1 and 2.
4. To install the printer driver, click Printer Driver and follow the
on-screen instructions to install the printer driver software.
5. If the computer is connected to the printer by a USB cable:
a. Click Start, select Settings, click Printers.
b. Right-click the icon for the printer.
c. From the popup menu, select Properties.
d. Click the Details tab.
e. For Print to the following port, select SSUSB and click the
OK button.
6. If you want to install the Remote Control Panel, click RCP and
follow the on-screen instructions. For more information on the
Remote Control Panel, refer to the Phaser 3400 Personal Laser
Printer Reference Manual (on the CD-ROM).
12
Phaser 3400 Personal Laser Printer
Page 23

Using the Macintosh installer
Use the installer application to automatically install the PostScript
PPD onto your computer's hard disk.
1.
Insert the Phaser 3400 printer's CD-ROM into your computer's
CD-ROM drive.
2.
Double click the CD-ROM icon.
3.
Double click the folder for your language.
Folder Language
DE German
EN English
ES Spanish
FR French
IT Italian
PT Portuguese
4. Double click the Installer icon.
5.
On the introductory screen, click the Continue button.
6.
Read the installation notes, then click the Continue button.
7. In the Installer dialog box, click the Install button.
8. Either set up the printer in the Chooser or on your desktop (if your
computer is connected to the printer with a USB cable). Refer to
the following section for more information if using a USB cable.
Note
To print, you must also have the LaserWriter 8 printer driver
installed. If needed, run the LaserWriter 8 installer, which is
available on the printer CD-ROM.
Setting up the printer when using a USB cable
1.
Locate the Desktop Printer Utility in the Apple Extras folder.
2.
Double click the Desktop Printer Utility.
User Guide
13
Page 24

3. In the New Desktop Printer dialog box after With, select
LaserWriter 8, select Printer (USB) in the list, and click the OK
button.
4. In the top part of the dialog box, click the Change button, select
the PPD from the list, and click the Select button.
5. In the middle part of the dialog box, click the Change button,
select the Phaser 3400 printer, and click the OK button.
6. With both the PPD file and printer specified, click the Create
button.
7. Type the desired name for the printer under Save desktop
printer as and click the Save button.
An icon for the new printer now appears on the desktop.
14
Phaser 3400 Personal Laser Printer
Page 25

Printing
When sending a job to the printer, select special features in the printer
driver.
■
Windows — Use the PCL 6 driver or a PostScript driver with the
Phaser 3400 PPD file.
■
Macintosh — Use the LaserWriter 8 driver with the Phaser 3400
PPD file.
Features available with these drivers include:
■
Number of copies
■
Paper size, source, and type
■
Orientation
■
Image quality
■
Image enhancement
■
Graphics mode
■
Multiple up
■
Fit to page/Scaling
■
Print as mirror image
■
True Type fonts
■
Watermarks
In addition, the PCL 6 driver includes:
■
Toner save mode
■
Manual two-sided printing
■
Booklet printing
■
Poster printing
For information on Windows PCL 6 driver features, click the Help
button on the driver tab.
Refer to the Phaser 3400 Personal Laser Printer Reference Manual (on
the CD-ROM) for information on printing two-sided jobs, printing from
Linux, and using the Remote Control Panel (with Windows).
User Guide
15
Page 26

Troubleshooting Printing Problems
For more information, refer to the Phaser 3400 Personal Laser Printer
Reference Manual on the printer CD-ROM or access the
troubleshooting knowledge base at
www.xerox.com/officeprinting/infoSMART/
General things to check
■
Make sure that your computer is connected to the printer with the
right cable.
■
Use an IEEE-1284-rated cable for parallel connections.
■
Use a compliant cable rated USB Specification Revision 1.0
or 1.1 for USB connections.
■
Make sure that the printer cable is connected properly. If using a
parallel cable, make sure that the clips on the connector are
securely fastened.
■
Test whether the cable is defective by swapping the cable with
one known to work.
■
There should not be any intermediate device (such as a scanner or
removable drive) between the computer and the printer. If there is
an intermediate device, remove it. Power off the computer,
printer, and device, then connect the printer directly to the
computer. After you power up the computer and the printer,
re-submit the print job.
■
Make sure that the Phaser 3400 laser print cartridge is installed
properly by removing and reinserting it; refer to the Laser Print
Cartridge Installation instruction sheet on the Phaser 3400
printer’s CD-ROM for more information.
■
Make sure that the top cover is closed securely.
■
Make sure that paper is properly loaded in the trays and that the
trays are fully inserted into the printer.
■
Make sure that the printer is selected as the default printer.
■
Print a Configuration Sheet (as described on page 2) to confirm
that the printer is functioning.
16
Phaser 3400 Personal Laser Printer
Page 27

■
If using Windows, access the printer driver (as described on
page 25) and check the settings.
■
Make sure that the print job is being sent to the correct port
(for example, LPT1). For Windows 95, Windows 98, or
Windows Me, check the settings on the Details tab. For
Windows 2000 or Windows NT, check the settings on the
Ports tab.
■
Print a test page from the General tab of the printer driver. If
the test page doesn’t print, un-install and then reinstall the
printer driver. If the test page does print, the problem is not
due to the printer or driver; check the application.
Indicator lights
For the location of the indicator lights on the control panel, see page 2.
■
If the Data light is off, check the power switch, power cord
connection, and power source.
■
If the Error light is on, check to see that the laser print cartridge is
properly inserted in the machine.
■
If the Error light blinks fast twice, then is off, blinks twice, then is
off, etc., the toner in the laser print cartridge is getting low. You
can still print approximately 500 pages (with 5% coverage) but
may want to order a replacement laser print cartridge; refer to for
more information.
■
If the Paper light and Error light are both on, check for paper jams
or misfeeds.
■
If the Paper light and Error light alternately blink, remove paper
from the face-down output tray on top of the printer.
■
If only the Paper light is on, add paper to the printer.
■
If the Manual light and Data light are on, the printer is in
manual-feed mode. Insert paper in the multi-purpose tray and
press the Print button.
■
If all lights are on, there is a system error. Turn the power off and
then back on to clear. If the problem persists, contact Xerox
Customer Support.
User Guide
17
Page 28

Paper Jams
If the Error light (top) and Paper light (third) on the
control panel are both on, the printer has a paper jam.
Jam prevention tips
■
Only use paper supported by the printer; see page 6.
■
Make sure that the paper is loaded correctly.
■
Don't add paper above the tray's fill line.
■
If paper is still jamming, flip the paper over in the paper tray.
■
Do not remove the tray while printing.
■
If printing on heavy paper or special media, only load the media
in the multi-purpose tray.
■
Special media, such as thick paper and envelopes, should only be
output to the face-up tray. Open the face-up tray in the back of the
printer before sending the job to the printer.
Clearing jams in the exit area
1. If you see paper in the exit area, gently pull the paper to remove it;
if successful, skip to Step 11.
1710-38
18
Phaser 3400 Personal Laser Printer
Page 29

2. If there is resistance when you pull the paper or the paper is not
visible, open the rear cover.
1710-39
3. Detach the vinyl strip.
1710-40
4. Press the rear cover down until the plastic clips of the rear tray
snap out.
1710-54
5. Gently pull the paper to remove it; if successful, skip to Step 9.
User Guide
19
Page 30

6. If there is still resistance when you pull the paper, pinch the tabs
to release the exit roller, then swing the roller to the left.
1710-41
7. Gently remove the jammed paper.
Note
If you still cannot remove the paper, refer to "Clearing paper
jams inside the printer" (the following section).
8. Replace and secure the exit roller.
9. Re-attach the vinyl strip.
10. Close the rear cover.
11. Open and close the top cover to resume printing.
20
Phaser 3400 Personal Laser Printer
Page 31

Clearing jams inside the printer
1.
Open the top cover and remove the laser print cartridge.
1710-08
Caution
Do not expose the laser print cartridge to heat or direct
sunlight.
2. Carefully lift up the metal guide.
3. Gently remove the jammed paper.
4. Gently lower the metal guide.
User Guide
1710-35
21
Page 32

5. Replace the laser print cartridge and close the top cover.
1710-37
Clearing jams in the tray area
1. Pull out the paper tray.
1710-42
2. Gently pull the jammed paper to remove it.
3. Push the stack of paper down until the bottom plate of the tray
locks into place.
22
Phaser 3400 Personal Laser Printer
Page 33

4. Slide the tray back into the printer.
1710-51
5. To resume printing, open and close the top cover.
User Guide
23
Page 34

Getting Help
Refer to the following resources for information about the Phaser 3400
printer.
Printer CD-ROM
The printer’s auto-running CD-ROM contains various resources
available for installing and learning more about the Phaser 3400
printer.
■
Printer software
■
Read Me release notes
■
Phaser 3400 Personal Laser Printer User Guide (this manual)
■
Phaser 3400 Personal Laser Printer Reference Guide
■
Installation poster
■
Videos
■
Laser Print Cartridge installation instructions
■
Repacking instructions
Reference Guide
The Phaser 3400 Personal Laser Printer Reference Guide, on the
printer’s CD-ROM, contains information on the following topics:
■ Loading the optional A5/A6 tray
■ Printing two-sided jobs
■ Linux printing
■ Remote Control Panel
■ Troubleshooting printing problems
■ Print quality
■ Maintenance and cleaning
■ Material Safety Data Sheet
■ Certifications
24
Phaser 3400 Personal Laser Printer
Page 35

Videos
The Phaser 3400 videos, on the printer’s CD-ROM, contain information
on the following topics:
■
Replacing the laser print cartridge
■
Loading media in the tray and multi-purpose tray
■
Clearing jams
■
Installing the network card
■
Installing the second paper tray assembly
Windows driver and driver help system
When using Windows 95, Windows 98, Windows Me, Windows 2000,
or Windows NT, install the custom PCL 6 driver from the Printer
CD-ROM. Then access the printer driver to view information about the
printer features on the driver tabs by clicking the Help button on the
tab.
To access the Phaser 3400 PCL 6 printer driver:
1.
Click Start, select Settings, then click Printers.
2.
In the Printers folder, right-click the icon for your Phaser 3400
printer.
3. From the popup menu, select Properties.
User Guide
25
Page 36

Xerox web sites
To link to product and supplies information, download printer
drivers, view documents, and access support information:
www.xerox.com/officeprinting
infoSMART™ Knowledge Base
To access the troubleshooting knowledge database used by Xerox
Customer Support staff:
www.xerox.com/officeprinting/infoSMART
Technical support
To view technical support information:
www.xerox.com/officeprinting/support
On-line documentation
To view documentation about a printer:
www.xerox.com/officeprinting/documentation
Local sales and support centers
To find your local sales and support centers:
www.xerox.com/officeprinting/contacts
26
Phaser 3400 Personal Laser Printer
Page 37

Customer support centers
Before calling for customer support, write down the serial number of
your printer; refer to page 1 for the location of the serial number
.
Argentina
(54)-114-378-5444
Australia
1-800-811-177
Austria
+43 (1) 7956 7083
Belgium-French
+32 (70) 222 045
Belgium-Dutch
+32 (70) 222 047
Bolivia
+(5913) 469-090
Brazil
0800-21-8400
Canada
1-800-835-6100
Chile
800 200 600
Colombia
571-636-3011
Finland
0800 11 8388
France
0825 393 490
Germany
01805 004392
Hong Kong
2513-2513
Italy
199 112 088
Japan
+81 03-3448-3040
Korea
82 (2) 528 4661
Mexico
+52 (5) 628-1091
The Netherlands
0900 202 1154
New Zealand
0 800 449 177
Puerto Rico
1-800-835-6100
Singapore
1-800-356-5565
ASEAN
+(65) 251 3006
Spain
902 160236
Sweden
+46 (771) 1788 08
Switzerland
+41 (848) 845107
Taiwan
(02) 2757 1567
Thailand
2-645-3600
UK
0870 241 3459
US
1-800-835-6100
Denmark
7010 7288
Ecuador
593 (2) 520-480
User Guide
Norway
8150 0308
Venezuela
+58 (2) 265 2625
27
Page 38

Printer Specifications
Item Specification and Description
Print Speed 17 pages per minute for Letter size;
16 pages per minute for A4 size
Resolution True 600 x 600 dpi; 1200 dpi Resolution
Output Capacity ■ Face-down tray: 250 Sheets
■ Face-up tray: 100 Sheets
Input Capacity
■ Tray 1: 550 sheets of paper
(16 to 28 lbs./60 to 105 g/m
■ Multi-purpose tray: 100 sheets of paper
(16 to 43 lbs./60 to 163 g/m
2
)
2
), 20 transparencies,
25 labels, or 10 envelopes
■ Optional Second Tray: 550 sheets of paper
(16 to 28 lbs./60 to 105 g/m2)
■ Optional A5/A6 tray: 250 sheets of paper
(16 to 28 lbs./60 to 105 g/m2)
Power Rating AC 100-128V/200-240V, 50/60 Hz
Acoustic Noise
Operating
Environment
■ Standby: Less than 35 dB
■ Operating: Less than 49 dB
■ Temperature: 10~30 degrees C/50~90 degrees F
■ Humidity: 20 percent - 80 percent relative humidity
Weight 16.1 Kg/35.5 lbs. (with packaging materials)
External
Dimensions
■ Width: 362 mm (14.25 in.)
■ Depth: 409 mm (16.1 in.)
■ Height: 295 mm (11.6 in.)
Print Cartridges For part numbers, refer to page 3
Emulation PCL6, PCL5e, PostScript Level 3, Epson FX-850,
IBM ProPrinter
Fonts 45 scalable (35 Intellifont, 1 Bitmap, Euro)
CPU 166 MHz, 32-bit RISC processor
Memory Standard 16 Mbytes, Expandable to 80 Mbytes: (Installed
into the slot labeled DRAM Module) 100 pin, SDRAM,
non-parity: 50 ns. 16 Mbytes, 32 Mbytes, or 64 Mbytes;
for part numbers, refer to page 3.
28
Phaser 3400 Personal Laser Printer
Page 39

Item Specification and Description
Interfaces ■ Bidirectional Parallel Standard (IEEE 1284) – Modes
supported: Compatible, Nibble, Byte, ECP
■ USB Interface Standard – USB 1.0/1.1 compliant,
12 Mbps, 1 port
User Guide
29
Page 40

609T14478
 Loading...