

Page 1

Version 1.1
December 2013
Xerox® WorkCentre™
3315DN/3325DN/3325DNI
User Guide
Page 2

©2013 Xerox Corporation. All rights reserved. Xerox® and Xerox and Design® are trademarks of Xerox Corporation in the United
States and/or other countries.
Document Version 1.1: December 2013
Page 3

Table of Contents
1 Getting Started
Machine Overview. . . . . . . . . . . . . . . . . . . . . . . . . . . . . . . . . . . . . . . . . . . . . . . . . . . . . . . . . . . . . . . . . . . . . . . . .8
Powering on the Machine . . . . . . . . . . . . . . . . . . . . . . . . . . . . . . . . . . . . . . . . . . . . . . . . . . . . . . . . . . . . . . . . 11
Control Panel Overview . . . . . . . . . . . . . . . . . . . . . . . . . . . . . . . . . . . . . . . . . . . . . . . . . . . . . . . . . . . . . . . . . . 12
Software. . . . . . . . . . . . . . . . . . . . . . . . . . . . . . . . . . . . . . . . . . . . . . . . . . . . . . . . . . . . . . . . . . . . . . . . . . . . . . . . 16
Loading Paper . . . . . . . . . . . . . . . . . . . . . . . . . . . . . . . . . . . . . . . . . . . . . . . . . . . . . . . . . . . . . . . . . . . . . . . . . . 18
Loading Documents . . . . . . . . . . . . . . . . . . . . . . . . . . . . . . . . . . . . . . . . . . . . . . . . . . . . . . . . . . . . . . . . . . . . . 22
Media Output Locations . . . . . . . . . . . . . . . . . . . . . . . . . . . . . . . . . . . . . . . . . . . . . . . . . . . . . . . . . . . . . . . . . 23
Machine Status . . . . . . . . . . . . . . . . . . . . . . . . . . . . . . . . . . . . . . . . . . . . . . . . . . . . . . . . . . . . . . . . . . . . . . . . . 25
General Care and Consumables . . . . . . . . . . . . . . . . . . . . . . . . . . . . . . . . . . . . . . . . . . . . . . . . . . . . . . . . . . 29
Further Assistance. . . . . . . . . . . . . . . . . . . . . . . . . . . . . . . . . . . . . . . . . . . . . . . . . . . . . . . . . . . . . . . . . . . . . . . 30
2Copy
Copy Procedure . . . . . . . . . . . . . . . . . . . . . . . . . . . . . . . . . . . . . . . . . . . . . . . . . . . . . . . . . . . . . . . . . . . . . . . . . 32
Copy Options . . . . . . . . . . . . . . . . . . . . . . . . . . . . . . . . . . . . . . . . . . . . . . . . . . . . . . . . . . . . . . . . . . . . . . . . . . . 36
Using the Layout Options . . . . . . . . . . . . . . . . . . . . . . . . . . . . . . . . . . . . . . . . . . . . . . . . . . . . . . . . . . . . . . . . 39
Media Output Locations . . . . . . . . . . . . . . . . . . . . . . . . . . . . . . . . . . . . . . . . . . . . . . . . . . . . . . . . . . . . . . . . . 43
3Scan
Scanning Overview . . . . . . . . . . . . . . . . . . . . . . . . . . . . . . . . . . . . . . . . . . . . . . . . . . . . . . . . . . . . . . . . . . . . . . 46
Scan Procedure . . . . . . . . . . . . . . . . . . . . . . . . . . . . . . . . . . . . . . . . . . . . . . . . . . . . . . . . . . . . . . . . . . . . . . . . . 47
Scan Options. . . . . . . . . . . . . . . . . . . . . . . . . . . . . . . . . . . . . . . . . . . . . . . . . . . . . . . . . . . . . . . . . . . . . . . . . . . . 53
Scan Assistant . . . . . . . . . . . . . . . . . . . . . . . . . . . . . . . . . . . . . . . . . . . . . . . . . . . . . . . . . . . . . . . . . . . . . . . . . . 55
Scan Using TWAIN . . . . . . . . . . . . . . . . . . . . . . . . . . . . . . . . . . . . . . . . . . . . . . . . . . . . . . . . . . . . . . . . . . . . . . 56
Scan Using WIA Driver. . . . . . . . . . . . . . . . . . . . . . . . . . . . . . . . . . . . . . . . . . . . . . . . . . . . . . . . . . . . . . . . . . . 57
Macintosh Scanning . . . . . . . . . . . . . . . . . . . . . . . . . . . . . . . . . . . . . . . . . . . . . . . . . . . . . . . . . . . . . . . . . . . . . 58
Linux Scanning. . . . . . . . . . . . . . . . . . . . . . . . . . . . . . . . . . . . . . . . . . . . . . . . . . . . . . . . . . . . . . . . . . . . . . . . . . 60
4E-mail
E-mail Procedure . . . . . . . . . . . . . . . . . . . . . . . . . . . . . . . . . . . . . . . . . . . . . . . . . . . . . . . . . . . . . . . . . . . . . . . . 64
E-mail Options . . . . . . . . . . . . . . . . . . . . . . . . . . . . . . . . . . . . . . . . . . . . . . . . . . . . . . . . . . . . . . . . . . . . . . . . . . 68
Address Book . . . . . . . . . . . . . . . . . . . . . . . . . . . . . . . . . . . . . . . . . . . . . . . . . . . . . . . . . . . . . . . . . . . . . . . . . . . 70
Smart Key Addresses . . . . . . . . . . . . . . . . . . . . . . . . . . . . . . . . . . . . . . . . . . . . . . . . . . . . . . . . . . . . . . . . . . . . 71
5Fax
Fax Procedure. . . . . . . . . . . . . . . . . . . . . . . . . . . . . . . . . . . . . . . . . . . . . . . . . . . . . . . . . . . . . . . . . . . . . . . . . . . 74
Fax Options . . . . . . . . . . . . . . . . . . . . . . . . . . . . . . . . . . . . . . . . . . . . . . . . . . . . . . . . . . . . . . . . . . . . . . . . . . . . . 78
Using Fax Send Options . . . . . . . . . . . . . . . . . . . . . . . . . . . . . . . . . . . . . . . . . . . . . . . . . . . . . . . . . . . . . . . . . 80
Xerox WorkCentre 3315DN/3325DN/3325DNI
User Guide
3
Page 4

Using Fax Forward. . . . . . . . . . . . . . . . . . . . . . . . . . . . . . . . . . . . . . . . . . . . . . . . . . . . . . . . . . . . . . . . . . . . . . . 83
Using Secure Receive . . . . . . . . . . . . . . . . . . . . . . . . . . . . . . . . . . . . . . . . . . . . . . . . . . . . . . . . . . . . . . . . . . . . 85
Address Book. . . . . . . . . . . . . . . . . . . . . . . . . . . . . . . . . . . . . . . . . . . . . . . . . . . . . . . . . . . . . . . . . . . . . . . . . . . . 86
Fax from PC. . . . . . . . . . . . . . . . . . . . . . . . . . . . . . . . . . . . . . . . . . . . . . . . . . . . . . . . . . . . . . . . . . . . . . . . . . . . . 90
Receiving Faxes . . . . . . . . . . . . . . . . . . . . . . . . . . . . . . . . . . . . . . . . . . . . . . . . . . . . . . . . . . . . . . . . . . . . . . . . . 91
6Print
Printing using Windows . . . . . . . . . . . . . . . . . . . . . . . . . . . . . . . . . . . . . . . . . . . . . . . . . . . . . . . . . . . . . . . . . . 94
Xerox Easy Printer Manager (EPM). . . . . . . . . . . . . . . . . . . . . . . . . . . . . . . . . . . . . . . . . . . . . . . . . . . . . . . 113
Wireless Setting Program
(WorkCentre 3325DNI) . . . . . . . . . . . . . . . . . . . . . . . . . . . . . . . . . . . . . . . . . . . . . . . . . . . . . . . . . . . . . . . . . 114
SetIP . . . . . . . . . . . . . . . . . . . . . . . . . . . . . . . . . . . . . . . . . . . . . . . . . . . . . . . . . . . . . . . . . . . . . . . . . . . . . . . . . . 116
Printing using Macintosh. . . . . . . . . . . . . . . . . . . . . . . . . . . . . . . . . . . . . . . . . . . . . . . . . . . . . . . . . . . . . . . . 117
Printing using Linux. . . . . . . . . . . . . . . . . . . . . . . . . . . . . . . . . . . . . . . . . . . . . . . . . . . . . . . . . . . . . . . . . . . . . 120
Printing using Unix . . . . . . . . . . . . . . . . . . . . . . . . . . . . . . . . . . . . . . . . . . . . . . . . . . . . . . . . . . . . . . . . . . . . . 122
7USB Port
Inserting the USB Memory Device . . . . . . . . . . . . . . . . . . . . . . . . . . . . . . . . . . . . . . . . . . . . . . . . . . . . . . . 126
Scanning to USB Memory Device . . . . . . . . . . . . . . . . . . . . . . . . . . . . . . . . . . . . . . . . . . . . . . . . . . . . . . . . 127
Printing from USB Memory Device. . . . . . . . . . . . . . . . . . . . . . . . . . . . . . . . . . . . . . . . . . . . . . . . . . . . . . . 128
Managing USB Memory . . . . . . . . . . . . . . . . . . . . . . . . . . . . . . . . . . . . . . . . . . . . . . . . . . . . . . . . . . . . . . . . 129
8 CentreWare Internet Services
Using CentreWare Internet Services . . . . . . . . . . . . . . . . . . . . . . . . . . . . . . . . . . . . . . . . . . . . . . . . . . . . . 132
Status . . . . . . . . . . . . . . . . . . . . . . . . . . . . . . . . . . . . . . . . . . . . . . . . . . . . . . . . . . . . . . . . . . . . . . . . . . . . . . . . . 133
Jobs . . . . . . . . . . . . . . . . . . . . . . . . . . . . . . . . . . . . . . . . . . . . . . . . . . . . . . . . . . . . . . . . . . . . . . . . . . . . . . . . . . . 134
Print . . . . . . . . . . . . . . . . . . . . . . . . . . . . . . . . . . . . . . . . . . . . . . . . . . . . . . . . . . . . . . . . . . . . . . . . . . . . . . . . . . . 137
Address Book. . . . . . . . . . . . . . . . . . . . . . . . . . . . . . . . . . . . . . . . . . . . . . . . . . . . . . . . . . . . . . . . . . . . . . . . . . . 138
Properties . . . . . . . . . . . . . . . . . . . . . . . . . . . . . . . . . . . . . . . . . . . . . . . . . . . . . . . . . . . . . . . . . . . . . . . . . . . . . . 141
Support . . . . . . . . . . . . . . . . . . . . . . . . . . . . . . . . . . . . . . . . . . . . . . . . . . . . . . . . . . . . . . . . . . . . . . . . . . . . . . . . 142
9 Paper and Media
Loading Paper. . . . . . . . . . . . . . . . . . . . . . . . . . . . . . . . . . . . . . . . . . . . . . . . . . . . . . . . . . . . . . . . . . . . . . . . . . 144
Setting Paper Size and Type. . . . . . . . . . . . . . . . . . . . . . . . . . . . . . . . . . . . . . . . . . . . . . . . . . . . . . . . . . . . . 148
Media Specifications . . . . . . . . . . . . . . . . . . . . . . . . . . . . . . . . . . . . . . . . . . . . . . . . . . . . . . . . . . . . . . . . . . . 150
10 Machine Status and Setups
Machine Status Menu . . . . . . . . . . . . . . . . . . . . . . . . . . . . . . . . . . . . . . . . . . . . . . . . . . . . . . . . . . . . . . . . . . 154
Machine Information . . . . . . . . . . . . . . . . . . . . . . . . . . . . . . . . . . . . . . . . . . . . . . . . . . . . . . . . . . . . . . . . . . . 155
Toner Level . . . . . . . . . . . . . . . . . . . . . . . . . . . . . . . . . . . . . . . . . . . . . . . . . . . . . . . . . . . . . . . . . . . . . . . . . . . . 156
Information Pages . . . . . . . . . . . . . . . . . . . . . . . . . . . . . . . . . . . . . . . . . . . . . . . . . . . . . . . . . . . . . . . . . . . . . 157
Feature Defaults . . . . . . . . . . . . . . . . . . . . . . . . . . . . . . . . . . . . . . . . . . . . . . . . . . . . . . . . . . . . . . . . . . . . . . . 159
Print Setup . . . . . . . . . . . . . . . . . . . . . . . . . . . . . . . . . . . . . . . . . . . . . . . . . . . . . . . . . . . . . . . . . . . . . . . . . . . . . 165
4
Xerox WorkCentre 3315DN/3325DN/3325DNI
User Guide
Page 5

Fax Setup. . . . . . . . . . . . . . . . . . . . . . . . . . . . . . . . . . . . . . . . . . . . . . . . . . . . . . . . . . . . . . . . . . . . . . . . . . . . . . 166
System Setup . . . . . . . . . . . . . . . . . . . . . . . . . . . . . . . . . . . . . . . . . . . . . . . . . . . . . . . . . . . . . . . . . . . . . . . . . . 170
Network Settings . . . . . . . . . . . . . . . . . . . . . . . . . . . . . . . . . . . . . . . . . . . . . . . . . . . . . . . . . . . . . . . . . . . . . . . 178
Local Drive. . . . . . . . . . . . . . . . . . . . . . . . . . . . . . . . . . . . . . . . . . . . . . . . . . . . . . . . . . . . . . . . . . . . . . . . . . . . . 180
11 General Care and Troubleshooting
General Care . . . . . . . . . . . . . . . . . . . . . . . . . . . . . . . . . . . . . . . . . . . . . . . . . . . . . . . . . . . . . . . . . . . . . . . . . . . 182
Troubleshooting. . . . . . . . . . . . . . . . . . . . . . . . . . . . . . . . . . . . . . . . . . . . . . . . . . . . . . . . . . . . . . . . . . . . . . . . 188
Further Assistance. . . . . . . . . . . . . . . . . . . . . . . . . . . . . . . . . . . . . . . . . . . . . . . . . . . . . . . . . . . . . . . . . . . . . . 221
12 Specifications
Machine Specifications . . . . . . . . . . . . . . . . . . . . . . . . . . . . . . . . . . . . . . . . . . . . . . . . . . . . . . . . . . . . . . . . . 224
Electrical Specifications . . . . . . . . . . . . . . . . . . . . . . . . . . . . . . . . . . . . . . . . . . . . . . . . . . . . . . . . . . . . . . . . . 227
Feature Specifications . . . . . . . . . . . . . . . . . . . . . . . . . . . . . . . . . . . . . . . . . . . . . . . . . . . . . . . . . . . . . . . . . . 228
13 Safety
Notices and Safety . . . . . . . . . . . . . . . . . . . . . . . . . . . . . . . . . . . . . . . . . . . . . . . . . . . . . . . . . . . . . . . . . . . . . 232
Safety Labels and Symbols. . . . . . . . . . . . . . . . . . . . . . . . . . . . . . . . . . . . . . . . . . . . . . . . . . . . . . . . . . . . . . 233
Operational Safety Information . . . . . . . . . . . . . . . . . . . . . . . . . . . . . . . . . . . . . . . . . . . . . . . . . . . . . . . . . 234
Basic Regulations . . . . . . . . . . . . . . . . . . . . . . . . . . . . . . . . . . . . . . . . . . . . . . . . . . . . . . . . . . . . . . . . . . . . . . 238
Copy Regulations . . . . . . . . . . . . . . . . . . . . . . . . . . . . . . . . . . . . . . . . . . . . . . . . . . . . . . . . . . . . . . . . . . . . . . 242
Fax Regulations . . . . . . . . . . . . . . . . . . . . . . . . . . . . . . . . . . . . . . . . . . . . . . . . . . . . . . . . . . . . . . . . . . . . . . . . 245
Material Safety Data . . . . . . . . . . . . . . . . . . . . . . . . . . . . . . . . . . . . . . . . . . . . . . . . . . . . . . . . . . . . . . . . . . . 248
Product Recycling and Disposal . . . . . . . . . . . . . . . . . . . . . . . . . . . . . . . . . . . . . . . . . . . . . . . . . . . . . . . . . 249
Energy Program Compliance . . . . . . . . . . . . . . . . . . . . . . . . . . . . . . . . . . . . . . . . . . . . . . . . . . . . . . . . . . . . 251
Environment, Health and Safety (EH&S) Contact Information. . . . . . . . . . . . . . . . . . . . . . . . . . . . . 252
Index
Xerox WorkCentre 3315DN/3325DN/3325DNI
User Guide
5
Page 6

6
Xerox WorkCentre 3315DN/3325DN/3325DNI
User Guide
Page 7

Getting Started
This chapter includes:
• Machine Overview on page 8
• Powering on the Machine on page 11
• Control Panel Overview on page 12
• Software on page 16
• Loading Paper on page 18
• Loading Documents on page 22
• Media Output Locations on page 23
• Machine Status on page 25
• General Care and Consumables on page 29
• Further Assistance on page 30
1
Xerox WorkCentre 3315DN/3325DN/3325DNI
User Guide
7
Page 8
Machine Overview
2
4
1
5
7
8
8
1 2
3
4
5
6
7
9
13
12
11
10
14
16
15
17
18
19
1112123
13414
5
15
6
16717818919
10
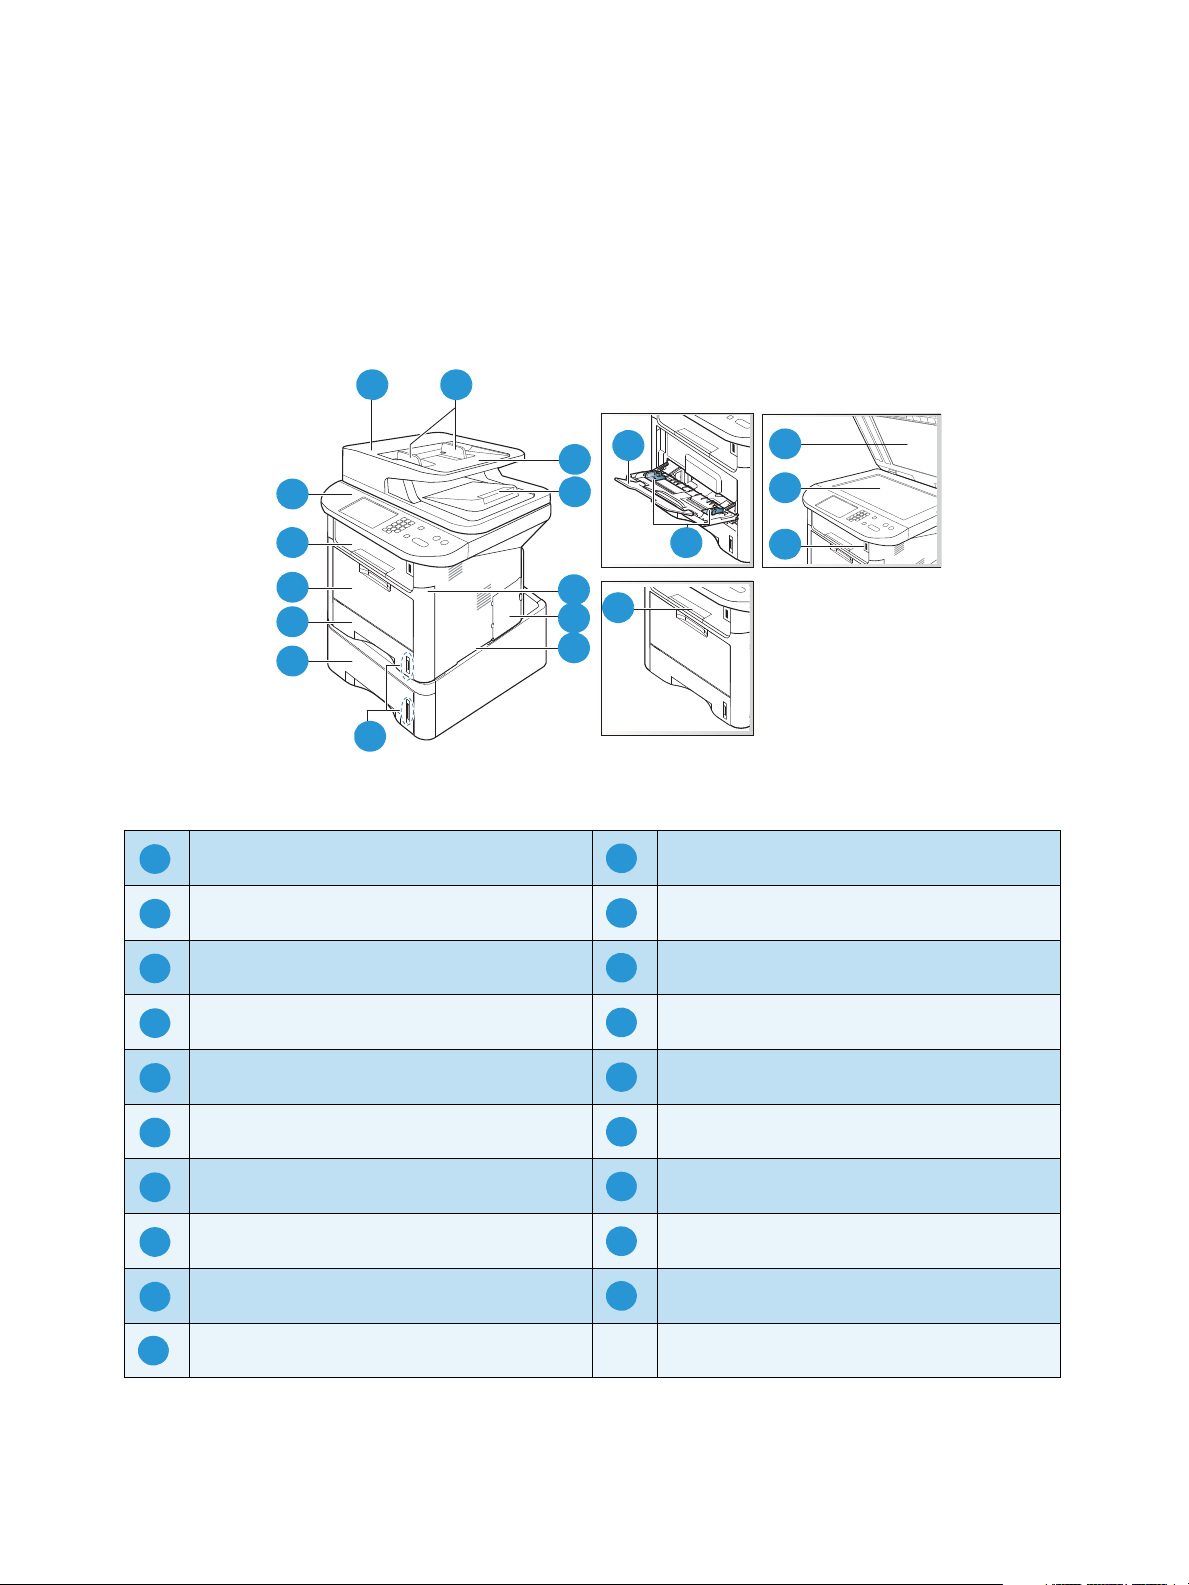
Machine Overview
Before you use your machine, take some time to familiarize yourself with the various features and
options.
Front View
1
13
12
11
10
9
8
2
14
3
4
15
5
16
6
7
Automatic Document Feeder Cover Bypass Tray
Automatic Document Feeder Width Guides Output Tray
Automatic Document Feeder Input Tray Control Panel
17
18
19
Automatic Document Feeder Output Tray Bypass Tray Extension
Front Cover Bypass Tray Width Guides
Control Board Cover Output Tray Support
Handle Document Glass Cover
Paper Level Indicator Document Glass
Paper Tray 2 (Optional) USB Memory Device Port
Paper Tray 1
8
Xerox WorkCentre 3315DN/3325DN/3325DNI
User Guide
Page 9
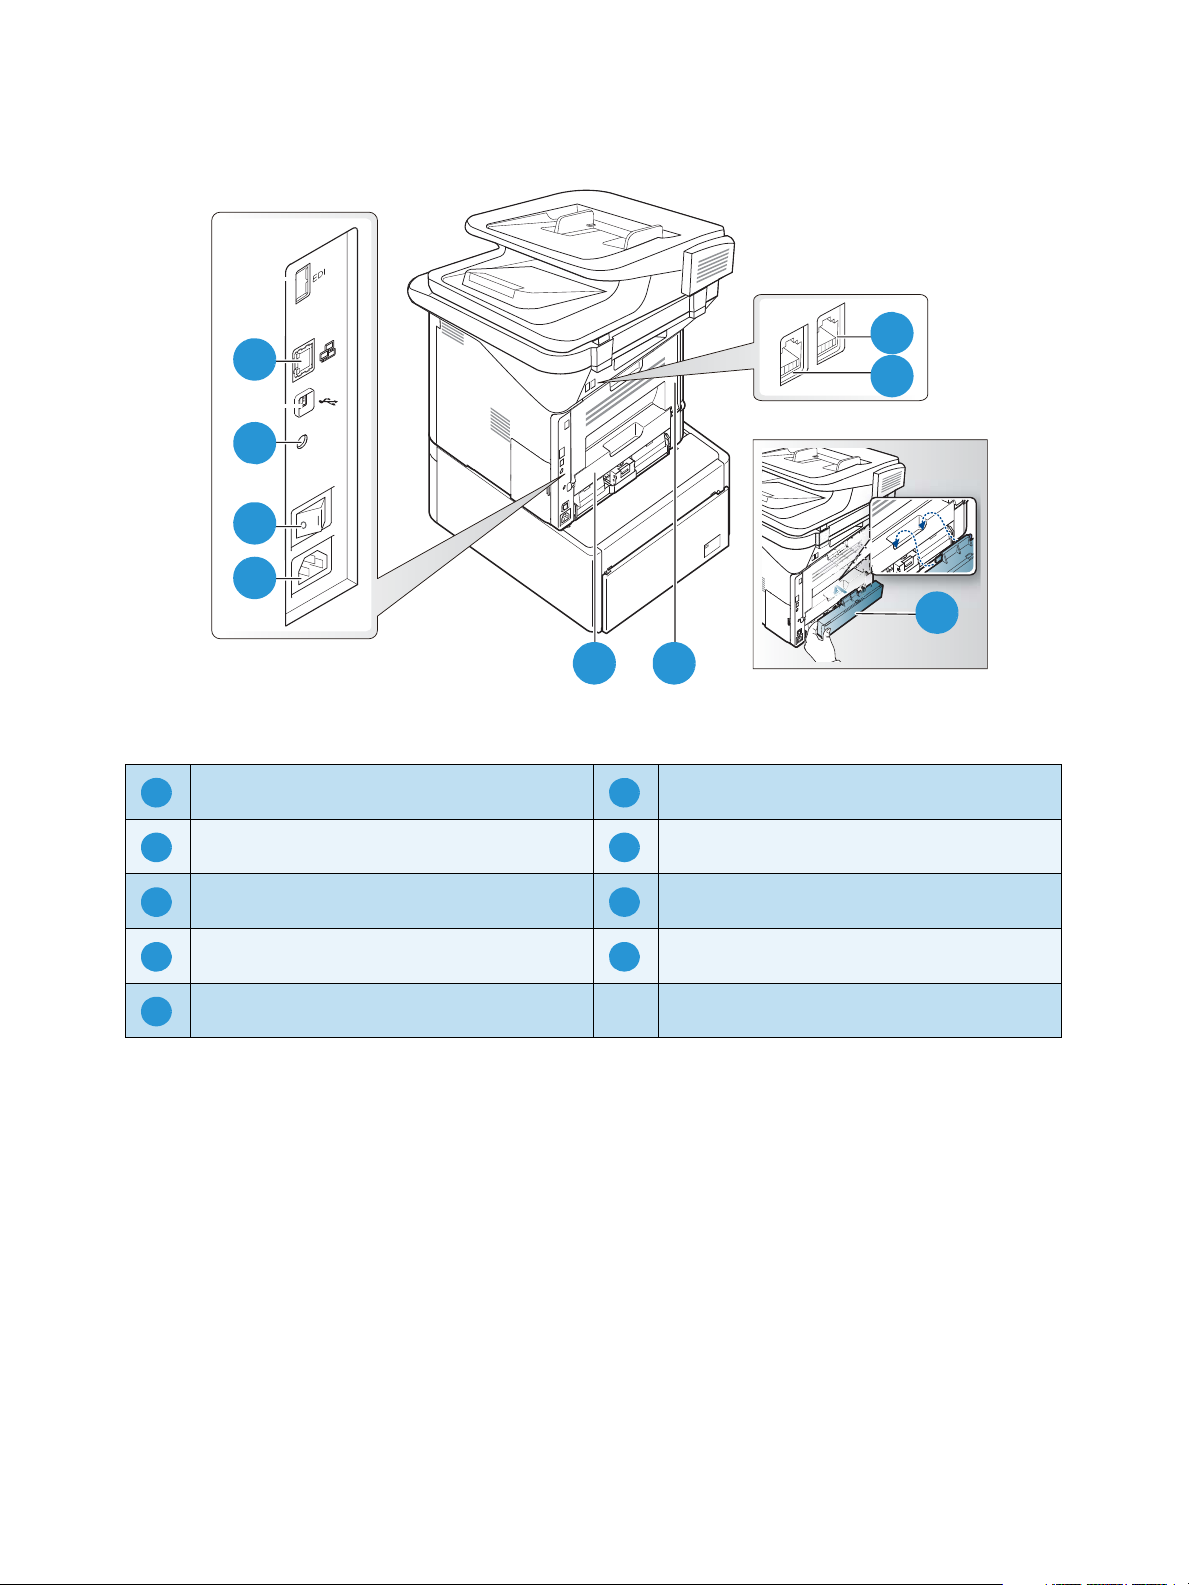
Rear View
1
2
3
4
5
6
11
7 8
9
10
7
3
2
1
4
5 6
8
9
1627384
9
5
Machine Overview
Network Port Rear Door
IEEE 1284 Parallel Connector (Optional) Paper Tray Rear Cover
Power Switch Telephone Line Socket
Power Receptacle Extension Telephone Socket
Duplex Unit
Xerox WorkCentre 3315DN/3325DN/3325DNI
User Guide
9
Page 10
Machine Overview
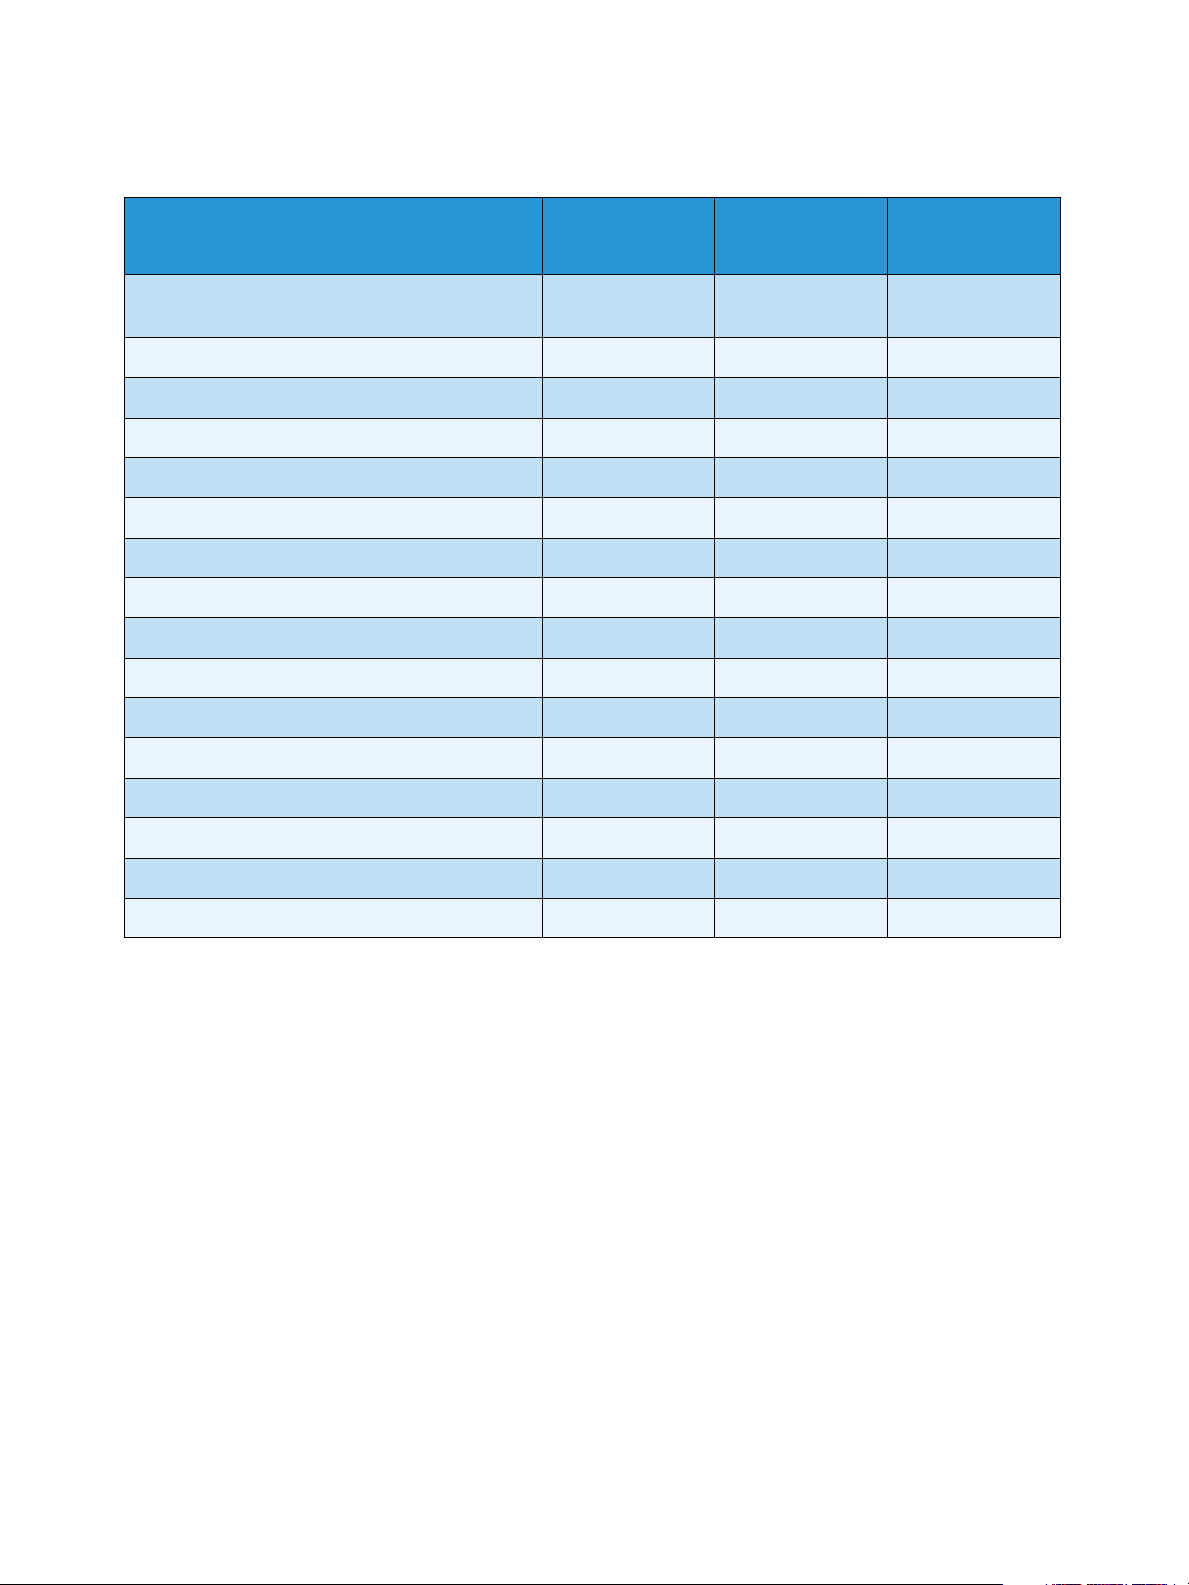
Product Configurations
Component
Duplex Automatic Document Feeder (50
sheets)
Automatic Document Feeder (50 sheets) Not Applicable Not Applicable Standard
Paper Tray 1 (250 sheets) Standard Standard Standard
Bypass Tray (50 sheets) Standard Standard Standard
Paper Tray 2 (520 sheets) Optional Optional Optional
Copy Standard Standard Standard
Scan to SMB and FTP Standard Standard Not Applicable
Network Printing Standard Standard Standard
E-mail Standard Standard Standard
Scan Standard Standard Standard
Scan To and Print From USB Standard Standard Standard
Embedded Fax Standard Standard Standard
USB Memory Device Port Standard Standard Standard
WorkCentre
3325DNI
Standard Standard Not Applicable
WorkCentre
3325DN
WorkCentre
3315DN
Memory Expansion (Option) 512MB 512MB 256MB
Mass Storage Device (HDD) 2GB 2GB Not applicable
Wireless Enabled Standard Not Applicable Not Applicable
Note: The internal Mass Storage Device (HDD) is used on the WorkCentre 3325DN / 3325DNI
models to support Secure Print, Delayed Print, Proof Print, Spooling of Scan to FTP/SMB jobs and
Stored Jobs, and to provide an increased capacity for downloaded fonts.
10
Xerox WorkCentre 3315DN/3325DN/3325DNI
User Guide
Page 11
Powering on the Machine
1
2
1
2
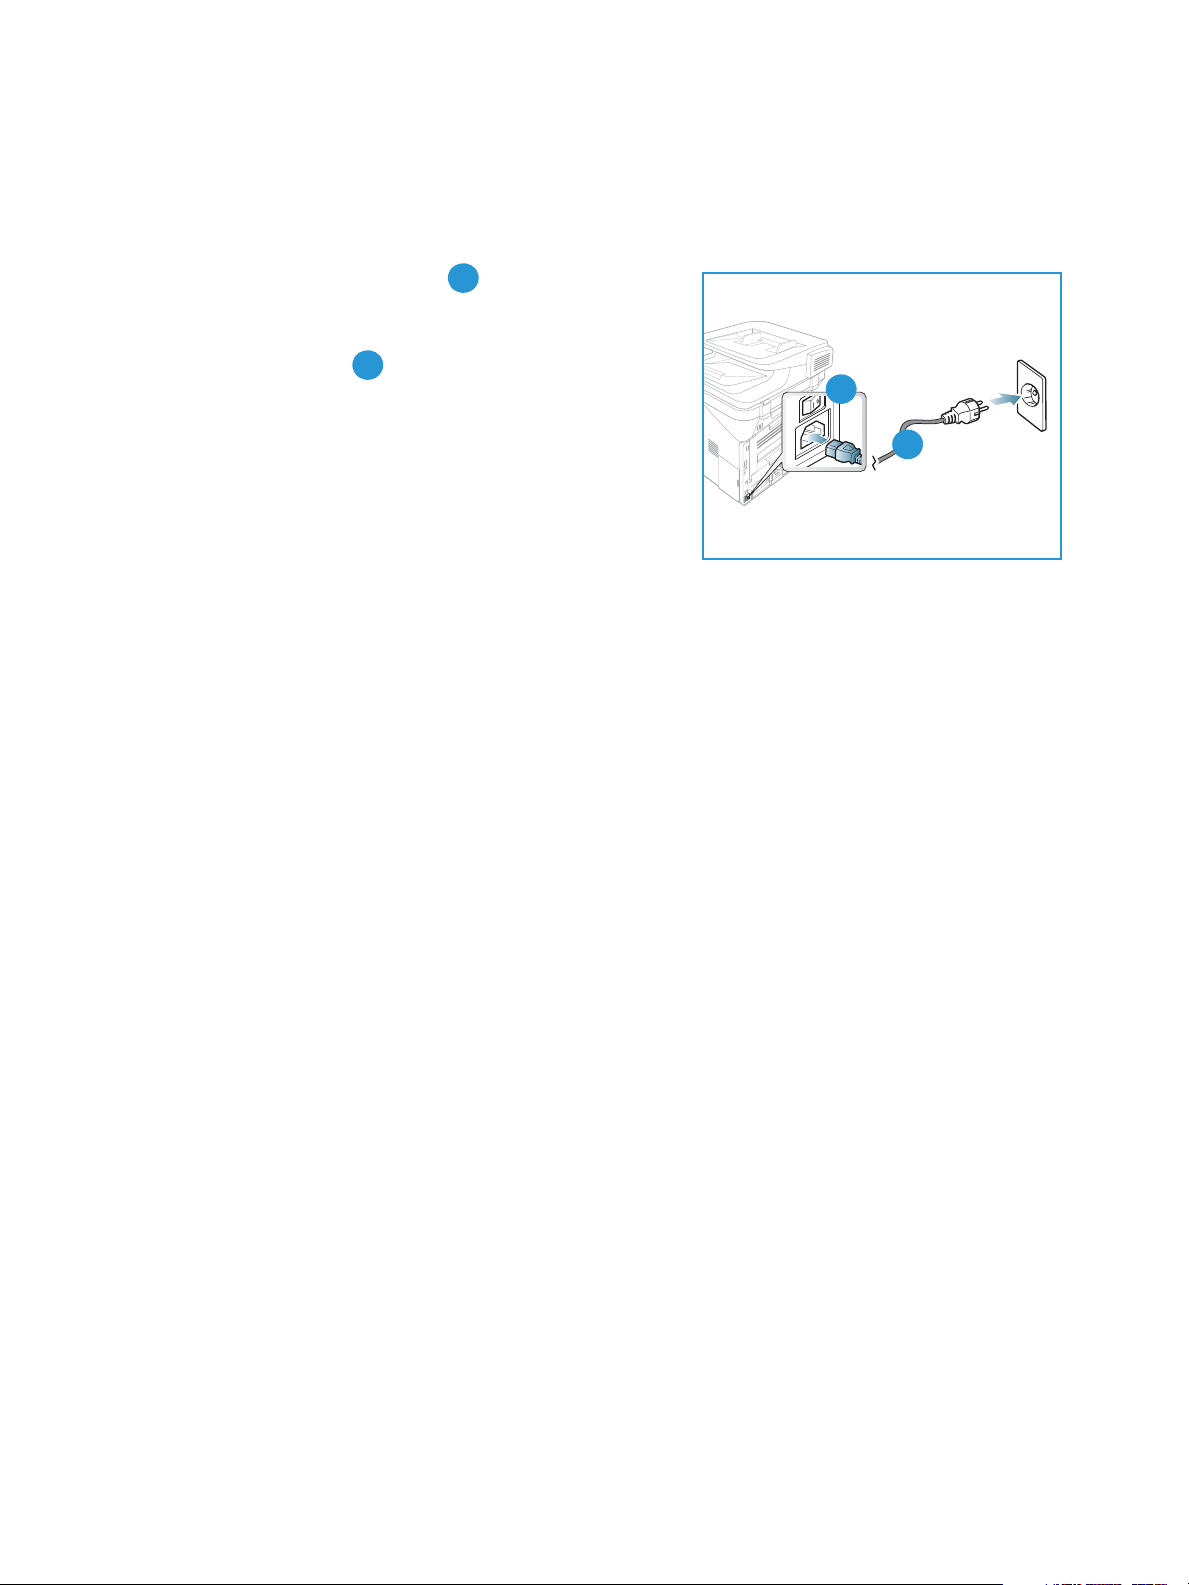
Powering on the Machine
The On/Off switch and the power cable socket are at the rear of the machine.
1. Connect the
power outlet. The power cord must be plugged into a
grounded power socket.
2. Press the
Power Save
This machine contains advanced energy conservation
technology that reduces power consumption when it is not in
active use.
• When the printer does not receive data for an extended
period of time, the Power Save mode becomes active and power consumption is automatically
lowered.
•Press the Power Save button to select the Power Save mode immediately.
AC Power Cord to the machine and a
ON/OFF switch to the ON (I) position.
To restore the machine to a normal state, press any button.
Note: When in Power Save mode, the machine will not recognize when a USB Memory Device is
inserted into the USB port. Press any button to restore the machine to a normal state and reinsert
the USB Memory Device into the port.
Powering off the Machine
There are two ways to switch the machine off:
•Press the ON/OFF switch to the (O) position.
•Press the Power Save button and select Power Down and then OK.
Xerox WorkCentre 3315DN/3325DN/3325DNI
User Guide
11
Page 12
Control Panel Overview
.com
2
3
4
5
6
8
9
10
7
14
15
11
17 18
16
19
21
22
23
12
13
24
20
1
123
45678
9
101112
13
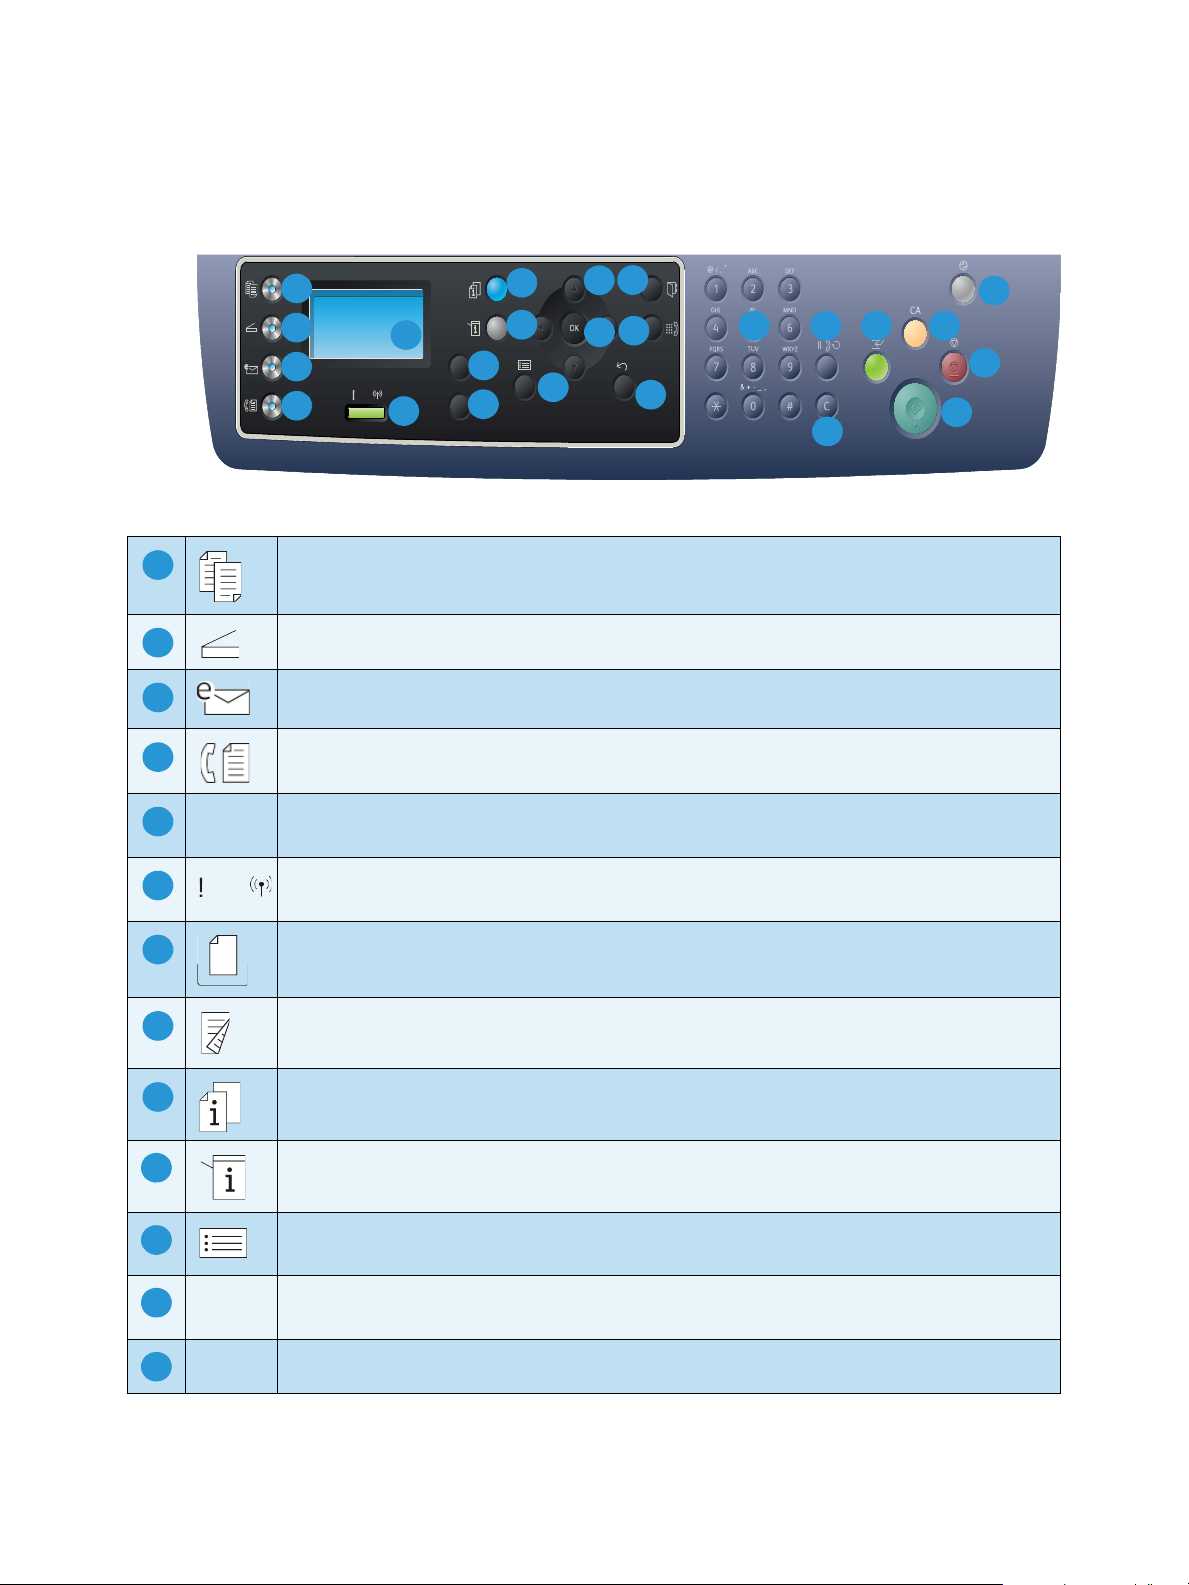
Control Panel Overview
.
Copy: Activates Copy mode.
Scan: Activates Scan mode.
E-mail: Activates E-mail mode.
Fax : Activates Fax mode.
Display Screen: Displays all the available programming features, plus general machine
information.
Status / Wireless LED: The color of the LEDs indicates the machine’s current status. For
more information refer to Status / Wireless LED on page 188. (3325DNI only)
Paper Supply: Used to select a paper tray for the Copy job.
2 Sided: Used to select whether your originals are 1 sided or 2 sided, or to produce 1 or 2
sided output.
Job Status: Displays job options for active and saved jobs. You can print or delete active
jobs or saved jobs.
Machine Status: Accesses machine information, status information, the machine serial
number and various reports to print.
Menu: Enters Menu Mode and enables you to access options and settings.
Arrows: The up/down and left/right arrows are used to scroll through the options available
in the selected menu, and to increase or decrease values.
OK: Confirms the selection on the screen.
12
Xerox WorkCentre 3315DN/3325DN/3325DNI
User Guide
Page 13
Control Panel Overview
141516
17
18
19
20
212223
24
.com
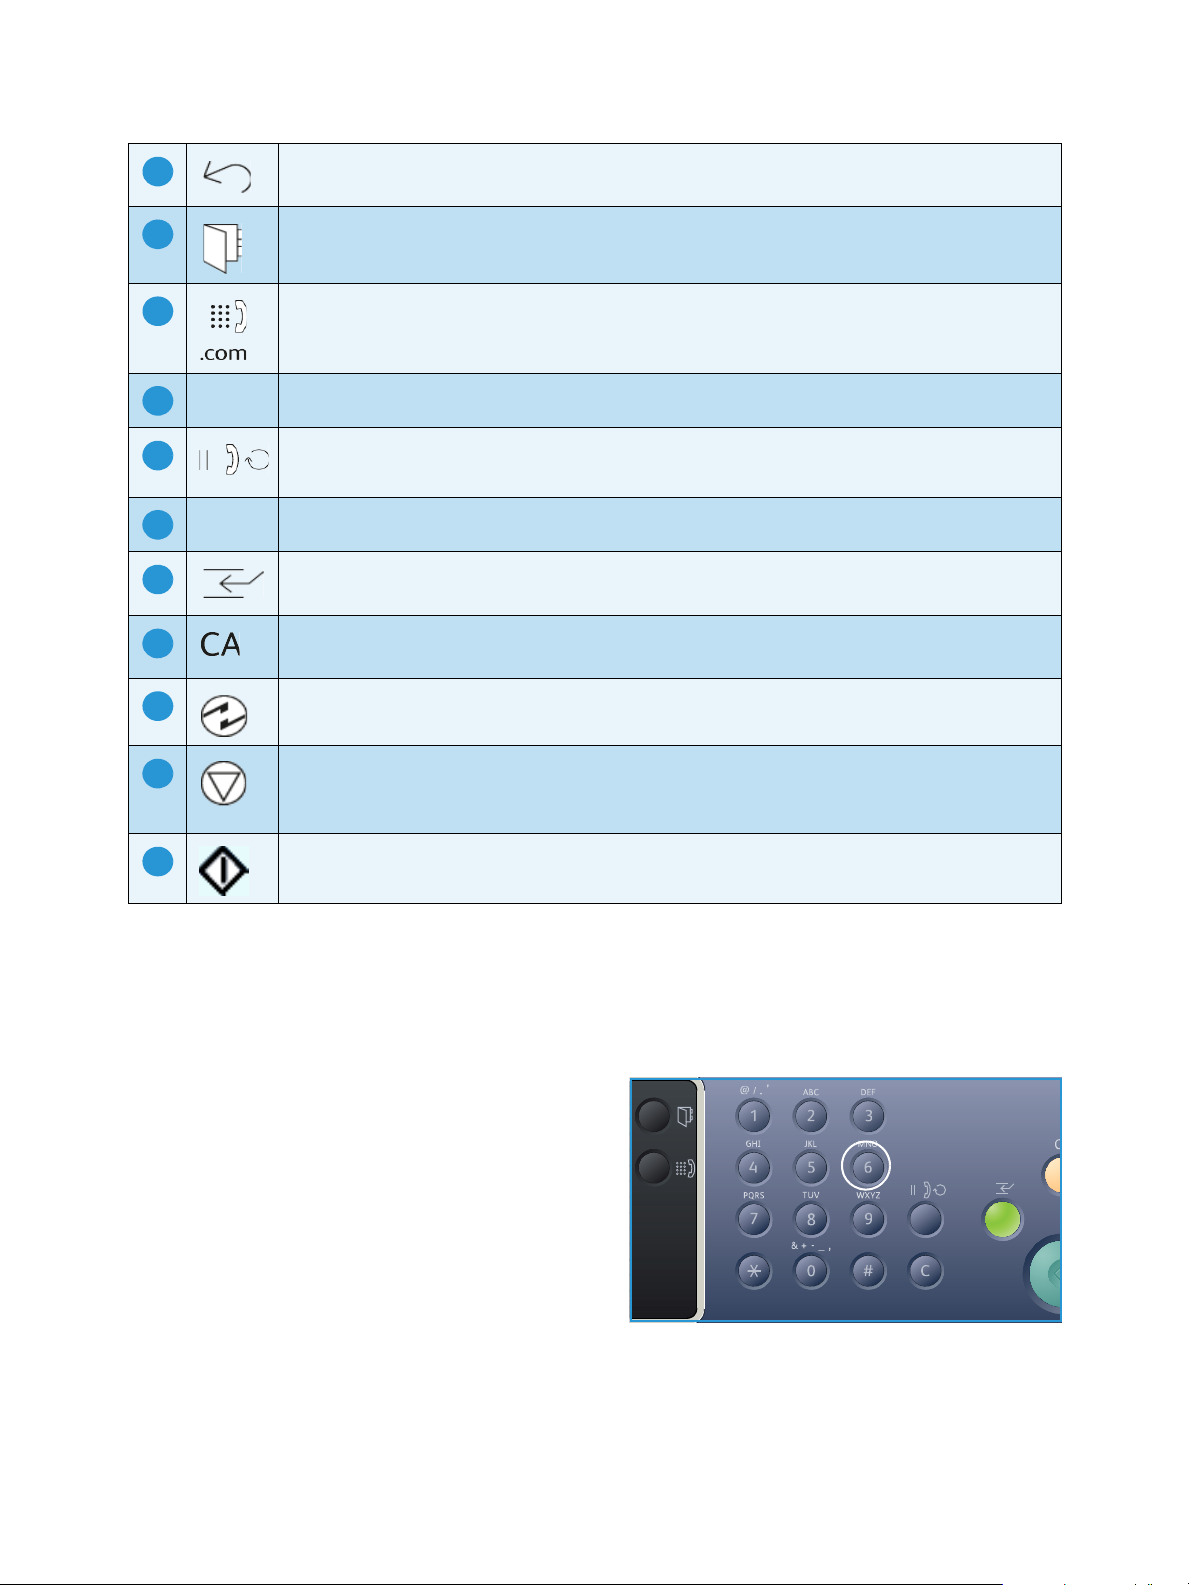
Back: Used to go back one level in the menu.
Address Book: Used to search for stored fax numbers or e-mail addresses.
Manual Dial + .com: In Fax mode, opens the fax line. In E-mail mode provides access to
commonly used e-mail address text, for example .com or .org. The text available can be
customized using CentreWare Internet Services.
Keypad: Used to enter alphanumeric characters.
Pause / Redial: In standby mode redials the last number. In edit mode inserts a pause into
a fax number.
‘C’ Cancel Entry: Cancels the previous entry made on the keypad.
Interrupt Printing: Interrupts the current job to run a more urgent job.
(Not applicable to the 3315DN)
Clear All: Clears the last selections made.
Power Save: Sends the machine into Power Save mode or Power Down. Press the button
again to restart a powered off machine.
Stop: Pressing the Stop button stops the job in progress. Pressing Stop also exits the Menu
Mode. If you have logged in to use the machine, pressing Stop will bring up the Log Out
option.
Start: Activates a job.
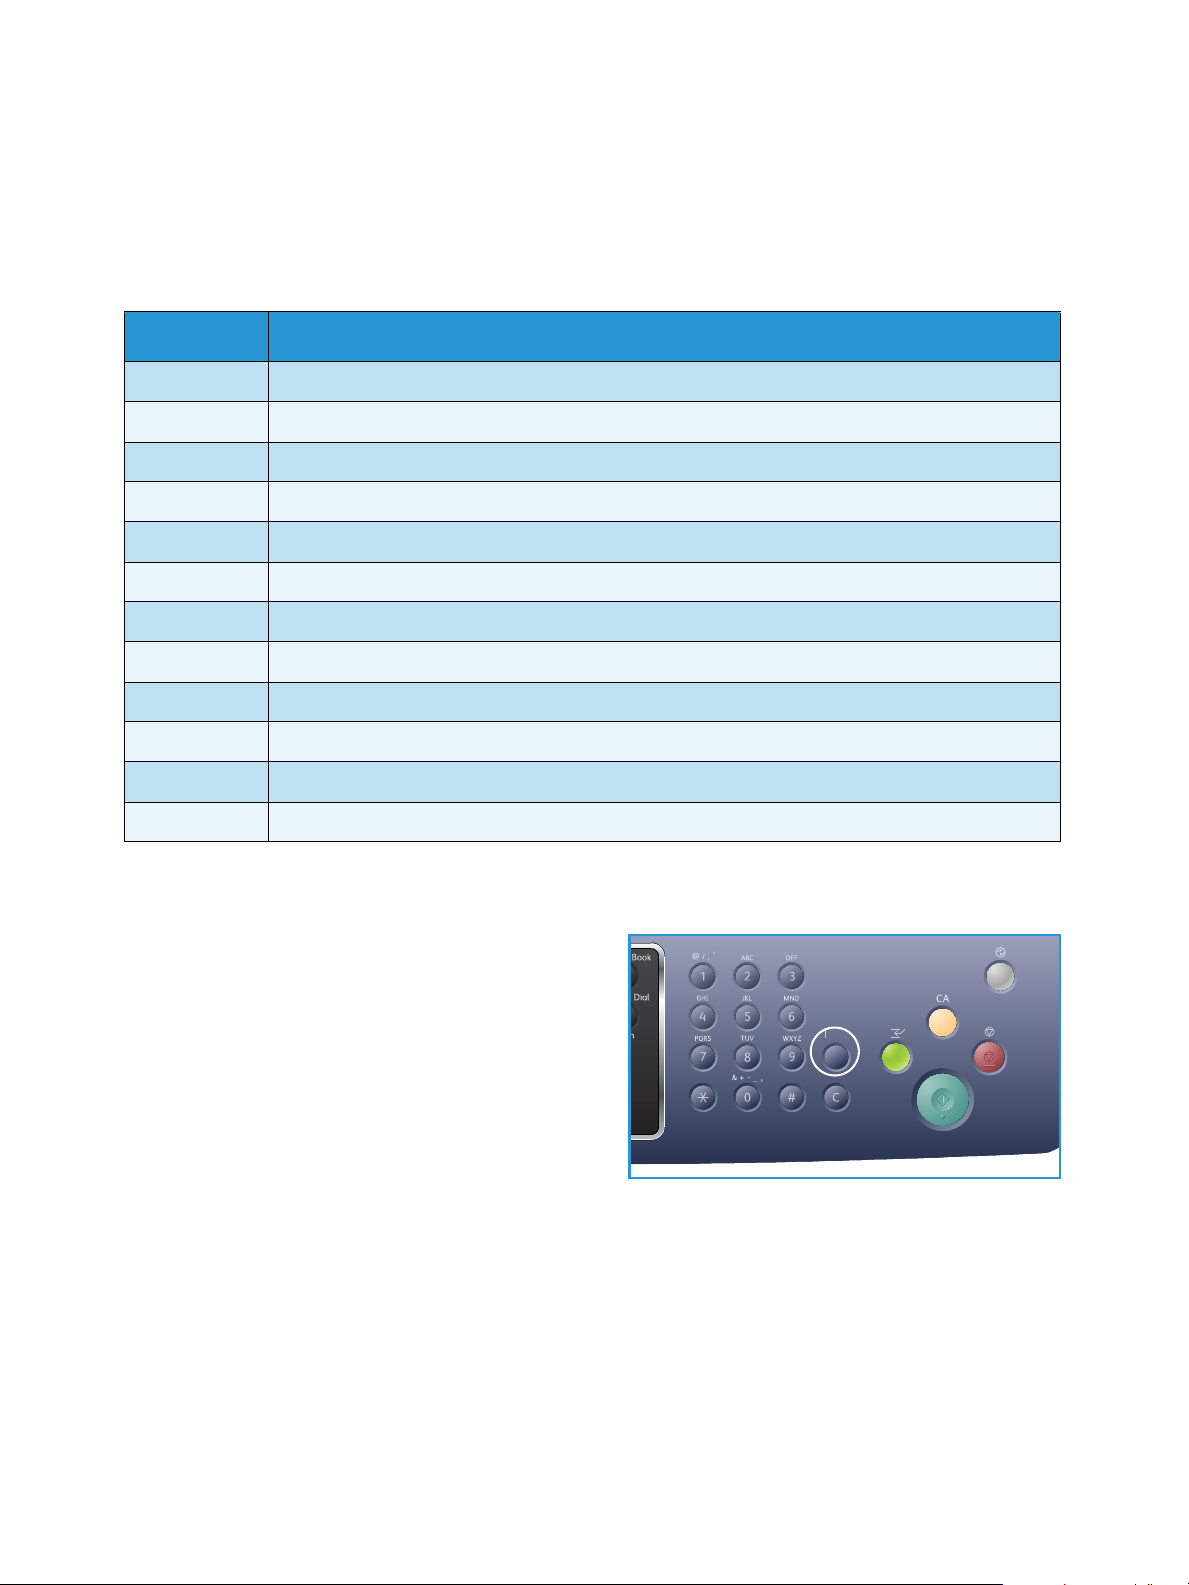
Using the Keypad
As you perform various tasks, you may need to enter names and numbers. For example, when you set
up your machine, you enter your name or your company’s name, and the fax number. When you store
fax numbers or e-mail addresses in memory, you may also enter the corresponding names.
1. When you are prompted to enter a letter, locate
the button labeled with the character you want.
Press the button until the correct letter appears
on the display.
• For example, to enter the letter O, press 6,
labeled with MNO.
• Each time you press 6, the display shows a
different letter, M, N, O, m, n, o and finally 6.
2. You can enter special characters, such as @ / . & +
. Refer to Keypad Characters on page 14.
-
3. To enter additional letters, repeat step 1. If the next letter is printed on the same button wait 2
seconds between presses, or move the cursor by pressing the right arrow and then press the button
again. The cursor will move to the right and the next letter will appear on the display.
Xerox WorkCentre 3315DN/3325DN/3325DNI
User Guide
13
Page 14
Control Panel Overview
If you make a mistake while entering a number or name, press the left arrow to delete the last
digit or character. Then enter the correct number or character.
4. When you have finished entering all characters, press OK.
Keypad Characters
Key Assigned Numbers, Letters or Characters
1 @ / . ‘ 1
2 A B C a b c 2
3 D E F d e f 3
4 G H I g h i 4
5 J K L j k l 5
6 M N O m n o 6
7 P Q R S p q r s 7
8 T U V t u v 8
9 W X Y Z w x y z 9
0 & + - , 0 _
* *
# #
Inserting a Pause
With some telephone systems, you must dial an
access code (9, for example) and listen for a second
dial tone. In such cases, you must insert a pause in the
telephone number. You can insert a pause while you
are setting up speed dial numbers.
To insert a pause, press Pause / Redial at the
appropriate place while entering the telephone
number. A dash [ - ] appears on the display at the
corresponding location.
14
Xerox WorkCentre 3315DN/3325DN/3325DNI
User Guide
Page 15
Control Panel Overview
Menu Overview
The control panel provides access to various menus. These menus can be accessed by pressing the
appropriate service button e.g. Copy, Scan, E-mail or Fax and the Menu button or by inserting a USB
device. The menu options available are as follows:
Copy Menu
•Original Size
•Reduce/Enlarge
• Lighten/Darken
•Contrast
• Original Type
•Layout
•Background
Suppression
• Margin Shift
•Edge Erase
Insert USB
Device
Menu
USB
Options:
•Print
From USB
•Scan To
USB
•Manage
Files
• Available
Space
Scan
Menu
Scan To:
•USB
• Local PC
• Network
PC
•SMB
•FTP
•WSD
Scan
Feature s:
•USB
Fea tur e
•FTP
Fea tur e
•SMB
Fea tur e
E-mail
Menu
•Original
Size
•Original
Ty pe
•Resolution
•Output
Color
• Lighten /
Darken
•Contrast
Fax Me nu
• Lighten /
Darken
•Contrast
•Resolution
•Original
Size
•Multi Send
• Delay Send
• Priority
Send
• Forward
•Secure
Receive
Machine
Status Menu
• Machine
Information
• Toner Level
• Information
Pages
•Feature
Defaults
•Print Setup
•Fax Setup
•System
Setup
• Network
Settings
• Local Drive
Note: Some menu options may be unavailable depending on your machine configuration and
whether the machine is in the Ready state. Also, for some services such as E-mail and Fax,
additional selections or setups may be required before the Menu options can be accessed.
Job
Status
Menu
•Active
Jobs
•Saved
Jobs
Xerox WorkCentre 3315DN/3325DN/3325DNI
User Guide
15
Page 16
Software
Software
After you have set up your machine and connected it to your computer, you must install the printer
and scanner software. The software required for Windows or Macintosh is supplied on the CD delivered
with your machine, additional software can be downloaded from www.xerox.com. The following
software is available:
CD OS Contents
Printer
Software
Printer
Software
Windows • Printer Driver: Use the printer driver to take full advantage of your
printer’s features. PCL6, Postscript and XPS drivers are provided.
• MFP PC Fax: Use to fax directly from your PC.
• Scanner Driver: TWAIN and Windows Image Acquisition (WIA) drivers
are available for scanning documents on your machine.
• Xerox Scan Assistant: Used to adjust scan settings and start the
scanning process directly from your computer. The preview window
allows you to view the scan and make adjustments as necessary and
preferred settings can be preserved as ‘favorites’ and added to a
pre-defined list.
• Xerox Easy Print Manager (EPM): Conveniently combines access to
device settings, printing/scanning environments, settings/actions, Scan
to PC, Fax to PC, and launching applications such as Xerox Scan
Assistant and CentreWare Internet Services in one location.
Note: Login is required to change Printer Settings.
• Wireless Setting Program: When installing the WorkCentre 3325DNI
you can use the Wireless Setting program that was automatically
installed with the printer driver to configure the wireless settings.
• SetIP program: A utility program allowing you to select a network
interface and manually configure the addresses for use with the TCP/IP
protocol.
Linux • Printer Driver: Use this driver to take full advantage of your printer’s
features.
• Scanner Driver: A SANE driver is available for scanning documents on
your machine.
Note: Linux software is available on xerox.com only.
16
Xerox WorkCentre 3315DN/3325DN/3325DNI
User Guide
Page 17
CD OS Contents
Software
Printer
Software
Printer
Software CD
Unix • Printer Driver: Use this driver to take full advantage of your printer’s
features.
Note: Unix software is available on xerox.com only.
Macintosh • Printer Driver: Use this driver to take full advantage of your printer’s
features.
• Scanner Driver: A TWAIN driver is available for scanning documents on
your machine.
• SetIP program: A utility program allowing you to select a network
interface and manually configure the addresses for use with the TCP/IP
protocol.
• Smart Panel: This utility enables remote management, displaying toner
levels, printer status, and problem alerts.
• Scan and Fax Manager: This utility allows you to configure MFP PC Fax
and Scan settings.
Xerox WorkCentre 3315DN/3325DN/3325DNI
User Guide
17
Page 18
Loading Paper
1 2
21
1
2
Loading Paper
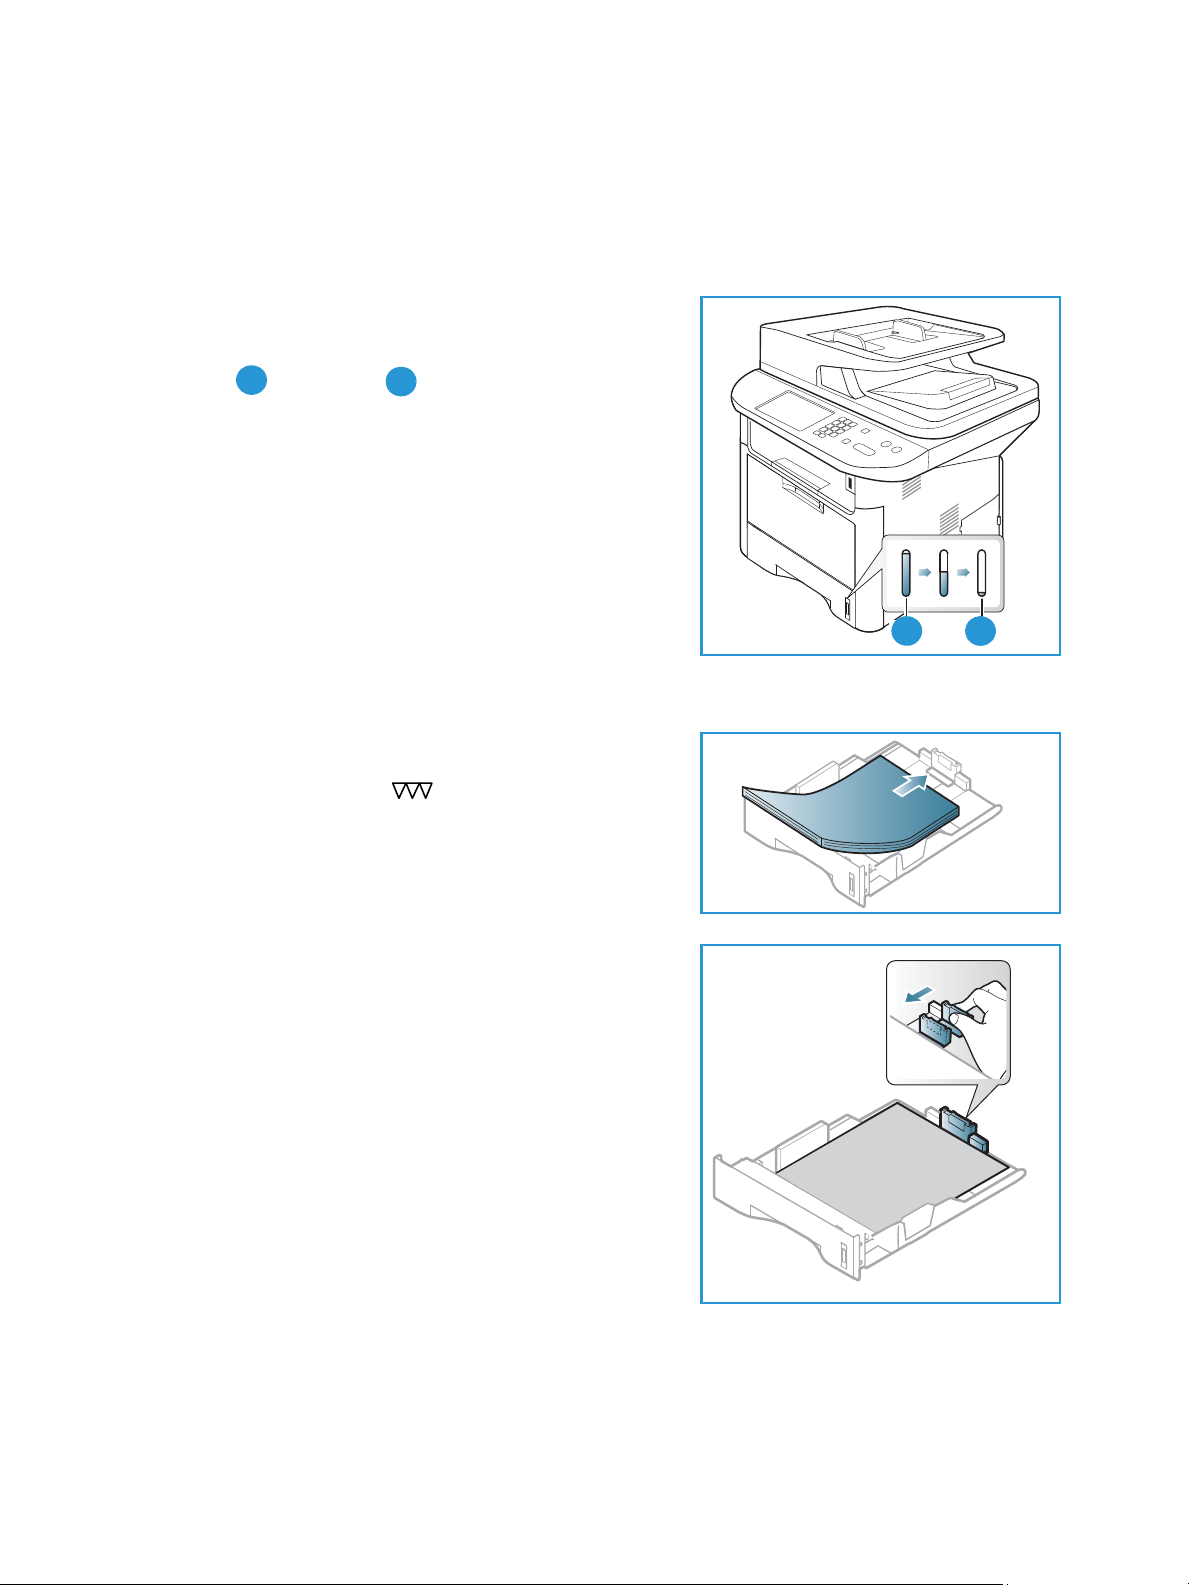
Paper Tray 1 and Paper Tray 2 (optional)
The paper level indicator on the front of trays 1 and 2 shows
the amount of paper currently left in the tray. When the tray
is empty, the indicator is completely lowered as shown in the
illustration: shows full, shows empty. Paper tray 1
can hold up to 250 sheets and paper tray 2 (optional) can
hold up to 520 sheets of 20 lb (80 g/m
media specifications, refer to Media Specifications on
page 225.
2
) paper. For more
To load the paper:
1. Pull out the paper tray and load paper into the tray, print
side down. Do not fill above the Maximum Fill line
indicated by the symbol .
2. Slide the paper length guide until it lightly touches the
end of the paper stack.
18
Xerox WorkCentre 3315DN/3325DN/3325DNI
User Guide
Page 19
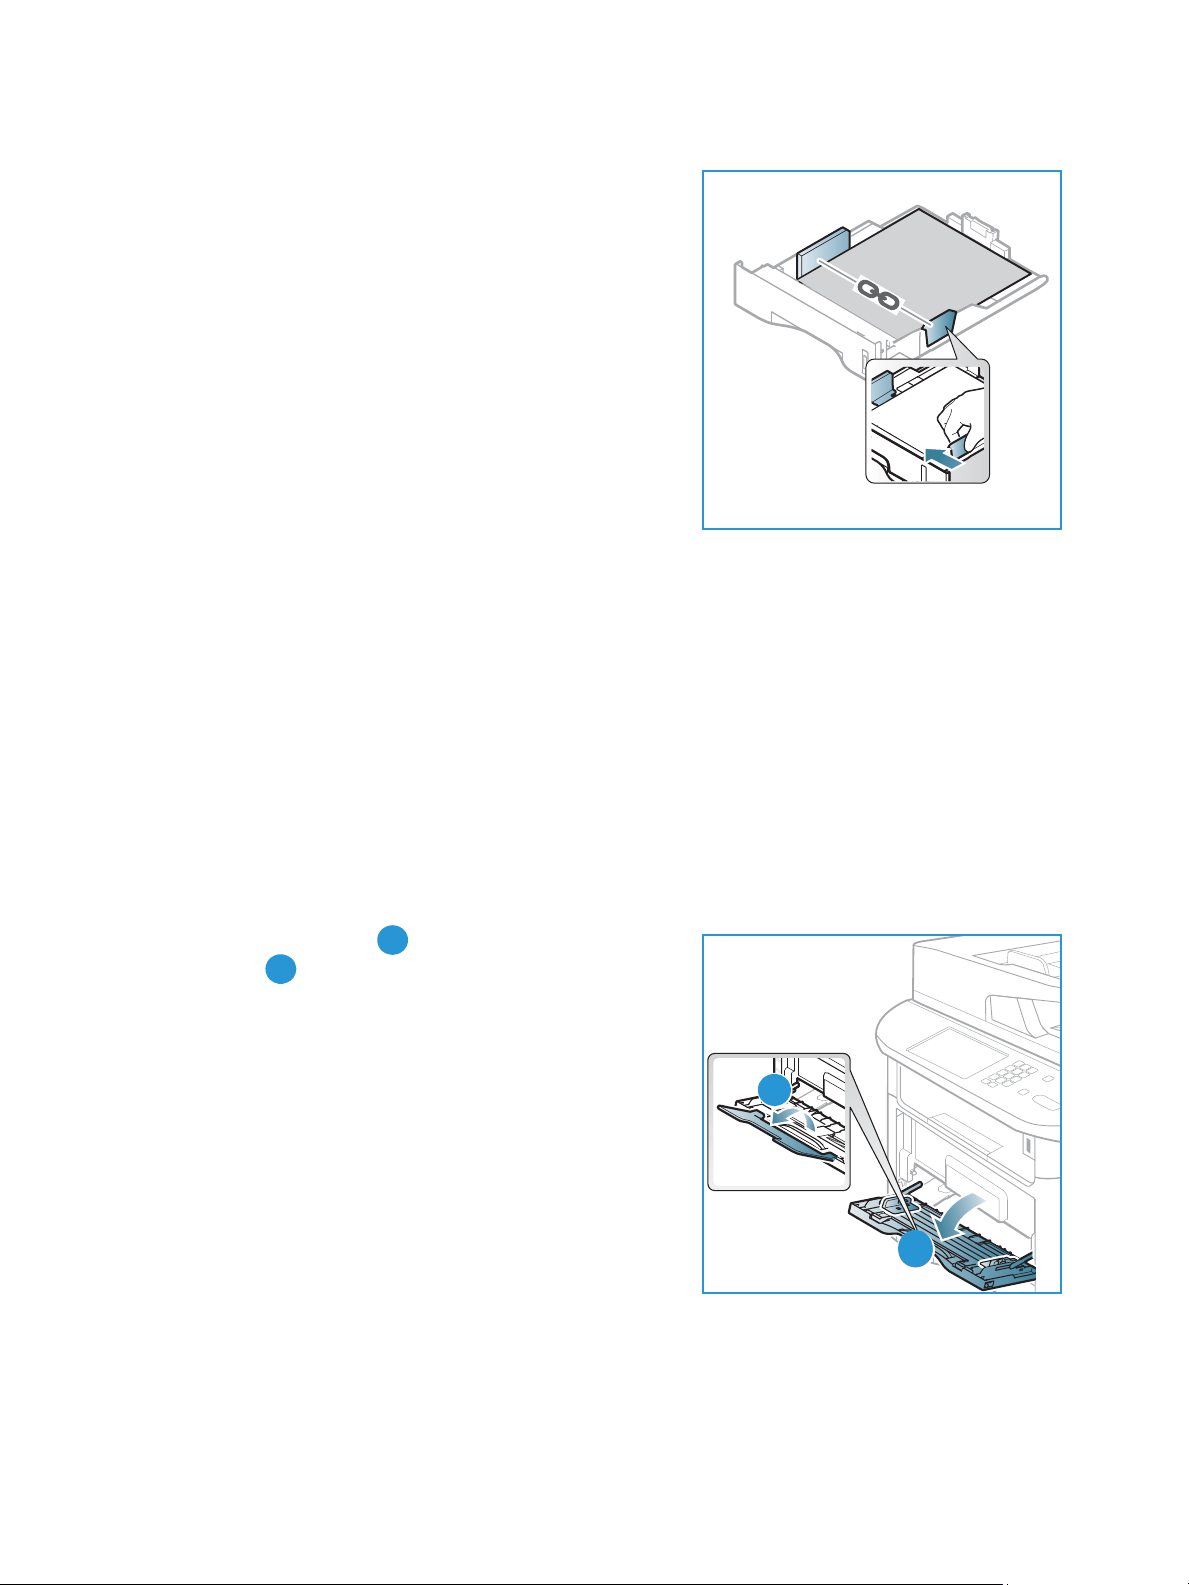
3. Position the side guide by squeezing the lever and sliding
2
1
1
2
it towards the stack of paper, until it gently touches the
side of the stack.
4. Insert the paper tray into the machine.
5. After loading paper in the paper tray, set the paper size
and type using the control panel. Press OK to confirm the
settings or Stop to change the settings. These settings
will apply to Copy and Fax modes.
6. When printing from your computer, ensure you press the
Select Paper button to specify the correct paper size,
color and type. Not confirming the paper details may
result in printing delays. For information about setting
the paper type and size on the control panel, refer to
Setting Paper Size and Type on page 148.
Note: The settings made from the printer driver on your computer override the settings on the
control panel.
For more information on loading paper, refer to Paper and Media on page 143.
Loading Paper
Bypass Tray
The bypass tray is located on the front of your machine. It can be closed when not in use, making the
product more compact. Use the bypass tray to print transparencies, labels, envelopes or postcards in
addition to making quick runs of paper types or sizes that are not currently loaded in the main paper
tray.
The bypass tray can hold a maximum of 50 sheets of 20 lb (80 g/m²) bond paper, 5 transparency
sheets or 5 envelopes.
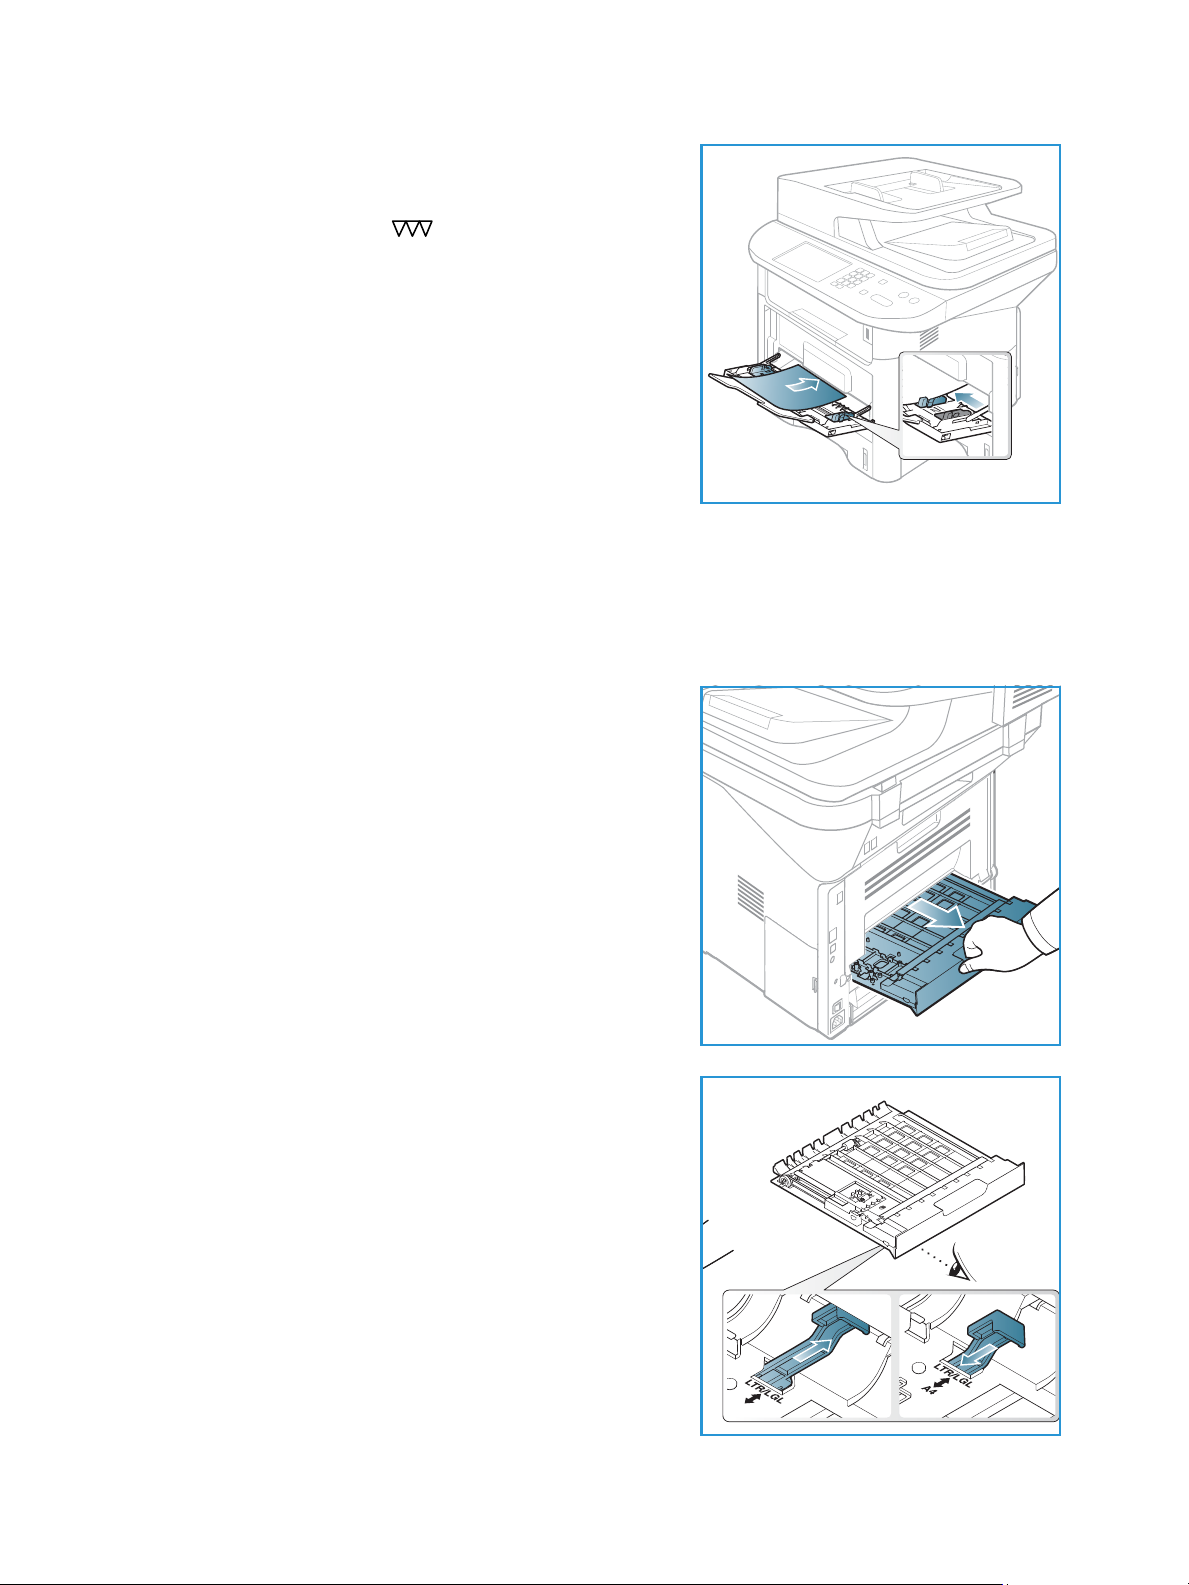
1. Lower the bypass tray and unfold the paper support
extension .
2. Prepare a stack of paper for loading by flexing or fanning
it back and forth. Straighten the edges on a level surface.
Remove any curl on postcards, envelopes and labels
before loading them into the bypass tray.
When using the bypass tray for special media it may be
necessary to use the rear door for the output. For further
information refer to Media Output Locations on page 23.
3. Load the print material between the width guides with
the print side facing up.
Note: Hold transparencies by the edges and avoid
touching the print side.
Xerox WorkCentre 3315DN/3325DN/3325DNI
User Guide
19
Page 20
Loading Paper
A4
4. Adjust the paper guide to the width of the stack of print
material. Ensure you have not loaded too much print
media. The stack should be below the Maximum Fill line
indicated by the symbol .
5. When printing from your computer, ensure you press the
Select Paper button to specify the correct paper size,
color and type. Not confirming the paper details may
result in printing delays. For information about setting
the paper type and size on the control panel, refer to
Setting Paper Size and Type on page 148.
Note: The settings made from the printer driver on your
computer override the settings on the control panel.
6. After printing, remove any unfed paper and close the
bypass tray.
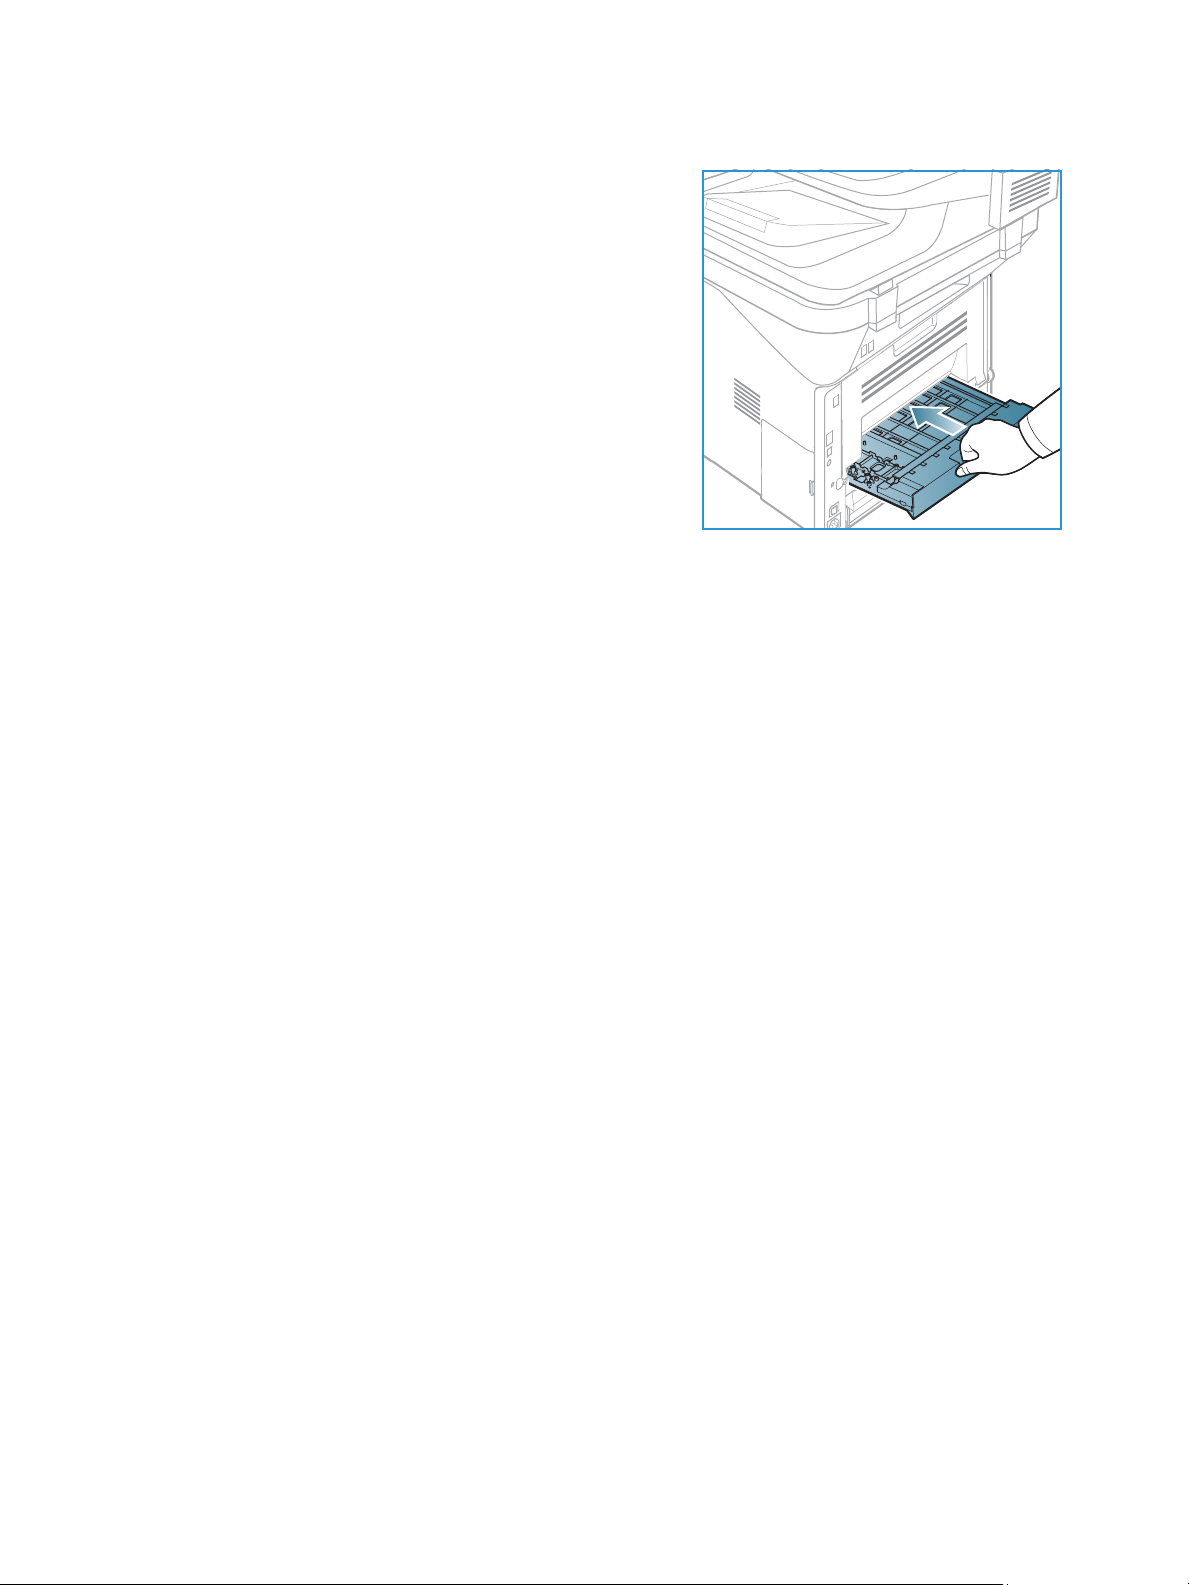
Duplex Unit
The duplex unit is preset to either Letter size or A4 depending on your country. To change the size of
the duplex unit, follow the instructions below.
1. Pull the duplex unit out of the machine.
2. Adjust the guides to match the size of paper you will be
using.
20
Xerox WorkCentre 3315DN/3325DN/3325DNI
User Guide
Page 21
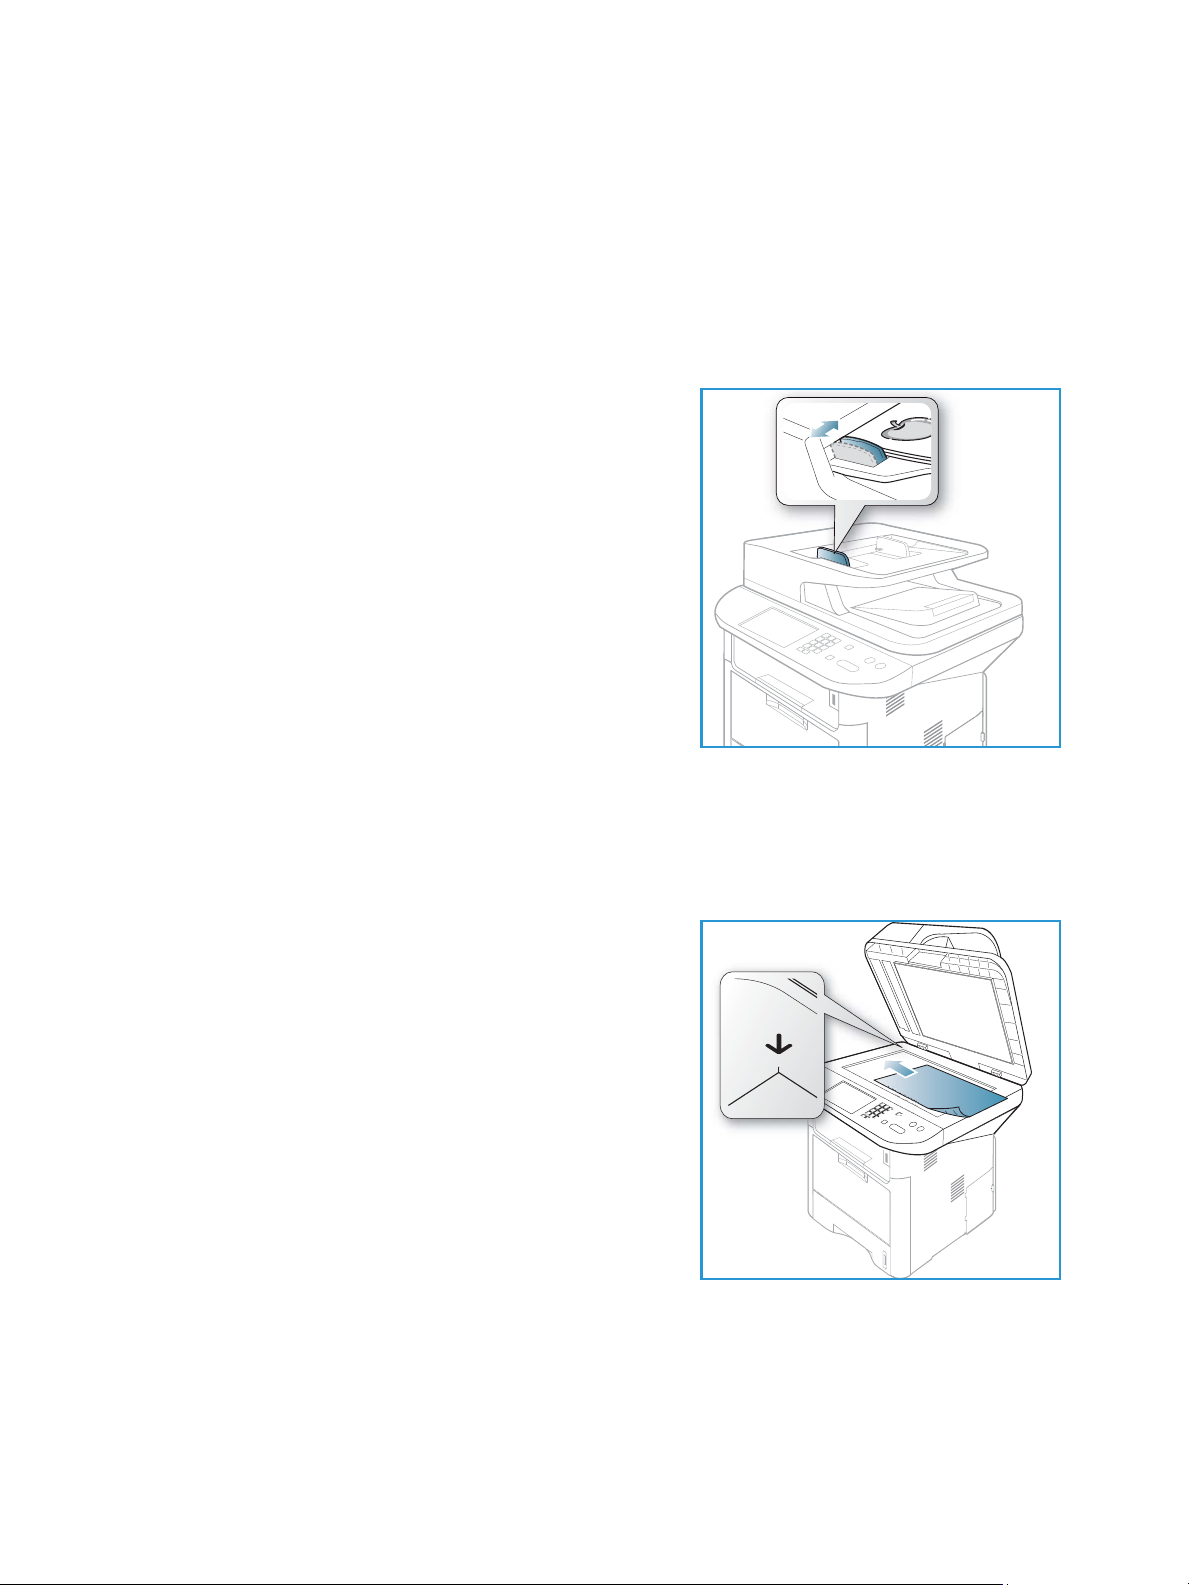
3. Insert the duplex unit back into the machine, aligning
the edges of the unit with the feed grooves on the inside
of the machine. Make sure the duplex unit is fully pushed
in.
Loading Paper
Xerox WorkCentre 3315DN/3325DN/3325DNI
User Guide
21
Page 22
Loading Documents
Loading Documents
Documents can be loaded either into the automatic document feeder or onto the document glass.
Automatic Document Feeder
The automatic document feeder can hold a maximum of 50 originals of 20 lb (80 g/m²) thickness.
1. Load documents to be scanned face up in the input tray
of the automatic document feeder with the top of the
document to the left of the tray.
2. Move the document guide to just touch both sides of the
document.
Document Glass
The document glass can be used for oversized, torn or damaged originals and for books and
magazines.
1. Open the automatic document feeder and place single
documents face down on the document glass aligned
with the rear left corner.
2. The default document size is 8.5 x 11” or A4. For other
sized documents, change the Original Size option. Refer
to Copy Options on page 36 for further information.
Note: Documents are only scanned once even when
several copies are selected.
22
Xerox WorkCentre 3315DN/3325DN/3325DNI
User Guide
Page 23
Media Output Locations
1
1
2
2
The machine has two output locations:
• Output tray (face down) up to a maximum of 150
sheets of 20 lb (80 g/m²) paper.
Media Output Locations
• Rear door (face up) one sheet at a time.
The machine sends output to the output tray by default. If special media such as envelopes print out
with wrinkles, curl, creases or black bold lines, the rear door should be used for the output. Open the
rear door and keep it open while printing one sheet at a time.
Note: The rear door output can only be used for simplex jobs. Duplex printing with the rear door
open will cause paper jams.
Using the Output Tray
The output tray collects printed paper face down, in the order in which the sheets were printed. The
output tray should be used for most jobs. When the output tray is full, a message displays on the
control panel.
Xerox WorkCentre 3315DN/3325DN/3325DNI
User Guide
23
Page 24
Media Output Locations
To u s e t h e output tray, make sure that the rear door is closed.
Notes:
• If paper coming out of the output tray has problems, such as excessive curl, try printing
to the rear door.
• To reduce paper jams, do not open or close the rear door while the printer is printing.
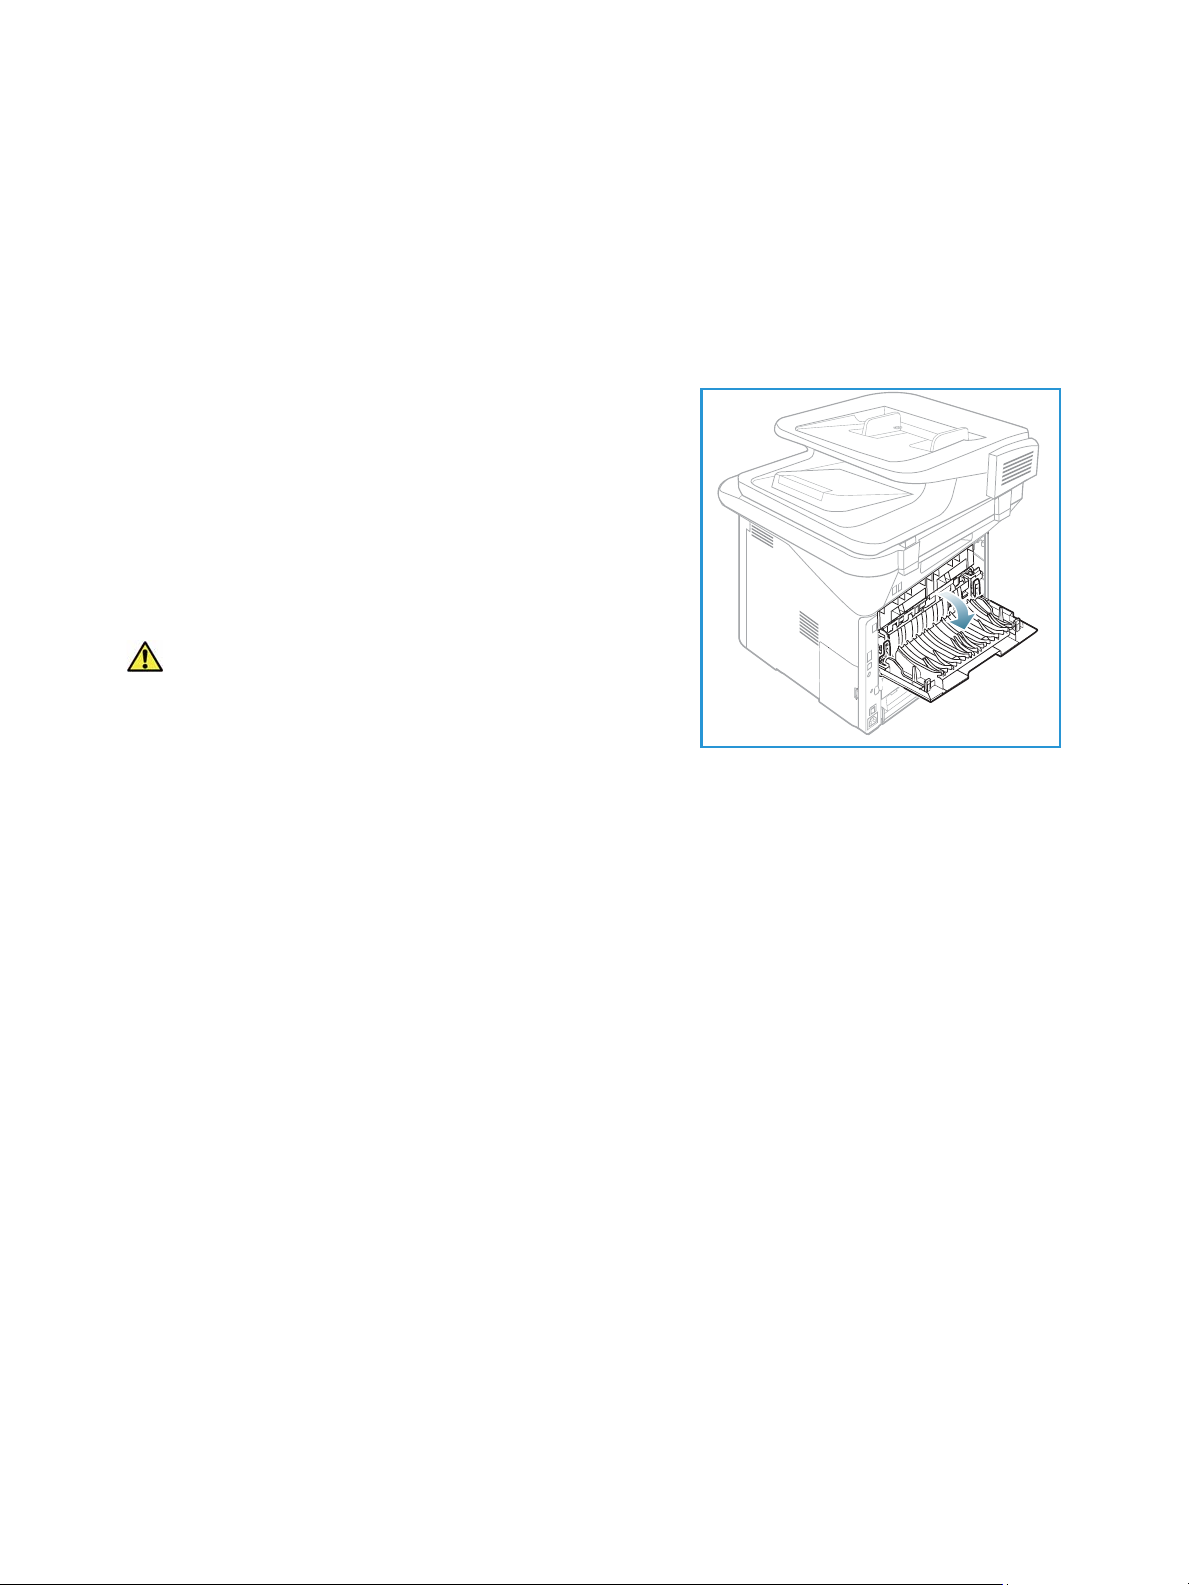
Using the Rear Door
When using the rear door, paper comes out of the machine
face up. Printing from the bypass tray to the rear door
provides a straight paper path and might improve the output
quality when printing on special media. Whenever the rear
door is open, the output is delivered there.
Note: The rear door output can only be used for simplex
jobs. Duplex printing with the rear door open will cause
paper jams.
CAUTION: The fuser area inside the rear door of your
machine becomes very hot when in use. Take care when
you access this area.
24
Xerox WorkCentre 3315DN/3325DN/3325DNI
User Guide
Page 25
Machine Status
Machine Status
The Machine Status button provides information about the machine and access to the machine
setups. After your machine is installed, it is recommended that the settings and options are customized
by the System Administrator to fully meet the requirements of the Users. Access to these options is
usually password protected. Please discuss your requirements with your System or Machine
Administrator to ensure you get optimum performance from your machine.
The Machine Status options include machine information, toner level, information pages, feature
defaults, system setups and network settings. These options are described below.
Note: Some options may be unavailable depending on your machine configuration.
Machine Information
Use this option to access the following information:
•Model
• Printer Name
•DNS Name
•IP Address
• IPv6 Address
• Serial Number
• Activation Date
•Billing Counters
Toner Level
Use this option to check the level of toner in the print cartridge. The toner level is indicated on the
status bar.
Information Pages
This option allows the user to print the following reports:
Report Description
Menu Map Prints the menu map which shows the layout and current settings of this
machine.
All Reports This option enables you to print all the reports and information pages.
Configuration This report provides information about your machine setup, including
the serial number, IP Address, installed options and the software
version.
Demo Page The demo page is printed to check the quality of the print.
Xerox WorkCentre 3315DN/3325DN/3325DNI
User Guide
25
Page 26
Machine Status
Report Description
Supplies Info Prints the supplies information page.
Address Book This list shows all of the Fax and E-mail addresses currently stored in the
machine’s memory.
Fax S end This report shows the fax number, the number of pages, the elapsed
time of the job, the communication mode, and the communication
results for a particular Fax job.
Note: You can set up your machine to automatically print a Send Report
after each Fax job. (See Fax Set up on page 166.)
Fax S ent This report shows information on the faxes you have recently sent.
Note: You can set the machine to automatically print this report every
50 communications. (See Auto Report on page 169.)
E-mail Sent This report shows information on the e-mails you have recently sent.
Fax Rece ived This report shows information on the faxes you have recently received.
Scheduled Job This list shows the documents currently stored for delayed faxing along
with the start time and type of each operation.
Junk Fax This list shows the fax numbers specified as junk fax numbers. To add or
delete numbers, access the Junk Fax Setup menu. (See Fax Setup on
page 166.)
Network Configuration This list shows information about your machine’s network connection
and configuration.
User Auth. This list shows users who are authorized to use the e-mail function.
PCL Font Prints the PCL font list.
PS Font Prints the PS font list.
EPSON Font Prints the EPSON font list.
Stored Jobs Prints jobs currently stored on the optional memory or HDD within the
machine.
Completed Jobs Prints a list of completed jobs.
Net User Auth.
Usage Counter This list shows the number of impressions made on the machine. The list
Prints users and their IDs who logged into the Domain.
includes:
• Total Impressions
• Black Impressions
• Maint. Impressions
• Sheets
• 2 Sided Sheets
Fax O ption s Prints fax setup information.
26
Xerox WorkCentre 3315DN/3325DN/3325DNI
User Guide
Page 27

Machine Status
Feature Defaults
Your machine provides default settings for Copy, Scan, E-mail and Fa x so that you can quickly and
easily make selections for your job. The default selections can be changed by selecting the Machine
Status button on the control panel and the down arrow to select Feature Defaults . A password may be
required to access and change the System Setup settings.
Note: Some options may be unavailable depending on your machine configuration.
Copy Defaults
The default selections for the Copy options including Original size, Quantity, Collation, Reduce/Enlarge,
Lighten/Darken, Contrast and Original Type can be set to those most frequently used. When you copy a
document, the default settings are used unless they have been changed for the current job. Once the
current job is complete the settings return to the default settings. A password may be required to
access and change the default settings.
Scan Defaults
The default selections for the Scan options including Original Size, Original Type, Resolution, Output
Color, File Format, Lighten/Darken and Contrast, can be set to those most frequently used for the Scan
to USB, Scan to FTP and Scan to SMB options. When you scan a document, the default settings are
used unless they have been changed for the current job. A password may be required to access and
change the default settings.
E-mail Defaults
The default selections for the E-mail options, including Original Size, Original Type, Resolution, Output
Color, File Format, Lighten/Darken and Contrast can be set to those most frequently used. When you
e-mail a document, the default settings are used unless they have been changed for the current job.
Once the current job is complete the settings return to the default settings. A password may be
required to access and change the default settings.
Fax Setup
Your machine provides you with various user-selectable options for setting up the fax system. You can
change the default settings for your preferences and needs. Receiving and Sending settings can be
customized. A password may be required to access and change the Fax Setup settings.
Print Setup
You can change the default settings for various options within the print environment to meet your
preferences and needs. A password may be required to access and change the Print Setup settings.
Xerox WorkCentre 3315DN/3325DN/3325DNI
User Guide
27
Page 28

Machine Status
System Setup
System Setup options enable you to customize settings which are specific to the machine, such as Date
& Time and Power Save. A password may be required to access and change the System Setup settings.
Network Settings
You may set up the network using the machine's display screen. Before doing that, you must have the
relevant information concerning the type of network protocols and computer system you use. If you
are not sure which setting to use, contact your System Administrator to configure this machine on the
network. A password may be required to access and change the Network Settings.
Local Drive (WorkCentre 3325DN / 3325DNI only)
Enables a location on the machine’s hard drive to be set up for stored scan, print and fax jobs.
Note: For full instructions on accessing and customizing the machine settings, refer to Machine
Status and Setups on page 153.
28
Xerox WorkCentre 3315DN/3325DN/3325DNI
User Guide
Page 29
General Care and Consumables
General Care and Consumables
There is only one customer replaceable consumable in the machine, the print cartridge.To place an
order for Xerox consumables, please contact your local Xerox Representative giving your Company
Name, product number and the machine serial number. Supplies can also be ordered from
www.xerox.com, refer to Support on page 142 for further information.
The machine serial number can be displayed by pressing the Machine Status button, then highlighting
Machine Information and pressing OK. For further information about locating the serial number,
please refer to Locating the Serial Number on page 221.
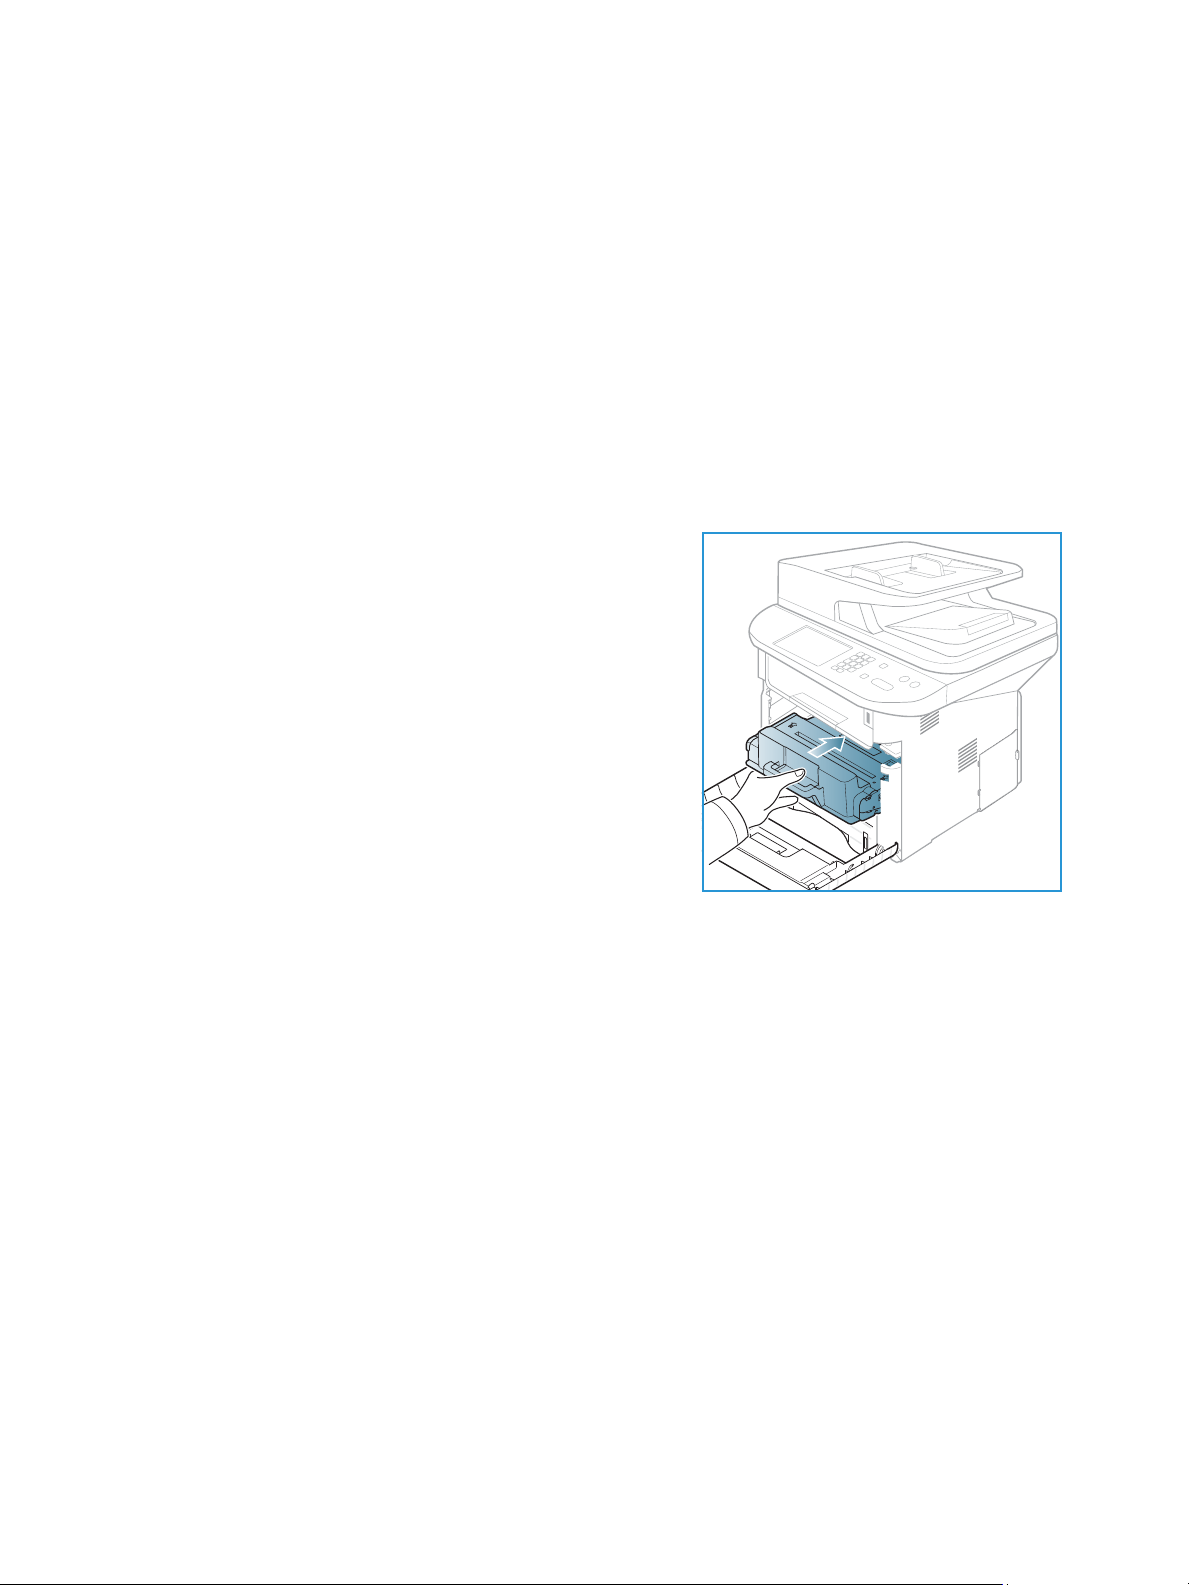
Print Cartridge
To avoid print quality problems resulting from worn parts and
to maintain your machine in top working condition, the print
cartridge will need to be replaced after printing the specified
number of pages or when the life span of the cartridge has
expired.
The machine will display a message when the print cartridge
needs to be replaced. Only replace the cartridge when a
message instructs you to do so or when instructed by a Xerox
representative. To replace the print cartridge, follow the
instructions provided within this guide or with the
consumable.
To re pla c e t h e print cartridge, refer to General Care and
Troubleshooting on page 181. To purchase a new print
cartridge, contact your local Xerox representative or authorized dealer. Supplies can also be ordered
from www.xerox.com, refer to Support on page 142 for further information.
Cleaning Tasks
Performing regular cleaning activities ensures the machine is kept free of dust and debris. The machine
covers, control panel and automatic document feeder should all be cleaned using a soft lint-free cloth,
lightly dampened with water. Xerox Cleaning Fluid or Anti-Static Cleaner can be used to clean the
document glass, but must be applied using a cloth and not poured directly on the document glass.
Remove any residue with a clean cloth or paper towel.
For further information on maintenance tasks, refer to General Care and Troubleshooting on page 181.
Xerox WorkCentre 3315DN/3325DN/3325DNI
User Guide
29
Page 30

Further Assistance
Further Assistance
For any additional help visit our customer web site at www.xerox.com or contact the Xerox Support
Center quoting the machine serial number.
Xerox Support Center
If a fault cannot be resolved by following the display instructions, check Error Messages on page 198. If
the difficulty persists, contact the Xerox Support Center. The Xerox Support Center will want to know
the nature of the problem, the machine serial number, the fault code (if any) plus the name and
location of your company.
For information about locating the serial number, please refer to Locating the Serial Number on
page 221.
Documentation
Most answers to your questions will be provided by the documentation that is supplied on CD with the
Xerox WorkCentre 3315DN/3325DN/3325DNI. Alternatively you can access the documents from
www.xerox.com/support.
• Install Guide - contains information about installing the machine.
• Quick Use Guide - provides basic information on how to use the machine.
• User Guide (this document) - contains instructions and information about all the features on the
machine.
• System Administration Guide - provides detailed instructions and information about connecting
your machine to the network and installing optional features.
30
Xerox WorkCentre 3315DN/3325DN/3325DNI
User Guide
Page 31

Copy
This chapter includes:
• Copy Procedure on page 32
• Copy Options on page 36
• Using the Layout Options on page 39
• Media Output Locations on page 43
2
Xerox WorkCentre 3315DN/3325DN/3325DNI
User Guide
31
Page 32

Copy Procedure
Copy Procedure
This section describes the basic procedure for making copies:
• Loading Documents on page 32
• Select the Features on page 33
• Enter the Quantity on page 34
• Start the Job on page 34
• Check the Job Status on page 35
• Stop the Copy Job on page 35
If an authentication feature is enabled, you may need an account before using the machine. To get an
account, or for more information, contact your System Administrator.
Note: Some options may be unavailable depending on your machine configuration.
Loading Documents
Documents can be loaded either into the automatic document feeder or onto the document glass.
Automatic Document Feeder
The automatic document feeder can hold a maximum of 50 originals of 20 lb (80 g/m²) thickness.
1. Load documents to be scanned face up in the input tray
of the automatic document feeder with the top of the
document to the left of the tray.
2. Move the document guide to just touch both sides of the
document.
32
Xerox WorkCentre 3315DN/3325DN/3325DNI
User Guide
Page 33

Copy Procedure
Document Glass
The document glass can be used for oversized, torn or damaged originals and for books and
magazines.
1. Open the automatic document feeder and place single
documents face down on the document glass aligned
with the rear left corner.
2. The default document size is 8.5 x 11” or A4. For other
sized documents, change the Original Size option. Refer
to Copy Options on page 36 for further information.
Note: Documents are only scanned once even when
several copies are selected.
Select the Features
Various features can be selected for your Copy job. The paper and 2 sided options are selected from
buttons on the control panel. Additional Copy options are available through the Menu button. Once
you have made a selection, press Back to return to the Ready screen.
Note: Some options may be unavailable depending on your machine configuration.
1. Press the Copy button on the control panel.
2. Press the Paper Supply button on the control
panel:
• Auto Select: With this option selected, the
machine chooses the correct paper for the
Copy job based on the size of the originals
being scanned.
• Tray 1: Use this option to select the paper
loaded in Tray 1.
• Tray 2: Use this option to select the paper loaded in Tray 2.
Note: Tray 1 can hold 250 sheets of 20 lb (80 g/m²) paper and the optional tray 2 can hold 520
sheets of 20 lb (80 g/m²) paper. Weight ranges from 16 - 43 lbs bond (60 - 163 g/m²). Sizes range
from 105 x 148 mm to 216 x 356 mm (A6 to Legal).
• Bypass Tray: Use this option when feeding individual types of stock, for example letterhead
or labels for one-off jobs.
Note: The bypass tray holds up to 50 sheets of 20 lb (80 g/m²) paper or up to 5 transparency
sheets or up to 5 envelopes. Weight ranges from 16 - 58 lbs bond (60 - 220 g/m²). Sizes range from
76 x 127 mm (custom) to 216 x 356 mm (Legal).
Select the Paper Supply option required using the up/down arrows and press OK.
Xerox WorkCentre 3315DN/3325DN/3325DNI
User Guide
33
Page 34

Copy Procedure
For more information, refer to Paper and Media on page 143.
3. Press the 2 Sided button on the control panel. Two-sided copies can be made automatically from
one or two-sided originals:
• 1 1 Sided: Use this option for 1 sided originals when 1 sided copies are required.
• 1 2 Sided: Use this option for 1 sided originals when 2 sided copies are required.
• 1 2 Sided, Rotate Side 2: This option produces 2 sided copies from 1 sided originals and
rotates 180 degrees every second side image. Use this option to create documents which can
be read in a “head to toe” manner, for example a calendar.
• 2 2 Sided: Use this option for 2 sided originals when 2 sided copies are required.
• 2 1 Sided: Use this option for 2 sided originals when 1 sided copies are required.
• 2 1 Sided, Rotate Side 2: This option produces 1 sided copies from 2 sided originals and
rotates 180 degrees every second side image. The “read” orientation for this option varies
depending on the input originals. For example, if “head to head” orientation originals are
scanned, the output will be “head to toe”. If “head to toe” orientation originals are scanned,
the output produced will be “head to head”.
Select the 2 Sided option required using the up/down arrows and press OK.
Note: Not all the 2 sided options are available on the WorkCentre 3315DN.
4. Additional Copy options are available through the Menu button. For information about
programming additional options, refer to Copy Options on page 36.
Enter the Quantity
• The maximum copy quantity is 999.
• Use the keypad on the control panel to enter the number of copies required. The number entered
is displayed in the upper right-hand corner of the display.
Note: To cancel an incorrect entry, press the C button and enter the correct quantity.
Start the Job
1. Press the Start button. Each document is scanned only once.
2. If using the document glass to scan 2 sided originals, the machine displays a message when ready
to scan side 2. Continue scanning until all sides have been scanned.
The images are scanned and the Copy job is printed.
34
Xerox WorkCentre 3315DN/3325DN/3325DNI
User Guide
Page 35

Copy Procedure
Check the Job Status
1. Press the Job Status button on the control panel
to display job status information.
2. A list of Active Jobs or Saved Jobs is displayed.
Select your job using the up/down arrows and
press OK.
3. The following Job Options are available:
For active jobs:
• Release
•Cancel
For save d jobs:
•Print
• Delete
Interrupt the Copy Job
To interrupt the active Copy job so that a more urgent job can take priority:
1. Press the Job Interrupt button on the control panel.
2. Remove the active job originals from the automatic document feeder or from the document glass.
3. Program the priority job.
4. Place the originals for the priority job on the document glass or in the automatic document feeder.
5. Press Start.
6. When the priority job is complete, press the Job Interrupt button again.
7. Replace the originals from the first job and press start. The interrupted job will resume copying.
Stop the Copy Job
Follow the steps below to cancel an active Copy job.
1. Press the Stop button on the control panel.
Follow the steps below to cancel a queued Copy job.
1. Press the Job Status button on the control panel to display the active jobs.
2. Use the up/down arrows and select the job required, press OK.
3. Select Delete and OK.
4. Select Yes to delete the job or No to return to previous screen.
Xerox WorkCentre 3315DN/3325DN/3325DNI
35
User Guide
Page 36
Copy Options
Copy Options
Your machine provides the following options to customize your Copy jobs. Use the Menu button to
access the options. For information about changing the default Copy settings, refer to Feature Defaults
on page 159.
Notes:
• Some options may be unavailable depending on your machine configuration.
• If you press Stop while setting the Copy options, all of the options you have set for the
current Copy job will be canceled and return to their default status after the machine
completes the Copy job in progress.
Feature Description Options
Original Size Allows you to specify the
size of the image to be
scanned.
Reduce/Enlarge Originals can be reduced
or enlarged between 25%
and 400% when using the
document glass, or from
25% to 100% when using
the automatic document
feeder.
Lighten/Darken Adjusts the lightness or
darkness of the output.
• A4
• A5
• B5
• Letter
• Legal
• Executive
• Folio
• Oficio
• 100 %: Produces an image on the copies the same size
as the image on the original.
• Variable %: Use the keypad or the up/down arrows to
enter the percentage required.
• Auto Fit: Reduces or enlarges the image on the copies
based on the size of the original and the size of the
selected output paper.
• Presets: The most commonly used reduce/enlarge
percentages have been provided as preset options.
These preset options can be customized by your
System or Machine Administrator to meet individual
needs.
• Lighten +1 to +5: Lightens the image in increments to
the lightest setting of Lighten +5; works well with dark
print.
• Normal: Works well with standard typed or printed
originals.
• Darken +1 to +5: Darkens the original in increments
to the darkest setting of Darken +5; works well with
light print.
36
Xerox WorkCentre 3315DN/3325DN/3325DNI
User Guide
Page 37
Feature Description Options
Copy Options
Contrast Increases or decreases the
contrast between light and
dark areas of the image.
Original Type The Original Type setting is
used to improve the image
quality by selecting the
document type for the
originals.
Layout This option is used to copy
multiple documents onto
one sheet of paper, copy
from book originals, create
booklet output and
produce documents which
can be pasted together to
make a poster.
• Less +1 to +5: Decreases the contrast in increments to
the lowest contrast setting of Less +5.
• Normal: No contrast adjustment is made.
• More +1 to +5: Increases the contrast in increments
up to the highest contrast setting of More +5.
• Te xt : Use for originals containing mostly text.
• Text and Photo: Use for originals with mixed text and
photographs.
• Photo: Use when the originals are photographs.
• Normal: Select this option to match the layout of the
originals.
• 2 Up: This feature is used to copy two documents, in a
reduced size, onto one sheet of paper.
• 4 Up: This feature is used to copy four documents, in a
reduced size, onto one sheet of paper.
• ID Card Copy: The machine prints one side of the
original on the upper half of the paper and the other
side on the lower half without reducing the size of the
original.
• Poster Copy: Your original will be divided into 9
portions. You can paste the printed pages together to
make one poster-sized document.
• Clone Copy: The machine prints multiple original
images onto a single page. The number of images is
automatically determined by the machine based on
the original size and the paper size.
• Book Copy: Use when copying bound documents and
books.
• Booklet Creation: This allows you to print your
document on both sides of the paper and arranges
the pages so that the paper can be folded in half after
printing to produce a booklet.
Refer to Using the Layout Options on page 39 for
instructions.
Background
Suppression
Use to automatically
reduce or eliminate the
dark background resulting
from scanning colored
paper or newspaper
originals.
• Off: Select if Background Suppression is not required.
• Auto: Select to automatically eliminate background.
• Enhance: Levels 1 to 4: Suppresses the background
color in increments, level 4 representing the greatest
amount of background elimination.
Xerox WorkCentre 3315DN/3325DN/3325DNI
User Guide
37
Page 38

Copy Options
Feature Description Options
Margin Shift Allows you to shift the
image on the page by a
specified amount.
Edge Erase Allows you to erase spots,
drill holes, fold creases and
staple marks along any of
the four edges of a
document.
• Off: Select if Margin Shift is not required.
• Auto Center: Automatically copies the image in the
center of the page. This feature is only available when
you place originals on the document glass.
• Custom Margin: Use the numeric keypad to enter the
left, right, top or bottom margin amount from
0 to 20 mm.
• Off: Select if Edge Erase is not required.
• Small Original: erases the edge of the original if it is
small. This feature is only available when you place
originals on the document glass.
• Hole Punch: Erases the marks from book binding
holes.
• Book Center: Erases the middle part of the page to
eliminate the dark horizontal marks reproduced when
you copy a book. This feature is only available when
you place originals on the document glass.
• Border Erase: Use the numeric keypad to enter the
left, right, top or bottom amount of margin to erase.
38
Xerox WorkCentre 3315DN/3325DN/3325DNI
User Guide
Page 39

Using the Layout Options
1 2
1 2
3 4
Using the Layout Options
This option is used to copy multiple documents onto one sheet of paper, copy from book originals,
create booklet output and produce documents which can be pasted together to make a poster.
Note: Some options may be unavailable depending on your machine configuration.
2 Up or 4 Up Copying
This feature is used to copy two or more documents, in a
reduced size, onto one sheet of paper. It is ideal for creating
handouts, storyboards or documents used for archival
purposes.
Note: Originals must be loaded in the automatic
document feeder when using this feature.
1. Press Copy on the control panel.
2. Press Menu on the control panel.
3. Press the up/down arrows to highlight Layout and press OK.
4. Select the option required:
• Normal: Copies an original onto one sheet of paper.
• 2 Up: Copies two separate originals onto one sheet of paper.
• 4 Up: Copies four separate originals onto one sheet of paper.
Note: For landscape originals, place the top of the document at the back of the feeder. For portrait
originals, place the top of the document to the left.
5. Select OK to save your selections and press Menu to return to the top level menu.
6. Load originals and press Start.
ID Card Copy
The machine prints one side of the original on the upper half
of the paper and the other side on the lower half without
reducing the size of the original. This feature is helpful for
copying a small-sized item, such as a business card.
Note: This Copy feature is available only when you place
originals on the document glass. If the original is larger
than the printable area, some portions may not be
printed.
Your machine can print 2 sided originals on one sheet of A4, Letter, Legal, Folio, Executive, B5, A5, or A6
paper.
1. Press Copy on the control panel.
2. Press Menu on the control panel.
3. Press the up/down arrows to highlight Layout and press OK.
Xerox WorkCentre 3315DN/3325DN/3325DNI
User Guide
39
Page 40

Using the Layout Options
4. Press the up/down arrows to highlight ID Card Copy and press OK.
5. Press Menu to return to the top level menu.
6. Place the front side of the original face down on the
document glass, aligned with the tip of the registration
arrow and close the automatic document feeder.
7. Press Start.
Place Front Side Press OK appears on the display. Press
OK on the control panel.
Your machine begins scanning the front side and shows
Place Rear Side Press Start.
8. Turn the original over and place the rear side of the
original face down on the document glass and close the
automatic document feeder.
9. Press Start on the control panel to begin copying.
Book Copy
This feature enables you to specify which page or pages of a
book are to be scanned. The book original is placed face down
on the document glass with the spine of the book lined up
with the book marker.
1. Press Copy on the control panel.
2. Press Menu on the control panel.
3. Press the up/down arrows to highlight Layout and press
OK.
4. Press the up/down arrows to highlight Book Copy and
press OK.
5. Press the up/down arrows to highlight the option
required:
• Off: Use to deactivate the feature.
• Left Page Only: Use to scan and copy the left page of a bound document.
• Right Page Only: Use to scan and copy the right page of a bound document.
• Both Pages: Use to scan and copy both pages of a bound document. The left page of the
book will be scanned first.
6. Select OK to save your selections and press Menu to return to the top level menu.
7. Place the book original face down on the document glass with the spine of the book lined up with
the book marker at the center of the rear edge of the document glass.
8. Press Start.
B A
B A
40
Xerox WorkCentre 3315DN/3325DN/3325DNI
User Guide
Page 41

Using the Layout Options
9. If another page requires scanning, select Yes to add another page. Place the book with the new
page to be scanned on the document glass, select the Copy option required and press OK.
When you have finished scanning all the pages required, select No at the Another Page? prompt.
Booklet Creation
This allows you to print your document on both sides of the
paper and arranges the pages so that the paper can be folded
in half after printing to produce a booklet.
1. Insert the documents neatly into the automatic
document feeder, face up. The first page should be on
top with the headings towards the left of the machine.
Note: The originals must be loaded in the automatic
document feeder to enable the Booklet Creation feature
to be selected.
2. Press Copy on the control panel.
3. Press Menu on the control panel.
4. Press the up/down arrows to highlight Layout and press OK.
5. Press the up/down arrows to highlight Booklet Creation and press OK.
6. Press the up/down arrows to highlight 1 Sided Originals or 2 Sided Originals and press OK.
7. Select OK to save your selections and press Menu to return to the top level menu.
8. Load originals and press Start.
Poster Copy
Your original will be divided into 9 portions. You can paste the
printed pages together to make one poster-sized document.
Note: This Copy feature is available only when you place
originals on the document glass.
1. Press Copy on the control panel.
2. Press Menu on the control panel.
3. Press the up/down arrows to highlight Layout and press
OK.
4. Press the up/down arrows to highlight Poster Copy and press OK.
5. Select OK to save your selections and press Menu to return to the top level menu.
6. Load originals and press Start.
Each portion is scanned and printed one by one.
Xerox WorkCentre 3315DN/3325DN/3325DNI
User Guide
41
Page 42
Using the Layout Options
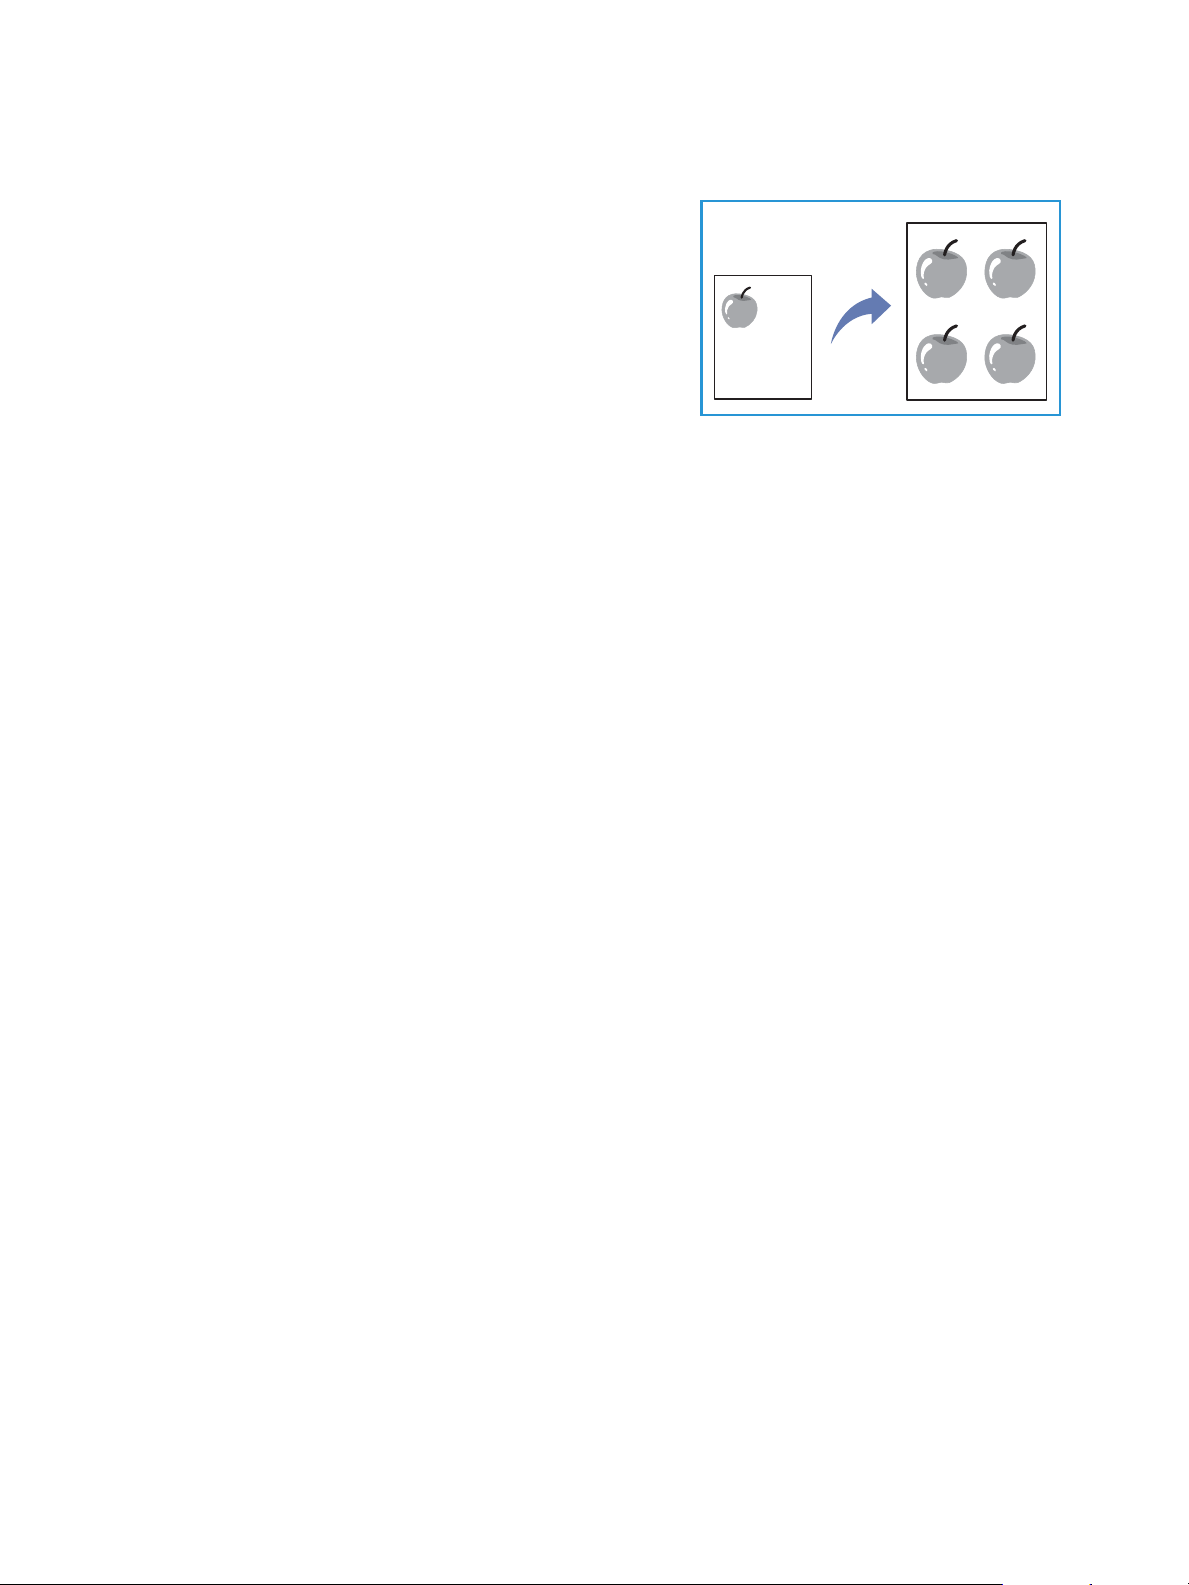
Clone Copy
The machine prints multiple original images on a single page.
The number of images is automatically determined by the
original image and the paper size.
Note: This Copy feature is available only when you place
originals on the document glass.
1. Press Copy on the control panel.
2. Press Menu on the control panel.
3. Press the up/down arrows to highlight Layout and press
OK.
4. Press the up/down arrows to highlight Clone Copy and press OK.
5. Select OK to save your selections and press Menu to return to the top level menu.
6. Load originals and press Start.
42
Xerox WorkCentre 3315DN/3325DN/3325DNI
User Guide
Page 43

Media Output Locations
1
1
2
2
The machine has two output locations:
• Output tray (face down) up to a maximum of 150
sheets of 20 lb (80 g/m²) paper.
Media Output Locations
• Rear door (face up) one sheet at a time.
The machine sends output to the output tray by default. If special media such as envelopes print out
with wrinkles, curl, creases or black bold lines, the rear door should be used for the output. Open the rear
door and keep it open while printing one sheet at a time.
Note: The rear door output can only be used for simplex jobs. Duplex printing with the rear door
open will cause paper jams.
Using the Output Tray
The output tray collects printed paper face down, in the order in which the sheets were printed. The
output tray should be used for most jobs. When the output tray is full, a message displays on the
control panel.
Xerox WorkCentre 3315DN/3325DN/3325DNI
User Guide
43
Page 44

Media Output Locations
To u s e t h e output tray, make sure that the rear door is closed.
Notes:
• If paper coming out of the output tray has problems, such as excessive curl, try printing
to the rear door.
• To reduce paper jams, do not open or close the rear door while the printer is printing.
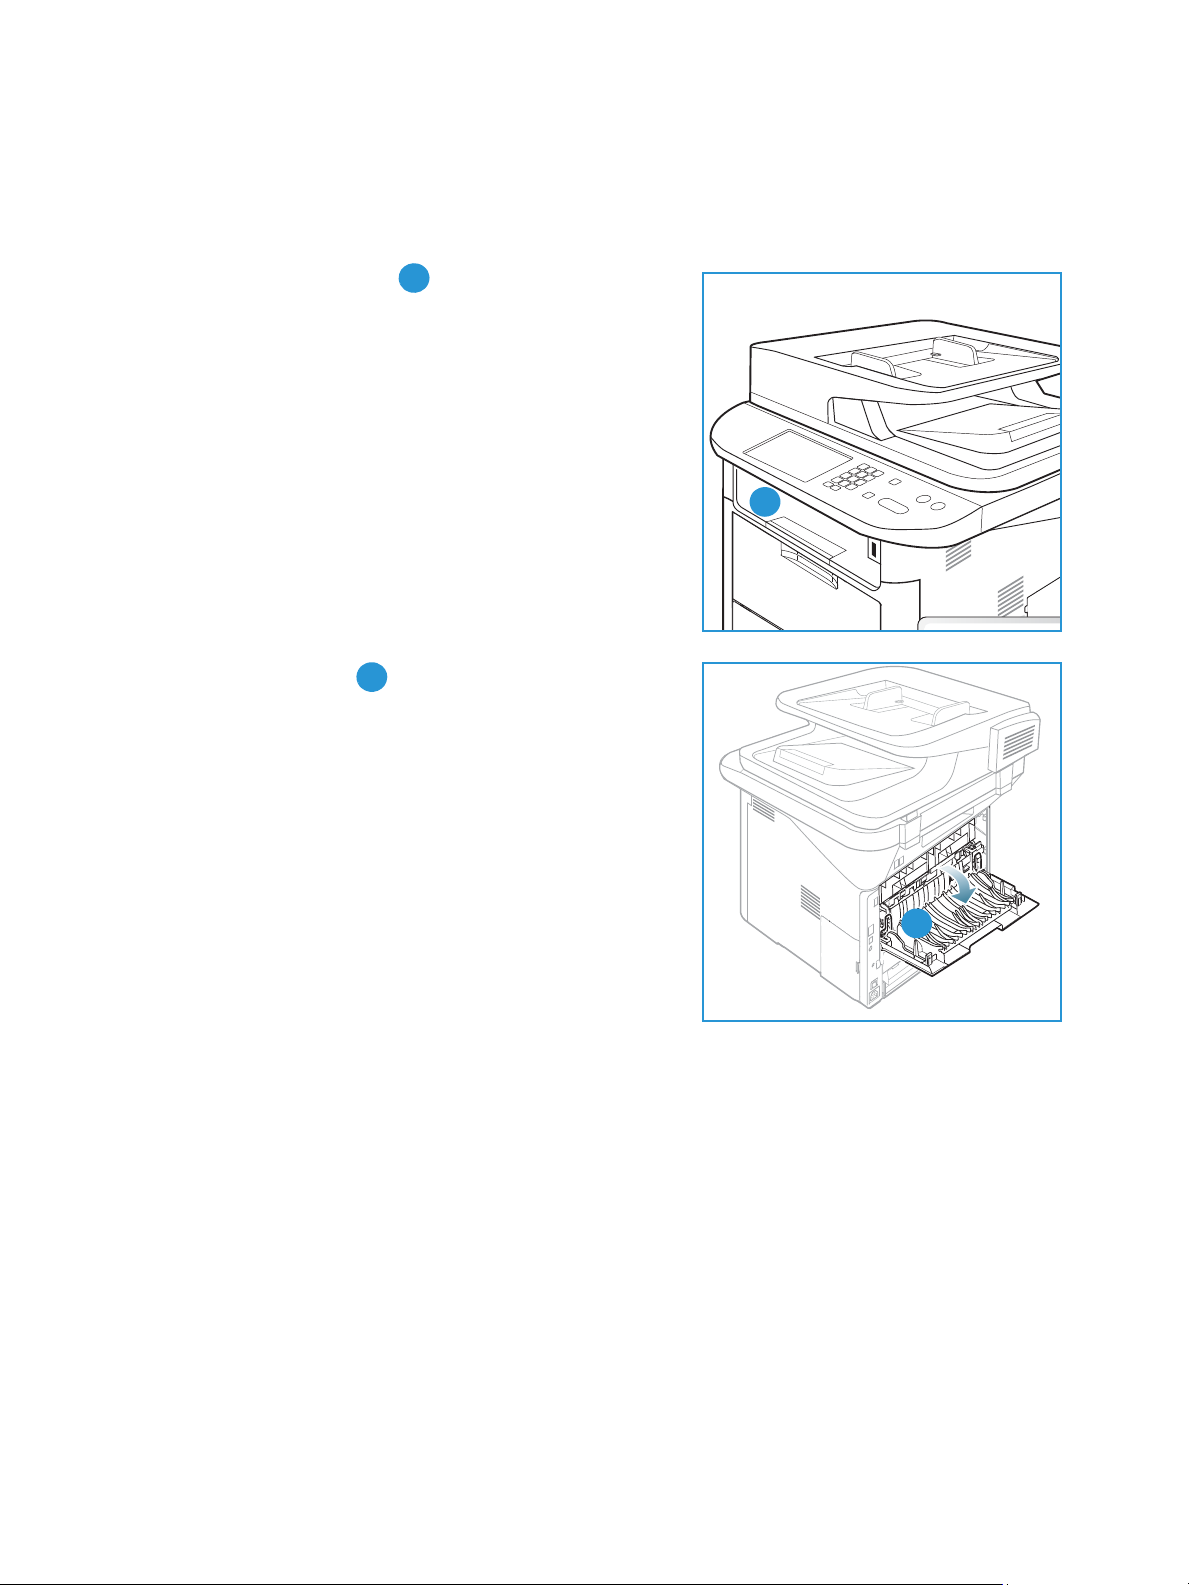
Using the Rear Door
When using the rear door, paper comes out of the machine
face up. Printing from the bypass tray to the rear door
provides a straight paper path and might improve the output
quality when printing on envelopes or special media.
Whenever the rear door is open, the output is delivered there.
Note: The rear door output can only be used for simplex
jobs. Duplex printing with the rear door open will cause
paper jams.
CAUTION: The fuser area inside the rear door of your
machine becomes very hot when in use. Take care when
you access this area.
44
Xerox WorkCentre 3315DN/3325DN/3325DNI
User Guide
Page 45

Scan
This chapter includes:
• Scanning Overview on page 46
• Scan Procedure on page 47
• Scan Options on page 53
• Scan Assistant on page 55
• Scan Using TWAIN on page 56
• Scan Using WIA Driver on page 57
• Macintosh Scanning on page 58
• Linux Scanning on page 60
3
Xerox WorkCentre 3315DN/3325DN/3325DNI
User Guide
45
Page 46

Scanning Overview
Scanning Overview
Scanning with your machine lets you turn pictures and text into digital files that can be stored on your
computer or sent to a repository. Your machine can scan via USB or network to a PC or server, as well as
directly to a USB memory device. The following filing options are available for Scan:
• USB: Using this option, you can scan an image to a USB Memory Device inserted into the USB
Memory Device port.
• Local PC: This option can be used if the machine is connected to a PC via a USB cable. For
Windows scanning, the Easy Printer Manager must be installed on your PC prior to use. For
Macintosh scanning, the Scan and Fax Manager must be installed.
• Network PC: Using this option the scanned data will be stored to a networked PC. For Windows,
the Easy Printer Manager must be installed on your PC prior to use. For Macintosh scanning, the
Scan and Fax Manager must be installed.
• SMB: Using this option, you can scan an image and upload it to a shared folder on an SMB server.
• FTP: Using this option, you can scan an image and upload it to an FTP server.
• WSD: Using this option you can scan to applications or computers that support Microsoft's Web
Services for Devices.
Note: Some options may be unavailable depending on your machine configuration.
For instructions on setting up and configuring the Scan function, refer to the System Administrator
Guide.
Scanning Methods
Your machine offers the following ways to scan an image using a local connection:
• TWAIN: TWAIN drivers handle the communication between computer software and the scanning
device. This feature can be used via a local connection or a network connection.
Refer to Scan Using TWAIN on page 56.
• WIA (Windows Image Acquisition): To use this feature your computer must be connected to the
machine via a USB cable.
Refer to Scan Using WIA Driver on page 57.
46
Xerox WorkCentre 3315DN/3325DN/3325DNI
User Guide
Page 47
Scan Procedure
Scan Procedure
Using Scan, an electronic file can be created from a hard copy original. The electronic file can be
scanned in color or black and white depending on the Color option selected. The file can then be sent
to a specified destination.
This section describes the basic procedure for scanning:
• Loading Documents on page 47
• Select the Scan Destination on page 48
• Select the Features on page 50
• Start the Job on page 51
• Check the Job Status on page 51
• Stop the Job on page 52
If an authentication feature is enabled, you may need an account before using the machine. To get an
account, or for more information, contact the System Administrator.
Note: Some options may be unavailable depending on your machine configuration and the Scan
features and destination selected.
Loading Documents
Documents can be loaded either into the automatic document feeder or onto the document glass.
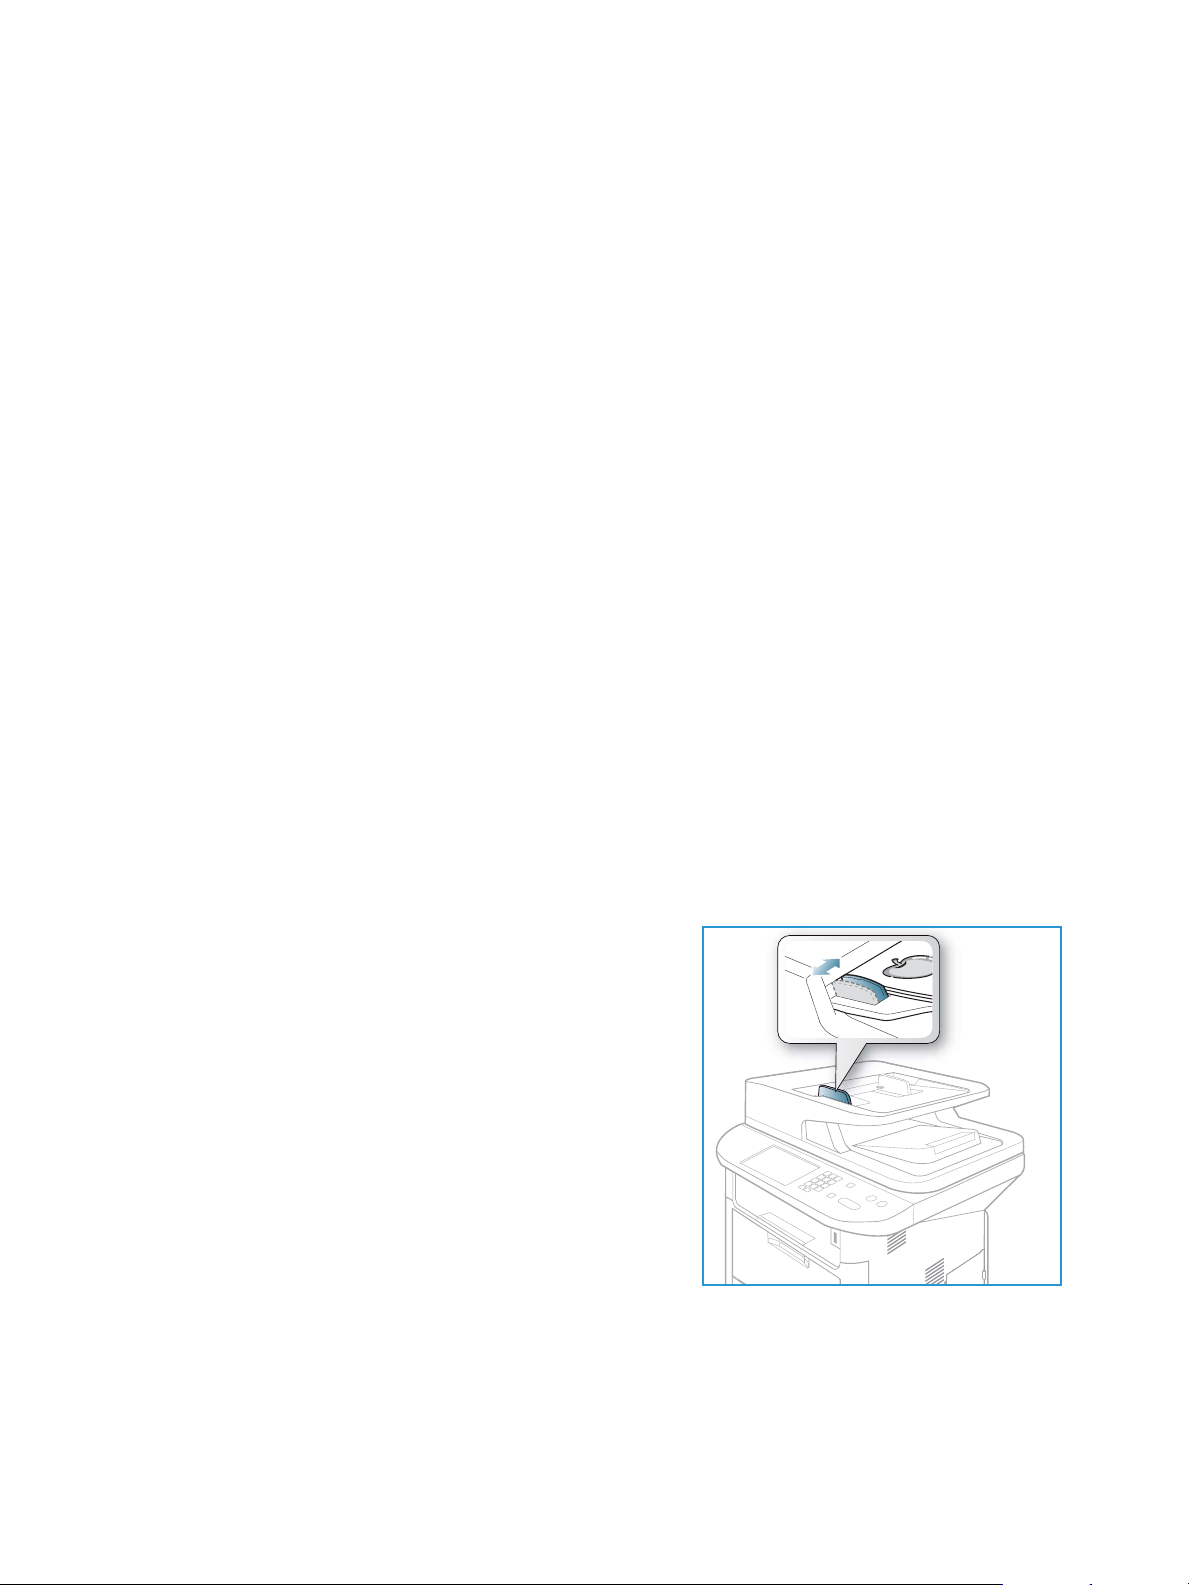
Automatic Document Feeder
The automatic document feeder can hold a maximum of 50 originals of 20 lb (80 g/m²) thickness.
1. Load documents to be scanned face up in the input tray
of the automatic document feeder with the top of the
document to the left of the tray.
2. Move the document guide to just touch both sides of the
document.
Xerox WorkCentre 3315DN/3325DN/3325DNI
User Guide
47
Page 48

Scan Procedure
Document Glass
The document glass can be used for oversized, torn or damaged originals and for books and
magazines.
1. Open the automatic document feeder and place single
documents face down on the document glass aligned
with the rear left corner.
2. The default document size is 8.5 x 11” or A4. For other
sized documents, change the Original Size option. Refer
to Scan Options on page 53 for further information.
Note: Documents are only scanned once even when
several copies are selected.
Select the Scan Destination
Note: Some options may be unavailable depending on your machine configuration.
Scan to USB
1. Load the documents to be scanned either face down on the document glass or face up into the
automatic document feeder.
2. Insert a USB Memory Device into the USB memory port on your machine. The USB menu
automatically displays.
Note: When in Power Save mode, the machine will not recognize when a USB Memory Device is
inserted into the USB port. Press any button to restore the machine to a normal state and reinsert
the USB Memory Device into the port.
3. Press the up/down arrows to highlight Scan to USB and press OK.
Scan to Local PC
To u s e Scan to Local PC, the machine must be connected to your PC or workstation via a USB cable. The
scan driver must be installed on your PC prior to use. For instructions, refer to the System Administrator
Guide.
1. Press Scan on the control panel.
2. Press the up/down arrows to highlight Local PC.
3. Press OK. If you see the Not Available message, check the port connection and/or setup.
4. Press the up/down arrows until the scan destination you want highlights and press OK.
48
Xerox WorkCentre 3315DN/3325DN/3325DNI
User Guide
Page 49

Scan Procedure
Scan to Network PC from Control Panel
Make sure that your machine is connected to a network. Make sure the machine has been configured
using the Xerox Scan Assistant utility and the scan driver has been installed. For instructions, refer to
the System Administrator guide.
1. Press Scan on the control panel.
2. Press the up/down arrows to highlight Network PC.
3. Press OK. If you see the Not Available message, check the connection and/or setup.
4. Press the up/down arrows to highlight the Login ID you want and press OK.
5. If necessary, enter the password using the keypad and press OK.
6. Press the up/down arrows to highlight the Scan Destination you want and press OK.
7. Press the up/down arrows to highlight the Resolution you want and press OK.
8. Press the up/down arrows to highlight the Color option you want and press OK.
9. Press the up/down arrows to highlight the File Format you want and press OK.
Note: You can also use the Xerox Scan Assistant to scan documents directly from your PC. Refer to
Scan Assistant on page 55.
Scan to SMB
Make sure that your machine is connected to a network. Make sure the machine has been configured
using CentreWare Internet Services. Refer to the System Administrator guide for instructions.
1. Press Scan on the control panel.
2. Press the up/down arrows to highlight SMB and press OK.
3. If required, press the 2 Sided button and Menu button to select the Scan settings. Refer to Select
the Features on page 50.
4. Press OK.
5. If Authentication is enabled, enter your Login ID and, if required, your password.
6. Press the up/down arrows until the server you want highlights and press OK.
7. Press the up/down arrows to highlight the File Format you want and press OK.
Scan to FTP
Make sure that your machine is connected to a network. Make sure the machine has been configured
using CentreWare Internet Services. Refer to the System Administrator guide for instructions.
1. Press Scan on the control panel.
2. Press the up/down arrows to highlight FTP and press OK.
3. If required press the 2 Sided button and Menu button to select the Scan settings. Refer to Select
the Features on page 50.
4. Press OK.
5. If Authentication is enabled, enter your Login ID and, if required, your password.
6. Press the up/down arrows until the server you want highlights and press OK.
7. Press the up/down arrows to highlight the File Format you want and press OK.
Xerox WorkCentre 3315DN/3325DN/3325DNI
User Guide
49
Page 50

Scan Procedure
Scan to WSD
Using this option you can scan to applications or computers that support Microsoft's Web Services for
Devices.
1. Press Scan on the control panel.
2. Press the up/down arrows to highlight WSD and press OK.
3. If required press the 2 Sided button and Menu button to select the Scan settings. Refer to Select
the Features on page 50.
4. Press OK.
5. Press the up/down arrows until the destination you want highlights and press OK.
6. Press the up/down arrows to highlight the File Format you want and press OK.
Scan to Local Drive
Using this option you can scan documents to the machine’s hard drive, and print scanned documents
from the machine hard drive. Folders within the Local Drive are created within CentreWare Internet
Services by the System Administrator. Refer to the System Administrator Guide for more information.
To scan a document to the Local Drive:
1. Press Scan on the control panel.
2. Press the up/down arrows to highlight Scan to Local Drive and press OK. The Search ID screen
will appear.
3. Select your required folder on the Local Drive. The Default Public folder appears and any other
folders that were created within the Internet Services Jobs > Local Drive page.
4. Select the features from the Scan to Local Drive menu.
Select the Features
Various features can be selected for your Scan job when the machine is in Ready mode.
Note: Some of the following options may be unavailable depending on your machine
configuration and the scan method selected.
Once you have made a selection, press Back to return to the Ready screen.
1. Press the 2 Sided button on the control panel. The following 2 Sided options are available:
• 1 1 Sided: Use this option for 1 sided originals.
• 2 1 Sided: Use this option for 2 sided originals.
• 2 1 Sided, Rotated: Use this option for 2 sided originals which have the second side
rotated. This option will rotate the second side image 180 degrees.
Select the 2 Sided option required using the up/down arrows and press OK.
50
Xerox WorkCentre 3315DN/3325DN/3325DNI
User Guide
Page 51
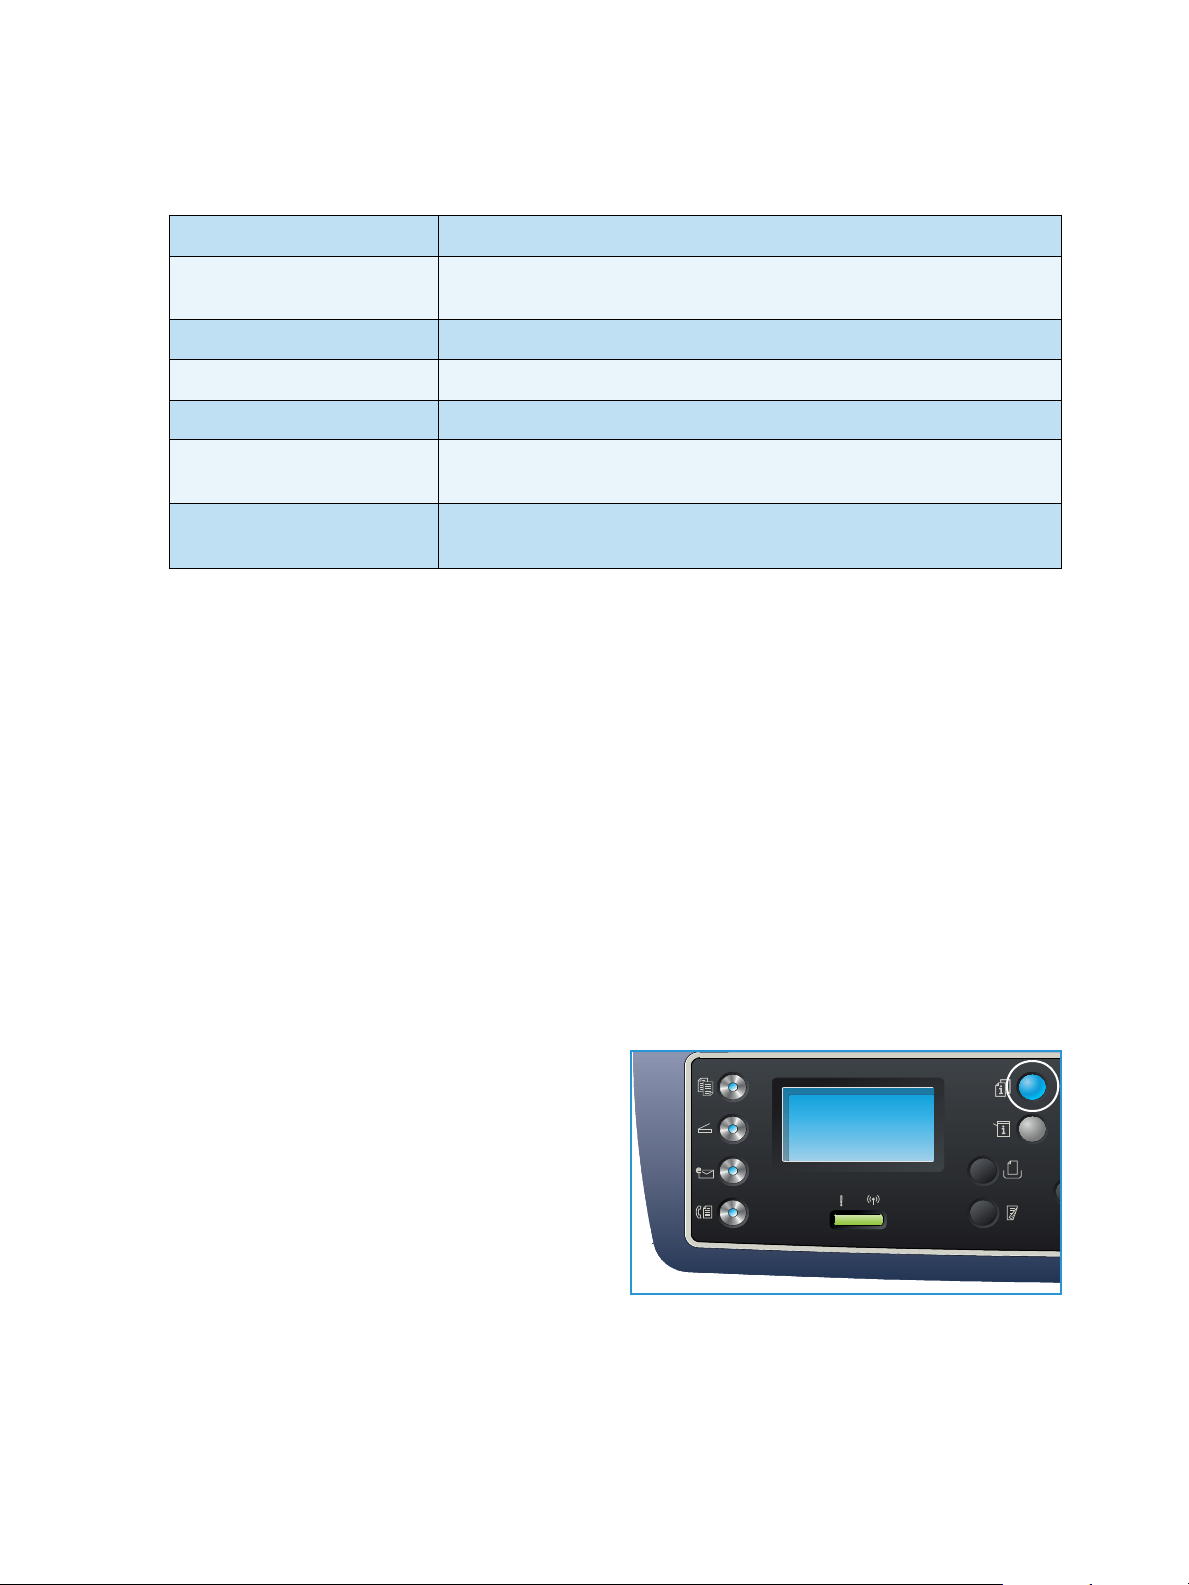
Scan Procedure
2. The following features are available through the Menu button for Scan to USB, Scan to FTP and
Scan to SMB.
Original Size Use to set the size of the image being scanned.
Original Type Used to improve the image quality by selecting the document type for
the originals.
Resolution Sets the image resolution. A higher resolution increases the file size.
Output Color Sets the color mode of the scanned image.
File Format Sets the file format of the saved image.
Lighten/Darken Provides manual control to adjust the lightness or darkness of the
scanned images.
Contrast Use to increase or decrease the contrast between black and white
images.
Press the up/down arrows until the feature you want highlights and press OK. Select the setting
required and press OK.
For information about each of the options refer to Scan Options on page 53.
Start the Job
1. Press the Start button.
2. If using the document glass to scan 2 sided originals, the machine displays a message when ready
to scan side 2. Continue scanning until all sides have been scanned.
3. Your machine begins scanning the original, and then asks if you want to scan another page.
4. To scan another page, press the left/right arrows to highlight Yes and press OK. Load an original
and press Start. Otherwise, press the left/right arrows to highlight No and press OK.
The images are scanned and sent to the destination selected.
Check the Job Status
1. Press the Job Status button on the control panel
to display job status information.
2. A list of Active Jobs or Saved Jobs is displayed.
Select your job using the up/down arrows and
press OK.
3. The following Job Options are available:
For active jobs:
• Release
•Cancel
For save d jobs:
•Print
• Delete
Xerox WorkCentre 3315DN/3325DN/3325DNI
User Guide
51
Page 52

Scan Procedure
Stop the Job
Follow the steps below to cancel an active Scan job.
1. Press the Stop button on the control panel.
Follow the steps below to cancel a queued Scan job.
1. Press the Job Status button on the control panel to display the active jobs.
2. Use the up/down arrows to select the job required, press OK.
3. Select Delete and OK.
4. Select Yes to delete the job or No to return to previous screen.
52
Xerox WorkCentre 3315DN/3325DN/3325DNI
User Guide
Page 53

Scan Options
Scan Options
Your machine provides the following options to customize your Scan jobs. Use the Menu button to
access the options. For information about changing the default Scan settings, refer to Scan Defaults on
page 161.
Note: Some of the following options may be unavailable depending on your machine
configuration and the scan method selected.
Feature Description Options
Original Size Allows you to specify the
size of the image to be
scanned.
Original Type The Original Type setting is
used to improve the image
quality by selecting the
document type for the
originals.
Resolution Resolution affects the
appearance of the
scanned image. A higher
resolution produces a
better quality image. A
lower resolution reduces
communication time when
sending the file over the
network.
•A4
•A5
•B5
•Letter
•Legal
•Executive
•Folio
•Oficio
• Te xt : Use for originals containing mostly text.
• Text and Photo: Use for originals with mixed text and
photographs.
• Photo: Use when the originals are photographs.
• 300 dpi: Recommended for high quality text
documents that are to pass through OCR applications.
Also recommended for high quality line art or medium
quality photos and graphics. This is the default
resolution and the best choice in most cases.
• 200 dpi: Recommended for average quality text
documents and line art. Does not produce the best
image quality for photos and graphics.
• 100 dpi: Recommended for lower quality text
documents or if a smaller file size is required.
Output Color Select Output Color to
produce black and white,
grayscale or color output.
• Color: Use to select color output from your original.
• Grayscale: Use if output is to be in shades of gray.
• Black and White: Use to select black and white
output regardless of the color of your original.
Xerox WorkCentre 3315DN/3325DN/3325DNI
User Guide
53
Page 54

Scan Options
Feature Description Options
File Format File Format determines the
type of file created and
can be temporarily
changed for the current
job. Select the file format
you wish to use for your
scanned image.
Lighten/Darken Adjusts the lightness or
darkness of the output.
• PDF (Portable Document Format): Allows recipients
with the right software to view, print or edit the
electronic file, no matter what their computer
platform.
• Single-TIFF (Tagged Image File Format): Produces a
graphic file that can be opened by a variety of graphic
software packages across a variety of computer
platforms. A separate file is produced for each image
scanned.
• Multi Page TIFF: Produces a single TIFF file
containing several pages of scanned images. More
specialized software is required to open this type of
file format.
• JPEG (Joint Photographic Experts Group): Produces
a compressed graphic file that can be opened by a
variety of graphic software packages across a variety
of computer platforms. A separate file is produced for
each image scanned.
• BMP: A simple bitmapped graphics format. (Scan to
USB option only.)
• Lighten +1 to +5: Lightens the image in increments to
the lightest setting of Lighten +5; works well with dark
print.
• Normal: Works well with standard typed or printed
originals.
• Darken +1 to +5: Darkens the original in increments
to the darkest setting of Darken +5; works well with
light print.
Contrast Increases or decreases the
contrast between light and
dark areas of the image.
54
Xerox WorkCentre 3315DN/3325DN/3325DNI
User Guide
• Less +1 to +5: Decreases the contrast in increments to
the lowest contrast setting of Less +5.
• Normal: No contrast adjustment is made.
• More +1 to +5: Increases the contrast in increments
up to the highest contrast setting of More +5.
Page 55

Scan Assistant
Scan Assistant
The Scan Assistant is a Xerox utility that is automatically installed with the your Xerox Printer Driver. It
provides an interface to select a scanner and to adjust Scan settings and start the scanning process
directly from your computer. Using the preview window allows you to view the scan and make
adjustments as necessary using the easy access buttons on the left of the preview window. Preferred
settings can be preserved as ‘favorites’ and added to a pre-defined list.
For information about using the Scan Assistant, refer to the Xerox WorkCentre
3315DN/3325DN/3325DNI Utilities Guide available on Xerox.com.
Xerox WorkCentre 3315DN/3325DN/3325DNI
User Guide
55
Page 56

Scan Using TWAIN
Scan Using TWAIN
If you want to scan documents using other software, you will need to use TWAIN compliant software,
such as Adobe Photoshop. Follow the steps below to scan with TWAIN compliant software.
1. Make sure that the machine is connected to your computer and powered on.
2. Install the TWAIN driver. Follow the install instructions provided with your driver.
3. Load originals face up into the automatic document feeder, or place a single original face down on
the document glass.
4. Open an application, such as Adobe Photoshop.
5. Open the TWAIN window and set the scan options.
6. Scan and save your scanned image.
56
Xerox WorkCentre 3315DN/3325DN/3325DNI
User Guide
Page 57

Scan Using WIA Driver
Scan Using WIA Driver
Your machine also supports the Windows Image Acquisition (WIA) driver for scanning images. WIA is
one of the standard components provided by Microsoft Windows and works with digital cameras and
scanners.
Note: The WIA driver works only on Windows XP/Vista/7.0 with a USB port.
1. Make sure that the machine is connected to your computer and powered on.
2. Install the WIA driver. Follow the install instructions provided with your driver.
3. Load originals face up into the automatic document feeder, or place a single original face down on
the document glass.
4. Scan the originals using the following instructions:
Windows XP
a. From the Start menu, select Control Panel > Scanners and Cameras.
b. Double click your scanner driver icon. The Scanner and Camera Wizard appears. Select Next.
c. Set the options in the Choose scanning preferences window. Select Next.
d. Enter a picture name, and select a file format and destination to save the picture.
e. Select Next to scan your originals.
f. Select Next and Finish to view the images.
Windows Vista
a. From the Start menu select Control Panel > Scanners and Cameras.
b. Double click Scan a document or picture. The Windows Fax and Scan application appears.
You ca n s elec t View scanners and cameras to view the scanners.
c. If there is no Scan a document or picture instruction visible, open the MS Paint program and
from the File menu click From Scanner or Camera... .
d. Select New Scan. The scan driver displays. Choose your scanning preferences.
e. Select Scan.
Windows 7
a. From the Start menu select Control Panel > Devices and Printers.
b. Click the right mouse button on the device driver icon in Printers and Faxes > Start Scan.
New Scan application appears.
c. Choose your scanning preferences.
d. Select Scan.
Xerox WorkCentre 3315DN/3325DN/3325DNI
User Guide
57
Page 58

Macintosh Scanning
Macintosh Scanning
You can scan documents using Image Capture on Macintosh systems.
Scanning with USB Connection
Make sure that the machine is connected to your computer via the USB cable and powered on. Install
the scan driver. Follow the install instructions provided with your driver.
1. Load originals face up into the automatic document feeder, or place a single original face down on
the document glass.
2. Start Applications and click Image Capture.
If the No Image Capture device connected message appears, disconnect the USB cable and
reconnect it. If the problem continues, refer to the Image Capture help option to resolve the
problem.
3. Select the device required.
4. Set the scan options on this program.
5. Scan and save your scanned image.
For more information about using Image Capture, use the Image Capture help option.
Use TWAIN-compliant software to apply more scan options. You can also scan using TWAIN-compliant
software, such as Adobe Photoshop. Scan processes differ according to the TWAIN-compliant software
being used. Please refer to the User Guide supplied with the software for instructions.
If scanning does not operate in Image Capture, update Mac OS to the latest version. Image Capture
operates correctly in Mac OS X 10.3.9 or higher, and Mac OS X 10.4.7 or higher.
Scanning from a Network Connected Machine
Make sure that the machine and your workstation are powered on and connected to the network.
Install the scan driver. Follow the install instructions provided with your driver.
1. Load originals face up into the automatic document feeder, or place a single original face down on
the document glass.
2. Start Applications and click Image Capture.
3. Depending on the Mac OS version, follow the steps below.
• For 10.4-10.5:
•Click Devices then Browse Devices from the Menu bar.
• Select your machine in the Twain devices option. Make sure that the Use TWAIN
software checkbox is checked.
•Click Connect.
If a warning message appears, click Change Port... to select the port, or if TWAIN UI appears,
click Change Port... from the Preference tab and select a new port.
• For 10.6, select your device below SHARED.
4. Set the scan options on this program.
58
Xerox WorkCentre 3315DN/3325DN/3325DNI
User Guide
Page 59

Macintosh Scanning
5. Scan and save your scanned image.
If scanning does not operate in Image Capture, update Mac OS to the latest version. Image Capture
operates correctly in Mac OS X 10.4.7 or higher.
For more information about using Image Capture, use the Image Capture help option.
You can also scan using TWAIN-compliant software, such as Adobe Photoshop. Scan processes differ
according to the TWAIN-compliant software being used. Please refer to the User Guide supplied with
the software for instructions.
Using Scan and Fax Manager
Use the Scan and Fax Manager program to check the installed scan driver’s condition, to change scan
settings and to add or delete document folders for storing scanned documents. To use the Scan and
Fax Manager program:
1. Select /Applications/Xerox and run Scan and Fax Manager.
2. Select the appropriate device in Scan and Fax Manager.
3. Select Properties.
4. Use the Set Scan button to change the file destination or scan settings, to add or delete
application programs and to format files. You can change the scanning device by using Change
Port (Local or Network).
5. Select OK.
Xerox WorkCentre 3315DN/3325DN/3325DNI
User Guide
59
Page 60

Linux Scanning
Linux Scanning
You can scan a document using the Unified Driver Configurator window. Make sure that the machine is
powered on and connected to your computer via USB cable, or connected to the network. Install the
scan driver. Follow the install instructions provided with your driver.
Scanning
1. Double-click the Unified Driver Configurator on your desktop.
2. Click the button to switch to Scanners Configuration.
3. Select the scanner in the list.
• If you use only one machine device and it is connected to the computer and turned on, your
scanner appears in the list and is automatically selected.
• If you have two or more scanners connected to your computer, you can select any scanner to
work at any time. For example, while acquisition is in progress on the first scanner, you may
select the second scanner, set the device options and start the image acquisition
simultaneously.
4. Click Properties.
5. Load originals face up into the automatic document feeder, or place a single original face down on
the document glass.
6. From the Scanner Properties window, click Preview.
The document is scanned and the image preview appears in the Preview Pane.
7. Drag the pointer to set the image area to be scanned in the Preview Pane.
8. Change the scan options in the Image Quality and Scan Area sections.
• Image Quality: This option allows you to select the color composition and the scan
resolution for the image.
• Scan Area: This option allows you to select the page size. The Advanced button enables you
to set the page size manually.
If you want to use one of the preset scan option settings, select the option from the Job Type
drop-down list. (See Job Type Settings on page 60.)
9. Click Default to restore the default setting for the scan options.
10. When you have finished, click Scan to start scanning.
The status bar appears on the bottom left of the window to show you the progress of the scan. To
cancel scanning, click Cancel.
The scanned image appears.
11. When you are finished, click Save on the toolbar.
12. Select the file directory where you want to save the image and enter the file name.
13. Click Save.
Job Type Settings
You can save your scan option settings for later use.
60
Xerox WorkCentre 3315DN/3325DN/3325DNI
User Guide
Page 61
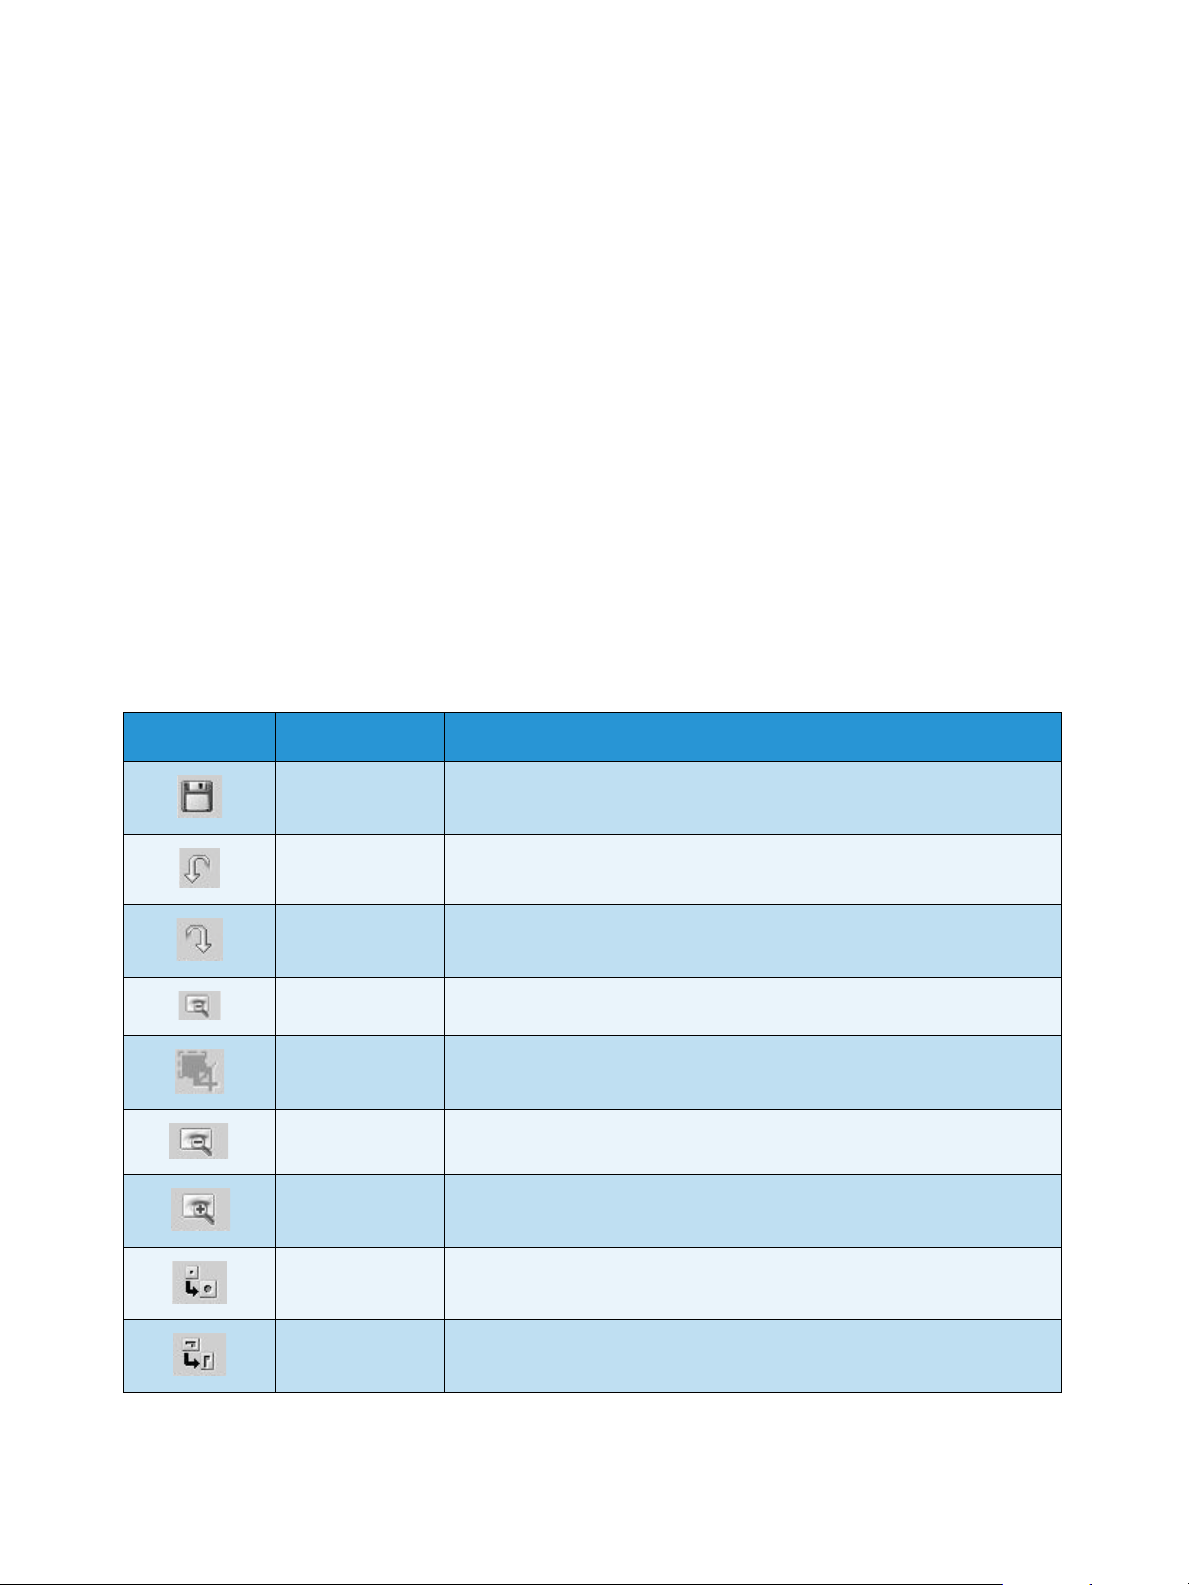
Linux Scanning
Saving a New Job Type Setting
1. Change the options from the Scanner Properties window.
2. Click Save As.
3. Enter the name for your setting.
4. Click OK.
Your setting is added to the Job Type drop-down list.
Deleting a Job Type Setting
1. Select the setting you want to delete from the Job Type drop-down list.
2. Click Delete.
The setting is deleted from the list.
Using the Image Manager
The Image Manager application provides you with menu commands and tools to edit your scanned
image. Use the following tools to edit the image:
To ol s Name Function
Save Saves the image.
Undo Cancels your last action.
Redo Restores the action you canceled.
Scroll Allows you to scroll through the image.
Crop Crops the selected image area.
Zoom Out Zooms the image out.
Zoom In Zooms the image in.
Scale Allows you to scale the image size; you can enter the size manually, or
set the rate to scale proportionally, vertically, or horizontally.
Rotate Allows you to rotate the image; you can select the number of degrees
from the drop-down list.
Xerox WorkCentre 3315DN/3325DN/3325DNI
User Guide
61
Page 62

Linux Scanning
To ol s Name Function
Flip Allows you to flip the image vertically or horizontally.
Effect Allows you to adjust the brightness or contrast of the image, or to invert
the image.
Properties Shows the properties of the image.
For further details about the Image Manager application, refer to the on screen help.
62
Xerox WorkCentre 3315DN/3325DN/3325DNI
User Guide
Page 63

E-mailing with your machine lets you turn pictures and text into digital files that can be sent to an
e-mail address. You can scan the originals and e-mail the scanned image to several destinations from
the machine by e-mail.
This chapter includes:
• E-mail Procedure on page 64
• E-mail Options on page 68
• Address Book on page 70
• Smart Key Addresses on page 71
4
Xerox WorkCentre 3315DN/3325DN/3325DNI
User Guide
63
Page 64

E-mail Procedure
E-mail Procedure
If E-mail has been enabled, an electronic file can be created from a hard copy original. The electronic
file can be e-mailed to a specified address.
Note: Refer to the System Administrator Guide for instructions on enabling E-mail.
This section describes the basic procedure for e-mailing. Follow the steps below.
• Loading Documents on page 64
• Enter the E-mail Address on page 65
• Select the Features on page 66
• Start the Job on page 66
• Check the Job Status on page 67
• Stop the E-mail Job on page 67
Note: Some options may be unavailable depending on your machine configuration.
If an authentication feature is enabled, you may need an account before using the machine. To get an
account, or for more information, contact the System Administrator.
Loading Documents
Documents can be loaded either into the automatic document feeder or onto the document glass.
Automatic Document Feeder
The automatic document feeder can hold a maximum of 50 originals of 20 lb (80 g/m²) thickness.
1. Load documents to be scanned face up in the input tray
of the automatic document feeder with the top of the
document to the left of the tray.
2. Move the document guide to just touch both sides of the
document.
64
Xerox WorkCentre 3315DN/3325DN/3325DNI
User Guide
Page 65

E-mail Procedure
.com
Document Glass
The document glass can be used for oversized, torn or damaged originals and for books and
magazines.
1. Open the automatic document feeder and place single
documents face down on the document glass aligned
with the rear left corner.
2. The default document size is 8.5 x 11” or A4. For other
sized documents, change the Original Size option. Refer
to E-mail Options on page 68 for further information.
Note: Documents are only scanned once even when
several copies are selected.
Enter the E-mail Address
1. Press the E-mail button on the control panel.
If Authentication is enabled, enter your Login ID
and Password (if required).
2. When Enter From Address: appears, enter the
sender’s e-mail address and press OK.
If Send to Myself? appears, press the left/right
arrows to highlight Yes or No and press OK.
3. When Enter Destination Addresses: appears,
enter the recipient’s e-mail address and press
OK.
•Use the .com button to add commonly used
address text to the e-mail address, for
example .com or @yourdomainname.com.
Press the .com key repeatedly until the text
required is displayed and press OK. The text
is added to the address. The Smart Key text
can be customized using CentreWare
Internet Services, refer to Smart Key
Addresses on page 71 for instructions.
• E-mail addresses can also be added using
the Address Book, refer to Address Book on page 70 for instructions.
• Press the down arrow and enter additional e-mail addresses if required and press OK.
4. If File Format appears, highlight the file format required and press OK.
5. Enter an e-mail subject and press OK.
Xerox WorkCentre 3315DN/3325DN/3325DNI
User Guide
65
Page 66

E-mail Procedure
6. When Ready to E-mail appears you can add or edit the recipient list, press Menu to select
additional features or press Start to scan your originals.
• To add additional recipients, highlight Add Another Address and enter the address required.
• To edit or delete recipients, use the up/down arrows to highlight the address requiring editing
or deleting and press OK. Use the left arrow key to delete characters and then edit the
address. To delete the address, press the down arrow key to highlight Delete and select OK.
Select the Features
Various features can be selected for your e-mail job. The most common features are selected from the
control panel. Once you have made a selection, press Back to return to the Ready screen.
1. The following features are available through the Menu button:
Note: Some of the following options may be unavailable depending on your machine
configuration.
Original Size Use to set the size of the image being scanned.
Original Type Used to improve the image quality by selecting the document type for
the originals.
Resolution Sets the image resolution. A higher resolution increases the file size.
Output Color Sets the color mode of the scanned image.
Lighten/Darken Provides manual control to adjust the lightness or darkness of the
scanned images.
Contrast Use to increase or decrease the contrast between black and white
images.
2. Press the up/down arrows until the feature you want highlights and press OK. Select the setting
required and press OK.
For information about each of the options refer to E-mail Options on page 68.
Start the Job
1. Press the Start button.
The images are scanned and sent to the e-mail address or addresses entered.
66
Xerox WorkCentre 3315DN/3325DN/3325DNI
User Guide
Page 67

Check the Job Status
1. Press the Job Status button on the control panel
to display job status information.
2. A list of Active Jobs or Saved Jobs is displayed.
Select your job using the up/down arrows and
press OK.
3. The following Job Options are available:
For active jobs:
• Release
•Cancel
For save d jobs:
•Print
• Delete
Stop the E-mail Job
Follow the steps below to cancel an active e-mail job.
1. Press the Stop button on the control panel.
E-mail Procedure
Follow the steps below to cancel a queued e-mail job.
1. Press the Job Status button on the control panel to display the active jobs.
2. Use the up/down arrows to select the job required, press OK.
3. Select Delete and OK.
4. Select Yes to delete the job or No to return to previous screen.
Xerox WorkCentre 3315DN/3325DN/3325DNI
User Guide
67
Page 68
E-mail Options
E-mail Options
Your machine provides the following options to customize your E-mail jobs. Use the Menu button to
access the options. For information about changing the default E-mail settings, refer to E-mail Defaults
on page 163.
Note: Some options may be unavailable depending on your machine configuration.
Feature Description Options
Original Size Allows you to specify the
size of the image to be
scanned.
Original Type The Original Type setting is
used to improve the image
quality by selecting the
document type for the
originals.
Resolution Resolution affects the
appearance of the
scanned image. A higher
resolution produces a
better quality image. A
lower resolution reduces
communication time when
sending the file over the
network.
•A4
•A5
•B5
•Letter
•Legal
•Executive
•Folio
•Oficio
• Te xt : Use for originals containing mostly text.
• Text and Photo: Use for originals with mixed text and
photographs.
• Photo: Use when the originals are photographs.
• 300 dpi: Recommended for high quality text
documents that are to pass through OCR applications.
Also recommended for high quality line art or medium
quality photos and graphics. This is the default
resolution and the best choice in most cases.
• 200 dpi: Recommended for average quality text
documents and line art. Does not produce the best
image quality for photos and graphics.
• 100 dpi: Recommended for lower quality text
documents or if a smaller file size is required.
Output Color Select Output Color to
produce black and white,
grayscale or color output.
68
Xerox WorkCentre 3315DN/3325DN/3325DNI
User Guide
• Color: Use to select color output from your original.
• Grayscale: Use if output is to be in shades of gray.
• Black and White: Use to select black and white
output regardless of the color of your original.
Page 69

Feature Description Options
E-mail Options
File Format File Format determines the
type of file created and
can be temporarily
changed for the current
job. Select the file format
you wish to use for your
scanned image.
Lighten/Darken Adjusts the lightness or
darkness of the output.
• Single-TIFF (Tagged Image File Format): Produces a
graphic file that can be opened by a variety of graphic
software packages across a variety of computer
platforms. A separate file is produced for each image
scanned.
• Multi-TIFF: Produces a single TIFF file containing
several pages of scanned images. A more specialized
software is required to open this type of file format.
• PDF (Portable Document Format): Allows recipients
with the right software to view, print or edit the
electronic file, no matter what their computer
platform.
• JPEG (Joint Photographic Experts Group): Produces
a compressed graphic file that can be opened by a
variety of graphic software packages across a variety
of computer platforms. A separate file is produced for
each image scanned.
• Lighten +1 to +5: Lightens the image in increments to
the lightest setting of Lighten +5; works well with dark
print.
• Normal: Works well with standard typed or printed
originals.
• Darken +1 to +5: Darkens the original in increments
to the darkest setting of Darken +5; works well with
light print.
Contrast Increases or decreases the
contrast between light and
dark areas of the image.
• Less +1 to +5: Decreases the contrast in increments to
the lowest contrast setting of Less +5.
• Normal: No contrast adjustment is made.
• More +1 to +5: Increases the contrast in increments
up to the highest contrast setting of More +5.
Xerox WorkCentre 3315DN/3325DN/3325DNI
User Guide
69
Page 70

Address Book
Address Book
You ca n u se CentreWare Internet Services to set up an Address Book with the e-mail addresses you use
frequently and then easily and quickly enter e-mail addresses by selecting them from the Address Book.
Refer to the System Administrator Guide for detailed instructions on setting up an Address Book.
Searching the Address Book
There are two ways to search for an address in memory. You can either preview the entries sequentially
or search by entering the first letters of the name associated with the address.
1. Press E-mail on the control panel.
2. Enter the Sender Address (From Address) and press OK. The Enter To Addresses field appears.
3. Press the Address Book button on the control panel.
4. Enter a few letters of the name you are searching for. The machine will return matching names.
5. Press the up/down arrows until the name and address you want highlights and press OK.
Printing the Local Address Book
1. Press the Machine Status button on the control panel.
2. Press the up/down arrows to highlight Information Pages and press OK.
3. Press the up/down arrows to highlight Address Book and press OK.
Yo ur Address Book information prints out.
70
Xerox WorkCentre 3315DN/3325DN/3325DNI
User Guide
Page 71

Smart Key Addresses
.com
Smart Key Addresses
The Smart Key addresses enable you to quickly access and select commonly used e-mail address text
from the .com button on the control panel. For example .com or @yourdomainname.com. Up to six
Smart Key addresses can be set up using CentreWare Internet Services. Refer to the System
Administrator Guide for setup instructions.
Using Smart Key Addresses
The Smart Key addresses are selected by pressing the
.com key on the control panel.
When entering the e-mail address, press the .com key
repeatedly until the address text required is displayed
and press OK.
Xerox WorkCentre 3315DN/3325DN/3325DNI
User Guide
71
Page 72

Smart Key Addresses
72
Xerox WorkCentre 3315DN/3325DN/3325DNI
User Guide
Page 73

Fax
This chapter includes:
• Fax Procedur e on page 74
• Fax Op tions on page 78
• Using Fax Send Options on page 80
• Using Fax Forward on page 83
• Using Secure Receive on page 85
• Address Book on page 86
• Fax from PC on page 90
• Receiving Faxes on page 91
5
Xerox WorkCentre 3315DN/3325DN/3325DNI
User Guide
73
Page 74
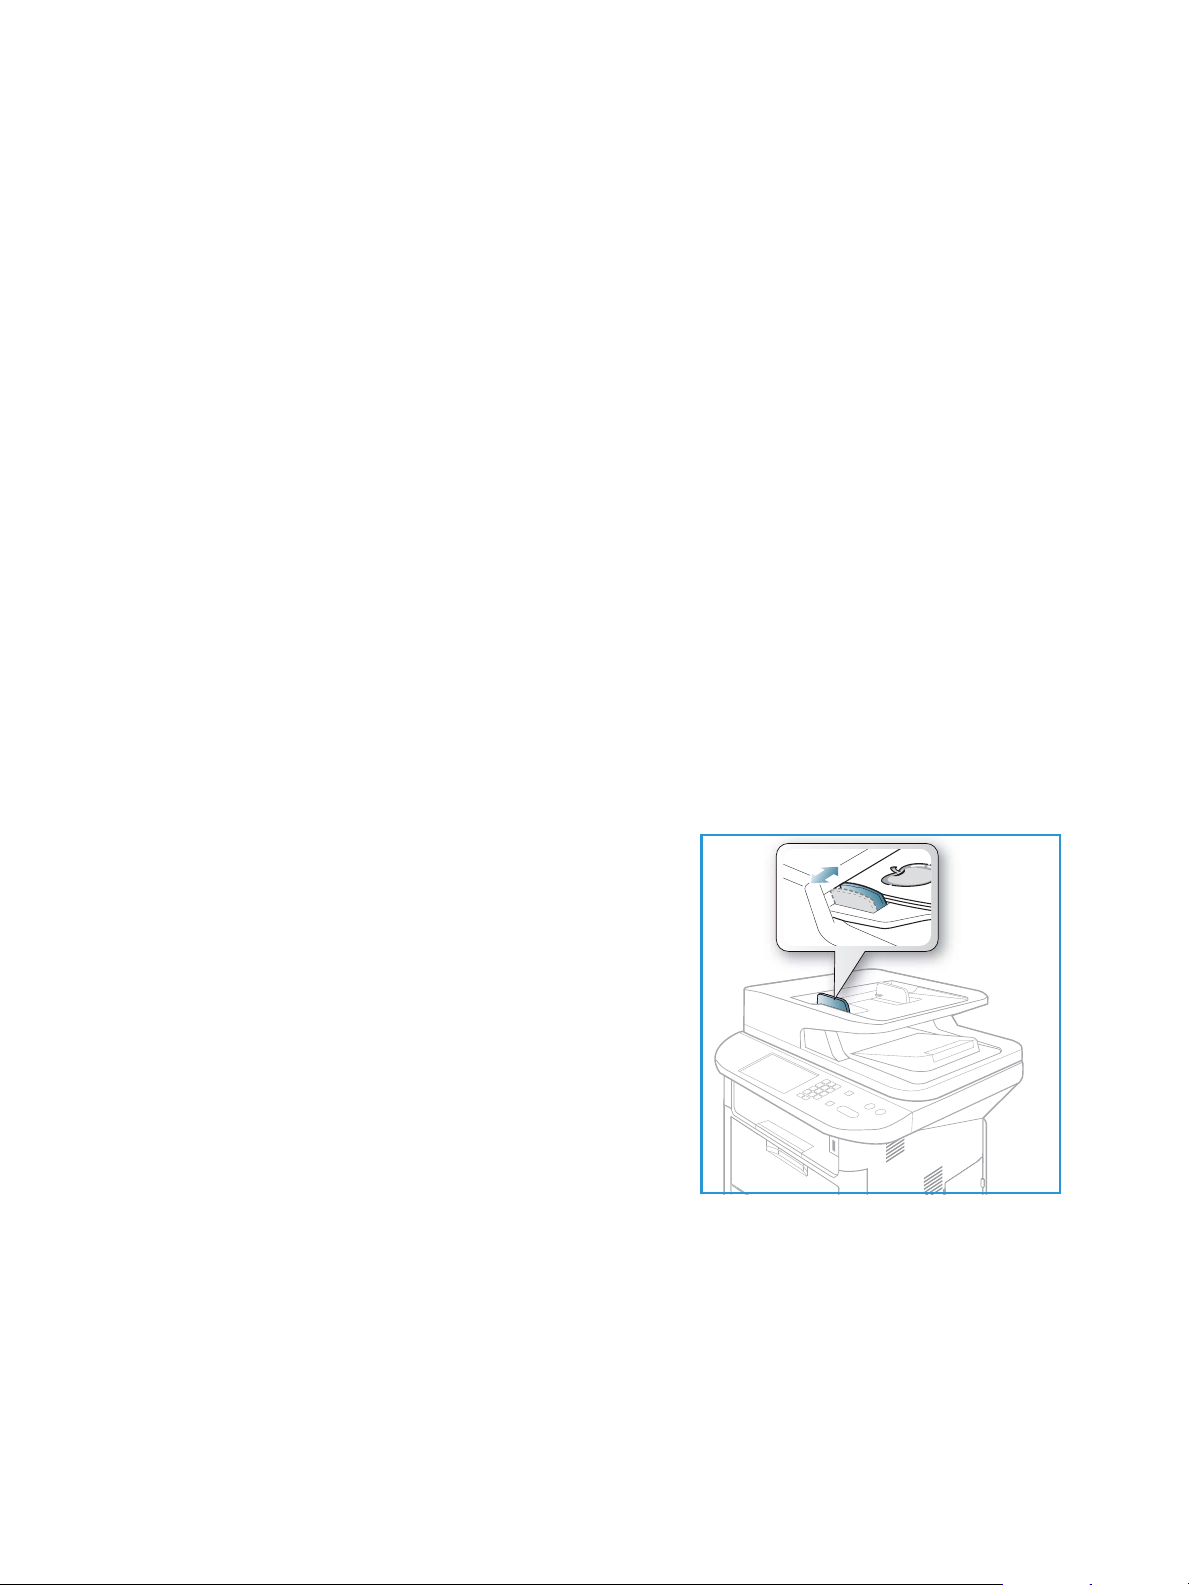
Fax Proc edure
Fax Procedure
This section describes the basic procedure for sending faxes. Follow the steps below.
• Loading Documents on page 74
• Select the Features on page 75
• Enter the Fax Number on page 76
• Start the Job on page 76
• Check the Job Status on page 77
• Stop the Fax Job on page 77
• Fax Confirmation on page 77
If an authentication feature is enabled, you may need an account before using the machine. To get an
account, or for more information, contact the System Administrator.
Note: Refer to the System Administrator Guide for information on setting up the Fax feature.
Loading Documents
Documents can be loaded either into the automatic document feeder or onto the document glass.
Automatic Document Feeder
The automatic document feeder can hold a maximum of 50 originals of 20 lb (80 g/m²) thickness.
1. Load documents to be scanned face up in the input tray
of the automatic document feeder with the top of the
document to the left of the tray.
2. Move the document guide to just touch both sides of the
document.
74
Xerox WorkCentre 3315DN/3325DN/3325DNI
User Guide
Page 75

Fax Proc edure
Document Glass
The document glass can be used for oversized, torn or damaged originals and for books and
magazines.
1. Open the automatic document feeder and place single
documents face down on the document glass aligned
with the rear left corner.
2. The default document size is 8.5 x 11” or A4. For other
sized documents, change the Original Size option. Refer
to Fax Options on page 78 for further information.
Note: Documents are only scanned once even when
several copies are selected.
Select the Features
Various features can be selected for your fax job. Once you have made a selection, press Back to return
to the Ready screen.
1. The following features are available through the Menu button.
Lighten/Darken This provides manual control to adjust the lightness or darkness of the
scanned images.
Contrast Increases or decreases the contrast between light and dark areas of the
image.
Resolution A higher resolution produces better quality for photos. A lower resolution
reduces communication time.
Original Size This option allows you to specify the size of the image to be scanned.
Multi Send You can use this feature to send a fax to multiple locations.
Delay Send Use to set your machine to send a fax at a later time.
Priority Send Use when a high priority fax need to be sent ahead of reserved
operations.
For ward You can set the machine to forward a received or sent fax to another fax,
e-mail or server destination.
Secure Receive Use to restrict printing of received faxes when the machine is
unattended.
Add Page Use to add additional documents to a delayed fax job which is saved in
memory.
Xerox WorkCentre 3315DN/3325DN/3325DNI
User Guide
75
Page 76
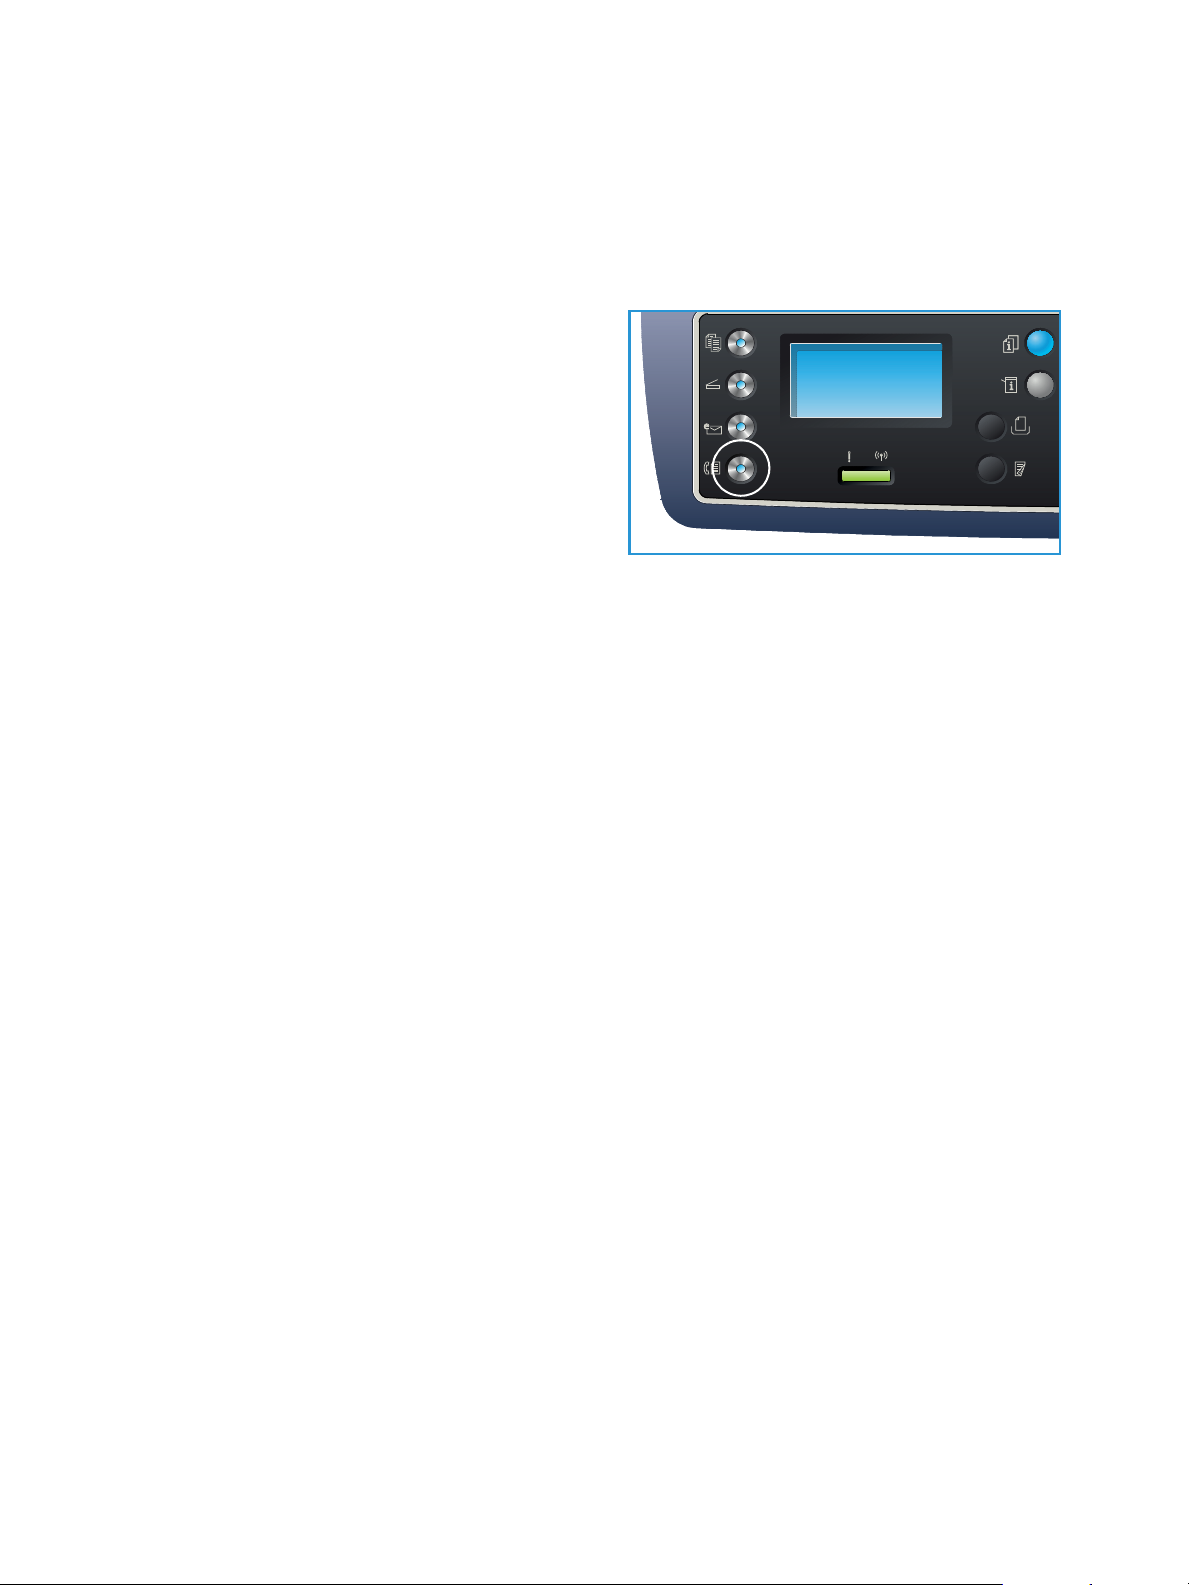
Fax Proc edure
2. Press the up/down arrows until the feature you want highlights and press OK. Select the setting
required and press OK.
For more information about each of the options refer to Fax Options on page 78.
Enter the Fax Number
1. Press the Fax button on the control panel.
2. Enter the recipient’s fax number by:
• Keypad Dial: Use this option to enter the
number using the keypad. For instructions
refer to Using the Keypad on page 13.
• Manual Dial: Allows you to get the dial tone
before entering the fax number.
• Pause / Redial: Allows you to send to the
last number or list of numbers dialed. For
information about entering a Pause within the number, refer to Inserting a Pause on page 14.
• Speed Dial: For a one-digit (0-9) speed dial number, press and hold the corresponding digit
button on the keypad. For a two or three-digit speed dial number, press the first digit
button(s) and then hold down the last digit button.
• Address Book: Select the Address Book button to access the address book and select a
Speed Dial or Group Dial entry to add to the recipient list. Refer to Address Book on page 86
for instructions.
Start the Job
1. Press the Start button.
2. If using the document glass to scan 2 sided originals, the machine displays a message when ready
to scan side 2. Continue scanning until all sides have been scanned.
The machine scans the originals, dials the entered number and attempts to connect with the
remote fax machine. Once connected, the machine sends the fax job.
If the number you have dialed is busy or there is no answer when you send a fax, the machine
automatically redials the number every three minutes, up to seven times according to the factory
default settings.
3. If the display shows Retry Redial? press OK to redial the number without waiting. To cancel the
automatic redialing, press Stop.
Note: To change the time interval between redials and the number of redial attempts, refer to Fax
Setup on page 166.
To print a confirmation or error report, refer to Information Pages on page 25.
76
Xerox WorkCentre 3315DN/3325DN/3325DNI
User Guide
Page 77
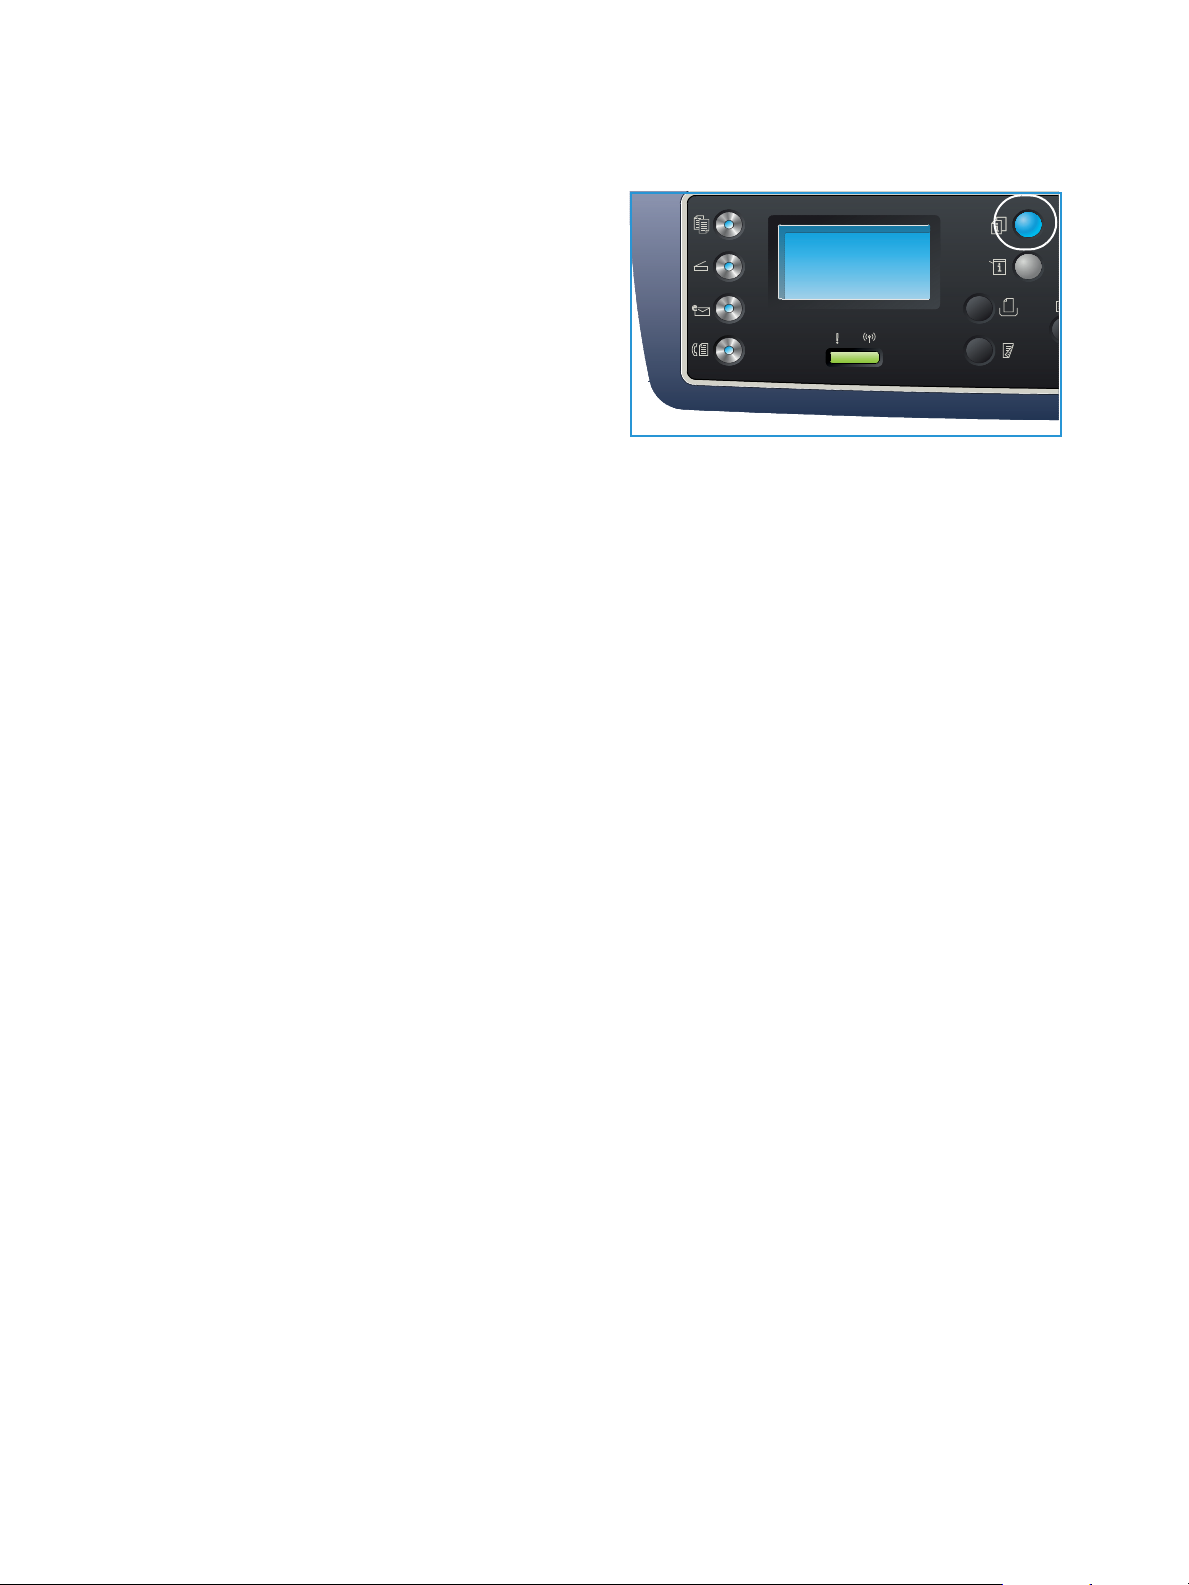
Check the Job Status
1. Press the Job Status button on the control panel
to display job status information.
2. A list of Active Jobs or Saved Jobs is displayed.
Select your job using the up/down arrows and
press OK.
3. The following Job Options are available:
For active jobs:
• Release
•Cancel
For save d jobs:
•Print
• Delete
Stop the Fax Job
Follow the steps below to cancel an active fax job.
1. Press the Stop button on the control panel.
Fax Proc edure
Follow the steps below to cancel a queued fax job.
1. Press the Job Status button on the control panel to display the active jobs.
2. Use the up/down arrows and select the job required, press OK.
3. Select Delete and OK.
4. Select Yes to delete the job or No to return to previous screen.
Fax Confirmation
• When the last page of your original has been sent successfully, the machine beeps and returns to
Ready mode.
• If something goes wrong while sending your fax, an error message appears on the display. For a
list of error messages and their meanings, refer to Fax Proble ms on page 219. If you receive an
error message, press Stop to clear the message and try to send the fax again.
• You can set your machine to print a confirmation report automatically each time sending a fax is
completed. For further details, refer to Fax Setup on page 166.
Xerox WorkCentre 3315DN/3325DN/3325DNI
User Guide
77
Page 78
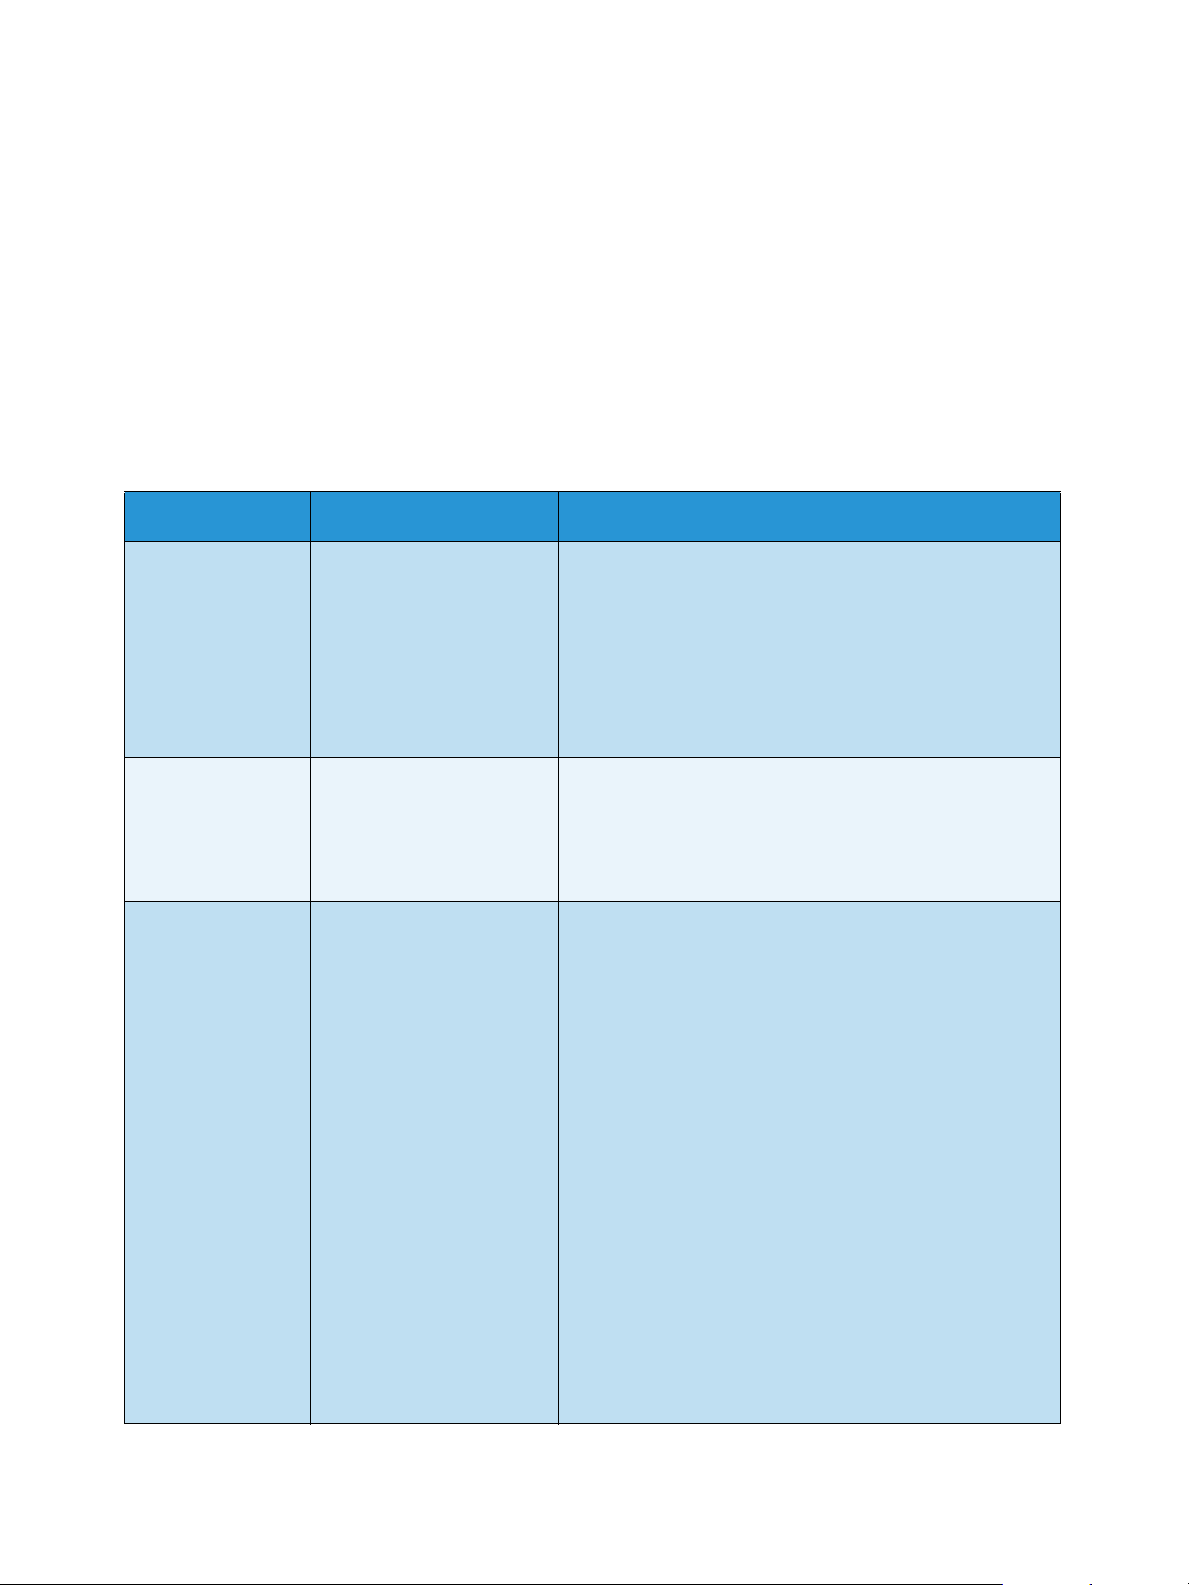
Fax O ption s
Fax Options
Your machine provides the following options to customize your fax jobs. Use the Menu button to
access the options. For information about changing the default Fax settings, refer to Fax S e tup on
page 166.
Notes:
• Some options may be unavailable depending on your machine configuration.
• If you press Stop while setting the fax options, all of the options you have set for the
current fax job will be canceled and return to their default status after the machine
completes the job in progress.
Feature Description Options
Lighten/Darken Adjusts the lightness or
darkness of the output.
Contrast Increases or decreases the
contrast between light and
dark areas of the image.
Resolution Resolution affects the
appearance of the fax at
the receiving fax terminal.
A higher resolution
produces a better quality
image. A lower resolution
reduces communication
time.
• Lighten +1 to +5: Lightens the image in increments to
the lightest setting of Lighten +5; works well with dark
print.
• Normal: Works well with standard typed or printed
originals.
• Darken +1 to +5: Darkens the original in increments
to the darkest setting of Darken +5; works well with
light print.
• Less +1 to +5: Decreases the contrast in increments to
the lowest contrast setting of Less +5.
• Normal: No contrast adjustment is made.
• More +1 to +5: Increases the contrast in increments
up to the highest contrast setting of More +5.
• Standard: Recommended for text documents. It
requires less communication time, but does not
produce the best image quality for graphics and
photos.
• Fine: Recommended for line art and photos. This is
the default resolution and the best choice in most
cases.
• SuperFine: Recommended for use with high quality
photos and graphics.
• Photo Fax: Recommended for originals containing
shades of gray or photographs.
• Color Fax: Recommended for originals with colors.
Sending a color fax is enabled only if the remote fax
machine supports color fax reception and you send
the fax manually. In this mode, memory transmission
is not available.
Note: When your machine is set to Super Fine resolution
and the remote fax machine does not support Super Fine
resolution, the machine transmits using the highest
resolution mode supported.
78
Xerox WorkCentre 3315DN/3325DN/3325DNI
User Guide
Page 79
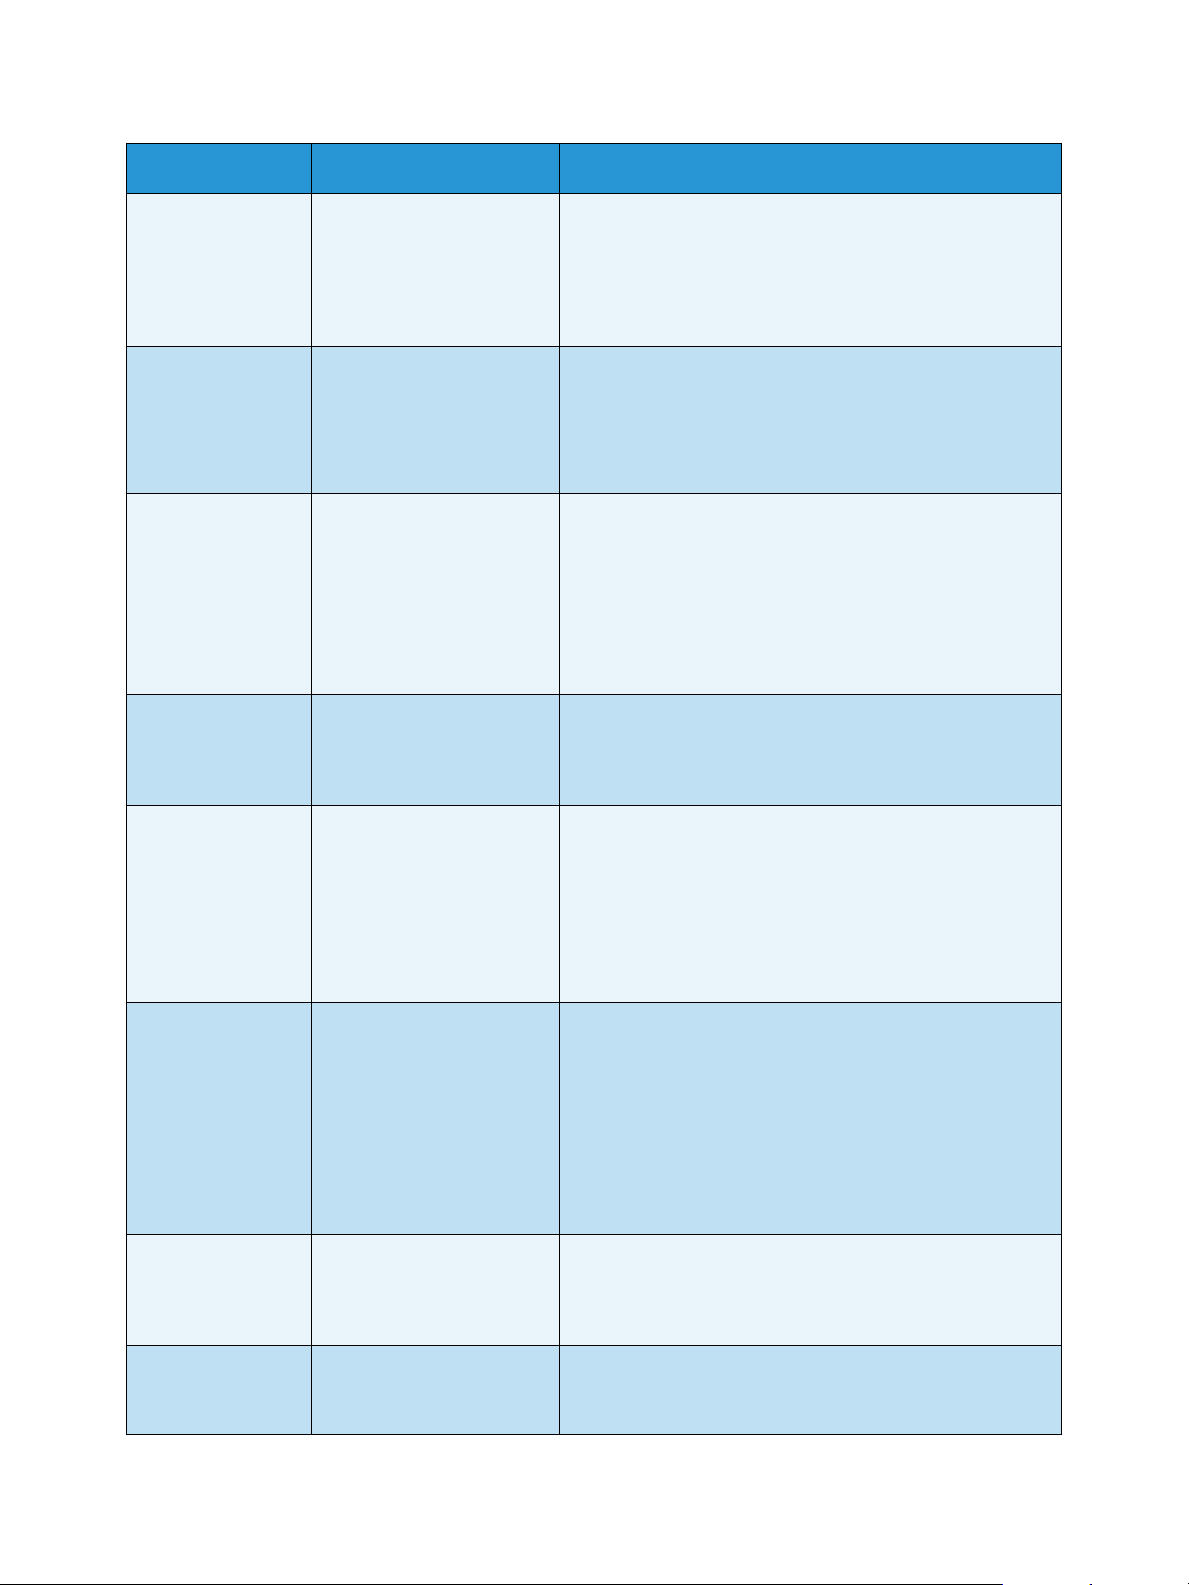
Feature Description Options
Fax Options
Original Size Allows you to specify the
size of the image to be
scanned.
Multi Send You can use the Multi Send
feature to send a fax to
multiple locations.
Delay Send You can set your machine
to send a fax at a later
time when you will not be
present.
Priority Send This function is used when
a high priority fax needs to
be sent ahead of reserved
operations.
• A4
• A5
• B5
• Letter
•Executive
• Fax 1: Use this option to enter the first fax number.
• Fax 2: Use this option to enter the second fax number.
• Another Number?: Use this option to enter additional
fax numb ers.
Refer to Multi Send on page 80 for instructions.
• Fax 1: Use this option to enter the first fax number.
• Another Number?: Use this option to enter additional
fax numb ers.
• Job Name: Enter a name for the job using the keypad.
• Start Time: Enter a time for the fax to be transmitted
using the keypad.
Refer to Delay Send on page 80 for instructions.
• Fax : Use this option to enter the fax number.
• Job Name: Enter a name for the job using the keypad.
Refer to Priority Send on page 82 for instructions.
Forward You can set the machine to
forward a received or sent
fax to an othe r fax, e-mail
or server destination.
Secure Receive You may need to prevent
your received faxes from
being accessed by
unauthorized people. In
Secure Receive mode, all
incoming faxes go into
memory and can be
printed by entering a
4-digit password.
Add Page Use to add additional
documents to a Delayed
Fax job which is saved in
memory.
Cancel Job You can cancel a Delayed
Fax job which is saved in
memory.
• Fax : Use this option to forward a fax to another fax
number.
• E-mail: Use this option to forward faxes to an e-mail
address.
• Server: Use this option to forward faxes to a specified
server location.
Refer to Using Fax Forward on page 83 for instructions.
• On: Use this option to activate Secure Receive.
• Off: Use this option to deactivate Secure Receive.
• Print: Use this option to print the faxes received into
memory. If a 4-digit password was set when
activating Secure Receive, this password will be
required to print the faxes.
Refer to Using Secure Receive on page 85 for instructions.
Refer to Adding Documents to a Delayed Fax on page 81
for instructions.
Refer to Canceling a Delayed Fax on page 81 for
instructions.
Xerox WorkCentre 3315DN/3325DN/3325DNI
User Guide
79
Page 80

Using Fax Send Options
Using Fax Send Options
Note: Some options may be unavailable depending on your machine configuration.
Multi Send
You can use the Multi Send feature to send a fax to multiple locations. The fax is automatically stored
in memory and then transmitted from memory to the fax destinations entered. After transmission, the
job is automatically erased from memory. You cannot send a color fax using this feature.
1. Press Fax on the control panel.
2. Press Menu on the control panel.
3. Press the up/down arrows to highlight Multi Send and press OK.
4. Enter the number of the first receiving fax machine and press OK.
You ca n s elec t speed dial numbers or a group dial number using the Address book button. For
details, see Address Book on page 86.
Note: Once you have entered a group dial number, you cannot enter any more group dial
numbers.
5. Enter the second fax number and press OK.
The display asks you to enter another fax number. To enter more fax numbers, press OK when Yes
is highlighted and repeat the steps. You can add up to 10 destinations.
When you have finished entering fax numbers, press the left/right arrows to select No at the
Another No.? prompt and press OK.
6. Load originals and press Start to start storing the scanned original data into memory.
If using the document glass to scan more than one original, select Ye s to add another page. Load
another original and press OK.
When you have finished, select No at the Another Page? prompt.
The machine sends the fax to the numbers you entered in the order in which you entered them.
Delay Send
You can set your machine to send a fax at a later time when you will not be present. Use this feature to
transmit faxes during off-peak hours or when sending to another country or time zone. You cannot
send a color fax using this feature.
1. Press Fax on the control panel.
2. Press Menu on the control panel.
3. Press the up/down arrows to highlight Delay Send and press OK.
4. Enter the number of the receiving fax machine and press OK.
You ca n s elec t speed dial numbers or a group dial number by pressing the Address book button.
For details, see Address Book on page 86.
80
Xerox WorkCentre 3315DN/3325DN/3325DNI
User Guide
Page 81

Using Fax Send Options
The display asks you to enter another fax number. To enter more fax numbers, press OK when Yes
highlights and repeat the steps. You can add up to 10 destinations.
Note: Once you have entered a group dial number, you cannot enter any more group dial
numbers.
When you have finished entering fax numbers, press the left/right arrows to select No at the
Another No.? prompt and press OK.
5. Enter the Job Name you want and press OK. If you do not want to assign a name, skip this step.
For details on how to enter alphanumeric characters, refer to Using the Keypad on page 13.
6. Enter the time using the number keypad and press OK.
If you set a time earlier than the current time, the fax will be sent at that time on the following
day.
7. Load originals and press Start to start storing the scanned original data into memory.
If using the document glass to scan more than one original, select Ye s to add another page. Load
another original and press OK.
When you have finished, select No at the Another Page? prompt.
The machine returns to Ready mode. The display reminds you that you are in Ready mode and that a
delayed fax is set.
Adding Documents to a Delayed Fax
You can add additional documents to the Delayed Fax job which is saved in memory.
1. Load the originals to be added and select the fax settings required.
2. Press Fax on the control panel.
3. Press Menu on the control panel.
4. Press the up/down arrows to highlight Add Page and press OK.
5. Press the up/down arrows until the fax job you want appears and press OK.
6. Press Start.
If adding more than one original, select Yes at the Another Page? prompt. Load another original
and press OK.
When you have finished, select No at the Another Page? prompt.
Canceling a Delayed Fax
You can cancel a Delayed Fax job which is saved in memory.
1. Press Fax on the control panel.
2. Press Menu on the control panel.
3. Press the up/down arrows to highlight Cancel Job and press OK.
4. Press the up/down arrows until the fax job you want appears and press OK.
Press OK when Yes highlights to confirm and cancel the job.
The selected fax is deleted from memory.
Xerox WorkCentre 3315DN/3325DN/3325DNI
User Guide
81
Page 82

Using Fax Send Options
Priority Send
This function is used when a high priority fax needs to be sent ahead of other fax jobs in memory. The
original is scanned into memory and immediately transmitted when the current operation is finished.
In addition, a Priority Send fax will interrupt a Multi Send fax being sent. The fax is interrupted between
destinations, for example after the transmission to destination A ends and before the transmission to
destination B begins, or between redial attempts.
1. Press Fax on the control panel.
2. Press Menu on the control panel.
3. Press the up/down arrows to highlight Priority Send and press OK.
4. Enter the number of the receiving fax machine and press OK.
You ca n s elec t speed dial numbers or a group dial number using the Address book button. For
details, see Address Book on page 86.
5. Enter the job name you want and press OK. If you do not want to assign a name, skip this step.
For details on how to enter alphanumeric characters, refer to Using the Keypad on page 13.
6. Load originals and press Start.
If an original is placed on the document glass, select Yes at the Another Page? prompt. Load
another original and press OK.
When you have finished, select No at the Another Page? prompt.
The machine scans and sends the fax to the destinations entered.
82
Xerox WorkCentre 3315DN/3325DN/3325DNI
User Guide
Page 83

Using Fax Forward
Using Fax Forward
You can set the machine to forward a received or sent fax to another fax, e-mail or server destination. If
you are out of the office but have to receive the fax, this feature may be useful.
When you forward a fax to an e-mail address or an FTP or SMB server, you must use CentreWare
Internet Services to set up the destination details. You can forward a fax to a total of five destinations.
Refer to the System Administrator Guide for instructions.
Note: Some options may be unavailable depending on your machine configuration.
Forwarding Sent Faxes
You can set the machine to forward a copy of every fax sent to another fax number, an e-mail address
or a server location. A copy of all sent faxes will continue to be forwarded to the destination set until
the option is deactivated. To deactivate Fax Forward, refer to Deactivating Fax Forward on page 84.
1. Press Fax on the control panel.
2. Press Menu on the control panel.
3. Press the up/down arrows to highlight Forward and press OK.
4. Select the option required:
Fax
a. Press the up/down arrows to highlight Fax and press OK.
b. Press the up/down arrows to highlight Send Forward and press OK.
c. Press the up/down arrows to highlight On and press OK.
d. Enter the fax number to which faxes are to be sent and press OK.
E-mail
a. Press the up/down arrows to highlight E-mail and press OK.
b. Press the up/down arrows to highlight Send Forward and press OK.
c. Press the up/down arrows to highlight On and press OK.
d. Enter your e-mail address and press OK.
e. Enter the e-mail address to which faxes are to be sent and press OK.
Server
a. Press the up/down arrows to highlight Server and press OK.
b. Press the up/down arrows to highlight Send Forward and press OK.
c. Press the up/down arrows to highlight On and press OK.
Forwarding Received Faxes
You can forward faxes received from remote fax machines to another fax number, an e-mail address or
a server location. When the machine receives a fax, it is stored in memory and then sent to the
destination you have set. All received faxes will continue to be forwarded to the destination set until
the option is deactivated. To deactivate Fax Forward, refer to Deactivating Fax Forward on page 84.
1. Press Fax on the control panel.
Xerox WorkCentre 3315DN/3325DN/3325DNI
User Guide
83
Page 84

Usi ng Fax Fo rward
2. Press Menu on the control panel.
3. Press the up/down arrows to highlight Forward and press OK.
4. Select the option required:
Fax
a. Press the up/down arrows to highlight Fax and press OK.
b. Press the up/down arrows to highlight Receive Forward and press OK.
c. Press the up/down arrows to highlight On and press OK.
d. Enter the fax number to which faxes are to be sent and press OK.
E-mail
a. Press the up/down arrows to highlight E-mail and press OK.
b. Press the up/down arrows to highlight Receive Forward and press OK.
c. Press the up/down arrows to highlight On and press OK.
d. Enter your e-mail address and press OK.
e. Enter the e-mail address to which faxes are to be sent and press OK.
Server
a. Press the up/down arrows to highlight Server and press OK.
b. Press the up/down arrows to highlight Receive Forward and press OK.
c. Press the up/down arrows to highlight On and press OK.
Deactivating Fax Forward
Follow the steps below to deactivate the Fax Forward option.
1. Press Fax on the control panel.
2. Press Menu on the control panel.
3. Press the up/down arrows to highlight Fax Feature and press OK.
4. Press the up/down arrows to highlight Forward and press OK.
5. Press the up/down arrows to highlight Fax, E-mail or Server and press OK.
6. Press the up/down arrows to highlight Send Forward or Receive Forward and press OK.
7. Press the up/down arrows to highlight Off and press OK.
84
Xerox WorkCentre 3315DN/3325DN/3325DNI
User Guide
Page 85

Using Secure Receive
Using Secure Receive
You may need to prevent your received faxes from being accessed by unauthorized people. In secure
receive mode, all incoming faxes go into memory until they are accessed and released for printing. A
4-digit password can be set to prevent faxes being printed by unauthorized users. If Secure Receive
mode is deactivated, any faxes stored in memory are automatically printed.
Note: Some options may be unavailable depending on your machine configuration.
Activating Secure Receive
1. Press Fax on the control panel.
2. Press Menu on the control panel.
3. Press the up/down arrows to highlight Secure Receive and press OK.
4. Press the up/down arrows to highlight On and press OK.
5. Enter the four-digit password you want to use and press OK.
You ca n a ctiva t e secure receive mode without setting a password, but this will not protect your
fax es.
Re-enter the password to confirm it and press OK.
When a fax is received in secure receive mode, your machine stores it in memory and shows Secure
Receive to let you know that a fax has been received.
Deactivating Secure Receive Mode
1. Press Fax on the control panel.
2. Press Menu on the control panel.
3. Press the up/down arrows to highlight Secure Receive and press OK.
4. Press the up/down arrows to highlight Off and press OK.
5. If required, enter the four-digit password and press OK.
The mode is deactivated and the machine prints all faxes stored in memory.
Printing Secure Faxes
1. Press Fax on the control panel.
2. Press Menu on the control panel.
3. Press the up/down arrows to highlight Secure Receive and press OK.
4. Press the up/down arrows to highlight Print and press OK.
5. If required, enter the four-digit password and press OK.
The machine prints all of the faxes stored in memory.
Xerox WorkCentre 3315DN/3325DN/3325DNI
User Guide
85
Page 86

Address Book
Address Book
You can use CentreWare Internet Services to set up an Address Book with the fax numbers you use
frequently and then easily and quickly enter fax numbers by selecting them from the Address Book.
Refer to the System Administrator Guide for detailed instructions on setting up an Address Book.
You can also set up an Address Book at the machine. The address book can store up to 500 entries on
the WorkCentre 3325DN / 3325DNI and up to 200 entries on the WorkCentre 3315DN. You can
include Speed Dial numbers and Group numbers and also print out a list of all the address book entries.
Before beginning to store fax numbers, make sure that your machine is in Fax mode.
Speed Dial Numbers
You can store up to 200 frequently-used fax numbers as speed dial numbers.
Registering a Speed Dial Number
1. Press Fax on the control panel.
2. Press Address Book on the control panel.
3. Press the up/down arrows to highlight New & Edit and press OK.
4. Press the up/down arrows to highlight Speed Dial and press OK.
5. Enter a speed dial number between 1 and 200 and press OK.
If an entry is already stored in the number you choose, a message is displayed. To start over with
another speed dial number, press Back.
6. Enter the name you want and press OK.
For details on how to enter alphanumeric characters, refer to Using the Keypad on page 13.
7. Enter the fax number you want and press OK.
8. Press Stop to return to Ready mode.
Editing Speed Dial Numbers
1. Press Fax on the control panel.
2. Press Address Book on the control panel.
3. Press the up/down arrows to highlight New & Edit and press OK.
4. Press the up/down arrows to highlight Speed Dial and press OK.
5. Enter the speed dial number you want to edit and press OK.
6. Edit the details required:
• Change the name and press OK.
• Change the fax number and press OK.
7. Press Stop to return to Ready mode.
86
Xerox WorkCentre 3315DN/3325DN/3325DNI
User Guide
Page 87

Address Book
Using Speed Dial Numbers
When you are prompted to enter a destination number while sending a fax, enter the speed dial
number representing the stored number you want.
•For a one-digit (0-9) speed dial number, press and hold the corresponding digit button on the
number keypad.
• For a two or three-digit speed dial number, press the first digit button(s) and then hold down the
last digit button.
You can also search through memory for an entry by pressing Address Book. (See Address Book on
page 86.)
Group Dial Numbers
If you frequently send the same document to several destinations, you can group these destinations
and set them under a group dial number. You can then use a group dial number to send a document to
all of the destinations within the group. You can set up to 200 group dial numbers using the
destination’s existing speed dial numbers.
Registering a Group Dial Number
1. Press Fax on the control panel.
2. Press Address Book on the control panel.
3. Press the up/down arrows to highlight New & Edit and press OK.
4. Press the up/down arrows to highlight Group Dial and press OK.
5. Enter a group dial number between 1 and 200 and press OK.
If an entry is already stored in the number you choose, the display shows a message to allow you
to change it.
6. Enter the name you want and press OK.
For details on how to enter alphanumeric characters, refer to Using the Keypad on page 13.
7. Enter the first few letters of the speed dial’s name you want.
8. Press the up/down arrows until the name and number you want highlights and press OK.
9. Press OK when Yes highlights at the Add Another? prompt.
Repeat the steps to add other speed dial numbers into the group.
When you have finished, press the left/right arrows to select No at the Add Another? prompt and
press OK.
10. Press Stop to return to Ready mode.
Editing a Group Dial Number
1. Press Fax on the control panel.
2. Press Address Book on the control panel.
3. Press the up/down arrows to highlight New & Edit and press OK.
4. Press the up/down arrows to highlight Group Dial and press OK.
5. Enter the group dial number you want to edit and press OK.
Xerox WorkCentre 3315DN/3325DN/3325DNI
87
User Guide
Page 88

Address Book
6. Enter the name you want to edit and press OK.
7. Enter the first few letters of the speed dial name you want to add or delete.
8. Press the up/down arrows until the name and number you want highlights and press OK.
If you entered a new speed dial number, Add? appears.
If you enter a speed dial number stored in the group, Delete? appears.
Press OK to add or delete the number.
9. Press OK when Yes highlights to add or delete more numbers and repeat the steps.
When you have finished, press the left/right arrows to select No at the Another Number? and
press OK.
10. Press Stop to return to Ready mode.
Using Group Dial Numbers
To u s e a group dial entry, you need to search for and select it from memory.
When you are prompted to enter a fax number while sending a fax, press Address Book. There are two
ways to search for a number in memory. You can either scan from A to Z sequentially, or you can search
by entering the first letters of the name associated with the number.
Searching Sequentially
1. Press Fax on the control panel.
2. Press Address Book on the control panel.
3. Press the up/down arrows to highlight Search & Dial and press OK.
4. Press the up/down arrows to highlight Group Dial and press OK.
5. Press the up/down arrows to highlight All and press OK.
6. Press the up/down arrows until the name and number you want highlights. You can search
upwards or downwards through the entire memory in alphabetical order.
Searching using the Name
1. Press Fax on the control panel.
2. Press Address Book on the control panel.
3. Press the up/down arrows to highlight Search & Dial and press OK.
4. Press the up/down arrows to highlight Group Dial and press OK.
5. Press the up/down arrows to highlight Search ID and press OK.
Enter the first few letters of the name you want.
6. Press the up/down arrows until the group dial’s name and number you want highlights.
Deleting an Address Book Entry
1. Press Fax on the control panel.
2. Press Address Book on the control panel.
3. Press the up/down arrows to highlight Delete and press OK.
4. Press the up/down arrows to highlight Speed Dial or Group Dial and press OK.
5. Press the up/down arrows until the searching method you want highlights and press OK.
88
Xerox WorkCentre 3315DN/3325DN/3325DNI
User Guide
Page 89

Address Book
• Select Search All to search for an entry by scanning through all entries in Address Book.
• Select Search ID to search for an entry by entering the first few letters of the name.
6. Press the up/down arrows until the name you want highlights and press OK.
Or, enter the first letters. Press the up/down arrows until the name you want highlights and press
OK.
7. Press OK when Yes highlights to confirm the deletion.
8. Press Stop to return to Ready mode.
Printing the Address Book
You can check your Address Book settings by printing a list.
1. Press Fax on the control panel.
2. Press Address Book on the control panel.
3. Press the up/down arrows to highlight Print and press OK.
Xerox WorkCentre 3315DN/3325DN/3325DNI
User Guide
89
Page 90

Fax fro m PC
Fax from PC
You can send a fax from your PC without going to the machine. To send a fax from your PC you will
need to install the PC-Fax software and customize the software settings. Refer to the System
Administrator Guide for setup instructions.
To send a fax from the PC:
1. Open the document you want to send.
2. Select Print from the File menu.
The Print window is displayed. It may look
slightly different depending on your application.
3. Select Xerox MFP PC Fax from the Name
drop-down list box.
4. Select OK. The Fax Options screen displays.
5. Select the Add button to add new recipients,
either by directly typing names and fax numbers
or by adding names from the relevant address
book.
6. Select the quality required for the fax - either
Standard or Fine.
7. If you want to add a cover page to your fax,
check the Use Cover Page checkbox and
complete the cover page information fields.
Select the Advanced button to access more
options for the cover page.
8. To see a preview of the fax before it is sent, select
the Preview button.
9. To be notified of the time of the fax delivery,
check the Notify me on delivery checkbox.
10. When all selections have been made, select the Send button to send the fax to all listed recipients.
90
Xerox WorkCentre 3315DN/3325DN/3325DNI
User Guide
Page 91

Receiving Faxes
Receiving Faxes
Manual Receive
There are two methods for receiving a fax manually:
• On Hook Dial: You can receive a fax call by pressing On Hook Dial and then pressing Start when
you hear a fax tone from the remote machine. The machine begins receiving a fax. If a handset is
available you can answer calls using the handset.
To change the number of rings, see Fax Setup on page 166.
• Using an Extension Telephone: This feature works best when you are using an extension
telephone connected to the EXT socket on the back of your machine. You can receive a fax from
someone you are talking to on the extension telephone, without going to the fax machine. When
you receive a call on the extension phone and hear fax tones, press the keys *9* on the extension
phone. The machine receives the fax.
*9* is the remote receive code preset at the factory. The first and the last asterisks are fixed, but
you can change the middle number to whatever you wish. For details about changing the
Start Code
, see Receiving on page 167.
RCV
Using an Answering Machine
To use this mode, you must attach an answering machine to the EXT socket on the back of your
machine. If the caller leaves a message, the answering machine stores the message as it would
normally. If your machine detects a fax tone on the line, it automatically starts to receive the fax.
Notes:
• If you have set your machine to this mode and your answering machine is switched off,
or no answering machine is connected to EXT socket, your machine automatically goes
into Fax mode after a predefined number of rings.
• If your answering machine has a user-selectable ring counter, set the machine to answer
incoming calls within 1 ring.
• If you are in Tel mode when the answering machine is connected to your machine, you
must switch off the answering machine. otherwise, the outgoing message from the
answering machine will interrupt your phone conversation.
Using DRPD Mode
Distinctive Ring is a telephone company service which enables a user to use a single telephone line to
answer several different telephone numbers. The particular number someone uses to call you is
identified by different ringing patterns, which consist of various combinations of long and short ringing
sounds. This feature is often used by answering services who answer telephones for many different
clients and need to know which number someone is calling in on to properly answer the phone.
Using the Distinctive Ring Pattern Detection (DRPD) feature, your fax machine can learn the ring
pattern you designate to be answered by the fax machine. Unless you change it, this ringing pattern
will continue to be recognized and answered as a fax call, and all other ringing patterns will be
Xerox WorkCentre 3315DN/3325DN/3325DNI
User Guide
91
Page 92

Receiving Faxes
forwarded to the extension telephone or answering machine plugged into the EXT socket. You can
easily suspend or change DRPD at any time.
Before using the DRPD option, Distinctive Ring service must be installed on your telephone line by the
telephone company. To set up DRPD, you will need another telephone line at your location, or someone
available to dial your fax number from outside.
For information about setting up DRPD, refer to Setting up DRPD Mode on page 168.
Receiving Faxes in Memory
Since your machine is a multi-tasking device, it can receive faxes while you are making copies or
printing. If you receive a fax while you are copying or printing, your machine stores incoming faxes in
its memory. Then, as soon as you finish copying or printing, the machine automatically prints the fax.
92
Xerox WorkCentre 3315DN/3325DN/3325DNI
User Guide
Page 93

The Xerox WorkCentre 3315DN/3325DN/3325DNI produces high quality prints from electronic
documents. You can access the printer from your computer by installing the appropriate printer driver.
To access the many printer drivers which can be used with your machine, refer to the Drivers CD or
download the latest versions from the Xerox website at www.xerox.com.
This chapter includes:
• Printing using Windows on page 94
• Xerox Easy Printer Manager (EPM) on page 113
• Wireless Setting Program (WorkCentre 3325DNI) on page 114
• SetIP on page 116
• Printing using Macintosh on page 117
• Printing using Linux on page 120
• Printing using Unix on page 122
6
Xerox WorkCentre 3315DN/3325DN/3325DNI
User Guide
93
Page 94

Printing using Windows
Printing using Windows
The following provides an overview of the print procedure and features available when printing using
Windows.
Install Printer Software
You can install the printer software for local printing and network printing. To install the printer
software on the computer, perform the appropriate installation procedure depending on the printer in
use. The printer software also provides the Fax from PC function if selected during the installation
process.
A printer driver is software that lets your computer communicate with your printer. The procedure to
install drivers may differ depending on the operating system you are using. All applications should be
closed on your PC before beginning installation.
You can install the printer software for a local, networked or wireless printer using the typical or custom
method. For further information refer to the System Administrator Guide.
Local Printer
A local printer is a printer directly attached to your computer using a printer cable, such as a USB cable.
If your printer is attached to a network, refer to Networked Printer on page 96.
Note: If the “New Hardware Wizard” window appears during the installation procedure, select
Close or Cancel.
1. Make sure that the printer is connected to your computer and powered on.
2. Insert the supplied CD-ROM into
your CD-ROM drive. The CD-ROM
should automatically run, and an
installation window appear.
• If the installation window
does not appear, select the
Start button and then Run.
Ty pe X:\Setup.exe,
replacing “X” with the letter
which represents your drive
and select OK.
• If you use Windows Vista,
select Start > All programs
> Accessories > Run, and
type X:\Setup.exe. If the
AutoPlay window appears in
Windows Vista, select Run Setup.exe in the Install or run program field, and select Continue
in the User Account Control window.
3. Select Install Software.
94
Xerox WorkCentre 3315DN/3325DN/3325DNI
User Guide
Page 95
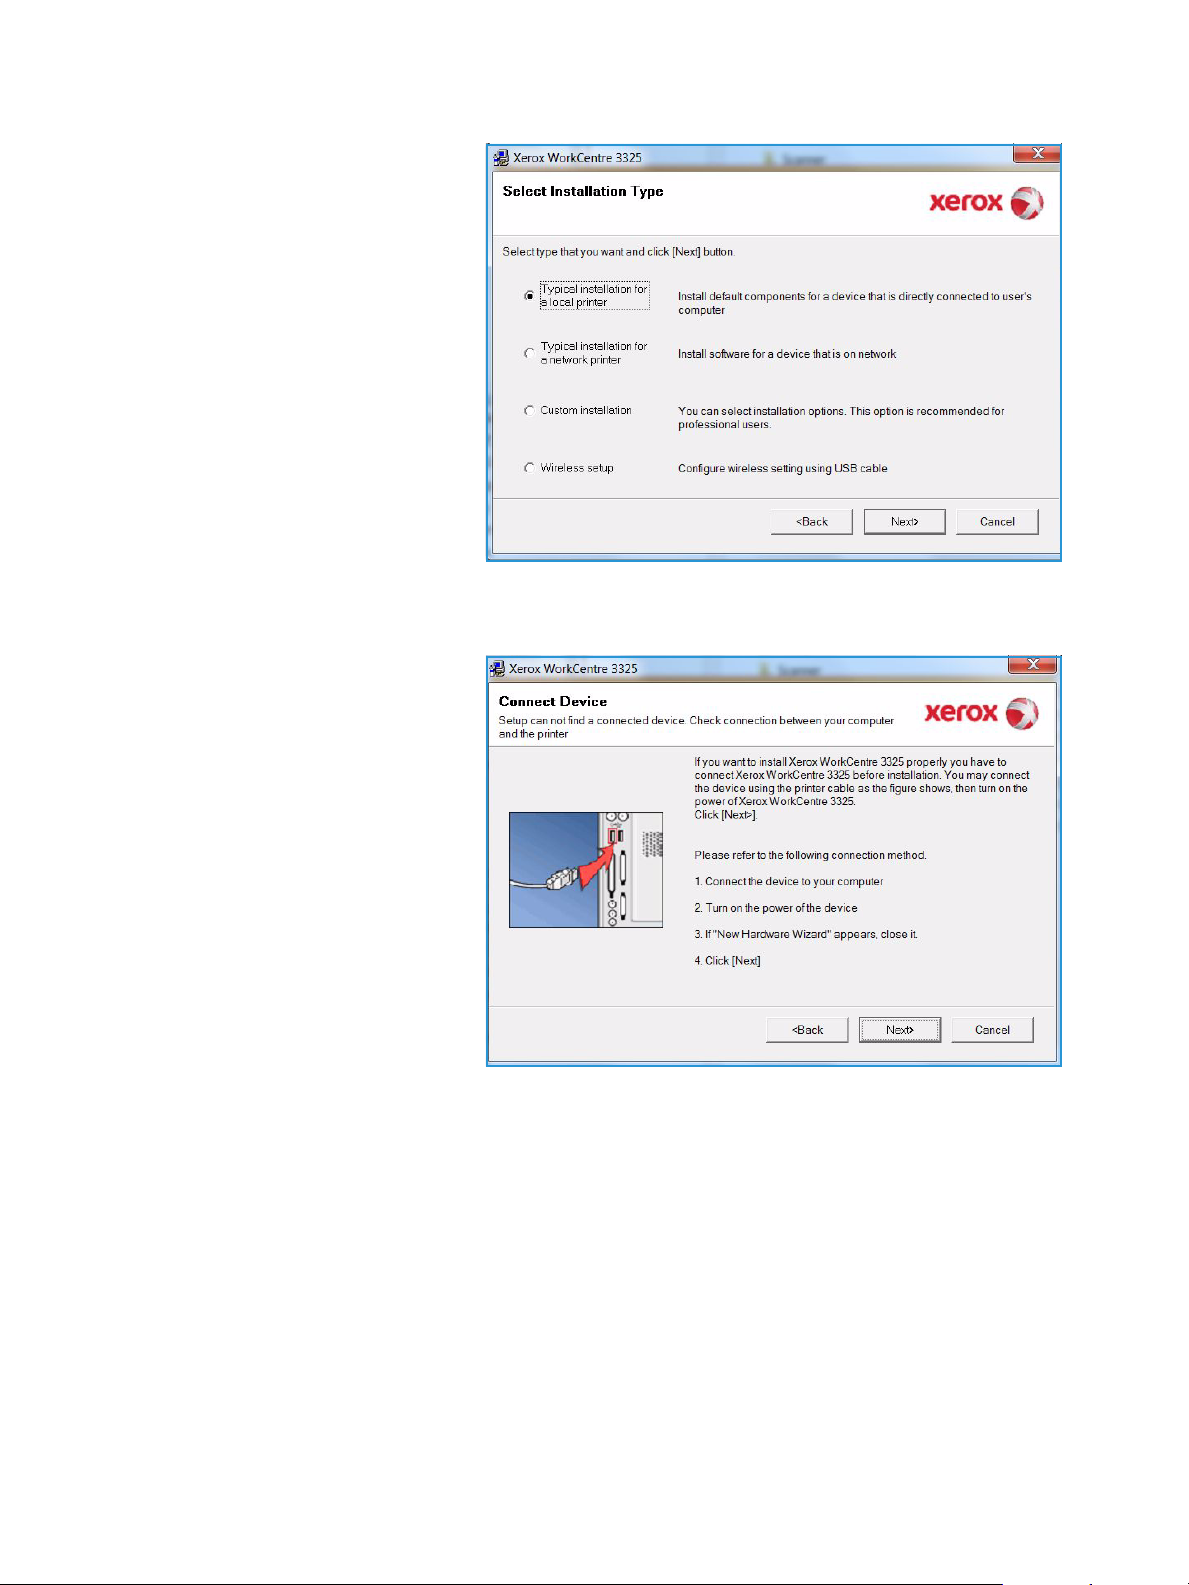
Printing using Windows
4. Select Typical installation for a
local printer and follow the
wizard instructions to install the
local printer.
If your printer is not already connected to the computer, the Connect Device screen will appear.
After connecting the printer, select Next.
Note: If you don’t want to
connect the printer at this time,
select Next and then No on the
following screen. Then the
installation will start and a test
page will not be printed at the
end of the installation.
Xerox WorkCentre 3315DN/3325DN/3325DNI
User Guide
95
Page 96
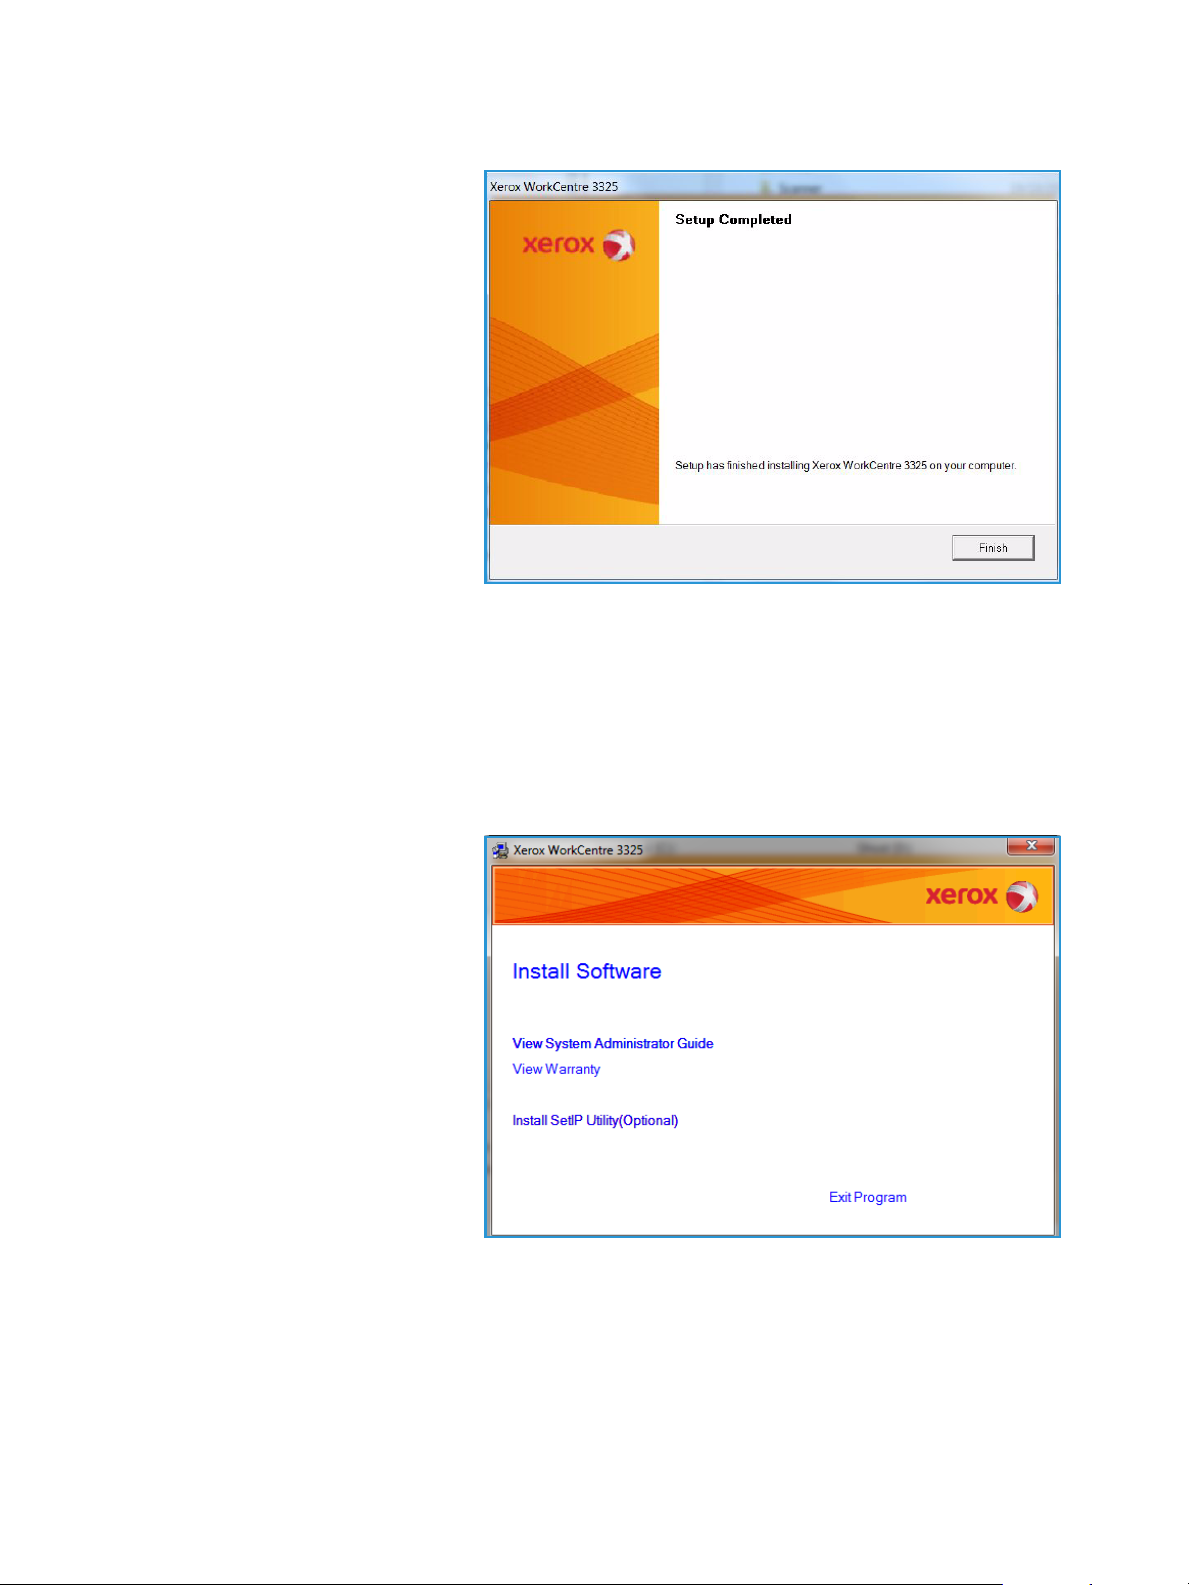
Printing using Windows
5. After the installation is finished,
select Finish.
If your printer is connected to the
computer, a Tes t Pr i nt page will be
printed. If the Te s t Pr i nt operation is
successful, continue on to Print
Procedure on page 102 in this
document. If the print operation
failed, refer to Troubleshooting on
page 188.
Networked Printer
When you connect your printer to a network, you must first configure the TCP/IP settings for the
printer. After you have assigned and verified the TCP/IP settings, you are ready to install the software
on each computer on the network.
1. Make sure that the printer is connected to your network and powered on. For details about
connecting to the network, refer to the System Administrator Guide.
2. Insert the supplied CD-ROM into
your CD-ROM drive.
The CD-ROM should
automatically run, and an
installation window appears.
• If the installation window
does not appear, select the
Start button and then Run.
Ty pe X:\Setup.exe,
replacing “X” with the letter
which represents your drive
and select OK.
• If you use Windows Vista,
select Start > All programs
> Accessories > Run, and
type X:\Setup.exe. If the
AutoPlay window appears in Windows Vista, select Run Setup.exe in Install or run program
field, and select Continue in the User Account Control window.
3. Select Install Software.
96
Xerox WorkCentre 3315DN/3325DN/3325DNI
User Guide
Page 97
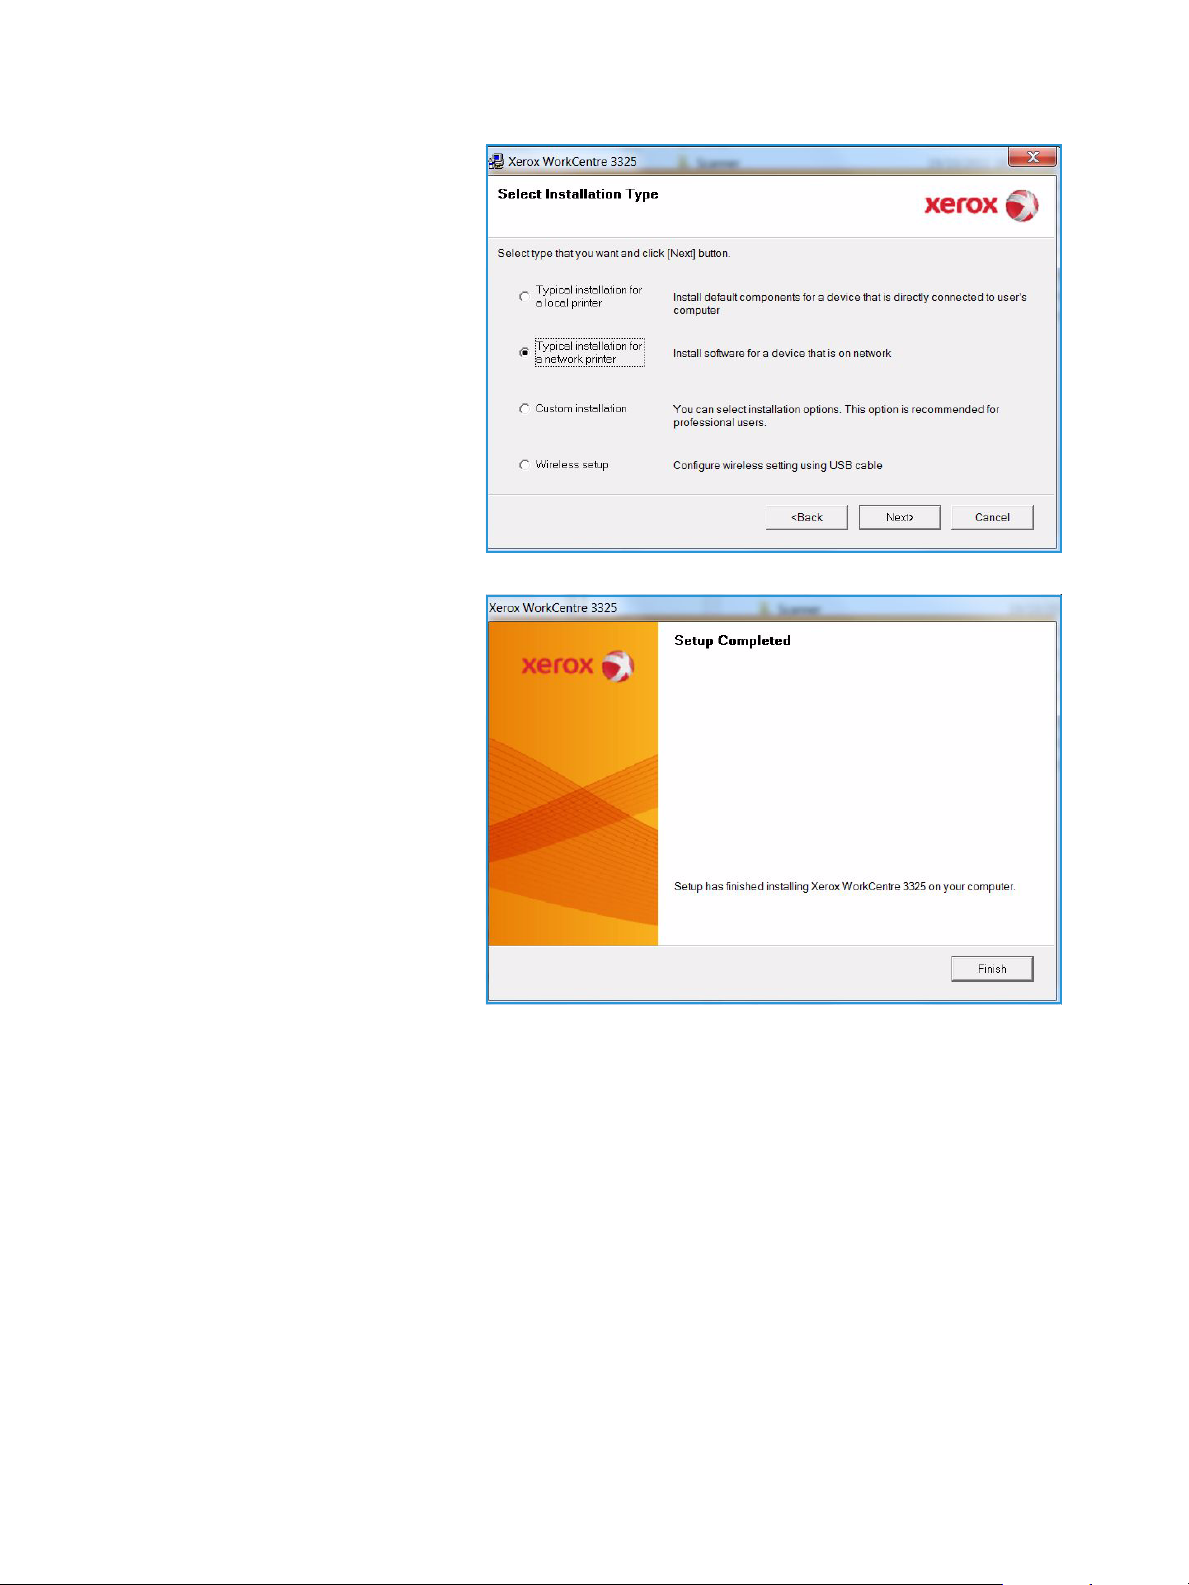
4. Select Typical installation for a
network printer and follow the
wizard instruction to select and
install the printer.
Note: For custom install
instructions, refer to the System
Administrator Guide.
5. After the installation is finished,
select Finish.
Printing using Windows
If your printer is connected to the
network, a Tes t Pri n t page will be
printed. If the Te s t Pr i nt operation is
successful, continue on to Print
Procedure on page 102 in this
document. If the print operation
failed, refer to Troubleshooting on
page 188.
Xerox WorkCentre 3315DN/3325DN/3325DNI
User Guide
97
Page 98

Printing using Windows
Custom Installation
With the custom installation, you can choose individual components to install.
1. Make sure that the printer is
connected to your computer and
powered on.
2. Insert the supplied CD-ROM into
your CD-ROM drive.
The CD-ROM should
automatically run, and an
installation window appears. If
the installation window does not
appear, select Start and then
Run. Type X:\Setup.exe, replacing
"X" with the letter which
represents your drive and select
OK.
If you use Windows Vista, select
Start > All programs > Accessories
> Run, and type X:\Setup.exe.
Note: If the AutoPlay window appears in Windows Vista, select Run Setup.exe in Install or run
program field, and select Continue in the User Account Control window.
3. Select Install Software.
4. Select Custom installation.
5. Select Next.
98
Xerox WorkCentre 3315DN/3325DN/3325DNI
User Guide
Page 99

6. Select your printer and select
Next.
Note: If your printer is not
already connected to the
computer, the following window
will appear.
7. Connect the printer and select
Next.
If you don't want to connect the
printer at this time, select Next,
and then No on the following
screen. Then the installation will
start and a test page will not be
printed at the end of the
installation.
Printing using Windows
Note: The installation window
that appears in this User Guide
may differ depending on the
printer and interface in use.
Xerox WorkCentre 3315DN/3325DN/3325DNI
User Guide
99
Page 100

Printing using Windows
8. Select the components to be
installed and select Next. You
can change the desired
installation folder by selecting
Browse.
9. After the installation is finished,
a window asking you to print a
test page appears. If you choose
to print a test page, select the
checkbox and select Next.
Otherwise, just select Next and
skip to step10.
10. If the test page prints out
correctly, select Yes. If not, select
No to reprint it.
11. Select Finish.
Wireless Printer (WorkCentre 3325DNI)
When you connect your printer to a network, you must first configure the TCP/IP settings for the
printer. After you have assigned and verified the TCP/IP settings, you are ready to install the software
on each computer on the network.
1. Make sure that the printer is connected to your computer with a usb cable and powered on. For
details about connecting to the network, refer to the System Administrator Guide.
100
Xerox WorkCentre 3315DN/3325DN/3325DNI
User Guide
 Loading...