

Xantrex
Truecharge 20+/40+ Amp
Multistage Battery Charger
TC20+
TC40+
Owner’s Guide
Truecharge 20+/40+ Amp
Multistage Battery Charger
Owner’s Guide

About Xantrex
Xantrex Technology Inc. is a world-leading supplier of advanced power electronics and controls with
products from 50 watt mobile units to 1 MW utility-scale systems for wind, solar, batteries, fuel cells,
microturbines, and backup power applications in both grid-conn ected and standalone systems. Xantrex
products include inverters, battery chargers, programmable power supplies, and variable speed drives that
convert, supply, control, clean, and distribute electrical power.
Trademarks
Truecharge is a trademark of Xantrex International. Xantrex is a registered trademark of Xantrex
International.
Other trademarks, registered trademarks, and product names are the property of their respective owners and
are used herein for identification purposes only.
Notice of Copyright
Truecharge 20+/40+ Owner’s Guide © June 2005 Xantrex International.
Disclaimer
UNLESS SPECIFICALLY AGREED TO IN WRITING, XANTREX TECHNOLOGY INC.
(“XANTREX”)
(a) MAKES NO WARRANTY AS TO THE ACCURACY, SUFFICIENCY OR SUITABILITY OF ANY
TECHNICAL OR OTHER INFORMATION PROVIDED IN ITS MANUALS OR OTHER DOCUMENTATION.
(b) ASSUMES NO RESPONSIBILITY OR LIABILITY FOR LOSS OR DAMAGE, WHETHER DIRECT,
INDIRECT, CONSEQUENTIAL OR INCIDENTAL, WHICH MIGHT ARISE OUT OF THE USE OF SUCH
INFORMATION. THE USE OF ANY SUCH INFORMATION WILL BE ENTIRELY AT THE USER’S RISK.
Date and Revision
June 2005, Revision A
Part number
445-0050-01-01
Contact information
Phone: 1-800-670-0707 (toll free in North America)
Phone: 1-360-925-5097 (outside of North America)
Fax: 1-360-925-5143
Email: CustomerService@xantrex.com
Web: www.xantrex.com

About This Guide
Purpose and scope
This guide introduces the Truecharge+ battery chargers, describes their
features, explains how they charge batteries, and provides procedures for their
installation and operation. The guide does not provide details for particular
brands of batteries. Please consult the battery manufacturer for this
information.
This guide provides information for two products, Truecharge 20+ and
Truecharge 40+. Where information is specific to one product, that product is
referred to by name. Where information applies to both products, they are referred
to collectively as Truecharge+.
Audience
The guide is written for anyone intending to install and operate a Truecharge+
battery charger. Xantrex recommends, however, that the product be installed
by a certified technician or electrician.
Organization
This guide contains four chapters and four appendixes.
Chapter 1, “Introduction” introduces and describes features of the Truecharge+
multistage battery chargers.
Chapter 2, “Installing Truechar ge+” lists the materials you receive, provides site
recommendations for installing Truecharge+, and provides the materials and
procedures for its installation.

About This Guide
Chapter 3, “Operation” provides background information for charging
batteries with Truecharge+ and procedures for charging and for
equalizing batteries. Chapter 3 also expla i ns how to calculate charging
times, how generators affect Truecharge+ and explains how the front
panel indicator lights are interpreted.
Chapter 4, “Maintenance and Troubleshooting” provides information for
maintaining and troubleshooting Truecharge+.
Appendix A “Specifications” contains the Truecharge+ physical,
electrical, AC input, and protection feature specifications.
Appendix B “Battery Charging” describes the Truecharge+ multistage
charging algorithm.
Appendix C “Battery Maintenance” contains procedures for maintaining
the battery enclosure, battery terminals and lugs, and battery cables. It
also provides a list of the clothing, tools, equipment, and supplies you
should have before you begin battery maintenance.
Appendix D “Product and System Information” contains the Xantrex
warranty for your product and return instructions. It also contains a place
for you to record the serial number and date of purchase and other details
of your battery charger.
iv

Contents
Important Safety Instructions
Explosive gas precautions - - - - - - - - - - - - - - - - - - - - - - - - - - - - - - - - - - - - - 1–x
Precautions When Working With Batteries - - - - - - - - - - - - - - - - - - - - - - - - - 1–x
1Introduction
Truecharge+ Features- - - - - - - - - - - - - - - - - - - - - - - - - - - - - - - - - - - - - - - - 1–2
20/40 Amp Continuous Rating - - - - - - - - - - - - - - - - - - - - - - - - - - - - - - - - 1–2
Simultaneous Three-Battery Bank Charging - - - - - - - - - - - - - - - - - - - - - - - 1–2
Wide Voltage Range Operation - - - - - - - - - - - - - - - - - - - - - - - - - - - - - - - - 1–2
Selector Switches - - - - - - - - - - - - - - - - - - - - - - - - - - - - - - - - - - - - - - - - - 1–3
Extensive Protection Features - - - - - - - - - - - - - - - - - - - - - - - - - - - - - - - - - 1–3
Isolated Design - - - - - - - - - - - - - - - - - - - - - - - - - - - - - - - - - - - - - - - - - - - 1–3
Fixed Voltage Mode - - - - - - - - - - - - - - - - - - - - - - - - - - - - - - - - - - - - - - - 1–4
Optional Accessories - - - - - - - - - - - - - - - - - - - - - - - - - - - - - - - - - - - - - - - 1–4
Indicator Lights and Settings on the Front Panel - - - - - - - - - - - - - - - - - - - - - - 1–4
How Truecharge+ Works - - - - - - - - - - - - - - - - - - - - - - - - - - - - - - - - - - - - - 1–6
2 Installing Truecharge+
Materials List - - - - - - - - - - - - - - - - - - - - - - - - - - - - - - - - - - - - - - - - - - - - - 2–2
Preparing for Installation- - - - - - - - - - - - - - - - - - - - - - - - - - - - - - - - - - - - - - 2–2
Location - - - - - - - - - - - - - - - - - - - - - - - - - - - - - - - - - - - - - - - - - - - - - - - 2–3
Circuits - - - - - - - - - - - - - - - - - - - - - - - - - - - - - - - - - - - - - - - - - - - - - - - - 2–3
Wiring Requirements- - - - - - - - - - - - - - - - - - - - - - - - - - - - - - - - - - - - - - - 2–5
DC Wiring - - - - - - - - - - - - - - - - - - - - - - - - - - - - - - - - - - - - - - - - - - - - -2–5
AC Wiring - - - - - - - - - - - - - - - - - - - - - - - - - - - - - - - - - - - - - - - - - - - - -2–6
Tools- - - - - - - - - - - - - - - - - - - - - - - - - - - - - - - - - - - - - - - - - - - - - - - - - - 2–7
Materials - - - - - - - - - - - - - - - - - - - - - - - - - - - - - - - - - - - - - - - - - - - - - - - 2–7
Installing Truecharge+ - - - - - - - - - - - - - - - - - - - - - - - - - - - - - - - - - - - - - - - 2–8
Mounting- - - - - - - - - - - - - - - - - - - - - - - - - - - - - - - - - - - - - - - - - - - - - - - 2–8
Connecting DC Wiring For A Single Battery Or Multiple Batteries- - - - - - - - 2–9
v

Contents
Connecting to AC Wiring- - - - - - - - - - - - - - - - - - - - - - - - - - - - - - - - - - - 2–11
Grounding - - - - - - - - - - - - - - - - - - - - - - - - - - - - - - - - - - - - - - - - - - - - - 2–14
Installing Optional Accessories - - - - - - - - - - - - - - - - - - - - - - - - - - - - - - - - 2–14
Battery Temperature Sensor - - - - - - - - - - - - - - - - - - - - - - - - - - - - - - - - - 2–14
Remote Display Panel - - - - - - - - - - - - - - - - - - - - - - - - - - - - - - - - - - - - - 2–15
3 Operation
About Charging - - - - - - - - - - - - - - - - - - - - - - - - - - - - - - - - - - - - - - - - - - - - 3–2
Charging Time - - - - - - - - - - - - - - - - - - - - - - - - - - - - - - - - - - - - - - - - - - - 3–2
Battery Temperature - - - - - - - - - - - - - - - - - - - - - - - - - - - - - - - - - - - - - - - 3–3
Using A Generator As Source Power - - - - - - - - - - - - - - - - - - - - - - - - - - - - 3–4
Indicator Light Activity On The Front Panel - - - - - - - - - - - - - - - - - - - - - - - 3–4
Charging batteries - - - - - - - - - - - - - - - - - - - - - - - - - - - - - - - - - - - - - - - - - - 3–5
Equalizing Flooded Batteries - - - - - - - - - - - - - - - - - - - - - - - - - - - - - - - - - - - 3–7
About Equalizing - - - - - - - - - - - - - - - - - - - - - - - - - - - - - - - - - - - - - - - - - 3–7
Performing An Equalization - - - - - - - - - - - - - - - - - - - - - - - - - - - - - - - - - - 3–8
4 Maintenance and Troubleshooting
Care and Maintenance - - - - - - - - - - - - - - - - - - - - - - - - - - - - - - - - - - - - - - - 4–2
Troubleshooting- - - - - - - - - - - - - - - - - - - - - - - - - - - - - - - - - - - - - - - - - - - - 4–2
Indicator Light Flashing Sequences - - - - - - - - - - - - - - - - - - - - - - - - - - - - - 4–2
Typical Problems - - - - - - - - - - - - - - - - - - - - - - - - - - - - - - - - - - - - - - - - - 4–4
A Specifications
Physical Specifications - - - - - - - - - - - - - - - - - - - - - - - - - - - - - - - - - - - - - - - A–2
Electrical Specifications - - - - - - - - - - - - - - - - - - - - - - - - - - - - - - - - - - - - - - A–2
AC Input Specifications - - - - - - - - - - - - - - - - - - - - - - - - - - - - - - - - - - - - - - A–4
Protection Features- - - - - - - - - - - - - - - - - - - - - - - - - - - - - - - - - - - - - - - - - - A–4
Approvals- - - - - - - - - - - - - - - - - - - - - - - - - - - - - - - - - - - - - - - - - - - - - - - - A–5
B Battery Charging
Charging Algorithms - - - - - - - - - - - - - - - - - - - - - - - - - - - - - - - - - - - - - - - - B–2
Battery Type- - - - - - - - - - - - - - - - - - - - - - - - - - - - - - - - - - - - - - - - - - - - - B–2
Charge Algorithm Stages - - - - - - - - - - - - - - - - - - - - - - - - - - - - - - - - - - - - B–2
Equalization Charge- - - - - - - - - - - - - - - - - - - - - - - - - - - - - - - - - - - - - - - - B–4
Two-Stage Charging- - - - - - - - - - - - - - - - - - - - - - - - - - - - - - - - - - - - - - - - - B–4
C Battery Maintenance
vi

Maintenance Guidelines - - - - - - - - - - - - - - - - - - - - - - - - - - - - - - - - - - - - - - C–2
Preparation for Cleaning Batteries - - - - - - - - - - - - - - - - - - - - - - - - - - - - - - - C–3
Clothing- - - - - - - - - - - - - - - - - - - - - - - - - - - - - - - - - - - - - - - - - - - - - - - - C–3
Tools- - - - - - - - - - - - - - - - - - - - - - - - - - - - - - - - - - - - - - - - - - - - - - - - - - C–3
Equipment - - - - - - - - - - - - - - - - - - - - - - - - - - - - - - - - - - - - - - - - - - - - - - C–3
Supplies- - - - - - - - - - - - - - - - - - - - - - - - - - - - - - - - - - - - - - - - - - - - - - - - C–3
Maintaining and Cleaning - - - - - - - - - - - - - - - - - - - - - - - - - - - - - - - - - - - - - C–4
Battery Enclosure and Batteries- - - - - - - - - - - - - - - - - - - - - - - - - - - - - - - - C–4
Terminals & Lugs - - - - - - - - - - - - - - - - - - - - - - - - - - - - - - - - - - - - - - - - - C–4
Cables - - - - - - - - - - - - - - - - - - - - - - - - - - - - - - - - - - - - - - - - - - - - - - - - - C–5
D Product and System Information
Warranty - - - - - - - - - - - - - - - - - - - - - - - - - - - - - - - - - - - - - - - - - - - - - - - - D–2
DISCLAIMER - - - - - - - - - - - - - - - - - - - - - - - - - - - - - - - - - - - - - - - - - - - - D–4
Product - - - - - - - - - - - - - - - - - - - - - - - - - - - - - - - - - - - - - - - - - - - - - - - - D–4
Exclusions - - - - - - - - - - - - - - - - - - - - - - - - - - - - - - - - - - - - - - - - - - - - - - D–4
WARNING: LIMITATIONS ON USE- - - - - - - - - - - - - - - - - - - - - - - - - - - D–4
Return Material Authorization Policy - - - - - - - - - - - - - - - - - - - - - - - - - - - - - D–5
Return Procedure - - - - - - - - - - - - - - - - - - - - - - - - - - - - - - - - - - - - - - - - - - - D–5
Information about your Truecharge+- - - - - - - - - - - - - - - - - - - - - - - - - - - - - - D–7
Contents
Index - - - - - - - - - - - - - - - - - - - - - - - - - - - - - - - - - - - - - - - - - - Index–1
vii

viii

Important Safety Instructions
WARNING
This chapter contains important safety and operating
instructions as prescribed by UL and CSA standards for
chargers used in residential, RV, and marine applications.
Read and keep this Owner’s Guide for future reference.
1. Before using the charger, read all instructions and cautionary
markings on the charger, the batteries, and all appropriate sections
of this guide.
2. Do not expose the charger to rain, snow, spray, or bilge water. To
reduce risk of fire hazard, do not cover or obstruct the ventilation
openings. Do not install the charger in a zero-clearance
compartment. Overheating may result.
3. Use only attachments recommended or sold by the manufacturer.
Doing otherwise may result in a risk of fire, electric shock, or injury
to persons.
4. The charger is designed to be permanently connected to your AC
and DC electrical systems. Xantrex recommends that all wiring be
done by a certified technician or electrician to ensure adherence to
the local and national electrical codes applicable in your
application.
5. To avoid a risk of fire and electric shock, make sure that existing
wiring is in good condition and that wire is not undersized. Do not
operate the charger with damaged or substandard wiring.
6. Do not operate the charger if it has received a sharp blow, been
dropped, or otherwise damaged in any way. If the unit is damaged,
see the Warranty section in Appendix D, “Product and System
Information”.
ix

Important Safety Information
7. Do not disassemble the charger. See Appendix D, “Product and
System Information” for instructions on obtaining service.
Attempting to service the unit yourself may result in a risk of
electrical shock or fire. Internal capacitors remain charged after all
power is disconnected.
8. To reduce the risk of electrical shock, disconnect both AC and DC
power from the charger before attempting any maintenance or
cleaning or working on any circuits connected to the charger.
Turning off controls will not reduce this risk.
9. The charger must be provided with an equipment-grounding
conductor connected to the AC input ground.
10. For marine applications in the United States, external connections to
the charger shall comply with the United States Coast Guard
Electrical Regulations (33CFR183, Sub part 1).
Explosive gas precautions
1. W orking in the vicinity of lead-acid batteries is dangerous. Batteries
generate explosive gases during normal operation. Therefore you
must read this guide and follow the instructions exactly before
installing or using your charger.
2. TrueCharge 20+ and TrueCharge 40+ have been approved as
Ignition Protected. They may be installed in areas containing
gasoline tanks and fittings which require Ignition Protected
equipment. Xantrex recommends, nevertheless, that it is safest not
to install electrical equipment in these areas.
3. To reduce the risk of battery explosion, follow these instructions
and those published by the battery manufacturer and the
manufacturer of the equipment in which the battery is installed.
Precautions When Working With Batteries
1. Have someone within range of your voice or close enough to come
to your aid when you work near a lead-acid battery.
2. Have plenty of fresh water and soap nearby in case battery acid
contacts skin, clothing, or eyes.
x

Important Safety Information
3. Wear complete eye protection and clothing protection. Avoid
touching your eyes while working near batteries.
4. If battery acid contacts skin or clothing, wash immediately with
soap and water. If acid enters your eye, immediately flood it with
running cold water for at least twenty minutes and get medical
attention immediately.
xi


1
Introduction
Chapter 1, “Introduction” introduces and
describes features of the Truecharge+ multistage
battery chargers.

Introduction
Truecharge+ Features
Truecharge+ is an advanced battery charger designed specifically for high
performance, deep-cycle lead-acid batteries. It is smaller and lighter than
many other chargers and can be installed or stored in small compartments.
It has AC to DC isolation, a surge protector, and many other safety
features which reduce potential shock and fire hazards.
20/40 Amp Continuous Rating
Truecharge 20+ delivers a 20 amp charging current and the
Truecharge 40+ delivers 40 amps for approximately 75% of the charging
cycle. The chargers only reduce the charging current below these rated
levels when the battery is approaching full charge or when there may be
overheating in high ambient temperatures. Because it delivers rated
current over most of the charge cycle, Truecharge+ charges your batteries
faster than many other chargers with a higher rating.
Many other chargers only deliver their rated charging current for a short
initial part of the charge cycle.
Simultaneous Three-Battery Bank Charging
Truecharge+ has three separate DC positive terminals to allow charging
of three separate batteries (or battery banks). The total current into the
batteries is a maximum of either 20 amperes or 40 amperes, depending on
the model, which is divided amongst the batteries according to their state
of discharge.
Note: The three outputs are not independently voltage regulated so it
is important to avoid systems with mixed types of batteries.
Wide Voltage Range Operation
Truecharge+ maintains the correct charging voltage for your battery when
the AC line voltage drops as low as 90 VAC, or rises as high as 135 VAC.
A surge protector in T ruecharge+ protects it from surges and spikes on the
AC power line.
1–2

Truecharge+ Features
Selector Switches
Truecharge+ has selector switches for charge mode, battery type, and
battery temperature setting.
Charge mode The charge-mode switch allows you to select three-step charge, two-step
charge or 13.5 volt fixed output modes. Refer to Appendix B, “Battery
Charging” for an explanation of the charging algorithms.
Battery type The battery-type switch allows you to set the Truecharge+ for the
charging characteristics of flooded, AGM, and gel batteries.
Temperature The battery temperature switch allows you to set charging characteristics
based on the battery temperature. By setting the switches correctly before
you begin charging your battery, you will be ensuring that it receives the
best possible charge.
Extensive Protection Features
Truecharge+ provides the following protection features:
• Opening of the internal output fuse if a battery is accidentally
connected with reversed polarity
• Fuse opening or electronic shutdown if there is a short circuit on the
output of the Truecharge +
• Built-in protection against accidental connection to a higher battery
voltage, up to 24 VDC
• Unit shutdown if it becomes overheated because of inadequate
ventilation or a high ambient temperature
• Unit shutdown if the battery gets too hot (with battery temperature
sensor only)
Isolated Design
The DC battery charging circuits of T ruecharge+ are galvanically isolated
by a transformer from the AC power circuits. This feature reduces the risk
of electric shock and helps to prevent corrosion problems in marine
applications.
1–3
Introduction
Fixed Voltage Mode
The fixed voltage mode setting is meant to be used as a power supply or
battery eliminator. It is not meant for charging batteries. The battery type,
battery temperature, and equalize switches are all ignored in fixed voltage
mode. The remote battery temperature sensor does not compensate the
voltage, but the battery over-temperature shutdown is still active.
Optional Accessories
Battery
Temperature
Sensor
Remote panel The remote panel allows you to monitor the charging progress of two
The remote Battery Temperature Sensor (BTS) automatically adjusts the
charge according to the temperature of one of the batteries. With a BTS
installed, the unit provides a more accurate temperature-compensated
charge for the battery to which the sensor is attached.
batteries or battery banks, the total charge current, and charger status from
a convenient location.
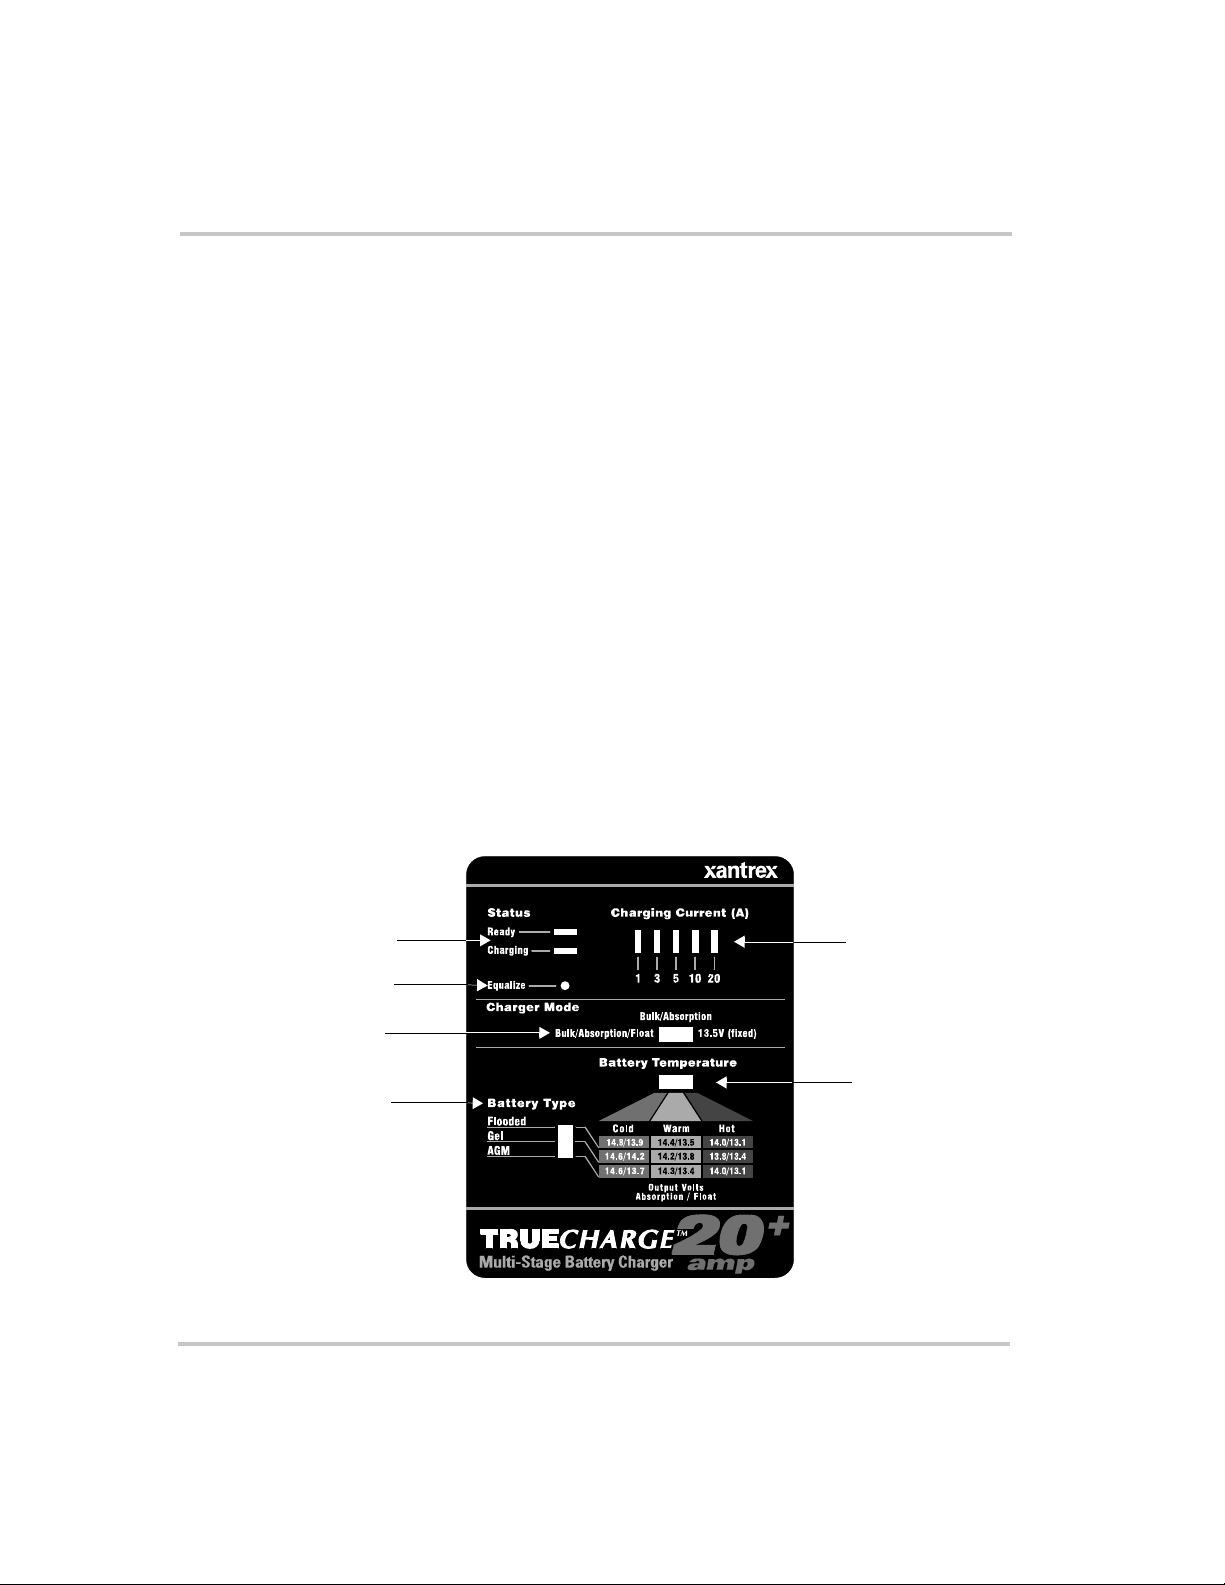
Indicator Lights and Settings on the Front Panel
This section describes the parts of the front panel of the Truecharge 20+.
Figure 1-1 shows the front panel. Descriptions are provided in Table 1-1
1
3
4
2
1–4
6
5
Figure 1-1 Front panel of Truecharge 20+ battery charger

Indicator Lights and Settings on the Front Panel
Table 1-1 Truecharge+ front panel
Panel
Item Description
1 Status indicator lights which indicate that batteries are charged and
ready for use or that the batteries are being charged or equalized.
2
3 The recessed Equalize button is triggered manually to enter or leave
4 The Charger Mode switch from which you can select a three-stage or
5 The battery selection switch for choosing flooded, gel or AGM
6 The battery-temperature switch for choosing the battery temperature
Indicator lights which show the total charging current, in amps, into
the three battery banks.
The indicator lights show:
1, 3, 5, 10, 20 A (Truecharge20+)
2, 5, 10, 20, 40 A (Truecharge 40+)
the equalization mode.
two-stage charge or a 13.5 volt power su pp ly mode to power 12 volt
loads when you don’t have a battery.
batteries.
for the charge. Temperature settings compensate the output voltage
for the battery temperature.
Note that a battery temperature sensor overrides the temperature
settings on the front panel.
The indicator lights are also used to indicate error codes. See Chapter 4,
“Maintenance and Troubleshooting”
1–5

Introduction
How Truecharge+ Works
Truecharge+ changes the alternating current (AC) supply from the utility
to the controlled low-voltage, direct current (DC) required to charge the
battery by using high-frequency, switched-mode power conversion
circuits. The high-frequency power conversion method is similar to that
used in power supplies for computers and other electronic equipment. It
results in a significantly smaller and lighter charger than other power
conversion methods allow.
The controlled DC output is fed to three isolations diodes, one for each
battery bank. These diodes isolate the batteries from each other and
prevent current flow from one battery to the others.
1–6

2
Installing
Truecharge+
Chapter 2, “Installing Truecharge+” lists the
materials you receive, provides site
recommendations for installing Truechar ge+, and
provides the materials and procedures for its
installation.
The chapter also makes reference to the
installation codes that may be applicable in your
application, for example, the US National
Electrical Code (NEC, NFPA 70), the Canadian
Electrical Code (CEC, CSA C22.1), and the
American Boat and Yacht Council (ABYC)
Recommended Practices.

Installing Truecharge+
Materials List
Figure 2-1 Truecharge 20+ (left) and Truecharge 40+ (right)
Contents The unit is packed with the following materials:
• Owner’s Guide
• Wiring cover with 2 blunt-tip screws and two lock washers
• AC cable clamp
• Three twist-on wire nuts
• Three crimp-on butt-splices
Recording
information
After unpacking the unit, record the serial number and other purchase
information on page D–7 of this guide.
Preparing for Installation
Mounting Truecharge+ is designed to be permanently mounted. It is virtually
maintenance free when properly installed.
Conditions Before mounting and connecting Truecharge+, be sure you meet the
requirements for
• location
• circuits
• wiring
• tools and materials
2–2

Location
Preparing for Installation
Install Truecharge+ in a location that meets the requirements set out in
Table 2-1.
Table 2-1 Physical requirements for a Truecharge+ installation
Condition Description
Dry The unit is intended for use in a dry location. Do not allow water
or other fluids to drip or splash on Truecharge+. Do not mount
the charger in an area subject to rain, spray or splashing bilge
water.
Clean Do not expose Truecharge+ to metal filings or any other form of
conductive contamination. The presence of conductive
contamination can cause damage and void your warranty.
Cool For best performance, the ambient air temperature should be
between 32 °F (0 °C) and 95 °F (30 °C)– the cooler the better. At
higher ambient temperatures, the output current will be
automatically reduced to protect the charger from high internal
temperatures.
Ventilated Allow at least 4 inches (10 cm) of clearance around all sides of
the Truecharge+ for air flow. Ensure that the ventilation
openings on the unit are not obstructed. If mounting in a
compartment, ventilate the compartment with louvres or cut-outs
to prevent overheating.
Safe This battery charger is Ignition Protected, so it can be installed in
areas containing gasoline tanks or fittings wh i c h usually require
Ignition Protected equipment. Xantrex recommends, however,
that it is safest not to install electrical equipment in these areas.
Close to AC
junction box
Close to
batteries
Avoid the use of extended wire lengths if possible.
Avoid excessive cable lengths and use the recommended wire
lengths and sizes. Undersized or overly long cables may affect
charging accuracy.
Circuits
Truecharge+ is designed to operate from a 15 amp, 120 VAC (nominal)
branch circuit. The circuit must be protected by a 15 amp circuit breaker.
Any switch in the circuit should be rated for a minimum of 10 amps for
Truecharge20+ installations and 15 amps for Truecharge40+
installations. Refer to Appendix A “Specifications” for the actual current
draw.
2–3
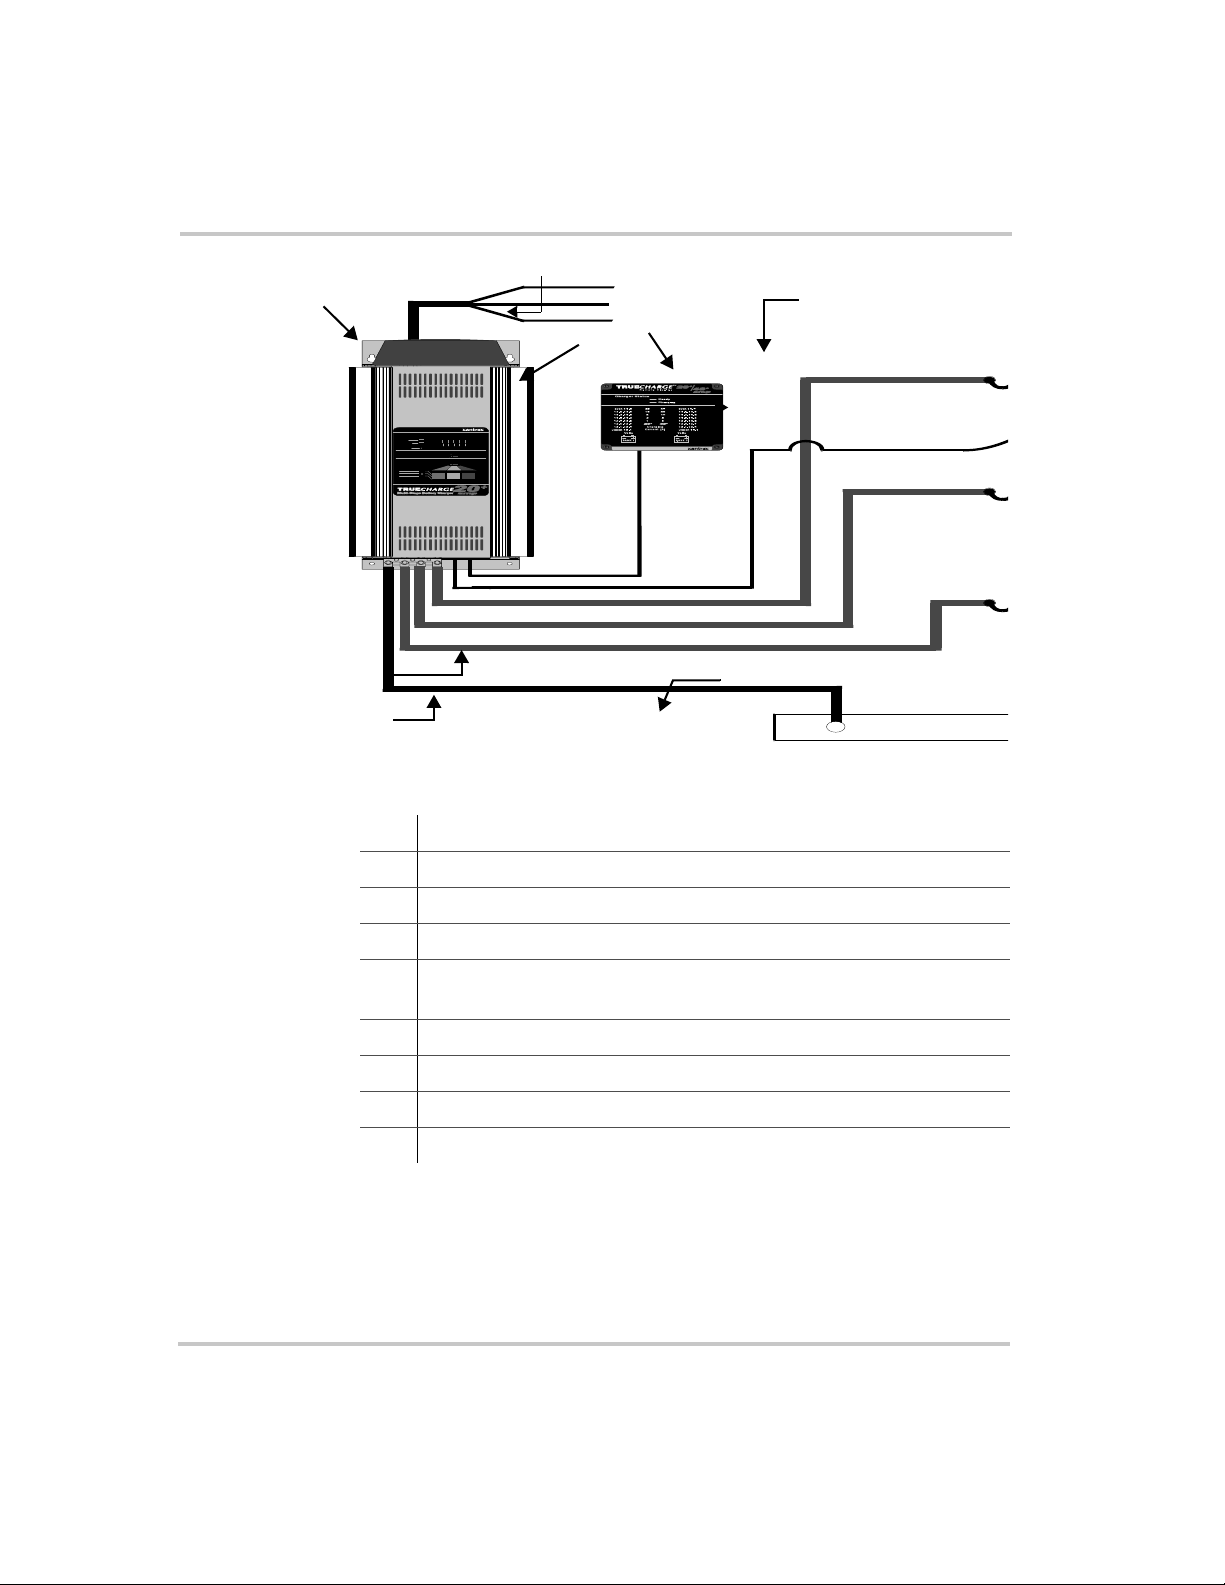
Installing Truecharge+
2
StatusCharging Current (A)
Ready
Charging
1 3 5 10 20
Equalize
Charger Mode
Bulk/Absorption
Bulk /A bsorptio n/Float 13.5 V (fixed)
Batte ry T emperature
Battery Type
Flooded
ColdWarmHot
Gel
14.4/13.514.0/1 3.1
14.8/1 3.9
AGM
14.2/13.8
14.6/1 4.2
14.6/1 3.7
Outp ut Volts
Absorption / Float
1
L
N
G
8
5
6
9
13.8 /1 3.4
14.0 /1 3.114.3/13.4
TM
4
7
3
Figure 2-2 Truecharge+ system
1 120 VAC source with 15 amp breaker
2 AC input wiring compartment
3 DC negative cable
4 DC positive cables
5 DC circuit breaker or DC fuse and disconnect rated at 25 amps
maximum for TC 20+ or 50 amps maximum for the TC 40+
6 Battery or battery bank
7 Engine negative bus or DC ground bus
8 Remote panel (optional)
9 Battery temperature sensor (optional)
2–4

Wiring Requirements
Figure 2-2 depicts a typical configuration system for the Truecharge+
showing the AC and DC wiring and protection devices required for a
successful installation.
DC Wiring
The DC wiring must meet the following requirements:
• Length and size
Preparing for Installation
Wire Length
(
maximum length
one way
)
Wire Size AWG
a
feet meters TC 20+ TC 40+
5 1.5 No. 10 No. 8
7.5 2.25 No. 8 No. 6
20 3 No. 6 No. 6
a.Based on ABYC Recommended Practice
E-9, 75 °C wire, 3% voltage drop
Use the largest recommended size rather than the minimum for best
performance and safety.
• DC Disconnect
The DC circuit from the battery to the cha r ge r mus t be equi pped with
a disconnect and over-current protection device. The device usually
consists of a DC-rated circuit breaker, a “fused disconnect”, or a
separate fuse and disconnect. These devices must be rated for DC
voltage and current. Do not substitute devices rated only for AC
voltage: they may not operate properly.
• Over-current protection
The current rating must be matched to the size of th e DC wiring u sed
and to the charger output, in accordance with the applicable codes.
The following recommended current ratings for the DC fuse or
breaker meet the requirements in ABYC, NEC, and CEC codes.
Truecharge 20+: 25 A
Truecharge 40+: 50 A
2–5

Installing Truecharge+
AC Wiring
Be sure that your AC wiring meets the following requirements before you
install the Truecharge+:
• Input wiring
The AC input wiring for Truecharge+ should be three-conductor
cable, providing a line, neutral, and ground conductor in an outer
jacket. The conductors must be No. 14 AWG or larger. For marine
applications the ABYC requires stranded wire. It stands up to
vibration better than solid wire. For RV applications, the NEC allows
solid wire in multi-conductor cable, but stranded wire will again
withstand vibration better.
• 120 VAC, 15 amp branch circuit
The circuit supplying the Truecharge+ must be rated 120 VAC,
single-phase, 15 amps maximum. It may be either a 15 amp
shorepower connection or a dedicated 15 amp branch circuit from
your 30 amp or 50 amp shorepower connection. In either case the
charger must be protected by a 15 amp breaker or fuse maximum.
• Disconnect devices
Each system requires a method of disconnecting the AC and DC
circuits. If the over-current protection device is a circuit breaker, it
will also serve as the disconnect. If a fuse is used, a disconnect switch
is needed ahead of the fuse.
2–6

Tools
Materials
Preparing for Installation
To mount and connect Truecharge+ you need:
p a slot screwdriver with a maximum 3/16 in wide blade for the DC
terminals
p a No. 1 Phillips screwdriver for securing the AC wiring compartment
cover
p a wire stripper
p the manufacturer's recommended crimp tool for any crimp terminals
that are being used
You need the following material:
p 3 conductor No. 14 AWG AC cable
p Appropriately sized DC cables for each battery, with suitable
connectors at the battery end
p DC fuse and disconnect or circuit breaker for each battery bank
p Mounting hardware (#8 recommended), minimum 4.
p Other means to route and secure AC and DC wiring
2–7

Installing Truecharge+
Installing Truecharge+
WARNING Shock and Energy Hazards
Be sure to read the safety guidelines and pay attention to all
cautions and warnings throughout the installation procedure.
The installer is responsible for ensuring compliance with the
installation codes for your particular application.
Disconnect all sources of AC and DC power before proceeding.
CAUTION Reverse polarity
Before making the final DC connection, check the cable
polarity at both the battery and the charger. Positive must be
connected to positive; negative must be connected to negative.
Reversing the positive and negative battery cables can damage
your charger and void the warranty. This type of damage is
easily detected.
Installation
steps
Mounting
2–8
Truecharge+ is installed in three steps. The unit is
1. mounted (page 2–8)
2. connected to the batteries (page 2–9)
3. connected to its AC power source (page 2–11)
Mount the Truechar ge+ on a vertical surface such as a bulkhead, using the
mounting holes provided. Mounting hardware shou ld be corrosion
resistant and #8 (4 mm). For secure, permanent mounting, use all four
mounting holes. The DC connections should be at the bottom and the AC
connections at the top.

Installing Truecharge+
Connecting DC Wiring For A Single Battery Or Multiple Batteries
WARNING
Truecharge+ cannot be set to deliver different charging
profiles at each output. Therefore all the batteries you are
charging must be the same type, that is, all should be flooded,
or all gel, or all AGM.
The procedure for installing the DC wiring applies to a single battery or
multiple batteries or battery banks. Figure 2-3 shows the connection
order.
Status Charging Current (A)
Ready
Charging
1 3 5 10 20
Equaliz e
Charger Mode
Bulk/Absorption
Bulk/Absorption/Float 13. 5V (fixed)
Battery Temperature
Battery Type
Flooded
Cold Warm Hot
Gel
14.8/13.9
14.4/13.514.0/13.1
AGM
14.2/13.8
14.6/14.2
14.6/13.7
Output Volts
Absorption / Float
TM
3 -red
2 -red
1 -red
14-black
4
10
11
13.8/13.4
14.0/13.114.3/13.4
5
12
6
DC Negative Bus
13
789
Figure 2-3 DC wiring connection order
2–9

Installing Truecharge+
mz
To install the DC wiring:
1. Plan the route the DC wires will follow trying to make it as short as
possible. Measure the required wire length, and cut the cables. Allow
some extra length for connections and to provide slack in the wires.
It is possible that the connection to the battery negative circuit may
not actually be right at the battery. For example, on boats the proper
location for the negative connection is often at an engine negative bus
or a DC negative bus. If in doubt, consult the boat schematics.
2. Identify the positive wires, by using color-coded wire or by marking
both ends of the wire with colored tape or similar kind of marking.
Repeat with a different color for the negative. Most installation codes
recommended color codes, with the positive usually being red and the
negative being black.
Note: You may find it helpful to label each cable, associating it with the battery
bank it is connected to. For example, Bank 1 (–), Bank 1 (+), Bank 2 (–) and so on.
3. Install the DC circuit breakers or fuses in the battery positive circuits
close to the battery.
4. Route the wiring to the batteries and to the charger, but don’t connect
it yet. Try to avoid routing wiring through an electrical distribution
panel, battery isolator, or other devi ce that will add additional voltage
drops.
5. Strip 5/16 in (8mm) of insulation from the ends to be connected to the
charger.
6. Fully insert each positive wire into the positive terminal on the
charger (Figure 2-3, 1, 2, 3). Make sure there are no stray wire strands
protruding from the terminal. Tighten the connector (20 in-lbs torque)
and test that the wire is secure. Repeat this step for up to three
batteries or battery banks.
7. Connect the positive cable from the positive wire terminals on the
charger to the battery fuse or breaker, which should be installed on the
battery positive terminals (Figure 2-3, 4, 5, 6).
Leave the DC disconnects or breakers in the Off position until
installation is complete. Leaving them off helps prevent sparking
when you actually make the connections.
2–10

Installing Truecharge+
8. Before proceeding, carefully check the wiring polarity – make sure
the positive on the charger is going to the positive on the batteries
(fuse or breaker) and make sure the negative on the charger is going
to the battery negative terminal (or engine negative bus or DC
negative bus). Do not reverse the connections.
If you reverse the polarity of any one of the DC connections, the
internal fuse for that output bank opens. A qualified technician must
replace this fuse for that bank to function. The other banks should
continue to function normally.
.
9. To make a single battery bank connection:
• Connect the negative cable to the battery negative terminal
• Fully insert the negative wire into the negative terminal on the
charger (Figure 2-3,14). Make sure there are no stray wire strands
protruding from the terminal. Tighten the connector (20 in-lbs
torque) and test that the wire is secure.
10. To make multiple battery bank conn ections using a DC negative bus:
• Connect up to three negative cables to the DC negative bus or
engine negative bus (Figure 2-3, 7,8,9), one for each battery bank.
• Connect each negative cable to the battery negative terminal
(Figure 2-3, 10, 11, 12)
• Connect a negative cable from the DC negative bus to the negative
terminal on the Truecharge+ (Figure 2-3, 13, 14).
11. Fully insert the negative wire into the negative terminal on the
charger (Figure 2-3, 14). Check all connections for tightness and to
ensure the conductors are fully inserted in their terminals with no
stray wire strands protruding. Tight en the connector (20 in-lbs torque
recommended) and test that the wire is secure.
Connecting to AC Wiring
To connect AC wiring:
1. Make sure the AC source circuit is disconnected by turning off the
breaker feeding the circuit, unplugging from shorepower and
disconnecting any other power sources such as a generator.
2. Plan the routing the AC wiring will follow from the source (usually a
15 amp breaker in an AC distribution panel) to the charger. Measure
the required length of three-conductor No. 14 AWG wire, and cut it.
Allow some extra length for connections and to provide slack.
2–11

Installing Truecharge+
3. Route the wiring without connecting it to the AC source or to the
charger yet.
4. Install the supplied cable clamp in the knock-out of your choice on
the AC wiring compartment on the top end of the charger and tighten
the locknut. Run the AC wiring through the cable clamp and about 6
inches into the wiring compartment.
5. Carefully remove approximately 3 inches of the outer jacket, being
careful not to cut or nick the insulation on the individual conductors.
6. Connect the AC wiring to the Truecharge+ pigtail wires in the wiring
compartment junction box, being sure to connect the line conductor to
the line, the neutral to the neutral, and the ground to the ground. The
pigtail wires are color coded as follows:
Conductor Color code
Line Black or brown
Neutral White or blue
Ground Green or green with
yellow stripe
2–12
7. Make the connections with the twist-on or crimp-on connectors
supplied or with other approved connectors suitable for your
installation.
For boat installations, use the crimp-on butt splice connectors
following the procedure “To connect AC wires with the crimp-on
butt-splice connector” on page 2–13. The ABYC Standards and
Recommended Practices for Small Craft prohibit twist-on connectors
for AC connections on a boat. For non-marine installations in
locations not subject to vibration, either type of connector may be
used.
8. When all connections are completed, push the wiring with connecto rs
inside the wiring compartment. In stall wiring compartment cover and
fasten with the blunt-tip screws and lock washers supplied
9. Tighten the cable clamp to secure the wiring. Be sure it grips the outer
cable jacket and not the individual wires.
10. Continue the installation by connecting the other end of the AC
wiring to your AC source, observing the color code described above.

Installing Truecharge+
To connect AC wires with the crimp-on butt-splice connector:
Note: You must exercise care when crimping butt-splice connectors.
Use a crimp tool designed for this type of connector such as a Panduit,
catalog number CT100, CT160, or CT 260.
1. Using a wire stripper, carefully strip 5/16” (8mm) from the ends of
the two wires being connected.
2. Insert one wire into one end of the butt-splice, insert the butt-splice
into the crimping tool, and crimp firmly. The proper location for the
crimp is approximately 1/16” (1.6mm) past where the butt-splice
insulation tapers down as shown in Figure 2-4
1/16 “
STRIP 5/16”
Figure 2-4 Butt-splice connection
CRIMP TOOL
3. Repeat Step 2 for the other end of the butt-splice.
4. Tighten the cable clamp to secure the wiring so that it grips the outer
cable jacket (not the individual wires).
5. When all connections are completed, push the wiring with connectors
inside the wiring compartment. Install wiring compartment cover and
fasten with the blunt-tip screws and lock washers supplied.
6. Continue the installation by connecting the other end of the AC
wiring to your AC source observing the color code described above.
2–13

Installing Truecharge+
Grounding
WARNING Electric shock hazard
Do not make an ungrounded connection. Have an
electrician install a properly grounded circuit if one is not
already installed. Improper connection can result in risk of
an electric shock.
Truecharge+ must be grounded to reduce the risk of electrical shock. The
AC input ground wire must be properly connected to ground in
accordance with all applicable electrical codes. Meeting electrical codes
is achieved by connecting the ground conductor of the AC input cable to a
properly grounded ground terminal in the AC distribution panel wh ere the
15 amp branch circuit originates.
If your installation code allows the use of a flexible AC cord to attach
Truecharge+ to a standard AC socket, the cord and plug must be equipped
with a ground conductor and a ground pin (that is, a three-prong plug) and
the socket must be able to accept the plug without modification.
Installing Optional Accessories
If you have purchased the accessories, you can also install the Battery
T emperature Sensor (BTS) and the Re mote Display Panel at this time. For
maximum battery life, Xantrex strongly recommends the use of the BTS.
Battery Temperature Sensor
Purpose The BTS provides the charger with temperature information which
overrides the temperature settings on the front panel. If your batteries are
located where temperatures are consistently high or consistently low, or
vary frequently, consider the use of a BTS to prolong the life of your
batteries.
Installation The Battery Temperature Sensor Installation sheet offers suggestions for
the most appropriate battery to monitor and the best placement of the
temperature sensor on the battery.
2–14

Installing Optional Accessories
Effect on
charging
With the BTS, the charging setpoints are temperature-compensated up to
140 °F (60 °C). If the battery temperature excee ds 140 °F the charger
stops charging. The BTS also provides more accurate compensation over
a wider range of temperatures than the front panel temperature settings.
For example, with the switch in the HOT position, the charger
compensation is equivalent to the BTS compensation at 95 °F (35 °C). At
95 °F, absorption voltage for a gel battery is reduced to 13.8 VDC. At
122 °F (50 °C) the absorption voltage for the same battery is reduced to
13.4 VDC if the BTS is installed. It would still be at 13.8 VDC if you are
just using the temperature setting switch.
Remote Display Panel
The Remote Display Panel allows you to monitor battery charger activity
away from the charger whenever Truecharge+ is operating. The panel
displays the total charging current and the voltages of the two batteries or
battery banks connected to the two positive terminals closest to the
negative terminal.
The insert card which accompanies the panel provides the directions for
installing it.
2–15


3
Operation
Chapter 3, “Operation” provides background
information for charging batteries with
Truecharge+ and procedures for charging and for
equalizing batteries. Chapter 3 also explains how
to calculate charging times, how generators affect
Truecharge+ and explains how the front panel
indicator lights are interpreted.

Operation
About Charging
This section provides information about
• calculating the charging time
• effect of battery temperature on charging
• indicator light activity during the charging process
• using a generator to run Truecharge+
Charging Time
Formula Charging time will depend on the capacity of your battery and on how
deeply it is discharged.The following equation calculates an approximate
charging time:
Charging time = CAP x DOD
CC x 80%
where:
Charging Time: Battery recharge time in hours
CAP: Battery capacity in amp-hours
DOD: Battery depth of discharge in per cent. A fully
discharged battery has 100% DOD
CC: Charge current, the rated current output of the
charger in amperes
80%: Typical charging efficiency for lead-acid batteries
Example A Group 27 size battery rated at 82 amp-hours is 40% discharged, that is,
it has a DOD = 40. Charging time with a Truecharge 20+ unit is
calculated as follows:
Charging time = 82 Ah x 40% = 2 hours
20 A x 80%
3–2

Battery Temperature
About Charging
Temperature
switch
Effect of
temperature
Selecting the correct temperature setting selects the appropriate charging
voltage to compensate for battery temperature.
Batte ry T emperatu re
Sele ctor S witc h
Batte ry Temperature
Cold W arm H ot
14.8/1 3.9
14.6/14.2
Output Volts
Absorption / Flo at
14.4 /1 3.5 14.0/13.1
13.8/1 3.4
14.2 /1 3.8
14.0 /1 3.114.3 /1 3.414.6/13.7
(5 0°F/1 0°C to 8 0°F/2 7°C )
COLD
(b elo w 50°F/1 0°C )
WARM
HOT
(a bove 8 0°F /2 7°C )
Cold battery temperature If you choose the Cold setting,
Truecharge+ delivers, for example, 14.8 volts in absorption mode and
13.9 volts in float for a Flooded battery.
Hot battery temperature If you choose the Hot setting for the same
battery, the charger delivers 14.0 volts in absorption mode and 13.1 volts
in float, nearly one volt of difference from the cold battery charge.
Consequence of wrong selection If you choose a cold temperature
setting for a hot battery, you risk overcharging your battery. If you are in
doubt about which to choose, or if you are leaving the charger connected
for an extended time, select Hot to reduce the risk of overcharging. The
same is true for Gel and AGM type batteries. The life of your battery will
be extended if all banks are in a similar temperature environment and you
make sure the switch setting is correct each time you charge. You should
consider purchasing a Xantrex battery temperature sensor if you expect
wide temperature fluctuations.
3–3

Operation
Using A Generator As Source Power
The Truecharge+ can be run from a regular power source or from an
alternate power source such as a generator. Refer to Appendix A,
“Specifications” for AC input draw to determine the size of generator you
need.
Many generators provide output voltage that is modified sine wave
(MSW) rather than the true sine wave (TSW) that your utility provides.
Xantrex does not recommend the use of Truecharge+ with MSW
generators due to increased heating of the charger.
Indicator Light Activity On The Front Panel
Indicator light activity shows what is happening during the charging
process and is also helpful in troubleshooting. Refer to Chapter 4,
“Maintenance and Troubleshooting” for more information about
interpreting indicator lights.
During the charging process, indicator lights are interpreted as follows:
Activity Charger status
Charging indicator light is
lit
Both Ready and Charging
indicator lights illuminate
The unit is charging in bulk or absorption
mode
The unit is performing the pre-equalization
absorption charge or is performing the
equalization charge.
3–4

Activity Charger status
Charging batteries
Ready indicator is lit,
Charging indicator is not
Rapid flashing of all
indicator lights
Charging Current indicator
lights
Charging batteries
The unit is either in float mode of three-step
charging, monitor mode of two-step
charging, or in fixed-voltage output mode.
Truecharge+ can’t respond to your request.
You may have pressed the equalization
button for an inappropriate setting such as a
gel battery. Check your settings.
These lights indicate the charging current.
At transition points when the current is
changing, two indicator lights may flash
alternately , then settle into the new char ging
current reading. This happens because the
current is between the two values indicated
by the two indicator lights.
Note that the indicator light values are
minimums. For example, the 10 amp
indicator light indicates current in excess of
10 amps.
Before you start Before you start to charge batteries read the “Important Safety
Instructions” on page ix and take all safety precautions when working
with batteries.
To charge your batteries:
1. If possible, disconnect all loads from the battery, by removing battery
cables, by opening a disconnect switch, or by switching loads off.
The charger detects a battery is fully charged when its charging
current drops below a preset limit. The presence of electrical loads on
the battery may interfere with this detection method. A timer-based
charge termination feature acts as a backup, but the charging currentbased method is preferable.
3–5

Operation
2. Set the Battery Type selector switch according to the table below.
If your battery is then select
Flooded (has removable caps
intended for refilling)
Any sealed type but AGM Gel
Absorbed glass mat AGM
Flooded
3. Set the Battery Temperature selector switch for the temperature of
your battery as follows:
If battery temperature is Select
Below 50 °F (10 °C) Cold
Between 50 °F (10° C) and
Warm
80 °F (27 °C)
Above 80 °F (27 °C) Hot
If temperatures fluctuate near the batteries, set this switch each time
you charge the batteries.
If your batteries are in different locations with different temperature
ranges, set the switch to Hot or to the temperature of the warmest
location.
3–6
Note: The remote temperature sensor, if installed, overrides this setting,
and it controls the charge voltage based only on the battery to which
the sensor is attached.
4. Ventilate the area around the battery thoroughly. Review the charging
instructions supplied by the manufacturer of your batteries and take
any steps required such as removing battery caps, adding distilled
water and so forth.
5. Apply AC power to Truecharge+ by closing the AC breaker and/or
applying shorepower. The indicator lights will blink as an
initialization sequence runs, lasting typically 10 seconds or so. After
initialization the yellow charging indicator light illuminates.
During charging, the charging current indicator lights show the total
current being delivered to the batteries. When charging a discharged
battery, the 20 A indicator light on Truecharge 20+ (40 A indicator

Equalizing Flooded Batteries
light on Truecharge40+) will light for most of the charging cycle.
Near the end of the cycle, the char ging current decre ases and the oth er
indicator lights illuminate in sequence.
The charger pauses every 15 minutes for approximately 10 seconds to
measure the battery voltage and to check for new or disconnected
batteries. It then resumes charging. You may notice an occa sional
change in fan speed on Truecharge 40+ as this takes place.
After charging After charging is complete Truecharge+ enters into one of these modes:
Float mode When the Ready indicator light lights, the battery is fully
charged and ready for use. If you selected Bulk/Absorption/Float mode,
Truecharge+ is in Float mode and will maintain the battery’s charge.
Monitor mode If you selected Bulk/Absorption mode, the Ready
indicator light shows the charger is now in Monitor mode and is checking
battery voltage and elapsed time since the last charge cycle.
Recharging With either charging mode, the Truecharge+ will begin a charging cycle
21 days after the last cycle, or when battery voltage drops to below 12.5
VDC for 15 minutes or if AC power is disconnected and reconnected.
Equalizing Flooded Batteries
About Equalizing
Frequency Approximately once a month, you may wish to equalize your flooded
batteries by using the battery charger equalization mode.
Important Equalization can damage your batteries if it is not performed properly.
Never equalize a battery more than twice a month. Always check battery
fluid level before and after equalization. Fill batteries only with distilled
water.
Battery manufacturers' recommendations on equalization vary. Always
follow the battery manufacturer's instructions so batteries are properly
equalized. As a guide, a heavily used battery may require equalization
once a month while a battery in light duty service, only needs equalizing
every two to four months. Truecharge+ provides a high-quality charge so
batteries will not need to be equalized as often as with a lower quality
charger.
3–7

Operation
Battery type Truecharge+ equalizes only flooded lead-acid batteries. It does not
equalize sealed lead-acid batteries since they can be damaged by this
process. If the battery type selector is set for Gel or AGM, and you try to
equalize them, the indicator lights on the front pane l flash but
Truecharge+ does not enter equalization mode.
Duration Equalization is manually terminated when the specific gravity in each cell
is about 1.265 and remains constant at that level. Truecharge+
automatically exits the equalization mode after six hours, whatever the
specific gravity, in the event you cannot terminate the equalization
yourself.
Battery charge
state
Equalization is only performed on fully-charged batteries. If they are not
charged, the first part of the process is similar to the absorption charge
and ensures the battery is fully charged.
Recommended Xantrex recommends that you run a normal charge cycle on the batteries
before you equalize them. While Truecharge+ will charge discharged
batteries as part of the equalization cycle, it does not indicate when the
charging has finished and the equalization begins. It is a recommended
practice to only equalize batteries which are fully charged.
Performing An Equalization
3–8
CAUTION Risk of battery damage
Truecharge+ cannot automatically determine when to stop
the equalization of a battery. You must monitor the battery
specific gravity throughout equalization to determine the
end of the equalize cycle. The six hour time-out is intended
as a safety feature but may not be sufficiently short to
prevent battery damage.
WARNING Explosion hazard
During equalization, the battery generates potentially
flammable gases. Follow all the battery safety precautions
listed in this guide. Ventilate the area around the battery
thoroughly and ensure that there are no sources of flame or
sparks in the vicinity

Equalizing Flooded Batteries
Important Turn off or disconnect all loads on the battery during equalization. The
voltage applied to the battery during equalization may be above the safe
levels for some loads. Be sure to check battery electrolyte before and after
equalization. Fill only with distilled water.
To equalize your batteries:
1. Using a toothpick or other small object with a fine point such as a
paper clip or pen-point, press the recessed Equalize button on the
control panel below the Charging and Ready indicator lights. Press
and hold for about 5 seconds until both the Charging and Ready
indicator lights illuminate. The charger is now in equalization mode.
2. Monitor the specific gravity of each cell of the battery during
equalization with a battery hydrometer.
Equalization is complete when the specific gravity of each cell of the
battery remains constant. Most lead-acid batteries have a specific
gravity of approximately 1.265 when fully charged.
3. To terminate the equalization charge when the battery reaches the
target specific gravity , momentarily press the equalization button. The
charger will go to float mode for three-stage charging or monitor
mode for two-step charging.
4. If the specific gravity is still rising when the charger automatically
exits equalization to float mode after 6 hours, you can initiate further
equalization by pressing the Equalize button for five seco nds.
5. When equalization has finished, check the battery electrolyte level. If
necessary, refill with distilled water only.
3–9

3–10

4
Maintenance and
Troubleshooting
Chapter 4, “Maintenance and Troubleshooting”
provides information for maintaining and
troubleshooting Truecharge+.

Maintenance and Troubleshooting
Care and Maintenance
WARNING Risk of electrical shock
Truecharge+ contains no user serviceable components. Do not
attempt servicing unless you are a qualified technician or
electrician. Contact your dealer or the manufacturer for service
information.
Cleaning Truecharge+ contains solid-state electronic components that require no
maintenance. The best care you can give the unit is to protect it from
contact with liquids, spray, or fumes which may cause corrosion.
Disconnect all AC and DC power and clean the outside of the case and
wiring with a damp cloth if you suspect it has come in contact with
battery fluid, salt water, gasoline or oil, or other corrosive material.
Corrosion on the battery terminal posts may be removed with a solution
of water and baking soda.
Routine checks Periodically, check all wiring connections, DC and AC, to be sure they
have not loosened or deteriorated. Also check all cable clamps to ensure
they are tightly fastened.
Troubleshooting
Indicator Light Flashing Sequences
Table 4-1 Indicator light sequences on Truecharge+
Display Condition
Charging indicator light is on, all
indicator lights light in sequence
repeatedly
Charging indicator light blinks, all
others are off
Highest charging current indicator
light blinks, all others are off
4–2
Battery is not detected
The battery voltage is greater than
15.5 VDC
Unit is in over-temperatur e or und e r-
temperature shutdown

Table 4-1 Indicator light sequences on Truecharge+
Display Condition
Troubleshooting
Middle charging current indicator
light blinks, all others are off
Truecharge+ is in over-temperature
shutdown due to excessive battery
temperature. This shutdown only occurs
if the BTS is installed.
4–3

Maintenance and Troubleshooting
Typical Problems
This section lists typical problems you may have with the Truecharge+,
suggests their causes, then offers possible solutions to the problems.
Symptom Indicator lights do not turn on, or remain on, when charger is
connected to an AC receptacle.
Possible Cause Solution
1. No power at AC
receptacle
2. Defective wiring
3. Open fuses in charger
1. Ensure that power is available at
receptacle
2. Replace wiring
3. Have charger serviced by
qualified person
Symptom Indicator lights continue to blink when charger connected to
battery. Charging indicator light does not turn on continuously.
Possible Cause Solution
1. Charger does not detect
battery for one of
following reasons:
• poor connection
• reverse polarity
1. Check polarity and quality of
battery connection.
If cables are damaged or internal
fuse open, have the charger
serviced by a qualified person.
connection
• damaged wiring
• open fuse in charger
2. Battery voltage is too low.
2. Check the battery.
Do not attempt to charge a 6 volt
battery. If battery is rated for 12
volts, leave it connected for 8
hours to see if it will recover. If
battery doesn't start charging
after 8 hours, it is permanently
damaged and will not accept a
charge.
4–4

Troubleshooting
Symptom Charging light blinks but does not come on steadily. Other
indicator lights are off.
Possible Cause Solution
1. Battery voltage is too
high (above 15.5 volts).
1. Check battery. Do not charge a
battery rated at more than 12 volts
nominal.
2. Battery is connected to
another charging source
with voltage above
15.5 VDC.
2. Disconnect or turn off other
charging sources such as the
alternator or the charger on a
generator with electric start.
Symptom The 20 amp indicator light blinks on Truecharge 20+, or the
40 amp light blinks on Truecharge 40+. Other indicator lights are off
(only when temperature sensor is installed).
Possible Cause Solution
Battery temperature is too high
for safe charging.
Allow battery to cool. Improve
ventilation or install in cooler
location. It may indicate a shorted
cell in the battery or excessive
water loss.
Symptom Truecharge+ appears to be taking too long to charge battery.
Ready indicator light does not light after 24 hours of charging.
Possible Cause Solution
1. Battery capacity is too high
for Truecharge+ model.
1. Use a higher capacity
charger.
2. Load connected to battery is
draining charge current so
that battery does not
2. Disconnect load or switch
load off.
recharge.
3. Battery has a damaged cell.
3. Replace battery.
4–5


A
Specifications
Appendix A “Specifications” contains the
Truecharge+ physical, electrical, AC input, and
protection feature specifications.

Specifications
Physical Specifications
Dimensions 151/8 in x 6 3/4 in x 2 3/4 in
385 mm x 172 mm x 70 mm
Weight Truecharge 20+ 6.9 lbs (3.1 kg)
Truecharge 40+ 7.4 lbs (3.3 kg)
AC input connections Three color-coded No. 16 AWG wires
(L, N, G) minimum 6 inches long in a
separate AC wiring enclosure with
provision for connection of a ½ inch
cable clamp or conduit hub
DC output
connections
Four-pole (3 positives and 1 common
negative) terminal strip rated for 60 A
per pole, No 6 - 14 AWG wire
Electrical Specifications
Electrical Specifications
Number of battery bank outputs 3, diode isolated (no independent regulation)
Nominal battery voltage 12 VDC
Normal operating output range 0 – 16 VDC
Rated DC output current (total)
Charge modes Switch settings for three-step, two-step, or fixed
Battery type compensation Switch settings for Flooded, Gel, and AGM
Battery temperature
compensation
Truecharge 20 +
20 ADC
voltage
batteries
Charge voltage is battery-temperature compensated
manually (switch settings) for Cold (10 °C/ 50 °F),
Warm (10–27 °C/50–80 °F) and
Hot (>27 °C/80 °F) ranges, or automatically with
optional remote battery temperature sensor
Truecharge 40 +
40 ADC
A–2

Electrical Specifications
Electrical Specifications
Absorption voltage
Hot Warm Cold
Flooded 14.0 14.4 14.8 VDC
Gel 13.8 14.2 14.6 VDC
AGM 14.0 14.3 14.6 VDC
Float voltage at no load
Flooded 13.1 13.5 13.9 VDC
Hot Warm Cold
Gel 13.4 13.8 14.2 VDC
AGM 13.1 13.4 13.7 VDC
Equalize mode current Truecharge 20+
5 ADC
Equalize mode—maximum
16.0 VDC
output voltage
Fixed voltage mode—nominal
13.5 ± 0.12 VDC
output voltage
Truecharge 40+
10 ADC
A–3

Specifications
AC Input Specifications
Truecharge 20+ Truecharge 40+
AC input voltage range 90 – 135 VAC, 50/60 Hz
Maximum AC input current at
6.5 A
rms
12 A
rms
90 VAC
Typical AC input current at
4.6 A
rms
8.5 A
rms
120 VAC
No-load AC power draw
less than 3 watts less than 3 watts
(without remote panel)
Power factor rated load 0.66 0.68
Efficiency—peak 83% 83%
Surge protection Line-to-neutral surge protector rated at 150 V
Protection Features
Protection features
Battery reverse polarity Internal fuses for each output, non-user replaceable
Safe non-operating
battery voltage
Over-voltage limits Will not start charging if any battery voltage is greater than
24 VDC maximum
15.0 VDC
Will not continue charging if any battery voltage is greater than
16.0 VDC
Output current limit Truecharge 20+
20.5 – 22.5 Adc
A–4
Truecharge 40+
41.0 – 44.0 Adc

Approvals
Protection features
Over-temperature Internal charger temperature is measured. Unit shuts down and
restarts as follows:
• Over-temperature shutdown at 62 °C
• Over-temperature restart at 61 °C
Current derating in
ambient temperatures—
automatic output
Battery over-temperature
protection
Truecharge 20+
20 A at 30 °C to 10 A at 50 °C
Battery temperature as sensed by the battery temperature sensor
(if installed) results in charger shutdown at a battery
temperature of 60 °C.
Approvals
Safety CSA/NRTL approved to CSA107.2 and
UL1236, including the marine supplement,
ignition protection, and UL458, UL1564
Truecharge 40+
40 A at 30 °C to 20 A at 50 °C
A–5

A–6

B
Battery Charging
Appendix B “Battery Charging” describes the
Truecharge+ multistage charging algorithm.

Battery Charging
Charging Algorithms
Battery Type
Truecharge+ charges lead-acid flooded, gel, and AGM (absorbed gla ss
mat) batteries.
Flooded “Flooded” batteries have removable battery caps for refilling with
distilled water and testing the electrolyte.
Gel The sealed gel battery has its electrolyte is in the form of a gel rather than
a liquid and does not require topping up. Battery caps are not removable.
AGM AGM (absorbed glass mat) batteries are similar to gel batteries except the
electrolyte is absorbed into a fibreglass matting.
WARNING Risk of battery damage
Since the Truecharge+ has o nly one battery type setting for all
batteries connected to its three banks, do not mix types. All
connected batteries should be of one kind: Flooded or Gel or AGM.
Charge Algorithm Stages
Three-stage
charging
Stages The three automatic stages are:
B–2
Truecharge+ charges batteries in a sequence known as a three-stage
charge. The charging voltage delivered to the battery depends on the
battery
• type setting
• temperature (by switch setting or battery temperature sensor)
• state of charge
•bulk
• absorption
•float
There is a fourth stage, equalization, that is initialized manually since it is
only performed occasionally and only on flooded batteries.

Charging Algorithms
Bulk Charge In the first stage, known as the bulk charge, Truecharge+ delivers its full-
rated output current.This constant current is delivered to the batteries until
the battery voltage approaches its absorption voltage—typically around
14.4 volts for 12 volt batteries. The bulk charge stage restores about 75%
of the battery’s charge.
Absorption
Charge
During the absorption charge, the charging voltage is held constant near
the gassing voltage, and the battery gradually reduces the charging current
it demands as it attains full charge. Once the current drops below 4 Adc
for three minutes, the charger either exits to Float for gel and AGM
batteries or charges flooded batteries for one more hour.
This extended one-hour charge ensures that the batteries are fully topped
up and is recommended by the flooded battery manufacturers.
Float Charge The float charge is a maintenance mode in which the output voltage of the
charger is reduced to a lower level, typically about 13.5 volts to maintain
the battery’s charge without losing electrolyte through gassing. Unlike
many standalone chargers, Truecharge+ can be left connected to your
battery indefinitely without risk of overcharging.
In the float mode, the charger will initiate a new charge cycle under any of
these conditions:
• AC power is disconnected and reconnected
• any battery drops below 12.5 VDC for 15 minutes
• 21 days have passed from the time the charger completed Absorption.
The chart in Figure B-1 shows the three-stage charging profile.
B–3

Battery Charging
Charging started
DC Voltage
Constant current
at maximum
charge rate
DC Current
Time
Figure B-1 Three-stage charging profile
Equalization Charge
The equalization charge must be manually initiated because it is not
required each time the battery is recharged. Equalization is a deliberate
overcharge designed to return each cell to optimum condition by reducing
sulfation and stratification in the battery . The overchar ge helps the battery
to reach and maintain peak capacity by equalizing the chemistry in the
individual battery cells.
Bulk stage
Absorption stage
Constant voltage
at Absorption
voltage setting
Float stage
Constant voltage
at the Float
voltage setting
Load current on demand
An equalization charge should be performed only on vented, flooded
(non-sealed or “wet”) batteries. It should be performed only if
recommended by the battery manufacturer and only as often as specified.
Two-Stage Charging
Difference from
three-stage
B–4
In a two-stage charge, the charger finishes the Absorption charge but does
not go to Float mode because some battery manufacturers advise against
floating their batteries. The Truecharge+ goes into a monitoring mode
instead where the charger monitors the batteries but does not charge or
float them.
A new charge cycle will be initiated under the same conditions as for
three-step charging.

C
Battery
Maintenance
Appendix C “Battery Maintenance” contains
procedures for maintaining the battery enclosure,
battery terminals and lugs, and battery cables. It
also provides a list of the clothing, tools,
equipment, and supplies you should have before
you begin battery maintenance.

Battery Maintenance
Maintenance Guidelines
WARNING Risk of acid burns
Wear appropriate eye protection and rubber gloves when
carrying out battery maintenance activities.
WARNING Risk of fire, explosion, burns
Use caution when wearing jewellery or working with metal tools
around batteries. Do not allow any metal object to contact both
battery terminals at the same time. The metal may become
welded to the battery terminals causing extreme heating or fire.
Electrolyte At a minimum, check the level of the electrolyte in each battery cell once
a month (for flooded batteries). It should be above the top of the plates,
but not completely full. Most batteries have a plastic cup that just touches
the electrolyte when the cell is full. Don’t overfill the batteries, or the
electrolyte will spill out when the batteries are being charged. Refill the
batteries with distilled water only—“spring” water and regular tap water
may have high mineral levels. These can poison the battery chemistry and
reduce battery life and should not be used.
Battery
connections
C–2
It is also good to periodically check the battery connections for tightness
and corrosion. If you find any corrosion, disconnect power from
Truecharge+, disconnect the cables, and carefully clean them with a mild
solution of baking soda and water. Ensure that all caps are on tight so
solution doesn’t enter the battery. Rinse the top of the battery with clean
water when you have finished.
To reduce the amount of corrosion on the battery terminals, coat them
with anti-corrosion grease or liquid neoprene (liquid electrical tape) after
re-assembly. This is available from automotive parts stores or battery
suppliers. Do not apply anything between the terminal and the cable lugs.
The connection should be metal to metal. Apply the protective material
only after the bolts have been tightened.
Dirty batteries can leak current and tend to run warmer. Cleaning batteries
when necessary is easy and safe when you follow the instructions below.

Preparation for Cleaning Batteries
The appropriate clothing, tools, equipment, and supplies are listed below.
Gather what you need before beginning.
Clothing
Appropriate clothing could include old clothes, rubber boots, or old
shoes. Battery acid is highly corrosive, so wear something you can live
without just in case you splash some on yourself. Be sure to wear rubber
gloves and eye protection.
Tools
p Adjustable wrench or appropriately sized sockets and ratchet for
battery terminals
p Torque wrench
p Soft-bristled brush (a discarded toothbrush works fine)
p 6 inch scrub brush
p Inexpensive ½ inch chip brush or soldering brush
Preparation for Cleaning Batteries
Equipment
Supplies
p Eye protection
p Rubber gloves
p Water hose with spray nozzle or five gallon watering bucket
p Empty spray bottle
p Baking soda. (Always keep on hand in the event of a spill.)
p Hand cleaner or soap
p Towel
p After reattaching cables: anti-corrosion grease (available at auto, RV,
and marine stores)
C–3

Battery Maintenance
Maintaining and Cleaning
Follow these procedures to maintain the
• battery enclosure
• battery terminal and lugs
• cables
WARNING
Review the “Important Safety Instructions” on page ix before
you begin.
Battery Enclosure and Batteries
Mix four ounces of baking soda with a gallon of fresh water and fill a
spray bottle. Spray the solution on all exposed surfaces of the battery
compartment, and wash down the exposed surfaces of the batteries and
their enclosure. Scrub stubborn areas with the scrub brush. Baking soda
will neutralize any acid that may have collected on these surfaces. Finish
by rinsing with water.
Terminals & Lugs
Loose battery terminals and lugs exposed to open air corrode rapidly. The
corrosion appears as a white powder or granular foam on the terminals
and any nearby exposed metal parts. This powder is actually a crystallized
form of sulfuric acid. If it contacts your skin, it will cause burns unless
you rinse it off immediately. Most textiles that are exposed to this
corrosive eventually dissolve.
The most common cause of battery system failure is loose or corroded
battery terminals and cable lugs. If any white powdery residue forms
between the battery cable lug and the battery terminal, remove the cable
for cleaning. When it is necessary to detach a battery cable from the
battery, disconnect all loads and charging sources. Using the appropriate
tool, remove the negative battery cable first and re-install it last.
To remove any stubborn residue, sprinkle baking soda directly on the
area, scrub with a wet toothbrush (or other soft-bristle brush), add water
as required, and then rinse.
C–4

Cables
Maintaining and Cleaning
Reconnect the battery cable terminals to the battery lugs and tighten to
approximately 10–15 foot-pounds using the torque wrench. If you do not
have a torque wrench, use an appropriate tool to tighten the bolts
reasonably snug. Do not over-tighten.
After tightening the cables, evenly coat all the exposed metal surfaces of
the battery terminals and lugs with liquid neoprene. This will cure to form
an airtight protective layer. If liquid neoprene is not available, use a light
coating of anti-corrosion grease or other sealant. Do not let anything
come between the mating surfaces of the lugs and terminals.
Inspect all battery cables for missing or damaged insulation or loose
connections. Inspect any openings that the cables pass through. All such
openings must be equipped with a rubber grommet or conduit to prevent
chafing on the cable. If necessary, replace worn grommets. If the cable
insulation is worn, replace the cable.
C–5

C–6

Product and
System
D
Information
Appendix D “Product and System Information”
contains the Xantrex warranty for your product
and return instructions. It also contains a place
for you to record the serial number and date of
purchase and other details of your battery
charger.

Product and System Information
Warranty
What does this warranty cover? This Limited Warranty is provided
by Xantrex Technology, Inc. ("Xantrex") and covers defects in
workmanship and materials in your Xantrex Truecharge 20+ and
Truecharge 40+. This warranty lasts for a Warranty Period of 12 months
from the date of purchase at point of sale to you, the original end user
customer.
This Limited Warranty is transferable to subsequent owners but only for
the unexpired portion of the Warranty Period.
What will Xantrex do? Xantrex will, at its option, repair or replace
the defective product free of charge, provided that you notify Xantrex of
the product defect within the Warranty Period, and provided that Xantrex
through inspection establishes the existence of such a defect and that it is
covered by this Limited Warranty.
Xantrex will, at its option, use new and/or reconditioned parts in
performing warranty repair and building replacement products. Xantrex
reserves the right to use parts or products of original or improved design
in the repair or replacement. If Xantrex repairs or replaces a product, its
warranty continues for the remaining portion of the original Warranty
Period or 90 days from the date of the return shipment to the customer,
whichever is greater. All replaced products and all parts removed from
repaired products become the property of Xantrex.
D–2
Xantrex covers both parts and labor necessary to repair the product, and
return shipment to the customer via a Xantrex-selected non-expedited
surface freight within the contiguous United States and Canada. Alaska
and Hawaii are excluded. Contact Xantrex Customer Service for details
on freight policy for return shipments outside of the contiguous United
States and Canada.
How do you get service? If your p roduct requires troubleshooting or
warranty service, contact your merchant. If you are unable to contact your
merchant, or the merchant is unable to provide service, contact Xantrex
directly at:
Phone: 1-800-670-0707 (toll free in North
America) or 1-360-925-5097 (direct)
Fax: 1-360-925-5143
Email: CustomerService@xantrex.com

Warranty
Direct returns may be performed according to the Xantrex Return
Material Authorization Policy described in your product manual. For
some products, Xantrex maintains a network of regional Authorized
Service Centers. Call Xantrex or check our website to see if your product
can be repaired at one of these facilities.
In any warranty claim, dated proof of purchase must accompany the
product and the product must not have been disassembled or modified
without prior written authorization by Xantrex.
Proof of purchase may be in any one of the following forms:
• The dated purchase receipt from the original purchase of the product
at point of sale to the end user, or
• The dated dealer invoice or purchase receipt showing original
equipment manufacturer (OEM) status, or
• The dated invoice or purchase receipt showing the product exchanged
under warranty
What does this warranty not cover? This Limited Warranty does not
cover normal wear and tear of the product or costs related to the removal,
installation, or troubleshooting of the customer's electrical systems. This
warranty does not apply to and Xantrex will not be responsible for any
defect in or damage to:
a) the product if it has been misused, neglected, improperly
installed, physically damaged or altered, either internally or
externally, or damaged from improper use or use in an unsuitable
environment;
b) the product if it has been subjected to fire, water, generalized cor-
rosion, biological infestations, or input voltage that creates operating conditions beyond the maximum or minimum limits listed
in the Xantrex product specifications including high input voltage
from generators and lightning strikes;
c) the product if repairs have been done to it other than by Xantrex
or its authorized service centers (hereafter "ASCs");
d) the product if it is used as a component part of a product
expressly warranted by another manufacturer;
e) the product if its original identification (trade-mark, serial num-
ber) markings have been defaced, altered, or removed.
D–3

Product and System Information
DISCLAIMER
Product
THIS LIMITED WARRANTY IS THE SOLE AND EXCLUSIVE WARRANTY PROVIDED BY
XANTREX IN CONNECTION WITH YOUR XANTREX PRODUCT AND IS, WHERE
PERMITTED BY LAW, IN LIEU OF ALL OTHER WARRANTIES, CONDITIONS,
GUARANTEES, REPRESENTATIONS, OB LIG ATIONS AND LIABILITIES, EXPRESS OR
IMPLIED, STATUTORY OR OTHERWISE IN CONNECTION WITH THE PRODUCT,
HOWEVER ARISING (WHETHER BY CONTRACT, TORT, NEGLIGENCE, PRINCIPLES OF
MANUFACTURER'S LIABILITY, OPERATION OF LAW, CONDUCT, STATEMENT OR
OTHERWISE), INCLUDING WITHOUT RESTRICTION ANY IMPLIED WARRANTY OR
CONDITION OF QUALITY, MERCHANTABILITY OR FITNESS FOR A PARTICULAR
PURPOSE. ANY IMPLIED WARRANTY OF MERCHANTABILITY OR FITNESS FOR A
PARTICULAR PURPOSE TO THE EXTENT REQUIRED UNDER APPLICABLE LAW TO
APPLY TO THE PRODUCT SHALL BE LIMITED IN DURATION TO THE PERIOD
STIPULATED UNDER THIS LIMITED WARRANTY.
IN NO EVENT WILL XANTREX BE LIABLE FOR ANY SPECIAL, DIRECT, INDIRECT,
INCIDENTAL OR CONSEQUENTIAL DAMAGES, LOSSES, COSTS OR EXPENSES
HOWEVER ARISING WHETHER IN CONTRACT OR TORT INCLUDING WITHOUT
RESTRICTION ANY ECONOMIC LOSSES OF ANY KIND, ANY LOSS OR DAMAGE TO
PROPERTY, ANY PERSONAL INJURY, ANY DAMAGE OR INJURY ARISING FROM OR AS
A RESULT OF MISUSE OR ABUSE, OR THE INCORRECT INSTALLATION, INTEGRATION
OR OPERATION OF THE PRODUCT.
Exclusions
If this product is a consumer product, federal law does not allow an
exclusion of implied warranties. To the extent you are entitled to implied
warranties under federal law, to the extent permitted by applicable law
they are limited to the duration of this Limited Warranty. Some states and
provinces do not allow limitations or exclusions on implied warranties or
on the duration of an implied warranty or on the limitation or exclusion of
incidental or consequential damages, so the above limitation(s) or
exclusion(s) may not apply to you. This Limited Warranty gives you
specific legal rights. You may have other rights which may vary from
state to state or province to province.
WARNING: LIMITATIONS ON USE
Please refer to your product user manual for limitations on uses of the
product.
D–4

Return Material Authorization Policy
Return Material Authorization Policy
Before returning a product directly to Xantrex you must obtain a Return
Material Authorization (RMA) number and the correct factory "Ship To"
address. Products must also be shipped prepaid. Product shipments will
be refused and returned at your expense if they are unauthorized, returned
without an RMA number clearly marked on the outside of the shipping
box, if they are shipped collect, or if they are shipped to the wrong
location.
When you contact Xantrex to obtain service, please have yo ur inst ruction
manual ready for reference and be prepared to supply:
• The serial number of your product
• Information about the installation and use of the unit
• Information about the failure and/or reason for the return
• A copy of your dated proof of purchase
Return Procedure
1. Package the unit safely , preferably using the orig inal box and pack ing
materials. Please ensure that your product is shipped fully insured in
the original packaging or equivalent. This warranty will not apply
where the product is damaged due to improper packaging.
2. Include the following:
• The RMA number supplied by Xantrex Technology Inc. clearly
marked on the outside of the box.
• A return address where the unit can be shipped. Post office boxes are
not acceptable.
• A contact telephone number where you can be reached during work
hours
• A brief description of the problem
3. Ship the unit prepaid to the address provided by your Xantrex
customer service representative.
If you are returning a product from outside of the USA or Canada
In addition to the above, you MUST include return freight funds and are
fully responsible for all documents, duties, tariffs, and deposits.
D–5

Product and System Information
If you are returning a product to a Xantrex Authorized Service
Center (ASC) A Xantrex return material authorization (RMA) number
is not required. However, you must contact the ASC prior to returning the
product or presenting the unit to verify any return procedures that may
apply to that particular facility.
D–6

Information about your Truecharge+
Information about your Truecharge+
Please record the following information when you unpack your
Truecharge+unit.
:
r Model Number
r Serial Number
r Purchased From
r Purchase Date
If you need to contact Customer Service, please gather the following
information before calling.The information will assist the service
representative in providing you with better service.
r Type of installation (for
example, home, boat, RV)
r Length of time unit has been
installed
r Battery bank size
r Battery type (Flooded, Gel,
AGM)
r AC wiring size and length
r DC wiring size and length
r Battery Temperature Sensor
installed
D–7

Product and System Information
D–8

Index
A
absorption charge, battery activity
during
B–3
AC input specifications
AC wiring requirements
AGM (absorbed glass mat) batteries
AGM batteries, selector switch for
anti-corrosion grease
A–4
2–6
B–2
1–3
C–2
B
baking soda C–3
batteries
AGM (absorbed glass mat)
first aid when working with
maintenance guidelines
precautions when working with
battery not detected by charger
battery temperature sensor
battery temperature, importance of in
charging
battery type selector switch
battery types
description of
suitable for equalization
battery voltage too high
bulk charge, battery activity during
3–3
B–2
B–2
1–x
C–2
1–x
4–4
2–14
1–3
3–8
4–5
B–3
C
charge mode selector switch 1–3
charging algorithm, three stage
B–2
charging batteries, procedure for
charging current
charging indicator light, significance of
charging time, calculating
charging too slow
charging, effect of battery temperature
circuit requirements
continuous rating
current, reduction of in high ambient
Customer Service
email
D–2
fax number
phone number
1–2
3–4
4–5
sensor on
2–15
2–3
1–2
temperatures
D–2
D–2
A–5
3–5
3–2
D
DC disconnect device 2–5
DC wiring requirements
distilled water
C–2
2–7
E
electric specifications A–2
electrolyte level, checking for
email, contacting Customer Service by
D–2
C–2

Index
equalization charge B–4
equalization of batteries, understanding
equalizing, procedure
3–9
F
failure to operate 4–4
fan speed, change in speed of
fax number for Customer Service
features
first aid
fixed voltage mode
float charge, battery activities during
flooded batteries
formula for charging time
1–2
1–xi
equalizing
selector switch for
3–8
1–4
1–3
3–7
D–2
B–3
3–2
G
galvanic isolation 1–3
gel batteries, selector switch for
generator
limitations of modified sine wave
using as source power
grounding, necessity for
1–3
3–4
3–4
2–14
I
indicator lights
activity of
used in troubleshooting
installation
battery temperature sensor
codes to be observed
physical requirements for installing
procedure for
tools required for
wiring diagram
wiring order
3–4
4–2
2–14
2–1
2–8
2–7
2–4
2–9
3–7
2–3
M
maintaining batteries C–2
maintaining the Truecharge+ unit
materials list
monitor mode
2–2
3–7
4–2
N
neoprene, liquid C–2
O
optional accessories 2–14
P
physical specifications A–2
power source, generator as
power supply, using TrueCharge+ as
pre-installation requirements
problems, typical when operating
protection features
description
specifications
1–3
A–4
3–4
2–2–2–7
4–4
R
remote display panel, purpose of 2–15
reverse polarity, conse quences of
2–8
S
safety instructions 1–ix–1–xi
selector switches
simultaneous charging
specifications
system diagram
1–3
1–2
A–2–A–5
2–4
1–4
L
liquid neoprene C–5
Index–2

T
telephone number for Customer Service D–2
temperature switch
description of
setting for charging
temperature, effect of in charging
terminals and lugs, maintenance of
three-battery charging
three-stage charging algorithm
explanation
three-stage charging profile
(diagram)
tools, required for installation
troubleshooting, use of indicator lights in
two-stage charging, difference from three-stage
1–3
3–3
3–3
C–4
1–2
B–2
B–4
2–7
4–2
4
V
voltage range when charging 1–2
W
warranty
terms and conditions
wiring order for installation (figure)
D–2
2–9
Index
B–
Index–3


Xantrex Technology Inc.
Toll free 1 800 670 0707
Direct 1 360 925 5097
Fax 1 360 925 5143
CustomerService@xantrex.com
www.xantrex.com
 Loading...