


Use & Care Guide
Guide d’utilisation et d’entretien
Heat Pump Dryer
Sécheuse avec pompe à chaleur
Para obtener acceso al Manual de uso y
cuidado en español, o para obtener información adicional acerca de su producto, visite: www.whirlpool.com.
If you have any problems or questions, visit us at www.whirlpool.com
Pour tout problème ou toute question, consulter www.whirlpool.ca
W10858718B W10858720B - SP

Table of Contents |
|
|
DRYER SAFETY....................................................................... |
|
2 |
OPERATING INSTRUCTIONS................................................ |
|
4 |
ACCESSORIES.................................................................. |
|
4 |
HEAT PUMP TECHNOLOGY............................................. |
|
5 |
CONTROL PANEL AND FEATURES.................................. |
|
6 |
PROGRAM/CYCLE GUIDE............................................... |
|
7 |
USING YOUR DRYER....................................................... |
|
9 |
DRYER CARE.................................................................. |
|
12 |
INSTALLATION INSTRUCTIONS......................................... |
|
14 |
INSTALLATION REQUIREMENTS................................... |
|
14 |
LOCATION REQUIREMENTS.......................................... |
|
15 |
DRAIN SYSTEM.............................................................. |
|
16 |
ELECTRICAL REQUIREMENTS – U.S.A. ONLY.............. |
17 |
|
ELECTRIC DRYER POWER HOOKUP – |
|
|
CANADA ONLY................................................................ |
|
18 |
ELECTRIC INSTALLATION – U.S.A. ONLY ..................... |
|
18 |
LEVEL DRYER................................................................. |
|
24 |
COMPLETE INSTALLATION CHECKLIST....................... |
|
24 |
DOOR REVERSAL (OPTIONAL)...................................... |
|
25 |
TROUBLESHOOTING............................................................ |
|
30 |
WARRANTY........................................................................... |
|
35 |
ASSISTANCE OR SERVICE................................... |
Back Cover |
|
DRYER SAFETY
Table de matières |
|
|
SÉCURITÉ DE LA SÉCHEUSE.............................................. |
|
36 |
INSTRUCTIONS D’UTILISATION......................................... |
|
37 |
ACCESSOIRES................................................................ |
|
37 |
TECHNOLOGIE DE POMPE À CHALEUR....................... |
38 |
|
TABLEAU DE COMMANDE ET CARACTÉRISTIQUES... |
39 |
|
GUIDE DE PROGRAMMES............................................. |
|
40 |
UTILISATION DE LA SÉCHEUSE.................................... |
|
42 |
ENTRETIEN DE LA SÉCHEUSE...................................... |
|
45 |
INSTRUCTIONS D’INSTALLATION...................................... |
|
47 |
EXIGENCES D’INSTALLATION........................................ |
|
47 |
EXIGENCES D’EMPLACEMENT..................................... |
|
48 |
SYSTÈME DE VIDANGE.................................................. |
|
49 |
SPÉCIFICATIONS ÉLECTRIQUES – |
|
|
ÉTATS-UNIS SEULEMENT.............................................. |
|
50 |
RACCORDEMENT DE LA SÉCHEUSE ÉLECTRIQUE – |
|
|
CANADA UNIQUEMENT................................................. |
|
51 |
INSTALLATION ÉLECTRIQUE – |
|
|
ÉTATS-UNIS SEULEMENT ............................................. |
|
51 |
RÉGLAGE DE L’APLOMB DE LA SÉCHEUSE................ |
57 |
|
LISTE DE VÉRIFICATION POUR |
|
|
INSTALLATION TERMINÉE.............................................. |
|
57 |
INVERSION DE LA PORTE (FACULTATIF)....................... |
58 |
|
DÉPANNAGE.......................................................................... |
|
63 |
GARANTIE.............................................................................. |
|
66 |
ASSISTANCE OU SERVICE...................... |
Couverture arrière |
|
2
IMPORTANT SAFETY INSTRUCTIONS
WARNING: To reduce the risk of fire, electric shock, or injury to persons when using the dryer, follow basic precautions, including the following:
νRead all instructions before using the dryer.
νDo not place items exposed to cooking oils in your dryer. Items contaminated with cooking oils may contribute to a chemical reaction that could cause a load to catch fire. .
νDo not dry articles that have been previously cleaned in, washed in, soaked in, or spotted with gasoline, dry-cleaning solvents, or other flammable or explosive substances as they give off vapors that could ignite or explode.
νDo not allow children to play on or in the dryer. Close supervision of children is necessary when the dryer is used near children.
νBefore the dryer is removed from service or discarded, remove the doors to the drying compartment.
νDo not reach into the dryer if the drum is moving.
νDo not install or store the dryer where it will be exposed to the weather.
νDo not tamper with controls.
νDo not repair or replace any part of the dryer or attempt any servicing unless specifically recommended in
this Use and Care Guide or in published user-repair instructions that you understand and have the skills to carry out.
νDo not use fabric softeners or products to eliminate static unless recommended by the manufacturer of the fabric softener or product.
νDo not use heat to dry articles containing foam rubber or similarly textured rubber-like materials.
νClean lint screen before or after each load.
νKeep the grille on the rear of the dryer free from the accumulation of lint, dust, and dirt.
νThe interior of the appliance should be cleaned periodically by qualified service personnel.
νSee “Electrical Requirements” in “Installation Instructions” for grounding instructions.
SAVE THESE INSTRUCTIONS
3
OPERATING INSTRUCTIONS
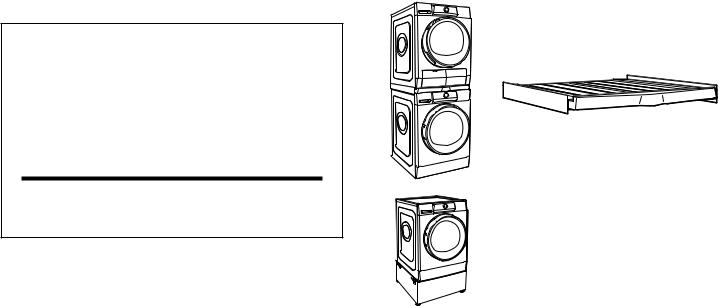
Accessories
INSTALLATION & MAINTENANCE
ACCESSORIES
FACTORY CERTIFIED PARTS – these three words represent quality parts and accessories designed specifically for your appliance.
Time tested engineering that meets our strict quality specifications.
FACTORY CERTIFIED PARTS
Accessories designed for your appliance:
Enhance your new washer and dryer with the following genuine Whirlpool accessories. For more information on options and ordering, call 1-866-698-2538, or visit us at: www.whirlpool.com/accessories. In Canada, call 1-800-688-2002 or visit us at www.whirlpoolparts.ca.
Stack Kit
If space is at a premium, the stack kit allows the dryer to be installed on top of the washer.
12" Pedestal
Color-matched pedestals raise the washer and dryer to a more comfortable working height.
4
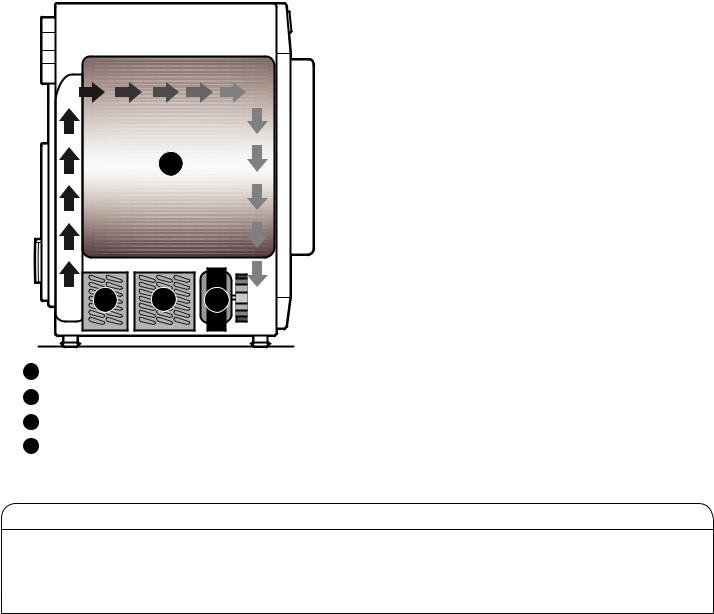
Heat Pump Technology
A typical dryer uses large amounts of energy; this dryer consumes a fraction of the energy by recycling and reclaiming heat. This dryer is a ventless heat pump dryer that uses a refrigeration system to dry and recycle the same air. The laundry
is dried with low temperatures; therefore it may feel cooler than expected during and after the drying process.
The heat pump dryer’s heating phase is longer than in traditional dryers. If possible, do not open the dryer door during the process as heat can escape from the drum and can make longer drying times.
Heat Pump Unit |
Benefits of a Heat Pump |
|
2
1 |
4 |
3 |
1Condenser is heating up the air
2Drying
3Air blower
4Evaporator is drying air and discharging condensation water
•ENERGY: Regenerates energy to reduce overall energy consumption.
•PERFORMANCE: Allows flexibility to manage drying performance and energy savings.
•FABRIC CARE: Capability to use less heat than vented dryer.
•VENTLESS DESIGN: Allows installation in more locations throughout the home.
New Sounds from a Heat Pump
•Dryer runs on a compressor like your refrigerator and you may notice a hum from the compressor.
•The water from wet clothes is pumped out to your drain or water tank. You may notice a gurgling sound occasionally.
Use Automatic Cycles for better fabric care and energy savings
Use the Automatic Cycles to provide the most energy savings and enhanced fabric care from the dryer. During Automatic Cycles, heat pump unit temperature and moisture level are sensed in the load. This sensing occurs throughout the drying cycle and the dryer shuts off when the load reaches the selected dryness. Use the NORMAL dryness level to provide optimal energy savings.
With Timed Dry, the dryer runs the amount of time set and can result in shrinkage, wrinkling, and static due to over-drying. Use Timed Dry for the occasional damp load that needs a little more drying time.
5
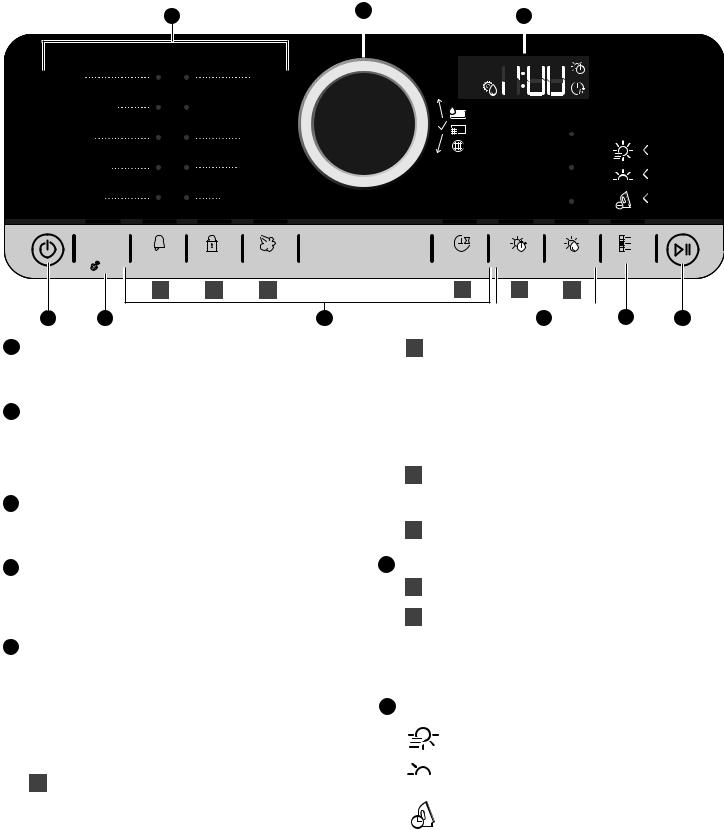
Control Panel and Features
3 |
4 |
9 |
|
|
|
|||
|
|
|
|
|
||||
|
|
|
|
|
|
|
|
|
|
|
|
|
|
|
|
|
|
|
|
|
|
|
|
|
|
|
|
|
|
|
|
|
|
|
|
Mixed |
Wool |
|
|
||
|
||
Heavy Duty |
Bulky/Bedding |
|
|
||
|
||
Normal |
Air Dry |
|
Synthetics |
Refresh |
|
Delicates |
Timed Dry |
|
X-Dry
Dry
Damp
Dry
P
Program |
Cycle |
Control |
Steam |
Delay |
Timed |
Dryness |
Options |
3 Sec |
Signal |
Lock |
|
Start |
Dry |
Level |
|
|
|
Hold 3 Sec |
|
|
|
|
|
|
A |
B |
C |
D |
A |
B |
|
1 |
2 |
5 |
1POWER BUTTON
Touch until the indicator above the Program button lights up. Symbols appear on the control panel and sounds are played.
2PROGRAM (cycle)
When you turn on the dryer, the light above this button will turn on. The program settings which you used last will appear on the control panel. This button also lets you set water conductivity (see “Adapting the dryer to water conductivity” for more information).
3PROGRAM/CYCLE AREA
An indicator next to each program/cycle lights up as you use the knob to scroll through the list. Press the knob when the indicator next to the desired program/cycle lights up.
4CONTROL KNOB
Turn the knob to select a program/cycle for your laundry load, change dryness level, set drying time or delay start time, or select Other Options. Press the knob to confirm your selection.
5OPTIONS
Touch to activate additional dry options or additional features on the dryer before touching the Start/Pause button. Additional dry options or additional features selected after touching the Start/Pause button may not be activated.
To return to factory default cycle settings, unplug the dryer for 30 seconds, then plug back in.
NOTE: Not all options are available with all cycles.
ACycle Signal
Use to turn on or off the signal indicating the end of a drying cycle.
NOTE: Touch and hold the Cycle Signal button for about one second to turn sounds on or off.
|
|
7 |
8 |
6 |
|||
BControl Lock
Use to lock the controls of the dryer and avoid
an accidental change in cycle options or preferences during a drying cycle.
Touch and hold CONTROL LOCK to lock or unlock the controls of the dryer.
NOTE: The Control Lock function may be enabled when recovering from a power failure. To unlock the control, touch and hold CONTROL LOCK.
CSteam
Touch to activate the Steam option, which adds humidity to the end of the Heavy Duty, Normal, or Synthetics cycle to help smooth out wrinkles.
DDelay Start
Touch to start your program/cycle at a later time.
6 SETTINGS
ATimed Dry
Sets the length of a Timed Dry cycle.
BDryness Level
When using some Automatic Cycles, you may select a Dryness Level based on the type of load you are drying.
NOTE: Dryness Level is for use with Automatic Cycles only.
7 OTHER OPTIONS

 Save Time
This option provides quicker drying.
 Gentle
 This option dries laundry more gently by reducing the drying temperature.
Wrinkle Shield™
This option helps to avoid creasing if you cannot unload the laundry soon after the program/cycle ends. The dryer starts to tumble the laundry periodically a few minutes after the program/cycle ends. This tumbling will last up to approximately 12 hours. Tumbling can be stopped any time by touching the Power button to turn off the dryer.
6
8START/PAUSE BUTTON
Touch to start, or touch and hold to pause, a program/ cycle.
9LED DISPLAY
When you select a program/cycle, its default settings will light up and the Estimated Time Remaining will be displayed. Factors such as load size and dryness level may affect the time shown in the display.
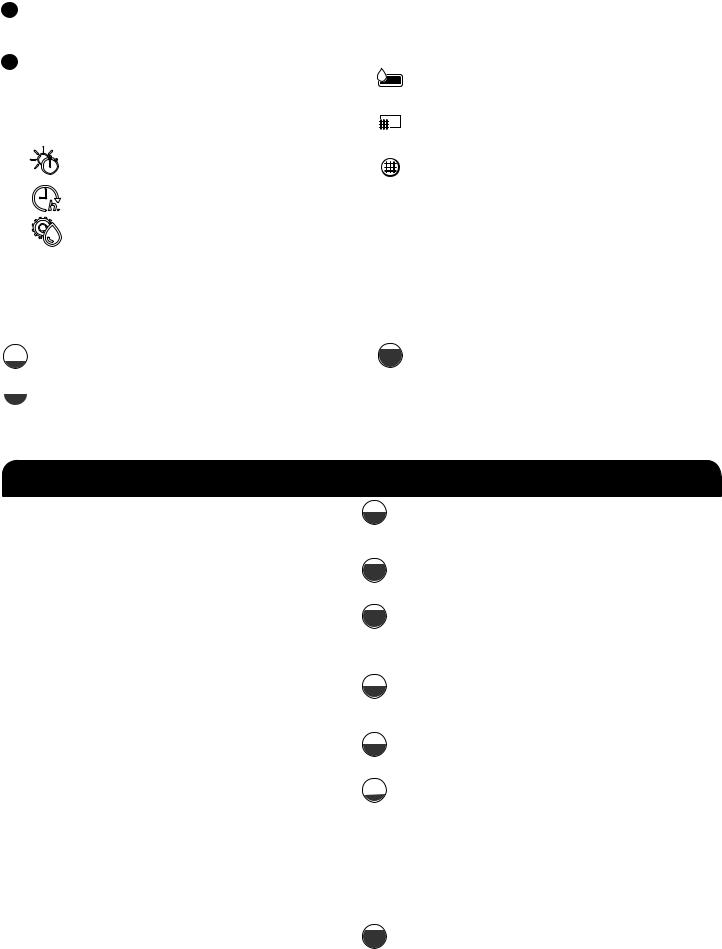
Symbols
Drying time
Delay start
Conductivity adjustment
STATUS INDICATORS (next to control knob)
These indicators will light up to alert you when certain conditions occur.
Symbols
Water tank full (see “Empty Water Tank” in “Using Your Dryer”)
Clean bottom filter (see “Cleaning the Bottom Filter” in “Dryer Care”)
Clean door filter (see “Cleaning the Lint Screen” in “Dryer Care”)
Program/Cycle Guide – Automatic Cycles
Settings and options shown in bold are default settings for that cycle. If settings are changed, the new settings will be remembered. If there is a power failure, settings will return to the default. Not all settings and options are available on each cycle.
Load Size Recommendations
For best results, follow the wet load size recommendations noted for each cycle.
Small load: Fill the dryer drum with 3–4 items, not more |
Large load: Fill the dryer drum up to about ¾ full. |
than ¼ full. |
Do not pack tightly. Items need to tumble freely. |
 Medium load: Fill the dryer drum up to about ½ full.
Use Automatic Cycles for better fabric care and energy savings
The dryer senses moisture in the load or air temperature and shuts off when the load reaches the selected dryness level. Use the NORMAL dryness level to provide optimal energy savings.
|
Mixed laundry |
Mixed |
Dry |
Wrinkle Shield™ |
Uses Medium heat to dry large loads of mixed fabrics and |
|
|
|
|||||
|
made of cotton, |
|
|
|
items. |
|
|
linen, or synthetic |
|
|
|
|
|
|
fibers and blends |
|
|
|
|
|
|
|
|
|
|
|
|
|
Heavyweight items |
Heavy Duty |
Dry |
Steam |
Offers stepped drying, starting with High heat followed by |
|
|
or heavy work |
|
|
Wrinkle Shield™ |
Medium heat for enhanced fabric care and energy savings. |
|
|
clothes |
|
|
Gentle |
|
|
|
|
|
|
|
|
|
|
Work clothes, |
Normal |
Extra Dry |
Steam |
Uses Medium heat to dry large loads of cotton or mixed |
|
|
mixed cottons, |
|
Dry |
Dryness Level |
fabrics and items. Tumbling reverses intermittently to |
|
|
corduroys |
|
Damp Dry |
Wrinkle Shield™ |
redistribute the load for thorough drying. |
|
|
|
|
|
Gentle |
|
|
|
|
|
|
Save Time |
|
|
|
Normally soiled |
Synthetics |
Extra Dry |
Steam |
Uses lower heat than the Normal cycle. Tumbling reverses |
|
|
laundry made of |
|
Dry |
Dryness Level |
intermittently to redistribute the load for thorough drying. |
|
|
artificial fibers or |
|
Damp Dry |
Wrinkle Shield™ |
|
|
|
cotton blends |
|
|
Gentle |
|
|
|
|
|
|
|
|
|
|
Undergarments, |
Delicates |
Dry |
Wrinkle Shield™ |
Uses Extra Low heat to gently dry delicate items. |
|
|
blouses, lingerie, |
|
|
|
|
|
|
performance wear |
|
|
|
|
|
|
|
|
|
|
|
|
|
Wool items labelled |
Wool |
Dry |
N/A |
Uses Low heat to provide a short, finishing touch to items |
|
|
with the Woolmark |
|
|
|
that have been air-dried. |
|
|
logo and identified |
|
|
|
|
|
|
as machine |
|
|
|
|
|
|
washable, as well |
|
|
|
|
|
|
as textiles made of |
|
|
|
|
|
|
silk (see care label |
|
|
|
|
|
|
recommendations), |
|
|
|
|
|
|
linen, wool, and |
|
|
|
|
|
|
viscose marked as |
|
|
|
|
|
|
hand-wash only |
|
|
|
|
|
|
|
|
|
|
|
|
|
Comforters, pillows, |
Bulky/ |
Dry |
Wrinkle Shield™ |
Use for drying large, bulky items; do not overfill dryer drum. |
|
|
sheets |
Bedding |
|
|
Partway through the cycle, the signal will sound to indicate |
|
|
|
|
|
|
when it is time to rearrange items for optimal drying. |
|
7

Program/Cycle Guide – Adjustable Time Cycles
Settings and options shown in bold are default settings for that cycle. If settings are changed, the new settings will be remembered. If there is a power failure, settings will return to the default. Not all settings and options are available on each cycle.
Load Size Recommendations
For best results, follow the wet load size recommendations noted for each cycle.
Small load: Fill the dryer drum with 3–4 items, not more |
Large load: Fill the dryer drum up to about ¾ full. |
than ¼ full. |
Do not pack tightly. Items need to tumble freely. |
Medium load: Fill the dryer drum up to about ½ full. |
|
Adjust drying time on Timed Dry Cycles
When you select the Timed Dry or Air Dry cycle, the time appears in the display. Use the knob to set the drying time from 10 to 180 minutes (3 hours).
Items |
|
Available |
|
|
to Dry: |
Cycle: |
Options: |
Cycle Details: |
|
|
|
|
|
|
Any load |
Air Dry |
Wrinkle Shield™ |
For airing out, refreshing, and loosening up laundry without heating. |
|
NOTE: Line dry |
|
|
|
|
foam, rubber, |
|
|
|
|
plastic, or heat- |
|
|
|
|
sensitive fabrics. |
|
|
|
|
|
|
|
|
|
Any load |
Timed |
Wrinkle Shield™ |
Use to dry items with low heat to a damp level for items that do not require |
|
|
Dry |
|
an entire drying cycle. |
|
|
|
|
|
|
Program/Cycle Guide – Refresh Cycle
The Refresh cycle is designed for use with dry loads to loosen wrinkles, reduce odors, and refresh fabrics.
|
Shirts, blouses, |
Refresh |
Dry |
Use to reduce odors and light wrinkles. Do not add dryer sheets. Before |
|
|
|
||||
|
and slacks |
|
|
loading laundry into the drum, spray it with a maximum of 6.8 oz (200 ml) |
|
|
|
|
|
water. |
|
|
|
|
|
|
|
8

Using Your Dryer
WARNING: To reduce the risk of fire, electric shock, or injury to persons, read the IMPORTANT SAFETY INSTRUCTIONS before operating this appliance.
1. Empty water tank
Hold the handle and carefully pull out the water tank. Holding the full water tank with both hands, empty out the water. Then push the container back into place. Make sure that it is properly inserted.
2. Clean door lint screen
Clean the lint screen before each load. Pull the lint screen straight up and out. Press tab down and open lint screen. Roll lint off the screen with your fingers. Push the lint screen firmly back into place.
IMPORTANT: Clean lint screen before each dryer use as a screen blocked with lint will increase drying time.
3. Clean bottom filter
Clean the bottom filter after every 5 cycles. Open the filter door on the bottom of the dryer and grab the handle to pull out filter. Remove the foam from the bottom filter. Clean the filter foam and filter by hand or rinse with water – do not wash the filter foam in a washer. Wring out the filter foam – do not insert it in the bottom filter dripping wet. For additional cleaning information, see “Dryer Care.”
Replace the filter foam on the bottom filter. Replace the bottom filter in the filter chamber. Fold the filter handle down and close the bottom door.
NOTE: To turn off the “Clean bottom filter” ( ) status indicator, the filter must be removed and replaced with the Power button touched ON and no cycle running.
9
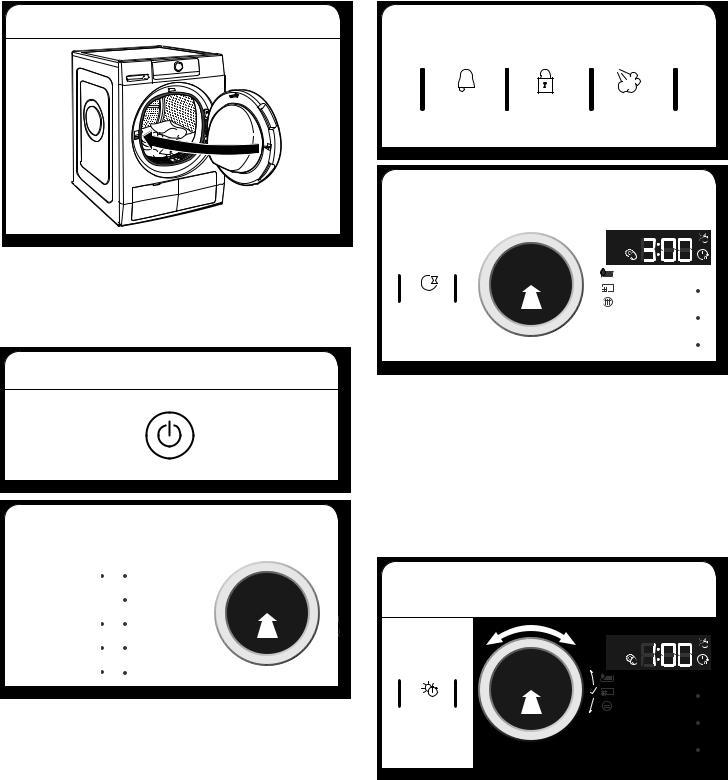
4. Load dryer
Open the door by pulling on the handle. Place laundry in the dryer. Add a dryer sheet to wet load if desired. Close the door.
IMPORTANT: Do not tightly pack the dryer. Items need to tumble freely. Tightly packing can lead to poor drying performance and may increase wrinkling and tangling.
5. Touch Power button to turn on dryer
6. Select program/cycle
Mixed |
Wool |
Heavy Duty |
Bulky/Bedding |
Normal |
Air Dry |
Synthetics |
Refresh |
Delicates |
Timed Dry |
|
|
Turn the knob to select a program/cycle for your laundry load. As you turn the knob, an indicator light will light up next to the program/cycle names to the left of the knob. Stop turning
when the indicator next to the desired program/cycle lights up. Press the knob to confirm your selection.
See “Program/Cycle Guide” for details on program/cycle features.
7. Select options, if desired
Cycle |
Control |
Steam |
Signal |
Lock |
|
|
Hold 3 Sec |
|
|
|
|
8. Setting a delayed start, if desired
|
|
|
|
X-Dry |
|
|
|
|
|
Delay |
|
|||
|
|
|||
Start |
|
|
||
|
|
|
|
Dry |
|
|
|
|
Damp |
|
|
|
|
Dry |
|
|
|
|
|
If you do not want to begin a cycle immediately, you may choose the Delay Start option. This will delay the start of the drying cycle by up to 23 hours.
To set a Delayed Start:
1.Touch the Delay Start button to set the desired delay time.
2.Turn the knob to the number of hours you want to delay the start of the drying cycle. The delay time will appear on the display. Press the knob to confirm your selection.
After touching the Start/Pause button, the time will count down until the delay time has been reached. The dryer will start and the display will show the remaining time in the cycle.
9. If Air Dry or Timed Dry was selected, set drying time
Timed |
X-Dry |
|
|
Dry |
|
|
Dry |
|
Damp |
|
Dry |
When you select a timed cycle, the indicator light above “Timed Dry” lights up. Turn the knob to select the desired time, up to 180 minutes. Press the knob to confirm your selection.
10
10. If an automatic cycle was selected, set dryness level
Dryness |
X-Dry |
|
|
Level |
|
|
Dry |
|
Damp |
|
Dry |
When you select an automatic cycle, the indicator light above “Dryness Level” lights up. Turn the knob to select the desired level. As you turn the knob, an indicator light will light up next to the dryness levels to the right of the knob. Stop turning when the indicator next to the desired level lights up. Press the knob to confirm your selection.
11. Select any additional options*
|
Options |
||||||||
|
|
|
|
|
|
|
|
|
|
Wool |
|
|
|
|
|
|
|
|
|
|
|
|
|
|
|
|
|
|
|
|
|
|
|
|
|
|
|
|
|
|
|
|
|
|
|
|
|
|
|
ding |
|
|
|
|
|
|
|
|
|
|
|
|
|
|
|
|
|
|
|
r Dry |
|
|
|
|
X-Dry |
||||
|
|
|
|
|
|||||
fresh |
|
|
|
|
Dry |
||||
d Dry |
|
|
|
|
Damp |
||||
|
|
|
|
|
Dry |
||||
|
|
|
|
|
|
|
|
|
|
After setting drying time or dryness level, the indicator light above “Options” lights up. Turn the knob to select the desired option(s). As you turn the knob, the option symbols above the Options button will light up one at a time as you turn the knob. Stop turning when the symbol of the desired option lights up. Press the knob to confirm your selection.
*Not all options and settings are available with all program/ cycles. See “Program/Cycle Guide” for available options and settings.
12. Touch Start/Pause button to begin drying program/cycle
Touch the Start/Pause button to start the drying program/ cycle. To pause a program/cycle in progress, touch the Start/ Pause button once, then touch again to continue the program/ cycle. To cancel a program/cycle, touch the Power button.
13. Touch Power button to turn off dryer after program/cycle ends
When the display indicates that the cycle has finished, touch the Power button to turn off the dryer. Open the door and take out your laundry.
To save energy, the dryer turns off automatically about a quarter hour after the program/cycle ends.
If not turned off right after the program/cycle ends, the dryer will tumble the laundry for about 10 minutes to prevent wrinkling. The display shows an animation.
NOTE: If the Power button is touched and held, a countdown will be displayed. At the end of the countdown, any errors will be erased and the program/cycle will restart.
14. Remove garments promptly after cycle is finished
Promptly remove garments after cycle has completed to reduce wrinkling.
Adapting the dryer to water conductivity
The drying results are affected by the conductivity of the water used during washing. If, by modifying the available dryness levels (damp dry, dry, and extra dry), you are not satisfied with the final drying results, you can adapt the water conductivity level. The dryer comes with preset level 3. Choose between level 1 (most damp results) and 5 (most dry results).
1. Touch and hold the Program button. The |
P |
|
display will count down until the Conductivity |
||
Adjustment symbol on the display flashes |
Program |
|
3 Sec |
||
and the current setting is shown. |
||
|
2.Turn the knob to adjust the level (1-2-3-4-5). Press the knob to confirm your selection.
NOTE: This new setting will affect all future cycles. If the desired drying results are attained, water conductivity will not require further adjustment.
11
 Loading...