


WASHER/DRYER
USE AND CARE GUIDE
Table of Contents |
|
WASHER/DRYER SAFETY............................................ |
2 |
WHAT’S NEW UNDER THE LID?.................................. |
4 |
CHECK YOUR VENT SYSTEM |
|
FOR GOOD AIRFLOW .................................................. |
5 |
CONTROL PANELS AND FEATURES........................... |
6 |
WASHER CYCLE GUIDE............................................... |
8 |
DRYER CYCLE GUIDE.................................................. |
9 |
USING YOUR WASHER............................................... |
10 |
USING YOUR DRYER.................................................. |
13 |
WASHER/DRYER MAINTENANCE............................. |
14 |
TROUBLESHOOTING.................................................. |
18 |
WARRANTY................................................................. |
25 |
ASSISTANCE OR SERVICE......................... |
Back Cover |
LAVEUSE/SÉCHEUSE GUIDE D’UTILISATION ET D’ENTRETIEN
Table des matières |
|
|
SÉCURITÉ DE LA LAVEUSE/SÉCHEUSE.................. |
26 |
|
QUOI DE NEUF SOUS LE COUVERCLE?.................. |
28 |
|
VÉRIFICATION D’UNE CIRCULATION |
|
|
D’AIR ADÉQUATE POUR LE SYSTÈME |
|
|
D’ÉVACUATION .......................................................... |
|
29 |
TABLEAUX DE COMMANDE |
|
|
ET CARACTÉRISTIQUES............................................ |
|
30 |
GUIDE DE PROGRAMMES DE LA LAVEUSE............ |
32 |
|
GUIDE DE PROGRAMMES DE LA SÉCHEUSE......... |
33 |
|
UTILISATION DE LA LAVEUSE................................... |
|
34 |
UTILISATION DE LA SÉCHEUSE................................ |
|
37 |
ENTRETIEN DE LA LAVEUSE/SÉCHEUSE................ |
39 |
|
DÉPANNAGE................................................................ |
|
44 |
GARANTIE.................................................................... |
|
55 |
ASSISTANCE OU SERVICE............ |
Couverture arrière |
|
Designed to use only HE High Efficiency detergents. Conçue pour utiliser un détergent haute efficacité seulement.
W11107884A W11107887A-SP
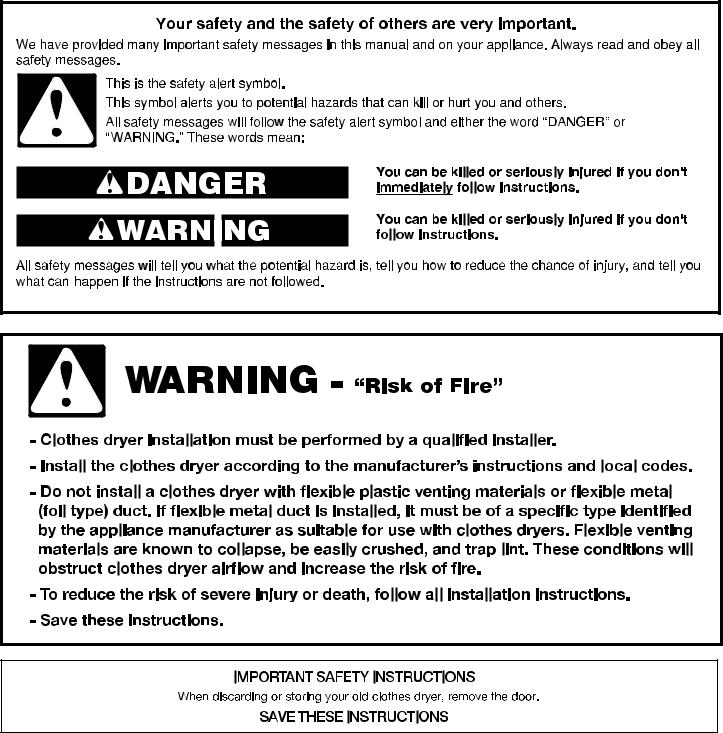
WASHER/DRYER SAFETY
2

3

WHAT’S NEW UNDER THE LID?
Your new washer will operate differently than your past agitator-style washer.
Lid Lock
To allow for higher spin speeds, the lid will lock and the Lid Lock light will turn on. When this light is lit, the lid is locked and cannot be opened. When this light is blinking, the washer is paused. When this light is off, the lid can be opened. After a cycle is started, the washer will fill to the appropriate water level. When the washer is done filling, it will start to agitate. If you need to open the lid to add a
garment after this point, the lid will remain unlocked during the entire agitation portion of the wash phase. The cycle will automatically pause when the lid is opened, and the cycle will resume once the lid is closed and you press the Start/Pause button. The lid will lock before the spin phase begins. If you need to pause or stop after this point, you must press the START/PAUSE button and wait for the lid to unlock. The lid will only unlock after washer movement has stopped. Depending on when in the cycle you try to pause, it may take several seconds to several minutes for the lid to unlock (for example, 1 minute if the cycle is in the spin phase). Press the START/PAUSE button to resume the cycle.
Choosing the Right Detergent
Use only High Efficiency detergents. The package will be marked “HE” or “High Efficiency.” Using non-HE detergent will likely result in longer cycle times and reduced rinsing performance. It may also result in component malfunction and, over time, buildup of mold or mildew. HE detergents should be low-sudsing and quick-dispersing to produce the right amount of suds for the best performance. They should hold soil in suspension so it is not redeposited onto clean clothes. Not all detergents labeled as High Efficiency are identical in formulation and their ability to reduce suds. For example, natural, organic, or homemade HE detergents may generate a high level of suds. Always follow the detergent manufacturer’s instructions to determine the amount of detergent to use.
Use only High Efficiency (HE) detergent.


 Sounds
At different stages of the wash cycle, you may hear sounds and pauses that are different from those of your previous washer. For example, you may hear a clicking and hum at the beginning of the spin phase as the lid lock goes through a self-test. There will be different kinds of humming and whirring sounds as the washplate tests for load balance or moves the load. And sometimes, you may hear nothing at all as the washer determines the correct water level for your load or allows time for clothes to soak.
IMPORTANT: The lid must be closed before the washer basket fills with water and for the wash cycle to start. If the lid is open and filling stops, close the lid and press the START/PAUSE button to complete the cycle.
4
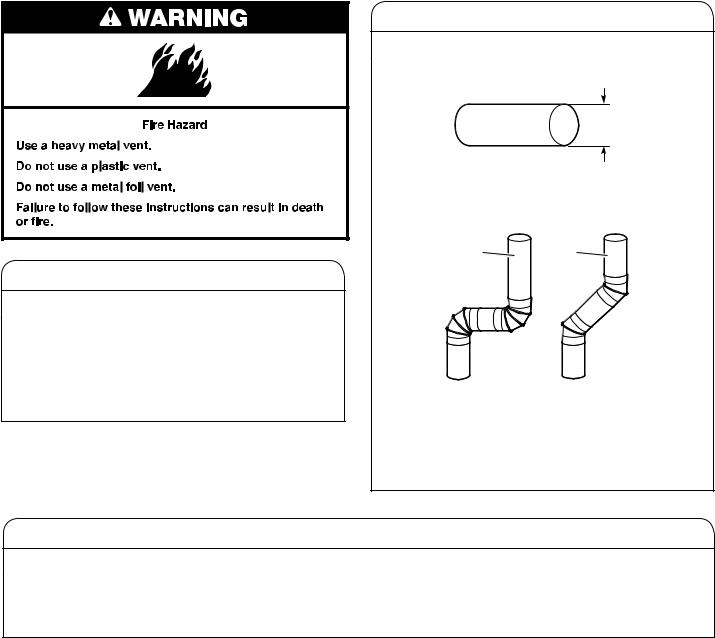
CHECK YOUR VENT SYSTEM FOR GOOD AIRFLOW
Good airflow
Along with heat, dryers require good airflow to efficiently dry laundry. Proper venting will reduce your drying times and improve your energy savings. See Installation Instructions.
The venting system attached to the dryer plays a big role in good airflow.
Service calls caused by improper venting are not covered by the warranty and will be paid by the customer, regardless of who installed the dryer.
Maintain good airflow:
nClean your lint screen before each load.
nReplace plastic or foil vent material with 4" (102 mm) diameter heavy, rigid vent material.
4" (102 mm)
nUse the shortest length of vent possible.
nUse no more than four 90° elbows in a vent system; each bend and curve reduces airflow.
Good |
Better |
nRemove lint and debris from the exhaust hood.
nRemove lint from the entire length of the vent system at least every 2 years. When cleaning is complete, be sure to follow the Installation Instructions supplied with your dryer for final product check.
nClear away items from the front of the dryer.
Use Automatic cycles for better fabric care and energy savings
Use the Automatic Dry cycles to provide the most energy savings and enhanced fabric care from the dryer. During Automatic Dry cycles, drying air temperature or moisture level are sensed in the load. This sensing occurs throughout the drying cycle, and the dryer shuts off when the load reaches the selected dryness.
With Timed Drying, the dryer runs the amount of time set and sometimes results in shrinkage, wrinkling, and static due to overdrying. Use Timed Drying for the occasional damp load that needs a little more drying time.
5
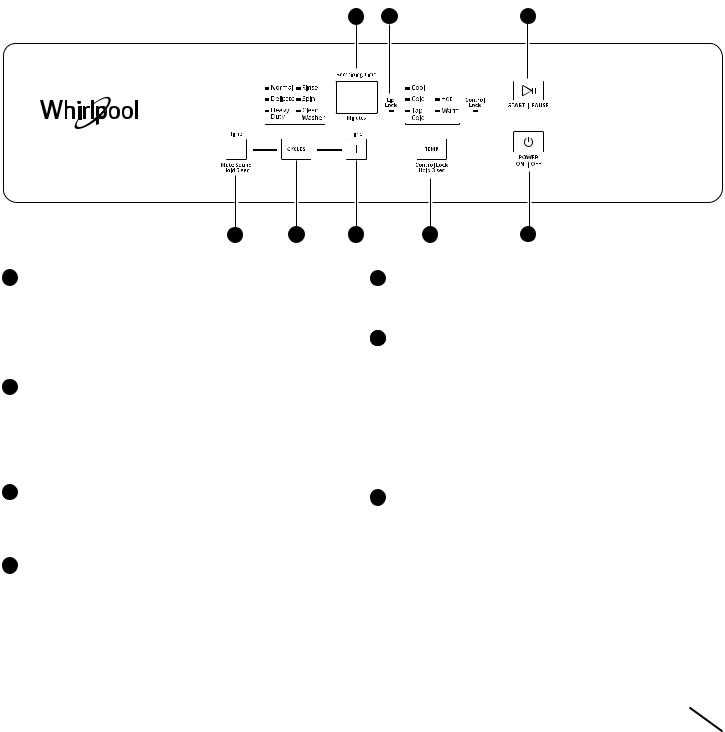
CONTROL PANELS AND FEATURES
WASHER
1 |
2 |
3 |
4 |
5 |
4 |
6 |
7 |
1LED TIME/STATUS DISPLAY
The Remaining Time display shows the time required for the cycle to complete. Factors such as load size and water pressure may affect the time shown in the display. Tightly packed loads, unbalanced loads, excessive suds, or adding or removing items may cause the washer to adjust the cycle time as well.
2LID LOCK LIGHT
The Lid Lock indicator lights up when the lid is locked and cannot be opened. If you need to open the lid, press and hold START/PAUSE. The lid will unlock 1 minute after the washer movement has stopped. This may take several minutes if the load was spinning at high speed. Press the START/PAUSE button again to restart the cycle.
3START/PAUSE
After selecting a wash cycle, press START/PAUSE to start the cycle. Press once to pause a cycle. The flashing lights indicate the selected cycle and the current process.
4CYCLE TIME (+ or -)
■■ Press “+” or “-” to adjust the duration of a cycle.
■■ LED display will show the time remaining for the cycle to complete.
■■ If an out-of-range adjustment is made, a buzzer will sound.
End-of-Cycle Signal
Press and hold the plus (+) button for 3 seconds to enable or disable the end-of-cycle signal.
Press and hold the minus (-) button for 3 seconds to mute the signal.
5CYCLES
Press CYCLES to select a wash cycle. Choose from Normal, Delicate, Heavy Duty, Rinse, Spin, or Clean Washer.
6TEMP
Select a wash temperature based on the type of fabric and soils being washed. For best results and following the garment label instructions, use the warmest wash water safe for your fabric.
CONTROL LOCK
Press and hold TEMP for 3 seconds to lock the controls. Press and hold for 3 seconds to unlock. You may still press POWER ON/OFF to turn off the washer.
7POWER ON/OFF
Press POWER ON/OFF to turn on or off the washer. Press once while a cycle is running to stop the washer.
6
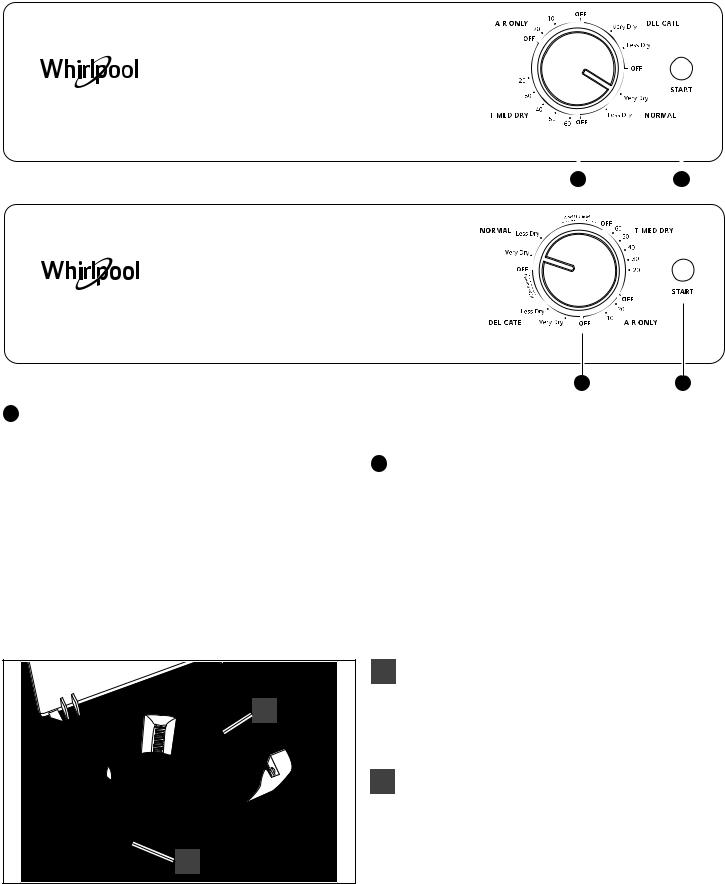
DRYER
240V MODELS
120V MODELS
8DRYER CYCLE KNOB
Use your Dryer Cycle knob to select available cycles on your dryer. Turn the knob to select a cycle for your laundry load. See “Dryer Cycle Guide” for detailed descriptions of cycles.
TIMED DRY
Will run the dryer for the specified time on the control. Drying time and temperature will depend on your dryer model.
NORMAL and DELICATE CYCLES
These cycles sense moisture in the load or air temperature and shut off when the load reaches the selected dryness level. They give the best drying in the shortest time. Drying time will vary based on fabric type, load size, and dryness setting.
|
|
|
|
|
|
|
|
|
|
|
|
|
|
|
|
|
|
|
|
|
|
|
|
|
|
|
|
|
|
|
|
|
|
|
|
|
|
|
|
|
|
|
|
|
|
|
|
|
|
|
|
|
|
|
|
|
|
|
|
|
|
|
|
|
|
|
|
|
|
|
|
|
|
|
|
|
|
|
|
|
|
|
|
|
|
|
|
8 |
|
|
|
9 |
||||||
|
|
|
|
|
|
|
|
|
|
|
|
|
|
|
|
|
|
|
|
|
|
|
|
|
|
|
|
|
|
|
|
|
|
|
|
|
|
|
|
|
|
|
|
8 |
9 |
AIR ONLY
This cycle will run the dryer without heat for the specified time on the control.
9START BUTTON
Press the START button to start the dryer.
DISPENSERS |
A |
A |
B |
B |
Liquid fabric softener dispenser
Pour measured liquid fabric softener into the liquid fabric softener dispenser if desired. It will dispense automatically at the optimum time.
n Use only liquid fabric softener in this dispenser.
NOTE: The fabric softener dispenser rotates around the wash basket and may not be in the same spot each time.
Liquid chlorine bleach dispenser
This dispenser holds up to 3/4 cup (180 mL) liquid chlorine bleach. The bleach will be automatically diluted and dispensed at the optimum time during the wash cycle. This dispenser cannot dilute powdered bleach.
NOTE: Fill dispenser with only liquid bleach.
7

WASHER CYCLE GUIDE
Each cycle listing includes a performance chart rating its cleaning power, gentleness on items, and resource efficiency. Not all cycles or options are available on all models. Refer to the CYCLES button on your washer.
Wash temperatures are selected using the Temp button.
For best performance:
n Choose the cycle that best fits the load being washed.
n Decrease or increase the maximum target water temperature for any cycle.
nDo not leave the washer lid open unattended once the washer has started to fill.
Cottons, linens, |
Normal |
Medium/High Use this cycle for normally soiled cottons and linens. Wash |
|
and mixed-garment |
|
combines a medium wash time and a high-speed spin to shorten |
|
loads |
|
drying time. |
|
|
|
Good |
Best |
|
|
Cleaning |
|
|
|
Gentleness |
|
|
|
Efficiency† |
|
Machine-wash silks, |
Delicate |
Short/High Use this cycle for lingerie and loosely knit items. Wash combines |
|
hand-washed fabrics |
|
a short wash time for gentle soil removal, and a high-speed spin |
|
|
|
to shorten drying time. |
|
|
|
Good |
Best |
|
|
Cleaning |
|
|
|
Gentleness |
|
|
|
Efficiency† |
|
Sturdy fabrics, |
Heavy Duty |
|
Long/High |
Use this cycle for sturdy or heavily soiled loads, or when using |
|
colorfast items, |
|
|
|
bleach. Wash combines a long wash time, two rinses, and a |
|
towels, jeans |
|
|
|
high-speed spin for maximum soil removal. |
|
|
|
|
|
Good |
Best |
|
|
|
|
Cleaning |
|
|
|
|
|
Gentleness |
|
|
|
|
|
Efficiency† |
|
Swimsuits and |
Rinse |
N/A |
N/A |
Use this cycle for additional rinsing of the washer load |
|
items requiring |
|
|
|
or hand-washed items. This cycle uses some agitation and |
|
rinsing without |
|
|
|
finishes with a high-speed spin. |
|
detergent |
|
|
|
|
|
Hand-washed |
Spin |
N/A |
N/A/High |
Use this cycle to remove excess water from the washer load |
|
garments or |
|
|
|
or hand-washed items. |
|
dripping-wet items |
|
|
|
|
|
No clothes in |
Clean |
N/A |
Short/N/A |
Use this cycle every 30 washes to keep the inside of your washer |
|
washer |
Washer |
|
|
fresh and clean. This cycle uses a higher water level. Use with |
|
|
|
|
|
affresh® washer cleaner tablet or regular liquid chlorine bleach to |
|
|
|
|
|
thoroughly clean the inside of your washer. This cycle should not |
|
|
|
|
|
be interrupted. See “Washer Care.” |
|
|
|
|
|
IMPORTANT: Do not place garments or other items in the washer |
|
|
|
|
|
during the Clean Washer cycle. Use this cycle with an empty |
|
|
|
|
|
wash tub. Do not use thickened, easy-pour, or no-splash bleach |
|
|
|
|
|
when running the Clean Washer cycle as excess suds may occur. |
|
|
|
|
|
See “Washer Care” in “Washer/Dryer Maintenance.” |
|
†Efficient use of resources, such as energy and water.
IMPORTANT: Do not presoak items in your washer by lifting the lid or stopping the cycle. Failure to follow this instruction can result in property damage. If needed, presoak items in a small wash basin prior to loading the washer.
8
 Loading...