

Whirlpool AMD 302, AMD 301, AMD 304, AMD 303, AMD 306 INSTRUCTION FOR USE
...
4
BEFORE USING THE APPLIANCE
To make the most out of your new appliance,
please read the user instructions carefully and keep
them handy for future consultation.
Before using the appliance please follow and
set according to the below indications:
Remote Control (RC) presetting:
Each time the batteries are replaced in the remote
control, the RC is pre-set on Heat pump.
If the air conditioner that you purchased is a
cooling only, then the pre-set on Heat pump will
not bring any changes.
Auto-Restart presetting Function:
To set the auto-restart function, press the
Emergency button (ON/OFF) on the indoor unit
for at least 5 seconds
A buzz sound will signal that the auto-restart
function is set and the air conditioner is in standby.
To cancel the auto-restart function, repeat the
above steps.
SAFETY PRECAUTIONS
• Do not install the appliance if it is connected to
the power supply.
• The Installation and service/repair must be
performed by a qualified technician, in
compliance with the producer's instructions and
following local safety norms. Do not repair or
replace any parts of the appliance unless it is
specifically written in the user instructions.
• The grounding of this appliance is compulsory.
• Make sure that the power supply cord is long
enough to allow the right connection. Do not
use any extension cord for power supply.
• Do not pull the power supply cord to remove it
from the socket.
• Do not twist or press the power supply cord,
and make sure it is not broken.
• Once installation is completed, the electric
components must not be accessible to the users.
• Do not touch the operation buttons when your
hands are wet and don't use the appliance when
you are barefoot.
• Physically or mentally disabled people, children
and people without any experience with the
product are only allowed to use the appliance if
they have had specific training on how to
operate the appliance by a person responsible
for their security and well-being. The appliance
is not intended for use by disabled people and
very young children without supervision.

5
AIR CONDITIONER PRECAUTIONS
Please strictly follow the below instructions:
• Long and direct exposure to cool air might be
harmful to health. It is advisable to set the
louvers in order to avoid direct cool air and
deflect it within the room.
• Prevent the air flow from reaching the gas
burners and stoves.
• Upon malfunctioning first turn the appliance off
by pressing the ON/OFF button on the remote
control, then disconnect it from the mains.
• Do not place any objects on the outdoor unit.
• This product contains Fluorinated Greenhouse
Gases covered by the Kyoto Protocol, the
refrigerant gas being in a hermetically sealed
system. Refrigerant gas: R410a has a
GlobalWarming Potential (GWP) 1975.
SAFEGUARDING THE ENVIRONMENT
• This appliance has been made of recyclable or
re-usable material. Scrapping must be carried
out in compliance with local waste disposal
regulations. Before scrapping it, make sure to
cut off the mains cord so that the appliance
cannot be re-used.
• For more detailed information on handling and
recycling of this product, contact your local
authorities who deal with the separate collection
of rubbish or the shop where you bought the
appliance.
SCRAPPING OF PACKAGING
• The packaging can be 100% recycled as
confirmed by the recycling symbol . The
various parts of the packaging must not be
dispersed in the environment, but must be
scrapped in line with local authority regulations.
SCRAPPING OF APPLIANCE
• This appliance is marked according to the
European Directive 2002/96/EC, Waste
Electrical and Electronic Equipment (WEEE).
• By ensuring that this product is disposed of
correctly, you will help to prevent potentially
negative consequences for the environment and
for human health.
• The symbol on the product or on the
documents accompanying the product indicates
that this appliance should not be treated as
household waste, but must be given to the
appropriate local gathering place where electric
and electronic appliances are stored and
recycled.
6
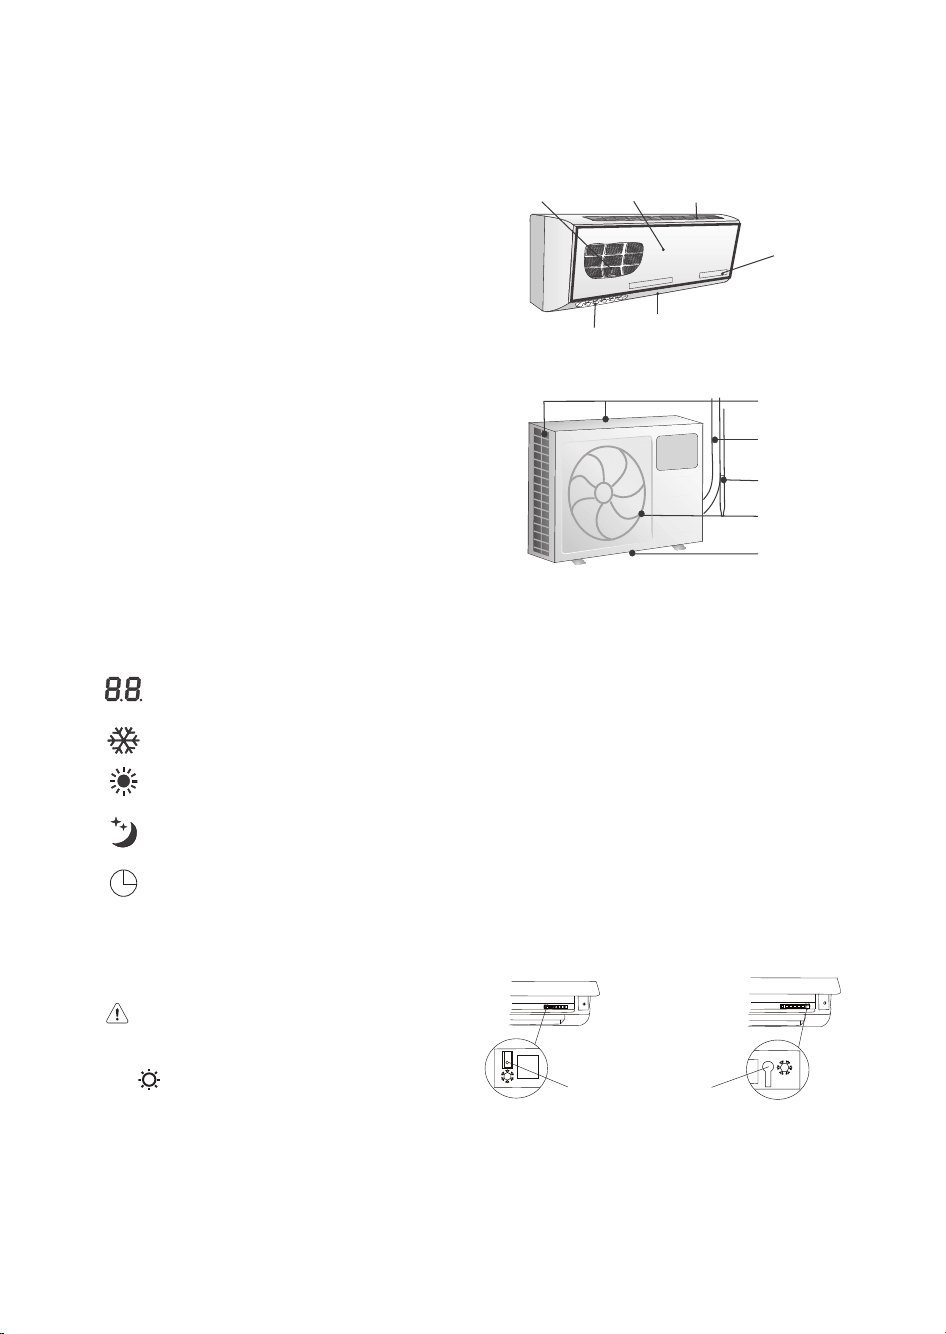
IDENTIFICATION OF PARTS
1. Outdoor unit and Indoor unit
1. Filter
2. Front Panel
3. Air inlet
4. Display
5. Deflector
6. Left / Right deflector (Manual operation)
Outdoor unit
7. Air inlet
8. Connecting pipe
9. Drain hose
10. Air outlet
11. Drain opening
The figure above is only a simple presentation of the unit, it may not match the external appearance of the
unit you purchased.
2. Display Indicators
Temperature indicator
Displays set or room temperature.
COOL MODE indicator lamp
HEAT MODE indicator lamp
Sleep indicator
It lights up during sleep mode.
Timer indicator lamp
If the batteries in the remote control are flat, or the remote control is faulty, use the Emergency operation
switch.
3. Emergency Operation switch
The places of e different models maybe
different, but all of the emergency operation switch
of emergency operation switches are shown by the
icon .
• Cooling only mode
Every time the switch is pressed, it changes in sequence from COOL → STOP.
• Heat pump mode
Every time the switch is pressed, it changes in sequence from COOL → HEAT → STOP.
Emergency
Operation switch
q
w
y
e
r
t
u
i
o
a
s
7
The following table shows the set temperature, fan speed and deflector values during emergency operation.
Hold the knob and move the deflector to change right/left airflow direction. Never attempt to adjust the
deflector during operation as the fan rotates at very high speed and may injure your fingers.
4. Horizontal Louver
Mode Set temperature Fan speed Deflector
Cooling 24 °C High Swing
Heating 24 °C High Swing
A. Signal window: The signal is sent to the indoor unit.
B. OPERATION DISPLAY: It displays the current settings.
C. JET button: Used to activate rapid cooling.
D. ON/OFF button: When this button is pressed, the appliance starts
if it is powered up or stops if it is already running.
E. FAN button: Press this button to change the fan speed of the
indoor unit in the order of Low - Medium - High - Auto.
F. SWING button: Used to stop or start vertical adjustment louver
swinging and set the desired up/down airflow direction.
G. CLOCK button: Please see "Timer operation".
H. 6TH SENSE button: Used to enter fuzzy logic smart operation
I. TEMPERATURE ADJUSTMENT buttons: Used to set time in
TIMER on/off mode and REAL TIME CLOCK. Every press of the
button increases the setting temperature by 1°C. And the highest
setting temperature is 31°C. Every press of the button decreases
the setting temperature by 1°C. And the lowest setting
temperature is 16°C.
J. TIMER ON button: Please see "Timer operation".
K. TIMER OFF button: Please see "Timer operation".
L. MODE button: Press this button to change the operation mode in
the order of Cool - Dry - Heat - Fan.
M. SLEEP button: Used to set or cancel Sleep Mode operation.
NOTE:
• Keep the remote controller within 6 metres in front of the indoor unit without any obstructions.
• If the air conditioner is not used for a long time, remove the batteries.
• In this illustration, each section is shown with all the displays on for the purpose of explanation. Some
models may not feature all displays.
• Never tear the batteries open or expose them to naked flames, since this can lead to explosion.
B
F
I
G
D
E
J
C
H
K
L
M
A
REMOTE CONTROL FUNCTIONS
AND INDICATORS
8
STORAGE AND TIPS FOR USING THE RC
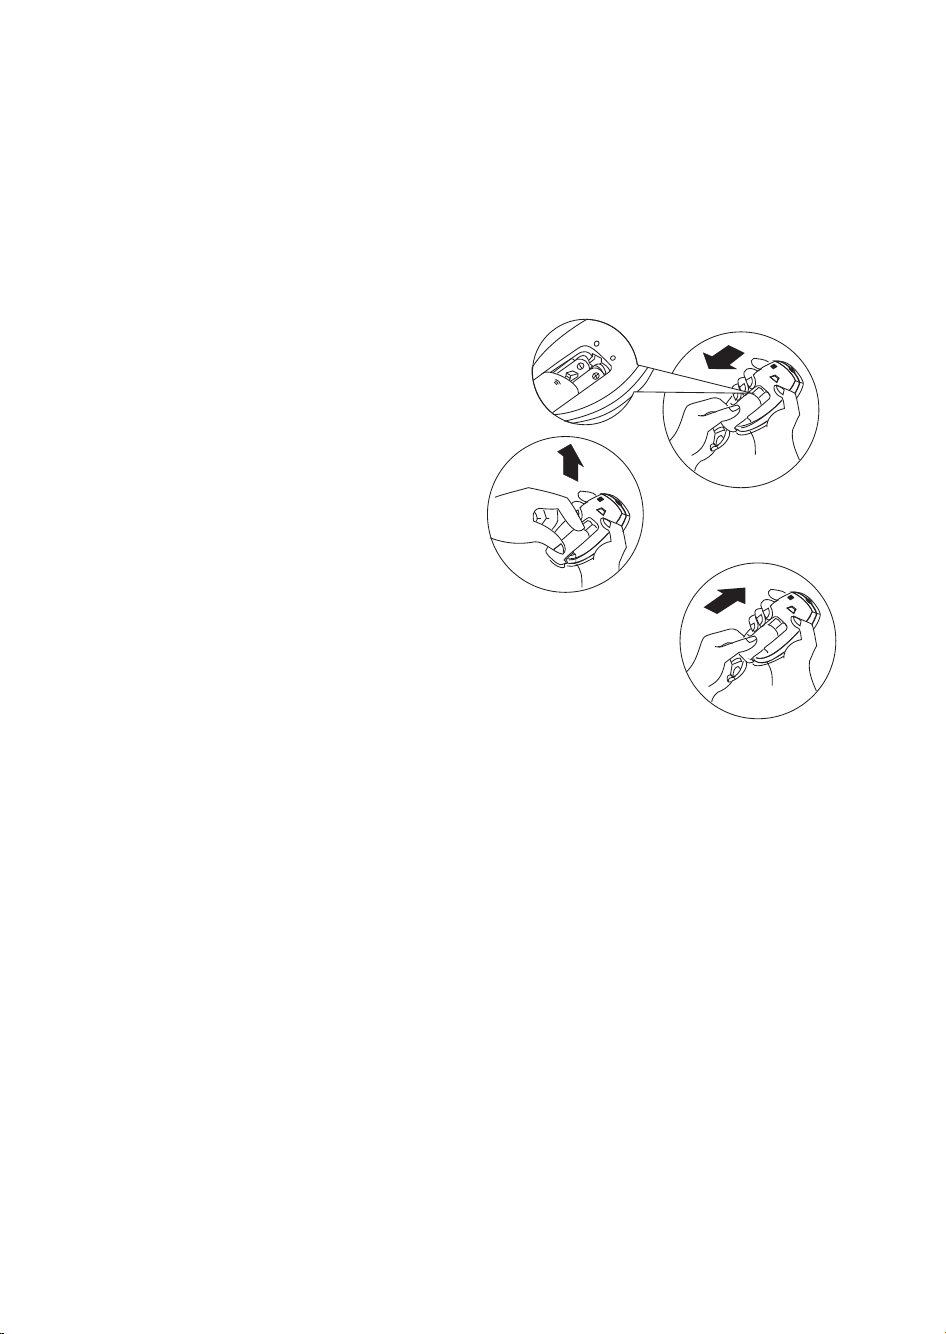
How to Insert the Batteries
Remove the battery cover in the direction of the
arrow.
Insert new batteries making sure that the (+) and
(-) of battery are matched correctly.
Refit the cover by sliding it back into position.
Note:
• Use 2 LR03 AAA (1.5volt) batteries. Do not use
rechargeable batteries.
Replace batteries with new ones of the same
type when the display becomes dim.
• If the replacement is done within 1 minute, the
remote control will keep original presetting.
However, if you replace batteries taking more
than 3 minutes, all presetting will be cancelled
and timer will display Zero.
How to remove the batteries
Remove the battery cover in the direction of the
arrow.
Press the positive pole of the battery softly with
your fingers, then draw the batteries out of the
compartment.
All this should be done by adults, children are
forbidden to remove the batteries from the
remote control in order to avoid danger of
swallow.
Disposal of the batteries
Please discard the batteries as sorted municipal
waste at the accessible collection point.

9
OPERATING MODE DESCRIPTION
AUTO restart
• The same mode/ fan speed/set temperature/swing angle as prior to the power cut are restored.
COOL mode
• Press SWING button to change up/down air flow direction.
Press FAN button to change the fan speed of the indoor unit.
Press the TEMPERATURE ADJUSTMENT button to change the temperature setting.
DRY mode
• Indoor fan motor control
In Dry mode, the fan motor runs at low speed.
When the compressor switches off, the indoor fan continues running.
• In Dry mode, the temperature settings remain the same, but 2°C lower than the previous temperature.
• Compressor control
When the room temperature is below 16°C, the compressor is off.
When it is over 16°C, the compressor runs intermittently, with operation periods depends on the
temperature setting and the room temperature.
When the room temperature is over or equal to 23 °C, the compressor runs for 8 mins and remains off
for 3 mins.
When the room temperature is below 23, the compressor runs for 2 mins and remains off for 3 mins.
When the room temperature is lower than the set temperature, the compressor runs for 1 min and
remains off for 4 mins.
FAN mode
• In this mode, the indoor unit operates like a fan only.
When the fan speed is set to Auto, the fan speed is low.
Press SWING button to change up/down air flow direction.
Press FAN button to change the fan speed from Low-Med.-High of the indoor unit.
HEAT mode (heat pump type)
• Press SWING button to change up/down air flow direction.
Press FAN button to change the fan speed of the indoor unit.
Press ROOM TEMPERATURE ADJUSTMENT button to change the temperature setting.
SLEEP mode
• When this button is pressed, the fan speed is low. In sleep mode, the temperature setting increases (in
cooling mode) by 1°C or decreases (in heating mode) by 2°C per hour automatically. After 2 hours, the
temperature setting remains at the user temperature setting +2°C (in cooling mode) and -4°C (in
heating mode). When the room temperature is lower (in cooling mode) or higher (in heating mode)
than the set temperature, the compressor stops until the room temperature is higher (in cooling mode)
or lower (in heating mode) than the set temperature.
DEFROST
A.Defrosting is activated: in the presence of both of the conditions listed below.
• When the compressor has been running for 40 mins;
• The temperature of the outdoor pipe OPT ≤ -4°C and has been running for 1min.
B. Defrosting is ended: in the presence of one of the conditions listed below.
• The temperature of outdoor pipe OPT ≥ 15°C and has been running for 1min.
• Defrosting has been active for over 10 mins.
JET mode
Used to activate rapid cooling. Rapid cooling operates at high fan speed with 16°C as automatic set
temperature. If you press the on/off button when the appliance is running, it will be stopped. When the
room temperature is lower than the set temperature (16°C), the compressor stops, fan speed remains
high.
 Loading...