

Whirlpool AD040 User Manual

HOW re MAKE A HOME lyic”
Use And Care
A Note to You
Dehumidifler Safety
Parts and Features
Before Using Your
Dehumidifier
Using Your Dehumidifier
Choosing the proper
location
Operating your
dehumidifier
Adjusting the water level
control lever
Disposing of collected
water
Caring for Your
Dehumidifier...........................11
Troubleshooting
Requesting Assistance
or Service
Index
........................................
Warranty..................................16
...........................
.................
..................
.............................
..........
...................................
...........................
...........................
......................................
.....................
................................
10
13
14
15
2
3
4
5
7
7
8
9
PART NO. 1169992 Rev. A
1-800-253-1301
Call our Consumer Assistance Center
with questions or comments.
DEHUMIDIFIERS
MODELS AD025 ADO30
ADO40 ADO50
5
95

A Note to You
Thank you for buying a WHIRLPOOL® appliance.
Because your life is getting busier and more complicated, WHIRLPOOL Dehumidifiers are
easy to use, save time, and help you manage your home better. To ensure you enjoy years of
trouble-free operation, we developed this Use and Care Guide. It contains valuable informa
tion about how to operate and maintain your appliance properly and safely. Please read it
carefully. Also, please complete and mail the Ownership Registration Card provided with your
appliance. This card helps us notify you about any new information on your appliance.
Please record your model's information.
Whenever you call to request service for
your appliance, you need to know your
complete model number and serial number.
You can find this information on the model
and serial number label (see diagram on
page 4 for location of label).
Please also record the purchase date of
your appliance and your dealer’s name,
address, and telephone number.
Keep this book and the sales slip together in a safe place for future reference.
Our Consumer Assistance Center oaa *1^0*1 number is toll-free 24 hours a day. l"0UU-^30- lOU I
Model Number.
Serial Number .
Purchase Date.
Dealer Name _
Dealer Address
Dealer Phone
NOTE: Your dehumidifier will...
• work best when the water pan is properly
placed. See page 6.
• give off some heat during normal operation.
• not operate when the room temperature is
below 65°F (18.3°C).
• automatically turn on and off according to
the amount of humidity in the air (usually
there is less humidity during the winter
months).
• need to have its coils cleaned at least once
a year. See pages 11-12.

Dehumidifier Safety
Your safety is important to us.
This guide contains safety statements under
warning symbols. Please pay special attention
to these symbols and follow any instructions
given. Here is a brief explanation of the use of
the warning symbol.
This symbol alerts you to such dangers
as fire, electrical shock, burns, and
personal injury.
^WARNING
IMPORTANT SAFETY INSTRUCTIONS
ikWARNING
• Read all instructions before using your
dehumidifier.
• Complete the installation and electrical
requirements as described in “Before
Using Your Dehumidifier” on pages
5 and 6.
• Never allow children to operate or play
with the dehumidifier.
• Never clean dehumidifier parts with
flammable fluids. The fumes can create
a fire hazard or explosion.
To reduce the risk of fire, eiectricai shock, or
personai injury when using your dehumidifier,
follow these basic precautions:
• FOR YOUR SAFETY •
DO NOT STORE OR USE GASOLINE
OR OTHER FLAMMABLE VAPORS
AND LIQUIDS IN THE VICINITY OF
THIS OR ANY OTHER APPLIANCE.
THE FUMES CAN CREATE A FIRE
HAZARD OR EXPLOSION.
___
- SAVE THESE INSTRUCTIONS -
Help us help you
Please:
• Install the dehumidifier properly on a floor,
table, or shelf that is level and strong
enough to support it with a full pan of
water. Your dehumidifier can weigh
between 50 lbs (22.5 kg) and 75 lbs
(33.75 kg), depending on the amount
of water collected in the pan.
• Make sure the dehumidifier is the correct
size for the area you want to dehumidify.
• Connect the dehumidifier to the proper
kind of outlet, with the correct electrical
supply and grounding. (See “Meeting
electrical requirements" on page 5.)
• Use the dehumidifier only for jobs as
described in this manual.
• Make sure the dehumidifier is not used
by children or anyone unable to operate
it properly.
• Maintain your dehumidifier properly.
DO NOT REMOVE TECH SHEET from
inside cabinet. Your service technician
will need this information.
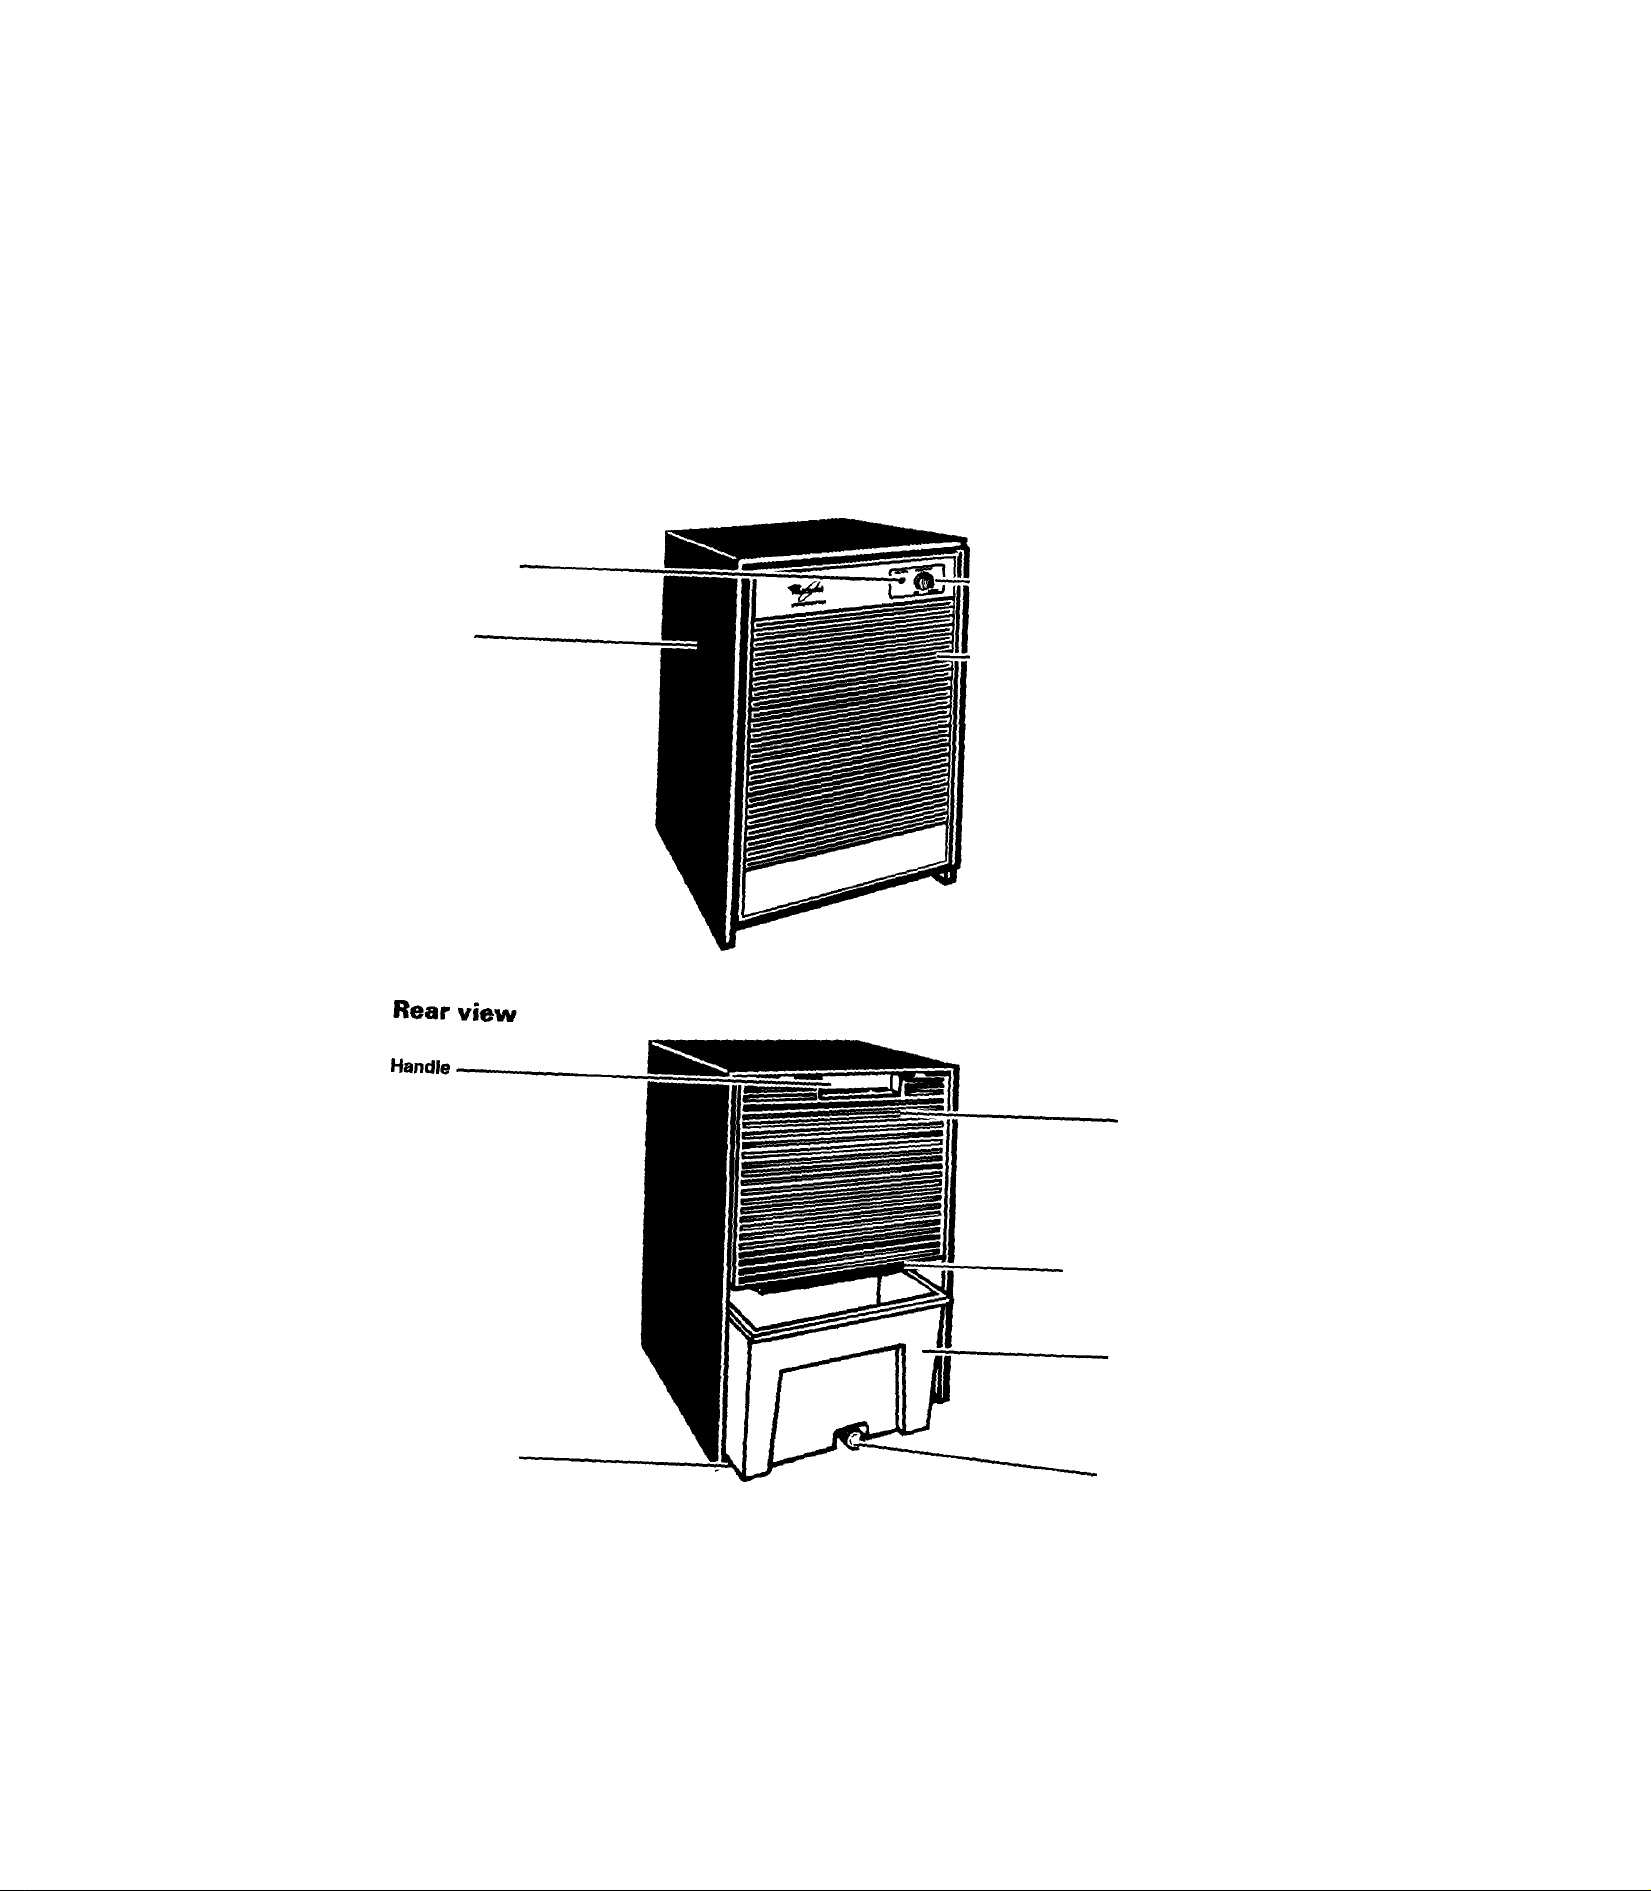
Psrts and FaaturGS
Front view
Pan full light
{p-8)
Cabinet
- Humidistat
(P-8)
Front grille
(P-11)
Model and serial
number label
(on cabinet under
water pan)
Rear grille
(P- 12)
Condenser and
evaporator coils
(not shown)
(p. 12)
Water pan
(PP- 6, 10)
Drain hose
connection
(p. 10)
Before Using Your Dehumidifier
Proper electrical grounding and installation are important for obtaining the best possible
results from your dehumidifier. This section tells you how to connect your dehumidifier to the
proper electrical supply and how to install it.
Meeting electrical requirements
OBSERVE ALL GOVERNING CODES
AND ORDINANCES.
Electrical ground is required on this
appliance.
A 115 volt, 60 Hz., AC only, 15 ampere
fused electrical supply is recommended.
(Time-delay fuse or circuit breaker is
recommended.) It is recommended that a
separate circuit serving oniy this appliance
be provided. Do not use an extension
cord.
DO NOT, UNDER ANY CIRCUMSTANCES,
REMOVE THE POWER SUPPLY CORD
GROUND PRONG.
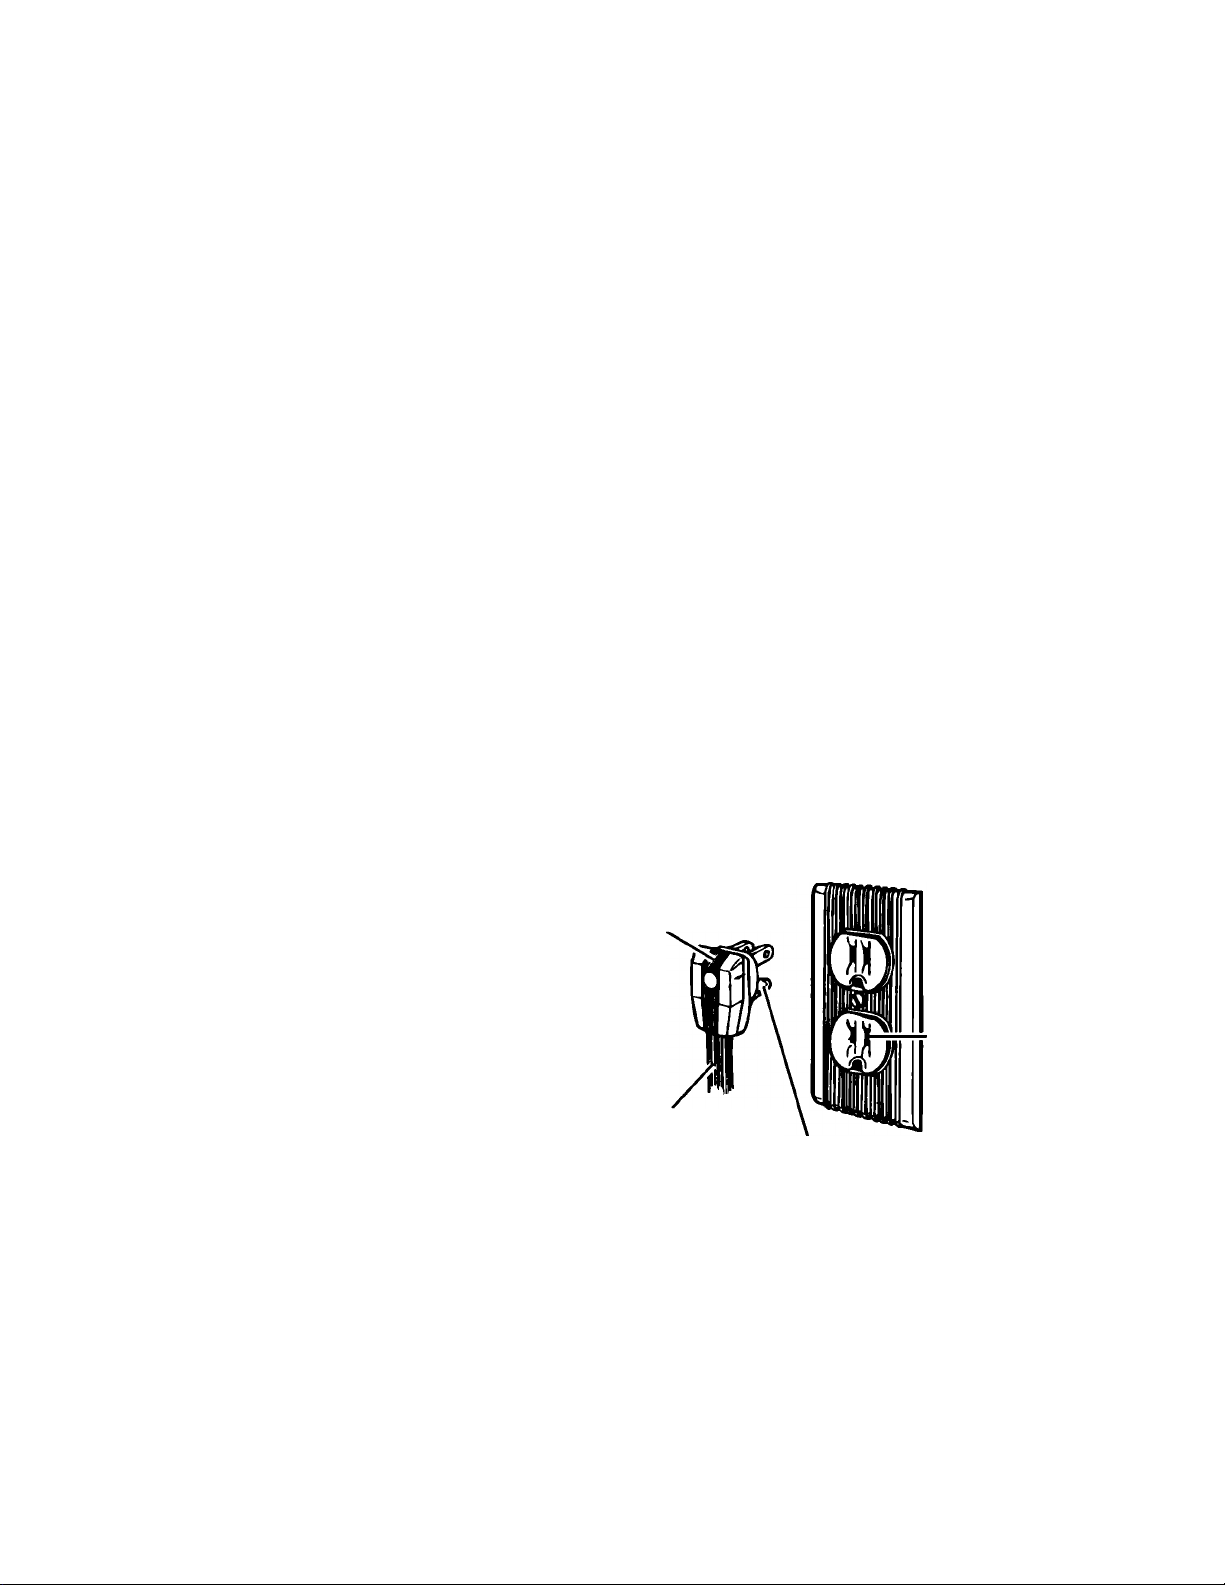
Recommended grounding method
For your personal safety, this appliance
must be grounded. This appliance has a
power supply cord with a 3-prong grounding
plug. To minimize possible shock hazard,
the cord must be plugged into a mating
grounding type wall receptacle, grounded in
accordance with the National Electrical
Code (ANSI/NFPA 70, latest edition) and all
local codes and ordinances. If a mating wall
receptacle is not available, it is the responsi
bility of the customer to have a properly
grounded, 3-prong wall receptacle installed
by a qualified electrician.
3-prong
grounding
plug
3-prong
grounding
type wall
receptacle
Power supply cord
Grounding
prong
 Loading...