

PRO 3000
/ mem
Type 6014
ThermoScan

English 4, 13
Français 14, 23
Deutsch 24, 33
Español 34, 43
Italiano 44, 53
Nederlands 54, 63
Welch Allyn Customer Service:
UK 0207-36556780, Fax 0207-3659694
France 01-60 09 3366, Fax 01-60 09 6797
Deutschland 07477-9271-0, Fax 07477-9271-90
España 091-74 99 357, Fax 091-74 99 361
Portugal
0214-15 42 83, Fax 0214-15 42 86
Italia 0269-68 24 25, Fax 0269-63 36 97
Nederland 00353-46 67 700
For other European countries, please call 00353-46 67 700
for service in English
6-014-126/00/XI-01/G3
GB/F/D/E/P/I/NL
Printed in Germany
Internet:
www.welchallyn.com

1
10
2
3
4
5
6
7
8
9
/ mem
11
b
a
13
12
Deutsch English
The Braun ThermoScan thermometer has been carefully developed
for accurate, safe and fast human body temperature measurements
in the ear. The shape of the thermometer prevents it from being
inserted too far into the ear canal to damage the eardrum.
However, as with any thermometer, proper technique is critical
to obtaining accurate temperatures. Therefore, please read all
instructions carefully and thoroughly before using this product.
Important
ø
Do not expose the thermometer to temperature extremes
(below –20ºC/4ºF or over 50ºC/ 122º F) nor excessive
humidity (>95% RH).
ø
The probe window must be kept clean, dry, and undamaged
at all times to ensure accurate readings. To protect the probe
window, always keep the thermometer in the storage cover
while transporting or when not in use.
ø
This thermometer must only be used with genuine Braun
ThermoScan probe covers.
ø
To avoid inaccurate readings, always attach a new, clean
probe cover for each temperature reading.
How does Braun ThermoScan work?
Braun ThermoScan measures the infrared heat generated
by the eardrum and surrounding tissue. To help ensure accuracy,
the thermometer «scans» by taking 8 measurements in just one
second and displaying the highest temperature.
The displayed ThermoScan temperature is the actual measured ear
canal temperature plus a mathematical adjustment to approximate
the familiar oral range. However, this is not necessarily the same as
an oral temperature measured at the same time.
Why measure in the ear?
Clinical studies have shown that the ear is an excellent site for
temperature measurement because temperatures taken in the ear
reflect the body’s core temperature. Body temperature is regulated
by the hypothalamus, which shares the same blood supply as
the tympanic membrane. Changes in core body temperature, are
usually seen sooner at the tympanic membrane than at other sites,
such as the rectum, mouth or under the arm.
4
Advantages of taking temperatures at the ear versus traditional
sites:
ø
Axillary
temperature readings only reflect skin temperature
which may not indicate the internal body temperature.
ø
Rectal
temperatures often lag significantly behind internal body
temperature changes, especially at times of rapidly changing
temperatures.
ø
Oral
temperatures are often influenced by eating, drinking,
thermometer placement, breathing through the mouth,
or the inability of the person to close their mouth completely.
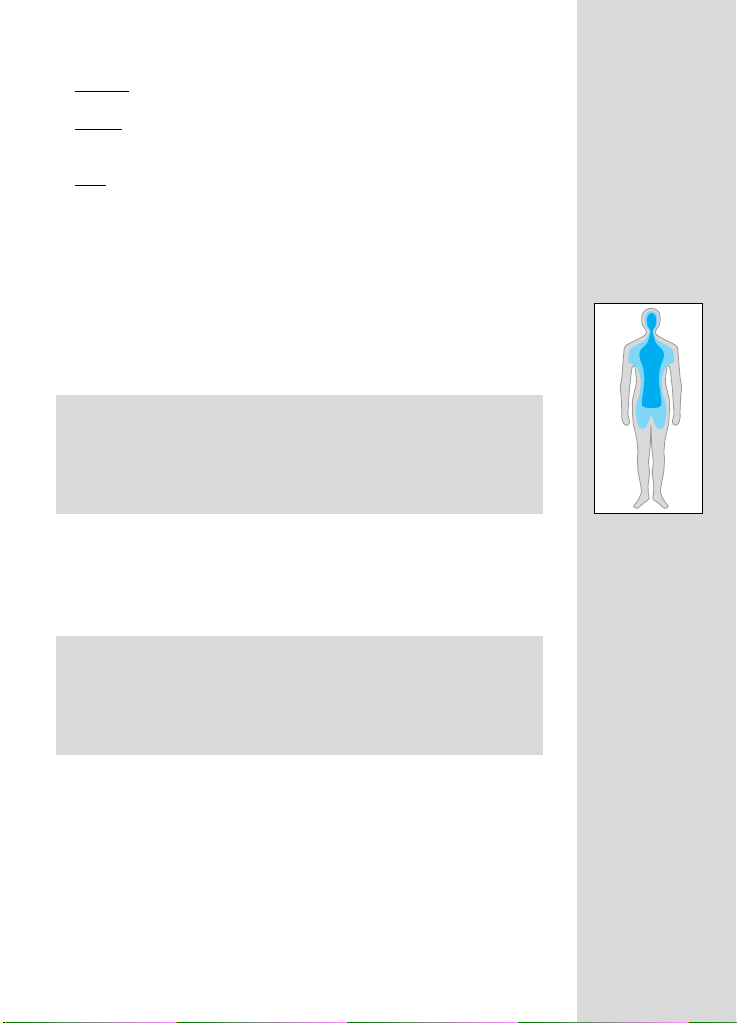
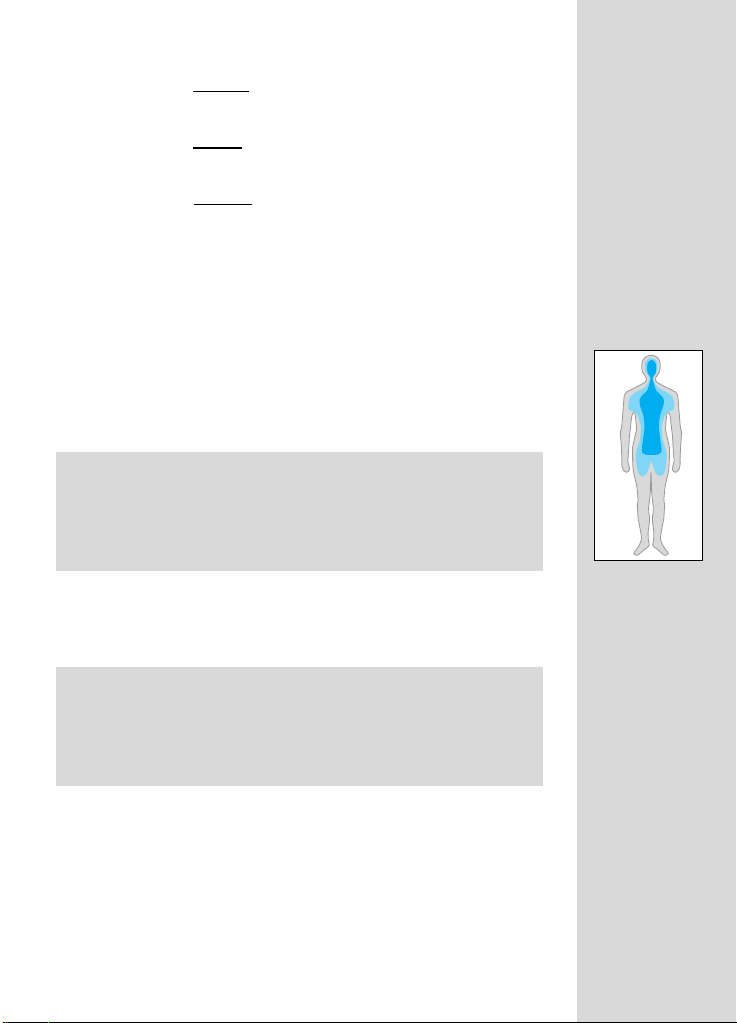
Body temperature
Normal body temperature is a range. The following table
that ranges of normal also vary by site. Therefore, readings from
different sites, even if taken at the same time, should not be directly
compared.
Axillary: 34.7°C - 37.3°C 94.5°F - 99.1°F
Oral: 35.5°C - 37.5°C 95.9°F - 99.5°F
Rectal: 36.6°C - 38.0°C 97.9°F -100.4°F
ThermoScan
”
: 35.8°C - 38.0°C 96.4°F -100.4°F
Also, a person’s normal temperature range tends to decrease with
age. The following table shows normal ThermoScan ranges by age.
@
shows
Normal ThermoScan temperature ranges
”
0 - 2 years 36.4°C - 38.0°C 97.5°F - 100.4°F
3 - 10 years 36.1°C - 37.8°C 97.0°F - 100.0°F
11 - 65 years 35.9°C - 37.6°C 96.6°F - 99.7°F
> 65 years 35.8°C - 37.5 °C 96.4 °F - 99.5 °F
The range of normal varies from person to person and can be
influenced by many factors such as time of day, level of activity,
medications and gender.
1. Chamberlain, J.M., Terndrup, T.E., New Light on Ear Thermometer Readings,
Contemporary Pediatrics,
2. Chamberlain, J.M., et al., Determination of Normal Ear Temperature with an Infrared
Emission Detection Thermometer,
March 1994.
Annals of Emergency Medicine,
January 1995.
5
Product description
1. Probe cover
2. Probe window
3. Probe
4. Probe cover detector
5. Probe cover ejector
6. Display (LCD)
7. LCD light button
8. /mem button (On/memory function)
9. Battery door lock
10. Battery door
11. Activation button
12. Label
13. Storage cover
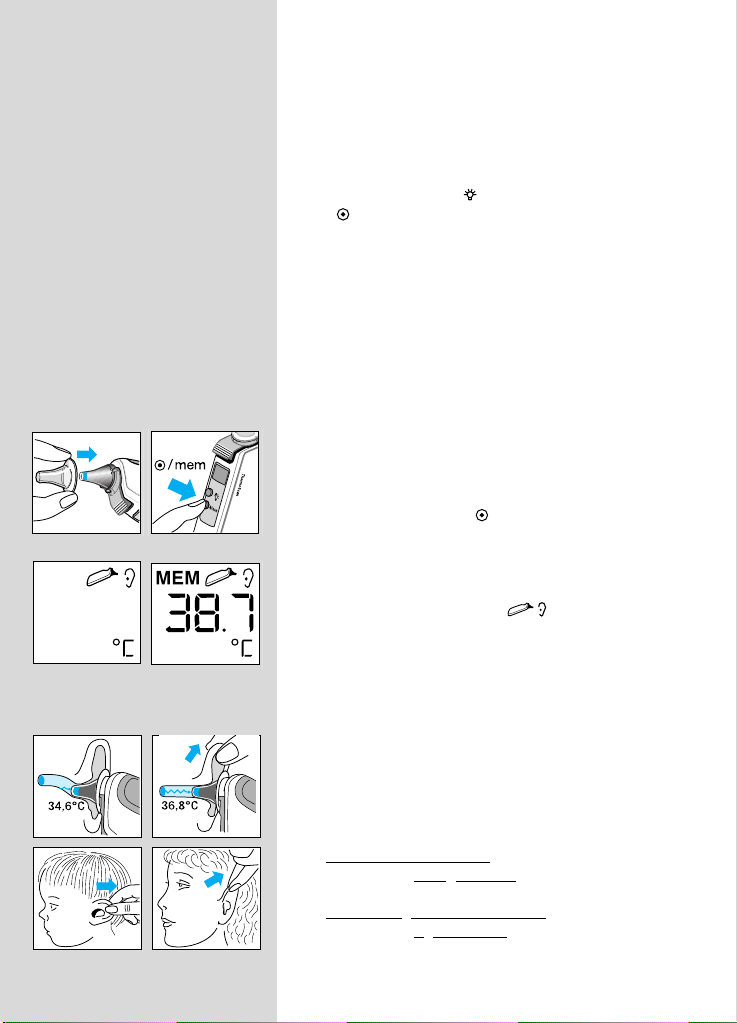
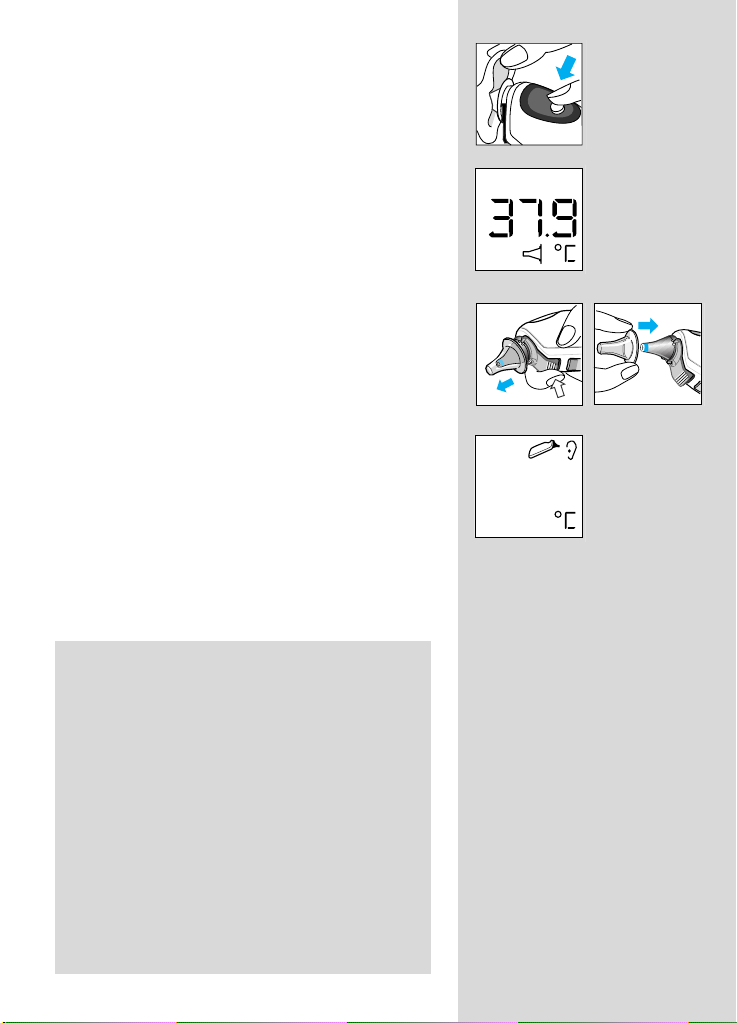
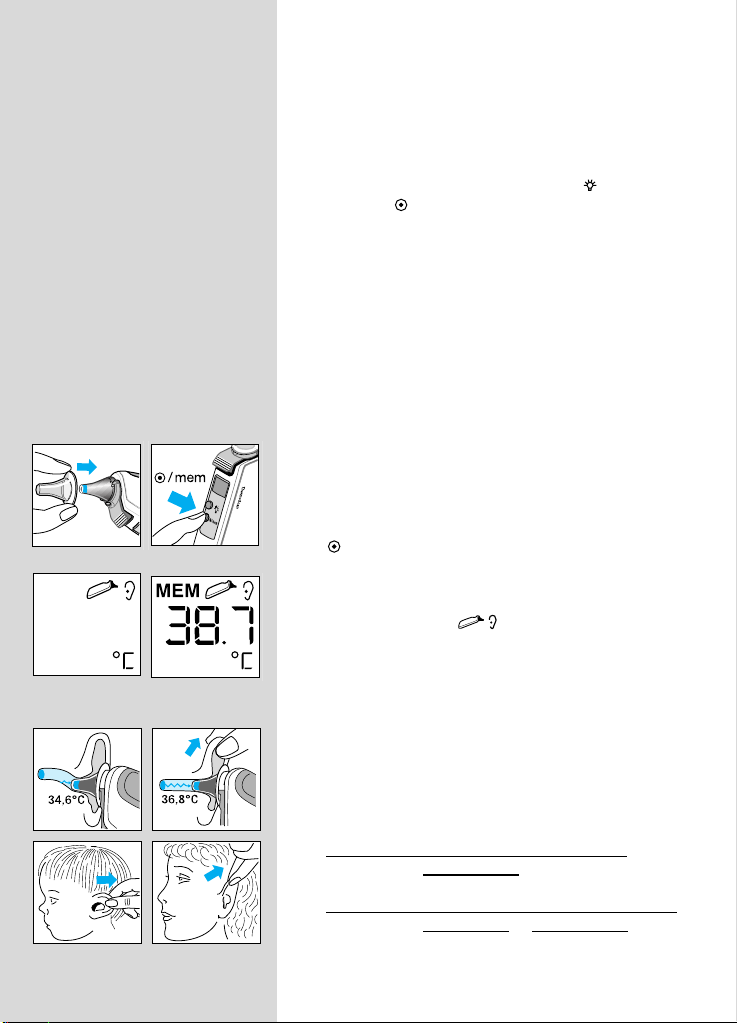
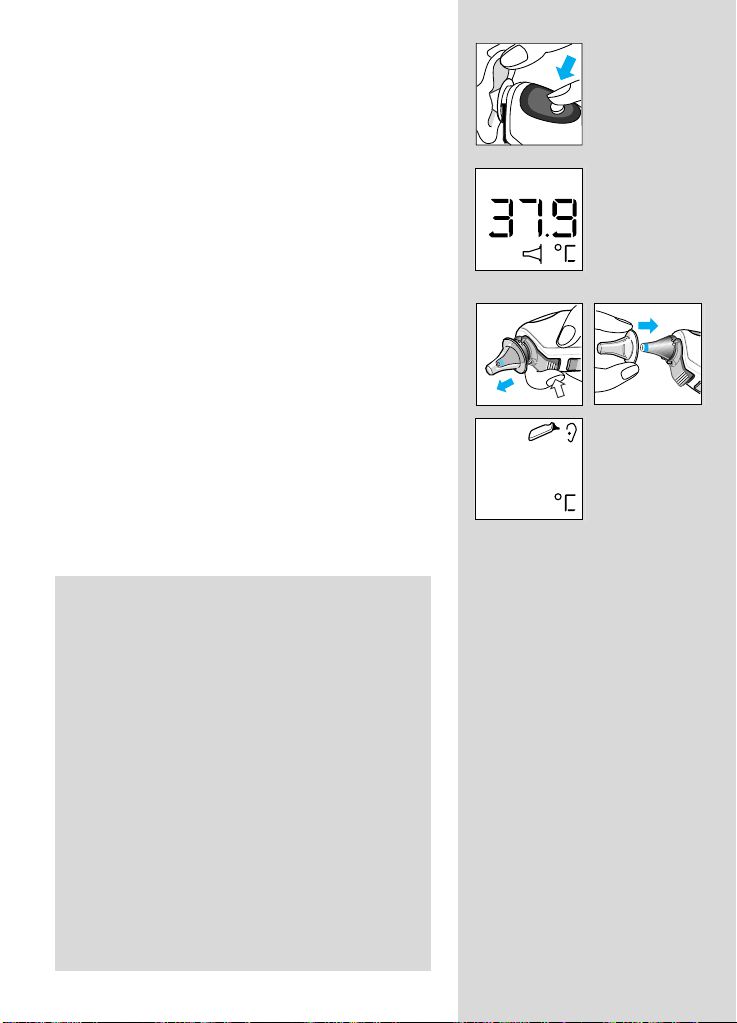
How to use Braun ThermoScan
1.
Always use a new, clean probe cover for each
measurement to help ensure an accurate
reading.
Attach a new, clean probe cover or, if already
attached, press the /mem button.
The LCD (liquid crystal display) is activated,
showing all segments.
When the ready symbol is displayed
the thermometer is ready for use.
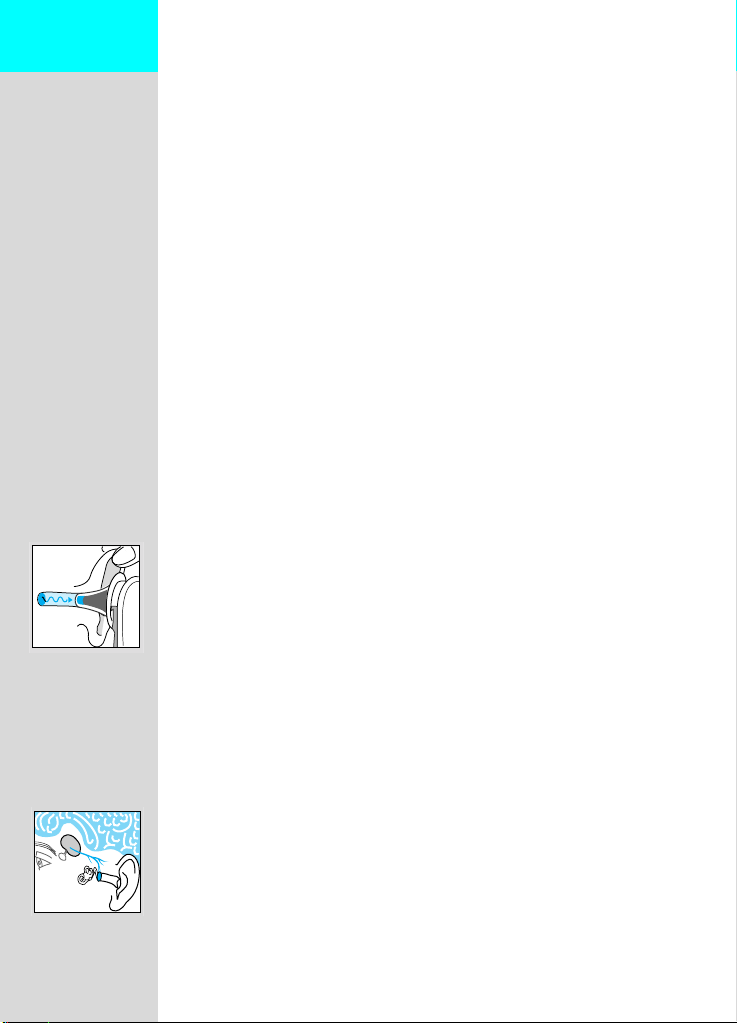
2. Perform an «ear tug» to straighten the ear canal.
This gives the thermometer a clear view of
the eardrum.
Childr
en under 1 year:
Pull the ear straight back.
Children aged 1 year to adult:
Pull the ear up and back.
6
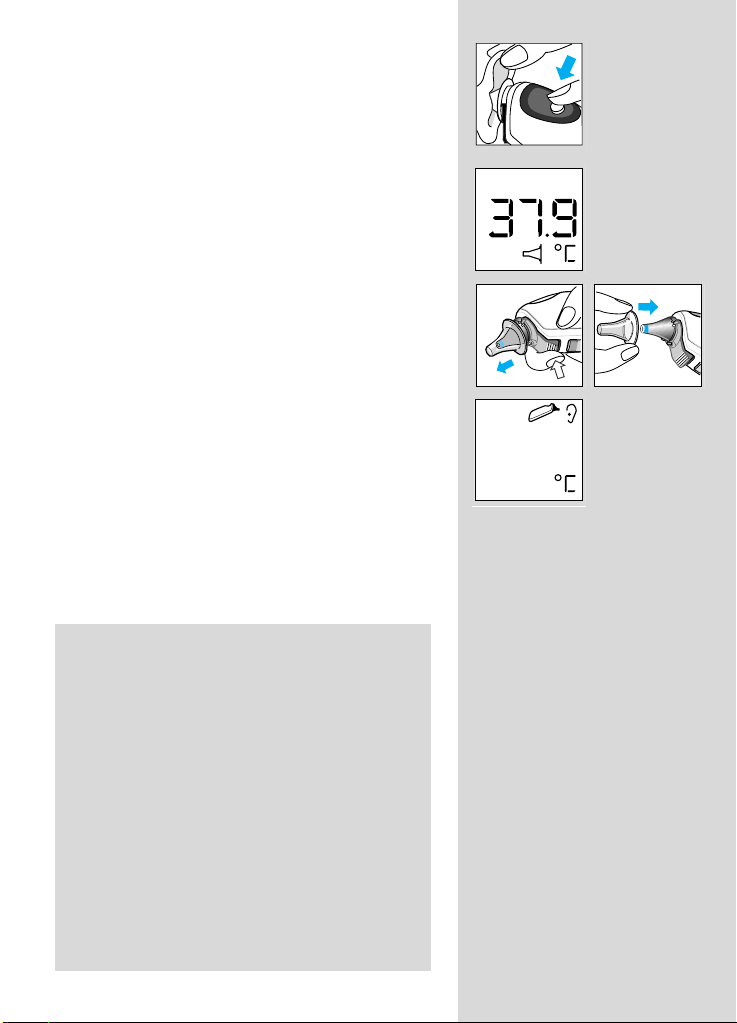
3. While tugging the ear, fit the probe snugly into
the ear canal as far as possible and press
the activation button.
Release it when you hear a beep.
This is the Temp Beep that confirms the end
of measurement.
4. Remove the thermometer from the ear canal.
The LCD displays the temperature measured and
the probe cover symbol.
5.
Replace the probe cover after each
measurement:
Press the ejector button and put on a new,
clean probe cover.
Only then, the probe cover symbol disappears
from the display. The thermometer is now ready
for use again.
6. If no button is pressed or no new probe cover is
attached within 30 seconds, the thermometer
will turn off automatically.
Note: In the following situations, it is recommended that you take three temperatures in the
same ear. If they differ, use the highest reading.
ø
Infants in the first 90 days of life.
ø
Children under three years of age who have
a condition such as a compromised immune
system and for whom the presence or
absence of fever is critical.
ø
When you are first learning to use the ear
thermometer until you are comfortable with
the technique and are obtaining consistent
readings.
Important: As with any type of thermometer,
slight temperature variations (± 0.2-0.3 °C /
± 0.3-0.5°F) can occur, if consecutive
measurements are taken.
7

Temperature taking hints
ø
The right ear reading may differ from the reading taken at the left
ear. Therefore, always take the temperature in the same ear.
ø
The ear must be free from obstructions or excess earwax buildup to take an accurate reading.
ø
External factors may influence ear temperatures, including when
an individual has:
– been lying on one ear or the other
– had their ears covered
– been exposed to very hot or very cold temperatures, or
– been recently swimming or bathing.
In these cases, remove the individual from the situation
and wait 20 minutes prior to taking a temperature.
ø
For persons wearing hearing aids or ear plugs, remove the
device and wait 20 minutes prior to taking a temperature.
ø
Use the untreated ear if prescription ear drops or other ear
medications have been placed in the ear canal.
8
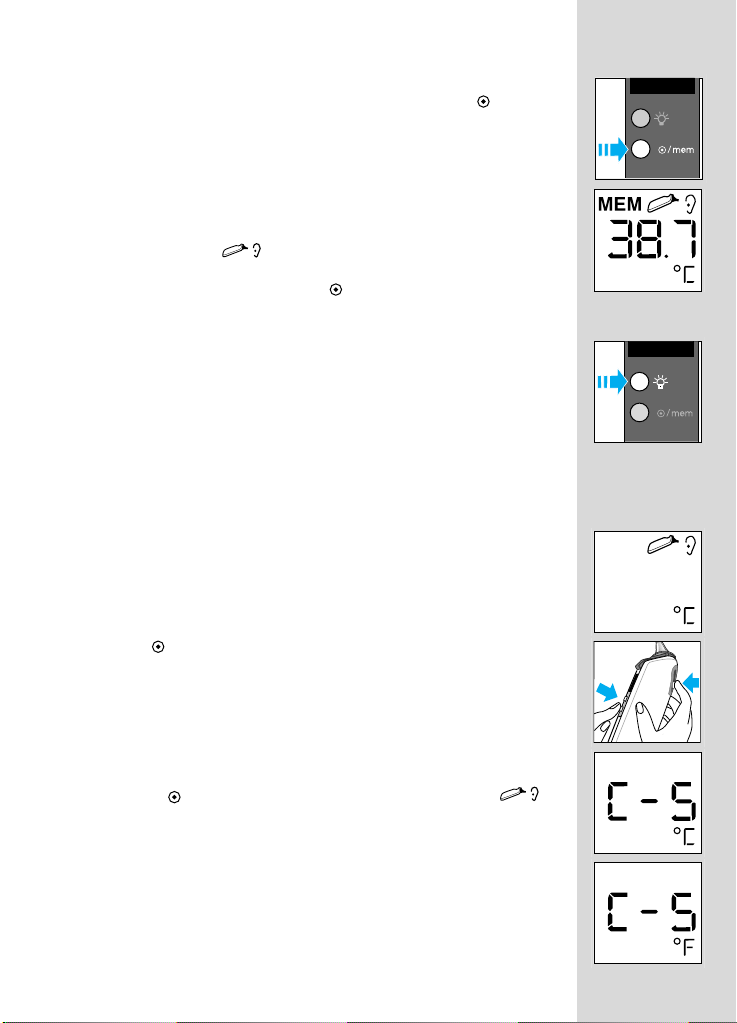
Memory mode
The last temperature taken before the thermometer powers down is
stored in memory. To enter the memory mode, press the /mem
button.
The last stored temperature is displayed along with the MEM symbol.
Even in memory mode, a new temperature can be taken provided
that the ready symbol
is shown.
To quit the memory mode, press the /mem button again.
LCD light
for easy nighttime reading
Changing the temperature scale
This thermometer is shipped with the Celsius temperature scale
activated. If you wish to switch to Fahrenheit (°F), proceed as
follows:
ø
Turn on the thermometer.
(If it is already turned on, make sure it is not in memory mode.)
ø
Press the
/mem
button and keep it pressed. Then press and
release the activation button to switch over to the «change
temperature scale» mode.
ø
By pressing the activation button again, the Fahrenheit scale is
activated, «°F» is displayed on the LCD. Each further pressing
of the activation button toggles the scale between °C and °F.
ø
Release the
/mem
button to return to the ready symbol .
The temperature stored in memory will automatically be converted
to the selected scale when displayed on the LCD.
9
Care and cleaning
Braun ThermoScan probe covers are intended for single use
only! To ensure accurate readings, always use Braun
ThermoScan disposable probe covers with the Pro 3000
thermometer. Damaged, perforated, or soiled probe covers
can lead to inaccurate temperature readings. Additionally,
the accuracy of your temperature readings can be affected by
damage to the probe window, or the presence of dirt and ear
wax on the probe window.
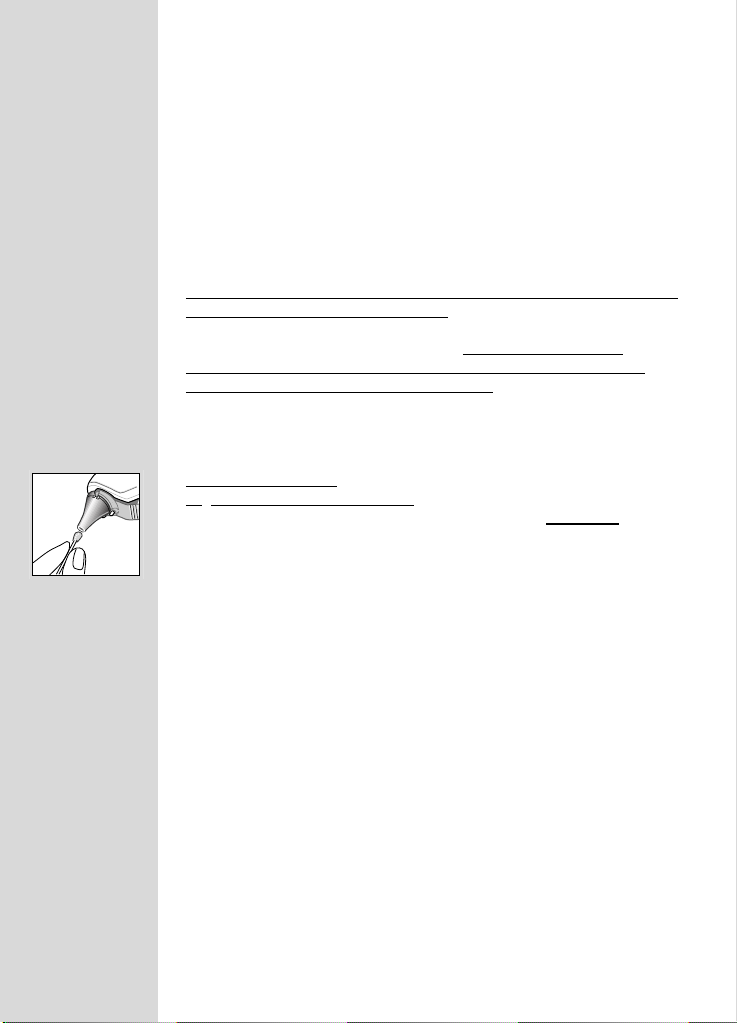
Probe Window
To assure a high level of accuracy, it is very important to keep this
window clean, dry and undamaged. Fingerprints, earwax, dust and
other soiling compounds reduce transparency of the window and
result in lower temperature readings. If
accidentally placed in the ear without a probe cover installed,
the window must be cleaned immediately. Additionally, the window
and/or probe tip area should never be modified, changed, or
adjusted. These changes will affect calibration and accuracy of
the thermometer.
T
o clean the window, gently wipe its surface with a cotton swab
sli
ghtly moistened with alcohol and immediately wipe dry with a
clean cotton swab. After cleaning, allow at least 5
time before taking temperatures. Make sure probe window is clean
and dry. Avoid touching the window except when cleaning is
required. If the window is damaged, the thermometer must be
returned to Welch Allyn for service.
the thermometer is
minutes drying
10
Note: Do not use any chemical other than alcohol to clean
the probe window.
Thermometer
Use a soft, cloth slightly moistened with alcohol to clean the
thermometer display and exterior. Do not use abrasive cleaners.
Never submerge the thermometer in water or any other liquid.
Store thermometer and probe covers in a dry location free from dust
and contamination and away from direct sunlight. The ambient
temperature at the storage location should remain fairly constant
and within the range of 10°C -40°C (50°F to 104°F).
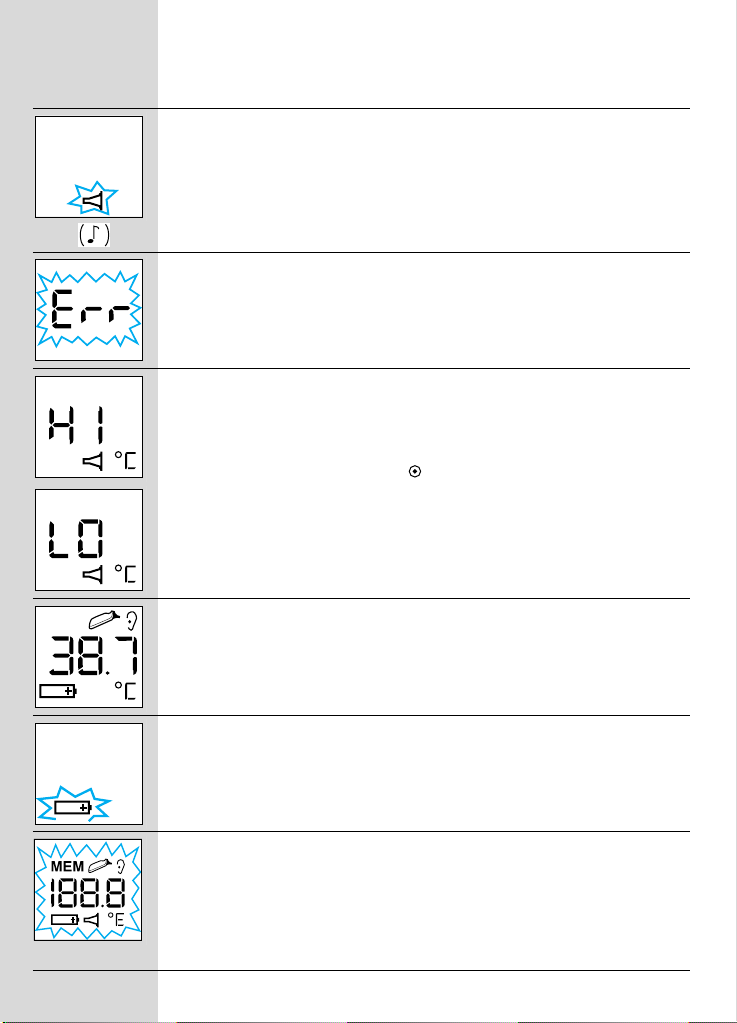
Error message
Troubleshooting
Situation Solution
No probe cover is attached
and activation button was
pressed while probe was in the
ear.
Make sure probe window is clean;
refer to section «Care and cleaning»
if necessary.
Attach new, clean probe cover to
stop error beeps.
Ambient temperature is not
within the allowed operating
range of 10°C-40°C
(50°F to 104°F) or changing
too rapidly.
Temperature taken is not
within displayed temperature
range (20°C-42.2°C/ 68°F108°F).
HI = too high
LO = too low
Battery is low, but
thermometer will still operate
correctly.
(No light function)
Battery is too low to take
correct temperature readings.
System error
• If error persists
• If error still persists
Allow the thermometer to remain in a
room for 30 minutes where
the temperature is between
10°C and 40°C (50°F to 104°F).
Make sure new, clean probe cover is
attached and thermometer is
properly inserted.
To clear the error message, attach a
new, clean probe cover or press the
/mem button.
Then, take a new temperature.
Insert new batteries
Insert new batteries
Wait 30 seconds until thermometer
powers down, then turn on again.
… reset the thermometer by
removing the batteries and putting
them back in.
…call Welch Allyn Customer Service
(see page 2).
11
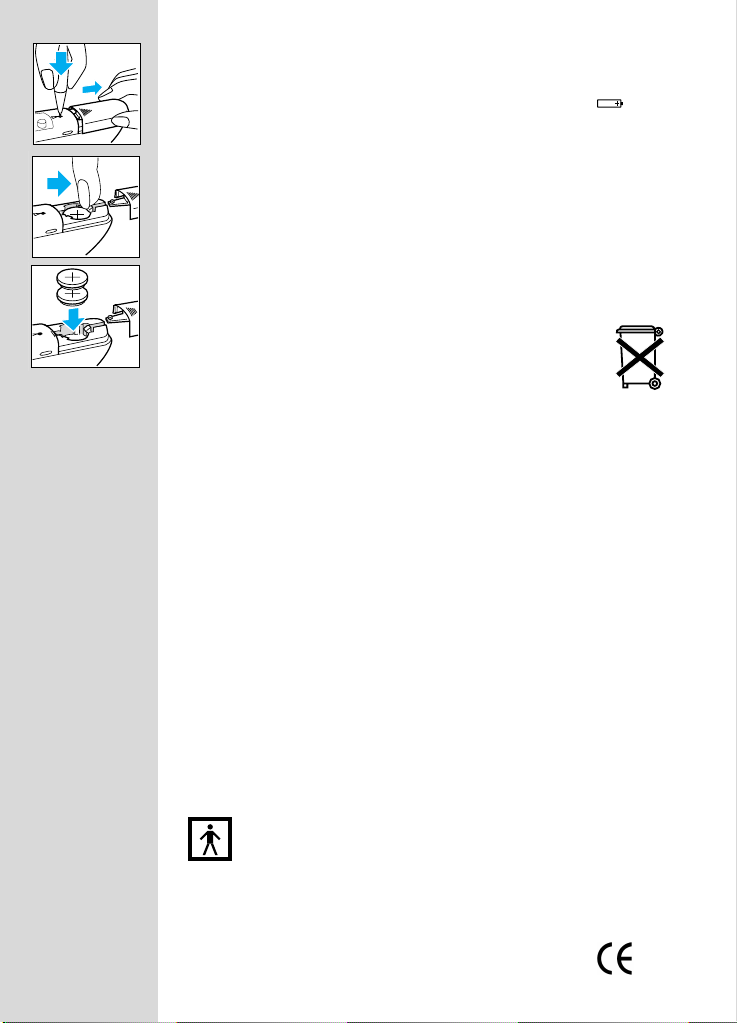
Replacing the batteries
The thermometer is supplied with 2 lithium cells, type CR 2032/
DL 2032. Insert new batteries when the battery symbol
appears on the display.
Using the tip of a ball-point pen, press the battery door lock to open
the battery compartment.
Using your finger, press the battery release.
Remove the batteries and replace with new batteries, making sure
the poles are in the right direction.
Slide battery door back in until it snaps in place.
To protect the environment, dispose of empty batteries
at your retail store or at appropriate collections sites
according to national or local regulations.
To dispose of the thermometer, please return it to a
Welch Allyn Service Centre.
Calibration
The thermometer is initially calibrated at the time of manufacture.
If at any time you question the accuracy of measurement or the
performance of the thermometer, contact a Welch Allyn Service
Centre. To determine the date of manufacture, refer to the Lot
number located in the battery compartment. The first digit refers to
the last digit in the year of manufacture. The next two digits refer to
the calendar week in the year of manufacture.
For example: LOT 842...
This thermometer was manufactured during the 42nd week in 1998.
12
Product specifications
Displayed temperature range: 20 - 42.2 ºC (68 -108 ºF )
Operating ambient temperature range: 10 - 40 º C (50 -104 ºF)
Display resolution: 0.1 ºC or ºF
Accuracy: 35.5 - 42.0 ºC (98.0 -107.6 ºF ) : ± 0.2 ºC
Battery life: 5000 measurements
The Braun ThermoScan PRO3000 has been found to be immune
to electromagnetic fields and does not produce any measurable
RF emissions.
This product conforms to the provisions of the
EC directive 93/42 /EEC (Medical Device Directive).
outside this range: ± 0.3 ºC
Type BF equipment / Subject to change without notice.
0297

Guarantee
This product is guaranteed for 3 years from date of purchase
against material and/or workmanship defects. These will be
eliminated either by repairing or exchanging the appliance as we
may choose. All other claims, including for damages, are excluded.
Service under the guarantee does not affect its expiry date.
Claims only valid in countries where product is officially sold and
if accompanied by a proof of purchase.
Claims arising out of the sales contract with the vendor are not
affected by this guarantee.
13

Français
Le thermomètre ThermoScan de Braun a été élaboré avec soin pour
prendre des mesures de température auriculaire précises, rapides
et en toute sécurité. Sa forme prévient tout risque d’insertion trop
profonde dans le conduit auditif susceptible d’endommager le
tympan.
Toutefois, à l’instar des autres thermomètres, il est nécessaire
d’utiliser celui-ci de manière appropriée afin d’obtenir des
lectures précises. Nous vous invitons donc à lire attentivement
les instructions d’utilisation ci-après.
Important
ø
N’exposez pas le thermomètre à des températures extrêmes
(inférieures à –20 ºC ou supérieures à 50ºC) ou à une
humidité excessive (plus de 95% d’humidité relative).
ø
La lentille doit toujours être gardée propre, sèche et en bon
état pour assurer des lectures précises. Pour protéger la
lentille, toujours ranger le thermomètre dans son boîtier lors
du transport ou quand il n’est pas utilisé.
ø
Ce thermomètre doit uniquement être utilisé avec des
protecteurs de sonde ThermoScan de Braun.
ø
Pour éviter des lectures incorrectes, toujours mettre en
place un protecteur de sonde neuf, propre, pour chaque
prise de température.
Fonctionnement du thermomètre ThermoScan
de Braun
Le thermomètre ThermoScan de Braun mesure la chaleur
infrarouge émise par le tympan et le tissu environnant.
Ce thermomètre à haute précision prend 8 mesures en une
seconde seulement et affiche la température la plus élevée.
La température affichée par ThermoScan est la température réelle
mesurée dans le conduit auditif, plus un ajustement mathématique
pour se rapprocher de l'échelle de température orale. Toutefois,
la température prise n'est pas nécessairement la même qu'une
température orale prise au même moment.
14
Avantages de la température auriculaire
Des études cliniques ont montré que l’oreille est un endroit idéal
pour mesurer la température, car mesurée dans l'oreille elle reflète
la température « centrale » ou interne du corps. La température
corporelle est régulée par l'hypothalamus qui est irrigué par les
mêmes flux sanguins que la membrane tympanique. Les changements de température corporelle sont ainsi détectés plus tôt dans
la membrane tympanique que dans les autres parties du corps
telles que le rectum, la bouche ou les aisselles.
Les avantages de la prise de température auriculaire par rapport
aux autres prises de températures :
ø
La température
axillaire
reflète uniquement la température de la
peau qui peut ne pas correspondre à la température corporelle
interne.
ø
La température
rectale
reflète souvent avec retard les variations
de la température interne du corps et particulièrement lors
de changements rapides de température.
ø
La température
buccale
est souvent influencée par l’alimentation, la consommation de boissons, la position du thermomètre dans la bouche, la respiration ou même l'incapacité à
fermer complètement la bouche.
Température du corps
La température normale du corps correspond à une fourchette
de valeurs. Le tableau
varie en fonction de la partie du corps où la température est prise.
C’est pourquoi il ne faut pas établir de comparaison directe entre
les températures prises en des endroits différents même si elles
sont prises au même moment.
Température axillaire: 34,7°C - 37,3°C
Température orale : 35,5°C - 37,5°C
Température rectale: 36,6°C - 38,0°C
ThermoScan
La fourchette normale de température d’un individu tend également
à décroître avec l’âge. Le tableau suivant indique les fourchettes
normales de température avec ThermoScan en fonction de l’âge.
@
ci-dessous indique que cette fourchette
”
: 35,8°C - 38,0°C
Fourchettes normales de températures avec ThermoScan”
0 - 2 ans 36,4°C - 38,0°C
3 - 10 ans 36,1°C - 37,8°C
11 - 65 ans 35,9°C - 37,6 °C
plus de 65 ans 35,8°C - 37,5°C
La fourchette des températures normales varie d’une personne à
l’autre et peut être influencée par de nombreux facteurs tels qu'un
moment précis de la journée, le type d'activité, la prise de
médicaments et le sexe de l'individu.
1. Chamberlain, J.M., Terndrup, T.E., New Light on Ear Thermometer Readings,
Contemporary Pediatrics,
2. Chamberlain, J.M., et al., Determination of Normal Ear Temperature with an Infrared
Emission Detection Thermometer,
mars 1994.
Annals of Emergency Medicine,
janvier 1995.
15
Description du produit
1. Protecteur de sonde
2. Lentille
3. Sonde
4. Détecteur de protecteur de sonde
5. Ejecteur de protecteur de sonde
6. Affichage à cristaux liquides (écran LCD)
7. Touche pour éclairage de l’écran
8. Touche /mem (mise en marche / fonction
de mémorisation)
9. Fermeture du compartiment des piles
10. Couvercle du compartiment des piles
11. Bouton de lecture
12. Messages sur autocollants
13. Boîtier de rangement
Mode opératoire du thermomètre
Braun ThermoScan
1.
Toujours mettre un nouveau protecteur
de sonde, propre, à chaque utilisation, pour
garantir une lecture précise.
Mettez un nouveau protecteur de sonde propre.
S'il est déjà en place, appuyer sur la touche
/mem.
L'affichage à cristaux liquides (écran LCD)
est activé, montrant toutes les fonctions.
Quand le symbol est affiché,
le thermomètre est prêt à l’emploi.
16
2. Exercez une traction sur l’oreille pour redresser
le conduit auditif. Le thermomètre obtient ainsi
bonne vision du tympan.
Pour
les enfants agés de moins d’un an :
Tirez l’oreille vers
Pour les enfants de plus d’un an et les adultes :
Tirez l’oreille vers le haut et vers l’arrière.
l’arrière.
3. Pendant que vous tirez l’oreille, introduisez
délicatement la sonde dans le conduit auditif et
appuyez sur le bouton de lecture. Relâcher le
bouton de lecture quand vous entendez
un « bip ». Ce son indique la fin de la mesure.
4. Retirez le thermomètre du conduit auditif.
L'écran LCD affiche la température mesurée
ainsi que le symbole « protecteur de sonde ».
5.
Remplacez le protecteur de sonde après
chaque mesure : pour ce faire, appuyez sur
le bouton éjecteur et fixez un nouveau
protecteur de sonde.
Alors seulement, le symbole « protecteur de
sonde » disparaît de l'écran. Le thermomètre est
de nouveau prêt à l'emploi.
6. Si aucune touche n’est actionnée ou si le
changement du protecteur de sonde n'est pas
effectué dans les 30 secondes qui suivent,
le thermomètre s’éteindra automatiquement.
Remarque: Dans les situations suivantes, il est
recommandé d’effectuer 3 prises de
température dans la même oreille. Si elles sont
différentes, utilisez la lecture la plus élevée.
ø
Pour les nourrissons de 90 jours ou moins.
ø
Pour les enfants de moins de 3 ans ayant par
exemple un système immunitaire déficient
et pour lesquels la présence ou l’absence
de fièvre est cruciale.
ø
Lorsque vous apprenez à utiliser le thermomètre auriculaire pour la première fois
jusqu’à ce que vous soyez à l’aise avec
la technique et obteniez des lectures
constantes.
Important : A l’instar de tout thermomètre,
de légères variations de température peuvent se
produire ( ± 0,2 - 0,3°C), si des prises sont
effectuées consécutivement.
17

Conseils pour la prise de température auriculaire
ø
Il peut y avoir une différence de température entre l’oreille
gauche et l’oreille droite. Il faut donc toujours prendre la
température dans la même oreille.
ø
L’oreille ne doit pas être obstruée par des particules
quelconques ou un excés de cérumen si l’on veut avoir une
lecture précise.
ø
Des facteurs externes peuvent influencer la température
auriculaire, tels que :
– avoir dormi sur une oreille ou sur l'autre
– avoir eu les oreilles recouvertes auparavant
– avoir été exposé à des températures élevées ou très basses
– avoir nagé ou pris un bain.
Dans ces cas-là, attendre une vingtaine de minutes avant de
prendre la température.
ø
Pour les individus portant un appareil auditif ou des boules
Quiès, enlever l'appareillage et attendre une vingtaine de
minutes avant de prendre la température.
ø
Si l'on utilise des gouttes ou un traitement auriculaire, mesurer
la température dans l'oreille non traitée.
18

Mode mémoire
La dernière température prise avant l’arrêt du thermomètre est
mémorisée. Pour activer le mode mémoire, appuyez sur
la touche /mem.
La température mémorisée est affichée en même temps que
le symbole MEM.
Vous pouvez prendre de nouvelles températures même quand
le mode mémoire est activé, tant que le symbol
est affiché.
Pour quitter le mode mémoire, appuyez de nouveau sur
la touche /mem.
Eclairage de l’affichage à cristaux liquides
Facilite les lectures de température la nuit.
Changement de l'échelle de températures
Ce thermomètre est livré avec un affichage des températures
en °Celsius. Si vous souhaitez obtenir un affichage en °Fahrenheit,
procédez comme suit:
ø
Mettre en marche le thermomètre
(s’il est déjà en marche, vérifiez qu’il n’est pas en mode
mémoire).
ø
Appuyez sur la touche
Appuyez ensuite sur le bouton de lecture et relâchez-le pour
passer au mode « changement d’échelle de température ».
ø
En appuyant à nouveau sur le bouton de lecture, l’échelle
de température en °Fahrenheit est activée et l’indication «°F»
s’affiche sur l'écran LCD.
Ensuite, à chaque fois que l'on appuie sur le bouton de lecture,
l'échelle de température passe des °C aux °F et inversement.
ø
Relâchez la touche
indiquant que le thermomètre est prêt à l’emploi.
/mem
/mem
et maintenez-la enfoncée.
pour revenir au symbole
Les températures mémorisées seront automatiquement converties
dans l’échelle de température sélectionnée, lors de l'affichage sur
l'écran LCD.
19

Instructions d’entretien et de nettoyage
Les protecteurs de sonde ThermoScan de Braun sont conçus
pour une utilisation unique. Pour assurer une lecture précise,
il faut toujours utiliser les protecteurs de sonde ThermoScan
avec le thermomètre Pro 3000.
Les protecteurs de sonde endommagés, perforés ou souillés
peuvent conduire à une mauvaise lecture de la température.
De plus, la précision des lectures de température peut
également être affectée par une sonde abîmée ou la présence
de saleté et de cérumen sur la sonde.
La lentille
Pour assurer un haut niveau de précision, il est très important de
garder cette lentille propre, sèche et en bon état. Traces de doigts,
bouchon de cérumen, poussières et autres causes de souillures
peuvent réduire la transparence de la lentille et amener à des
lectures de température basses. Si le thermomètr
accidentellement introduit dans l’oreille sans un protecteur de
sonde, nettoyez la lentille immédiatement. De plus, la lentille et/ou
l’extrémité de la sonde ne doivent jamais être modifiées, changées
ou ajustées. En effet, ces modifications affecteraient l’étalonnage
et la précision du thermomètre.
e est
20
Pour nettoyer la lentille
tampon d’ouate légèrement humidifié d'alcool et essuyez
immédiatement avec un tampon d'ouate propre et sec.
Après avoir nettoyé la lentille, laissez sécher pendant au moins
5
minutes avant une nouvelle prise de température. La lentille doit
être propre et sèche. Evitez de toucher la lentille sauf lorsqu’un
nettoyage est nécessaire. Si elle est endommagée, retournez
impérativement le thermomètre à la société Welch Allyn pour
vérification.
Note : n’utilisez aucun autre produit que de l’alcool pour
nettoyer la lentille.
Thermomètre
Utilisez un chiffon doux légèrement humidifié d’alcool pour nettoyer
la zone d’affichage et l’extérieur de l’appareil. N’utilisez pas de
produits de nettoyage abrasifs et ne plongez jamais le thermomètre
dans l’eau ou dans un quelconque autre liquide.
Conservez le thermomètre et les protecteurs de sonde dans un
endroit sec exempt de poussiére, ne présentant pas de risques
de contamination et à l’abri de l’exposition directe au soleil.
La température ambiante de l‘endroit de stockage doit être
constante, comprise entre 10°C et 40°C.
, essuyez doucement sa surface avec un

Message
Situation Solution
d’erreur
Causes principales de panne et solutions
Aucun protecteur de sonde
n’est installé et le bouton
de lecture a été enfoncé
alors que la sonde était
dans l’oreille.
Vérifiez que la lentille est propre.
Consultez le paragraphe « Entretien et
nettoyage » si nécessaire. Fixez un
nouveau protecteur de sonde propre
pour que les « bip » signalant une erreur
s’arrêtent.
La température ambiante
n’est pas comprise dans
la fourchette opératoire
autorisée (10°C - 40°C)
ou elle change trop
rapidement.
La température relevée
n’est pas comprise dans
l’intervalle de températures
affiché (20 °C - 42,2°C).
HI = trop élevée
LO = trop basse
Les piles sont faibles mais
le thermomètre fonctionne
correctement (pas de
fonction d’éclairage de
l’écran).
Les piles sont trop faibles
pour pouvoir lire correctement la température.
Placez le thermomètre pendant
30 minutes dans une pièce où
la température est comprise entre
10°C et 40°C.
Vérifiez qu’un nouveau protecteur
de sonde propre est en place et que
le hermomètre est correctement inséré
dans l’oreille. Pour enlever le message
d'erreur, mettez en place un nouveau
protecteur de sonde, propre, ou
appuyez sur la touche /mem.
Prenez une nouvelle température.
Mettre de nouvelles piles.
Mettre de nouvelles piles.
Erreur système
• Si l’erreur persiste
• Si le problème n’est
toujours pas résolu
Attendez 30 secondes que
le thermomètre s'éteigne puis mettezle à nouveau en marche.
… retirez les piles et remettez-les en
place pour re-initialiser le thermomètre.
… appelez le Service Après-vente de
Welch Allyn (voir page 2).
21

Remplacement des piles
Le thermomètre est livré avec deux piles au lithium, du type CR 2032/
DL 2032.
est affiché.
Avec la pointe d’un stylo bille, appuyez sur le couvercle du
compartiment des piles pour l’ouvrir.
Avec le doigt, appuyez sur le ressort de dégagement des piles.
Enlevez les piles et remplacez-les, en vous assurant que
les pôles + et - sont dans le bon sens.
Faîtes glisser le couvercle du compartiment des piles d'un coup sec
vers l'arrière jusqu’à sa bonne mise en place.
Pour le respect de l'environnement, déposer les piles
usagées chez son revendeur ou dans les lieux de collecte
prévus à cet effet selon la réglementation en vigueur.
Pour vous défaire du thermomètre en fin de vie, renvoyez
le au un centre de Service Après-vente de Welch Allyn.
Mettre de nouvelles piles lorsque le symbole
Etalonnage
Le thermomètre fait l’objet d’un étalonnage au moment de sa
fabrication. Si à un moment donné vous avez le moindre doute sur
la précision de la mesure ou la performance du thermomètre,
contactez un centre de Service Après-vente de Welch Allyn. Pour
déterminer la date de fabrication, se référer au numéro de Lot
figurant dans le compartiment des piles. Le premier chiffre
correspond au dernier chiffre de l’année de fabrication.
Les 2 chiffres suivants correspondent à la semaine de fabrication.
Par exemple : LOT 842…
Ce thermomètre a été fabriqué la 42ème semaine de l’année 1998.
Spécifications du produit
Intervalle de températures affiché : 20 - 42,2 º C
Intervalle de température ambiante pendant l’utilisation : 10 - 40º C
Résolution de l’affichage : 0,1 ºC ou ºF
Précision : 35,5 - 42,0 ºC: ± 0,2 ºC
Durée de vie des piles: 5000 prises de température
En dehors de cet intervalle : ± 0,3 ºC
22
Equipment de type BF
Sujet à modifications sans préavis.
Il a été démontré que ThermoScan Pro 3000 est insensible aux
interférences des champs magnétiques et qu’il ne produit pas
lui-même d’émissions de fréquences radioélectriques.
Ce produit est conforme aux dispositions de la directive
européennee 93/42/EEC (Directive sur les appareils
médicaux).
0297

Garantie
Nous accordons une garantie de trois ans sur ce produit, à partir
de la date d’achat.
Pendant la durée de la garantie, Braun se réserve le droit de décider
de la prise à sa charge de la réparation de l’appareil ou de son
échange.
Toutes les autres réclamations, y compris celles invoquant
les dommages occasionnés par une utilisation inadéquate de
l’appareil, excluent toute prétention à la garantie.
Toute réparation au titre de la garantie ne modifie pas la date
d’expiration de celle-ci.
Cette garantie est reconnue dans tous les pays où Braun ou son
distributeur commercialise l’appareil.
Elle n’est valable que sur présentation du bon d’achat.
.
Les garanties offertes par un revendeur n’entrent pas dans le cadre
de la garantie Braun.
Clause speciale pour la France
Outre les dispositions ci-dessus relatives aux garanties offertes par
la société Braun au-delà du champ d’application de la garantie
légale prévue par le Code civil français, par exemple, après
l’expiration du bref délai de l’article 1648 du Code civil, s’applique
en tout état de cause la garantie légale qui oblige le vendeur
professionnel à garantir l’acheteur contre toutes les conséquences
des défauts ou vices cachés de la chose vendue ou du service
rendu dans les conditions des articles 1641 et suivants du
Code civil.
23

Deutsch Deutsch
Das Braun ThermoScan Thermometer wurde entsprechend hoher
Präzisions- und Sicherheitsanforderungen für die Messung der
menschlichen Körpertemperatur im Ohr entwickelt. Durch seine
Form kann das Thermometer nur so weit in das Ohr eingeführt
werden, dass Verletzungen des Trommelfells vermieden werden.
Wie bei jedem anderen Thermometer ist die richtige Messtechnik
eine wesentliche Voraussetzung für genaue Messergebnisse.
Bitte lesen Sie vor der Benutzung die Gebrauchsanweisung
sorgfältig durch.
Wichtig
ø
Das Gerät sollte weder extremen Temperaturen
(unter –20ºC oder über 50º C) noch zu hoher Luftfeuchtigkeit
(über 95% relative Luftfeuchtigkeit) ausgesetzt werden.
ø
Um die Genauigkeit der Meßergebnisse sicherzustellen, muss
die Messlinse immer sauber, trocken und unbeschädigt sein.
Zum Schutz der Messlinse sollte das Thermometer beim
Transport oder Nichtgebrauch stets in der Schutzhülle
aufbewahrt werden.
ø
Dieses Thermometer darf nur mit original Braun
ThermoScan Messfiltern benutzt werden.
ø
Verwenden Sie für jede Messung einen neuen, sauberen
Messfilter, um ungenaue Messwerte zu vermeiden.
Wie funktioniert das Braun ThermoScan
Ohr-Thermometer?
Braun ThermoScan misst die Infrarot-Wärme, die vom Trommelfell
und dem umliegenden Gewebe abgegeben wird. Um ein genaues
Messergebnis zu erzielen, führt das Thermometer in einer Sekunde
8 Messungen durch und zeigt die höchste Temperatur an.
24
Die angezeigte ThermoScan Temperatur entspricht der im
Gehörgang gemessenen, tatsächlichen Temperatur, zuzüglich einer
mathematischen Anpassung zur Annäherung an übliche, oral
gemessene Temperaturen. Dies entspricht jedoch nicht unbedingt
einer zur gleichen Zeit oral gemessenen Temperatur.
Warum im Ohr Temperatur messen ?
Klinische Studien haben gezeigt, dass sich das Ohr zur
Temperaturmessung besonders gut eignet, weil die dort
gemessene Temperatur die «Körperkerntemperatur» widerspiegelt.
Die Körpertemperatur wird durch den Hypothalamus reguliert,
der von derselben Blutzufuhr versorgt wird wie das Trommelfell.
Demzufolge können Veränderungen der «Körperkerntemperatur»
schneller am Trommelfell erfasst werden als an anderen
Körperstellen wie z. B. Rektum, Mund oder unter dem Arm.

Vorteile der Temperaturmessung im Ohr gegenüber herkömmlichen
Messmethoden:
ø
Axillar
gemessene Temperaturen geben Aufschluss über die
Hauttemperatur, die nicht unbedingt der Körperkerntemperatur
entspricht.
ø
Rektal
gemessene Temperaturen können nur zeitverzögert
Veränderungen der Körperkerntemperatur anzeigen, insbesondere wenn es sich um rasche Temperaturveränderungen
handelt.
ø
Oral
gemessene Temperaturen werden durch Trinken, Essen,
schnelles Atmen beeinflusst und hängen wesentlich von der
richtigen Positionierung des Thermometers im Mund ab.
Körpertemperatur
Die normale Körpertemperatur bewegt sich immer innerhalb eines
Bereiches. Die nachfolgende Tabelle@ zeigt, dass der Normalbereich
je nach Messmethode variiert. Daher können Messergebnisse
verschiedener Messstellen auch nicht unmittelbar miteinander
verglichen werden.
Axillar: 34,7°C - 37,3°C
Oral: 35,5°C - 37,5°C
Rektal: 36,6°C - 38,0°C
ThermoScan
Die Normaltemperatur eines Menschen nimmt auch mit dem Alter
ab. Die folgende Tabelle zeigt die ThermoScan Normalbereiche
nach Altersgruppen.
Normale ThermoScan Temperatur-Bereiche”:
0 - 2 Jahre 36,4°C - 38,0°C
3 - 10 Jahre 36,1°C - 37,8°C
11 - 65 Jahre 35,9°C - 37,6°C
> 65 Jahre 35,8°C - 37,5 °C
”
: 35,8°C - 38,0°C
Der Normalbereich kann von Person zu Person schwanken und
unterliegt vielen Einflussgrößen wie z.B. Tageszeit, Aktivitätsgrad,
Medikamenteneinnahme und Geschlecht.
1. Chamberlain, J.M., Terndrup, T.E., New Light on Ear Thermometer Readings,
Contemporary Pediatrics,
2. Chamberlain, J.M., et al., Determination of Normal Ear Temperature with an Infrared
Emission Detection Thermometer,
März 1994.
Annals of Emergency Medicine,
Januar 1995.
25

Gerätebeschreibung
1. Messfilter
2. Messlinse
3. Messspitze
4. Messfilter-Fühler
5. Messfilter-Abwurf-Taste
6. Anzeige ( LCD)
7. Taste für Anzeigenbeleuchtung
8. /mem Taste (Einschalt-/Speicherfunktion)
9. Batteriefach-Verriegelung
10. Batteriefach-Abdeckung
11. Aktivierungsknopf
12. Aufkleber
13. Schutzhülle
So verwenden Sie Ihr Braun
ThermoScan Thermometer
1.
Verwenden Sie für jede Messung einen
neuen, sauberen Messfilter, um genaue
Messergebnisse zu erhalten.
Einen neuen, sauberen Messfilter aufsetzen
oder, falls bereits aufgesetzt, die /mem Taste
drücken.
Die Anzeige wird aktiviert und zeigt alle
Symbole.
Wenn das Bereitschaftssymbol in der
Anzeige erscheint, ist das Thermometer
messbereit.
26
2. Durch ein Zurückziehen der Ohrmuschel wird
die natürliche Biegung des Gehörgangs
begradigt, und die Messspitze erhält eine freie
Sicht auf das Trommelfell.
unter einem Jahr:
Kinder
Ohrmuschel gerade nach hinten
Kinder ab 1 Jahr und
Ohrmuschel nach schrä
Erwachsene
g oben ziehen.
ziehen.
3. Während die Ohrmuschel gezogen wird,
die Messspitze behutsam so weit wie möglich in
den Gehörgang einführen und den Aktivierungsknopf drücken. Aktivierungsknopf loslassen,
wenn ein Signalton zu hören ist. Dieser bestätigt,
dass der Messvorgang abgeschlossen ist.
4. Messspitze aus dem Ohr nehmen.
Die gemessene Temperatur wird zusammen mit
dem Messfilter-Symbol angezeigt.
5. Ersetzen Sie den Messfilter nach jeder
Messung: Betätigen Sie die MessfilterAbwurf-Taste und setzen Sie einen neuen,
sauberen Messfilter auf.
Erst dann verschwindet das Messfilter-Symbol
von der Anzeige, und das Thermometer ist
wieder messbereit.
6. Wenn innerhalb von 30 Sekunden kein weiterer
Tastendruck erfolgt, schaltet sich das
Thermometer automatisch aus.
In den folgenden Fällen empfehlen wir, drei
Messungen im selben Ohr vorzunehmen. Sind
die Werte unterschiedlich, ist der höchste
Messwert zu verwenden:
ø
bei Neugeborenen in den ersten
90 Lebenstagen,
ø
bei Kindern unter 3 Jahren mit
geschwächtem Immunsystem, bei denen
das Vorhandensein von Fieber von kritischer
Bedeutung ist,
ø
bei Anwendern, die den Gebrauch des
Thermometers erlernen, bis sie mit der
Methode vertraut sind und reproduzierbare
Werte erzielen.
Wichtig: Wie bei jedem anderen Thermometertyp kann es zu geringfügigen Messschwankungen (± 0,2 - 0,3 °C) kommen, wenn
aufeinander folgende Messungen
vorgenommen werden.
27

Nützliche Hinweise
ø
Es kann vorkommen, dass aus anatomischen Gründen
die im rechten Ohr gemessene Temperatur von einer Messung
im linken geringfügig abweicht. Daher sollte bei wiederholten
Messungen immer im selben Ohr gemessen werden.
ø
Das Ohr darf nicht durch z.B. eine größere Ansammlung von
Ohrenschmalz verstopft sein.
ø
Äußere Faktoren können die Temperaturmessung im Ohr
beeinflussen, besonders,
– wenn man längere Zeit auf dem Ohr gelegen hat,
– wenn das Ohr bedeckt war,
– wenn man extrem hohen oder niedrigen Temperaturen
ausgesetzt war,
– wenn man gebadet hat oder schwimmen war.
In diesen Fällen empfehlen wir, ca. 20 Minuten vor der
Temperaturmessung zu warten.
ø
Hörhilfen oder Hörgeräte müssen ca. 20 Minuten vor
der Temperaturmessung herausgenommen werden.
ø
Wenn in einem Ohr Ohrentropfen verabreicht wurden, sollte
eine Messung im anderen Ohr durchgeführt werden.
28

Speicherfunktion
ThermoScan speichert die zuletzt
gemessene Temperatur,
bevor sich das Thermometer ausschaltet.
Drücken Sie die /mem Taste, um in den Speichermodus zu
gelangen.
Die gespeicherte Temperatur wird zusammen mit dem
MEM Symbol angezeigt.
Sofern das Bereitschaftssymbol
sichtbar ist, kann auch im
Speichermodus jederzeit eine neue Temperaturmessung
durchgeführt werden.
Um den Speichermodus zu verlassen, die /mem Taste nochmals
drücken.
Beleuchtung der LCD-Anzeige
für leichtes Ablesen auch bei Nacht
Umschalten der Messskala
Dieses Thermometer wird mit Celsius-Einstellung geliefert.
Soll die Temperatur in Fahrenheit (°F ) angezeigt werden, ist wie
folgt vorzugehen:
ø
Thermometer einschalten
ø
/mem
ø
Aktivierungsknopf drücken und wieder loslassen:
Taste drücken und halten.
Das Thermometer befindet sich nun im MessskalaUmschaltmodus.
ø
Durch ein weiteres Drücken des Aktivierungsknopfes wird die
Fahrenheit-Skala eingestellt. °F erscheint in der LCD-Anzeige.
Jedes weitere Drücken schaltet zwischen Fahrenheit- und
Celsius-Skala hin und her.
ø
Wird die
/mem
Taste losgelassen, erscheint wieder
das Bereitschaftssymbol .
(Gerät darf nicht im MEM Modus sein).
Eine im Speicher befindliche Temperatur wird automatisch in
die gewählte Messskala umgerechnet und entsprechend
angezeigt.
29

Pflege und Reinigung
Braun ThermoScan Messfilter sind nur für einmaligen Gebrauch
bestimmt.
Verwenden Sie für jede Messung einen neuen, sauberen
Messfilter, um genaue Messergebnisse zu erhalten. Beschädigte oder verschmutzte Messfilter können zu ungenauen
Messergebnissen führen. Außerdem kann die Genauigkeit der
Messungen auch durch eine beschädigte oder verschmutzte
Messlinse beeinträchtigt werden.
Messlinse
Um ein hohes Maß an Genauigkeit zu gewährleisten, muss die
Messlinse sauber, trocken und intakt sein. Fingerabdrücke,
Ohrenschmalz, Staub und andere Verunreinigungen verringern die
Durchlässigkeit der Linse und führen zu niedrigeren Messwerten.
Wir
d das Thermometer einmal versehentlich ohne Messfilter ins Ohr
gehalten, muss die Linse sofort gereinigt werden. Außerdem darf
die Linse oder der Bereich der Messspitze weder modifiziert noch
verstellt werden. Jegliche Manipulation beeinträchtigt die
Kalibrierung und damit die Genauigkeit des Thermometers.
30
Zum Reini
Alkohol getränkten Wattestäbchen abwischen und sofort mit einem
neuen Wattestäbchen trockenwischen. Nach dem Reinigen noch
5 Minuten nachtrocknen lassen, bevor wieder Messungen vorgenommen werden. Die Messlinse muss sauber und trocken sein.
Außer beim Reinigen sollte die Linse nicht berührt werden.
Ist die Linse beschädigt, muss das Thermometer an den Welch
Allyn Kundendienst eingeschickt werden.
Achtung: Zur Reinigung der Messlinse darf ausschliesslich
Alkohol verwendet werden.
Thermometer
Das Thermometer-Gehäuse mit LCD-Anzeige mit einem weichen,
mit Alkohol getränkten Tuch reinigen. Keine aggressiven
Reinigungsmittel verwenden. Das Gerät weder in Wasser noch in
andere Flüssigkeiten tauchen.
Gerät und Messfilter an einem trockenen, staubfreien Ort aufbewahren und vor direkter Sonneneinstrahlung schützen. Die Temperatur am Aufbewahrungsort sollte einigermaßen konstant im
Bereich zwischen 10 °C und 40 °C liegen.
gen die Oberfläche der Linse vorsichtig mit einem in

Fehlerbehebung
Anzeige Situation Lösung
Es ist kein Messfilter aufgesetzt und der Aktivierungsknopf wurde im Ohr gedrückt.
Stellen Sie sicher, dass die Messlinse
sauber ist. Ggf. reinigen
(siehe «Pflege und Reinigung»).
Signalton ertönt bis zum Aufsetzen
eines Messfilters.
Umgebungstemperatur liegt
nicht innerhalb des zulässigen
Betriebsbereiches (10°C 40°C) oder ändert sich zu
schnell.
Gemessene Temperatur liegt
außerhalb des anzeigbaren
Temperaturbereiches (20 °C 42,2 °C).
HI = zu hoch
LO = zu niedrig
Batterie ist schwach, aber
korrekte Messungen können
noch durchgeführt werden.
(Keine Anzeigen-Beleuchtung
mehr)
Batterie ist leer. Neue Batterien einsetzen.
Thermometer 30 Minuten in einem
Raum mit einer Temperatur zwischen
10°C und 40°C aufbewahren, dann
dort erneut messen.
Sicherstellen, dass ein neuer,
sauberer Messfilter aufgesetzt und
das Thermometer richtig im Ohr
positioniert wird.
Dann erneut messen.
Neue Batterien einsetzen.
Systemfehler
• Falls der Fehler noch nicht
behoben ist,
• Falls obige Maßnahmen nicht
geholfen haben,
30 Sekunden warten, bis sich
das Gerät
einschalten.
... Batterien herausnehmen und
wieder einsetzen.
... rufen Sie den Welch Allyn
Kundendienst an (siehe S.2).
ausschaltet, dann wieder
31

Neue Batterien einsetzen
Das Gerät wird mit 2 Lithium-Zellen ( 3 Volt, CR2032/DL 2032)
ausgeliefert. Setzen Sie neue Batterien ein, wenn das Batteriesymbol auf der LCD-Anzeige erscheint.
Drücken Sie (z.B. mit der Spitze eines Kugelschreibers) auf
die Batteriefach-Verriegelung und schieben Sie die BatteriefachAbdeckung in Pfeilrichtung nach unten weg.
Drücken Sie mit dem Finger auf die Batterie-Halterung
und entfernen Sie die alten Batterien.
Setzen Sie zwei neue Batterien polrichtig ein. Schieben Sie
die Batteriefach-Abdeckung wieder ein, bis sie einrastet.
Nur verbrauchte (entladene) Batterien entsorgen.
Sie gehören nicht in den Hausmüll, sondern sollten bei
den entsprechenden Sammelstellen oder im Handel
abgegeben werden.
Das Gerät kann bei den Welch Allyn Kundendienststellen
entsorgt werden.
Kalibrierung
Das Thermometer wird im Werk kalibriert. Falls Sie Zweifel an der
Messgenauigkeit oder der Funktion des Gerätes haben, schicken
Sie das Gerät an eine Welch Allyn Kundendienststelle.
Aufschluss über das Herstellungsdatum gibt die LOT-Nummer, die
sich im Batteriefach befindet. Die erste Stelle nach LOT entspricht
der letzten Stelle des Herstellungsjahres. Die zwei folgenden Stellen
beziehen sich auf die Kalenderwoche im Herstellungsjahr.
Beispiel: LOT842...
Dieses Thermometer wurde in der 42. Woche des Jahres 1998
produziert.
32
Technische Daten
Anzeigbarer Temperaturbereich: 20 - 42,2 ºC
Betriebsbereitschaft bei Umgebungstemperatur: von 10 ºC - 40 ºC
Auflösung der LCD-Anzeige: 0,1ºC oder ºF
Genauigkeit: von 35,5ºC - 42,0ºC: ± 0,2 ºC
Batterie-Lebensdauer: 5000 Messungen
Änderungen vorbehalten.
Dieses Gerät entspricht dem EMV-Gesetz (EG-Richt-
linie 89/336/EWG) sowie den Bestimmungen der
EG-Richtlinie 93/42/EEC (Richtlinie für medizinische Geräte).
außerhalb dieses Bereiches: ± 0,3 ºC
Anwendungsteil des Typs BF
0297

Garantie
Als Hersteller übernehmen wir für dieses Gerät – nach Wahl
des Käufers zusätzlich zu den gesetzlichen Gewährleistungsansprüchen gegen den Verkäufer – eine Garantie von 3 Jahren
ab Kaufdatum.
Innerhalb dieser Garantiezeit beseitigen wir nach unserer Wahl
durch Reparatur oder Austausch des Gerätes unentgeltlich alle
Mängel, die auf Material- oder Herstellungsfehlern beruhen.
Durch die Ausführung von Garantieleistungen wird die Garantiefrist
in keiner Weise berührt.
Die Garantie wird unter Vorlage des Kaufbelegs in den Ländern
gewährt, in denen das Produkt von Braun oder ihren autorisierten
Händlern verkauft wird; sie erlischt beim Eingriff anderer als der
von Braun autorisierten Stellen.
Im Garantiefall senden Sie bitte das vollständige Gerät mit dem
Kaufbeleg einem unserer autorisierten Servicehändler oder an eine
Welch Allyn Kundendienststelle.
33

Español
El termómetro Braun ThermoScan ha sido cuidadosamente
diseñado para tomar la temperatura en el oído de una forma rápida,
segura y precisa. La forma del termómetro está especialmente
pensada para introducirse sólo lo necesario en el canal auditivo,
evitando totalmente el contacto con el tímpano.
Sin embargo, como en todos los termómetros, la utilización de
una técnica adecuada resulta crucial para obtener mediciones
precisas. Por tanto, recomendamos leer detenidamente las
instrucciones de uso antes de utilizar el producto.
Importante
ø
No exponga el termómetro a temperaturas extremas
(por debajo de –20ºC o por encima de 50ºC) ni a humedad
excesiva (>95% HR).
ø
La ventana de la sonda debe mantenerse limpia, seca y sin
daños en todo momento para asegurar lecturas precisas.
Para proteger la ventana de la sonda, mantenga el
termómetro en el estuche protector durante el transporte o
cuando no lo utilice.
ø
Este termómetro debe ser utilizado únicamente con
protectores de sonda originales Braun ThermoScan.
ø
Para evitar lecturas imprecisas utilice siempre un protector
de sonda nuevo y limpio para cada medición de temperatura.
¿Cómo funciona Braun ThermoScan?
Braun ThermoScan mide el calor infrarrojo desprendido por el
tímpano y los tejidos adyacentes. Para asegurar una mayor
precisión, el termómetro realiza 8 mediciones y muestra
la temperatura más alta obtenida.
La temperatura ThermoScan mostrada es el resultado de
la medición de la temperatura en canal auditivo más un ajuste
matemático para aproximarla al rango normal en la boca. Sin
embargo, esto no es necesariamente igual que la temperatura oral
medida al mismo tiempo.
34
¿Porqué tomar la temperatura en el oído?
Estudios clínicos han mostrado que el oído es un lugar excelente
para medir la temperatura, ya que las temperaturas tomadas en el
oído reflejan la temperatura interna o «central» del cuerpo.
La temperatura del cuerpo es regulada por el hipotálamo, que
comparte el riego sanguíneo con la membrana del tímpano.
Por tanto, cualquier variación de temperatura es detectada con
mayor antelación en la membrana del tímpano que en otras zonas
del cuerpo, como el recto, la boca o la axila.

Ventajas de tomar la temperatura en el oído en comparación con
otras partes del cuerpo:
ø
La temperatura
que puede no indicar la temperatura interna del cuerpo.
ø
La temperatura
axilar
refleja solamente la temperatura de la piel,
rectal
a menudo sufre retrasos significativos
ante variaciones de la temperatura interna del cuerpo, especialmente ante cambios rápidos de temperatura.
ø
La temperatura
oral
es a menudo afectada por la comida,
la bebida, la respiración agitada, la colocación del termómetro
o la incapacidad de la persona para cerrar completamente la
boca.
La temperatura corporal
La temperatura normal del cuerpo se refleja en un rango de
temperatura. La siguiente tabla
de temperatura también varía según la parte del cuerpo. En consecuencia, las mediciones en diferentes partes, incluso si son
tomadas al mismo tiempo, no deben compararse directamente.
Axilar: 34,7°C - 37,3°C
Oral: 35,5°C - 37,5°C
Rectal: 36,6°C - 38,0 °C
ThermoScan
”
: 35,8°C - 38,0°C
Igualmente, el rango normal de temperatura de una persona tiende
a decrecer con la edad. La siguiente tabla muestra los rangos
normales ThermoScan para cada edad.
@
muestra que este rango normal
Rangos normales ThermoScan según la edad
”
0 - 2 años 36,4°C - 38,0°C
3 - 10 años 36,1°C - 37,8°C
11 - 65 años 35,9°C - 37,6°C
> 65 años 35,8 °C - 37,5°C
El rango de temperatura normal varía de una persona a otra, y
puede estar influido por muchos factores como el momento del día,
el nivel de actividad, la medicación y el sexo.
1. Chamberlain, J.M., Terndrup, T.E., New Light on Ear Thermometer Readings,
Contemporary Pediatrics, Marzo 1994.
2. Chamberlain, J.M., et al., Determination of Normal Ear Temperature with an Infrared
Emission Detection Thermometer, Annals of Emergency Medicine, Enero 1995.
35

Descripción del producto
1.Protector de sonda
2.Ventana de la sonda
3.Sonda
4.Detector de protector de sonda
5.Botón de expulsión de protector de sonda
6.Pantalla de cristal líquido
7.Botón de iluminación de pantalla
8.Botón /mem (puesta en marcha/función
de memoria)
9.Cierre de la tapa del compartimento para
las pilas
10. Tapa del compartimento de las pilas
11. Botón de activación
12. Etiqueta
13. Estuche protector
Cómo utilizar Braun ThermoScan
1. Use siempre un protector de sonda nuevo y
limpio en cada medición para asegurar una
lectura precisa.
Coloque un protector de sonda nuevo y
limpio o, si ya está colocado, presione el botón
/mem.
La pantalla de cristal líquido se activará,
mostrando todos los símbolos.
Cuando aparezca el símbolo
el termómetro estará listo para tomar
la temperatura.
36
2. Tire de la oreja para enderezar el canal auditivo
y conseguir una visión más clara del tímpano.
Niños
menores de 1 año:
Tire de la oreja horizontalmente hacia atrás.
Niños mayores de 1 año y adultos:
Tire de la oreja hacia atrás
y arriba.

3. Mientras tira de la oreja, introduzca la sonda
suavemente en el canal auditivo tanto como sea
posible y presione el botón de activación.
Suéltelo cuando escuche la señal acústica.
Esta señal informa de que la medición de
temperatura ha terminado.
4. Retire el termómetro del oído. La pantalla de
cristal líquido le mostrará la temperatura tomada
y el símbolo de protector de sonda.
5. Sustituya el protector de sonda después
de cada medición: presione el botón de
expulsión del protector de sonda y coloque
otro nuevo y limpio.
Sólo entonces, el símbolo del protector de
sonda desaparecerá de la pantalla. El termómetro estará listo para utilizarse de nuevo.
6. Si transcurridos 30 segundos desde la última
medición no se ha presionado ningún botón o
no se ha colocado ningún protector de sonda, el
termómetro se desconectará automáticamente.
Nota: En los siguientes casos se recomienda
tomar la temperatura tres veces en el mismo
oído. Cuando éstas sean distintas, tomar
el valor más alto.
ø
Bebés, especialmente en los primeros tres
meses.
ø
Personas con alguna condición como,
por ejemplo, una deficiencia en el sistema
inmunológico, para quienes la presencia
o ausencia de fiebre sea crítica.
ø
Cuando esté aprendiendo a usar el
termómetro Braun ThermoScan, hasta que
se sienta cómodo con la técnica y esté
obteniendo lecturas consistentes.
Importante: Como con cualquier otro tipo
de termómetro, al realizar varias mediciones
consecutivas pueden presentarse pequeñas
variaciones de temperatura (± 0.2-0.3°C).
37

Consejos para tomar la temperatura
ø
La temperatura puede variar según sea tomada en el oído
izquierdo o derecho. En consecuencia, es recomendable tomar
siempre la temperatura en el mismo oído.
ø
Para conseguir una medición precisa, asegúrese de que el oído
está libre de obstrucciones o de acumulación de cera.
ø
Factores externos pueden influir en la temperatura del oído,
incluyendo cuando el individuo:
– ha estado recostado sobre un oído u otro.
– ha tenido sus oídos tapados.
– ha sido expuesto a temperaturas muy frías o calientes,
– o cuando ha estado recientemente nadando o duchándose.
En estos casos, espere 20 minutos antes de tomar la
temperatura.
ø
Para personas que usen audífonos o prótesis auditivas quite el
audífono o prótesis y espere 20 minutos antes de tomar la
temperatura.
ø
Si se han recetado gotas o algún otro medicamento para el oído,
tome la temperatura en el oído que no haya sido tratado.
38

Modo de memoria
La última temperatura tomada antes de apagarse el termómetro es
almacenada en la memoria. Para entrar en el modo de memoria,
presione el botón /mem.
La última temperatura almacenada aparece junto al símbolo MEM.
Aunque se encuentre en el modo de memoria, puede seguir
tomando la temperatura mientras el símbolo aparezca en
la pantalla.
Para salir del modo de memoria, presione el botón /mem otra vez.
Iluminación de pantalla
Para un uso más fácil durante la noche.
Cambio en la escala de temperatura
El termómetro se suministra con la escala Celsius de temperatura
preestablecida. Si desea cambiar a escala Fahrenheit (°F ) siga
los siguientes pasos:
ø
Ponga en marcha el termómetro.
(Si ya está en funcionamiento, asegúrese de que no esté en
modo de memoria.)
ø
Presione el botón /mem y manténgalo apretado. Para cambiar
a modo «cambio de escala de temperatura», presione el botón
de activación.
ø
Presionando otra vez el botón de activación, la escala
Fahrenheit es activada y el símbolo «°F» aparece en la pantalla.
Cada vez que presione el botón de activación, irá alternando
entre °C y °F.
ø
Al soltar el botón /mem el símbolo volverá a aparecer en
pantalla.
La temperatura almacenada en la memoria es convertida a la
escala de temperatura que aparece en la pantalla de cristal líquido.
39

Cuidados y limpieza
Los protectores de sonda Braun ThermoScan han sido
diseñados para un solo uso. Para asegurar mediciones
precisas, utilice siempre protectores de sonda desechables
Braun ThermoScan con su termómetro Pro 3000. Un protector
de sonda dañado, perforado o sucio puede alterar la precisión
de las temperaturas tomadas. Adicionalmente, la precisión
de sus mediciones de temperatura puede verse afectada por
desperfectos o por la presencia de suciedad o cera del oído
en la ventana de la sonda.
Ventana de la sonda
Para garantizar un elevado grado de pr
mantener esta ventana limpia, seca y sin daños. Las huellas
dactilares, el cerumen, el polvo u otros residuos reducen la
transparencia de la ventana y provocan lecturas de temperatura
más bajas. En caso de que el termómetr
accidentalmente en el interior del oído sin un protector de sonda,
la ventana de la sonda deberá ser limpiada inmediatamente.
Además, la zona de la ventana o punta de la sonda no debe ser
nunca alterada, cambiada o ajustada. Estos cambios afectarían
a la calibración y precisión del termómetro.
ecisión, es muy importante
o sea introducido
40
Para limpiar la ventana de la sonda
bastoncillo de algodón ligeramente humedecido con alcohol y
séquela de inmediato con un nuevo bastoncillo de algodón.
Después de la limpieza, deje secar el termómetro al menos durante
5
minutos antes de tomar la temperatura de nuevo. La ventana
de la sonda tiene que estar limpia y seca. Evite tocar la ventana de
la sonda salvo en el momento de la limpieza. Si la ventana de la
sonda sufriera algún daño, lleve el termómetro a un Centro de
Servicio Welch Allyn para su reparación.
Nota: No utilizar ningún producto químico que no sea alcohol
para limpiar la ventana de la sonda.
Termómetro
Use un paño suave y ligeramente humedecido con alcohol para
limpiar la pantalla y el exterior del termómetro. No utilice
limpiadores abrasivos ni sumerja el termómetro en agua ni en otros
líquidos.
Guarde el termómetro y los protectores higiénicos en un lugar seco,
sin polvo ni polución y alejados de la luz directa del sol.
La temperatura en este lugar debe permanecer constante y dentro
del margen comprendido entre 10°C -40 °C.
, frote su superficie con un

Mensaje
Situación Solución
de error
Problemas y soluciones
El protector de sonda no está
colocado y se ha presionado el
botón de activación con la
sonda introducida en el oído.
Asegúrese de que la ventana de
la sonda está limpia; para más información véase la sección «Cuidados
y limpieza». Coloque un protector
de sonda nuevo y limpio para que
la señal acústica de error se
desconecte.
La temperatura ambiente
no está comprendida entre
el rango operativo de
10°C-40 °C o cambia muy
rápidamente.
La temperatura tomada no
está entre el rango de
temperatura mostrado
(20°C-42,2°C).
HI = más alta
LO = más baja
Las pilas se están agotando
pero el termómetro funciona
correctamente.
(Pero no la iluminación de
pantalla)
Las pilas se han agotado.
El termómetro no puede tomar
la temperatura correctamente.
Deje el termómetro en una
habitación cuya temperatura esté
comprendida 10°C y 40°C durante
30 minutos.
Asegúrese de que el termómetro se
introduce correctamente en el oído y
lleva colocado un protector de sonda
nuevo y limpio.
Para borrar el mensaje de error,
introduzca un protector de sonda
nuevo y limpio o presione el botón
de puesta en marcha.
Tome de nuevo la temperatura.
Sustituya las pilas por otras nuevas.
Sustituya las pilas por otras nuevas.
Error del sistema
• Si persiste un error,
• Si todavía persiste,
Espere 30 segundos hasta que el
termómetro se apague automáticamente. Póngalo en marcha otra vez.
... reajuste el termómetro retirando
las pilas y volviéndolas a colocar.
...lame al Servicio de Atención al
Consumidor Welch Allyn (ver pág. 2).
41

Cambio de las pilas
El termómetro lleva instaladas 2 pilas de litio tipo CR 2032/DL 2032.
Coloque pilas nuevas cuando el símbolo aparezca en la
pantalla.
Para abrir el compartimento de las pilas, presione el cierre de la
tapa con la punta de un bolígrafo.
Presione el dispositivo que suelta la batería.
Retire las pilas agotadas y reemplácelas con pilas nuevas,
asegurándose de que los polos están en la posición correcta.
Deslice la tapa del compartimento de las pilas hasta que encaje
en su sitio.
Para proteger el medio ambiente, deposite las pilas
gastadas en los contenedores especiales destinados a
tal efecto según establece la legislación.
Cuando quiera deshacerse del termómetro, por favor
envíelo un centro de Servicio Welch Allyn.
Calibración
El termómetro ha sido calibrado inicialmente en el momento de su
fabricación. Si en algún momento Ud tiene dudas sobre la precisión
de la medición o el funcionamiento del termómetro, contacte con
un centro de Servicio Welch Allyn. Para conocer la fecha de
fabricación de termómetro, tome nota del número de Lote del
aparato que se encuentra dentro del compartimento de las pilas.
El primer dígito se refiere al último dígito del año de fabricación.
Los dos dígitos siguientes se refieren a la semana del calendario del
año de fabricación. Por ejemplo: LOT 842...........
Este termómetro fue fabricado durante la semana 42 del año 1998.
42
Especificaciones
Rango de temperatura mostrada: 20 - 42,2 ºC
Rango de temperatura ambiente para funcionamiento correcto:
10 - 40 º C
Resolución: 0.1 ºC o ºF
Precision: 35,5 - 42,0ºC: ± 0,2ºC, fuera de este rango: ± 0,3 ºC
Vida útil de las pilas: 5000 mediciones
Type BF equipment
Sujeto a modificaciones sin previo aviso.
Se ha probado que Braun ThermoScan PRO 3000 es inmune a los
campos electromagnéticos y no produce ninguna emisión de RF.
Este producto satisface las disposiciones establecidas
en la directiva CE 93/42/EEC (Directiva para Aparatos
Médicos)
0297

Garantía
Braun concede a este producto tres años de garantía desde
la fecha de compra.
Dentro del período de garantía, subsanaremos, sin cargo alguno,
cualquier defecto del aparato imputable tanto a los materiales
como a la fabricación, ya sea reparando, sustituyendo piezas o
facilitando un aparato nuevo según nuestro criterio.
Cualquier otra reclamación por daños queda excluida. Esta
garantía sólo será válida dentro del período amparado por la
misma. Las reclamaciones sólo serán validas en los países donde
se venden oficialmente y siempre y cuando la carjeta de registro
este sellada y fechada.
Cualesquiera otras reclamaciones no especificadas están
excluídas a menos que la ley prevea otra cosa con carácter
obligatorio.
43

Italiano
Il termometro Braun ThermoScan è stato progettato con cura
per rilevare la temperatura corporea nel canale auricolare in modo
preciso, sicuro e rapido. La sua forma permette di inserirlo nel canale
auricolare in modo appropriato, senza recare danno al timpano.
Tuttavia, come con tutti i termometri, è importante utilizzare
una tecnica corretta per ottenere rilevazioni precise. Per
questo motivo, si consiglia di leggere attentamente questo
manuale in tutte le sue parti prima di utilizzare il prodotto.
Importante
ø
Evitare di esporre il termometro a temperatura e umidità
estreme, fuori dai valori da –20 ºC a 50ºC e superiori a 95%
di umidità relativa senza condensa.
ø
Per garantire rilevazioni precise la lente della sonda deve
essere mantenuta pulita, asciutta ed integra. Per proteggere
la lente della sonda, tenere sempre il termometro nella
propria custodia protettiva durante il trasporto o quando non
utilizzato.
ø
Questo termometro deve essere sempre utilizzato con
coprisonda Braun ThermoScan originali.
ø
A garanzia di una rilevazione precisa, utilizzare sempre un
coprisonda nuovo e pulito per ogni rilevazione di
temperatura.
Come funziona Braun ThermoScan
Braun ThermoScan misura i raggi infrarossi emessi dalla membrana
timpanica e dai tessuti circostanti. Per garantire una maggiore
precisione il termometro effettua 8 misurazioni successive in 1 solo
secondo e riporta sul display la temperatura più elevata.
La temperatura rilevata da ThermoScan riportata sul display è
la reale temperatura del canale auricolare più un aggiustamento
matematico per approssimare la rilevazione al più familiare
intervallo di temperatura orale. Tuttavia, questa temperatura non
necessariamente corrisponde esattamente alla temperatura orale
misurata nello stesso momento.
44
Perchè prendere la temperatura nell'orecchio?
Studi clinici hanno dimostrato che l'orecchio è un eccellente punto
di rilevazione della temperatura perchè le temperature rilevate
nell'orecchio riflettono la reale temperatura degli organi vitali,
o temperatura interna. La temperatura corporea è regolata
dall'Ipotalamo, che condivide la stessa irrorazione sanguigna della
membrana timpanica. Per questa ragione, variazioni nella
temperatura corporea si riflettono con maggior precisione
e tempestività nella membrana timpanica che in altri siti di
rilevazione, quali il retto, la bocca o il cavo ascellare.

Vantaggi di una rilevazione timpanica rispetto ai siti di rilevazione
tradizionali:
ø
La temperatura
ascellare
rileva unicamente la temperatura
cutanea e quindi non è un indicatore preciso della temperatura
corporea interna.
ø
La temperatura
rettale
spesso differisce significativamente da
modificazioni della temperatura interna, specialmente nel caso
di rapidi cambiamenti di temperatura.
ø
La temperatura
orale
è spesso influenzata dall'assunzione di
cibo, bevande e dal posizionamento del termometro, dal respiro
tramite la bocca o dall'incapacità delle persone di chiudere
la bocca completamente.
La temperatura corporea
La normale temperatura corporea è compresa in un intervallo.
La tabella
temperatura normale varia in funzione del sito di rilevazione. Per
questo motivo rilevazioni effettuate in siti differenti, anche se nello
stesso momento, non dovrebbero essere direttamente confrontate.
Allo stesso modo, la temperatura normale di ciascuna persona
tende a ridursi con l'età. La tabella seguente illustra gli intervalli di
normale temperatura rilevata con ThermoScan per fascie d'età.
@
riportata di seguito dimostra che tale intervallo di
Ascellare: 34,7°C - 37,3°C
Orale: 35,5 °C - 37,5 °C
Rettale: 36,6 °C - 38,0°C
ThermoScan
”
: 35,8°C - 38,0°C
Intervalli di temperatura normale rilevata con ThermoScan
”
0 - 2 anni 36,4°C - 38,0°C
3 - 10 anni 36,1°C - 37,8°C
11 - 65 anni 35,9°C - 37,6°C
> 65 anni 35,8 °C - 37,5°C
L'intervallo di normalità varia da persona a persona e può essere
influenzato da molti fattori quali il momento della giornata, il livello
di attività fisica svolta, farmaci assunti e sesso della persona.
1. Chamberlain, J.M., Terndrup, T.E., New Light on Ear Thermometer Readings,
Contemporary Pediatrics, marzo 1994.
2. Chamberlain, J.M., et al., Determination of Normal Ear Temperature with an Infrared
Emission Detection Thermometer, Annals of Emergency Medicine, gennaio 1995.
45

Descrizione del prodotto
1.Coprisonda
2.Lente della sonda
3.Sonda
4.Rilevatore di coprisonda
5.Tasto per espulsione coprisonda
6.Display a cristalli liquidi
7.Tasto luce display
8.Tasto /mem (accensione/funzione memoria)
9.Chiusura del comparto pila
10. Coperchio del comparto pila
11. Tasto di attivazione
12. Etichette adesive
13. Custodia protettiva
Come utilizzare Braun ThermoScan
1. Utilizzare sempre un coprisonda nuovo e
pulito per ogni rilevazione a garanzia di una
rilevazione precisa.
Posizionare un coprisonda nuovo e pulito o,
se già posizionato, premere il tasto /mem.
Il display a cristalli liquidi si attiva, visualizzando
tutti i segmenti.
Quando il simbolo appare sul display,
il termometro è pronto per l'uso.
46
2. Effettuare una trazione del padiglione auricolare
per raddrizzare il canale auricolare. Questa
trazione permette al termometro di avere una
chiara visione della membrana timpanica.
Bambini
Tirare l'orecchio indietr
Bambini oltr
Tirare l'orecchio indietr
fino ad 1 anno:
o.
e 1anno ed adulti:
o e verso l'alto.

3. Mentre si effettua la trazione dell'orecchio,
inserire la sonda il più a fondo possibile nel
canale auricolare e premere il tasto di attivazione. Rilasciare il tasto quando lo strumento
emette un segnale acustico. Questo segnale
conferma la fine della rilevazione.
4. Rimuovere il termometro dal canale auricolare.
Il display visualizza la temperatura rilevata ed
il simbolo del coprisonda.
5. Sostituire il coprisonda dopo ogni
rilevazione: premere il tasto di espulsione del
coprilente e posizionare un coprilente nuovo
e pulito.
Il simbolo del coprisonda sparisce. Il termometro è pronto per una nuova rilevazione.
6. Se non viene azionato alcun tasto e non viene
posizionato un nuovo coprisonda entro
30 secondi, il termometro si spegne
automaticamente.
Nota: Nelle seguenti situazioni, si raccomanda
di prendere la temperatura 3 volte sempre dallo
stesso orecchio. Se le temperatura rilevate
fossero diverse, considerare il valore più alto.
ø
Neonati, nei primi 90 giorni di vita.
ø
Bambini con meno di 3 anni in condizioni
particolari, come nel caso di un sistema
immunitario deficitario, e per i quali la
presenza o assenza di febbre è un fattore
critico.
ø
Quando si utilizza per le prime volte il
termometro, finché non ci si sente sicuri con
il metodo di utilizzo e le rilevazioni sono
coerenti.
Importante: con tutti i tipi di termometro si
possono riscontrare variazioni minime della
temperatura (± 0,2-0,3°C) se si effettuano più
rilevazioni consecutive.
47

Suggerimenti per la rilevazione della temperatura
ø
E’ normale che la temperatura rilevata nell’orecchio destro
differisca leggermente dalla temperatura rilevata nell'orecchio
sinistro. Quindi utilizzare sempre lo stesso orecchio per la
rilevazione.
ø
L’orecchio deve essere libero da ostruzioni o eccesso di cerume
per una rilevazione precisa.
ø
Fattori esterni possono influenzare la temperatura timpanica,
incluso se l'individuo:
– E’ stato sdraiato su di un lato
– Ha avuto l'orecchio coperto
– E’ stato esposto a temperature molto calde o molto fredde o
– Ha recentemente effettuato una doccia/ bagno, ha nuotato.
In questi casi riportare l'individuo in una condizione normale ed
attendere 20 minuti prima di procedere con la rilevazione.
ø
Per individui portatori di apparecchi acustici o tappi auricolari
rimuovere il dispositivo ed attendere 20 minuti prima di
procedere con la rilevazione.
ø
Utilizzare l'orecchio non trattato se sono state somministrate
gocce auricolari o sono state inserite altre medicazioni nel
canale auricolare.
48

Funzione memoria
L'ultima temperatura rilevata prima dello spegnimento del
termometro rimane nella memoria dello strumento. Per attivare
la funzione premere il tasto /mem.
L'ultima temperatura memorizzata appare sul display con il
simbolo MEM.
Anche utilizzando la funzione memoria, una nuova temperatura
può essere rilevata assicurandosi che il simbolo pronto
appaia sul display.
Per uscire dalla funzione memoria premere nuovamente
il tasto /mem.
Luce del display a cristalli liquidi
per facilitare la lettura notturna
Cambiare la scala di riferimento
L'interruttore Celsius/Fahrenheit è posizionato al momento
dell'imballaggio sulla posizione Celsius. Se si desidera visualizzare
la temperatura in gradi Fahrenheit (°F ), seguire le seguenti fasi:
ø
Accendere il termometro. (Se già acceso, assicurarsi che
la funzione memoria non sia attiva.)
ø
Premere il tasto /mem e mantenerlo premuto.
Contemporaneamente premere e rilasciare il tasto di attivazione
per passare alla funzione che permette di cambiare la scala di
riferimento.
ø
Premendo nuovamente il tasto di attivazione viene attivata
la scala Fahrenheit, sul display a cristalli liquidi appare «°F».
Ogni pressione successiva del tasto di attivazione cambia
la scala tra °C ed °F.
ø
Rilasciare il tasto /mem per tornare alla posizione
pronto .
La temperatura memorizzata sarà automaticamente convertita
nella scala prescelta quando visualizzata sul display.
49

Cura e pulizia
I coprisonda Braun ThermoScan devono essere utilizzati
una sola volta! A garanzia di una corretta rilevazione utilizzate
sempre coprisonda monouso Braun ThermoScan con il
termometro Pro 3000. Coprisonda danneggiati, perforati o
sporchi possono determinare rilevazioni non precise. Inoltre,
la precisione della rilevazione può essere influenzata da danni
alla lente della sonda, o dalla presenza di sporco o cerume
sulla lente.
Lente della sonda
Per garantir
mantenere la lente pulita, asciutta ed intatta. Impronte digitali,
cerume, polvere o altri residui riducono la trasparenza della lente e
comportano rilevazioni più basse di temperatura. Se il termometr
viene accidentalmente posizionato nel canale auricolare senza un
coprisonda inserito, occorre pulire immediatamente la lente.
Inoltre la lente e/o la punta della sonda non devono essere
modificate, cambiate o aggiustate. Questi cambiamenti compromettono la calibrazione e la precisione del termometro.
e un elevato livello di precisione, è molto importante
o
50
Per pulir
batuffolo di cotone inumidito con alcol e immediatamente dopo
asciugatela con un batuffolo di cotone asciutto. Dopo la pulizia,
attendere almeno 5
procedere con ulteriori rilevazioni. Assicurarsi che la lente della
sonda sia pulita ed asciutta. Evitate di toccare la lente se non
quando è necessario pulirla. Se la sonda è danneggiata il
termometro deve essere inviato alla sede Welch Allyn.
Nota: non utilizzare alcuna sostanza chimica diversa dall’alcol
per effettuare la pulizia della lente.
Termometro
Utilizzare un panno morbido, inumidito con alcol per la pulizia
del display e della parte esterna. Non utilizzare detergenti abrasivi.
Non immergere il termometro in acqua o altri liquidi.
Conservare il termometro ed i coprisonda in un luogo asciutto,
libero dalla polvere o da contaminazioni e lontano dalla luce solare
diretta. La temperatura ambiente, nel locale in cui viene conservato
il termometro, dovrebbe rimanere sempre relativamente costante
in un intervallo compreso tra i 10 °C ed i 40 °C.
e la lente strofinate delicatamente la superficie con un
minuti affinchè la lente si asciughi prima di

Visualizzazione di errore
Situazione Soluzione
Non è stato posizionato un
coprilente e si è premuto il
tasto di attivazione con il
termometro posizionato
nell'orecchio.
Assicurarsi che la lente della
sonda sia pulita; riferisi alla sezione
«Cura e pulizia» se necessario.
Posizionare un coprilente nuovo e
pulito per interrompere il segnale
acustico di errore.
La temperatura ambiente è al di
fuori dei valori operativi (10°C-
40°C) o sta cambiando troppo
rapidamente.
La temperatura rilevata è al di
fuori del intervallo di
temperatura visualizzato
(20°C-42,2°C).
HI = troppo alta
LO = troppo bassa
La pila si stà esaurendo, ma il
termometro funzionerà ancora
correttamente (non funziona
la luce del display).
La pila è troppo scarica e non
possono più essere rilevate
temperature corrette.
Portare il termometro per almeno
30 minuti in una stanza con
temperatura ambiente compresa tra
i 10°C ed i 40 °C.
Assicurarsi di aver inserito un
coprilente nuovo e pulito e che il
termometro sia correttamente
posizionato.
Poi rilevare una nuova temperatura.
Inserire le nuove pile.
Inserire le nuove pile.
Errore di sistema
• Se la segnalazione di errore
persiste
• Se il messaggio si ripete
Attendere 30 secondi sino allo
spegnimento del termometro quindi
riaccendere lo strumento.
… resettare il termometro rimuovendo e riposizionando le batterie
… telefonate al servizio clienti
Welch Allyn (vedere pagina 2).
51

Sostituzione delle pile
Il termometro è fornito con 2 pile al litio, tipo CR 2032/DL 2032.
Inserire le nuove pile quando il simbolo appare sul display.
Utilizzando la punta di una penna a sfera, premere la chiusura
del comparto pila per aprirlo. Premere con un dito per il rilascio
delle pile.
Rimuovere le pile e sostituirle con pile nuove, assicurandosi che i
poli siano nella giusta direzione.
Far scivolare lo sportello dello scomparto pila fino a completa
chiusura.
Per proteggere l'ambiente, gettare le pile scariche
presso gli appositi punti di raccolta secondo quando
stabilito dalla normativa nazionale o locale.
Per lo smaltimento del termometro, per cortesia
contattate un Centro Servizio Welch Allyn.
Calibrazione
Il termometro è calibrato al momento della fabbricazione.
Il qualsiasi momento abbiate dei dubbi sulla precisione della
rilevazione o sul funzionamento del termometro, Vi chiediamo di
contattare un Centro Servizio Welch Allyn.
Per determinare la data di produzione, fare riferimento al numero
LOT dello strumento, posizionato nel comparto pile. La prima cifra
è l'ultimo numero dell'anno di produzione. Le altre 2 cifre indicano
la settimana in cui è stato prodotto. Per esempio LOT 842.......
Questo termometro è stato prodotto nella 42º settimana del 1998.
52
Caratteristiche del prodotto
Intervallo di temperatura visualizzato: 20 - 42,2 º C
Valori operativi della temperatura ambiente: 10 - 40º C
Risoluzione del display: 0,1 ºC o ºF
Precisione: 35,5 - 42,0 ºC : ± 0,2 º C
Durata delle pile: 5000 rilevazioni
Soggetto a modifiche senza comunicazione.
Braun ThermoScan PRO 3000 è stato dimostrato immune ai campi
elettromagnetici e non produce alcuna emissione misurabile a
radiofrequenza.
Questo prodotto soddisfa le disposizioni della Direttiva
Europea 93/42/EEC (Medical Device Directive).
oltre questo intervallo: ± 0,3 ºC
Strumentazione tipo BF
0297

Garanzia
Questo prodotto è garantito per tre anni dalla data di acquisto
contro difetti di materiale o di fabbricazione. nel periodo di garanzia
verranno eliminati tali difetti sia riparando il prodotto sia
sostituendolo, secondo il caso. La garanzia non copre altri tipi di
danni o contestazioni. L’effettuazione di riparazioni in garanzia non
modifica la data di scadenza della garanzia.
La garanzia è estesa a tutti i paesi in cui il prodotto è distribuito da
Braun e vale solo se lo scontrino di acquisto.
Questa garanzia non riguarda rivendicazioni relative a controversie
con il negoziante dovo è stato acquistato il prodotto.
53

Nederlands
De Braun ThermoScan thermometer is met zorg ontwikkeld voor
een nauwkeurige, veilige en snelle temperatuuropname in het oor.
De thermometer is zo ontworpen dat hij niet te ver in de gehoorgang
kan worden ingebracht; het trommelvlies kan dus niet worden
beschadigd.
Echter, zoals met iedere thermometer, is een goede techniek
belangrijk voor het verkrijgen van een nauwkeurige meting.
Lees daarom vóór het gebruik van de oorthermometer de
gebruiksaanwijzing aandachtig en grondig door.
Belangrijk
ø
Stel de thermometer niet bloot aan extreme temperaturen
(onder –20ºC of boven 50ºC) of zeer hoge vochtigheid
(>95% relatieve vochtigheid).
ø
Voor het verkrijgen van nauwkeurige metingen dient de lens
van de sonde altijd schoon, droog en onbeschadigd te
blijven. Om de lens van de sonde te beschermen dient u de
thermometer, wanneer deze wordt vervoerd of niet wordt
gebruikt, altijd in de beschermkap te plaatsen.
ø
De thermometer mag alleen worden gebruikt met echte
Braun ThermoScan lenskapjes.
ø
Breng voordat u de temperatuur opneemt altijd een nieuw,
schoon lenskapje aan om onnauwkeurige metingen te
voorkomen.
Hoe werkt de Braun ThermoScan?
De Braun ThermoScan meet de infrarode warmte die wordt
afgegeven door het trommelvlies en het omringende weefsel. Om
de nauwkeurigheid te kunnen garanderen «scant» de thermometer
de afgegeven warmte door in slechts één seconde 8 metingen te
verrichten. De hoogste temperatuur wordt vervolgens op het
digitale display weergegeven.
De temperatuur die op het display wordt weergegeven is de
gemeten actuele temperatuur in de gehoorgang plus een
correctiefactor, die overeenkomt met het algemene bereik van de
orale temperatuur. Deze temperatuur hoeft echter niet overeen te
komen met een orale temperatuurmeting op hetzelfde moment.
54
Waarom temperaturen in het oor?
Klinische studies hebben aangetoond dat het oor een uitstekende
plaats is om de temperatuur te meten. De in het oor opgenomen
temperatuur geeft namelijk de «kern» of interne temperatuur van
het lichaam weer. De lichaamstemperatuur wordt gereguleerd door
de hypothalamus, die dezelfde bloedvoorziening heeft als het
trommelvlies. Hierdoor worden veranderingen in de interne
lichaamstemperatuur eerder gemeten bij het trommelvlies dan op
andere plaatsen, zoals in het rectum, de mond of onder de arm.

Voordelen van het temperaturen in het oor ten op zichte van
traditionele plaatsen van meting:
ø
Axillaire
temperatuurmetingen geven de huidtemperatuur weer.
Deze geeft mogelijk niet de interne lichaamstemperatuur weer.
ø
Rectaal
gemeten temperaturen blijven (in tijd) vaak significant
achter bij veranderingen in interne lichaamstemperatuur, vooral
als de lichaamstemperatuur snel verandert.
ø
Oraal
gemeten temperaturen worden beinvloed door eten,
drinken, het plaatsen van de thermometer, ademen door de
mond of het niet in staat zijn van de persoon de mond helemaal
te sluiten.
Lichaamstemperatuur
De normale lichaamstemperatuur ligt binnen een bepaald temperatuurbereik. De onderstaande tabel
afhankelijk is van de plaats van meting. Daarom kunnen temperaturen die op verschillende plaatsen worden gemeten, of op dezelfde
tijd worden gemeten, niet direct met elkaar worden vergeleken.
Axillair: 34,7°C - 37,3°C
Oraal: 35,5°C - 37,5 °C
Rectaal: 36,6°C - 38,0°C
ThermoScan
”
: 35,8°C - 38,0°C
@
laat zien dat dit bereik tevens
Bovendien daalt het normale temperatuurbereik naarmate een persoon
ouder wordt. De volgende tabel laat normale temperatuurbereiken
zien per leeftijdsgroep wanneer wordt gemeten met de ThermoScan.
Normaal ThermoScan bereik per leeftijdsgroep”
0 - 2 jaar 36,4°C - 38,0°C
3 - 10 jaar 36,1°C - 37,8°C
11 - 65 jaar 35,9°C - 37,6°C
> 65 jaar 35,8 °C - 37,5°C
Het normale temperatuurbereik varieert van persoon tot persoon
en kan worden beïnvloed door vele factoren zoals het moment van
de dag, mate van activiteit, medicijn gebruik en geslacht.
1. Chamberlain, J.M., Terndrup, T.E., New Light on Ear Thermometer Readings,
Contemporary Pediatrics, maart 1994.
2. Chamberlain, J.M., et al., Determination of Normal Ear Temperature with an Infrared
Emission Detection Thermometer, Annals of Emergency Medicine, jannari 1995.
55
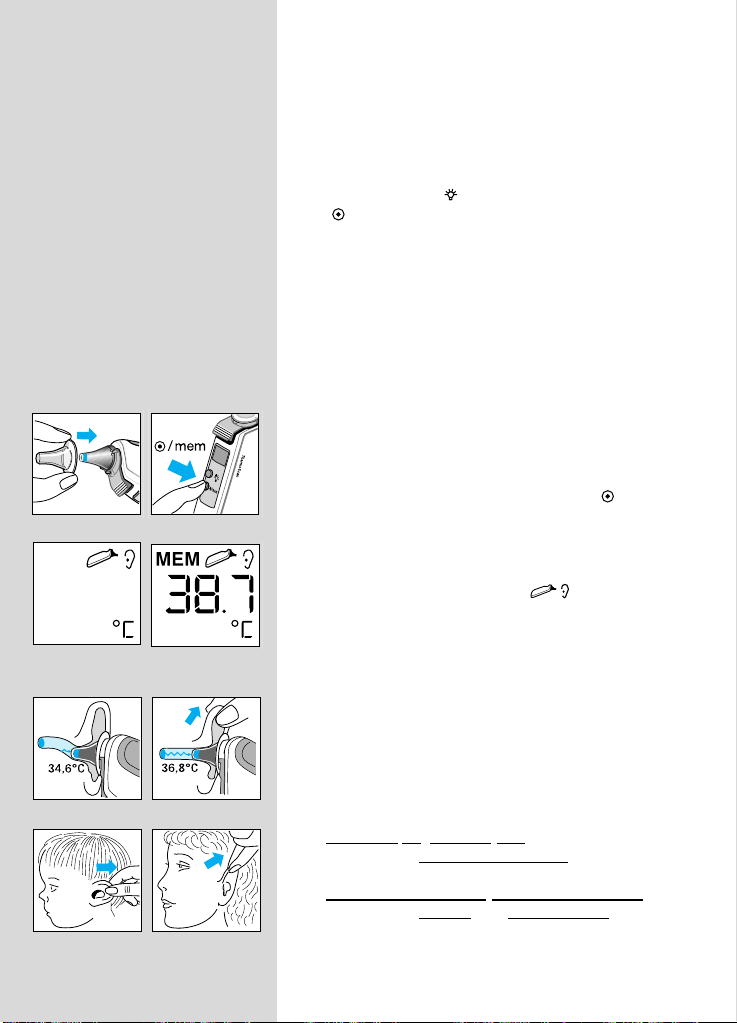
Productomschrijving
1.Lenskapje
2.Lens van sonde
3.Sonde
4.Lenskap detector
5.Knop voor verwijderen van lenskapje
6.LCD-display
7.LCD-lichtknop
8. /mem knop (Aan/geheugenfunctie)
9.Batterijdeksel sluiting
10. Batterijdeksel
11. Activeringsknop
12. Stickers
13. Beschermkap
Het gebruik van de Braun ThermoScan
1. Gebruik voor elke meting een nieuw,
schoon lenskapje zodat u zeker bent van
een nauwkeurige temperatuurweergave.
Breng, indien dit nog niet is gebeurd, een nieuw
schoon lenskapje aan en druk op de /mem
knop.
Het LCD-display (vloeibare-kristallenscherm)
wordt geactiveerd en laat alle gegevens zien.
Wanneer het klaar-symbool op het display
verschijnt, is de thermometer klaar voor gebruik.
56
2. Door aan het oor te trekken strekt u de
gehoorgang zodat de lens goed zicht heeft op
het trommelvlies.
Kinder
en jonger dan 1jaar:
Trek het oor r
Kinder
Trek het oor omhoo
echt naar achteren.
en ouder dan 1jaar en volwassenen:
g en naar achteren.

3. Terwijl u aan het oor trekt brengt u de
thermometer met een enigszins heen- en
weergaande beweging zo ver mogelijk in de
gehoorgang en druk u op de activeringsknop.
Laat de knop los wanneer u een signaal hoort.
Dit signaal geeft aan dat de meting is beëindigd.
4. Haal de sonde uit de gehoorgang. Het LCDdisplay laat de gemeten temperatuur zien en het
symbool voor het lenskapje.
5. Vervang het lenskapje na iedere meting:
druk de knop voor het verwijderen van het
lenskapje in en plaats een nieuw, schoon
exemplaar.
Alleen dan verdwijnt het symbool voor het
lenskapje van het display. De thermometer is nu
weer klaar voor gebruik.
6. Als er binnen 30 seconden niet op een knopje
wordt gedrukt of als er geen nieuw lenskapje
wordt aangebracht, zal de thermometer
automatisch uitschakelen.
Opmerking: In de volgende situaties wordt
aanbevolen driemaal de temperatuur in
hetzelfde oor op te nemen, waarbij u uitgaat van
de hoogste temperatuur.
ø
Jonge kinderen, met name onder de leeftijd
van drie maanden.
ø
Personen bij wie bijvoorbeeld de
immunologische afweer is verzwakt en waar
de aanwezigheid of afwezigheid van koorts
van wezenlijk belang is.
ø
Wanneer u de Braun ThermoScan voor het
eerst leert gebruiken, tot u met de techniek
vertrouwd bent en consistente resultaten
verkrijgt.
Belangrijk: Zoals met ieder type thermometer,
kunnen zich geringe temperatuurvariaties
(± 0,2 - 0,3 °C) voordoen als opeenvolgende
temperatuurmetingen worden verricht.
57

Tips voor het opnemen van de temperatuur
ø
Het komt voor dat de opgenomen temperatuur in het rechteroor
iets verschilt van die in het linkeroor. Neem daarom altijd de
temperatuur op in hetzelfde oor.
ø
Voor een nauwkeurige temperatuurweergave mag het oor niet
verstopt zijn of een aanzienlijke hoeveelheid oorsmeer bevatten.
ø
Externe factoren kunnen de temperatuur beïnvloeden, ook in het
geval wanneer iemand:
– op één van beiden oren heeft gelegen
– bedekte oren heeft
– is bloot gesteld aan hele hete of erg koude temperaturen, of
– pas heeft gezwommen of gedoucht.
Zorg ervoor dat de betreffende persoon zich niet meer in de
bovengenoemde situatie bevindt en wacht 20 minuten alvorens
de temperatuur op te nemen.
ø
Indien van toepassing dient men een gehoorapparaat of
oordoppen te verwijderen en 20 minuten te wachten voordat
de temperatuur kan worden opgenomen.
ø
Wanneer voorgeschreven oordruppels of andere medicijnen
voor het oor in de gehoorgang zijn gedaan, dient de temperatuur
in het andere oor te worden opgenomen.
58

Geheugenfunctie
Voordat de thermometer wordt uitgeschakeld, wordt de laatst
geregistreerde temperatuur opgeslagen in het geheugen.
Om de geheugenfunctie te activeren drukt u op de /mem knop.
De laatst opgeslagen temperatuur wordt samen met het
MEM symbool op het display getoond.
Ook in de geheugenstand kunnen nieuwe temperaturen worden
opgenomen, mits het klaar-symbool zichtbaar is.
Om de geheugenstand uit te schakelen drukt u nogmaals
op de /mem knop.
LCD-lichtknop
om 's nachts eenvoudig de temperatuur te kunnen aflezen
Veranderen van de temperatuurschaal
Deze thermometer wordt geleverd met een geactiveerde Celsius
temperatuurschaal. Als u de temperatuur in Fahrenheit (°F) wilt
aflezen, dient u als volgt te handelen:
ø
Zet de thermometer aan.
(Is de thermometer al aan, zorg er dan voor dat hij niet in de
geheugenstand staat.)
ø
Druk de /mem knop in en houd deze ingedrukt. Druk tevens
op de activeringsknop en laat hem weer los om over te
schakelen op de stand «change temperature scale».
ø
Door de activeringsknop nog een keer in te drukken wordt de
Fahrenheitschaal geactiveerd. Op het LCD-display verschijnt
«°F». Iedere volgende keer dat de activeringsknop wordt
ingedrukt verandert de schaalaanduiding in °C of °F.
ø
Laat de /mem knop los om het klaar-symbool weer op
het display te krijgen.
De in het geheugen opgeslagen temperatuur zal automatisch
worden omgezet naar de geselecteerde schaal op het LCD-display.
59

Onderhoud en reiniging
Braun ThermoScan lenskapjes zijn bedoeld voor eenmalig
gebruik! Om zeker te zijn van een nauwkeurige meting dient u
voor de Pro 3000 thermometer altijd verwisselbare Braun
ThermoScan lenskapjes te gebruiken. Een beschadigd,
geperforeerd of vuil lenskapje kan resulteren in een onnauwkeurige meting. Bovendien kan de nauwkeurigheid van de
meting worden beïnvloed door een beschadiging aan de lens
van de sonde of door vuil of oorsmeer op de lens van de sonde.
Lens van sonde
Om absolute nauwkeurigheid te garander
dat deze lens schoon, droog en onbeschadigd blijft.
Vingerafdrukken, oorsmeer, stof en ander vuil verminderen de
doorzichtigheid van de lens en resulteren in een lagere
temperatuurweergave. Als de thermometer per ongeluk zonder
lenskapje in het oor wordt gebruikt, dan moet de lens onmiddellijk
worden schoongemaakt. Bovendien mag de lens en/of de sonde
nooit veranderd, aangepast of opnieuw geïnstalleerd worden.
Deze veranderingen tasten de nauwkeurigheid en de meetinstelling
van de thermometer aan.
en, is het zeer belangrijk
60
Om de lens te r
wattenstaafje, bevochtigd met alcohol. Wrijf de lens vervolgens
onmiddellijk droog met een schoon wattenstaafje. Na het reinigen
minstens 5
opneemt. Controleer of de lens van de sonde schoon en droog is.
Vermijd aanraking van de lens, behalve wanneer het dient te worden
gereinigd. Bij beschadiging van de lens dient u de thermometer
naar Welch Allyn te sturen voor controle.
Belangrijk: gebruik geen andere middelen dan alcohol voor het
reinigen van het lens van de sonde.
Thermometer
Gebruik een zachte doek, bevochtigd met alcohol, om het display
en de buitenkant van de thermometer te reinigen. Gebruik geen
schuurmiddelen. Dompel de thermometer nooit onder in water of
andere vloeistoffen.
Bewaar de thermometer en de lenskapjes op een droge plaats,
vrij van stof en vochtigheid en niet in direct zonlicht. Op de plaats
waar u het apparaat opbergt dient de temperatuur redelijk constant
te zijn en tussen 10 °C en 40 °C te blijven.
einigen wrijft u zachtjes over het oppervlak met een
minuten laten drogen voordat u weer temperaturen

Oplossen van problemen
Foutmelding Situatie Oplossing
Er is geen lenskapje
aangebracht en de
activeringsknop werd
ingedrukt terwijl de sonde
zich in het oor bevond.
Controleer of de lens van de sonde
schoon is; zie zo nodig onderdeel
«Onderhoud en reiniging».
Breng een nieuw, schoon lenskapje
aan om het signaal te laten stoppen.
De omgevingstemperatuur
ligt niet tussen de toegestane
10 °C en 40 °C
te snel.
De opgenomen temperatuur
ligt niet binnen het temperatuurbereik op het display
(20°C - 42,2°C).
HI = te hoog
LO = te laag
De batterijen zijn bijna leeg,
maar de thermometer kan nog
steeds correct de
temperatuur opnemen.
(Geen lichtfunctie)
De batterijen zijn te leeg om
de temperatuur nog correct te
kunnen opnemen.
of verandert
Laat de thermometer 30 minuten
acclimatiseren in een ruimte waar
de temperatuur tussen 10 °C en 40 °C
ligt.
Controleer of een nieuw, schoon
lenskapje is aangebracht en of de
sonde goed in het oor is geplaatst.
Neem de temperatuur nogmaals op.
Plaats nieuwe batterijen.
Plaats nieuwe batterijen.
Systeemfout
• Als de foutmelding blijft
• Als de foutmelding nog
steeds blijft
Wacht 30 seconden tot de thermometer uitschakelt en zet hem
vervolgens weer aan.
... «reset» de thermometer door
de batterijen te verwijderen en ze
vervolgens weer terug te plaatsen.
... bel de Welch Allyn Consumenten
Service (zie bladzijde 2).
61

Vervangen van de batterijen
De thermometer is uitgerust met 2 lithium cellen, type CR 2032/
DL 2032. Plaats nieuwe batterijen wanneer het batterijsymbool
op het display verschijnt.
Door gebruik te maken van de punt van een ball-point drukt u de
sluiting van het batterijdeksel in om de batterijruimte te kunnen
openen. Schuif het batterijdeksel met een vinger open.
Verwijder de batterijen en vervang ze door nieuwe en let er daarbij
op dat de polen in de juiste richting staan. Schuif het batterijdeksel
terug tot het op zijn plaats klikt.
In het belang van het milieu dient u lege batterijen in te
leveren bij uw winkelier of volgens nationale of lokale
richtlijnen af te geven bij een daarvoor bestemd depot.
Bij afdanken van de thermometer, deze alstublieft
retourneren aan een Welch Allyn Service Center.
Ijken
De thermometer is in de fabriek geijkt. Indien u twijfelt aan de
nauwkeurigheid van metingen of aan de werking van de thermometer, neemt u dan contact op met een Welch Allyn Service Center.
De productiedatum van de thermometer kunt u bepalen aan
de hand van het Lot nummer dat te vinden is in de batterijruimte.
Het eerste cijfer geeft het laatste cijfer van het productiejaar weer.
De volgende twee cijfers geven de kalenderweek aan waarin
de thermometer is geproduceerd. Bijvoorbeeld: LOT 842...
Deze thermometer is geproduceerd in week 42 van 1998.
62
Productspecificaties
Temperatuurbereik op het display : 20 - 42,2 º C
Omgevingstemperatuur voor goed functioneren van thermometer:
10 - 40 º C
Display resolutie: 0,1 ºC of ºF
Nauwkeurigheid: 35,5 - 42,0 ºC: ± 0,2 ºC
Levensduur batterij: 5000 metingen.
Type BF uitrusting
Wijzigingen voorbehouden.
De Braun ThermoScan PRO 3000 is ongevoelig bevonden voor
electromagnetische velden en produceert geen meetbare RF
stralingen.
Dit product voldoet aan de voorschriften volgens
de EG richtlijn 93/42/EEC (Medical Device Directive).
buiten dit bereik: ± 0,3 ºC
0297

Garantie
Op dit produkt wordt een garantie van 3 jaren verleend geldend
vanaf de koopdatum.
Binnen de garantieperiode zullen fabricage- en/of materiaalfouten
gratis door ons worden verholpen, door reparatie, door vervanging
van onderdelen of door omruilen van het apparaat.
Alle overige aanspraken op garantie, waaronder beschadigingen,
kunnen niet worden gehonoreerd. Reparaties tijdens de
garantieperiode hebben geen invloed op de duur van de periode.
De garantie is alleen van toepassing in laden waar dit produkt wordt
verkocht en indien het is voorzien van een aankoopbewijs.
Andere of aanvullende garantiebepalingen voortvloeiende uit de
koopovereenkomst met de verkoper hebben geen invloed op de
Braun garantiebepalingen.
63
 Loading...