

Page 1

PartnerConnect® software
Installation guide
Page 2

© 2012 Welch Allyn. All rights are reserved. To support the intended use of the product described in this publication,
the purchaser of the product is permitted to copy this publication, for internal distribution only, from the media
provided by Welch Allyn. No other use, reproduction, or distribution of this publication, or any part of it, is permitted
without written permission from Welch Allyn. Welch Allyn assumes no responsibility for any injury to anyone, or for
any illegal or improper use of the product, that may result from failure to use this product in accordance with the
instructions, cautions, warnings, or statement of intended use published in this manual.
Welch Allyn, Connex, and Spot Vital Signs and PartnerConnect are registered trademarks of Welch Allyn. Microsoft
and Windows are registered trademarks of Microsoft Corporation.
Software in this product is Copyright 2012 Welch Allyn or its vendors. All rights are reserved. The software is
protected by United States of America copyright laws and international treaty provisions applicable worldwide.
Under such laws, the licensee is entitled to use the licensed software as intended in its directions for use. The
software may not be copied, decompiled, reverse-engineered, disassembled, or otherwise reduced to human
perceivable form. This is not a sale of the software or any copy of the software; all right, title, and ownership of the
software remain with Welch Allyn or its vendors.
For information about any Welch Allyn product, call Welch Allyn Technical Support:
USA
+1 800 535 6663
+1 315 685 4560
Canada
European Call Center
Germany
Latin America
Singapore
United Kingdom
+1 800 561 8797
+353 46 90 67790
+49 695 098 5132
+1 305 669 9003
+65 6419 8100
+44 207 365 6780
Welch Allyn, Inc.
4341 State Street Road
Skaneateles Falls, NY 13153-0220 USA
www.welchallyn.com
DIR 80016392 Ver. D
Australia
China
France
Japan
Netherlands
South Africa
Sweden
+61 2 9638 3000
+86 21 6327 9631
+33 155 69 58 49
+81 42 703 6084
+31 202 061 360
+27 11 777 7555
+46 85 853 6551
Regulatory Affairs Representative
Welch Allyn Limited
Navan Business Park
Dublin Road
Navan, County Meath
Republic of Ireland
Page 3

Contents
PartnerConnect software installation .................................................... 1
Troubleshooting ...................................................................................... 5
iii
Overview ............................................................................................................................................. 1
Before you begin ............................................................................................................................... 1
Install PartnerConnect software .................................................................................................... 1
Issue: Cannot send Ctrl+Alt+Del command to Axeda Desk Top server ................................... 6
Disable the UAC ................................................................................................................................ 7
Disable Alt+Ctrl+Del on login .......................................................................................................... 7
Issue: Unable to receive data from the Connex VM server ....................................................... 7
TCP/UDP ports used ......................................................................................................................... 8
Configure PartnerConnect with proxy settings .................................. 11
Removing PartnerConnect software .................................................... 15
Remove PartnerConnect software on Windows® XP ............................................................. 15
Remove PartnerConnect software on Windows Vista® and Windows® 7 ......................... 17
Page 4

iv Contents PartnerConnect® software
Page 5

PartnerConnect software installation
Overview
PartnerConnect® software provides the following:
Remote resource monitoring: This remote monitoring tool monitors your Welch Allyn
•
Platform systems and devices. It captures operating information (excluding clinical data) and
periodically sends it to Welch Allyn.
• Software updates: This program allows you to automatically receive updates for Welch
Allyn Platform software.
• Remote troubleshooting: PartnerConnect allows Welch Allyn technical support to access
your system, when permitted, to assist in troubleshooting. The customer is in complete control
as to if and when Welch Allyn is permitted remote access via a Secure Socket Layer (SSL)
connection established from the customer site (not from Welch Allyn).
1
Before you begin
• Ensure that this computer meets hardware and software requirements.
• Ensure that you have administrator rights for this computer.
• Ensure that you are using the console of the system on which you are installing the software.
Remote connections for software installation are not supported.
• Close all programs before starting the installation.
Install PartnerConnect software
1. Enter this URL in your web browser:
http://www.welchallyn.com/promotions/services/PartnerConnect.htm
The Welch Allyn PartnerConnect screen displays.
2. Click the following link:
Download PartnerConnect to your desktop now!
If you plan to use a proxy server, also click this link:
Download Deployment Utility to configure Proxy server for PartnerConnect connectivity
The File Download dialog appears.
3. Select one of the following options:
• Run: Starts the installation program.
Page 6
2 PartnerConnect software installation PartnerConnect® software
• Save: Downloads the installation program, partnerConnect.exe, to a location you choose.
If you select this option, make sure the Close this dialog box when download
completes checkbox is not checked and, after the download is complete, click Run.
Note If the checkbox is checked, you will need to locate the
installation program on your computer or network to start it.
If a security warning notifies you that the publisher could not be verified, confirm that you
want to run the installation program.
The Welcome screen appears.
4. Click Next.
The License Agreement screen appears.
5. Accept the license and click Next.
Note If you are performing an update to your software, this is the final
step in the update process. If you are performing a new install, the
Site Information screen appears.
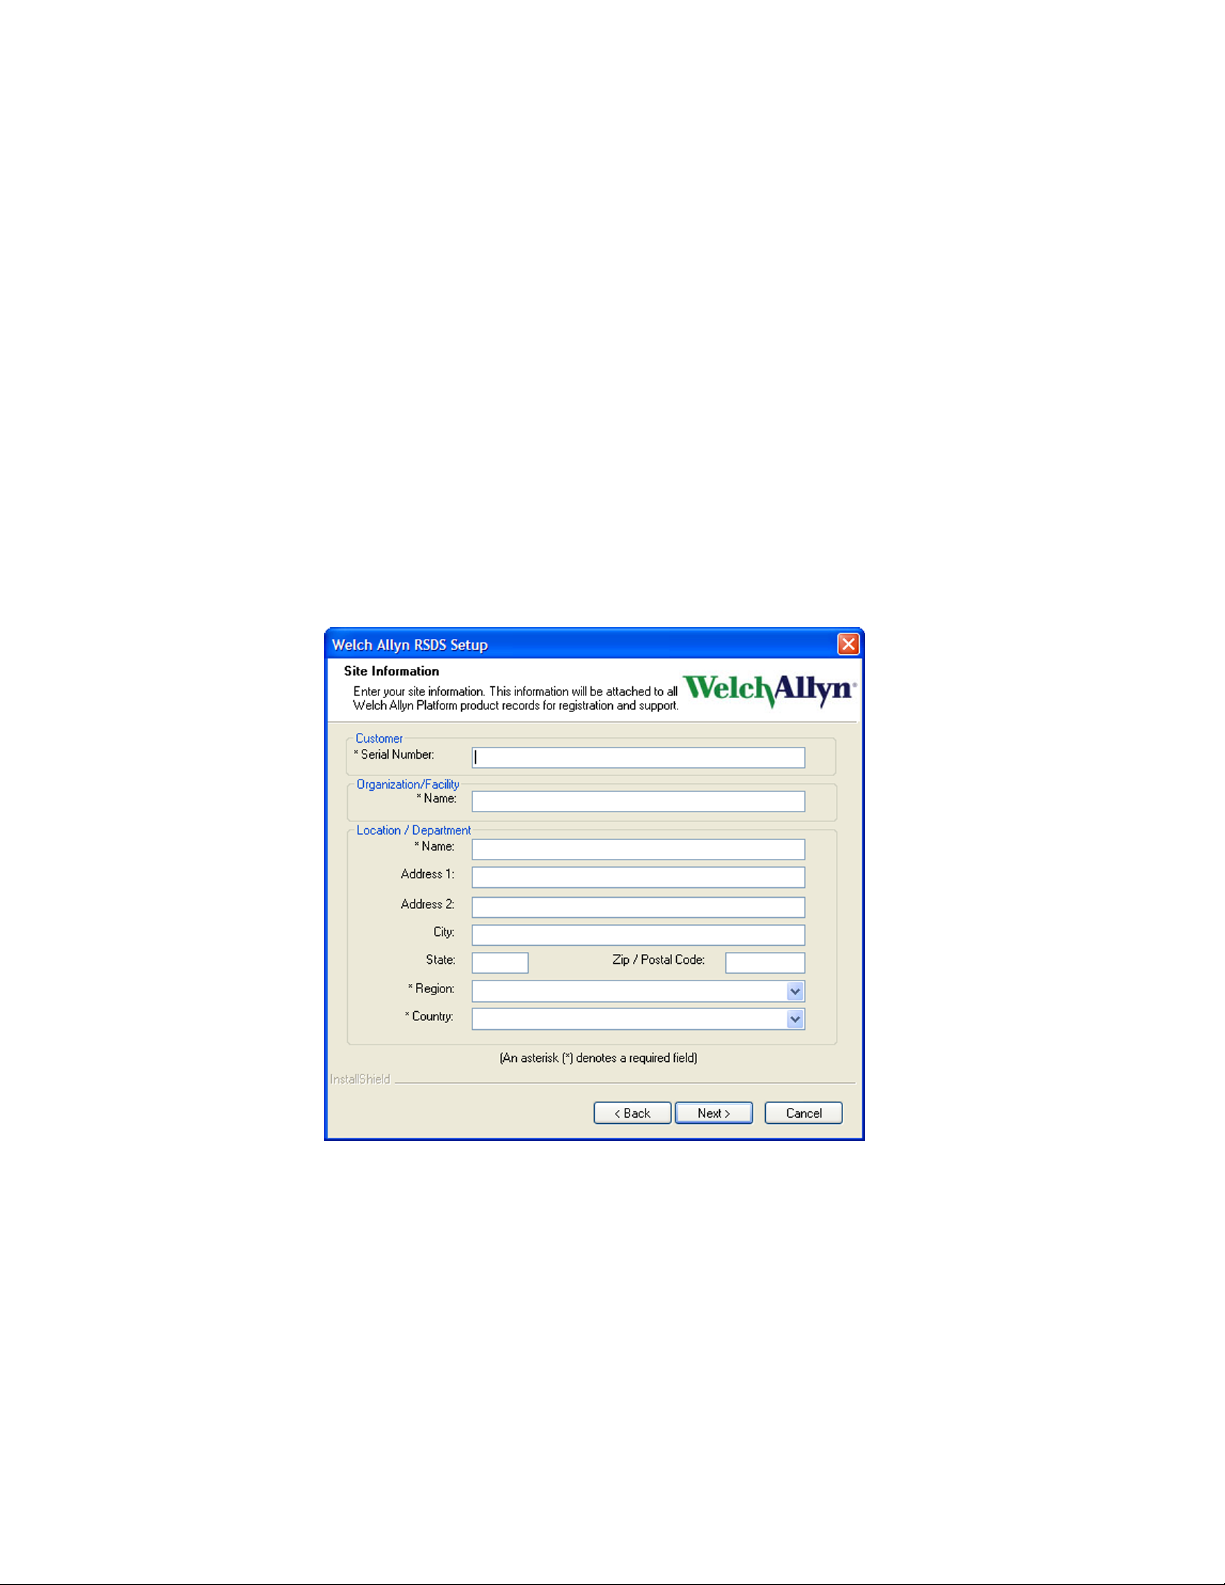
6. Enter information as shown in the next table. The table and the documentation of the product
for which you are installing PartnerConnect explain where to find the information.
Note This information allows Welch Allyn to quickly and efficiently locate
this system for remote connection.
Field Description
Customer
Serial Number* Enter the serial number. For information about
locating the serial number, see your product
documentation.
Organization/Facility
Name* Enter the organization (customer) name followed by
its city and state. For example, ABC Hospital
Page 7

Installation guide PartnerConnect software installation 3
System-New York NY. For more information, see
your product documentation.
Location/Department
Name* Enter the location code from HIS. For example,
3NW, ER, 7NTower. This code should match the
code provided to your product software. If the
location is not defined, create a unique location
code.
If the following locations are not defined, use
the following codes:
DATACENTER: Use this for the data center,
computer room, or server room.
BioMed: Use this for the Biomedical
department.
Address 1 and 2 Enter the street address or post office box.
City Enter the city of the organization location.
State Enter the state or province of the organization
location.
Region* Select a region that matches your location from the
pull-down list.
Country* Enter the country of the organization location.
* Required field
Click Next.
7.
The Setup program displays the settings you selected, providing an opportunity to ensure that
the settings are correct before proceeding.
8. Click Next.
Setup copies and installs the files you selected. Setup then prompts you to specify post-install
tasks.
9. Select Install the Axeda Desktop Server. This allows Welch Allyn to remotely access
your system—only upon your request—to assist in troubleshooting.
If you check this box, the Axeda Desktop Server installs immediately after you exit this Setup
program.
10. Click Next.
Setup verifies a successful installation.
11. Click Finish.
If you did not grant permission for remote access, you are now finished.
If you selected “Install the Axeda Desktop Server,” the remote troubleshooting option begins
its installation by displaying an Introduction screen immediately after you click Finish.
12. Click Next.
The License Agreement screen appears.
13. Accept the license and click Next.
The Choose Install Folder screen appears.
14. Identify where you want the installation program to install the Axeda Desktop server software
and click Next.
Page 8

4 PartnerConnect software installation PartnerConnect® software
The Service screen appears.
15. Check to install as a service and click Next.
16. Check to start as a service and click Next.
17. Enter a name for the service (the default is Axeda Desktop Server) and click Next.
The program displays the settings you selected, providing an opportunity to ensure that these
are the settings you want.
18. Click Install.
The program installs the server. This may take several minutes.
The program displays a message verifying a successful installation.
19. Click Done.
Page 9

Troubleshooting
This section contains information that you can use to resolve problems encountered during
installation.
Note Prior to completing troubleshooting tips presented in this section, reboot your
computer, and then verify that the issue still exists.
5
Page 10

6 Troubleshooting PartnerConnect® software
Issue: Cannot send Ctrl+Alt+Del command to Axeda Desk Top server
If the client cannot send a Ctrl+Alt+Del command to the Axeda Desk Top server after installing on a
Windows 7 operating system, change the configuration using one of the following methods.
• Change the domain group policy setting.
• Change the local group policy setting.
The next sections explain how.
Change the domain group policy setting
If the remote computer is connected to a domain, enable this group policy setting for subdomains
or for the entire domain:
Note Only a domain administrator can modify the domain group policy.
Note The domain group policy overrides the local group policy. If the domain group policy
is not set, you can use local group policy setting mentioned in the next section.
1. Log in to the remote computer as the domain administrator.
2. Click the Start button, select Run, type gpmc.msc and click OK.
3. In the left section, select the desired domain, then right-click and choose Create a GPO in
this domain, and link it here.
4. Right-click the new GPO and select Edit.
5. In the left section, navigate to Computer Configuration > Administrative Templates >
Windows Components > Windows Logon Options.
6. In the right section, double-click the Disable or enable software Secure Attention
Sequence policy and click Enabled.
7. Set the policy option to Services.
8. Click OK and close the Group Policy Object Editor.
Sending Ctrl+Alt+Del on all computers connected to the domain selected in step 3 is now enabled.
Change the local group policy setting
If the remote computer is a member of a workgroup or is connected to a domain with no domain
group policy set, follow these steps:
Log in to the remote computer as a local or domain administrator.
1.
2. Click the Start button, select Run, type gpedit.msc and press Enter.
3. In the left section, navigate to Computer Configuration > Administrative Templates >
Windows Components > Windows Logon Options.
4. In the right section, double-click the Disable or enable software Secure Attention
Sequence policy and click Enabled.
5. Set the policy option to either Services or Services and Ease of Access applications.
6. Click OK and close the Group Policy Object editor.
Sending Ctrl+Alt+Del on the remote computer is now enabled.
Page 11

Installation guide Troubleshooting 7
Disable the UAC
1. Click the Start button, and then select Run.
The Run dialog appears.
2. Type msconfig and press Enter.
The System Configuration Utility dialog appears.
3. Click the Tools tab.
4. Locate and highlight Disable UAP or Disable UAC, and then click the Launch button.
A command prompt window appears and runs the processes that disable UAC.
5. Close command prompt window.
6. Close the System Configuration Utility dialog.
7. Restart computer for the change to take effect.
Disable Alt+Ctrl+Del on login
1. Go to the Control Panel, and select System and Maintenance.
2. Click Administrative Tools then the Local Security Policy.
The Local Security Settings window appears.
3. Select Computer Configuration > Windows Settings > Security Settings > Local
Policies > Security Options.
Security options appear in the details pane.
4. Locate and double-click Interactive Logon: Do not require CTRL +ALT +DEL.
The setting's dialog appears.
5. Click Disabled, and then click OK.
6. Restart computer for the change to take effect.
When logging in, the logon screen will automatically appear without pressing Ctrl+Alt+Del. Users
must still provide a name and password.
Issue: Unable to receive data from the Connex VM server
If the client cannot receive data from the Connex VM server after installing, traffic from the server
may be blocked. Change the firewall rule to allow communication through port 17001 for the
following:
Required
Server name IP address
ghsom1.axeda.com 209.202.157.179 443, 17002 80, 17001 Waltham
ports
Optional
ports Location
ghuk1.axeda.com 89.234.8.217 443, 17002 80, 17001 London
ghjap1.axeda.com 124.40.23.210 443, 17002 80, 17001 Tokyo
ghsj1.axeda.com 198.66.245.39 443, 17002 80, 17001 San Jose
Page 12

8 Troubleshooting PartnerConnect® software
Required
Server name IP address
gas-de1.axeda.com 62.209.44.17 443, 17002 80, 17001 Frankfurt
gas-hk3.axeda.com 120.136.45.13 443, 17002 80, 17001 Hong Kong
gas-aus.axeda.com 122.202.65.179 443, 17002 80, 17001 Sydney
gas-sj4.axeda.com 204.42.142.84 443, 17002 80, 17001 San Jose
gas-bo4.axeda.com 209.202.167.141 443, 17002 80, 17001 Waltham
gas-bo5.axeda.com 209.202.167.142 443, 17002 80, 17001 Waltham
gas-bo6.axeda.com 209.202.186.30 443, 17002 80, 17001 Waltham
Note If you need IP addresses, contact your IT network person to resolve the DNS names
to an IP address, based on your current and local settings.
For additional diagnostic information, go to the following URL:
https://welchallynsolutions.com/drm/actions/sitepreputility/show
After logging in, this screen appears:
ports
Optional
ports Location
TCP/UDP ports used
The following table lists the port assignments used by the Welch Allyn PartnerConnect solution.
After installation, you can use this information to configure the firewalls, virus software, and router
access lists for your facility.
Page 13

Installation guide Troubleshooting 9
Application Port number Protocol
AxedaDesktopServer 5920 TCP
AxedaDesktopServer 5920 UDP
WelchAllynRSDSGateway 3011 TCP
WelchAllynRSDSGateway 3030 TCP
Welch Allyn PartnerConnect — External Connection 443 HTTPS (TCP)
Page 14

10 Troubleshooting PartnerConnect® software
Page 15

Configure PartnerConnect with proxy settings
If you use a proxy server for your external Web connections, complete the following steps.
Install the Axeda Deployment Utility by entering the following at a command prompt:
1.
deployment.exe
11
This program is in the folder where PartnerConnect resides.
2. Launch the Axeda Deployment Utility by selecting the following:
Start> All Programs> Axeda> Deployment> Axeda_Deployment
The Axeda Deployment Utility dialog appears.
3. Select how to connect to the agent: This dialog box specifies how to connect the deployment
utility to the running agent. You must connect the utility to the agent to retrieve and modify
device settings.
• Agent is installed on this computer: Select this option if the deployment utility is
installed on the same computer as the agent.
Page 16

12 Configure PartnerConnect with proxy settings PartnerConnect® software
• Agent is installed on networked computer: Select this option if the agent device
is on the same local network as the deployment utility computer. If you select this option,
type or select the host name or IP address of the agent device. The Host field accepts
IPv4 and IPv6 addresses as well as alphanumeric characters for a machine name.
• Agent is connected via serial cable: Select this option if the agent device is
connected to the deployment utility computer by a serial cable. If you select this option,
type or select the serial COM port.
4. Click OK to connect to the agent.
5. Click Enterprise Servers in the left pane, then select the Proxy Servers tab.
6. Select the appropriate proxy setting for the site.
• Enable Proxy Auto-Configuration: The agent communicates directly with the
enterprise server; it does not go through a proxy server.
• Enable HTTP Proxy: The script identifies the HTTP proxy server IP address and port.
• Enable SOCKS Proxy: The script identifies the SOCKS proxy server IP address and
port.
7. Save the settings to the agent. After you add or edit settings using the deployment utility, you
must send the changed settings information to the agent and restart the agent.
a. Click Deploy Changes to Agent.
Page 17

Installation guide Configure PartnerConnect with proxy settings 13
If any required information is missing (for example, model and serial information), you are
prompted to configure that information before deploying changed settings. In addition,
any missing settings appear in the Configuration window below the associated settings
window name. To configure it, click the name of the missing setting.
When prompted to send configuration settings to the agent, click Yes.
b.
Page 18

14 Configure PartnerConnect with proxy settings PartnerConnect® software
Page 19

Removing PartnerConnect software
Remove PartnerConnect software on Windows® XP
1. Select Start> Settings> Control Panel.
The Control Panel appears.
2. Select Add or Remove Programs and make sure that Change or Remove Programs
is selected in the left pane.
15
Windows lists the programs on this computer.
3. Scroll to the following Welch Allyn programs:
4. Remove the programs, starting with PartnerConnect (listed in Add/Remove Programs as
Welch Allyn RSDS). For each program:
a. Select the program.
The program listing expands to display additional information and a Change/Remove
button.
b. Select Change/Remove.
Windows launches the uninstall program.
c. Follow the prompts to remove the program.
Accept the default values on the following screen.
Page 20

16 Removing PartnerConnect software PartnerConnect® software
Axeda Desktop Server uninstall program will prompt you to reboot the computer. You can
reboot at a later time, but you must reboot to finish the uninstall.
5.
Verify that the programs you deleted are removed:
a. Reboot the computer.
b. Select Start> Settings> Control Panel.
The Control Panel appears.
c. Select Add or Remove Programs.
Windows lists the programs on this computer.
d. Visually inspect to make sure that the programs you deleted no longer appear in the list of
programs.
If the programs are not in the program list, the PartnerConnect program is now removed
from your computer.
If the programs still appear in the program list, contact your IT department or workstation
support and ask if there is anything on the network that prevents program removal.
To verify that the programs you deleted are removed:
Navigate to the uninstall screen.
1.
Windows lists the programs on this computer.
2. Visually inspect to make sure that the programs you deleted no longer appear in the list of
programs.
If the programs are not in the program list, the PartnerConnect and Axeda Desktop Server
programs are now removed from your computer.
If the programs still appear in the program list, contact your IT department or workstation
support and ask if there is anything on the network that prevents program removal.
In certain situations, programs external to Welch Allyn software may block uninstallation. If this is
a possibility in your IT environment, contact your IT department to verify whether additional steps
are required.
Page 21

Installation guide Removing PartnerConnect software 17
Remove PartnerConnect software on Windows Vista® and Windows® 7
1. Select >Control Panel.
The Control Panel appears.
2. Select Uninstall a program in the Programs section.
Windows lists the programs on this computer.
3. Scroll to the following Welch Allyn programs.
4. Remove the programs, starting with PartnerConnect (listed in Add/Remove Programs as
Welch Allyn RSDS). For each program:
a. Select the program.
b. Click the uninstall option.
Windows launches the uninstall program.
c. Follow the prompts to remove the program.
Page 22

18 Removing PartnerConnect software PartnerConnect® software
Note Accept the default values on the following screen:
The Axeda Desktop Server uninstall program will prompt you to reboot the computer. You
can reboot at a later time, but you must reboot to complete the uninstall.
To verify that the programs you deleted are removed:
Navigate to the uninstall screen.
1.
Windows lists the programs on this computer.
2. Visually inspect to make sure that the programs you deleted no longer appear in the list of
programs.
If the programs are not in the program list, the PartnerConnect and Axeda Desktop Server
programs are now removed from your computer.
If the programs still appear in the program list, contact your IT department or workstation
support and ask if there is anything on the network that prevents program removal.
In certain situations, programs external to Welch Allyn software may block uninstallation. If this is
a possibility in your IT environment, contact your IT department to verify whether additional steps
are required.
Page 23

 Loading...