

Page 1
Welch Allyn Connex® Central Station
Quick Reference Card
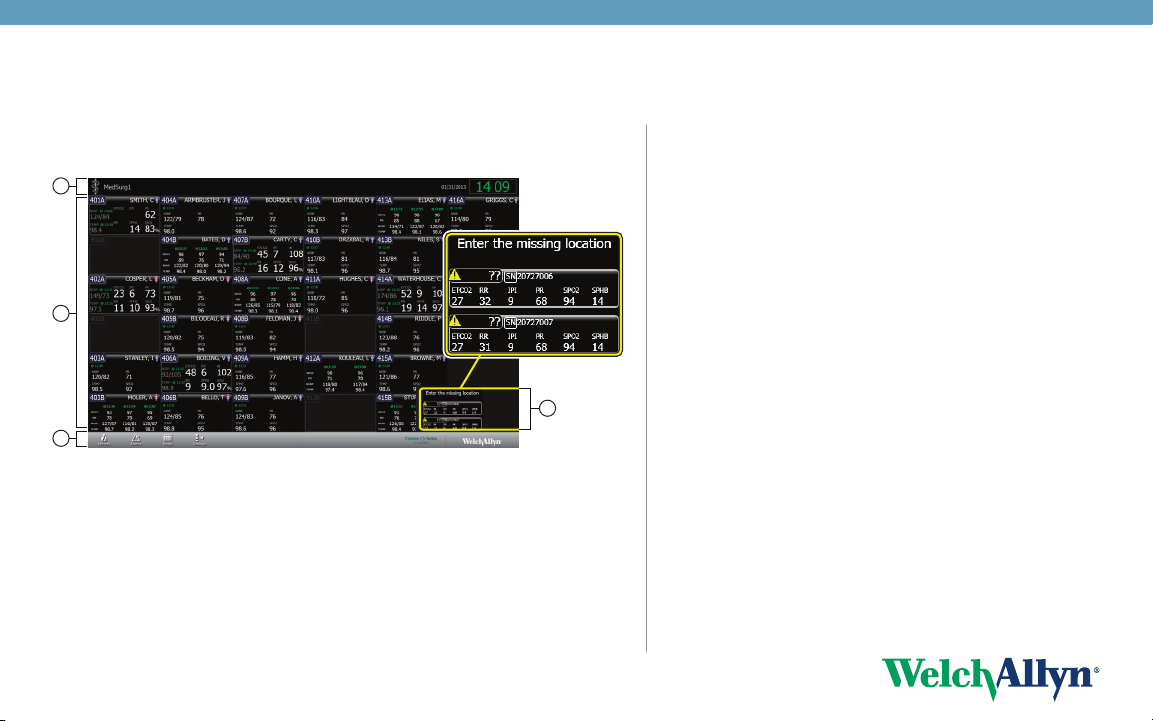
Main Monitoring screen overview
1
2
4
3
1. System message area. This section of the screen displays the covered location, date, time,
and any patient or technical alarms.
2. Patient data area. This section of the screen displays patient tiles arranged in rows and
columns.
3. Navigation area. This section of the screen displays secondary links to the Patient list,
Station Alarms, View options, Settings, and system notifications.
4. Waiting area. This section of the screen displays patient tiles awaiting confirmation.
Note Do not leave a patient tile in the Waiting area for an extended amount of time, as
patient measurements are not saved until the patient is confirmed. The waiting area
is a temporary placeholder for patient tiles. Confirm the patient as soon as possible.
Add a patient at the central station
Note This method is only recommended for use when your central
station is not connected to an Admit/Discharge/ Transfer
system.
1. Click the Patients icon. The Patient List appears.
2. Click Add. The Patient Details window appears.
3. Scan the patient’s barcode or use the keyboard to enter the patient’s
ID, name, date of birth, and other information.
Note The patient’s first or last name can not exceed 32 characters.
If the ADT system sends a first or last name longer than 32
characters, the name will be truncated, and will generate a
conflict.
4. Click Save. The Confirm Changes dialog box appears.
5. Review the information in the dialog box, and if correct, click Ye s to
return to the Main Monitoring screen. If further editing is required,
click No to return to the previous screen.
Admit a patient from the Waiting area
1. In the Waiting area, click the patient tile you want to admit. The
Device Detail window appears.
2. Click Edit. The Patient Details window appears.
3. Enter the patient information, choose a location for the patient and
click Save. The Confirm Changes dialog box appears.
4. Review the information in the dialog box, and if correct, click Ye s to
return to the Main Monitoring screen. If further editing is required,
click No to return to the previous screen.
Page 2

Admit a patient from the Patient List
1. Click the Patients icon. The Patient List appears.
2. In the Unconfirmed area, click the patient you want to admit. The Patient
Details window appears.
3. Enter the patient location and device information. Click Save. The Confirm
Changes dialog box appears.
4. Review the information in the dialog box, and if correct, click Ye s to return to the
Main Monitoring screen. If further editing is required, click No to return to the
previous screen.
Admit a patient from a room tile
1. Click on the patient tile in the Main Monitoring screen. The Patient Detail screen
appears.
2. Click Edit. The Patient Details window appears.
3. Enter the patient information, choose a location for the patient and click Save.
The Confirm Changes dialog box appears.
4. Review the information in the dialog box, and if correct, click Ye s to return to the
Main Monitoring screen. If further editing is required, click No to return to the
previous screen.
Assign a patient to a room
1. Click and drag a patient tile from the waiting area to the appropriate room. The
Confirm Patient dialog box appears.
2. Click OK to confirm the transfer. The patient tile appears in the room area.
3. Click the patient tile. The Device Details window appears.
4. Click Edit. The Patient Details window appears.
5. Enter the patient’s ID, name, date of birth, and other information.
6. Click the Room / Bed pull-down menu and select the appropriate room or bed.
7. Click Save. The Confirm Changes dialog box appears.
8. Review the information in the dialog box, and if correct, click Ye s to return to the
Main Monitoring screen. If further editing is required, click No to return to the
previous screen.
Transfer a patient to a new unit - same central station
1. Click on the tile of the patient you want to transfer. The Device Details window
appears.
2. Click Edit. The Patient Details screen appears.
3. Edit the patient’s new unit and bed and click Save. The Confirm Changes dialog
box appears.
4. Review the information in the dialog box, and if correct, click Ye s to return to the
Main Monitoring screen. If further editing is required, click No to return to the
previous screen.
Transfer a patient to a new unit - different central station
1. Click on the tile of the patient you want to transfer. The Device Details window
appears.
2. Click Edit. The Patient Details screen appears.
3. Click Discharge. The patient is moved to the Discharged tab in the Patients
List.
4. Physically move the patient to the new unit.
5. At the new unit, admit or pre-admit the patient as described.
Discharge a patient at the central station
Note You cannot discharge a patient who is continuously sending vital signs
measurements to the central station. These patients appear in the list
with the icon.
1. Click the Patients icon. The Patient List appears.
2. Click on the patient name of the patient you want to discharge. Click Discharge.
The Confirm Changes dialog box appears.
3. Click Yes to discharge the patient. The Main Monitoring screen appears.
Note It is important to discharge patients on a regular basis in order to keep
the patient list current and up to date.
Page 3

Alarm indicators and controls
Icon Description
Alarm off
No visual or audio alarms are enabled.
Alarm on
Visual and audio alarms are enabled.
Alarm audio off
Alarm limits and visual alarm signals remain active. A reminder
signal periodically occurs.
Alarm audio paused
You have temporarily paused the audio tone for this alarm.
Alarm active
One or more alarms are active. Click this icon to pause the audio
tone.
Red icons represent high priority alarms, and yellow icons
represent medium or low priority alarms.
Multiple alarms notification
Click this icon to cycle through the messages for the active alarm
priority level.
Information status message
This icon is displayed with messages that are unrelated to
physiological alarms.
Pause an alarm at the central station
Audio alarm characteristics
• After you pause an alarm, the alarm returns after a pause interval if the
condition that caused the alarm persists.
• If a new alarm condition occurs during a pause interval, a new audio tone
occurs.
1. Click in the System Message area. The alarm is paused. Visual indications
remain in the patient tile until the condition is corrected or until the next
measurement is taken.
2. If multiple alarms are active, a multiple alarms notification appears in the System
Message area. Respond to multiple alarms as follows:
a. Click in the System Message area. (See note below.)
b. Read the alarm message for the second alarm.
c. Click .
d. Continue to click the multiple alarms notification and reset tones until you
have read all of the messages.
Note The multiple alarms notification button displays the number of active
alarms inside the alarm icon. A set of dots appears below the icon. These
dots indicate the display order of alarms from highest (left) to lowest
(right) priority, as well as the most recent in the case of multiple alarms
of the same priorit y.
Page 4

Note Alarm limits that are adjusted at the central station are also adjusted at
the device.
1. Click on a patient tile. The Device Details window appears.
2. Confirm that the alarm is on.
3. Select the Alarms tab. The Alarms tab appears.
4. You can manually enter upper and lower parameter alarm limits by entering a
value in the numeric boxes on the left and right side.
5. You can adjust the range of the parameter alarm by clicking and dragging the left
or right side of the slider bar.
6. You can adjust the overall range of the parameter alarm by clicking and dragging
the center of the slider bar.
7. Click . The Main Monitoring screen appears. The alarm limits are adjusted at
the central station and at the monitor.
Review patient alarms
1. Click on a patient tile. The Device Details window appears.
2. Click Review. The Patient Review window appears.
3. Click Patient Alarms. The Patient Alarms tab appears.
Station Alarms
This window displays all of the central station messages and patient alarms
generated during the previous 12 hours. Click the Alarms icon in the Navigation area
to open the Station Alarms window.
Welch Allyn Technical Support
www.welchallyn.com/support
© 2013, Welch Ally n, Inc. All rights reserved. M at. No. 719961, 80018419 Ver. A
1054 61
Connectivity TilesAdjust patient alarm limits at the central station
Signal lost
This tile is displayed when the device has
been unintentionally disconnected from
the central station. For information on
reconnecting the monitor to the central
station, see the device directions for use.
Standby
This tile is displayed when continuous
monitoring has been paused at the device.
For information on how to resume continuous
monitoring, see the device directions for use.
Temporarily disconnected
This tile is displayed when the device has
been intentionally disconnected from the
central station. If reasons for disconnecting
from the central station have been
configured, the reason appears under the
Temporarily disconnected message. For
more information, see the device directions
for use.
 Loading...