

Page 1

Service Manual
Aneroid Sphygmomanometers
Welch Allyn, Inc.
4341 State Street Road
P.O. Box 220
Skaneateles Falls, NY 13153-0220
95P504 Rev. D Copyright 2001
Page 2

-
Page 3

Revision Information
Date ECN#/
ECO#
8/31/00 A Introduction of Aneroid
5/15/01 B Corrected tolerance levels in
8/18/03 5-46368 C Correction of tooling part
5/27/04 1000873 D Corrected BOM, tooling and
Revision Description Author Approved
JDB
Service Manual
JDB
the gauge tests sections.
Corrected m inor gramm atical
errors.
WWR DLK
numbers. Arden document
release to SKF.
BSW RJS
procedures.
Drawings and/or illustrations and/or part numbers in this document are for
reference only. For the most current revision call the Welch Allyn Customer
Service phone number listed in Section 1.
Service Manual 95P504 Rev. D Welch Allyn Aneroid Sphygmomanometers i
Page 4

ii
Welch Allyn Aneroid Sphygmomanometers 95P504 Rev. D
Page 5

Table of Contents
Section 1 General Information
To Service Personnel .....................................................................................................................1
Intent of Manual and Product Scope .............................................................................................1
Limited Warranty .........................................................................................................................2
Warranty, Service, and Spare Parts ...............................................................................................2
Warranty Service ...........................................................................................................................2
Assistance and Parts ......................................................................................................................2
Repairs ..........................................................................................................................................3
Packing Instructions ......................................................................................................................3
Periodic Calibration Requirements ................................................................................................3
New S&K Movement ...................................................................................................................5
Old Style Movements ....................................................................................................................6
Section 2 Service
Tools Required for Service ............................................................................................................9
Test Specifications .........................................................................................................................11
Test Equipment Bench Layout ......................................................................................................11
Section 3 Repair and Calibration
Classic Pocket Aneroid Gauges
(Date stamp of September 2003 or earlier)
..............................................13
Initial Gauge Check 13
Opening/Removing and Replacing Parts of the Classic Pocket Gauge ...........................................13
Calibration of the Classic Pocket Gauge .......................................................................................13
Aligning Sector Gear on the Classic Pocket Gauge ........................................................................13
Setting the Classic Pocket Gauge Tension .....................................................................................14
Setting the Classic Pocket Gauge Span ..........................................................................................14
Check and finish the calibration of the Classic Pocket Gauge .......................................................14
Classic Pocket Aneroid Gauges
(Date stamp of October 2003 or later)
...................................................16
Initial Gauge Check ......................................................................................................................16
Opening/Removing and Replacing Parts of the Classic Pocket Gauge ...........................................16
Calibration of the Classic Pocket Gauge .......................................................................................16
Checking the Classic Pocket Gauge Span ......................................................................................16
Average Zero Starting Position .....................................................................................................17
Span Adjustment of the Classic Pocket Aneroid ............................................................................17
Linearity Adjustment of the Classic Pocket Aneroid (As required) ................................................18
High Readings of the Classic Pocket Aneroid:
(Predominantly at 250 and 200)
....................................18
Check and finish the calibration of the Classic Pocket Gauge .......................................................19
Testing the Classic Pocket Gauge ..................................................................................................19
Classic Wall and Mobile Aneroid Gauge
(Date stamp of July 2003 or earlier)
....................................... 21
7670 series Wall and Mobile Aneroid Disassembly .......................................................................21
Classic Wall and Mobile Aneroid Disassembly .............................................................................21
Calibration of the Wall and Mobile Gauge ...................................................................................21
Sector Gear Alignment for the Wall and Mobile Aneroid ..............................................................21
Setting the Tension of the Wall and Mobile Aneroid .....................................................................22
Service Manual 95P504 Rev. D Welch Allyn Aneroid Sphygmomanometers iii
Page 6

Table of Contents
Setting the span of the Wall and Mobile Aneroid ..........................................................................22
Check and finish calibration of the Wall and Mobile Aneroid ......................................................22
Classic Wall and Mobile Aneroid Gauge
(Date stamp of October 2003 and later.)
.................................24
7670 series Wall and Mobile Aneroid Disassembly .......................................................................24
Classic Wall and Mobile Aneroid Disassembly .............................................................................24
Calibration of the Wall and Mobile Gauge ...................................................................................24
Checking the Wall/Mobile Gauge Span .........................................................................................24
Average Zero Starting Position .....................................................................................................25
Span Adjustment of the Wall Aneroid ...........................................................................................25
Check and finish calibration of the Wall and Mobile Aneroid ......................................................27
Classic Hand Aneroid Gauge
(Date stamp of September 2003 or earlier)
................................................29
Replacing Parts of the Hand Gauge ..............................................................................................29
Calibration of the Classic Hand Gauge .........................................................................................29
Aligning the Sector Gear on the Classic Hand Gauge ....................................................................30
To set the tension of the Classic Hand Gauge ...............................................................................30
Setting the span of the Classic Hand Gauge ..................................................................................30
Check and finish calibration of the Classic Hand Gauge ...............................................................31
Testing of the Classic Hand Gauge ...............................................................................................31
Test Specifications .........................................................................................................................31
Classic Hand Aneroid Gauge
(Date stamp of October 2003 or later)
......................................................32
Replacing Parts of the Classic Hand Gauge ...................................................................................32
Calibration of the Classic Hand Gauge .........................................................................................32
Checking the Classic Hand Gauge Span ........................................................................................32
Average Zero Starting Position .....................................................................................................33
Span Adjustment of the Classic Hand Aneroid ..............................................................................33
Linearity Adjustment of the Classic Hand Aneroid: (As required) .................................................34
Check and finish the calibration of the Classic Hand Gauge .........................................................35
Economy Aneroid Gauge
(Stopped production on 7/15/03)
..................................................................37
Replacing Parts of the Economy Gauge .........................................................................................37
Calibration of the Economy Gauge ...............................................................................................37
Aligning the Sector Gear of the Economy Gauge ...........................................................................37
Setting the tension of the Economy Gauge ....................................................................................37
Setting the span of the Economy Gauge ........................................................................................38
Check and finish calibration of the Economy Gauge .....................................................................38
Testing of the Economy Gauge 39
TR-1 Silver Ring Hand Aneroid ....................................................................................................40
Replacing Parts of the Silver Ring .................................................................................................40
Calibration of the Silver Ring Hand Aneroid ................................................................................40
Checking the Silver Ring Gauge Span ...........................................................................................40
Average Zero Starting Position .....................................................................................................41
Span Adjustment of the Silver Ring Aneroid .................................................................................41
iv
Welch Allyn Aneroid Sphygmomanometers 95P504 Rev. D
Page 7

Table of Contents
Linearity Adjustment of the Silver Ring Aneroid: (As required) ....................................................41
Check and finish the calibration of the Silver Ring Gauge .............................................................43
TR-2 Pro Check Hand Aneroid ....................................................................................................44
Replacing Parts on Pro Check Hand Aneroid ................................................................................44
Calibration of the Pro Check Hand Aneroid .................................................................................44
Checking the Pro Check Hand Gauge Span ..................................................................................44
Average Zero Starting Position .....................................................................................................44
Span Adjustment of the Pro Check Hand Aneroid ........................................................................45
Linearity Adjustment of the Pro Check Hand Aneroid: (As required) ...........................................45
High Readings of the Pro Check Aneroid: (Predominantly at 250 and 200) ..................................45
Check and finish the calibration of the Pro Check Hand Gauge ....................................................47
Section 4 Repair Parts
Old Style Classic Pocket Repair Parts ............................................................................................49
Old Style Classic Hand Repair Parts .............................................................................................50
Old Style 767 Wall Repair Parts ...................................................................................................51
Old Style Classic Wall/Mobile Repair Parts ..................................................................................52
Economy Aneroid Repair Parts .....................................................................................................53
TR1 Silver Ring Repair Parts ........................................................................................................54
TR2 Pro Check Repair Parts .........................................................................................................55
S&K Classic Pocket Repair Parts .................................................................................................56
S&K Classic Hand Repair Parts ....................................................................................................57
S&K Wall/Mobile Series 509 Repair Parts ....................................................................................58
S&K WalL 767 Series Repair Parts ...............................................................................................59
Service Manual 95P504 Rev. D Welch Allyn Aneroid Sphygmomanometers v
Page 8

General Information Section 1
To Service Personnel
The information contained in this publication is subject to change without notice and
should not be construed as a commitment by Welch Allyn, Inc.
Welch Allyn assumes no responsibility for any errors that may appear in this manual. If the
product and/or its operation varies significantly from any description herein, please contact
the following:
Welch Allyn, Inc.
1-800-535-6663
315-685-4100
Fax (315)-685-3361
Welch Allyn, Inc.
4341 State Street Road
Skaneateles Falls, NY 13153-0220
USA
This product has been designed to provide a high degree of safety and reliability. However,
we can not guarantee against: deterioration of components due to aging, normal wear,
tampering, and abuse.
Only Authorized Welch Allyn personnel or agents must perform all service and repairs,
using approved Welch Allyn replacement parts and approved process materials. Failure to
follow these guidelines will invalidate the product warranty. Please refer to the product
warranty for specific coverage.
Intent of Manual and Product Scope
This manual provides technical service and re-calibration information to technicians
authorized to repair and re-calibrate Welch Allyn, Inc. products. When used in conjunction
with the required test equipment and tools, technicians will be able to diagnose, repair, recalibrate, and test the Aneroid Sphygmomanometer.
The manual includes: re-calibration instructions, fault/cause analysis, step-by-step
disassembly and re-assembly procedures, repair, adjustment, and re-test procedures.
Service Manual 95P504 Rev. D Welch Allyn Aneroid Sphygmomanometers 1
Page 9

Section 1 General Information
Limited Warranty
Welch Allyn, Inc. warrants the Aneroid Sphygmomanometers when new, to be free of
defects in material and workmanship and to perform in accordance with manufacturer's
specifications for a period of (see Table 1-1) from the date of purchase from Welch Allyn,
Inc. or its authorized distributors or agents. Welch Allyn, Inc. will either repair or replace
any components found to be defective or at variance from manufacturer's specifications
within this time at no cost to the customer. It shall be the purchaser's responsibility to
return the instrument to Welch Allyn, Inc. or an authorized distributor, agent or service
representative. This warranty does not include breakage or failure due to tampering,
misuse, neglect, accidents, modification or shipping. This warranty is also void if the
instrument is not used in accordance with manufacturer's recommendations or if repaired
by other than Welch Allyn, Inc. or an authorized agent. Purchase date determines warranty
requirements. No other express warranty is given.
To receive service assistance or to ask questions regarding this warranty, please call your
nearest Welch Allyn Technical Support Center.
Warranty, Service, and Spare Parts
Warranty Service
All repairs on products under warranty must be performed or approved by Welch Allyn.
Unauthorized repairs will void the warranty. In addition, whether or not covered under
warranty, any product repair shall exclusively be performed by Welch Allyn trained and
certified service personnel.
Assistance and Parts
If the product fails to function properly or if assistance, service, or spare parts are required,
contact the nearest Welch Allyn Technical Support Center.
USA 1-800-535-6663 Latin America (+1) 305-669-9591
European Call Center (+353) 469-067-790 United Kingdom 0-207-365-6780
France (+33) 1-60-09-33-66 Germany (+49) 7477-927-173
Canada 1-800-561-8797 South Africa (+27) 11-777-7509
Australia (+61) 2-9638-3000 Singapore (+65) 6291-0882
Japan (+81) 3-5212-7391 China (+86) 21-6327-9631
Before contacting Welch Allyn it is helpful to attempt to duplicate the problem and to
check all accessories to ensure that they are not the cause of the problem.
2 Welch Allyn Aneroid Sphygmomanometers Service Manual 95P504 Rev. D
Page 10

General Information Section 1
When calling, please be prepared to provide:
• The product name, model number and complete description of the problem
• The serial number of your product (if applicable)
• The complete name, address and phone number of your facility
• For out-of-warranty repairs or spare parts orders, a purchase order (or credit card)
number
• The required spare or replacement part number(s), for parts order
Repairs
If your product requires warranty, extended warranty, or non-warranty repair service, first
call the nearest Welch Allyn Technical Support Center. A representative will assist you in
troubleshooting the problem and will make every effort to solve the problem over the
phone, avoiding a potential unnecessary return.
In case the return cannot be avoided, the representative will record all necessary
information and will provide a Return Material Authorization (RMA) number, as well as
the appropriate return address.
A Return Material Authorization (RMA) number must be obtained prior to any return. Be
sure to note this number on the outside of your shipping box.
Packing Instructions
If you have to return goods for service, follow these recommended packing instructions:
• Remove all hoses, and ancillary products (as appropriate) before packing, unless you
suspect they are associated with the problem.
• Wherever possible use the original shipping carton and packing materials.
• Include a packing list and the Welch Allyn Return Material Authorization (RMA)
number.
• Be sure to note the (RMA) number on the outside of your shipping box.
It is recommended that all returned goods be insured. Claims for loss or damage to the
product must be initiated by the sender.
Periodic Calibration Requirements
Welch Allyn sphygmomanometers are manufactured to high standards for quality and
accuracy. The instruments are manufactured using calibrated pressure standards traceable
to the National Institute of Standards and Technology.
During normal operation, the location of the pointer within the oval/square indicates that
the instrument is most likely in calibration. Should the pointer rest outside the oval/box
with zero pressure applied, the instrument should be re-calibrated.
Welch Allyn recommends that the calibration of mechanical sphygmomanometers be
checked using the following procedures on an annual basis even if the pointer rests inside
the oval/box.
Service Manual 95P504 Rev. D Welch Allyn Aneroid Sphygmomanometers 3
Page 11

Section 1 General Information
1. Connect the instrument under test to a high-quality, known pressure standard (traceable
to the National Institute of Standards and Technology) and a 500 cc test volume.
2. Pressurize the gauge to slightly above 300 mmHg and bleed down the pressure no faster
than 10 mmHg per second, stopping to check the pressure at 300, 250, 200, 150, 100, 60,
and 0 mmHg.
3. Record the readings of the instrument under test and the applied pressure. The
difference is the error of the instrument. The error of the reference pressure should be
added to the specified accuracy of the instrument under test (±3 mmHg) to determine the
working accuracy of your calibration set-up.
NOTE: Your ability to measure the accuracy of a sphygmomanometer depends upon the
sensitivity of the pressure standard you use for the calibration procedure.
Example: If using a device (e.g., digital pressure standard) rated at ±0.1 mmHg, you will
be able to determine the accuracy of the gauge being tested to within ±3.1 mmHg.
Welch Allyn recommends using a pressure standard that is as sensitive as possible when
performing calibration checks. A Setra Pressure Meter (part no. 2270-01), which is
calibrated for ±0.1 mmHg, or Netech Pressure Meter (part no. 200-2000IN), which is
calibrated for ±1.0 mmHg, work well for this application.
4 Welch Allyn Aneroid Sphygmomanometers Service Manual 95P504 Rev. D
Page 12
General Information Section 1
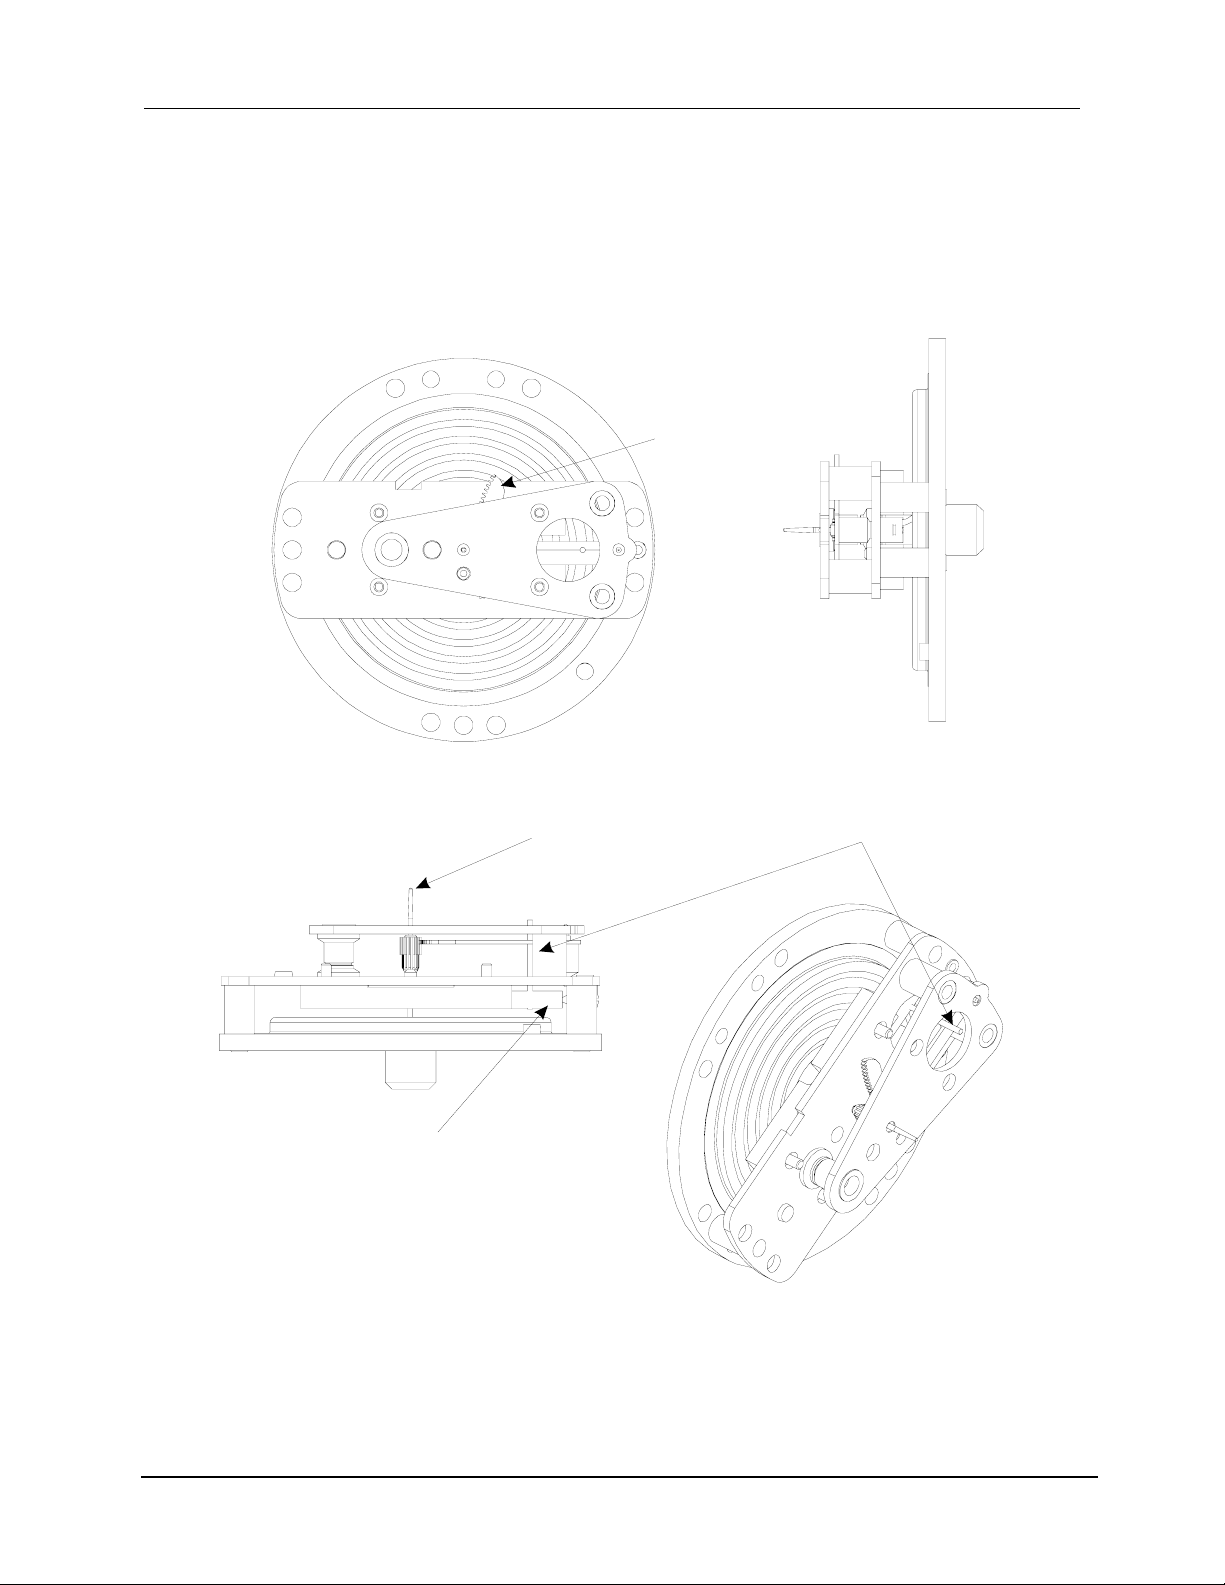
New S&K Movement
The S&K movement is now being used in all Classic Hand Aneroid, Classic Pocket
Aneroid, Wall Aneroid Series 509, Wall Aneroid Series 767, TR1 Silver Ring and TR2
ProCheck aneroids. The S&K movement looks similar to Figure 1-1. Please familiarize
yourself with the different parts of the S&K movement.
Sector Gear
Cross Shaft
Figure 1-1. New style S&K Movement.
Adjustment PinPinion
Service Manual 95P504 Rev. D Welch Allyn Aneroid Sphygmomanometers 5
Page 13

Section 1 General Information
A
A
Old Style Movements
Welch Allyn still supports the Older Style Classic Hand Aneroid, Classic Pocket Aneroid,
Wall Aneroid Series 509 and Wall Aneroid Series 767. The Older movements look similar
to Figure 1-2.
BOTTOM PLATE
ND BEARING PLATE
TapTite
Screw
TOP PLATE
AND JEWELS
ASSEMBLY
(JEWEL VERSION)
Pinion
Hair
Spring
ASSEMBLY
ARBOR AND GEAR
SECTOR ASSY
Radius Plate
nd Push Rod
Assembly
Screw &
Washer
Top
Plate
Sector Alignment
Mark
Stop Lug
Leaf Spring
Figure 1-2. Old style aneroid movement.
Bottom
Plate
6 Welch Allyn Aneroid Sphygmomanometers Service Manual 95P504 Rev. D
Page 14

General Information Section 1
Table 1-1. Aneroid warranty table.
Model Model No. Description Warranty Comments
Classic Hand Aneroid 5098-06 w/Infant Cuff Lifetime Replace w/S&K Assy.
5098-05 w/Adult Cuff Lifetime Replace w/S&K Assy.
5098-02 w/Child Cuff Lifetime Replace w/S&K Assy.
5098-20 w/Various Size Cuffs Lifetime Replace w/S&K Assy.
5098-23 w/Various Size Printed Cuffs Lifetime Replace w/S&K Assy.
5098-18 w/Various Printed Ped Cuffs Lifetime Replace w/S&K Assy.
Classic Pocket Aneroid 5090-06 w/Child Cuff Lifetime Replace w/S&K Assy.
5090-02 w/Adult Cuff Lifetime Replace w/S&K Assy.
5090-41 w/Lg. Adult Cuff Lifetime Replace w/S&K Assy.
5090-37 w/Thigh Cuff Lifetime Replace w/S&K Assy.
Wall Aneroid Series 509 5091-38 w/Adult Cuff Lifetime Replace w/S&K Assy.
5091-22 w/Adult Cuff & Orange Scale Lifetime Replace w/S&K Assy.
5091-60 w/5 legged stand Lifetime Replace w/S&K Assy.
5091-41 w/4 legged stand
Wall Aneroid 767 Series 7670-01 w/Adult Cuff Lifetime Replace w/S&K Assy.
TR1 (Siler Ring) Hand Aneroid 5098-29 w/Child Cuff 10 year No Change
5098-27 w/Adult Cuff 10 year No Change
5098-28 w/Lg. Adult Cuff 10 year No Change
5098-30 w/Various Size Printed Cuffs 10 year No Change
TR2 (Procheck) Hand Aneroid 5098-72 w/Child Cuff 5 year No Change
5098-70 w/Adult Cuff 5 year No Change
5098-71 w/Lg. Adult Cuff 5 year No Change
5098-73 w//Various Size Printed Cuffs 5 year No Change
Durashock DS45-09 w/Child Cuff 10 year No Change
DS45-09P w/Printed Child Cuff 10 year No Change
DS45-10 w/Sm. Adult Cuff 10 year No Change
DS45-11 w/Adult Cuff 10 year No Change
DS45-12 w/Lg. Adult Cuff 10 year No Change
Durashock DS44-09 w/Child Cuff 5 year No Change
Service Manual 95P504 Rev. D Welch Allyn Aneroid Sphygmomanometers 7
Page 15

Section 1 General Information
Model Model No. Description Warranty Comments
DS44-09P w/Printed Child Cuff 5 year No Change
DS44-10 w/Sm. Adult Cuff 5 year No Change
DS44-11 w/Adult Cuff 5 year No Change
DS44-12 w/Lg. Adult Cuff 5 year No Change
Arden Wall Aneroid Arden-W01 Gage & Cuff 5 year No Change
Arden-W02 Gage Only 5 year No Change
Arden Pocket Aneroid Arden-G01 w/Adult Cuff 5 year No Change
Arden-G02 w/Lg. Adult Cuff 5 year No Change
Arden-G03 w/Child Cuff 5 year No Change
Arden-G04 Gage Only 5 year No Change
Economy Pocket Aneroid 7050-23 w/Child Cuff 10 year Discontinue selling after 7/15/2003
7050-14 w/Adult Cuff 10 year Discontinue selling after 7/15/2003
7050-24 w/Lg. Adult Cuff 10 year Discontinue selling after 7/15/2003
7050-43 w/Thigh Cuff 10 year Discontinue selling after 7/15/2003
Mercurial 5097-30 Desk 10 year Discontinued selling after 3/15/2003
5097-29 w/Mobile Stand 10 year Discontinued selling after 3/15/2003
5097-26 w/Wall Mount 10 year Discontinued selling after 3/15/2003
5097-11 w/Wall Mount & Orange Scale 10 year Discontinued selling after 3/15/2003
8 Welch Allyn Aneroid Sphygmomanometers Service Manual 95P504 Rev. D
Page 16

Service Manual 95P504 Rev. D Welch Allyn Aneroid Sphygmomanometers 9
Tools Required for Service
Service Section 2
Tool Number Description Old Style
Economy
Local Tool Store Tweezers X
Local Tool Store Jewelers Screwdriver X X X
Local Tool Store 3/8" Open End Wrench X
Local Tool Store Pliers to Grip Luer X
Local Tool Store 5/16" Open End Wrench X
T112854 500cc Volume X X X X X X X X X X X
T106763 509/7670 Fixture X X X X
T18891 Adapter for Torque wrench X X X X X X
T110657 Calibration Dial X
T112663 Calibration Dial X
T112949 Calibration Dial X
T18781 Calibration Dial X X
T18833 Calibration Dial X X
T19036 Calibration Dial X
T105721 Calibration Dial X X
T106845A Calibration Tool X X X X X
T18816 Calibration Tool (S+K) X X X X X X
T105644 Collet X
T108212 Economy Gauge Fixture X
T107569 Hand Gauge Fixture X X
T108897 Movement Removal Wrench X X X
T74555 Pocket Gauge Fixture X X
T55804-1 Pocket Screw Cap Assy. X
T19034 Pointer Assembly Tool X X X X X X
T34935 Pointer Block X X X X
T18814 Pointer Removal Tool X X X X X X X X X X X
T19035 S&K removal Wrench X X X X X X
T113249 Screw Cap Removal Tool X
T107345 Span Wrench X
T119628 Tension Setting Tool X X X X X
T113265 Thumbscrew Wrench X X
T112655 Top Plate Wrench X X X X
T112459 Torque Screwdriver X X X X
Old Style
Pocket
Old Style
Hand
Old Style
509
Old Style
7670
TR-2 TR-1 S&K
Hand
S&K
Pocket
S&K
509
S&K
7670
Page 17

10 Welch Allyn Aneroid Sphygmomanometers Service Manual 95P504 Rev. D
Tool Number Description Old Style
Economy
T18904 Torque Wrench (S & K) X X X X X X
T112584 TR-1 & TR-2 Fixture X X
T105258 Wrench X X X
Local Tool Store Red Loctite #266 X X X X X X X X X X X
Local Tool Store 3M Plastic Adhesive #1099 X
Tool Number Description Old Style
Economy
5088-01 Bulb and Valve X X X X X X X
Gomco 300 or
equivlant∗∗∗∗
9585TPK4∗∗∗ "T" Fitting X X X X X X X X X X X
9586TPK4∗∗∗ "Y" Fitting X X X X X X X X X X X
97P24 Pneumatic Tubing (4ft.) X X X X X X X X X X X
200-2000in∗ Netech Digital Pressure Meter X X X X X X X X X X X
2270-01∗∗ Setra Digital Pressure Meter X X X X X X X X X X X
Local Tool Store Torque Bit size T5 X X X X
NOTE: Only one of the pressure meters are needed. The user can choose which will work best for them.
∗ Order from Netech (800-547-6557)
∗ ∗ Order from Setra (800-257-3872)
∗ ∗ ∗ Order from Festo (704-527-1427)
∗ ∗ ∗ ∗ Order from PMED (303-393-7800)
Suction Pump (Must be able to
pull a suction of -20 mmHg)
Old Style
Pocket
Old Style
Pocket
Old Style
Hand
Test equipment
Old Style
Hand
Old Style
509
Old Style
509
Old Style
7670
Old Style
7670
TR-2 TR-1 S&K
Hand
TR-2 TR-1 S&K
Hand
X X X X X X
S&K
Pocket
S&K
Pocket
S&K
509
S&K
509
S&K
7670
S&K
7670
Section 2 Service
Page 18

Service Manual 95P504 Rev. D Welch Allyn Aneroid Sphygmomanometers 11
Test Specifications
The following are the pressure test points that each gauge must be tested to after any repair is made.
1. The gauge must be accurate to within ±3 mmHg at the following test pressures:
a) 0 mmHg (pointer inside the oval/rectangle)
b) 60 mmHg
c)100 mmHg
d)150 mmHg
e)200 mmHg
f)250 mmHg
g)300 mmHg
Note: Calibration of all gauges must be performed using a Calibrated Digital Pressure Meter, traceable to NIST standards, as
the pressure standard, to ensure complete accuracy.
Test Equipment Bench Layout
Service Section 2
500 cc Volume
Figure 2-1. Test Equipment Bench layout.
Gauge
Under
Test
Digital
Pressure
Meter
Bulb and Valve
Page 19

12 Welch Allyn Aneroid Sphygmomanometers Service Manual 95P504 Rev. D
Section 2 Service
Page 20

Repair and Calibration Section 3
Classic Pocket Aneroid Gauges
Initial Gauge Check
1. Before performing calibration:
a) Check the clip for correct tension. Replace before calibration.
b) Ensure the lock nut is tight.
c) Check the hair spring. Ensure that the hair spring is uniform and not distorted.
d) Check the pinion. Ensure that it rotates correctly and is not bent.
(Date stamp of September 2003 or earlier)
Opening/Removing and Replacing Parts of the Classic Pocket Gauge
2. Place the pocket gauge into the Pocket Gauge Fixture (T74555).
3. Remove the bezel by unscrewing it from the case. Remove the crystal.
4. Remove the pointer, using the pointer removal tool (T18814).
5. Pry out the dial, using a small flat head screwdriver.
6. Remove the capsule locking nut using span wrench (T107345).
7. Remove the screw cap, using (T113249). Remove the capsule.
Note: The arm of the movement fits into the top of the capsule.
8. Remove the 2 screws that are holding down the gauge movement using (T108897).
Note: Some units will use phillip head screws to secure the movement.
9. Remove the movement.
Note: Reassemble in reverse order.
Calibration of the Classic Pocket Gauge
10. Connect the gauge to test equipment.
11. Place the gauge in to the pocket fixture (T74555).
12. Remove the bezel, crystal, pointer and dial.
Aligning Sector Gear on the Classic Pocket Gauge
13. View the sector gear and ensure that it is in the proper position. The right edge of the
sector gear should align with the mark on the base of the movement.
14. If the sector gear is not aligned properly, loosen the capsule nut using (T107345). Adjust
the sector gear by turning the capsule until the sector gear is in the correct position per step
#13. Tighten the capsule nut.
Service Manual 95P504 Rev. D Welch Allyn Aneroid Sphygmomanometers 13
Page 21

Section 3
Repair and Calibration
Setting the Classic Pocket Gauge Tension
15. Loosen the sector stop lug and pull it towards the bottom of the gauge.
16. Using your left index finger, push the sector gear all the way to the post and hold in
that position.
17. Place the tension setting tool (T119628) onto the pinion at the 9 o’clock position.
18. Rotate the tension setting tool clockwise to the 5 o’clock position.
19. Release the sector gear and continue rotating the tension setting tool to the 9 o’clock
position. The sector gear should be moving during this step.
20. Bring the sector stop lug back to correct position and lock it into place.
Setting the Classic Pocket Gauge Span
21. Place the test dial (T105721) onto the gauge. Place the test pointer onto the pinion.
Rotate the test dial until the pointer is at "0".
22. Apply 320 mmHg to the gauge.
23. Release the pressure to 300 mmHg.
24. If the pointer is pointing to less than "300", place the calibration tool (T106845A) into
the radius plate slot above the screw. Rotate the calibration tool counter clockwise towards
the bottom of the gauge until the test pointer reaches "300". Release the pressure to 0
mmHg and check at the "0" point.
25. If the test pointer is pointing to greater than "300", position the calibration tool
(T106845A) between the sector gear and the radius plate. Rotate the tool clockwise until
the pointer is at "300" (this brings the radius plate down). Release the pressure to 0 mmHg
and check the "0" point.
26. If the pointer is not at "0" upon full release of pressure, rotate the test dial until the test
pointer is on the "0" mark of test dial. Repeat steps 22-25 until span is set.
27. Check for leaks by pinching off the tubing from the test equipment while pressure is
applied to the gauge. There should be no leakage or movement of the pointer.
Check and finish the calibration of the Classic Pocket Gauge
28. Remove the test pointer and test dial. Replace the gauge’s dial.
29. Apply a small amount of red Loctite #266 to the hub of the pointer. Place the gauge’s
pointer onto the pinion. Ensure that it is resting in the center of the oval/square. Gently tap
the pointer with a small hammer to secure.
14 Welch Allyn Aneroid Sphygmomanometers Service Manual 95P504 Rev. D
Page 22

Repair and Calibration Section 3
30. If the pointer is to the left of the oval/square’s center, rotate the pointer counter
clockwise until you feel a slight resistance. Release the pointer. Ensure that the pointer
returns to the center of the oval/square "0". Repeat until correct.
31. If the pointer is to the right of the oval/square’s center, rotate the pointer clockwise
until a slight resistance is felt. Release the pointer. Ensure that the pointer returns to the
center of the oval/square "0" each time. Repeat until correct.
32. Place the crystal and bezel back onto the gauge. Test the gauge.
33. Connect the gauge to the test equipment.
34. Apply 320 mmHg to the gauge.
35. Release the pressure to 300 mmHg.
Note: The aneroid gauge must be accurate to "3 mmHg at the stated target pressures. Use
a calibrated digital pressure meter.
36. Compare the reading of the calibrated digital pressure meter to that of the gauge under
test.
37. The following are the pressure test points that each gauge must be tested to after any
repair is made. The gauge must be accurate to within "3 mmHg at the following test
pressures:
a) 0 mmHg (pointer inside the oval/rectangle)
b) 60 mmHg
c) 100 mmHg
d) 150 mmHg
e) 200 mmHg
f) 250 mmHg
g) 300 mmHg
Note: Calibration of all gauges must be performed using a Calibrated Digital Pressure
Meter as the pressure standard for complete accuracy.
Service Manual 95P504 Rev. D Welch Allyn Aneroid Sphygmomanometers 15
Page 23

Section 3
Repair and Calibration
Classic Pocket Aneroid Gauges
(With S&K movement)
(Date stamp of October 2003 or later)
Initial Gauge Check
1. Before performing calibration:
a) Check the gauge for a sticky or jumpy pointer movement.
b) Attach gauge to test equipment and test for leaks.
c) Check the clip for correct tension. Replace before calibration.
Opening/Removing and Replacing Parts of the Classic Pocket Gauge
2. Place the pocket gauge into the Pocket Gauge Fixture (T74555).
3. Remove the bezel by unscrewing it from the case. Remove the crystal.
4. Remove the pointer by using the pointer removal tool (T18814).
5. Pry out the dial by using a small flat head screwdriver.
6. The pocket end cap cannot be removed.
7. Remove the movement using (T18904).
Note: Reassemble in reverse order. Ensure you tighten the movement down with torque
wrench (T18904) using adapter (T18891)
Calibration of the Classic Pocket Gauge
8. Connect the gauge to the test equipment.
9. Place the gauge in to the pocket fixture (T74555).
10. Remove the bezel, crystal, pointer and dial.
Checking the Classic Pocket Gauge Span:
11. Place the test dial (T18781) onto the gauge. Place the test pointer onto the pinion.
Rotate the test dial until the pointer is at "0".
12. Apply 320 mmHg to the gauge.
13. Release the pressure to 300 mmHg.
14. Observe the position of the pointer. If the pointer does not align with the "300", go to
Average Zero Starting Position
16 Welch Allyn Aneroid Sphygmomanometers Service Manual 95P504 Rev. D
Page 24

Repair and Calibration Section 3
15. If the pointer does align with "300", go to Linearity Adjustment of the Classic Pocket
Aneroid.
Average Zero Starting Position
16. Apply 60 mmHg of pressure to the gauge. Release the pressure to zero. Mentally note
where the test pointer is pointing on the test dial.
17. Apply a -20 mmHg of vacuum to the gauge. Release the pressure to zero. Mentally
note where the test pointer is pointing on the test dial.
18. Take the average of where the pointer was between step 16 and step 17. Rotate the test
dial’s zero mark to that averaged position.
Span Adjustment of the Classic Pocket Aneroid
19. Apply 320 mmHg of pressure to the gauge. Bleed down to 300 mmHg. Note the
pointer’s position and maintain pressure.
20. If the span is too low, using calibration tool (T18816), bend the adjustment pin away
from pinion parallel to gear sector arm. See Figure 3-1. Release the pressure to 0. Make
sure to re-adjust the test dial so that the pointer will be slightly left of the graduation line.
Re-pressurize to 320 mmHg then to 300 mmHg to evaluate the effects of the adjustment.
21. If the span is too high, using calibration tool (T18816), bend the adjustment pin
towards the pinion parallel to the gear sector arm. See Figure 3-1. Release the pressure to
0. Make sure to re-adjust the test dial so that the pointer will be slightly left of the
graduation line. Re-pressurize to 320 mmHg then to 300 mmHg to evaluate effects of
adjustment.
22. Repeat the above steps as required to obtain correct span adjustment.
Pinion
Figure 3-1. S&K span adjustment.
Service Manual 95P504 Rev. D Welch Allyn Aneroid Sphygmomanometers 17
Page 25

Section 3
Repair and Calibration
Linearity Adjustment of the Classic Pocket Aneroid: (
As required
)
Note: If the 0 mmHg and 300 mmHg position are correct, and the other points at 250
mmHg or 60 mmHg are either too high or too low, perform the following adjustments.
High Readings of the Classic Pocket Aneroid:
(Predominantly at 250 and 200)
23. Remove the test pointer and test dial. Position the calibration tool (T18816) over the
adjusting pin and push it down to the cross shaft. Note:You may have to move the gear
sector with your finger of other hand to allow the calibration tool to slide down to the
cross shaft.
24. Move the hook away from the diaphragm (approximately 15 degrees), by pushing on
the sector gear. While maintaining this position, lift the tool up from cross shaft
approximately 1/16 inch and bend the pin back approximately 15 degrees. See Figure 3-2.
Lift the calibration tool up to the point where the pin makes contact with the gear sector
and bend the pin up, approximately 30 degrees.
Approximately 15 degrees
Approximately 30 degrees
Cross Shaft
Hook
Figure 3-2. S&K pin adjustment if reading is high at 250 mmHg.
25. Remove the tool and release the gear sector. The resultant bend should result in the
gear sector starting position being a maximum of 2 teeth extending beyond the top plate
when viewed from a top position and a minimum of 2 teeth within the edge of the top
plate. (This must be checked by pushing the gear sector 2 teeth from the other side of the
top plate). Adjust the secondary bend if the gear sector is out of these limits. Re-assemble
the test dial and test pointer. Recheck span and adjust as necessary prior to inspecting the
intermediate points.
Low Readings of the Classic Pocket Aneroid at 60 or 100:
26. Remove the test pointer and test dial. Position the calibration tool over the adjusting
pin and push it down to the cross shaft. Lift the tool approximately 1/16 inch and bend the
pin approximately 15 degrees. See Figure 3-3. While maintaining this position, lift the tool
18 Welch Allyn Aneroid Sphygmomanometers Service Manual 95P504 Rev. D
Page 26

Repair and Calibration Section 3
to point where the pin makes contact with the gear sector. Bend the pin down 30 degrees.
Remove the tool and release the gear sector. Check for gear sector starting position as
defined previously. Adjust if necessary. Re-assemble the test dial and test pointer. Recheck
the span and adjust as necessary prior to inspection at the intermediate points.
Approximately 15 degrees
Figure 3-3. S&K pin adjustment if reading is low at 60 mmHg.
Approximately 30 degrees
Note: In all adjustments during calibration, the gear sector starting position will affect
accuracy. Sometimes, this alone can be used as an individual adjustment to achieve
conformance. Higher readings will be realized when the gear sector is extending beyond
the edge of the top plate and lower readings will be realized when it is within the edge of
the top plate.
27. Check for leaks by pinching off the tubing from the test equipment while pressure is
applied to the gauge. There should be no leakage or movement of the pointer.
Check and finish the calibration of the Classic Pocket Gauge
28. Remove the test pointer and test dial. Replace the gauge’s dial.
29. Apply a small amount of red Loctite #266 to the hub of the pointer. Place the gauge’s
pointer onto the pinion. Ensure that it is resting in the center of the oval. Gently tap the
pointer with small hammer to secure or use (T19034) pointer assembly tool.
30. Place the crystal and bezel back onto the gauge and test the gauge.
Testing the Classic Pocket Gauge
31. Connect the Pocket Gauge to the test equipment.
32. Apply 320 mmHg to the gauges.
33. Release the pressure to 300 mmHg.
Service Manual 95P504 Rev. D Welch Allyn Aneroid Sphygmomanometers 19
Page 27

Section 3
Repair and Calibration
Note: The aneroid or mercury gauge must be accurate to "3 mmHg at the stated target
pressures. Use a calibrated digital pressure meter.
34. Compare the reading of the calibrated digital pressure meter to that of the Pocket
Gauge under test.
35. The following are the pressure test points that each gauge must be tested to after any
repair is made. The gauge must be accurate to within "3 mmHg at the following test
pressures:
a) 0 mmHg (pointer inside the oval/rectangle)
b) 60 mmHg
c) 100 mmHg
d) 150 mmHg
e) 200 mmHg
f) 250 mmHg
g) 300 mmHg
Note: Calibration of all gauges must be performed using a Calibrated Digital Pressure
Meter as the pressure standard for complete accuracy.
20 Welch Allyn Aneroid Sphygmomanometers Service Manual 95P504 Rev. D
Page 28

Repair and Calibration Section 3
Classic Wall and Mobile Aneroid Gauge
7670 series Wall and Mobile Aneroid Disassembly
1. Remove the bezel from the case by prying the 4 tabs up. Pull out on the bezel.
2. Remove the crystal.
3. Remove the pointer by using the pointer removal tool (T18814). Visually inspect and
straighten if needed.
4. Remove the screws of the dial by using the torque driver (T112459). Remove the dial.
5. Remove the screws that are holding down the mount to the case of the gauge by using a
Phillips head screwdriver.
Note: Reassemble in reverse order.
Classic Wall and Mobile Aneroid Disassembly
6. Remove the crystal by pushing down and out at the top. Remove the crystal.
(Date stamp of July 2003 or earlier)
7. Remove the pointer by using the pointer removal tool (T18814). Inspect and straighten
if needed.
8. Remove the dial by removing the screws with the torque driver (T112459).
9. Remove the movement and the mount by unscrewing the standoffs. Remove them from
the case.
Note: Reassemble in reverse order.
Calibration of the Wall and Mobile Gauge
Note: Before performing calibration:
a) Check the hair spring. Ensure it is uniform and not distorted.
b) The movement should be slow when released.
c) Check the pinion. Ensure that it rotates correctly and is not bent.
10. Connect the gauge to the test equipment.
11. Remove the bezel, crystal, pointer and dial.
Sector Gear Alignment for the Wall and Mobile Aneroid
13. View the sector gear and ensure proper position. The right edge of the sector gear
should align with the mark on the base of the movement.
Service Manual 95P504 Rev. D Welch Allyn Aneroid Sphygmomanometers 21
Page 29

Section 3
Repair and Calibration
14. If the sector gear is not aligned properly, loosen the capsule nut using (T105258).
Adjust the sector gear by turning the capsule until the sector gear is in the correct position
per step 13. Tighten the capsule nut.
Setting the Tension of the Wall and Mobile Aneroid
15. Loosen the sector stop lug and pull it towards the bottom of the gauge.
16. Using your left index finger, push the sector gear all the way to the post and hold that
in position.
17. Place the tension setting tool (T119628) onto the pinion at the 9 o’clock position.
18. Rotate the tension setting tool clock wise to the 5 o’clock position.
19. Release the sector gear and continue rotation to the 9 o’clock position. The sector gear
should be moving during this step.
20. Bring the lug back to the correct position and lock it into place.
Setting the span of the Wall and Mobile Aneroid
21. Place the test dial (T112641 for 767 Series) or (T112663 for 509 Series) onto the
gauge. Place the test pointer onto the pinion. Rotate the test dial until the pointer is at "0".
22. Apply 320 mmHg of pressure to the gauge.
23. Release the pressure to 300 mmHg.
24. If the pointer is pointing to less than "300", place the calibration tool (T106845A) into
the radius plate slot above the screw. Rotate the calibration tool counter clockwise towards
the bottom of the gauge until the sector gear pointer reaches "300". Release the pressure
to 0 mmHg and check at the "0" point.
25. If the pointer is pointing to greater than "300", using the calibration tool (T106845A)
positioned between the sector gear and the radius plate. Rotate the tool clockwise until the
pointer is at "300" (this brings the radius plate down). Release the pressure to 0 mmHg
and check the "0" point.
26. If the pointer is not pointing at "0" upon the release of pressure, rotate the test dial
until the pointer is on the "0" mark of test dial. Repeat steps 22-25 until the span is set.
27. Check for leaks by pinching off the tubing from the test equipment while pressure is on
the gauge. There should be no visible leak.
Check and finish calibration of the Wall and Mobile Aneroid
28. Remove the test pointer and test dial. Replace the gauge’s dial.
22 Welch Allyn Aneroid Sphygmomanometers Service Manual 95P504 Rev. D
Page 30

Repair and Calibration Section 3
29. Apply a small amount of red Loctite #266 to the hub of the pointer. Place the gauge’s
pointer onto the pinion. Ensure the pointer is resting in center of oval "0". Tap the pointer
with small hammer slightly to secure.
30. If the pointer is to the left of the oval/square’s center, rotate the pointer counter
clockwise until you feel a slight resistance. Release the pointer. Ensure the pointer returns
to the center of the oval/square "0". Repeat until correct.
31. If the pointer is to the right of the oval/square’s center, rotate the pointer clockwise
until a slight resistance is felt. Release the pointer. Ensure the pointer returns to the center
of the oval/square "0" each time. Repeat until correct.
32. Place the crystal and perform a full test.
Testing of the Wall and Mobile Aneroid
33. Connect the Wall or Mobile Gauge to the test equipment.
34. Apply 320 mmHg of pressure to the gauge.
35. Release the pressure to 300 mmHg.
36. Compare the reading of wall or mobile gauge under test to a calibrated digital pressure
meter.
Test Specifications
37. The following are the pressure test points that each gauge must be tested to after any
repair is made. The gauge must be accurate to within "3 mmHg at the following test
pressures:
a) 0 mmHg (pointer inside the oval/rectangle)
b) 60 mmHg
c) 100 mmHg
d) 150 mmHg
e) 200 mmHg
f) 250 mmHg
g) 300 mmHg
Note: Calibration of all gauges must be performed using a Calibrated Digital Pressure
Meter as the pressure standard for complete accuracy.
Service Manual 95P504 Rev. D Welch Allyn Aneroid Sphygmomanometers 23
Page 31

Section 3
Repair and Calibration
Classic Wall and Mobile Aneroid Gauge
(With S&K movement.)
(Date stamp of October 2003 and later.)
7670 series Wall and Mobile Aneroid Disassembly
1. Remove the bezel from the case by prying the 4 tabs up. Pull out on the bezel.
2. Remove the crystal.
3. Remove the pointer by using the pointer removal tool (T18814). Visually inspect and
straighten if needed.
4. Remove the screws of the dial by using the torque driver (T112594A). Remove the dial.
5. Remove the screws that are holding down the mount to the case of the gauge by using a
Phillips head screwdriver.
6. Remove the movement using (T19035).
Note: Reassemble in reverse order. Ensure you tighten the movement down with torque
wrench (T18904) using adapter (T18891).
Classic Wall and Mobile Aneroid Disassembly
7. Remove the crystal by pushing down and out at the top. Remove the crystal.
8. Remove the pointer by using the pointer removal tool (T18814). Inspect and straighten
if needed.
9. Remove the dial by removing the screws with the torque driver (T112459A).
10. Remove the movement and the mount by unscrewing the standoffs. Remove them
from the case.
Note: Reassemble in reverse order. Ensure you tighten the movement down with torque
wrench (T18904) using adapter (T18891).
Calibration of the Wall and Mobile Gauge
11. Connect the gauge to the test equipment.
12. Remove the bezel, crystal, pointer and dial.
Checking the Wall/Mobile Gauge Span
13. Place the test dial (T18833) onto the gauge. Place the test pointer onto the pinion.
Rotate the test dial until the pointer is at "0".
24 Welch Allyn Aneroid Sphygmomanometers Service Manual 95P504 Rev. D
Page 32

Repair and Calibration Section 3
14. Apply 320 mmHg to the Gauge.
15. Release the pressure to 300 mmHg.
16. Observe the position of the pointer. If the pointer does not align with the "300", go to
Average Zero Starting Position.
17. If the pointer does align with "300", go to Linearity Adjustment of the Wall/Mobile
Aneroid.
Average Zero Starting Position
18. Apply 60 mmHg of pressure to the gauge. Release the pressure to zero. Mentally note
where the test pointer is pointing on the test dial.
19. Apply a -20 mmHg of vacuum to the gauge. Release the pressure to zero. Mentally
note where the test pointer is pointing on the test dial.
20. Take the average of where the pointer was between step 18 and step 19. Rotate the test
dial’s zero mark to that averaged position.
Span Adjustment of the Wall Aneroid
21. Apply 320 mmHg of pressure to the gage to then bleed down to 300 mmHg. Mentally
note position and maintain pressure.
22. If the span is too low, using calibration tool (T18816), bend the adjustment pin away
from pinion parallel to gear sector arm. Change pressure to 0 mmHg. Make sure to readjust the test dial so that the pointer will be slightly left of the graduation line. Repressurize to 320 mmHg then to 300 mmHg to evaluate the effects of the adjustment. See
Figure 3-4.
23. If the span is too high, using calibration tool (T18816), bend the adjustment pin
towards the pinion parallel to the gear sector when pressurized at 300 mmHg. Change the
pressure to 0 mmHg. Make sure to re-adjust the test dial so that the pointer will be slightly
left of the graduation line. Re-pressurize to 320 mmHg then to 300 mmHg to evaluate
effects of adjustment. See Figure 3-4.
24. Repeat the above steps as required to obtain correct span adjustment.
Service Manual 95P504 Rev. D Welch Allyn Aneroid Sphygmomanometers 25
Page 33

Section 3
Figure 3-4. S&K span adjustment.
Repair and Calibration
Linearity Adjustment of the Wall/Mobile Aneroid: (As required)
Note: If the 0 mmHg and 300 mmHg position are correct, and the other points at 250
mmHg or 60 mmHg are either too high or too low, then perform the following
adjustments.
High Readings of the Wall/Mobile Aneroid:
(Predominantly at 250 and 200)
25. Remove the test pointer and test dial. Position the calibration tool (T18816) over the
adjusting pin and push it down to the cross shaft. Move the gear sector with your finger of
other hand to allow access. Rotate the pin by pushing the sector gear, to move the hook
away from the diaphragm (approximately 15 degrees). While maintaining this position, lift
the tool up from cross shaft approximately 1/16 inch and bend the pin back approximately
15 degrees. See Figure 3-5. Lift the calibration tool up to the point where the pin makes
contact with the gear sector and bend the pin up, approximately 30 degrees.
Approximately 15 degrees
Approximately 30 degrees
Cross Shaft
Hook
Figure 3-5. S&K pin adjustment if reading is high at 250 mmHg.
26 Welch Allyn Aneroid Sphygmomanometers Service Manual 95P504 Rev. D
Page 34

Repair and Calibration Section 3
26. Remove the tool and release the gear sector. The resultant bend should result in the
gear sector starting position being a max. of 2 teeth extending beyond the top plate when
viewed from a top position and a minimum of 2 teeth within the edge of the top plate.
(This must be checked by pushing the gear sector 2 teeth from the other side of the top
plate). Adjust the secondary bend if the gear sector is out of these limits. Re-assemble the
test dial and test pointer. Recheck span and adjust as necessary prior to inspecting the
intermediate points.
Low Readings of the Wall/Mobile Aneroid at 60 or 100
27. Remove the test pointer and test dial. Position the calibration tool over the adjusting
pin and push it down to the cross shaft. Lift the tool approximately 1/16 inch and bend the
pin approximately 15 degrees. See Figure 3-6. While maintaining this position, lift the tool
to point where the pin makes contact with the gear sector. Bend the pin down 30 degrees.
Remove the tool and release the gear sector. Check for gear sector starting position as
defined previously. Adjust if necessary. Re-assemble the test dial and test pointer. Recheck
the span and adjust as necessary prior to inspection at the intermediate points.
Approximately 15 degrees
Figure 3-6. S&K pin adjustment if reading is low at 60 mmHg.
Approximately 30 degrees
Note: In all adjustments during calibration, the gear sector starting position will affect
accuracy. Sometimes, this alone can be used as an individual adjustment to achieve
conformance. Higher readings will be realized when the gear sector is extending beyond
the edge of the top plate and lower readings will be realized when it is within the edge of
the top plate.
28. Check for leaks by pinching off the tubing from the test equipment while pressure is
applied to the gauge. There should be no leakage or movement of the pointer.
Check and finish calibration of the Wall and Mobile Aneroid
29. Remove the test pointer and test dial. Replace the gauge’s dial.
Service Manual 95P504 Rev. D Welch Allyn Aneroid Sphygmomanometers 27
Page 35

Section 3
Repair and Calibration
30. Apply a small amount of red Loctite #266 to the pointer’s hub. Place the gauge’s
pointer onto the pinion. Ensure the pointer is resting in center of oval "0". Gently tap the
pointer with small hammer to secure or use (T112697) pointer assembly tool.
31. Place the crystal and perform a full test.
Testing of the Wall and Mobile Aneroid
32. Connect the Wall or Mobile Gauge to the test equipment.
33. Apply 320 mmHg of pressure to the gauge.
34. Release the pressure to 300 mmHg.
35. Compare the reading of wall or mobile gauge under test to a calibrated digital pressure
meter.
36. The following are the pressure test points that each gauge must be tested to after any
repair is made. The gauge must be accurate to within "3 mmHg at the following test
pressures:
a) 0 mmHg (pointer inside the oval/rectangle)
b) 60 mmHg
c) 100 mmHg
d) 150 mmHg
e) 200 mmHg
f) 250 mmHg
g) 300 mmHg
Note: Calibration of all gauges must be performed using a Calibrated Digital Pressure
Meter as the pressure standard for complete accuracy.
28 Welch Allyn Aneroid Sphygmomanometers Service Manual 95P504 Rev. D
Page 36

Repair and Calibration Section 3
Classic Hand Aneroid Gauge
Note: Before calibrating the Classic Hand Gauge:
a) Check the connector fitting for damage
b) Inspect o-ring
c) Check spring and ball
d) Move thumb screw and check for uniform movement
e) Check movement for damage.
(Date stamp of September 2003 or earlier)
Replacing Parts of the Hand Gauge
1. Pull the bulb off of the valve body.
2. Place the hand gauge into the hand gauge fixture (T107569).
3. Remove the bezel by unscrewing it counter clockwise from the case. Remove the crystal.
4. Remove the pointer by using the pointer removal tool (T18814).
5. Pry out the dial by using a small flat head screwdriver.
6. Remove the cover of the hand gauge by unscrewing the two cover screws with a phillips
head screwdriver.
7. Loosen the locking nut from the capsule. Remove both from the case.
8. Remove the movement screws from the case. Remove the movement from the case.
9. Remove the thumbscrew using tool (T113265 thumbscrew wrench). Turn the
thumbscrew counter clockwise to remove.
10. Remove the thumbscrew valve body using a 5/8" socket.
Note: Reassemble in reverse order.
Calibration of the Classic Hand Gauge
11. Connect the gauge to the test equipment.
12. Ensure that the valve of the gauge is closed. Place the gauge in to fixture (T107569).
13. Increase the pressure to 250 mmHg. Allow the pressure to stabilize for 15 seconds.
Check for a leak.
14. Remove the bezel, crystal, pointer and dial.
Service Manual 95P504 Rev. D Welch Allyn Aneroid Sphygmomanometers 29
Page 37

Section 3
Repair and Calibration
Aligning the Sector Gear on the Classic Hand Gauge
15. Tighten all screws.
16. View the sector gear and ensure proper position. The sector gear is in the proper
position when the right edge of the sector gear is aligned with the mark on the base of the
movement.
17. If the sector gear not aligned properly, remove the two cover screws. Loosen the
capsule nut using a 3/8" wrench. Adjust the sector gear using a 5/16 wrench. Turn the
capsule sector gear until is in the correct position per step 16. Tighten capsule nut.
To set the tension of the Classic Hand Gauge
18. Loosen the sector stop lug and pull it towards the bottom of gauge.
19. Using your left index finger, push the sector gear all the way to the post and hold it in
that position.
20. Place the tension setting tool (T119628) onto pinion at the 9 o’clock position.
21. Rotate the tool clock wise to the 5 o’clock position.
22. Release the sector gear and continue rotation to the 9 o’clock position. The sector gear
should be moving during this step.
23. Bring the lug back to the correct position and lock it into place.
Setting the span of the Classic Hand Gauge
24. Place the test dial (T105721) onto the gauge. Place the test pointer onto the pinion.
Rotate the dial until the pointer is at pointing at "0".
25. Apply 320 mmHg of pressure to the gauge.
26. Bleed the pressure down to 300 mmHg.
27. If the pointer is pointing to less than "300", place the calibration tool (T106845A) into
the radius plate slot above screw. Rotate the calibration tool counter clockwise towards the
bottom of the gauge until the sector gear pointer reaches "300". Release the pressure to 0
mmHg and check at the "0" point.
28. If the pointer is pointing to greater than "300", using the calibration tool (T106845A)
positioned between the sector gear and the radius plate. Rotate the tool clockwise until the
pointer is at "300" (this brings the radius plate down). Release the pressure to 0 mmHg
and check the "0" point.
30 Welch Allyn Aneroid Sphygmomanometers Service Manual 95P504 Rev. D
Page 38

Repair and Calibration Section 3
29. If the pointer is not at "0" upon the release of pressure, rotate the test dial until the
pointer is on the "0" mark of test dial. Repeat steps 25-28 until the span is set.
Check and finish calibration of the Classic Hand Gauge
30. Remove the test pointer and test dial. Replace the gauge’s dial.
31. Apply a small amount of red Loctite #266 to the hub of the pointer. Place the pointer
onto the pinion and ensure it is resting in center of oval "0". Gently tap the pointer with a
small hammer to secure.
32. If the pointer is to the left of the oval/square’s center, rotate the pointer counter
clockwise until you feel a slight resistance. Release the pointer. Ensure the pointer returns
to the center of the oval/square "0". Repeat until correct.
33. If the pointer is to the right of the oval/square’s center, rotate the pointer clockwise
until a slight resistance is felt. Release the pointer. Ensure the pointer returns to the center
of the oval/square "0" each time. Repeat until correct.
34. Place the crystal and bezel back onto the gauge and check.
Testing of the Classic Hand Gauge
35. Connect the hand gauge to the test equipment.
36. Apply 320 mmHg of pressure to the gauge.
37. Release the pressure to 300 mmHg.
38. Compare the reading of the gauge to that of the calibrated digital pressure meter.
Test Specifications
39. The following are the pressure test points that each gauge must be tested to after any
repair is made. The gauge must be accurate to within "3 mmHg at the following test
pressures:
a) 0 mmHg (pointer inside the oval/rectangle)
b) 60 mmHg
c) 100 mmHg
d) 150 mmHg
e) 200 mmHg
f) 250 mmHg
g) 300 mmHg
Note: Calibration of all gauges must be performed using a Calibrated Digital Pressure
Meter as the pressure standard for complete accuracy.
Service Manual 95P504 Rev. D Welch Allyn Aneroid Sphygmomanometers 31
Page 39

Section 3
Repair and Calibration
Classic Hand Aneroid Gauge
Note: Before calibrating the Classic Hand Gauge:
a) Check pointer movement for sticky or jumpy movement
b) Check for bent pinion.
c) On gages with air release valve, check air release valve function.
d) Connect to test equipment and check for a leak.
e) Pump bulb to indicate between 250-300 mmHg. Actuate air release valve by
partially depressing button and observe for controllable deflation rate.
f) Fully depress button and observe for rapid dump rate (should be immediate).
g) On gages with button, check button function.
(Date stamp of October 2003 or later)
Replacing Parts of the Classic Hand Gauge
1. Pull the bulb off of the valve body.
2. Place the hand gauge into the hand gauge fixture (T107569).
3. Remove the bezel by unscrewing it counter clockwise from the case. Remove the crystal.
4. Remove the pointer by using the pointer removal tool (T18814).
5. Pry out the dial by using a small flat head screwdriver.
6. Remove the thumbscrew using tool (T113265 thumbscrew wrench). Turn the
thumbscrew counter clockwise to remove.
7. Remove the thumbscrew valve body using a 5/8" socket.
Note: Reassemble in reverse order. Ensure you tighten the movement down with torque
wrench (T18904) using adapter (T18891)
Calibration of the Classic Hand Gauge
8. Connect the gauge to the test equipment.
9. Ensure that the valve of the gauge is closed.
10. Increase the pressure to 250 mmHg. Allow the pressure to stabilize for 15 seconds.
Check for a leak.
11. Remove the bezel, crystal, pointer and dial.
Checking the Classic Hand Gauge Span
12. Place the test dial (T18781) onto the gauge. Place the test pointer onto the pinion.
Rotate the test dial until the pointer is at "0".
32 Welch Allyn Aneroid Sphygmomanometers Service Manual 95P504 Rev. D
Page 40

Repair and Calibration Section 3
13. Apply 320 mmHg to the Gauge.
14. Release the pressure to 300 mmHg.
15. Observe the position of the pointer. If the pointer does not align with the "300", go to
Average Zero Starting Position.
16. If the pointer does align with "300", go to Linearity Adjustment of the Classic Hand
Aneroid.
Average Zero Starting Position
17. Apply 60 mmHg of pressure to the gauge. Release the pressure to zero. Mentally note
where the test pointer is pointing on the test dial.
18. Apply a -20 mmHg of vacuum to the gauge. Release the pressure to zero. Mentally
note where the test pointer is pointing on the test dial.
19. Take the average of where the pointer was between step 17 and step 18. Rotate the test
dial’s zero mark to that averaged position.
Span Adjustment of the Classic Hand Aneroid
20. Apply 320 mmHg of pressure to the gage to then bleed down to 300 mmHg. Note
position and maintain pressure.
21. If the span is too low, using calibration tool (T18816), bend the adjustment pin away
from pinion parallel to gear sector arm. Change pressure to 0. Make sure to re-adjust the
test dial so that the pointer will be slightly left of the graduation line. Re-pressurize to
320 mmHg then to 300 mmHg to evaluate the effects of the adjustment.
22. If the span is too high, using calibration tool (T18816), bend the adjustment pin
towards the pinion parallel to the gear sector when pressurized at 300 mmHg. Change the
pressure to 0. Make sure to re-adjust the test dial so that the pointer will be slightly left of
the graduation line. Re-pressurize to 320 mmHg then to 300 mmHg to evaluate effects of
adjustment. See Figure 3-7.
23. Repeat the above steps as required to obtain correct span adjustment.
Service Manual 95P504 Rev. D Welch Allyn Aneroid Sphygmomanometers 33
Page 41

Section 3
Figure 3-7. S&K span adjustment.
Repair and Calibration
Linearity Adjustment of the Classic Hand Aneroid: (
As required
)
Note: If the 0 mmHg and 300 mmHg position are correct, and the other points at 250
mmHg or 60 mmHg are either too high or too low, then perform the following
adjustments.
High Readings of the Wall/Mobile Aneroid:
(Predominantly at 250 and 200)
24. Remove the test pointer and test dial. Position the calibration tool (T18816) over the
adjusting pin and push it down to the cross shaft. Move the gear sector with your finger of
other hand to allow access. Rotate the pin by pushing the sector gear, to move the hook
away from the diaphragm (approximately 15 degrees). While maintaining this position, lift
the tool up from cross shaft approximately 1/16 inch and bend the pin back approximately
15 degrees. See Figure 3-8. Lift the calibration tool up to the point where the pin makes
contact with the gear sector and bend the pin up, approximately 30 degrees.
Approximately 15 degrees
Approximately 30 degrees
Cross Shaft
Hook
Figure 3-8. S&K pin adjustment if reading is high at 250 mmHg.
34 Welch Allyn Aneroid Sphygmomanometers Service Manual 95P504 Rev. D
Page 42

Repair and Calibration Section 3
25. Remove the tool and release the gear sector. The resultant bend should result in the
gear sector starting position being a max. of 2 teeth extending beyond the top plate when
viewed from a top position and a minimum of 2 teeth within the edge of the top plate.
(This must be checked by pushing the gear sector 2 teeth from the other side of the top
plate). Adjust the secondary bend if the gear sector is out of these limits. Re-assemble the
test dial and test pointer. Recheck span and adjust as necessary prior to inspecting the
intermediate points.
Low Readings of the Classic Hand Aneroid at 60 or 100
26. Remove the test pointer and test dial. Position the calibration tool over the adjusting
pin and push it down to the cross shaft. Lift the tool approximately 1/16 inch and bend the
pin approximately 15 degrees. See Figure 3-9. While maintaining this position, lift the tool
to point where the pin makes contact with the gear sector. Bend the pin down 30 degrees.
Remove the tool and release the gear sector. Check for gear sector starting position as
defined previously. Adjust if necessary. Re-assemble the test dial and test pointer. Recheck
the span and adjust as necessary prior to inspection at the intermediate points.
Approximately 15 degrees
Figure 3-9. S&K pin adjustment if reading is low at 60 mmHg.
Approximately 30 degrees
Note: In all adjustments during calibration, the gear sector starting position will affect
accuracy. Sometimes, this alone can be used as an individual adjustment to achieve
conformance. Higher readings will be realized when the gear sector is extending beyond
the edge of the top plate and lower readings will be realized when it is within the edge of
the top plate.
27. Check for leaks by pinching off the tubing from the test equipment while pressure is
applied to the gauge. There should be no leakage or movement of the pointer.
Check and finish the calibration of the Classic Hand Gauge
28. Remove the test pointer and test dial. Replace the gauge’s dial.
Service Manual 95P504 Rev. D Welch Allyn Aneroid Sphygmomanometers 35
Page 43

Section 3
Repair and Calibration
29. Apply a small amount of red Loctite #266 to the hub of the pointer. Place the gauge’s
pointer onto the pinion. Ensure that it is resting in the center of the oval. Gently tap the
pointer with small hammer to secure or use (T112697) pointer assembly tool.
30. Place the crystal and bezel back onto the gauge and test the gauge.
31. The following are the pressure test points that each gauge must be tested to after any
repair is made. The gauge must be accurate to within "3 mmHg at the following test
pressures:
a) 0 mmHg (pointer inside the oval/rectangle)
b) 60 mmHg
c) 100 mmHg
d) 150 mmHg
e) 200 mmHg
f) 250 mmHg
g) 300 mmHg
Note: Calibration of all gauges must be performed using a Calibrated Digital Pressure
Meter as the pressure standard for complete accuracy.
36 Welch Allyn Aneroid Sphygmomanometers Service Manual 95P504 Rev. D
Page 44

Repair and Calibration Section 3
Economy Aneroid Gauge
Note: Before performing calibration:
a) Check the clip for correct tension. Replace before calibration.
b) Ensure the lock nut is tight.
c) Check the hair spring. Ensure that the hair spring is uniform and not distorted.
d) Check the pinion. Ensure that it rotates correctly and is not bent.
(Stopped production on 7/15/03)
Replacing Parts of the Economy Gauge
1. Remove the two screws from the back of the case using a phillips head screwdriver.
2. Remove the Economy cover and the crystal.
3. Remove the pointer using the pointer removal tool (T18814).
4. Pry the dial from the case using a small flat head screwdriver.
5. Remove the movement from the case using (T108897).
6. Loosen the screw from the case using (T105258) and remove the capsule.
Note: Reassemble in reverse order. Use 3M Plastic Adhesive #1099 to secure the dial onto
the case.
Calibration of the Economy Gauge
7. Connect the gauge to the test equipment.
8. Place the gauge in to fixture (T108212)
9. Remove the bezel, crystal, pointer and dial.
Aligning the Sector Gear of the Economy Gauge
10. Tighten all screws.
11. View the sector gear and ensure it is in the proper position. The right edge of sector
gear should align with the mark on base of the movement.
12. If the sector gear not aligned properly, loosen the capsule nut using wrench (T105258).
Adjust the sector gear by turning the capsule until sector gear is in correct position per step
#11. Tighten the capsule nut.
Setting the tension of the Economy Gauge
13. Loosen the sector stop lug with (T112772) and pull it towards the bottom of the
gauge.
Service Manual 95P504 Rev. D Welch Allyn Aneroid Sphygmomanometers 37
Page 45

Section 3
Repair and Calibration
14. Using your left index finger, push the sector gear all the way to the post and hold it in
that position.
15. Place the tension setting tool (T119628) onto the pinion at the 9 o’clock position.
16. Rotate the tool clock wise to the 5 o’clock position.
17. Release the sector gear and continue rotation to the 9 o’clock position. The sector gear
should be moving during this step.
18. Bring the lug back to the correct position and lock it into place.
Setting the span of the Economy Gauge
19. Place the test dial (T110657) onto the gauge. Place the test pointer onto the pinion.
Rotate the dial until the pointer is at "0" (the bottom of the gauge).
20. Apply 320 mmHg of pressure to the gauge.
21. Bleed the pressure down to 300 mmHg.
22. If the pointer is pointing to less than "300", place the calibration tool (T106845A) into
the radius plate slot above screw. Rotate the calibration tool counter clock-wise towards
the bottom of the gauge until the sector gear pointer reaches "300". Release the pressure
to 0 mmHg and check at the "0" point.
23. If the pointer is pointing to greater than "300", position the calibration tool
(T106845A) between the sector gear and the radius plate. Rotate the tool clock wise until
the pointer is at "300" (this brings the radius plate down). Release the pressure to 0 mmHg
and check the "0" point.
24. If the pointer is not at "0" upon release of pressure, rotate the test dial until the pointer
is on the "0" mark of test dial. Repeat steps 20-23 until the span is set.
25. Check for leaks by pinching off the tubing from the test equipment while pressure is
applied to the gauge. There should be no visible leak.
Check and finish calibration of the Economy Gauge:
26. Remove the test pointer and test dial. Replace the gauge’s dial. Use 3M Plastic
Adhesive #1099 to secure the dial onto the case.
27. Apply a small amount of red Loctite #266 to the hub of the pointer. Place the gauge’s
pointer onto the pinion. Rest the pointer in the center of the oval/square. Gently tap the
pointer with a small hammer to secure the pointer.
38 Welch Allyn Aneroid Sphygmomanometers Service Manual 95P504 Rev. D
Page 46

Repair and Calibration Section 3
28. If the pointer is to the left of the oval/square’s center, rotate the pointer counter
clockwise until you feel a slight resistance. Release the pointer. Ensure the pointer returns
to the center of the oval/square "0". Repeat until correct.
29. If the pointer is to the right of the oval/square’s center, rotate the pointer clockwise
until a slight resistance is felt. Release the pointer. Ensure the pointer returns to the center
of the oval/square "0" each time. Repeat until correct.
30. Place the crystal and bezel back onto the gauge and test.
Testing of the Economy Gauge
31. Connect the economy gauge to be tested to the test equipment.
32. Apply 320 mmHg of pressure to the gauge.
33. Release the pressure to 300 mmHg.
34. Compare the reading of the gauge to that of the calibrated digital pressure meter.
Test Specifications
35. The following are the pressure test points that each gauge must be tested to after any
repair is made. The gauge must be accurate to within "3 mmHg at the following test
pressures:
a) 0 mmHg (pointer inside the oval/rectangle)
b) 60 mmHg
c) 100 mmHg
d) 150 mmHg
e) 200 mmHg
f) 250 mmHg
g) 300 mmHg
Note: Calibration of all gauges must be performed using a Calibrated Digital Pressure
Meter as the pressure standard for complete accuracy.
Service Manual 95P504 Rev. D Welch Allyn Aneroid Sphygmomanometers 39
Page 47

Section 3
Repair and Calibration
TR-1 Silver Ring Hand Aneroid
Replacing Parts of the Silver Ring
1. Unscrew the bulb from the gauge.
2. Place a screwdriver under the bezel in the opening provided and lift the bezel.
3. Place a screwdriver under the crystal in the opening provided and lift the crystal.
4. Using the (T18814) pointer removal tool, remove the pointer from the pinion.
5. Remove the dial from the housing.
6. Remove the movement using (T19035) movement removal tool.
7. Remove the movement internal housing. (Pry loose with a jewlers screwdriver)
8. Remove the valve body-trigger module.
Note: Reassemble in reverse order. Ensure you tighten the movement down with torque
wrench (T18904) using adapter (T18891).
Calibration of the Silver Ring Hand Aneroid
9. Attach the air supply to the gauge with a luer fitting.
10. Position the test dial and test pointer on gage.
11. Apply 300 mmHg of pressure to the gauge. View the gauge and ensure the gauge leaks
no greater than 10 mmHg in 5 seconds.
Checking the Silver Ring Gauge Span
12. Place the test dial (T19036) onto the gauge. Place the test pointer onto the pinion.
Rotate the test dial until the pointer is at "0".
13. Apply 320 mmHg to the Gauge.
14. Release the pressure to 300 mmHg.
15. Observe the position of the pointer. If the pointer does not align with the "300", goto
Average Zero Starting Position.
16. If the pointer does align with "300", goto Linearity Adjustment of the Silver Ring
Aneroid.
40 Welch Allyn Aneroid Sphygmomanometers Service Manual 95P504 Rev. D
Page 48

Repair and Calibration Section 3
Average Zero Starting Position
17. Apply 60 mmHg of pressure to the gauge. Release the pressure to zero. Mentally note
where the test pointer is pointing on the test dial.
18. Apply a -20 mmHg of vacuum to the gauge. Release the pressure to zero. Mentally
note where the test pointer is pointing on the test dial.
19. Take the average of where the pointer was between step 17 and step 18. Rotate the test
dial’s zero mark to that averaged position.
Span Adjustment of the Silver Ring Aneroid
20. Apply 320 mmHg of pressure to the gage to then bleed down to 300 mmHg. Note
position and maintain pressure.
21. If the span is too low, using calibration tool (T18816), bend the adjustment pin away
from pinion parallel to gear sector arm. Change pressure to 0. Make sure to re-adjust the
test dial so that the pointer will be slightly left of the graduation line. Re-pressurize to
320 mmHg then to 300 mmHg to evaluate the effects of the adjustment.
22. If the span is too high, using calibration tool (T18816), bend the adjustment pin
towards the pinion parallel to the gear sector when pressurized at 300 mmHg. Change the
pressure to 0. Make sure to re-adjust the test dial so that the pointer will be slightly left of
the graduation line. Re-pressurize to 320 mmHg then to 300 mmHg to evaluate effects of
adjustment. See Figure 3-10.
23. Repeat the above steps as required to obtain correct span adjustment.
Figure 3-10. S&K span adjustment.
Linearity Adjustment of the Silver Ring Aneroid: (
As required
)
Note: If the 0 mmHg and 300 mmHg position are correct, and the other points at 250
mmHg or 60 mmHg are either too high or too low, then perform the following
adjustments.
Service Manual 95P504 Rev. D Welch Allyn Aneroid Sphygmomanometers 41
Page 49

Section 3
Repair and Calibration
High Readings of the Silver Ring Aneroid:
(Predominantly at 250 and 200)
24. Remove the test pointer and test dial. Position the calibration tool (T18816) over the
adjusting pin and push it down to the cross shaft. Move the gear sector with your finger of
other hand to allow access. Rotate the pin by pushing the sector gear, to move the hook
away from the diaphragm (approximately 15 degrees). While maintaining this position, lift
the tool up from cross shaft approximately 1/16 inch and bend the pin back approximately
15 degrees. See Figure 3-11. Lift the calibration tool up to the point where the pin makes
contact with the gear sector and bend the pin up, approximately 30 degrees.
Approximately 15 degrees
Approximately 30 degrees
Cross Shaft
Hook
Figure 3-11. S&K pin adjustment if reading is high at 250 mmHg.
25. Remove the tool and release the gear sector. The resultant bend should result in the
gear sector starting position being a max. of 2 teeth extending beyond the top plate when
viewed from a top position and a minimum of 2 teeth within the edge of the top plate.
(This must be checked by pushing the gear sector 2 teeth from the other side of the top
plate). Adjust the secondary bend if the gear sector is out of these limits. Re-assemble the
test dial and test pointer. Recheck span and adjust as necessary prior to inspecting the
intermediate points.
Low Readings of the Silver Ring Aneroid at 60 or 100
26. Remove the test pointer and test dial. Position the calibration tool over the adjusting
pin and push it down to the cross shaft. Lift the tool approximately 1/16 inch and bend the
pin approximately 15 degrees. See Figure 3-12. While maintaining this position, lift the
tool to point where the pin makes contact with the gear sector. Bend the pin down 30
degrees. Remove the tool and release the gear sector. Check for gear sector starting
position as defined previously. Adjust if necessary. Re-assemble the test dial and test
pointer. Recheck the span and adjust as necessary prior to inspection at the intermediate
points.
42 Welch Allyn Aneroid Sphygmomanometers Service Manual 95P504 Rev. D
Page 50

Repair and Calibration Section 3
Approximately 15 degrees
Figure 3-12. S&K pin adjustment if reading is low at 60/100 mmHg.
Approximately 30 degrees
Note: In all adjustments during calibration, the gear sector starting position will affect
accuracy. Sometimes, this alone can be used as an individual adjustment to achieve
conformance. Higher readings will be realized when the gear sector is extending beyond
the edge of the top plate and lower readings will be realized when it is within the edge of
the top plate.
27. Check for leaks by pinching off the tubing from the test equipment while pressure is
applied to the gauge. There should be no leakage or movement of the pointer.
Check and finish the calibration of the Silver Ring Gauge
28. Remove the test pointer and test dial. Replace the gauge’s dial.
29. Apply a small amount of red Loctite #266 to the hub of the pointer. Place the gauge’s
pointer onto the pinion. Ensure that it is resting in the center of the oval. Gently tap the
pointer with small hammer to secure or use (T112697) pointer assembly tool.
30. Place the crystal and bezel back onto the gauge and test the gauge.
31. The following are the pressure test points that each gauge must be tested to after any
repair is made. The gauge must be accurate to within "3 mmHg at the following test
pressures:
a) 0 mmHg (pointer inside the oval/rectangle)
b) 60 mmHg
c) 100 mmHg
d) 150 mmHg
e) 200 mmHg
f) 250 mmHg
g) 300 mmHg
Note: Calibration of all gauges must be performed using a Calibrated Digital Pressure
Meter as the pressure standard for complete accuracy.
Service Manual 95P504 Rev. D Welch Allyn Aneroid Sphygmomanometers 43
Page 51

Section 3
Repair and Calibration
TR-2 Pro Check Hand Aneroid
Replacing Parts on Pro Check Hand Aneroid
1. Insert a screwdriver at bottom of the crystal and pry out crystal.
2. Loosen and remove pointer using (T18814).
3. Insert the screwdriver at the bottom of the dial and remove the dial from the gauge.
4. Unscrew the complete base plate with the movement and remove the washer using
T112833 movement removal tool.
Note: Reassemble in reverse order. Ensure you tighten the movement down with torque
wrench (T18904) using adapter (T18891)
Calibration of the Pro Check Hand Aneroid
5. Connect the gauge to the air supply with luer fitting
6. Position test dial and test pointer on the gage.
7. Apply 300 mmHg of pressure. View the gauge and ensure the leak is no greater than 10
mmHg in 5 seconds.
Checking the Pro Check Hand Gauge Span
8. Place the test dial (T112949) onto the gauge. Place the test pointer onto the pinion.
Rotate the test dial until the pointer is at "0".
9. Apply 320 mmHg to the Gauge.
10. Release the pressure to 300 mmHg.
11. Observe the position of the pointer. If the pointer does not align with the "300", go to
Average Zero Starting Position.
12. If the pointer does align with "300", goto Linearity Adjustment of the Pro Check
Hand Aneroid.
Average Zero Starting Position
13. Apply 60 mmHg of pressure to the gauge. Release the pressure to zero. Mentally note
where the test pointer is pointing on the test dial.
14. Apply a -20 mmHg of vacuum to the gauge. Release the pressure to zero. Mentally
note where the test pointer is pointing on the test dial.
44 Welch Allyn Aneroid Sphygmomanometers Service Manual 95P504 Rev. D
Page 52

Repair and Calibration Section 3
15. Take the average of where the pointer was between step 13 and step 14. Rotate the test
dial’s zero mark to that averaged position.
Span Adjustment of the Pro Check Hand Aneroid
16. Apply 320 mmHg of pressure to the gage to then bleed down to 300 mmHg. Note
position and maintain pressure.
17. If the span is too low, using calibration tool (T18816), bend the adjustment pin away
from pinion parallel to gear sector arm. Change pressure to 0. Make sure to re-adjust the
test dial so that the pointer will be slightly left of the graduation line. Re-pressurize to
320 mmHg then to 300 mmHg to evaluate the effects of the adjustment.
18. If the span is too high, using calibration tool (T18816), bend the adjustment pin
towards the pinion parallel to the gear sector when pressurized at 300 mmHg. Change the
pressure to 0. Make sure to re-adjust the test dial so that the pointer will be slightly left of
the graduation line. Re-pressurize to 320 mmHg then to 300 mmHg to evaluate effects of
adjustment. See Figure 3-13.
19. Repeat the above steps as required to obtain correct span adjustment.
Figure 3-13. S&K span adjustment.
Linearity Adjustment of the Pro Check Hand Aneroid: (
As required
)
Note: If the 0 mmHg and "300 mmHg position are correct, and the other points at 250
mmHg or 60 mmHg are either too high or too low, then perform the following
adjustments.
High Readings of the Pro Check Aneroid: (Predominantly at 250 and 200)
20. Remove the test pointer and test dial. Position the calibration tool (T18816) over the
adjusting pin and push it down to the cross shaft. Move the gear sector with your finger of
other hand to allow access. Rotate the pin by pushing the sector gear, to move the hook
away from the diaphragm (approximately 15 degrees). While maintaining this position, lift
Service Manual 95P504 Rev. D Welch Allyn Aneroid Sphygmomanometers 45
Page 53

Section 3
Repair and Calibration
the tool up from cross shaft approximately 1/16 inch and bend the pin back approximately
15 degrees. See Figure 3-14. Lift the calibration tool up to the point where the pin makes
contact with the gear sector and bend the pin up, approximately 30 degrees.
Approximately 15 degrees
Approximately 30 degrees
Cross Shaft
Hook
Figure 3-14. S&K pin adjustment if reading is high at 250 mmHg.
21. Remove the tool and release the gear sector. The resultant bend should result in the
gear sector starting position being a max. of 2 teeth extending beyond the top plate when
viewed from a top position and a minimum of 2 teeth within the edge of the top plate.
(This must be checked by pushing the gear sector 2 teeth from the other side of the top
plate). Adjust the secondary bend if the gear sector is out of these limits. Re-assemble the
test dial and test pointer. Recheck span and adjust as necessary prior to inspecting the
intermediate points.
Low Readings of the Pro Check Hand at 60 or 100
22. Remove the test pointer and test dial. Position the calibration tool over the adjusting
pin and push it down to the cross shaft. Lift the tool approximately 1/16 inch and bend the
pin approximately 15 degrees. See Figure 3-15. While maintaining this position, lift the
tool to point where the pin makes contact with the gear sector. Bend the pin down 30
degrees. Remove the tool and release the gear sector. Check for gear sector starting
position as defined previously. Adjust if necessary. Re-assemble the test dial and test
pointer. Recheck the span and adjust as necessary prior to inspection at the intermediate
points.
46 Welch Allyn Aneroid Sphygmomanometers Service Manual 95P504 Rev. D
Page 54

Repair and Calibration Section 3
Approximately 15 degrees
Figure 3-15. S&K pin Adjustment if reading is low at 60 mmHg.
Approximately 30 degrees
Note: In all adjustments during calibration, the gear sector starting position will affect
accuracy. Sometimes, this alone can be used as an individual adjustment to achieve
conformance. Higher readings will be realized when the gear sector is extending beyond
the edge of the top plate and lower readings will be realized when it is within the edge of
the top plate.
23. Check for leaks by pinching off the tubing from the test equipment while pressure is
applied to the gauge. There should be no leakage or movement of the pointer.
Check and finish the calibration of the Pro Check Hand Gauge
24. Remove the test pointer and test dial. Replace the gauge’s dial.
25. Apply a small amount of red Loctite #266 to the hub of the pointer. Place the gauge’s
pointer onto the pinion. Ensure that it is resting in the center of the oval. Gently tap the
pointer with small hammer to secure or use (T112697) pointer assembly tool.
26. Place the crystal and bezel back onto the gauge and test the gauge.
27. The following are the pressure test points that each gauge must be tested to after any
repair is made. The gauge must be accurate to within "3 mmHg at the following test
pressures:
a) 0 mmHg (pointer inside the oval/rectangle)
b) 60 mmHg
c) 100 mmHg
d) 150 mmHg
e) 200 mmHg
f) 250 mmHg
g) 300 mmHg
Note: Calibration of all gauges must be performed using a Calibrated Digital Pressure
Meter as the pressure standard for complete accuracy.
Service Manual 95P504 Rev. D Welch Allyn Aneroid Sphygmomanometers 47
Page 55

Section 3
Repair and Calibration
48 Welch Allyn Aneroid Sphygmomanometers Service Manual 95P504 Rev. D
Page 56

Repair Parts Section 4
Old Style Classic Pocket Repair Parts
Part Number Description
51P52C Clip Assembly
32P180 Lock nut
34P760A Crystal
3P831 Bezel
35P804 Screw cap (NS)
61S681 Diaphragm Assembly
63S401 Pointer
93S617 Movement
9P2594 Screw, Movement
11P363 Spring
7P689 Pin for Clip
Cast Housing
Not Available
7P689
11P363
63S401
9P2594
51P52C
93S617
34P760A
61S681
32P180
Service Manual 95P504 Rev. D Welch Allyn Aneroid Sphygmomanometers 49
35P804
Page 57

Section 4 Repair Parts
Old Style Classic Hand Repair Parts
Part Number Description Part Number Description
9P2651 Screw, Cover 3P831 Bezel
9S132 Thumb Screw 34P760A Crystal
42P252 Valve Body Assembly 63S401 Pointer
5090-30 Screen Assy/Bulb Adapter 9P2594 Screw, Movement
12P490 Bulb Adapter 93S617 Movement
5098-07 Lure Lock Set 61S694 Diaphragm Assembly
5086-01 Bulb 32P527 Lock Nut
Cast Housing
Not Available
42P252
12P490
5090-30
5098-07
Hand Gauge Cover
Not Available
9P2651
61S693
32P727
93S617
3P831
34P760A
63S401
Dial Not Available
50 Welch Allyn Aneroid Sphygmomanometers Service Manual 95P504 Rev. D
Page 58

Repair Parts Section 4
Old Style 767 Wall Repair Parts
Part Number Description
3P844 Bezel
34P768 Crystal
63S411 Pointer
93S617A Movement
61S681 Diaphragm Assembly
2P1138 Mount
32P727 Nut
2P1631 Housing
32P763 Lock nut, Case 8P1064 Bushing - Not pictured
96P135 Basket - Not pictured
9P2841 Dial Mounting Screw
2P1631
Not pictured
8P1064
9P2464
32P763
Dial
Not
Available
34P768
63S411
9P2841
32P727
96P135
2P1138
93S617A
61S411
3P844
Service Manual 95P504 Rev. D Welch Allyn Aneroid Sphygmomanometers 51
Page 59

Section 4 Repair Parts
Old Style Classic Wall/Mobile Repair Parts
Part Number Description Part number Description
2P1138 Mount 34P417 Crystal
9P1804 Spacer 9P2841 Dial Mounting Screw
61S681 Diaphragm Assembly 63S298 Pointer, USA
14P1718 Bracket 2P1503 Housing, Gray, Wall
8P949 Bracket Bushing 9P2465 Screw (Case)
32P763 Bracket Nut 22P830 Washer (Case)
93S617A Movement
2P1503
63S298
9P2455
32P763
8P949
34P417
9P2841
92P2465
22P830
61S681
32P727
Dial Not Available
2P1138
93S617A
14P1718
9P1804
52 Welch Allyn Aneroid Sphygmomanometers Service Manual 95P504 Rev. D
Page 60

Repair Parts Section 4
Economy Aneroid Repair Parts
Part Number Description
34P640 Crystal
93S618 Movement
32P727P Jam Nut
63S401 Pointer
9P2563 Screw Housing
61S693 Capsule
9P2851 Screw, Movement
Housing Not Available Front Cover Not Available
34P640
Clip Not Available
61S693
Dial Not Available
63S401
32P727
9P2563
93S618
Service Manual 95P504 Rev. D Welch Allyn Aneroid Sphygmomanometers 53
9P2851
Page 61

Section 4 Repair Parts
TR1 Silver Ring Repair Parts
Part Number Description Part Number Description
12P368 Adapter 52P1848 Dial
75P240 O-Ring 18P192 Bulb Collar
2P1632 Housing 23P430 Bulb Adapter
33P131 Movement Cup 97S581 Bulb
70P450 Button 11P1240 Spring
7P716 Pivot Pin 42S262 Valve Body
93S720 Movement 8S61 Valve Assembly
22P1454 Washer 5090-30 Screen Assy/Bulb Adapter
34P434 Crystal 3P847 Bezel
39P505 Trim Ring 63S410 Pointer
54 Welch Allyn Aneroid Sphygmomanometers Service Manual 95P504 Rev. D
Page 62

Repair Parts Section 4
TR2 Pro Check Repair Parts
Part Number Description
34P761 Crystal
See Note Dial
93S720 Movement
97S583 Bulb
18P190 Bulb Ring
70P446 Trigger
8S61 Valve Assembly
11P1240 Compression Spring See Note Housing
See Note Valve Body
Not pictured
Housing not available
see Note
70P446
18P190
97S583
TR-2 ProCheck Hand Gauge
Note: Housing, dial,
pointer and S&K
movement come as a
Dial not available
see Note
34P761
set. Order 44S915
Pointer not available
see Note
93S720
Service Manual 95P504 Rev. D Welch Allyn Aneroid Sphygmomanometers 55
Page 63

Section 4 Repair Parts
S&K Classic Pocket Repair Parts
Ref# Part# Description
1 590001-1 CLASSIC POCKET HOUSING W/LOGO
2 590006 SPRING, CLASSIC POCKET
3 590008 CLIP, CLASSIC POCKET
4 7P689 GROOVE PIN
5 5001915 WASHER, 16MM X 1.5MM
7 0121000SA MOVEMENT, HAND & POCKET
8 52P1837A GRAY 1.9 DIAL BLANK
9 590005-3 WHITE POINTER
11 590007 END CAP,POCKET
14 106108-34 O-RING
15 34P760A CRYSTAL
16 3P831 BEZEL
16
11
15
10
Dial
Not Available
7
5
14
1
4
2
3
56 Welch Allyn Aneroid Sphygmomanometers Service Manual 95P504 Rev. D
Page 64

Repair Parts Section 4
S&K Classic Hand Repair Parts
Ref# Part# Description Ref# Part# Description
1 590104-1 CLASSIC HAND HOUSING W/LOGO 16 590111 TUBING CONNECTOR,CLASSIC HAND
2 5001915 WASHER, 16MM X 1.5MM 17 43P803 GASKET
4 0121000SA MOVEMENT, HAND & POCKET 18 12P368 FITTING,LUER LOCK,PLATED
5 52P1837A GRAY 1.9 DIAL BLANK 19 43P455T O RING
7 590005-3 WHITE POINTER 20 42P252 VALVE BODY
9 34P760A CRYSTAL 21 75P231 O-RING
10 3P831 BEZEL 22 11P1166 SPRING
12 106108-34 O-RING 23 64P494 BALL
13 590105 END CAP, CLASSIC HAND 24 9S132 THUMB SCREW
15 106108-33 O-RING 26 590101N BULB ADAPTER SA
14
10
9
7
Dial
Not Available
4
2
1
26
12
13
20
21
22
16
15
18
17
19
23
24
Service Manual 95P504 Rev. D Welch Allyn Aneroid Sphygmomanometers 57
Page 65

Section 4 Repair Parts
S&K Wall/Mobile Series 509 Repair Parts
Ref# Part# Description
1 590250 SUB ASSY, 5091 WALL
3 9P2841 SCREW,0-40 X .19 PAN HEAD
4 18-87-911 POINTER,WHITE, 59MM
6 590201 BEZEL, 5091 ANEROID
7 34P417 CRYSTAL
7
6
4
3
Dial Not Available
1
1
58 Welch Allyn Aneroid Sphygmomanometers Service Manual 95P504 Rev. D
Page 66

Repair Parts Section 4
S&K WalL 767 Series Repair Parts
Ref# Part# Description
1 590350 SUB ASSY, 767 WALL
3 9P2841 SCREW,0-40 X .19 PAN HEAD
4 18-87-910 POINTER,BLK/ORANGE, 59MM
6 34P768 CRYSTAL,767 ANEROID
7 3P844 BEZEL,767 ANEROID
7
6
4
3
Dial Not Available
1
1
Service Manual 95P504 Rev. D Welch Allyn Aneroid Sphygmomanometers 59
Page 67

Section 4 Repair Parts
60 Welch Allyn Aneroid Sphygmomanometers Service Manual 95P504 Rev. D
 Loading...