

Page 1
USER GUIDE
Page 2

Table of Contents
GETTING STARTED ..........................................................................................................................................4
Main Window Essentials .................................................................................................................................................................5
Operation Modes ..............................................................................................................................................................................7
Setup .....................................................................................................................................................................................................8
RECORDING ...................................................................................................................................................11
Tracks ................................................................................................................................................................................................... 11
> Track Names .................................................................................................................................................................................. 11
> Adding Tracks ............................................................................................................................................................................... 11
> Master Bus ..................................................................................................................................................................................... 11
> Track Controls ............................................................................................................................................................................... 12
> Track Meters .................................................................................................................................................................................. 12
Monitoring a Recording ................................................................................................................................................................ 13
Starting a Recording ...................................................................................................................................................................... 13
PLAYING BACK ...............................................................................................................................................14
Rulers ................................................................................................................................................................................................... 14
> Markers ........................................................................................................................................................................................... 15
> Enabling a Marker for MIDI Program Changes ................................................................................................................. 15
Main Window Tools ........................................................................................................................................................................ 18
Mixer .................................................................................................................................................................................................... 19
Inspector ............................................................................................................................................................................................ 20
2 2
Page 3

CONTROLS AND MENUS...............................................................................................................................21
Session Window .............................................................................................................................................................................. 21
Preferences Window ...................................................................................................................................................................... 22
> Tracks Preferences: Audio System Settings ....................................................................................................................... 22
> Tracks Preferences: MIDI System Settings .......................................................................................................................... 24
> Tracks Preferences: Session Settings .................................................................................................................................... 25
> Tracks Preferences: Preferences ............................................................................................................................................. 26
> Tracks Preferences: Sync ........................................................................................................................................................... 27
Main Window ................................................................................................................................................................................... 28
Transport Panel ................................................................................................................................................................................28
Top Bar ................................................................................................................................................................................................ 29
Tools ..................................................................................................................................................................................................... 30
Region Menus .................................................................................................................................................................................. 31
System Status Indicators .............................................................................................................................................................. 32
Information Page ............................................................................................................................................................................ 33
Meter Section ................................................................................................................................................................................... 34
Export (File Menu) ..........................................................................................................................................................................35
Page 4

GETTING STARTED
Tracks Live is a unique multitrack sound recorder, designed from the ground up to meet the specic needs of live
sound engineers. It combines rock-solid operation with an intuitive workow. It’s quick to set up, simple to use, and very exible.
Tracks Live does all the things you’d expect of a multitrack recorder, so if you’re familiar with recorders, you can probably
install the software, launch the application, and get to work. You shouldn’t run into problems.
Tracks Live also has a few features that go beyond what you usually see in a recorder. Some of these features aren’t obvious when
you rst open the application, so please consult this user guide in order to learn more about them.
To get the most out of Waves Tracks Live, we suggest that you also become familiar with the Waves support site:
http://www.waves.com/support. There you will nd an extensive answer base, software updates, and current information
about licensing and registration.
4
Page 5

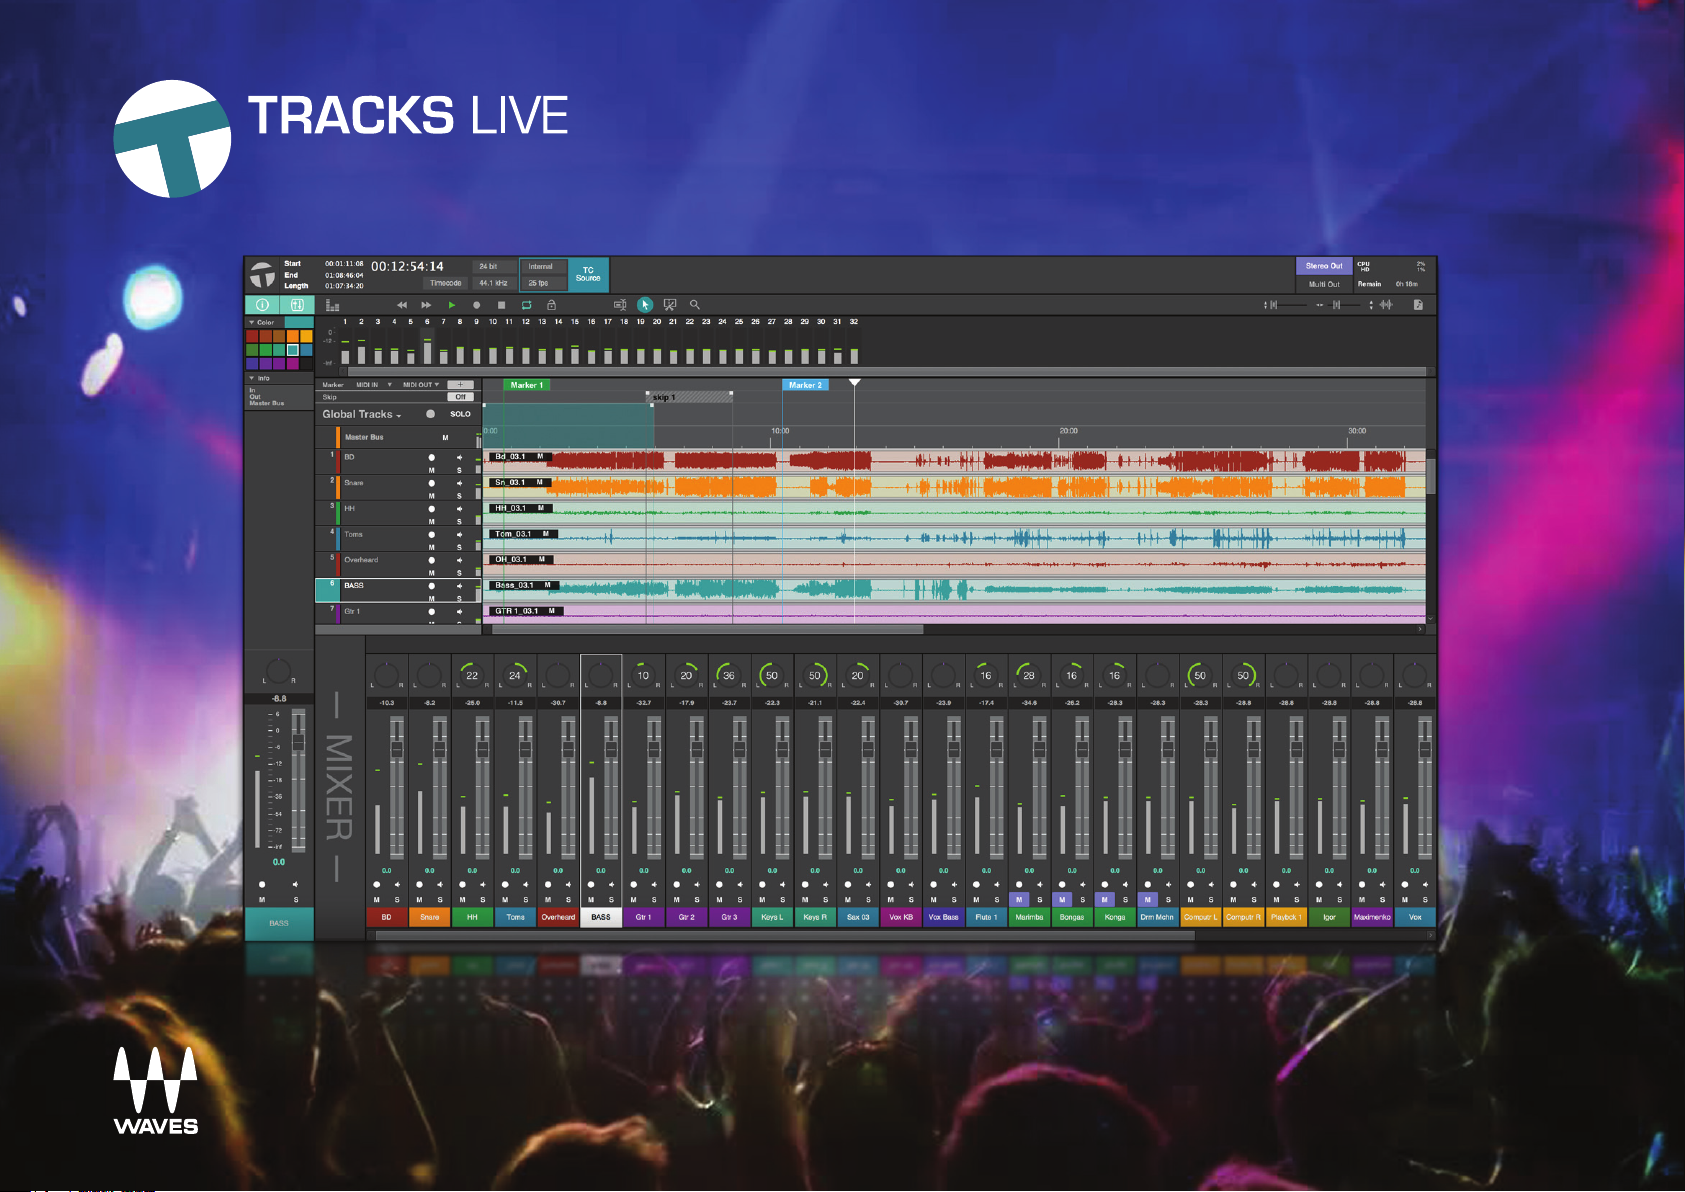
Main Window Essentials
All record, playback, edit, and marking functions are carried out in the Main window. It’s a very straightforward recording
environment, and it’s where you will spend most of your time.
Tracks Live: Main Window
12
10
8
6
4
3
14
5
4
151317
7
2
11
9 9
7
16
19
20
18
6
1
21
22 232425
28
29
26 27
32
30
Solo Button
1
Input Monitoring Button
2
Track Name
3
Mute Button
4
31
Record Enable Button
5
Channel Fader Position
6
Channel Fader
7
Peak Meter
8
Channel Panner
9
Info Panel Hide/View
10
Track Color Selector Hide/View
11
Inspector Hide/View
12
Mixer Hide/View
13
Meter Hide/View
14
Transport: Rewind
15
Transport: Fast Forward
16
Transport: Play
17
Transport: Record
18
Transport: Stop
19
Loop Playback
20
System Lock
21
Range Select Tool
22
Object Select Tool
23
Split Tool
24
Zoom Tool
25
Vertical Zoom Control
26
Horizontal Zoom Control
27
Stereo Out Mode Selector
28
Multi Out Mode Selector
29
CPU and HD Usage Indicator
30
Media Button
31
Waveform Zoom Control
32
5
Page 6

A Tracks Live session can consist of up to 256 tracks. You can view the Main window timeline only or see the timeline with a mixer.
Alternatively, you can use the Inspector to control a selected track without giving up track space. Enable these views with the
buttons on the right side of the window.
Solo or record-enable tracks individually or with Global Track buttons.
Physical input from the I/O device
Track name as dened in the Audio System Settings window.
Double-click to rename.
Mono track
Stereo track
6
Drag a track to change its position. When you move a track, it gets new I/O assignments that match its new location.
Page 7

Operation Modes
There are two modes for monitoring a recording:
■
The Multi Out mode sends each track to an output port without creating a stereo mix. Tracks go directly to their I/O ports. When
Multi Out mode is selected, the Tracks Live mixer is bypassed and is not visible.
■
The Stereo Out mode adds a mixer with a stereo out, providing a 2-track monitor or reference mix that can be sent to an external
device. When Stereo Out mode is selected, a Master Bus track appears.
Ruler
Above the tracks is the Ruler section. It is divided into four rulers:
■
Marker ruler
7
■
Skip ruler
■
Loop range
■
Timecode/Time ruler
You can hide the Marker and Skip rulers from the Global Tracks drop-down menu.
Page 8
Setup
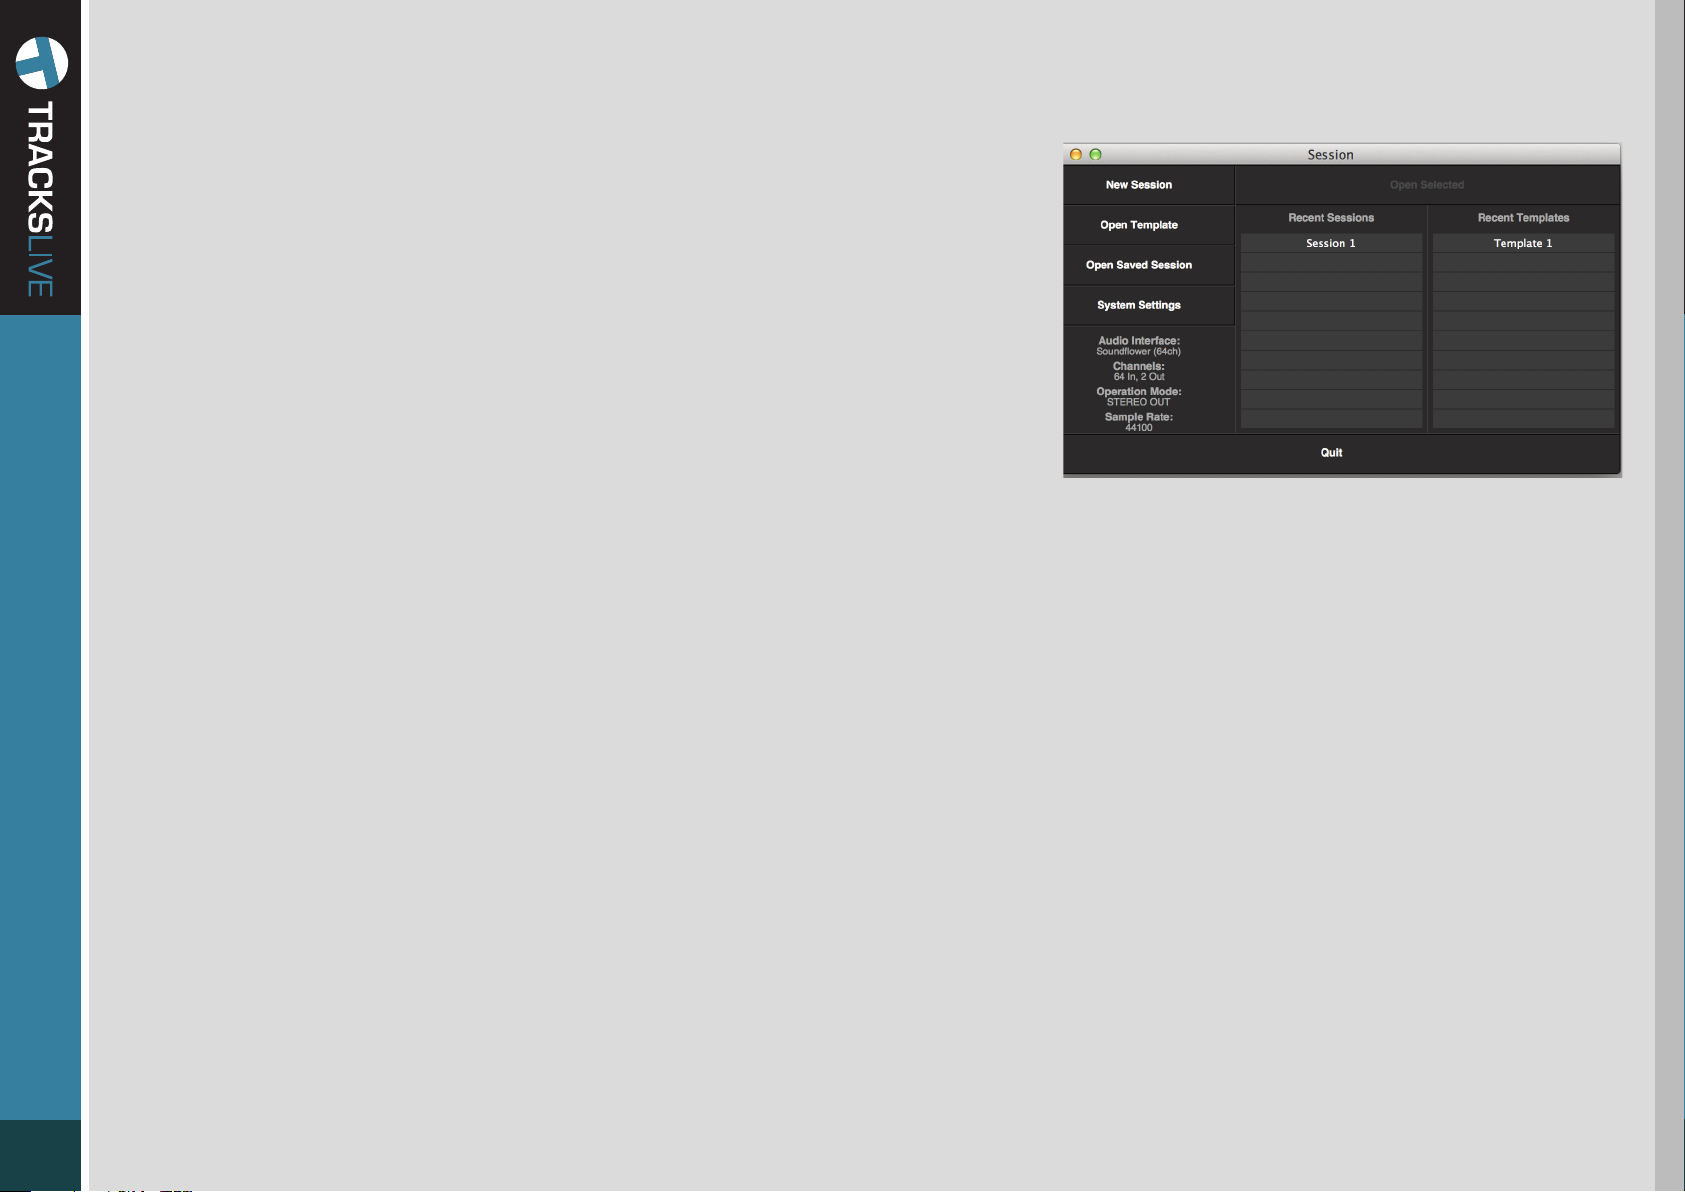
When you launch Tracks Live, you will rst see the Session Setup window.
Choose between opening a saved session or template, or creating a new session.
To create a new Tracks Live session:
1. Check that the current settings are correct for the new session. These settings
are displayed in the box on the left.
2. If these are not what you want for the new session, click System Settings and
congure the system in the Preferences window. When nished, click OK to
return to the Session window.
3. Click New Session and save the le.
To create a Tracks Live session from a template:
A template is a complete Tracks Live session, without audio. Templates enable you to store and recall commonly-used setups and to
create new sessions from these.
Open Template takes you to a browser with all available Tracks Live templates. Once a template opens, save it as a Tracks Live
8
session.
—Or—
Recent Template displays the ten most recent templates. Open a template and save it as a session.
Templates are created from existing sessions. Choose Save as Template from the File menu in the active session. These les carry the
extension *.template, and can be placed in any folder. There are no factory templates.
To open an existing Tracks Live session:
Open Saved Session. This takes you to a browser. Open the desired session le.
—Or—
Open a Recent Session. The ten most recent sessions are listed in the window.
The System Settings button opens the Tracks Preferences page.
Page 9

Audio System Settings Page
To Set Track Preferences
1
Select I/O interface.
2
Set sample rate and buer size
3
Select output mode:
Stereo or Multi
4
Congure inputs
5
Congure outputs
6
Click OK to return to the
Settings window.
1
2
conguration of input channels is
determined by the I/O device.
Input ports. The number and
3
4
Input ports On/O selector
Recorder input tracks can be
named and moved here.
Track names will appear in the
5
Main window.
Output ports. Number of output
channels is determined by I/O
device.
6
9
Use the Tracks Preferences page to select an interface, set sample rate and bit depth, congure I/Os and tracks, and choose an
operation mode. The number of I/O ports determines how many input and output tracks are available. Complete your assignment
and click OK. This returns you to the Session Setup window.
Page 10

7
Click New Session.
7
Name the session. This creates a new session and opens the Main window.
10
You are now ready to record.
Page 11
RECORDING
In this section you will nd an overview of the recording process. For more information, refer to the Controls and Menus section.
Tracks
Tracks Live can provide up to 256 stereo tracks, 256 mono tracks, or a combination thereof. When you rst open a session, the
number of tracks is equal to the number of active input ports shown in the Audio System Settings window. Input channels that
have been turned o will not appear in the track sequence.
To select a track, click anywhere on its track header.
■
Ctrl (CMD) + Click selects multiple tracks
■
Shift + Click selects a range of tracks.
■
Drag a selected track to re-sequence the track order.
When you move a track, its input and output ports are reassigned.
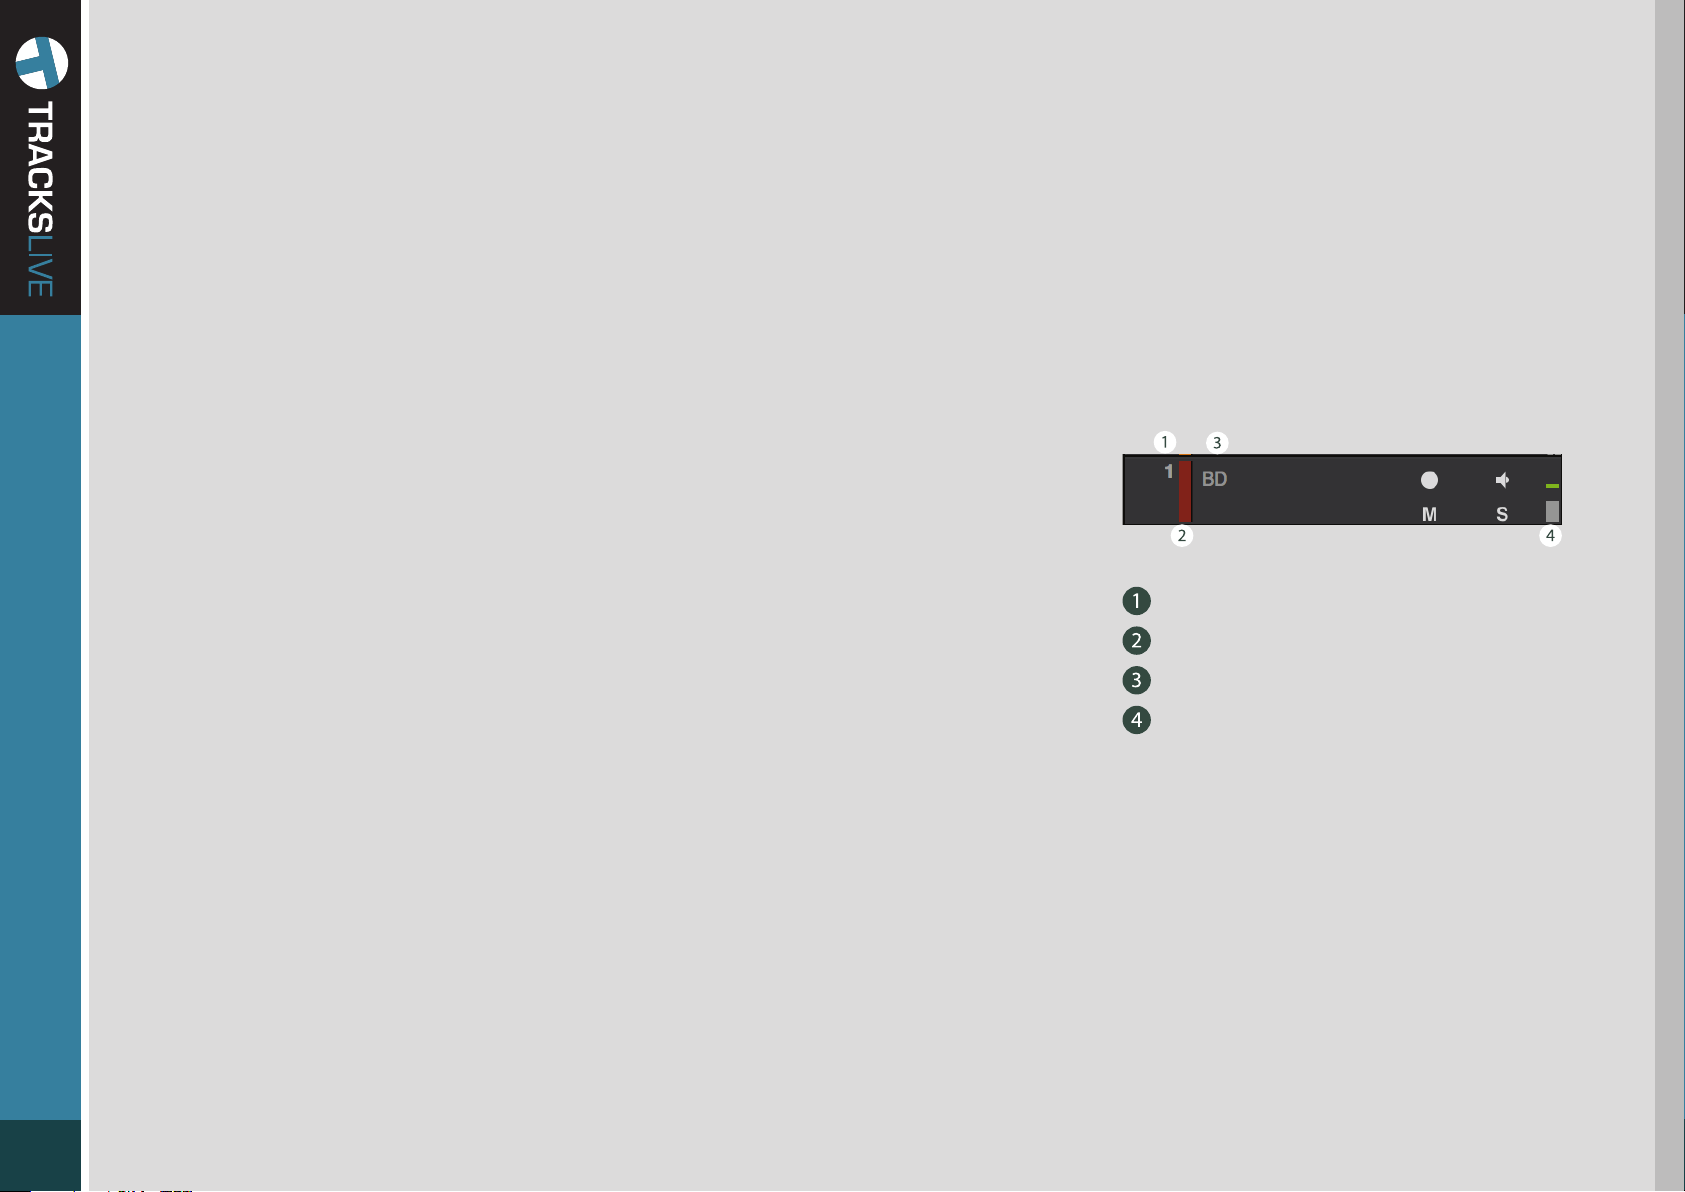
Track Number
11
Track Na mes
Name a track by double-clicking on the track’s name cell.
Tab to move from one name cell to the next.
You cannot rename a track that is Record Enabled.
Track Color
Track Name
Track Meter
Adding Tracks
Use the Tracks menu to add or remove tracks. A new track is created directly beneath
a selected track.
Master Bus
When a session is in the Stereo Out mode, a Master Bus appears at the bottom of the tracks section. This bus is the stereo output of
the mixer, and is used to send the monitor mix to another destination. The Master Bus is not used in Multi Out mode.
Page 12
Track Controls
Solo, Mute, Record Enable, and Input Monitoring can be selected on any track.
Record Enable
Input Monitoring
Solo
Mute
■
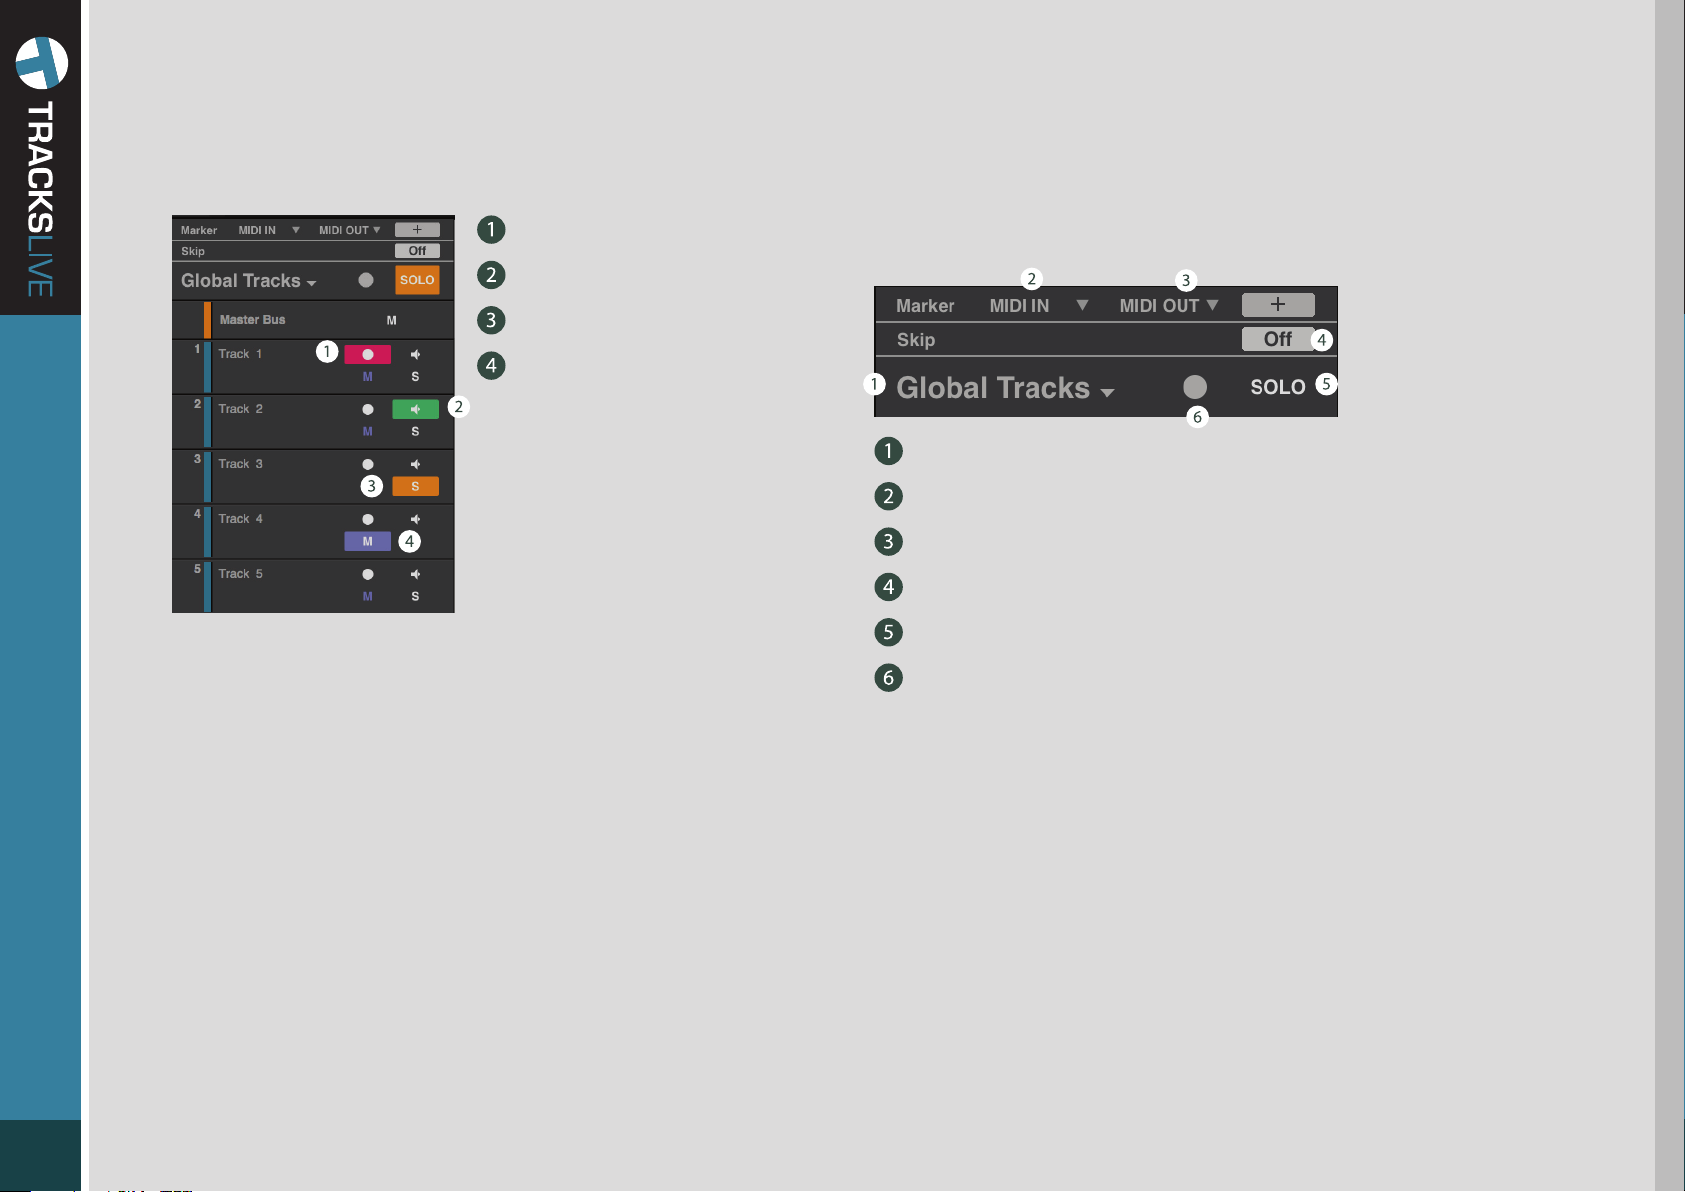
Global Solo clears the solos on all tracks.
To set the status of all tracks, use the
Global Tracks commands.
Global Tracks Drop-Down Menu
Marker MIDI Input Port Selector/Activity Indicator
Marker MIDI Output Port Selector/Activity Indicator
Global Skip Enable/Disable
Clear Solo
Global Record Enable/Disable Indicator/Button
12
■
In Multi Out mode, the Global Mute button selects/deselects mutes on all tracks. Click twice to clear all mutes when only certain
tracks are muted.
■
To make a track Solo Safe, Crtl/CMD + click on the track’s Solo button.
■
To make a track Record Safe, Crtl/CMD + click on the track’s Record Ready button. The button will turn grey.
Track Meters
Each track has an input meter, to the right of the Solo/Mute section.
Page 13

Monitoring a Recording
Tracks Live has two modes of operation: Stereo Out and Multi Out.
Use the Stereo Out mode to create a stereo monitor mix while recording. When you select this mode and click on the Mixer button,
the Tracks Live mixer window appears. Recording is not aected by the mixer.
■
The mixer has one stereo master bus.
■
The mixer’s Mute, Solo, Input Monitoring, and Record Enable modes reect their status in the track.
■
The Inspector on the left side of the mixer provides a focused view of the selected track. This is useful when you prefer to see more
tracks but still want to control the mix of selected channels.
The mixer is bypassed in Multi Out mode, serving instead as a meter section.
The Multi Out mode is useful when monitoring through an external console or for doing virtual soundcheck. No stereo mix is
created. Instead, each track outputs directly to an I/O port.
Starting a Recording
Record Enable readies a track for recording. Use the Global Enable button to enable and disable all tracks for recording. The Record
13
button begins and ends recording on all enabled tracks. You can toggle in and out of recording on a specic track, on the y, by
clicking on its Record Enable button.
If no tracks are record-enabled, pressing the Record button will enable all tracks and initiate the recording. A new recording takes
on the name of its track, followed by a take number.
Page 14

PLAYING BACK
Start and stop playback with the space key, the Transport window, or by double-clicking on the ruler.
Rulers
The Ruler section is used to control the playhead, dene areas to skip or loop on playback, and set location markers, which can be
enabled to trigger or respond to MIDI commands.
Click on the Time ruler section to place the playhead. Double-click on the ruler to immediately play from that location.
14
MIDI Input and Output Port Selectors
Add marker button
Global Skip On/O
Marker
Skip Range
Use the drop-down menu on the Global Tracks
panel to expose and hide the Skip and Marker rulers.
MIDI-enabled marker
Locked MIDI-enabled marker
8
Playhead
9
Timeline Ruler
Page 15

Markers
Markers are placeholders or tab points that are used to navigate on the timeline. To add a marker, place the
playhead at the desired location and then click the “+” button on the left of the Marker ruler, or double-click on
the ruler itself. You can set an on-the-y marker when the playhead is moving.
Slide a marker horizontally to change its location. Right-click to reveal its
contextual menu.
Use this menu to manage and position the marker.
Enabling a Marker for MIDI Program Changes
A marker can be used to send and receive program change messages.
• In record mode, a marker is placed on the Markers ruler when Tracks Live receives a program change message from an external device.
• When the transport is in playback or stop mode and Tracks Live receives a program change message, the playhead will relocate to the
15
marker that corresponds to the program change number received on the MIDI port.
To enable a marker to send/receive program change messages, right-click and select Show Memory Locations List.
You can also access this page from the View menu. This page has two tabs: Location List and Marker List. Select Marker List. Here you
can locate to, lock, name, and color-code markers.
Page 16

Select the marker and enable Program Change. Three drop-down menus will appear. Choose the appropriate bank, program, and
channel information. The marker will display “MIDI” next to its name.
Assign ports with the Marker MIDI In and Out drop-down menus in the Global panel. (Only enabled MIDI ports will appear in the dropdown menus.)
To enable a marker to send/receive program change messages, select Memory Locations List in the marker’s contextual menu or in the
View menu. Enable Program Change for that marker. The marker will now display MIDI.
Assign ports with the Marker MIDI In and Out drop-down menus in the
Global panel. (Only enabled MIDI ports will appear in the drop-down menus.)
Range Controls
There are two types of markers: Selection and Skip. Use the Ruler to dene timeline ranges you wish to skip or save as a selection.
Range information is displayed in the Memory Locations List, under the Location List tab. Right-click on the selection and choose
the menu item Add to Locations List.
16
This table displays all memory locations, and is accessed from the View menu. Locate to a selection by clicking on it. Right-click to
rename, update, or delete it. Loop markers are not displayed in this list.
Page 17

Skip
To skip over a range during playback, click-drag in the Skip ruler. The resulting yellow band denes what will not
be played.
■
Change the location of a skip range by dragging.
■
Change its duration by dragging on the corner boxes.
■
Combine two skip ranges by moving them together.
Skip ranges can be turned on and o in the Location List, or by clicking on the Skip marker.
To disable all skip ranges, deselect the Global Skip button.
A range selection can be modied and then saved. Trim its edges (Shift+drag) or change in- or out-times in the value boxes of the
Location List. Right-click and select Update Current Selection to modify the current selection, or Add to Locations List to create a
new entry.
Loop Playback
Dene a playback loop range by dragging on the Loop ruler.
17
■
Change the location of the range by dragging.
■
Change its duration by dragging on the corner boxes.
■
Right-click to reveal a contextual menu for further adjustments.
Dene only one loop range at a time.
Select the Loop button on the transport panel to engage the loop. The playhead will relocate to the beginning of the loop, awaiting
a play command.
Page 18

Main Window Tools
Four tools are located in the top toolbar. Each can be accessed by its toolbar button or by typing its number. Alternatively, right-click
on any empty area of the timeline to reveal a menu for quick access to the window tools.
Range Select - Denes part of a region, a complete region, multiple regions, or any area on the timeline. This tool is most
commonly used to select an area to be deleted.
Object Select - Selects entire regions. CTRL/CMD + click to select multiple regions. CTRL/CMD + Shift to select a range of
regions. This tool is also used to copy and move regions.
Split - Splits a region where the tool is hovered.
Zoom - Zooms to a selected area. To zoom out, click Ctrl + click with the zoom tool.
Other Zoom Controls
In addition to the Zoom tool, there are three zoom controls at the right-hand side of the toolbar.
18
Track Height - Makes all tracks taller or shorter. To resize individual tracks, use the mouse wheel or the track’s contextual menu.
Horizontal Zoom - Zooms in/out horizontally to playhead.
Waveform zoom - Increases/decreases height of the waveform.
Mouse Wheel Controls
Moves the Main window display vertically.Mouse wheel
Moves timeline horizontally.Shift + wheel
Zooms in/out horizontally to playhead (keyboard + and - will also zoom vertically).CTRL + wheel
Changes vertical track size.ALT + wheel
Page 19

Mixer
Tracks Live includes a monitor mixer for creating a reference mix. It is available only in the Stereo Out mode.
Use the button on the right-hand corner of the Main page to hide/unhide the mixer.
The mixer is simple and intuitive.
■
Channel names reect track names.
■
Controls/displays for mute, solo, record enable, and input monitor mirror those on the tracks.
■
Fader and meters range: -∞ to +6 dB. Adjust meter behavior in the Preferences window.
In the Stereo Out mode, the output of the mixer is routed to the Master Bus, which can
be sent to an I/O port for monitoring.
19
Page 20

Inspector
It is not necessary to view the Mixer pane to control the level and panning of a track. The Inspector is a sidebar that displays
the channel strip of a selected track. This allows you control a focused track while seeing many tracks in the Main window. It is
not necessary to view the Mixer pane to control the level and panning of a track.
Use the button labeled
Beneath this panel is a palette that can be used to color-code tracks.
The Info section reveals the input and output routing for the selected track.
i to open the Inspector.
20
Page 21

CONTROLS AND MENUS
This chapter provides a description of the major windows and controls.
Session Window
The Session window appears when you launch Tracks Live. Here you load your saved sessions
and create new ones.
Open Recent Sessions
The ten most recent sessions are displayed in a column on the right. Double-click on a session
name and it will load.
Open Saved Session
Opens a browser window from which you load session les. Tracks Live sessions end with the extension “ardour.”
New Session
Creates a new session based on the settings shown in the System Status box. This is useful when you want to create a session with
the same I/O and audio conguration as the current one.
21
Current System Settings Display
The current System status is displayed on the left side of the window. This reports the current setting of the Tracks Live system, not
that of the selected session. Tracks Live will issue a request to the I/O device to match its sample rate to the sample rate saved with
the session. If the I/O device cannot complete this request, then the session will play at an incorrect speed.
System Settings
Opens the Audio Systems Settings tab of the Tracks Preferences page, where sample rate, bit depth, and I/O parameters are set.
Before creating a new session, conrm that I/O settings, track names, audio parameters and monitoring mode are set correctly. Click OK
to conrm settings and return to the Session window, where you can create a new session based on this conguration. The Preferences
page is discussed in detail in the next section. You can also access the Preferences page by typing [CMD/CTRL + , (comma)].
Page 22

Preferences Window
The Tracks Preferences window consists of four tabs:
■
Audio System Settings
■
MIDI System Settings
■
Session Settings
■
Preferences
Tracks Preferences: Audio System Settings
This section is used to congure hardware I/O devices.
General information concerning the audio engine and
interface is shown at the top of the tab.
22
Page 23

Audio Engine
This is a xed value: Core Audio for Macintosh, ASIO for Windows.
Interface
Selects the I/O device. All available devices are listed, as are devices that were available previously but presently are not. Select None
to disconnect all I/O devices. Tracks Live automatically detects connected interface devices. When a new interface is detected, it will
be added to the list of available interfaces in the drop-down menu.
Sample Rate (44.1, 48, 88.2, 96, 172.4, 192 kHz)
Sets the system sample rate. Choosing a sample rate from the drop-down menu sends a request to the I/O device to adjust to the
selected rate. If the device cannot meet this request, you will have to adjust the I/O manually using the device’s control panel. If
the I/O is still unable to adjust to the requested sample rate, Tracks Live will accept the device’s sample rate, resulting in incorrect
playback speed.
Buer Size (32, 64, 128, 256, 512, 1024 samples)
Selects the buer size for the audio engine. Default is 1024 samples.
Device Control Panel
Opens the control panel of the selected (current) I/O device.
Latency
23
Indicates the system’s input, output, and total latency.
Operation Mode
There are two operation modes:
Multi Out Each track is routed to its own port. No internal mixing.
Stereo Out Stereo mix of all tracks is sent via a master bus to an
output port.
Page 24

I/O Conguration
Used to enable and disable input and output ports.
Port names are determined by the I/O. You may apply device port names to newly created tracks, if desired.
Select Name Tracks after Driver to assign tracks the names of the
corresponding driver channels. To restore original track names, click
Reset Track Names to Default.
I/O inputs and outputs can be turned on or o, either individually or as a
group using the All buttons.
24
Tracks Preferences: MIDI System Settings
Tracks Live automatically senses connected MIDI devices. When a new device is detected, it is added to the list of available
interfaces.
MIDI Ports displays all detected ports
Port On/O enables a MIDI port. Enabled ports are visible in the MIDI Marker drop-down menu on the Main window.
MTC Input selects MTC input port.
Page 25

Tracks Preferences: Session Settings
New Session Default Location sets the path for a new session. Recordings share the same path.
Auto Lock Timer sets the amount of time after Record is initiated until Tracks Live will go into a locked state. When the interface is
locked, keyboard and mouse input are disabled until the interface is manually unlocked. This prevents accidental interference with
ongoing recordings. You can lock the system manually by clicking the Lock button on the Transport panel.
25
File Type, Bit Depth and Frame Rate are normally determined during setup. However, these settings can be changed while a
session is open—all subsequent recordings will bear the new parameters.
Page 26

Tracks Preferences: Preferences
Most of the Preferences tab is quite obvious, but a few items may need explanation.
Meter Ballistics Sets the speed of the meter bar release.
Drive Buering Changes the size of the drive buer to optimize the
system for dierent drive speeds. In general, a smaller buer yields
greater responsiveness. Fast drives can normally use a smaller buer
size. Slower drives require a larger buer.
Color Track Panel Applies the track’s color to the entire mixer channel
strip, meter bridge, and track header
The Transport Record Latch ensures that the Transport remains in
record ready each time the recorder plays. If channels are armed when
Play begins, those channels will begin recording immediately.
26
Page 27

Tracks Preferences: Sync
Sets the timecode format and port used for synchronizing with external devices.
Tracks Live can lock to longitudinal timecode (LTC) or to MIDI timecode (MTC).
LTC
1. Open the Sync tab in the preferences page. Select LTC from the
drop-down menu and choose the port to which the LTC source is
connected.
2. Set the session timecode frame rate to match that of the
timecode source. Session timecode can be set in the Main window
or in the Sessions Settings tab.
3. Open the Session Timecode Sync Selector/Display menu in the
Top Bar. Select LTC (the default is Internal). A notice will appear to
indicate timecode status. Playback will begin when valid timecode
is received.
4. Use the Sync Selector/Display menu to toggle the transport in
and out of timecode chase mode.
27
MTC
1. To lock the recorder to a MIDI timecode source, select MTC from
the Sync Selector/Display menu.
2. Choose a sync port from the list of options.
Timecode Interruption
The Freewheel setting represents the maximum duration of missing
or irregular timecode that the recorder will “coast across” before the
playhead stops. When valid timecode is again received, the recorder
re-locks to timecode and play/record is resumed. Range: 0–4916
milliseconds
Jam Sync When encountering invalid timecode, this mode unlocks the recorder from its timecode source and remains its own
timecode master, even if valid time code is re-established. It will continue to generate timecode until the transport is stopped.
Page 28

Main Window
Use of the Main window is discussed in the previous chapter. This section describes the window’s menus and controls in more
depth.
Transport Panel
The Tracks Live transport controls work just as you’d expect with any recorder/player.
Previous Marker moves the playhead to the previous marker. If no markers are present, the playhead moves to the session start
time, 00:00:00:00.
Next Marker moves the playhead to the next marker. If no markers are present, the playhead moves to the session’s end.
Play starts/stops transport play.
Record begins recording on all enabled tracks. If no tracks are record-enabled, Record enables all tracks and begins recording.
Stop stops playback and record.
28
Loop enables/disables the loop range as set in the Ruler.
Lock disables keyboard and mouse input. When Lock is engaged, a System Locked window appears, which you can then use to
unlock the system. Use Preferences > Session Settings > Auto Lock Timer to set the time that elapses between tracks being
record enabled and the system entering locked mode.
The Lock function protects you from ruining a recording because of an accidental keystroke or mouse nudge. All commands except
Unlock System are ignored. However, Lock is not a security feature that will prevent others from accessing your session. It is not
password protected.
Page 29

Top Bar
The left side of the Top Bar provides information. It also provides control over basic session parameters.
Selection Display
Playhead Position Display
Clock Format Display Selector
Session Bit Depth
The three small displays indicate start, end, and length of selections. The large time indicator indicates playhead location.
Select display format with the drop-down menu. There are three more display buttons in this section.
i
Shows/hides the Inspector
Reveals the Main Page mixerMixer
Hides/unhides meters that show an overview of all tracks in the session. In this view, the Main page is hidden.Meter
Session Sample Rate Selector/Display
Session Timecode Sync Selector/Display
Session Frame Rate Selector/Display
29
Four buttons provide quick access to session setup controls. These controls are locked when the transport is playing or recording.
Both take you to the Session Settings window Bit depth / Frame rate
Drop-down menu of sample rate options Sample rate
Drop-down menu of timecode optionsSession Timecode Sync
Selector/Display
Page 30

Too ls
Three tools are used to select, move, and cut regions on the timeline. A fourth is used to zoom. Choose a tool using the Top Bar
buttons, or with numbers 1–4 on the keyboard.
Range Select - Denes part of a region, a complete region, multiple regions, or any area on the timeline.
Object Select - Selects entire regions. CTRL/CMD + click to select multiple regions. CTRL/CMD + Shift + click to select a range of
regions. This tool is also used to copy and move regions. Grab the end of a region to change its length.
Split - Splits all selected regions.
Zoom - Zooms to an area specied by the icon.
You can also choose a tool by right-clicking on any empty part of the timeline.
30
In addition to the Zoom tool, there are three zoom controls on the right side of the toolbar.
Track Height - Makes all tracks taller or shorter. To resize individual tracks, use the mouse wheel.
Horizontal Zoom Zooms - in/out horizontally to the playhead
Waveform zoom - Increases/decreases waveform height
Page 31

Region Menus
Region control menus provide additional control over regions and the ranges within them. If a region does not include a
selected range, right-click to access this menu.
This menu oers standard cut/paste editing features, as well as tools for managing regions.
31
If a region includes a selected range, the Range menu will appear.
This menu is used primarily to dene a range and apply it to functions such
as loop, skip, and punch. Numerous le functions can be accessed from this
menu.
Page 32

Fade Menu
Adjust fade length by grabbing the box at the top using the Object Select tool.
To change the fade type, right-click on the fade to reveal this menu.
32
System Status Indicators
CPU and HD - Percent of CPU being used.
Remain - Remaining recording time,
based on number of currently enabled tracks.
Inspector
The Inspector oers additional information and controls.
Use the button labeled i to open the Inspector.
Track Input Display
Track Output Display
Page 33

Use the palette to color-code tracks. Select a track, or a group of tracks, and then choose a
color.
The Info section reveals the input and output routing for the selected track. Select the Master
Bus (Stereo Out mode only) to reveal inputs and outputs for all tracks in the session.
A fader/meter focuses a selected track. This enables you to view and control the level and pan of a track without opening
the Mixer view.
33
Information Page
This button opens a splash screen that indicates the version of Tracks Live that you are running.
Page 34

Meter Section
The Meter window provides a clean overview of input level for each track. As in other views, the Inspector is
used to control monitor level and pan for a selected track. Meter behavior is controlled on the Preferences tab.
Record-Enabled Overview
Above the rulers you can nd small meter bridge that indicates which tracks are record-enabled and signal level. Hover over a cell to
34
reveal its track name and state.
Page 35

Export (File Menu)
Exports to a stereo mix or stems.
Dene export range in the timeline. There are four ways to set the range:
• Selection
• Skip markers
• Loop denitions
• Session
Choose Mixdown or Stem Export from the File Menu
• Mixdown creates a stereo mix of all channels in the dened time range.
• Stem Export creates a separate export le for each channel.
Export Dialog Box
File Format tab
• Dene export le format, details, name, and folder.
35
Page 36

Time Span tab
• Choose the method of dening export range (selection, skip markers, loop, session). Only ranges that have been dened on the
timeline are displayed. If no audio is selected and there are no active skip markers or loops, then the export range will be the session
length plus ve seconds.
36
Page 37

Channels tab
In the Mixdown mode
• Export stereo audio mixdown as two mono les or as interleaved stereo le.
In the Stem Export mode
• The stem export mode creates a new le for each checked channel.
All tracks in the session appear in the list. Deselect to remove the track from the export.
37
• Export Region Contents creates a continuous le from each session channel. Automation, mutes, and solos
are ignored.
• Export Track Output also creates a continuous le from each session channel. All automation is
incorporated in the export.
 Loading...