

Page 1

C1
Setup Guide
Page 2

Table of Contents
Chapter 1 ........................................... Introduction .... 2
Chapter 2 .................................. Basic Use of Setups .... 7
Chapter 3 .......................Basic Dynamic Processors .. 15
Chapter 4 .......................................... Simple Setups .. 21
Chapter 5 ...........................................Compression .. 26
Chapter 6 .................................C1 Noise Reduction .. 31
Chapter 7 ..................................................DeEssers .. 38
Chapter 8 ............................................... Enhancers .. 43
Chapter 9 ..........................................Keying Setups .. 50
C1 Set-up Guide Manual
11
1
11
Page 3

Chapter 1 - Introduction
The Setups Library’s purpose
The C1 at heart is simply a compressor and expander/gate with some added filters, but its unique design, evolved
through many years of experience and refinement, makes it a versatile tool for any number of specialized and
useful audio processing tasks. Moreover, its performance at most of these tasks is state-of-the-art, either comparable to or superior to dedicated professional products available elsewhere. Many of the tasks it can do are unique
to the C1.
The C1 Setups Library allows the C1 to be configured to become any of a number of dedicated processors. The
Library consists of a variety of setup files, each of which when loaded turn the C1 into a specialized problem
solver or creative tool.
What can you do with the C1?
Among the tasks the C1 can perform using the setups library are the following, with relevant setups and their
chapters listed:
• Conventional high-level compression
Chapter 3: C1 Classic Compressor/Gate
C1 Classic Compressor/Expander
Chapter 5: C1 HLcompress + DeHiss
Chapter 8: C1 HLcompress+bass/treb enhance
C1 HLcompress+treble enhance
• Conventional Low level expansion
Chapter 3: C1 Classic Compressor/Expander
Chapter 4: C1 EQ + LLexpander
C1 Multimedia Speech 2
• Versatile conventional gating
Chapter 3: C1 Classic Compressor + Gate
C1 Classic DeEsser + Gate
Chapter 4: C1 Multimedia Speech 1
• De-esser - reducing excessive speech or vocal sibilance
Chapter 3: C1 Classic DeEsser + Gate
Chapter 7 - all setups
C1 Set-up Guide Manual
22
2
22
Page 4

• Noise reducers - reducing background noises
Chapter 5: C1 HLcompress + DeHiss
Chapter 6 - all setups
Chapter 7: C1 De-Ess + De-Hiss 1
C1 De-Ess + EQ + De-Hiss 2
C1 De-Hiss + EQ + De-Ess 3
C1 De-Hiss + EQ + De-Ess 4
• De-reverberation - reducing the audible effect of room reverberation,
especially on speech
Chapter 5: C1 Compressor + De-Reverb
• Hiss removal
See Noise Reducers above
• Rumble removal
Chapter 6: C1 Rumble Reducer
C1 High-pass filter
• Mid-level compressor - making sounds louder without compressing
the dynamics of loud sounds
Chapter 4: C1 Multimedia Speech 1
C1 Multimedia Speech 2
Chapter 5: C1 Compressor + De-Reverb
Chapter 8: C1 MLcompress+bass/treb enhance
C1 MLcompress+treble enhance
• Low level detail enhancer - bringing up the level of quiet sounds
to make them more clearly audible
Chapter 4: C1 EQ + LLcompressor
Chapter 7: C1 De-Ess + LLcompress
Chapter 8: all setups
• Spectral enhancers - giving sounds more depth, brightness or impact
without the unpleasant side effects of conventional equalization or the harshness
and artificiality of some commercial enhancers.
Chapter 8: all setups
• Dynamic equalization - permitting a sound to be equalized in different ways
at different sound levels, giving effects impossible with a simple equalizer.
Chapter 8: all setups
C1 Set-up Guide Manual
33
3
33
Page 5

• Speech/Vocal intelligibility enhancer - makes speech and vocals more clearly
audible under difficult listening conditions without sounding artificial under
ideal conditions
Chapter 8: C1 Speech Enhancer
• Louder multimedia files - allows optimum sound quality to be obtained even
from 8 bit 22 kHz multimedia files without “squeezing the life out of” the
original sound file.
Chapter 4: C1 Multimedia Speech 1
C1 Multimedia Speech 2
• Ducking of one signal keyed by another
Chapter 9: C1 Ducking 1
C1 Ducking 2
• Gating of one signal keyed by another
Chapter 9: C1 Keyed Gate
• Expansion of one signal keyed by another - ideal for creating convincing
rhythmic tracks out of any continuous sound effect.
Chapter 9: C1 Keyed Expander
• Duck-EQ - keyed ducking within a frequency band of one signal keyed by another,
to allow space to be created in a mix when several sounds conflict in the same
frequency band.
Chapter 9: C1 Ducked EQ 1
C1 Ducked EQ 2
• Creative keyed equalization of one signal by another, allowing the dynamics of a
key signal to alter the sound of a second signal
Chapter 9: C1 Keyed EQ Expander
C1 Set-up Guide Manual
44
4
44
Page 6

Combinations of effects
Also, the C1 allows one-pass real-time preview and processing of many combinations of two or even three effects
at the same time, for example allowing you to compress a sound file and at the same time to remove side-effects
such as increased audibility of noise or room reverberation. These combined effects include:
• Compressor + Low-level expander
Chapter 3: C1 Classic Compressor + Expander
Chapter 4: C1 Multimedia Speech 2
• Compressor + gate
Chapter 3: C1 Classic Compressor + Gate
Chapter 4: C1 Multimedia Speech 1
• Compressor + equalizer
Chapter 4: C1 EQ + LLcompressor
C1 Compressor + EQ
• Equalizer + Gate
Chapter 4: C1 EQ + Gate
• compressor + noise reducers
Chapter 5: C1 HLcompress + DeHiss
• expander + de-hissing
Chapter 6: C1 Noise Reducer
• compressor + de-hissing
Chapter 5: C1 HLcompress + DeHiss
• compressor + de-esser
Chapter 7: C1 Compressor + DeEsser 1
• compressor + enhancer
Chapter 8: C1 HLcompress+bass/treb enhance
C1 HLcompress+treble enhance
C1 MLcompress+bass/treb enhance
C1 MLcompress+treble enhance
• De-Esser + gate
Chapter 3: C1 DeEsser+ Gate
• Enhancer + gate
Chapter 8: C1 Bass/treb enhance+Gate
C1 Treble enhance + Gate
• compressor + de-reverberation
Chapter 5: C1 Compressor + De-Reverb
C1 Set-up Guide Manual
55
5
55
Page 7

In most cases, the compression may either be of conventional high-level type, including limiting, or mid level
compression leaving the dynamics of the loudest parts of sounds unaffected, but bringing up quieter details.
On using setups
All the setups in this library should be treated as starting points. You will always have to adjust the setups for use
with each individual sound file, to match its loudness, spectral content, dynamics, and specific problems it suffers
from, as well as the specific results you desire.
For your convenience this manual describes for each setup which controls are most useful and how they should
be adjusted to achieve the desired effect. The actual adjustment uses your skill as a listener to decide the most
satisfactory effect, and suggestions and hints are for guidance, not limitations on your creativity or skill.
The guidance for each setup describes not just its purely technical use but a little about what kind of effects and
side-effects can be expected so that the user can listen for these and make a judgement as to the best trade-off in
any particular case.
In many setups you may in particular have to adjust the output gain to prevent overload clipping on particular
signals, due to transient overshoots etc. Instructions on how to prevent overload clipping are given in section 2.5
(Output level and clipping) of this manual.
In all setups, you have the option of using or not using lookahead. This will not affect the basic functionality of
any setup but may affect fine details of sounds. For further details on the effects of lookahead see the C1 User’s
Guide section on Lookahead and section 2.6 (Lookahead) of this manual.
This manual is divided into a number of chapters, several of which are devoted to setups performing a particular
kind of task.
These specialized chapters may be considered almost as product manuals in their own right, devoted to describing the use of a specialized “product” obtained when the C1 is loaded with a particular kind of setup.
There is however, considerable overlap between chapters, because many of the setups in effect involve two
processing effects working together, so that some degree of cross-reference between chapters is necessary when
the “other” effect belongs to another chapter.
In using this setups Library manual, it is assumed that you have the basic skills in using the C1 found in the
WaveSystem Plug-in General Controls chapter of the C1 User’s Guide. If not, please review this chapter!
C1 Set-up Guide Manual
66
6
66
Page 8
Chapter 2 - Basic Use of Setups
Quick tour of the C1
This section is not a substitute for the C1 User’s Guide, but simply an overview that may
be found useful in using the setups library, since extensive reference is made to the
module structure of the C1 in setups descriptions.
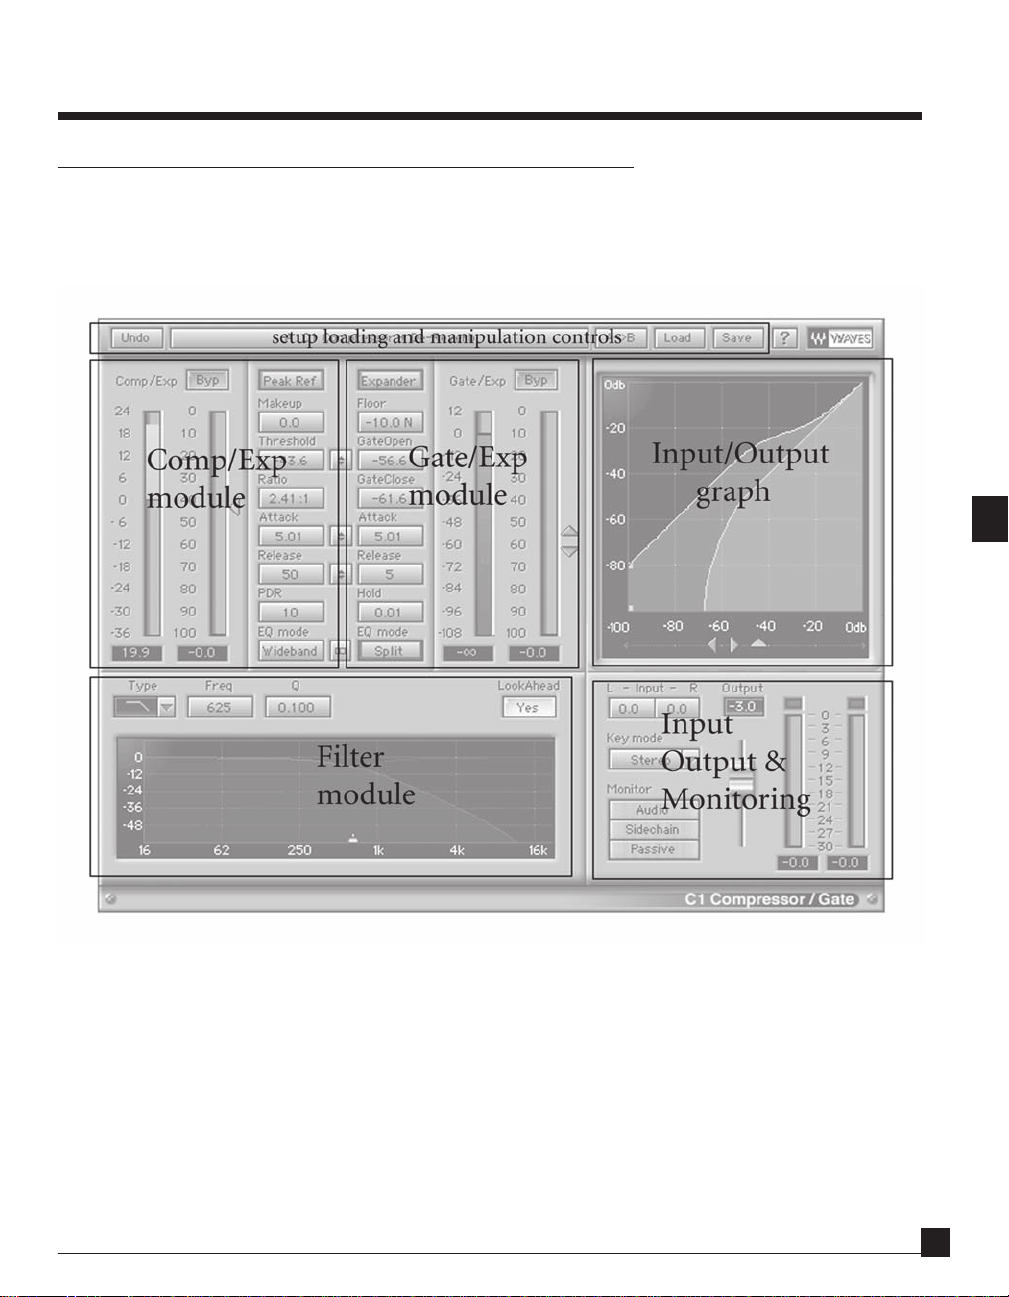
The C1 user interface is divided into the main areas shown in the above figure.The C1 user interface is divided into the main areas shown in the above figure.
The C1 user interface is divided into the main areas shown in the above figure.
The C1 user interface is divided into the main areas shown in the above figure.The C1 user interface is divided into the main areas shown in the above figure.
C1 Set-up Guide Manual
77
7
77
Page 9

These areas are:
Two dynamics processing modules, and their controls and metering:
• The Comp/Exp (“Compressor/Expander”) module
This acts as a compressor or an expander (which may operate at low, middle or high input levels). It
includes two bar meters to monitor respectively gain reduction (in red) or increase (in yellow), and input
dynamics control level (in blue). The various buttons and Value Windows control the operating parameters, as described by the captions, and in detail in the main C1 User’s Guide.
• The Gate/Exp (“Gate/Expander”) module
This acts as a Gate, or a low-level (downward) expander or low-level compressor. It includes two bar meters
to monitor respectively gain reduction (in red) or increase (in yellow), and input dynamics control level (in
blue). The various buttons and Value Windows control the operating parameters, as described by the
captions, and in detail in the main C1 User’s Guide.
• A filter module, including graphical display of filter responses
This filter module may be used to equalize just the control sidechains of the dynamics processor, or to split
the audio into two bands only one of which is dynamically processed, or any combinations of the two.
Filter type, frequency and Q buttons and Values Windows are provided for filter adjustment. A graphical
display shows the frequency responses of the “active” filter band in red, and the complementary “passive”
band of the bandsplit in blue. The filters may also be adjusted by clicking and dragging the cross-marker on
the graph.
• An input/output (I/O) graphical display of dynamic signal levels
This displays the way the output level of the two dynamics modules (yellow for the Comp/Exp module,
light blue for the Gate/Exp module) varies with input level, and shows the moment-by-moment variations
of level on the graph itself. The triangular grab markers below the graph display, and can be used to adjust,
the threshold settings of the two dynamics modules by clicking and dragging.
• An input and output signal level control and monitoring area
• A number of controls for saving, loading, copying and altering setups
• Controls for previewing and processing sound files
• A title bar indicating name of loaded setup
• An IDR button for optimizing digital resolution at the 16 or 20 bit wordlength.
C1 Set-up Guide Manual
88
8
88
This includes an output level slider, input level controls for left and right channels (which are normally left
at 0 dB unless alterations in balance are required), peak-reading output level meters for the 2 stereo
channels, and buttons to switch between normal stereo operation and keyed operating modes, and a
monitor button to allow auditioning either of the processed audio or of the sidechain or passive bandsplit
signal band signals for setting up purposes.
Page 10

Detailed instructions on the use of controls are given in the main C1 User’s Guide.
Controls which are recommended for use with setups below are indicated within the text in bold typeface.
Loading setups
Place the setup files you wish to use in one (or more) folder of your choice. We shall call this folder the C1 setups
folder, but you may choose any other names, and any location on your hard (or other) disc(s) you wish.
Please be sure to keep safety copies of all setup files in the setups Library in another location (e.g. on a floppy
disc) so that you have the original setup files in case you accidentally alter the ones in the C1 setups folder(s).
To load the setup you wish to use, click on the Load button, and select the setup file you wish to use, and either
click on the Open button or double click on the setup file name. The setup name will appear at the top of the C1
window, and all buttons, Value Windows and graphical displays will be set up to the pre-set settings in that setup.
You may load two setups in the C1 at a time. The SetupA/SetupB button may be clicked to change from one of
these setups to the other. If you load a setup in the setup B position, this will not affect the setup loaded into the
setup A position, or vice-versa.
This is useful for making quick switched A/B comparisons between two different setups, for example to check
whether one sounds better than another.
The name of the last setup loaded or copied into or saved from Setup A or Setup B will be displayed in the title
bar at the top of the C1 window.
Making use of Setups
Once you have loaded a setup, you may alter the value or setting of any control on the C1 in the manner
described in the main C1 User’s Guide.
In most setups, certain controls are important in adjusting the effects and other controls should not normally be
used. In the instructions for each setup, the controls that may be adjusted are indicated in bold type.
The simplest way to develop new customized setups for your own use is to modify the values of controls from a
single setup in the Setups Library. However, there is another way of compiling new setups from existing ones, i.e.
editing by copying and pasting controls settings from one setup to another. Editing allows you to take “bits and
pieces” from different setups and incorporate then all into a single new setup. This, for example, you can take
some or all of the Comp/Exp module button and Value Window settings from a first setup, some or all of the
Gate/Exp module button and Value Window settings from a second setup, and some or all of the filter button
and Value Window settings from a third setup.
Editing is most useful when the Comp/Exp and Gate/Exp modules are set up to do completely independent
tasks. Then you can take one module from one setup and the other from another setup to compile a new
combination setup. However, be warned that if both use the filter module (i.e. if neither are in Wideband EQ
mode), this will only work if both use the same filter module setup. If either of the modules is in Wideband
C1 Set-up Guide Manual
99
9
99
Page 11

mode, this will not be a problem.
You can do editing by compiling the setup you want in setup A and loading the setups you wish to edit from, one
at a time, into setup B.
Hint: To save time, load the first setup you are compiling from straight into setup A. Then you do not have to
paste its control settings from setup B to setup A.
Saving and Editing setups
After a setup has been altered, according to the instructions given and your judgement, you may wish to save it
for future use on similar sound files. This is done by clicking the Save button. You will enter a dialog box which
allows you select a folder in which to locate the setup, or even to create a new folder to save it in, according to the
usual Apple conventions. You should type the name you wish to give the setup in the “Save file as:” window, and
then click the Save button in the dialog box. After you have done this, the name of the setup in the title bar at the
top of the C1 window will change to the new setup name.
Warning: Before saving a setup, ensure that the monitor button is in Audio mode, unless you specifically want the
setup to load later in another monitor mode.
The simplest way to develop new customized setups for your own use is to modify the values of controls from a
single setup in the Setups Library, or from previously prepared setups you may have. However, there is another
way of compiling new setups from existing ones, i.e. editing. Editing allows you to take “bits and pieces” from
different setups and incorporate then all into a single new setup. This, for example, you can take some or all of
the Comp/Exp module button and Value Window settings from a first setup, some or all of the Gate/Exp module
button and Value Window settings from a second setup, and some or all of the filter button and Value Window
settings from a third setup.
Editing is most useful when the Comp/Exp and Gate/Exp modules are set up to do completely independent
tasks. Then you can take one module from one setup and the other from another setup to compile a new
combination setup. However, be warned that if both use the filter module (i.e. if neither are in Wideband EQ
mode), this will only work if both use the same filter module setup. If either of the modules is in Wideband
mode, this will not be a problem.
You can do editing by compiling the setup you want in setup A and loading the setups you wish to edit from, one
at a time, into setup B. To paste the settings of a number of control buttons, value widows and/or grab markers
from setup B to setup A, proceed as in the following example.
C1 Set-up Guide Manual
1010
10
1010
Page 12
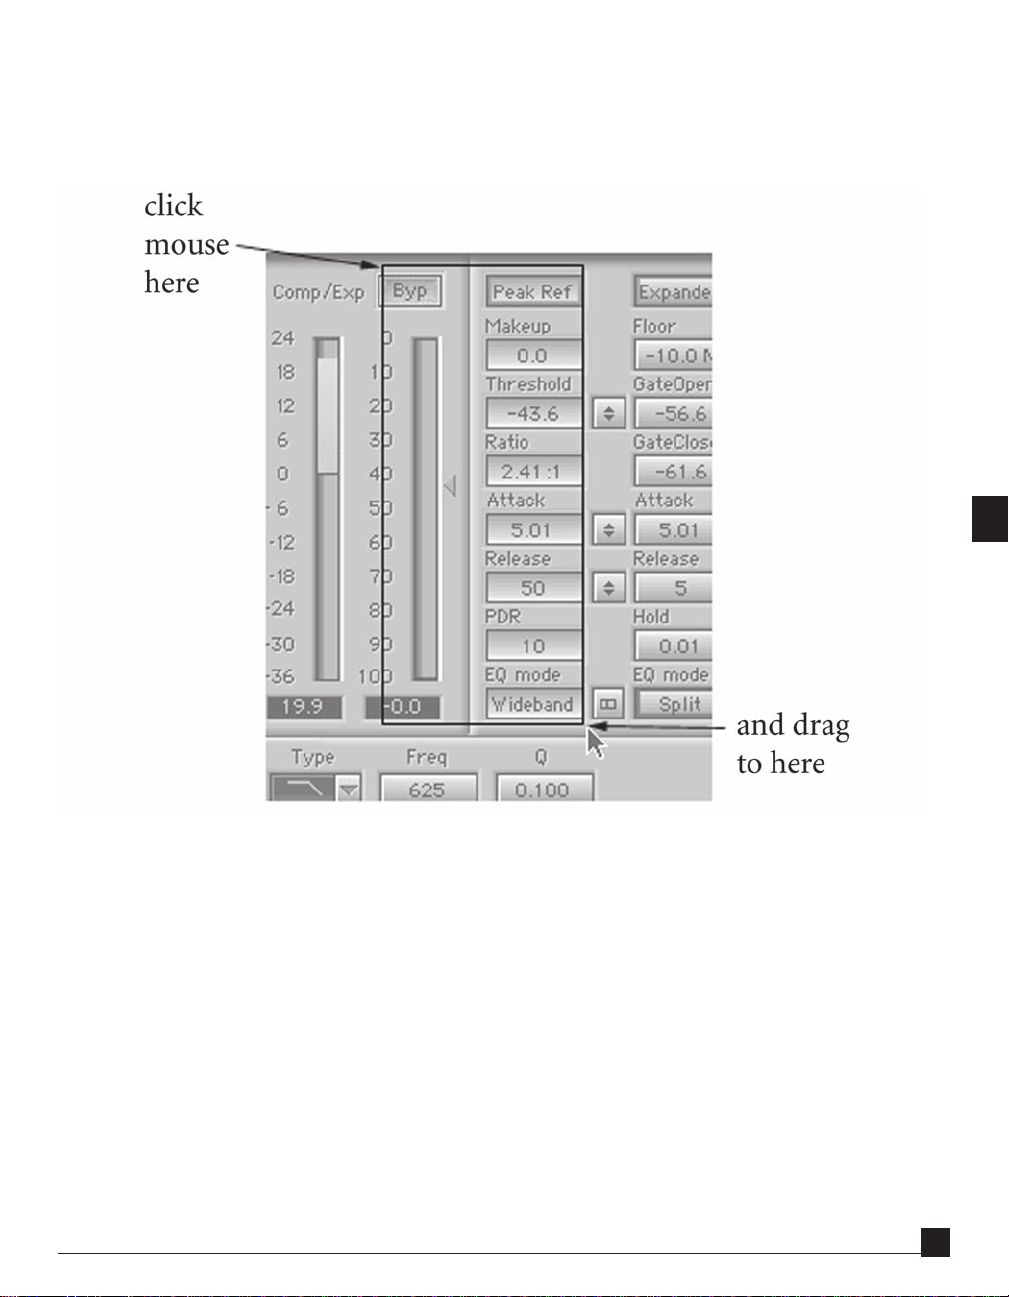
First, in setup B, select the desired buttons, Value windows and/or grab markers by click and holding down the
mouse button at a point outside the desired controls (not in a button or Value Window!), and dragging the
mouse to form a rectangle intersecting or including just the desired controls as shown in the following illustration for all the Comp/Exp module controls:
Letting go of the mouse button, you will have selected all controls intersected by the rectangle. Then press the c key
on the keyboard (NOT control C !) to copy the control settings. Then switch to setup A by clicking the Setup A
button, select the same controls as before by click and drag, and then press the v key on the keyboard (NOT control
V!) to paste the control settings.
This completes the pasting operation.
You may switch back to setup B by clicking the setup B button, load a new setup from the setups Library into
setup B, and paste control setting from another part of this setup into setup A by repeating the above procedure.
And so on until you have compiled your new setup in setup A. Then you can save it if desired, or just use it for
processing.
The same method can be used to compile a setup into setup B from setups loaded into setup A.
C1 Set-up Guide Manual
1111
11
1111
Page 13
Hint: To save time, load the first setup you are compiling from straight into setup A. Then you do not have to
paste its control settings from setup B to setup A.
Output level and clipping
You may sometimes find on particular sounds that use of setups Library setups will cause clipping or overload
distortion. Such clipping can be caused by excessive gains or from transient overshoots.
The internal processing in the C1 is designed so that clipping distortion cannot occur in the internal signal
processing algorithm, so that the only risk of clipping comes from excessive output gain. Thus all you need do to
prevent clipping is to reduce output gain appropriately.
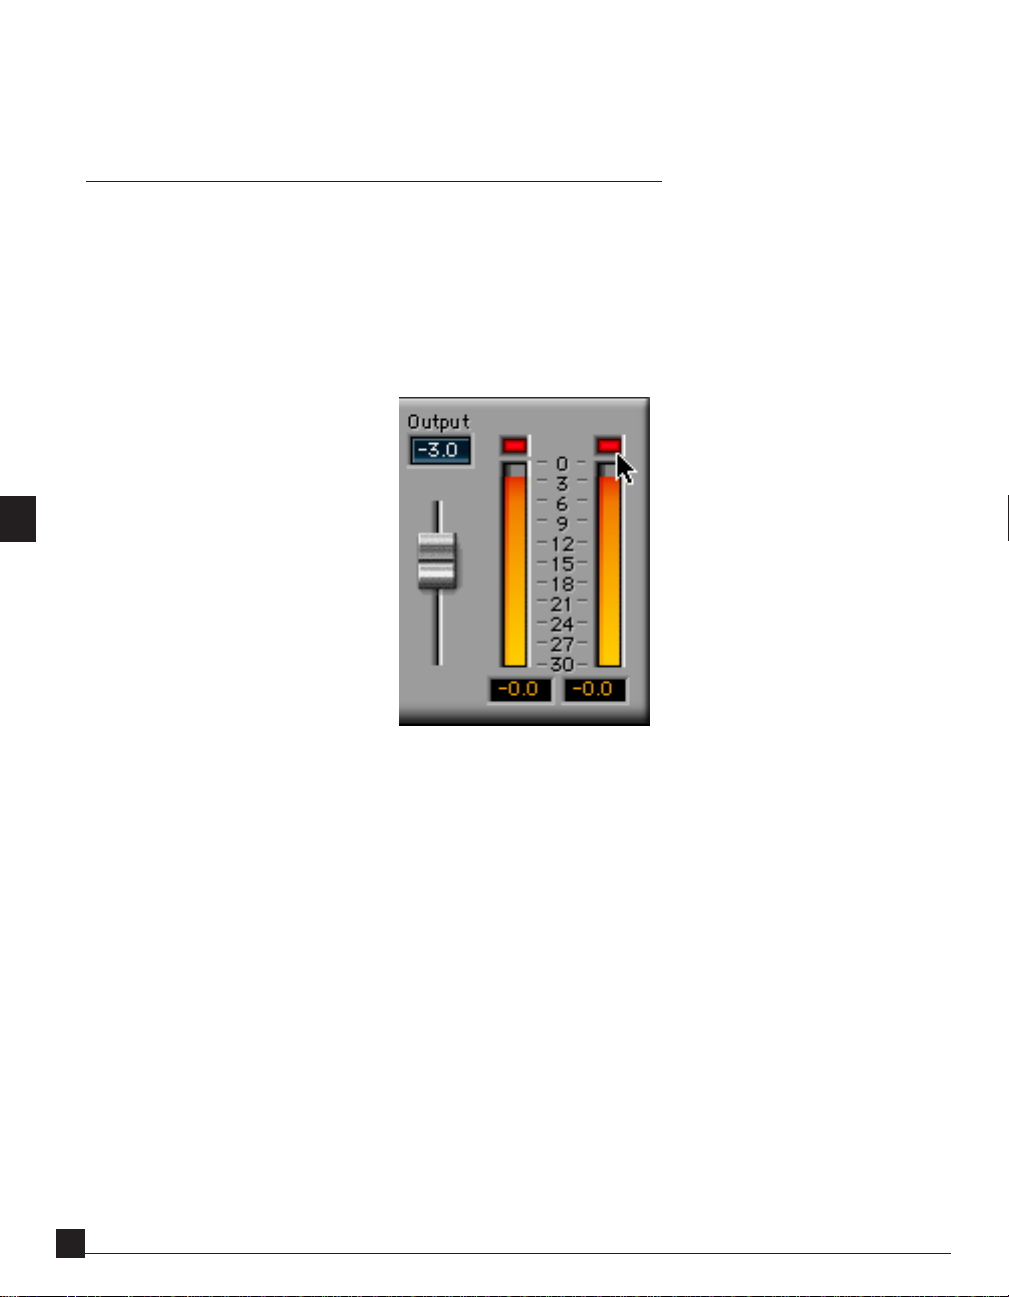
Output meter showing ten clippings and with mouse positioned to reset the overload indication by clicking.
The windows above the output level meters show the number of overload clippings occurring during preview or
during processing a file in red. They may be reset before a preview or processing by clicking on them. If, after
processing, clipping is shown, you may wish to undo the processing and to re-do it with a lower output gain to
prevent clipping, although one or two or very few clippings only may prove not to be audible.
The readings at the bottom of the output level meters shows the maximum peak level achieved during preview or
processing. It may be reset before preview or processing by clicking on the meter itself. These readings are useful
to allow increase in output level if the sound is undermodulated. If for example, the peak level shown in previewing or processing a file is -4.7 dBFS (relative to digital full scale) in the highest of the two channels, then you may
increase the output level by say 4.6 dB without the re-processing of the file (after undoing previous processing)
causing overload.
C1 Set-up Guide Manual
1212
12
1212
Page 14

However, be aware that the peak level occurring in processing a whole sound file may not be indicated during
preview of just a limited segment of that file. You can check peak levels either by
(i) processing the file, and then undoing the processing after taking meter readings, or
(ii) clicking the playback button so that it is illuminated, and then playing the entire sound file under Sound
Designer II™, or at least all parts of the sound file which are loud enough to be expected to cause clipping
problems.
Hint: Especially when using compression or limiting, you may find that transient peaks are reduced in level, often
by 2 or 3 dB, if you process using Lookahead in Yes mode, rather than process without Lookahead. However, this
can also subtly affect the sound, so use your judgement here as to whether this is desirable in your case.
Lookahead
The use of the lookahead button will not seriously affect any of the setups in the setups library and may be set to
“Yes” or “No” as desired by the user.
To some users, the function of the lookahead button may seem mysterious, as it at first sight seems to do little.
Internally, it delays the audio signals just enough to match inevitable delays required to derive the gain control
signals used to alter signal gains in compression, expansion and gating. Most analog dynamic processors do not
have lookahead. The C1 provides the option of simulating analog processing by switching lookahead out (i.e. the
lookahead button displays No). With lookahead in (i.e. the lookahead button displays Yes), generally, the shape of
compressed transients is better, with less overshoot (see the illustrations below), and there is less premature
gating of initial transients such as sibilants or drumstick sounds.
C1 Set-up Guide Manual
1313
13
1313
Page 15

4 kHz test signal with sudden 20 dB step
Effect of compression on 4 kHz test signal without and with lookahead for limiting at threshold -30 dBFS with 5
msec attack time. Note the reduced overshoot of the transient. The effect is less extreme on most real world audio
waveforms!
Thus in most situations, the processing is better behaved with lookahead, and setups in the setups library are
loaded with lookahead.
However, the actual sound without lookahead is different - for example, transients often sound brighter if
compressed without lookahead, so this may be preferred on the basis of sound. The initial gating of transients
like short sibilant sounds may also sometimes be wanted to modify the sound - and again no lookahead would
then be preferred.
Also, because lookahead starts modifying the sound slightly before the start of a transient, it can sometimes cause
a subtle but noticeable “pre-echo” effect sounding like a slightly disturbing room echo, especially on high-quality
speech. If this effect is audible, you may again prefer not to use lookahead.
As seen in the above waveform illustrations taken from Sound Designer II™, the time delays used to implement
lookahead have no effect on the timing of processed files, which remain exactly synchronized to unprocessed
files.
C1 Set-up Guide Manual
1414
14
1414
Page 16

Chapter 3 - Basic Dynamic Processors
Classic processors
This chapter describes a few setups that are what may be termed “classic” dynamic processors, the kind of basic
workhorses used for most dynamic processing in the audio industry: the Compressor/Gate, Compressor/
Expander and DeEsser/Gate.
Classic Compressor and Gate
This is a classic (high-level) soft-knee compressor/limiter with a classic gate.
C1 Set-up Guide Manual
1515
15
1515
Page 17

Setup name: C1 Classic Compressor/Gate
The Comp/Exp module is here set up as a wideband high-level compressor, and the Threshold, Ratio, Attack and
Release controls are conventional in use, provided that the ratio is kept within the range 1 to 50. Above a ratio of
20, the compressor acts as a soft-knee limiter. The Makeup gain allows extra gaiun to compensate for any loss of
level due to the compressors reduction of high-level gain.
The PDR (program-dependent release) allow the compressor to respond more rapidly to transients of limited
duration, giving a faster release for short transients. The setting here is the duration in msec of transients for
which the release time is more rapid. For morte sustained sounds of longer duration, the release time is that set
by the Release control. PDR minimizes prolonged gain reductions caused by short transients.
For A/B comparisons of the processed with the original signal, the gain of the bypassed signal may be adjusted by
using the bypass gain value window (below the bypass button) so that there is little audible gain change when
switching between bypass in and out.
The Gate/Exp module is set to a classic fully-functioned gate. As loaded, the GateOpen and GateClose levels are
pre-set 4 dB apart to minimize gate “chatter”. The hold control ensures a minimum gate on time which again
helps prevent chatter. Attack and Release may be adjusted in the usual way. If it is desired to retain some of the
background atmosphere during quiet passages, the floor control may be used to adjust the remaining signal level
when the gate is “off ”.
The Compressor may be switched in or out by clicking on the Comp/Exp bypass button (over the Comp/Exp bar
meters).
The Gate may be switched in or out by clicking on the Gate/Exp bypass button (over the Gate/Exp bar meters).
Classic Compressor and Expander
This is a classic (high-level) soft-knee compressor/limiter with a classic soft-knee 2:1 downward expander.
Setup name: C1 Classic Compressor/Expander
The compressor is identical to that in the previous setup, and used in the same way.
The Gate/Exp module is now in low-level (downward) expander mode. GateOpen controls the expander
threshold. Attack and Release may be adjusted in the usual way. If it is desired to retain some of the background
atmosphere during quiet passages, the floor control may be used to adjust the remaining signal level. The
expander is a soft-knee 2:1 device, but the effective expansion ratio below threshold may be increased by using
the “negative” polarity settings of the floor control (indicated by “N” after the dB indication in the floor window),
with increased effective ratio as the floor setting moves between -100 N and -10 N.
The Compressor may be switched in or out by clicking on the Comp/Exp bypass button (over the Comp/Exp bar
meters).
C1 Set-up Guide Manual
1616
16
1616
Page 18

The expander may be switched in or out by clicking on the Gate/Exp bypass button (over the Gate/Exp bar
meters).
Classic De-Esser and Gate
This is a classic de-esser with a classic gate.
Setup name: C1 Classic DeEsser + Gate
The Comp/Exp module here is used to implement a de-esser to reduce the level of high-level sibilants. This is
implemented as a limiter responding to the level of an equalised sidechain signal in the “Ess” frequency band. The
attack and release times are intentionally short to minimise the effect on the signal once an “Ess” sound is over.
The degree of de-essing ixs adjusted by moving the threshold up or down. The only other controls used for deessing may sometimes be the frequency to tune the precise band of “Ess” frequencies.
The gate is identical to that in the C1 Classic Compressor/Gate setup above.
The De-Esser may be switched in or out by clicking on the Comp/Exp bypass button (over the Comp/Exp bar
meters).
The Gate may be switched in or out by clicking on the Gate/Exp bypass button (over the Gate/Exp bar meters).
About Compression
Compression is the process of reducing the dynamic range of a sound, by altering the gain. So, for a given
number of dB change of level at the input, a smaller number of dB change of level takes place at the output. The
ratio
Input dB change
Output dB change
is termed the compression ratio, so that if every 2 dB input change causes a 1 dB output change, the compression
ratio is 2.
Conventional “hard knee” compressors normally have a constant compression ratio when the input signal rises
above a user-preset “threshold level, but the C1 has a more sophisticated compression characteristic matched
better to the way the ears hear sound, rather than to an abstract mathematical law. This is not only a “soft knee”
law - designed to be neither too hard nor too soft, but involves other features allowing uses in different kinds of
compression modes.
C1 Set-up Guide Manual
1717
17
1717
Page 19

The C1 allows three distinct kinds of compression of sounds -
• conventional high-level compression, for which the highest sound levels above a threshold are compressed
and reduced in level.
• mid-level compression, in which sounds in the middle of the dynamic range are compressed, but where
both very low level and very high level sounds are not compressed.
• low-level compression, for which the very quietest parts of a sound are raised in level to make them louder
or more audible, but the louder parts of a sound are unaffected.
Typical high-level compressor setup.
Typical mid-level compressor setup.
C1 Set-up Guide Manual
1818
18
1818
Page 20

Typical low-level compressor setup.
-
These three kinds of compression all have important uses, and this flexibility of the C1 makes it a much more
effective tool for obtaining precisely the kind of compression needed in any given application. Using conventional
high level compression in an attempt to solve all problems often results in an over-compressed sound which has
“all the life squeezed out of it”, whereas choosing the appropriate form of compression can result in a much more
pleasant and natural sound.
Setups for all kinds of compression in the C1 are available. In each case, the other dynamic module can be used
for other tasks, often to solve problems that arise when compression is applied. Compressed sounds often have
excessively audible low-level noise, or other low-level sounds such as room reverberation or echoes can be
increased to an annoying level. The other processing module can often be used to counteract these problems.
Setups in the Library using the three types of compression include:
High-level compression:
C1 Classic Compressor/Gate
C1 Classic Compressor/Expander
C1 Classic DeEsser + Gate
C1 Compressor + EQ
C1 HLcompress + DeHiss
C1 HLcompress+bass/treb enhance
C1 HLcompress+treble enhance
Mid-Level compression:
C1 Multimedia Speech 1
C1 Multimedia Speech 2
C1 Speech Compress/Expand 1
C1 Compressor + De-Reverb
C1 Compressor + DeEsser 1
C1 MLcompress+bass/treb enhance
C1 MLcompress+treble enhance
C1 Set-up Guide Manual
1919
19
1919
Page 21

Low-Level compression:
C1 EQ + LLcompressor
C1 De-Ess + LLcompress
In general, wherever a wideband high-level compressor is used in the Comp/Exp module, it may be replaced by a
mid-level compressor, and vice-versa, by pasting Comp/Exp control settings from one setup to another.
Which type of compression?
The choice of type of compression depends on what you wish to achieve, and also the nature of the sound file.
If the aim is simply to get the loudest sound possible, then high-level compression or limiting should be used. But
be aware that this can also cause the compressed sound to lack a sense of dynamics and seem oppressive.
Additionally, especially over cheap reproducing systems with small loudspeakers (e.g. portable radios, portable
headphone stereos and small computer loudspeakers), the high average levels can drive the amplifiers or
loudspeakers into distortion, giving a fatiguing and unclear sound for the listener.
If however, the aim is not loudness for its own sake, but to ensure that the quietest passages are clearly audible
even under difficult or noisy listening conditions (e.g. in an automobile) or via systems with a high floor noise or
distortion level (e.g. 8 bit multimedia files), then what you may need is low-level or mid-level compression. This
raises the quieter passages above the low level at which they are not adequately audible. This will make those
passages clearly audible and less prone to low-level noise or distortion without losing the sense of high-level
dynamics, and without pushing all louder sounds to near peak level.
Mid-level compression combines these virtues with making the wanted sound seem louder, by raising the level of
the middle sound levels at which signals such as speech spend most of the time.
Low-level compression is preferred where you do not necessarily wish to make the louder sounds in a sound file
louder still, but where you need to make the quietest passages or details of sound more audible. Classical music,
or drama or documentary where background ambiences need to be made more audible, particularly can benefit
from low-level compression.
C1 Set-up Guide Manual
2020
20
2020
Page 22

Chapter 4 - Simple Setups
Multimedia Speech setups
These setups are wideband compressors + gates or downward expanders suitable for use when preparing
multimedia speech files, especially those that will later be reduced to 8 bit resolution. This setup may also be used
with other multimedia sounds and with speech in other applications where loudness must be combined with
quietness between words.
With 8 bit multimedia files, the 8 bit quantization introduces several quality problems. If the sound is above the
quantization “floor” level, the quantization sounds like a steady hiss, and it is desirable to minimize its subjective
level by maximizing speech loudness. However, if this is done, any background noise is brought up in level, and is
liable to give cause the quantization noise to sound very unpleasant between words, with a distinctly “grainy” and
intermittent quality. The solution here is to combine mid-level compression to bring up speech levels to be above
the quantization noise level during syllables, with gating or effective downward expansion of low-level input
signals to prevent them causing the granular sound of bad quantization noise. To minimize loss of quality, this
processing should be done on 16 bit files on the C1 possibly at a 44.1 or 48 kHz sampling rate, later using a
specialist tool such as the Waves L1 Ultramaximizer to perform the final stage of conversion after sampling rate
conversion to maximize file levels and convert to 8 bits.
Soft-knee mid level compression of the kind unique to the C1 is ideal for multimedia speech, since it compresses
the middle speech levels at which speech spends most of its time, without “squashing” the dynamics of speech
peaks or of low-level sounds. In this way, a more natural loud sound is obtained than by using conventional highlevel compression. The problem that quiet sounds are brought up a great deal in level is solved by the gating or
downward expansion.
C1 Set-up Guide Manual
2121
21
2121
Page 23

Setup name: C1 Multimedia Speech 1
The Comp/Exp module is set up as a mid-level compressor to squeeze the top 60 dB of the input dynamic range
into the top 40 dB of the output dynamic range, as can be seen from the yellow input/output curve on the graph,
This causes a large gain increase at low levels as can be seen from the yellow bar in the Comp/Exp gain reduction
meter. The threshold and ratio (between perhaps 1.5 and 3) may be adjusted to vary this compression curve,
using the “PeakRef mode” to keep the top of the curve in the right place.
The high gain of low level sounds thus caused (20 dB for the setup illustrated above) may be counteracted by
using the Gate/Exp module as a gate to switch off sounds below a certain level. The gate is a conventional one
with GateOpen and GateClose thresholds, Attack, Release and Hold adjustments. The values shown are typical of
those useful in gating speech, although each case will require different adjustment. For multimedia 8 bit applications, a floor of minus infinity as shown should be used, and the GateOpen thresholds should not be much lower
than shown to avoid audible inter-syllable quantization granularity in the final 8 bit sound file.
For gating speech with attack times such as 2 msec or even 5 msec, initial speech sibilants tend to get diminished
or cut off unless you use lookahead in the “Yes” position.
Setup name: C1 Multimedia Speech 2
This setup is not illustrated because it is identical to the above except that the Gate button is switched to “Ex-
pander” mode (this may be done by clicking on it). This turns the Gate into a downward expander, whose
adjustments are similar except that GateClose and Hold are inoperative. The downward expander, used at an
extreme “negative polarity” floor setting of -10 N, gives a useful degree of reduction of background noises, and
may often be preferable to a gate on account of its gentler “soft knee” reduction of gain.
Equalizer with Wideband dynamics processor
Among the simplest setups to understand are those that combine a single conventional wideband dynamics
processor with a simple equalizer, allowing both dynamics processing and EQ to be carried out in a single step.
The C1 allows one of its modules to be used for dynamics processing, while the other one is used in a mode
where no dynamics processing occurs, but where the use of “split band” plus a suitable “makeup gain” in that
band gives equalization.
Setup name: C1 EQ + Gate
The Gate/Comp module in this setup is a normal “wideband” gate, and it may be adjusted in the usual way for
gates. It is here operated in “lookahead” mode to minimize loss of starting transients.
The Comp/Exp section is set to ratio 1 so that it does absolutely no processing, but it is in split band mode, which
allows the gain of the active frequency band (shown in red on the following graph) to be raised or lowered.
C1 Set-up Guide Manual
2222
22
2222
Page 24

Adjustment of the EQ in no way affects the operations of the gate. The twoAdjustment of the EQ in no way affects the operations of the gate. The two
Adjustment of the EQ in no way affects the operations of the gate. The two
Adjustment of the EQ in no way affects the operations of the gate. The twoAdjustment of the EQ in no way affects the operations of the gate. The two
processes are completely independent.processes are completely independent.
processes are completely independent.
processes are completely independent.processes are completely independent.
The equalizer gain in the active band is adjusted by click-and-dragging the Makeup gain Value Window (highlighted in the previous graphic). The filter type, frequency and Q controls may be used to adjust the shape of
equalization used. As loaded, the bass below 125 Hz and treble above 4 kHz is boosted (for Makeup gain greater
than 0 dB) or cut (for Makeup gain less than 0 dB). The is achieved by using filter type bandreject, which
attenuates middle frequencies but lets through low and high.
Other filter type settings obtained by clicking on the type button are:
lowpass, which may be used to boost or cut lower frequencies,
highpass, which may be used to boost or cut higher frequencies, or
bandpass, which may be used to boost or cut a band of frequencies centered at the preset frequency.
C1 Set-up Guide Manual
2323
23
2323
Page 25

The EQ may be switched in or out by clicking on the Comp/Exp bypass button (over the Comp/Exp bar meters).
The Gate may be switched in or out by clicking on the Gate/Exp bypass button (over the Gate/Exp bar meters).
Setup name: C1 EQ + LLexpander
This setup combines an equalizer with a conventional wideband low-level (or downward) expander.
The equalizer is used as in the C1 EQ + Gate setup, and the low-level expander is implemented by the Gate/Exp
module, whose controls are used in the usual way. This setup may be used for example when the equalization
brings up background noises, where the expander may help to reduce them again without having the sudden
switching effect that can be caused by a gate.
The EQ may be switched in or out by clicking on the Comp/Exp bypass button (over the Comp/Exp bar meters).
The LLexpander may be switched in or out by clicking on the Gate/Exp bypass button (over the Gate/Exp bar
meters).
Setup name: C1 EQ + LLcompressor
This setup combines an equalizer (implemented and adjusted as in the previous two examples by the Comp/Exp
module makeup gain plus the filter module) and a low-level compressor implemented by the Gate/Exp module.
The Low level compressor brings up the level of low-level sounds below a threshold set by the GateOpen control.
The amount of boost, between 0 and +12 dB, is set by adjusting the Floor control. This effect is useful to make
inaudible low-level details in a sound more audible, whether these are background ambient noises needed for
“atmosphere”, quiet from-audience speech at a low level in a conference recording, or quiet noises associated with
a louder sound whose increase in level will make the sound seem “hyper-real”.
The equalization, adjusted as before, does not affect the low-level compression dynamic processing, but only the
tonal quality of the result.
The EQ may be switched in or out by clicking on the Comp/Exp bypass button (over the Comp/Exp bar meters).
The LLcompressor may be switched in or out by clicking on the Gate/Exp bypass button (over the Gate/Exp bar
meters).
Setup name: C1 Compressor + EQ
Unlike the previous setups, this has the Comp/Exp module used for wideband dynamic processing and the Gate/
Exp module set up in split mode with the filter as an equalizer.
The equalizer is adjusted exactly as before, except that now the floor control is used to adjust the EQ gain rather
than the Makeup control. So the floor control is raised to increase gain in the active band and lowered to decrease
it.
The Comp/Exp module is adjusted as a high level compressor in the conventional way with threshold, makeup
gain, ratio, attack, release and PDR (program dependent release) controls adjusted in the usual way, and as
described in the C1 User’s Guide.
C1 Set-up Guide Manual
2424
24
2424
Page 26

The Compressor may be switched in or out by clicking on the Comp/Exp bypass button (over the Comp/
Exp bar meters).
The EQ may be switched in or out by clicking on the Gate/Exp bypass button (over the Gate/Exp bar meters).
The Comp/Exp section may also be set up as a mid-level compressor as used in the multimedia speech setups of
section 4.1 above.
C1 Set-up Guide Manual
2525
25
2525
Page 27

Chapter 5 - Compression
compressor setups
Here we describe a few more setups combining compression with other functions. For a basic review of compression see sections 3.5 and 3.6 above.
Speech compressor/expander 1
Setup name: C1 Speech Compress/Expand 1
This setup allows a high degree of speech compression and increased level with minimum effect on the naturalness of speech sound. The more natural compressed quality has the downside that the objective unweighted
dynamic range can vary more widely than with a wideband compressor.
One important feature is the use of a sidechain EQ that rolls off gently in the bass - note the low Q. (The actual
sidechain EQ in dB is 1.5x the number of dB indicated). This reduction of bass gives a much better and more
natural compressed sound on speech, and a much less “constricted” sound. Typically the best effect occurs for
frequencies from 60 to 180Hz.
C1 Set-up Guide Manual
2626
26
2626
Page 28

The Comp/Exp module is used as a mid-level compressor, and the ratio and threshold controls can be adjusted
to taste over a range in which the ratio may be varied between 1.5 and perhaps 5 and the threshold between - 30
and say -70 dB.
Although the sidechain EQ gives a more natural sound, the high degree of compression brings up background
noise and reverb. This may be countered by the low-level expander of the Gate/Exp module, set to come into
action at the bottom of the compression curve, and also using the sidechain EQ.
This has the effect of reducing noise and also any room reverberation present.
GateOpen is the threshold for downward expansion of noise and reverb, and a setting as high as possible that has
little or no audible effect on speech level is recommended, providing that this does not cause too much audible
modulation of noise.
One may drag all thresholds (for Comp/Exp and Gate/Exp module) together by click-and-dragging the button
between the threshold and GateOpen Value Windows when adjusting threshold to particular speech and
background noise characteristics.
The compressor may be bypassed by clicking on the Comp/Exp button, and the expander may be bypassed by
clicking on the Gate/Exp button.
Mid-level compression plus speech De-reverberation
C1 Set-up Guide Manual
2727
27
2727
Page 29

Setup name: C1 Compressor + De-Reverb
This setup uses the Comp/Exp module as a mid-level compression unit and squeezes the top 60 dB of dynamic
range into 40 dB without compressing the lowest or highest level sounds. Such mid-level compression is useful
for making sounds louder and for fitting sounds into the limited dynamic range of say 8 bit multimedia files,
without causing the sound to drive peak levels so hard that the sound becomes unpleasant on cheap systems.
Such mid level compression, however, brings up low level parts of the sound by around 20 dB and this can cause
unpleasant side effects. The Gate/Exp module can be used in various ways to reduce these side effects.
One side-effect on speech is that room reverberation, which can often already be unpleasant with recordings
made outside good studio settings, is further increased to unacceptable levels. The Gate/Exp module here is set
up to remove bass signal components at lows levels. This removes background rumble noises and bass components of reverberation tails. Especially on male speech, this has the subjective effect of reducing or removing
room reverberation, while having very little effect on speech tonal quality providing the GateOpen threshold is
set carefully by ear.
To switch mid level compression in or out, click on the bypass button over the Comp/Exp module bar meters.
To switch speech de-reverberation in or out, click on the bypass button over the Gate/Exp module bar meters.
Controls for mid-level compression:
Comp/Exp module used for mid-level compression.
• Makeup. as needed
• Threshold. -70 to -20.
• Ratio 1 to 3
• Attack, Release, PDR: As needed
Controls for bass de-reverberation:
Gate/Exp module set to bass de-reverberation
• GateOpen threshold. -40 to -15 set by ear to leave signal bass balance unaltered while diminishing reverb bass.
• Attack, Release: As needed - usually attack not too short (to avoid distortion of the bass frequencies) and
release not too long (to allow quick response to low level in the bass)
Other controls
• Lookahead
• Frequency: In range 200 to 600 Hz for best sound
• Output Level (has same function in this setup as makeup)
C1 Set-up Guide Manual
2828
28
2828
Page 30

High-level Compressor + De-Hisser.
Setup name: C1 HLcompress + DeHiss
This is two effects which may be used independently of each other (by bypassing the other) or together. Each may
be set-up and optimised independently - adjustments of one do not affect the other.
The Comp/Exp module is set up as a wideband High Level (HL) compressor with Makeup gain. Note that the
Comp/Exp ratio is set beyond the “infinite” setting of full limiting to a negative “over-limiting” ratio setting to
bring down peaks a little further. This is very effective providing any cancellation nulls lie beyond 0 dB.
The use of compression with gain has, however, the side effect of bringing up any background hiss in a recording.
The Gate/Exp module is set up as a de-hisser to minimise the effect of his with least effect on the sound. It is a
low-level expander whose action is confined to a carefully-tuned frequency band centered around 7.5 kHz. (See
chapter 6 for more information on noise reduction.)
The filters chosen here for de-hissing are generally suitable for hiss with a white, pink or blue spectrum, requiring
only perhaps a couple of kHz up or down tuning of frequency - beware however that one is not tuning out hiss
emphasis due to a monitor speaker coloration! The tonal effect of the maximum available hiss reduction can be
heard by setting the Monitor button to passive mode. The Q setting turns out to be fairly critical - lower will filter
out more hiss, but modulation noise - variations of the hiss up and down with the wanted signal, will become
C1 Set-up Guide Manual
2929
29
2929
Page 31

more audible. A Q of 0.5 is about the best compromise, although a Q of up to 0.6 can be used. Generally, the
optimum filter settings do not have a lot of leeway and end up close to those in the setup.
The GateOpen threshold setting is the critical one for de-hissing; it should be adjusted up and down until the
highest setting that has no significant unwanted effect on tonal quality of the signal is found. This is the optimum
de-hiss setting. The setting is a trade-off between loss of treble on the wanted signal and hiss level. On most
speech and popular music without very wide dynamics, there is usually a good setting that has very little tonal
effect but a subjective hiss reduction of 6 dB or more. The above GateOpen setting was for a white hiss at a level
of only -45 dB relative to digital peak - very hissy indeed, but had little tonal effect.
Generally speaking, de-hissing is more difficult on material with a very wide dynamic range, since the tonal
effects in quiet passages will be more audible.
Useful Controls:
Comp/Exp module set to high-level compression/limiter.
• Makeup. as needed
• Threshold. -30 to 0.
• Ratio -50 to -5 or 1 to 50 as needed
• Attack, Release, PDR: As needed
Gate/Exp module set to de-hissing
• GateOpen threshold. -25 to -80 set by ear to leave signal treble balance unaltered while diminishing hiss.
Other Useful controls
• Frequency: In range 5000 to 10000 Hz for lowest perceived hiss
• Q: In range 0.45 to 0.6 for best trade off of modulation noise versus hiss reduction
• Output Level (has same function in this setup as makeup)
C1 Set-up Guide Manual
3030
30
3030
Page 32

Chapter 6 - C1 Noise Reduction
About Dynamic Noise Reduction
The C1 becomes a very powerful and effective single-ended noise reduction system when loaded with Noise
Reduction, De-Hiss or De-Rumble setups. It allows reduction or removal of hiss, rumble or other background
noises with the minimum of side-effects.
Noise can usually be reduced or removed from a sound file by heavy filtering of the most audible noise frequencies, but this usually also severely degrades the tonal quality of the wanted signal. Another conventional method
of reducing noise is to gate or downward-expand low-level sounds, but this also often has the side-effect of
altering or removing wanted low-level sounds that are not in the noise frequency range - and one can usually
hear the noise coming and going as signal level alters..
In noise reduction setups, the C1 acts as an intelligent filter that only filters noise when it has to, leaving the
wanted signal unfiltered when the wanted signal is loud enough to mask the noise in the frequency band being
noise-filtered. It combines the virtues of a noise filter and of a downward expander or gate, while minimising the
weaknesses of both.
The principle of dynamic filtering of noise, filtering the signal only when it is below a threshold level in the
frequency band of greatest audibility, is not a new one. But in the C1 implementation, the frequency band shape,
the nature of the dynamic and sidechain filtering, the attack and decay time constants, the expansion law and the
nature of the filter as it dynamically varies have all been optimized for optimum subjective results.
Understanding that the noise reduction is a filter that comes in or fades out as the signal energy varies in the
noise band is important. Too much filtering, and the wanted signal is affected. Too little filtering, and a lot of
noise remains. The adjustment of the noise reduction setups is to obtain the optimum compromise between too
much filtering and too much noise.
But it is also important to be aware of a potential side effect - noise modulation. As the filter comes in or goes out,
one may hear also the effect of noise modulation, i.e., the noise level going up and down with the wanted signal.
This can be a very distracting effect, and sometimes it is less distracting to leave some noise in than to suffer from
excessive noise modulation.
All available forms of noise reduction suffer from audible side effects, and require the user to listen carefully, and
to adjust them to minimize these. We believe that the C1 offers the best trade-offs among available dynamic filter
noise reducers, having fewer side effects for a given degree of noise reduction.
The use of the C1 noise reduction is now described with reference to the setups provided in the C1 setups library.
You should load the setups described and try them out on appropriately noisy soundfiles, adjusting them as
described below.
C1 Set-up Guide Manual
3131
31
3131
Page 33

C1 Hiss Reducers
Setup name : C1 Noise Reducer
This is intended for Hiss reduction. It provides two stages of processing. The dynamic noise filtering is provided
by the Gate/Exp module, used in Bandsplit mode with the filtering shown on the frequency response graph. The
band shown in red is the band whose level is reduced in quiet passages to reduce hiss.
An optional wideband low-level expander is provided by the “Comp/Exp” module. This can, optionally, be used
to gently pull down further the level of any very quiet passages in which the reduced noise may still be audible. It
can be switched in or out at the user’s option by clicking on the Comp/Exp button to bypass the Comp/Exp
module. The noise reduction works very effectively on its own, and this low-level expander is provided simply to
provide a further reduction in quiet passages if desired.
The adjustments to the Noise Reducer (Gate/Exp module) are essentially just three controls:
(i) GateOpen threshold in the Gate/Exp module.
Moving this upward will increase the amount of filtering both of the signal and noise, moving it down will
decrease the amount of filtering. Normally, one would use the highest setting that does not audibly degrade the
wanted signal or cause objectionable modulation noise. The precise setting is a judgement depending on the skill
and aims of the user.
C1 Set-up Guide Manual
3232
32
3232
Page 34

Hint. It is often best to adjust the GateOpen level by click-and-dragging the button (highlighted in the previous
picture) between the threshold and GateOpen Value Windows. This has the effect of moving both GateOpen and
Comp/Exp thresholds up and down together. The reason for this is that if you decide to use the low-level
expansion option for further reduction of noise in quiet passages, then the level at which this is effective remains
matched to the noise reduction GateOpen threshold.
(ii) Filter frequency.
This adjusts the center frequency of the frequency band subjected to filtering. Normally, this would lie somewhere between 5 and 10 kHz depending on the tonal balance of the hiss, with 7.5 kHz being a typical frequency
for “white” hiss noise.
(iii) Filter Q.
This adjusts the width of the filtered frequency band. The lower the Q, the wider the band and greater the
amount of perceived noise reduction, but lower Q’s also increase the risk of audible modulation noise effects. In
practice a Q of between 0.5 and 0.6 is usually best for this reason.
Hint: When adjusting the filtering, you may like to switch the Monitor button to Passive mode. This monitors the
“passive” band (shown on the frequency response graph in blue), which corresponds to the maximally filtered
signal. This allows you to hear the effect of the filtering on its own without the dynamic processing, and is useful
for tuning for minimum hiss audibility.
Switching between “Passive” and “Audio” monitor mode, by clicking on the Monitor button also provides a direct
comparison between conventional filtering and the noise reduced audio. In many cases, it will be found that the
noise reducer mode, once adjusted, almost magically gives the same noise reduction as the Passive mode, but
with little of the treble loss given by simple filtering.
Other controls that can be used.
Normally the above controls are all you need ever use for noise reduction adjustment, but a finer control is
possible if one has extra patience. The Floor control can be moved from its preset -10 N setting to less extreme
“negative polarity” settings between -10 N and -100 N or to floor settings below say -6 dB. This gives a reduced
noise reduction effect, but also reduces modulation noise. A combination of floor and GateOpen threshold may
give better results than GateOpen threshold alone, especially where only a partial degree of noise reduction is
required and where the noise background fluctuates in level. However, juggling the effect of these two controls is
more difficult than just using GateOpen threshold.
When the wideband expander is used, its effect may be adjusted by operating its threshold independently of that
of GateOpen, although the preset 30 dB difference in values is generally roughly right. The Comp/Exp module’s
attack, release and PDR values may be adjusted in the usual way for an expander for optimum sound.
In general, you should usually not alter the attack and release time constants from their preset values in the Gate/
Exp module - the values used are about optimum for hiss filtering applications, and also quite well matched to
high frequency “crackle” and 78 rpm surface noise.
C1 Set-up Guide Manual
3333
33
3333
Page 35

The use of high-pass filter mode for hiss filtering is generally less effective than the bandpass filtering shown
above, mainly because it gives more audible hiss noise for a given degree of tonal alteration, being less well
matched to the ear’s sensitivity to hiss.. However, if it is used, generally use Q = 0.6 to minimize modulation noise
effects.
This kind of setup can also be effective with other kinds of high frequency noise, including “scratch” noise from
old 78 rpm recordings, and even certain kinds of electrical buzz. For 78 rpm noises, the noise reduction may
work better if the Gate/Exp Attack is increased to 5 msec, with the Gate/Exp Release left at 1 msec.
Setup name: C1 Noise Reducer 2
This is a very powerful noise reducer also designed to reduce hiss and other high frequency noises. The Gate/Exp
module is used as a noise reducer identical to that in the above noise reducer. The Comp/Exp section, however, is
configured as a second bandsplit low-level expander also capable of achieving noise reduction. The two sections
combined give twice the amount of expansion action at low levels. This setup is useful where the maximum
degree of noise reduction is required without too much tonal effect on the wanted signal.
The adjustments to C1 Noise Reducer 2 are essentially just three controls:
(i) Click-and-drag on the highlighted button between threshold and GateOpen.
Moving this upward will increase the amount of filtering both of the signal and noise, moving it down will
decrease the amount of filtering. Normally, one would use the highest setting that does not audibly degrade the
wanted signal or cause objectionable modulation noise. The precise setting depends on the skill and aims of the
user.
(ii) Filter frequency.
This adjusts the center frequency of the frequency band subjected to filtering. Normally, this would lie somewhere between 5 and 10 kHz depending on the tonal balance of the hiss, with 7.5 kHz being a typical frequency
for “white” hiss noise.
(iii) Filter Q.
This adjusts the width of the filtered frequency band. The lower the Q, the wider the band and greater the
amount of perceived noise reduction, but lower Q’s also increase the risk of audible modulation noise effects. In
practice a Q setting of between 0.5 and 0.6 is usually best for this reason.
Hint: When adjusting the filtering, you may like to switch the Monitor button to Passive mode. This monitors the
“passive” band (shown on the frequency response graph in green), which corresponds to the maximally filtered
signal. This allows you to hear the effect of the filtering on its own without the dynamic processing, and is useful
for tuning for minimum hiss audibility.
Switching between Passive and Audio monitor mode, by clicking on the Monitor button also provides a direct
comparison between conventional filtering and the noise reduced audio.
C1 Set-up Guide Manual
3434
34
3434
Page 36

Longer attack times of 5 ms may be used in the two modules - this will have the effect of making the noise
reducer 2 work better with impulsive noises such as those on 78 rpm records. Leave the release time at 1 msec.
Either module may be switched out by clicking the Comp/Exp or Gate/Exp button to bypass the relevant
module.
Setup name: C1 Gate Noise Reducer
This noise reducer uses a bandsplit gate rather than an expander to cut out noise. This is extremely effective in
quiet passages, but results in audible sudden appearance and disappearance of hiss. This can be acceptable when
one sound source (e.g. a noisy keyboard or electric guitar) is part of a mix. This setup, also includes, in the
Comp/Exp module, a second gentle low-level bandsplit downward expander to provide some noise reduction
above the gate threshold, so as to make gate switching effects on noise less audible.
The adjustments for the Gate Noise reducer are the same as for Noise Reducer 2 above.
In addition, The GateClose (normally set between 0 and 9 dB lower than GateOpen) and Hold controls of the
gate can be used in the usual way to keep the gate open longer (during which it will let through more noise) if
desired to preserve more treble of the wanted sound..
Rumble Reduction
Setup name: C1 Rumble Reducer
This setup reduces bass rumble noises in much the same way that the previous setup reduced hiss noises. Many
recordings have excessive low frequency or “rumble” noise, either due to traffic, air conditioning or similar sound
sources, or due to air currents or other spurious noises transmitted to the microphone body. Rather than filter
out all low frequency sounds to remove these, a rumble reducer that retains bass response for higher level sounds
is often preferable, and can have virtually inaudible action.
Its mode of operation is identical to the previous noise reducer with just two exceptions: the filters are now tuned
for removing bass frequencies rather than treble, and (ii) the Gate/Exp Attack and Release time constants are set
to be longer to minimize bass distortion.
The filter frequency control may be adjusted by ear with the Monitor button in Passive mode to minimize the
audible rumble noise, Clicking on the Monitor button back to Audio mode, the GateOpen threshold may then be
adjusted to reduce rumble level while having the minimum effect on the tonal quality of wanted sounds.
As before, the Comp/Exp section is set up as a gentle low-level expander to reduce any residual noise in quiet
passages, and it may be adjusted by moving the threshold up or down. It may be removed from the algorithm by
clicking the Comp/Exp button into bypass mode.
Hint: If the rumble level is very high, it may not be possible to remove rumble without some tonal effect on the
wanted signal. In this case, one should first process the sound file to remove the very lowest rumble frequencies
by using the Waves Q10 parametric equalizer with a steep cut high-pass filter, for example one taken from the
Q10 setups Library bandlimit filters such as the high-pass filter from the Broadcast44.1.setup, adjusted to cut off
C1 Set-up Guide Manual
3535
35
3535
Page 37

at the highest acceptable frequency. In the case of deep rumble, this will remove the largely inaudible but very
high energy very low frequencies. The C1 Rumble reducer should then be used on the processed file to reduce the
more audible remaining components of rumble.
If a Q10 parametric equalizer is not available, the C1 itself may be used as a high pass-filter for the first stage of
processing by loading the setup C1 high-pass filter described below. This may be adjusted in frequency and used
for processing to remove the lowest rumble frequencies before the C1 Rumble reducer is applied. However, the
sharpness of filtering is less good than can be achieved using the Q10.
Setup name: C1 High-pass filter.
This uses the “Active” monitor mode position (normally used for monitoring the sidechain signal) as a 36 dB per
octave high pass filter for applications such as cutting out infrasonic and deep bass rumble sounds. The cut-off
frequency may be adjusted by adjusting the frequency Value Window, which actually shows the frequency at
which the filter is 9 dB down. An octave higher the filter is only about 1.5 dB down, and an octave lower about 30
dB down. This filter may be used as the first stage in processing where the C1 Rumble Reducer described above is
used as the second stage of processing.
Removal of miscellaneous noise
The reduction of noise or background sounds with arbitrary frequency spectrum, rather than just hiss or rumble,
involves a greater degree of user patience, experimentation and skill in setting up the C1. The method is as
follows.
Load either the C1 Noise Reducer or the C1 Rumble Reducer setup. Initially, click the Monitor button to Passive
mode, and tune the filter, using the type, frequency and Q controls for a useful degree of reduction of the
unwanted background noises, while making sure that the removal of wanted sounds is not excessively severe. (It
is in making this judgement that personal skill and experience are important). Then click the Monitor button
back to Audio mode.
One should set up the Attack and Release times of the Gate/Exp section according to the active band response
shown in red on the frequency response display. The rule here is to make Gate/Exp Attack and Release times
roughly equal, or Release perhaps only twice as large as Attack, and to set Attack at around 1 ms if the active band
response shown in red on the frequency response display is shown as below say -15 dB at all frequencies below 1
kHz. If the active band response is more extended at low frequencies, then longer Gate/Exp attack and release
times should be used to prevent nonlinear distortion, with Attack and Release times being increased inversely as
the bass response frequency of the active band is lowered, up to around 7 ms for an extended bass component in
the active band.
One then sets the GateOpen threshold to achieve the desired trade-off between noise reduction and unwanted
effects on the wanted signal. In the event that a satisfactory degree of noise reduction is obtained only at the
expense of excessive low-level “pumping” of the signal, there are two things you can do to improve the trade-off.
First, you can reset the filter so that the active band affects a smaller frequency range, affecting less of the wanted
signal. If this does not produce the desired results, you can use the floor control set to somewhere in the range -5
dB to -15 dB to reduce the amount of wanted-signal pumping. This will also reduce the degree of noise reduction, but may give a more satisfactory trade-off, achieving moderate noise reduction but with fewer side effects.
C1 Set-up Guide Manual
3636
36
3636
Page 38

In some situations, you may prefer to set the Gate/Exp module mode to “Gate” rather than “Expander”, especially
if the noise is only obtrusive in “quiet” gaps in the program material and not during loud passages, and generally
in that application you may use somewhat longer Gate/Exp release times of up to say 100 msec. Such gate settings
may be used also if the sound is just one component in a mix.
C1 Set-up Guide Manual
3737
37
3737
Page 39

Chapter 7 - De-Essers
On De-Essers
De-essers are essentially dynamic processors that reduce the signal gain during peak-level sibilants (“esses”) by
operating a gain reduction during high levels in the “Ess” frequency band typically centered at about 7 kHz. They
are used to reduce excessive sibilance in speech and other vocal sounds.
Two different kinds of de-essers can be implemented on the C1:
Sidechain de-essers, which reduce the gain of all frequencies in the signal during a high level in the “Ess”
frequency band. This is the most familiar type of de-esser, and
Bandsplit de-essers, which reduce the gain only in the “Ess” frequency band but leave other frequencies unaltered.
De-essers also differ in the degree of gain reduction as the “Ess” level increases, and different implementations
produce different tonal qualities to de-essing. Which is preferred is partly a question of subjective choice, and
partly a question of what other functionality (e.g. compression, gating, noise reduction, etc.) is also available with
a particular de-esser in the C1.
Which kind of de-esser?
There are 5 different de-esser modes possible on the C1. These are:
(1) using the Comp/Exp module in sidechain mode
(2) using the Comp/Exp module in split mode
(3) Using the Gate/Exp module in Expander sidechain mode + gain makeup
(4) Using the Gate/Exp module in Expander split mode + Comp/Exp makeup in split mode .
(5) Using the Gate/Exp module in Gate split mode + Comp/Exp makeup in split mode.
Each of these de-essers have a different sound and also allow use with different combinations of processing. So
the choice will be made partly on sound and partly on other processing one wishes to do at the same time.
Sidechain v. bandsplit de-essers
Sidechain de-essers have the least tonal effect on the sound, their downside being that their gain variations can
sometimes be heard as gain pumping or instability.
Bandsplit de-essers work by varying the gain in the Ess-band. Generally, these have far fewer gain instability
effects, since they only affect the Ess band, but their downside is that they can also cause a tonal dulling. This
effect tends to be least if the Gate-Split de-esser is used and most if the Comp/Exp module split de-esser is used.
C1 Set-up Guide Manual
3838
38
3838
Page 40

The setups below all use one dynamics module for the main de-essing and the other for other tasks. Where
stated, the other module may be switched out if not required.
Compressor + De-Esser
Setup name: C1 Compressor + DeEsser 1
This setup combines a compressor (here set to mid-level compression using the Comp/Exp module in PeakRef &
wideband mode) and a de-esser implemented using the Gate/Exp module in sidechain expander mode. The -12
dB output gain is intended to compensate for the +12 dB floor gain used in the de-essing in the Gate/Exp
module. Any additional desired change of output gain may be used.
The compressor may be switched in or out by clicking the bypass button above the Comp/Exp module meter
bars. The de-esser may be switched in or out by clicking the Gate/Exp bypass button above the Gate/Exp meter
bars.
De-Essing adjustments
The GateOpen level is used to adjust the degree of de-essing. You can see by the grey area at the top of the gain
reduction meter of the Gate/Exp module, and by the level metering on the light blue line on the input/output
graph how the high-level sibilant sounds are being reduced in level. The frequency band of de-essing, shown in
red on the frequency response graph, may be adjusted by altering the filter frequency (typically in the range 5000
to 11000 Hz) and the Q (typically 0.4 to 0.6).
Compressor adjustments
The ratio (typically in the range 1.0 to 3.0) of the compressor, and its threshold (typically in the range -35 to -60
dB) may be used to adjust the compression effect to taste, and the attack, release and PDR may also be altered as
usual. The degree of low-level gain increase given by the compressor is indicated by the yellow bar of the gain
reduction meter of the Comp/Exp module.
De-Ess & De-Hiss
Setup name: C1 De-Ess + De-Hiss 1
This setup uses the Comp/Exp module in sidechain mode as a de-esser, and the Gate/Exp module in split
expander mode as a de-Hisser, They share the filter setting, but are otherwise independent. Either module may be
bypassed or substituted by another setup for that module without affecting the functioning of the other.
The de-esser may be switched in or out by clicking the bypass button above the Comp/Exp module meter bars.
The de-hisser may be switched in or out by clicking the Gate/Exp bypass button above the Gate/Exp meter bars.
C1 Set-up Guide Manual
3939
39
3939
Page 41

De-essing adjustments
The Comp/Exp module is set up to “duck” in level whenever high levels arrive in the active “Ess” frequency band.
Altering the threshold control alters the degree of de-essing. You can see by the level metering on the yellow line
on the input/output graph and the gain reduction meter (shown in color as a red bar) in the Comp/Exp module
how the high-level sibilant sounds are being reduced in level. The ratio control in the range say 2 through 50 to 5 can also be used to alter the quality of the de-essed sound. Generally, ratio settings near 2 or 5 give a moderate
degree of de-essing but few unnatural side effects. Ratios near 20 to 50 or -50 to -25 give more effective de-essing,
but more side effects, and negative ratios if overdone with too low a threshold can result in an over-processed
effect that sounds like the speaker has lost his/her teeth!
De-hissing adjustments
The Gate/Exp module is set up as a de-hisser, and the degree of de-hissing can be adjusted by moving the
GateOpen threshold up or down until the effect on tonal quality is minimal. This allows a trade-off between
degree of hiss reduction and alteration of tone quality. You can see from the gain reduction meter (shown in
color as a red bar) in the Gate/Exp module how much hiss reduction is taking place.
Small adjustments in frequency and Q can be used to optimise either the de-hissing or de-essing, or some
compromise between the two.
Hint. When using both effects together, in setting up the de-hissing or de-essing, it is helpful to switch the other
processing module to bypass by means of the bypass button above the bar-meter section of the other module.
That way one can avoid confusion caused by the interaction of the two processes. Once each is set up individually, switch in both and make final adjustments to each to minimise any tonal dulling. Note that to avoid dulling,
the threshold should always be set at least 15 dB, preferably more, below GateOpen.
De-Ess + LowLevel compressor
Setup name: C1 De-Ess + LLcompress
This setup uses the Comp/Exp module in sidechain mode as a de-esser and the Gate/Exp module in wideband
expander mode with positive floor gain as a low-level compressor to make sounds louder.
The de-esser may be switched in or out by clicking the bypass button above the Comp/Exp module meter bars.
The low-level compressor may be switched in or out by clicking the Gate/Exp bypass button above the Gate/Exp
meter bars.
The Comp/Exp module is set up to “duck” in level whenever high levels arrive in the active band. Altering the
threshold control alters the degree of de-essing. The ratio control in the range say 2 through 50 to -5 can also be
used to alter the quality of the de-essed sound.
The filter may be tuned in frequency and Q slightly to alter the predominant de-essing frequency band. One can
monitor the selection of Ess frequencies by switching the monitor button to “sidechain”.
C1 Set-up Guide Manual
4040
40
4040
Page 42

Control of low-level compression
The floor control, between 0 and 12 dB and the GateOpen threshold of the expander module can be used to
adjust the degree of low-level compression. Higher settings of floor give a higher degree of compression. The
threshold adjusts the sound level below which compression occurs. The attack and release times of the low-level
compressor can be adjusted to taste in the usual way for a compressor. Use of lookahead in the “yes” position is
usually recommended.
Bandsplit De-Ess, De-Hiss and EQ
Setup name: C1 De-Ess + EQ + De-Hiss 2
This is very similar to C1 De-Ess + De-Hiss 1 except that now the de-esser is working in bandsplit rather than
sidechain mode. Adjustments are made in much the same way as for the C1 De-Ess + De-Hiss 1 setup, although
the sound quality of this de-esser is rather different, often requiring significantly lower threshold settings.
A second difference of this setup is that it can additionally be used to alter the EQ by altering the level of the
active band, using the makeup gain to boost or cut the active band. This helps to compensate for any slight
dulling of mid-level sounds given by the combination of de-essing and de-hissing, or may be used to provide
additional tonal alteration.
Bandsplit De-Hiss, De-Ess and EQ
Setup name: C1 De-Hiss + EQ + De-Ess 3
This setup combines a de-hisser using the Comp/Exp module in PeakRef & bandsplit mode) and a de-esser
implemented using the Gate/Exp module in bandsplit expander mode. The -12 dB makeup gain in the Comp/
Exp module is intended to compensate for the +12 dB floor gain used in the de-essing in the Gate/Exp module.
Any additional desired change of output gain may be used.
The de-hisser may be switched in or out only by altering the value of ratio to 1, since its make-up gain is part of
the functioning of the de-esser. The de-esser may be switched out by clicking the Gate/Exp bypass button above
the Gate/Exp meter bars and also altering the makeup gain to 0 dB.
De-Essing adjustments
The GateOpen level is used to adjust the degree of de-essing. You can see by the grey area at the top of the gain
reduction meter of the Gate/Exp module, and by the level metering on the light blue line on the input/output
graph how the high-level sibilant sounds are being reduced in level. The frequency band of de-essing, shown in
red on the frequency response graph, may be adjusted by altering the filter frequency (typically in the range 5000
to 11000 Hz) and the Q (typically 0.4 to 0.6).
C1 Set-up Guide Manual
4141
41
4141
Page 43

De-Hisser adjustments
The threshold (typically in the range -65 to -100 dB) may be used to adjust the de-Hissing effect to obtain the
best compromise between hiss level and alteration of tonal quality of the wanted sound. The degree of hiss
reduction at each moment is indicated by the red bar of the gain reduction meter of the Comp/Exp module.
You should try and ensure that the de-hissing threshold is not too close to the de-essing threshold, since otherwise there will be a significant loss of the “ess” frequencies at all signal levels.
EQ adjustments.
You can alter the overall tonal quality further by adding additional EQ in the active band. This may be done by
varying the Makeup gain up or down around its normal level. This can also help to compensate for tonal losses
due to the combined effect of the de-hissing and de-essing.
Setup name: C1 De-Hiss + EQ + De-Ess 4
This is used identically to the previous set-up, differing from it only in that the Gate/Exp module is now in gate
rather than expander mode.
However, the more extreme sudden change of gain above the “Ess” threshold given by the gate means that the
subjective effect of this setup is very different. In some cases, it will be found to be very effective at de-essing, but
in other cases, the effect may be found to be overdone.
C1 Set-up Guide Manual
4242
42
4242
Page 44

Chapter 8 - Enhancers
About enhancement
Quite often one wishes to add clarity and/or depth to a soundfile to give it more “pizazz”, intelligibility or impact.
This can be done using conventional equalization, but all too often this has the side effects of making bass boomy
or treble harsh and uncomfortable. The C1 enhancement modes allow clarity and depth to be added either to a
single sound or to a complete mix with far fewer unpleasant side effects.
The general idea of these enhancers is to boost bass or treble frequencies only at lower levels below a threshold,
but not at high levels. This ensures that the loudest, and potentially most oppressive, parts of the sound do not
have an exaggerated bass or treble, while the quieter parts have the extra warmth or sparkle obtained by being
boosted in level. Generally, the choice of boosted frequencies is fairly critical for optimum effect, although the
choice may depend to some extent on the sound being processed.
Speech and vocal enhancer (with optional mid-level compressor).
C1 Set-up Guide Manual
4343
43
4343
Page 45

Setup name: C1 Speech Enhancer
The Gate/Exp module is here used in bandsplit mode to boost speech presence frequencies for enhanced
intelligibility without the degree of unpleasant harshness or sibilance associated with conventional presence EQ.
These frequencies are boosted by the setting of the floor control at low levels only, the threshold for those levels
being set by the GateOpen threshold control.
The selective boosting only of lower levels in the presence band achieves a clarity and an ability for speech or
vocals to cut through noisy listening environments (or dense mixes) without the unpleasantness given by simple
EQ used to the same end, and the results still sound reasonable on high-quality reproduction systems.
Adjustment
The degree and subtlety of the effect may be varied by adjustment of the floor level boost between 0 and +12 dB
(which acts as a presence gain control), with higher settings giving a greater effect, and the GateOpen threshold lower GateOpen settings of threshold give a more subtle effect and higher ones a more blatant effect.
This is an effect that can be used subtly, almost subliminally, to just make speech (or musical vocals) seem more
“present” without any very obvious change of tonal quality in a mix, or it can be used to provide blatant tonal
changes with fewer than usual side effects.
This is usually best with frequency and Q settings roughly as shown - lower frequencies tends to start
emphasising harshness, and higher frequencies emphasise brightness rather than vocal intelligibility - however,
this may be an effect that may be wanted to brighten mixes without serious side effects.
The Comp/Exp module , shown bypassed above, is set up for a moderate degree of wideband mid-level compression, suitable for making speech louder without making peak levels drive the reproduction system too hard too
much of the time. The compression effect may be adjusted by moving the threshold up or down and the
compression ratio between say 1 and 3.
C1 Set-up Guide Manual
4444
44
4444
Page 46

Brightness enhancer + compensating noise control.
Setup name: C1 Treble Enhancer
The primary function of this setup is to act as an effective “brightness enhancer”. This is provided by the Gate/
Exp module in split mode. It will be noted that many consumers prefer the sound of Dolby™ B cassettes without
Dolby™ decoding because of the low-level brightness enhancement done by that process, and the basic enhancement idea here is similar, but more controllable. High frequencies are boosted by up to 9 dB, the degree of boost
being controlled by the floor control, and this boost takes place below a threshold set by the GateOpen threshold.
These two controls may be tuned - floor between 0 and + 12 dB and GateOpen typically between -20 and -60 dB,
for optimum enhancement of a particular mix or sound. The effect gets more subtle as GateOpen and Floor are
lowered, and more blatant as they are raised.
The yellow bar on the Gate/Exp gain reduction meter can be used to monitor the degree of gain increase in the
treble moment by moment.
The Comp/Exp module is here used in an unusual low-level expansion bandsplit mode to solve the problem that
the enhancer also raises the level of any low-level hiss noise present, by acting as a gentle noise reducer at very low
levels to pull the noise back down again. Generally speaking, the threshold should be set very low so as to ensure
C1 Set-up Guide Manual
4545
45
4545
Page 47

that the noise reduction does not affect the mid-levels that are being boosted by the enhancer. The threshold
should be adjusted by ear to ensure that the noise reduction is effective without affecting enhancement effects too
much.
The red bar on the Comp/Exp gain reduction meter can be used to monitor the amount of low-level treble noise
reduction moment by moment.
There is nothing sacred about the filter frequency and Q settings used in this setup - but it is often found that the
high-pass setting works best at maximum Q of 0.6. The setting shown is one that generally increases brightness
without too much mid range harshness creeping in. You may also care to experiment using settings with
bandpass filter type tuned with frequency in the region 3 to 9 kHz and having Q’s in the region 0.3 to 0.6.
Bass enhancer + compensating rumble control.
Setup name: C1 Bass Enhancer
This is the bass equivalent of the brightness enhancer above.
The primary function of this setup is to act as an effective “bass enhancer”. This is provided by the Gate/Exp
module in split mode. It provides an added bass richness or depth, even played back via modest equipment,
without making the bass overwhelming and unpleasant. Selected low frequencies are boosted by up to 9 dB,
controlled by the floor control, and this boost takes place below a threshold set by the GateOpen threshold. These
two controls may be tuned - floor between 0 and + 12 dB and GateOpen typically between -15 and -50 dB, for
optimum enhancement of a particular mix or sound. The effect gets more subtle as GateOpen and Floor are
lowered, and more blatant as they are raised.
The yellow bar on the Gate/Exp gain reduction meter can be used to monitor the degree of gain increase in the
bass moment by moment.
The Comp/Exp module is here used in an unusual low-level expansion bandsplit mode to solve the problem that
the enhancer also raises the level of any low-level rumble noise present, by acting as a gentle noise reducer at very
low levels to pull the noise back down again. Generally speaking, the threshold should be set very low so as to
ensure that the noise reduction does not affect the mid-levels that are being boosted by the enhancer. The
threshold should be adjusted by ear to ensure that the noise reduction is effective without affecting enhancement
effects too much.
There is nothing sacred about the filter settings used in this setup - but it is often found that the bandpass filter
type setting with frequency tuned to predominant frequencies in the range 100 to 150 Hz works best at maximum Q of 0.6. The setting shown is one that generally increases the bass in contemporary popular music
without too much lower mid range muddiness creeping in. You may also care to experiment using lowpass filter
type setting with frequency tuned in the frequency region up to 350 Hz and having Q’s of 0.6.
Generally, the lower the bass frequencies selected, the longer should be the Gate/Exp release times to minimise
possible bass distortion effects.
C1 Set-up Guide Manual
4646
46
4646
Page 48

Bass & Treble enhancer + compensating noise control.
Setup name: C1 Bass/Treble Enhancer
This is the equivalent of the two enhancers above when enhancement of both frequency extremes at the same
time is required.
The primary function of this setup is to act as an effective “bass and treble enhancer”. This is provided by the
Gate/Exp module in split mode. It provides an added bass richness or depth and an added brightness, even
played back via modest equipment, without making the bass or treble overwhelming and unpleasant. Selected
low and high frequencies are boosted by up to 9 dB, with boost controlled by the floor control, and this boost
takes place below a threshold set by the GateOpen threshold. These two controls may be tuned - floor between 0
and + 12 dB and GateOpen between -15 and -50 dB, for optimum enhancement of a particular mix or sound.
The effect gets more subtle as GateOpen and Floor are lowered, and more blatant as they are raised.
The yellow bar on the Gate/Exp gain reduction meter can be used to monitor the degree of gain increase in the
bass and treble moment by moment.
The Comp/Exp module is here used in an unusual low-level expansion bandsplit mode to solve the problem that
the enhancer also raises the level of any low-level rumble and hiss noise present, by acting as a gentle noise
reducer at very low levels to pull the noise back down again. Generally speaking, the threshold should be set very
low so as to ensure that the noise reduction does not affect the mid-levels that are being boosted by the enhancer.
The threshold should be adjusted by ear to ensure that the noise reduction is effective without affecting enhancement effects too much.
There is nothing sacred about the filter settings used in this setup - but it is often found that the band-reject filter
type setting with frequency tuned to predominant frequencies in the range 500 to 1000 Hz works best at Q
between 0.15 and 0.3 so as to give the desired bass and treble crossover frequencies on the graph. The setting
shown with crossover frequencies around 125 Hz and 4 kHz is one that generally increases the bass and brightness in contemporary popular music without too much lower mid range muddiness or upper mid range
harshness creeping in.
Cheap System enhancer + compensating noise control.
Setup name: C1 CheapSystem Enhancer
This is a variation of the Bass & Treble enhancer above, designed to solve the problem of an enhanced sound
designed to be played on cheap crummy systems, such as many multimedia systems, AM radios, cheap portable
headphone systems or even utilitarian PA and muzak-type systems, preferably while still sounding good on highend systems. It actually manages to incorporate three functions: a high level bandwidth reducer, a low level bassand-treble enhancer, and a single ended noise reducer.
Cheap systems often have limited frequency range at the two frequency extremes, and they often distort if one
attempts to push much level into them at the frequency extremes, so that limitation of bandwidth at high input
level is necessary to get the best out of such systems - but this often makes the sound terrible over better systems.
C1 Set-up Guide Manual
4747
47
4747
Page 49

This setup combines bandwidth limitation between 250 and 4000 Hz at high levels - reducing levels at the
frequency extremes by 6 dB, with 12 dB bass and treble enhancement at low levels. This subjectively causes an
overall increase in bass and treble - even on cheap systems, with a nice-sounding enhancement, while actually
limiting the degree to which cheap systems are exposed to signals they cannot handle. The result is that cheap
systems can be played louder without distortion and yet give enhanced bass and treble at the same time. The
effect is sufficiently subtle that the enhancement also sounds good on high-quality systems.
The main control here is the GateOpen threshold control, which should be set somewhere between -15 and -35
dB on typical programme material. The gain Makeup control sets the degree of high-level attenuation of bass
and treble, which should always be less than the degree of boost of floor, which sets the amount of lower-level
enhancement. The Comp/Exp threshold control, which should be set low by ear to have minimum side effects on
the wanted signal, acts as a low-level noise reducer for any noise present in the source material.
The yellow bar on the Gate/Exp gain reduction meter can be used to monitor the degree of gain increase in the
bass and treble moment by moment, but the degree of gain increase in this setup is reduced by the makeup value,
in the case shown above, by 6 dB.
Compressors + Enhancers
These 4 setups use the Comp/Exp module in wideband mode for compression and the Gate/Exp module in
bandsplit mode for enhancement. The two modules operate effectively independently on one another. These
setups are particularly useful for maximising impact of sound files that have to be squeezef into a narrow
dynamic range, such as for multimedia or broadcast material.
Setup names:
C1 HLcompress+bass/treb enhance
C1 HLcompress+treble enhance
C1 MLcompress+bass/treb enhance
C1 MLcompress+treble enhance
The Gate/Exp and Filter modules of these setups are the same, and used in the same way, as those for the C1 bass/
treble enhancer or the C1 treble enhancer above.
The Comp/Exp module of these setups is used as a compressor. The HLcompress setups are high-level compressors that may be used conventionally, similarly to as describedefor the C1 HLcompress + De-Hiss setup. The
MLcompress setups are mid-level compressors similar to, and used in the same way as, the Comp/Exp sections
of Chapter 4: C1 Multimedia Speech 1, C1 Multimedia Speech 2 and Chapter 5: C1 Compressor + De-Reverb.
C1 Set-up Guide Manual
4848
48
4848
Page 50

Enhancers + Gate
These two setups provide enhancement plus gate, using the Comp/Exp with Filter modules as an enhancer and
the Gate/Exp module in Wideband Gate mode as a gate.
Setup name: C1 Treble enhance + Gate
The Comp/Exp module in split mode of this setup acts as an effective “brightness enhancer”. Low-level high
frequencies are boosted by up to 10 dB, the degree of boost being controlled by the ratio control, and this boost
takes place below a threshold set by the threshold. These two controls may be tuned - ratio between 1 and 1.60
and threshold typically between -40 and -80 dB, for optimum enhancement of a particular mix or sound. The
effect gets more subtle as threshold and ratio are lowered, and more blatant as they are raised.
The yellow bar on the Comp/Exp gain reduction meter can be used to monitor the degree of gain increase in the
treble moment by moment.
There is nothing sacred about the filter frequency and Q settings used in this setup - but it is often found that the
high-pass setting works best at maximum Q of 0.6. The setting shown is one that generally increases brightness
without too much mid range harshness creeping in. You may also care to experiment using settings with
bandpass filter type tuned with frequency in the region 3 to 9 kHz and having Q’s in the region 0.3 to 0.6.
The Gate is a conventional fully-functioned wideband gate. The GateClose threshold is preset 3 dB lower than the
GateOpen threshold so as to reduce gate “chatter”, and the hold control ensures a minimum gate on time which
again helps prevent chatter. Attack and Release may be adjusted in the usual way. If it is desired to retain some of
the background atmosphere during quiet passages, the floor control may be used to adjust the remaining signal
level when the gate is “off”.
Setup name: C1 Bass/treb enhance+Gate
The Comp/Exp module in split mode of this setup acts as an effective “enhancer” of ther bas and treble frequency
extremes. Low-level low and high frequencies are boosted by up to 10 dB, the degree of boost being controlled by
the ratio control, and this boost takes place below a threshold set by the threshold. These two controls may be
tuned - ratio between 1 and 1.60 and threshold typically between -40 and -80 dB, for optimum enhancement of a
particular mix or sound. The effect gets more subtle as threshold and ratio are lowered, and more blatant as they
are raised.
The yellow bar on the Comp/Exp gain reduction meter can be used to monitor the degree of gain increase in the
bass and treble moment by moment.
There is nothing sacred about the filter frequency and Q settings used in this setup - and the bass and treble
ranges that are enhanced may be adjusted by varying the Q and frequency around the preset values.
The gate is adjusted in the same way as in the previous setup.
C1 Set-up Guide Manual
4949
49
4949
Page 51

Chapter 9 - Keying Setups
About keying
These setups make use of the key mode button, and allow a signal in one of the two channels to control the
dynamics of the other.
The most common uses of this kind of facility is ducking and gating. Ducking reduces the gain of one signal
when the other is above a threshold. It is normally used to make a background sound quieter when a foreground
sound must be heard over the background. It is commonly used with a speech signal to control the dynamics of
loud background noises such as audience applause during a broadcast announcement or commentary, so that
the speech is clearly audible over the background.
The other common use is keyed or triggered gating, where the level in one track is used to operate a gate in a
second track, so that sounds in the second track are allowed through only rhythmically in time with the occurrence of sounds in the first track. For example, one can use a drumbeat on the left track to control the gating of a
steady sound in the right track so as to create a different percussion sound having the tonal quality of the steady
sound, in time with the original drumbeat. By using sidechain filtering, one can pick out particular frequency
components of the drumbeat such as a snare, bass drum or cymbal sound to key or trigger the other sound.
By using bandsplit processing with ducking or triggered gating, one can process just a selected frequency band
rather than the full signal spectrum.
Keying can also be used with expanders instead of gates, which has particular uses in creating rhythmic tracks out
of steady sounds such as natural steady sound effects like wind noises, rainfall, babbling streams, waterfalls, crowd
noise, audience applause etc., as well as artificial continuous sounds like looped sounds, synthesiser tracks etc. If
used with bandsplit, this can give otherwise steady sounds that vary in quality rhythmically in time with the
original keying track. A sound effect can be made to take on musical rhythmic qualities by being transformed by
a keying effect. This leads to a considerable variety of creative musical effects in dance and ambient musics, as
well as ways of integrating sound effects and music in radio, TV, video and film drama, documentary, games and
advertising applications. The keyed EQ expansion effect described below is particularly flexible and effective in
these applications.
Preparing and processing files for keyed effects
Because Plug-Ins for Sound Designer II™ are stereo processors capable of taking in and processing only two
channels of sound at a time, to obtain the keying effect, it is first necessary to prepare a sound file having the
keying sound that controls the dynamics on one channel, and the sound that is to be dynamically processed - the
keyed or triggered sound on the other. The C1 provides the option for either channel to be allocated to the keyed
or keying sound. For ease of description, we assume that the keying or triggering sound is in the left channel and
that the sound to be dynamically processed or keyed is in the right channel. For this option, the Key Mode button
is in the L -> R mode. All keying setups are loaded in this mode.
When processing sound files in this mode, only the dynamically processed sound on the right channel will be
present, with nothing on the left channel. If you wish to preserve the original keying sound as well on the left
C1 Set-up Guide Manual
5050
50
5050
Page 52

channel, in an unprocessed form, you should before processing select the right channel signal only. Processing
will then result in a stereo file with the unprocessed keying signal on the left, and the processed keyed signal on
the right channel. This is useful in cases such as ducking where it is usually desired to mix these two signals
together at a later stage.
Hint: If you wish to process or key a stereo signal by a mono keying signal, this cannot be done directly on the C1
because of its limitation to two channels of input. However, a stereo workaround exists as follows. Suppose that
you start off with a file K of the keying signal and a stereo file B of the stereo signal to be processed. Use the mix
option of Sound Designer II to mix two new stereo files BL and BR, where BL has a mono mix of K on the left
channel and the left channel of B on the right channel of BL, and where BR has a mono mix of K on the left
channel and the right channel of B on the right channel of BR.
In order to preserve stereo balance later, use 100% gains for transferring channels of B to BL and BR, DO NOT
use scaling, and ensure that all time delays in the mixing are zero. Then process both BL and BR with the setup
you have chosen, taking care not to change any control values when processing the two files (again to ensure
stereo balance is preserved). The resulting processed files PL and PR may now again be mixed into a new stereo
file P by putting the right channel of PL onto the left channel of P and the right channel of PR onto the right
channel of P again using the Sound Designer II mix option. P will be the desired processed stereo file.
If one needs to mix the processed file with the unprocessed keying signal K, the last stage of preparing P may be
bypassed, and the final mixed file M be obtained by mixing from PL, PR and K, putting the right channel of PL
onto the left channel of M, the right channel of PR onto the right channel of M, and the original sound file K
mixed and panned into M as desired. The C1 introduces no relative time delays between files even when
lookahead is used, so that the files will stay in synchronism.
If the keying sound is on the right channel and the sound to be dynamically processed is on the left channel, click
the Key Mode button to the R -> L position. Where relevant, select the left channel signal before processing in
this case.
Ducking
Ducking is an effect in which the gain of the keyed sound is reduced when the keying sound is louder than a
user-determined threshold level. It is typically used to mix speech and background sounds where the background
sound would normally drown out the speech, e.g. applause. If the speech or vocal sounds are used as the keying
signal, and the applause signal gain is reduced in response to the speech, then the applause will be reduced in
level enough that the speech will remain audible when the unprocessed speech is mixed with the ducked
applause, because the applause level will be reduced during speech. Many similar applications exist where an
important sound can be used to reduce the level of less important sounds to make it more audible.
For example, in recordings of amplified music, a mix from direct feeds from microphones and instruments can
be used to duck ambience microphones, so that audience response is audible when the music is not playing, but
the sound of the ambience microphone is reduced so as not to muddy the sound of the mix when the music is
playing.
When using ducking processing, it is a good idea only to process the right channel (when using L -> R key
mode), so that the processed file has the unprocessed keying signal (e.g. speech or music) on its left channel and
5151
51
C1 Set-up Guide Manual
5151
Page 53

the ducked signal (e.g. applause) on its right channel. The mix can then be done direct from the processed file.
The setups library provided two kinds of ducking. The first continues to duck levels further as the level of the
keying sound (e.g. speech) increases further, whereas the second gives a fixed user-determined gain reduction
when the keying sound is at any level above threshold. The second type of ducking may be preferred as giving a
more natural result, but it is very much up to the user which is considered most appropriate.
Setup name: C1 Ducking 1
Here, the Comp/Exp module is used as a ducking device. The peaks of the sound on the left channel cause the
right channel to reduce during those peaks.
The threshold level of the keying signal at which gain reduction starts is controlled by the Threshold control. The
ratio control, which typically may be set between 2 and 50 or -50 and -15, controls the degree of ducking above
threshold. The time duration for which the gain reduction lasts is controlled by the Comp/Exp Release control.
The longer this is set, the fewer disturbing rapid level fluctuations will be heard in the ducked sound.
An added refinement is the use of the sidechain mode, so that it is the peaks in the equalized left channel sound
that causes the right channel to duck. The above is actually tuned so that the right channel ducks during speech
presence peaks on the left channel.
The active frequencies of the keying signal that operate the gain ducking may be selected by operating the filter
type, frequency and Q controls. The effect of the equalisation on the keying signal may be auditioned by clicking
the monitor button to Sidechain position. Keying by the wideband signal may also be selected by clicking the
Comp/Exp EQ mode button to Wideband.
Setup name: C1 Ducking 2
Here, the Gate/Exp module is used as a ducking device. The peaks of the sound on the left channel cause the right
channel to reduce during those peaks.
The threshold level of the keying signal at which gain reduction starts is controlled by the GateOpen control. The
floor control, which may be set between 0 and +12 dB, (set to 12 dB in the above example) controls the ducking
gain reduction above threshold. The output gain must be set at an equal and opposite compensating gain
reduction (-12 dB in the above example) to ensure no gain when the keying signal is low in level. The output gain
may, of course, be additionally varied about this value according to the user’s requirements. The time duration
for which the gain reduction lasts is controlled by the Gate/Exp Release control. The longer this is set, the fewer
disturbing rapid level fluctuations will be heard in the ducked sound.
An added refinement is the use of the sidechain mode, so that it is the peaks in the equalized left channel sound
that causes the right channel to duck. The above is actually tuned so that the right channel ducks during speech
presence peaks on the left channel.
The active frequencies of the keying signal that operate the gain ducking may be selected by operating the filter
type, frequency and Q controls. The effect of the equalisation on the keying signal may be auditioned by clicking
the monitor button to Sidechain position. Keying by the wideband signal may also be selected by clicking the
Gate/Exp EQ mode button to Wideband.
C1 Set-up Guide Manual
5252
52
5252
Page 54

Ducked EQ
Ducked EQ is a variation of standard ducking, using the C1’s bandsplit mode, where the gain reduction is
confined to a limited frequency band. This is an extremely useful effect or tool whenever a mix suffers from the
common problem of several sounds in a mix all occupying the same frequency range, so making sounds
unintelligible. This setup creates “space” in the mix allowing a chosen predominant sound to become audible
without losing the other sounds.
It may also be used in situations where conventional ducking is used (e.g. of applause when mixed with speech),
where the ducking processing can be confined to a limited frequency band for reduced audible side effects.
Put the sound you wish to predominate in the mix on the left channel of a sound file and one or more of the
clashing sounds on the right. Then using L -> R key mode and bandsplit mode for the ducking, ducking is
confined to the active band of a filter tuned to the frequency band in which the aural clash occurs. Peaks in the
intended predominant sound causes the level of the other sound to “duck” during peaks - but only in the
problem frequency band. This minimizes the audible side effects of ducking, since the complementary passive
frequency band remains unprocessed.
The interfering sounds duck in level only at the moments they need to. A typical example is a mix with saxes,
electric guitar and vocals, all of which clash around 2 kHz. Putting the vocals on the left of the sound file and the
sax or guitar on the right ducks the problem frequency range when needed to make the vocals clearly audible,
while letting through these instruments the rest of the time and in frequency bands not needed for vocal
audibility.
As in the straightforward ducking case, there are two kinds of ducked EQ setup provided in the C1 setups
Library. The first continues to duck levels in the active frequency band further as the level of the keying sound
(e.g. vocals) increases further, whereas the second gives a fixed user-determined gain reduction in the active
frequency band when the keying sound is at any level above threshold. The second type of ducking may be
preferred as giving a more natural result, but it is very much up to the user which is considered most appropriate.
Setup name: C1 Ducked EQ 1
Apart from the filter controls, this is used and adjusted in an identical manner to the C1 Ducking 1 setup
described above.
The active frequency band in which the ducking operates is shown in red on the frequency response graph, and
may be selected by operating the filter type, frequency and Q controls. The effect of the equalisation on the
keying signal may be auditioned by clicking the monitor button to Sidechain position.
The ducked EQ may be bypassed by clicking on the Comp/Exp button immediately above the Comp/Exp bar
meters.
Setup name: C1 Ducked EQ 2
Apart from the filter controls, this is used and adjusted in an identical manner to the C1 Ducking 2 setup
described above, with one exception: The floor control, which may be set between 0 and +12 dB, (set to 12 dB in
C1 Set-up Guide Manual
5353
53
5353
Page 55

the above example) controls the ducking gain reduction above threshold as before, but the makeup gain must be
set at an equal and opposite compensating gain reduction (-12 dB in the above example) to ensure no gain in the
active frequency band when the keying signal is low in level. .
The active frequency band in which the ducking operates is shown in red on the frequency response graph, and
may be selected by operating the filter type, frequency and Q controls. The effect of the equalisation on the
keying signal may be auditioned by clicking the monitor button to Sidechain position.
The ducked EQ may be bypassed by clicking on both the Comp/Exp and Gate/Exp buttons immediately above
the module bar meters.
Keyed Gating
Setup name: C1 Keyed Gate
Here the Gate/Exp module is used as a gate for the signal on the right channel, and the gating is keyed or
triggered (i.e. opened) by the signal on the left channel. The gating is tuned by the sidechain filter and the
GateOpen and GateClose threshold. The signal on the right channel is switched in time with the beat on the left
channel. The longish release time shown here is to get a sense of “decay” after the beat, and the hold time is used
to establish a minimum time for which the signal is switched fully on.
The GateOpen threshold may be moved up or down to adjust the triggering of the gate. Gate/Exp Release and
Hold times can be varied to alter the “decay” of the percussion envelope effect.
The type, frequency and Q of the sidechain filter can be tuned so that the frequencies of the signal used for
keying can be selected. The effect of the equalisation on the keying signal may be auditioned by clicking the
monitor button to Sidechain position. Keying by the wideband signal may also be selected by clicking the Gate/
Exp EQ mode button to Wideband.
The keying can be bypassed by clicking on the Gate/Exp button immediately above the Gate/Exp bar meters.
Keyed expander
Setup name: C1 Keyed Expander
This setup is similar to a keyed gate, except that it replaces the gate by a low level (downward) expander. This has
the effect of not cutting off the keyed sound during quiet passages, but of modulating its level with the envelope
of the keying or trigger sound. This is particularly good for using keying to create a “new” percussion sound from
a steady state sound like hiss or a synthesiser drone or even a natural sound effect like a babbling brook (be
creative!). Unlike using a gate, a keyed expander has a more subtle and “organically natural” quality, due to its
preservation of dynamic variations in the original keying signal.
Both the Gate/Exp and the Comp/Exp modules are set up as almost-identical keyed expanders in this setup, and
either may be used for this effect on their own. But if both are switched in, the effect is more dramatic and
effective.
C1 Set-up Guide Manual
5454
54
5454
Page 56

The thresholds of either module (i.e. threshold and GateOpen) may be moved up or down together, by click-and
dragging on the “button” between the Threshold and GateOpen Value Windows, to vary the threshold level
below which expansion occurs. Release times can be jointly varied, by click-and-dragging on the “button”
between the two Release Value Windows, to alter the “decay” of the percussion envelope effect.
The type, frequency and Q of the sidechain filter can be tuned so that the frequencies of the signal used for
keying can be selected. The effect of the equalisation on the keying signal may be auditioned by clicking the
monitor button to Sidechain position. Keying by the wideband signal may also be selected by clicking the Gate/
Exp EQ mode button to Wideband.
The keying of either or both of the two modules can be bypassed by clicking either or both of the bypass buttons
immediately above the module bar meters.
Keyed EQ expansion
This is an especially flexible creative effect, in which a keying sound such as a percussion or drum track alters the
equalization of a steady or continuous sound so as to impose the rhythmic percussion effect on the new sound.
The flexibility lies is the ability both to tune the frequencies, and hence the tonal quality, of the sound that are
effected and the exact degree, from almost subliminally audible to blatant, to which the EQ is varied in time with
the original percussion. Additionally, the overall EQ can be varied in this setup.
This effect can be used to add varied rhythmic effects to continuous, drone or natural sounds that may not even
be musical in nature, and can be useful in both musical applications and for musical dramatic effects in drama,
documentary and other applications. In musical applications, the EQ can be tuned to ensure maximum audibility of the rhythmic effect of the keyed sound within a mix.
Setup name: C1 Keyed EQ Expander.
This setup is based on a keyed expander in bandsplit mode
The degree of boost of the selected active frequency band above the keying threshold is set by the makeup gain
and the floor control, which may be set between +12 and -40 dB, must be set to an equal and opposite gain to
ensure no gain in the active frequency band when the keying signal is low in level.
Any other degree of EQ in the active band above threshold can be used by setting makeup and output gains to
equal and opposite settings. Additional overall adjustment of EQ in the active band at both high and low levels of
the keying signal may be provided by varying the makeup gain above or below this setting.
The active frequency band in which the keyed EQ operates is shown in red on the frequency response graph, and
may be selected by operating the filter type, frequency and Q controls. The effect of the equalisation on the
keying signal may be auditioned by clicking the monitor button to Sidechain position.
The longish release time shown here is to get a sense of “decay” after the beat, and adds a kind of reverberant
decay effect to the keyed sound.
C1 Set-up Guide Manual
5555
55
5555
Page 57

The GateOpen threshold may be moved up or down to adjust the keying threshold. Gate/Exp Release time can be
varied to alter the “decay” of the percussion envelope effect.
The keyed EQ expansion may be bypassed by clicking on both the Comp/Exp and Gate/Exp buttons immediately above the module bar meters.
C1 Set-up Guide Manual
5656
56
5656
Page 58

Acknowledgements
These setups were compiled using a wide variety of sound materials, including commercial recordings. Of
particular use were unprocessed recordings from the Alan Parsons/Stephen Court “Sound Check” test CD, the
EBU SQAM (Sound Quality Assessment Material) CD, and a limited edition CD-R “Higher Fidelity from 78s” of
careful unprocessed 78 rpm transcriptions by Peter Adamson. Thanks are due to Peter Adamson, Peter Craven,
Jerry Bruck, Geoffrey Barton and many others who have contributed by discussions over the years to the knowhow incorporated into these setups. Also to Meir Shashoua and Seva for almost superhuman endurance far, far
beyond the call of duty in making this all possible.
The text of this setups manual was written by Michael Gerzon, with contributions and Editing by Seva.
C1 Set-up Guide Manual
5757
57
5757
 Loading...