

Page 1

Warn Industries, Inc.
12900 S.E. Capps Road
Clackamas, OR USA 97015-8903
1-503-722-1200 FAX: 1-503-722-3000
www.warn.com
Customer Service / Service Clients: 1-800-543-9276
International Sales Support / Les Ventes internationales
Soutiennent: 1-503-722-3005
© 2012 Warn Industries, Inc.
WARN®, the WARN logo are registered trademarks of Warn Industries, Inc.
WARN® et le logo WARN sont des marques
déposées de Warn Industries, Inc.
(31”) ZEON CONTROL PACK
89969A0
RELOCATION KIT
INSTALLATION GUIDE
GUIDE D’INSTALLATION
Page 2

English .......................................................................... 1
Page 3
ORIGINAL INSTRUCTIONS
SYMBOL INDEX
Zeon Control Pack Relocation Kit
31” Cable Length
Every winching situation has the potential for personal injury. In order to minimize that risk, it is important to read
this guide and The Basic Guide to Winching Techniques carefully. Please familiarize yourself with the operation of your
winch before using it and be constantly safety oriented. In this guide we provide important safety information and
instructions on how to install your Control Pack Relocation Kit. Please read the Basic Guide to Winching Techniques for
information on how to properly use your winch and proper rigging techniques.
Please keep this manual and other product literature found in this kit for future reference. Should you be missing any of
the necessary instructions, please visit www.warn.com or contact us at the number below.
TABLE OF CONTENTS:
SAFETY
Symbol Index .............................................................................................................................................................................2
General Safety Precautions ................................................................................................................................................... 3
INSTRUCTIONS
Before you Begin ......................................................................................................................................................................4
Parts List ...........................................................................................................................................................................4
Tools Required ...............................................................................................................................................................5
Torque Specifications ..................................................................................................................................................5
Installation Instructions ......................................................................................................................................................6-9
Remove Control Pack From Winch .....................................................................................................................6-7
Installing Relocation Cables ......................................................................................................................................7
Relocating the Control Pack .....................................................................................................................................8
Connecting the Contactor .........................................................................................................................................9
Mounting Hole Drill Template .......................................................................................................................................... 10
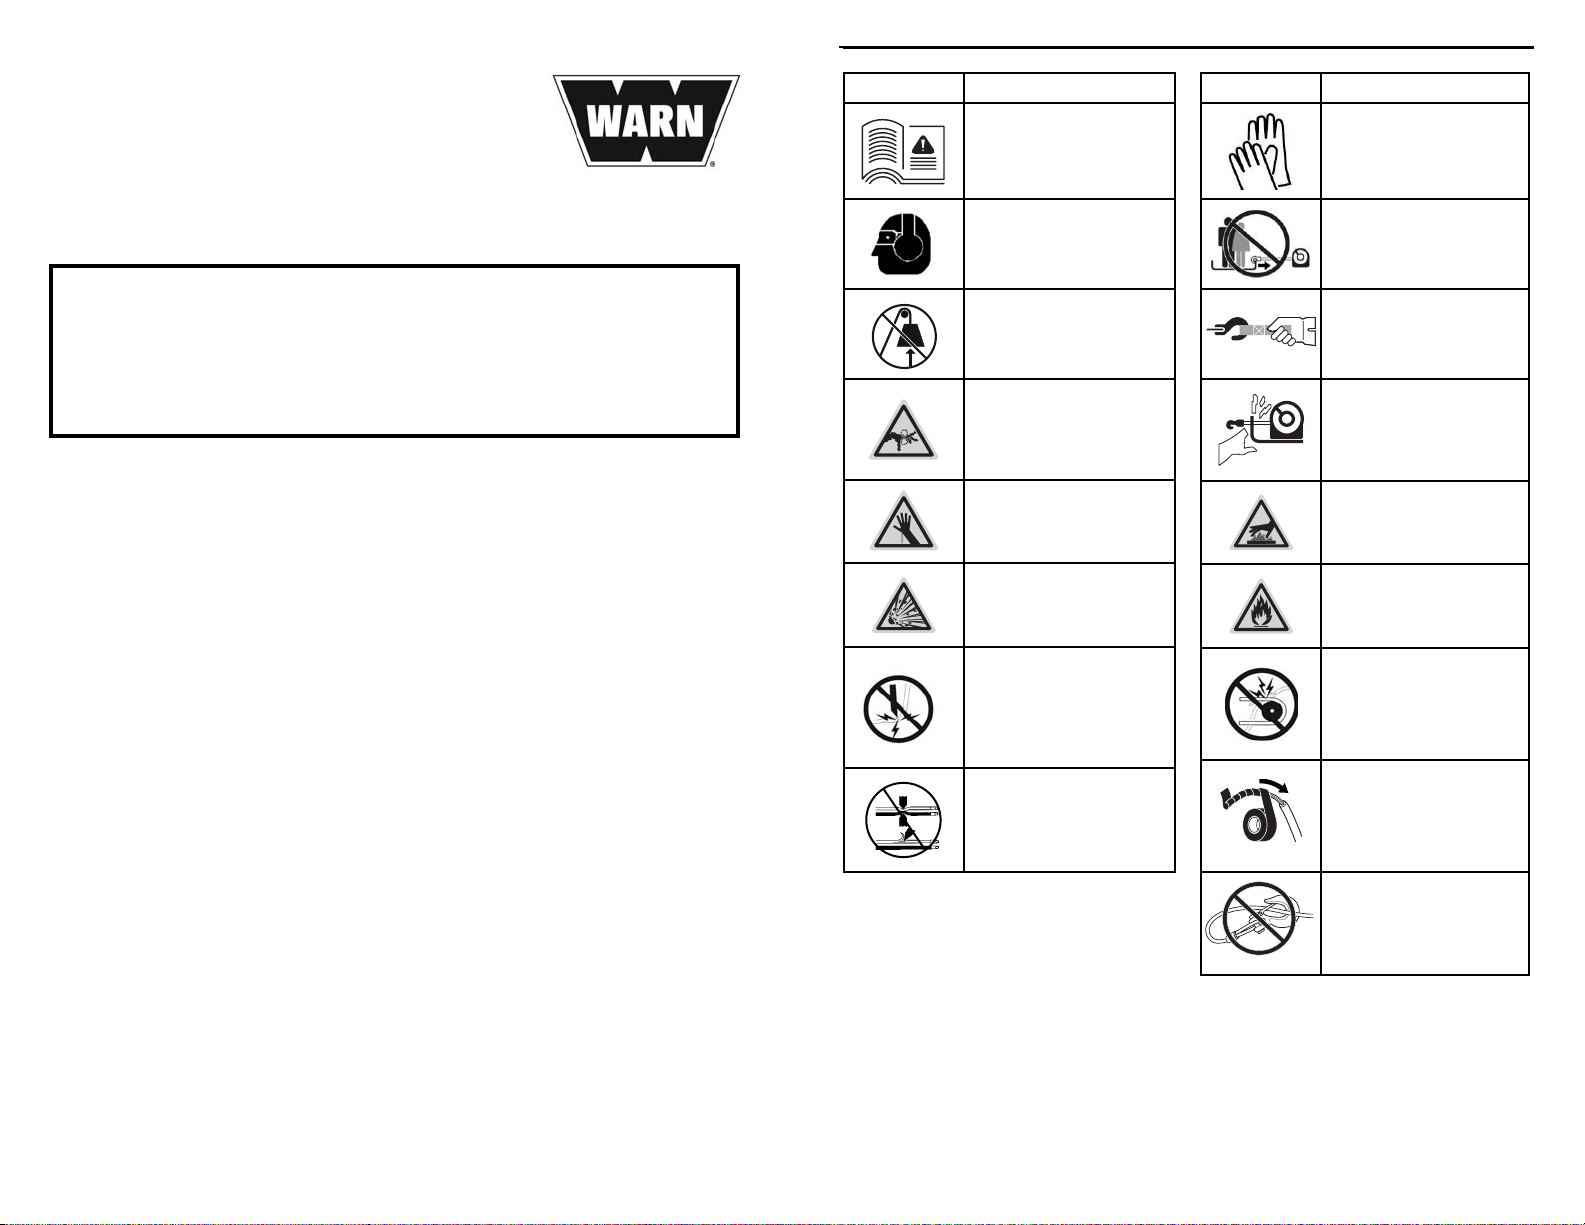
SYMBOL EXPLANATION
Read All Product
Literature
Always Wear Hearing and
Eye Protection
Never Use Winch as a
Hoist
Finger/Fairlead Crushing
Hazard
Hand Piercing/Cutting
Hazard
Explosion/Bursting
Hazard
Never Route Electrical
Cables through Sharp
Edges Hazard
Avoid Installing Electrical
Cables around Pinch and
Wear/Abrasion Points
SYMBOL EXPLANATION
Always Wear Leather
Gloves
Do Not Move People
Always Use Supplied
Hook Strap
Fairlead Pinch Point
Hot Surface Hazard
Fire and Burn Hazard
Never Route Electrical
Cables through or near
Moving Parts Hazard
Exposed Wiring Hazard,
Insulate Exposed Wiring
and Terminals
Never Hook Back on
Rope
WARN® and th e WARN logo are reg istered tr ademark s of Warn Indus tries, Inc.
© 2012 Warn Industries, Inc.
WARN INDUSTRIES
1
Warn Industries Inc.
12900 SE Capps Road
Clackamas, OR 97015
USA
Customer Service: (800) 543-9276
International Fax: (503) 722-3005
Fax: (503) 722-3000
www.warn.com
WARN INDUSTRIES
89969A0 2
Page 4

GENERAL SAFETY PRECAUTIONS
BEFORE YOU BEGIN
Warnings and Cautions
As you read these instructions, you will see WARNINGS,
CAUTIONS, NOTICES and NOTES. Each message has a specifi c
purpose. WARNINGS are safety messages that indicate
a potentially hazardous situation, which, if not avoided
could result in serious injury or death. CAUTIONS are safety
messages that indicate a potentially hazardous situation
which, if not avoided, could result in minor or moderate injury.
A CAUTION may also be used to alert against unsafe practice.
CAUTIONS and WARNINGS identify the hazard, indicate how
to avoid the hazard, and advise of the probable consequence
of not avoiding the hazard. NOTICES are messages to avoid
property damage. NOTES are additional information to help
you complete a procedure. PLEASE WORK SAFELY!
WARNING
MOVING PARTS ENTANGLEMENT HAZARD
Failure to observe these instructions could lead to
serious injury or death.
General Safety:
• Always Know Your Winch. Take time to fully read the
Instructions and/or Operations Guide, and/or Basic
Guide to Winching Techniques, in order to understand
your winch and its operations.
• Always keep wired remote control lead and power cord
clear of the drum, rope, and rigging. Inspect for cracks,
pinches, frayed wires or loose connections. Damaged
components must be replaced before operation.
WARNING
CHEMICAL AND FIRE HAZARD
Failure to observe these instructions could lead to
serious injury or death.
• Always remove jewelry and wear eye protection.
• Never route electrical cables across sharp edges.
• Never route electrical cables near parts that get hot.
• Never route electrical cables through or near moving
parts.
• Always place the supplied terminal boots on
wires and terminals as directed by the installation
instructions.
• Never lean over battery while making connections.
• Never route electrical cables over battery terminals.
• Never short battery terminals with metal objects.
• Always verify area is clear of fuel lines, fuel tank,
brake lines, electrical wires, etc., when drilling.
• Always consult operator’s manual for proper wiring
details.
• Always insulate and protect all exposed wiring and
electrical terminals.
• Never mount contactor with electrical terminals
touching metal objects.
CAUTION
Please familiarize yourself with the components.
• Mounting Kit PN89970: Includes a mounting bracket and all needed hardware to mount your kit.
• Mounting Kit PN89965: Does not include a mounting bracket and you will need to purchase some
additional hardware to complete mounting*.
• Bracket Kit PN89770 is available for purchase if you later decide to use a bracket for mounting.
Contact a Warn Industries customer service representative at 1.800.543.9276.
Parts List
Description Qty Part Number Description Qty Part Number
31” Wire Assembly Kit with
Mounting Bracket
31” Cable Assembly 1 89663 31” Wire Assembly 1 89663
Wire housing top 1 89372 Wire housing top 1 89372
M4 screw 2 64503 M4 screw 2 64503
Butt splice 1 85978 Butt splice (18 AWG) 1 85978
31” ground extension 1 89963 31” ground extension 1 89963
Bracket 1 89729 *M6 bolt needed 4
M6 bolt 4 86346 *M6 lock washer needed 4
M6 lock washer 4 77009
5/16” bolt 4 21331
5/16” washer 8 1324
5/16” lock nut 4 2002
31” Cable Assembly
89970
31” Wire Assembly Kit without
Mounting Bracket*
OPTIONAL BRACKET KIT - - SOLD SEPARATELY
Bracket Kit 89770
Bracket 1 89729
M6 Bolt 4 86346
M6 Lock Washer 4 77009
5/16” Bolt 4 21331
5/6” Washer 8 1324
5/16” Lock Nut 4 2002
89965
NOT INCLUDED IN KIT
NOT INCLUDED IN KIT
Bracket
WARNING
FALLING OR CRUSHING HAZARD
Failure to observe these instructions could lead to
serious injury or death.
•
Always stand clear, keep hands clear, keep others away.
WARN INDUSTRIES
3 89969A0
MOVING PARTS ENTANGLEMENT HAZARD
Failure to observe these instructions could lead to
minor or moderate injury.
To avoid injury to hands or fi ngers:
• Never leave remote control where it can be activated
during free spooling, rigging, or when the winch is not
being used.
• Never leave the winch remote control plugged in
when installing, freespooling, rigging, servicing or
when the winch is not being used.
Wire Housing Top
M4 Screws (2)
Butt Splice
M6 Bolt (4)
5/16” Washer (8)
* NOTE: Four (4) M6 bolts and four (4) M6 lock washers must be purchased separately in order to complete installation without
use of bracket.
WARN INDUSTRIES
89969A0 4
5/16” Bolt (4)
5/16” Lock Nut (4)
31” Ground Extension
M6 Lock Washer (4)
Page 5

BEFORE YOU BEGIN
INSTALLATION INSTRUCTION
Tools Required
• Torx Driver Set
• Ratchet/Wrench Set (Standard/Metric)
• Drill and Drill Bit Set
• Wire Cutters
• Wire Strippers/Wire Crimps
• Torque Wrench (30 lb. ft. capacity)
• Zip Ties
• Cable Protection (i.e., flexible electrical conduit or electrical tape)
Torque Specifi cations
Please use the recommended torque specifi cations when assembling this product unless otherwise
specifi ed in the instructions.
FASTENER SIZE
(Grade 5)
FASTENER TORQUE FASTENER SIZE
(Class 8.8)
FASTENER TORQUE
lb-ft (N.m) lb-ft (N.m)
1/4" 8 (11) M4 (2) 3
5/16" 17 (23) M5 (4.5) 6
3/8" 30 (40) M6 (7.5) 10
7/16” 48 (66) M8 (18) 25
1/2" 74 (100) M10 (37) 50
9/16” 106 (144)
5/8" 148 (200)
3/4” 269 (364)
Inspect all nuts and bolts on all related hardware periodically. Tighten all nuts that appear to be loose. Stripped, fractured, or bent bolts
or nuts need to be replaced.
REMOVE CONTROL PACK FROM WINCH
To prevent serious injury or death. Always
WARNING
place the supplied terminal boots on wires and terminals as
directed by the installation instructions.
To prevent serious injury or death from
WARNING
electrical fi re:
Never route electrical cables across sharp edges.
Never route electrical cables near parts that get
hot.
Never route electrical cables through or near
moving parts.
Avoid pinch and wear/abrasion points when
installing all electrical cables.
Always insulate and protect all exposed wiring
WARNING
and electrical terminals.
1. Disconnect the vehicle battery cables, negative
terminal first. All work with electrical wires
and cables must be completed with the battery
completely disconnected from the vehicle
wiring.
2. Disconnect the ground cable on the under side
of the winch (see Figure 1). Make sure the small
black wire that connects to the control pack is
disconnected and hanging freely.
3. Remove the top buss bar cover by unscrewing the
fastener holding it in place. Retain fastener for
later use.
4. Remove the three motor terminal nuts and lock
washers that secure the buss bars to the motor.
Retain the terminal nuts and lock washers for
future step.
Remove
Screw
Terminal
Nuts
Small Black
Wire
Disconnect Ground Wire
Figure 1
Buss Bar Cover
Control Pack
Buss Bars
Figure 2
WARN INDUSTRIES
5 89969A0
5. Remove the four (4) flat head torx drive screws
located on the underside of the tie plate. NOTE:
Rope may need to be spooled out to complete
this step.
WARN INDUSTRIES
89969A0 6
Control Pack
Remove
(4 total)
Figure 3
Page 6

INSTALLATION INSTRUCTION
INSTALLATION INSTRUCTION
6. Once all four (4) control pack screws have been
removed, gently lift the control pack off of the tie
plate and set aside to be further disassembled.
7. Remove the motor terminal buss bar insulator
after control pack has been removed.
Motor Terminal Buss Bar
Insulator
Figure 4
INSTALLING RELOCATION CABLES
1. Disassemble the control pack by removing the
four (4) flat head torx drive screws.
2. Gently lift the control pack cover off of the
contactor plate assembly. The cover should
remain wired to the contactor during this
assembly process. Simply move the cover to
one side or out of the way while working on the
contactor. This cover will be reinstalled.
Remove
Figure 5
3. Remove terminal nuts and lock washers securing
the three buss bars to the contactor (see Figure 6).
Set aside terminal nuts and lock washers, as they
will be used later on. Buss bars will not be used
for new installation.
4. Loosen the two flat head torx drive screws
securing the contactor to the contactor plate.
Only loosen. Do not remove.
5. Using the terminal nuts and lock washers
removed in previous step, connect the
labeled cables (A, F1 and F2) to corresponding
contactor terminal. Torque nuts to 8.5 - 9 N-m
(75-80 in. lb.). Refer to Figure 7.
6. Tighten the two flat head torx drive screws
and nuts used to secure the contactor to the
contactor plate. Secure fasteners to specified
torque requirements in torque specification chart
found in these instructions.
7. Once the cables have been installed, reinstall
the cover using the four (4) flat head torx drive
screws previously removed. Refer to the torque
section of this document.
WARN INDUSTRIES
7 89969A0
Buss Bars
Loosen
Screws (2x)
Figure 6
A
F2
Tighten
screws (2x)
F1
F2
A
F1
Figure 7
RELOCATING THE CONTROL PACK
To prevent serious injury or death from
WARNING
electrical fi re:
Never route electrical cables across sharp edges.
Never route electrical cables near parts that get
hot.
Never route electrical cables through or near
moving parts.
Avoid pinch and wear/abrasion points when
installing all electrical cables.
1. (Optional) Depending on your specific
relocation kit, you can attach the shown
bracket, for easier mounting, using the supplied
hex head bolts and lock washers. If you would
like to purchase the bracket shown please
contact: WARN Industries at 1-800-543-9276 or
visit www.warn.com.
2. Find an appropriate mounting location to
mount the control pack. Make sure to check
that the cables and ground wire can be routed
to the winch and that the control pack is easily
accessible and on a solid mounting surface.
Always verify area is clear of fuel lines, fuel
WARNING
tank, brake lines, electrical wires, etc., when drilling.
Never mount contactor with electrical
WARNING
terminals touching metal objects.
3. If using the mounting bracket, match drill the
5/16” holes in the bracket to the mounting
surface you choose to mount your control pack
to. Be sure to check the area before you drill to
avoid hitting any electrical cables or gas lines.
If opting not to use the mounting bracket,
you can use the attached template as a guide
for drilling mounting holes. Holes should be
drilled to 6.5mm diameter.
4. Mount the bracket using the supplied 5/16”
bolts with two (2) flat washers and nylock nuts
as shown. If opting not to use the mounting
bracket, M6 screws and lock washers must
be purchased separately to complete this
installation.
WARN INDUSTRIES
89969A0 8
Bracket
[Kit (89770)]
[Bracket only (89729)]
M6 Hex Head Screws
(included in kit)
[89970]
Figure 8
5/16” Bolts
2x Flat
Washers
Nylock Nuts
Figure 9
Page 7

INSTALLATION INSTRUCTION
INSTALLATION INSTRUCTION
CONNECTING THE CONTROL PACK
Loose or unsecured power cables can cause
WARNING
serious injury or death.
1. Attach the wire terminal housing to the motor
terminals on the winch using terminal nuts and
lock washer previously removed.
2. Install the cover plate and fasten with the two
supplied machine screws. Do not over tighten
screws, over tightening could damage the
plastic components.
3. Use the supplied butt splice connector and the
black extension wire to lengthen the contactor
ground wire (see Figure 11).
4. Reconnect the ground cable and small black
wire to winch motor ground. Ensure the
ground wire is securely fastened. Secure
fasteners to specified torque requirements
in torque specification chart found in these
instructions.
5. Carefully inspect electrical cable routing. Is
it neat and tidy? Zip tie and secure electrical
cables. Zip ties should be snug, but not cutting
into wire insulation. Use electrical tape, pieces
of rubber hose or electrical conduit to protect
electrical cables and wire harness where
needed to avoid electrical cable insulation wear
or abrasion.
6. Attach battery cables, red (positive) cable
FIRST, black (negative) second. Install boots
as appropriate to protect connections. Torque
battery terminal fasteners as directed by vehicle
service manual.
7. Make sure to plug in the winch remote and
ensure that drum is turning in the proper
direction when spooling in/out before using in
the field.
OUT
Cover Plate
Figure 10
Ground Wire
Figure 11
Figure 12
Wire Terminal Housing
Butt Connector
Mounting Hole Drill Template
4.41
(112)
Template NOT to scale
3.70
(94)
IN
8. Installation complete.
WARN INDUSTRIES
9 89969A0
WARN INDUSTRIES
89969A0 10
Page 8

 Loading...