

Page 1

Warn Industries, Inc.
12900 S.E. Capps Road
Clackamas, OR USA 97015-8903
1-503-722-1200 FAX: 1-503-722-3000
www.warn.com
Customer Service / Service Clients: 1-800-543-9276
International Sales Support / Les Ventes internationales
Soutiennent: 1-503-722-3008
© 2011 Warn Industries, Inc.
WARN®, the WARN logo are registered trademarks of Warn Industries, Inc.
WARN® et le logo WARN sont des marques
déposées de Warn Industries, Inc.
62885A6
WARN WINCH LINE
(Domestic)
BASIC GUIDE TO WINCHING TECHNIQUES
LE MANUEL DE BASE DES TECHNIQUES DE
TREUILLAGE
Page 2

English...........................................................................1
Français.......................................................................21
Español........................................................................41
Page 3
ORIGINAL INSTRUCTIONS
The Basic Guide to
Winching Techniques
Every winching situation has the potential for personal injury. In order to minimize
that risk, it is important that you read this Basic Guide carefully, familiarize yourself
with the operation of your winch before having to use it, and be constantly safety
oriented. In this Guide, we will set forth many of the basic rules of safe winch
operation. However, because every winching situation is different, your constant
good judgment and consistent focus on safety are of great importance.
T A B L E O F C O N T E N T S :
Symbol Index . . . . . . . . . . . . . . . . . . . . . . . . . . . . . . . . . . . . . . . . . . . . . . . . . . . . . . . . . . . . . . . . . . . . 2
General Safety Precautions . . . . . . . . . . . . . . . . . . . . . . . . . . . . . . . . . . . . . . . . . . . . . . . . . . . . . 3-5
Winch basics . . . . . . . . . . . . . . . . . . . . . . . . . . . . . . . . . . . . . . . . . . . . . . . . . . . . . . . . . . . . . . . . . . . 6-7
How the winch works . . . . . . . . . . . . . . . . . . . . . . . . . . . . . . . . . . . . . . . . . . . . . . . . . . . . . . . . . . . 8
Winch accessories & enhancements . . . . . . . . . . . . . . . . . . . . . . . . . . . . . . . . . . . . . . . . . . . 9-10
Before you pull . . . . . . . . . . . . . . . . . . . . . . . . . . . . . . . . . . . . . . . . . . . . . . . . . . . . . . . . . . . . . . 11-14
Pulling . . . . . . . . . . . . . . . . . . . . . . . . . . . . . . . . . . . . . . . . . . . . . . . . . . . . . . . . . . . . . . . . . . . . . . . 14-17
Rigging techniques . . . . . . . . . . . . . . . . . . . . . . . . . . . . . . . . . . . . . . . . . . . . . . . . . . . . . . . . . . 18-19
Maintenance. . . . . . . . . . . . . . . . . . . . . . . . . . . . . . . . . . . . . . . . . . . . . . . . . . . . . . . . . . . . . . . . . . . . 20
The final analysis . . . . . . . . . . . . . . . . . . . . . . . . . . . . . . . . . . . . . . . . . . . . . . . . . . . . . . . . . . . . . . . . 20
WARN INDUSTRIES OFF-ROAD PRODUCTS
12900 S.E. Capps Road
Clackamas, OR 97015-8903 USA
Customer Service: 1-800-543-WARN
Fax: 1-503-722-3000
www.warn.com
Page 4
SYMBOL INDEX
GENERAL SAFETY PRECAUTIONS
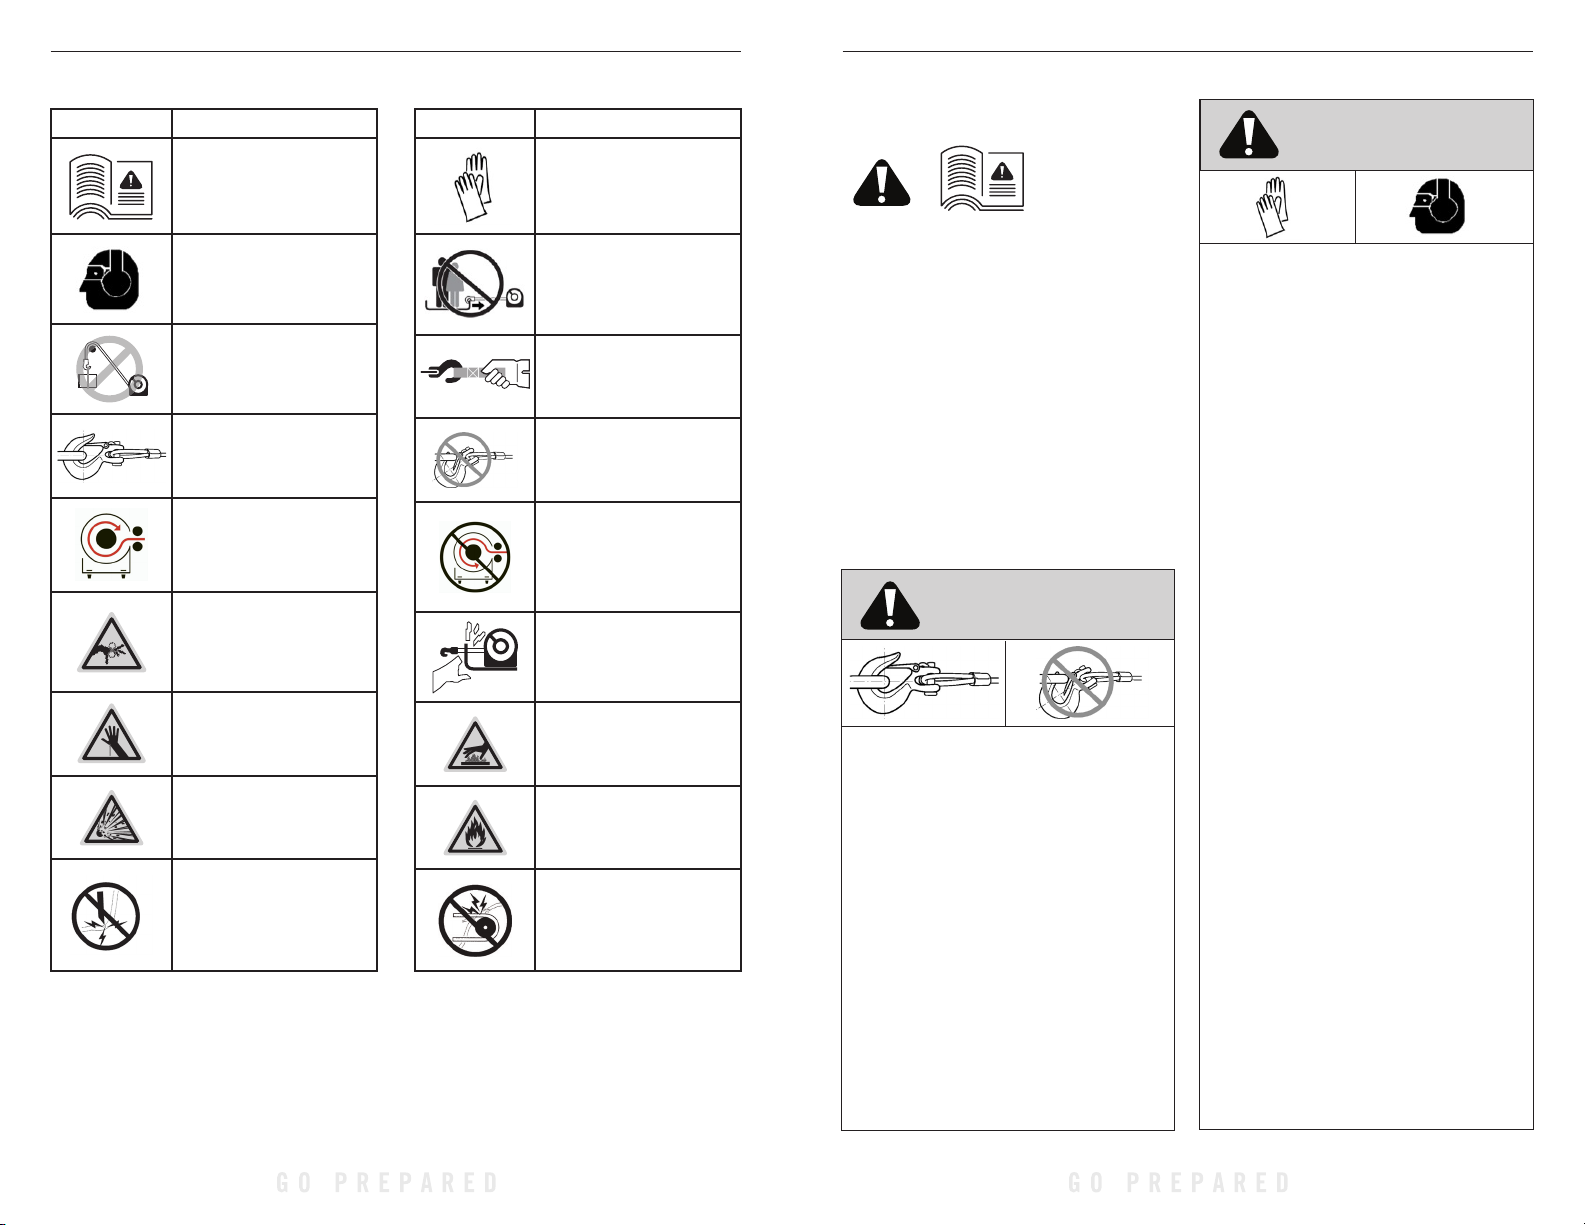
SYMBOL EXPLANATION
Read the Instruction
Manual
Always Wear Hearing and
Eye Protection
Never Use Winch as a
Hoist
Properly Seat Load in
Throat of Hook
Wind Rope on Bottom of
Drum
Finger/Fairlead Crushing
Hazard
Hand Piercing/Cutting
Hazard
Explosion/Bursting Hazard
Sharp Edge Hazard
SYMBOL EXPLANATION
Always Wear Leather
Gloves
Do Not Move People
Always Use Supplied Hook
Strap
Never Apply Load to Hook
Tip or Latch
Never Wind Rope Over Top
of Drum
Fairlead Pinch Point
Hot Surface Hazard
Fire and Burn Hazard
Moving Parts Hazard
Warnings and Cautions
As you read these instructions, you will see WARNINGS,
CAUTIONS, NOTICES and NOTES. Each message has a specific
purpose. WARNINGS are safety messages that indicate a
potentially hazardous situation, which, if not avoided could
result in serious injury or death. CAUTIONS are safety messages
that indicate a potentially hazardous situation which, if not
avoided, could result in minor or moderate injury. A CAUTION
may also be used to alert against unsafe practice. CAUTIONS
and WARNINGS identify the hazard, indicate how to avoid the
hazard, and advise of the probable consequence of not avoiding
the hazard. NOTICES are messages to avoid property damage.
NOTES are additional information to help you complete a
procedure. PLEASE WORK SAFELY!
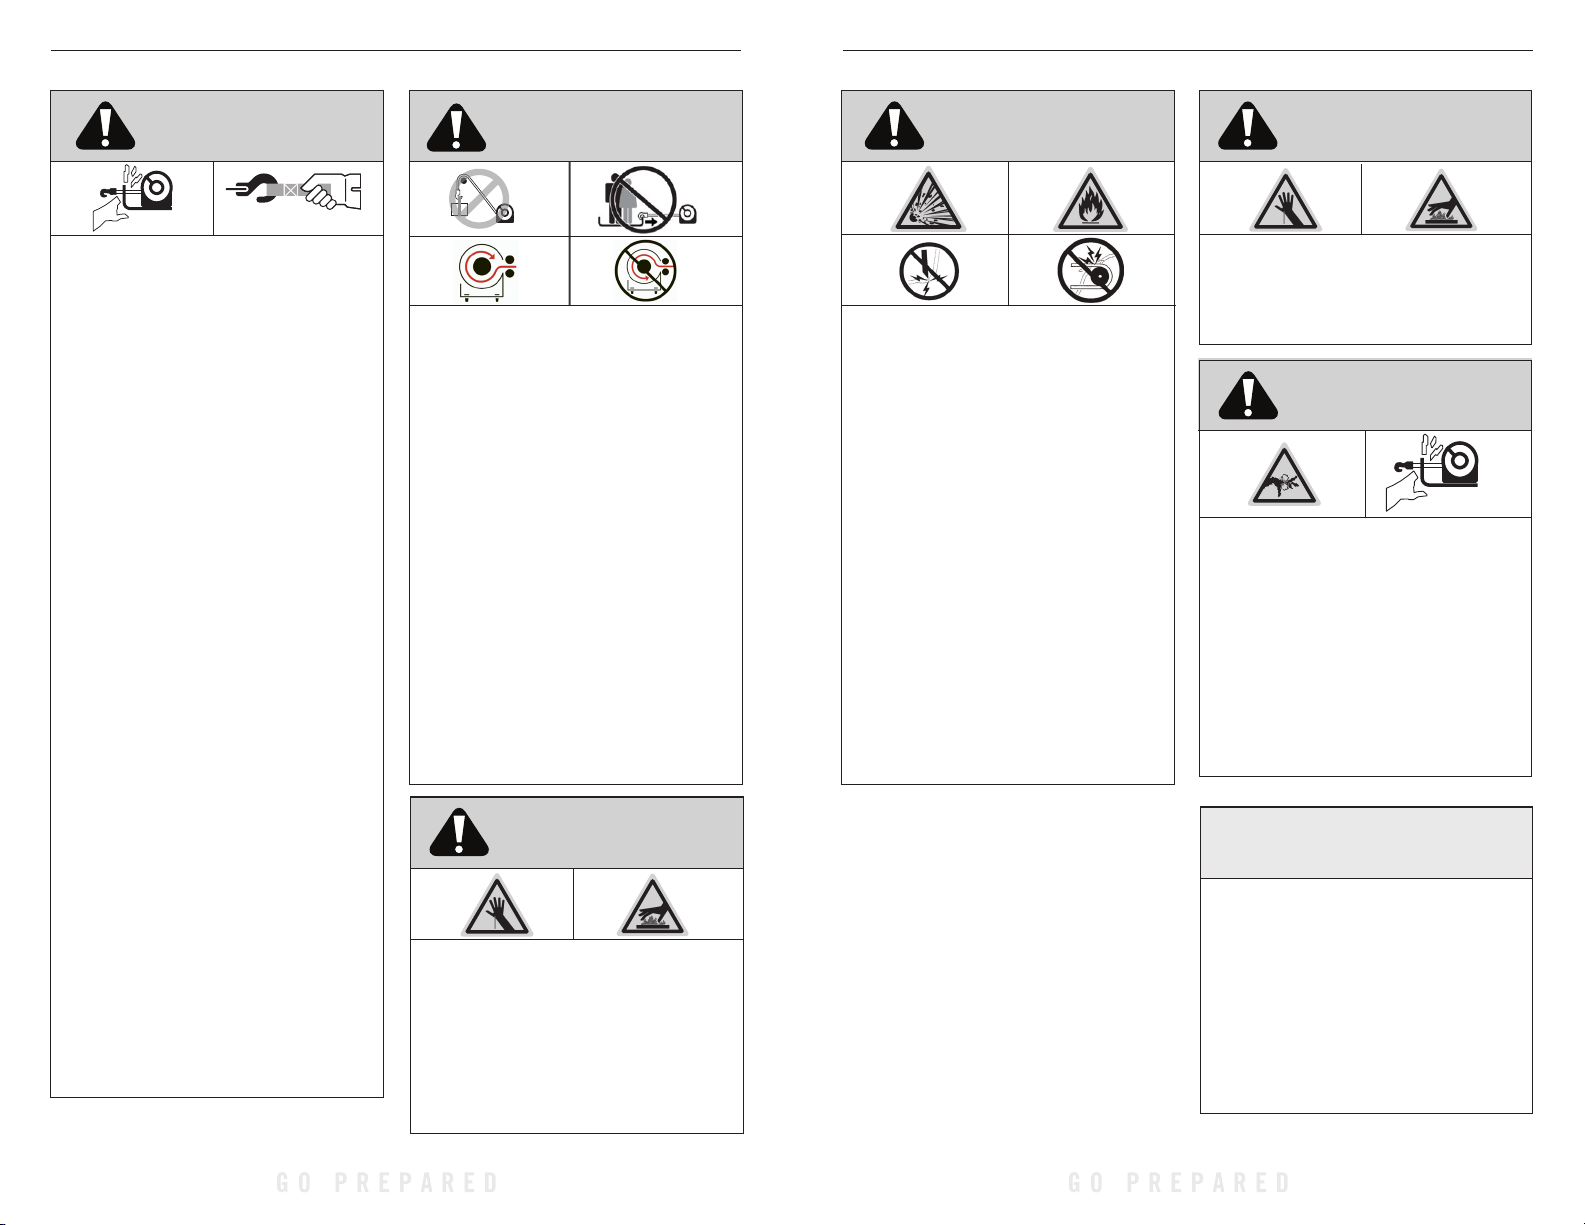
WARNING
MOVING PARTS ENTANGLEMENT HAZARD
Failure to observe these instructions could lead to
serious injury or death.
• Always ensure hook latch is closed and not supporting
load.
• Never apply load to hook tip or latch. Apply load only to
the center of hook.
• Never use a hook whose throat opening has increased, or
whose tip is bent or twisted.
• Always use a hook with a latch.
• Always ensure the operator and bystandnders are aware
of the stability of the vehicle and/or load.
• Always keep wired remote control lead and power cord
clear of the drum, rope, and rigging. Inspect for cracks,
pinches, frayed wires or loose connections. Damaged
components must be replaced before operation.
• Always pass remote lead thru window when used in
vehicle.
WARNING
MOVING PARTS ENTANGLEMENT HAZARD
Failure to observe these instructions could lead to
serious injury or death.
General Safety:
• Always Know Your Winch. Take time to fully read the
Instructions and/or Operations Guide, and/or Basic Guide
to Winching Techniques, in order to understand your
winch and its operations.
• Never exceed winch or winch rope rated capacity. Double
line using a snatch block to reduce winch load.
• Always wear heavy leather gloves when handling winch
rope.
• Never use winch or winch rope for towing. Shock loads
can damage, overload and break rope.
• Never use a winch to secure a load.
• Never operate this winch when under the influence of
drugs, alcohol or medication.
• Never operate this winch if you are under 16 years of age.
Installation Safety:
• Always choose a mounting location that is sufficiently
strong to withstand the maximum pulling capacity of your
winch.
• Always use grade 5 (grade 8.8 metric) or better hardware.
• Never weld mounting bolts.
• Always use factory approved mounting hardware,
components, and accessories.
• Never use bolts that are too long.
• Always complete the winch installation and hook
attachment before installing the wiring.
• Always keep hands clear of winch rope, hook loop, hook
and fairlead opening during installation, operation, and
when spooling in or out.
• Always position fairlead with warning readily visible on
top.
• Always prestretch rope and respool under load before
use. Tightly wound rope reduces chances of “binding”,
which can damage the rope.
WA RN I ND US TR IE S • TH E BA SI C GU IDE TO WI NC HI NG T EC HN IQ UE S
2 3
WA RN I ND US TR IE S • TH E BA SI C GU IDE TO WI NC HI NG T EC HN IQ UE S
Page 5
GENERAL SAFETY PRECAUTIONS
WARNING
WARNING
WARNING
GENERAL SAFETY PRECAUTIONS
CAUTION
MOVING PARTS ENTANGLEMENT HAZARD
Failure to observe these instructions could lead to
serious injury or death.
Winching Safety:
• Always inspect winch rope, hook, and slings before
operating winch. Frayed, kinked or damaged winch
rope must be replaced immediately. Damaged
components must be replaced before operation. Protect
parts from damage.
• Always remove any element or obstacle that may
interfere with safe operation of the winch.
• Always be certain the anchor you select will withstand
the load and the strap or chain will not slip.
• Always use supplied hook strap whenever spooling
winch rope in or out, during installation and during
operation.
• Always require operators and bystanders to be aware of
vehicle and or load.
• Always be aware of stability of vehicle and load during
winching, keep others away. Alert all bystanders of an
unstable condition.
• Always unspool as much wire rope as possible when
rigging. Double line or pick distant anchor point.
• Always take time to use appropriate rigging techniques
for a winch pull.
• Never touch winch rope or hook while someone else is
at the control switch or during winching operation.
• Never engage or disengage clutch if winch is under
load, winch rope is in tension or drum is moving.
• Never touch winch rope or hook while under tension or
under load.
• Always stand clear of winch rope and load and keep
others away while winching.
• Never use vehicle to pull load on winch rope. Combined
load or shock load can damage, overload and break
rope.
• Never wrap winch rope back onto itself. Use a choker
chain or tree trunk protector on the anchor.
FALLING OR CRUSHING HAZARD
Failure to observe these instructions could lead to
serious injury or death.
• Always stand clear, keep hands clear, keep others away.
• Never operate winch with less than 5 wraps of rope
around the drum. Rope could come loose from the drum,
as the rope attachment to the drum is not designed to
hold a load.
• Never use winch as a hoist or to suspend a load.
• Always be certain anchor will withstand load, use
appropriate rigging and take time to rig correctly.
• Never use winch to lift or move persons.
• Never use excessive effort to freespool winch rope.
• Always use proper posture/lifting technique or get lifting
assistance while handling and installing product.
• Always spool the rope onto the drum in the direction
specified by the winch warning label on the winch and/or
documentation. This is required for the automatic brake
(if so equipped) to function properly.
• Always spool the winch rope onto the drum as indicated
by the drum rotation label.
WARNING
CUT AND BURN HAZARD
Failure to observe these instructions could lead to
serious injury or death.
To avoid injury to hands and fingers:
• Always wear heavy leather gloves when handling winch
rope.
• Always be aware of possible hot surfaces at winch motor,
drum or rope during or after winch use.
CHEMICAL AND FIRE HAZARD
Failure to observe these instructions could lead to
serious injury or death.
• Always remove jewelry and wear eye protec tion.
• Never route electrical cables across sharp edges.
• Never route electrical cables near parts that get hot.
• Never route electrical cables through or near moving
parts.
• Always place the supplied terminal boots on wires and
terminals as directed by the installation instructions.
• Never lean over battery while making connections.
• Never route electrical cables over battery terminals.
• Never short battery terminals with metal objects.
• Always verify area is clear of fuel lines, fuel tank, brake
lines, electrical wires, etc., when drilling.
• Always consult operator’s manual for proper wiring
details.
• Always insulate and protect all exposed wiring and
electrical terminals.
CUT AND BURN HAZARD
Failure to observe these instructions could lead to
minor or moderate injury.
• Never let winch rope slip through your hands.
CAUTION
MOVING PARTS ENTANGLEMENT HAZARD
Failure to observe these instructions could lead to
minor or moderate injury.
To avoid injury to hands or fingers:
• Never leave remote control where it can be activated
during free spooling, rigging, or when the winch is not
being used.
• Never leave the winch remote control plugged in when
installing, freespooling, rigging, servicing or when the
winch is not being used.
NOTICE
AVOID WINCH AND EQUIPMENT DAMAGE
• Always avoid side pulls which can pile up wire rope
at one end of the drum. This can damage wire rope or
winch.
• Always ensure the clutch is fully engaged or disengaged.
• Always use care to not damage the vehicle frame when
anchoring to a vehicle during a winching operation.
• Never submerge winch in water.
• Always store the remote control in a protected, clean,
dry area.
WA RN I ND US TR IE S • TH E BA SI C GU IDE TO WI NC HI NG T EC HN IQ UE S
4 5
WA RN I ND US TR IE S • TH E BA SI C GU IDE TO WI NC HI NG T EC HN IQ UE S
Page 6
ELECTRIC WINCH BASICS
ELECTRIC WINCH BASICS
WA RNI NG
Always take time
to fully understand
your winch and the
winching operation
by reviewing this
guide and the
Operator’s Guide
included with your
winch..
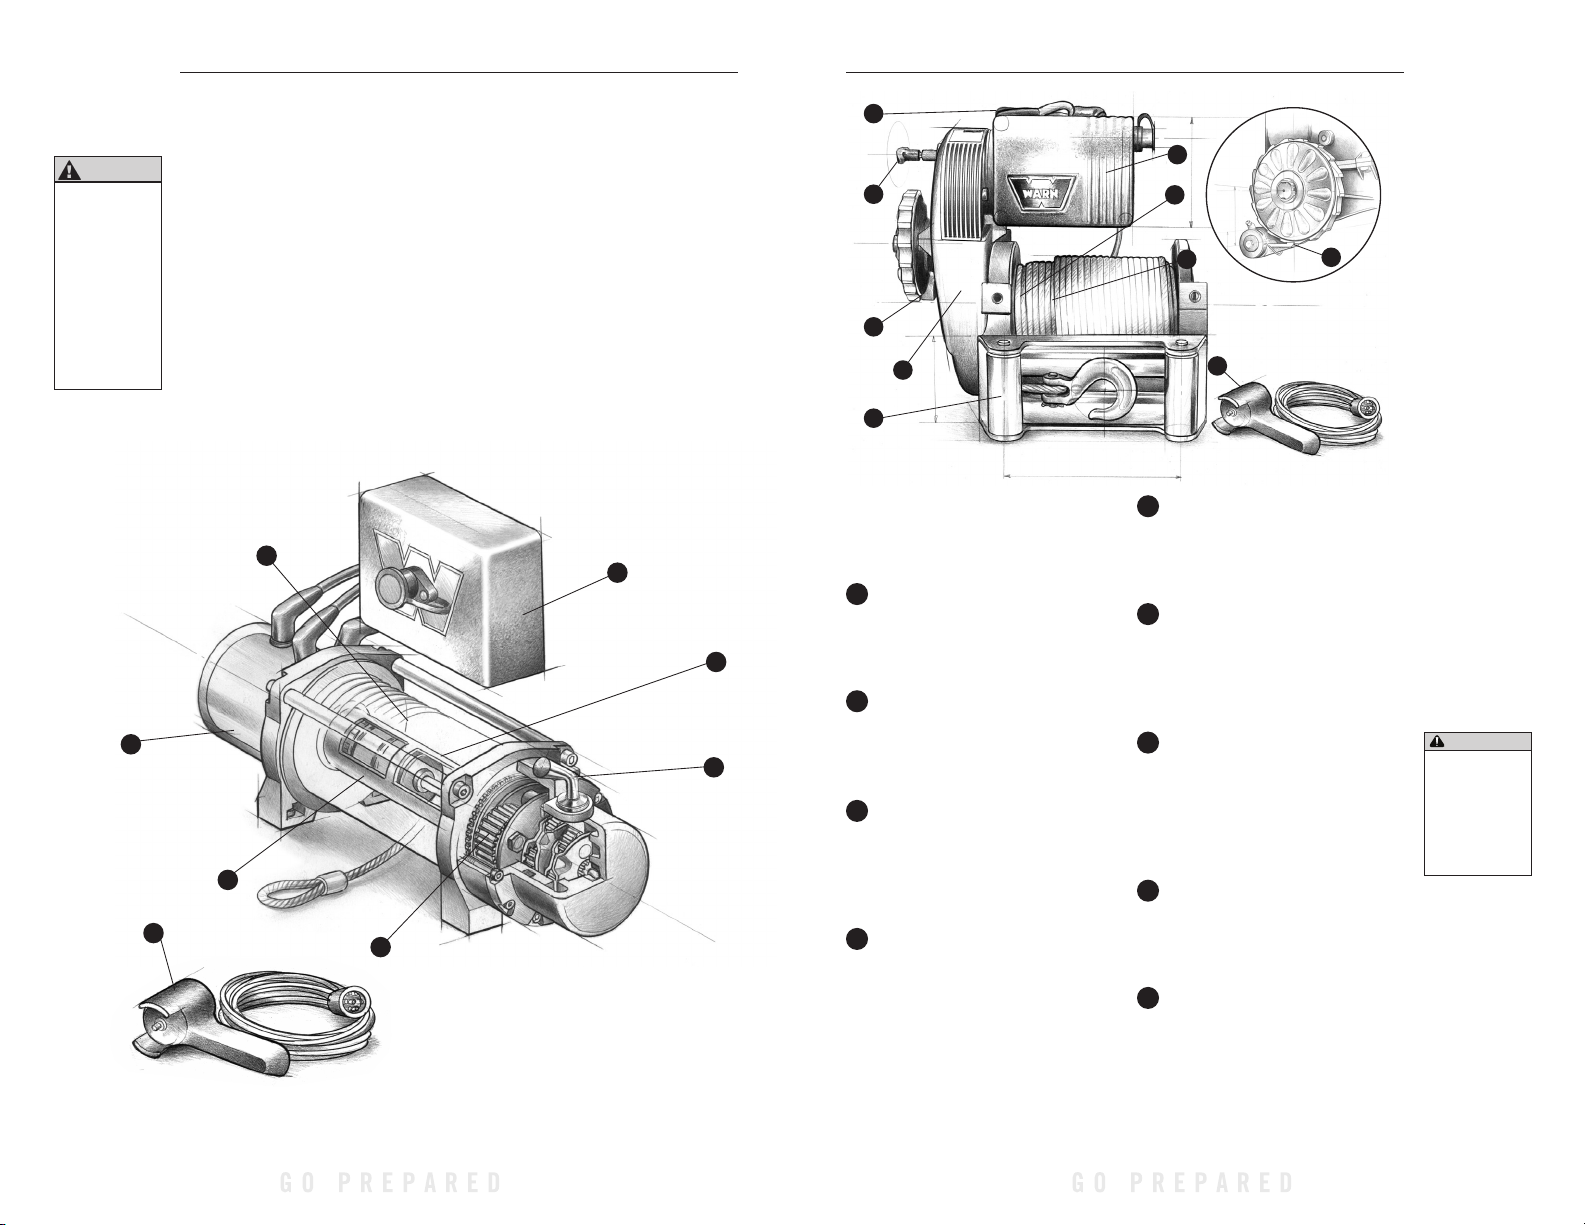
Structural components of
a planetary gear winch
1
So, you have your Warn winch and you’re
ready to get out on the trails: climb a few
boulders, splash a little mud, traverse the
occasional stream. Basically, you’re ready
to explore the backcountry and otherwise
have a great time.
Well, if you’re smart enough to go
prepared with the best, you’re probably
smart enough to know that to keep having
a great time, you need to fully understand
your winch and the winching operation.
That’s exactly what this guide intends to
do: provide you with a basic understanding
of your winch and teach you the basics of
proper winching techniques. But before
we get started, we must emphasize that
3
6
9
the informa tion in this guide is general in
nature. Because no two situations are alike,
it would be nearly impossible to review
them all. We can, however, provide you
with the general principles and techniques.
Then it is up to you to take the time to
analyze the situation and apply the proper
technique.
Along with a little common sense, the
guidelines laid out in this book can help
you keep off-roading fun. Just remember
to think through each situation before you
act and TREAD LIGHTLY!
8
2
7
5
1
7
6
5
4
To start, you should familiarize
yourself with your Warn winch and each
of its components: Practice using your
winch before using it on the trail.
1
Motor Typically the winch motor
is powered by the vehicle’s battery.
The motor provides power to the gear
mechanism, which turns the winch drum
and winds the wire rope.
2
Winch Drum The winch drum is the
cylinder onto which the wire rope feeds.
The drum is driven by the motor and
drive train. Its direction can be changed
using the remote control.
Wire Rope The wire rope’s diameter
3
and length are determined by the winch’s
load capacity and design. Wrapped
around the winch drum and fed through
the fairlead, the wire rope is looped at
the end to accept the hook’s clevis pin.
Fairlead When using the winch at
4
an angle, the fairlead (or wire lead) acts
to guide the wire rope onto the spooling
drum. It minimizes damage to the wire
rope while it goes through the winch
mount or bumper.
8
2
3
Inset above: There is a stopper
on the side of the winch body for
this large diameter reel. In fact,
this reel is also the brake.
9
5
Gear Train The reduction gear
6
converts the winch motor power into a
large pulling force. The gear train design
makes it possible for the winch to be
lighter and more compact.
6
Braking System The brake is
automatically applied to the winch drum
when the winch motor is stopped and
there is load on the wire rope. The brake
prevents the winch from paying out line,
which in turn holds the vehicle in place.
Clutch The clutch allows the
7
operator to manually disengage the
spooling drum from the gear train,
enabling the drum to rotate freely
(known as “freespooling”). Engaging the
clutch “locks” the winch drum back onto
the gear train.
Control Box Using electrical power
8
from the vehicle’s battery, the control
box solenoids switch power to the
motor, enabling the operator to change
the direction of the winch drum rotation.
9
Remote Control The remote control
plugs into the winch control box,
allowing the operator to control the
The 8274-50 winch has
a different structure.
This winch uses spur
gears for reduction.
Moreover, it has an
automatic disc type
brake on the body side.
WA RNI NG
Never engage or
disengage clutch
if winch is under
load, winch rope is
in tension or drum is
moving.
winch direction, as well as stand well
clear of the wire rope while operating
the winch.
WA RN I ND US TR IE S • TH E BA SI C GU IDE TO WI NC HI NG T EC HN IQ UE S
6 7
WA RN I ND US TR IE S • TH E BA SI C GU IDE TO WI NC HI NG T EC HN IQ UE S
Page 7
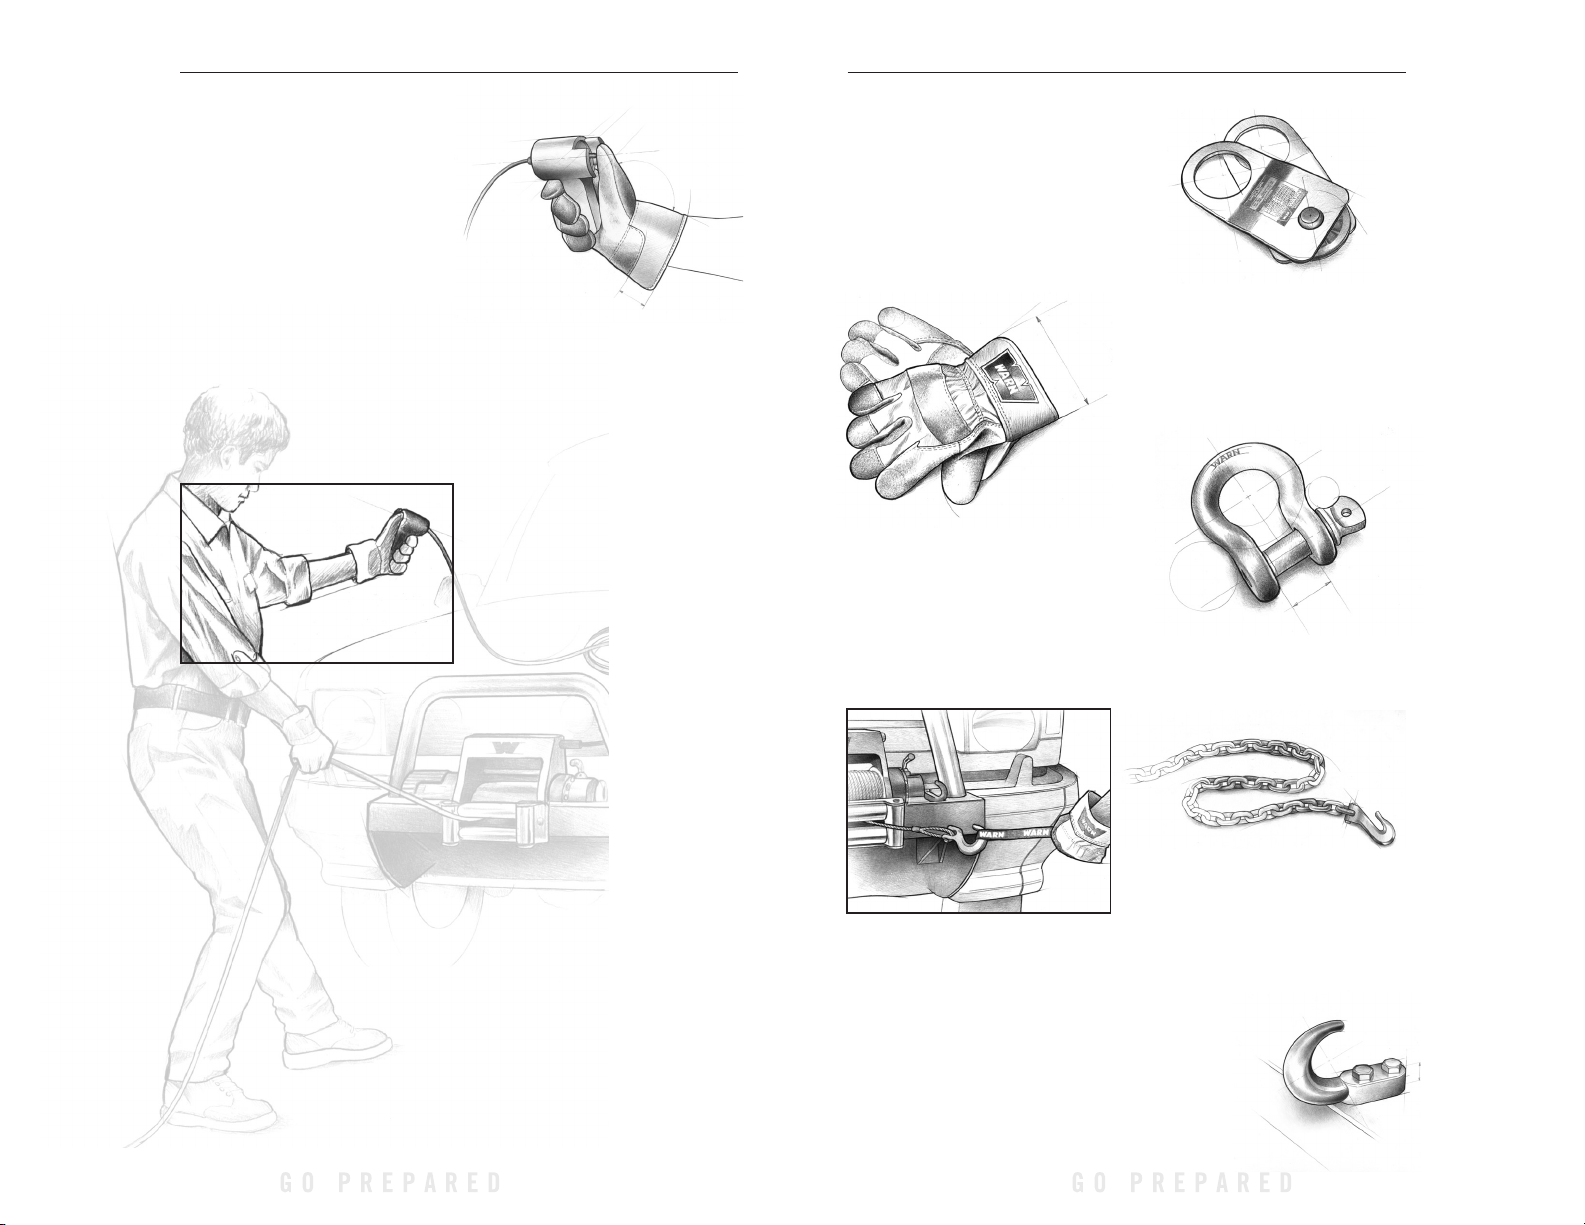
The winch is controlled
by the hand held
remote control to
allow the operator to
stand clear during the
winching process.
HOW THE WINCH WORKS
Winch Mechanics
Now that you’ve familiarized
yourself with your Warn winch and its
components, we can begin reviewing
how it works. The major advantage of
an electric-powered winch is that it
can provide reliable service for intermittent utility and recreational use even
while the vehicle’s engine is stalled
— assuming, of course, that sufficient
battery current is available. Your winch
can operate at high current loads, and,
for this reason, the control box uses a
high current control system to safely
handle the current flow.
It is important to understand that the
longer the pull, the more heat that is
created, just like a hot plate. Prolonged
winching without cooling the winch
motor will damage the motor. Also, if
the engine is idling during winching,
the battery may drain faster than it is
charging. So pay close attention to your
voltage gauge to make sure you aren’t
draining your battery too low to start
your vehicle.
Control Of Your Winch
The winch is controlled by the
hand held remote control to allow the
operator to stand clear while controlling
the winching process. The remote
control provides control of the forward
or reverse rotation of the spooling drum.
How the Winch Reacts to Load
Warn winches are rated by pulling
capacity. The maximum pulling capacity
occurs on the first layer of wire rope
on the drum. As the layers increase,
the pulling power decreases. It’s the
mathematics of winching. Exceeding
the winch capacity could cause the
winch to fail or the wire rope to break.
Thinking through how you intend to use
your winch now, could save you a big
headache later.
In addition, you’ll also want to
make sure that your winch’s mounting
system and your vehicle’s frame can
accommodate the rated load of your
winch.
So analyze your situation. Use your
judgement to calculate how much
weight you intend to pull. Calculate the
gross weight and multiply by 1.5 and
then do not exceed the rating of your
winch or wire rope.
WINCH ACCESSORIES YOU’LL WANT TO HAVE WITH YOU
Alone, the winch is not much more than
a simple tool. But when used with certain
accessories and enhancements, your
Warn winch can become a versatile and
productive tool. In this section, we’ll
review several of these items. Some are
vital to the safe operation of your winch,
while others offer added versatility and
convenience.
Gloves Wire rope, through use, will
develop “barbs” which can slice skin. It is
extremely important to wear protective
gloves while operating the winch or
handling the wire rope. Avoid loose
fitting clothes or anything that could
become entangled in the wire rope and
other moving parts.
Hook Strap Use to hold the hook
and keep fingers away from the fairlead
as the wire rope is being spooled in.
Winches develop tremendous pulling
forces and can easily remove fingers and
limbs that are placed in pinch points. Put
the hook into the loop and hold the strap
between the thumb and forefingers.
Snatch Block Used properly, the
multi-purpose snatch block allows you to:
(1) increase your winch’s pulling power;
and (2) change your pulling direction
without damaging the wire rope. Proper
use of the snatch block is covered in
“Before You Pull”.
Clevis/D-Shackles The D-Shackle is
a safe means for connecting the looped
ends of cables, straps and snatch blocks.
The shackle’s pin is threaded to allow
easy removal.
Choker Chain Can be used to hook-
up to another vehicle or sharp objects
for an anchor point. Chains, however, will
damage or kill trees.
Tow Hooks Secured properly to your
vehicle’s frame, tow hooks provide an
attachment point for wire hooks, straps,
and chains.
WA RN I ND US TR IE S • TH E BA SI C GU IDE TO WI NC HI NG T EC HN IQ UE S
8 9
WA RN I ND US TR IE S • TH E BA SI C GU IDE TO WI NC HI NG T EC HN IQ UE S
Page 8
WINCH ACCESSORIES YOU’LL WANT TO HAVE WITH YOU
BEFORE YOU PULL
CA UT IO N
Never use a strap for
winching.
Never use a strap
for towing. The strap
can be easily cut or
abraded.
Never use “bungie”
straps that develop
tremendous and
potentially dan ger ous
amounts of force
when stretched.
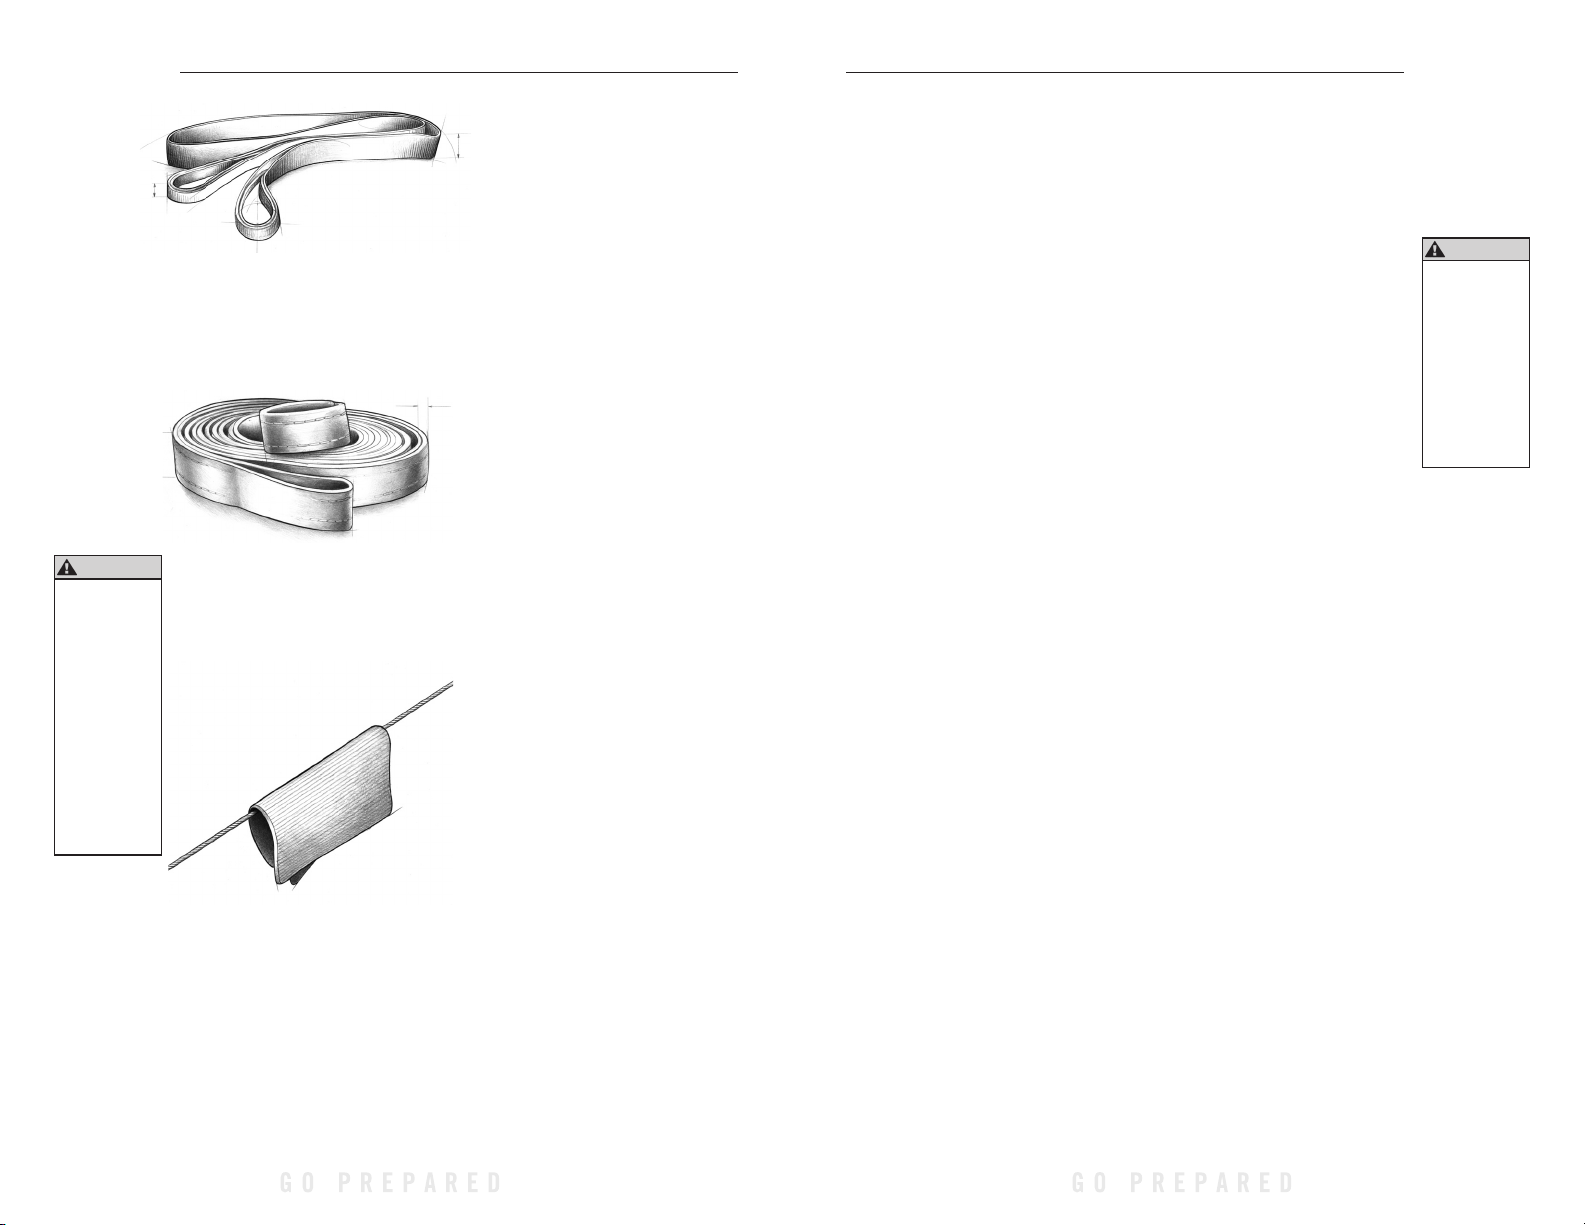
Tree Trunk Protector Typically made
of tough, high-quality nylon, it provides
the operator an attachment point for the
winch rope to a wide variety of anchor
points and objects, as well as protect
living trees.
Recovery Strap Never use a recovery
strap in a winching operation. Because
it is designed to stretch, it stores energy
and could react like a rubber band
should your rigging fail. Use the recovery
strap to “snatch” out a stuck vehicle.
Heavy Blanket In certain situations
you may decide to throw a heavy
blanket or similar object over the wire
rope. A heavy blanket, such as a quilted
mover’s blanket, can absorb energy
should the wire rope break. Place it
on the wire rope midway between
the winch and the anchor point. Do
this before the wire rope is put under
tension. Do not approach or move the
blanket once tension is applied. Do not
allow it to get pulled into the fairlead.
If necessary to move or remove the
blanket, slack the tension on the wire
rope first.
Shovels & Hand Tools Quite often
during winching activities, you’ll find
yourself in need of some additional help.
You may want to stow equipment such
as a shovel, an axe and a Hi-Lift jack for
additional assistance when needed.
Backup Parts Important backup
parts to carry for backcountry travel
should include an extra screw-pin
shackle, snatch block, and remote
controlp. For severe and continued
winch use, consider including an extra
wire rope and winch hook.
Toolbox Items Items to bring along
include hand wrenches, screwdrivers,
pliers, and tools to change wire rope.
Booster Cables Many roadside
emergencies stem from a dead battery.
To prevent exhausting your electrical
source, you can install a dual battery
system and a battery isolator kit. Also, it’s
wise to include battery booster cables
and the Warn quick-connect cable
system.
Battery Recommendations A fully
charged conventional automotive
battery with a minimum rating of 650
cold cranking amps is recommended
to obtain peak performance from your
winch. Make sure all electrical connections are clean and tight.
Practice using your winch before you
get stuck. A real situation is no time to be
learning how to use your winch. Make sure
new wire rope is stretched before it is first
used.
Stretching Wire Rope
The life of a wire rope is directly related
to the use and care it receives. During its first
use, a new wire rope must be spooled onto
its drum under a load of at least 1000 lbs.
(454 kgs). Use the following instructions to
properly stretch the wire rope onto the winch
drum.
1) Choose a FLAT AND LEVEL location that
is large enough to run out the entire length
of wire rope.
2) Turn the clutch lever on the winch to
the “Free Spool” position. Spool out the wire
rope to the last 5 wraps on the drum. Once
the wire rope is spooled out, turn the clutch
lever on the winch to the “Engaged” position.
3) Attach the hook end of the rope to a
suitable anchor point and back the vehicle
away from the anchor point until there is very
little slack in the wire rope. Before getting
out of the vehicle, set the parking brake,
place the vehicle in gear or park and turn the
vehicle off.
4) Connect the remote control to the
winch. Standing approximately 8 ft away
from the winch, power in the winch until all
of the slack is wound onto the winch drum.
Disconnect the remote control from the
winch. Hold tension on the wire rope with
one hand; carefully push the wire rope to the
side of the drum the wire rope is attached to
so there are no gaps between each coil on
the drum. Be sure to check that the wire rope
is winding off of the bottom of the drum, not
the top, or the automatic load holding brake
will not function properly. (If the wire rope is
winding off the top you have powered the
winch “out” instead of “in” on the remote
control).
5) The following steps should be done
using two people for proper safety. If you
attempt to tension your wire rope alone be
sure to always engage the parking brake,
place the transmission in gear and turn the
vehicle off every time you exit the vehicle to
inspect the winch wire rope. Never exit the
vehicle with a load on the winch wire rope.
Tensioning the wire rope is critical to ensure
a long product life. Tensioning the wire rope
will prevent outer layers of wire rope from
pinching and deforming the inner layers.
6) Use care to evenly wrap each layer to
prevent damage to the rope.
7) Pass the remote control through the
driver’s window for the driver of the vehicle
to operate. Instruct your assistant to stand
to the side of the vehicle and away from the
winch wire rope. Your assistant should signal
you if the wire rope is winding correctly by
watching it move across the fairlead as the
wire rope is powered in. Start the vehicle and
place the transmission in neutral. Release
the parking brake while applying moderate
brake pedal pressure. Press power in on the
remote control switch. After winching in for
approximately 6 ft, stop winching. Slowly let
up off of the brake pedal and then apply the
parking brake. This will ensure that there is
no load on the winch rope. Then place the
transmission in park or gear and turn the
vehicle off. Exit the vehicle and inspect the
winch to make sure that the wire rope is
being evenly wound onto the winch drum
and not sinking into the lower layer. If the
wire rope is sinking, power the wire rope out
and repeat this step from the beginning with
more brake pedal pressure.
8) When you are convinced the wire rope
is winding onto the winch drum properly,
repeat step 6 until the vehicle is within 6 ft of
the winch anchor. Once within 6 ft, slowly let
up off of the brake pedal and then apply the
parking brake. This will ensure that there is
no load on the winch wire rope. Then place
the transmission in park or in gear and turn
the vehicle off. Exit the vehicle. Disconnect
the hook from the anchor. While holding onto
the supplied hook strap, hold tension on the
winch rope and slowly power in the winch by
“pulsing” the power in on the remote control
until the hook is within 3 ft of the fairlead.
Stop winching in and attach the hook to a
suitable anchor point on the vehicle. DO NOT
POWER THE HOOK INTO THE FAIRLEAD. This
could cause damage to the fairlead. Once
the hook is suitably attached to the vehicle,
power in the remaining slack in the winch
rope by “pulsing” the power in on the remote
until there is minimal slack in the winch wire
rope.
WA RNI NG
Never operate winch
with less than 5
wraps of rope around
the drum. Rope could
come loose from the
drum, as the rope
attachment to the
drum is not designed
to hold a load.
WA RN I ND US TR IE S • TH E BA SI C GU IDE TO WI NC HI NG T EC HN IQ UE S
10 11
WA RN I ND US TR IE S • TH E BA SI C GU IDE TO WI NC HI NG T EC HN IQ UE S
Page 9
BEFORE YOU PULL
BEFORE YOU PULL
WA RNI NG
Always use
supplied hook strap
whenever spooling
winch rope in or out,
during installation
or operation to
avoid injury to
hands and fingers.
WA RNI NG
Always keep hands
clear of winch rope,
hook loop, hook and
fairlead opening
during installation,
operation, and when
spooling in or out.
Whether you’re recovering another
vehicle or pulling a stump from the
ground, knowing the proper winching
techniques can help keep you and others
around you safe. And perhaps the most
important part of the winching process,
regardless of the situation, is what you
do before you pull.
In this section, we’ll show you the
basic fundamentals for effective winching. However, it is up to you to analyze
the situation and make the decisions
necessary for the proper use of your
winch. Apply your knowledge of your
winch and the basic fundamentals
you’ve practiced and adjust your techniques to your unique situation. Some
keys to remember when using your Warn
winch:
1. Always take your time to assess
your situation and plan your pull
carefully.
2. Always take your time when using a
winch.
3. Use the right equipment for your
situation.
4. Always wear leather gloves and
do not allow the wire rope to slide
through your hands.
5. You and only you should handle the
wire rope and operate the remote
control switch.
6. Think safety at all times.
7. Practice. Practice and practice the
steps.
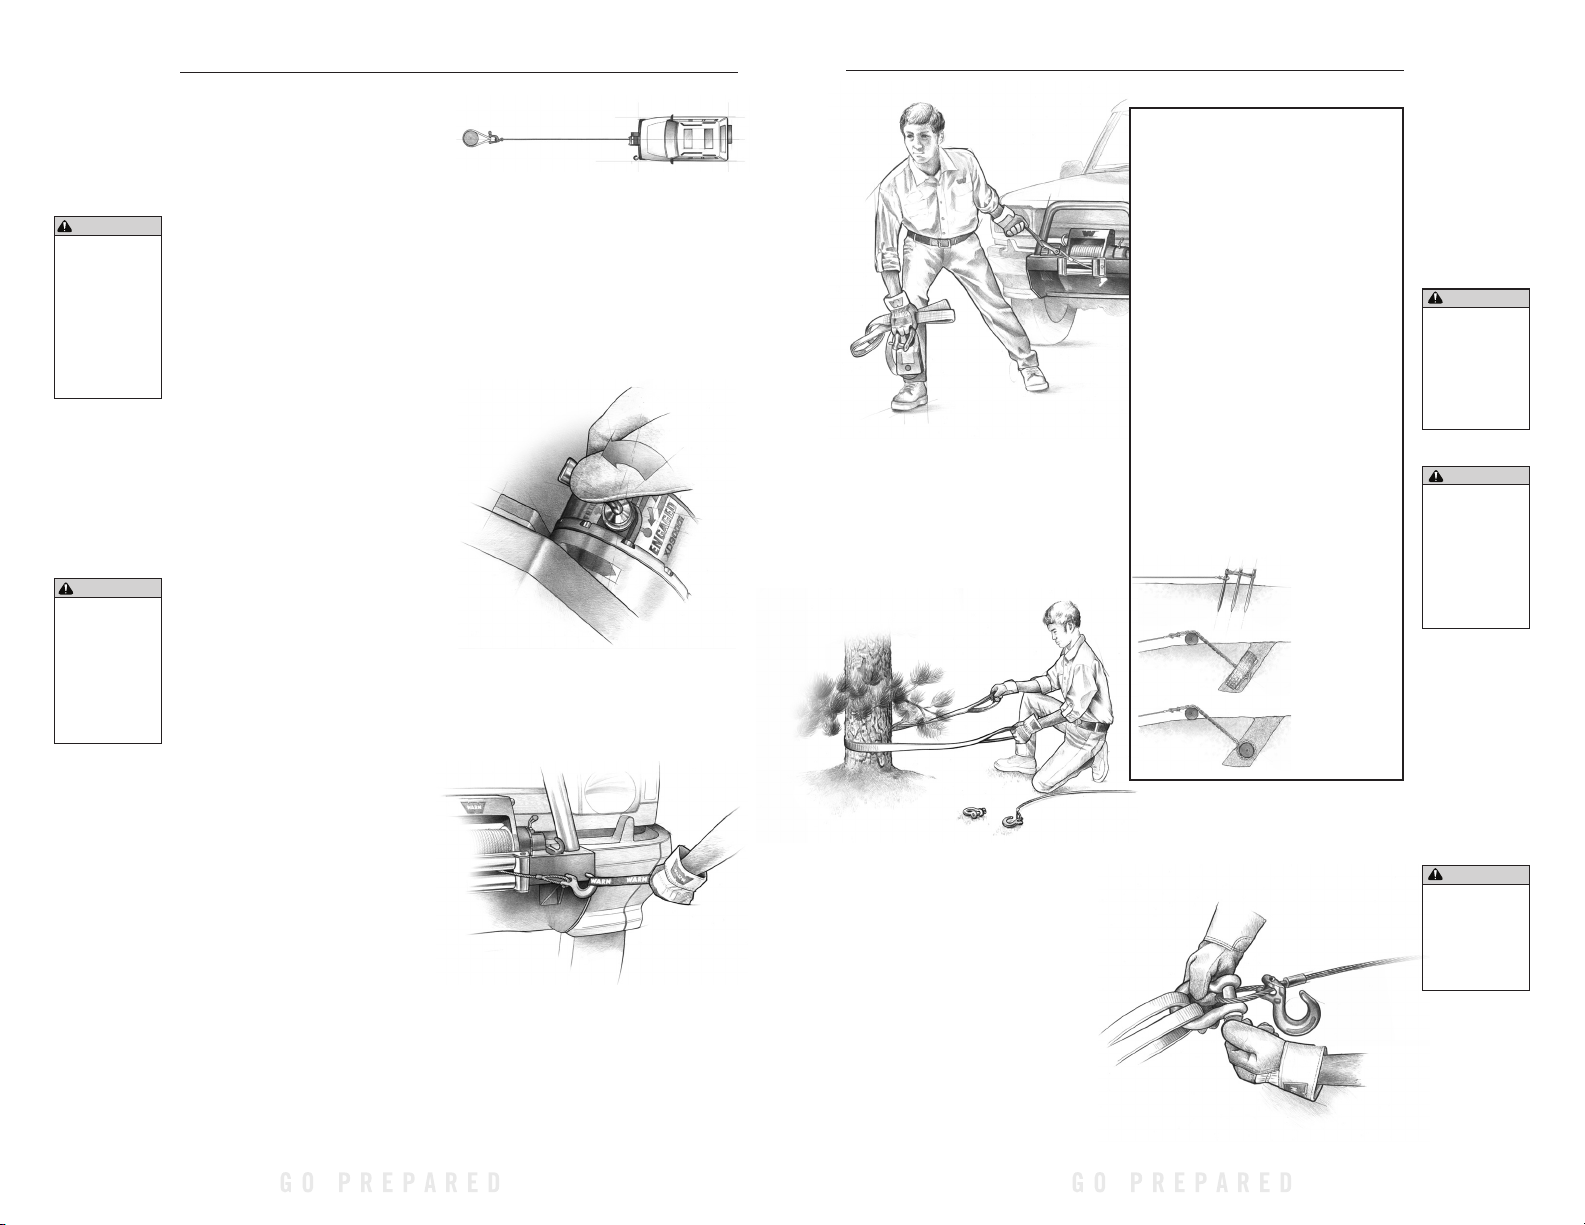
Single line pull
Rigging for the Pull
The following steps describe how
to recover your vehicle with rigging a
single line pull. Double or multiple line
rigging techniques follow the same basic
steps, but use a snatch block to assist
the process.
Step 1: PUT ON GLOVES.
Step 2: DISENGAGE CLUTCH. To allow
free spooling of the winch drum,
rotate the clutch lever on the winch
to Disengage. Freespooling conserves
battery power.
Step 3: FREE THE WINCH HOOK AND
ATTACH HOOK STRAP. Free the winch
hook from its anchor point. Attach hook
strap to the hook (if not attached).
Step 4: PULL WIRE TO ANCHOR POINT.
Pull out enough wire rope to reach your
anchor point. Be sure to keep a certain
amount of tension in the wire. It can
become twisted and overwrap when
slackened, leading to wire rope damage.
To prevent loosing the end, hold the
winch hook in the hook strap while you
work.
Step 5: SECURE TO THE ANCHOR POINT.
Once you’ve established your anchor
point, secure the tree trunk protector or
choker chain around the object.
Step 6: ATTACH THE CLEVIS/DSHACKLE
AND HOOK STRAP. Attach the shackle to
the two ends of the strap or chain and
through the hook loop, being careful
not to over tighten (tighten and backoff 1/2 turn).
How to choose an anchor point:
A secure anchor is critical to winching
operations. An anchor must be strong
enough to hold while winching. Natural
anchors include trees, stumps, and rocks.
Hook the cable as low as possible. If no
natural anchors are available, when
recovering another vehicle, your vehicle
becomes the anchor point. In this case,
be sure to put the transmission in neutral,
apply the hand brake and block its wheels to
prevent your vehicle from moving.
Ideally, you’ll want an anchor point
that will enable you to pull straight in the
direction the vehicle will move. This allows
the wire rope to wind tightly a nd evenly
onto the spooling drum. An anchor point as
far away as possible will provide the winch
with its greatest pulling power.
Stakes or axles,
driven in at an
angle and tied
together.
Spare tire and rim
buried deep and
the chain secured
through the rim.
Buried log with
chain secured
around the log.
WA RNI NG
Never engage or
disengage clutch
if winch is under
load, winch rope is
in tension or drum is
moving.
CAUT ION
Never leave remote
control where it
can be activated
during free spooling,
rigging, or when the
winch is not being
used.
WA RNI NG
Never wrap winch
rope back onto itself.
Use a choker chain or
tree trunk protector
on the anchor.
WA RN I ND US TR IE S • TH E BA SI C GU IDE TO WI NC HI NG T EC HN IQ UE S
12 13
WA RN I ND US TR IE S • TH E BA SI C GU IDE TO WI NC HI NG T EC HN IQ UE S
Page 10
WA RNI NG
Never use winch as
a hoist or to suspend
a load.
WA RNI NG
Never use winch
or winch rope for
towing.
Shock loads can
damage, overload
and break rope.
WA RNI NG
Never operate winch
with less than 5
wraps of rope around
the drum. Rope could
come loose from the
drum, as the rope
attachment to the
drum is not designed
to hold a load.
N O T I C E
Always avoid
continuous side pulls
which can pile up
wire rope at one end
of the drum. This
pile up of wire can
damage wire rope or
winch.
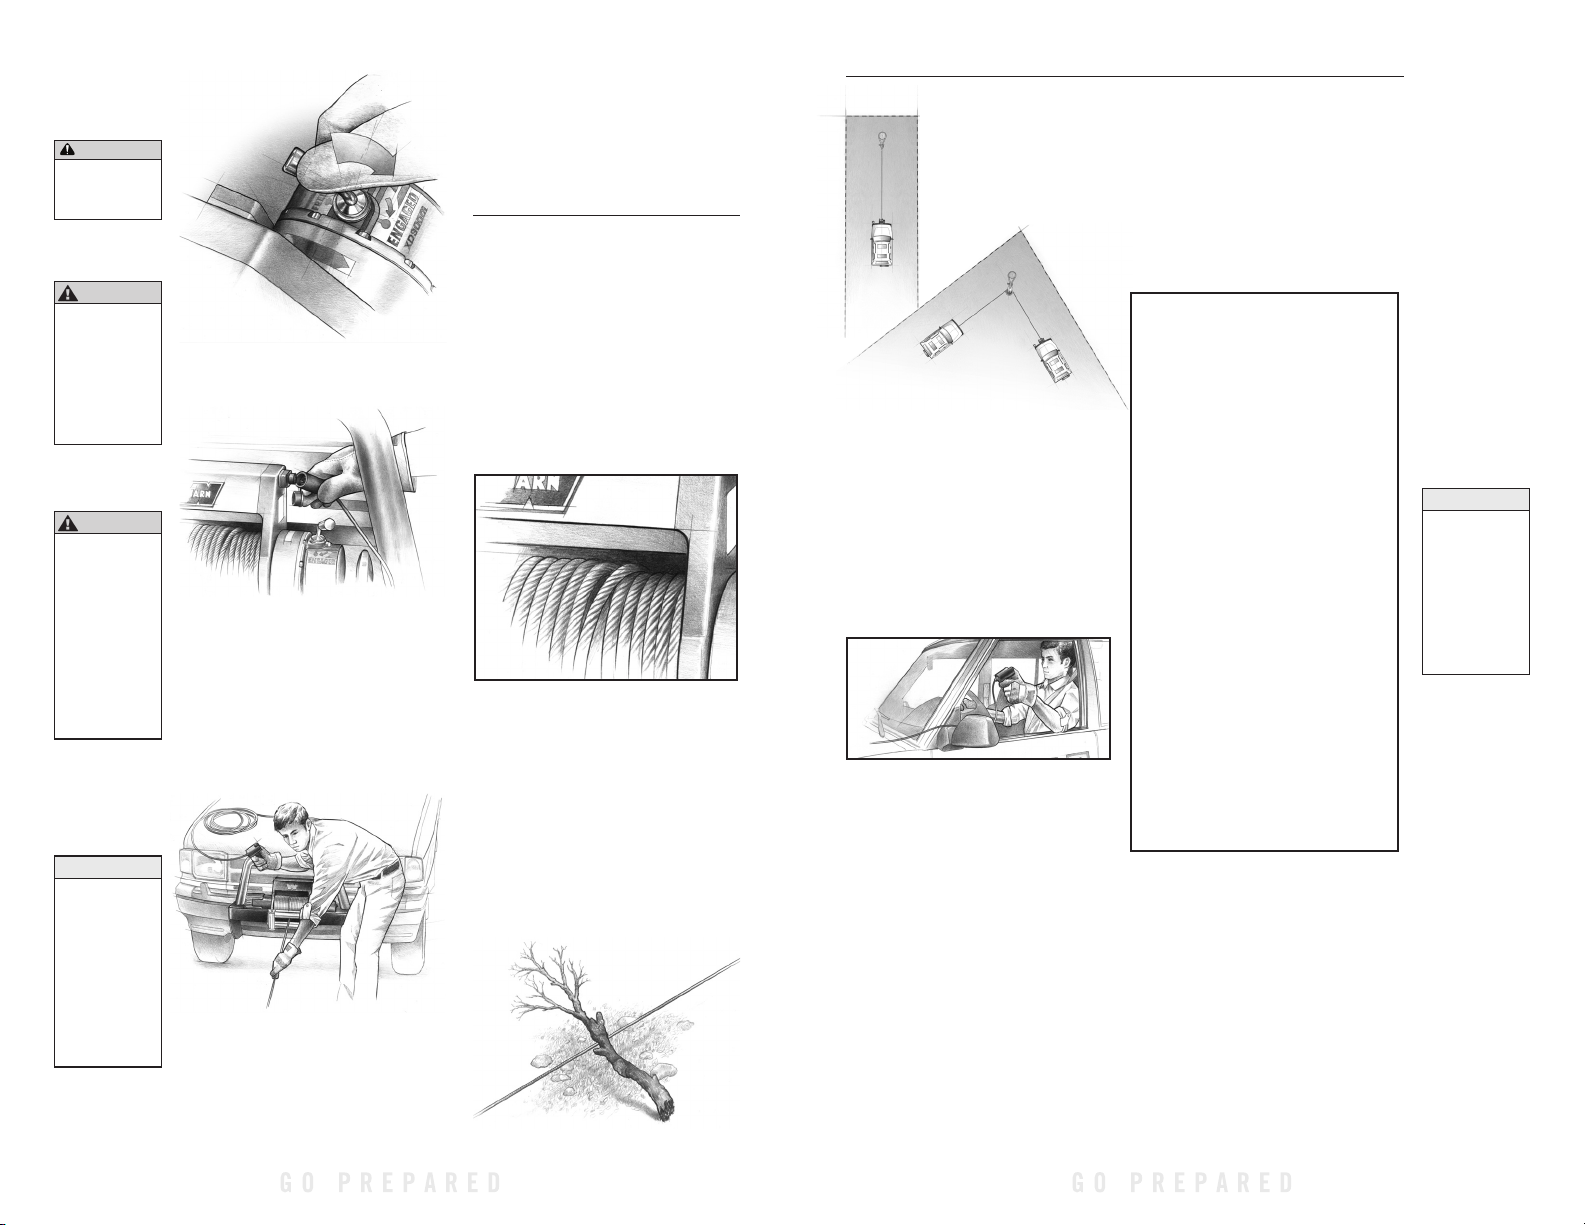
Step 7: LOCK THE CLUTCH. Lock the
winch drum by rotating the clutch lever
on the winch to Engage.
Step 8: CONNECT THE REMOTE
CONTROL. Be careful not to let the
remote control cord dangle in front of
the winch. If you choose to control the
winch from inside your vehicle, always
pass the remote through a window to
avoid pinching the cord in the door.
Always disconnect the remote control
when not in use.
Step 9: PUT WIRE ROPE UNDER TENSION.
Using the winch switch, slowly wind the
wire rope until no slack remains. Once the
wire rope is under tension, stand well
clear, and never step over it.
Step 10: CHECK YOUR ANCHOR. Make
sure all connections are secured and
free of debris before continuing with the
winching procedure.
PULLING
As you probably have already noticed,
there are many things to do and consider
before you actually begin pulling. Think
through what you’re doing and you can
keep yourself and those around you out
of harm’s way.
Operating your winch properly is so
important, in fact, you should practice
these techniques before having to face
the distractions and stresses of a real
winching situation.
Step 11: CHECK WIRE ROPE. The wire
rope should be neatly wound around the
spooling drum. Improper winding can
cause damage to the wire rope.
Step 12: LAY SOMETHING OVER THE
WIRE ROPE, if you decide it is necessary,
midway between the winch and the
anchor point to absorb energy should
the wire rope snap loose. Tree limbs,
heavy jackets, chain, back pack and the
like may be used for this purpose.
Establish “no people”
zones:
Step 13: MAKE YOUR INTENTIONS CLEAR.
Be sure that everyone in the immediate
vicinity surrounding the winching
operation is completely aware of your
intentions before you pull.
Declare where the spectators should
not stand — never behind or in front of
the vehicle and never near the wire rope
or snatch block. Your situation may have
other “no people” zones.
Step 14: BEGIN WINCHING. With the
winching vehicle’s engine on and light
tension already on the wire rope, begin
winching slowly and steadily. Be sure
that the wire rope is winding evenly
and tightly around the spooling drum.
For additional assistance, the winched
vehicle can be slowly driven while being
pulled by the winch.
Step 15: FOR VEHICLE RECOVERY,
continue pulling until the vehicle is on
stable ground. If you are able to drive
the vehicle, the winching operation is
complete.
PULLING
Step 16: SECURE VEHICLE. Once recovery
of the vehicle is complete, be sure to
secure the vehicle’s brakes and put the
Transmission in “park” (automatic) or
“low” gear for (manual) transmissions.
Release tension in the wire rope.
What to look for under load
The wire rope must always spool
onto the drum as indicated by the drum
rotation decal on the winch.
As you power in, make sure the wire
rope winds evenly and tightly on the
drum. This prevents the outer wire wraps
from drawing into the inner wraps,
binding and damaging the wire rope.
Avoid shock loads by using the control
switch intermittently to take up wire rope
slack. Shock loads can momentarily far
exceed the winch and wire rope ratings.
During side pulls the wire rope tends
to stack up at one end of the drum. This
stack can become large enough to cause
serious damage to the winch. So, line up
pulls as straight ahead as possible and
stop winching if the wire rope comes
close to the tie rods or mounting plate.
To fix an uneven stack, spool out that
section of the rope and reposition it to
the opposite end of the drum which will
free up space for continued winching.
N O T I C E
Avoid over heating
the winch motor. For
extended winch ing,
stop at reasonable
intervals to allow the
winch motor to cool
down.
WA RN I ND US TR IE S • TH E BA SI C GU IDE TO WI NC HI NG T EC HN IQ UE S
14 15
WA RN I ND US TR IE S • TH E BA SI C GU IDE TO WI NC HI NG T EC HN IQ UE S
Page 11

PULLING
Winching hand signals
In some situations, recovery could involve two people. One drives and controls the winch,
while the other provides navigation instructions and ensures the wire rope is winding
properly. You and your helper must established clear and precise hand signals and review so
everyone clearly understands. It should also be understood that if the driver controlling the
winch cannot see both hands of the assistant, the winch should not be activated.
Suggested signals:
1) Direction of steering
Hold your arms out with
thumbs up and tilt your
hands in the direction you
advise the driver to steer.
2) Power in the wire rope
Hold your forefinger in the
air above your shoulder
height and draw small
circles in the air to indicate
to wind the winch.
3) Power out the wire rope
Hold your forefinger pointing
down and draw circles in the
air at about waist height to
indicate feeding more wire
from the winch.
4) Pulse wind the wire rope
Tells the driver to wind the
winch in short, quick bursts.
Open and close the two
fingertips until you want the
winch to stop.
How to spool under no load
Arrange the remote control lead so it
can not be caught in the winch. Arrange
the wire rope so it will not kink or tangle
when spooled. Be sure any wire rope
already on the spooling drum is wound
tightly and evenly layered. Tighten and
straighten the layer if necessary. Keep
the wire rope under light tension and
spool the wire rope back onto the winch
drum in even layers. Stop frequently
to tighten and straighten the layers as
necessary. Repeat this process until the
winch hook is the same distance as the
full length of the remote control from
the winch. Pinch the hook between your
thumb and forefinger and attach the
hook strap. Hold the hook strap between
the thumb and forefinger to keep tension
on the wire rope. Walk the wire rope
towards the fairlead, carefully spooling
in the remaining wire rope by pulsing the
remote control switch. Store the hook
at the fairlead or tensioned to a suitable
location to the side.
If you do not have the hook strap, use
a length of cord or something similar. To
prevent serious injury, NEVER put your
fingers inside the hook area as you are
powering in.
PULLING
WA RNI NG
Always keep hands
clear of winch rope,
hook loop, hook and
fairlead opening
during installation,
operation, and when
spooling in or out.
Step 18: REWIND WIRE ROPE. The person
handling the wire rope should walk the
rope in and not let it slide through the
hand and control the winch at all times.
5) Stop the winch
Clinch fist, palm to driver, held high
enough for driver to see and other
arm straight out at shoulder height
is the sign to stop the winch.
WA RN I ND US TR IE S • TH E BA SI C GU IDE TO WI NC HI NG T EC HN IQ UE S
6) Braking
Cross your palms together
to tell the driver to apply the
foot brake.
16 17
7) Drive assist
Tells driver to give the tires more
drive force to assist the winching
process.
Step 19: DISCONNECT REMOTE
CONTROL. Disconnect the remote control
cord from the control box and store in a
clean and dry place. Winching operations
are now complete. Put the cap on the
solenoid plug in.
Step 17: DISCONNECT WIRE ROPE.
Disconnect from the anchor.
WA RN I ND US TR IE S • TH E BA SI C GU IDE TO WI NC HI NG T EC HN IQ UE S
Page 12

RIGGING TECHNIQUES
RIGGING TECHNIQUES
Various winching situations
will require application of
other winching techniques.
These could range from too
little distance to achieve
maximum pull using
straight line rigging, simply
increasing pulling power,
or maintaining a straightline pulling situation. You
will have to assess what
technique is correct for your
situation. Think “safety” at
all times.
How to change the pulling
direction
All winching operations should
have a straight line from the
winch to the object being
pulled. This minimizes
the wire rope collect ing
on one side of the drum
affecting pulling efficiency
and damag ing wire rope. A
snatch block, secured to a
point directly in front of the
Single line
Double line
Triple line
vehicle, will enable you to change your
pulling direction while still allowing the
wire rope to be at 90º to wind properly
onto the spooling drum.
Increasing pulling power
In some cases, you may find yourself
needing more pulling power. The use
of snatch blocks increases mechanical
advantage and that increases your
pulling power:
Double line
Because pulling power decreases with
the number of layers of wire rope on the
winch drum, you can use a snatch block
to double line out more wire rope. This
decreases the number of layers of wire
rope on the drum, and increases pulling
power.
Start by feeding out enough wire rope
to free the winch hook. Attach the hook
to your vehicle’s frame/tow hook and run
the wire rope through a snatch block.
Disengage the clutch and, using the
snatch block, pull out enough wire to
reach your anchor point. Do not attach
hook to mounting kit.
Secure to the anchor point with a tree
trunk protector or choker chain. Attach
the clevis/shackle. Attach the shackle to
the two ends of the strap/chain, being
careful not to over tighten (tighten and
back-off 1/2 turn).
Triple Line
Use the same techniques as the
Double Line. Select a robust mounting
location on your vehicle for the snatch
block and the screw-pin shackle. Keep a
90º angle between the winch and run
the wire rope to the first anchor-point
and through the snatch block. Secure
rope back to the vehicle. Put the wire
rope through the snatch block and
secure with the screw-pin shackle on the
vehicle as close to the winch as practical.
Now run the wire rope to the final anchor
point.
Secure to the anchor point with a tree
trunk protector or choker chain. Attach
the clevis/shackle. Attach the shackle to
the two ends of the strap/chain, being
careful not to over tighten (tighten and
back-off 1/2 turn).
Secure the winch hook. While
keeping the line near the ground, insert
the winch hook through the screw-pin
shackle. Check your anchor. Make sure all
connections are secured and free of debris
before continuing with the winching
procedure.
WA RN I ND US TR IE S • TH E BA SI C GU IDE TO WI NC HI NG T EC HN IQ UE S
18 19
WA RN I ND US TR IE S • TH E BA SI C GU IDE TO WI NC HI NG T EC HN IQ UE S
Page 13

MAINTENANCE THE FINAL ANALYSIS
TRADUCTION DE LA NOTICE ORIGINALE
WA RNI NG
Never operate winch
with less than 5
wraps of rope around
the drum. Rope could
come loose from the
drum, as the rope
attachment to the
drum is not designed
to hold a load.
• Inspect the wire rope before and after
each winching operation. If the wire
rope has become kinked or frayed,
the wire rope needs to be replaced.
Be sure to also inspect the winch
hook and hook pin for signs of wear or
damage. Replace if necessary.
• Keep winch, wire rope, and switch
control free from contaminants. Use
a clean rag or towel to remove any
dirt and debris. If necessary, unwind
winch completely (leaving a minimum
of 5 wraps on spooling drum), wipe
clean, and rewind properly before
storage. Using a light oil on the wire
rope and winch hook can keep rust
and corrosion from forming.
• Operating your winch for a long
period of time places an extra burden
on your vehicle’s battery. Be sure to
check and maintain your battery and
battery cables according to manufacturer guidelines. Also inspect switch
control and all electrical connections
to be certain they are clean and tight
fitting.
• Inspect the remote control for
damage, if so equipped. Be sure to cap
the remote socket to prevent dirt and
debris from entering the connections.
Store remote control in a protected,
clean, dry area.
• No lubrication is required for the life
of the winch.
The basic guide to proper winching
techniques cannot cover all the possible
situations in which you may need to
use a winch. In the final analysis, the
decisions you make will determine the
final outcome. So think through each
situation and each step of use. Always
be mindful of your own safety and the
safety of others. Pay attention and you’ll
have fun.
Le manuel de base des
techniques de treuillage
Chaque situation de treuillage peut potentiellement occasionner des blessures.
Pour minimiser ce risque, il est important que vous lisiez ce guide de base
avec attention, que vous vous familiarisiez avec le maniement du treuil avant
de l’utiliser, et que vous vous préoccupiez avant tout de la sécurité. Nous
exposons dans ce guide de nombreuses règles de sécurité fondamentales pour
le maniement du treuil. Toutefois, comme chaque situation de treuillage est
différente, votre bon sens et votre attachement constant aux principes de sécurité
sont d’une importance primordiale.
T A B L E D E S M A T I È R E S :
Index des symboles . . . . . . . . . . . . . . . . . . . . . . . . . . . . . . . . . . . . . . . . . . . . . . . . . . . . . . . . . . . . . 22
`Mesures générales de sécurité . . . . . . . . . . . . . . . . . . . . . . . . . . . . . . . . . . . . . . . . . . . . . . . 23-25
Les principes de base du treuillage . . . . . . . . . . . . . . . . . . . . . . . . . . . . . . . . . . . . . . . . . . . 26-27
Comment fonctionne le treuil . . . . . . . . . . . . . . . . . . . . . . . . . . . . . . . . . . . . . . . . . . . . . . . . . . 28
Les accessoires du treuil et les améliorations . . . . . . . . . . . . . . . . . . . . . . . . . . . . . . . . . . 29-30
Avant de treuiller . . . . . . . . . . . . . . . . . . . . . . . . . . . . . . . . . . . . . . . . . . . . . . . . . . . . . . . . . . . . 31-34
Treuillage . . . . . . . . . . . . . . . . . . . . . . . . . . . . . . . . . . . . . . . . . . . . . . . . . . . . . . . . . . . . . . . . . . . . 34-37
Techniques de câblage . . . . . . . . . . . . . . . . . . . . . . . . . . . . . . . . . . . . . . . . . . . . . . . . . . . . . . . 38-39
Maintenance. . . . . . . . . . . . . . . . . . . . . . . . . . . . . . . . . . . . . . . . . . . . . . . . . . . . . . . . . . . . . . . . . . . . 40
En dernière analyse . . . . . . . . . . . . . . . . . . . . . . . . . . . . . . . . . . . . . . . . . . . . . . . . . . . . . . . . . . . . . 40
WA RN I ND US TR IE S • TH E BA SI C GU IDE TO WI NC HI NG T EC HN IQ UE S
20
WARN INDUSTRIES OFF-ROAD PRODUCTS
12900 S.E. Capps Road
Clackamas, OR 97015-8903 États-Unis
Service à la clientèle : 1-503-722-3008
Télécopie: 1-503-722-3000
www.warn.com
Page 14

INDEX DES SYMBOLES
SYMBOLE EXPLICATION
SYMBOLE EXPLICATION
Avertissements et
mises en garde
MESURES GÉNÉRALES DE SÉCURITÉ
AVERTISSEMENT
Lire le manuel d'utilisation
Toujours porter un
dispositif de protection
auditive et oculaire
Ne jamais utiliser le treuil
comme palan.
Positionner correctement
la charge dans la gorge du
crochet
Enrouler le câble sur le
dessous du tambour
Danger d'écrasement des
doigts dans le guide-câble
Risque de percement/
coupure des mains
Risque d'explosion/
rupture
Danger en raison d'une
arête tranchante
Toujours porter des gants
de cuir
Ne pas déplacer des
personnes
Toujours utiliser la sangle
de crochet fournie
Ne jamais appliquer la
charge sur l'extrémité ou
le loquet du crochet
Ne jamais enrouler le
câble sur le dessus du
tambour
Point de pincement du
guide-câble
Risque de surface chaude
Risque d'incendie et de
brûlure
Danger lié à des pièces
mobiles
Les directives suivantes comprennent des indications
intitulées AVERTISSEMENT, ATTENTION, AVIS et REMARQUE. Chacune
a un objectif bien précis : AVERTISSEMENT présente des consignes de
sécurité soulignant un danger potentiel qui, s’il n'est pas évité, peut
entraîner des blessures graves ou la mort. ATTENTION comprend des
consignes de sécurité signalant un danger potentiel qui, s'il n'est pas
évité, peut entraîner des blessures légères ou modérées. ATTENTION
sert aussi à signaler une utilisation dangereuse. ATTENTION et
AVERTISSEMENT identifient un danger, indiquent comment l'éviter
et montrent ses conséquences possibles si on l'ignore. AVIS présente
des consignes visant à éviter les dommages matériels. REMARQUE
donne des renseignements additionnels qui aident à accomplir une
procédure. TRAVAILLEZ PRUDEMMENT !
AVERTISSEMENT
DANGER DE HAPPEMENT PAR DES PIÈCES
MOBILES
Le non-respect des consignes peut entraîner des
blessures graves ou la mort.
• Toujours s'assurer que le loquet du crochet est fermé et
qu'il ne soutient aucune charge.
• Ne jamais appliquer la charge sur l'extrémité ou le loquet
du crochet. Appliquer la charge uniquement au centre du
crochet.
• Ne jamais utiliser un crochet dont l'ouverture de la gorge
a augmenté ou dont l'extrémité est courbée ou tordue.
• Toujours utiliser un crochet muni d'un loquet.
• Toujours s'assurer que l'opérateur et les personnes
présentes sont conscients de la stabilité du véhicule et/ou
de la charge.
• Toujours garder le fil de la télécommande et le cordon
d'alimentation à l'écart du tambour, du câble et du
câblage. S'assurer qu’il n’y a pas de fissures, de points de
pincement, de fils effilochés ou de connexions desserrées.
Tous les composants endommagés doivent être remplacés
avant d'utiliser le produit.
• Toujours faire passer la télécommande par la fenêtre, si
on l'utilise de l’intérieur d’un véhicule.
DANGER DE HAPPEMENT PAR DES PIÈCES
MOBILES
Le non-respect des consignes peut entraîner des
blessures graves ou la mort.
Consignes de sécurité générales :
• Il faut toujours avoir une bonne connaissance du treuil.
Prendre le temps de bien lire le manuel d’utilisation, et/
ou le manuel de base des techniques de treuillage, afin de
comprendre le treuil et son fonctionnement.
• Ne jamais excéder la capacité nominale du treuil ou du
câble d'acier. Un câblage double avec poulie ouvrante
permet de réduire la charge subie par le treuil.
• Toujours porter des gants de cuir épais durant la
manipulation du câble du treuil.
• Ne jamais utiliser le treuil ou le câble du treuil pour faire
du remorquage. Cela peut endommager, surcharger et
casser le câble.
• Ne jamais se servir du treuil pour maintenir une charge.
• Ne jamais faire fonctionner l'appareil sous l'effet de
drogues, de l'alcool ou de médicaments.
• Ne jamais laisser des personnes âgées de moins de 16 ans
utiliser ce treuil.
Consignes de sécurité se rapportant à l’installation :
• Toujours choisir une surface de montage suffisamment
résistante pour supporter la capacité de traction maximale
du treuil.
• Toujours utiliser un matériel de montage de catégorie 8,8
ou supérieure.
• Ne jamais souder les boulons de montage.
• Toujours utiliser un matériel de montage, des composants
et des accessoires homologués par le fabricant.
• Ne jamais utiliser des boulons trop longs.
• Toujours achever le montage du treuil et la fixation du
crochet avant d'effectuer le câblage.
• Toujours garder les mains éloignées du câble du treuil, de
la boucle du crochet, du crochet et de l'ouverture du guidecâble durant l'installation et l’utilisation de l'appareil et
l'enroulement ou le déroulement du câble.
• Toujours positionner le guide-câble avec l'avertissement
visible sur le dessus.
• Toujours étirer au préalable le câble et l’enrouler sous
charge avant de l’utiliser. Un câble enroulé de manière
serrée réduit le risque qu'il coince et soit endommagé.
WA RN I ND US TR IE S • LE M AN UE L DE B AS E DES TEC HN IQ UE S DE T RE UI LL AG E
22 23
WA RN I ND US TR IE S • LE M AN UE L DE B AS E DES TEC HN IQ UE S DE T RE UI LL AG E
Page 15

MESURES GÉNÉRALES DE SÉCURITÉ
AVERTISSEMENT
AVERTISSEMENT
AVERTISSEMENT
MESURES GÉNÉRALES DE SÉCURITÉ
ATTENTION
DANGER DE HAPPEMENT PAR DES PIÈCES
MOBILES
Le non-respect des consignes peut entraîner des
blessures graves ou la mort.
Consignes de sécurité concernant le treuillage :
• Toujours inspecter le câble du treuil, le crochet et les
élingues avant de faire fonctionner le treuil. Tout câble de
treuil effiloché, tordu ou endommagé doit être remplacé
immédiatement. Tous les composants endommagés doivent
être remplacés avant d'utiliser le produit. Protéger toutes les
pièces contre le risque de dommages.
• Toujours s'assurer que tout objet ou obstacle pouvant gêner
la bonne utilisation du treuil est écarté.
• Toujours s'assurer que le point d'ancrage choisi peut
supporter la charge et que la sangle ou la chaîne ne glisse
pas.
• Toujours utiliser la sangle de crochet fournie pour enrouler
ou dérouler le câble du treuil, durant l'installation ou
l'utilisation.
• Toujours exiger de l'opérateur et des personnes présentes
d’être attentifs au véhicule et à la charge.
• Toujours être conscient de la stabilité du véhicule et de
la charge durant le treuillage. Veiller à ce que personne ne
s'approche. Alerter toutes les personnes alentour en cas
d'instabilité.
• Toujours dérouler autant de câble que possible avant de
procéder au câblage. Utiliser une ligne double ou choisir un
point d’ancrage distant.
• Toujours prendre le temps d'utiliser des techniques de
câblage adaptées avant d'utiliser le treuil pour tirer.
• Ne jamais toucher le câble du treuil ou le crochet lorsqu'une
autre personne est à l'interrupteur de commande ou durant
le fonctionnement du treuil.
• Ne jamais essayer d'embrayer ou de débrayer si le treuil
est sous charge, si le câble du treuil est en tension ou si le
tambour est en train de tourner.
• Ne jamais toucher le câble ou le crochet lorsque le câble est
tendu ou sous charge.
• Toujours se tenir à l'écart du câble du treuil et de la charge
durant l'utilisation et ne jamais laisser personne s'approcher.
• Ne jamais se servir d'un véhicule pour tirer une charge
sur le câble du treuil. La charge combinée ou un choc peut
endommager, surcharger et casser le câble.
• Ne jamais replier le câble du treuil sur lui-même. Utiliser
toujours une chaîne ou une protection de tronc d'arbre sur le
point d'ancrage.
DANGER DE CHUTE OU D'ÉCRASEMENT
Le non-respect des consignes peut entraîner des
blessures graves ou la mort.
• Toujours rester à l'écart, en gardant les mains et les autres
personnes à l'écart également.
• Ne jamais utiliser le treuil avec moins de 5 spires de câble
enroulées autour du tambour. Le câble pourrait se dérouler
du tambour, étant donné que l'ancrage du câble n'est pas
conçu pour retenir une charge.
• Ne jamais utiliser le treuil comme palan ou pour suspendre
une charge.
• Toujours s'assurer que le point d'ancrage peut supporter la
charge, et prendre le temps d'employer des techniques de
câblage appropriées.
• Ne jamais utiliser le treuil pour soulever ou transporter des
personnes.
• Ne jamais forcer trop fort pour dérouler le câble du treuil.
• Toujours utiliser une posture/technique de levage
adéquate ou demander de l'aide lors de la manipulation ou
de l'installation du produit.
• Toujours enrouler le câble sur le tambour dans le sens
spécifié par l’étiquette d'avertissement apposée sur le
treuil ou la documentation du treuil. Cela est nécessaire
pour que le frein automatique (le cas échéant) fonctionne
correctement.
• Toujours enrouler le câble du treuil sur le tambour comme
indiqué par l’autocollant de rotation du tambour.
AVERTISSEMENT
RISQUE DE COUPURE ET DE BRÛLURE
Le non-respect des consignes peut entraîner des
blessures graves ou la mort.
Pour éviter de se blesser les mains et les doigts :
• Toujours porter des gants de cuir épais durant la
manipulation du câble du treuil.
• Toujours penser aux surfaces chaudes au niveau du moteur
du treuil, du tambour ou du câble durant ou après l'utilisation
du treuil.
RISQUES ASSOCIÉS AUX PRODUITS
CHIMIQUES ET RISQUE D'INCENDIE
Le non-respect des consignes peut entraîner des
blessures graves ou la mort.
• Toujours retirer les bijoux et porter des lunettes de
sécurité.
• Ne jamais faire passer les câbles électriques par-dessus
des bords tranchants.
• Ne jamais faire passer les câbles électriques à proximité
de pièces qui s'échauffent.
• Ne jamais faire passer les câbles électriques à travers des
pièces mobiles ou à proximité.
• Toujours placer les capuchons fournis sur les fils et les
bornes, conformément aux instructions d'installation.
• Ne jamais se pencher au-dessus de la batterie en
procédant aux connexions.
• Ne jamais faire passer les câbles électriques par-dessus
les bornes de la batterie.
• Ne jamais court-circuiter les bornes de la batterie avec
des objets métalliques.
• Toujours s'assurer que la zone ne contient pas de
conduites de carburant, de réservoir de carburant, de
conduites de frein, de câblage électrique, etc., avant tout
perçage.
• Toujours consulter le manuel de l'utilisateur pour les
informations correctes de câblage.
• Toujours isoler et protéger tous les fils et bornes
électriques exposés.
RISQUE DE COUPURE ET DE BRÛLURE
Le non-respect des instructions peut entraîner des
blessures mineures ou modérées.
• Ne jamais laisser le câble du treuil glisser dans les mains.
ATTENTION
DANGER DE HAPPEMENT PAR DES PIÈCES
MOBILES
Le non-respect des instructions peut entraîner des
blessures mineures ou modérées.
Pour éviter de se blesser les mains ou les doigts :
• Ne jamais laisser la télécommande dans un
emplacement où elle peut être activée durant la mise en
roue libre, le câblage ou quand le treuil n'est pas utilisé.
• Ne jamais laisser la télécommande du treuil branchée
durant l'installation, le déroulement en roue libre, le
câblage, l'entretien ou quand le treuil n'est pas utilisé.
AVIS
ÉVITER D'ENDOMMAGER LE TREUIL ET
L'ÉQUIPEMENT
• Toujours éviter de tirer sur le côté, ce qui a pour effet
d'empiler le câble du treuil sur l'une des extrémités du
tambour. Cela peut endommager le câble ou le treuil.
• Toujours s'assurer d'avoir complètement embrayé ou
complètement débrayé.
• Toujours faire attention à ne pas endommager le cadre
du véhicule si l'on décide de s'arrimer à un véhicule pour
pouvoir travailler avec le treuil.
• Ne jamais submerger le treuil dans l'eau.
• Toujours ranger la télécommande dans un endroit sûr,
propre et sec.
WA RN I ND US TR IE S • LE M AN UE L DE B AS E DES TEC HN IQ UE S DE T RE UI LL AG EWA RN I ND US TR IE S • LE M AN UE L DE B AS E DES TEC HN IQ UE S DE T RE UI LL AG E
24 25
Page 16

LES PRINCIPES DE BASE DU TREUILLAGE
LES PRINCIPES DE BASE DU TREUILLAGE
AV ERT ISSE MEN T
Prenez toujours
le temps de bien
comprendre votre
treuil et l’utilisation
du treuil en passant
en revue ce guide et
le guide d’utilisation
inclus avec votre
treuil.
Composants structurels
d’un treuil à engrenage
planétaire
Vous voici propriétaire d’un treuil Warn
et vous êtes prêt à partir sur les pistes :
escalader quelques éboulis, faire gicler
un peu de boue, traverser un cours d’eau
occasionnel. En somme, vous êtes prêt
à visiter l’arrière-pays et passer un bon
moment.
Si vous avez été suffisament brillant
pour sélectionner le meilleur équipement
qui soit, vous êtes sans doute suffisament
brillant pour savoir que pour continuer
à passer un bon moment, vous devez
pleinement comprendre et maîtriser le treuil
et les techniques de treuillage.
Et c’est exactement l’objectif de ce
guide : vous fournir une compréhension
globale du treuil et vous enseigner les
3
1
6
9
techniques de treuillage. Mais avant de
commencer, nous devons souligner que
les informations contenues dans ce guide
sont de nature générale. Parce qu’il n’y
a pas deux situations identiques, il serait
pratiquement impossible de les examiner
toutes en détail. Nous pouvons toutefois
vous fournir les principes généraux et
les techniques. Ce sera ensuite à vous de
prendre le temps d’analyser la situation et
d’appliquer la technique adéquate.
Avec un peu de bon sens, les règles
exposées dans ce livre peuvent vous aider à
prolonger le plaisir de vos escapades dans
la nature. Pensez juste à étudier chaque
situation avant d’agir et d’Y ALLER EN
DOUCEUR!
8
2
7
5
1
7
6
5
4
Pour commencer, vous devez vous
familiariser avec votre treuil Warn et
chacun de ses composants : entrainezvous avec le treuil avant de l’utiliser sur
la piste.
- Le moteur du treuil est typiquement
1
alimenté par la batterie du véhicule.
Le moteur fournit de la puissance au
système de rapports qui fait tourner le
tambour et enroule le câble.
2
- Le tambour du treuil est le cylindre
sur lequel le câble s’enroule. Le tambour
est entraîné par le moteur et le train
d’engrenage. Son sens peut être changé
en utilisant la télécommande.
- Le diamètre du câble et sa longueur
3
sont déterminés par la structure et la
puissance de traction du treuil. Enroulé
autour du treuil, le câble passe par le
guide-câble et se termine par une boucle
pour l’axe de chape du crochet.
- Quand vous utilisez le treuil à un
4
angle, le guide-câble permet de guider
le câble sur le tambour. Il minimise les
dommages sur le câble lorsqu’il traverse
le support du treuil ou le pare-chocs.
8
2
3
Détail ci-dessus : Il y a une
butée sur le coté du corps du
treuil pour ce tambour à gros
diamètre. En fait, ce tambour
sert également de frein.
9
- Le rapport de démultiplication
5
6
convertit la puissance du moteur en
une force de traction considérable.
La conception du train d’engrenages
permet au treuil d’être compact et léger.
- Le frein du tambour est
6
automatiquement actionné lorsque le
moteur du treuil est à l’arrêt et qu’il y a
une charge sur le câble. Le frein empêche
le treuil de dévider le câble, ce qui
maintient le véhicule en place.
- L’embrayage permet à l’opérateur
7
de dissocier manuellement le tambour
du train d’engrenages, permettant
au tambour de tourner librement.
L’engagement de l’embrayage rend de
nouveau le tambour solidaire du train
d’engrenages.
8
- En utilisant le courant de la
batterie du véhicule, les solénoïdes
du boîtier de commande commutent
l’alimentation vers le moteur, permettant
ainsi à l’opérateur de changer le sens de
rotation du tambour.
9
- La télécommande se branche dans
le boîtier de commande et permet à
Le treuil 8274-50 a une
structure différente.
Ce treuil utilise des
engrenages cylindriques
à denture droite pour la
démultiplication.
De plus, il dispose
d’un frein à disque
automatique sur le coté
du corps du treuil.
AV ERT ISSE MEN T
Ne jamais essayer
d'embrayer ou de
débrayer si le treuil
est sous charge, si
le câble du treuil est
en tension ou si le
tambour est en train
de tourner.
l’opérateur de commander le sens de
rotation du treuil tout en restant loin du
câble pendant le fonctionnement du
treuil.
WA RN I ND US TR IE S • LE M AN UE L DE B AS E DES TEC HN IQ UE S DE T RE UI LL AG E
26 27
WA RN I ND US TR IE S • LE M AN UE L DE B AS E DES TEC HN IQ UE S DE T RE UI LL AG E
Page 17

COMMENT FONCTIONNE LE TREUIL
LES ACCESSOIRES DU TREUIL ET LES AMÉLIORATIONS
Le treuil est commandé
par une télécommande
portable pour permettre
à l’opérateur de rester à
l’écart pendant la durée
du treuillage.
Le treuil d’un point de vue mécanique
Maintenant que vous vous êtes
familiarisé avec le treuil Warn et ses
composants, vous pouvez commencer à
étudier son fonctionnement. L’avantage
principal d’un treuil électrique est
qu’il peut fournir un service stable
pour une utilisation intermittente et
récréationnelle, même si le moteur du
véhicule est en panne – en supposant
bien sûr qu’il y a suffisamment de
courant dans la batterie. Le treuil peut
opérer avec une intensité de courant
importante et, pour cette raison, le
boîtier de commande dispose d’un
système de commande de haute
intensité pour gérer le courant en toute
sécurité.
Il est important de comprendre que
plus le treuillage est long, plus cela
crée de la chaleur, exactement comme
une plaque chauffante. Un treuillage
prolongé sans refroidir le moteur du
treuil peut endommager celui-ci. De la
même façon, si le moteur du véhicule
tourne au ralenti pendant le treuillage, la
batterie peut être amenée à se décharger
plus rapidement qu’elle ne se charge.
Faites donc bien attention à la jauge de
tension pour ne pas vider la batterie au
point de ne plus pouvoir démarrer le
véhicule.
Commande du treuil
Le treuil est commandé par une
télécommande portable pour permettre
à l’opérateur de rester à l’écart tout
en commandant le treuillage. La
télécommande permet de commander
la rotation en avant et en arrière du
tambour.
Comment le treuil réagit aux charges
Les performances des treuils Warn
sont indiquées pour la capacité de
traction maximale. Celle-ci est obtenue
lorsque la première couche de câble est
sur le tambour. Au fur et à mesure que
les couches augmentent, la puissance
de traction décroît. Cela fait partie des
mathématiques du treuillage. Dépasser
la capacité du treuil peut entraîner un
blocage du treuil ou la rupture du câble.
Réfléchissez sérieusement aux façons
dont vous comptez utiliser le treuil afin
de vous éviter des tracas plus tard.
De plus, vous devriez également vous
assurer que l’ensemble de support du
treuil et le cadre du véhicule peuvent
supporter la charge nominale du treuil.
Il vous faut donc analyser la situation.
Usez de votre jugement pour calculer
le poids de ce que vous avez l’intention
de treuiller. Calculez le poids global et
multipliez-le par 1,5. Ce poids ne doit pas
dépasser les cotations pour le treuil et
le câble.
Seul, le treuil n’est guère plus qu’un simple
outil. Mais utilisé conjointement avec
un certain nombre d’accessoires, votre
treuil Warn devient un outil polyvalent
extrêmement efficace. Dans cette section,
nous allons passer en revue un certain
nombre de ces accessoires. Certains
d’entre eux sont indispensables pour de
bonnes conditions de fonctionnement du
treuil, alors que d’autres le rendent plus
polyvalent et simple d’utilisation.
Gants - Le câble, par usure, va
présenter des « barbillons » qui peuvent
déchirer la peau. Il est extrêmement
important de porter des gants de
protection pendant l’utilisation du treuil
ou la manipulation du câble. Évitez de
porter des vêtements amples ou quoi que
ce soit qui puisse se prendre dans le câble
ou dans d’autres parties mobiles du treuil.
Sangle à crochet - Utilisez la sangle
pour tenir le crochet tout en gardant les
doigts éloignés du guide-câble pendant
le rembobinage du câble. Les treuils
développent une force de traction énorme
et peuvent facilement arracher des doigts
ou un membre malencontreusement pris
dans le câble. Mettez le crochet dans la
boucle et tenez la sangle entre le pouce
et l’index.
WA RN I ND US TR IE S • LE M AN UE L DE B AS E DES TEC HN IQ UE S DE T RE UI LL AG EWA RN I ND US TR IE S • LE M AN UE L DE B AS E DES TEC HN IQ UE S DE T RE UI LL AG E
Poulie ouvrante - Utilisée
correctement, la poulie multifonction vous
permet de (1) augmenter la puissance
de traction du treuil et (2) changer la
direction du treuillage sans endommager
le câble. L’utilisation correcte de la poulie
est couverte dans la section « Avant de
treuiller ».
Manille d’ancrage - La manille
d’ancrage est un moyen sûr pour attacher
ensemble les boucles de câble, les sangles
et les poulies ouvrantes. La clavette
de la manille est filetée pour faciliter
l’extraction.
Élingue - L’élingue peut être utilisée
pour rattacher le câble à un autre véhicule
ou à des objets coupants pour former un
point d’ancrage. Une élingue va toutefois
endommager ou tuer les arbres.
Crochets de remorquage - Des
crochets de remorquage correctement fixés
sur le châssis du véhicule procurent un
point d’attache pour les
crochets, les sangles
et les élingues.
28 29
Page 18

LES ACCESSOIRES DU TREUIL ET LES AMÉLIORATIONS
AVANT DE TREUILLER
AT TEN TION
Ne jamais utiliser
une sangle pour le
treuillage.
Ne jamais utiliser
une sangle de
remorquage. La
sangle peut être
facilement coupé ou
abrasé.
Ne jamais utiliser
des sangles
élastiques. Celles-ci
développent une
force énorme en
tension et sont
potentiellement
dangereuses.
Sangle de protection de tronc
d’arbre - Généralement faite en nylon
ultra-résistant de haute qualité, elle
offre à l’opérateur une variété de points
d’ancrage pour le câble du treuil tout en
protégeant le tronc des arbres.
Sangle de dépannage - N’utilisez
jamais de sangles de dépannage dans
une opération de treuillage. Parce
qu’elles sont conçues pour s’étirer, elles
emmagasinent de l’énergie et peuvent
agir comme un élastique si le câblage
lâche. Utilisez les sangles de dépannage
pour « arracher » un véhicule bloqué.
Couverture lourde - Dans certaines
situations, vous déciderez peut-être de
jeter une couverture lourde ou un objet
similaire sur le câble. Une couverture
lourde, comme celles qu’utilisent les
déménageurs, peut absorber l’énergie
si le câble venait à se rompre. Placez-la
au milieu du câble, entre le treuil et le
point d’ancrage, avant de mettre le câble
sous tension. Ne vous approchez pas et
ne déplacez pas la couverture lorsque
le câble est en tension. Ne laissez pas la
couverture être entraînée dans le guidecâble. S’il est nécessaire de déplacer ou
d’enlever la couverture, commencez par
relâcher la tension du câble.
Pelles et outils manuels - Vous aurez
souvent besoin d’aide supplémentaire
pendant les activités de treuillage. Vous
seriez avisé d’emporter diverses pièces
d’équipement telles qu’une pelle, une
hache et un cric en cas de besoin.
Pièces de rechange - Les pièces
de rechange les plus importantes
à emporter dans une escapade en
nature comprennent une manille à
vis de rechange, une poulie et une
télécommande. Pour une utilisation
intense et continue, songez également
à prendre un câble et un crochet de
rechange.
Boîte à outils - La boîte à outils doit
comprendre des clés, des tournevis, des
pinces et des outils pour changer de
câble.
Câbles de démarrage - De nombreux
véhicules bloqués sur le bord des routes
le sont à cause d’une batterie vide.
Pour éviter d’épuiser la batterie, vous
pouvez installer un système de batterie
secondaire et un kit d’isolation pour la
batterie. Il est aussi sage de se munir de
câbles de démarrage pour la batterie et
du kit de câble à connexion rapide Warn.
Recommandations concernant la
batterie Il est recommandé d’utiliser
une batterie automobile conventionnelle
pleinement chargée ayant une capacité
de démarrage à froid de 650 A pour
obtenir une performance optimale avec
le treuil. Assurez-vous que toutes les
connexions électriques sont propres et
bien serrées.
Entraînez-vous à utiliser le treuil avant d’être
coincé quelque part. Une situation réelle n’est
pas un moment approprié pour apprendre à
utiliser le treuil. Assurez-vous qu’un câble neuf a
été étiré avant de l’utiliser pour la première fois.
Étirement initial du câble
La durée de vie du câble est directement liée
à son utilisation et à l’entretien qu’il recevra. Lors
de sa première utilisation, un câble neuf doit être
enroulé sur son tambour sous une charge d’au
moins 454 kg . Suivez simplement les directives
suivantes pour étirer correctement le câble sur
le tambour.
1) Choisissez un emplacement PLAT ET
DE NIVEAU suffisamment grand pour pouvoir
dérouler le câble sur toute sa longueur.
2) Mettez le levier d’embrayage du treuil en
position « Free Spool » (déroulement en roue
libre). Déroulez le câble de façon à ne laisser
que 5 spires sur le tambour. Une fois le câble
déroulé, mettez le levier d’embrayage du treuil
en position « Engaged » (en prise).
3) Fixez le crochet du câble à un point
d’ancrage approprié et éloignez le véhicule
du point d’ancrage jusqu’à ce qu’il n’y ait
presque plus de mou dans le câble. Avant de
descendre du véhicule, serrez le frein à main et
mettez le véhicule en prise ou en position de
stationnement, puis éteignez le moteur.
4) Connectez la télécommande au treuil.
Tenez-vous à environ 2,5 m du treuil et enroulez
le câble sur le tambour du treuil jusqu’à éliminer
complètement le mou du câble. Déconnectez
la télécommande du treuil. Maintenez le câble
tendu d’une main; poussez avec précaution le
câble d’acier vers le côté du tambour auquel
le câble est fixé de façon à ce qu’il n’y ait
pas d’espace entre les spires sur le tambour.
Assurez-vous que le câble d’acier s’enroule sur
le bas du tambour et non sur le haut, sinon
le frein de retenue automatique de la charge
ne fonctionnera pas correctement. (Si le câble
d’acier s’enroule sur le haut, cela signifie
que vous avez actionné le treuil en mode de
déroulement et non d’enroulement au moyen de
la télécommande.)
5) Par mesure de sécurité, les étapes
suivantes devraient être effectuées par deux
personnes. Si vous tentez de tendre le câble tout
seul, assurez-vous de toujours mettre le frein
à main, la transmission en prise et d’éteindre
le moteur du véhicule chaque fois que vous
descendez du véhicule pour inspecter le câble
du treuil. Ne quittez jamais le véhicule alors
que le câble du treuil porte une charge. Le
tensionnement du câble est essentiel pour
assurer une longue durée de vie au produit. Le
tensionnement du câble empêchera les couches
extérieures du câble de pincer et déformer les
couches intérieures.
6) Prenez soin d’enrouler chaque couche de
manière uniforme afin d’éviter d’endommager
le câble.
7) Faites passer la télécommande par
la fenêtre du conducteur afin de l’utiliser.
Demandez à l’assistant de s’éloigner du
véhicule et du câble. L’assistant doit indiquer
si le câble s’enroule correctement à mesure
qu’il défile sur le guide-câble et s’enroule.
Démarrez le véhicule et mettez la transmission
au point mort. Desserrez le frein à main tout en
appuyant modérément sur la pédale de frein.
Appuyez sur la touche « Power in » (enrouler)
de la télécommande. Effectuez le treuillage sur
environ 1,8 m, puis arrêtez. Relâchez lentement
la pédale de frein puis serrez le frein à main. Cela
permet d’assurer qu’il n’y a aucune charge sur
le câble. Mettez le levier de vitesses en position
de stationnement ou en prise, puis éteignez le
moteur. Descendez du véhicule et inspectez le
treuil pour vous assurer que le câble est enroulé
uniformément sur le tambour du treuil et qu’il
ne creuse pas la couche inférieure. Si c’est le cas,
déroulez le câble et répétez cette étape à partir
du début en appliquant davantage de pression
sur la pédale de frein.
8) Après vous être assuré que le câble
s’enroule correctement sur le tambour, répétez
l’étape six jusqu’à ce que le véhicule soit à moins
de 2 m du point d’ancrage. Une fois la distance
atteinte, relâchez lentement la pédale de frein
puis serrez le frein à main. Cela permet d’assurer
qu’il n’y a aucune charge sur le câble. Mettez le
levier de vitesses en position de stationnement
ou en prise, puis éteignez le moteur. Descendez
du véhicule. Décrochez le crochet du point
d’ancrage. Tout en retenant le cordon du crochet
fourni, maintenez la tension sur câble et enroulez
lentement le treuil par de petites pressions sur
l’interrupteur de commande jusqu’à ce que le
crochet soit à moins de 1 m du guide-câble.
Arrêtez le treuillage et fixez le crochet sur un
point d’ancrage approprié sur le véhicule. NE
LAISSEZ PAS LE CROCHET ATTEINDRE LE GUIDECÂBLE. Cela pourrait endommager le guidecâble. Une fois le crochet fixé correctement au
véhicule, enroulez le câble de façon à éliminer
le mou restant en appliquant de petites
pressions sur la touche « Power in » (enrouler)
de la télécommande jusqu’à ce que le mou soit
minime sur le câble du treuil.
AV ERT ISSE MEN T
Ne jamais utiliser
le treuil avec moins
de 5 spires de câble
enroulées autour du
tambour, car le câble
pourrait se dérouler
du tambour, étant
donné que l’ancrage
du câble n’est pas
conçu pour retenir
une charge.
WA RN I ND US TR IE S • LE M AN UE L DE B AS E DES TEC HN IQ UE S DE T RE UI LL AG E
30 31
WA RN I ND US TR IE S • LE M AN UE L DE B AS E DES TEC HN IQ UE S DE T RE UI LL AG E
Page 19

AVANT DE TREUILLER
AVANT DE TREUILLER
AV ERT ISSE MEN T
Toujours utiliser le
cordon du crochet
fourni pour enrouler
ou dérouler le câble,
durant l'installation
ou l’utilisation pour
éviter de se blesser
les mains ou les
doigts.
AV ERT ISSE MEN T
Toujours garder
les mains éloignées
du câble du treuil,
de la boucle du
crochet, du crochet
et de l'ouverture
du guide-câble
durant l'installation
et l’utilisation
de l'appareil et
l'enroulement ou
le déroulement du
câble.
Que vous soyez en train de dépanner
un autre véhicule ou en train d’arracher
une souche du sol, la connaissance des
techniques de treuillage vous permettra
de maintenir un bon niveau de sécurité
pour vous-même et ceux qui vous
entourent. La partie la plus importante
de la procédure de treuillage est peutêtre ce qui est fait avant de treuiller.
Nous allons couvrir dans cette section
les fondements d’un treuillage efficace.
Toutefois, c’est à vous d’analyser la
situation et de prendre les décisions
nécessaires pour l’utilisation correcte du
treuil. Appliquez ce que vous savez du
treuil, les bases sur lesquelles vous vous
êtes entraîné et adaptez vos techniques
à la situation dans laquelle vous vous
trouvez. Quelques points clés à se
rappeler quand vous utilisez le treuil
Warn :
1. Prenez toujours le temps d’évaluer
la situation dans laquelle vous vous
trouvez et préparez le treuillage
avec soin.
2. Prenez toujours votre temps quand
vous utilisez un treuil.
3. Utilisez l’équipement correct pour la
situation.
4. Portez toujours des gants en cuir et
ne laissez pas le câble glisser dans
les mains.
5. Vous et seulement vous
devez manier le câble et faire
fonctionner la télécommande.
6. Pensez toujours en termes de
sécurité.
7. Entraînez-vous. Faites et refaites
les étapes.
Traction avec un câble
Câbler pour le treuillage
Les étapes suivantes décrivent
comment dépanner le véhicule avec
un treuillage sur câblage simple. Les
techniques de câblage double ou
multiple suivent les mêmes étapes de
base mais utilisent une poulie ouvrante
pour assister la procédure.
Étape 1 : METTEZ DES GANTS.
Étape 2 : DÉBRAYEZ. Pour permettre au
tambour de tourner en roue libre, mettez
l’embrayage du treuil en position de
débrayage. Le déroulement en roue libre
économise la batterie.
Étape 3 : LIBÉREZ LE CROCHET DU
TREUIL ET ATTACHEZ LA SANGLE DU
CROCHET. Libérez le crochet du treuil de
son point d’ancrage. Attachez la sangle
du crochet au crochet (si ce n’est pas le
cas).
Étape 4 : TIREZ LE CÂBLE JUSQU’AU
POINT D’ANCRAGE. Tirez suffisamment
de câble pour atteindre le point
d’ancrage. Assurez-vous de conserver
une certaine tension dans le câble. Il
peut se tordre ou se doubler s’il n’est pas
tendu, ce qui peut l’endommager. Pour
éviter de perdre le bout, maintenez le
crochet dans la sangle à crochet pendant
que vous travaillez.
Étape 5 : FIXATION SUR LE POINT
D’ANCRAGE. Lorsque vous avez
déterminé le point d’ancrage, fixez la
sangle de protection de tronc d’arbre ou
l’élingue autour de l’objet choisi.
Étape 6 : ATTACHEZ LA MANILLE
D’ANCRAGE ET LA SANGLE DU CROCHET.
Fixez la manille aux deux bouts de la
sangle ou de l’élingue et à travers la
boucle du crochet, en faisant attention
à ne pas trop serrer (serrez puis relâchez
d’un demi-tour).
Comment choisir un point d’ancrage :
Un point d’ancrage stable est essentiel
pour toutes les opérations de treuillage.
L’ancrage doit être suffisamment solide
pour tenir pendant le treuillage. Les points
d’ancrages naturels comprennent les arbres,
les souches et les rochers. Accrochez le
câble aussi bas que possible. Si aucun point
d’ancrage n’est disponible lorsque vous
dépannez un autre véhicule, votre véhicule
devient le point d’ancrage. Dans ce cas,
assurez-vous de mettre la transmission au
point mort, mettez le frein à main et bloquez
les roues pour empêcher que votre véhicule
ne bouge.
Idéalement, choisissez un point
d’ancrage qui vous permettra de tirer
droit dans la direction de déplacement
du véhicule. Cela permet au câble de
s’enrouler de façon serrée et uniforme sur
le tambour du treuil. Choisissez un point
d’ancrage aussi éloigné que possible, afin de
maximiser la puissance de traction du treuil.
Des piquets ou des
axes, enfoncés en
biais et attachés
ensemble.
Une roue de
secours (avec la
jante) enfoncée
profondément dans
le sol, avec une
chaîne fixée dans
la jante.
Un tronçon d’arbre
enfoncé dans le sol
et attaché avec une
chaîne.
AV ERT ISSE MEN T
Ne jamais essayer
d'embrayer ou de
débrayer si le treuil
est sous charge, si
le câble du treuil est
en tension ou si le
tambour est en train
de tourner.
ATTENTION
Ne jamais laisser la
télécommande dans
un emplacement
où elle peut être
activée durant la
mise en roue libre,
le câblage ou quand
le treuil n'est pas
utilisé.
AVERTISSEMENT
Ne jamais replier
le câble du treuil sur
lui-même. Utiliser
toujours une chaîne
ou une protection
de tronc d’arbre sur
le point d’ancrage.
WA RN I ND US TR IE S • LE M AN UE L DE B AS E DES TEC HN IQ UE S DE T RE UI LL AG E
32 33
WA RN I ND US TR IE S • LE M AN UE L DE B AS E DES TEC HN IQ UE S DE T RE UI LL AG E
Page 20

AVERTISSEMENT
Ne jamais utiliser
le treuil comme
palan ou pour
suspendre une
charge.
AV ERT ISSE MEN T
Ne jamais utiliser
le treuil ou le câble
du treuil pour faire
du remorquage. Cela
peut endommager,
surcharger et casser
le câble.
AV ERT ISSE MEN T
Ne jamais utiliser
le treuil avec moins
de 5 spires de câble
enroulées autour du
tambour, car le câble
pourrait se dérouler
du tambour, étant
donné que l’ancrage
du câble n’est pas
conçu pour retenir
une charge.
A V I S
Toujours éviter de
tirer continuellement
sur le côté, ce qui a
pour effet d’empiler
le câble sur l’une
des extrémités
du tambour.
Cela pourrait
endommager le
câble ainsi que le
treuil.
Étape 7 : BLOQUEZ L’EMBRAYAGE.
Bloquez le tambour du treuil en faisant
pivoter le levier de l’embrayage sur le
treuil en position « Embrayage ».
Étape 8 : CONNECTEZ LA
TÉLÉCOMMANDE. Faites attention à ne
pas laisser le câble de la télécommande
pendre devant le treuil. Si vous
décidez de commander le treuil de
l’intérieur du véhicule, passez toujours
la télécommande par la fenêtre pour
éviter de pincer le fil électrique dans
la portière. Déconnectez toujours la
télécommande quand elle n’est pas en
marche.
Étape 9 : METTEZ LE CÂBLE EN TENSION.
En utilisant la télécommande, rembobinez
lentement le câble jusqu’à ce qu’il n’y
ait plus de mou. Lorsque le câble est en
tension, restez bien à l’écart et ne passez
jamais par-dessus.
Étape 10 : VÉRIFIEZ LE POINT D’ANCRAGE.
Avant de poursuivre la procédure de
treuillage, assurez-vous que toutes les
connexions sont bien faites et exemptes
de débris.
TREUILLAGE
Comme vous l’avez certainement déjà
remarqué, il y a de nombreuses choses
à faire et à prendre en compte avant de
commencer le treuillage. Soyez attentif
à ce que vous faites afin d’éviter tout
accident.
L’utilisation correcte du treuil est
si importante que vous devriez vous
entraîner à pratiquer ces techniques
avant d’avoir à faire face aux distractions
et au stress d’une véritable situation de
treuillage.
Étape 11 : VÉRIFIEZ LE CÂBLE. Le câble
doit être proprement enroulé autour du
tambour. Le câble peut être abîmé s’il
n’est pas enroulé correctement.
Étape 12 : PLACEZ QUELQUE CHOSE
SUR LE CÂBLE si vous le jugez nécessaire,
à mi-chemin entre le treuil et le point
d’ancrage, pour absorber l’énergie si le
câble venait à se rompre. Vous pouvez
utiliser à cette fin des branches d’arbre,
des vestes lourdes, une chaîne, un sac à
dos et autres objets similaires.
Établissez des « zones
interdites » :
Étape 13 : FAÎTES CONNAÎTRE VOS
INTENTIONS. Avant de commencer à
treuiller, assurez-vous que toutes les
personnes présentes à proximité du
treuil sont complètement conscientes de
vos intentions.
Indiquez exactement les emplacements
où les spectateurs ne doivent pas se
placer - jamais en aval ou en amont du
véhicule, ni à proximité du câble ou de
la poulie ouvrante. La situation peut
présenter d’autres « zones interdites ».
Étape 14 : COMMENCEZ À TREUILLER.
Le moteur du véhicule du treuil étant
en marche et le câble déjà légèrement
tendu, commencez à treuiller lentement
et régulièrement. Assurez-vous que
le câble s’enroule régulièrement et
fermement autour du tambour. Pour
faciliter la manœuvre, le véhicule tracté
peut être conduit doucement tout en
étant tiré par le treuil.
Étape 15 : POUR LA RÉCUPÉRATION DU
VÉHICULE, continuez à tirer jusqu’à ce
que le véhicule soit sur un plan stable.
Lorsque vous êtes à même de conduire
le véhicule, l’opération de treuillage est
terminée.
TREUILLAGE
Étape 16 : ASSUREZ-VOUS DU
VÉHICULE. Lorsque la récupération du
véhicule est terminée, assurez-vous
du véhicule en mettant le frein à main
et en positionnant la boîte de vitesse
sur « park » (dans le cas d’une boîte
automatique) ou en première (avec une
boîte manuelle). Relâchez la tension du
câble.
Ce qu’il faut surveiller sous charge
Le câble doit toujours s’enrouler
sur le tambour dans le sens indiqué
par l’étiquette de rotation du tambour
apposée sur le treuil.
Lorsque vous rembobinez, assurezvous que le câble d’acier s’enroule sur le
tambour de manière uniforme et serrée.
Cela empêche les spires extérieures de
s’enfoncer dans les spires intérieures, ce
qui peut coincer et endommager le câble.
Pour éviter les à-coups, actionnez
l’interrupteur de commande de manière
intermittente afin d’éliminer le mou
du câble. Les charges de choc peuvent
momentanément dépasser de loin la
capacité du treuil et du câble.
Lorsque vous enroulez le câble
en tirant de côté, celui-ci s’empile
principalement sur l’une des extrémités
du tambour. Un tel empilement peut
éventuellement endommager le treuil
sérieusement. Pour éviter cela, dirigez
le câble le plus droit possible durant la
traction et arrêtez le treuil si le câble se
rapproche des barres d’accouplement ou
de la plaque de montage. Pour corriger un
enroulement inégal, déroulez la section de
câble en cause et redirigez-la vers l’autre
extrémité du tambour, ce qui libérera de
la place pour poursuivre le travail avec
le treuil.
A V I S
Éviter de surchauffer
le moteur du treuil.
Pour un treuillage
de longue durée,
arrêter le moteur
à intervalles
raisonnables pour
lui permettre de
refroidir.
WA RN I ND US TR IE S • LE M AN UE L DE B AS E DES TEC HN IQ UE S DE T RE UI LL AG E
34 35
WA RN I ND US TR IE S • LE M AN UE L DE B AS E DES TEC HN IQ UE S DE T RE UI LL AG E
Page 21

TREUILLAGE
Signalisation à bras pour le treuillage
Dans certains cas, la récupération peut nécessiter deux personnes. L’une dirige et commande
le treuil pendant que l’autre donne les instructions de navigation et s’assure que le câble
s’enroule correctement. Vous et votre assistant devez établir des signaux à bras clairs et
précis, et les revoir jusqu’à bien les maîtriser. Il doit être compris que si l’opérateur ne peut pas
voir les deux mains de l’assistant, le treuil ne doit pas être actionné. Signaux proposés :
1) Direction de conduite
Étendez les bras avec les
pouces vers le haut, et
penchez les mains dans
la direction que vous
conseillez au conducteur..
.
.
.
5) Arrêt du treuillage
Pour signaler l’arrêt du treuillage,
fermez le poing, paume en direction
du conducteur, suffisamment haut
pour que le conducteur puisse le voir,
et tendez l’autre bras à hauteur de
l’épaule.
2) Enroulement du câble
Maintenez l’index en
l’air, au-dessus du niveau
de l’épaule, et dessinez
des petits cercles dans
l’air pour demander
l’activation du treuil.
WA RN I ND US TR IE S • LE M AN UE L DE B AS E DES TEC HN IQ UE S DE T RE UI LL AG E
3) Déroulement du câble
Maintenez l’index vers le bas
et dessinez des cercles en l’air
au niveau de la ceinture pour
demander plus de mou.
6) Freinage
Croisez les paumes pour
indiquer au conducteur qu’il
doit appuyer sur la pédale
de frein.
4) Treuillage par à-coups
Demande à l’opérateur de
treuiller par série de petites
tractions rapides. Ouvrez et
fermez l’index et le majeur
continuellement jusqu’à ce que
vouliez arrêter le treuil.
7) Assistance par la conduite
Signifie au conducteur de donner
plus de puissance pour assister la
procédure de treuillage.
Comment rembobiner à vide
Disposez la télécommande de telle
sorte qu’elle ne puisse pas être prise dans
le treuil. Arrangez le câble à enrouler
de manière à ce qu’il ne s’entortille ni
ne s’emmêle pendant le rembobinage.
Assurez-vous que le câble qui est déjà
sur le tambour est enroulé de manière
uniforme et serrée. Serrez et arrangez la
couche de câble si nécessaire. Gardez
une légère tension dans le câble et
rembobinez-le sur le tambour du treuil
en couches uniformes. Arrêtez-vous
fréquemment pour resserrer et arranger
les couches lorsque c’est nécessaire.
Répétez la procédure jusqu’à ce que
le crochet du treuil soit à la même
distance que la longueur totale de
la télécommande du treuil. Pincez le
crochet entre le pouce et l’index et
attachez le cordon du crochet. Tenez
le cordon du crochet entre le pouce et
l’index pour maintenir la tension sur
le câble. Guidez le câble vers le guidecâble tout en le rembobinant avec
précaution avec de petites pressions sur
la télécommande. Rangez le crochet sur
le guide-câble ou tendu sur un endroit
approprié sur le côté.
Si vous ne disposez pas de sangle de
crochet, utilisez un morceau de corde ou
quelque chose de similaire. Pour éviter
tout accident grave, éloignez TOUJOURS
les doigts de la zone du crochet lorsque
vous rembobinez.
Étape 17 : DÉCONNECTEZ LE CÂBLE.
Décrochez-le du point d’ancrage.
WA RN I ND US TR IE S • LE M AN UE L DE B AS E DES TEC HN IQ UE S DE T RE UI LL AG E
TREUILLAGE
Étape 18 : ENROULEZ LE CÂBLE. La
personne qui s’occupe du câble doit
guider le câble à l’intérieur, ne pas le
laisser glisser dans la main et contrôler le
treuil en permanence.
Étape 19 : DÉBRANCHEZ LA
TÉLÉCOMMANDE. Débranchez la
prise de la télécommande du boîtier
de commande et rangez-la dans un
endroit propre et sec. Les opérations de
treuillages sont maintenant complétées.
Remettez le capuchon sur la prise du
solénoïde.
AVERTISSEMENT
Toujours garder
les mains éloignées
du câble du treuil,
de la boucle du
crochet, du crochet
et de l'ouverture
du guide-câble
durant l'installation
et l’utilisation
de l'appareil et
l'enroulement ou
le déroulement du
câble.
36 37
Page 22

TECHNIQUES DE CÂBLAGE
TECHNIQUES DE CÂBLAGE
Différentes situations de treuillage
nécessitent d’autres techniques
de treuillage. Celles-ci peuvent
aller d’un manque de place
pour obtenir une traction
suffisante en utilisant un
câblage direct à la simple
augmentation de la
puissance de traction ou
au maintien d’un treuillage
en ligne droite. Vous devrez
évaluer la technique la plus
adaptée à la situation. Pensez
toujours « sécurité ».
Comment changer la direction
du treuillage
Toutes les opérations de
treuillage doivent se faire en ligne
droite, du treuil à l’objet qui est
halé. Cela réduit au minimum
l’accumulation de câble sur
un coté du tambour, ce
qui diminuerait l’efficacité
du treuillage tout en
endommageant le câble.
Une poulie ouvrante, fixée
à un point situé directement
en face du véhicule, vous
Câblage simple
Câblage double
Câblage triple
permettra de changer la direction de
treuillage tout en conservant un angle de
90° avec le câble, lui permettant ainsi de
s’enrouler correctement sur le tambour.
Augmenter la puissance de treuillage
Dans certains cas, vous aurez besoin
de plus de puissance de traction.
L’utilisation de poulies ouvrantes
augmente l’avantage mécanique et,
par là même, la puissance de traction
pulling power:
Câblage double
Comme la puissance de traction
décroît en fonction des couches de
câble sur le tambour du treuil, vous
pouvez utiliser une poulie ouvrante
pour dédoubler le câblage et réduire la
quantité de câble sur le tambour. Ceci
réduit le nombre de couches de câble sur
le tambour et augmente la puissance de
traction.
Commencez par extraire suffisamment
de câble pour libérer le crochet du
treuil. Attachez le crochet au châssis du
véhicule ou au crochet de remorquage
et faites passer le câble par la poulie
ouvrante.
Débrayez et, tout en utilisant la poulie
ouvrante, tirez suffisamment de câble
pour atteindre le point d’ancrage. Ne
fixez pas le crochet au kit de montage.
Fixez le câble au point d’ancrage avec
une sangle de protection ou une élingue.
Attachez la manille d’ancrage. Fixez la
manille aux deux bouts de la sangle /
élingue en faisant attention de ne pas
trop serrer (serrez puis relâchez d’un
demi-tour).
Câblage triple
Utilisez la même technique que pour
le câblage double. Sélectionnez un point
de montage robuste sur le véhicule
pour la poulie ouvrante et la manille
d’ancrage à vis. Maintenez un angle
de 90º avec le treuil et faites passer le
câble par le premier point d’ancrage
et la poulie ouvrante. Fixez le câble
en retour au véhicule. Faites passer le
câble par la poulie ouvrante et fixez-le à
l’aide de la manille d’ancrage à vis sur le
véhicule, aussi près que possible du treuil.
Maintenant, tirez le câble jusqu’au point
d’ancrage final.
Fixez le câble au point d’ancrage avec
une sangle de protection ou une élingue.
Attachez la manille d’ancrage. Fixez la
manille aux deux bouts de la sangle /
élingue en faisant attention de ne pas
trop serrer (serrez puis relâchez d’un
demi-tour).
Fixez le crochet du treuil. Tout en
gardant la ligne près du sol, insérez le
crochet dans la manille d’ancrage à vis.
Vérifiez le point d’ancrage. Avant de
poursuivre la procédure de treuillage,
assurez-vous que toutes les connexions
sont bien faites et exemptes de débris.
WA RN I ND US TR IE S • LE M AN UE L DE B AS E DES TEC HN IQ UE S DE T RE UI LL AG E
38 39
WA RN I ND US TR IE S • LE M AN UE L DE B AS E DES TEC HN IQ UE S DE T RE UI LL AG E
Page 23

MAINTENANCE EN DERNIÈRE ANALYSE
TRADUCCIÓN DEL MANUAL ORIGINAL
AV ERT ISSE MEN T
Ne jamais utiliser
le treuil avec moins
de 5 spires de câble
enroulées autour du
tambour, car le câble
pourrait se dérouler
du tambour, étant
donné que l’ancrage
du câble n’est pas
conçu pour retenir
une charge.
• Inspectez le câble avant et après
chaque utilisation du treuil. S’il y a un
vrillage dans le câble ou que celui-ci
est effiloché, remplacez-le. Examinez
également le crochet du treuil et son
axe pour détecter tout signe d’usure
ou de dommage. Remplacez-le si
nécessaire.
• Gardez le treuil, le câble et la
télécommande exempts de
contaminants. Utilisez un chiffon ou
une serviette propre pour enlever
les saletés et débris éventuels. Si
nécessaire, déroulez complètement
le câble (en laissant un minimum de
5 spires sur le tambour), essuyez-le et
rembobinez-le correctement avant de
le ranger. Appliquez une huile légère
sur le câble et le crochet du treuil pour
empêcher la rouille et la corrosion.
• Faire fonctionner le treuil pendant une
longue période peut mettre la batterie
du véhicule à l’épreuve. Assurezvous de bien vérifier la batterie et
ses câbles en suivant les instructions
du constructeur. Vérifiez également
l’interrupteur de commande et toutes
les connexions électriques pour vous
assurer qu’ils sont propres et bien
serrés.
• Inspectez, le cas échéant, la
télécommande au cas où elle serait
endommagée. Assurez-vous de bien
couvrir la prise de télécommande pour
éviter que la poussière et la saleté ne
pénètrent dans les connexions. Rangez
la télécommande dans un endroit sûr,
propre et sec.
• Aucune lubrification n’est nécessaire
pendant la durée de service du treuil.
Le manuel de base pour les techniques
de treuillage ne peut pas couvrir toutes
les situations possibles où vous pourriez
avoir à utiliser un treuil. En dernière
analyse, les décisions que vous prendrez
détermineront le résultat final. Assurezvous donc de bien réfléchir à chaque
situation et à chaque étape à effectuer.
Gardez toujours à l’esprit votre propre
sécurité et celles des personnes alentour.
Faites attention et vous passerez un bon
moment.
Guía básica de técnicas para
el uso del cabrestante
En cada situación donde se utiliza un cabrestante existe la posibilidad de ocasionar
daños personales. Para reducir al mínimo este peligro, es importante leer esta guía
atentamente y familiarizarse con el funcionamiento del cabrestante antes de tener
que usarlo; también debe concentrarse en la seguridad. En esta guía, se establecen
muchas de las reglas de seguridad para el uso del cabrestante. No obstante,
debido a que cada situación en la que se utiliza el cabrestante es diferente, es muy
importante el buen juicio y un enfoque constante en la seguridad.
Í N D I C E :
Índice de símbolos . . . . . . . . . . . . . . . . . . . . . . . . . . . . . . . . . . . . . . . . . . . . . . . . . . . . . . . . . . . . . . 42
Precauciones generales de seguridad . . . . . . . . . . . . . . . . . . . . . . . . . . . . . . . . . . . . . . . . 43-45
Lo fundamental del cabrestante . . . . . . . . . . . . . . . . . . . . . . . . . . . . . . . . . . . . . . . . . . . . . . 46-47
Cómo funciona el cabrestante . . . . . . . . . . . . . . . . . . . . . . . . . . . . . . . . . . . . . . . . . . . . . . . . . . 48
Accesorios y mejoras del cabrestante . . . . . . . . . . . . . . . . . . . . . . . . . . . . . . . . . . . . . . . . . 49-50
Antes de usar el cabrestante . . . . . . . . . . . . . . . . . . . . . . . . . . . . . . . . . . . . . . . . . . . . . . . . . 51-54
Tracción . . . . . . . . . . . . . . . . . . . . . . . . . . . . . . . . . . . . . . . . . . . . . . . . . . . . . . . . . . . . . . . . . . . . . 54-57
Técnicas de maniobrado . . . . . . . . . . . . . . . . . . . . . . . . . . . . . . . . . . . . . . . . . . . . . . . . . . . . . 58-59
Mantenimiento . . . . . . . . . . . . . . . . . . . . . . . . . . . . . . . . . . . . . . . . . . . . . . . . . . . . . . . . . . . . . . . . . 60
El análisis final . . . . . . . . . . . . . . . . . . . . . . . . . . . . . . . . . . . . . . . . . . . . . . . . . . . . . . . . . . . . . . . . . . 60
PRODUCTOS DE WARN INDUSTRIES PARA USO
FUERA DE CARRETERAS ASFALTADAS
12900 S.E. Capps Road
Clackamas, OR 97015-8903 (EE. UU.)
Servicio de atención al cliente: 1-800-543-WARN
40
Fax: 1-503-722-3000
www.warn.com
Page 24

ÍNDICE DE SÍMBOLOS
SÍMBOLO EXPLICACIÓN
SÍMBOLO EXPLICACIÓN
Advertencias y
precauciones
PRECAUCIONES GENERALES DE SEGURIDAD
ADVERTENCIA
Lea el manual de
instrucciones
Lleve puesta siempre
protección ocular y
auditiva
Nunca utilice el cabrestante
como si fuese una grúa
Fije de forma apropiada la
carga en la garganta del
gancho
Enrolle el cable en la parte
inferior del tambor
Peligro de aplastamiento
de los dedos o la guía del
cable
Peligro de perforación o
corte en las manos
Peligro de explosión o
rotura
Peligro de borde afilado
Lleve puestos siempre
guantes de cuero
No lo use para desplazar
personas
Use siempre la correa del
gancho suministrada
No aplique nunca una
carga a la punta del gancho
o al seguro
Nunca enrolle el cable en la
parte superior del tambor
Punto de pellizco de la guía
del cable
Peligro de superficie
caliente
Peligro de incendio y
quemaduras
Peligros asociados con
partes móviles
Al leer estas instrucciones, verá ADVERTENCIAS, PRECAUCIONES,
AVISOS y NOTAS. Cada mensaje tiene un propósito específico. Las
ADVERTENCIAS son mensajes de seguridad que indican que está
ante una situación potencialmente peligrosa que, si no se evita,
puede resultar en lesiones graves o la muerte. Las PRECAUCIONES
son mensajes de seguridad que indican una situación de posible
peligro que, si no se evita, puede resultar en lesiones menores o
de poca gravedad. Las PRECAUCIONES pueden alertar también
contra prácticas no seguras. Las PRECAUCIONES y ADVERTENCIAS
identifican el peligro, indican cómo evitarlo y advierten de las
posibles consecuencias si no se evita tal peligro. Los AVISOS
son mensajes para evitar daños a la propiedad. Las NOTAS
son información adicional que le ayudarán a llevar a cabo un
procedimiento. ¡TRABAJE SIEMPRE DE FORMA SEGURA!
ADVERTENCIA
PELIGRO DE ENREDO EN LAS PARTES
MÓVILES
De no seguirse estas instrucciones, podrían
producirse lesiones graves o incluso la muerte.
• Verifique siempre que el seguro del gancho está cerrado y
que no soporta carga.
• No aplique nunca una carga a la punta del gancho o al
seguro. Aplique la carga únicamente al centro del gancho.
• No use nunca un gancho cuya abertura haya aumentado o
cuya punta esté doblada o retorcida..
• Utilice siempre un gancho con seguro.
• Asegúrese siempre de que el operador y otras personas sean
conscientes de la estabilidad del vehículo y/o la carga.
• Mantenga siempre el cable del control remoto y el cable
de alimentación alejados del tambor, el cable y el cordaje.
Inspeccione la posible existencia de grietas, pellizcos, cables
deshilachados o conexiones sueltas. Los componentes
dañados deberán reemplazarse antes de la operación.
• Pase siempre el control remoto a través de una ventana
cuando lo utilice en un vehículo.
WA RN I ND US TR IE S • GU ÍA B ÁS ICA DE T ÉCN IC AS P AR A EL U SO D EL C AB RE ST AN TE
PELIGRO DE ENREDO EN LAS PARTES
MÓVILES
De no seguirse estas instrucciones, podrían
producirse lesiones graves o incluso la muerte.
Seguridad general:
• Conozca siempre el funcionamiento del cabrestante. Lea
detenidamente las Instrucciones, la Guía de operación y/o la
Guía básica de técnicas del cabrestante para comprender el
funcionamiento y la manipulación del cabrestante.
• No exceda nunca la capacidad nominal del cabrestante ni
del cable del cabrestante. Emplee un cable doble con una
polea para reducir la carga del cabrestante.
• Lleve puestos siempre guantes gruesos de cuero para
manipular el cable del cabrestante.
• No use nunca el cabrestante o el cable del cabrestante para
remolcar. Un golpe a las cargas puede dañar, sobrecargar o
romper el cable.
• No utilice nunca el cabrestante para amarrar una carga.
• No ponga nunca en funcionamiento este cabrestante
si se encuentra bajo los efectos de drogas, alcohol o
medicamentos..
• Nunca opere este cabrestante si es menor de 16 años de edad.
Seguridad en la instalación:
• Elija siempre una ubicación de montaje que sea lo
suficientemente sólida para soportar la capacidad de carga
máxima del cabrestante.
• Utilice siempre piezas de grado 5 (grado 8,8 milimétrico) o
superior.
• No suelde nunca los pernos de montaje.
• Use siempre piezas de montaje, componentes y accesorios
aprobados por el fabricante.
• No utilice nunca pernos que sean demasiado largos.
• Complete siempre la instalación del cabrestante y el
acoplamiento del gancho antes de instalar el cableado.
• Mantenga siempre las manos alejadas del cable del
cabrestante, del bucle del gancho, del gancho y de la
abertura de la guía durante la instalación, la operación, y en
el enrollado y desenrollado.
• Ponga siempre la guía del cable con la etiqueta de
advertencia visible en la parte superior.
• Realice siempre un estiramiento previo del cable y vuelva a
enrollarlo con carga antes de usarlo. Un cable bien enrollado
reduce las posibilidades de tener “dobleces” que puedan
dañar el cable.
42 43
Page 25

PRECAUCIONES GENERALES DE SEGURIDAD
ADVERTENCIA
ADVERTENCIA
PRECAUCIONES GENERALES DE SEGURIDAD
ADVERTENCIA
PRECAUCIÓN
PELIGRO DE ENREDO EN LAS PARTES
MÓVILES
De no seguirse estas instrucciones, podrían producirse
lesiones graves o incluso la muerte.
Seguridad durante la operación del cabrestante:
• Inspeccione siempre el cable del cabrestante, el gancho y las
eslingas antes de poner el cabrestante en funcionamiento. Si
el cable del cabrestante está deshilachado, retorcido o dañado,
deberá reemplazarse de inmediato. Los componentes dañados
deberán reemplazarse antes de la operación. Evite que las piezas
resulten dañadas.
• Retire siempre cualquier elemento u obstáculo que pueda
provocar inseguridad en la operación del cabrestante.
• Verifique siempre que el anclaje seleccionado soportará la carga y
que la correa o la cadena no se deslizará.
• Use siempre la correa suministrada con el gancho cuando vaya
a enrollar o desenrollar el cable del cabrestante, durante la
instalación y durante la operación.
• Requiera siempre a los operadores y las personas presentes que
estén atentos al vehículo y/o la carga.
• Tenga siempre presente la estabilidad del vehículo y de la carga
durante el uso del cabrestante; haga que las personas presentes se
mantengan alejadas. Alerte a todas las personas presentes de una
posible inestabilidad.
• Siempre enrolle tanto cable como sea posible al prepararse para
el maniobrado. Emplee un cable doble o elija un punto de anclaje
distante.
• Tómese siempre su tiempo para asegurar la carga con técnicas
apropiadas antes de arrastrarla con el cabrestante.
• No toque nunca el cable del cabrestante ni el gancho si hay
alguien cerca del interruptor de control, o si el cabrestante está en
funcionamiento.
• Nunca embrague ni desembrague si el cabrestante está
soportando una carga, si el cable está en tensión o si el tambor
está en movimiento.
• No toque nunca el cable del cabrestante ni el gancho mientras
están tensos o con carga.
• Manténgase siempre alejado del cable del cabrestante y de la
carga, y no deje que otros se acerquen cuando el cabrestante esté
en funcionamiento.
• No use nunca un vehículo para tirar de la carga en el cable del
cabrestante La carga combinada o un golpe en la carga puede
dañar, sobrecargar o romper el cable.
• No enrolle nunca el cable del cabrestante sobre sí mismo. Utilice
una cadena o un cable de estrangulación, o un protector de tronco
de árbol en el anclaje.
WA RN I ND US TR IE S • GU ÍA B ÁS ICA DE T ÉCN IC AS P AR A EL U SO D EL C AB RE ST AN TE
PELIGRO DE CAÍDA O APLASTAMIENTO
De no seguirse estas instrucciones, podrían
producirse lesiones graves o incluso la muerte.
• Siempre manténgase usted, las manos y a otros alejados.
• No accione nunca accione el cabrestante si no hay, al menos, 5
vueltas de cable alrededor del tambor. El cable podría soltarse
del tambor, ya que el acoplamiento del cable al tambor no está
construido para aguantar cargas.
• No use nunca el cabrestante como grúa o para suspender una
carga.
• Compruebe siempre que el anclaje soportará la carga. Utilice
técnicas de maniobrado adecuadas y tómese tiempo para operar
de forma correcta.
• No utilice nunca el cabrestante para levantar o desplazar
personas..
• Nunca realice esfuerzos excesivos para enrollar el cable del
cabrestante.
• Utilice siempre posturas y técnicas de levantamiento adecuadas
o solicite ayuda a la hora de manipular e instalar el producto.
• Enrolle y desenrolle el cable del tambor siempre en la dirección
especificada en la etiqueta de advertencia del cabrestante o en
la documentación. Esto es necesario para el funcionamiento
correcto del freno automático (si viene equipado con ello).
• Siempre enrolle el cable del cabrestante alrededor del tambor en
el sentido indicado por la marca de rotación del cabrestante.
ADVERTENCIA
PELIGRO DE CORTES Y QUEMADURAS
De no seguirse estas instrucciones, podrían producirse
lesiones graves o incluso la muerte.
Para evitar daños en las manos:
• Lleve puestos siempre guantes gruesos de cuero para
manipular el cable del cabrestante.
• Tenga siempre en cuenta que las superficies del motor, del
tambor o del cable del cabrestante pueden estar calientes
durante o después del uso del mismo.
PELIGRO DE INCENDIO O POR PRESENCIA
DE PRODUCTOS QUÍMICOS
De no seguirse estas instrucciones, podrían
producirse lesiones graves o incluso la muerte.
• No lleve nunca puestas joyas, y lleve siempre protección
ocular.
• No pase nunca los cables eléctricos por bordes agudos.
• No pase nunca los cables eléctricos cerca de piezas que se
calienten.
• No pase nunca los cables eléctricos por partes móviles o
cerca de ellas.
• Coloque siempre las fundas de terminales suministradas
en los cables y los terminales, tal como se indica en las
instrucciones de instalación.
• No se apoye nunca en la batería si está haciendo
conexiones.
• No pase nunca los cables eléctricos sobre los terminales de
la batería.
• No acorte nunca los terminales de la batería con objetos
metálicos.
• Si va a perforar, verifique siempre que en el área no haya
tuberías o tanques de combustible, tuberías de sistema de
frenado, cables eléctricos, etc.
• Consulte siempre el manual del usuario para obtener
detalles de cableado adecuados.
• Aísle y proteja siempre los cables y los terminales
eléctricos que queden expuestos.
WA RN I ND US TR IE S • GU ÍA B ÁS ICA DE T ÉCN IC AS P AR A EL U SO D EL C AB RE ST AN TE
PELIGRO DE CORTES Y QUEMADURAS
De no seguirse estas instrucciones, podrían
producirse lesiones menores o moderadas.
• Nunca deje que el cable del cabrestante se deslice por sus
manos.
PRECAUCIÓN
PELIGRO DE ENREDO EN LAS PARTES
MÓVILES
De no seguirse estas instrucciones, podrían
producirse lesiones menores o moderadas.
Para evitar daños en las manos:
• No deje nunca el control remoto donde pueda activarse
durante el enrollado libre, maniobrado o cuando el
cabrestante no esté en uso.
• No deje nunca el control remoto del cabrestante conectado
cuando se esté instalando o haciendo enrollado libre,
maniobras o mantenimiento ni cuando no se esté utilizando
el cabrestante.
AVISO
EVITE DAÑOSAL EQUIPO Y AL CABRESTANTE
• Evite siempre los tirones laterales, ya que pueden apilar el
cable en un extremo del tambor. Esto puede dañar el cable del
cabrestante o el cabrestante.
• Compruebe siempre que se ha embragado o desembragado
completamente.
• Sea precavido siempre para no dañar la estructura cuando
vaya a anclar su vehículo en una operación con el cabrestante.
• No sumerja nunca el cabrestante en agua.
• Guarde siempre el control remoto en un área protegida,
limpia y seca.
44 45
Page 26

LO FUNDAMENTAL DEL CABRESTANTE
LO FUNDAMENTAL DEL CABRESTANTE
AD VER TENC IA
Siempre tome
el tiempo para
comprender
completamente
el cabrestante y la
operación de tiro
mediante la revisión
de esta guía y la
Guía del operador
que se incluye con el
cabrestante.
Componentes
estructurales de un
cabrestante de engranajes
planetarios
1
De modo que ya tiene el cabrestante
WARN y está preparado para probarlo:
subir a unas cuantas rocas, salpicar un
poco de barro y atravesar algún que otro
arroyo. En resumen, ya está listo para
explorar el campo y para disfrutar.
Muy bien. Si es lo suficientemente
inteligente como para ir preparado con lo
mejor, probablemente también lo sea para
saber que, si quiere disfrutar, tiene que
entender perfectamente cómo funciona el
cabrestante.
Esto es precisamente lo que intenta
hacer esta guía: proporcionarle un
conocimiento básico del cabrestante
y enseñarle lo fundamental de las
técnicas apropiadas de uso. Pero antes
3
6
9
de comenzar, debemos aclarar que la
información en esta guía es solamente
de carácter general. Como no hay dos
situaciones iguales, sería casi imposible
ilustrar todos los casos que pueden
presentarse. No obstante, podemos
brindarle los principios y las técnicas
generales. Será su responsabilidad suya
tomarse el tiempo necesario para analizar
la situación y aplicar la técnica apropiada.
El sentido común y las instrucciones
que se incluyen en este libro le pueden
ayudar a disfrutar de la máquina. No olvide
que debe analizar cada situación antes de
proceder y ACTUAR CAUTELOSAMENTE.
8
2
7
5
1
7
6
5
4
Para comenzar, debe familiarizarse con
el cabrestante Warn y con cada uno de
sus componentes: Practique el uso del
cabrestante antes de utilizarlo.
1
Motor. Por lo general, el motor del
cabrestante funciona con la batería de su
vehículo. El motor proporciona energía
al mecanismo de engranajes, que gira el
tambor del cabrestante y enrolla el cable.
Tambor del cabrestante. El tambor
2
del cabrestante es el cilindro en el cual
se enrolla el cable. El motor acciona
esta pieza y el tren accionador. Se puede
cambiar el sentido de giro utilizando el
control remoto.
Cable metálico. El diámetro del cable
3
y su longitud se determinan de acuerdo a
la capacidad de carga del cabrestante y a
su diseño del mismo. Enrollado alrededor
del tambor del cabrestante a través de
la guía, el cable se enlaza al final para
aceptar el perno del enganche.
Guía. Cuando se usa el cabrestante en
4
ángulo, la guía del cable actúa para dirigir
el cable hacia el tambor de enrollado. Esto
reduce al mínimo los daños que puede
sufrir el cable cuando pasa por la montura
o el paragolpes del cabrestante.
8
2
3
Dibujo superior: Hay un freno a un
lado del cabrestante para esta rueda
de gran diámetro. De hecho, esta
rueda también es el freno.
9
Tren de engranajes. El engranaje de
5
6
reducción convierte la energía del motor
del cabrestante en una fuerza de gran
tracción. El diseño del tren de engranajes
hace posible que el cabrestante sea más
ligero y compacto.
Sistema de freno. El freno se acciona
6
automáticamente en el tambor del
cabrestante cuando se para el motor de
éste y hay carga en el cable. El freno evita
que el cabrestante suelte cable, lo que
mantiene al vehículo en su lugar.
Embrague. El embrague permite al
7
usuario desactivar el tambor de enrollado
desde el sistema de engranajes, lo que
permite al tambor girar libremente
(llamado “enrollado manual”). Al
embragar se vuelve a “bloquear” el
tambor del cabrestante en el tren de
engranaje.
Caja de control. Los solenoides de
8
la caja de control transmiten corriente al
motor utilizando la energía eléctrica de la
batería del vehículo. Esto permite que el
usuario cambie la dirección de la rotación
del tambor del cabrestante.
Control remoto. El control remoto
9
se conecta a la caja de control, y el
El cabrestante
8274-50 tiene una
estructura diferente.
Este cabrestante
utiliza engranajes de
dentadura recta para
reducir.
Además, éste tiene un
freno automático de
disco en el lado de la
máquina.
ADVERTENC IA
Nunca embrague
ni desembrague si
el cabrestante está
soportando una
carga, si el cable
está en tensión o si
el tambor está en
movimiento.
usuario puede controlar la dirección del
cabrestante y mantenerse alejado del
cable mientras funciona.
WA RN I ND US TR IE S • GU ÍA B ÁS ICA DE T ÉCN IC AS P AR A EL U SO D EL C AB RE ST AN TE
46 47
WA RN I ND US TR IE S • GU ÍA B ÁS ICA DE T ÉCN IC AS P AR A EL U SO D EL C AB RE ST AN TE
Page 27

El cabrestante está
controlado por el
control remoto de mano
para permitir al usuario
estar alejado durante el
proceso de tracción.
CÓMO FUNCIONA EL CABRESTANTE
Mecánica del cabrestante
Ahora que ya se ha familiarizado con
el cabrestante Warn y sus componentes,
podemos empezar a ver cómo funciona.
La mayor ventaja de un cabrestante
eléctrico es que puede proporcionar un
servicio fiable, bien sea para usarse en
el trabajo o en situaciones recreativas,
incluso cuando el motor del vehículo se
cala, por supuesto, suponiendo que hay
la suficiente corriente disponible en la
batería. El cabrestante puede funcionar
a altas cargas y, por esta razón, la caja de
control utiliza un sistema de control para
aceptar sin peligro el flujo de corriente.
Es importante comprender que
cuanto más prolongando sea el tiro, más
calor se creará, al igual que una plancha
caliente. Si se utiliza el cabrestante sin
dejar enfriar su motor, puede producir
daños en dicho motor. Asimismo, si
el motor está funcionando durante la
tracción, la batería puede desgastarse
más rápido de lo que se carga. Por lo
tanto, preste atención al indicador de
voltaje para asegurarse de que la batería
no está demasiado baja para poner en
marcha su vehículo.
Control del cabrestante
cabrestante para permitir al usuario estar
alejado mientras controla el proceso de
tracción. El control remoto posibilita el
control de la rotación hacia delante y
hacia atrás del tambor de enrollado.
Cómo reacciona el cabrestante a la
carga
por su capacidad de tracción. La
capacidad de tracción máxima ocurre
en la primera capa de cable del tambor.
A medida que aumentan las capas,
disminuye la potencia de tiro. Esta
es la realidad matemática del uso de
cabrestantes. Exceder la capacidad del
cabrestante puede producir que éste
falle o que el cable se rompa. Analizar
ahora cómo desea usar el cabrestante
le puede evitar graves problemas más
tarde.
de que el sistema de montaje del
cabrestante y el armazón del vehículo
puedan soportar la carga establecida del
cabrestante.
Utilice la razón para calcular la cantidad
de peso del que quiere tirar. Calcule
el peso bruto y multiplíquelo por 1,5;
no exceda la capacidad nominal del
cabrestante o del cable.
El control remoto de mano controla al
Los cabrestantes Warn se clasifican
Además, también debe asegurarse
Por lo tanto, analice su situación.
ACCESORIOS Y MEJORAS DEL CABRESTANTE
El cabrestante no es mucho más que
una simple herramienta. Pero cuando se
utiliza con ciertos accesorios y mejoras,
el cabrestante Warn puede convertirse
en una herramienta de múltiples usos
y muy productiva. En esta sección,
veremos varios de estos aspectos.
Algunos de ellos son vitales para utilizar
el cabrestante sin correr peligro, pero
otros ofrecen versatilidad adicional y
comodidad.
Guantes. Con el uso, el cable llegará
a tener “púas” que pueden cortar la
piel. Es extremadamente importante
llevar guantes protectores mientras el
cabrestante está en funcionamiento o si
se toca el cable. Evite usar ropa suelta o
cualquier otra cosa que se pueda enredar
en el cable o en otras partes móviles.
Correa del gancho. Se utiliza para
sujetar el gancho y proteger los dedos de
la guía a medida que se enrolla el cable.
Los cabrestantes adquieren una gran
fuerza de tiro y pueden cortar fácilmente
los dedos y los miembros del cuerpo que
se encuentren en determinados lugares.
Coloque el gancho dentro del enlace y
sujete la correa entre el pulgar y el dedo
índice.
Polea. Si se usa la polea
correctamente, ésta le permite: (1)
aumentar la potencia de tiro del
cabrestante y (2) cambiar la dirección de
tiro sin dañar el cable. El uso apropiado
de la polea se trata en la sección “Antes
de usar el cabrestante”.
Enganches en forma de D. El
enganche en forma de D es un medio
seguro de conectar los extremos
enlazados de cables, correas y poleas.
El perno del enganche es roscado para
poderlo quitarlo fácilmente.
Cadena de estrangulación. Se puede
utilizar para enganchar a otro vehículo
o a objetos cortantes como punto de
anclaje. No obstante, las cadenas dañarán
o destruirán los árboles que se utilizan.
Ganchos de remolque. Si se aseguran
de forma apropiada al armazón del
vehículo, los ganchos de remolque
proporcionan un punto
de unión para los
ganchos del cable,
las correas y las
cadenas.
WA RN I ND US TR IE S • GU ÍA B ÁS ICA DE T ÉCN IC AS P AR A EL U SO D EL C AB RE ST AN TE
48 49
WA RN I ND US TR IE S • GU ÍA B ÁS ICA DE T ÉCN IC AS P AR A EL U SO D EL C AB RE ST AN TE
Page 28

ACCESORIOS Y MEJORAS DEL CABRESTANTE
ANTES DE USAR EL CABRESTANTE
PR ECA UCIÓ N
Nunca utilice una
correa para la izada.
Nunca utilice
una correa para el
remolque. La correa
se pueden cortar
fácilmente ni se
erosione.
Nunca utilice
correas de goma que
producen una gran
fuerza al estirarse,
lo cual supone un
posible peligro.
El protector de tronco de árbol.
Por lo general, está fabricado de nilón
de gran calidad, proporciona al usuario
un punto de unión para el cable del
cabrestante a una gran variedad de
puntos de anclaje y objetos, y, al mismo
tiempo, protege los árboles vivos.
Correa de recuperación. Nunca
utilice una correa de recuperación
durante el funcionamiento del
cabrestante. Como está diseñada para
estirarse, ésta acumula energía y puede
reaccionar como una goma elástica si
falla el maniobrado. Utilice la correa de
recuperación para extraer un vehículo
estancado.
Manta pesada. Es posible que, en
ciertas situaciones, necesite poner
una manta pesada o un objeto similar
encima del cable. Una manta pesada,
tal como las enguatadas que se utilizan
en mudanzas, puede absorber energía
en caso de rotura del cable. Colóquela
sobre el cable hacia la mitad, entre
el cabrestante y el punto de anclaje.
Haga esto antes de tensar el cable. No
se acerque a la manta ni la mueva una
vez que se haya tensado el cable. No
permita que se acerque a la guía. Si hay
que mover o quitar la manta, disminuya
primero la tensión del cable.
Palas y herramientas de mano.
Con mucha frecuencia, durante
las actividades de tracción, se dará
cuenta de que necesita más ayuda.
Se recomienda obtener herramientas
como palas, un hacha y un gato de
gran elevación para asistirle cuando lo
necesite.
Piezas de repuesto. Algunas piezas
de repuesto, que son importantes llevar
en viajes al campo, son, por ejemplo,
un enganche adicional de perno
roscado, una polea y una unidad de
control remoto. Si utiliza el cabrestante
de forma continuada y lo utiliza para
realizar trabajos de consideración, sería
recomendable incluir un cable y un
gancho adicionales.
Artículos en la caja de herramientas.
Son llaves de tuercas manuales,
destornilladores, alicates y herramientas
para cambiar el cable.
Cables de arranque. Muchos casos
de emergencias en carretera se deben
a baterías desgastadas. Para evitar
agotar su fuente de energía, puede
instalar un sistema de batería doble y un
conjunto aislador de batería. También se
recomienda incluir cables de arranque
para la batería y el sistema de cables
Warn de conexión rápida.
Recomendaciones para la batería
Para obtener el mejor rendimiento
posible de su cabrestante, se recomienda
una batería de automóvil normal
totalmente cargada con una capacidad
mínima de 650 amperios para el
arranque en frío. Compruebe que las
conexiones eléctricas estén limpias y
apretadas.
Pruebe el cabrestante antes de quedarse
estancado. Una situación real no es el momento
para aprender a utilizarlo. El nuevo cable debe
estar tensado antes de su primer uso.
Estiramiento del cable
La vida útil del cable está directamente
relacionada con la forma en que se utiliza y se
cuida. Durante su primer uso, un cable nuevo
debe enrollarse en el tambor bajo una carga
de, por lo menos, 454 kg (1000 lbs). Siga las
instrucciones siguientes para tensar el cable
correctamente en el tambor del cabrestante.
1) Escoja una superficie PLANA Y PAREJA
que sea lo suficientemente amplia como para
poder extender todo el cable.
2) Gire la palanca del embrague del
cabrestante hacia la posición “Free Spool”
(enrollado libre). Desenrolle el cable del tambor
hasta las últimas 5 vueltas. Una vez desenrollado
el cable, ponga la palanca del embrague
del cabrestante en la posición “Engaged”
(embragado).
3) Acople el extremo del cable con gancho
a un punto de anclaje apropiado y aleje el
vehículo de tal punto hasta que quede muy
poco cable suelto. Antes de salir del vehículo,
ponga el freno de mano, deje una velocidad
puesta o en aparcado (vehículos automáticos) y
apague el vehículo.
4) Conecte el control remoto al cabrestante.
Desde una distancia de aproximadamente 2.5
metros (8 pies) del cabrestante, enrolle el cable
hasta que se halla enrollado todo el cable suelto
en el tambor del cabrestante. Desconecte el
control remoto del cabrestante. Mantenga la
tensión en el cable con una mano; empuje
cuidadosamente el cable hacia el lado del
tambor al que esté enganchado, de forma que
no haya espacios libres en el tambor entre cada
vuelta. Verifique que el cable se enrolle en la
parte inferior del tambor y no en la superior,
ya que, en caso contrario, el freno de carga
automático no funcionará correctamente (si
el cable se enrolla en la parte superior, habrá
desenrollado el cabrestante en lugar de
enrollarlo con el control remoto).
5) Para una mayor seguridad, dos personas
deberán realizar los pasos siguientes. Si trata
de tensar el cable usted solo, verifique siempre
que el freno de mano esté puesto, deje una
marcha puesta y apague el vehículo cada vez
que lo abandone para inspeccionar el cable.
No salga nunca del vehículo con una carga
aplicada al cable. Tensar el cable es fundamental
para garantizar una larga vida útil del mismo.
Al tensarse el cable, se evitará que sus capas
exteriores pellizquen o deformen las capas
interiores.
6) Procure enrollar cada vuelta de forma
pareja para evitar daños al cable.
7) Pase el control remoto a través de la
ventanilla del conductor para que pueda
usarlo el conductor del vehículo. Pida a su
ayudante que se ubique en la parte lateral del
vehiculo, alejado del cable del cabrestante. Él
deberá indicarle si el cable se está enrollando
correctamente al verlo pasar por la guía.
Arranque el vehículo y ponga la transmisión
en punto muerto. Suelte el freno de mano
mientras presiona moderadamente el pedal del
freno. Pulse el botón de enrollar en el control
remoto. Después de enrollar aproximadamente
2 metros (6 pies) de cable, pare el enrollado.
Lentamente deje de presionar el pedal del freno
para aplicar el freno de mano. Esto asegurará
que no haya carga en el cable del cabrestante. A
continuación, ponga la transmisión en aparcado
(vehículos automáticos) o ponga una velocidad
con la palanca de cambios y apague el vehículo.
Salga del vehículo y asegúrese de que el cable
del cabrestante esté enrollándose de forma
pareja en el tambor y no hundiéndose en la
capa inferior. Si el cable se está hundiendo,
desenróllelo y repita este paso desde el
principio con más presión en el pedal del freno.
8) Cuando esté convencido de que el
cable está enrollándose correctamente
en el tambor, repita el paso 6 hasta que el
vehículo se encuentre a 2 metros (6 pies) del
anclaje del cabrestante. Una vez que esté a
2 metros (6 pies), deje de presionar el pedal
del freno lentamente para utilizar el freno
de mano. Esto asegurará que no haya carga
en el cable del cabrestante. A continuación,
ponga la transmisión en aparcado (vehículos
automáticos) o ponga una velocidad con la
palanca de cambios y apague el vehículo. Salga
del vehículo. Desenganche el gancho del punto
de anclaje. Mientras que sostiene la correa del
gancho (incluida en el producto), mantenga la
tensión en el cable del cabrestante y enróllelo
lentamente pulsando el botón de enrollado
en el control remoto hasta que el gancho se
encuentre a 1 metro (3 pies) de la guía. Pare de
enrollarlo y enganche el gancho al punto de
anclaje apropiado en el vehículo. NO PERMITA
QUE EL GANCHO TOQUE LA GUIA. Esto podría
causar daños a la guía. Una vez que el gancho
esté bien acoplado al vehículo, enrolle el resto
del cable suelto pulsando el botón de enrollado
en el control remoto hasta que haya una
holgura mínima en el cable.
ADVERTENC IA
No accione el
cabrestante si no
hay, al menos, 5
vueltas de cable
alrededor del
tambor. El cable
podría soltarse del
tambor, ya que el
acoplamiento del
cable al tambor no
está construido para
aguantar cargas.
WA RN I ND US TR IE S • GU ÍA B ÁS ICA DE T ÉCN IC AS P AR A EL U SO D EL C AB RE ST AN TE
50 51
WA RN I ND US TR IE S • GU ÍA B ÁS ICA DE T ÉCN IC AS P AR A EL U SO D EL C AB RE ST AN TE
Page 29

ANTES DE USAR EL CABRESTANTE
ANTES DE USAR EL CABRESTANTE
ADVERTENC IA
Use siempre la
correa del gancho
suministrada
cuando vaya
a enrollar o
desenrollar el cable
del cabrestante
o durante la
instalación o la
operación para
evitar daños en las
manos.
ADVERTENC IA
Mantenga siempre
las manos alejadas
del cable del
cabrestante, del
bucle del gancho,
del gancho y de
la abertura de
la guía durante
la instalación, la
operación, y en
el enrollado y
desenrollado.
El conocer las técnicas apropiadas
en el uso del cabrestante, ya sea para
recuperar otro vehículo o para sacar
un tocón de árbol de la tierra, puede
servir para protegerse a sí mismo y a las
personas que le rodean. Quizás la parte
más importante en el uso del cabrestante
sea, en cualquier situación, lo que usted
hace antes de la tracción.
En esta sección, le mostramos lo
fundamental para usar su cabrestante
eficazmente. No obstante, usted es el
responsable de analizar la situación y
tomar las decisiones necesarias para usar
correctamente el cabrestante. Haga uso
de sus conocimientos sobre cabrestantes
y de los principios básicos que haya
practicado, y adapte sus técnicas a la
situación en particular. Cuando vaya a
utilizar el cabrestante Warn, recuerde lo
siguiente:
1. Tómese su tiempo siempre para
evaluar la situación y planifique
la operación de tracción
cuidadosamente.
2. Cuando utilice un cabrestante,
tómese siempre su tiempo.
3. Utilice el equipo apropiado para su
situación en particular.
4. Utilice siempre guantes de cuero, y
no permita que el cable se deslice
entre sus manos.
5. Únicamente usted deberá manejar
el cable y operar el conmutador
del control remoto.
6. Piense en su seguridad en todo
momento.
7. Practique lo más posible cada
fase.
Tracción con cable sencillo
Maniobrado para la tracción
Las siguientes fases describen cómo
recuperar su vehículo utilizando tracción
con cable sencillo. Las técnicas de
maniobrado de cable doble o múltiple
siguen el mismo proceso pero utilizan una
polea para realizar la tracción.
Paso 1: PÓNGASE LOS GUANTES.
Paso 2: DESEMBRAGUE. Para permitir
el enrollado libre del tambor del
cabrestante, gire la palanca del embrague
para desembragar. El enrollado libre
conserva la energía en la batería.
Paso 3: LIBERE EL GANCHO DEL
CABRESTANTE Y ACOPLE LA CORREA.
Libere el gancho del cabrestante de su
punto de anclaje. Acople la correa del
gancho a éste (si no estuviera acoplada).
Paso 4: TIRE DEL CABLE HACIA EL PUNTO
DE ANCLAJE. Desenrolle suficiente cable
para alcanzar el punto de anclaje. Debe
haber cierta tensión en el cable. Si se
afloja, es posible que el cable se dañe si
se enreda o se enrolla más de lo debido.
Para evitar perder el final, ponga el
gancho del cabrestante en la correa del
gancho mientras usted trabaja.
Paso 5: ASEGURAR AL PUNTO DE
ANCLAJE. Una vez que haya elegido un
punto de anclaje, asegure el protector
del tronco del árbol o la cadena de
estrangulamiento alrededor del objeto.
Paso 6: ACOPLE EL ENGANCHE EN
FORMA DE D Y LA CORREA DEL GANCHO.
Acople el enganche a los dos extremos
de la correa o la cadena y a través del
bucle del gancho, y asegúrese de no
sobretensarla (tense y retroceda media
vuelta).
Cómo elegir un punto de anclaje:
En vital realizar un anclaje seguro
cuando se utiliza el cabrestante. El punto
de anclaje debe ser lo suficientemente
fuerte como para sujetar el cabrestante
mientras se esté usando. Los puntos
naturales de anclaje pueden ser árboles,
tocones o rocas. Enganche el cable
en la parte más baja posible. Si no se
encuentran puntos naturales de anclaje
cuando se está tratando de recuperar
otro vehículo, su vehículo será dicho
punto. En esta situación, la transmisión
se deberá poner en neutro; también
se deberá accionar el freno de mano y
bloquear las ruedas para evitar que su
vehículo se mueva.
Lo ideal es tener un punto de anclaje
que le permita tirar en línea recta en
la dirección hacia donde el vehículo
se vaya a mover. Esto permitirá que el
cable se enrolle bien y de forma pareja
en el tambor de enrollado. Un punto
de anclaje lo más alejado posible
proporcionará al cabrestante la mayor
capacidad de tracción posible.
Postes o ejes,
clavados en ángulo
y unidos.
Rueda de repuesto
y aro enterrados
profundamente y la
cadena asegurada a
través del aro.
Tronco enterrado
con cadena
asegurada
alrededor del
mismo.
ADVERTENC IA
Nunca embrague
ni desembrague si
el cabrestante está
soportando una
carga, si el cable
está en tensión o si
el tambor está en
movimiento.
PREC AUCIÓN
No deje nunca
el control remoto
donde pueda
activarse durante
el enrollado libre,
el maniobrado
o cuando el
cabrestante no esté
en uso.
ADVERTENC IA
No enrolle nunca el
cable del cabrestante
sobre sí mismo.
Utilice una cadena
o un cable de
estrangulación,
o un protector de
tronco de árbol en el
anclaje.
WA RN I ND US TR IE S • GU ÍA B ÁS ICA DE T ÉCN IC AS P AR A EL U SO D EL C AB RE ST AN TE
52 53
WA RN I ND US TR IE S • GU ÍA B ÁS ICA DE T ÉCN IC AS P AR A EL U SO D EL C AB RE ST AN TE
Page 30

ADVERTENC IA
No use nunca
el cabrestante
como grúa o para
suspender una
carga.
ADVERTENC IA
No use nunca el
cabrestante o el
cable del cabrestante
para remolcar. Un
golpe a las cargas
puede dañar,
sobrecargar o romper
el cable.
ADVERTENC IA
Nunca accione el
cabrestante si no
hay, al menos, 5
vueltas de cable
alrededor del
tambor. El cable
podría soltarse del
tambor, ya que el
acoplamiento del
cable al tambor no
está construido para
aguantar cargas.
A V I S O
Evite los tirones
laterales continuos,
ya que pueden
apilar el cable en un
extremo del tambor.
Tal apilamiento
puede dañar el cable
o el cabrestante.
Paso 7: BLOQUEO DEL EMBRAGUE.
Bloquee el tambor del cabrestante
girando la palanca del embrague para
embragar.
Paso 8: CONECTE EL CONTROL
REMOTO. Asegúrese de que el cable del
control remoto no se enrede enfrente
del cabrestante. Si desea controlar
el cabrestante desde el interior del
vehículo, pase siempre éste por la
ventana para evitar atrapar el cordón
en la puerta. Desconecte siempre el
control remoto cuando no lo esté
usando.
Paso 9: PONER EL CABLE BAJO TENSIÓN.
Con el conmutador del cabrestante,
enrolle lentamente el cable hasta que
esté completamente tenso. Una vez que
el cable esté tenso, aléjese lo más posible
y no lo pise nunca.
Paso 10: COMPRUEBE EL ESTADO DEL
PUNTO DE ANCLAJE. Asegúrese de que
todas las conexiones estén aseguradas, y
despeje el área de cualquier objeto antes
de continuar con el proceso de tracción.
TRACCIÓN
Como ya habrá notado, hay mucho que
hacer y que tener en cuenta antes de
empezar la tracción. Piense en lo que
está haciendo para poder protegerse así
mismo y a los demás.
Es muy importante accionar
correctamente el cabrestante; de hecho,
debería practicar estas técnicas antes de
enfrentarse a las distracciones y al estrés
que conlleva una situación real donde
hay que utilizarlo.
Paso 11: REVISE EL CABLE. El cable
deberá estar enrollado de forma
adecuada en el tambor. El cable se
puede dañar si el enrollado no se hace
correctamente.
Paso 12: PONGA ALGO SOBRE EL CABLE,
si cree que es necesario, hacia la mitad
entre el cabrestante y el punto de
anclaje, con el fin de absorber fuerza en
caso que el cable se suelte. Se pueden
utilizar ramas de árboles, chaquetas
pesadas, cadenas, mochilas y objetos
parecidos con este propósito.
Establezca las zonas
prohibidas para las
personas:
Paso 13: COMUNIQUE SUS INTENCIONES.
Asegúrese de que todas las personas que
estén en las inmediaciones del cabrestante
que se pondrá en funcionamiento sepan
bien cuáles son sus intenciones antes de
comenzar la tracción.
Ponga límites en cuanto al lugar donde
deben estar los espectadores; nunca
detrás o enfrente del vehículo y nunca
cerca del cable o de la polea. Su situación
puede exigir tener otras zonas donde la
gente no puede estar.
Paso 14: PONGA EN FUNCIONAMIENTO
EL CABRESTANTE. Con el motor en
funcionamiento del vehículo que se va a
usar para ayudar al cabrestante y con el
cable ya ligeramente tensado, comience
la tracción lentamente y a un ritmo
constante. El cable se deberá enrollar
correctamente alrededor del tambor. Para
obtener mejor tracción, se podrá conducir
lentamente el vehículo del que se está
tirando mientras se usa el cabrestante.
Paso 15: PARA RECUPERAR UN VEHÍCULO,
continúe tirando hasta que éste se
encuentre en terreno firme. Si puede
conducir el vehículo, el uso del cabrestante
habrá finalizado.
TRACCIÓN
Paso 16: ASEGURE EL VEHÍCULO. Una vez
completa la recuperación del vehículo,
ponga los frenos y la transmisión en
“aparcar”, si es automático, o en una
velocidad corta si es manual. Afloje la
tensión del cable.
Qué hay que considerar cuando
haya carga
El cable debe enrollarse alrededor del
tambor en el sentido que indica la marca
de rotación que hay en el cabrestante.
Al enrollar el cable, éste debe quedar
tenso y bien distribuido en el tambor.
Esto evita que las vueltas más externas
del cable se traben con las vueltas
internas, lo cual puede ocasionar
atascamientos y daños al cable.
Evite sacudidas de la carga utilizando
el conmutador de control de forma
intermitente a fin de tensar y hacer
entrar las porciones del cable que
puedan quedar flojas. Las sacudidas
de la carga pueden hacer sobrepasar
momentáneamente la capacidad
nominal del cabrestante y del cable.
Durante operaciones de tiro lateral,
el cable tiende a acumularse en un
extremo del tambor. Esta acumulación
de cable puede hacerse excesiva, lo
que puede causar daños serios al
cabrestante. Por consiguiente, haga las
operaciones de tiro en línea recta, si es
posible, y pare el cabrestante si el cable
se acerca a las varillas de conexión o a
la placa de montaje. Para solucionar
la acumulación despareja de cable,
desenrolle esa sección y colóquelo en
el extremo opuesto del tambor, lo que
dejará espacio para continuar con el
enrollado.
A V I S O
Evite sobrecalentar
el motor del
cabrestante. Si el
uso del cabrestante
se va a realizar
durante un periodo
de tiempo largo,
detenga el motor en
intervalos razonables
para permitir que se
enfríe.
WA RN I ND US TR IE S • GU ÍA B ÁS ICA DE T ÉCN IC AS P AR A EL U SO D EL C AB RE ST AN TE
54 55
WA RN I ND US TR IE S • GU ÍA B ÁS ICA DE T ÉCN IC AS P AR A EL U SO D EL C AB RE ST AN TE
Page 31

TRACCIÓN
Señales con la mano durante el uso del cabrestante
En algunas situaciones, se necesitan dos personas para hacer la recuperación. Una conduce
y controla el cabrestante, mientras la otra proporciona las instrucciones y se asegura de que
el cable se enrolla correctamente. Usted y su ayudante deben establecer claramente y de
forma precisa las señas de manos y repasarlas para asegurarse de que los dos las entienden.
También debe estar claro que si el conductor que controla el cabrestante no puede ver
ambas manos del ayudante, no deberá activar el cabrestante. Señas sugeridas:
1) Dirección de giro
Extender las manos con los
pulgares hacia arriba y doblar la
mano hacia la dirección que quiera
que el conductor gire.
2) Enrollar el cable
Alzar el dedo índice por encima
del hombro y hacer pequeños
círculos en el aire para indicar
que se enrolle el cabrestante.
3) Desenrollar el cable
Poner el dedo índice apuntando
hacia abajo y hacer pequeños
círculos en el aire a la altura de la
cintura aproximadamente para
indicar que se suelte más cable del
cabrestante.
4) Enrollado por impulso del cable
Indicar al conductor que enrolle el
cabrestante en arranques cortos y
rápidos. Abrir y cerrar la parte superior
de los dedos hasta que se desee que se
pare el cabrestante.
Cómo enrollar el cable cuando
no hay carga
Disponga la dirección por control
remoto de forma que no pueda
engancharse en el cabrestante. Disponga
el cable de forma que no se doble ni se
trabe al enrollarlo. Asegúrese de que el
cable ya enrollado en el tambor esté bien
tenso y dispuesto en capas uniformes.
Tense y enderece la capa si es necesario.
Mantenga el cable bajo una tensión
ligera y vuelva a enrollarlo en el tambor
del cabrestante en capas uniformes. Pare
frecuentemente para tensar y enderezar
las capas según sea necesario. Repita
este proceso hasta que el gancho del
cabrestante esté a la misma distancia que
la longitud total del control remoto desde
el cabrestante. Sujete el gancho entre el
pulgar y el dedo índice y acople la correa
del mismo. Tome la correa entre el pulgar
y el índice para mantener la tensión del
cable. Ayude a que el cable pase hacia la
guía, enrollando cuidadosamente el resto
mientras pulsa el interruptor del control
remoto. Ponga el gancho en la guía o
tense hasta encontrar un lugar adecuado
en uno de los lados.
Si no tiene la correa del gancho, utilice
la longitud de un cordón o algo parecido.
Para prevenir lesiones graves, NUNCA
ponga los dedos dentro del área del
gancho al
enrollar.
TRACCIÓN
Paso 18: ENROLLE DE NUEVO EL CABLE.
La persona encargada del cable deberá
ayudar a enrollarlo y no dejarlo resbalar
por la mano. Asimismo, esta persona
deberá controlar el cabrestante en todo
momento
ADVERTENC IA
Mantenga siempre
las manos alejadas
del cable del
cabrestante, del
bucle del gancho,
del gancho y de
la abertura de
la guía durante
la instalación, la
operación, y en
el enrollado y
desenrollado.
5) Parar el cabrestante
La seña para parar el cabrestante es cerrar la
mano en un puño, la palma hacia el conductor,
mantenerla lo suficientemente elevada como
para que el conductor la vea y la
estirada hacia delante al nivel del hombro.
otra mano
WA RN I ND US TR IE S • GU ÍA B ÁS ICA DE T ÉCN IC AS P AR A EL U SO D EL C AB RE ST AN TE
6) Frenar
Cruzar las palmas para
indicar al conductor que
accione el freno de pie.
56 57
7) Asistencia en la conducción
Indicar al conductor que dé más
potencia a las ruedas para ayudar
en el proceso de tracción con el
cabrestante.
Paso 17: DESCONECTE EL CABLE.
Desconecte el cable del punto de anclaje.
WA RN I ND US TR IE S • GU ÍA B ÁS ICA DE T ÉCN IC AS P AR A EL U SO D EL C AB RE ST AN TE
Paso 19: DESCONECTE EL CONTROL
REMOTO. Desconecte el cordón
del control remoto desde su caja y
guárdelo en un lugar limpio y seco.
Las operaciones del cabrestante ya se
han finalizado. Ponga la cubierta en la
conexión del solenoide.
Page 32

TÉCNICAS DE MANIOBRADO
TÉCNICAS DE MANIOBRADO
En varias situaciones donde se
utiliza el cabrestante, se requieren
aplicaciones de otras técnicas
de tracción. Éstas pueden ser
tales como poner una distancia
corta para obtener una
tracción máxima utilizando el
maniobrado de línea recta,
simplemente aumentar la
potencia de tiro, o mantener
una situación de tiro en
línea recta. Usted tendrá que
decidir qué técnica es la más
adecuada para la situación en
que se encuentra. Tenga en
mente la “seguridad” en todo
momento..
Cómo cambiar la dirección
de tiro
Todas las operaciones
realizadas con el cabrestante
deben hacerse en línea recta:
desde éste hasta el objeto
del que se quiera tirar.
Esto reduce al mínimo la
acumulación del cable
a uno de los lados del
tambor, lo que impide
que el tiro sea eficaz y daña
Cable sencillo
Cable doble
Cable triple
el cable. Una polea, fijada en un punto
directamente enfrente del vehículo, le
permitirá cambiar la dirección del tiro
mientras continúa permitiendo que
el cable forme un ángulo de 90º para
enrollarse correctamente en el tambor.
Aumento de la potencia de tiro
En algunos casos, notará que se
necesita más potencia de tiro. El uso de
poleas aumentan la ventaja mecánica, y
esto incrementa la potencia de tiro:
Cable doble
Debido a que la potencia de tiro
disminuye con el número de capas del
cable en el tambor del cabrestante, se
puede utilizar una polea para utilizar el
cable doble. Esto disminuye el número
de capas del cable en el tambor y
aumenta la potencia de tiro.
Comience soltando suficiente
cable como para sacar el gancho del
cabrestante. Enganche el gancho al
armazón del vehículo o del gancho de
remolque y pase el cable a través de la
polea.
Desembrague y utilice la polea, suelte
el suficiente cable como para alcanzar
el punto de anclaje. No enganche el
gancho al conjunto de montaje.
Asegure el punto de anclaje con
el protector del tronco del árbol o la
cadena de estrangulación. Acople el
enganche. Acople el enganche a los dos
extremos de la correa o cadena, y tenga
cuidado de no sobretensarla (tense y
retroceda media vuelta).
Cable triple
Utilice las mismas técnicas que en el
doble cable. Busque en su vehículo un
lugar resistente para el montaje de la
polea y del enganche de perno roscado.
Mantenga un ángulo de 90º entre el
cabrestante y pase el cable por el primer
punto de anclaje y de la polea. Asegure
el cable al vehículo. Pase el cable por la
polea y asegúrela con un enganche de
perno roscado en el vehículo tan cerca
del cabrestante como sea posible. Ahora
pase el cable por el punto de anclaje final.
Asegure el punto de anclaje con el
protector del tronco del árbol o la cadena
de estrangulación. Acople el enganche.
Acople el enganche a los dos extremos
de la correa o cadena, teniendo cuidado
de no sobretensarla (tense y retroceda
media vuelta).
Asegure el gancho del cabrestante.
Mientras mantiene la correa cerca
del suelo, introduzca el gancho del
cabrestante en el enganche de perno
roscado. Compruebe el estado del punto
de anclaje. Asegúrese de que todas las
conexiones estén aseguradas, y despeje
el área de cualquier objeto antes de
continuar con el proceso de tracción.
WA RN I ND US TR IE S • GU ÍA B ÁS ICA DE T ÉCN IC AS P AR A EL U SO D EL C AB RE ST AN TE
58 59
WA RN I ND US TR IE S • GU ÍA B ÁS ICA DE T ÉCN IC AS P AR A EL U SO D EL C AB RE ST AN TE
Page 33

MANTENIMIENTO EL ANÁLISIS FINAL
ADVERTENC IA
Nunca accione el
cabrestante si no
hay, al menos, 5
vueltas de cable
alrededor del
tambor. El cable
podría soltarse del
tambor, ya que el
acoplamiento del
cable al tambor no
está construido para
aguantar cargas.
• Compruebe el cable de tracción
antes y después de cada operación
que se efectúe con el cabrestante. Si
el cable está desgastado o doblado,
reemplácelo por otro nuevo.
Inspeccione también el gancho del
cabrestante y el pasador y verifique
si está desgastado o dañado.
Reemplácelo si es necesario.
• Mantenga el cabrestante, el cable y
el control de conmutación libres de
contaminantes. Utilice un paño limpio
o una toalla para quitar la suciedad.
Si fuera necesario, desenrolle el
cable completamente (dejando un
mínimo de 5 vueltas en el tambor
de enrollado), límpielo y vuelva a
enrollarlo correctamente antes de
guardarlo. El uso de un aceite ligero en
el cable y en el gancho del cabrestante
puede protegerlos contra la oxidación
o corrosión.
• Usar el cabrestante durante un
largo periodo de tiempo gasta
demasiada batería en el vehículo.
Revise y mantenga en buen estado
la batería y los cables de acuerdo
a las instrucciones del fabricante.
Inspeccione también el control de
conmutación y todas las conexiones
eléctricas para cerciorarse de que están
limpias y en buenas condiciones.
• Inspeccione el control remoto, si lo
tuviera, para cerciorarse de que no esté
dañado. Asegúrese de cubrir el control
remoto para evitar que entre suciedad
en las conexiones. Almacene el control
remoto en un área protegida, limpia y
seca.
• No se requiere lubricación durante la
vida útil del cabrestante.
La guía básica de técnicas apropiadas
de tracción no puede tratar todas las
posibles situaciones en que se tenga
que utilizar un cabrestante. En el análisis
final, las decisiones que usted tome
determinarán el resultado final. Por lo
tanto, analice bien cada situación y cada
fase de uso. Piense siempre en su propia
protección y en la de los demás. Ponga
atención y lo disfrutará.
WA RN I ND US TR IE S • GU ÍA B ÁS ICA DE T ÉCN IC AS P AR A EL U SO D EL C AB RE ST AN TE
60
 Loading...