

VTech VSP725 Owner's Manual

Administrator and Provisioning Manual
VSP725
SIP Endpoint Deskset
Rev. 3 05/14

VSP725 Administrator and Provisioning Manual
Congratulations on your purchase of this VTech product. Before using this VTech
product, please read Important Safety Information on page 138 of this manual.
ease thoroughly read this manual for all the feature operations and troubleshooting
Pl
information necessary to install and operate your new VTech product. You can also
visit our website at businessphones.vtech.com or call 1 (888) 370-2006.
Model number: VSP725
Type: SIP-endpoint deskset telephone
Serial number: ________________________________
Purchase date: ________________________________
Place of purchase: _____________________________
Both the model and serial numbers of your VTech product can be found on the
bottom of the console.
Save your sales receipt and original packaging in case it is necessary to return your
product for warranty service.
2

VSP725 Administrator and Provisioning Manual
Table of contents
Introduction.................................................................................................. 5
Audience ................................................................................................... 5
Related documents ..................................................................................... 5
About the deskset....................................................................................... 5
Getting started .............................................................................................. 7
Quick reference guide.................................................................................. 7
Programmable Keys.................................................................................... 8
Other possible programmable key settings.................................................. 8
Network Requirements.................................................................................... 9
Configuring the Phone ...................................................................................10
Using the Phone Menu ...................................................................................11
Status......................................................................................................11
Viewing Line status.................................................................................12
Using the Admin Settings menu...................................................................13
Network Setting ........................................................................................14
Line Menu.................................................................................................16
Provisioning Menu......................................................................................17
Using the WebUI...........................................................................................18
Saving Your Settings..................................................................................19
WebUI: Status..............................................................................................20
WebUI: System ............................................................................................21
SIP Account Management ...........................................................................21
Dial Plan...................................................................................................23
Call Settings .............................................................................................32
User Preferences .......................................................................................34
Programmable Keys...................................................................................36
Speed Dial Keys ........................................................................................39
Signaling Settings......................................................................................41
Ringer Settings..........................................................................................42
Paging Zone..............................................................................................43
Network ......................................................................................................44
Basic Network Settings...............................................................................44
Advanced Network Settings.........................................................................45
Contacts......................................................................................................47
Local Directory..........................................................................................47
Directory Import/Export ..........................................................................50
Blacklist ...................................................................................................51
Blacklist Import/Export............................................................................53
LDAP .......................................................................................................54
Broadsoft .................................................................................................57
Call History...............................................................................................58
Servicing .....................................................................................................59
Reboot.....................................................................................................59
Time and Date ..........................................................................................60
Firmware Upgrade .....................................................................................63
Provisioning..............................................................................................65
Security ...................................................................................................71
Certificates ...............................................................................................72
System Logs.............................................................................................73
Provisioning Using Configuration Files ..............................................................75
3 Table of contents

VSP725 Administrator and Provisioning Manual
Resynchronization—Configuration File Checking .............................................75
The Provisioning Process.............................................................................75
Phone Restart ...........................................................................................76
Configuration File Types..............................................................................77
Data Files.................................................................................................77
Configuration File Guide..............................................................................78
Guidelines for the MAC-Specific Configuration File.......................................78
Securing Configuration Files with AES Encryption ........................................78
Troubleshooting............................................................................................80
Specifications...............................................................................................82
Soft Keys.....................................................................................................83
Appendix A: Configuration File Settings ............................................................85
“sip_account” Module: SIP Account Settings..................................................85
General Configuration File Settings ...........................................................85
MAC-Specific Configuration File Settings ....................................................97
“network” Module: Network Settings ............................................................99
General Configuration File Settings ...........................................................99
MAC-Specific Configuration File Settings..................................................101
“provisioning” Module: Provisioning Settings................................................104
“time_date” Module: Time and Date Settings...............................................108
“log” Module: Log Settings........................................................................113
“remoteDir” Module: Remote Directory Settings...........................................114
“web” Module: Web Settings .....................................................................119
“user_pref” Module: User Preference Settings..............................................120
General Configuration File Settings .........................................................120
MAC-Specific Configuration File Settings..................................................120
“call_settings” Module: Call Settings...........................................................123
“pfk” Module: Programmable Feature Key Settings.......................................126
“speed_dial” Module: Speed Dial Settings....................................................127
“ringersetting” Module: Distinctive Ringer Settings .......................................128
“file” Module: Imported File Settings ..........................................................129
General Configuration File Settings .........................................................129
MAC-Specific Configuration File Settings..................................................130
“tone” Module: Tone Definition Settings......................................................131
“profile” Module: Password Settings ...........................................................135
General Configuration File Settings .........................................................135
MAC-Specific Configuration File Settings..................................................135
“page_zone” Module: Paging Zone Settings.................................................135
Maintenance...............................................................................................137
Important Safety Information.......................................................................138
Safety Information...................................................................................138
Industry Canada.........................................................................................139
FCC part 15................................................................................................140
GPL License Information ..............................................................................141
4 Table of contents

VSP725 Administrator and Provisioning Manual
Introduction
This administrator and provisioning guide contains detailed instru ctions for
configuring the VSP725 deskset. Please read this guide before attempting to
configure the telephone.
Audience
This guide is written for installers and system administrators. It assumes that you
are familiar with networks and VoIP, both in theory and in practice. This guide also
assumes that you have ordered your IP PBX equipment or service and selected which
PBX features you want to implement. This guide references specific IP PBX
equipment or services only for features or settings that have been designed for a
specific service. Please consult your equipment or service provider for recommended
switches, routers, and firewall and NAT traversal settings, and so on.
As the VSP725 deskset becomes certified for IP PBX equipment or services, VTech
may make interop guides available for those specific services. Th e interop guides will
recommend second-party devices and settings, along with deskset-specific
configurations for optimal performance with those services.
Related documents
The VSP725 Deskset Quick Start Guide contains a quick reference guide to the
deskset external features and brief instructions on connecting the deskset to a
working IP PBX system.
The VSP725 Deskset User Guide contains a quick reference guide, full installation
instructions, instructions for making and receiving calls, and a guide to all userconfigurable settings.
The documents are available from our website at businessphones.vtech.com.
About the deskset
The VTech VSP725 deskset is full-featured business phone designed to work with
popular SIP telephone (IP PBX) equipment and services. Once you have ordered and
configured your SIP equipment or service, the deskset enables you to make and
receive calls as you would with any other business phone. The deskset provides
calling features like hold, transfer, conferencing, speakerphone, quick dial numbers
and one-touch voicemail access.
The VSP725 features include:
2.5-inch backlit Liquid Crystal Display
Speakerphone, Headset, Hold and Mute
Up to 3 SIP account registrations
Up to 6 active SIP sessions
3-way conferencing
12 dual-function programmable keys
Message Waiting alert LED
Dual 10/100 Mbps Ethernet ports
Power over Ethernet
DECT cordless headset support
For information about registering a cordless headset, see the VSP725 Deskset
User Guide.
5 Introduction

VSP725 Administrator and Provisioning Manual
200-entry Call Log
There are two network ports, known as the Ethernet port and PC port, at the back of
the deskset. The Ethernet port allows the VSP725 deskset to connect to the IP PBX.
The PC port is for another device such as a personal computer to connect to the
Ethernet network through the deskset.
You can configure the deskset using the deskset’s own menus, a browser-based
interface called the WebUI, or an automatic provisioning process (see Provisioning
g Configuration Files on page 75). The WebUI enables you to configure the
Usin
deskset
resides on the deskset and may get updated with firmware updates.
The VSP725 deskset supports intercom and call transfers between system extensions
and can connect you and two other parties on the same conference call.
The telephone also has 12 dual-function programmable keys. You can program these
keys for quick dial, busy lamp field, line access or any of the functions described in
Programmable Keys on page 8.
using a PC that is connected to the same Local Area Network. The WebUI
6 Introduction
VSP725 Administrator and Provisioning Manual
Getting started
Quick reference guide
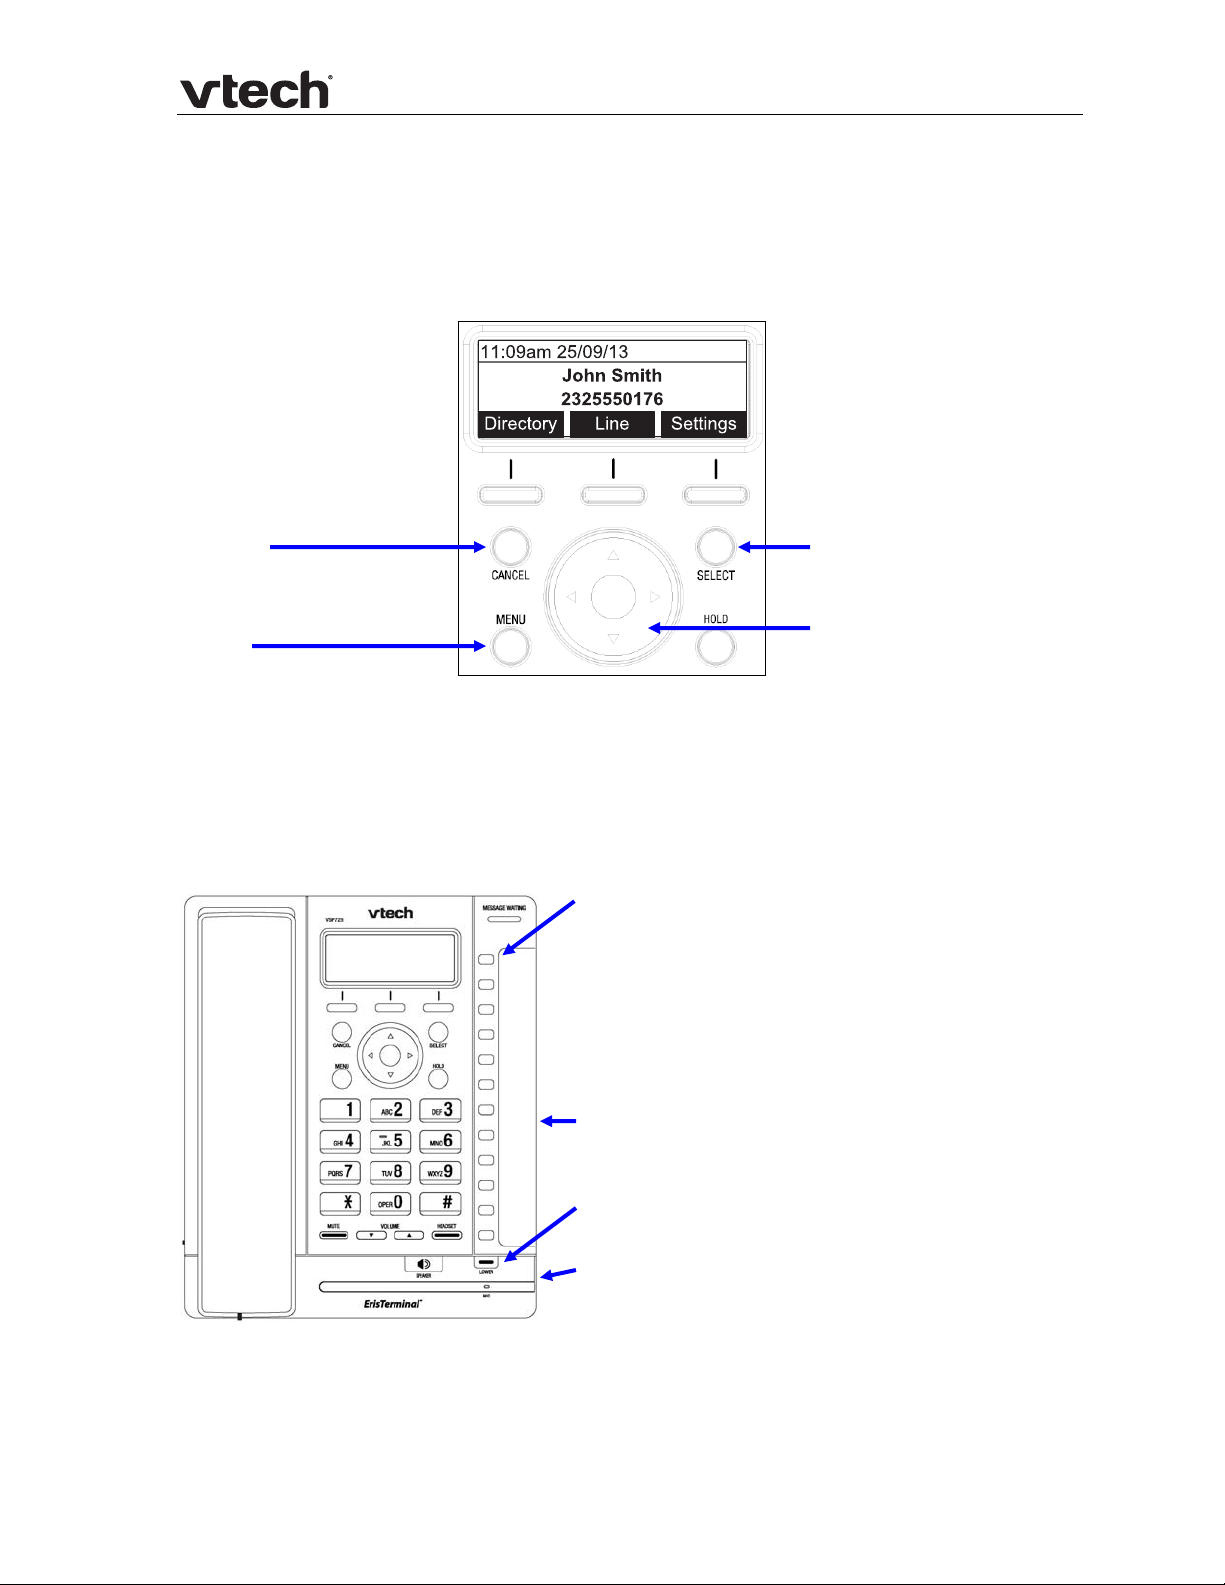
The controls you will need to use to configure the phon e manually are described
below.
CANCEL
While in a menu, press
to cancel an operation
and exit the menu.
MENU
Press to enter the menu.
SELECT
Press to select a menu item
or save an entry or setting.
NAVIGATION KEY
While in menus, press or to
scroll through the menu,
highlight items or change
settings. While entering names
or numbers, press or to
move the cursor left or right.
The deskset external features that are relevant to installation and configuration are
described below.
Programmable keys
Can be programmed to perform various functions or access various
features.
For example:
Press to access a line to make a call
Press to dial a monitored extension or a quick-dial number
Press to answer a ringing call on any line or monitored
extension
Key label card
To write on the card, pull out the card
from under the plastic cover.
LOWER
When assigning or dialing a quick-dial number, press to switch to
lower position (the second of 12 locations) of a programmable key
Corded headset input (on side)
7 Getting started

VSP725 Administrator and Provisioning Manual
Programmable Keys
The table below lists the default settings for the programmable feature keys (PFKs).
The key assignments on your phone may be different. Some keys may be
programmed as Quick Dial keys, for example. To assign functions to programmable
keys, see Programmable Keys on page 36.
Key N
1 Line—Account 1*
2 Line—Account 1
3 Line—Account 1
4 Directory
5 Call History
6 Redial
7 Messages
8 Do Not Disturb
9 Call Forward All
10 None
11 None
12 None
13 – 24 None
* You can assign more than one key to an account. For example, you can configure Line keys
1 and 2 to access Account 1, and Line keys 3 and 4 to access Account 2. Use the key label
card to label the keys appropriately for deskset users after configuration.
umber Setting
Other possible programmable key settings
Call Forward No Answer—Turns Call Forward No Answer (CFNA) on and off.
When CFNA is on, unanswered incoming calls are forwarded to another number
after a specified delay.
Call Forward Busy—Turns Call Forward Busy (CFB) on and off . When CFB is on,
incoming calls are forwarded to another number when the line is busy.
Quick Dial
BLF—Busy lamp field keys let you monitor activity at other phones. The key
LED indicates call status.
Page—If this feature is enabled, press the Page key to call one or a group of
phones. You can configure pages to be automatically answered. See SIP
Accoun
Park
codes, see SIP Account Management on page 21.
Retrieve Parked Call—Dials the ac
In Call DTMF—Dials a string of numbers while you are on a call. For example,
pressing the key might dial a conference access code.
Call Return—Dials the number of the last missed call.
Group Call Pickup—Dials the Group Call Pickup code, allowing y ou to answer a
call ringing at any extension within an admin-defined group.
Direct Call Pickup—Dials the Direct Call Pickup code, allowing you to answer a
call ringing at a specific extension. After pressing the but ton, you may need to
enter the extension number manually.
t Management on page 21.
Call—Dials the access code to park your current call. To program access
cess code to retrieve a parked call.
8 Getting started

VSP725 Administrator and Provisioning Manual
Network Requirements
A switched network topology is recommended for your LAN (using standard 10/100
Ethernet switches that carry traffic at a nominal rate of 100 Mbit/s).
The office LAN infrastructure should use Cat.-5/Cat.-5e cable.
The LAN connections to the deskset(s) should all be wired. However, wireless
connections to other devices (such as laptops) in your office will not impede
performance.
All desksets must reside on a single subnet. A Dynamic Host Configuration Protocol
(DHCP) server is recommended and must be on the same subnet as the desksets so
that IP addresses can be auto-assigned. In most cases, your network router will
have a DHCP server. By default, the deskset has DHCP enabled for automatic IP
address assignment.
NOTE: Some DHCP servers have default settings that limit the number of network IP
addresses assigned to devices on the network. You should log in to your server to
confirm that the IP range is sufficient.
If no DHCP server is present, you can assign static IPs to desksets. You can assign a
static IP address using the deskset menus. Go to Admin settings > Network
setting > Set static IP. If you do not have a DHCP server or do not manually
assign static IPs, you will not be able to access the WebUI and/or enable automatic
time updates from an NTP server.
A DNS server is recommended to resolve the path to the Internet and to a server for
firmware and configuration updates. If necessary, the system administrator can also
download upgrade files and use the WebUI to update the deskset firmware and/or
configuration settings manually.
For users whose computers require a GigE Ethernet frame rate (a gigabit per
second), use separate Ethernet connections for the deskset and the computer. The
Ethernet connection through a deskset is limited to 100 Mbits/s.
9 Network Requirements

VSP725 Administrator and Provisioning Manual
Configuring the Phone
You can configure the phone using one of three methods:
From the phone itself, using the menus. The phone menus are best suited to
configuring a few settings, perhaps after the initial setup has been done. For
administrators, the settings available on the phone menus are limited to
network settings. See Using the Admin Settings menu on page 13. Most of the
settings acc
the menu, they can customize the screen appearance, sounds, and manage
calls. For more information, see the VSP725 Deskset User Guide.
The Web User Interface, or WebUI, which you access using your Internet
browser. See Using the WebUI on page 18. The browser-based interface is easy
to navigate
The WebUI has every setting required for configuring a single phone. You can
enter service provider account settings on the WebUI, configure the
programmable keys, and set up provisioning, which will allow you to
automatically and remotely update the phone after in itial configuration.
Provisioning using configuration files. Workin g with configuration files is the
best way to configuring multiple phones. There are several met hods available
to enable the phone to locate and upload the configuration file. For example,
you can enable the phone, when it starts up or reboots, to check for the
presence of a configuration file on a provisioning server. If the configu ration file
is new or has been modified in any way, the phone auto mati call y downloads
the file and applies the new settings. For more information, see Provisioning
g Configuration Files on page 75.
Usin
essible on the phone itself are most useful for end users. Through
and best-suited to configuring a large variety of phone settings.
10 Configuring the Phone
VSP725 Administrator and Provisioning Manual
Using the Phone Menu
The phone menu has four main sub-menus:
Features—manage calls, view and add directory entries, view call history,
access messages, and use the speed dial menu.
Status—view the deskset network status, account registration status, and
product information.
User Settings—allows the user to set the language for the display, configure
the appearance of the display, customize the audio settings, and register a
DECT headset.
Admin Settings—configure network settings (enter static IP addresses, for
example) and account settings.
This guide contains instructions for using the Admin Settings menu and for accessing
the Status menu. See the VSP725 User Guide for more information about Features
and User Settings.
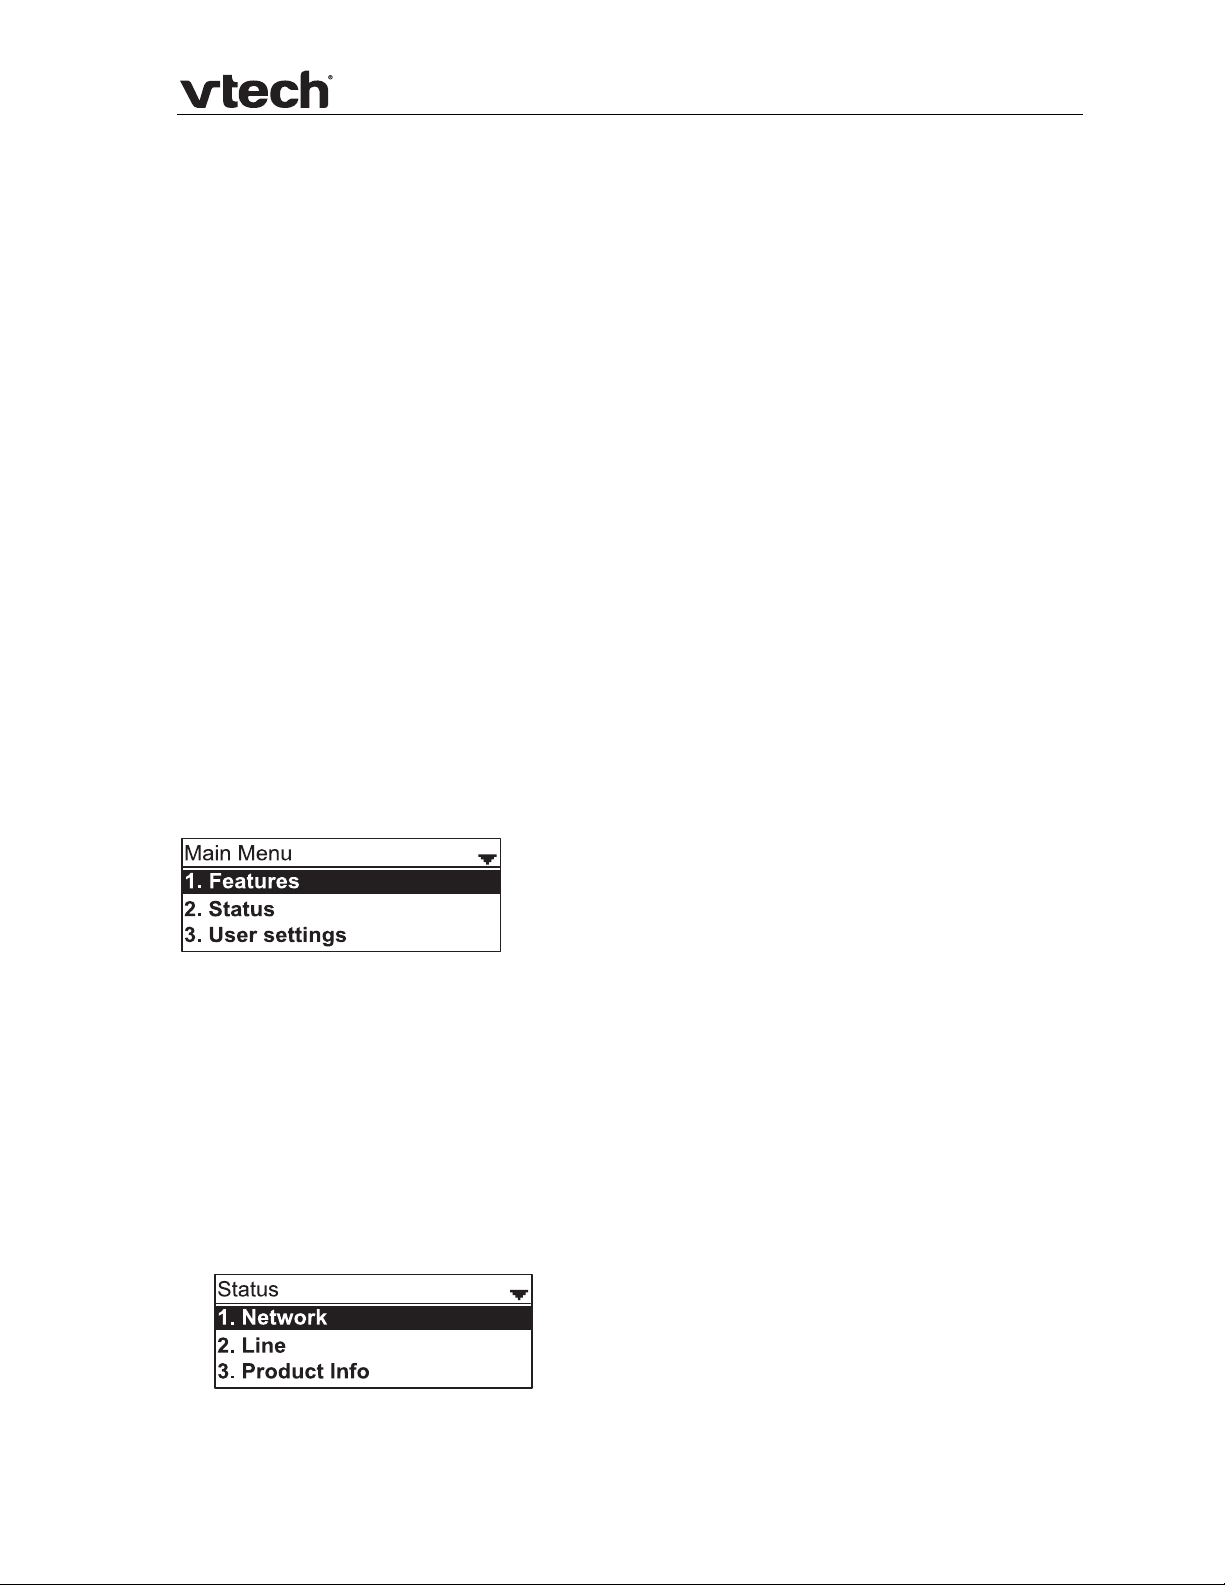
To use the phone menu:
1. When the phone is idle, press MENU.
The main menu appears.
2. Press or to highlight the desired sub-menu, and then press SELECT.
You can also press a corresponding dial pad key to select a numbered menu
item. Press 2 to view the Status menu, for example.
Press SELECT or an appropriate soft key to save changes.
Press CANCEL to cancel an operation, exit the menu display or return to the
idle screen.
Status
Use the status menu to verify network settings and begin troubleshooting if network
problems or account registration issues affect phone operation.
You can also find the software version of the phone on the Product Info screen,
available from the Status menu.
To view the Status menu:
1. When the phone is idle, press MENU.
2. On the Main menu, press or to highlight Status, then press SELECT. The
Status menu appears.
11 Using the Phone Menu

VSP725 Administrator and Provisioning Manual
3. On the Status menu, press or to highlight the desired menu, then press
SELECT.
The available status menus are listed in the following table.
Menu Information listed
1. Network IP address
DHCP status (Enabled/Disabled)
Subnet Mask
Gateway IP address
DNS server 1 IP address
DNS server 2 IP address
SNTP server URL
MAC address
2. Line Lines and registration status. On the Line menu, highlight and select
the desired line to view detailed line status informat ion:
Line status (Registered/Not registered)
Line display name
Line User ID
Registrar Server IP address
Registrar Server port number
Proxy server IP address
Proxy server port number
3. Product Info Model number
Serial number
MAC address
Software version
V-Series
Hardware version
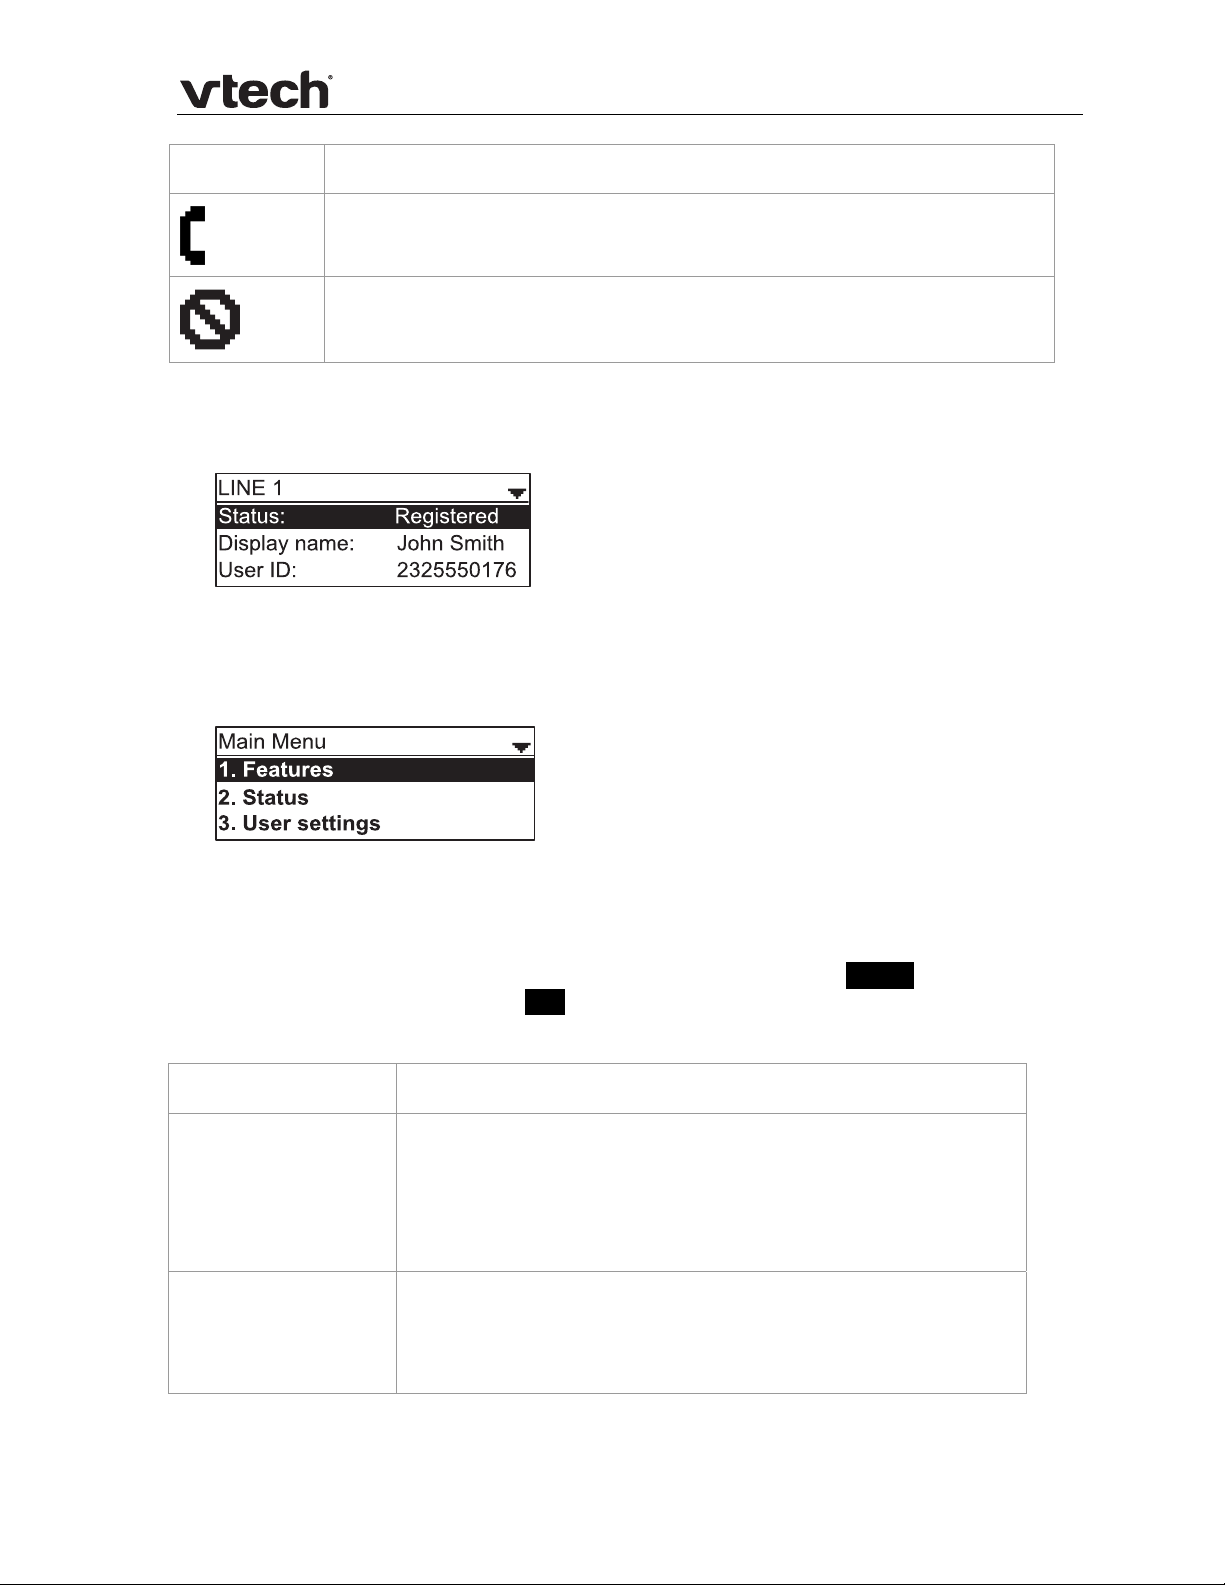
Viewing Line status
When you select Line from the Status menu, the Line menu appears, listing the
available lines along with icons indicating each line’s current registration status.
12 Using the Phone Menu
VSP725 Administrator and Provisioning Manual
Icon Description
Line registered
Line not registered
To view complete status information for a line:
1. On the Line menu, press or to highlight the desired line, then press
SELECT. The full line status screen appears.
Using the Admin Settings menu
To access the Admin Settings menu:
1. When the phone is idle, press MENU. The Main menu appears.
2. Press or to highlight Admin Settings, and then press SELECT.
-orPress 4 (Admin settings) on the dial pad.
3. Use the dial pad to enter the admin password, and then press ENTER. The default
password is admin (press the 123 soft key to enter letters with the dial pad).
The Admin Settings are listed in the following table.
Setting Options
1. Network setting 1. DHCP (Enable, Disable)
2. Set static IP
3. VLAN ID
4. Others
2. Line 1. LINE 1
2. LINE 2 (if available)
3. LINE 3 (if available)
13 Using the Phone Menu

VSP725 Administrator and Provisioning Manual
3. Provisioning 1. Server
2. Login
3. Password
4. Reset to default Press SELECT to display a screen that allows you to reset
the phone to factory default settings.
5. Restart phone Press SELECT to display a screen that allows you to restart
the phone.
Network Setting
Use the Network setting menu to configure network-related settings for the phone.
NOTE: After you press Save for any of the network settings, the phone restarts .
To use the Network setting menu:
1. From the Admin Settings menu, press or to highlig ht Network setting,
then press SELECT.
The Network setting menu appears.
2. Press or to highlight the desired option, then press SELECT:
DHCP
Set static IP
VLAN ID
Others (DNS and NTP servers).
To enable or disable DHCP:
1. From the Network setting menu, press or to highlight DHCP, then press
SELECT.
2. Press or to select Enabled or Disabled, then press Save.
DHCP is enabled by default, which means the deskset will get its IP address from the
network. When DHCP is disabled, you must enter a static IP address for the deskset.
NOTE: You must be familiar with TCP/IP principles and protocols to configure static
IP settings.
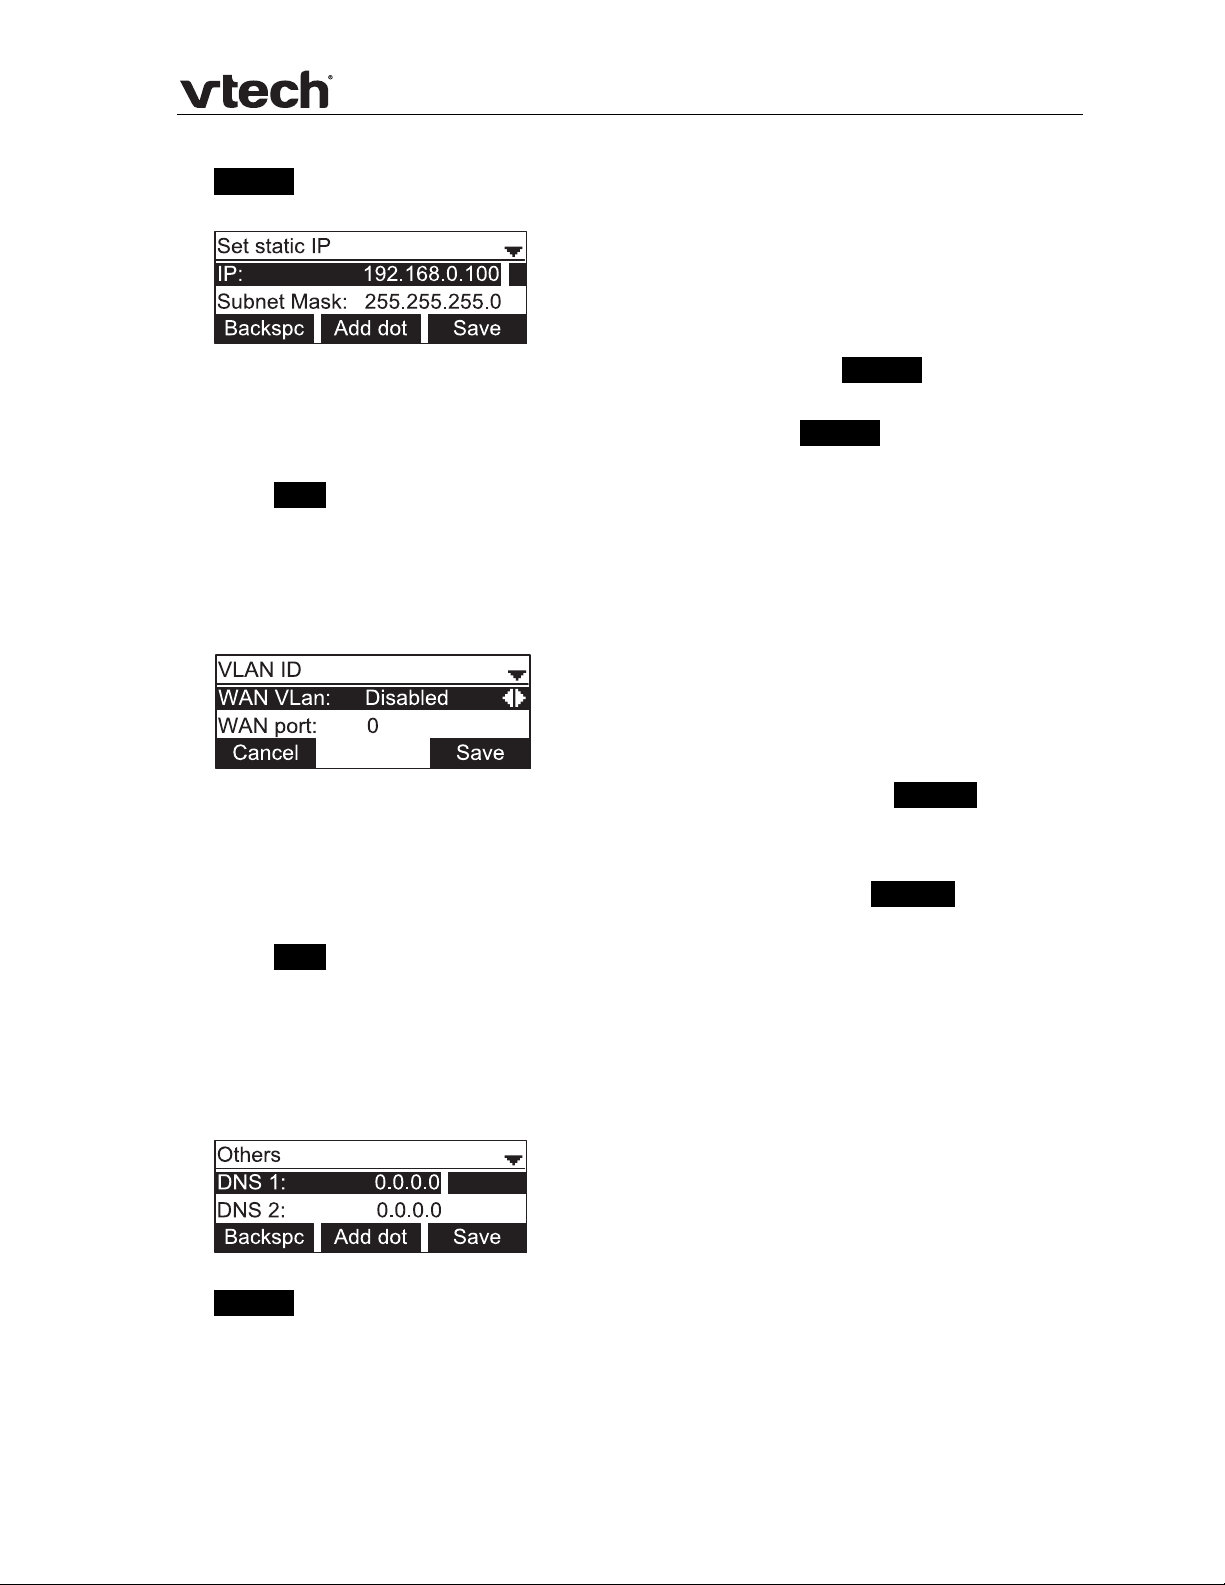
To set static IP for the deskset:
1. From the Network setting menu, press or to highlight Set static IP, and
then press SELECT.
If DHCP is disabled, the Set static IP menu appears. If DHCP is enabled, an
error message appears briefly before returning you to the Network setting menu.
14 Using the Phone Menu
VSP725 Administrator and Provisioning Manual
2. On the Set static IP menu, enter the static IP address. Use the dial pad and the
Add dot soft key to enter characters. Press or to advance to the next
character.
3. Press and enter the Subnet Mask. Use the dial pad and the Add dot soft key to
enter characters. Press or to advance to the next character.
4. Press and enter the Gateway. Use the dial pad and the Add dot soft key to
enter characters. Press or to advance to the next character.
5. Press Save.
To set the VLAN ID for the deskset:
1. From the Network setting menu, press or to highlight VLAN ID, and then
press SELECT.
2. On the VLAN ID menu, press or to enable or disable the WAN Vlan.
3. Press and enter the WAN port number. Use the dial pad and the Backspc soft
key to enter characters. The valid range is 0 to 4095.
4. Press and then press or to enable or disable the PC port Vlan.
5. Press and enter the PC port number. Use the dial pad and the Backspc soft key
to enter characters. The valid range is 0 to 4095.
6. Press Save.
To set other settings (DNS and NTP):
1. From the Network setting menu, press or to highlight Others, and then
press SELECT.
If DHCP is disabled, the Others menu appears. If DHCP is enabled, an error
message appears briefly before returning you to the Network setting menu.
2. Enter the IP address for the primary DNS server. Use the dial pad and the
Add dot soft key to enter characters. Press or to advance to the next
character.
3. Press and enter the IP address for the secondary DNS server. The deskset uses
this server if the primary server does not respond.
15 Using the Phone Menu

VSP725 Administrator and Provisioning Manual
4. Press and enter the IP address for the NTP server. If the deskset does not use
an NTP server, you must manually enter the time and date settings.
5. Press Save.
Line Menu
Use the Line menu to configure line-specific settings for the phone.
To use the Line setting menu:
1. From the Admin Settings menu, press to highlight Line, and then press
SELECT.
The Line menu appears.
2. Highlight the desired line, if necessary, by pressing , and then press SELECT.
The full configuration menu for that line appears.
You can configure:
Display name
User ID
Authorization ID
Authorization Password
SIP Registrar Server IP
Registrar Server port
Proxy server IP
Proxy server port
Register (Yes or No)
Answer page (Manual or Auto)
For more information about these settings, see SIP Account Management on page
21.
3. Edit the Line settings
setting:
Backspc—deletes a character
123—enables you to enter numbers, lower case letters, or upper case letters
with the dial pad. Does not appear when the setting accepts numbers only.
Save—saves and applies the new settings
Edit—enables you to edit the setting (appears for the Password setting)
using the dial pad and the soft keys available for each
Press or to advance to the next character.
16 Using the Phone Menu

VSP725 Administrator and Provisioning Manual
Provisioning Menu
Use the Provisioning menu to manually configure auto-provisioning settings. For
more information about auto-provisioning, see Provisioning on page 65 and
Provisioning Using Configuration Files on page 75.
he Provisioning menu you can configure:
On t
Server string—the URL of the provisioning server. The URL can include a
complete path to the configuration file.
Login ID—the username the phone will use to access the provisioning server.
Login PW—the password the phone will use to access the provisioning server.
To use the Provisioning menu:
1. From the Admin Settings menu, press to highlight Provisioning, and then
press SELECT.
The Provisioning menu appears.
2. Enter the server URL using the dial pad keys:
Backspc—deletes a character
123—enables you to enter numbers, lower case letters, or upper case letters
with the dial pad. Does not appear when the setting accepts numbers only.
Save—prompts you to reboot the phone and apply the new settings
Edit—enables you to edit the setting (appears for the Password setting)
The format of the URL must be RFC 1738 compliant, as follows:
“<schema>://<user>:<password>@<host>:<port>/<url-path>”
“<user>:<password>@” may be empty.
“<port>” can be omitted if you do not need to specify the port number.
3. Press to move to the next line and enter the Login ID for access to the
provisioning server if it is not part of the server strin g.
4. Press to move to the next line and enter the Login password.
5. Press Save .
17 Using the Phone Menu

VSP725 Administrator and Provisioning Manual
Using the WebUI
The Web User Interface (WebUI) resides on your deskset. You can access it using an
Internet browser. After you log in to the WebUI, you can configure the phone on the
following pages:
System
o SIP Account Management
o Call settings
o User Preferences
o Programmable Keys
o Speed Dial Keys
o Signaling Settings
o Ringer Settings
Network
o Basic Network Settings
o Advanced Network Settings
Contacts
o Local Directory
o Blacklist
o LDAP
o Broadsoft
o Call History
Servicing
o Reboot
o Time and Date
o Firmware Upgrade
o Provisioning
o Security
o Certificates
o System Logs
The WebUI also has a Status page, where you can view network status and general
information about your phone. The information on this page matches the Status
menu on the phone.
To access the WebUI:
1. Ensure that your computer is connected to the same network as your deskset.
Your computer may already be connected to the network through the PC port on
the back of your deskset.
2. Find the IP address of your phone:
a. When the phone is idle, press MENU
b. Press to
c. With Network highlighted, press SELECT.
The Network status screen appears.
d. On the Network status screen, note the IP Address.
18 Using the WebUI
highlight Status, and then press SELECT.
.

VSP725 Administrator and Provisioning Manual
3. On your computer, open an Internet browser. (Depending on your browser, some
of the pages presented here may look different and have different controls.
Ensure that you are running the latest update of your preferred browser.)
4. Type the phone IP address in the browser address bar and press ENTER on your
computer keyboard.
The browser displays a window asking for your user name and password.
5. For the user name, enter admin. For the password, enter the default password,
admin. You can change the password later on the Servicing > Security page.
6. Click OK.
The WebUI appears.
Click topics from the navigation bar along the top of the WebUI, and then click links
to individual pages along the left. You view and change settings in two different
types of fields: drop-down lists and entry fields into which you type information. For
your security, the WebUI times out after 10 minutes, so if it is idle for that time, you
must log in again.
The remaining procedures in this section assume that you are already l ogged into
the WebUI.
NOTE: The settings tables in this section contain settings that appear in the WebUI
and their equivalent settings in the configuration file template. You can use the
configuration file template to create custom configuration files. Configuration files
can be hosted on a provisioning server and used for automatically configuring
phones. For more information, see Provisioning Using Configuration Files on page 75.
Saving Your Settings
Each WebUI settings page has a button. Click to save any changes
you have made on the page. During a configuration session, click
move on to the next WebUI page.
before you
19 Using the WebUI
VSP725 Administrator and Provisioning Manual
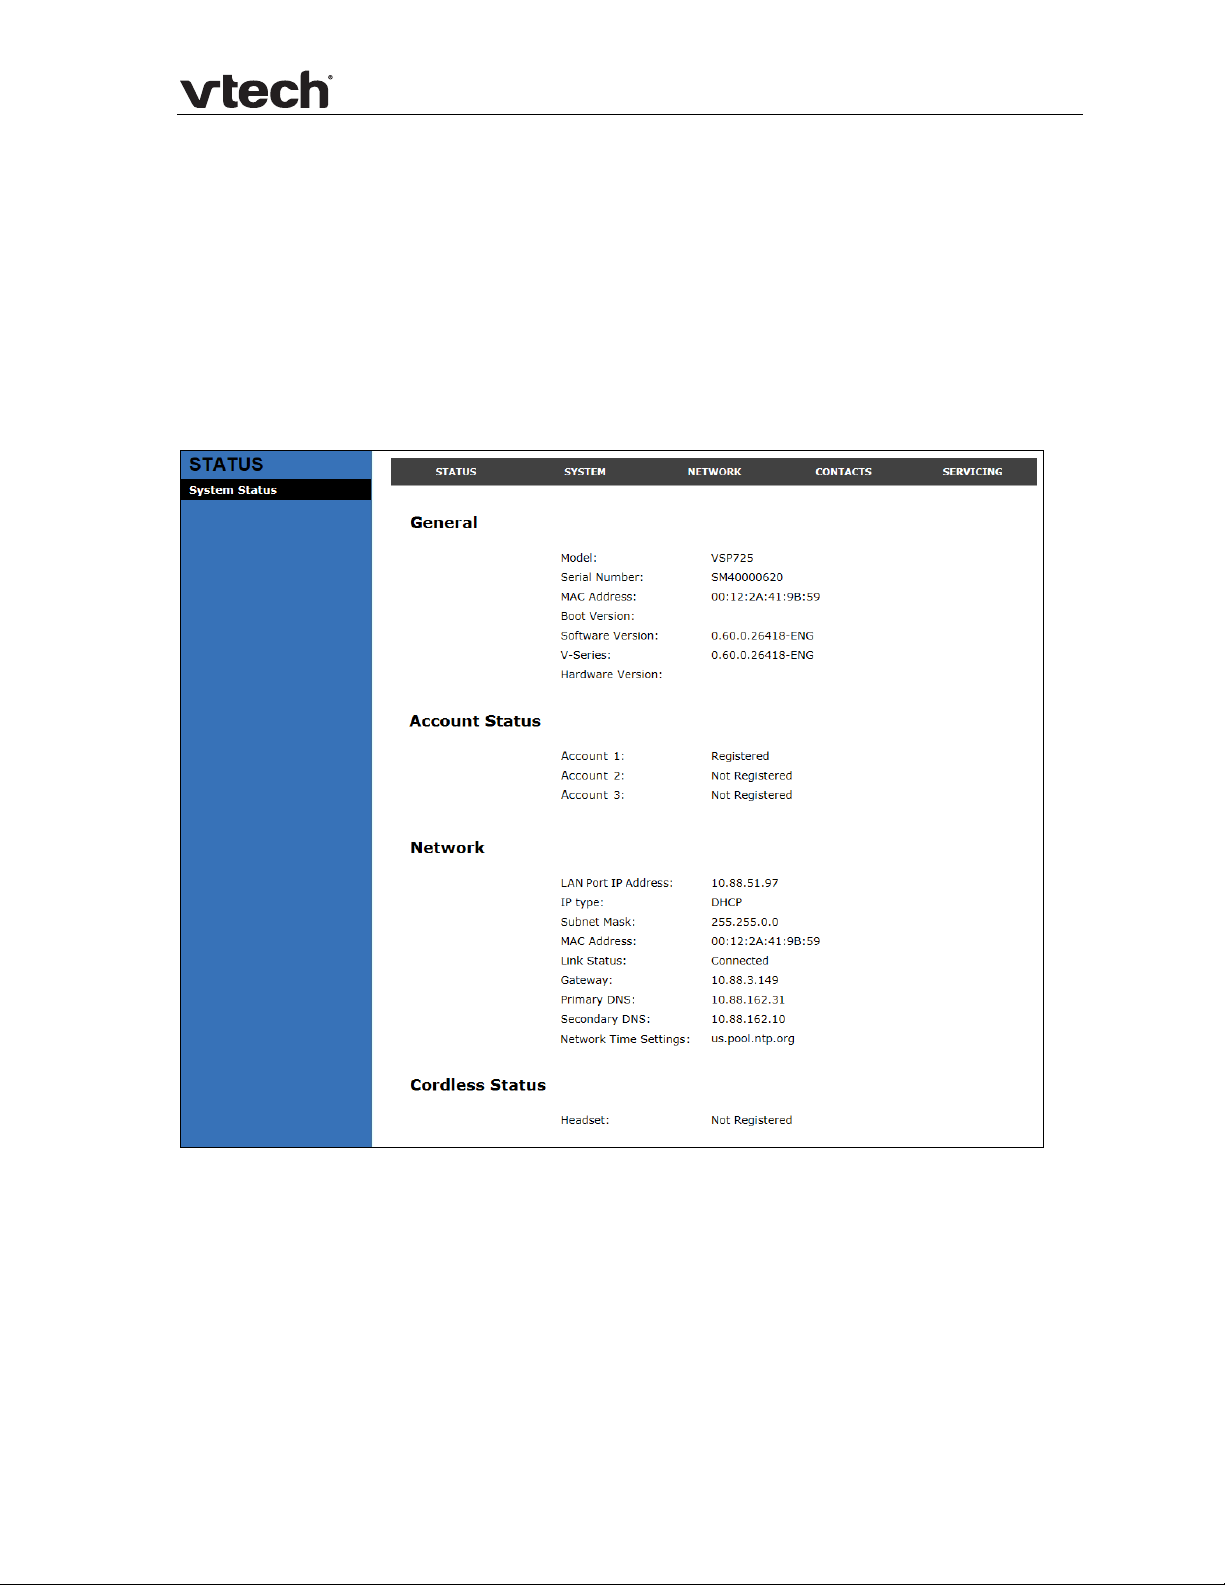
WebUI: Status
The WebUI System Status page is equivalent to the Status menu on the deskset. The
System Status page shows:
General information about your phone, including model, MAC address, and
software version
Account Status information about your SIP account registration
Network information regarding your phone’s network address and network
connection
Cordless Status indicating whether a cordless headset is registered to the
deskset.
20 WebUI: Status
VSP725 Administrator and Provisioning Manual
WebUI: System
SIP Account Management
On the SIP Account Management pages, you can enter the account settings for each
line you have ordered from your service provider. There is an Account settings page
for each available line.
The sip account settings are also available as parameters in the configuration file.
See “sip_account” Module: SIP A
ccount Settings on page 85.
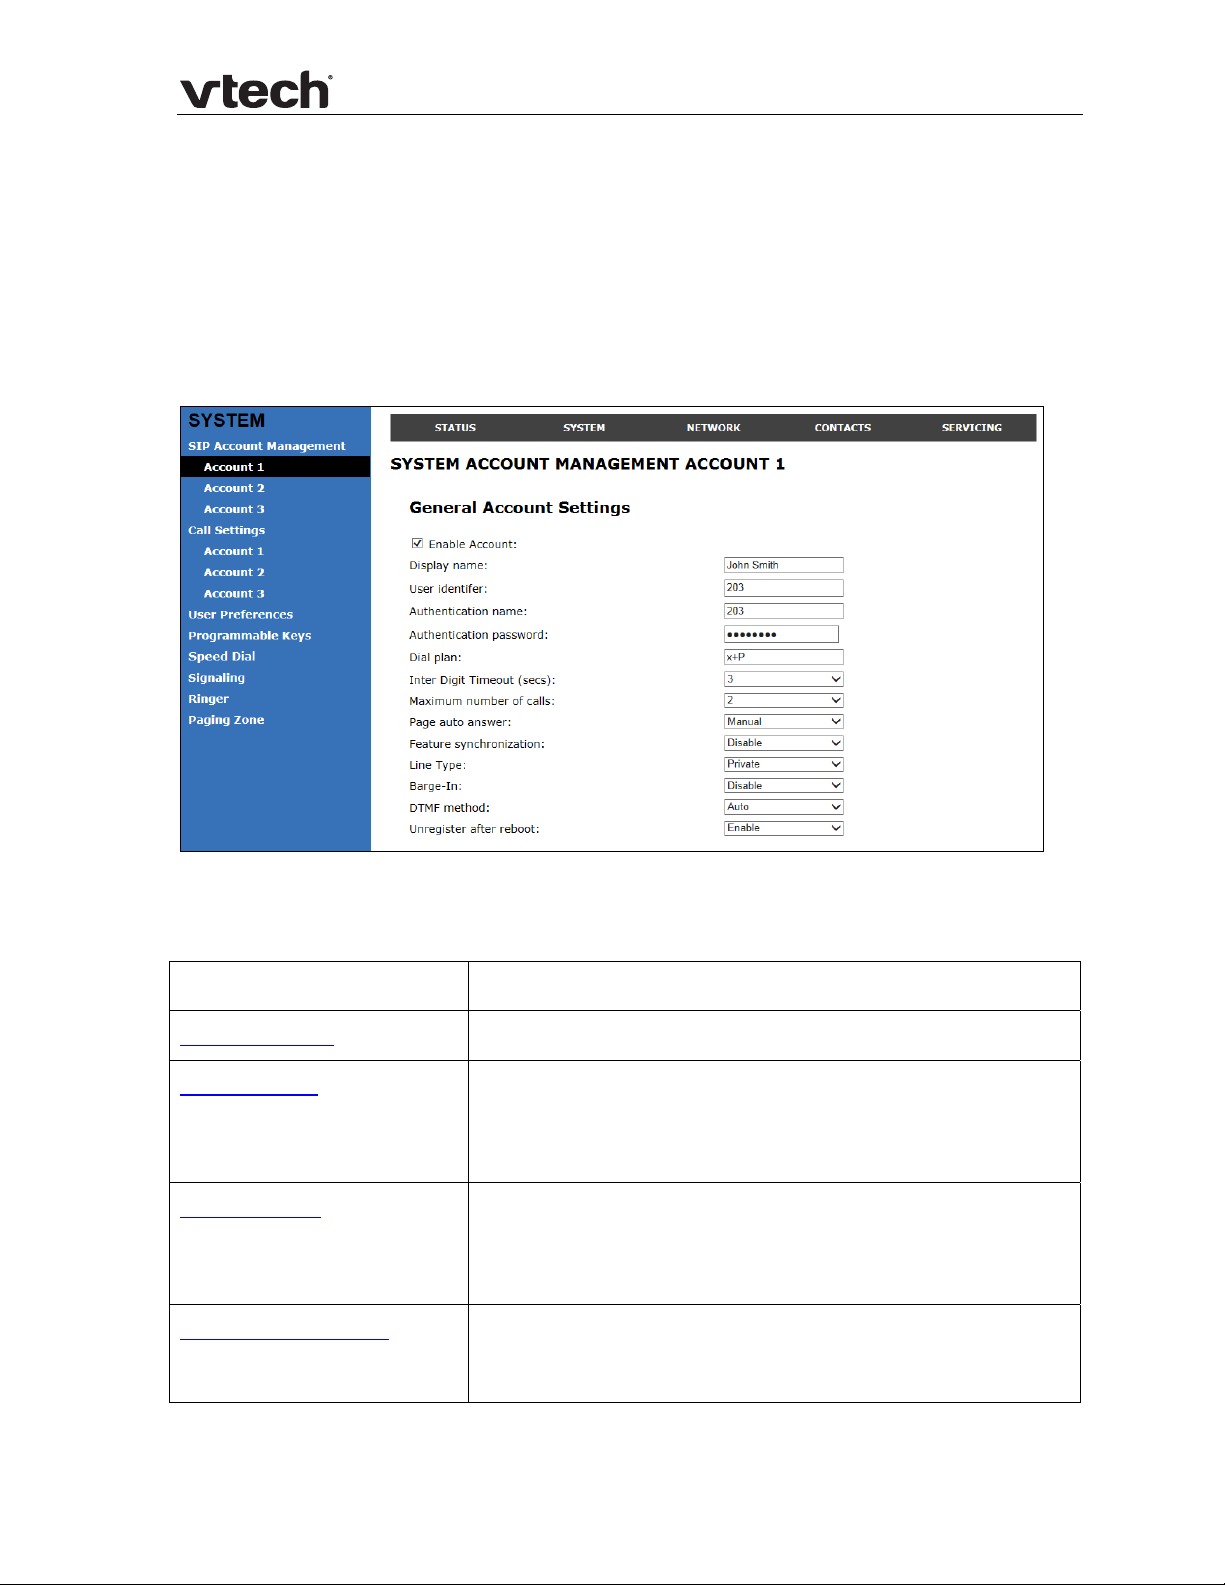
General Account Settings
Click the link for each setting to see the matching configuration file parameter in
Appendix A: Configuration File Settings. Default values and
Setting Description
Enable Account Enable or disable the SIP account. Select to enable.
Display Name Enter the name that will appear on the phone LCD when
account x is selected. The display name is also the text
portion of the caller ID that is displayed for outgoing calls
using account x.
User identifier Enter the User identifier supplied by your service provider.
The User ID, also known as the Account ID, is a SIP URI
field used for SIP regis tratio n. It i s also used a s pa rt of the
caller ID displayed for outgoing calls.
Authentication name If authentication is enabled on the server, enter the
authentication name (or authentication ID) for
authentication with the server.
ranges are listed there.
21 WebUI: System

VSP725 Administrator and Provisioning Manual
Authentication password
Dial Plan Enter the dial plan, with dialing strings separated by a |
Inter Digit Timeout (secs) Sets how long the phone waits after any “P” (pause) in
Maximum Number of Calls Select the maximum number of concurrent active calls
Page Auto Answer When set to Auto, enables the deskset to automatically
Feature Synchronization Enables the phone to synchronize with Broadworks
Line Type Select the line type to Private or Shared. A private line will
If authentication is enabled on t he server, e nter the
authentication password for a uthe nticatio n with t he ser ver.
symbol. See Dial Plan on pa g e 23.
the dial string or in the dial plan.
allowed for that account.
answer when a page is received. This is usually the desired
behavior for paging.
Application Server. Changes to features such as DND, Call
Forward All, Call Forward No Answer, and Call Forward
Busy on the server side will also update the settings on
the phone menu and WebUI. Similarly, changes using the
phone or WebUI will update the settings on the server.
be accessible only at the deskset you are configuring.
Shared lines can be assigned to m ore than o ne deskset. F or
more information about using shared lines, see the VSP725
Deskset User Guide.
Barge-in Enables subscribers to shared lines to “barge in” on active
calls on other shared lines.
DTMF method Select the default DTMF transmission method. You may
need to adjust this if call quality problems are triggering
unwanted DTMF tones or you have problems sending
DTMF tones in general.
Unregister after reboot Enables the phone to unregister the account(s) after
rebooting—before the account(s) register agai n as the
phone starts up. If other phones that share the same
account(s) unregister unexpectedly in tandem with the
rebooting deskset, disable this setting.
22 WebUI: System

VSP725 Administrator and Provisioning Manual
Dial Plan
The dial plan consists of a series of dialing rules, or strings, that determine whether
what the user has dialed is valid and when the phone should dial the number.
Dialing rules must consist of the elements defined in the table below.
Element Description
x Any dial pad key from 0 to 9, including # and *.
[0-9] Any two n u m b e r s s e p a r a t e d b y a h y phen, where the second number is greater
than the first. All numbers within the range or valid, excluding # and *.
x+ An unlimited series of digits.
, This represents the playing of a secondary dial tone after the user enters
the digit(s) specified or dials an external call prefix before the comma. For
instance, “9,xxxxxxx” means the secondary dial tone is played after the
user dials 9 until any new digit is entered. “9,3xxxxxx” means only when
the digit 3 is hit would the secondary dial tone stop playing.
PX This represents a pause of a defined time; X is the pause duration in
seconds. For instance, “P3” would represent pause duration of 3 seconds.
When “P” only is used, the pause time is the same as the Inter Digit
Timeout (see SIP Account Management on page 21).
(0:9) This is a substitution rule where the first number is replaced by the second.
For example, “(4:723)xxxx” would replace “46789” with “723-6789”. If the
substituted number (the first number) is empty, the second number is
added to the number dialed. For example, in “(:1)xxxxxxxxxx”, the digit 1
is appended to any 10-digit number dialed.
|
A sample dial plan appears below.
This separator is used to indicate the start of a new pattern. Can be used to
add multiple dialing rules to one pattern edit box.
23 WebUI: System
VSP725 Administrator and Provisioning Manual
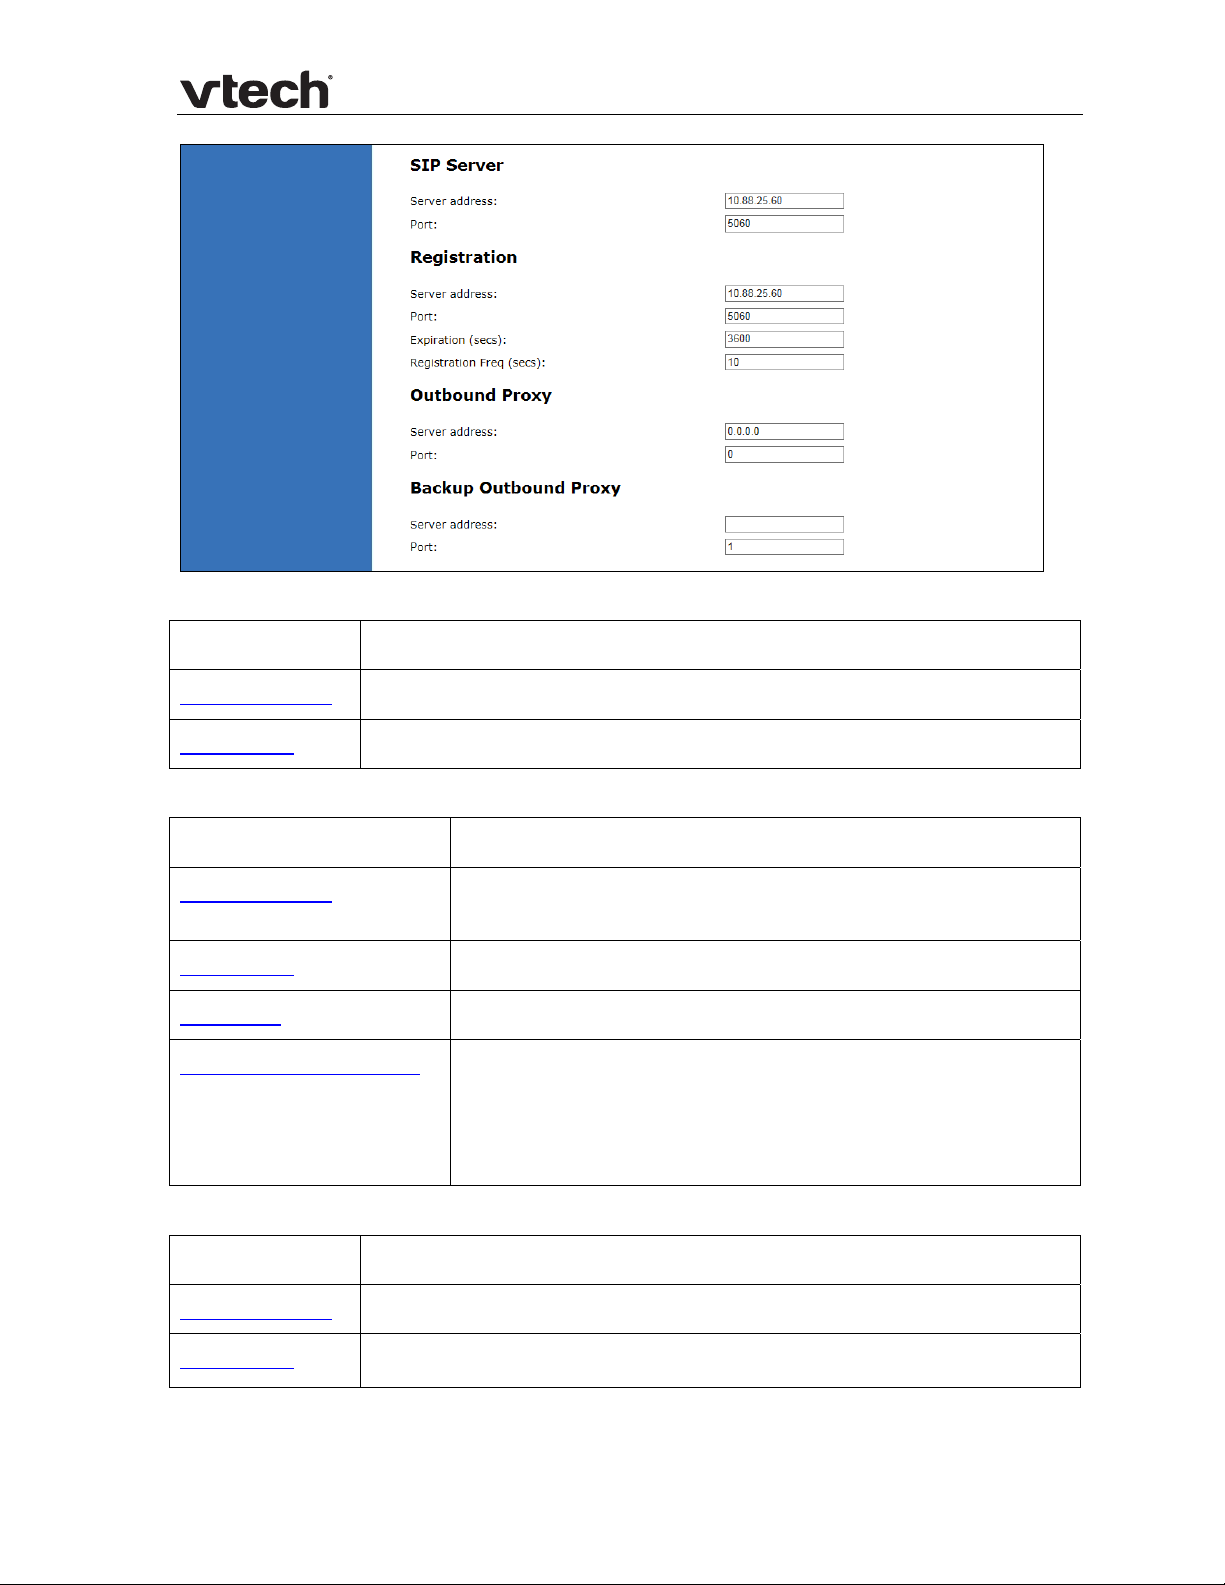
SIP Server Settings
Setting Description
Server address Enter the IP address or domain name for the SIP server.
Server port Enter the port number that the SIP server will use.
Registration Settings
Setting Description
Server address Enter the IP address or domain name for the registrar
server.
Server port Enter the port number that the registrar server will use.
Expiration Enter the desired registration expiry time in seconds.
Registration Freq (secs) Enter the desired registration retry frequency in seconds. If
registration using the Primary Outbound Proxy fails, the
Registration Freq setting determines the number of seconds
before a registration attempt is made using the Backup
Outbound Proxy.
Outbound Proxy Settings
Setting Description
Server address Enter the IP address or domain name for the proxy server.
Server port Enter the port number that the proxy server will use.
24 WebUI: System
VSP725 Administrator and Provisioning Manual
Backup Outbound Proxy Settings
Setting Description
Server address Enter the IP address or domain name for the backup proxy server.
Server port Enter the port number that the backup proxy server will use.
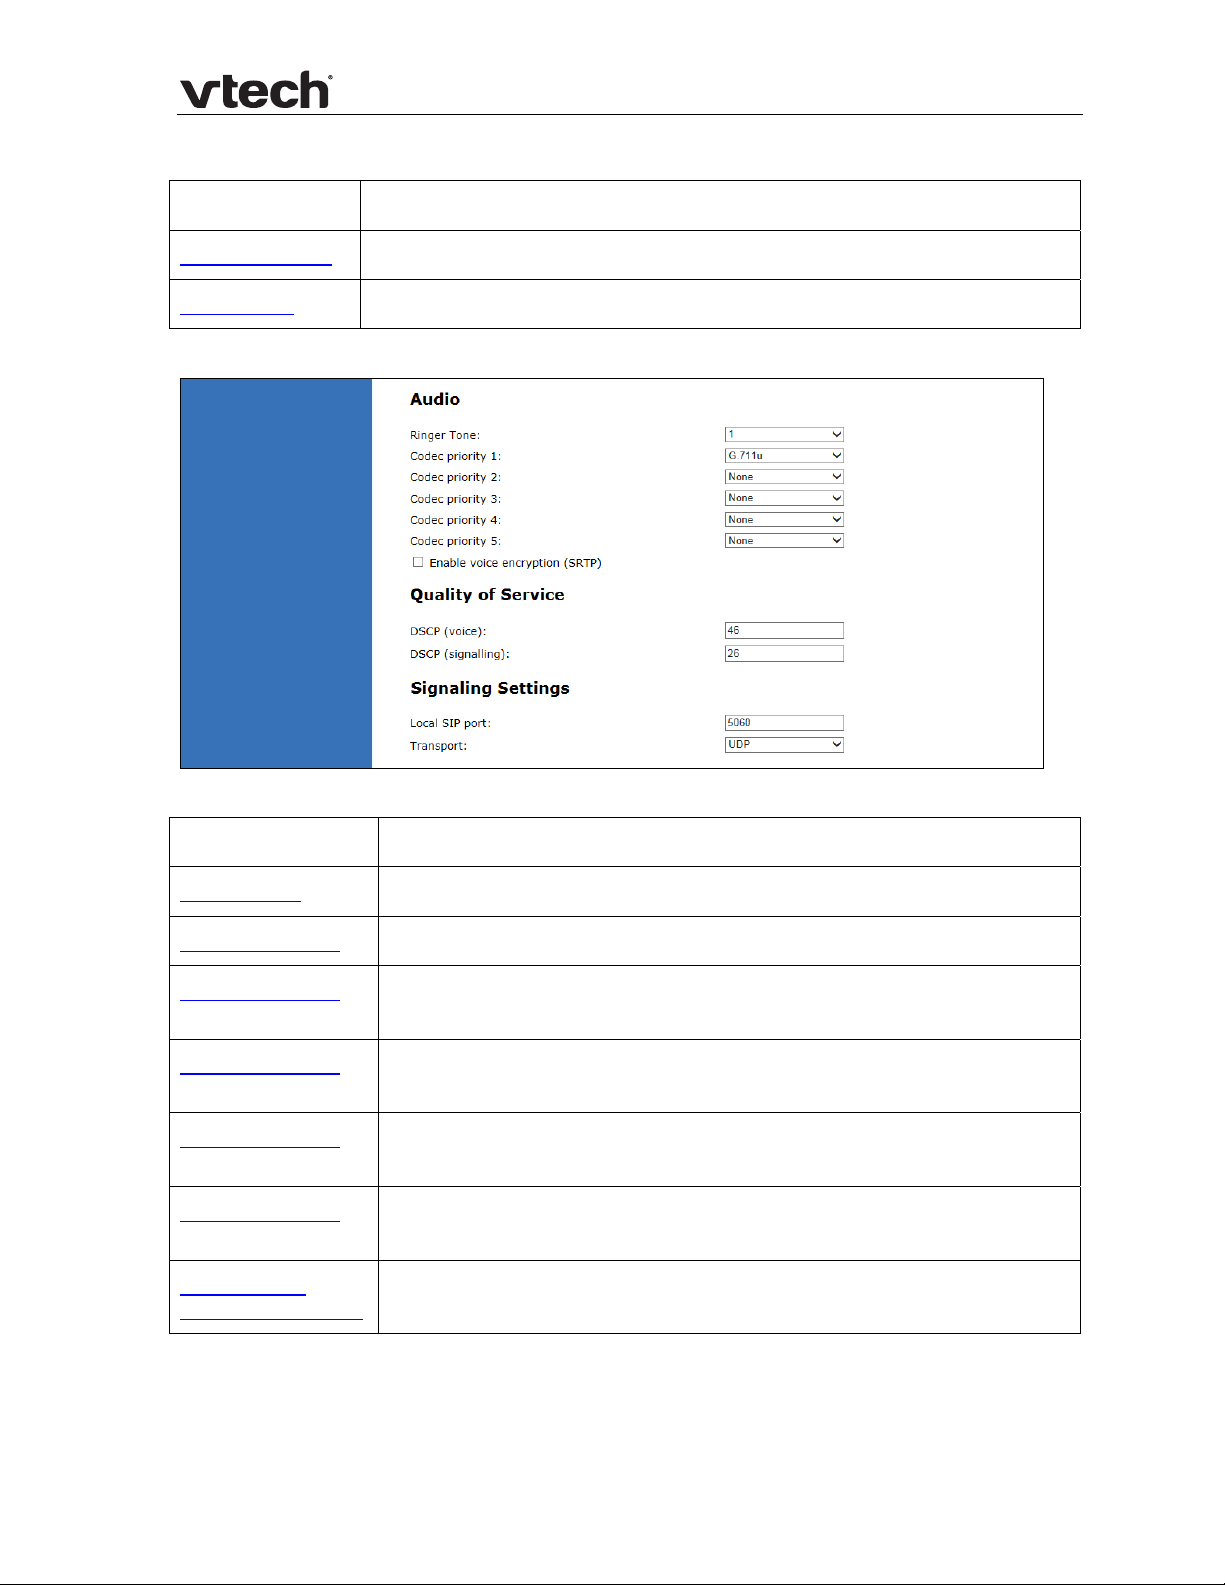
Audio Settings
Setting Description
Ringer Tone Sets the ringer tone for incoming calls on the account.
Codec priority 1 Select the codec to be used first during a call.
Codec priority 2 Select the codec to be used second during a call if the previous
codec fails.
Codec priority 3 Select the codec to be used third during a call if previous codecs
fail.
Codec priority 4 Select the codec to be used fourth during a call if previous codecs
fail.
Codec priority 5 Select the codec to be used fifth during a call if previous codecs
fail.
Enable voice
encryption (SRTP)
Select to enable secure RTP for voice packets.
25 WebUI: System
VSP725 Administrator and Provisioning Manual
Quality of Service
Setting Description
DSCP (voice) Enter the Differentiated Services Code Po int (DSCP) value from the
Quality of Service setting on your router or switch.
DSCP (signalling) Enter the Differentiated Services Code Point (DSCP) value from the
Quality of Service setting on your router or switch.
Signaling Settings
Setting Description
Local SIP port Enter the local SIP port.
Transport Select the SIP transport protocol:
TCP (Transmission Control Protocol) is the most reliable protocol
and includes error checking and delivery validation.
UDP (User Datagram Protocol) is generally less prone to
latency, but SIP data may be subject to network congestion.
TLS (Transport Layer Security)—the VSP600 supports secured
SIP signalling via TLS. Optional server authentication is
supported via user-uploaded certificates. TLS certificates are
uploaded using the configuration file. See “file” Module:
Imported File Settings o
provider.
n page 129 and consult your service
26 WebUI: System
VSP725 Administrator and Provisioning Manual
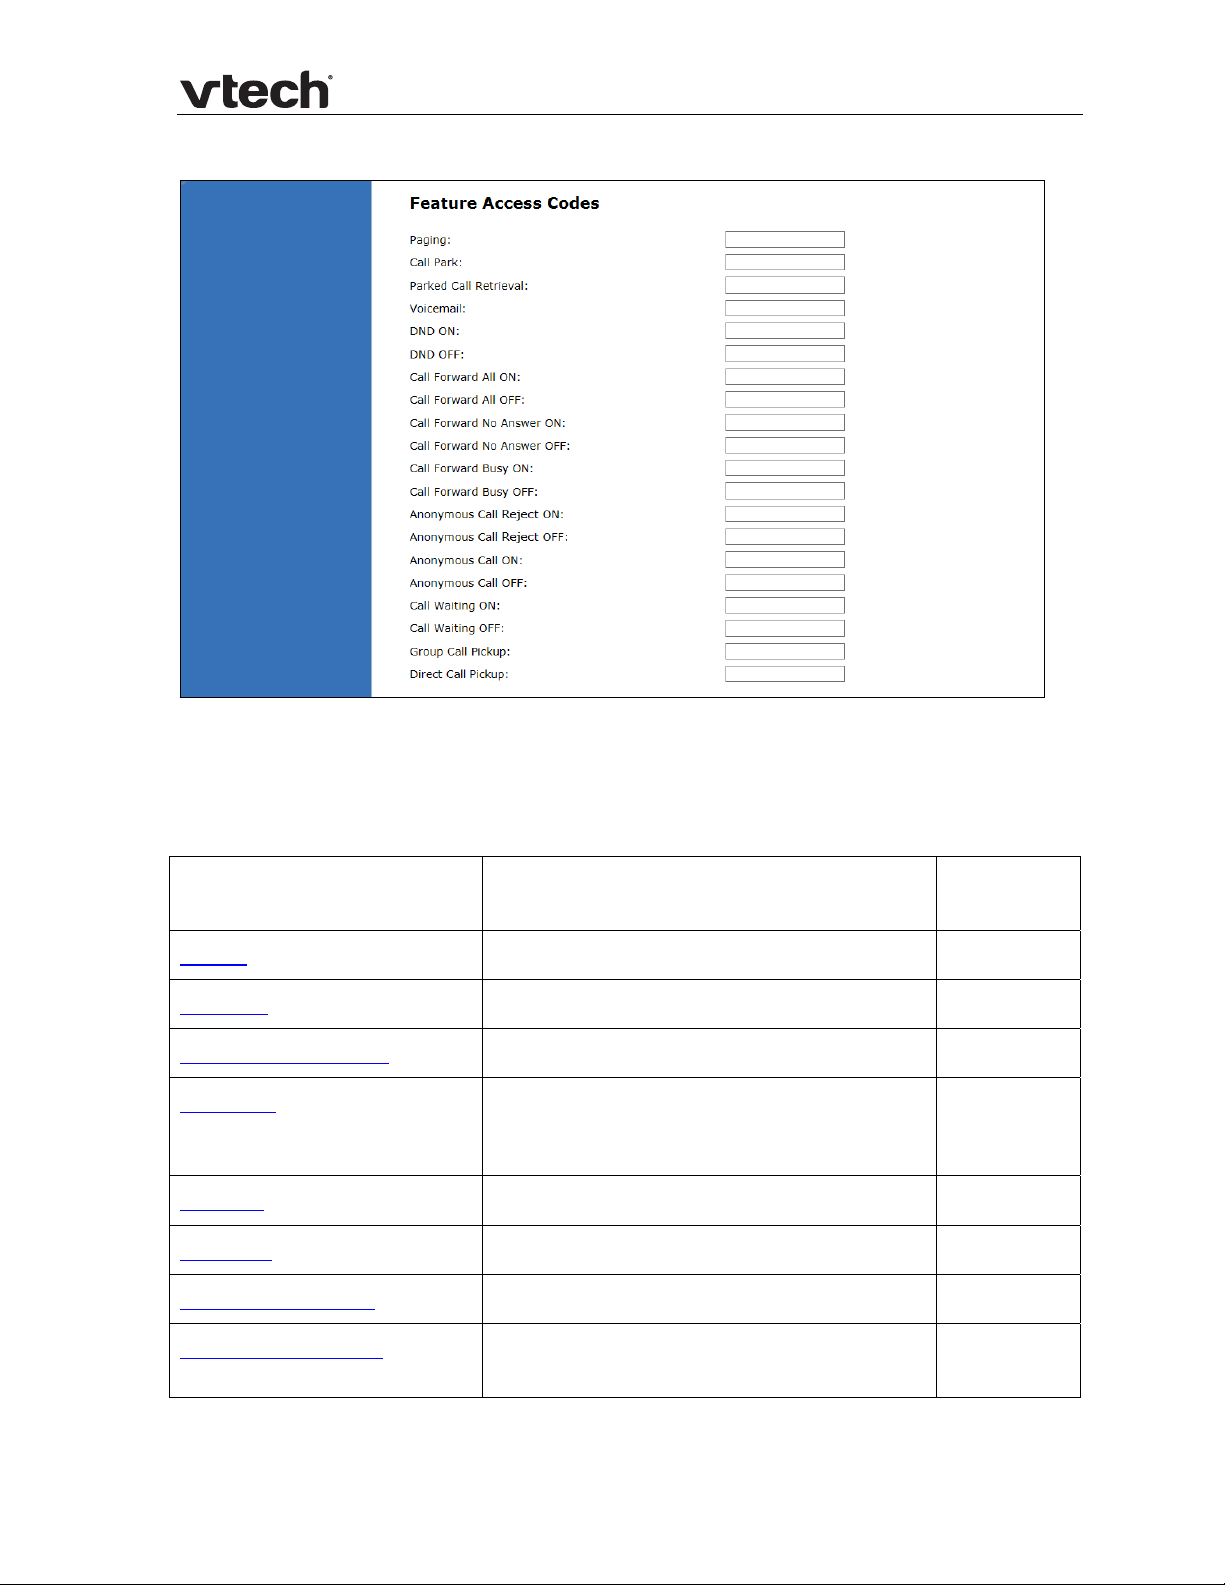
Feature Access Codes Settings
If your IP PBX service provider uses feature access codes, then enter the applicable
codes here. You can assign many of these features to programmable feature keys,
which enables end users to press the keys to dial out the codes you enter here. To
configure programmable feature keys, see Programmable Keys on page 36.
Settin
Paging Enter the paging access code. Yes
Call Park Enter the call park access code. Yes
Parked Call Retrieval Enter the call park retrieval access code. Yes
Voicemail Enter the voicemail access code. The code
DND ON Enter the Do Not Disturb ON access code. Yes
DND OFF Enter the Do Not Disturb OFF access code. Yes
g Description Assignable
to PFK?
Yes
is dialed when the user selects a line from
the phone’s Message menu.
Call Forward All ON Enter the Call Forward All ON access code. Yes
Call Forward All OFF Enter the Call Forward All OFF access
code.
27 WebUI: System
Yes
VSP725 Administrator and Provisioning Manual
Call Forward No Answer ON
Call Forward No Answer OFF Enter the Call Forward No Answer OFF
Call Forward Busy ON Enter the Call Forward Busy ON access
Call Forward Busy OFF Enter the Call Forward Busy OFF access
Anonymous Call Reject ON Enter the Anonymous Call Reject ON
Anonymous Call Reject OFF Enter the Anonymous Call Reject OFF
Anonymous Call ON Enter the Anonymous Call ON access code. No
Anonymous Call OFF Enter the Anonymous Call OFF acces s code. No
Call Waiting ON Enter the Call Waiting ON access code. No
Enter the Call Forward No Answer ON
access code.
access code.
code.
code.
access code.
access code.
Yes
Yes
Yes
Yes
No
No
Call Waiting OFF Enter the Call Waiting OFF access code. No
Group Call Pickup Enter the Group Call Pickup code. Dialing
the code enables the user to answer a call
ringing at another deskset that is part of
the same group.
Direct Call Pickup Enter the Direct Call Pickup code. Dialing
the code enables the user to answer a call
ringing at another deskset.
Yes
Yes
28 WebUI: System
VSP725 Administrator and Provisioning Manual
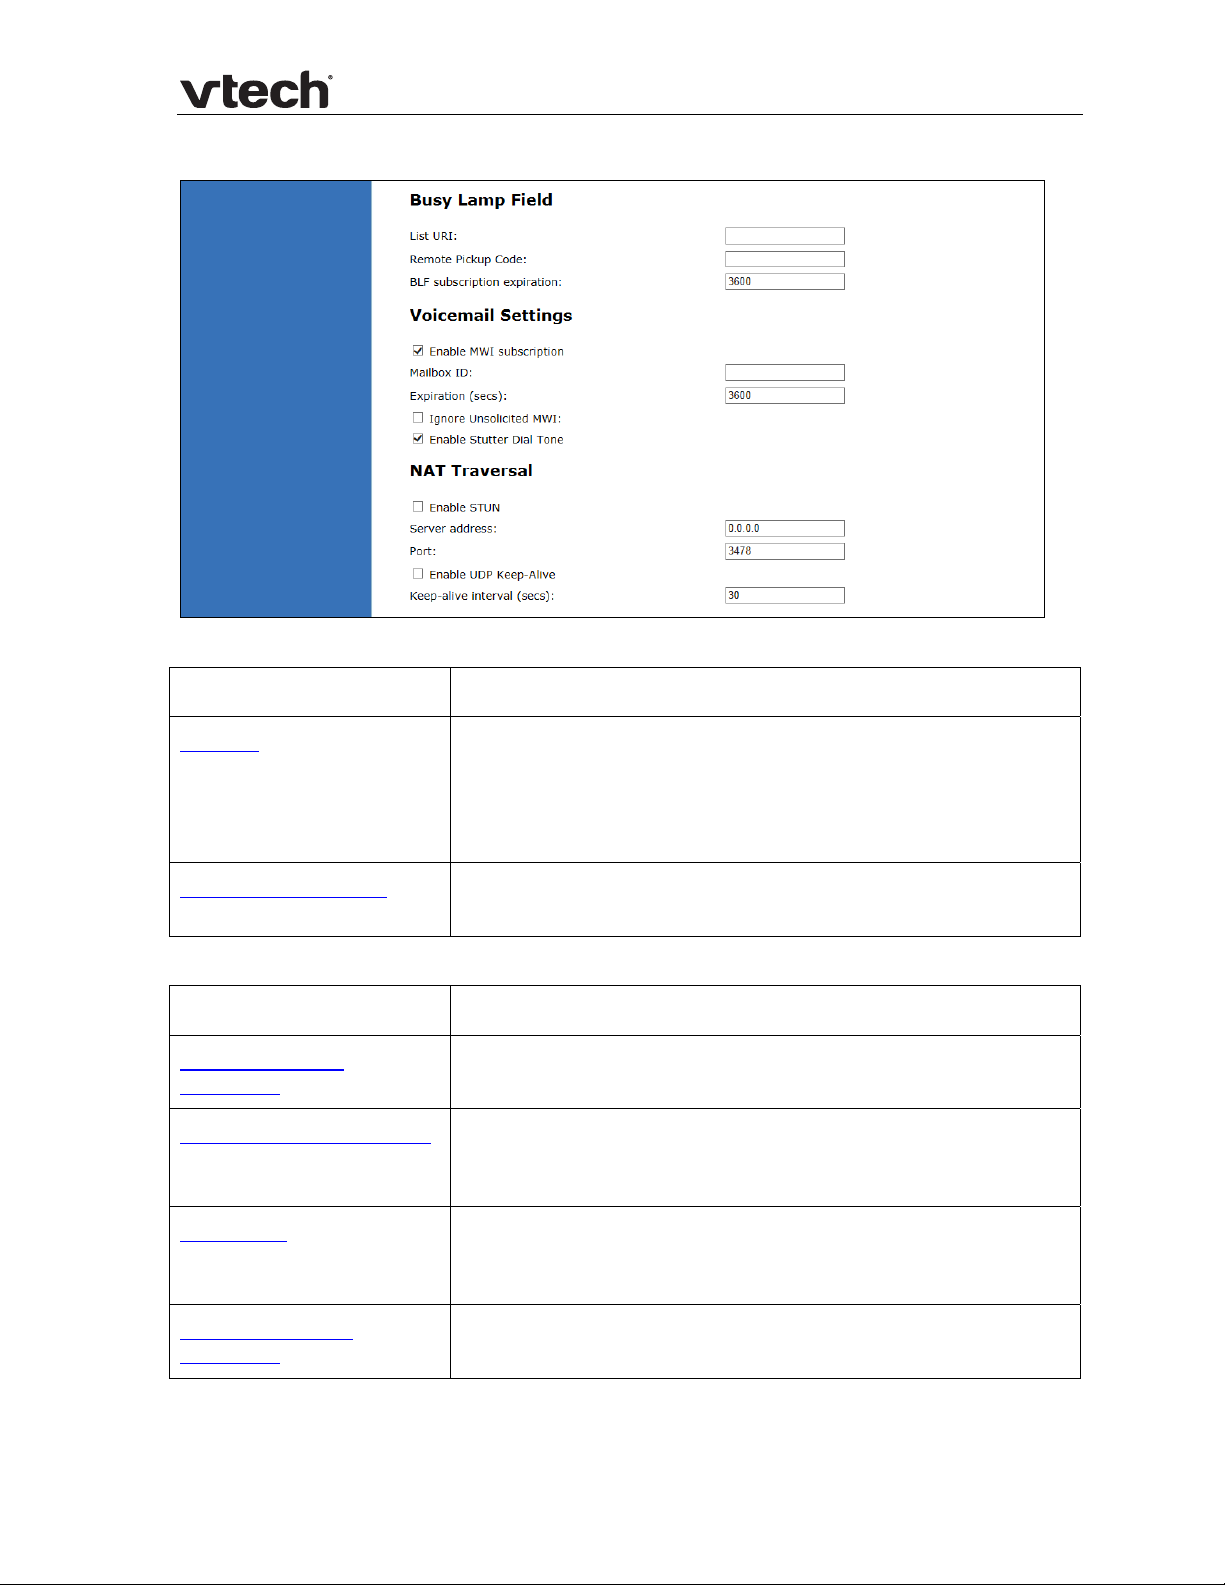
Busy Lamp Field
Setting Description
List URI Enter the BLF list URI, as supplied by or set up with your
service provider. For example, blf-list1@sipservice.com.
This list contains a list of extensions that are eligible f or BLF
monitoring. You can assign keys for BLF monitoring on the
Programmable Keys page. See page 36.
Remote Pickup Code Enter the remote pickup code for the BLF list, as supplied
by your service provider.
Voicemail Settings
Setting Description
BLF subscription
expiration
Enable MWI Subscription When enabled, the account subscribes to the “message
Mailbox ID Enter the URI for the mailbox ID. The phone uses this URI
Enter the BLF subscription expiry time (in seconds) for
account x.
summary” event package. The account may use the User
ID or the service provider’s “Mailbox ID”.
for the MWI subscription. If left blank, the User ID is used
for the MWI subscription.
MWI subscription
expiration
29 WebUI: System
Enter the MWI subscription expiry time (in seconds) for
account x.

VSP725 Administrator and Provisioning Manual
Ignore unsolicited MWI
Enable Stutter Dial Tone Enables or disables the stutter dial tone for that account
NAT Traversal
Setting Description
Enable STUN Enables or disables STUN (Simple Traversal of UDP through
When selected, unsolicited MWI notifications—notifications
in addition to, or instead of SUBSCRIBE and NOTIFY
methods—are ignored for account x. If the deskset receives
unsolicited MWI notifications, the deskset Message Waiting
LED will not light to indicate new messages.
Disable this setting if:
MWI service does not involve a subscription to a
voicemail server. That is, the server supports unsolicited
MWI notifications.
you want the Message Waiting LED to indicate new
messages when the deskset receives unsolicited MWI
notifications.
(indicating message(s) waiting) when the phone goes off
hook.
NATs) for account x. The Enable STUN setting allows the
phone to identify its publicly addressable information
behind a NAT via communicating with a STUN server.
Server address Enter the STUN server IP address or domain name.
Server port Enter the STUN server port.
Enable UDP Keep-Alive Enables or disables UDP keep-alives. Keep-alive packets are
used to maintain connections established through NAT.
Keep-alive interval (secs) Enter the interval (in seconds) for sending UDP keep-alives.
30 WebUI: System
 Loading...