

Page 1

Model: i6727
User’s manual
w w w . v t e c h p h o n e s . c o m
Page 2

Important! Before using this telephone,
please read the Important safety instruc-
tions on page 35 of this manual.
NEED HELP?
This manual has all the feature operations and troubleshooting you need to install
and operate your new VTech telephone. Please take the time to review thoroughly
to ensure proper installation of this VTech innovative and feature rich product.
You can also visit our website at www.vtechphones.com for support,
shopping, and everything new at VTech. In Canada go to www.vtechcanada.com.
Page 3

Table of contents
Installation . . . . . . . . . . . . . . . . . . . . . . . . 1
Parts checklist . . . . . . . . . . . . . . . . . . . . . . 1
Telephone base installation . . . . . . . . . . . . . . . 2
Install handset battery . . . . . . . . . . . . . . . . . . 3
Belt clip & headset . . . . . . . . . . . . . . . . . . . . 4
Headset . . . . . . . . . . . . . . . . . . . . . . . . 4
Belt clip . . . . . . . . . . . . . . . . . . . . . . . . . 4
About caller ID . . . . . . . . . . . . . . . . . . . . . . 5
If you subscribe to DSL service . . . . . . . . . . . . . 6
Wall mounting bracket installation . . . . . . . . . . . . 7
Desk/table bracket installation . . . . . . . . . . . . . . 7
Telephone settings . . . . . . . . . . . . . . . . . . . . 8
Handset layout . . . . . . . . . . . . . . . . . . . . . . 8
Telephone base layout . . . . . . . . . . . . . . . . . . 9
Ringer volume . . . . . . . . . . . . . . . . . . . . . 10
Ringer melody . . . . . . . . . . . . . . . . . . . . . 10
Key tone . . . . . . . . . . . . . . . . . . . . . . . . 10
Language . . . . . . . . . . . . . . . . . . . . . . . . 11
Clear voicemail . . . . . . . . . . . . . . . . . . . . . 11
Dial type . . . . . . . . . . . . . . . . . . . . . . . . 11
Basic operation . . . . . . . . . . . . . . . . . . . . . 12
Make, answer and end calls with the handset . . . . . 12
Speakerphone . . . . . . . . . . . . . . . . . . . . . 12
Mute . . . . . . . . . . . . . . . . . . . . . . . . . . 12
Volume . . . . . . . . . . . . . . . . . . . . . . . . . 13
Ringer mute. . . . . . . . . . . . . . . . . . . . . . . 13
Call waiting . . . . . . . . . . . . . . . . . . . . . . . 13
Intercom . . . . . . . . . . . . . . . . . . . . . . . . 13
Conference call . . . . . . . . . . . . . . . . . . . . . 14
Transfer an external call . . . . . . . . . . . . . . . . 14
Switch between external and internal calls . . . . . . 15
Answer an incoming call during an intercom call . . . 15
Find handset . . . . . . . . . . . . . . . . . . . . . . 15
Voicemail . . . . . . . . . . . . . . . . . . . . . . . . 15
Advanced operation . . . . . . . . . . . . . . . . . . 16
Director y . . . . . . . . . . . . . . . . . . . . . . . . 16
Store a directory entry . . . . . . . . . . . . . . . . 16
Chart of characters . . . . . . . . . . . . . . . . . 17
Search the directory . . . . . . . . . . . . . . . . . 18
Dial a directory entry. . . . . . . . . . . . . . . . . 18
Edit a directory entry. . . . . . . . . . . . . . . . . 18
Director y . . . . . . . . . . . . . . . . . . . . . . . . 19
Delete a directory entry . . . . . . . . . . . . . . . 19
Caller ID . . . . . . . . . . . . . . . . . . . . . . . . 19
Review the call log . . . . . . . . . . . . . . . . . 20
Dial a call log entry . . . . . . . . . . . . . . . . . 20
Save an entry to the directory . . . . . . . . . . . . 21
Delete one or all entries . . . . . . . . . . . . . . . 22
Handset display screen messages. . . . . . . . . . . 22
Redial list . . . . . . . . . . . . . . . . . . . . . . . . 23
Dial from redial . . . . . . . . . . . . . . . . . . . . 23
Delete a redial entry . . . . . . . . . . . . . . . . . 23
Handset display screen messages. . . . . . . . . . . 24
Handset and base indicators . . . . . . . . . . . . . . 26
Handset lights . . . . . . . . . . . . . . . . . . . . . 26
Base lights . . . . . . . . . . . . . . . . . . . . . . . 26
Page 4

Table of contents
Handset icons . . . . . . . . . . . . . . . . . . . . . 26
Battery information . . . . . . . . . . . . . . . . . . . 27
Troubleshooting . . . . . . . . . . . . . . . . . . . . 28
Important safety instructions . . . . . . . . . . . . . . 35
Operating range . . . . . . . . . . . . . . . . . . . . 36
Maintenance . . . . . . . . . . . . . . . . . . . . . . 36
About cordless telephones . . . . . . . . . . . . . . . 36
Warranty . . . . . . . . . . . . . . . . . . . . . . . . 37
FCC, ACTA and IC regulations . . . . . . . . . . . . . 38
The RBRC® Seal. . . . . . . . . . . . . . . . . . . . 39
Technical specications . . . . . . . . . . . . . . . . 40
Index . . . . . . . . . . . . . . . . . . . . . . . . . . 41
Page 5
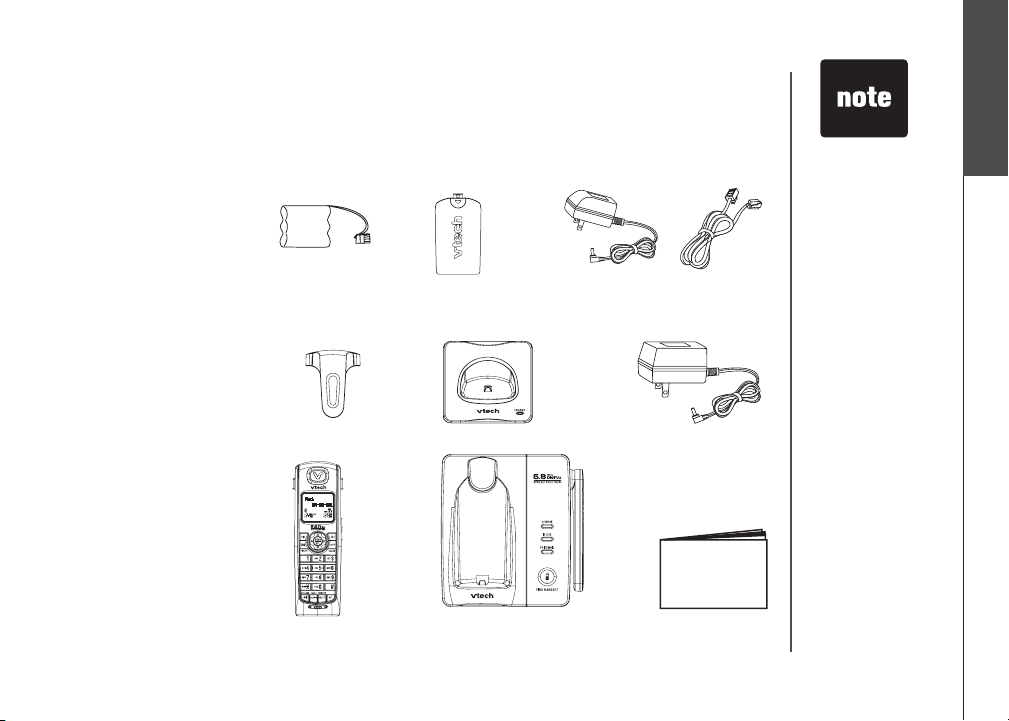
Installation
Parts checklist
Remember to save your sales receipt and original packaging in case it is necessary to ship your
telephone for warranty ser vice. Check to make sure the telephone package includes the following:
1. Batteries (2)
2. Batter y compart me nt
covers (2)
3. Charger adapter
4. Telephone line cord
5. Belt clips (2)
6. Charger
7. Base power adapter
8. Handsets (2)
9. Tel ep ho ne base with
wall mounting/desktop
bracket
10. User’s manual
1. Batteries (2)
5. Belt clips (2)
2. Battery compartment covers (2)
6. Charger
3. Charger adapter
7. Base power adapter
4. Telephone line cord
• To purchase
replacement
batteries,
visit us on the
web at www.
vtechphones.com
or call VTech
Communications,
Inc. at 1 (800)
595-9511 in the
United States.
In Canada,
go to www.
vtechcanada.
com. or call 1
(800) 267-7377.
Installation
Basic operation
8. Handsets (2)
9. Telephone base with wall mounting/
desktop bracket
www.vtechphones.com
10. User’s manual
1
Page 6
• Use only the
VTech battery
and AC power
adapter supplied
with this
telephone.
• This power unit
is intended to be
correctly oriented
in a vertical
or oor mount
position. The
prongs are not
designed to hold
the plug in place
if it is plugged
into a ceiling or
an under the
table/cabinet
outlet.
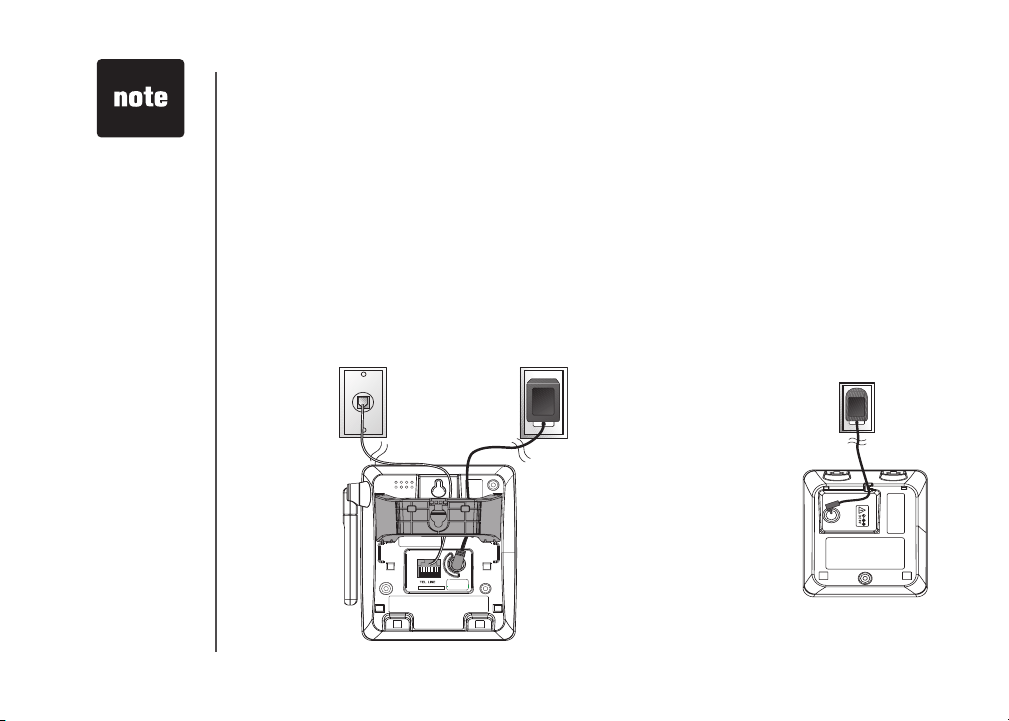
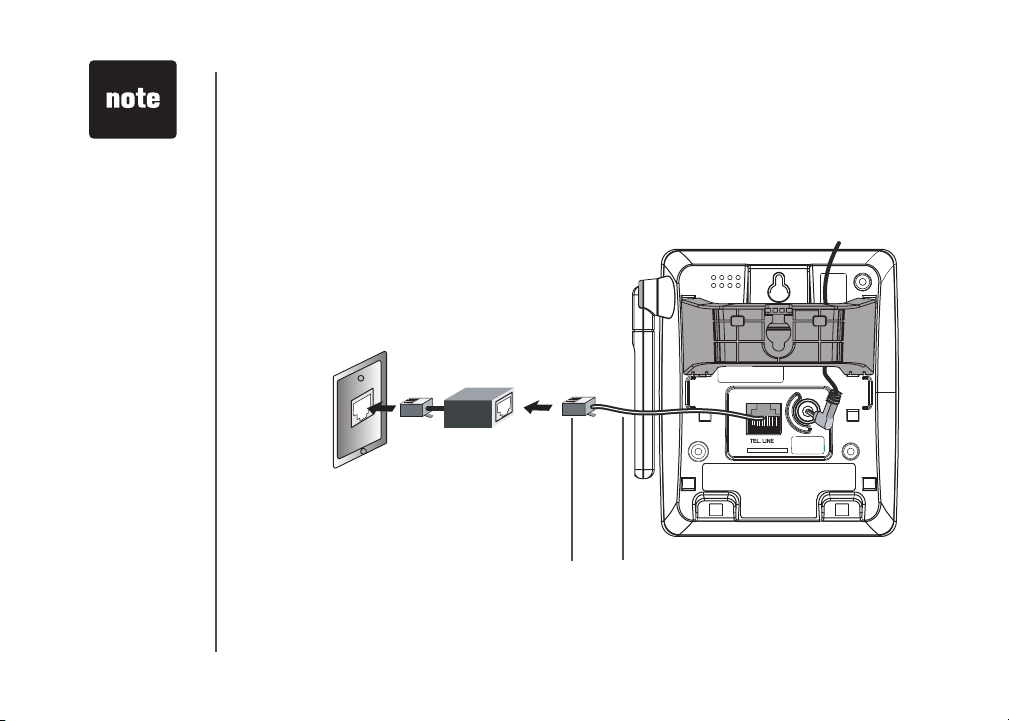
Installation
Telephone base installation
It is recommended to install the telephone base away from any electronic equipment and appliances
such as personal computers, computer routers, television sets, microwave ovens, and refrigerators.
Avoid excessive heat, cold, dust or moisture. When a location is selected, install the telephone base
and the charger as shown below.
• Plug the connector into the power jack at the bottom of the telephone base and chargers. Route cords
through slots and plug the power adapter into an electrical outlet not controlled by a wall switch.
• Plug one end of the telephone line cord into the telephone line jack at the bottom of the telephone
base. Route the telephone line cord through slot, then plug the other end of the cord into the modular
wall telephone outlet.
Plug the telephone line cord
into a telephone jack.
Plug power adapter into an electrical
outlet not controlled by a wall switch.
2
www.vtechphones.com
Page 7
Installation
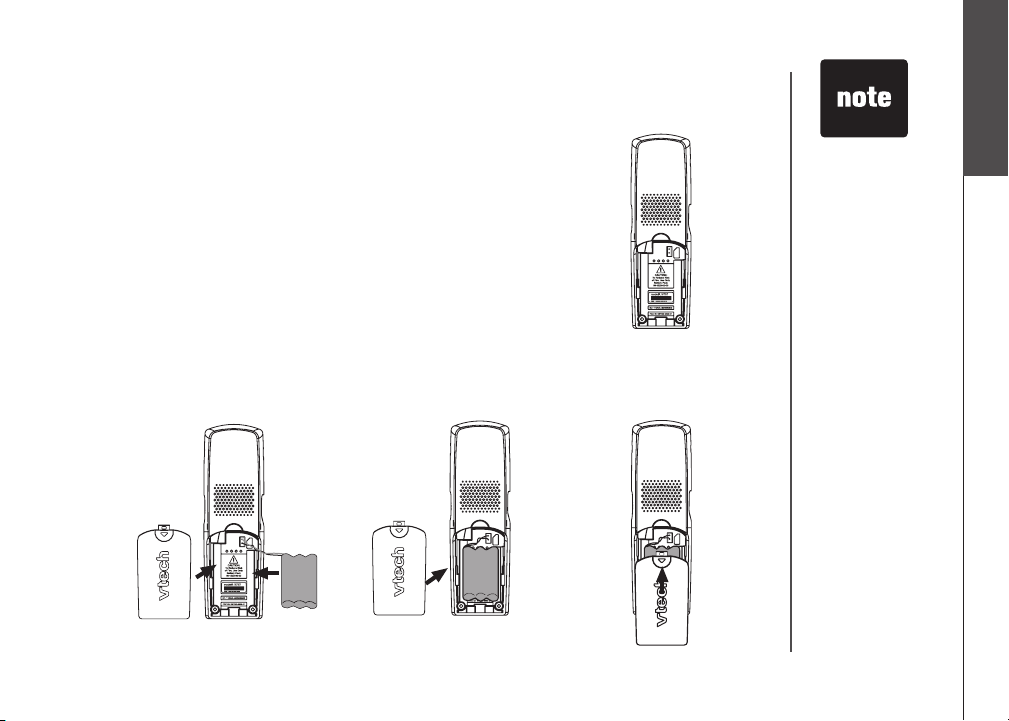
Install handset battery
• Align the two holes of the battery plug with the socket pins in the
handset battery compartment, matching the red and black wires to
the color-coded label.
• Place the battery in the compartment with the wires in the upper left
corner.
• Position the battery compartment cover and slide it towards the unit
until it clicks into place.
• For optimal performance, we recommend that you charge the handset
for 16 hours.
You can keep the battery charged by returning the handset to the
telephone base after each use. When the battery power is fully depleted,
a full recharge takes about 16 hours.
• If the handset will
not be used for a
prolonged period,
remove the
battery to prevent
possible leakage.
• To purchase
replacement
batteries,
visit us on the
web at www.
vtechphones.com
or call VTech
Communications,
Inc. at 1 (800)
595-9511 in the
United States.
In Canada,
go to www.
vtechcanada.
com. or call 1
(800) 267-7377.
• After you install
the battery, there
may be enough
power for shor t
calls.
Installation
Basic operation
www.vtechphones.com
3
Page 8
Installation
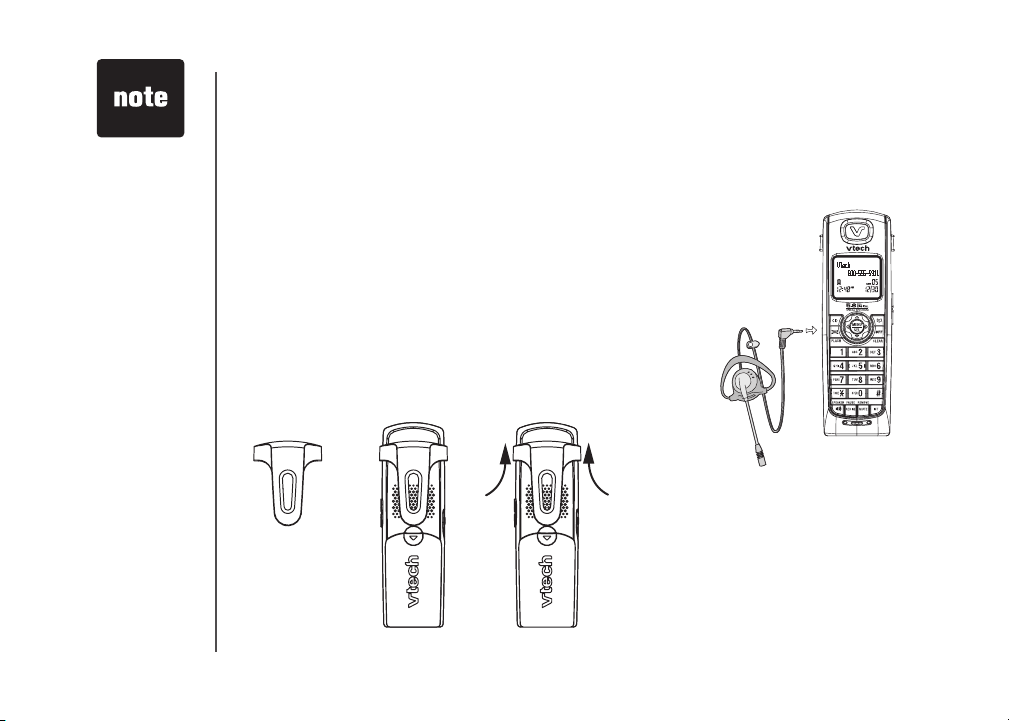
Belt clip & headset (optional)
• To purchase a
headset, visit us
on the web at
www.vtechphones.
com or call VTech
Customer Service
at 1 (800) 595 -
9511. In Canada,
go to www.
vtechcanada.com.
or call 1 (800) 267-
7377.
• Whenever a
compatible
headset is
connec ted to the
cordless handset,
the microphone
on the handset
will be muted.
This reduces
background noise
and improves the
sound quality.
• If the sound quality
of the headset
is poor, try
unplugging it, and
rmly plugging it in
again.
4
For hands-free telephone conversations, use any industry
standard 2.5mm headset (purchased separately). For best
results, use a VTech 2.5mm headset.
Headset
Plug the 2.5 mm headset into the jack on the side of
the handset (beneath the small rubber ap).
Belt clip
Align the pins on the inside edge of the
clip with the notches on the sides of the
handset.
www.vtechphones.com
Page 9

Installation
About caller ID
The caller ID with call waiting feature in this telephone let you see the name and telephone number
of the caller before answering the call, even when you’re already on a call. These features require
services provided by your local telephone company.
Contact your telephone company if:
• you have both caller ID and call waiting, but as separate services (you may need combined
service),
• you have only caller ID service, or only call waiting service, or
• you do not subscribe to any caller ID or call waiting services but wish to try these services.
You can use this telephone with regular caller ID service, and you can use its other features without
subscribing to either caller ID or combined caller ID with call waiting service. There may be fees for
these services, and these services may not be available in all areas.
The caller ID features will work only if both you and the caller are in areas offering caller ID service,
and if both telephone companies use compatible equipment.
Installation
Basic operation
www.vtechphones.com
5
Page 10
• Most DSL
providers
recommend
installing a DSL
lter in every
telephone jack.
Your DSL service
provider may
provide more
information
regarding
telephone
interference.
Installation
If you subscribe to DSL service
If there is interference during telephone conversations and/or your caller ID features are not functioning
properly, install a DSL lter to the telephone line between the telephone base and the telephone wall
jack. To obtain a DSL lter and more information about DSL interference, contact your DSL service
provider.
DSL lter (for
DSL users)
To single telephone jack (RJ11C)
6
www.vtechphones.com
Telephone line cord
Page 11
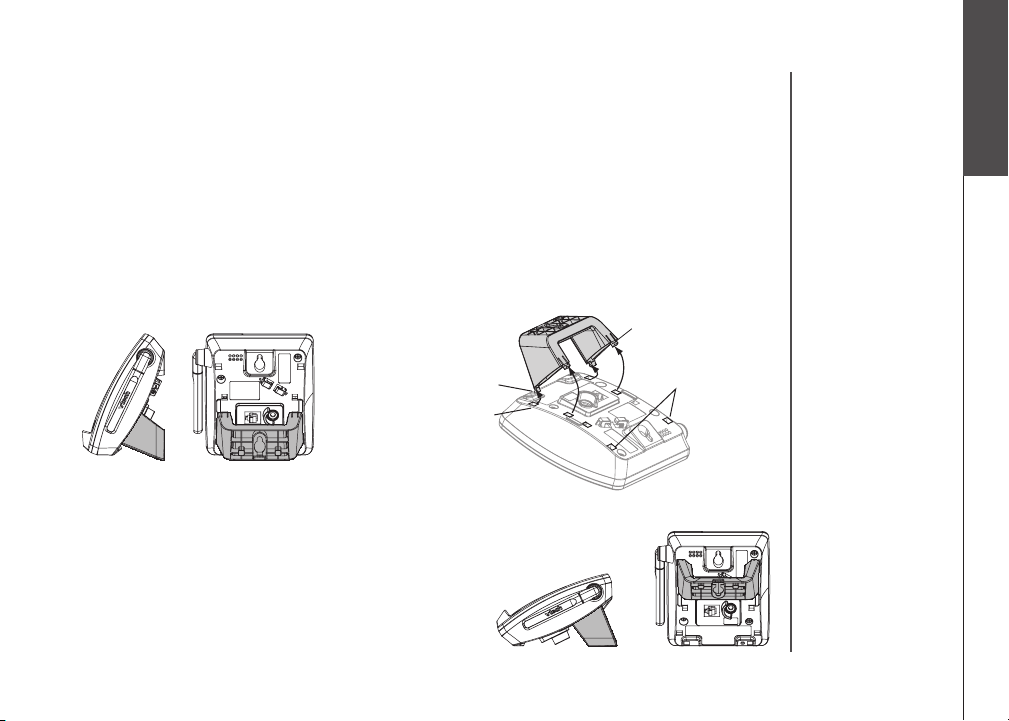
Installation
Wall mounting bracket installation (optional)
Your telephone base comes with the wedge installed, ready for desktop use. If you prefer to mount
your telephone on the wall (optional), it is designed to mount on a standard telephone wall plate. For
wall mounting, follow these instructions:
• First, insert the lower portion tabs of the wall mounting bracket into the lower grooves in the telephone
base, then snap the upper por tion tabs of the wall mounting bracket into place.
• Mount the telephone base on the wall by positioning it so the mounting studs will t into the holes on the
telephone base and wall mounting bracket. Slide the telephone base down on the mounting studs until it locks
into place.
•
To remove the bracket, press both upper portion tabs rmly inward and pull the bracket downward
until it release from the grooves.
upper portion tab
Installation
Basic operation
lower portion tab
lower grooves
Desk/table bracket installation
To place your telephone base on a desk or table, insert the
wall mounting/desktop bracket.
Insert the lower portion tabs of the bracket into the upper
•
grooves of the telephone base.
• Snap the upper portion tabs of the bracket into place.
To remove the bracket, press both upper portion tabs
•
firmly inward and pull the bracket upward until it is
released from the grooves.
www.vtechphones.com
upper grooves
7
Page 12
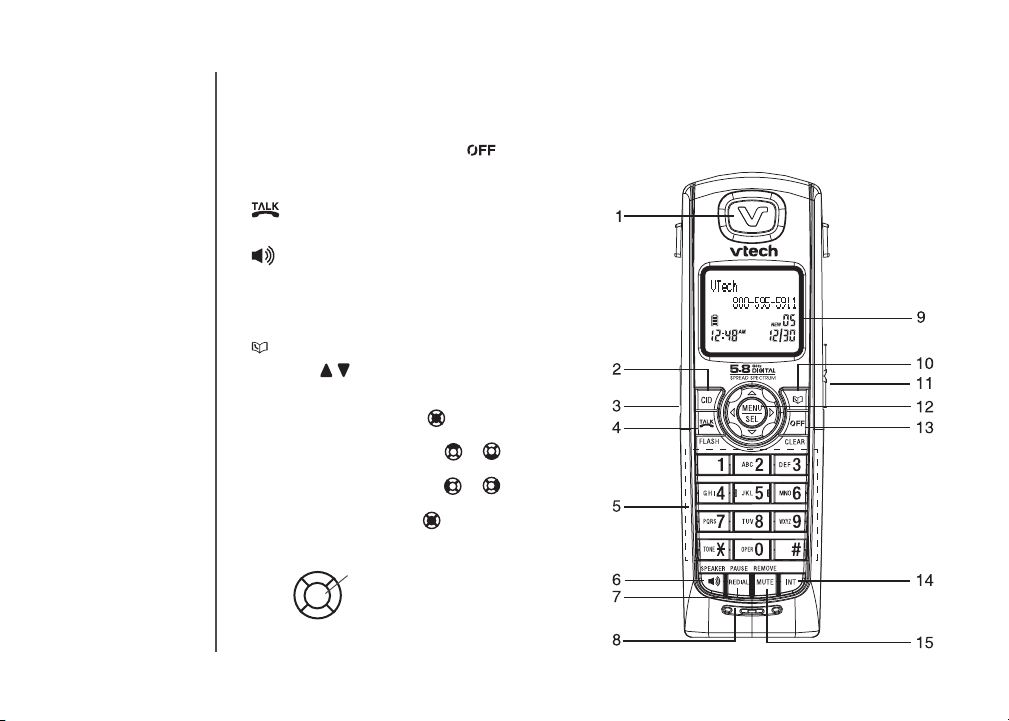
Telephone settings
Handset layout
1. Earpiece
2. CID (caller ID)
3. Headset jack (2.5mm)
4. /FLASH
5. Dial pad keys (0-9, *, #)
6. / SPEAKER
7. REDIAL/PAUSE
8. Microphone
9. Handset display
10. Director y
11. Volume (( / )
12. NavKey
Pres s the center NavKey to displ ay
menus.
Press the up or down NavKey or to
navigate through menus (see page 10).
Press the left or right NavKey or to
navigate through menus (see page 10).
Press the center NavKey to select a
highlighted menu item.
UP
CENTER
LEFT
RIGHT
DOWN
13. /CLEAR
14. INT (intercom)
15. MUTE/REMOVE
8
www.vtechphones.com
Page 13
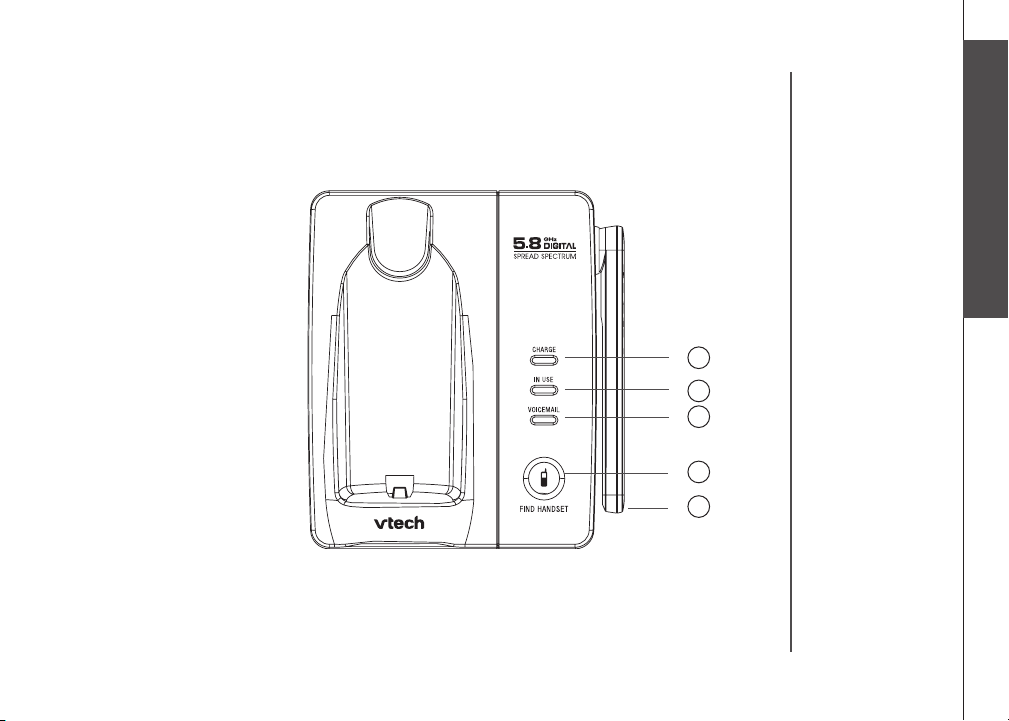
Telephone settings
Telephone base layout
1. CHARGE light
2. IN USE light
3. VOICE MAIL light
4. FIND HANDSET
5. AntennaAntenna
Telephone settings
Basic operation
1
2
3
4
5
www.vtechphones.com
9
Page 14
• Ringer will be off
if the volume is
set to zero, and
a ringer off icon
will be displayed.
If the ringer is
•
turned off while
scrolling through
the options
in RINGER
MELODY, the
sample of ringer
will not be heard.
10
Telephone settings
Ringer volume
Your telephone has seven volume levels to choose from. You can adjust ringer volume
either by the volume control on the right side of the handset, or in the handset menu.
To change the ringer volume:
• Make sure the handset is in idle mode.
• Press the volume button / to display the current volume level on the screen.to display the current volume level on the screen.
• Press VOL oror VOL to choose the desired volume level. �hen nished,to choose the desired volume level. �hen nished,
the new volume level will be saved.
-OR-
• Press the center NavKey in idle mode to display the menu.
• Press the up or down NavKey or to reach RINGER VOLUME then
press the center NavKey to conrm.
• Press the left or right NavKey or to adjust the volume. A sample of
each ringer volume will be played when scrolling through the choices.
• Press the center NavKey to save. You’ll hear a conrmation tone.
Ringer melody
This feature allows you to choose from ten ringer tones for incoming calls. To
choose a ringer tone:
• Press the center NavKey in idle mode to display menu.
• Press the up or down NavKey or to reachto reach RINGER TONE, and press
the center NavKey to conrm.
• Press the up or down NavKey
sample of the ringer tone will be played when scrolling through the options.
• Press the center NavKey to save. You’ll hear a conrmation tone.
Key tone
If you set the key tone to off, you will not hear a beep tone when you press
any of the handset keys.
• Press the center NavKey in idle mode to display menu.
www.vtechphones.com
or
to choose the desired ringer tone. A
CALL LOG
>RINGER VOLUME
RINGER VOLUME
RINGER VOLUME
>RINGER TONE
RINGER TONE
1
>KEY TONE
LANGUAGE
Page 15
Telephone settings
• Press the up or down NavKey or to reachto reach KEY TONE then press
the center NavKey .
• Press the up or down NavKey
press the center NavKey .
Language
The language menu allows you to select bet ween ENGLISH, FRANÇAIS or
ESPAÑOL to be used in all menus and screen displays. To change the language:
• Press the center NavKey in idle mode to display menu.
• Press the up or down NavKey or to reachto reach LANGUAGE then press
the center NavKey .
• Press the up or down NavKey or to scroll through the choices, thento scroll through the choices, then
press the center NavKey .
Clear voicemail
In this menu, you can turn off the message waiting indication on the
handset screen.
• Press the center NavKey in idle mode to display menu.
• Press the up or down NavKey or to reachto reach CLR VOICE MAIL, and
press the center NavKey .
• Press the center NavKey to conrm when TURN INDICATOR OFF?
displays, or press OFF/CLEAR to cancel.
Dial type
The dial type is preset to touch tone. If you would like to change this setting
to dial pulse (rotary):
• Press the center NavKeyPress the center NavKey in idle mode to display menu.
• Press the up or down NavKeyPress the up or down NavKey or to reachto reach DIAL TYPE then press
the center NavKey .
• Press the up or down NavKeyPress the up or down NavKey or to choose betweento choose between TONE or
PULSE, then press the center NavKey .
or
to choose between ON or OFF then
www.vtechphones.com
KEY TONE
ON
LANGUAGE
ENGLISH
>CLR VOICE MAIL
DIAL TYPE
TURN INDICATOR
OFF?
>DIAL TYPE
DIAL TYPE
TONE
• When the
telephone is in
pulse dial mode,
it is possible
to switch to
temporar y tone
dial mode during
an ongoing call
by pressing
*TONE. Once
pressed, tone
dial mode will
be used for the
rest of the call.
After hang up,
the telephone will
return to pulse
dialing for the
next call.
Telephone settings
Basic operation
11
Page 16

• The screen
displays
the elapsed time
as you talk (in
hours, minutes
and seconds).
• While entering a
number to dial,
press MUTE/
REMOVE or
OFF/CLEAR
to backspace;
press and hold
REDIAL/PAUSE
to insert a pause.
Basic operation
Make, answer and end calls with the handset
• To make a call press /FLASH or /SPEAKER, then dial the
number.
-OR-
• Dial the number then press /FLASH or /SPEAKER.
• To answer a call, press /FLASH, /SPEAKER or any of the dial
pad keys (0-9, #, *).
• To end a call, press OFF/CLEAR, or put the handset in the telephone
base or charger.
Speakerphone
• During a call, press /SPEAKER on the handset to select between
speakerphone and normal handset use.
Mute
The mute function allows you to hear the other party, but they will not
be able to hear you. To use the mute function:
• During a call, press MUTE/REMOVE on the handset.
• The screen will display the MUTE icon .
• Press MUTE/REMOVE again to return to normal conversation.
PHONE 00:00
MUTED
MUTE
12
www.vtechphones.com
Page 17

Basic operation
Volume
• During a call, use the volume button on the right side of the handset to
adjust the listening volume.
• Press the VOL or VOL volume control key to adjust the volume to a
comfortable level.
Ringer mute
This feature allows you to mute the ringer temporarily when the telephone
is ringing.
• Press OFF/CLEAR or MUTE/REMOVE on the handset to temporarily
silence the ringer. The next call will ring normally.
Call waiting
If you have call waiting service, you will hear a tone if there is an incoming
call during a telephone conversation. Press the /FLASH on the handset
to answer the new incoming call.
Intercom
The intercom feat ure allo ws conver sation between one handset to
another.
• Press INT to display menu while in idle mode.
• The screen will display INTERCOM TO:
• Use the dial pad to select the handset you wish to intercom.
•
The screen of the originating handset will display CALLING HANDSET X.
• The destination handset will ring, and the screen will display HANDSET
X IS CALLING.
Telephone settings
Basic operation
RINGER MUTE
INTERCOM TO:
CALLING
HANDSET X
HANDSET x
IS CALLING
www.vtechphones.com
13
Page 18

• If the destination
handset does
not pick up the
intercom call,
the originating
handset can
return to the
external call by
pressing
/FLASH, or
OFF/CLEAR.
• If a call remains
on hold for about
100 seconds,
the screen of
the originating
handset shows
UNABLE TO
CALL. TRY
AGAIN and
reconnects to
the external call
automatically.
The destination
handset returns
to idle mode.
Basic operation
• To answer the intercom call on the handset, press /FLASH,
/SPEAKER, INT or any dialing keys (0-9,#,*) on the handset.
• To end an intercom call, press INT, OFF/CLEAR, or place the handset
back in the telephone base or charger.
Conference call
You can conference up to two registered handsets on an external line. If
one handset is on the line, press /FLASH or /SPEAKER on another
handset to join the call.
Transfer an external call
This telephone allows you to transfer an external call from one handset to
any other handset.
• During a call, press INT to put the call on hold at the originating handset.
The screen will display TRANSFER TO:
• Use the keypad to select the number of the destination handset, and the
screen will display CALLING HANDSET X.
• The destination handset will ring and the screen displays HANDSET X
IS CALLING.
• To answer the call at the destination handset, press /FLASH,
/SPEAKER, INT or any dialpad keys (0-9, #, *) on the destination
handset.
• Now the party at the originating handset can have a conversation with the
party at the destination handset, and the screen displays INTERCOM.
To let the destination handset join the external conversation, press and
hold INT on the originating handset.
• Press OFF/CLEAR on the originating handset to transfer the call.
TRANSFER TO:
INTERCOM
14
www.vtechphones.com
Page 19

Basic operation
Switch between external and internal calls
When on an external call and you wish to intercom another system handset
in your home without ending the external call:
• Press INT. The screen will display TRANSFER TO:
• Press the handset number you wish to reach. The screen will display
CALLING HANDSET X. The destination handset will ring and its screen
will display HANDSET X IS CALLING.
• Press INT on the originating handset to switch between the external call
(outside) and intercom call.
Answer an incoming call during an intercom call
• During an intercom call, there will be an alert tone signaling an incoming
call.
• To answer the incoming call, press /FLASH or /SPEAKER on
the handset, and the intercom call will end automatically.
• To terminate the intercom call without answering the incoming call, press
OFF/CLEAR on the handset.
Find handset
This feature allows the telephone base to page all the handsets.
• Press FIND HANDSET on telephone base, all the handset(s) will ring
and the screens display PAGING.
• To stop paging, press FIND HANDSET again on the telephone base,
/FLASH or any dialpad keys (0-9, #, *) on the handset.
Voicemail
If you subscribe to voicemail service and you have a new voicemail
message, the VOICEMAIL indicator on the telephone base will ash and
the handset will display NEW VOICE MAIL . Please contact your local
telephone company for more information about voicemail ser vice.
www.vtechphones.com
Telephone settings
OUTSIDE
Basic operation
** PAGING **
15
Page 20

• Since the
directory is
shared by all the
handsets, only
one handset
can review the
directory at a
time.
If a handset
•
attempts to enter
the directory
while another
handset is in the
directory, NOT
AVAILABLE AT
THIS TIME will
be displayed.
Advanced operation
Directory
The directory on the handset can store up to 50 entries, each entry consists
up to 32 digits and 16 characters.
• The directory can be accessed while in idle mode by pressing or the
center NavKey twice.
• Press OFF/CLEAR to exit the menu without saving any changes.
• DIRECTORY EMPTY is displayed on screen when there is no entry in
the directory.
Store a directory entry
• Press the center NavKey in idle mode to display menu, and press the
center NavKey to enter the directory.
• Press the up or down NavKey or to choose STORE when in the
director y menu. Press the center NavKey to select.
• The screen displays ENTER NUMBER. Use the dial pad to enter the
number.
•
Press MUTE/REMOVE to backspace, or press and hold REDIAL/PAUSE
for at least three seconds to insert a pause. Press the center NavKey .
• The screen displays ENTER NAME. Use the dial pad (see the Chart of
characters on page 17) to enter the name.
• Press MUTE/REMOVE to backspace, or press # to insert a space. Press
the center NavKey to conrm.
• When the directory is full and a save is attempted, LIST FULL will
display.
• If you attempt to save a number already stored in the directory, ALREADY
SAVED will display.
DIRECTORY EMPTY
>DIRECTORY
CALL LOG
REVIEW
>STORE
ENTER NUMBER
_
LIST FULL
16
www.vtechphones.com
Page 21

Advanced operation
Directory
Chart of characters
Use the dial pad and the chart below to enter a name (up to 16 characters). Each press of a particular
key causes characters to be displayed in the following order:
Number Characters by number of key presses
Key 1 2 3 4 5 6 7 8 9
1 1 # ‘ , - . &
2 A B C 2 a b c
3 D E F 3 d e f
4 G H I 4 g h i
5 J K L 5 j k l
6 M N O 6 m n o
7 P Q R S 7 p q r s
8 T U V 8 t u v
9 W X Y Z 9 w x y z
0 0
* * ? ! / ( ) @
# space
• When entering characters, press MUTE/REMOVE to backspace. The entire name or number can
be removed by pressing and holding MUTE/REMOVE for at least three seconds.
• To insert a dialing pause, press and hold REDIAL/PAUSE for at least three seconds until a
lowercase p appears on the handset screen.
www.vtechphones.com
• When you enter
a name, the
handset will
automatically
display the rst
character of
each word in
uppercase.
• Press the up or
down NavKey
or to move the
cursor one space
to the left or right.
• Press # to enter a
space.
Advanced operation
17
Page 22

Advanced operation
Directory
Search the directory
Entries are sorted alphabetically, and names beginning with numbers
are presented rst. An alphabetical search can be done after entering
the directory.
For example, press 5 (JKL) once to nd Jenny, twice to nd Kristen, or
three times to nd Linda.
Press to enter the directory, or press the center NavKey to choose
•
REVIEW when in the directory.
• Use the dial pad to display the rst name beginning with a letter
associated with that key.
Dial a directory entry
• Press to enter the directory, or press the center NavKey to choose
REVIEW when in the directory menu.
• Press the up or down NavKey or to scroll to the desired entry, or
use the alphabetical search to nd it.
• Press /FLASH or /SPEAKER to dial the entry.
Edit a directory entry
• Press to enter the directory, or press the center NavKey and
use the up or down NavKey or to choose REVIEW when in the
director y menu and press the center NavKey .
Press the up or down NavKey or to scroll to the desired entry,
•
or use the alphabetical search to nd the number. Press the center
NavKey .
• The screen displays EDIT NUMBER. Use the dial pad to enter the
number.
>REVIEW
STORE
VTECH
188005959511
EDIT NUMBER
595-9511_
18
www.vtechphones.com
Page 23

Advanced operation
Directory
Press MUTE/REMOVE to backspace, or press and hold REDIAL/
•
PAUSE for at least three seconds to insert a pause. Press the center
NavKey .
• The screen displays EDIT NAME. Use the dial pad (see thethe dial pad (see the(see the Chart of
characters on page 17) to enter the name. to enter the name..
Press MUTE/REMOVE to backspace, or press # to insert a space.
•
Press the center NavKey to conrm.
Delete a directory entry
• Press to enter the directory, or press the center NavKey to choose
REVIEW when in the directory menu.
• Use the up or down NavKey or to scroll to the desired entry, or use
the alphabetical search to nd the number.
• Press MUTE/REMOVE to remove the entry, you’ll hear a conrmation
tone.
Caller ID
If you subscribe to caller ID service, information about each caller will be
displayed after the rst or second ring. This information will be stored in
the call log.
• The call log can store up to 50 entries.
• You can review, redial, and copy the entry into the directory.
• Entries are displayed in reverse chronological order, from the newest to
the oldest entry.
• When the call log is full, the oldest entry is deleted to make room for new
incoming call information.
EDIT NAME
VTECH_
Advanced operation
www.vtechphones.com
19
Page 24

• Due to regional
service
differences,
the caller ID
information
may not be
available for
every incoming
call. In addition,
the callers may
intentionally
block their name
and/or telephone
number.
• The time of all
handsets is
automatically set
and updated with
incoming caller ID
information if you
subscribe to this
service.
Advanced operation
Caller ID
• XX MISSED CALL and the NEW icon will be displayed on screen
if there are new call log entries (including missed and un-reviewed
calls.)
• CALL LOG EMPTY will display on screen if there are no call log
entries.
The call log can be accessed on the handset by pressing CID, or pressing
the center NavKey then CALL LOG, then press the center NavKey
again. If the telephone number of caller ID matches the exact telephone
number in the directory, the name of the entry will be shown, otherwise,
the name will be shown as delivered by the telephone company.
Review the call log
• When in the call log, use the up or down NavKey or to scroll
through the call log on the handset.
• The name, number, date and time of all incoming calls are displayed
on the screen.
There will be an error tone when the list reaches the top or the end
•
of the call log.
Dial a call log entry
• When in the call log, use the up or down NavKey or to scroll to
the desired entry.
Press # repeatedly to display the possible dialing options when the
•
telephone number in call log has 7, 8, 10 or 11 digits. For example, if the
original number was 800-595-5911, then the display options will be:
Press /FLASH or/SPEAKER to dial the entry.
•
HANDSET x
XX MISSED CALLS
CALL LOG EMPTY
>CALL LOG
RINGER VOLUME
A. PERSON
595-9511
AM
3:45
1-800-595-5911
1/02
595-5911
1-595-5911
800-595-5911
20
www.vtechphones.com
Page 25

Advanced operation
Caller ID
Save an entry to the directory
• When in the call log, press the up or down NavKey or to scroll
to the desired entry. Press # repeatedly to display the possible dialing
options when the telephone number in call log has 7, 8, 10 or 11
digits. For example, if the original number was 800-595-5911, then
the display options will be :
• Press the center NavKey to save the entry.
• If the entr y has a name and a number, the screen displays SAVED.
• If the entry only has a name or a number, EDIT NAME or EDIT
NUMBER will display on screen. Use the dial pad to enter the name
or number, and press the center NavKey to save the entry.
595-5911
1-595-5911
800-595-5911
1-800-595-5911
SAVED
• While reviewing
the call log, press
# repeatedly to
display the other
dialing options.
The available
options are: (1
+ area code +
number, area code
+ number, 1 +
number, number
only).
• When saving or
deleting a number
on one handset, it
will automatically
update all other
handsets.
Only one handset
•
can review the
directory or call log
at a time. If another
handset at tempts
to enter the call
log, it will display
NOT AVAILABLE
AT THIS TIME.
Advanced operation
www.vtechphones.com
21
Page 26

Advanced operation
Caller ID
• If the entry does not have a name and a number, UNABLE TO SAVE
will display on screen.
Delete one or all entries
• While in the call log, press the up or down NavKey or to scroll to
the desired entry.
• Press MUTE/REMOVE to delete an entry. Press and hold MUTE/
REMOVE to delete all entries, the screen display DELETE ALL CALLS?
then press the center NavKey , you’ll hear a conrmation tone.
Handset display screen messages
Display: Means:
PRIVATE NAME
PRIVATE NUMBER
PRIVATE CALLER
UNKNOWN NAME
UNKNOWN NUMBER
UNKNOWN CALLER
LONG DISTANCE
The other party is blocking the name information.
The other party is blocking the telephone number information.
The other party is blocking the name and number information.
This caller’s name is unavailable.
This caller’s number is unavailable.
No call information is available about this caller.
This is a long distance call.
UNABLE TO SAVE
DELETE ALL
CALLS?
22
www.vtechphones.com
Page 27

Advanced operation
Redial list
The telephone stores the ve most recently dialed numbers in the redial
list. You can review, redial, or save numbers into the directory.
• �hen there are already ve entries in the redial list, the oldest entry is
deleted to make room for the newest entry.
• Entries are displayed in reverse chronological order, i.e. from the most
recent to the oldest entry.
The redial list can be accessed on the handset by pressing REDIAL/
PAUSE while in idle mode.
Dial from redial
• While in the redial list, press REDIAL, or press the up or down NavKey
or to scroll to the desired number.
• Press /FLASH or /SPEAKER to dial the number.
To change the number before dialing, press the center NavKey to
•
select the number, and use the keypad to change the number.
Press MUTE/REMOVE to backspace, or press and hold REDIAL/
•
PAUSE for at least three seconds to insert a pause. Press
/FLASH or /SPEAKER to dial the number.
Delete a redial entry
• When in the redial list, press REDIAL, or press the up or down NavKey
or to scroll to the number to be deleted.
• Press and ho ld MUTE/REMOVE to remove the redia l entry. A
conrmation tone will be heard.
Advanced operation
www.vtechphones.com
23
Page 28

Handset display screen messages
ALREADY SAVED
CALL LOG EMPTY
CALLING HANDSET X
CONNECTING......
DIRECTORY EMPTY
HANDSET X IS CALLING
INTERCOM
INCOMING CALL
INTERCOM ENDED
LIST FULL
LOW BATTERY
NO SIGNAL, CALL ENDED
OUTSIDE
**PAGING**
PLACE IN CHARGER
The telephone number you have entered is already stored in
the directory.
There are no call log entries.
Calling another handset.
The cordless handset is searching for the telephone base.
There is no directory entry.
Other handset is calling.
The handset is on an intercom call.
There is an incoming call.
The handset is terminating an intercom call.
The directory is full.
The battery needs to be recharged.
Communication between handset and telephone base is lost
in intercom call.
Connected to the external call during call transfer.
The cordless handset locator has been activated.
The battery is very low. The handset should be placed in the
telephone base or charger.
24
www.vtechphones.com
Page 29

Handset display screen messages
RINGER MUTE
SAVED
UNABLE TO CALL
TRY AGAIN
UNABLE TO SAVE
WARNING
CHECK BATTERY!
XX MISSED CALLS
MICROPHONE ON
LINE IN USE
ENDED
NO LINE
NEW VOICE MAIL
PHONE
SPEAKER
The ringer is muted temporarily during incoming call.
Your operation has been saved.
Target handset is out of range, or on an external call during intercom
call.
You are attem pting to save caller ID entry with no name or
number.
The battery is not installed or not installed properly in the handset.
-OR -
The battery needs to be replaced.
-OR -
An incorrect battery has been installed by mistake. Use only the
supplied VTech battery or equivalent.
There are un-reviewed calls in your call log.
MUTE has been turned off and the person on the other end can
hear you.
A handset on the telephone line is in use.
You have just ended a call.
There is no telephone line connected.
There are new voice mail message(s).
The handset is in use.
The handset speakerphone is in use.
Appendix
www.vtechphones.com
25
Page 30

Handset and base indicators
Handset lights
• On when the handset speakerphone is in use.
Base lights
IN USE • Flashes when there is an incoming call, or another handset is in use.
• On when the handset is in use.
VOICEMAIL • Flashes when there is a new message on the answer machine.
CHARGE • On when the handset is in the telephone base.
Handset icons
MUTED
• Microphone is muted.
• Ringer off.
26
NEW
NEW VOICEMAIL • New voicemail received.
SPEAKER • In speakerphone mode.
Battery indicator
• New call log entries.
• Cycles (low, medium, and full) when handset battery is charging.
• Flashes when a low battery condition is detected.
www.vtechphones.com
Page 31
Battery
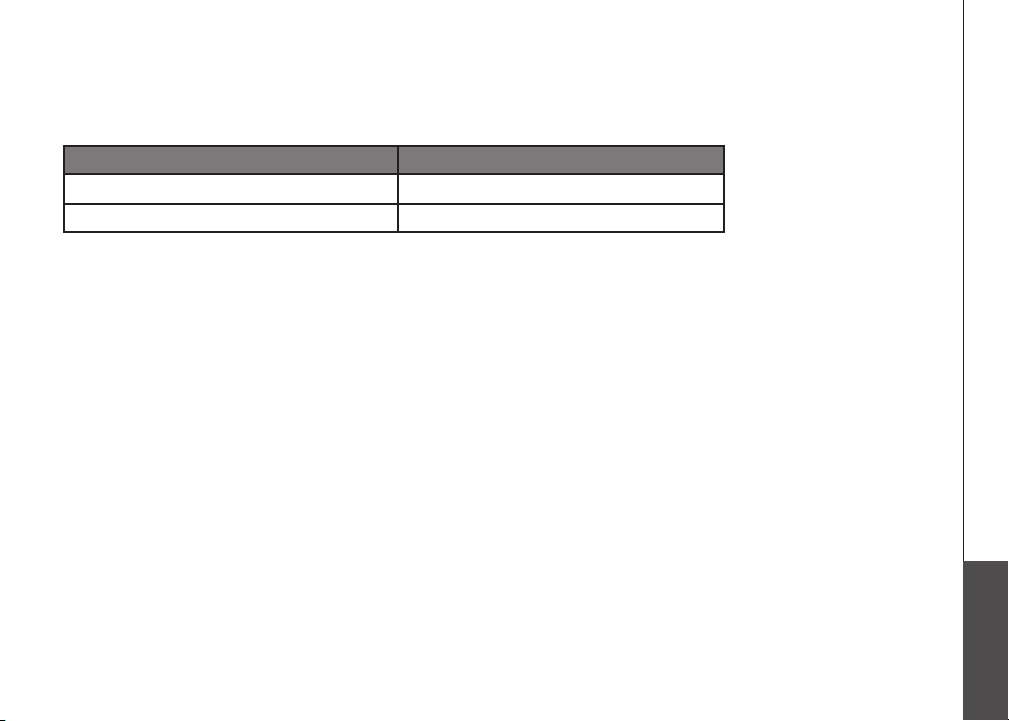
After the battery is fully charged, you can expect the following performance:
Operation Operating time
While in use (talking) 8 hours
While not in use (standby*) 96 hours (4 days)
*Hands et is off the telephone b ase but not in u se.
The battery needs charging when:
• A new batter y is installed in the handset.
• The telephone beeps twice when taken off the telephone base.
• Battery indicator on the handset display is ashing.
CAUTION:
To reduce the risk of re or injury to persons, read and follow these instructions:
1. Use only the battery(ies) provided or equivalent.
2. Do not dispose of the battery(ies) in a re. They may explode. Check with local waste management codes for special
disposal instructions.
3. Do not open or mutilate the battery(ies). Released electrolyte is corrosive and may cause burns or injury to the eyes or
skin. The electrolyte may be toxic if swallowed.
4. Exercise care in handling batteries in order not to create a short circuit with conductive materials such as rings, bracelets,
and keys. The battery and/or conductor may overheat and cause burns.
5. Charge the battery(ies) provided with or identied for use with this product only in accordance with the instructions and
limitations specied in this manual.
WARNING:
TO PREVENT FIRE OR SHOCK HAZARD, DO NOT EXPOSE THIS PRODUCT TO RAIN OR ANY TYPE OF MOISTURE.
Appendix
www.vtechphones.com
27
Page 32

Troubleshooting
If you have difculty operating your telephone, please try the suggestions below. For Customer Service, visit our website at
www.vtechphones.com, or call VTech Communications at 1 (800) 595-9511; In Canada, visit our website at www.vtechcanada.
com, or call V Tech Telecommunications Canada Ltd. at 1 (800) 267-7377.
Problem Suggestion
My telephone does not
work at all.
Low Battery is
displayed on screen.
Make sure the batter y is installed and charged correctly (see pages 3 and 27). For optimum
•
daily performance, return the cordless handset to the telephone base after use.
Make sure the power adapter is securely plugged into an outlet not controlled by a wall
•
switch.
Make sure the telephone line cord is plugged rmly into the telephone base and the modular
•
wall jack.
Unplug the unit’s electrical power. Wait for approximately 15 seconds, then plug it back in.
•
Allow up to one minute for the cordless handset and base to synchronize.
Charge the battery in the cordless handset for at least 16 hours.
•
Remove and re-insert the battery. If that still does not work, it may be necessary to purchase
•
a new battery.
Disconnect the telephone base from the modular jack and plug in a working telephone. If this
•
telephone does not work, the problem is probably in the wiring or the local service. Call the
local telephone company.
Place the handset in the telephone base or charger for recharging.
•
Remove and re-install the battery and use it normally until fully discharged, then recharge the
•
handset on the telephone base or charger for 16 hours.
If the above measures do not correct the problem, the battery may need to be replaced.
•
28
www.vtechphones.com
Page 33

Troubleshooting
Problem Suggestion
The battery does not
charge in the handset
or the handset battery
does not accept charge.
Make sure the handset is placed in the charger correctly. The CHARGE light on the telephone
•
base or charger should be on.
Remove the battery from the handset and install it in the spare battery compartment on the
•
side of the telephone base and let it charge for 16 hours. Then re-install the charged battery
into the handset.
If the cordless handset is in the charger or in the telephone base but the CHARGE light is not
•
on, refer to The charge light is off in this section.
It may be necessary to purchase a new battery. Please refer to the Battery section (see page
•
27) of this user’s manual.
The telephone might be malfunctioning. Please refer to the Warranty section (see page 37)
•
of this user’s manual for further instruction.
The CHARGE light is
off.
Clean the charging contacts on the cordless handset(s) and telephone base each month using
•
a pencil eraser or a dry non-abrasive fabric.
Make sure the power adapter and telephone line cords are plugged in correctl y and
•
securely.
Unplug the power adapter. Wait for 15 seconds before plugging it back in. Allow up to one
•
minute for the cordless handset and telephone base to reset.
The telephone might be malfunctioning. Please refer to the Warranty section (see page 37)
•
of this user’s manual for further instruction.
www.vtechphones.com
Appendix
29
Page 34

Troubleshooting
Problem Suggestion
The CHARGE Indicator
on the telephone base
is ashing.
There is no dial tone. First, try all the above suggestions.
The telephone does not
ring when there is an
incoming call.
This is a signal that the battery is very low, completely depleted, or when there is no electrical
•
contact between the battery and the telephone base.
Ensure the connector of the battery is securely plugged into the handset and place the handset
•
in the telephone base for charging.
•
Move the cordless handset closer to the telephone base. It might be out of range.
•
The telephone line cord might be malfunctioning. Try installing a new telephone line cord.
•
Disconnect the telephone base from the telephone jack and connect a different telephone.
•
If there is no dial tone on the telephone either, the problem is in your wiring or local service.
Contact your local telephone company.
Make sure the ringer is on. (See page 10).
•
Make sure the telephone line cord and power adapter are plugged in properly (see page 2).
•
The cordless handset may be too far from the telephone base. Move it closer to the telephone
•
base.
There may be too many extension phones on the telephone line to allow all of them to ring
•
simultaneously. Try unplugging some of them.
If the other telephones in your home are having the same problem, the problem is in the wiring
•
or local service. Contact the local telephone company (charges may apply).
Other electronic products can cause interference to your cordless telephone. Try installing your
•
telephone as far away as possible from the following electronic devices: wireless routers, radios,
radio towers, pager towers, cellular telephones, digital telephones, intercoms, room monitors,
televisions, VCRs, personal computers, kitchen appliances, and other cordless telephones.
30
www.vtechphones.com
Page 35

Troubleshooting
Problem Suggestion
The telephone does not
ring when there is an
incoming call.
I cannot dial out. First, try all the above suggestions.
Test a working telephone at the telephone jack. If another telephone has the same problem,
•
the problem is in the telephone jack. Contact your local telephone company (charges may
apply).
The telephone line cord might be malfunctioning. Try installing a new telephone line cord.
•
Re-install the batter y and place the cordless handset in the telephone base.
•
Wait for the cordless handset to synchronize with the telephone base. Allow up to one minute
•
for this to take place.
•
Make sure there is a dial tone before dialing. It is normal if the cordless handset takes a second
•
or two to synchronize with the telephone before producing a dial tone. Wait an extra second
before dialing.
Makes sure the telephone is set to the correct dial mode (pulse dial or tone dial) for the
•
service in your area. Refer to the Dial type section of this user’s manual (page 11) to set the
dial mode.
If the other telephones in your home are having the same problem, the problem is in the wiring
•
or local service. Contact your local telephone company (charges may apply).
Eliminate any background noise. Noise from a television, radio, or other appliances may cause
•
the telephone to not dial out properly. If you cannot eliminate the background noise, rst try
muting the cordless handset before dialing, or dialing from another room in your home with
less background noise.
Appendix
www.vtechphones.com
31
Page 36

Troubleshooting
Problem Suggestion
There is noise
or interference
during a telephone
conversation.
My calls fade out or
cut in and out when I
am using the cordless
handset.
The handset may be out of range. Move it closer to the telephone base.
•
Appliances or other cordless telephones plugged into the same circuit as the telephone base
•
can cause interference. Try moving the appliance or telephone base to another outlet.
Other electronic products can cause interference to your cordless telephone. Try installing
•
your telephone as far away as possible from the following electronic devices: wireless routers,
radios, radio towers, pager towers, cellular telephones, digital telephones, intercoms, room
monitors, televisions, VCRs, personal computers, kitchen appliances, wireless routers, and
other cordless telephones.
Microwave ovens operate on the same frequency as your telephone. It is normal to experience
•
static on your telephone while the microwave oven is operating. Do not install this telephone
in the same outlet or near a microwave oven.
If your telephone is plugged in with a modem or a surge protector, plug the telephone (or
•
modem/surge protector) into a different location. If this solves the problem, re-locate your
telephone or modem farther apart from each other, or use a different surge protector.
The layout of your home or ofce might be limiting the operating range. Trying moving the
•
telephone base to another location, preferably a higher location for better reception.
Disconnect the telephone base from the modular jack and plug in a corded telephone. If calls
•
are still not clear, the problem is probably in the wiring or local service. Contact your local
service company (charges may apply).
If the other telephones in your home are having the same problem, the problem is in the wiring
•
or local service. Contact the local telephone company (charges may apply).
Do you have DSL service? If yes, you need to have a DSL lter installed at every telephone jack
•
that has a telephone connected to it. Contact your DSL service provider for lter information.
32
www.vtechphones.com
Page 37

Troubleshooting
Problem Suggestion
I hear other calls when
using the telephone.
Disconnect the telephone base from the telephone jack. Plug in a different telephone. If you
•
still hear other calls, the problem is probably in the wiring or local service. Call your local
telephone company.
I hear noise in the
cordless handset, and
none of the keys or
buttons work.
My caller ID features are
not working properly.
The system does not
re c eive ca lle r I D or
the system doe s not
display caller ID during
call waiting.
Make sure the telephone line cord is plugged in securely.•
Caller ID is a subscription service. You must subscribe to this service from your local telephone
•
company for this feature to work on your telephone.
The caller may not be calling from an area which supports caller ID.
•
Both you and the caller’s telephone companies must use equipment which are compatible
•
with caller ID service.
If you subscribe to DSL service, install a DSL lter to the telephone line between the telephone
•
base and the telephone line jack. Contact your DSL service provider for lter information.
Make sure you subscribe to Caller ID with Call Waiting features services provided by the local
•
telephone company.
The caller may not be calling from an area which supports caller ID.
•
Both you and the caller’s telephone companies must use equipment which are compatible
•
with caller ID service.
If you subscribe to DSL service, install a DSL lter to the telephone line between the telephone
•
base and the telephone line jack. Contact your DSL service provider for lter information.
www.vtechphones.com
Appendix
33
Page 38

Troubleshooting
Problem Suggestion
The messages on
the system are very
difcult to hear.
My cordless handset
beeps five times and
i s n o t p e r fo rmi n g
normally.
Common cure for
electronic equipment.
34
Press VOL / on the side of the handset to increase the speaker volume.•
Make sure the power cord is securely plugged into the telephone base. Plug the unit into a
•
different working electrical outlet not controlled by a wall switch.
Move the cordless handset closer to the telephone base. It may be out of range.
•
Reset the telephone base by unplugging the unit’s electrical power. Wait for 15 seconds and
•
plug it back in again. Allow up to one minute for the cordless handset and the telephone base
to synchronize.
Other electronic products can cause interference to your cordless telephone. Try installing
•
your telephone as far away from these electronic devices as possible: wireless routers, radios,
radio towers, pager towers, cellular telephones, intercoms, room monitors, televisions, personal
computers, kitchen appliances and other cordless telephones.
If the unit is not responding normally, trying putting the cordless handset in the telephone base
•
or the charger. If it does not seem to respond, try the following (in the order listed):
Disconnect the power to the telephone base.
•
Disconnect the battery on the cordless handset and the spare battery in the telephone base.
•
Wait a few minutes before connecting power to the telephone base.
•
Re-install the batter y and place the cordless handset into the telephone base or charger.
•
Wait for the cordless handset to synchronize its connection with the telephone base. Allow up
•
to one minute for this to take place.
www.vtechphones.com
Page 39

Important safety instructions
�hen usi ng your teleph one equipm ent, basic s afety preca utions sho uld always be fol lowed to redu ce the risk of re, electri c shock and i njury, inclu ding the foll owing:
1. Read and un derstand a ll instruc tions.
2. Follow all w arnings and i nstruct ions marked o n the produc t.
3. Unplug t his produc t from the wall o utlet befor e cleaning. D o not use liqui d or aerosol c leaners. Us e a damp cloth f or cleaning .
4. Do not use t his produc t near water (for exam ple, near a bath tub, kitche n sink, or swim ming pool).
5. Do not plac e this prod uct on an unst able table, s helf, stand o r other unsta ble surfac es.
6. Slots and ope nings i n the b ack or bottom of the telephone base and h andset a re provi ded for ventilatio n. To prote ct them from overheat ing, the se open ings mus t not b e
blocke d by placing the prod uct on a soft sur face such as a bed, sof a or rug. This produ ct should never be pl aced near or over a radiat or or heat register. This pr oduct shou ld
not be plac ed in any area wh ere proper ven tilation is n ot provided .
7. This prod uct should be oper ated only from the ty pe of power source ind icated on the mark ing label. If you are not sure of the t ype of power supply in your ho me, consult your
dealer or l ocal power c ompany.
8. Do not allo w anything t o rest on the powe r cord. Do not i nstall this p roduct wh ere the cord m ay be walked on.
9. Never push ob jects of any kind in to this produc t through slo ts in the base or hand set as they may touch da ngerous volt age points or sh ort out part s that could resu lt in a risk
of re or ele ctric sho ck. Never spi ll liquid of any k ind on the pro duct.
10. To reduc e the risk of electri c shock, do not disas semble this pro duct, but take it to an authoriz ed service fac ility. Openin g or removing parts of the bas e or handset other than
speci ed access d oors may expo se you to dange rous voltag es or other ris ks. Incorr ect reasse mbling can c ause elect ric shock w hen the prod uct is subse quently us ed.
11. D o not overload w all outlets a nd extensio n cords as th is can result i n the risk of r e or electri c shock.
12. U nplug this p roduct fro m the wall outl et and refer ser vicing to an autho rized serv ice facili ty under th e following c ondition s:
A. W hen the power su pply cord o r plug is damag ed or frayed.
B. If l iquid has bee n spilled on to the produ ct.
C. If th e product ha s been expos ed to rain or water.
D. If th e product do es not operat e normally by fo llowing th e operating i nstructi ons. Adjust o nly those c ontrols tha t are covered by th e operation i nstructi ons, as impr oper
adjus tment of othe r controls m ay result in dam age and often r equires ex tensive work by a n authorize d technici an to restore th e product to n ormal oper ation.
E. If t he product h as been drop ped and the ba se and/or han dset has bee n damaged.
F. If the prod uct exhibi ts a distinc t change in pe rforman ce.
13. Avo id using a tel ephone (other t han cordle ss) during an el ectrica l storm. Ther e is a remote ris k of electri c shock from l ightning.
14. D o not use the tel ephone to re port a gas le ak in the vici nity of the l eak.
15. O nly put the ha ndset of your te lephone nex t to your ear whe n it is in normal t alk.
16. T his power uni t is intended to b e correct ly oriented i n a vertica l or oor mount p osition. T he prongs are n ot designe d to hold the plu g in place if it i s plugged in to a ceiling or
under-th e-table /cabinet out let.
SAVE THESE INSTRUCTIONS
www.vtechphones.com
Appendix
35
Page 40

Operating range
This cordless telephone operates with the maximum power allowed by the Federal Communications Commission (FCC). Even so, this handset and telephone base can communicate over only a
certain distance ----which can vary with the locations of the telephone base and handset, the weather, and the layout of your home or ofce.
When the handset is out of range, the handset will display Searching. The user can access the handset directory, and certain parts of the menu system, i.e. handset setting and registration, but not
the time setting and base setting. Not possible will be displayed if access is tried.
If there is a call while the handset is out of range, it might not ring, or if it does ring, the call might not connect well when you press TALK/FLASH. Move closer to the telephone base, then press
TALK/FLASH to answer the call.
If the handset moves out of range during a telephone conversation, there might be interference.
To improve reception, move closer to the base.
Maintenance
Taking care of you r telephone
Your cordles s telephone c ontains sop histicated e lectroni c parts, so it mu st be treated with car e.
Avoid roug h treatment
Place the h andset down ge ntly. Save the original p acking mater ials to protec t your telephon e if you ever need to ship it .
Avoid water
Your telephon e can be damage d if it gets wet. Do not use t he handset out doors in the r ain, or handle i t with wet hands . Do not install y our telephon e base near a sink , bathtub or show er.
Electri cal storms
Electri cal storms can som etimes cause p ower surges har mful to electroni c equipment . For your own safet y, use cauti on when using e lectric ap pliances dur ing storms.
Cleanin g your telephon e
Your teleph one has a dur able plastic casing that should ret ain its luster for many year s. Clean i t only with a soft c loth slightly dampened wi th water or a mild soap. Do not use exc ess water or
cleanin g solvents of any kind.
Remember that electrical appliances can cause serious injury if used when you are wet or standing in water. If your telephone base should fall into water, DO NOT RETRIEVE IT UNTIL YOU
UNPLUG THE POWER CORD AND TELEPHONE LINE CORDS FROM THE WALL. Then pull the unit out by the unplugged cords.
About cordless telephones
• Privacy: th e same features that make a cordless tel ephone convenient creat e some limitations . Telepho ne calls are transmit ted between the base and the cordles s handset by radio waves , so
there is a po ssibilit y that your cord less telepho ne conversations c ould be intercepte d by radio r eceiving eq uipment within ran ge of the cordless h andset. For thi s reason, you should n ot think
of cordle ss telephone conve rsations as b eing as private a s those on corded tel ephones.
• Electrical Power: The telephone b ase of this cord less telepho ne must be conne cted to a working el ectrical outle t. The electri cal outlet should no t be controlle d by a wall switch. Call s cannot
be made fro m the cordles s handset if the tele phone base is u nplugged or sw itched off, or if the e lectrica l power is interr upted.
• Potent ial TV Interferenc e: Some cordl ess teleph ones operate at frequencies t hat may caus e interferenc e to televi sions and VCRs. To minimize or prevent such interference, do not place
the teleph one base of the cordless te lephone near or on to p of a TV or VCR. If interferen ce is experienced, mov ing the cordless tele phone father away from the TV or VCR wil l often red uce or
eliminat e the interfer ence. (Applies to 25 c hannel cord less telepho nes only).
• Recha rgeable Bat teries: This p roduct conta ins either Nickel-C admium or N ickel-Met al Hydride rec hargeable bat teries. Exer cise care in h andling bat teries in orde r not to short the battery
with con ducting mate rial such as r ings, bracel ets, and keys. The batte ry or condu ctor may overhea t and cause harm . Observe pr oper polari ty between t he battery an d the battery char ger.
• Nickel-Meta l Hydride Re chargeable Batteries: Dispose of these bat teries in a safe manner. Do not burn or puncture. Like other batter ies of th is type, if burned or p unctured, they could
release c austic material whi ch could cause inj ury.
36
www.vtechphones.com
Page 41

Warranty
What doe s this limited warr anty cover?
The manuf acturer of this V Tech Product war rants to the hold er of a valid pro of of purchase (“ Consumer ” or “you”) t hat the Product a nd all acces sories provided in the sales package (“ Product” )
are free f rom defect s in material and workmanshi p, pursuant t o the follow ing terms an d conditions, w hen installed a nd used nor mally and in accordance wi th the Product o perating instru ctions.
This limi ted warranty ex tends only to the Co nsumer for Prod ucts purchased a nd used in the Un ited States of A merica and Ca nada.
What will V Tech do if t he Product is not free from defe cts in materials and workmanship during th e limited warranty period (“ Materially De fective Produc t”)?
During th e limited warrant y period, V Tech’s authorized se rvice rep resentative will repair or r eplace at VTech’s o ption, witho ut charge, a Materia lly Defective Prod uct. If we repa ir the Product, we
may use new or refurbis hed replac ement part s. If we choo se to replace the Product, we may replace i t with a new or refur bished Produc t of the same o r similar de sign. We will retain defec tive
parts, mo dules, or equipment . Repair or rep lacement of the Pro duct, at VTech’s option, is your exc lusive remedy. VTech wil l return repaire d or replacemen t Products to you in wor king conditi on.
You should expe ct the repair or repl acement to take a pproximatel y 30 days.
How long is t he limited warranty period?
The limited warra nty period for the Product ext ends for ONE (1) YEAR from the date of purchase. If VTech repairs or repla ces a Materiall y Defectiv e Product under the terms of this limited warr anty,
this limite d warrant y also appl ies to repaired or replacem ent Product for a period of eith er (a) 90 days from the date the repair ed or replacemen t Product is shipp ed to you or (b) the time remaining
on the orig inal one-year warra nty; whichever is lo nger.
What is not covered by this limited warranty?
This limi ted warranty d oes not cover:
1. Pr oduct that has be en subjected to mi suse, accident, shi pping or other physica l damage, improp er installation, ab normal operat ion or handling, negle ct, inundation, re, wa ter or other liquid
intrusi on; or
2. Pr oduct that ha s been damage d due to repair, alter ation or modicat ion by anyone oth er than an author ized service rep resentative of VTech; or
3. Pr oduct to the ex tent that the proble m experienc ed is caused by si gnal condit ions, network rel iability, or ca ble or antenna sy stems; or
4. Pr oduct to the ex tent that the proble m is caused by use w ith non-VTech acces sories; or
5. Pr oduct whos e warranty/qua lity stickers, Pr oduct seria l numbers plates or el ectronic se rial numbers have be en removed, alte red or rendered ille gible; or
6. Pr oduct purc hased, used, ser viced, or ship ped for repai r from outside th e United States of A merica or Canada , or used for comm ercial or in stitutiona l purposes ( including but not limit ed to
Product s used for rental pur poses); or
7. Pr oduct retur ned without va lid proof of pur chase (see item 2 below); or
8. Ch arges for installa tion or set up, adju stment of customer c ontrols, and inst allation or repair of s ystems outsi de the unit.
How do you get warranty s ervice?
To obtain warranty ser vice in the United States of America , please call 1-80 0-595-9511; In Canada, please dial 1 (800) 267-7377. NOTE: Before callin g for service, please rev iew the user’s manual
- a check of t he Product co ntrols and features m ay save you a service ca ll.
Except as provided by applicable law, you assume the risk of l oss or damage during trans it and tr ansporta tion and are respon sible for del ivery or handling char ges incur red in the tr ansport of
the Pro duct(s) to t he servi ce location. VTech will re turn repaired or replaced Product u nder this limited warra nty to yo u, transpo rtation, del ivery or handling char ges prepaid. VTech ass umes
no risk f or damage or loss of the P roduct in t ransit. If the Pr oduct failure i s not covered by this limit ed warrant y, or proof of pur chase does not m eet the term s of this lim ited warrant y, VTech wil l
notify you and will request tha t you authori ze the cost of rep air prior to any fur ther repair ac tivity. You must pay for the cost of repair and return shipping cost s for the rep air of Products t hat are
not covere d by this limited w arranty.
What must you return wit h the Product to get w arranty service?
1. Re turn the entir e original pac kage and contents in cluding the Produ ct to the VTech servi ce location along w ith a descriptio n of the malfunc tion or difcul ty; and
2. In clude “valid pro of of purchase” (sale s receipt) ide ntifying t he Product pur chased (Product m odel) and the date of pur chase or receipt; a nd
3. Pr ovide your name, c omplete and corre ct mailing addres s, and telepho ne number.
Appendix
www.vtechphones.com
37
Page 42

Warranty
Other Li mitations
This warrant y is the complete and exclu sive agreement betwe en you and VTech. It supersedes all other wri tten or oral communic ations related to this Produc t. VTech provides no other warra nties
for this Pr oduct. The w arranty excl usively describ es all of VTech’s respon sibilities r egarding the Prod uct. There are no ot her express warrant ies. No one is autho rized to make mo dication s to
this limi ted warranty a nd you should not rely o n any such modi cation.
State/Pr ovincial Law Right s: This warranty gi ves you speci c legal rights, and yo u may also have other righ ts, which var y from state to state or pr ovince to prov ince.
Limitat ions: Impli ed warranti es, including those of tnes s for a parti cular purp ose and mercha ntability (an u nwritten w arranty t hat the Pro duct is t for ordin ary use) are lim ited to one year from
date of purchase. Some states/pr ovinces d o not allo w limitati ons on how long an impl ied warrant y lasts, so the above l imitation may n ot apply to yo u. In no event shall VTech be liable for any
indirec t, special, incide ntal, conseq uential, or simil ar damages (incl uding, but not limit ed to lost prots or revenu e, inability to use th e Product or other ass ociated equipment , the cost of subs titute
equipme nt, and claims by third parti es) resulti ng from the use of this Product . Some states/prov inces do not allow the exc lusion or limitation of in cidental or con sequential da mages, so the above
limitati on or exclusion may not a pply to you.
Please retain your original sales receipt as proof of purchase.
FCC, ACTA and IC regulations
FCC Part 15
This equipment has been tested and found to comply with the requirements for a Class B digital device under Part 15 of the Federal Communications Commission (FCC) rules. These requirements are intended
to provide reasonable protection against harmful interference in a residential installation. This equipment generates, uses and can radiate radio frequency energy and, if not installed and used in accordance
with the instructions, may cause harmful interference to radio communications. However, there is no guarantee that interference will not occur in a particular installation. If this equipment does cause harmful
interference to radio or television reception, which can be determined by turning the equipment off and on, the user is encouraged to try to correct the interference by one or more of the following measures:
Reorient or relocate the receiving antenna.
•
Increase the separation between the equipment and receiver.
•
Connect the equipment into an outlet on a circuit different from that to which the receiver is connected.
•
Consult the dealer or an experienced radio/TV technician for help.
•
Changes or modications to this equipment not expressly approved by the party responsible for compliance could void the user’s authority to operate the equipment.
To ensure safety of users, the FCC has established criteria for the amount of radio frequency energy that can be safely absorbed by a user or bystander according to the intended usage of the product.
This product has been tested and found to comply with the FCC criteria. The handset may be safely held against the ear of the user. The telephone base shall be installed and used such that parts of the
user’s body other than the hands are maintained at a distance of approximately 20 cm (8 inches) or more. If you choose to use a clipping device, please make sure to only use the supplied VTech belt clip.
FCC Part 68 and ACTA
This equipment complies with Part 68 of the FCC rules and with technical requirements adopted by the Administrative Council for Terminal Attachments (ACTA). The label on the back or bottom of this
equipment contains, among other things, a product identier in the format US:AAAEQ##TXXXX. This identier must be provided to your local telephone company upon request.
The plug and jack used to connect this equipment to premises wiring and the telephone network must comply with applicable Part 68 rules and technical requirements adopted by ACTA. A compliant
telephone cord and modular plug is provided with this product. It is designed to be connected to a compatible modular jack that is also compliant. An RJ11 jack should normally be used for connecting
to a single line and an RJ14 jack for two lines. See Installation Instructions in the user’s manual.
The Ringer Equivalence Number (REN) is used to determine how many devices you may connect to your telepho ne line and still have them ring when you are called. The REN for this product is
encoded as the 6th and 7th characters following the US: in the product identier (e.g., if ## is 03, the REN is 0.3). In most, but not all areas, the sum of all RENs should be ve (5.0) or less. For more
information, please contact your local telephone company.
38
www.vtechphones.com
Page 43

FCC, ACTA and IC regulations
This equipment may not be used with Party Lines. If you have specially wired alarm dialing equipment connected to your telephone line, ensure the connection of this equipment does not disable your
alarm equipment. If you have questions about what will disable alarm equipment, consult your telephone company or a qualied installer.
If this equipment is malfunctioning, it must be unplugged from the modular jack until the problem has been corrected. Repairs to this telephone equipment can only be made by the manufacturer or its
authorized agents. For repair procedures, follow the instructions outlined under the Limited Warranty.
If this equipment is causing harm to the telephone network, the telephone company may temporarily discontinue your telephone service. The telephone company is required to notify you before inter-
rupting service. If advance notice is not practical, you will be notied as soon as possible. You will be given the opportunity to correct the problem and the telephone company is required to inform you
of your right to le a complaint with the FCC. Your telephone company may make changes in its facilities, equipment, operation, or procedures that could affect the proper functioning of this product.
The telephone company is required to notify you if such changes are planned.
If this product is equipped with a corded or cordless handset, it is hearing aid compatible.
If this product has memory dialing locations, you may choose to store emergency telephone numbers (e.g., police, re, medical) in these locations. If you do store or test emergency numbers, please:
Remain on the line and briey explain the reason for the call before hanging up.
•
Perform such activities in off-peak hours, such as early morning or late evening.
•
Industry Canada
This equipment complies with regulations RSS210 and CS-03 of Industry Canada. Operation is subject to the following two conditions: (1) this device may not cause interference, and (2) this device
must accept any interference, including interference that may cause undesired operation of the device.
The term ‘’IC: ‘’ before the certication/registration number only signies that the Industry Canada technical specications were met.
The Ringer Equivalence Number (REN) for this terminal equipment is 0.1. The REN is an indication of the maximum number of devices allowed to be connected to a telephone interface. The
termination on an interface may consist of any combination of devices subject only to the requirement that the sum of the RENs of all the devices does not exceed ve.
The RBRC® Seal
The RBRC® Seal on the nickel -metal-hydrid e batter y indicates that VTech Commu nications, Inc. is volu ntarily partici pating in an industry pr ogram to collec t and
recycle t hese batteries at th e end of their useful li ves, when taken out of ser vice within the U nited States and Cana da.
The RB RC® prog ram provi des a c onvenient a lternative to placing used nickel-metal -hydride bat teries in to the t rash or municipal waste,which may be illegal in
your area.
VTech’s participation in RBRC® makes it easy for you to drop off the spent battery at local retailers parti cipating in the RBRC® program or at authorized VTech product
servi ce centers. Pl ease call 1-800- 8-BATTERYTM for inform ation on Ni-MH bat tery recycl ing and dispo sal bans/restric tions in your area. V Tech’s involvement in
this prog ram is part of it s commitment to pro tecting our en vironment an d conserv ing natural res ources.
RBRC® is a registered trademark of Re chargeable Ba ttery Recycling Corporat ion.
Appendix
www.vtechphones.com
39
Page 44

Technical specications
Frequency control Crystal controlled
Transmit frequency Telephone base: 5725-5850 MHz
Receive frequency Telephone base: 2400-2483.5 MHz
Channels 95
Nominal effective range Maximum power allowed by FCC and IC. Actual operating range may vary according
Size Handset: 158.7mm X 52.7mm X 41.3mm
Weight Handset: 145.0 grams (including battery)
Power requirements Handset: 3 cells AAA 3.6V 600mAh NiMH battery
Memory Director y: 50 memory locations; up to 32 digits, 16 characters per location
40
PLL synthesizer
Handset: 2400-2483 MHz
Handset: 5725-5850 MHz
to environmental conditions at the time of use.
Telephone base: 128.7mm X 122.6mm X 77.5mm
Telephone base: 423.8 grams
Telephone base: DC 9V@ 400mA
Charger: DC 9V @200mA
Call log: 50 memory locations
www.vtechphones.com
Page 45

Index
A
About caller ID 5
About cordless telephones 36
Advanced operation 16-23
Answer an incoming call during an
intercom call 15
B
Base layout 9
Basic operation 12-15
Battery 27
Belt clip 4
C
Caller ID 5, 19-22
Call waiting 13
Chart of characters 17
Clear voice mail 11
Conference call 14
D
Delete a directory entry 19
Delete a redial entry 23
Delete one or all entries 22
Dial a call log entry 20
Dial a directory entry 18
Dial from redial 23
Dial type 11
Director y 16-18
E
Edit a directory entry 18
F
FCC, ACTA and IC regulations 38, 39
Find handset 15
H
Handset and base indicators 26
Handset display screen message s
22-25
Handset icons 26
Handset layout 8
Handset lights 26
Headset 4
I
If you subscribe to DSL service 6
Important safety instructions 35
Index 41
Installation 1-7
Install handset battery 3
Intercom 13
Internet 6
K
Key tone 10
L
Language 11
M
Maintenance 36
Make, answer, and end calls with the
handset 12
Mute 12
O
Operating range 36
P
Parts checklist 1
R
Redial list 23
Review the call log 20
Ringer melody 10
Ringer mute 13
www.vtechphones.com
41
Page 46

Index
Ringer volume 10
S
Save an entry to the directory 21
Search the directory 18
Store a directory entry 16
Speakerphone 12
Switch between external and intercom
call 15
T
Table of contents ii, iii
Technical specications 40
The RBRC® Seal 39
Telephone base installation 2
Telephone base layout 9
Telephone settings 8-11
Transfer an external call 14
Troubleshooting 28-34
V
Voicemail 15
Voicemail service 5
Volume 13
W
Wall mounting bracket installation 7
Warranty 37,38
42
www.vtechphones.com
Page 47

VTECH TELECOMMUNICATIONS LTD.
A member of THE VTECH GROUP OF COMPANIES.
Distributed in the U.S.A. by VTech Communications, Inc., Beaverton, Oregon
Distributed in Canada by VTech Telecommunications Canada, Ltd., Richmond, B.C.
Copyright ©2007 for VTECH TELECOMMUNICATIONS LTD.
Printed in China.
Issue Ver
0.6
91-000923-020-100
 Loading...