

Page 1

T
Compatible with
Hearing Aid T-Coil
TIA-1083
Congratulations
on purchasing your new VTech product.
Before using this telephone, please read the
Important safety instructions
on page 47 of this manual.
This manual has all the feature operations and troubleshooting necessary to install and operate
your new VTech telephone. Please review this manual thoroughly to ensure proper installation
and operation of this innovative and feature rich VTech product. For support, shopping, and
everything new at VTech, visit our website at www.vtechphones.com.
In Canada, please visit www.vtechcanada.com.
The ENERGY STAR® program (www.energystar.gov) recognizes and encourages
the use of products that save energy and help protect our environment. We are
proud to mark this product with the ENERGY STAR
latest energy efficiency guidelines.
Telephones identified with this logo have reduced noise and interference when
used with most T-coil equipped hearing aids and cochlear implants. The TIA-1083
Compliant Logo is a trademark of the Telecommunications Industry Association.
Used under license.
®
label indicating it meets the
i
Page 2

Table of contents
Getting started . . . . . . . . . . . . . . . . . 1
Parts checklist . . . . . . . . . . . . . . . . . .
Telephone base and charger(s) installation . . .
Battery installation and charging . . . . . . . . .
Mounting bracket installation
Handset layout . . . . . . . . . . . . . . . . . . 6
Telephone base layout . . . . . . . . . . . . . . 7
Telephone settings . . . . . . . . . . . . . . . 8
Date and time
Ringer
. . . . . . . . . . . . . . . . . . . . . . . 9
Ringer volume (handset) . . . . . . . . . . . . .
Dial mode
Home area code . . . . . . . . . . . . . . . . . 10
Language . . . . . . . . . . . . . . . . . . . . . 11
Telephone operation . . . . . . . . . . . . . . 12
Make calls . . . . . . . . . . . . . . . . . . . . 12
Answer calls . . . . . . . . . . . . . . . . . . . 12
End calls . . . . . . . . . . . . . . . . . . . . . 12
Volume . . . . . . . . . . . . . . . . . . . . . . 12
Channel . . . . . . . . . . . . . . . . . . . . . . 12
Call waiting . . . . . . . . . . . . . . . . . . . .
Temporary tone dialing . . . . . . . . . . . . . .
Redial
. . . . . . . . . . . . . . . . . . . . . . . 14
Find handset
Transfer an external call . . . . . . . . . . . . . 15
Directory . . . . . . . . . . . . . . . . . . . . .
. . . . . . . . . . . . . . . . . . . 8
. . . . . . . . . . . . . . . . . . . . . 10
. . . . . . . . . . . . . . . . . . . 14
. . . . . . . . . . . 4
13
13
16
Store a directory entry . . . . . . . . . . . . . .
1
Character chart . . . . . . . . . . . . . . . . . . 17
Review the directory
2
Edit a directory entry . . . . . . . . . . . . . . .
3
Delete a directory entry
Copy a directory entry into speed dial . . . . . . 20
Dial a number from the directory . . . . . . . . .
Speed dial . . . . . . . . . . . . . . . . . . . .
Store a speed dial entry . . . . . . . . . . . . .
Edit a speed dial entry
Delete a speed dial entry
9
Dial a speed dial number
Reassign speed dial locations . . . . . . . . . .
About caller ID . . . . . . . . . . . . . . . . . . 25
Call log . . . . . . . . . . . . . . . . . . . . . . 26
Review the call log . . . . . . . . . . . . . . . .
Make call log entries ready to dial . . . . . . . .
Dial a call log number
Save a call log entry to the directory . . . . . . .
Delete from the call log . . . . . . . . . . . . . . 30
Call log display screen messages . . . . . . . .
Answering system . . . . . . . . . . . . . . . 32
Message capacity . . . . . . . . . . . . . . . .
Activate the answering system . . . . . . . . . .
Set the clock . . . . . . . . . . . . . . . . . . . 33
Answering system setup . . . . . . . . . . . . .
. . . . . . . . . . . . . . . 17
. . . . . . . . . . . . . . 19
. . . . . . . . . . . . . . 22
. . . . . . . . . . . . . 23
. . . . . . . . . . . . . 23
. . . . . . . . . . . . . . . 28
16
18
20
21
21
24
27
27
29
31
32
33
34
www.vtechphones.com
ii
Page 3

Table of contents
Set number of rings. . . . . . . . . . . . . . . . 34
Set telephone base ringer . . . . . . . . . . . .
Set remote access code . . . . . . . . . . . . . 35
Set message alert tone . . . . . . . . . . . . . . 36
Outgoing announcement . . . . . . . . . . . . .
Play your announcement . . . . . . . . . . . . 37
Record your own announcement . . . . . . . . . 38
Delete your announcement . . . . . . . . . . . . 38
New message indication . . . . . . . . . . . . .
Message playback . . . . . . . . . . . . . . . . 39
Options during playback . . . . . . . . . . . . .
Delete all messages . . . . . . . . . . . . . . . 40
Record and play memos . . . . . . . . . . . . . 40
Record a memo. . . . . . . . . . . . . . . . . . 40
Memo playback . . . . . . . . . . . . . . . . . . 40
Call screening . . . . . . . . . . . . . . . . . .
Call intercept . . . . . . . . . . . . . . . . . . .
Message window displays
Remote access . . . . . . . . . . . . . . . . . . 43
Appendix. . . . . . . . . . . . . . . . . . . . . 44
Handset display screen messages
Battery . . . . . . . . . . . . . . . . . . . . . . 46
Important safety instructions . . . . . . . . . . .
. . . . . . . . . . . . 42
. . . . . . . . 44
35
37
39
39
41
41
47
Troubleshooting
Operating range . . . . . . . . . . . . . . . . .
Maintenance . . . . . . . . . . . . . . . . . . .
About cordless telephones . . . . . . . . . . . . 59
Warranty . . . . . . . . . . . . . . . . . . . . . 59
FCC, ACTA and IC regulations
The RBRC® seal . . . . . . . . . . . . . . . . . 62
Technical specications . . . . . . . . . . . . . 63
Index . . . . . . . . . . . . . . . . . . . . . . . 64
. . . . . . . . . . . . . . . . . . 48
58
58
. . . . . . . . . . 61
www.vtechphones.com
iii
Page 4
Getting started
CHARGE
OPER
DEF
JKL
P
QRS
W
XYZ
TUV
MNO
TONE
ABC
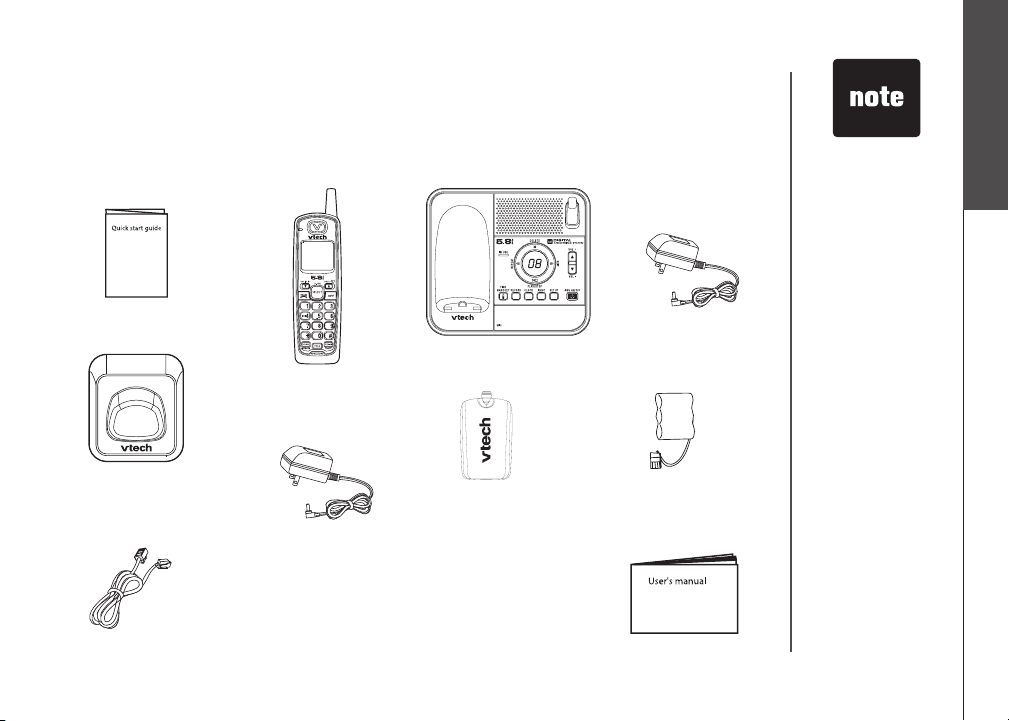
Parts checklist
Your telephone contains the following items. Save your sales receipt and original
packaging in case your telephone needs warranty service.
1. Quick start guide
2. Handsets
(2 for CS5121-2,
3 for CS5121-3/CS5122-3,
4 for CS5121-4)
Telephone base with
3.
mounting bracket
4. Telephone base
power adapter
To purchase
•
replacement
batteries or power
adapter(s), visit
our website at
www.vtechphones.
com or call
1 (800) 595-9511.
In Canada, go to
www.vtechcanada.
com or call 1 (800)
267-7377.
Getting started
Basic operation
5. Chargers
(1 for CS5121-2,
2 for CS5121-3/CS5122-3,
3 for CS5121-4)
9. Telephone line cord
6. Charger adapters
(1 for CS5121-2,
2 for CS5121-3/CS5122-3,
3 for CS5121-4)
7. Battery compartment
covers
(2 for CS5121-2,
3 for CS5121-3/CS5122-3,
4 for CS5121-4)
www.vtechphones.com
8. Batteries
(2 for CS5121-2,
3 for CS5121-3/CS5122-3,
4 for CS5121-4)
10. User’s manual
1
Page 5
Use only the
DC 7.5V
•
power adapter(s)
supplied with this
product. To order
a replacement,
visit our website at
www.vtechphones.
com or call
1 (800) 595-9511.
In Canada, go to
www.vtechcanada.
com or call 1 (800)
267-7377.
The power
•
adapters are
intended to be
correctly oriented
in a vertical
or oor mount
position. The
prongs are not
designed to hold
the plug in place
if it is plugged into
a ceiling or an
under-the-table/
cabinet outlet.
Getting started
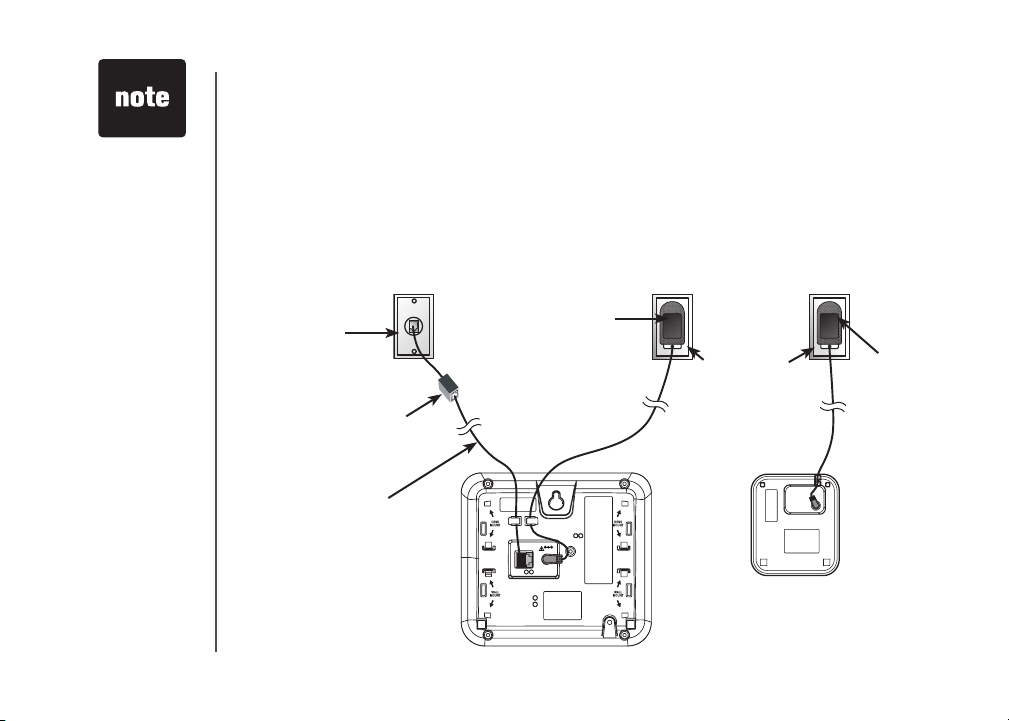
Telephone base and charger(s) installation
Install the telephone base and charger(s) as shown below. Make sure that the
electrical outlet is not controlled by a wall switch. If you subscribe to high-speed
Internet service (Digital Subscriber Line - DSL) through your telephone lines,
you must install a DSL lter between the telephone base and the telephone
wall jack. The lter will prevent noise and caller ID problems caused by DSL
interference. Please contact your DSL service provider for more information
about DSL lters.
Telephone
wall jack
DSL lter (not included)
required if you have
DSL high-speed
Internet service
Telephone line cord
Telephone base
Telephone base
power adapter
Electrical outlet
(not controlled by
a wall switch)
Charger
adapter
Charger
2
www.vtechphones.com
Page 6
Getting started
CHARGE
OPER
DEF
JKL
P
QRS
W
XYZ
TUV
MNO
TONE
ABC
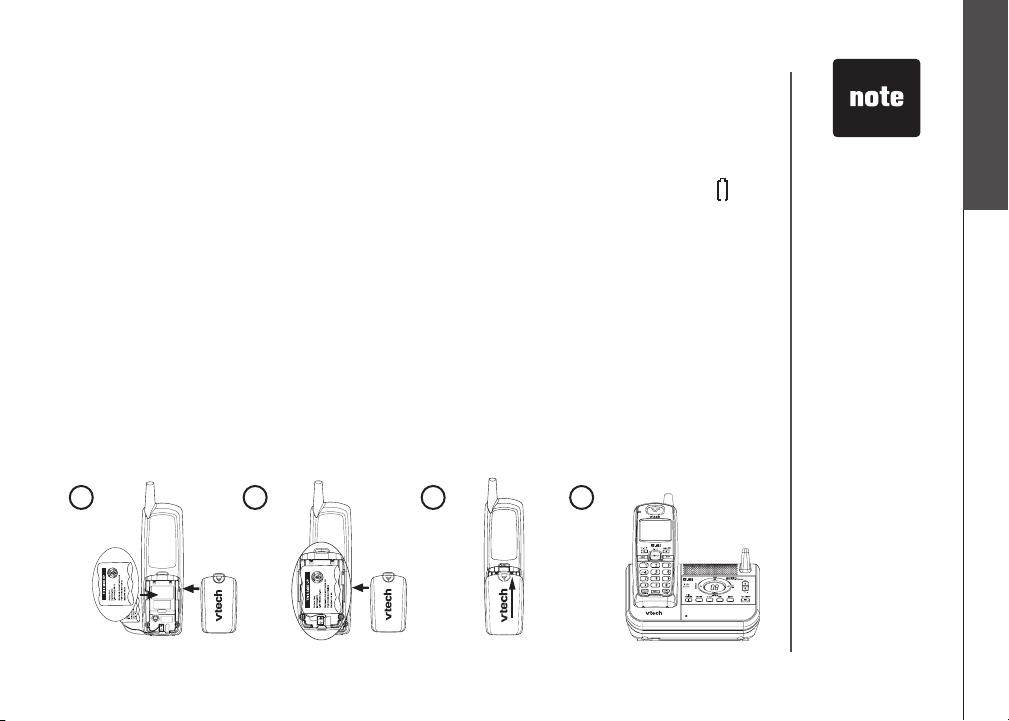
Battery installation and charging
Install the battery as shown below. The battery may have enough charge for
short calls. For best performance, charge the battery for at least 16 hours before
use. When the battery power is low, LOW BATTERY will be displayed and will
ash on the handset screen. When fully charged, the handset battery provides
approximately ve hours of talk time or six days of standby time.
1.
Insert the plug of the battery as indicated. Make sure it is plugged securely
and matches the color-coded label inside the battery compartment.
2.
Place the battery with the label
the battery compartment.
Align the battery compartment cover at against the battery compartment,
3.
then slide it upwards until it clicks into place.
4.
Charge the handset by placing it in the telephone base or charger. The handset
charge light will be on when charging.
THIS SIDE UP facing up and the wires inside
If the handset will
•
not be used for
a long period of
time, remove the
battery to prevent
possible leakage.
To purchase
•
replacement
batteries, visit our
website at www.
vtechphones.
com or call
1 (800) 595-9511.
In Canada, go to
www.vtechcanada.
com or call 1 (800)
267-7377.
Getting started
Basic operation
1
2
3
www.vtechphones.com
4
3
Page 7
Getting started
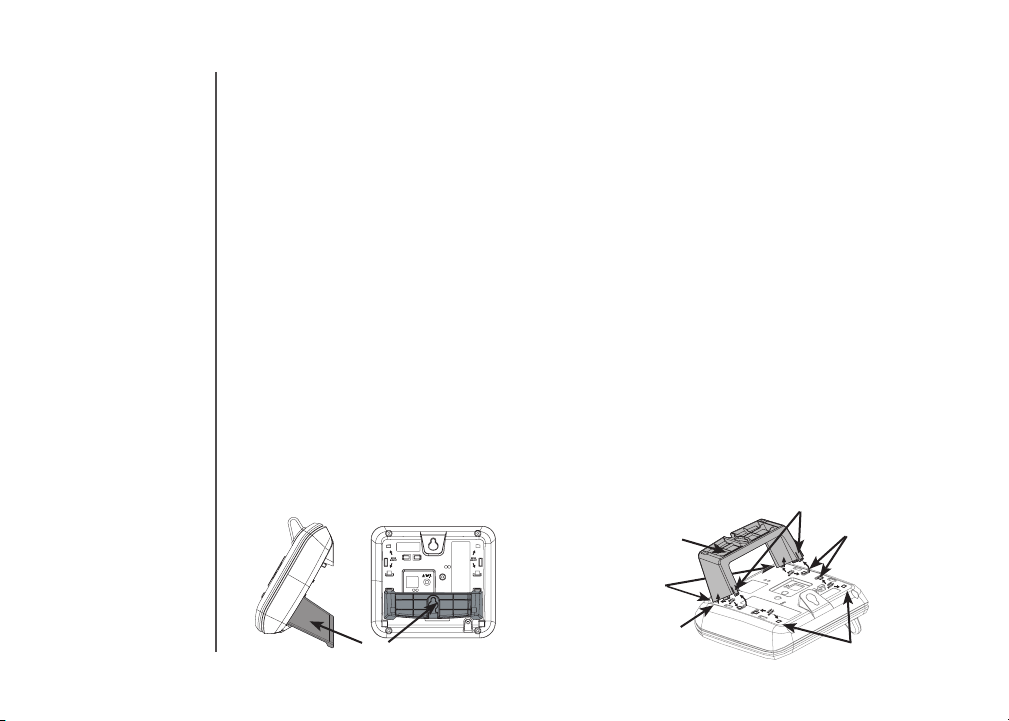
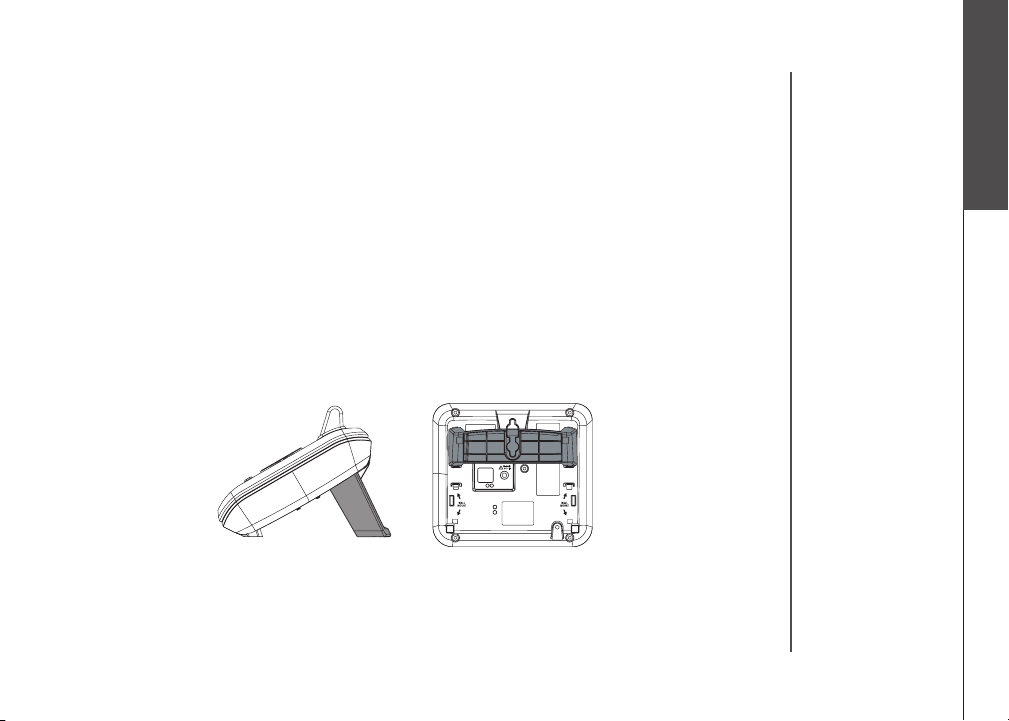
Mounting bracket installation
Your telephone base comes with the mounting bracket installed, ready for desktop
use. You may also mount your telephone onto a standard telephone wall plate.
Wall mounting bracket installation:
To prepare the telephone base for wall mounting, you will need to remove the
bracket if it is currently attached for desktop use. Press on the tabs located on
the legs of the bracket to loosen, then lift the bracket up and away from the
telephone base.
1.
First, insert the lower portion tabs of the mounting bracket into the lower
grooves in the telephone base, then snap the upper portion tabs of the mounting
bracket into place.
2.
Mount the telephone base on the wall by positioning it so the mounting studs
will t into the holes on the telephone base and mounting bracket. Slide the
telephone base down on the mounting studs until it locks into place.
To remove the bracket, press both upper portion tabs rmly inward and pull
3.
the bracket downward until it releases from the grooves.
upper portion tabs
Mounting bracket
lower portion
tabs
middle grooves
lower groove
4
Mounting bracket in wall mount orientation
www.vtechphones.com
upper grooves
Page 8
Getting started
Mounting bracket installation (continued)
Desktop/tabletop bracket installation:
Your phone comes ready for table or desktop use. If you have repositioned the
bracket for wall mounting and now want to return to desktop use, follow these
steps:
1.
Insert the lower portion tabs of the mounting bracket into the upper grooves
of the telephone base.
2.
Snap the upper portion tabs of the bracket into place.
To remove the bracket, press both upper portion tabs rmly inward and pull
3.
the bracket upward until it is released from the grooves.
Getting started
Basic operation
www.vtechphones.com
5
Page 9
Getting started
CHARGE
OPE R
DE F
JKL
P
QRS
W
X YZ
TUV
MNO
TONE
AB C
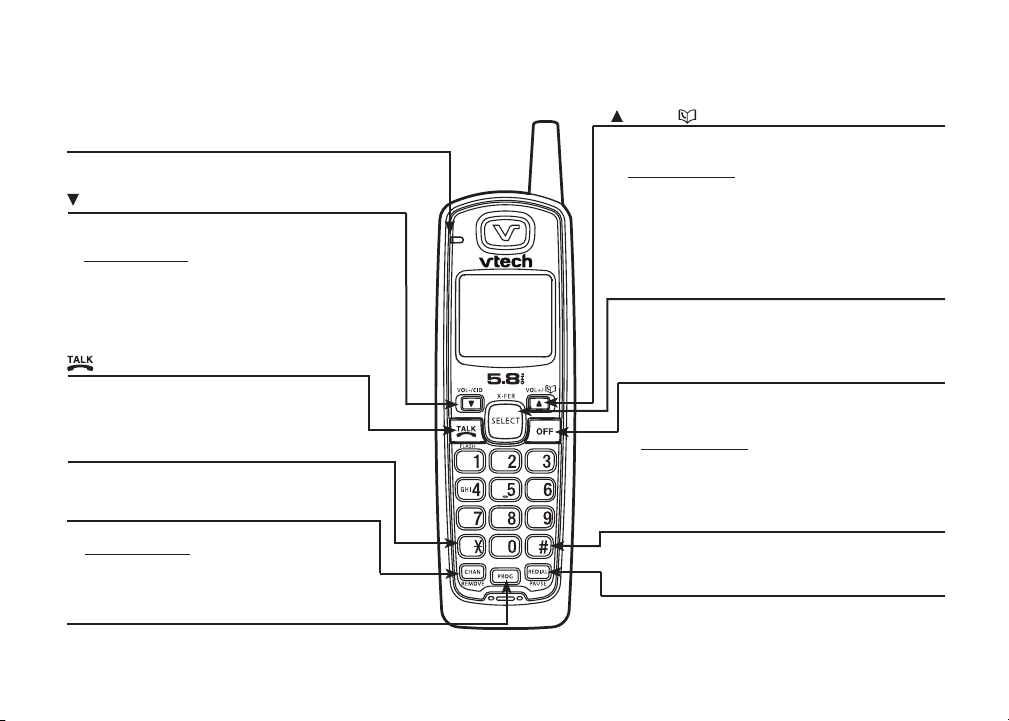
Handset layout
CHARGE light
• On when the handset is charging in the telephone
base or charger.
/VOL-/CID
• When the telephone is not in use, press to
review the call log.
•
Press and hold while the phone is not in use to
adjust ringer volume.
• During a call, press to decrease the listening
volume. A double beep will sound at the
lowest setting.
• Press to scroll down while in programming mode
or reviewing the redial list.
/FLASH
• Press to make or answer a call.
• During a call, press to receive an
incoming call when you receive a call
waiting alert.
TONE
*
• Press to switch to tone dialing temporarily
when using the pulse service (page 13).
CHAN/REMOVE
• Switch to a clearer channel while on a call.
• Press and hold to delete all records in the
call log when the phone is not in use.
When reviewing the call log or redial list,
•
press to delete the desired record.
PROG
• Press to enter programming mode
while the telephone is not in use.
6
www.vtechphones.com
/VOL+/
• Press to display the directory when the
telephone is not in use.
• Press and hold adjust the ringer volume
when the telephone is not in use.
• During a call, press to increase the listening
volume. A double beep will sound when the
highest setting is reached.
• Press to scroll up while in programming mode
or reviewing the redial list.
SELECT/X-FER
• Press to store a programming option or a
directory entry.
• During a call, press to transfer a call to
another handset.
OFF
• During a call, press to hang up.
• While the handset is ringing, press to silence
the ringer.
•
Press and hold while the telephone is
not in use to erase the MISSED CALLS
display.
• During programming, press to exit without
making changes.
#
• Press repeatedly to display other dialing
options when reviewing the call log (page 27).
REDIAL/PAUSE
• Press
• While dialing or entering numbers into the
repeatedly to review the redial list.
directory, press to insert a dialing pause.
Page 10
Getting started
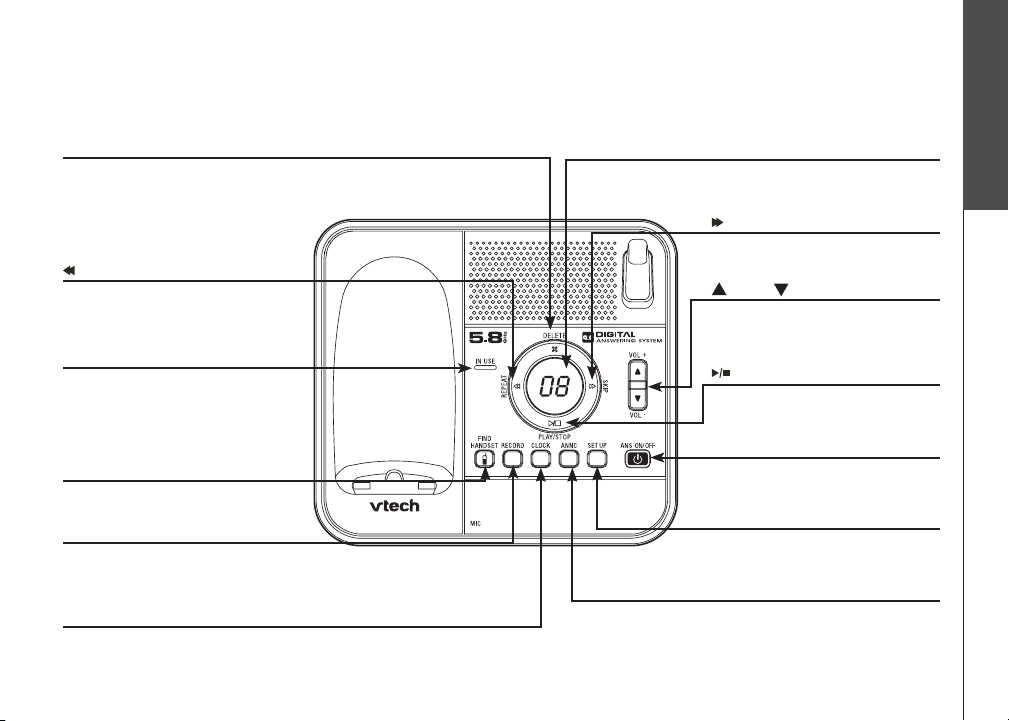
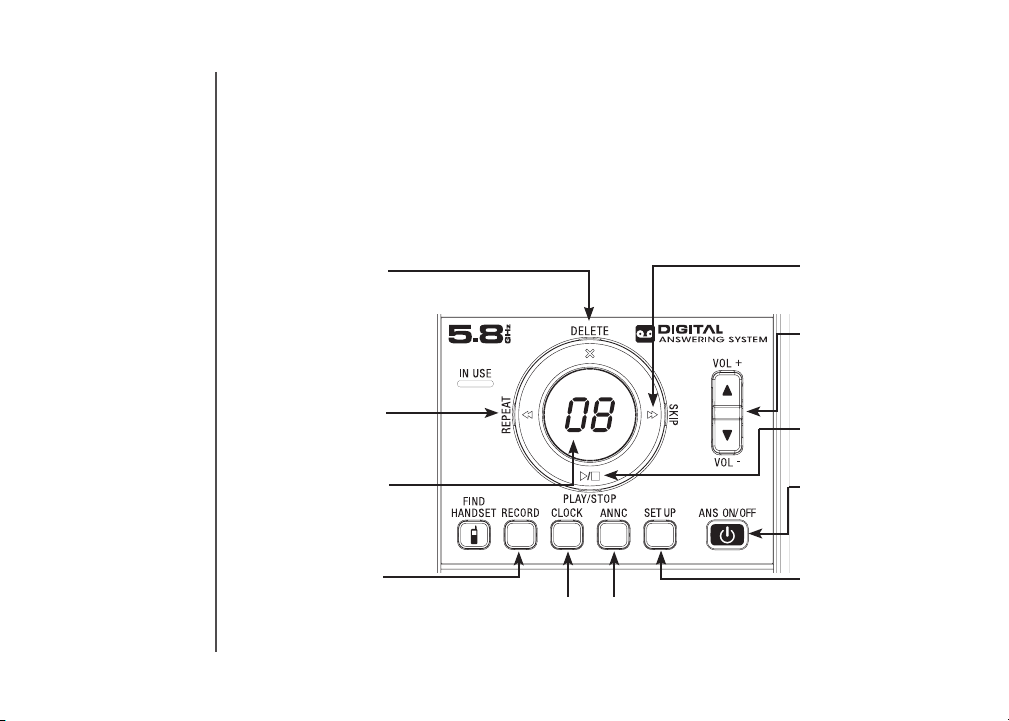
Telephone base layout
X/DELETE
Pres s t o d el e t e m es s ag e
•
currently playing (page 39).
Press t wice to delete all old
•
me s sage s whe n answ eri n g
system is not in use (page 40).
/REPEAT
Pres s to repeat a m ess age
•
or pre ss twice to play back
previous messages (page 39).
IN USE light
Flashe s whe n there is an
•
incoming call.
On steady while on a call.
•
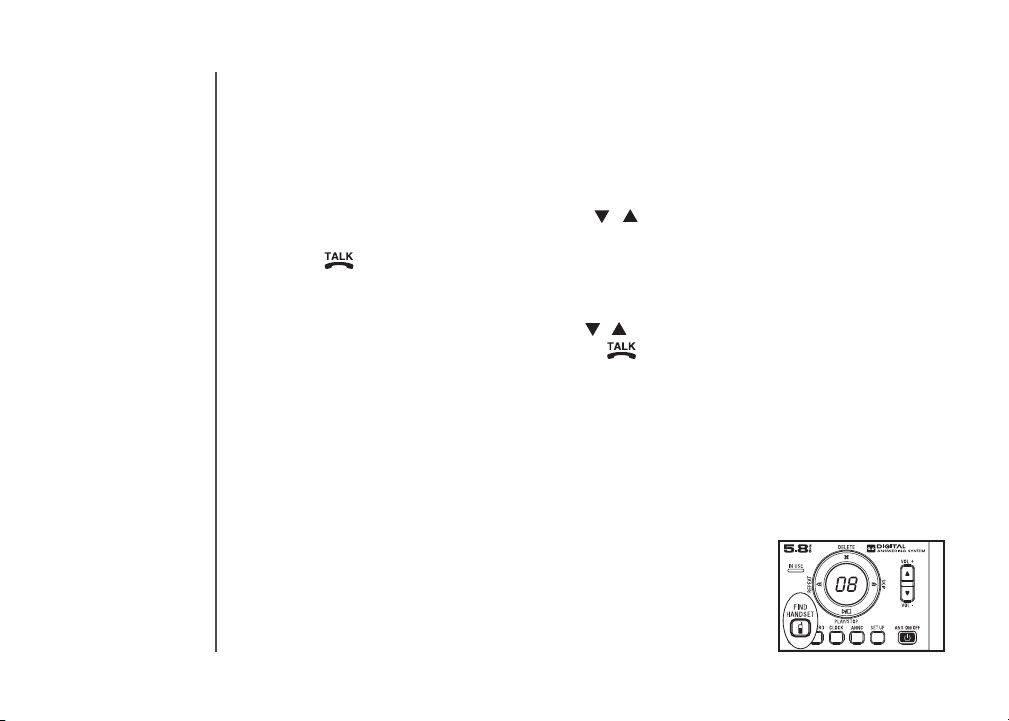
FIND HANDSET
Press to page all hand set s
•
(page 14).
RECORD
Press to record a memo (page
•
40) or an announcement on the
answering system (page 38).
CLOCK
Press to preview the date and time. Press again to set the
•
clock (page 33).
www.vtechphones.com
Message window
Shows the status and number
•
of messages (page 42).
/SKIP
Pr e ss to sk i p to th e next
•
message (page 39).
VOL+/ VOL-
Press to adjust the playback
•
volume during playback
(page 39).
/PLAY/STOP
Press to play or stop messages
•
(page 39).
ANS ON/OFF
Press to turn the answering
•
system on or off (page 33).
SET UP
Press to enter to the set up
•
menu (pages 34-36).
ANNC
Press to enter announcement
•
mode (pages 37-38).
Getting started
Basic operation
7
Page 11

In the event of a
•
power failure, the
time may need to
be reset.
Telephone settings
Date and time
If you subscribe to caller ID service, the date and time will be set automatically
with the next incoming call. If you do not have caller ID service, you can set the
date and time manually and individually for each handset.
Press PROG when the handset is not in use.
1.
Press or until DATE/TIME is displayed. Press SELECT.
2.
When the month is ashing, press or until the screen displays the correct
3.
month and then press SELECT.
When the date is ashing, press or until the screen displays the correct
4.
date and then press SELECT.
When the hour is ashing, press or until the screen displays the correct
5.
hour and then press SELECT.
When the minute is ashing, press or until the screen displays the correct
6.
minute and then press SELECT.
7.
AM or PM is ashing, press or to choose between AM or PM and
When
then press SELECT. You will hear a conrmation tone.
8
www.vtechphones.com
Page 12
Telephone settings
Ringer
You can select from the different ringers.
Press PROG when the handset is not in use.
1.
Press or until the screen displays RINGER: and the current setting.
2.
Press SELECT. The current setting ashes, and you will hear a sample of the ringer.
3.
Press or to select RINGER: 1, 2, 3, or 4. You will hear a sample of each
4.
ring tone.
Press SELECT to conrm your selection. You will hear a conrmation tone.
5.
Ringer volume (handset)
You can change the ringer volume to a comfortable level or turn the ringer off.
Press PROG when the handset is not in use. Press or until the screen
1.
displays RINGER VOL: and the current setting.
Press SELECT. The current setting ashes, and you will hear a sample of the
2.
ringer volume.
Press or to select ringer volume from OFF, LOW or HI. You will hear a
3.
sample of the selected volume level.
Press SELECT to conrm your selection. You will hear a conrmation tone.
4.
-OR-
Press and hold or
1.
when the handset is not in use. The current setting ashes and you will hear a sample
of the ringer volume.
Press or to select ringer volume from OFF, LOW or HI. You will hear a
2.
sample of the selected volume level.
Press SELECT to conrm your selection. You will hear a conrmation tone.
3.
until the screen displays RINGER VOL: and the current setting
www.vtechphones.com
If the ringer
•
volume is set to
OFF, RINGER
OFF and will be
displayed.
Even if the ringer
•
volume is set to
OFF, the handsets
will still ring
when you press
FIND HANDSET.
The telephone
•
base ringer
volume is set
separately. See
page 35 for
details.
Telephone settings
Basic operation
9
Page 13

If, in the future,
•
your phone
service provider
requires you to
dial the area code
when making a
local call, or you
want to cancel the
home area code
you have already
programmed,
reprogram your
home area code
to 000.
Press
•
CHAN/REMOVE
when in the home
area code menu
to delete the
stored home area
code. ___ will be
displayed.
Telephone settings
Dial mode
If you have touch tone service, the telephone is ready for use as soon as the
battery is charged. If you have pulse (rotary) service, you will need to change
the dial mode.
Press PROG when the handset is not in use.
1.
Press or until the screen displays DIAL MODE: and the current setting.
2.
Press SELECT. The current setting ashes.
3.
Press or to select TONE or PULSE.
4.
Press SELECT to conrm your selection. You will hear a conrmation tone.
5.
Home area code
If you dial your local calls using only seven digits (area code not required), you can
program your home area code, following the steps below. By programming your
home area code, when you receive a call within your local area, the telephone
number will automatically be stored without the area code in the call log.
Press PROG when the handset is not in use.
1.
Press or until the screen displays HOME AREA CODE.
2.
Press SELECT. The stored area code is displayed with the rst digit ashing.
3.
Use the dial key pad to enter the desired home area code.
4.
Press SELECT to conrm. You will hear a conrmation tone.
5.
10
www.vtechphones.com
Page 14

Telephone settings
Language
Press PROG when the handset is not in use.
1.
Press or until LANGUAGE is displayed.
2.
Press SELECT. The current setting ashes.
3.
Press or until the screen displays the desired language (ENGLISH,
4.
ESPANOL or FRANCAIS).
Press SELECT to conrm your selection. You will hear a conrmation tone.
5.
www.vtechphones.com
Telephone settings
Basic operation
11
Page 15
The call timer
•
will be activated
during a call to
show call duration.
The handset will
•
beep if it is moved
out of range while
on a call.
Telephone operation
Make calls
Press /FLASH and then use the dial pad keys to dial a number.
•
-OR-
Enter the phone number rst. You can press to backspace and press
1.
CHAN/REMOVE to erase digits.
Press /FLASH to dial.
2.
Answer calls
Press any dial pad keys (except /VOL-/CID, /VOL+/ and OFF) to answer
•
an incoming call.
End calls
Press OFF or put the handset back to the telephone base or charger to end
•
a call.
Volume
Press /VOL-/CID or /VOL+/ to adjust the listening volume during
•
a conversation.
Channel
Press CHAN/REMOVE to switch to a clearer channel while on a call.
•
12
www.vtechphones.com
Page 16

Telephone operation
Call waiting
If you subscribe to call waiting service and you are on a call when a new call
comes in, you will hear a beep. The caller ID information will be displayed if
you subscribe to combined caller ID with call waiting service from your local
telephone company.
Press /FLASH on the handset to put the current call on hold and answer
•
the incoming call.
Press /FLASH at anytime to alternate between calls.
•
Temporary tone dialing
If you have pulse (rotary) service, you can change from pulse to touch tone dialing
during a call by pressing TONE*. This is useful if you need to send touch tone
signals to access telephone banking or long distance services.
Once you have initiated your call by dialing the phone number in pulse (rotary), press
TONE*. Now, all subsequent key presses will be sent as touch tone signals.
After you hang up, the phone will return to pulse (rotary) dialing for the next call.
Telephone operation
Basic operation
www.vtechphones.com
13
Page 17
Telephone operation
Redial
The telephone stores ve most recently dialed telephone numbers on the
•
redial list. When the list is full, the oldest entry is deleted to make room for the
new entry.
Press REDIAL/PAUSE, then press
•
review the redial list. Press CHAN/REMOVE to delete the displayed number.
Press /FLASH, then press REDIAL/PAUSE to dial the last telephone
•
number dialed.
-OR-
Press REDIAL/PAUSE, then press
the desired entry displays, then press /FLASH to dial the number.
Find handset
Press FIND HANDSET on the telephone base to locate the handsets when
•
the telephone is not in use and there is no handset in the telephone base. All
handsets will ring and
Press FIND HANDSET again or put the handset back in the telephone base
•
to stop the paging tone of all handsets.
-OR-
Press OFF on the selected handset or put it back in the
charger to stop the paging tone of that particular handset.
PAGING** will be displayed on all handset screens.
**
, or REDIAL/PAUSE
, or REDIAL/PAUSE
repeatedly to
repeatedly until
14
www.vtechphones.com
Page 18

Telephone operation
Transfer an external call
An external call can be forwarded to another handset during a conversation.
1.
While on a call, press
screen will show CALL TRANSFERED.
2.
When the other handset(s) rings, press
answer and its screen will show TRANSFERED CALL.
3.
After another handset has answered the transferred call, the originating
handset screen will display
Press /FLASH on the originating handset to cancel the call forwarding
•
before any other handset answers the call.
•
If no handset answers the forwarded call within 30 seconds, the call will be
forwarded back to the originating handset. Press
handset to answer the call. The call will be disconnected if the originating
handset does not answer within 30 seconds.
SELECT/X-FER on the originating handset and its
/FLASH on a desired handset to
SYSTEM HS BUSY.
/FLASH on the originating
Telephone operation
Basic operation
www.vtechphones.com
15
Page 19

Each handset
•
director y is
independent
of the other
handsets. If you
make changes
to the directory
of one handset,
they will not be
reected in the
other handsets.
Telephone operation
Directory
The directory can store up to 20 entries (including nine speed dial entries). Each
entry may consist of a number up to 24 digits and a name up to 14 characters.
Store a directory entry
Press PROG when the handset is not in use. The screen displays DIRECTORY.
1.
Press SELECT. The screen displays ENTER NAME.
2.
Use the dial pad keys to enter the name. See the Character chart on page 17.
3.
Press to move the cursor to the left or to the right.
•
Press CHAN/REMOVE to erase a character.
•
When nished, press SELECT or PROG. The screen displays ENTER NUMBER.
4.
Use the dial pad keys to enter the telephone number.
5.
Press to move the cursor to the left or to the right.
•
Press CHAN/REMOVE to erase a digit.
•
Press REDIAL/PAUSE to insert a dialing pause (P will be displayed).
•
Press SELECT or PROG. The screen displays DISTINCT RING? and the
6.
current setting.
Press or to choose Y (yes) if you wish to customize this entry or choose
7.
N (no) for a normal ringer. If you choose Y, a will be displayed with the
directory entry.
Press SELECT or PROG to conrm and you will hear a conrmation tone.
8.
16
www.vtechphones.com
Page 20
Telephone operation
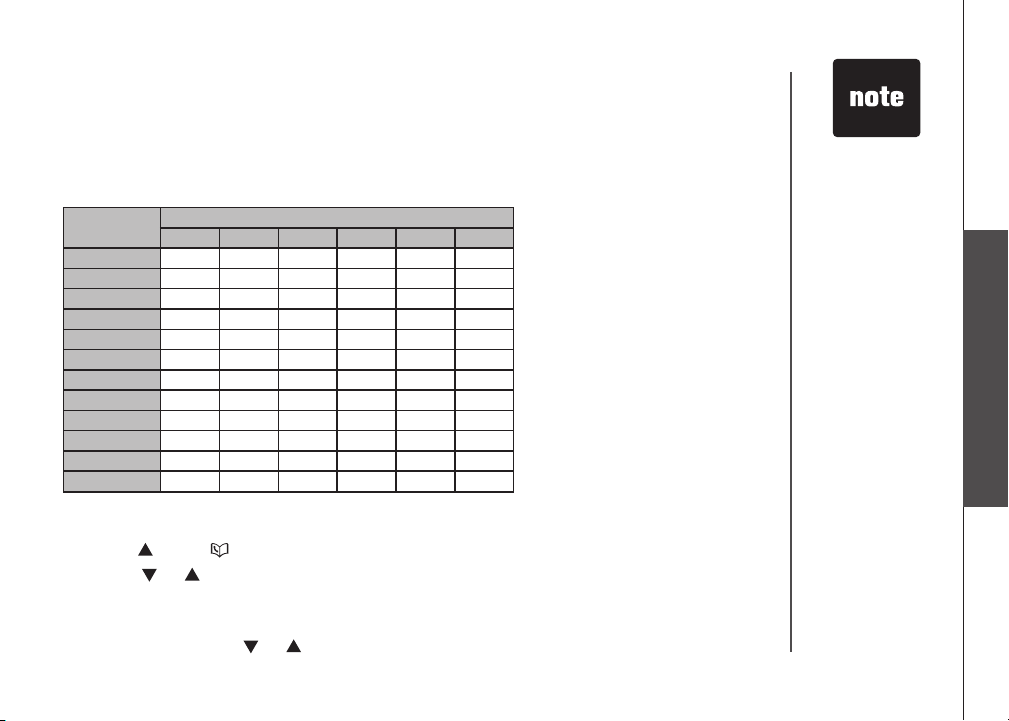
Character chart
Use the dial pad keys and the chart below to enter a name (up to 14 characters).
An error tone will sound if you try to enter more than 14 characters. Each press
of a particular key causes the characters to be displayed in the following order:
Dial ke y
1 1
2 A B C 2
3 D E F 3
4 G H I 4
5 J K L 5
6 M N O 6
7 P Q R S 7
8 T U V 8
9 W X Y Z 9
0 0
*
# &
Review the directory
Press /VOL+/ when the handset is not in use. The screen displays DIRECTORY.
1.
Press or to scroll through the entries stored in the directory alphabetically.
2.
- OR -
Press the dial pad key for the rst letter of the name you want to search. If
necessary, scroll
Charact ers by num ber of key pr esses
1 2 3 4 5 6
*
,
, - . #
or to nd the desired entry.
www.vtechphones.com
• When you reach
the end of the list
in the directory,
END OF LIST will
be shown on the
screen and there
will be an error
tone.
• If you press a
dial pad key for
alphabetical
search while in
the directory and
there are no entries
starting with the
letters of that key,
NO DATA will be
displayed on the
screen.
Telephone operation
Basic operation
17
Page 21
Telephone operation
Edit a directory entry
Press /VOL+/ when the handset is not in use. The screen displays
1.
DIRECTORY.
Press or to scroll through the entries stored in the directory alphabetically.
2.
- OR -
Press the dial pad key for the rst letter of the entry you want to edit. If
necessary, scroll
3.
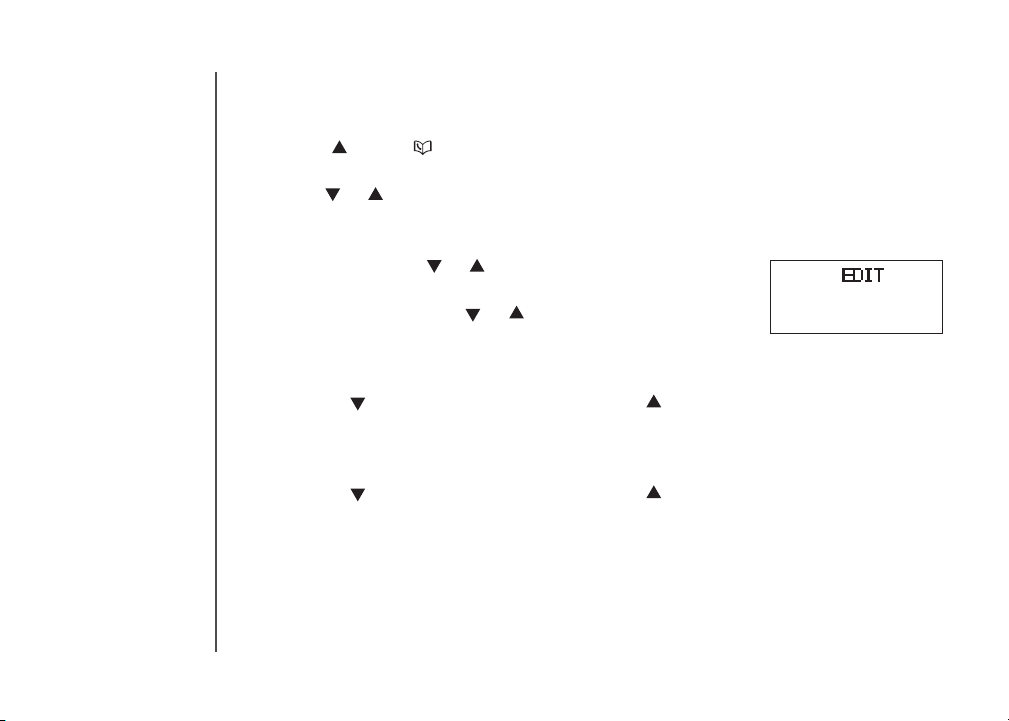
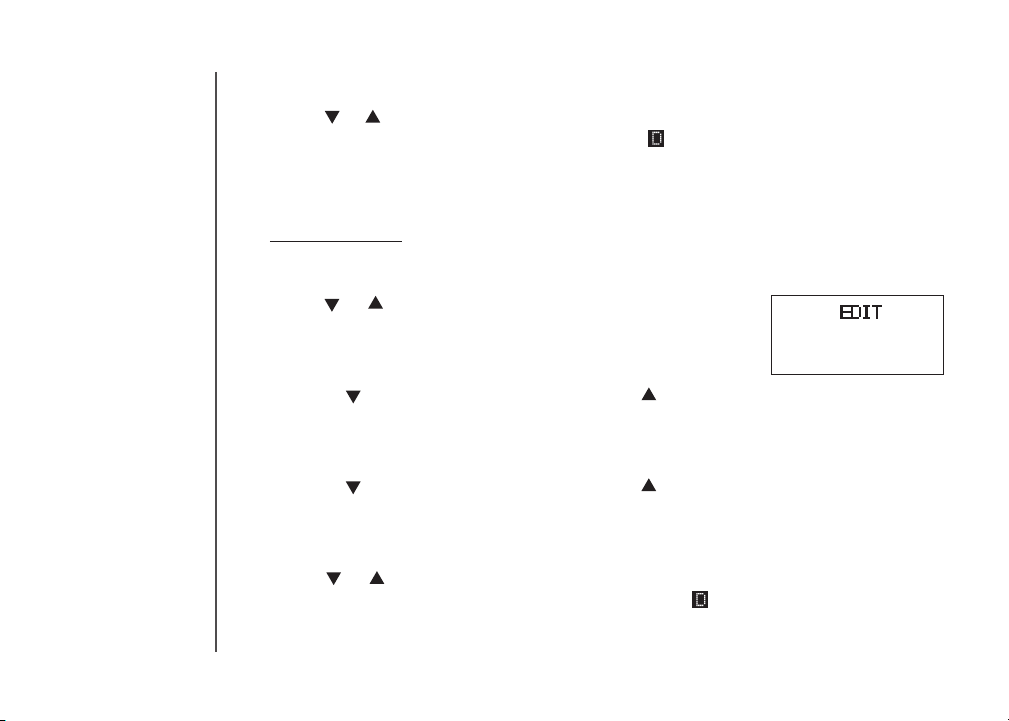
When the screen displays the desired entry, press
or to nd the desired entry.
SELECT. Then press or until EDIT ashes.
Press SELECT. The screen displays the name and
4.
number. The cursor appears at the beginning of the name.
• Use the dial pad keys to edit the name.
• Press to move the cursor to the left or to the right.
• Press CHAN/REMOVE to erase a character.
Press SELECT to move on to the phone number.
5.
• Use the dial pad keys to edit the number.
• Press to move the cursor to the left or to the right.
• Press CHAN/REMOVE to erase a digit.
• Press REDIAL/PAUSE to insert a dialing pause (P will be displayed).
Press SELECT. The screen displays DISTINCT RING? and the current setting.
6.
SPEED EDIT DEL
8005959511
18
www.vtechphones.com
Page 22

Telephone operation
Press or to choose Y (yes) if you wish to customize this entry, or choose
7.
N (no) for a normal ringer. If you choose Y, a will be displayed with the
directory entry.
Press SELECT to conrm and you will hear a conrmation tone.
8.
Delete a directory entry
Press /VOL+/ when the handset is not in use. The screen displays
1.
DIRECTORY.
Press or to scroll through the entries stored in the directory alphabetically.
2.
- OR -
Press the dial pad key for the rst letter of the entry you want to delete. If
necessary, scroll or to nd the desired entry.
3.
When the screen displays the desired entry, press
SELECT. Then pres s or until DEL (delete)
ashes.
Press SELECT. The screen displays ERASE NO YES and the number. The
4.
current choice ashes.
Press until YES ashes.
5.
Press SELECT. You will hear a conrmation beep.
6.
www.vtechphones.com
SPEED EDIT DEL
8005959511
Telephone operation
Basic operation
19
Page 23

Telephone operation
Copy a directory entry into speed dial
Press /VOL+/ when the handset is not in use. The screen displays
1.
DIRECTORY.
Press or to scroll through the entries stored in the directory alphabetically.
2.
- OR -
Press the dial pad key for the rst letter of the entry you want to copy. If
necessary, scroll or to nd the desired entry.
3.
When the screen displays the desired entry, press
SELECT. Then press or until SPEED ashes.
Press SELECT. The screen displays ENTER 1-9.
4.
Press a key (1-9) to copy this entry from the directory to the speed dial memory
5.
and assign the memory location. You’ll hear a conrmation beep. A memory
location number (01 through 09) will be displayed with this entry.
Dial a number from the directory
Press /VOL+/ when the handset is not in use. The screen displays
1.
DIRECTORY.
Press or to scroll through the entries stored in the directory alphabetically.
2.
- OR -
Press the dial pad key for the rst letter of the desired entry. If necessary, scroll
or to nd the desired entry.
3.
When the screen displays the desired entry, press
SPEED EDIT DEL
8005959511
/FLASH.
20
www.vtechphones.com
Page 24

Telephone operation
Speed dial
Your telephone can store up to nine telephone numbers with names (up to 14
characters and 24 digits in each location) in the speed dial memory locations
you assign in each handset.
Store a speed dial entry
Press PROG when the handset is not in use and then press or until the
1.
screen displays SPEED DIAL.
Press SELECT. The screen displays ENTER 1-9.
2.
Press a key (1 through 9) to assign the speed dial location where this number
3.
will be stored. The screen displays ENTER NAME.
4.
Use the dial pad keys to enter the name (see the
17) and then press SELECT or PROG .
Press to move the cursor to the left or to the right.
•
Press CHAN/REMOVE to erase a character.
•
The screen displays ENTER NUMBER.
5.
6.
Use the dial pad keys to enter the telephone number, and then press
or PROG.
Press to move the cursor to the left or to the right.
•
Press CHAN/REMOVE to erase a digit.
•
Press REDIAL/PAUSE to insert a dialing pause (P will be displayed).
•
The screen displays DISTINCT RING? and the current setting.
7.
Character chart on page
SELECT
The entries stored
•
in the speed
dial memor y will
be numbered
01 through 09
and share the
memory in the
director y.
Press OFF at
• any time to exit the Speed dial menu.
If the location is
•
not empty, the
new entry will
replace the old
entry and the
old entry will
be moved to a
director y location.
Telephone operation
Basic operation
www.vtechphones.com
21
Page 25
22
Telephone operation
Press or to choose Y (yes) if you wish to customize this entry, or choose N
8.
(no) for a normal ringer. If you choose Y, a will be displayed with the entry
Press SELECT or PROG to conrm. You will hear a conrmation tone.
9.
Edit a speed dial entry
Press and hold the speed dial location key (1-9) of the desired entry when the
1.
handset is not in use.
When the screen displays the entry you want to edit, press SELECT. Then
2.
press or until EDIT ashes.
Press SELECT. The screen displays the name and
3.
number. The cursor appears at the beginning of the
name. Use the dial pad keys to edit the name.
Press to move the cursor to the left or to the right.
•
Press CHAN/REMOVE to erase a character.
•
Press SELECT to move on to the phone number. Use the dial pad keys to
4.
edit the number.
Press to move the cursor to the left or to the right.
•
Press CHAN/REMOVE to erase a digit.
•
Press REDIAL/PAUSE to insert a dialing pause (P will be displayed).
•
Press SELECT. The screen displays DISTINCT RING? and the current setting.
5.
Press or to choose Y (yes) if you wish to customize this entry, or choose
6.
N (no) for a normal ringer. If you choose Y, a will be displayed with the
directory entry.
Press SELECT to conrm. You will hear a conrmation tone.
7.
www.vtechphones.com
SPEED EDIT DEL
8005959511
01
Page 26

Telephone operation
Delete a speed dial entry
Press and hold the speed dial location key (1-9) of the desired entry when the
1.
handset is not in use.
When the screen displays the desired entry, press SELECT. Then press or
2.
until DEL (delete) ashes.
Press SELECT. The screen displays ERASE NO YES and the number. The
3.
current choice ashes.
Press until YES ashes.
4.
Press SELECT. You will hear a conrmation beep.
5.
Dial a speed dial number
Press and hold a speed dial location key (1-9) of the
1.
desired entry when the handset is not in use.
Press /FLASH to dial the displayed number.
2.
SPEED EDIT DEL
8005959511
01
Telephone operation
Basic operation
www.vtechphones.com
23
Page 27

Telephone operation
Reassign speed dial locations
Press and hold the speed dial location key (1-9) of the desired entry when the
1.
handset is not in use.
2.
When the screen displays the desired entry, press
SELECT. Press or until SPEED ashes.
Press SELECT. The screen displays ENTER 1-9.
3.
Press a key (1-9) to reassign this entry into another memory location. You will
4.
hear a conrmation beep.
SPEED EDIT DEL
8005959511
01
24
www.vtechphones.com
Page 28

Telephone operation
About caller ID
The caller ID with call waiting feature in this telephone lets you see the name
and telephone number of the caller before answering the call, even when already
on a call. These features require services provided by your local telephone
company.
Contact your telephone company if:
•
you have both caller ID and call waiting, but as separate services (you may
need combined service),
•
you have only caller ID service, or only call waiting service, or
•
you do not subscribe to any caller ID or call waiting services but wish to try
these services.
You can use this telephone with regular caller ID service, and you can use its
other features without subscribing to either caller ID or combined caller ID with
call waiting service. There may be fees for these services, and these services
may not be available in all areas.
The caller ID features will work only if both you and the caller are in areas offering
caller ID service, and if both telephone companies use compatible equipment.
Telephone operation
Basic operation
www.vtechphones.com
25
Page 29

If you answer
•
a call before
the information
appears on the
screen, it will not
be stored in the
call log.
The time on
•
all handsets is
automatically set
and updated with
incoming caller ID
information if you
subscribe to this
service.
Due to regional
•
service
differences,
the caller ID
information may
not be available
for every incoming
call. In addition,
the callers may
intentionally
block their names
and/or telephone
numbers.
26
Telephone operation
Call log
Caller’s name
Time of call
If you subscribe to caller ID service, information about each caller will be displayed
after the rst or second ring.
•
The call log can store up to 45 entries.
•
When the call log is full, the earliest entry will be deleted to make room for new
incoming call information.
CID EMPTY will be displayed if there is no record in the call log.
•
•
Each handset has its own independent call log. If you delete one or all call log
entries from one handset, it will not affect the call log of other handset(s).
VTECH
800-595-9511
NEW05
AM
6:10
08/17
Date of call
www.vtechphones.com
Caller’s telephone number
New call l og indicator and
location in the call log
Page 30

Telephone operation
Review the call log
Press /VOL-/CID to view the call log when the handset is not in use.
1.
Press or to scroll through the entries.
2.
There will be an error tone when you reach the end of the call log list and the
screen will display
Make call log entries ready to dial
Although the call log entries received have 10 digits (the
area code plus the seven-digit number), in some areas,
you may need to dial only the seven digits, or a 1 plus the
seven digits, or a 1 plus the area code plus the seven digits.
You can change the number of digits that you dial from or
store in the call log.
While reviewing the call log, press
different dialing options for local and long distance numbers
before dialing or saving the telephone number in the
directory. See the example on the right.
You may also press 1 repeatedly to add or remove a 1 in
front of the telephone number before dialing or saving it in
the directory. See the examples on the right.
When the number displayed is in the correct format for
dialing, press
END OF LIST.
# repeatedly to display
/FLASH to call the number.
800-595-9511
1-800-595-9511
595-9511
1-595-9511
800-595-9511
1-800-595-9511
595-9511
1-595-9511
If you have
•
programmed a
home area code
(page 10), only
the last seven
digits of the
incoming phone
numbers from
that area code
will be displayed
while reviewing
the call log. Press
# repeatedly to
display all possible
dialing options.
Telephone operation
Basic operation
www.vtechphones.com
27
Page 31

Telephone operation
Dial a call log number
Press /VOL-/CID to enter the call log when the handset is not in use.
1.
Press or to select the desired entry, then press /FLASH.
2.
-OR-
Press /VOL-/CID to enter the call log when the handset is not in use.
1.
Press or to select the desired entry.
2.
Press SELECT, then DIAL ashes.
3.
Press /FLASH or SELECT.
4.
28
www.vtechphones.com
Page 32
Telephone operation
Save a call log entry to the directory
Press /VOL-/CID to enter the call log when the handset is not in use.
1.
Press or to select the desired entry. If you wish to
2.
change how the number is saved, press # repeatedly
until the desired option displays. See the Make call log
entries ready to dial section on page 27.
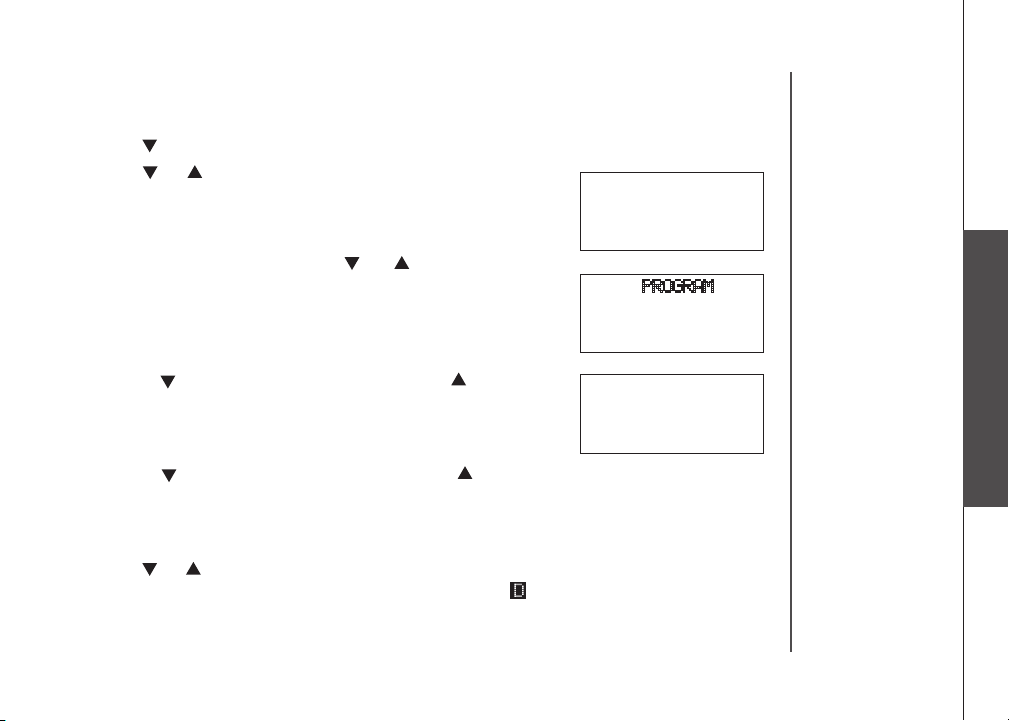
Press SELECT, then press or until PROGRAM
3.
ashes.
Press SELECT again.
4.
5.
Enter or edit the name if necessary. See the
Character
chart on page 17.
Press to move the cursor to the left or to the right.
•
Press CHAN/REMOVE to erase a character.
•
Press SELECT to move on to the phone number.
6.
Edit the number if necessary.
Press to move the cursor to the left or to the right.
•
Press CHAN/REMOVE to erase a digit.
•
Press REDIAL/PAUSE to insert a dialing pause (P will be displayed).
•
Press
7.
SELECT to continue.
Press or to choose Y (yes) if you wish to customize this entry, or choose
N (no) for a normal ringer. If you choose Y, a will be displayed with the
directory entry.
Press SELECT to conrm. You will hear a conrmation tone.
8.
800-595-9511
5:40PM 12/30
DIAL PROGRAM
5:40PM 12/30
DISTINCT RING? N
8005959511
NEW28
800-595-9511
NEW28
Telephone operation
Basic operation
www.vtechphones.com
29
Page 33

Telephone operation
Delete from the call log
Delete an entry:
Press /VOL-/CID to enter the call log.
1.
Press or to select the entry to be deleted.
2.
Press CHAN/REMOVE. You will hear a conrmation beep.
3.
Delete all entries:
Press and hold CHAN/REMOVE when the telephone is not in use. The screen
1.
displays ERASE ALL? N Y. The current choice ashes.
Press until Y (yes) ashes.
2.
Press SELECT. You will hear a conrmation beep.
3.
30
www.vtechphones.com
Page 34
Telephone operation
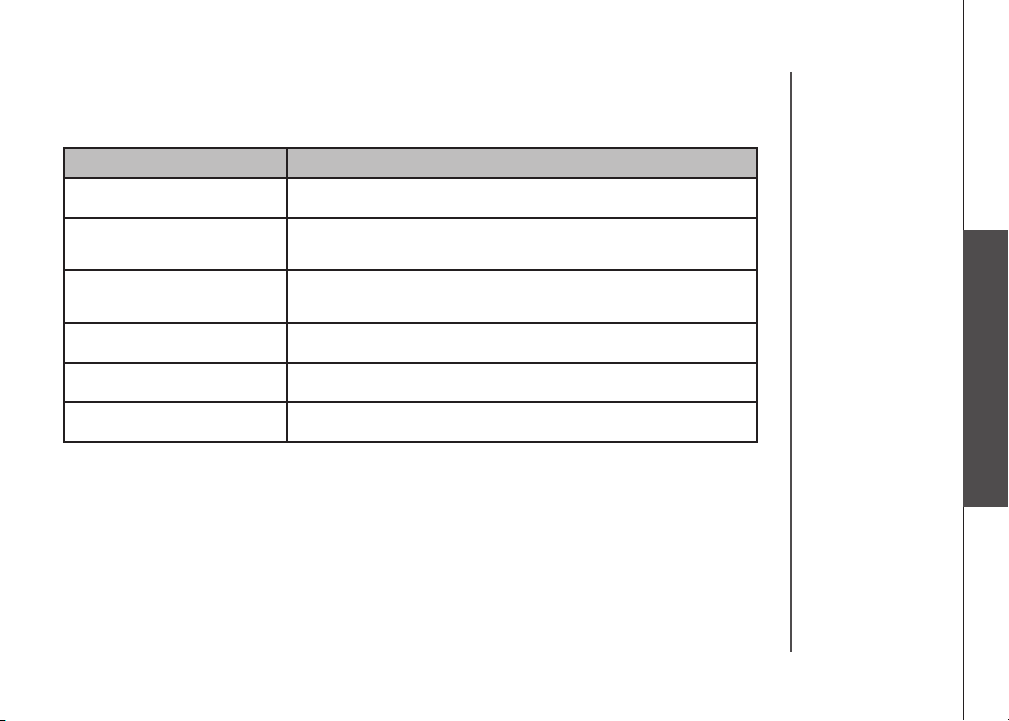
Call log display screen messages
Displays: When:
PRIVATE NAME
PRIVATE NUMBER
PRIVATE CALLER
UNKNOWN NAME
UNKNOWN NUMBER
UNKNOWN CALLER
The caller is blocking the name information.
Th e caller is blockin g the tele phone number
information.
The caller is blocking the name and number
information.
This caller’s name is unavailable.
This caller’s number is unavailable.
No call information is available about this caller.
Telephone operation
Basic operation
www.vtechphones.com
31
Page 35
32
Answering system
Message capacity
The answering system can record up to 95 messages, depending on the length
of each message. Each individual message can be up to four minutes in length,
and the total maximum recording time is approximately 12 minutes. Messages
will remain available for replay until they are deleted.
Press to delete
message currently
playing (page 39).
Press twice to delete
all old messages when
answering system is not
in use (page 40).
Press to repeat a
message. Press
twice to play back
previous messages
(page 39).
Shows the status
and number of
messages (page
42).
Press to record a
memo (page 40) or
an announcement
on the answering
system (page 38).
Press to set
the clock
(page 33).
www.vtechphones.com
Press to enter
announcement mode
(pages 37-38).
Press to skip to
the next message
(page 39).
Press to adjust
volume during
playback (page
39).
Press to play or
stop messages
(page 39).
Press to turn the
answering system
on or off (page 33).
Press to listen to the
set up menu (pages
34-36).
Page 36

Answering system
Activate the answering system
The answering system must be turned on to answer and record messages.
If the answering system is turned on, the
ANS ON/OFF to turn the answering system off or on.
Set the clock
Before playing each message, the answering system announces the day and
time of the message received. Before using the answering system, set the day,
time and year, so that messages are dated correctly. If the clock is not set before
new messages are recorded, the system will announce “Time and day not set.”
before each message is played to remind you to set the clock.
Press CLOCK. The system announces the clock setting (e.g. day, time and
1.
year), then announces: “To set the clock, press CLOCK.”
Press CLOCK. The system announces the current day.
2.
Press /SKIP or /REPEAT until the system announces the correct day, then
3.
press CLOCK. The system announces the current hour.
Press /SKIP or /REPEAT until the system announces the correct hour, then
4.
press CLOCK. The system announces the current minute.
Press /SKIP or /REPEAT until the system announces the correct minute,
5.
then press CLOCK. The system announces the current year.
Press
6.
/SKIP or /REPEAT
press CLOCK. The system announces the current clock setting and exits the
clock menu.
until the system announces the correct year, then
ANS ON/OFF light will be on. Press
If you have caller
•
ID service the
clock will be set
automatically with
incoming calls,
but you will need
to make sure the
year is correct.
Press and hold
•
/SKIP or
/REPEAT
while setting
the minutes or
year to advance
or decrease by
increments of ten.
Basic operation
Answering system
www.vtechphones.com
33
Page 37

Answering system
Answering system setup
The answering system uses voice prompts to guide you through the steps to set
up the answering system. Press /PLAY/STOP anytime to save and exit the
SET UP menu.
Set number of rings
This feature allows you to select the number of rings before the answering
system answers. You can choose from two, four or six rings or toll saver. With
toll saver active, the answering system answers after two rings when there is a
new message, and after four rings when there is no new message. To set the
number of rings:
Press SET UP when in idle mode and the system announces the current
1.
number of rings setting.
Press /SKIP or /REPEAT until the system announces the desired setting,
2.
then press SET UP to save the setting and go to the next setting, or press
/PLAY/STOP to save and return to the idle mode.
34
www.vtechphones.com
Page 38

Answering system
Set telephone base ringer
This feature allows you to select the telephone base ringer volume level.
Press SET UP when in idle mode until the system announces the telephone
1.
base ringer setting. There are three levels: HI (high), OF (off) and LO (low).
Press /SKIP or /REPEAT until the system announces the desired telephone
2.
base ringer volume level, then press SET UP to save the setting and go to the
next setting, or press /PLAY/STOP to save and return to the idle mode.
Set remote access code
A two-digit security code is required to access the answering system from any
touch tone telephone. The preset code is 19. You can set the remote access
code from 10 to 99.
To set the remote access code:
Press SET UP when in idle mode until the system announces the remote
1.
access code setting.
Press /SKIP or /REPEAT to change the remote access code by one, or
2.
press and hold /SKIP or /REPEAT to change it by increments of ten. Press
SET UP to save the setting and go to the next setting, or press /PLAY/STOP
to save and return to the idle mode.
The handset
•
ringer volume is
set separately.
See page 9 for
details.
Basic operation
Answering system
www.vtechphones.com
35
Page 39

The answering
•
system must be
turned on for the
message alert
tone to function.
Answering system
Set message alert tone
This feature programs the system to beep every 10 seconds to alert you of new
messages when the telephone is not in use. The tone will stop when all new
messages have been reviewed.
To set the message alert tone:
Press SET UP when in idle mode until the system announces the message
1.
alert tone setting.
Press /SKIP or /REPEAT to select on or off, then press SET UP to save
2.
and go to the next setting, or press /PLAY/STOP to save and return to the
idle mode.
36
www.vtechphones.com
Page 40

Answering system
Outgoing announcement
The outgoing announcement is the greeting callers hear when calls are answered
by the answering system.
The telephone is preset with a greeting that answers calls with
a message after the tone.” You can use this preset announcement, or replace it
with your own. While in the ANNC menu, press ANNC again to exit at anytime.
Play your announcement
Press ANNC when in idle mode and the system will announce “Announcement.
1.
Press PLAY or press RECORD.”
Press /PLAY/STOP to play the announcement. You can press it again to
2.
stop playback.
“Hello, please leave
Your
•
announcement
can be up to
90 seconds in
length.
Announcements
•
shorter than two
seconds will not
be recorded.
Basic operation
Answering system
www.vtechphones.com
37
Page 41

When your
•
announcement
is deleted, calls
will be answered
with the preset
announcement.
Answering system
Record your own announcement
Press ANNC while in idle mode and the system will announce “Announcement.
1.
Press PLAY or press RECORD.”
Press RECORD and the system announces, “Record after the tone. Press
2.
STOP when you are done.”
3.
After the tone, speak towards the microphone at the bottom front of the
telephone base from about nine inches away.
Press /PLAY/STOP when nished.
4.
5.
The answering system will automatically playback the newly recorded
announcement and there will be a conrmation tone. Press /PLAY/STOP
to stop the playback at anytime.
6.
You can record your announcement again by following the steps above.
Delete your announcement
Press ANNC while in idle mode and the system will announce “Announcement.
1.
Press PLAY or press RECORD.”
Press X/DELETE and the system will announce “Announcement deleted.”
2.
38
www.vtechphones.com
Page 42

Answering system
New message indication
The message display counter will ash when there are new answering system
messages.
If the new message alert tone is turned on, the telephone base will beep every
ten seconds when there are unreviewed messages.
Message playback
Press /PLAY/STOP to listen to messages.
1.
Press /PLAY/STOP again to stop playback.
2.
If you have new messages waiting, you will hear only new messages (oldest rst). If
there are no new messages, the system will play back all messages (oldest rst).
When playback begins, the total number of messages is announced, followed by
the day and time of the rst message to be played.
Options during playback
Press VOL+/ VOL- to adjust the speaker volume.
•
Press /SKIP to skip to the next message.
•
Press /REPEAT to repeat the message currently playing. Press /REPEAT
•
twice to listen to the previous message.
Press X/DELETE to delete the current message. The system will advance to
•
the next message.
If the system
•
has less than
ve minutes of
recording time
left, the remaining
time will be
announced.
If F is ashing
•
in the message
window, the
memory is full.
You will have
to delete some
messages before
new ones can be
recorded.
Only old
•
messages can
be deleted.
Messages can
only be deleted
after they are
played.
Basic operation
Answering system
www.vtechphones.com
39
Page 43

Memos shorter
•
than one second
will not be
recorded.
“Memor y is full.”
•
will be announced
if you press
RECORD when
the memory is
full.
Each memo can
•
be up to four
minutes in length.
Answering system
Delete all messages
Press X/DELETE when the system is not in use. The system will announce
“To delete all old messages, press DELETE again.” Press X/DELETE again. All
previously heard messages will be erased. The system will announce “All old
messages deleted.”
Record and play memos
Memos are your own recorded messages used as reminders for yourself or other
household members using the same answering system. They are saved, played
back and deleted the same way as the answering system messages.
Record a memo
Press RECORD when in idle mode. The system announces, “Record after
1.
the tone. Press STOP when you are done.”
2.
After the tone, speak towards the microphone at the bottom front of the
telephone base from about nine inches away.
Press /PLAY/STOP when nished recording.
3.
Memo playback
Press /PLAY/STOP when in idle mode. See Options during playback on
page 39 for other options.
40
www.vtechphones.com
Page 44

Answering system
Call screening
If the answering system is on, you can listen at the telephone base to a caller
leaving a message on the answering system. If the base volume is set to 1, you
will not hear your messages as callers leave them.
Call intercept
When a caller is leaving a message on the answering system and you decide
to answer the call, press /FLASH.
Basic operation
Answering system
www.vtechphones.com
41
Page 45

Answering system
Message window displays
The message counter usually displays the total number of memos and incoming
messages. See the list below for explanations of other displays in this counter.
Window displays: When:
0 No messages.
1-95 Total number of old message(s) recorded.
0-94 (ashing) Total number of new and old messages recorded.
The telephone base may have lost and regained power.
Time and day may need to be set.
1-95 & F (alternating) Memory is full with total number of messages recorded.
1-99 (counting) Elap sed time while recording memo or announcement (up to 9 0
seconds).
99 (ashing) Recording time exceeds 99 seconds.
1-95 (ashing) Current message number during new message playback.
1-95 Current message number during old message playback.
1-8 Current volume level while adjusting.
10-99 Current remote access code while setting.
2, 4, 6, tS Current number of rings while setting.
-- System is answering a call, or being set the time and date, or being
accessed remotely.
-- (ashing) System is being programmed or initialized.
42
www.vtechphones.com
Page 46

Answering system
Remote access
A two-digit security code is required to access the system remotely from any touch
tone telephone that does not share the same line with your answering system.
The factory preset code is 19; see page 35 to change it.
1.
Dial your telephone number from any touch tone telephone.
2.
When the system answers and announces the greeting, enter the two-digit
security code. If you have new messages, the system will play them (new
messages rst) automatically.
3.
You may also enter one of the following remote commands.
Command Function
1 Play all messages.
2 Play only new messages.
3 Delete the current message (during playback).
33 Delete all old messages.
4 Repeat the current message (during playback).
5 Stop.
*5 Hear a list of remote commands.
6 Skip to the next message (during playback).
*7 Record a new announcement.
8 End the call.
0 Turn the answering system on or off.
Hang up or press 8 to end the call.
4.
www.vtechphones.com
If you pause more
•
than four seconds
after each
remote command
completed,
the system
will announce
the help menu
options. If no
remote command
is entered within
15 seconds, the
remote access
call will be
automatically
disconnected.
When the
•
answering system
is turned off,
the telephone
will answer after
10 rings, and
announce “Please
enter your remote
access code.”
Basic operation
Answering system
43
Page 47

Handset display screen messages
Displays: When:
LOW BATTERY
CID EMPTY
CONNECTING...
DIRECTORY EMPTY
LINE IN USE
MEMORY FULL
XX MISSED CALLS
**PAGING**
PARALLEL SET ON
PHONE
POWER FAILURE
OR OUT OF RANGE
**RINGING**
The battery needs to be recharged.
There are no call log entries.
The cordless handset is searching for the telephone base.
There are no directory entries.
The answering system is in use.
The directory is full.
There are unreviewed calls in the call log.
The cordless handset locator has been activated.
Another telephone on the same line is in use.
The handset is in use.
There is no power connected to the telephone base or the
handset is too far away from the telephone base.
There is an incoming call.
44
www.vtechphones.com
Page 48

Handset display screen messages
Displays: When:
RINGER OFF
SCANNING...
SYSTEM HS BUSY
The handset ringer is turned off.
The telephone base is searching for another available
channel.
Another system handset is in use.
Appendix
www.vtechphones.com
45
Page 49
Battery
After the battery is fully charged for 16 hours, you can expect the following performance:
Operation Operating time
While in use (talking) Five hours
While not in use (standby*) Six days
*Handset is off the telephone base but not in use.
The battery needs charging when:
A new battery is installed in the handset.
•
•
The handset beeps.
LOW BATTERY is displayed and the battery indicator on the handset screen is ashing.
•
CAUTION:
To reduce the risk of re or injury to persons, read and follow these instructions:
Use only the battery(ies) provided or equivalent. To order a replacement, visit our website at www.vtechphones.com or
•
call 1 (800) 595-9511. In Canada, go to www.vtechcanada.com or call 1 (800) 267-7377.
Do not dispose of the battery(ies) in a re. Check with local waste management codes for special disposal instructions.
•
Do not open or mutilate the battery(ies). Released electrolyte is corrosive and may cause burns or injury to the eyes or
•
skin. The electroly te may be toxic if swallowed.
Exercise care in handling batteries in order not to create a short circuit with conductive materials such as rings, bracelets,
•
and keys. The battery and/or conductor may overheat and cause burns.
Charge the batter y(ies) provided with or identied for use with this product only in accordance with the instructions and
•
limitations specied in this manual.
WARNING:
TO PREVENT FIRE OR SHOCK HAZARD, DO NOT EXPOSE THIS PRODUCT TO WATER OR ANY TYPE OF MOISTURE.
46
www.vtechphones.com
Page 50

Important safety instructions
When usi ng your telephone e quipment, basic safety pr ecauti ons shou ld always be followed t o reduce the risk of re, elec tric sho ck and injury, incl uding the following:
Read and un derst and all instruct ions.
1.
Follow all warning s and inst ructions marke d on the pro duct.
2.
Unplug t his prod uct from the wall ou tlet befo re cleaning. Do not u se liqui d or aerosol cleaners. Use a damp cloth for clean ing.
3.
Do not use t his prod uct near water (for example, near a bathtub, kitchen sink, or swim ming poo l).
4.
Do not place this pr oduct o n an unsta ble tabl e, shelf, st and or oth er unstable surfaces.
5.
Slots and ope nings in the b ack or bottom of the telephone bas e and handset are prov ided for ventilation. To protect them fr om overh eating, these openin gs
6.
must not be blo cked by placing t he product on a soft surfac e such as a bed, sofa or rug. Thi s produ ct sho uld never be plac ed near or over a radiator or heat
register. This product shou ld not be pl aced in any area where p roper ventilation is not provided.
This produc t sho uld b e ope rated only f rom t he type of power source indicated on the marking label. If you are not sure of the typ e of power supply in your
7.
home, consult your dealer or l ocal power company.
Do not allow anything to rest o n the power c ord. Do no t install this pro duct where the cord may be walke d on.
8.
Never push objects of any kind into this produc t through the slot s in the telephone base or hand set because they may touch dangerous voltage points or create
9.
a short c ircuit. Never spi ll liqui d of any kind o n the product.
To reduce th e risk of electr ic shoc k, do not disassemble t his pro duct, b ut take it to an authorized se rvic e facili ty. Openi ng or rem oving par ts of the telephone
10.
base or handset ot her than sp ecie d acc ess doors may expo se you to dangerous volt ages or other ris ks. Incorrec t reassembl ing can cau se ele ctric shoc k
when the p roduc t is subse quentl y used.
Do not overload wall outlets an d extens ion cord s.
11.
Unplug t his prod uct from the wall ou tlet and refer servicing to an author ized ser vice facility under the followi ng conditions:
12.
When the p ower supp ly cord or plug is dam aged or frayed.
A.
If liqui d has been s pilled o nto the pro duct.
B.
If the pro duct has been expo sed to rai n or water.
C.
If the pro duct do es not oper ate norma lly by following the o perating instru ction s. Adjust o nly thos e contro ls that are c overed by the operati on instr uctions.
D.
Improp er adjustment of other controls may resul t i n d amage and oft en require s ex tensi ve w ork by an author ized techn ician to restore the produ ct to
normal o peration.
If the pro duct has been dro pped and t he telep hone bas e and/or ha ndset ha s been dam aged.
E.
If the pro duct exhibits a di stinct change in performance.
F.
Avoid usin g a teleph one (other than cord less) duri ng an elec trica l storm. There is a rem ote risk of e lectr ic shoc k from lightning.
13.
Do not use t he telephone to rep ort a ga s leak in the vicini ty of the l eak.
14.
Only put t he handset of your tel ephone n ext to your e ar when it is in normal talk mod e.
15.
The power adapters a re intend ed to be cor rectl y oriente d in a verti cal or o or mount position. The pron gs are not d esigne d to hold th e plug in place if it is
16.
plug ged into a c eiling or an under-the-table/cab inet outlet.
SAVE THESE INSTRUCTIONS
www.vtechphones.com
Appendix
47
Page 51

Troubleshooting
If you have difculty with your telephone, please try the suggestions below. For Customer Service, visit
our website at www.vtechphones.com, or call 1 (800) 595-9511; in Canada, call 1 (800) 267-7377.
Problem Suggestion
My telephone does not
work at all.
LOW BATTERY is
displayed on screen.
Make sure the battery is installed and charged correctly (page 3). For optimum daily
•
performance, return the handset to the telephone base or charger(s) after use.
Make sure the power adapter is securely plugged into an outlet not controlled by a wall
•
switch.
Make sure the telephone line cord is plugged rmly into the telephone base and the wall jack.
•
Unplug the unit’s electrical power. Wait for approximately 15 seconds, then plug it back in.
•
Allow up to one minute for the handset and telephone base to synchronize.
Charge the battery in the handset for at least 16 hours.
•
Remove and re-insert the battery. If that still does not work, it may be necessary to purchase
•
a new battery.
Disconnect the telephone base from the jack and plug in a working telephone. If this telephone
•
does not work, the problem is probably in the wiring or the local service. Call the local telephone
company.
Place the handset in the telephone base or charger for recharging.
•
Remove and re-install the battery and use it normally until fully depleted, then recharge the
•
handset on the telephone base or charger(s) for 16 hours.
If the above measures do not correct the problem, the battery may need to be replaced.
•
48
www.vtechphones.com
Page 52

Troubleshooting
Problem Suggestion
The battery does not
charge in the handset
or the handset battery
does not accept
charge.
Make sure the handset is placed in the telephone base or charger(s) correctly. The handset
•
CHARGE light should be on.
Remove the battery from the handset and then re-install it in the handset. Put the handset
•
back to the telephone base or charger(s) and charge for 16 hours.
If the handset is in the charger or in the telephone base but the handset
•
on, see The CHARGE light is off in this section.
It may be necessar y to purchase a new battery. Please see the Battery section of this user’s
•
manual (page 46).
The telephone might be malfunctioning. Please see the
•
(page 59) for further instruction.
CHARGE light is not
Warranty section of this user’s manual
The CHARGE light is
off.
Clean the charging contacts on the handset(s) and telephone base each month using a pencil
•
eraser or a dry non-abrasive fabric.
Make sure the power adapter and telephone line c ords are plug ge d in correctly and
•
securely.
Unplug the power adapter. Wait for 15 seconds before plugging it back in. Allow up to one
•
minute for the handset and telephone base to reset.
The telephone might be malfunctioning. Please see the
•
(page 59) for further instruction.
Warranty section of this user’s manual
www.vtechphones.com
Appendix
49
Page 53

Troubleshooting
Problem Suggestion
There is no dial tone. First, try all the above suggestions.
•
Move the handset closer to the telephone base. It might be out of range.
•
The telephone line cord might be malfunctioning. Try installing a new telephone line cord.
•
Disconnect the telephone base from the telephone jack and connect a different telephone. If
•
there is no dial tone on the other telephone either, the problem is in your wiring or local service.
Contact your local telephone company.
My h an dset displays
CONNECTING...
50
Move the handset closer to the telephone base. You might have moved out of range.•
www.vtechphones.com
Page 54

Troubleshooting
Problem Suggestion
The telephone does
not ring when there is
an incoming call.
Make sure the handset ringer is on (page 9) and the telephone base ringer is on (page 35).
•
Make sure the telephone line cord and power adapter are plugged in properly (page 2).
•
The handset may be too far from the telephone base. Move it closer to the telephone base.
•
There may be too many extension telephones on the telephone line to allow all of them to ring
•
simultaneously. Try unplugging some of them.
If the other telephones in your home are having the same problem, the problem is in the wiring
•
or local service. Contact the local telephone company (charges may apply).
Other electronic products can cause interference to your cordless telephone. Try installing your
•
telephone as far away as possible from the following electronic devices: wireless routers, radios,
radio towers, pager towers, cellular telephones, digital telephones, intercoms, room monitors,
televisions, VCRs, personal computers, kitchen appliances, and other cordless telephones.
Test a working telephone at the telephone jack. If another telephone has the same problem, the
•
problem is in the telephone jack. Contact your local telephone company (charges may apply)
The telephone line cord might be malfunctioning. Try installing a new telephone line cord.
•
Remove and re-insert the battery and place the handset in the telephone base.
•
Wait for the handset to synchronize with the telephone base. Allow up to one minute for this
•
to take place.
.
Appendix
www.vtechphones.com
51
Page 55

Troubleshooting
Problem Suggestion
I cannot dial out. First, try all the above suggestions.
•
Make sure there is a dial tone before dialing. It is normal if the handset takes a second or two
•
to synchronize with the telephone base before producing a dial tone. Wait an extra second
before dialing.
Make sure the telephone is set to the correct dial type (pulse dial or tone dial) for the service in
•
your area. See Dial mode on page 10 to set the dial type.
If the other telephones in your home are having the same problem, the problem is in the wiring
•
or local service. Contact your local telephone company (charges may apply).
Eliminate any background noise. Noise from a television, radio, or other appliances may
•
cause the telephone not to dial out properly. If you cannot eliminate the background noise,
rst try muting the handset before dialing, or dialing from another room in your home with less
background noise.
52
www.vtechphones.com
Page 56

Troubleshooting
Problem Suggestion
There is noise
or interference
during a telephone
conversation.
My calls cut in and out
when I am using the
cordless handset.
•
The handset may be out of range. Move it closer to the telephone base.
•
Appliances or other cordless telephones plugged into the same circuit as the telephone base
can cause interference. Try moving the appliance or telephone base to another outlet.
Other electronic products can cause interference to your cordless telephone. Try installing your
•
telephone as far away as possible from the following electronic devices: wireless routers, radios,
radio towers, pager towers, cellular telephones, digital telephones, intercoms, room monitors,
televisions, VCRs, personal computers, kitchen appliances, and other cordless telephones.
If your telephone is plugged in with a modem or a surge protector, plug the telephone (or
•
modem/surge protector) into a different location. If this doesn’t solve the problem, re-locate
your telephone or modem far ther apar t from each other, or use a different surge protector.
The layout of your home or ofce might be limiting the operating range. Try moving the telephone
•
base to another location, preferably a higher location for better reception.
Disconnect the telephone base from the telephone jack and plug in a corded telephone. If
•
calls are still not clear, the problem is probably in the wiring or local service. Contact the local
telephone company (charges may apply).
If the other telephones in your home are having the same problem, the problem is in the wiring
•
or local service. Contact the local telephone company (charges may apply).
If you subscribe to high-speed Internet service (Digital Subscriber Line - DSL) through your
•
telephone lines, you must install a DSL lter between the telephone base and the telephone
wall jack. The lter will prevent noise and caller ID problems caused by DSL interference.
Please contact your DSL ser vice provider for more information about DSL lters.
Appendix
www.vtechphones.com
53
Page 57

Troubleshooting
Problem Suggestion
I hear other calls when
using the telephone.
I hear noise in the
handset, and none of
the keys or buttons
work.
My caller ID features are
not working properly.
Disconnect the telephone base from the telephone jack. Plug in a different telephone. If
•
there are still other calls, the problem is probably in the wiring or local service. Call your local
telephone company.
Press CHAN/REMOVE to switch to a clearer channel when on a call.
•
Make sure the telephone line cord is plugged in securely.
•
Remove and re-insert the battery.
•
Caller ID is a subscription service. You must subscribe to this service from your local telephone
•
company for this feature to work on your telephone.
The caller may not be calling from an area which suppor ts caller ID.
•
Both you and the caller’s telephone companies must use equipment which are compatible
•
with caller ID service.
If you subscribe to high-speed Internet service (Digital Subscriber Line - DSL) through your
•
telephone lines, you must install a DSL lter between the telephone base and the telephone
wall jack. The lter will prevent noise and caller ID problems caused by DSL interference.
Please contact your DSL ser vice provider for more information about DSL lters.
54
www.vtechphones.com
Page 58

Troubleshooting
Problem Suggestion
The system does
not receive caller ID,
or the system does
not display caller ID
during call waiting.
Caller ID entries do not
match the numbers I
need to dial.
The answering system
does not answer after
the number of rings to
which I programmed it.
Make sure you subscribe to caller ID with call waiting features provided by the local telephone
•
company.
The caller may not be calling from an area which suppor ts caller ID.
•
Both you and the caller’s telephone companies must use equipment which are compatible
•
with caller ID service.
If you subscribe to high-speed Internet service (Digital Subscriber Line - DSL) through your
•
telephone lines, you must install a DSL lter between the telephone base and the telephone
wall jack. The lter will prevent noise and caller ID problems caused by DSL interference.
Please contact your DSL ser vice provider for more information about DSL lters.
Although the call log entries you receive have 10 digits, (the area code plus the seven-digit
•
number,) in some areas, you may need to dial only seven digits, or a 1 plus the seven digits,
or a 1 plus the area code plus the seven digits. You can change the number of digits that you
dial or store from the call log.
While reviewing the call log, press
•
long distance numbers before dialing or saving the telephone number.
Make sure the answering system is on. When the answering system is on, the red light on the
•
ANS ON/OFF key should be lit.
If toll saver is activated, the number of rings changes to two when there are new messages
•
waiting (see page 34).
If the memor y is full or if the answering system is off, the system will answer after ten rings.
•
In some cases, the answering system will be affected by the ringing system used by the local
•
telephone company.
# repeatedly to display these dialing options for local and
Appendix
www.vtechphones.com
55
Page 59

Troubleshooting
Problem Suggestion
The answering system
does not record
messages.
The messages on the
answering system are
incomplete.
Make sure the answering system is on.
•
Make sure the memory of the answering system is not full.
•
If a caller leaves a very long message, part of it may be lost when the system disconnects the
•
call after four minutes.
If the caller pauses for more than ve consecutive seconds, the system stops recording and
•
disconnects the call.
If the memory on the system becomes full during a message, the system stops recording and
•
disconnects the call.
If the caller’s voice is very soft, the system may stop recording and disconnect the call.
•
The messages on
the system are very
difcult to hear.
The answering system
does not respond to
remote commands.
56
Press VOL+ on the telephone base to increase the speaker volume.•
Make sure your remote access code is correct (page 43).
•
Make sure you are calling from a touch-tone telephone. When dialing a number, there should
•
be tones. If there are clicks, then it is not a touch-tone telephone and cannot activate the
answering system.
The answering system may not detect the remote access code when the announcement is
•
playing. Wait until the announcement is over before entering the code.
There may be interference on the telephone line you are using. Press the keypad keys rmly
•
when dialing.
www.vtechphones.com
Page 60

Troubleshooting
Problem Suggestion
The announcement
message is not clear.
My cordless handset
beeps and is not
performing normally.
When recording the announcement, make sure you speak in a normal tone of voice about nine
•
inches from the telephone base.
Make sure there is no background noise (television, music, trafc, etc.) when recording.
•
Make sure the power cord is securely plugged into the telephone base. Plug the unit into a
•
different working electrical outlet not controlled by a wall switch.
Move the handset closer to the telephone base. It may be out of range.
•
Reset the telephone base by unplugging the unit ’s electrical power. Wait for 15 seconds
•
and plug it back in again. Allow up to one minute for the handset and the telephone base to
synchronize.
Other electronic products can cause interference to your cordless telephone. Try installing
•
your telephone as far away from these electronic devices as possible: wireless routers, radios,
radio towers, pager towers, cellular telephones, intercoms, room monitors, televisions, personal
computers, kitchen appliances and other cordless telephones.
Common cure for
electronic equipment
If the unit is not responding normally, try putting the handset in the telephone base or the
•
charger(s). If it does not seem to respond, try the following (in the order listed):
Disconnect the power to the telephone base.
•
Disconnect the battery on the handset.
•
Wait a few minutes before connecting the power to the telephone base.
•
Re-install the battery and place the handset into the telephone base or charger(s).
•
Wait for the handset to synchronize with the telephone base. Allow up to one minute for this
•
to take place.
www.vtechphones.com
Appendix
57
Page 61

Operating range
This cordless telephone operates with the maximum power allowed by the Federal Communications Commission (FCC). Even so, this handset and telephone base can
communicate over only a certain distance ---- which can vary with the locations of the telephone base and handset, the weather, and the layout of your home or ofce.
When the handset is out of range, the handset will display
If there is a call while the handset is out of range, it might not ring, or if it does ring, the call might not connect well when you press
telephone base, then press /FLASH to answer the call.
If the handset moves out of range during a telephone conversation, there might be interference
To improve reception, move closer to the telephone base.
CONNECTING...
/FLASH. Move closer to the
Maintenance
Taking car e of your tel ephon e
Your cordless telephone contains so phisti cated electron ic part s, so it must be treated with care.
Avoid roug h treat ment
Place the handset down gent ly. Save the ori ginal packing materials to protect your telephone if you ever need to sh ip it.
Avoid wate r
Your teleph one can be dam aged if it gets wet. Do not use the handset outdoor s in the rain, or handle it wi th wet ha nds. Do not install t he tele phone b ase near a
sink, bat htub or sh ower.
Elect rical s torms
Electr ical sto rms can sometime s cause power surges harmful to electr onic equipment . For your own s afety, take caution wh en using e lectrical appliances during storms.
Clean ing your te lepho ne
Your telephon e has a durabl e plasti c casing th at should retain its luster for many year s. Clean it only with a sof t cloth slightly da mpened w ith water or a mild soap.
Do not use excess water o r cleaning solven ts of any kin d.
Remember that electrical appliances can cause serious injury if used when you are wet or standing in the water. If the telephone base should fall into the water, DO
NOT RETRIEVE IT UNTIL YOU UNPLUG THE POWER CORD AND TELEPHONE LINE CORD FROM THE WALL. Then pull the unit out by the unplugged cords.
58
www.vtechphones.com
Page 62

About cordless telephones
Privacy: The same features that make a cordless telephone convenient create some limitations. Telephone calls are transmitted between the telephone base and
•
the cordle ss handset by radio waves, so there is a possibility that the cordless teleph one convers ations coul d be intercepted by radio recei ving equipment within
range of t he cordless handset. For this reason, you should not thi nk of cord less tel ephone c onversations as b eing as pr ivate as th ose on cor ded tele phones .
Elect rical power: The telepho ne base of this cordless telepho ne must be connec ted to a working elect rical out let. The electrical out let should not be controlled
•
by a wall swit ch. Calls cannot be made from t he cordless handset if th e telephone base is unplugged or switched of f, or if the el ectri cal power i s interru pted.
Potent ial T V int erfe rence: Some cordless telephones op erate at frequencie s that may cause in terfer ence to telev isions and VCRs. To minimize or preve nt
•
such inter ference, do not place the tel ephone base of the cordle ss telephone near or on top of a TV or VCR. If interference is experience d, moving the co rdless
telephone farther away fro m the TV or VCR w ill often reduc e or elimin ate the interference.
Recha rgeab le bat terie s: This product contai ns either Nickel-cad mium or Nickel- metal hyd ride re charge able bat teries. Exercise care in handl ing bat teries i n
•
order not to create a short circuit with condu cting mate rial such as rin gs, bracelets, and keys. The bat tery or cond uctor may overh eat and cause harm. Observe
proper p olarit y betwe en the bat tery an d the battery cha rger.
Nickel -ca dmium re charg eable batte ries: Di spose of these bat teries i n a safe manner. Do not burn or puncture. Like oth er batter ies of thi s type, i f burned or
•
punctu red, they c ould release cau stic mate rial whi ch coul d cause injury.
Warranty
What do es this li mited wa rrant y cover?
The manufacturer of t his VTech Produc t warra nts to t he hol der of a valid proof of purch ase (“Consumer” or “you” ) that the Product and all access ories p rovide d
in t he sales package (“Prod uct” ) ar e fr ee f rom defect s in material and workma nship, pursuant to the fo llowin g ter ms and condit ions, when inst alled and used
normal ly and in accordance with the Product operating instructions. Thi s limite d warranty exte nds only to the Consumer for Products purchase d and use d in the
United States of America an d Canada.
What wil l VTech do if t he Product is not f ree fro m defects in materials and workmanship during the limited warra nty pe riod (“M ateri ally De fecti ve Product”)?
During the limited warranty period, VTech’s authorized servi ce representative will repair or replace at VTech’s o ption, without charge, a Materially Defective Product. If
we repair the Product, we may use new or refurbished repla cement parts. If we choose to replace the Product , we may replace it with a new or refurbished Produc t of
the same or similar design. We w ill retain defecti ve parts, modules , or equipme nt. Repair or replacement of the Product, at VTech’s option, is your exclusive remedy.
VTech will return the r epaired o r replac ement Pro ducts to you in work ing condition. You should expe ct the repair or replacement to take approximately 30 days.
How long i s the limi ted warranty p eriod?
The limite d warranty period for the Product extend s for ONE (1) YEAR from the date of purc hase. If VTech repai rs or replace s a Materially Defective Prod uct under
the terms of this limited warranty, this limited warra nty also applies to the repaired or replacem ent Product for a period of either (a) 9 0 days from the date the repaired
or replacement Pr oduct i s shippe d to you or (b) the time remai ning on th e origin al one-year warran ty; whichever is longer.
What is not covere d by this limited wa rrant y?
This lim ited warranty does not cover :
1. Produ ct that has been subjected to misuse, accident, shipping or ot her physical damage, impro per installation , abnorm al operation or han dling, neglect,
inundation, re, water or other l iquid in trusio n; or
Appendix
www.vtechphones.com
59
Page 63

Warranty
2. Produ ct that ha s been dam aged due to repair, alter ation or modication by anyo ne other t han an auth orized se rvic e representative o f VTech; or
3. Produ ct to the ex tent that t he probl em experienced i s caused by signal conditi ons, net work reliabilit y, or cable or antenna systems; or
4. Produ ct to the ex tent that t he probl em is caus ed by use with non-V Tech access ories; or
5. Produ ct whose warrant y/qualit y stickers, product ser ial numb er plates or electr onic ser ial numb ers have been removed , altered o r rendered illegible; or
6. Produ ct purcha sed, used, ser vice d, or shipped for rep air from outsi de the United Stat es of America or Canada, or used for commercial or insti tutional purpose s
(inclu ding but n ot limite d to Produc ts used for rental p urposes); or
7. Produ ct returned with out a valid p roof of pur chase (se e item 2 below); or
8. Charg es for installation or set up, ad justme nt of custo mer cont rols, and installation or repair of sys tems outside the u nit.
How do you get warra nty service?
To obtain warranty ser vice in the United States of America, please call 1 (800) 595-9 511. In Canada, please call 1 (800) 267-7377. NOTE: Before calling for serv ice,
please r eview the u ser’s manu al - a chec k of the Prod uct’s c ontrols and featur es may save you a servic e call.
Except as prov ided by applicable law, you assume the risk of loss or damage during transit and transpor tatio n and are responsi ble for delivery or handlin g charges
incurr ed in the transpor t of the Produ ct(s) to the service loc ation. V Tech will return repaired or replace d Produc t under thi s limited war ranty to yo u, transp ortat ion,
deliver y or handling charges prepaid. VTech assumes no risk for damage or loss of t he Product in transit. If the Product failure is not covered by this limited warranty,
or proof of pur chase do es not meet the te rms of this li mited warr anty, VTech will notify you and will reque st that you auth orize the cost of repair pr ior to any fur ther
repair ac tivit y. You must pay for the c ost of rep air and return shipping cos ts for the repair of Pro ducts t hat are not c overed by th is limite d warrant y.
What must you retu rn with the Produ ct to get warrant y serv ice?
1.
Return the entire original package a nd contents incl uding th e Produc t to the VTech s ervice locat ion alon g with a des cripti on of the ma lfunction or difcul ty; and
2. Inclu de “valid proof of purchase” (sales receipt) identif ying the Produc t purcha sed (Prod uct mod el) and the date of purc hase or re ceipt; and
3. Provid e your name, c omplet e and corr ect mail ing address, and te lephon e number.
Other Limita tions
This warrant y is t he co mplete and exc lusive agreement bet ween you and VTech. I t supe rsedes all other w ritten or or al co mmunic ations related to th is Pro duct.
VTech prov ides no other warr anties f or this Pr oduct . The warr anty exc lusivel y descr ibes all of VTech’s res ponsibilitie s regarding the Produc t. There are no oth er
express w arranti es. No one i s authorized to make mo dications to this limited warranty and you s hould not rely on any such modication.
State/ Provinc ial Law Rights: This warrant y gives you s peci c legal r ights, and you may als o have other rights, which var y from state to state or province to provin ce.
Limitations: Implied warranties, including those of tne ss for a particular purpose and merchant abilit y (an unwritten warr anty that the Prod uct is t for ordinar y use)
are lim ited to one ye ar from the d ate of purcha se. Som e state s/provi nces do not allow limitations on how l ong an implied warranty l asts, so the above limitat ion
may not appl y to you. In no event s hall V Tech be liable for any i ndirec t, special, incidenta l, consequential, or similar damages (inc luding , but not limited to lost
prots o r revenue, in abilit y to use the Produc t or other as sociat ed equip ment, th e cost of su bstitute equipm ent, and c laims by third par ties) resulting fro m the use
of this Produ ct. So me states/provinces do not allow the excl usion or limi tation of inc idental or c onsequ ential damage s, so t he above limit ation or exclusion may
not appl y to you.
Please retain your original sales receipt as proof of purchase.
60
www.vtechphones.com
Page 64

FCC, ACTA and IC regulations
FCC Part 15
This equi pment has bee n tested and found to comply with the requirements for a Class B digital device under Part 15 of the Federal Co mmunic ations Commissi on
(FCC) rules. These requirements are intended to provide reasonable protectio n against harmful interference in a residential installati on. This equipm ent
generates, uses and can rad iate radio freq uency energy and, if not inst alled and use d in accordance with the ins tructions, may cause harmful inter ference to radio
commun icatio ns. However, there is no g uarantee that i nterference will not occur in a partic ular in stallat ion. If this e quipme nt does cause harmfu l inter ferenc e to
radio or te levision re ceptio n, which c an be determined by tur ning the e quipme nt of f and on, the user is en courag ed to try to correc t the interferenc e by one or
more of the followi ng measur es:
Reorie nt or relocate the re ceiving antenna.
•
Increa se the sep aration b etween t he equip ment and r eceiver.
•
Connect the equ ipment into an outl et on a circ uit dif ferent from that to which the re ceiver is connec ted.
•
Consul t the deal er or an experience d radio/ TV technician for help.
•
Change s or modicati ons to t his equipment not expres sly approved by t he party responsibl e for complian ce could void the user’s author ity to operate the
equipm ent.
This device c omplies with Part 15 of the FCC rules . Operation is subje ct to t he foll owing t wo con ditions: (1) this device may not ca use har mful in terference, and
(2) this devic e must acce pt any inter ference received, includ ing inter ferenc e that may cause undesire d operati on. Privacy of communi cation s may not be ensured
when usi ng this telephone.
To ensure safety of user s, the FCC has estab lished cr iteria for the amount of radio fre quency energy that can be safely absorbed by a user or bystander according
to the intended usage of th e produ ct. Thi s produ ct has be en tested and foun d to comp ly with t he FCC cr iteria. The hand set may be safely he ld again st the ear of
the user. The tel ephone base shall b e install ed and used such that par ts of the us er’s body other than the hands are mai ntained at a distanc e of approxi mately 20
cm (8 inches) or more. If you choose to use a clip ping dev ice, please make sur e to only use the supp lied VTech b elt clip.
This Cla ss B digital appar atus com plies wi th Canadian ICES- 003.
FCC Part 68 and ACTA
This equipment compli es with Part 68 of t he FCC rules and with tech nical requirem ents ado pted by th e Admini strative Counci l for Terminal Attach ments (ACTA).
The la bel on the back or bott om of this e quipme nt con tains, among other things , a pr oduct ident ier i n the format US:AA AEQ##TXXX X. Thi s identier must b e
provided to your lo cal telephone co mpany upon request.
The plug and jack used to conne ct this equipm ent to pre mises wiring and the telephone network must comply with applicable Part 68 ru les and technical
requirements adop ted by ACTA. A complia nt telephon e cord and modular plug is provided with this pro duct. It is design ed to be connected to a compati ble modula r
jack that i s also com pliant. An RJ11 jack should normally be u sed for connecti ng to a single line and an RJ14 jack fo r two lines. See Installation Instruc tions in the
user’s manual.
The R inger Equivalence Number (REN) is use d to determine how many devic es you may connec t to your telephone lin e and still have t hem r ing w hen yo u are
called. The REN fo r this product i s encod ed as the 6th and 7th characters fo llowing the US: in the produ ct iden tier (e.g., if ## is 03, the REN is 0. 3). In most, but
not all are as, the sum of all RENs sh ould be ve (5.0) or less. For more informatio n, please contac t your loc al telephone com pany.
This e quipme nt may n ot be u sed wi th Par ty Lines. If you have speci ally w ired al arm di aling e quipme nt con nected to your telephone line, ens ure the connection
of this equipment d oes no t disa ble you r alarm equipment. If you have questions about what will disable alarm e quipme nt, co nsult your tel ephone compa ny or a
quali ed installer.
www.vtechphones.com
Appendix
61
Page 65

FCC, ACTA and IC regulations
If this eq uipment is malfunction ing, it must be unplugged fr om the mod ular jac k until the problem has been c orrect ed. Repai rs to this telephone equip ment can
only be ma de by the manufacturer or its authorize d agents. For repair procedures, foll ow the ins tructions out lined un der the Limited Warranty.
If this equipment is ca using har m to the teleph one network, the tel ephone company may tem porari ly disco ntinue your telephone servi ce. The tele phone co mpany
is req uired to noti fy you befor e inter ruptin g ser vice. If adva nce notice is not practical, you wil l be n otied as soon as possible. You w ill be given the o ppor tunity
to co rrect the problem and the telep hone company is required to infor m you of your r ight to le a complain t wit h the FCC. Your telep hone company may make
change s in its fa ciliti es, equi pment, o peration, or pro cedure s that could affe ct the pr oper function ing of this produ ct. The telepho ne comp any is req uired to n otify
you if suc h change s are plann ed.
If this pr oduct is equipp ed with a corded or c ordles s handset, it is hearing aid c ompatible.
If this product has memor y dialing locat ions, you m ay choose to store emergency telepho ne numbe rs (e.g., police, re, med ical) in t hese locations. If you do
store or test emergency numbers, please:
Remain on the line an d briey explain the reason for the call before ha nging up.
Perfor m such activities in off- peak hours, such a s early mo rning or l ate evening .
Indust ry Canada
Operation is subject to the follow ing two conditions: (1) this devic e may not cause harmful inter ferenc e, and (2) this device mu st accept any interfer ence, inc luding
interference t hat may cause undesired oper ation.
The term ‘ ’IC: ‘’ before the certic ation /registration nu mber onl y signi es that the Industr y Canad a techni cal spe cications were met.
The Ring er Equival ence Number (REN) fo r this terminal equ ipment i s 0.1. The REN is an indic ation of the maximum number of devic es allowe d to be conn ected
to a teleph one interface. T he termin ation on an interface may con sist of any c ombination of dev ices subject on ly to the requireme nt that the s um of the REN s of
all the devices does not exce ed ve.
This pro duct me ets the ap plicab le Indus try Can ada tech nical specications .
The RBRC® seal
The RBRC® seal on the nickel-cadmium battery indicates that VTech Communications, Inc. is voluntarily participati ng in an industry program
to colle ct and recycle these batteries at th e end of their useful lives, whe n taken out of servi ce within the Unit ed States a nd Canada.
The RBRC® progra m provides a convenient alternative to p lacing u sed nic kel-cadmium batterie s into the trash or municipal waste, whi ch
may be ille gal in your area.
VTech’s part icipat ion in RBRC
at aut horized VTech product s ervice ce nters. Pleas e cal l 1- 800 -8 -BATT ERYTM for infor mation on Ni-Cd bat tery recycling a nd disposa l
bans/restric tions in your area. VTech’s involvement in this program is part of its com mitment to protecting our environment and conser ving
natural resourc es.
RBRC® is a regi stere d trade mark of R echargeabl e Battery Recycling Co rpora tion.
®
makes it easy for you to dro p off the s pent bat tery at lo cal retailers par tici pating in t he RBRC® program or
62
www.vtechphones.com
Page 66

Technical specications
Frequency control Crystal controlled PLL synthesizer
Transmit frequency
Channels 30
Nominal effective range Maximum power allowed by FCC and IC. Actual operating range may vary according
Size Handset: 7.32in X 2.01in X 1.57in (186.0mm X 51.0mm X 40.0mm)
Weight Handset: 5.14oz (145.6g) (including battery)
Power requirements Handset: 3.6V 400mAh Ni-Cd battery
Memory Handset directory: 20 memory locations (including 9 speed dial entries);
Handset: 5857.20-5865.90 MHz
Telephone base: 912.75-917.10MHz
to environmental conditions at the time of use.
Telephone base: 5.95in X 5.34in X 3.70in (151.1mm X 135.6mm X 94.0mm)
Charger: 3.19in X 3.62in X 1.97in (81.0mm X 92.0mm X 50.0mm)
Telephone base: 9.17oz (260g)
Charger: 2.37oz (67.2g)
Telephone base: 7.5V AC @ 350mA
Charger: 7.5V AC @150mA
up to 24 digits and 14 characters
Handset call log: 45 memory locations; up to 11 digits and 15 characters
Appendix
www.vtechphones.com
63
Page 67

Index
A
About cordless telephones 59
Activate the answering system 33
Answer calls 12
Answering system 32
Answering system setup 34
B
Base volume 35
Battery 3, 46
C
Call intercept 41
Call log 26
Call log display screen messages 31
Call screening 41
Call waiting 13
Caller ID 25
Channel 12
Charger installation 2
Charging 3
Character chart 17
Copy a directory entry into
speed dial 20
D
Date and time 8
Delete a directory entry 19
64
Delete messages from
answering system 40
Delete a speed dial entry 23
Delete from the call log 30
Delete your announcement 38
Desk/table bracket installation 5
Dial a call log number 28
Dial a number from the directory 20
Dial a speed dial number 23
Dial mode 10
Director y 16
DSL lter 2
E
Edit a directory entry 18
Edit a speed dial entry 22
End calls 12
F
FCC, ACTA and IC regulations 61
Find handset 14
H
Handset display screen
messages 44
Handset layout 6
Handset volume 9
Home area code 10
www.vtechphones.com
I
Important safety instructions 47
Index 64
L
Language 11
M
Maintenance 58
Make call log entries ready to dial 27
Make calls 12
Memo playback 40
Message capacity 3
Message playback 3
Message window displays 42
2
9
N
New message indication 39
O
Operating range 58
Options during playback 39
Outgoing announcement 37
P
Parts checklist 1
Pause 14
Play your announcement 37
Page 68

R
RBRC® seal 62
Reassign speed dial locations 24
Record a memo 4
Record your own announcement 38
Redial 14
Remote access 4
Review the directory 17
Review the call log 2
Ringer 9
Ringer volume 9
0
3
7
T
Technical specications 63
Telephone base installation 2
Telephone base layout 7
Telephone settings 8
Temporary tone dialing 13
Transfer an external call 1
Troubleshooting 4
5
8
V
Volume 9, 12, 35
S
Save a call log entry to the directory 29
Set message alert tone 3
Set number of rings 3
Set remote access code 35
Set telephone base ringer 35
Set the clock 33
Speed dial 2
Store a directory entry 1
Store a speed dial entry 21
1
6
4
6
W
Wall mounting bracket installation 4
Warranty 59
www.vtechphones.com
Appendix
65
Page 69

VTECH TELECOMMUNICATIONS LTD.
A member of THE VTECH GROUP OF COMPANIES.
Distributed in the U.S.A. by VTech Communications, Inc. Beaverton, Oregon
Distributed in Canada by VTech Technologies Canada, Ltd., Richmond, B.C.
Copyright ©2008 for VTECH TELECOMMUNICATIONS LTD.
Printed in China.
91-002141-010-100
Page 70

Models:
CS5121-2/CS5121-3
CS5122-3/CS5121-4
User’s manual
w w w . v t e c h p h o n e s . c o m
 Loading...