

Page 1

Volkswagen Corrado 1990 - 1994
Body
Body-Front Doors (Page GR-57)
Central locking
assembly
bi-pressure pump, removing
checking
gas flap activator, adjusting
gas flap activator, removing/installing
electrical troubleshooting
master activators, removing/installing
pump/control module, location
rear lid activator, removing/installing
Door lock
checking
door lock, removing/installing
inner handle, removing
installing
re-keying locks
Front door
assembly
impact bar, removing
removing/adjusting
seal, removing/installing
Window regulator
bordering frame, removing/installing
carrier to glass, bonding
drilling out rivet
removing/installing
Page 2

Volkswagen Corrado 1990 - 1994
Body
Body-Front Doors (Page 57-2)
Page 3
Volkswagen Corrado 1990 - 1994
Body
Body-Front Doors (Page 57-3)
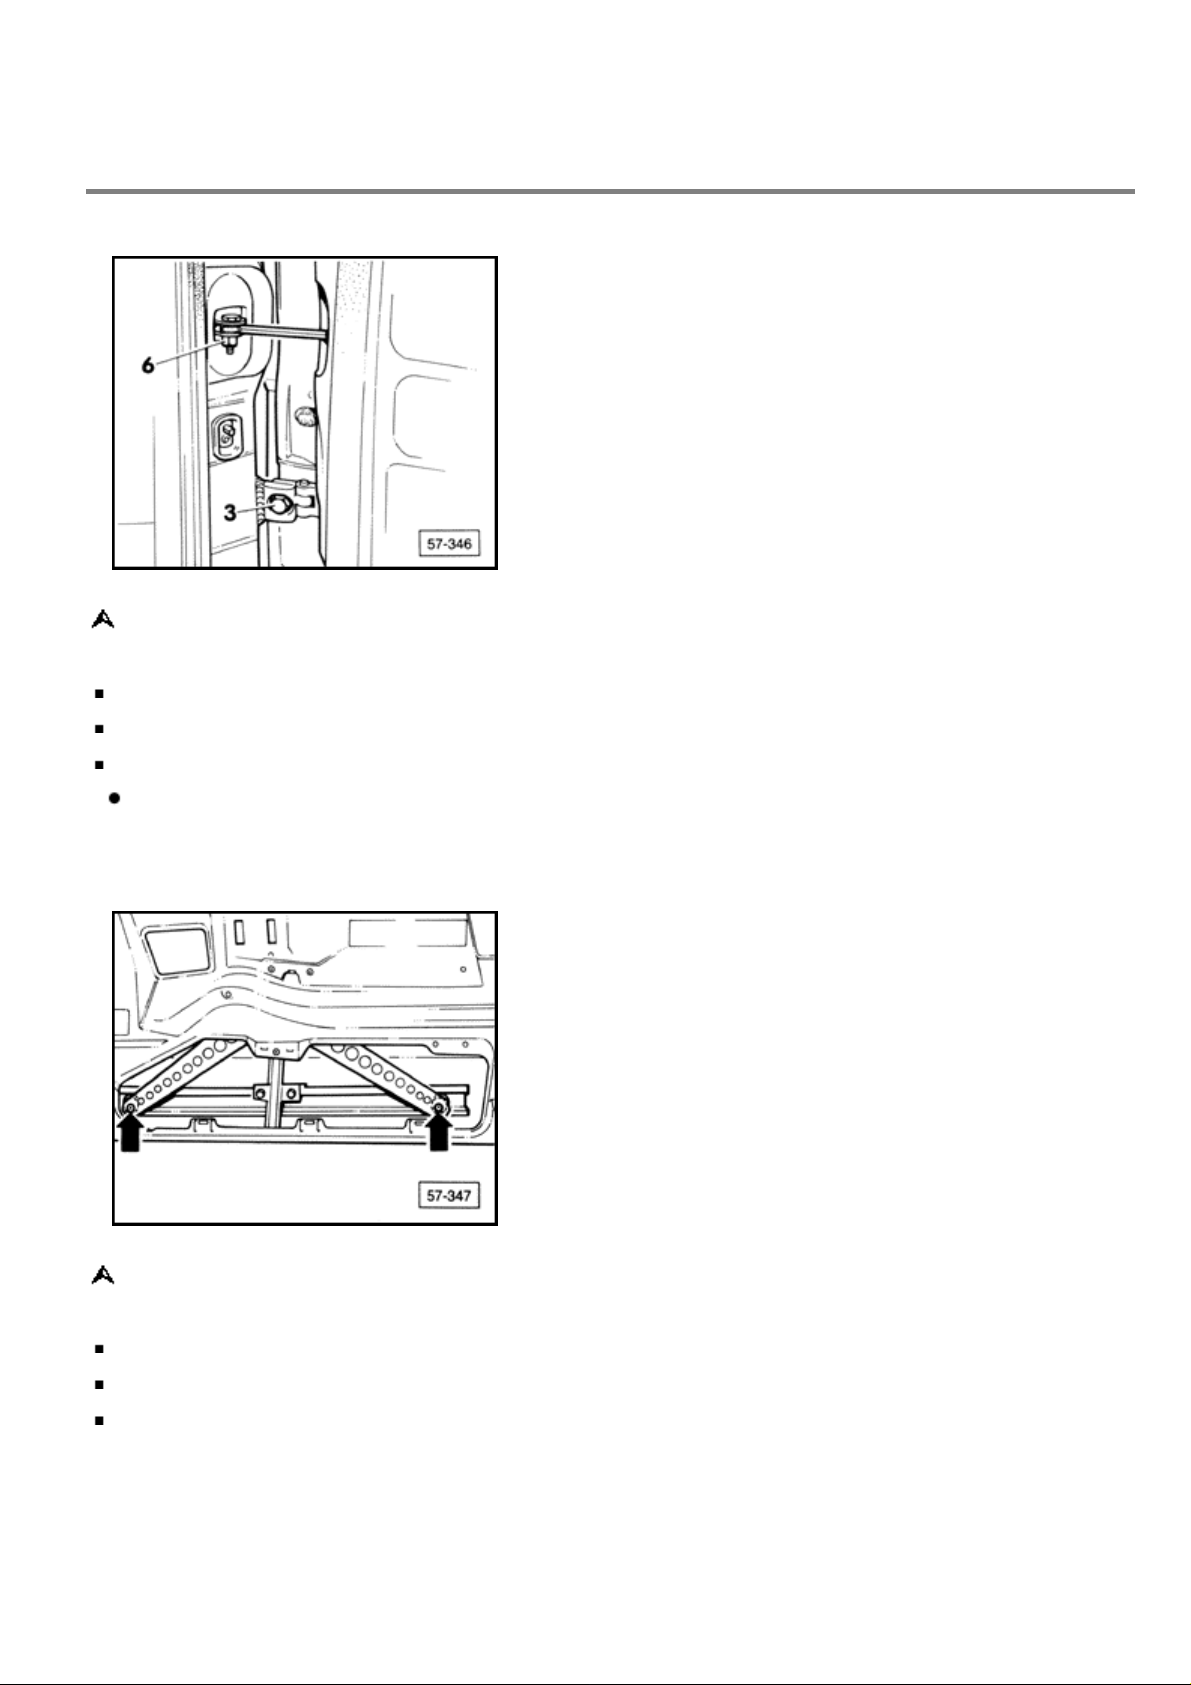
Fig. 1 Door, removing/adjusting
unscrew nut 6 and pull out bolt
remove hex head bolt 3 from upper and lower hinge part
remove door with help of a second mechanic
tightening torques:
nut
hex head bolt 3 = 55 Nm (41 ft lb)
= 3 Nm (2 ft lb)
6
Fig. 2 Window regulator, removing
lower door glass fully
unscrew door glass and pull off guide arms (
push door glass upward and wedge in place
arrows
)
Page 4
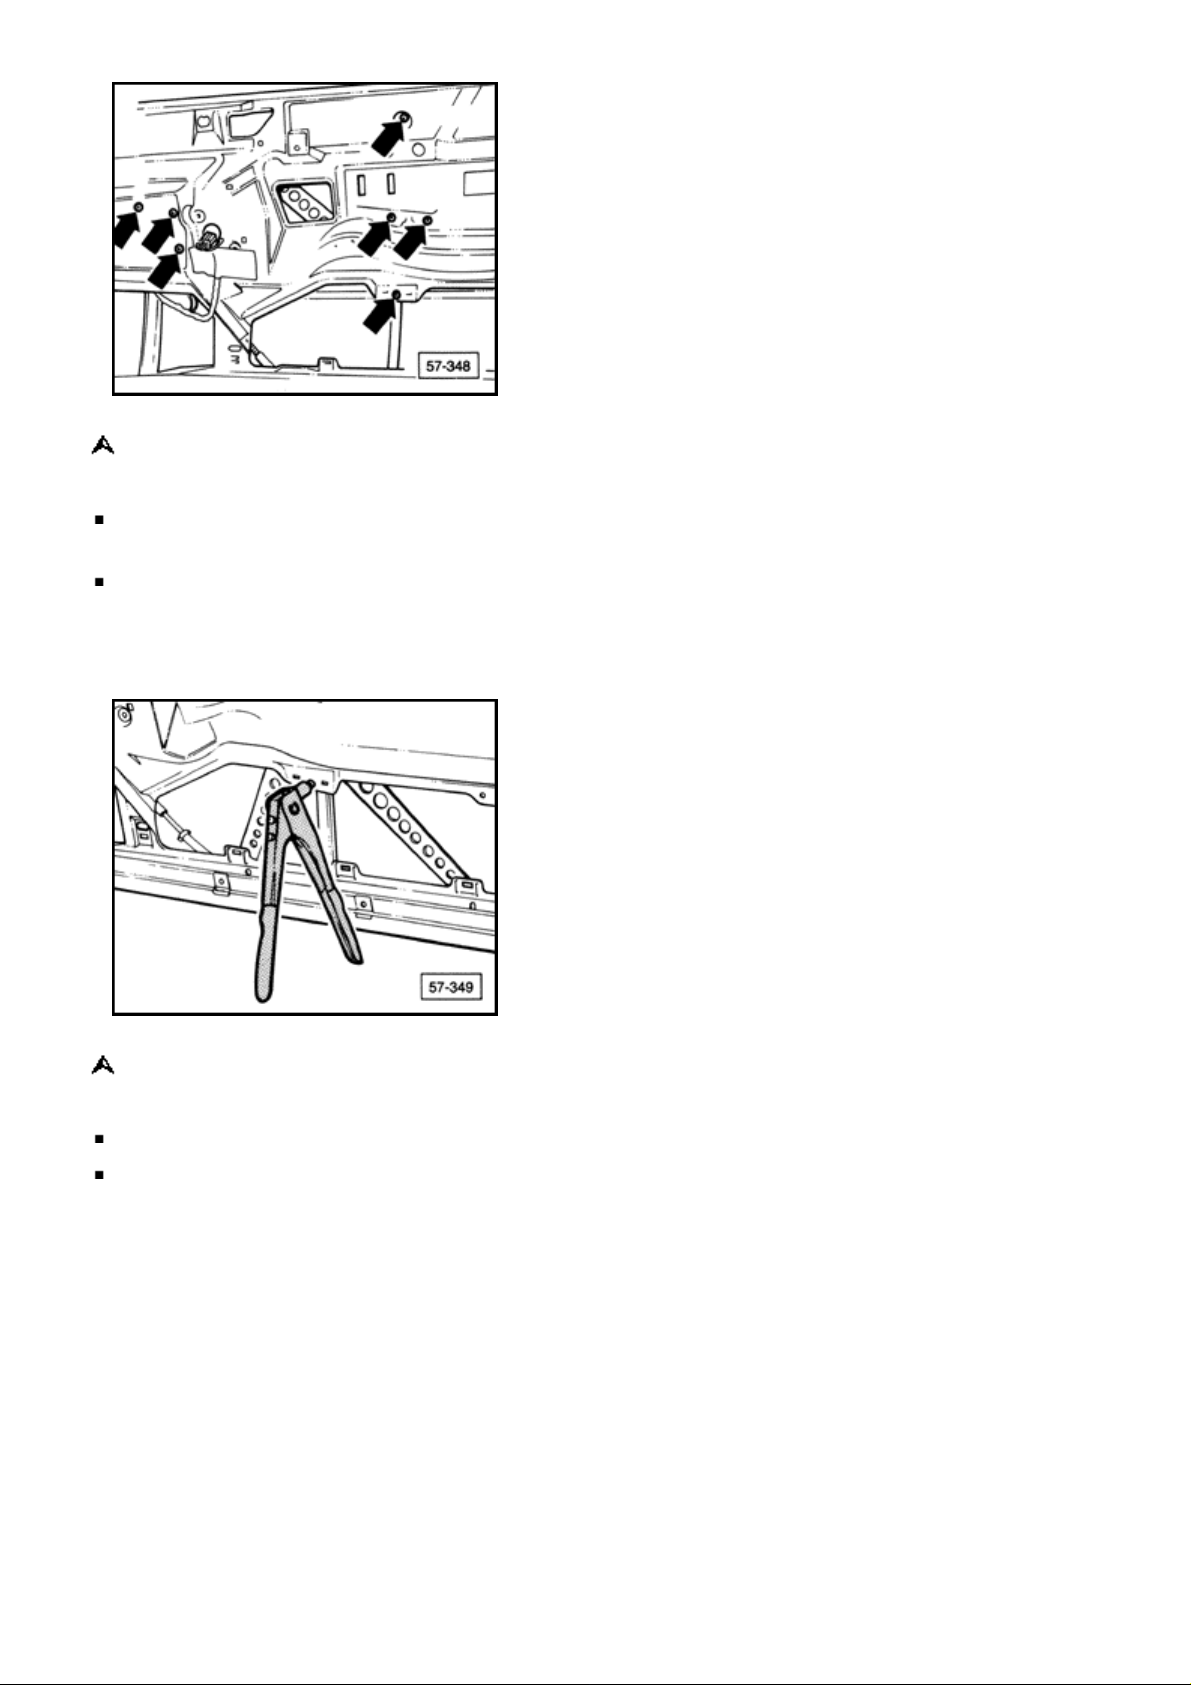
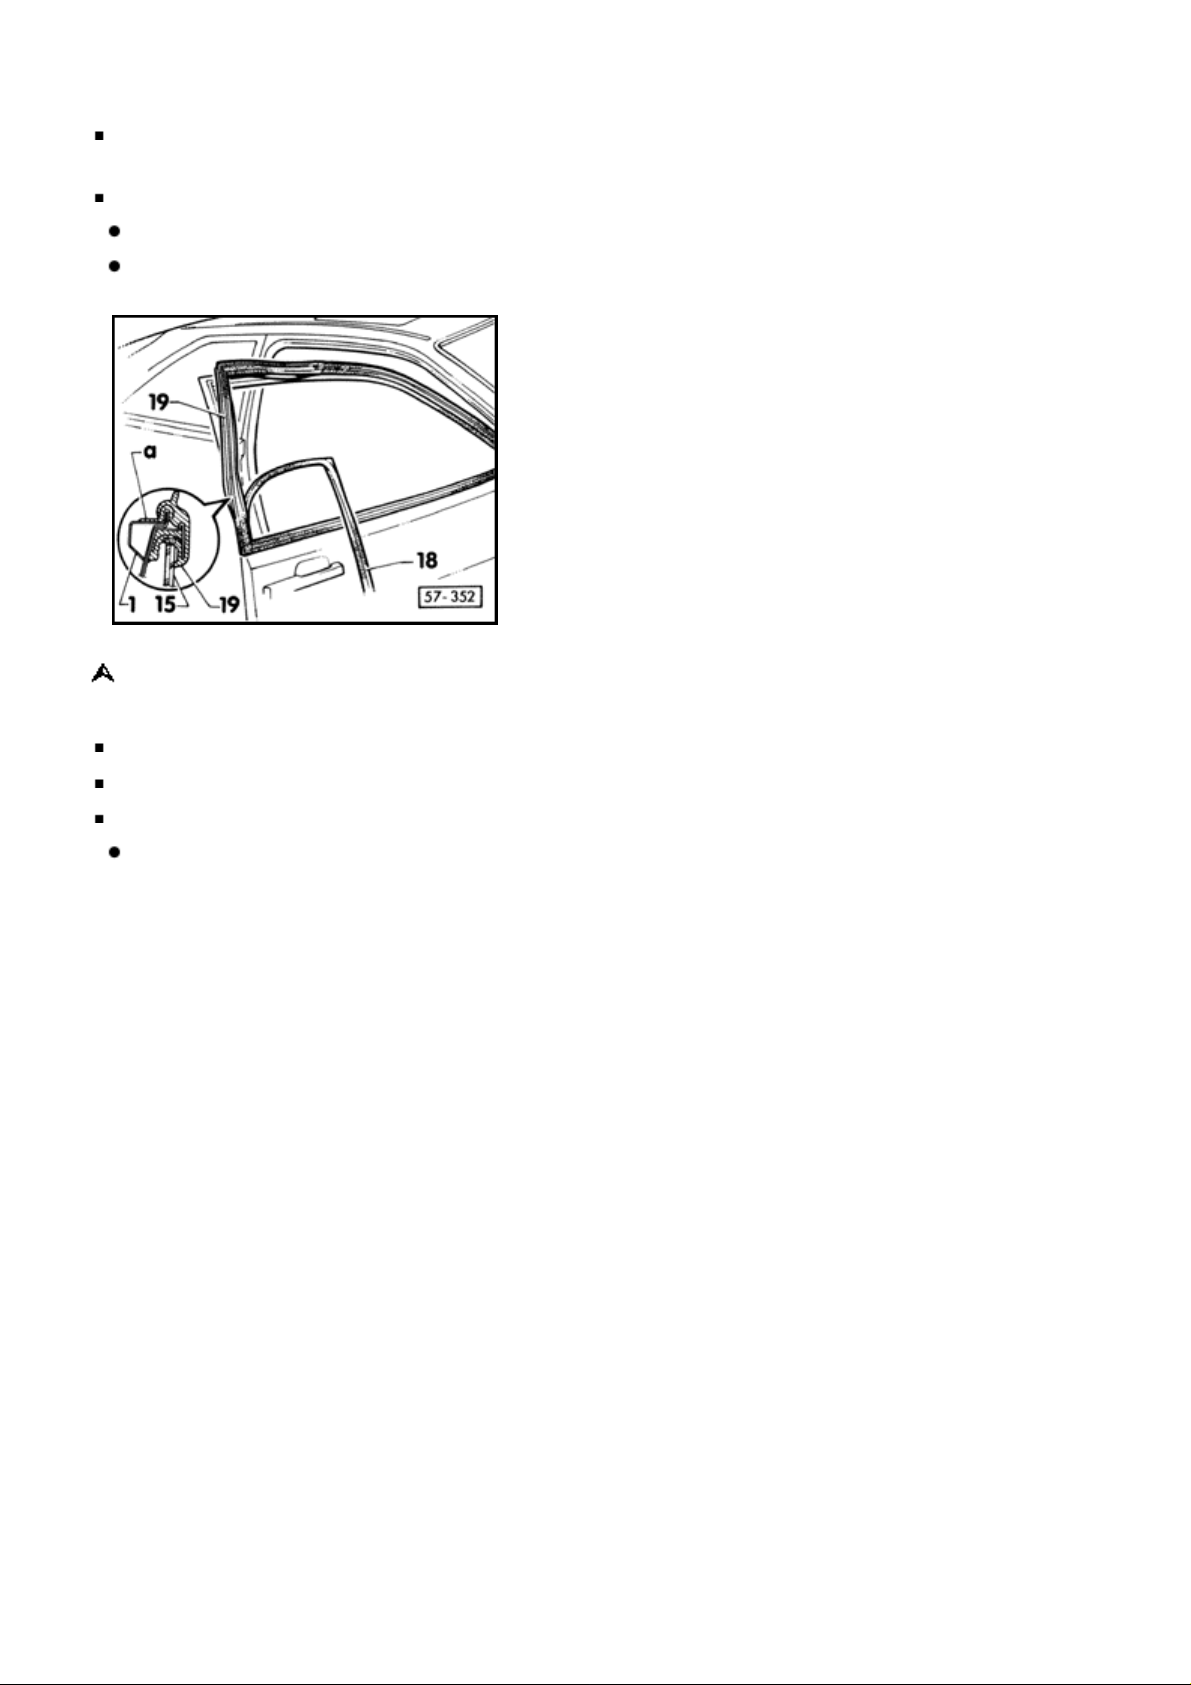
Fig. 3 Drilling out rivet
drill out rivets (
mandrel
remove window regulator from bottom
Notes
Check rivet points for paint damage and apply anti-corrosion primer as required.
arrows
) with a 5 mm (13/64 in.) drill and drive out rivet shafts with a
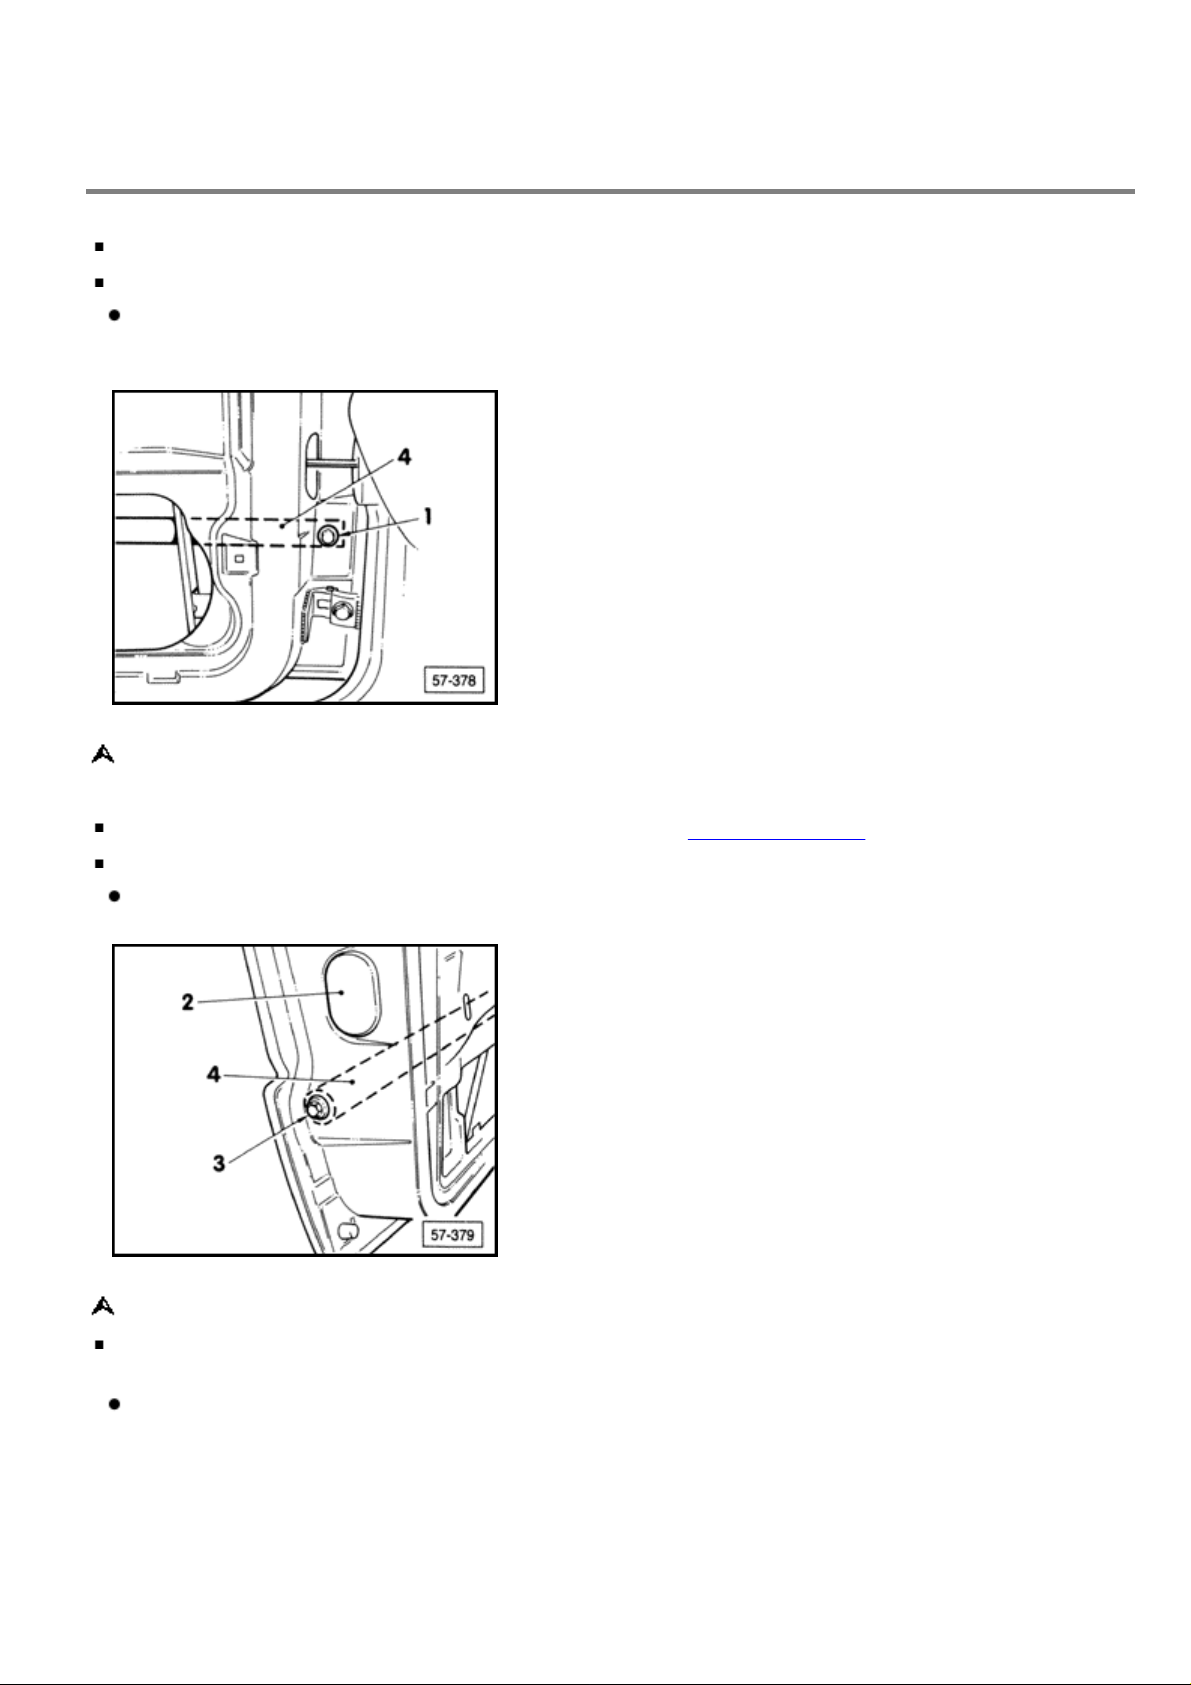
Fig. 4 Window regulator, installing
insert window regulator in door and align with mounting holes
rivet window regulator to inner door panel (rivet Part No.
N 101 283.01
)
CAUTION!
Part numbers are listed for reference only. Always consult with the Parts Department for
latest information.
Page 5

Volkswagen Corrado 1990 - 1994
Body
Body-Front Doors (Page 57-4)
Fig. 5 Door glass, removing/installing/adjusting
lower door glass fully
unscrew door glass, pull off guide arms (Fig. 2), tilt door glass toward front and
remove upward (window well seal, inner, removed)
tightening torque = 7 Nm (5 ft lb)
when installing door glass, sliding support must engage with guide rail when door
glass is installed
adjust door glass by loosely bolting door glass together with window regulator
raise door glass to top (glass will center) and tighten bolts
tightening torque = 7 Nm (5 ft lb)
Fig. 6 Window carrier to door glass, bonding
CAUTION!
Part numbers are listed for reference only. Always consult with the Parts Department for
latest information.
when repairing, area that is to be covered with adhesive should be cleaned prior to
bonding (Part No.
D 009 400 01
) and primed (glass primer Part No.
D 009 200
)
Page 6
attach window carrier to door glass with adhesive, Part No.
cartridge)
prior to installation, the bonding area (window carrier/door glass) must harden for at
least 24 hours
dimensions for window carrier:
= 425 mm (16-39/64 in.)
a
= 475 mm (18-1/2 in.), curvature of glass not included
b
D 009 100 03
(small
Fig. 7 Trim frame, removing/installing
remove cover (triangular plates inside and out)
pull off edge protection 18 from flange
snap off trim frame 19 from flange trim frame
trim frame is bonded with door frame at interior lip
- adhesive surface
a
- door frame
1
- door glass
15
Page 7
Volkswagen Corrado 1990 - 1994
Body
Body-Front Doors (Page 57-5)
install by inserting trim frame into rear portion of window well
push trim frame down and press onto flange from upper corner
remove protective paper on adhesive tape only after trim frame has been properly
seated
Fig. 8 Impact bar, removing
remove inner door panel and plastic moisture barrier, Repair Group 70
remove guide rail
- impact bar
4
pry off cover cap 2, remove hex head bolts
mounting opening
tightening torque = 25 Nm (18 ft lb)
and take out impact bar from
1,3
Page 8
Volkswagen Corrado 1990 - 1994
Body
Body-Front Doors (Page 57-6)
Page 9

Volkswagen Corrado 1990 - 1994
Body
Body-Front Doors (Page 57-7)
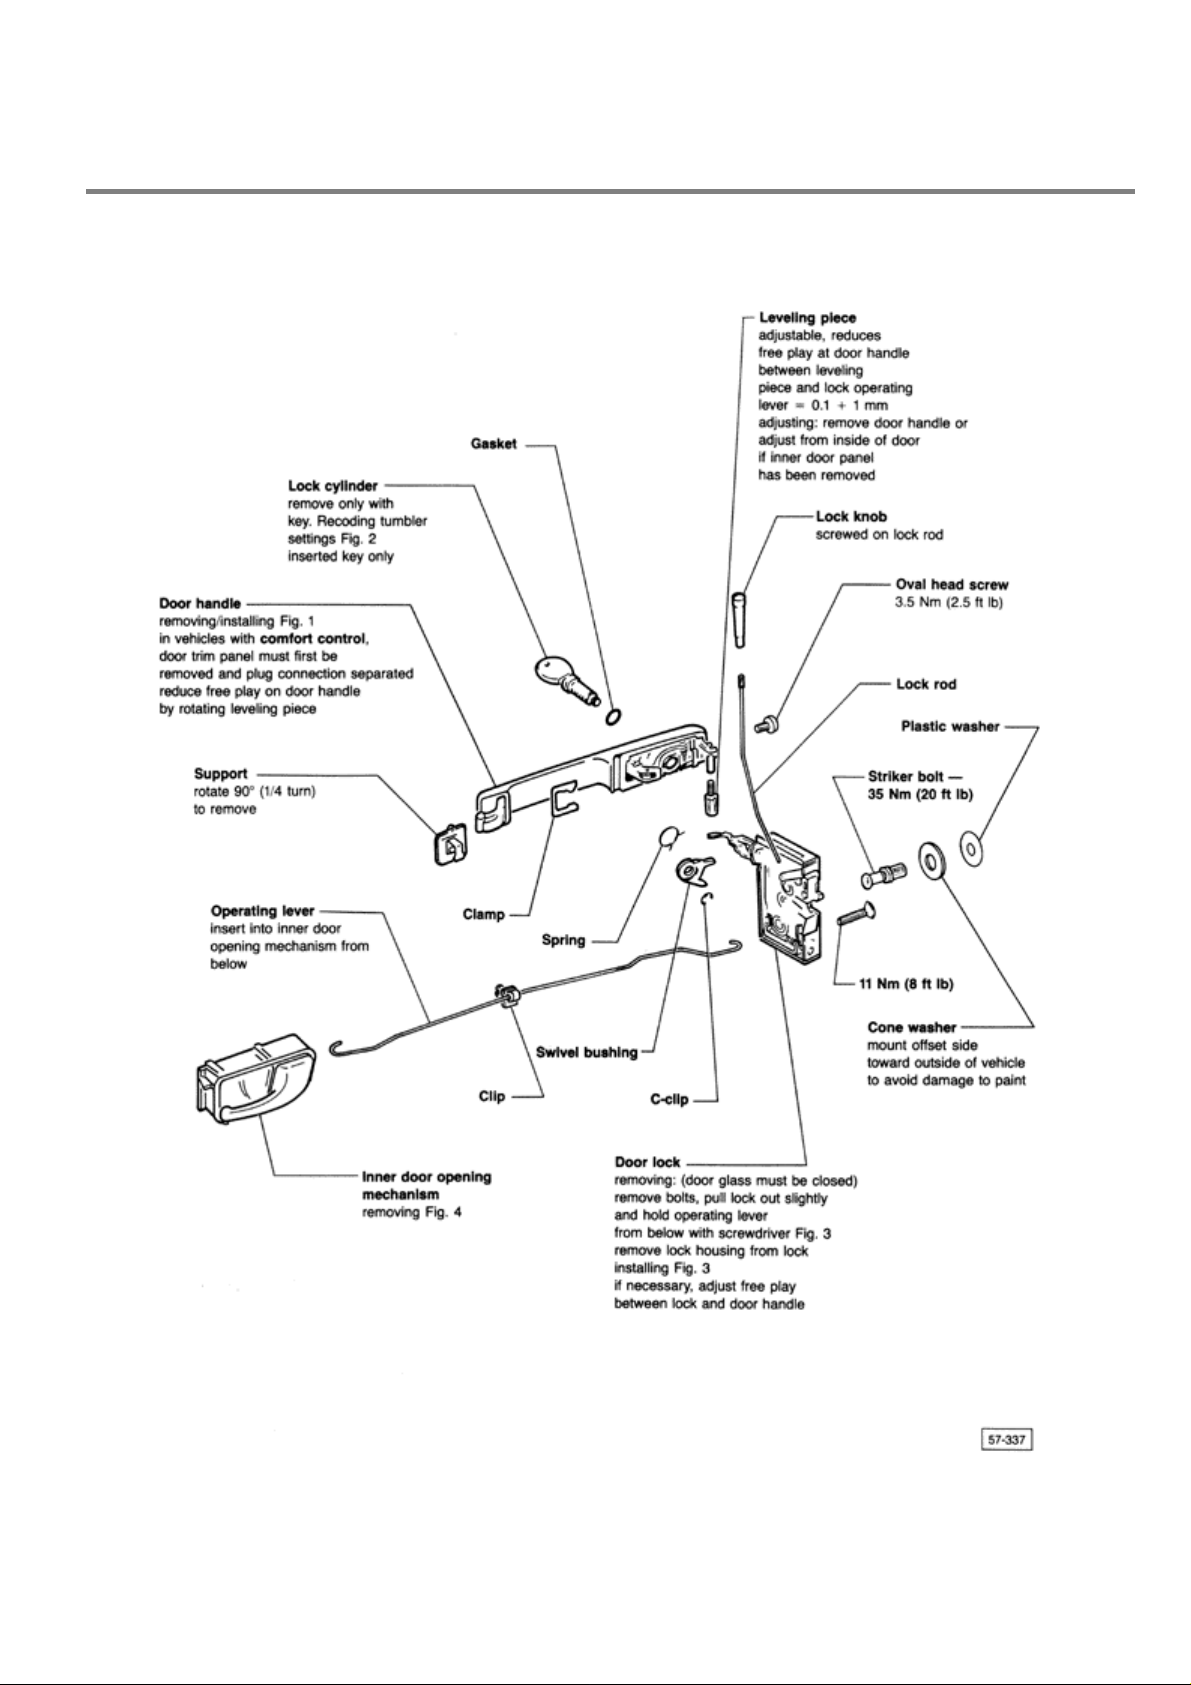
Fig. 1 Door handle, removing/installing
remove bolt and washer assembly
push door handle in direction of arrow and pivot out of door
when installing check washer 2 and clip 3 for damage
check tolerance (free play of door handle) between leveling piece and operating
lever. If necessary, adjust through rotating leveling piece
0.1 + 1 mm
torque fastening bolt 7 Nm (5 ft lb)
Fig. 2 Identical tumbler setting, maintaining
matching tumbler settings in vehicle can be made by rearranging tumblers
possible locking plate sizes = 1 2 3 4
C
CAUTION!
Part numbers are listed for reference only. Always consult with the Parts Department for
latest information.
Notes
Lubricate tumblers and springs with lubricant, Part No.
G 000 400
, and insert lock cylinder guide
Page 10

channels.
Fig. 3 Door lock, installing
pull operating lever A 90 and fasten through opening B with screwdriver
check tolerance (free play of door handle) between leveling piece and door lock
operating lever, if necessary, adjust by rotating leveling piece
0.1 + 1 mm, see page 57-6
Fig. 4 Door inner handle, removing
push flange out of hole in inner door panel with a screwdriver
push door handle in direction of arrow
Page 11

Volkswagen Corrado 1990 - 1994
Body
Body-Front Doors (Page 57-8)
Door inner seal, removing
remove or loosen inner trim, see Repair Group 70
door inner seal 1 is fitted on door flange
2
Door inner seal, installing
Reinstall in reverse order of removal.
Door lock with freeplay adjustment as of VIN 50 NK 015 279
- Door handle
1
- Door lock with freeplay adjustment
2
- Bolt
3
- Cap
4
- Nut
5
20 Nm (15 ft lb)
with freeplay adjustment
Page 12

Removing
- unclip cap -4-
- remove bolts -3-
- pull away door lock -2- slightly and lock operating lever with 3 mm mandrel
- pull out door lock and unhook pull rod from inner lock mechanism
Page 13

Volkswagen Corrado 1990 - 1994
Body
Body-Front Doors (Page 57-8a)
Installing
- loosen nut -3- with 5.5 mm wrench
release lever will give way
right side = left hand thread
left side = right hand thread
Assembly position
1
- install door lock
Installed position
2
use torque wrench
torque to 2.4 Nm (2 in. lb)
Notes
This adjustment must be made whenever the door handle is removed, replaced or reinstalled.
freeplay adjustment actuated between release lever and actuating lever
- tighten nut -3-
VAG 1783
- check for proper function
and insert
VAG 1784
or equivalent
Page 14

Volkswagen Corrado 1990 - 1994
Body
Body-Front Doors (Page 57-9)
Page 15

Volkswagen Corrado 1990 - 1994
Body
Body-Front Doors (Page 57-10)
Fig. 1 Bi-pressure pump, removing
loosen right luggage compartment trim in rear area
remove hex nut
tightening torque = 6 Nm (4 ft lb)
remove bi-pressure pump 1 from deadener
Bi-pressure pump, installing
Install all components in reverse order of removal.
3
2
Fig. 2 Master activators, removing
close window
remove door trim, Repair Group 70
carefully remove door film
Page 16

remove pressure line and connector from switch element
open hinge and activator 4 and unhook lock rod
remove screws
Fig. 3 Master activators, installing
Notes
For lock rod assembly, activator and door lock must be in locked position.
7
6
Door lock on driver's side must be in
lock washer 5 must be locked
push in lock rod and close hinge
closed
position.
4
CAUTION!
Do not pull lock rod downward when pushing in.
Page 17

Volkswagen Corrado 1990 - 1994
Body
Body-Front Doors (Page 57-11)
Notes
When locking, hinge 4 must turn lock washer 5 and unlock.
conduct functional test, page 57-13
Fig. 4 Gas flap activator, removing
remove pressure line on activator
remove screws
open hinge on activator 4 and unhook lock rod
Gas flap activator, installing
Install all components in reverse order of removal, noting adjustment of activator, page 11a
8
6
Page 18

Gas flap lock rod, removing
open hinge on activator 4 and unhook lock rod
open gas flap 9, unscrew tank lock
unhook lock ring 11 and pry out rubber sleeve
screw on tank lock
unclip lock plug
pull lock rod 6 downward out of tank opening
Gas flap lock rod, installing
Reinstall all components in reverse order of removal.
10
13
10
6
12
Page 19

Volkswagen Corrado 1990 - 1994
Body
Body-Front Doors (Page 57-11a)
Gas flap activator, adjusting
Notes
Gas flap activators must be adjusted on vehicles that are not equipped with the 4.0 mm (5.32 in.)
distance spacer. The spacer is not available as a replacement part, and may not be retrofitted to
earlier vehicles.
hook lock rod 1, hinge 2 on activator
pull lock rod 1 out of activator until pretension distance a between support 4 and
rubber boot 5 is attained
= 4.0mm (5/32 in.)
a
3
Notes
From VIN 50 MK 002 478, a 4.0 mm (5/32 in.) spacer (
arrow
) is installed to maintain pretension
Page 20

distance
close hinge 2 on activator
a
if gas flap activator is replaced, the spacer may be transferred to the replacement
activator
Page 21

Volkswagen Corrado 1990 - 1994
Body
Body-Front Doors (Page 57-12)
Fig. 5 Activator for rear lid, removing
turn clips (
remove pressure line from activator
arrows
) 90 (1/4 turn) (unlock) and unclip inner trim for rear lid
17
unclip tension rod 14 from clip
remove hex head bolts
tightening torque = 10 Nm (7 ft lb)
Activator for rear lid, installing
Install all components in reverse order of removal.
16
15
Page 22

Volkswagen Corrado 1990 - 1994
Body
Body-Front Doors (Page 57-13)
Central locking, checking
Notes
All locks must close within approximately 2 seconds. If the bi-pressure pump runs longer than 5
seconds, either the linkage or the activator is not correctly adjusted or the system has leaks.
The shut-off point in the activator is not attained if the linkage is not adjusted correctly - bipressure pump "
Test conditions
rear lid and gas flap must be closed
windows completely open
Locking, checking
push lock button on either door down
both lock buttons must go down, both doors, rear lid and gas flap are locked
pulses
." After 35 seconds the control unit must shut off the bi-pressure pump.
repeat on passenger door
Notes
The central locking procedure can be done on the passenger side. Central locking of all activators
is possible through the door locks on both doors.
Page 23

Volkswagen Corrado 1990 - 1994
Body
Body-Front Doors (Page 57-14)
Central locking, electrical troubleshooting
Notes
Always refer to appropriate wiring diagram.
Test requirements
fuses S16, S52
battery voltage
vacuum system
bi-pressure pump with control module (
activators properly adjusted, see Index
Tools required
digital multimeter
Notes
Should one or more activators not operate, check if bi-pressure pump operates longer than 5
seconds, then pulses (pumps) again. If yes, eliminate leak in vacuum system.
OK
OK
OK
Fluke 83 (US 1119)
) accessible
V 69
Page 24

Volkswagen Corrado 1990 - 1994
Body
Body-Front Doors (Page 57-15)
Page 25

Volkswagen Corrado 1990 - 1994
Body
Body-Front Doors (Page 57-16)
Page 26

Volkswagen Corrado 1990 - 1994
Body
Body-Front Doors (Page 57-17)
Central locking system pump and control module, location/terminal
identification
Location
The central locking system pump and control module are located in the luggage compartment, on
the right.
Connector terminal identification
1 = T 12/1
2 = T 12/2
3 = T 12/3
4 = T 12/4
5 = T 12/5
6 = T 12/6
7 = T 12/7
8 = T 12/8
Connector color
- transparent
T 12
Notes
See wiring diagram for wire routing to connector
when performing any electrical tests or repairs.
9 = T 12/9
10 = T 12/10
11 = T 12/11
12 = T 12/12
. Always refer to appropriate wiring diagram
T 12
Page 27

Volkswagen Corrado 1990 - 1994
Body
Body-Front Doors (Page 57-18)
Re-keying locks
Lock cylinders cannot be ordered by specified key numbers. On most cars one-key convenience
can be retained by changing the appropriate lock tumblers to match the key that is going to be
used.
Notes
Tumblers in the ignition lock
On certain older vehicles, the glove box key is different than the ignition key. A separate kit is
available from the Parts Department to change this lock.
Key code, locating
The key code is a two-letter, four-digit number that represents the contour of the key.
The key code may be found on:
cannot
be changed.
the plastic plate that comes with the original set of keys
recorded by owner or selling dealer in vehicle owners manual
door handle
ignition lock
rear lid lock
Lock cylinder tumblers, changing
select correct tumbler repair kit
bags are marked by numbers
insert lock's original key into cylinder lock
1-2-3-4
to identify the tumblers
Page 28

carefully remove lock cylinder
do not damage O-ring
place thumb and forefinger over tumblers to hold them in place
pull out key
Page 29

Volkswagen Corrado 1990 - 1994
Body
Body-Front Doors (Page 57-19)
if tumblers are peened in place, carefully remove peened metal with suitable tool
until lock tumblers can be removed
place lock cylinder on clean flat surface
release the cylinder and tumblers slowly
tumblers will come out as you let go
CAUTION!
Do not lose any springs or tumblers.
remove all tumblers and springs from cylinder
Selecting tumblers
CAUTION!
VW Key Code Service Catalog is strictly confidential.
look up key code of ignition lock in Key Code Service Catalog
catalog will tell you what tumblers to use and the sequence they are to be inserted
into lock cylinder
Example:
Key code
The code in catalog is listed in following sequence:
3-1-3-2-3-1-3
add 1 to the
use tumbler sizes in this order:
4-3-4-1-3-4-1
3 1 3 2 3 1 3
1
+
41
AH 9129
1
42313
and
first
= tumbler arrangement according to code list
= tumbler arrangement of converted lock cylinder
tumbler size to initially make the lock work. In example
third
Page 30

Volkswagen Corrado 1990 - 1994
Body
Body-Front Doors (Page 57-20)
CAUTION!
Part numbers are for reference only. Always consult with the parts department for the
latest information.
Notes
Lubricate the tumblers and springs with
the lock cylinder.
reading key code numbers from left to right, insert tumblers in the lock cylinder
housing starting at the key slot
Notes
When working with a lock cylinder with only 5 tumblers, use tumbler number sequence
first two tumblers.
G 000 400
grease or equivalent as they are inserted into
minus
the
Example:
4142313
- - 42313
Notes
The central locking procedure can be done on the passenger side. Central locking of all activators
is possible through the door locks on both doors.
= code from catalog
= are the tumblers to be used
 Loading...