

Vodafone NWL-224, NWL-222 User Manual
Vodafone
MachineLink
4G Lite
Quick Start Guide
and Safety Manual
MPRT-00005-000 rev 8 - MachineLink 4G Lite QSG.indd 1 13/11/2018 10:38:55 AM

Welcome
to the world of mobile communications
Thank you for choosing a Vodafone MachineLink 4G Lite IoT
router. This guide will help you set up, connect and congure your
device quickly and easily.
MPRT-00005-000 rev 8 - MachineLink 4G Lite QSG.indd 2 13/11/2018 10:38:56 AM
Chapters
Getting started
2
3 Device overview
5 Installing your device
8 Mounting your device
12 Overview of LED indicators
14 Advanced conguration and troubleshooting
17 Verifying connection status
18 Safety and product care
Package
contents
MPRT-00005-000 rev 8 - MachineLink 4G Lite QSG.indd 1 13/11/2018 10:38:56 AM
This package includes
• 1x Vodafone MachineLink
4G Lite IoT router
• 2 x LTE Tube Antennas
• 1 x Six-way terminal block
• 1 x 1.5m Yellow Ethernet
cable 8P8C
• 1 x DIN rail mounting
bracket
• 1 x Quick start guide
1

Getting
started
Depending on your individual setup, you may need certain
components to congure your device correctly.
• External power supply unit for the Vodafone MachineLink 4G Lite
router (not included).
• Flathead screwdriver for terminating power input wires.
• Laptop or PC for advanced conguration.
• Additional fasteners and screwdrivers for specic wall or rail
mounting.
2
MPRT-00005-000 rev 8 - MachineLink 4G Lite QSG.indd 2 13/11/2018 10:38:56 AM

Device
overview
2 3
1
ITEM DESCRIPTION
1 Aux antenna socket SMA female connector for auxiliary antenna (receive diversity).
2 Serial port Female DE-9 port supporting 9-wire RS-232, RS-485 or RS-422
(software selectable).
3 GPS antenna socket SMA female connector for GPS antenna.
4 Main antenna socket SMA female connector for main antenna.
4
3
MPRT-00005-000 rev 8 - MachineLink 4G Lite QSG.indd 3 13/11/2018 10:38:56 AM
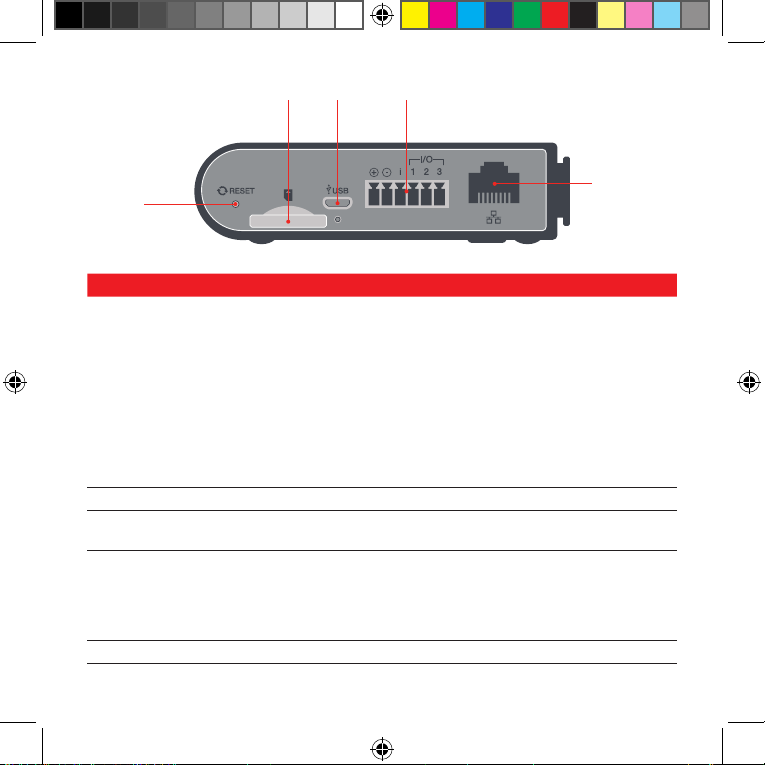
6 7 8
5
ITEM DESCRIPTION
5 Reset button
6 SIM card slot Insert SIM card here.
7 Micro USB 2.0 OTG port
8 Six-way terminal block
connector
9 RJ45 Fast Ethernet port Connect one or several devices via a network switch here.
• Press and hold for less than 5 seconds to reboot to normal mode. The
LEDs are green and extinguish in sequence to indicate that the router
will reboot normally if the button is released during this period.
• Press and hold for 5 to 15 seconds to reboot to recovery mode.
The LEDs are amber and extinguish in sequence to indicate that the
router will reboot to recover y mode if the button is released during
this period.
• Press and hold for 15 to 20 seconds to reset the router to factory
default settings. The LEDs are red and extinguish in sequence to
indicate that the router will reset to factor y default settings if the
button is released during this period.
Provides connectivity for optional external storage or a USB Ethernet
dongle. Supplies up to 0.5A to connected device.
Connect power source, ignition and I/O wires here. Power, ignition and I/O
wires may be terminated on the supplied terminal block and connected
to a power source. Refer to the diagram and table under Step 5 of the
Installing your device section for correct wiring of the terminal block.
Operates in the 8-40V DC range.
9
4
MPRT-00005-000 rev 8 - MachineLink 4G Lite QSG.indd 4 13/11/2018 10:38:56 AM

Installing
Push to eject
Sim tray
your device
Step 1
The Vodafone MachineLink 4G Lite router comes equipped with an
internal soldered-down GDSP SIM which is ready for use. If you have an
additional SIM card that you would like to use, you can insert it in the SIM
card tray. To eject the SIM card tray, use the end of a paper clip to press
the SIM Eject button. Place the SIM card in the tray and then insert the
loaded tray into the SIM slot with the gold side facing up, as shown below.
5
MPRT-00005-000 rev 8 - MachineLink 4G Lite QSG.indd 5 13/11/2018 10:38:56 AM
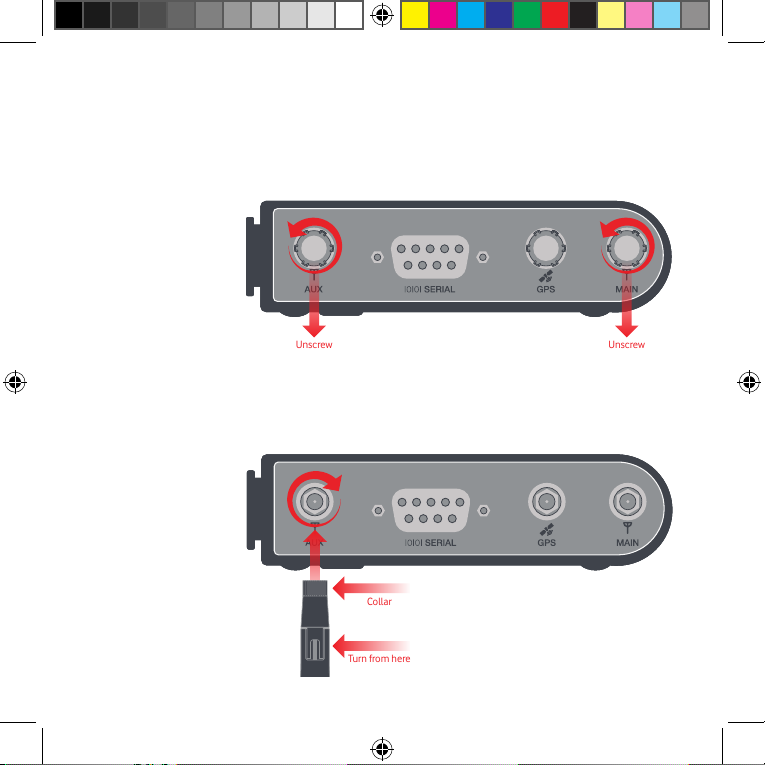
Step 2
Unscrew Unscrew
Collar
Turn from here
The MachineLink 4G Lite router is shipped with caps on the Main,
Auxiliary and GPS antenna sockets. To attach the supplied antennas,
rst remove the antenna socket caps from the Main and Auxiliary
antenna sockets by turning them in an anti-clockwise direction.
Then screw the antennas onto the sockets, turning them by the
collar in a clockwise direction.
When the collar has been sufciently
tightened, turn the antenna in a clockwise direction until it has
reached the desired orientation.
6
MPRT-00005-000 rev 8 - MachineLink 4G Lite QSG.indd 6 13/11/2018 10:38:57 AM

Please refer to the Device overview section for the antenna socket
layout. If you have purchased a GPS antenna, remove the socket cap
from the GPS antenna socket and attach the antenna to the socket in
the same manner.
Step 3
Mount your router in a suitable location using the options listed in the
Mounting options section.
When selecting a location to mount the MachineLink 4G Lite router,
keep in mind that it features high performance antennas designed to
provide optimum signal strength in a wide range of environments. You
can check the signal strength by observing the colour and number of
LEDs illuminated on the front of the device. For a precise reading of
the signal strength, refer to the Status page on the web user interface.
If you nd the signal strength is weak, try moving the router to a
different place, mounting it differently or changing the orientation of
the antennas.
The signal strength LEDs update within a few seconds with a rolling
average signal strength reading. When selecting a location for the
router, please allow up to 20 seconds for the signal strength LEDs to
update before repositioning.
7
MPRT-00005-000 rev 8 - MachineLink 4G Lite QSG.indd 7 13/11/2018 10:38:57 AM
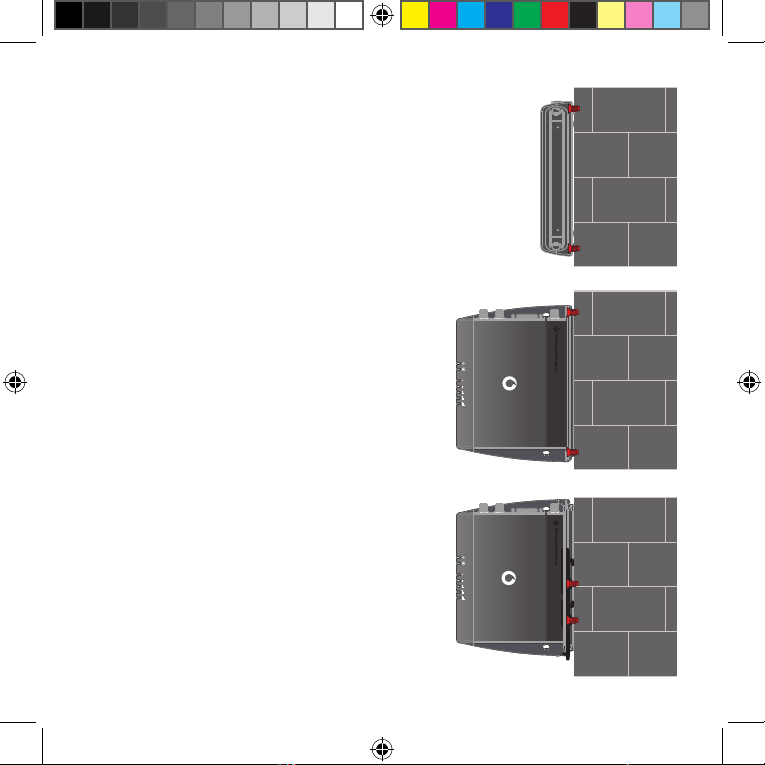
Wall mount
1. Flat against the wall
Use a minimum of 2 screws (3.5mm
diameter) through the holes on the side of
the device.
2. Perpendicular to the wall
3. Mounted via DIN Rail Bracket
Use a minimum of 2 screws (3.5mm
diameter) through the holes on the
DIN rail bracket.
8
MPRT-00005-000 rev 8 - MachineLink 4G Lite QSG.indd 8 13/11/2018 10:38:57 AM

DIN Rail
mounting
bracket
C Section DIN
rail mount
Top hat DIN rail
mount
Desk mount
Push to release
V Bend allows you to snap the DIN
bracket onto the middle of a DIN rail,
rather than sliding it onto the end
9
MPRT-00005-000 rev 8 - MachineLink 4G Lite QSG.indd 9 13/11/2018 10:38:58 AM

Step 4
Connect power to your router using one of the following options.
1. DC power via the the six-way connector
Remove the attached green terminal block from your router and
connect to the router’s power socket using a DC power supply, sold
separately.
2. DC power via eld terminated power source
If an 8-40V DC power supply is available, you can insert the wires
into the supplied terminal block to power your router. Use a athead
screwdriver to tighten the terminal block screws and secure the power
wires, making sure that you have correctly wired the terminal block as
illustrated below.
10
MPRT-00005-000 rev 8 - MachineLink 4G Lite QSG.indd 10 13/11/2018 10:38:58 AM
 Loading...