

Page 1

Installing Application Manager
Application Manager 1.5
This document supports the version of each product listed and
supports all subsequent versions until the document is replaced
by a new edition. To check for more recent editions of this
document, see http://www.vmware.com/support/pubs.
EN-000856-00
Page 2

Installing Application Manager
You can find the most up-to-date technical documentation on the VMware Web site at:
http://www.vmware.com/support/
The VMware Web site also provides the latest product updates.
If you have comments about this documentation, submit your feedback to:
docfeedback@vmware.com
Copyright © 2012 VMware, Inc. All rights reserved. This product is protected by U.S. and international copyright and intellectual
property laws. VMware products are covered by one or more patents listed at http://www.vmware.com/go/patents.
VMware is a registered trademark or trademark of VMware, Inc. in the United States and/or other jurisdictions. All other marks
and names mentioned herein may be trademarks of their respective companies.
VMware, Inc.
3401 Hillview Ave.
Palo Alto, CA 94304
www.vmware.com
2 VMware, Inc.
Page 3

Contents
Installing and Configuring Application Manager 5
1
Application Manager Deployment Checklists 9
Introduction to Application Manager 11
2
Security Considerations and System Requirements for Application Manager 19
3
Application Manager Recommendations and Requirements 19
Preparing to Install Application Manager 23
4
Prepare to Install Application Manager 23
Convert the Virtual Appliance File Format 24
Installing Application Manager 27
5
Start the Application Manager Virtual Appliance 27
Use the Virtual Appliance Interface for the Initial Application Manager Configuration 28
Configuring Application Manager with the Operator Setup Wizard 33
6
Access the Application Manager Operator Web Interface 33
Making Additional Application Manager Configurations 35
7
Configure Application Manager for Logging 35
Configuring SSL Connectivity to Application Manager 36
Configuring Clustering for Application Manager 41
Update Application Manager 44
Troubleshooting Application Manager 47
8
Potential Network Time Protocol Issue 47
Missing the Application Manager Operator Web Interface Password 48
Connector Issue Prevents Administrator Access to Application Manager 49
Using a Static IP Address for Application Manager with vCenter Server Can Result in an Access
Issue 50
Index 51
VMware, Inc. 3
Page 4

Installing Application Manager
4 VMware, Inc.
Page 5

Installing and Configuring Application
Manager 1
This information describes how to install Application Manager, the on-premise appliance as opposed to the
hosted version of Application Manager. When you host Application Manager, you control the operator and
administrator pages that allow you to manage end-user access to your Windows, SaaS, and Web applications.
The Connector is a required software piece that you must install separately.
Intended Audience
This information is intended for organization administrators. The information is written for experienced
Windows and Linux system administrators who are familiar with VMware virtual machine technology,
identity management, entitlement, and directory services. SUSE Linux is the underlying operating system of
the Application Manager virtual appliance. Knowledge of Linux is essential to configure the Application
Manager directly and to perform system-level functions, such as configuring network settings, time settings,
and log files. Knowledge of other technologies, such as VMware ThinApp and RSA SecurID, is helpful if you
plan to implement those features.
Application Manager Installation Overview
This process involves a variety of tasks and you can deploy the Application Manager in several different ways.
A key distinction in deployments is in the mode of authentication you choose. See Chapter 2, “Introduction to
Application Manager,” on page 11. An important deployment factor depends on if you choose to provide
Application Manager users with access to Windows applications captured as ThinApp packages. See Installing
and Configuring the Connector for more information.
Installation and Configuration Flow of an Application Manager
Deployment
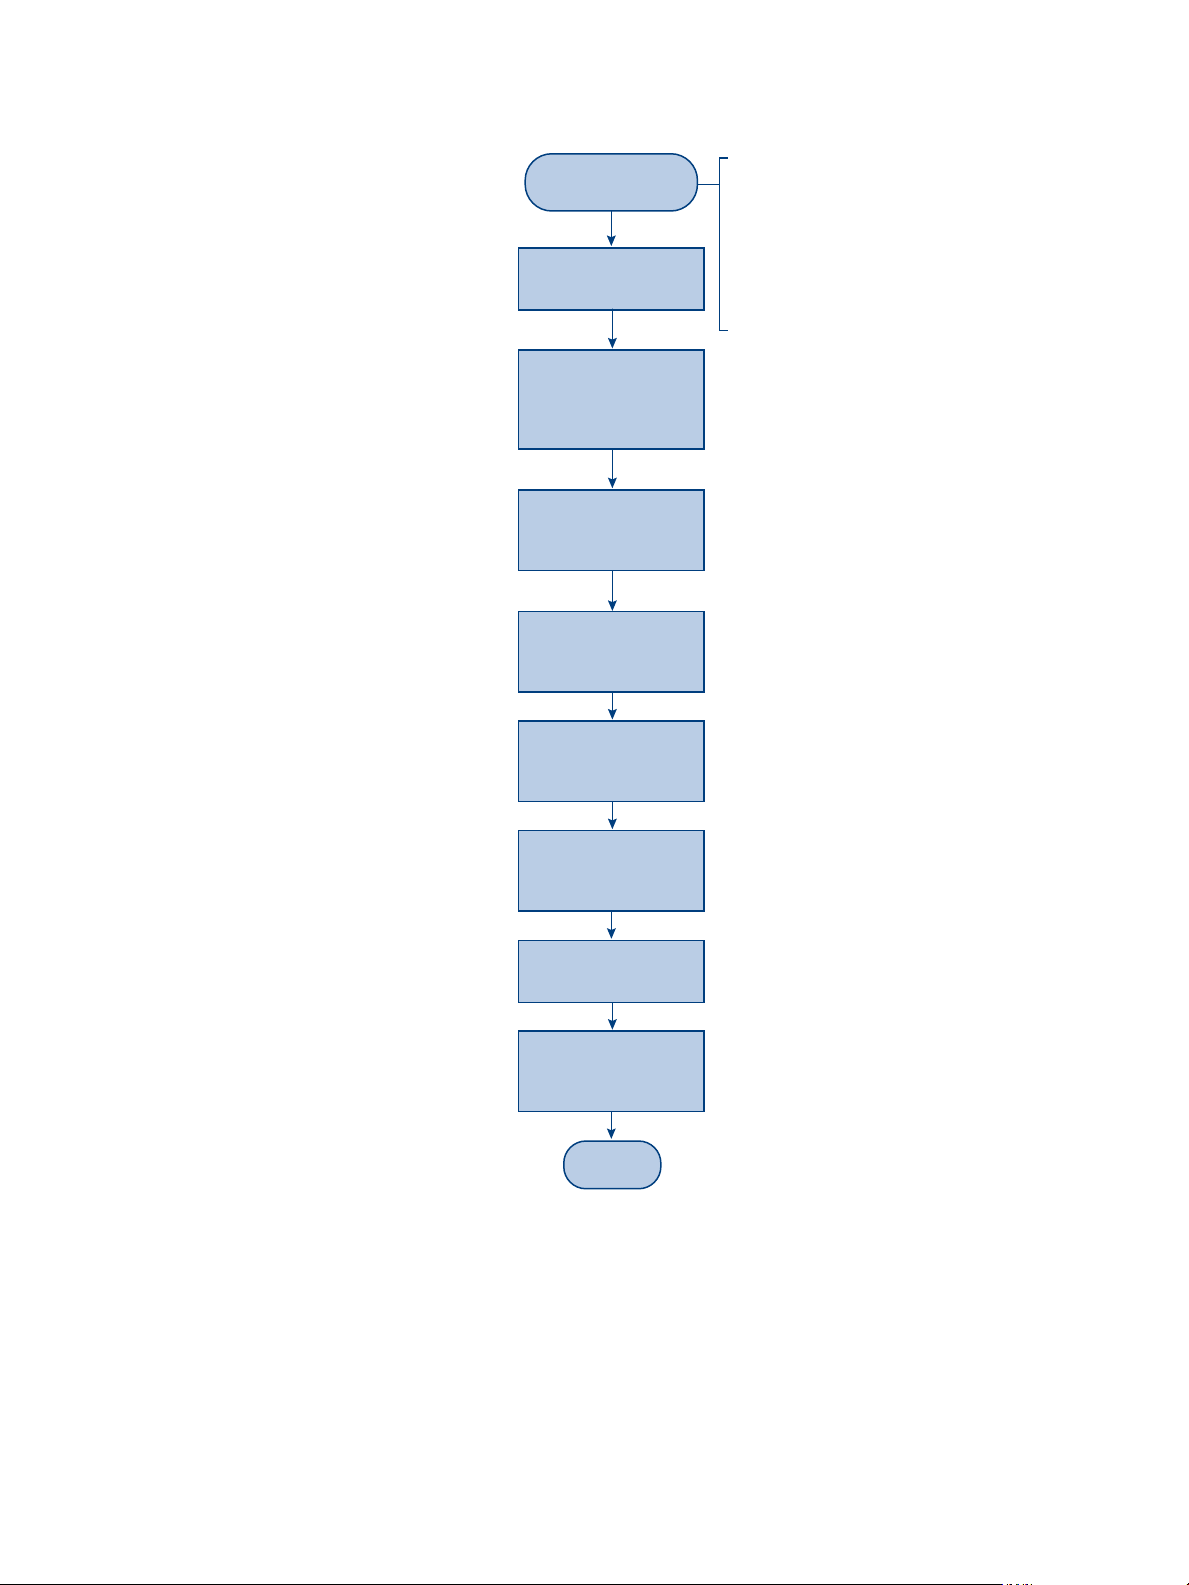
Figure 1-1 provides a broad overview of the installation and configuration tasks involved in an on-premise
Application Manager deployment. The summary that follows reiterates the main steps.
VMware, Inc.
5
Page 6
• Create DNS records for the Service and the Connector
• Ensure the hardware, software, and network requirements
are met
• Prepare the optional features that apply. For example,
create the ThinApp repository for ThinApp integration
and configure KDC for Kerberos authentication
• Prepare ESXi for the mode of authentication suitable for
your enterprise: Service Authentication mode, Connector
Authentication mode, or both
Obtain the virtual
appliances
End
Install and
Configure the
Service virtual
appliance
Install and
configure the
Connector
Return to the
Service as an
operator
Configure the
Service as an
administrator
Configure
logging
Provide users with
URLs to access
applications
Obtain the Service and Connector
virtual appliances
Provide network information, including:
• IP/subnet/gateway info
• DNS servers
• Hostname
• A Network Time Protocol server
• Time zone
• SSL connectivity to the Service*
• Use a browser to login to the Operator
Web interface
• Run the setup wizard
• Copy and save the URL for the Service
and the activation code for the Connector
In the Web interface, you can enable
SSL for end user authentication*
Configure the
Service as
an Operator
Configure the Connector using the virtual appliance interface
and the applicable wizards of the Web interface. If you are
providing users with access to Windows Applications captured
as ThinApp packages, configure the Windows Apps page
Create delegated operators, add
applications, etc
Using a browser, return to the Service for further
configuration. For example, you can configure
IdP Discovery, add applications, create groups,
set entitlements, and define roles for delegated
administration
Return to the virtual appliances of
both the Service and Connector to
configure logging
Distribute URLs to users to provide access
to the User Portal and directly to individual
applications
*NOTE: SSL connectivity to the Service and the Connector is disabled by default to simplify the configuration of your
Application Manger deployment during the proof-of-concept phase. You can enable SSL later when you are prepared
to put Application Manager into production. Verify that the state of SSL, enabled or disabled, always matches between
the Connector and the Service.
After you enable SSL for your Application Manager deployment, perform the following tasks that apply:
• If you are providing users with access to Windows Applications captured as ThinApp packages, reinstall
the Horizon Agent on each user’s system to update the Service URL from HTTP to HTTPS.
• Update each SAML application that you previously configured without SSL to now use SSL. Therefore,
ensure that each SAML application now reaches Application Manager using HTTPS instead of HTTP.
This might involve working with account administrators for specific applications.
Prepare your
environment
Installing Application Manager
Figure 1-1. Application Manager Installation and Configuration Flowchart
1 Prepare your environment:
6 VMware, Inc.
Page 7

Chapter 1 Installing and Configuring Application Manager
n
Create DNS records for Application Manager and the Connector.
n
Ensure hardware and software requirements are met.
n
Prepare the optional features that apply. For example, create the ThinApp repository for ThinApp
integration and configure KDC for Kerberos authentication.
n
Prepare vSphere for Connector Authentication mode.
2 Obtain virtual appliances:
n
Obtain the Application Manager and Connector virtual appliances.
3 Install and configure the Application Manager virtual appliance:
n
Provide network information, including:
n
IP/subnet/gateway info
n
DNS servers
n
Hostname
n
A Network Time Protocol server
n
Time zone
n
SSL connectivity to Application Manager
4 Configure Application Manager as an operator:
n
Use a browser to log in to the Operator Web interface.
n
Run the setup wizard to create your first organization.
n
Copy and save the URL for Application Manager and the activation code for the Connector.
5 Install and configure the Connector:
n
Configure the Connector using the virtual appliance interface and the applicable wizards of the Web
interface. If you are providing users with access to Windows Applications captured as ThinApp
packages, configure Windows Apps in the Connector setup wizard. You can also perform additional
configuration such as setting up RSA SecurID.
n
In the Web interface, you can enable SSL for end user authentication.
6 Return to Application Manager as an operator of your first organization:
n
Create delegated operators, add applications, additional organizations, etc.
7 Configure Application Manager as an administrator:
n
Using a browser, return to Application Manager for further configuration. For example, you can add
ThinApp packages, configure IdP Discovery for ThinApp integration, add applications, create
groups, set entitlements, and define roles for delegated administration.
8 Configure logging:
n
Configure logging for Application Manager. Return to the Connector virtual appliance interface to
configure logging for the Connector.
9 Provide users with URLs to access applications:
n
Distribute URLs to users to provide access to the User Web interface and directly to individual
applications
Trial, Test, and Production Deployment Phases
To reduce the complexity of the deployment process, you might want to deploy Application Manager in phases.
VMware, Inc. 7
Page 8

Installing Application Manager
SSL connectivity, load balancing, and high availability add layers of complexity to your deployment that can
be avoided during the proof-of-concept phase.
By default, secure ports are disabled for the Connector and Application Manager. For the proof-of-concept
phase, you can install the Connector and Application Manager using the default insecure ports. This frees you
during this phase from managing SSL certificates.
Also, by default, Application Manager uses an internal database server. To support load balancing or high
availability you must install and configure a supported external database server and point multiple Application
Manager instances to that external database server. For the proof-of-concept phase, you can use the default
internal database server. This frees you from installing an external database server and configuring clustering.
Table 1-1. Recommended Phases of Deployment
Phase Recommended Actions
Trial (Proof-ofConcept)
Test (PreProduction)
Production
n
SSL Connectivity (Do not configure)
n
For Application Manager, keep the insecure ports enabled and the secure ports disabled.
These settings are accessible with the Application Manager virtual appliance interface, on
the Configure Web Server screen.
n
For the Connector, accept the default insecure mode. This setting is accessible with the
Connector virtual appliance interface, on the Configure Web Server screen.
NOTE You can test ThinApp integration in Insecure mode.
n
Load Balancing and High Availability (Do not configure)
n
For Application Manager, keep the internal database server configuration. This setting is
accessible with the Application Manager virtual appliance interface, on the Configure
Database Connection screen.
n
SSL Connectivity
n
For Application Manager, disable the insecure ports and enable the secure ports.
n
For the Connector, enable secure mode, which requires you to reset and reconfigure the
Connector.
n
Generate both an Application Manager SSL certificate and a Connector SSL certificate.
n
If you are using self-signed SSL certificates, deploy the certificates to user machines. In
addition, distribute the Application Manager certificate to each Connector instance.
n
Reconfigure SAML applications to use HTTPS instead of HTTP.
n
Reinstall the Horizon Agent on user machines to use HTTPS instead of HTTP.
n
Load Balancing and High Availability
n
For Application Manager, install a supported external database server and point multiple
Application Manager instances to that external database server.
n
SSL Connectivity
n
Replace your self-signed SSL certificates with signed third-party CA certificates.
n
For Application Manager, verify that insecure ports are disabled and secure ports are
enabled.
n
For the Connector, verify that secure mode is enabled.
n
Verify that SAML applications are configured for HTTPS.
n
Verify that the Horizon Agent has been reinstalled on user machines to use HTTPS.
n
Load Balancing and High Availability
n
For Application Manager, install a supported external database server and point multiple
Application Manager instances to that external database server.
8 VMware, Inc.
Page 9

Application Manager Deployment Checklists
You can use the Application Manager Deployment Checklist to gather the necessary information to install
Application Manager on premise.
Network Information for Application Manager
Table 1-2. Application Manager Network Checklist
Information to Gather List the Information
IP Address
Subnet Mask
Gateway
DNS Server
Network Information for the Connector
Table 1-3. Connector Network Checklist
Information to Gather List the Information
Chapter 1 Installing and Configuring Application Manager
IP Address
Subnet Mask
Gateway
DNS Server
DNS Record for Application Manager
Table 1-4. Application Manager DNS Checklist
Information to Gather List the Information
Application Manager Host
(MyHost.MyDomain.com)
The best practice is to use the same name
for MyHost that you plan to use for your
first organization.
First Organization
(MyOrg.MyDomain.com)
When you configure Application
Manager, organizations are created
within logical/functional containers for
users and applications.
DNS Record for the Connector
Table 1-5. Connector DNS Checklist
Information to Gather List the Information
Connector Host
VMware, Inc. 9
Page 10

Installing Application Manager
Active Directory Domain Controller
Table 1-6. Active Directory Domain Controller Checklist
Information to Gather List the Information
Active Directory IP Address
Active Directory FQDN
10 VMware, Inc.
Page 11

Introduction to Application Manager 2
Application Manager is an identity and access management service or virtual appliance that unifies your
software as a service (SaaS) applications and Windows applications (captured as ThinApp packages) into a
single catalog for entitlement.
Table 2-1. Application Manager Component Terminology
Application Manager Component Other Terms Used Description
Application Manager deployment
Application Manager
n
Application Manager
n
Application Manager Appliance
Application Manager virtual appliance
interface
Application Manager Operator Web
interface
n
None The entire Application Manager
deployment, including Application
Manager, the Connector, the related
interfaces to access those components,
and all other components necessary to
enable users to access applications.
None
n
hosted service
n
on-premise appliance
n
virtual appliance interface The interface of the Application
n
Operator Web interface The browser-based interface of the on-
Two versions of Application Manager
exist: the hosted service and the onpremise virtual appliance. As a
generalization, both versions are
referred to as the service. If you have the
hosted service, it is maintained for you.
If you have the on-premise appliance,
you install and maintain it yourself.
Application Manager stores
entitlement, SaaS, policy, and ThinApp
package information and
communicates with your Connector
instances to access Active Directory
information.
Manager virtual appliance. You use this
interface to perform the initial
configuration of Application Manager
on premise. You also use this interface
to access the command-line interface of
the underlying Linux operating system.
premise version of Application
Manager that individuals with operator
privileges access to manage
organizations and the Operator
application catalog. Application
Manager provides multi-tenancy. This
interface provides an overview of all the
organizations managed by Application
Manager.
VMware, Inc. 11
Page 12

Installing Application Manager
Table 2-1. Application Manager Component Terminology (Continued)
Application Manager Component Other Terms Used Description
Application Manager Administrator
Web interface
Application Manager User Web
interface
Application Manager internal database
server
Application Manager Operator
application catalog
Application Manager Administrator
application catalog
n
Administrator source application
catalog
n
Administrator active application
catalog
Application Manager User application
catalog
Connector
Connector virtual appliance interface
n
Administrator Web interface The browser-based interface of
Application Manager that you, as an
administrator of a specific organization,
use to manage user access and
entitlements to SaaS and ThinApppackaged applications. This interface
provides an overview of a single
organization.
n
Workspace
n
User Web interface
The browser-based interface of
Application Manager that users access
to use SaaS or ThinApp-packaged
applications. This interface includes the
User Portal, which provides users easy
access to applications.
n
internal database server The default database server, vPostgres
9.1, that ships with the on-premise
version of Application Manager. You
can use this internal database server
during the proof-of-concept phase of
deployment. For production, you
should disable the internal database
server and use a supported external
database server, such as PostgreSQL 9.1.
n
Operator application catalog
n
Operator catalog
The master catalog of applications,
which is accessible using the operator
Web interface. Operators can create
application in this catalog. Operators
can assign applications to all
organizations in the system or only to
specific organizations.
n
Administrator application catalog
n
Administrator catalog
A catalog of applications accessible
using the Administrator Web interface.
You, as an organization administrator,
manage the applications assigned to
you by operators. To make applications
available to users, you must move them
from the Administrator source
application catalog to the Administrator
active application catalog.
n
User application catalog
n
User catalog
A catalog of applications accessible
using the User Web interface. Users
access and use the applications assigned
to them by you as an organization
administrator.
n
Connector Appliance
n
Connector instance
The virtual appliance you install in your
enterprise network to connect
Application Manager to Active
Directory and to the ThinApp package
repository.
n
None The interface of the Connector virtual
appliance. You use this interface to
make the initial configurations of the
Connector. You also use this interface to
access the command-line interface of the
underlying Linux operating system.
12 VMware, Inc.
Page 13

Chapter 2 Introduction to Application Manager
Table 2-1. Application Manager Component Terminology (Continued)
Application Manager Component Other Terms Used Description
Connector Web interface
ThinApp Repository
Horizon Agent
n
None The browser-based interface you use to
n
Windows applications network
share
n
Agent A ThinApp-specific component
configure and manage the Connector
after using the Connector virtual
appliance to make the initial Connector
configurations.
A shared folder that you create to store
Windows applications captured as
ThinApp packages. You then provide
users access to these applications.
installed on user's Windows systems
that allows users to access Windows
applications captured as ThinApp
packages.
Flow of Applications Through the Various Application Manager
Catalogs
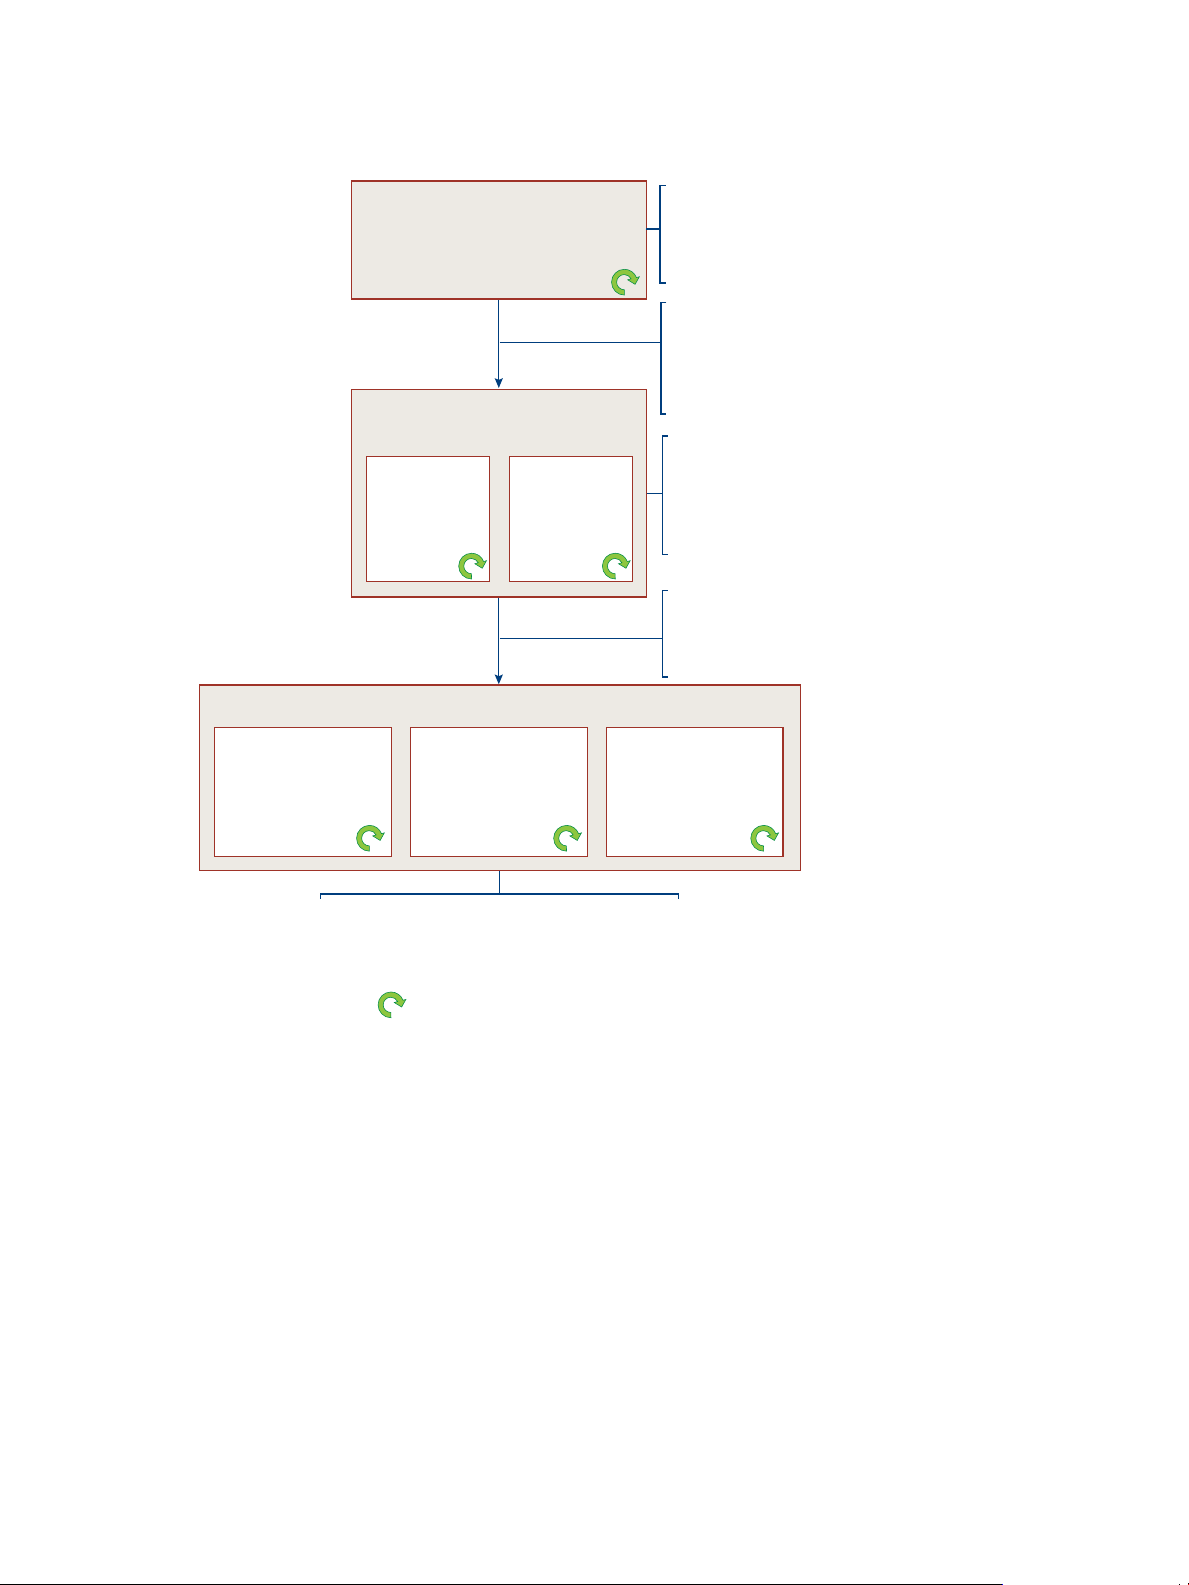
Applications move through a hierarchy of Application Manager catalogs before appearing in a user’s User
Portal, where the user can launch them.
1 The Application Manager Appliance ships with a set of default applications available in the Operator
application catalog. Operators then customize the Operator application catalog by adding and deleting
applications. They can make specific applications available to each organization, which places the
application in organizations’ Administrator source application catalog. Operators can make applications
public (available to all organizations) or private (available to only specified organizations).
2 When organization administrators initially access their organization’s catalog, they access the
Administrator source application catalog, which was prepopulated by the operator. Administrators can
add applications not provided by operators. Next, administrators move the applications from the
Administrator source application catalog to the Administrator active application catalog. By adding group
and individual user entitlements, administrators entitle specific applications to specific users.
Administrators can entitle applications as automatic or self-activated.
3 When users access the Application Manager User Web interface, their Workspace, they see the User Portal
and an Application Catalog link. The application catalog lists all applications to which users are entitled.
Unless the administrator made an application automatically available, users must activate each
application in the User application catalog that they want to use. Activating an application moves it to the
User Portal where the user can launch it.
VMware, Inc. 13
Page 14
Next, the administrator entitles
users and groups to
specific applications.
The administrator can entitle
applications as either automatic
or self-activated.
Application Manager Operator
application catalog
Operator
OperatorApp1 OperatorApp4 OperatprApp8
OperatorApp11 OperatorApp12
Administrator
of Example
Organization
Application Manager
Administrator application catalog
OperatorApp1
OperatorApp4
OperatorApp11
OperatorApp12
OrgApp1
OperatorApp1
OperatorApp12
OrgApp1
Users
User 1
Application Manager
User application
catalog
OperatorApp1
OperatorApp12
User 2
Application Manager
User application
catalog
OperatorApp12
User 3
Application Manager
User application
catalog
OperatorApp1
OperatorApp12
OrgApp1
Dynamic List:The catalogs are dynamic.
Applications can be added and deleted.
For this example, Application
Manager ships with ten
applications (OperatorApp1–
OperatorApp10). The operator
deletes seven applications and
adds two others (OperatorApp11
and OperatorApp12).
The operator assigns applications
to each organization. For example,
the operator assigns OperatorApp1,
OperatorApp4, OperatorApp11, and
OperatorApp12 to Example
Organization, where they populate
the Administrator source application
catalog.
For this example, the administrator
of Example Organization adds
OrgApp1 to the source catalog.
Next, the administrator moves
OperatorApp1, OperatorApp12,
and OrgApp1 to the active catalog,
keeping OperatorApp4 and
OperatorApp11 inactive.
Users launch applications from the User Portal, not the User catalog.
Depending on how the administrator assigned applications, users
might be able to access all of their entitled applications immediately
in the User Portal. If not, they must go to the User catalog to activate
an application. Users cannot add applications to the catalog.
Administrator source
application catalog
Administrator active
application catalog
Installing Application Manager
Figure 2-1. Application Manager Application Catalogs
Application Manager Authentication Modes
Application Manager facilitates username and password validation by using your Active Directory server on
site. You install the Connector as a virtual appliance that communicates with your local directory using LDAP.
You can use LDAP over SSL.
The Connector can operate in two different modes: Connector Authentication mode or Service Authentication
mode. You can also combine both modes in one deployment. However, the Application Manager Appliance
only supports Connector authentication mode. Service Authentication mode is supported for the Application
Manager hosted service. The modes of authentication indicate the flow of user authentication to access
Application Manager.
In Connector Authentication mode, once users are logged in to the internal network, they are usually not
prompted for their credentials when attempting to access the Application Manager. In specific situations where
users are prompted for their credentials to access Application Manager, the Connector presents the login page.
14 VMware, Inc.
Page 15

Application Manager User Authentication
Connector Authentication mode refers to access to Application Manager where the Connector is the starting
point for user authentication.
Table 2-2. Providing User Access to Application Manager in Connector Authentication Mode
User Access From Inside the Enterprise Network User Access From Outside the Enterprise Network
n
Configure Kerberos authentication or
username/password authentication.
If you decide to enable Internet access to Application Manager and the Connector to provide users outside the
enterprise network access to Application Manager, configure them in one of the following ways:
n
Install Application Manager and the Connector inside the DMZ.
n
n
Chapter 2 Introduction to Application Manager
Install both the Application Manager and Connector
virtual appliances in a manner that provides Internet
access. Kerberos authentication is not available outside
the network. Therefore, the best practice is to use RSA
SecurID authentication, though username/password
authentication is available as well.
You can install the Connector and Application Manager
virtual appliances without Internet access. However, to
provide user access from outside the enterprise network,
users will need a VPN connection.
n
Install a reverse proxy server in the DMZ pointing to Application Manager and the Connector installed
behind the firewall.
n
Configure firewall port forwarding or router port forwarding to point to Application Manager and the
Connector installed behind the firewall.
For Connector Authentication mode, if you do not configure IdP discovery, you must provide users access to
specific URLs that direct the authentication flow through the Connector. These URLs contain the appropriate
information to direct users through the Connector directly to Application Manager. You must provide users
access to such URLs.
IMPORTANT Configuring IdP discovery eliminates the need to use the long URLs provided in the following
table. See “IdP Discovery,” on page 17.
Table 2-3. Connector Authentication Mode: URL Examples
Target URL Example Information
https://
MyOrg.MyDomain.com/SAAS/API/1.0/GET/federatio
n/request?i=IDP#&s=0
The Application Manager
User Web Interface
https://ConnectorHost.MyDomain/login/ Use this URL for testing and
When your deployment is
production ready, provide this URL
to users to give them access to the
User Web interface. Replace MyOrg
and MyDomain with the appropriate
values and replace IDP# with the IdP
ID available on the Connector
Internal Access page.
troubleshooting purposes if Kerberos
is not configured. Replace
ConnectorHostConnectorHost and
MyDomain with the appropriate
values.
VMware, Inc. 15
Page 16

Installing Application Manager
Table 2-3. Connector Authentication Mode: URL Examples (Continued)
Target URL Example Information
https://ConnectorHost.MyDomain/authenticate/ Use this URL for troubleshooting and
Specific Applications https://
MyOrg.MyDomain.com/SAAS/API/1.0/GET/federatio
n/request?i=IDP#&s=SP#
testing purposes if Kerberos is
configured. Replace ConnectorHost
and
MyDomain with the appropriate
values.
When your deployment is
production ready, provide this URL
to users to give them one-click access
to a specific application. Replace the
placeholders. For example, replace
SP# with the ID number for a specific
application. The application ID
numbers are available from the
Application Manager User
application catalog.
For deployments where Kerberos is configured, the Connector validates user desktop credentials using
Kerberos tickets distributed by the key distribution center (KDC).
In Connector Authentication mode, the Connector acts as a federation server within your network, creating
an in-network federation authority that communicates with Application Manager using SAML 2.0 assertions.
The Connector authenticates the user with Active Directory within the enterprise network (using existing
network security).
A troubleshooting-related aspect of Connector Authentication mode is that users can still be authenticated
even when Kerberos fails. In fact, users can still be authenticated when Kerberos is not configured. In such
cases, an Application Manager redirect takes place causing the Connector to present users with a login page.
This Connector-supplied login page prompts users to provide their usernames and passwords again for access
to Application Manager. The Connector then validates users against Active Directory.
Connector Authentication Mode and RSA SecurID
After you install the Connector in Connector Authentication mode, you can configure SecurID to provide
additional security. For an overview of using RSA SecurID with the Connector, see Installing and Configuring
the Connector.
You can configure SecurID with or without Kerberos. However, the most common use case is to use SecurID
to authenticate users outside the enterprise network, while Kerberos authentication is not available outside
the network. See “IdP Discovery,” on page 17 for more information about configuring two Connector
instances, one instance for users inside the enterprise network and the other for users outside the network.
RSA SecurID with Result
Kerberos configured Kerberos authentication takes precedence. Users are only prompted for their
SecurID passcode if Kerberos authentication fails.
username-password verification as
part of Connector Authentication
mode
For various reasons, both intentional and unintentional, Kerberos authentication might not function. For
example, you might intentionally prevent specific users from accessing the enterprise network. Also, nonWindows machines do not support Kerberos authentication. When Kerberos and SecurID are both configured,
but Kerberos authentication fails, users are prompted for their SecurID passcode.
SecurID takes precedence and username password verification is disabled. Users
are prompted for their SecurID passcode. They are never prompted for their Active
Directory credentials.
16 VMware, Inc.
Page 17

IdP Discovery
You configure the IdP Discovery feature using the Application Manager Administrator Web interface. See
Application Manager Administration Help. The IdP Discovery feature works in conjunction with Connector
Authentication mode. IdP Discovery refers to the discovery of identity providers. The Connector acts as an
identity provider. Therefore, even though users access a URL directly to Application Manager, such as
https://MyOrg.MyDomain.com, when IdP Discovery is properly configured, it finds (discovers) and redirects
users to the specific Connector instance. With a single URL, you can provide all users access to the User Web
Interface.
For the IdP Discovery feature to function, you must configure IP address ranges in Application Manager. When
you have multiple Connector instances, the order in which the corresponding Connector records are listed in
Application Manager is important if the IP ranges overlap. In such cases, the first Connector record to include
an IP address is given precedence.
CAUTION When you remove or reset a Connector instance, you must remove the corresponding Connector
record from the list of Connector records accessible with the Application Manager Administrator Web
interface.
The IdP Discovery feature typically applies when users attempt to access Application Manager from inside
the enterprise network and when they are on the same domain as the Active Directory instance.
Chapter 2 Introduction to Application Manager
When users within the specified IP address ranges access the provided URL, their request is processed in
Connector Authentication mode and the request is redirected to the Connector. Assuming that Kerberos is
configured, a SAML assertion generated by the Connector is used for authentication and users are granted
access to the User Web interface without being prompted for their username and password. If Kerberos is not
configured, users must provide their username and password on the Connector login page to gain access.
When users outside the specified IP address range use the provided URL, their request is processed in Service
Authentication mode, if you have it enabled, requiring them to provide their username and password on the
Application Manager login page to gain access.
You can configure your Application Manager deployment with IdP Discovery in a variety of ways, one of
which is summarized in the example that follows.
External RSA SecurID
and Internal Kerberos
Authentication Example
of IdP Discovery
This is one possible way to configure IdP Discovery and SecurID in the same
Application Manager deployment. For an overview of configuring RSA
SecurID with the Connector, see Installing and Configuring the Connector. For
this deployment, you configure two Connector instances, both in Connector
Authentication mode.
n
Internal - First Connector instance in Connector Authentication mode: You
do not configure SecurID for this Connector instance. In Application
Manager, you configure IP address ranges to include users within the
enterprise network.
n
External - Second Connector instance in Connector Authentication mode:
You configure SecurID for this Connector instance. In Application
Manager, you configure a single IP address range that includes all possible
users. Therefore, you set the IP address range from 0.0.0.0 to
255.255.255.255.
The result of this configuration is that users attempting to access the User Portal
are authenticated in Connector Authentication mode. Users inside the
enterprise network are authenticated by Kerberos or username/password
authentication. Users outside the enterprise network are authenticated by
SecurID authentication.
VMware, Inc. 17
Page 18

Installing Application Manager
ThinApp Packages
ThinApp package access requires Connector Authentication mode. See Installing and Configuring the
Connector for information about integrating the Connector with ThinApp.
Evaluation and Quick Access to Application Manager
For evaluation purposes, you can access the User Portal as an administrative user with minimum configuration.
This quick-access configuration works in Connector Authentication mode only. Using the Connector Web
interface, you run the initial configuration wizard, stopping before running the setup wizard. The initial
configuration wizard requires you to provide your activation code and information for Active Directory. The
Active Directory information is not used for Directory Sync because quick-access configuration does not enable
directory synchronization. The Active Directory information is required for the following purposes:
n
To establish a connection to Active Directory, which is used to verify your administrative user credentials
when you attempt to log in to Application Manager.
n
To allow you to log in to the Application Manager. You use the username associated with the Bind DN
user account and respective password as the credentials to log in to Application Manager as an
administrator.
With quick-access configuration, you cannot configure Kerberos authentication, nor can you access Windows
applications captured as ThinApp packages. Also, with the quick-access configuration, you can use the default
internal database, instead of configuring an external database. The purpose of quick-access configuration is to
provide easy access to the basic functionality of Application Manager, which you can evaluate.
Application Manager Database
Application Manager stores information, such as user information, application entitlements, and policies in
an internal database that runs directly in the Application Manager virtual appliance.
IMPORTANT During the proof-of-concept phase, you can use the internal database server. Do not use the internal
database server in production. For production, install and configure an external database server.
To support high availability and load balancing of Application Manager instances, you must configure a
connection from each Application Manager instance to a shared external database server. See “Configure an
External Database Connection,” on page 41. When you switch to an external database server and use multiple
Application Manager instances, you make Application Manager highly available. Making the external
database server highly available is outside the scope of this document. Refer to the database product
documentation for more information.
18 VMware, Inc.
Page 19

Security Considerations and System
Requirements for Application
Manager 3
When you install and configure Application Manager, you install the Application Manager virtual appliance
and use both the Application Manager virtual appliance interface and the Application Manager Web interface
for configuration purposes. You must manage the Web interface with care to avoid security issues.
Consider the Application Manager system requirements within the context of the following security concerns:
n
The Application Manager virtual appliance interface is accessible to anyone with access to the machine
on which vSphere and the virtual appliance are hosted. Protection relies on firewalling and enforcing
authentication to the vSphere host.
n
The Application Manager Web interface listens on HTTP ports 8443 for administration and port 443 for
user authentication.
Insecure mode
8080 for operation and administration and 80 for user authentication.
Secure mode
For quick trials and tests, you can use Insecure mode. For pre-production testing and production, you should
switch to Secure mode.
8443 for operation and administration and 443 for user authentication.
Application Manager Recommendations and Requirements
To synchronize your Active Directory data effectively with Application Manager, ensure that the environment
for the Application Manager virtual appliance meets the minimum requirements.
The following components are required:
n
The Application Manager virtual appliance that VMware provides as an Open Virtual Appliance .ova file.
n
VMware vSphere as the host of the virtual appliance. See the release notes for the currently supported
vSphere versions.
n
A virtual machine client, such as vSphere Client, that provides access to Application Manager virtual
appliance interface. This client is required to deploy the .ova file to vSphere and to access the deployed
virtual appliance remotely in order to configure networking.
n
The appropriate VMware licenses.
n
A conversion tool, if your VMware hypervisor does not open OVA files directly. VMware offers a free
tool for Windows and Linux. See “Convert the Virtual Appliance File Format,” on page 24.
You must consider your entire Application Manager deployment. Therefore, consider how you are integrating
the Connector with Application Manager when you make decisions about hardware, resource, and network
requirements. See Installing and Configuring the Connector.
VMware, Inc.
19
Page 20

Installing Application Manager
Hardware Requirements for the Application Manager Virtual Appliance Host
Ensure that the environment for the host, the vSphere instance, to run the Application Manager virtual
appliance meets the minimum hardware requirements.
Table 3-1. Minimum Application Manager Hardware Requirements
Component Minimum Requirement
Processor One Intel Xeon Dual Core, 3.0GHz, 4MB Cache
RAM 6GB DDR2 667 MHz, ECC and registered
On-board LAN One 10/100/1000Base-TX port
Storage 32GB
Resource Requirements and Recommendations for the Application Manager
Virtual Appliance
Ensure that the resources allocated to the Application Manager virtual appliance meet the minimum
requirements.
IMPORTANT In reference to storage, you can use the internal database for the proof-of-concept phase. Do not
use the internal database server in production. For production, install and configure an external database
server.
Table 3-2. Application Manager Resource Requirements and Recommendations
Component Required Recommended
Processor 2 vCPU 4 vCPU for higher performance
Randomaccess
memory
Storage 32GB External database sizing information: 64GB
4GB 4GB
for first 100,000 users. Add 20GB for each
additional 100,00 users
Network Configuration Requirements for the Application Manager Virtual
Appliance
For the Application Manager virtual appliance is specific to configuring a Network Time Protocol (NTP) server.
Table 3-3. Network Configuration Requirements
Network Requirements
Access to a Network Time Protocol (NTP) server made available in one of the following ways:
n
To allow Application Manager to access an external NTP server, you must ensure that the outbound firewall port 123
(NTP Protocol) is opened from Application Manager to the Internet.
n
If you do not want a firewall port open for the NTP server, you must ensure that the NTP configuration is pointing to
an internal NTP server. You perform this action when you configure the Application Manager using the Application
Manager virtual appliance interface.
Inbound firewall port 443 opened from users outside the enterprise network to Application Manager.
20 VMware, Inc.
Page 21

Chapter 3 Security Considerations and System Requirements for Application Manager
System Requirements for User Systems Running the Horizon Agent
This requirement applies when Application Manager provides ThinApp Package access. If users run the
Horizon Agent from their systems, ensure that users' systems meet the minimum requirements.
Table 3-4. User System Requirements
Component Required
Random-access memory 1GB
VMware, Inc. 21
Page 22

Installing Application Manager
22 VMware, Inc.
Page 23

Preparing to Install Application
Manager 4
Preparing to install the Application Manager involves creating the DNS name; obtaining the Application
Manager virtual appliance; and configuring the hardware, resource, and network settings of the Application
Manager host. Other preinstallation tasks might be required depending on the specifics of your deployment.
This chapter includes the following topics:
n
“Prepare to Install Application Manager,” on page 23
n
“Convert the Virtual Appliance File Format,” on page 24
Prepare to Install Application Manager
You must prepare your environment for the installation of Application Manager.
Prerequisites
n
Plan your Application Manager deployment, deciding how to integrate the Connector. See Installing and
Configuring the Connector.
n
Ensure that all the hardware, network, and resource requirements are met. See “Application Manager
Recommendations and Requirements,” on page 19.
Procedure
1 Create the Domain Name System (DNS) record for the Application Manager virtual appliance host.
CAUTION As part of creating the DNS record, create a pointer (PTR) resource record in a reverse lookup
zone. This allows reverse resolving of IP addresses, which is a required configuration for Application
Manager to function properly.
VMware, Inc. 23
Page 24

Installing Application Manager
The DNS name must be available in your DNS server for the Application Manager hostname to be
recognized. Depending on your organization, creating the DNS record might take several days. Provide
enough time to ensure that the DNS name is available when required.
The hostname has at least three parts, a.b.c. For example, Org1.MyDomain.com.
IMPORTANT When you are prompted for a hostname in the Application Manager virtual appliance, be
aware that the name you enter, such as Temp.MyDomain.com, is also used for initial access to the Operator
Web interface. For example: http://Temp.MyDomain.com. The first part of the hostname, "Temp" in this
example, is later replaced with the first organization you create in the Operator Web interface. If you name
the first organization Org1, http://Org1.MyDomain.com can be used to reach Application Manger in the
future. The URL http://Temp.MyDomain.com continues to provide access to Application Manager, too.
To avoid having two URLs that access the same interface, the best practice is to enter a DNS name where
the first part of the name, such as Org1, matches the first organization name that you plan to create. This
practice allows one URL, http://Org1.MyDomain.com, to continuously provide access to Application
Manager.
2 Create a DNS address record, or DNS address records, for each additional organization you plan to create
for Application Manager, pointing to the same IP address.
3 Download the .ova file for the Application Manager virutal appliance from the VMware Download Center
and deploy it.
You can download the .ova file directly to the vSphere host or you can download it to another machine.
Convert the Virtual Appliance File Format
You can convert the virtual appliance file format from the OVA format to the VMX format by using the VMware
OVF tool. Perform this file format conversion only if the hypervisor does not support the OVA format.
The Open Virtualization Format (OVF) tool is a free command-line utility that can convert file formats of virtual
machines. You install the virtual appliance on a VMware hypervisor that supports the VMX format and convert
the OVA format to the VMX format.
Procedure
1 Download the VMware OVF tool from the VMware Web site and install it.
Follow the installer instructions to install the tool.
2 Create and name a directory in your hypervisor's data store, which is the directory where virtual machines
reside.
Provide the name for the directory.
3 Move to that directory.
The converter tool deposits output files in the current directory.
4 Start the converter tool with the following command:
name
path-to-ovftool
-tt=VMX
ova-file-name VMX-file-
For example: /usr/bin/ovftool -tt=VMX virtualappliance-1.1.0.ova virtualappliance
The command might take a few minutes to complete. The following is sample output:
Opening OVA source:
../virtualappliance-1.1.0.ova
Opening VMX target: central-virtualappliance
Target: central-virtualappliance.vmx
24 VMware, Inc.
Page 25

Chapter 4 Preparing to Install Application Manager
Disk progress: 36%
…
Disk Transfer Completed
Completed successfully
Example: File Conversion Output
Two items appear in your current directory as a result of this task: a .vmdk disk image file and a .VMX virtual
machine configuration file, as the following example shows:
-rw------- 1 root root 1.6G 2011-05-17 14:46 central-virtualappliance-disk1.vmdk
-rw-r--r-- 1 root root 1.1K 2011-05-17 14:46 central-virtualappliance.vmx
What to do next
Install the virtual appliance on your hypervisor.
VMware, Inc. 25
Page 26

Installing Application Manager
26 VMware, Inc.
Page 27

Installing Application Manager 5
After you install Application Manager virtual appliance, you can access the Application Manager Operator
Web interface to run the Operator setup wizard.
Installing Application Manager includes the following tasks:
n
Use vSphere Client to install the Application Manager virtual appliance.
n
Start and configure the virtual appliance.
n
Use the Application Manager Web interface to perform the initial configuration of Application Manager
necessary to log in to Application Manager as an operator.
The steps to prepare the virtual appliance can vary. For specific instructions, see the vSphere documentation.
This chapter includes the following topics:
n
“Start the Application Manager Virtual Appliance,” on page 27
n
“Use the Virtual Appliance Interface for the Initial Application Manager Configuration,” on page 28
Start the Application Manager Virtual Appliance
Starting the Application Manager virtual appliance gives you access to the Application Manager virtual
appliance interface, including the CLI of the underlying SLES operating system.
VMware, Inc.
You perform the preliminary configuration of Application Manager with the virtual appliance interface. The
underlying operating system for Application Manager is SUSE Linux Enterprise Server (SLES) 11 SP1. You can
configure the operating system files directly from the Application Manager virtual appliance interface. Use
caution when editing the operating system files since changes can have unanticipated affects on the
deployment.
Procedure
1 Use vSphere Client to install the Application Manager virtual appliance by choosing the Deploy OVF
Template option.
See VMware vSphere documentation.
2 Power on the virtual appliance.
This action boots the virtual appliance's SLES operating system, starts the Application Manager processes,
and connects to a DHCP server, if present, to acquire an IP address.
During start up, the virtual machine displays messages in the Application Manager virtual appliance interface.
You can usually ignore the messages until you are prompted to change the UNIX password. You can perform
the initial configuration of the Application Manager as described in “Use the Virtual Appliance Interface for
the Initial Application Manager Configuration,” on page 28.
27
Page 28

Installing Application Manager
Use the Virtual Appliance Interface for the Initial Application Manager Configuration
Use the Application Manager virtual appliance interface to make the initial configurations to Application
Manager, such as network and time-related configurations.
When you install the Application Manager virtual appliance, the Application Manager virtual appliance
interface first prompts you for the root and sshuser passwords. After you provide and confirm the passwords,
the interface presents you with a wizard that leads you through the basic configuration. You can return to the
Application Manager virtual appliance interface at any time to update these settings or to perform other
configurations to the SLES operating system.
Prerequisites
n
Configure the Application Manager virtual appliance interface after you have installed the virtual
appliance on vSphere. See “Start the Application Manager Virtual Appliance,” on page 27.
n
Verify that you followed the steps to prepare for the installation of the Application Manager. See “Prepare
to Install Application Manager,” on page 23.
n
If applicable, open a firewall port for an external Network Time Protocol (NTP) server. For more
information about the network requirements for configuring an NTP server, see “Application Manager
Recommendations and Requirements,” on page 19.
Procedure
1 At the root UNIX password prompts, provide and confirm the root user password for access to the SLES
operating system of the Application Manager.
2 At the sshuser UNIX password prompts, provide and confirm the password for remote access to the SLES
operating system of Application Manager.
Application Manager creates the user sshuser for you. This user can access Application Manager virtual
appliance command line remotely using the ssh Linux command, or SSH client. This user has limited
privileges to the command line. Therefore, once you connect remotely, you might want to use the su
command to switch users from sshuser to root.
IMPORTANT SSH (Secure Shell) client is a program for remote access. By default ssh access is limited to
machines on the same subnet. Changing the scope of access involves sshd, the ssh daemon, and might
require you to edit the hosts.allow and hosts.deny files. See Linux man pages for more information.
The wizard of the Application Manager virtual appliance interface starts.
28 VMware, Inc.
Page 29

Chapter 5 Installing Application Manager
3 Respond to the wizard prompts with information specific to your deployment.
Option Action
Respond to the IPv6 prompt.
Respond to the DHCPv4 prompt.
Respond to the hostname prompt.
Type y if you have an IPv6 network. If you do not have an IPv6 network,
accept the default response of n.
NOTE The recommended practice is to use a static IP address.
If you have a static IP address, type n. Continue responding to the
subprompts related to a static IP address.
If you have a DHCPv4 address, accept the default response y and continue
responding to the subprompts related to DHCP and a proxy server.
If you respond with n, continue responding to the subprompts related to a
static IP address, including subprompts about IPv4 address, netmask,
gateway, DNS servers, and proxy server.
Type a unique hostname with at least three parts, a.b.c.
IMPORTANT Be aware that the name you enter, such as
Temp.MyDomain.com, is also used for initial access to the Operator Web
interface. For example: http://Temp.MyDomain.com. The first part of the
hostname, "Temp" in this example, is later replaced with the first
organization you create in the Operator Web interface. If you name the first
organization Org1, http://Org1.MyDomain.com can be used to reach
Application Manger in the future. The URL http://Temp.MyDomain.com
continues to provide access to Application Manager, too. To avoid having
two URLs that access the same interface, the best practice is to enter a
hostname where the first part of the name, such as Org1, matches the first
organization name that you plan to create. This practice allows one URL,
http://Org1.MyDomain.com, to continuously provide access to Application
Manager.
When you are finished configuring the network settings, the main screen of the Application Manager
virtual appliance interface appears.
4 If necessary, configure a Network Time Protocol server.
By default, the Application Manager Appliance points to specific external NTP servers, as listed in
the /etc/ntp.conf file. However, networking or DNS issues might prevent the virtual appliance from
reaching the external NTP servers. Also, you might want to use NTP servers other than the default settings.
When you properly configure the Application Manager deployment, the time for all systems is maintained
within a range of one minute.
CAUTION Failure to follow the NTP recommendations can prevent user access to the Application Manager
Web interface since both the SAML and Kerberos protocols rely on an accurate system clock. The protocols
used between Application Manager and the Connector and between the Connector and Active Directory
require that the time synchronization of these systems falls within a narrow range.
a Select Login and log in to the Linux operating system with root credentials.
b Using Linux commands configure Application Manager's time settings.
See Timekeeping best practices for Linux guests (KB 1006427) for information about time settings for
SLES 11. Consult the section on NTP recommendations.
c Exit the command line to return to the main page of the Application Manager virtual appliance
interface.
5 Confirm the Network Time Protocol configuration.
You should check this screen in the following situations:
n
When you first install the Application Manager Appliance.
n
Any time in the future when you modify the networking environment that can affect the ability to
contact the NTP server or when you change the NTP configuration.
VMware, Inc. 29
Page 30

Installing Application Manager
n
As a troubleshooting option when users experience an access issue.
See the troubleshooting section for information about the possible messages on this screen.
6 Set the time zone for Application Manager.
a Select Set Timezone.
b Continue selecting location options to select your specific time zone.
7 In the Application Manager virtual appliance interface, select Configure to view or set available
configuration options.
You should initially configure the Application Manager virtual appliance for testing or trial purposes.
Therefore, you can leave several options unconfigured and return to the Application Manager virtual
appliance later for further configuration. The following list describes options you can skip during the
initial configuration.
Option Description
Generate New SSL Certificate
Configure Web Server
Configure Database Connection
Database Key Management
Gather Diagnostic Information for
Support
8 Record the Application Manager hostname or IP address as listed on the Change Application Manager
Configuration page.
By default, SSL is not enabled and no SSL certificate is needed. You do not
need to enable SSL for trials or testing. However, for security reasons, you
should enable SSL before you move the deployment to production.
If you configure your Web server to be secure, you need a certificate to certify
your organization's Application Manager Website to end users. You can use
either a third-party CA certificate or you can generate your own self-signed
SSL certificate. If you use a self-signed SSL certificate, you must deploy it to
user machines for ThinApp integration.
Insecure. By default, the Web server uses insecure ports, which is appropriate
for initial trials or testing. Also, using insecure ports allows you to test
ThinApp integration without installing certificates on user machines.
Secure. Use secure ports for pre-production testing or production. To use
secure ports, you need either a third-party CA certificate or an SSL certificate
to certify your organization's Application Manager Website to end users.
By default, Application Manager uses an internal database that runs directly
in the Application Manager virtual appliance. To support high availability
and load balancing, you must disable the internal database and configure a
connection to a supported external database.
Database key management applies when you point multiple Application
Manager instances to a shared external database.
Gathering diagnostic information applies to a troubleshooting procedure
that involves gathering log and other data for technical support purposes.
When you finish the initial configuration of the Application Manager virtual appliance, you can enter the
hostname in a browser to gain initial access to the Application Manager Operator Web interface. The
Operator setup wizard leads you through the creation of the first Application Manager organization.
Option Description
Configure Hostname
Configure Network
The three-part hostname is listed.
The IP address is listed.
9 Restart the Apache Tomcat server for the time zone configuration to take effect.
a In the Application Manager virtual appliance interface, select Configure.
b Type the number to Manage Web Server.
c Type the number to Restart Tomcat.
30 VMware, Inc.
Page 31

Application Manager is ready for further configuration.
What to do next
Use a browser to access the Operator Web interface.
Chapter 5 Installing Application Manager
VMware, Inc. 31
Page 32

Installing Application Manager
32 VMware, Inc.
Page 33

Configuring Application Manager with
the Operator Setup Wizard 6
Use the Operator setup wizard for the initial configuration of Application Manager, including the creation of
the first organization. You can then configure the Connector or return to the Operator Web interface for further
configuration.
The setup wizard leads you through a quick and simple configuration process.
Access the Application Manager Operator Web Interface
When Application Manager has a hostname and IP address, you can use a browser to access the Operator Web
interface. The first time you access the Operator Web Interface, the Operator setup wizard leads you through
the initial configuration, including the creation of the first Application Manager organization.
Running the Operator setup wizard creates your deployment's initial Application Manager organization.
NOTE In the Operator setup wizard, you are required to provide a name for your organization. That name
becomes part of the URL used to access your initial organization. See “Prepare to Install Application
Manager,” on page 23 for the best practice for creating a DNS record for the virtual appliance host. That best
practice relates to the name you choose for your organization.
Prerequisites
Verify that the following conditions are met:
n
The VMware Application Manager license key is available.
n
You have configured the Application Manager virtual appliance and have the hostname or IP address of
the Application Manager recorded and available. See “Use the Virtual Appliance Interface for the Initial
Application Manager Configuration,” on page 28.
n
You have access to a supported browser. See the Application Manager release notes for the updated list.
Procedure
1 Use a supported browser to access the Application Manager Operator Web interface.
Point the browser to the three-part hostname of the Application Manager.
http://SubDomain.MyDomain.com
CAUTION Use the Application Manager hostname, not the IP address, to access the Connector Web
interface.
The Operator Web interface appears, prompting you to begin the Operator setup wizard.
VMware, Inc.
33
Page 34

Installing Application Manager
2 Run the Operator setup wizard to create your initial organization.
During the setup, you must decide to generate an activation token or to create a temporary administrator.
IMPORTANT Whichever option you choose, to generate a Connector activation token or to create a
temporary administrator, be aware that to reach Application Manager with a browser before you configure
the Connector, you must use a specific URL, such as: http://MyOrg.MyDomain.com/SAAS/login/0. Replace
the place holders MyOrg and MyDomain with the appropriate information. After you have configured the
Connector, you as an administrator, and users can access Application Manager with the short URL,
http://MyOrg.MyDomain.com/.
n
Generate a Connector activation token. This is the default action. Use this option if you want to
configure the Connector next. After you have configured the Connector, you can configure the
Application Manager Administrator Web interface. When you select this option, you are provided
the short organization URL and activation code. Copy and save that information. You need the
activation code to configure the Connector. The short organization URL is applicable after you
complete your Application Manager deployment.
n
Create a temporary administrator. Select this option if you want access to the Application Manager
Administrator Web interface prior to configuring the Connector. In this situation, when you are ready
to configure the Connector, you must generate the activation code by logging in to Application
Manager as a temporary administrator and adding an identity provider. When you select this option,
an email message is sent to you with a specific link to Application Manager, and with a temporary
administrator username and password. To access Application Manager as a temporary administrator,
use the information in the email message. You can use the link provided or use the following long
URL: http://MyOrg.MyDomain.com/SAAS/login/0.
After you complete the setup wizard, you are provided a link to the Operator dashboard.
3 If you want to view or configure the Operator Web interface before proceeding with any other task, follow
the link to the Operator dashboard.
IMPORTANT From this point forward, to access the Operator Web interface directly with a URL, use the
following URL: http://MyOrg.MyDomain.com/SAAS/login/0.
What to do next
In most cases, the best practice after completing the Operator setup wizard is to first configure the Connector
and then configure the Application Manager Administrator Web interface as an administrator.
34 VMware, Inc.
Page 35

Making Additional Application
Manager Configurations 7
Key Application Manager functionality can be configured with the Application Manager virtual appliance
interface or with a combination of interfaces.
When you install Application Manager, the virtual appliance leads you through a configuration wizard. After
you perform that initial configuration, you can use the virtual appliance interface and other interfaces for
further configuration. Perform the configuration tasks that apply to your deployment.
This chapter includes the following topics:
n
“Configure Application Manager for Logging,” on page 35
n
“Configuring SSL Connectivity to Application Manager,” on page 36
n
“Configuring Clustering for Application Manager,” on page 41
n
“Update Application Manager,” on page 44
Configure Application Manager for Logging
You can configure logs in the Application Manager virtual appliance interface. You configure Web server
logging behavior in the /usr/local/horizon/conf/log4j.properties file. To store logging information
externally, you can configure an external syslog server.
VMware, Inc.
By default, Application Manager logs Web-server related information as follows:
n
Web server log file: /opt/vmware/horizon/horizoninstance/logs/horizon.log.
You can edit the log configuration files to control where the Connector stores the log information.
Table 7-1. Application Manager Logging Configuration
Log Configuration File Filepath Information
log4j.properties /usr/local/horizon/c
onf/log4j.properties
syslog /etc/syslog-
ng/syslog-ng.conf
The best practice is to store program logs in an external syslog server.
For more information about editing log4j files, see Apache documentation on Apache Logging Services.
Web server logs rotate with a default size of 50MB as
configured in the log4j.properties file. By default, these
logs are stored
in
/opt/vmware/horizon/horizoninstance/logs/horizon
.log. For more details about the Web server logging behavior,
see the log4j.properties file. The Web server logging
behavior is preconfigured and might not require any further
configuration.
Configure the syslog-ng file to direct program logs to your
external syslog server.
35
Page 36

Installing Application Manager
Prerequisites
Verify that a syslog server is installed, configured, and accessible from Application Manager.
Procedure
1 Access the Application Manager virtual appliance interface.
2 Select Login and log in to the SLES operating system.
3 Use the appropriate commands to access and configure the log4j.properties file to send logs to syslog
internally.
4 Use the appropriate commands to access and configure the syslog-ng.conf file to send logs to an external
syslog server.
5 Restart the Apache Tomcat server for the changes to the log4j.properties file to take effect.
a In the Application Manager virtual appliance interface, select Configure.
b Type the number to Manage Web Server.
c Type the number to Restart Tomcat.
After you configure the log configuration files, the new logging behavior takes effect.
Configuring SSL Connectivity to Application Manager
SSL connectivity to Application Manager and the Connector is disabled by default to simplify the configuration
of your Application Manager deployment during the proof-of-concept phase. Whether you configure a selfsigned certificate or a third-party CA certificate, you can implement the necessary tasks in phases.
Verify that the state of SSL, enabled or disabled, always matches between the Connector and Application
Manager. You can wait to enable SSL until you move Application Manager into production.
NOTE You do not need an SSL certificate if the Configure Web Server option of Application Manager and the
Connector are set to insecure mode. In secure mode, you can use either a self-signed or a third-party SSL
certificate. Typically, self-signed SSL certificates are used during pre-production testing, but you can use a
third-party SSL certificate during testing if you want. During production, the best practice is to use a thirdparty CA SSL certificate.
For detailed information of the SSL-related tasks to perform during the recommended deployment phases, see
“Trial, Test, and Production Deployment Phases,” on page 7. The following bulleted items provide an overview
of tasks you should perform, if applicable, after you enable SSL for your Application Manager deployment:
n
Update each SAML application that you previously configured without SSL to now use SSL. In other
words, ensure that each SAML application now reaches Application Manager using HTTPS instead of
HTTP. This might involve working with account administrators for specific SAML applications. See
Application Manager Administration Help for information about configuring SAML applications.
n
If you are providing users with access to Windows Applications captured as ThinApp packages, reinstall
Horizon Agent on each user's system to update the Application Manager URL from HTTP to HTTPS. See
Deploy Horizon Agent.
Procedure
1 Enable Secure Ports for the Application Manager on page 37
To enable SSL for your Application Manager deployment, first enable secure ports for Application
Manager.
36 VMware, Inc.
Page 37

Chapter 7 Making Additional Application Manager Configurations
2 Enable Secure Ports for the Connector on page 37
To enable SSL for your Application Manager deployment, after you enable secure ports for Application
Manager, you must enable secure ports for the Connector. For the Connector, enabling secure ports
requires you to reset and reconfigure the Connector, which requires a new activation code.
3 Generate an SSL Certificate on page 38
If you decide to use a self-signed SSL certificate instead of a third-party CA certificate, you need to
generate and distribute the certificate.
4 Copy the Self-Signed Application Manager SSL Certificate to Each Connector Instance on page 39
If you have generated a self-signed Application Manager SSL certificate, you must copy the certificate
to each Connector instance associated with that Application Manager instance.
5 Configure a Third-Party CA Certificate for Application Manager on page 40
The best practice is to configure a third-party CA certificate after you have configured a self-generated
certificate.
Enable Secure Ports for the Application Manager
To enable SSL for your Application Manager deployment, first enable secure ports for Application Manager.
Enabling secure ports for the Application Manager is the first task in series of tasks required to enable SSL.
Procedure
1 Access the Application Manager virtual appliance interface.
2 Select Configure.
3 At the prompt, type the number to Configure Web Server.
4 At the prompt, type the number to ports 443 and 8443.
This enables secure ports 443 and 8443.
5 At the prompt, type the number to ports 80 and 8080.
This disables insecure ports 80 and 8080.
6 Exit the Application Manager virtual appliance interface.
What to do next
Enable secure ports for the Connector.
Enable Secure Ports for the Connector
To enable SSL for your Application Manager deployment, after you enable secure ports for Application
Manager, you must enable secure ports for the Connector. For the Connector, enabling secure ports requires
you to reset and reconfigure the Connector, which requires a new activation code.
For the Connector, secure ports are always enabled and cannot be disabled. Insecure port 80 is enabled by
default and can be disabled. This task involves disabling insecure port 80 and resetting the Connector
configuration.
Prerequisites
Enable secure ports for Application Manager.
Procedure
1 Access the Connector virtual appliance interface.
2 Select Configure.
VMware, Inc. 37
Page 38

Installing Application Manager
3 At the prompt, type the number to Configure Web Server.
4 At the prompt, type the number to port 80.
This disables insecure port 80.
5 Exit the Connector virtual appliance interface.
6 Log into Application Manager as either an operator or administrator to create a new activation code for
the Connector.
Table 7-2. Methods for Creating a New Connector Activation Code
u
Application Manager Operator Web Interface Application Manager Administrator Web Interface
You can use the Operator Web interface to create an
activation code for a new Connector instance.
1 Navigate to the Organizations tab.
2 Click an organization name.
3 Click Manage Organization Connectors.
4 Select Generate New Connector, then click Save.
An activation code appears. The code is available
until the Connector is activated.
You can also use the Administrator Web interface to
create an activation code for a new Connector instance.
1 Navigate to the Settings tab.
2 Click Identity Provider Add Identity Provider.
3 Enter a name and description, then click Save.
An activation code appears. The code will be
available until the Connector is activated.
7 Leave Application Manager open so that you can copy the activation code into the Connector Web
interface.
8 Access the Connector Web interface.
9 Navigate to the Configuration page of the Advanced tab.
10 Click Reset to reset the Connector configuration.
11 When prompted, paste the activation code, select Use SSL option, then click Next.
12 Continue to configure the Connector.
The Connector is reconfigured with secure ports enabled.
What to do next
Configure SSL by performing either of the following:
Generate an SSL Certificate
If you decide to use a self-signed SSL certificate instead of a third-party CA certificate, you need to generate
and distribute the certificate.
Prerequisites
n
Enable secure ports for the Application Manager.
n
Enable secure ports for the Connector.
Procedure
1 Access the Application Manager virtual appliance interface.
2 Select Configure.
3 At the prompt, type the number to Generate New SSL Certificate.
4 Enter a domain name with at least two parts.
The name should match part of the host name.
5 Copy the certificate to each Connector instance.
38 VMware, Inc.
Page 39

Chapter 7 Making Additional Application Manager Configurations
6 Deploy the certificate to each user machine.
For production rollout, multiple tools are available to deploy SSL certificates to user machines. For testing
with a limited number of users, users can install the SSL certificate themselves from an accessible location.
Copy the Self-Signed Application Manager SSL Certificate to Each Connector Instance
If you have generated a self-signed Application Manager SSL certificate, you must copy the certificate to each
Connector instance associated with that Application Manager instance.
Prerequisites
n
Enable secure ports for Application Manager.
n
Enable secure ports for the Connector.
n
Generate a self-signed Application Manager SSL certificate.
Procedure
1 Access the Application Manager virtual appliance interface.
2 Select Login and log in to the Linux operating system with the appropriate credentials.
3 Enter the following Keytool command to access the certificate:keytool -list -
keystore /opt/vmware/horizon/horizoninstance/conf/tcserver.keystore -rfc -storepass changeme
4 Copy the text from BEGIN CERTIFICATE to END CERTIFICATE and save it to a file location such
as /tmp/cert.pem.
5 Use your method of choice to copy the file from the Application Manager virtual appliance to the
Connector virtual appliance, such as to the following location: /tmp/cert.pem.
Many methods are available for copying and moving files between systems, such as using the ssh
command.
6 In the Connector virtual appliance interface, issue commands to move the certificate to the common SUSE
certificate store while creating a symbolic link to the certificate file, such as the following:
cp /tmp/cert.pem /etc/ssl/certs/
c_rehash
7 In the Connector virtual appliance interface, enter the command below to import the certificate into the
Java keystore:
keytool -importcert -file /tmp/cert.pem -keystore /usr/java/jre-vmware/lib/security/cacerts storepass changeit
8 When asked if you trust this certificate, enter yes.
9 Restart the Connector Web server using the following command:
/etc/init.d/tcserver-c2 restart
NOTE If the command to import the certificate into the Java keystore fails with the following error:
:~ # keytool -importcert -file /tmp/cert.pem -keystore
/usr/java/jre-vmware/lib/security/cacerts -storepass changeit
keytool error: java.lang.Exception: Certificate not imported, alias <mykey> already exists
Delete the certificate with the alias mykey using the following command :~ # keytool -delete -alias
mykey -keystore /usr/java/jre-vmware/lib/security/cacerts -storepass changeit . Then run the
import command used in step 6 again.
VMware, Inc. 39
Page 40

Installing Application Manager
The self-signed Application Manager certificate has been copied to the Connector, allowing Application
Manager and Connector to communicate using SSL.
What to do next
Use the Application Manager deployment to verify that SSL is functioning between Application Manager and
the Connector. If an SSL problem exists, when you use the Connector Web interface and provide the activation
code, the Connector displays an error message indicating that the Connector cannot connect to a specified
URL. See the troubleshooting section of Installing and Configuring the Connector.
Configure a Third-Party CA Certificate for Application Manager
The best practice is to configure a third-party CA certificate after you have configured a self-generated
certificate.
To obtain a signed third-party CA certificate, follow the Apache Tomcat SSL Configuration instructions with
the following exceptions: instead of editing the server.xml file and creating a keystore, use the Configure Web
Server option in the Application Manager virtual appliance interface to enable the secure option and to generate
an SSL certificate. The generated certificate is automatically placed in the existing keystore, so later you can
simply replace it with your signed third-party certificate. See detailed instructions below.
Prerequisites
During the proof-of-concept phase or test phase, generate an Application Manager SSL certificate. For more
information about the recommended phases of deployment, see “Trial, Test, and Production Deployment
Phases,” on page 7.
Procedure
1 If you have not yet generated a self-signed certificate, use the Application Manager virtual appliance
interface now to generate an SSL certificate.
2 Follow the Apache Tomcat SSL Configuration instructions to create a certificate signing request (CSR).
3 Send the certificate request to the certificate authority (CA) for signing.
IMPORTANT If you determine that a wildcard certificate suits your enterprise's requirements, communicate
to the CA that you require a wildcard certificate in the format CN=*.MyDomain.com. For example, if your
hostname is Org1.mydomain.com, request a certificate with CN=*.mydomain.com. If you use a wildcard
certificate, you can also use it as the SSL certificate for the Connector.
4 Use keytool to delete the certificate you generated so that you can replace it with the signed third-party
certificate.
5 Follow the Apache Tomcat SSL Configuration instructions to import the signed third-party certificate to
the keystore. Use the following keystore information.
Keystore Location /opt/vmware/horizon/horizoninstance/conf/tcserver.keystore
Keystore Alias tcserver
Keystore Password changeme
6 Use the Application Manager virtual appliance to restart the Apache Tomcat server.
a In the Application Manager virtual appliance interface, select Configure.
b Type the number to Manage Web Server.
c Type the number to Restart Tomcat.
40 VMware, Inc.
Page 41

Chapter 7 Making Additional Application Manager Configurations
What to do next
Use the Application Manager deployment to verify that SSL is functioning between Application Manager and
the Connector. If an SSL problem exists, when you use the Connector Web interface and provide the activation
code, the Connector displays an error message indicating that the Connector cannot connect to a specified
URL.
Configuring Clustering for Application Manager
To configure Application Manager instances in a cluster, you must connect each Application Manager instance
to a shared external database server.
By default, Application Manager uses its internal database server. You can use the internal database server if
you deploy a single Application Manager instance. However, if you use multiple Application Manager
instances you must use an external database server and point each Application Manager instance to that
external database server.
Application Manager employs encryption to secure the Application Manager data. The Application Manager
instances in your deployment must all have a copy of the same master key. When you first configure an
Application Manager instance, a new master key is generated automatically and stored in the master keystore
of that Application Manager instance. You can then add additional Application Manager instances to the
cluster. However, in order to access the encrypted data of the shared database server, each Application
Manager instance in the cluster must have a copy of the same master key.
To ensure that each Application Manager instance has a copy of the same master key, you can perform one of
two procedures.
Table 7-3. Methods for Copying a Master Key Among Application Manager Instances
Configure a New Application Manager Instance and
Clone an Existing Application Manager Instance
This method is simpler and less prone to error. After you
have configured an Application Manager instance, you use
the Application Manager virtual appliance Interface to
configure a connection to an external database server, which
disables the internal database and creates a master key.
To create additional Application Manager instances, you can
clone a previously configured Application Manager virtual
appliance. The cloned Application Manager instance
matches the original. Therefore, it is configured with a copy
of the master key and it is connected to the external database.
IMPORTANT After you clone a virtual machine, you must
assign the cloned virtual machine a new IP address and
hostname. Other actions might be required. Search
http://kb.vmware.com/kb/ for related VMware Knowledge
Base articles.
Fetch an Existing Master Keystore
If you do not clone a previously configured Application
Manager virtual appliance, you must install and configure a
new Application Manager instance to point to the same
external database server as the first Application Manager
instance. Then you must fetch the master keystore from a
previously created Application Manager instance. This
action copies the master key to the current Application
Manager instance, allowing that instance to read the
encrypted data in the external database. For each Application
Manager instance you add to the cluster, you must fetch the
master keystore from a previous instance.
Configure an External Database Connection
To configure clustering for Application Manager, for each Application Manager instance, you must connect
the Application Manager instance to an external database server. You can then add additional Application
Manager instances to the deployment.
The action of configuring a connection from an Application Manager instance to an external database server
automatically disables the internal database server. You must configure an external database connection for
the first Application Manager instance that you connect to the external database server.
NOTE If you make a clone of a previously configured Application Manager instance, the cloned Application
Manager instance automatically connects to the external database server. You do not need to configure an
external database connection for the additional instance.
VMware, Inc. 41
Page 42

Installing Application Manager
If you choose to configure an additional Application Manager instance instead of cloning it, you must configure
the additional instance and fetch the master keystore from a previously configured Application Manager
instance.
Prerequisites
Have a plan for your Application Manager deployment that includes how you will handle load balancing and
high availability. Before you connect the Application Manager instances to an external database server, perform
the following:
n
Install and configure PostgresSQL 9.1 as the external database server, with the citext module installed.
The citext module supports the CITEXT data type, a case insensitive text type.
n
Install and configure the load balancing implementation.
n
Install and configure all the instances of Application Manager that you plan to use.
n
Consider the Connector in your deployment. You can use multiple Connector instances as well as multiple
Application Manager instances and should consider how you will use load balancing throughout the
Application Manager deployment.
Procedure
1 Access the Application Manager virtual appliance interface.
2 Select Configure and press Enter.
3 At the prompt, type the number to Database Key Management and press Enter.
4 At the prompt, type the number to Configure Database Connection option and press Enter.
5 Respond to the prompts about the database connection and press Enter after each response.
a Enter y to indicate that you want to connect to the external database server.
b Enter the IP address or the FQDN of the database server.
c Enter the name of the user with read and write privileges to the database.
d Enter the password of the user you just entered, the user with read and write privileges to the database.
6 Enter q when prompted to return to the Database Connection Configuration page.
If this Application Manager instance is the first in the cluster, the master key is generated automatically.
You do not need to fetch a master key store. You can exit the Database Connection Configuration page.
However, if this Application Manager instance is being added to a cluster where one or more Application
Manager instances already exist, continue to the next step.
7 If you plan to fetch a master keystore from a previously created Application Manager instance in the
cluster, on the system from which you will fetch the master keystore, enable root access to the ssh tool.
a On the Application Manager instance from which you will fetch the master keystore, log in to the
operating system and open the file /etc/ssh/sshd-config for editing.
b Locate the following line PermitRootLogin no and change it to PermitRootLogin yes,
c Restart the ssh tool with the following command /etc/rc.d/sshd restart.
8 Return to the Application Manager instance to which you want to copy the fetched master keystore and
complete the fetching procedure.
a Access the Change Application Manager Configuration screen, and if necessary, access the next page
of options, at the prompt, type the number to Database Key Management, and press Enter.
b At the prompt, type the number to Fetch Master Keystore and press Enter.
42 VMware, Inc.
Page 43

Chapter 7 Making Additional Application Manager Configurations
c At the respective prompts, provide the IP address, root username, and root password of the
Application Manager instance from which the master keystore is to be copied.
d Exit the Database Connection Configuration page.
What to do next
Log in to Application Manager as an operator to manage Application Manager clusters. Also, you can generate
a new master key for an Application Manager cluster at any time. See “Configure an External Database
Connection,” on page 41
Generate a New Master Key for an Application Manager Cluster
You can generate a new master key from any Application Manager instance in a cluster. However, you must
update every Application Manager instance in the cluster with the new key.
To further protect the encrypted data in the external database, you might want to periodically generate a new
master key for your Application Manager cluster. When you generate a master key in an Application Manager
instance, you must then copy the newly generated key to each of the remaining Application Manager instances
that use the same database. You copy the key by accessing an Application Manager instance and fetching the
master keystore from the Application Manager instance you used to generate the new key.
CAUTION After you generate a new master key, the other Application Manager instances that use the same
database stop functioning until you copy over the newly generated master key.
Prerequisites
Create an Application Manager cluster.
Procedure
1 Access the Application Manager virtual appliance interface of one of the Application Manager instances
in your Application Manager cluster.
2 Select Configure and press Enter.
3 If necessary, access the next page of options, at the prompt, type the number to Database Key
Management, and press Enter.
4 At the prompt, type the number to Generate New Master Key and press Enter.
5 At the prompt, type y to proceed with the key generation.
The new key is generated.
6 For each remaining Application Manager instance that uses the same database, fetch the master keystore
from the Application Manager instance you just used to generate the new key.
a Access the Application Manager virtual appliance interface of an Application Manager instance that
you have not yet updated with the newly generated master key.
b Select Configure and press Enter.
c Return to the Database Connection Configuration page.
d At the prompt, type the number for the Fetch Master Keystore option and press Enter.
e At the respective prompts, provide the IP address, username, and password of the Application
Manager instance from which the master keystore is to be copied.
Once you have updated the master key of each Application Manager instance that shares the same database,
all the instances can access the shared database.
VMware, Inc. 43
Page 44

Installing Application Manager
Update Application Manager
You can check for updates in the Operator Web interface or the Application Manager virtual appliance
interface. However, in most cases, using the Operator Web interface is more convenient. To install the update,
you must use the virtual appliance interface.
Prerequisites
n
Verify that Application Manager is installed and properly configured.
n
Take a snapshot of the Application Manager virtual appliance as a backup.
n
If you are using an external database, back up the database.
n
Ensure that Application Manager can resolve and reach vapp-updates.vmware.com on port 80 over HTTP.
Procedure
1 Check for updates of Application Manager
Table 7-4. Methods of Checking for Application Manager Updates
u
Application Manager Operator Web Interface Application Manager Virtual Appliance Interface
Using the Operator Web interface, you have two ways
to check for updates.
n
When updates are available, a message
automatically appears in the Dashboard tab.
n
Manually check for updates.
a Click the Settings tab.
b Click the System Information link.
c Click the Check for Updates link.
A message appears informing you if an update
is available.
You can also use the Application Manager virtual
appliance interface to check for updates. If an update is
available, you can install the update directly from the
Application Manager virtual Appliance interface.
1 In the Application Manager virtual appliance
interface, select Configure.
2 If necessary, access the next page of options and, at
the prompt, type the number to Update
Application Manager.
3 At the prompt, type the number to Check for
Updates.
If an update is available, an option appears on the
page allowing you to download the update.
2 If an update is available, download the update.
If you used the Application Manager virtual appliance interface to check for updates, you have already
performed the initial substeps required for this step.
a In the Application Manager virtual appliance interface, select Configure and press Enter.
b If necessary, access the next page of options, at the prompt, type the number to Update Application
Manager, and press Enter.
A new screen appears that provides information about the end user license agreement (EULA).
c Access and read the EULA.
d At the prompt, type the number to Download and Install the Update and press Enter.
e At the prompt, type y to accept the EULA and proceed with the update.
The update completes.
f Press Enter, then type q to exit the update screen.
Your version of Application Manager is updated. From the Application Manager Web interfaces, the build
number of the updated Application Manager version appears at the bottom of pages.
44 VMware, Inc.
Page 45

Chapter 7 Making Additional Application Manager Configurations
What to do next
Log in to the Application Manager Operator Web interface to verify that the build number located at the bottom
of each page has increased to the appropriate build.
VMware, Inc. 45
Page 46

Installing Application Manager
46 VMware, Inc.
Page 47

Troubleshooting Application Manager 8
You can troubleshoot some problems with Application Manager directly from the Application Manager Web
interface, while some troubleshooting involves other aspects of your Application Manager deployment.
This chapter includes the following topics:
n
“Potential Network Time Protocol Issue,” on page 47
n
“Missing the Application Manager Operator Web Interface Password,” on page 48
n
“Connector Issue Prevents Administrator Access to Application Manager,” on page 49
n
“Using a Static IP Address for Application Manager with vCenter Server Can Result in an Access
Issue,” on page 50
Potential Network Time Protocol Issue
As a troubleshooting or preventative procedure, you can check the Application Manager Network Time
Protocol (NTP) configuration.
Problem
The protocols used between Application Manager and the Connector and between the Connector and Active
Directory require that the time synchronization of these systems falls within a narrow range. The time settings
of these systems might not be synchronized or the time settings might drift out of synchronization. When you
installed the Application Manager appliance, you either used the default NTP configuration, or you
reconfigured NTP. See “Use the Virtual Appliance Interface for the Initial Application Manager
Configuration,” on page 28 for steps specific to NTP configuration. Also, see the following VMware Knowledge
Base article on the topic: Timekeeping best practices for Linux guests (KB 1006427).
VMware, Inc.
You can follow the Solution section in the following situations to prevent an NTP-related problem from
occurring:
n
When you first install the Application Manager Appliance.
n
When you modify the networking environment that can affect the ability of Application Manager to
contact the NTP server.
n
When you change the NTP configuration
You can also follow the Solution section to troubleshoot, for example when users cannot access Application
Manager.
Cause
The time setting of the Application Manager virtual appliance is not properly synchronized with an NTP server.
47
Page 48

Installing Application Manager
Solution
1 In the Application Manager virtual appliance interface, select Configure.
2 If necessary, access the next page of options, at the prompt, type the number to NTP Status, and press
Enter.
A new screen appears that provides information about the NTP configuration. The NTP status is listed at
the top of the page.
Types of Status
Messages Explanation
Time Server
Connection Error
Not Synchronized The status message is in red text and indicates that the Application Manager virtual appliance
Synchronized The status message is in green text and indicates that the Application Manager virtual appliance
Waiting to Stabilize The status message is in red text and indicates that the NTP status has not stabilized yet. This
If the status indicates that there is a time server connection error, the NTP configuration is
incorrect or the Application Manager instance is not able to reach an NTP server. You must
troubleshoot your configuration to find the cause.
time has drifted by a minute (60,000 milliseconds) or more, or has not polled an NTP server in
30 minutes or more. The NTP configuration is incorrect.
Example Causes:
n
A firewall is preventing the Application Manager instance from reaching an NTP server.
n
The DNS cannot resolve the NTP server.
You must troubleshoot your configuration to find the cause.
has not drifted outside the 60,000 ms range and no more than 30 minutes has passed since the
NTP server was last polled.
Example:
n
3ms clock drift, last poll 176 seconds ago.
Such a status message verifies that polling of the NTP server and the resetting of clock drift is
taking place.
should be a temporary state. If the message persists, you must troubleshoot your configuration
to find the cause.
3 If a recent change is not reflected on the NTP Status page, type the option to Restart NTP and press Return.
NTP configurations can occur slowly. Therefore, you might want to implement this step to force the
synchronization.
4 If you determine that the time setting of the Application Manager virtual appliance is not properly
synchronized with an NTP server, check the current NTP configuration of the appliance to verify that the
configuration conforms to the guidelines in the referenced KB article.
Missing the Application Manager Operator Web Interface Password
If you no longer have the Application Manager Operator Web interface password, you can use the Linux
command line of the Application Manager virtual appliance to change the password.
Problem
You cannot access the Application Manager Web interface.
Cause
You do not have the Application Manager Web interface password. For example, you have forgotten or
misplaced the password.
Solution
1 Access the Application Manager virtual appliance interface.
2 Select Login and log in to the Linux operating system with root credentials.
48 VMware, Inc.
Page 49

Chapter 8 Troubleshooting Application Manager
3 Run the following command: hznAdminTool setOperatorPassword -pass
You must replace the placeholder newpassword with a new password of your choice.
A message appears indicating that the operator password has been successfully set.
newpassword
.
Connector Issue Prevents Administrator Access to Application Manager
An IdP Discovery configuration issue might make Application Manager inaccessible. You can create a
temporary administrator to access Application Manager, where you can add an identity provider, which
generates an activation token for another Connector instance.
Problem
A Connector instance is unreachable, which prevents you from logging in to Application Manager as an
administrator or as a user.
Cause
The Identity Providers page in the Administrator Web interface is misconfigured. A potential issue is that a
Connector instance becomes non-functional or you accidentally delete the instance.
Solution
1 Create a temporary administrator.
a Use a browser to access http://MyOrg.MyDomain.com/SAAS/login/0.
b Log in as an operator.
c Click the name of the appropriate organization in the Organizations tab.
d Click Add Temporary Administrator User.
e Complete the text boxes and click Submit.
This action generates an email message that is sent to the address you provided. The email includes a link
to Application Manager and a username and password. You can use that link or the following URL
http://MyOrg.MyDomain.com/SAAS/login/0 to access Application Manager until you configure another
Connector instance. Once you configure a new Connector instance, you can use the following short URL
to access the Connecter: http://MyOrg.MyDomain.com/.
2 Generate a new Connector activation code.
a Use a browser to access http://MyOrg.MyDomain.com/SAAS/login/0.
b Log in as the temporary administrator with the information provided in the email message.
c Navigate to the Identity Providers page by selecting Settings > Identity Providers.
d Click Add Identity Providers.
3 Complete the text boxes and click Save.
4 Copy and save the Connector activation code for use when you configure a Connector instance.
5 Install another instance of the Connector and use the activation code you just received.
VMware, Inc. 49
Page 50

Installing Application Manager
Using a Static IP Address for Application Manager with vCenter Server Can Result in an Access Issue
If you use vCenter Server to deploy Application Manager Appliance using a static IP address and an access
issue occurs, a specific misconfiguration might exist.
Problem
Either you cannot access the Operator Web interface, or if you catch the problem earlier, you realize when you
configure the Access Manager virtual appliance that Application Manager is using a DHCP IP address instead
of the static IP address that you provided when you deployed the virtual appliance.
Cause
You did not configure the respective vCenter Server IP pool correctly. This setting overrides the configurations
you made while deploying the virtual appliance. Therefore, when you deploy the Application Manager virtual
appliance, even though you set the IP allocation policy to Fixed and provide a static IP address, Application
Manager uses a DHCP IP address instead.
Solution
1 Return to vCenter Server and Configure the respective IP Pool to use static IP addresses.
2 Deploy the Application Manager virtual appliance again, setting the IP allocation policy to Fixed and
providing the static IP address for the virtual appliance.
50 VMware, Inc.
Page 51

Index
A
activation code 33
Apache Tomcat 48
Application Catalog 11
Application Manager
description 11
operating system 28
supported browsers 33
Application Manager virtual appliance
interface 28
audience 5
B
browser, support for Application Manager 33
C
CA certificate 40
CLI interface 27
clustering, Application Manager 41
command line 48
command-line interface 28
configuring
gateway 28
IP address 28
netmask 28
Connector, description 11
Connector Authentication mode 11
Connector CLI interface, description 11
Connector virtual appliance interface 27
D
DHCP 28
DHCP server 27
DNS 23
DNS record 23
Domain Name System 23
H
Horizon Connector virtual appliance interface,
description 11
Horizon Connector Web interface,
description 11
Horizon deployment, description 11
Hybrid mode 11
hypervisor 23
I
installation checklist 9
internal database 41
IP address 28
K
KDC, See key distribution center
Kerberos 11
key distribution center 11
L
Linux, SUSE 5
Linux system administrators 5
logging 35
logs, syslog 35
M
master key 43
master keystore 43
mode
Connector Authentication 11
Service Authentication 11
N
network configuration settings 19
Network Time Protocol, See NTP
network time protocol, troubleshooting 47
NTP, configuring 19
E
external database 41, 43
F
flowchart, installation and configuration 5
G
gateway information 28
VMware, Inc. 51
O
Operator setup wizard 33
OVA 23
OVA file format, converting 24
overview, installation and configuration 5
OVF conversion tool, using 24
Page 52

Installing Application Manager
P
password, the Application Manager Web
interface 48
port
123 19
389 19
443 19
80 19
8080 19
8443 19
88 19
ports
Application Manager 37
Connector 37
insecure 19
secure 19
preinstallation 23
R
requirements
hardware 19
network 19
resource 19
U
update 44
User Portal 11
username-password verification 11
V
vCenter Server 50
virtual appliance, file format 24
virtual appliance interface 35
VMX file format 24
vSphere 19
W
Web server 48
Windows system administrator 5
S
SaaS 11
Secure Sockets Layer, See SSL
SecurID 11
self-generated certificate 40
self-signed certificate 38, 39
Service Authentication mode 11
setup wizard
configuration 33
introduction 27
Operator 33
SLES 27
software as a service, See SaaS
ssh 28
SSH client, See ssh
SSL 36
SSL certificate 40
subnet 28
SUSE Linux 5, 28
SUSE Linux Enterprise Server, See SLES
syslog 35
system administrator
Linux 5
Windows 5
T
temporary administrator 33
temporary administrator, troubleshooting 49
Tomcat, Apache 48
52 VMware, Inc.
 Loading...