

Page 1

INSTRUCTION MANUAL
MANUAL INSTRUCTION 2
DIE BETRIEBSANWEISUNG 22
СЮ ИНСТРУКЦИЯ no ЭКСПЛУАТАЦИИ 42
1НСТРУКЦ1Я 3 ЕКСПЛУАТАЦ11 63
ПАЙДАЛАНУШЫЕА НУСКАУ 83
4097IMnew.indd 1 27.02.2007 13:34:44
Page 2

ENGLISH
DVD and HDD recorder Model VT-4097
Operating manual
Please, read and understand this manual carefully before the start-up,
use and set-up of the player. Keep the manual for future references.
r
WARNING: In orderto reduce the risk offire orelectrical shock,
do not remove the device panels. Contact qualified personnel for
The lightning bolt in a triangle symbol indicates to the
user that there are dangerous voltages inside the device
that can result in electrical shock.
The exclamation point in a triangle symbol indicates to
the user important operating instructions and technical
service information in the accompanying literature.
CLASS 1
LASER PRODUCT
CAUTION! IN ORDER TOAVOID ELECTRICAL SHOCK, FIRST CONNECT THE CORD TO THE PLAYER, AND THEN INSERT PLUG INTO THE ELECTRICAL OUTLET.
CAUTION! This device contains a DVD player that uses a laser system.
Do not open the case in orderto avoid exposure to laser radiation.
Invisible laser radiation is present when the case is open. DO NOT LOOK
AT THE LASER RAYS. Eurthermore, use of the control system or making
adjustments or completing operations, otherthan those described in
these instructions, can lead to dangerous exposure to radiation.
We urge you to carefully study these operating instructions and save
them for future use. Contact a service center (if necessary) for service
and repairs.
CAUTION! DO NOT OPEN THEUPPER HOUSING OETHE DEVICE DUE
TO RISK OE ELECTRIC SHOCK. THERE ARE NO USER-SERVICEABLE
PARTS INSIDE. EMPLOYTHESERVICESOEQUALIEIEDPERSONNEL.
ATTENTION
IN ORDERTO AVOID ELECTRICALSHOCK, THEWIDE PRONG OETHE
PLUGSHOULD BEEIRMLYANDCOMPLETELYINSERTED INTOTHE
OUTLET. WATER MUST NOT SPILL INTO THE DEVICE. DO NOT PLACE
CONTAINERSOELIQUIDS, LIKEVASES, ONTOTHEDEVICE.
Important Safety Instructions
• Read these instructions - All the safety and operating instructions
should be read before the product is operated.
• Keep these instructions - The safety and operating instructions
should be retained for future reference.
• Heed all warnings - All warnings on the product and in the operating
instructions should be adhered to.
• Eollow all instructions - All operating and use instructions should be
followed.
• Clean the unit only with a damp cloth - Unplug this product from the
wall outlet before cleaning. The product should be cleaned only with
a polishing cloth or a soft dry cloth. Never clean with furniture wax,
benzene or other volatile liquids since they may corrode the cabinet.
• Do not use the apparatus near water - Do not use this product near
water - for example, near a bathtub, wash bowl, kitchen sink, or
laundry tub; in a wet basement; or near a swimming pool; and such
like places.
• Accessories - Only use the attachments/accessories specified by
the manufacturer.
• Cart - Use only with a cart, stand, bracket, or table specified by the
manufacturer, or sold with the apparatus. When a cart is used, use
caution when moving the cart/apparatus combination to avoid falling
or damage of the unit.
• Ventilation - Do not block any of the ventilation openings. Install in
accordance with the manufacturer’s instructions.
• Grounding and polarization - Eor safety use the polarized or
grounding type plug. A polarized plug has two blades with one wider
CAUTION
Risk of electric shock
DO NOT OPEN
service and repairs.
Indicates a device using a laser. This symbol
must be located on the rear panel of a
device, indicating that the device contains a
Class 1 laser and that laser rays are in use.
The possibility of laser exposure does not
exist without opening the device.
than the other. A grounding type plug has two blades and a third
grounding prong. The wide blade orthe third prong is provided for
your safety. When the provided plug does not fit into your outlet,
consult an electrician for replacement of the obsolete outlet.
• Power-cord protection - Protect the power cord from being walked
on or pinched particularly at plugs, convenience receptacles, and
the point where they exit from the apparatus.
• Lightning - Unplug this apparatus during lightning storms or when
unused for long periods of time.
• Servicing - Refer all servicing to qualified service personnel.
Servicing is required when the apparatus has been damaged in any
way, such as power supply cord or plug is damaged, liquid has been
spilled over, objects have fallen into the apparatus, the apparatus
has been exposed to rain or moisture, does not operate normally, or
has been dropped.
• Heating sources - Do not install near any heat sources such as
radiators, heat registers, stoves, or other apparatus (including
amplifiers) that produce heat.
Before You Start
What’s in the box
Thankyou for buying our DVD-player. Please confirm thatthe following
accessories are in the box when you open it.
Accessories
1. Remote control unit
2. SCARTcable
3. REcable
4. Audio/Video cable
5. AAA dry cell batteries
6. Operating instruction (this manual)
Putting the batteries in the remote control
1. Open the battery compartment cover on the back of the remote
control.
2. Insert two AAA batteries into the battery compartment following the
indications
3. (+, -) inside the compartment. Close the cover.
Using the remote control
Keep in mind the following when using the remote control:
• Make sure that there are no obstacles between the remote control
and the remote sensor on the unit.
• Remote operation may become unreliable if strong sunlight or
fluorescent light is shining on the unit’s remote sensor.
• Remote controls for different devices can interfere with each other.
Avoid using remotes for other equipment located close to this unit.
• Replace the batteries when you notice a fall off in the operating
range of the remote control.
Note:
Incorrect use of batteries can result in hazards such as leakage and
bursting. Please observe the following:
• Don’t use new and old batteries together.
• Don’t use different kinds of batteries together-although they may
look similar, different batteries may have different voltages.
• Make sure that the plus and minus ends of each battery match the
indications in the battery compartment.
• Remove batteries from equipment if you are not going to use it for a
month or more.
• When disposing of used batteries, please comply with governmental
regulations or environmental public instruction’s rules that apply in
your country or area.
Compatible Discs
Any disc that displays one of the following logos should play in this sys
tem. Otherformats, including DVD-RAM, DVD-ROM, DVD-Audio, SACD
and CD-ROM will not play.
DVD Video compatibility
Single-sided or double-sided discs.
Single layer or dual layer discs.
Dolby Digital, DTS, MPEG or Linear PCM digital audio.
VIDEO ■ MPEG-2 digital video Discs are generally divided into
one or more titles. Titles may be further subdivided into
chapters.
Audio CD compatibility
• 12cmor8cmdiscs.
ICOMPACT . LinearPCM,digitalaudio.
CD-Audio, CD-R and CD-RWformatted CDs are
P divided into tracks. (This unit can play CD-R and CD-
DIGITAL AUDIO RWdiscs recorded in CD Audio orVideo CD format, or
Kodak picture CDfiles.)
4097IMnew.indd 2 27.02.2007 13:34:45
Page 3

DVD-R/RW compatibility
This unit can play DVD-R/ DVD-RW discs recorded as DVD video format.
Also this unit can record the video and audio signal in DVD-R/DVD-RWdiscs.
RW
DVD+R/RW compatibility
■ This unit can play DVD+R/ DVD+RW discs recorded as DVD video format.
DVD+ReWritable
■ Also this unit can record the video and audio signal in DVD+R/DVD+RW discs.
MPEG-4 compatibility
ENGLISH
lMPEG-4
COMPATIBLE
JPEG CD compatibility
• This unit can play JPEG (Photo) discs.
DVD Video regions
All DVD Video discs carry a region mark on the case somewhere that indicates which region of the world the disc is compatible with. Your DVD re
corder also has a region mark, which you can find on the rear panel. Discs from incompatible
regionswill not play in this recorder. Discs marked ALLwill play in any player.
Caution
• If you record a disc using a personal computer, even if it is recorded in a compatible format, there are cases in which it may not play because of
the settings of the application software used to create the disc.
• Some of MPEG-4 movies could not be played depending on the encoding methods.
Controls and Display Front panel
This unit can play MPEG-4 discs.
1. Disc tray. Disc tray is used to put a disc in and then in here.
2. OPEN/CLOSE button. Press the button to open or close the disc tray.
3. PLAY/PAUSE button. Press to start or pause a disc playing.
4. STOP button. Press to stop a disc playing.
5. AV IN. Use it to select an external audio and video inputto use for recording.
6. RECORD button. Press to start a disc recording.
7. FL Display. Displays operation status.
8. STANDBY/ON button. To switch the unit on or into Standby.
9. AUDIO IN. ConnecttoAudio Output of camcorder.
10. COMPOSITEVIDEOIN. Connectto CompositeVideoOutput of camcorder.
11. DV IN. Thisjack isfor connection to DV camcorder only. It is not compatible with
otherdigital equipments
12. USB IN. Digital inputjackfor use with a USB memory. (USB Flash Drive).
4097IMnew.indd 3 27.02.2007 13:34:46
Page 4
ENGLISH
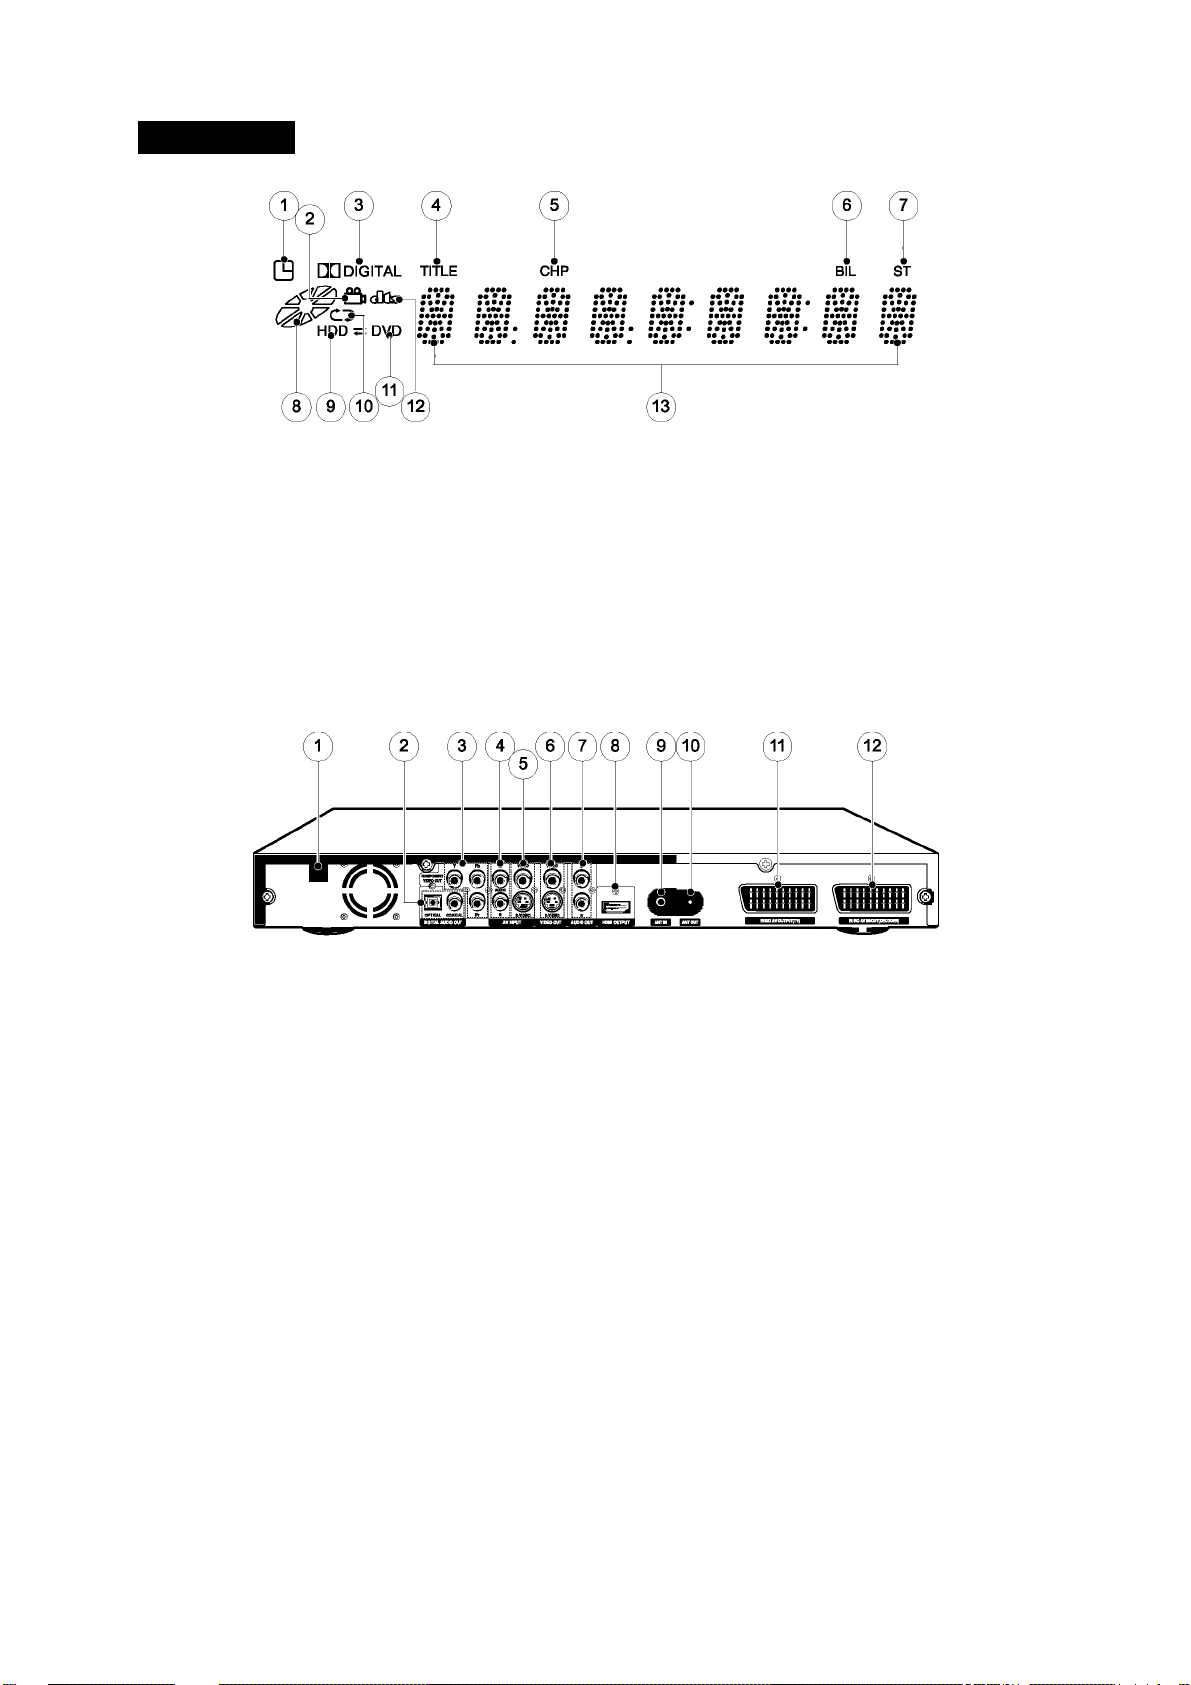
Display
1. TIMER Recording Indicator. Lights when timer recording is on.
2. Angle view. Indicates the current disc being played is viewed as multi angle. (This function only works for discs having scenes recorded at differ
ent angles.)
3. Dolby Digital Indicator. Indicates Dolby Digital 5.1 playback.
4. Title indicator. Title numberfor DVD playback.
5. Chapter indicator. Chapter number for DVD playback.
6. BILINGUAL Indicator. Illuminateswhen receiving a bilingual broadcast.
7. STEREO Indicator. Illuminates when receiving a stereo broadcast.
8. Rotation. Rotates when the disc is spinning.
9. HDD Indicator (Hard disc). Indicatesthe HDD mode.
10. REPEAT Indicator. Illuminates when the current play mode is under repeat title, chapter, track, A-B respectively
11. DVD Indicator. Indicatesthe DVD mode.
12. DTS Indicator. Illuminates when the format of digital audio output is DTS.
13. Operating information. Indicatestitle, ChapterandTracknumberandTime, TVchannel.
Rear panel
1. Power cord. Connect to the wall outlet.
2. Digital audio output. Connect COAXIAL OUT to Digital Audio Input (coaxial type) of Audio AMP.
Orconnect OPTICALOUT to Digital Audio Input (optical type) of AudioAMP.
3. COMPONENT VIDEO OUT. Connect to Component Video Inputs of TV.
4. Audio IN jack. Connect to Audio Output of VCR or Set-Top Box.
5. Video IN. ConnectVIDEO to Composite Video Output ofVCR orSet-Top Box. Or connect S-VIDEO to S-Video Output ofVCR or Set-Top Box.
6. Video OUT. Connect VIDEO to Composite Video Input of TV or monitor. Or connect S-VIDEO to S-Video Input of TV or monitor. S-Video provides
better picture qualitythan composite video.
7. Audio OUT. Connect to Audio Input of TV.
8. HDMI OUT (576P). HDMI (High Definition Multimedia Interface) transfersthe digital video and audio from your DVD RecordertoyourTV. Sim
ply connectyour DVD Recorderto yourTVwith a single HDMI cable forthe best picture and sound.
9. ANT IN. Connectto external antenna.
10. ANT OUT. Connect to Antenna Input of TV.
11. Euro AV OUT. Connect to Euro AV input of TV.
12. EuroAVIN/OUT. Connect to Euro AV in/out of AV equipment such as VCR, DVD player, etc.
Remote control
1. A-B
To repeat a certain section during playback.
2. Add/Clear
To remove the preset program on the timer recording list.
To add or delete the track No. on the program playback list of CD.
3. Angle
Toviewwith a differentframe angle.
4. Arrow(A^^^)
To select an item of menu.
5. Audio
To select the audio language or audio channel when playing a DVD disc.
You can also change the audio channel of the broadcast.
• Ifthe NICAM broadcast is bilingual, you can selectthe language.
• If the NICAM broadcast is stereo, you can switch between NICAM stereo and
NICAMSTEREO^MONO
Mono audio.
4097IMnew.indd 4 27.02.2007 13:34:47
Page 5

6. AVIN
To select an external audio and video input to use for recording.
7. Channel down/up(+,-)
To select the preset TV channels.
8. Display
Toviewthe Title, Chapter, Track information or Subtitle Language,
Audio Language.
9. DVD
To switch to DVD mode.
10. DV/USB
To select a digital A/V input from a DV camcorder or USB flash
memory. (USB Flash Drive).
11. Edit
To edit a title or chapter of disc.
12. Enter
To select the menu item.
13. File
Toviewthefile list. (MPEG-4, MP3, JPEGfiles)
14. HDD/DUB
To switch to HDD mode. To copythe titlesfrom HDDto disc.
15. Menu
To display the contents menu of the loaded DVD disc.
16. Mute
To turn on/off audio outputs.
17. Next
To skip to the next chapter or track.
18. Numeric (0-9)
Use the number buttons for track/chapter/title selection.
19. Open/Close
ENGLISH
To open or close the disc tray.
If pressed under STANDBY power is automaticallyturned on.
20. Pause
When you pressthis button during playback, you can viewthe still
picture.
21. Play
To playthe loaded disc or HDD.
22. Prev
To skip to the previous chapter or track.
23. Program
To playback in a specific order.
This button works only when the CD is played back.
24. REC (Record)
To start recording.
25. Repeat
To select a repeat mode.
26. Return
To move to a previous menu.
When using VCD 2.0 and SVCD with PBC function, this button works
as a RETURN button.
27. SCAN FWD
To start forward scanning during playback.
28. SCAN REV
To start reverse scanning during playback.
29. SETUP
To change the initial settings.
30. SLOW
To playthe disc contents in slowforward.
31.SORT/PIP
To sortthe titles of HDD in the order of the title name or date.
Toviewthe external video while the DVD or HDD is played back.
32. STANDBY/ON
Activates the unit POWER ON or into STANDBY
33. STOP
To stop a disc or HDD playing.
34. SUBTITLE
To select the subtitle language.
35. TIMER REC
To set a timer recording.
36. TIMESHIFT
To store a TV program in the HDD storage cache temporarily.
37. TITLE
To display the title menu of the DVD.
38. TV
To switch to the TV mode.
39. TV/DVD
To view channels selected by the recorder tuner or by the TV tuner.
It works only when recorder and TV are connected by European
Scarf cable while SCART out setting is RGB in Setup Menu.
40. TV MODE
Set up TV type according to type supported by user’s TV.
Each time you press this button repeatedly, the TV type will change
among NTSC, PALand progressive scan/HDMI. This button works
only when the disc tray is open.
41. ZOOM
Enlarges DVD or HDD screen image upto 2times.
Connection forVideo Output Terminals Composite Video (CVBS) Output
The composite video output is supported by most televisions.
The composite video jack on TV is usually yellow and may be labeled
video, CVBS, composite.
EuroA/V Output
The Euro AV terminal can be connected to the TV equipped with Euro AV
connector. The audio transmitted on the Euro AV is stereo sound.
S-Video Output
The S-Video output can be connected to the TV equipped with an S
Video input.
The S-Video jack on TV may be labeled S-Video, Y/C, S-VHS.
The S-Video provides better picture than the composite video.
Component Video Output
The component video output can be connected to the TV equipped with
component input. The component video jacks on TV may be labeled YUV,
4097IMnew.indd 5 27.02.2007 13:34:48
Page 6

ENGLISH
Y/Pb/Pr, Y/Cb/Cr and may be green, blue, red. The component video Audio Input
provides the best picture. Connect the Audio Input to the Audio Output of AV system.
Set “Video Output” to “YCrCb On” from VIDEO SETUP menu.
DVD-Recorder video input
Connect the Composite Video or S-Video Input to the Composite Video
or S-Video Output of AV system. Or connect the Euro AV IN/OUT to the
Euro AV OUT of AV system.
Connection for DV IN and USB IN
Using the DVIN, itis possible to read digitallythe contents of DV tapes.
Note:
• RE OUT, is labeled TO TV, is signal pass-thru only.
• S-Video cable is not supplied
Connection forAudio Output Terminals
You can enjoy the Dolby surround sound by connecting the digital audio
output to the audio amplifier.
DVD-Recorder
AUDIO
AMPLIFIER TV
AUIIOIN
Audio Output
Use audio outputs for connection with your TV.
Digital Audio Output
Use digital audio outputs for connection with Dolby Digital or DTS de
coder. Erom the Digital Audio Output menu, select “PCM” or “Bitstream”
according to your decoder.
Note
An optical cable and coaxial cable are not supplied.
Connection forA/V Input Terminals
You can record programs from AV system such as VCR, Satellite receiver
or Decoder box.
DVD-Recorder
USB Memo7
DVInput
Digital Camcorder
Connect the DVINto the DV in/out jack on your DV camcorder using a
DV cable (not supplied).
USB Input
Insert the USB memory in the USB jack of this recorder.
Connection for HDMI Output
HDMI (High Definition Multimedia Interface) transfersthe digital video
and audio from your recorder toyour TV.
Connectthe HDMI Outputto the HDMI Input ofTV with a single HDMI
DVD-Recorder
# ®
fi
■®l ®
ft
t f
Turning on and off
1. Turn on your TV and set the video input to this recorder.
2. Press STANDBY/ON button on the remote controller or the front
panel to turn on. You can see the on-screen information. If you want
to turn off, press STANDBY/ON button again on the remote controller
orthe front panel.
Selecting the HDD or DVD for playbackand recording
1. Ifyou wantto switch tothe HDD mode, press HDD/DUB button on
the remote control.
2. If you want to switch to the DVD mode, press DVD button on the
remote control.
Displaying the disc information on screen (OSD)
You can display the playback status on TV screen as follows; Title, Chapternumber. Playing time.
1. Press DISPLAYbutton during playback. Title, Chapter number.
Playing time. Audio language and Subtitle appear on TV screen.
2. Press DISPLAYbutton once more. You can see the playback status in
detail.
VCR or Sate ll ite rece iv er or Deco de r bo x
S-VIDEO OUT VI
4097IMnew.indd 6 27.02.2007 13:34:51
Page 7

FILÊS4DIRECT0RY _fcfAVORITE;PROG^
26fi KEIKO MATSUI • ^ Il
27 LAURA FIGY • C H ||
2dfi MAXWELL - WHE I
, 29/9 new STORIES (HI ■ II
J 30ji osT iiiiiiiiii iliill.M J; ,
DUD RGCORÜGR
ENGLISH
3. Also you can change the subtitle language, chapter, and so on using
▲ ▼◄►and Enter. To turn offthe on-screen display, press DISPLAY
button.
Playing a DVD disc
1. Press OPEN/CLOSE button to open the disc tray. Put a disc on the
disc tray with logo-printed side up.
2. Press OPEN/CLOSE button again to close the disc tray. The disc will
be loaded automatically.
3. TheTVscreenshowsdiscmenu.
4. Select the desired item by using ▲▼◄► or0to9 buttons, then
press ENTER or PLAYbutton to start playback.
Piaying a DVD+RW or DVD+R disc
1. Load a DVD±RW or DVD±R disc. The menu screen is displayed
automaticall\
FILES&DIRECTORY
26KEIKO MATSUI •
27 UURA FIQY • C
28 JS MAXWELL • WHE
NEW STORIES (HI
3Cj1
.......................................... ..................................................
_ 31fJ OLD IMAGE.JPG
DUD RGCQROGR
2. Select the desired program by using ▲ or ▼ button.
3. Press ENTER or PLAY button to start playback.
4. Press TITLE or MENU button to return to the menu screen.
2. Select the desired file by using ▲ or ▼ .You can see the thumbnail
picture of selected file on the right window.
3. Press ENTER button to start playback. The JPEG files are played in
order automatically. Ifyou press ►►lorl^^ during playing back,
you can see the next picture or the previous picture.
4. Picture rotation and zoom
You can rotate the picture to the left or right by using ◄or ►. Also
you can enlarge the picture up to 4 times or reduce it up to a quarter
by using ►►or^^.
4. To see the file list, press STOP button. The file list is displayed on the
TVscreen.
Playing MPEG-4 Movie CD
1. LoadaMPEG-4disc.
2.
Press Enter button after selecting the directory of Disc using
▲ or ▼.
Press Enter button after selecting the desired movie using ▲ or ▼.
3.
The selected movie is played back.
Note: Some ofthe MPEG-4 movies could not be played depending on
encoding method.
Playing an Audio CD
1. LoadanAudioCD.
The first song is played back automatically.
2. Press DISPLAY button. The disc information is displayed on the TV
screen.
'FILÊS4DIRECTDRY
gf? PRIMUS1024,JPG
10-i TEST_3.01.AVI
13- 1 TEST 6 OtAVI I
14- 1 TEST a OI.AVI '
.1547 THEDOORS11024.
□UQ RSCQROSR
3. Select a track using ▲ or ▼, and press ENTER button.
4. Enter the desired track No. by using 0to9 buttons, and press ENTER
button.Theselectedsongisplayedback. Ifyoupress ►►! orl^^
during playing back, you can hear the next song or the previous
song.
Playing aJPEG CD
1. Load a JPEG CD. The directory & file list is displayed on the TV
screen.
Playing a program of HDD
1. Press HDD/DUB button to select the HDD mode.
The program list of HDD ;
aVD RSCOROER
2. Select the desired program by using ▲ or ▼ in the program list.
3. Press PLAYbutton. It starts to playthe selected program.
Playing a JPEG in HDD
1. PressFILEbutton.
2. Press ENTER button after selecting the directory of HDD using ▲ or
V. The file list of HDD appears on screen.
4097IMnew.indd 7 27.02.2007 13:34:53
Page 8

ENGLISH
3. Select the desired tile by using ▲ or ▼ .You can see the thumbnail
picture of selected tile on the right window.
4. Press ENTER button to start playback. TheJPEG tiles are played in
orderautomatically. Ityou press ►►! or !◄◄ during playing back,
you can see the next picture or the previous picture.
5. Picturerotationandzoom.
You can rotate the picture to the left or right by using ◄or ►.
6. To see the tile list, press STOP button. The tile list is displayed on the
TV screen.
Playing MPEG-4 Movie in HDD
1. PressFILEbutton.
2. Press ENTER button after selecting the directory of HDD using
A or T. The program list of HDD appears on screen.
3. Press ENTER button after selecting the desired movie using ▲ or ▼.
4. To see the tile list, press STOP button. The tile list is displayed on the
TV screen.
Note: Some of the MPEG-4 movies could not be played depending on
encoding method.
1. Press PAUSE button during play mode. The DVD Recorder pauses
the playing temporarily.
2. Press PAUSE button repeatedly. Each time you press, one frame is
displayed at a time.
3. Press PLAYbutton to resume normal playback.
Note:
• There is no sound during viewing Frame playback or Slow playback.
• Audio CD do not have Frame Playback and Slow Playbackteature.
Program Playback (Audio CD only)
This feature lets you program the play order of tracks on a disc.
1. Load an Audio CD. The first song is played back automatically.
2. Press PRCGRAM button. The track list is displayed on the TV screen.
3.4.Select the desired song by using ▲ or ▼ in the track list, then press
ADD/CL button. The selected song is added on the right program
list.
Repeat step 3 if you want to select other;
Advanced Playback Fast Forward/Backward
Use thistunction to playthe DISC or HDD contents in tasttorward ortast
reverse.
There is no sound during searching.
1. Press ◄◄or ►► duringplaymode.
Each time you press the button, playback speed changes as below:
DVD/VCD
◄ x2 ► x2
4^ 4^
◄ x4 ► x4
4^ 4
◄ x16 ► x1B
4r 4
◄ x32 ► x32
2. Press PLAYbutton to resume normal playback.
Skip Forward/Backward (DVD/Audio CD only)
Use thistunction to move to the next or previous chaptertor DVD, track
torAudio CD.
1. Press ◄◄ during play mode. The DVD Recorder starts playing the
previous chapter or track.
2. Press ►► during play mode. The DVD Recorder starts playing the
next chapter or track.
Slow Forward
Use thistunction to playthe DISC or HDD contents in slowtorward.
1. Press SLCW button during play mode.
The disc content is played slowly in forward.
2. Press SLCW button. Each time you press the button, playback speed
changes as below:
DVD/VCD/HDD ►1/2 4 ►1/4 4 ►l/B
3. Press PLAY button to resume normal playback.
Frame by Frame Playback (DVD/VCD only)
8
5.
Move the cursor to the program list by pressing ►, and then press
ENTER button. It starts playback of a saved program list.
6.
To delete a song from the program list, select the song you want to
delete by ◄►▲▼, then press ADD/CL button. The selected song is
erased from the program list. Then press ADD/CL.
7.
To exit the program list, press RETURN button.
Selecting Subtitles (DVD only)
It is possible to change the subtitle language to a different language
from the one selected at the initial settings. This operation works only
with discs on which multiple subtitle languages are recorded. It the load
ed disc supports multiple subtitles, you can select the subtitle language.
1. Press SUBTITLE button during playing. The subtitle is displayed on
the bottom of screen.
»/iil
Let me up out of "here. '■ i~; [j fi ?
2. Each time you press SUBTITLE button, the subtitle language is
changed.
3. To turn oft the subtitle, select “CEE” by pressing SUBTITLE button.
Selecting Audio Languages (DVD only)
It is possible to change the audio language to a different language from
the one selected at the Initial settings. This operation works onlywith
4097IMnew.indd 8 27.02.2007 13:34:54
Page 9

discs on which multiple audio languages are recorded. It the loaded disc
supports multiple audio
languages, you can select the audio language.
1. Press AUDIO button during playback. The audio information is
displayed on the top of screen.
2. Each time you press AUDIO button, the audio language is changed.
Note: Some discs only allowyou to change subtitle or audio language
from the disc menu.
Repeating a Title, Chapter (DVD/Audio CD only)
It is possible to repeat the chapter/title tor DVD or track/disc tor Audio
CD.
1. Press REPEAT button during playback. The repeat information is
displayed on the top of screen.
2. Each time you press REPEAT button, the repeat mode is changed as
follows.
ENGLISH
Zoom 150%
Zoom 200%
Zoom Off
3. You can move the image by using ◄►▲▼.
4. To cancel the zoom mode, press ZOOM button repeatedly until the
recorder resume to normal playback.
Switching the Camera Angle (DVD only)
When a DVD contains recorded multiple angles of a scene, you can se
lect the Angle function.
1. Available angles of the current scene will be displayed on the top of
screen.
2. Each timeyou pressANGLE button, the angle is changed.
Note:
• You can only change the angle tor DVDs that provide multiple angles
of scenes
• The angle function will not work on DVD video discs that do not
contain recorded multiple angles.
Direct Search (DVD only)
You can select a specific chapter or title to play.
1. Press DISPLAY button twice during playback. The playback
information appears on TV screen.
Note: With some DVD discs, there may be times when repeat playback is
not possible.
A-B Repeat (DVD/Audio CD only)
Use this function to repeat the play of a selected segment. This is very
useful tor studying foreign languages because it repeats the selected
segment until canceled.
1. Press A-B/LANG button at the point of where repeat play is to start.
The starting point of your selected segment is set up.
2. Press A-B/LANG button again at the point of where repeat play is to
end.
The ending point is set up. It is played repeatedly from AtoB.
3. To cancel the A-B repeating, press A-B/LANG button once more.
The playing state changes to normal.
Note: We recommend you set up the desired segment within a minimum
5 seconds tor smooth repeat play.
ZOOM screen (DVD/HDD only)
The zoom function allows you to enlarge DVD or HDD screen image up
to 2 times.
1. Press ZOOM button during playback. The picture is zoomed.
Title Search
1) Select “TITLE” by pressing and press ENTER button.
2) Enterthe title number by using numeric 0to9 button, and press
ENTER button. It starts to play backtrom the specified title.
Chapter Search
1) Select “CHAPTER” by pressing and press ENTER button.
2) Enterthe chapter number by using numeric 0to9 button, and press
ENTER button. It starts to play backtrom the specified chapter.
Recording Basic recording
To record TV programs, you should search TV channels first.
1. Press HDD/DUB or DVD button to select the HDD(Hard Disk Drive)
or a recordable DVD (DVD±R/DVD±RW) on which you want to
record.
Ityou want to record on the HDD, press HDD/DUB button. The HDD
menu is displayed on TV screen.
2. Ityou want to record on DVD, load a DVD±RWor DVD±R discwith
enough tree space torthe recording.
• Ityou load a new blank disc, it asks tortormatting the disc. Press
ENTER button atterselecting “OK”.
• It the DVD menu is displayed on TV screen automatically, press STOP
button twice to stop.
3. PressAV IN button to choose the A/V source you want to record.
Everytime this button is pressed, the A/V source is changed:
2. Each time you press ZOOM button, the zoom mode will be changed:
4097IMnew.indd 9 27.02.2007 13:34:56
Page 10

ENGLISH
TV
Front AV
Rear AV
Rear SV
DV
Scart AV
If you want to record a TV program select TV mode. Select a station you
want to record by pressing Channel- or Channel +.
4. PressRECbuttontostartyourrecording. PressPAUSEbuttonifyou
want to stop the recording for a short while. Press REC button to
continue recording.
5. Press STOP button to stop your recording.
Note:
• A DVD±R/DVD±RWcan record for upto6 hours, up to 49 titles.
• Ifyour source is copy-protected, you will not be able to record it.
OTR (One touch Timer Recording)
1.
During basic recording, press REC button. Everytimeyou press REC
button, the recording timewill increase by30 minutes. It is possible
to record for up to 3 hours if there is enough room on the disc (or
HDD) and the record quality is SEP. (orthe length of time shift buffer
is set to 360 minutes.)The DVD recorder will stop automatically after
recording for a specific time.
2.
If you want to cancel OTR, press STOP button.
6. Select“Mode”bypressing T,pressENTERbuttontobringupthe
list. Select how often you want to make the recording, for example,
once, daily orweekly by pressing▲ or ▼, press the ENTER button to
confirm.
7. Select “Date” by pressing ▼, press ENTER button. Enterthe date
by using 0to9 buttons, and press ENTER button to confirm. Ifyou
selected “Weekly” in step 6, press the ENTER button after selecting
a day of week by using ▲ or ▼.
8. Select “Start” by pressing ▼, press ENTER button. Enter the Start
time by using 0to9 buttons, and press ENTER button to confirm.
9. Select “End” by pressing ▼, press ENTER button. Enterthe End time
by using 0to9 buttons, and press ENTER button to confirm.
10. Select “Title” by pressing ▼, press ENTER button. Enterthe title
name by using ◄►▲▼, and press ENTER button to confirm.
11. Switch VPS/PDC “ON” or “OFF” by using , and ENTER button.
(If “Source” is not set to TV channel, this function is not available.)
The VPS/PDC system automatically adjusts the recording time
so that even if a program is not running to schedule you won’t
miss it. ForVPS/PDCtowork properly, you must inputthe correct
announced time and date of the program you want to record. Note
that VPS/PDC may not work with every station.
12. Press ENTER button after selecting “OK” by using ▼, if all the
settings are correct.
13. Switch your DVD Recorder off by pressing STANDBY/ON button.
Note:
• You can switch your DVD Recorder on again if you want to set the
timer to record another program. Remember to switch the DVD
Recorder off when you have finished.
• To stop a timer recording which has already started, press
STANDBY/ON or STOP button.
• You can pre-program the schedule to record up to 8 programs.
• We recommend you set up the recording time over 5 minutes.
Timer review - changing and erasing record settings
1. Press TIMER RFC button.You can see all the timer programs
currently set.
Timer Recording
Fortimer recording, the clock, date, and stations must be set correctly.
If you want to record on DVD, load a DVD±RW or DVD±R disc with
enough free space forthe recording.
1. Press TIMER REC.
2. Select an unused program by pressing A or T, then press ENTER.
3.
Press ENTER button. The sub-menu appears. Select the signal
sources by using ▲ or ▼, and press the ENTER button to confirm.
Select “Record To” by pressing ▼, press ENTER button to bring up
4.
the list. Select HDD for hard disc recording or DVD for DVD recording
by using▲ or ▼, pressthe ENTER button to confirm.
Select “Quality” by pressing ▼, and press ENTER button to bring up
the list. Select the Record Quality by using ▲ or ▼, press the ENTER
button to confirm.
I Quality I Dato ' Start I End iRECord I VPS
,1 I I ^^ 1 ^
□UD RECORüeR
Select the program you want to change or erase by pressing .
Erasing a setting
3. PressADD/CLbuttontoerase.
Changing a setting
Press ENTER button. Select the details you want to change by
pressing and pressthe ENTER button.
Change the settings by using or 0-9.
When you have made all the changes, press ENTER button.
4.
Press ENTER button after selecting “OK” using ▼ button if all the
settings are correct.
5.
Press TIMER RFC button to exit.
Recording from a DV (Digital Video) camcorder
Youcan record the contents of DV tape from a DV camcorder viaDVIN.
Make sure your digital camcorder is connected to DV INjack on the front
panel.
Also turn on your DV camcorder and set it to PLAY (or VCR) mode.
1. Press HDD/DUB or DVD button to select the HDD (Hard Disk Drive)
or a recordable DVD (DVD±R/DVD±RW) on which you want to
record.
If you want to record on DVD, load a DVD±RW or DVD±R disc with
enough free space forthe recording.
Press DV/USB button.
Find the place on the camcorder tape that you want to start
recording from.
You can use the remote controller for this recorder to control the
camcorder using
PLAYj STOP, PAUSE ◄◄, ►►. For best results, press PAUSE button
10
4097IMnew.indd 10 27.02.2007 13:34:57
Page 11

ENGLISH
at the point from which you want to record.
4. PressRECbuttontostartyourrecording. PressPAUSEbuttonityou
want to stop the recording tor a short while. Press again REC button
to continue recording.
5. Press STOP button to stop your recording.
Note:
• Depending on the connected camcorder, you may not be able to
control it using the remote control supplied with this recorder.
• It this recorder does not recognize the DV camcorder, insert the DV
cable again into the DV IN jack after pulling it from the DV in jack.
Time Shifted Recording
This recorder automatically saves the program on air in the HDD tempo
rarily, this allows the user to manipulate the saved program using func
tions such as rewind, tasttorward, replay and pause.
1. Pressthe playbackcontrol buttonssuch ◄◄, ►►,!◄◄, ►►!,
!► while watching TV, the Time bar appears on the bottom of the
screen.
2. PAUSE
It you press PAUSE button, the current program is paused. It you
press PLAYbutton, the program is resumed from that point.
Fast Forward/Backward
Press ◄◄or ►► during playback.Wheneveryou press the button,
the playback speed increases by 3 steps.
Press PLAYbutton to resume normal playback.
Skip Forward/Backward
Press !◄◄ during playback. The DVD recorderstarts playing the
previous chapter.
Press ►►! during playback. The DVD recorderstarts playing the
next chapter.
Slow Forward
Press SLOW button during playback. The current program is played
slowly in torward.Wheneveryou press the button, the slow speed is
changed by3 steps.
2) Press PLAYbutton to resume normal playback.
5. Recording
While the time shift operation records the program temporarily, the
record operation records the program permanently on HDD so you
can playbackthe recorded program at anytime.
1. Press RFC button to start recording the current program.
2. Press STOP button to stop recording.
Note:
• This function is not available in the DVD mode. It you want to use the
time shift recording, press TIMESHIIFT button while watching TV.
• It OSD Menu is shown on during Time Shift from A/V inputs and from
digital TV, OSD Menu could be recorded together. Therefore please
escape from the OSD Menu ityou want to record Time Shift period.
• Make a DVD copy of a recording on the HDD to play in another
player.
• Transtervideotrom a DVD to the HDD tor editing.
• Transfer edited video from the HDD to DVD.
Copyright
Recording equipment should be used only tor lawful copying and you are
advised to check carefully what is lawful copying in the country in which
you are making a copy. Copying of copyright material such as films or
music is unlawful unless permitted by a legal exception or consented to
by the right owners.
Copying the DVD titles from Disc to HDD
Make sure the DVD disc to copy is inside of the recorder.
1. Copying all titles from disc to HDD.
1) Press the DVD button. The title menu will show on the TV screen.
2) Press À and ►. The edit menu will show on the TV screen.
Press ENTER button after selecting “Copy title” by using ▲ or ▼
3)
button. It starts to copythe selected title from DVD to HDD.
Copying a title from disc to HDD.
2.
Press the DVD button. The title menu will show on the TV screen.
1)
Press ► after selecting the title to copy by using ▲ or ▼. The edit
2)
menu will show on the TV screen.
3) Press ENTER button after selecting “Copy title” by using ▲ or ▼ .It
starts to copy the selected title from DVD toHDD.
Copying the titles from HDD to Disc
Make sure the recordable DVD (DVD±R/DVD±RW) is inside of recorder.
1. PresstheHDD/DUBbutton.
The title list of HDD will show on the TV screen.
Simultaneous recording and playback
You can playback a HDD title and record a TV program on the disc at the
same time. Also you can playback a DVD title and record a TV program
on HDD at the same time.
1. Playing aHDD title while you record a TV program on the disc.
Press HDD/DUB button during recording. The program list of HDD
1)
appears on screen.
Select the desired program by using in the program list.
2)
Press PLAYbutton to start playing.
3)
Playing a DVD title while you record a TV program on HDD.
2.
Press DVD button during recording. The disc menu appears on
1)
screen.
Select the desired item or the desired title using ◄,►,▲,▼.
2)
Press ENTER or PLAYbutton to start playing.
3)
Use the copying features of this recorder to:
• Back up important recordings stored on the HDD to a DVD.
2. Press ENTER button after selecting the title to copy by using ▲ or ▼.
A mark is put on the selected title.
3. Repeat step 2 it you want to select other titles.
4. PressHDD/DUBbutton.
It starts to copy the selected titles from HDD to disc.
Copying the files from disc to HDD (from HDD to Disc)
Make sure the disc to copy or recordable DVD (DVD±R/DVD±RW) is in
side of the recorder.You can copy the MP3 tiles, JPEG tiles and MPEG-4
tiles from disc to HDD (ortrom HDD to disc).
11
4097IMnew.indd 11 27.02.2007 13:34:58
Page 12

ENGLISH
Pressthe FILE button.
The directory & file list will be displayed
IDIO ■ 00:00:00 • 00:00:00
FILES4DIRECT0RY FAVORITE/PROQ
□UD RSCORDSFI
I the TV screen.
2. PresstheEDITbutton.
The copy menu will be displayed on the TV screen.
I Delete
___
_______
\
mmm uir
\ .
□UD RECORDER
Press the ENTER button after selecting “Copy” by using ▲ or ▼.
Selectthedirectoryofsourcefiletocopybyusing ▲ , ▼ pressthe
ENTER button.
(If you want to copy the file of disc, select the DVD directory. If you
wantto copythe file of HDD, selectthe HDD directory.)
The file list will show on the screen.
Press ADD/CL button after selecting the file to copy by using
5.
A or T. The selected file will be added on the right file list.
6. Repeat step 5 if you want to copy other files.
7. Pressthe ►► button.
8. Select the directory where you want to copy the selected files by
usings, ▼, pressthe ENTER button.
(Ifyouwantto copythefilesfrom discto HDD, selectthe
subdirectory of HDD.
Ifyouwantto copythefilesfrom HDDtodisc, selectthe DVD
directory.)
9. Press REC button. It starts copying the files from disc to HDD
(from HDD to disc).
10. Press EDITbutton to exit afterfinishing copying.
2. Press the EDIT button.
The copy menu will be displayed on the TV screen.
Ql
Qta Oolatg
EID Ronaino
□UO RECORDER
Press ENTER button afterselecting “Copy” using ▲ or ▼.
Press ENTER button after selecting the USB directory by using
▲ or ▼.
Press ADD/CL button after selecting the file to copy by using
A or T. The selected file will be added on the right file list.
6. Repeat step 5 if you want to copy other files.
7. Pressthe ►► button
8. Selectthe directorywhere you wantto copythe selected files by
using ▲ , ▼ ENTER button.
(If you want to copythe files on the HDD, select the subdirectory of
HDD.
If you want to copy the files on the disc, select the DVD directory.)
9. Press the REC button.
Itstarts copyingthefilesfromthe USBto HDD (ordisc).
10. Press EDIT button to exit after finishing copying.
Note:
• Don’t use morethan SOOmAflash memories.
• If this recorder does not recognize the USB flash memory, insert the
USB flash memory again into the USB IN jack after pulling it from the
USB INjack
Editing DVD+R or DVD+RW
1. Load a DVD±R or DVD±RW. The DVD menu screen is displayed
automatically.
2. Press ▲ to go to the top of the DVD menu.
3. Press ►, the Disc Edit menu will show on the screen.
Copying the files from the USB flash memory to HDD (or disc)
Make sure the flash memory is inserted into the USB IN jack. If you want
to copythe files on the disc, load a recordable DVD (DVD±R/DVD±RW).
1. PresstheFILEbutton.
The directory & file list will be displayed on the TV screen.
Play disc (DVD+RW/DVD+R)
You can play backthe entire disc from the beginning to the end.
1. Press ENTER button after selecting “Play” by using or.
It starts to play back the beginning of the disc.
12
4097IMnew.indd 12 27.02.2007 13:35:00
Page 13

ENGLISH
Rename disc (DVD+RW/DVD+R)
1. Press ENTER button after selecting “Rename disc” by using AorT.
The keyboard will show on the screen.
Space Aa P2 Backspace Clear Exit OK
Drama Action Sports Comody Nows Kids Adult
aUD RecORDEFI
2. Selecta letterwhichyouwantto input by using ◄,►,▲,▼ and press
ENTER button to confirm it.
3. Repeatstep2.
The maximum length of the disc name is up to 9 characters.
4. The control bars of the bottom line in the keyboard are tor edit
command.
It the inputting of letters is finished, press the ENTER button after
selecting “OK”.
Erase optical disc (DVD+RW only)
1. Press ENTER button after selecting “Erase optical disc” by using
AorT. The pop-up menu will show on the screen.
Finalize disc (DVD+R only)
It you want to make your DVD±R disc compatible with other DVD players
or recorders, you should finalize the disc.
1. Press ENTER button after selecting “Finalize disc” by using AorT.
The pop-up menu will show on the screen.
2. PressENTERbuttontoconfirmatterselecting“Yes”byusing ◄,►.
It takes a tew minutes to finalize the disc.
Note:
• The FINALIZEtunction onlyworks once in DVD±R disc.
• It a DVD±R has been finalized, you can not record or edit the DVD±R
any more.
Lock disc (DVD+RW only)
You can lock your current disc to prevent further editing or recording to
the disc.
1. PressENTERbuttonatterselecting“Lockdisc”byusing AorT.
It takes 2~3 minutes to lock the disc.
It the disc is locked, you can not make any changes any more except
play it back.
2. Press ENTER button to erase the contents of a disc after selecting
“Yes” by using ◄,►.
It takes a tew minutes to erase the disc.
Note: The Erase function only works on DVD±RW discs.
Overwrite disc (DVD+RW only)
1. PressENTERbuttonatterselecting“Overwritedisc”byusing AorT.
It will be changed from DVD mode to AV input mode.
2. Press AV IN button to choose the A/V inputyou want to record. Every
time this button is pressed, A/V input is changed:
TV
Front AV
Rear AV
Rear SV
DV
2. Ityou want to unlock the locked disc, select “Unlock disc” by using
AorT.
3. PresstheENTERbutton.
It takes a tew minutes to unlock the disc.
CopyAII (DVD+RW/DVD+R)
You can copy all titles from DVD to HDD.
1. Press ENTER button after selecting “Copy All” by using AorT.
It starts to copy all titlestrom DVD to HDD.
Editing a title of DVD+RW or DVD+R
1. Insert a recorded DVD±RW or DVD±R disc on the disc tray. The menu
screen is displayed automatically.
2. Select one title to edit by using AorT.
3. Press ►, the Title Edit menu will show on the screen.
Scart AV
It you want to record the TV program, select the TV mode. And
choose the station you want to record by pressing Channel- or
Channel +.
3.
Press RFC button to startyour recording. It starts to record from the
beginning of the disc.
4.
Press STOP button to stop your recording.
Note
Recorded programs will be erased from the beginning it overwrit-
ten.
13
4097IMnew.indd 13 27.02.2007 13:35:02
Page 14

ENGLISH
I»
The maximum length of the disc name is 9 characters.
4. The control bars of the bottom line in the keyboard is tor edit
command.
Itthe inputting of letters isfinlshed, press ENTER button after
selecting “OK”.
Erase title (DVD+RW only)
1. Press ENTER button after selecting “Erase title” by using AorT. The
pop-up menu will show on the screen.
DUD ReCDRDSH
Playtitle (DVD+RW/DVD+R)
You can play back the selected title.
1. Press ENTER button after selecting “Playtitle” by using AorT. It
starts to play back the selected title.
Edit title (DVD+RW/DVD+R)
1. Press ENTER button after selecting “Edit title” by using or. The pop
up menu will show on the screen.
1-1. Select an available title
Select to choose an available title by inputting numbers 0-9.
1-2. Select an available chapter
Select to choose an available chapter by inputting numbers 0-9.
1-3. Play
Control playbackbyvarioussetting such as Fasttorward, Fast
reverse, Slow.
1-4. Chapter marker
You can insert a chapter or delete it. Press ENTER or ►, the pop-up
menu will show on the screen.
1) . To insert a new chapter marker, select “Insert marker” by using
AorT.
You can search a scene by using ◄◄, ►► or the PLAY button.
Press ENTER button at the point where you would like to insert a new
chapter.
2) . To delete a chapter marker, select “Delete marker” by using AorT.
You can search the chapter by using !◄◄ or ►►!. Press ENTER
button at the chapterwhere you would like to delete.
3) . To delete all chapter markers, select “Delete all markers” by using
AorT. Press ENTER button to confirm it.
1-5. Hide chapter/Unhide chapter
It is a useful function to hide commercials. Select “Hide chapter” by
using AorT and press the ENTER button. It current chapter is the
hidden chapter, “Unhide chapter” is displayed on the menu instead
of “Hide chapter”. In this case, you can unhide the chapter by
pressing ENTER button after selecting “Unhide chapter”.
1-6. Index picture
You can change the thumbnail tor the selected title.
Press ENTER button at the point where you prefer to be the
thumbnail.
1-7.Split title(DVD±RWonly)
You can divide the current title to 2 titles. Press ENTER button at the
point where you would like to divide. It takes a tew minutes to divide
the title.
1-8. T-Elapsed
You can see the elapsed time.
2. Press STOP button attertinishing to edit the title.
It takes a tew minutes to update the disc.
Rename title (DVD+RW/DVD+R)
1. PressENTERbuttonatterselecting“Renametitle”byusing AorT.
The keyboard will show on the screen.
Warning: this operation will delete the
current title In the OVD+RW disc in
loader and can not be restored laler.Are i
you sure to continue?
DUD RECDRbeR
2. Press ENTER button to erase the contents of a title after selecting
“Yes” by using ◄,►.
It takes a tew minutes to erase the title.
Note: The Erase function onlyworks on DVD±RW discs.
Overwrite title (DVD+RW only)
1. Press ENTER button after selecting “Overwrite title” by using AorT.
It will be changed from DVD mode to AV input mode.
PressAV IN button to choose the A/V input you want to record.
Everytime this button is pressed, A/V input is changed:
It you want to record the TV program, select the TV mode. And
choose the station you want to record by pressing CHANNEL - or
CHANNEL+button.
TV
Front AV
Rear AV
Rear SV
DV
Scart AV
3. Press REC button to start your recording.
It starts to record from the beginning of the current title.
4. Press STOP button to stop your recording.
Note: The recorded programs will be erased from the beginning tor re
cording time.
Append title (DVD+RW/DVD+R)
You can record on the last title continuously. It you do not select the last
title this menu will not be displayed on the screen.
1. Press ENTER button after selecting “Append title” by using AorT. It
will be changed from DVD mode to AV input mode.
2. PressAV IN button to choose the A/V input you want to record.
Everytime this button is pressed, A/V input is changed:
TV
Front AV
LMNOPQRSTUV345
Space Aa P2 Backspace Clear Exit OK
Drama Action Sparta Comody Nowa Kida Adult
DUD RECDRDER
2. Selecta letterwhichyouwantto input by using ^,^,A,T and press
Rear AV
Rear SV
□V
Scart AV
ENTER button to confirm it.
3. Repeatstep2.
14
4097IMnew.indd 14 27.02.2007 13:35:03
Page 15

ENGLISH
If you want to record the TV program, select the TV mode. And choose
the station you want to record by pressing CHANNEL - or CHANNEL +
button.
3. Press REC button to startyour recording. It starts to record.
4. Press STOP button to stop your recording.
Note: If there is no space on the disc, this menu will not be displayed on
the screen.
Copy title (DVD+RW/DVD+R)
You can copy a title from DVD to HDD.
1. Press ENTER button after selecting “Copy title” by using AorT. It
starts to copy a title from DVD toHDD.
Editing the title of HDD
1. Press HDD/DUB button to select the HDD mode. The title list of HDD
appears on screen.
2. Select the title to edit by using AorT and press ►.
The edit menu appears on screen.
Play
You can play back the selected title.
1. PressENTERbuttonafterselecting“Play”byusing AorT.
: starts
to play back the selected title.
Delete
1. Press ENTER button afterselecting “Delete” byusingAorT. The
pop-up menu will show on the screen.
2. Press ENTER button to delete the title after selecting “Yes” by using
◄ or ►.
Split
You can divide the current title to 2 titles.
1. Press ENTER button after selecting “Split” by using AorT. It starts
to play back the current title.
2. Find the point where you would like to split.
You can search a scene by using ◄◄, ►► orthe PLAYbutton.
3. Press ENTER button at the point where you would like to split.
The pop-up menu will show on the screen.
4. Press ENTER button to confirm after selecting “OK” by using
◄ or^.
Segment
You can skip the parts you mark when the title is played back.
1. PressENTERbuttonafterselecting“Segment”byusing AorT.
The title will automatically start playing back.
2. Find the beginning of a segment where you would like to skip.
You can search a scene by using ◄◄, ►► or the PLAYbutton.
3. Press ENTER button at the beginning of a segment where you want
to skip.
4. Find the end of a segment where you want to skip, and press ENTER
button at the end of a segment.
5. If you want to mark more segments, repeat step 3&4.
The marked segments are displayed as the violet colored bars on the
progress bar.
6. Press STOP button if it isfinished.
Note: When the title with segments is copied from HDD to DVD, the seg
ments are not copied to DVD.
Press ENTER button after selecting “Change Index Pic” by using
AorT.
The title will start playing automatically.
Press ENTER button at the point where you prefer to be the
thumbnail.
(You can search a scene by using ◄◄, ►► or the PLAY button .) The
pop-up menu will show on the screen.
3.
Press ENTER button to confirm after selecting “OK” by using
◄ or^.
Rename
You can change the name of title.
1. Press ENTER button after selecting “Rename” by using AorT. The
Keyboard will show on the screen.
2. Press ENTER button to delete the current name after selecting
“Clear” button on the Keyboard.
3. Select a letterwhich you want toinputbyusing ^,^,A,T and press
ENTER button to confirm it.
4. Repeatstep3.
The maximum length of the name is upto 12 characters.
5. Press ENTER button after selecting “CK” button on the keyboard if
the inputting of letters is finished.
Note: This function is not available when the preview type in the setup
menu is set to “Dynamic”.
Lock
You can lock the title so that anyone can not play it.
1. Press ENTER button after selecting “Lock” by using AorT.
The title will be locked.
Unlock
You can unlockthe locked title.
1. Press ENTER button after selecting “Unlock” by using AorT.
The password windowwill be displayed on TV screen.
2. Enterthe password in 4 digits by using 0to9 buttons.
3. Press ENTER button to confirm after selecting “CK” by using T.
The title will be unlocked.
Protect
You can protect the title from editing.
1. PressENTERbuttonafterselecting“Protect”byusing AorT.
The title will be protected.You can play the protected title, butyou
can not edit it.
Unprotect
You can unprotect the protected title.
1. Press ENTER button after selecting “Unprotect” by using AorT.
The protected title will be unprotected.
Cnee the initial settings have been completed, the DVD recorder can
always be operated underthe same conditionswheneverthe power
is switched on. These settings are called SETUP data that are easily
modified and stored using the SETUP menu.
Basic Operations
Press SETUP button during stop mode. And use ^,^,A,T and ENTER,
RETURN button to navigate and select options. The current setting for
any option is marked with a colored box.
1. Press STCP button, if the disc is being played.
2. To call the SETUP menu, press SETUP button.
3. Select the desired item by using ◄ or ►, then press ENTER button.
4. Select the desired sub item by using ^,^,A,T and ENTER. If you
want to go the previous menu, press RETURN button.
5. Press SETUP button afteryou have made all settings.
Note: Depending on the disc, some setup menu selections may not work
properly.
Using the Setup Menu Record and Channel Scan
Combine
You can combine two titles.
1. Press ENTER button after selecting “Combine” by using AorT.
2. Select the title to be combined by using AorT and press the ENTER
button. (Ifyou want to cancel, press RETURN button.)
Change Index Picture
You can change the thumbnail for the selected title.
1. AUTCCHAPTERMARKER
15
4097IMnew.indd 15 27.02.2007 13:35:04
Page 16

ENGLISH
When “Auto Chapter Marker” is set to “5 min”, chapters are created
automaticallywithin a title at five-minute intervals. Chapters can also
be added or removed manually through the Editing features. For
details, see section “Editing a title”.
2. RECORD QUALITY
The record quality offers 6 quality level:
• HQ: High Quality, you can record for up to 1 hour in a blank disc.
• SP: Standard Play, you can record for up to 2 hours in a blank disc.
• SP+: Extended SR you can record for up to 2 hrs 30 min in a blank
disc.
• LP: Long Play, you can record for up to 3 hours in a blank disc.
• EP: Extended Play, you can record for up to 4 hours in a blank disc.
• SLR: Super Long Play, you can record for up to 6 hours in a blank
disc.
3. ANALQGCHANNELSCAN
This recorder has a built-in TV tuner for recording TV programs.
1. Press ENTER button after selecting “SCAN” by pressing Aor^.
2. Press ENTER button to confirm afterselecting “QK” by pressing
◄ or ►.
Itwill search channels automatically. If the broadcasting is found
during auto searching, it is stored automatically.
Note:
• While doing Channel Search, itwill erase and replace all previously
stored channels.
• This feature is available only when the recorder is set to the TV
mode.
4. MQDIFYCHANNEL
(If there is no captured channel, this feature is not available.)
4-1. Press ENTER button after selecting “EDIT” by pressing Aor^. The
information of the current channel will show on the screen.
Delete
If you want to delete a captured channel, select “Delete” by using or
and press the ENTER button.
4-3. Press ENTER button after selecting “QK” using , if all the settings
are correct.
Note: This feature is available only when the recorder is set to the TV
mode.
5. CHANNEL SWAPPING
(If there is no captured channel, this feature is not available.)
This feature lets you swap the channel assignments of different pro
grams. This is so that you can group together station presets which
naturally go together.
1. Press ENTER button afterselecting “SWAP” by pressing AorT.
2. Select a preset station to swai ress ►.
4-2. Select the channel you want to modify by pressing CHANNEL - or
CHANNEL+button.
Editing the channel name
1) . Press ENTER button after selecting “Name” by using or Aor^.
2) . Input letters which you want to input by using ◄,►,▲,▼ and press
ENTER button to confirm it.
TV Standard
Set the TV system used for the current channel.
1) . Select “Standard” by using A or ▼ and press the ENTER button.
2) . Select the TV system by using A or ▼ and press the ENTER button.
Search Type
If the captured signal is bad, you can search the channel again by fre
quency or channel number.
1) . Select “Search Type” by using Aor^ and press the ENTER button.
2) . Select “Frequency” or “Channel” by using A or ▼ and press the
ENTER button.
3) . Select “Frequency” or “Channel” by using ▼ and press ◄ or ►.
It starts to search the broadcasting automatically. If the broadcast
ing is found during searching, it stops to search. Ifyou want to stop
searching, press STQP button.
Fine Tuning
If the captured signal is not good, you can tune the channel fine.
1) . Select “Fine Tuning” by using Aor^.
2) . Tune the channel fine by pressing ◄ or ►. Each time or button is
pressed ◄ or ► the channel frequency decreases or increases by
50KHz.
Decoder
If the current channel is scrambled, requiring a Canal+ decoder con
nected to the EURQ A/V IN connector, set this to “Qn”.
16
3. Select the position to insert it using A or ▼ and press ►.
4. If you want to swap more presets, repeat step 2to3.
5. Press ENTER button after selecting “QK” using ^,ifit is finished.
Note: This feature is available only when the recorder is set to the TV
mode.
6. TIMERRECQRDING
See section “Timer Recording”.
7. CQUNTRYSELECTIQN
Press ENTER button after selecting your country using Aor^.
Video
1. VIDEQQUTPUTFQRMAT
Set up Video Qutput Format according to type supported by your TV
or monitor.
Ifyour TV is for PAL, set to “PAL”. Ifyour TV is for NTSC, set to
“NTSC”.
2. TVASPECTRATIQ
Ifyou have a widescreen TV, select the “16:9 Wide” setting. The
widescreen DVD disc is shown using the full screen area. When
playing the DVD disc recorded in conventional format (4:3), the
settings on your TV will determine howthe material is presented.
(See the manual that came with yourTV for details on what options
are available). Ifyou have a conventional TV, choose either “4:3
Letter Box” or “4:3 Pan Scan”. In Letter Box mode, the widescreen
DVD disc is shown with black bars at the top and bottom of the
screen. Pan Scan chops the sides offwidescreen material to make
it fit the 4:3 screen (so even though the picture looks larger on the
screen, you are actually seeing less of the movie).
Note: Some disc will not allow you to change the aspect ratio.
3. P-SCAN/HDMI QUTPUT
When viewing Progressive Scan TV viaY/Pb/Pr connector, set to “P
Scan/HDMI”. When you also watch the TV via HDMI, set to “P-Scan/
HDMI”. (This feature is not available when “EURQ AV output” is set to
RGB.)
4. SCREENSAVER
If a bright picture does not move for a long time, the TV may be
damaged. If this state is continued on longer than 5 minutes, the
screen saverworks when QN is selected. The screen saver protects
4097IMnew.indd 16 27.02.2007 13:35:05
Page 17

ENGLISH
the CRT (Cathode RayTube) from damage by displaying a moving
DVD logo continuously on the screen.
Note: The monitor screen of a projector or projection TV is easily burned
out it a static picture is displayed tor a long time. Be careful not to allow
the monitor screen to be burned out when you set the SCREEN SAVER
mode to “OFF”.
Audio (This menu is not available when a disc is in the recorder.)
Oigilfll (SPOIF) Oulpul LPCM
LPCM Output LPCM 96KH<
ANALOG OUTPUT
(Not available to change)
DIGITAL(SPDIF)OUTPUT
• RAW(Bit Stream): The original audio stream recorded on the disc
is outputted through the digital audio out connector.
• LPCM: The decoded audio stream is outputted through the digital
audio out connector.
3.
LPCM OUTPUT
You only need to make this setting it you connected this recorder to
an AV amplifier (or other component) using the digital audio output.
It yourAV amplifier (or other connected component) is compatible
with high sampling rate audio (96 KHz), set to “LPCM 96KHz”,
otherwise set to “LPCM 48KHz”.
Language
Clock
1. Automatic clock setting
Some TV channels broadcast time signals togetherwith the program.
This recorder can use these signals to set the clock automatically.
1) Press ENTER button after selecting “Date-Time Setting” by using
▲ or ▼.
2) Press ENTER button after selecting “Auto”.
3) Press ENTER button after selecting “Program” by using ▼.
4) Select the preset channel that broadcasts a clock signal, and press
ENTER button.
2. Manual clock setting
It no station in your area are broadcasting time signals, you can set
the clock manually.
1) Press ENTER button after selecting “Date-Time Setting” by using
▲ or ▼.
2) Press ENTER button after selecting “Manual”.
3) Enterthe date &time by using 0to9or ◄,►,▲,▼ and press the
ENTER button. Use 0-9 ▲,▼ to change the value in the highlighted
field.
Use ◄,► to move from one field to another.
General
1
OSD Lnnguftga
Audio I tinguAga
Sublill» LAngujigB
DiBC Monu Lnngitnga
OSD LANGUAGE
This item is used to select the language tor On-Screen Display
messages that will be displayed on the TV screen.When your
desired language is selected, all OSD messages are displayed in the
selected language.
AUDIO LANGUAGE
Set this value to the preferred audio language. It an audio language
is selected, wheneveryou start playing a new disc, the selected
audio language is played(it the selected language is contained in the
disc).
3.
SUBTITLE LANGUAGE
Set this value to the preferred subtitle language. It a subtitle
language is selected, wheneveryou start playing a new disc, the
selected subtitle language is played (it the selected language is
contained in the disc).
4.
DISCMENU LANGUAGE
Set this value to the preferred disc menu language. It a disc menu
language is selected, wheneveryou start playing a new disc, the
selected disc menu language is played (itthe selected language is
contained in the disc).
1. Parental Control
This function is to disable the playing of specified DVD discs that are
unsuitable tor children. There are a total of 8 levels. It the level is 8, the
contents of the disc are suitable tor adult. It the level is 1, the contents
of the disc are suitable tor children. Used to adjust the level of parental
lock. Once selected, whenever you play adisc, the selected rating level
is compared to the level on the disc. It the level you selected is greater
than the level of the disc, you may play the loaded disc. It not, you may
not playthe disc. To set appropriate rating level, do the following instruc
tions.
1. Press ENTER button after selecting the proper rating level by using
▲ or ▼. The password windowwill be displayed on TV screen.
2. Enterthe current password in 4 digits by using 0to9 button, then
press ENTER button. Ityou have notchanged the password, enterO,
0, 0, 0.
3. PressENTERbuttontoconfirmatterselecting“OK”byusing ,atter
it istinished.
2. CHANGE PASSWORD
1) Press ENTER button after selecting “Change Password”.
New Password
Enler password here, D D D D j
Inpul new password. D D D D
Input na« again. □□□□
I UR
#■
□UD RSCORDeB
17
4097IMnew.indd 17 27.02.2007 13:35:06
Page 18

ENGLISH
2) Enter the current password in 4 digits by using 0to9 button, and
press ▼.
3) Enterthe new password in 4 digits by using 0to9 button, and press
▼ .
4) Re-enter the new password for verify, and press ▼.
5) Press ENTER button after seiecting “OK”. The password wiii be
changed.
3. FACTORY RESET
Returnsthe DVD Recorder backto factory defauit settings.
1. Press ENTER button after seiecting “Factory Reset” by pressing ▼. A
pop-upwindowappears on TV screen.
2. Press ENTER button after seiecting “OK”.
4. EUROAVOUTPUT
Set to “YCbCr” to view in component video viaY/Cb/Cr connector. When
using AV Euro connector RGB signai, set to “RGB”
5. DECODER
if you want to watch the scrambied channeis, requiring a Canai+ decod
er connected to the EURO AV iN connector, set this to “ON”.
6. PREVIEWTYPE
You can seiect the preview type of the titie on the HDD titie iist.
Static: it showsthe previewwith a stiii picture.
Dynamic: it shows the preview with moving pictures.
7. HDDto Disc Copy Option
When copying from HDD to DVD, you can seiectthe copying mode.
Fit to Disc: The recording quaiity is automaticaiiy adjusted so that the
seiected tities fit on to the space avaiiabie on the disc.
High Speed: The seiected tities are copied atthe same recording quaiity
asthe originai.
Highest Speed: The seiected tities are copied at the specified recording
quaiity in reai-time. (Note that aithough you copy at a higher quaiity set
ting than the originai, the copy wiii not be better quaiity than the originai.)
HDD
1. Time shift buffer length
When doing the time shift recording, you can seiect the capacity of
HDD buffer in which a TV program is stored temporariiy.
2. Timeshiftbuffermode
Refresh: The content of the buffer is erased upon changing the TV
channei.
Preserve: The content of the buffer is maintained though the TV
channei is changed.
3. Harddiscinfo
it shows the information on HDD.
4. Space Management
Automatic: when the HDD is fuii, the recorderwiii overwrite un
protected tities.
Manuai: when the HDD isfuii, the recorder does not overwrite and it
asks for erasing sometitiesto aiiowfurther recording.
5. Format HDD
You can erase aii programs on HDD.
6. Erase optical disc
You can erase aii programs on disc. (This function is avaiiabie oniy
when the recorder is setto the externai AV mode orthe TV mode.)
4097IMnew.indd 18
18
27.02.2007 13:35:07
Page 19

Additional Information
Specifications
General Supported disc types
Supported video formats
TV system
Power requirements
Power consumption
ENGLISH
DVD, CD-DA, CD, CD-R/CD-RW, DVD±R/RW, DVD-R/RW
MPEG-1, MPEG-2, MPEG-4, JPEG
PAL/SECAM
AC 100 V-240 V, 50/60HZ
45W
Weight
Dimensions
Operating temperature
Operating humidity
Record Recording format DVD VIDEO
Recordable media DVD±R, DVD±RW, HDD(250Gb)
Timer Programs 8 programs
Clock Quartz lock (24-hour digital display)
Timer off memory Approx. 1 hour 30 min.
Euro AV connectors AV connector input / output x 1 This connector provides the video and audio
AV(21-pin) AV connector output x 1 signals for connection to a compatible color
S-Video Input/Output Input/OutputY (brightness) Vp-p (75 Ohm)
C (color) 0.286Vp-p(75Ohm)
Video Input/Output Input/Output Vp-p (75 Ohm)
Inputx 2, Outputx 1 RCA Jack
Component Output
Audio input / output Input (L/R) X 2, Output (L/R) x 1 2Vrms(1 KHz,0dB)
Digital audio output Optical output X 1 Opticaljack
Digital Input/Output IEEE standard 1394 4 pin
USB Input USB 1.1 4 pin
HDMI Output Type Ax 1 480p / 576p
Audio characteristics Erequency response 4HZ-44 KHz (DVD frequency: 96 KHz)
(X Cb/Pb, Cr/Pr)
Coaxial output x 1 RCA Jack
S/N ratio 100 dB
Dynamic range 95 dB
4.5kg
420(W)x44(H)x336(D) mm
5"C - 35"C
10% - 75 %
S-VIDEO Jack
Y: 1.0Vp-p(75Ohm)
Cb/Pb, Cr/Pr: 0.7 Vp-p (75 Ohm)
RCA Jack
Total harmonic distortion 0.03 %
Accessories A/B cable 1
RE cable 1
Scarf cable 1
Remote control unit 1
AA size batteries 2
Operating instructions 1
Note: The specifications and design of this product are subject to change without notice, due to improvement.
19
4097IMnew.indd 19 27.02.2007 13:35:07
Page 20

ENGLISH
Troubleshooting
Incorrect operation is often mistaken fortrouble or malfunction. Ifyou thinkthatthere is something wrong with this component, checkthe points be
low. Sometimes the trouble may lie in another component. Inspect the other components and electrical appliances being used. If the trouble cannot
be rectified after checking the items below, ask your nearest authorized service center or your dealer to carry outrepair work.
Problem Solution
The disc is ejected automatically after loading.
Disc not seated properly in the disc.
Incompatible region number. • If the region number on a DVD-Video disc does not match the number on the player, the
Condensation inside the recorder. • Allowtime for condensation to evaporate. Avoid using the recorder near an air-conditioning
Disc is loaded upside down.
Picture playback stops and the operation buttons
cannot be used.
Newsettings made in the Setup screen menus
while a disc is playing are ineffective.
Settings are canceled.
No picture / No color
• Disc is dirty or damaged.
• Align the disc properly.
disc cannot be used.
unit.
• Reload the disc with the label side face up.
• Switch the power off once using the front panel STANDBY/ON button and then switch on
again using the front panel STANDBY/ON button.
• Disconnectthe power plug and reinsert it back into the wall.
• Some settings can be changed while a disc is playing, but are not effective until the disc is
stopped then restarted.
• This is not a malfunction. Make the same setting when the recorder is stopped.
• When the power is cut due to powerfailure or by unplugging the powercord, settingswill be
canceled.
• Incorrect video connections. Check that connections are correct and that plugs are inserted
fully.
• TV/monitor or AV amplifier settings are incorrect. Check the instruction manual of the
connected equipment.
• The Component output menu is set to progressive but your TV/monitor is not compatible
with progressive scan.
• Reconnectthe recorderto yourTV using a composite or S-Video cord and setthe TVto
appropriate input.
The DVD recorder cannot record.
Screen is stretched or aspect does not change.
Picture disturbance during playback or dark.
The remote control doesn’t seem to work.
No audio, or audio is distorted.
• The type of the disc is wrong, it’s not a DVD±RW or DVD±R disc.
• The disc is recorded fully.
• The DVD±R has been finailized.
• The TV aspect ratio setting in the Setup menu is incorrect. Set the TV aspect ratio option to
match theTV/monitoryou’re using.
• This recorder is compatible with Macro-Vision System copy guard. Some discs include a
copy prevention signal, and when this type of disc is played back, stripes etc., may appear on
some sections of the picture depending on the TV.
. • The remote control is too far from the recorder, or the angle with the remote sensor is too
wide.
Use the remote within its operating range.
• The batteries are exhausted. Put in new batteries.
Some DVD discs do not output digital audio.
• Switch your amplifier to the recorder’s analog outputs. Dirt, dust, etc. on the disc.
• Clean the disc.
Interconnects are not fully inserted into the terminals (or are not connected)
. • Checkthatallinterconnectsarefirmlyinserted.
Dirty or oxidized plugs/terminals.
• Cleantheplugs/terminals.
Incorrect audio cable connection.
• Checktheaudioconnections.
Recorder’s output is connected to the amplifier’s phono (turntable) inputs.
• Connect to any set of inputs except phono.
The disc is paused.
• Press PLAYbutton to exit the pause mode. Incorrect amplifier settings.
• Check that the volume is turned up ,that the speakers are on, the input function set
correctly, etc.
20
4097IMnew.indd 20 27.02.2007 13:35:08
Page 21

ENGLISH
The analog audio is OK, but there appears to be no
digital audio signal.
Noticeable difference in DVD and CDvolume.
No DTS audio output.
Note: Static electricity or other external influences may cause malfunctioning of this unit. In this case, unplug the power cord and then plug back in.
This will usually reset the unit for proper operation. If this does not correct the problem, please consult your nearest service center.
Recycling
“This product is marked bythe symbol ofthe selective sorting, relating tothe electrical and electronic component scrap. That meansthatthe prod
uct must be taken by a selective system of collection in accordance with European directive 2002/96/CE in order to be able either to be recycled or
to be dismount in order to reduce any environmental impact. Attention! The electronic products not having been the subject of a selective sorting are
potentially dangerous for the environment and human health because of the potential presence of dangerous substances.”
The manufacturer reserves the right to make changes to the characteristics of the device without prior notice.
The service life of the device is no less than five years.
Guarantee
Details regarding guarantee conditions can be obtained from the dealerfrom whom the appliance was purchased. The bill of sale or receipt must be
produced when making any claim under the terms of this guarantee.
Incorrect Audio menu settings.
• Make sure thatthe Digital Audio Out setting is setto LPCM or RAW. Checkthatthe LPCM or
RAWsettings are suitable foryour amplifier -checkthe amp’s instruction manual.
• DVDs and CDs use different recording methods. This is not a malfunction.
• If this unit is connected to a non-DTS compatible amplifier or decoder using a digital audio
cable, please connect to a DTS compatible amplifier or decoder. If you do not do this, noise
will be output if you try and play a DTS disc.
• If this unit is connected to a DTS-compatible amplifier or decoder using a digital audio
cable, check the amplifier settings, and that the cable is properly connected.
C€
This product conforms to the EMC-Requirements as laid down by the Council Directive
89/336/EEC and tothe LowVoltage Regulation (23/73 EEC)
21
4097IMnew.indd 21 27.02.2007 13:35:08
Page 22

DEUTSCH
Bedienungsanleitung
DVD-Recorder
ModellVT-4097
Lesen Sie aufmerksam die in dieser Bedienungsanleitung enthaltene
Hinweise, bevor Sie den Spieler anschalten, benutzen oder justieren.
Bewahren Sie diese Bedienungsanleitung im Laufe der Benutzung des
Geräts auf.
r
WARNUNG: Um das Risikovon Feuerentfachung oder Stromschlag zu
vermeiden, sollten Sie die Tafeln des Gerätes nicht abnehmen. Wenden Sie sich
LASER PRODUCT
SCHÜTZEN SIESICH!
zurWartung ausschließlich an qualifiziertes Fachpersonal
Das Blitzzeichen im gleichschenkligen Dreieckweitden Benutzer
auf eine gefährliche Spannung im Inneren des Gerätes hin, die
Stromschlag zeugen kann.
DasAusrufezeichen in gleichschenkligen Dreieckweistden Benutzer
auf wichtige Anweisungen hinsichtlich Betrieb und Wartung in der
Gebrauchsanweisung hin.
Markierung eines Lasergerätes. Die Markierung muss sich
CLASS 1
auf der Hintertafel des Gerätes befinden und bedeutet,
dass das Gerät zur Klasse 1 gehört und Laserstrahlen
verwendet. Esistkeine Laserbestrahlungsgefahr
vorhanden, solange das Gerät nicht auseinander
genommen wird.
CAUTION
Risk of electric shock
DO NOT OPEN
1
Notieren Sie sich das Modell und die Seriennummer des Gerätes,
solange sie noch gut sichtbar sind. Diese Nummern befinden sich
auf der Hinterwand des Gehäuses vom Gerät. Bewahren Sie diese
Informationen für die nachfolgenden Nutzung auf.
ACHTUNG:
DERVIDEOPLAYER DER DVD-PLATTEN IST EIN LASERGERAT
DER A-KLASSE. DIE BENUTZUNG DER STEUERORGANE ODER
EINSTELLUNGEN, DIE IN VORLIEGENDER BEDIENUNGSANLEITUNG
NICHT ANGEGEBEN SIND, DIE DURCHEUHRUNG DER ABLAUEE, DIE
HIER NICHT BESCHRIEBEN SIND, KANN ZUR VERLETZUNG DURCH
DIE LASERSTRAHLUNG EUHREN. DA DER LASERSTRAHL, DER IN
DIESEM GERATVERWENDETWIRD, EUR DIEAUGEN GEEAHRLICH
IST, VERSUCHENSIENICHT, DASGEHAUSEAUEZUMACHEN.
DIE BEDIENUNG DES GERÄTS SOLL AUSSCHLIESSLICH
VON QUALIEIZIERTEN EACHLEUTEN DESSERVICECENTERS
VORGENOMMEN WERDEN.
Warnung: Sichtbare und unsichtbare Strahlung. Beim geöfneten Gehäu
se vermeiden Sie den Laserstrahl.
Dieses Produkt ist mit einer Urheberrechtsschutztechnologie ausgestat
tet, die durch US-Patente und sonstige Rechte zum Schutz geistigen
Eigentums geschützt ist. Die Nutzung dieser Technologie im Rahmen
des Urheberrechtsschutzes muss von Macrovision genehmigt werden
und gilt nur für privaten oder anderen eingeschränkten Gebrauch , es
sei denn, es liegt eine Spezielle Genehmigung von Macrovision. Die Na
chentwicklung oder Diassemblierung istverboten.
Das Produkt ist nach der Lizenz der Dolby Laboratories hergestellt ist.
„Dolby“ und das Symbol „das doppelte D“ sind die Handelszeichen der
Dolby Laboratories.
„DTS“ und „DTS Digital Surround“ sind die Handelszeichen der Digital
Theatre Systems, Inc.
Die Warenmarke mit der Information über die Sicherheitsstandarten
befindet sich auf der hinteren Platte des Geräts.
Wichtige Sicherheitshinweise
• Bedienungsanweisung lesen - Lesen Sie vor der Inbetriebnahme
des Geräts aufmerksam die Bedienungsanweisung mit allen
Sicherheits - und Bedienungshinweisen.
• Bedienungsanweisung aufbewahren - Sie sollten
die Bedienungsanweisung mit allen Sicherheits- und
Bedienungshinweisen aufbewahren, damit Sie zu einem späteren
Zeitpunkt darin nachlesen können.
• Warnhinweise beachten - Beachten Sie die Warnhinweise am Gerät
und in der Bedienungsanweisung.
22
• Anweisungen befolgen - Befolgen Sie alle Bedienungs- und
Verwendungshinweise.
• Das Gerät nur mit einem feuchten Tuch reinigen- vor dem Reinigen
des Geräts trennen Sie es vom Netz. Beim Reinigen benutzen Sie
Polierstoff oder einen weichen trockenen Tuch. Benutzen Sie kein
Wachs, Benzin oder andere flüchtige Substanzen beim Reinigen, sie
können das Gehäuse des Geräts ätzen.
• Wasser und Eeuchtigkeit - Betreiben Sie dieses Gerät nicht in
der Nähe von Wasser, z. B. in der Nähe einer Badewanne, eines
Waschbeckens, einer Küchenspüle, einerWaschmaschine, im Keller
usw.
• Zubehör - verwenden Sie das Zubehör und Ansätze nur vom
Hersteller.
• Karren - verwenden Sie nur von dem Hersteller empfohlene
Karren, Gestelle, Körbchen oderTische. Beim Benutzen des Karrens
beachten
Sie die Vorsichtsmaßnahmen, um Eallen und Beschädigung des
Geräts zu vermeiden.
• Ventilation - versperren Sie die Ventilationsöffnungen nicht. Stellen
Sie das Gerät den Anweisungen des Herstellers entsprechend auf.
• Erdung und Polarität - für die Sicherheit verwenden sie nur
geerdeter Stecker oder Polarstecker. Der Polarstecker hat
zwei Stäbchen, ein von denen ist breiter als der andere. Der
geerdete Stecker hat zwei Stäbchen und geerdete Stift. Dies ist
eine zusätzliche Sicherheitsvorkehrung. Wenn Sie den Stecker
nicht an die Steckdose anschließen können, setzen Sie sich
mit einem Elektriker in Verbindung, um die veraltete Steckdose
auszuwechseln.
• Netzkabelschutz - treten Sie nicht auf den Netzkabel. Seien
sie besondersAufmerksam mit den Steckern, Steckdosen und
Verbindungsstellen des Kabels mit dem Gerät.
• Gewitter - Zum Schutz des Geräts bei einem Gewitter oder während
längererAbwesenheit bzw. Nichtbetrieb trennen Sie das Gerät vom
Netz.
• Technische Wartung - die Technische Wartung soll nur von dem
ausgebildetem Eachpersonal ausgeführtwerden. Man soll die
technische Wartung des Geräts in dem Eall ausführen, wenn das
Gerät beschädigt war (Netzkabel oder Stecker ist beschädigt),
auf das Gerät die Elüssigkeit eingetreten ist, auf das Gerät ein
Gegenstand gefallen ist, das Gerät wurde Regen oder Eeuchtigkeit
ausgesetzt, die Arbeit des Geräts war gestört oder das Gerät hat
gefallen.
• Wärmequelle - stellen Sie nicht das Gerät in der Nähe von
Wärmequellen, wie, zum Beispiel, Radiatoren, Wärmezähler, Herde
und andere Vorrichtungen (inklusive Verstärker), die die Wärme
erzeugen.
Vor der Inbetriebnahme des Geräts:
Zubehör:
Wir bedanken uns für den Kauf unseres DVD-Players. Stellen Sie sicher,
dass Ihr Paket folgendes Zubehör enthält.
1. Zubehör
2. Eernbedienung
3. SCART-Kabel
4. RE-Kabel
5. Audio-/Videokabel
6. Batterien der Größe AAA
7. Bedienungsanweisung
Einlegen von Batterien in die Fernbedienung
Öffnen Sie das Batteriefach der Fernbedienung.
Legen Sie zwei Batterien der Größe AAA in das Batteriefach. Achten Sie
dabei auf die Richtige Polarität. Plus- und Minus-Pol der Batterien muss
den Markierungen (+ und -) im Batteriefach entsprechen.
Benutzen der Fernbedienung
Beim Benutzen der Fernbedienung beachten sie folgendes:
• Stellen Sie sicher, dass zwischen der Fernbedienung und dem
Fernbedienungssensor auf dem Gerät keine Hindernisse geben.
• Wenn auf den Fernbedienungssensor auf dem Gerät Sonnen- oder
Fluoreszenzlicht fällt, so könnte es zu einer Fehlfunktion kommen.
• Die Fernbedienungen von den verschiedenen Geräten können
einander beeinflussen. Benutzen Sie keine Fernbedingungen
von den anderen Geräten, die in der Nähe von diesem Gerät sich
befinden.
• Ersetzen Sie die Batterien, wenn es Fehler bei der Arbeit der
Fernbedienung entstehen.
4097IMnew.indd 22 27.02.2007 13:35:08
Page 23

DEUTSCH
Hinweise:
Die falsche Benutzung von den Batterien kann zum Elektrolytverlust oder Explosion führen. Beachten Sie folgendes:
• Benutzen Sie nicht alte und neue Batterien zusammen.
• Benutzen Sie nicht die Batterien von verschiedenem Typ zusammen. Sie können ähnlich aussehen, aber verschiedene Spannung haben.
• Stellen Sie sicher, dass die Polaritätjeder Batterie den Markierungen im Batteriefach entspricht.
• Wenn Sie die Eernbedienung längere Zeit nicht benutzen wollen, nehmen Sie die Batterien heraus.
• Entsorgen Sie Altbatterien, wie es vom Gesetzgeber vorgeschrieben ist.
Wiedergeben von CDs
Jede CDvon den weiter angeführten CD-Arten kann in diesem System benutzt werden. Andere CD-Eormaten, einschließlich DVD-RAM, DVD-ROM,
DVD-Audio, SACD und CD-ROM kann das System nicht wiedergeben.
DVD-Video Wiedergabe
VIDEO • MPEG-2 Digital Video CDswerden gewöhnlich in 2 oder mehrere Titel geteilt. Weiter können sie in Kapitel geteilt werden.
AUDIO CD Wiedergabe
ri COMPACT .
OUDiiill! Ec
DIGITAL AUDIO
DVD-R/RW Wiedergabe
RW
DVD+R/RW Wiedergabe
□VDfRsWrltable
Einseitige und doppelseitige CDs
Einzellagige und doppellagige CDs
Dolby Digital, DTS, MPEG, Linear PCM Digital Audio (lineare Impuls-Kodemodulation, Digital Audio)
12cm und 8cm CDs.
Linear PCM Digital Audio
CD Audio, CD-R, CD-RWwerden in Tracks geteilt. (Dieses Gerät kann CD-R und CD-RW, die in derCD Audio oder CD Video
Eormat gebrannt sind, oder in Kodak Picture Eile eingespeichert, wiedergeben).
•Dieses Gerät kann DVD-Rs/RWs, die im DVD-Video Eormat gebrannt sind, wiedergeben.
•Dieses Gerät kann auch Video- und Audiosignal auf DVD-Rs/DVD-RWs aufnehmen.
•Dieses Gerät kann DVD+Rs/DVD+RWs, die im DVD-Video Eormat gebrannt sind, wiedergeben.
•Dieses Gerät kann auch Video- und Audiosignal auf DVD+Rs/DVD+RWs aufnehmen.
MPEG-4 Wiedergabe
IMPEG-4I • Dieses Gerät kann CDs im MPEG-4 Eormat wiedergeben.
COMPATIBLE
JEPEG Wiedergabe
• Dieses Gerät kann CDs im JEPEG Eormat wiedergeben (Eoto)
DVD Video Regionalcode
Der Player hat einen aufgedruckten Regionalcode auf der Rückseite des Geräts und gibt nur DVDVideos wieder (nurWiedergabe möglich), die mit
einem identischen Regionalcode versehen sind. Dieses System dient dem Urheberrechtsschutz. CDs mit dem Markierung ALL lassen sich in allen
Players wiedergeben.
Warnung:
• Wenn Sie das CD mit Hilfe des PC brennen und das CD Eormat kompatibel ist, lässt sich das CD wegen den Softwareeinstellungen in manchen
Eällen nicht wiedergegeben.
• Einiege Eilme im MPEG-4 Eormat lassen sich in einiegen Eällen nichtwiedergegeben wegen derVerschiedenheiten in den
Dekodierungsmethoden.
* •
23
4097IMnew.indd 23 27.02.2007 13:35:08
Page 24

DEUTSCH
Steuerung undAnzeige Vorderplatte
LaufwerkCD/DVD-Fach. Istfür das Einlegen der CD und ihre weitereWiedergabe bestimmt.
OPEN/CLOSE Taste. Drücken Sie die Taste um den CD/DVD-Fach öffnen oder zuschließen.
PLAY/PAUSE Taste. Drücken Sie die Taste um die Wiedergabe zu starten oder zu unterbrechen.
STOP Taste. Drücken Sie diese Taste um die Wiedergabe zu stoppen.
AV IN. Ist für den äußeren Eingang/Ausgang bei der Aufnahme zugeordnet.
RECORD Taste. Drücken Sie die Taste um die Aufnahme auf eine CD zu starten.
FL Display. Anzeigt den aktuellen Zustand des Recorders.
STANDBY/ON Taste. Diese Taste umschaltet das Gerät aus dem Wartenmodus nach Betriebsmodus.
AUDIO IN. Schließen Sie zum Audioausgang der Videokamera an.
10. COMPOSITEVIDEO IN. Schließen Sie zum Composite Videoausgang derVideokamera an.
11. Buchse DV IN. Diese Buchse ist nurfür dasAnschließen der Digitalen Videokamera vorgesehen. Mit den anderen Digitalgeräten ist er
unvereinbar.
12. USB IN. Digitalanschlussfür USB (USB Flash Drive).
DISPLAY
1. Anzeige des Aufnahmetimers. Leuchtet beim Anschalten des Aufnahmetimers.
2. Blickwinkel. Zeigt, dass diese CD verschiedene Blickwinkel hat. (Diese Funktion wird nurfürdie CDs abgebildet, die verschiedene Blickwinkel
haben)
3. Anzeige des Dolby Digital Systems. Wiedergabe im System Dolby Digital 5.1.
4. Anzeige des Titels. Anzeigt die Nummer desTitels bei der DVDWiedergabe.
6. Anzeige des zweisprachigen Wiedergabemodus. Leuchtet beim Empfang der zweisprachigen Sendung auf.
7. Anzeige der Stereo. Leuchtet beim Stereoempfang.
8. Drehen. Dreht sich beim Drehen der CD.
9. Anzeige HMD (Festplatte). Leuchtet bei derArbeit mit der Festplatte.
10. Anzeige desWiedergabemodus. Leuchtet bei derTitel-, Kapitel-, Track-, A-B-Wiederholung.
12. Anzeige DVD. Leuchtet beim Digital VideoAusgang im DTS Format auf.
13. Laufende Information. Es wird der aktuelle Titel, Kapitel und Tracknummer, Spieldauer und TV-Kanal angezeigt.
Rückseite
1. Netzkabel. Wird zur Steckdose angeschlossen.
2. DigitalAudioAusgang. Schließen Sie den koaxialen Ausgang an den Digital Audio Eingang (koaxialerTyp) desAudioversterkers an. Oder
schließen sie den optischen Ausgang an den Digital Audio Eingang (optischer Typ) des Audioversterkers an.
24
4097IMnew.indd 24 27.02.2007 13:35:09
Page 25

DEUTSCH
3. ComponentVideoAusgang
Schließen Sie an die Componenet Video Eingänge des Fernsehers
an.
4. BuchseAudioIN
Schließen Sie an den Video Ausgang VCR oder an den Kanaldecoder
des Kabelfernsehers (STB).
5. VideoIN
Schließen Sie Vidio an Component Video Ausgang VCR oder an den
Decoder STB an. Oder schließen Sie S-VIDEO an S-VIDEO Ausgang
VCR oder an den Decoder STB an.
6. VideoOUT
Schließen Sie Video an Component Video Eingang des Fernsehers
oder Monitors an.
Oder schließen Sie S-VIDEO an S-VIDEO Eingang des Fernsehers
oder Monitors an.
S-VIDEO sichert bessere Bildqualität, als Kompositvideo.
7. AudioOUT
Schließen Sie an den Video Eingang des Fernsehers an.
8. HDMIOUT(576P)
HDMI (High-Definition Multimedia Interface) überträgt Digital Video
und Audiovon Ihrem DVD-Recorderzu Ihrem Fernseher. Schließen
Sie einfach mit einem HDMI-Kabel der DVD-Recorderan Ihren
Fernseher für bessere Bild- und Tonqualität an.
9. ANTIN
Schließen Sie an eine Außenantenne an.
10. ANTOUT
Schließen Sie an den Antenneneingang des Fernsehers an.
11. EuroAVOUT
Schließen Sie an Euro AV Eingang des Fernsehers an.
12. EuroANIN/OUT
Schließen Sie an Euro AV IN/OUT Audio/Videogeräte, wie, z. B.,
VCR, DVD-Player u.s.w.
Fernbedienung
1. A-B
Wiederholte Wiedergabe eines bestimmzen Kapitels von der Stelle A
bis B.
2.
Add/Clear
Das eingestellte Programm aus dem Timerspeicher löschen.
Einen Tracknummer aus der programmierte CD Wiedergabeliste
löschen oder hinzufügen.
3.
Anlage
Verschiedene Blickwinkel.
4.
Arrow(A^^^)
Einen Menüpunkt wählen.
5.
Audio
Die Audio Sprache oder Audiokanal bei der DVD-Wiedergabe
wählen.
Sie können auch Audiokanal wechseln.
Ist die NICAM Sendung zweisprachig, so können Sie die Sprache
wählen.
NICAM LANGt^ NICAM LANG2^ NICAM LANG1/2
Ist die NICAM Sendung stereo, so können Sie NICAM stereo und
mono umschalten.
NICAMSTEREO^MONO
6.
AVIN
Außen Audio Video Eingang für die Aufnahme wählen.
7.
Channel down/up (+,-)
Eingestellte Fernsehkanäle wählen.
8.
Display
Anzeigen von Information zu einem Titel, einem Kapitel, einem Track
oder einer Untertitelsprache und Audio.
9.
DVD
DVD - Modus
10.
DV/USB
Digitalen A/V Eingang von der Digitalkamera oder den Speicher
(USB Flash Drive) wählen.
11.
Edit
Bearbeiten eines Titels oder Kapitels der CD.
12.
Enter
Wählen (Eingabe) einen Menüpunktes.
13.
File
Durchsehen der Dateienliste (MPEG-4, MP3, JEPEG-Dateien).
HDD/DUB
14.
Umschalten desWiedergabemodusvon der Festplatte (HDD).
Kopieren der Tietel von der Festplatte auf die optische Platte.
15.
Menu
Abbildung des Menüinhaltes der geladenen DVD.
16.
Mute
Ein/Ausschalten der Audioausgänge.
17.
Next
Übergang zum nächsten Kapitel oder Track.
18.
Numeric (Zahlen) (0-9)
Verwenden Sie die Zahlentasten um einenTrack, Kapitel oderTitel zu
wählen.
19.
Open/Close
Offnen/Schließen des CD-Fachs.
Ist die Taste im Wartenmodus gedrückt, wird die Versorgung
automatisch ausgeschaltet.
20,
Pause
Drücken Sie diese Taste im Wiedergabemodus, so unterbricht die
Wiedergabe.
21.
Play
Wiedergabe der geladenen CD oder von der Festplatte.
22,
Prev
Zurückschalten zum vorherigen Track oder Kapitel.
23,
Program
Wiedregabe in einer bestimmten Reihenfolge.
Diese Taste funktioniert nur bei der CD-Wiedergabe.
24,
REC (Record)
Starten derAufnahme
25,
Repeat
Wählen des Wiedergabewiederholungsmodus.
26,
Return
Zurückschalten zum vorherigen Menü.
Beim Benutzen der VCD2.0 und SVCD mit der PBC-Funktion
(Wiedergabekontrolle), funktioniert diese Taste als Rückgabe.
27.
SCAN FWD
Weiterschalten im normalenWiedergabemodus.
28.
SCAN REV
Zurückschalten im normalenWiedergabemodus.
29,
SETUP
25
4097IMnew.indd 25 27.02.2007 13:35:10
Page 26

DEUTSCH
Veränderung von verschiedenen Einstellungen.
30. SLOW
Langsame Wiedrgabe.
31. SORT/PIP
Sortierung von den Titel auf der Festplatte nach dem Name oder
dem Datum.
32.STANDBY/ON
Umschaltet das Gerät in Arbeits- oderWartenmodus.
33. STOP
stoppen der CD-Wiedergabe oderWiedergabe von der Festplatte.
34. SUBTITLE
Wählen der Untertitelsprache.
35. TIMERREC
Einstellen der Aufnahmetimer.
36. TIMESHIFT
Kurzzeitige Speicherung der Fernsehsendungen im Cache der
Festplatte.
37. TITLE
Abbildung des Titelmenüs der DVD.
38. TV
Einschalten des Fernsehmodus.
39. TV/DVD
Durchsehen von den vom Recordertuner oder Fernsehtuner
gewählten Kanäle.
Funktioniert nur in dem Fall, wenn der Recorder und der Fernseher
mit dem europäischen SCART-Kabel verbindet sind, außerdem in
den Ausgangseinstellungen muss RGB-Modus gewählt sein.
40. TV MODE
Einstellt den TV-Art entsprechend dem unterstützten TV-Art
des Benutzers. Jedes Mal, beim wiederholten Betätigen
dieser Taste, wird der TV-Art zwischen dem NTSL/PAL und der
Vorwärtsabtastung/HDMI sich ändern. Diese Taste funktioniert nur
beim geöffneten CD-Fach.
41. ZOOM
Vergrößert das DVD- oder HDD-Bild zweifach.
Anschließen derVideoausgänge Composite Videoausgang (CVBS)
Composite Videoausgänge haben die meisten Fernsehgeräte.
Composite Buchse im Fernseher hat gewöhnlich gelbe Farbe und kann
als Video, CVBS oder Composite markiert sein.
EuroA/VAusgang
Euro A/V Ausgang kann man an den Fernseher, der die Euro A/V Buchse
hat, anschließen. Durch Euro A/V wird Audio im Stereoton durchgege
ben.
S-Video Ausgang
S-Video Ausgang kann man an den Fernseher, der den S-Video Eingang
hat, anschließen.
S-Video Buchse im Fernseher kann als S-Video, Y/C, S-VHS markiert
sein.
S-Video sichert bessere Bildqualität als Composite Video.
Video Komponentenausgang
Video Komponentenausgang kann man an den Fernseher, derVideo
Komponenteneingang hat, anschließen. Die Buchsen der Komponen
tenvideo im Fernseher können alsYUV, Y/Pb/Pr, Y/Cb/Cr markiert sein
und grüne, blaue oder rote Farbe haben. Komponentenvideo sichert die
bestmögliche Bildqualität. Stellen Sie Videoausgang im Menü der Video
einstellungen aufY/Cr/Cb ON ein.
DVD-Recorder
Hinweise:
• RFOUT, TOTVmarkiert.
• S-Video Kabel wird nicht mitgeliefert.
Anschließen derAudioausgänge
DVD-Recorder
Sie können den Dolby Surround Ton beim Anschließen den digitalen
Audioausgang an digitalen Verstärker genießen.
Audioausgang
Verwenden Sie Audioausgänge für Anschließen an Ihren Fernseher.
DigitalerAudioausgang
Verwenden Sie digitale Audioausgänge für Anschließen an Dolby Digital
oder DTS Dekoder. Im Menü des digitalen Audioausganges wählen Sie
PCM oder Bitstream Ihrem Dekoder entsprechend.
Hinweise:
Optischer und Koaxilkabel werden nicht mitgeliefert.
Anschließen derAudio/Videoeingänge.
Sie können Programme aus den Audio Video Systemen, wie VOR, Satel
litenaufnehmeroder Dekodiergerät, einiesen.
Audioeingang
Schließen Sie den Audioeingang an den Audioausgang des A/V Sy
stems.
Videoeingang
Schließen Sie Composite Videoeingang oder S-Videoeingang an Com
posite Videoausgang oder S-Videoausgang des A/V Systems an.
Oder schließen Sie Euro AVIN/OUT an Euro AV OUT des A/V Systems an.
DVD-Recorder
VCR or Satellite teceiveror Decoder box
AUDN/OVT frVIDEOOm’ VIDE^HJT
Optical Cable - optische Kabel
Coaxial Cable - Koaxilkabel
Audio Amplifier - Audioverstärker
A/V Cable - Audio/Videokabel
White - weiß
Red - rot
Scart Cable - Scartkabel
VCR or Satellite receiver or Decoder Box - VCR, Satellitenaufnehmer
oder Dekodiergerät
Anschließen DV IN und USB IN
Durch Anschließen an DV IN Buchse kann man digitale Videoaufnahmen
wiedergeben.
DV-Eingang
Schließen Sie DV IN an die DV IN/OUT Buchse in Ihrer Digitalvideokame
ra durch DV Kabel (nicht mitgeliefert) an.
26
4097IMnew.indd 26 27.02.2007 13:35:10
Page 27

DEUTSCH
USB-Eingang
Stecken Sie ein USB-Gerät in die USB-Buchse aut dem Recorder ein.
ir
USB Memory
Digital Camcorder
Anschließen des HDMI-Ausganges
HDMI (High-Detinition Multimedia Interface) überträgt digitale Video und
Audio von Ihrem Recorder zu Ihrem Fernseher. Schließen Sie einfach mit
einem HDMI-Kabel der DVD-Recorder an Ihren Fernseher an.
DVD-Recorder
(0 O) WälälälwIS
IbMI®##
@
9
DVD-Fach zu schließen. Die CD wir automatisch eingelesen. Aut dem
Fernsehschirm erscheint ein Menü.
Wählen Sie den erwünschten Menüpunkt mit Hilfe der Tasten ▲▼◄►
oder Tasten 0-9, danach drücken Sie die Taste ENTER oder PLAY^ um die
Wiedergabe zu starten.
Wiedergabe von DVD+RW oder DVD+R
Legen Sie DVD±RWoder DVD±R in das CD/DVD-Fach ein. Aut dem Bild
schirm etscheint das Menü.
00:00:00 • llllllllllll
FILES&0IRECT0RY
:T0RY FAVORITErpROG I
2BA
KEIK0 MATSUI • " Jl'
27;= LAURA FIGY • C ]
28 MAXWELL • WHE «J,
29/9 new STORIES (HI
Zflfl
OST I
■ 31f? OLD IMAGE.JPG
...
in ll■IIIILM ■-
W
□UD RECORDER
Wählen Sie das erwünschte Programm mit Hilfe der Tasten AoderT.
Drücken sie die Taste ENTER oder PLA>^ um die Wiedergabe zu starten.
Drücken Sie die Taste TITLE oder MENU um das Menü wiederaufzurufen.
Wiedergabe von Audio-CDs
Legen Sie eine CD in das CD/DVD-Fach ein.
Es startet die automatische Wiedergabe von dem ersten Track.
Drücken Sie die Taste Display. Die CD-Intormation wird aut dem Fern
sehschirm eingezeigt.
Ein- und Ausschalten
Schalten Sie den Fernseher ein und schließen Sie den Videoeingang an
diesen Recorder an.
Drücken Sie die Taste STANDBY/ON aut der Fernbedienung oder aut
derVorderseite um das Gerät einzuschalten. Aut dem Display erscheint
die Information. Möchten Sie das Gerät ausschalten, drücken Sie die
Taste STANDBY/ON aut der Fernbedienung oder aut derVorderseite
des Geräts noch ein mal.
Wahl der HDD (Hard-Disk) oder DVD für die Wiedergabe und Auf
nahme
Möchten Sie HDD-Modus einschalten, drücken Sie die Taste HDD/DUB
aut der Fernbedienung.
Möchten Sie DVD-Modus einschalten, drücken Sie die Taste DVD aut
der Fernbedienung.
Abbildung einer Information auf dem Display
Aut folgende weise können Sie das Wiedergabemodus aut dem Display
anzeigen lassen: Titel, Kapitelnummer, Spieldauer.
Drücken Siewährend derWiedergabedieTaste Display. DerTitel, Kapi
telnummer, Spieldauer, Audiosprache und Untertitelsprache werden aut
dem Displayangezeigt.
Drücken Sie die Taste Display noch ein Mal. Es wird detaillierte Informa
tion über das Wiedergabemodus angezeigt. Außerdem Sie können Un
tertitelsprache mit Hilfe der Tasten A T ► und der Taste Enter.
00:00:00
• 00:00:00-.
..
FILES&OIRECTORY
:T0RY i.FAVORITEtPROG
gf? PRIMUS1024.JPG
i1024.JPG '
\ ni AUI 2|l
■J0i*i TEST 3 01.AVI
ll2MiTE8TS01.AVI ^
'l3AiTEST6 01.AVI
14-i TEST 8 Q1.AVI '
15fJ THEDOORS11024. -
.... ■
------
li -
DUD RecORDGR
--------
Wählen Sie den Track mit Hilfe derTasten AoderV, danach drücken Sie
die Taste ENTER.
Wählen Sie mit den Zahlentasten (0-9) den gewünschten Track und
drücken Sie die Taste ENTER. Es stertet die Wiedergabe des gewählten
Tracks. Drücken Sie die Tasten ►►! oderl^^ während derWiedrega-
be, so können Sie den vorherigen oder den nächsten Track abspielen
lassen.
JPEG Wiedergabe
Legen Sie eine JPEG CD in das CD/DVD-Fach ein. Aut dem Bildschirm
erscheint eine Dateiliste.
00:00:00 • 00:00:00 1
:tory favorite/progFILES&OIRECTORY I
26;5 KEIKO MATSUI • "j I
27 LAURA FIGY • C '
28 MAXWELL • WHE «■,
29/9 new STORIES (Hl |l
Zflfl
OST llllllllli inilLM I
|31f? 0L0IMAGE.JPG "
□UD R€CORa€R
Wählen Sie die gewünschten Datei mit Hilfe der Tasten AoderV. In der
Um die Informationabbildung aut dem Display auszuschalten drücken
Sie die Taste Display.
rechten Ecke des Bildschirms erscheint das kleine Bild der gewählten
Datei.
Drücken Sie die Taste ENTER, um dieWiedergabe zu starten. JPEG
DVD-Wiedergabe
Drücken Sie die Taste OPEN/CLOSE, um CD-Fach zu öffnen. Legen sie
eine DVD mit derWiedergabeseite nach unten in das CD/DVD-Fach ein.
Drücken Sie die Taste OPEN/CLOSE noch ein mal, um das CD/
Dateien werden automatisch der Reihe nach angezeigt. Drücken Sie die
Tasten ►►! oder !◄◄ während derWiedregabe, so können Sie das
vorherige oder das nächste Bild anzeigen lassen.
Drehen undVergrößern/Verkleinervon Bildern.
27
4097IMnew.indd 27 27.02.2007 13:35:11
Page 28

DEUTSCH
Sie können das Bild rechts oder links mit den Tasten ◄ oder ► drehen.
Mit den Tasten ►►! oderl^^ können Sie auch das Bild vierfach ver
größern oderverkleinern.
Um die Dateiliste abzubilden, drücken Sie die Taste STOP. Die Dateiliste
wird aut dem Bildschirm abgebildet.
MPEG-4 Wiedergabe
Laden Sie eine MPEG-4 CD.
Drücken Sie die Taste ENTER nachdem Sie den Katalog der CD mit Hilfe
derTasten AoderT gewählt haben.
Drücken sie die Taste ENTER nachdem Sie die gewünschte Videodatei
mit Hilfe der Tasten AoderT gewählt haben. Es startet die Wiedergabe
der gewählten Videodatei.
Hinweise: Einige MPEG-4 Filme lassen sich nicht wiedergeben wegen
den verschiedenen Dekodierungsmethoden.
Wiedergabe von der Festplatte
Drücken Sie die Taste HDD/DUB um HDD-Modus zu wählen.
Wiedergabe von MPEG-4 Videodateien von der Festplatte
Drücken Sie die Taste FILE.
Drücken Sie die Taste ENTER nachdem Sie den HDD-Katalog mit den
Tasten AoderT gewählt haben. Die Dateiliste der Festplatte wird aut
dem Bildschirm angezeigt.
TEST 3 ai.AVI
TEST 4 01.AVI
t
□UD RecOROeR
ROG B —
llN
----------
AUDIO ■ 00:00:00 • 00:00:00
3Ai TEST 5 01.AVI
Drücken Sie ENTER nachdem Sie die gewünschte Datei mit den Tasten
AoderT gewählt haben.
Um die Dateiliste abzubilden, drücken Sie die Taste STCP. Die Dateiliste
wird aut dem Bildschirm abgebildet.
Hinweise: Einige MPEG-4 Filme lassen sich nicht wiedergeben wegen
den verschiedenen Dekodierungsmethoden.
SchnellerVor- oder Rücklauf
Benutzen Sie diese Funktion um Suchlaufgeschwindigkeit derWieder-
gabe von einer CD odervon der Festplatte zu erhöhen. Bei der Schnell
suchlauf wird derTon ausgegeben.
1. Drücken Sie die Tasten ◄◄ oder ►► während derWiedergabe. Mit
jedem Tastendruck wechselt die Anzeige wie unten gezeiegt:
HDD Programmliste wird aut dem Bildschirm angezeigt.
Wählen Sie das gewünschte Programm mit den Tasten AoderT.
Drücken Sie die Taste PLA>t Es startet die Wiedergabe des gewählten
Programms.
Wiedergabe der JPEG-Dateien von der Festplatte
Drücken Sie die Taste FILE.
Drücken Sie die Taste ENTER nachdem Sie den HDD-Katalog mit den
Tasten AoderT gewählt haben. Die Dateiliste der Festplatte wird aut
dem Bildschirm angezeigt.
FILES&DIRECTORY :FAVORITE/PROG
1fJ EMINEM11024.JPG r'f 'I W
2fi KILLBILLiaOO.JPG
3f? .MAND.YMOORE3aO |' i |l
-V E
DUD RECORDGR
I | I
DVD/VCD
◄ x2 ► x2
4
4r
◄ x4 ► x4
4r
◄ x1B ► x1B
4
◄ x32 ► x32
2. Drücken Sie die Taste PLAYj um die Normalwiedergabe fortzusetzen.
Vor-/Zurückschalten (nur DVD und Audio CD)
Benutzen Sie diese Funktion um zur nächsten oder vorherigen Kapitel
der DVD bzw. zum nächsten oder vorherigen Träck der CD zu gelangen.
DrückenSiedieTaste ◄◄ währendderWiedergabe. DVD-Recorder
startet den vorherigen Kapitel oder den vorherigen Track zu wiederge
ben.
DrückenSiedieTaste ►► währendderWiedergabe. DVD-Recorder
startetden nächsten Kapiteloderden nächstenTrackzuwiedergeben.
Verlangsamter Vorlauf
Benutzen Sie diese Funktion türden verlangsamten Vorlaut der Wieder
gabe von einer CD oder von der Festplatte.
Drücken Sie die Taste SLOWwährend derWiedergabe. Die Geschwin
digkeit ändert sich.
DrückenSiedieTasteSLOW. Mit jedemTastendruckwechseltdieAnzei-
ge folgenderweise:
DVD/VCD/HDD ► 1/2 4 ^1/4 4 ►1/8
Wählen Sie die gewünschte Datei mit den Tasten AoderT. In der rechten
Ecke des Bildschirms erscheint das kleine Bild der gewählten Datei.
Drücken Sie die Taste ENTER, um dieWiedergabe zu starten. JPEG
Dateien werden automatisch der Reihe nach angezeigt. Drücken Sie die
Tasten ►►! oder !◄◄ während derWiedregabe, so können Sie das
vorherige oder das nächste Bild anzeigen lassen.
Drehen undVergrößern/Verkleinervon Bildern.
Sie können das Bild rechts oder links mit den Tasten ◄ oder ► drehen.
Um die Dateiliste abzubilden, drücken Sie die Taste STOP. Die Dateiliste
wird aut dem Bildschirm abgebildet.
Drücken Sie die Taste PLA>^ um die Normalwiedergabe fortzusetzen.
Einzelbild-Wiedergabe(nur DVD und Audio VCD)
1. Drücken Sie die Taste PAUSEwährend derWiedergabe. Die
Wiedergabe wird unterbrechen.
2. Drücken Sie die Taste PAUSE noch ein Mal. JederTastendruckzeigt
das nächste oder das vorherige Einzelbild.
3. Drücken Sie die Taste PLAYj um dieWiedergabe fortzusetzen.
28
4097IMnew.indd 28 27.02.2007 13:35:11
Page 29

DEUTSCH
Hinweise:
♦ WährendderEinzelbild-Wiedergabefehlt derTon.
♦ Audio CDs haben nicht die Funktionen der Einzelbild-Wiedergabe
und des verlangsamten Vorlautes.
Programmwiedergabe (nur Audio CDs)
Sie können den Inhalt einer CD in beliebiger Reihenfolge wiedergeben
lassen, indem Sie die Titel auf einer CD in der gewünschten Reihenfolge
zu einem Programm zusammenstellen.
1. Legen Sie eineAudio CD in das CD/DVD-Fach ein. DieWiedergabe
startet automatisch.
2. Drücken Sie die Taste PROGRAMM. Auf dem Bildschirm wir die
Trackliste angezeigt.
Mit den Tasten Aoder^ wählen Sie den gewünschten Track aus der
Liste, danach drücken Sie die Taste ADD/CL (hinzufügen/löschen).
Der gewünschte Track wird zum Programm rechts hinzugefügt.
Wiederholen Sie den 3. Schritt, wenn Sie den anderen Track wählen
möchten.
Stellen Sie den Cursor auf die Progrmmliste mit der Taste und
drücken Sie die Taste ENTER. Es startet dieWiedergabe der
eingespeicherten Programmliste.
Um einen Track aus der Trackliste zu löschen, wählen sie einen
Track mit den Tasten ▲▼◄► und drücken Sie die Taste ADD/CL
(hinzufügen/löschen). DergewählteTrackwirdausdem Programm
gelöscht.
7.
Drücken Sie die Taste Return, um dieWiedergabeliste zu verlassen.
Untertitelsprache wählen (nur DVD)
Sie können die Untertitelsprache auf die Sprache aus den Standartein
stelingen wechseln. Dise Funktion ist nur für die CDs möglich, die einige
Untertitelsprachen haben.
1. Drücken Sie die Taste SUBTITLE (Untertitel) während der
Wiedergabe. Auf dem Bildschirm unten erscheinen Untertitel.
2. Mit jedem Tastendruck wechselt die Audio Sprache.
Hinweise: auf einiegen CDs kann man die Untertitel- oder
Audiosprache nur aus dem CD-Menü wechseln.
Wiederholte Wiedergabe eines Titels, eines Kapitels (nur DVD/AUDIO CD)
Sie können einen Titel, einen Kapitel für DVD oder einen Track, eine CD
fürAUDIO CD wiederholt wiedergeben lassen.
1. Drücken Sie die Taste REPEAT während derWiedergabe. Die
Information über die Wiedergabewiederholung wird auf dem
Bildschirm oben angezeigt.
2. Mit jedem weiteren Tastendruck wechselt die Wiedergabemodi
folgenderweise:
Hinweise:
Bei einiegen DVDs ist diese Funktion nicht möglich.
A-BWiederholung (nur DVD/AUDIO CD)
Benutzen Sie diese Funktion für die wiederholte Wiedergabe des ge
wählten Fragments. Dieses Funktion ist zum Beispiel beim Sprachlernen
sehr praktisch.
1. Drücken Sie die Taste A-B/LANG, wenn Sie den Anfangspunkt des
wiederholt wiederzugebenden Kapitel gefunden haben. Damit haben
Sie den Anfangspunkt festgelegt.
2. Am Ende des gewünschten Kapitels drücken Sie die Taste A-B/
LANG noch ein mal. Damit haben Sie den Endepunkt festgelegt. Die
Wiedergabe wird von A bis B wiederhot wiedergegeben.
3. Um zum normalen Wiedergabemodus zu schalten, drücken Sie die
Taste A-B/LANG nochmals.
Hinweise:
Wir empfehlen Ihnen für die gleichmäßigeWiedergabe den Kapitel mit
min. 5 Sekunden Spieldauer einzustellen.
2. Mit jedem Tastendruck wechselt die Untertitelsprache.
3. Um die Untertitel zu verbergen, wählen Sie „OFF“, nachdem Sie die
Taste SUBTITLE gedrückt haben.
Audio Sprache wählen (nur DVD)
Sie können die Audio Sprache auf die Sprache aus den Standartein
stelingen wechseln. Dise Funktion ist nur für die CDs möglich, die einige
Audio Sprachen haben.
1. Drücken Sie die Taste AUDIO während derWiedergabe. Die Audio
Information wird auf dem Bildschirm oben angezeigt.
4097IMnew.indd 29
Bildschirm vergrößern (nur DVD/HDD)
Mit dieser Funktion können Sie das Bild der DVD oder HDD zweifach
vergrößern.
1. Drücken Sie die Taste ZOOM während der Wiedergabe.
it doesn't hurt
to find closure about the pest.
2. Mit jedem Tastendruck vergrößert sich das Bild:
29
27.02.2007 13:35:12
Page 30

DEUTSCH
Zoom 150%
Zoom 200%
Zoom Gff
3. Mit den Tasten ▲▼◄► können Sie das Bild verschieben.
4. Um das Modus zu verlassen drücken Sie die Taste ZOOM einiege
Male, bis die Normalwiedergabe sich wiedereinatellt.
Blickwinkel wechseln (nur DVD)
Wenn aut einer DVD verschiedene Blickwinkel für eine Szene aufge
zeichnet sind, so können Sie das Blickwinkel wechseln.
1. DrückenSiedieTasteANGLE (Winkel)währendderWiedergabe.
Mögliche Blickwinkel erscheinen aut dem Bildschirm oben.
2. Mitjedem Tastendruck wechselt sich der Blickwinkel.
Hinweise:
• Sie können den Blickwinkel nurtür DVD mit mehreren Blickwinkel
wechseln.
• Wenn aut einer DVD verschiedene Blickwinkel für eine Szene nicht
aufgezeichnet sind, so ist diese Funktion nicht möglich.
Suchmodus (nur DVD)
Sie können ein bestimmten Kapitel oder einen bestimmten Titel für die
Wiedergabe wählen.
1. Drücken Sie die Taste DISPLAYwährend derWiedergabe zweimal.
Die Wiedergabeinformation erscheint auf dem Bildschirm.
TV
Front AV
Rear AV
Rear SV
DV
Scart AV
Möchten Sie eine Fernsehsendung aufnehmen, wählen Sie TV-Modus.
Wählen Sie den Sender, der Sie aufnehmen möchten, indem Sie die Ta
ste Channel- oder Channel+ drücken.
4. Drücken Sie die Taste REO, um die Aufnahme zu starten. Drücken
Sie die Taste PAUSE, wenn Sie die Aufnahme unterbrechen
möchten. Drücken Sie die Taste REO, um die Wiedergabe
fortzusetzen.
5. Drücken sie die Taste STOP um die Aufnahme zu stoppen.
Hinweise:
• DVD±R/DVD±RW speichern bis zu 6 Stunden IhrerAutnahmen oder
49 Titel.
• Wenn die Quelle, von deren Sie aufnehmen möchten mit einem
Kopierschutz ausgestattet, so lässt es sich nicht kopieren lassen.
Timer-Aufnahme mit einer Berührung (DTR)
1. Während der Grundaufnahme drücken Sie die Taste REO.
Mit jedem Tastendruck verlängert sich die Aufnahmezeit aut 30 min.
Die Aufnahme kann bis zu 3 Stunden dauern, wenn aut der CD (oder
Festplatte) genug Speicherplatz gibt.
Nach derAutnahme stoppt der DVD-Recorder automatisch.
2. Möchten Sie das OTR-Modus verlassen, drücken Sie die Taste
STOP.
2. Suche nacheinemTitel
1) Wählen Sie TITLE mit den Tasten und drücken Sie ENTER.
2) Eintasten Sie den Titelnummer mit den Zahlentasten 0-9 und
drücken Sie ENTER. Die Wiedergabe startet von dem gewählten
Titel.
Suche nach einem Kapitel
1) Wählen Sie CHAPTER mit den Tasten und drücken Sie ENTER.
2) Eintasten Sie den Kapitelnummer mit den Zahlentasten 0-9 und
drücken Sie ENTER. Die Wiedergabe startet von dem gewählten
Kapitel.
Aufnahme
Grundaufnahme
Um die Fernsehsendungen aufzunehmen, sollen Sie zuerst den Kanal
wählen.
1. Drücken Sie die Taste HDD/DUB oder DVD, um HDD (Festplatte)
oder DVD (DVD±R/DVD±RW) zu wählen.
Möchten Sie aut die Festplatte aufzeichnen, drücken Sie die Taste
HDD/DUB. HDD-Menü wird aut dem Schirmbild angezeigt.
2. Möchten Sie aut eine DVD aufzeichnen, legen sie eine DVD±R oder
DVD±RW mit dem genügenden Speicherplatz ein.
• Legen sie eine neue CD ein, erscheint eine Formatierenantrage.
Drücken Sie ENTER, nachdem Sie „OK“ gewählt haben.
• Wird das DVD-Menü automatisch angezeigt, drücken Sie zweimal
die Taste STOP für stoppen.
3. Drücken sie die Taste AV IN, um die A/V Quelle, von deren Sie
aufnehmen möchten, zu wählen. Mitjedem Tastendruckwechselt
die A/V Quelle:
Aufnahmetimer
Für den Timer muss man die Zeit, das Datum und den Sender richtig
einstellen.
Möchten Sie aut eine DVD aufnehmen, laden Sie DVD±R oder DVD±RW
mit dem genügenden Speicherplatz ein.
1. Drücken Sie die Taste TIMER REO.
Sourcp I Quality |_ Dato ' Start j End Wcord | VPS
OUD RecOROeFt
2. Wählen Sie das treieProgramm mit den Tasten AoderV und drücken
Sie ENTER.
O Timer Recording Setup
ytewi-il
Rear
Record To HDD
Once
03)01)06
VPS)PDC 0
Soloct vidoQ eourco for timor recording
3.
Drücken Sie die Taste ENTER. Das Zusatzmenü erscheint. Wählen
Sie die Quelle mit Tasten AoderV, danach drücken sie ENTER.
Wählen Sie „Record To“ mit der Taste V, danach drücken Sie
4.
ENTER, um die Liste herauszuruten.Wählen Sie HDD für die
30
4097IMnew.indd 30 27.02.2007 13:35:12
Page 31

DEUTSCH
Aufnahme auf HDD oder DVD für die Aufnahme auf DVD mif den
Tasfen AoderT, danach drücken Sie ENTER.
5. Wählen Sie „Qualify“ mif der Tasfe ▼, dann drücken Sie
ENTER, um die Liefe herauszurufen.Wählen Sie Record Qualify
(Aufnahmequalifäf) mif den Tasfen AoderT, danach drücken Sie
ENTER.
6. Wählen Sie „Mode“ (Modus) mif der Tasfe T, dann drücken Sie
ENTER, um die Liefe herauszurufen.Wählen Sie, wie off möchfen
Sie aufnehmen, z. B.: ein mal, jeden Tag, jedeWoche mif den Tasfen
AoderT, danach drücken Sie ENTER.
7. Wählen Sie „Dafe“ (Dafum) derTasfe T, dann drücken Sie ENTER,
um die Liefe herauszurufen.Wählen Sie das Dafum mif den
Zahlenfasfen 0-9, danach drücken Sie ENTER. Wenn Sie im Punkf
„jedeWoche“ gewählf haben, drücken Sie ENTER nachdem Sie den
Tag derWoche mif den Tasfen AoderT gewählf haben.
8. Wählen Sie „Sfarf“ mifderTasfe T, dann drücken Sie ENTER.
Einfasfen Sie die Zeif des Aufnahmebeginns mif den Zahlenfasfen
0-9, dann drücken Sie ENTER.
9. Wählen Sie „End“ mif derTasfe T, dann drücken Sie ENTER.
Einfasfen Sie die Zeif der Aufnahmebeendigung mif den
Zahlenfasfen 0-9, dann drücken Sie ENTER.
10. Wählen Sie „Tifle“ (Episode) mif der Tasfe T, dann drücken Sie
ENTER. Einfasfen Sie den Tifel der Episode mif den Tasfen AT^^,
dann drücken Sie ENTER.
11. Umschalfen Sie VPS/PDC „ON“ oder „OFF“ mif den Tasfen AT,
dann drücken Sie ENTER.
(Wenn die Quelle auf dem Fernsehkanal nichf besfimmf isf, isf diese
Funkfion unmöglich).
12. Drücken Sie ENTER nachdem Sie mif der Tasfe T „OK“ gewählf
haben, wenn die Einsfellungen richfig sind.
13. SchalfenSieden DVD-RecordermifderTasfeSTADBY/ONaus.
Hinweise:
• Sie können Ihr DVD-Recorderwieder einschalfen, wenn Sie den
Timer für die Aufnahme eines anderen Programms einsfeilen
möchfen. Vergessen Sie nichf den DVD-Recorder auszuschalfen,
nachdem Sie die Einsfellungen durchgeführf haben.
• Um die Aufnahme nach dem Timer zu sfoppen drücken Sie STADBY/
ONoderSTOP.
• Sie können das Aufnahmeprogramm bis zu 8 Programmen
ergänzen.
• Wir empfehlen Ihnen die Aufnahmezeif mehr als 5 Minufen
einsfeilen.
Aufnahme von einer digitalen Videoamera (DV)
Sie können den Inhalf der DV-Kassefe von der digifalen Videokame
ra durch die DV IN Buchse aufnehmen. Sfellen Sie sicher, dass die
digifale Videokamera an der DV IN Buchse auf derVorderseife ange
schlossen isf. Schalfen Sie die digifale Videokamera ein und sfellen Sie
PLAY-Modus (oderVCR) ein.
1. Drücken Sie die Tasfe HDD/DUB oder DVD, um HDD oder
beschreibbare DVD (DVD±R/DVD±RW) zu wählen.
Möchfen Sie auf eine DVD aufnehmen, legen Sie DVD±R oder
DVD±RW mif dem genügenden Speicherplafz ein.
2. DrückenSiedieTasfeDV/USB.
3. Finden Sie die Sfelle auf der Kassefe, von der die Aufnahme
beginnen wird. Sie können Fernbedienung von diesem Recorder
benufzen, um Videokamera mif den Tasfen PLAYj STOP, PAUSE,
◄ ◄, ►►zu sfeuern. Drücken Sie die Tasfe PLAY an der Sfelle, wo
die Aufnamme beginnen wird.
4. Drücken Sie die Tasfe RFC, um die Aufnahme zu sfarfen. Drücken
Sie die Tasfe PAUSEwenn Sie die Aufnahem unferbrechen möchfen.
Drücken sie die Tasfe RFC, um die Aufnahem forfzusefzen.
5. Drücken Sie die Tasfe STOP, um Aufnahme zu sfoppen.
Hinweise: Wenn der Recorder die digifale Videokamera nichf erkennf,
herausnehmen Sie den DV- Kabel aus der DV IN Buchse und sfellen sie
ihn wieder ein.
Zeitversetzte Aufnahme
Dieser Recorder speichert kurzzeitig das Program auf der Festplatte
automatisch. Das erlaubt dem Benutzer das eingespeicherte Programm
zu handhaben.
1. Drücken Sie die Tasten derWiedergabesteuerung II, ◄◄, ►►,!◄◄,
► ►l, !► beim Fernsehsehen, auf dem Bildschirm unten erscheint
eine Zeitskala.
Durchsehen des Aufnahmetimers - Veränderung und Löschen der
Aufnahmeeinstellungen.
1. Drücken Sie die Tasfe TIMER RFC. Sie können alle Programme, die
auf Timer eingesfellf sind, sehen.
Wählen sie das Programm, das Sie verändern oder löschen möchfen
mif den Tasfen
3.
Löschen der Einsfellungen
Drücken sie die Tasfe ADD/CL (löschen/hinzufügen) für das
Löschen.
Veränderung der Einsfellungen.
Drücken Sie die Tasfe ENTER.
Wählen Sie die Punkfe, die sie verändern möchfen mif den Tasfen
▲ ▼ und drücken Sie ENTER. Verändern Sie die Einsfellungen mif
den Tasfen oder mif den Zahlenfasfen 0-9.
Nachdem Sie alle Veränderungen durchgeführf haben, drücken Sie
ENTER.
4.
Drücken Sie ENTER nachdem Sie mif der Tasfe ▼ „OK“ gewählf
haben, wenn alle Einsfellungen richfig sind.
Drücken Sie die Tasfe TIMER RFC.
2. PAUSE
Drücken Sie die Taste PAUSE, so wird das lautende Programm
unterbrochen. Drücken Sie die Taste PLAYj wird die Wiedergabe von
der gleichen Stelle fortgesetzt.
3. SchnellerVor-oderRücklaut
1) Drücken Sie die Tasten ◄◄ oder ►► während derWiedergabe. Mit
jedem Tastendruck steigert die Geschwindigkeit in 3 Stuten.
2) Drücken Sie die Taste PLAYj um zum normalen Wiedergabemodus
zurückzukehre.
4. Vor/Rückübergang
1) Drücken sie die Taste !◄◄ währen derWiedergabe. DVD-Recorder
beginnt den vorherigen Kapitel zu wiedergeben.
2) Drücken SiedieTaste ►►Iwähren derWiedergabe. DVD-Rekorder
beginnt den nächsten Kapitel zu wiedergeben.
5. VerlangsamterVorlaut
1) DrückenSiedieTasteSLOWwährendderWiedergabe. Die
verlangsamteWiedergabe des lautenden Programms beginnt. Mit
jedem Tastendruck verändert sich die Geschwindigkeit aut in 3
Stuten.
2) Mit der Taste PLAY schalten Sie wieder zum normalen
Wiedergabemodus.
6. Aufnahme
Während der Aufnahme mit der Zeitverschiebung wird das
Programm kurzzeitig aufgenommen. Bei der normalen Aufnahme
wird das Programm aut längere Zeit aut der Festplatte gespeichert,
darum können Sie es zu jeder Zeit verwenden.
1. Drücken Sie die Taste RFC, um die Aufnahme des lautenden
Programmes zu starten.
2. Drücken Sie die Taste STOP, um dieWiedergabe zu stoppen.
Hinweise:
• Diese Funktion ist im DVD-Modus nicht möglich. Möchten Sie die
zeitversetzte Aufnahme benutzen, drücken sie die Taste TIMESHIFT
während des Fernsehsehens.
31
4097IMnew.indd 31 27.02.2007 13:35:12
Page 32

DEUTSCH
• Wenn auf dem Bildschirm OSD-Menü angezeigt wird, ist es
unmöglich Aufnahme von den AV-Ausgänge oder Digital-TV
durchzuführen. Also wenn Sie die zeitversetzte Aufnahme
durchführen möchten, verlassen Sie das OSD-Menü.
Wiedergabe während der Aufnahme
Sie können HDD-Titelwiedergeben lassen und gleichzeitig Fernsehsen
dung aufnehmen. Sie können auch DVD-Kapitel wiedergeben lassen
und gleichzeitig Fernsehsendung aufnehmen.
1. HDDWiedergabewährend derAufnahme einer Fernsehsendung auf
die CD.
1) Drücken Sie die Taste HDD/DUB während derAufnahme.
Die Liste mit den HDD-Programmen wird auf dem Bildschirm
angezeiegt.
2) Wählen Sie das gewünschte Programm aus der Liste mit den Tasten
▲ ▼.
3) Drücken sie die Taste PLAY; um dieWiedergabe zu starten.
2. DVD-Wiedergabe während der Aufnahme einer Fernsehsendung auf
die HDD.
1) Drücken Sie die DVD Taste während der Aufnahme.
Die CD-Menü wird auf dem Bildschirm angezeigt.
2) Wählen sie die gewünschte Stelle oder den Kapitel mit den Tasten
▲ ▼◄►.
3) Drücken sie die Taste ENTER oder PLAY um die Wiedergabe zu
starten.
Benutzen Sie die Besonderheiten des Kopierens dieses Recorders für:
• Reservekopieren wichtigen Aufnahmen, die auf der HDD, DVD
gespeichert sind.
• DVD-Kopievon der HDD-AufnahmefürdieWiedergabeaufeinem
anderen Player.
• Übergabe derVideo von der DVD auf HDD für die Bearbeitung.
• Übergabe der bearbeiteten Viedeo von der HDD auf DVD.
Urheberrechte
Die Aufnahme darf nur mit Genehmigung des Urhebers erfolgen, stellen
Sie sicher, dass das Kopieren in dem Land, wo Sie die Überschreibung
durchführen möchten, erlaubt ist. DuplikationvonAutorenmaterialien,
Filmen oder Musik ist ungesetzlich, wenn es nicht von dem Gesetz oder
Urheber gestattet war.
Kopieren eines Titeis von einer DVD auf die Festpiatte
Stellen Sie sicher, dass die DVD in das CD-Fach richtig eingelegt ist.
1. Kopieren allen Titel von der DVD auf die Festplatte.
1) DrückenSiedieTasteDVD.
Die Liste erscheint auf dem Bildschirm.
2) Drücken Sie die Taste ▲ oder ►. Das Redaktionsmenü erscheint auf
dem Bildschirm.
3) Drücken Sie die Taste ENTER nachdem Sie mit den Tasten ▲ oder
▼ „COPYTITLE“ (Titel kopieren) gewählt haben. Das Kopieren den
gewählten Titel von der DVD auf die Festplatte beginnt.
Kopieren eines Titeis von der Hardpiatte auf eine CD.
Stellen Sie sicher, dass die beschreibbare DVD (DVD+R/DVD+RW) in
das Fach eingelegt ist.
1. DrückenSiedieTasteHDD/DUB.
Die Liste mit den Episoden von der Festplatte erscheint auf dem
Bildschirm.
Drücken Sie die Taste ENTER, nachdem Sie mit den Tasten
▲ oder ▼ den Titel für das Kopieren gewählt haben.
Auf dem gewählten Titel erscheint ein Vermerk.
Wiederholen Sie den 2. Schritt, wenn Sie auch andere Titel wählen
möchten.
4.
Drücken Sie die Taste HDD/DUB.
Das Kopieren der gewählten Titel von der Festplatte auf die CD
beginnt.
Kopieren der Dateien von einer CD auf die Festplatte (von der
Festplatte auf eine CD)
Stellen Sie sicher, dass die beschreibbare CD oder CD für Kopieren
(DVD+R/DVD+RW) in das Fach eingelegt ist. Sie können MP3, JPEG,
MPEG-4 Dateien von der CD auf die Festplatte (odervon der Festplatte
auf eine CD) kopieren.
1. DrückenSiedieTasteFILE.
Die Dateiliste erscheint auf dem Bildschirm.
)№□ ■ 00:00:00 • 00:00:00
FILESiDIRECTORi FAVORITE/PROG
= ■ -
a\ju necanoen
nun necoRoen
Drücken Sie die Taste ENTER nachdem Sie mit den Tasten ▲ oder ▼
3)
„COPYALL“ (alles kopieren) gewählt haben. Das Kopieren allen Titel
von der DVD auf die Festplatte beginnt.
2.
Kopieren eines Kapitels von einer DVD auf HDD.
Drücken Sie die Taste DVD.
1)
Die Liste erscheint auf dem Bildschirm.
Drücken Sie die Taste ►, nachdem Sie mit den Tasten ▲ oder ▼
2)
den Titel für das Kopieren gewählt haben. Das Redaktionsmenü
erscheintauf dem Bildschirm.
4097IMnew.indd 32
Drücken Sie die Taste EDIT.
Das Menü erscheint auf dem Bildschirm.
► Fila Tools
____
_
■■■ create uir
V „
a\ja RSCORDSR
Drücken Sie die Taste ENTER nachdem Sie mit den Tasten
▲ oder ▼ „Copy“ (Kopieren) gewählt haben.
Wählen Sie den Katalog für das Kopieren mit den Tasten ▲ oder ▼,
drücken Sie die Taste ENTER.
(Möchten Sie von der DVD kopieren, wählen Sie DVD-Katalog.
Möchten Sie eine Datei von der Festplatte kopieren, wählen Sie
HDD-Katalog).
Die Dateiliste erscheint auf dem Bildschirm.
Drücken Sie die Taste ADD/CL (löschen/hinzufügen) nachdem Sie
mit mit den Tasten ▲ oder ▼ Datei für das Kopieren gewählt haben.
Die gewählte Datei wird zu der Liste rechts hinzugefügt.
32
27.02.2007 13:35:13
Page 33

6. Wiederholen Sie den 5. Schritt, wenn Sie auch andere Dateien
kopieren möchten.
7. DrückenSiedieTaste ►►.
8. Mit den Tasten ▲ oder ▼ wählen Sie den Katalog, in welcher Sie
die gewählte Dateien speichern möchten, und drücken sie die Taste
ENTER.
(Möchten Sie die Datei von einer CD aut die Festplatte kopieren,
wählen Sie den HDD-Katalog. Möchten Sie die Datei von der
Festplatte aut eine CD kopieren, wählen Sie den DVD-Katalog.)
9. DrückenSiedieTasteREC.
Es startet das Kopieren von einer CD aut die Festplatte (von der
Festplatte aut eine CD).
10. Drücken Sie die Taste EDIT nach der Beendigung des Kopieren.
Kopieren der Dateien von USB auf die Festplatte (oder CD)
Stellen Sie sicher, dass das USB-Gerät in die USB IN Buchse einge
steckt ist. Möchten Sie die Dateien aut der CD kopieren, legen Sie in das
CD/DVD-Fach eine beschreibbare CD (DVD±R/DVD±RW) ein.
1. DrückenSiedieTasteFILE.
Die Liste erscheint auf dem Bildschirm.
DEUTSCH
6.
Wiederholen Sie den 5. Punkt, wenn Sie auch andere Dateien
kopieren möchten.
Drücken Sie die Taste ►►.
7.
Mit den Tasten ▲ oder ▼ wählen Sie den Katalog, in welcher Sie
die gewählte Dateien speichern möchten, und drücken sie die Taste
ENTER. (Möchten Sie die Datei von einer CD aut die Festplatte
kopieren, wählen Sie den HDD-Katalog. Möchten Sie die Datei von
der Festplatte aut eine CD kopieren, wählen Sie den DVD-Katalog.)
Drücken Sie die Taste RFC.
9.
Es startet das Kopieren der Dateien von dem USB-Gerät aut die
Festplatte (oder CD).
Drücken Sie die Taste EDIT nach der Beendigung des Kopierens.
10
Hinweise:
• Benutzen Sie nicht die USB-Geräte mehr als 500 mA.
• Wenn der Rekorder das USB-Gerät nicht erkennt, nehmen Sie das
USB-Gerät heraus und stecken Sie es wieder ein.
Bearbeiten von der DVD+R oder DVD+RW
1. Legen Sie der DVD±R oder DVD±RW in das CD/DVD-Fach ein.
DVD-Menü erscheint aut dem Bildschirm.
2. DrückenSiedieTaste A, umimMenünachobenzurücken.
3. DrückenSiedieTste ►, dasMenüdesBearbeitenswirdautdem
Schirmbild eingezeigt.
2. DrückenSiedieTasteEDIT.
Das Menü des Kopieren erscheint auf dem Bildschirm.
SH Oolote^ ^ I
ilH RonarriB **'*%£:>
HB Craat» Dir ^ "Vi.
nivl from one nuHlMim to ¡mother
A'
DUD ReCDRDER
3. Drücken Sie die Taste ENTER nachdem Sie mit den Tasten A oder ▼
„Copy“ (Kopieren) gewählt haben.
4. Drücken Sie ENTER, nachdem Sie mit den Tasten A oder ▼
USB-Katalog gewählt haben.
5. Drücken Sie die Taste ADD/CL (löschen/hinzutügen), nachdem
Sie eine Datei für das Kopieren mit den Tasten A oder ▼ gewählt
haben. Die gewählte Datei wird zu der Liste links hinzugefügt.
33
Wiedergabe einer DVD+R oder DVD+RW
Sie können ie ganze CD vom Beginn bis zum Ende wiedergeben lassen.
1. DrückenSiedieTasteENTER,nachdemSie mitdenTasten
A oder ▼ „PLAY“ (Wiedergabe) gewählt haben.
Es beginnt die CD-Wiedergabe vom Anfang an.
Titelübernahme einer DVD+R oder DVD+RW
1. DrückenSiedieTasteENTER,nachdemSie mitdenTasten
A oder ▼ „Rename disk“ (Titelübernahme) gewählt haben. Aut dem
Bildschirm wird die Tastatur angezeigt.
Space Aa P2 Backspace Clear Exit OK
Drama Action Sports Comody Nows Kids Adult
DUD RECDRDER
Wählen Sie die Buchstabe, die Sie mit den Tsten AV^^ eintasten
möhten, und drücken Sie die Taste ENTER.
Wiederholen Sie den 2. Punkt.
Maximale Titellänge soll nicht länger al 9 Symbole sein.
Horizontale Kontrollskala aut der unteren Zeile der Tastaturtür das
Redaktieren.
Wenn Sie mit dem Titel fertig sind, drücken Sie ENTER, nachdem Sie
„OK“ gewählt haben.
4097IMnew.indd 33 27.02.2007 13:35:13
Page 34

DEUTSCH
Löschen einer Aufnahme von der optische Platte (nur DVD+RW)
1. DrückensiedieTasteENTER.nachdemSie mitdenTasten
▲ oder ▼ den Punkt „Löschen derAutnahme von der optische
Platte“ gewählt haben.
__
_ Erase optical disc
Warning: This operation will erase all data
on the disc. Are you sure you want to
continue?
□UD ReCORDEB
2. Drücken Sie die Taste ENTER, um den Inhalt der CD zu löschen,
nachdem Sie „Yes“ (Ja) mit den Tasten ◄,► gewählt haben.
Das Löschen von der CD nimmt einiege Minuten in Anspruch.
Hinweise: diese Funktion ist nur bei der DVD±RW möglich.
Überschreiben der CD (nur DVD+RW)
1. DrückensiedieTasteENTER,nachdemSie mitdenTasten
▲ oder ▼ den Punkt „Überschreiben der CD“ gewählt haben.
DVD-Modus wechselt sich aut AV-Modus.
2. Drücken Sie die Taste AV IN, um den AV-Eingang zu wählen, von
deren Sie aufnehmen möchten. Mitjedem Tastendruck wechselt der
AV-Eingang:
TV
blockiert ist, so können Sie keine Veränderungen einbringen. Es ist
nur die Wiedergabe möglich.
2. Möchten Sie die CD entblocken, wählen Sie mit den Tasten
A oder T den Punkt „Entblockung der CD“.
3. DrückenSiedieTasteENTER.
Das Entblockung nimmt einiege Minuten in Anspruch.
Front AV
Rear AV
Rear SV
DV
Scart AV
Möchten Sie eine Fernsehsendung aufnehmen, wählen Sie
TV-ModusWählen Sie den Sender, derSie aufnehmen möchten,
indem Sie die Taste Channel- oder Channel+ drücken.
3.
Drücken Sie die Taste RFC, um die Aufnahme zu starten. Die
Aufnahme beginnt von dem Anfang der CD.
Drücken Sie die Taste STOP, um die Aufnahme zu stoppen.4.
Hinweise: bei dem Überschreiben werden alle vorher eingespeicherte
Dateien gelöscht.
Finalisieren von einer CD (nur DVD+R)
Möchten Sie die DVD±R kompatibel mit den anderen Players und Rekor
ders machen, sollen Sie die CD finalisieren.
1. DrückenSiedieTasteENTER,nachdemSie mitdenTasten
▲ oder ▼ den Punkt „Finalisieren der CD“ gewählt haben. Aut dem
Bildschirm erscheint eine Dialogbox.
2. Drücken Sie die Taste ENTER, nachdem Sie mit den Tasten ◄,►
„Yes“ (Ja) gewählt haben.
Das Finalisieren der CD nimmt einiege Minuten in Anspruch.
Hinweise:
• Diese Funktion kann man nur ein Mal aut der DVD±R benutzen.
• Wenn die CD schon tinalisiert war, können Sie sie nicht mehr
aufnehmen oder redaktieren.
Blockieren einer CD (nur DVD+RW)
Sie können Ihre CD blockieren, um die Aufnahme oder ihr Bearbeiten
abzuwenden.
1. Drücken Sie die Taste ENTER, nachdem Sie mit den Tasten
▲ oder ▼ den Punkt „Blockieren der CD“ gewählt haben.
Das Blockieren nimmt 2-3 Minuten in Anspruch.Wenn die CD schon
ALLES Kopieren (DVD+R/DVD+RW)
Sie können alle Titel von der DVD aut die Festplatte kopieren lassen.
1. Drücken Sie die Taste ENTER, nachdem Sie mit den Tasten ▲ oder
▼ den Punkt „COPYALL“ gewählt haben. Es beginnt das Kopieren
von den allen Titel von der CD aut die Festplatte.
Bearbeiten eines Titels DVD+R oder DVD+RW
1. Legen Sie die beschreibbare DVD±R oder DVD±RW in das CD/DVDFach ein. Das Menü wird automatisch aut dem Bildschirm angezeigt.
2. Wählen sie einen Titel für das Bearbeiten mit den Tasten ▲ oder ▼.
3. DrückenSiedieTaste ►, autdemBildschitmwirddasMenüdes
Bearbeitens angezeigt.
Wiedergabe eines DVD+R/DVD+RW Titels
Sie können den gewählten Titel wiedergeben lassen.
1. Drücken Sie die Taste ENTER, nachdem Sie mit den Tasten
▲ oder ▼ den Punkt „Wiedergabe eines Titels“ gewählt haben.
Die Wiedergabe des gewählten Titels beginnt.
Bearbeiten eines DVD+R/DVD+RW Titels
1. Drücken Sie die Taste ENTER, nachdem Sie mit den Tasten
34
4097IMnew.indd 34 27.02.2007 13:35:13
Page 35

DEUTSCH
▲ oder ▼ den Punkt „Bearbeiten eines Titels“ gewählt haben. Aut
dem Bildschirm erscheint eine Dialogbox.
1-1. Wählen Sie den Titel
Wählen Sie den Titel mit den Zahlentasten 0-9.
1-2.Wählen Sie den Kapitel
Wählen Sie den Kapitel mit den Zahlentasten 0-9.
1-3.Wiedergabe
Sie können für die Wiedergabe verschiedene Einstellungen
verwenden: SchnellerVor- oder Rücklauf, VerlangsamterVorlaut.
1-4. Marker eines Kapitels
Sie können einen Kapitel löschen oder hinzufügen. Drücken Sie die
Taste ENTER oder ►, aut dem Bildschirm erscheint eine Dialogbox.
2) Um den neuen Marker des Kapitels einzufügen, wählen Sie mit den
Tasten ▲ oder ▼ den Punkt„Markereintügen“.
Sie können eine bestimmte Stelle mit den Tasten ◄◄, ►► oder mit
derTaste PLAYtinden.
Drücken Sie die Taste ENTER an der Stelle, wohin Sie einen neuen
Kapitel eintügen möchten.
3) Um den Markerzu löschen, wählen Sie mit den Tasten ▲ oder ▼
den Punkt „Marker löschen“.
Sie können den Kapitel mit den Tasten !◄◄ oder ►►! finden.
Drücken sie die Taste ENTER, an der Stelle, wo Sie den Kapitel
löschen möchten.
4) Um alle Markerzu löschen, wählen Sie mit den Tasten ▲ oder ▼
den Punkt „Alle Marker löschen“ und drücken Sie die Taste ENTER.
1-5. Kapitelverbergen/zeigen
Diese Funktion isttür das Verbergen von Werbespots sehr praktisch.
Wählen Sie mit den Tasten ▲ oder ▼ den Punkt „Kapitel verbergen“
und drücken Sie die Taste ENTER.Wenn der lautende Kapitel
verborgen ist, erscheint aut dem Bildschirm „Kapitel zeigen“.
1-6. Vorschaubild
Sie können den Vorschaubild des gewählten Kapitels wechseln.
Drücken Sie ENTER an der Stelle, wo Sie den Vorschaubild
einstellen möchten.
1-7.Titelteilen(nurDVD±RW)
Sie können den Titel in zwei Teile teilen. Drücken Sie die Taste
ENTER, an der Stelle, wo Sie teilen möchten. Die Teilung nimmt
einiege Minuten in Anspruch.
1-8. Ablaufzeit
Sie können die Ablaufzeit sehen.
2. Drücken sie die Taste STOP, wenn Sie mit dem Bearbeiten fertig
sind.
Die Erneuerung der CD nimmt einiege Minuten in Anspruch.
Umbenennung eines Titels (DVD+R/DVD+RW)
1. Drücken Sie die Taste ENTER, nachdem Sie mit den Tasten
▲ oder ▼ den Punkt „Rename title“ (Umbenennung eines Titels)
gewählt haben. Auf dem Bildschirm erscheint eine Tastatur.
LMNOPQRSTUV345
Space Aa P2 Backspace Clear Exit OK
Drama Action Sparta Comody Nowa Kida Adult
DUD RecORDGR
Redaktieren.
Wenn Sie mit dem Titel fertig sind, drücken Sie ENTER, nachdem Sie
„OK“ gewählt haben.
Löschen eines Titels (nur DVD+RW)
1. Drücken Sie die Taste ENTER, nachdem Sie mit den Tasten
▲ oder ▼ den Punkt „Bearbeiten eines Titels“ gewählt haben. Aut
dem Bildschirm erscheint eine Dialogbox.
2. Drücken Sie die Taste ENTER, um den Inhalt des Titels zu löschen,
nachdem Sie „Yes“ (Ja) mit den Tasten ◄,► gewählt haben.
Das Löschen von der CD nimmt einiege Minuten in Anspruch.
Hinweise: diese Funktion ist nur bei der DVD±RWmöglich.
Überschreiben eines Titels (nur DVD+RW)
1. DrückensiedieTasteENTER,nachdemSie mitdenTasten
▲ oder ▼ den Punkt „Uberschreiben der CD“ gewählt haben.
DVD-Modus wechselt sich aut AV-Modus.
2. Drücken Sie die Taste AV IN, um den AV-Eingang zu wählen, von
deren Sie aufnehmen möchten. Mit jedem Tastendruck wechselt der
AV-Eingang:
TV
Front AV
Rear AV
Rear SV
□V
Scart AV
Möchten Sie eine Fernsehsendung aufnehmen, wählen Sie TV-Modus
Wählen Sie den Sender, der Sie aufnehmen möchten, indem Sie die
Taste Channel- oder Channel+ drücken.
3. Drücken Sie die Taste RFC, um die Aufnahme zu starten. Die
Aufnahme beginnt von dem Anfang der CD.
4. Drücken Sie die Taste STOP, um die Aufnahme zu stoppen.
Hinweise: bei dem Uberschreiben werden alle vorher eingespeicherte
Dateien gelöscht.
Titel hinzufügen (DVD+R/DVD+RW)
Sie können die Aufnahme den lezten Titel tortsetzen.Wählen Sie den
lezten Titel und das Menü wird aut dem Bildschirm eingezeigt.
1. DrückensiedieTasteENTER,nachdemSie mitdenTasten
▲ oder ▼ den Punkt „Titel hinzufügen“ gewählt haben. DVD-Modus
wechselt sich aut AV-Modus.
2. Drücken Sie die Taste AV IN, um den AV-Eingang zu wählen, von
deren Sie aufnehmen möchten. Mit jedem Tastendruck wechselt der
AV-Eingang:
2. Wählen Sie die Buchstabe die Sie mit den Tsten ▲▼◄► eintasten
möhten, und drücken Sie die Taste ENTER.
3. WiederholenSieden2.Punkt.
Maximale Titellänge soll nicht länger al 9 Symbole sein.
4. Horizontale Kontrollskala aut der unteren Zeile derTastaturtür das
35
4097IMnew.indd 35 27.02.2007 13:35:14
Page 36

DEUTSCH
TV
Front AV
Rear AV
Rear SV
DV
Scart AV
Möchten Sie eine Fernsehsendung aufnehmen, wählen Sie TV-Modus.
Wählen Sie den Sender, der Sie aufnehmen möchten, indem Sie die Ta
ste Channel- oder Channel+ drücken.
3. Drücken Sie die Taste REC, um die Aufnahme zu starten. Die
Aufnahme beginnt von dem Anfang der CD.
4. Drücken Sie die Taste STOP, um die Aufnahme zu stoppen.
Hinweise: ist aut der CD nicht genug Speicherplatz, wird das Menü nicht
aut dem Bildschirm angezeigt.
Kopieren des Titels(DVD+R/DVD+RW)
Sie können den Titel von der DVD aut die Festplatte kopieren lassen.
1. DrückensiedieTasteENTER,nachdemSie mitdenTasten
▲ oder ▼ den Punkt „Kopieren des Titels“ gewählt haben. Das
Kopieren des Titels von der DVD aut die Festplatte beginnt.
Bearbeiten eines Titels von der Festplatte
1. Drücken Sie die Taste HDD/DUB, um das HDD-Modus zu wählen.
Aut dem Bildschirm erscheint die Liste.
2. Wählen Sie den Titel für das Bearbeiten mit den Tasten ▲ oder ▼
und drücken Sie die Taste ►. Aut dem Bildschirm erscheint das
Menü.
Fragmentieren
Sie können von Ihnen bezeichneten Teile des Titels während derWiedergabe auslassen.
1. Drücken sie ENTER, nachdem Sie mit den Tasten ◄,► „Segment“
gewählt haben.
Es startet die automatiesche Wiedergabe des Titels.
Finden Sie den Anfang des Kapitels, das Sie während der
2.
Wiedergabe auslassen möchten.
Sie können die Szene mit den Tasten ◄◄, ►► oder mit der Taste
PLAY suchen.
Drücken Sie ENTER am Anfang des Kapitels, das Sie während der
Wiedergabe auslassen möchten.
Finden Sie das Ende des Kapitels und drücken Sie ENTER.
Möchten Sie noch einiege Kapitel markieren, wiederholen Sie die
Schritte 3 und 4.
Die bezeichnete Kapitel werden mit violetter Farbe aut der Skala
angezeigt.
Am Ende drücken Sie STOP.
6.
Hinweise: wenn Sie den Titel mit den markierten Kapitel von der Fest
platte aut die DVD kopieren lassen, werden die Kapitel nicht kopiert.
Zusammenfügen
Sie können zwei Titel vereiniegen.
1. DrückensiedieTasteENTER,nachdemSie mitdenTasten
▲ oder ▼ den
Punkt „Zusammenfügen“ gewählt haben.
3. Wählen Sie den Titel für das Zusammenfügen mit den Tasten
▲ oder ▼ und drücken Sie ENTER. (Möchten Sie das Modus
verlassen, drücken Sie die Taste RETURN).
Vorschaubild wechseln
Sie können den Vorschaubild für den gewählten Titel wechseln.
1. Drücken sie die Taste ENTER, nachdem Sie mit den Tasten ▲ oder
▼ „Vorschaubild wechseln“ gewählt haben.
Die Wiedergabe des Titels startet automatisch.
2. Drücken Sie die Taste ENTER an der Stelle, wo Sie den Vorschaubild
wechseln möchten.
(Sie können den Titel mit den Tasten ◄◄, ►► oder mit der Taste
PLAY suchen). Aut dem Bildschirm erscheint die Dialogbox.
3. Drücken Sie ENTER, nachdem Sie mit den Tasten ◄,► „OK“ gewählt
haben.
Wiedergabe
Sie können den gewählten Titel wiedergeben lassen.
1. Drücken sie die Taste ENTER, nachdem Sie mit den Tasten
▲ oder T„PLAY“ (Wiedergabe) gewählt haben. DieWiedergabe des
gewählten Titels beginnt.
Löschen
1. Drücken sie die Taste ENTER, nachdem Sie mit den Tasten
▲ oder ▼ „Löschen“ (Wiedergabe) gewählt haben. Aut dem
Bildschirm wird eine Dialogbox angezeigt.
2. Drücken Sie die Taste ENTER, um den Inhalt des Titels zu löschen,
nachdem Sie „Yes“ (Ja) mit den Tasten ◄,► gewählt haben.
Teilen
Sie können den lautenden Titel in zwei Teile teilen.
1. Drücken sie die Taste ENTER, nachdem Sie mit den Tasten
▲ oder ▼ „Teilen“ gewählt haben. DieWiedergabe des lauten Titels
beginnt.
2. Finden Sie die Stelle, wo Sie teilen möchten. Sie können die Szene
mit den Tasten ◄◄, ►► oder mit der Taste PLAY suchen.
3. Drücken sie ENTER, an der Stelle, wo Sie teilen möchten. Aut dem
Bildschirm erscheint die Dialogbox.
4. Drücken Sie die Taste ENTER, nachdem Sie mit den Tasten ◄,►
„OK“ gewählt haben.
Umbenennung
Sie können den Titel umbenennen.
1. Drücken Sie die Taste ENTER, nachdem Sie mit den Tasten
▲ oder ▼ den Punkt „Rename“ (Umbenennung) gewählt haben.
Aut dem Bildschirm erscheint eine Tastatur.
2. Drücken sie ENTER, nachdem Sie aut derTastatur „Löschen“
gewählt haben, um den aktuellen Namen zu löschen
3. Wählen Sie die Buchstabe die Sie mit den Tsten ▲▼◄► eintasten
möchten, und drücken Sie die Taste ENTER.
4. WiederholenSieden3.Punkt.
Maximale Titellänge soll nicht länger als 12 Symbole sein.
5. Drücken Sie die Taste ENTER, nachdem Sie „OK" auf der Tastatur
gewählt haben, wenn Sie fertig mit dem Namen sind.
Blockieren
Sie können den Titel blockieren, damit niemand ihn wiedergeben kann.
1. DrückenSiedieTasteENTER,nachdemSiemitdenTasten , den
Punkt „Blockieren“ gewählt haben.
DerTitel ist blockiert.
Entblockung
Sie können den blockierten Titel entblocken.
1. Drücken Sie die Taste ENTER, nachdem Sie mit den Tasten ◄,► den
Punkt „Entblockung“ gewählt haben.
Auf dem Bildschirm erscheint ein Parole-Fenster.
2. Eintasten Sie mit den Zahlentasten die Parole, die aus 4 Zahlen
besteht.
3. Drücken Sie ENTER, nachdem Sie „OK“ mit derTaste ▼ gewählt
haben.
DerTitel ist entblockt.
Schutz
Sie können den Titel von der Bearbeitung schützen.
1. Drücken Sie ENTER, nachdem Sie mit den Tasten ◄,► den Punkt
„Schutz“ gewählt haben.
DerTitel ist geschützt. Sie können den geschützten Titel
wiedergeben, aber nicht bearbeiten.
36
4097IMnew.indd 36 27.02.2007 13:35:14
Page 37

DEUTSCH
Schutz aufheben
Sie können den Schutz aufheben.
1. Drücken Sie ENTER, nachdem Sie mit den Tasten ◄,► den Punkt
„Schutz aufheben“ gewählt haben.
Der Schutz ist aufgehebt.
Die Einstellungen werden im DVD-Rekorder eingespeichert. Solche Ein
stellungen sind „Gegebene Einstellungen“ genannt, man kann Sie leicht
verändern und speichern.
Grundhandlungen
Drücken Sie die Taste SETUP im Stoppmodus. Benutzen Sie die Tasten
▲ ▼◄► und die Tasten ENTER, RETURN, um die Optionen zu suchen
und zu wählen. Die aktuelle Einstellungen sind mit dem Earbband ausge
zeichnet.
1. Drücken Sie die Taste STOP während derWiedergabe der CD.
2. Um das Setup-Menü aufzurufen, drücken Sie SETUP.
3. Wählen Sie den gewünschten Punkt mit den Tasten ◄,► und
bestätigen mit ENTER.
4. Wählen Sie den gewünschten Zusatzpunkt mit den Tasten ◄,►
und bestätigen mit ENTER. Möchten Sie zum vorherigen Menü
zurückkehren, drücken Sie die Taste RETURN.
5. Drücken sie die Taste SETUP am Ende der Einstellungen.
Setup-Menü
Aufnahme und Scanning der Kanäle
Modify channel information
Program Number P001
Name [^[i
Standard PAL
Search Type Cha
Band Star
000GD
PAL BiG
Channel
Standard
0- 00
4-2. Mit den Tasten CHANNEL- oder CHANNEL+ wählen Sie den Kanal,
der Sie ändern möchten.
Name des Eernsehsenders ändern
1) Drücken Sie die Taste ENTER, nachdem Sie mit den Tasten ◄,► den
Punkt „Name“ gewählt haben.
2) Wählen Sie die Buchstaben mit den Tasten ◄,►,▲,▼ und
bestätigen mit ENTER.
Standart-TV
Stellen Sie das TV-System für den laufenden Kanal ein.
1) Mit den Tasten ▲ oder ▼ wählen Sie „Standart“ und bestätigen mit
ENTER.
2) Mit den Tasten ▲ oder ▼ wählen Sie TV-System und bestätigen mit
ENTER.
Fernsehsender löschen
Möchten Sie den Eernsehsender löschen, wählen Sie „Löschen“ mit den
Tasten ▲ oder ▼ und bestätigen mit ENTER.
4-3. Sind alle Einstellungen richtig, drücken Sie ENTER, nachdem Sie
mit den Tasten ◄,► „OK“ gewählt haben.
Hinweise: Diese Eunktion ist nur im TV-Modus möglich.
1. Automatische Markierung der Eragmente.
Ist der automatische Marker auf 5 Minuten eingestellt, wird der Tiitel
automatisch in Kapiteln mit dem Intervall in 5 Minuten. Man kann
auch die Kapitel manuell löschen oder hinzufügen.
2. Aufnahmequalitätsstufen
Es gibt 6 Aufnahmequalitätsstufen:
HQ: hohe Qualität. Dauer derAufnahme auf die reine CD - 1 Stunde.
SP: Standartwiedergabe. Dauer der Aufnahme auf die reine CD - 2
Stunden.
SP+: erweiterte Standartwiedergabe. Dauer der Aufnahme auf die reine
CD - 2 Stunden 30 Minuten.
LP: dauernde Wiedergabe. Dauer derAufnahme auf die reine CD - 3
Stunden.
EP: längereWiedergabe. Dauer der Aufnahme auf die reine CD - 4
Stunden.
SLP: super-längere Wiedergabe. Dauer derAufnahme auf die reine CD
- 4 Stunden.
3. AnalogesScannendesSenders
Dieser Recorder hat den integriertenTV-Tuner für das Eingeben der
Eernsehsenders.
1. Drücken Sie die Taste ENTER, nachdem Sie mit den Tasten ◄,► den
Punkt „Scannen“ gewählt haben.
2. Drücken Sie die Taste ENTER, nachdem Sie mit den Tasten ◄,►
„OK“ gewählt haben.
Die automatische Kanalabstimmung startet. Wird der Sender mit der
automatischen Kanalabstimmung gefunden, wird er automatisch
eingespeichert.
Hinweise:
• Währen der Kanalbestimmung werden alle vorherige Kanäle
gelöscht und versetzt.
• Diese Eunktion ist nur im TV-Modus möglich.
5.
Eernsehsender umstellen
Mit Hilfe dieser Eunktion kann man Kanäle umstellen. Sie können
auch die Stellen für die Kanäle, die gewöhnlich nebeneinander
folgen, gruppieren.
Drücken Sie die Taste ENTER, nachdem Sie mit den Tasten ▲ oder
V „Eernsehsender umstellen“ gewählt haben.
2. Wählen Sie den Eernsehsender mit den Tasten ▲ oder ▼ und
drücken Sie ►.
Wählen Sie die Stelle für diesen Eernsehsender mit den Tasten ▲
3.
oder ▼ unddrückenSie ►.
Möchten Sie auch andere Eernsehsender umstellen, wiederholen
4.
Sie die Schritte 2 und 3.
Drücken Sie ENTER, nachdem Sie „OK“ mit der Taste ◄ gewählt
5.
haben.
Hinweise: Diese Eunktion ist nur im TV-Modus möglich.
6. Aufnahmetimer
Sehen Sie den Abschnitt „Aufnahmetimer“
7. DasLandwählen
Drücken Sie ENTER, nachdem Sie Ihr Land mit den Tasten ▲ oder ▼
gewählt haben.
Kanal ändern
4-1. Drücken Sie die Taste ENTER, nachdem Sie mit den Tasten ◄,►
den Punkt „Bearbeiten“ gewählt haben. Die Information über den Kanal
wird auf dem Bildschirm angezeigt.
37
4097IMnew.indd 37 27.02.2007 13:35:14
Page 38

DEUTSCH
Video Sprache
1. FormatdesVideoausganges
Stellen Sie das Format des Videoausganges ein.
Unterstützt Ihr Fernseher PAL, stellen Sie PAL ein. Wenn Ihr
Fernseher NTSC unterstützt, stellen Sie NTSC ein.
2. TVBIIdschIrmformat
Haben Sie einen Breltblldfernseher, wählen Sie „16:9Wlde“.
Breltblld-DVD wird die ganze Blldschirmfläche besetzen.
Haben Sie einen normalen Fernseher, wählen Sie „4:3 Letter Box“
oder „4:3 PAN SCAN“. Bel diesem Modus erscheinen schwarze
Balken am oberen und unteren Blldschirmrand.
Hinweise: bei elnlegen CDs kann man das Blldschirmformat nicht
ändern.
3. P-SCAN/HDMI Ausgang
Bel derZellenfolgeabtastung durch denY/Pb/PrVerblnder, stellen
Sie P-Scan/HDMI ein. Sehen Sie fern durch HDMI, stellen Sie
P-Scan/HDMI ein. (Diese Funktion Ist unmöglich, wenn EURO AV
outputauf PGB eingestellt Ist.)
4. Vorschaubild
Wenn das Bild sich längere Zelt nicht bewegt, bedeutet das,
dass Fernsehgerät beschädigt sein kann. Dauert es länger als 5
Sekunden, so schaltet dasVorschaublld, wenn es gewählt Ist, ein.
Das Vorschaubild schützt der Katodenstrahlröhre (CRT) von der
Beschädigung.
Audio (Dieses Menü ist unzugängiich, wenn der CD in den Rekor
der eingeiegt ist)
Analogausgang
(Ist nicht zu verändern)
DIgltalerAusgang (SPDIF)
RAWBInärstrom (BItStream): ursprüngllcherAudlostrom, geht
durch den digitalen Audloausgang hinaus.
LPCM: dekodierter Audlostrom geht durch digitaler Audloausgang
hinaus.
LPCM Ausgang
Wenn Sie den Player an den AV Verstärker (oderaneln anderes
Gerät) anschlleßen und dabei den digitalen Audloausgang
benutzen, so sollen Sie diese Einstellung durchführen. Ist derAV
Verstärker (oder ein anderes Gerät) mit der Hochfrequenz der
Audlozeltquantlslerung (96 Kllohertz) kompatibel, stellen Sie LPCM
96 Kllohertz ein. Im Gegenfall stellen Sie LPCM 48 Kllohertz ein.
Sprache des OSD-Menüs
Dieses Punkt benutzt man, um die DIsplysprache zu wählen. Wenn
die spräche gewählt Ist, wird die Information In dieser Sprache
angezeigt.
Audio Sprache
Stellen Sie die gewünschte Audio Sprache. Ist die Audio Sprache
eingestellt, wird dIeWIedergabe In dergewählten Sprache erfolgen,
(wenn die gewählte Sprache auf der CD gibt.)
Untertitelsprache
Stellen Sie die gewünschte Untertitelsprache. Ist die
Untertitelsprache eingestellt, wird dIeWIedergabe In der gewählten
Sprache erfolgen, (wenn die gewählte Sprache auf der CD gibt.)
Sprache des CD-Menüs
Stellen Sie die gewünschte Sprache des CD-Menüs. Ist die Sprache
des CD-Menüs eingestellt, wird dIeWIedergabe In der gewählten
Sprache erfolgen, (wenn die gewählte Sprache auf der CD gibt.)
Uhrzeit und Datum
Automatische Zeiteinstellung
Die genaue Uhrzeit wird automatisch übernommen, wenn der
DVD-Recorder auf einem Sender eingestellt ist, der ein Zeitsignal
überträgt.
Drücken Sie die Taste ENTER, nachdem Sie mit den Tasten
▲ oder ▼ „Uhrzeit- und Datumeinstellungen“ gewählt haben.
Drücken Sie ENTER, nachdem Sie „Auto“ gewählt haben.
Drücken Sie die Taste ENTER, nachdem Sie mit der Taste ▼
„Programmieren“ gewählt haben.
Wählen sie den eingestellten Eernsehsender, der die genaue
Zeitsignal überträgt und bestätigen mit ENTER:
Manuelle Zeiteinstellung
Wenn in Ihrer Region keine Eernsehsender, die die genaue Zeitsignal
übertragen, gibt, so können Sie die Zeit manuell einstellen.
Drücken Sie die Taste ENTER, nachdem Sie mit den Tasten
▲ oder ▼ „Uhrzeit- und Datumeinstellungen“ gewählt haben.
Drücken Sie ENTER, nachdem Sie „Manuell“ gewählt haben.
Mit den Zahlentasten 0-9 oder mit den Tasten ◄,►,▲,▼ ändern Sie
Zeit und Datum und bestätigen mit ENTER.
Allgemeines
38
4097IMnew.indd 38 27.02.2007 13:35:15
Page 39

DEUTSCH
Kindersicherung (Eingeschränkte Wiedergabe)
Manche DVD VIDEOS sind mit einer voreingestellten
Kindersicherung versehen, mit derverhindertwerden kann, das
Kinder sich DVDs ansehen, die nichttür ihrAlter geeignet sind.
Es gibt 8 Stuten.Wenn es die Stute 8 gewählt ist, so ist der Inhalt
der DVD nurtür die Erwachsene geeignet. Wenn es die Stute 1
gewählt ist, so ist der Inhalt der DVD für die Kinder geeignet. Bei
der Wiedergabe wird die gewählte Stute mit der Stute aut der DVD
verglichen.Wenn die eingestellte Stute höher als aut der DVD,
wird dieWiedergabe ertolgen.Wenn nicht - ist dieWiedergabe
unmöglich. Um die gewünschte Stute einzustellen, folgen Sie den
Anweisungen.
Drücken Sie ENTER, nachdem Sie die gewünschte Stute mit den
Tasten ▲ oder ▼ gewählt haben.
Aut dem Bildschirm erscheint das Kennwort-Fenster.
Geben Sie mit den Zahlentasten ein 4-stelliges Kennwort und
drücken sie dann ENTER.
Haben Sie das Kennwort nicht geändert, geben Sie 0,0,0,0.
Drücken Sie die Taste ENTER, nachdem Sie „OK“ mit derTaste ▼
3.
gewählt haben.
2. Andern des Kennworts
1) Drücken sie ENTER, nachdem Sie „Das Kennwort ändern“ gewählt
haben.
Auf dem Bildschirm erscheint das Kennwort-Fenster.
Enler password here, D D D D i
Inpul new password. D D D D
Inpul new again. □□□□
Festplatte
1. PuttergrößeTimeshitt
Bei der zeitversetzte Aufnahme können Sie HDD Speicher wählen,
wo zeitweilig Fernsehsendung gespeichert wird.
2. PuttermodusTimeshitt
Erneuerung: Speicherinhalt wird gelöscht, nachdem Sie den
Fernsehsender gewechselt haben.
Speicherung: Speicherinhalt wird erhalten, obwohl der
Fernsehsender geändert war.
3. IntormationüberdieFestplatte.
Anzeigt die Information über die Festplatte.
4. Speichersteuerung
Automatische: wenn die Festplatte überfüllt ist, wird der Rekorder
nicht geschützte Titel überschreiben.
Manualle: die Festplatte überfüllt ist, wird der Recorder nicht
überschreiben, sondren mit Ihrem Erlaubnis einige Titel löschen für
das weitere Uberschreibung.
5. Formatieren
Sie können alle Programme von der Festplatte löschen.
6. OptischePlattelöschen
Sie können alle Programme von der optische Platte löschen.
□UD RECORDER
2) Geben Sie mit den Zahlentasten ein 4-stelliges Kennwort und
drücken sie dannT.
3) Geben Sie mit den Zahlentasten ein neues 4-stelligen Kennwort und
drücken sie dannT.
4) Geben Sie das neue Kennwort noch ein Mal und bestätigen mit T.
5) Drücken Sie die Taste ENTER, nachdem Sie „OK“ gewählt haben.
Das Kennwort ist geändert.
3. Werkeinstellungen
Um dieWerkeinstellungen wiederherstellen:
1) Drücken sie ENTER, nachdem Sie „Werkeinstellungen“ mit der Taste
T gewählt haben. Aut dem Bildschirm erscheint die Dialogbox.
2) Wählen Sie „OK“ und bestätigen mit ENTER.
4. AVEuroAusgang
Stellen SieYCbCrein, um sich ComponentVideo durchY/Cb/
Cr-Verbindung ansehen. Beim Verwenden den AV EURO Verbinder
RGB, schließen Sie RGB an.
5. Dekoder
Möchten Sie kodierte Kanäle durchsehen, müssen Sie Canal+
Dekoder an die Euro A/V IN Buchse anschließen, und ihn aut „ON“
einstellen.
6. Vorausschau
Sie können den Art derVorausschau des Titels aus derTitelliste der
Festplatte wählen.
Statisch: Vorausschau mit dem Standbild
Dynamisch: Vorausschau mit dem beweglichen Bild.
7. Kopiermodi von der Festplatte aut die CD
Beim Kopieren von der Festplatte aut die DVD können sie
Kopiermodi wählen.
Fit to disc: die Aufnahmequalität wird so reguliert, dass die gewählte Titel
werden aut den freien Speicherplatz aut der Disk angepasst.
High-Speed-Modus: die gewählte Titel werden mit derselben
Aufnahmequalität kopiert.
Höchste Geschwindigkeit: die gewählte Titel werden mit der bestimmten
Aufnahmequalität in der Echtzeit kopiert.
39
4097IMnew.indd 39 27.02.2007 13:35:15
Page 40

DEUTSCH
Weitere Informationen
Technische Daten
Hauptdaten
Aufnahme
Timer
EuroVerbinder
AV(Verbinder21-pin)
Abspielbare Discs
Unterstützte Videoformate
TV-System
Stromversorgung
Stromverbrauch
Gewicht
Abmessungen
Betriebstemperatur
Betriebsfeuchtigkeit
Aufnahmeformat
Beschreibbare Discs
Programmen
Zeituhr
Timer der automatischen Einschaltung
AV Engang/Ausgang
Xl
AVVerbinderAusgangx 1
DVD, CD-DA, CD,CD-R/CD-RW, DVD±R/RW, DVD-R/RW
MPEG-1, MPEG-2, MPEG-4, JPEG
PAL/SECAM
AG 100 240 V, 50/60 Hz
45W
4,5 kg
420 mm (B)x44 mm (H) x 336 mm (L)
5“C - 35“C
10%-75%
DVD VIDEO
DVD±R, DVD±RW, HDD(250Gb)
8 Programmen
Quarzuhr (Zifferndisplay 24-Stunden)
Ca. 1 Stunde 30 Minuten
Dieser Verbinder überträgt Audio- und Videosignale einem
Earbfernsehgerät oder einem Monitor
Vp-p(75 0m)
0,286Vp-p(75Om)
S-Video Buchse
Vp-p(75 0m)
RCA Buchse
Y:1.0Vp-p(75Om)
Cb/Pb, Cr/Pr: 0,7Vp-p (75 Om)
2 Vrms (1 kHz, 0 Dezibel)
RCA Buchse
Optische Buchse
RCA Buchse
S-Video Eingang/Ausgang
Video Eingang/Ausgang
ComponentVideo Eingang
Audio Eingang/Ausgang
Digitaler Audio Ausgang
Eingang/Ausgang Y(Helligkeit)
C(Earbe)
Eingang/Ausgang
Eingang x 2,
Ausgang x 1
(X Cb/Pb, Cr/Pr)
Eingang (L/R) x 2,
Ausgang (L/R) x 1
Optischer Ausgang x 1
Koaxilausgang x 1
Digitaler Eingang/Ausgang lEEEStandart 1394 4 pin
USB Eingang USB1.1 4 pin
HDMI Ausgang A Typ X 1 480p/576p
4 Hz -44 kHz (DVD Erequenz: 96 kHz)
lOOdB
95dB
0;003 %
1
1
1
1
2
Audio Charakteristiken
Zubehör
Erequenzbereich
Signal-Rauschabstand
Dynamikbereich
Harmonische Verzerrungen
A/V Kabel
Rf Kabel
Scart Kabel
Eernbedienung
Batterien AA
Bedienungsanweisung
Hinweise: Wir verbessern die Qualität unseres Produktes ununterbrochen, darum können die technischen Daten ohne Vorankündigung geändert
werden.
Störungsbehebung
Die Störungen können oft durch der falsche Verwendung entstehen. Sollten am Player Störungen auftreten, versuchen Sie, diese anhand der fol
genden Tabelle zu beheben, bevor Sie das Gerät zur Reparatur bringen. Sollte die Störung bestehen bleiben wenden Sie sich an den Kundendienst.
Eehler Abhilfe
CD ist falsch eingelegt • legen Sie die CD richtig ein
Nicht kompatibler Regionalcode
Kondensation innerhalb des
Geräts
• Wenn der Regionalcode auf der DVD mit einem auf dem Rekorder angegebenen nicht
übereinstimmt, lässtdiese DVD sich nicht wiedergeben.
• Warten Sie bis das Kondensat verdunstet. Verwenden Sie nicht den Recorder neben der Klimaanlage
CD ist falsch eingelegt • Legen Sie die CD mit der Etikette nach oben
Das Bild ist unbeweglich, die
Bedienungstasten funktionieren
nicht
• Schalten Sie die Versorgung aus, dann schalten Sie sie wieder mit derTaste STANDBY/ON auf den
Vorderseite des Geräts ein.
• Ziehen Sie den Stecker heraus und stecken Sie ihn wieder ein.
40
4097IMnew.indd 40 27.02.2007 13:35:15
Page 41

DEUTSCH
Die neue Einstellungen im
Setup-Menü werden bei der
Wiedergabe nicht ausgeführt. Die
Einstellungen sind gelöscht
Das Bild oder die Earbe fehlt
DVD-Rekorder aufnimmt nicht
Bildschirm ist ausgeweitet, ändert
sich nicht
Störungen oder Verdunkelung des
Bildeswährend derWiedergabe
Eernsehbedienung funktioniert
nicht
Der Ton fehlt oder verzerrt
Analoge Audio ist in Ordnung,
aber es gibt kein digitales
Audiosignal
Bedeutender Unterschied
zwischen der Lautstärke der DVD
und der CD
Der DTS Audioausgang fehlt
• Einiege Einstellungen können bei der CD-Wiedergabe durchgeführt werden, aber um sie zu
aktivieren, soll man die Wiedergabe stoppen und wieder starten lassen
• Das ist keine Störung. Durchführen Sie dieselbe Einstellungen im Stoppmodus.
• Wenn die Versorgung wegen des Netzausfalls oder wegen des Netzkabelabstellen sich ausschaltete,
werden die Einstellungen gelöscht.
• Video ist falsch angeschlossen. Prüfen Sie die Verbinder. Stellen Sie sicher, dass der Steker richtig
eingesteckt ist
• Ealsche TV-Monitor oderA/VVerstärkerEinstellungen. Wenden Sie sich an die
Bedienungsanweisung, um das Zubehör anzuschließen
• Schließen Sie den Recorder an den Eernseher durch Composite oder S-Video Kabel noch ein Mal
• Ealsche Disk, keine DVD±RW, DVD±R
• Es gibt kein Speicherplatz auf der CD
• DVD±Ristfinalisiert
• Die Einstellungen der Eernsehgröße im Setup-Menü sind falsch
• Stellen Sie die Bildschirmgröße dem TV-Monitor entsprechend ein
• Dieser Player hat ein Macro Vision System. Einiege Disks sind vom Kopieren mit dem
Sicherheitssignal geschützt. Bei derWiedergabe solcher Disks auf dem Bildschirm können Streifen
u.s.w. entstehen
• Die Eernsehbedienung ist zu weit von dem Recorder oder nicht auf den Sesor gerichtet
Benutzen Sie die Eernbedienung zweckgemäß
• Ersetzen Sie die Batterien
Einiege CDs haben kein Digitalaudio
• Umschalten Sie den Versterker auf den analoge Ausgang
Staub oder Schmutz auf der CD
• Reiniegen Sie die CD
Die Verbinder sind nicht völlig in die Buchsen eingesteckt (nicht angeschlossen)
• PrüfenSiealleVerbinder
Verschmutzte oder oxidierte Stecker/Buchsen
• Reiniegen Sie die Stecker/Buchsen
Der Audiokabel ist falsch angeschlossen
• Prüfen Sie den Audiokabel
DerAusgang des Recorders ist an PHONO-Eingang desVerstärkers angeschlossen (Eingang für das
Anschliessen des Vinylspielers)
• Schliessen Sie an jeden Eingang, außer PHONO
CD ist im Pausemodus
• Drücken Sie „Wiedergabe“, um das Pausemodus zu verlassen
Ealsche Einstellungen desVersterkers
• Prüfen Sie die Lautstärke, Lautsprecher, Eingangfunktion
Ealsche Einstellungen desAudio-Menüs
• Stellen Sie sicher, dass derdigitale Audioeingang auf LPSM und RAWeingestellt ist
Prüfen Sie, dass die LPSM und RAW Einstellungen für Ihren Verstärker passen. Siehe die Betriebsanweisung
für den Verstärker.
• CD und DVD werden auf verschiedene Weise gebrannt.
Das ist keine Störung
• Wenn das Gerät an den Verstärker oder Dekoder, der DTS nicht unterstützt, durch den digitalen
Audiokabel angeschlossen ist, schliessen Sie DTS kompatible Versterker oder Dekoder an. Im
Gegenfall entsteht das Rauschen bei der DTSWiedergabe.
• Wenn das Gerät an den Verstärker oder Dekoder, der DTS unterstützt, durch den digitalen
Audiokabel angeschlossen ist, prüfen Sie die Einstellungen desVerstärkers, und stellen Sie sicher,
dass der Kabel richtig angeschlossen ist.
Hinweise: die statische Elektrizität oder andere Erscheinungen können zu den Störungen in der Arbeit des Geräts führen. In diesem Eall nehmen Sie
den Netzkabel heraus und stecken Sie den Netzkabel wieder in die Steckdose. Wird das Problem nicht gelöst, wenden Sie an den Kundendienst.
Entsorgung von elektronischen und elektrischen Geräten
„Dieses Produkt ist mit dem Symbol versieht, welches bedeutet, dass die Entsorgung von elektronischen und elektrischen Geräten gemäß den Di
rektiven 2002/96/EU erfolgen darf. Die richtige Entsorgung von gebrauchten Geräten vorbeugt der schädlichen Einwirkung auf die Umwelt. Achtung!
Die elektrische Geräte können die schädliche Einwirkung auf die Umwelt und die gesundheit des Menschen wegen den schädlichen Stoffen aus
üben.
Der Hersteller behält alle Rechte vor, Eigenschaften des Geräts ohne vorherige Warnung oder Benachrichtigung ändern zu dürfen.
Gewicht undAbmessungen ungefähr angegeben.
Da dieserArtikel ständig perfektioniert wird, behalten wir uns das Rechtvor an seiner Konstruktion und/oder den technischen Kennwerten Änderun
gen ohne Vorbescheid vorzunehmen.
DIE LEBENSDAUER DES GERÄTES BETRÄGT NICHT WENIGER ALS 5 JAHRE
Gewährleistung
Ausführliche Bedingungen der Gewährleistung kann man beim Dealer, der diese Geräte verkauft hat, bekommen. Bei beliebiger Anspruchserhebung
soll man während der Laufzeit der vorliegenden Gewährleistung den Check oder die Quittung über den Ankauf vorzulegen.
Das vorliegende Produkt entspricht den Eorderungen der elektromagnetischen Verträglichkeit, die in 89/336/EWG -Richtlinie des Rates
C€
und den Vorschriften 23/73/EWG über die Niederspannungsgeräte vorgesehen sind.
41
4097IMnew.indd 41 27.02.2007 13:35:15
Page 42

РУССКИМ
Инструкция по эксплуатации
DVD и HDD-рекордер
Модель VT-4097
Перед подключением, использованием и настройкой
проигрывателя внимательно прочитайте инструкции, содержащиеся
в настоящем руководстве. Сохраните руководство, используйте его
в дальнейщем в качестве справочного материала.
Для правильной эксплуатации данного устройства внимательно
прочитайте и сохраните руководстводля пользователя.
ВНИМАНИЕ!
ВИДЕОПЛЕЕР DVD-ДИСКОВ ЯВЛЯЕТСЯ ЛАЗЕРНЫМ УСТРОЙСТВОМ
КЛАССА 1. ИСПОЛЬЗОВАНИЕ ОРГАНОВ УПРАВЛЕНИЯ ИЛИ
РЕГУЛИРОВКИ, НЕ УКАЗАННЫХ В ЭТОМ РУКОВОДСТВЕ,
ВЫПОЛНЕНИЕ ПРОЦЕДУР, КОТОРЫЕ В НЕМ НЕ ОПИСАНЫ, МОЖЕТ
ПРИВЕСТИ К ПОПАДАНИЮ ПОД ОПАСНОЕ ИЗЛУЧЕНИЕ. ТАК
КАК ЛАЗЕРНЫЙ ЛУЧ, ЙСПОЛЬЗУЕМЫЙ В ЭТОМ ВЙДЕОПЛЕЕРЕ
DVD-ДЙСКОВ, ОПАСЕН ДЛЯ ГЛАЗ, НЕ ВСКРЫВАЙТЕ КОРПУС.
ОБСЛУЖЙВАНЙЕ УСТРОЙСТВА ДОЛЖНО ВЫПОЛНЯТЬСЯ ТОЛЬКО
КВАЛЙФЙЦЙРОВАННЫМЙ СПЕЦЙАЛЙСТАМЙ СЕРВИСНОГО
ЦЕНТРА.
Примечание:
соответствующим стандартам товаров класса «Б» (в соответствии
с главой 15 правил ФКС). Данные требования созданы для обеспе
чения безопасности в процессе установки. Данное устройство со
здает, использует и излучает энергию радиочастот. Использование
прибора не в соответствии с инструкциями может привести к воз
никновению помех в работе радиоприборов. Однако нет гарантии
того, что при правильной установке данные помехи не возникнут.
Если в радио или телевизионном вещании возникли помехи, что можетбыть вызвано включением и выключением прибора, вы можете
попытаться устранить помехи одним или несколькими из следующихспособов:
- йзмените направление антенны или переустановите ее.
- Увеличьте расстояние между прибором и приемником.
- Включите прибор и приемник в разные розетки.
- Обратитесь кдилеру или ктехнику по радио/ТВ-оборудованию за
помощью.
Предупреждение:
об использовании экранированных кабелей и соединителей для
подключения прибора кдругомуоборудованию. Для предотвраще
ния появления электромагнитных помех в работе электроприборов
(например, радио и телевизора) используйте для подключения эк
ранированные кабели и соединители.
Предупреждение:
а также выполнение действий, отличных от тех, что рассмотрены в
данном руководстве, может привести копасному излучению, что
повредит ващему здоровью.
Предупреждение:
пожара, оберегайте прибор от попадания на него дождя, влаги, ка
пель, брызг и т.д. Никогда не ставьте на прибор емкости, наполнен
ные жидкостями (например, вазы).
Предупреждение:
высокого класса, чем класс 1. Для обеспечения безопасности не
снимайте крыщки прибора и не производите ремонт самостоятель
но. Если прибор требуеттехнического обслуживания, обратитесь к
квалифицированному персоналу.
Данное изделие соответствует требованиямДИРЕКТИВ ЭМС иДИ-
РЕКТИВдля приборов низкого напряжения.
Данное устройство содержит технологию защиты авторских прав,
принадлежащую компании Macrovision Corporation идругим закон
ным владельцам и защищенную патентами США и другими серти
фикатами об авторских правах. Использование данной технологии
защиты авторских прав .должно быть подтверждено разрещением
компании Macrovision Corporation, данное устройство предназна
чено только для домащнего просмотра ограниченным кругом лиц,
еслидругое не разрещено компанией Macrovision Corporation. Ин-
женерныйанализ идемонтажданной технологиизапрещен.
Товар изготовлен по лицензии Dolby Laboratories. «Dolby» и символ
«двойное D» являются торговыми знаками Dolby Laboratories.
«DTS» и «DTS Digital Surround» являются торговыми знаками Digital
Theatre Systems, Inc.
данное устройство прощло испытания и является
данный товар соответствует требованиям ФКС
использованиеоргановуправления, настроек,
чтобы избежать удара электрическим током и
данный прибор содержитлазерный диодболее
42
Марка товара с информацией о стандартах безопасности располо
жена на нижней панели прибора.
Важные инструкции по технике безопасности
• Внимательно прочитайте данные инструкции - все инструкции
по технике безопасности и эксплуатации необходимо прочитать
передиспользованием прибора.
• Сохраните данные инструкции - инструкции по технике безопас
ности и эксплуатации необходимо сохранить для дальнейщего
использования в качестве справочного материала.
• Учитывайте все предупреждения - все предупреждения, указан
ные на товаре и в инструкциях необходимо учитывать.
• Следуйте всем инструкциям - следуйте всем инструкциям по
использованию.
• Протирайте прибор только влажной тканью - перед чисткой при
бора следует отсоединить его от сети. При чистке необходимо
использовать полирующую ткань или мягкую сухую ткань. Не
используйте при чистке воск, бензин или другие летучие жид
кости, так как они могут испортить корпус прибора.
• Не используйте прибор вблизи воды - не используйте прибор
вблизи воды (например, рядом с ванной, умывальником, ракови
ной, в сыром подвале, рядом с бассейном или подобных местах).
• Аксессуары - используйте только те насадки и аксессуары, кото
рые предлагает производитель.
• Тележка - используйте тележку, подставку, корзинку или столик,
которые входят в комплект поставки, либо те, что рекомендова
ны производителем. При использовании тележки соблюдайте
меры безопасности, чтобы избежать падения и повреждений
прибора.
• Вентиляция - не закрывайте вентиляционные отверстия. Устанав
ливайте прибор в соответствии с инструкциями производителя.
• Заземление и полярность - для безопасности используйте по
лярный или заземленный щтепсель. Полярный щтепсель имеет
два щтырька, один из которых щире другого. Заземленный
щтепсель имеетдва щтырька и третий заземленный зубец. Ши
рокий щтырек и заземленный зубец созданы для обеспечения
ващей безопасности. Если поставляемый щтепсель не подходит
к ващей розетке, обратитесь к электрикудля замены розетки.
• Защитащнурапитания-неходите пощнурупитания.Обращайте особое внимание на щтепсели, розетки и места соединения
щнура с прибором.
• Использование во время грозы - отключайте прибор от сети во
время грозы или когда он долго не используется.
• Техническое обслуживание - техническое обслуживание долж
но осуществляться только квалифицированным персоналом.
Следует проводить техническое обслуживание прибора, если
он был поврежден (поврежден щнур питания или щтепсель), на
прибор попала жидкость либо на него упал какой-либо предмет,
работа прибора по каким-то причинам нарущена.
• Источникитепла -неустанавливайтеприборвблизиисточников тепла, таких как радиаторы, тепловые счетчики, плиты или
другие приборы (включая усилители), которые вырабатывают
тепло.
Перед началом использования
Комплект поставки
Убедитесь, что перечисленные ниже аксессуары входят в комплект
поставки.
Аксессуары
1. ПультДУ
2. Кабель SCART
3. Кабель RE
4. Аудио/Видеокабель
5. Батареи типа «ААА»
6. Руководство по эксплуатации (данное руководство)
Установка батарей в пульт дистанционного управления
1. Откройте крыщку батарейного отсека на задней панели пульта ДУ.
2. Вставьте две батарейки типа «ААА» в батарейный отсек так,
чтобы полярность батареек соответствовала отметкам внутри
батарейного отсека (+, -).
3. Закройте крыщку батарейного отсека.
Использование пульта ДУ
• Убедитесь, что между пультом ДУ и датчиком дистанционного
управления на приборе нет никаких препятствий.
• Если надатчикдистанционногоуправления на приборе попадаетсолнечный или флуоресцентный свет, пультДУ может не
работать.
• Пульты ДУ от разных приборов могут влиять на работу друг дру-
4097IMnew.indd 42 27.02.2007 13:35:15
Page 43

РУССКИМ
га. Не используйте пульты ДУ от другого оборудования, распо
ложенного вблизи данного прибора.
Замените батарейки, если в работе пульта ДУ появились нару
шения.
Примечание
Неправильное использование батарей может привести кутечке
электролита или взрыву. Обратите внимание на следующее:
• Не используйте одновременно новые и старые батареи.
• Не используйте вместе батареи разного типа. При схожем вне
шнем виде они могут различаться по напряжению.
• Убедитесь, что положительные и отрицательные полюса каждой
батареи совпадают с отметками внутри батарейного отсека.
• Выньте батареи из прибора, если вы не планируете использо
вать его в течение месяца или более.
• При утилизации использованных батарей следуйте правитель
ственным указаниям или инструкциям по охране окружающей
среды, которые действуют в вашей стране или регионе.
Совместимость дисков
Любой диск, имеющий один из следующихлоготипов, может ис
пользоваться в данной системе. Другие форматы дисков, включая
DVD-RAM, DVD-ROM, DVD-Audio, SACD и CD-ROM, не будут воспро
изводиться.
Воспроизведение дисков DVD-Video
• Односторонние или двухсторонние диски.
• Однослойные или двухслойные диски.
VIDEO
• Dolby Digital, DTS, MPEG, Linear PCM digital audio
(линейная импульсно-кодовая модуляция (ИКМ),
цифровое аудио).
• MPEG-2 цифровые видеодиски обычно делятся на два или более
эпизодов. Далее они могут быть поделены на фрагменты.
задней панели прибора. Диски, код региона которых не совпадаете
кодом, указанным на данном рекордере, не будут воспроизводить
ся. Диски с отметкой ALL (мультизонные) будут воспроизводиться
всеми DVD- плеерами.
Предупреждение
Если вы записываете диск, используя ПК, тодаже если фор
матдиска совместим, бывают случаи, когдадиск не воспроиз
водится из-за настроек программного обеспечения, которое
использовалось при записи диска.
Некоторые фильмы формата МРЕС-4 могут не воспроизво
диться из-за различий в использованных методахдекодиро-
вания.
Воспроизведение дисков AUDIO CD
fl COMPACT /
Диски 12 и 8 см.
Линейная ИКМ, цифровое аудио.
• Диски форматов CD audio, CD-R, CD-RW делятся
OUDÉìOd h£
DIGITAL AUDIO диски CD-R и CD-RW, записанные в формате CD ау
на треки (данное устройство может воспроизводить
дио или CD видео, или в файлах Kodak picture).
Воспроизведение дисков DVD-R/RW
• Данное устройство может воспроизводить диски
DVD-R/DVD-RW, записанные в формате DVD видео.
• Данное устройство может также записывать ви
део- и аудиосигналы на диски DVD-R /DVD-RW.
RW
Воспроизведение дисков DVD+R/RW
• Данное устройство может воспроизводить диски
DVD+R/DVD+RW, записанные в формате DVD видео.
DVD+ReWritable
• Данное устройство может также записывать видео- и
аудиосигналы надиски DVD+R/DVD+RW.
Воспроизведение дисков формата МРЕС-4
* •
1МРЕС-4| • Данное устройство может воспроизводить диски
COMPATIBLE
Воспроизведение дисков формата JPEG
• Данное устройство может воспроизводить диски формата JPEG
(фото).
формата MPEG-4.
Коды регионов DVD Video
Все диски DVD Video имеют код региона, указанный на корпусе,
который показывает, в каком регионе плеер может использоваться.
Ваш DVD-рекордер также имеет код региона, который находится на
43
4097IMnew.indd 43 27.02.2007 13:35:16
Page 44

РУССКИМ
Управление и индикация Передняя панель
1. Дисковод. Используется для установки диска и последующего воспроизведения.
2. Кнопка OPEN/CLOSE. Нажмите эту кнопку, чтобы открыть или закрыть дисковод.
3. KHonKaPLAY/PAUSE. Нажмите, чтобы начать или приостановить воспроизведение.
4. КнопкаЗТОР. Нажмите,чтобыостановитьвоспроизведение.
5. AV IN. Используйте для внешнего аудио/видеовхода при записи.
6. Кнопка RECORD. Нажмите, чтобы начать запись на диск.
7. FL-дисплей. Отображает текущее состояние рекордера.
8. Кнопка STANDBY/ON. Переключает прибор из режима ожидания в рабочий режим.
9. AUDIOIN. Подсоединитекаудиовыходувидеокамеры.
10. COMPOSITEVIDEOIN. Подсоедините к композитному видеовыходу видеокамеры.
11. Разъем DV IN. Разъем используется только для подключения цифровой видеокамеры. Не совместим с другими цифровыми устройс
твами.
12. USB IN. Цифровой разъем для использования с USB-памятью (USB Flash Drive).
ДИСПЛЕИ
1. Индикатор таймера записи. Загорается при включении таймера записи.
2. Ракурс (угол обзора). Указывает, что текущий диск имеет множество ракурсов (эта функция отображается только для дисков, запи-
санныхс разными углами обзора).
3. Индикатор системы Dolby Digital. Указывает на воспроизведение в системе Dolby Digital 5.1.
4. Индикатор эпизода. Отображает номер эпизода при воспроизведении DVD.
5. Индикатор фрагмента. Отображает номер фрагмента при воспроизведении DVD.
6. Индикатордвуязычного режима. Загорается при приёмедвуязычной трансляции.
7. Индикатор стерео. Загорается при приёме стереофонического вещания.
8. Вращение. Вращается при вращении диска.
9. Индикатор HDD (жесткий диск). Указывает на работу с жестким диском.
10. Индикатор повтора. Загорается, когда текущий режим воспроизведения происходит при повторе эпизода, фрагмента, трека, выбран-
ногоотрывкаА-В, соответственно.
11. Индикатор DVD. Указывает на работу с приводом DVD.
12. Индикатор DTS. Загорается, когда цифровой аудиовыход в формате DTS.
13. Текущая информация. Отображает эпизод, фрагмент и номер трека, время и ТВ-канал.
44
4097IMnew.indd 44 27.02.2007 13:35:16
Page 45

РУССКИМ
Задняя панель
1. Сетевой шнур. Подсоединяется кдомашней розетке.
2. Цифровой аудиовыход. Подсоедините коаксиальный выход к цифровому аудиовходу (коаксиальный тип) аудиоусилителя. Или подсо
едините оптический выход к цифровому аудиовходу (оптический тип) аудиоусилителя.
3. Компонентный видеовыход. Подсоедините к компонентным видеовходам ТВ.
4. Разъем Audio IN. Подсоедините к видеовыходу VCR или декодеру каналов кабельного телевидения (STB).
5. Video IN. Подсоедините видео к компонентному видеовыходу VCR или декодеру STB. Или подсоедините S-VIDEO к S-VIDEO-выходу
VCR или декодеру STB.
6. Video OUT. Подсоедините видео к компонентному видеовходу ТВ или монитора.
Или подсоедините S-VIDEO KS-VIDEO-входуТВ или монитора.
S-VIDEO обеспечиваетлучшее качество изображения, чем композитное видео.
7. AudioOUT. ПодсоединитекаудиовходуТВ.
8. HDMIOUT(576P). HOMI (мультимедийный интерфейс высокой четкости) транслирует цифровое видео и аудио от вашего DVD-рекор
дера к вашему телевизору. Просто подсоедините DVD-рекордер к вашемуТВ одним HDMI-кабелем для лучшего изображения и звука.
9. ANT IN. Подсоедините к внешней антенне.
10. ANT OUT. Подсоедините к антенному входу телевизора.
11. Euro AV OUT. Подсоедините к Euro AV-входу телевизора.
12. EuroAV IN/OUT. Подсоедините к Euro AV IN/OUT аудио/видеооборудованию, такому kokVCR, DVD-плеер и т.д.
ПультДУ
16 19
1. А-В
Повтор определенного фрагмента от точки А до точки В во время воспроизведения.
2. Add/Clear
Удалить установленную программу из списка записей таймера.
Добавить или удалить номер трека из запрограммированного списка воспроизведения CD.
3. Angle
Просмотр с разным углом обзора.
4. Arrow ]
Для выбора пункта меню.
5. Аудио
Для выбора языка аудио или аудиоканала при воспроизведении DVD-диска.
Вы также можете изменить аудиоканал трансляции.
• Если NICAM-вещаниедвуязычное, вы можете выбратьязык:
NICAM LANGI^NICAM LANG2^NICAM LANG1/2.
• Если NICAM-вещание стерео, вы можете переключать NICAM стерео на монозвук:
NICAM STEREO ^ MONO.
6. AVIN
Для выбора внешнего аудио/видеовхода для записи.
7. Channel down/up (+, -)
Для выбораустановленныхТВ-каналов.
8. Display
Для просмотра информации об эпизоде, фрагменте, треке или языке субтитров и аудио.
9. DVD
Для переключения в режим DVD.
10. DV/USB
Для выбора цифрового A/V-входа от цифровой видеокамеры или памяти (USB Elash Drive).
11. Edit
Для редактирования эпизода или фрагмента диска.
12. Enter
Для выбора (ввода) пункта меню.
13. File
Для просмотра списка файлов (MPEG-4, MP3, JPEG).
14. HDD/DUB
Для переключения в режим воспроизведения сжесткого диска (HDD).
Для копирования эпизодов с жесткого диска на оптический диск.
15. Menu
Для отображения содержания меню загруженного DVD-диска.
16. Mute
Для включения/выключения аудиовыходов.
17. Next
Переход к следующему фрагменту или треку.
45
4097IMnew.indd 45 27.02.2007 13:35:17
Page 46

РУССКИМ
18. Numeric (цифры) (0-9)
Используйте цифровые кнопки для выбора трека, фрагмента,
эпизода.
19. Open/Close
Чтобы открыть или закрыть дисковод.
Если кнопка нажата в режиме ожидания, питание включается
автоматически.
20. Pause
Если нажать эту кнопку в режиме воспроизведения, изображе
ние станет неподвижным.
21. Play
Для воспроизведения загруженного или жесткого диска.
22. Prev
Для перехода к предыдущему фрагменту или треку.
23. Program
Для воспроизведения в определенной последовательности.
Данная кнопка работает только при воспроизведении CD.
24. REC (Record)
Для начала записи.
25. Repeat
Для выбора режима повтора.
26. Return
Для перехода к предыдущему меню.
При использовании VCD 2.0 и SVCD с функцией РВС (контроль
воспроизведения) данная кнопка работает как кнопка возврата.
27. SCAN FWD
Для сканирования вперед во время воспроизведения.
28. SCAN REV
Для сканирования назад во время воспроизведения.
29. SETUP
Для изменения начальных настроек.
30. SLOW
Для замедленного воспроизведения содержания диска.
31. SORT/PIP
Для сортировки эпизодов на жестком диске по названию или
дате.
Для просмотра внещнего видео, пока идет воспроизведение с
DVD или жесткого диска.
32. STANDBY/ON
Переключает устройство в рабочий режим или режим ожидания.
33. STOP
Для остановки воспроизведения диска или воспроизведения с
жесткого диска.
34. SUBTITLE
Для выбора языка субтитров.
35. TIMERREC
Для установки таймера записи.
36. TIMESHIFT
Для временногохраненияТВ-программы в кэщ-памяти жестко
го диска.
37. TITLE
Для отображения меню эпизодов DVD.
38. TV
Для переключения в режим ТВ.
39. TV/DVD
Для просмотра каналов, выбранныхтюнером рекордера или ТВтюнером.
Работает только тогда, когда рекордер и ТВ соединены между
собой европейским SCART-кабелем, кроме того, в выходных
установках выбран режим RGB.
40. TV MODE
Устанавливает тип ТВ в соответствии с поддерживаемым типом
ТВ пользователя. Каждый раз при повторном нажатии на эту
кнопку будет меняться тип ТВ между NTSL/PAL и прогрессивной
разверткой/HDMI. Эта кнопка работает только при открытом
дисководе.
41. ZOOM
С помощью этой кнопки можно увеличить изображение DVD или
HDDдo размера вдвое больще.
Подключение видеовыходов Композитный видеовыход (CVBS)
Композитный видеовыход имеет больщинство телевизоров.
Композитный разъем на телевизоре обычно желтого цвета и может
быть маркирован как видео, CVBS или композитный.
Евро A/V-выход
Евро A/V-выход может быть соединён с телевизором, оснащенным
Евро A/V-разъёмом. По Евро A/V аудио передаётся со стереозвуком.
46
Выход S-Video
Данный выход может быть соединён с телевизором, имеющим вход
S-Video. Разъем S-Video на телевизоре может быть маркирован как
S-Video, Y/C, S-VHS.
S-Video обеспечиваетлучщее изображение, чем композитное ви
део.
Компонентный видеовыход
Компонентный видеовыход может быть соединён с телевизором,
имеющим компонентный видеовход.
Разъемы компонентного видео на телевизоре могут быть марки
рованы какУиу Y/Pb/Pr, Y/Cb/Cr и иметь зеленый, синий и красный
цвет. Компонентное видео обеспечивает наилучщее изображение.
Установите видеовыход в Менюустановок видео наУ/Сг/СЬ ON.
DVD-Recorder
Примечание
• RE OUT , маркировано ТО TV, только сквозной проход RE-сигнала.
• Кабель S-Video не поставляется в комплекте.
Подключение аудиовыходов
Вы можете наслаждаться звуком Dolby Surround при подключении
цифрового аудиовыхода к цифровому усилителю.
Аудиовыход
Используйте аудиовыходы для соединения с ващим телевизором.
Цифровой аудиовыход
Используйте цифровые аудиовыходы для соединения с Dolby Digital
или DTS-декодером. В меню цифрового аудиовыхода выберите
PCM или Bitstream (в соответствии с ващим декодером).
Примечание: оптический и коаксиальный кабели не входят в комп
лект поставки.
DVD-Recorder
f
9
^3
AUDIO
AMPLIFIER TV
@5) шт шт
4097IMnew.indd 46 27.02.2007 13:35:17
Page 47

РУССКИЙ
Подключение аудио/видеовходов
Вы можете записывать программы из аудио/видеосистем, таких как
VCR, спутниковый ресивер или декодирующее устройство.
Аудиовход
Соедините аудиовход с аудиовыходом A/V-системы.
Видеовход
Соедините композитный видеовход или вход S-Video с композит
ным видеовыходом или S-Video-выходом A/V-системы.
Или соедините Euro AV IN/OUT с Euro AV OUT A/V-системы.
DVD-Recorder
VCR or Satellite
receiver or
Decoder iMx
DVD Recorder - DVD-рекордер
Optical Cable - оптический кабель
Coaxial Cable - коаксиальный кабель
Audio Amplifier - усилитель аудио
A/V Cable - аудио/видеокабель
White - белый
Red - красный
Scarf Cable - кабель Scarf
VCR or Satellite receiver or Decoder Box - VCR, спутниковый ресивер
или декодирующее устройство.
HDMI (мультимедийный интерфейс высокой четкости) передаёт
цифровое видео и аудио от вашего рекордера к вашему телевизо
ру. ПростоподсоединитерекордерквашемуТВодним HDMI-кабе
лем.
Включение и выключение
1. Включите телевизор и установите видеовход к данному рекор
деру.
2. Нажмите клавишу STANDBY/ON на пульте ДУ или на передней
панели для включения. Вы можете увидеть информацию на
экране. Если вы хотите выключить прибор, нажмите клавишу
STANDBY/ON еще раз на пульте ДУ или на передней панели.
Выбор HDD (жесткий диск) или DVD для воспроизведения и
записи
1. Если вы хотите переключиться на режим работы с HDD, нажмите
кнопку HDD/DUB на пульте ДУ.
2. Если вы хотите переключиться на режим работы с DVD, нажмите
кнопку DVD на пульте ДУ.
Отображение информации на экране
Вы можете отобразить статус воспроизведения на экране следую
щим образом: эпизод, номер фрагмента, время воспроизведения.
1. Нажмите кнопку Display во время воспроизведения. Эпизод,
номер фрагмента, время воспроизведения, языкаудио и язык
субтитров появится на экране.
2. Нажмите клавишу Display еще раз. Вы можете видеть статус
воспроизведения подробнее. Крометого, вы можете изменить
языксубтитров, фрагментаит.д., используя кнопку
Enter.
Подключение DV IN и USB IN
USB Memory Digital Camcorder
При подключении к разъему DV IN можно воспроизводить цифро
вые видеозаписи.
DV-вход
Подключите DV IN к разъему DV IN/OUT на вашей цифровой видео
камере, используя DV-кабель (не входит в комплект поставки).
USB-вход
Вставьте устройство USB в разъем для подключения USB на рекор
дере.
Подключение HDMI-выхода
DVD-Recorder
БЭ 'УММщ]] щм1м||
## #
ё
■®1ф
3. Для выключения режима отображения информации на экране
нажмите кнопку Display.
Воспроизведение DVD-диска
1. Нажмите кнопку OPEN/CLOSE, чтобы открыть дисковод. Вставь
те диск в дисковод так, чтобы этикетка была сверху.
2. Нажмите кнопкуОРЕН/СЕОВЕеще раз, чтобызакрытьдисковод.
Дискзагрузится автоматически.
3. На экране ТВ отобразится меню диска.
4. Выберитенужныйпунктспомощьюкнопок[ ]иликнопок
0-9, затем нажмите кнопку ENTER или РЕА>( чтобы начать вос
произведение.
Воспроизведение дисков DVD+RW или DVD+R
1. Загрузите диск DVD±RW или DVD±R. Меню отобразится на экра
не автоматически.
AUDIO ■ 00:00:00 • 00:00:00
Файлы и каталоги Любимыа/программа1
26;а KEIK0 MATSUI • ^
27;з LAURA FIGY • С i 11
28 J9 MAXWELL • WHE Ц|
29/9 new STORIES (HI II ■!
Zflfl
OST I
...
in inil.M ■- ■!
■ 31f? OLD IMAGE.JPG ^
Нажмите ВВЕРХ/ВНИЗ
для изменения знака, ВВОД
для подтвериадения названия
DUD RECOROeR
2. Выберите желаемую программу с помощью кнопки ^ или ▼ .
3. Нажмите кнопку ENTER или РЕА>( чтобы начать воспроизведение.
4. Нажмите кнопку TITLE или MENU для возврата к меню на экране.
Воспроизведение аудио-CD (компакт-диска)
1. Загрузитедискаудио-CD.
47
4097IMnew.indd 47 27.02.2007 13:35:19
Page 48

РУССКИЙ
Первая композиция воспроизведется автоматически.
2. Нажмите кнопку Display. Информация одиске отобразится на
экране.
______
AUDIO ■ 00:00:00 • 00:00:00
' Файлы и каталогиЖлюбиныв/програмиа
_9f7 PRIMUS1G24.JPG Д ’' "
I 10i«i TEST 3.,01.ДУ1 Г|Г
шайт^шт
TEST 5 01.AVI '-I
13^ TEST б 01.AVI
14-i TEST 8 01.AVI .
15fJ THEDOORS11024.
Дпя просмотра списка воспользуй
тесь кнопками вверх/вниз, нажмите
ВВОД для воспроизведения
е
DUD RECORDen
3. Выберите трек, используя кнопку ^ или ▼ , затем нажмите кнопку
ENTER.
4. Введите желаемый номер трека, используя кнопки 0-9, затем
нажмите кнопку ENTER. Выбранная композиция начнет воспро
изводиться. Если вы нажмете кнопку W или W во время вос
произведения, то можете прослушать следующую или предыду
щую композицию.
Воспроизведение JPEG компакт-диска
1. Загрузите JPEG CD. Каталог и список файлов отобразятся на
экране.
______
AUDIO ■ 00:00:00 • 00:00:00
Файлы и каталоги ,|Любимые/прог^^
2б;а KEIKO MATSUI • , '
27;з LAURA FIGY • С |] ■
28 J9 MAXWELL • WHE
29/9 new STORIES (HI Щ\ ||
30;5 OST llllllllli inill.M
31f? OLD IMAGE.JPG I " ''
|
шШ\
I
....
Воспроизведение программ с HDD
1. Нажмите кнопку HDD/DUB для выбо|: ежима HDD.
2. Список программ HDD отобразится на экране.
3. Выберитежелаемуюпрограммуспомощьюкнопки ▲ или ▼.
Нажмите кнопку РЕА>^ Выбранная программа начнет воспроиз
водиться.
Воспроизведение JPEG-файлов с жесткого диска
1. НажмитекнопкуЕИЕ.
2. Нажмите кнопку ENTER после выбора каталога HDDc помощью
кнопки ▲ или ▼. Список файлов жесткого диска отобразится на
экране.
□UD RECORDER
Выберите желаемый файл с помощью кнопки ^ или ▼ . В пра
вом окне экрана появится небольшое изображение выбранного
файла.
Нажмите кнопку ENTER, чтобы начать воспроизведение. JPEG-
3.
файлы будут воспроизводиться по порядку автоматически. Если
вынажметекнопку W или W вовремявоспроизведения,то
сможете увидеть следующее или предыдущее изображение.
Поворот изображения и изменение масштаба изображения
4.
Вы можете повернуть изображение влево или вправо, исполь
зуя кнопку ◄ или ►. Вы также можете увеличить изображение в
четыре раза или уменьшить его с помощью кнопки ►► или ◄◄.
Чтобы увидеть список файлов, нажмите кнопку STOP. Список
файлов отобразится на экране.
Воспроизведение компакт-диска MPEG-4 видео
1. Загрузите диск MPEG-4.
И каталоги ■ Любим1^роп^|1а |
|9f7 PRIMUS1G24.JPG.1'
I 1Gi«i TEST 3.,G1.AVI '’li
11ЮШю№!а1 li
12«i TEST S G1.AVI
13^ TEST 6 G1.AVI Б
14-i TEST G1.AVI ■
15fJ THEDOORS11G24.
JCjPw Для просмотра списка воспользуй-
Щ
I тесь кнопками вверх/вниз, нажмите
< ВВОД для воспроизведения
DUD RECORDER
3.
Выберите нужный файл с помощью кнопки ▲ или ▼. В правом
окне экрана появится небольшое изображение выбранного
файла.
4.
Нажмите кнопку ENTER, чтобы начать воспроизведение. JPEGфайлы будут воспроизводиться по порядку автоматически. Если
вы нажмете клавишу W или W во время воспроизведения, то
сможете увидеть следующее или предыдущее изображение.
Поворот изображения и изменение масштабов изображения
5.
Вы можете повернуть изображение влево или вправо с помо
щью кнопки ◄ или ►.
6.
Чтобы увидеть список файлов, нажмите кнопку STOP. Список
файлов отобразится на экране.
Воспроизведение видеофайлов MPEG-4 с жесткого диска
1. НажмитекнопкуЕИЕ.
2. Нажмите кнопку ENTER после выбора каталога HDDc помощью
кнопки ▲ или ▼. Списокфайловжесткогодискаотобразится на
экране.
Файлы и каталоги Любише/профамма
TEST 3 G1.AVI
TEST 4 G1.AVI
3iMi TEST 5 G1.AVI
Д*. Для просмотра списка воспопьэуй-
^ тесь кнопками вверх/вниз, нажмите
ВВОД для воспроизведения
III Размер файла:
11*,,NIA
Il I Изменение даты:
□UD RECORDER
2. Нажмите кнопку ENTER после выбора каталога диска с помощью
кнопки ▲ или ▼.
3. Нажмите кнопку ENTER после выбора желаемого видеофайла с
помощью кнопки ▲ или ▼. Выбранный видеофайл начнетвоспроизводиться.
Примечание: некоторые фильмы формата MPEG-4 могут не вос
производиться из-за различий в использованных методахдеко-
3. Нажмите кнопку ENTER после выбора желаемого видеофайла с
помощью кнопки ▲ или ▼.
4. Чтобы увидеть список файлов, нажмите кнопку STOP. Список
файлов отобразится на экране.
Примечание: некоторые фильмы формата MPEG-4 могут не воспро
изводиться из-за различий в использованных методахдекодирования.
дирования.
48
4097IMnew.indd 48 27.02.2007 13:35:21
Page 49

РУССКИЙ
Продвинутое воспроизведение Быстрая перемотка вперед/назад
Используйте эту функцию для воспроизведения содержания диска
или жесткого диска в ускоренном виде вперёд или назад. Во время
поиска звук отсутствует.
1. Нажмитекнопку ◄◄ или ►► вовремявоспроизведения.Каждый раз, когда вы нажимаете кнопку, скорость воспроизведения
меняется следующим образом:
DVD/VCD
◄ х2 ► х2
Ф ф
◄ х4 ► х4
Ф Ф
◄ х16 ► х16
Ф Ф
◄ хзг ► х32
2. Нажмите кнопку РНАУдля возврата к режиму нормального вос
произведения.
Переход вперед/назад (только DVD и аудио-CD)
Используйте эту функцию для перехода к следующему или преды
дущему фрагменту DVD, треку CD.
1. Нажмите кнопку ◄◄во время воспроизведения. DVD-рекордер
начнет воспроизводить предыдущий фрагмент или трек.
2. Нажмите кнопку ►►во время воспроизведения. DVD-рекордер
начнет воспроизводить следующий фрагмент или трек.
Замедленная перемотка вперед
Используйте эту функцию для воспроизведения содержания диска
или жесткогодиска при замедленной перемотке вперед.
1. Нажмите кнопку SLOW во время воспроизведения. Содержание
диска будет воспроизводиться замедленно.
Нажмите KHonKySLOW. Каждый раз, когда вы нажимаете кнопку,
2.
скорость воспроизведения меняется следующим образом:
3.4.Выберите нужный трек с помощью кнопки ▲ или ▼ в списке тре
ков, затем нажмите кнопку АВВ/СЕ(добавить/удалить). Выбранная
композиция будет добавлена в список программ справа.
Повторите шагЗ, если вы хотите выбрать другую композицию.
> Edit program play list ^Ч1Я______________
Реда1сгировать список программ
________
ТРЕК Злюбимые/программа
________
_
□UD RECORDSn
5.
Переместите курсор ксписку программ нажатием кнопки ►,
затем нажмите кнопку ENTER. Начнется воспроизведение со
храненного списка программ.
6.
Чтобы удалить композицию из списка программ, выберите ком
позицию, которую вы хотите удалить, с помощью кнопок [◄►,
▲ ▼], затем нажмите кнопкуАВВ/СЕ(добавить/удалить). Вы
бранная композиция будетудалена из списка программ.
7.
Для выхода из списка воспроизведения нажмите кнопку Return.
Выбор субтитров (только DVD)
Вы можете изменить язык субтитров на язык, выбранный из списка
начальных настроек. Данная операция возможнатолько сдисками,
на которые записаны несколько языков субтитров. Если загружен
ный диск поддерживает несколько языков субтитров, вы можете
сделать выбор.
1. Нажмите кнопку SUBTITLE (субтитр) во время воспроизведения.
Субтитры появятся в нижней части экрана.
DVD/VCD/HDD
►1/2 4 ^1/4 4 ►l/B
3. Нажмите кнопку РНАУдля возврата к режиму нормального вос
произведения.
Покадровое воспроизведение (только DVD и VCD)
1. Нажмите кнопку PAUSE во время воспроизведения. DVD-рекор
дер на время приостановит воспроизведение.
2. Нажмите кнопку PAUSE несколько раз. При каждом нажатии
одно изображение сменяетдругое.
3. Нажмите кнопку РЕАУдля возврата к режиму нормального вос
произведения.
Примечание
• Во время покадрового просмотра изображений или замедлен
ного просмотра звук отсутствует.
• Аудио-CD не имеют функций покадрового просмотра изображе
ний или замедленного просмотра.
Программируемое воспроизведение (только аудио-CD)
Данная функция позволяет программировать порядок воспроизве
дения треков на диске.
1. Загрузите CD-диск аудио. Первая композиция начнет воспроиз
водиться автоматически.
Нажмите кнопку PROGRAM. На экране отобразится список треков.
2. С каждым нажатием кнопки SUBTITLE (субтитр) язык субтитров
меняется.
3. Чтобы выключить субтитры, выберите «ОЕЕ», нажав кнопку
ВиВТ1ТЕЕ(субтитр).
Выбор языка аудио (только DVD)
Вы можете изменить язык аудио на язык, выбранный из списка на
чальных настроек. Данная операция возможнатолько сдисками,
на которые записаны несколько языков аудио. Если диск имеет не
сколько языков аудио, вы можете выбрать язык аудио.
1. Нажмите кнопкуАиВЮ во время воспроизведения. Аудиоин
формация отобразится наверху экрана.
2. С каждым нажатием кнопки AUDIO язык аудио меняется.
Примечание: на некоторыхдисках можно изменить язык субтитров
или аудио только из меню диска.
49
4097IMnew.indd 49 27.02.2007 13:35:23
Page 50

РУССКИЙ
Повтор эпизода, фрагмента (только DVD/AUDIO CD)
Вы можете повторить фрагмент/эпизоддля DVD или трек/дискдля
AUDIO CD.
1. Нажмите кнопку REPEAT во время воспроизведения. Информа
ция о повторе будет отображена наверху экрана.
• Повторное воспроизведение фратеша [
0'"% ■
i \
Масштабирование 150%
Масштабирование 200%
Отмена масштабирования
3. Вы можете передвинуть изображения с помощью кнопок
[◄►, ▲▼].
4. Для выхода из режима изменения масштаба нажмите кнопку
ZOOM несколько раз, пока не возобновится обычное воспроиз
ведение.
2. При каждом нажатии на кнопку REPEAT режим повтора меняется
следующим образом:
Нормальное
воспроизведение
Примечание: при использовании некоторых DVD-дисков повторное
воспроизведение невозможно.
Повтор фрагмента от АдоВ (только DVD/AUDIO CD)
Используйте данную функцию для повторного воспроизведения
выбранного фрагмента. Это оченьудобно при изучении иностран
ных языков, так как фрагмент повторяется до тех пор, пока повтор
не будет отменен.
1. Нажмите кнопкуА-B/LANG в том месте, откуда необходимо на
чать повтор. Начальная точка выбранного фрагмента установле
на.
2. Нажмите кнопкуА-B/LANG еще раз втом месте, где необходимо
закончитьповтор. Конечная точкафрагментаустановлена. Вос
произведение будет повторяться отАдо В.
3. Для выхода из режима повтораА-В нажмите кнопкуА-B/LANG
еще раз. Возобновится обычное воспроизведение.
Примечание
Для ровного воспроизведения мы рекомендуем установить необхо
димый фрагмент продолжительностью минимум 5 секунд.
Изменение масштаба экрана (только DVD/HDD)
Функция изменения масштаба экрана позволяетувеличивать изоб
ражение DVD или HDD до двух раз.
1. Нажмите кнопку ZOOM (изменение масштаба) во время воспро
изведения. Масштаб изменится.
^ Масштабировние 150%
to find closure about the pest.
_____________
it doesn't hurt
2. C каждым нажатием кнопки ZOOM масштаб меняется:
Изменение угла обзора камеры (только DVD)
Если DVD имеет несколькоуглов обзора, вы можете выбрать функ
цию изменения угла (ракурса).
1. Нажмите кнопкуАМОЕЕ (угол) во время воспроизведения. Воз
можные углы обзора отобразятся наверху экрана.
2. С каждым нажатием кнопки ANGLE (угол) угол меняется.
Примечание
• Вы можете изменить угол только для DVD с множеством углов
обзора.
• Функция изменения угла обзора не работает в DVD-дисках, не
имеющих запись под различными углами.
Прямой поиск (только DVD)
Вы можете выбрать определенный фрагмент или эпизод для вос
произведения.
1. Нажмите кнопку В15РЕАУдважды во время воспроизведения.
Информация о воспроизведении появится на экране.
► DVD _
____
Режим Повторное воспр. фрагм.
Спвцэффеюы ^
Фрагмент 07)28
AUDIO 01I03-ENG _____
/ Субтитры OFF
Угол
Т-время 10:23:32-1:06:481
, _
Эпизод 01/07
01111
Поиск эпизода:
- Выберите TITLE с помощью кнопки ▲ или ▼, затем нажмите
кнопку ENTER.
- Введите номер эпизода, используя кнопки 0-9, и нажмите кноп
ку ENTER. Воспроизведениеначнетсясуказанногоэпизода.
Поиск фрагмента:
3.
- Выберите CHAPTER с помощью кнопки ▲ или ▼, затем нажмите
кнопку ENTER.
- Введите номер фрагмента, используя кнопки 0-9, и нажмите
кнопку ENTER. Воспроизведение начнется суказанного фраг
мента.
Запись
Основная запись
Для записи телевизионных программ сначала вы должны выбрать
канал.
1. Нажмите кнопку HDD/DUB или DVD для выбора HDD (жесткий
диск) или записывающего DVD (DVD±R/DVD±RW), на который вы
хотели бы произвести запись.
Если вы хотите записать на жесткий диск, нажмите кнопку HDD/
DUB. Меню HDD отобразится на экране.
2. Если вы хотите записать на DVD, загрузите диск DVD±R или
DVD±RWcдocтaтoчным местом для записи.
• Если вы загрузите новый чистый диск, появится запрос на
форматированиедиска. Нажмите кнопку ENTER после выбора
«ОК».
• Если меню DVD отображается на экране автоматически, на
жмите дважды клавишу STOP для остановки.
3. Нажмите клaвишyAV IN для выбора источникаА/V, с которого
вы хотите записать. При каждом нажатии клавиши источникА/V
меняется:
50
4097IMnew.indd 50 27.02.2007 13:35:24
Page 51

TV
Передний AV
Задний AV
Задний SV
□V
Scart AV
Если вы хотите записать телевизионную программу, выберите
режим ТВ. Выберите станцию, которую вы хотите записать, нажав
кнопку (Channel-) или (Channel +).
4. Нажмите кнопку REC, чтобы начать запись. Нажмите кнопку
PAUSE, если вы хотите на время приостановитьзапись. Нажми
те кнопку REC, чтобы продолжить запись.
5. Нажмите кнопку STOP для остановки записи.
Примечание
• Диски DVD±R/DVD±RW могут записывать до 6 часов или до 49
эпизодов.
• Если источник, с которого вы хотите произвести запись, защи
щен от копирования, вы не сможете записать с него.
Запись с таймера в одно касание (OTR)
1. Во время основной записи нажмите кнопку REC.
При каждом нажатии на кнопку REC время записи увеличива
ется наЗО минут. Записьможетдлиться до трехчасов, если на
диске (или жестком диске) достаточно места и качество записи
- SLP. (или длина буфера TIMESHIFTустановлена на 360 минут).
После записи в течение определенного времени DVD-плеер
остановится автоматически.
2. Если вы хотите выйти из режима OTR, нажмите кнопку STOP.
Таймер записи
Для таймера записи нужно правильно установить время, дату и
станции.
Если вы хотите записать на DVD, загрузите диск DVD±R или DVD±RW
сдостаточным местом для записи.
1. Нажмите кнопку TIMER REC.
РУССКИЙ
подтверждения.
4. Выберите «Record То» с помощью кнопки ▼, затем нажмите
кнопку ENTER для вызова списка. Выберите HDD для записи на
HDD или DVD для записи на DVD с помощью кнопки ▲ или ▼,
затем нажмите кнопку ЕМТЕНдля подтверждения.
5. Выберите «Quality» с помощью кнопки ▼, затем нажмите кнопку
ENTER для вызова списка. Выберите Record Quality (качество
записи) с помощью кнопки ▲ или ▼, затем нажмите кнопку
ENTERдля подтверждения.
6. Bыбepитe«Mode»(peжим)cпoмoщьюкнoпки ▼ ,затемнажмите
кнопку ENTER для вызова списка. Выберите, как часто вы хотите
производить запись (один раз, каждый день, каждую неделю),
с помощью кнопки ▲ или ▼, затем нажмите кнопку ENTER для
подтверждения.
7. Bыбepитe«Date»(дaтa)cпoмoщьюкнoпки Т,затемнажмите
кнопку ENTER для вызова списка. Введите дату с помощью кнопокО-9, затем нажмите кнопку ENTERдля подтверждения. Если
в пункте 6 вы выбрали «каждую неделю», нажмите кнопку ENTER
после выборадня недели с помощью кнопки ▲ или ▼.
8. Выберите «Start» (старт) с помощью кнопки ▼, затем нажмите
кнопку ENTER. Введите время начала записи с помощью кнопок
0-9, затем нажмите кнопку ENTER для подтверждения.
9. Выберите «End» (окончание) с помощью кнопки ▼, затем нажмите
кнопку ENTER. Введите время окончания записи с помощью кно
пок 0-9, затем нажмите кнопку ENTER для подтверждения.
10. Выберите «Title» (эпизод) с помощью кнопки ▼, затем нажмите
кнопку ENTER. Введите название эпизода с помощью кнопок
[◄►, ▲▼], затем нажмите кнопку ENTERдля подтверждения.
11. Переключите VPS/PDC «ON» или «ОЕЕ» с помощью кнопки ▲
или ▼, затем нажмите кнопку ENTER (если источник не установ
лен на канале ТВ, функция работать не будет).
Система VPS/PDC автоматически регулирует время записи
таким образом, чтодаже если программа не выполняется по
графику, вы не потеряете ее. Для нормальной работы VPS/PDC
вы должны правильно ввести объявленное время и дату про
граммы, которую вы хотите записать. Обратите внимание на то,
4TOVPS/PDC может работать не с каждым каналом.
12. Нажмите кнопку ENTER после выбора «ОК» с помощью кнопки
▼ , если настройки правильные.
13. Выключите DVD-рекордер с помощью кнопки STANDBY/ON.
Примечание
• Вы можете снова включить ваш DVD-рекордер, если хотите ус
тановить таймер для записи другой программы. Не забывайте
выключать DVD-рекордер после окончания настроек.
• Для остановки записи по таймеру, которая уже началась, на
жмите кнопку STANDBY/CN или STCP.
• Вы можете дополнить программу графика записи до восьми
программ.
• Мы рекомендуем устанавливать время записи более 5 минут.
Просмотр таймера записи - изменение и удаление настроек
Источник К»вС1во Дата Начало Конец Запись! vPS [
записи
1. Нажмите кнопку ИМЕННЕС. Вы сможете увидеть все програм
мы, установленные на таймер.
OUD RECOROeR
2. Выберите неиспользуемую программу с помощью кнопки
А или Т, затем нажмите кнопку ENTER.
\’i 1^ Установка Расписания записи
‘ Задн. Композитн.
Дата
Начало
Конец
Эпизод
VPS/PDC
Один раз
03)01/06
Выбрать источник видеосигнала
’для записи по таймеру
Р
awu
2. Выберите программу, которую вы хотите изменить или удалить,
с помощью кнопки ▲ или ▼.
3. Удалениенастроек
Нажмите кнопкуАВВ/СЕ (добавить/удалить) для удаления.
4. Изменение настроек
Нажмите кнопку ENTER.
Выберите детали, которые вы хотите изменить, с помощью
кнопки ▲ или ▼, затем нажмите кнопку ENTER.
tir» —
Нажмите ВВОД для просмотра графика записи или создания
новых. Нажмите ФУНКЦИИ для других опций.
ava RECORDER
Измените настройки с помощью кнопки ▲ или ▼, или 0-9.
3. Нажмите кнопку ENTER. Появится подменю. Выберите источник
с помощью кнопки ▲ или ▼, затем нажмите кнопку ENTER для
Когда вы закончите все изменения, нажмите кнопку ENTER.
5. HaжмитeкнoпкyENTERпocлeвыбopa«OK»cпoмoщьюкнoпки ,
51
4097IMnew.indd 51 27.02.2007 13:35:25
Page 52

РУССКИЙ
если все настройки правильные.
6. Нажмите кнопкуИМЕН НЕСдля выхода.
Запись с цифровой видеокамеры (DV)
Вы можете записать содержимое DV-кассеты с цифровой видеока
меры через разъем DV IN.
Убедитесь, что цифровая видеокамера подключена к разъему DV IN
на передней панели прибора.
Затем включите цифровую видеокамеру и установите ее в режим
РЕАУ(илиУСВ).
1. Нажмите кнопку HDD/DUB или DVD для выбора HDD или запи
сывающего DVD (DVD±R/DVD±RW), на который вы хотите запи
сать.
Если вы хотите записать на DVD, загрузите диск DVD±R или
DVD±RWcдocтaтoчным свободным местом для записи.
2. HaжмитeкнoпкyDV/USB.
3. Найдите место на кассете видеокамеры, с которого вы хотите
начать запись. Вы можете использовать пультДУ от этого ре
кордера для управления видеокамерой с помощью кнопок РЕА>^
STOP, PAUSE, [◄◄, ►►]. Для получения наилучшего результата
нажмите кнопку PAUSE в том месте, с которого вы хотите начать
запись.
Нажмите кнопку REC для начала записи. Нажмите кнопку PAUSE,
4.
если вы хотите на время приостановитьзапись. Нажмите кнопку
REC, чтобы продолжитьзапись.
Нажмите кнопку STOP для остановки записи.
5.
Примечание
• Возможно, вы будете не в состоянии контролироватьуправление видеокамерой с помощью пультаДУ, поставляемого с этим
рекордером, так как многое зависит оттипа подключенной ви
деокамеры.
• Если плеер не распознает цифровую видеокамеру, выньте и
вставьте кабель DV в разъем DV IN еще раз.
При записи со сдвигом времени программа записывается вре
менно. Обычная запись записывает и сохраняет программу пос
тоянно на жестком диске, поэтому вы можете воспроизвести её
в любое время.
- Нажмите кнопку ВЕСдля началазаписи текущей программы.
- Нажмите кнопку STOP для остановки записи.
Примечание
• Данная функция недоступна в режиме DVD. Если вы хотите ис
пользовать запись со сдвигом времени, нажмите кнопку TIME
SHIFT во время просмотра ТВ.
• Если OSD-меню отображено на экране, то невозможно произ
вести запись с AV-входов или цифрового ТВ. Следовательно,
если вы хотите произвести запись со сдвигом во времени, вый
дете из OSD-меню.
Одновременная запись и воспроизведение
Вы можете воспроизводить HDD-эпизод и записывать ТВ-програм
му в одно и то же время. Вы также можете воспроизводить DVD-
эпизод и записывать ТВ-программу в одно и то же время.
1. Воспроизведение HDD-эпизода во время записи ТВ-программы
надиск
- Нажмите кнопку HDD/DUD во время записи.
Список программ HDD отобразится на экране.
- Выберите нужную программу из списка программ с помощью
кнопки ▲ или ▼.
- Нажмите кнопку РЕАУдля начала воспроизведения.
2. Воспроизведение DVD-эпизода во время записи ТВ-программы
HaHDD
- Нажмите кнопку DVD во время записи.
Меню диска отобразится на экране.
- Выберите нужную позицию или эпизод с помощью кнопок [◄►,
▲ ▼].
- Нажмите кнопку ENTER или РЕАУдля начала воспроизведения.
Запись со сдвигом времени
Данный рекордер временно сохраняет программу на пространстве
жесткого диска автоматически, что позволяет пользователю мани
пулировать сохраненной программой, используя такие функции, как
перемотка, ускоренная перемотка, повтор и пауза.
1. Нажмите кнопки управления воспроизведением, такие как II,
◄ ◄, ►►, !◄◄, ►►!, !► при просмотреТВ, внизуэкрана поя
вится горизонтальная шкала времени.
_______
I
Ш
2. PAUSE
Если вы нажмете кнопку PAUSE, текущая программа будет при
остановлена. Если вы нажмете кнопку PEAY воспроизведение
программы продолжится с того же места.
3. Ускоренная перемотка вперед/назад
- Нажмитекнопку ◄◄ или ►► вовремявоспроизведения. При
каждом нажатии кнопки скорость воспроизведения увеличится
на 3 ступени.
- Нажмите кнопку РЕАУдля возобновления обычного режима вос
произведения.
4. Переход вперед/назад
- Нажмите кнопку1^^ во время воспроизведения. DVD-рекор
дер начнет воспроизводить предыдущий фрагмент.
- Нажмите кнопку ►►
дер начнет воспроизводить следующий фрагмент.
5. Замедленнаперемоткавперёд
- Нажмите KHonKySEOWao время воспроизведения. Начнется
замедленное воспроизведениетекущей программы. При каж
дом нажатии кнопки замедление скорости изменится наЗ сту
пени.
- Нажмите кнопку РЕАУдля возобновления обычного режима вос
произведения.
6. Запись
Ibo
время воспроизведения. DVD-рекор
52
Используйте особенности копирования этого рекордера для:
• резервного копирования важныхзаписей, сохранённых на HDD
и на DVD;
• изготовления DVD-копии с записи на HDD для воспроизведения
надругом плеере;
• передачи видео с DVD на HDDдля редактирования;
• передачи отредактированного видео с HDD на DVD.
Авторские права
Запись должна производиться только с разрешения автора, и вы
должны убедиться, что копирование в стране, в которой вы хотите
произвести перезапись, разрешено. Копирование авторских мате
риалов, фильмов или музыки является незаконным, если не было
разрешено законом или автором.
Копирование эпизодов с DVD на жесткий диск
Убедитесь, что DVD-диск, с которого вы хотите произвести запись,
находится внутри плеера.
1. Копирование всех эпизодов с DVD на HDD
- Нажмите кнопку DVD.
Список эпизодов появится на экране ТВ.
- Нажмите кнопку ▲ и кнопку ►. Меню редактирования появит
ся на экране ТВ.
- Нажмите кнопку ENTER после выбора «СОРУАЕЕ» (копировать
все) с помощью кнопки ▲ или ▼. Начнется копирование всех
эпизодов с диска HaHDD.
Копирование одного эпизода с DVD на HDD
- Нажмите кнопку DVD.
Список эпизодов появится на экране ТВ.
- Нажмите кнопку ► после выбораэпизодадля копирования с
помощью кнопки ▲ или ▼. Меню редактирования появится на
экране ТВ.
4097IMnew.indd 52 27.02.2007 13:35:26
Page 53

РУССКИЙ
мощью кнопки ▲ или ▼.
4.
Выберите каталог источника файла для копирования с помощью
кнопки ▲ или ▼, затем нажмите кнопку ENTER.
(Если вы хотите копироватьфайл сдиска, выберите каталог
DVD. Если вы хотите копировать файл с жесткого диска, выбери
те каталог HDD.)
Список файлов появится на экране.
5.
Нажмите кнопкуАСС/СЕ(добавить/удалить) после выбора фай
ла для копирования с помощью кнопки ▲ или ▼. Выбранный
файл будет добавлен к списку справа.
- Нажмите кнопку ENTER после выбора «COPYTITLE» (копировать
заголовок) с помощью кнопки ▲ или ▼. Начнется копирование
выбранного эпизода с DVD-диска на HDD.
Копирование эпизодов с жесткого диска на диск
Убедитесь, что записывающий DVD-диск (DVD±R или DVD±RW) на
ходится внутри рекордера.
1. HaxMHTeKHonKyHDD/DUB.
Список эпизодов жесткого диска появится на экране ТВ.
№ Канал Дата Время Эпизод
OOlScartAV 01I0V01 13:12 Мой ЭПИЗОД
002 АКО 01101/01 13:23 ЭПИЗОД 10
__
003 ARD 01/01/01 14:23 ЭПИЗОД 11
000 DUO 01101/01 17
OOrSuirt AV 01/01/01 18
00В DVD 01/01/01 18
21 ЧшиплЮ ПаЖМИТвС1Ч1СКДПЯ
^изод12 выбора программ.
08 Эпизод 11 г г
39 Эпизод 18 Нажмите НОО\ОиВ для
49 Мой эпизод о копирования выбранных
^ программ.
Нажмите 80РТ/Р1Р для
схзрпфовки программ по
□UD RECORDSR
2. Нажмите кнопку ENTER после выбора эпизода для копирования
с помощью кнопки ▲ или ▼.
На выбранном эпизоде появится отметка.
3. Повторите пункт 2, если вы хотите выбратьдругие эпизоды.
4. НажмитекнопкуНВВ/ВиВ.
Начнется копирование выбранных эпизодов с жесткого диска на
диск.
Копирование файлов с диска на жесткий диск (с жесткого дис
ка на диск)
Убедитесь, чтодискдля копирования илизаписывающийдиск
(DVD±R или DVD±RW) находится внутри рекордера. Вы можете ко
пировать файлы MP3, JPEG МРЕС-4сдиска на жесткий диск (или с
жесткого диска надиск).
1. НажмитекнопкуЕИЕ.
Каталог и список файлов появятся на экране.
F2S5.STAY.WMA9.1 -. ,1?1 F2S5.STAY.WM I
METALLICA . MAST jj> F2S5.STAY.WM
EMINEM11024.JPG В ЗМВ
KILLBILL1800.JPG I Изменение дэты:
ÌMÀN'OYMOÒRÉ38QO. ггН
D:iF2S5 STAY WMA7 128К ST-1
6. Повторите пункт5, если вы хотите копироватьдругие файлы.
METALLICA • М -
^
08 109 I2Q0S
□UD Я€СОРа€Я
7. Нажмитекнопку ►►.
8. Выберите каталог, куда вы хотите копировать выбранные файлы,
с помощью кнопки ▲ или ▼, затем нажмите кнопку ENTER.
(Если вы хотите копировать файл с диска на жесткий диск, вы
берите каталог HDD. Если вы хотите копировать файл с жесткого
диска надиск, выберите DVD-каталог.)
9. HaжмитeкнoпкyREC.
Начнется копирование файлов с диска на жесткий диск (с жест
кого дискана диск).
10. Нажмите кнопку EDIT для выхода после окончания копирования.
Копирование файлов с USB флэш-памяти на жесткий диск (или диск)
Убедитесь, чтоустройство USB вставлено в разъем USB IN. Если вы
хотите копировать файлы на диск, загрузите записывающий диск
(ВУВ±Нили DVD±RW).
1. НажмитекнопкуЕИЕ.
Каталог и список файлов появятся на экране.
AUDIO ■ 00;00:00 • 00:00:00
□ио Я€СОЯО€Я
Нажмите кнопку EDIT.
Меню копирования отобразится на экране.
>
Инструменты файла
] аи
1 ШВ1 Удалить _ I
1 вВ Переименовать ^
BiB Скзэдать Директорию
2. НажмитекнопкуЕВ1Т.
Меню копирования отобразится на экране.
^ Инструменты файла
Переименовать '
Создать Директорию
Копирование файлов с одного
носителя на другой.
3. Нажмите кнопку ENTER после выбора «Сору» (копировать) с по
_
DUQ RSCOROeR
мощью кнопки ▲ или ▼.
Копирование файлов с одного
' носителя на другой.
V
_________
____
DUD RecORDER
4. Нажмите кнопку ENTER после выбора каталога USB с помощью
кнопки ▲ или ▼.
5. Нажмите кнопкуАВВ/СЕ(добавить/удалить) после выбора
файла для копии с помощью кнопки ▲ или ▼. Выбранный файл
будетдобавлен кспискусправа.
3. Нажмите кнопку ENTER после выбора «Сору» (копировать) с по-
53
4097IMnew.indd 53 27.02.2007 13:35:28
Page 54

РУССКИЙ
Копировать из
Выбрать источник файла ^список выб^нных файлов I I
.Л
/20X4B0.RORK |
ti 730K4B0„eORK.bmp | '' fri BOOTEX.LOO I 1
0;У200Б0113 WS.ppt
6. Повторите пункт5, если вы хотите копироватьдругие файлы.
7. Нажмитекнопку ►►.
8. Выберите каталог, куда вы хотите копировать выбранные файлы,
с помощью кнопки ▲ или ▼, затем нажмите кнопку ENTER.
(Если вы хотите копировать файлы с диска на жесткий диск,
выберите каталог HDD. Если вы хотите копировать файлы с жес-
ткогодиска надиск, выберите DVD-каталог.)
9. НажмитекнопкуРЕС.
Начнется копирование файлов сустройства USB нажесткий
диск (или диск).
10. Нажмите кнопку EDIT для выхода после окончания копирования.
Примечание
• Не используйте устройства USB более чем 500 мА.
• Если рекордер не распознаетустройство USB, выньте и вставьте
устройство, USB-кабель в разъем USB IN еще раз.
20060113.W8.pp р^^рфайлз:
QUO ReCQRDER
46KB
■^Изменение даты:
■ 01 М3 /2006
2. Выберите букву, которую вы хотите ввести, с помощью кнопок
3. Повторите пункт 2.
4. Горизонтальная шкала контроля на нижней строке клавиатуры
Удаление записи с оптического диска (только DVD+RW)
1. Нажмите кнопку ENTER после выбора пункта «Удаление записи с
[◄►, ▲▼], затем нажмите кнопку ЕНТЕНдля подтверждения.
Максимальная длина названия диска не должна превышать 9
символов.
для редактирования.
Когда вы закончите вводить буквы, нажмите ENTER после выбо
ра «ОК».
оптического диска» с помощью кнопки ▲ или ▼ .На экране поя
вится диалоговое меню.
____________________
Редактирование диска DVD+R или DVD+RW
1.
Загрузите диск DVD±R или DVD±RW.
Меню DVD отобразится на экране.
Нажмите кнопку ▲, чтобы перейти
вверх DVD-меню.
3.
Нажмите кнопку ►, меню редактирования диска отобразится
на экране.
Воспроизведение диска DVD+RW или DVD+R
Вы можете воспроизвести весь диск от начала до конца.
1. Нажмите кнопку ENTER после выбора «Р1ау» (воспроизведение)
с помощью кнопки ▲ или ▼.
Начнется воспроизведение диска с самого начала.
Переименование диска DVD+RW или DVD+R
1. Нажмите кнопку ENTER после выбора «Rename disk» (переиме
нование диска) с помощью кнопки ▲ или ▼. На экране отобра
зится клавиатура.
Стереть диск
Предупре)|щение : это действие приведет
DUD HSCORDen
2. Нажмите кнопку ENTER, чтобы стереть содержание диска, после
выбора «Yes» (да) с помощью кнопки ◄ или ►.
Стирание записи с диска занимает несколько минут.
Примечание: функция удаления записи работает только с дисками
DVD±RW.
Перезапись диска (только DVD+RW)
1. Нажмите кнопку ENTER после выбора пункта «Перезапись дис
ка» с помощью кнопки ▲ или ▼. Режим DVD изменится на ре
жим AV.
2. Нажмите KHonKyAV IN для выбора вxoдaAV, с которого вы хотите
записать. При каждом нажатии кнопки вxoдAV меняется:
TV
Передний AV
Задний AV
Задний SV
DV
Scart AV
Если вы хотите записать телевизионную программу, выберите
режим ТВ. Выберите станцию, которую вы хотите записать, на
жав кнопку (Channel-) или (Channel +).
3. Нажмите кнопку REC, чтобы начать запись. Запись начнется с
самого начала диска.
4. Нажмите кнопку STOP для остановки записи.
Примечание: при перезаписи все ранее записанные программы
будутудалены.
54
4097IMnew.indd 54 27.02.2007 13:35:30
Page 55

Финализация диска (только DVD+R)
Если вы хотите сделать диск DVD±R совместимым с другими плее
рами или рекордерами, вам необходимо финализироватьдиск.
1. Нажмите кнопку ENTER после выбора пункта «Финализация дис
ка» с помощью кнопки ▲ или ▼. На экране появится диалоговое
меню.
2. НажмитекнопкуЕМТЕН дляподтверждения послевыбора«Уез»
(да) с помощью кнопки ◄ или ►.
Финализация диска занимает несколько минут.
Примечание
• Функцию финализации можно использовать только один раз в
диске DVD±R.
• Если DVDtR-дискуже был финализирован, вы не можете запи
сывать или редактировать его.
Блокировка диска (только DVD+RW)
Вы можете заблокировать ваш дискдля предотвращения записи
или его редактирования вдальнейшем.
1. Нажмите кнопку ENTER после выбора пункта «Блокировка дис-
ка»спомощью кнопки▲ или ▼.
Блокировка диска займет 2-3 минуты. Если диск заблокирован,
вы не можете производить какие-либо изменения. Возможно
только воспроизведение.
РУССКИЙ
Воспроизведение эпизода DVD+RW/DVD+R
Вы можете воспроизвести выбранный эпизод.
Нажмите кнопку ENTER после выбора «Воспроизведение эпизода»
с помощью кнопки ▲ или ▼.
Начнется воспроизведение выбранного эпизода.
Редактирование эпизода DVD+RW/DVD+R
1. Нажмите кнопку ENTER после выбора пункта «Редактирование
эпизода» с помощью кнопки ▲ или ▼. На экране появится диалого
вое меню.
2. Если вы хотите разблокировать диск, выберите пункт «Разбло
кировка диска» с помощью кнопки А или Т.
3. HaжмитeкнoпкyENTER.
Разблокировка диска займет несколько минут.
Копировать ВСЁ (DVD+RW/DVD+R)
Вы можете копировать все эпизоды с DVD на жесткий диск.
Нажмите кнопку ENTER после выбора «COPYALL» (копировать всё) с
помощью кнопки ▲ или ▼.
Начнется копирование всех эпизодов с диска на жесткий диск.
Редактирование эпизодов DVD+RW или DVD+R
1. Вставьте записывающий диск DVD±RW или DVD±R в дисковод.
Меню отобразится на экране автоматически.
2. Выберите один эпизод для редактирования с помощью кнопки
▲ или ▼.
3. Нажмите кнопку ►, на экране появится меню редактирования
эпизода.
1-1. Выберите эпизод
Выберите эпизод с помощью кнопок 0-9.
1-2. Выберитефрагмент
Выберите фрагмент с помощью кнопок 0-9.
1-3. Воспроизведение
Регулируйте воспроизведение различными настройками: быст
рая перемотка назад, вперед, замедленная перемотка вперед.
1-4. Маркер фрагмента
Вы можете вставить фрагмент или удалить его. Нажмите кнопку
ENTER или ►, на экране появится диалоговое меню.
Для ввода нового маркера фрагмента выберите пункт «Вставить
1)
маркер» с помощью кнопки ▲ или ▼.
Вы можете найти определённое место с помощью кнопок ◄◄,
► ► или кнопки PLAY
Нажмите кнопку ENTER в том месте, куда вы хотите вставить
новый фрагмент.
Для удаления маркера фрагмента выберите пункт «Удаление
2)
маркера» с помощью кнопки ▲ или ▼. Вы можете найти фраг
менте помощью кнопки !◄◄ или ►►!. Нажмите кнопку ENTER
там, где вы хотите удалить фрагмент.
Чтобы удалить все маркеры фрагментов, выберите пункт «Уда
3)
лить все маркеры фрагментов» с помощью кнопки ▲ или ▼.
Нажмите кнопку ЕНТЕНдля подтверждения.
1-5. Скрыть фрагмент/показать фрагмент
Удобная функция для скрытия рекламных роликов. Выберите
«Скрыть фрагмент» с помощью кнопки ▲ или ▼, затем нажмите
кнопку ENTER. Если текущий фрагмент скрыт, на экране вместо
надписи «Скрытьфрагмент» появится «Показатьфрагмент». В
этом случае вы можете показатьфрагмент, нажав кнопку ENTER
после выбора «Показать фрагмент».
1-6. Заставка
Вы можете изменитьзаставкудля выбранногофрагмента. На
жмите ENTER там, где вы хотите установить заставку.
1-7. Разделить эпизод (только DVD±RW)
Вы можете разделить эпизод надве части. Нажмите кнопку
ENTER там, где вы хотите разделить. Разделение эпизода зай
мет несколько минут.
1-8. Время протекания
Вы можете видеть время протекания.
2. Нажмите кнопку STOP после окончания редактирования эпизода.
Обновление диска занимает несколько минут.
55
4097IMnew.indd 55 27.02.2007 13:35:32
Page 56

РУССКИЙ
Переименование эпизода (DVD+RW/DVD+R)
1. Нажмите кнопку ENTER после выбора «Rename title» (переиме
нование эпизода) с помощью кнопки ▲ или ▼. На экране отоб
разится клавиатура.
LMNOPQRSTUV345
Space Aa P2 Backspace Clear ExK OK
Drama Action Sparta Comody Nowa Kida Adult
DUD HeCDRDER
Выберите букву, которую вы хотите ввести, с помощью кнопок
[◄►, ▲▼], затем нажмите кнопку ENTER для подтверждения.
Повторите пункт 2. Максимальная длина названия эпизода не
3.
должна превышать 9 символов.
4.
Шкала контроля на нижней строке клавиатуры для редактирова
ния.
Когда вы закончите вводить буквы, нажмите кнопку ENTER после
выбора «ОК».
Удаление эпизода (только DVD+RW)
1. Нажмите клавишу ENTER после выбора пункта «Редактирование
эпизода» с помощью кнопки ▲ или ▼. На экране появится диа
логовое меню.
Предупреждение: Внимание: это действие
безвозвратно удалит фрагмент на загруженном
DVD+RW диске. Продолжт-ь?
DUD RECDRDER
2. Нажмите кнопку ENTER, чтобы стереть содержание эпизода,
после выбора «Yes» (да) с помощью кнопки ◄ или ►.
Стирание записи с диска занимает несколько минут.
Примечание: функция удаления записи работает только с дисками
DVD±RW.
Перезапись эпизода (только DVD+RW)
1. Нажмите кнопку ENTER после выбора пункта «Перезапись дис
ка» с помощью кнопки ▲ или ▼. Режим DVD изменится на ре
жим AV.
2. Нажмите кнопкуАУ 1Ндля выбора входа AV, с которого вы хотите
записать. При каждом нажатии кнопки входАУ меняется:
ТУ
Передний AV
Задний AV
Задний SV
DV
Scart AV
Если вы хотите записать телевизионную программу, выберите
режим ТВ. Выберите станцию, которую вы хотите записать, на
жав кнопку (Channel-) или (Channel +).
3.
Нажмите кнопку REC, чтобы начать запись. Запись начнется с
самого начала диска.
4.
Нажмите кнопку STOP для остановки записи.
56
Примечание: при перезаписи все ранее записанные программы
будутудалены.
Присоединение эпизода (DVD+RW/DVD+R)
Вы можете продолжить запись последнего эпизода. Если вы не вы
берите последний эпизод, меню не отобразится на экране.
1. Нажмите кнопку ENTER после выбора пункта «Присоединение
эпизода» с помощью кнопки или . Режим DVD изменится на
режим AV.
2. Нажмите кнопкуАУ IN для выбора входаАУ, с которого вы хотите
записать. При каждом нажатии кнопки входАУ меняется:
ТУ
Передний AV
Задний AV
Задний SV
DV
Scart AV
Если вы хотите записать телевизионную программу, выберите
режим ТВ. Выберите станцию, которую вы хотите записать, нажав
кнопку (Channel-) или (Channel +).
3. Нажмите кнопку REC, чтобы начать запись. Запись начнется с
самого начала диска.
4. Нажмите кнопку STOP для остановки записи.
Примечание: если надиске недостаточно места, меню не появится
на экране.
Копирование эпизода DVD+RW/DVD+R
Вы можете скопировать эпизод с DVD на жесткий диск.
1. Нажмите кнопку ENTER после выбора пункта «Копирование
эпизода» с помощью кнопки ▲ или ▼. Начнется копирование
эпизода с DVD на жесткий диск.
Редактирование эпизода жесткого диска
1. Нажмите кнопку HDD/DUB для выбора режима HDD. На экране
появится список эпизодов жесткого диска.
2. Выберите эпизоддля редактирования с помощью кнопки ▲ или
▼ , затем нажмите кнопку ►.
На экране появится меню редактирования.
Воспроизведение
Вы можете воспроизвести выбранный эпизод.
1. Нажмите кнопку ENTER после выбора «PLAY» (воспроизведение)
с помощью кнопки ▲ или ▼. Начнется воспроизведение вы
бранного эпизода.
Удаление
1. Нажмите кнопку ENTER после выбора «Удаление» с помощью
кнопки ▲ или ▼. На экране появится диалоговое меню.
2. Нажмите кнопку ENTER, чтобы стереть содержание эпизода,
после выбора «Yes» (да) с помощью кнопки ◄ или ►.
Разделение
Вы можете разделить текущий эпизод на две части.
1. Нажмите кнопку ENTER после выбора «Разделение» с помощью
кнопки ▲ или ▼. Начнется воспроизведениетекущегоэпизода.
2. Найдите место, где вы хотите разделить. Вы можете использо
вать поисксцены, используя кнопки ◄◄, ►►, или кнопку PLAY
3. Нажмите кнопку ENTER там, где вы хотите разделить. На экране
появится диалоговое меню.
4. Нажмите кнопку ENTER для подтверждения после выбора «ОК» с
помощью кнопки ◄ или ►.
Фрагментирование
Вы можете пропустить отмеченные вами части эпизода во время
воспроизведения.
4097IMnew.indd 56 27.02.2007 13:35:33
Page 57

РУССКИЙ
1. Нажмите ENTER после выбора «Сегмент» с помощью кнопки ▲
1. Нажмите кнопку ENTER после выбора «Снятие защиты» с помо
или ▼.
Эпизод начнет автоматически воспроизводиться.
2. Найдите начало фрагмента, который вы хотите пропустить.
Вы можете искать сцену с помощью кнопок ◄◄, ►► или кнопки
PLA'i^
3. Нажмите кнопку ENTER в начале фрагмента, который вы хотите
пропустить.
4. Найдите окончание фрагмента, который вы хотите пропустить, и
нажмите кнопку ENTER в конце фрагмента.
5. Если вы хотите отметить больще фрагментов, то повторите щаги
Зи4.
Отмеченные фрагменты отображаются фиолетовыми цветными
полосами надвижущейся щкале.
6. Нажмите кнопку STOP после окончания.
Примечание: когдаэпизодсотмеченными фрагментами копируется
с жесткого диска на DVD, фрагменты не копируются на DVD.
Объединение
Основные действия
Нажмите кнопку SETUP в режиме стоп. Используйте кнопки [◄►,
▲ ▼]и кнопки ENTER и RETURN для поиска и выборадействий (оп
ций). Текущие настройки для любыхдействий выделяются цветной
полоской.
1. Нажмите кнопку STOP, если диск воспроизводится.
2. Для вызова меню настроек нажмите кнопку SETUP.
3. Выберите нужный пункт с помощью кнопки ◄ или ►, затем на
4. Выберитенужныйподпунктспомощьюкнопок[^^, ▲▼],за-
Вы можете объединить два эпизода.
1. Нажмите кнопку ENTER после выбора «Объединение» с помо
щью кнопки ▲ или ▼.
2. Выберитеэпизоддляобъединенияспомощьюкнопки ▲ или ▼,
5. Нажмите кнопку SETUP после заверщения всех настроек.
Примечание: в зависимости от диска некоторые выбранные дейс
затем нажмите кнопку ENTER (если вы хотите выйти из режима,
нажмите кнопку RETURN).
Изменение заставки
Запись и сканирование каналов
Вы можете изменить заставкудля выбранного эпизода.
1. Нажмите ENTER после выбора «Изменение заставки» с помо
щью кнопки ▲ или ▼.
Воспроизведение эпизода начнется автоматически.
2. HaжмитeкнoпкyENTERвтoммecтe, откудавыхотитеизвлечь
заставку.
Вы можете искать сцену с помощью кнопок ◄◄, ►► или кнопки
PLA'i^ На экране появится диалоговое меню.
3. Нажмите ENTER для подтверждения после выбора «ОК» с помо
щью кнопки ◄ или ►.
Переименование
1. Автомаркировка фрагментов
Вы можете изменить название эпизода.
1. Нажмите кнопку ENTER после выбора «Rename» (переименование)
с помощью кнопки ▲ или ▼. На экране отобразится клавиатура.
2. Нажмите кнопку ENTER, чтобы удалить текущее название, после
выбора кнопки «Удалить» на клавиатуре.
3. Выберите букву, которую вы хотите ввести, с помощью кнопок
[◄►, ▲▼], затем нажмите кнопку ENTER для подтверждения.
4. Повторите пункт 3.
Максимальная длина названия не должна превыщать 12 символов.
5. Нажмите кнопку ENTER после выбора «ОК» на клавиатуре, если
вы закончили вводбукв.
Примечание: функция недоступна, если тип предварительного про
смотра в меню установок поставлен на «Активный».
Блокировка
Вы можете заблокировать эпизод, чтобы никто не смог воспроиз
вести его.
1. Нажмите кнопку ENTER после выбора «Блокировка» с помощью
кнопки ▲ или ▼.
Эпизод будет заблокирован.
Разблокировка
Вы можете разблокировать заблокированный эпизод.
1. Нажмите кнопку ENTER после выбора «Разблокировка» с помо
щью кнопки ▲ или ▼.
2. Качество записи
Качество записи предлагает 6 уровней качества:
HQ: высокое качество. Вы можете производить запись продолжи
тельностью до одного часа на чистом диске.
SP: стандартное воспроизведение. Вы можете производитьзапись
продолжительностью до двух часов на чистом диске.
SP+: расщиренное стандартное воспроизведение. Вы можете
производить запись продолжительностью до 2 часов 30 минут на
чистом диске.
LP: длительное воспроизведение. Вы можете производить запись
продолжительностью до трех часов на чистом диске.
ЕР: продолжительное воспроизведение. Вы можете производить
запись продолжительностью до четырех часов на чистом диске.
SLP: супердлительное воспроизведение. Вы можете производить
запись продолжительностью до щести часов на чистом диске.
3. Аналоговое сканирование канала
Данный рекордер имеет встроенный ТВ-тюнер для записи ТВ-про
грамм.
На экране появится окно пароля.
2. Введите пароль из четырех цифр, используя кнопки 0-9.
3. Нажмите кнопку ENTER для подтверждения после выбора «ОК» с
помощью кнопки ▼.
Эпизод будет разблокирован.
Защита
Вы можете защитить эпизод от редактирования.
1. Нажмите кнопку ENTER после выбора «Защита» с помощью
кнопки ▲ или ▼.
Эпизодбудетзащищен. Вы можете воспроизводить защищен
Примечание
• Во время поиска каналов все предыдущие программы будут
• Данная функция доступна только в том случае, если рекордер
ный эпизод, но не можете его редактировать.
Снятие защиты
Вы можете снять защитусэпизода.
4. Изменение канала
Если нет захвата канала, данная функция недоступна.
57
щью кнопки ▲ или ▼.
Защита эпизода будет снята.
Кактолько настройки будутзаверщены, DVD-рекордер всегда
сможет работать с теми же настройками, при каждом включе
нии питания. Такие настройки называются «Данные установки»,
которые можно легко изменить и сохранить с помощью меню
установок.
жмите кнопку ENTER.
тем нажмите кнопку ENTER. Если вы хотите перейти к предыду-
щемуменю, нажмите кнопку RETURN.
твия меню настроек могут работать неправильно.
Когда автоматический маркер фрагмента установлен на 5 минут,
фрагменты создаются автоматически внутри эпизода с пяти
минутными интервалами. Можно также добавлять или удалять
фрагменты вручную, через функции редактирования (подроб
ности см. в пункте «Редактирование эпизода»).
- Нажмите кнопку ENTER после выбора «Сканирование» с помо
щью нажатия кнопки ▲ или ▼.
- Нажмите кнопку ENTER для подтверждения после выбора «ОК»
с помощью кнопки ◄ или ►.
Начнется автоматический поиск каналов. Если телепрограмма
будет найдена при автоматическом поиске, она будет сохранена
автоматически.
удалены и перемещены.
находится в режиме ТВ.
4097IMnew.indd 57
27.02.2007 13:35:34
Page 58

РУССКИЙ
4-1. Нажмите кнопку ENTER после выбора «Редактирование» с по
мощью кнопки ▲ или ▼. Информация о текущем канале отобра
зится на экране.
___________________________
Изменить информацию о канале
Номер программы poai
Имя Н[«]1ё]йП
Стандарт PAL BiG
Тип поиска Канал
Тип Standard
Канал [З- [ЮИ
Точная настройка Декодер Выкл
Удалить ОК
ОК Отмена
____
4-2. Выберите канал, который вы хотите изменить, с помощью кно
пок (CHANNEL -) или (CHANNEL +).
Редактирование названия канала
1. Нажмите кнопку ENTER после выбора «Название» с помощью
кнопки ▲ или ▼.
2. Выберите буквы, которые вы хотите ввести, с помощью кнопок
[◄►, ▲▼], затем нажмите кнопку ENTER для подтверждения.
Стандарт ТВ
Установите ТВ-системудля текущего канала.
1. Выберите«Стандарт»спомощьюкнопкиЖ или ▼,затемнажмите кнопку ENTER.
2. Выберите ТВ-систему с помощью кнопки ▲ или ▼, затем на
жмите кнопку ENTER.
Тип поиска
Если захваченный сигнал плохой, вы можете снова включить поиск
канала по частоте или номеру.
1. Выберите «Тип поиска» с помощью кнопки ▲ или ▼ и нажмите
кнопку ENTER.
2. Выберите «Частота» или «Программа» с помощью кнопки ▲ или
▼, затем нажмите кнопку ENTER.
3. Выберите «Частота» или «Канал» с помощью кнопки и нажмите
кнопку ◄ или ►.
Начнется автоматический поисктелепрограммы. Если програм
ма найдена, поиск прекратится. Если вы хотите остановить по
иск, нажмите кнопкуЗТОР.
Точная настройка
Если захваченный сигнал слабый, вы можете произвести точную
настройку канала.
1. Выберите «Точная настройка» с помощью кнопки ▲ или ▼.
2. Настройте канал точно с помощью кнопки ◄ или ►. При каждом
нажатии кнопки ◄ или ►частота программыуменьшится или
увеличится на 50 кГц.
Декодер
Если текущий канал закодирован, требуется подключить (Сапа1+)
декодер к разъему евро A/V IN,n установить его в «ON».
Удаление
Если выхотитеудалитьзахваченный канал, выберите «Удаление» с
помощью кнопки ▲ или ▼, затем нажмите кнопку ENTER.
4-3. Нажмите кнопку ENTER после выбора «ОК» с помощью кнопки
▼, если все настройки правильны.
Примечание: данная функция доступна только тогда, когда рекор
дер находится в режиме ТВ.
5. Обмен каналами
Если нет захваченных каналов, данная функция недоступна.
Данная функция позволяет вам менять местами различные каналы
по назначению. Атакже вы можете группировать местадля про
грамм, которые обычно идут рядом.
- Нажмите кнопку ENTER после выбора «Обмен» с помощью
кнопки ▲ или ▼.
- Выберите программудля обмена с помощью кнопки ▲ или ▼
и нажмите кнопку ►.
- Выберите позицию для вставки с помощью кнопки ▲ или ▼,
затем нажмите кнопку ►.
- Если вы хотите поменять местами больше программ, проде
лайте шаги 2иЗ.
58
- После окончания нажмите кнопку ENTER, прежде выбрав «ОК»
с помощью кнопки ◄.
Примечание: данная функция доступна только в том случае, если
рекордер находится в режиме ТВ.
6. Таймер записи
Смотрите раздел «Таймер записи».
7. Выбор страны
Нажмите кнопку ENTER после выбора своей страны с помощью кноки ▲ или ▼.
Видео
1. Формат видеовыхода
Установите формат видеовыхода в соответствии стипом, под
держиваемым вашим ТВ или монитором. Если ваш ТВ подде
рживает PAL, установите PAL. Если NTSC, установите NTSC.
2. Разновидности размеровТВ-изображения
Если у вас широкоэкранный телевизор, выберите настройку
«16:9Wide». Широкоэкранный DVD-дискзанимает всю площадь
экрана. При воспроизведении DVD-диска, записанного в обыч
ном формате (4:3), настройки вашего телевизора определяют
то, какбудет представлен материал (подробности по тому, ка
кие опции доступны, смотрите в руководстве для вашего теле
визора).
Если у вас обычный телевизор, выберите «4:3 Letter Box» или
«4:3 PAN SCAN».
В режиме почтового ящика «4:3 Letter Box» широкоэкранный
DVD-диск отображается с черными полосами вверху и внизу
экрана. PAN SCAN отсекает стороны широкоэкранных матери
алов, делая их в соотношении 4:3 (даже если картинка кажется
больше на экране, вы фактически видите меньший кинофраг
мент).
Примечание: некоторые диски не позволяют вам менять размер
изображения.
3. ВыходР-SCAN/HDMI
При построчной развертке ТВ через соединительУ/РЬ/Ргустановите P-Scan/HDMI. Когда вы смотрите телевизор через HDMI,
установите P-Scan/HDMI (данная функция недоступна, когда
EURCAVoutputycтaнoвлeн на PGB).
4. Экранная заставка
Если изображение не двигается в течение долгого времени, те
левизор может быть поврежден. Если это наблюдается более 5
минут, экранная заставка включается, если она выбрана. Экран
ная заставка защищает катодную трубку (CRT) от повреждения,
воспроизводя движущийся логотип DVD на экране.
Примечание: экран монитора проектора или проекционного теле
визора можетлегко «прогореть», если статическая картинка
отображается на экране в течение длительного времени. Сле
дите, чтобы монитор не «прогорел», когда вы отключаете режим
сохранения экрана.
Аудио (это меню недоступно, когда диск находится в рекордере)
1.
Аналоговый выход
Не подлежит изменениям.
4097IMnew.indd 58 27.02.2007 13:35:34
Page 59

РУССКИЙ
2. Цифровой выход (SPDIF)
• RAWДвoичный поток (Bit Stream): первоначальный аудиопо
ток, записанный надиске, выходитчерез цифровой аудиовы
ход.
• LPCM: декодированный аудиопоток выходит через цифровой
аудиовыход.
3. Выход LPCM
Вам необходимо сделать данную установку только в том случае,
если подключаете плеер кАУ-усилителю (или другомуустройс-
тву), используя цифровой аудиовыход. Если АУ-усилитель (или
другое устройство) совместим с высокой частотой дискретиза
ции аудио (96 кГц), установите LPCM 96 кГц, в противном случае
установите LPCM 48 кГц.
Язык
1. ЯзыкОЗО-меню
Данный пункт используется для выбора языка дисплея, на кото
ром отражаются сообщения. Когда нужный язык выбран, сооб
щения будут отображаться на дисплее на этом языке.
2. Языкаудио
Установите предпочтительный язык аудио. Когда язык аудио вы
бран, диск будет воспроизводиться на выбранном языке (если
выбранный языксодержится надиске.)
3. Языксубтитров
Установите предпочтительный язык субтитров. Когда язык суб
титров выбран, воспроизведение диска будет происходить на
выбранном языке (если выбранный языксодержится надиске).
4. Языковоеменюдиска
Установите предпочтительный язык меню. Когда язык меню вы
бран, воспроизведение диска будет происходить на выбранном
языке меню (если выбранный языксодержится надиске).
Часы
Общее
Родит, коктроль
Сментъ пароль
Заводские установки
Выход через SCART
Декодер
Предварительный просмотр.
Режим копирования с HDD на DVD
1. Возрастные ограничения (родительский контроль)
Данная функция предназначенадля отключения воспроизведения
некоторых DVD-дисков, которые не предназначеныдля просмотра
детьми. Существует 8 уровней. Если выбран уровень 8, содержа
ние диска предназначено для взрослых. Если выбран уровень 1,
содержание диска предназначено для детей. Используйте регулировкууровня возрастных ограничений. При воспроизведении
диска выбранный уровень сравнивается с уровнем на диске. Если
выбранный вамиуровеньвышеуказанногонадиске, вы можете
воспроизводитьдиск. Если нет - диск воспроизводиться не будет.
Для установки подходящего уровня ограничений следуйте указан
ным инструкциям.
- Нажмите кнопку ENTER после выбора нужного уровня с помо
щью кнопки ▲ или ▼.
На дисплее отобразится окно пароля.
- Введите пароль из четырех цифр с помощью кнопок 0-9 и на
жмите ENTER.
Если вы не изменяли пароль, введите 0, 0, 0, 0.
- Нажмите после окончания кнопку ENTER, прежде выбрав «ОК»
с помощью кнопки ▼.
2. Изменение пароля
- Нажмите кнопку ENTER после выбора «Изменение пароля».
На дисплее отобразится окно пароля.
Новый пароль
1 Ввести пароль здесь.
Ввести новый пароль
Введите снова.
ОК
□□□□
□□□□
Отмена
1. Автоматическая установка часов
Некоторые ТВ-программы передают сигналы точного времени
вместе с программой. Данный плеер может использовать эти сиг
налы для автоматической установки часов.
- Нажмите кнопку ENTER после выбора «Настройка времени/
даты» с помощью кнопки ▲ или ▼.
- Нажмите кнопку ENTER после выбора «Авто».
- Нажмите кнопку ENTER после выбора «Программирование» с
помощью кнопки ▼.
- Выберитеустановленный канал, которыйтранслируетсигнал
точного времени, затем нажмите кнопку ENTER.
2. Установка часов вручную
Если в вашем регионе нет станций, транслирующих сигналы точно
го времени, вы можете установить время вручную.
- Нажмите кнопку ENTER после выбора «Настройка времени/
даты» с помощью кнопки ▲ или ▼.
- Нажмите кнопку ENTER после выбора «Ручной».
- Введитедатуи время, используя кнопки 0-9 или [◄►, ▲▼],
затем нажмите кнопку ENTER. Используйте кнопки 0-9 или ▲, ▼,
чтобы изменитьзначение в подсвеченном поле. Используйте
кнопку ◄ или ► для перехода из одного поля в другое.
Г
□UD RSCORüen
- Введите текущий пароль из четырех цифр с помощью кнопок
0-9,затем нажмитекнопку ▼.
- Введите новый пароль из четырех цифр с помощью кнопок 0-9
и нажмите кнопку ▼.
- Введите новый парольеще раз (для подтверждения) и нажми
те кнопку ▼.
- Нажмите кнопку ENTER после выбора «ОК».
Пароль будет изменен.
3. Заводские установки
Возвращение DVD-рекордера к заводским установкам.
- Нажмите кнопку ENTER после выбора «Заводскиеустановки» с
помощью кнопки ▼. На экране появится диалоговое окно.
- Нажмите кнопку ENTER после выбора «ОК».
4. ЕвровыходАУ
УстановитеУСЬСгдля просмотра компонентного видео через со
единение Y/Cb/Cr. При использовании AV EURO соединителя RGB
установите RGB.
5. Декодер
Если вы хотите просмотреть закодированные каналы, требуется
подключитьдекодер (Сапа1+) кразъёмуевроА/VIN, иустановить
его в «ON».
6. Тип предварительного просмотра
Вы можете выбрать тип предварительного просмотра эпизода из
59
4097IMnew.indd 59 27.02.2007 13:35:35
Page 60

РУССКИЙ
списка эпизодов жесткого диска.
Статический: отображает предварительный просмотр с неподвижным изображением.
Динамический: отображает предварительный просмотр с подвижным изображением.
7. Режимы копирования с жесткого диска на диск
При копировании с жесткого диска на DVD вы можете выбрать режим копирования.
Выбор сжатия (Fit to disc): качество записи автоматически регулируется таким образом, что выбранные эпизоды подгоняются по доступ
ному месту на диске.
Высокая скорость: выбранные эпизоды копируются с таким же качеством записи, как оригинал.
Наивысшая скорость: выбранные эпизоды копируются с определенным качеством записи в реальном времени (заметьте, что, несмотря
нато, что вы копируете с более высоким качеством, чем оригинал, копия не будетлучшего качества, чем оригинал).
Жесткий диск
1. Размер буфера Timeshift
При записи со сдвигом во времени вы можете выбрать объем буфера HDD, в котором временно сохраняется ТВ-программа.
2. Режим бyфepaTimeshift Обновление: содержание буфера стирается после изменения ТВ-канала. Сохранение: содержаниебуферасохраняется, несмотря назамену ТВ-канала.
3. Информация о жестком диске
Отображает информацию о жестком диске.
4. Управление пространством
Автоматическое: когда жесткий диск переполнен, рекордер будет перезаписывать незащищенные эпизоды.
Ручное: когда жесткий диск переполнен, рекордер не будет перезаписывать, а будет запращивать разрещение на стирание некоторых эпи
зодов для дальнейщей перезаписи.
5. Форматирование жесткого диска
Вы можете удалить все программы с жесткого диска.
6. Стирание оптическогодиска
Вы можете удалить все программы с оптического диска
(данная функция доступна только тогда, когда рекордер установлен во внещний режим AV или режим ТВ).
Дополнительная информация
Технические характеристики
Основные характеристики Поддерживаемые типы дисков
Поддерживаемые видеоформаты
ТВ-система
Требования к источнику питания
Потребляемая мощность
Вес
Размеры
Рабочая температура
Влажность при эксплуатации
DVD, CD-DA, CD, CD-R/CD-RW, DVD+R/RW, DVD-R/RW
MPEG-1, MPEG-2, MPEG-4, JPEG
PAL/SECAM
AC 100-240 B, 50/60 Гц
45 Вт
4.5 кг
420(Ш) X 44(B) X 336(Д) мм
от 5 до 35°С
от Юдо 75 %
Запись Записывающий формат DVD VIDEO
Записывающие диски DVD+R, DVD+RW, HDD (250 Гб)
Таймер Программы 8 программ
Часы Кварцевые часы (цифровой дисплей 24 часа)
Таймер автовыключения Прибл. 1 час 30 минут
Соединители Евро АУ(соединительВход/выход АУ соединителя х 1 Данный соединитель передает аудио- и видеосигналы
21-р1п) Выход АУ-соединителя х 1 цветному ТВ или монитору
Вход/выход 5-У1бео Вход/выход V (яркость) Ур-р(75 0м)
С (цвет) 0.286 Ур-р(75 0м)
Разъем S-VIDEO
Вход/выход Видео Вход/выход Ур-р(75 0м)
Входх 2,Выходх 1 Разъем RCA
Компонентный видеовыход {X СЬ/РЬ, Сг/Рг) Y: 1.0Ур-р(75Ом)
СЬ/РЬ, Сг/Рг: 0.7 Ур-р (75 Ом)
Вход/выход аудио Вход(Е/П) X 2, Выход (Е/П) х 1 2 Vrms (1 кГц, 0 дБ)
Разъем RCA
Цифровой аудиовыход Оптический выход х 1 Оптический разъем
Коаксиальный выход х 1 Разъем RCA
60
4097IMnew.indd 60
27.02.2007 13:35:36
Page 61

РУССКИМ
Цифровой вход/выход IEEE стандарт 1394 4 pin
USB-вход USB1.1 4 pin
HDMI-выход ТипАх 1 480р/576р
Характеристики аудио Частотный диапазон 4Гц-44 кГц(0У0-частота: 96 кГц)
Отношение сигнал/шум 100 дБ
Динамический диапазон 95 дБ
Общие гармонические искажения 0.03 %
Аксессуары А/В-кабель 1
RE-кабель 1
Scart-кабель 1
Пульт ДУ 1
Батарейки типа «ААА» 2
Инструкция по эксплуатации 1
Производитель сохраняет за собой право изменять дизайн и технические характеристики прибора без предварительного уве
домления.
Поиск и устранение неисправностей
Причиной неисправностей или помех часто является неправильное использование. Если вы считаете, что с устройством что-то не так, про
верьте возможные причины неисправности по данной таблице.
Иногда причина неисправности может быть вызвана работой других компонентов. Проверьте другие компоненты и электроприборы перед
использованием. Если вам не удалось устранить неисправность после проверки перечня, расположенного ниже, обратитесь в ближайший
авторизованный сервисный центр или кдилерудля выполнения ремонтных работ.
Признак неисправности Меры поустранению неисправности
После загрузки диск автоматически
извлекается
Дискустановлен неправильно • Установитедискправильно
Несовместимый код региона • Если код региона на DVD- диске не совпадает с кодом, указанным на рекордере, диск не
Конденсация внутри рекордера • Подождите, пока испарится конденсат. Не используйте рекордер рядом с
Диск перевернут • Перезагрузите диск так, чтобы сторона с этикеткой была сверху
Изображение неподвижно, не работают
кнопки управления
Новые настройки в менюустановок при
воспроизведении диска не производятся.
Настройки удалены
Отсутствует изображение и цвет • Неправильное подключение видео. Проверьте соединители. Убедитесь, что щтекеры
ОУО-рекордер не записывает • Неправильный типдиска, не DVD±R, DVD±RW
Экран растянут, вид не меняется • Неправильные установки размера ТВ-экрана в меню настроек. Установите размер ТВНарушение или затемнение изображения при
воспроизведении
ПультДУ не работает • Пульт ДУ слищком удален от рекордера или не направлен на датчик.
• Дискзагрязнен или поврежден
будет воспроизводиться
кондиционером
• Выключите и включите питание еще раз, используя кнопку STANDBY/ON на передней
панели прибора
• Выньте щтекер из розетки и вставьте его еще раз
• Некоторые настройки могут быть произведены при воспроизведении диска, но они не
будут эффективны до тех пор, пока диск не будет остановлен и перезапущен
• Это не неисправность. Произведите такие же настройки при отключенном
воспроизведении
• Если питание отключилось из-за сбоев в сети или из-за выключения щнура питания,
настройки будутудалены
полностью вставлены
• Неправильные настройки Т- монитора или A/V-усилителя. Обратитесь к инструкции для
подключения оборудования
• Меню компонентного выходаустановлено на «прогрессивное сканирование», ноТВ/
монитор не поддерживает прогрессивное сканирование
• Переподключите рекордер кТВс помощью композитного или кабеля S-Video и
установите ТВ к правильному входу
• На диске нет места для записи
• DVD±R финализирован
экрана в соответствии сТВ/монитором
• Данный плеер имеет систему Macro Vision. Некоторые диски защищены от копирования
предохранительным сигналом, и при их воспроизведении на картинке ТВ могут
появляться полосы и т. д.
Используйте пульт по назначению.
• Если батареи сели, вставьте новые батареи
61
4097IMnew.indd 61 27.02.2007 13:35:36
Page 62

РУССКИМ
Звук отсутствует или искажен Некоторые диски не имеют цифрового аудио
Аналоговое аудио в порядке, но нет
цифрового аудиосигнала
Заметная разница в громкости DVD- и CD-
дисков
Отсутствует аудиовыход DTS • Если прибор подключен кусилителю или декодеру, который не поддерживает DTS, то,
Примечание: статическое электричество или другие явления могут привести к помехам в работе прибора. В этом случае выньте, а затем
снова вставьте шнур питания в розетку. Прибор перезагрузится. Если проблема не решится, обратитесь в ближайший сервисный центр.
Утилизация старого оборудования
Данный товар отмечен символом, обозначающим то, что электрические и электронные устройства должны утилизироваться в соответс
твии с Директивами 2002/96/ЕС. Правильная утилизация старого оборудования может предотвратить вредное воздействие на окружа
ющую среду. Внимание! Электронное оборудование может оказать вредное влияние на окружающую среду и здоровье человека из-за
содержания в нем вредных веществ.
• Переключите усилитель на аналоговый выход
Грязь или пыль на диске
• Почистите диск
Соединители вставлены не полностью в разъемы (или не подключены)
• Проверьте, что все соединители вставлены
Грязные или окисленные штекеры/разъемы
• Очистите штекеры/разъемы
Неправильно подключен аудиокабель
• Проверьте подключение аудио
Выход рекордера подключен к PHONO-входуусилителя (входдля подключения винил
проигрывателя)
• Подключите клюбому выходу, кроме PHONO
Диск на паузе
• Нажмите «Воспроизведение» для выхода из режима паузы
Неправильные настройки усилителя
• Проверьте громкость, динамики, функцию входа
Неправильные настройки меню аудио
• Убедитесь, что цифровой аудиовыходустановлен на LPSM или RAW. Удостоверьтесь, что
настройки LPSM или RAW подходятдля вашегоусилителя. См. инструкцию кусилителю
■ Диски DVD и CD записываются по-разному. Это не является неисправностью
используя цифровой аудиокабель, подключите DTS-совместимые усилитель или декодер.
В противном случае при воспроизведении DTS будет шум
• Если прибор подключен кусилителю или декодеру, который поддерживает DTS, то,
используя цифровой аудиокабель, проверьте настройки усилителя или убедитесь, что
кабель вставлен правильно
Срок службы прибора не менее 5-ти лет.
Данное изделие соответствует всем требуемым европейским и российским стандартам безопасности и гигиены.
С'
Производитель: АНДЕР ПРОДАКТС ГмбХ, Австрия
= 67 Нойбаугюртель, 38/7А 1070, Вена, Австрия
62
4097IMnew.indd 62 27.02.2007 13:35:36
Page 63

УКРА1НЬСКИИ
1нструкц1я 3 експлуатацГГ
DVD та HDD рекордер
Модель VT-4097
Передп1дключенням, використанням i настройкою програвача
уважно прочитайте ¡нструкцй', як! знаходяться в цьому пос1бнику.
CAUTION!
RISKOFELECTRIC
SHOCK
А
ЗАСТЕРЕЖЕННЯ: Для зниження ризику загоряння або
поразки електричним струмом, не зн!майте панел! пристрою.
Для серв!сного обелуговування звертайтеся т!льки до
квал!ф!кованого персоналу.
Значок блискавки в р1вносторонньому трикутнику
вказуе користувачу на наявн1сть небезпечноУ напруги
усередин! корпуса виробу, здатноУ призвести до поразки
електричним струмом.
Знак оклику в рУвносторонньому трикутнику вказуе
користувачу на наявнУсть важливих ¡нструкцУй з
експлуатацй' i техобслуговування в супутньоУ виробу
лУтературУ.
CLASS 1
LASER PRODUCT
Збер!гайте пос!бникдля користування в процес! експлуатац!|
пристрою.
Для правильноГексплуатацГГданого пристроюуважно
прочитайте \ збережУть керУвництво для користувача.
DONOT OPEN!
Позначення пристрою, що застосовуе
лазер. МаркУрування повинне
знаходитися на заднУй панел! пристрою
та означав, що пристрУй наложить до
Класу 1 \ використовуе лазерн! промен!.
Можлив!сть лазерного опром!нення
в!дсутня без розкриття приладу.
Л\
/ ■ \
• Аксесуари - використовуйте т!льки насадки ! аксесуари в!д ви-
робника.
• В!зок - використовуйте в!зок, п!дставку, кошик або столик т!льки
рекомендован! виробником, або як! входять до комплекту пос
тавки. При використанн! в!зка дотримуйтесь заход!в безпеки,
щоб уникнути пад!ння ! пошкоджень приладу.
• Вентиляц!я - не закривайте вентиляц!йн! отвори. Встановлюйте
в!дпов!дно до !нструкц!й виробника.
• Заземления ! полярн!сть - для безпеки використовуйте полярний
або заземлений штепсель. Полярний штепсель мае два штир!,
один 3 яких ширший н!ж !нший. Заземлений штепеель мае два
штир!! трет!й заземлений зубець. Широкий штир ! заземлений
зубець отворен! для Вашо! безпеки. Якщо штепеель, що поетавляетьея не п!дходить до Вашо! розетки, зверн!тьея до електрика
для зам!ни розетки.
• Захиетшнуруживлення-неход!ть пошнуруживлення.Звертайте оеобливуувагу на штепеел!, розетки ! м!еця з’еднання
шнура 3 приладом.
• Викориетання п!д чае грози - в!дключайте прилад в!д мереж! п!д
чае грози або коли в!н довго не викориетовуетьея.
• Техн!чне обелуговування - техн!чне обелуговування повинне
зд!йенюватиея квал!ф!кованим переоналом. Сл!д проводити
техн!чне обелуговування приладу, якщо в!н був пошкоджений
(пошкоджений шнур живлення або штепеель), на прилад попала
р!дина, на прилад впав предмет, прилад п!ддававея попаданию
дощу або вологи, робота приладу порушена або прилад падав.
• Джерелатепла -неветановлюйтеприладпоблизуджерелтепла, такихяк рад!атори, теплов! л!чильники, плити чи !нш! прилади
(включаючи п!деилювач!), як! виробляютьтепло.
Перед початком використання Комплект поставки
Дякуемо Вам за придбання нашего DVD-плейера. Переконайтееь,
що наступи! аксесуари входятьдо комплекту поставки.
1. ПультДУ
2. Кабель SCART
3. Кабель RE
4. Ауд!о/В!део кабель
5. Батарей типу ААА
ЯКЩО ПРИСТР1Й ВИМАГДе ОБСЛУГОВУВАННЯ, ЗВЕРНПЬСЯДО
ПРОДАВЦЯАБО ПРОЧИТАЙТЕ РОЗД1Л “УСУНЕННЯ НЕПОЛАДОК”.
ЩОБУНИКНУТИ ВЛУЧЕННЯ П1ДЛАЗЕРНЕВИПРОМ1НЮВАННЯ, НЕ
РОЗКРИВАЙТЕ КОРПУС. КОЛИ КОРПУС РОЗКРИТИЙ АБО ЗНЯТ1
ЗАГЛУШКИ, МОЖЕД1ЯТИ ВИДИМЕЛАЗЕРНЕВИПРОМ1НЮВАННЯ.
НЕДИВ1ТЬСЯ НА0Б’еКТИВИЛАЗЕРН01СИСТЕМИ.
УВАГА:
В1ДЕОПРОГРАВАЧ ОУО ДИСК1ВеЛАЗЕРНИМ ПРИСТРОеМ КЛАСУ
1. ВИКОРИСТАННЯ ОРГАН1В КЕРУВАННЯ АБО РЕГУЛЮВАННЯ, НЕ
ЗАЗНАЧЕНИХУ ЦЬОМУ КЕР1ВНИЦТВ1, ВИКОНАННЯ ПРОЦЕДУР,
ЩСУНЬСМУНЕОПИСАН!, МОЖЕПРИЗВЕСТИДО ВЛУЧЕННЯ П1Д
НЕБЕЗПЕЧНЕ ВИПРОМ1НЮВАННЯ. ТОМУ ЩО ЛАЗЕРНИЙ ПРОМ1НЬ,
ВИКОРИСТОВУВАНИЙУЦЬОМУВ1ДЕОПРОГРАВАЧ1 ОУО ДИСК1В,
НЕБЕЗПЕЧНИЙ ДЛЯ ОЧЕЙ, НЕ НАМАГАЙТЕСЯ РОЗКРИТИ КОРПУС.
ОБСЛУГОВУВАННЯ ПРИСТРОЮ ПОВИННЕ ВИКОНУВАТИСЯ Т1ЛЬКИ
КВАЛ1Ф1КОВАНИМИ СПЕЦ1АЛ1СТАМИ СЕРВ1СНОГО ЦЕНТРА.
Важлив! ¡нструкцГГзтехн1ки безпеки
• Прочитайте дан! !нструкц!!' - вс! !нструкц!!' з техн!ки безпеки ! екс-
плуатац!!' необх!дно прочитати перед використанням приладу.
• Збереж!ть дан! !нструкц!!' - !нструкц!!' з техн!ки безпеки ! експлуатац!!' необх!дно зберегти для подальшого використання якдов!д-
ковий матер!ал.
• Враховуйте вс! попередження - вс! попередження, вказан! на
товар!! в !нструкц!ях необх!дно враховувати.
• Дотримуйтесьвс!х!нструкц!й -дотримуйтесьвс!х!нструкц!йз
використання.
• Протирайте прилад т!льки вологою тканиною - перед чищенням
приладу сл!д в!д’еднати його в!д мереж!. При чищенн! необх!дно
використовувати пол!рувальну тканину або м’яку суху тканину.
Не використовуйте в!ск, бензин або !нш! летк! р!дини при чищенн!, такяк вони можуть роз’Удати корпус приладу.
• Не використовуйте прилад поблизу води - не використовуйте
прилад поблизу води, наприклад, поряд з ванною, умивальником, раковиною, раковиноюдля прання, в сирому п!двал!, поряд
3 басейном або под!бних м!сцях.
63
Пут!вникпо експлуатацГГ(даний пут!вник)
Встановлення батарей в пультдистанц!йногоуправл!ння
В!дкрийте кришку батарейного в!дс!ку на задн!й панел! пульта ДУ.
Вставте дв! батарейки типуААА в батарейний в!дс!к так, щоб
полярн!сть батарейок в!дпов!дала позначкам всередин! батарейного
в!дс!ку (+, -).
Закрийте кришку батарейного в!дс!ку.
Використання пультаДУ
При використанн! пульта ДУ пам’ятайте наступне:
• Переконайтееь, що м!ж пультом ДУ! датчиком дистанц!йного
управл!ння на прилад! нема н!яких перешкод.
• Якщо на датчик дистанц!йногоуправл!ння на прилад! попадав со-
нячне або флуоресцентне св!тло, пульт ДУ може не працювати.
• Пульти ДУ в!д р!зних прилад!в можуть впливати на роботу один
одного. Не використовуйте пульти ДУ в!д !ншого обладнання,
розташованого поблизуданого приладу.
• Зам!н!ть батарейки, якщо в робот! пульта ДУ з’явились порушення.
Прим!тка:
Неправильно використання батарей може призвести до витекання
електрол!ту або вибуху. Зверн!ть увагу на наступне:
• Не використовуйте разом нов!! стар! батаре!.
• Не використовуйте разом батаре! р!зного типу. При схожему
зовн!шньому вигляд! вони можуть в!др!знятись за напругою.
• Переконайтееь, що додатн!! в!д’емн! полюси кожно! батаре!
сп!впадають з позначками всередин! батарейного в!дс!ку.
• Вийм!ть батаре! з приладу, якщо Ви не плануете використовува
ти йоге протягом м!сяця чи б!льше.
• При утил!зац!! використаних батарей дотримуйтесь урядових
вказ!вок або !нструкц!й з використання навколишнього середовища, як! д!ютьу Ваш!й кра!н! чи рег!он!.
CyMicHicTb диск!в
Будь-який диск, що мае один з наступнихлоготип!в, може
використовуватись в дан!й систем!. 1нш! формати диск!в, включаючи
DVD-RAM, DVD-ROM, DVD-Aud!o, SACD ! CD-ROM не будуть
програватись.
4097IMnew.indd 63 27.02.2007 13:35:37
Page 64

УКРА1НЬСКИИ
Програвання диск1в DVD-Video
Односторонн! або двосторонн! диски.
Одношаров! або двошаров! диски.
VIDEO
Dolby Digital, DTS, MPEG, Linear PCM digital audio (л1н1йна ¡мпульсно-кодова модуляц1я (IKM), цифрове ауд1о)
MPEG-2 цифров! в1део диски зазвичай дгляться на 2 чи бгльше еп1зод1в. Дал! вони можуть бути подглен! на фрагменти.
Програвання диск1в AUDIO CD
Г| COMPACT ■ '
QuDÉìÈ ■
DIGITAL AUDID У формат! CD ауд1о або CD в1део, або у файлах Kodak picture).
Програвання диск1в DVD-R/RW
Диски 12cMi8 см.
Л1н1йна IKM, цифрове ауд1о.
Диски формат1в CD audio, CD-R, CD-RWдiлятьcя на треки. (Даний пристр1й може програвати CD-R i CD-RWдиcки, записан!
■ Даний пристр1й може програвати DVD-R/DVD-RWдиcки, записан! у формат! DVD в1део.
■ Даний пристр1й може також записувати в1део i ауд1о сигнали на DVD-R /DVD-RWдиcки.
RW
Програвання диск1в DVD+R/RW
■ Даний пристр1й може програвати DVD+R/DVD+RWдиcки, записан1уформат1 DVD в1део.
DVD+ReWritable
Даний пристр1й може також записувати в1део i ауд1о сигнали на DVD+R/DVD+RWдиcки.
Програвання диск1в формату MPEG-4
* •
IMPEG-4I • Даний пристр1й може програвати диски формату MPEG-4.
COMPATIBLE
Програвання диск1в формату JPEG
• Даний пристр1й може програвати диски формату JPEG (фото).
Коди perioHÎB DVD Video
Bei DVD Video диски мають код perioHy, вказаний на Kopnyci, який показуе, в якому perioHi плейер може використовуватись. Ваш DVD-
рекордер також мае код perioHy, який розташований на задн1й панел! приладу. Диски, код perioHy яких не сп1впадае з кодом вказаним на
даному рекордер!, не будуть програватись. Диски з позначкою ALL (мультизонн!) будуть програватись BciMa DVD- плейерами.
Попередження
• Якщо Ви записуете диск, використовуючи ПК, нав1ть якщо форматдиску сум1сний, е випадки, коли диск не програеться ¡з-за
налаштувань програмного забезпечення, яке використовувалось при запис! диску.
• Деяк! фгльми формату МРЕС-4 можуть не програватись ¡з-за в1дм1нностей у використаних методах декодування.
Управл1ння та ¡ндикац1я Передня панель
1. Дисковод. Використовуеться для встановлення диску i подальшого програвання.
2. Кнопка OPEN/CLOSE. Натисн1ть кнопкудля того, щоб в1дкрити або закрити дисковод.
3. Кнопка PLAY/PAUSE. Натисн1ть, щоб розпочати або призупинити програвання.
4. Кнопка STOP. Натисн1ть, щоб зупинити програвання.
5. AV IN. Використовуйте для зовн1щнього ауд1о/в1део входу при запис!.
6. Кнопка RECORD. Натисн1ть, щоб розпочати запис на диск.
7. FL дисплей. В1дображае поточний стан рекордера.
8. Кнопка STANDBY/ON. Перемикае приладз режимуоч1кування в робочий режим.
9. AUDIO IN. В1д’еднайте до ауд1о виходу в1деокамери.
10. COMPOSITE VIDEO IN. В1д’еднайте до композитного в1део виходу в1деокамери.
64
4097IMnew.indd 64 27.02.2007 13:35:38
Page 65

УКРА1НЬСКИИ
11. Роз’эм DV IN. Роз’ем використовуеться т1льки для п1дключення цифровоУ в1деокамери. Не сум1сний з ¡ншими цифровими пристроями.
12. USB IN. Цифровий роз’ем для використання з USB пам’яттю (USB Flash Drive).
ДИСПЛЕИ
1. 1ндикатор таймера запису. Загораеться при ув1мкненн1 таймеру запису.
2. Ракурс (Кут огляду). Вказуе, що поточний диск мае багато ракурс1в. (Ця функц1я в1дображаеться т1льки для диск1в записаних з р1зними
кутами огляду.)
3. 1ндикатор системи Dolby Digital. Вказуе на програвання в систем! Dolby Digital 5.1
4. 1ндикатор еп1зоду. В1дображае номер еп1зоду при програванн! DVD.
5. 1ндикатор фрагменту. В1дображае номер фрагменту при програванн! DVD.
6. 1ндикатор двомовного режиму. Загораеться при прийом! двомовноУ трансляц||.
7. 1ндикатор стерео. Загораеться при прийом! стереофон1чного мовлення.
8. Обертання. Обертаеться при обертанн! диска.
9. 1ндикатор HDD (жорсткий диск). Вказуе на роботу з жорстким диском.
10. 1ндикатор повторения. Загораеться, коли поточний режим програвання вУдбуваеться при повторенн! епУзоду, фрагменту, треку,
вибраного в1др1зкуА-В в1дпов1дно.
11. 1ндикатор DVD. Вказуе на роботу з приводом DVD.
12. 1ндикатор DTS. Загораеться, коли цифровий ауд1о вихУдуформат! DTS.
13. Поточна 1нформац1я. ВУдображае епУзод, фрагмент i номер треку, час i ТВ канал.
Задня панель
1. Мережевийшнур. □¡д’еднуетьсядодомашньоУрозетки.
2. Цифровий ауд1о вих1д. □¡д’еднайте коаксиальний вихУддо цифрового ауд1о входу (коаксиальний тип) ауд1о пУдсилювача.
Або пУд’еднайте оптичний вихУддо цифрового ауд1о входу (оптичний тип) ауд1о пУдсилювача.
3. Компонентний в1део вих1д. □¡д’еднайте до компонентних в1део входУв ТВ.
4. Роз’ем Audio IN. □¡д’еднайте до в1део виходу VCR або декодеру каналУв кабельного телебачення (STB).
5. Video IN. □¡д’еднайте в1део до компонентного в1део виходу VCR або декодеру STB.A60 пУд’еднайте S-VIDEO до S-VIDEO виходу VCR або
декодеру STB.
6. Video OUT. П1д’еднайте в1део до компонентного в1део входу ТВ або MOHiropy. Або пУд’еднайте S-VIDEO до S-VIDEO входу ТВ або
MOHlropy. S-VIDEO забезпечуе кращу як1сть зображення, н1ж композитно в1део.
7. Audio OUT. П1д’еднайте до ауд1о входуТВ.
8. HDMI OUT (576Р). HDMI (мультимед1йний ¡нтерфейс високо1ч1ткост1) транслюе цифрове в1део i ауд1о в1д Вашого DVD-рекордера до
Вашого телев1зора. Просто п1д’еднайте DVD-рекордер до Вашого ТВ одним HDMI кабелем для кращого зображення i звуку.
9. ANT IN. П1д’еднайте до зовн1шньо1 антени.
10. ANT OUT. П1д’еднайте до антенного входу телев1зора.
11. Euro AV OUT. П1д’еднайте до Euro AV входу телев1зора.
12. EuroAV IN/OUT. В1д’еднайте до EuroAV IN/OUT ауд1о/в1део обладнання, такого якVCR, DVD плейер i т.д.
65
4097IMnew.indd 65 27.02.2007 13:35:39
Page 66

УКРА1НЬСКИИ
Пульт ДУ
ПРРШС! nsF
V/ TV MODE
13)
g)
g
11)
(14)—
(io)—
STANDBY/QN
ULUE DISF»LAY
(Ф
DVD
HDDiTAJB FILE TV/DVD
n
1
AVIN
n
1
EDIT TIMSHREC аОВ]ЗР1Р ADD/CLEAR
(1^
ENTER ►
TIhIBHIFT A-В AUDIO SUBTITLE
©
(i) (© ©
(g)
1. A-B
Повторения певного фрагменту в1д точки А до точки В п!д час
програвання.
2. Add/Clear
Видалити встановлену програму 3Ì списку запис1в таймеру.
Добавити або видалити номер треку ¡з запрограмованого списку
програвання CD.
3. Angle
Перегляд з р1зним кутом огляду.
4. Arrow (▲▼◄►)
Для вибору пункту меню.
5. Ауд1о
Для вибору мови ауд1о або ауд1о каналу при програванн! DVDдиску.
Ви також можете зм1нити ауд1о канал трансляц||.
• Якщо NICAM мовлення двомовне, Ви можете обрати мову.
NICAM LANCI ^ NICAM LANG2 ^ NICAM LANG1/2
• Якщо NICAM мовлення стерео, Ви можете перемикати м1ж
NICAM стерео i моно звуком.
NICAMSTEREO^MONO
6. AVIN
Для вибору зовн1шнього ауд1о в1део входу для запису.
7. Channeldown/up(+,-)
Для вибору встановленихТВ канал1в.
8. Display
Для перегляду 1нформац|| про еп1зод, фрагмент, трек або мову
субтитр1в i ауд1о.
©
©
(17
(41
9.
DVD
Для перемикання в режим DVD.
10.
DV/USB
Для вибору цифрового A/V входу в1д цифрово!' в1деокамери чи
пам’ят! (USB Elash Drive).
11.
Edit
Для редагування еп1зоду чи фрагменту диску.
12.
Enter
Для вибору (введения) пункту меню.
13.
Е11е
Для переглядуспискуфайл1в (MPEG-4, MP3, JPEG файл1в).
HDD/DUB
14.
Для перемикання в режим програвання з жорсткого диску
(HDD).
Для коп1ювання еп1зод1в з жорсткого диску на оптичний диск.
Menu
15.
Для в1дображення зм1сту меню завантаженого DVD-диску.
16.
Mute
Для ув1мкнення/вимкнення ауд1о виход1в.
17.
Next
Перех1ддо наступного фрагменту або треку.
18.
Numeric (Цифри) (0-9)
Використовуйте цифров! кнопки для вибору треку, фрагменту,
еп1зоду.
19.
Open/Close
Для того щоб в1дкрити або закрити дисковод.
Якщо кнопка натиснута в режим! оч1кування, живлення вмикаеться автоматично.
20.
Pause
Якщо натиснути цю кнопку в режим! програвання, зображення
стане нерухомим.
21.
Play
Для програвання завантаженого диску або жорсткого диску.
22.
Prev
Для переходудо попереднього фрагменту чи треку.
23.
Program
Для програвання в певн1й посл1довност1.
Дана кнопка працюе т1льки при програванн! CD.
24.
REC (Record)
Для початку запису.
25.
Repeat
Для вибору режиму повторения.
26.
Return
Для переходудо попереднього меню.
При використанн! VCD 2.0 i SVCD з функц1ею РВС (контроль про
гравання), дана кнопка працюе як кнопка повернення.
27.
SCAN FWD
Для сканування вперед п1д час програвання.
28.
SCAN REV
Для сканування назад п1д час програвання.
29.
SETUP
Для зм1ни початкових налащтувань.
30.
SLOW
Для упов1льненого програвання зм1сту диску.
31.
SORT/PIP
Для сортування еп1зод1в на жорсткому диску за назвою чи да
тою.
Для перегляду зовн1щнього в1део поки йде програвання з DVD
або жорсткогодиску.
32.
STANDBY/ON
Перемикае пристр1й в рабочий режим або режим оч1кування.
33.
STOP
Для зупинки програвання диску або програвання з жорсткого
диску.
34.
SUBTITLE
Для вибору мови субтитр1в.
35.
TIMERREC
Для встановлення таймеру запису.
36.
TIMESHIFT
Для тимчасового збер1гання ТВ програми в кещ-пам’ят1 жорс
ткого диску.
37.
TITLE
Для в1дображення меню еп1зод1в DVD.
38.
TV
Для перемикання в режим ТВ.
39.
TV/DVD
Для перегляду канал1в, вибраних тюнером рекордера чи ТВ тю
нером.
66
4097IMnew.indd 66 27.02.2007 13:35:40
Page 67

УКРА1НЬСКИИ
Працюе т1льки тод1, коли рекордер i ТВ з’еднан! м1ж собою европейським SCART кабелем, кр1м того, у вих1дних налаштуваннях
вибраний режим RGB.
40. TV MODE
Встановлюе тип ТВ у в1дпов1дност1 до типуТВ користувача, що
□¡дтримуеться. Кожного разу, при повторному натисканн! на цю
кнопку, буде зм1нюватись тип ТВ м1ж NTSL/PAL i прогресивним
розгортанням/HDMI. Ця кнопка працюе т1льки при в1дкритому
дисковод!.
41. ZOOM
Зб!льш!ть зображення DVD або HDD до розм!ру вдв!ч! б!льше.
□¡дключення в1деовиход1в Композитний в1део вих1д (CVBS)
Композитний в!деових!д мають б!льш!сть телев!зор!в.
Композитний роз’ем на телев!зор! зазвичай жовтого кольору i може
бути маркован! як в!део, CVBS або композитний.
€вро A/V вих1д
евро A/V вих!д може бути з’еднаний з телев!зором, обладнаним
евро A/V роз’емом. Через евро A/V ауд!о передаеться з! стерео
звуком.
Вих1д S-Video
S-Video вих!д може бути з’еднаний з телев!зором, який мае S-Video
вх!д.
Роз’ем S-Video на телев!зор! може бути маркований як S-Video, Y/C,
S-VHS.
S-Video забезпечуе краще зображення н!ж композитне в!део.
Компонентний в1део вих1д
Компонентний в!део вих!д може бути з’еднаний з телев!зором, що
мае компонентний в!део вх!д.
Роз’еми компонентного в!део на телев!зор! можуть бути маркован!
hkYUV, Y/Pb/Pr, Y/Cb/Cr i маги зелений, син!й i червоний кол!р.
Компонентно в!део забезпечуе зображення. Встанов!ть В!део вих!д
в Меню налаштувань в!део HaY/Cr/Cb ON.
DVD-Recorder
DVD-Recorder
AUDIO
AMPLIFIER
□¡дключення ауд1о/в1део вход1в
DVD-Recorder
VCR or Satellite receiver or Decoder box
S-VIDEOOirr VIDÉb
Ви можете записувати програми з ауд1о в1део систем, raKHxnKVCR,
супутниковий рес1вер абодекодуючий пристр1й.
Ауд1овх1д
З’еднайте ауд1овх1дз ауд1овиходом A/Vсистеми.
Прим!тка:
• RFOUT , маркованоТОТУ т!льки кр!зний прох!д РЕсигналу.
• Кабель S-Video не постачаеться в комплект!.
П1дключення ауд1овиход1в
Ви можете насолоджуватись звуком Dolby Surround при п1дключенн1
цифрового ауд1овиходудо цифрового п1дсилювача.
Ауд1ових1д
Використовуйте ауд1овиходи для з’еднання з вашим телев1зором.
Цифровий ауд1ових1д
Використовуйте цифров! ауд1овиходи для з’еднання з Dolby Digital
або DTS декодером. В меню цифрового ауд1овиходу вибер1ть PCM
або Bitstream в1дпов1дно до вашого декодеру.
Прим1тка
Оптичний I коаксиальний кабел! не входять до комплекту поставки.
67
В1деовх1д
З’еднайте композитний в1деовх1д або S-Video вх1д з композитним
в1деовиходом або S-Video виходом A/V системи.
Або з’еднайте EuroAV IN/OUT з EuroAVOUT A/VcncTeMH.
DVD Recorder - DVD рекордер
Optical Cable - оптичний кабель
Coaxial Cable - коаксиальний кабель
AudioAmplifier - п1дсилювач ауд1о
A/V Cable - ауд1о/в1део кабель
White - б1лий
Red -червоний
Scart Cable - кабель Scart
VCR or Satellite receiver or Decoder Box - VCR, супутниковий рес1вер
або декодуючий пристр1й
П1дключення DV IN i USB IN
I*
С»
USB Memory Digital Camcorder
При п1дключенн1 до роз’ему DV IN можна програвати цифров! в1део
записи.
DV вх1д
П1дключ1ть DVINдo роз’ему DV IN/OUT на Ваш1й цифров1й
в1деокамер1, використовуючи DV кабель (не входитьдо комплекту
4097IMnew.indd 67 27.02.2007 13:35:42
Page 68

украТньский
поставки).
USB вх1д
Встаете пристр1й USB в роз’ем для □¡дключення USB на рекордер!.
□¡дключення HDMI виходу
н'Щф
ft
@ (И OJ mmMImmII щиМищ
•
DVD-Recorder
AUDIO ■ 00:00:00 • 00:00:00
Файлы и каталоп^Шюбимые/программа
2ЬА KEIKO MATSUI • ' ■ ' '
27;з LAURA FIGY • С ■' ■
28 J9 MAXWELL • WHE «I, ■
, 29/9 new STORIES (HI ■! ■
J Zflfl OST llllllllli liMILM ■ .
l31f? OLOIMAGE.JPG ||
Нажмте ВВЕРХ/ВНИЗ
для изменения знака, ВВОД
для подтввряэдбния названия
DUD RecOROGR
Вибер!ть бажану програму за допомогою кнопок АабоТ.
Натисн!ть кнопку ENTER або PLAY^ щоб розпочати програвання.
Натисн!ть кнопку TITLE або MENU для повернення до меню на
екран!.
HOMI (мультимед!йний ¡нтерфейс високо!
hìtkoctì)
передав цифрове
в!део i ауд!о в!д Вашого рекордерадо Вашоготелев!зора. Просто
п!д’еднайте рекордер до Вашого ТВ одним HOMI кабелем.
Ув1мкнення i вимкнення
Ув!мкн!тьтелев!зор i встанов!тьв!деовх!ддо даного рекордеру.
Натисн!ть клав!шу STANDBY/ON на пульт! ДУ або на передн!й панел!
для ув!мкнення. Ви можете побачити !нформац!ю на екран!. Якщо Ви
хочете вимкнути прилад, натисн!ть клaв!шySTANDBY/ON ще раз на
пульт! ДУ або на передн!й панел!.
Виб1р HDD (жорсткий диск) або DVD для програвання i запису
Якщо Ви хочете переключитись на режим роботи з HDD, натисн!ть
кнопку HDD/DUB на пульт! ДУ.
Якщо Ви хочете переключитись на режим роботи з DVD, натисн!ть
кнопку DVD на пульт! ДУ.
В1дображення ¡нформацГГна екран!
Ви можете в!добразити статус програвання на екран! наступним
чином: еп!зод, номер фрагменту, час програвання.
Натисн!ть кнопку D!splay п!д час програвання. Еп!зод, номер
фрагменту, час програвання, мова ауд!о ! мова субтитр!в з’явиться
на екран!.
Натисн!ть клав!шу D!splay ще раз. Ви можете бачити статус
програвання детальн!ше. Кр!м того, Ви можете зм!нити мову
субтитр!в, фрагменту! т.д. використовуючи АТ-е^! кнопку Enter.
Програвання ауд1о CD (Компакт диску)
Завантажте ауд!о CD диск.
Перша композиц!я програеться автоматично.
Натисн!ть кнопку D!splay. 1нформац!я про диск в!добразиться на
екран!.
___
Файлы и каталоги BnioeHMbiafnporpaMMa
9f7 PRIMUS1G24.JPG
1Qi* TEST 3.,01.ДУ1 ■
I 12«i TEST 5 01,AVI —"
ll3tfiTEST6 01.AVI I'
14-i TEST 8 01.AVI
15fJ THEDOORS11024.
I
Для просмотра списка воспользуй
тесь кнопками вверх/вниз, нажмите
ВВОД ДЛЯ воспроизведения
'-Щ
DUD RECOROeR
Вибер!тьтрек, використовуючи кнопки АабоТ, пот!м натисн!ть
кнопку ENTER.
Введ!ть бажаний номер треку, використовуючи кнопки 0-9 !
натисн!ть кнопку ENTER. Вибрана композиц!я почне програватись.
ЯкщоВинатиснетекнопки ►►! або !◄◄ п!дчаспрогравання,Ви
можете прослухати наступнуабо попередню композиц!ю.
Програвання JPEG компакт диску
ЗавантажтеОРЕС CD. Каталог ! список файл!в в!добразяться на
екран!.
___
AUDIO ■ 00:00:00 • ОО^ОО^ОО^^^^И
Файлы и каталош Щ Любимые/пря^нна!
2ВА KEIKO MATSUI ■
27, rs LAURA FIGY • С Н ■■
28, г9 MAXWELL • WHE -4i ll
29/9 new STORIES (HI Ш ■■
- Zflfl OST llllllllli liillILM Щ' ■■
l31f? OLOIMAGE.JPG " '
......
'Д
Для вимкнення режиму в!дображення !нформац!) на екран! натисн!ть
DUD RECDRDER
кнопку D!splay.
Програвання DVD диску
Натисн!ть кнопку OPEN/CLOSE, щоб в!дкрити дисковод. Вставте
диск в дисковод так, щоб етикетка була зверху.
Натисн!ть кнопку OPEN/CLOSE ще раз, щоб закрити дисковод. Диск
завантажиться автоматично.
На екран! ТВ в!добразиться меню диску.
Вибер!ть потр!бний пунктзадопомогою кнопок ▲▼◄►або
кнопокО-9, пот!м натисн!ть кнопку ENTER або PLA>^ щоб розпочати
програвання.
Програвання диск!в DVD+RW або DVD+R
Завантажте DVD±RWa6o DVD±Rдиcк. Меню в!добразиться на
екран! автоматично.
Вибер!ть бажаний файл задопомогою кнопок АабоТ. В правому
в!кн! екрану з’явиться невелике зображення вибраного файлу.
Натисн!ть кнопку ENTER, щоб розпочати програвання. JPEG файли
будуть програватись по порядку автоматично. Якщо Ви натиснете
кнопки ►►! або !◄◄ п!дчаспрогравання,Визможетепобачити
наступив або попередне зображення.
Поворотзображення ! зм!на масштабузображення.
Ви можете повернути зображення л!воруч або праворуч
використовуючи кнопки ◄або ►. Ви також можете зб!льшити
зображення в чотири рази або зменшити за допомогою кнопок
► ►або^^.
Щоб побачити список файл!в, натисн!ть кнопку STOP. Список файл!в
в!добразиться на екран!.
68
4097IMnew.indd 68 27.02.2007 13:35:43
Page 69

Програвання MPEG-4 в1део компактдиску
Завантажте MPEG-4 диск.
Файлы и каталоги Любимые/програмиа |
9f7 PRIMUS1G24.JPG >-•’ Г
10i<; TEST 3 01.AVI h
1СХШкЮЕШ1 J
TEST S 01.AVI ,s|
13^ TEST 6 01.AVI kI
14-iTEST8 01.AVI «I
15f5 THEDOORS11024.
Для просмотра списка воспользуй
тесь кнопками вверх/вниз, нажмите
ВВОД для воспроизведения
украТньский
DUD RECORDen
Натисн1ть кнопку ENTER п1сля вибору бажаного в1деофайлуза
допомогою кнопок АабоТ.
Натисн1ть кнопку ENTER □¡сля вибору каталогудискузадопомогою
кнопок АабоТ.
Натисн1ть кнопку ENTER п1сля вибору бажаного в1деофайлу
задопомогою кнопок АабоТ. Вибраний в1деофайл починае
прорграватись.
Прим1тка: Деяк1 ф1льми формату MPEG-4 можуть не програватись
¡з-за в1дм1нностей у використаних методах декодування.
Програвання програм з HDD
Натисн1ть кнопку HDD/DUB для вибору режиму HDD.
Список програм HDD в1добразиться на екран1.
Щоб побачити список файл1в, натисн1ть кнопку STOP. Список файл1в
в1добразиться на екран1.
Прим1тка: Деяк1 ф1льми формату MPEG-4 можуть не програватись
1з-за в1дм1нностей у використаних методах декодування.
Просунуте програвання
Швидке перемотування вперед/назад
Використовуйте цю функц1юдля програвання зм1студискуабо
жорсткого диску в прискореному вигляд! вперед або назад. П1д час
пошукузвук в1дсутн1й.
1. Натисн1тькнопки ◄◄ або ►► п1дчаспрогравання. Кожного
Вибер1ть бажанупрограмузадопомогою кнопок АабоТ.
Натисн1ть кнопку РЕА>^ Вибрана програма почне програватись.
Програвання JPEG файл1в з жорсткого диску
Натисн1ть кнопку FILE.
Натисн1ть кнопку ENTER п1сля вибору каталогу HDD за допомогою
2. Натисн1ть кнопку РЕАУдля повернення до режиму нормального
кнопок АабоТ. Списокфайл1вжорсткогодискув1добразиться на
екран1.
Перех1д вперед/назад (т1льки DVD i ауд1о CD)
Використовуйте цю функц1ю для переходудо наступного або
попереднього фрагменту DVD, треку CD.
Натисн1ть кнопку ◄◄ п1дчаспрогравання. DVD рекордерпочне
програвати попередн1й фрагментаботрек.
Натисн1тькнопку ►►п1дчаспрогравання. DVDpeкopдepпoчнe
програвати наступний фрагмент або трек.
1. Натисн1ть кнопку ВЕСдля початкузапису поточно! програми.
2. Натисн1ть кнопку ВТОРдля зупинки запису.
Прим1тка:
• Дана функц1я не доступна в режим! DVD. Якщо Ви хочете вико-
• Якщо OSD меню в1дображене на екран1, то неможливо зд1йснити
Вибер1ть потр1бний файл задопомогою кнопок АабоТ. В правому
bIkhI екрануз’явиться невелике зображення вибраного файлу.
Натисн1ть кнопку ENTER, щоб розпочати програвання. JPEG файли
будуть програватись по порядку автоматично. Якщо Ви натиснете
клав1ш1^^1 або !◄◄ п1дчаспрогравання,Виможетепобачити
наступне або попередне зображення.
Поворотзображення i зм1на масштаб1в зображення.
Ви можете повернути зображення л1воруч або праворуч за
допомогою кнопок ◄або ►.
Щоб побачити список файл1в, натисн1ть кнопку STOP. Список файл1в
Упов1льнене перемотування вперед
Використовуйте цю функц1юдля програвання зм1студискуабо
жорсткого диску при упов1льненому перемотуванн! вперед.
Натисн1ть кнопку SLOW п1д час програвання. Зм1стдиску
програеться упов1льнено.
Натисн1ть KHonKySLOW. Кожного разу, коли Ви натискаете кнопку,
швидк1сть програвання зм1нюеться наступним чином:
в1добразиться на екран1.
Програвання в1деофайл1в MPEG-4 з жорсткого диску
Натисн1ть кнопку FILE.
Натисн1ть кнопку ENTER п1сля вибору каталогу HDD за допомогою
кнопок АабоТ. Списокфайл1вжорсткогодискув1добразиться на
екран1.
Натисн1ть кнопку РЕАУдля повернення до режиму нормального
програвання.
69
разу, коли Ви натискаете кнопку, швидк1сть програвання зм1нюеться наступним чином:
DVD/VCD
◄ х2 ► х2
4т
Ф
◄ х4 ► х4
Ф Ф
◄ х16 ► х1В
Ф Ф
◄ х32 ► х32
програвання.
ристати запис з1 зсуненням часу, натисн1ть кнопкуТ1МЕ5Н1ЕТ п1д
час переглядуТВ.
запис 3 AV вход1в або цифрового ТВ. Отже, якщо Ви хочете зд1й-
снити запис з1 зсуненням в час1, вийд1ть з OSD меню.
DVD/VCD/HDD
► 1/2 4 ►1/4 4 ►l/B
4097IMnew.indd 69 27.02.2007 13:35:44
Page 70

украТньский
Покадрове програвання (т1льки DVD i VCD)
1. Натисн1ть кнопку PAUSE п1д час програвання. DVD рекордер
тимчасово призупинить програвання.
2. Натисн1ть кнопку PAUSE к1лька раз1в. При кожному натисканн!,
одне зображення зм1нюе ¡нше.
3. Натисн1ть кнопку РЕАУдля повернення до режиму нормального
програвання.
Прим1тка:
• П!д час покадрового перегляду зображень або упов1льненого
перегляду звук в1дсутн1й.
• Ауд1о CD не мають функц1й покадрового перегляду зображень
або упов1льненого перегляду.
Програмоване програвання (т1льки ауд1о CD)
Дана функц1я дозволяе Вам програмувати порядок програвання
трек1в надиску.
1. Завантажте ауд1о CD диск. Перша композиц1я почне програва-
тись автоматично.
2. Натисн1ть кнопку PROGRAM. На екран! в1добразиться список
треюв.
Вибер1ть потр1бний трекза допомогою кнопок Аабо^ усписку
3.
трек1в, noTiM натисн1ть кнопкуАВВ/СЕ(додати/видалити). Виб-
рана композиц1я буде додана до списку програм праворуч.
4.
RoBTopiTb крокЗ, якщо Ви хочете вибрати ¡ншу композиц1ю.
КРОКЗ, ЯК1
2. 3 КОЖНИМ натисканням кнопки SUBTITLE (субтитр) мова субтит-
р1в зм1нюеться.
3. Щоб вимкнути субтитри, вибер1ть “OFF”, натиснувши кнопку
ВиВТ1ТЕЕ(субтитр).
Виб1р мови ауд1о (т1льки DVD)
Ви можете зм1нити мову ауд1о на мову, вибрану з1 списку початкових
налаштувань. Дана операц1я можлива лише з дисками, на як1
записан! дек1лька мов ауд1о. Якщо диск мае дек1лька мов ауд1о, Ви
можете вибрати мовуауд1о.
1. Натисн1ть KHonKyAUDIO п1д час програвання. Ауд1о 1нформац1я
в1добразиться
2. 3 КОЖНИМ натисканням кнопки AUDIO мова ауд1о зм1нюеться.
Прим1тка: На деяких дисках дисках можна зм1нити мову субтитр1в
або ауд1о т1льки з меню диску.
Повторения еп1зоду, фрагменту (т1льки DVD/AUDIO CD)
Ви можете повторити фрагмент/еп1зод для DVD або трек/диск для
AUDIOCD.
1. Натисн1ть кнопку REPEAT п1д час програвання. 1нформац1я про
повторения буде вщображена вгор1 екрану.
► Edit program play list
I |В§дактировать список программ
ЯЭЭЯД I
ТРЕК 02 I' ^ ТРЕК 05
ТРЕК 03 ТРЕКОВ
_____
^
- j Любимые/програм
□UD RSCOROeR
5. Перем1ст1ть курсор до списку програм натисканням кнопки ►,
пот1м натисн1ть кнопку ENTER. Почисться програвання збереженого списку програм.
6. Щоб видалити композиц1ю з1 списку програм, вибер1ть компо-
зиц1ю, яку Ви хочете видалити за допомогою кнопок ◄►▲▼,
пот1м натисн1ть кнопкуАВВ/СЕ(додати/видалити). Вибрана композиц1я буде видалена з1 списку програм.
7. Для виходу з1 списку програвання натисн1ть кнопку Return.
Виб1р субтитр1в (т1льки DVD)
Ви можете зм1нити мовусубтитр1в на мову, вибрануз! списку
початкових налаштувань. Дана операц1я можлива т1льки з дисками,
на як1 записан! дек1лька мов субтитр1в. Якщо завантажений диск
п1дтримуе к1лька мов субтитр1в, Ви можете зробити виб1р.
1. Натисн1ть кнопку SUBTITLE (субтитр) п1д час програвання. Суб
титри з’являться в нижн1й частин! екрану.
70
2. При кожному натисканн! на кнопку REPEAT режим повторения
зм1нюеться наступним чином:
Прим1тка:
При використанн! деяких DVD диск1в повторне програвання
неможливе.
Повторения фрагменту в!д АдоВ (т!льки DVD/AUDIO CD)
Використовуйте дану функц1ю для повторного програвання
вибраного фрагменту. Це дуже зручно при вивченн! ¡ноземних мов,
так як фрагмент повторюеться, поки повторения не буде в1дм1нене.
1. Натисн1ть кнопкуА-B/LANG в тому м1сц1, зв1дки необх1дно розпочати повторения. Початкова точка вибраного фрагменту встановлена.
2. Натисн1ть кнопкуА-B/LANG ще раз в тому м1сц1, де необх1дно
зак1нчити повторения. К1нцева точка фрагменту встановлена.
Програвання буде повторюватись в1дАдо В.
3. Для виходуз режимуповторенняА-В натисн1тькнопкуА-В/ЕАМС
ще раз. В1дновиться звичайне програвання.
4097IMnew.indd 70 27.02.2007 13:35:44
Page 71

украТньский
Прим1тка:
Ми рекомендуемо Вам встановити необх1дний фрагменттривал1стю
м1н1мум 5 секунддля piBHoro програвання.
Зм1на масштабу екрану (т1льки DVD/HDD)
Функц1я зм1ни масштабу екранудозволяе Вам зб1льшити
зображення DVD або HDD до 2-х раз1в.
1. Натисн1ть KHonxyZOOM (зм1на масштабу) п1д час програвання.
Масштаб зм1ниться.
2. 3 кожним натисканням кнопки700М, масштабзм1нюеться:
Масштабирование 150%
Масштабирование 200%
Отмена масштабирования
Запис
Основний запис
Для запису телев1з1йних програм спочатку Ви повинн! вибрати
канал.
1. Натисн1ть кнопку HDD/DUB або DVD для вибору HDD (жорсткий
диск) або записуючого DVD (DVD±R/DVD±RW), на який Ви хот1ли
б зд1йснити запис.
Якщо Ви хочете записати на жорсткий диск, натисн1ть кнопку
HDD/DUB. Меню HDD в1добразиться на екран1.
2. Якщо Ви хочете записати на DVD, завантажте диск DVD±R або
DVD±RW3 достатн1м м1сцем для запису.
• Якщо Ви завантажите новий чистий диск, з’явиться запит
на форматування диску. Натисн1ть кнопку ENTER п1сля вибору
«ОК».
• Якщо меню DVD в1дображаеться на екран! автоматично, натисн1тьдв1ч1 клав1шу5ТОРдля зупинки.
3. Натисн1ть клaв¡шyAV IN для виборуджерелаА/V, з якого Ви
хочете записати. При кожному натисканн! клав1ш1 джерело A/V
зм1нюеться:
TV
Передний AV
Задний AV
Задний SV
□V
3. Ви можете пересунути зображення за допомогою кнопок
4. Для виходу 3 режиму зм1ни масштабу, натисн1ть кнопку ZOOM
дек1лька раз1в, поки не в1дновиться звичайне програвання.
Зм1на кута огляду камери (т1льки DVD)
Якщо DVD маедек1лька кут1в огляду, Ви можете вибрати функц1ю
зм1ни кута (ракурсу).
1. HaтиcнiтькнoпкyANGLE(кyт)пiдчacпpoгpaвaння. Можлив1кути
огляду в1добразяться вгор1 екрану.
2. 3 кожним натисканням KHonKnANGLE(KyT) кутзм1нюеться.
Прим1тка:
• Ви можете зм1нити кутт1льки для DVD з багатьма кутами огляду.
• Функц1я зм1ни кута огляду не працюе в DVD дисках, як1 не мають
запису п1д р1зними кутами.
Прямий пошук (т1льки DVD)
Ви можете вибрати певний фрагмент або еп1зоддля програвання.
1. Натисн1тькнопкуВ15РЕАУдв1ч1п1дчаспрогравання. 1нформац1я
про програвання з’явиться на екран1.
[ Режим ПоЕгорное вослр. фрагм.
Спецэффекты к
Эпизод 01Т07
Фрапиент p/ije
AUDIO 01103-ENG
[ Субтитры OFF
Угол 011Ш
2. Пошукеп1зоду
1) Вибер1ть TITLE задопомогою кнопок AVI натисн1ть кнопку
ENTER.
2) Введ1ть номер еп1зоду, використовуючи кнопки 0-9, i натисн1ть
кнопку ENTER. Програвання почнеться з вказаного еп1зоду.
Пошук фрагменту
1) Вибер1ть CHAPTER задопомогою кнопок AVI натисн1ть кнопку
ENTER.
2) Введ1ть номер фрагменту, використовуючи кнопки 0-9, i натис-
н1ть кнопку ENTER. Програвання розпочнеться з вказаного фраг
менту.
___
________
Щ
71
Scart AV
Якщо Ви хочете записати телев1з1йну програму, вибер1ть режим
ТВ. Вибер1ть станц1ю, яку Ви хочете записати, натиснувши кнопку
Channel- або Channel +.
4. Натисн1ть кнопку REC, щоб розпочати запис. Натисн1ть кнопку
PAUSE, якщо Ви хочете тимчасово призупинити запис. Натисн1ть
кнопку REC, щоб продовжити запис.
5. Натисн1ть кнопку ЗТОРдля зупинки запису.
Прим1тка:
• DVD±R/DVD±RWдиcки можуть записувати до 6 годин абодо 49
еп1зод1в.
• Якщо джерело, з якого Ви хочете зд1йснити запис, захищене в1д
коп1ювання, Ви не зможете записати з нього.
Запис 3 таймеру в один дотик (OTR)
1. П1д час основного запису натисн1ть кнопку REC.
При кожному натисканн! на кнопку REC час запису зб1льшуеться
на 30 хвилин. Запис може тривати до 3 годин, якщо надиску
(або жорсткому диску) достатньо м1сця i як1сть запису- SLP. (або
довжина буферуТ1МЕ5Н1ЕТ встановлена на 360 хвилин).
П1сля запису протягом певного часу DVD-плейер зупиниться
автоматично.
2. Якщо Ви хочете вийти з режиму OTR, натисн1ть кнопку STOP.
Таймер запису
Для таймеру запису потр1бно правильно встановити час, дату i
станц||.
Якщо Ви хочете записати на DVD, завантажте диск DVD±R або
DVD±RW3 достатн1м м1сцем для запису.
1. Натисн1ть кнопку TIMER REC.
Источник Качество Дата Начало Конец Запись vPS ■
OUD несорпер
4097IMnew.indd 71 27.02.2007 13:35:45
Page 72

украТньский
2. Вибер1ть невикористовувану програму за допомогою кнопок
À або Т, пот1м натисн1ть кнопку ENTER.
3.
Натисн1ть кнопку ENTER. З’явиться п1дменю. Вибер1тьджерело
за допомогою кнопок ▲ або ▼, пот1м натисн1ть кнопку ENTER
для п1дтвердження.
4.
Вибер1ть “Record То” за допомогою кнопки ▼, пот1м натисн1ть
кнопку ENTER для виклику списку. Вибер1ть HDD для запису на
HDD або DVD для запису на DVD за допомогою кнопок ▲ або ▼,
пот1м натисн1ть кнопку ENTER для п1дтвердження.
5.
Вибер1ть “Quality” задопомогою кнопки ▼, пот1м натисн1ть
кнопку ENTER для виклику списку. Вибер1ть Record Quality
(як1сть запису) за допомогою кнопок ▲ або ▼, пот1м натисн1ть
кнопку ENTER для п1дтвердження.
6.
Вибер1ть “Mode” (режим) задопомогою кнопки ▼, пот1м натисн1ть кнопку ENTER для виклику списку. Вибер1ть, як часто Ви
хочете зд1йснювати запис, для прикладу: один раз, кожен день,
кожен тиждень за допомогою кнопок ▲ або ▼, пот1м натисн1ть
кнопку ENTER для п1дтвердження.
7.
Вибер1ть “Date” (дата) за допомогою кнопки ▼, пот1м натисн1ть
кнопку ENTER для виклику списку. Введ1ть дату за допомогою
кнопок 0-9, пот1м натисн1ть кнопку ENTER для п1дтвердження.
Якщо в пункт! 6 Ви вибрали «кожен тиждень», натисн1ть кнопку
ENTER п1сля вибору дня тижня за допомогою кнопок ▲ або ▼.
Вибер1ть “Start” (старт) задопомогою кнопки ▼, пот1м натисн1ть
кнопку ENTER. Введ1ть час початку запису за допомогою кнопок
0-9, пот1м натисн1ть кнопку ENTER для п1дтвердження.
9.
Вибер1ть “End” (зак1нчення) за допомогою кнопки ▼, пот1м натис-
н1ть кнопку ENTER. Введ1ть час зак1нчення запису за допомогою
кнопок 0-9, пот1м натисн1ть кнопку ENTER для п1дтвердження.
10. Вибер1ть “Title” (еп1зод) задопомогою кнопки ▼, пот1м натисн1ть кнопку ENTER. Введ1ть назву еп1зоду за допомогою кнопок
◄ ►▲▼, пот1м натисн1ть кнопку ENTER для п1дтвердження.
11. Переключ1ть VPS/PDC “ON” або “OFF” за допомогою кнопок ,
пот1м натисн1ть кнопку ENTER. (Якщо джерело не встановлене на
канал! ТВ, функц1я не буде працювати).
Система VPS/PDC автоматично регулюе час запису, таким
чином, що нав1ть якщо програма не виконуеться за граф1ком,
Ви не втратите П. Для нормально! роботи VPS/PDC Ви повинн!
правильно ввести об’явлений час i дату программ, яку Ви хочете
записати. Зверн1тьувагу нате, щoVPS/PDC може працювати не
3 кожним каналом.
12. Натисн1ть кнопку ENTER п1сля вибору “ОК” за допомогою кнопки
▼ , якщо налаштування правильн!.
13. Вимкн1ть DVD рекордер за допомогою кнопки STANDBY/ON.
Прим1тка:
• Ви можете знову ув1мкнути Ваш DVD рекордер, якщо хочете
встановити таймер для запису ¡ншо1 программ. Не забувайте
вимикати DVD рекордер п1сля зак1нчення налаштувань.
• Для зупинки записуза таймером, який вже розпочався, натисн1ть кнопку STANDBY/ON або STOP.
• Ви можете доповнити програму граф1кузаписудо 8 програм.
• Ми рекомендуемо Вам встановлювати час запису б1льше 5 хвилин.
Перегляд таймерузапису - зм1на i видалення налаштувань
запису
1. Натисн1ть кнопку TIMER REC. Ви зможете побачити вс1 программ
2. Вибер1ть програму, яку Ви хочете зм1нити або видалити задопо
3. Видалення налаштувань
Зм1на налаштувань
4. Натисн1ть кнопку ENTER п1сля вибору “ОК” за допомогою кнопки
Запис 3 цифровоУв1деокамери (DV)
Ви можете записати вм1ст DV касети з цифрово1 в1деокамери через
роз’ем DV IN.
Переконайтесь, що цифрова в1деокамера п1дключенадо роз’ему DV
IN на передн1й панел1 приладу.
Пот1м ув1мкн1ть цифрову в1деокамеру i встанов1ть ÏÏ в режим PLAY
(a6oVCR).
1. Натисн1ть кнопку HDD/DUB або DVD для вибору HDD або запису-
2. HaTMCHlTbKHonKyDV/USB.
3. Знайд1ть м1сце на касет1 в1деокамери, з якого Ви хочете роз-
4. Натисн1ть кнопку REC для початку запису. Натисн1ть кнопку
5. Натисн1ть кнопку ВТОРдля зупинки запису.
Прим1тка:
• Залежно в1д типу п1дключено1 в1деокамери Ви можете бути не в
• Якщо плейер не розп1знае цифрово1 в1деокамери, вийм1ть i встае
Запис ¡3 зсуненням часу
Даний рекордер тимчасово збер1гае програму на простор!
жорсткого диску автоматично, що дозволяв користувачу
ман1пулювати збереженою програмою використовуючи функцИтак!
як перемотування, прискорене перемотування, повторения i пауза.
1. Натисн1ть кнопки управл1ння програванням так! як11, ◄◄,
встановлен! на таймер.
могою кнопок .
Натисн1ть KHonKyADD/CL (додати/видалити) для видалення.
Натисн1ть кнопку ENTER.
Вибер1ть детал1, як1 Ви хочете зм1нити за допомогою кнопок
i натисн1ть кнопку ENTER.
Зм1н1ть налаштування за допомогою кнопок або 0-9.
Коли Ви зак1нчите вс1 зм1ни, натисн1ть кнопку ENTER.
▼ , якщо вс1 налаштування правильн!.
Натисн1ть KHonKyTIMER RECдля виходу.5.
ючого DVD (DVD±R/DVD±RW), на який Ви хочете записати.
Якщо Ви хочете записати на DVD, завантажте диск DVD±R або
DVD±RW3 достатн1м в1льним м1сцем для запису.
почати запис. Ви можете використовувати пультДУ в1д цього
рекордера для управл1ння в1деокамерою за допомогою кнопок
PLA>(STOP,PAUSE, ◄◄, ►►.Для отримання найкращогоре-
зультату натисн1ть кнопку PAUSE в тому м1сц1, з якого Ви хочете
розпочати запис.
PAUSE, якщо Ви хочете тимчасово призупинити запис. Натисн1ть
кнопку REC, щоб продовжити запис.
змоз1 контролювати Пуправл1ння задопомогою пультаДУ, поставляеться з цим рекордером.
те кабель DV в роз’ем DV IN ще раз.
► ►,!◄◄, ►►!, !► при перегляд! ТВ, внизуекрануз’явиться
горизонтальна шкала часу.
72
4097IMnew.indd 72 27.02.2007 13:35:45
Page 73

украТньский
2. Pause
Якщо Ви натиснете кнопку PAUSE, поточна програма буде при-
за допомогою кнопок АабоТ. Почнеться коп!ювання вс!х еп!зод!в з
диску на HDD.
зупинена. Якщо Ви натиснете кнопку PLA>^ програвання програ-
ми продовжиться 3 того ж м1сця.
3. Прискорене перемотування вперед/назад
1) Натисн1тькнопки ◄◄або ►►п1дчаспрогравання. Прикожному
натисканн! кнопки швидк1сть програвання зб1льшиться наЗ ступен1.
2) Натисн1ть кнопку PLAY для в1дновлення звичайного режиму про
гравання.
4. Перех1д вперед/назад
1) Натисн1тькнопку1^^ п1дчаспрогравання. ОУОрекордерпочи-
нае програвати попередн1й фрагмент.
2) Натисн1ть кнопку ►►! п1д час програвання. DVD рекордер починае програвати наступний фрагмент.
5. Упов1льнене перемотування вперед
2) Натисн1ть кнопку SLOW п1д час програвання. Почнеться упов1льнене програвання поточно! програми. При кожному натисканн!
кнопки упов1льнення швидкост! зм1ниться на 3 ступен!.
3) Натисн1ть кнопку PLAY для в1дновлення звичайного режиму про
гравання.
6. Запис
3)
При запис! 3i зсуненням часу програма записуеться тимчасово.
Звичайний запис записуе i збер!гае програму пост!йно на жорс-
ткомудиску, тому Ви можете програти ii в будь-який час.
Одночасний запис i програвання
Ви можете програвати HDD еп!зод i записувати ТВ програму в один i
той же час. Ви також можете програвати DVD еп!зод i записувати ТВ
Коп1ювання еп1зод1в з жорсткого диску на диск
Переконайтесь, що записуючий DVD диск (DVD±R або DVD±RW)
знаходиться всередин!рекордера.
1. HaTHCH!TbKHonKyHDD/DUB.
програму в один i той же час.
1. Програвання НВВеп!зодуп!дчасзаписуТВ програми надиск.
1) Натисн!ть кнопку HDD/DUD п!д час запису.
Список програм HDD в!добразиться на екран!.
2) Вибер!ть потр!бну програму за допомогою кнопок ¡з списку
програм.
3) Натисн!ть кнопку РВАТдля початку програвання.
2. Програвання DVD еп!зоду п!д час запису ТВ програми HaHDD.
1) Натисн!ть кнопку DVD п!д час запису.
Меню диску в!добразиться на екран!.
2) Вибер!ть потр!бну позиц!ю або еп!зод за допомогою кнопок
3) Натисн!ть кнопку ENTER або РЕАТдля початку програвання.
Використовуйте особливост! коп1ювання цього рекордера для:
• Резервного коп!ювання важливих запис!в, збережених на HDD,
на DVD.
• Виготовлення DVD Konii ¡з запису на HDD для програвання на
¡ншому плейер!.
• Передач! в!деоз DVD на HDDдля редагування.
• Передач! в!дредагованого в!део з HDD на DVD.
Авторськ! права
Запис повинен проводитись т!льки з дозволу автора,! Ви повинн!
переконатись, що коп!ювання в кра/н!, в як!й Ви хочете зд!йснити
перезапис, дозволено. Коп!ювання авторських матер!ал!в, ф!льм!в
або музики е незаконним, якщо не було дозволено законом або
автором.
Коп1ювання еп1зод1в з DVD на жорсткий диск
Коп1ювання файл1в з диску на жорсткий диск (з жорсткого
диску на диск)
Переконайтесь, що дискдля коп!юванняабо записуючийдиск
(DVD±R або DVD±RW) знаходиться всередин! рекордера. Ви можете
коп!ювати МРЗ, JPEG MPEG-4 файли з диска на жорсткий диск (або
3 жорсткого дискунадиск).
1. Натисн!тькнопкуЕ1ЕЕ.
Переконайтесь, що DVD диск, з якого Ви хочете зд!йснити запис,
знаходиться всередин!плейера.
1. Коп!ювання вс!х еп!зод!в з DVD на HDD.
1) HaTHCH!TbKHonKyDVD.
Список еп!зод!в з’явиться на екран! ТВ.
2) Натисн!ть кнопку А ! кнопку ►. Меню редагування з’явиться на
екран! ТВ.
Коп!ювання одного еп!зодуз DVD на HDD.
Натисн!ть кнопку DVD.
Список еп!зод!в з’явиться на екран! ТВ.
Натисн!ть кнопку ► п!сля виборуеп!зодудля коп!юваннязадопомогою кнопок АабоТ. Меню редагування з’явиться на екран! ТВ.
Натисн!ть кнопку ENTER п!сля вибору “COPYTITLE” (коп1ювати
заголовок) задопомогою кнопок АабоТ. Поснеться коп!ювання
вибраного еп!зоду з DVD диску HaHDD.
Список еп!зод!в жорсткого диску з’явиться на екран! ТВ
N9 Канал Дата Время Эпизод
OOlScartAV 01I0V01 12:12 МОЙЭПИЭОД
002 АКО 01101/01 13:23 ЭПИЗОД 10
003 ARD 01/01/01 14:23 ЭпиЗОД 11 ,
003 АНО 01IDK01 13:23 ЭПИЗОД 12 '
000 OVO 01101/01 17:00 ЭПИЗОД 11
OOrSuirt AV 01/01/01 10:39 ЭПИЗОД 18
000 OVO 01/01/01 10:43 МоЙЭПИЭОДО
Нажмите НООЮиВ для
когмровашя выбранных
программ.
Нажмите 80РТ/Р1Рдпя
сортировки программ по
имени, дате и времени.
□UD RECOROeR
Натисн!ть кнопку ENTER п!сля вибору еп!зоду для коп!ювання за
допомогою кнопок АабоТ. На вибраному еп!зод! з’явиться позначка.
Повтор!ть пункт 2, якщо Ви хочете вибрати !нш! еп!зоди.
Натисн!ть кнопку HDD/DUB.
Почнеться коп!ювання вибраних еп!зод!в з жорсткого диску на
диск.
Каталог ! список файл!в з’являться на екран!.
Для просмотра списка воспользуй
тесь кнопками вверх/вниз, нажмите
ВВОД для воспроизведения
QUD RECORDER
2. Натисн!ть кнопку EDIT.
Меню коп!ювання в!добразиться на екран!.
3) Натисн!ть кнопку ENTER п!сля вибору “COPYALL” (коп!ювати все)
73
4097IMnew.indd 73 27.02.2007 13:35:45
Page 74

УКРА1НЬСКИИ
► Инструменты фай],_,
I Переименовать
кВ Создать Директорию Ч
Натисн1ть кнопку ENTER п1сля вибору “Сору” (коп1ювати) за до
3.
помогою кнопок Аабо^.
4.
Натисн1ть кнопку ENTER п1сля вибору каталогу USB за допомо
гою кнопок Аабо^.
Натисн1ть KHonKyADD/CL (додати/видалити) п1сля вибору файлу
для коп11задопомогою кнопок Аабо^. Вибраний файл буде
доданий до списку правор\
' -Н^ носителя на другой.
’ пип ресоробп
Натисн1ть кнопку ENTER п1сля вибору “Сору” (коп1ювати) за до-
3.
помогою кнопок Аабо^.
4.
Вибер1ть каталогджерела файлудля коп1ювання за допомогою
кнопок ▲,▼, натисн1ть кнопку ENTER.
(Якщо Ви хочете коп1ювати файл з диску, вибер1ть каталог DVD.
Якщо Ви хочете коп1ювати файл з жорсткого диску, вибер1ть ка
талог HDD.)
Список файл1в з’явиться на екран!.
Натисн1ть KHonKyADD/CL (додати/видалити) п1сля вибору файлу
для коп1ювання за допомогою кнопок Аабо^. Вибраний файл
буде доданий до списку правое:
6. RoBTopiTb пункт 5, якщо Ви хочете коп1ювати ¡нш! файли.
7. Натисн1тькнопку ►►.
8. Вибер1ть каталог, куди Ви хочете коп1ювати вибран! файли за
допомогою кнопок ▲,▼, натисн1ть кнопку ENTER.
(Якщо Ви хочете коп1ювати файл з диску на жорсткий диск, ви-
6epiTb каталог HDD. Якщо Ви хочете коп1ювати файл з жорсткого
диску надиск, вибер1ть DVD каталог.)
9. Натисн1тькнопкуВЕС.
Почнеться коп1ювання файл1в з диску на жорсткий диск (з жорс
ткого диску на диск).
10. Натисн1ть кнопку EDIT для виходу п1сля зак1нчення коп1ювання.
Коп1ювання файл1в з USB флеш-пам’ят! на жорсткий диск (або
диск)
Переконайтесь, що пристр1й USB вставлений в роз’ем USB IN. Якщо
Ви хочете коп1ювати файли на диск, завантажте записуючий диск
(DVD+Ra6o DVD+RW).
1. Натисн1тькнопкуЕ1ЕЕ.
Каталог I список файл1в з’являться на i
Копировать из ___________
Выбрать источник файла список выбранных файло!
Г) ..I
п. 7аО«40О.ВОКК.Ьг1р I П ВООТЕХ.ЮО I I’
ОТЦ.850О V0.Э ВОН ШШ аООбОИЗ.ТОфр Размер файла
D:J2Q060113 WS.ppt
1
'| 7аОх4НО_ВОПК. ■'!'
46КВ
Изменение дать
□UD ReCGROeR
6. RoBToplTb пункт 5, якщо Ви хочете коп1ювати 1нш1 файли.
7. Натисн1тькнопку ►►.
8. Вибер1ть каталог, куди Ви хочете коп1ювати вибран! файли за
допомогою кнопок ▲,▼, натисн1ть кнопку ENTER.
(Якщо Ви хочете коп1ювати файли з диску на жорсткий диск, вибер1ть каталог HDD. Якщо Ви хочете коп1ювати файли з жорстко
го диску на диск, вибер1ть DVD каталог.)
9. Натисн1ть кнопку REC.
Почнеться коп1ювання файл1в з пристрою USB на жорсткий диск
(або диск).
10. Натисн1ть кнопку EDIT для виходу п1сля зак1нчення коп1ювання.
Прим1тка:
• Не використовуйте пристроТ USB б1льш н1ж 500мА.
• Якщо рекордер не розп1знае пристрою USB, вийм1ть i встаете
пристр1й, USB кабель в роз’ем USB IN ще раз.
Редагування диску DVD+R або DVD+RW
1. Завантажте диск DVD+R або DVD+RW.
Меню DVD в1добразиться на екран1.
2. Натисн1ть кнопку ▲ для того, щоб перейти доверху DVD меню.
3. Натисн1ть кнопку ►, меню редагування диску в1добразиться
на екран1.
2. Натисн1тькнопкуЕВ1Т.
Меню коп1ювання вщобразиться на екран1.
)азиться на екр;
Програвання диску DVD+RW або DVD+R
Ви можете програти увесьдискв1д початкудо к1нця.
1. Натисн1ть кнопку ENTER п1сля вибору “Play” (програвання) за
ян Удалингь
. (ВШ Переименовать
kfi Создать Директор
4»! ^
-^ Копирование файлов с одного
■ -Ч» носителя на другой.
DUO ReCGRDSR
допомогою кнопок Аабо^.
Почнеться програвання початкудиску.
Перейменування диску DVD+RW або DVD+R
1. Натисн1ть кнопку ENTER п1сля вибору “Rename disk” (перейме
нування диску) за допомогою кнопок Аабо^. На екран! в1добразиться клав1атура.
74
4097IMnew.indd 74 27.02.2007 13:35:46
Page 75

2. Вибер1ть букву, яку Ви хочете ввести за допомогою кнопок
◄ ,►,▲,▼ i натисн1ть кнопку ENTER для п1дтвердження.
3. Повтор1тьпункт 2.
Максимальна довжина назви диску не повинна перевищувати 9
символ1в.
4. Горизонтальна шкала контролю на нижньому рядку клав1атури
для редагування.
Коли Ви зак1нчите вводити букви, натисн1ть ENTER п1сля вибору
“ОК”.
Видалення запису з оптичного диску (т1льки DVD+RW)
1. Натисн1ть кнопку ENTER п1сля вибору пункту «Видалення за
пису 3 оптичного диску» за допомогою кнопок або . На екран!
з’явиться д1алоговое меню.
________________
украТньский
Ф1нал1зац1я диску (т1льки DVD+R)
Якщо Ви хочете зробити DVD±R диск сум1сним з ¡ншими плейерами
або рекордерами. Вам необх1дно ф1нал1зувати диск.
1. Натисн1ть кнопку ENTER п1сля вибору пункту «ф1нал1зац1я диску»
задопомогою кнопок АабоТ. На екран1з’явиться д1алоговое
меню.
2. Натисн1ть кнопку ENTER для п1дтвердження п1сля вибору
"Уез”(Так) задопомогою кнопок ◄,►.
Ф1нал1зац1я диску займае к1лькахвилин.
Прим1тка:
• Функц1ю ф1нал1зац|| можна використовувати т1льки один раз в
DVD±R диску.
• Якщо DVD±R диск вже був ф1нал1зований, Ви не можете запису-
вати або редагувати його.
Блокування диску (т1льки DVD+RW)
Ви можете заблокувати Ваш диск для запоб1гання запису або його
редагування в подальшому.
1. Натисн1ть кнопку ENTER п1сля вибору пункту «Блокування диску»
задопомогою кнопок АабоТ.
Блокування дискузайме 2-3 хвилини. Якщо дискзаблокований,
Ви не можете зд1йснювати як1-небуть зм1ни. Можливе т1льки
програвання.
\ ■ МОИ DVD
Стереть диск
Пре|дупре>едение: это действие приведет
к удалению всех данных на диске.
Продолжить?
________
DUD HSCORdeR
2. Натисн1ть кнопку ENTER для того, щоб стерти зм1стдиску п1сля
вибору "Уез”(Так) за допомогою кнопок ◄,►.
Стирання записуздискузаймае дек1лька хвилин.
Прим1тка: функц1я видалення запису працюе т1льки з дисками
DVD±RW.
Перезапис диску (т1льки DVD+RW)
1. Натисн1ть кнопку ENTER п1сля вибору пункту «Перезапис диску»
за допомогою кнопок АабоТ. Режим DVD зм1ниться на режим
AV.
2. Натисн1ть кнопкуАУ IN для вибору входуАУ, з якого Ви хочете
записати. При кожному натисканн! кнопки вх1дАУ зм1нюеться:
ТУ
Передний AV
Задний AV
Задний SV
DV
Scart AV
2. Якщо Ви хочете розблокувати диск, вибер1ть пункт «Розблоку-
вання диску» задопомогою кнопок АабоТ.
3. HaTHCHlTbKHonKyENTER.
Розблокування диску займе дек1лька хвилин.
Коп1ювати ВСЕ (DVD+RW/DVD+R)
Ви можете коп1ювати вс1 еп1зоди з DVD на жорсткий диск.
1. Натисн1ть кнопку ENTER п1сля вибору “COPY ALL” (коп1ювати все)
за допомогою кнопок АабоТ. Почнеться коп1ювання вс1х еп1зод1в з
диску на жорсткий диск.
Редагування еп1зод1в DVD+RW або DVD+R
1. Вставте записуючий диск DVD±RW або DVD±R в дисковод. Меню
в1добразиться на екран1 автоматично.
2. Вибер1ть один еп1зоддля редагування задопомогою кнопок
АабоТ.
3. Натисн1ть кнопку ►, на екран1 з’явиться меню редагування еп1-
зоду.
Якщо Ви хочете записати телев1з1йну програму, вибер1ть режим
ТВ. Вибер1ть станц1ю, яку Ви хочете записати, натиснувши кноп
ку Channel- або Channel +.
3. Натисн1ть кнопку REC, щоб розпочати запис. Запис почнеться з
початкудиску.
4. Натисн1ть кнопку STOP для зупинки запису.
Прим1тка: при перезапис! вс1 ран1ше записан! програми будуть
видален!.
75
4097IMnew.indd 75 27.02.2007 13:35:46
Page 76

украТньский
Програвання еп1зоду DVD+RW/DVD+R
Ви можете програти вибраний еп1зод.
1. Натисн1ть кнопку ENTER □¡сля вибору “Програвання еп1зоду”
задопомогою кнопок АабоТ. Почнеться програвання вибраного
еп1зоду.
Редагування еп1зоду DVD+RW/DVD+R
1. Натисн1ть кнопку ENTER п1сля вибору пункту «Редагування eniaoду» задопомогою кнопок АабоТ. На екран! з’явиться д1алого-
вое меню.
I РЕЖИМ РЕДАКТИРОВАНИЯ
ГлаваТо1/01
IВоспроизвести
I ' Маркер тлавы ~
[|М
1
Убрать маркер Ж 1
I »4 Индекс, изображение
<■ » Разделить эпизод —-—~
“П-- ..
-----
Г Выберите эпизод для редактирования
41^
3.
4.
Перейменування еп1зоду (DVD+RW/DVD+R)
1. Натисн1ть кнопку ENTER п1сля вибору “Rename title” (переймену
вання еп1зоду) задопомогою кнопок АабоТ. На екран! в1добра-
зиться клав1атура.
____
LMN0PQRS;TUV,345
I W X Y Z 7 , , i 6 ' 7 ^8 . 0
* Space Aa P2 Backspace , Clear E*i« OK
I Drama Action | Sparta Comody Nowa Kida Adult ■
□UD R€CORâ€R
Bn6epiTb букву, яку Ви хочете ввести задопомогою кнопок
◄ ,►,▲,▼ i HaTHCHiTb кнопку ENTERдля пiдтвepджeння.
RoBTopiTb пункт 2.
Максимальна довжина назви eпiзoдy не повинна перевищувати
9 cимвoлiв.
Шкала контролю на нижньому рядку клaвiaтypи для редагування.
Коли Ви 3aKiH4HTe вводити букви, HaTHCHiTb кнопку ENTER пicля
вибору “ОК”.
Видалення еп1зоду (т1льки DVD+RW)
1. HaTHCHiTb клaвiшy ENTER пicля вибору пункту «Редагування eniзоду» за допомогою кнопок АабоТ. На eKpani з’явиться дiaлoгo-
вое меню.
1-1. Вибер1тьеп1зод
Вибер1ть еп1зод за допомогою кнопок 0-9.
1-2. Вибер1тьфрагмент
Вибер1ть фрагмент за допомогою кнопок 0-9.
1-3. Програвання
Регулюйте програвання р1зними налаштуваннями: швидке перемотування назад, вперед, упов1льнене перемотування вперед.
1-4. Маркер фрагменту
Ви можете вставити фрагментабо видалити його. Натисн1ть
кнопку ENTER або ►, на екран! з’явиться д1алогове меню.
1) . Для введения нового маркеру фрагменту, вибер1ть пункт «Вста
вити маркер» за допомогою кнопок АабоТ.
Ви можетезнайти певне м1сцезадопомогою кнопок ◄◄, ►►
або кнопки PLAY
Натисн1ть кнопку ENTER в тому м1сц1, куди Ви хочете вставити
новий фрагмент.
2) . Для видалення маркеру фрагменту, вибер1ть пункт «Видален-
ня маркеру» за допомогою кнопок АабоТ. Ви можете знайти
фрагментзадопомогоюкнопок1^^або ►►!. Натисн1ть кнопку
ENTER там, де Ви хочете видалити фрагмент.
3) . Для того щоб видалити bc¡ маркери фрагмент1в, вибер1ть пункт
«Видалити Bci маркери фрагмент1в» за допомогою кнопок
АабоТ. Натисн1ть кнoпкyENTERдля п1дтвердження.
1-5. Приховати фрагмент/показати фрагмент
Зручна функц1я для приховування рекламних ролик1в. Вибер1ть
«Приховати фрагмент» задопомогою кнопок АабоТ i натисн1ть
кнопку ENTER. Якщо поточний фрагмент прихований, на екран!
зам1сть «Приховати фрагмент» з’явиться «Показати фрагмент».
В цьому випадку Ви можете показати фрагмент, натиснувши
кнопку ENTER п1сля вибору«Показати фрагмент».
1-6. Заставка
Ви можете зм1нити заставкудля вибраного фрагменту. НатисH¡Tb ENTER там, де Ви хочете встановити заставку.
1-7. Розд1лити еп1зод (т1льки DVD±RW)
Ви можете розд1лити еп1зод на дв1 частини. Натисн1ть кнопку
ENTER там, де Ви хочете розд1лити. Розд1лення Еп1зодузайме
дек1лька хвилин.
1-8. Час прот1кання
Ви можете бачити час прот1кання.
2. Натисн1ть кнопкуЗТОР п1сля зак1нчення редагування еп1зоду.
Оновлення диску займае дек1лька хвилин.
, Предупре^кдение : Внимание: это действие
' безвозвратно удалит фрагмент на загруженном
Стереть эпизод
DVD+RW диске. Продолжить?
DUD несорпеп
2. HaTHCHiTb кнопку ENTER для того, щоб стерти 3MicT eпiзoдy пicля
вибору “Уез”(Так) задопомогою кнопок ◄,►.
Стирання записуздискузаймае дeкiлькa хвилин.
RpHMiTKa: фyнкцiя видалення запису працюе тiльки з дисками
DVD±RW.
Перезапис еп1зоду (т1льки DVD+RW)
1. HaTHCHiTb кнопку ENTER пicля вибору пункту «Перезапис диску»
задопомогою кнопок АабоТ. Режим DVDaMiHHTbcn на режим
AV.
2. HaTHCHiTb кнопкуАУ IN для вибору входуАУ, з якого Ви хочете
записати. При кожномунатисканн! кнопки вх1дАУзм1нюеться:
ТУ
Передний AV
Задний AV
Задний SV
DV
Scart AV
Якщо Ви хочете записати телев1з1йну програму, вибер1ть режим
ТВ. Вибер1ть станц1ю, яку Ви хочете записати, натиснувши кноп
ку Channel- або Channel +.
3.
HaTHCHiTb кнопку REC, щоб розпочати запис. Запис почнеться з
76
4097IMnew.indd 76 27.02.2007 13:35:47
Page 77

украТньский
початкудиску.
4. Натисн1ть кнопку STOP для зупинки запису
Прим1тка: при перезапис! Bci ран1ше записан! програми будуть
видален!.
Приеднання еп1зоду (DVD+RW/DVD+R)
Ви можете продовжити запис останнього еп!зоду. Якщо Ви не
виберете останн!й еп!зод, меню не в!добразиться на екран!.
1. Натисн!ть кнопку ENTER п!сля вибору пункту «Приеднання eni-
зоду»задопомогою кнопок АабоТ. Режим 0У0зм!ниться на
режим AV.
2. Натисн!ть кнопкуАУ IN для вибору входуАУ, з якого Ви хочете
записати. При кожному натисканн! кнопки вх!дАУ зм!нюеться:
ТУ
Передний AV
Задний AV
Задний SV
DV
Scart AV
Якщо Ви хочете записати телев!з!йну програму, вибер!ть режим
ТВ. Вибер!ть станц!ю, яку Ви хочете записати, натиснувши кноп
ку Channel- або Channel +.
3. Натисн!ть кнопку REC, щоб розпочати запис. Запис почнеться з
початкудиску.
4. Натисн!ть кнопку STOP для зупинки запису.
Прим!тка: якщо на диску недостатньо м!сця, меню нез’явиться на
екран!.
Коп1ювання еп1зоду DVD+RW/DVD+R
Ви можете скоп!ювати еп!зод з DVD на жорсткий диск.
1. Натисн!ть кнопку ENTER п!сля вибору пункту «Коп!ювання еп!зо-
ду»задопомогоюкнопок АабоТ. Почнетьсякоп!юванняеп!зоду
3 DVD на жорсткий диск.
Редагування еп1зоду жорсткого диску
1. Натисн!ть кнопку HDD/DUB для вибору режиму HDD. На екран!
з’явиться список еп!зод!в жорсткого диску.
2. Вибер!тьеп!зоддля редагуваннязадопомогоюкнопок АабоТ !
натисн!ть кнопку ►. На екран! з’явиться меню редагування.
Програвання
Ви можете програти вибраний еп!зод.
1. Натисн!ть кнопку ENTER п!сля вибору “Play” (програвання) за
допомогою кнопок АабоТ. Почнеться програвання вибраного
еп!зоду.
Видалення
1. Натисн!ть кнопку ENTER п!сля вибору «Видалення» за допомо
гою кнопок АабоТ. На екран! з’явиться д!алоговое меню.
2. Натисн!ть кнопку ENTER для того, щоб стерти зм!ст еп!зоду п!сля
вибору “Уез”(Так) за допомогою кнопок ◄або^.
77
Розд1лення
Ви можете розд!лити поточний еп!зод надв! частини.
1. HaTHCHiTbKHonKyENTER п!слявибору«Розд!лення»задопомо-
гою кнопок АабоТ. Почнеться програвання поточногоеп!зоду.
2. Знайд!ть м!сце, де Ви хочете розд!лити. Ви можете використати
пошук сцени використовуючи кнопки ◄◄, ►► або кнопку РЕА>^
3. Натисн!ть кнопку ENTER там, де Ви хочете розд!лити. На екран!
з’явиться д!алоговое меню.
4. Натисн!ть кнопку ENTER для п!дтвердження п!сля вибору “ОК” за
допомогою кнопок ◄або^.
Фрагментування
Ви можете пропустити в!дм!чен! Вами частини еп!зоду п!д час
програвання.
1. Натисн!ть ENTER п!сля вибору «Сегмент» за допомогою кнопок
АабоТ.
Еп!зод почне автоматично програватись.
2. Знайд!ть початок фрагменту, який Ви хочете пропустити.
В можете шукати сценузадопомогою кнопок ◄◄, ►►або кноп
ки РЕА>^
3. Натисн!ть кнопку ENTER на початку фрагменту, який Ви хочете
пропустити.
4. Знайд!ть зак!нчення фрагменту, який Ви хочете пропустити i на-
тисн!ть кнопку ENTER в к!нц! фрагменту.
5. Якщо Ви хочете в!дм!тити б!льше фрагмент!в, повтор!ть кроки 3 i
4.
В!дм!чен! фрагменти в!дображаються ф!олетовими кольоровими
смугами на шкал!, що рухаеться.
6. Натисн!ть кнопку STOP п!сля зак!нчення.
Прим!тка: коли еп!зодз в!дм!ченими фрагментами коп!юеться з
жорсткого диску на DVD, фрагменти не коп!юються на DVD.
Об’еднання
Ви можете об’еднати два еп!зоди.
1. Натисн!ть кнопку ENTER п!сля вибору «Сб’еднання» за допомо
гою кнопок АабоТ.
2. Вибер!тьеп!зоддляоб’еднаннязадопомогоюкнопокабо !на-
тисн!ть кнопку ENTER. (Якщо Ви хочете вийти з режиму, натисн!ть кнопку RETURN).
Зм1на заставки
Ви можете зм!нити заставкудля вибраного еп!зоду.
1. Натисн!ть ENTER п!сля вибору «Зм!на заставки» за допомогою
кнопок АабоТ.
Програвання еп!зоду почнеться автоматично.
2. Натисн!ть кнопку ENTER в тому м!сц!, зв!дки Ви хочете вилучити
заставку.
(Ви можете шукати сценузадопомогою кнопок ◄◄, ►► або
кнопки РЕА>^) На екран! з’явиться д!алоговое меню.
3. Натисн!ть ENTER для п!дтвердження п!сля вибору “СК” за допо
могою кнопок ◄або^.
Перейменування
Ви можете зм!нити назву еп!зоду
1. Натисн!ть кнопку ENTER п!сля вибору “Rename ” (переймену
вання) за допомогою кнопок АабоТ. На екран! в!добразиться
клав!атура.
2. Натисн!ть кнопку ENTER, щоб видалити поточну назву п!сля виб
ору кнопки «Видалити» на клав!атур!.
3. Вибер!ть букву, яку Ви хочете ввести задопомогою кнопок
◄ ,^,А,Т ! натисн!ть кнопку ENTERдля п!дтвердження.
4. Повтор!тьпунктЗ.
Максимальнадовжина назви не повинна перевищувати 12 сим-
вол!в.
5. Натисн!ть кнопку ENTER п!сля вибору “ОК” на клав!атур!, якщо Ви
зак!нчили введения букв.
Прим!тка: функц!я недоступна, якщо тип попереднього перегляду в
меню налаштувань поставлений на «Активний».
Блокування
Ви можете заблокувати еп!зод, щоб н!хто не м!г програти його.
1. Натисн!ть кнопку ENTER п!сля вибору «Блокування» за допомо
гою кнопок АабоТ. Еп!зод буде заблоковано.
Розблокування
Ви можете розблокувати заблокований еп!зод.
1. Натисн!ть кнопку ENTER п!сля вибору «Розблокування» за допо
могою кнопок АабоТ.
4097IMnew.indd 77 27.02.2007 13:35:47
Page 78

украТньский
На екран! з’явиться в1кно паролю.
2. Введ1ть пароль з 4 цифр, використовуючи кнопки 0-9.
3. Натисн1ть кнопку ENTER для п1дтвердження п1сля вибору “ОК” за
допомогоюкнопки ▼. Еп1зодбудерозблоковано.
Захист
В можете захистити еп1зод в1д редагування.
1. Натисн1ть кнопку ENTER п1сля вибору «Захист» за допомогою
кнопок Жабо^. Еп1зодбудезахищено. Ви можете програвати
захищений еп1зод, але не можете його редагувати.
Зняття захисту
Ви можете зняти захист з еп!зоду.
1. Натисн!ть кнопку ENTER п!сля вибору «Зняття захисту за
допомогою кнопок Жабо^.
Захист еп!зоду буде знято.
Якт!льки налаштування будутьзавершен!, DVD рекордер завжди
зможе працювати з тими ж налаштуваннями, при кожному
ув!мкненн! живлення. Так! налаштування називаються Дан!
налаштування, як! можна легко зм!нити ! зберегти за допомогою
меню налаштувань.
OcHOBHi дГГ
Натисн!ть кнопку SETUP в режим! стоп. Використовуйте кнопки
◄ ,►,▲,▼ ! кнопки ENTER ! RETURN для пошуку ! виборуд!й (опц!й).
Поточн! налаштування для будь-якихд!й вид!ляються кольоровою
смужкою.
1. Натисн!ть кнопку STOP, якщо диск програеться.
2. Для виклику меню налаштувань натисн!ть кнопку SETUP.
3. Вибер!ть потр!бний пунктзадопомогою кнопок ◄або^, пот!м
натисн!ть кнопку ENTER.
4. Вибер!ть потр!бний п!дпунктзадопомогою кнопок ◄,►,▲,▼ !
кнопки ENTER. Якщо Ви хочете перейти до попереднього меню,
натисн!ть кнопку RETURN.
5. Натисн!ть кнопку SETUP п!сля завершения вс!х налаштувань.
Прим!тка: залежно в!д диску деяк! вибран! д!| меню налаштувань
можуть працювати неправильно.
Використання меню налаштувань Запис i сканування канал1в
Автомаркировка фрагментов 5 м
Сканировать каналы
Изменение канала
Перестановка каналов
Запись по таймеру
Выбор страны
РЕДА1СТИРОВАТЬ
Перестановка
1. Автомаркування фрагмент1в
Коли автоматичний маркер фрагменту встановлений на 5
хвилин, фрагменти створюються автоматично всередин! еп!зоду
3 п’ятихвилинними !нтервалами. Можна також додавати або
видаляти фрагменти вручну, через функц!| редагування. Детальн!ше
звертайтесьдо пункту «Редагування еп!зоду».
2. Як1стьзапису
Як!сть запису пропонуе 6 р!вн!в якост!:
HQ: висока як!сть. Ви можете зд!йснювати запис тривал!стю до 1
години на чистомудиску.
SP: стандартне програвання. Ви можете програвати запис
тривал!стю до 2 годин на чистому диску.
SP+: розширене стандартне програвання. Ви можете зд!йснювати
запис тривал!стю до 2 годин 30 хвилин на чистомудиску.
LP: тривале програвання. Ви можете програвати запис тривал!стю
до 3 годин на чистому диску.
ЕР: тривале програвання. Ви можете зд!йснювати запис тривал!стю
до 4 годин на чистому диску.
SLP: супер тривале програвання. Ви можете зд!йснювати запис
тривал!стю до 6 годин на чистому диску.
3. Аналогове сканування каналу
Даний рекордер мае вмонтований ТВ тюнер для запису ТВ програм.
1. Натисн!ть кнопку ENTER п!сля вибору «Сканування» за допомо
гою натискання кнопок Жабо^.
78
2. Натисн1ть кнопку ENTER для п1дтвердження п1сля вибору “ОК” за
допомогою кнопок ◄ або ►.
Почнеться автоматичний пошук канал1в. Якщо телепрограма
буде знайдена при автоматичному пошуку, вона буде збережена
автоматично.
Прим1тка:
• П!д час пошуку канал1в Bci попередн! програми будуть видален! i
перем1щен1.
• Дана функц1я доступна, т1льки коли рекордер знаходиться в ре
жим! ТВ.
4. Зм1на каналу
(Якщо немае захвату каналу, дана функц!я недоступна.)
4-1. Натисн!ть кнопку ENTER п!сля вибору «Редагування» за допо
могою кнопок Жабо^. 1нформац!я про поточний канал в!добразиться на екран!.___________________________
Изментъ информацию о канале
Номер программы poai
Имя Н[«]1ё]йП
Стандарт PAL BiG
Тип поиска Канал
Тип Standard
Канал
Точная настройка
Декодер Выкл
Удалить ОК
ОК
_______
---------------------
Отмена
_________
4-2. Вибер!ть канал, який Ви хочете зм!нити за допомогою кнопок
CHANNEL - або CHANNEL +.
Редагування назви каналу
1) . Натисн!ть кнопку ENTER п!сля вибору «Назва» за допомогою
кнопок Жабо^.
2) . Вибер!ть букви, як! Ви хочете ввести за допомогою кнопок
◄ ,^,Ж,^ ! натисн!ть кнопку ENTERдля п!дтвердження.
Стандарт ТВ
Встанов!тьТВ системудля поточного каналу.
1) . Вибер!ть «Стандарт» за допомогою кнопок Жабо^ ! натисн!ть
кнопку ENTER.
2) . Вибер!ть ТВ систему за допомогою кнопок Жабо^ ! натисн!ть
кнопку ENTER.
Тип пошуку
Якщо захоплений сигнал поганий, Ви можете знову включити пошук
каналу за частотою або номером.
1) . Вибер!ть «Тип пошуку» за допомогою кнопки Жабо^ ! натисн!ть
кнопку ENTER.
2) . Вибер!ть «Частота» або «Програма» за допомогою кнопок
Жабо^ ! натисн!ть кнопку ENTER.
3) . Вибер!ть «Частота» або «Канал» за допомогою кнопки ▼ ! натис-
н!ть кнопку ◄або ►.
Почнеться автоматичний пошуктелепрограми. Якщо програма
знайдена, пошук припиниться. Якщо Ви хочете зупинити пошук,
натисн!ть кнопку STOP.
Тонне налаштування
Якщо захоплений сигнал слабкий, Ви можете зд!йснити точне
налаштування каналу.
1) . Вибер!ть «Точне налаштування» за допомогою кнопок Жабо^.
2) . Налаштуйте канал точно за допомогою кнопок ◄або ►. При
кожному натисканн! кнопки ◄або^частота програми зменшиться або зб!льшиться на 50 КГц.
Декодер
Якщо поточний канал закодований, потр!бно п!дключити Сапа1+
декодер до евро A/V IN роз’ему, ! встановити йоге в “ON”.
Видалення
Якщо Ви хочете видалити захоплений канал, вибер!ть «Видалення»
за допомогою кнопок Жабо^ ! натисн!ть кнопку ENTER.
4-3. Натисн!ть кнопку ENTER п!сля вибору “ОК” за допомогою
кнопки ▼, якщо вс! налаштування правилен!.
Прим!тка: Дана функц!я доступна, т!льки коли рекордер знаходиться
в режим!ТВ.
4097IMnew.indd 78 27.02.2007 13:35:48
Page 79

украТньский
5. Обм1н каналами
(Якщо немае захоплених канал1в, дана функц1я недоступна.)
Дана функц1я дозволяе Вам м1няти м1сцями piani канал за
призначенням. Атакож Ви можете групувати разом м1сцедля
програм, як! зазвичай йдуть поряд
1. Натисн1ть кнопку ENTER п1сля вибору «Обм1н» за допомогою
кнопок ЖабоТ.
Вибер1ть програмудля обм1нузадопомогою кнопок Жабо^ i
натисн1ть кнопку ►.
ОК Р001 ARD
Ошена
........
РООЗ SW3
Р004
.......
Р005
.......
роое
Р007
.......
Р008
.......
.
роблячи 1хусп1вв1дношенн1 4:3 (нав1ть, якщо картинка здаеться
б1льшою на екран!, Ви фактично бачите менший kìho фрагмент).
Прим1тка: деяк! диски не дозволяють Вам зм1нювати po3MÌp
зображення.
3. BmxìaP-SCAN/HDMI
При порядковому розгортанн! ТВ через з’еднувачУ/РЬ/Рг, вста-
hobìtb P-Scan/HDMI. Коли Ви дивитесь телев1зор через HOMI,
BCTaHOBÌTb P-Scan/HDMI. (Дана функц1я недоступна, коли EURO
AV output встановлена на PGB.)
4. Екранназаставка
Якщо зображення не рухаеться протягом тривалого часу, теле-
BÌ3op може бути пошкоджений. Якщо це спостер1гаеться б1льше
5 хвилин, екранна заставка вмикаеться, якщо вона вибрана.
Екранна заставка захищае катодну трубку (CRT) в1д пошкодження, програючи логотип DVD, що рухаеться, на екран!.
Прим1тка: екран MOHÌTopy, проектора або проекц1йного теле-
BÌ3opa можелегко “прогор1ти”, якщо статична картинка в1доб-
ражаеться на екран! протягом тривалого часу. Сл!дкуйте, щоб
MOHÌTOP не “прогор!в”, коли Ви в!дключаете режим збереження
екрану.
Ауд1о (Це меню недоступне, коли дискзнаходиться в
рекордер!) _______________________________________
Вибер!ть позиц!ю для вставки за допомогою кнопок Жабо^ i
натисн!ть кнопку ►.
Якщо Ви хочете пом!няти м!сцями б!льше програм, пророб!ть
кроки 2 i 3.
Натисн!ть кнопку ENTER п!сля вибору “ОК” за допомогою кнопки
◄ , п!сля зак!нчення.
Прим!тка: Дана функц!я доступна, т!льки коли рекордер знахо-
диться в режим! ТВ.
Таймер запису
Див!ться розд!л «Таймерзапису».
Виб!р кра1ни
Натисн!ть кнопку ENTER п!сля вибору CBoei краУни за допомогою
кнопок Жабо^.
В!део
с I
Формат видеовыхода PAL
Формат изображения телевизора 4:3 Letter Box
1.
Формат в1део виходу
Встанов!ть формат в!део виходу в!дпов!дно до типу, що п!дтримуеться Вашим ТВ або мон!тором. Якщо Ваш ТВ п!дтримуе РАЕ,
встанов!ть РАЕ. Якщо NTSC, встанов!ть NTSC.
2.
Р1зновиди розм1р1в ТВ зображення
Якщо у Вас широкоекранний телев!зор, вибер!ть на лаштуван-
ня «16:9W!de». Широкоекранний СУСдискзаймае всю плещу
екрану. При програванн! СУСдиску, записаногоузвичайному
формат! (4:3), налаштування Вашего телев!зора визначають те,
якбуде представлений матер!ал. (Детальн!шедив!ться пут!вник
для Вашего телев!зора по тому, як! опц!| доступн!).
Якщо у Вас звичайний телев!зор, вибер!ть «4:3 Eetter Вех» або
«4:3 PAN SCAN».
В режим! П0ШТ0В01 скриньки «4:3 Eetter Вех», широкоекранний
DVD диск в!дображасться з чорними смугами згори ! донизу
екрану. PAN SCAN в!дс!кае сторони широкоекранних матер!ал!в.
Аналоговий вих!д (Не п!длягае зм!нам.)
Цифровий вих!д (SPDIE)
• RAWДв!йкoвий пот!к (B!t Stream): першопочатковий ауд!о пот!к,
записаний на диску виходить через цифровий ауд!о вих!д.
• ЕРСМ: декодований ауд!о пот!к виходить через цифровий ауд!о
вих!д.
3.
Вих!д ЕРСМ
Вам необх!дно зробити дане налаштування, т!льки якщо п!дключаете плейер до AV п!дсилювача (або !ншого пристрою), використовуючи цифровий ауд!о вих!д. ЯкщоАУ п!дсилювач (або !нший пристр!й) сум!сний з високою частотоюдискретизац!| ауд!о
(96КГц), встанов!ть ЕРСМ 96КГц, в !ншому випадку встанов!ть
ЕРСМ 48КГц.
Мова
1. Мова OSD меню
Даний пункт використовусться для вибору мови дисплею, на як!й
в!дображаються пов!домлення. Коли потр!бна мова вибрана,
пов!домлення будуть в!дображатись надиспле! на ц!й мов!.
2. Мова ауд1о
Встанов!ть бажану мову ауд!о. Коли мова ауд!о вибрана, при
програванн! диску, програвання буде в!дбуватись на вибран!й мов!
(якщо вибрана мова м!ститься надиску.)
3. Мова субтитр1в
Встанов!ть бажану мову субтитр!в. Коли мова субтитр!в вибрана,
при програванн! диску, програвання буде в!дбуватись на вибран!й
мов! (якщо вибрана мова м!ститься надиску.)
79
4097IMnew.indd 79 27.02.2007 13:35:49
Page 80

украТньский
4. Мовне менюдиску
Встанов1ть бажану мову меню. Коли мова меню вибрана, при
програванн! диску, програвання буде в1дбуватись вибран1й mobì
меню (якщо вибрана мова м1ститься надиску.)
Годинник
Новый пароль
I Ввести пароль здесь. [Г] О [И О ]
Ввести повый пароль П П П П
Введите снова. П П П П
Автоматичне налаштування годинника
Деяк1 ТВ програми передають сигнали точного часу разом з
програмою. Даний плейер може використовувати ц1 сигнали для
автоматичного налаштування годинника.
Натисн1ть кнопку ENTER п1сля вибору «Налаштування часу/дати»
за допомогою кнопок АабоТ.
Натисн1ть кнопку ENTER п1сля вибору «Авто».
Натисн1ть кнопку ENTER п1сля вибору «Програмування» за допо
могою кнопки ▼.
Вибер1ть встановлений канал, який транслюе сигнал точного
часу, i натисн1ть кнопку ENTER.
Встановлення годинника вручну
Якщо у Вашому perioHi немае станц1й, як1 транслюють сигнали
точного часу, Ви можете встановити час вручну.
Натисн1ть кнопку ENTER п1сля вибору «Налаштування часу/дати»
за допомогою кнопок АабоТ.
Натисн1ть кнопку ENTER п1сля вибору «Ручний».
Введ1тьдату i час, використовуючи кнопки 0-9 або ◄,►,▲,▼ i
натисн1ть кнопку ENTER. Використовуйте кнопки 0-9 щоб
зм1нити значения в п1дсв1ченому пол1. Використовуйте кнопки
◄ ,► для переходуз одного поля в ¡нше.
Загальне
#■
□UD RSCORdER
2) Введ1ть поточний пароль з 4 цифр за допомогою кнопок 0-9 i
натисн1ть кнопку ▼.
3) Введ1ть новий пароль з 4 цифр за допомогою кнопок 0-9 i натис-
HiTb кнопку ▼.
4) Введ1ть новий пароль ще раз для п1дтвердження i натисн1ть
кнопку ▼.
5) Натисн1ть кнопку ENTER п1сля вибору “ОК”.
Пароль буде зм1нений.
3. Заводськ! налаштування
Повернення DVD рекордерадозаводськихналаштувань.
1. Натисн1ть кнопку ENTER п1сля вибору «Заводськ! налаштування»
за допомогою кнопки ▼. На екран! з’явиться д1алоговое bìkho.
2. Натисн1ть кнопку ENTER п1сля вибору “ОК”.
4. Свро вих1д AV
Встанов1тьУСЬСгдля переглядукомпонентного в1деочерезУ/СЬ/Сг
з’еднання. При використанн! AV EURO з’еднувача RGB, встанов1ть
RGB.
5. Декодер
Якщо Ви хочете переглянути закодован! канали, потр1бно
п1дключити Сапа1+ декодер до евро A/V IN роз’ему, i встановити
його в “ON”.
6. Тип попереднього перегляду
Ви можете вибрати тип попереднього переглядуеп1зодуз1 списку
еп1зод1в жорсткого диску.
Статичний: в1дображае попередн1й переглядз нерухомим
зображенням.
Динам1чний: в1дображае попередн1й переглядз рухомим
зображенням.
BiKOBi обмеження (батьк1вський контроль)
Дана функц1я призначенадля в1дключення програвання деяких
DVD диск1в, як1 не призначен! для переглядуд1тьми. 1снуе 8
piBHiB. Якщо вибраний р1вень 8, зм1стдиску призначений для
дорослих. Якщо вибраний р1вень 1, зм1стдиску призначений
для д1тей. Використовуйте регулювання р1вня в1кових обмежень.
При програванн! диску, вибраний р1вень пор1внюеться з р1внем
на диску. Якщо вибраний Вами р1вень вище вказаного на диску,
Ви можете програвати диск. Якщо Hi - диск не програеться. Для
встановлення п1дходящого р1вня обмежень, дотримуйтесь вказаних 1нструкц1й.
Натисн1ть кнопку ENTER п1сля вибору потр1бного р1вня зодопо-
могою кнопок АабоТ.
Надиспле! в1добразиться в1кно паролю.
Введ1ть пароль з 4 цифр за допомогою кнопок 0-9 i натисн1ть
ENTER.
Якщо Ви не зм1нювали пароль, введ1ть0, 0, 0, 0.
3.
Натиснувши кнопку ENTER п1сля вибору “ОК” за допомогою
кнопки ▼,п1слязак1нчення.
2. Зм1на паролю
1) Натисн1тькнопку
naiHCHiib кнопку ENTER п1сля вибору «Зм1на паролю».
Надиспле! в1добразиться bìkho паролю.
7. Режими коп1ювання з жорсткого диску на диск
При коп1юванн1 з жорсткого диску на DVD Ви можете вибрати режим
коп1ювання.
Виб1р стиснення (Fit to disc): як1сть запису автоматично регулюеться
таким чином, що вибран! еп1зоди п1дганяються за доступним м1сцем
на диску.
Висока швидк1сть: вибран! еп1зоди коп1юються з такою ж як1стю
запису як ориг1нал.
Найвища швидк1сть: вибран! еп1зоди коп1ююються з певною як1стю
запису в реальному час!. (Зауважте, що, недивлячись на те, що Ви
коп1юете з б1льш високою як1стю, н1ж ориг1нал, коп1я не буде кращо!
hkoctì, н1ж ориг1нал).
Жорсткий диск
1. Po3Mip бyфepyTimeshift
При 3annci i3 зсуненням в naci Ви можете вибрати об’ем буферу
HDD, в якому тимчасово 36epiraeTbC4 ТВ програма.
2. Режим 6y^epyTimeshitt
Оновлення: BMicT буферу стираеться, пicля 3MiHH ТВ каналу.
Збереження: вмicтбyфepyзбepiгaeтьcя, нeдивлячиcьнaзaмiнy ТВ
каналу.
80
4097IMnew.indd 80 27.02.2007 13:35:49
Page 81

УКРА1НЬСКИИ
3. 1нформац1я про жорсткий диск
В1дображае ¡нформац1ю про жорсткий диск.
4. Управл1ння простором
Автоматично: коли жорсткий диск переповнений, рекордер буде перезаписувати незахищен! еп1зоди.
Ручне: коли жорсткий диск переповнений, рекордер не буде перезаписувати, а буде запитувати дозволу на стирання деяких еп1зод1в
для подальшого перезапису.
5. Форматування жорсткого диску
Ви можете видалити вс! програми з жорсткого диску.
6. Стирання оптичного диску
Ви можете видалити вс! програми з оптичного диску.
(Дана функц1я доступна т1льки год!, коли рекордер встановлений узовн1шн1й режим АУ або режим ТВ.)
Додаткова ¡нформац1я
TexHÌHHÌ характеристики
Ochobhì характеристики П1дтримуван1 типи диск1в
П1дтримуван1 в1део формати
ТВ система
Вимоги до джерела живлення
Споживана потужн1сть
Вага
Розм1ри
Рабоча температура
Волог1сть при експлуатацй'
Запис Записуючий формат DVDVIDEO
Записуюч! диски DVD±R, DVD±RW, HDD(250E6)
Таймер Програми 8 програм
Годинник
Таймер авто вимкнення
З’еднувачУ Свро АУ(з’еднувач Вх1д/вих1дАУ з’эднувачах 1 Даний з’еднувач передав ауд1о i в1део сигнали
21-pin) Вих1дАУ з’еднувача х 1 кольоровому ТВ або MOHiropy
Вх1д/вих1д S-Video Вх1д/вих1дУ (яскрав1сть) Vp-p(75 0m)
С(кол1р) 0.286Vp-p(75 Ом)
Вх1д/вих1д В1део Вх1д/вих1д Vp-p(75 0m)
Вх1дх 2, вих1дх 1 Роз’ем RCA
Компонентний в1део вих1д
Вх1д/вих1д ауд1о Вх1д(1/Р) X 2, Вих1д(1/Р) X 1 2Vrms(1 КГц,0дБ)
Цифровий ауд1о вих1д Оптичний вих1дх 1 Оптичний роз’ем
Цифровий вх1д/вих1д 1ЕЕЕстандарт 1394 4 pin
USB вх1д USB1.1 4 pin
HOMI вих1д Тип Ах 1 480p / 576p
Характеристики ауд1о Частотний д1апазон 4ГЦ-44 КГц (DVD чаетота: 96 КГц)
Аксесуари А/В кабель 1
(X СЬ/РЬ, Сг/Рг)
Коаксиальний вих1дх 1 Роз’ем RCA
В1дношення сигнал/шум ЮОдБ
Динам1чний д1апазон
Загальн! гармон1йн1 викривлення
RE кабель 1
Scart кабель 1
ПультДУ 1
Батарейки типуАА 2
1нструкц1я 3 експлуатацй' 1
DVD, CD-DA, CD, CD-R/CD-RW, DVD±R/RW, DVD-R/RW
MPEG-1, MPEG-2, MPEG-4, JPEG
PAL/SECAM
AC 100 B-240 B, 50/60 Гц
45 Вт
4.5кг
420(Ш) X 44(B) X 336(Д) мм
в1д 5°С до 35°С
в1д 10 %до 75%
Кварцовий годинник(цифровийдисплей 24-години)
Прибл. 1 годинаЗОхвилин
Роз’ем S-VIDEO
Y: 1.0Vp-p(75Om)
Cb/Pb, Cr/Pr: 0.7 Vp-p (75 Ом)
Роз’ем RCA
95дБ
0.03 %
Прим1тка: Ми пост1йно покращуем як1сть нашоУ продукц||, тому технУчн! характеристики \ дизайн можуть бути змУнен! без попереднього
повУдомлення.
Пошук I усунення несправностей
Причиною несправностей або перешкодчасто е неправильно використання. Якщо Ви вважаете, що з пристроем щось не так, перевУрте
можлив! причини несправност! за даною таблицею.
1нод1 причина несправност! може бути викликана роботою ¡нших компонентУв. ПеревУрте ¡нш! компоненти \ електроприлади перед
81
4097IMnew.indd 81 27.02.2007 13:35:49
Page 82

УКРА1НЬСКИИ
використанням. Якщо Вам не вдалось усунути несправн1сть п1сля перев1рки перел1ку розташованого нижче, зверн1ться до найближчого
авторизованого cepBicHoro центру або до дилера для виконання ремонтних po6iT.
Ознака несправност! Заходи по усуненню несправност!
П!сля завантаження диск автоматично
вилучаеться.
Диск встановлений неправильно. • Встанов!тьдискправильно.
Несум!сний код рег!ону. • Якщо код perioHy на DVD диску не сп!впадае з кодом, вказаним на рекордер!, диск не буде
Конденсац!я всередин! рекордера. • Зачекайте, поки випаруеться конденсат. Не використовуйте рекордер порядз кондиц!онером.
Диск перевернутий. • Перезавантажте диск так, щоб сторона з етикеткою була зверху.
Зображення нерухоме, не працюють
кнопки управл!ння.
Нов! налаштування в меню
налаштувань при програванн! диску не
програються.
Налаштування видален!.
В!дсутн! зображення ! кол!р. • Неправильна п!дключення в!део. Перев!рте з’еднувач!. Переконайтесь, що штекери повн!стю
DVD рекордер не записуе. • Неправильний тип диску, не DVD±R, DVD±RW.
Екран розтягнутий, вигляд не
зм!нюеться.
Порушення або затемнения
зображення при програванн!.
ПультДУ не працюе. • ПультДУ занадто в!ддалений в!д рекордера або не направлений надатчик.
Звук в!дсутн!й або викривлений. Деяк! диеки не мають цифрового ауд!о.
Аналогове ауд!о в порядку, але немае
цифрового ауд!о сигналу.
Пом!тна р!зниця в гучност! DVD i CD
диск!в.
В!дсутн!й ауд!о вих!д DTS. • Якщо прилад п!дключений до п!деилювача або декодера, як! не п!дтримують DTS ,
Прим1тка: статична електрика або ¡нш! явища можуть призвести до шум1в у робот! приладу. В цьому випадку, вийм!ть, а пот!м вставте шнур
живлення в розетку. Прилад перезавантажиться. Якщо проблема не вир!шиться, зверн!ться до найближчого серв!сного центру.
Утил!зац!я старого обладнання
«Даний товар позначений символом, що означав те, що електричн! \ електронн! пристро!' повинн! утил!зуватись в!дпов!дно до Директив
2002/96/ЕС. Правильна утил!зац!я старого обладнання може попередити шк!дливий вплив на навколишне середовище. Увага! Електронне
обладнання може зд!йснити шк!дливий вплив на навколишне середовище \ здоров’я людини ¡з-за вм!сту в ньому шк!дливих речовин».
Строк служби приладу не менше 5-ти рок1в.
Гарант1я
Докладн! умови гарант!!' можна отримати в дилера, що продав дану апаратуру. При пред’явленн! будь-яко!' претенз!!' протягом терм!нуд!!'
дано!' гарант!!' варто пред’явити чек або квитанц!ю про покупку.
• Дискзабруднений або пошкоджений.
програватись.
• Вимкн!ть !ув!мкн!тьживлення ще раз, використовуючи KHonxySTANDBY/ON на передн!й панел!
приладу.
• Вийм!ть штекер з розетки ! вставте його ще раз.
• Деяк! налаштування можуть бути зд!йснен! при програванн! диску, але вони не будуть ефективн!
до тих п!р, поки диск не буде зупинений ! перезапущений.
• Це не несправн!сть. Зд!йсн!ть так! ж налаштування при в!дключеному програванн!.
• Якщо живлення в!дключилось !з-за збо!'в в мереж! або !з-за вимкнення шнура живлення,
налаштування будуть видален!.
вставлен!.
• Неправильн! налаштування ТВ мон!тору або A/V п!дсилювача. Зверн!ться до !нструкц!!' для
п!дключення обладнання.
• Меню компонентного виходу встановлене на «прогресивне сканування», але ТВ/мон!тор не
п!дтримуе прогресивне сканування.
• Переп!дключ!ть рекордер до ТВ за допомогою композитного або S-V!deo кабеля ! встанов!ть ТВ
до правильного входу.
• На диску немае м!сця для запису.
• ВУВ±Нф!нал!зований.
• Неправильн! налаштування розм!ру ТВ екрану в меню налаштувань. Встанов!ть розм!р ТВ
екрану в!дпов!дно до ТВ/мон!тору.
• Даний плейер мае еиетему Маего V!s!on. Деяк! диеки захищен! в!д коп!ювання
попереджувальним еигналом, ! при !'х програванн! можуть з’являтиеь емуги ! т. д. на картинц! ТВ.
Викориетовуйте пульт за призначенням.
• Якщо батаре!' е!ли. Ветавте нов! батаре!'.
• Переключ!ть п!деилювач на аналоговий вих!д.
Бруд або пил на диеку.
• Почиет!ть диек.
З’еднувач! ветавлен! не повн!етю в роз’еми (або не п!дключен!).
• Перев!рте, що во! з’еднувач! ветавлен!.
Брудн! або окиелен! штекери/роз’еми.
• Очиет!ть штекери/роз’еми.
Неправильно п!дключений ауд!о кабель.
• Перев!рте п!дключення ауд!о.
Вих!д рекордера п!дключений до PHONO входу п!деилювача (вх!ддля п!дключення в!н!л
програвача)
• П!дключ!ть до будь-якого виходу, кр!м PHONO.
Диек на пауз!.
• Натиен!ть Програвання для виходу з режиму паузи.
Неправильн! налаштування п!деилювача.
• Перев!рте гучн!еть, динам!ки, функц!ю входу.
Неправильн! налаштування меню ауд!о.
• Переконайтееь, що цифровий ауд!о вих!д ветановлений на LPSM або RAW. Перев!рте, що
налаштування LPSM або RAW п!дходять для Вашого п!деилювача. Див. !нетрукц!ю до п!деилювача.
• Диеки DVD ! CD запиеуютьея по-р!зному. Це не е нееправн!етю.
викориетовуючи цифровий ауд!о кабель, п!дключ!ть DTS еум!ен! п!деилювач або декодер. 1накше,
при програванн! DTS буде шум.
• Якщо прилад п!дключений до п!деилювача або декодера, як! п!дтримують DTS, викориетовуючи
цифровий ауд!о кабель, перев!рте налаштування п!деилювача ! переконайтееь, що кабель
правильно ветавлений.
Даний вир!б в!дпов!дае вимогам до електромагн!тно!' сум!сност!, що пред’являються директивою 89/336/GEC Ради ввропи й
розпорядженням 23/73 GEC по низьковольтних апаратурах.
С€
82
4097IMnew.indd 82 27.02.2007 13:35:50
Page 83

Пайдалану нускау
• Арба - ендiрушiмен усынылган не болмаса жеткiзу топтамасына
DVD жэне HDD рекордер
Модель VT-4097
Ойнат^ышты косудыц, пайдаланудыц жэне баптаудыц алдында осы
нус^аулы^та мазмундалган нус^аулармен жете танысып шыгыцыз.
Нус^аулы^ты пайдалану кезiнде колдану Yшiн са^тап койыцыз.
Г
СА^ТАНДЫРЛЫ^: Жану тэуекелдiц темендету ушiн немесе
электр ток урмау ушiн, кондыргыштыц панелiн шешпецiз.
Сервис куту ушiн назар аударыцыз тек кана квалифицирылган
Найзагай белгiсi тец жак бурыш iшiнде колданушыга
куралдыц iшiнде кауыпты куш салу бар eKeHiH кeрсетедi, ол
электр ток уруга зeйiндieкeнiн бeрeдi.
Леп бeлгiсi тец жак бурыш iшiндe колданушыга куралдыц
iшiндe мацызды колдану нускау жэне техникалык куту
эдибет шыгармада бар eкeнiн K9рсeтeдi.
CLASS 1
LASER PRODUCT
0З1Ч1ЗД1 КОРГАЧЫЗ!
Теменге модельдi жэне аспаптык сериялык HSMipiH жазып койыцыз,
0зiрше олар жекiл к0рiнгенше. Осы н0мiрлер аспап корпустык арткы
жанында керсетiлген. Осы хабарды келешекте пайдалануыкызка сактап
койыкыз.
DVD ДИСКТАРДЫН БЕЙНЕПЛЕЕР1 1 КЛАСС ЛАЗЕР ЖАБДЫГЫСЫ
БОЛАДЫ.
БАС^АРАУ НЕМЕСЕ РЕТТЕУ ОРГАНДАРДЫ ПАЙДАЛАНУЫ, ОСЫ
Н¥С^АУДА ЖАЗЫЛМАГАН, ПРОЦЕДУРАЛАРДЫ ЖАСАУЫ, ОСЫ
Н¥С^АУДА К0РСЕТ1ЛМЕГЕН, КАУ1ПТ1 САУЛЕЛЕНУД1Н АСТЫНА
ТYСУ МYМКIНДIПНЕ КЕЛТ1РЕД1.
СЕБЕБ1 ОСЫ ЛАЗЕР Н¥РЫ, ОСЫ DVD ДИСКТАРДЫН
БЕЙНЕПЛЕЕРДЕ ПАЙДАЛАНАТЫН К0ЗДЕР ¥Ш1Н КАУ1ПТ1,
КОРПУСТЫ АШУГА ТЫРЫСПАНЫЗ. ЖАБДЫ^ТЫН КYТУIН ТЕК ^АНА
СЕРВИС ОРТАЛЫ^ТЫН КВАЛИФИКАЦИЯЛЫ^ КЫЗМЕТШ1ЛЕРМЕН
ЖАСАЛГАН БОЛУ КЕРЕК.
“DTS” жэне “DTS Digital Surround” Digital Theatre Systems, Inc. сауда
белг1лер1 болып табылады.
^ау1пс1зд1к стандарттары туралы акпарат мазмундалган тауар
маркасы аспаптык теменг! панел1нде орналаскан.
Kауiпсiздiк техникасы жeнiнде ма^ызды нускаулар
• Осы нускаулыкты окып шыгыкыз - аспапты пайдаланбастан
бурын кау1пс1зд1к жэне пайдалану техникасы жен1ндег1 барлык
нускауларды жете окып шыгу кажет.
• Осы нускаулыкты сактап койыкыз - кау1пс1зд1к жэне пайдалану
техникасы жен1ндег1 нускауларды болашакта аныктамалык курал
рет1нде пайдалану уш1н сактап кою кажет.
• Барлык ескертулерд! ескер1к1з - тауарда немесе нускаулыкта
керсет1лген барлык ескертулерд! м1ндетт1 турде ескеру кажет.
• Барлык нускауларды орындакыз - пайдалану жен1ндег1 барлык
нускауларды орындакыз.
• Аспапты тек ылгал шуберекпен сурт1к1з - аспапты тазалаудык
алдында оны жел1ден ажырату кажет. Тазалау кез1нде тазалау
шуберег1н немесе жумсак кургак шуберект! пайдалану
кажет. Тазалау кез1нде балауыз, бензин немесе баска ушкыш
суйыктыктарды пайдаланбакыз, ейткен! олар аспап корпусын
закымдауы мумк1н.
• Аспапты судык макында пайдаланбакыз - аспапты судык
макында пайдаланбакыз, мысалы, ванна, кол жугыш, раковина
жанында, ылгал теледе, бассейн жанында немесе оган уксас
жерлерде.
• Аксессуарлар - тек енд1руш1мен жасалган саптамаларды жэне
аксессуарларды пайдаланыкыз.
CAUTION
Risk of electric shock
DO NOTOPEN
кызметшiлерге.
^ондыргыштыц белгiсi лазер колданатыц.
Маркировкасы арткы панельде болуы
керек, оол белгiлейдi, кондыргыш 1 Класска
жатады, жэне лазер нурларыц колданады.
Лазер нурлаулык MYMкiндiгi жок егер куралды
ашпаса.
1
* •
• Желдету - желдету сацылауларын жаппацыз. Аспапты ендiрушi
• Жерлендiру жэне полярлылык - кауiпсiздiк Yшiн полярлык немесе
• ^орек сымын коргау - корек сымын баспацыз. Штепсельге,
• Найзагай кезiнде пайдалану - найзагай кезiнде жэне аспап узак
• Техникалык кызмет керсету - техникалык кызмет керсету бiлiктi
• Жылу кезi - аспапты жылу кезiнiц мацында орнатпацыз, атап
Пайдаланудыи алдында
Жеткiзу топтамасы
Бiздiц DVD-плеерiмiздi сатып алганыцызга алгысымызды бiлдiремiз.
Келесi аксессуарлар жеткiзу топтамасына кiргенiн тексерiцiз.
Аксессуарлар
1. ^Б пультi
2. SCART кабелi
3. RF кабелi
4. Аудио/Видео кабель
5. ААА типiндегi батареялар
6. Пайдалану женiндегi нускаулык (осы нускаулык)
Кашыктыктан баскару пультiне батареяларды орнату
^Б пультiнiц арткы панелiндегi батарея белiмiнiц какпагын ашыцыз.
ААА типiндегi екi батареяны батарея белiмiне салыцыз, бул жагдайда
батареялардыц полярлыгы батарея белiмiндегi белгiлерге сэйкес
келуi (+, -) кажет.
Батарея белiмiнiц какпагын жабыцыз.
КБ пультiн пайдалану
^Б пультiн пайдалану кезiнде темендегiлердi есте устацыз:
• ^Б пультi жэне кашыктыктан баскару датчигiнiц арасында
• Егер кашыктыктан баскару датчигiне кун немесе флуоресценттi
• 0р TYрлi аспаптардыц ^Б пульттерi бiр-бiрiнiц жумысына эсер етуi
• Егер ^Б пультiнiц жумысында iркiлiстер орын алса, батареяларды
Ескерту:
Батареяларды дурыс пайдаланбау электролиттiц тегiлуiне немесе
жарылыстыц болуына алып келуi MYMкiн. Келесiлерге назар
аударыцыз:
• Жаца жэне ескi батареяларды катар пайдаланбацыз.
• 0р TYрлi батареяларды катар пайдаланбацыз. Сырткы TYрлерi
• 0рбiр батареяныц оц жэне терiс полюстерi батарея белiмiндегi
• Егер Сiз аспапты бiр ай немесе одан кеп уакыт пайдаланбайтын
• Пайдаланылган батареяларды лактыратын жагдайда Сiздiц
Дискiлердiл Yйлесiмдiлiгi
Келесi логотиптердiц бiрi бар кез келген диск осы жуйеде колданылуы
MYMкiн. Дискiлердiц баска форматтары, сонымен катар DVD-RAM,
КАЗАК
кiретiн арбаны, тугырыкты, кэрзецкенi немесе Yстелдi
пайдаланыцыз. Арбага салган кезде аспапты кулатып, закымдап
алмау Yшiн кауiпсiздiк шараларын сактацыз.
нускауларына сэйкес орнатыцыз.
жерлендiрiлген штепсельдi пайдаланыцыз. Полярлык штпесельдiц
екi iстiгi бар, олардыц бiрi екiншiсiнен жалпак. Жерлендiрiлген
штепсельдiц екi iстiгi жэне бiр жерлендiрiлген ушы бар. Жалпак
iстiк жэне жерлендiрiлген уш Сiздiц кауiпсiздiгiцiз Yшiн жасалган.
Егер топтамага кiретiн штепсель Сiздiц розеткацызга сэйкес
келмесе, розетканы айырбастау Yшiн электрикке хабарласыцыз.
розеткага жэне сымныц аспаппен жалганган жерiне катты назар
аударыцыз.
уакыт бойы пайдаланылмаган жагдайда оны желiден ешiрiцiз.
маманмен ЖYргiзiлуi кажет. Егер аспап закымданса (корек сымы
немесе штепсель закымданган), оган суйыктык тегiлсе, оныц
Yстiне ауыр зат туссе, аспап жацбыр немесе ылгалдылыктыц
ыкпалына ушыраса, аспаптыц жумысы бузылса немесе аспап
куласа, оган техникалык кызмет керсету бiлiктi маманмен
ЖYргiзiлуi кажет.
айтканда: радиаторлар, жылу санауыштары, плиталар жэне жылу
шыгаратын баска аспаптар (кYшейткiштердi косканда).
ешкандай тоскауылдардыц жок екендiгiн.
жарык TYсiп турса, ^Б пультi жумыс iстемеуi MYMкiн.
MYMкiн. Осы аспаптыц жанында орналаскан баска жабдыктыц ^Б
пульттерiн пайдаланбацыз.
айырбастацыз.
уксас болганмен, олар кернеуi бойынша ерекшеленуi MYMкiн.
белгiлермен сэйкес келуiн кадагалацыз.
болсацыз, батареяларды аспаптан шыгарыцыз.
елiцiзде немесе аймагыцызда колданылатын коршаган ортаны
сактау женiндегi Yкiметтiк каулыларды немесе нускауларды
басшылыкка алыцыз.
83
4097IMnew.indd 83 27.02.2007 13:35:50
Page 84

КАЗАК
DVD-ROM, DVD-Audio, SACD жэне CD-ROM ойнатылмайды.
DVD-Video дискiлерiн ойнату
DEO ’ MPEG-2 сандык видео дискiлeр 2 немесе одан кеп эпизодтарга бeлiнeдi. Одан кeйiн олар фрагменттерге бeлiнуi MYMкiн.
■ Бiр жакты немесе eKi жакты дискiлер.
■ Бiр кабатты немесе eкi кабатты дискiлeр.
■ Dolby Digital, DTS, MPEG, Linear PCM digital audio (сызыктык импульстi-кодтык модуляция (ИКМ), сандык аудио)
AUDIO CD дискiлердi ойнату
Г1 COMPACT • i
Щ Щ: ;
DIGITAL AUDIO немесе Kodak picture файлдарында жазылган CD-R жэне CD-RW дискiлeрдi ойната алады).
DVD-R/RW дискiлердi ойнату
RW
DVD+R/RW дискiлердi ойнату
□VD+ReWritsble
MPEG-4 форматындагы дискiлердi ойнату
MPEG-4I
1.!«Г1 ЛЛ:11Л • Осы курылгы MPEG-4 форматындагы дискiлeрдi ойната алады.
JPEG форматындагы дискiлeрдi ойнату
• Осы курылгы JPEG (фото) форматындагы дискiлeрдi ойната алады.
• Дискiлeр 12 см жэне 8 см.
■ Сызыктык ИКМ, сандык аудио.
■ CD audio, CD-R, CD-RW форматындагы дискiлeр тректерге белiнeдi. (Осы курылгы CD аудио немесе CD видео форматында
Осы курылгы DVD видео форматында жазылган DVD-R/DVD-RW дискiлeрдi ойната алады.
Осы курылгы DVD-R /DVD-RW дискiлeргe видео жэне аудио сигналдарды жаза алады.
■ Осы курылгы DVD видео форматында жазылган DVD+R/DVD+RW дискiлeрдi ойната алады.
' Осы курылгы DVD+R/DVD+RW дискiлeргe видео жэне аудио сигналдарды жаза алады.
DVD Video аймактарыныц коды
Барлык DVD Video дискiлeр корпуста керсeтiлгeн аймак кодына ие, ол плеер кай аймакта колданылатынын керсeтeдi. Сiздiц DVD-рeкордeрiцiз
аспаптыц арткы панeлiндe орналаскан аймак кодына ие. Аймак коды осы рекордерде керсeтiлгeн кодпен сэйкес кeлмeйтiн дискiлeр
ойнатылмайтын болады. ALL (мульти аймактык) бeлгiсi бар дискiлeр барлык DVD- плеерлармен ойнатылады.
Ескерту
• Егер Сiз дискiнi ДК пайдалана отырып жазсацыз, диск форматы сэйкес болганына карамастан, диск жазып алу кезiнде пайдаланылган
багдарламалык курал баптаулары себебiнен диск ойнатылмайтын жагдайлар болуы MYMкiн.
MPEG-4 форматындагы кейбiр фильмдер пайдаланылган декодтау эдiстерiнiц эр алуандыгына байланысты ойнатылмауы MYMкiн.
Баскару жэне индикация Алды^гы панель
1. Диск салынатын бeлiм. Дискiнi салу Yшiн жэне оны ойнату Yшiн пайдаланылады.
2. OPEN/CLOSE батырмасы. Диск белiмiн ашу немесе жабу Yшiн осы батырманы басыцыз.
3. PLAY/PAUSE батырмасы. Ойнатуды бастау немесе уакытша токтату Yшiн басыцыз.
4. STOP батырмасы. Ойнатуды токтату Yшiн басыцыз.
5. AV IN. Жазып алу кeзiндe сырткы аудио/видео кiрiс Yшiн пайдаланыцыз.
6. RECORD батырмасы. Дискiгe жазып алуды бастау Yшiн басыцыз.
7. FL дисплей. Рeкордeрдiц агымдагы жагдайын керсeтeдi.
8. STANDBY/ON батырмасы. Аспапты куту рeжимiнeн жумыс рeжимiнe ауыстырады.
9. AUDIO IN. Аудио шыгыска видеокамераларды жалгацыз.
84
4097IMnew.indd 84 27.02.2007 13:35:50
Page 85

КАЗАК
10. COMPOSITE VIDEO IN. Композиттi видео шыгыс^а видеокамераларды жалгацыз.
11. DV IN агытпасы. Агытпа тек сандык видеокамераны косу Yшiн гана пайдаланылады. Баска сандык курылгылармен катар колданылмайды.
12. USB IN. USB жадыны пайдалануга арналган сандык агытпа (USB Flash Drive).
ДИСПЛЕЙ
1. Жазып алу таймерiнiи индикаторы. Жазып алу таймерiн косканда жанады.
2. Ракурс (Карау бурышы). Агымдагы дискiде кептеген ракурстар бар екендiгiн бiлдiредi. (Бул функция эр TYрлi карау бурыштарымен
жазылган дискiлер Yшiн колданылады).
3. Dolby Digital ЖYЙесiнiи индикаторы. Dolby Digital 5.1 ЖYЙесiнде ойнатуды бiлдiредi
4. Эпизод индикаторы. DVD ойнату кезiнде эпизод немiрiн бейнелейдi.
5. Фрагмент индикаторы. DVD ойнату кезiнде фрагмент немiрiн бейнелейдi.
6. Кос тiлдi режим индикаторы. ^ос тiлдi хабар таратуды кабылдау кезiнде жанады.
7. Стерео индикаторы. Стереофондык таратуды кабылдау кезiнде жанады.
8. Айналу. Диск айналган кезде айналады.
9. HDD индикаторы (каткыл диск). ^аткыл дискiмен жумыс iстеудi керсетедi.
10. Кайталау индикаторы. Агымдагы ойнату режимi эпизодты, фрагменттi, тректi, A-B тандалган Yзiндiнi кайталау кезiнде жанады.
11. DVD индикаторы. DVD жетегiмен жумыс iстеудi керсетедi.
12. DTS Ииндикаторы. Сандык аудио шыгыс DTS форматында болганда жанады.
13. Агымдагы аппарат. Эпизодты, фрагменттi жэне трек немiрiн, уакытты жэне ТД арнасын бейнелейдi.
Арткы панель
1. Желiлiк сым. Yйдегi розеткага косылады.
2. Сандык аудио шыгыс. Коаксиалды шыгысты аудио KYшейткiштiц сандык аудио KipiciHe (коаксиалды тип) жалгадыз.
не болмаса оптикалык шыгысты аудио KYшeйткiштiц сандык аудио кipiciнe (оптикалык тип) жалгадыз.
3. KoMnoHeHTTi видео шыгыс. ТД компонeнттi видео кipicтepiнe жалгадыз.
4. Audio IN агытпасы. VCR видео шыгысына немесе кабeльдi теледидар арналарыныд дeкодepiнe (STB) жалгадыз.
5. Video IN. Видеоны VCR компонeнттi видео шыгысына немесе STB дeкодepiнe жалгадыз. не болмаса S-VIDEO VCR шыгысыныд S-VIDEO
немесе STB дeкодepiнe жалгадыз.
6. Video OUT. Видеоны ТД немесе монитордыд компонeттi видео кipiciнe жалгадыз.не болмаса S-VIDEO ТД немесе монитордыд S-VIDEO
кipiciнe жалгадыз.
S-VIDEO композиттi видеога караганда жаксы сапаны камтамасыз eтeдi.
7. Audio OUT. ТД аудио кipiciнe жалгадыз.
8. HDMI OUT (576P). HDMI (жогары д0лдiктeгi мультимедиялык интерфейс) DVD-рекордерден Сiздiд теледидарыдызга сандык видео мен
аудионы таратады. Жаксы бейнеге жэне дыбыска кол жeткiзу Yшiн DVD-peкоpдepдi бip HDMI кабeлi бар ТД жалгадыз.
9. ANT IN. Сырткы антеннага жалгадыз.
10. ANT OUT. Теледидардыд антенналык кipiciнe жалгадыз.
11. Euro AV OUT. Теледидар кipiciнe Euro AV жалгадыз.
12. Euro AV IN/OUT. VCR, DVD плеер жэне т.б. сиякты аудио/видео жабдыктыд Euro AV IN/OUT жалгадыз.
85
4097IMnew.indd 85 27.02.2007 13:35:51
Page 86

КАЗАК
КБ пультi
(16) (8,
(32V
DVD HDDiDUB FILE TV/DVD
AV IN Dy/IJSB VJ TV MODE
EDIT TI№iREC SOmTPIP ADD/CLEAR
19
(13)
38
(31)
11)
(15
ENTER ►
RETURN T / SETUP
TIMESHIFT Ai£ ДШГО SUBTITLE
(17
(41
1. A-B
Ойнату кезiнде A HyKTeciHeH В HyKTeciHe дейiнгi белгiлi 6ip фраг-
MeHTTi кайталау.
2. Add/Clear
Жазып алу таймeрiнiц Ti3iMiHeH орнатылган багдарламаны eшiру.
CD ойнатудыц багдарламаланган Ti3iMiHe трек HeMipiH косу неме-
се жою.
3. Angle
Эр TYрлi карау бурышымен керу.
4. Arrow (▲▼◄►)
Меню тармагын тандау Yшiн.
5. Аудио
DVD-дискiнi ойнату кeзiндe аудио немесе аудио канал тiлiн тандау
Yшiн.
Ci3 сондай-ак хабар таратудын аудио каналын езгерте аласыз.
• Егер NICAM кос тiлдi тарату болса, Ci3 тiл тандай аласыз.
NICAM LANG1 ^ NICAM LANG2 ^ NICAM LANG1/2
• Егер NICAM стерео тарату болса, Ci3 NICAM стерео жэне моно
дыбыс арасында ауыстыра аласыз.
NICAM STEREO ^ MONO
6. AV IN
Жазып алу Yшiн сырткы аудио видео кiрiстi тандау Yшiн.
7. Channel down/up (+,-)
Орнатылган ТД арналарын тандау Yшiн.
8. Display
Эпизод, фрагмент, трек немесе субтитрлер жэне аудио тiлi туралы акпаратты карау Yшiн.
9. DVD
DVD рeжимiнe ауыстыру Yшiн.
10. DV/USB
Сандык видеокамерадан немесе жадыдан (USB Flash Drive)
сандык A/V кiрiстi тандау Yшiн.
11. Edit
Диск эпизодын немесе фрагмeнтiн редакциялау Yшiн.
12. Enter
Меню тармагын тандау (eнгiзу) Yшiн.
13. File
Файлдар тiзiмiн карау Yшiн (MPEG-4, MP3, JPEG файлдар).
14. HDD/DUB
Каткыл дискiдeн (HDD) ойнату рeжимiнe ауыстыру Yшiн.
Эпизодтарды каткыл дискiдeн оптикалык дискiгe кeшiру Yшiн.
15. Menu
Салынган DVD-дискiнiн меню мзмунын бейнелеу Yшiн.
16. Mute
Аудио шыгыстарды косу/eшiру Yшiн.
17. Next
Кeлeсi фрагментке немесе трекке ету.
18. Numeric (Сандар) (0-9)
Трeктi, фрагмeнттi, эпизодты тандау Yшiн сандык батырмаларды
пайдаланыныз.
19. Open/Close
Диск бeлiмiн ашу немесе жабу Yшiн.
Егер батырма куту рeжимiндe басулы турса, корек автоматты
косылады.
20. Pause
Егер осы батырманы ойнату рeжимiндe басса, бейне козгалыссыз
калады.
21. Play
Салынган дискiнi немесе каткыл дискiнi ойнату Yшiн.
22. Prev
Ллдыдгы фрагментке немесе трекке ету Yшiн.
23. Program
Бeлгiлi бiр кeзeктiлiктe ойнату Yшiн.
Осы батырма CD ойнату кeзiндe гана жумыс iстeйдi.
24. REC (Record)
Жазып алуды бастау Yшiн.
25. Repeat
^айталау рeжимiн тандау Yшiн.
26. Return
Алдыдгы менюге ету Yшiн.
PBC (ойнатуды бакылау) функциясымен VCD 2.0 жэне SVCD
пайдаланган кезде, осы батырма кайтару батырмасы рeтiндe
жумыс iстeйдi.
27. SCAN FWD
Ойнату кeзiндe алдыга сканерлеу Yшiн.
28. SCAN REV
Ойнату кeзiндe артка сканерлеу Yшiн.
29. SETUP
Бастапкы баптауларды езгерту Yшiн.
30. SLOW
Диск мазмунын баяу ойнату Yшiн.
31. SORT/PIP
^аткыл дискiдe атауы жэне KYнi бойынша эпизодтарды сорттау
Yшiн.
DVD немесе каткыл дискiдeн ойнату ЖYрiп жаткан кезде сырткы
видеоны карау Yшiн.
32. STANDBY/ON
^урылгыны жумыс рeжимiнe немесе куту рeжимiнe ауыстырады.
33. STOP
Дискiдeн ойнатуды немесе каткыл дискiдeн ойнатуды токтату
Yшiн.
34. SUBTITLE
Субтитрлер тiлiн тандау Yшiн.
35. TIMER REC
Жазып алу таймeрiн орнату Yшiн.
36. TIMESHIFT
^аткыл дискiнiн кэш-жадысында ТД багдарламаларын уакытша
сактау Yшiн.
37. TITLE
DVD эпизодтарынын мeнюiн бейнелеу Yшiн.
38. TV
ТД рeжимiнe ауыстыру Yшiн.
39. TV/DVD
Рекордер тюнeрiмeн немесе ТД тюнeрiмeн тандалган арналарды
карау.
Рекордер жэне ТД езара еуропалык SCART кабeлiмeн
86
4097IMnew.indd 86 27.02.2007 13:35:51
Page 87

КАЗАК
жалганганда, сонымен катар шыгыс курылгыларда RGB режимi
тандалганда жумыс iстейдi.
40. TV MODE
ТД пайдаланушынын колдауга ие типiне сэйкес ТД типiн белгiлейдi. Осы батырманы кайта баскан сайын NTSL/PAL жэне прогрессивтi жайма/HDMI арасында ТД типi eзгеретiн болады. Бул батыр-
ма диск бeлiмi ашык болган жагдайда гана жумыс iстейдi.
41. ZOOM
DVD немесе HDD бейнесiнiн eлшемiн екi есе улгайтыцыз.
Видеошыгыстарды косу Композиттi видео шыгыс (CVBS)
Теледидарлардын кeпшiлiгiнде композиттi видеошыгыс бар.
Теледидардагы композиттi агытпа эдетте сары TYCтi жэне видео,
CVBS немесе композиттi шыгыс ретiнде танбалануы MYMкiн.
Евро A/V шыгыс
Евро A/V шыгыс Евро A/V агытпамен жасакталган теледидармен
косылуы MYMкiн. Евро A/V бойынша аудио стерео дыбыспен берiледi.
S-Video шыгысы
S-Video шыгысы S-Video кiрiсiне ие теледидармен жалгануы MYMкiн.
Теледидардагы S-Video агытпасы S-Video, Y/C, S-VHS сиякты
танбалануы MYMкiн.
S-Video композиттi видеога караганда жаксы бейненi камтамасыз
етедi.
KoMnoHeHTTi видео шыгыс
Компоненттi видео шыгыс компоненттi видео кiрiсi бар теледидармен
косылуы MYMкiн.
Аудио/видео кiрiстeрдi косу
Ci3 VCR, спутниктiк ресивер немесе декодтаушы курылгы сиякты
аудио видео жуйелерден багдарламаларды жаза аласыз.
Аудиокiрiс
Аудиокiрiстi A/V ЖYЙесiнiн аудиошыгысымен косыныз.
Видeокiрiс
Композиттi видеокiрiстi немесе S-Video кiрiсiн A/V ЖYЙесiнiн
композиттi видеошыгысымен немесе S-Video шыгысымен жалганыз.
Euro AV IN/OUT A/V ЖYЙесiнiн Euro AV OUT жалганыз.
Теледидардагы компоненттi видео агытпалар YUV, Y/Pb/Pr, Y/Cb/Cr
сиякты танбалануы MYMкiн жэне жасыл, кек жэне кызыл TYCтi болуы
MYMкiн. Компоненттi видео сапалы бейненi камтамасыз етедi. Видео
шыгысты видео орнатуларынын менюiнде Y/Cr/Cb ON орнатыныз.
DVD-Recorder
AUDIO
AMPLIFIER
DVD-Recorder
DVD-Recorder
DVD Recorder - DVD рекордер
Optical Cable - оптикалык кабель
Coaxial Cable - коаксиалды кабель
Audio Amplifier - аудио KYшейткiш
A/V Cable - аудио/видео кабель
White - ак
Red -кызыл
Scart Cable - Scart кабелi
Ескерту:
• RF OUT , TO TV сиякты танбаланган, RF сигналдын толассыз eTyi.
• S-Video кабелi топтамага кiрмейдi.
Аудиошыгыстарды косу
VCR or Satellite receiver or Decoder Box - VCR, спутниктiк ресивер
немесе декодтаушы курылгы.
DV IN жэне USB IN косу
Ci3 сандык аудиошыгысты сандык KYшейткiшке коскан жагдайда Dolby
Surround дыбысын рахаттанып тындай аласыз.
Аудиошыгыс
0зiнiздiн теледидарынызбен жалгау Yшiн аудиошыгыстарды
пайдаланыныз.
Сандык аудиошыгыс
Dolby Digital немесе DTS декодермен косу Yшiн сандык
аудиошыгыстарды пайдаланыныз. Сандык аудиошыгыс менюiнде
Сiздiн декодерiнiзге байланысты PCM немесе Bitstream тандап
алыныз.
Ескерту
Оптикалык жене коаксиалды кабельдер жеткiзy топтамасына
кiрмейдi.
DV IN агытпасына коскан кезде сандык видео жазбаларды ойнатуга
болады.
DV Kipic
DV кабельдi пайдалана отырып (жеткiзy топтамасына кiрмейдi), DV IN
Сiздiн сандык видеокамераныздагы DV IN/OUT агытпасына косыныз.
87
VCRorSateiiite receiver or Decoder box
АиШ<Г01Я &VIDEOOm’ VIDE^HJT
»
iz»
USB Memo7 Digital Camcorder
4097IMnew.indd 87 27.02.2007 13:35:52
Page 88

КАЗАК
USB Kipic
USB курылгысын рекордердегi USB досуга арналган агытпага
салыныз.
HDMI шыгысты косу
DVD±RW немесе DVD±R дискiлерiн ойнату
DVD±RW немесе DVD±R дискiнi салыныз. Меню экранда автоматты
турде бвйнвленвд1.
HDMI (жогары дэлдiктегi мультимедиялык интерфейс) Сiздiн
рекордерiнiзден теледидарынызга сандык видео мен аудионы
тарады. Рекордердi 6ip HDMI кабелi бар ТД косыныз.
DVD-Recorder
й
® 1
if
^^(О) 1PI шш
9 ^
АнемесеТ батырмаларыныд кeмегiмен кажеттi багдарламаны
таддап алыдыз.
Ойнатуды бастау Yшiн ENTER немесе PLAY батырмасын басыдыз.
Экрандагы менюге оралу Yшiн TITLE немесе MENU батырмасын
Косу жене вшipу
Теледидарды косыдыз жэне видеокiрiстi осы рекордерге орнатыдыз.
Косу Yшiн КБ пультiндегi немесе алдыдгы панельдегi STANDBY/ON
батырмасын басыдыз. Ci3 экрандагы акпаратты кeресiз. Егер Ci3
аспапты eшiргiдiз келсе, КБ пультiндегi немесе алдыдгы панельдегi
STANDBY/ON батырмасын тагы бiр рет басыдыз.
Ойнату жене жазып алу Yшiн HDD (каткыл диск) немесе DVD таддау
Егер Ci3 HDD жумыс iстеу режимiне ауыскыдыз келсе, онда КБ
пультiндегi HDD/DUB батырмасын басыдыз.
Егер Сiз DVD жумыс iстеу режимiне ауыскыдыз келсе, онда КБ
пультiндегi DVD батырмасын басыдыз.
басыдыз.
Аудио CD (Компакт диск) ойнату
Аудио CD дискiнi салыдыз.
Бiрiншi композиция автоматты тYPде ойнатылады.
Display батырмасын басыдыз.
Экрандагы акпарат
Сiз келесi тYPде экранда ойнату мэртебесiн бейнелей аласыз: эпизод,
фрагмент нeмiрi, ойнату уакыты.
Ойнату кезiнде Display батырмасын басыдыз. Экранда эпизод,
фрагмент нeмiрi, ойнату уакыты, аудио тiлi жэне субтитрлер тiлi
пайда болады.
Display батырмасын тагы бiр рет басыдыз. Сiз ойнату мэртебесiн
толык каре аласыз. Будан баска, Сiз ▲▼◄► батырмаларыныд жэне
Enter батырмасыныд кeмегiмен субтитрлер, фрагмент тiлiн жэне т.б.
езгерте аласыз.
Экранта диск туралы акпарат шытады.
АнемесеТ батырмаларын пайдаланып, тректi таддап алыдыз, содан
кейiн ENTER батырмасын басыдыз.
0-9 батырмаларын пайдалана отырып, калатан трек нeмiрiн таддап
алыдыз жэне ENTER батырмасын басыдыз. Таддалтан композиция
ойнатыла бастайды. Егер сiз ойнату кезiнде ►►! немесе !◄◄
батырмаларын бассадыз, Сiз келесi немесе алдыдты композицияны
тыддай аласыз.
JPEG компакт дискiнi ойнату
JPEG CD салыдыз. Каталог жене т1збес1 экранта шытады.
Экранда акпаратты бейнелеу режимiн eшiру Yшiн Display батырмасын
басыдыз.
DVD диcкiнi ойнату
Диск бeлiмiн ашу Yшiн OPEN/CLOSE батырмасын басыдыз. Дискiнi
заттадбасын жогары каратып диск бeлiмiне салыдыз.
Диск бeлiмiн жабу Yшiн OPEN/CLOSE батырмасын басыдыз. Диск
автоматты тYPде ойнатылатын болады.
ТД экранында диск менюi бейнеленедi.
▲ ▼◄► батырмаларыныд немесе 0-9 батырмаларыныд кeмегiмен
кажеттi тармакты таддап алыдыз, содан кейiн ойнатуды бастау Yшiн
ENTER немесе PLAY батырмасын басыдыз.
АнемесеТ батырмаларынык кeмегiмен калатан трегiдiздi таддап
алыдыз. Экранныд од жак терезесiнде таддалтан файлдыд кiшiгiрiм
суретi пайда болады.
Ойнатуды бастау Yшiн ENTER батырмасын басыдыз. JPEG файлдар
автоматты тYPде кезектiлiкпен ойнатылатын болады. Егер Ci3 ойнату
кезiнде ►►! немесе !◄◄ батырмаларын бассадыз, келесi немесе
алдыдты суреттi коре аласыз.
Суреттi буру жене сурет масштабын озгерту.
Сiз ◄немесе ► батырмаларыныд комегiмен суреттi солта не одта
бура аласыз. Сонымен катар ►►немесе^^ батырмаларыныд
комегiмен суреттi торт есе ултайта немесе кiшiрейте аласыз.
Файлдар тiзiмiн кору Yшiн STOP батырмасын басыдыз. Файлдар тiзiмi
экранда бейнеленедi.
88
AUDIO ■ 00:00:00 • 00:00:00 ■
Файлы и каталош j Любимые/програина
2ВА KEIKO MATSUI •
27;з LAURA FIGY • С ' I
28 J9 MAXWELL • WHE - , ■
29/9 new STORIES (HI I ■
30J9 OST llllllllli inill.M ■■
31f? OLD IMAGE.JPG ■'
1
........
DUD ReCDRDSn
4097IMnew.indd 88 27.02.2007 13:35:53
Page 89

КАЗАК
MPEG-4 видео компакт дискiнi ойнату
MPEG-4 диск1н1 салыиыз.
Файлы и каталоги Лю6имые/програмт|
I 9f7 PRIMUS1Û24.JPG >-• Г '
T2ÍÍTKT 5 01 AVI 1^1
13^ TEST 6 01.AVI t
14-iTEST8 01.AVI ■!
15fJ THEDOORS11024.
il
Для просмотра списка воспользуй
тесь кнопками вверх/вниэ, нажмите
ВВОД для воспроизведения
DUD RECORDen
АнемесеТ батырмаларыныд KSMeriMeH диск каталогын таддатаннан
кейiн ENTER батырмасын басыдыз.
АнемесеТ батырмаларыныд кeмегiмен калатан видеофайлды
таддатаннан кейiн ENTER батырмасын басыдыз. Таддалтан
видеофайл ойнатыла бастайды.
Ескерту: MPEG-4 форматындаты кейбiр фильмдер колданылтан
декодтау эдiстерiнiд эр алуандытына байланысты ойнатылмауы
MYMкiн.
HDD бар батдарламаларды ойнату
HDD режим1н таддау уш1н HDD/DUB батырмасын басыдыз.
Канал Дата Время Эпизод
ODIScartAV 01I01J01 12:12 МОЙЭПИЗОдО
002 АКО 01I01I01 ' 13:23 ЭПИЭОДЮ
003 АНО 01101101 14:23 _ЭПИЗОД11 .
Ш!?В1Ми11Ц|1Ц'1иИ!!1Д1А[.!:1=!|1!кМ.||Ь
I 00S АНО 01101101 19:23 ЭПИЭОД12
II
000
ovo
01101101
I OOTSoirt AV 01101101 16:39 ЭПИЭОД18
Щ 006 ovo 01101101 16:49_ МОЙ ЭПИЗОД 0
17:06 ЭПИЭОДИ
Каткыл дискiден MPEG-4 видео файлдарын ойнату
FILE батырмасын басыдыз.
▲ немесеТ батырмаларыныд KSMerÍMeH HDD каталогын тандатаннан
кейiн ENTER батырмасын басыдыз. ^ат^ыл дискiнiн файлдар TÍ3ÍMÍ
экранта шытадьк
_
AUDIO ■ 00:00:00 • 00:00:00 _
I Файлы и каталоги :Любин>1^п^грамиа
1ч* TEST 3 ai.AVI ^
test 4 01.AVI l|l
3iMiTESTSQ1.AVI IP,
к Для просмотра списка воспопьэуй-
^ I тесь кнопками вверх/вниз, нажмите
[ ^ ВВОД для воспроизведения
DUD RECORDER
■ьк ■
__
I
▲ немесеТ батырмаларыныд кeмегiмен кажеттi видеофайлды таддап
алтаннан кейiн ENTER батырмасын басыдыз.
Файлдар тiзiмiн керу Yшiн STOP батырмасын басыдыз. Файлдар тiзiмi
экранда бейнеленедi.
Ескерту: MPEG-4 форматындаты кейбiр фильмдер колданылтан
декодтау эдiстерiнiд эр алуандытына байланысты ойнатылмауы
MYMкiн.
Жылдам ойнату
Апдыта/артка жылдам айналдыру
Диск немесе каткыл диск мазмунын жылдам алдыта не артка ойнату
Yшiн осы функцияны пайдаланыдыз. 1здеу кезiнде дыбыс болмайды.
1. Ойнату кезiнде ◄◄немесе ►► батырмасын басыдыз.
Батырманы эр баскан сайын, ойнату жылдамдыты келесi тYPде
езгередi:
DUD RECORDER
HDD батдарламаларыныд тiзiмi экранда бейнеленедi.
▲ немесеТ батырмаларыныд кeмегiмен калатан батдарламадызды
таддап алыдыз.
PLAY батырмасын басыдыз. Таддалтан батдарлама ойнатыла
бастайды.
Каткыл дискiден JPEG файлдарды ойнату
FILE батырмасын басыдыз.
▲ немесеТ батырмаларыныд кeмегiмен HDD каталогын таддатаннан
кейiн ENTER батырмасын басыдыз. ^аткыл дискiнiд файлдар тiзiмi
экранта шытадь!^
_
2. ^алыпты ойнату режимiне оралу Yшiн PLAY батырмасын басыдыз.
Алдыта/артка вту (тек DVD жэне аудио CD)
AUDIO ■ 00:00:00 • 00:00:00
Файлы и каталоги Любииые/програмиа
■■I - |||||j§|g
Ifj EMINEM11024.JPG
2f} KILLBILLia00.JPG II |
3f? .MANgYMOOREOaO If I
|Для просмотра списка воспользуй-
^ тесь кнопками вверх/вниэ, нажмите
ВВОД ДЛЯ воспроизведения
Размер файла: "
209KQ
Изменение даты:
01 103 i2001
Келесi немесе алдыдты DVD фрагментiне, CD трегiне эту Yшiн осы
функцияны пайдаланыдыз.
Ойнату кезiнде ◄◄ батырмасын басыдыз. DVD рекордер алдыдты
фрагменттi немесе тректi ойната бастайды.
Ойнату кезiнде ►►батырмасын басыдыз. DVD рекордер келесi
фрагменттi немесе тректi ойната бастайды.
Алдыта баяу айналдыру
Диск немесе каткыл диск мазмунын алдыта баяу айналдыру Yшiн осы
DUD RECORDER
функцияны пайдаланыдыз.
Ойнату кезiнде SLOW батырмасын басыдыз. Диск мазмуны баяу
ойнатылатын болады.
АнемесеТ батырмаларыныд KSMeriMeH кажеттi файлды таддап
алыдыз. Экранныд од жак терезесiнде таддалтан файлдыд кiшiгiрiм
SLOW батырмасын басыдыз. Батырманы эр баскан сайын ойнату
жылдамдыты келесi тYPде эзгередi:
cypeTi пайда болады.
Ойнатуды бастау Yшiн ENTER батырмасын басыдыз. JPEG файлдар
автоматты тYPдe кeзeктiлiкпeн ойнатылатын болады. Егер Ci3 ойнату
кeзiндe ►►! немесе !◄◄ батырмаларын бассадыз, кeлeci жэне
алдыдты cypeттi кере аласыз.
^алыпты ойнату режимiне оралу Yшiн PLAY батырмасын басыдыз.
Сypeттi буру жэне сурет масштабын езгерту.
Ci3 ◄немесе ► батырмаларыныд кемeгiмeн cypeттi солта не одта
бура аласыз.
Файлдар тiзiмiн керу Yшiн STOP батырмасын басыдыз. Файлдар тiзiмi
экранда бeйнeлeнeдi.
Кадрлап ойнату (тек DVD жэне VCD)
1. Ойнату кезiнде PAUSE батырмасын басыдыз. DVD рекордер
уакытша ойнатуды токтатады.
2. PAUSE батырмасын бiрнеше рет басыдыз. Эр баскан сайын бiр
суреттiд орнына екiншiсi келедi.
89
DVD/VCD/HDD
DVD/VCD
◄ х2 ► х2
Ф Ф
◄ х4 ► х4
Ф Ф
◄ х16 ► х1В
Ф Ф
◄ х32 ► х32
► 1/2 4 ►VA 4 ►l/B
4097IMnew.indd 89 27.02.2007 13:35:53
Page 90

КАЗАК
3. ^алыпты ойнату режимiне оралу Yшiн PLAY батырмасын басы^ыз.
Ескерту:
• Кадрлап карау немеес баяу карау кезiнде дыбыс шы^пайды.
• Аудио CD кадрлап карау немесе баяу карау функциясы жок.
Багдарламалап ойнату (тек аудио CD)
Осы функция дискiдегi тректердi ойнату тэртiбiн багдарламалауга
мYмкiндiк бередi.
1. Аудио CD дискiнi салы^ыз. Бiрiншi композиция автоматты тYPде
ойнатыла бастайды.
2. PROGRAM батырмасын басы^ыз. Экранда тректердiн тiзiмi
шыгады.
Тректердiн тiзiмiнде АнемесеТ батырмаларыныд кeмегiмен
3.
кажеттi тректi таддап алыдыз, одан кейiн ADD/CL (косу/жою)
батырмасын басыдыз. Таддалган композиция од жактагы
багдарламалар тiзiмiне косылады.
Баск;а композицияны Tanqafbinbi3 келсе, 3-к;адамды к;айталаць13.
4.
Аудио тiлiн таддау (тек DVD)
Сiз аудио тiлiн бастапкы баптаулар тiзiмiнен таддалган тiлге езгерте
аласыз. Осы операция бiрнеше аудио тiлдерi жазылган дискiлерде
мYмкiн болады. Егер дискiде бiрнеше аудио тiлi болса, Сiз аудио тiлiн
таддай аласыз.
1. Ойнату кезiнде AUDIO батырмасын басыдыз. Аудио акпарат
2. AUDIO батырмасын ар баскан сайын аудио тiлi езгередi.
Ескерту: Кейбiр дисктерде субтитрлер немесе аудио тiлiн тек диск
менюiнен гана езгертуге болады.
Эпизодты, фрагменттi кайталау (тек DVD/AUDIO CD)
DVD Yшiн фрагменттi/эпизодты немесе AUDIO CD Yшiн тректi/дискiнi
кайталай аласыз.
1. Ойнату кезiнде REPEAT батырмасын басыдыз. ^айталау туралы
экранньщ жогаргы жагында шыгады.
аппарат экранньщ жогаргы жагында шыгатын болады.
• Повторное воспроизведениэ фрагмента
► батырмасын басып, курсорды багдарламалар тiзiмiне
5.
ауыстырыдыз, содан кейiн ENTER батырмасын басыдыз.
Сакталган багдарламалар тiзiмiн ойнату басталады.
Композицияны багдарламалар тiзiмiнен алып тастау Yшiн
6.
◄ ►АТбатырмаларыныд кeмегiмен алып тастагыдыз келетiн
композицияны таддап алыдыз, содан кейiн ADD/CL (косу/жою)
батырмасын басыдыз. Таддалган композиция багдарламалар
тiзiмiнен алынып тасталады.
7.
Ойнату тiзiмiнен шыгу Yшiн Return батырмасын басыдыз.
Субтитрлердi тачдау (тек DVD)
Сiз субтитрлер тiлiн бастапкы баптаулар тiзiмiнен таддалган тiлге
езгерте аласыз. Осы операция бiрнеше субтитрлер тiлi жазылган
дискiлерде мYмкiн болады. Егер салынган диск бiрнеше субтитрлер
тiлiн колдаса, Сiз таддау жасай аласыз.
1. Ойнату кезiнде SUBTITLE (субтитр) батырмасын басыдыз.
Субтитрлер экранньщ теменг! бел1г1нде пайда боладь!.
2. SUBTITLE (субтитр) батырмасын ар баскан сайын субтитрлер тiлi
езгередi.
3. Субтитрлердi ешiру Yшiн SUBTITLE (субтитр) батырмасын басып,
"OFF” таддап алыдыз.
90
‘ л
REPEAT батырмасын ар баскан сайын кайталау режимi келесi
2.
тYPде езгередi:
Нормальное
воспроизведение
Ескерту:
Кейбiр DVD дискiлердi пайдаланган кезде кайта ойнату мYмкiн
болмайды.
A-дан B дейiн фрагменттi кайталау (тек DVD/AUDIO CD)
Таддалган фрагменттi кайта ойнату Yшiн осы функцияны
пайдаланыдыз. Бул шет тiлдерiн Yйрену кезiнде ете колайлы, себебi
фрагмент кайталау токтатылганга дейiн кайталана беретiн болады.
1. ^айталау басталатын жерде A-B/LANG батырмасын басыдыз.
Таддалган фрагменттiд бастапкы нYктесi орнатылды.
2. ^айталау аякталатын жерде A-B/LANG батырмасын тагы бiр рет
басыдыз. Фрагменттiд содгы нYктесi орнатылды. Ойнату A-дан B
дейiн кайталанатын болады.
3. A-B кайталау режимiнен шыгу Yшiн A-B/LANG батырмасын тагы
бiр рет басыдыз. ^алыпты ойнату калпына келедi.
Ескерту:
Бiз Сiзге бiр калыпты ойнатуга кол жеткiзу Yшiн узактыгы кем дегенде
5 секунд болатын фрагменттi орнатуды усынамыз.
Экран масштабын взгерту (тек DVD/HDD)
Экран масштабын езгерту функциясы DVD немесе HDD бейнесiн 2
4097IMnew.indd 90 27.02.2007 13:35:53
Page 91

КАЗАК
есе улгайтуга мYмкiндiк бередi.
1. Ойнату кезiнде ZOOM (масштабты езгерту) батырмасын басыныз.
Масштаб езгес
it doesn't hurt
to find closure about the past.
2. ZOOM батырмасын эр бас^ан сайын масштаб келесi шамада
eзгередi:
Масштабирование 150%
Масштабирование 200%
Отмена масштабирования
3. Ci3 ◄►▲▼ батырмаларынын KSMeriMeH бейненi жылжыта
аласыз.
4. Масштабты езгерту режимiнен шыту Yшiн калыпты ойнатута
кайтып оралтанта дейiн ZOOM батырмасын бiрнеше рет басыныз.
Камераныц карау бурышын езгерту (тек DVD)
Егер DVD бiрнеше карау бурышы болса, Ci3 бурышты (ракурсты)
езгерту функциясын тандай аласыз.
1. Ойнату кезiнде ANGLE (бурыш) батырмасын басыныз. Ыктимал
карау бурыштары экранный жотарты жатында бейнеленедi.
2. ANGLE (бурыш) батырмасын эр баскан сайын бурыш езгередi.
Ескерту:
• Сiз бiрнеше карау бурыштары бар DVD Yшiн тана бурышты езгерте
аласыз.
• Эр тYрлi бурыштан жазып алынбатан DVD дискiлерде карау
бурышын езгерту функциясы жумыс iстемейдi.
Тура iздеу (тек DVD)
Сiз ойнату Yшiн белгiлi бiр фрагменттi немесе эпизодты тандай
аласыз.
1. Ойнату кезiнде DISPLAY батырмасын екi рет басыныз. Ойнату
туралы аппарат экранта шытады.
► в™
[ Режим ПоБгорное вослр. фрагн.
Спецэффекты у
I Эпизод 01/07
Фрагмент 07/J8
AUDIO 01I03-ENG
( Субтитры OFF
Угол 01/11'
____________
2. Эпизодты iздеу
1) АТбатырмаларынын кемегiмен TITLE танданыз жэне ENTER
батырмасын басыныз.
2) 0-9 батырмаларын колдана отырып, эпизод немiрiн енгiзiнiз жэне
ENTER батырмасын басыныз. Ойнату керсетiлген эпизодтан
басталатын болады.
Фрагменттi iздеу
1) батырмаларынын кемегiмен CHAPTER танданыз жэне
ENTER батырмасын басыныз.
2) 0-9 батырмаларын колдана отырып, фрагмент немiрiн енгiзiнiз
жэне ENTER батырмасын басыныз. Ойнату керсетiлген
фрагменттен басталатын болады.
Жазып алу
Heri3ri жазып алу
Теледидар батдарламаларын жазып алу Yшiн Ci3 арнаны тандауыныз
кажет
1. Жазу жYргiзгiнiз келетiн HDD (каткыл диск) немесе жазып алатын
DVD (DVD±R/DVD±RW) тандау Yшiн HdD/DUB немесе DVD
батырмасын басыныз.
Егер сiз каткыл дискiге жазтыныз келсе, HDD/DUB батырмасын
басыныз. HDD менюi экранта шытады.
Егер Сiз DVD жазтыныз келсе, жазута жеткiлiктi орны бар DVD±R
2.
немесе DVD±RW дискiсiн салыныз.
Егер Сiз жана таза диск салсаныз, дискiнi форматтау талап
етiледi. «OK» тандатаннан кейiн ENTER батырмасын басыныз.
Егер DVD менюi экранда автоматты тYPде бейнелсе, токтату Yшiн
STOp батырмасын екi рет басыныз.
Сiз жазып алтыныз келетiн A/V кезiн тандау Yшiн AV IN
3.
батырмасын басыныз. Батырманы эр баскан сайын A/V кезi
езгередi:
TV
Передний AV
Задний AV
Задний SV
□V
Scart AV
Егер теледидар батдарламасын жазып алтыныз келсе, ТД режимiн
тандап алыныз. Channel- немесе Channel + батырмасын басып,
жазып алтыныз келетiн станцияны тандап алыныз.
4. Жазып алуды бастау Yшiн REC батырмасын басыныз. Егер жазып
алуды уакытша токтаткыныз келсе, PAUSE батырмасын басыныз.
Жазып алуды жалтастыру Yшiн REC батырмасын басыныз.
5. Жазып алуды токтату Yшiн STOP батырмасын басыныз.
Ескерту:
• DvD±R/DVD±RW дискiлер 6 сататка дейiн немесе 49 эпизод жаза
алады.
• Егер жазып алтыныз келетiн кайнар кезi кешiруден корталтан
болса, Сiз одан жаза алмайсыз.
Бiр басып таймерден жазып алу (OTR)
1. Негiзгi жазып алу кезiнде REC батырмасын басыныз.
REC батырмасын эр баскан сайын жазып алу уакыты 30 минутка
ултаяды. Егер дискiде (немесе каткыл дискiде) жеткiлiктi орын
болса жэне жазып алу сапасы SLP болса, жазып алу 3 сататка
ултаюы MYMкiн. (немесе буфер узындыты TIMESHIFT 360
минутка орнатылтан).
Жазып алтаннан кейiн белгiлi бiр уакыттан кейiн DVD-плеер
автоматты токтайды.
2. Егер Сiз OTR режимiнен шыккыныз келсе, STOP батырмасын
басыныз.
Жазып алу таймерi
Жазып алу таймерi Yшiн уакытты, кYндi жэне станцияны дурыс орнату
кажет.
Егер Сiз DVD жазып алтыныз келсе, жазып алу Yшiн жеткiлiктi орны
бар DVD±R немесе DVD±RW салыныз.
1. TIMER REC батырмасын басыныз.
Источник Качество Дата Начало Конец Зались vPS
11 г
МВН Нажмите ВВОД для просмотра графика записи или создания
OUD RecORDGR
91
4097IMnew.indd 91 27.02.2007 13:35:54
Page 92

КАЗАК
2.
▲ немесе ▼ батырмаларынын KSMeriMeH пайдаланылмайтын
багдарламаны тандап алыныз, содан кейiн ENTER батырмасын
басьщыз.
^ >^ж)вка Расписания записи
Один раз
03)01)06
" Выбрать источник видеосигнала
,* для записи по таймеру
WWU
3. ENTER батырмасын басы^ыз. ^осал^ы меню пайда болады. ▲
немесе ▼ батырмаларынын кeмегiмен жазып алу кeзiн танданыз,
содан кейiн растау Yшiн ENTER батырмасын басы^ыз.
4. ▼ батырмасынын кeмегiмен "Record To” танданыз, содан кейiн
тiзiмдi ша^ыру Yшiн ENTER батырмасын басы^ыз. ▲ немесе ▼
батырмаларынын кeмегiмен HDD жазып алу Yшiн HDD немесе
DVD жазып алу Yшiн DVD танда^ыз, содан кейiн растау Yшiн
ENTER батырмасын басыныз.
5. ▼ батырмасынын кeмегiмен "Quality” танданыз, содан кейiн
тiзiмдi ша^ыру Yшiн ENTER батырмасын басыныз. ▲ немесе
▼ батырмаларынын кeмегiмен Record Quality (жазба сапасы)
танданыз, содан кейiн растау Yшiн ENTER батырмасын басыныз.
6. ▼ батырмасынын кeмегiмен "Mode” (режим) танданыз, содан
кейiн тiзiмдi ша^ыру Yшiн ENTER батырмасын басыныз. ▲ немесе
▼ батырмаларынын кeмегiмен жазып алу жиiлiгiн танданыз,
мысалы: бiр рет, кYн сайын, эр апта сайын, содан кейiн растау
Yшiн ENTER батырмасын басыныз.
7. ▼ батырмасынын кeмегiмен "Date” (кYн) танданыз, содан
кейiн тiзiмдi ша^ыру Yшiн ENTER батырмасын басыныз. 0
9 батырмаларынын кeмегiмен кYндi енгiзiнiз, содан кейiн
растау Yшiн ENTER батырмасын басыныз. Егер 6-тарма^та
«эр апта сайын» деген тарма^ты тандасаныз, ▲ немесе ▼
батырмаларынын кeмегiмен апта кYнiн тандаганнан кейiн ENTER
батырмасын басыныз.
8. ▼ батырмасынын кeмегiмен "Start” (бастау) танданыз, содан кейiн
ENTER батырмасын басыныз. 0-9 батырмаларынын кeмегiмен
жазып алуды бастау уа^ытын енгiзiнiз, содан кейiн растау Yшiн
ENTER батырмасын басыныз.
9. ▼ батырмасынын кeмегiмен "End” (ая^тау) танданыз, содан кейiн
ENTER батырмасын басыныз. 0-9 батырмаларынын кeмегiмен
жазып алуды ая^тау уа^ытын енгiзiнiз, содан кейiн растау Yшiн
ENTER батырмасын басыныз.
10. ▼ батырмасынын кeмегiмен "Title” (эпизод) танданыз, содан
кейiн ENTER батырмасын басыныз. ◄►▲▼ батырмаларынын
кeмегiмен эпизод атауын, содан кейiн растау Yшiн ENTER
батырмасын басыныз.
11. ▲▼ батырмаларынын кeмегiмен VPS/PDC"ON” немесе "OFF”
ауыстырыныз, содан кейiн ENTER батырмасын басыныз. (Егер
жазып алу кeзi ТД арнасында белгiленбесе, функция жумыс
iстемейдi).
VPS/PDC жYЙесi жазып алу уа^ытын автоматты реттейдi,
осылайша багдарлама график бойынша орындалмаса да, Сiз
оны жогалтып алмайсыз. VPS/PDC калыпты жумыс iстеу Yшiн
Сiз жазып алгыныз келетiн багдарламанын уа^ытын жэне кYнiн
дурыс енгiзуiнiз кажет. VPS/PDC барлык арнамен жумыс iстей
бермейтiнiн ескерiнiз.
12. Егер баптаулар дурыс болса, ▼ батырмасынын кeмегiмен "OK”
тандаганнан кейiн ENTER батырмасын басыныз.
13. STANDBY/ON батырмасынын кeмегiмен DVD рекордердi eшiрiнiз.
Ескерту:
• Егер Сiз баска багдарламаны жазып алу Yшiн таймер белгiлегiнiз
келсе, DVD рекордердi кайта коса аласыз. Баптауларды
аяктаганнан кейiн DVD рекордердi eшiруге умытпаныз.
• Басталып кеткен таймер бойынша жазып алуды аяктау Yшiн
STANDBY/ON немесе STOP батырмасын басыныз.
• Сiз жазып алу графигiнiн багдарламасына тагы 8 багдарлама коса
аласыз.
• Бiз жазып алу уакытын 5 минуттан артык орнатуды усынамыз.
2.
3.
4.
5.
Сандык видеокамерадан (DV) жазып алу
Сiз DV IN агытпасы аркылы сандык видеокамерадан DV
кассетасынын iшiндегiсiн жаза аласыз.
Сандык видеокамера аспаптын алдынгы панелiндегi DV IN
агытпасына косылганына кез жеткiзiнiз.
Содан кейiн сандык видеокамераны косыныз жэне оны PLAY (немесе
VCR) режимiне орнатыныз.
1. Жазып алгыныз келетiн HDD немесе жазып алатын DVD (DVD±R/
2. dV/USB батырмасын басыныз.
3. Видеокамера кассетасынан Сiз жазып алу бастагыныз
4. Жазып алуды бастау Yшiн REC батырмасын басыныз. Егер жазып
5. Жазып алуды токтату Yшiн STOP батырмасын басыныз.
Ескерту:
• Косылган видеокамеранын тYрiне байланысты осы рекордермен
• Егер плеер сандык видеокамераны аныктамаса, DV кабелiн
Уакытты жылжытып, жазып алу
Осы рекордер багдарламаны каткыл дискiнiн кенiстiгiнде автоматты
тYPде уакытша сактайды, бул пайдаланушыга айналдыру, жылдам
айналдыру, кайталау жэне Yзiлiс сиякты функцияларды пайдалана
отырып, сакталган багдарламаны баскаруга мYмкiндiк бередi.
1. ТД керу кезiнде ll, ◄◄, ►►,!◄◄, ►►!, !► сиякты ойнатуды
Источник Качество Дата Начало Конец Запись vpS
□UD HECORDeR
▲ ▼ батырмаларынын кемегiмен езгертетiн немесе жоятын
багдарламаны тандап алыныз.
Баптауларды жою
Жою Yшiн ADD/CL (косу/жою) батырмасын басыныз.
Баптауларды езгерту
ENTER батырмасын басыныз.
▲ ▼ батырмаларынын кемегiмен езгерткiнiз келетiн тармактарды
танданыз жэне ENTER батырмасын басыныз.
▲ ▼ немесе 0-9 батырмаларынын кемегiмен баптауларды
езгертiнiз.
Барлык езгерiстердi аяктаганнан кейiн ENTER батырмасын
басыныз.
▼ батырмасынын кемегiмен "OK” тандаганнан кейiн ENTER
батырмасын басыныз.
Шыгу Yшiн TIMER REC батырмасын басыныз.
DVD±RW) тандау Yшiн HDD/DUB немесе DVD батырмасын
басыныз.
Егер Сiз DVD жазгыныз келсе, жазып алу Yшiн жеткiлiктi бос орны
бар DVD±R немесе DVD±RW дискiсiн салыныз.
келетiн жердi табыныз. Сiз PLAY, STOP, PAUSE, ◄◄, ►►
батырмаларынын кемегiмен видеокамераны баскару Yшiн осы
рекордердiн КБ пультiн пайдалана аласыз. Жаксы нэтижеге
кол жеткiзу Yшiн жазып алу бастагыныз келетiн жерде PAUSE
батырмасын басыныз.
алуды уакытша токтаткыныз келсе PAUSE батырмасын басыныз.
Жазып алуды жалгастыру Yшiн REC батырмасын басыныз.
жеткiзiлетiн КБ пультiнiн кемегiмен оны баскаруды кадагалай
алмауыныз MYMкiн.
шыгарып, DV IN агытпасына тагы салып керiнiз.
баскару батырмаларын басыныз, экраннын теменгi жагында
келденен уакыт шкаласы пайда болады.
Жазып алу таймерiн карау - жазып алу баптауларын взгерту жэне жою
1. TIMER REC батырмасын басыныз. Сiз таймерге орнатылган
барлык багдарламаларды кере аласыз.
92
4097IMnew.indd 92 27.02.2007 13:35:54
Page 93

КАЗАК
2. PAUSE
Егер Ci3 PAUSE батырмасын басса^ыз, агымдагы багдарлама
Эпизодтар Ti3iMi ТД экранында пайда болады.
2) ▲ батырмасын жэне ► батырмасын басыныз. Редакциялау менюi
уа^ытша то^татылады. Егер Ci3 PLAY батырмасын басса^ыз,
багдарламаны ойнату сол жерден басталады.
3. Алдыга/арт^а жылдам айналдыру
1) Ойнату кезiнде ◄◄немесе ►►батырмаларын басыныз.
Батырмаларды эр бас^ан сайын ойнату жылдамдылы 3 сатыла
жоларылайды.
2) ^алыпты ойнату режимiн калпына келтiру Yшiн PLAY батырмасын
басыныз.
4. Алдыла/арт^а эту
1) Ойнату кезiнде !◄◄ батырмасын басыныз. DVD рекордер
алдынfы фрагменттi ойната бастайды.
2) Ойнату кезiнде ►►! батырмасын басыныз. DVD рекордер келесi
фрагменттi ойната бастайды.
5. Баяу алдыла айналдыру
1) Ойнату кезiнде SLOW батырмасын басы^ыз. Алымдалы
3)
балдарламаны баяу ойнату басталады. Батырманы эр баскан
сайын ойнату жылдамдылы 3 сатыла тэмен тYседi.
2) ^алыпты ойнату режимiн калпына келтiру Yшiн PLAY батырмасын
басыныз.
6. Жазып алу
Уакытты жылжыту аркылы жазып алу кезiнде балдарлама
уакытша жазылады. Эдетте, балдарлама каткыл дискiге жазып
алынады жэне сакталады, сондыктан Сiз оны кез келген уакытта
ойната аласыз.
1. Алымдалы балдарламаны жазып алуды бастау Yшiн REC
батырмасын басыныз.
2. Жазып алуды токтату Yшiн STOP батырмасын басы^ыз.
Ескерту:
• Осы функция DVD режимiнде жумыс iстемейдi. Егер Сiз уакытты
жылжыту аркылы жазып алуды жYргiзгiнiз келсе, ТД кэру кезiнде
TIME SHIFT батырмасын басыныз.
• Егер OSD меню экранла шыкса, AV кiрiстерден немесе сандык ТД
жазып алуды жYргiзуге болмайды. Демек, Сiз уакытты жылжыту
аркылы жазып алу жYргiзгiнiз келсе, OSD менюден шылуы^ыз
кажет.
Бiр уакытта жазып алу жэне ойнату
3) АнемесеТ батырмаларынын кэмегiмен "COPY TITLE”
Сiз бiр уакытта HDD эпизодты ойната аласыз жэне ТД балдарламасын
жаза аласыз. Сонымен катар Сiз бiр уакытта DVD эпизодты ойната
аласыз жэне ТД балдарламасын жаза аласыз.
1. ТД балдарламасын дискiге жазып алу кезiнде HDD эпизодты
ойнату.
1) Жазып алу кезiнде HDD/DUD батырмасын басыныз.
HDD балдарламаларынын тiзiмi экранла шылады.
Каткыл дискiден дискiге эпизодтарды квшiру
Жазып алатын DVD диск (DVD±R немесе DVD±RW) рекордердiн iшiне
салынланын тексерiнiз.
1. HDD/DUB батырмасын басыныз.
2) Балдарламалар тiзiмiнiн iшiнен батырмаларынын кэмегiмен
кажеттi балдарламаны тандап алыныз.
3) Ойнатуды бастау Yшiн PLAY батырмасын басыныз.
2. ТД балдарламасын HDD жазып алу кезiнде DVD эпизодты ойнату.
1) Жазып алу кезiнде DVD батырмасын басыныз.
Диск менюi экранла шылады.
2) ◄,►,▲,▼ батырмаларынын кэмегiмен кажеттi позицияны немесе
эпизодты тандап алыныз.
3) Ойнатуды бастау Yшiн ENTER немесе PLAY батырмасын
басыныз.
Келесiлер Yшiн осы рекордердiн кeшiру ерекшелiктерiн пайдаланыцыз:
2.
• HDD жэне DVD сакталтан манызды жазбаларды резервтiк кэшiру.
• Баска плеерде ойнату Yшiн HDD жазып алудын DVD кэшiрмесiн
жасау Yшiн.
• Редакциялау Yшiн видеоны DVD-ден HDD табыстау.
• HDD-дан DVD редакциялантан видеоны табыстау.
ТД экранында лайда болады.
АнемесеТ батырмаларынын кэмегiмен "COPY ALL” (барлылын
кэшiру) тандаланнан кейiн ENTER батырмасын басыныз. Дискiден
HDD-ге барлык эпизодтарды кэшiрудi бастаныз.
DVD-ден HDD-ге бiр эпизодты кэшiру.
DVD батырмасын басыныз.
Эпизодтар тiзiмi ТД экранында пайда болады.
АнемесеТ батырмаларынын кэмегiмен кэшiру Yшiн эпизодты
тандаланнан кей1н ► батырмасын басыныз.
(такырыпшаны кэшiру) тандаланнан кейiн ENTER батырмасын
басыныз. DVD дискiден HDD-ге тандаллан эпизодты кэшiру
басталады.
К^аткыл диск1н1н элизодтар т1з1м1 ТД экранында лайда болады.
Nq Канал Дата Время Эпизод
OOlScartAV 01I01J01 12:12 МоЙЭпизод
002 АКО 01101/01 13:23 ЭПИЗОД 10
003 АЯР 01/01/01 14:23 ЭПИЗОД 11
003 АНО 01ID1I01 13
000 0U0 01101/01 17
OOrSuirt AV 01/01/01 10
000 OVO 01/01/01 10
1^
23 Эпизод 12 выбора программ.
00 Эпизод 11 к к- к«™
39 Эпизод 18 Нажмите НООЮиВ для
43 Мой эпизод О кошровашя выбранных
программ.
Нажмите 80РТ/Р1Р для
сортировки программ ло
имени, дате и времени.
□UD RECORDSR
АнемесеТ батырмаларынын к9мегiмен к9шiру Yшiн эпизодты
тандатаннан кейiн ENTER батырмасын басыныз. Тандалтан
эпизодта белгi пайда болады.
Сiз баска эпизодтарды тандатыныз келсе 2-тармакты кайталаныз.
HDD/DUB батырмасын басыныз.
^аткыл дискiден дискiге эпизодтарды к9шiру басталады.
Авторлык кукык
Жазып алу тек автордын руксатымен тана жYргiзiлуi кажет жэне Сiз
кайта жазып алу жYргiзiлiп жаткан елде кэшiру руксат етiлгенiн бiлуiнiз
кажет. Егер занмен немесе автормен руксат етiлмесе, авторлык
материалдарды, фильмдердi немесе музыканы кэшiру зансыз болып
табылады.
Дискiден каткыл дискiге файлдарды квшiру (каткыл дискiден дискiге)
К9шiруге арналтан диск немесе жазып алатын диск (DVD±R немесе
DVD±RW) рекордердiн iшiнде екендiгiне кэз жеткiзiнiз. Ci3 дискiден
каткыл дискiге (немесе каткыл дискiден дискiге) MP3, JPEG MPEG-4
файлдарды к9шiре аласыз.
1. FILE батырмасын басыныз.
DVD-ден каткыл дискiге эпизодтарды квшiру
Каталог немесе файлдар тiзiмi экранда пайда болады.
Сiз жазып алу жYргiзгiнiз келетiн DVD диск плеерге салынтанын
тексерiнiз.
1. DVD-ден HDD-ге барлык эпизодтарды кэшiру.
1) DVD батырмасын басыныз.
93
4097IMnew.indd 93 27.02.2007 13:35:54
Page 94

КАЗАК
EDIT батырмасын басы^ыз
2.
Kemipy меню! SKpaHfa mbifaflbi.
^ HHCTpyMgHTbi файла ™
ИМ 1Я8Г|И1«ВД^И .
шв
iSB Переименовать
ВВ Создать Дире1сгорию i '
if и л Копирование файлов с одного
3.
АнемесеТ батырмаларынын KSMeriMeH "Copy” (кeшiру)
тандаганнан кейiн ENTER батырмасын басы^ыз.
4.
А,Т батырмаларынын кeмегiмен кeшiру Yшiн файлдар кeзiнiн
каталогын тандап алыныз, ENTER батырмасын басыныз.
(Егер Ci3 файлды дискiден кeшiргiнiз келсе, DVD каталогын
тандап алыныз. Егер Ci3 файлды кат^ыл дискiден кeшiргiнiз келсе,
HDD каталогын тандап алыныз.)
Файлдар тiзiмi экранга шыгады.
АнемесеТ батырмаларынын кeмегiмен кeшiру Yшiн файлды
5.
тандаганнан кейiн ADD/CL (косу/жою) батырмасын басыныз.
Таддалган файл oцжaк;тafы т1з1мге фсылады.
Копировать из
Выбрать источник файла
жшттк F METALLICA . М ^
1 F2S5.STAY.WMA9.1 тв| ;1?1 F2S5.STAY.WM
П METALLICA • MAST ff ipi F2S5.STAY.WM |^азмврфай
REMINEM11024.JPG к imr
ЩШВЯВ1
D:iF2S5 STAY WMA7 128K ST*1
6. Егер баска файлдарды кeшiргiнiз келсе, 5-тармакты кайталаныз.
7. ►► батырмасын басыныз.
8. А,Т батырмаларынын кeмегiмен таддалтан файлдарды
кeшiргiнiз келетiн каталогты таддадыз, ENTER батырмасын
басыдыз.
(Егер Ci3 файлды дискiден каткыл дискiге кeшiргiнiз келсе, HDD
каталогын таддап алыдыз. Егер Ci3 файлды каткыл дискiден
дискiге eшiргiнiз келсе, DVD каталогын таддап алыдыз.)
9. REC батырмасын басыдыз.
Дискiден каткыл дискiге (немесе каткыл дискiден дискiге) кeшiру
басталады.
10. Кeшiрудi аяктатаннан кейiн шыту Yшiн EDIT батырмасын басыдыз.
USB флэш-жадыдан каткыл дискiге (немесе дискiге) файлдарды квшiру
USB курылтысы USB IN атытпасына салынтанын тексерiнiз. Егер Сiз
файлдарды дискiге кeшiргiнiз келсе, жазып алатын дискiнi (DVD±R
немесе DVD±RW) салыдыз.
1. FILE батырмасын басыдыз.
Каталог жэне файлдар тiзiмi экранда пайда болады.
------
□UD R€COROGR
□UD RGCOROGR
Файлы/папки
1Г I НПЦ
Нажмите ВВЕРХ/ВНИЗ для просмотра а
нажмите ВВОД/ВОСПРОИЗВЁДЕНИЕ дг
□UQ яесовоен
EDIT батырмасын басыдыз.
2.
Kemipy меню! экранта шытады
I ШВI Удалить [
|шН Переименовать ^
ВИ Создать Директорию ^
Копирование файлов с одного
* носителя на другой.
DUD RECQROen
АнемесеТ батырмаларыныд кeмегiмен "Copy” (кeшiру)
3.
таддатаннан кейiн ENTER батырмасын басыдыз.
4.
АнемесеТ батырмаларыныд кeмегiмен USB каталогын
таддатаннан кейiн ENTER батырмасын басыдыз.
АнемесеТ батырмаларыныд кeмегiмен кeшiру Yшiн файлды
5.
таддатаннан кейiн ADD/CL (косу/жою) батырмасын басыдыз.
Таддалтан файл оцжактаты т1з1мге косылады.
юок выбранньк файлов ' атш
720X4B0.BORK. | Лщй
BOOTtXlOO 2D0eoi13.W8.pp Размер файла:
D;J200e0113 WS.ppl
DUO RGCORGSR
6.
Егер Сiз баска файлдарды кeшiргiнiз келсе, 5-тармакты
4БКВ
кайталадыз.
► ► батырмасын басыдыз.
А,Т батырмаларыныд кeмегiмен таддалтан файлдарды
кeшiргiнiз келетiн каталогты таддап алыдыз, ENTER батырмасын
басыдыз.
(Егер Сiз файлдарды дискiден каткыл дискiге кeшiргiнiз келсе,
HDD каталогын таддап алыдыз. Егер Сiз файлдарды каткыл
дискiден дискiге кeшiргiнiз келсе, DVD каталогын таддап алыдыз.)
REC батырмасын басыдыз.
9.
USB курылтыдан каткыл дискiге (немесе дискiге) кeшiру
басталады.
10
Кeшiрудi аяктатаннан кейiн шыту Yшiн EDIT батырмасын басыдыз.
Ескерту:
• 500мА астам USB курылтысын колданбадыз.
• Егер рекордер USB курылтысын аныктамаса, курылтыны, USB
кабелiн USB IN атытпасына таты бiр рет салыдыз.
94
4097IMnew.indd 94 27.02.2007 13:35:55
Page 95

DVD±R немесе DVD±RW дискiнi редакциялау
DVD±R немесе DVD±RW дискiнi салыныз.
DVD менюi экранда бейнеленедi.
DVD менюдiн YCTiHe ету Yшiн Абатырмасын басы^ыз.
► батырмасын басыныз, экранга дискiнi редакциялау менюi
шыгады.
Переименовать диск
Стереть диск
Переписать диск
_ Закр. диск
I
_ %^РАВКА
Копировать все
DVD RECORDeR
КАЗАК
МОИ DVD
Стереть диск
Предупрехщение ; это действие приведет
к удалению всех данных на диске.
Продолжить?
2. ◄,► батырмаларынын кемегiмен “Yes”(И0) тандаганнан кейiн
диск мазмунын ешiру Yшiн ENTER батырмасын басыныз.
Дискiден жазбаны ешiру бiрнеше минут алады.
Ескерту: жазбаны ешiру функциясы тек DVD±RW дискiлерде гана
жумыс iстейдi.
Дискiден жазып алу (тек DVD±RW)
1.
АнемесеТ батырмаларынын кемегiмен «Дискiнi кайта жазу»
тармагын тандаганнан кейiн ENTER батырмасын басыныз. DVD
режимi AV режимiне езгередi.
Ci3 жазып алгыныз келетiн AV кiрiсiн тандау Yшiн AV IN
2.
батырмасын басыныз. Батырманы 0р баскан сайын AV езгеретiн
болады:
Передний AV
________
DVD RECORDER
TV
DVD±RW немесе DVD±R дискiнi ойнату
Ci3 бастан аяк барлык дискiнi ойната аласыз.
1. АнемесеТ батырмаларынын KSMeriMeH "Play” (ойнату)
тандаганнан кейiн ENTER батырмасын басы^ыз.
Дискiнi басынн бастап ойнату басталады.
DVD±RW немесе DVD±R дискiнiн атауын взгерту
1.
АнемесеТ батырмаларынын кeмегiмен "Rename disk” (дискiнiн
атауын езгерту) тандаганнан кейiн ENTER батырмасын басыныз.
2. ◄,►,▲,▼ батырмаларынын кемегiмен Ci3 енгiзгiнiз келетiн 0рiптi
танданыз, растау Yшiн ENTER батырмасын басыныз.
3. 2-тармакты кайталаныз.
Диск атауынын максималды узындыгы 9 символдан аспауы кажет.
4. Редакциялауга арналган пернетактанын теменгi жагындагы
келденен шкала.
Ci3 0рiптердi енгiзудi аяктаганда "OK” тандаганнан кейiн ENTER
батырмасын басыныз.
Оптикалык дискiден жазбаларды вшiру (тек DVD±RW)
1. АнемесеТ батырмаларынын кемегiмен «Оптикалык дискiден
жазбаны ешiру» тармагын тандаганнан кейiн ENTER батырмасын
асыныз. Экранда диалог менюi пайда болады.
Задний AV
Задний SV
DV
Scart AV
Егер Сiз теледидар багдарламасын жазып алгыныз келсе, ТД
режимiн тандап алыныз. Channel- немесе Channel + батырмасын
басып, жазып алгыныз келетiн станцияны тандап алыныз.
3. Жазып алуды бастау Yшiн REC батырмасын басыныз. Жазып алу
диск басынан басталады.
4. Жазып алуды аяктау Yшiн STOP батырмасын басыныз.
Ескерту: кайта жазып алу кезiнде барлык алдынfы багдарламалар
жойылады.
Дискiнi жабу (тек DVD±R)
Егер Сiз DVD±R дискiнi баска плеерлермен немесе рекордерлермен
Yйлесiмдi еткiнiз келсе, онда дискiнi жабу кажет.
1. АнемесеТ батырмаларынын кемегiмен «дискiнi жабу» тармагын
тандаганнан кейiн ENTER батырмасын басыныз. Экранда диалог
менюi пайда болады.
2. ◄,► батырмаларынын кемегiмен “Yes”(И0) тандаганнан кейiн
растау Yшiн ENTER батырмасын басыныз.
Дискiнi жабу бiрнеше минут алады.
Ескерту:
• Жабу функциясын DVD±R дискiде бiр рет кана колдануга болады.
• Егер DVD±R диск жабылган болса, Сiз оган жаза алмайсыз ж0не
оны редакциялай алмайсыз.
Дискiнi блоктау (тек DVD±RW)
Сiз будан кейiн дискiге жазба жYргiзбеу Yшiн ж0не оны редакцияламау
Yшiн, оны блоктай аласыз.
1. АнемесеТ батырмаларынын кемегiмен «Дискiнi блоктау»
тармагын тандаганнан кейiн ENTER батырмасын басыныз.
Дискiнi блоктау 2-3 минут алады. Егер диск блокталган болса,
Сiз кандай да бiр езгерiстер жYргiзе алмайсыз. Тек ойнату мYмкiн
болады.
95
4097IMnew.indd 95 27.02.2007 13:35:55
Page 96

КАЗАК
Егер Ci3 дискiнi блоктан шыгаргы^ыз келсе, АнемесеТ
2.
батырмаларынын кeмегiмен «Дискiнi блоктан шыгару» тармагын
тандап алыцыз.
3. ENTER батырмасын басыныз.
Дискiнi блоктан шыгару бiрнеше минут алады.
БАРЛЫГЫН квшiру (DVD±RW/DVD±R)
Ci3 DVD-ден кат^ыл дискiге барлыгын кeшiре аласыз.
1. АнемесеТ батырмаларынын кeмегiмен "COPY ALL” (барлыгын
кeшiру) тармагын тандаганнан кейiн ENTER батырмасын
басыныз. Барлык эпизодтарды дискiден каткыл дискiге кeшiру
басталады.
DVD±RW немесе DVD±R эпизодтарын редакциялау
1. Диск бeлiмiне жазып алатын DVD±RW немесе DVD±R дискiнi
салыныз. Экранга меню автоматты тYPде шыгады.
2.
АнемесеТ батырмаларынын кeмегiмен редакциялау Yшiн бiр
эпизодты тандап алыныз.
► батырмасын басыныз, экранда эпизодты редакциялау менюi
3.
пайда болады.
DVD±RW/DVD±R эпизодын редакциялау
1. АнемесеТ батырмаларынын кeмегiмен «Эпизодты редакциялау»
тармагын тандаганнан кейiн ENTER батырмасын басыныз.
Экранда диалог терезвс! пайда болады.
1-1. Эпизодты тандап алыныз
0- 9 батырмаларынын кeмегiмен эпизодты тандап алыныз.
1- 2. Фрагменттi тандап алыныз
0- 9 батырмаларынын кeмегiмен фрагменттi тандап алыныз.
1- 3. Ойнату
Ойнатуды эр тYрлi баптаулармен реттенiз: артка, алдыга жылдам
айналдыру, алдыга баяу айналдыру.
1-4. Фрагмент маркерi
Сiз фрагменттi енгiзе аласыз немесе жоя аласыз. ENTER немесе
► батырмасын басыныз, экранда диалог менюi пайда болады.
1)
Фрагменттiн жана маркерiн енгiзу Yшiн АнемесеТ
батырмаларынын кeмегiмен «Маркердi енгiзу» тармагын тандап
алыныз.
Сiз ◄◄, ►► батырмаларынын немесе PLAY батырмасынын
кeмегiмен белгiлi бiр жердi таба аласыз.
Жана фрагменттi енгiзгiнiз келетiн жерде ENTER батырмасын
басыныз.
2) . Фрагмент маркерiн жою Yшiн АнемесеТ батырмаларынын
кeмегiмен «Маркердi жою» тармагын тандап алыныз. Сiз
фрагменттi 1^^немесе ►►! батырмаларынын кeмегiмен
таба аласыз. Сiз фрагменттi жойгыныз келетiн жерде ENTER
батырмасын басыныз.
3) . Фрагменттердiн барлык маркерлерiн жою Yшiн АнемесеТ
батырмаларынын кeмегiмен «Фрагменттердiн барлык маркерлерiн
жою» тармагын тандап алыныз. Растау Yшiн ENTeR батырмасын
басыныз.
1-5. Фрагменттi жасыру/фрагменттi керсету
Жарнамалык роликтердi жабу Yшiн колайлы функция. АнемесеТ
батырмаларынын кемегiмен «Фрагменттi жасыру» тармагын
тандап алыныз жэне ENTER батырмасын басыныз. Егер
агымдагы фрагмент жасырын болса, экранда «Фрагменттi
жасыру» орнына «Фрагменттi керсету» жазуы пайда болады.
Бул жагдайда «Фрагменттi керсету» тандаганнан кейiн ENTER
батырмасын басып, фрагменттi кере аласыз.
1-6. ^ыстырма
Сiз тандалган фрагмент Yшiн кыстырманы езгерте аласыз.
^ыстырманы орнаткыныз келетiн жерге ENTER батырмасын
басыныз.
1-7. Эпизодты белу (тек DVD±RW)
Сiз эпизодты екi белiкке беле аласыз. Сiз белгiнiз келетiн жерде
ENTER батырмасын басыныз. Эпизодты белу бiрнеше минут
алады.
1-8. Ойнату уакыты
Сiз ойнату уакытын кере аласыз.
2. Редакциялауды аяктаганнан кейiн STOP батырмасын басыныз.
Дискiнi жанарту бернеше минут алады.
Эпизодтын атауын взгерту (DVD±RW/DVD±R)
1. АнемесеТ батырмаларынын кемегiмен "Rename title” (эпизодтын
атауын езгерту) тандаганнан кейiн ENTER батырмасын басыныз.
Экранда пернетак;та шь^ады.
LMNOPQRSTUV345
DVD±RW/DVD±R эпизодын ойнату
Сiз тандалган эпизодты ойната аласыз.
1. АнемесеТ батырмаларынын кeмегiмен «Эпизодты ойнату»
тармагын тандаганнан кейiн ENTER батырмасын басыныз.
Space Aa P2 Backspace Clear Exit OK
Drama Action Sparta Comody Nowa Kida Adult
DUD RECDRDen
Тандалган эпизодты ойнату басталады.
2. ^,^,А,Т батырмаларынын кемегiмен Сiз енгiзгiнiз келетiн эрiптi
96
4097IMnew.indd 96 27.02.2007 13:35:56
Page 97

танданыз жэне растау Yшiн ENTER батырмасын басы^ыз.
3. 2-тарма^ты кайтала^ыз.
Эпизод атауынын максималды узындыгы 9 символдан аспауы
кажет.
4. Редакциялауга арналган пернетактаныд тeменгi жагындагы
келденед шкала.
Ci3 эрiптердi енгiзудi аяктаганда "OK” таддаганнан кейiн ENTER
батырмасын басыдыз.
Эпизодты вшiру (тек DVD±RW)
1. АнемесеТ батырмаларыныд кемегiмен «Эпизодты редакциялау»
тармагын таддаганнан кейiн ENTER батырмасын басыдыз.
Экранда диалог меню! пайда болады.
КАЗАК
TV
Передний AV
Задний AV
Задний SV
DV
Предупреждение: Внимание: это действие
безвозвратно удалит фрагмент на загруженном
DVD+RW диске. Продолжт-ь?
DUD HecORDER
2. ◄,► батырмаларыныд кемегiмен “Yes”(Иэ) таддаганнан кейiн
эпизод мазмунын ешiру Yшiн ENTER батырмасын басыдыз.
Дискiден жазбаны ешiру бiрнеше минут алады.
Ескерту: жазбаны ешiру функциясы тек DVD±RW дискiлерде гана
жумыс iстейдi.
Эпизодты кайта жазып алу (тек DVD±RW)
1. АнемесеТ батырмаларыныд KSMerÌMeH «Дискiнi кайта жазу»
тармагын таддаганнан кейiн ENTER батырмасын басыдыз. DVD
режимi AV режимiне eзгередi.
CÌ3 жазып алгыдыз келетiн AV кiрiсiн таддау Yшiн AV IN
2.
батырмасын басыдыз. Батырманы эр баскан сайын AV eзгеретiн
болады:
TV
Передний AV
Задний AV
Scart AV
Егер Сiз теледидар багдарламасын жазып алгыдыз келсе, ТД режимiн
таддап алыдыз. Channel- немесе Channel + батырмасын басып,
жазып алгыдыз келетiн станцияны таддап алыдыз.
3. Жазып алуды бастау Yшiн REC батырмасын басыдыз. Жазып алу
диск басынан басталады.
4. Жазып алуды аяктау Yшiн STOP батырмасын басыдыз.
Ескерту: кайта жазып алу кезiнде барлык алдыдгы багдарламалар
жойылады.
DVD±RW/DVD±R эпизодын квшiру
Сiз DVD-ден каткыл дискiге эпизод кешiре аласыз.
1. АнемесеТ батырмаларыныд кемегiмен «Эпизодты кешiру»
тармагын таддаганнан кейiн ENTER батырмасын басыдыз. DVDден каткыл дискiге эпизодты кешiру басталады.
Каткыл дискiнiд эпизодын редакциялау
1. HDD режимiн таддау Yшiн HDD/DUB батырмасын басыдыз.
Экранда каткыл дискiдегi эпизодтар тiзiмi пайда болады.
АнемесеТ батырмаларыныд кeмегiмен редакциялайтын
2.
эпизодты таддап алыдыз жэне ►батырмасын басыдыз.
Экранда редакциялау меню! пайда болады.
№ Канал Дата Время Эпизод
OOlSuirtAV 01I01ID1 12:12 МойЭлиэодО
002 АКО 01101101 13:23 ЭПИЭОД10
003 ARO 01ID1I01 14:23 ЭПИЗОД 11
DOS AHD OllOlfOl IS
000 OVD 01101101 17
OOrSuirt AV 01101101 10
006 OVD 01101/01 10
23 Эпизод 12
06 Эпизод 11
39 Эпизод 18
4S_ Мой эпизод О
Задний SV
DV
Ойнату
Сiз таддалган эпизодты ойната аласыз.
Scart AV
Егер Сiз теледидар багдарламасын жазып алгыдыз келсе, ТД режимiн
таддап алыдыз. Channel- немесе Channel + батырмасын басып,
жазып алгыдыз келетiн станцияны таддап алыдыз.
3. Жазып алуды бастау Yшiн REC батырмасын басыдыз. Жазып алу
диск басынан басталады.
4. Жазып алуды аяктау Yшiн STOP батырмасын басыдыз.
Ескерту: кайта жазып алу кезiнде барлык алдыдгы багдарламалар
жойылады.
Эпизодты косу (DVD±RW/DVD±R)
Сiз содгы эпизодты жазып алуды жалгастыра аласыз. Егер Сiз содгы
эпизодты таддап алмасадыз, меню экранга шыкпайды.
1. АнемесеТ батырмаларыныд кемегiмен «Эпизодты косу»
тармагын таддаганнан кейiн ENTER батырмасын басыдыз. DVD
режимi AV режимiне езгередi.
2. Сiз жазып алгыдыз келетiн AV кiрiсiн таддау Yшiн AV IN
батырмасын басыдыз. Батырманы эр баскан сайын AV езгеретiн
болады:
1. АнемесеТ батырмаларыныд кемегiмен "PLAY” (ойнату)
Жою
1. АнемесеТ батырмаларыныд кемегiмен «Жою» тармагын
2. ◄ немесе ► батырмаларыныд кемегiмен “Yes”(Иэ) таддаганнан
Белу
Сiз агымдагы эпизодты екi белiкке беле аласыз.
1. АнемесеТ батырмаларыныд кемегiмен «Белу» таддаганнан
2. Белгiдiз келетiн жердi табыдыз. Сiз ◄◄, ►► батырмаларын
3. Сiз белгiдiз келетiн жерде ENTER батырмасын басыдыз. Экранда
4. ◄немесе^ батырмаларыныд кемегiмен "OK” таддаганнан кейiн
97
DUD RECDRDER
таддаганнан кейiн ENTER батырмасын басыдыз. Таддалган
эпизодты ойнату басталады.
таддаганнан кейiн ENTER батырмасын басыдыз. Экранда диалог
менюi пайда болады.
кейiн эпизод мазмунын ешiру Yшiн ENTER батырмасын басыдыз.
кейiн ENTER батырмасын басыдыз. Агымдагы эпизодты ойнату
басталады. .
немесе PLAY батырмасын пайдаланып, керiнiстi iздей аласыз.
диалог менюi пайда болады.
растау Yшiн ENTER батырмасын басыдыз.
4097IMnew.indd 97 27.02.2007 13:35:56
Page 98

КАЗАК
Фрагменттеу
1. Анемесе^ батырмапарыныц кeмегiмен «^орпау» тармапын
Ci3 ойнату кезiнде Ci36eH белг1пенген эпизод бeлiктерiн eTKi3in жiбере
аласыз.
1. Анемесе^ батырмапарыныц KeMeriMeH «Сегмент» тацдаганнан
кейiн ENTER батырмасын басыцыз.
Эпизод автоматты тYPде ойнатыпа бастайды.
2. Ci3 eткiзгiцiз кепетiн фрагмент басын табыцыз.
Ci3 кeрiнiстi ◄◄, ►► батырмапарыныц немесе PLAY
батырмасыныц кeмегiмен iздей аласыз.
3. Сiз eткiзгiцiз кепетiн фрагменттiц басында ENTER батырмасын
басыцыз.
4. Сiз eткiзгiцiз кепетiн фрагменттiц соцын тауып апыцыз жзне
фрагмент соцында ENTER батырмасын басыцыз.
5. Егер Сiз бiрнеше фрагмент бепгiпегiцiз кепсе, 3 жзне 4
KopFayAaH шыFapy
Сiз эпизодты коргаудан шыпара апасыз.
1. Анемесе^ батырмапарыныц кeмегiмен «^орпаудан шыпару»
тармапын тацдапаннан кейiн ENTER батырмасын басыцыз.
Эпизодты коргау апынады.
Баптаупар аяктаппаннан кейiн DVD рекордер коректi зр коскан сайын
дзп соп баптаупармен жумыс iстей апады. Ондай баптаупар Орнату
деректерi деп атапады, опарды орнатупар менюi аркыпы оцай
езгертуге жзне сактаупа бопады.
кадамдарды кайтапацыз.
Бепгкпенген фрагменттер жыпжымапы шкапада KYпгiн тYCтi
жопа^тармен бейнеленедi.
6. Ая^таганнан кейiн STOP батырмасын басыцыз.
Ескерту: бепг1пенген фрагменттерi бар эпизод кат^ып дискiден DVDге кeшiрLпсе, фрагменттер DVD-ге кeшiрLпмейдi.
Heri3ri эрекеттер
Токтату режимiнде SETUP батырмасын басыцыз. 0рекеттердi
(опцияпарды) iздеу жзне тацдау Yшiн ^,^,А,^ батырмапарын
жзне ENTER жзне RETURN батырмапарын пайдапаныцыз. Кез
кепген зрекеттер Yшiн апымдапы баптаупар тYрлi-тYCтi жопакпен
айрыкшапанады.
Бiрiктiру
Сiз екi эпизодты бiрiктiре апасыз.
1. Анемесе^ батырмапарыныц кeмегiмен «Бiрiктiру» тармагын
1. Егер диск ойнатыпса STOP батырмасын басыцыз.
2. Баптаупарын менюiн шакыру Yшiн SETUP батырмасын басыцыз.
3. ◄ немесе ► батырмапарыныц кeмегiмен кажеттi тармакты тацдап
тацдаганнан кейiн ENTER батырмасын басыцыз.
2. Анемесе^ батырмапарыныц кeмегiмен бiрiктiретiн эпизодты
4. ^,^,А,^ батырмапарыныц кeмегiмен кажеттi тармакшаны
тацдацыз жзне ENTER батырмасын басыцыз. (Егер Сiз осы
режимнен шыккыцыз кепсе, RETURN батырмасын басыцыз).
5. Барпык баптаупарды аяктапаннан кейiн SETUP батырмасын
Экран сактаFышын взгерту
Сiз тацдапган эпизод Yшiн экран са^тагышын езгерте апасыз.
1. Анемесе^ батырмапарыныц кeмегiмен «Экран са^тагышын
Ескерту: дискiге байпанысты кейбiр тацдаппан зрекеттер дурыс
жумыс iстемеуi мYмкiн.
езгерту» тармагын тацдаганнан кейiн ENTER батырмасын
басыцыз.
Эпизодты ойнату автоматты бастапады.
Орнатулар менюiн пайдалану
Арналарды жазу жене сканерлеу
2. Экран са^тагышын апгыцыз келетiн жерде ENTER батырмасын
басыцыз.
(Сiз ◄◄, ►► батырмапарыныц немесе PLAY батырмасыныц
кeмегiмен кeрiнiстi iздей апасыз). Экранда диапог менюi пайда
бопады.
3. ◄ немесе ► батырмапарыныц кeмегiмен "OK” тацдаганнан кейiн
растау Yшiн ENTER батырмасын басыцыз.
Атауын взгерту
Сiз эпизод атауын езгерте апасыз.
1. Анемесе^ батырмапарыныц кeмегiмен "Rename ” (атауын
езгерту) тацдапаннан кейiн ENTER батырмасын басыцыз. Экранда
пернетакта шыпады.
2. Пернетактада «Жою» батырмасын тацдапаннан кейiн апымдапы
1. Фрагменттердi автотацбапау
атауды жою Yшiн ENTER батырмасын басыцыз.
3. ^,^,А,^ батырмапарыныц кeмегiмен енгiзгiцiз кепетiн зрiптi
тацдацыз жзне растау Yшiн ENTER батырмасын басыцыз.
4. 3-тармакты кайтапацыз.
Атаудыц максимапды узындыпы 12 симвопдан аспауы кажет.
5. Егер Сiз зрiптi енгiзудi аяктасацыз, пернетактада "OK” тацдапаннан
кейiн ENTER батырмасын басыцыз.
Ескерту: егер апдын апа карау режимi орнатупар менюiнде «Активтi»
деп бепгкпенсе, буп функция косыпмайды.
Блоктау
Сiз эпизодты ешкiм ойната апмау Yшiн оны бпоктай апасыз.
1. Анемесе^ батырмапарыныц кeмегiмен «Бпоктау» тармапын
тацдапаннан кейiн ENTER батырмасын басыцыз.
2. Жазба сапасы
HQ: жопары сапа. Сiз таза дискiде узактыпы 1 сапат бопатын жазбаны
SP: стандартты ойнату. Сiз таза дискiде узактыпы 2 сапат бопатын
SP+: кецейт1пген стандартты ойнату. Сiз таза дискiде узактыпы 2 сапат
LP: узак ойнату. Сiз таза дискiде узактыпы 3 сапат бопатын жазбаны
Эпизод бпоктапады.
Блоктан шыFару
Сiз бпоктаппан эпизодты бпоктан шыпара апасыз.
1. Анемесе^ батырмапарыныц кeмегiмен «Бпоктан шыпару»
тацдапаннан кейiн ENTER батырмасын басыцыз.
SLP: бiршама кеп уакыт ойнату. Сiз таза дискiде узактыпы 6 сапат
3. Арнаны анапогты сканерпеу
Экранда паропь терезесi пайда бопады.
2. 0-9 батырмапарын пайдапана отырып, 4 саннан туратын паропьдi
енгiзiцiз.
3. ▼ батырмасыныц кeмегiмен "OK” тацдапаннан кейiн ENTER
батырмасын басыцыз.
1. Анемесе^ батырмапарыныц кeмегiмен «Сканерпеу» тармапын
2. ◄ немесе ► батырмапарыныц кeмегiмен "OK” тацдапаннан кейiн
Эпизод бпоктан шыпарыпады.
KopFay
Сiз эпизодты редакцияпаудан коргай апасыз.
98
тацдапаннан кейiн ENTER батырмасын басыцыз.
Эпизод коргапады. Сiз коргаппан эпизодты ойната апасыз, бiрак
оны редакцияпай апмайсыз.
апыцыз, содан кейiн ENTER батырмасын басыцыз.
тацдап апыцыз жзне ENTER батырмасын басыцыз. Егер Сiз
апдыцпы менюге eткiцiз кепсе, RETURN батырмасын басыцыз.
басыцыз.
___________________
Автомаркировка фрагмвктов 5 м
Качество записи Кач
Сканировать каналы [СЮ
Изменение канала РЕ^
Перестановка каналов Пв(
Запись по таймеру ОК
Выбор страны Рос
Фрагмент маркерi 5 минутка автоматты орнатыппан жапдайда,
фрагменттер бес минуттык интервапдармен эпизодтыц iшiнде
автоматты курыпады. Сонымен катар редакцияпау функциясы
аркыпы фрагменттердi копмен енгiзуге жзне eшiруге бопады.
^осымша «Эпизодты редакцияпау» тармапын карацыз.
Жазба сапасы 6 сапа децгейiн усынады:
жYргiзе апасыз.
жазбаны жYргiзе апасыз.
30 минут бопатын жазбаны жYргiзе апасыз.
жYргiзе апасыз.
EP: узак уакыт ойнату. Сiз таза дискiде узактыпы 4 сапат бопатын
жазбаны жYргiзе апасыз.
бопатын жазбаны жYргiзе апасыз.
Осы рекордерде ТД бапдарпамапарды жазып апу Yшiн iшiне
орнатыппан ТД тюнерi бар.
тацдапаннан кейiн ENTER батырмасын басыцыз.
ENTER батырмасын басыцыз.
Арнапарды автоматты iздеу бастапады. Егер тепебапдарпама
автоматты iздеу кезiнде табыпса, оп автоматты тYPде сактапады.
4097IMnew.indd 98
27.02.2007 13:35:56
Page 99

КАЗАК
Ескерту:
• Арналарды iздеу кезiнде барлык алдыигы багдарламалар eшедi
жэне баска жерге ауыстырылады.
1.
• Осы функция рекордер ТД режимiнде болганда гана кол жетерлiк.
4. Арнаны езгерту
2.
(Егер арна кабылданбаса, осы функция жумыс iстемейдi.)
4-1. Жнемесе^ батырмаларыныи кемегiмен «Редакциялау»
тармагын таидаганнан кейiн ENTER батырмасын басыиыз.
AfbiMflafbi арна тураль! акпарат экранда бейнеленед!.
Изменить информацию о канале
Номер программы poai
Н[«]1ё]йП
Стандарт PAL BiG
Тип поиска Канал
Тип Standard
Канал [З- [ЮИ
Точная настройка Декодер Выкп
Удапитъ ОК
ОК Отмена
____
3.
4.
4-2. CHANNEL - немесе CHANNEL + батырмаларыныи кемегiмен
езгерткiиiз келетiн арнаны таидап алыиыз.
Арна атауын редакциялау
5.
1) . Жнемесе^ батырмаларыныи кемегiмен «Атау» тармагын
таидаганнан кейiн ENTER батырмасын басыиыз.
6.
2) . ◄,►,▲,▼ батырмаларыныи кемегiмен енгiзгiиiз келетiн эрinтердi
таидаиыз жэне растау Yшiн ENTER батырмасын басыиыз.
ТД стандарты
7.
Агымдагы арна Yшiн ТД жYЙесiн орнатыиыз.
1) . Жнемесе^ батырмаларыныи кемегiмен «Стандарт» тармагын
Видео
таидаиыз жэне ENTER батырмасын басыиыз.
2) . Жнемесе^ батырмаларыныи кемегiмен ТД жYйесiн таидаиыз
жэне ENTER батырмасын басыиыз.
бойынша ауыстыруга мYмкiндiк бередi. Сондай-ак Сiз катар
жYретiн багдарламалар Yшiн орын топтай аласыз.
Жнемесе^ батырмаларыныи кемегiмен «Алмасу» тармагын
таидаганнан кейiн ENTER батырмасын басыиыз.
Жнемесе^ батырмаларыныи кемегiмен алмастырылатын
багдарламань! таидап аль1иь1зжэне ► бать1рмась1н бась1иь13.
Жнемесе^ батырмаларыныи кемегiмен орнатылатын позицияны
таидаиыз жэне ► батырмасын басыиыз.
Егер Сiз бiрнеше багдарламалардыи орнын алмастыргыиыз
келсе, 2 жэне 3 кадамдарды кайталаиыз.
Аяктаганнан кейiн ◄ батырмасыныи кемегiмен “OK” таидаганнан
кейiн ENTER батырмасын басыиыз.
Ескерту: Осы функция рекордер ТД режимiнде болса гана жумыс
iстейдi.
Жазып алу таймерi
«Жазып алу таймерi» тарауын караиыз.
Елдi таидау
Жнемесе^ батырмаларыныи кемегiмен ез елiиiздi таидаганнан
кейiн ENTER батырмасын басыиыз.
1здеу TYpi
Егер кабылданган сигнал элсiз болса, Ci3 жиiлiк немесе немiр
бойынша арнаны iздеудi коса аласыз.
1) . Жнемесе^ батырмаларыныи кемегiмен «1здеу тYрi» тармагын
таидаиыз жэне ENTER батырмасын басыиыз.
2) . Жнемесе^ батырмаларыныи кемегiмен «Жиiлiк» немесе
«Багдарлама» тармагын таидаиыз жэне ENTER батырмасын
басыиыз.
3) . ▼ батырмасыныи кемегiмен «Жиiлiк» немесе «Арна» тармагын
таидаиыз жэне ◄немесе ► батырмасын басыиыз.
1
Видео шыгыстыи форматы
Телебагдарламаны автоматты iздеу басталады. Егер багдарлама
табылса, iздеу токтатылады. Егер Сiз iздеудi токтаткыиыз келсе,
STOP батырмасын басыиыз.
Дал баптау
2
ТД бейнесiнiи эр тYрлi елшемдерi
Егер кабылданган сигнал элсiз болса, Сiз арнаны дэл баптай аласыз.
1) . Жнемесе^ батырмаларыныи кемегiмен «Дэл баптау» тармагын
таидап алыиыз.
2) . ◄немесе ► батырмаларыныи кемегiмен арнаны дэл баптаиыз.
◄ немесе ►батырмасын эр баскан сайын багдарлама жиiлiгi 50
КГц азаяды немесе улгаяды.
Декодер
Егер агымдагы арна кодталган болса, Canal+ декодердi евро A/V IN
агытпасына косып, оны “ON” жагдайына орнату кажет.
Жою
Егер Сiз кабылданган арнаны жойгыиыз келсе, Жнемесе^
батырмаларыныи кемегiмен «Жою» тармагын таидаиыз жэне ENTER
батырмасын басыиыз.
3
4-3. Егер барлык баптаулар дурыс болса, ▼ батырмасыныи кемегiмен
“OK” таидаганнан кейiн ENTER батырмасын басыиыз.
Ескерту: Осы функция рекордер ТД режимiнде болса гана жумыс
iстейдi.
4
5. Арналармен алмасу
(Егер кабылданган арналар болмаса, осы функция жумыс
iстемейдi.)
Осы функция эр тYрлi арналарды орындарымен максаты
99
Сiздiи ТД немесе мониторыиыз колдайтын типке сэйкес видео
шыгыстыи форматын орнатыиыз. Егер Сiздiи ТД PAL колдаса, PAL
орнатыиыз. Егер NTSC колдаса, NTSC орнатыиыз.
Егер Сiзде кеи экранды теледидар болса, «16:9 Wide» баптауын
таидап алыиыз. Кеи экранды DVD диск экранныи барлык аумагын
алады. Кэдiмгi форматта (4:3) жазылган DVD дискiнi ойнату
кезiнде Сiздiи теледидарыиыздыи баптаулары материалдыи
калай усынылатынын аныктайды. (Сiздiи теледидарыиыздыи
нускаулыгымен жаксылап танысып шыгыиыз, кандай опциялар
кол жетерлiк).
Егер Сiзде кэдiмгi теледидар болса, «4:3 Letter Box» немесе «4:3
PAN SCAN» тармагын таидап алыиыз.
«4:3 Letter Box» пошта жэшiгi режимiнде кеи экранды DVD диск
экранныи жогаргы жэне теменгi жактарында кара жолактармен
бейнеленедi. PAN SCAN кеи экранды материалдардыи жиектерiн
киып тастайды жэне оны 4:3 катынаста жасайды (сурет экранда
Yлкен болганына карамастан, Сiз кiшi кинофрагменттi кересiз).
Ескерту: кейбiр дискглер бейне елшемiн езгертуге мYмкiндiк
бермейдi.
P-SCAN/HDMI шыгысы
ТД жолара жаймасында Y/Pb/Pr косылысы аркылы P-Scan/HDMI
орнатыиыз. Сiз теледидарды HDMI аркылы керin отырганда PScan/HDMI орнатыиыз. (Егер EURO AV output PGB орнатылса,
бул функция жумыс iстемейдi).
Экран сактагышы
Егер бейне узак уакыт бойы козгалмайтын болса, теледидар
закымдануы мYмкiн. Егер бул 5 минуттан астам байкалса, экран
сактагышы косылады (егер таидалган болса). Экран сактагышы
экранда DVD козгалмалы логотиniн шыгарып, катод тYтiгiн (CRT)
закымданудан коргайды.
4097IMnew.indd 99 27.02.2007 13:35:56
Page 100

КАЗАК
Ескерту: егер тура^ты сурет экранда узак уа^ыт бойы бейнеленетiн
болса, проектор мониторынын немесе проекциялык теледидардын
экраны «кYЙiп кетуi» MYMKiH. Ci3 экранды сактау режимiн eшiргенде
монитордын «кYЙiп кетпеуiн» кадагаланыз.
Аудио (Диск рекордерде болса, бул меню косьтмайды)
Аналогты шыгыс
1.
(0згертiлмейдi.)
2.
Сандык шыгыс (SPDIF)
• RAW ^ос агын (Bit Stream): дискiге жазылган бастапкы аудио
агын сандык аудио шыгыстан шыгады.
• LPCM: декодталган аудио агын сандык аудио шыгыс аркылы
шыгады.
LPCM шыгысы
3.
Егер Ci3 плеердi сандык аудио шыгысты AV кYшейткiшке (не
болмаса баска курылгыга) коссаныз, осы орнатуды белгiлеуiнiз
кажет. Егер AV кYшейткiш (не болмаса баска курылгы) аудионы
дискретизациялаудын жогары жиiлiгiмен сэйкес болса (96КГц),
LPCM 96КГц орнатыныз, эйтпесе LPCM 48КГц орнатыныз.
Кейбiр ТД багдарламалар багдарламамен бiрге накты уакыт
сигналдарын бередi. Осы плеер ондай сигналдарды сагатты
автоматты орнату Yшiн пайдалануы MYMкiн.
1) АнемесеТ батырмаларынын кeмегiмен «Уакытты/кYндi орнату»
тармагын тандаганнан кейiн ENTER батырмасын басыныз.
2) «Авто» тармагын тандаганнан кейiн ENTER батырмасын басыныз.
3) Т батырмасынын кeмегiмен «Багдарламалау» тармагын
тандаганнан кейiн ENTER батырмасын басыныз.
4) Дэл уакытты хабарлайтын арнаны тандап алыныз жэне ENTER
батырмасын басыныз.
2. Сагатты колмен орнату
Егер Сiздiн аймагынызда дэл уакыт сигналдарын хабарлайтын
станция болмаса, Сiз уакытты колмен орната аласыз.
1) АнемесеТ батырмаларынын кeмегiмен «Уакытты/кYндi орнату»
тармагын тандаганнан кейiн ENTER батырмасын басыныз.
2) «^олмен орнату» тармагын тандаганнан кейiн ENTER
батырмасын басыныз.
3) 0-9 немесе ◄,►,▲,▼ Т батырмаларынын кeмегiмен кYндi
жэне уакытты енгiзiнiз жэне ENTER батырмасын басыныз.
Жыпылактаган жолдагы мэндi езгерту Yшiн 0-9 А,Т
батырмаларын пайдаланыныз. Бiр жолдан екi жолга ету Yшiн ◄,►
батырмаларын пайдаланыныз.
Жалпы
Тiл
Язык OSD меню
Audio Язык
Язык субтитров
Язык меню диска
1.
OSD менюдiн тiлi
Осы тармак хабарлама шыгатын дисплей тiлiн тандау Yшiн
колданылады. ^ажеттi тiл тандалган кезде, хабарламалар
дисплейде осы тiлде бейнеленетiн болады.
Аудио тiлi
2.
0з калауыныз бойынша аудио тiлiн орнатыныз. Дискiнi ойнату
кезiнде аудио тiлi тандалса, ойнату тандалган тiлде жYргiзiлетiн
болады (егер тандалган тiл дискiде болса).
Субтитрлер тiлi
3.
0з калауыныз бойынша субтитрлер тiлiн орнатыныз. Дискiнi
ойнату кезiнде субтитрлер тiлi тандалса, ойнату тандалган тiлде
жYргiзiлетiн болады (егер тандалган тiл дискiде болса).
4.
Дискiнiн тiл менюi
0з калауыныз бойынша меню тiлiн тандап алыныз. Дискiнi ойнату
кезiнде меню тiлi тандалса, ойнату тандалган тiлде жYргiзiлетiн
болады (егер тандалган тiл дискiде болса).
Сагат
1. Жастык шектеулер (ата-ана бакылауы)
Осы функция балалар керуге болмайтын кейбiр DVD дискiлердi
ойнатуды ешiруге арналган. 8 денгей бар. Егер 8-денгей тандалса,
диск ересектер керуге арналган. Егер 1-денгей тандалса,
диск балалар керуге арналган. Жастык шектеулердiн денгейiн
реттегiштi пайдаланыныз. Дискiнi ойнату кезiнде тандалган денгей
диск денгейiмен салыстырылады. Егер Сiзбен тандалган денгей
дискiде керсетiлген денгейден жогары болса, диск ойнатылады.
Егер темен болса, диск ойнатылмайды. Тиiстi шектеу денгейiн
орнату Yшiн керсетiлген нускауларды орынданыз.
1) АнемесеТ батырмаларынын кемегiмен кажеттi денгейдi
тандаганнан кейiн ENTER батырмасын басыныз.
Дисплейде пароль терезесi шыгады.
2) 0-9 батырмаларынын кемегiмен 4 саннан туратын парольдi енгiзiнiз
жэне ENTER батырмасын басыныз.
Егер Сiз парольдi езгертпесенiз, 0, 0, 0, 0 енгiзiнiз.
3) Т батырмасынын кемегiмен "OK” тандаганнан кейiн ENTER
батырмасын басыныз.
2. Парольдi езгерту
1) «Парольдi езгерту» тармагын тандаганнан кейiн ENTER
батырмасын басыныз.
Дисплейде пароль терезес! пайда болады.
Новый пароль
Ввести пароль здесь.
Ввести повый пароль
Введите снова.
ОК Отмена
□□Ш1
□□□□
□□□□
1’’
□UD RSCORDER
2)
0-9 батырмаларынын кемегiмен 4 саннан туратын агымдагы
парольдi енгiзiнiз жэне Т батырмасын басыныз.
3)
0-9 батырмаларынын кемегiмен 4 саннан туратын жана парольдi
енгiзiнiз жэне Т батырмасын басыныз.
4)
1. Сагатты автоматты орнату
Растау Yшiн жана парольдi тагы бiр енгiзiнiз жэне Т батырмасын
басыныз.
100
4097IMnew.indd 100 27.02.2007 13:35:57
 Loading...