

Page 1
INSTRUCTION MANUAL
PORTABLE DIGITAL RADIO
MODEL VT-3595 BK
www.vitek-aus.com
3
7
12
16
20
3595IM.indd 1 09.03.2007 17:20:05
Page 2
Page 3
English
FM/MW/SW1-8 10 BAND DIGITAL
RECEIVER WITH ALARM
CLOCK
PRECAUTIONS
1. Avoid fierce lash, falling on the
ground.
2. Do not put the radio in the places
where it is under sunshine, heat
or humidity.
. Keep magnetic tape, magnetic
card and other magnetic record
software away from the speaker,
in order to avoid that the record
is erased or there is noise in the
magnetic tape.
4. If something falls in the radio,
please apply to a maintenance
man.
5. When it is thundering and
lightning, please do not use the
radio.
6. Each index of the radio is
adjusted well, so please do not
adjust the components in the
radio.
7. Use a soft cloth with detergent to
clean the cabinet. Please do not
use alcohol, thinner and other
strong detergent to clean it.
POWER
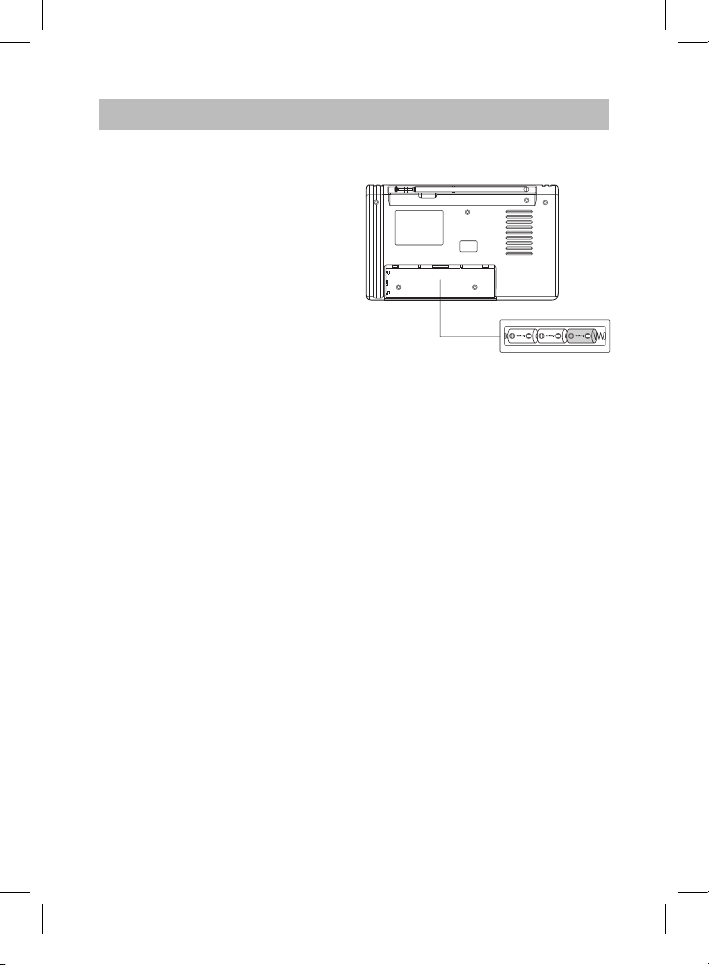
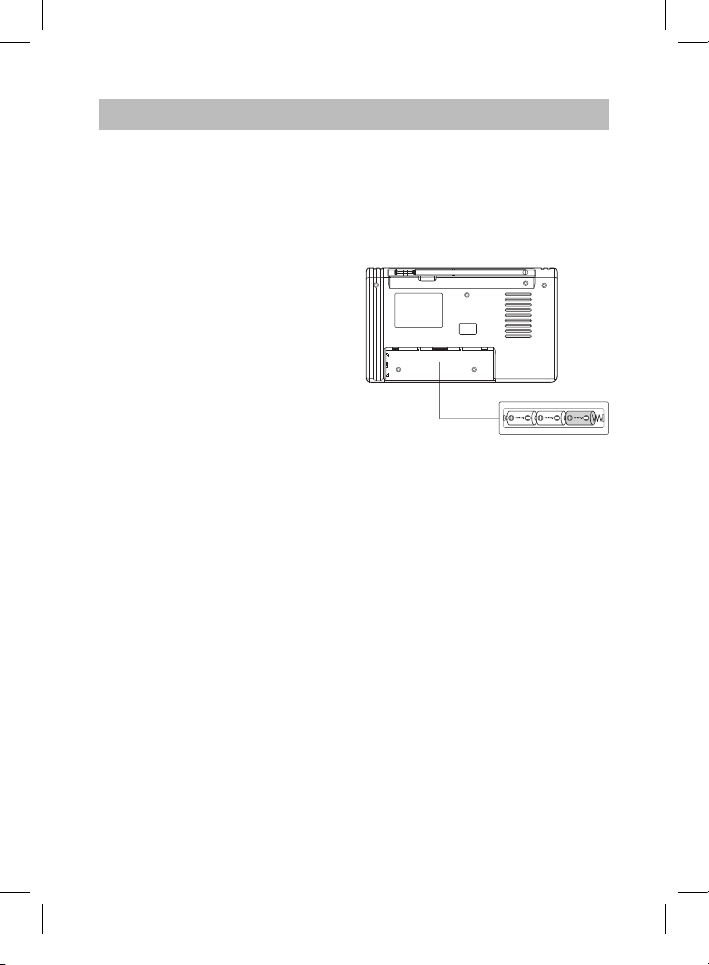
Installing batteries
1. The radio uses three UM1
batteries, please put the new
batteries in the battery slot
according to the polarity.
2. If the sound is distorted or the
volume is faint, please change
the batteries in time.
Hint: please use high quality alkaline
batteries.
Attention:
1. Do not use new and old or
batteries of different types
together.
2. In order to prevent the leakage of
the electrolysis liquid or danger of
explosion, do not charge, heat or
resolve the batteries.
. If you do not use the radio for a
long time, please take out the
batteries, lest the leakage of the
battery corrodes the parts in the
radio.
4. When the electrolysis liquid
leaked, please clear it away, and
then install new batteries.
220V External Power
When using external power, connecting the radio with the 220V outlet by a
220V external power line, the battery
supply inside the radio is cut automatically.
Attention: The mains voltage for the
radio is 180V-240V, if the voltage exceeds the range, the radio will work
abnormally.
3595IM.indd 3 09.03.2007 17:20:06
Page 4
English
4
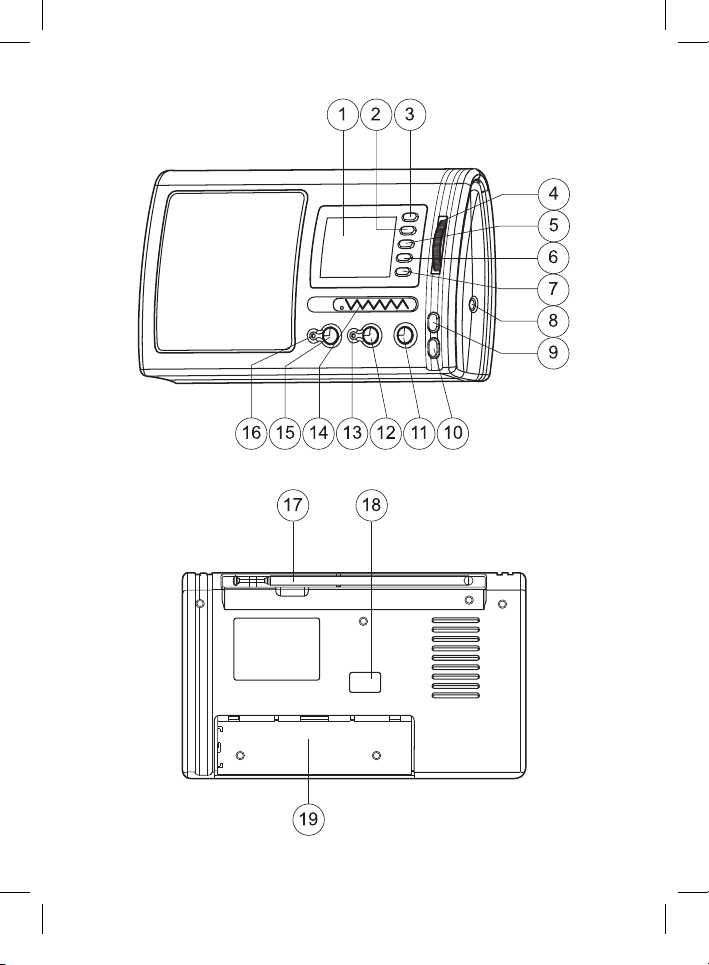
APPEARANCE DIAGRAM & FUNCTION INDICATION
1. Display screen
2. Alarm ON/OFF button
. Alarm set button
4. Tuner
5. Time set button
6. Minute adjustment button
7. Hour adjustment button
8. Earphone socket
9. Volume + button
10. Volume - button
11. Power OFF button
12. AM band/Power ON button
1. AM Indicator
14. AM Band selector
15. FM band/Power ON button
16. FM indicator
17. Telescopic antenna
18. AC power socket
19. Battery slot
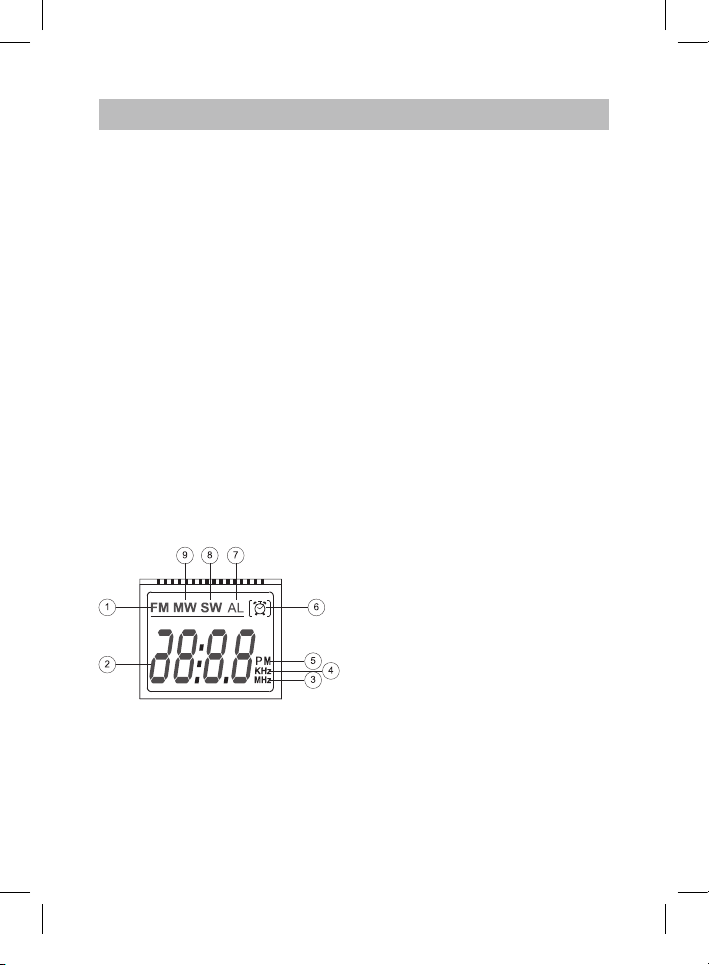
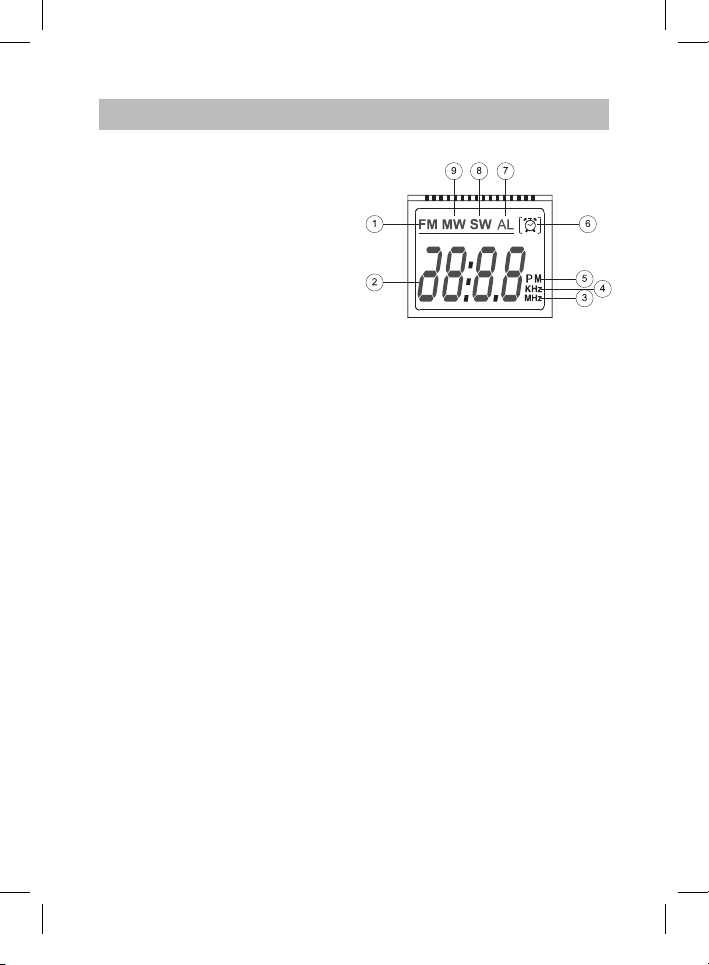
LCD EXPLANATION
1. FM band indicator
2. Frequency or time indicator
. FM and SW frequency unit
indicator
4. MW frequency unit indicator
5. Afternoon time indicator
6. Alarm ON indicator
7. Alarm time set indicator
8. SW band indicator
9. MW band indicator
RECEPTION OPERATION
1. Press the FM band/Power ON
button (15) to turn on the radio,
to receive FM band program,
meanwhile the FM indicator (16)
lights up.
2. Press the AM band/Power ON
button (12) to turn on the radio,
to receive AM band program,
meanwhile the AM indicator (1)
lights up. Move the AM Band
selector (14) to select MW, SW1-8
station program.
. In receiving state, press the VOL+
button (9)/VOL- button (10) to
adjust volume; you can select
your desired volume.
4. Turn the Tuner (4) and observe
the frequency on the display,
you can search for your desired
station program.
5. In order not to affect others, you
can use earphones to listen to
the radio. Plug the earphones
into the Earphone socket (8) (the
speaker inside the radio switches
off automatically); you can listen
to the radio by earphones.
6. When you do not want to listen
to the radio, press the Power off
button (11) to turn off the power.
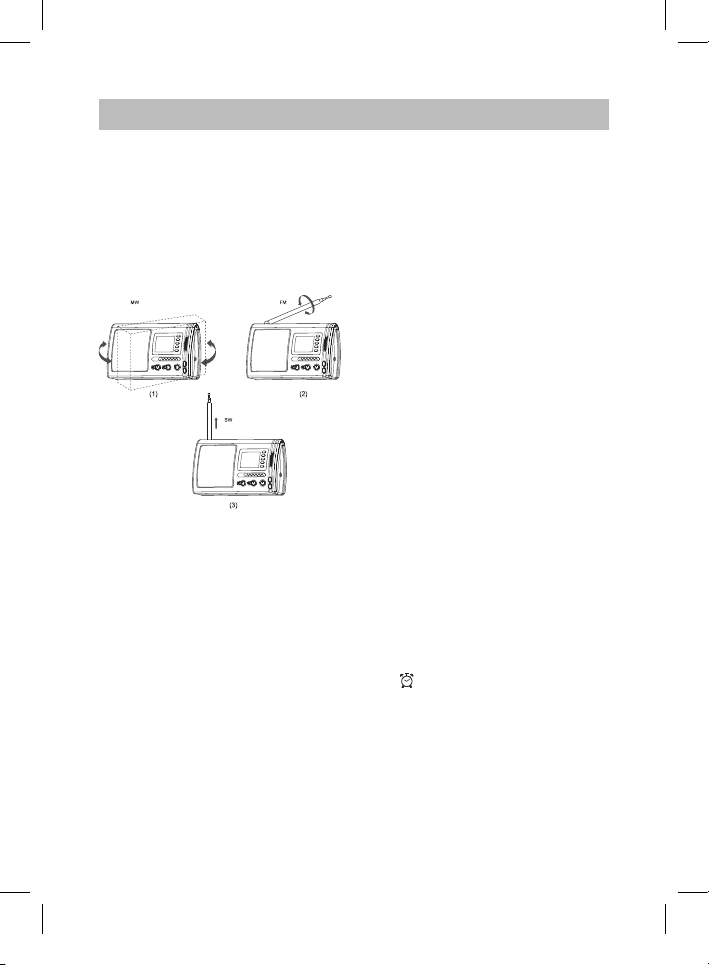
Usage of antenna
1. Receive MW stations by using the
internal magnetic antenna and
you can get the best reception by
Page 5
English
5
rotating the direction of the radio.
2. When you receive FM station,
please pull out the telescopic
antenna to get the best reception
by changing its length and angle.
. When you receive SW station,
please pull out the telescopic
antenna and keep it vertical, to
get better reception.
CLOCK SETTING
1. After installation of batteries,
in the state of clock, the 12:00
appears on the LCD.
2. To set clock time keep the
Time set button (5) pressed,
meanwhile press the Hour
adjustment button (7) to adjust
hours, or meanwhile press the
Minute adjustment button(6) to
adjust minutes.
. If you want to see the time when
the radio is working, keep the
time set button (5) pressed,
the time appears on the display
screen.
4. The 12-hour system is used in
the radio. NO PM on the display
screen means morning time,
PM on the display screen means
afternoon time.
ALARM SET TING
After you have completed to set the
electronic clock time, you can set the
alarm time:
1. In the state of clock, press
the alarm set button (), the
symbol of “AL” displays on the
display screen. Press the Hour
adjustment button (7) to adjust
hours, and press the Minute
adjustment button (6) to adjust
minutes, adjust your desired time
for the radio to turn on.
2. When the radio works, press the
alarm set button (), the alarm
time displays on the display
screen, and the symbol of “AL”
displays.
Attention: When setting the alarm
time, NO PM means morning time,
PM means afternoon time.
ALARM FUNCTIONS
1. Keep the radio in the state of
clock, press the Alarm ON/OFF
button (2) once, the symbol of
“ “ displays on the display
screen, the Alarm ON/OFF
function begins to work.
2. When the time comes, the radio
will turn on automatically, the FM
band frequency will be displayed
on the display screen.
. The radio automatically turns off
within an hour of working (When
3595IM.indd 5 09.03.2007 17:20:08
Page 6
English
6
using alarm on function).
4. If you want to turn off the radio
ahead of time, it will not turn off
even with the Power off button
pressed. Press the Alarm ON/OFF
button (2) to turn off the radio.
Attention: The alarm on function can
be used as sleep function to avoid
power wasting.
1. In the working state, press
the alarm ON/OFF button (2),
the alarm symbol “ “ will be
displayed on the LCD.
2. Set the alarm on time as clock
time, the radio will automatically
turn on and turn off within 1 hour
of working.
. Press the alarm ON/OFF (2)
button if you want to turn off the
radio ahead of time.
Specifications
1. Frequency Range
FM 87-108 MHz
MW 526.5-1606.5 KHz
SW1 5.95-6.20 MHz
SW2 7.10-7.0 MHz
SW 9.50-9.90 MHz
SW4 11.65-12.05 MHz
SW5 1.60-1.80 MHz
SW6 15.10-15.60 MHz
SW7 17.50-17.90 MHz
SW8 21.45-21.85 MHz
2. Sensitivity
FM: 22dBµ
MW: 70dBµ
SW: 8dBµ
. Single-signal Selectivity: ≥ 10dB
4. Power:
AC 220V 50Hz
DC 4.5V three UM1 batteries
5. Maximum current: ≤ 50mA
6. Speaker: Ø 92 mm/8 Ohm/1 W
7. Earphone: Ø .5 mm/ 2 Ohm.
8. Unit Size: 220 х 11 х 60 mm.
9. Weight: 655g (without battery)
The manufacturer reserves the right
to make changes to the characteristics of the device without prior notice.
The service life of the device is no
less than five years.
Guarantee
Details regarding guarantee conditions can be obtained from the
dealer from whom the appliance was
purchased. The bill of sale or receipt
must be produced when making any
claim under the terms of this guarantee.
This product conforms to
the EMC-Requirements as
laid down by the Council
Directive 89/6/EEC and
to the Low Voltage
Regulation (2/7 EEC)
Page 7
7
Deutsch
10Frequenzdigitalempfänger mit
Bereichen FM/MW/SW18 und
Wecker
Warnung
1. Schützen Sie das Gerät von
Fallen und Schlägen.
2. Setzen Sie das Gerät der
Einwirkung von Sonnenstrahlen,
Hochtemperaturen und
Feuchtigkeit nicht aus.
3. Um die zufällige Löschung der
Aufnahme und das Erscheinen
des Lärms auf dem Tonband
zu vermeiden, halten Sie das
Tonband, die Magnetkarte und
anderes schreibendes Software
möglichst weit vom Lautsprecher.
4. Im Falle, wenn
Fremdgegenstände in den
Empfänger geraten sind,
versuchen Sie nicht, sie
selbständig aus dem Gerät
herauszuziehen, wenden Sie sich
an den Fachman.
5. Benutzen Sie den Empfänger
während des Gewitters und
Blitzes nicht.
6. Alle Innenteile des Empfängers
sind ordnungsgemäß reguliert
und brauchen keine zusätzliche
Einstellung.
7. Für das Putzen benutzen Sie
den weichen mit dem neutralen
Waschmittel angefeuchten
Stoff, gebrauchen Sie Spiritus,
Verdünner und starke
Waschmittel nicht.
Stromversorgung.
1. In diesem Gerät werden 3
Batterien UM 1 gebraucht.
Bei der Einstellung der neuen
Batterien in das Batterienfach
befolgen Sie die Polung streng.
2. Wenn der Laut verstellt ist oder
das Lautniveau schwach ist,
ersetzen Sie die Batterien.
Ratschlag: benutzen Sie die
hochqualitative alkalische Batterien.
Achtung:
1. Benutzen Sie alte und
neue Batterien, Batterien
verschiedenen Typs gleichzeitig
nicht.
2. Um das Ausfließen der
Elektrolytflüssigkeit und
die Explodierungsgefahr zu
vermeiden, laden Sie die
Batterien wieder nicht auf,
wärmen Sie sie nicht und nehmen
Sie sie nicht auseinander.
3. Wenn das Gerät längere Zeit
außer Betrieb ist, ziehen Sie die
Batterien hinaus, um im Falle des
Batterienausfließens die Teile
des Empfängers nicht zu
beschädigen.
4. Im Falle des Ausfließens der
Elektrolytflüssigkeit, entfernen
Sie sie sorgfältig und stellen neue
Batterien ein.
3595IM.indd 7 09.03.2007 17:20:09
Page 8
8
Deutsch
Außenstromversorgungsquelle
(220 V).
Beim Anschließen des Empfängers
zur Außenwechselstromversorgungsquelle mit Spannung 220 V wird die
Batterienversorgung automatisch
ausgeschalten.
Achtung: Die erlaubte Spannung des
Empfängers ist 180240 V, wenn die
Spannung höher ist, wird die Arbeit
des Empfängers unstabil sein.
Schema und Steuerungsfunktionen.
1. Display.
2. Taste für Ein/Ausschaltung des
Weckers.
3. Taste für Weckereinstellung.
4. Senderwähler.
5. Taste für Zeiteinstellung.
6. Taste für Minuteneinstellung.
7. Taste für Uhreinstellung.
8. Kopfhöreranschluss.
9. Taste für Lautstärkevergrößerung.
10. Taste für Lautstärkeverringerung.
11. Taste für
Versorgungsausschaltung.
12. Taste für
Versorgungseinschaltung /
AMBereicheinschaltung.
13. Anzeiger des AMBereichs.
14. Wähler des AM Bereichs.
15. Taste für
Versorgungseinschaltung /
FMBereicheinschaltung.
16. Anzeiger des FMBereichs.
17. ausziehbare Antenne.
18. Anschluss für die Wechselstromv
ersorgungsquelle.
19. Batterienfach.
LCDBildschirm
1. Einschaltungsanzeiger des
FMBereichs.
2. Anzeiger der Frequenz oder Zeit.
3. Anzeiger der FM/ SW
Frequenzbereiche.
4. Anzeiger des
MWFrequenzbereiches.
5. Anzeiger der Vormittags/
Nachmittagzeit.
6. Anzeiger der
Weckereinschaltung.
7. Anzeiger der
Weckerzeiteinstellung.
8. Anzeiger des SWBereichs.
9. Anzeiger des MWBereichs.
Senderempfang
1. Drücken Sie die Taste für
Versorgungseinschaltung /
FMBereicheinschaltung (15), um
den Empfänger und den Empfang
der FMStationen einzuschalten,
dann leuchtet der Anzeiger des
FMBereichs (16).
2. Drücken Sie die Taste für
Versorgungseinschaltung
/AMBereicheinschaltung (12),
um den Empfänger und den
Empfang der AMStationen
Page 9

9
Deutsch
einzuschalten, dann leuchtet der
Anzeiger des FMBereichs (13).
Benutzen Sie den Wähler des
AM Bereichs (14) für die Wahl
der Programme 18 MW, SW
Bereichs.
3. Wenn der Empfänger
eingeschaltet ist, drehen
Sie den Wähler für
Lautstärkevergrößerung (9) und
Lautstärkeverringerung (10), um
die Lautstärke zu regulieren.
4. Drehend den Senderwähler
finden Sie den gewünschten
Sender (4), die Frequenz
widerspiegelt sich auf dem
Display.
5. Benutzen Sie die Kopfhörer, um
sich alleine das Radio anzuhören.
Beim Anschluss der Kopfhörer
(8) wird der Radiolautsprecher
automatisch ausgeschaltet.
6. Für die Radioausschaltung
drücken Sie die Taste für
Versorgungsausschaltung (11),
auf dem Display erscheint die
Zeit.
Antennenbetrieb.
Empfang der MWSender.
Die MWSender werden durch die
Innenmagnetantenne empfangen. Um
die beste Empfangsqualität zu erreichen, suchen Sie nach der optimalen
Antennenstellung.
Empfang der FMSender.
Die FMSender werden durch die
ausziehbare Antenne empfangen.
Ziehen Sie die Antenne aus. Um die
beste Empfangsqualität zu erreichen,
ändern Sie die Länge und den Richtungswinkel der Antenne.
Empfang der SWSender.
Die SWSender werden durch die ausziehbare Antenne empfangen. Ziehen
Sie die Antenne aus und halten sie in
senkrechter Richtung für den besten
Empfang fest.
Zeiteinstellung.
1. Nachdem Sie Batterien
eingestellt haben, erscheint auf
dem LCDBildschirm die Zeit
«12:00».
2. Um die Zeit einzustellen, drücken
Sie die Taste für Zeiteinstellung
(5), halten Sie diese Taste
fest, drücken Sie die Taste
für Uhreinstellung (7), um die
Stunden anzugeben; um die
Minuten anzugeben, drücken Sie
die Taste für Minuteneinstellung
(6).
3. Um die Zeit während des
Radiobetriebs zu sehen,
drücken Sie die Taste für die
Zeiteinstellung und halten Sie
fest.
3595IM.indd 9 09.03.2007 17:20:09
Page 10

10
Deutsch
4. Im Empfänger wird die
12Stundenuhrformat benutzt.
Das Fehlen der Leuchte «PM»
auf dem Display bedeutet
Morgenzeit. Die Leuchte «PM»
bedeutet Nachmittagszeit.
Weckereinstellung.
Nachdem Sie die Zeit der Digitaluhr
eingestellt haben, geben Sie die Zeit
des Weckers, wenn es nötig ist:
1. Im Betrieb der
Zeitwiederspiegelung
drücken Sie die Taste für
Weckereinstellung (3), auf dem
Bildschirm erscheint das Symbol
«AL» (Wecker), drücken Sie die
Taste für Uhreinstellung (7),
um die stunden anzugeben;
um die Minuten einzustellen,
drücken Sie die Taste für
Minuteneinstellung (6). Dem
Wunsch nach stellen Sie die Zeit
der Radioeinschaltung.
2. Während des Radiobetriebs
drücken Sie die Taste für
Weckereinstellung (3) und halten
Sie die fest auf dem Bildschirm
erscheint die Zeit des Weckers
und das Symbol «AL» (Wecker).
5. Achtung: Beim Einstellen des
Weckers bedeutet das Fehlen der
Leuchte «PM» auf dem Display
Morgenzeit. Die Leuchte «PM»
bedeutet Nachmittagszeit.
Funktionen des Weckers.
1. Im Betrieb der Zeiteinstellung
drücken Sie die Taste für Ein/
Ausschalten des Weckers (2)
ein Mal, auf dem Bildschirm
erscheint das Symbol , die
Funktion ist eingeschaltet.
2. Das Radio wird automatisch um
eingestellte Zeit ausgeschaltet,
auf dem Display erscheint die
Frequenz des FMBereiches.
3. Nach einer Stunde wird das
Radio automatisch ausgeschaltet
(die Weckerfunktion ist
eingeschaltet).
4. Das Radio wird bis zur
eingestellten Zeit nicht
ausgeschaltet, sogar wenn man
die Taste für Radioversorgun
gsausschaltung drückt. Dafür
muss man die Taste für Ein/
Ausschalten des Weckers (2).
Achtung: Die Funktion der Weckereinschaltung kann im Zweck der Energiesparung verwendet werden.
1. Im Radiobetrieb drücken Sie die
Taste für Ein/Ausschalten des
Weckers (2), auf dem Display
erscheint das Symbol .
2. Stellen Sie die Zeit der
Weckereinschaltung auf die
laufende Zeit um, das Radio wird
automatisch in einer Stunde ein
und ausgeschaltet.
3. Drücken Sie die Taste für Ein/
Ausschaltung des Weckers
(2), um das Radio bis zur
eingestellten Zeit auszuschalten.
Technische Charakteristiken.
1. Frequenzbereich.
FM: 87108 mHz.
MW: 526.51606.5 kHz.
SW1:5.956.20 mHz.
Page 11

11
Deutsch
SW2:7.107.30 mHz.
SW3:9.509.90 mHz.
SW4:11.6512.05 mHz.
SW5:13.6013.80 mHz.
SW6:15.1015.60 mHz.
SW7:17.5017.90 mHz.
SW8:21.4521.85 mHz.
2. Empfindlichkeit.
FM: 22 Dezibelµ .
MW: 70 Dezibelµ.
SW: 38 Dezibelµ.
3. Selektivität: ≥ 10 Dezibel.
4. Leistung:
AC: 220 V, 50 Hz.
DC: 3 Batterien, 4.5 V.
5. Gebrauchter Strom (max):
≤ 350 mA
6. Lautsprecher: Ø 92 mm/8 Ohm/
1 Watt.
7. Kopfhörer: Ø 3.5 mm/ 32 Ohm.
8. Größe: 220 * 131 * 60 mm.
9. Gewicht: 655 g (ohne Batterien).
Da dieser Artikel ständig perfektioniert wird, behalten wir uns das Recht vor an
seiner Konstruktion und/oder den technischen Kennwerten Änderungen ohne
Vorbescheid vorzunehmen.
DIE LEBENSDAUER DES GERÄTES BETRÄGT NICHT WENIGER ALS 5 JAHRE
Gewährleistung
Ausführliche Bedingungen der Gewährleistung kann man beim Dealer, der diese
Geräte verkauft hat, bekommen. Bei beliebiger Anspruchserhebung soll man
während der Laufzeit der vorliegenden Gewährleistung den Check oder die
Quittung über den Ankauf vorzulegen.
Das vorliegende Produkt entspricht den Forderungen
der elektromagnetischen Verträglichkeit, die in 89/336/EWG Richtlinie des Rates und den Vorschriften 23/73/EWG über die
Niederspannungsgeräte vorgesehen sind.
3595IM.indd 11 09.03.2007 17:20:10
Page 12

12
Русский
10-частотный цифровой ресивер
с диапазонами FM/MW/SW 1-8 и
будильником
Меры предосторожности
1. Оберегайте прибор от ударов и
падений.
2. Не подвергайте радиоприемник воздействию прямых
солнечных лучей, высоких температур и влажности.
. Во избежание случайного сти-
рания записи и появления шумов на магнитной ленте держите магнитную ленту, магнитную
карту и другое записывающее
программное обеспечение
подальше от динамика.
4. В случае попадания в радиоприемник посторонних предметов не пытайтесь вынуть их
самостоятельно, обратитесь за
помощью к квалифицированному специалисту.
5. Не пользуйтесь радиоприемником во время грозы.
6. Все компоненты внутри радиоприемника отрегулированы должным образом и не
нуждаются в дополнительной
настройке.
7. Для чистки корпуса используйте мягкую ткань, смоченную
нейтральным моющим средством, не следует использовать
спирт, разбавитель и сильные
моющие средства.
Питание
Установка батарей
1. В данном радиоприемнике используются три батареи UM1.
При установке новых батарей в
батарейный отсек строго соблюдайте полярность.
2. Если звук искажен или уровень
звучания слабый, замените
батареи.
Совет: используйте высококачест-
венные щелочные батареи.
Внимание!
1. Не используйте новые и старые
батареи, батареи разного типа
одновременно.
2. Во избежание утечки электролитической жидкости или
опасности взрыва не перезаряжайте, не нагревайте и не
разбирайте батареи.
. Если радиоприемник не ис-
пользуется в течение долгого
времени, выньте батареи, чтобы в случае утечки батарей не
повредить детали радиоприемника.
4. Если произошла утечка электролитической жидкости, тщательно удалите ее и установите
новые батареи.
Внешний источник питания (220 В)
При подсоединении радиоприемника к внешнему источнику питания
переменного тока с напряжением
220 В питание от батарей автоматически отключается.
220 AC Power Socket - гнездо для
подключения источника питания
переменного тока 220 В.
AC Power Jack - разъем для подключения источника питания переменного тока.
Внимание! Допустимое напряжение
Page 13

1
Русский
радиоприемника 180-240 В. Если
напряжение превышает допустимое, работа радиоприемника будет
нестабильной.
Схема и функции управления
1. Дисплей
2. Кнопка включения/выключения
будильника
. Кнопка установки будильника
4. Тюнер
5. Кнопка установки времени
6. Кнопка установки минут
7. Кнопка установки часов
8. Гнездо для подключения наушников
9. Кнопка увеличения громкости
10. Кнопка уменьшения громкости
11. Кнопка отключения питания
12. Кнопка включения питания /
AM-диапазона
1. Индикатор AM-диапазона
14. Переключатель AM-диапазона
15. Кнопка включения питания /
FM-диапазона
16. Индикатор FM-диапазона
17. Телескопическая антенна
18. Гнездо для подключения источника питания переменного
тока
19. Батарейный отсек
ЖК-дисплей
1. Индикатор включения FM-диапазона
2. Индикатор частоты или времени
. Индикатор частоты FM- и SW-
диапазонов
4. Индикатор частоты MW-диапазона
5. Индикатор времени до/после
полудня
6. Индикатор включения будильника
7. Индикатор установки времени
будильника
8. Индикатор SW-диапазона
9. Индикатор MW-диапазона
Прием радиостанций
1. Нажмите кнопку включения питания /FM-диапазона (15), чтобы включить радиоприемник и
прием FM-станций, загорится
индикатор питания (16).
2. Нажмите кнопку включения
питания AM-диапазона (12),
чтобы включить радиоприемник и прием AM-станций, загорится индикатор питания (1).
Используйте переключатель
частот (14) для выбора программ 1-8 диапазона MW, SW.
. Когда радиоприемник включен,
поворачивайте регулятор увеличения (9) и уменьшения (10)
громкости для настройки необходимого уровня громкости.
4. Вращая ручку тюнера (4), выберите желаемую станцию; частота станции будет отображаться
на экране.
5. Для индивидуального прослушивания радио используйте
наушники. При включении наушников в разъем (8) автоматически отключается динамик
радио.
6. Для выключения радио нажмите кнопку отключения питания
(11), на экране отобразится
время.
3595IM.indd 13 09.03.2007 17:20:10
Page 14

14
Русский
Использование антенны
Прием MW-станций
Прием MW-станций осущест-
вляется с помощью внутренней
магнитной антенны. Наилучшего приема можно добиться,
изменяя положение радиоприемника.
Прием FM-станций
Прием FM-станций осущест-
вляется с помощью телескопической антенны. Вытяните
антенну. Наилучшего приема
можно добиться, изменяя длину и угол направления антенны.
Прием SW-станций
Прием SW-станций осущест-
вляется с помощью телескопической антенны. Вытяните
антенну и зафиксируйте ее в
вертикальном положении для
достижения наилучшего приема.
Установка времени
1. После установки батарей на
ЖК-дисплее отобразится время - «12:00».
2. Чтобы установить нужное время, нажмите кнопку установки
времени (5) и, удерживая ее
в таком положении, нажмите
кнопку установки часов (7) для
установки часов; для установки
минут нажмите кнопку установки минут (6).
. Для того чтобы увидеть время
во время работы радио, нажмите и удерживайте кнопку
установки времени (5).
4. В радиоприемнике используется формат времени «12 часов».
Отсутствие индикатора PM на
дисплее означает утреннее
время. Индикатор PM означает
время после полудня.
Установка будильника
После завершения установки
времени электронных часов
установите время будильника,
если это необходимо:
1. В режиме отображения времени нажмите кнопку установки
будильника (), на экране
отобразится символ «AL» (будильник), нажмите кнопку установки часов (7) для установки
часов, для установки минут
нажмите кнопку установки минут (6). По желанию установите
время включения радио.
2. Во время работы радио нажмите кнопку установки будильника () и удерживайте ее в
таком положении - на экране
отобразится время будильника
и символ «AL» (будильник).
Внимание! При установке времени
будильника отсутствие индикатора
PM на экране означает утреннее
время, PM означает время после
полудня.
Функции будильника
1. В режиме установки времени
нажмите кнопку включения/выключения будильника (2) один
раз, на экране отобразится
символ , функция включена.
2. Радио автоматически включит-
Page 15

15
Русский
ся в установленное время, на
экране отобразится частота
FM-диапазона.
. По истечении часа работы радио
автоматически отключится (функция будильника включена).
4. Радио не отключится до установленного времени даже при
нажатии кнопки отключения
питания радио; для его выключения нажмите кнопку включения/выключения будильника
(2).
Внимание! Функция включения бу-
дильника может использоваться в целях экономии энергии.
1. В режиме работы радио нажмите кнопку включения/выключения будильника (2), на
экране отобразится символ .
2. Переведите время включения
будильника на текущее время,
радио автоматически будет
включаться и выключаться по
истечении одного часа работы.
. Нажмите кнопку включения/
выключения будильника (2),
чтобы выключить радио до
установленного времени.
Технические характеристики
1. Диапазон частот
FM: 87-108 МГц
MW: 526.5-1606.5 кГц
SW1:5.95-6.20 МГц
SW2:7.10-7.0 МГц
SW:9.50-9.90 МГц
SW4:11.65-12.05 МГц
SW5:1.60-1.80 МГц
SW6:15.10-15.60 МГц
SW7:17.50-17.90 МГц
SW8:21.45-21.85 МГц
2. Чувствительность
FM: 22 дБµ
MW: 70 дБµ
SW: 8 дБµ
. Избирательность: ≥ 10 дБ
4. Мощность:
AC: 220 В, 50 Гц
DC: батареи по 4.5 В
5. Потребляемый ток (максимум):
≤ 50 мА
6. Динамик: Ø 92 мм/8 Ом/1 Вт
7. Наушники: Ø .5 мм/ 2 Ом
8. Размер: 220 х 11 х 60 мм
9. Вес: 655 г (без батарей)
Производитель оставляет за собой
право изменять характеристики
прибора без предварительного
уведомления.
Срок службы прибора не менее
5-ти лет.
Данное изделие соответствует
всем требуемым европейским и
российским стандартам безопасности и гигиены.
Производитель:
АНДЕР ПРОДАКТС ГмбХ,
Австрия
Нойбаугюртель, 8/7А
1070, Вена, Австрия
3595IM.indd 15 09.03.2007 17:20:11
Page 16

16
Україньский
10-частотний цифровий ресівер
з діапазонами FM/MW/SW1-8 і
будильником
Запобіжні заходи
1. Оберігайте прилад від ударів і
падінь.
2. Не піддавайте радіоприймач
впливу прямих сонячних променів, високих температур і
вологості.
. Задля уникнення випадкового
стирання запису і появи шумів
на магнітній стрічці, тримайте
магнітну стрічку, магнітну карту
та інше записуюче програмне
забезпечення подалі від динаміка.
4. У випадку попадання в
радіоприймач посторонніх
предметів, не намагайтесь вийняти їх самостійно, зверніться
по допомогу до кваліфікованого
спеціаліста.
5. Не користуйтесь радіоприймачем під час грози і блискавки.
6. Всі компоненти всередині
радіоприймача відрегульовані
належним чином і не потребують додаткового налаштування.
7. Для чищення корпусу використовуйте м'яку тканину, змочену
нейтральним миючим засобом,
не слід використовувати спирт,
розріджувач і сильні миючі засоби.
Живлення.
Встановлення батарей.
1. В даному радіоприймачі використовуються три батареї UM 1.
При встановленні нових батарей в батарейний відсік суворо
дотримуйтесь полярності.
2. Якщо звук викривлений або рівень звучання слабкий, замініть
батареї.
Порада: використовуйте високоякісні лужні батареї.
Увага:
1. Не використовуйте нові і старі
батареї або батареї різного
типу одночасно.
2. Задля уникнення витоку електролітичної рідини або небезпеки вибуху, не перезаряджайте,
не нагрівайте і не розбирайте
батареї.
. Якщо радіоприймач не вико-
ристовується протягом тривалого часу, вийміть батареї, щоб
у випадку витоку батарей не
пошкодити деталі радіоприймача.
4. У випадку витоку електролітичної рідини, ретельно видаліть її і
встановіть нові батареї.
Зовнішнє джерело живлення
(220 в).
При, під'єднанні радіоприймача до
зовнішнього джерела живлення
змінного струму з напругою 220 в,
живлення від батарей автоматично
відключається.
220 AC Power Socket - гніздо для
підключення джерела живлення
змінного струму 220 в.
AC Power Jack - роз'єм для підключення джерела живлення змінного
струму.
Page 17

17
Україньский
Увага: припустима напруга
радіоприймача 180-240 в, якщо
напруга перевищує припустиму,
робота радіоприймача буде нестабільною.
Схема и функції керування.
1. Дисплей.
2. Кнопка увімкнення/вимкнення
будильника.
. Кнопка встановлення будиль-
ника.
4. Тюнер.
5. Кнопка встановлення часу.
6. Кнопка встановлення хвилин.
7. Кнопка встановлення годинника.
8. Гніздо для підключення навушників.
9. Кнопка збільшення гучності.
10. Кнопка зменшення гучності.
11. Кнопка відключення живлення.
12. Кнопка увімкнення живлення /
AM діапазону.
1. Індикатор AM діапазону.
14. Перемикач AM діапазону.
15. Кнопка увімкнення живлення /
FM діапазону.
16. Індикатор FM діапазону.
17. Телескопічна антена.
18. Гніздо для підключення джерела живлення змінного струму.
19. Відсік для батарейок.
ЖК-дисплей
1. Індикатор увімкнення FM діапазону.
2. Індикатор частоти або часу.
. Індикатор частоти FM і SW діа-
пазонів.
4. Індикатор частоти MW діапазону.
5. Індикатор часу до/після полудня.
6. Індикатор увімкнення будильника.
7. Індикатор встановлення часу
будильника.
8. Індикатор SW діапазону.
9. Індикатор MW діапазону.
Прийом радіостанцій
1. Натисніть кнопку увімкнення
живлення /FM діапазону частот
(15), щоб увімкнути радіоприймач і прийом FM станцій,
загориться індикатор живлення
(16).
2. Натисніть кнопку увімкнення
живлення /AM діапазону частот
(12), щоб увімкнути радіоприймач і прийом AM станцій, загориться індикатор живлення (1).
Використовуйте перемикач
частот (14) для вибору програм
1-8 діапазону MW, SW.
. Коли радіоприймач увімкне-
ний, повертайте регулятор
збільшення (9) і зменшення
(10) гучності для налаштування
необхідного рівня гучності.
4. Обертаючи ручку тюнера,
оберіть бажану станцію (4),частота станції буде відображатись
на екрані.
5. Для індивідуального прослуховування радіо, використовуйте
навушники. При увімкненні
навушників в роз'єм (8), автоматично відключається динамік
радіо.
6. Для вимкнення радіо натисніть
кнопку відключення живлення
(11), на екрані відобразиться
час.
3595IM.indd 17 09.03.2007 17:20:12
Page 18

18
Україньский
Використання антени.
Прийом MW станцій.
Прийом MW станцій здійснюється
за допомогою внутрішньої магнітної
антени. Найкращого прийому можна добитись, змінюючи положення
радіоприймача.
Прийом MW станцій.
Прийом FM станцій здійснюється за
допомогою телескопічної антени.
Втягніть антену. Найкращого прийому можна добитись, змінюючи
довжину і кут спрямування антени.
Прийом SW станцій.
Прийом SW станцій здійснюється за
допомогою телескопічної антени.
Витягніть антену і зафіксуйте її в
вертикальному положенні для досягнення найкращого прийому.
Встановлення часу.
1. Після встановлення батарей на
РК-дисплеї відобразиться час
- «12:00».
2. Щоб встановити потрібний час
натисніть кнопку встановлення часу (5), і, утримуючи її в
такому положенні, натисніть
кнопку встановлення годин (7)
для встановлення годин; для
встановлення хвилин натисніть
кнопку встановлення хвилин
(6).
. Для того щоб побачити час під
час роботи радіо натисніть і
утримуйте кнопку встановлення часу.
4. В радіоприймачі використовується формат часу 12 годин.
Відсутність індикатора «PM» на
дисплеї означає ранковий час.
Індикатор «PM» означає час
після полудня.
Встановлення будильника.
Після завершення встановлення
часу електронного годинника,
встановіть час будильника, якщо це
необхідно:
1. В режимі відображення часу
натисніть кнопку встановлення будильника (), на екрані
відобразиться символ «AL»
(будильник), натисніть кнопку
встановлення годин (7) для
встановлення годин; для встановлення хвилин натисніть
кнопку встановлення хвилин
(6).За бажанням встановіть час
увімкнення радіо.
2. Під час роботи радіо натисніть
кнопку встановлення будильника () і утримуйте її в такому
положенні - на екрані відобразиться час будильника і символ
«AL» (будильник).
Увага: При встановленні часу будильника, відсутність індикатора
PM на екрані означає ранковий час,
PM означає час після полудня.
Функції будильника
1. В режимі встановлення часу
натисніть кнопку увімкнення/
Page 19

19
Україньский
вимкнення будильника (2) один
раз, на екрані відобразиться
символ , функція увімкнена.
2. У встановлений час автоматично увімкнеться радіо, на екрані
відобразиться частота FM діапазону.
. Після години роботи радіо ав-
томатично відключиться (функція будильника увімкнена).
4. Радіо не відключиться до встановленого часу, навіть при
натисканні кнопки відключення живлення радіо, для його
вимкнення натисніть кнопку
увімкнення/вимкнення будильника (2).
Увага: Функція увімкнення будиль-
ника може використовуватись з
метою економії енергії.
1. В режимі роботи радіо натисніть кнопку увімкнення/
вимкнення будильника (2), на
екрані відобразиться символ .
2. Переведіть час увімкнення
будильника на поточний час,
радіо автоматично буде вмикатись і вимикатись після однієї
години роботи.
. Натисніть кнопку увімкнення/
вимкнення будильника (2), щоб
вимкнути радіо до встановленого часу.
Технічні характеристики.
1. Діапазон частот.
FM: 87-108 мГц.
MW: 526.5-1606.5 кГц.
SW1:5.95-6.20 мГц.
SW2:7.10-7.0 мГц.
SW:9.50-9.90 мГц.
SW4:11.65-12.05 мГц.
SW5:1.60-1.80 мГц.
SW6:15.10-15.60 мГц.
SW7:17.50-17.90 мГц.
SW8:21.45-21.85 мГц.
2. Чутливість.
FM: 22 дБµ .
MW: 70 дБµ.
SW: 8 дБµ .
. Вибірковість: ≥ 10 дБ.
4. Потужність:
AC: 220 в, 50 Гц.
DC: батареї по 4.5 в.
5. Споживаний струм (максимум):
≤ 50 мА.
6. Динамік: Ø 92 мм/8 Ом /1 вт.
7. Навушники: Ø .5 мм/2 Ом.
8. Розмір: 220 х 11 х 60 мм.
9. Вага: 655 г (без батарей).
Виробник залишає за собою право
змінювати характеристики приладу
без попереднього повідомлення.
Строк служби приладу не менше
5-ти років.
Гарантія
Докладні умови гарантії можна отримати в дилера, що продав дану
апаратуру. При пред’явленні будьякої претензії протягом терміну дії
даної гарантії варто пред’явити чек
або квитанцію про покупку.
Даний виріб відповідає
вимогам до електромаг
нітної сумісності, що
пред’являються директи-
вою 89/6/ ЄЕС Ради
Європий розпорядженням 2/7
ЄЕС по низьковольтних апаратурах.
3595IM.indd 19 09.03.2007 17:20:13
Page 20

20
Қазақ
FM/MW/SW1-8 диапазондары және
оятқыш сағаты бар 10 жиілікті
сандық ресивер
Сақтық шаралары
1. Аспапты соққыдан және құлап
кетуден сақтаңыз.
2. Радиоқабылдағышты тікелей
күн сәулесінің, жоғары
температураның және
ылғалдылықтың ықпалына
ұшыратпаңыз.
3. Жазбаның кездейсоқ өшіп
қалуына және магниттік таспада
шуылдардың пайда болуына жол
бермеу үшін магнит таспасын,
магнит картасын және басқа
жазып алатын бағдарламалық
құралдарды динамиктерден
алшақ ұстаңыз.
4. Радиоқабылдағышқа бөтен
заттар түскен жағдайда,
оларды өз бетіңізше шығаруға
тырыспаңыз, білікті маманның
көмегіне жүгініңіз.
5. Найзағай кезінде
радиоқабылдағышты
пайдаланбаңыз.
6. Радиоқабылдағыштың барлық
құрамбөліктері тиісті түрде
реттелген және қосымша
баптауды қажет етпейді.
7. Корпусты тазалау үшін бейтарап
жуу құралында малынған жұмсақ
шүберекті пайдаланыңыз,
спирт, еріткіш және қатты жуу
құралдарын пайдаланбаған жөн.
Қорек.
Батареяларды салу.
1. Осы радиоқабылдағышта
UM 1 түріндегі үш батарея
пайдаланылады. Жаңа
батареяларды салу кезінде
полярлықты қатаң сақтаңыз.
2. Егер дыбыс бұрмаланса не
болмаса дыбыс деңгейі тым
әлсіз болса, батареяларды
айырбастаңыз.
Кеңес: жоғары сапалы сілтілік
батареяларды пайдаланыңыз.
Назар аударыңыз:
1. Жаңа және ескі не болмаса әр
түрлі типтегі батареяларды қатар
пайдаланбаңыз.
2. Электролит сұйықтығының
төгілуіне жол бермеу үшін
не болмаса жарылыс қаупін
туғызбау үшін батареяларды
қайта зарядтамаңыз,
қыздырмаңыз және
бөлшектемеңіз.
3. Егер радиоқабылдағыш ұзақ
уақыт бойы пайдаланылмайтын
болса, одан батареяларды
шығарыңыз, бұл батарея
ағып кеткен жағдайда
радиоқабылдағыштың
бөлшектерін зақымдамау үшін
қажет.
4. Электролит сұйықтығы төгілген
жағдайда оны жақсылап сүртіп
алыңыз және жаңа батареялар
салыңыз.
Сыртқы қорек көзі (220 в).
Радиоқабылдағышты кернеуі 220 в.
болатын айнымалы ток сыртқы қорек
көзіне қосқан жағдайда батареядан
қоректену автоматты түрде өшеді.
220 AC Power Socket - 220 в.
кернеудегі айнымалы ток қорек көзін
қосуға арналған ұяшық.
Page 21

21
Қазақ
AC Power Jack – айнымалы ток қорек
көзін қосуға арналған ағытпа.
Назар аударыңыз:
радиоқабылдағыштың рауалы
кернеуі 180-240 в, егер кернеу
рұқсат етілгеннен асып түсетін болса,
радиоқабылдағыштың жұмысы
тұрақты болмайды.
Схемасы және басқару
функциялары.
1. Дисплей.
2. Оятқыш сағатты қосу/өшіру
батырмасы.
3. Оятқыш сағатты орнату
батырмасы.
4. Тюнер.
5. Уақытты орнату батырмасы.
6. Минутты орнату батырмасы.
7. Сағатты орнату батырмасы.
8. Құлақаспап қосуға арналған
ұяшық.
9. Дыбыс қаттылығын ұлғайту
батырмасы.
10. Дыбыс қаттылығын азайту
батырмасы.
11. Қоректі өшіру батырмасы.
12. Қоректі қосу/AM жиіліктер
диапазонының батырмасы.
13. AM диапазонының индикаторы.
14. AM диапазонын
ауыстырыпқосқыш.
15. Қоректі қосу/FM жиіліктер
диапазонының батырмасы.
16. FM диапазонының индикаторы.
17. Телескоптық антенна.
18. Айнымалы ток қорек көзін қосуға
арналған ұяшық.
19. Батарея салатын бөлім.
СК-дисплей
1. FM диапазонын қосу
индикаторы.
2. Жиілік немесе уақыт индикаторы.
3. FM және SW жиіліктер
диапазонының индикаторы.
4. MW жиіліктер диапазонының
индикаторы.
5. Түске дейінгі/түстен кейінгі уақыт
индикаторы.
6. Оятқыш сағатты қосу
индикаторы.
7. Оятқыш сағатты орнату
индикаторы.
8. SW диапазонының индикаторы.
9. MW диапазонының индикаторы.
Радиостанцияны қабылдау
1. Радиоқабылдағышты және FM
станцияны қабылдауды қосу үшін
қоректі қосу/FM диапазонының
батырмасын (15) басыңыз, қорек
индикаторы жанады (16).
2. Радиоқабылдағышты және АM
станцияны қабылдауды қосу үшін
қоректі қосу/AM диапазонының
батырмасын (12) басыңыз,
қорек индикаторы жанады (13).
MW, SW диапазонының 1-8
бағдарламаларын таңдау үшін
жиіліктерді ауыстырыпқосқышты
(14) пайдаланыңыз.
3. Радиоқабылдағыш қосулы
тұрғанда, қажетті дыбыс деңгейін
баптау үшін дыбыс қаттылығын
ұлғайту (9) немесе азайту (10)
реттегішін айналдырыңыз.
4. Тюнер тұтқасын айналдыра
отырып, қалаған станцияңызды
таңдап алыңыз (4), станция
жиілігі экранда бейнеленетін
болады.
5. Радионы дербес тыңдау үшін
құлақаспап қолданыңыз.
3595IM.indd 21 09.03.2007 17:20:13
Page 22

22
Қазақ
Құлақаспапты құлақаспап
салынатын ағытпаға (8) салыңыз,
радионың динамигі автоматты
түрде сөнеді.
6. Радионы өшіру үшін қоректі
өшіру (11) батырмасын басыңыз,
экранда уақыт бейнеленеді.
Антеннаны пайдалану.
MW станцияларды қабылдау.
MW станцияларды қабылдау ішкі
магнит антеннасының көмегімен
жүргізіледі. Радиоқабылдағыштың
жағдайын өзгерте отырып, жақсы
қабылдауға қол жеткізуге болады
(1-сурет).
FM станцияларды қабылдау.
FM станцияларды қабылдау
телескоптық антеннаның көмегімен
жүргізіледі. Антеннаны шығарыңыз.
Жақсы қабылдауға антеннаның
ұзындығын және антеннаны бағыттау
бұрышын өзгерту арқылы қол
жеткізуге болады (2-сурет).
SW станцияларды қабылдау.
SW станцияларды қабылдау
телескоптық антеннаның көмегімен
жүргізіледі. Антеннаны ұзартыңыз және
жақсы қабылдауға қол жеткізу үшін оны
тік жағдайда бекітіңіз (3-сурет).
Уақытты орнату.
1. Батареяларды салғаннан кейін
СК-дисплейде уақыт бейнеленеді
- «12:00».
2. Қажетті уақытты орнату үшін
уақытты орнату батырмасын
(5) басыңыз және оны сол
күйде басып, ұстап тұрыңыз,
сағатты орнату үшін сағатты
орнату батырмасын (7) басыңыз;
минутты орнату үшін минутты
орнату батырмасын (6) басыңыз.
3. Радионы тыңдау кезінде уақытты
көру үшін уақытты орнату
батырмасын басып, ұстап
тұрыңыз.
4. Радиоқабылдағышта 12 сағат
уақыт форматы қолданылады.
Дисплейде «PM» индикаторының
болмауы таңғы уақытты білдіреді.
«PM» индикаторы түстен кейінгі
уақытты білдіреді.
Оятқыш сағатты орнату
Электронды сағаттың уақытын
орнатуды аяқтағаннан кейін оятқыш
сағат уақытын орнатуға болады (еге
қажет болса):
1. Уақытты бейнелеу режимінде
оятқыш сағатты орнату батырмасын
(3) басыңыз, экранда «AL» (оятқыш
сағат) символы бейнеленеді,
сағатты орнату үшін сағатты орнату
батырмасын (7) басыңыз; минутты
орнату үшін минутты орнату
батырмасын (6) басыңыз. Қалауыңыз
бойынша радио қосылатын уақытты
орнатыңыз.
2. Радио жұмыс істеп жатқанда
оятқыш сағатты орнату батырмасын
(3) басыңыз және оны сол күйде
басып ұстап тұрыңыз – экранда
оятқыш сағат уақыты және «AL»
(оятқыш сағат) символы шығады.
Назар аударыңыз: Оятқыш сағат
уақытын орнату кезінде «PM»
индикаторының болмауы таңғы
Page 23

2
Қазақ
уақытты білдіреді. «PM» индикаторы
түстен кейінгі уақытты білдіреді.
Оятқыш сағат функциясы.
1. Уақытты орнату режимінде
оятқыш сағатты қосу/өшіру
батырмасын (2) бір рет басыңыз,
экранда символы пайда
болады, функция қосылады.
2. Радио автоматты түрде
белгіленген уақытта қосылады,
экранда FM диапазон жиілігі
бейнеленеді.
3. Бір сағат жұмыстан кейін радио
автоматты түрде өшеді (оятқыш
сағат функциясы қосылады).
4. Радио қорегін өшіру батырмасын
басқан кезде де радио
белгіленген уақытқа дейін
өшпейді, оны өшіру үшін оятқыш
сағатты қосу/өшіру батырмасын
(2) басыңыз.
Назар аударыңыз: Оятқыш сағатты
қосу функциясы энергияны үнемдеу
мақсатында пайдаланылуы мүмкін.
1. Радио жұмысы режимінде
оятқыш сағатты қосу/өшіру
батырмасын (2) басыңыз,
экранда символы шығады.
2. Оятқыш сағатты қосу уақытын
ағымдағы уақытқа ауыстырыңыз,
радио бір сағат жұмыстан кейін
автоматты түрде қосылатын және
өшетін болады.
3. Белгіленген уақытқа дейін
радионы өшіру үшін оятқыш
сағатты қосу/өшіру батырмасын
(2) басыңыз.
Техникалық сипаттамалары.
1. Жиіліктер диапазоны.
FM: 87-108 мГц.
MW:526.5-1606.5 кГц.
SW1:5.95-6.20 мГц.
SW2:7.10-7.30 мГц.
SW3:9.50-9.90 мГц.
SW4:11.65-12.05 мГц.
SW5:13.60-13.80 мГц.
SW6: 15.10-15.60 мГц.
SW7:17.50-17.90 мГц.
SW8:21.45-21.85 мГц.
2. Сезгіштігі.
FM:22 дБµ .
MW: 70 дБµ.
SW: 38 дБµ .
3. Іріктемелігі: ≥ 10 дБ.
4. Қуаты:
AC: 220 в, 50 Гц.
DC: 3 батарея, 4.5 в.
5. Тұтынылатын ток (максимум):
≤ 350 мА.
6. Динамик: Ø 92 мм/8 Ω/1 вт.
7. Құлақаспап: Ø 3.5 мм/ 32 Ω.
8. Өлшемі: 220 х 131 х 60 мм.
9. Салмағы: 655 г (батареяларсыз).
Өндіруші өз артынан құқықты
қалдырады аспаптың сипаттмаларды
өзгертуге алдына ескертпесіз.
Аспаптың жұмыс мерзімі 5 жылдан
кем емес.
Гарантиялық мiндеттiлiгi
Гарантиялық жағдайдағы қаралып
жатқан бөлшектер дилерден тек
сатып алынған адамға ғана берiледi.
Осы гарантиялық мiндеттiлiгiндегi
шағымдалған жағдайда төлеген чек
немесе квитанциясын көрсетуi қажет.
Бұл тауар ЕМС
– жағдайларға сәйкес
келедi негiзгi Мiндеттеме
лер 89/336/EEC
Дерективаның
ережелерiне енгiзiлген
Төменгi Ережелердiң
Реттелуi (73/23 EEC)
3595IM.indd 23 09.03.2007 17:20:14
Page 24

GB
A production date of the item is indicated in the serial number on the technical
data plate. A serial number is an eleven-unit number, with the first four figures
indicating the production date. For example, serial number 0606ххххххх means
that the item was manufactured in June (the sixth month) 2006.
DE
Das Produktionsdatum ist in der Seriennummer auf dem Schild mit technischen
Eigenschaften dargestellt. Die Seriennummer stellt eine elfstellige Zahl dar, die
ersten vier Zahlen bedeuten dabei das Produktionsdatum. Zum Beispiel bedeutet
die Seriennummer 0606xxxxxxx, dass die Ware im Juni (der sechste Monat) 2006
hergestellt wurde.
RUS
Дата производства изделия указана в серийном номере на табличке
с техническими данными. Серийный номер представляет собой
одиннадцатизначное число, первые четыре цифры которого обозначают
дату производства. Например, серийный номер 0606ххххххх означает, что
изделие было произведено в июне (шестой месяц) 2006 года.
Kz
Бұйымның шығарылған мерзімі техникалық деректері бар кестедегі сериялық
нөмірде көрсетілген. Сериялық нөмір он бір саннан тұрады, оның бірінші
төрт саны шығару мерзімін білдіреді. Мысалы, сериялық нөмір 0606ххххххх
болса, бұл бұйым 2006 жылдың маусым айында (алтыншы ай) жасалғанын
білдіреді.
UA
Дата виробництва виробу вказана в серійному номері на табличці з
технічними даними. Серійний номер представляє собою одинадцятизначне
число, перші чотири цифри якого означають дату виробництва. Наприклад,
серійний номер 0606ххххххх означає, що виріб був виготовлений в червні
(шостий місяць) 2006 року.
 Loading...