

Visara 5350 Installation

CCA-3074 Channel Console Appliance
Installation and Configuration
P/N 707161-003


CCA-3074 Installation and Configuration
Revision Information
Issue/Revision Schedule
Comments Revision Number Date
Initial Release 707160-001 02/07/2012
Second Release 707160-002 03/04/2013
Third Release 707160-003 06/11/2013
707161-003 iii


CCA-3074 Installation and Configuration
Table of Contents
Revision Information.........................................................................................................iii
Table of Contents.................................................................................................................v
Chapter 1. CCA-3074 Installation ................................................................................... 1-1
Product Overview ....................................................................................................... 1-1
Initial Installation........................................................................................................ 1-3
Chassis Installation ..................................................................................................... 1-3
Rack Installation ......................................................................................................... 1-5
Cabling the CCA-3074 for Power...............................................................................1-7
Cabling for ESCON....................................................................................................1-8
Cabling for FICON.....................................................................................................1-9
Cabling for Ethernet.................................................................................................. 1-10
Local Console Control..............................................................................................1-11
Editing the FEP4600.ini File.....................................................................................1-11
Powering up the CCA-3074...................................................................................... 1-12
Chapter 2. Configuration Overview................................................................................. 2-1
Initial Configuration of the CCA-3074.......................................................................2-2
Initial Connection Panel......................................................................................... 2-3
Login Panel............................................................................................................2-4
CCA-3074 Status Panel ......................................................................................... 2-5
Making Configuration Updates..............................................................................2-7
Network Options Panel.......................................................................................... 2-7
Field Definitions ............................................................................................... 2-8
Button Definitions............................................................................................. 2-9
Server Options Panel............................................................................................2-10
Field Definitions ............................................................................................. 2-10
Button Definitions........................................................................................... 2-11
Security Options Panel......................................................................................... 2-12
Changing Passwords.......................................................................................2-12
Enable/Disable Network Services...................................................................2-13
Button Definitions........................................................................................... 2-13
Chapter 3. Connectivity Overview ..................................................................................3-1
Non-SNA TN3270 Interface.......................................................................................3-1
Static Definitions or Pooled Definitions................................................................ 3-2
Encryption Used or Not.........................................................................................3-2
Connection Password Requirement....................................................................... 3-2
Resource Assignment Methods..............................................................................3-2
Connecting a TN3270E Client to a Specific LU ........................................................3-3
Using Client IP Address.........................................................................................3-3
Using Listening Port..............................................................................................3-3
Using Predefined Format.......................................................................................3-4
707161-003 v

Using Nicknames................................................................................................... 3-4
Connecting a TN3270E Client to a Session Pool ....................................................... 3-5
Using Client IP Address.........................................................................................3-5
Using Listening Port..............................................................................................3-5
Using Predefined Format.......................................................................................3-6
Using Nicknames................................................................................................... 3-6
Using Client Subnet Address................................................................................. 3-6
Select from a Menu Presented to the Client...........................................................3-7
Providing Coax Connectivity Through the CSS32.....................................................3-7
Chapter 4. ESCON CU Configuration............................................................................. 4-1
Update ESCON/FICON CUs Panel............................................................................4-3
Field Definitions .................................................................................................... 4-4
Button Definitions.................................................................................................. 4-5
UNITADD Address Format........................................................................................ 4-6
Configuring Sessions..................................................................................................4-7
Field Definitions .................................................................................................... 4-7
Button Definitions.................................................................................................. 4-8
Chapter 5. Host Circuit Configuration.............................................................................5-1
Configuring the Host Circuits.....................................................................................5-1
Field Definitions .................................................................................................... 5-2
Button Definitions.................................................................................................. 5-3
Configuring NSNA Host Sessions .............................................................................. 5-4
Field Definitions .................................................................................................... 5-4
Button Definitions.................................................................................................. 5-6
Chapter 6. TN3270 Client Configuration ........................................................................ 6-1
Configuring Listen Ports............................................................................................. 6-3
Field Definitions .................................................................................................... 6-4
Button Definitions.................................................................................................. 6-4
Configuring Session Pools..........................................................................................6-5
Field Definitions .................................................................................................... 6-6
Button Definitions.................................................................................................. 6-7
Configuring TN3270 Client Access............................................................................6-8
Field Definitions .................................................................................................... 6-9
Button Definitions................................................................................................ 6-10
Nicknames.................................................................................................................6-11
Field Definitions .................................................................................................. 6-12
Button Definitions................................................................................................ 6-12
Managing TN3270 User IDs..................................................................................... 6-13
Field Definitions .................................................................................................. 6-14
Button Definitions................................................................................................ 6-14
vi 707161-003

CCA-3074 Installation and Configuration
Appendix A. CSS32 Coax Subsystem............................................................................ A-1
CSS32 Factory Configuration.................................................................................... A-1
Example CCA-3074 Configuration to Support the CSS32........................................ A-2
Adjustments to the CSS32 Factory Default Configuration........................................ A-4
Using the Telnet Interface.......................................................................................... A-5
DEC VT220 7-bit.................................................................................................. A-6
Visara VT3270......................................................................................................A-7
Making Configuration Changes on the CSS32..................................................... A-8
Changing the IP Address, Subnet Mask, or Default Gateway Address................... A-10
Adding a Second Upstream CCA-3074 Destination ............................................... A-11
Allowing for Multiple Session Assignments to the Same CCA-3074..................... A-14
Supporting More Than 128 or 256 Client Sessions From a CSS32 ........................ A-14
Adding a Second Printer Queue (Second Coax Printer).......................................... A-15
Appendix B. Worksheets.................................................................................................B-1
Coax Port Mapping on the CCA-3074........................................................................B-1
Coax Port Mapping on the CCA-3074 – Example .....................................................B-2
CCA-3074 Session Assignments Worksheet..............................................................B-3
CCA-3074 Session Assignments Worksheet – Example............................................B-4
707161-003 vii


CCA-3074 Installation and Configuration
Chapter 1. CCA-3074 Installation
This chapter covers procedures needed to position the CCA-3074 such that it is ready to
be configured.
Product Overview
The Visara CCA-3074 Console Concentrator Appliance provides a means to support
consoles for up to 96 LPARs, spread over one or more IBM mainframe computers, using
ESCON or FICON channel interface cables.
The Visara CCA-3074 Console Concentrator Appliance consists of an enterprise class
server platform running Linux OS and unique application software. Up to 16 control unit
images and up to 256 sub-channels are supported through a single ESCON or FICON
interface to one or more Non-SNA hosts. A second ESCON interface can be added to
provide an additional 16 control unit images and up to 256 additional sub-channels. Up to
four FICON interfaces are supported, each providing up to 256 subchannels and 16 CU
images.
Each console host session can be configured to be shared by multiple TN3270 clients
simultaneously if needed, through the Session Sharing feature. Additionally, console
sessions can be configured as Hot Sessions, appearing to the host as if there is always a
device powered on for that session. Users can connect to the session as needed without
having to vary the session active.
Client connections are supported through a pair of 10/100/1000 Mbps Ethernet interfaces.
Optionally one or two quad Ethernet cards may be added to increase the total number of
Ethernet interfaces to six or ten. The CCA-3074 supports a mix of TN3270E display and
printer clients.
The CCA-3074 can be configured to support SSL encryption between clients and the
server.
Additionally, the CCA-3074 acts as an SNMP MIB II agent on TCP/IP networks and can
be configured to send email alerts when certain problems are encountered.
Coax interface support can be provided through use of the CSS32 coax subsystem. The
CSS32 can be direct attached via an Ethernet crossover cable for maximum security and
reliability or can be network attached for more flexibility. When direct attached, the
CSS32 provides direct console support for when the network may be unavailable.
With a direct attached monitor, keyboard, and mouse, the CCA-3074 can also support up
to ten console sessions directly for when the network may be down.
A replacement for IBM's 3174-XXL, 3274, and 2074 series and the Visara SCON series,
the Visara CCA-3074 provides more than just plug compatibility, it communicates across
multi-network environments.
Configuration of the CCA-3074 is achieved by means of a secure web browser interface
(HTTPS). This browser connection can be made through the network or from a direct
attached monitor, keyboard, and mouse. The CCA-3074 ships with a default
configuration including a default IP address. To connect from an external PC you must
perform one of the following:
707161-003 1-1

Chapter 1. Installation
Change the IP address of the CCA-3074 through a direct attached monitor,
keyboard, and mouse initially.
Modify the default configuration on the floppy that comes with the CCA-3074,
for your own network requirements (modify the FEP4600.ini file found on the
3.5” floppy disk).
Modify the IP configuration of the PC you are using to give it a compatible IP
address to the default IP address of the CCA-3074 (must be a different IP address
on the same subnet).
Once configured, the CCA-3074 is capable of running independently, without human
intervention. That is, if power is lost and regained, it will automatically boot back into
service using the stored configuration. You can manage the platform using the same
secure web browser connection from anywhere. Multiple management console interfaces
are supported by the CCA-3074, making it ideal for remote disaster recovery operations.
1-2 707161-003

CCA-3074 Installation and Configuration
Initial Installation
Installation of the CCA-3074 consists of multiple steps, and may involve more than one
person. The CCA-3074 can be locally or remotely configured. Tasks required to complete
an installation include:
1. Mounting the hardware platform (if desired) in a rack or placing the platform
within the necessary proximity of all of the network connections required to
satisfy the configuration.
2. Cabling the unit for power, ESCON, FICON, and Ethernet connections as
needed.
Locally configuring:
3. Attach monitor, mouse, and keyboard directly to the unit.
4. Once booted, select Start>Programs>Firefox.
Remotely configuring:
3. Editing the FEP4600.ini file if necessary to provide access to a web browser
capable platform, such as a PC, or change the IP address on a web browser
capable platform to be compatible to the CCA-3074 default address.
4. Powering up the unit with the floppy containing the FEP4600.ini file.
5. Connect to the platform with a web browser to finish the configuration.
Chassis Installation
Tools needed:
1. Phillips Screw Driver
2. Antistatic Strap
Installing Chassis Rails:
Please make sure that the chassis covers and chassis rails are installed on the chassis
before you install the chassis into the rack.
To avoid personal injury and property damage, please follow all the safety steps listed
below.
Before installing the chassis rails:
1. Enclose the chassis with chassis covers.
2. Unplug the AC power cord(s).
3. Remove all external devices and connectors.
707161-003 1-3
Chapter 1. Installation
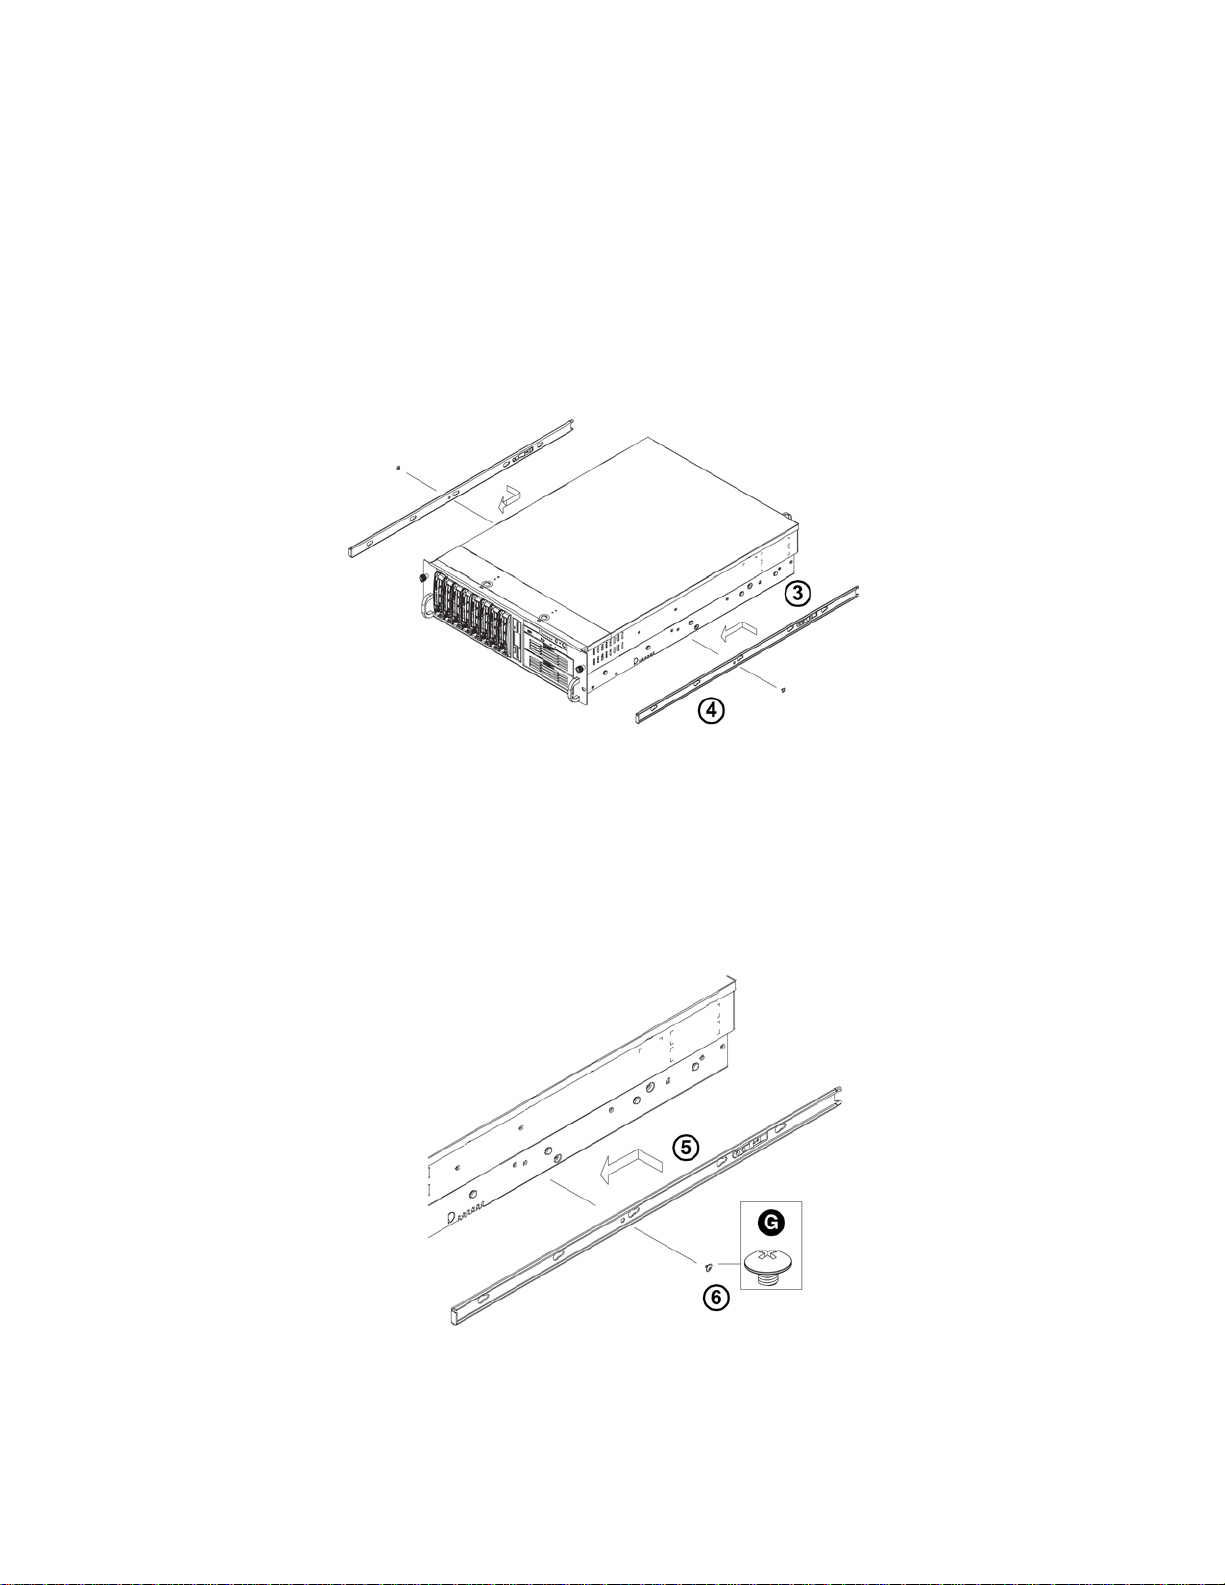
Procedures to install chassis rails:
1. Included in the shipping package is a pair of rail assemblies. In each rail
assembly, locate the inner rail and the outer rail.
2. Press the locking tab to release the inner rail from its locking position and pull out
the inner rail from the rail assembly. (The inner rails are to be attached to the
chassis and the outer rails are to be installed in the rack.)
3. Locate the five rail buttons and each side of the chassis and locate the five
corresponding holes on each of the inners rails.
(Please note that one end of the hole is larger than the other end of the hole.)
4. Align the larger end of each hole against its corresponding button. Once all
aligned, push the holes toward their corresponding buttons and the rail is placed
on the chassis.
5. Once the rail is placed on the chassis, pull the rail forward until the rail buttons
lock in the small ends of the corresponding holes.
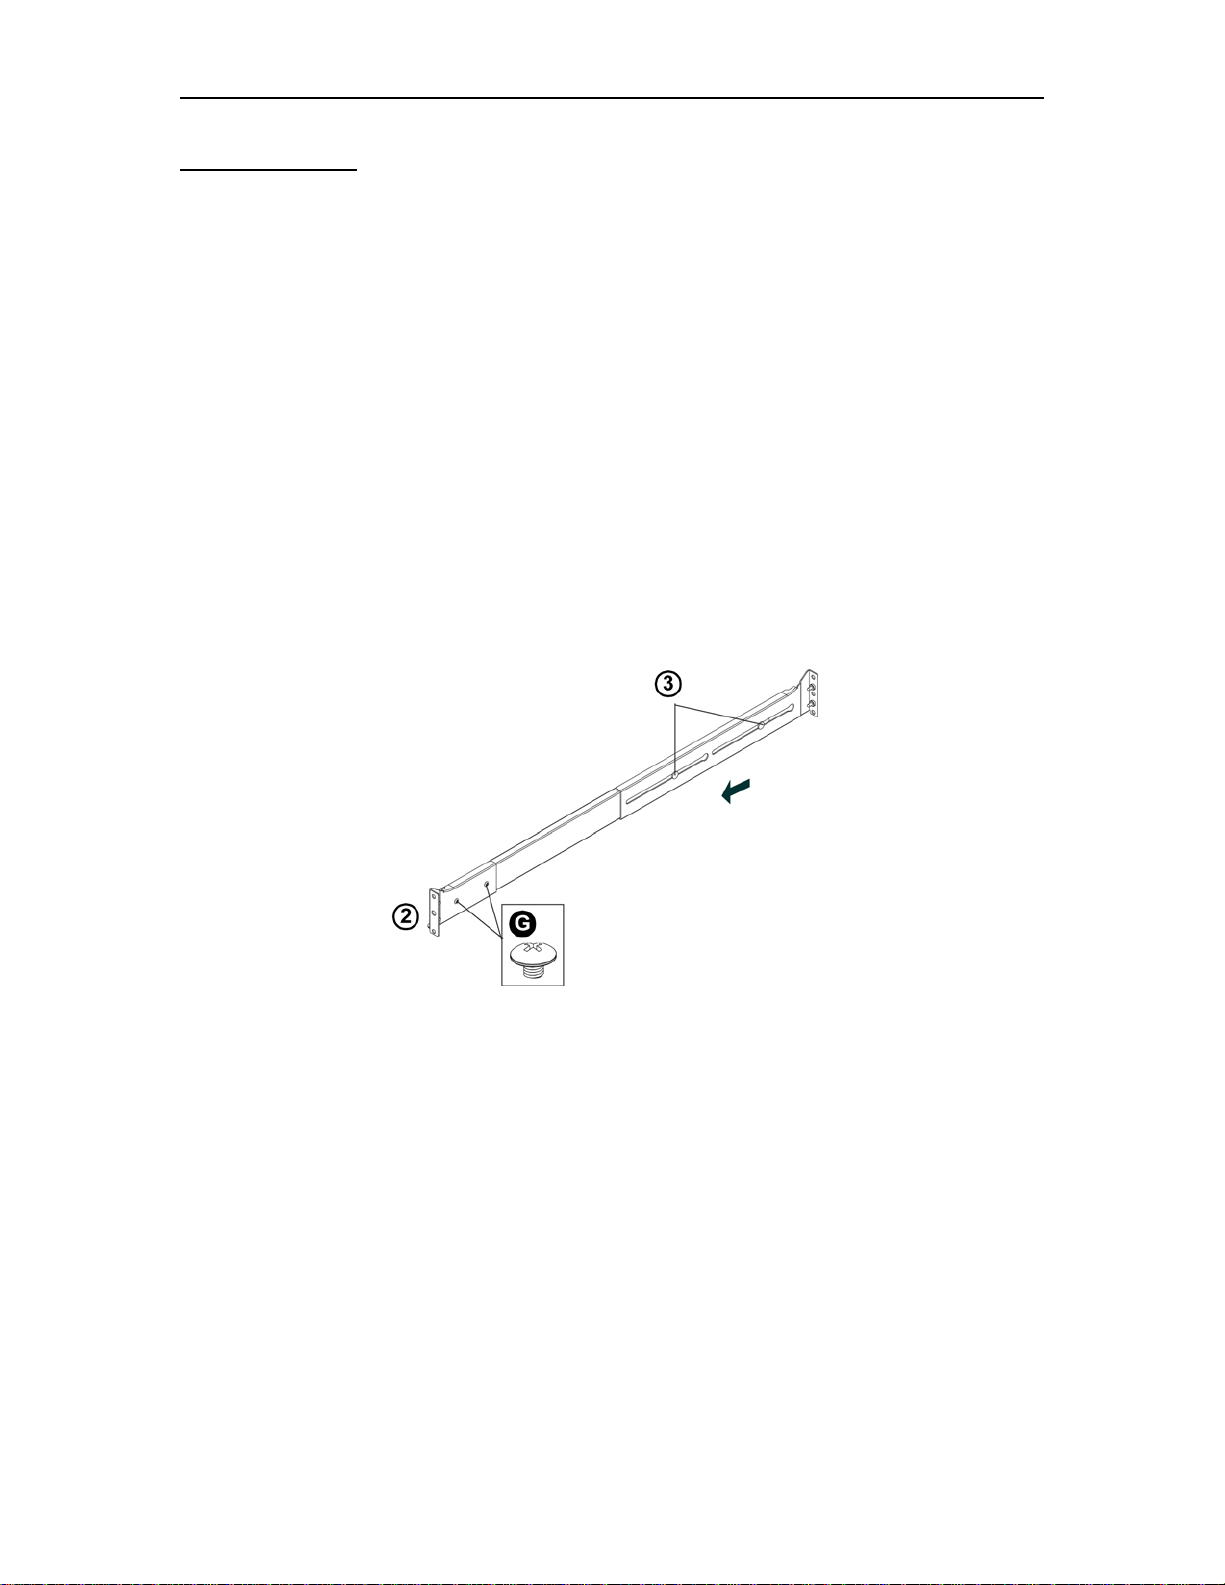
6. Secure the rail to the chassis with a Type G screw. Repeat the above steps to
install the other rail on the chassis.
1-4 707161-003
CCA-3074 Installation and Configuration
Rack Installation
After you have installed the inner rails on the chassis, you are ready to install the outer
rails of the rail assemblies to the rack.
(The rails are designed to fit in the racks with the depth of 28-33”.)
Procedure:
1. In the package, locate a pair of front (short) and rear (long) brackets. Please note
that the brackets are marked with Up/Front Arrows (front) and Up/Rear arrows
(rear).
2. Secure the front (short) bracket (marked with the Up/Front arrows) to the outer
rail with two Type G screws.
3. Locate the two buttons on the outer rail and attach the rear (long) bracket to it by
sliding the opening of the rear rail through the button.
4. Measure the depth of your rack and adjust the length of the rails accordingly.
5. Repeat the same steps to install the other outer rail on the chassis.
6. Secure both outer rail assemblies to the rack with Type H screws and Type I
washers.
707161-003 1-5

Chapter 1. Installation
7. Slide the server chassis into the rack from the front.
(The server may not slide into the rack smoothly or easily when installed the first
time. Some adjustments to the slide assemblies might be needed for easy
installation.)
8. You will need to release the safety taps on both sides of the chassis in order to
completely remove the chassis out of the rack.
1-6 707161-003
CCA-3074 Installation and Configuration
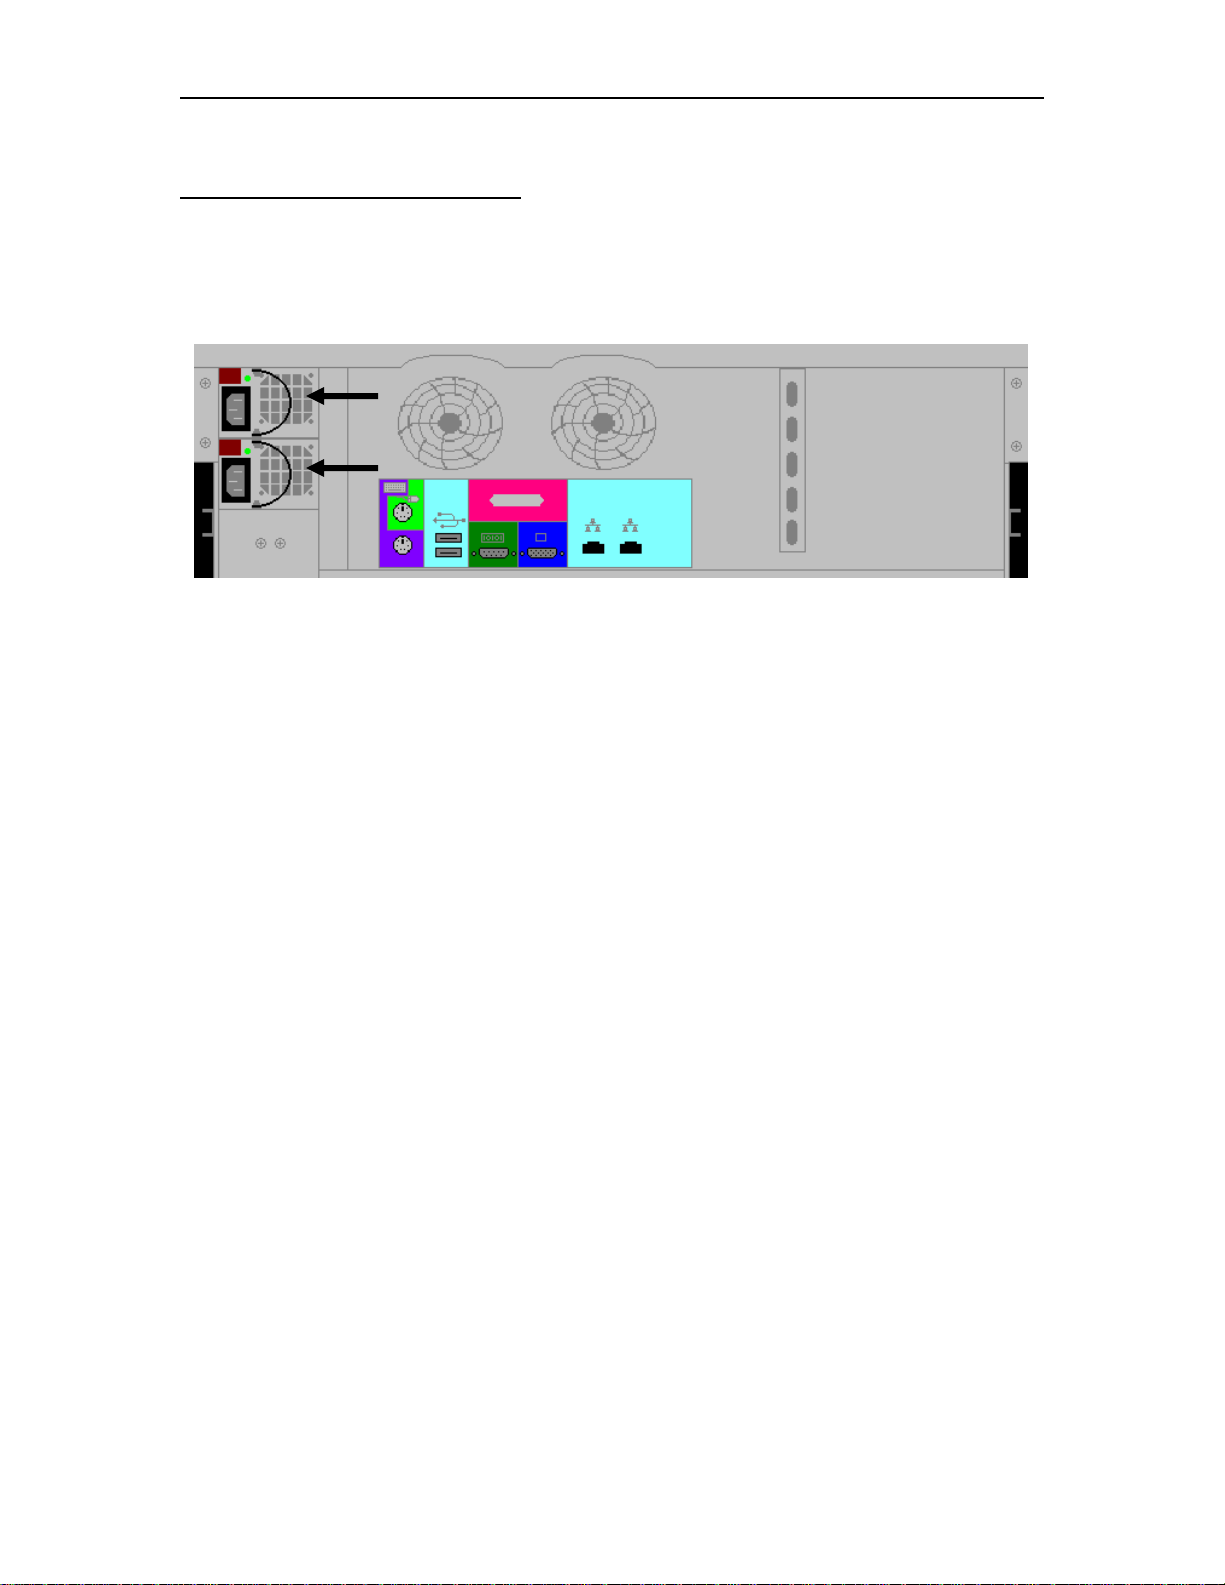
Cabling the CCA-3074 for Power
The CCA-3074 supports two hot-swappable power supplies. Each power supply requires
a separate power cord, which can be plugged into a separate properly grounded power
source if available. Each supply can provide the full power requirements for the unit.
707161-003 1-7
Chapter 1. Installation
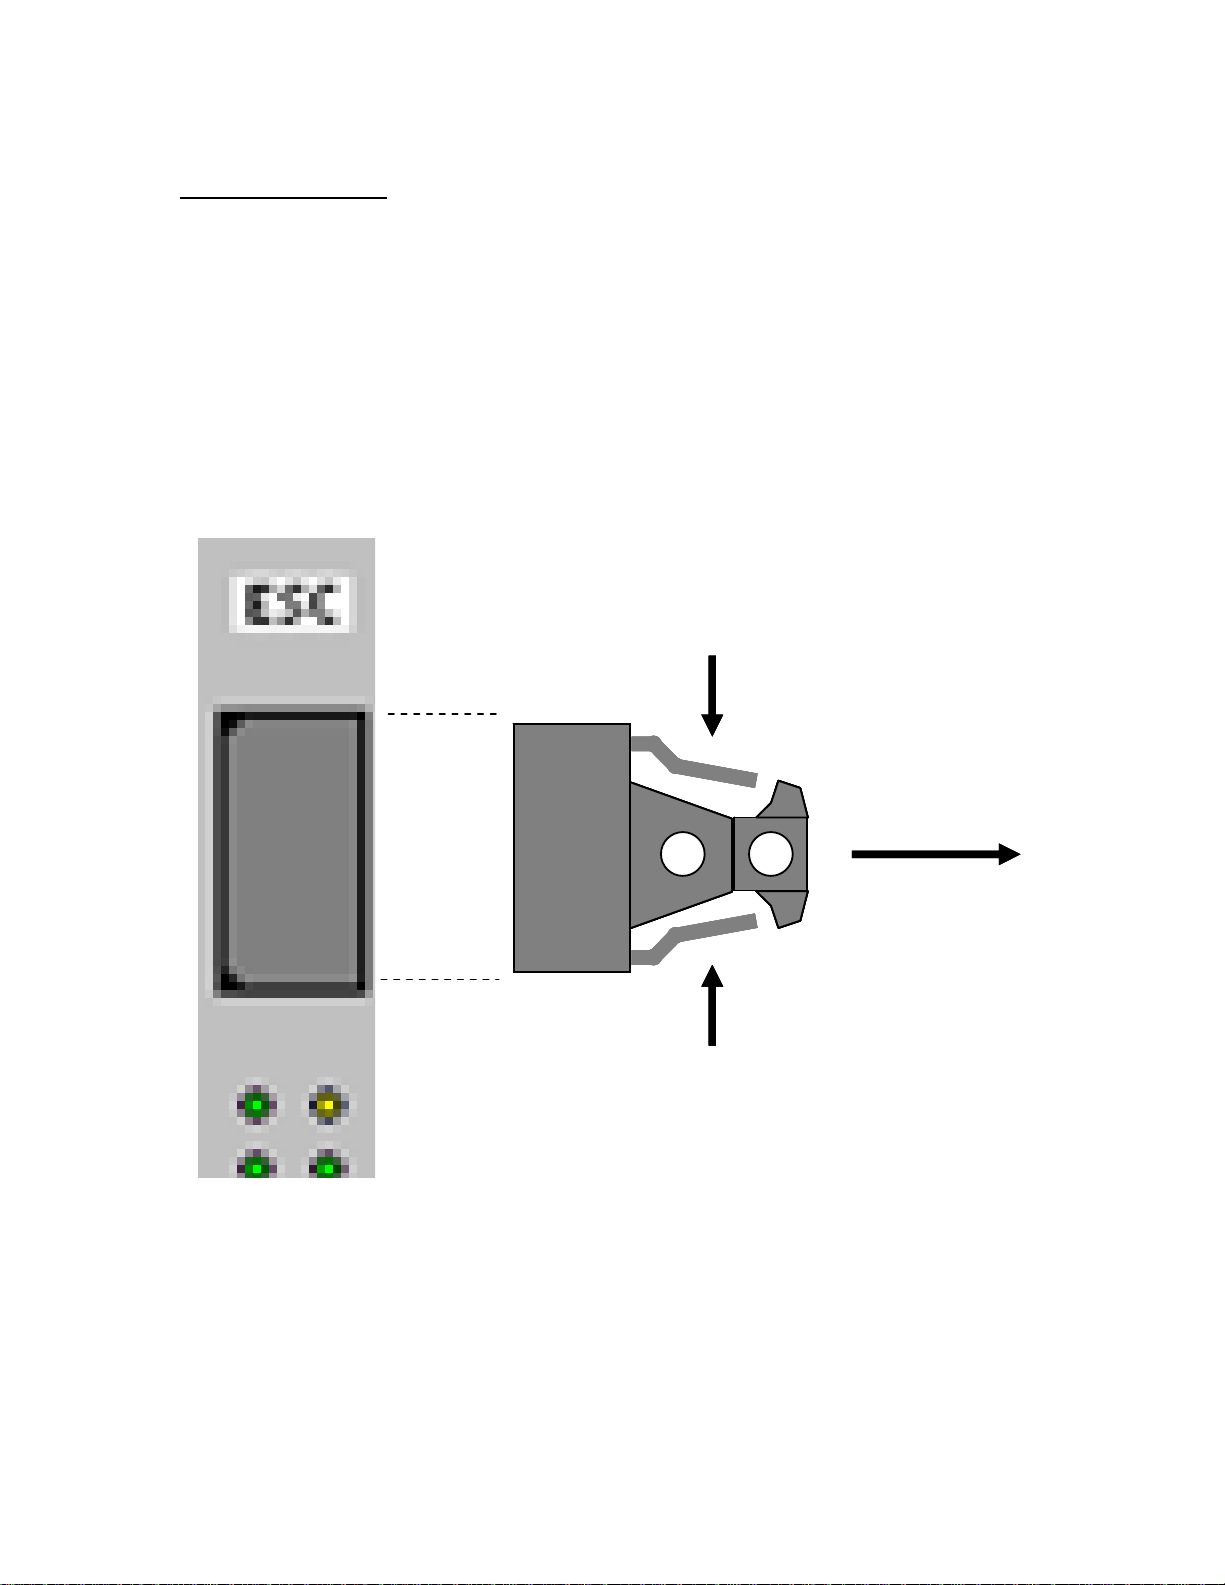
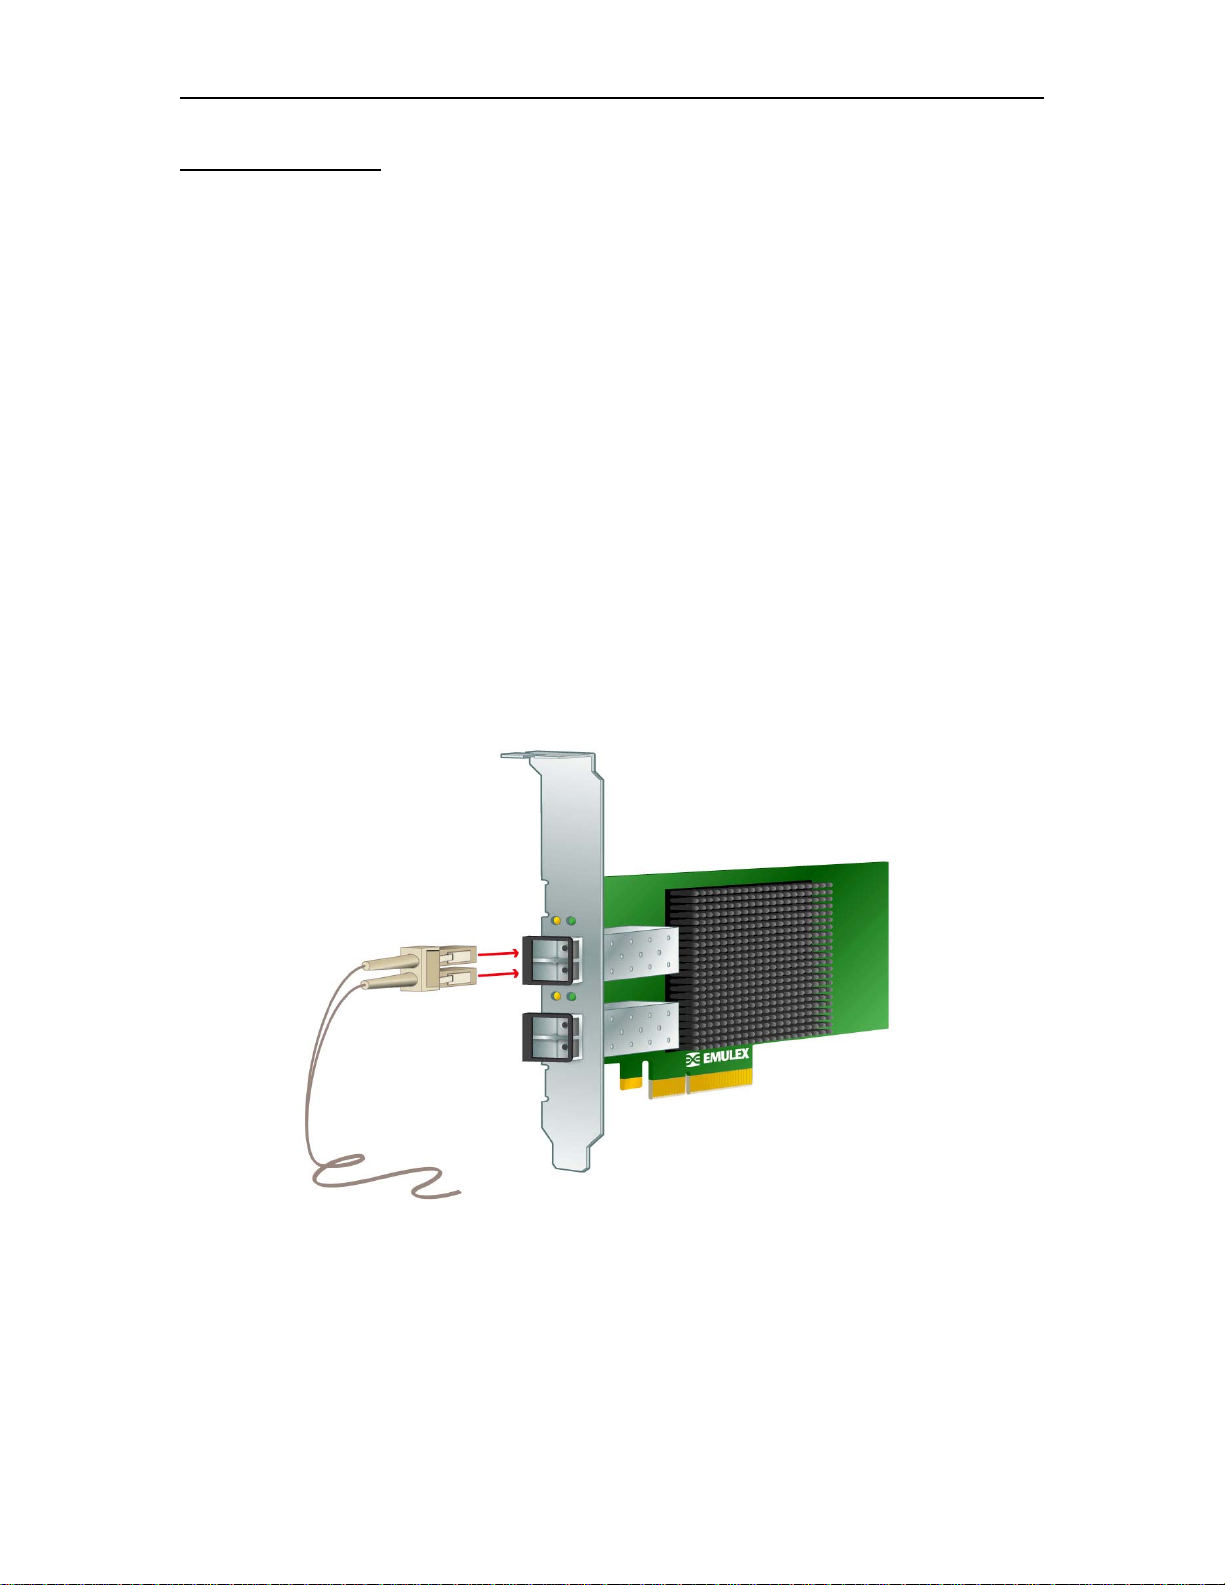
Cabling for ESCON
The ESCON interface card used by the CCA-3074 uses a duplex ESCON interface cable.
The ESCON interface card ships with a plastic plug inserted into the ESCON interface,
for purposes of keeping dust from the optical leads and to help protect the connector
during shipment. The plastic plug should be left in place until you are ready to attach the
ESCON cable. When ready, squeeze the sides of the plastic plug to disengage it and
allow it to be removed, as diagrammed below. (You may want to set this plug aside in a
safe place for future use.) Insert the ESCON cable into the cavity vacated by the plastic
plug, and push in until you hear/feel it click into place. Be careful when handling ESCON
cables, and do not bend the cables any more than necessary. The cables are fiber optics,
and bending them too tightly will cause them to break internally, and make them useless.
Squeeze
Squeeze
Squeeze
Squeeze
Extract
Extract
1-8 707161-003
CCA-3074 Installation and Configuration
Cabling for FICON
The FICON interface card used by the CCA-3074 may have 1, 2, or 4 individual FICON
interfaces built in. Each FICON interface includes a transceiver mounted on the interface
card. FICON transceivers come in short wave and long wave versions. Correct
transceivers for the customer’s environment should have been shipped with the platform.
However if the correct transceivers are not installed, it is possible to swap transceivers in
the field. Please refer to the CCA-3074 Users Guide and Maintenance Manual for
information regarding this.
The FICON interface card ships with a plastic plug inserted into each FICON interface,
for purposes of keeping dust from the optical leads and to help protect the connector
during shipment. The plastic plug(s) should be left in place until you are ready to attach
the FICON cable(s). When ready, remove each plastic plug and set aside in a safe place
for future use. Insert the FICON cable into the cavity vacated by the plastic plug, and
push in until you hear/feel it click into place. Be careful when handling FICON cables,
and do not bend the cables any more than necessary. The cables are fiber optics, and
bending them too tightly will cause them to break internally, and make them useless.
707161-003 1-9
Chapter 1. Installation
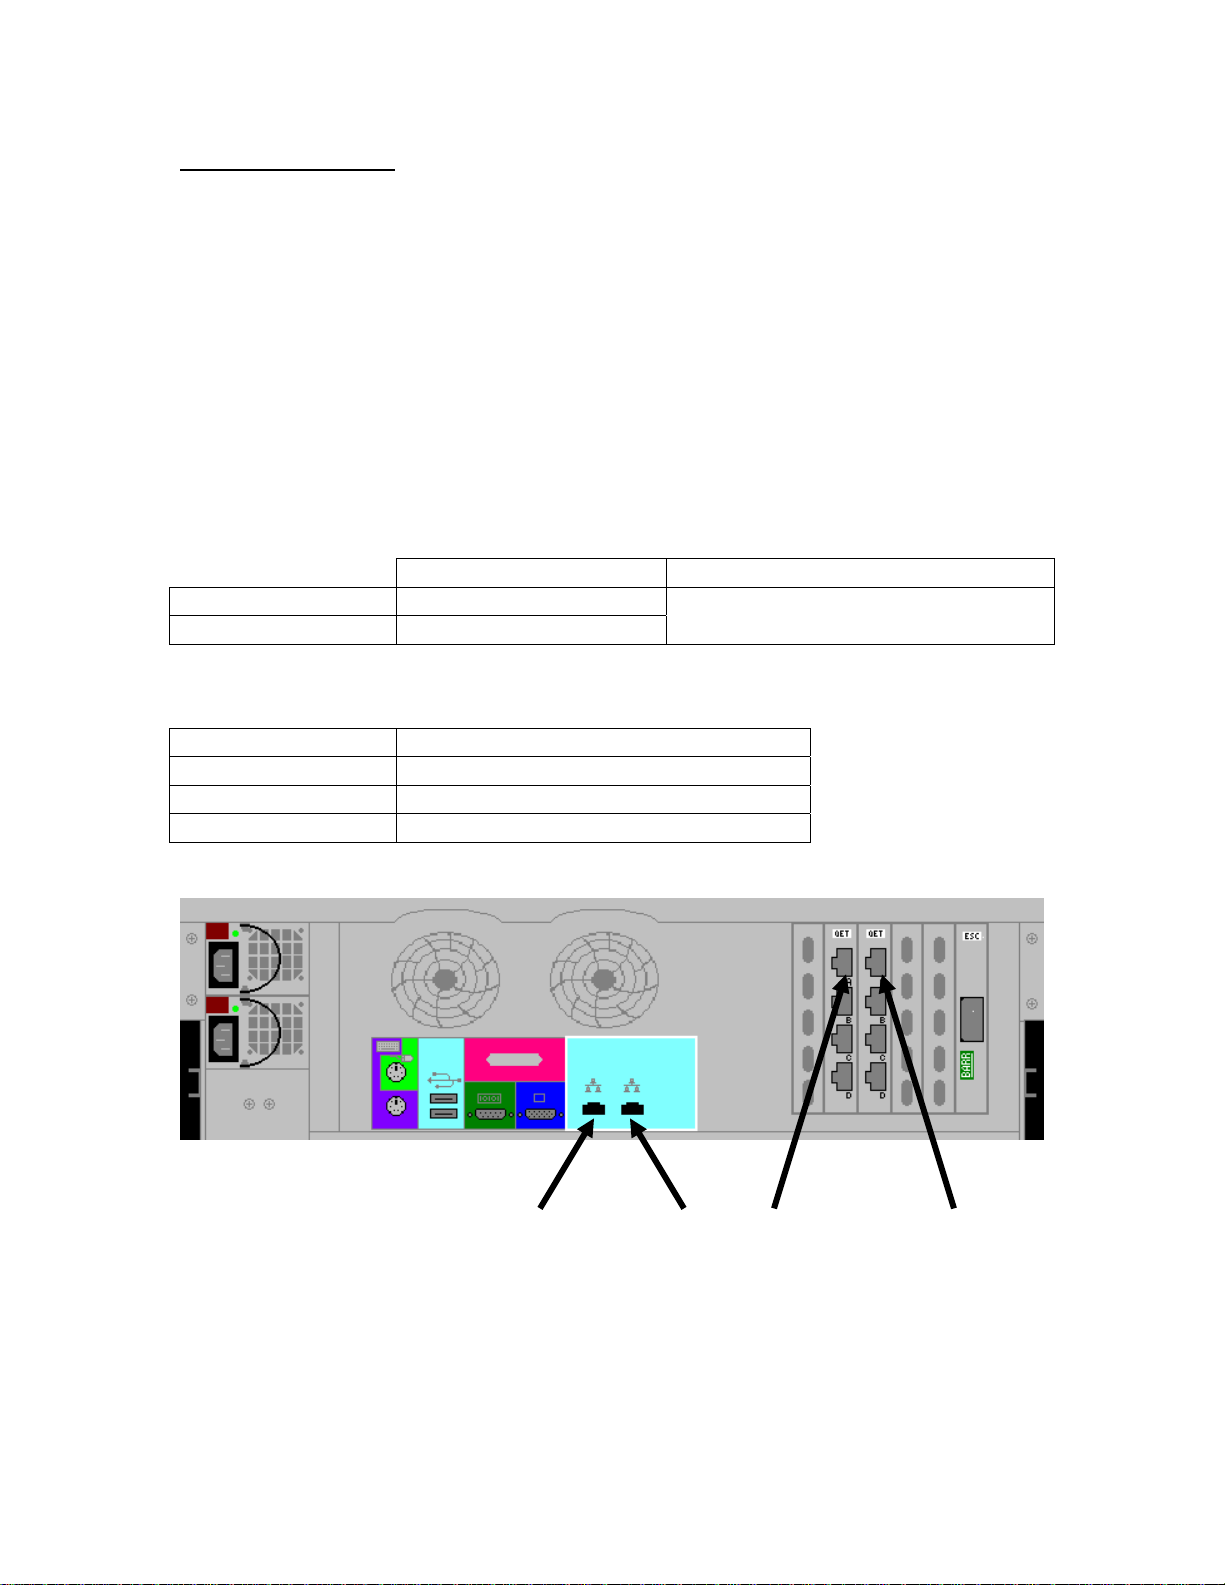
Cabling for Ethernet
The Ethernet interfaces for the CCA-3074 each consist of an RJ45 socket. Plug a
standard Ethernet cable with an RJ45 jack mounted on the end, into the appropriate
socket until you feel it click into place. The Ethernet interface of the CCA-3074 will
default to auto-detect the speed and can be plugged into a switch or hub running at 10
Mhz, 100 Mhz, or 1000 Mhz. Note that the interface may be reconfigured to operate at a
specific speed in the configuration. The first two Ethernet interfaces come in the base
platform. Up to 8 additional Ethernet interfaces can be added through the addition of 2
Quad Ethernet cards. Numbering of those additional Ethernet interfaces is based on slot
positioning and is numbered from top to bottom, right to left as viewed from the rear of
the platform (see diagram below).
Ethernet Cable Spec
Category 3, 4, or 5 ANSI/IEEE Standard
Maximum Length 100 meters (328 feet) 802.3I – 1990 Section 14 or greater
Minimum Length 1 meter (3.28 feet)
Recommended Minimum Cabling Type
Ethernet Speed Minimum Twisted Pair Cable Type
10 Mbps Cat 3
100 Mbps Cat 5
1000 Mbps Cat 5e
Ethernet 0 Ethernet 1 Ethernet 6 Ethernet 2
1-10 707161-003

CCA-3074 Installation and Configuration
Local Console Control
You can attach a monitor, keyboard and mouse to the back of the CCA-3074 to perform
the initial configuration. The CCA-3074 supports a standard SVGA compatible monitor
and uses a PS2 style interface for both the keyboard and mouse. Click on the [Start]
button and select Programs>Firefox to bring up the local browser for connecting to
configuration.
Editing the FEP4600.ini File
The CCA-3074 ships with a default IP address of 192.168.0.46. You can use this address
as is, providing that you connect to the platform with a PC configured for a compatible
address using a crossover cable or an appropriate hub. However, if you prefer to connect
the CCA-3074 to your existing IP network and assign it a different IP address, you can
override the existing IP address by editing the FEP4600.ini file found on the 3.5” floppy
that is included with the CCA-3074 when it ships. If the original diskette that ships with
the product cannot be located, the file may be created with the entries as shown below,
and saved to a floppy using the FEP4600.ini file name.
[Network]
IP=192.168.0.46
NetMask=255.255.255.0
DefaultGateway=192.168.0.254
Notes regarding FEP4600.ini file entries:
1. No white space is allowed within the entries (spaces or tabs).
2. The data is not case sensitive.
3. The diskette is not required for future reboots and should be removed after the
initial load.
4. If the diskette is in the drive when the CCA-3074 is powered up in the future,
the values within the file will override any settings saved on the hard drive.
5. Obviously, select values that are compatible with your network, and
specifically the device that will be used to configure your platform.
707161-003 1-11
Chapter 1. Installation
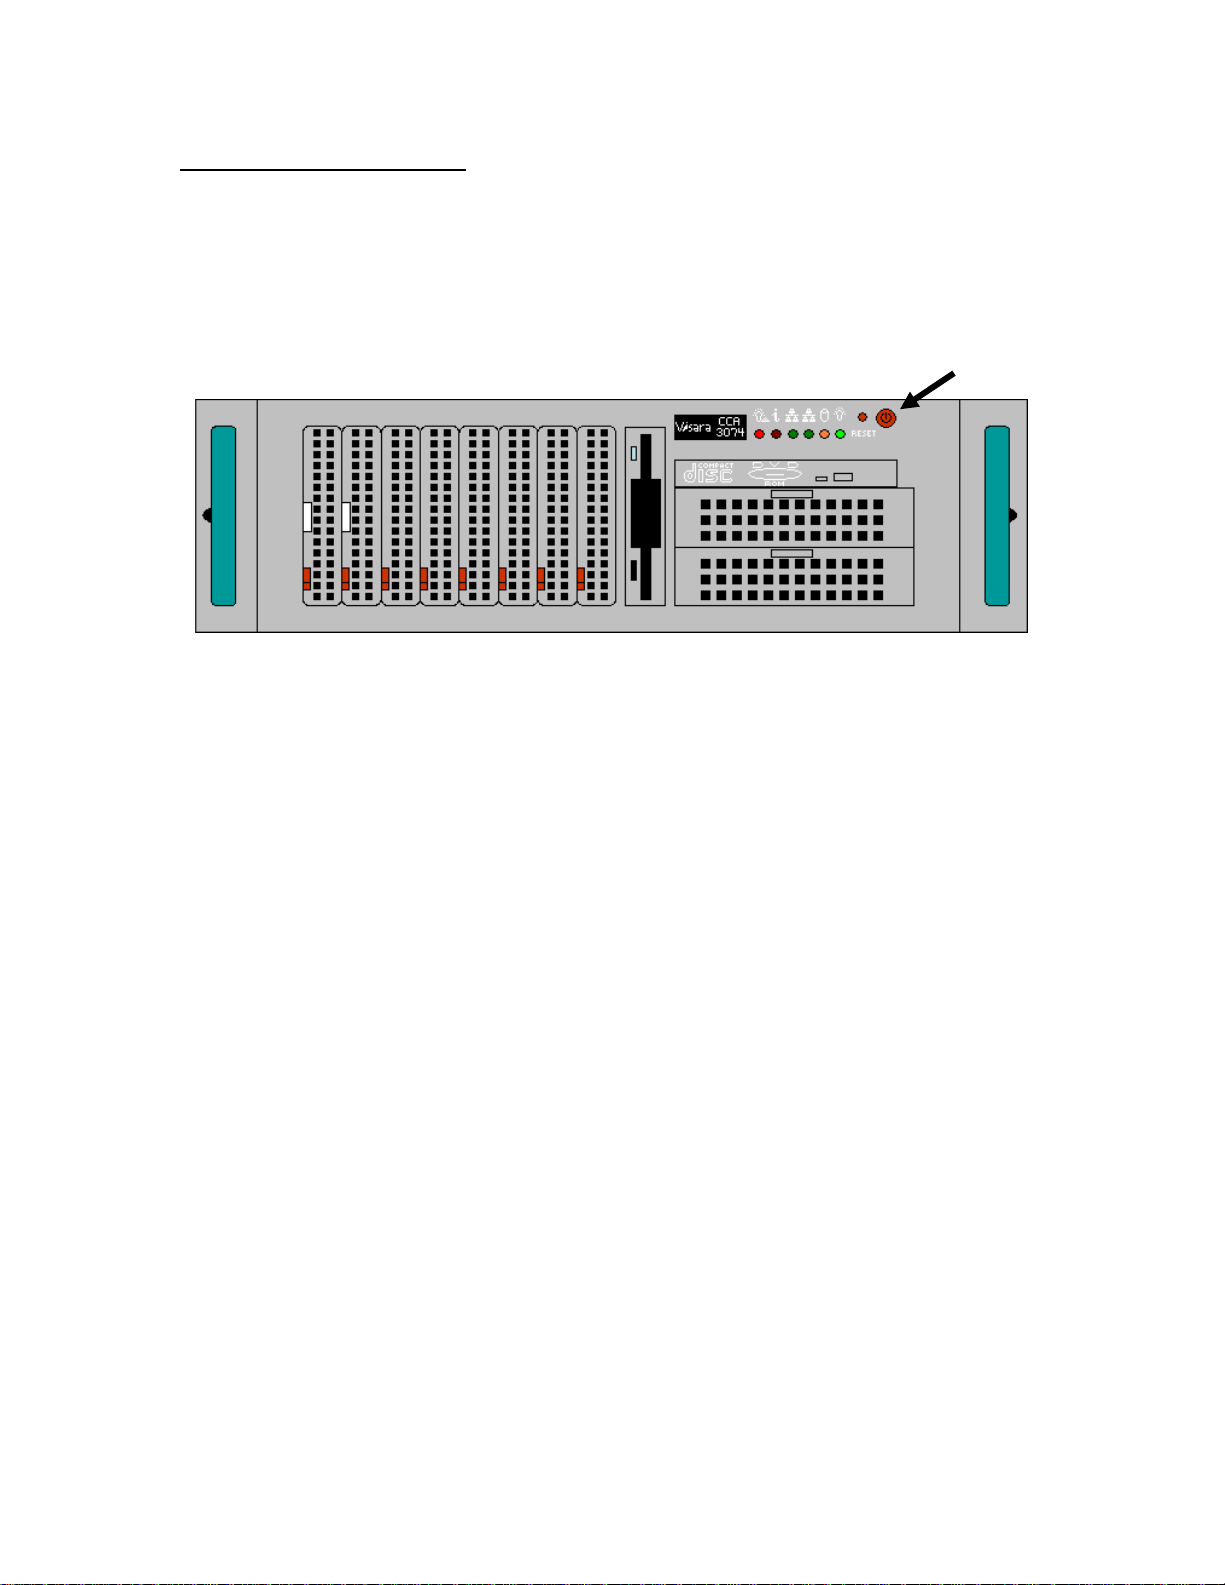
Powering Up the CCA-3074
If you are applying an IP address, insert the floppy with the FEP4600.ini file into the
floppy drive before applying power. With one or more power cables attached to the
CCA-3074 and a power source, press the power button (button is located in the upper
right corner of the front of the platform) to apply power.
Power Button
If none of the indicators light up with the power applied, recheck the power cable
connections and check any power switches or circuit breakers associated with your power
source.
Once the power up sequence has completed (should take less than 5 minutes), you should
be ready to configure the CCA-3074 with your browser or through the local console
interface.
1-12 707161-003

CCA-3074 Installation and Configuration
Chapter 2. Configuration Overview
The configuration for the CCA-3074 is stored on the hard drive in the file FEP4600.ini
located in the /usr/local/etc directory. This file is actually a link to the file that was the
last active configuration file (identified as active on the Save/Restore Configurations
panel). Multiple configuration files can be created and stored on the hard drive. A default
configuration file is loaded on in the factory. You will need to perform a configuration to
customize the CCA-3074 for your environment. Once configured, you should keep a
backup of your configuration in a safe place. You may copy your active configuration to
a USB memory stick or you may use the Visara eManager product to retrieve backups of
your CCA-3074 automatically.
Note: if a floppy with a FEP4600.ini file is inserted into the floppy drive, the file will
be copied over to the hard drive at boot time (overwriting the current configuration
stored there), and the CCA-3074 will attempt to boot on the provided configuration.
Configuration of the Visara CCA-3074 platform is accomplished through a locally
attached monitor, keyboard, and mouse, or through a secure browser interface (HTTPS).
Note that the browser that you use should be capable of establishing an HTTPS
connection. Each CCA-3074 ships from the factory preconfigured for the IP address of
192.168.0.46. You may use this address or define a different address by editing the
FEP4600.ini file included on the diskette that shipped with the CCA-3074. Refer to the
previous chapter if you need to change the IP address.
You may override the configuration stored on the hard drive by inserting a floppy
containing a copy of the FEP4600.ini file, and forcing a boot of the platform.
The configuration of your CCA-3074 is password protected. If you forget your password,
you may work around the problem by using the original floppy which ships with the
platform. It has the default administrative password (‘admin’) configured (and
encrypted). Just insert the floppy and reboot. Do not attempt to edit the password in the
file to make a change. Because it is encrypted, typing anything in its place will change
the password to something unknown. If you have forgotten your password and have also
misplaced your floppy, contact your Visara representative. Note that you should limit the
parameters in the file to just the password entry, since any parameters listed in the file
may overwrite your current configuration parameters.
707161-003 2-1

Chapter 2. Configuration Overview
Initial Configuration of the CCA-3074
You can perform the initial configuration of your CCA-3074 by attaching a monitor,
keyboard and mouse directly to the CCA-3074. You may also connect a PC directly to
the CCA-3074 by using a crossover Ethernet cable connected directly between the
Ethernet 0 interface (leftmost Ethernet as looking from the rear) and your PC. You may
also connect the CCA-3074 directly to a hub or switch and connect your PC to the same
hub or switch. When connecting to the CCA-3074 using the default IP address, your PC
must be configured with an appropriate IP address to be able to communicate on the same
subnet as the CCA-3074 (192.168.0.x, where x= 1-254, but do not use ‘46’ which is used
by the CCA-3074, or ‘254’ which is already defined as the default gateway in the file).
If you are using the directly attached monitor, keyboard, and mouse, you may open the
local browser by using the mouse to select Start>Programs>Firefox. Firefox is the
browser that is included on the CCA-3074. The local browser will make the connection
using the internal network address and thus does not need to be configured for an IP
address initially.
If you are using a PC, once you have an appropriate hardware connection between your
PC and the CCA-3074, start your browser and connect to the configured IP address. (i.e.
‘http://192.168.0.46’)
2-2 707161-003
CCA-3074 Installation and Configuration
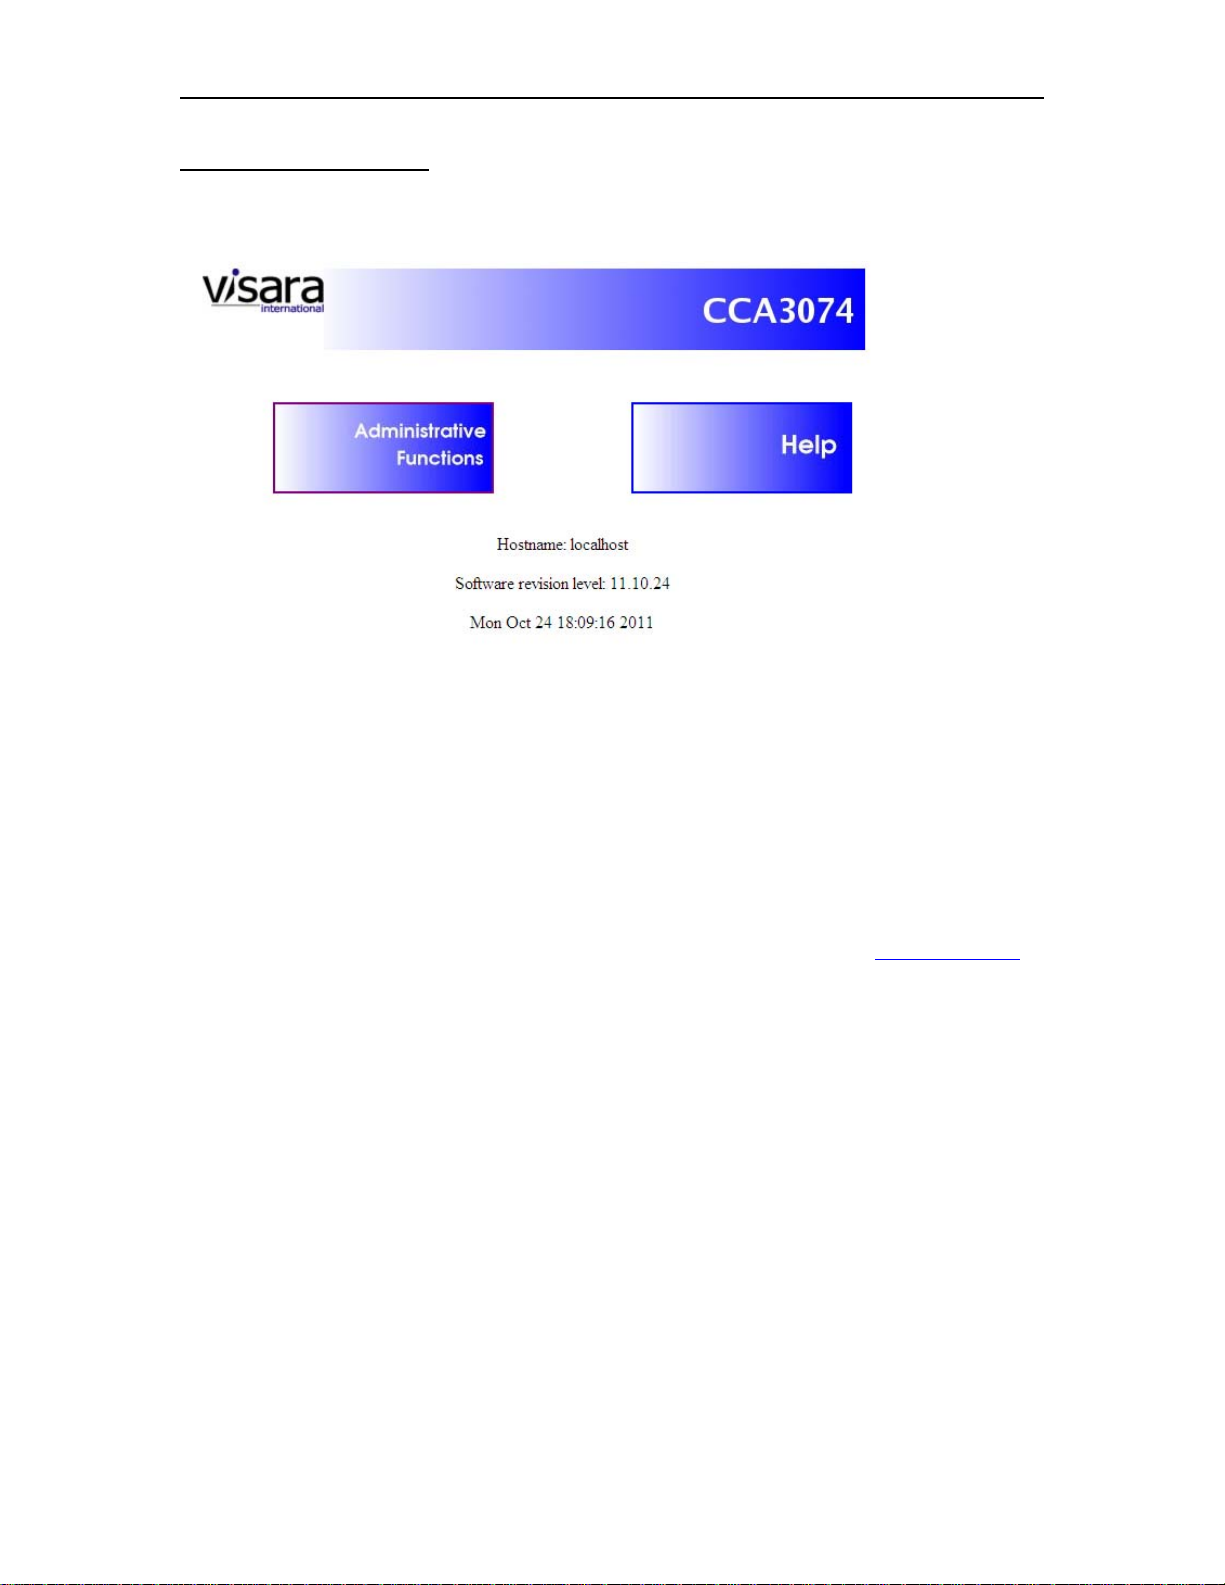
Initial Connection Panel
The initial connection should appear similar to the diagram below.
Note that on this initial panel, you have access to platform documentation included on the hard
drive by pressing the [Help] button. You also have information displayed as the Hostname (as
configured), software revision level, and date and time of creation of the software that is running.
If you suspect that the documentation found on your hard drive is outdated or missing, you may
find the latest released documentation for this product on the Visara web site: www.visara.com
Once on the Visara web site, select ‘Support’ from the menu and then ‘Product Manuals’.
707161-003 2-3
Chapter 2. Configuration Overview
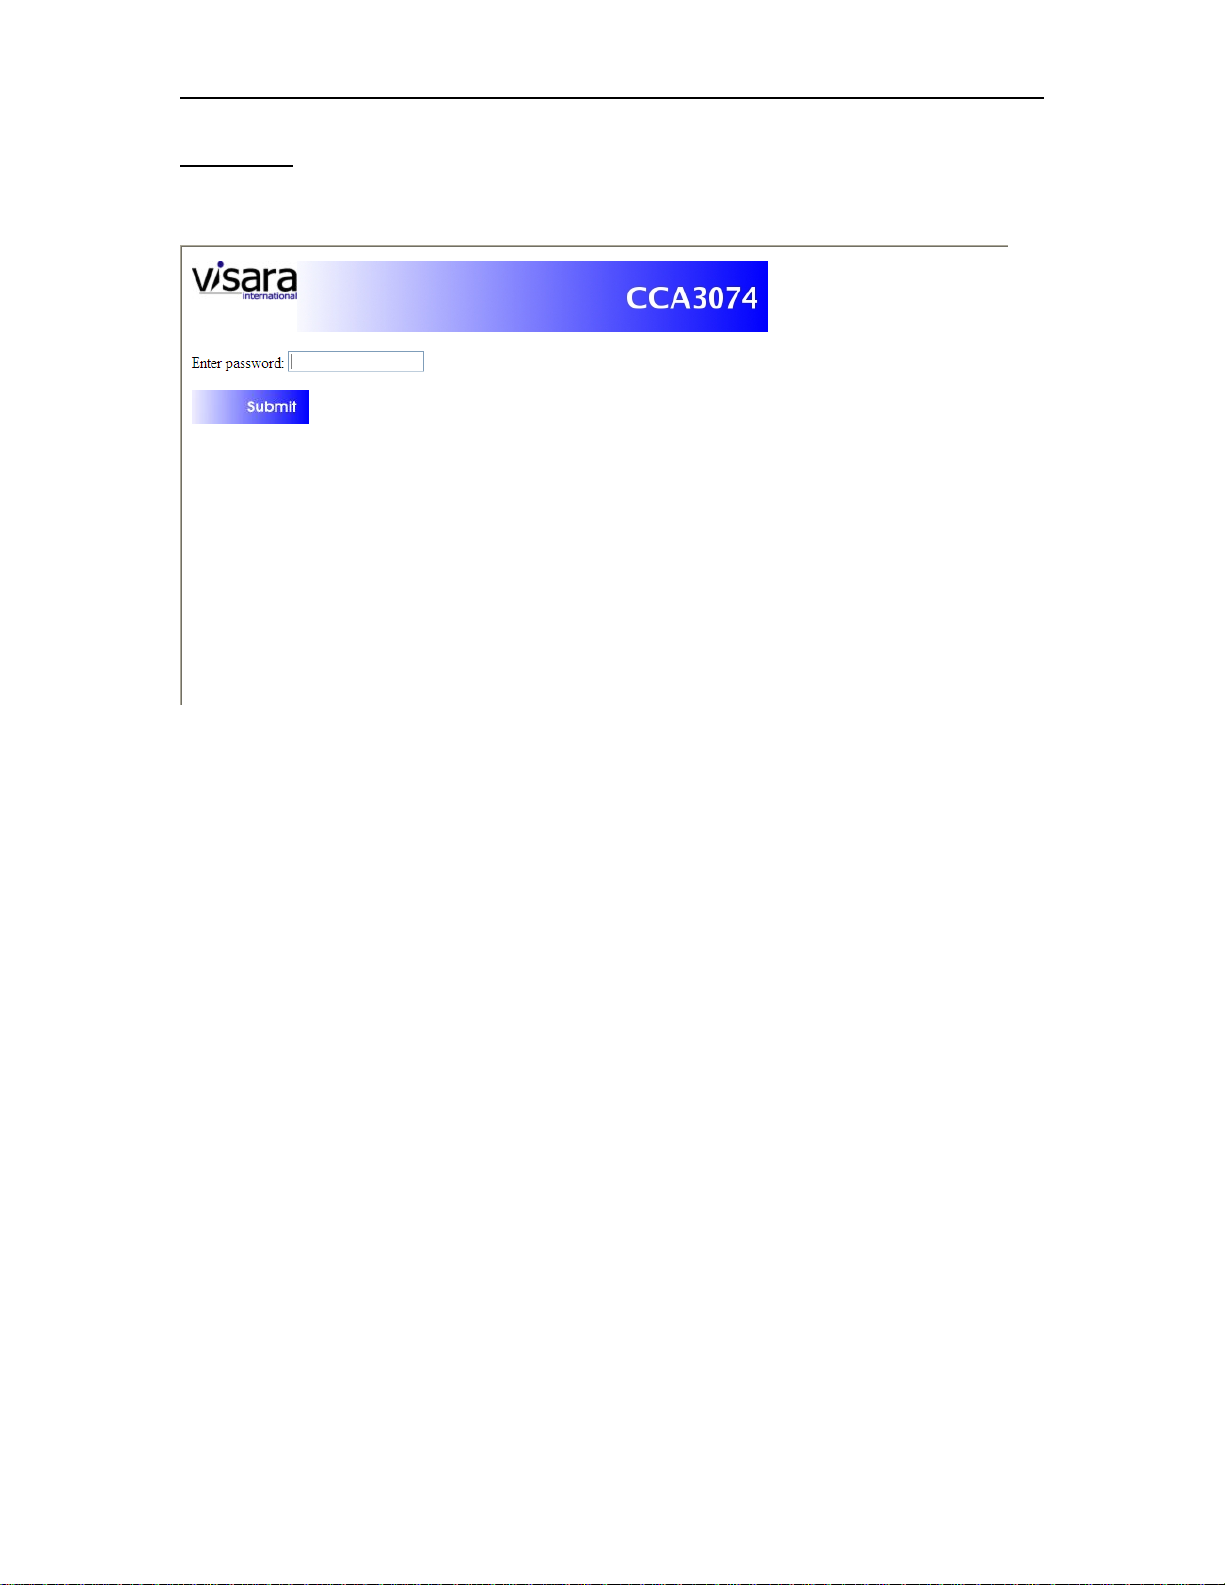
Login Panel
Select the administrative functions button. The following panel should appear.
Note that you may get a security alert when you attempt to proceed to get the Password
prompt. This is due to the secure SSL browser connection and the Visara self-signed
certificate.
If you do not wish to see this warning each time that you establish a connection, you can
normally view and install the certificate on the PC or thin client platform that you are
using the browser from.
Enter the default administrator password (‘admin’) to continue. The next panel to appear
is the Connections panel, and will appear similar to the one shown next. (This panel
reflects a platform that already has a configuration on it.)
2-4 707161-003
CCA-3074 Installation and Configuration
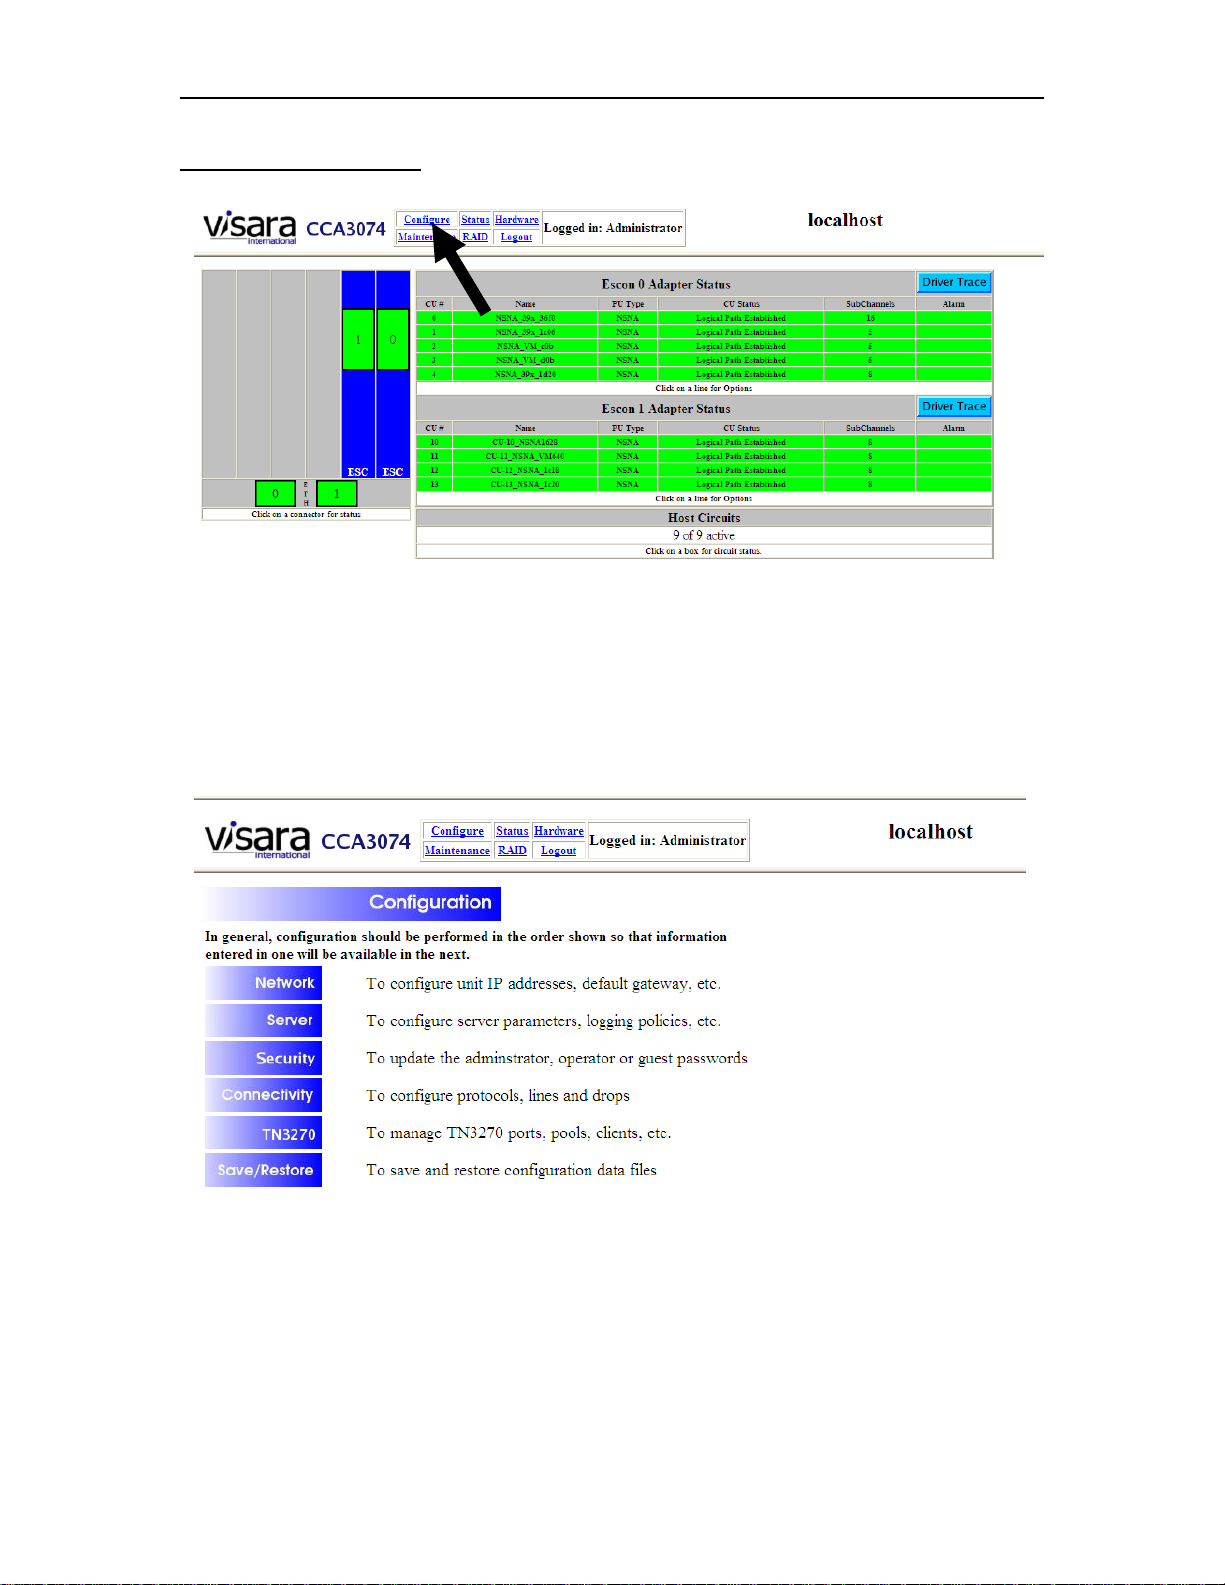
CCA-3074 Status Panel
A menu appears at the top of the screen.
Configuration of the CCA-3074 can be accessed by selecting the ‘Configuration’ menu
option. The following panel should appear:
707161-003 2-5

Chapter 2. Configuration Overview
The configuration of the CCA-3074 can be broken down into two categories.
Administrative configuration items
Communications configurations (‘Connectivity’) items
Administrative configuration items include:
Network options for management access
Server options for logging and email options
Security options for passwords and allowed protocol access
Configuration File management
Communications configuration items include:
Connectivity to configure ESCON and FICON CUs and Host Circuits,
TN3270 to configure Clients, Pools, and Ports, User IDs, Nicknames
For the best results, it is recommended that you perform the Communications portion of
the configuration in the order shown above.
2-6 707161-003
CCA-3074 Installation and Configuration
Making Configuration Updates
Before making major configuration changes, if you already have a working
configuration, you may want to either make a restore point, or at least save your current
configuration, so that you can go back to it if necessary. It should be noted that most of
the configuration panels have an ‘Update’ or ‘Submit’ button on them. These are used to
save the changes that you make on that panel. Changing values on a panel, then closing
the panel (by selecting the X in the upper right corner of the window or by pressing the
Return button, without pressing the Update button first, will not save your changes, and
any modifications will be lost. Normally you will get a message to remind you to save
your changes if changes have been made, when you attempt to leave the panel. Passwords
and nickname changes will take affect immediately. Some changes, mostly related to the
TN3270 configuration can be made to take effect immediately by utilizing the [Apply]
button found on the TN3270 Configuration Menu.
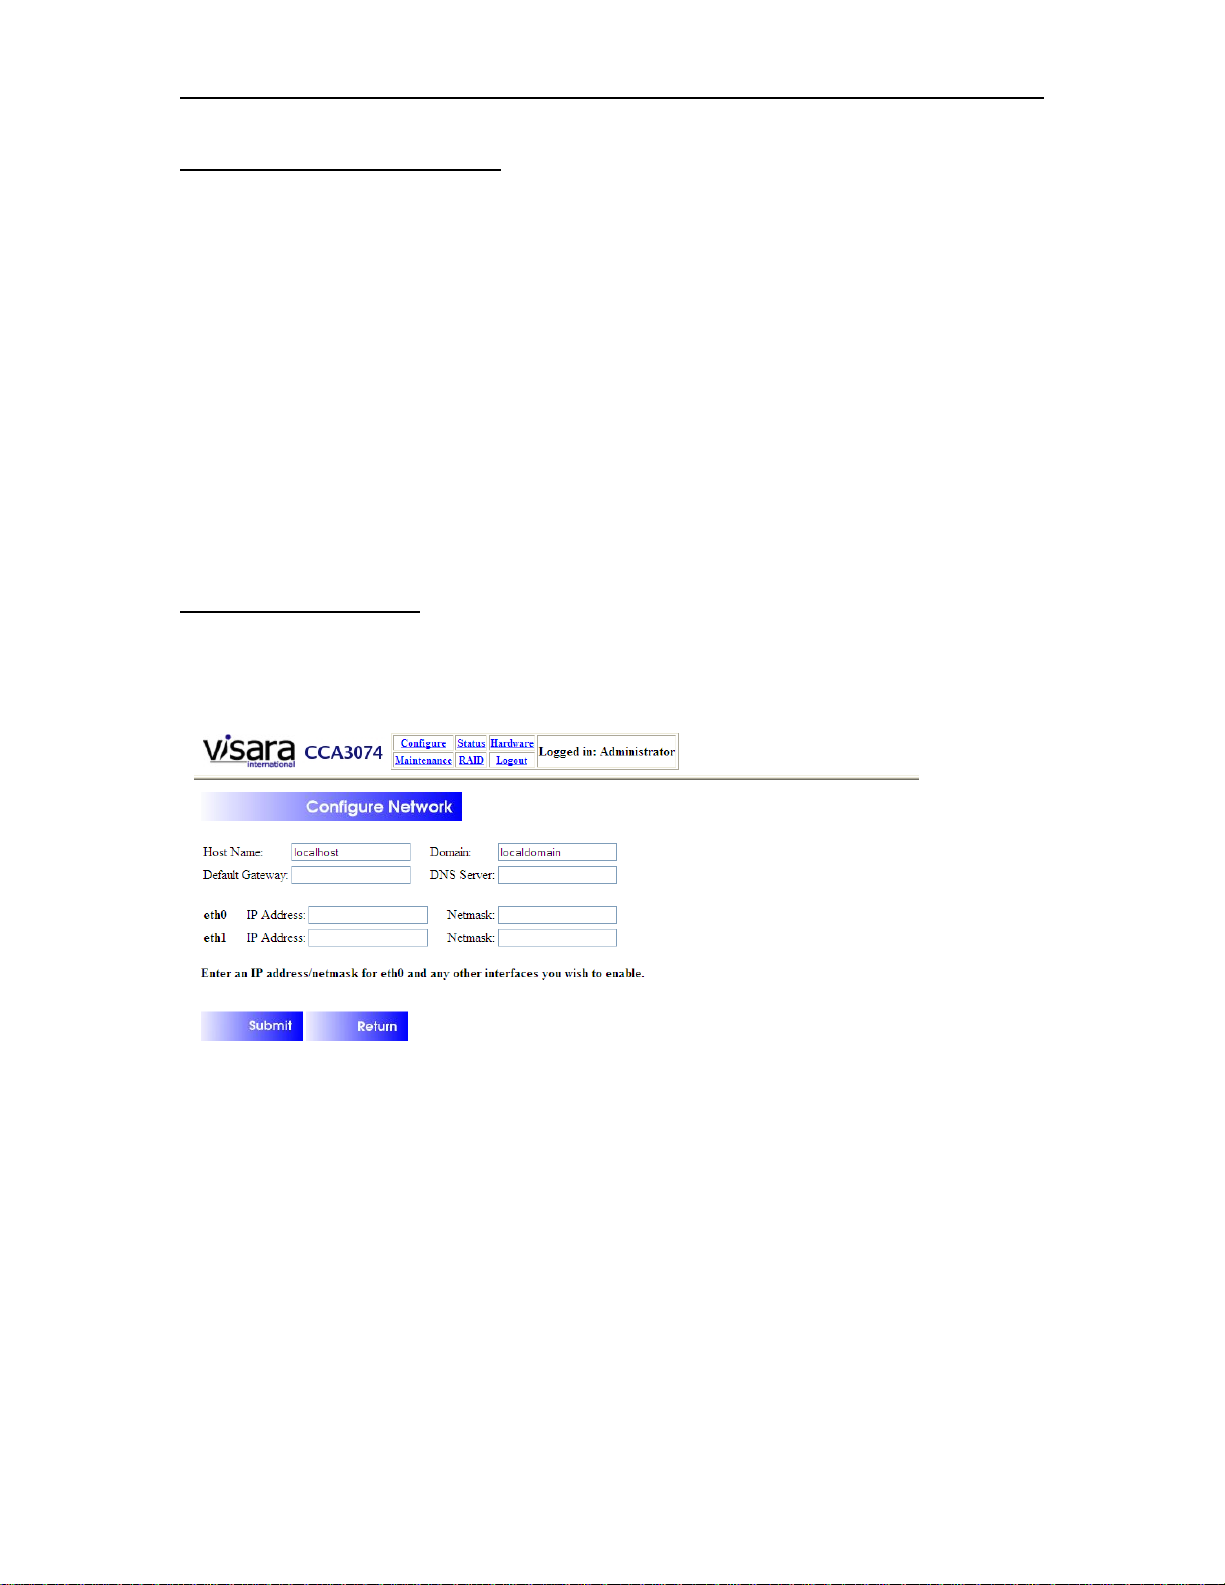
Network Options Panel
Selecting the ‘Network’ option will display the following configuration options:
If the Quad Ethernet Interface card is installed you will see additional eth2-5 entries for
IP address and netmask. If a second Quad Ethernet Interface card is installed you will see
additional eth6-9 entries for IP address and netmask.
The configuration options on this panel will allow you to modify the network interface
used for management of the CCA-3074. After you have entered all of the values that you
need, then press the ‘Submit’ button. The new values will be stored and will take affect
the next time the CCA-3074 gets booted.
707161-003 2-7
 Loading...