

Page 1
SSL1000 Installation Guide
Initial setup of the SSL1000 is simple:
1. Plug in the power and ethernet cables (see Cabling the Unit below).
2. Edit the SSL.INI file on the floppy (see Setting the Initial IP Address below).
3. Power up the unit with the floppy in the drive. When the self-tests and initializations are
complete, the unit plays a small fanfare.
4. Using any web browser, connect to the SSL1000 and complete the setup, which consists
of defining the Upstream and Downstream mappings, and logging options. The Manage-
ment Password is case sensitive, and is set at the factory to admin. (Details are on the
back side of this Quick Start Guide.)
Cabling the Unit
• The SSL1000 ships with three CAT5 ethernet cables: two standard and one “crossover”.
The standard cables should be used to connect the SSL1000 to an ethernet hub/switch.
The crossover cable (which is yellow and labeled “crossover”) should only be used for a
direct connection from the SSL1000 to a server.
• LAN1 is typically used for the “public” or “untrusted” side, where the traffic must be
encrypted. This will normally be the path from the firewall/router to the outside world.
• LAN2 is typically used for the “private” or “trusted” side, where the LAN cannot be monitored, and is considered safe for unencrypted traffic.
Facing the back of the unit, LAN1 is the RJ-45 connector on the LEFT next to the VGA
connector. (The keyboard, mouse, and monitor are only used for diagnostic purposes.)
Setting the Initial IP Addresses
On the floppy disk included with the unit is a file called SSL.INI, which includes a section that
looks like this:
[Configuration]
LAN1IP=204.48.36.155
LAN1NetMask=255.255.255.0
LAN2IP=192.168.1.1
LAN2NetMask=255.255.255.0
DefaultGateway=204.48.36.254
DNSserver=204.48.36.4
1. Using a plain-text editor (such as Windows’ Wordpad), change the IP addresses (and
subnet masks if needed) to the desired values. If the original floppy cannot be located,
just create the file on a floppy with the entries shown above.
Note: no whitespace (spaces or tabs) is allowed in these entries.
2. Put the floppy disk back into the SSL1000, and turn it on. The values in the file on the
floppy will be copied to the permanent copy on the hard disk, and will take affect imme-
diately. The floppy is not required for future reboots.
Visara International • 6833 Mount Herman Road • Morrisville, NC • 27560 • 888 334 4380 • [email protected]
707093-001
Page 2
SSL1000 Installation Guide
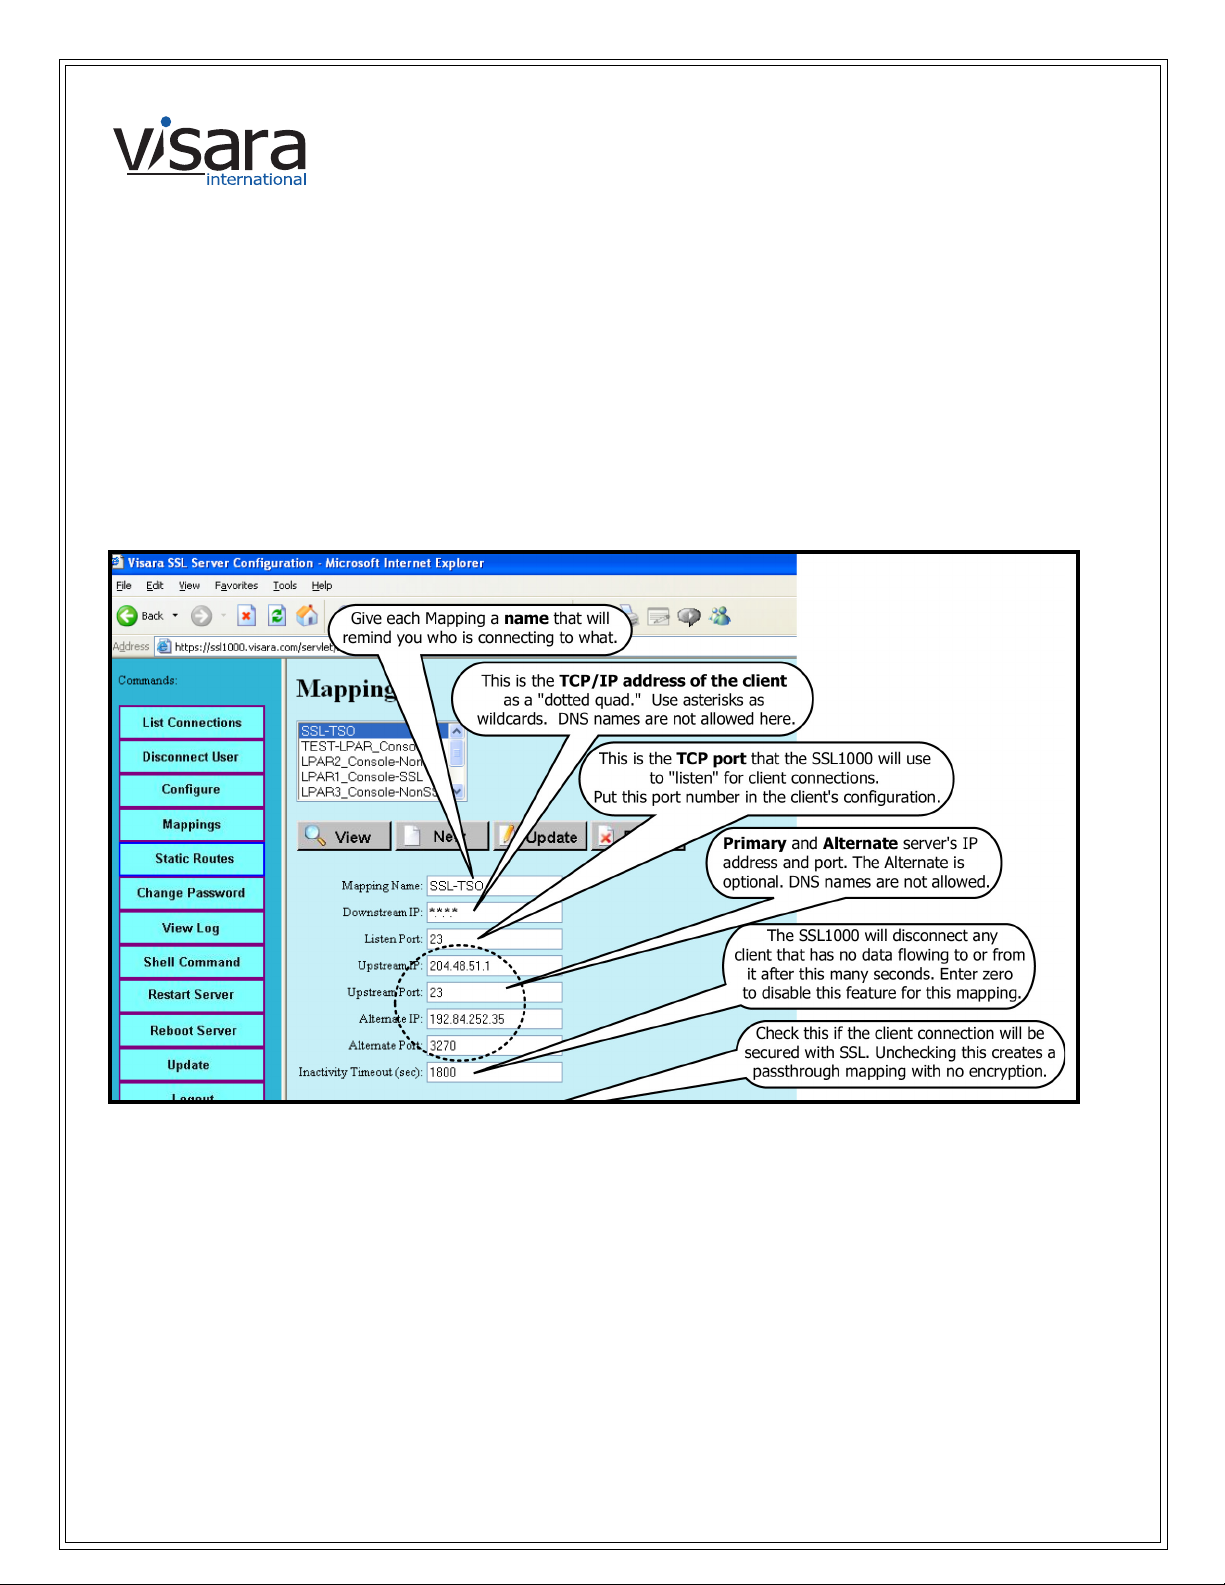
Mappings
Upstream to downstream Mappings are at the heart of the SSL1000. These define the paths
that the data will take, who may connect to which server, and which connections will be encrypted.
To create and manage Mappings, all you need is your browser. If your SSL1000 has the IP
address of 204.48.51.51, you should point your browser to http://204.48.51.51
Click on Administrative Functions, where you will be prompted for the administrator password (the default is admin). This will bring you to the administrator’s Main Menu. Click on
Mappings.
•To create a new Mapping, just fill in the blanks and click New.
•To create a new Mapping based on an existing one, click on it in the Mappings list,
click View, make your changes, give it a new name, then click New.
•To modify a Mapping, click on it in the Mappings list, click View, make your changes,
then click Update.
•To delete a Mapping, click on it in the Mappings list, click View, then click Delete.
Mapping changes take affect immediately and will govern all subsequent connections.
Current connections are not affected.
Visara International • 6833 Mount Herman Road • Morrisville, NC • 27560 • 888 334 4380 • [email protected]
707093-001
 Loading...