

Page 1

eTerm 350 Windows-based Terminal
User’s Manual
P/N 707018-006
Page 2

The information contained in this document is subject to change without notice. Visara, Inc. makes no warranty of any
kind with regard to this material including, but not limited to, the implied warranties of merchantability and fitness
for a particular purpose. Visara, Inc. shall not be liable for errors contained herein or for incidental or consequential
damages in connection with the furnishing, performance, or use of this material.
Safety and Regulatory Information
Safety
* UL1950, CSA950
* CE Mark, IEC950, EN60950, EU Low Voltage Directive
Electro-Magnetic Interference
* This equipment has been tested and found to comply with the limits for FCC part 15 Class B environment. This
equipment generates, uses, and can radiate radio frequency energy and, if not installed and used in accordance with
the instructions, may cause interference to radio communications. Operation is subject to the following two conditions:
(1)This device may not cause harmful interface, and
(2)This device must accept any interface received, including interface that may cause undesired operation.
* This apparatus complies with the CDoC CLASS “B” limits for radio interference as specified in the Canadian
Department of Communications Radio Interference Regulations. Operation in a residential area may cause
unacceptable interference to radio and TV reception requiring the owner or operator to take whatever steps are
necessary to correct the interference.
* Cet appariel est conformé aux normes CDoC CLASS “B: D’Interference radio tel que specifier par le Ministère
Canadien des communications dans les règlements D” Interference Radio. Cet équipment ne dépasse pas les limites
de Classe B d’émission de bruits radioélectriques pour les appareils numériques, telles que prescrites par le Règlement
sur le brouillage radioélectrique établi par le Ministère des Communications du Canada. L’exploitation faite en
milieu résidentiel peut entraîner le brouillage des réceptions radio et télé, ce qui obligerait le propriétaire ou l’opérateur
à prendre les dispositions nécessaires pour en éliminer les causes.
* CE mark, EN50022 Class B, EN50082-1, EU EMC Directive
* UCCI-B
ii 707018-006
Page 3

Software License Agreement
You should carefully read the following terms and conditions before operating the eTerm 350. It contains
software, the use of which is licensed by Visara, Inc. (“Visara”) to you for your use only as set forth
below. Installation of the eTerm 350 indicates your acceptance of these terms and conditions. If you do
not agree with them, you should promptly return the complete system, including documentation, and
your money will be refunded.
P/N 707018-006
1 LICENSE. In consideration of your payment of the license fee, Visara grants to you a nontransferable and nonexclusive license to use
the enclosed proprietary software program and any documentation relating thereto (collectively referred to as the “Program”) on a
single computer at a single location, or in the case of multiprocessor versions of the Program, on one node of a network. You assume all
responsibility for the selection of the Program to achieve your intended results and for the installation, use, and results obtained from
the Program.
2 PROGRAM OWNERSHIP. You own the physical media on which the Program is originally or subsequently recorded or fixed. This
Agreement does not transfer title and ownership of the Program or any underlying rights, patents, copyrights, trademarks, and trade
secrets.
3 RESTRICTIONS. The Program, including the accompanying documentation, is copyrighted. Unauthorized copying of the Program,
including a Program that has been modified, merged, or included with other software program(s) is expressly forbidden. You may not
copy the documentation accompanying the Program. You may make one copy of the Program (excluding accompanying documentation)
into any machine readable or printed form solely for backup purposes in support of your use of the Program on a single computer
(certain Programs, however, may include mechanisms to limit or inhibit copying). You must reproduce and include the Proprietary
Notices (as defined below) on the backup copy. You must maintain an accurate record of the location of the backup copy at all times. You
may not electronically transfer the Program from one computer to another over a network. You may not distribute copies of the
Program to others. You may modify the Program and/or merge it into another program for your use on the single computer. Any
portion of this Program merged into another program will continue to be subject to the terms and conditions of this Agreement. Yo u
may not modify, adapt, translate, reverse engineer, decompile, or disassemble, or in any manner decode the Program in order to derive
source code. You agree to never remove any patent, copyright, trademark, or other proprietary notices (collectively referred to as the
“Proprietary Notices”) or product identification affixed to the Program.
Any attempted sublicense, assignment, rental, sale, or other transfer of the Program or any right thereto shall be null and void. You may not use,
copy, or modify the Program, or any copy, modification, or merged portion, in whole or in part, except as expressly provided for in this
Agreement.
4 TERM. The license granted under this Agreement is effective until terminated. You may terminate it at any other time by destroying
the Program together with all copies, modifications, and merged portions in any form. It will also terminate if you fail to comply with
any term or condition of this Agreement. You agree upon such termination to destroy the Program together with all copies,
modifications, and merged portions in any form, and to certify to Visara that they have been destroyed. Upon termination there will be
no refund of any monies or other consideration paid by you.
5 LIMITED WARRANTY. The Program is Provided “as is” without warranty of any kind, either expressed or implied, including, but
not limited to, the implied warranties of merchantability and fitness for a particular purpose. The entire risk as to the quality and
performance of the Program is with you. Should the Program prove defective, you (and not Visara or its licensors, affiliates, contractors,
suppliers, or agents) assume the entire cost of all necessary servicing, repair, or correction.
Visara and/or its licensors do not warrant that the functions contained in the Program will meet your requirements or that the operation of the
Program will be uninterrupted or error free. However, Visara and/or its licensors warrant the media on which the Program is furnished to be free
from defects in materials and workmanship under normal use for a period of ninety (90) days from the date of delivery.
6 LIMITATIONS OF REMEDIES. Visara’s and/or its Licensors’ entire liability and your exclusive remedy shall be: (1) the replacement
of any media not meeting the “Limited Warranty” which is returned postage prepaid to Visara or an authorized representative with
proof of payment; or (2) if Visara and/or its licensors are unable to deliver replacement media which is free from detects in materials or
workmanship, you may terminate this Agreement by returning the Program and your money will be refunded.
In no event will Visara, its licensors, affiliates, contractors, suppliers, and agents be liable to you for any damages, including any lost profits, lost
savings, or other incidental or consequential damages arising out of the use or inability to use such Program (whether based on an action or
claim in contract, tort, or otherwise) even if Visara, its licensors, affiliates, contractors, suppliers, and agents have been advised of the possibility
of such damages or for any claim by any other party.
This Agreement will be governed by the laws of the State of North Carolina. Should you have any questions concerning this Agreement, please
contact your Visara Sales Representative or Visara, Inc., 2917 Highwoods Blvd., Suite 100, Raleigh, North Carolina 27604.
You acknowledge that you have read this Agreement, understand it, and agree to be bound by its terms and conditions. You further
agree that it is the complete and exclusive statement of the Agreement between us which supersedes any proposal or prior Agreement,
oral or written, and any other communications between us relating to the subject matter of this Agreement.
707018-006 iii
Page 4

Page 5

Table of Contents
Page
Chapter 1. eTerm Installation .................................................................................. 1-1
Usage Notice ................................................................................................. 1-1
Precautions ................................................................................................ 1-1
Introduction ................................................................................................... 1-2
About the Product ..................................................................................... 1-2
Package Overview..................................................................................... 1-2
Product Overview...................................................................................... 1-3
Installation ..................................................................................................... 1-4
Connecting the Terminal ........................................................................... 1-4
Powering On the Terminal ........................................................................ 1-4
Appendices .................................................................................................... 1-5
Troubleshooting ........................................................................................ 1-5
Specifications ............................................................................................ 1-6
Chapter 2. eTerm Setup Wizard .............................................................................. 2-1
Configuring the Unit ..................................................................................... 2-1
Welcome Screen........................................................................................ 2-1
License Agreement Screen........................................................................ 2-1
Enable/Disable Dynamic Assignment of IP Address................................ 2-2
Specify a Static IP Address ....................................................................... 2-3
Enable/Disable Name Resolution Services............................................... 2-4
Choose Display Resolution ....................................................................... 2-5
Configure Web Access .............................................................................. 2-6
Local Printer Setup ................................................................................... 2-7
Printer Port Setup ...................................................................................... 2-7
Printer Model Setup .................................................................................. 2-8
Printer Name ............................................................................................. 2-8
Printer Default ........................................................................................... 2-9
Additional Printer Setup ........................................................................... 2-9
Finishing the Setup Wizard ..................................................................... 2-10
Restarting after Setup Wizard ................................................................. 2-10
Chapter 3. eTerm Terminal Connection .................................................................. 3-1
Terminal Connection Manager ...................................................................... 3-1
Creating Connections to Terminal Server Host ............................................. 3-1
Starting the Connection Wizard ................................................................ 3-1
Creating a New Connection ...................................................................... 3-2
Deleting a Connection............................................................................... 3-6
Configuring an Auto-start Connection ...................................................... 3-7
Stopping an Auto-start Connection ........................................................... 3-7
Modifying a Connection ........................................................................... 3-7
Modifying a Microsoft Terminal Server Client Connection ..................... 3-7
Connections Properties Sheet ........................................................................ 3-8
Configure Properties Sheet............................................................................ 3-9
Hot-keys Functions...................................................................................... 3-11
Citrix ICA Client ......................................................................................... 3-12
Dial-Up Client ............................................................................................. 3-17
707018-006 v
Page 6

eTerm 350 Windows-based Terminal
Chapter 4. eTerm Terminal Properties .................................................................... 4-1
Terminal Properties ....................................................................................... 4-1
General ...................................................................................................... 4-1
Configuring the Unit via Terminal Properties ........................................... 4-1
Accessing the Terminal Properties Property Sheet ................................... 4-1
Resetting Factory Defaults........................................................................ 4-2
Input Tab ................................................................................................... 4-3
Display Tab ............................................................................................... 4-4
Network Tab .............................................................................................. 4-5
Reconfiguring Name Resolution............................................................... 4-7
Audio Tab .................................................................................................. 4-8
Serial Tab .................................................................................................. 4-9
Printers Tab ............................................................................................. 4-10
Security Tab ............................................................................................ 4-11
Upgrade Tab ............................................................................................ 4-11
Advanced Tab .......................................................................................... 4-13
Web Tab................................................................................................... 4-19
WBT Info ................................................................................................ 4-19
Chapter 5. eTerm 350 Plus ...................................................................................... 5-1
Page
Connection Types .......................................................................................... 5-1
Configuring Host Connections ...................................................................... 5-2
New Connection........................................................................................ 5-2
Connection Name...................................................................................... 5-2
Connection Type ....................................................................................... 5-2
Host Name / Address ................................................................................ 5-3
Terminal Type ........................................................................................... 5-3
Timeout ..................................................................................................... 5-4
Additional Connection Capabilities .............................................................. 5-5
Display Parameters, TN5250E.................................................................. 5-5
Printer Parameters, TN5250E ................................................................... 5-6
Display Parameters, TN3270 .................................................................... 5-7
Display Parameters, TN3270E.................................................................. 5-7
Printer Parameters, TN3270E ................................................................... 5-8
vi 707018-006
Page 7

Usage Notice
Warning- To reduce the risk of fire or electric shock, do not expose this product
to rain or moisture.
Warning- Please do not open or disassemble the product as this may cause
electric shock.
Precautions
Follow all warnings and precautions as recommended in this user’s manual to maximize
the life of your unit.
Do:
• Turn off the product before cleaning.
• Use a soft cloth moistened with mild detergent to clean the terminal housing.
Chapter 1. eTerm Installation
Don’t:
• Block the slots and openings on the unit provided for ventilation.
• Use abrasive cleaners, waxes or solvents for your cleaning.
• Place the terminal horizontally.
• Put heavy devices upon the terminal.
• Use under the following conditions:
– Extremely hot, cold or humid environment.
707018-006 1-1
Page 8
eTerm 350 Windows-based Terminal
Introduction
About the Product
This Windows-based Terminal is a simple device that allows you to use Microsoft
Windows applications running on a Windows NT server, supporting concurrent text
and graphics sessions. Through network communications you can share resources such
as a printer, exchange information from device to device, and run common software
programs. The outstanding features of the unit are listed as follows:
• Windows CE with RDP & ICA3
• Up to 1280 x 1024 display resolution
• Terminal emulator support (optional)
• Remote software upgrade capability
• 16-bit stereo audio output
• Modular design (mini tower) connects to any VESA standard monitor
• Display Windows NT/ 95/ 98/ 3.1, DOS (text) applications via multiuser Windows
NT and 2000 servers
Package Overview
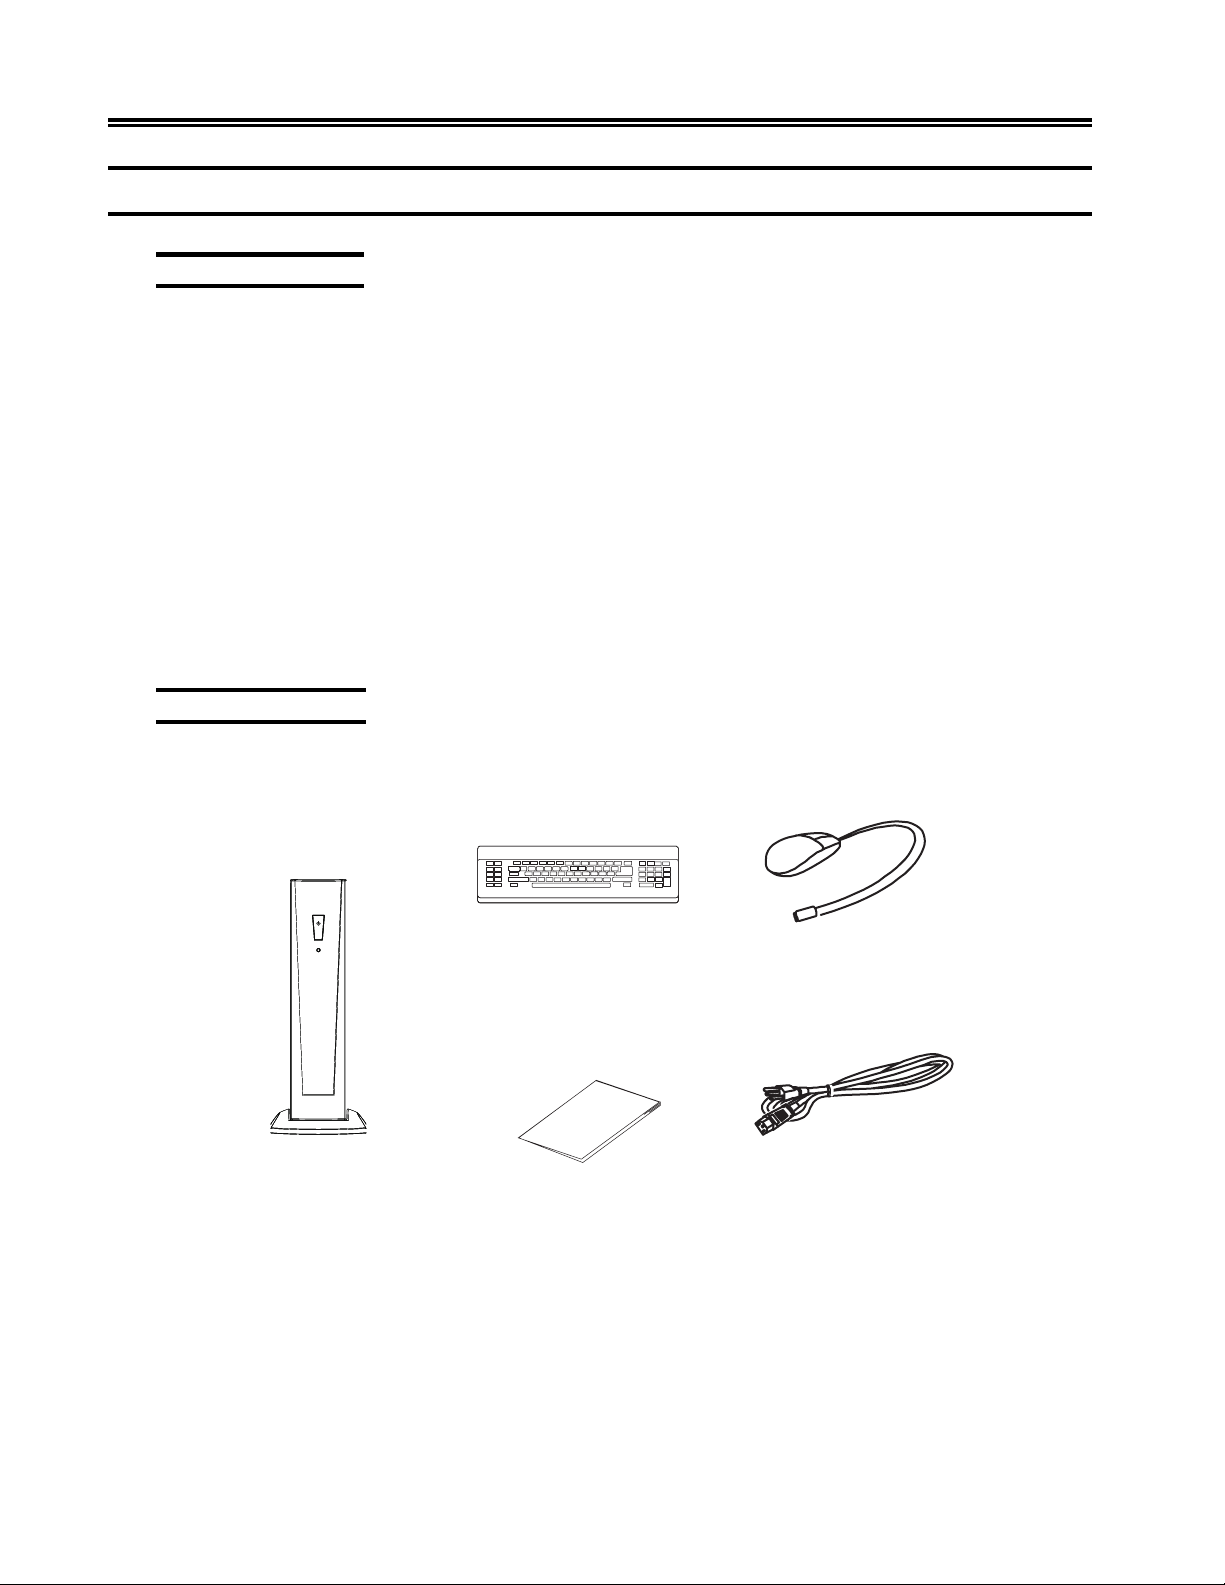
This Windows-based Terminal comes with all the items shown below. Check to make
sure your unit is complete. Contact your Sales person immediately if anything is missing.
Main Unit with
Desktop Stand
PS/2 Keyboard
PS/2 Mouse
Power Cord
Quick Start Card
1-2 707018-006
Page 9
Product Overview
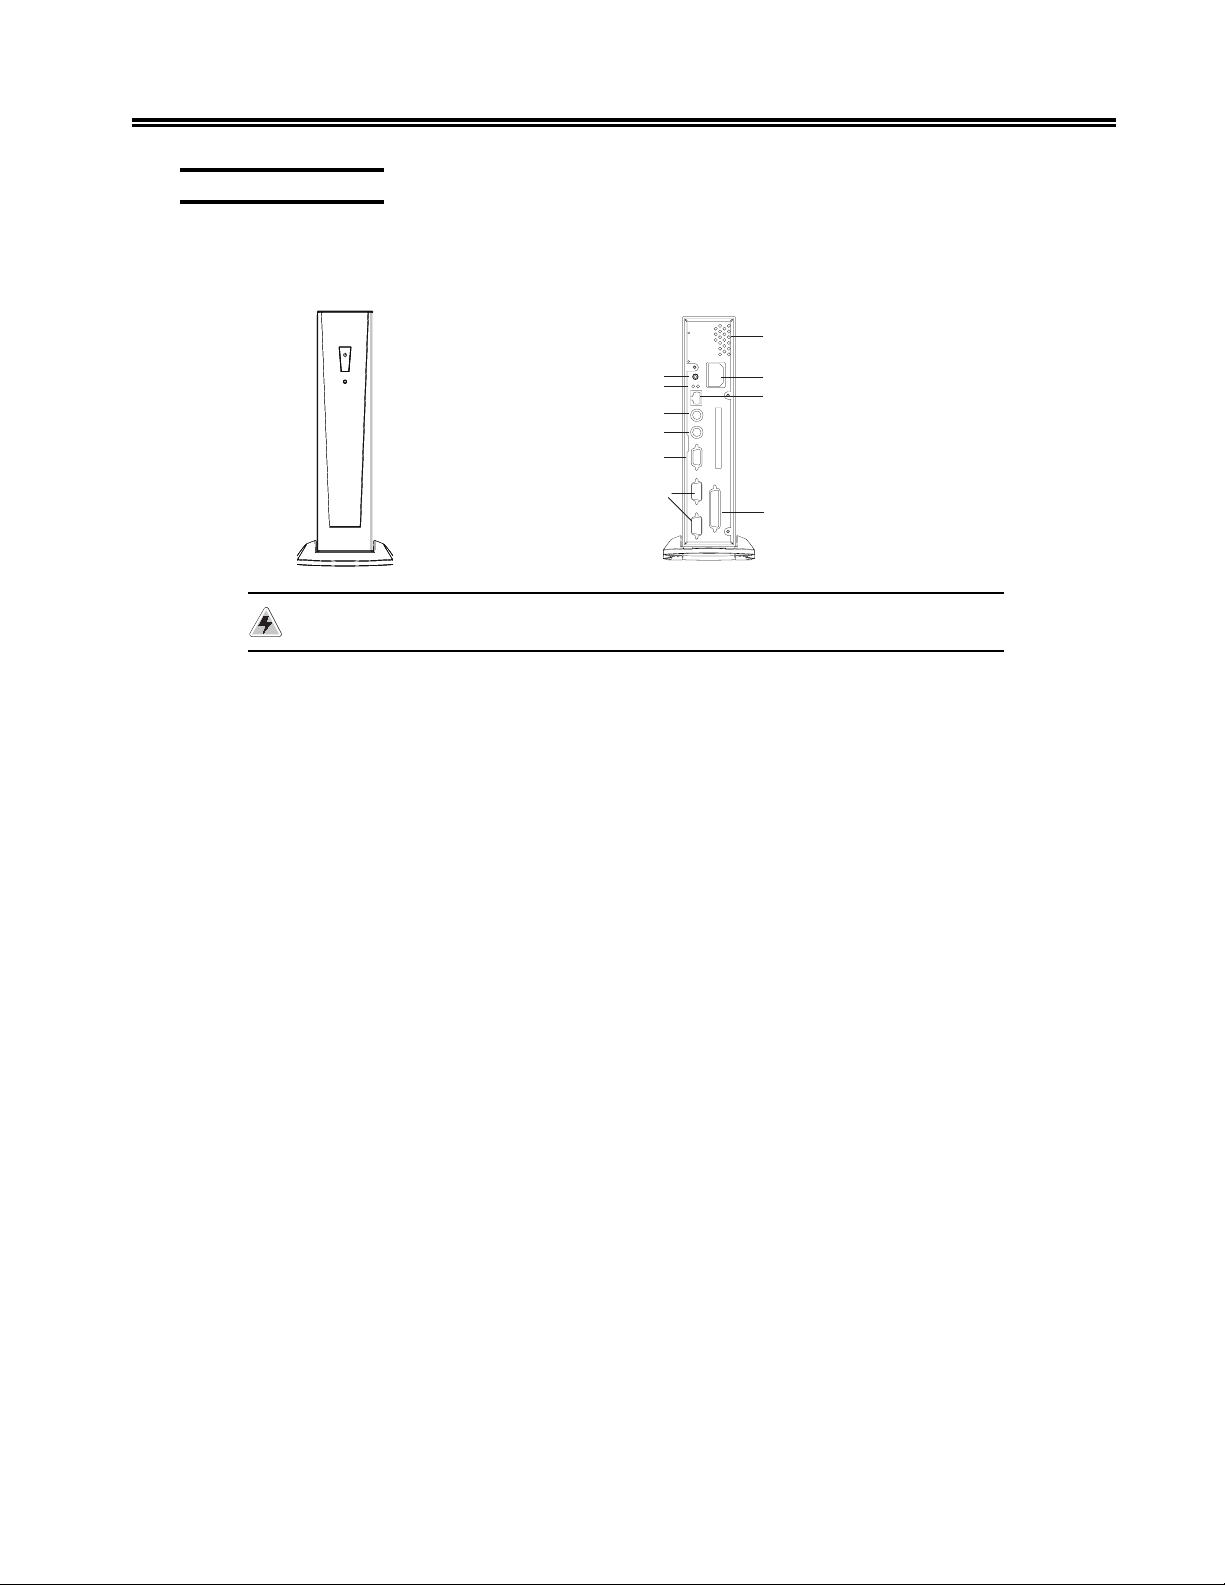
Front View
Chapter 1. eTerm Installation
Connection Ports &
Features (Rear View)
Air Vent
4. Audio Output Connector
5. LAN LED Indicators
6. PS/2 Mouse Connector
7. PS/2 Keyboard Connector
8. VGA Connector
9. Serial Port Connectors
(COM1, COM2)
1. Power Connector
2. RJ-45 Network Connector
3. Parallel Port Connector
Warning: Do not place the terminal horizontally.
1. Power Connector
This connector is for connecting the power cord with the terminal and the AC outlet.
2. RJ-45 Network Connector
This connector can be used to connect the built-in 32-bit 10/100-TX Ethernet
network LAN Controller to a host or Hub.
3. Parallel Port Connector
This connector can be used for printer.
4. Audio output Connector
This connector is used to connect to external speakers.
5. LAN LED Indicators
This LED indicates the link (green), activity (orange) status of network conditions.
The detailed information is explained as follows:
• Link Indicator (green)
This LED lights to indicate a successful network connection.
• Activity Indicator (orange)
This LED lights when there are network packets sent or received through the RJ45 port.
6. PS/2 Mouse Connector
This connector is for a mouse using a PS/2 plug (mini DIN).
7. PS/2 Keyboard Connector
This connector is for a standard keyboard using a PS/2 plug (mini DIN).
8. VGA Connector
This connector is for displaying on a standard VGA compatible device.
9. Serial Port Connectors (COM1, COM2 )
These connectors can be used for pointing devices or other serial devices, such as
a mouse or a modem.
707018-006 1-3
Page 10
eTerm 350 Windows-based Terminal
Installation
Connecting the Terminal
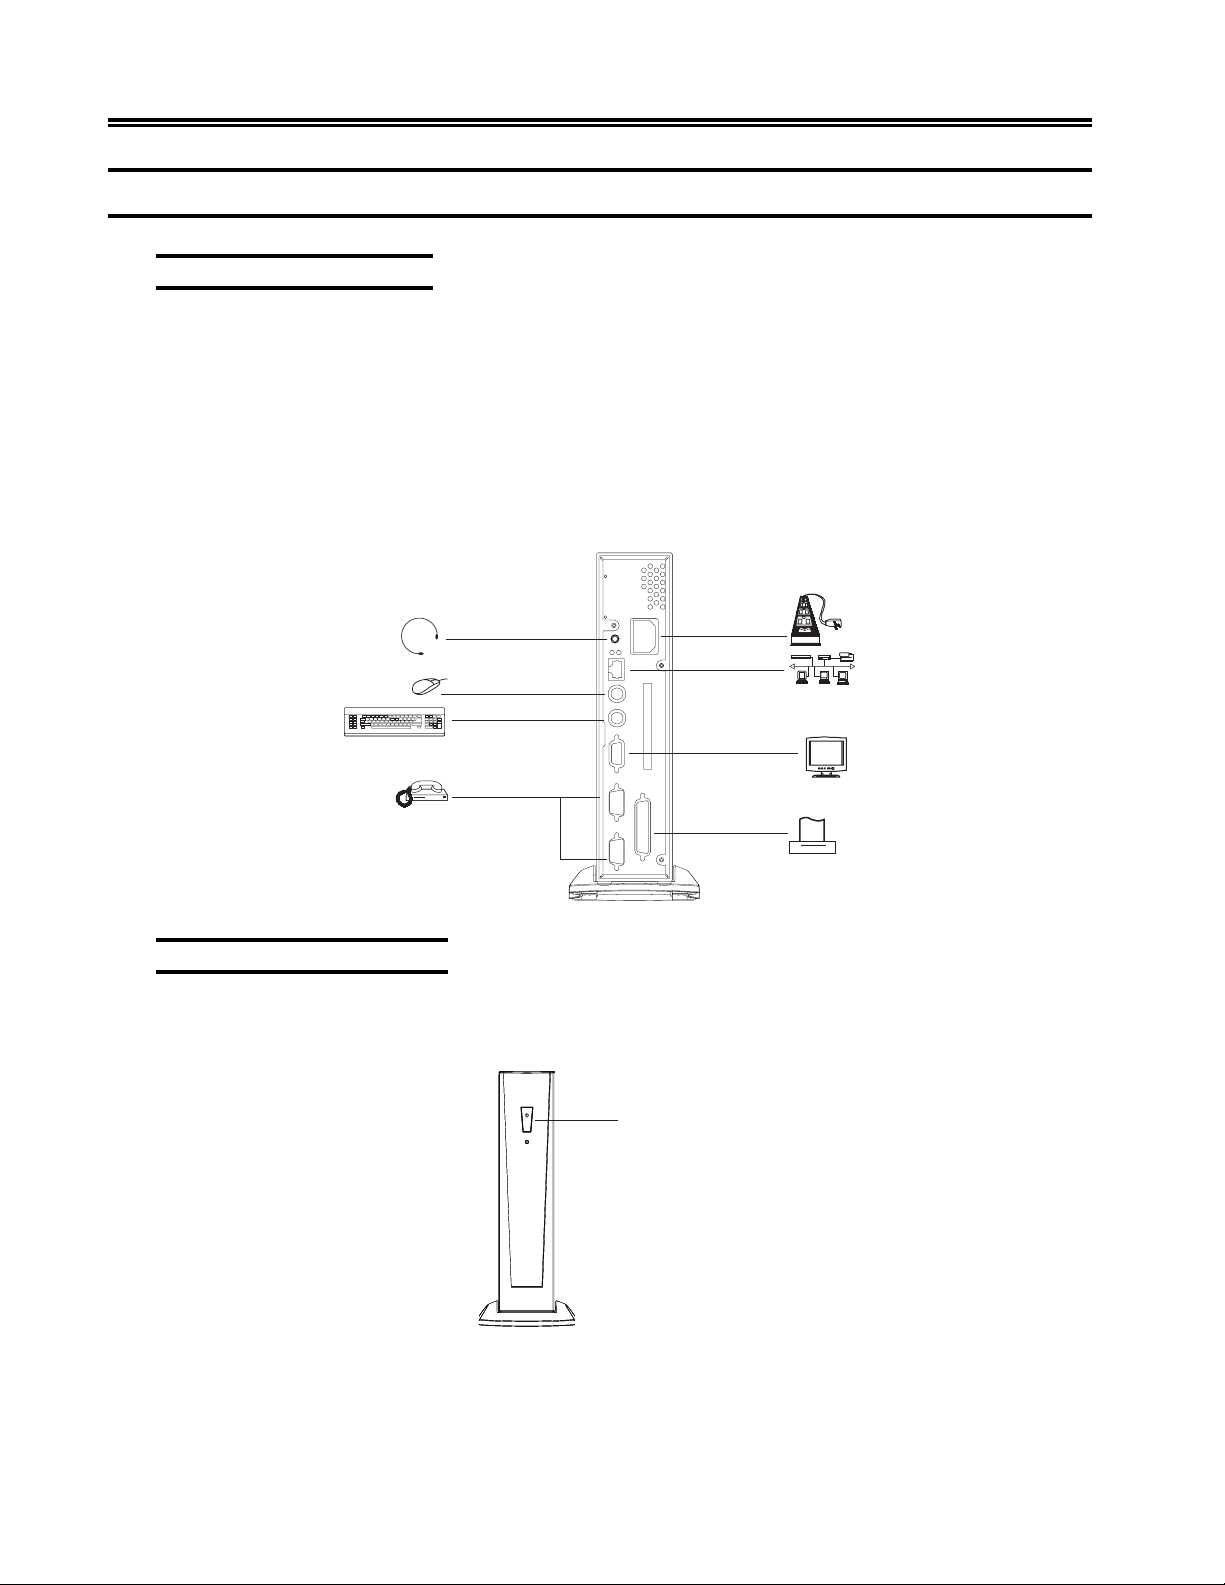
Follow these instructions to connect the terminal to its peripheral devices:
1. Connect the monitor to the video connector.
2. Connect the keyboard to the keyboard connector.
3. Connect the mouse to the mouse connector.
4. Connect the 10/100-TX network cable to the RJ-45 network connector.
5. Connect the power cord to the power connector with an AC outlet.
(Refer to the installation figure and the connector descriptions shown below.)
Audio line out
PS/2 Mouse
P/S2 Keyboard
to Power
AC Outlet
to Network
to Monitor
Powering On the Terminal
When you have made all the connections, turn on the terminal by pressing the power
switch and turn on the monitor.
to Serial Device
to Printer
Power Switch
1-4 707018-006
Page 11

Appendices
Troubleshooting
If you are experiencing trouble with the terminal, refer to the following. If the problem
persists, please contact your local Sales Representative.
Problem: Terminal cannot be turned on.
• Check that all I/O and power connectors are correctly and securely connected as
described in the “Installation” section.
• Make sure the pins of the connectors are not crooked or broken.
Problem: LAN function cannot be started.
• Ensure that the cable is securely connected to the network RJ-45 connector; and the
other end of the cable is also securely connected to its correct device. Please make
sure the link LEDs will light when the cable is well connected.
• Contact your system administrator.
Problem: Network server cannot be logged on.
• Ensure that the related network setting is correct.
• Contact your system administrator.
Chapter 1. eTerm Installation
707018-006 1-5
Page 12

eTerm 350 Windows-based Terminal
Specifications
Processor - Cyrix MediaGX™, 200MHz
Main Memory - 32MB SDRAM (up to 128MB)
Flash Memory - M-Systems Flash Disk On Chip 8MB (up to 24MB)
Graphics - Resolution: 640 x 480, 60/72/75/85Hz
800 x 600, 60/72/75/85Hz
1024 x 768, 60/70/75/85Hz
1280 x 1024, 60/75Hz
- Colors: 16.7M (max)
Audio - 16-bit stereo 44.1KHz audio output
Networking - TCP/IP with DNS and DHCP
- 10/100-TX Ethernet, twisted pair (RJ-45)
- Point to Point Protocol (PPP)
I/O Ports - One 3-pin power connector
- One 15-pin female VGA compatible connector
- One mini jack audio connector
- One 8-pin female RJ-45 connector
- One 6-pin female PS/2 mouse connector
- One 6-pin female PS/2 keyboard connector
- Two 9-pin male serial connectors
- One 25-pin female parallel connector
Power Supply - Input: AC 100~240V, 50~60Hz
Dimensions - 56 x 242 x 215mm / 2.2” x 9.5” x 8.5” (W x H x D)
Weight - 2.2 kg/ 4.8 lbs
Environmental - Operating temperature: 0° ~ 35°C / 32° ~ 95°F
- Humidity: 10%~90% non-condensing
- Storage temperature: -20° ~ 60°C / -4° ~ 140°F
- Humidity: 10%~95% non-condensing
Safety Regulation - FCC-B, CE-B, VCCI-II, UL, CUL, TUV
1-6 707018-006
Page 13
Chapter 2. eTerm Setup Wizard
Configuring the Unit
The first time you power up the system, the Setup Wizard will lead you though the
configuration process. After the Setup Wizard is completed, it will not reappear unless
the terminal performs a flash recovery or the terminal is reset to factory defaults.
This section explains each screen of this unit’s Setup Wizard in sequential order. After
you finish the Setup Wizard, you can change any configuration setting through the
Terminal Properties property sheet. You can open this Terminal Properties dialog
box anywhere at anytime by pressing the [F2] key.
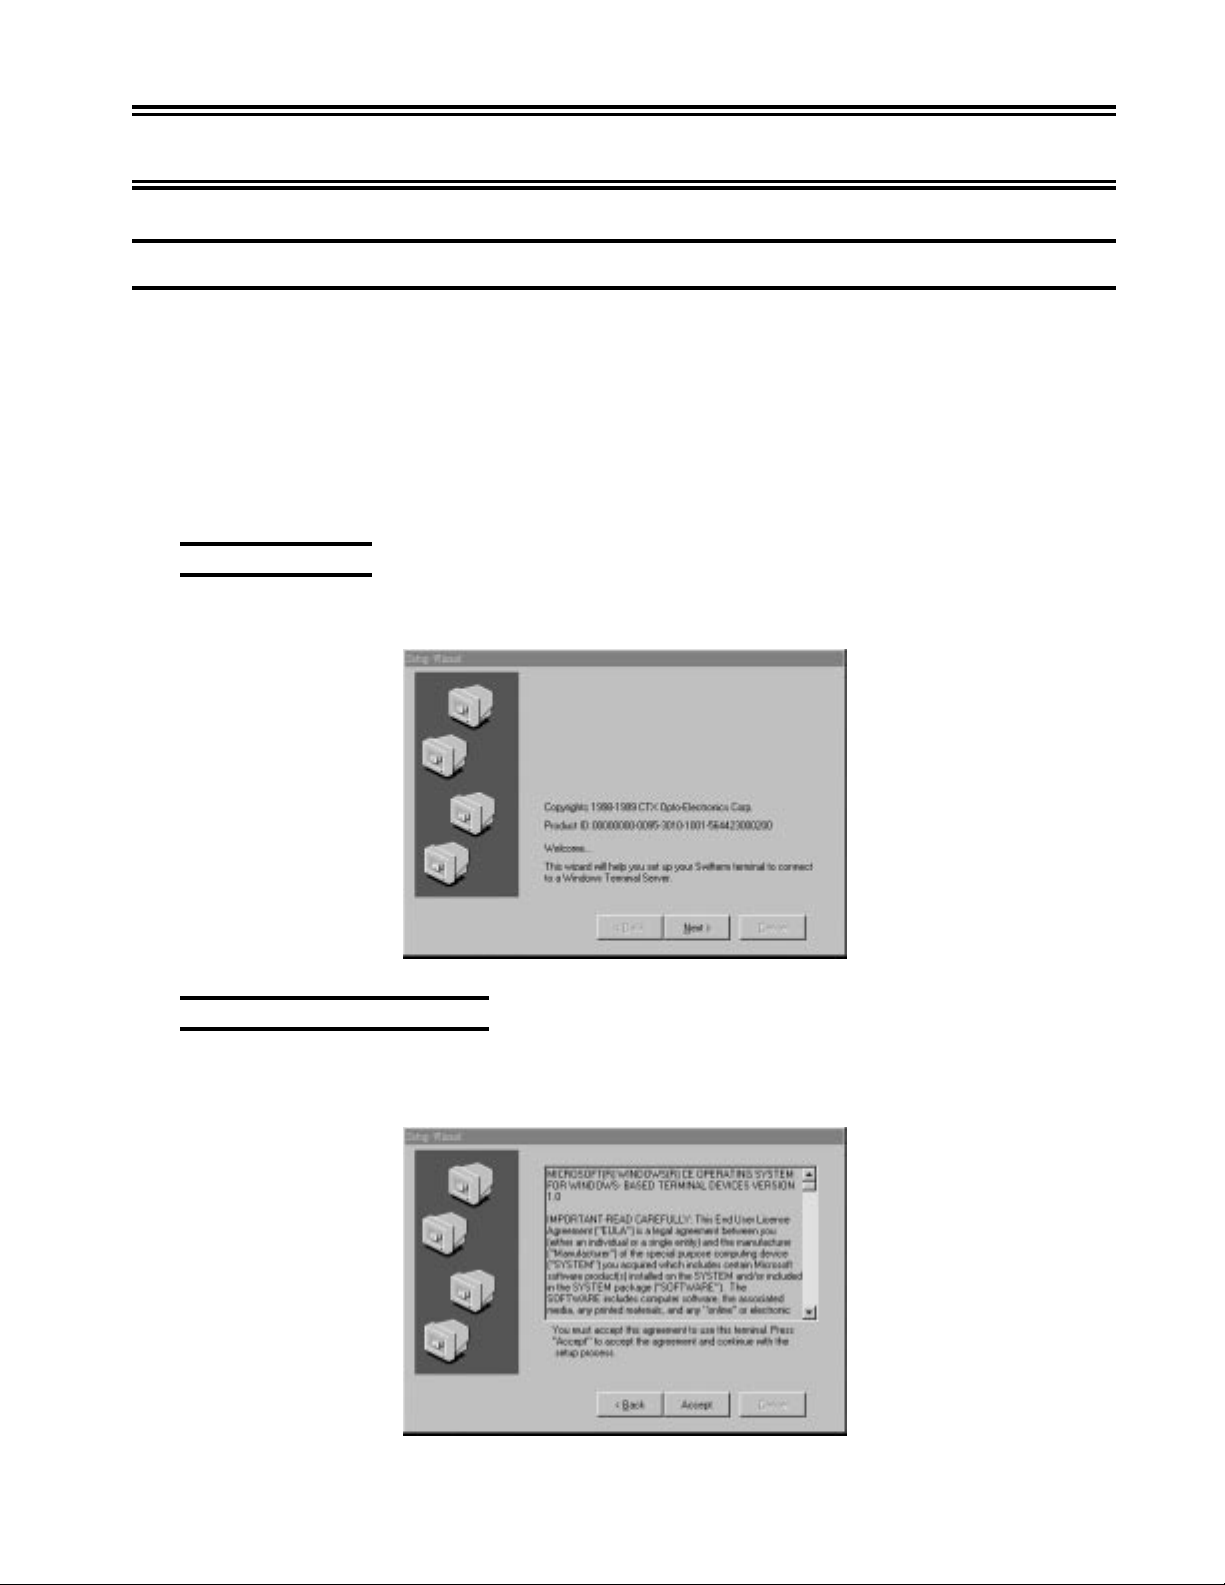
Welcome Screen
When the Welcome screen appears, click Next.
License Agreement Screen
The End User License Agreement specifies the legal terms governing your use of this
product. To proceed, click Accept.
707018-006 2-1
Page 14
eTerm 350 Windows-based Terminal
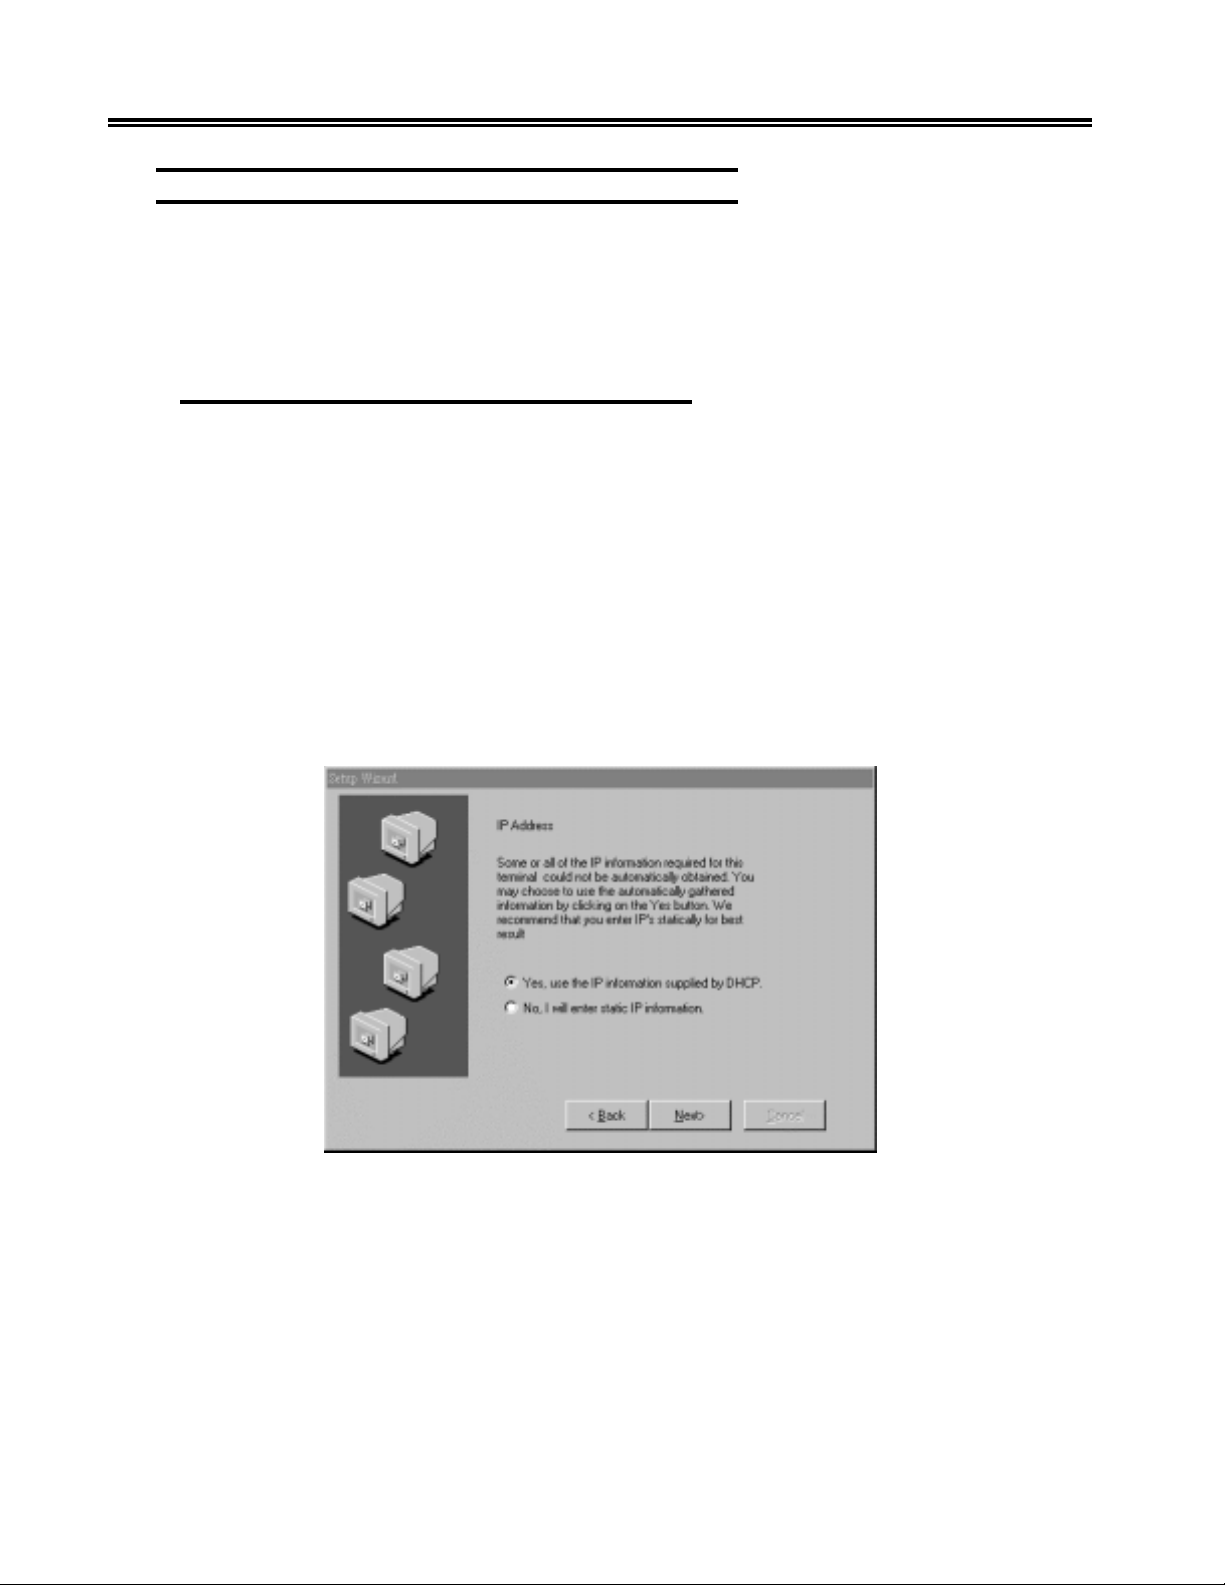
Enable/Disable Dynamic Assignment of IP Address
Network attached devices must contain a unique network identifier. If the network is
using TCP/IP as a communication protocol, these identifiers are called “IP addresses”.
The following series of screens will allow you to choose from two different methods of
assigning IP addresses.
Select the method of providing IP addresses.
If your network provides DHCP service, and you want it to provide the terminals IP
address, leave the first option selected. The unit can get its IP address though a DHCP
(Dynamic Host Configuration Protocol) service by default (provided the DHCP service
is available and the unit is properly connected to the network). The DHCP will
automatically assign an IP Address, which is drawn from a pool of available IP addresses,
when a unit is powered on and a request is broadcast over the network.
If you would rather specify a static IP address for the terminal, select the second option.
This option is selected automatically if your network does not provide a DHCP service,
or if the unit is not properly connected to the network. If your network does not provide
DHCP, leave the second option selected.
Select the appropriate method. Click Next.
Note: If your network does not provide a DHCP service, but you get the screen shown
above, make sure the unit is properly connected to the network, then restart it
by cycling the power off and then on.
2-2 707018-006
Page 15
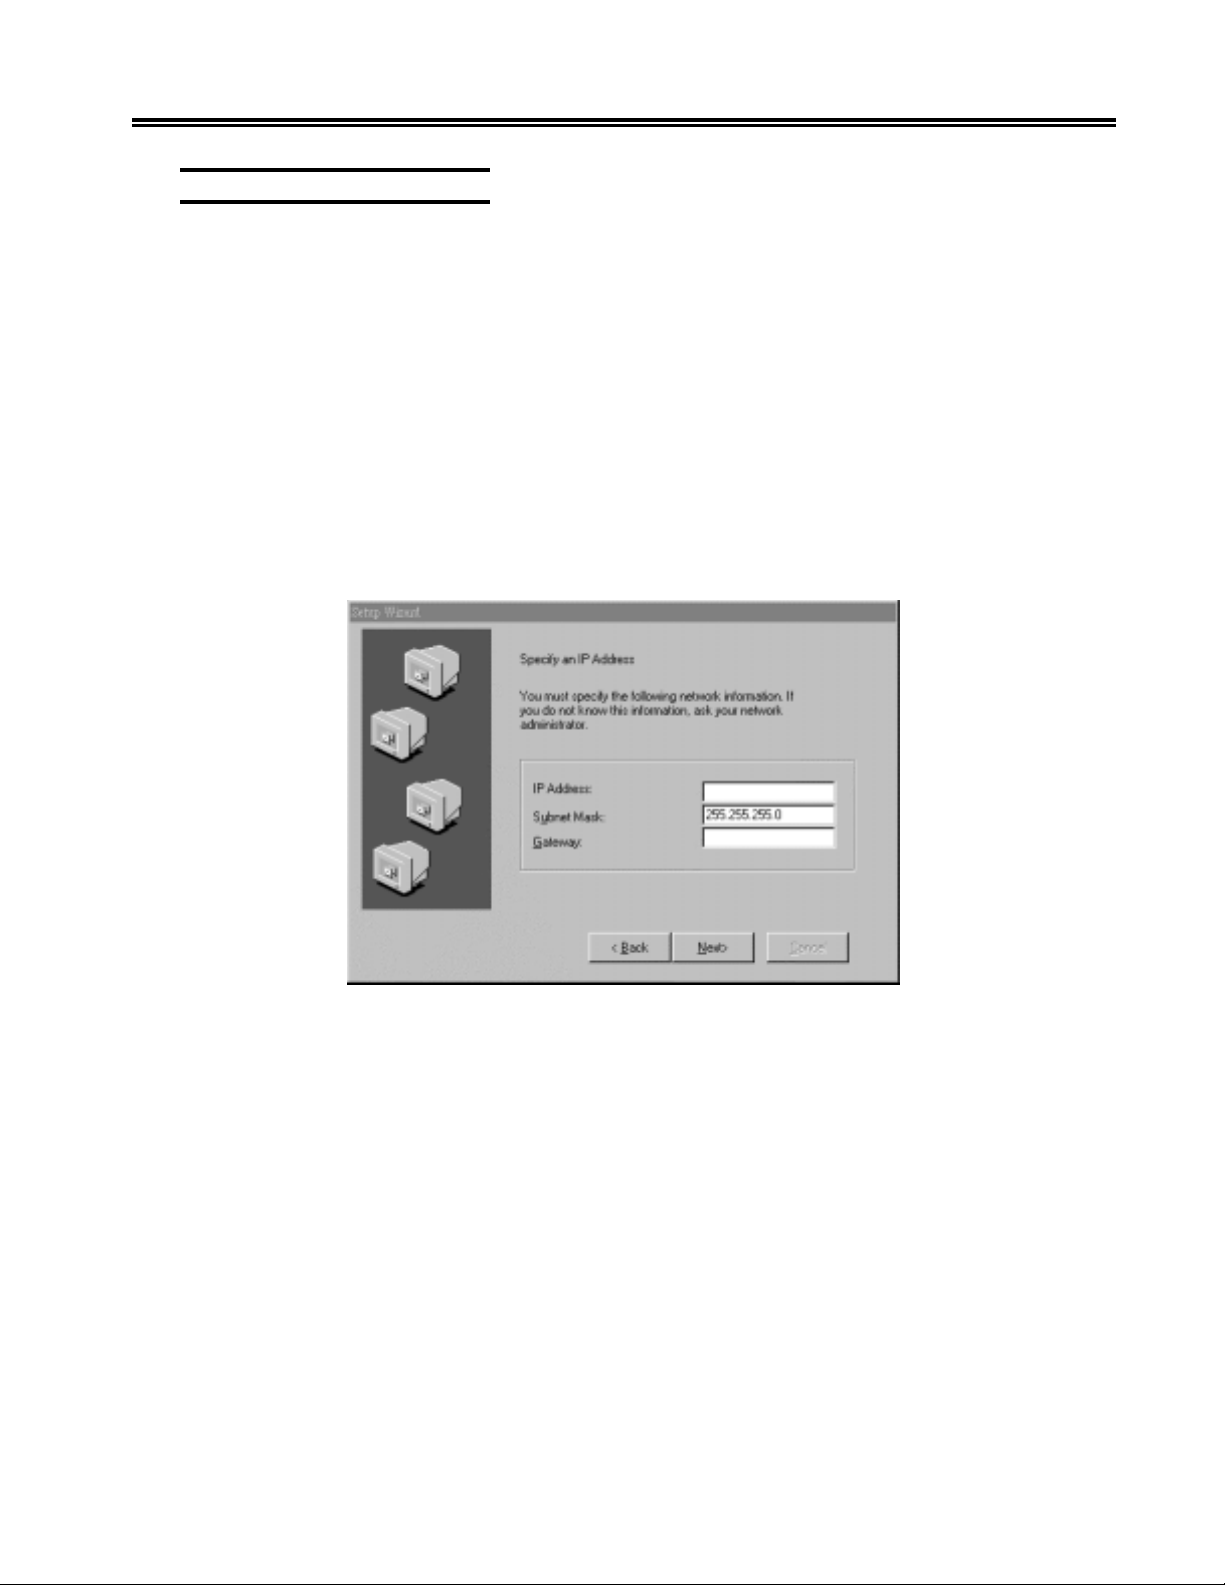
Specify a Static IP Address
If the method you selected on the prior screen was to enter a static IP Address, the
screen below will appear. You will be required to enter the following information onto
the screen. You may find it helpful to acquire this information from your system
administrator. Supply the following network information:
• IP address
Required for identifying this unit to the network. The format will follow the standard
addressing format.
• Subnet Mask
Required for designating which network the IP Address is a part of.
• Gateway
Optional address which identifies the machine through which a subnet communicates
with another network.
Complete the information and click Next.
Chapter 2. eTerm Setup Wizard
Note: Specify a static IP Address. The Subnet Mask will default to 255.255.255.0.
707018-006 2-3
Page 16
eTerm 350 Windows-based Terminal
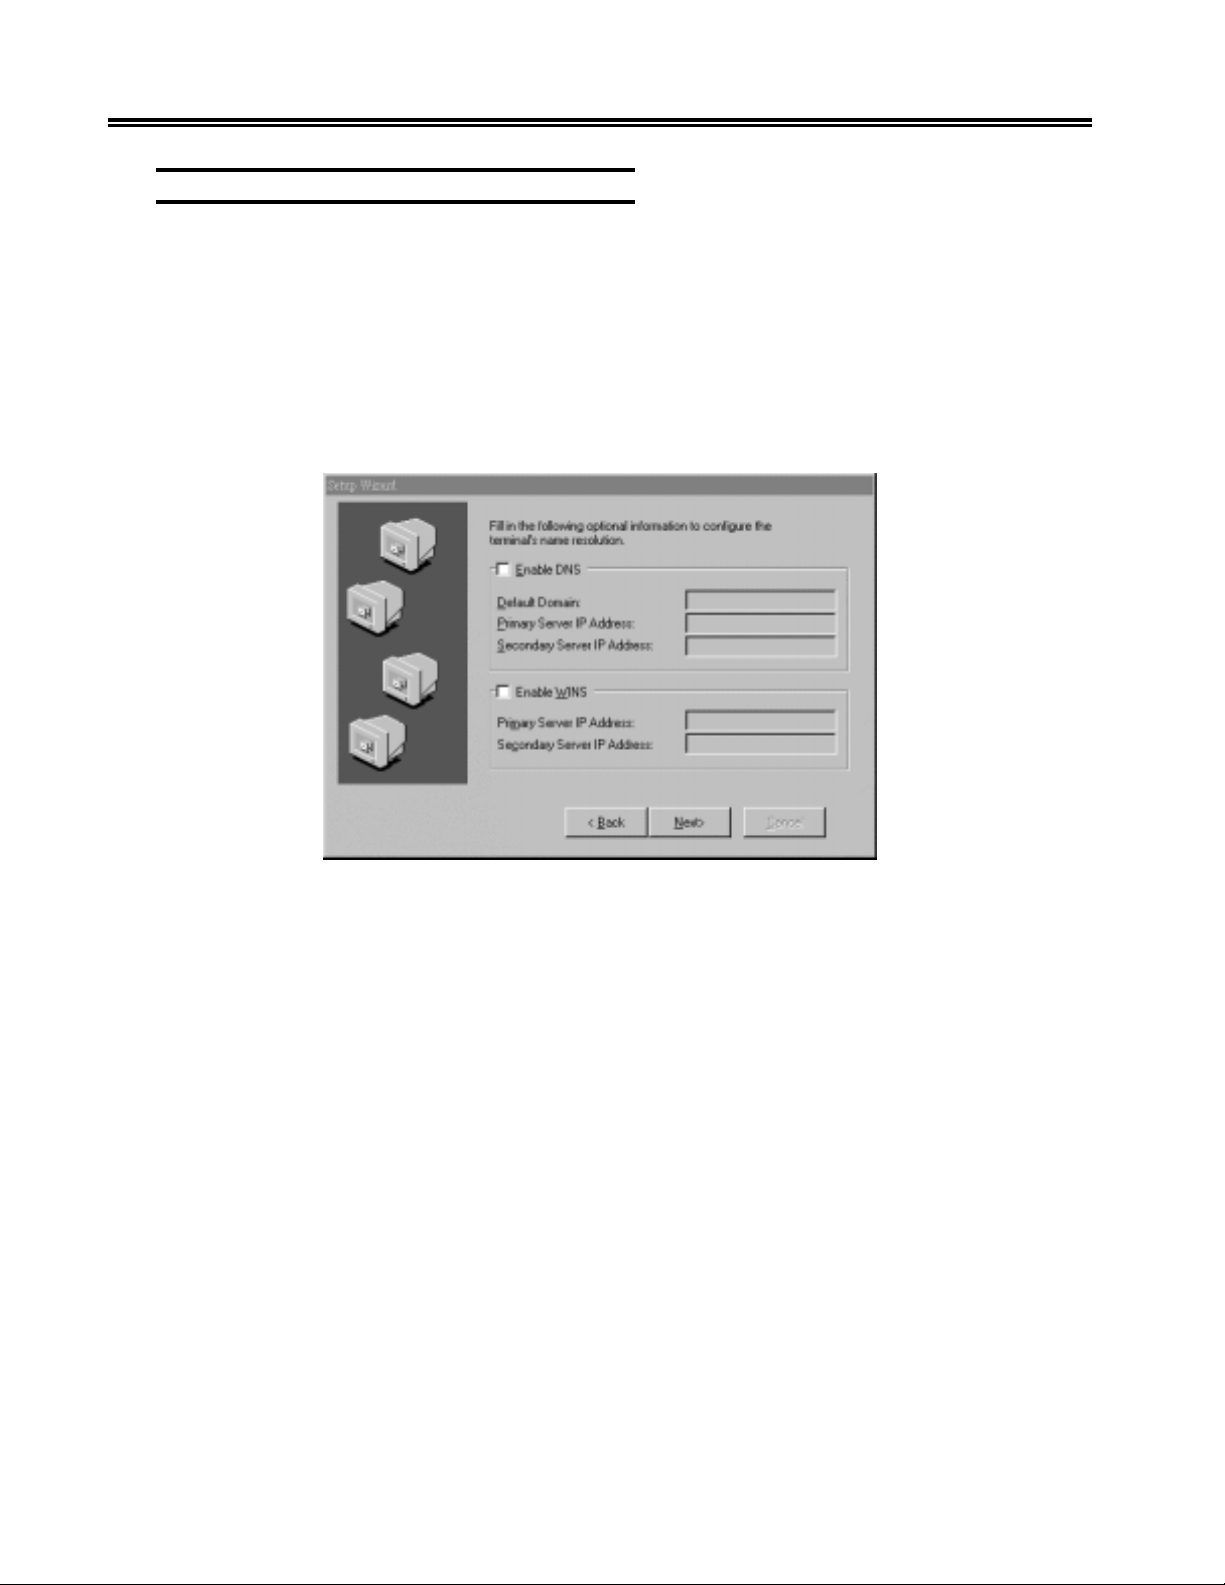
Enable/Disable Name Resolution Services
The screen shown below will only appear if you choose the Static IP Addressing method.
The DHCP method will provide the information required using a name resolution service.
Terminal Servers typically support both DNS (Domain Naming Service) and WINS
(Windows Internet Naming Service) name resolution services. This screen allows you
enable the unit to use one or both of these resolution services. To ensure that the selected
service works properly, they must be available on the network and properly configured.
• To enable DNS, WINS, or both, check the corresponding box. In the text boxes,
enter the following information as appropriate for each.
• Default Domain:
This refers to the name identifying the TCP/IP domain in which the DNS server
resides. Specifying a Default Domain and Primary Server IP Address lets users specify
a connection using a host name rather than a FQDN (Fully Qualified Domain Name).
For example, the connection could use the server name:
Dept_server instead of Dept_server.develop.bigblewcorp.com.
Enabling DNS on this dialog box assumes a DNS service is available and has been
properly configured.
• Primary Server IP Address:
The IP address of the DNS or WINS server to which you want device names routed
first for resolution. Windows NT includes WINS, but it must be properly configured.
• Secondary Server IP Address:
The IP address of the DNS or WINS server to which you want device names routed
if the primary server fails to resolve the name.
2-4 707018-006
Page 17
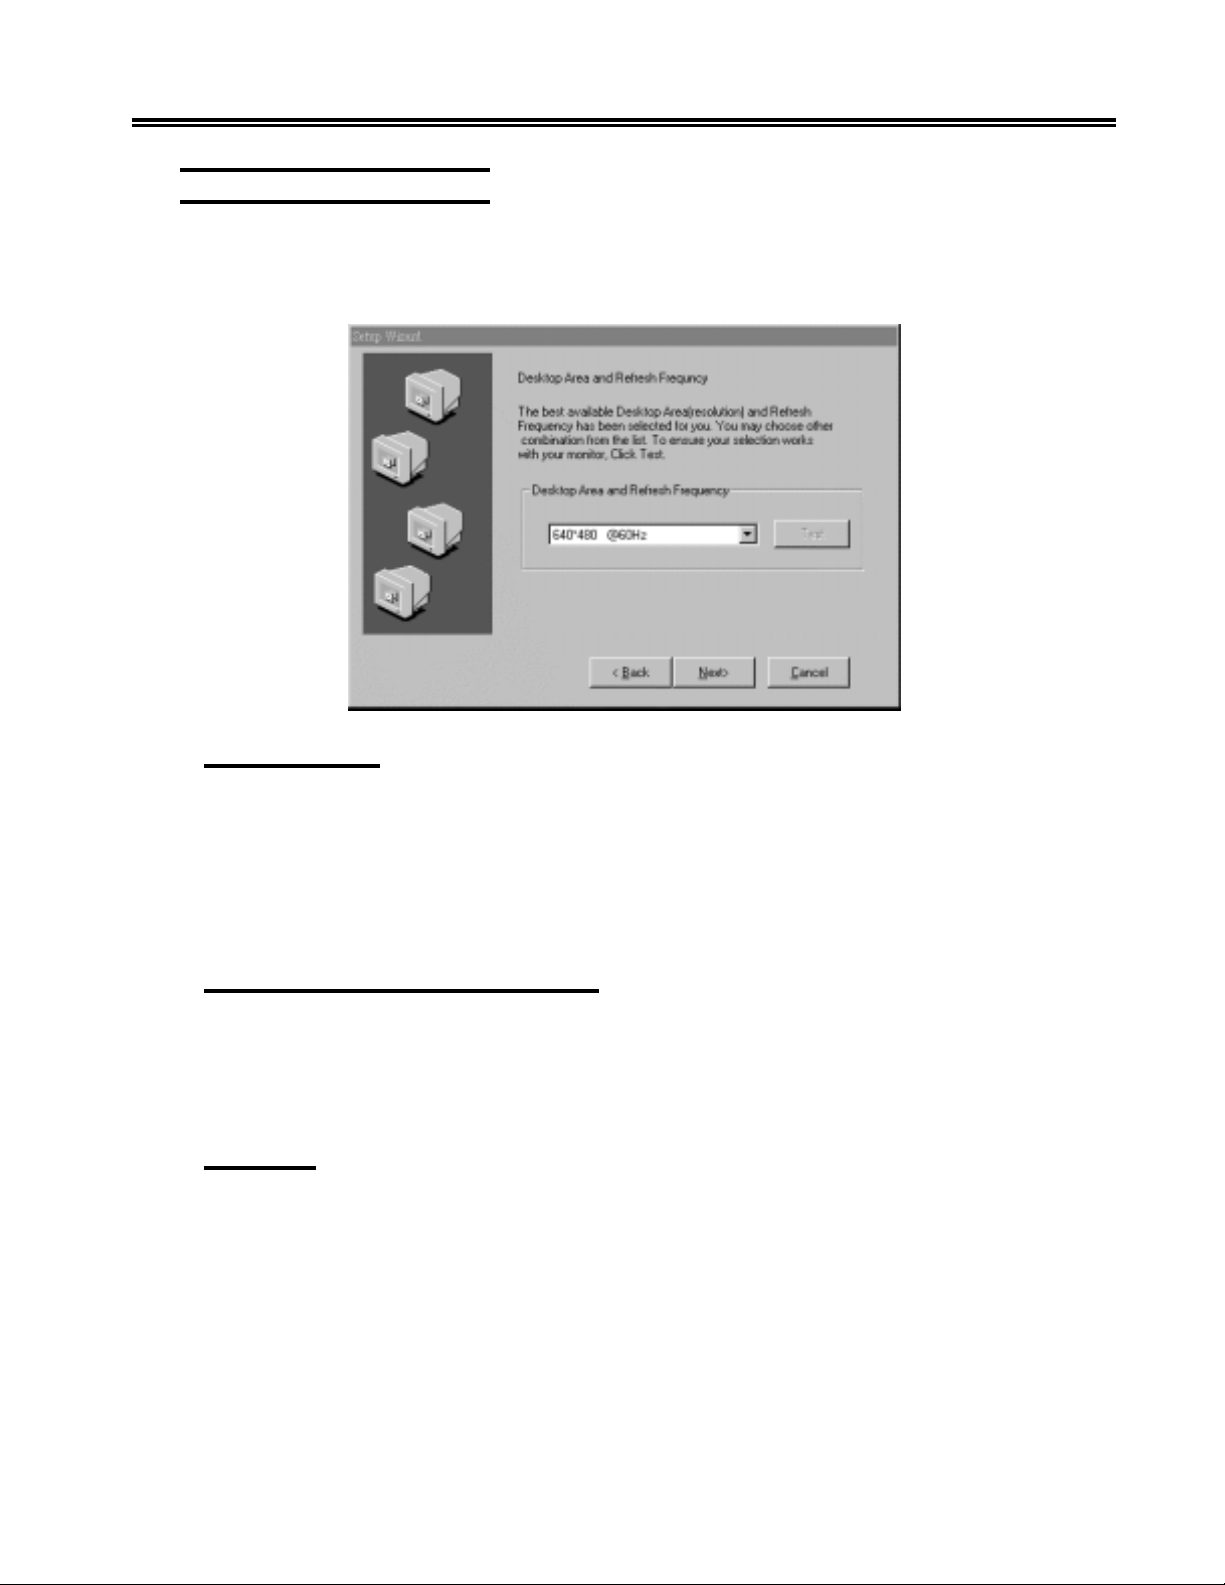
Choose Display Resolution
The following screen lets you choose a display resolution.
Select the desktop area and refresh frequency and click Next.
Chapter 2. eTerm Setup Wizard
About Monitors
Newer monitors contain a micro-controller that automatically detects the video chip
that is being used by your system. When you turn on the monitor, the micro-controller
will first check the display mode memory stored in the user setting area of the video
chip, and then the monitor’s factory pre-setting area. It then adjusts to the proper display
mode to get the best resolution. The best resolution is the largest desktop and the fastest
refresh rate the monitor supports. You can use virtually any monitor with the unit.
Trying Alternative Display Settings
If you get the default 640x480 desktop, which is standard VGA resolution, the monitor
may support a better resolution. If you want to test this, select a higher resolution from
the list box, then click Test. If the rectangular test is not distorted or skewed, the monitor
will support the selected resolution.
Safe Boot
If you can see the initial logo screen at power-on, but cannot see anything on the monitor
after that, you may need to use the Safe Boot at 640x480 feature.
To use this feature, complete the following.
• Power on the terminal.
• When you see the progress bar on the logo screen, press [F5] to boot at 640x480
at 60HZ.
707018-006 2-5
Page 18
eTerm 350 Windows-based Terminal
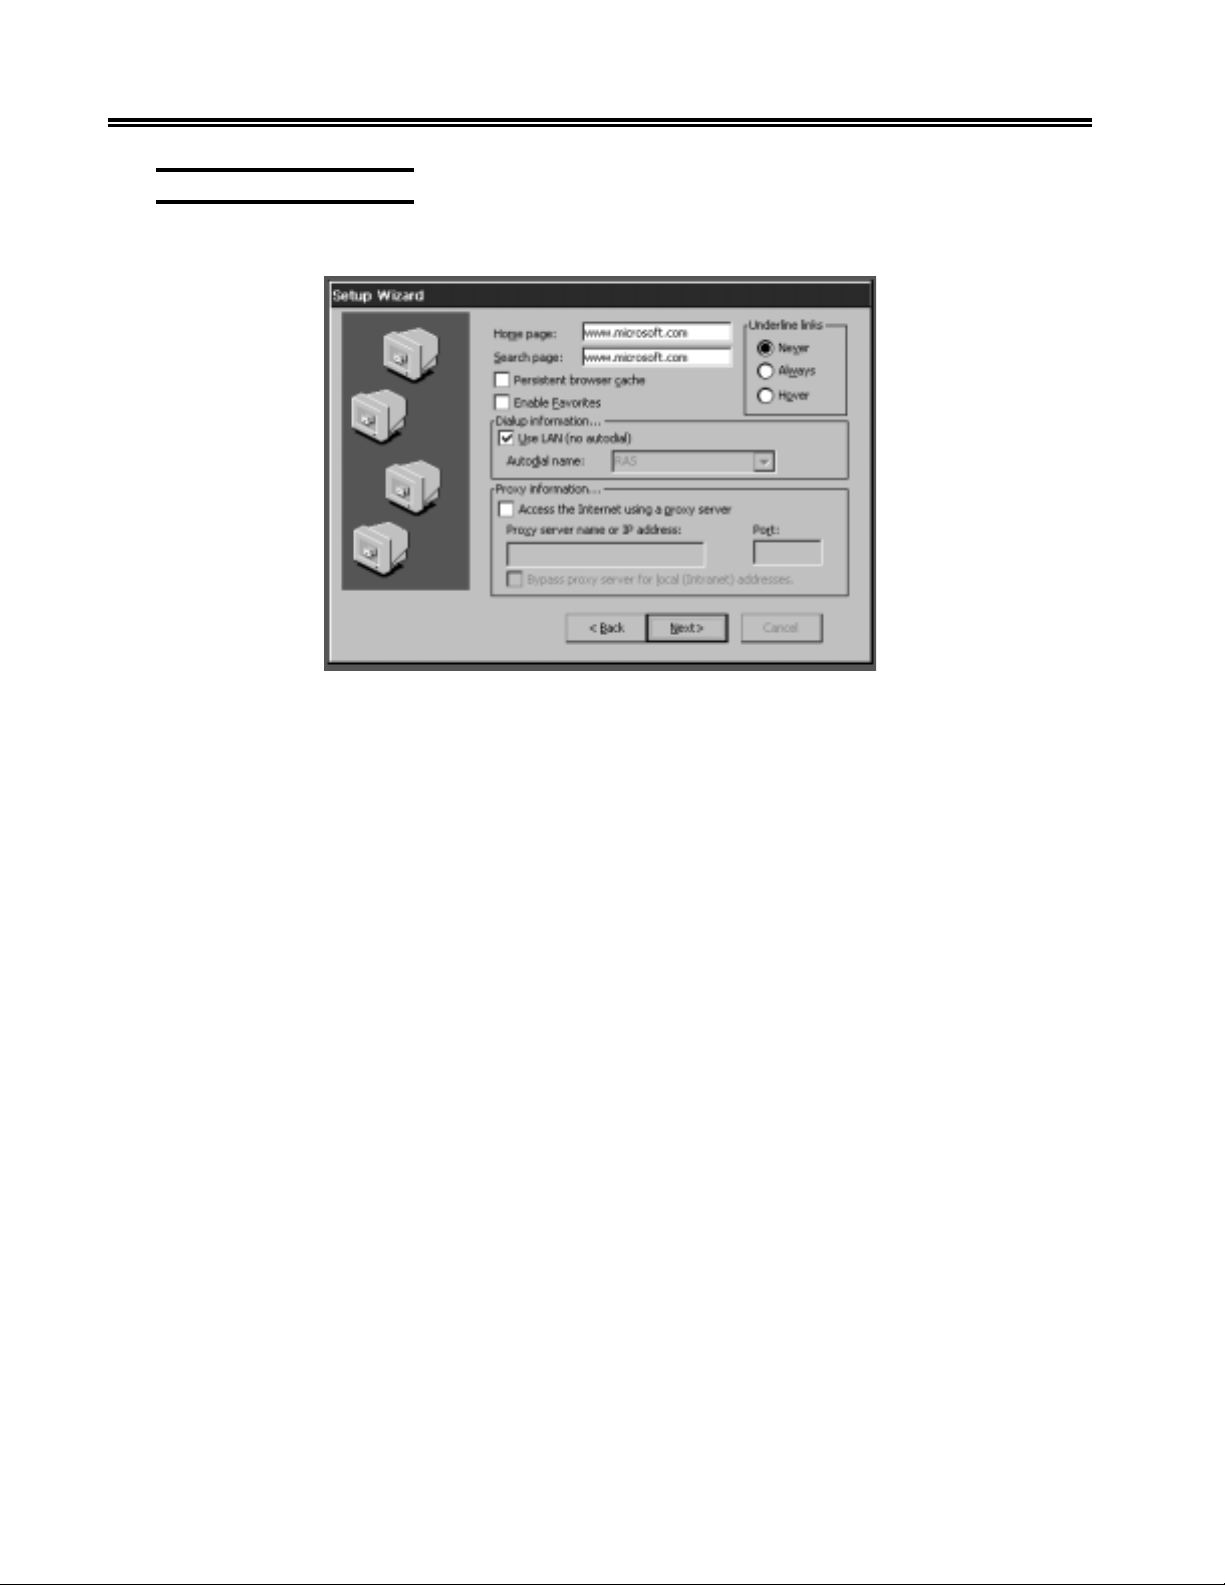
Configure Web Access
The following screen lets you configure the local Internet Explorer browser.
• Home Page
Enter the URL of the web site that is to be opened when the browser is started or the
Home icon is clicked.
• Search Page
Enter the URL of the web site that is to be opened when the Search icon is clicked.
• Underline Links
Enable the display of the underline for links on a web page.
• Persistent Browser Cache
If checked, the browser will remember the most recent URLs.
• Enable Favorites
If checked, the browser will remember the most recent URLs saved as Favorites.
• Dialup Info
Enable this checkbox if the unit is connected to a LAN.
• Proxy Info
Enable this checkbox if a Proxy server is required for accessing the Internet.
2-6 707018-006
Page 19
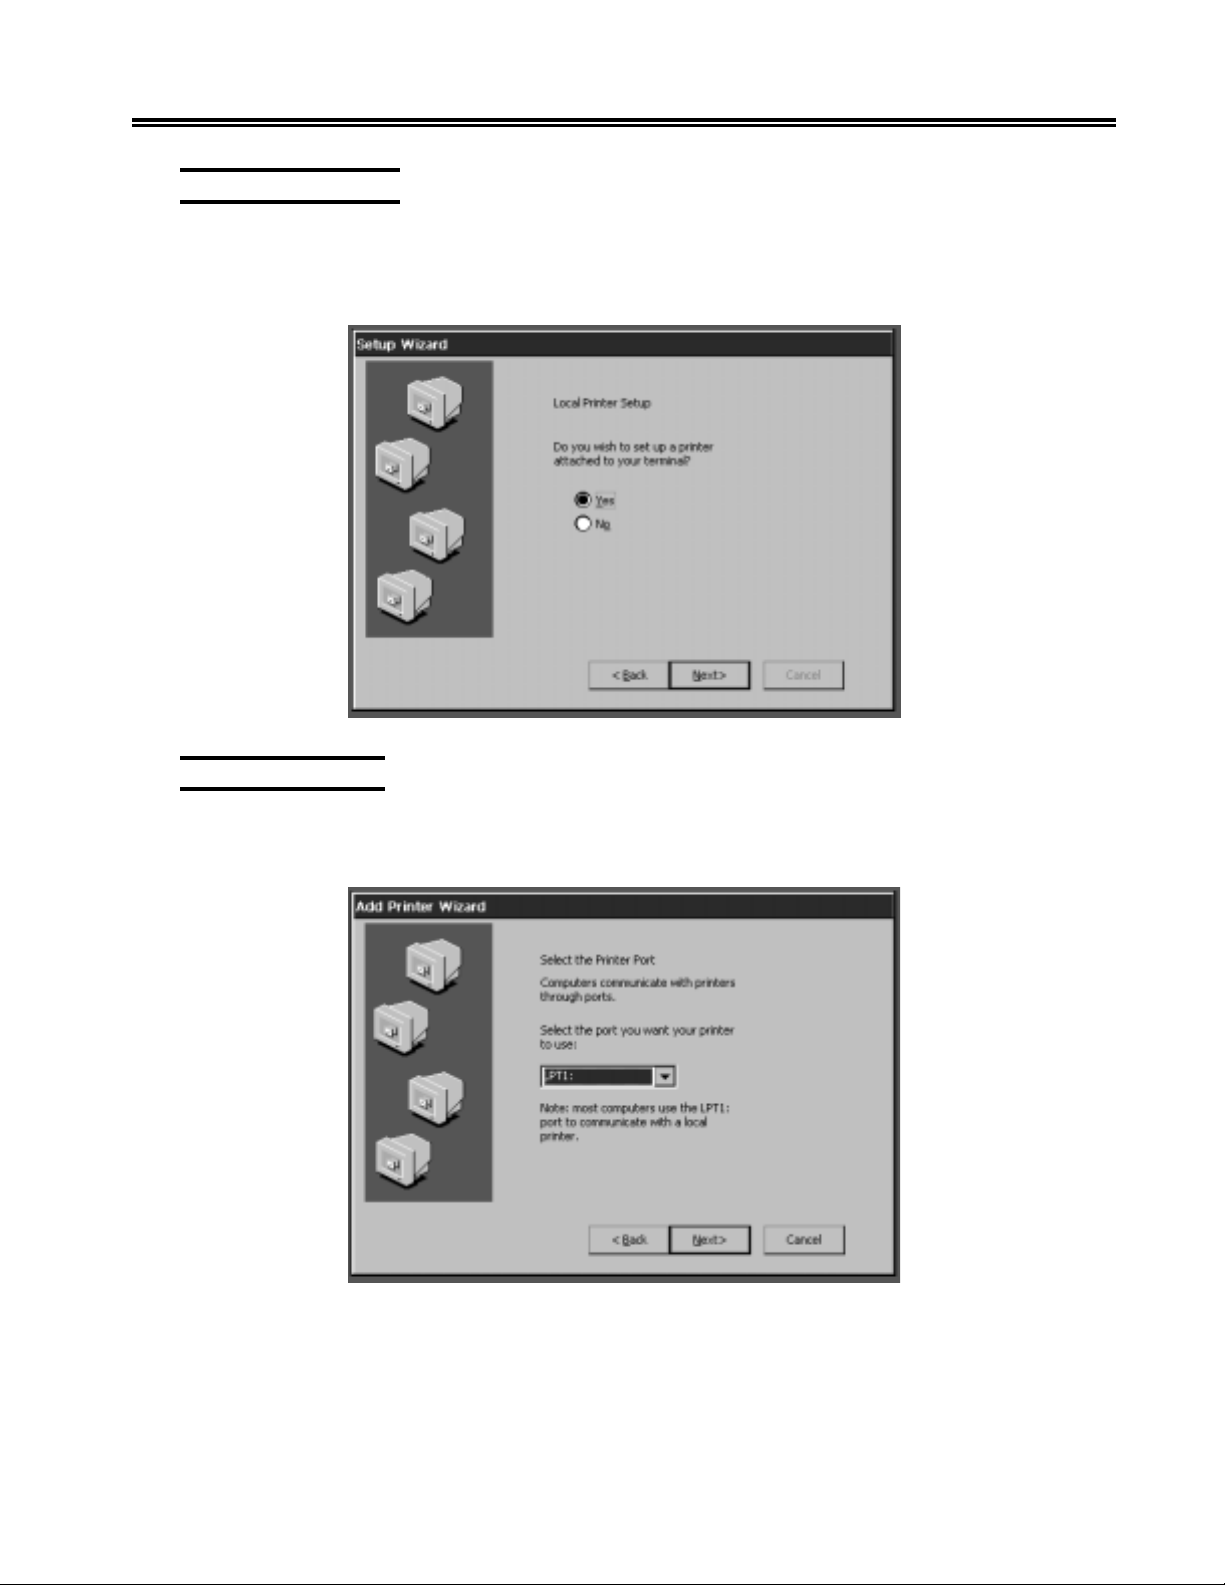
Local Printer Setup
The following screen enables the setup of a local-attached printer to the eTerm 350. If
the eTerm 350 will be connecting to a Windows 2000 Server Terminal Services using
the RDP client and a printer is attached locally, then select “Ye s”.
Chapter 2. eTerm Setup Wizard
Printer Port Setup
The following screen requires selection of a port where the local-attached printer is
connected on the eTerm 350.
707018-006 2-7
Page 20
eTerm 350 Windows-based Terminal
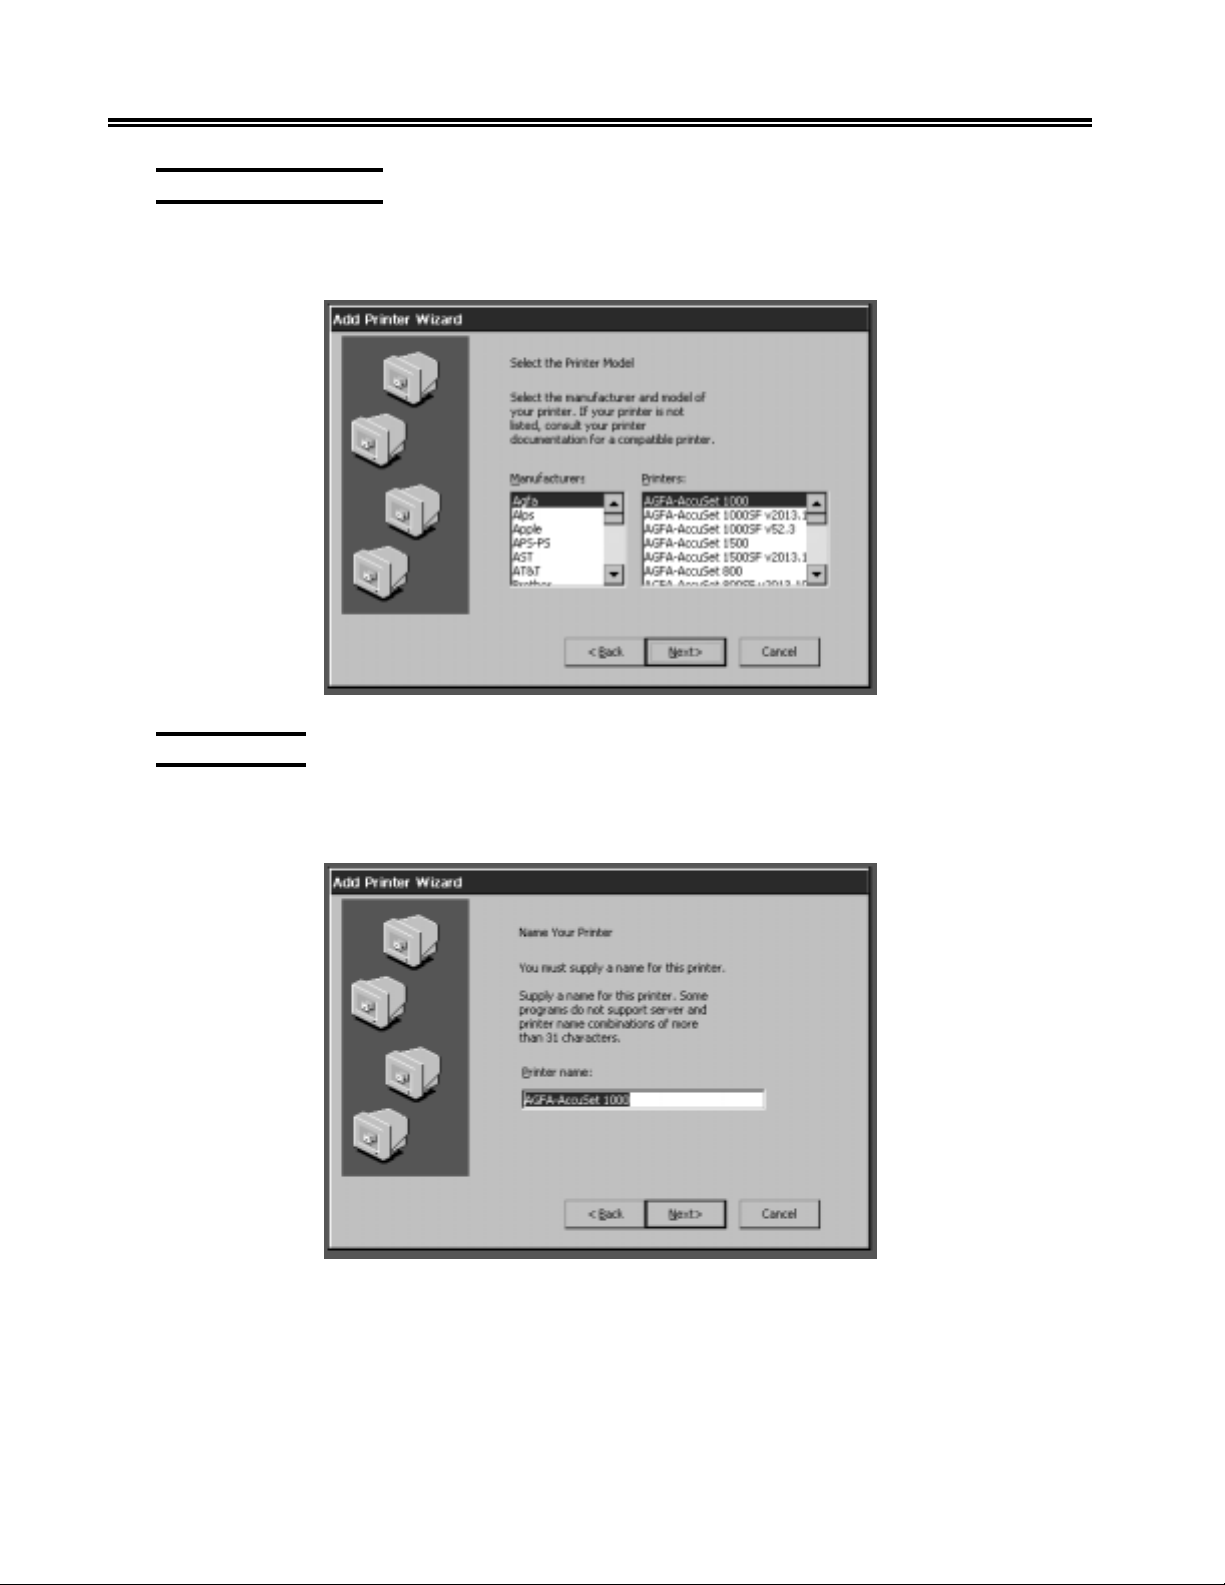
Printer Model Setup
The following screen requires selecting of the printer’s Manufacturer then select the
printer model.
Printer Name
The following screen requires a name be given to the printer. This name will show up
for the printer in the Printers folder in Windows 2000.
2-8 707018-006
Page 21
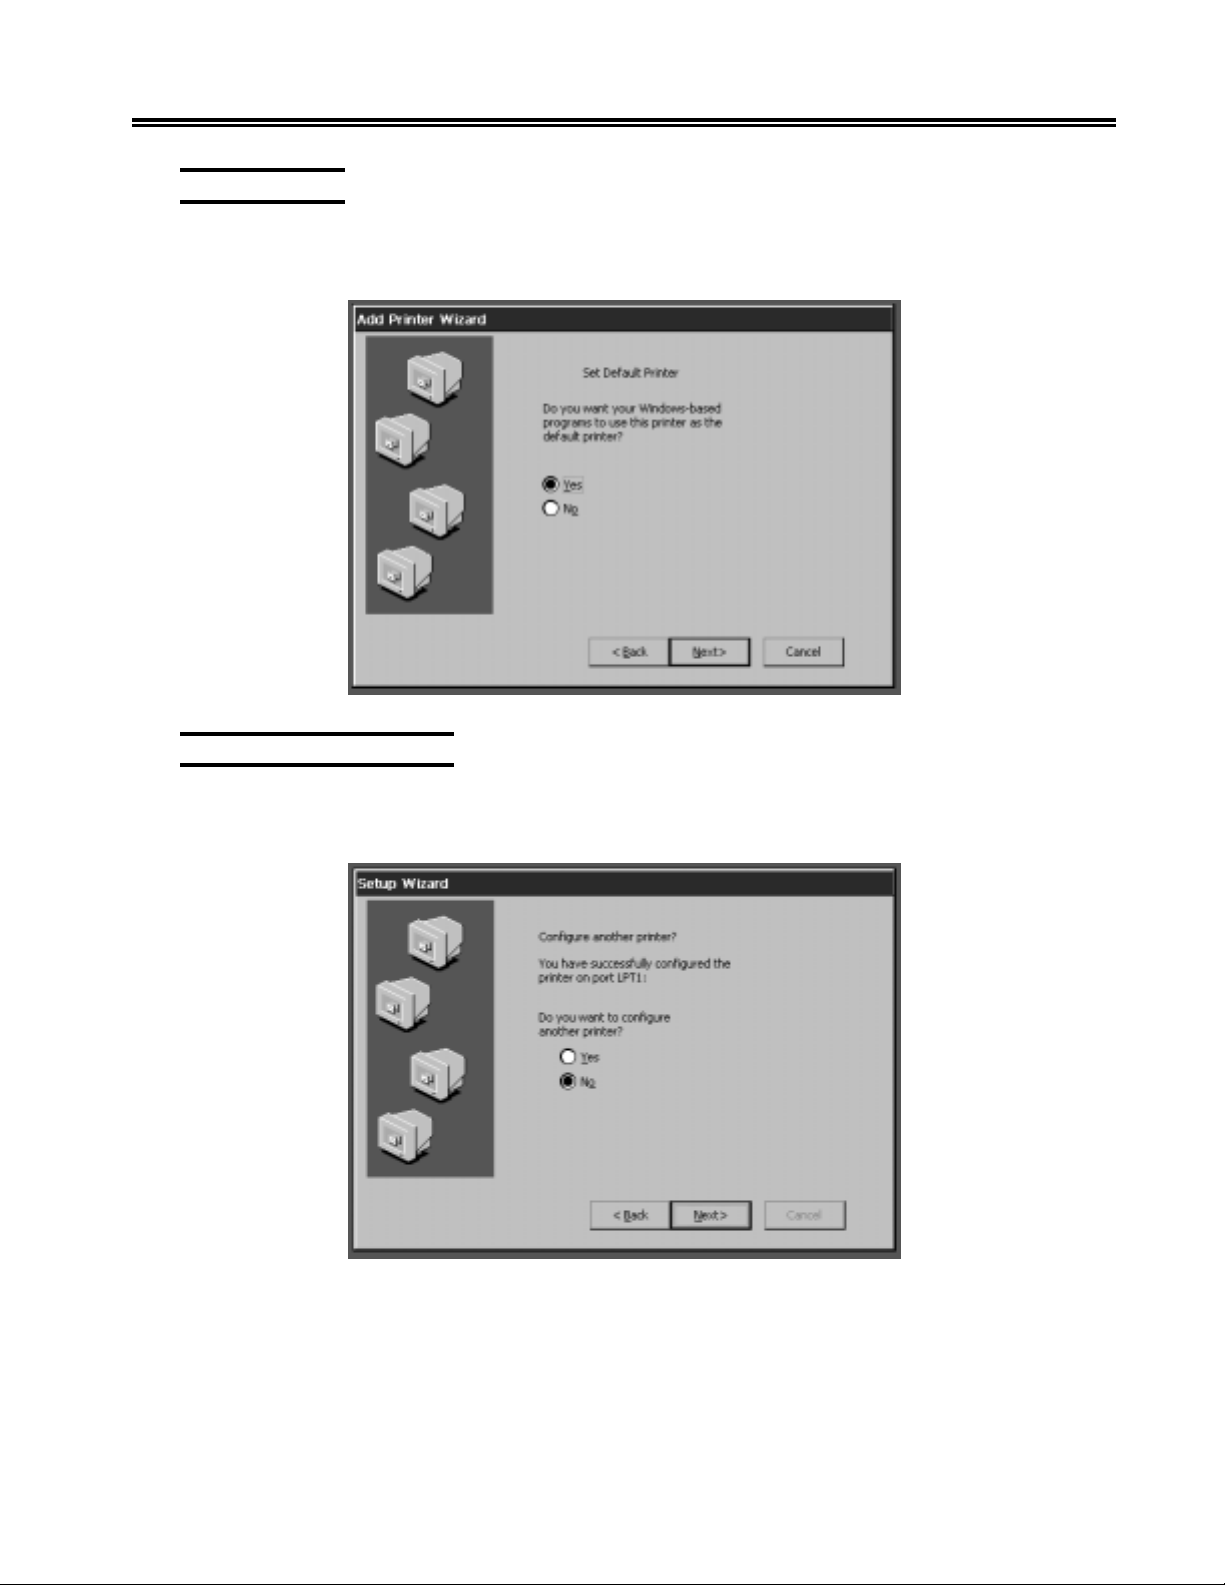
Printer Default
The following screen enables the local-attached printer to be the default printer when
running Windows apps on the Windows 2000 server.
Chapter 2. eTerm Setup Wizard
Additional Printer Setup
The following screen enables the configuring of another local-attached printer on a
different I/O port.
707018-006 2-9
Page 22
eTerm 350 Windows-based Terminal
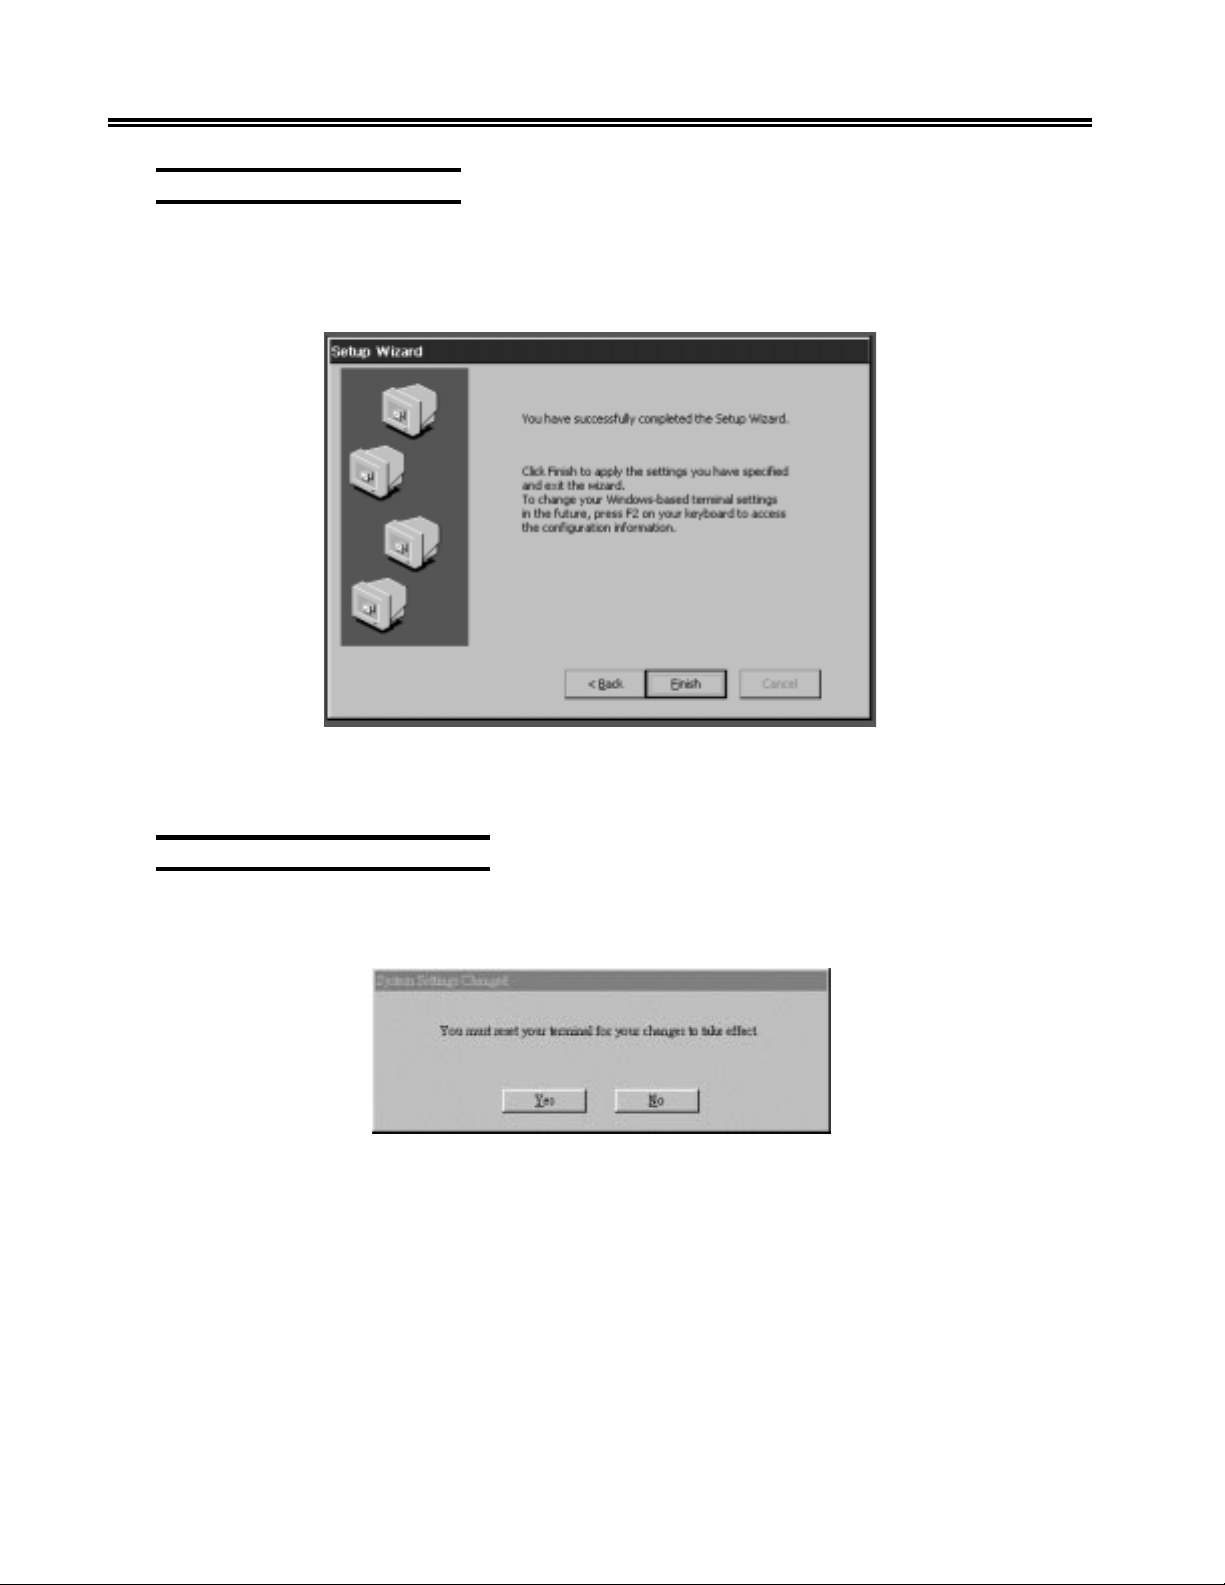
Finishing the Setup Wizard
This is the last screen of the Setup Wizard.
• To review or change settings made on previous pages, click Back.
• To apply the settings, click Finish.
To change these settings after you have finished the Setup Wizard, press [F2] to display
the Terminal Properties property sheet.
Restarting after Setup Wizard
You will now need to restart your system so that the changes you made will take effect.
Click Ye s .
2-10 707018-006
Page 23

Chapter 3. eTerm Terminal
Connection
Terminal Connection Manager
The Terminal Connection Manager is used for helping you to manage your terminal’s
network connection. It will appear on the screen each time the terminal is powered on.
Creating Connections to Terminal Server Host
For each client available on a unit, you can define any number of host connections. The
unit includes Microsoft Terminal Server Client for ICA and RDP. For information on
creating connections with alternate clients, refer to the documentation pertaining to
that client. Your unit may contain additional client software. If so, you can select alternate
clients for creating a connection in either of the following ways shown in this chapter.
Starting the Connection Wizard
You can start the Connection Wizard in the following ways:
1. When you finish the Setup Wizard, if no connections were previously defined,
the Connection Wizard appears automatically to ensure that you define at least
one.
2. When you start the terminal, if it has been configured, but there are no
connections defined, the Connection Wizard appears automatically to ensure that
you define at least one.
3. On the Configuration tab of the unit’s Terminal Connection Manager, click Add. In
the resulting New Connection Dialog box, select Microsoft Terminal Server Client.
The rest of this section describes creating a connection using the Connection Wizard.
707018-006 3-1
Page 24
eTerm 350 Windows-based Terminal
Creating a New Connection
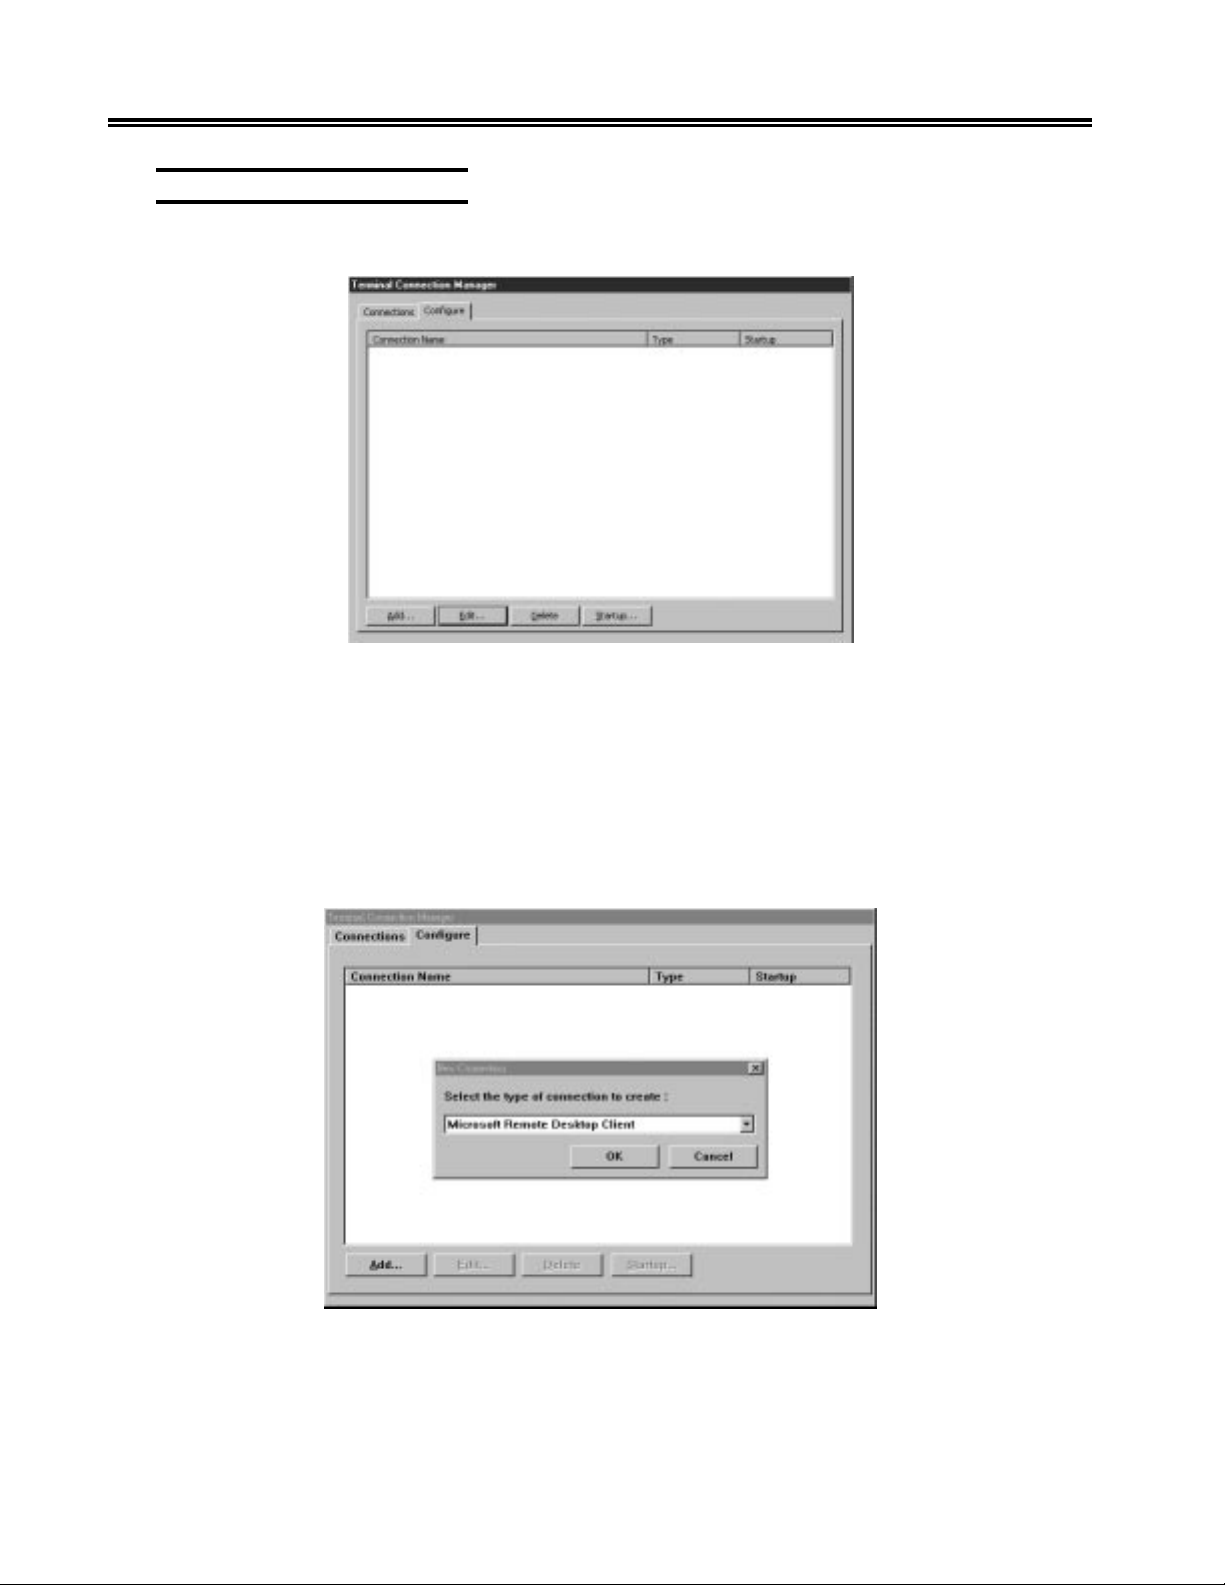
Select the Configure tab; click the Add button to create a new connection.
The following dialog box will appear. There are three types of connection protocols
that can be selected: Microsoft Remote Desktop Client via RDP (Remote Desktop
Protocol), Citrix ICA Client via ICA (Independent Computing Architecture)
protocol, and the Visara Host Connect Terminal Emulation Suite protocol. A fourth
entry called Dial-Up Client is a setup wizard to assist in the configuration of a dialup
session to a host. Use the scroll list to select what type of connection is needed to
connect to the server.
Select the desired protocol and click OK to continue.
Once you have selected Microsoft Remote Desktop Client, the Connection Wizard
appears. Use this application to create an RDP connection.
3-2 707018-006
Page 25
Chapter 3. eTerm Terminal Connection
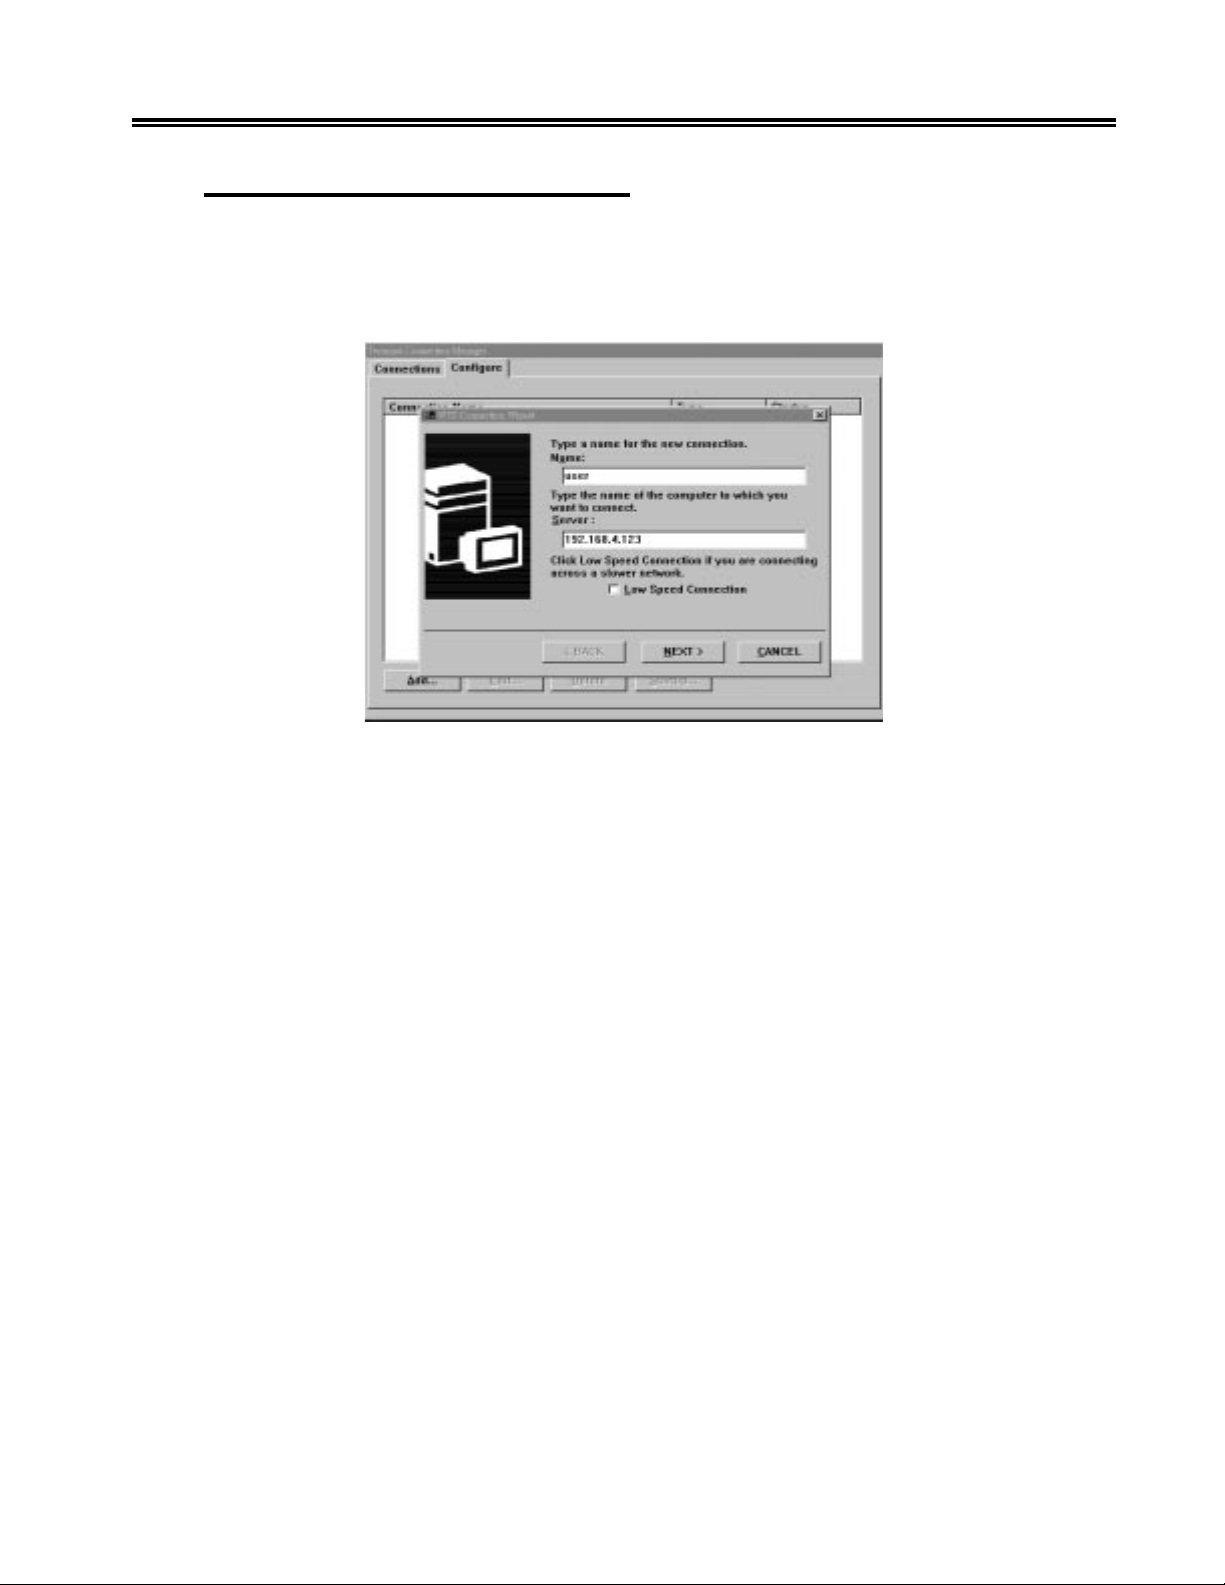
Specify Connection Name and Server
Type a name for the new connection in Name field and the name of the computer in
Server field to what you want to connect.
Click Next to continue.
• Name:
Enter the text that clearly identifies the connection you are creating. This might be
the name of the Terminal Server to which it connects, for example “TSE-1” or
“Engineering”, or perhaps the type of application or data provided by that server,
“Mail” or “Accounting”. The name can have up to 32 characters.
• Server:
Enter the IP address or, if DNS or WINS are enabled, the name of the Terminal
Server where you want this connection to login. If you specified a default domain
when you configured DNS (See “ Enable/Disable Name Resolution Server”), you
can specify just the Terminal Server name here, for example “Dept_Server”. However,
if you do not specify a default domain, or if the DNS server is in a different TCP/IP
domain from the terminal, then you must specify a Fully Qualified Domain Name
(FQDN) here, for example:
“Dept_server.develop.bigblewcorp.com.”
If neither DNS or WINS is configured, you must use the IP address of the Terminal
Server.
• Low Speed Connection:
If the physical connection to the Terminal Server is through a low bandwidth line
(WAN or serial line), rather than over an Ethernet cable, check this box.
707018-006 3-3
Page 26
eTerm 350 Windows-based Terminal
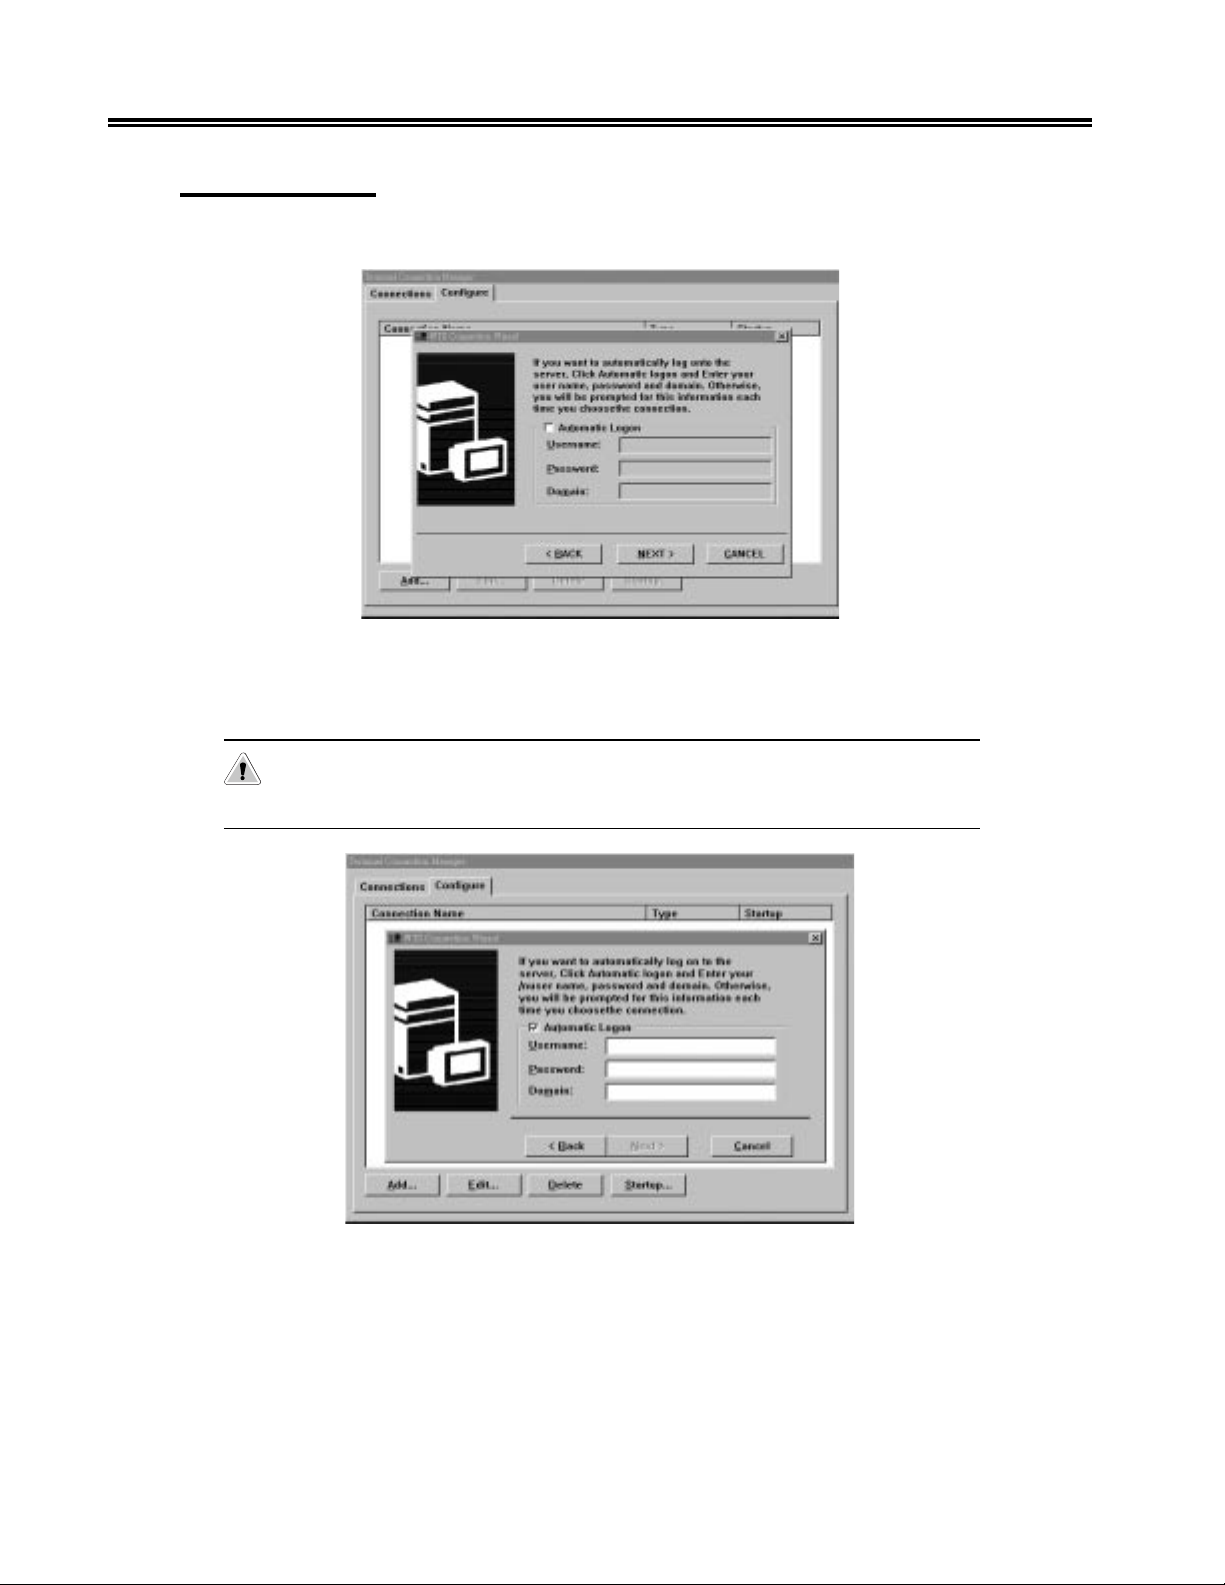
Automatic Logon
If you do not need an Automatic Logon to the server, click the Next button to continue.
If you want to automatically log on to the server, enable Automatic Logon icon. Enter
the information in User Name, Password, and Domain fields. Click Next button to
continue.
Caution: Depending on your environment, this may pose an unacceptable security
risk. If so, leave this feature disabled.
• Username:
Depending on what you enter for the Domain. The User ID can be a local or global
user account set up on a particular Server.
• Password:
The password associated with the user ID specified above.
3-4 707018-006
Page 27
Chapter 3. eTerm Terminal Connection
• Domain:
If the Terminal Servers in which you are creating the connection belongs to a Windows
NT domain, and the Primary Domain Controller is performing user authentication,
enter the Windows NT domain name such as “Dept_Server”. However, if the
Terminal Server is not a member of a Windows NT domain, or if you want user
authentication performed locally, enter the name of that Terminal Server.
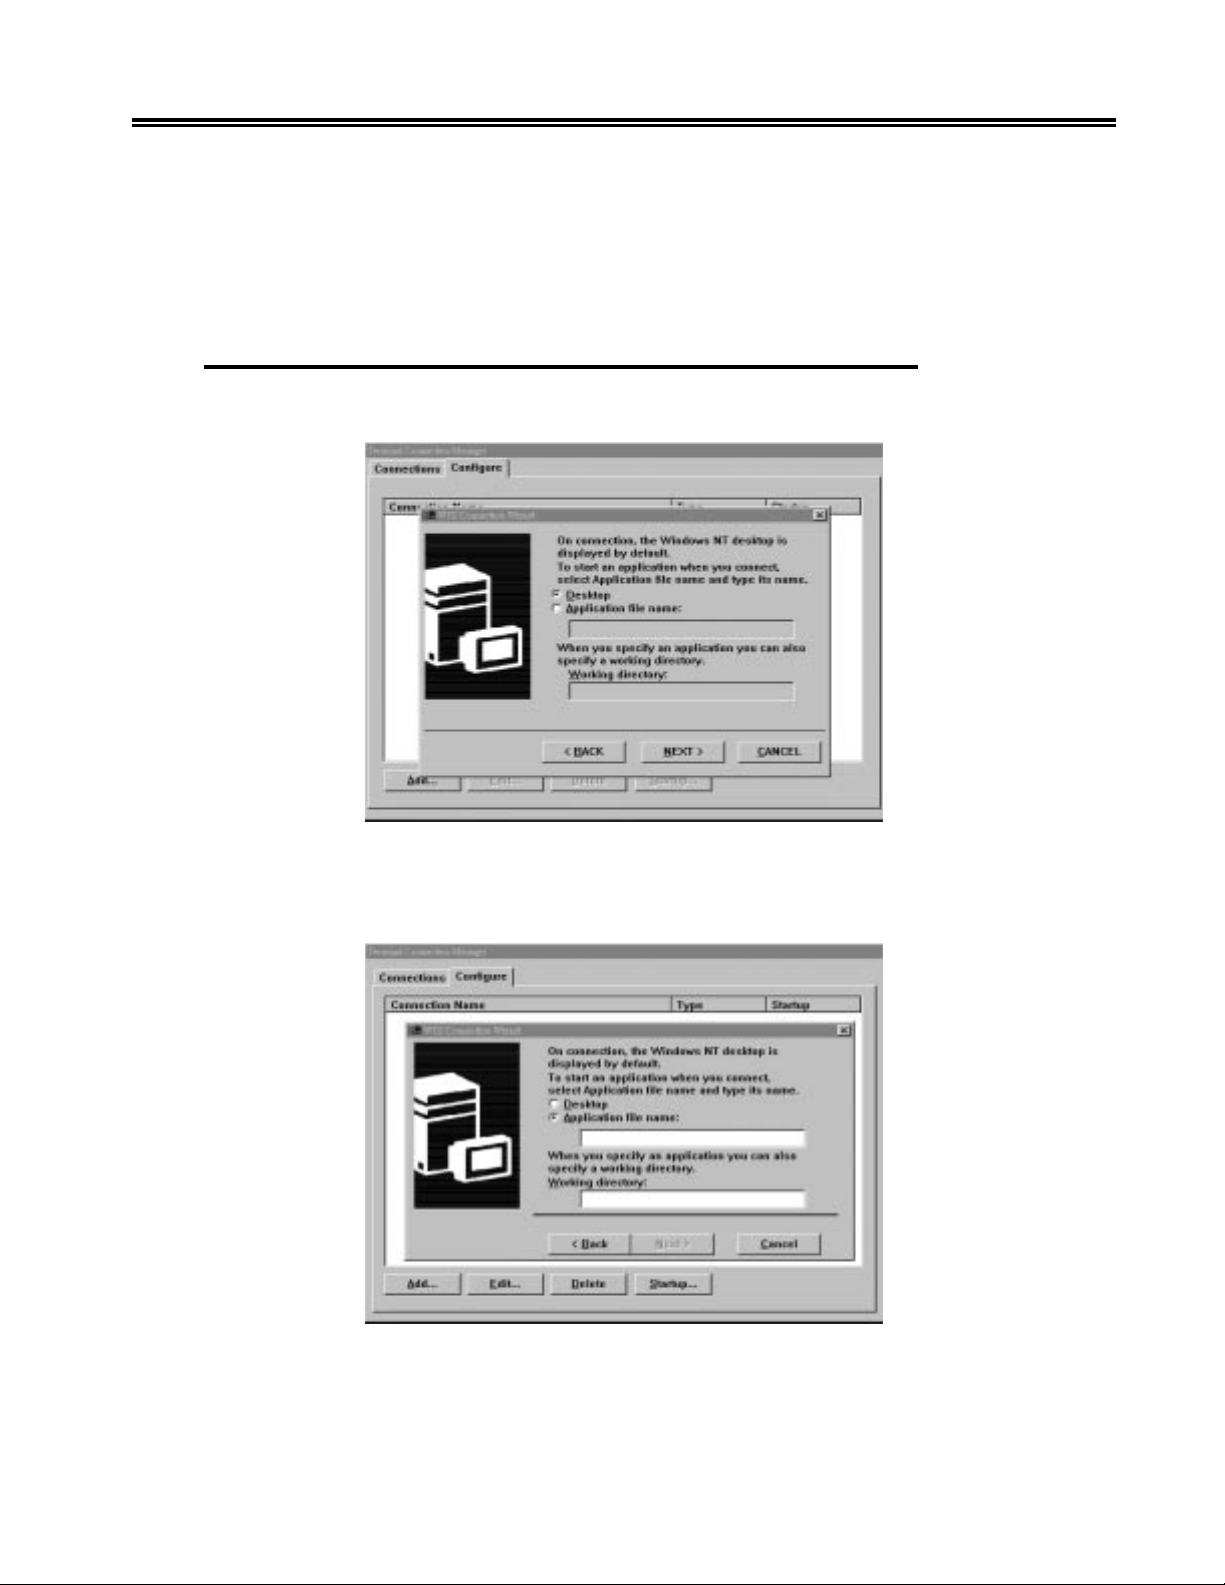
Selecting Windows NT Desktop or Application to Run at Logon
On connection, the Windows NT Desktop is displayed by default. Click Next.
Or you can select the Application file name icon and enter name of the application
you need. When specifying an application, you can also specify a working directory.
Click Next.
• Desktop:
Select this option if you want the connection to display Windows NT desktop.
707018-006 3-5
Page 28
eTerm 350 Windows-based Terminal
• Application file name:
Select this option if you want an application to start automatically as soon as the
connection is established. Enter the directory path and the filename of the desired
application. If the path to the application is not specified in the Path command on
the Terminal Server, you must specify the full pathname. When a user activates this
connection, the application starts automatically. When the user closes the application,
the connection also terminates.
• Working directory:
If you have specified an application for the connection to start, you can also specify the
pathname to a working directory for it to start in. Any data files generated by the application
are saved by default in the directory specified. If you do not specify a working directory,
data files are saved in the user’s home directory on the Terminal Server.
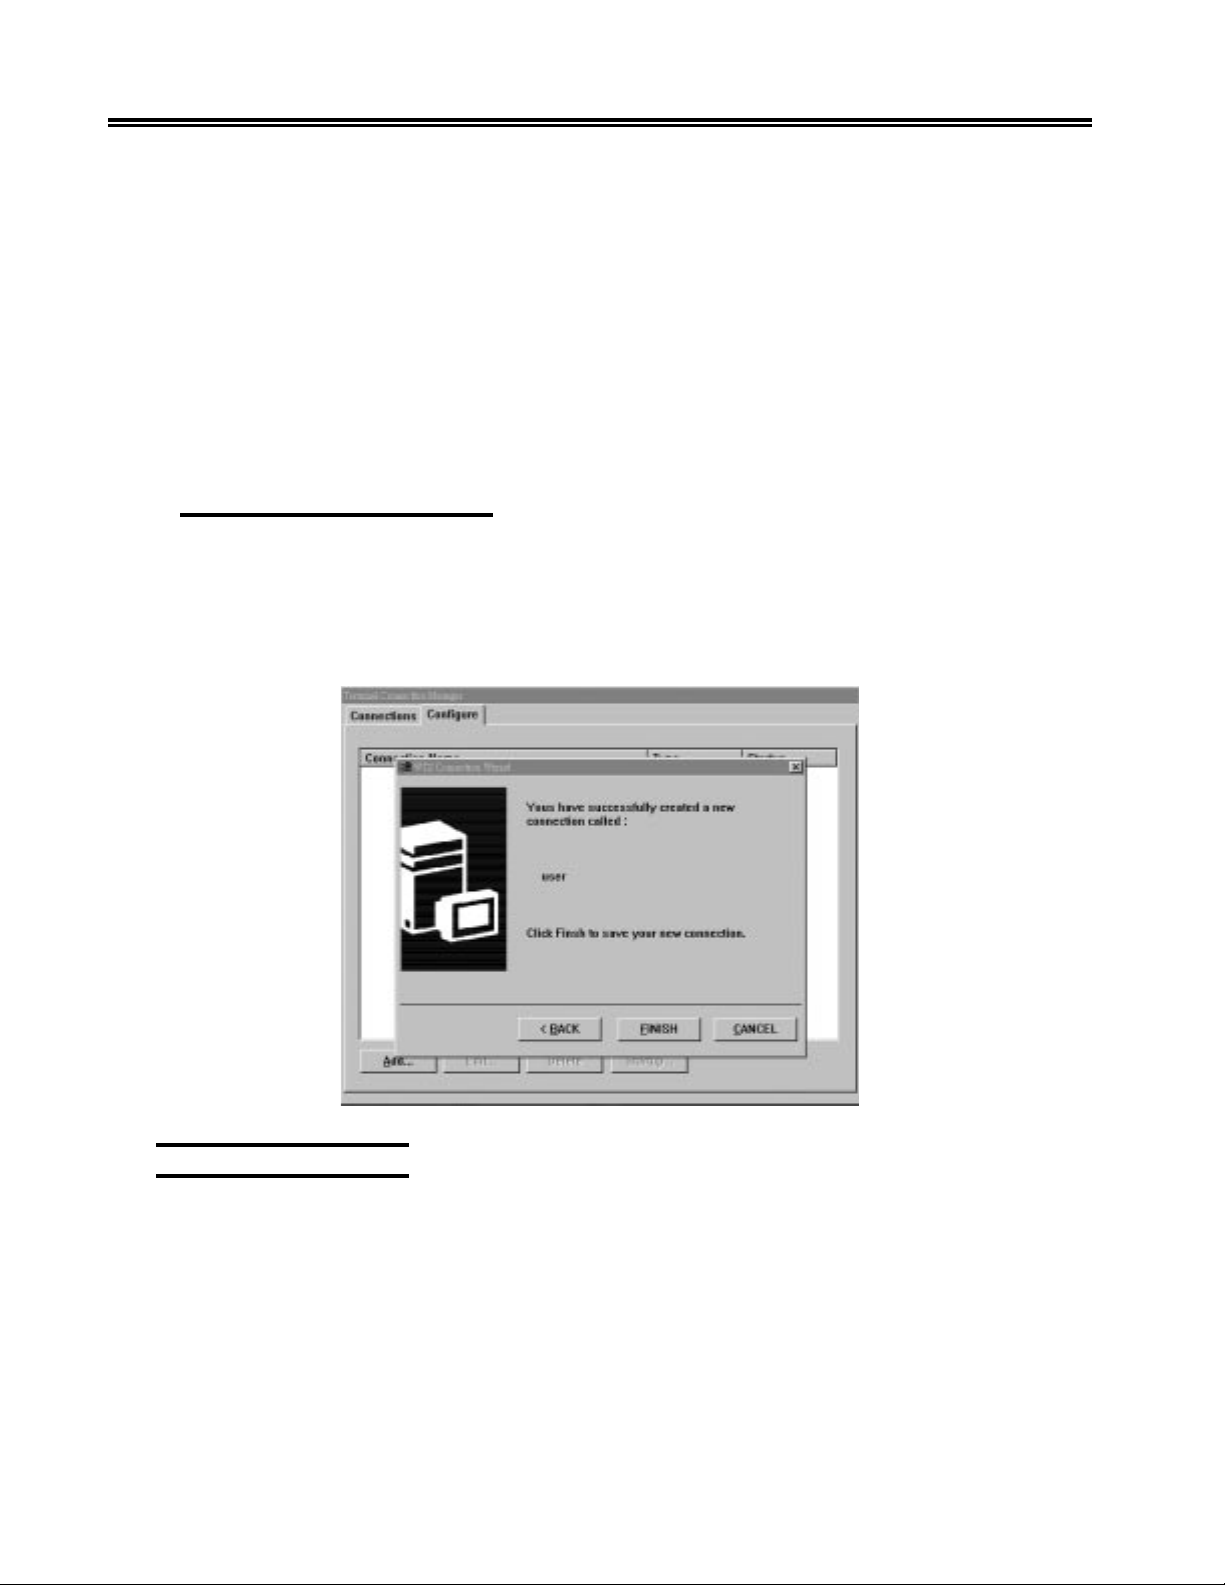
Completing the Connection
When the following dialog box appears, you have successfully created a new connection.
To review or change settings made with the Connection Wizard, click Back or Cancel
to quit this dialog box without saving. Click Finish to complete your new connection.
The new connection will now be included in the list of connections that you see when
you use the Connection Manager.
Deleting a Connection
To delete an existing connection, complete the following steps:
• On the Configuration tab of the Connection Manager, select the connection you
want to delete.
• Click Delete. The Confirm Connection Delete dialog box will appear. Click Ye s to
complete the deletion. Click No to cancel the deletion.
3-6 707018-006
Page 29

Configuring an Auto-start Connection
You can configure one or more connections to start automatically each time a user
starts up the unit.
To do this, complete the following steps:
• On the Configure tab of the Terminal Connection Manager, select the connection
you want to start up automatically.
• Click Startup.
• In the Connection Startup dialog box, click Automatically start the selected
connection at startup.
Stopping an Auto-start Connection
To prevent this auto-start sequence, complete the following steps.
• On the Configure tab of the Terminal Connection Manager, select the
connection you do not want to start up automatically.
• Click Startup.
• Disable the auto-start setting for the current connection by making the connection
the default connection.
• To return to your running connection, go to the Connection tab of the unit Connection
Manager and select the “Active” connection. Click Connect.
Chapter 3. eTerm Terminal Connection
Modifying a Connection
To modify attributes of an existing connection, complete the following steps.
• Insure that the connection is not active prior to modification.
• On the Configure tab of the Connection Manager, select the connection you want
to modify.
• Click Edit.
• The client’s utility for modifying a connection appears. Make the desired change.
Modifying a Microsoft Terminal Server Client Connection
To modify attributes of the Microsoft Terminal Server connection, complete the
following steps:
• On the Configure tab of the Connection Manager, select the desired RDP
connection.
• Click Edit to display the Properties sheet.
707018-006 3-7
Page 30
eTerm 350 Windows-based Terminal
Connections Properties Sheet
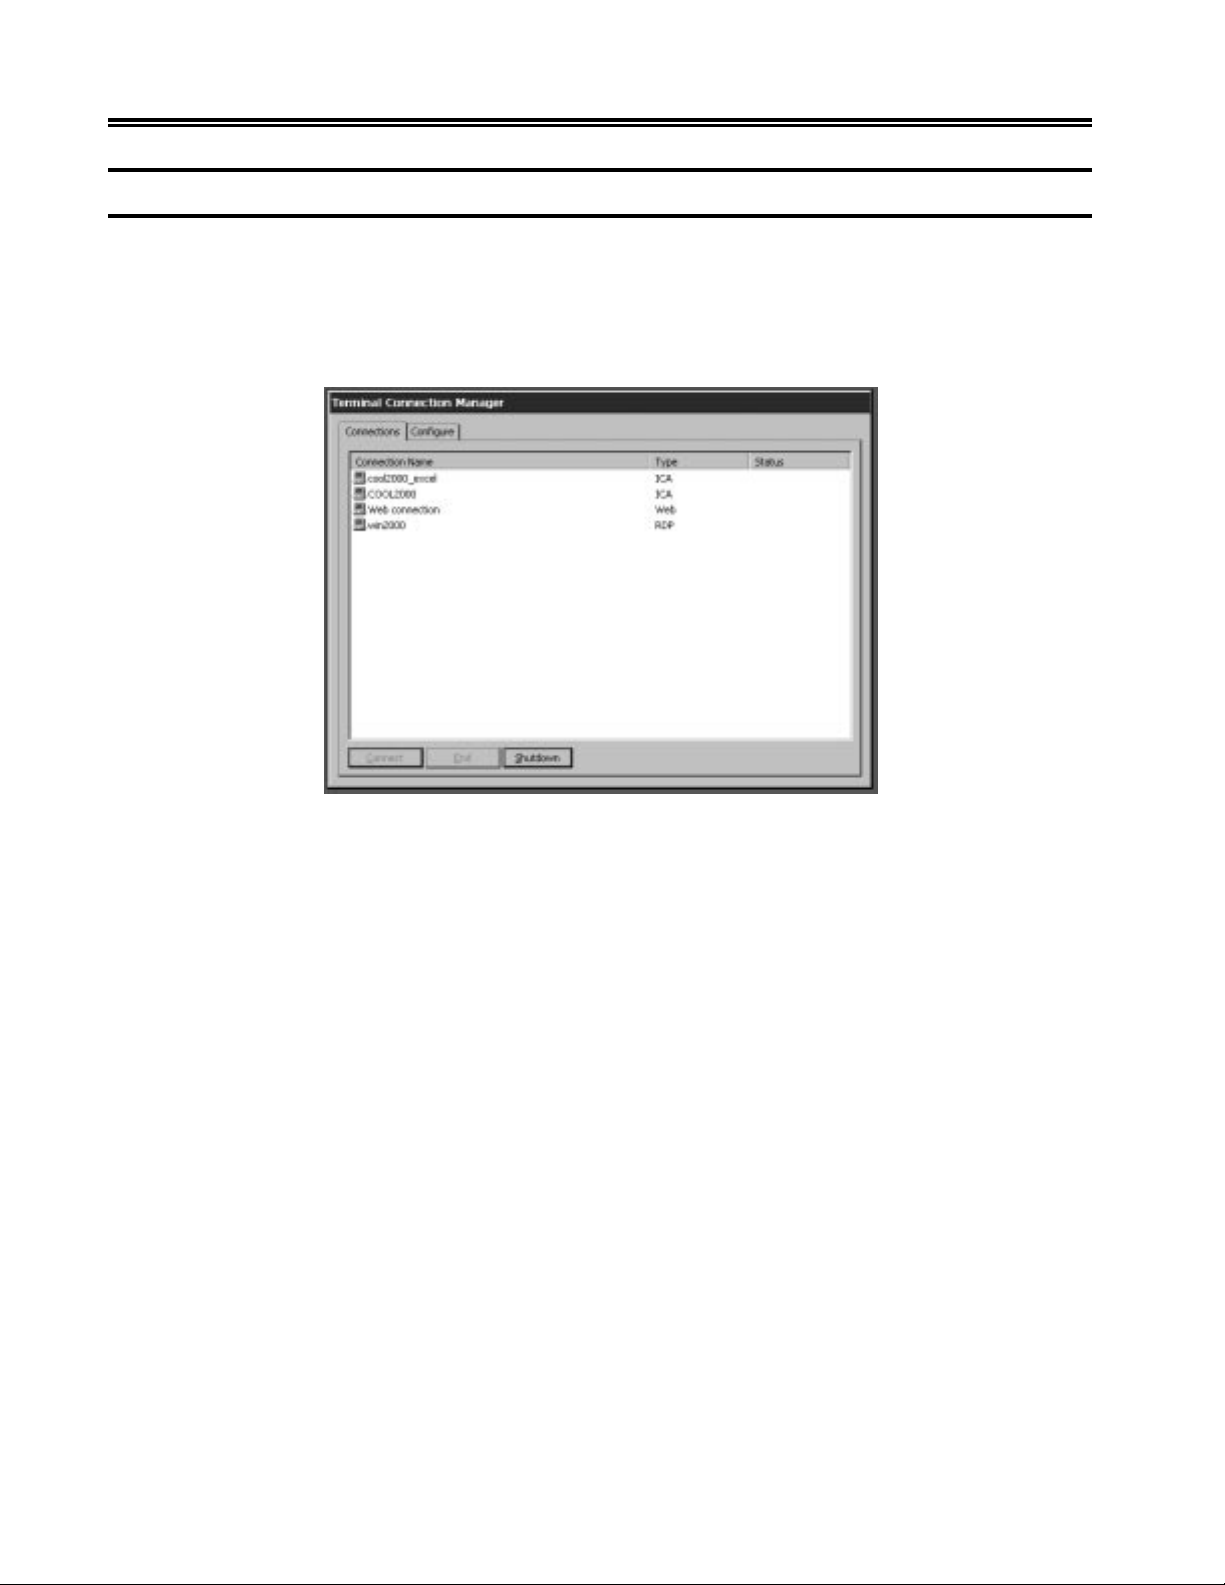
Connection Name: When finishing either the Microsoft Remote Desktop Client (RDP
Type) or Citrix ICA Client (ICA Type) connection, the new created connection will
appear on the Connection Name box.
See Terminal Connection Manager Section for directions on adding new connections.
• Connect:
Highlight a connection from the Connection Name box and click Connect button
to make a server connection. Also you can just double click this connection from
the Connection Name box to make a server connection.
• End:
When you need to end the connection process, highlight the required connection
and click the End button.
3-8 707018-006
Page 31
Configure Properties Sheet
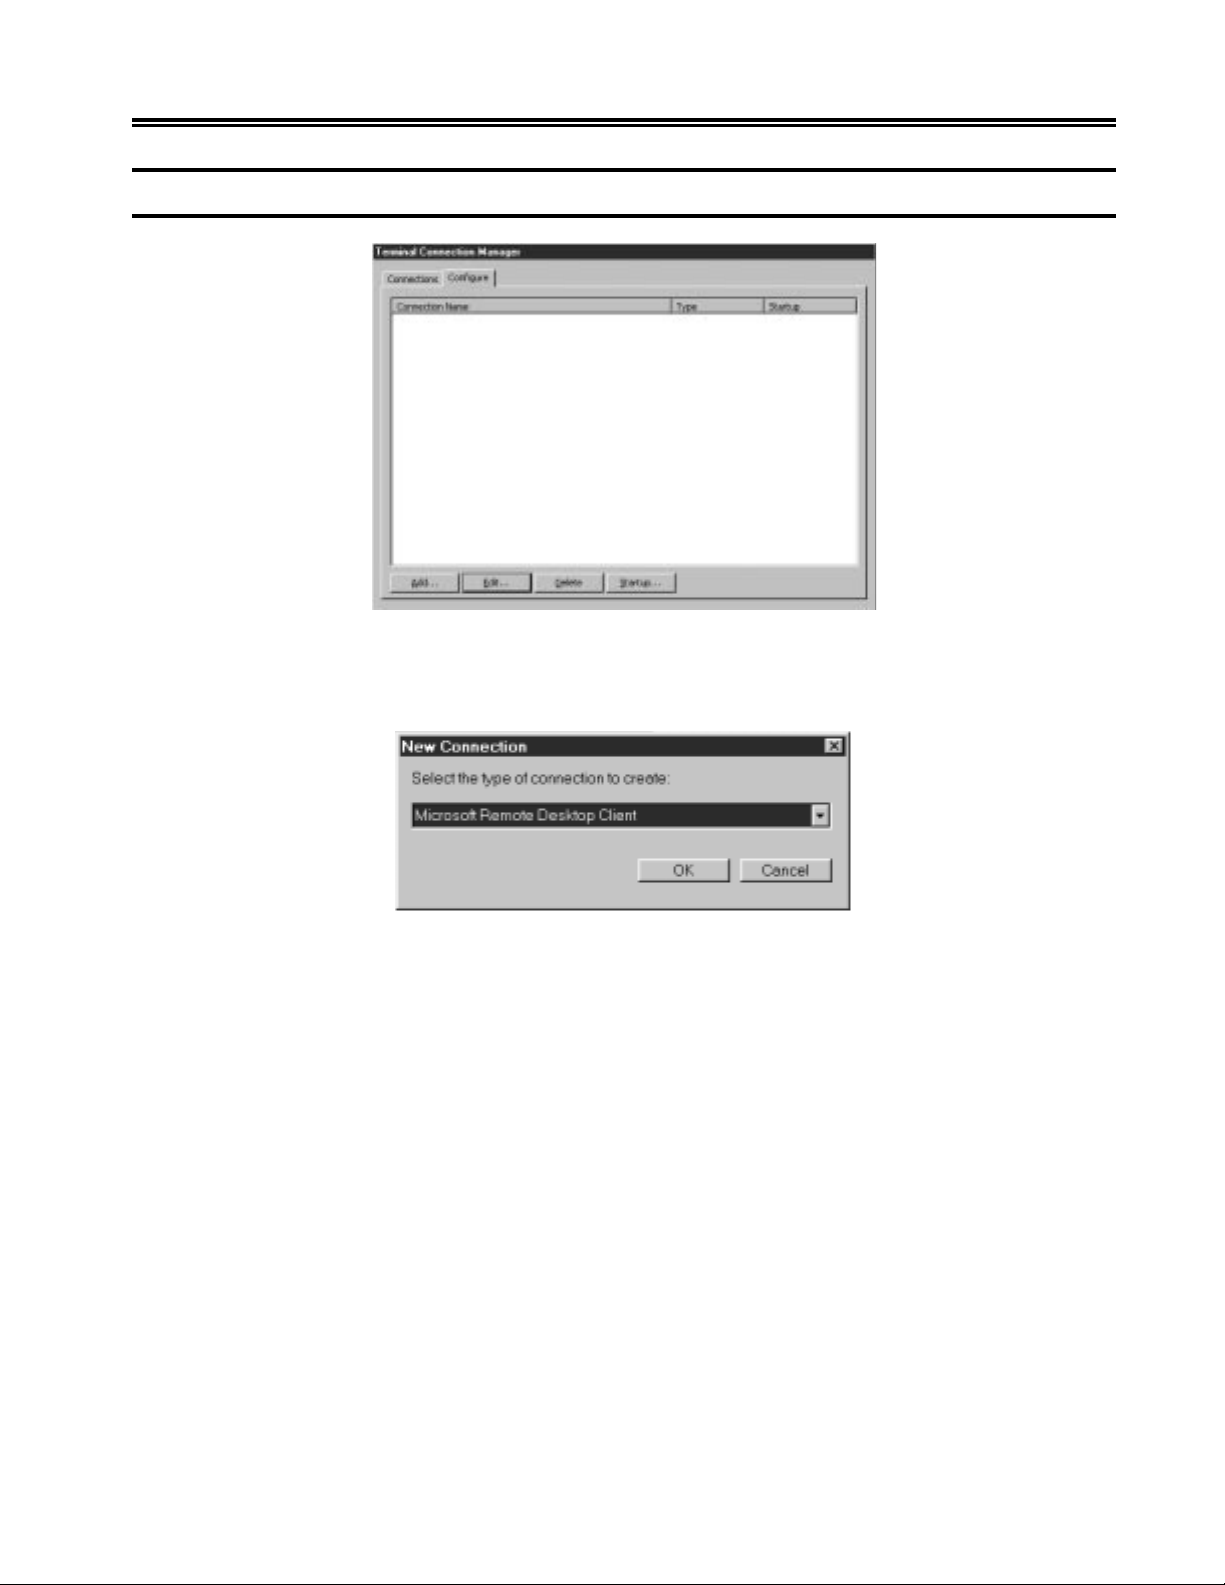
• Add:
This function is used for creating a new connection. Select the Configure icon and
click this Add button, the following New Connection dialog box will appear.
Chapter 3. eTerm Terminal Connection
• Edit:
The Edit command button allows the user to edit or modify the properties of an
existing connection. Highlight the connection from the Configure list and click the
Edit button, or you can just double click the connection from the Configure list.
Then adjust the properties of this connection.
707018-006 3-9
Page 32
eTerm 350 Windows-based Terminal
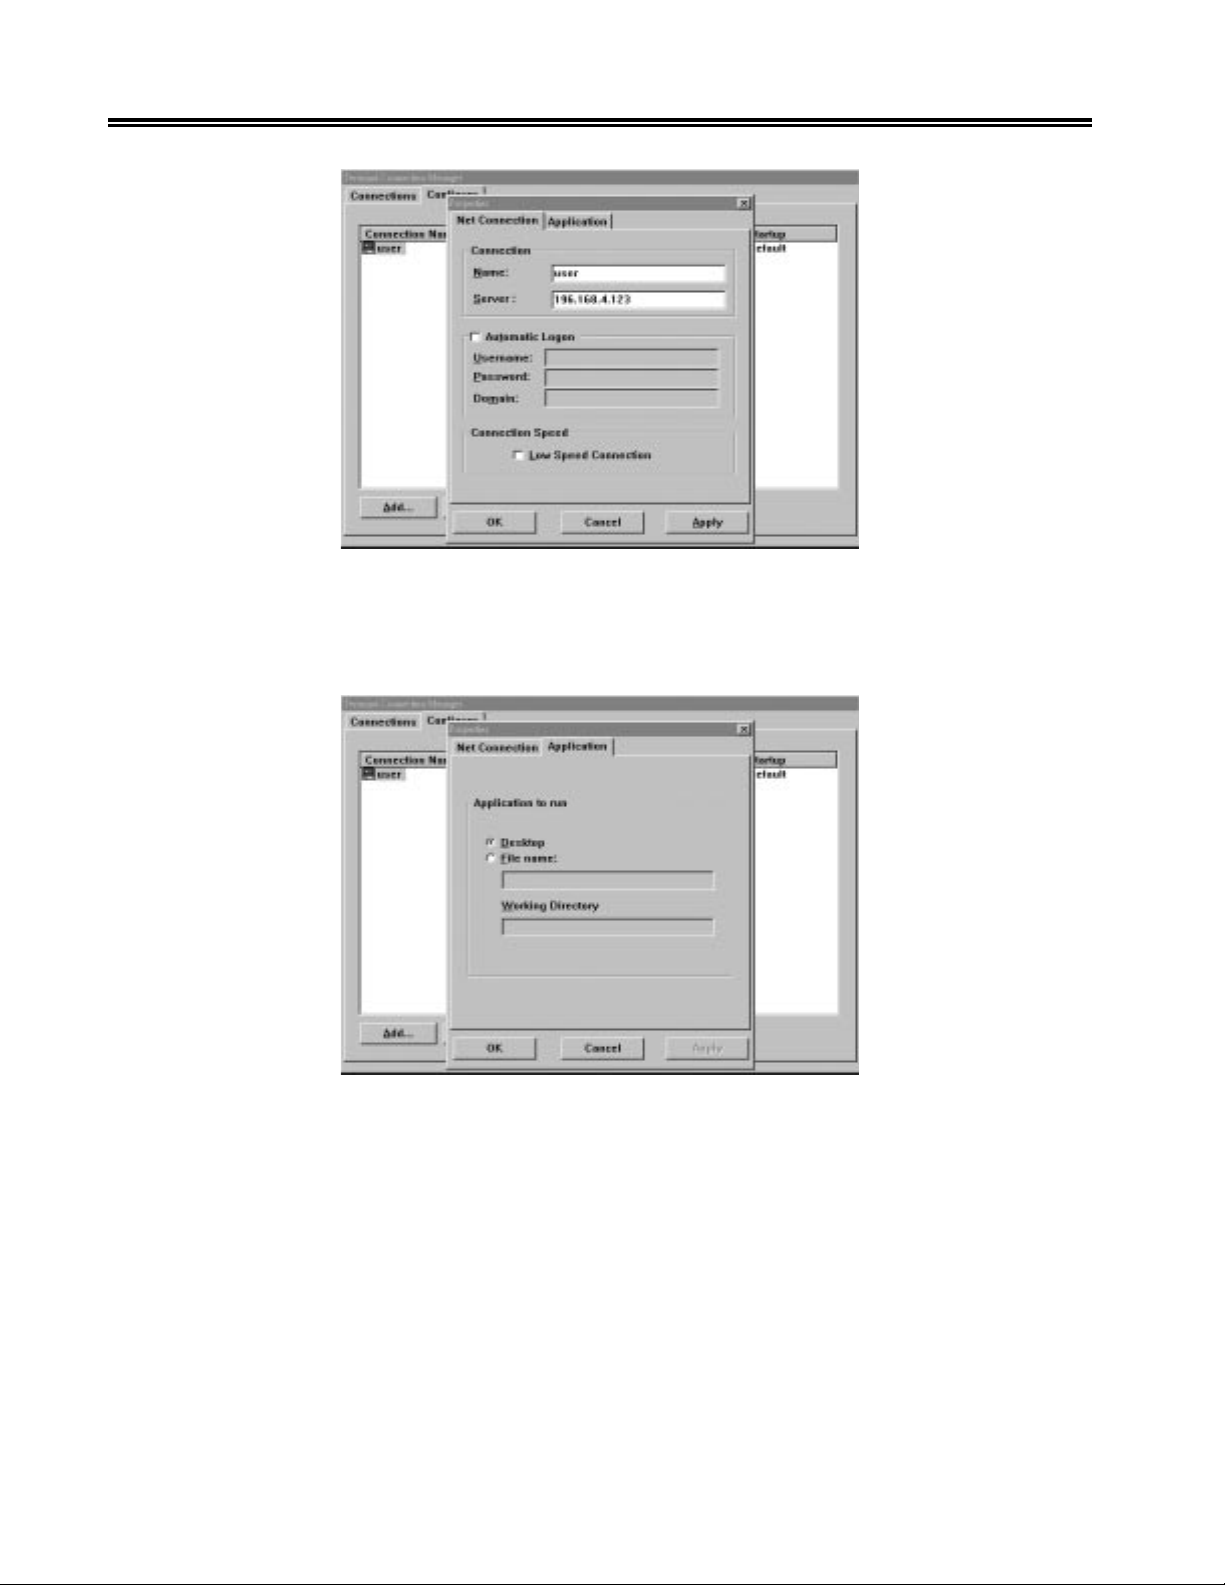
• Net Connections:
Use this function to adjust the connection server name and the server address. If you
want to automatically log onto the server, select the Automatic Logon icon. Enter
the Username, Password, and Domain information in these fields.
• Application:
Use this function to select the application type you want. On connection, the Windows
NT Desktop is displayed by default. You can also select the File name icon, enter
name of the application you need and specify the working directory.
3-10 707018-006
Page 33
Chapter 3. eTerm Terminal Connection
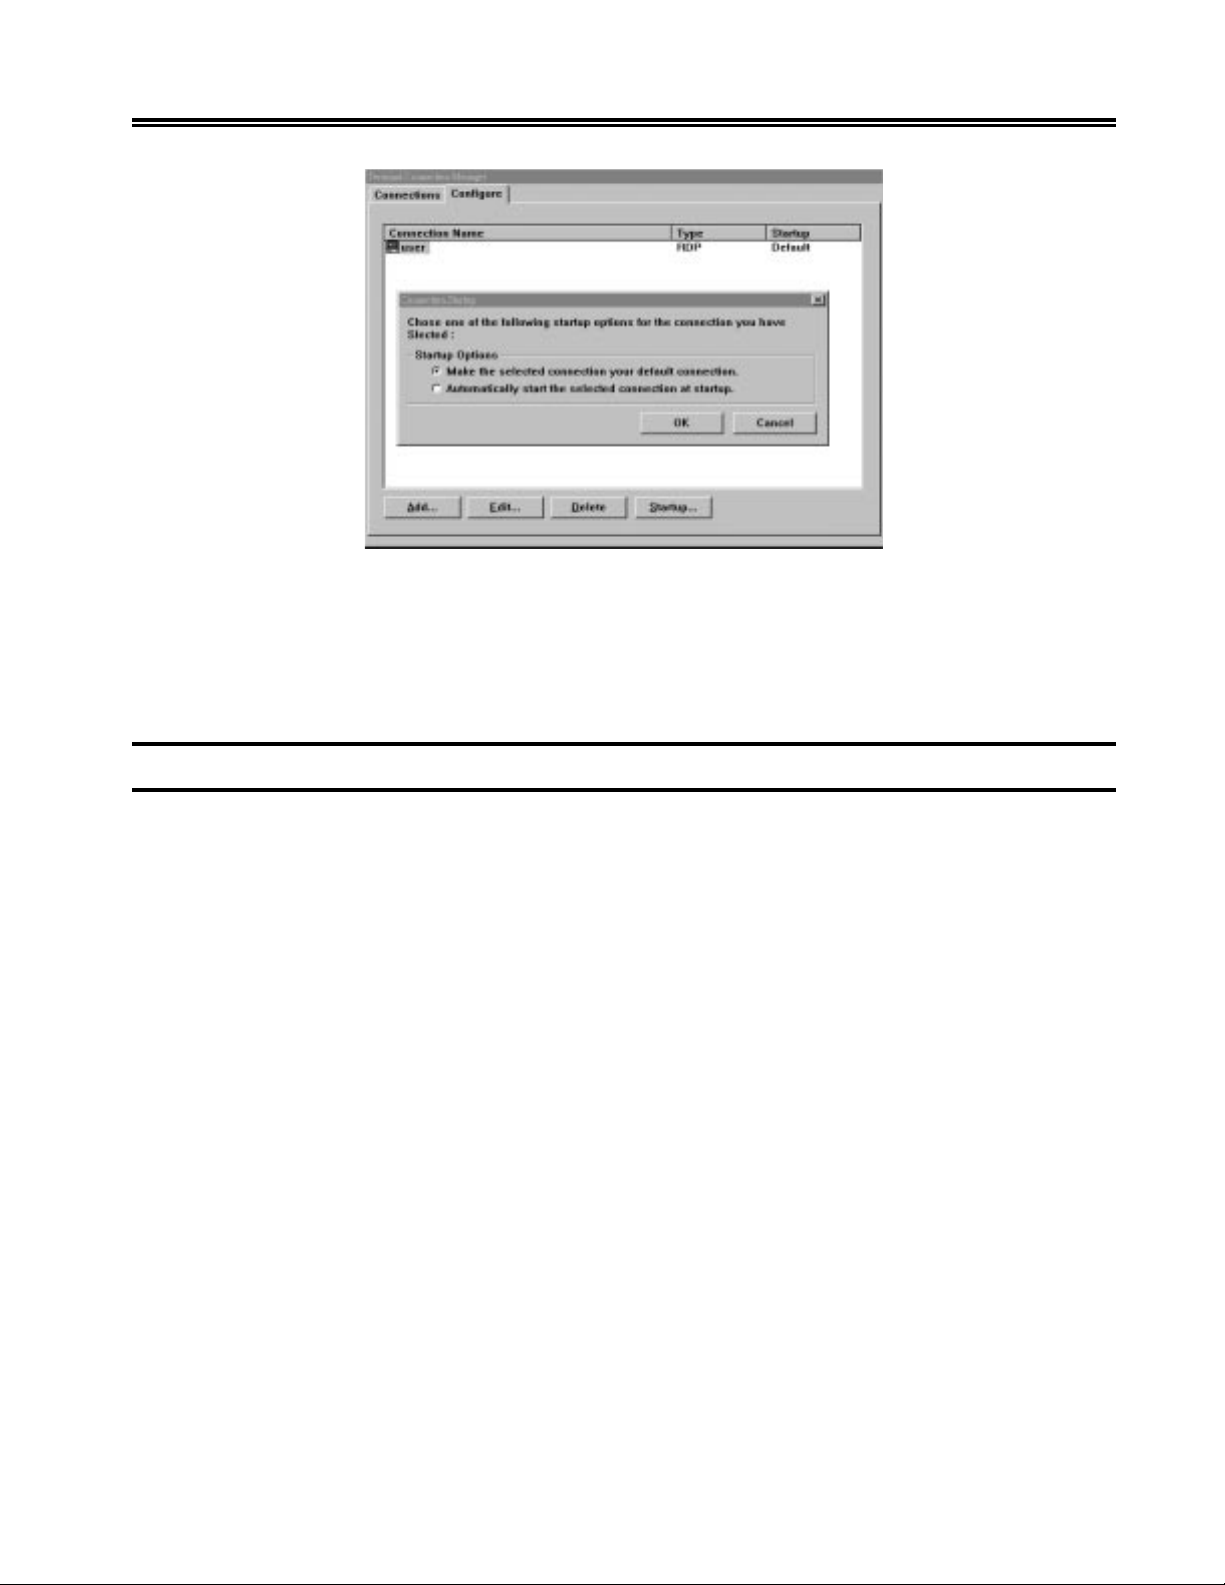
• Startup:
This function allows you choose the connection you want to startup. Select the
required connection, click the Startup button, and then the Connection Startup
dialog box will appear. Click OK to configure the startup option. Click Cancel to
quit this dialog box.
Hot-keys Functions
Ctrl + Alt + Up/Down Arrow: Use this function to switch between Active Connections.
Ctrl + Alt + Home: Use this function to go back to the Default Connection.
Ctrl + Alt + End: Use this function to go back to the Terminal Connection Manager.
707018-006 3-11
Page 34
eTerm 350 Windows-based Terminal
Citrix ICA Client
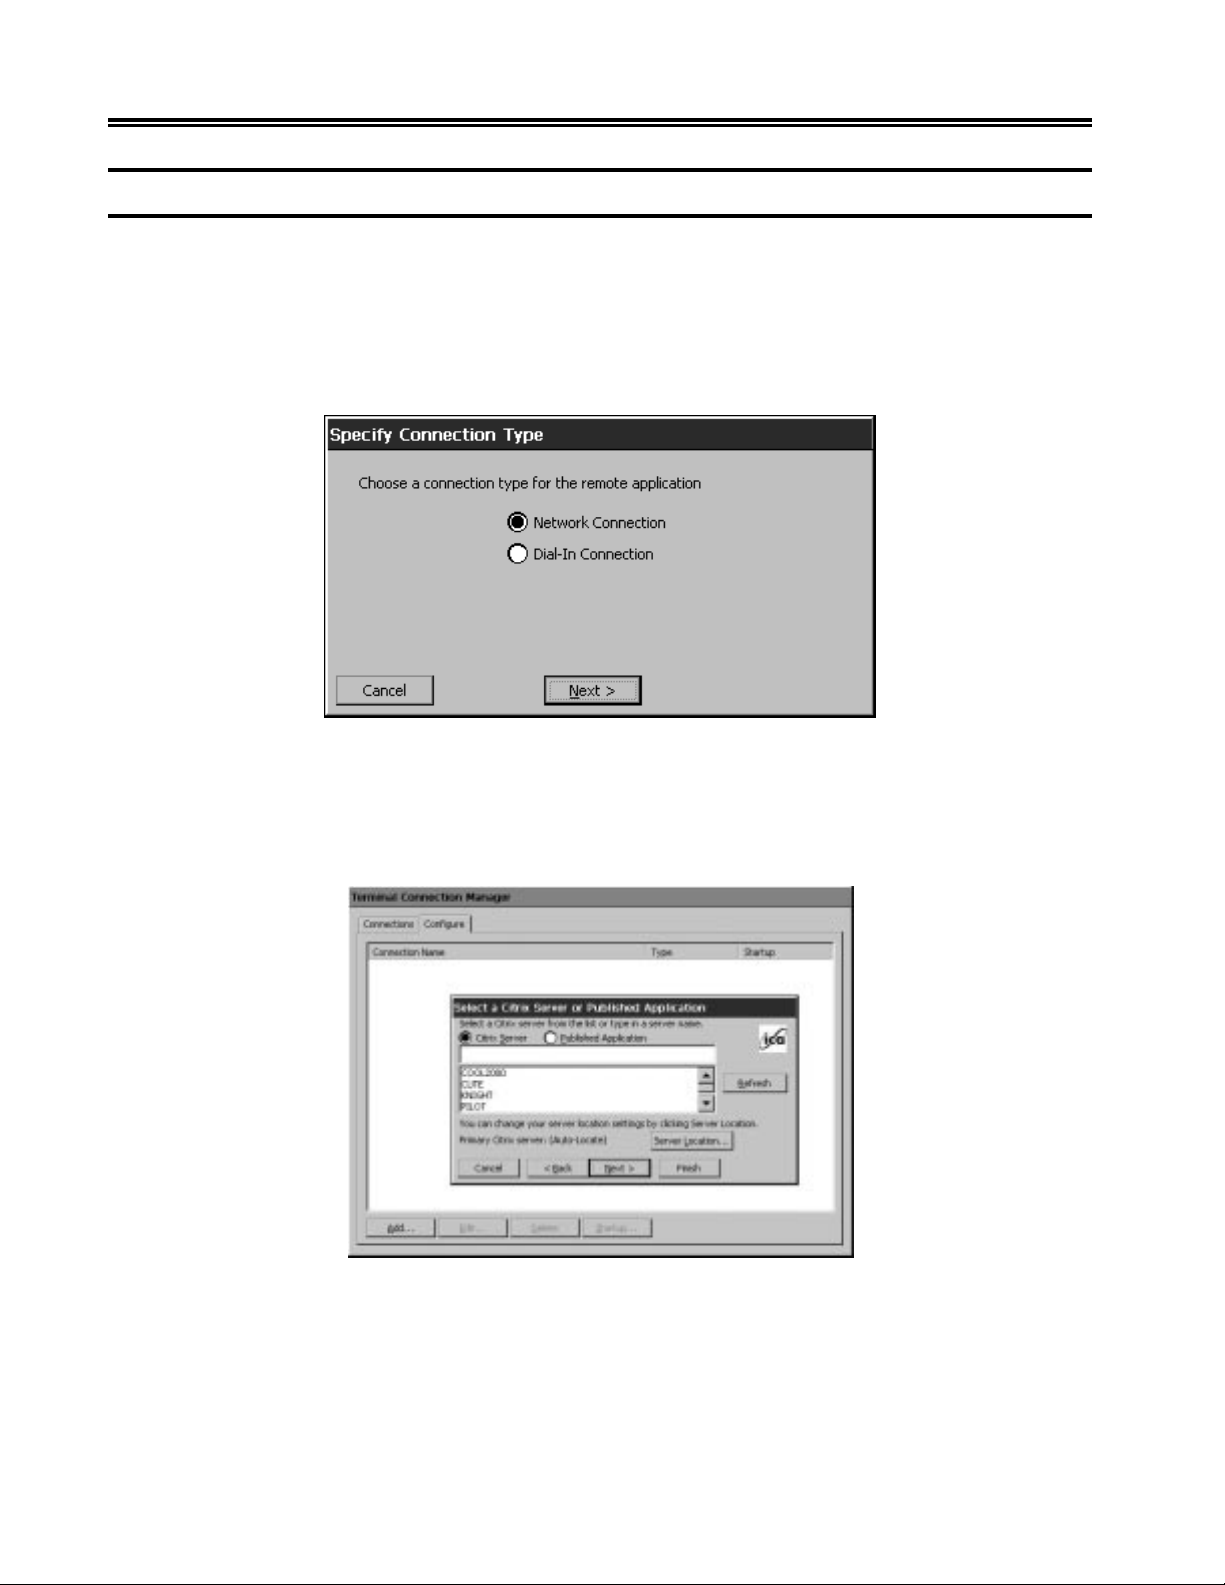
If you choose Citrix ICA Client, the Specify Connection Type dialog box will appear.
Use this application to create a Citrix ICA connection. Choose the Network Connection
or Dial-In Connection for the remote application.
• If you select the Network Connection and click the Next button, a message appears:
“Searching for Citrix servers...”. This type of connection requires a direct Ethernet
connection to the network.
• If you select the Dial-In Connection and click the Next button, the Dial-In
Devices dialog box appears. This type of connection is made through the attached
external modem.
Select the Citrix Server, Published Application, or type a server name in the field.
3-12 707018-006
Page 35
Chapter 3. eTerm Terminal Connection
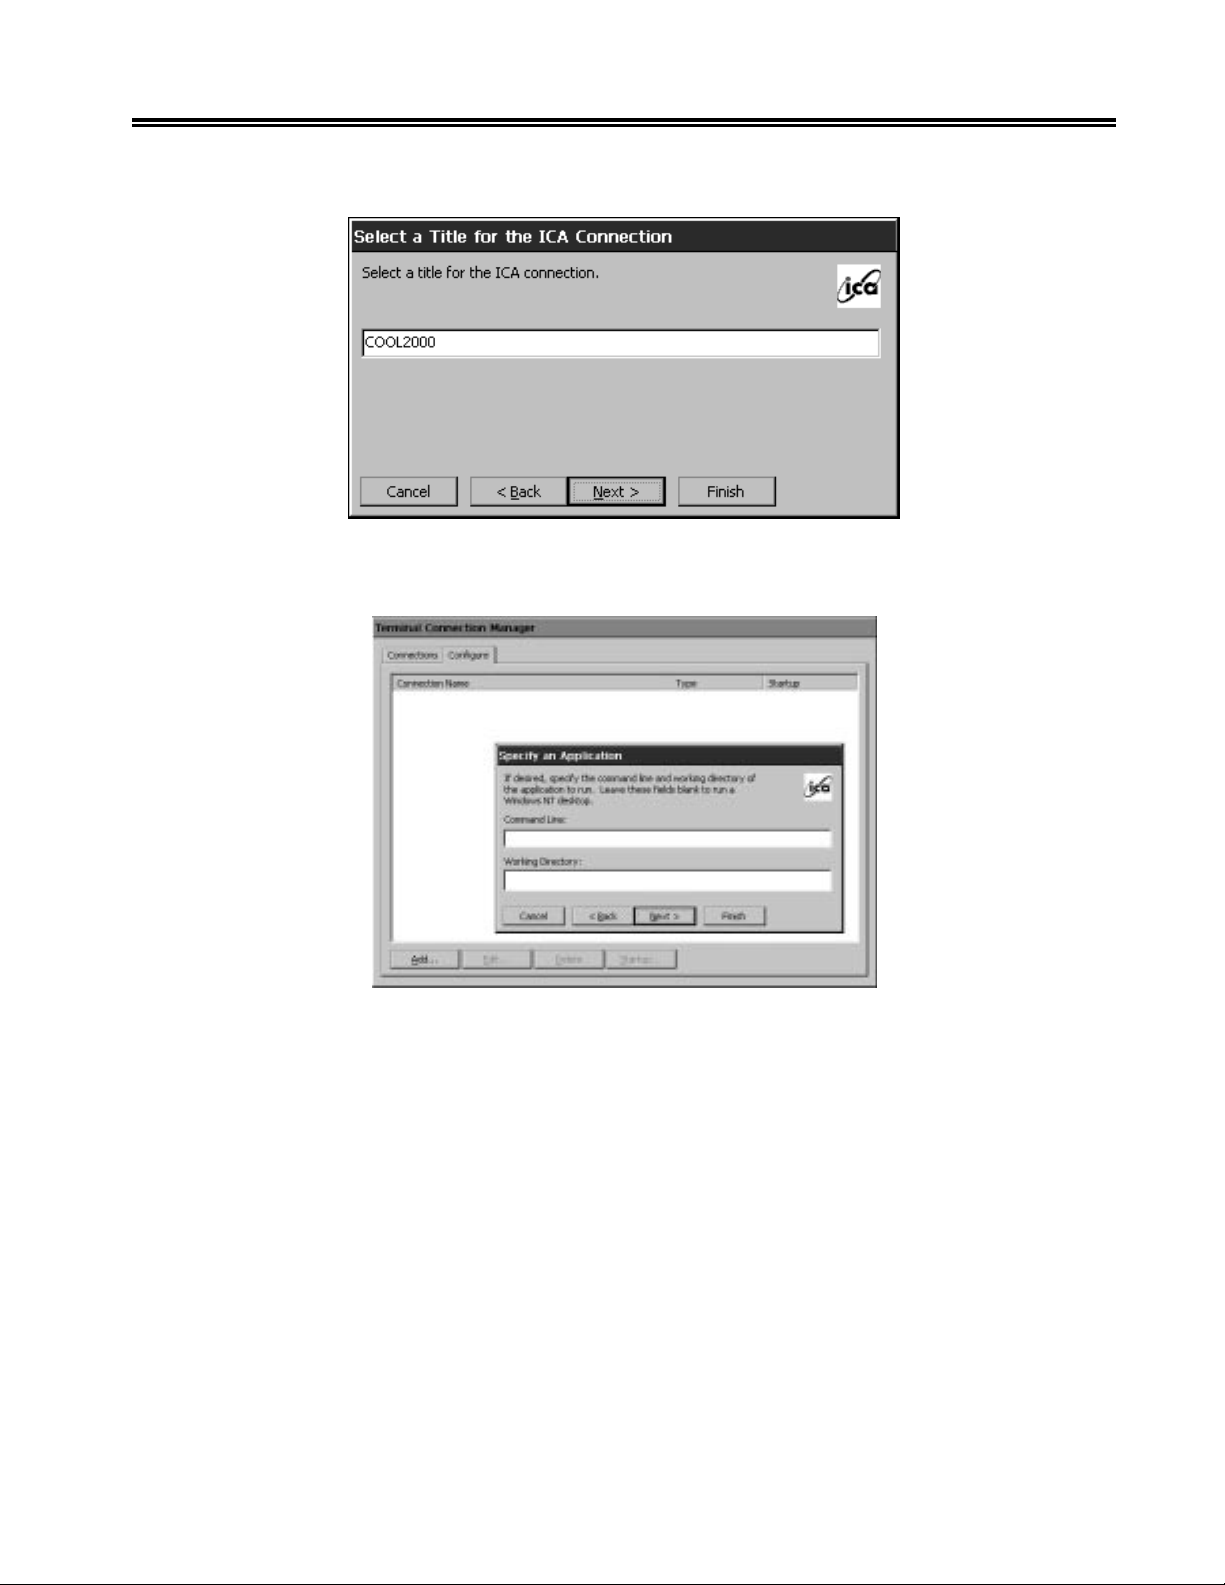
Choose the current server name appearing in the field. (You can also rename this server.)
If desired, you can specify the Command Line and Working Directory of the application
file. Or leave those fields blank and click Next to run a Windows NT Desktop.
707018-006 3-13
Page 36
eTerm 350 Windows-based Terminal
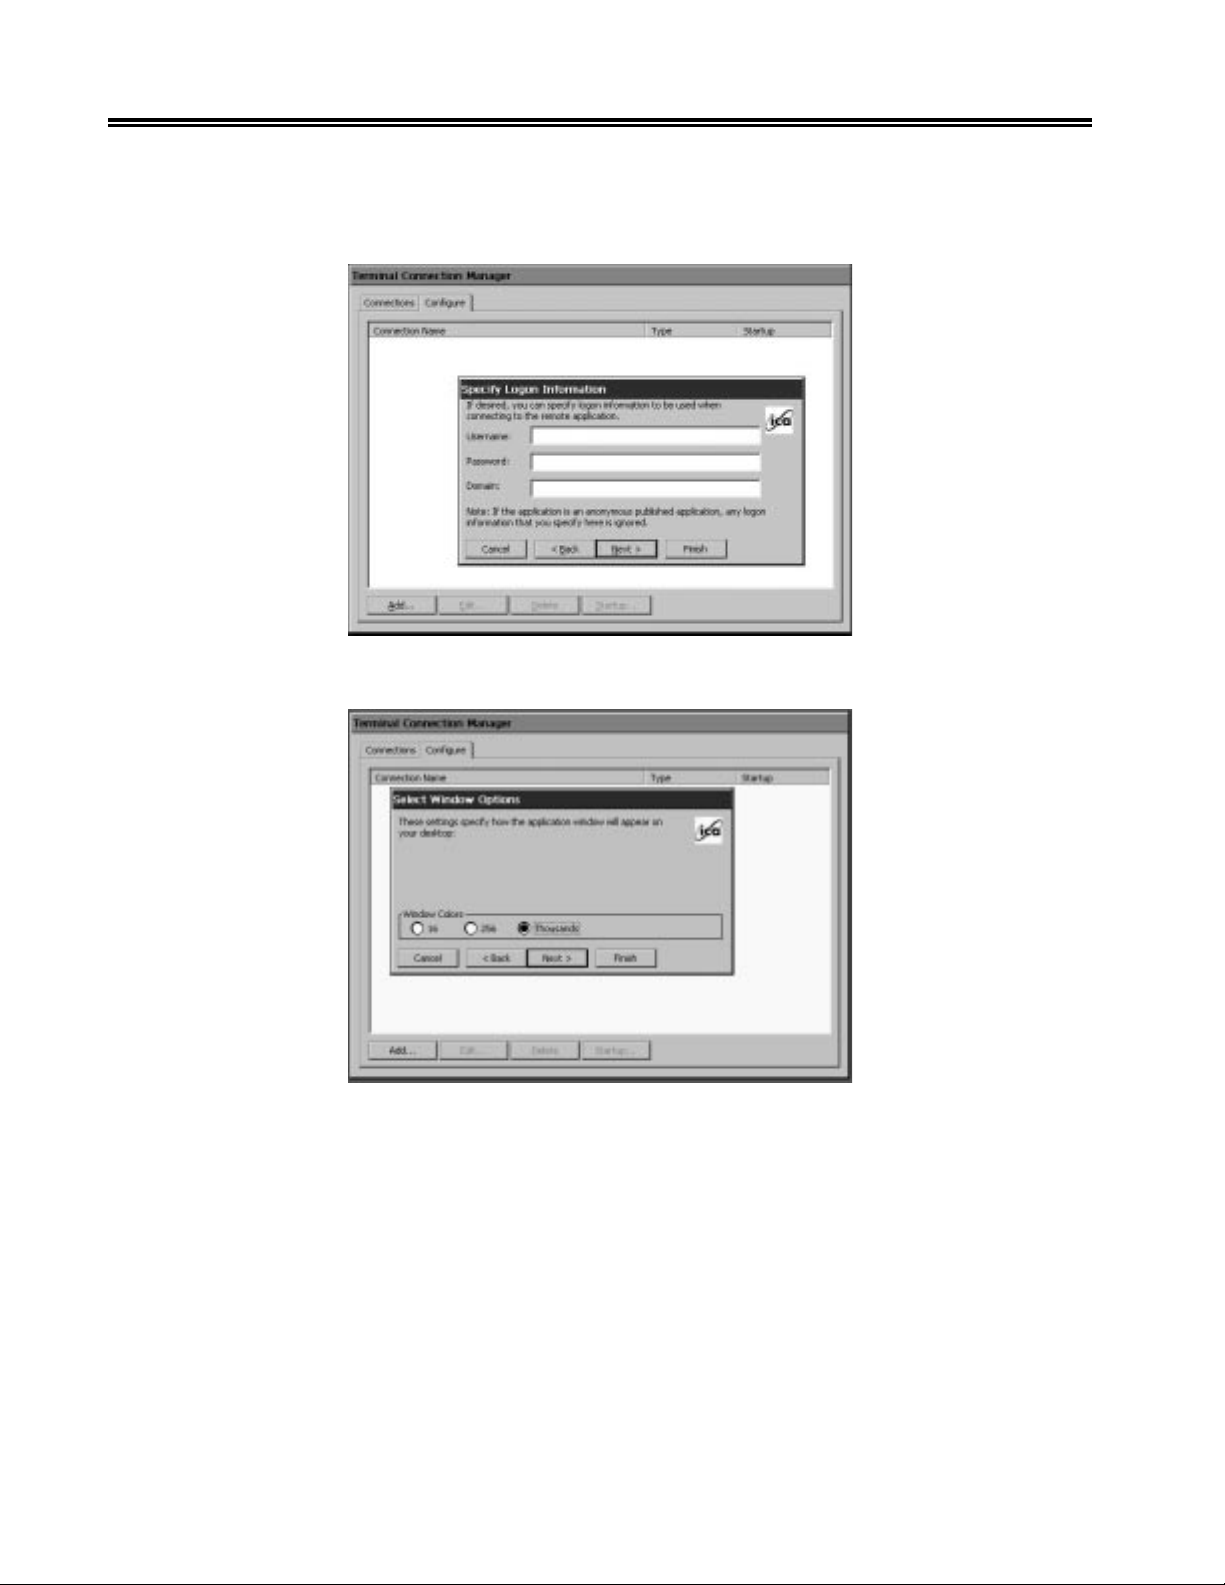
If you want to automatically log on to the server, enter the information in User Name,
Password, and Domain fields. If not, leave these fields blank and you will be prompted
for this information when connecting to a server. Click Next to continue.
Choose the desired color resolution. Click Next to continue.
3-14 707018-006
Page 37
Chapter 3. eTerm Terminal Connection
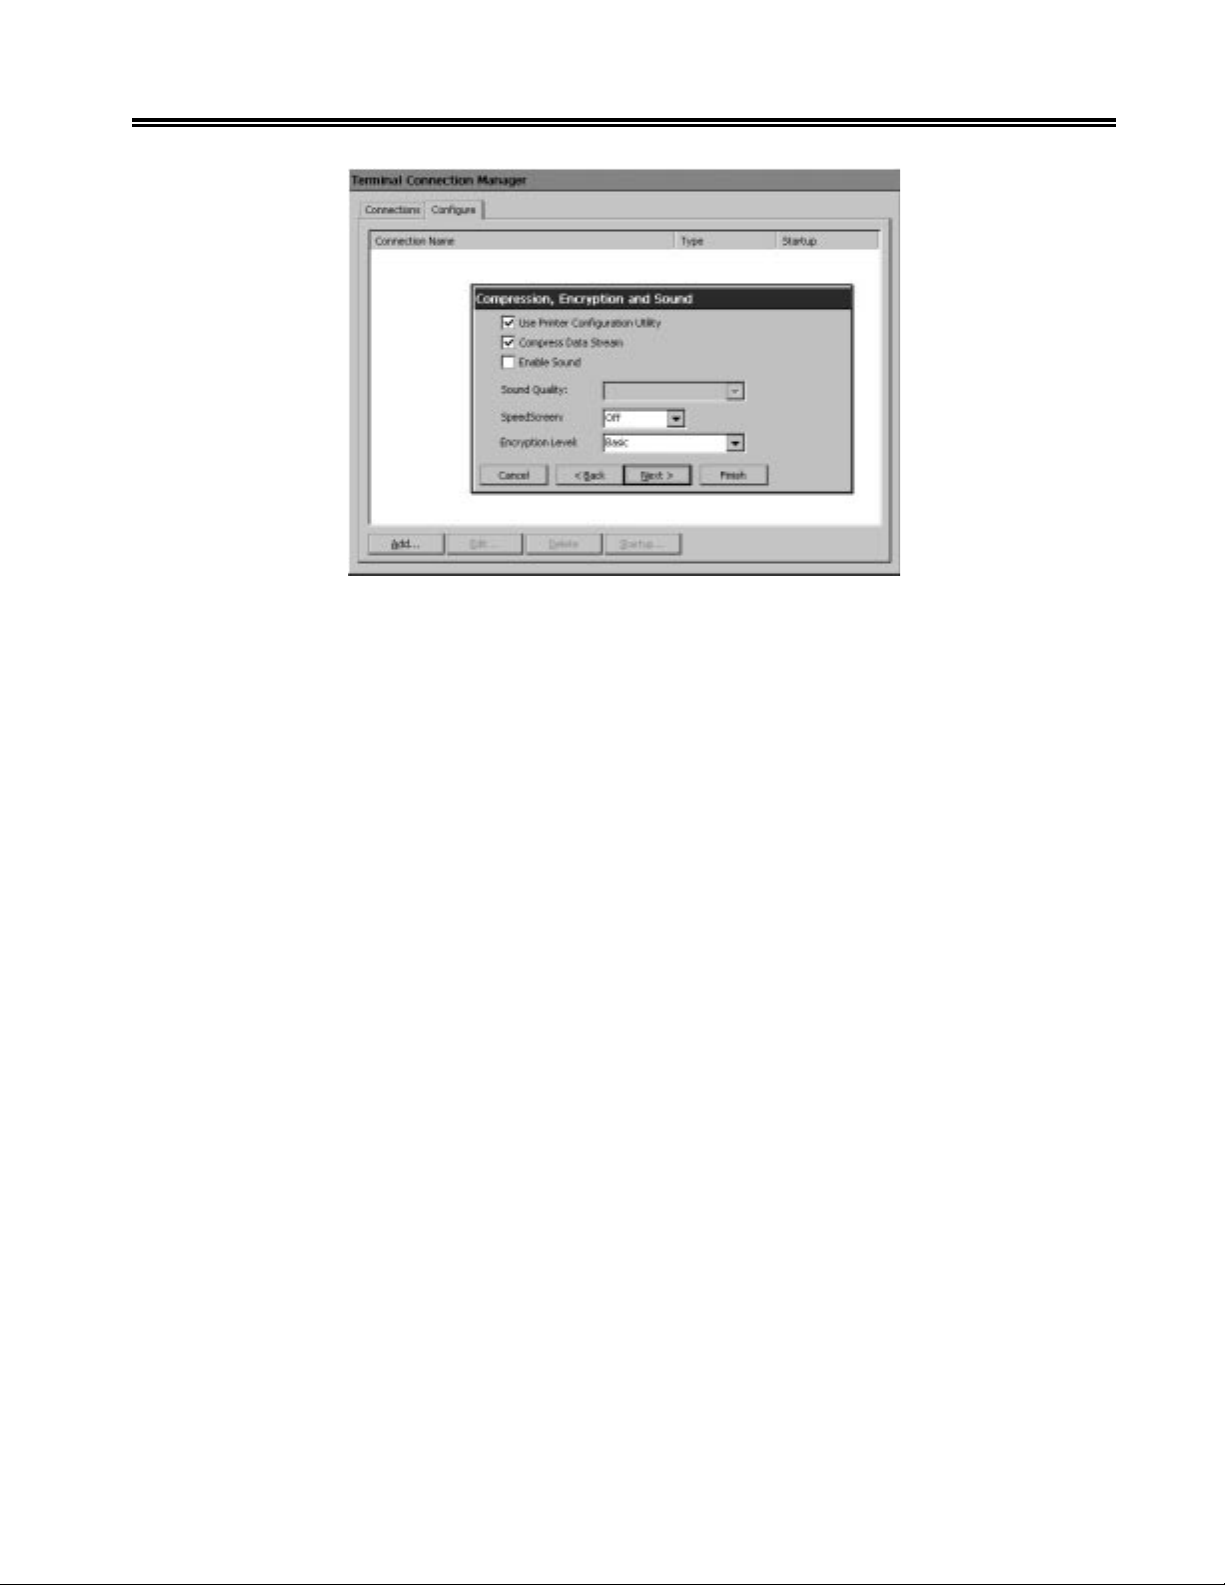
• Use Printer Configuration Utility:
Check this option if a printer is local-attached to the unit and connecting to a Winframe
or Metaframe 1.0 Citrix server. This option should be unchecked if connecting to a
Metaframe 1.8 Citrix server.
• Compress Data Stream:
Reduces the amount of data transferring between the terminal and server.
• Enable Sound:
Check this option to enable sound support. Published applications will be able to
play sounds on your client.
• High - This value provides the greatest audio quality but should only be used
when bandwidth consumption is not a concern.
• Medium - Using this value results in less bandwidth consumption than when
using High. Compression of sound data provides greater bandwidth efficiency
but reduces sound quality somewhat. This value is recommended for most LANbased connections.
• Low - This value offers the most efficient use of bandwidth but also decreases
sound quality severely. This value is recommended for low-bandwidth connections,
including most modem connections.
• Encryption level:
Select the level of encryption for the ICA connection. The default level is Basic.
Strong encryption using the RC5 algorithm is available with SecureICA Services.
SecureICA Services enables RSA RC5 encryption with 40, 56, or 128-bit session
keys. Select RC5 128-bit Login Only to use encryption during authentication.
The Citrix server must be configured to allow the selected encryption level or greater.
For example, if the Citrix server is configured to allow RC5 56-bit connections, the
ICA client can connect with RC5 56 or 128-bit encryption.
Note: Selecting RC5 encryption disables automatic logon to the Citrix server.
707018-006 3-15
Page 38
eTerm 350 Windows-based Terminal
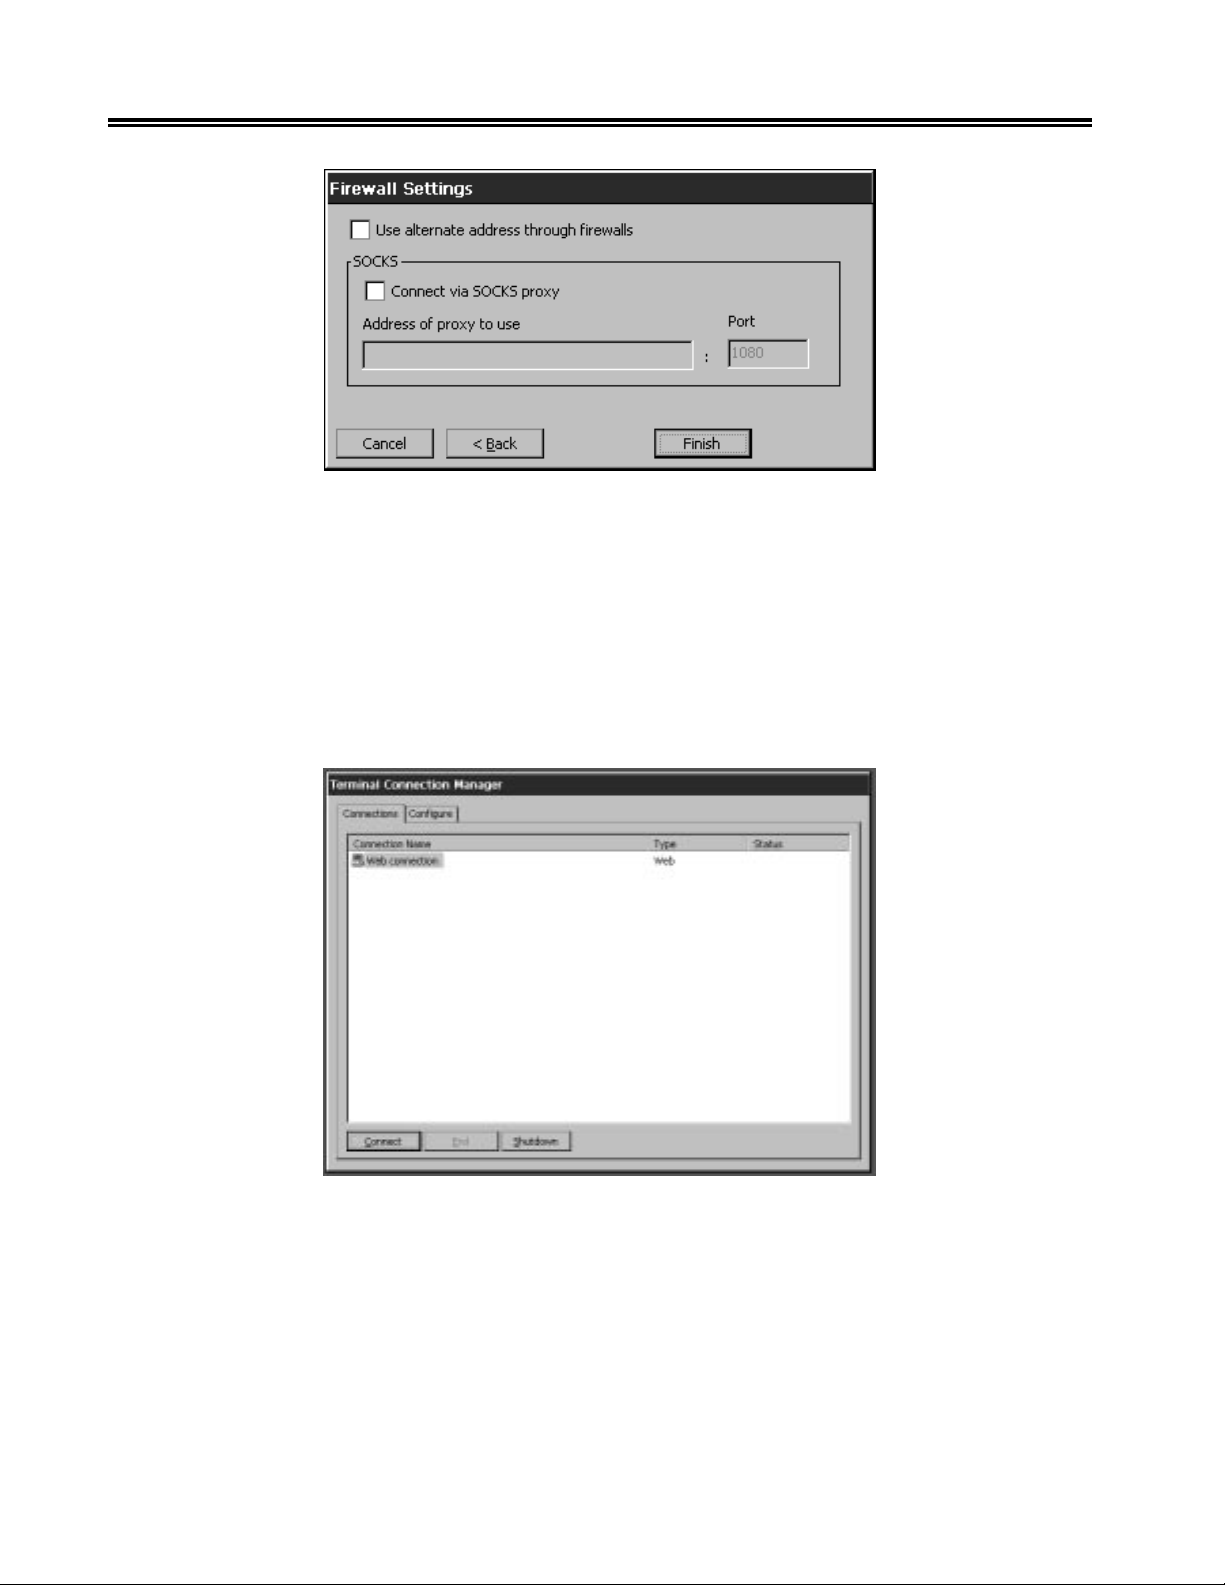
• Configuring the ICA Client to Use a SOCKS Proxy
If you are using a SOCKS proxy server to limit access to your Citrix servers, you
must configure a SOCKS proxy server to handle connections between clients and
the server. You can place the proxy server on either side of the firewall, or in some
situations, on both sides of the firewall. You can configure a default SOCKS proxy
for all connections or a SOCKS proxy with a specific connection entry.
• Configuring Alternate Address Translation
If the ICA Client is outside a firewall that uses address remapping, you must configure
the ICA Client to use the alternate address returned by the master ICA Browser.
This is necessary even if you are not using a SOCKS proxy server.
If the eTerm 350 has a connection to the Web (via dialup or LAN), double-clicking on
the Web connection entry will activate the local IE4.0 browser. The browser has limited
functionality and does not support downloads of any kind. To configure the browser, go
to Terminal Properties and select the Web tab.
3-16 707018-006
Page 39
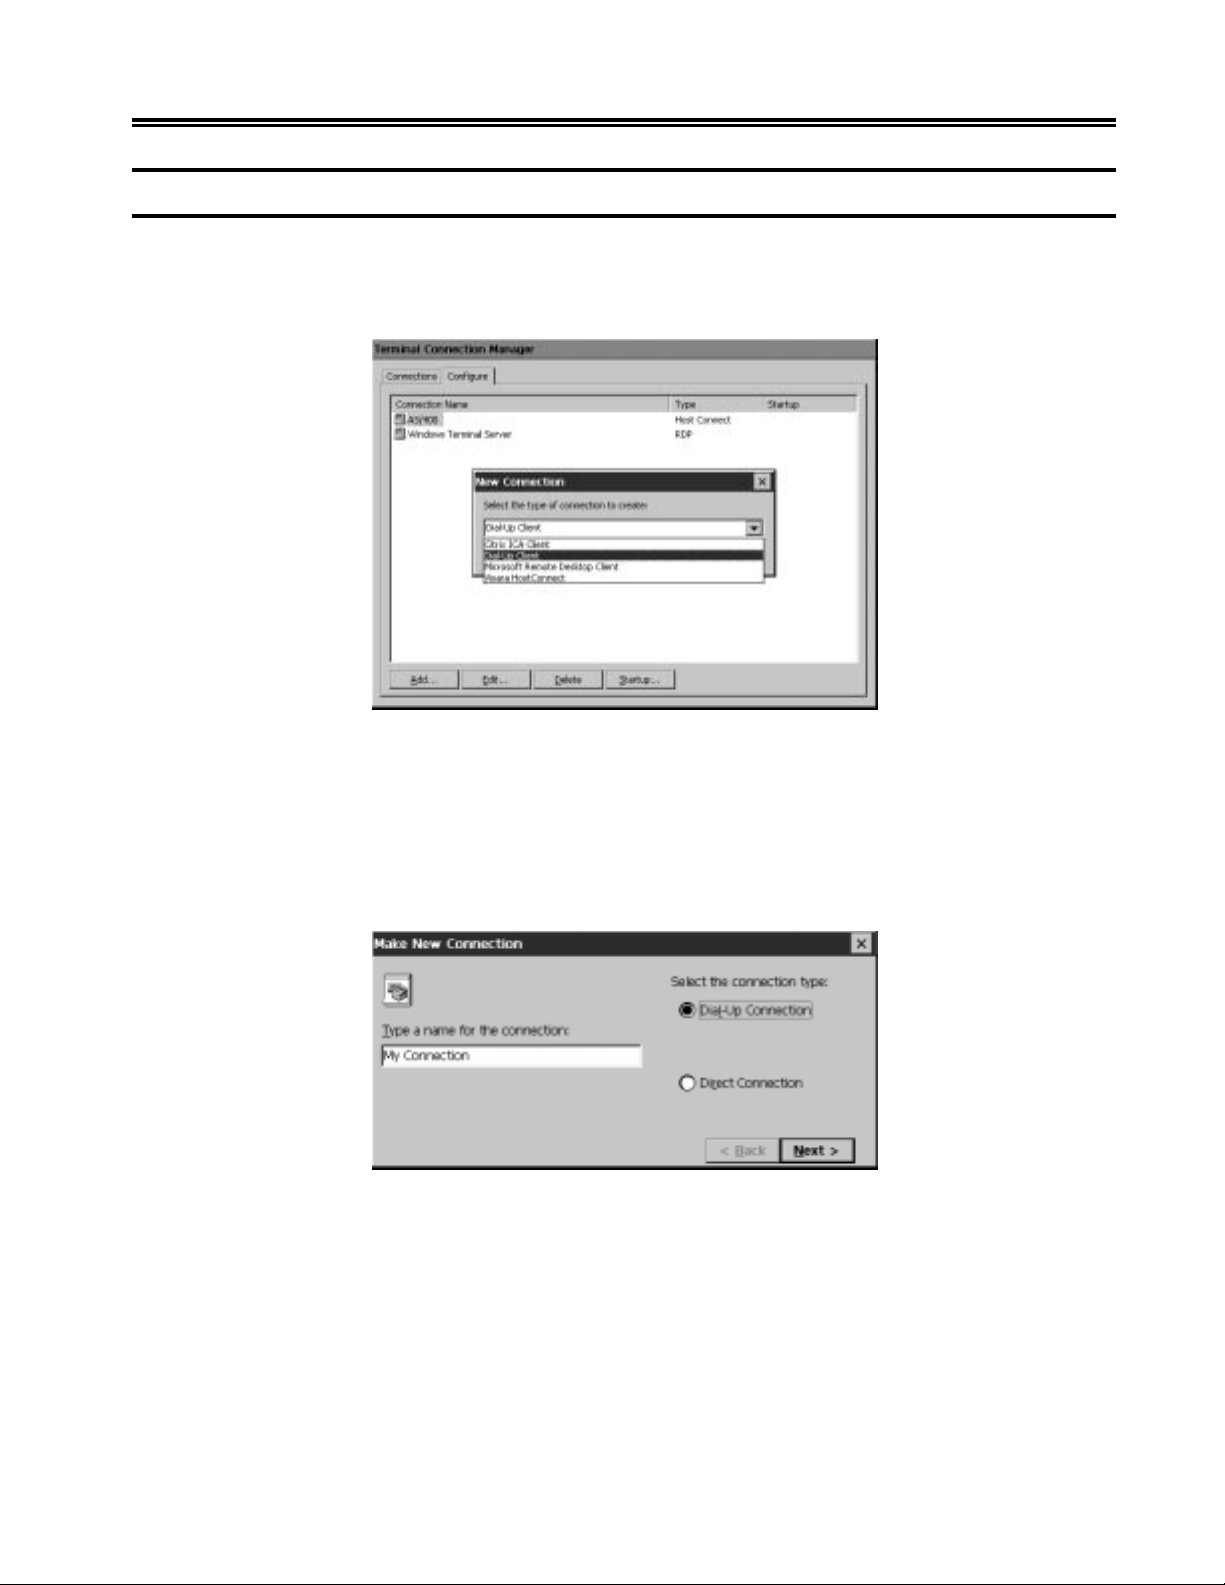
Dial-Up Client
The Dial-Up Client wizard configures the eTerm350 for a connection to a local or
remote host using serial PPP communications on the serial ports instead of the
ethernet port.
Chapter 3. eTerm Terminal Connection
• If you choose Dial-Up Client, the Make New Connection dialog box is displayed.
Type in any name for the connection. Select Direct Connection if the host is local.
A null modem cable will be required to connect the eTerm350 Com1 or Com2 port
to the local host. Select Dial-Up Connection if the host is remote. A Hayescompatible modem and standard modem cable will be required to connect the
eTerm350 to your ISP (internet service provider) or RAS (remote access server).
707018-006 3-17
Page 40
eTerm 350 Windows-based Terminal
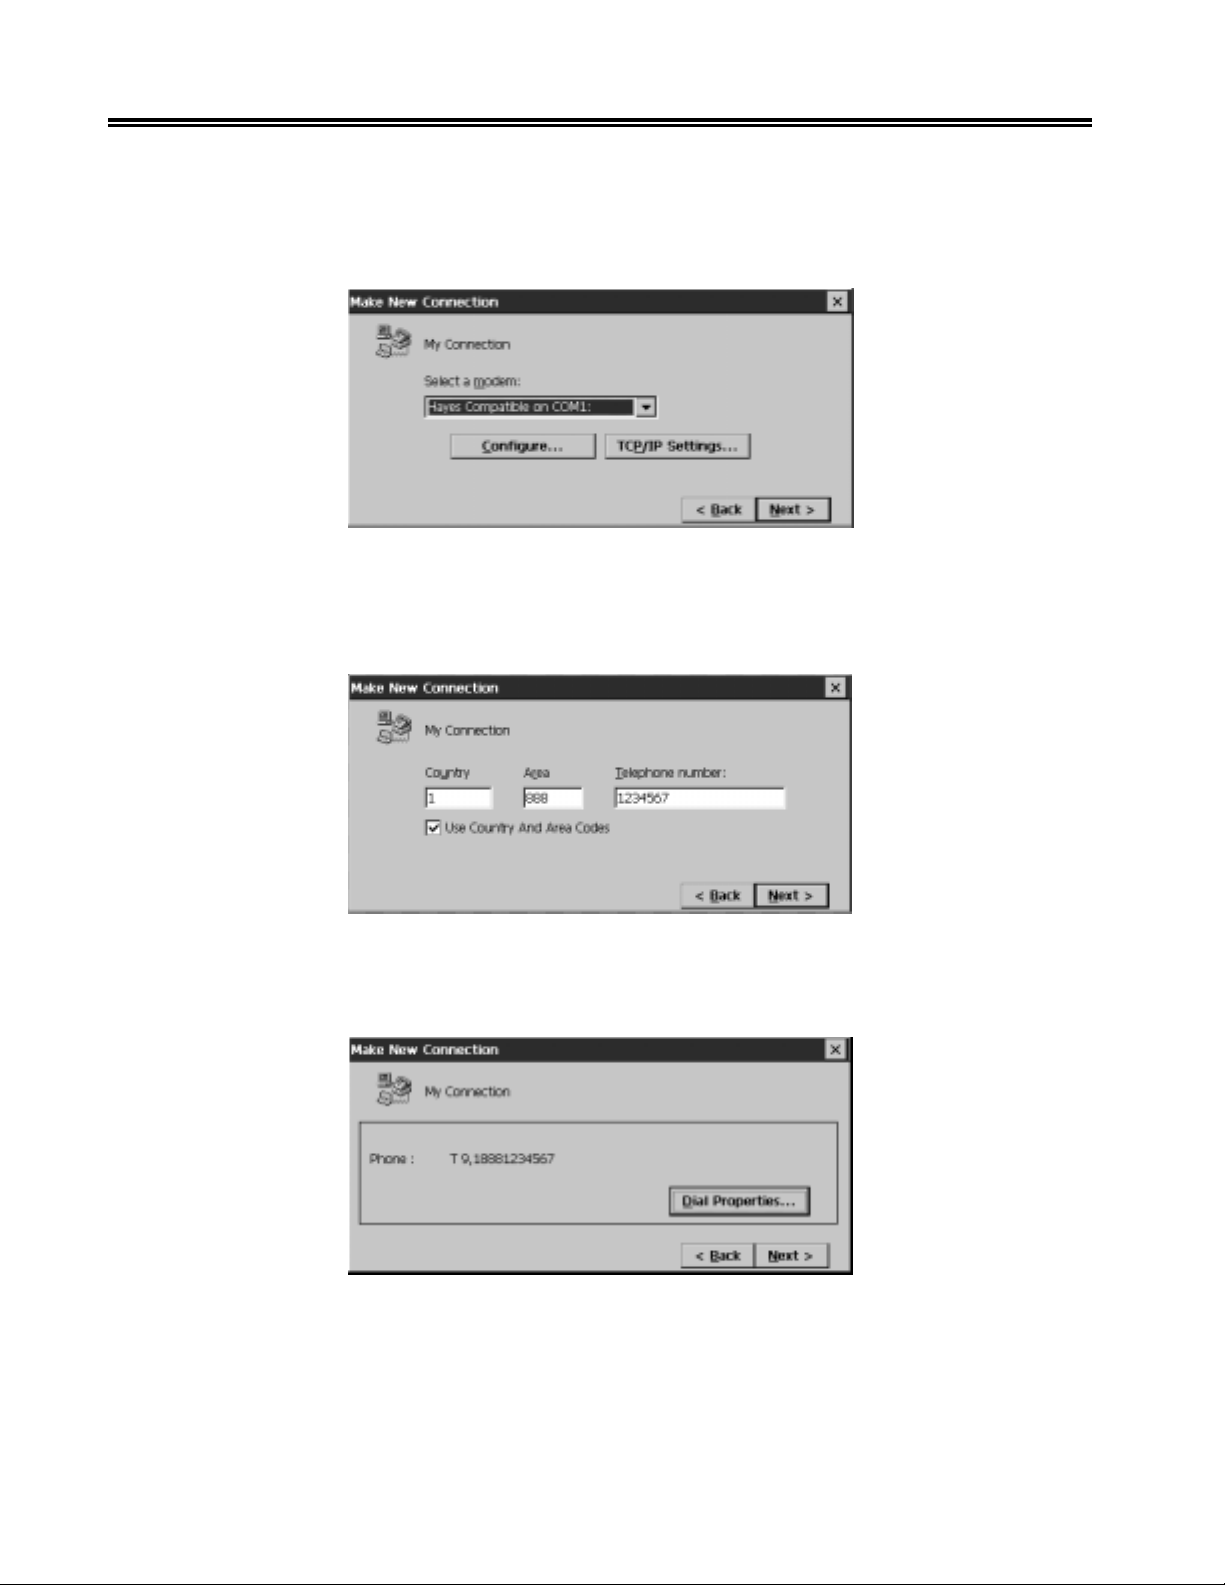
• Click the Next button. On the next dialog box, select the serial Com port that the
modem is connected to. Click on the Configure button if the modem settings require
any changes. Click on the TCP/IP Settings button to configure settings for your ISP
or RAS.
• Click the Next button. On the next dialog box, click on the Use Country and Area
Codes checkbox. Enter the Area Code and Telephone number of your ISP or RAS
that will be dialed.
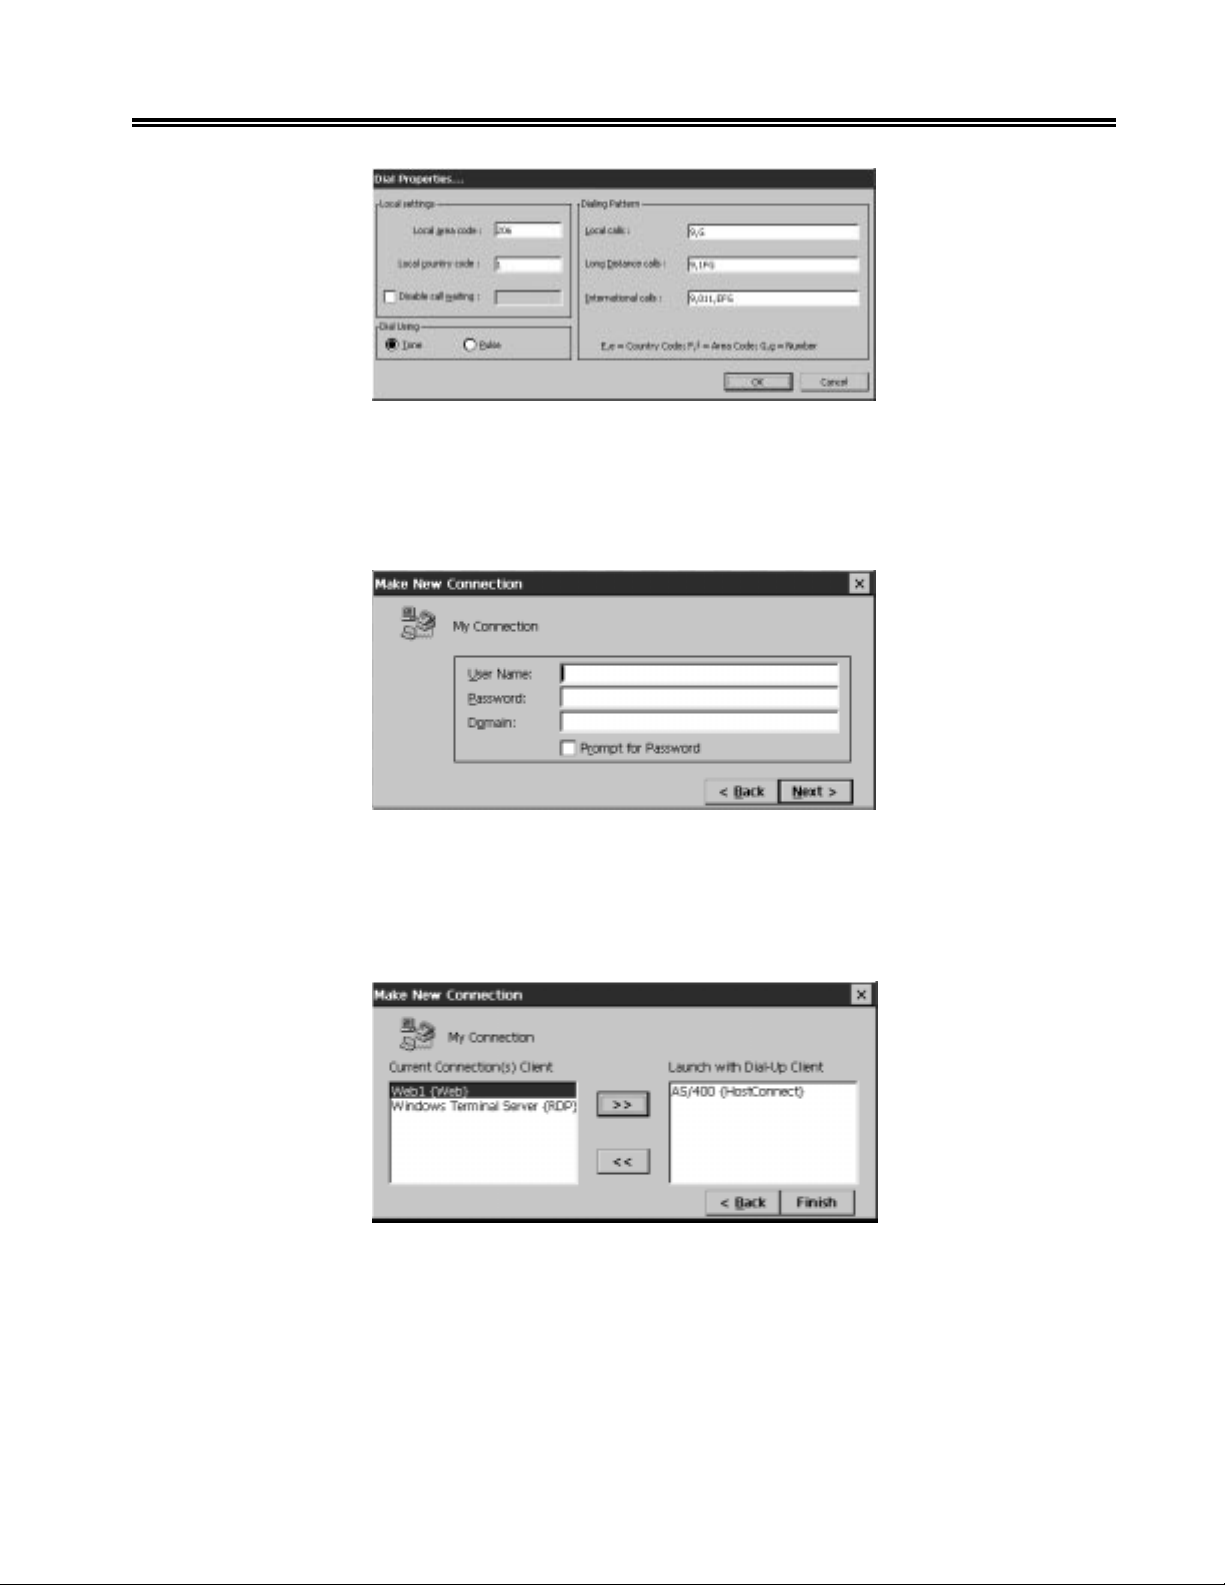
• Click the Next Button. On the next dialog box, click on the Dial Properties button
to configure Disable call waiting, Tone/Pulse dialing, etc.
3-18 707018-006
Page 41
Chapter 3. eTerm Terminal Connection
• Click the Next button. On the next dialog box, enter Username, Password and
Domain (if required). If the checkbox Prompt for Password is clicked on, then the
Dial-up Client will display a dialog box when the actual dialup session is started and
prompt for the ISP/RAS login information.
• Click the Next button. On the next dialog box, select from the list of configured host
clients that will be launched after the local or dialup serial connection is successfully
completed. Click on the >> button to select a client or << to deselect a client from
the Launch list.
707018-006 3-19
Page 42
eTerm 350 Windows-based Terminal
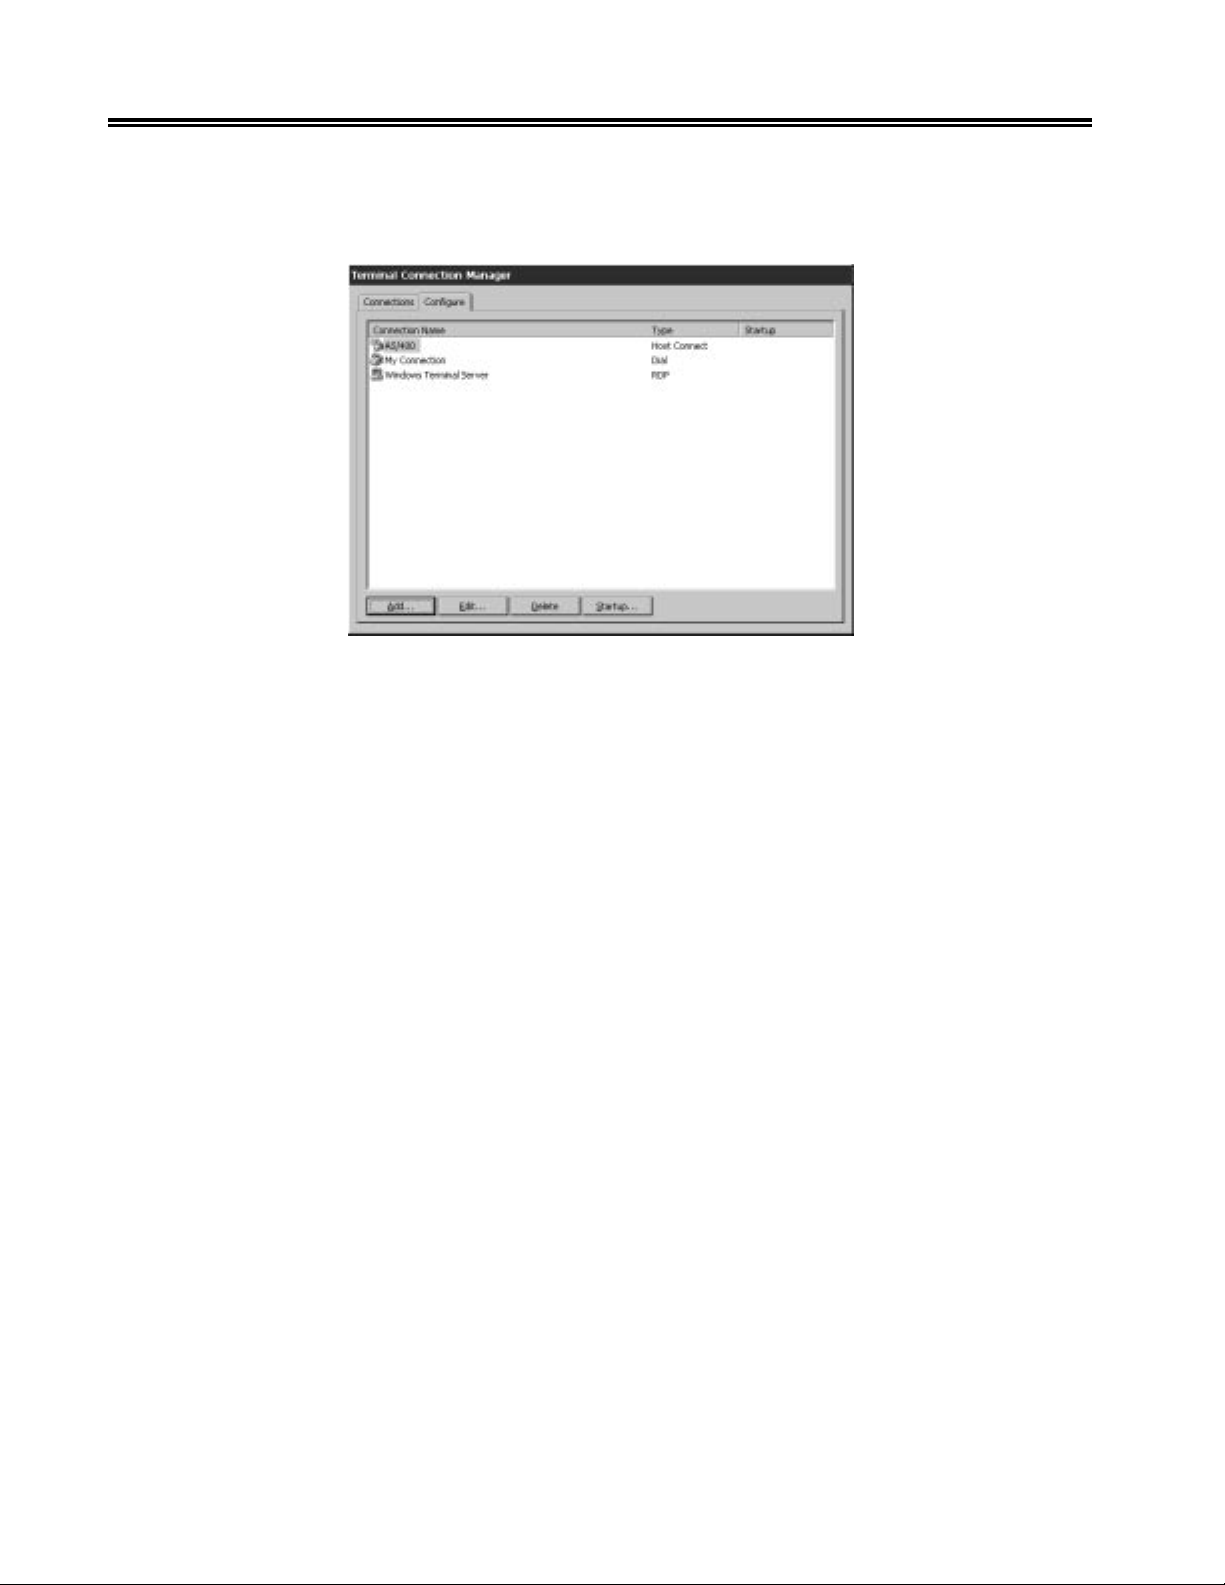
• Click on the Finish button. The Terminal Connections Manager will now display a
telephone icon (if dialup) or cable icon (if direct) next to the connection name that
was selected in the prior dialog box.
3-20 707018-006
Page 43
Chapter 4. eTerm Terminal
Terminal Properties
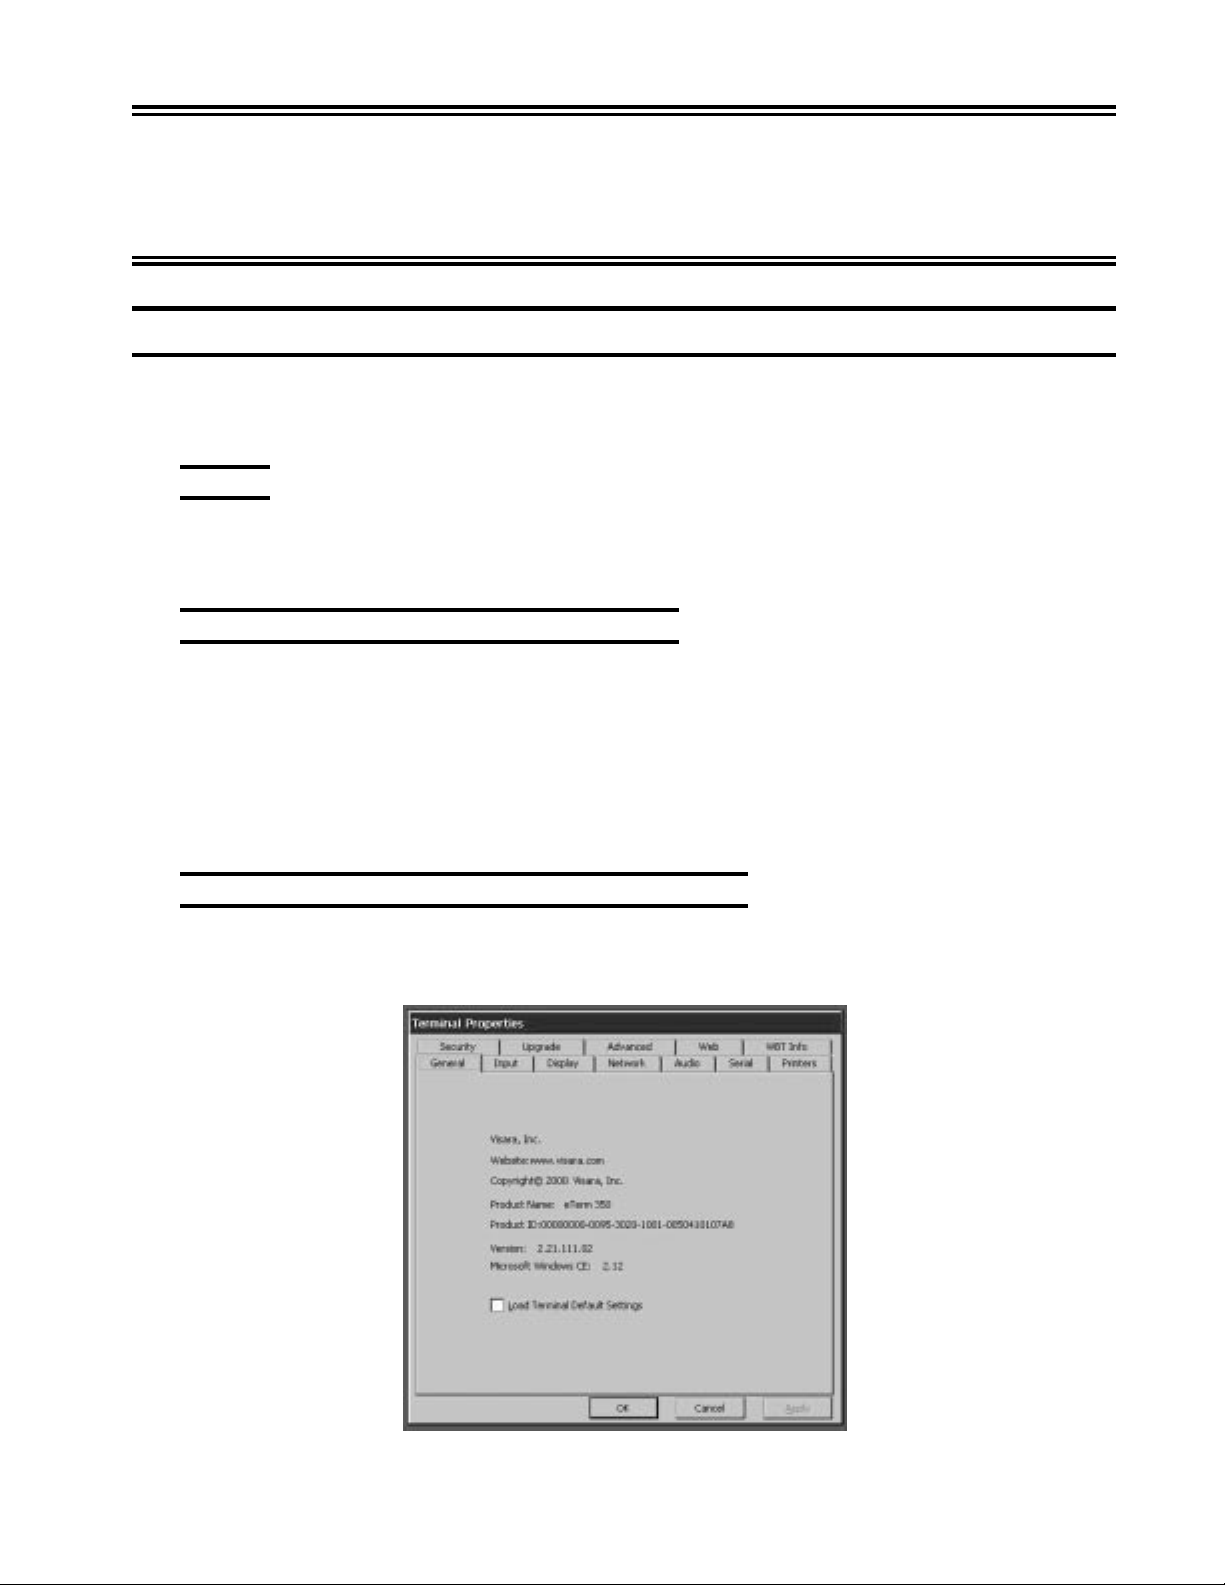
Under a normal operation, you can press the [F2] key to reset the terminal properties at
any time. There are eleven property sheets for you to modify the terminal properties.
General
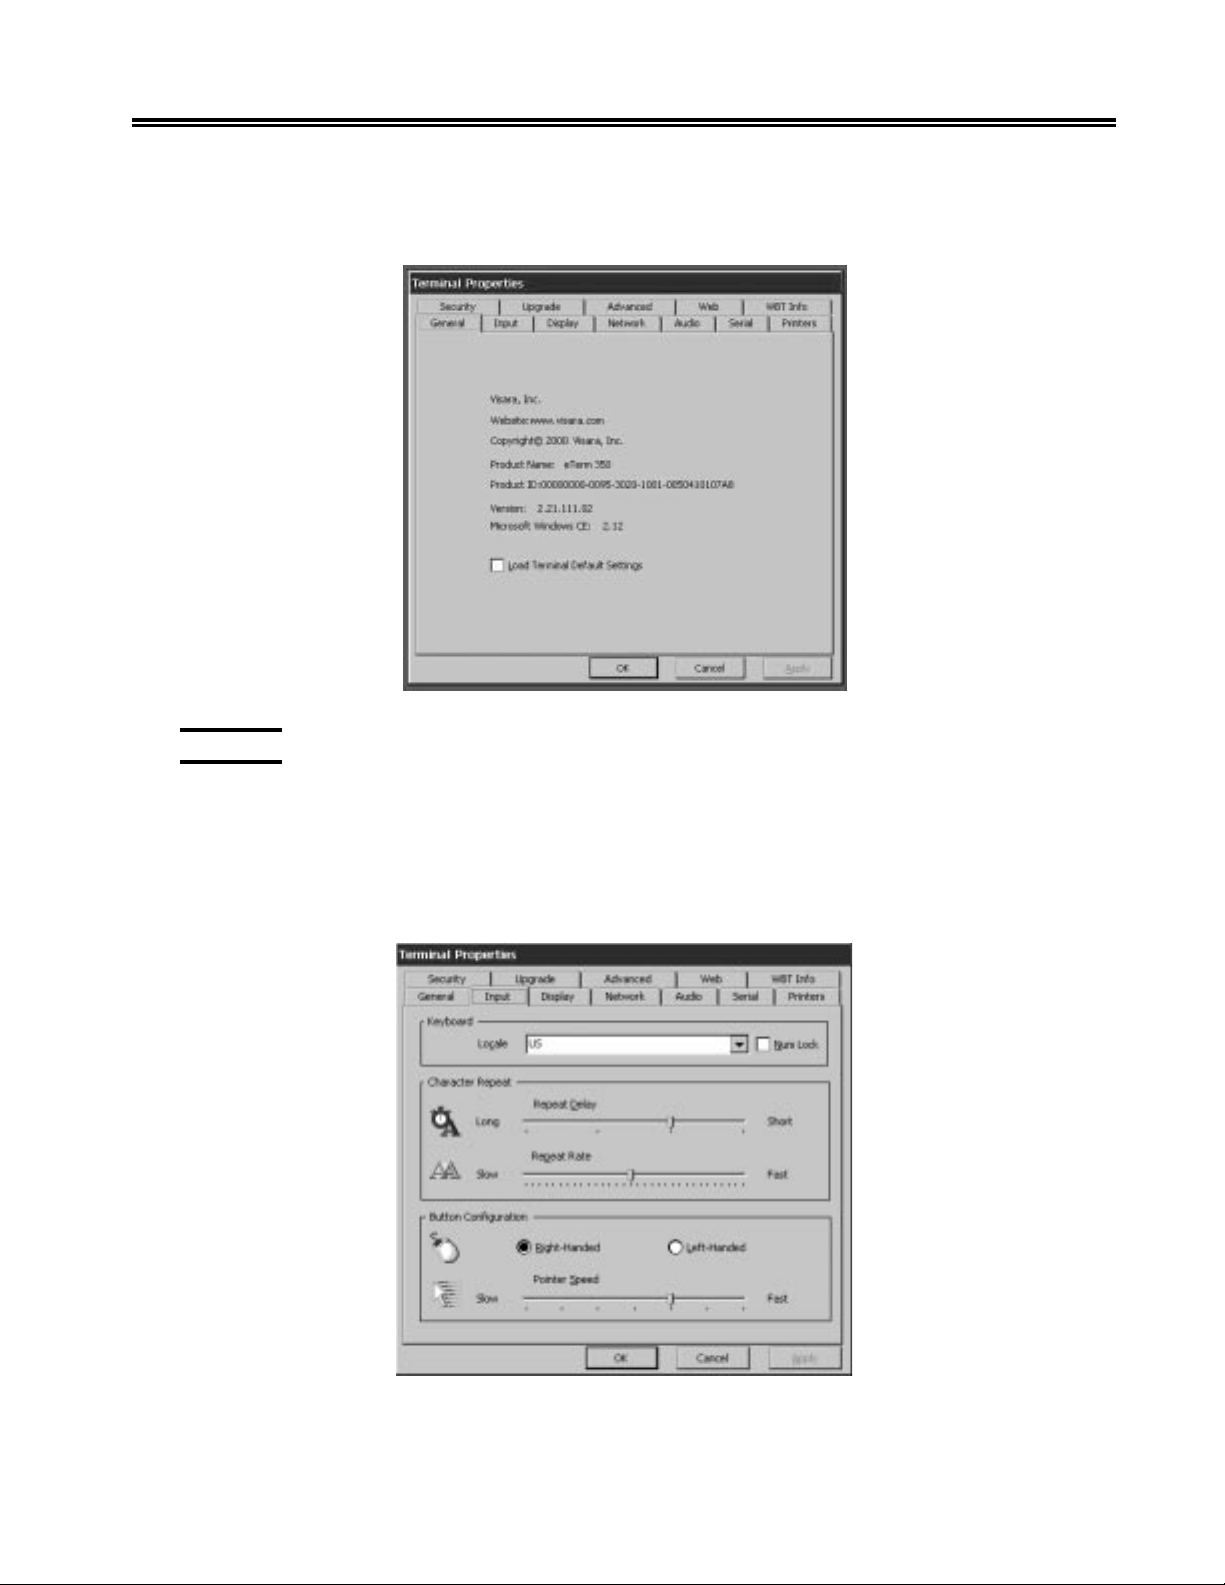
This sheet provides you the general information of the terminal. Click OK or Cancel to
quit the dialog box.
Configuring the Unit via Terminal Properties
When you start your unit the first time, or reset factory defaults, or when the terminal
recovers flash software, the Setup Wizard leads you through the process of setting
essential parameters, including the IP address, name resolution, and display
characteristics.
Properties
After you have performed initial configuration through the Setup Wizard, you can
modify configuration setting through the Terminal Properties property sheet.
Accessing the Terminal Properties Property Sheet
By default, you are able to display the Terminal Properties property sheet by pressing [F2]
when displaying the Terminal Connection Manager screen.
707018-006 4-1
Page 44

eTerm 350 Windows-based Terminal
Through the Terminal Properties property sheet, you can perform the following
configuration tasks:
• Check hardware and software status of the terminal.
• Change the network configuration.
• Reset the terminal to standard factory defaults.
• Change attributes for the keyboard, mouse and display.
• Adjust the audio volume and sounds properties.
• Specify server for software updates.
• Add/configure a local-attached printer.
• Enable/configure security settings for Connection Manager and Terminal Properties.
• Configure Advanced Settings such as DHCP Options, Global ICA Settings and SNMP.
• Configure local browser settings (if applicable).
When you finish viewing or modifying configuration settings in the Terminal Properties
property sheet, do one of the following:
• Click Apply to apply changes you have made without closing the dialog box.
• Click OK to apply the changes and close the dialog Box.
• Click Cancel to close the dialog box without applying any changes.
Resetting Factory Defaults
The unit is provided with factory default configuration values, which can restore if the
unit has been configured to an unrecognizable setting.
Resetting the terminal values on this tab WILL remove the Connection Parameters
on the Terminal Connection Manager screen.
To reset terminal properties values but save the Connection Parameters, use the Load
Terminal Default Settings (Retain Connection Manager sessions) checkbox on the
Advanced tab. To return the configuration of the unit to the default values set at the
factory, complete the following steps:
• Press [F2] to display the Terminal Properties property sheet.
• Select the General tab.
• Check Load Terminal Default Settings at the bottom of the dialog box, then
click OK.
4-2 707018-006
Page 45
Chapter 4. eTerm Terminal Properties
• Answer Ye s to the following dialog box stating that you are required to restart the
unit after the Terminal settings have been reset to default values. When you restart
the Terminal, the Setup Wizard will be automatically started.
Input Tab
To make modifications to the mouse and/or keyboard characteristics execute the
following steps:
• Press [F2] to display the Terminal Properties sheet.
• Select the Input tab.
• Modify the following attributes as desired.
707018-006 4-3
Page 46
eTerm 350 Windows-based Terminal
Keyboard
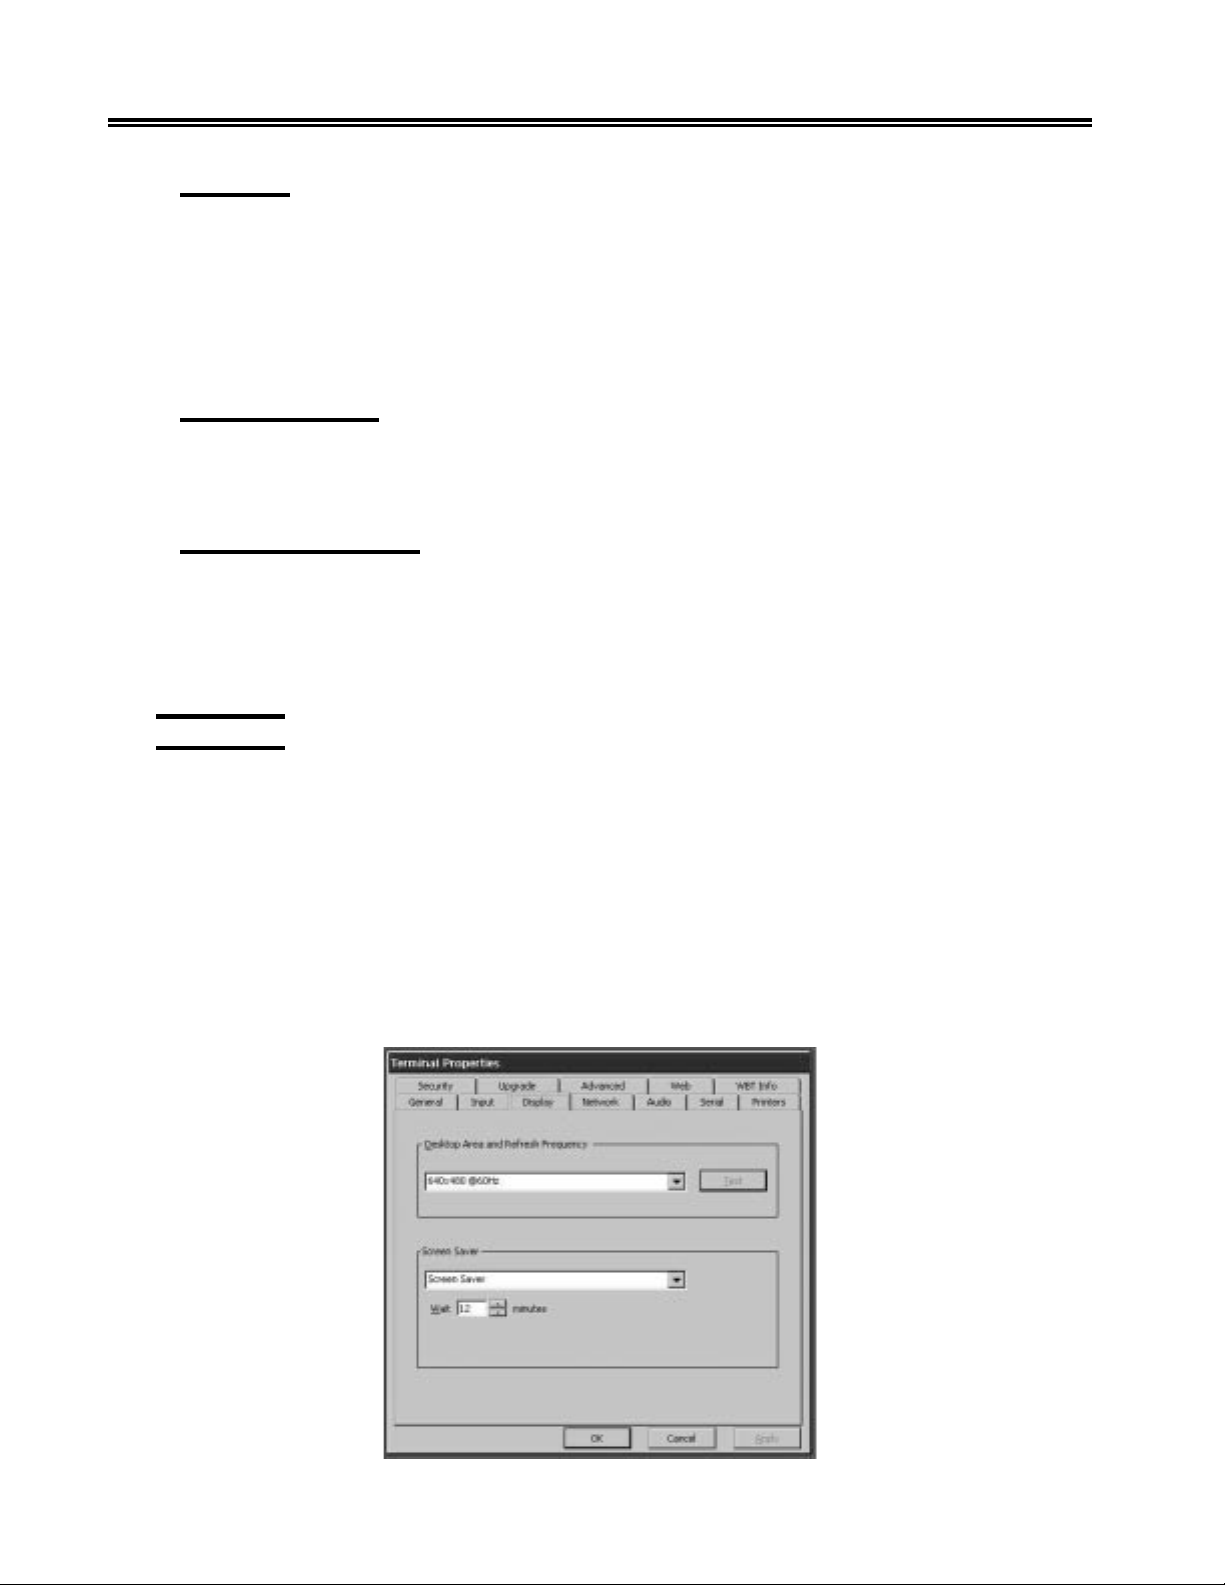
From the Locale list box, select the desired Keyboard type. You will need to restart
the unit.
Use this Locale scroll list to select the desired language of the keyboard. Select Numlock
if it is desired to have the Numpad be set for entering numbers (instead of cursor mode)
after bootup.
Character Repeat
• Use the Repeat delay button to adjust the repeat delay of the keyboard character.
• Use the Repeat rate button to adjust the repeat rate of keyboard character.
Button Configuration
• Select right or left-handed mouse button orientation.
• Adjust mouse pointer speed.
Click OK to save your changes or Cancel without saving to quit the dialog box.
Display Tab
To boot in “Safe Boot Mode” at 640 x 480 Hz, power on the terminal and press [F5]
when you see the loading bar on the start-up screen. It may be necessary to turn the unit
off and then back on again. The monitor may support higher resolutions and frequencies
than the default. If the unit restarts the Setup Wizard, it will give you the opportunity
to try different monitor settings. Otherwise, to try alternate monitor settings, complete
the following steps:
• Press [F2] to display the Terminal Properties property sheet.
• Select the Display tab.
Modify the following attributes as desired.
4-4 707018-006
Page 47
Chapter 4. eTerm Terminal Properties
Desktop Area and Refresh Frequency
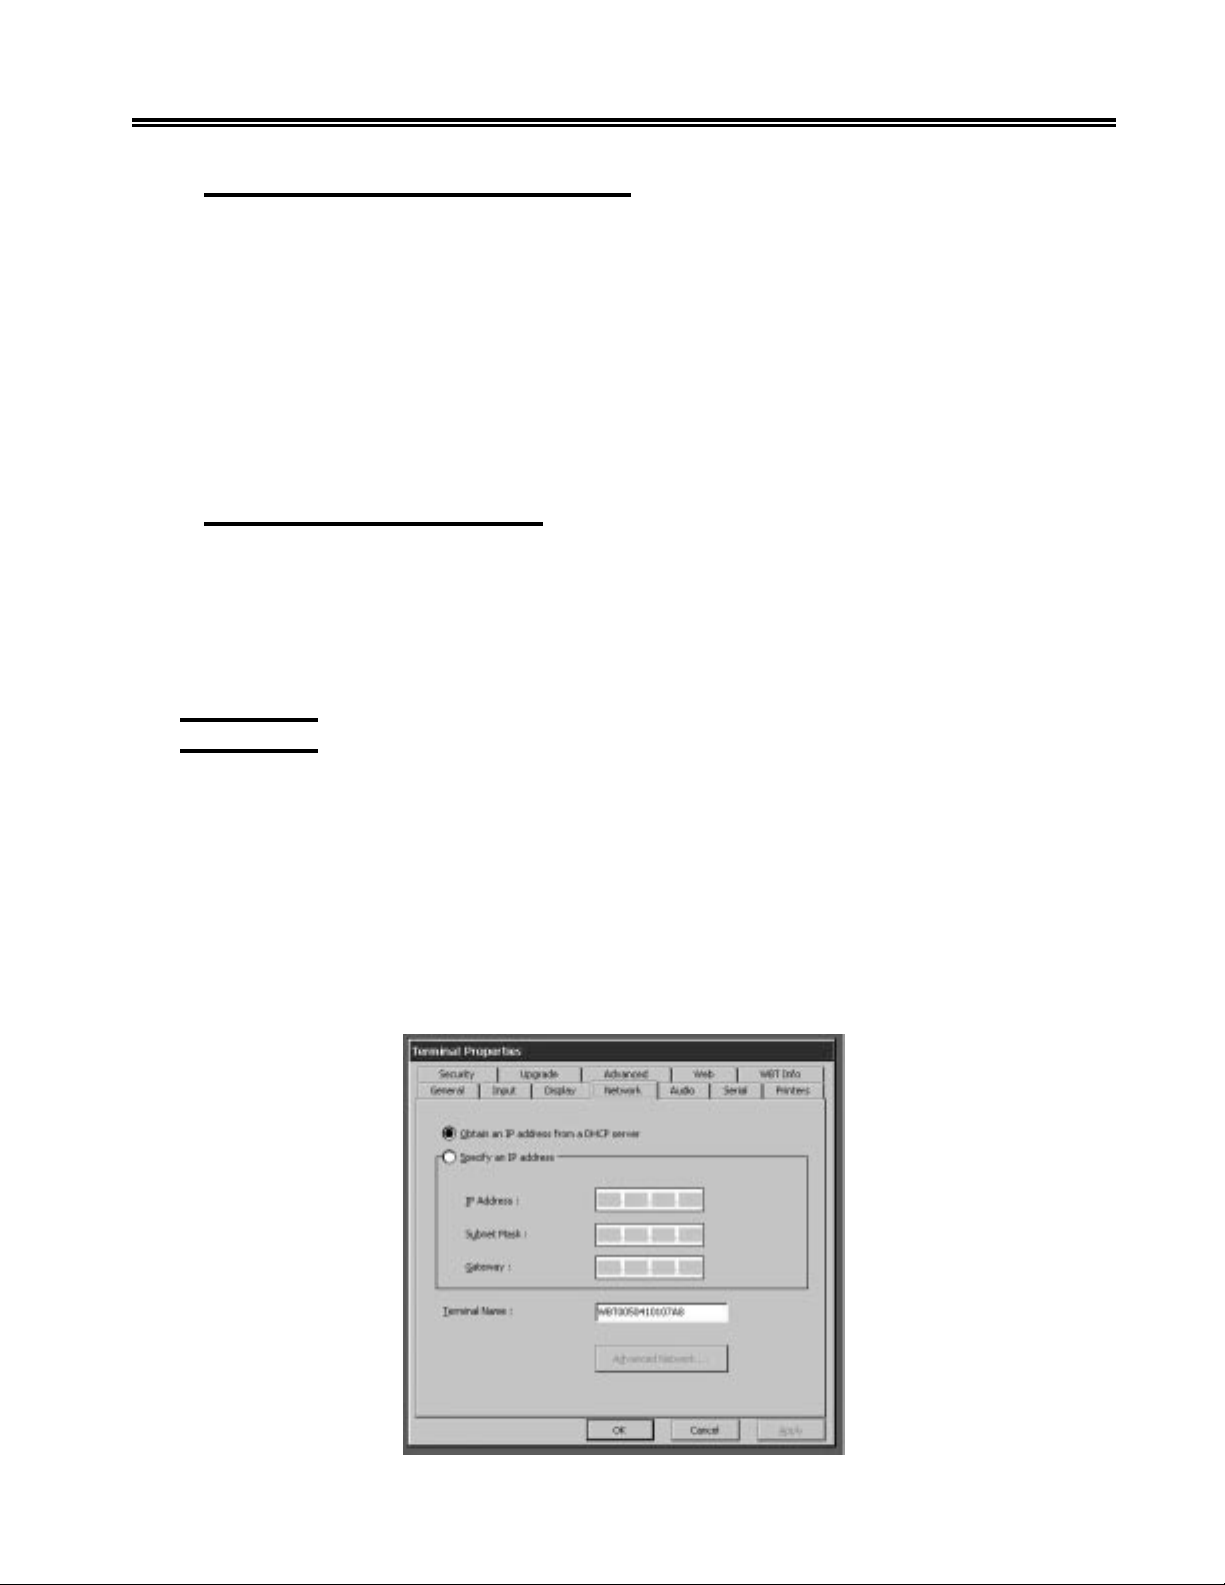
• Select the resolution and frequency of your monitor. 640x480 @60 Hz is the default.
If the screen is unreadable when you turn on the unit, the monitor settings are incorrect.
• If you changed the Desktop Area and Refresh Frequency setting, click Test. A
distorted partially visible test grid indicates that your monitor does not support that
resolution or frequency setting. Click No on the following dialog box, and then try a
different setting. When the grid is acceptable, click Ye s on the following dialog box.
Note: When you experience the problem that the monitor’s resolution is different
from the terminal’s, please reboot the unit while depressing the [F5] key to
reset the unit to 640 x 480 resolution.
Screen Saver/Wait –x Minutes
• Click on the Screen Saver pulldown field to disable/enable screen saver or turn
off video.
• Click Wait minutes to adjust the waiting time before screen saver starts.
• Enter the number of minutes the terminal is idle before the screen saver is activated.
• Click OK to save your changes or Cancel without saving to quit the dialog box.
Network Tab
Every unit needs a valid IP address to identify itself to the network. This unit supports
dynamic IP assignment through DHCP, or manual assignment of static IP address. If
the terminal is not using DHCP, but you want it to, complete the following steps:
Enabling DHCP to Assign IP Address
• Press [F2] to display the Terminal Properties sheet.
• Select the Network tab.
• Select Obtain an IP address from a DHCP server.
• Click OK.
707018-006 4-5
Page 48
eTerm 350 Windows-based Terminal
Manually Assigning a Static IP Address
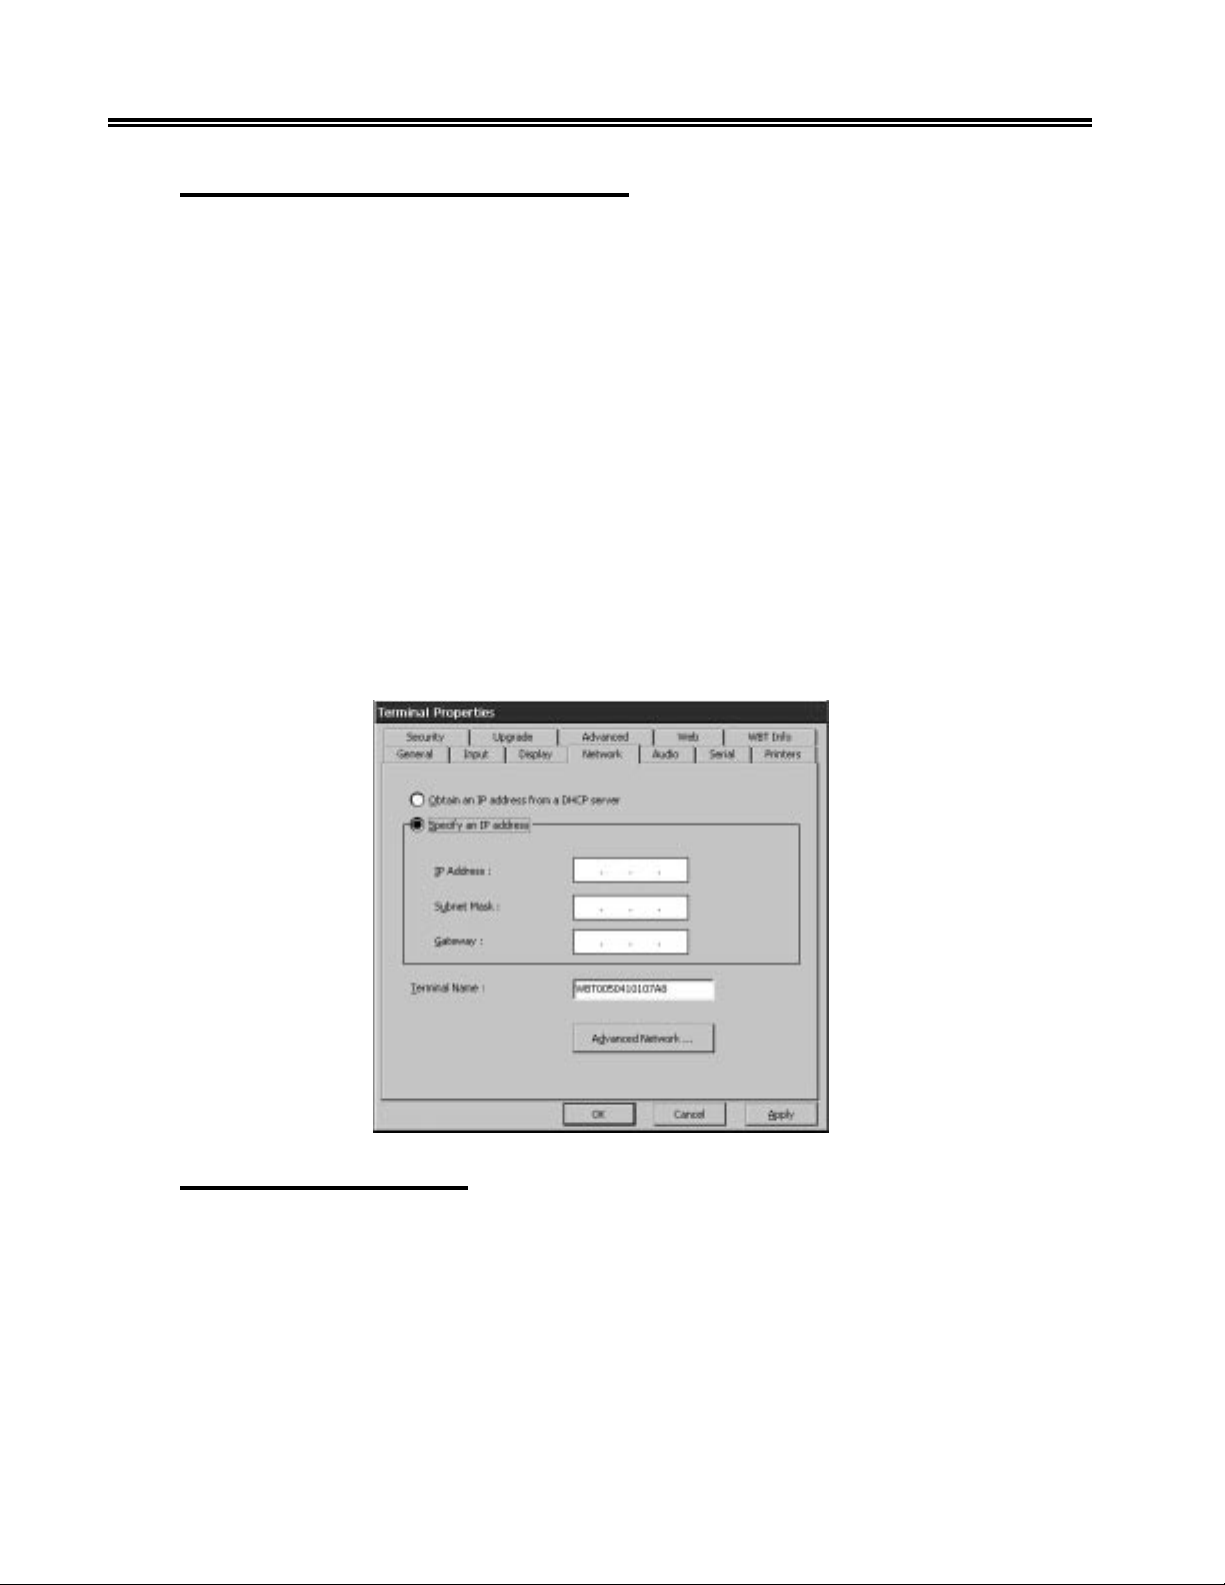
• Press [F2] to display the Terminal Properties property sheet.
• Select the Network tab.
• Select Specify an IP address.
If the method you selected on the prior screen was to enter a static IP Address, the
screen below will appear. You will be required to enter the following information onto
the screen. You may find it helpful to acquire this information from your system
administrator. Supply the following network information.
• IP address:
Required for identifying this unit to the network. The format will follow the standard
addressing format.
• Subnet Mask:
Required for designating which network the IP Address is a part of.
• Gateway:
Optional address that identifies the machine through which a subnet communicates
with another network
• Click Apply or OK to save your changes or Cancel without saving to quit the
dialog box.
Configure Terminal Name
This field contains the name that will be used by Windows 2000 Terminal Services
when configuring a local-attached printer. The default is WBT followed by the MAC
address. Example: WBT00009901DABC
4-6 707018-006
Page 49
Reconfiguring Name Resolution
To change whether and how hostnames used in connections are resolved to IP addresses,
complete the following steps.
• Press [F2] to display the Terminal Properties sheet.
• Select the Network Tab.
• Select Specify an IP Address.
• Provide the required IP information (see the Network section).
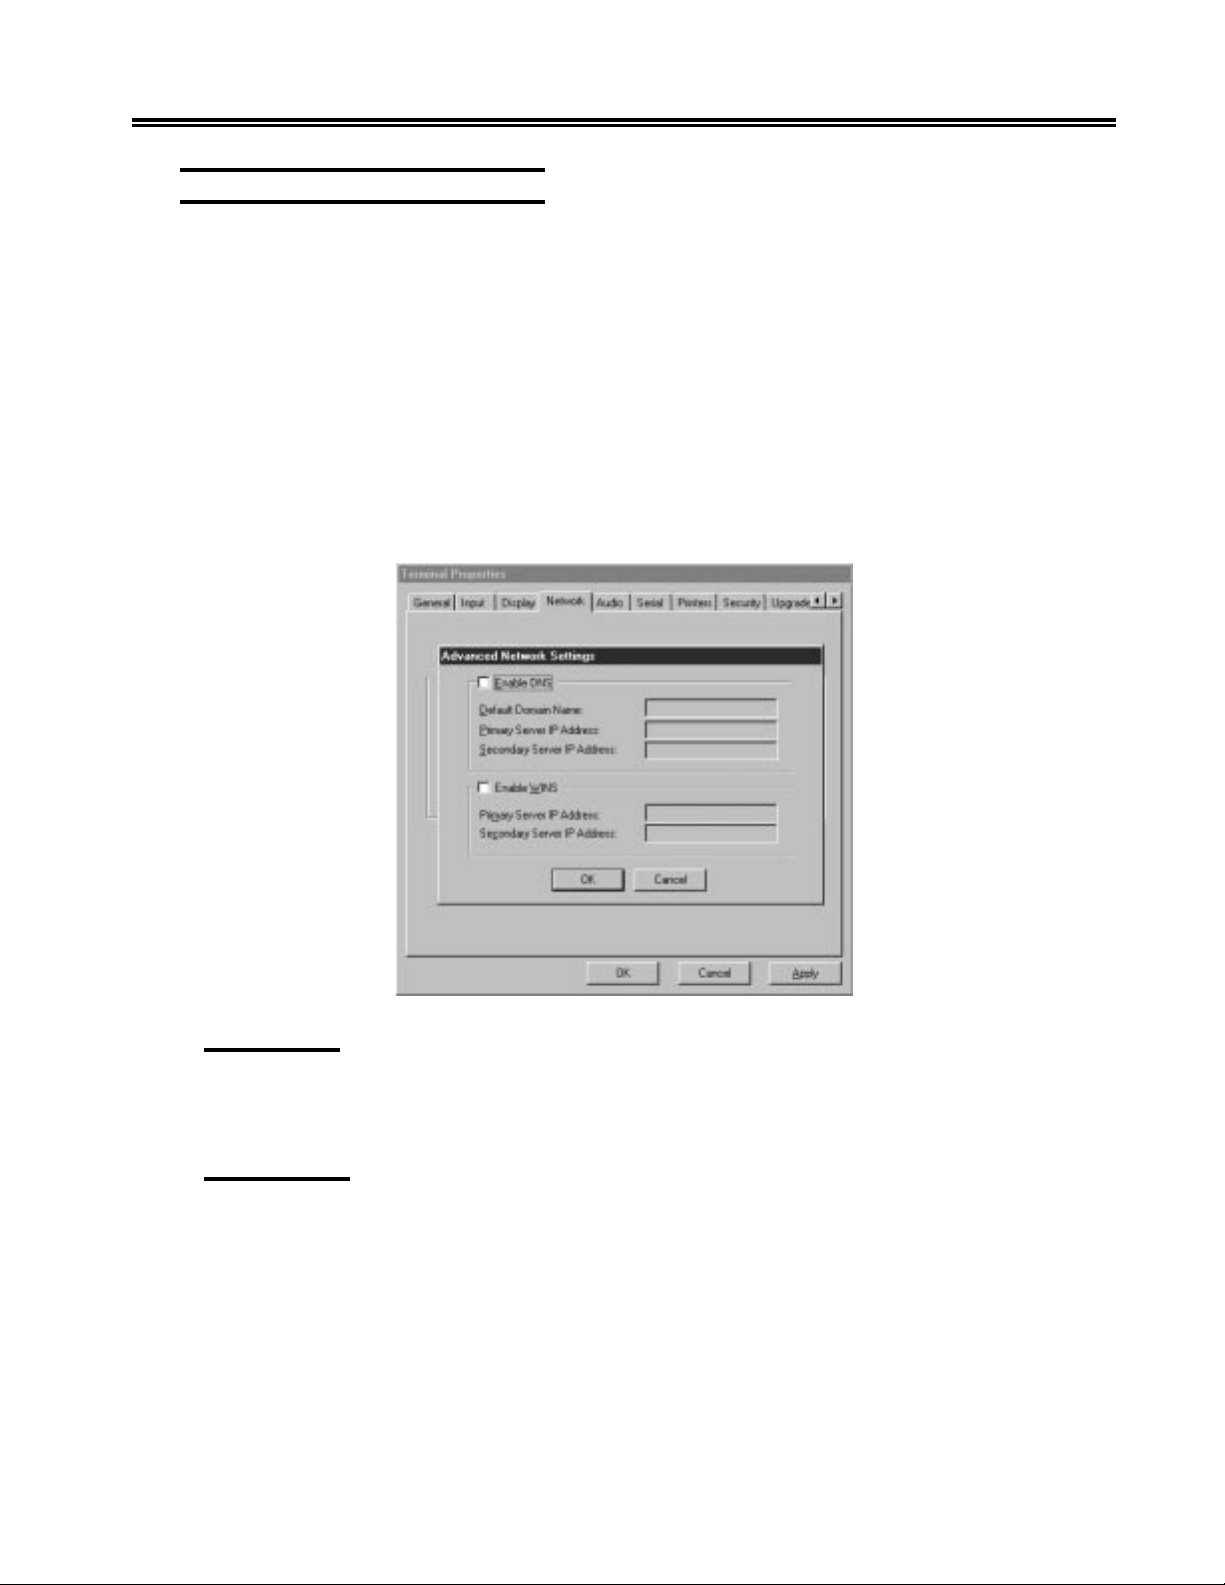
• Click “Advanced Network…” under the Network tab to display the Advanced
Network Setting dialog box.
• Verify the information boxes
If the terminal is using DHCP, values supplied by DHCP are grayed out; you will not be
able to change them. You can change all values that are not supplied by DHCP.
Chapter 4. eTerm Terminal Properties
Enable DNS
To resolve computer names, the unit will use the domain name. DHCP will supply
IP information.
Enable WINS
To resolve computer names, the unit will use Windows Internet Naming Service.
DHCP will supply IP information.
Click OK to save your changes or Cancel without saving to quit the dialog box.
707018-006 4-7
Page 50
eTerm 350 Windows-based Terminal
Audio Tab
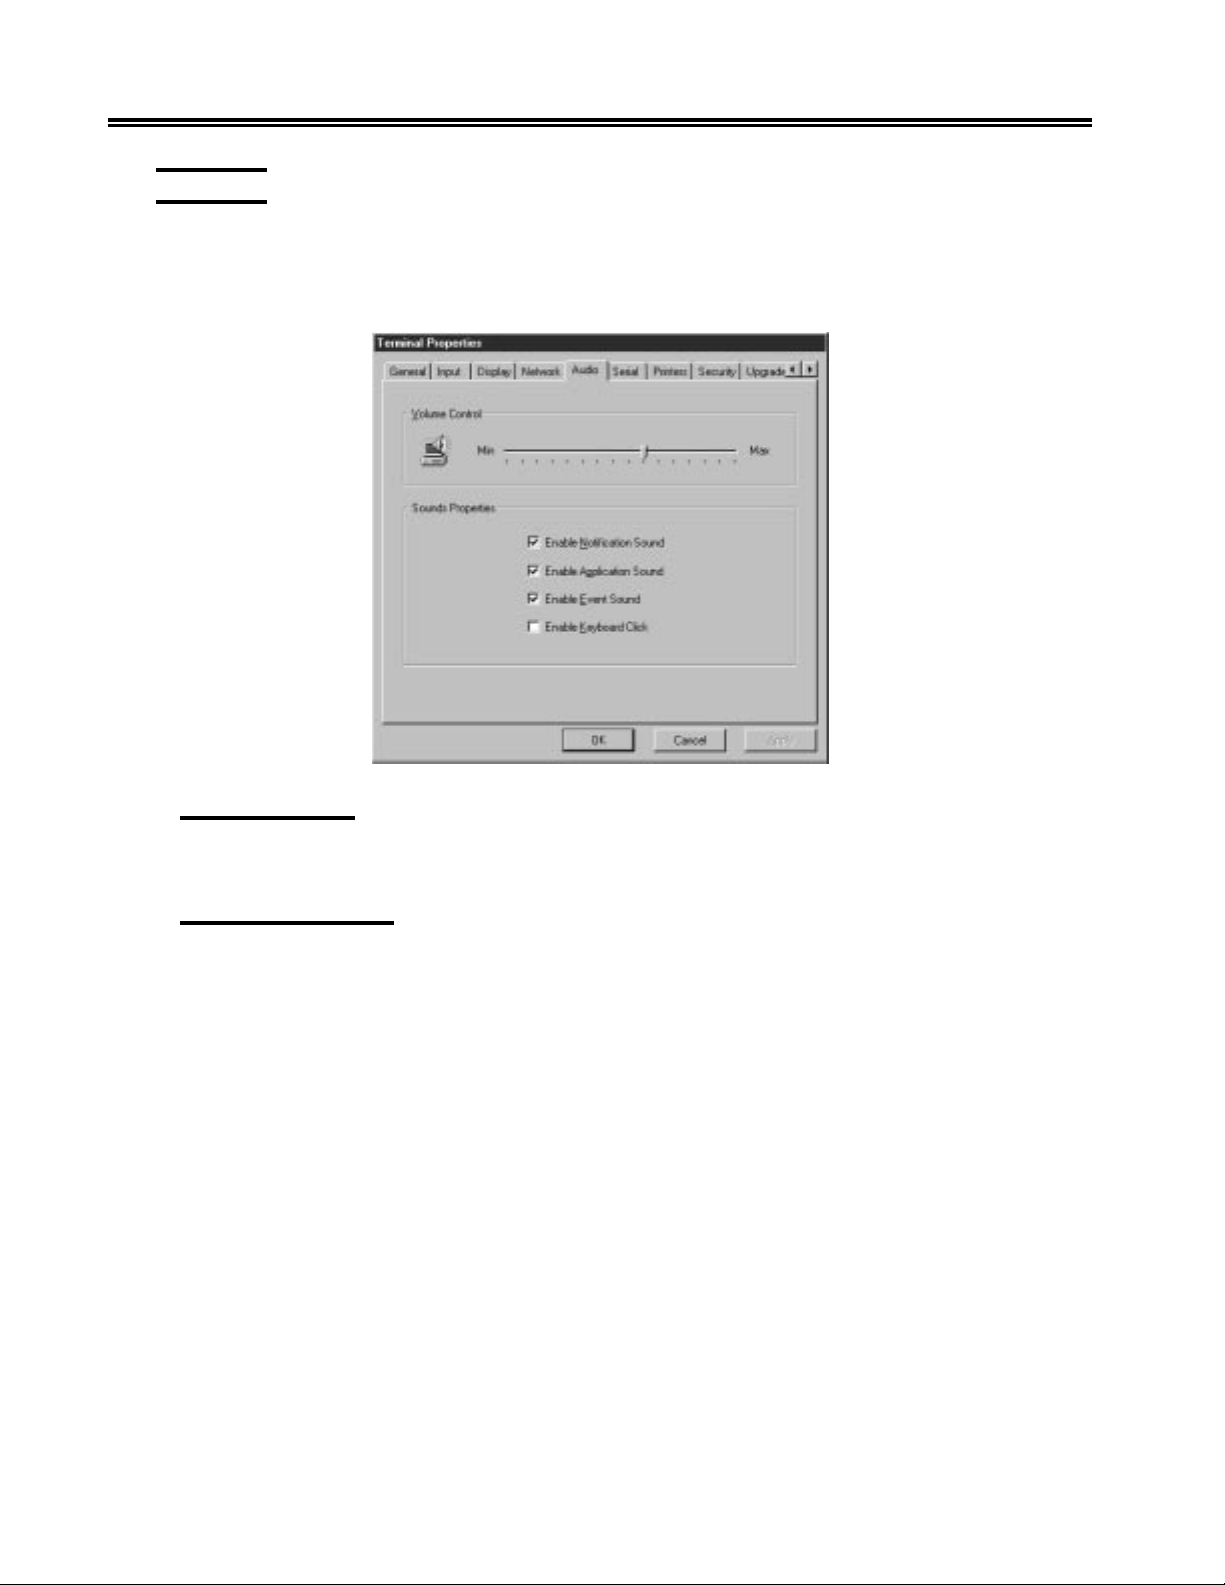
To adjust the volume and sound of the terminal, complete the following steps:
• Press [F2] to display the Terminal Properties.
• Select the Audio Tab.
Volume Control
Shift the control to adjust the audio volume of the terminal.
Sounds Properties
Choose the sound properties as listed in the above figure to activate a notification,
application, event, or keyboard click sound of the terminal.
Click OK to save your changes or Cancel without saving to quit the dialog box.
4-8 707018-006
Page 51
Serial Tab
Chapter 4. eTerm Terminal Properties
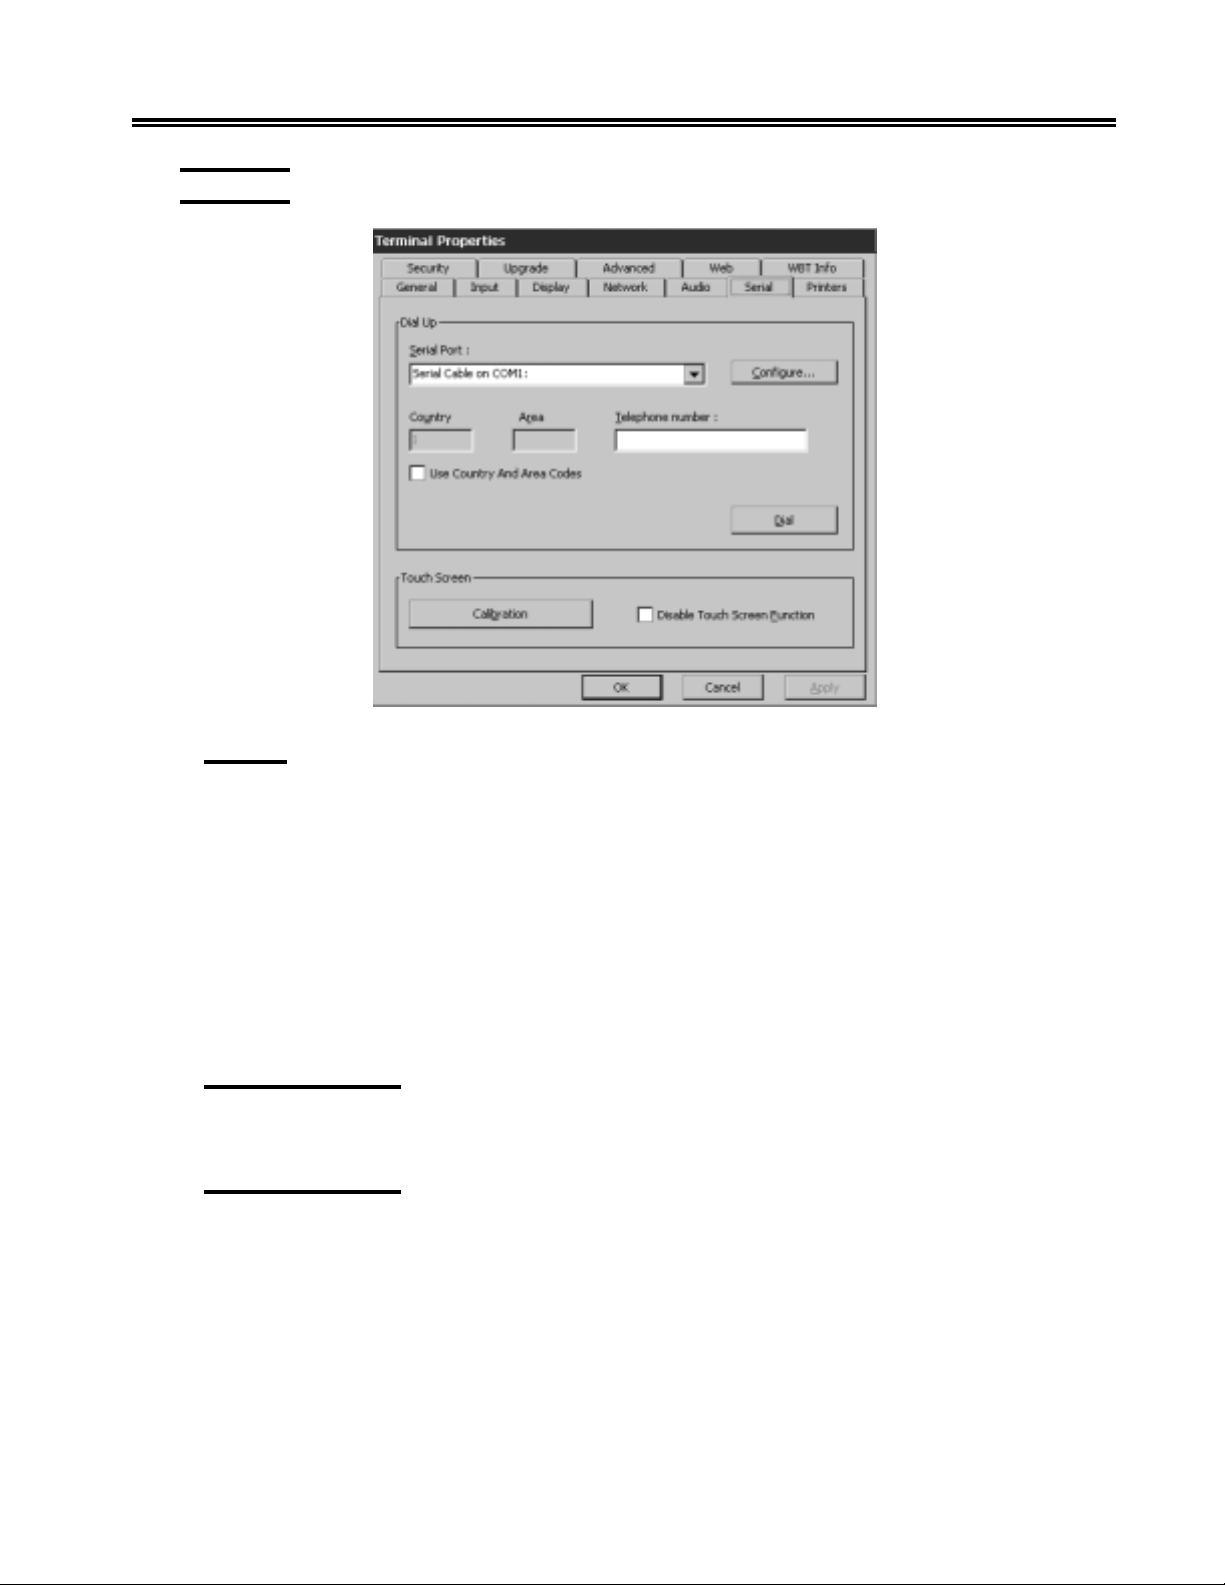
Dial Up
• Serial Port: Choose from the following Connection Types:
• Hayes Compatible on COM1:
• Hayes Compatible on COM2:
• Serial Cable on COM1:
• Serial Cable on COM2:
• Use Country and Area Codes checkbox – Checking this box will enable access to
the Country and Area fields.
• Telephone Number – Enter the telephone number that the modem will use to dial.
• Dial Button – Click the Dial button to initiate a Dial-up Connection.
Configure Button
Allows you to configure the Device Properties
Port Settings Tab
• Manual Dial Checkbox – Select this checkbox to allow the user to enter the dial
string manually.
• Terminals
• Use Terminal Window Before Dialing Checkbox – Select this checkbox to launch
an interactive terminal window prior to dialing the desired number.
• User Terminal Window After Dialing Checkbox – Select this checkbox to launch
an interactive terminal window after dialing the desired number.
707018-006 4-9
Page 52
eTerm 350 Windows-based Terminal
• Connections Preferences
• Baud Rate – Select the desired baud rate.
• Data Bits – Select the desired Data bits.
• Parity – Select the desired Parity.
• Stop Bits – Select the desired Stop Bits
• Flow Control – Select the desired Flow Control.
Call Options Tab
• Call Setup
• Cancel the call if not connected within ___ Seconds – Select this checkbox to
cancel the call if the connection has not be established with the configured amount
of time.
• Wait for dial tone before dialing checkbox – Select this checkbox to ensure that
the modem has recognized a dial tone prior to dialing.
• Wait for credit card tone ___ seconds – Select the desired time in seconds to
wait for a credit card tone.
• Extra Settings (special modem commands may be inserted into the dial string) –
Enter the desire modem commands to be inserted into the dial string.
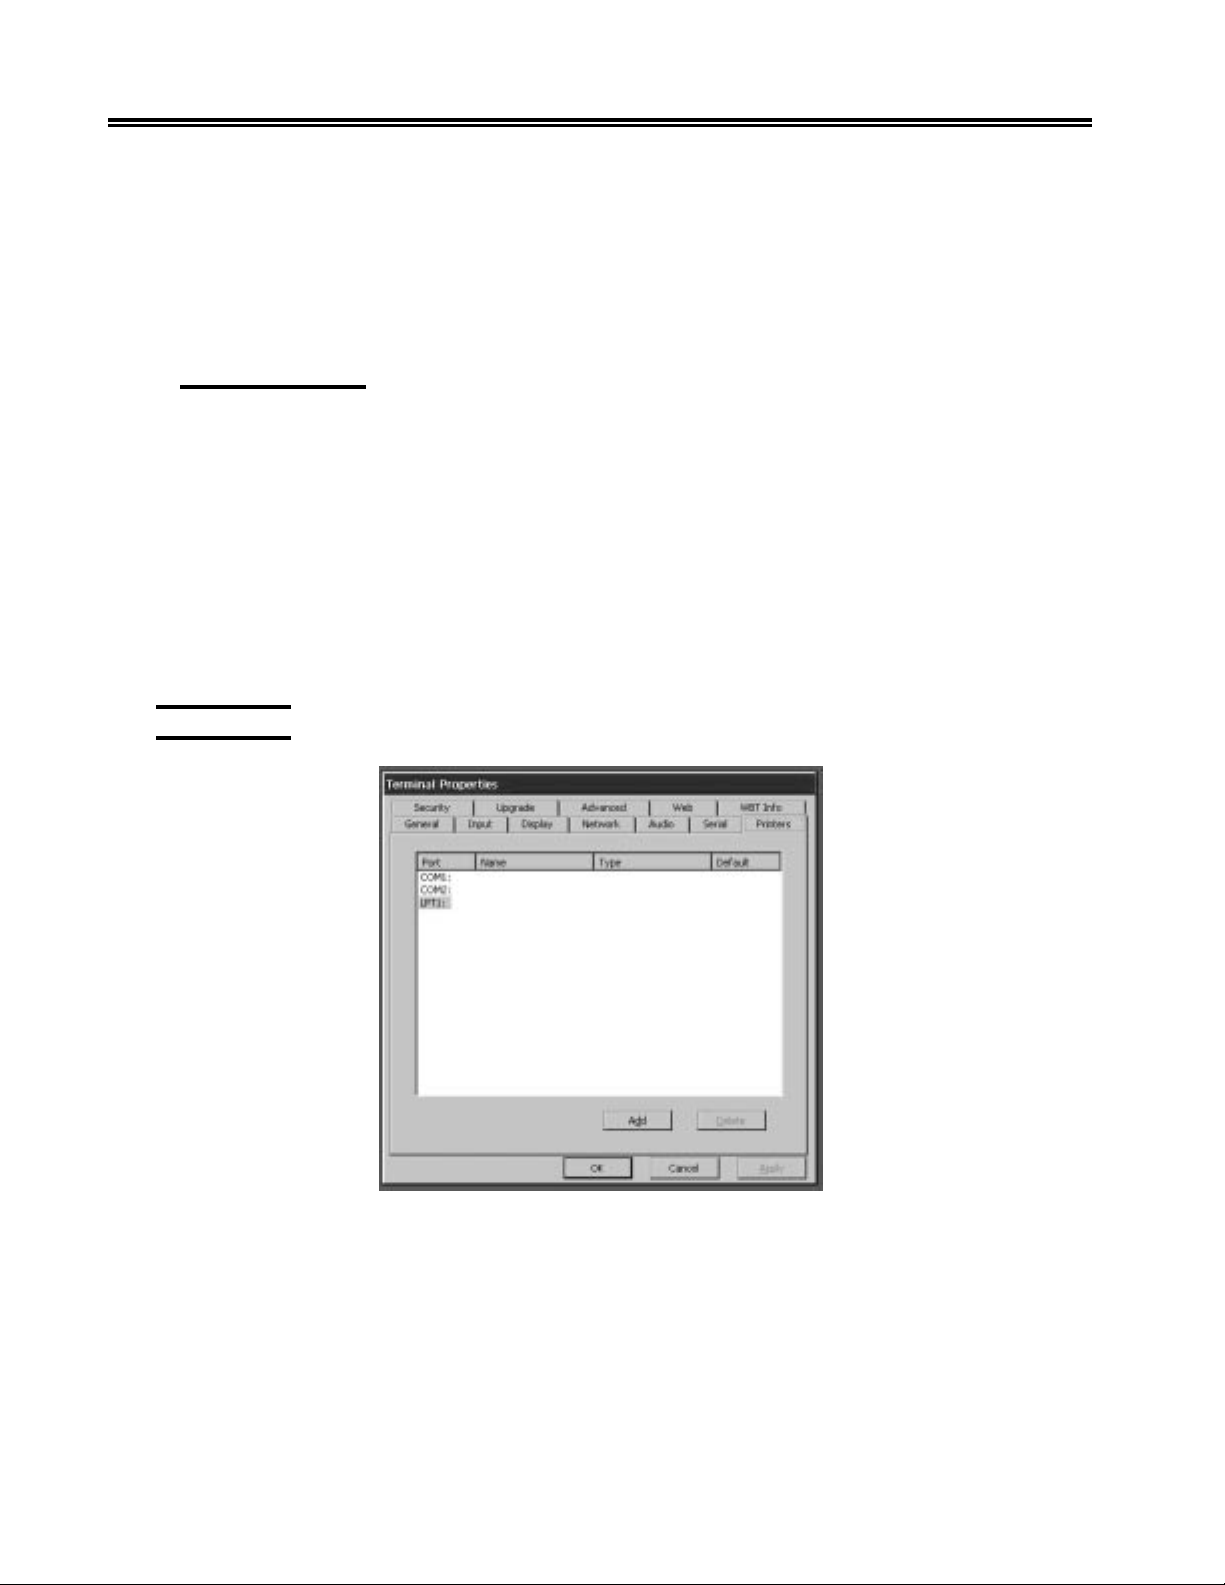
Printers Tab
If connecting to Windows 2000 Terminal Services (with RDP client) and a printer is
attached locally to the eTerm 350, then configure the printer by clicking on the Add
button. Enter a name for the printer and select the Manufacturer and Printer Model. If
the printer is to be used as the default Windows printer, check the “Make this the default
printer” box. After this tab is configured and the user connects and logs into the Windows
2000 server, the configured printer will automatically appear in the Printers folder on
the server.
4-10 707018-006
Page 53
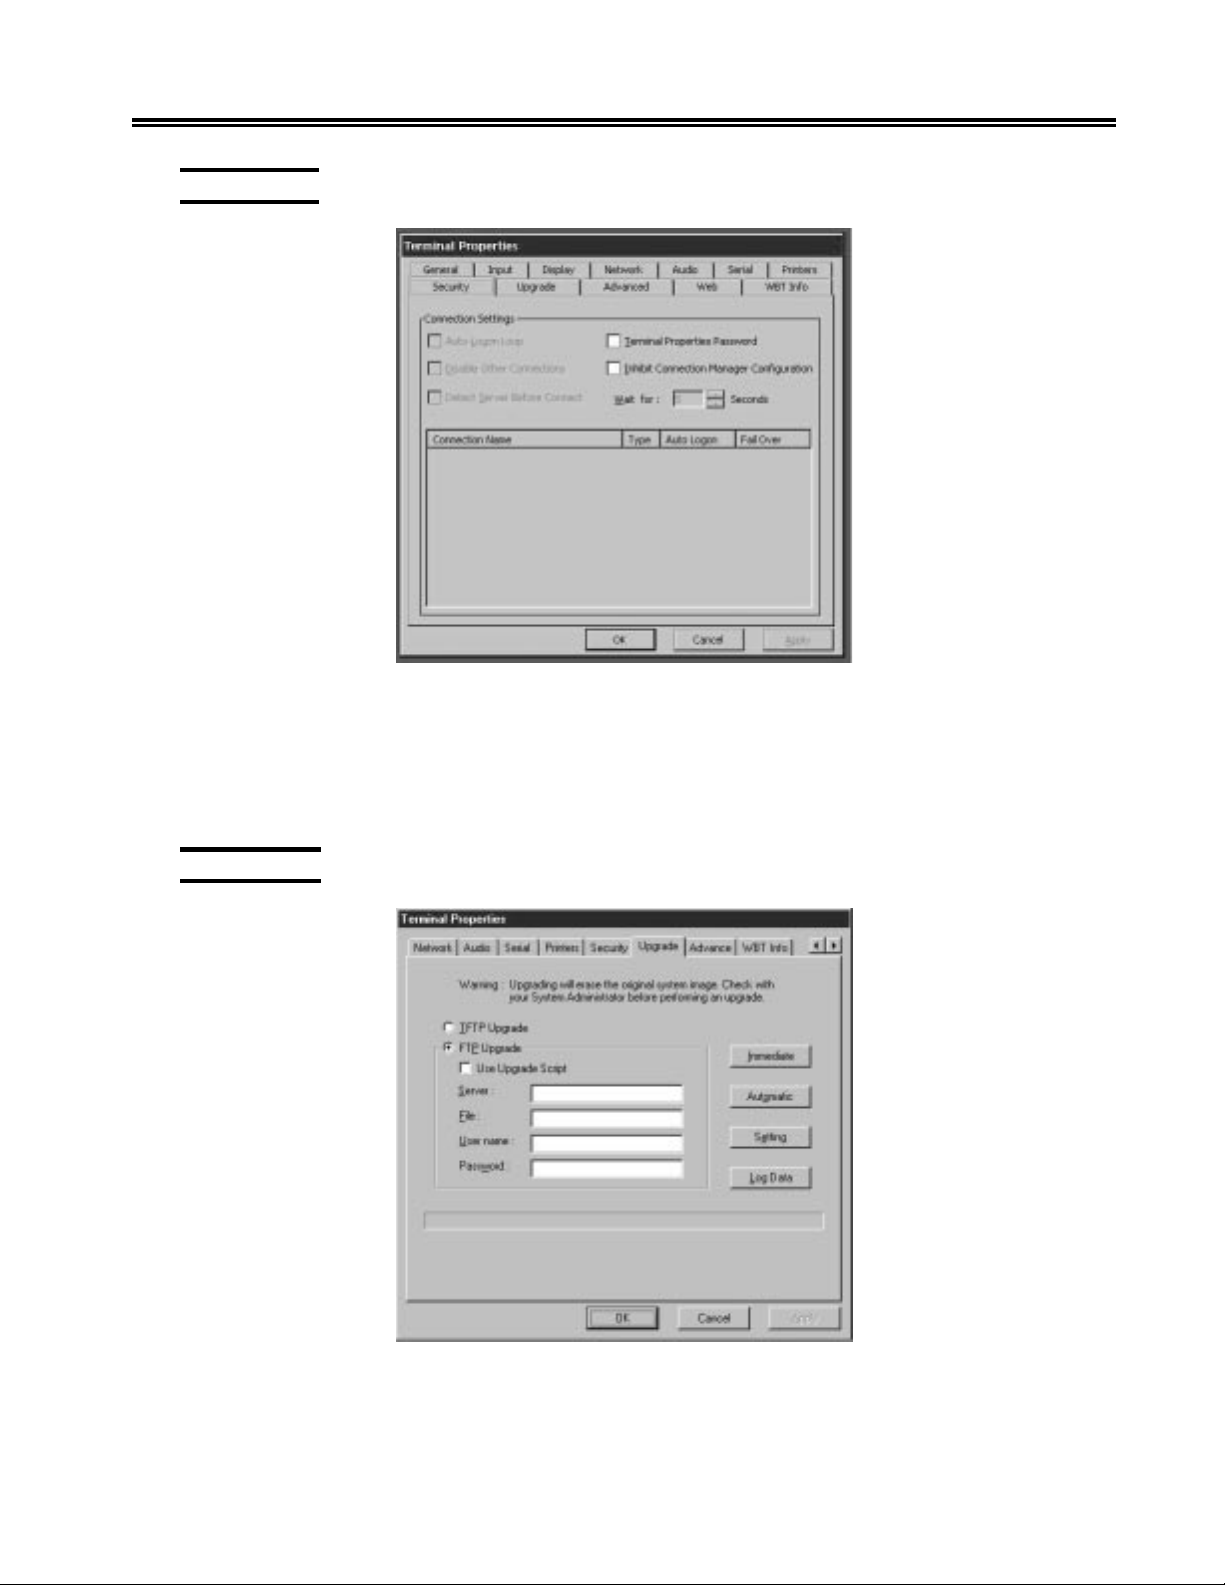
Security Tab
Chapter 4. eTerm Terminal Properties
• Terminal Properties Password Checkbox – Selecting this checkbox will allow
the user to specify a password to gain access to Terminal Properties.
• Inhibit Connection Manager Configuration – Selecting this checkbox will remove
the Configure Tab from the Connections Manager Screen, thus preventing an
unauthorized user access to sensitive configuration parameters.
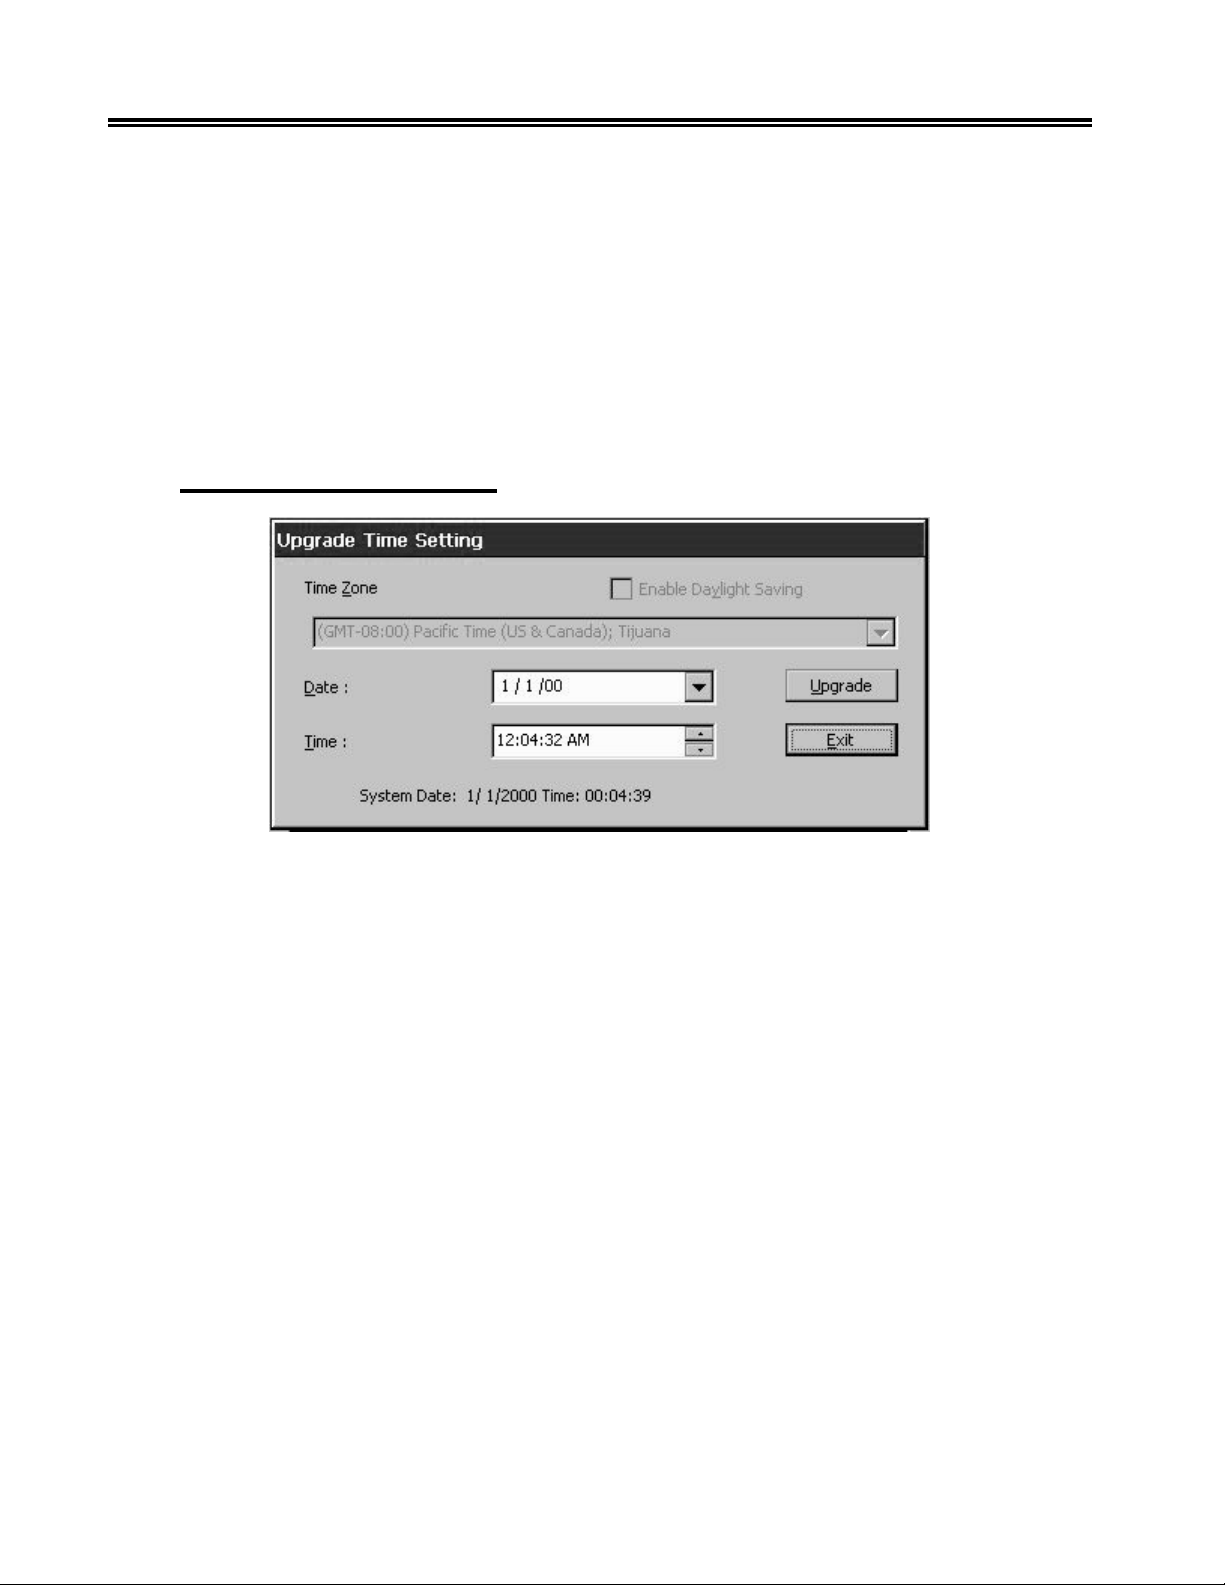
Upgrade Tab
• TFTP Upgrade – For Visara Internal Use Only
• FTP Upgrade – Select this option to specify the desired Upgrade information in the
fields defined below
707018-006 4-11
Page 54
eTerm 350 Windows-based Terminal
• Server – Enter the FTP server IP address
• File – Enter the path and filename of the upgrade image file
• User Name – Enter the FTP Server user name
• Password – Enter the FTP Server password for the user name listed above.
• Immediate Button – Select this button to perform the upgrade immediately
• Automatic Button – Select this button to perform the upgrade at a specified time.
See the Settings Button description below to define a specified time.
• Setting Button – Select the Setting button to specify a specific time for the upgrade
to occur.
• Log Data – Displays information detailing the last three (3) upgrades that occurred.
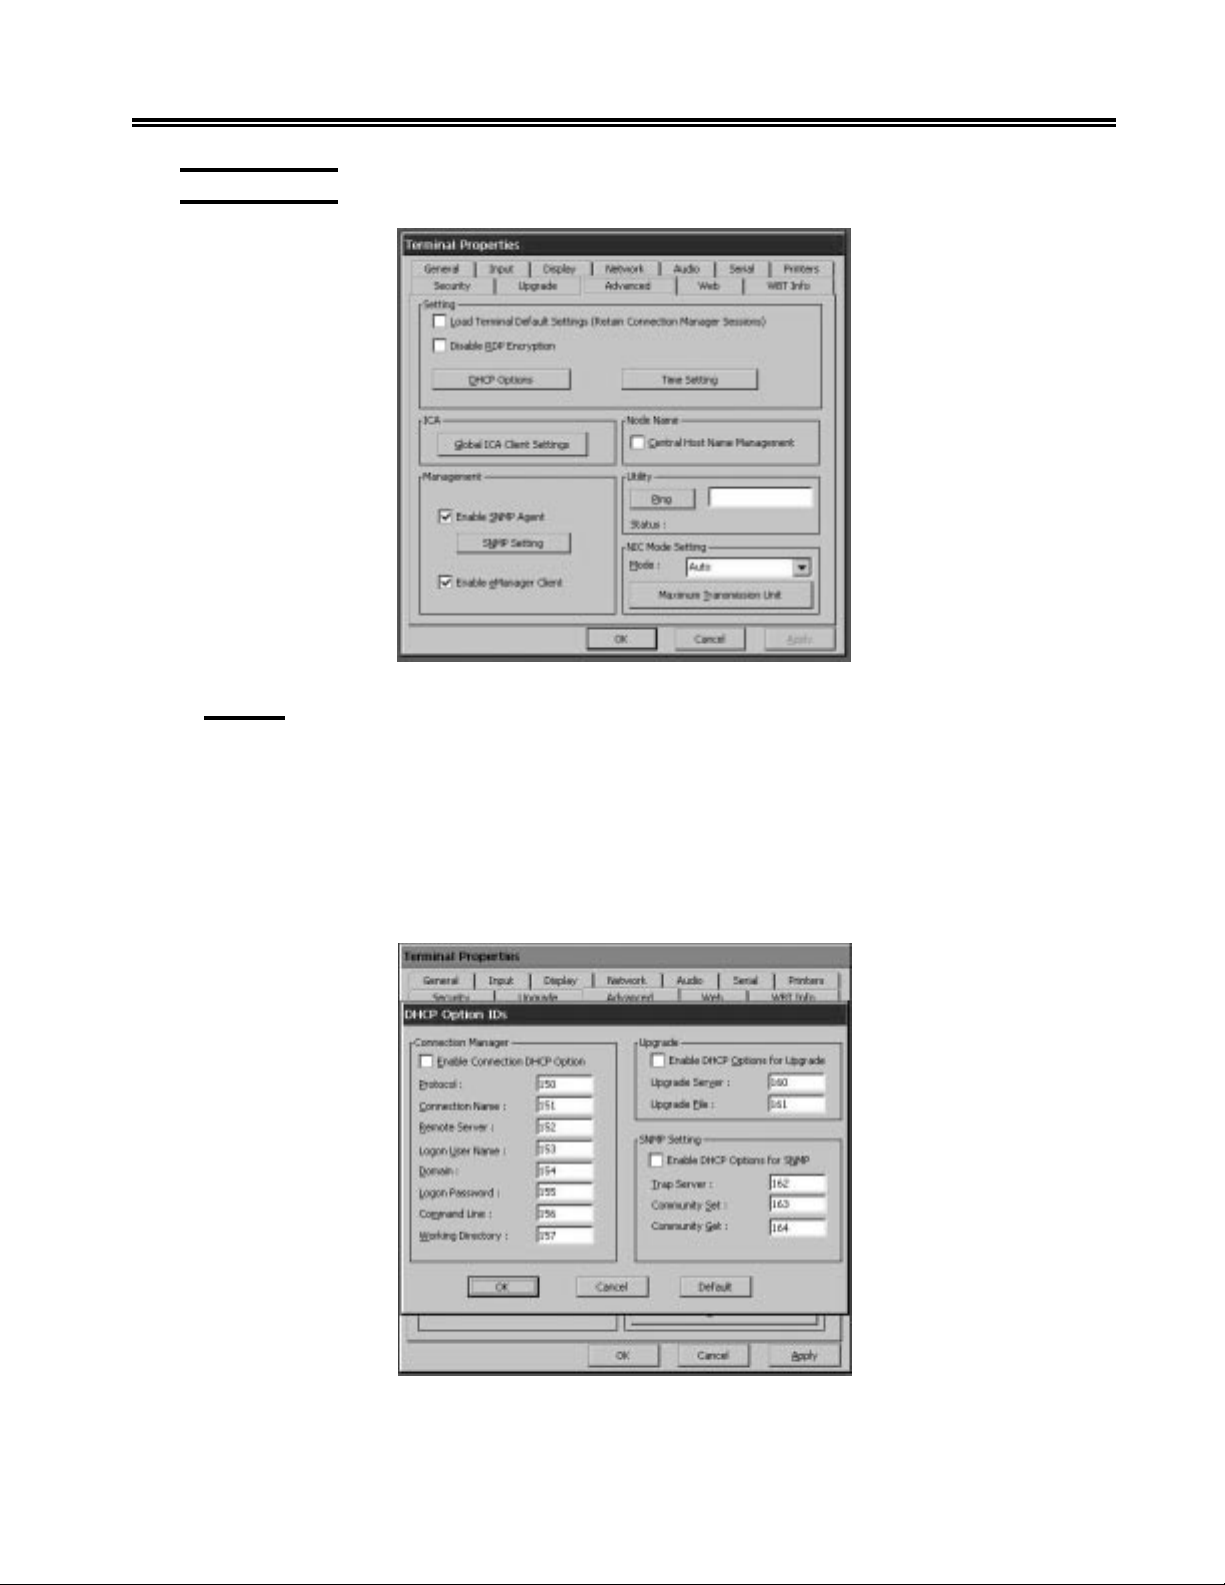
Upgrade/Local Time Setting
• Date
• Mon – Select the desired Month for the upgrade to occur
• Day – Select the desired Day for the upgrade to occur
• Time
• Hour – Select the desired Hour for the upgrade to occur
• Min – Select the desired Minute for the upgrade to occur.
• Upgrade Button – Select the Upgrade Button to schedule the Upgrade to perform
at the time specified above.
• Local Button – Selecting this button after adjusting the Date and Time will change
the time within the BIOS. Note that since the eTerm does not have a battery backup
for the clock, removing power to the eTerm will reset the time to January 1, 1999
and the user will need to adjust the time once power is restored to the unit.
• Exit Button – Exits the Upgrade/Local Time Settings Window
Click OK to save your changes or Cancel without saving to quit the dialog box.
4-12 707018-006
Page 55
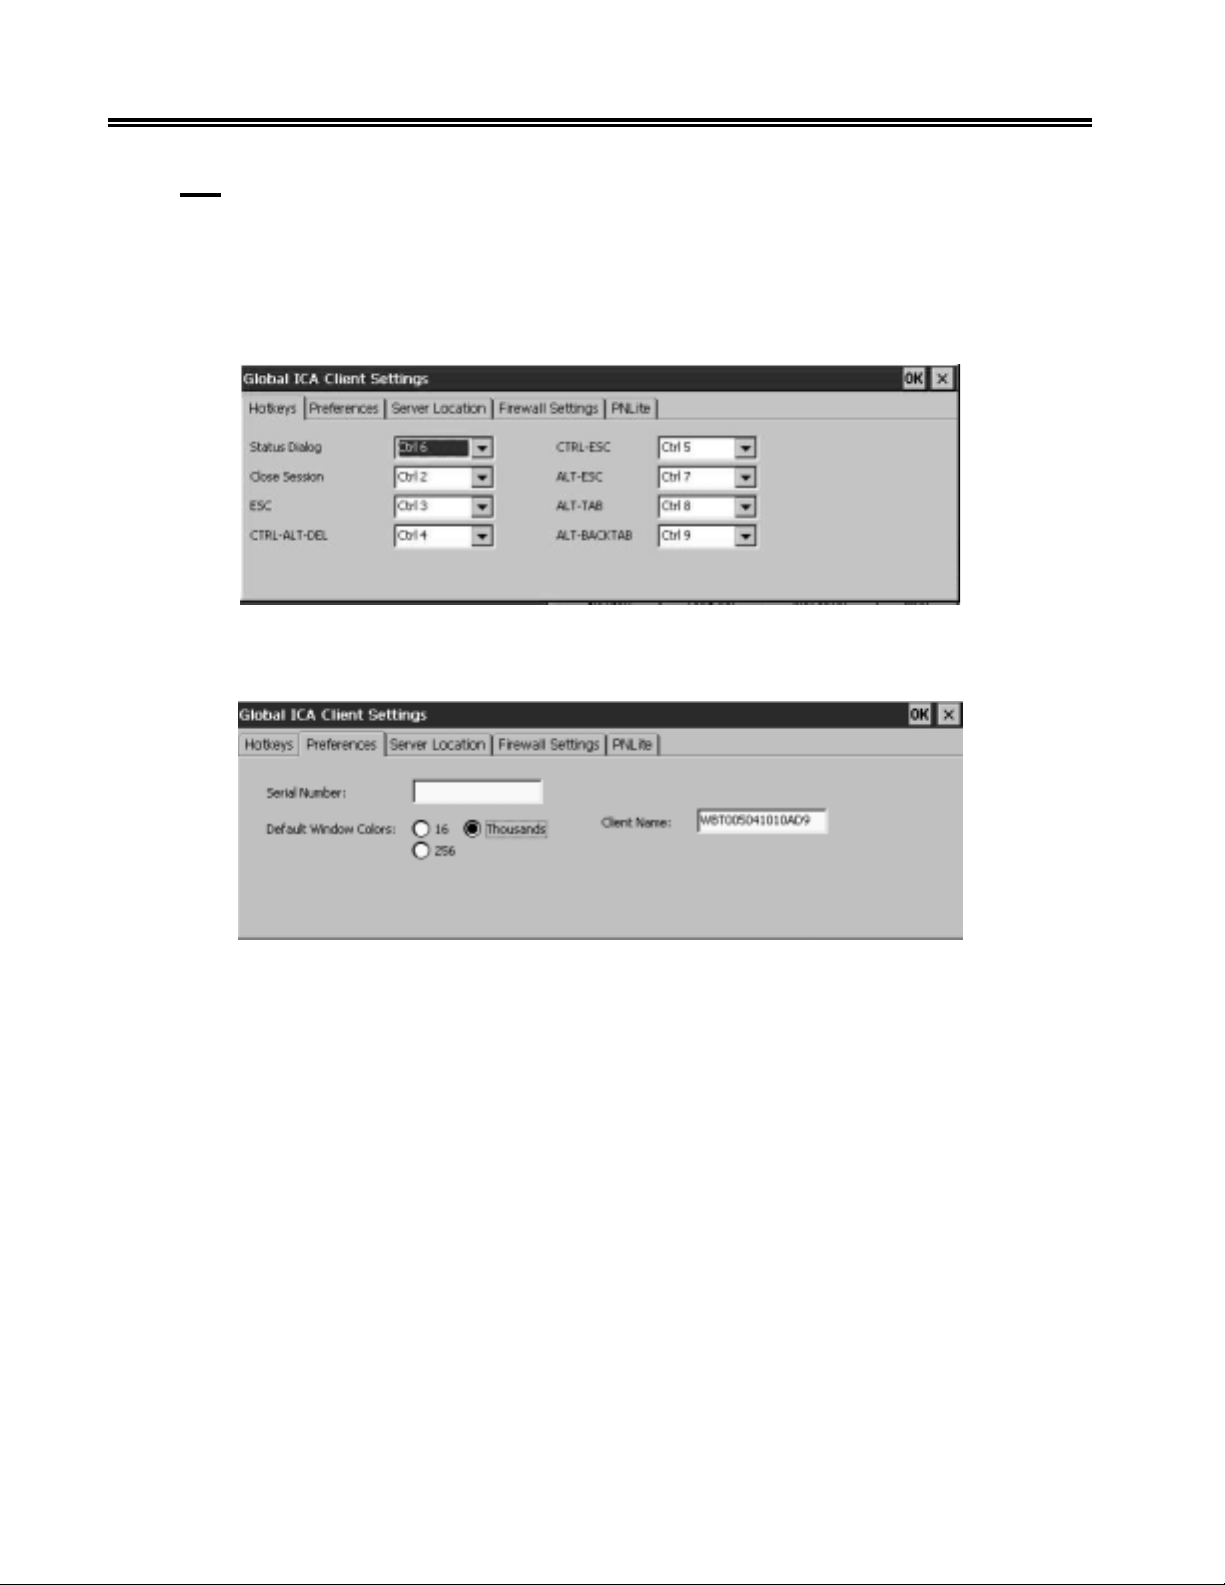
Advanced Tab
Chapter 4. eTerm Terminal Properties
Setting
• Load Terminal Default Settings (Retain Connection Manager Sessions) –
Selecting this checkbox will reset the eTerm to factory default settings, but will
retain all configured Connection Manager Sessions.
• Disable RDP Encryption – Only used when connecting to a Windows Terminal
Server configured for the French Language.
• DHCP Options – Allows the user to configure DHCP Option ID’s. Consult your
System Administrator before modifying any of these selections.
• Time Zone – Select the desired Time Zone based on your location.
707018-006 4-13
Page 56
eTerm 350 Windows-based Terminal
ICA
• Global ICA Client Settings Button – Displays the Global ICA Client Settings Window.
The Global ICA Client settings will allow the user to define the default settings
for all remote ICA application entries. Some of these global setting may be
overridden by entering your own values when creating a new ICA connection
within Connection Manager.
• Hotkeys Tab – These keys can be used within ICA sessions to control various ICA
functions. Consult your System Administrator before modifying any of these selections.
• Preferences Tab
• Default Window Colors – Select either 16, 256 or Thousands (65536 colors
only supported with Citrix Metaframe Feature Release 1).
• Serial Number – This is the serial number of the ICA software.
This serial number is used when connecting to certain versions of Winframe
software that requires each ICA client to have a Citrix PC client pack serial number
in order to connect to the server.
• Client Name – Allows the user to change the client name of the eTerm . The
citrix server uses this name to uniquely identify resources associated with a
particular device.
4-14 707018-006
Page 57
Chapter 4. eTerm Terminal Properties
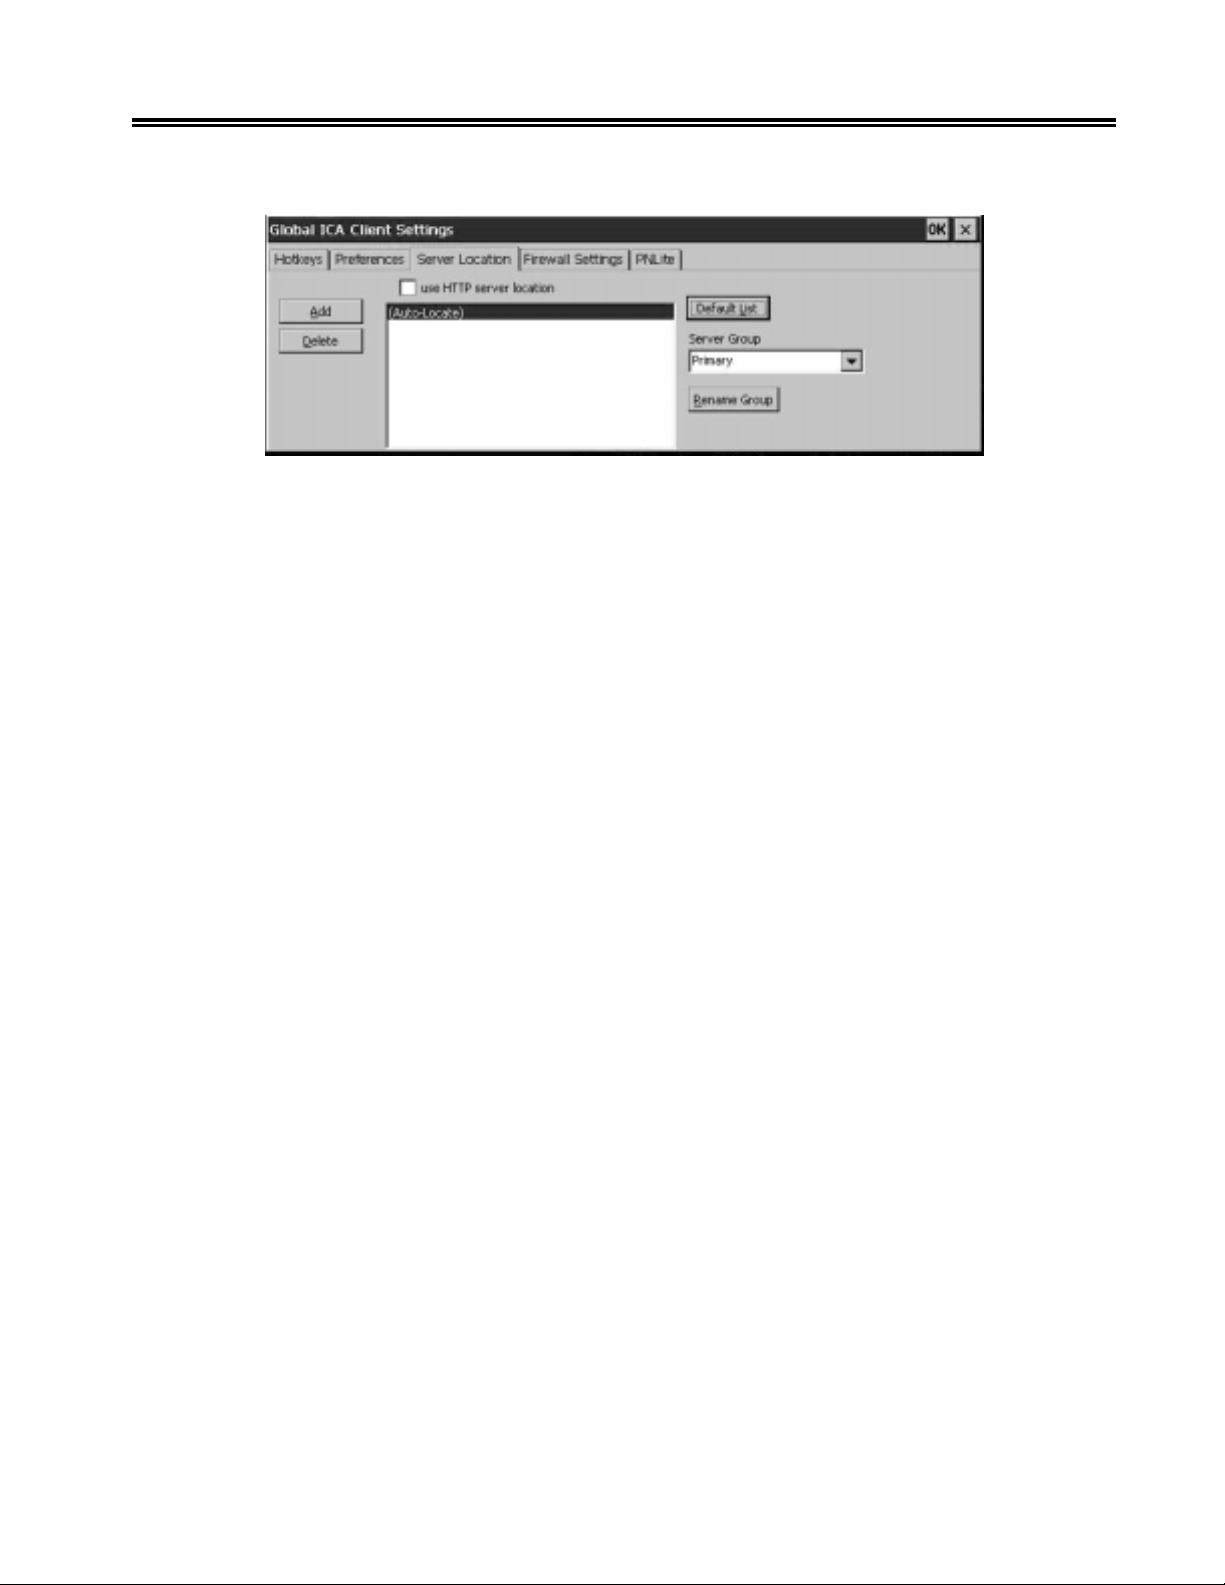
• Server Location Tab
• Server Location – Server location (also called the ICA Browser or server
browsing) provides a method for a user at a network-connected Citrix ICA Client
computer to view a list of all Citrix servers and published applications. Each
network protocol maintains a separate and independent master ICA browser. Set
a specific server address for the Citrix server that functions as the master browser
when your network configuration uses routers or gateways, or to eliminate
broadcasts on your network.
• Server Group – Use the Server Group and Address List fields to create lists of
specific servers that you want to designate as primary and backup servers for
connecting to application sets. Backup server groups provide business recovery
for your client in the event that you cannot contact any servers in your primary
group. You can define up to three groups of Citrix servers to which you want to
connect: a primary and two backups. Each group can contain from one to five
servers. When you specify a server group for your client, the client attempts to
contact all the servers within that group simultaneously (broadcasting) and the
first server to respond is the one to which you connect. Use this field to designate
whether the servers entered in the Address List field belong to your Primary, first
backup (Backup 1), or second backup (Backup 2) group.
• Address List – Use the address list field to view and change the list of Citrix
servers used in the selected server group. If you have not selected any servers,
[Auto-Locate] is selected by default.
Click Add to add a Citrix server to your server group’s address list.
Click Delete to remove the selected Citrix server from the Address List.
Note: If (Auto-Locate) is selected, the first server is located automatically.
707018-006 4-15
Page 58
eTerm 350 Windows-based Terminal
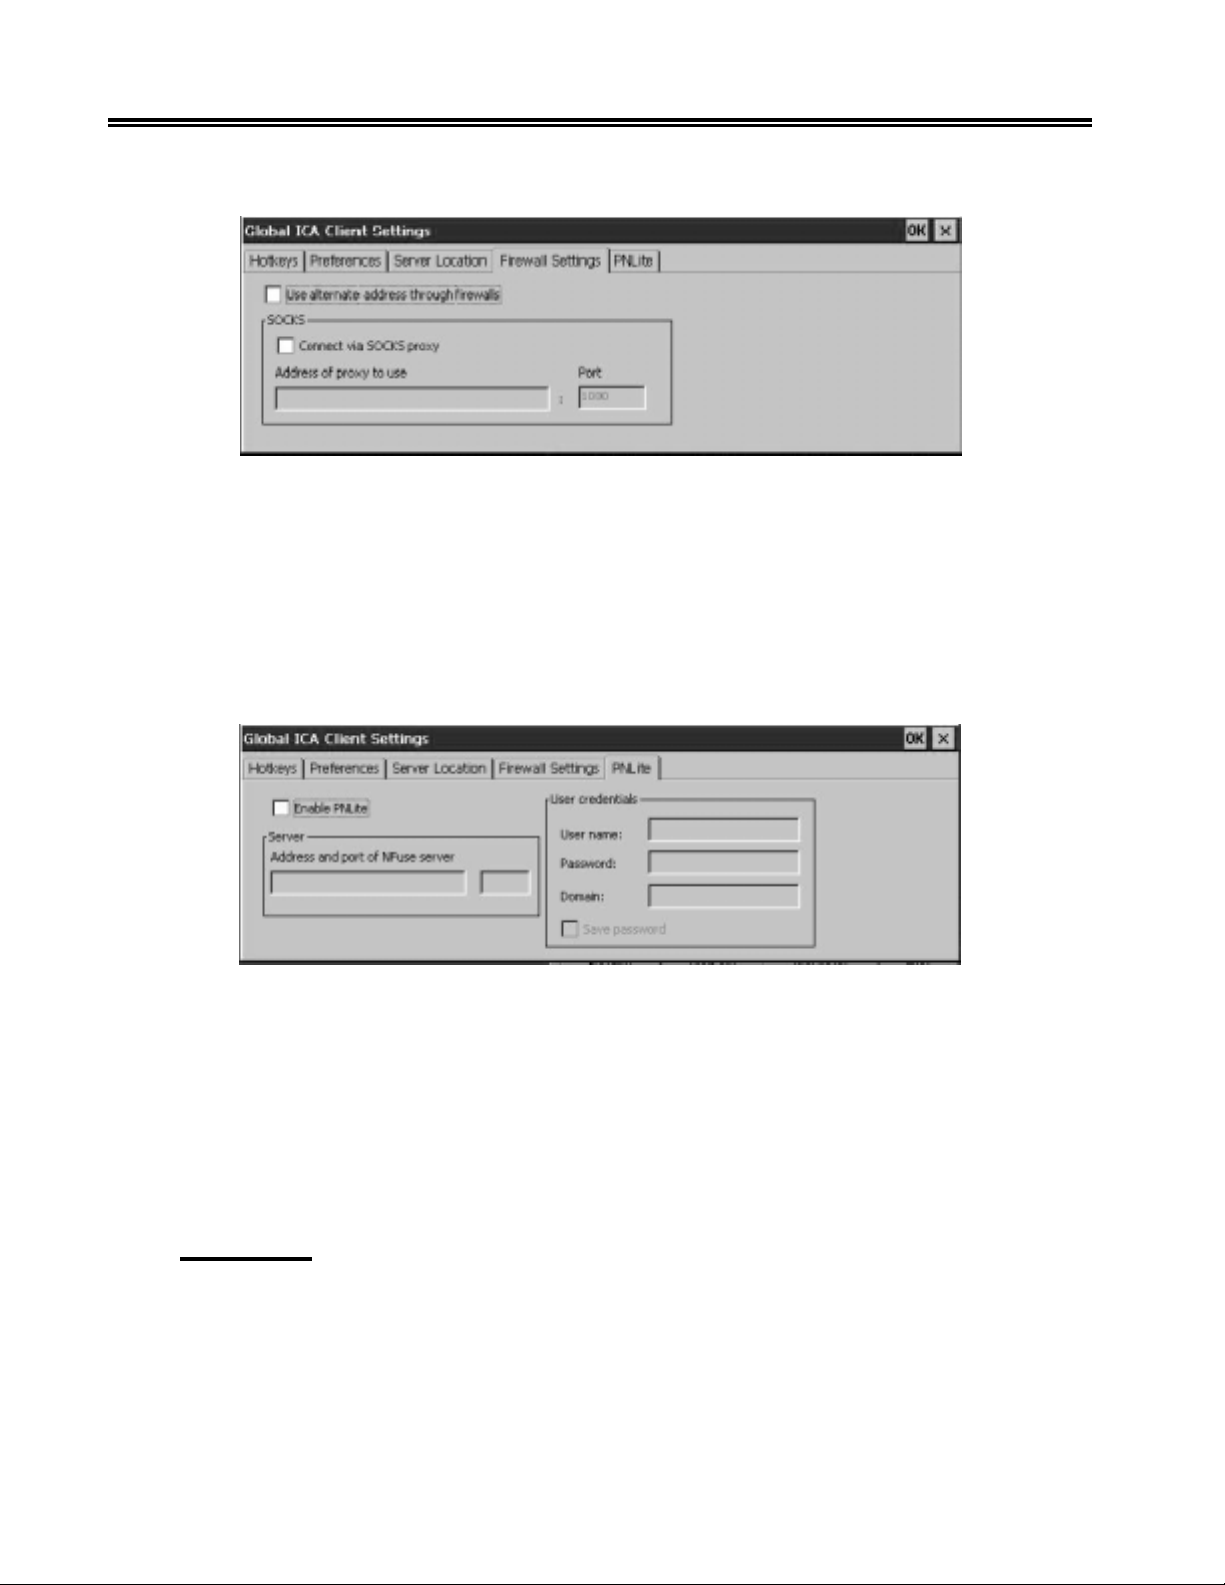
• Firewall Settings Tab
• Use alternate address through firewall – Select this option to instruct the ICA
Client to tell the Citrix server to send the alternate address (public address) of the
Citrix Server.
• Connect via SOCKS proxy – Select this check box to configure the ICA Client
to connect to a Citrix server through a SOCKS proxy server. You must also enter
the IP address and the port number (if different than 1080) of the SOCKS proxy
server.
• PNLite Tab
PNLite is an ICA connection mode that enables the CE client to connect to applications
available on a Citrix server without having to configure connections for each published
application.
To enable PNLite, check the “Enable PNLite” box. Enter the address and port number
of the NFuse server in the Address and port of NFuse server edit field. Enter your user
name, password, and domain in the appropriate User Credentials edit fields. Check the
Save Password box if you want the program to remember your password. Click OK to
save your changes.
Node Name
Central Host Name Management Checkbox – Selecting this checkbox will enable
the eTerm to send the client name defined within Global ICA Client Settings (default is
in the form of WBT+MAC address) when using DHCP.
4-16 707018-006
Page 59
Chapter 4. eTerm Terminal Properties
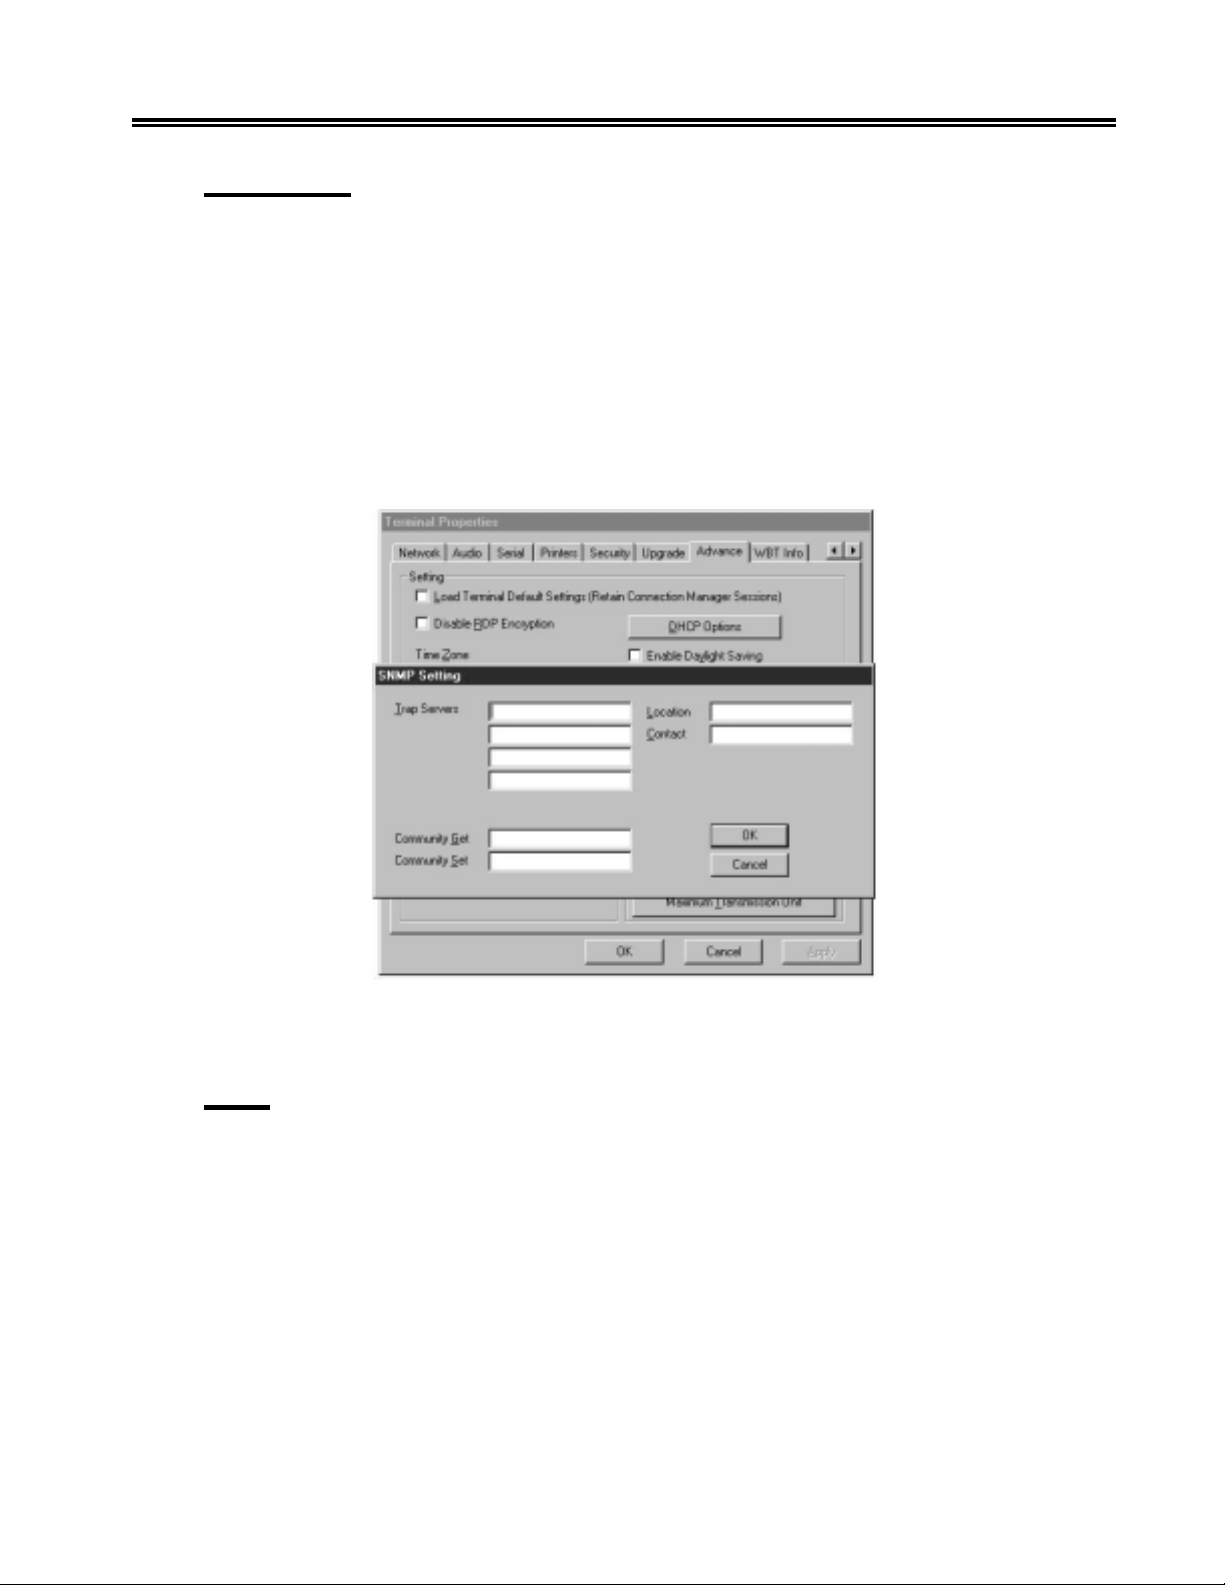
Management
• Enable SNMP Agent Checkbox – Selecting this checkbox will enable the SNMP
agent to send and receive requests from an SNMP Manager. Consult your System
Administrator for more information on this feature.
• SNMP Settings Button – Select SNMP Settings to configure the following SNMP
features:
• Trap Servers – Enter up to four (4) Trap Server Addresses
• Location – Enter the physical location of the eTerm
• Contact – Enter the contact information
• Community Get – Enter the Community Get rights for the eTerm
• Community Set – Enter the Community Set rights for the eTerm
• Enable eManager Client checkbox – Select this checkbox to allow the eTerm to
be managed by the Visara eManager Remote Management software package.
Utility
Ping – Enter an IP address in the designated field and click the Ping button to verity
that the eTerm is communicating on the network.
707018-006 4-17
Page 60
eTerm 350 Windows-based Terminal
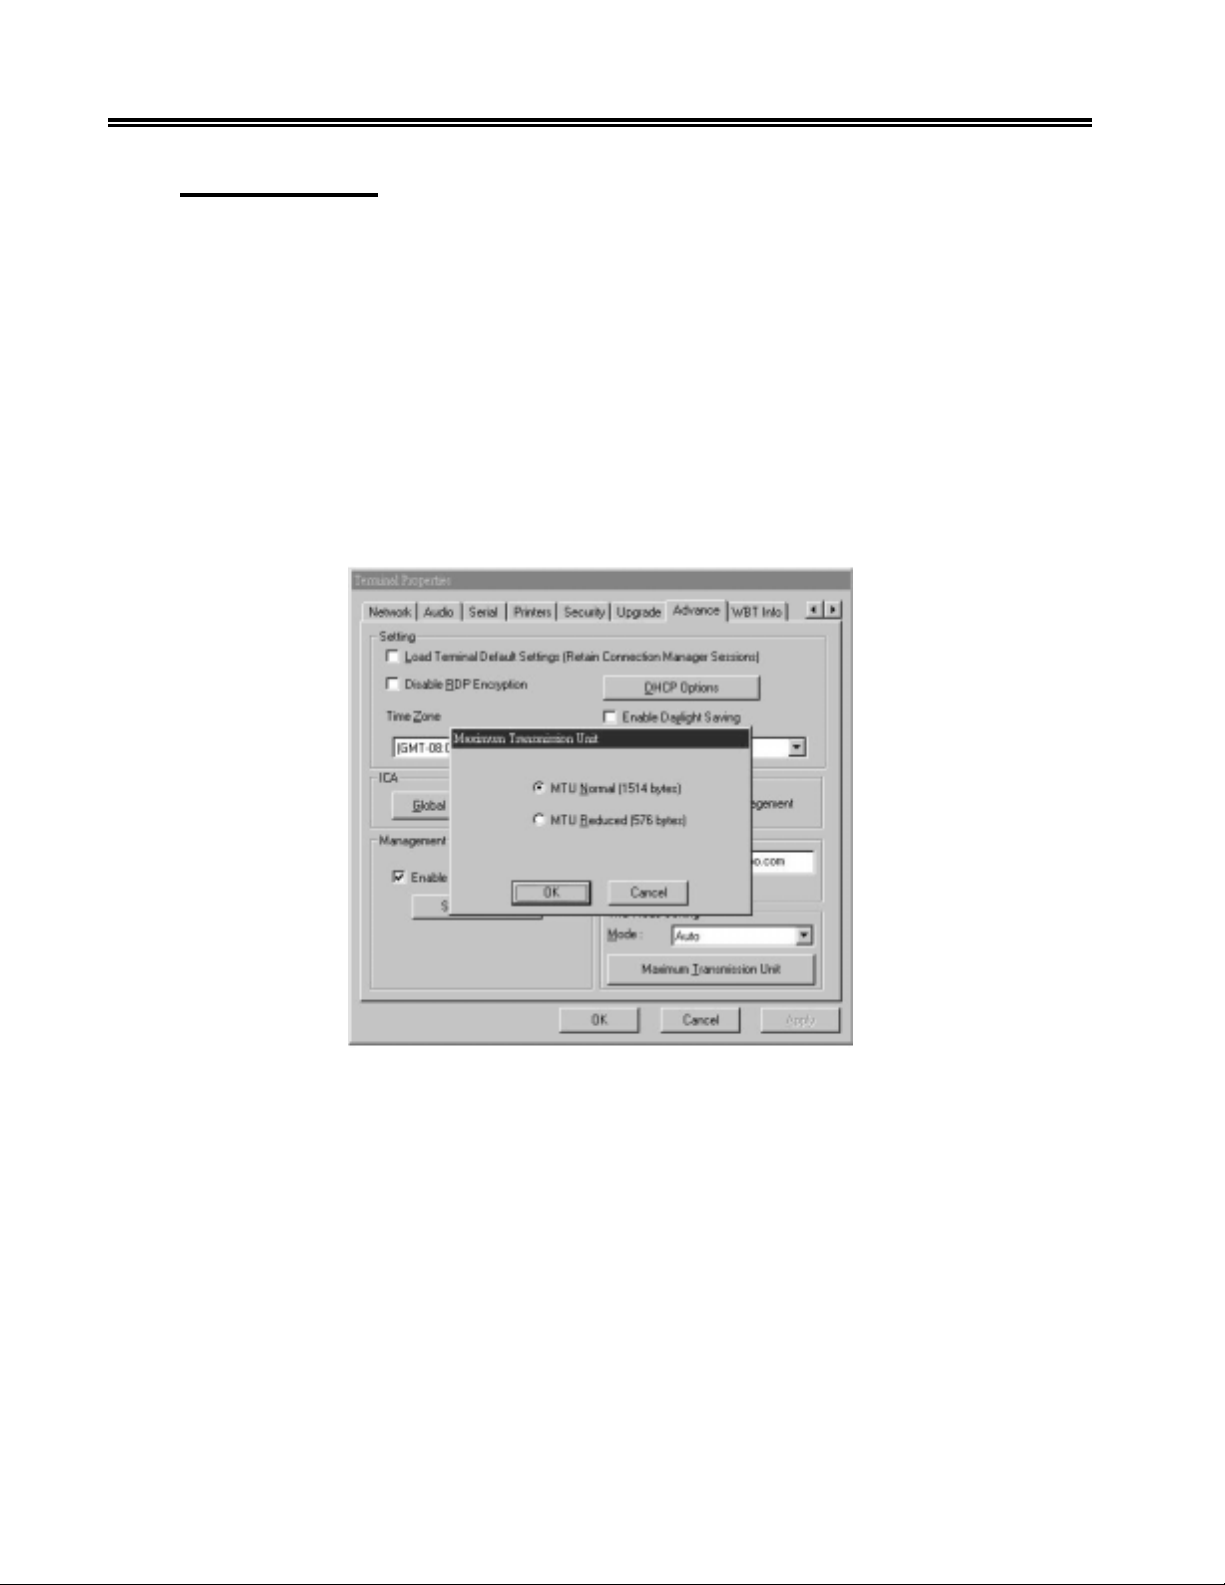
NIC Mode Setting
• Mode – Select the desired NIC speed based on your network configuration.
Consult your System Administrator before modifying these settings. The available
choices are:
• Auto – Auto-detect the network speed
• 10 Half Duplex – 10baseT Half Duplex
• 10 Full Duplex – 10baseT Full Duplex
• 100 Half Duplex – 100baseT Half Duplex
• 100 Full Duplex – 100baseT Full Duplex
• Maximum Transmission Unit (MTU) – Select the desired Transmission Unit size
based on your network configuration. The available choices are:
• MTU Normal (1514 bytes)
• MTU Reduced (576 bytes)
4-18 707018-006
Page 61
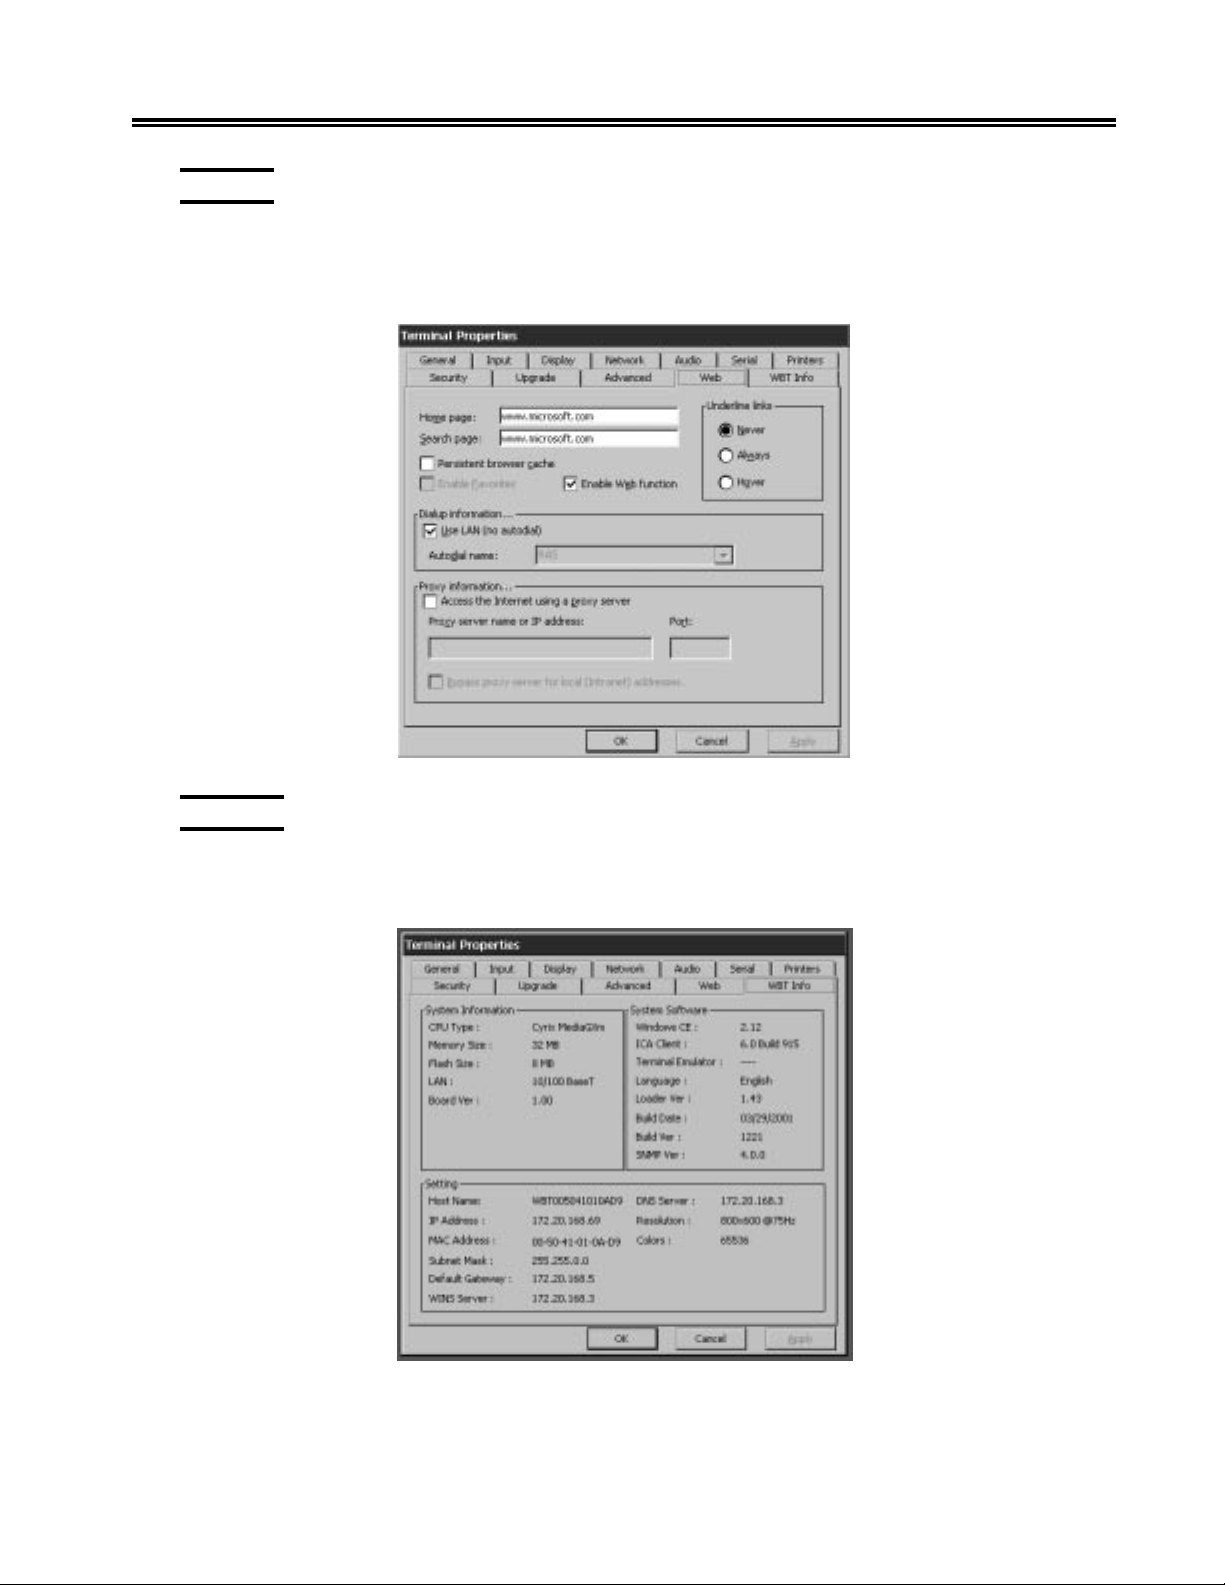
Web Tab
If applicable, the Web tab enables configuration of the local IE4.0 browser. Settings
that can be configured are: Home page, Search page, Persistent browser cache, Enable
favorites, Enable Web function, Dialup and Proxy information.
Chapter 4. eTerm Terminal Properties
WBT Info
Click WBT Info to obtain the Windows-Based Terminal information you are using.
Click OK, Cancel, or Apply to quit the dialog box.
707018-006 4-19
Page 62

Page 63

Chapter 5. eTerm 350 Plus
Connection Types
HostConnect is the application which provides simultaneous connections to a variety
of host systems using the Telnet protocol over TCP/IP on an Ethernet network.
HostConnect provides TN5250 emulation for access to IBM AS/400 systems, TN3270
terminal emulation for connection to IBM Mainframe systems, and ASCII terminal
emulation for connection to RS/6000, DEC, HP and other ASCII host computers. In
addition, HostConnect supports the TN5250E and TN3270E protocols, giving you access
to advanced features such as device-name selection, sign-on bypass and printing.
Host sessions can be configured to start automatically each time eTerm 350 is started or
you can start sessions as needed from the HostConnect Desktop or the menu bar in an
emulation session. HostConnect session types include:
• TN5250
TN5250 is a full featured emulation of the IBM 5250 twinax terminal and includes
support for Field Attributes, Text Assist and other unique 5250 functions.
Local screen printing is supported to a local-attached PCL5 printer ONLY.
• TN5250E Printer
TN5250E Printer emulating the IBM 3812-1 supports AS/400 Host Print Transform
using the AS/400 resident print drivers.
• TN3270
Emulating the IBM 3278 coax terminal, it includes full terminal emulation support
for 3270 keys and the screen attributes of a 3278 terminal session.
Local screen printing is supported to a local-attached PCL5 printer ONLY.
• TN3270E Printer
TN3270E Printer emulating the IBM 3287 supports host LU1 and LU3 data streams.
This driver ONLY supports PCL5 printers.
• ASCII
HostConnect also provides VT100 and 220 terminal emulation in a graphical window.
It contains substantial enhancements to the standard VT functions, including local
screen print to a local-attached PCL5 printer and color command support. These
features can be selected either from the pull-down menus or VT command sequences.
707018-006 5-1
Page 64
eTerm 350 Windows-Based Terminal
Configuring Host Connections
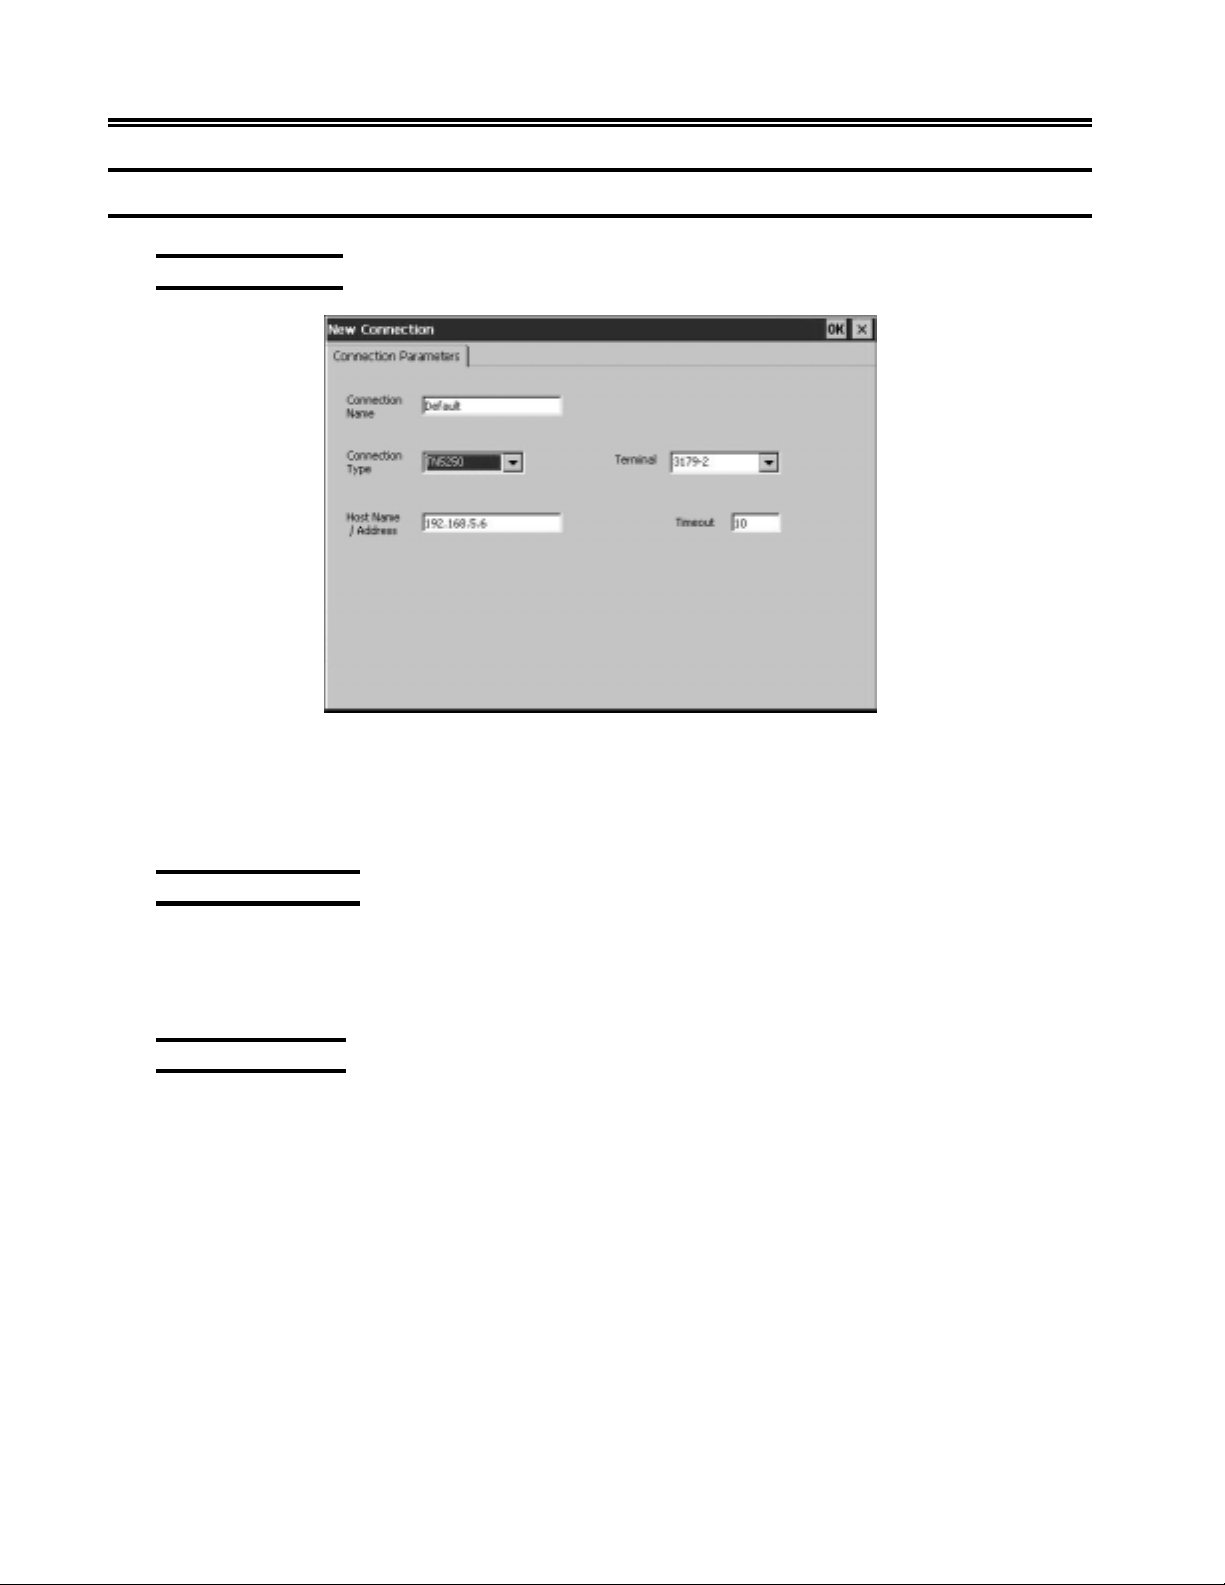
New Connection
Create a new HostConnect connection by clicking the add button in the Configure tab
of the main menu, then select HostConnect from the popup window. The New Connection
window will be displayed. The following configuration items are also available from
the Edit Connection button for existing connections.
Connection Name
Choose a name to identify each connection you configure. The name can be up to
sixteen characters long. When you start the connection, the name you chose will be
shown in the title bar of the open Session Window.
Connection Type
The connection type is dependent upon the host system to which you will connect. AS/
400 hosts typically use TN5250 or TN5250E. IBM mainframes use TN3270 and
TN3270E. UNIX and most non-IBM computers use ASCII emulation. To select a
Connection Type, click on the down arrow at the right of the drop-down list box and
choose the proper Connection Type for your host.
5-2 707018-006
Page 65

Host Name / Address
The e Term 350 supports Domain Name Services (DNS) names to make connections
with network servers. The Host Name/Address field therefore supports DNS names of
the host system with which a connection is to be established. For example, the Library
of Congress TN3270 server name is “LOCIS.LOC.GOV”. This field also supports the
IP address of the host system with which a connection is to be established. The Library
of Congress IP address for example, is 140.147.254.3.
Terminal Type
HostConnect supports various models of 3270, 5250 and ASCII terminals as described
below:
• 5250 Terminals
HostConnect supports emulation of a variety of 5250 terminal models, including
132-column mode and Text Assist. If the TN5250E protocol is selected and supported
by the host, advanced features such as device-name selection and sign-on bypass are
available. In addition, HostConnect supports a printer emulation under TN5250E.
Emulation of the following 5250 terminal models is included in HostConnect. All
models support Text Assist:
Model Screen Size
3179-2 24 x 80
Chapter 5. eTerm 350 Plus
3180-2 27 x 132
3196 24 x 80
3477-FC 27 x 132
3477-FG 27 x 132
3487-HA 27 x 132
3487-HC 27 x 132
5251-11 24 x 80
5291-1 24 x 80
• 5250 Printer
For 5250 printer emulation select connection type TN5250E and terminal type 3812.
For additional printer setup information see the section titled Additional Connection
Capabilities.
707018-006 5-3
Page 66

eTerm 350 Windows-Based Terminal
• 3270 Terminals
HostConnect supports emulation of a variety of 3270 terminal models and includes
support for extended highlighting, extended color, and alternate screen sizes. In
addition, if the TN3270E protocol is selected and supported by the host, more
advanced features such as device-name selection and reporting and access to the
SNA Bind information are enabled.
Emulation of the following 3270 color and mono terminal models is supported:
Model Screen Size EAB
3278-2 24 x 80 Yes
3278-3 32 x 80 Yes
3278-4 43 x 80 Yes
3278-5 27 x 132 Yes
• 3270 Printer
For 3270 printer emulation, select connection type TN3270E and Terminal type
3287. For additional printer setup information see the section titled “Additional
Connection Capabilities”.
• ASCII Terminals
HostConnect supports emulation of several ASCII terminal models and includes
support for double-high and double-wide characters, smooth scrolling and extended
highlighting.
Emulation of the following ASCII terminal models is supported:
Model Features
VT100 basic ASCII terminal
VT220 double-high and double-wide characters,
smooth scrolling and extended highlighting
Timeout
The number of seconds HostConnect will wait for a host connection to be established.
If a connection is not established within that time, the message “timed out” will be
displayed. The default is 10 seconds.
Depending upon the Connection Type you select, additional configuration capabilities
may be available.
5-4 707018-006
Page 67
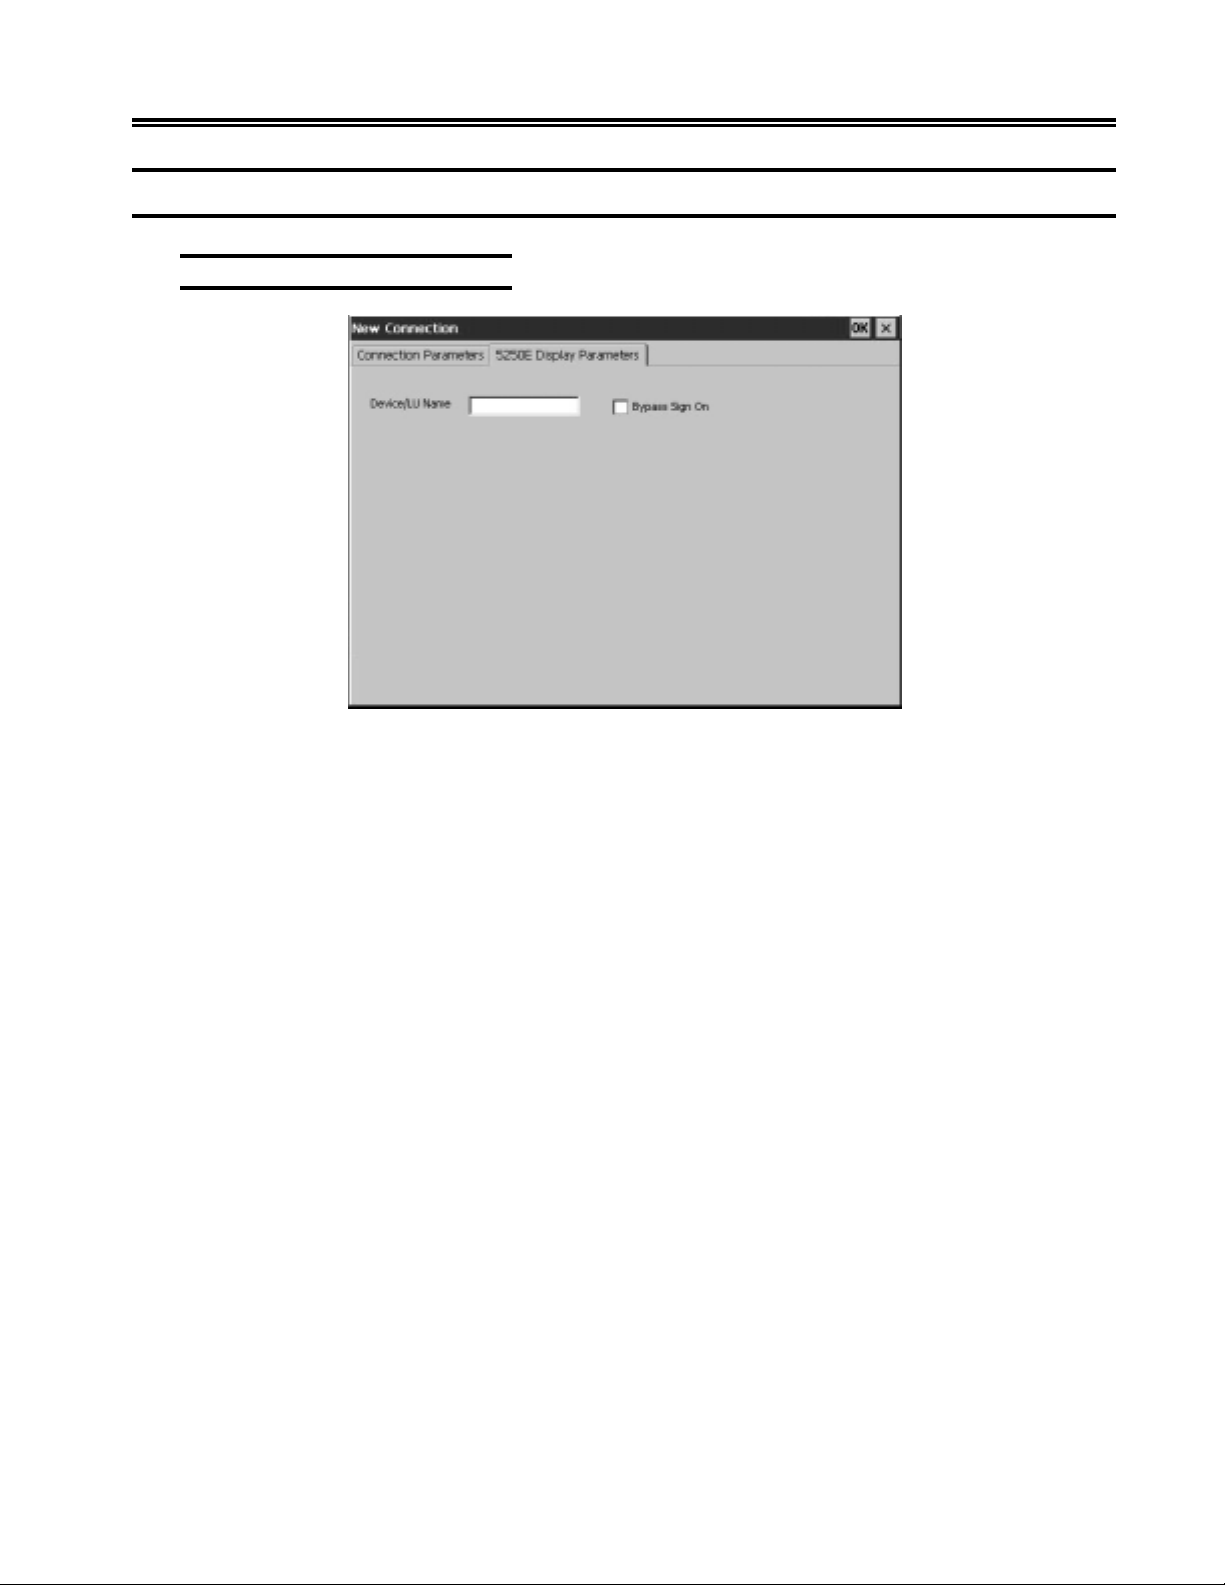
Additional Connection Capabilities
Display Parameters, TN5250E
Chapter 5. eTerm 350 Plus
The 5250E Display Parameter screen allows entry of the session Device or LU Name.
If Bypass Sign On is also selected, the screen provides input fields to support this
function. The Bypass Sign On is by default disabled. If you enable Bypass Sign-On,
you must enter a User Name and Password. Optionally, you may enter Program, Current
Library and Initial Menu. These fields are the same as those displayed on your sign on
screen. Optionally you may choose to encrypt your password. When enabled the
password is encrypted when transmitted over the network under TN5250E. This is
disabled by default.
707018-006 5-5
Page 68
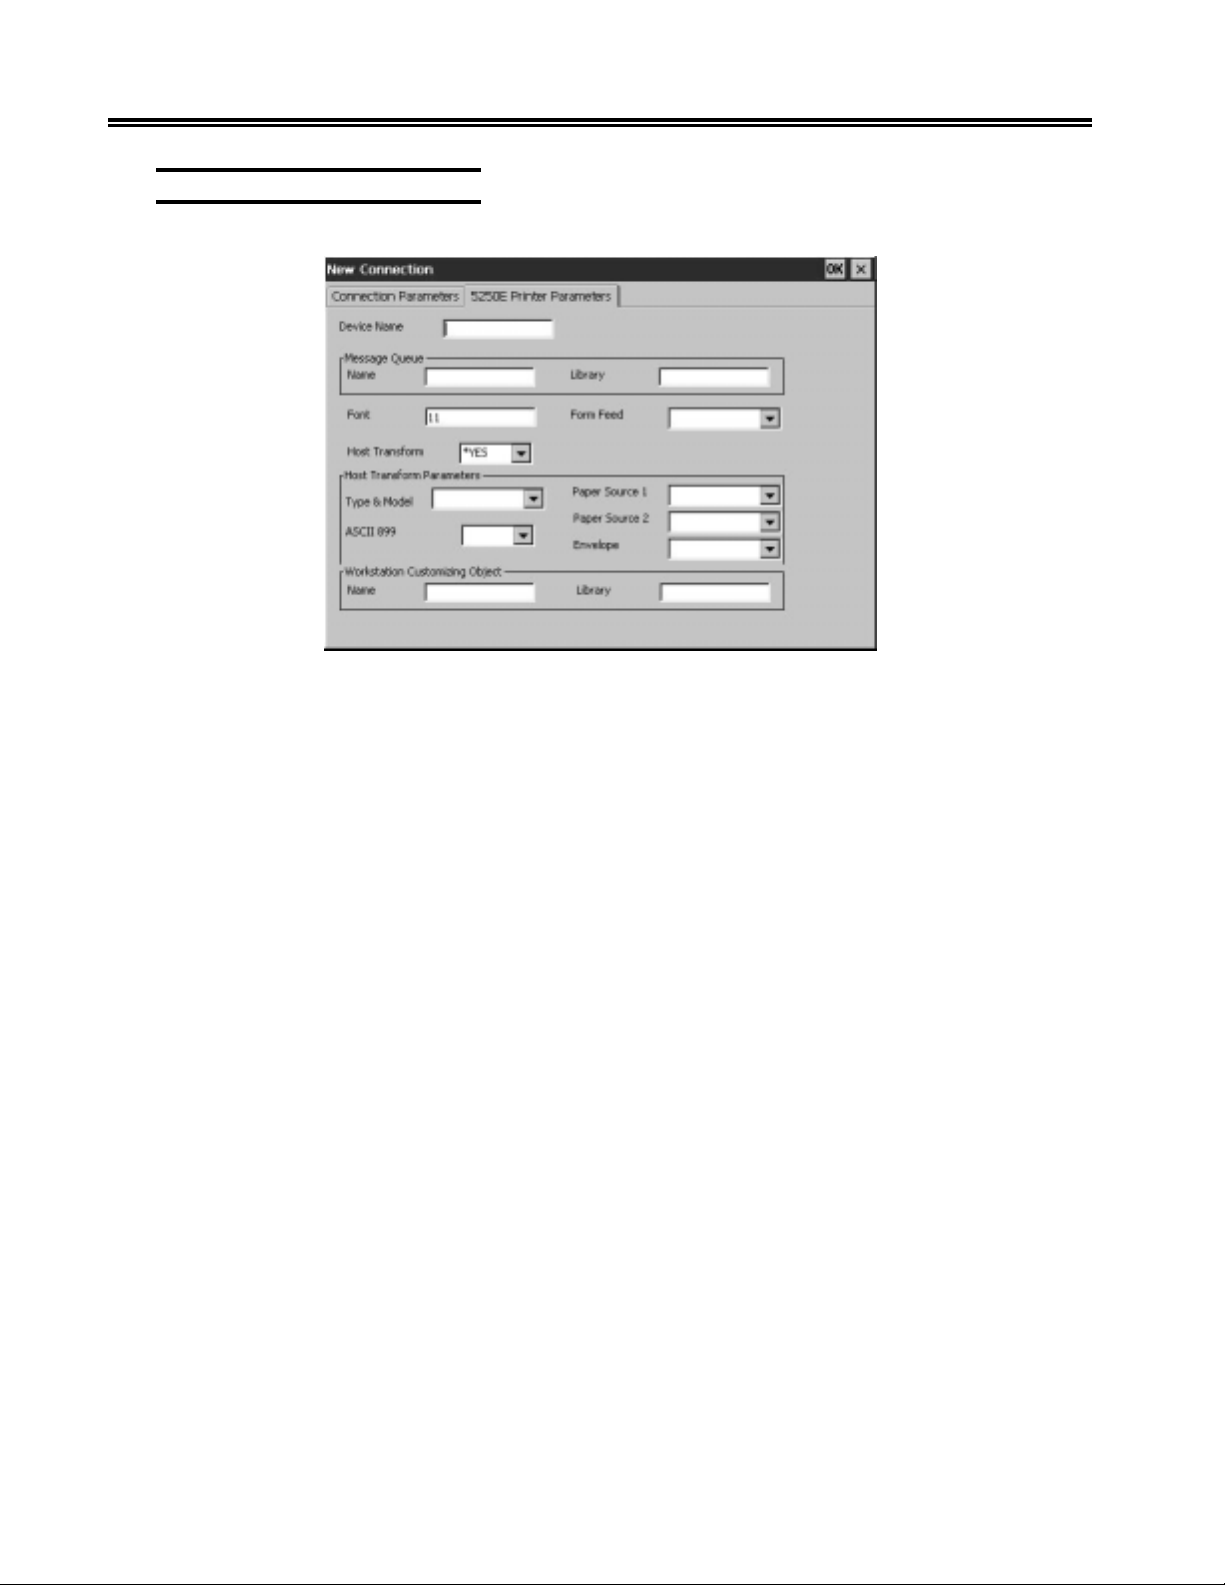
eTerm 350 Windows-Based Terminal
Printer Parameters, TN5250E
When TN5250E and terminal type 3812 are selected on the Connection Parameters
screen a new tab, 5250E Printer Parameters, will be displayed. The 5250E Printer
Parameter screen provides fields for entering additional settings for the printer emulation.
Once the settings are entered correctly the TN5250E printing will be automatically
configured on the AS/400 system. OS/400 versions prior to V4R3 may require certain
PTFs. Check with IBM to determine what PTFs you may require to support TN5250E
printing. Some fields are required as defined below:
• Device Name
This field entry is required. The name is arbitrary but must be unique. The name will
usually be supplied by the System Administrator.
• Message Queue
Not required. This field will identify the message queue where operational messages
are sent.
• Font
This field entry is required. The default value is 11.
• Form Feed
Not required. Identifies the type of forms used.
• Host Transform
This field entry is required. The default value is *YES.
• Host Transform Parameters
The Type and Model field is required. This field identifies the attached printer type.
If your printer type is not listed use a printer type with a compatible printer command
set. The other fields are not required.
• Workstation Customizing Object
Not required. Allows customization of the printer command stream.
5-6 707018-006
Page 69
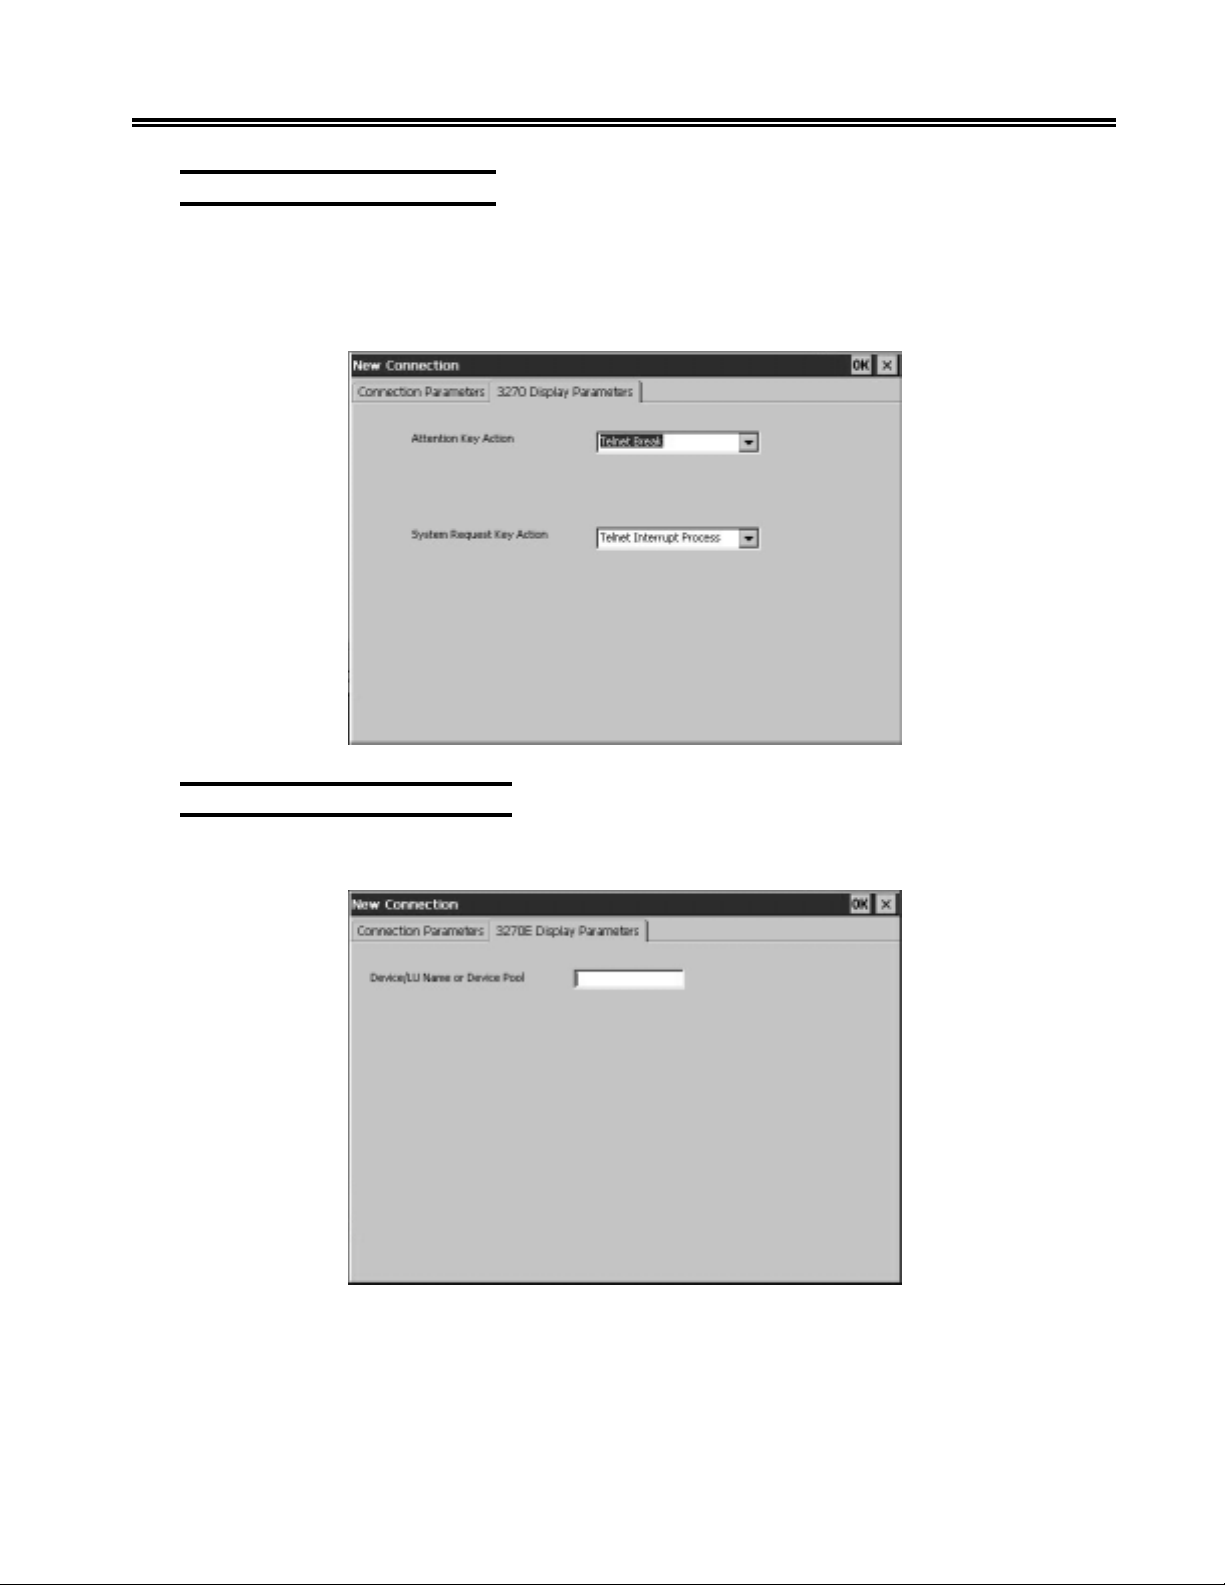
Display Parameters, TN3270
Attention Key Action and System Request Key Action. You can override the default
action for the Attention or System Request Key while connected to a host system. This
would be necessary if the host stops responding to HostConnect and the host also ignores
the default Telnet commands it receives when those keys are pressed.
Chapter 5. eTerm 350 Plus
Display Parameters, TN3270E
Enter your device or LU name.
707018-006 5-7
Page 70
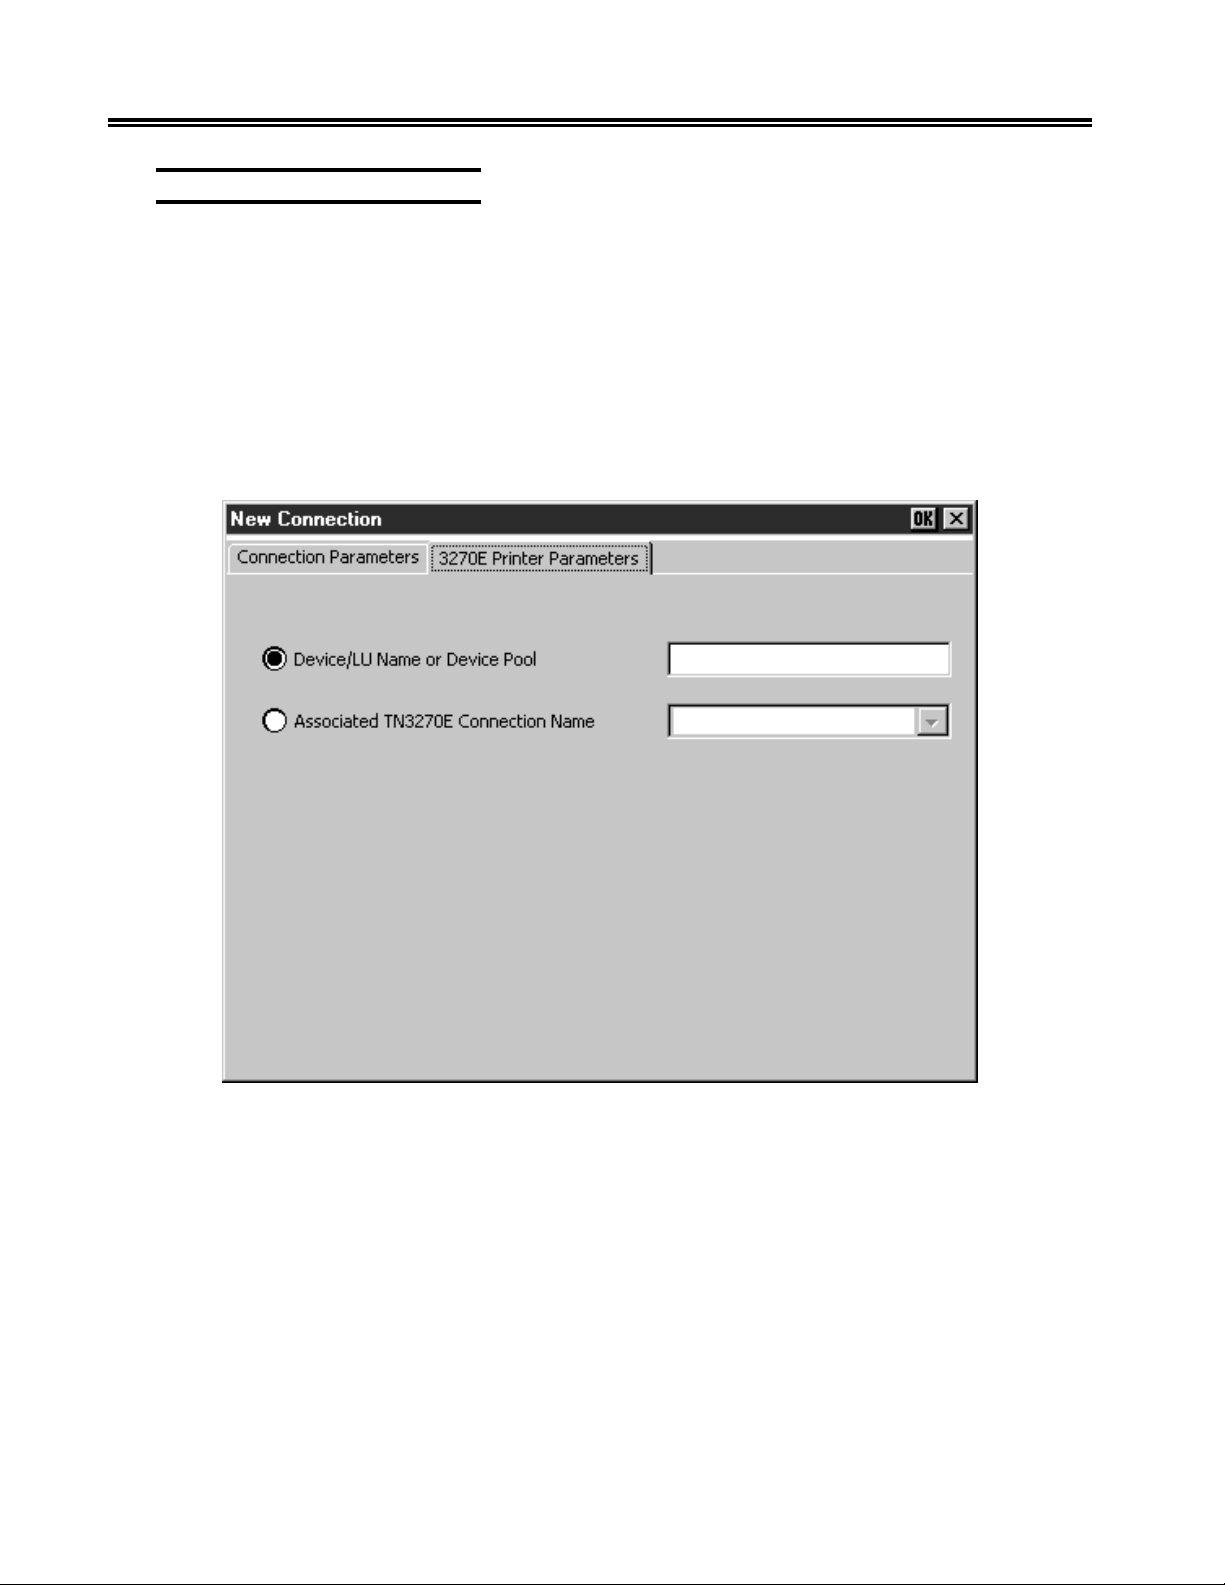
eTerm 350 Windows-Based Terminal
Printer Parameters, TN3270E
When TN3270E and terminal type 3287 are selected on the Connection Parameter
screen, a new tab, 3270E Printer Parameter, will be displayed. The 3270E Printer
Parameter screen provides the following options:
• Device/LU Name or Device Pool
Select this option to allow entry of a device name, LU name or device pool in the
corresponding field.
• Associated TN3270E Connection Name
Select this option to define a “paired” printer device with a predefined TN3270E
terminal. The pulldown field will list all TN3270E terminals that are configured on
the eTerm 350 Terminal Connection Manager.
Note: The 3287 printer client supports host LU1 and LU3 data streams for PCL5
printers only.
5-8 707018-006
 Loading...