

VIRTUFIT Water Resistance Row 1000 User Manual

1
VirtuFit Water Resistance Row 1000
Water Resistance Row 1000
ENG
User Manual

ENG
2
VirtuFit Water Resistance Row 1000
INDEX
Safety instructions 3-4
Checklist 4-5
Assembly instructions 6-8
Fill and empty tank 9
Adjustment Guide 10-11
Store 12
Maintenance 13
Operating Guide 14-17
Exercise Guide 18-21
Technical drawing 22
Parts List 23-26

ENG
3
VirtuFit Water Resistance Row 1000
SAFETY INSTRUCTIONS
WARNING: BEFORE BEGINNING ANY EXERCISE PROGRAM, CONSULT YOUR PHYSICIAN.
THIS IS ESPECIALLY IMPORTANT FOR INDIVIDUALS OVER THE AGE OF 35 OR PERSONS
WITH PRE-EXISTING HEALTH PROBLEMS. READ ALL INSTRUCTIONS BEFORE USING
ANY FITNESS EQUIPMENT. SAVE THESE INSTRUCTIONS.
ATTENTION
- Before starting any exercise program you should consult your physician to determine if you
have any medical or physical conditions that could put your health and safety at risk or
prevent you from using the equipment properly. Your physician’s advice is essential if you are
taking any medication that may aect your heart rate, blood pressure, or cholesterol level.
- Be aware of your body’s signals. Incorrect or excessive exercise can damage your health.
Stop exercising if you experience any of the following symptoms: pain, tightness in your chest,
irregular heartbeat, shortness of breath, lightheadedness, dizziness, or feelings of nausea. If
you do experience any of these conditions, you should consult your physician before
continuing with your exercise program.
- Keep children and pets away from the equipment. The equipment is designed for adult use only.
- Use the equipment on a solid, at level surface with a protective cover for your oor or carpet.
To ensure safety, the equipment should have at least 2 feet of free space all around it.
- Ensure that all nuts and bolts are securely tightened before using the equipment. The safety
of the equipment can only be maintained if it is regularly examined for damage and/or wear
and tear.
- Always use the equipment as indicated. If you nd any defective components while
assembling or checking the equipment, or if you hear any unusual noises coming from the
equipment during exercise, stop using the equipment immediately and don’t use the
equipment until the problem has been rectied.
- Wear suitable clothing while using the equipment. Avoid wearing loose clothing that may
become entangled in the equipment.
- Do not place ngers or objects into the moving parts of the equipment.
- The maximum user weight of this rower is 227KG.
- Move with caution when lifting and moving the equipment. Always use proper lifting technique
and seek assistance if necessary.
- Your product is intended for use in cool, dry conditions. You should avoid storage in extreme
cold, hot, or damp areas as this may lead to corrosion and other related problems.
- This equipment is designed for indoor use only! It is not intended for commercial use or medical
treatment!
ENG
4
VirtuFit Water Resistance Row 1000
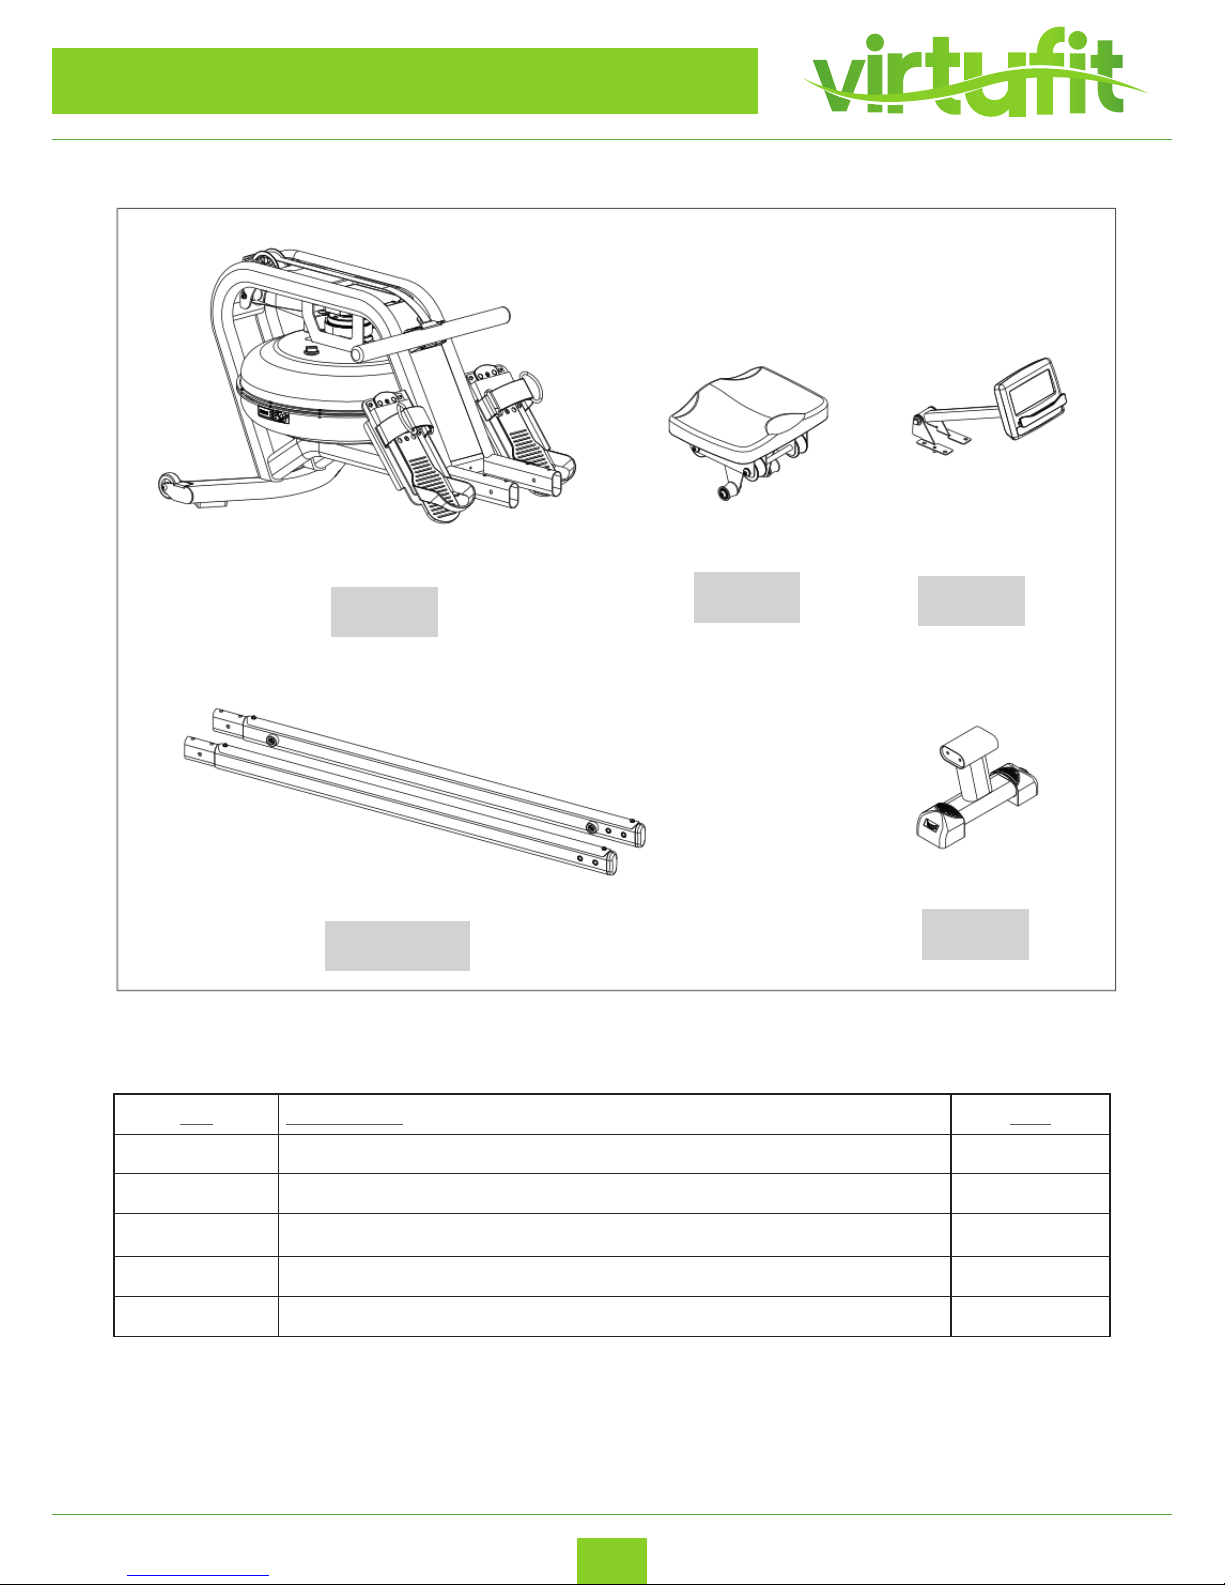
CHECKLIST
No. 1
No. 38
No. 51
No. 3 L/R
No. 2
No. Description QTY
1 Main frame 1
2 Rear Stabilizer 1
3 L/R Slide rail 2
38 Seat 1
51 Computer 1

ENG
5
VirtuFit Water Resistance Row 1000
CHECKLIST
TOOL KIT
#57 - M8*45 - 6 pcs
#61 - M8*75 - 4 pcs
#71 - M8 - 8 pcs
#89 - S5 - 1 pc
#90 - S13-17 - 1 pc
#95 - M8 - 6 pcs
#94 - M8 - 6 pcs
#68 - OD20*ID8.5*1.5 - 12 pcs
#58 - M8*15 - 4 pcs

ENG
6
VirtuFit Water Resistance Row 1000
ASSEMBLY INSTRUCTIONS
Open the box and remove all parts from the packaging and place them on the oor.
Missing parts: If you think you are missing certain parts in your package, carefully check the styrofoa and
the treadmill. Some parts (bolts, screws, etc.) are already attached to / in the treadmill.
Error message: Make sure that all cables are carefully attached. The aluminum legs are very sensitive and
should remain straight. Do you get an error message after mounting your rowing machine? Then you
should bend these copper feet straight again, this may cause the error message to disappear.
Allen bolts: Make sure that the Allen key ts securely into the bolt before you apply force to the key. In
this way you prevent the head of the socket head from being turned.
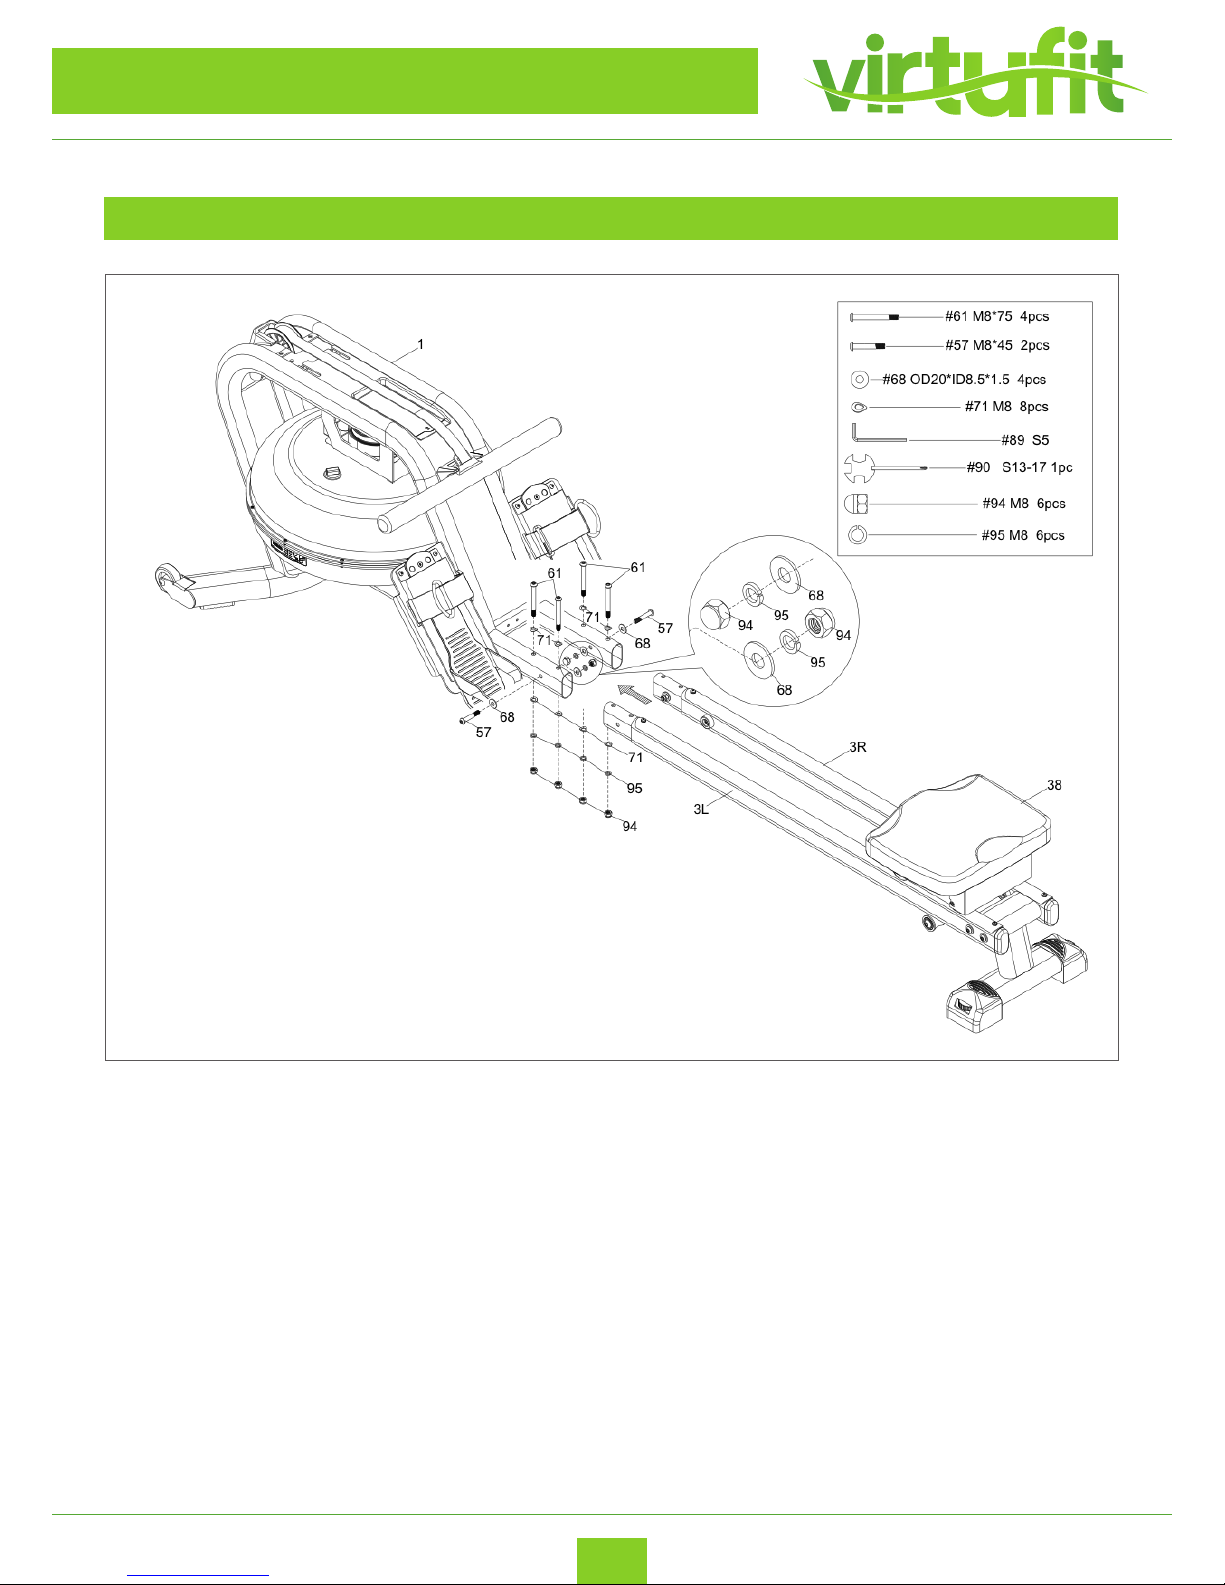
STEP 1
- Turn over the Slide Rail (3), the Rear Stabilizer (2) and the seat (38) as above picture;
- Install the slide rail (3 L/R) into the seat;
- Attach the Rear Stabilizer (2) to the Slide Rail (3), tighten with 4 Washers (68) and 4 screws (57).
ENG
7
VirtuFit Water Resistance Row 1000
STEP 2
ASSEMBLY INSTRUCTIONS
- Attach the Slide Rail (3) to the Main Frame (1), tighten with 8 Arc Washers (71), 4 screws (61), 4 screws
(61), 4 spring washers (95) and 4 cap nut (94) 4 washers (68), 4 screws (57), 2 spring washers (95) and
2 cap nut (94).
ENG
8
VirtuFit Water Resistance Row 1000
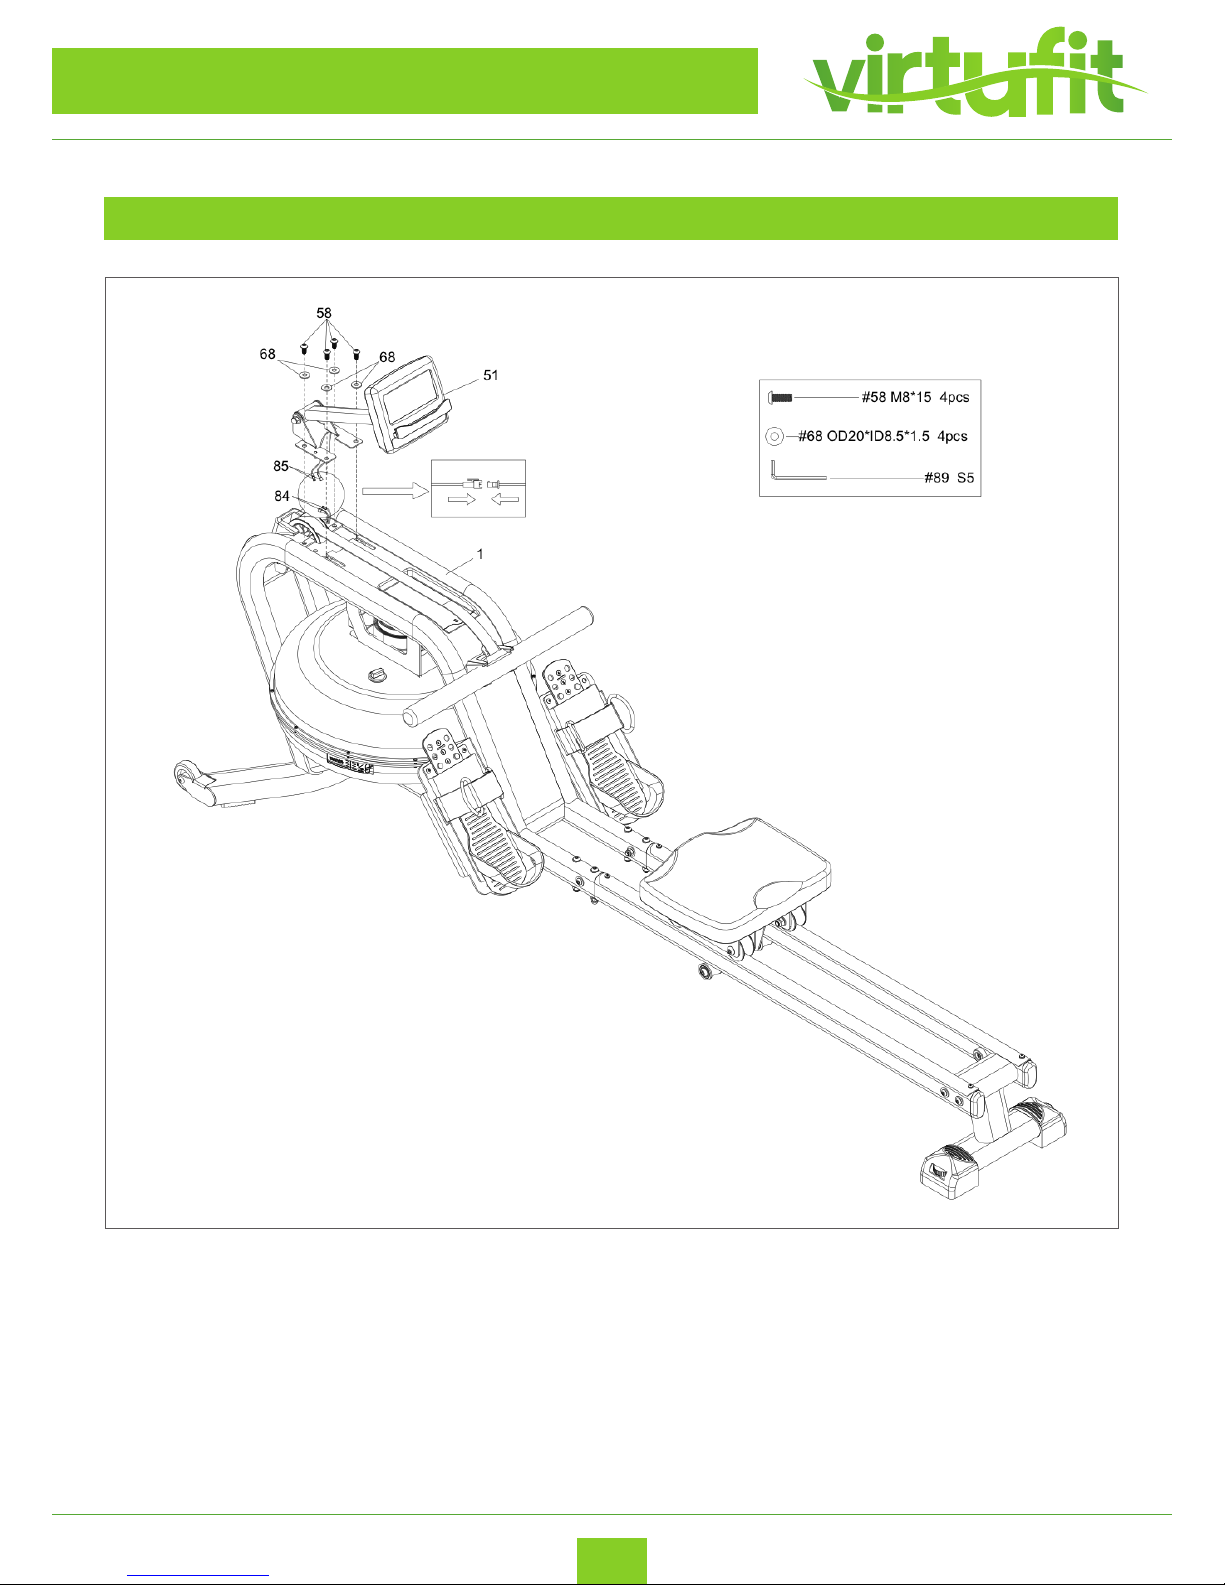
STEP 3
ASSEMBLY INSTRUCTIONS
- Connect the connection wire (85) to the sensor wire (84).
- Attach the Support for computer (51) to Main Frame, tighten with 4 Washers (68) and 4 screws (58).
- If the seat makes noise, the wheels under the seat should be slightly greased with the supplied
supplied silicone oil.

ENG
9
VirtuFit Water Resistance Row 1000
HOW TO FILL AND EMPTY THE TANK
1. Remove the Fill Plug (49) from the Upper Tank Cover;
2. To ll tank with water, refer to Fig. A. Insert the Funnel (92) into the tank, then use a cup or the Pumping
siphon (91) and a bucket to ll the tank. Use the water level gauge on the side of the tank to measure
desired water level in the tank.
3. To empty the tank, refer to Fig. B. Place a bucket next to the rower, and use the Pumping siphon (91) to
pump out the water from the tank into the bucket.
4. Insert the Fill Plug (49) into the Upper Tank Cover. Wipe excess water o of the frame.
NOTE:
– Fill the tank only with tap water. Add 1 water-purication tablet (1 packet is included.). Never use pool
chlorine or chlorine bleach. This will damage the tank and void the warranty.
– Add a water purication tablet every 6 months or as needed. If water remains cloudy, replace the water
in the tank.
– Water from the tank is not suitable for consumption. Dispose the water after pumping it out from the
tank.
– See Fig. A. The water level gauge is on the side of the tank. The maximum ll is the top bar. Never ll it
over this limit. Filling the tank over this limit will void the warranty.
– The resistance depends on the water level in the tank. Water level 1 is the lowest resistance. Level 6 is
a higher resistance.
WATER LEVEL
 Loading...