

Page 1
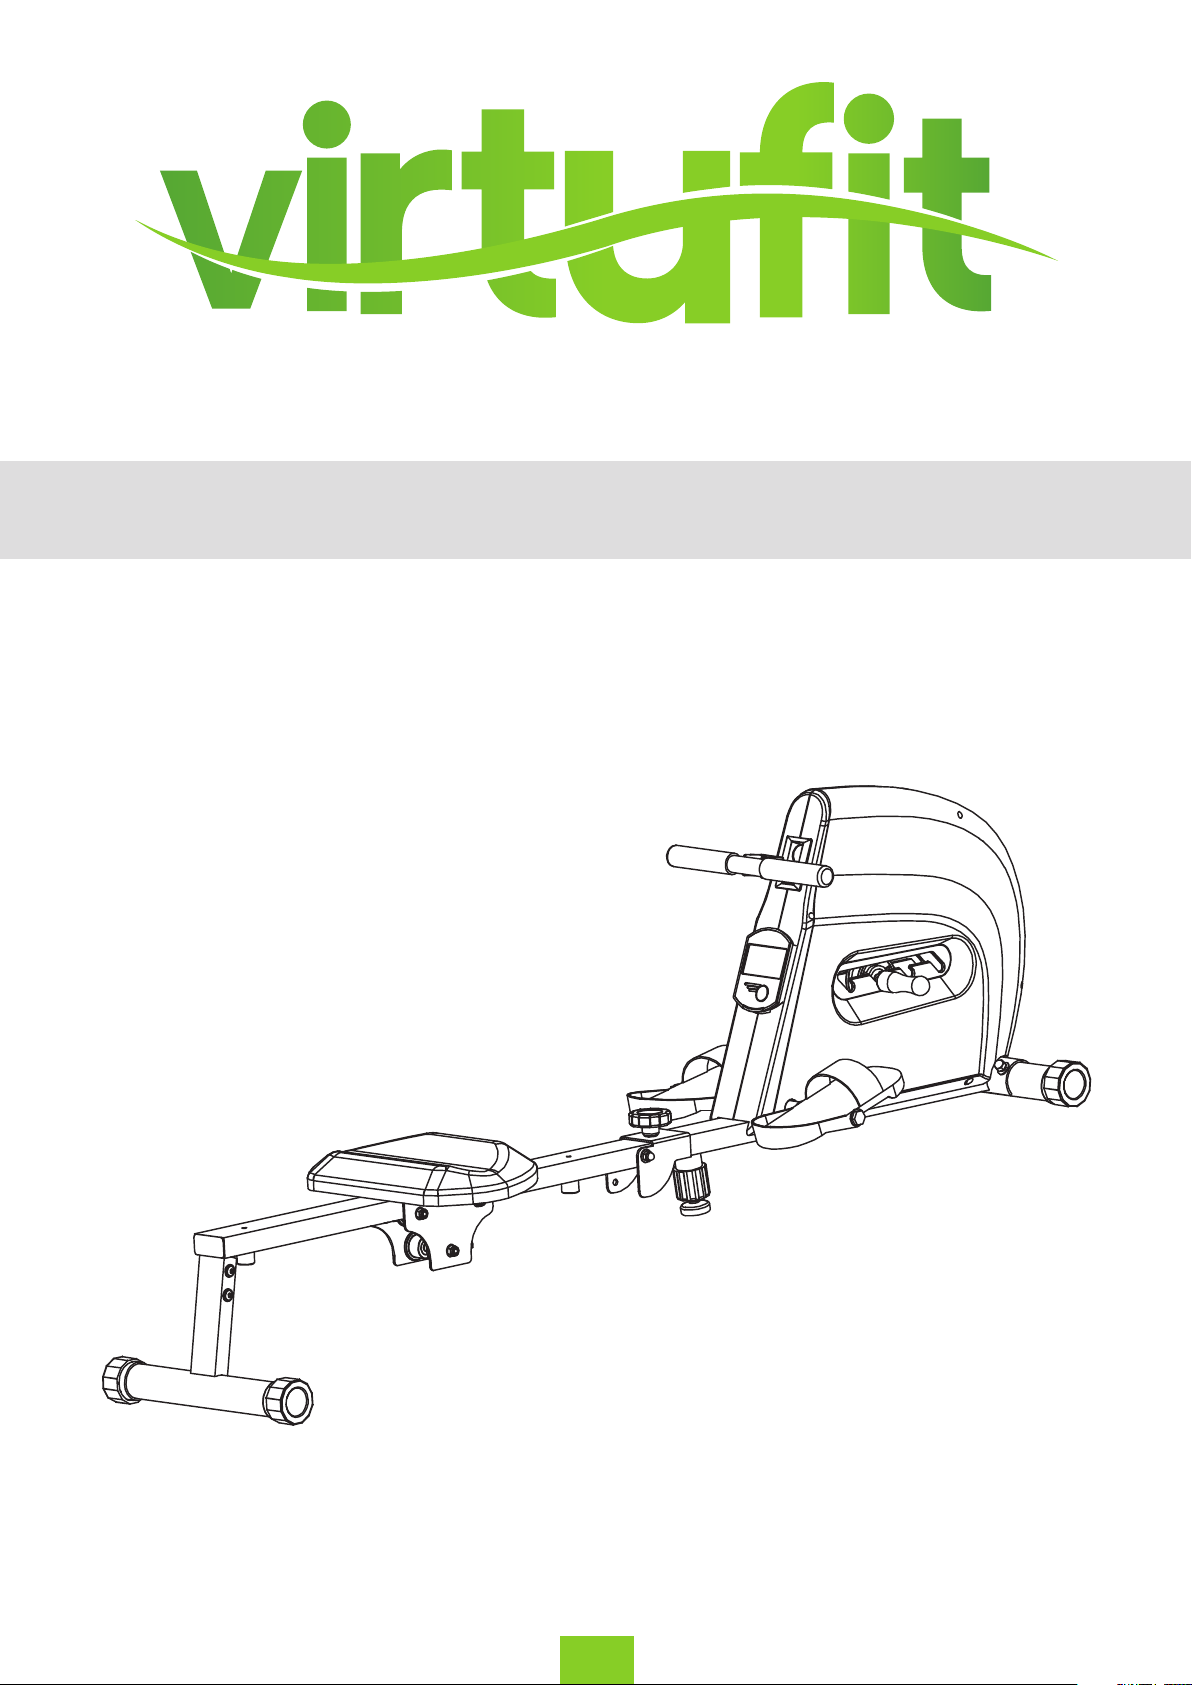
Row 1.0 Rowing Machine
User Manual
EN
Page 2
INDEX
SAFETY INSTRUCTIONS
CHECKLIST
ASSEMBLY INSTRUCTIONS
FOLDING INSTRUCTIONS
MAINTENANCE
TROUBLE SHOOTING
CONTROL PANEL
EXPLODED DRAWING
PARTS LIST
TRAINING INSTRUCTIONS
3 - 4
5 - 6
7 - 12
13
14 -15
16
17 - 18
19
20
21
VirtuFit Row 1.0 Rowing Machine
EN
2
Page 3

SAFETY INSTRUCTIONS
WARNING:
Before beginning any exercise program consult your physician. This is especially
important for people who are over 35 years old or who have pre-existing health
problems. Read all instructions before using any tness equipment. Do not operate this
exercise equipment without properly tted guards, as the moving parts can present a
risk of serious injury if exposed.
ATTENTION
– It is important to read this entire manual before assembling and using the equipment. Safe and
eective use can only be achieved if the equipment is assembled, maintained and used properly.
It is your responsibility to ensure that all users of the equipment are informed of all warnings and
precautions.
– Before starting any exercise program, you should consult your doctor to determine if you have
any medical or physical conditions that could put your health and safety at risk, or prevent you
from using the equipment properly. Your doctor’s advice is essential if you are taking medication
that aects your heart rate, blood pressure or cholesterol level.
– Be aware of your body’s signals. Incorrect or excessive exercise can damage your health. Stop
exercising if you experience any of the following symptoms: pain, tightness in your chest, irregular
heartbeat, extreme shortness of breath, lightheadedness, dizziness or feelings of nausea. If you do
experience any of these conditions you should consult your doctor before continuing with your
exercise program.
– Keep children and pets away from the equipment. The equipment is designed for adult use only.
– Use the equipment on a solid, at level surface with a protective cover for your oor or carpet. To
ensure safety, the equipment should have at least 0.5 metres of free space all around it.
– Before using the equipment, check that the nuts and bolts are securely tightened.
– The safety of the equipment can only be maintained if it is regularly examined for damage and/or
wear and tear.
– Always use the equipment as indicated. If you nd any defective components while assembling or
checking the equipment, or if you hear any unusual noises coming from the equipment during use,
stop immediately. Do not use the equipment until the problem has been rectied.
3
EN
VirtuFit Row 1.0 Rowing Machine
Page 4

SAFETY INSTRUCTIONS
– Wear suitable clothing while using the equipment. Avoid wearing loose clothing that may get caught
in the equipment or that may restrict or prevent movement.
– The max user weight is 115 KGS. Braking ability is independent of speed.
– The equipment is not suitable for therapeutic use.
– Care must be taken when lifting or moving the equipment so as not to injure your back. Always use
proper lifting techniques and/or seek assistance if necessary.
– Please keep the space at least 1 to 2 meter at the end of base frame to escape any accidents!
– Place the device on a clean and at surface. Do not place the equipment on a thick carpet.
– The device is for indoor use and not for outdoor use to prevent damage. Keep the storage location
dry, clean and at. It is forbidden to use the device for purposes other than training.
– Only use the machine in an environment with an ambient temperature between 10 ° C and 35 ° C.
Only store the device at an ambient temperature between 5 ° C and 45 ° C
Warranty claim is excluded if the cause of the defect is the result of:
• Maintenance assembly and repair work not carried out by an ocial dealer.
• In the event of improper use, neglect and / or poor maintenance.
• Failure to maintain the tness equipment in accordance with the manufacturer’s instructions (see
the enclosed manual).
VirtuFit Row 1.0 Rowing Machine
EN
4
Page 5
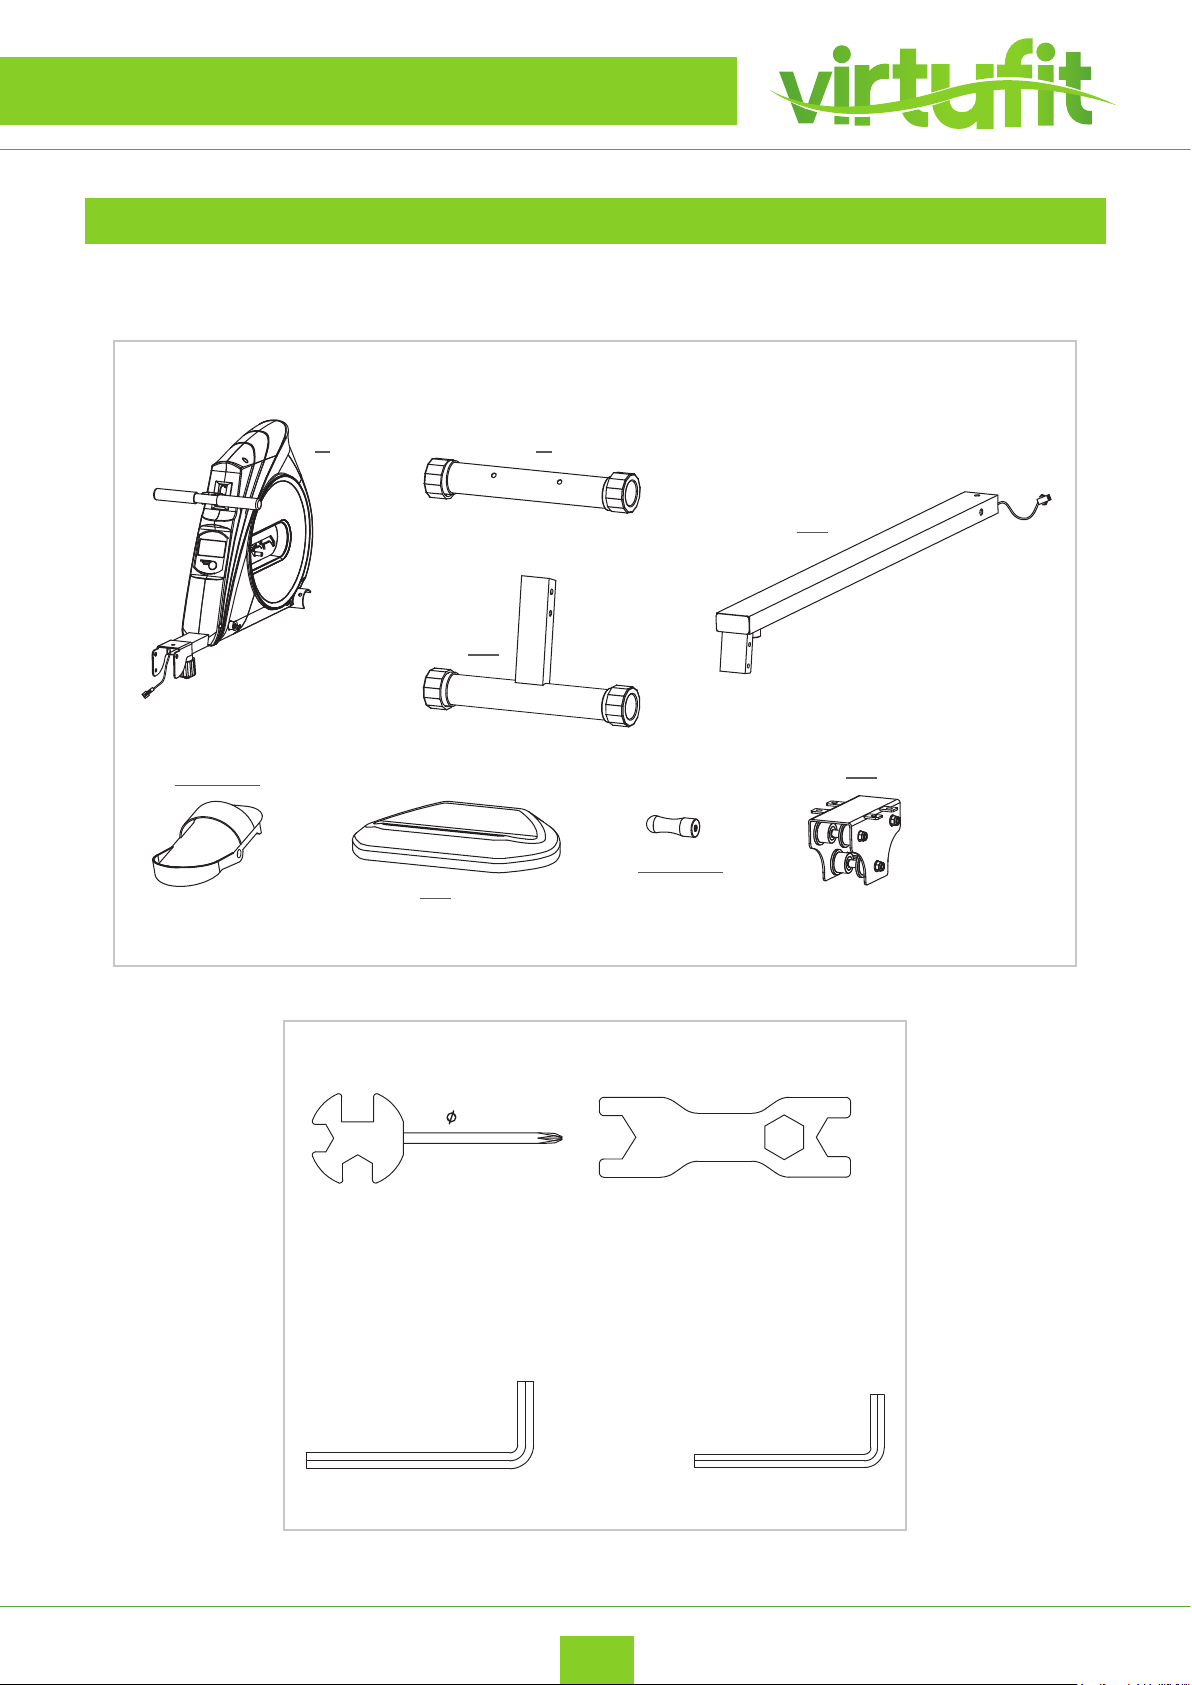
CHECKLIST
TOOLKIT
When you open the carton, you will nd the below parts in the carton.
1 2
45
47
10 (2x)
51
22 (2x)
52
5
EN
VirtuFit Row 1.0 Rowing Machine
Page 6
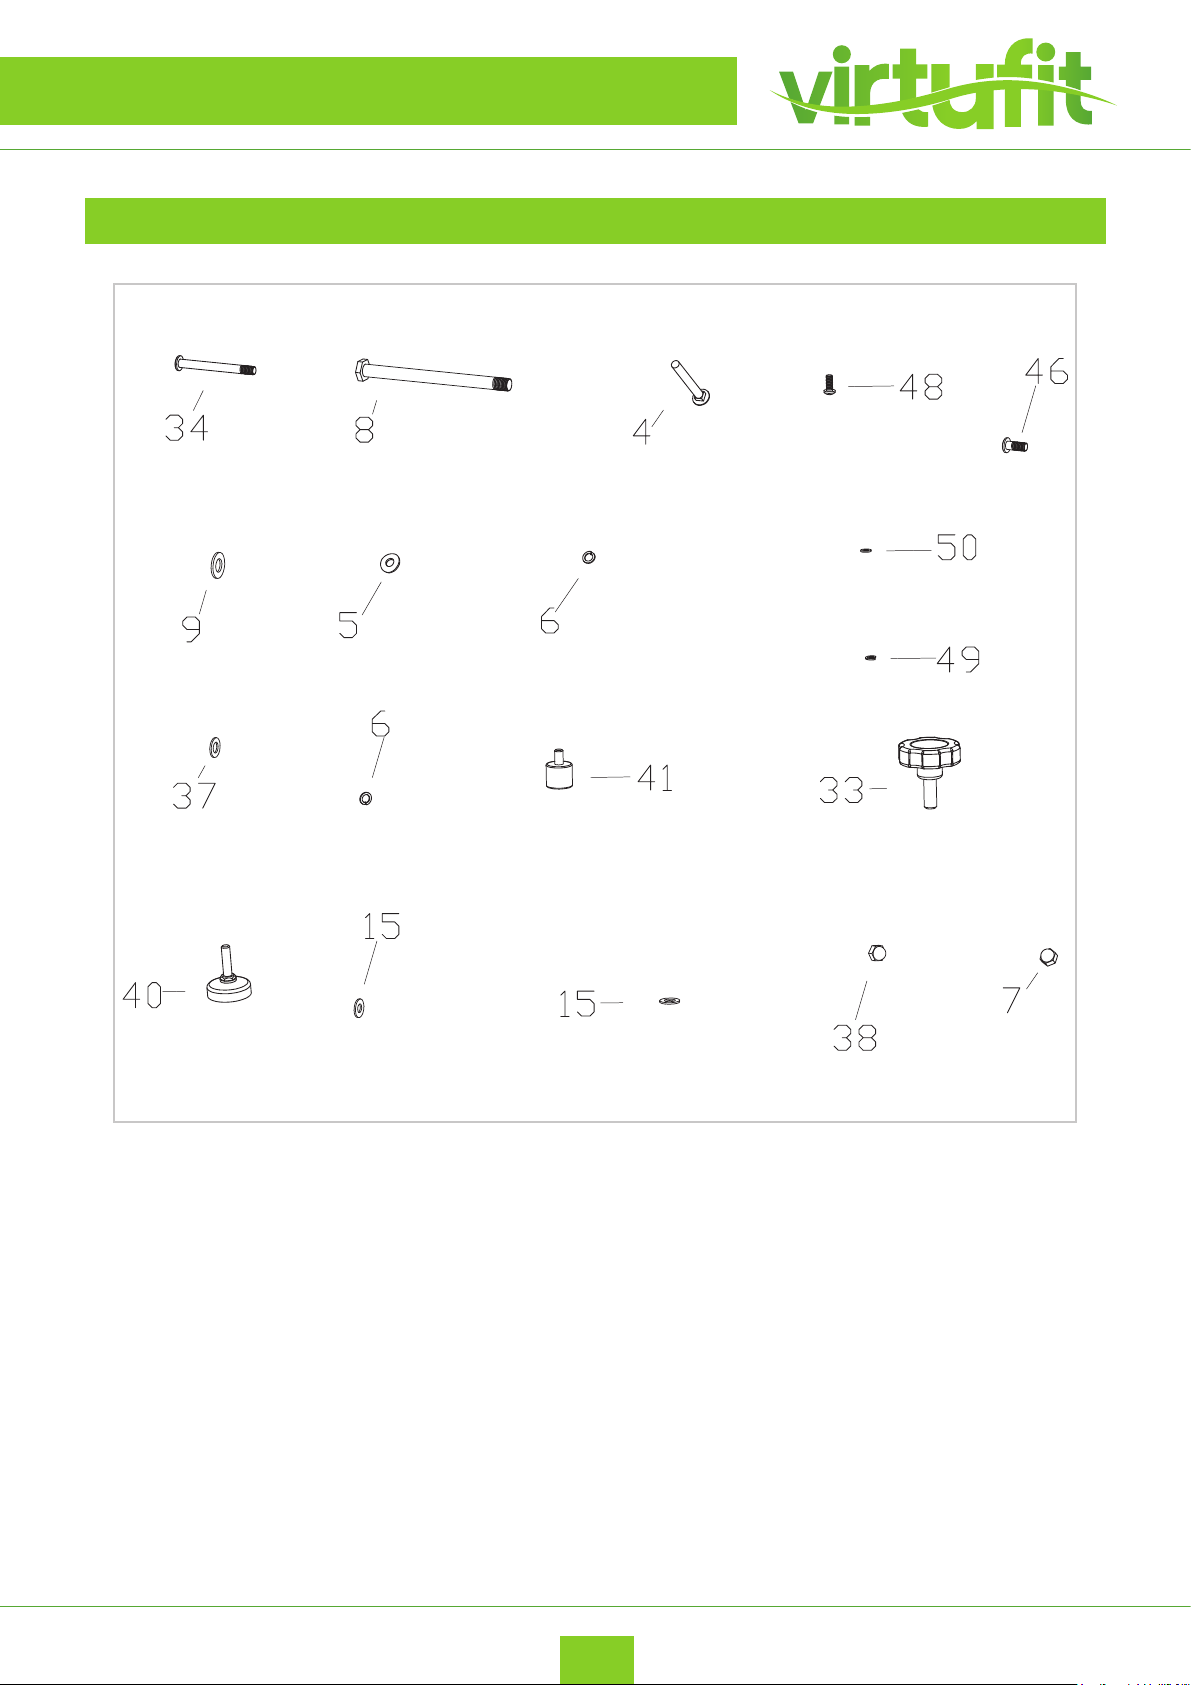
CHECKLIST
TOOLKIT
VirtuFit Row 1.0 Rowing Machine
EN
6
Page 7
ASSEMBLY INSTRUCTIONS
Missing parts: If you think you are missing certain parts in your package, carefully check the styrofoa and
the rowing machine. Some parts (bolts, screws, etc.) are already attached to / in the rowing machine.
Error message: Ensure that all cables are carefully attached. The aluminum legs are very sensitive and
must remain straight. Do you receive an error message after mounting your rowing machine? Then you
have to straighten these aluminum legs again, this may cause the error message to disappear.
Socket screws: The rowing machine contains socket screws, make sure that the allen key is rmly in the
bolt before you apply force to the key. In this way you prevent the head of the socket head screw from
being rotated.
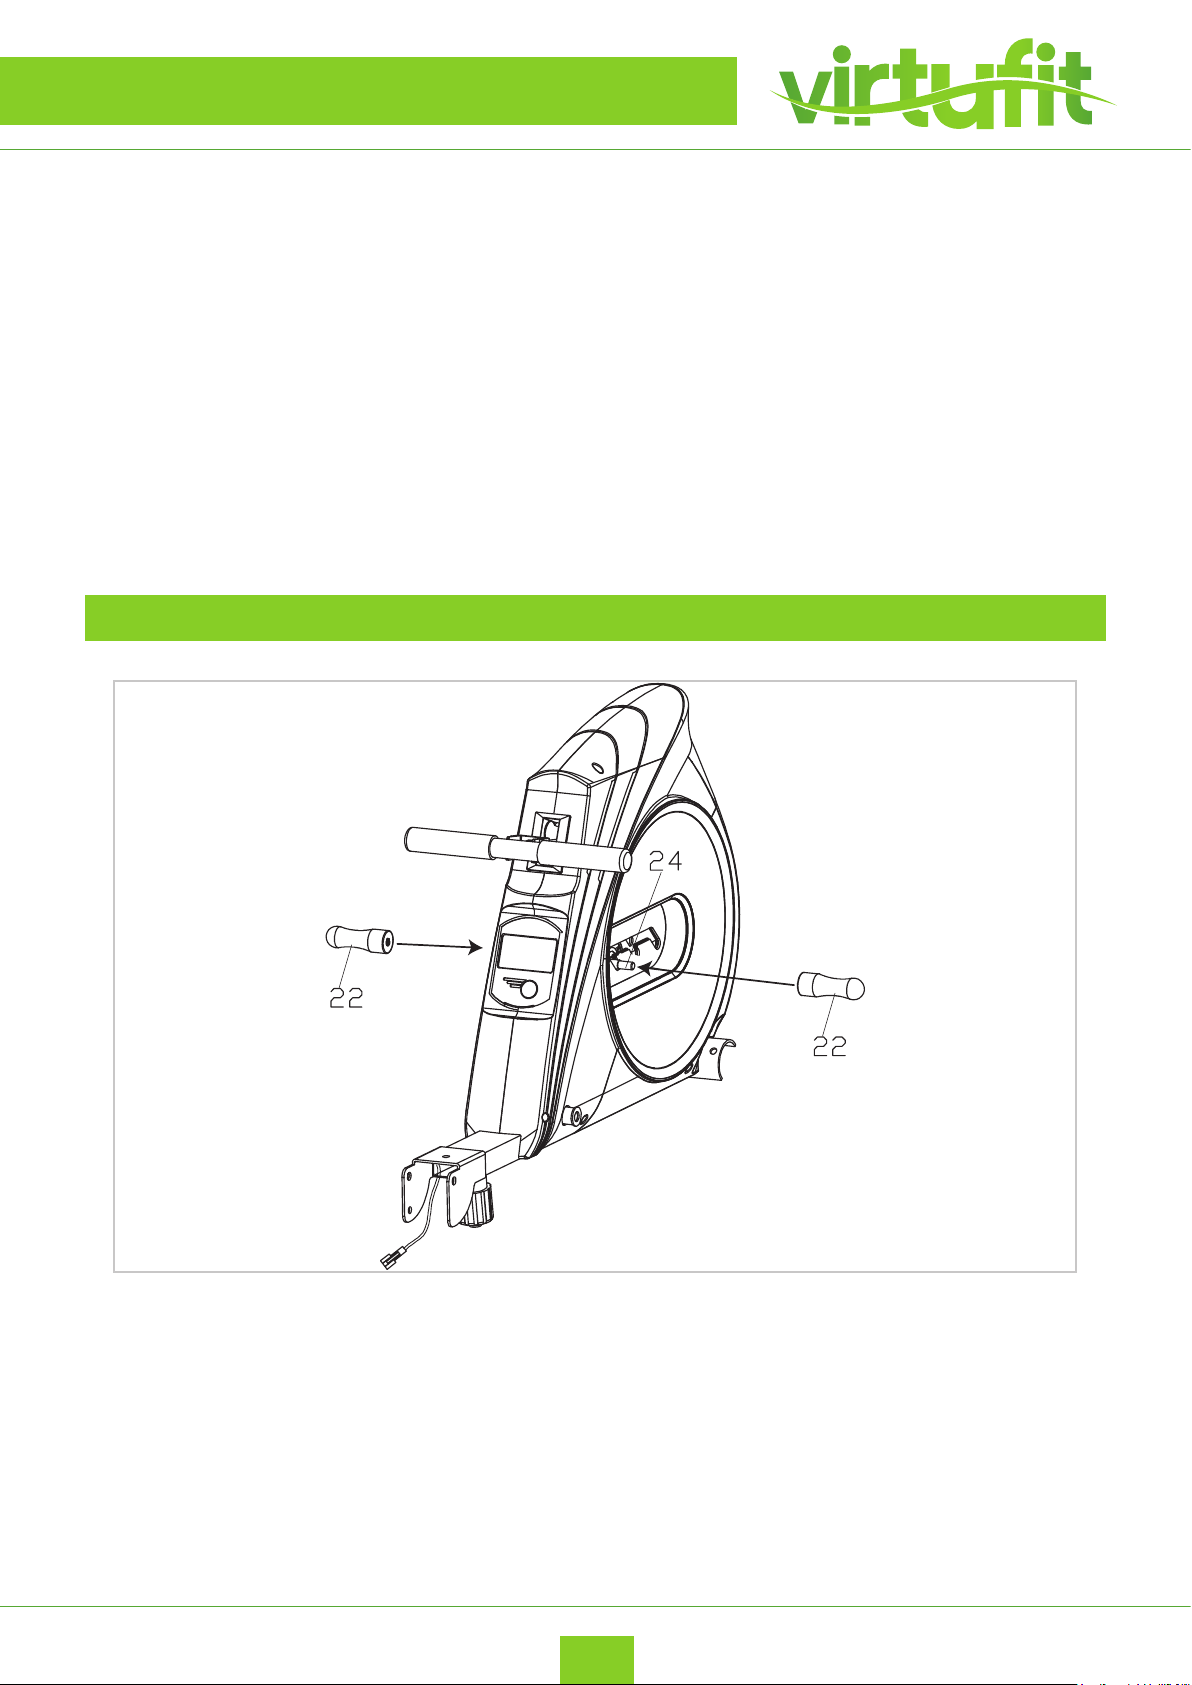
STEP 1
• Attach the handlebar (22) to the axle (24).
7
EN
VirtuFit Row 1.0 Rowing Machine
Page 8
ASSEMBLY INSTRUCTIONS
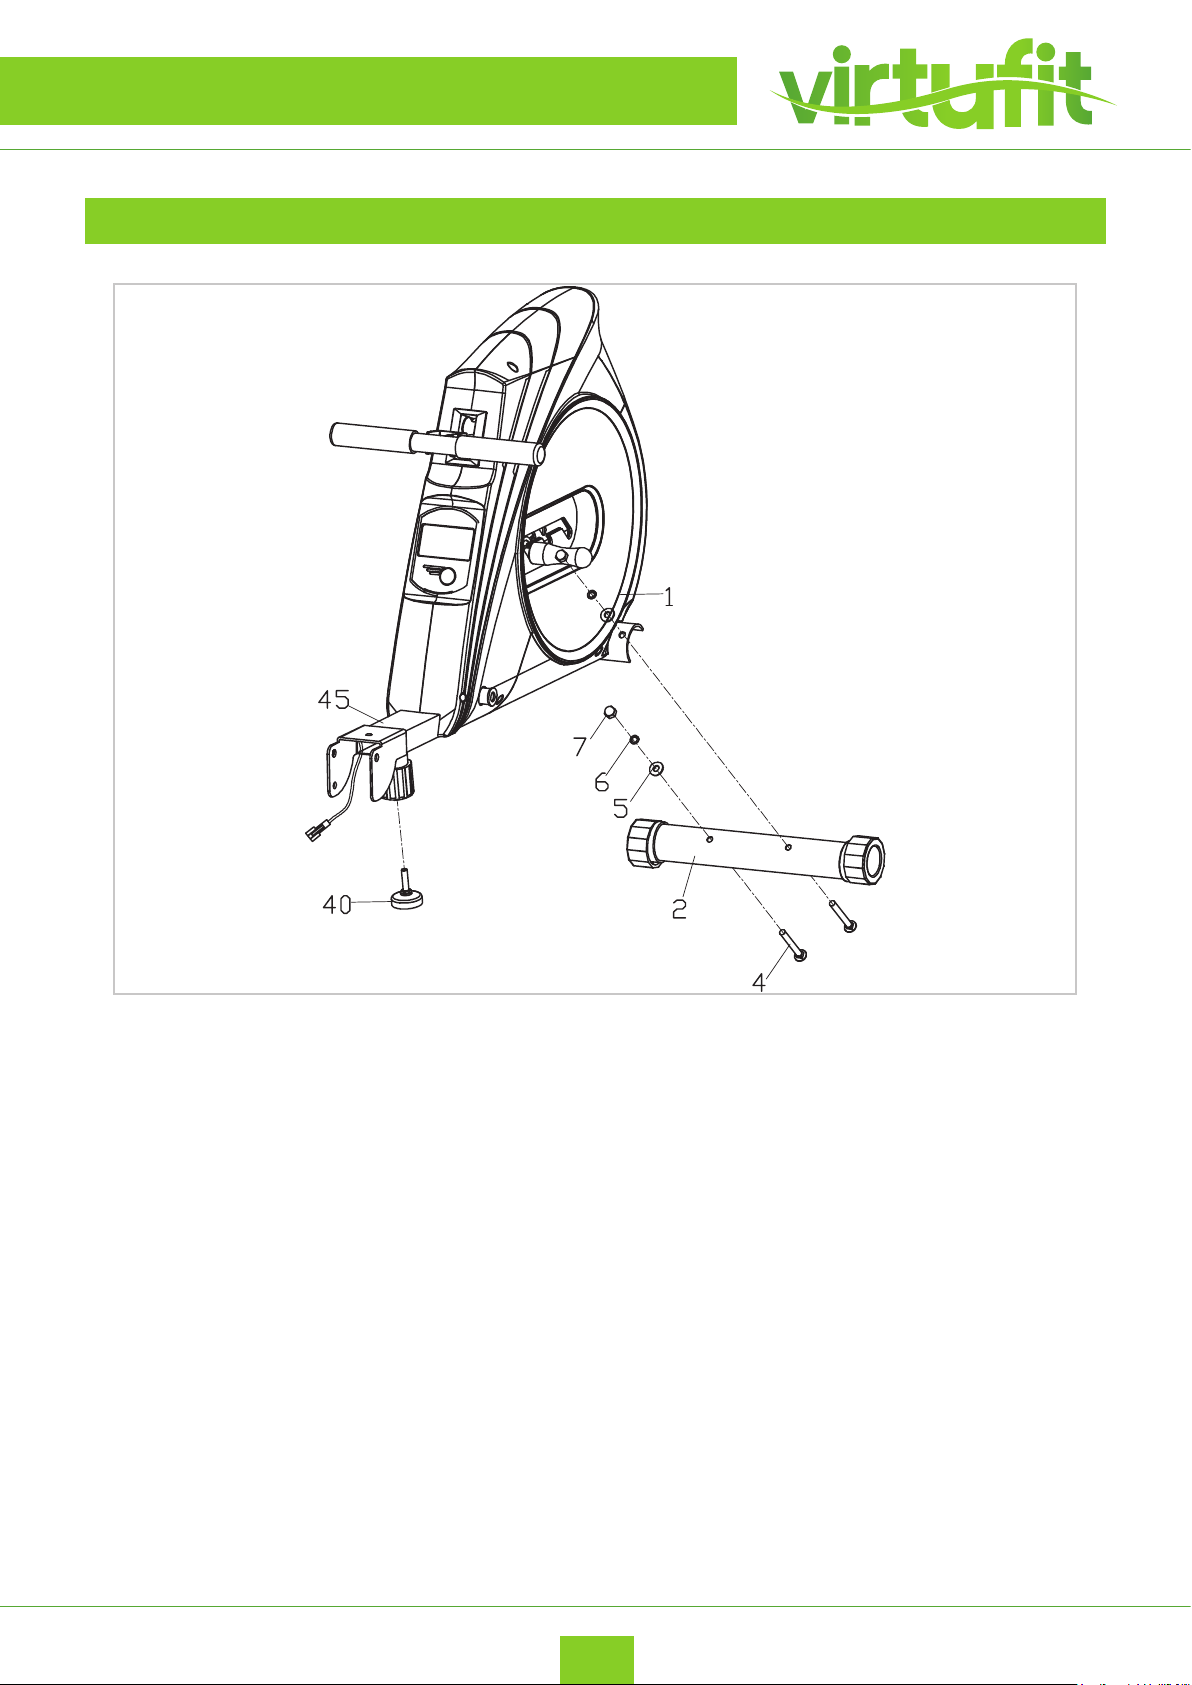
STEP 2
• Attach the front stabilizer (2) to the main frame (1) with the bolt (4), washer (5), spring washer (6)
and nut (7).
• Mount the adjustable cushion (40) on the main frame (1). Set to the appropriate position to the rail
frame (45).
VirtuFit Row 1.0 Rowing Machine
EN
8
Page 9
ASSEMBLY INSTRUCTIONS
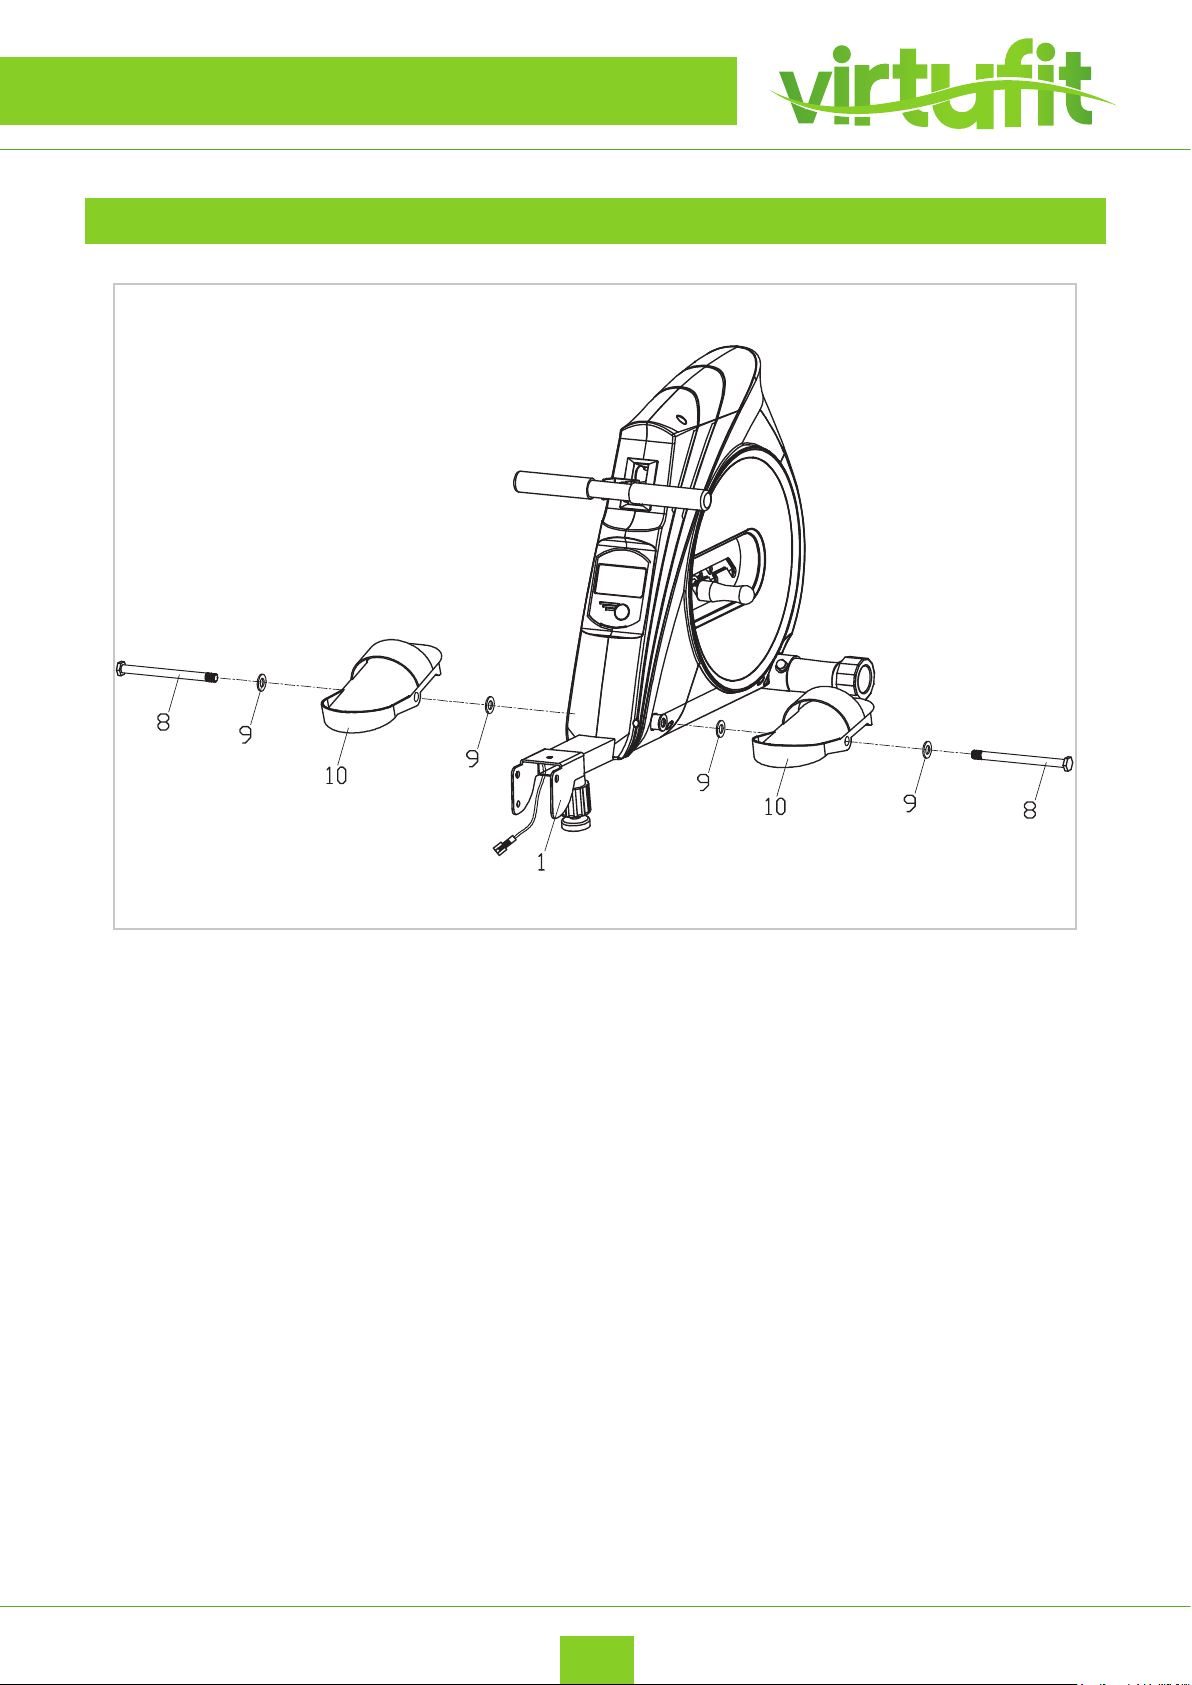
STEP 3
• Attach the pedals (10) to the main frame (1) with the bolts (8) and the at washers (9).
9
EN
VirtuFit Row 1.0 Rowing Machine
Page 10
ASSEMBLY INSTRUCTIONS
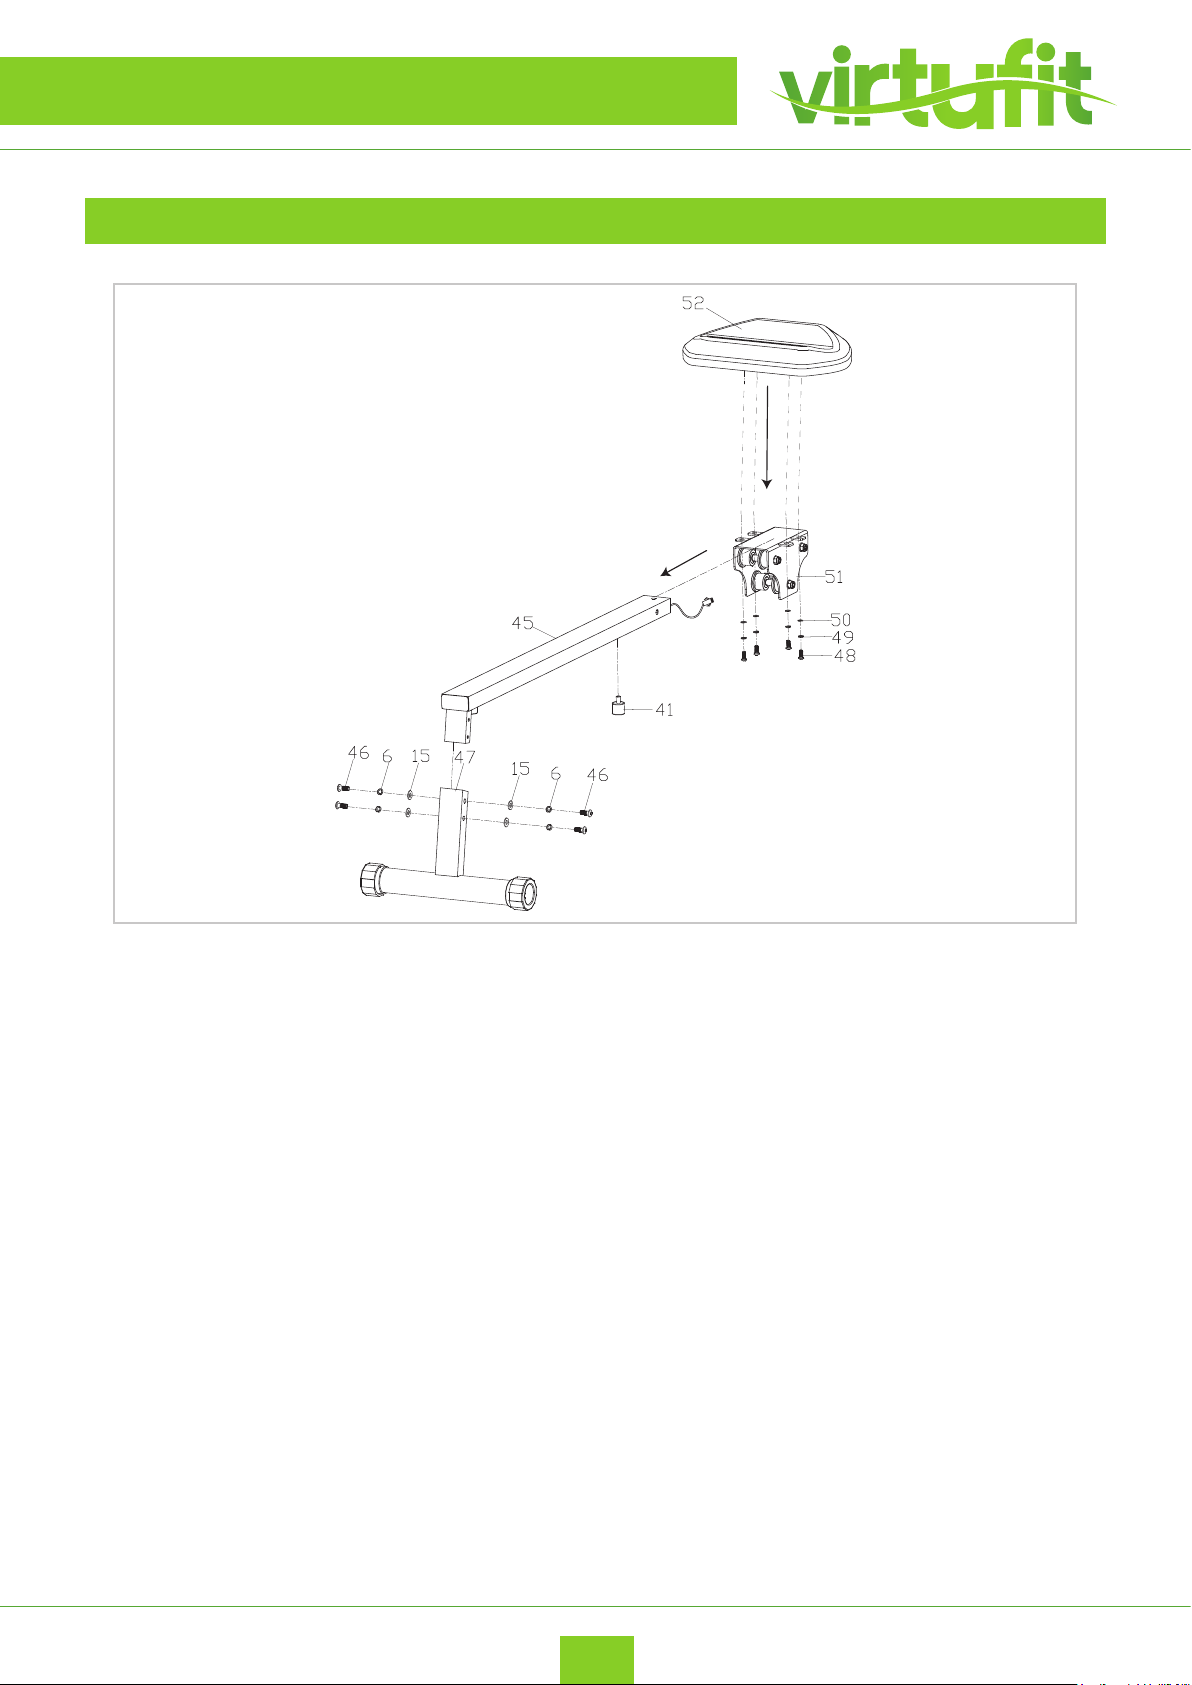
STEP 4
• Attach the saddle (52) to the saddle frame (51) with the screw (48) spring washers (49) and at
washers (50).
• Attach the rear support frame (47) to the rail frame (45) with the screw (46) spring washers (6) and
at rings (15).
• First remove the cushion (41) and then install the seat post (51) on the rail frame (45). Attach the
cushion (41) nally on rail frame (45).
VirtuFit Row 1.0 Rowing Machine
EN
10
Page 11
ASSEMBLY INSTRUCTIONS
STEP 5
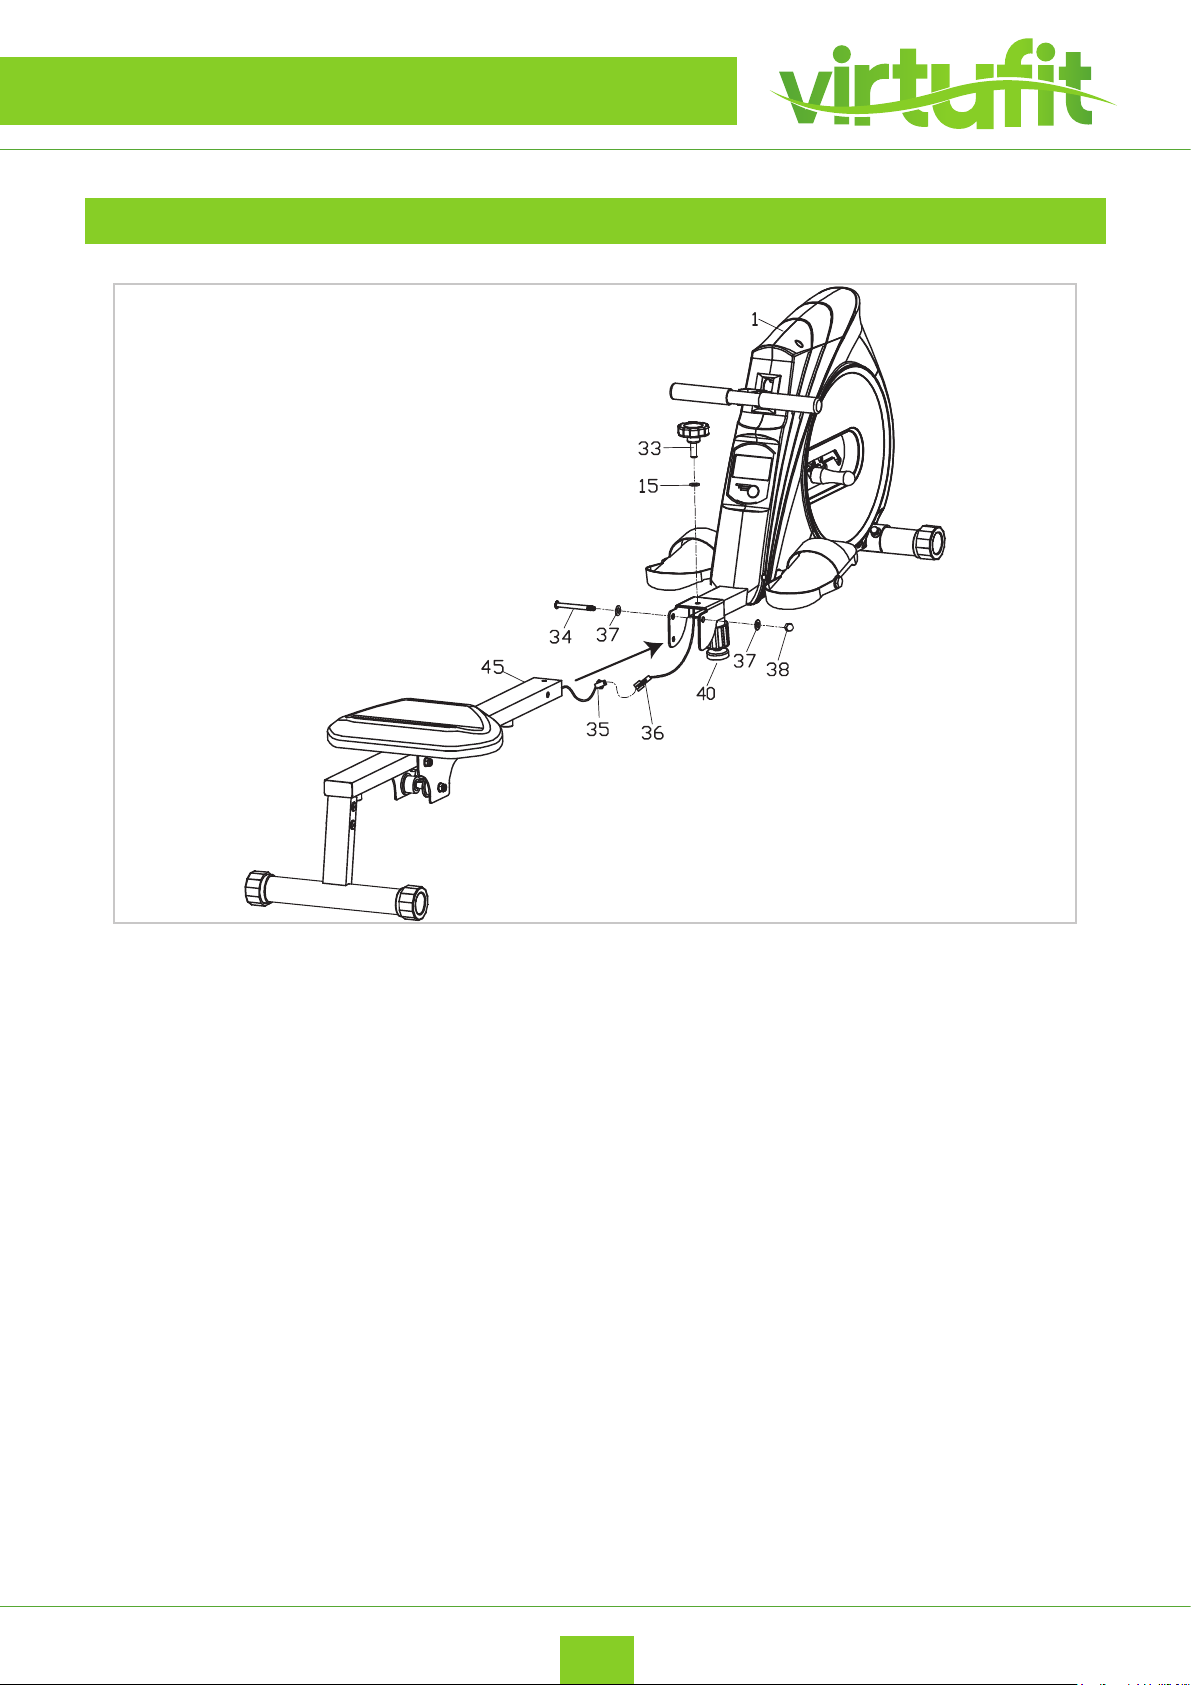
• Connect the wire (36) with the sensor wire (35). The sensor wire (35+36) must be around part “40”.
This reduces the chance of the cable getting pinched.
• Attach the rail frame (45) to the main frame (1) with the bolts (34), washers (37) and nuts (38).
• Then attach the bolt (33) and the at washer (15) to the main frame (1).
11
EN
VirtuFit Row 1.0 Rowing Machine
Page 12
ASSEMBLY INSTRUCTIONS
STEP 6
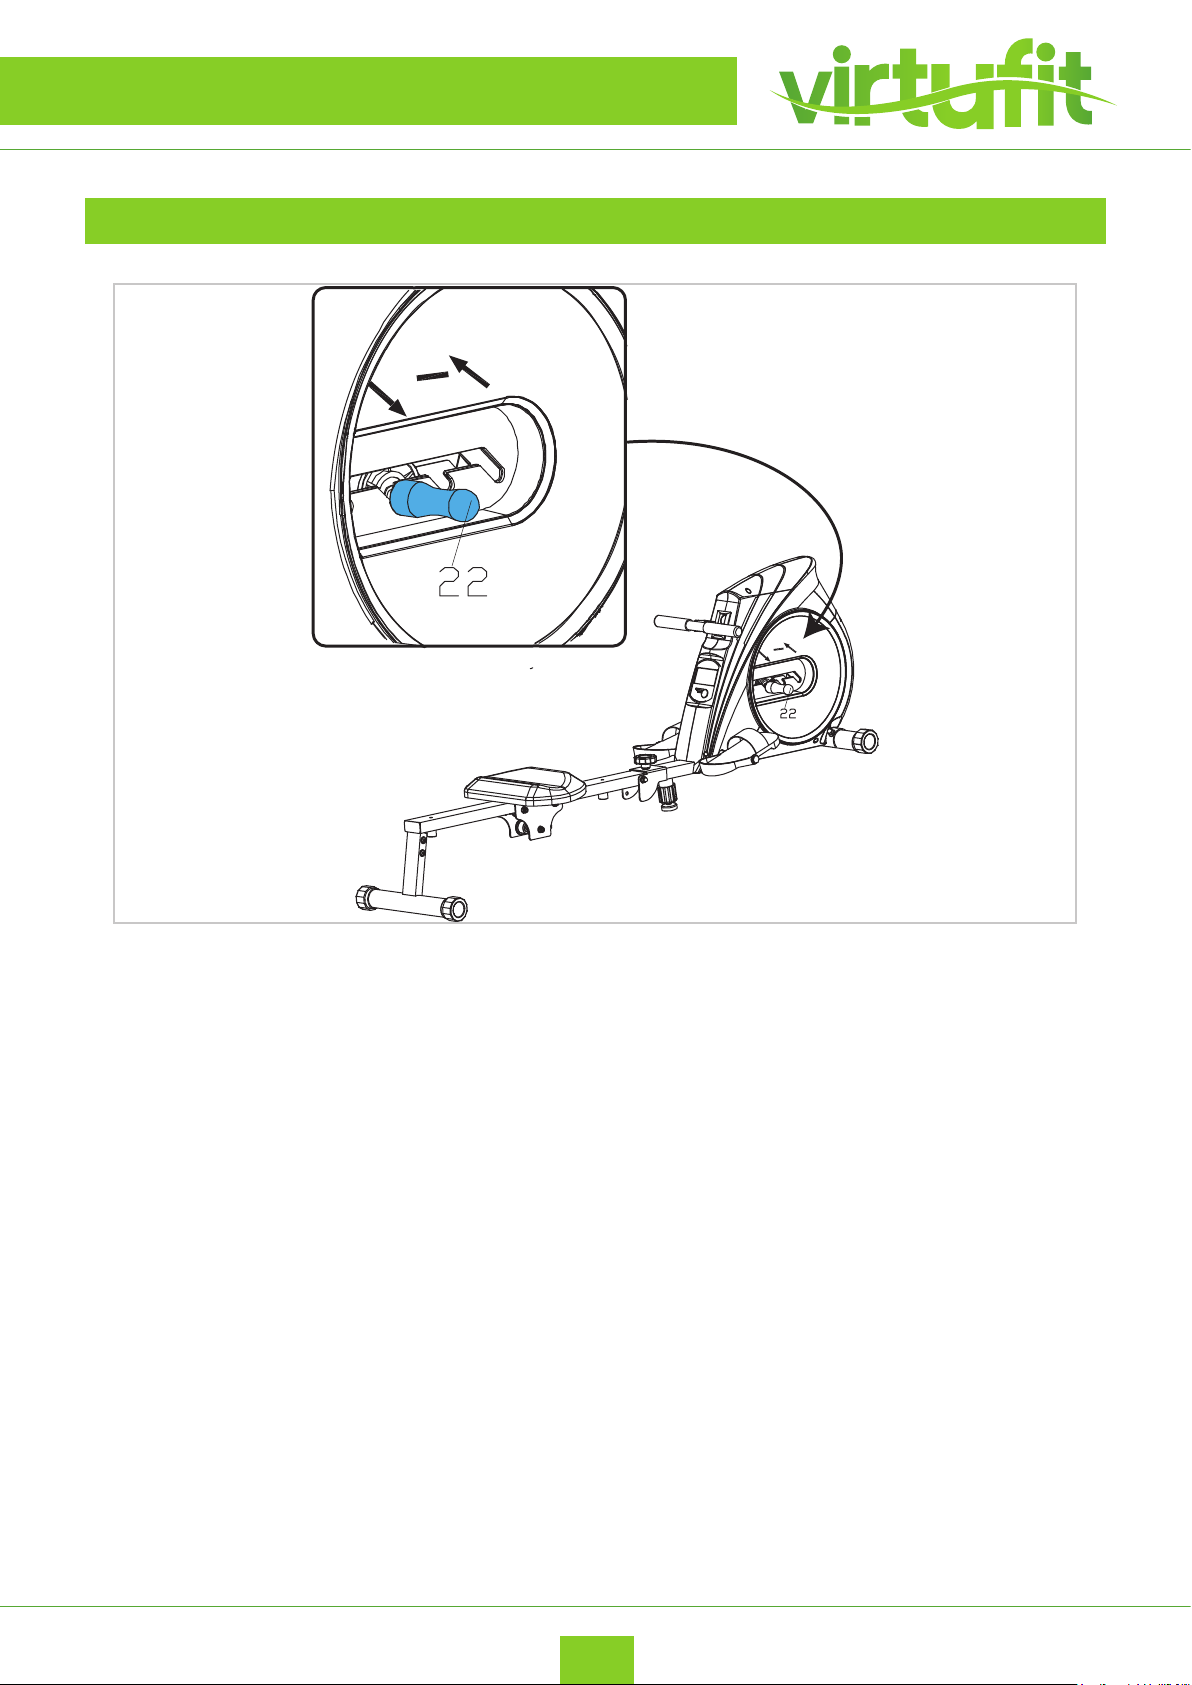
• Pull the handlebar (22) out of the groove as indicated by the arrow, pull the handlebar (22) forwards
or backwards, then insert the handlebar into a dierent groove.
Adjusting the support feet
The equipment is equipped with 4 support feet. If the equipment is not stable, the support feet can be
adjusted. Turn the support feet as required to put the equipment in a stable position.
NOTE! The machine is the most stable when all support feet are turned fully in. Therefore start
to level the machine by turning all support feet fully in, before turning out the required support
feet to stable the machine.
VirtuFit Row 1.0 Rowing Machine
EN
12
Page 13
FOLDING INSTRUCTIONS
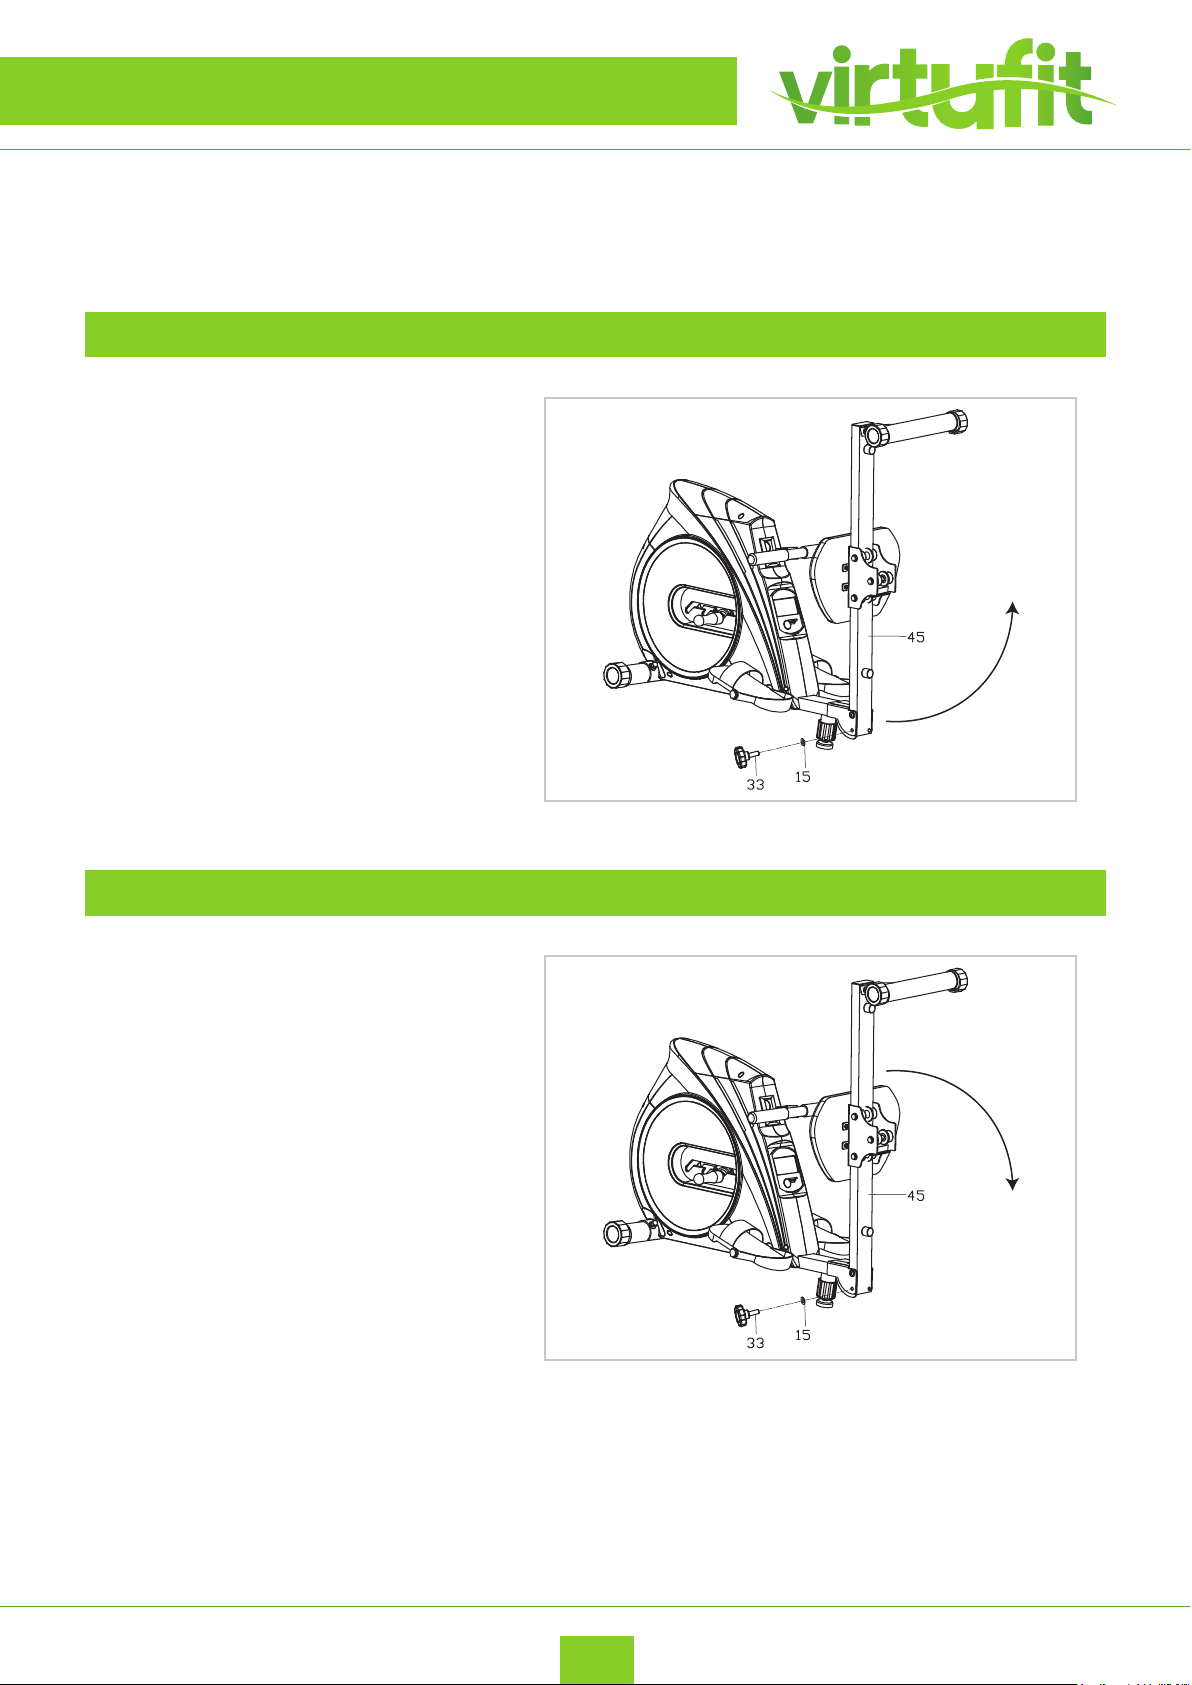
NOTE! Store your machine in a dry area away from children and high trac areas as shown in
the illustration. Be sure it is secure and cannot fall onto small animals or children.
FOLDING
Unscrew the locking pin (33), then remove
the locking pin and at washer (15), at the
same time fold the rails upwards. Replace
the locking pin (33) with at washer (15).
UNFOLDING
Unscrew the locking pin (33), then remove
the locking pin and at washer (15), at the
same time unfold the rails towards the
ground. Replace the locking pin (33) with at
washer (15).
13
EN
VirtuFit Row 1.0 Rowing Machine
Page 14
MAINTENANCE
Safe and eective use can only be achieved if the device will be assembled and maintained
well. It is your responsibility to ensure that the equipment is regularly maintained. Parts
that are already used and / or damaged must be replaced before continuing using. The
rower machine may only be used indoors and stored away, prolonged exposure to
weathering and changes in temperature / humidity can have a serious impact on the
electrical components and moving parts of the rowing machine.
DAILY MAINTENANCE
• Clean and remove sweat after each use. Do not use aggressive cleaning agents and ensure that
the device remains free of moisture.
• Check that the rail and the wheels under the seat are free from dust and dirt.
SEMI-ANNUAL MAINTENANCE
• Inspect all bolts and nuts in connection with moving parts of the device, tighten as required.
• Check the mobility of moving parts and components of the use equipment, silicone spray if
necessary.
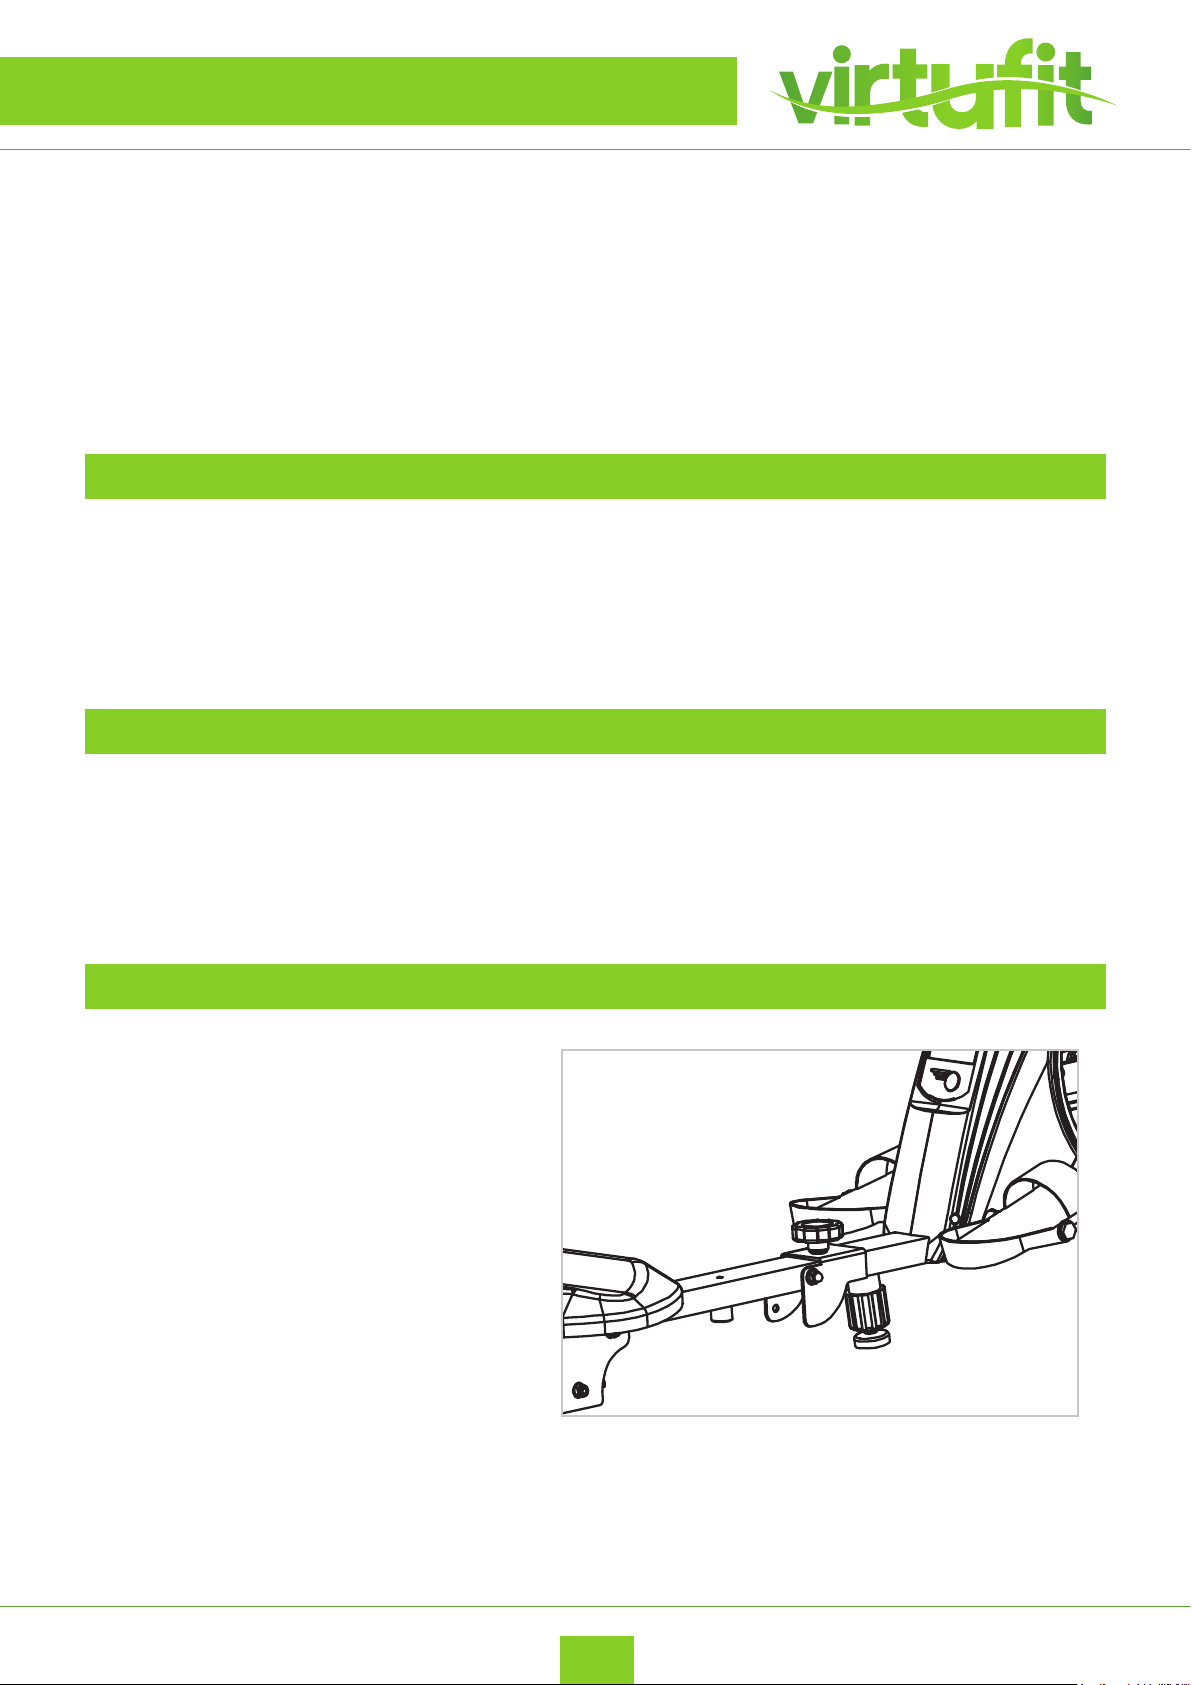
TENSION KNOB
TENSION KNOB ADJUSTMENT
You could adjust the tension for varied
resistance as shown in the illustration.
NOTE: You should begin your “Exercise
Period” at the resistance level and speed
to suit your needs. Remember to start out
slow and easy, and work your way up to the
tness level you desire.
VirtuFit Row 1.0 Rowing Machine
EN
14
Page 15
MAINTENANCE
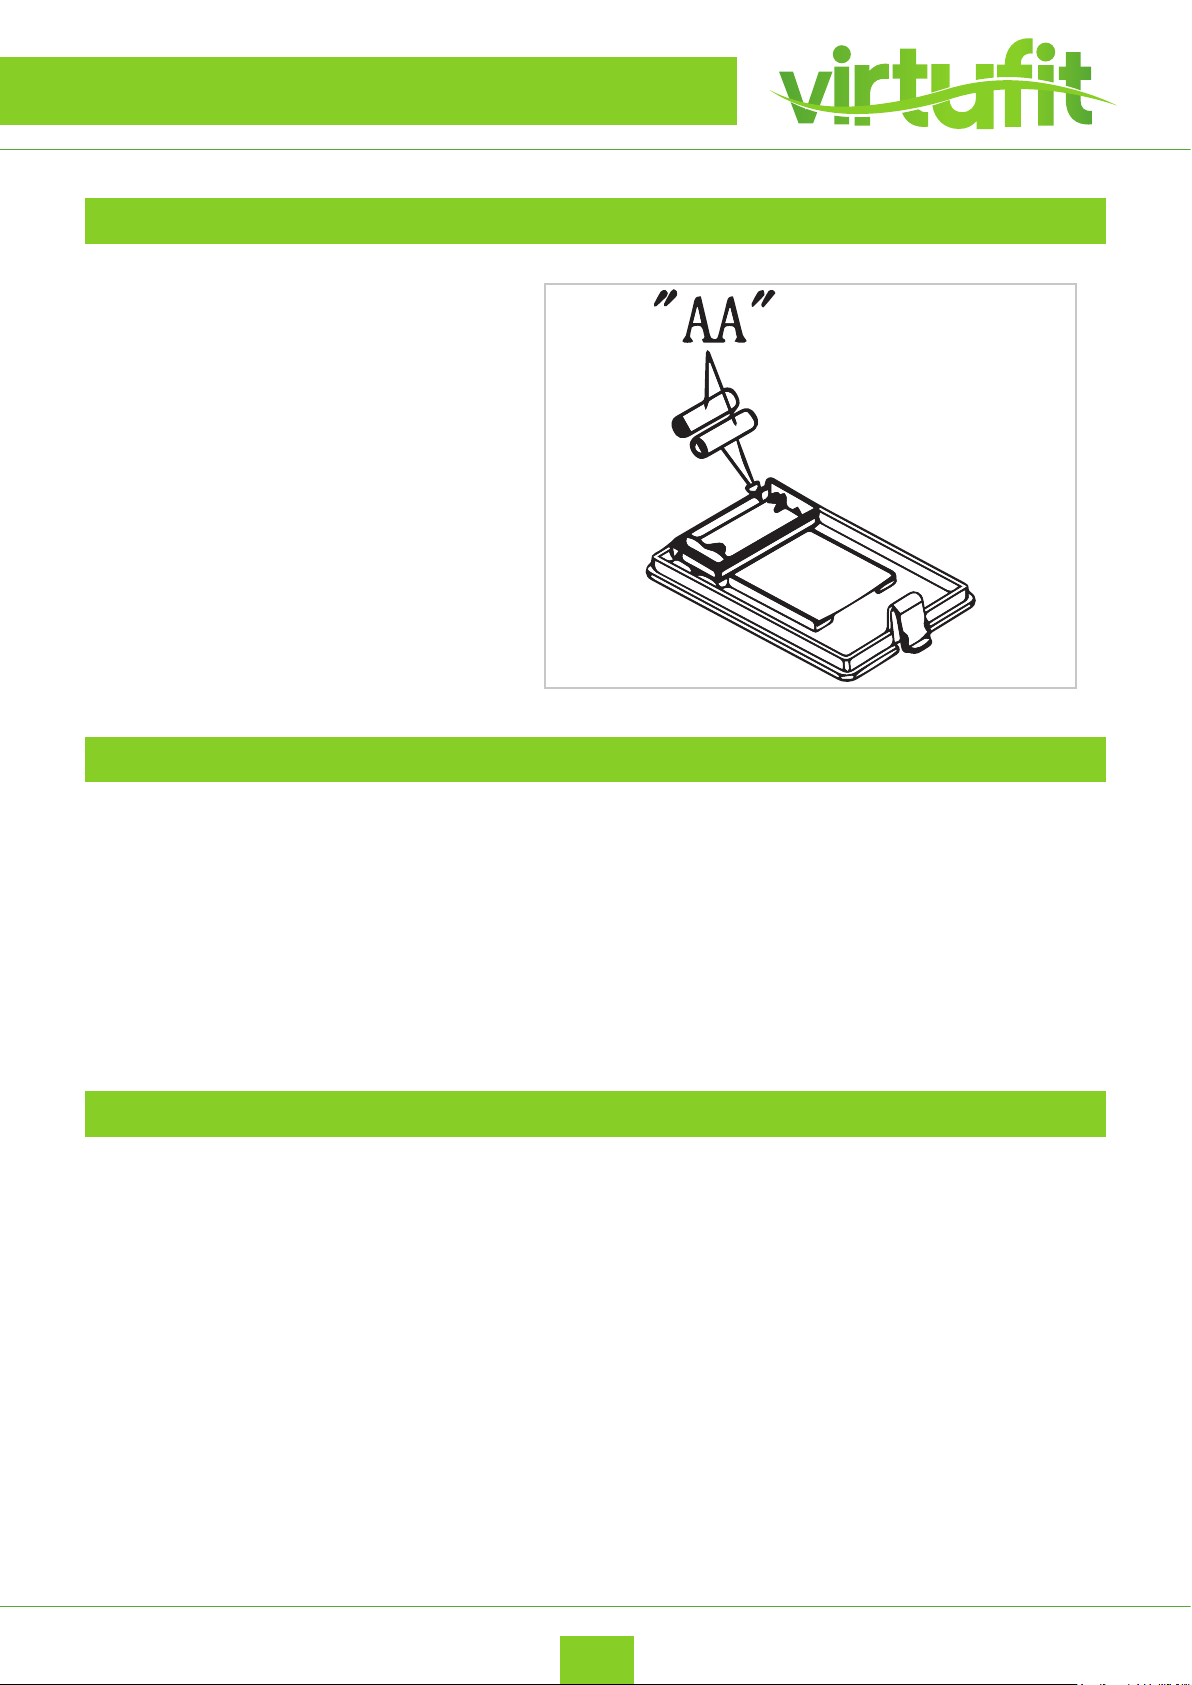
AA BATTERIJEN
The monitor uses on “AA” battery. You can
replace the battery through the back of the
unit.
The batteries must be installed correctly. If
the screen is unreadable or only parts of the
image work, follow the next step: Remove
the batteries and wait 15 seconds, then
reinsert the batteries correctly.
BATTERY
ADVICE FOR HANDLING BATTERIES
1. Remove the batteries when they are exhausted or if you do not use the product for an extended
period of time in order to avoid hazards through leaking batteries.
2. Do not recharge batteries nor dissemble or throw then into re. Danger of explosion!
3. Pay attention to the polarity (+) and (-). Always replace all the batteries; do not mix old and new batteries,
or dierent battery types.
4. Use preferably alkaline batteries, as they have a longer operation time then usual zinc-coalbatteries.
5. A change of batteries is necessary when the display becomes weaker or completely faded.
CHANGING THE BATTERIES
1. If you see an improper display on the monitor, please replace the batteries to have a good result.
2. Please use 2pcs of 1.5v AA batteries as a power supply.
15
EN
VirtuFit Row 1.0 Rowing Machine
Page 16

TROUBLE SHOOTING
PROBLEM SOLUTIONS
Display does not work
If the display no longer works, you can replace the batteries. These are at the back of the display.
Display shows no values
If the display does not show any values, you can try to check the sensor cables and the cables in the back
of the display. If this still does not work, you can move the sensor slightly.
Rowing machine beeps
Check that all bolts and nuts are tightened securely. Spray silicone spray if necessary. Also check the wheels
under the seat.
VirtuFit Row 1.0 Rowing Machine
EN
16
Page 17
CONTROL PANEL
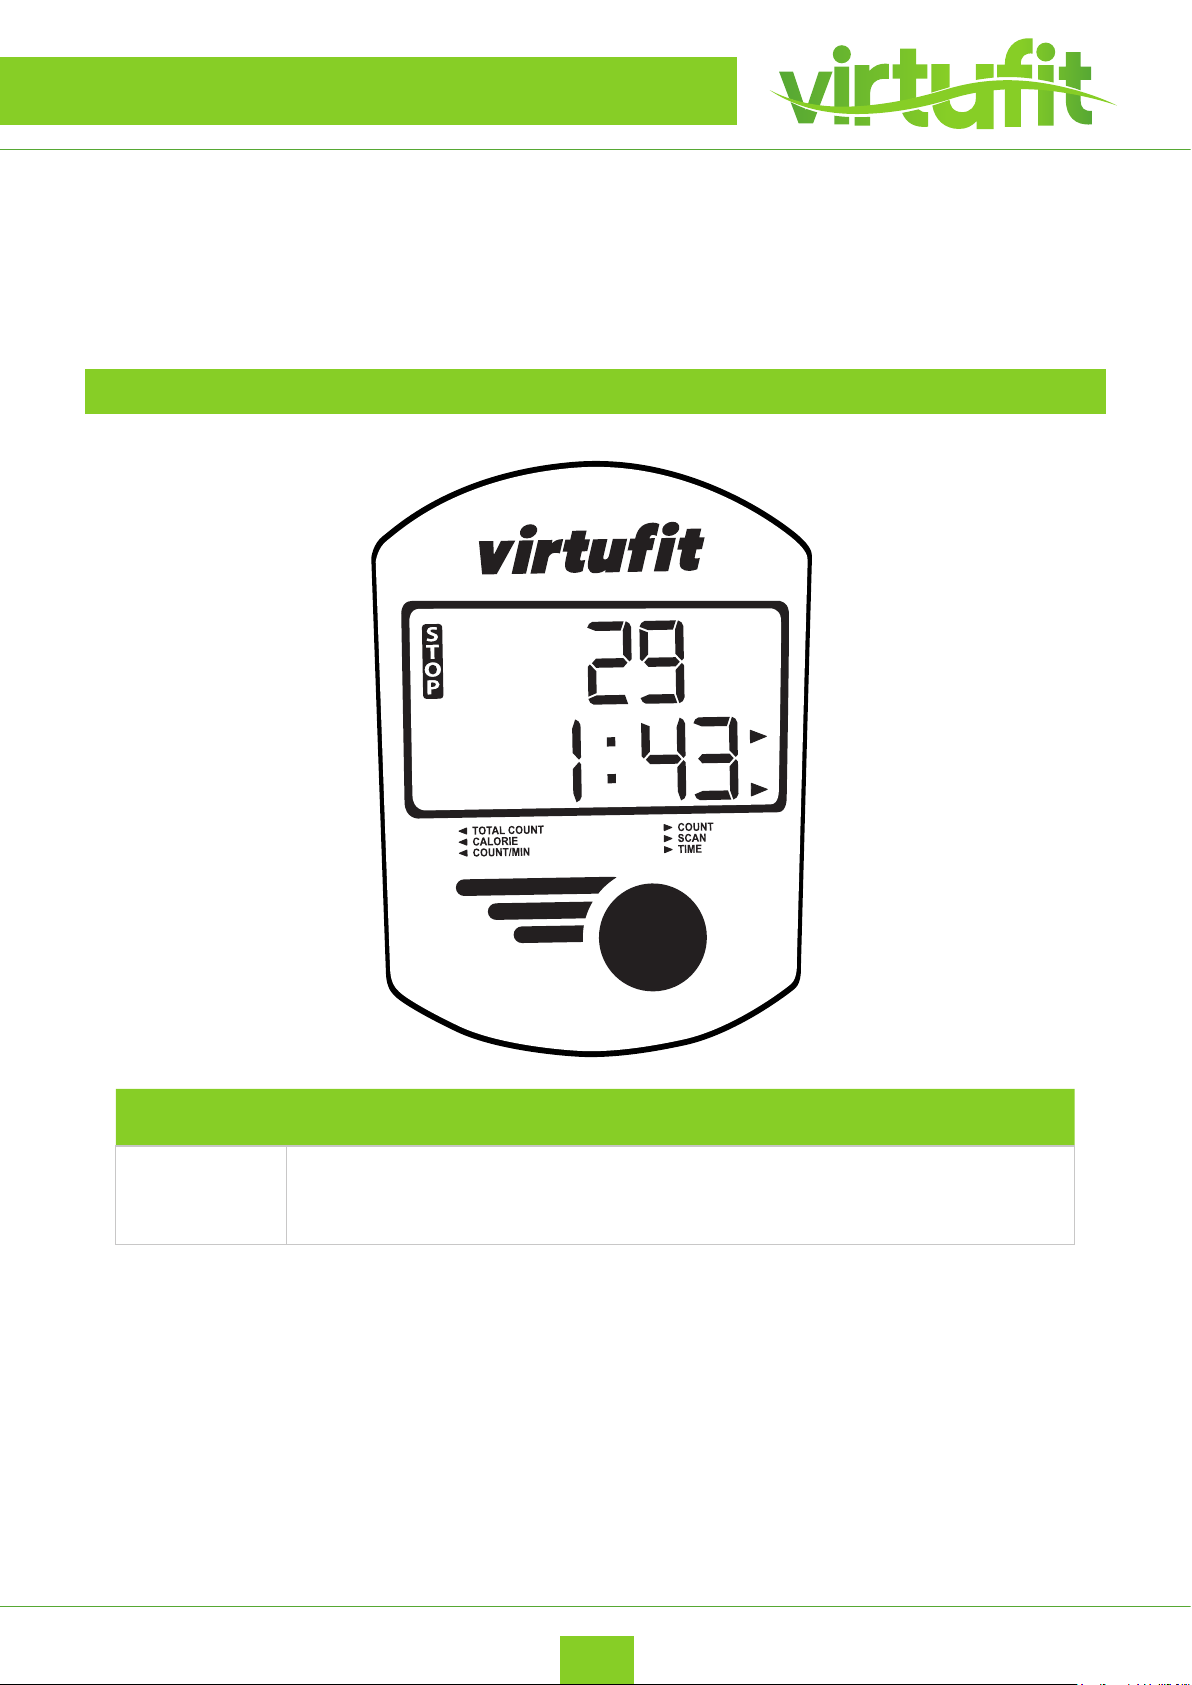
NOTE:
Keep the console away from direct sunlight. Dry the surface of the console when it is
covered with drops of sweat. Do not lean on the console. Only touch the display with the
tip of your nger. Make sure that your nails or sharp objects do not touch the display.
CONSOLE
17
BUTTON FUNCTION
MODE
Press Mode/ Reset button to select console functions.
EN
VirtuFit Row 1.0 Rowing Machine
Page 18

CONTROL PANEL
FUNCTION
BUTTON EXPLANATION
SCAN
TIME
COUNT
TOTAL
COUNT
CALORIES
COUNT/MIN
The following functions are displayed in the SCAN position: TIME, COUNT, TOTAL
COUNT, CALORIE, COUNT / MIN.
Counts rowing time from the beginning of the exercise to the end.
Counts the rowing strokes from start to nish.
Counts the total rowing strokes from start to nish.
Counts total calories from the beginning to the end of rowing.
Displays the current rowing strokes per minute or the frequency per minute.
AUTO ON/
OFF & AUTO
START/STOP
Without any signal being transmitted into the monitor for 4 minutes the monitor
will enter SLEEP mode automatically. Active training data will be lost. When you
start rowing or press the button, the monitor is working again.
VirtuFit Row 1.0 Rowing Machine
EN
18
Page 19
EXPLODED DRAWING
19
EN
VirtuFit Row 1.0 Rowing Machine
Page 20

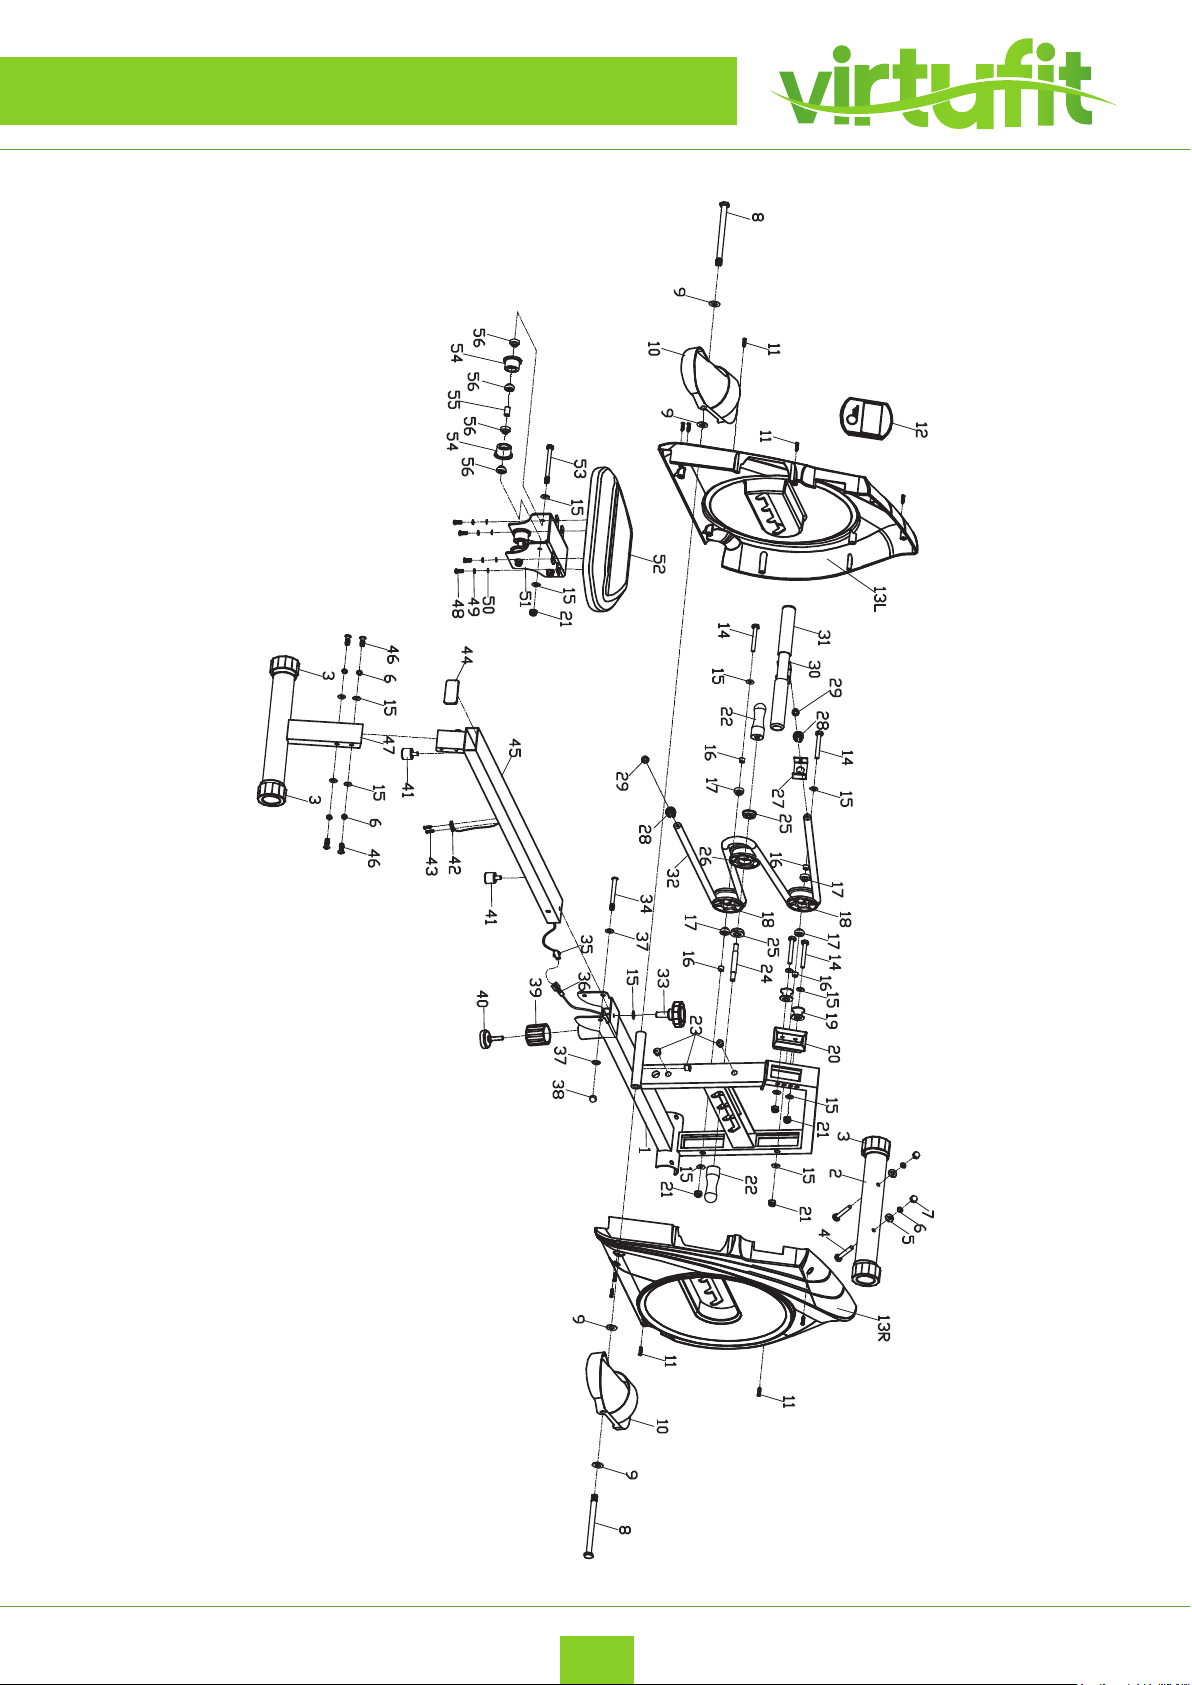
PARTS LIST
# DESCRIPTION QTY
1 Mainframe 1
2 Front stabilizer 1
3 End cap 4
4 Bolt M8*65 2
5 Arc washer d8*1.5*Φ20*R30 2
6 Spring washer D8 6
7 Nut M8 2
8 Bolt φ12.5*130*M12*16 2
9 Flat washer D13*φ26*2 4
10 Pedal 2
11 Screw ST4.2*18 10
12 Computer 1
13 L/R Chain cover 1 pr
# DESCRIPTION QTY
29 Plug 2
30 Handlebar 1
31 Foam grip 2
32 Rope 1
33 Bolt 1
34 Bolt M10x80 1
35 Sensor wire 1
36 Extended wire 1
37 Flat washer D10*φ20*1.5 2
38 Nut M10 1
39 End cap 1
40 Adjustable support leg 1
41 Cushion pad 2
14 Bolt M8*62 4
15 Flat washer D8*φ19*1.5 19
16 Bushing φ12*φ8.5*10.5 4
17 Bearing 608 4
18 Wheel 2
19 Idler wheel 2
20 Fixed sleeve 1
21 Nulon nut M8 7
22 Handlebar 2
23 End cap 3
24 Axle M10*φ12*95 1
25 Bearing φ32*φ12*11 2
26 Wheel 1
27 U-shaped washer 1
42 Sensor 1
43 Screw ST3*10 2
44 End cap 1
45 Rail tube 1
46 Screw M8*16 4
47 Rear support frame 1
48 Bolt M6*15 4
49 Spring washer D6 4
50 Flat washer D6 4
51 Saddle post 1
52 Saddle 1
53 Bolt M8*90 3
54 Wheel 6
55 Bushing φ12*φ8*20 3
28 Rope lock 2
VirtuFit Row 1.0 Rowing Machine
56 Bearing 12
EN
20
Page 21
TRAINING INSTRUCTIONS
A successful exercise program consists of a warm-up, aerobic exercise, and a cool-down.
Do the entire program at least two and preferably three times a week, resting for a day
between workouts. After several months, you can increase your workouts to four or ve
times per week.
WARMING UP
The purpose of warming up is to prepare your body for exercise and to minimize injuries. Warm up for two
to ve minutes before strength-training or aerobic exercising. Perform activities that raise your heart rate
and warm the working muscles. Activities may include brisk walking, jogging, jumping jacks, jump rope,
and running in place.
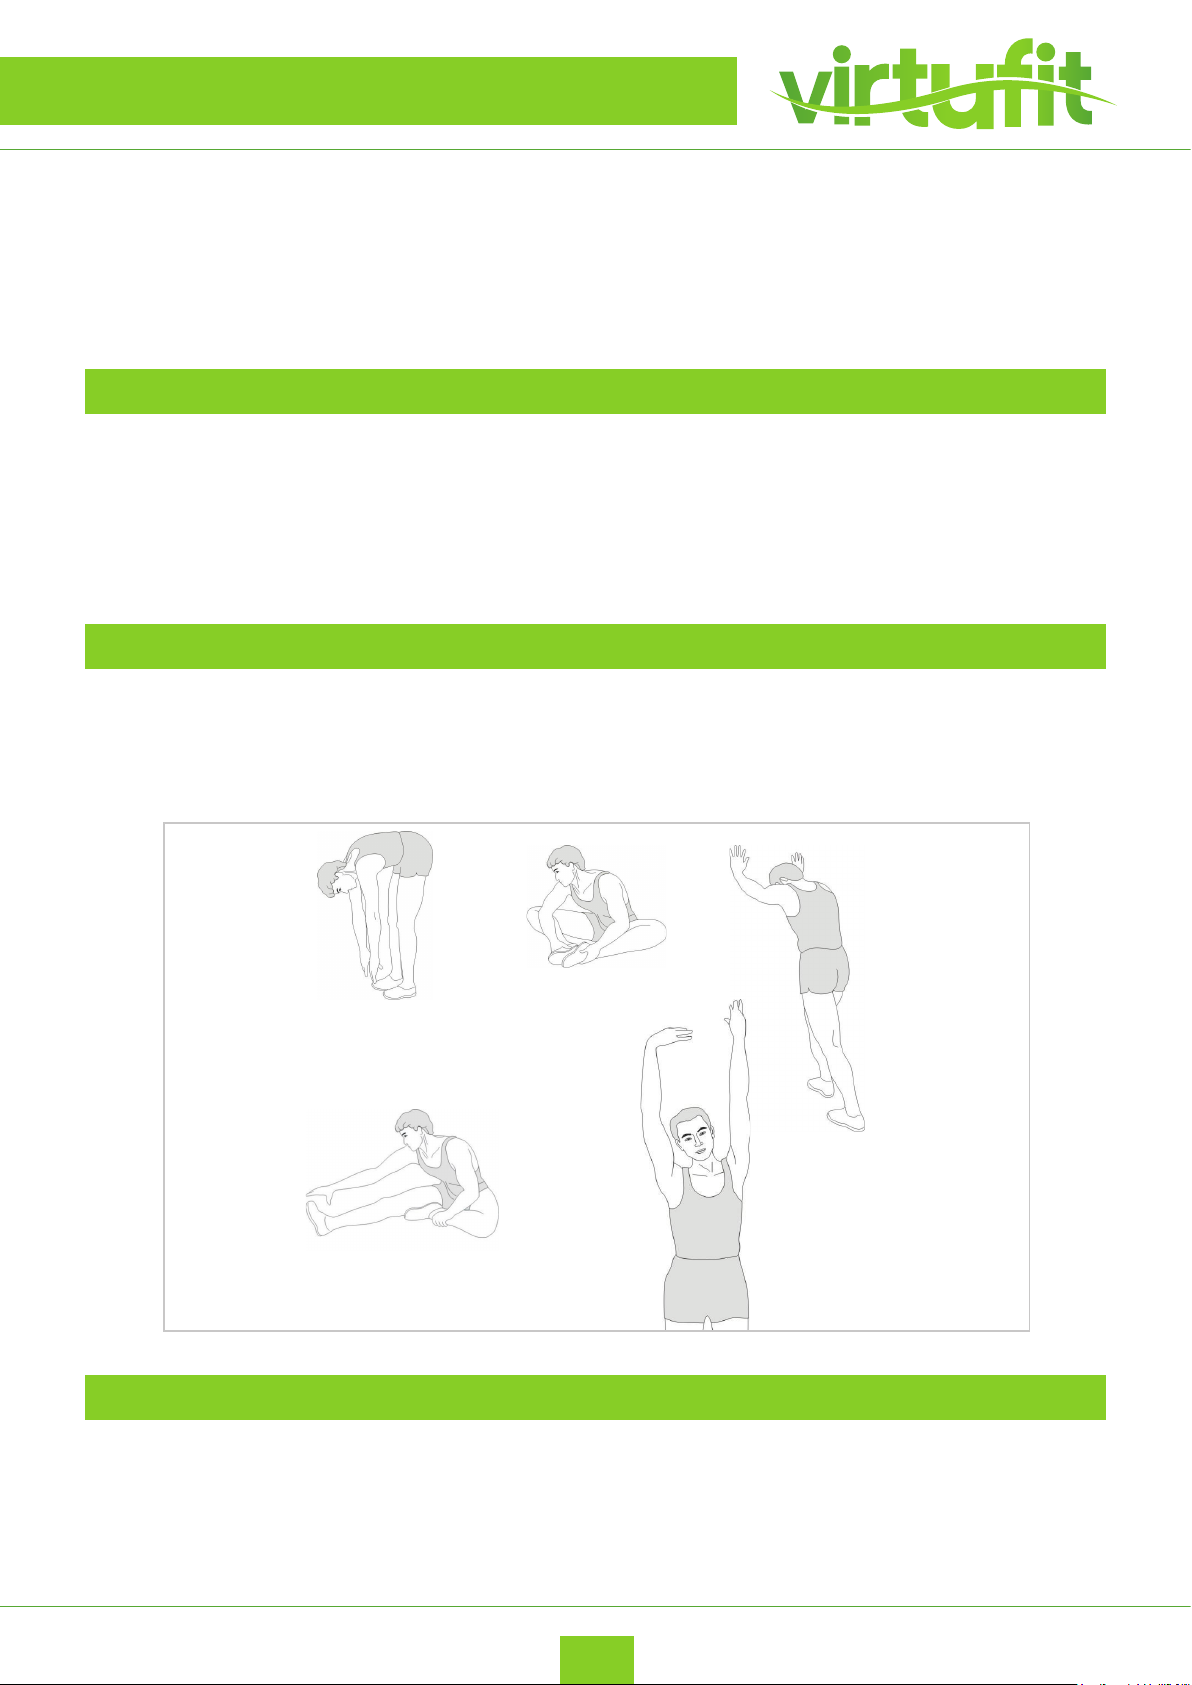
STRETCHEN
Stretching while your muscles are warm after a proper warm-up and again after your strength or aerobic
training session is very important. Muscles stretch more easily at these times because of their elevated
temperature, which greatly reduces the risk of injury. Stretches should be held for 15 to 30 seconds.
INNER THIGH STRETCH
TOE TOUCH
HAMSTRING STRETCH
SIDE STRETCH
ACHILLES STRETCH
COOLING DOWN
The purpose of cooling down is to return the body to its normal or near normal, resting state at the end of
each exercise session. A proper cool-down slowly lowers your heart rate and allows blood to return to the
heart.
21
EN
VirtuFit Row 1.0 Rowing Machine
Page 22

For questions or missing parts please contact your dealer.
 Loading...