

Page 1

HomeFusion Broadband
User Manual
Page 2

1
Getting Started ........................................................... 1
1.1 Basic Concepts ................................................................................................................................ 3
1.2 Contents of the HBR Box ............................................................................................................. 4
1.3 Getting to Know the HBR ............................................................................................................ 5
1.3.1 Front Panel ............................................................................................................................................ 6
1.3.2 Back Panel............................................................................................................................................10
2
Setup.......................................................................... 12
2.1 Connecting the HBR to the MoCA Network .......................................................................14
2.2 Powering on the HBR..................................................................................................................15
2.3 Connecting Your Network Devices........................................................................................16
2.3.1 Connecting Your Wireless Devices via WPS ............................................................................17
2.3.2 Connecting Your Wireless Device Manually............................................................................ 19
2.3.3 Wired Connection to the HBR....................................................................................................... 23
2.4 Wall Mounting the HBR (Optional) ........................................................................................24
3
Graphical User Interface (GUI)................................. 26
3.1 Main...................................................................................................................................................29
3.1.1 My Router ............................................................................................................................................ 30
3.1.2 My Network......................................................................................................................................... 32
3.1.3 Action Zone.........................................................................................................................................33
4
GUI:
Wireless Settings ...................................................... 34
4.1 Wireless Status ..............................................................................................................................35
4.2 Basic Security Settings................................................................................................................37
4.3 Advanced Security Settings......................................................................................................40
4.3.1 Securing Your Wireless Connection ........................................................................................... 41
4.3.2 SSID Broadcast ...................................................................................................................................42
4.3.3 Wireless MAC Authentication.......................................................................................................43
4.3.4 802.11b/g/n Mode............................................................................................................................44
4.3.5 Other Advanced Wireless Options..............................................................................................45
Page 3

5
GUI: My Network....................................................... 46
5.1 Network Status..............................................................................................................................47
5.2 Network Connections.................................................................................................................48
5.2.1 Ethernet Properties...........................................................................................................................49
5.2.2 Wireless Access Point Properties................................................................................................. 50
5.2.3 Coax Properties..................................................................................................................................51
5.2.4 Broadband Connection (LTE)........................................................................................................ 53
6
GUI: Firewall Settings............................................... 54
6.1 General.............................................................................................................................................56
6.2 Access Control...............................................................................................................................58
6.3 Port Forwarding............................................................................................................................60
6.4 DMZ Host ........................................................................................................................................61
6.5 Port Triggering ..............................................................................................................................62
6.6 Remote Aministration ................................................................................................................64
6.7 Static NAT........................................................................................................................................66
6.8 Advanced Filtering ......................................................................................................................67
6.9 Security Log....................................................................................................................................70
7
GUI: Parental Control ............................................... 71
7.1 Parental Control............................................................................................................................72
7.2 Rule Summary ...............................................................................................................................74
8
GUI: Advanced Settings ........................................... 75
8.1 HBA Advanced Pages..................................................................................................................77
8.1.1 Diagnostics .......................................................................................................................................... 79
8.1.2 Restore Defaults.................................................................................................................................81
8.1.3 Reboot the Router.............................................................................................................................83
8.1.4 ARP Table .............................................................................................................................................84
8.1.5 Quality of Service (QoS) ..................................................................................................................85
8.1.6 Local Administration........................................................................................................................ 86
Page 4

8.1.7 Remote Administration...................................................................................................................87
8.1.8 Dynamic DNS......................................................................................................................................89
8.1.9 DNS Server........................................................................................................................................... 91
8.1.10 Configuration File .............................................................................................................................93
8.1.11 System Settings .................................................................................................................................95
8.1.12 Firmware Upgrade............................................................................................................................98
8.1.13 Network Objects................................................................................................................................99
8.1.14 Universal Plug and Play................................................................................................................ 101
8.1.15 SIP ALG............................................................................................................................................... 102
8.1.16 MGCP ALG......................................................................................................................................... 103
8.1.17 IGMP Proxy ....................................................................................................................................... 104
8.1.18 Port Forwarding Rules.................................................................................................................. 105
8.1.19 Date and Time ................................................................................................................................. 107
8.1.20 Scheduler Rules............................................................................................................................... 108
8.1.21 Routing .............................................................................................................................................. 110
8.1.22 IP Address Distribution ................................................................................................................ 112
8.2 HBR Advanced Pages............................................................................................................... 114
8.2.1 Diagnostics ....................................................................................................................................... 116
8.2.2 Restore HBR Defaults .................................................................................................................... 117
8.2.3 Reboot HBR ...................................................................................................................................... 118
8.2.4 ARP Table .......................................................................................................................................... 119
8.2.5 Users.................................................................................................................................................... 120
8.2.6 DNS Server........................................................................................................................................ 121
8.2.7 System Settings .............................................................................................................................. 122
8.2.8 Port Configuration......................................................................................................................... 123
8.2.9 Date and Time ................................................................................................................................. 124
8.2.10 IP Address Distribution ................................................................................................................ 125
9
GUI: System Monitoring......................................... 126
9.1 HBR Status.................................................................................................................................... 128
9.2 Advanced HBR Status .............................................................................................................. 129
9.2.1 System Log ....................................................................................................................................... 130
9.2.2 Full Status/System wide Monitoring of Connections ....................................................... 131
9.2.3 Traffic Monitoring .......................................................................................................................... 132
9.3 Advanced HBA Status.............................................................................................................. 133
9.3.1 Bandwidth Monitoring................................................................................................................. 134
9.3.2 IGMP Proxy ....................................................................................................................................... 135
10
Support.................................................................... 136
10.1 General Troubleshooting ....................................................................................................... 138
10.2 Troubleshooting Your Wireless Connection ................................................................... 139
Page 5

10.3 Resetting your HBR ................................................................................................................... 141
10.4 Configuring Dynamic IP Addressing on Windows ........................................................ 143
Page 6

1
Getting
Started
Page 7

1 Getting Started
DMS-CTC-20110909-0007 v2.0 2
Introduction
This User Manual helps you get to know your HomeFusion Broadband service and
guides you through the configuration of features of the HomeFusion Broadband
Router.
Page 8
1 Getting Started
DMS-CTC-20110909-0007 v2.0 3
1.1 Basic Concepts
The Verizon 4G LTE Network
4G Long Term Evolution (LTE) is the latest standard for mobile Internet access and
offers superior connection speeds compared to 3G, the predecessor.
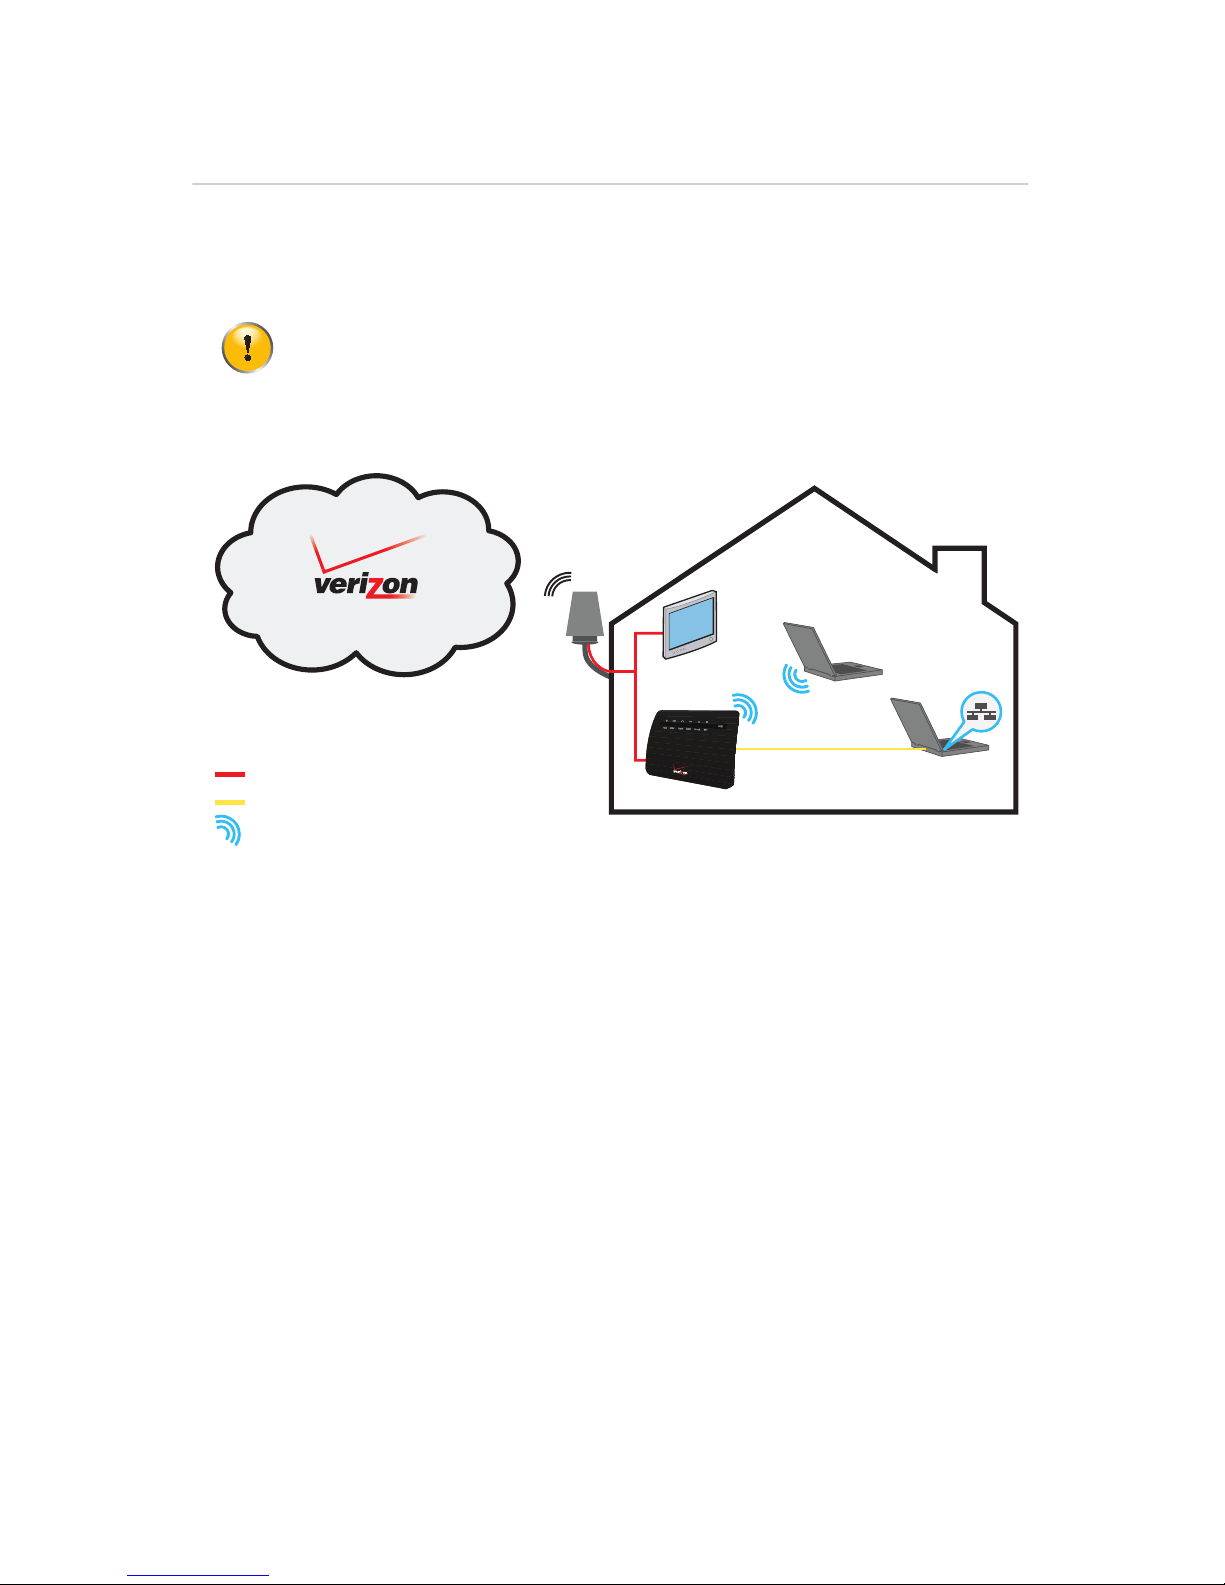
Your Home Network
Your home network consists of the following components:
One HomeFusion Broadband Antenna (HBA)
One HomeFusion Broadband Router (HBR)
One or more network devices (computers, network printers and so on)
MoCA is a standard for home networking over a coax connection.
The HBA
The HBA is mounted on the side of the house and is the interface between the
Verizon 4G LTE Network and your MoCA devices.
The HBR
The HomeFusion Broadband Router is located in your home and is responsible for
interconnecting:
WiFi devices (for example: portable computers, wireless printers, smartphones
with WiFi support and so on)
Wired Ethernet devices (for example: computers).
MoCA devices (for example: the HBA)
This means that all devices that are connected to the HBR will also have access to the
HBA, which in turn provides access to the Verizon 4G LTE Network.
The HomeFusion Broadband Router only supports 4G LTE to access the
Internet. It is not possible to fall back to 3G in the event of a temporary
service interruption of the 4G LTE network.
Your Home Networ
k
HBR
4G LTE Network
MoCA connection
Wired Ethernet connection
WiFi connection
HBA
Page 9
1 Getting Started
DMS-CTC-20110909-0007 v2.0 4
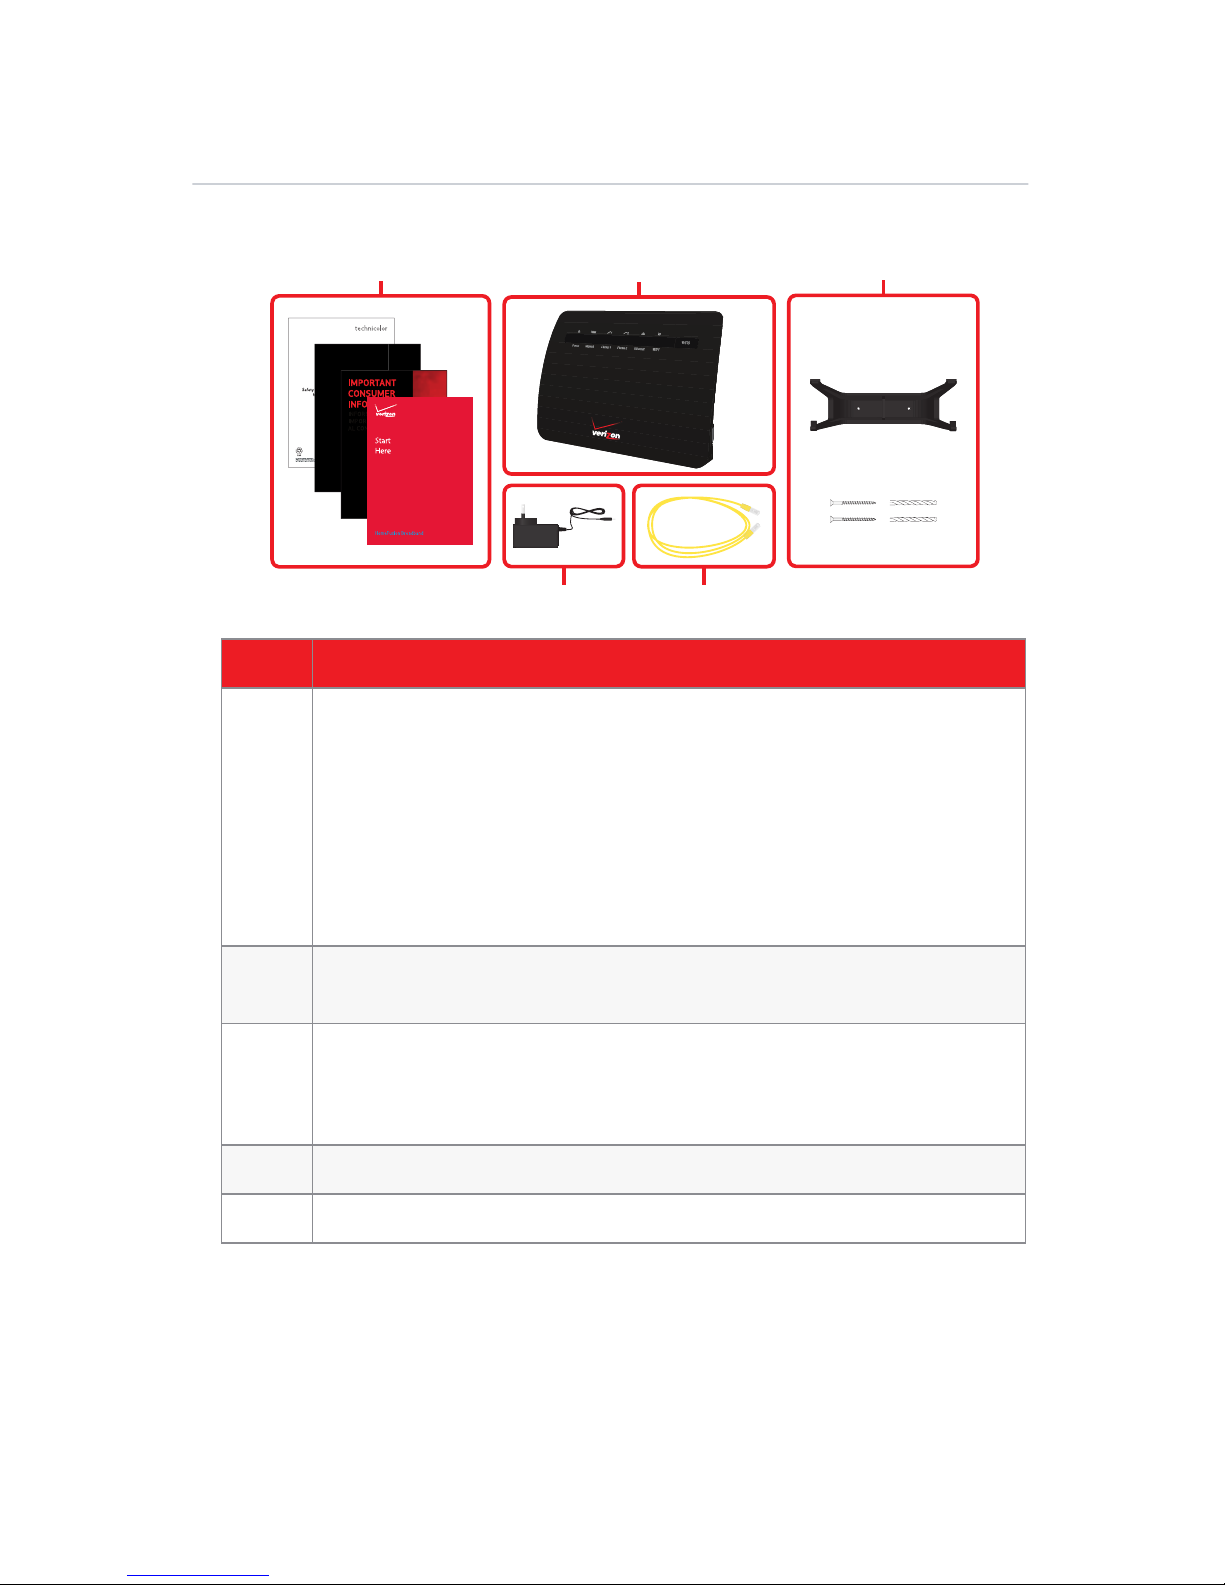
1.2 Contents of the HBR Box
Your box should contain the following items:
Item Description
1 F
our documents:
The Quick Start Guide (Start Here)
The Safety and Regulatory Notices
The Consumer Information about Radio Frequency Emissions and
Responsible Driving
Important Consumer Information
Read these documents before you start using your HBR.
2 The HomeFusion Broadband Router.
In this User Manual we will refer to it as HBR.
3 The Wall Mounting kit containing:
The wall mount docking station
Screws and plugs
4 One power supply for the HBR
5 One yellow Ethernet cable (RJ-45)
2
45
3
1
©2011 Verizo
n
Wireless. All
R
i
ghts Reserved.
CONSUMER
INFORMATION
ABOUT RADIO
FREQUENCY
EMISSIONS
AND
RESPONSIBLE
DRIVING
Page 10

1 Getting Started
DMS-CTC-20110909-0007 v2.0 5
1.3 Getting to Know the HBR
This section introduces you to the different components of the HBR.
Topic Page
“1.3.1 Front Panel” 6
“1.3.2 Back Panel” 10
Page 11
1 Getting Started
DMS-CTC-20110909-0007 v2.0 6
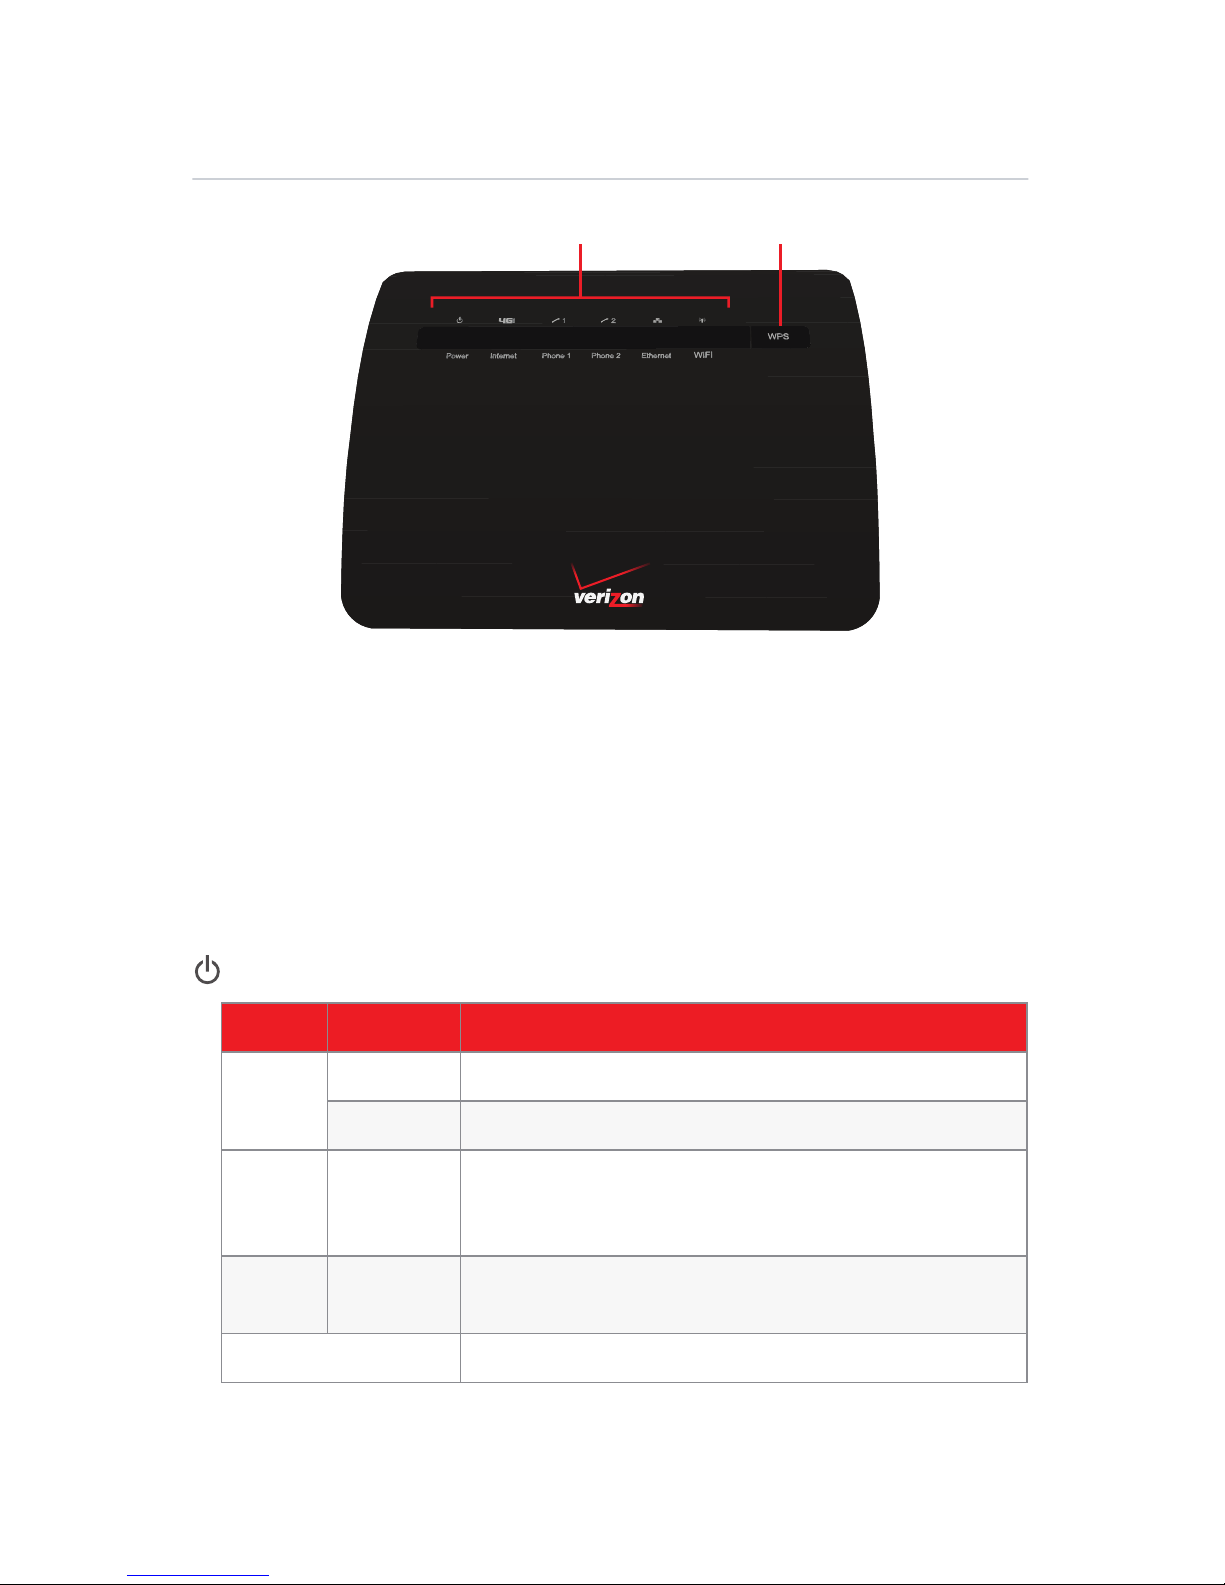
1.3.1 Front Panel
Components
On the front panel of the HBR, you can find:
The Status LEDs:
These Status LEDs allow you to check the state of the services offered by the HBR.
WPS button and LED:
The WPS button allows you to add new wireless clients to your local network in a
swift and easy way, without the need to enter any of your wireless settings
(network name, wireless key, encryption type).
Power LED
Status LEDs WPS button
Color State Description
Green Solid Powered on and functioning normally.
Blinking Starting up.
Amber Blinking Upgrade ongoing.
Do not remove any cables or switch off the HBR when
the HBR is upgrading.
Red Solid Error during startup.
Call Customer Care at 800-922-0204.
Off The HBR is powered off.
Page 12

1 Getting Started
DMS-CTC-20110909-0007 v2.0 7
Internet LED
Phone LED — Phone service is not supported at this time
Ethernet LED
Color State Description
Green Solid Connected to the MoCA network.
Blinking Connected to the MoCA network, activity.
Amber Solid Connected to the MoCA network but internal
registration failure.
Blinking Connected to the MoCA network, activity but internal
registration failure.
Red Solid No link to the MoCA network.
Blinking Connected to the MoCA network, HBA could not be
found.
Off The HBR is either powered off or starting up.
Color State Description
Green Solid Connected to the Verizon telephone network.
Blinking Call ongoing or connecting to the Verizon telephone
network.
Amber Blinking Voice mail message available.
Red Solid Failed to connect to the Verizon telephone network.
Off The HBR is either powered off or telephony is not
enabled.
Color State Description
Green Solid One or more the device(s) connected to the Ethernet
por
t, no client data activity
Blinking One or more the device(s) connected to the Ethernet
port, client data activity
Page 13
1 Getting Started
DMS-CTC-20110909-0007 v2.0 8
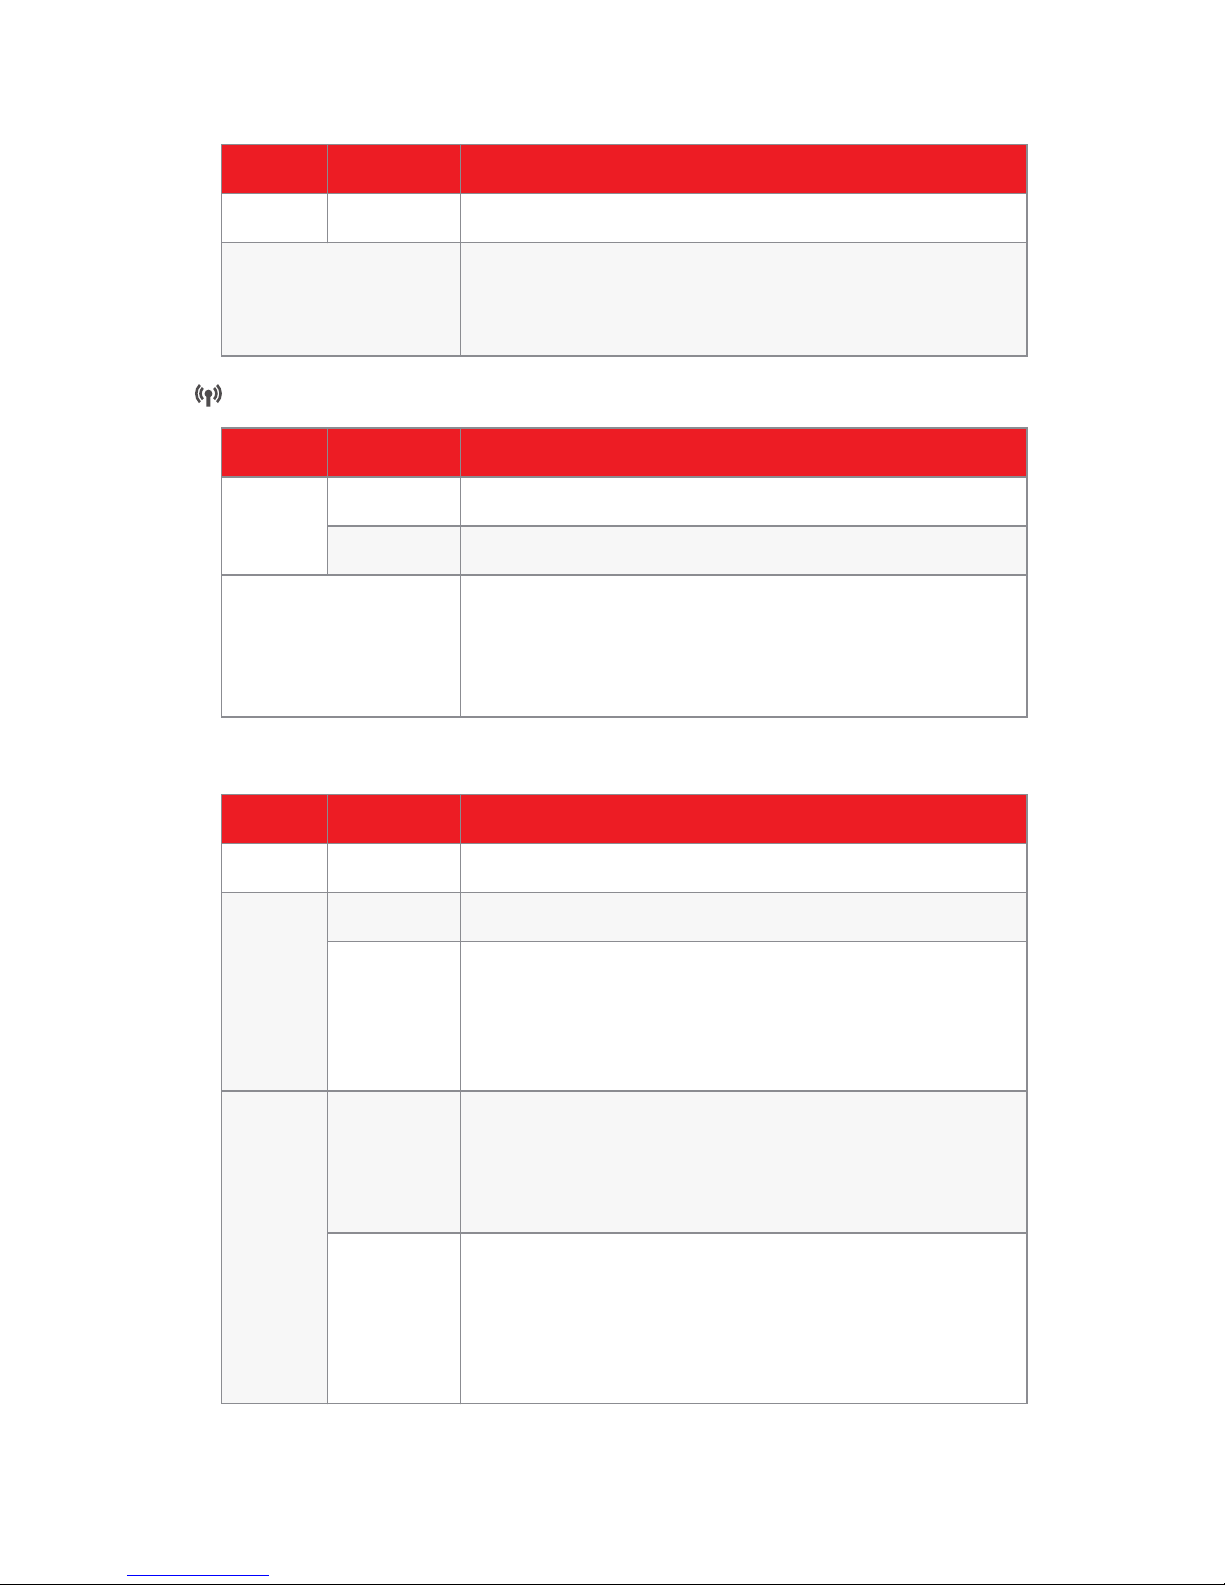
WiFi LED
WPS LED
Red
Solid
No devices connected to the Ethernet port.
Off The HBR is powered off or starting up.
All devices connected to the Ethernet ports are
powered off.
Color State Description
Green Solid Wireless is enabled, no client data activity
Blinking Wireless is enabled, client data activity
Off
The HBR is powered off or starting up.
Wireless is disabled.
For more information, see “4.2 Basic Security Settings”
on page 37.
Color State Description
Green Solid WPS successful.
Amber Solid WPS button pressed.
Blinking WPS session ongoing. The session will stop in either of
the following cases:
After a successful connection.
After two minutes.
Red Blinking at
a constant
rate
Connection failed or other error, try again.
If the problem persists, configure your wireless client
manually. For more information, see “2.3.2 Connecting
Your Wireless Device Manually” on page 19.
Blinking
with a
pause
pattern
Another WPS session is already ongoing. Wait for two
minutes and then try again.
If the problem persists, configure your wireless client
manually. For more information, see “2.3.2 Connecting
Your Wireless Device Manually” on page 19.
Color State Description
Page 14

1 Getting Started
DMS-CTC-20110909-0007 v2.0 9
For more information on how to connect your wireless clients using WPS, see
“2.3.1 Connecting Your Wireless Devices via WPS” on page 17.
Off WPS not initiated.
The HBR is powered off or starting up.
Color State Description
Page 15
1 Getting Started
DMS-CTC-20110909-0007 v2.0 10
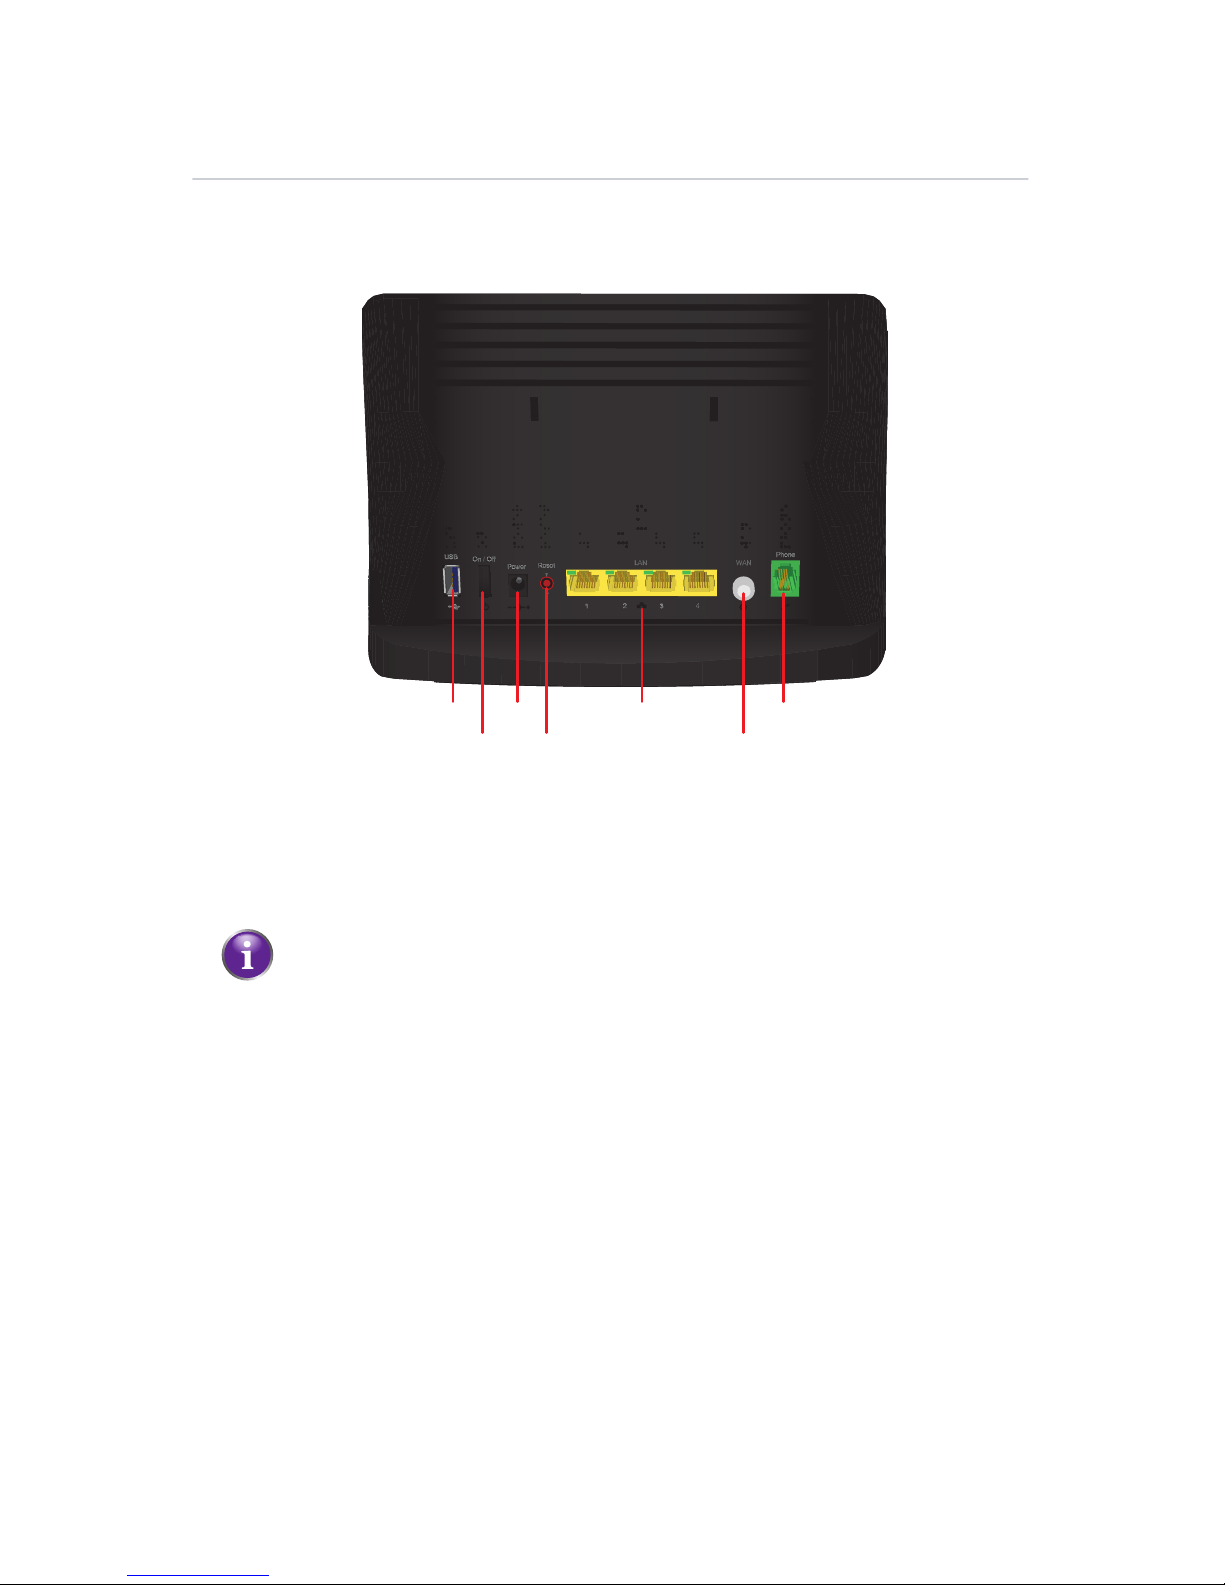
1.3.2 Back Panel
Overview
The following picture gives you an overview of all the back panel components:
USB port (A)
Allows you to power or charge your USB devices. The USB port can deliver up to
500mA of current. Consult the documentation of your device to check how much
current it needs to be able to power or charge.
Power switch (B)
Allows you to switch the HBR on/off.
Power inlet (C)
This is where you will plug in the power adapter.
Reset button (D)
If you press this button for:
2 seconds, the HBR will reboot.
10 seconds, the HBR will return to its factory default settings. All changes that you
made to the default configuration will be lost. For example: wireless settings,
date and time settings, static IP address allocation and so on.
A
B
C
D
E G
F
Any other possible use of the USB port is currently not supported.
Page 16

1 Getting Started
DMS-CTC-20110909-0007 v2.0 11
LAN Ethernet Ports (E)
Allow you to connect your local devices (for example: a laptop, network printer or
gaming console) using Fast Ethernet.
Each LAN port also has a LED to indicate the state of the Ethernet connection on this
port:
WAN coaxial cable port (F)
Allows you to connect the HBR to the HBA.
Phone port (G)
Allows you to connect your telephone to the Verizon Wireless telephone network.
LED State Description
On Device connected to this port, no client data ac
tivity.
Blinking Device connected to this port, client data activity
Off
The HBR is powered off or starting up.
No device connected to this port.
The Phone service is not supported at this time.
Page 17

2
Setup
Page 18

2 Setup
DMS-CTC-20110909-0007 v2.0 13
Setup procedure
Complete the following steps to setup the HBR:
1 If a different router was being used previously, disconnect it. Remove all
components, including power supplies and cables; they will not work with the
HBR.
2 Connect the HBR to the HBA.
For more information, see “2.1 Connecting the HBR to the MoCA Network” on
page 14.
3 Power on the HBR.
For more information, see “2.2 Powering on the HBR” on page 15.
4 Connect your network devices.
For more information, see “2.3 Connecting Your Network Devices” on page 16.
In case of problems
If you have trouble configuring the HBR, try the following:
1 Refer to “Support” on page 136.
2 If you did not find a solution in the Troubleshooting section, call the Customer
Care at 800-922-0204.
Optional configuration
After completing the setup procedure, the HBR is ready for use. Optionally, you can
now:
Further configure the HBR to your needs (for example, change the wireless
security) using the Graphical User Interface (GUI) of the HBR.
For more information, see “Graphical User Interface (GUI)” on page 26.
Wall mount the HBR. For more information, see “2.4 Wall Mounting the HBR
(Optional)” on page 24.
Normally, the Verizon Wireless technician already took care of the
installation of your HBR and HBA. So the only thing that you might need to
do is add new network devices to your network.
Page 19
2 Setup
DMS-CTC-20110909-0007 v2.0 14
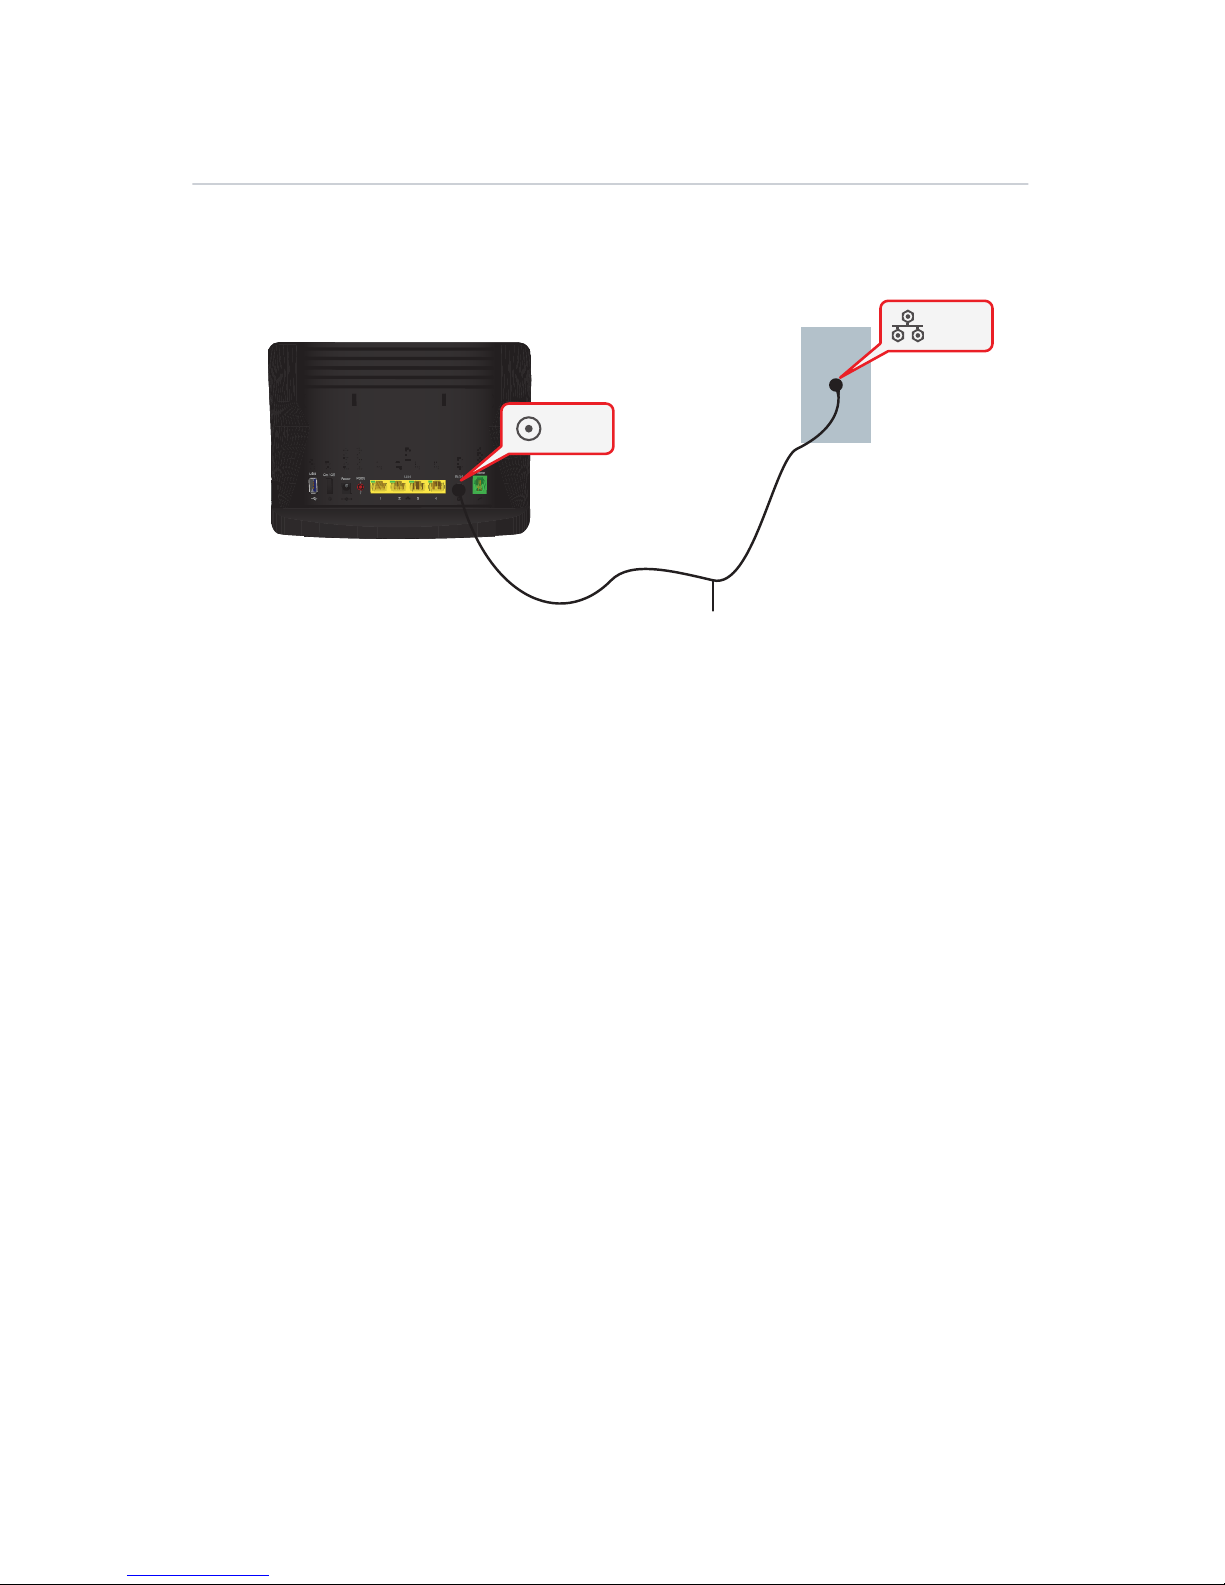
2.1 Connecting the HBR to the MoCA Network
Procedure
1 Take one end of the coaxial cable and connect into the coaxial wall jack.
2 Connect the other end to the WAN port of the HBR.
Coax
Coax cable
WAN
HBR
Page 20
2 Setup
DMS-CTC-20110909-0007 v2.0 15
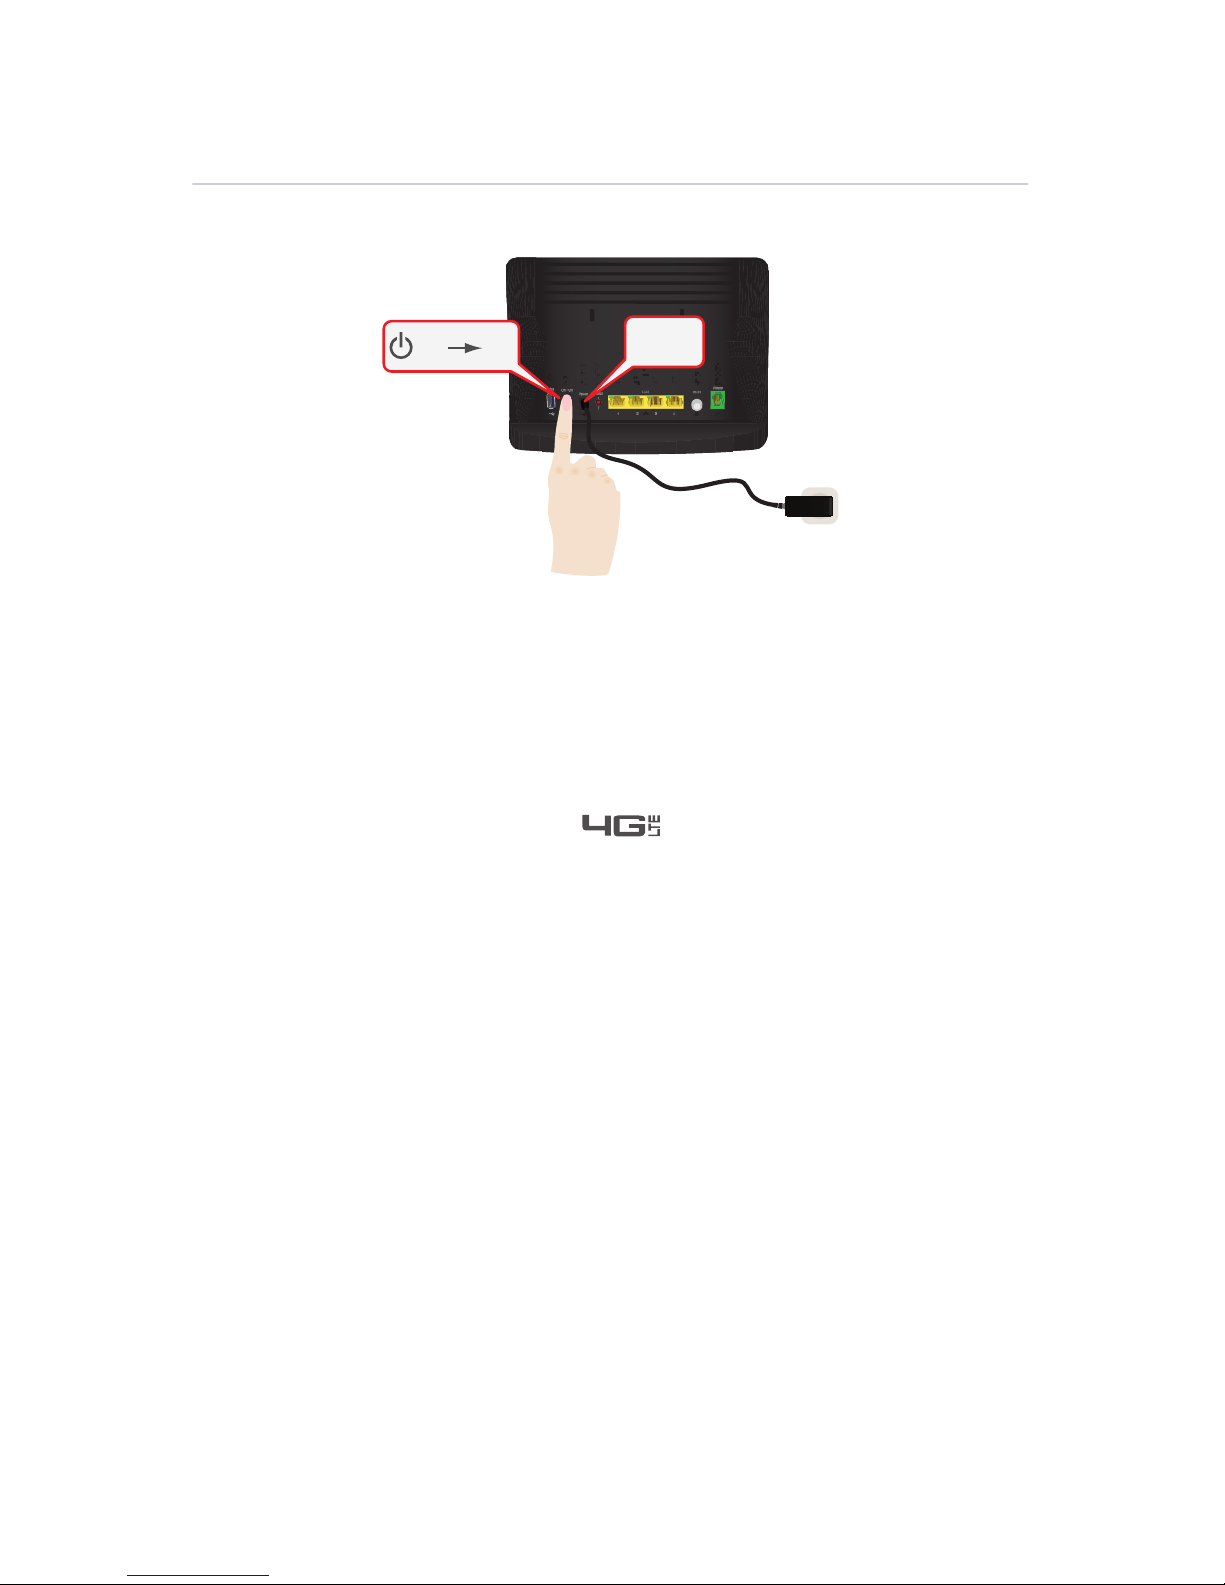
2.2 Powering on the HBR
Procedure
1 Take the power supply that is included with your HBR.
2 Connect the power cord to the Power port of the HBR.
3 Plug the other end into an electrical outlet.
4 Push the On/Off switch to turn on the HBR.
5 Wait a few minutes to allow the HBR to complete the start up phase.
6 The Power LED on the front panel of the HBR must be solid green.
7 After a few minutes, the Internet ( ) LED must be solid green.
If this is not the case, make sure that the coaxial cable is connected properly at
both ends. For more information, see “2.1 Connecting the HBR to the MoCA
Network” on page 14.
Off On
Power
Page 21

2 Setup
DMS-CTC-20110909-0007 v2.0 16
2.3 Connecting Your Network Devices
Introduction
This section helps you to connect your network devices (for example, a computer, a
network printer and so on) to the HBR network.
Connection options
If you want to connect your computer to the HBR using:
A wireless connection, you can connect your computer:
Via WPS push button configuration, proceed with “2.3.1 Connecting Your
Wireless Devices via WPS” on page 17.
By manually entering the settings, proceed with “2.3.2 Connecting Your Wireless
Device Manually” on page 19.
A wired (Ethernet) connection, proceed with “2.3.3 Wired Connection to the HBR”
on page 23.
Page 22

2 Setup
DMS-CTC-20110909-0007 v2.0 17
2.3.1 Connecting Your Wireless Devices via WPS
WPS
Wi-Fi Protected Setup (WPS) allows you to add new wireless devices to your local
network in a swift and easy way, without the need to enter any of your wireless
settings (network name, wireless key, encryption type).
Requirements
Your wireless device must support WPS. Check the documentation of your
wireless device for this.
The HBR must use WPA2 (default setting), WPA+WPA2 or WPA-TKIP.
Procedure
Proceed as follows:
1 Briefly press the WPS button on the HBR:
2 The WPS button LED starts blinking amber. This indicates that the HBR is now
searching for wireless devices that are in registration mode. You now have two
minutes to start WPS on your wireless device.
3 Start WPS on your wireless device.
4 The HBR is now exchanging the security settings.
5 At the end of the procedure the status of the WPS LED will change to either of the
following:
Solid green
This indicates that you have successfully registered your wireless device. You
are now connected to the HBR network.
Blinking red at a constant rate
This indicates that the HBR could not find your wireless device. Use the same
procedure to try again (you do not need to wait until the LED turns off).
Both Windows 7 and Windows Vista Service Pack 1 have native WPS
support.
It is not possible to use WPS when the HBR uses WEP or no encryption.
WPS
Page 23

2 Setup
DMS-CTC-20110909-0007 v2.0 18
Blinking red with a pause pattern
This indicates that another WPS session is already ongoing. Wait for two
minutes and then try again.
Troubleshooting
If you are having trouble connecting your wireless device via WPS, configure your
wireless client manually. For more information, see “2.3.2 Connecting Your Wireless
Device Manually” on page 19.
Page 24
2 Setup
DMS-CTC-20110909-0007 v2.0 19
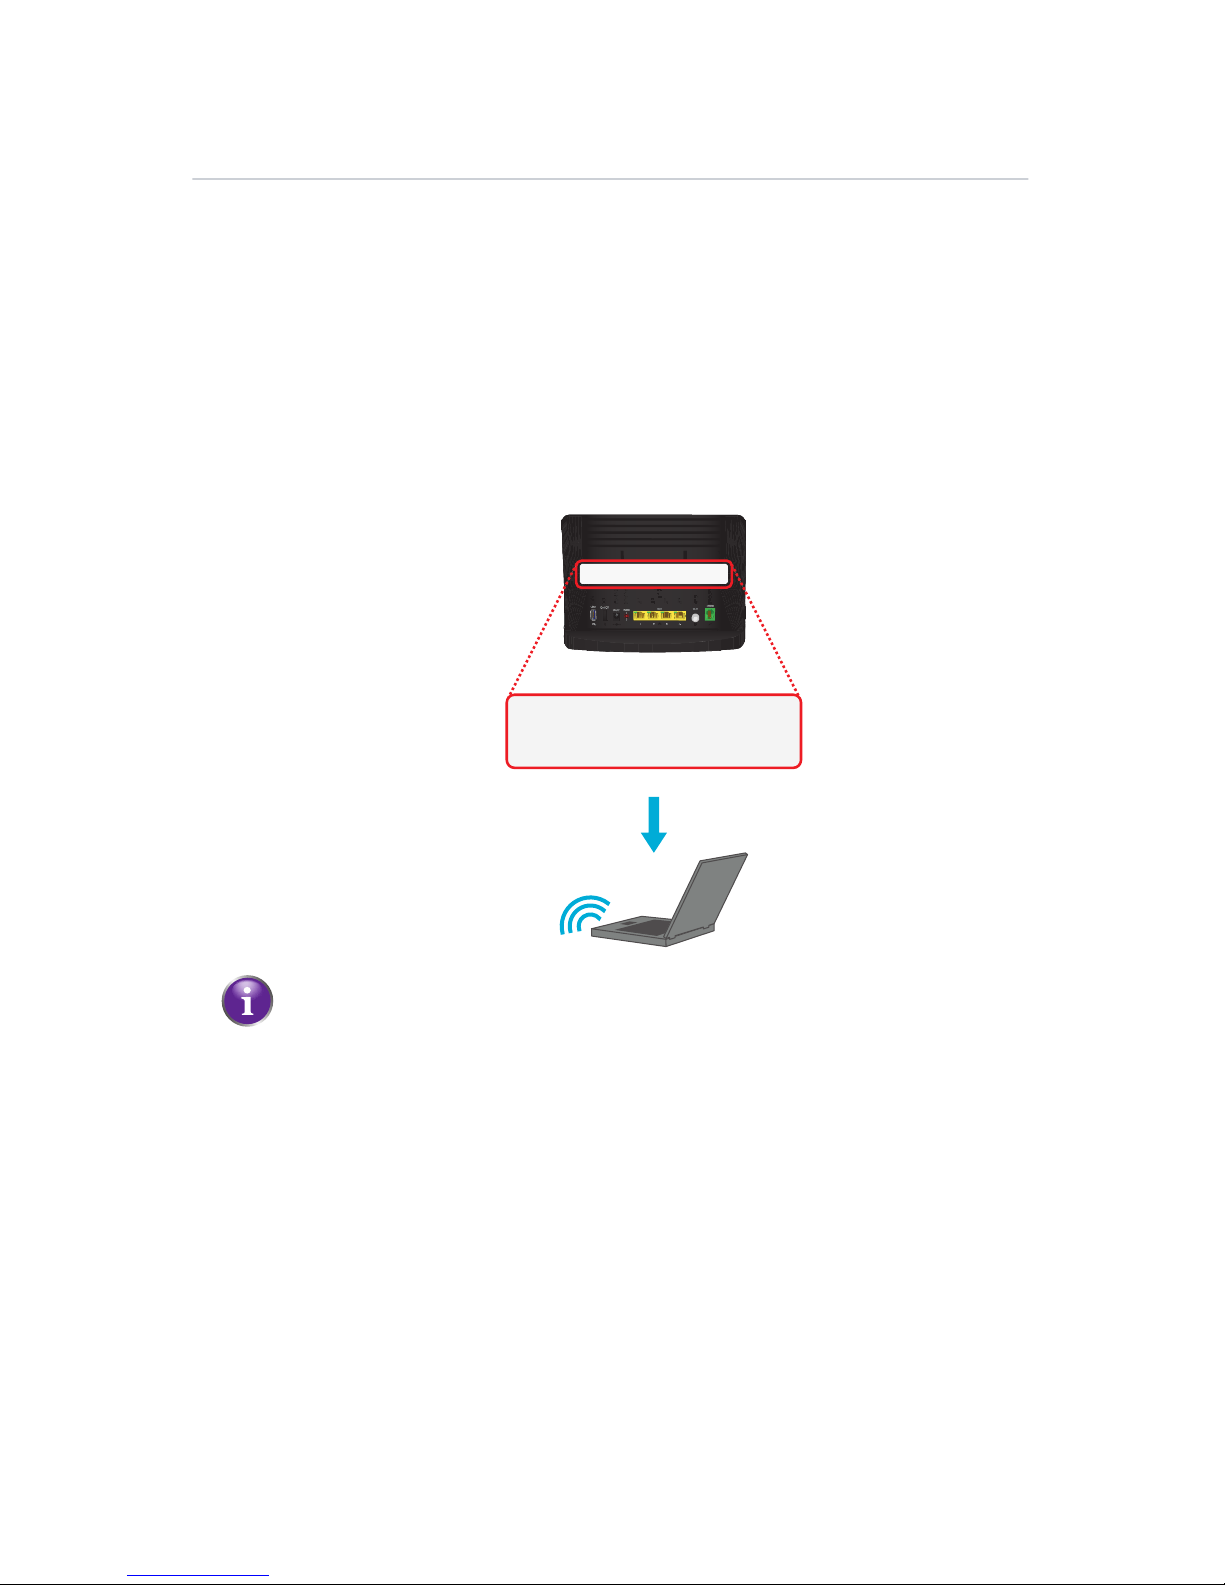
2.3.2 Connecting Your Wireless Device Manually
Requirements
Your network device must be equipped with a WiFi-certified wireless client.
Your network device must be configured to obtain an IP address automatically.
This is the default setting.
Procedure
If you want to connect a computer using the wireless network, configure the
wireless client on your computer with the wireless settings printed on the label of
the HBR.
To configure these settings on:
Windows 7, proceed with “Connect your computer on Windows 7” on page 20.
Windows Vista, proceed with “Connect your computer on Windows Vista” on
page 20.
Windows XP, proceed with “Connect your computer on Windows XP” on page 21.
Mac OS X, proceed with“Connect your computer on Mac OS X” on page 22.
On another operating system, consult the help of your wireless client or
operating system.
The default encryption type is WPA2.
SSID: **************
WEP/WPA2 key: **************
Page 25

2 Setup
DMS-CTC-20110909-0007 v2.0 20
Connect your computer on Windows 7
Proceed as follows:
1 Click the wireless network icon ( )in the notification area.
2 A list of available wireless networks appears.
Double-click the HBR access point.
3 Windows prompts you to enter the network security key.
Type the WPA2 key that is printed on the back of the HBR in the Network key
and Confirm network key box and click Connect.
Connect your computer on Windows Vista
Proceed as follows:
1 Click Start and click Connect To.
2 A list of available wireless networks appears.
3 Double-click the HBR access point.
The HBR is listed with the network name (SSID) that is printed on the
back of the HBR (for example: TNCAP123456).
The HBR is listed with the network name (SSID) that is printed on the
back of the HBR (for example: TNCAP123456).
Page 26

2 Setup
DMS-CTC-20110909-0007 v2.0 21
4 Windows prompts you to enter the network security key.
Type the WPA2 key that is printed on the back of the HBR in the Network key
and Confirm network key box and click Connect.
Connect your computer on Windows XP
Proceed as follows:
1 Right-click the wireless network connection icon ( or )in the notification area
and then click View Available Wireless Networks.
2 A list of available wireless networks appears.
Double-click the HBR access point. The HBR is listed with the network name
(SSID) that is printed on the back of the HBR (for example: TNCAP123456).
3 Windows prompts you to enter the network security key.
Type the WPA2 key that is printed on the back of the HBR in the Network key
and Confirm network key box and click Connect.
If the HBR is not in the list, see “Windows can not find the HBR access point”
on page 139.
Page 27

2 Setup
DMS-CTC-20110909-0007 v2.0 22
4 You are now connected to the HBR:
Connect your computer on Mac OS X
Proceed as follows:
1 Click the Airport icon on the menu bar.
2 A list of available wireless networks appears.
Select the HBR from the list.
3 The AirPort window prompts you to enter your WPA password.
In the Password box, type the WPA2 key that is printed on the back of the HBR
and select the Remember this network box and click OK.
4 You are now connected to the HBR network.
The HBR is listed with the network name (SSID) that is printed on the
back of the HBR (for example: TNCAP123456).
Page 28
2 Setup
DMS-CTC-20110909-0007 v2.0 23
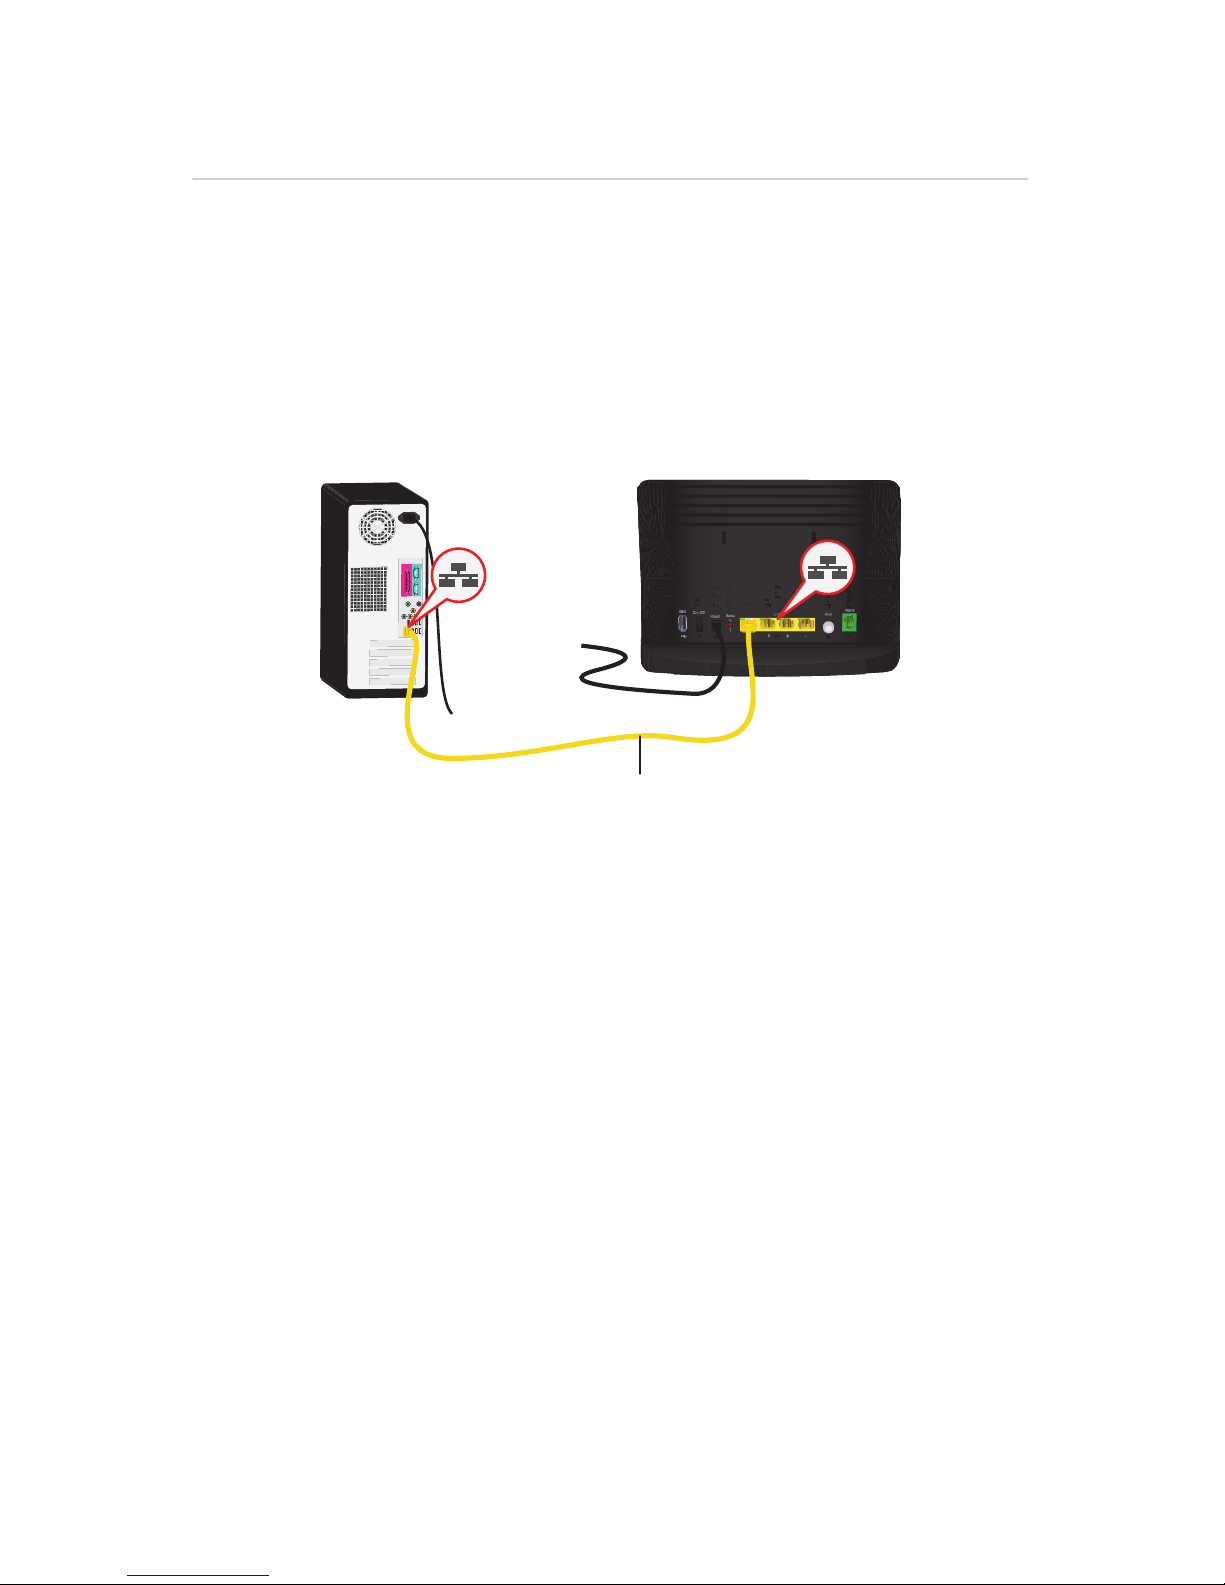
2.3.3 Wired Connection to the HBR
Requirements
Both your network device (for example, a computer, an Ethernet switch and so
on) and HBR must have a free Ethernet port.
Your network device must be configured to obtain an IP address automatically.
This is the default setting. For more information, see “10.4 Configuring Dynamic IP
Addressing on Windows” on page 143.
Procedure
Proceed as follows:
1 Take the yellow Ethernet cable that was included in your box.
2 Plug the Ethernet cable into one of the four yellow Ethernet ports on the back of
the HBR.
3 Plug the other end of the yellow Ethernet cable into an Ethernet port on the
computer.
4 If you have not yet started up your computer, start up your computer.
5 The LED on the connected Ethernet port should be solid green or blinking green.
6 Use the same procedure to connect your other Ethernet devices (computers,
network printers and so on).
Computer
HBR
Yellow Ethernet Cable
Page 29
2 Setup
DMS-CTC-20110909-0007 v2.0 24
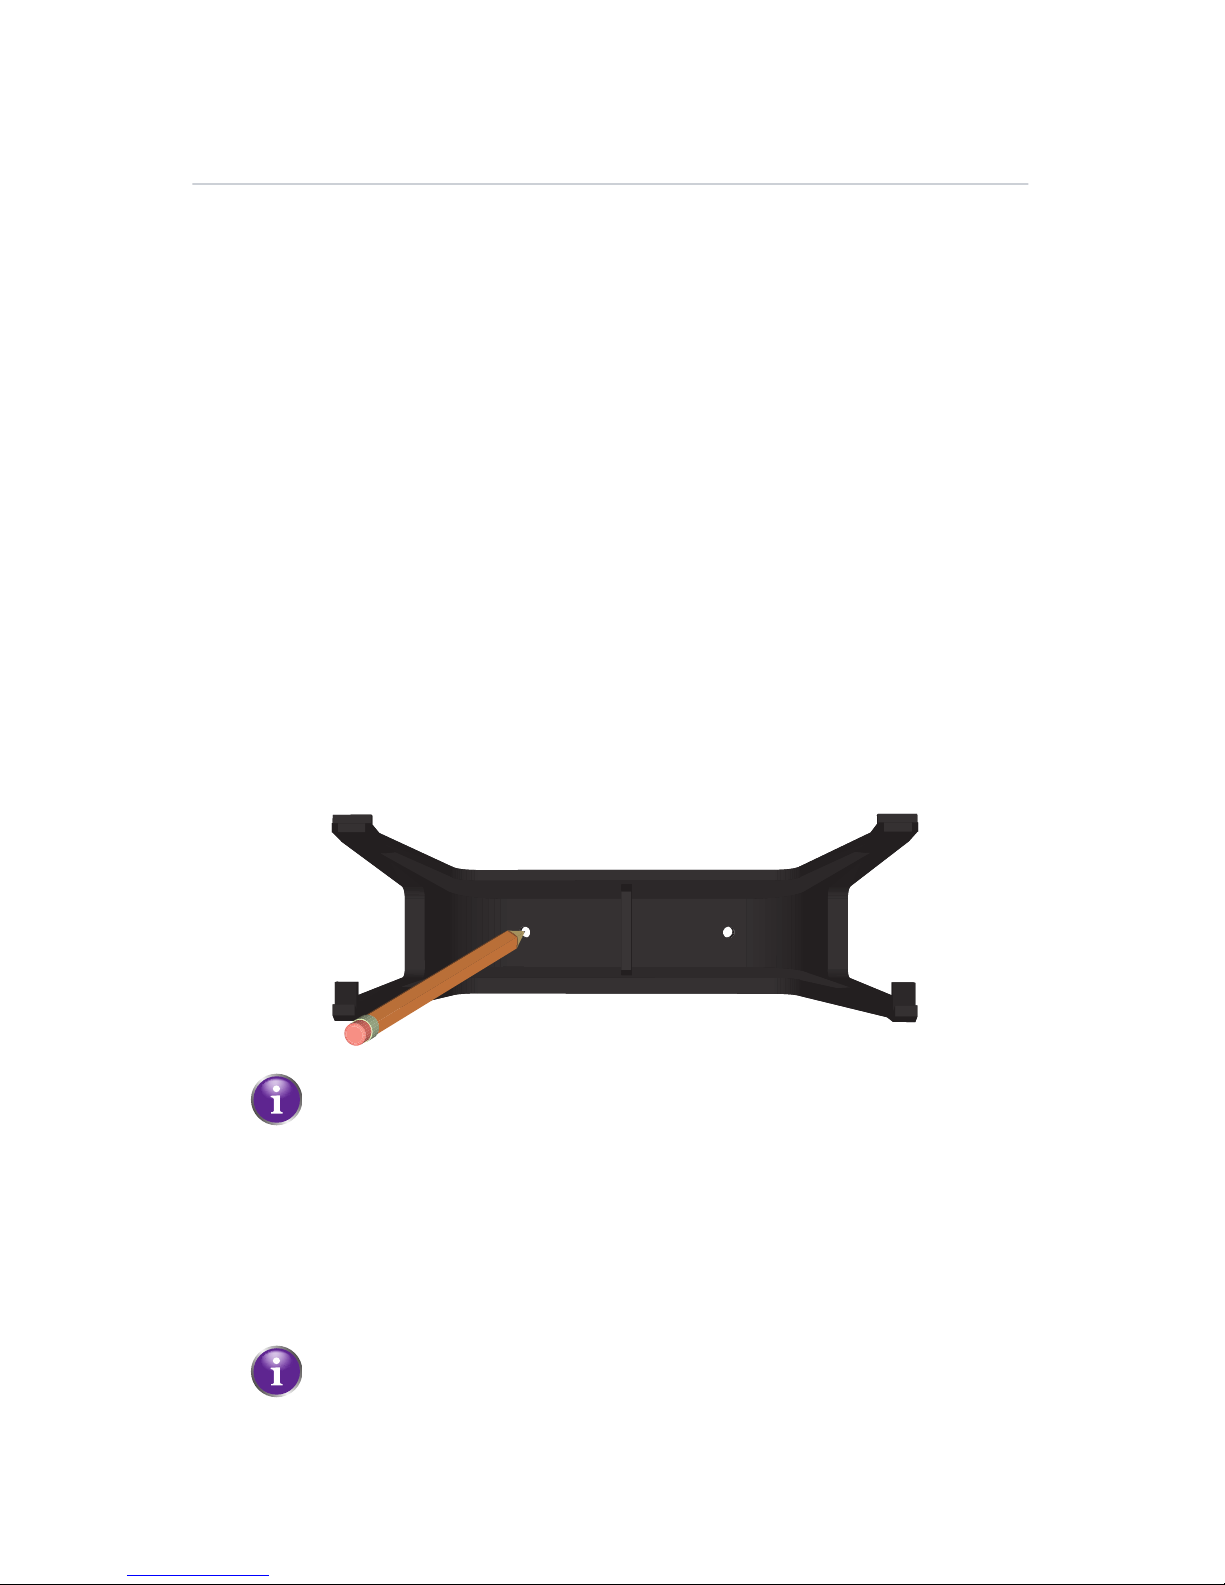
2.4 Wall Mounting the HBR (Optional)
Introduction
This section will help you to wall mount the HBR.
What you need
A power drill
A pencil to mark the mounting holes
A small level is recommended to level the two holes
The following box items:
The HBR
The wall mount bracket
The screws and wall plugs
Procedure
Proceed as follows:
1 Place the wall mount bracket against the wall at the position where you want to
mount the HBR.
2 Mark the mounting holes with a pencil.
3 Put the wall mount bracket down.
4 If you want to:
Use wall plugs, drill the mounting holes with a 15/64 inches diameter drill bit
and insert the wall plugs in the drilled holes.
Insert the screws directly into the wall, drill the mounting holes with a 5/64
inches diameter drill bit.
If possible, use a level placed on top of the bracket to level the bracket.
The wall plugs are used in softer material such as drywall to provide a
more secure mount.
Page 30

2 Setup
DMS-CTC-20110909-0007 v2.0 25
5 Place the wall mount bracket back into position and insert the screws.
6 Carefully hang the HBR on the wall mount bracket.
Page 31

3
Graphical
User
Interface
(GUI)
Page 32

3 Graphical User Interface (GUI)
DMS-CTC-20110909-0007 v2.0 27
Introduction
The Graphical User Interface (GUI) is a web browser interface that allows you to
configure both the HBR and the HBA settings.
Requirements
JavaScript must be enabled on your browser (this is the default setting). For more
information, consult the help menu of your web browser.
Accessing the GUI
Proceed as follows:
1 Open your web browser.
2 In the Address box, type
http://192.168.1.254 and press ENTER.
3 The HBR prompts you to enter your user name and password. Enter your user
name and password and click OK.
4 The HBR GUI appears.
If you did not yet change the password, type admin in the User Name box
and type the Login password printed on the back label of your HBR in the
Password box.
Login Password: **************
Page 33

3 Graphical User Interface (GUI)
DMS-CTC-20110909-0007 v2.0 28
Menu
The menu bar on the top contains the following items:
Icon Name For more information, see...
Main “3.1 Main
” on page 29.
Wireless Settings “4 GUI: Wireless Settings” on page 34.
My Network “5 GUI: My Network” on page 46.
Firewall Settings “6 GUI: Firewall Settings” on page 54.
Parental Control “7 GUI: Parental Control” on page 71.
Advanced “8 GUI: Advanced Settings” on page 75.
System Monitoring “9 GUI: System Monitoring” on page 126.
Page 34

3 Graphical User Interface (GUI)
DMS-CTC-20110909-0007 v2.0 29
3.1 Main
Main page
The Main page provides a summary view of the main services of the HBR. The
content of the page is divided into three groups:
My Router
For more information, see “3.1.1 My Router ” on page 30.
My Network
For more information, see “3.1.2 My Network” on page 32.
Action Zone
For more information, see “3.1.3 Action Zone” on page 33.
Page 35

3 Graphical User Interface (GUI)
DMS-CTC-20110909-0007 v2.0 30
3.1.1 My Router
Introduction
HBR Status
The HBR Status informs you about the status of your Internet connection:
Broadband Connection
Under 4G LTE Broadband Connection, you can view:
The status of the 4G LTE connection.
The signal strength of the 4G LTE connection.
The My Router pane displays the status of the HBR’s network
and Internet connection and contains the following items:
HBR Status
Broadband Connection
Quick Links
Icon Description
Indicates that the HBR is connected to the Internet.
Indicates that the HBR is not connected to the Internet.
Page 36

3 Graphical User Interface (GUI)
DMS-CTC-20110909-0007 v2.0 31
Quick Links
The Quick Links section provides links to frequently used pages. The following
quick links are available:
Port Forwarding
Click this link to assign a service (for example a HTTP server) to a network device.
Request for this service that are initiated from the Internet will automatically be
forwarded to this device.
Change Wireless Settings
Click this link to configure the wireless access point of the HBR.
For more information, see “GUI: Wireless Settings” on page 34.
Change Login User Name/Password
Click this link to change your login information.
For more information, see “8.2.5 Users” on page 120.
Verizon Help
Click this link to view the online help of the HBR.
Logout:
Click this link to quit your session. You will need to re-enter your user name and
password to return to the GUI.
Page 37

3 Graphical User Interface (GUI)
DMS-CTC-20110909-0007 v2.0 32
3.1.2 My Network
Introduction
The My Network pane, provides you an overview of
the devices that are currently connected to the HBR.
The following information is provided for each
device:
PC Name:
Displays the name that will be used to reference
to the device.
Connection Type:
Displays how the device is connected to the HBR
(Ethernet, Wireless or Coax).
IP Address:
Displays the IP address of the device.
Status:
Displays whether the device is currently
connected or not.
Page 38

3 Graphical User Interface (GUI)
DMS-CTC-20110909-0007 v2.0 33
3.1.3 Action Zone
Introduction
The Action Zone pane allows you to access specific Verizon
services and support information. Click:
GO TO THE INTERNET NOW to browse to your home
page.
Quick Start Guide to view the latest version of the Quick
Start Guide.
User Manual to view the latest version of this User
Manual.
Protection Plan to view more information on the Verizon
Wireless HomeFusion Broadband Protection Plan.
FAQ to view the Frequently Asked Questions.
Email to sign into your Verizon HomeFusion Email
Account.
Page 39

4
GUI:
Wireless
Settings
Page 40

4 GUI: Wireless Settings
DMS-CTC-20110909-0007 v2.0 35
4.1 Wireless Status
Introduction
The Wireless Status page provides you an overview of the wireless settings that are
currently used by the HBR.
Overview
The following settings are available:
Radio Enabled:
Displays whether the HBR’s wireless radio is active.
SSID:
To distinguish one wireless network from another, each wireless network has its
own network name, often referred to as Service Set IDentifier (SSID). All your
wireless devices on your network must use this network name.
Channel:
Displays the channel to which the wireless connection is currently set. When you
select Automatic (default setting), the HBR automatically selects the best
channel for your wireless communication. The actual channel will then be
displayed between parentheses (for example, Automatic (6) indicates that
channel 6 is selected).
Security Enabled:
Displays whether wireless security is enabled. If security is enabled, the HBR is
using one of the following encryption types to secure your wireless connection:
WEP 64-bit or 128-bit:
The oldest and also least secure encryption type. We recommend to use WPA 2
instead. Only use it if your wireless client does not support WPA.
WPA - TKIP
The first version of WPA. Only choose this option if none of your wireless
clients support WPA2.
Page 41

4 GUI: Wireless Settings
DMS-CTC-20110909-0007 v2.0 36
WPA+WPA2:
This is a mixed mode. In this mode, WPA2 is the preferred encryption type but
wireless clients that do not support WPA2 can still use WPA as encryption type.
Choose this option if not all of your wireless clients support WPA2 or if you are
not sure. Wireless clients that support WPA2 will use WPA2, the others will use
WPA.
WPA2 (default):
The most recent and most secure version of WPA. Choose this version if you
are sure that all your wireless clients support WPA2.
When you connect to the HBR, you have to enter the key that is listed next to
the encryption type.
SSID Broadcast:
Displays whether the HBR is broadcasting its SSID. If activated, the SSID will
appear in the list when a wireless client scans for available networks. For more
information, see “4.3.2 SSID Broadcast” on page 42.
MAC Authentication:
If MAC authentication is enabled, only wireless clients that are included in the
Access list are allowed to connect. For more information, see “4.3.3 Wireless MAC
Authentication” on page 43.
Wireless Mode:
Displays the types of wireless device that can join the network. Options include:
Compatibility Mode (802.11b/g/n)
In this mode 802.11b, 802.11g and 802.11n can be used to connect to the HBR.
Legacy Mode (802.11b/g)
In this mode only 802.11b- and 802.11g connections can be used to connect
to the HBR. 802.11n connections are not allowed.
WMM:
Wi-Fi Multimedia is a QoS (Quality of Service) system for your wireless
connection. It prioritizes packets based on their type (voice, video, best effort and
background).
Received Packets:
The number of packets received and sent since the HBR’s wireless capability was
activated.
Sent Packets:
Displays the number of packets received and sent since the HBR’s wireless
capability was activated.
Page 42

4 GUI: Wireless Settings
DMS-CTC-20110909-0007 v2.0 37
4.2 Basic Security Settings
Introduction
The Basic Security Settings page allows you to configure the basic wireless settings
of the HBR in a step-by-step approach.
Overview of the steps
This section describes:
Step 1: Turn Wireless ON/OFF
Step 2: Change the SSID setting to any name or code you want
Step 3: Channel
Step 4: Click on the button next to WEP
Step 5: Select a WEP Key
Step 6: Turn WPS ON
Step 7: Write down wireless settings
Step 1: Turn Wireless ON/OFF
If you want to:
Turn on the wireless interface, select On.
Turn off the wireless interface, select Off.
Be aware that wireless access will no longer be available. Make sure that nobody
is using the wireless connection before turning it off.
We recommend that you leave the wireless interface turned on.
Step 2: Change the SSID setting to any name or code you want
If you want to change the default network name of your wireless network, type the
new network name in the SSID box.
Your changes will only be applied as soon as you click the Apply button.
Page 43

4 GUI: Wireless Settings
DMS-CTC-20110909-0007 v2.0 38
Step 3: Channel
If you want to change the channel for your wireless communication, select a new
channel in the Channel list.
We recommend that you use Automatic (this is also the default). When Automatic
is selected the HBR will choose the channel that has the least interference. Only
change it if you experience wireless connectivity problems.
Step 4: Click on the button next to WEP
In this step you are able to use WEP encryption to secure your wireless connection.
WEP has been proven to have some security issues.
Step 5: Select a WEP Key
If you did choose to enable WEP in the previous step, this step will allow you to
choose the WEP key.
1 In the Select a WEP key list, select:
64/40 bit and Hex to enter a combination of 10 digits. You can choose any
letter from A-F or any number from 0-9. For example: 0FB310FF28.
64/40 bit and ASCII to enter a combination of 5 ASCII characters. For example:
hello.
128/104 bit and Hex to enter a combination of 26 digits. You can choose any
letter from A-F or any number from 0-9. Sample HEX WEP Key:
0FB310FF280FB310FF28123456.
128/104 bit and ASCII to enter a combination of 13 ASCII characters. For
example: sayhelloworld.
2 Enter the key of your choice in the Key Code box.
The only reason why you might consider to use WEP is if you have older
wireless devices in your network that only support WEP.
We recommended that you keep the Off option selected and use WPA2 or
WPA+WPA2 instead. For more information, see “4.3.1 Securing Your Wireless
Connection” on page 41.
Page 44

4 GUI: Wireless Settings
DMS-CTC-20110909-0007 v2.0 39
3 If needed, complete the other steps
4 Click Apply on the bottom of the page.
Step 6: Turn WPS ON
Wi-Fi Protected Setup (WPS) allows you to add new wireless clients to your local
network in a swift and easy way, without the need to enter any of your wireless
settings (network name, wireless key, encryption type).
WPS can only be turned on if you are using WPA or WPA+WPA2 to encrypt your
wireless connection. If WEP or no encryption is used, the selection will be
unavailable.
To turn WPS on/off:
1 Under WPS, select On/Off.
2 If needed complete the other steps.
3 Click Apply.
Step 7: Write down wireless settings
This step gives you an overview of the settings that will be active as soon as you click
the Apply button on the bottom of the page.
You can print or write down this overview, this might be useful when configuring a
wireless client.
APPLY YOUR CHANGES
Do not forget to click Apply on the bottom of your page to activate your changes.
Page 45

4 GUI: Wireless Settings
DMS-CTC-20110909-0007 v2.0 40
4.3 Advanced Security Settings
Introduction
The Advanced Security Settings page allows you to take your wireless security to
the next level.
To improve the security of your wireless network you can add the following security
levels:
Level 1: Securing your wireless traffic as it transmits through the air
This level is allows you to encrypt your wireless traffic with a wireless key to make
sure that only the sender and the receiver can read the data that is sent over your
wireless connection.
For more information, see “4.3.1 Securing Your Wireless Connection” on page 41.
Level 2: Stop your gateway from broadcasting your Wireless Network Name
(SSID)
This level allows you to disable the broadcasting of your wireless network name
to hide your wireless network from other users.
For more information, see “4.3.2 SSID Broadcast” on page 42.
Level 3: Limit access to certain wireless devices
This level allows you to:
Limit access based on the MAC address of the wireless device.
For more information, see “4.3.3 Wireless MAC Authentication” on page 43.
Limit access based on the wireless mode supported by the wireless device.
For more information, see “4.3.4 802.11b/g/n Mode” on page 44.
Page 46

4 GUI: Wireless Settings
DMS-CTC-20110909-0007 v2.0 41
4.3.1 Securing Your Wireless Connection
Encryption types
The HBR supports the following encryption types:
WEP:
The least safe encryption type used for wireless connections. WEP has been
proven to have security issues. Only use this encryption if your wireless device
does not support WPA2 or WPA.
WPA - TKIP
The first version of WPA. Only choose this option if none of your wireless clients
support WPA2.
WPA+WPA2:
This is a mixed mode. In this mode, WPA2 is the preferred encryption type but
wireless clients that do not support WPA2 can still use WPA as encryption type.
Choose this option if not all of your wireless clients support WPA2 or if you are
not sure. Wireless clients that support WPA2 will use WPA2. The others will use
WPA.
WPA2 (default and recommended encryption):
The most recent and most secure version of WPA. Choose this version if you are
sure that all your wireless clients support WPA2.
None
Although the HBR allows you to use WEP or no security, we strongly advise against
this! We recommend that you use WPA2.
Changing the encryption type
1 On the Wireless Settings menu, click Advanced Security Settings.
2 Under Level 1, select the encryption type of your choice.
3 Enter the pre-shared key of your choice or use the default one.
4 Click Apply.
Changing the wireless key
1 On the Wireless Settings menu, click Advanced Security Settings.
2 Under Level 1, re-select the encryption type that you are currently using.
3 Enter the pre-shared key of your choice or use the default one.
4 Click Apply.
If you want to configure WPA2 on the built-in wireless utility of Windows XP
Service Pack 2 (SP2), you first have to:
Upgrade your Windows XP to Service Pack 3.
- or -
Install the following update: http://support.microsoft.com/kb/917021.
Page 47

4 GUI: Wireless Settings
DMS-CTC-20110909-0007 v2.0 42
4.3.2 SSID Broadcast
SSID
To be able to distinguish one wireless network from another, each wireless network
has its own network name, often referred to as Service Set IDentifier (SSID). All your
wireless devices on your network must use this network name (and the correct
encryption).
Broadcast
By default, the HBR broadcasts its wireless SSID. Wireless clients can then detect the
presence of your network and inform the users that this network is available.
Disabling SSID Broadcast
Proceed as follows:
1 On the Wireless Settings menu, click Advanced Security Settings.
2 Under Level 2, click SSID Broadcast.
3 The SSID Broadcast page appears:
Click:
Enable to allow wireless clients to see your wireless network.
Disable to prevent wireless clients from seeing your wireless network.
4 Click Apply.
Enabling SSID broadcast does not mean that everyone can connect to your
network. They still need the correct wireless key to connect to the HBR
network. It only informs them that your network is present.
Page 48

4 GUI: Wireless Settings
DMS-CTC-20110909-0007 v2.0 43
4.3.3 Wireless MAC Authentication
MAC Address
A MAC (Media Access Control) address is a unique hexadecimal code that identifies a
device on a network. Each network device has such a MAC address.
MAC Authentication
When using MAC authentication, you allow or deny devices to access to your
network based on their MAC address.
Warning: MAC authentication alone is not enough!
Wireless MAC Authentication only offers a limited level of security. Hackers can
easily detect a trusted MAC address and clone this trusted MAC address to their own
computer, which will enable them to pass the MAC authentication filter. That’s why it
is important that you first secure your wireless connection (preferably with a WPA2
encryption key). This way hackers won’t be able to interpret your wireless traffic.
Enabling MAC Authentication
Proceed as follows:
1 On the Wireless Settings menu, click Advanced Security Settings.
2 Under Level 3, click Wireless MAC Authentication.
3 Select Enable Access List.
4 Select:
Accept all devices listed below if you want to block all devices by default.
Deny all devices listed below if you want to allow all devices by default.
5 Now you can add exceptions to the default rule: enter the MAC addresses of the
device in the Client MAC Address box and click Add. Repeat this step for each
device.
6 Click Apply.
If you choose Accept all devices listed below and you are currently
connected using a wireless connection, make sure to add the MAC address
of your wireless client. If you do not do so, you will be disconnected from
the wireless network.
Page 49

4 GUI: Wireless Settings
DMS-CTC-20110909-0007 v2.0 44
4.3.4 802.11b/g/n Mode
Introduction
The 802.11b/g/n Mode page allows you to specify which wireless standards you
want to support.
Wireless standards
The HBR is able to support the following wireless standards:
802.11n offers the highest speed (up to 130Mbps) and best range.
802.11g offers speeds up to 54Mbps.
802.11b offers speeds up to 11Mbps.
Procedure
Proceed as follows:
1 On the Wireless Settings menu, click Advanced Security Settings.
2 Under Level 3, click 802.11b/g/n Mode.
3 The 802.11 Mode page appears:
In the 802.11 Mode list, select either of the following modes:
Compatibility Mode (802.11b/g/n)
In this mode 802.11b, 802.11g and 802.11n can be used to connect to the HBR.
Legacy Mode (802.11b/g)
In this mode only 802.11b- and 802.11g connections can be used to connect
to the HBR. 802.11n connections are not allowed.
4 Click Apply.
Page 50

4 GUI: Wireless Settings
DMS-CTC-20110909-0007 v2.0 45
4.3.5 Other Advanced Wireless Options
Warning
Changing the Advanced Wireless Options may affect your router's wireless
performance. Do not make any changes to these options unless you have been
instructed to do so by Verizon Wireless support personnel.
Accessing the Advanced Wireless Options page
Proceed as follows:
1 On the Wireless Settings menu, click Advanced Security Settings.
2 Under Level 3, click Other Advanced Wireless Options.
3 The HBR prompts you to confirm your choice. Click Ye s .
4 The Advanced Wireless Options page appears.
Page 51

5
GUI: My
Network
Page 52

5 GUI: My Network
DMS-CTC-20110909-0007 v2.0 47
5.1 Network Status
Introduction
The Network Status page provides you an overview of the devices that are
currently connected to the HBR.
Device Information
The following information is provided for each device:
PC Name:
Displays the name that will be used to reference this device.
Connection Type:
Displays how the device is connected to the HBR (Ethernet, Wireless or Coax).
IP Address:
Displays the IP address of the device.
IP Address Allocation:
Displays whether the device is using:
A Dynamic IP address
In this case the HBR assigns the first available address in the address pool. This
also means that you may get a different IP address the next time you connect.
A Static IP address
In this case the device uses a dedicated IP address, you will always use the
same IP address for your connection. You can assign a static IP address either
on the HBR or your device.
MAC Address:
Displays the unique hardware address of the HBR.
Connected Devices
The Connected Devices pane on the right displays how many
devices are connected to a specific interface on the HBR.
Page 53

5 GUI: My Network
DMS-CTC-20110909-0007 v2.0 48
5.2 Network Connections
Warning
The settings covered in this section should be configured by experienced network
technicians only!
Introduction
The Network Connections page allows you to configure the network connections
of the HBR.
Click or the name of the connection to edit or view the settings of the
connection.
Page 54

5 GUI: My Network
DMS-CTC-20110909-0007 v2.0 49
5.2.1 Ethernet Properties
Introduction
The Ethernet Properties page allows you to view the properties of the Ethernet
switch of the HBR.
Accessing the Ethernet Properties page
Proceed as follows:
1 On the My Network menu, click Network Connections.
2 The Network Connections table appears. Click Ethernet.
3 The Ethernet Properties page appears:
4 If you want to change the DHCP settings of the HBR, click IP Address
Distribution. For more information, see “8.1.22 IP Address Distribution” on
page 112.
Page 55

5 GUI: My Network
DMS-CTC-20110909-0007 v2.0 50
5.2.2 Wireless Access Point Properties
Introduction
The Wireless Access Point Properties page allows you to:
Disable/enable the wireless access point.
View/ change the network name (SSID) of the wireless access point.
View the properties of the wireless access point of the HBR.
Access
Proceed as follows:
1 On the My Network menu, click Network Connections.
2 The Network Connections table appears. Click Wireless Access Point.
3 The Wireless Access Point Properties page appears:
4 If you want to:
Turn off the wireless access point, click Disable in the upper-right corner.
Change the network name (SSID), type the new name in the Name box and
click Apply.
Page 56

5 GUI: My Network
DMS-CTC-20110909-0007 v2.0 51
5.2.3 Coax Properties
Introduction
A coax connection connects devices (such as set-top boxes) to the HBR using a
coaxial cable.
The Coax Properties page allows you to:
Disable/enable the coax connection.
View/change the settings of the coax connection.
View Statistics about the coax connection.
Accessing the Coax Properties page
Proceed as follows:
1 On the My Network menu, click Network Connections.
2 The Network Connections table appears. Click Coax.
3 The Coax Properties page appears:
Properties
The following properties are available:
Status:
Displays the status of the coax connection.
Network:
Displays the type of network.
Connection Type:
Displays the type of connection.
MAC Address:
Displays the unique hardware address of this interface.
IP Address Distribution:
To change the value, click IP Address Distribution. For more information, see
“8.1.22 IP Address Distribution” on page 112.
Packets Received:
Displays the number of packets that were received on the coax interface.
Page 57

5 GUI: My Network
DMS-CTC-20110909-0007 v2.0 52
Sent Packets:
Displays the number of packets that were sent over the coax interface.
Time Span:
Displays the time amount of time for which the coax interface has been
connected.
Channel:
The channel used by the coax connection.
Controls
Click:
Settings to change the following advanced settings:
Channel
Allowable frequency
Network Coordinator Mode
Transmit Power Control
Maximum Transmit Power
Privacy
Statistics to view the statistics of your coax connection
Node statistics to view the statistics of the devices that are using the coax
connection.
Page 58

5 GUI: My Network
DMS-CTC-20110909-0007 v2.0 53
5.2.4 Broadband Connection (LTE)
Introduction
The Broadband Connection (LTE) page allows you to access the broadband settings
of the HBA.
Accessing the broadband LTE settings
Proceed as follows:
1 On the My Network menu, click Network Connections.
2 The Network Connections table appears. Click Broadband Connection (LTE).
3 The Broadband Connection (LTE) Properties page appears.
Page 59

6
GUI:
Firewall
Settings
Page 60

6 GUI: Firewall Settings
DMS-CTC-20110909-0007 v2.0 55
Overview
This chapter describes the Firewall Settings pages.
Topic Page
“6.1 General” 56
“6.2 Access Control” 58
“6.3 Port Forwarding” 60
“6.4 DMZ Host” 61
“6.5 Port Triggering” 62
“6.6 Remote Aministration” 64
“6.7 Static NAT” 66
“6.8 Advanced Filtering” 67
“6.9 Security Log” 70
Page 61

6 GUI: Firewall Settings
DMS-CTC-20110909-0007 v2.0 56
6.1 General
Introduction
The firewall controls the flow of data between the local network and the Internet.
Both incoming and outgoing data are inspected and then either accepted (allowed)
or rejected (barred) from passing through the HBR according to a set of rules. The
rules are calculated to stop unwanted intrusions from the outside, while allowing
local network users access to required Internet services.
Security levels
The HBR features three pre-defined firewall security levels:
Configuring the firewall settings
Proceed as follows:
1 On the top menu, click Firewall Setting.
2 The HBR prompts you to confirm your choice. Click Ye s .
Security Level Internet Requests
(Incoming Traffic)
Local network requests
(Outgoing Traffic)
Maximum
S
ecurity
(High)
Blocked:
No access to local network from
Internet, except as configured in
the Port Forwarding, DMZ host,
and Remote Access screens.
Limited:
Only commonly used
services, such as web
browsing and e-mail, are
permitted. These
services include Telnet,
FTP, HTTP, HTTPS, DNS,
IMAP, POP3 and SMTP.
Typical
Security
(Medium)
Blocked:
No access to local network from
Internet, except as configured in
the Port Forwarding, DMZ host,
and Remote Access screens.
Unrestricted:
All services are permitted,
except as configured in
the Access Control
screen.
Minimum
Security
(Low)
Unrestricted:
Permits full access from Internet
to local network; all connection
attempts permitted.
Unrestricted:
All services are permitted,
except as configured in
the Access Control
screen.
Page 62

6 GUI: Firewall Settings
DMS-CTC-20110909-0007 v2.0 57
3 The General page appears:
4 Select the firewall level of your choice.
5 Check the Block IP Fragments box to protect the local network from attacks that
use fragmented data packets to sabotage the network.
6 Click Apply to save your changes.
VPN over IPSec and some UDP-based services make legitimate use of IP
fragments. Do not select this check box if you are using one of these
services.
Page 63

6 GUI: Firewall Settings
DMS-CTC-20110909-0007 v2.0 58
6.2 Access Control
Introduction
The HBR has an integrated access control list that allows you to block access to
specific services on the Internet.
You are able to configure:
Which service has to be blocked (for example: no surfing on the Internet)
Which computers should have this restriction (for example: your children's
computers)
When does this restriction need to be active (for example: after 10pm).
Accessing the Access Control page
Proceed as follows:
1 On the top menu, click Firewall Settings.
2 The HBR prompts you to confirm your choice. Click Ye s .
3 On the left menu, click Access Control.
4 The Access Control table appears:
To:
Deactivate a rule, clear the check box next to the network device.
Reactivate a rule, select the check box next to the network device.
Edit a rule, click .
Delete a rule, click .
Add a new rule, click Add on the bottom of the table. For more information,
see “Adding new access control rules” on page 58.
Adding new access control rules
Proceed as follows:
1 On the bottom of the Access Control table, click Add.
2 The Add Access Control Rule appears:
Page 64

6 GUI: Firewall Settings
DMS-CTC-20110909-0007 v2.0 59
3 In the Networked Computer / Device list, select:
The device that you would like to block from using the service
User Defined if the device is not listed, or you want to create a group of
devices. Click Add to define the new device or device group and follow the
instructions.
Repeat this step for each device that you want to add.
4 In the Protocol list, select the protocol that you want to block.
5 In the When should this rule occur list, select either of the following:
Always to make this a permanent rule.
User Defined to specify the time frames in which this rule will be applied. The
configuration procedure is similar to the one described in “8.1.20 Scheduler
Rules” on page 108.
6 Click Apply to activate the rule.
The list contains the most frequently used protocols. To view the full list,
select Show All Services in the Protocol list.
Page 65

6 GUI: Firewall Settings
DMS-CTC-20110909-0007 v2.0 60
6.3 Port Forwarding
Introduction
In its default state, the HBR blocks all external users from connecting to, or
communicating with the network, making it safe from hackers who may try to
intrude on the network and damage it.
However, the network can be exposed to the Internet in certain limited and
controlled ways to enable some applications to work from the local network (game,
voice, and chat applications, for example) and to enable Internet access to servers in
the network. Port forwarding (sometimes referred to as local servers) supports both
of these functions.
To grant Internet users access to servers inside the local network, each service
provided, as well as the computer providing it, must be identified.
Accessing the Port Forwarding page
Proceed as follows:
1 On the top menu, click Firewall Settings.
2 The HBR prompts you to confirm your choice. Click Ye s .
3 On the left menu, click Port Forwarding.
4 The Port Forwarding page appears:
Creating a new port forwarding rule
Under Create new port forwarding rule:
1 Select either of the following:
The device for which you want to create the rule.
Specify IP to manually enter the IP address for the device that you want to
create the rule for.
2 Click Add to activate the rule.
Page 66

6 GUI: Firewall Settings
DMS-CTC-20110909-0007 v2.0 61
6.4 DMZ Host
Introduction
The DMZ (De-Militarized Zone) host feature allows one device on the network to
operate outside the firewall. To designate a DMZ host:
To use an Internet service, such as an online game or video-conferencing
program, not present in the Port Forwarding list and for which no port range
information is available.
To expose one computer to all services without restriction or security.
WARNING!
A DMZ host is not protected by the firewall and may be vulnerable to attack.
Designating a DMZ host may also put other computers in the local network at risk.
When designating a DMZ host, consider the security implications and protect it if
necessary.
Assigning a DMZ Host
Proceed as follows:
1 On the top menu, click Firewall Settings.
2 The HBR prompts you to confirm your choice. Click Ye s .
3 On the left menu, click DMZ Host.
4 The DMZ Host page appears:
Select the check box on the left and enter the IP address of the host that you
want to use as a DMZ host.
5 Click Apply.
Disabling the DMZ host
If, at any point, you want to disable the DMZ host:
1 Browse to the DMZ Host page.
2 Clear the check box on the left.
3 Click Apply.
Only one network computer can be a DMZ host at any time.
Page 67

6 GUI: Firewall Settings
DMS-CTC-20110909-0007 v2.0 62
6.5 Port Triggering
Introduction
Port triggering can be used for dynamic port forwarding configuration. By setting
port triggering rules, inbound traffic is allowed to arrive at a specific network host
using ports different than those used for the outbound traffic. The outbound traffic
triggers which ports inbound traffic is directed to.
Example
Scenario
1 A local user accesses a remote gaming server using UDP protocol on port 2222.
2 The gaming server responds by connecting the user using UDP on port 3333
when starting gaming sessions.
Problem
The firewall blocks inbound traffic by default. So the incoming message from the
game server (UDP:3333) will be blocked.
If it would pass the firewall, the message will be addressed to the public IP
address of the HBR. Since the HBR did not have any previous UDP messages on
port 3333, it will not know to which device it should forward the message.
Solution
To solve this problem, we use port triggering. This means that if the HBR detects
traffic on the trigger port (in our case UDP:2222) it will automatically open a specific
port (in our example: UDP:3333).
The HBR will also know that if it receives a UDP message on port 3333 it should be
forwarded to the same device that sent a request via UDP port 2222.
Accessing the Port Triggering page
Proceed as follows:
1 On the top menu, click Firewall Settings.
2 The HBR prompts you to confirm your choice. Click Ye s .
3 On the left menu, click Port Triggering.
Page 68

6 GUI: Firewall Settings
DMS-CTC-20110909-0007 v2.0 63
4 The Port Triggering page appears:
Click:
Add to create a new port triggering rule.
to delete a port triggering rule.
Adding a port triggering rule
On the Port Triggering page:
1 On the bottom of the table, click the Add list at the bottom of the page.
2 In the Add list, select either of the following:
One of the pre-defined service.
User Defined to create a new services definition if your service is not listed
and specify the following information:
Service Name
The name that you want to use to refer to this service.
Outgoing Trigger Ports
Enter the port number(s) that the local host will be using to contact the
remote host. When the HBR detects outbound traffic on this port, the HBR
will open the ports specified in your rule.
Incoming Ports to open
These ports will be opened when the rule is triggered. Incoming traffic
arriving at this port will we forwarded to the host that triggered the rule.
3 The port triggering rule is now created.
Page 69

6 GUI: Firewall Settings
DMS-CTC-20110909-0007 v2.0 64
6.6 Remote Aministration
WARNING
Enabling Remote Administration puts your local network at risk from outside
attacks.
Introduction
On the Remote Administration page, you can enable/disable:
Incoming WAN Access to the Telnet Server.
Incoming WAN Access to Web-Management.
Diagnostic Tools.
Telnet
Telnet is used to create a command-line session and gain access to all system
settings and parameters using a text-based terminal.
Web Management
Web Management is used to obtain access to the HBR GUI and gain access to all
settings and parameters, using a web browser. Both secure (HTTPS) and non-secure
(HTTP) access is available.
Diagnostic Tools
Diagnostic Tools are used for troubleshooting and remote system management by a
user or the ISP.
Accessing the remote administration page
Proceed as follows:
1 On the top menu, click Firewall Settings.
2 The HBR prompts you to confirm your choice. Click Ye s .
3 On the left menu, click Remote Administration.
Telnet and Web Management remote administration access may be used to
modify or disable firewall settings. Local IP addresses and other settings can
also be changed, making it difficult or impossible to access the HBR from the
local network. Therefore, remote administration access to Telnet or Web
Management services should be activated only when absolutely necessary.
Encrypted remote administration is performed using a secure SSL
connection, and requires an SSL certificate. When accessing the HBR for the
first time using encrypted remote administration, a warning appears
regarding certificate authentication because the HBR’s SSL certificate is selfgenerated. When encountering this message under these circumstances,
ignore it and continue. Even though this message appears, the self-generated
certificate is safe and provides a secure SSL connection.
Page 70

6 GUI: Firewall Settings
DMS-CTC-20110909-0007 v2.0 65
4 The Remote Administration page appears.
5 Select the services that you want to allow.
6 Click Apply.
Page 71

6 GUI: Firewall Settings
DMS-CTC-20110909-0007 v2.0 66
6.7 Static NAT
Introduction
Static NAT allows you to direct traffic coming from the Internet to a specific local
device.
For example: if you are running a web server, you want all incoming web requests to
be directed to your web server.
Accessing the Static NAT page
Proceed as follows:
1 On the top menu, click Firewall Settings.
2 The HBR prompts you to confirm your choice. Click Ye s .
3 The Static NAT page appears.
Creating a new Static NAT entry
1 Click Add or .
2 The Edit NAT/NAPT Rule page appears.
3 Under Local Host do either of the following:
Select Specify Address, and type the address of the local host.
Select the local host from the list.
4 In the Public IP address box, type the public IP address on which the requests
will be received.
5 If you want to make sure that the request is forwarded to the same port that it
was received on, select Enable Port Forwarding For Static NAT and select the
port forwarding rule you need.
6 Click Apply.
To create new port forwarding rules, click Port Forwarding Rules in the
Advanced menu. For more information see “8.1.18 Port Forwarding Rules”
on page 105.
Page 72

6 GUI: Firewall Settings
DMS-CTC-20110909-0007 v2.0 67
6.8 Advanced Filtering
WARNING
Only advanced technical users should use this feature.
Introduction
Advanced filtering is designed to allow comprehensive control over the firewall’s
behavior. Specific input and output rules can be defined, the order of logically
similar sets of rules controlled, and distinctions made between rules that apply to
the Internet and rules that apply to local network devices.
Rule sets
There are numerous rules automatically inserted by the firewall to provide improved
security and block harmful attacks. The pre-populated rules displayed here are
required for operation on the Verizon Network.
Two sets of rules can be configured:
Input Rule Sets allow you to create rules for inbound traffic.
Output Rule Sets allow you to create rules for outbound traffic.
Accessing the Advanced Filtering page
1 On the top menu, click Firewall Settings.
2 The HBR prompts you to confirm your choice. Click Ye s .
3 On the left menu, click Advanced Filtering.
4 The Advance Filtering page appears.
Click:
Add to add a new firewall rule.
Refresh to update the rule set tables.
Page 73

6 GUI: Firewall Settings
DMS-CTC-20110909-0007 v2.0 68
Adding a rule
On the Advanced filtering page:
1 Click Add next to the interface for which your want to create a rule.
2 The Add Advanced Filter page appears.
The following sections are available for configuration:
Matching:
To apply a firewall rule, a match must be made between IP addresses or ranges
and ports. Use the Source Address and Destination Address drop-down lists
to define the coupling of source and destination traffic. Port matching will be
defined when selecting protocols. For example, if the FTP protocol is selected,
port 21 will be checked for matching traffic flow between the defined source
and destination IPs.
Operation:
This is where the action the rule will take is defined. Select one of the following
radio buttons:
Drop
Deny access to packets that match the source and destination IP addresses
and vCP reset to the origination peer.
Accept
Allow access to packets that match the source and destination IP addresses
and protocol ports defined in upper section of the screen. The data transfer
session will be handled using Stateful Packet Inspection (SPI).
Accept Packet
Allow access to packets that match the source and destination IP addresses
and protocol ports defined in upper section of the screen. The data transfer
session will not be handled using Stateful Packet Inspection (SPI), so other
packets that match this rule will not be automatically allowed access. This
setting is useful when creating rules that allow broadcasting.
Logging:
Select Log Packets Matched by This Rule to add entries relating to this rule
to the security log. For more information, see “6.9 Security Log” on page 70.
When should this rule occur?
Allows you to specify when the rule must be active. Select:
Always if advanced filtering needs to be active all the time.
Page 74

6 GUI: Firewall Settings
DMS-CTC-20110909-0007 v2.0 69
User Defined if the rule will only be active at certain selected times. Then
click Add to add a schedule rule. The procedure is similar to the one
described in “8.1.20 Scheduler Rules” on page 108.
3 Click Apply.
Page 75

6 GUI: Firewall Settings
DMS-CTC-20110909-0007 v2.0 70
6.9 Security Log
Introduction
The security log displays a list of firewall-related events, including attempts to
establish inbound and outbound connections, attempts to authenticate at an
administrative interface (GUI or Telnet terminal), firewall configuration, and system
start-up.
Accessing the Security Log page
Proceed as follows:
1 On the top menu, click Firewall Settings.
2 The HBR prompts you to confirm your choice. Click Ye s .
3 On the left menu, click Security Log.
4 The Security Log page appears.
Security log table
The security log table provides you the following information:
Time:
The time (based on the HBR’s date and time settings) the event occurred.
Event:
There are three kinds of events listed in the system log: Firewall Info, Firewall
Setup, and System Log.
Event-Type:
The “Details” column displays more information about the packet or the event,
such as protocol, IP addresses, ports, etc.
Details:
Displays a textual description of the event
Page 76

7
GUI:
Parental
Control
Page 77

7 GUI: Parental Control
DMS-CTC-20110909-0007 v2.0 72
7.1 Parental Control
Introduction
The Parental control page allows you to:
Block all Internet access.
Users will not be able to access the internet unless you define exceptions to this
rule (for example: allows
www.verizon.com).
Block websites:
When the user tries to access the blocked page, he will get the standard page
announcing that this page has been blocked.
Redirect a website to another website.
When the user tries to access the blocked page he/she will be redirected to the
page of your choice (for example: an intranet page explaining the intranet
policy).
Creating a new rule
Proceed as follows:
1 On the top menu, click Parental Control.
2 The Parental Control page appears.
3 Under Step 1, complete the following steps:
a In the Networked Computer/Device list select the devices that you want to
create the new rule for. To select multiple entries, hold down the CTRL key
while selecting the entries.
b Click Add. The devices are now in the Selected Devices list.
Page 78

7 GUI: Parental Control
DMS-CTC-20110909-0007 v2.0 73
4 Under Step 2, complete the following steps:
a Select either of the following:
Block the following Websites and Embedded Keywords within a
Website to create a new blocking rule.
Allow the following Websites and Embedded Keywords within a
Website to specify an exception on a blocking rule.
Blocking ALL Internet Access.
b Enter the URL for the Website that you want to block in the Website box (for
example: www.evil.com) and/or enter a keyword in the Embedded keyword
within a Website list (for example: cracks, hacks and so on). Click Add.
c If needed add other website and/or keywords
d Under Create Schedule, you can specify when the rule will be active or
inactive.
e Under Create Rule Name, enter a Rule Name and Description.
5 Click Apply.
Page 79

7 GUI: Parental Control
DMS-CTC-20110909-0007 v2.0 74
7.2 Rule Summary
Introduction
The Rule Summary page allows you to view or change the existing parental control
rules.
Changing a parental control rule
Proceed as follows:
1 On the Parental Control menu, click Rule Summary.
2 The Rule Summary page appears.
3 Click:
to view the rule settings.
to edit the rule settings.
For more information, see “7.1 Parental Control” on page 72.
to delete the rule.
Page 80

8
GUI:
Advanced
Settings
Page 81

8 GUI: Advanced Settings
DMS-CTC-20110909-0007 v2.0 76
Introduction
The Advanced page allows you to configure the more advanced services of both
the HBA and the HBR.
To access the Advanced page, proceed as follow:
1 On the top menu, click Advanced.
2 The Advanced page appears.
3 On the bottom of this page, click:
HBA Advanced Settings to configure the settings of the HBA.
For more information, see “8.1 HBA Advanced Pages” on page 77.
HBR Advanced Settings to configure the settings of the HBA.
For more information, see “8.2 HBR Advanced Pages” on page 114.
Page 82

8 GUI: Advanced Settings
DMS-CTC-20110909-0007 v2.0 77
8.1 HBA Advanced Pages
Introduction
The Advanced HBA page contains links to the different configuration pages. These
pages are grouped by topic:
Utilities
DNS Servers
Configuration
Upgrade
Network services
Date and time
Router
Utilities
Click:
Diagnostics to perform diagnostic tests on the HBA.
For more information, see “8.1.1 Diagnostics” on page 79.
Restore Defaults to reset the HBA to its default settings.
For more information, see “8.1.2 Restore Defaults” on page 81.
Reboot Router to restart the HBA.
For more information, see “8.1.3 Reboot the Router” on page 83.
ARP Table to display active devices and their IP and MAC addresses.
For more information, see “8.1.4 ARP Table” on page 84.
Quality of Service (QoS) to view the QoS settings.
For more information, see “8.1.5 Quality of Service (QoS)” on page 85.
Local Administration allow users to access the GUI from your local network.
For more information, see “8.1.6 Local Administration” on page 86.
Remote Administration allow users to access the GUI from the Internet.
For more information, see “8.1.7 Remote Administration” on page 87.
DNS Servers
Click:
Dynamic DNS to configure Dynamic DNS settings.
For more information, see “8.1.8 Dynamic DNS” on page 89.
DNS Server to manage the local (LAN) network for host name and IP address.
For more information, see “8.1.9 DNS Server” on page 91.
Page 83

8 GUI: Advanced Settings
DMS-CTC-20110909-0007 v2.0 78
Configuration
Click:
Configuration File to save or restore a configuration.
For more information, see “8.1.10 Configuration File” on page 93
System Settings to change the system settings of the HBA.
For more information, see “8.1.11 System Settings” on page 95.
Upgrade
Click Firmware Upgrade to upgrade your HBA with the latest software.
For more information, see “8.1.12 Firmware Upgrade” on page 98.
Network services
Click:
Network Objects to create and manage network objects (discrete LAN subsets).
For more information, see “8.1.13 Network Objects” on page 99.
Universal Plug & Play to configure the interaction with other UPnP devices.
For more information, see “8.1.14 Universal Plug and Play” on page 101.
SIP ALG to enable/disable the SIP ALG.
For more information, see “8.1.15 SIP ALG” on page 102.
MGCP ALG to enable/disable the MGCP ALG.
For more information, see “8.1.16 MGCP ALG” on page 103.
IGMP Proxy to configure the IGMP proxy settings.
For more information, see “8.1.17 IGMP Proxy” on page 104.
Port Forwarding Rules to configure the port forwarding rules.
For more information, see “8.1.18 Port Forwarding Rules” on page 105.
Date and time
Click:
Date and Time to configure the HBA clock and calendar of the HBA.
For more information, see “8.1.19 Date and Time” on page 107.
Scheduler Rules to schedule the activation of firewall rules.
For more information, see “8.1.20 Scheduler Rules” on page 108.
Router
Click:
Routing to manage routing policies.
For more information, see “8.1.21 Routing” on page 110.
IP Address Distribution to manage the IP addresses of devices on the network.
For more information, see “8.1.22 IP Address Distribution” on page 112.
Page 84

8 GUI: Advanced Settings
DMS-CTC-20110909-0007 v2.0 79
8.1.1 Diagnostics
Introduction
The Diagnostics page allows you to let the HBA ping a device or website. Ping is
used to test if a host (for example, a website or a computer) is reachable.
Procedure
To diagnose network connectivity:
1 On the top menu, click Advanced.
2 The Advanced page appears. Click HBA Advanced Settings on the bottom of
the page and then click Ye s t o confirm that you want to access the advanced
settings.
3 Under , click Diagnostics.
4 The Diagnostics page appears.
In the Destination box, type one of the following:
The DNS name (for example: www.google.com) or IP address (for example:
141.11.249.33) of a website.
The DNS name (for example: Sascha-PC.lan) or IP address (for example:
192.168.1.3) of network device.
5 If needed change the number of pings in the Number of pings box.
6 Click Go.
7 The HBA is now pinging the destination. You can follow the progress in the
Packets box.
8 At the end of the test the results appear.
Under:
Status, you can see if the test was successful or not.
Packets, you can see the number packets that were received and the
percentage of packets that were lost.
Page 85

8 GUI: Advanced Settings
DMS-CTC-20110909-0007 v2.0 80
Round trip time, you can see the amount of time it took for the packet to get
back to the HBA.
Page 86

8 GUI: Advanced Settings
DMS-CTC-20110909-0007 v2.0 81
8.1.2 Restore Defaults
Introduction
The Restore Defaults page allows you to restore the HBA to the factory defaults.
Resetting the HBA
Proceed as follows:
1 On the top menu, click Advanced.
2 The Advanced page appears. Click HBA Advanced Settings on the bottom of
the page and then click Ye s t o confirm that you want to access the advanced
settings.
3 Under , click Restore Defaults.
4 The Attention page appears.
5 Optionally, click Save Configuration File to save the current configuration of the
HBA. This allows you to restore this configuration at any time. For more
information, see “8.1.10 Configuration File” on page 93.
6 Click Restore Defaults.
7 The HBA prompts you to confirm your choice.
Click Restore OK.
As described in “1.1 Basic Concepts” on page 3, both the HBR and the HBA are
responsible for bringing the Verizon services into your home.
It is therefore important to know that a reset to defaults may influence
specific services. If you reset:
The HBR, local network settings such as changes to WiFi SSID or keys, the
LAN address range, or time zone/DST will be lost.
The HBA, settings of Internet-related services such as Firewall, port
forwarding, and Parental controls would be reset.
Page 87

8 GUI: Advanced Settings
DMS-CTC-20110909-0007 v2.0 82
8 The HBA restores the factory defaults and restarts.
Page 88

8 GUI: Advanced Settings
DMS-CTC-20110909-0007 v2.0 83
8.1.3 Reboot the Router
Introduction
The Reboot the Router page allows you to restart your HBA.
WARNING
During the reboot, all services provided by the HBA will be unavailable.
Procedure
To reboot the HBA:
1 On the top menu, click Advanced.
2 The Advanced page appears. Click HBA Advanced Settings on the bottom of
the page and then click Ye s t o confirm that you want to access the advanced
settings.
3 Under , click Reboot Router.
4 The HBA prompts you to confirm the reboot.
Click OK.
5 The HBA restarts. It may take a few minutes before all services become available.
Page 89

8 GUI: Advanced Settings
DMS-CTC-20110909-0007 v2.0 84
8.1.4 ARP Table
ARP
The Address Resolution Protocol is a protocol that translates the IP address of a
network device into its MAC address.
The ARP table page
The ARP Table page provides you a mapping between the IP address and the MAC
address of the device that is using this IP address.
Viewing the ARP table
Proceed as follows:
1 On the top menu, click Advanced.
2 The Advanced page appears. Click HBA Advanced Settings on the bottom of
the page and then click Ye s t o confirm that you want to access the advanced
settings.
3 Under , click ARP Table.
4 The ARP Table page appears.
The following fields are available:
IP Address
MAC Address
Device
Displays the network interface that the device is using. For more information,
see “5.2 Network Connections” on page 48.
DHCP ACL
Click Add to add this device to the access control list. For more information,
see “6.2 Access Control” on page 58.
Page 90

8 GUI: Advanced Settings
DMS-CTC-20110909-0007 v2.0 85
8.1.5 Quality of Service (QoS)
QoS
Quality of Service (QoS) is a system that allows you to assign a higher or lower
priority to specific types of data.
For example: Data destined for your Setup Box must have higher priority than
normal traffic.
Accessing the QoS pages
Proceed as follows:
1 On the top menu, click Advanced.
2 The Advanced page appears. Click HBA Advanced Settings on the bottom of
the page and then click Ye s t o confirm that you want to access the advanced
settings.
3 Under , click Quality of Service (QoS).
4 The Quality of Service (QoS) pages appears.
Page 91

8 GUI: Advanced Settings
DMS-CTC-20110909-0007 v2.0 86
8.1.6 Local Administration
Introduction
The Local Administration page allows you to configure telnet access to your HBA.
Accessing the QoS pages
Proceed as follows:
1 On the top menu, click Advanced.
2 The Advanced page appears. Click HBA Advanced Settings on the bottom of
the page and then click Ye s t o confirm that you want to access the advanced
settings.
3 Under , click Local Administration.
4 The Local Administration page appears.
Page 92

8 GUI: Advanced Settings
DMS-CTC-20110909-0007 v2.0 87
8.1.7 Remote Administration
WARNING
Enabling Remote Administration puts your local network at risk from outside
attacks.
Introduction
On the Remote Administration page, you can enable/disable:
Incoming WAN Access to the Telnet Server.
Incoming WAN Access to Web-Management.
Diagnostic Tools.
Telnet
Telnet is used to create a command-line session and gain access to all system
settings and parameters using a text-based terminal.
Web Management
Web Management is used to obtain access to the HBR GUI and gain access to all
settings and parameters, using a web browser. Both secure (HTTPS) and non-secure
(HTTP) access is available.
Diagnostic Tools
Diagnostic Tools are used for troubleshooting and remote system management by a
user or the ISP.
Telnet and Web Management remote administration access may be used to
modify or disable firewall settings. Local IP addresses and other settings can
also be changed, making it difficult or impossible to access the HBR from the
local network. Therefore, remote administration access to Telnet or Web
Management services should be activated only when absolutely necessary.
Encrypted remote administration is performed using a secure SSL
connection, and requires an SSL certificate. When accessing the HBR for the
first time using encrypted remote administration, a warning appears
regarding certificate authentication because the HBR’s SSL certificate is selfgenerated. When encountering this message under these circumstances,
ignore it and continue. Even though this message appears, the selfgenerated certificate is safe and provides a secure SSL connection.
Page 93

8 GUI: Advanced Settings
DMS-CTC-20110909-0007 v2.0 88
Accessing the remote administration page
Proceed as follows:
1 On the top menu, click Advanced.
2 The Advanced page appears. Click HBA Advanced Settings on the bottom of
the page and then click Ye s t o confirm that you want to access the advanced
settings.
3 Under , click Remote Administration.
4 The Remote Administration page appears.
5 Select the services that you want to allow.
6 Click Apply.
Page 94

8 GUI: Advanced Settings
DMS-CTC-20110909-0007 v2.0 89
8.1.8 Dynamic DNS
Introduction
The Dynamic DNS service allows you to assign a dynamic DNS host name (for
example mywebpage.dyndns.org) to a broadband connection even if it is using a
dynamic IP address. As soon as the device gets a new IP address, the dynamic DNS
server updates its entry to the new IP address.
What you need
Before you can configure Dynamic DNS, you first have to create an account at a
Dynamic DNS service provider. For example:
www.dyndns.org
www.no-ip.com
www.dtdns.com
Accessing the Dynamic DNS page
Proceed as follows:
1 On the top menu, click Advanced.
2 The Advanced page appears. Click HBA Advanced Settings on the bottom of
the page and then click Ye s t o confirm that you want to access the advanced
settings.
3 Under , click Dynamic DNS.
4 The Dynamic DNS page appears.
Creating a new Dynamic DNS entry
On the Dynamic DNS page, proceed as follows:
1 Click New Dynamic DNS entry.
Page 95

8 GUI: Advanced Settings
DMS-CTC-20110909-0007 v2.0 90
2 The Dynamic DNS Host Entry page appears.
3 In the Host Name box, type the host name that you purchased at the Dynamic
DNS provider (for example: myhbr.dyndns.org).
4 In the User Name box type the user name of your Dynamic DNS account.
5 In the Password box, type the password of your Dynamic DNS account.
6 Optionally, you can:
Select Wildcard to support all URLs that contain your host name (for example,
newname.myhbr.dyndns.org).
Enter your mail exchange server in the Mail Exchanger box to redirect all mail
arriving at the hostname address to the specified mail exchange server.
Select Backup MX to specify a backup mail exchange server.
Select Offline to disable your Dynamic DNS hostname at the Dynamic DNS
provider.
7 Click Apply.
Page 96

8 GUI: Advanced Settings
DMS-CTC-20110909-0007 v2.0 91
8.1.9 DNS Server
Introduction
The Domain Name System (DNS) translates domain names into IP addresses and
vice versa. The HBA’s DNS server is an auto-learning DNS, which means that when a
new computer is connected to the network, the DNS server learns its name and
automatically adds it to the DNS table. Other network users can immediately
communicate with this computer using either its name or its IP address.
Services offered
The following services are provided by the DNS server of the HBA:
Shares a common database of domain names and IP addresses with the DHCP
server.
Supports multiple subnets within the local network simultaneously.
Automatically appends a domain name to unqualified names.
Allows new domain names to be added to the database using the HBA’s GUI.
Permits a computer to have multiple host names.
Permits a host name to have multiple IPs (needed if a host has multiple network
cards).
Configuration
The DNS Server does not require configuration. However, the list of computers
known by the DNS can be viewed or a new computer can be added to the list.
Viewing DNS Table
Proceed as follows:
1 On the top menu, click Advanced.
2 The Advanced page appears. Click HBA Advanced Settings on the bottom of
the page and then click Ye s t o confirm that you want to access the advanced
settings.
3 Under , click DNS Server.
4 The DNS Server page appears.
Click:
Add or to add a new entry to the list. For more information, see “Adding a
DNS entry” on page 92.
Page 97

8 GUI: Advanced Settings
DMS-CTC-20110909-0007 v2.0 92
to edit an existing DNS entry.
to delete an existing DNS entry.
Adding a DNS entry
On the DNS Server page:
1 Click Add DNS Entry at the bottom of the page.
2 The DNS Entry page appears.
3 Enter a DNS name for the host in the Host Name box.
4 Enter the IP address of the host in the IP Address box.
5 Click Apply.
Accessing a device via its DNS name
Once a device is listed in the DNS table you can access it via <DNS. name>.<DNS
suffix>.
Example
Your host is using PC-Jim as DNS name and lan as DNS suffix (this is the default DNS
suffix).
If this host is running a web server, you can access it via
http://PC-Jim.lan.
If this host is a Windows computer with shared files on it, you can access these
shared files via
\\PC-Jim.lan.
Page 98

8 GUI: Advanced Settings
DMS-CTC-20110909-0007 v2.0 93
8.1.10 Configuration File
Backing up your current configuration
Once have successfully configured your HBA, it is recommended that you backup
your configuration. This allows you to return to this configuration whenever you
need it (for example after misconfiguration, or a reset to the factory defaults).
Backing up your current configuration
Proceed as follows:
1 On the top menu, click Advanced.
2 The Advanced page appears. Click HBA Advanced Settings on the bottom of
the page and then click Ye s t o confirm that you want to access the advanced
settings.
3 Under , click Configuration File.
4 The Configuration File page appears.
5 Click the Save Configuration File.
6 A window appears to prompt you to save your file. Save your file to the location
of your choice.
WARNING!
Manually editing a configuration file can cause the HBA to malfunction or become
completely inoperable.
Restoring a previously saved configuration
Proceed as follows:
1 On the top menu, click Advanced and then click Yes t o confirm that you want to
access the advanced settings.
2 Under , click Configuration File.
Page 99

8 GUI: Advanced Settings
DMS-CTC-20110909-0007 v2.0 94
3 The Configuration File page appears.
4 Click the Load Configuration File.
5 The Load Configuration File page appears.
6 A window appears to prompt you to save your file. Save your file to the location
of your choice.
Page 100

8 GUI: Advanced Settings
DMS-CTC-20110909-0007 v2.0 95
8.1.11 System Settings
Introduction
The System Settings page allows you to configure various system and
management parameters.
The page is divided into the following groups:
Router Status
HomeFusion Broadband Antenna
Management Application Ports
System Logging
Security Logging
Outgoing Mail Server
Router Status
Under Router Status, the following properties are available:
HomeFusion Broadband Antenna’s Hostname
Specify the HBA’s host name by entering it into the text box. The host name is
used in combination with the Local Domain to access the HBA.
Local Domain
Specify the network’s local domain by entering it into this text box. The Local
Domain is used in combination with the Wireless Broadband Router’s
Hostname to access the HBA.
So if you change the host name to router and the local domain to home, you will
have to access the GUI using
http://router.home.
HomeFusion Broadband Antenna
Under HomeFusion Broadband Antenna, the following properties are available:
Automatic Refresh of System Monitoring Web Pages
Prompt for Password When Accessing via LAN
Warn User Before Configuration Changes
Select this option if you want to receive a warning before network changes are
applied.
Session Lifetime
Specifies how long the session will stay open when there is no activity on the GUI.
Configure a number of concurrent users that can be logged into the router
Allows to limit the number of users that can access the HBA at the same time.
Select the number of users from the drop-down list.
Management Application Ports
Under Management Application Ports, you can configure the port numbers of the
management services:
 Loading...