

Page 1
PIR40
N
E
O
U
A
D
A
PIR MOTION
PIR BEWEGI
CAPTEUR DE
DETECTOR D
PIR-BEWEGU
USER MANUAL
GEBRUIKERSH
MODE D’EMPL
MANUAL DEL
BEDIENUNGS
DETECTOR – BUIL
GSDETECTOR – IN
MOUVEMENT PIR –
MOVIMIENTOS PI
NGSMELDER – ZUM
ANDLEIDING
I
SUARIO
NLEITUNG
IN
BOUW
À ENCASTRER
R – PARA EMPOTR
EINBAUEN
2
8
12
17
22
R
Page 2
PIR40
A
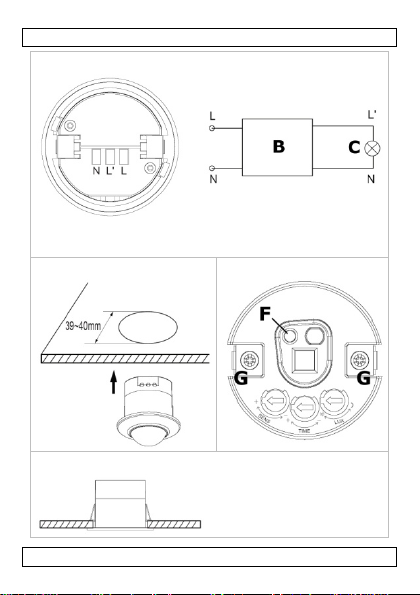
B = sensor – sensor – capteur – sensor – Sensor
C = load – belasting – charge – carga – Last
D
E
H
V. 01 – 16/10/2012 2 ©Velleman nv
Page 3
/
t
n
n
o
r
i
u
o
o
ging
n
n
t
4
A
m
o
;
e
a
v
n
m
©
o
a
a
o
s
o
a
o
g
I
PIR
0
J
1. Introduc
To all reside
Important e
returned to yo
the local env ir
If in doubt, c
Thank you for
before brin
transit, don't i
2. Safety I
Keep
V. 01 – 16/10
USER M
ion
ts of the European
vironmental infor
This
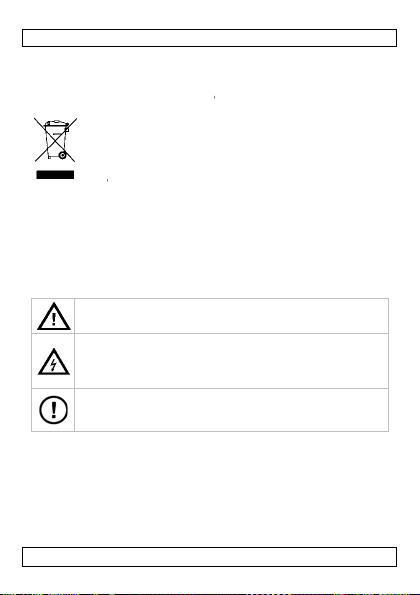
symbol on the device
sal of the device afte
disp
envi
onment. Do not disp
unso
rted municipal waste
alized company for r
spec
r distributor or to a l
nmental rules .
ntact your local w
choosing Velleman! P
this device into ser
stall or use it and co
structions
his device away fro
2012 3
NUAL
Union
ation about this pr
or the package indic
r its lifecycle could h
se of the unit (or bat
it should be taken t
cycling. This device
ocal recycling service
ste disposal auth
lease read the manu
ice. If the device was
tact your dealer.
children and unauth
duct
tes that
rm the
teries) as
a
hould be
. Respect
rities.
l thoroughly
dama
ed in
rized users.
Velleman nv
Page 4
/
o
i
e
a
G
epag
m
e
h
e
n
e
q
y
t
u
a
e
r
u
e
t
u
p
u
e
4
r
o
n
b
n
f
e
e
c
e
n
f
e
o
r
e
y
©
T
k
e
y
a
e
gr
e
g
e
h
e
d
s
s
e
T
Risk
live w
disass
repair
There
to an
3. General
Refer to the V
es of this
• Keep this d
• Protect this
operating t
• Indoor us
splashing a
• Keep the d
electrical e
• Familiarise
using it.
• All modifica
Damage ca
by the warr
• Only use th
an unautho
• Damage ca
is not cover
responsibili
• Keep this m
4. Installati
Refer to the ill
The in
1. Choose a
temperat
heating d
Also avoid
V. 01 – 16/10
f electroshock whe
res can cause life-th
emble or open the h
d by qualified perso
are no user-servicea
uthorized dealer for
uidelines
lleman® Service a
anual.
vice away from dust
device from shocks a
e device.
only. Keep this devi
d dripping liquids.
vice away from inter
uipment.
ourself with the func
ions of the device ar
sed by user modifica
nty.
device for its intend
ised way will void th
sed by disregard of
d by the warranty a
y for any ensuing de
anual for future refer
on
strations on page 2
stallation must be ca
roper location for th
re changes frequentl
vices. Make sure the
obstructions or movi
2012 4
PIR
0
n opening the cover.
eatening electroshoc
using yourself. Have
nel.
le parts inside the d
service and/or spare
d Quality Warrant
and extreme temper
nd abuse. Avoid brut
ce away from rain, m
erence from power
tions of the device b
forbidden for safety
tions to the device is
ed purpose. Usin
warranty.
ertain guidelines in t
d the dealer will not
ects or problems.
nce.
f this manual.
ried out by a qualifie
sensor. Avoid place
, e.g. near air condit
installation surface i
ng objects in the det
ouching
s. Do not
the device
vice. Refer
parts.
on the last
tures.
force when
oisture,
ids or other
fore actually
reasons.
not covered
th
device in
is manual
accept
person.
where
ioners or
immobile.
ction field
Velleman nv
Page 5

PIR40
of the sensor to prevent unnecessary activation. T he max.
installation height is 3.5 m.
2. The PIR sensor must be installed inside a hole which is max.
40 mm in diameter at the entrance, and at least 60 mm deep
(ideal: 100 mm). The clips must have enough space to expand
inside the hole (see [D/H]).
3. Deactivate and remove the fuse of the electric circuit on which
you want to install the device.
4. Take care of electrical wiring inside the ins tallation hole.
5. Connect the wiring to the terminals according to the
diagram [A].
6. Reinstall the fuse of the electric circuit and switch it on.
7. Set the detec tion distance ( SENS), the light s ensitivity (LUX),
and ON-timer (TIME) [E] to the desired values.
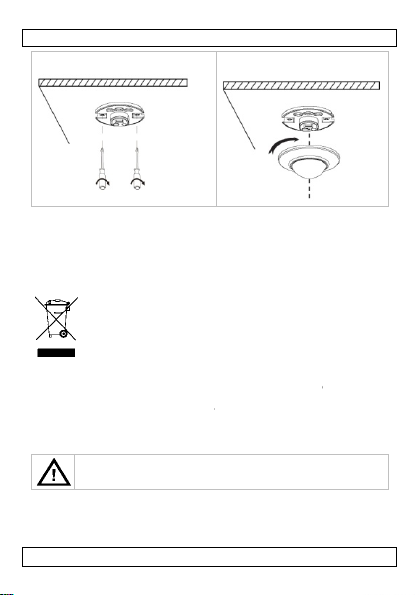
8. Loosen the screws of the clips [G].
9. Insert the PIR sensor into the opening [H]. Make sure not to
damage the cabling while doing so.
10. Test the device before installing it in the foreseen opening (see
further).
11. If the test is successful, tighten the screws of the clips to secure
the PIR sensor against the installation surface [I].
12. Place the transparent cover over the sensor [J].
5. Testing
Test 1 – Settings
SENS TIME LUX
max. min. max. (sun)
1. Make sure the transparent cover is in place.
2. Switch on the power.
3. Wait for the device to start up (± 30 seconds). The indicator LED
[F] must be off.
4. Wave your hand before the sensor. The load switches on. If
there is no further motion detection, it switches off after
± 8 seconds.
V. 01 – 16/10/2012 5 ©Velleman nv
Page 6

PIR40
Test 2
SENS TIME LUX
max. min. min. (moon)
1. Wait until the indicator LED is off.
2. Wave your hand before the detector. The load does not switch
on.
3. Cover the sensor with a piece of non-transparent black cloth.
The load switches on. If there is no further motion detection, it
switches off after ± 8 seconds.
Test 3
SENS TIME LUX
max. max. max. (sun)
1. Wait until the indicator LED is off.
2. Wave your hand before the sensor. The load switches on. If
there is no further motion detection, it switches off after
± 6 minutes.
6. Troubleshooting
The load doesn’t work
• Check if the power is available.
• Check if the load is not defect ive.
• Adjust the light sensitivity (LUX) setting.
Poor sensitivity
• Check if there is any obstruction in front of the detection window.
• Check if the ambient temperature is within specifications.
• Check settings for detection distance (SENS) and light sensitivity
(LUX).
• Check if the motion speed is wit hin specifications.
The load doesn’t switch off automatically
• Check if there a anything that triggers the sensor constantly (for
example, a moving curtain.
• Check the ON-timer settin g.
• Check if the power supply is within specifications.
• Check for temperature changes near the sensor (air conditioning,
heating…).
V. 01 – 16/10/2012 6 ©Velleman nv
Page 7

PIR40
7. Technical Specifications
detection angle 360°
ON-timer adjustable from 8 s (± 2 s)
working temperature -10 ~ +40°C
working humidity < 93% RH
light sensitivity < 10 ~ 2000 lx (adjustable)
rated load 300 W max. (tungsten) /
power supply 220 - 240 VAC / 50 Hz
power consumption 0.45 W (active) / 0.1 W (stand-by)
installation height 2.5 ~ 3.5 m
dimensions visible part Ø 50 x 17 mm
weight ± 48 g
Use this device with original accessories only. Velleman nv
cannot be held responsible in the event of damage or injury
resulting from (incorrect) use of this device. For more info
concerning this product and the latest version of this manual,
please visit our website www.velleman.eu. The information in
this manual is subject to change without prior notice.
© COPYRIGHT NOTICE
The copyright to this manual is owned by Velleman nv. All
worldwide rights reserved. No part of this manual may be copied,
reproduced, translated or reduced to any electronic medium or
otherwise without the prior written consent of the copyright holder.
distance max. 8 m
motion speed 0.6 ~ 1.5 m/s
up to 6 min (± 2 min)
100 W (fluorescent)
build-in part Ø 40 x 40 mm
PIR sensor Ø 28 mm
V. 01 – 16/10/2012 7 ©Velleman nv
Page 8
/
E
gez
m
y
e
d
t
v
a
n
n
e
w
a
d
r
g
k
o
e
jn
e
e
V
e
e
e
g
4
z
o
e
s
j
s
v
e
g
e
t
s
.
s
r
i
n
s
©
G
o
g gee
s
n
j
o
e
a
r
jd
e
s
e
n
e
o
n
n
g
s
1. Inleiding
Aan alle in
Belangrijke
terechtkomen
naar een loka
milieuwetgevi
Hebt u vrage
betreffend d
Dank u voor u
toestel in gebr
transport, inst
2. Veilighei
3. Algemen
Raadpleeg de
achteraan dez
• Bescherm t
• Bescherm t
bediening.
• Gebruik het
vochti
V. 01 – 16/10
G
BRUIKERSH
etenen van de Eur
ilieu-informatie b
Dit s
mbool op het toestel
als h
t na zijn levenscyclu
scha
e kan toebrengen aa
even
uele batterijen) niet
; het moet bi
afval
oor recyclage. U mo
l recyclagepunt bren
.
, contacteer dan d
verwijdering.
aankoop! Lees dez
uik neemt. Werd het
lleer het dan niet en
sinstructies
Houd
buiten het bereik van
ocutiegevaar bij he
Elekt
een
abels aan die onder
elektr
shocks te vermijden
laat r
paraties over aan ge
geen door de gebrui
Er zi
toest
l. Voor onderhoud of
uw de
.
ale
richtlijnen
elleman® service-
handleiding.
en stof en extreme
en schokken. Verm
toestel enkel binne
heid
en opspattende vloei
2012 8
PIR
0
ANDLEIDIN
pese Unie
treffende dit produ
of de verpakkin
wordt weggeworpe
n het milieu. Gooi dit
het gewone huish
bi
een ge
pecialiseerd bedrijf
t dit toestel naar uw
en. Respecteer de pl
e plaatselijke auto
handleiding grondig
oestel beschadigd ti
raadpleeg uw dealer.
kinderen en onbevo
t openen van het toe
troom staan om dod
Open de behuizing
choold personeel.
ker vervangbare ond
reserveonderdelen, c
en kwaliteitsgara
temperaturen.
d brute kracht tijde
shuis. Bescherm te
toffen.
ct
ft aan dat,
, dit toestel
toestel (en
udelijke
verdeler of
atselijke
iteiten
voor u het
ens het
den.
tel. Raak
lijke
iet zelf en
rdelen in dit
ntacteer
tie
s de
en regen,
Velleman nv
Page 9
/
g
d
ghe
d
u
j
n
d
s
e
g
a
g
o
j
w
g
v
6
e
e
u
e
e
e
gs
4
n
e
e
e
ge
g
d
o
n
a
t
d
a
w
1
z
c
d
g
,
s
©
k
e
e
e
e
b
j
a
m
ging
d
e
n
b
d
g
t
e
o
m
et g
a
ding
• Houd het to
netspannin
• Leer eerst
gebruiken.
• Om veili
Schade doo
niet onder
• Gebruik het
onoordeelk
• De garantie
richtli
verantwoor
rechtstreek
• Bewaar dez
4. Installati
Raadplee
Laat d
1. Kies een
toestel w
in de nabi
een onbe
bewegend
activerin
3.5 m.
2. De PIR-se
diameter
minstens
voldoend
[D/H]).
3. Schakel d
waaraan
4. Voorzie d
5. Bekabel d
6. Schakel d
7. Stel de de
activerin
8. Draai de s
V. 01 – 16/10
estel uit de buurt va
of andere elektrisch
e functies van het to
idsredenen mag u ge
r wijzigingen die de
e garantie.
toestel enkel waarvo
ndig gebruik vervalt
eldt niet voor scha
nen i
deze handleiding en
elijkheid afwijzen vo
verband mee houde
handleiding voor ve
e
de
fbeeldingen op pagi
e detector installeren
eschikte montagepla
rdt blootgesteld aan
heid van aircondition
eeglijke ondergrond.
e voorwerpen in het
te voorkomen. De m
nsor moet geplaatst
an max. 40 mm aan
0 mm diep (ideaal:
ruimte hebben om u
stroom uit door de
gaat werken uit te s
bedrading binnenin
terminals zoals aan
stroom opnieuw in.
tectieafstand (SENS)
duur (TIME) [E] in.
chroeven van de clip
2012 9
PIR
0
storingen veroorzaa
toestellen.
stel kennen voor u h
n wijzigingen aanbr
bruiker heeft aange
or het gemaakt is. Bi
de garantie.
e door het negeren v
uw dealer zal de
r defecten of proble
n.
rdere raadple
a 2 van deze handlei
door een technicus.
ts. Vermijd plaatsen
emperatuurschomm
ers of warmtebronne
Vermijd eveneens o
etectieveld om onno
ximale montagehoo
orden in een gat me
het begin van de op
00 mm). De clips m
it te zetten in het gat
ekering van de stroo
hakelen.
e uitsparing.
egeven in het diagra
de lichtgevoeligheid
los [G].
t door de
ngen.
racht valt
n bepaalde
en die hier
.
waar het
lingen, bijv.
. Zorg voor
stakels of
ige
te bedraagt
een
ning, en
eten
(zie
kring
m [A].
(LUX) en
Velleman nv
aat
.
Page 10
PIR40
9. Schuif de detector in de uitsparing [H]. Let erop dat u de kabels
niet beschadigt.
10. Test het toestel voor u het definitief plaatst in de voorziene
opening (zie verder).
11. Bij een geslaagde test, draai de schroeven van de clips vast om
de PIR-sensor te bevestigen aan het montageoppervlak. [I].
12. Plaats het doorzichtige kapje op de sensor [J].
5. Testen
Test 1 – Instellingen
SENS TIME LUX
max. min. max. (zon)
1. Zorg ervoor dat het doorzichtige kapje goed vastzit.
2. Schakel de stroom in.
3. Wacht totdat het toestel opstart (± 30 seconden). De
ledindicator [F] mag niet branden.
4. Beweeg uw hand langs de sensor. De belasting schakelt in.
Indien er geen beweging meer wordt gedetecteerd, schakelt de
belasting uit na ± 8 seconden.
Test 2
SENS TIME LUX
max. min. min. (maan)
1. Wacht totdat de ledindicator niet meer brandt.
2. Beweeg uw hand langs de sensor. De belasting schakelt niet in.
3. Bedek de sensor met een ondoorschijnend zwart doek. De
belasting schakelt in. Indien er geen beweging meer wordt
gedetecteerd, schakelt de belasting uit na ± 8 seconden.
Test 3
SENS TIME LUX
max. max. max. (zon)
1. Wacht totdat de ledindicator niet meer brandt.
2. Beweeg uw hand langs de sensor. De belasting schakelt in.
Indien er geen beweging meer wordt gedetecteerd, schakelt de
belasting uit na ± 6 minuten.
V. 01 – 16/10/2012 10 ©Velleman nv
Page 11

PIR40
6. Probleemoplossing
De belasting werkt niet
• Controleer of er stroom is.
• Controleer of de belasting defect is.
• Regel de instelling van de lichtgevoeligheid (LUX).
Slechte gevoeligheid
• Controleer of de sensor gehinderd wordt door een obstakel.
• Controleer of de omgevingstemperatuur voldoet aan de
specificaties.
• Controleer of de instellingen van de detectieafstand (SENS) en de
lichtgevoeligheid (LUX).
• Controleer of de bewegingssnelheid voldoet aan de specificaties
De belasting schakelt niet automatisch uit
• Controleer of er een obstakel is waardoor de sensor constant
getriggered wordt (bijvoorbeeld, een bewegend gordijn).
• Controleer de instelling van de activeringsduur.
• Controleer of de voeding voldoet aan de specifi caties.
• Controleer temperatuurschommelingen in de nabijheid van de
sensor (airconditioner, warmtebron, …).
7. Technische specificaties
waarneming hoek 360°
activeringsduur instelbaar van 8 s (± 2 s)
werktemperatuur -10 ~ +40°C
vochtigheidsgraad < 93% RH
gevoeligheid < 10 ~ 2000 lx (instelbaar)
max. belasting 300 W max. (tungsten) /
voeding 220 - 240 VAC / 50 Hz
verbruik 0.45 W (actief) / 0.1 W (stand-by)
installatiehoogte 2.5 ~ 3.5 m
bereik max. 8 m
snelheid 0.6 ~ 1.5 m/s
tot 6 min (± 2 min)
100 W (fluorescent)
V. 01 – 16/10/2012 11 ©Velleman nv
Page 12

/
o
n
ge
n
a
o
g
h
g
e
t
s
i
y
m
i
e
e
s
m
e
4
2
w
o
i
h
v
e
n
e
e
r
E
e
i
t
o
je
é
t
s
e
©
b
m
n
n
t
t
s
t
e
r
s
u
o
l
afmetingen
gewicht
Gebruik dit t
nv is niet aa
(verkeerd)
dit product e
www.vellem
allen tijde w
kennisgevin
© AUTEURSR
Velleman nv
Alle wereldw
om deze handl
te vertalen, te
zonder vooraf
rechthebbend
PIR
zichtbaar
ingebou
PIR-sens
± 48 g
estel enkel met or
sprakelijk voor sc
bruik van dit toest
de laatste versie
n.eu. De informati
rden gewijzigd zo
.
ECHT
eeft het auteur sr
ijde rechten voorb
eiding of gedeelten e
bewerken en op te sl
aande schriftelijke to
.
0
edeelte Ø 50
d gedeelte Ø 40
r Ø 28
inele accessoires.
ade of kwetsuren
el. Voor meer infor
an deze handleidi
in deze handleidi
der voorafgaande
cht voor deze hand
houden. Het is niet
van over te nemen,
aan op een elektroni
estemming van de
x 17 mm
x 40 mm
mm
Velleman
ij
atie over
, zie
kan te
leiding.
oegestaan
e kopiëren,
ch medium
1. Introduc
Aux résident
Des informat
ce produit
usagés à votr
convient de re
de l’environne
En cas de qu
élimination.
V. 01 – 16/10
MODE D’
ion
de l'Union europé
ons environnemen
mbole sur l'appareil
Ce s
l’éli
ination d’un appareil
l'env
ironnement. Ne pas
élect
ronique (et des piles
cipaux non sujets au
mun
trait
ra l’appareil en ques
fournisseur ou à un
pecter la réglementa
ent.
stions, contacter l
2012 1
MPLOI
nne
ales importantes c
u l'emballage indiqu
en fin de vie peut pol
ter un appareil élect
ventuelles) parmi le
tri sélectif ; une déch
ion. Renvoyer les éq
ervice de recyclage l
tion locale relative à
s autorités locales
oncernant
que
luer
ique ou
déchets
èterie
ipements
cal. Il
a protection
pour
Velleman nv
Page 13

/
m
g
u
e
s
u
n
a
m
d
s
g
n
n
a
t
s
f
o
s
ga
glig
c
e
4
3
a
v
r
e
l
t
e
r
s g
g
e
t
a
t
t
e
r
o
m
.
x
e
u
©
o
a
t
b
u
g
a
s
s
s
Nous vous re
attentivement
été endomma
votre revende
2. Consign
Garde
autori
Risq
Touch
morte
perso
Il n’y
Com
reven
3. Directive
Se référer à la
fin de notice.
er co
• Proté
• Protéger co
l’opération.
• Utiliser cet
pluie, de l’h
• Tenir l'appa
réseau élec
• Se familiari
• Toute modi
dommages
tombent pa
• N’utiliser qu
d'office la
• La garantie
eant
né
déclinera to
qui en résul
• Garder cett
ercions de votre ach
avant la mise en ser
é pendant le transpo
r.
s de sécurité
r hors de la portée d
ées.
e d’électrocution lo
er un câble sous tens
ls. Ne pas ouvrir pas
nel qualifié pour tou
aucune pièce maint
ander des pièces de
eur.
énérales
arantie de servic
tre la poussière. Pro
tre les chocs et le tr
ppareil uniquemen
umidité et des projec
reil à l'écart de sourc
rique ou autres appa
er avec le fonctionne
ication est interdite p
ccasionnés par des
sous la garantie.
’à sa fonction prévue
rantie.
ne s’applique pas au
ertaines directives d
ute responsabilité po
tent.
notice pour toute ré
PIR
0
t ! Lire la présente n
ice de l’appareil. Si l’
t, ne pas l’installer e
s enfants et des pers
rs de l’ouverture du
ion peut causer des é
e boîtier et consulter
e réparation.
nable par l’utilisateu
echange éventuelles
et de qualité Velle
éger contre la chale
iter avec circonspect
à l'intérieur. Proté
ions d’eau.
s d'interférences cau
eils électriques.
ment avant l’emploi.
our des raisons de sé
odifications par le cl
Un usage impropre
dommages survenu
cette notice et votre
r les problèmes et le
férence ultérieure.
tice
ppareil a
consulter
onnes non
oîtier.
lectrochocs
un
r.
chez votre
man® en
r extrême.
ion pendant
er de la
sées par le
curité. Les
ient ne
nnule
en
revendeur
défauts
V. 01 – 16/10
2012 1
Velleman nv
Page 14

/
e
è
j
e
r
a
r
e
d
a
d
g
p
o
e
u
4
4
g
e
p
p
g
u
é
e
s
s
T
u
g
e
v
I
©
n
E
q
u
n
n
d
s
r
g
4. Installati
Se référer aux
Confi
1. Choisir un
endroit pr
climatiseu
surface so
ets en
ob
afin d'évit
maximale
2. Le capteu
de max. 4
mm (l'idé
afin de se
3. Prévoir le
4. Connecte
5. Rebranch
6. Régler la
(LUX) et l
7. Desserrer
8. Glisser le
endomma
9. Tester l'a
prévue (v
10. Si le test
PIR à la s
11. Placer le c
on
illustrations en pa
r l’installation du dét
emplacement appro
s de sources de tem
rs ou des sources de
it immobile. Eviter é
mouvement dans le c
r toute activation in
est de 3.5 m.
PIR doit être install
0 mm à l'ouverture,
l: 100 mm). Les clip
déployer à l'intérieur
câblage électrique da
les câbles aux borne
r le courant.
istance de détection
durée d’activation (
les vis des clips [G].
étecteur dans le tro
er les câbles [H].
pareil avant de le fix
ir ci-après).
st réussi, serrer les
rface d'installation [
ouvercle transparent
PIR
0
e
2 de cette notice.
cteur à un technicie
rié pour le capteur.
érature instable, p.e
chaleur. Veiller à ce
alement des obstacle
hamp de détection d
tile. L’hauteur de mo
dans un trou avec u
t une profondeur mi
doivent avoir assez
du trou (voir [D/H])
ns le trou.
selon le diagramme
(SENS), la sensibilité
IME) [E].
en veillant à ne pas
r définitivement dan
is des clips pour fixe
].
sur le capteur [J].
.
viter tout
x. des
ue la
s ou des
capteur
e
nta
diamètre
imale de 60
'espace
.
[A].
de lumière
l'ouverture
le capteur
V. 01 – 16/10
2012 1
Velleman nv
Page 15

PIR40
5. Tester
Test 1 – Réglages
SENS TIME LUX
max. min. max. (soleil)
1. S'assurer que le couvercle transparent soit bien positionné.
2. Allumer le courant.
3. Patienter jusqu'à ce que l'appareil démarre (± 30 seconds).
L'indicateur LED [F] doit être éteint.
4. Passer votre main devant le capteur. La charge s'allume. Si
aucun mouvement n'est détecté par la suite, la charge s'éteint
après ± 8 secondes.
Test 2
SENS TIME LUX
max. min. min. (lune)
1. Patienter jusqu'à ce que l'indicateur LED s'éteigne.
2. Passer votre main devant le capteur. La charge ne s'allume
pas.
3. Couvrir le capteur avec un morceau de tissu noir et non
transparent. La charge s'allume. Si aucun mouvement n'est
détecté par la suite, la charge s'allume après ± 8 secondes.
Test 3
SENS TIME LUX
max. max. max. (soleil)
1. Patienter jusqu'à ce que l'indicateur LED s'éteigne.
2. Passer votre main devant le capteur. La charge s'allume. Si
aucun mouvement n'est détecté par la suite, la charge s'éteint
après ± 6 minutes.
6. Problèmes et solutions
La charge ne s'allume pas
• Vérifier le courant.
• Vérifier si la charge n'est pas défectueuse.
• Ajuster le réglage de la sensibilité de lumière (LUX).
V. 01 – 16/10/2012 15 ©Velleman nv
Page 16

PIR40
Faible sensibilité
• Vérifier si le capteur est entravé par un obstacle.
• Vérifier si la température d'environnement correspond aux
spécifications.
• Vérifier les réglages pour la distance de détection (SENS) et la
sensibilité de lumière (LUX).
• Vérifier si la vitesse de mouvement correspond aux spécifications.
La charge ne s'éteint pas automatiquement
• Vérifier si le capteur est enclenché en continu (par exemple, un
rideau voletant).
• Vérifier le réglage de la durée d'activation.
• Vérifier si l'alimentation correspond aux spécifications.
• Vérifier les variations de température près du capteur
(climatiseur, source de chaleur, …).
7. Spécifications techniques
détection angle 360°
durée d'activation réglable de 8 s (± 2 s) à 6 min (± 2 min)
température de service -10 ~ +40°C
taux d'humidité < 93% RH
sensibilité < 10 ~ 2000 lx (réglable)
charge max. 300 W max. (tungstène) /
alimentation 220 - 240 VCA / 50 Hz
consommation 0.45 W (activé) / 0.1 W (veille)
hauteur d'installation 2.5 ~ 3.5 m
dimensions partie visible Ø 50 x 17 mm
poids ± 48 g
N’employer cet appareil qu’avec des accessoires d’origine. La
SA Velleman ne peut, dans la mesure conforme au droit
applicable être tenue responsable des d ommages ou lésions
(directs ou indirects) pouvant résulter de l’utilisation de cet
appareil. Pour plus d’information concernant cet article et la
dernière version de cette notice, visiter notre site web
portée max. 8 m
vitesse 0.6 ~ 1.5 m/s
100 W (fluorescent)
partie cachée Ø 40 x 40 mm
capteur PIR Ø 28 mm
V. 01 – 16/10/2012 16 ©Velleman nv
Page 17

/
a
p
A
d
p
a
c
a
i
u
c
c
t
a
d
.
o
i
4
7
f
é
s
s
gr
L
r
r
r
r
R
o
g
d
©
é
é
o
o
u
o
c
a
t
i
m
)
o
a
s
e
a
o
a
o
www.vellem
cette notice
préalable.
© DROITS D’
SA Velleman
notice. Tous
traduction, co
cette notice p
que se soit est
n.eu. Toutes les in
euvent être modifi
UTEUR
est l’ayant droit de
roits mondiaux ré
ie ou diffusion , inté
r quelque procédé ou
interdite sans l’accor
PIR
0
ormations présent
es sans notificati
droits d’auteur p
ervés. Toute reprod
ale ou partielle, du c
sur tout support éle
d préalable écrit de l’
es dans
n
ur cette
ction,
ntenu de
tronique
yant droit.
1. Introduc
A los ciudad
Importantes
concerniente
unidad de reci
medio ambien
Si tiene duda
residuos.
¡Gracias por h
instrucciones
algún daño en
su distribuidor
2. Instrucci
Mante
capac
V. 01 – 16/10
MANUAL DE
ión
nos de la Unión Eu
informaciones sob
a este producto
símbolo en este apa
Este
as muestras inservibl
tira l
iente.
amb
re este aparato (ni la
No t
bas
ra doméstica; debe i
reci
laje. Devuelva este a
laje local. Respete la
e.
s, contacte con las
ber comprado el PI
el manual antes de u
el transporte no lo in
nes de seguridad
n
a el aparato lejos
tadas y niños.
2012 1
USUARIO
opea
e el medio ambien
ato o el embalaje ind
es, podrían dañar el
s pilas, si las hubiera
a una empresa espe
parato a su distribuid
s leyes locales en rel
autoridades locale
40! Lea atentament
sarlo. Si el aparato h
stale y póngase en c
el alcance de person
e
ca que, si
edio
en la
cializada en
r o a la
ción con el
para
las
sufrido
ntacto con
s no
Velleman nv
Page 18

/
g
t
e
gun
s
g
n
e
a
a
c
a
e
á
d
e
a
e
e
ó
r
t
e
n
a
4
8
c
g
t
n
a
x
a
o
e
n
o
ñ
o
p
g
n
r
p
e
je
e
©
ja
n
e
t
o
a
e
e
e
d
g
m
s
n
e
o
a
3. Normas
Véase la Gara
este manual d
• No exponga
temperatur
• No agite el
y la instala
• Utilice el ap
lluvia, hum
• No exponga
eléctricas u
• Familiaríces
• Por razones
aparato est
no autoriza
• Utilice sólo
manual. Su
• Daños caus
este manua
responsabl
• Guarde est
4. Instalaci
Véase las figu
1. Seleccion
lugar con
acondicio
instale el
V. 01 – 16/10
Ries
o de descargas elé
sufrir
una peligrosa descar
ado a la red eléctrica
conec
deje r
parar el aparato por
El usu
ario no habrá de efec
nin
a pieza. Contacte co
pieza
de recambio.
enerales
tía de servicio y c
l usuario.
este equipo a polvo.
s extremas.
parato. Evite usar e
ión.
rato sólo en interi
dad ni a ningún tipo
el aparato a interfer
otros aparatos eléctri
e con el funcionamie
de seguridad, las m
n prohibidas. Los da
as, no están cubiert
l aparato para las a
uso incorrecto anula
dos por descuido de
l invalidarán su
de ningún daño u ot
manual del usuario
n
as en la página 2 de
La ins
alación debe ser real
un lugar de monta
muchas variaciones d
ado o equipos de cal
parato en un lugar n
2012 1
PIR
0
tricas al abrir la ca
a eléctrica al tocar u
. No abra la caja ust
personal titulado.
uar el mantenimient
su distribuidor si ne
lidad Velleman ®
No exponga este equ
cesiva fuerza durant
res. No exponga est
de salpicadura o gote
ncias causadas por r
cos.
to del aparato antes
dificaciones no autori
os causados por mo
s por la garantía.
licaciones descritas e
arantía completa
la
las instrucciones de
ara
tía y su distribuidor
os problemas resulta
ara cuando necesite
ste manual del usua
izada por personal es
. No instale el aparat
e temperatura, p.ej.
facción. Asegúrese d
o expuesto a vibracio
. Puede
cable
d mismo y
de
cesita
l final de
ipo a
el manejo
equipo a
o.
des
de utilizarlo.
zadas del
ificaciones
n este
ente.
eguridad de
o será
ntes.
consultarlo.
rio.
pecializado.
en un
ire
e que
nes. Evite
Velleman nv
Page 19

PIR40
también obstáculos u objetos móviles en el rango de detección
para evitar una activación no necesaria. La altura de montaje
máx. es de 3.5m.
2. Instale el sensor PIR en un agujero con un diámetro de máx.
40mm en la entrada y una profundidad de mín. 60mm (ideal:
100mm). Asegúrese de que los clips tengan suficiente espacio
para expandir en el agujero (véase [D/H]).
3. Corte la corriente al desconectar el fusible del circuito de
conexión.
4. Provea el cable eléctrico en el agujero.
5. Conecte los cables (véase el diagrama [A]).
6. Vuelva a conectar la corriente.
7. Ajuste el ran go de detección (SENS), la sensibilidad a la luz
(LUX) y la duración de activación (TIME) [E].
8. Desatornille los tornillos de los clips [G].
9. Deslice el detector en el agujero pero asegúrese que no dañe los
cables [H].
10. Pruebe el aparato antes de instalarlo en el agujero (véase a
continuación).
11. Después de una prueba exitosa, atornille los tornillos de los clips
para fijar el sensor PIR en el agujero de montaje [I].
12. Coloque la tapa transparente en el sensor [J].
5. Someter a prueba
Test 1 – Ajustes
SENS TIME LUX
máx. mín. máx. (sol)
1. Asegúrese de que haya colocado la tapa transparente.
2. Active la alimentación.
3. Espere hasta que el aparato se active (± 30 segundos). El
indicador LED [F] está desactivado.
4. Mueve la mano delante del sensor. El aparato se activa. Se
desactiva después de ± 8 segundos si no detecta otro
movimiento.
V. 01 – 16/10/2012 19 ©Velleman nv
Page 20

PIR40
Test 2
SENS TIME LUX
máx. mín. mín. (luna)
1. Espere hasta que el indicador LED esté desactivado.
2. Mueve la mano delante del sensor. El aparato no se activa.
3. Cubra el sensor con una tela negra opaca.
El aparato se activa. Se desactiva después de ± 8 segundos si
no detecta otro movimiento.
Test 3
SENS TIME LUX
máx. máx. máx. (sol)
1. Espere hasta que el indicador LED esté desactivado.
2. Mueve la mano delante del sensor. El aparato se activa. Se
desactiva después de ± 6 segundos si no detecta otro
movimiento.
6. Solución de problemas
El aparato no funciona
• Verifique si tiene corriente.
• Verifique si el aparato funciona.
• Ajuste la sensibilidad a la luz (LUX).
Baja sensibilidad
• Verifique si hay un obstáculo delante de la ventana de detección.
• Controle la temperatura ambiente.
• Verifique los ajustes para el rango de detección (SENS) y la
sensibilida d a la luz (LUX).
• Controle si la velocidad de detección.
El aparato no se desactiva automáticamente
• Verifique si hay algo que active el sensor constantemente (p.ej.,
una cortina).
• Controle el ajuste «temporizador ON ».
• Controle la alimentación.
• Verifique si hay variaciones de temperatura cerca del sensor (aire
acondicionado, sistemas de calefacción, etc.).
V. 01 – 16/10/2012 20 ©Velleman nv
Page 21

PIR40
7. Especificaciones
detección ángulo 360°
duración de activación ajustable de 8 s (± 2 s) a 6 min (± 2 min)
temperatura de
funcionamiento
humedad < 93% RH
sensibilidad < 10 ~ 2000 lx (ajustable)
carga máx. 300 W máx. (tungsten) /
alimentación 220 - 240 VAC / 50 Hz
consumo 0.45 W (activado) / 0.1 W (en modo de
altura de instalación 2.5 ~ 3.5 m
dimensiones parte visible Ø 50 x 17 mm
peso ± 48 g
Utilice este aparato sólo con los accesorios originales.
Velleman NV no será responsable de daños ni lesiones
causados por un uso (indebido) de este aparato. Para más
información sobre este producto y la versión más reciente de
este manual del usuario, visite nuestra pági na
www.velleman.eu. Se pueden modificar las especificaciones y
el contenido de este manual sin previo aviso.
© DERECHOS DE AUTOR
Velleman NV dispone de los derechos de autor para este
manual del usuario. Todos los derechos mundiales
reservados. Está estrictamente prohibido r eproducir, tr aducir,
copiar, editar y guardar este manual del usuario o partes de ello sin
previo permiso escrito del derecho habiente.
alcance máx. 8 m
velocidad 0.6 ~ 1.5 m/s
-10 ~ +40°C
100 W (fluorescente)
espera)
parte empotrada Ø 40 x 40 mm
sensor PIR Ø 28 mm
V. 01 – 16/10/2012 21 ©Velleman nv
Page 22

/
B
n
o
w
e
a
n
i
r
s
e
c
e
gungsr
g
e
e
i
n
m
a
a
g
z
n
a
e
4
2
S
c
ü
o
S
e
s
s
t
n
S
ö
g
a
e
t
e
u
e
Qu
b
©
t
c
s
n
c
d
r
s
S
e
a
h
e
g
r
v
g
v
1. Einführu
An alle Einw
Wichtige Um
Batterien müs
entsorgt werd
örtliches Recy
Sie die örtlich
Falls Zweifel
Entsor
Wir bedanken
Bedienun
Überprüfen Si
sein, verwend
Händler.
2. Sicherhe
3. Allgemei
Siehe Vellem
Bedienungsanl
• Schützen Si
extremen T
V. 01 – 16/10
EDIENUNG
hner der Europäis
eltinformationen
Dies
s Symbol auf dem Pr
an, d
ss die Entsorgung di
Lebe
szyklus der Umwelt
Sie d
e Einheit (oder verw
unso
tiertes Hausmüll; die
en von einer speziali
n. Diese Einheit mus
ling-Unternehmen re
n Umweltvorschrifte
bestehen, wenden
ichtlinien an Ihre
uns für den Kauf des
sanl
vor Inbetriebn
eitun
, ob Transportschäd
n Sie das Gerät nich
tshinweise
Halte
Sie Kinder und Unb
schlaggefahr beim
Stro
ren von unter Spann
Berüh
ensgefährlichen elekt
zu leb
s Gehäuse nicht selb
Sie d
von F
chleuten reparieren.
ib
t keine zu wartenden
Es
teile bei Ihrem Fachh
Ersat
e Richtlinien
n® Service- und
eitung.
e das Gerät vor Stau
mperaturen.
2012 2
PIR
0
ANLEITUNG
hen Union
ber dieses Produk
dukt oder der Verpa
eses Produktes nach
chaden zufügen kan
ndeten Batterien) ni
Einheit oder verwen
ierten Firma zwecks
an den Händler ode
ourniert werden. Re
.
ie sich für
rtliche Behörde.
PIR40! Lesen Sie di
hme sorgfältig durc
n vorliegen. Sollte di
und wenden Sie sich
fugte vom Gerät fern
Öffnen des Gehäuses
ng stehenden Leitun
rischen Schlägen füh
r und lassen Sie das
Teile. Bestellen Sie e
ändler.
alitätsgarantie am
. Schützen Sie das G
kung zeigt
einem
. Entsorgen
ht als
eten
Recyclin
ein
pektieren
se
.
s der Fall
an Ihren
.
. Das
en könnte
en. Öffnen
Gerät nur
entuelle
Ende dieser
erät vor
Velleman nv
Page 23

/
S
o
d
u
e
k
e
n
e
n
w
S
m
n
n
e
n
nGeg
n
E
n
/
S
s
4
3
V
d
e
t
g
n
e
e
t
G
c
G
n
i
e
e
n
a
m
u
d
©
V
G
ü
g
c
g
ge
g
r
e
g
k
g
n
g
e
a
r
a
h
g
e
g
• Vermeiden
während de
• Verwenden
das Gerät v
• Setzen Sie
Anlagen) a
• Nehmen Si
seinen Fun
• Eigenmächt
verboten. B
Änderunge
• Verwenden
dieser Bedi
Produkt füh
• Bei Schäde
verursacht
resultierend
Haftung.
• Bewahren
Einsichtnah
4. Installati
Siehe Abbildu
Lasse
1. Wählen Si
mit Temp
Heizunge
Vermeide
enstä
unnötige
ist 3.5 m.
2. Montieren
Durchmes
mindeste
Federn ge
(siehe [D
3. Schalten
Stromkrei
V. 01 – 16/10
ie Erschütterungen.
r Installation und Be
Sie das Gerät nur im
r Regen und Feucht
as Gerät keine Störu
s.
das Gerät erst in Be
tionen vertraut gema
e Veränderungen si
i
i Schäden verursach
erlischt der Garanti
Sie das Gerät nur für
nungsanleitung sons
ren und erlischt der
, die durch Nichtbea
erden, erlischt der
e Folgeschäden über
ie diese Bedienungsa
e auf.
on
en, Seite 2 dieser B
Sie das Gerät von e
e einen geeigneten M
raturschwankungen,
. Wählen Sie einen vi
Sie ebenfalls Hinder
de im Erfassungsber
inschaltung zu verm
Sie den PIR-Melder i
ser von max. 40mm
s 60mm (ideal: 100
nügend Platz haben,
H]).
ie den Strom aus, in
es ausschalten.
2012 2
PIR
0
ermeiden Sie rohe
ienung des Gerätes.
Innenbereich. Sch
.
en (Stromnetz, ele
n
rieb, nachdem Sie si
cht haben.
d aus Sicherheitsgrü
t durch ei
anspruch.
Anwendun
kann dies zu Schäd
arantieanspruch.
htung der Bedienun
arantieanspruch. Für
immt der Hersteller
nleitung für künftige
edienun
nem Fachmann insta
ontageort. Vermeide
z.B. Klimaanlagen od
brationsfreien Monta
nisse oder bewegend
ich des Sensors, um
iden. Die max. Mont
ein Loch mit einem
m Eingang und eine
m). Beachten Sie, d
m das Gerät im Loc
em Sie die Sicherun
enmächti
en besch
sanleitung.
ewalt
tzen Sie
ktrische
h mit
nden
ieben in
n am
sanleitun
daraus
eine
llieren.
Sie Orte
er
eort.
eine
ehöhe
Tiefe von
ss die
zu halten
des
Velleman nv
Page 24

PIR40
4. Versehen Sie die Verdrahtung innerhalb des Loches.
5. Verdrahten Sie die Anschlüsse (Siehe Diagramm [A]).
6. Schalten Sie den Strom wieder ein.
7. Stellen Sie den Erfassungsbereich (SENS), die Empfindlichkeit
(LUX) und den Timer (TIME) ein [E].
8. Lockern Sie die Schrauben der Federn [G].
9. Schieben Sie das Gerät in das Loch [H]. Beachten Sie, dass Sie
die Kabel nicht beschädigen.
10. Testen Sie das Gerät vor der Montage (siehe weiter).
11. Ist der Test erfolgreich, so ziehen Sie die Schrauben der Federn
an, um das Gerät im Loch zu halten [I].
12. Setzen Sie den transparenten Deckel auf [J].
5. Einen Test durchführen
Test 1 – Einstellungen
SENS TIME LUX
max. min. max. (Sonne)
1. Beachten Sie, dass Sie den transparenten Deckel haben.
2. Verbinden Sie das Gerät mit dem Netz.
3. Warten Sie bis das Gerät aktiviert ist (± 30 Sekunden). Die
Anzeige-LED [F] ist ausgeschaltet.
4. Bewegen Sie die Hand vor dem Sensor. Das Gerät schaltet ein.
Es schaltet nach ± 8 Sekunden wieder aus, wenn keine
Bewegungen mehr erfasst werden.
Test 2
SENS TIME LUX
max. min. min. (Mond)
1. Warten Sie bis die Anzeige-LED ausgeschaltet ist.
2. Bewegen Sie die Hand vor dem Sensor. Das Gerät schaltet nicht
ein.
3. Bedecken Sie den Sensor mit einem schwarzen undurchsichtigen
Tuch.
Das Gerät schaltet ein. Es schaltet nach ± 8 Sekunden wieder
aus, wenn keine Bewegungen mehr erfasst werden.
V. 01 – 16/10/2012 24 ©Velleman nv
Page 25

PIR40
Test 3
SENS TIME LUX
max. max. max. (Sonne)
1. Warten Sie bis die Anzeige-LED ausgeschaltet ist.
2. Bewegen Sie die Hand vor dem Sensor. Das Gerät schaltet ein.
Es schaltet nach ± 6 Sekunden wieder aus, wenn keine
Bewegungen mehr erfasst werden.
6. Problemlösung
Das Gerät funktioniert nicht
• Überprüfen Sie, ob das Gerät mit dem Netz verbunden ist.
• Überprüfen Sie, ob das Gerät nicht kaputt ist.
• Regeln Sie die Lichtempfindlichkeit (LUX).
Niedrige Empfindlichkeit
• Überprüfen Sie, ob sich Hindernisse vor dem Erfassungsfenster
befinden.
• Überprüfen Sie die Umgebungstemperatur.
• Überprüfen Sie die Einstellungen für den Erfassungsbereich
(SENS) und die Lichtempfindlichkeit (LUX).
• Überprüfen Sie die Bewegungsgeschwindigkeit.
Das Gerät schaltet nicht automatisch aus
• Überprüfen Sie, ob irgendetwas dafür sorgt, dass sich der Sensor
ständig einschaltet (z.B., Vorhang).
• Überprüfen Sie die ON-Timer-Einstellung.
• Überprüfen Sie die Stromversorgung.
• Überprüfen Sie, ob es Temperaturschwenkungen in der Nähe vom
Sensor gibt (Klimaanlagen, Heizungen, usw.).
7. Technische Daten
Detektion Winkel 360°
Aktivierungsdauer von 8 s (± 2 s) bis 6 Min. (± 2 Min.)
Betriebstemperatur -10 ~ +40°C
Betriebsfeu chtigkeit < 93% RH
Empfindlichkeit < 10 ~ 2000 lx (einstellbar)
Bereich max. 8 m
Geschwindigkeit 0.6 ~ 1.5 m/s
einstellbar
V. 01 – 16/10/2012 25 ©Velleman nv
Page 26

PIR40
Nennlast 300 W max. (Tungsten) / 100 W
Stromversorgung 220 - 240 VAC / 50 Hz
Stromverbrauch 0.45 W (aktiv) / 0.1 W (Stand-by)
Installationshöhe 2.5 ~ 3.5 m
Abmessungen sichtbarer Teil Ø 50 x 17 mm
Gewicht ± 48 g
Verwenden Sie dieses Gerät nur mit originellen Zubehörteilen.
Velleman NV übernimmt keine Haftung für Schaden oder
Verletzungen bei (falscher) Anwendung dieses Ger ätes. Für
mehr Informationen zu diesem Produkt und die neueste
Version dieser Bedienungsanleitung, siehe www.velleman.eu.
Alle Änderungen ohne vorherige Ankündigung vorbehalten.
© URHEBERRECHT
Velleman NV besitzt das Urheberrecht für diese
Bedienungsanleitung. Alle weltweiten Rechte vorbehalten.
Ohne vorherige schriftliche Genehmigung des Urhebers ist es nicht
gestattet, diese Bedienungsanleitung ganz oder in Teilen zu
reproduzieren, zu kopieren, zu übersetzen, zu bearbeiten oder zu
speichern.
(fluoreszierend)
eingebauter Teil Ø 40 x 40 mm
PIR-Sensor Ø 28 mm
V. 01 – 16/10/2012 26 ©Velleman nv
Page 27

Velleman® Service and Quality Warranty
Since its foundation in 1972, Velleman®
acquired extensive experience in the
electronics world and currently distributes its
products in over 85 countries.
All our products fulfil strict quality
requirements and legal stipulations in the
EU. In order to ensure the quality, our
products regularly go through an extra
quality check, both by an internal quality
department and by specialized external
organisations. If, all precautionary measures
notwithstanding, problems should occur,
please make appeal to our warranty (see
guarantee conditions).
General Warranty Conditions Concerning
Consumer Products (for EU):
• All consumer products are subject to a 24-
month warranty on production flaws and
defective material as from the original date of
purchase.
• Velleman® can decide to replace an article
with an equivalent article, or to refund the
retail value totally or partially when the
complaint is valid and a free repair or
replacement of the article is impossible, or if
the expenses are out of proportion.
You will be delivered a replacing article or a
refund at the value of 100% of the purchase
price in case of a flaw occurred in the first
year after the date of purchase and delivery,
or a replacing article at 50% of the purchase
price or a refund at the value of 50% of the
retail value in case of a flaw occurred in the
second year after the date of purchase and
delivery.
• Not covered by warranty:
- all direct or indirect damage caused after
delivery to the article (e.g. by oxidation,
shocks, falls, dust, dirt, humidity...), and by
the article, as well as its contents (e.g. data
loss), compensation for loss of profits;
- consumable goods, parts or accessories
that are subject to an aging process during
normal use, such as batteries (rechargeable,
non-rechargeable, built-in or replaceable),
lamps, rubber parts, drive belts... (unlimited
list);
- flaws resulting from fire, water damage,
lightning, accident, natural disaster, etc.…;
- flaws caused deliberately, negligently or
resulting from improper handling, negligent
maintenance, abusive use or use contrary to
the manufacturer’s instructions;
- damage caused by a commercial,
professional or collective use of the article
(the warranty validity will be reduced to six
(6) months when the article is used
professionally);
- damage resulting from an inappropriate
packing and shipping of the article;
- all damage caused by modification, repair
or alteration performed by a third party
without written permission by Velleman®.
• Articles to be repaired must be delivered to
your Velleman® dealer, solidly packed
(preferably in the original packaging), and be
completed with the original receipt of
purchase and a clear flaw description.
• Hint: In order to save on cost and time,
please reread the manual and check if the
flaw is caused by obvious causes prior to
presenting the article for repair. Note that
returning a non-defective article can also
involve handling costs.
• Repairs occurring after warranty expiration
are subject to shipping costs.
• The above conditions are without prejudice
to all commercial warranties.
The above enumeration is subject to
modification according to the article (see
article’s manual).
Velleman® service- en kwaliteitsgarantie
Velleman® heeft sinds zijn oprichting in 1972
een ruime ervaring opgebouwd in de
elektronicawereld en verdeelt op dit moment
producten in meer dan 85 landen. Al onze
producten beantwoorden aan strikte
kwaliteitseisen en aan de wettelijke
bepalingen geldig in de EU. Om de kwaliteit
te waarborgen, ondergaan onze producten
op regelmatige tijdstippen een extra
kwaliteitscontrole, zowel door onze eigen
kwaliteitsafdeling als door externe
gespecialiseerde organisaties. Mocht er
ondanks deze voorzorgen toch een
probleem optreden, dan kunt u steeds een
beroep doen op onze waarborg (zie
waarborgvoorwaarden).
Page 28

Algemene waarborgvoorwaarden
consumentengoederen (voor Europese
Unie):
• Op alle consumentengoederen geldt een
garantieperiode van 24 maanden op
productie- en materiaalfouten en dit vanaf de
oorspronkelijke aankoopdatum.
• Indien de klacht gegrond is en een gratis
reparatie of vervanging van een artikel
onmogelijk is of indien de kosten hiervoor
buiten verhouding zijn, kan Velleman®
beslissen het desbetreffende artikel te
vervangen door een gelijkwaardig artikel of
de aankoopsom van het artikel gedeeltelijk of
volledig terug te betalen. In dat geval krijgt u
een vervangend product of terugbetaling ter
waarde van 100% van de aankoopsom bij
ontdekking van een gebrek tot één jaar na
aankoop en levering, of een vervangend
product tegen 50% van de kostprijs of
terugbetaling van 50 % bij ontdekking na één
jaar tot 2 jaar.
• Valt niet onder waarborg:
- alle rechtstreekse of onrechtstreekse
schade na de levering veroorzaakt aan het
toestel (bv. door oxidatie, schokken, val, stof,
vuil, vocht...), en door het toestel, alsook zijn
inhoud (bv. verlies van data), vergoeding
voor eventuele winstderving.
- verbruiksgoederen, onderdelen of
hulpstukken die onderhevig zijn aan
veroudering door normaal gebruik zoals bv.
batterijen (zowel oplaadbare als nietoplaadbare, ingebouwd of vervangbaar),
lampen, rubberen onderdelen,
aandrijfriemen... (onbeperkte lijst).
- defecten ten gevolge van brand,
waterschade, bliksem, ongevallen,
natuurrampen, enz.
- defecten veroorzaakt door opzet,
nalatigheid of door een onoordeelkundige
behandeling, slecht onderhoud of abnormaal
gebruik of gebruik van het toestel strijdig met
de voorschriften van de fabrikant.
- schade ten gevolge van een commercieel,
professioneel of collectief gebruik van het
apparaat (bij professioneel gebruik wordt de
garantieperiode herleid tot 6 maand).
- schade veroorzaakt door onvoldoende
bescherming bij transport van het apparaat.
- alle schade door wijzigingen, reparaties of
modificaties uitgevoerd door derden zonder
toestemming van Velleman®.
• Toestellen dienen ter reparatie aangeboden
te worden bij uw Velleman®-verdeler. Het
toestel dient vergezeld te zijn van het
oorspronkelijke aankoopbewijs. Zorg voor
een degelijke verpakking (bij voorkeur de
originele verpakking) en voeg een duidelijke
foutomschrijving bij.
• Tip: alvorens het toestel voor reparatie aan
te bieden, kijk nog eens na of er geen voor
de hand liggende reden is waarom het
toestel niet naar behoren werkt (zie
handleiding). Op deze wijze kunt u kosten en
tijd besparen. Denk eraan dat er ook voor
niet-defecte toestellen een kost voor controle
aangerekend kan worden.
• Bij reparaties buiten de waarborgperiode
zullen transportkosten aangerekend worden.
• Elke commerciële garantie laat deze
rechten onverminderd.
Bovenstaande opsomming kan eventueel
aangepast worden naargelang de aard
van het product (zie handleiding van het
betreffende product).
Garantie de service et de qualité
Velleman®
Depuis 1972, Velleman® a gagné une vaste
expérience dans le secteur de l’électronique
et est actuellement distributeur dans plus de
85 pays.
Tous nos produits répondent à des
exigences de qualité rigoureuses et à des
dispositions légales en vigueur dans l’UE.
Afin de garantir la qualité, nous soumettons
régulièrement nos produits à des contrôles
de qualité supplémentaires, tant par notre
propre service qualité que par un service
qualité externe. Dans le cas improbable d’un
défaut malgré toutes les précautions, il est
possible d’invoquer notre garantie (voir les
conditions de garantie).
Conditions générales concernant la
garantie sur les produits grand public
(pour l’UE) :
• tout produit grand public est garanti 24
mois contre tout vice de production ou de
matériaux à dater du jour d’acquisition
effective ;
• si la plainte est justifiée et que la réparation
ou le remplacement d’un article est jugé
Page 29

impossible, ou lorsque les coûts s’avèrent
disproportionnés, Velleman® s’autorise à
remplacer ledit article par un article
équivalent ou à rembourser la totalité ou une
partie du prix d’achat. Le cas échéant, il vous
sera consenti un article de remplacement ou
le remboursement complet du prix d’achat
lors d’un défaut dans un délai de 1 an après
l’achat et la livraison, ou un article de
remplacement moyennant 50% du prix
d’achat ou le remboursement de 50% du prix
d’achat lors d’un défaut après 1 à 2 ans.
• sont par conséquent exclus :
- tout dommage direct ou indirect survenu à
l’article après livraison (p.ex. dommage lié à
l’oxydation, choc, chute, poussière, sable,
impureté…) et provoqué par l’appareil, ainsi
que son contenu (p.ex. perte de données) et
une indemnisation éventuelle pour perte de
revenus ;
- toute pièce ou accessoire nécessitant un
remplacement causé par un usage normal
comme p.ex. piles (rechargeables comme
non rechargeables, intégrées ou
remplaçables), ampoules, pièces en
caoutchouc, courroies… (liste illimitée) ;
- tout dommage qui résulte d’un incendie, de
la foudre, d’un accident, d’une catastrophe
naturelle, etc. ;
- out dommage provoqué par une
négligence, volontaire ou non, une utilisation
ou un entretien incorrect, ou une utilisation
de l’appareil contraire aux prescriptions du
fabricant ;
- tout dommage à cause d’une utilisation
commerciale, professionnelle ou collective
de l’appareil (la période de garantie sera
réduite à 6 mois lors d’une utilisation
professionnelle) ;
- tout dommage à l’appareil qui résulte d’une
utilisation incorrecte ou différente que celle
pour laquelle il a été initialement prévu
comme décrit dans la notice ;
- tout dommage engendré par un retour de
l’appareil emballé dans un conditionnement
non ou insuffisamment protégé.
- toute réparation ou modification effectuée
par une tierce personne sans l’autorisation
explicite de SA Velleman® ; - frais de
transport de et vers Velleman® si l’appareil
n’est plus couvert sous la garantie.
• toute réparation sera fournie par l’endroit
de l’achat. L’appareil doit nécessairement
être accompagné du bon d’achat d’origine et
être dûment conditionné (de préférence dans
l’emballage d’origine avec mention du
défaut) ;
• tuyau : il est conseillé de consulter la notice
et de contrôler câbles, piles, etc. avant de
retourner l’appareil. Un appareil retourné
jugé défectueux qui s’avère en bon état de
marche pourra faire l’objet d’une note de
frais à charge du consommateur ;
• une réparation effectuée en-dehors de la
période de garantie fera l’objet de frais de
transport ;
• toute garantie commerciale ne porte pas
atteinte aux conditions susmentionnées.
La liste susmentionnée peut être sujette à
une complémentation selon le type de
l’article et être mentionnée dans la notice
d’emploi.
Garantía de servicio y calidad Velleman®
Desde su fundación en 1972 Velleman® ha
adquirido una amplia experiencia como
distribuidor en el sector de la electrónica en
más de 85 países. Todos nuestros productos
responden a normas de calidad rigurosas y
disposiciones legales vigentes en la UE.
Para garantizar la calidad, sometemos
nuestros productos regularmente a controles
de calidad adicionales, tanto a través de
nuestro propio servicio de calidad como de
un servicio de calidad externo. En el caso
improbable de que surgieran problemas a
pesar de todas las precauciones, es posible
recurrir a nuestra garantía (véase las
condiciones de garantía).
Condiciones generales referentes a la
garantía sobre productos de venta al
público (para la Unión Europea):
• Todos los productos de venta al público
tienen un período de garantía de 24 meses
contra errores de producción o errores en
materiales desde la adquisición original;
• Si la queja está fundada y si la reparación o
sustitución de un artículo no es posible, o si
los gastos son desproporcionados,
Velleman® autoriza reemplazar el artículo
por un artículo equivalente o reembolsar la
totalidad o una parte del precio de compra.
En este caso, usted recibirá un artículo de
Page 30

recambio o el reembolso completo del precio
de compra si encuentra algún fallo hasta un
año después de la compra y entrega, o un
artículo de recambio al 50% del precio de
compra o el reembolso del 50% del precio
de compra si encuentra un fallo después de
1 año y hasta los 2 años después de la
compra y entrega.
Por consiguiente, están excluidos entre
otras cosas:
- todos los daños causados directa o
indirectamente al aparato (p.ej. por
oxidación, choques, caída,...) y a su
contenido (p.ej. pérdida de datos) después
de la entrega y causados por el aparato, y
cualquier indemnización por posible pérdida
de ganancias;
- partes o accesorios, que estén expuestos
al desgaste causado por un uso normal,
como por ejemplo baterías (tanto
recargables como no recargables,
incorporadas o reemplazables), bombillas,
partes de goma, etc. (lista ilimitada);
- defectos causados por un incendio, daños
causados por el agua, rayos, accidentes,
catástrofes naturales, etc.;
- defectos causados a conciencia, descuido
o por malos tratos, un mantenimiento
inapropiado o un uso anormal del aparato
contrario a las instrucciones del fabricante;
- daños causados por un uso comercial,
profesional o colectivo del aparato (el
período de garantía se reducirá a 6 meses
con uso profesional);
- daños causados por un uso incorrecto o un
uso ajeno al que está previsto el producto
inicialmente como está descrito en el manual
del usuario;
- daños causados por una protección
insuficiente al transportar el aparato.
- daños causados por reparaciones o
modificaciones efectuadas por una tercera
persona sin la autorización explícita de
Velleman®;
- se calcula gastos de transporte de y a
Velleman® si el aparato ya no está cubierto
por la garantía.
• Cualquier artículo que tenga que ser
reparado tendrá que ser devuelto a su
distribuidor Velleman®. Devuelva el aparato
con la factura de compra original y
transpórtelo en un embalaje sólido
(preferentemente el embalaje original).
Incluya también una buena descripción del
fallo;
• Consejo: Lea el manual del usuario y
controle los cables, las pilas, etc. antes de
devolver el aparato. Si no se encuentra un
defecto en el artículo los gastos podrían
correr a cargo del cliente;
• Los gastos de transporte correrán a carga
del cliente para una reparación efectuada
fuera del período de garantía.
• Cualquier gesto comercial no disminuye
estos derechos.
La lista previamente mencionada puede
ser adaptada según el tipo de artículo
(véase el manual del usuario del artículo
en cuestión).
Velleman® Service- und Qualitätsgarantie
Seit der Gründung in 1972 hat Velleman®
sehr viel Erfahrung als Verteiler in der
Elektronikwelt in über 85 Ländern aufgebaut.
Alle Produkte entsprechen den strengen
Qualitätsforderungen und gesetzlichen
Anforderungen in der EU. Um die Qualität zu
gewährleisten werden unsere Produkte
regelmäßig einer zusätzlichen
Qualitätskontrolle unterworfen, sowohl von
unserer eigenen Qualitätsabteilung als auch
von externen spezialisierten Organisationen.
Sollten, trotz aller Vorsichtsmaßnahmen,
Probleme auftreten, nehmen Sie bitte die
Garantie in Anspruch (siehe
Garantiebedingungen).
Allgemeine Garantiebedingungen in
Bezug auf Konsumgüter (für die
Europäische Union):
• Alle Produkte haben für Material- oder
Herstellungsfehler eine Garantieperiode von
24 Monaten ab Verkaufsdatum.
• Wenn die Klage berechtigt ist und falls eine
kostenlose Reparatur oder ein Austausch
des Gerätes unmöglich ist, oder wenn die
Kosten dafür unverhältnismäßig sind, kann
Velleman® sich darüber entscheiden, dieses
Produkt durch ein gleiches Produkt zu
ersetzen oder die Kaufsumme ganz oder
teilweise zurückzuzahlen. In diesem Fall
erhalten Sie ein Ersatzprodukt oder eine
Rückzahlung im Werte von 100% der
Kaufsumme im Falle eines Defektes bis zu
Page 31

1 Jahr nach Kauf oder Lieferung, oder Sie
bekommen ein Ersatzprodukt im Werte von
50% der Kaufsumme oder eine Rückzahlung
im Werte von 50 % im Falle eines Defektes
im zweiten Jahr.
• Von der Garantie ausgeschlossen sind:
- alle direkten oder indirekten Schäden, die
nach Lieferung am Gerät und durch das
Gerät verursacht werden (z.B. Oxidation,
Stöße, Fall, Staub, Schmutz, Feuchtigkeit,
...), sowie auch der Inhalt (z.B. Datenverlust),
Entschädigung für eventuellen
Gewinnausfall.
- Verbrauchsgüter, Teile oder Zubehörteile,
die durch normalen Gebrauch dem
Verschleiß ausgesetzt sind, wie z.B.
Batterien (nicht nur aufladbare, sondern
auch nicht aufladbare, eingebaute oder
ersetzbare), Lampen, Gummiteile,
Treibriemen, usw. (unbeschränkte Liste).
- Schäden verursacht durch Brandschaden,
Wasserschaden, Blitz, Unfälle,
Naturkatastrophen, usw.
- Schäden verursacht durch absichtliche,
nachlässige oder unsachgemäße
Anwendung, schlechte Wartung,
zweckentfremdete Anwendung oder
Nichtbeachtung von Benutzerhinweisen in
der Bedienungsanleitung.
- Schäden infolge einer kommerziellen,
professionellen oder kollektiven Anwendung
des Gerätes (bei gewerblicher Anwendung
wird die Garantieperiode auf 6 Monate
zurückgeführt).
- Schäden verursacht durch eine
unsachgemäße Verpackung und
unsachgemäßen Transport des Gerätes.
- alle Schäden verursacht durch
unautorisierte Änderungen, Reparaturen
oder Modifikationen, die von einem Dritten
ohne Erlaubnis von Velleman®
vorgenommen werden.
• Im Fall einer Reparatur, wenden Sie sich
an Ihren Velleman®-Verteiler. Legen Sie das
Produkt ordnungsgemäß verpackt
(vorzugsweise die Originalverpackung) und
mit dem Original-Kaufbeleg vor. Fügen Sie
eine deutliche Fehlerbeschreibung hinzu.
• Hinweis: Um Kosten und Zeit zu sparen,
lesen Sie die Bedienungsanleitung nochmals
und überprüfen Sie, ob es keinen auf de
Hand liegenden Grund gibt, ehe Sie das
Gerät zur Reparatur zurückschicken. Stellt
sich bei der Überprüfung des Gerätes
heraus, dass kein Geräteschaden vorliegt,
könnte dem Kunden eine
Untersuchungspauschale berechnet.
• Für Reparaturen nach Ablauf der
Garantiefrist werden Transportkosten
berechnet.
• Jede kommerzielle Garantie lässt diese
Rechte unberührt.
Die oben stehende Aufzählung kann
eventuell angepasst werden gemäß der
Art des Produktes (siehe
Bedienungsanleitung des Gerätes).
Legen Heirweg 33, 9890 Gavere, Belgium
Made in PRC
Imported by Velleman nv
www.velleman.eu
 Loading...