

Page 1
Bedienungsanleitung
Instructions for use | Notice d´utilisation
Gebruiksaanwijzing | Istruzioni per l’uso
Instrucciones de uso | Návod k obsluze
Instrukcja obsługi
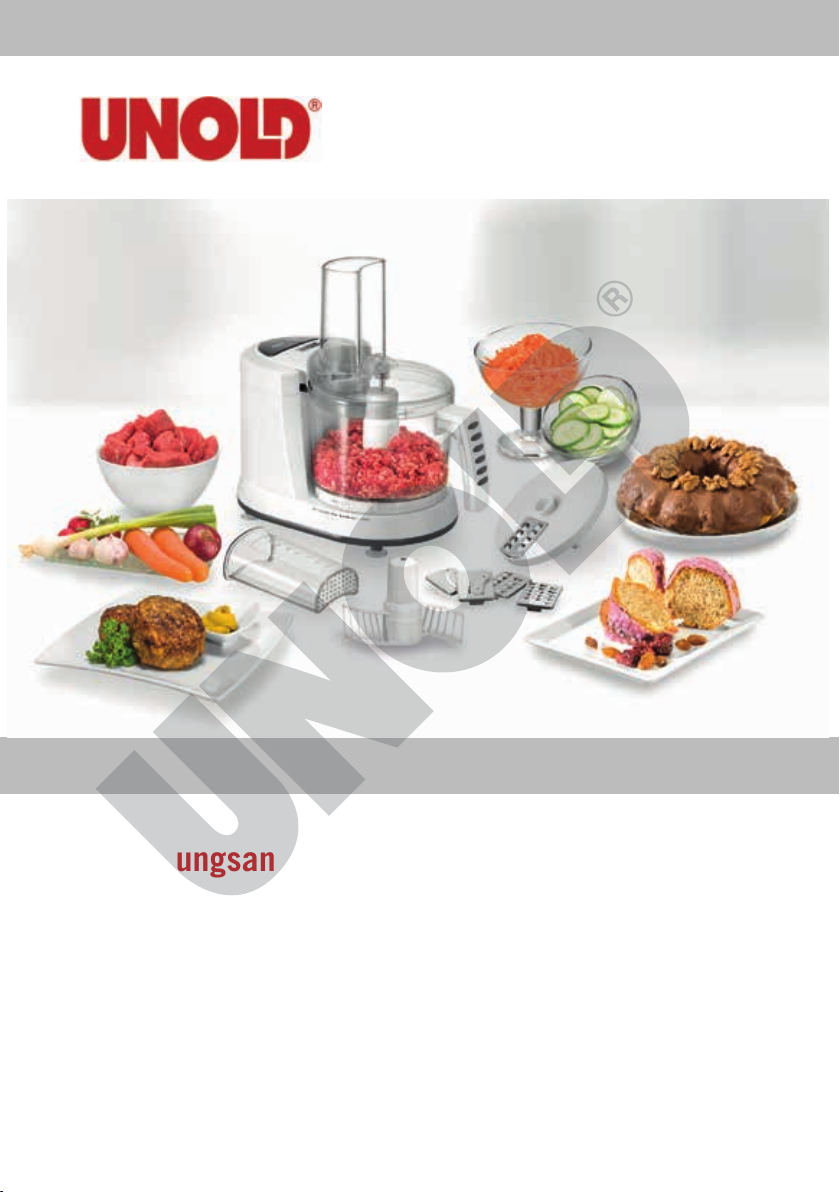
Modell 78501
KÜCHENMASCHINE KOMPAKT
Copyright UNOLD AG | www.unold.de
Page 2

SERVICE-HOTLINE
Copyright UNOLD AG | www.unold.de
Bei Fragen zu den Rezepten und zum Gebrauch des Gerätes können Sie sich direkt an unsere
Beraterin Frau Blum wenden:
Montag und Dienstag von 8 bis 12 Uhr und 13 bis 17 Uhr
Rufnummer: 0 18 05/94 18 99*
*derzeit 0,14 EUR/Minute aus dem Festnetz der Deutschen Telekom.
Bei Anrufen aus Mobilfunknetzen und aus dem Ausland (+49 18 05/94 18 99) können
abweichende Kosten anfallen. Ab 1.3.2010 Mobilfunkpreis maximal 0,42 EUR/Minute.
Kunden aus Österreich wählen bitte die Nummer (0) 1/8 10 20 39
Impressum:
Bedienungsanleitung Modell 78501
Stand: März 2016 /nr
Copyright ©
Mannheimer Straße 4
68766 Hockenheim
Telefon +49 (0) 62 05/94 18-0
Telefax +49 (0) 62 05/94 18-12
E-Mail info@unold.de
Internet www.unold.de
2
Page 3

INHALTSVERZEICHNIS
Copyright UNOLD AG | www.unold.de
Bedienungsanleitung Modell 78501
Technische Daten .....................................8
Symbolerklärung .......................................8
Für Ihre Sicherheit ....................................8
Vor dem ersten Benutzen ...........................11
Einsetzen und Abnehmen des
Rührbehälters...........................................11
Sicherheitsschalter ...................................12
Arbeiten mit dem Hackmesser ...................12
Arbeiten mit dem Rührer ...........................14
Arbeiten mit den Raspel- und
Schneidscheiben ......................................15
Reinigen und Pflegen ................................16
Tipps .......................................................17
Rezepte ...................................................17
Garantiebestimmungen .............................19
Entsorgung / Umweltschutz .......................19
Informationen für den Fachhandel ..............19
Service-Adressen ......................................20
Instructions for use Model 78501
Technical Specifications ............................21
Explanation of the symbols ........................21
For your safety ..........................................21
Before using the appliance the first time .....24
Inserting and removing the mixing bowl ......24
Safety switch............................................25
Using the chopping blade ..........................25
Using the mixing blade .............................26
Using the grating and slicing discs .............27
Cleaning and Care ....................................28
Recipes ...................................................29
Guarantee Conditions ................................31
Waste Disposal / Environmental Protection ..31
Service ....................................................20
Notice d´utilisation Modèle 78501
Spécification technique ............................32
Explication des symboles ...........................32
Pour votre sécurité ....................................32
Avant la première utilisation ......................35
Mettre et retirer le bol mélangeur ...............35
Commutateur de sécurité ..........................36
Travailler avec le hachoir ...........................36
Travailler avec le fouet...............................37
Travailler avec les disques à râper
et à émincer .............................................38
Nettoyage et entretien ...............................39
Recettes ..................................................40
Conditions de Garantie ..............................42
Traitement des déchets /
Protection de l’environnement ....................42
Service ....................................................20
Gebruiksaanwijzing Model 78501
Technische gegevens ................................43
Verklaring van de symbolen ........................43
Voor uw veiligheid .....................................43
Vóór het eerste gebruik ..............................46
Mengkom aanbrengen en verwijderen .........46
Veiligheidsschakelaar ................................47
Werken met het hakmes ............................47
Werken met de garde ................................48
Werken met de rasp- en snijschijven ...........49
Reiniging en onderhoud ............................50
Recepten .................................................51
Garantievoorwaarden .................................52
Verwijderen van afval / Milieubescherming ..52
Service ....................................................20
3
Page 4

INHALTSVERZEICHNIS
Copyright UNOLD AG | www.unold.de
Istruzioni per l’uso Modello 78501
Dati tecnici .............................................53
Significato dei simboli ..............................53
Per la vostra sicurezza ...............................53
Prima del primo utilizzo ............................56
Inserimento e rimozione del recipiente........56
Interruttore di sicurezza ............................57
Lavorare con la lama .................................57
Lavorare con la frusta ................................58
Lavorare con i dischi per grattugiare
e tagliare .................................................59
Pulizia e cura ...........................................60
Ricette ....................................................61
Norme die garanzia ...................................63
Smaltimento / Tutela dell’ambiente ............63
Service ....................................................20
Manual de instrucciones Modelo 78501
Datos técnicos .........................................64
Explicación de símbolos ............................64
Para su seguridad .....................................64
Manejo ....................................................67
Colocar y retirar el recipiente agitador .........67
Trabajar con la cuchilla para picar ..............68
Interruptor de seguridad ............................69
Trabajar con el agitador .............................69
Trabajar con los discos para rallar y cortar ...70
Limpieza y cuidado ...................................71
Recetas ...................................................72
Condiciones de Garantia ............................74
Disposición/Protección del medio
ambiente .................................................74
Service ....................................................20
Návod k obsluze Modelu 78501
Technické údaje ......................................75
Vysvětlení symbolů ....................................75
Pro Vaši bezpečnost ..................................75
Před prvním použitím ................................78
Vložení a vyjmutí míchací nádoby ...............78
Bezpečnostní spínač .................................79
Práce se sekacím nožem ...........................79
Práce s míchadlem ...................................80
Práce se strouhacími a krouhacími nástavci 80
Čištění a péče ..........................................82
Recepty ...................................................82
Záruční podmínky .....................................84
Likvidace / Ochrana životného prostředí .....84
Service ....................................................20
Instrukcja obsługi Modelu 78501
Dane techniczne ......................................85
Objaśnienie symboli ..................................85
Dla bezpieczeństwa użytkownika ................85
Przed pierwszym użyciem ..........................88
Wkładanie i zdejmowanie misy do
mieszania ................................................88
Wyłącznik bezpieczeństwa .........................89
Praca z nożem rozdrabniającym .................89
Praca z mieszadłem ..................................90
Praca z tarkami do tarcia i cięcia ................90
Czyszczenie i konserwacja .........................91
Przepisy ...................................................92
Warunki gwarancji.....................................94
Utylizacja / ochrona środowiska ..................94
Service ....................................................20
4
Page 5

BESTELLFORMULAR
Copyright UNOLD AG | www.unold.de
Bitte senden Sie das ausgefüllte Bestellformular an:
Abteilung Service
Mannheimer Straße 4
68766 Hockenheim
Anrede /
Title
Vorname /
First name
Name /
Surname
Straße/Nr. /
Street/No.
PLZ/Ort /
City
BESTELLUNG / ORDER Modell
Stück
Art.-Nr.
7850101 Stopfer
7850102 Deckel mit Einfüllschacht
7850108 Scheibenträger
7850138 Rührer
7850106 Hackmesser
7850140 Rührbehälter
7850110 Raspelscheibe fein
7850111 Raspelscheibe mittel
7850112 Raspelscheibe grob
7850113 Schneidscheibe fein
7850114 Schneidscheibe grob
Bezeichnung
Telefon +49 (0) 62 05/94 18-27
Telefax +49 (0) 62 05/94 18-22
E-Mail service@unold.de
Internet www.unold.de
Telefon
Phone No.
Telefax
Fax No.
E-Mail
Aktuelle Preise und Informationen erhalten Sie auf unserer Internetseite unter www.unold.de oder telefonisch bei
unserem Service.
5
Page 6

EINZELTEILE
Copyright UNOLD AG | www.unold.de
1
6
2
3
4
7
9
5
8
D Ab Seite 8
1 Stopfer mit Skala
2 Deckel mit Einfüllschacht
3 Rührbehälter mit Skala
4 Raspelscheiben
5 Schneidscheiben
6 Scheibenträger
7 Rührer
8 Hackmesser
9 Gerätebasis mit Antriebswelle
10 EIN-Schalter
11 AUS/IMPULS-Schalter
11
10
GB Page 21
1 Tamper with scale
2 Lid with filling shaft
3 Mixing bowl with scale
4 Grating discs
5 Slicing discs
6 Disc holder
7 Mixing blade
8 Chopping blade
9 Appliance base with drive shaft
10 ON switch
11 OFF/PULSE switch
Page 7

EINZELTEILE
Copyright UNOLD AG | www.unold.de
F Page 32
1 Bouchon verre mesureur
2 Couvercle avec ouverture de
remplissage
3 Bol mélangeur avec graduation
4 Disques à râper
5 Disques à émincer
6 Support à disques
7 Mélangeur
8 Hachoir
9 Base appareil avec arbre
d'entraînement
10 Bouton Marche
11 Bouton ARRET/IMPULSION
NL Pagina 43
1 Stamper met meetschaal
2 Deksel met vulschacht
3 Mengkom met meetschaal
4 Raspschijven
5 Snijschijven
6 Schijvendrager
7 Garde
8 Hakmes
9 Sokkel met aandrijfas
10 AAN-schakelaar
11 UIT/IMPULS-schakelaar
I Pagina 53
1 Pressino graduato
2 Coperchio con pozzetto di
riempimento
3 Recipiente graduato
4 Dischi per grattugiare
5 Dischi per tagliare
6 Portadisco
7 Frusta
8 Lama
9 Recipiente graduato
10 Interruttore on
11 Interruttore off/impulsi
ES Página 64
1 Empujador con escala
2 Tapa con boca de llenado
3 Recipiente agitador con escala
4 Discos para rallar
5 Discos para cortar
6 Soporte de discos
7 Agitador
8 Cuchilla
9 Base del aparato con eje de
accionamiento
10 Interruptor CONECTAR
11 Interruptor DESCONECTAR/IMPULSO
CZ Strany 75
1 Nacpavač se stupnicí
2 Kryt s plnicím otvorem
3 Míchací nádoba se stupnicí
4 Strouhací nástavce
5 Krouhací nástavce
6 Držák nástavců
7 Míchadlo
8 Sekací nůž
9 Základna přístroje s pohonnou hřídelí
10 Spínač ON
11 Spínač OFF/PULSE
PL Strony 85
1 Popychacz z podziałką
2 Pokrywa z podajnikiem
3 Misa do mieszania z podziałką
4 Tarka do tarcia
5 Tarka do cięcia
6 Oprawa tarek
7 Mieszadło
8 Nóż do rozdrabniania
9 Podstawa robota z wałem napędowym
10 Włącznik
11 Wyłącznik/włącznik impulsowy
Page 8
BEDIENUNGSANLEITUNG MODELL 78501
Copyright UNOLD AG | www.unold.de
TECHNISCHE DATEN
Leistung: 250 Watt, 230 V~, 50 Hz
Maße: Ca. 29,0 x 20,0 x 27,3 cm (L/B/H)
Gewicht: Ca. 1,5 kg
Kabellänge: Ca. 90 cm
Gehäuse: Kunststoff Weiß/Anthrazit
Ausstattung: Kompakte Küchenmaschine, Hackmesser zum Zerkleinern und
Zubehör: Hackmesser, Rührer, Scheibenträger, 2 Schneidscheiben,
Änderungen und Irrtümer in Ausstattungsmerkmalen, Technik, Farben und Design
vorbehalten
SYMBOLERKLÄRUNG
Dieses Symbol kennzeichnet eventuelle Gefahren, die Verletzungen
nach sich ziehen können oder zu Schäden am Gerät führen.
Kneten, Schnitzelwerk zum Raspeln und Schneiden, Rührer
für Sahne, Eiweiß und leichte Rührteige, Rührschüssel zur
Verarbeitung von ca. 0,5 Liter Flüssigkeit, Stopfer mit Skala,
Kurzbetriebszeit: eine Minute
3 Raspelscheiben, Bedienungsanleitung
FÜR IHRE SICHERHEIT
Bitte lesen Sie die folgenden Anweisungen und bewahren Sie diese auf.
Allgemeine Sicherheitshinweise
Das Gerät kann von Kindern
1.
ab 8 Jahren und von Personen mit verringerten physischen, sensorischen oder
mentalen Fähigkeiten oder
Mangel an Erfahrung und/
oder
Wissen benutzt werden, wenn sie beaufsichtigt werden oder bezüglich
des sicheren Gebrauchs des
Gerätes unterwiesen wurden
8
und die daraus resultierenden Gefahren verstanden
haben. Das Gerät ist kein
Spielzeug. Reinigung und
Benutzer
-Wartung dürfen
nicht durch Kinder durchgeführt werden, es sei denn
diese sind über 8 Jahre alt
und werden beaufsichtigt.
Bewahren Sie das Gerät
sowie das Kabel unzugänglich für Kinder unter 8 Jahren auf.
Kinder sollten beaufsichtigt
2.
werden, um sicher zu stel-
Page 9

len, dass sie nicht mit dem
Copyright UNOLD AG | www.unold.de
Gerät spielen.
3. Das Gerät an einem für Kinder unzugänglichen Ort aufbewahren.
Gerät nur an Wechselstrom
4.
mit Spannung gemäß Typenschild anschließen.
Dieses Gerät darf nicht mit
5.
einer externen Zeitschaltuhr
oder einem Fernbedienungssystem betrieben werden.
Tauchen Sie das Gerät oder
6.
die Zuleitung keinesfalls in
Wasser oder andere Flüssigkeiten ein.
Das Gerät ist ausschließlich
7.
für den Haushaltsgebrauch
oder ähnliche Verwendungs-
zwecke bestimmt, z. B.
Teeküchen in Geschäf-
ten, Büros oder sonstigen
Arbeitsstätten,
landwirtschaftlichen Betrie-
ben,
zur Verwendung durch Gäste
in Hotels, Motels oder sons-
tigen Beherbergungsbetrieben,
in Privatpensionen oder
Ferienhäusern.
8. Das Gerät und die Zuleitung
dürfen nicht in der Spülmaschine gereinigt werden.
Ziehen Sie den Stecker aus
9.
der Steckdose, bevor Sie das
Gerät zerlegen und reinigen,
Einzelteile abnehmen oder
anbringen wollen oder wenn
das Gerät an eine andere
Stelle gestellt wird.
10. Das Gerät darf nicht mit
Zubehör anderer Hersteller
oder Marken benutzt werden, um Schäden zu vermeiden.
Nach Gebrauch sowie vor
11.
dem Reinigen den Netzstecker aus der Steckdose
ziehen. Das Gerät niemals
unbeaufsichtigt lassen,
wenn der Netzstecker eingesteckt ist.
Prüfen Sie regelmäßig
12.
das Gerät, den Stecker
und die Zuleitung auf Verschleiß oder Beschädigungen. Bei Beschädigung des
Anschlusskabels oder anderer Teile senden Sie das
Gerät bitte zur Überprüfung
und Reparatur an unseren
Kundendienst. Unsachgemäße Reparaturen können
zu erheblichen Gefahren für
den Benutzer führen
und
haben den Ausschluss der
Garantie zur Folge.
Hinweise zum Aufstellen und Bedienen des Gerätes
13.
Das Gerät ist nur für die Nut-
zung in Innenräumen geeignet
Das Gerät bzw. die Zuleitung
14.
niemals mit nassen Händen
berühren.
15. Stellen Sie das Gerät aus
Sicherheitsgründen niemals
auf heiße Oberflächen, ein
Metalltablett oder auf nassen Untergrund. Das Gerät
oder die Zuleitung dürfen
nicht in der Nähe von Flammen betrieben werden.
Benutzen Sie die Küchen-
16.
maschine stets auf einer
9
Page 10

freien, ebenen und rutsch-
Copyright UNOLD AG | www.unold.de
festen Oberfläche.
Achten Sie darauf, dass
17.
die Zuleitung nicht über
den Rand der Arbeitsfläche
hängt, da dies zu Unfällen
führen kann, wenn z. B.
Kleinkinder daran ziehen.
18. Wickeln Sie die Zuleitung
nicht um das Gerät und vermeiden Sie Knicke in der
Zuleitung, um Schäden an
der Zuleitung zu vermeiden.
Die Zuleitung muss so ver-
19.
legt sein, dass ein Ziehen
oder darüber Stolpern verhindert wird.
Verschieben Sie das Gerät
20.
nicht, solange es in Betrieb
ist, um Verletzungen zu ver-
meiden.
Verwenden Sie keine heißen
21.
Flüssigkeiten. Achten Sie
darauf, dass die verwende-
ten Zutaten maximal Raumtemperatur haben.
Die Schneidwerkzeuge sind
22.
sehr scharf! Achten Sie beim
Aufstecken und Abnehmen
der Schneid- und Raspelscheiben darauf, sich nicht
zu verletzen.
Das Hackmesser ist eben-
23.
falls sehr scharf. Halten Sie
das Messer beim Einsetzen
in das Gerät und beim Reinigen stets am oberen Rand
fest, nicht jedoch an der
Messerklinge.
Ziehen Sie nicht das Gerät
24.
am Behältergriff nach oben,
wenn der Behälter im Gerät
verriegelt ist, das Gerät bzw.
der Griff könnte zerbrechen.
25. Überladen Sie den Behälter
nicht. Die Höchstfüllmenge
beträgt max. 0,5 l Zutaten.
Wenn Sie mehr Zutaten
einfüllen, kann das Gerät
beschädigt werden.
26. Verwenden Sie das Gerät
nicht, wenn der Scheiben
träger defekt ist, um Schäden am Gerät und Verletzungen zu vermeiden.
27.
Schalten Sie das Gerät nicht
ein, wenn der Behälter leer
ist.
28. Verwenden Sie immer den
Einfüllstopfer, wenn Sie
Zutaten nachträglich einfüllen. Zutaten nie von Hand
ein- oder nachschieben!
Nie harte Zutaten wie Kno-
29.
chen, oder Gegenstände wie
Kochlöffel durch den Einfülltrichter einführen. Es
besteht Verletzungsgefahr.
Sollten Zutaten an der
30.
Innenseite des Behälters
festhaften, schalten Sie das
Gerät aus, ziehen Sie den
Netzstecker und lösen Sie
diese Zutaten erst dann mithilfe eines Teigschabers.
Die Kurzbetriebszeit beträgt
31.
1 Minute. Lassen Sie das
Gerät nach einer Minute
kurz abkühlen und arbeiten
Sie dann erst weiter, um
eine Überhitzung des Motors
zu vermeiden.
32. Vorsicht: Vermeiden Sie den
Kontakt mit den beweglichen
10
Page 11
Teilen des Gerätes, wenn das
Copyright UNOLD AG | www.unold.de
Gerät in Betrieb ist. Halten
Sie die Hände, Haare oder
andere Gegenstände nicht
in die Nähe des Gerätes, es
besteht Verletzungsgefahr!
33. Wenn Sie den Rührbehälter
entleeren möchten, entfernen Sie immer zuerst das
Hackmesser bzw. die Trägerscheibe.
Schalten Sie das Gerät
34.
aus und warten Sie, bis
der Antrieb zum Stillstand
gekommen ist, bevor Sie den
Deckel entfernen.
35. Reinigen Sie das Gerät nach
jedem Gebrauch.
Berühren Sie niemals die drehenden Teile am Gerät und stecken Sie weder Gegenstände noch Körperteile in das laufende
Gerät, um Verletzungen zu vermeiden.
Vorsicht! Die Raspel- und Schneidscheiben sowie das Hackmesser sind sehr scharf - es besteht V
Nicht in das
laufende Gerät greifen bzw. Gegenstände hinein-
erletzungsgefahr!
stecken - es besteht Verletzungsgefahr!
Öffnen Sie auf keinen Fall das Gehäuse des Gerätes. Es besteht
die Gefahr eines Stromschlages.
Der Hersteller übernimmt keine Haftung bei fehlerhafter Montage, bei unsachgemäßer oder fehlerhafter
Verwendung oder nach Durchführung von Reparaturen durch nicht autorisierte Dritte.
VOR DEM ERSTEN BENUTZEN
1. Entfernen Sie alle Verpackungsmaterialien und Transport-
sicherungen. Halten Sie Verpackungsmaterial von Kindern fern
- Erstickungsgefahr!
2. Reinigen Sie alle abnehmbaren
Teile, wie im Kapitel Reinigen
und Pflegen, beschrieben.
EINSETZEN UND ABNEHMEN DES RÜHRBEHÄLTERS
1. Setzen Sie den Rührbehälter auf
die Gerätebasis. Achten Sie dabei
darauf, dass der Griff des Behälters etwas hinten positioniert ist
und drehen Sie dann den Behälter am Griff im Uhrzeigersinn und
entsprechend der Pfeilmarkierung
Achtung: Das Hackmesser
und die einzelnen Scheiben
sind sehr scharf, Verletzungsgefahr. Handhaben Sie diese
Arbeitsgeräte sehr vorsichtig.
in Richtung „Zu“ auf der Gerätebasis, bis der Behälter einrastet.
Der Pfeil am unteren Rand des
Behälters muss genau über der
Kreismarkierung auf der Gerätebasis liegen.
11
Page 12

2. Wählen Sie das gewünschte Werk-
Copyright UNOLD AG | www.unold.de
zeug aus und setzen Sie es in die
Rührschüssel. Informationen zum
richtigen Einsetzen der einzelnen
Werkzeuge erhalten Sie weiter
unten.
3. Der Rührbehälter und das entsprechende Rühr- oder Schneidwerkzeug muss immer eingesetzt
sein, bevor Sie Zutaten in den
Behälter füllen.
4. Setzen Sie den Deckel auf den
Rührbehälter. Der Einfüllschacht
des Deckels sollte zunächst so
positioniert werden, dass die
kleine Nase, die unterhalb des
Einfüllschachtes zu sehen ist, vor
der Führungsschiene an der Gerätebasis liegt.
5. Drehen Sie nun den Deckel soweit
im Uhrzeigersinn, bis diese Nase
in der Gerätebasis einrastet. Dies
SICHERHEITSSCHALTER
ist durch ein lautes Klicken zu
hören. Der Pfeil am oberen Rand
des Behälters muss exakt unter
der Kreismarkierung am Deckel
liegen.
6. Um den Deckel abzunehmen,
halten Sie den Behälter mit einer
Hand am Griff fest und drehen
Sie den Deckel entgegen dem
Uhrzeigersinn, bis die Nase aus
der Führungsschiene rutscht.
Nehmen Sie den Deckel nach
oben vom Gerät ab.
7. Um den Behälter abzunehmen,
drehen Sie diesen in Pfeilrichtung
auf „Auf“, bis er sich am Griff von
der Gerätebasis entfernen lässt.
Das Gerät ist mit einem Sicherheitsschalter ausgestattet, der verhindert, dass
das Gerät in Betrieb genommen werden kann, wenn es nicht richtig zusammengebaut wurde. Erst wenn alle Teile ordnungsgemäß montiert sind, lässt sich das
Gerät einschalten.
ARBEITEN MIT DEM HACKMESSER
Zum Zerkleinern von
Gemüse, Früchten, Brot und Brötchen zu Paniermehl,
Fleisch, Schokolade, Nüssen.
Ein sehr gutes Ergebnis erhalten Sie, wenn Sie die Zutaten
vorher in ca. zwei Zentimeter große Würfel schneiden.
Kneten von Teigen
Verwenden Sie kühlschrankkaltes Fett und kneten Sie den
Teig nicht zu lange. Bevor Sie den Teig nach dem Kneten
weiterverarbeiten, sollten Sie diesen auf der Arbeitsfläche
nochmals mit den Händen durchkneten.
12
Page 13

1. Achtung: Schalten Sie das Gerät
Copyright UNOLD AG | www.unold.de
nicht ein, ohne Lebensmittel
eingefüllt zu haben, da dies den
Motor beschädigen kann.
2. Lassen Sie das Gerät maximal
eine Minute am Stück arbeiten.
Lassen Sie das Gerät nach einer
Minute kurz abkühlen, bevor Sie
weiter arbeiten.
3. Die maximale Füllmenge beträgt
0,5 l Zutaten. Überschreiten
Sie diese Menge bitte nicht, um
Schäden am Gerät zu vermeiden.
Berücksichtigen Sie hierbei auch,
dass viele Lebensmittel wie z. B.
Fleisch, durch das Zerhacken ihr
Volumen vergrößern.
4. Vergewissern Sie sich, dass der
Rührbehälter richtig auf der Gerä-
tebasis sitzt.
5. Entfernen Sie den Klingenschutz
vom Hackmesser.
Fassen Sie das Messer nur am
oberen Stift an, die Klingen
des Messers sind sehr scharf.
Es besteht Verletzungsgefahr.
6. Setzen Sie vorsichtig das Hack-
messer auf die Welle im Rührbehälter.
7. Achtung: sowohl die Welle im
Gerät als auch das Innere der
Werkzeuge verfügt über eine
abgeflachte Seite. Alle Werkzeuge
lassen sich nur aufstecken, wenn
beide abgeflachten Seiten übereinander liegen.
8. Geben Sie die gewünschten Zutaten in den Rührbehälter. Achten
Sie darauf, den Behälter nicht zu
überfüllen.
9. Achtung: Wenn Sie einen Teig
kneten möchten, so geben Sie
zuerst alle trockenen Zutaten in
den Behälter. Geben Sie dann die
benötigte Flüssigkeit über den
Einfüllschacht hinzu, während
das Gerät rührt.
10. Setzen Sie den Deckel wieder auf
und verriegeln ihn.
11. Stecken Sie den Stecker in die
Steckdose.
12. Schalten Sie das Gerät am
Schalter „Ein„ ein. Das Messer
beginnt, sich zu drehen. Sie können aber auch die Taste „Aus/
Impuls“ betätigen, dann arbeitet
das Gerät in kurzen, kraftvollen
Schüben. Bitte verwenden Sie
den Impuls-Schalter nur in Intervallen, wenn Sie länger als fünf
Minuten arbeiten, verwenden Sie
die Dauerfunktion.
13. Sollten Zutaten an der Innenseite
des Behälters festhaften, schalten Sie das Gerät aus, ziehen Sie
den Netzstecker und lösen Sie
diese Zutaten erst dann mithilfe
eines Teigschabers.
14. Wenn die Zutaten die von Ihnen
gewünschte Konsistenz erreicht
haben, schalten Sie das Gerät am
„Aus/Impuls“-Schalter aus und
ziehen Sie den Stecker aus der
Steckdose.
15. Warten Sie, bis das Hackmesser
zum Stillstand gekommen ist.
13
Page 14

16. Entfernen Sie den Deckel.
Copyright UNOLD AG | www.unold.de
17. Entfernen Sie vorsichtig das
Hackmesser aus dem Behälter.
Fassen Sie das Messer nur am
oberen Stift an, die Klingen des
Messers sind sehr scharf. Es
besteht Verletzungsgefahr.
ARBEITEN MIT DEM RÜHRER
Zum Rühren bzw. Schlagen
von Sahne, Ei zu Eischnee und Biskuitteig. Verwenden Sie
ultrahocherhitzte Sahne, so kühlen Sie diese bitte vorher
einige Stunden im Kühlschrank vor.
18. Leeren Sie die Zutaten aus dem
Rührbehälter.
19. Sobald alle Teile gereinigt sind,
befestigen Sie aus Sicherheitsgründen bitte wieder den Klingenschutz am Hackmesser.
1. Beachten Sie die Hinweise zur
Vorbereitung im Kapitel „Arbeiten
mit dem Hackmesser“.
2. Setzen Sie vorsichtig den Rührer
auf die Welle im Rührbehälter.
3. Achtung: sowohl die Welle im
Gerät als auch das Innere der
Werkzeuge verfügt über eine
abgeflachte Seite. Alle Werkzeuge
lassen sich nur aufstecken, wenn
beide abgeflachten Seiten überei-
nander liegen.
4. Geben Sie die gewünschten Zutaten in den Rührbehälter. Achten
Sie darauf, den Behälter nicht zu
überfüllen.
5. Setzen Sie den Deckel wieder auf
und verriegeln ihn.
6. Stecken Sie den Stecker in die
Steckdose.
7. Schalten Sie das Gerät am Schalter „Ein„ ein. Der Rührer beginnt,
sich zu drehen. Sie können aber
auch die Taste „Aus/Impuls“
betätigen, dann arbeitet das Gerät
in kurzen, kraftvollen Schüben.
Bitte verwenden Sie den ImpulsSchalter nur in Intervallen von
fünf bis zehn Sekunden.
8. Sollten Zutaten an der Innenseite
des Behälters festhaften, schalten Sie das Gerät aus, ziehen Sie
den Netzstecker und lösen Sie
diese Zutaten erst dann mithilfe
eines Teigschabers.
9. Wenn die Zutaten die von Ihnen
gewünschte Konsistenz erreicht
haben, schalten Sie das Gerät am
„Aus/Impuls“-Schalter aus und
ziehen Sie den Stecker aus der
Steckdose.
10. Warten Sie, bis der Rührer zum
Stillstand gekommen ist.
11. Entfernen Sie den Deckel.
12. Entfernen Sie vorsichtig den Rührer aus dem Behälter.
13. Leeren Sie die Zutaten aus dem
Rührbehälter.
14
Page 15

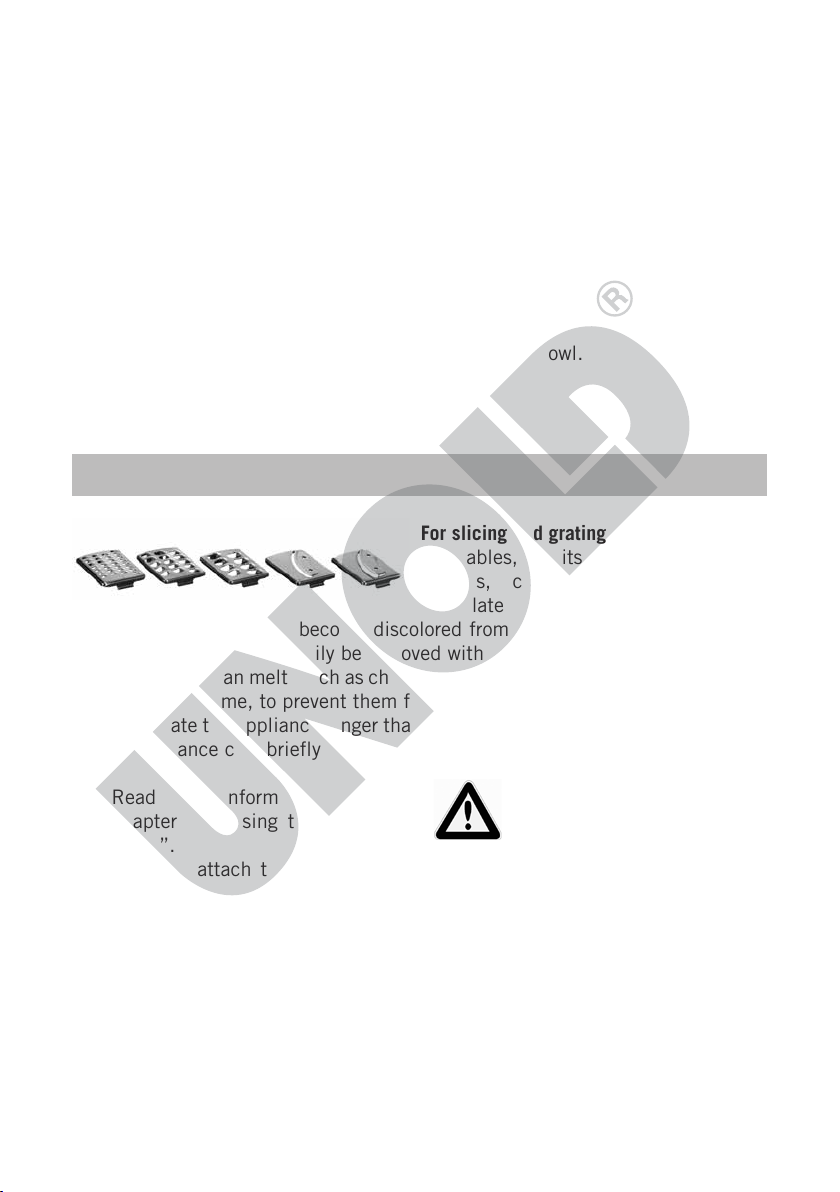
ARBEITEN MIT DEN RASPEL- UND SCHNEIDSCHEIBEN
Copyright UNOLD AG | www.unold.de
Zum Schneiden und Raspeln
von Gemüse, Früchten, Brot für Paniermehl, Käse, Parmesan, Kräutern, Schokolade
Bitte beachten Sie, dass sich der Kunststoff durch das Verarbeiten von z. B.
Karotten verfärben kann. Diese Verfärbungen können Sie mit Fett (z. B. Butter)
leicht entfernen.
Bei Zutaten, die schmelzen können (wie z. B. Schokolade oder Hartkäse) achten
Sie auf eine möglichst kurze Bearbeitungszeit, um zu verhindern, dass sich die
Zutaten zu sehr erwärmen. Lassen Sie das Gerät maximal eine Minute am Stück
arbeiten. Lassen Sie das Gerät nach einer Minute kurz erkalten, bevor Sie weiter
arbeiten.
1. Beachten Sie die Hinweise zur
Vorbereitung im Kapitel „Arbeiten
mit dem Hackmesser“.
2. Stecken Sie vorsichtig die
gewünschte Scheibe auf den
Scheibenträger. Die Scheiben
werden von oben in die Öffnung
des Scheibenträgers gesteckt.
Achten Sie dabei darauf, die fla-
che Seite der Scheibe passend
zur flachen Seite an der Öffnung
zu halten. Nur so lässt sich die
Scheibe einrasten. Prüfen Sie, ob
die Scheibe fest sitzt und fahren
Sie dann erst fort.
Achtung: Die Klingen der
Scheiben sind sehr scharf, es
besteht Verletzungsgefahr.
3. Setzen Sie nun den Scheibenträger auf die Welle im Rührbehälter.
4. Achtung: sowohl die Welle im
Gerät als auch das Innere der
Werkzeuge verfügt über eine
abgeflachte Seite. Alle Werkzeuge
lassen sich nur aufstecken, wenn
beide abgeflachten Seiten übereinander liegen.
5. Setzen Sie den Deckel wieder auf.
6. Schalten Sie das Gerät am Schalter „Ein“ ein. Der Rührer beginnt,
sich zu drehen. Sie können aber
auch die Taste „Aus/Impuls“
betätigen, dann arbeitet das Gerät
in kurzen, kraftvollen Schüben.
Bitte verwenden Sie den ImpulsSchalter nur in Intervallen von
fünf bis zehn Sekunden.
7. Füllen Sie die Zutaten durch den
Einfülltrichter. Sollten die Zutaten zu groß sein, müssen diese
halbiert oder geviertelt bzw. auf
die Größe des Einfülltrichters
geschnitten werden.
8. Verwenden Sie immer den Einfüllstopfer, um Zutaten nachträglich
einzufüllen. Zutaten nie von Hand
ein- oder nachschieben!
9. Nie harte Zutaten wie Knochen,
oder Gegenstände wie Kochlöffel
durch den Einfülltrichter einführen. Es besteht Verletzungsgefahr.
10. Wenn Sie mit dem Verarbeiten
der Zutaten fertig sind, schalten
Sie das Gerät am „Aus/Impuls“-
15
Page 16

Schalter aus und ziehen Sie den
Copyright UNOLD AG | www.unold.de
Stecker aus der Steckdose.
11. Warten Sie, bis der Scheibenträger zum Stillstand gekommen ist.
12. Entfernen Sie den Deckel.
13. Entfernen Sie vorsichtig den
Scheibenträger aus dem Behälter. Dies gelingt leichter, wenn
Sie den Behälter von der Basis
nehmen und etwas versetzt zur
Ursprungsposition wieder aufsetzen. So schiebt sich der Scheibenträger nach oben und sie
können ihn sicher und einfach
entnehmen.
14. Die Klingen der Scheiben sind sehr
scharf. Es besteht Verletzungsgefahr.
REINIGEN UND PFLEGEN
15. Technisch bedingt ist es möglich,
dass kleine Lebensmittelreste auf
dem Scheibenträger zurückbleiben.
16. Leeren Sie die Zutaten aus dem
Rührbehälter.
17. Um die Scheibe aus dem Scheibenträger zu entfernen, drehen
Sie den Scheibenträger um und
drücken Sie die Scheibe nach
unten aus dem Träger heraus.
Bitte seien Sie sehr vorsichtig,
da die Schneiden scharf sind
und Verletzungsgefahr besteht.
Vor dem Reinigen stets das
Gerät ausschalten und den
Stecker aus der Steckdose
ziehen.
1. Reinigen Sie das Gerät nach jeder
Verwendung.
2. Die Gerätebasis und die Zuleitung
dürfen nicht in Wasser oder
andere Flüssigkeiten getaucht
werden.
3. Mit Ausnahme der Gerätebasis
können Sie alle Teile in der
Spülmaschine reinigen (oberer
Korb). Sie können alle Teile außer
der Gerätebasis auch in warmem
Wasser reinigen, dem Sie etwas
mildes Spülmittel zugeben.
4. Die Schneidwerkzeuge sind sehr
scharf! Achten Sie beim Reinigen
der Schneid- und Raspelscheiben
und des Messer darauf, sich nicht
daran zu verletzen.
16
5. Lassen Sie die Schneidwerkzeuge
nie im Spülwasser liegen, um
Verletzungen zu vermeiden.
6. Die Gerätebasis wischen Sie bitte
mit einem feuchten Tuch ab und
trocknen diese anschließend gut.
7. Verwenden Sie keine scharfen Scheuermittel, Stahlwolle,
metallische Gegenstände, Desinfektionsmittel oder heiße Reinigungsmittel, da diese zu Beschädigungen führen können.
8. Befestigen Sie aus Sicherheitsgründen bitte wieder den Klingenschutz am Hackmesser, sobald
das Messer gereinigt ist.
9. Die verschiedenen Schneid- und
Raspelscheiben lassen sich gut
im Inneren des Einfüllstopfer
aufbewahren.
Page 17

10. Das Gerät muss vollkommen
Copyright UNOLD AG | www.unold.de
trocken sein, bevor Sie es wieder
benutzen dürfen.
einem trockenen und sicheren Ort
auf, um sie vor Staub, Stoß, Hitze
und Feuchtigkeit zu schützen.
11. Bewahren Sie die vollständig
getrocknete Küchenmaschine an
TIPPS
Achten Sie darauf, dass Zutaten wie Butter oder Eier Raumtemperatur haben,
bevor Sie diese Zutaten verarbeiten.
Wenn Sie Eischnee herstellen möchten, darf kein Eigelb im Eiweiß sein, da sonst
das Eiweiß nicht fest wird.
Wenn Sie Eier für ein Rezept benötigen, schlagen Sie diese in einem separaten
Gefäß auf und geben Sie diese erst dann in die Rührschüssel. So können Sie
hineingefallene Eierschalen vorher entfernen.
REZEPTE
Apfelmeerrettich
Reibescheibe fein
1 Apfel mit roter Schale, ca. 2 cm
Stangenmeerrettich (am besten vom
Kopf, da dieser zarter ist), 1 TL Sahne,
1 Prise Zucker
Apfel und Meerrettich mit feiner Reibescheibe reiben, mit Sahne und Zucker abschmecken. Schmeckt gut zu
gekochtem Fleisch und zu Räucherfisch
Rahmkohlrabi
Reibescheibe grob
1 Kohlrabi mittlerer Größe, 1 EL Butter, 1 EL zerkleinerte Petersilie, 1 EL
süße Sahne, Salz, Pfeffer, Muskat
Kohlrabi schälen, mit der groben Reibscheibe in Stifte reiben. Butter in einer
Pfanne erhitzen. Kohlrabi in der Butter bissfest dünsten. Mit Salz, Pfeffer
und Muskat würzen, Sahne untermengen und mit Petersilie bestreuen.
Birnenkuchen (Rührteig für Singlebackform, Durchmesser 20 cm)
50 g Butter, 1 Ei, 50 g Zucker, 1 Pck.
Vanillezucker, 1 EL Amaretto, 1 gehäufter TL Kakao, 100 g Mehl, 1 TL
Backpulver, 1–2 Birnen
Butter, Ei, Zucker, Vanillezucker und
Amaretto mit dem Rührer vermischen.
Kakaopulver, Mehl und Backpulver zugeben, mit Impulsschalter untermengen.
In eine gefettete Springform füllen.
Birnen schälen, vierteln, entkernen,
in Fächer schneiden und auf den Teig
drücken.
Im Backofen bei 160 °C ca. 30 Minuten backen.
Tipp: Bereiten Sie den Teig ohne Kakao und belegen diesen mit in Fächer
geschnittenen Apfelstücken oder Aprikosen.
Waffelteig
Rührer
50 g flüssige Butter, 1 Ei, 50 g Zucker, 1 Pck. Vanillezucker, 1 TL Rum,
100 g Mehl, 1/2 TL Backpulver
Butter, Ei, Zucker, Vanillezucker und
Rum mit dem Rührer vermischen.
17
Page 18

Mehl und Backpulver zugeben, mit
Copyright UNOLD AG | www.unold.de
Impulsschalter untermengen. In handelsüblichen Waffelautomaten portionsweise einfüllen, goldbraun backen.
Schlagsahne
Rührer
200 ml Schlagsahne, 1 Pck. Vanillezucker
Gekühlte Sahne und Vanillezucker mit
dem Rührer steif schlagen. Dabei oft
stoppen und Festigkeit kontrollieren.
Kartoffelgratin
Schneidscheibe grob
2 Kartoffeln, 100 ml süße Sahne, 1/2
Zwiebel, 1 Ei, 50 g geriebener Emmentaler, Salz, Pfeffer, Muskat
Kartoffeln schälen, mit der Schneidscheibe grob in Scheiben schneiden.
Die Zwiebel ebenfalls schälen und
grob in Scheiben schneiden.
Kartoffeln und Zwiebeln abwechselnd
in gefettete Auflaufform schichten.
Sahne mit Ei und Gewürzen verquir-
len, über die Kartoffeln gießen, mit
Käse bestreuen. Im Backofen bei
160 °C ca. 30 Minuten backen.
Möhrenrohkost
Reibscheibe mittel
1 Möhre, 1 Apfel, 1 EL Walnüsse,
2 EL Orangensaft, 1 TL Öl
Möhre schälen, Apfel entkernen und
vierteln. Apfel und Möhre mit der
Reibscheibe mittel reiben, mit Walnüssen bestreuen, Orangensaft und Öl
zufügen und mischen.
Kartoffelchips
Schneidscheibe fein
2 mehlige Kartoffeln, 1 EL Öl, 1 EL
Paprikapulver
Kartoffeln waschen und schälen.
Mit der Schneidscheibe fein in feine
Scheiben schneiden. Mit Öl und Paprikapulver marinieren.
Backblech mit Backpapier belegen.
Kartoffelscheiben darauf verteilen und
im Backofen bei 180 °C braun backen.
Hackepeter (Schweinemett)
Hackmesser
150g Schweineschnitzel, 1/2 Zwiebel
1 Eigelb, Salz, Pfeffer
Alle Zutaten mit dem Hackmesser fein
zerkleinern.
Mit dem Messer können Sie auch
Schokolade, Kräuter, Nüsse, trockene
Brotwürfel, Käse, Meerrettich, Ingwer
usw. hacken.
Leberknödel als Suppeneinlage
Hackmesser
150 Rinderleber, 1/2 Zwiebel, 1 eingeweichtes, ausgedrücktes Brötchen,
2 EL Semmelbrösel, 1 Ei, Salz, Pfeffer, Muskat
Alle Zutaten mit dem Hackmesser fein
hacken. 1 Liter Rinderbrühe erhitzen.
Mit einem kleinen Teelöffel kleine Nocken vom Teig stechen und in die kochende Flüssigkeit geben, gar ziehen
lassen.
Die Rezepte in dieser Bedienungsanleitung wurden von den Autoren und von der UNOLD AG
sorgfältig erwogen und geprüft, dennoch kann keine Garantie übernommen werden. Eine Haftung der
Autoren bzw. der UNOLD AG und ihrer Beauftragten für Personen-, Sach- und Vermögensschäden
ist ausgeschlossen.
18
Page 19
GARANTIEBESTIMMUNGEN
Copyright UNOLD AG | www.unold.de
Wir gewähren auf unsere Geräte eine Garantie von 24 Monaten, bei gewerblichem Gebrauch 12 Monate, ab dem Kaufdatum für Schäden, die bei bestimmungsgemäßem Gebrauch nachweislich auf Werksfehler zurückzuführen sind. Innerhalb
der Garantiezeit beheben wir Material- und Herstellungsfehler nach unserem Ermessen durch Reparatur oder Umtausch.
Unsere Garantieleistungen gelten ausschließlich für in Deutschland und Österreich verkaufte Geräte. Bei anderen Ländern
wenden Sie sich bitte an den zuständigen Importeur. Geräte, für die eine Mängelbeseitigung beansprucht wird, senden Sie
bitte zusammen mit einer Kopie des maschinell erstellten Kauf belegs, aus dem das Kaufdatum ersichtlich sein muss, sowie
einer Fehlerbeschreibung gut verpackt und freigemacht an unseren Kundendienst. Im Garantiefall werden dem Kunden in
Deutschland und Österreich entstandene Versandkosten zurückerstattet. Von der Garantie ausgeschlossen sind Schäden
durch Verschleiß, unsachgemäße Handhabung und Nichteinhaltung der Wartungs- und Pflegeanweisungen. Der Garantieanspruch erlischt, wenn Reparaturen oder Eingriffe am Gerät von dritter Stelle vorgenommen werden. Eventuelle Ansprüche des
Endverbrauchers gegenüber dem Verkäufer oder Händler werden durch diese Garantie nicht eingeschränkt.
ENTSORGUNG / UMWELTSCHUTZ
Unsere Geräte werden auf hohem Qualitätsniveau für eine lange Nutzungsdauer her ge stellt. Regelmäßige
Wartung und fachge rechte Reparaturen durch unseren Kunden dienst können die Nutzungsdauer des Gerätes verlängern. Wenn ein Gerät defekt und nicht mehr zu reparieren ist, beachten Sie bitte: Dieses Produkt
darf nicht zusammen mit dem normalen Hausmüll entsorgt werden. Sie müssen dieses Produkt an einer
ausgewiesenen Sammelstelle zum Recycling von elektrischen oder elektronischen Geräten ab liefern. Durch
das separate Sammeln und Recyceln von Abfallprodukten helfen Sie mit, die natürlichen Ressourcen zu
schonen und stellen sicher, dass das Produkt in gesundheits- und umweltverträglicher Weise entsorgt wird.
INFORMATIONEN FÜR DEN FACHHANDEL
Hiermit erklärt die UNOLD AG, dass sich die Küchenmaschine Kompakt 78501 in Übereinstimmung
mit den grundlegenden Anforderungen der europäischen Richtlinie für elektromagnetische
Verträglichkeit (2004/108/EC) und der Niederspannungsrichtlinie (2006/95/EC) bendet.
Hiermit bestätigt die UNOLD AG, dass sowohl das Produkt als auch die eingesetzten Rohstoffe den
Vorschriften des LFBG 2005, § 30+31 und der EC Richtlinie 1935/2004 in ihrer jeweils aktuellen
Fassung entspricht. Die gesetzlichen Grenzwerte werden eingehalten.
Die Übereinstimmung mit den Regularien bezieht sich auf den Tag der Erstellung dieser Erklärung.
Hockenheim, 28.5.2013
UNOLD AG, Mannheimer Straße 4, 68766 Hockenheim
Diese Anleitung kann im Internet unter www.unold.de als pdf-Datei heruntergeladen werden.
19
Page 20

SERVICE-ADRESSEN
Copyright UNOLD AG | www.unold.de
DEUTSCHLAND
Kundendienst
Telefon +49 (0) 62 05/94 18-27
Mannheimer Straße 4
68766 Hockenheim
Sie möchten innerhalb der Garantiezeit ein Gerät zur Reparatur einsenden? Auf unserer
Internetseite www.unold.de/ruecksendung können Sie sich einen Rücksendeschein ausdrucken,
um damit das Paket kostenlos bei der Post abzugeben (nur für Einsendungen aus Deutschland
und Österreich).
ÖSTERREICH SCHWEIZ
Telefax +49 (0) 62 05/94 18-22
E-Mail service@unold.de
Internet www.unold.de
Reparaturabwicklung, Ersatzteile:
ESC Electronic Service Center GmbH
Kelsenstraße 2
A-1030 Wien
Telefon +43 (0) 1/9 71 70 59
Telefax +43 (0) 1/9 71 70 59
E-Mail office@esc-service.at
MENAGROS AG
Hauptstr. 23
CH 9517 Mettlen
Telefon +41 (0) 71 6346015
Telefax +41 (0) 71 6346011
E-Mail info@bamix.ch
Internet www.bamix.ch
POLEN TSCHECHIEN
Quadra-Net
Dziadoszanska 10
61-248 Poznań
Internet www.quadra-net.pl
befree.cz s.r.o.
Škroupova 150
537 01 Chrudim
Telefon +42 0 46 46 01 881
E-Mail obchod@befree.cz
20
Page 21
INSTRUCTIONS FOR USE MODEL 78501
Copyright UNOLD AG | www.unold.de
TECHNICAL SPECIFICATIONS
Power: 250 Watts, 230 V~, 50 Hz
Dimensions: Approx. 29.0 x 20.0 x 27.3 cm (L / W / H)
Weight: Approx. 1.5 kg
Power cord
length:
Housing: Plastic, white/anthracite
Features: Compact food processor, chopping blade for chopping and
Accessories: Chopping blade, mixing blade, disc holder, 2 slicing discs,
Equipment features, technology, colours and design are subject to change without
notice. Errors and omissions excepted
EXPLANATION OF THE SYMBOLS
This symbol indicates potential hazards that may result in injury or
damage to the appliance.
Approx. 90 cm
kneading, shredder for grating and slicing, mixing blade for
whipped cream, egg whites and light sponge batters, mixing
bowl for processing about 0.5 liters of liquid, tamper with
scale, short-term operation: one minute
3 grating discs, operating instructions
FOR YOUR SAFETY
Please read the following instructions and keep them on hand for
later reference.
General safety information
This appliance can be used
1.
by children aged from 8 years
and above and persons with
reduced physical, sensory or
mental capabilities or lack of
experience and knowledge if
they have been given supervision or instruction concerning use of the applicance
a safe way
in
stand the hazards involved.
and under-
Children shall not play with
the appliance. Cleaning and
user maintenance shall not
be made by children without
supervision.
Children of less than 3 years
2.
should be kept away unless
continuously supervised.
3. Children aged from 3 years
and less than 8 years shall
only swith on/off the appli
ance provided that it has
been placed or installed in
its intended normal operating position and they have
21
Page 22

been given supervision or
Copyright UNOLD AG | www.unold.de
instruction concerning use of
the appliance in a safe way
and understand the hazards
involved. Children aged from
3 years and less than 8 years
shall not plug in, regulate
and clean the appliance or
perform user maintenance.
4. Keep the appliance out of
the reach of children.
5. Connect appliance only to an
AC power supply with voltage
corresponding to the voltage
on the rating plate.
6. Do not operate this appli
ance with an external timer
or remote control system.
7.
Never immerse the appli-
ance or the power cord in
water or other liquids.
The appliance is intended
8.
for household use only, or for
similar areas of use, such as:
kitchenettes in businesses,
offices or other workplaces,
agricultural enterprises,
for use by guests in hotels,
motels or other lodgings,
in private guesthouses or
holiday homes.
9. Do not clean the appliance or
power cord in a dishwasher.
10. Unplug the appliance from
the electrical outlet before
you disassemble and clean
the appliance, remove or
attach single parts or move
the appliance to another
location.
11. Do not use the appliance
with accessories of other
manufacturers or brands, to
prevent damage.
12. Unplug the appliance from
the power supply after use
and before cleaning. Never
leave the appliance unatten
ded when it is plugged in to
the power supply.
Check the appliance, the
13.
plug and the power cord regularly for wear or damage. If
the power cord or other parts
become damaged, send the
appliance for inspection and
repair to our after sales service. Unauthorized repairs
can result in serious risks to
the user and void the warranty.
Information on setup
and operati-
on of the appliance
14.
The appliance is suitable for
indoor use only.
15. Never touch the appliance or
power cord with wet hands.
16. For safety reasons, never
place the appliance on hot
surfaces, a metal tray or a
wet surface. Do not place
the appliance or power cord
near open flames during
operation.
17. Always use the food proces
sor on a level, uncluttered
and non-slip surface.
18.
Make sure that the power
cord does not hang over the
edge of the countertop or
table, since this can cause
accidents, for example if
small children pull on the
cord.
22
Page 23

19. Do not wrap the power cord
Copyright UNOLD AG | www.unold.de
around the appliance and
avoid kinking of the power
cord to prevent damage.
20. Route the power cord so that
there is no possibility of the
cord being pulled or tripped
over.
21. Do not move the appliance
as long as it is in operation,
to prevent injuries.
22. Do not use hot liquids. Make
sure that the ingredients are
not hotter than room tempe
-
rature.
23.
The cutting utensils are very
sharp! Take care not to injure
yourself when attaching and
removing the slicing and gra-
ting discs.
The chopping blade is also
24.
very sharp. When inserting
the blade in the appliance
and during cleaning, always
hold the blade by the top
edge, never on the knife
blade.
25. Do not lift the appliance by
pulling on the mixing bowl
handle when the mixing bowl
is locked in the appliance,
since this could damage
the appliance or break the
handle.
26. Do not overfill the mixing
bowl. The maximum capa
city for ingredients is 0.5 l.
If you overfill the container
with ingredients, this could
damage the appliance.
27.
Do not use the appliance if
the disc holder is defective,
in order to avoid injuries and
damage to the appliance.
28. Do not switch on the appliance if the mixing bowl is
empty.
Always use the tamper to
29.
add more ingredients. Never
add or push ingredients with
your hand!
30. Never insert hard objects
such as bones or cooking
spoons into the filling shaft.
Danger of injury.
31. If ingredients stick to the
inside of the mixing bowl,
switch off the appliance,
unplug it from the power
supply and then loosen the
ingredients using a spatula.
32. The short-term operating
time is 1 minute. After one
minute of operation, allow
the appliance to cool before
continuing, in order to avoid
overheating of the motor.
33. Caution: Avoid contact with
moving parts of the appli
ance when it is in operation.
Keep hands, hair or other
objects away from the appliance: Danger of injury!
If you want to empty the
34.
mixing bowl, always remove
the chopping blade or the
disc first.
35. Switch off the appliance
and wait until the motor has
stopped before you remove
the lid.
36. Clean the appliance after
every use.
23
Page 24
To avoid accidents, never touch the rotating parts of the
Copyright UNOLD AG | www.unold.de
appliance and do not insert objects or body parts into the
appliance during operation.
Caution! The grating and slicing discs and the chopping blade
are very sharp: Danger of injury!
Never reach or insert objects into the appliance while it is in
operation: Danger of injury!
Do not open the housing of the appliance under any
circumstances. There is danger of electric shock.
The manufacturer will not be liable in the event of incorrect assembly, improper or incorrect use or if
repairs are carried out by unauthorized third parties.
BEFORE USING THE APPLIANCE THE FIRST TIME
1. Remove all packaging materials
and transport safety devices. Keep
packaging materials away from
children - danger of suffocation!
2. Clean all removable parts as
described in the chapter on
cleaning and care.
INSERTING AND REMOVING THE MIXING BOWL
1. Place the mixing bowl on the
appliance base. Make sure that
the handle of the mixing bowl
is positioned somewhat toward
the back and then turn the bowl
by the handle clockwise corresponding to the arrow mark in
the direction of “Closed” on the
appliance base, until the bowl
locks into place. The arrow on the
bottom edge of the mixing bowl
must be exactly over the circle
mark on the appliance base.
2. Select a utensil and insert it in
the mixing bowl. How to correctly
insert the individual utensils is
described below.
3. The mixing bowl and the corresponding mixing or cutting utensil
24
must always be inserted before
you put ingredients into the bowl.
4. Place the lid on the mixing bowl.
The filling shaft of the lid should
initially be positioned so that
the small nose that can be seen
beneath the filling shaft is in front
of the guide rail on the appliance
base.
5. Now turn the lid clockwise until
this nose locks into the appliance
base. You will hear a loud click
when this happens. The arrow on
the top edge of the mixing bowl
must be exactly under the circle
mark on the lid.
6. To remove the lid, hold the mixing
bowl with one hand by the handle
and turn the lid counter-clockwise
Caution: The chopping blade
and the individual discs are
very sharp: Danger of injury.
Handle these utensils very
carefully.
Page 25

until the nose slips out of the
Copyright UNOLD AG | www.unold.de
guide rail. Remove the lid from
the appliance.
“Open” until it can be removed
from the appliance base by lifting
the handle.
7. To remove the mixing bowl, turn
it in the direction of the arrow to
SAFETY SWITCH
The appliance is equipped with a safety switch that prevents the appliance from
being operated if it has not been assembled correctly. The appliance can only be
switched on after all parts have been mounted correctly.
USING THE CHOPPING BLADE
For chopping
vegetables, fruits, bread and rolls for making bread crumbs,
meat, chocolate, nuts.
You will get very good results if you first cut the ingredients
into about 1-inch cubes.
Kneading dough
Use butter or margarine at refrigerator temperature and
do not knead the dough excessively long. Before using the
dough after kneading, you should knead it briefly on the
worktop by hand.
1. Caution: Do not switch on the
appliance without first putting
ingredients in the mixing bowl,
since this can damage the motor.
2. Do not operate the appliance longer than one minute at a time.
After one minute, let the appliance cool briefly before continuing.
3. The maximum capacity for ingredients is 0.5 l. Do not exceed this
quantity, in order not to damage
the appliance. Also take into
account that many foods, such
as meat, increase in volume as a
result of chopping.
4. Make sure that the mixing bowl is
seated correctly on the appliance
base.
5. Remove the blade guard from the
chopping blade.
Do not touch the blades; they
are very sharp. Danger of
injury.
6. Place the chopping blade carefully onto the shaft in the mixing
bowl.
25
Page 26

7. Caution: both the shaft in the
Copyright UNOLD AG | www.unold.de
appliance and the inside of the
utensils have a flattened side. All
utensils can be inserted only if
both flattened sides are aligned.
8. Fill the desired ingredients into
the mixing bowl. Be careful not to
overfill the bowl.
9. Caution: If you want to knead
dough, first put all dry ingredients
into the mixing bowl. Then add
the required liquid by pouring it
through the filling shaft while the
appliance is mixing.
10. Place the lid on the bowl and lock
it into place.
11. Plug the power cord into an electrical outlet.
12. Switch on the appliance by set-
ting the switch to „On“. The blade
starts to turn. You can also press
the “Off/Pulse” button, in which
case the appliance will operate
in short, powerful bursts. Use the
Pulse switch only in intervals; if
you work longer than five minutes, use the continuous function.
13. If ingredients stick to the inside
of the mixing bowl, switch off
the appliance, unplug it from the
power supply and then loosen the
ingredients using a spatula.
14. When the ingredients have
reached the desired consistency,
switch the appliance off by means
of the “Off/Pulse” switch and
unplug it from the power supply.
15. Wait until the chopping blade has
stopped moving.
16. Remove the lid.
17. Carefully remove the chopping
blade from the bowl. Do not touch
the blades; they are very sharp.
Danger of injury.
18. Empty the ingredients from the
mixing bowl.
19. As soon as all parts have been
cleaned, put the blade guard back
on the chopping blade to prevent
injuries.
USING THE MIXING BLADE
For mixing, whipping
cream, beating egg whites and making sponge batter. If
you use ultra-high temperature cream, refrigerate it first for
several hours before whipping.
1. Read the information in the
chapter on “Using the chopping
blade”.
2. Place the mixing blade carefully
onto the shaft in the mixing bowl.
3. Caution: both the shaft in the
appliance and the inside of the
utensils have a flattened side. All
26
utensils can be inserted only if
both flattened sides are aligned.
4. Fill the desired ingredients into
the mixing bowl. Be careful not to
overfill the bowl.
5. Place the lid on the bowl and lock
it into place.
Page 27
6. Plug the power cord into an
Copyright UNOLD AG | www.unold.de
electrical outlet.
7. Switch on the appliance by setting
the switch to „On“. The mixing
blade starts to turn. You can also
press the “Off/Pulse” button, in
which case the appliance will
operate in short, powerful bursts.
Use the Pulse switch only in
intervals of five to ten seconds.
8. If ingredients stick to the inside
of the mixing bowl, switch off
9. When the ingredients have
reached the desired consistency,
switch the appliance off by means
of the “Off/Pulse” switch and
unplug it from the power supply.
10. Wait until the mixing blade has
stopped moving.
11. Remove the lid.
12. Carefully remove the mixing blade
from the bowl.
13. Empty the ingredients from the
mixing bowl.
the appliance, unplug it from the
power supply and then loosen the
ingredients using a spatula.
USING THE GRATING AND SLICING DISCS
For slicing and grating
vegetables, fruits, bread for bread
crumbs, cheese, Parmesan, herbs,
chocolate
Note that the plastic can become discolored from some foods, such as carrots.
Such discolorations can easily be removed with a little butter.
Ingredients that can melt (such as chocolate or hard cheese) should be processed
for only a short time, to prevent them from becoming too warm.
Do not operate the appliance longer than one minute at a time. After one minute,
let the appliance cool briefly before continuing.
1. Read the information in the
chapter on “Using the chopping
blade”.
2. Carefully attach the desired disc
on the disc holder. Insert the disc
from above into the opening in
the disc holder. Make sure that
the flat side of the disc matches
the flat side of the opening. Only
then can the disc lock into place.
Do not continue until after checking to make sure that the disc
is firmly in place.
Caution: The blades of the
discs are very sharp: Danger of
injury.
3. Now place the disc holder onto
the shaft in the mixing bowl.
4. Caution: both the shaft in the
appliance and the inside of the
utensils have a flattened side. All
utensils can be inserted only if
both flattened sides are aligned.
5. Place the lid on the appliance.
6. Switch on the appliance by setting
the switch to „On“. The mixing
27
Page 28

blade starts to turn. You can also
Copyright UNOLD AG | www.unold.de
press the “Off/Pulse” button, in
which case the appliance will
operate in short, powerful bursts.
Use the Pulse switch only in intervals of five to ten seconds.
7. Add the ingredients through the
filling shaft. If the ingredients are
too large, they must first be halved or quartered or cut to the size
of the filling shaft.
8. Always use the tamper to add
more ingredients. Never add or
push ingredients with your hand!
9. Never insert hard objects such as
bones or cooking spoons into the
filling shaft. Danger of injury.
10. When you have finished processing the ingredients, switch the
appliance off by means of the
“Off/Pulse” switch and unplug
the appliance from the power
supply.
11. Wait until the disc holder has
stopped moving.
12. Remove the lid.
13. Carefully remove the disc holder
from the bowl. This is easier to do
if you lift the bowl from the base
and replace it offset somewhat
from the original position. This
pushes the disc holder up and you
can remove it easily and safely.
14. The blades of the discs are very
sharp. Danger of injury.
15. Due to the design of the appliance, it is possible that small pieces of food can remain on the disc
holder.
16. Empty the ingredients from the
mixing bowl.
17. To remove the disc from the
disc holder, turn the disc holder
around and press the disc downward out of the holder.
Please be very careful, since
the cutting edges are sharp
and there is a risk of injury.
CLEANING AND CARE
Before cleaning, always turn
off the appliance and unplug it
from the power supply.
1. Clean the appliance after every
use.
2. Do not immerse the appliance
base and power cord in water or
other liquids.
3. With the exception of the appliance base, all parts can be cleaned in the dishwasher (top basket). You can also wash all parts
except the appliance base in
warm water with a little mild dishwashing detergent.
28
4. The cutting utensils are very sharp!
Take care not to injure yourself
when cleaning the slicing and grating discs and the chopping blade.
5. Never leave the cutting utensils
in the dishwater, in order to avoid
injuries.
6. Wipe off the appliance base with
a moist cloth and then dry it thoroughly.
7. Do not use any abrasive scouring
agents, steel wool, metal objects,
disinfectants or hot cleaning
agents, since they can damage
the appliance.
Page 29

8. As soon as the chopping blade
Copyright UNOLD AG | www.unold.de
has been cleaned, put the blade
guard back on, in order to prevent
injuries.
9. The various slicing and grating
discs can be stored inside the
tamper.
RECIPES
10. The appliance must be completely dry before you use it again.
11. When completely dry, store the
food processor in a dry, safe place
so that it is protected from dust,
shocks, heat and moisture.
Apple Horseradish
Grating disc, fine
1 red apple, ca. 2 cm horseradish
(preferably from top end, since it is
more tender), 1 tsp cream, 1 pinch
sugar
Grate apple and horseradish with
fine grating disc, season with cream
and sugar. Serve with cooked meat or
smoked fish
Creamed Kohlrabi
Grating disc, coarse
1 medium kohlrabi, 1 tbsp butter,
1 tbsp chopped parsley, 1 tbsp sweet
cream, salt, pepper, nutmeg
Peel kohlrabi and grate with the coarse
grating disc. Melt butter in a pan.
Steam kohlrabi in butter until firm to
the bite. Season with salt, pepper and
nutmeg, add cream and sprinkle with
parsley.
Pear Cake
Sponge batter for 20 cm baking pan
for singles
50 g butter, 1 egg, 50 g sugar, 1 envelope vanilla sugar, 1 tbsp amaretto,
1 heaped tsp cocoa, 100 g flour, 1 tsp
baking powder, 1–2 pears
Use mixing blade to mix butter, egg,
sugar, vanilla sugar and amaretto. Add
cocoa powder, flour and baking powder
and mix in with Pulse switch.
Spread batter in a greased springform
pan.
Peel pears, quarter, core and cut into
fans and press into the batter.
Bake at 160°C about 30 minutes.
Tip: Prepare the batter without cocoa
and cover with apples or apricots cut
into fans.
Waffle Batter
Mixing blade
50 g melted butter, 1 egg, 50 g sugar,
1 envelope vanilla sugar, 1 tsp rum,
100 g flour, 1/2 tsp baking powder
Use mixing blade to mix butter, egg,
sugar, vanilla sugar and rum. Add flour
and baking powder and mix in with
Pulse switch. Ladle by portions into a
standard waffle maker and bake until
golden brown.
Whipped Cream
Mixing blade
200 ml whipping cream, 1 envelope
vanilla sugar
Use mixing blade to beat cooled cream
and vanilla sugar until stiff. Pause
frequently to check consistency.
Au Gratin Potatoes
Slicing disc, coarse
2 potatoes, 100 ml sweet cream, 1/2
onion, 1 egg, 50 g grated Swiss cheese
salt, pepper, nutmeg
29
Page 30

Peel potatoes and slice using the
Copyright UNOLD AG | www.unold.de
coarse slicing disc. Peel the onion and
slice thickly.
Alternately layer potatoes and onions
in a greased casserole.
Whisk cream with egg and seasonings,
pour over the potatoes and sprinkle
with cheese. Bake at 160°C about
30 minutes.
Carrot Slaw
Grating disc, medium
1 carrot, 1 apple, 1 tbsp walnuts,
2 tbsp orange juice, 1 tsp oil
Peel carrot, core and quarter apple.
Grate apple and carrot with the
medium grating disc, sprinkle with
walnuts, add orange juice and oil and
mix.
Potato Chips
Slicing disc, fine
2 mealy potatoes, 1 tbsp vegetable oil,
1 tbsp paprika powder
Wash and peel potatoes. Slice in
thin slices with the fine slicing disc.
Marinate with oil and paprika powder.
Cover the baking sheet with baking
paper. Spread potatoes on baking
sheet and bake at 180°C until brown.
Minced Meat
Chopping blade
150 g pork cutlet, 1/2 onion, 1 egg
yolk, salt, pepper
Chop all ingredients with the chopping
blade.
You can also use the chopping blade
for chocolate, herbs, nuts, dry bread
crumbs, cheese, horseradish, ginger,
etc.
Liver Dumplings (as soup garnish)
Chopping blade
150 g beef liver, 1/2 onion, 1 roll,
soaked in water and squeezed out,
2 tbsp fine bread crumbs, 1 egg, salt,
pepper, nutmeg
Chop all ingredients with the chopping
blade. Heat 1 liter beef broth. Using a
small teaspoon, spoon small amounts
of the mixture into the boiling liquid
and let steep until done.
The authors have thoroughly considered and tested the recipes included in these operating
instructions. Nevertheless, a guarantee cannot be accepted. The authors, respectively UNOLD AG
and their assignees shall not be liable for personal injuries, material damages and financial loss.
30
Page 31

GUARANTEE CONDITIONS
Copyright UNOLD AG | www.unold.de
We grant a 24 months guarantee, and in case of commercial use a 12 months guarantee, starting from the date of purchase
for any damage demonstrably due to manufacturing defects and when the appliance has been used according to its intended
use. Within the warranty period we will remedy defective materials or workmanship through repair or replacement, at our
option. Our warranty terms apply only to appliances sold in Germany and Austria. For other countries, please contact the responsible importer. In the event of a claim for remedy of defects, please send the appliance to our after sales service, properly
packaged and postage paid, together with a copy of the automatically generated sales receipt, which must show the date of
purchase, and a description of the defect. If the defect is covered by the warranty, the customer will be reimbursed for the
shipping costs only in Germany and Austria. The warranty does not cover damage from normal wear, improper handling and
failure to comply with the maintenance and care instructions. The warranty is void if repairs or modifications are made to the
appliance by third parties. Any claims of the end consumer vis-à-vis the retailer are not limited by this warranty.
WASTE DISPOSAL / ENVIRONMENTAL PROTECTION
Our appliances are produced on a high quality level for a long lifetime. Regular maintenance and expert
repairs by our after-sales service can extend the useful life of the appliance. If an appliance is defective
and repair is not possible we ask you to follow the following instructions for disposal. Do not dispose this
appliance together with your standard household waste. Please bring this product to an approved collection
point for recycling of electric and electronic products. By separate collection and disposal of waste products
you help to protect natural resources and ensure, that the product is disposed in an adequate way to protect
health and environment.
The instruction booklet is also available for download: www.unold.de
31
Page 32

NOTICE D´UTILISATION MODÈLE 78501
Copyright UNOLD AG | www.unold.de
SPÉCIFICATION TECHNIQUE
Puissance : 250 watts, 230 V~, 50 Hz
Dimensions : Env. 29,0 x 20,0 x 27,3 cm (longueur/largeur/hauteur)
Poids : Env. 1,5 kg
Longueur de câble : Env. 90 cm
Boîtier : Plastique Blanc/anthracite
Caractéristiques : Robot ménager compact, hachoir pour hacher et pétrir, accessoire pour
râper et trancher, fouet pour crème fouettée, blancs en neige et pâte à
gâteau, bol mélangeur d‘env. 0,5 litre de liquide, bouchon verre mesureur,
temps fonctionnement bref : une minute
Accessoires : Hachoir, fouet, support à disques, 2 disques à émincer, 3 disques à râper,
notice d’utilisation
Modifications et erreurs des caractéristiques de l‘équipement, de la technique, des couleurs et du
design réservées
EXPLICATION DES SYMBOLES
Ce symbole vous indique des risques possibles qui puissent entraîner des lésions ou des
endommagements de l’appareil.
POUR VOTRE SÉCURITÉ
Veuillez lire les indications
suivantes et les conserver.
Consignes de sécurité générales
1. Lappareil peut être utilisé par
des enfants en dessous de
8 ans et des personnes aux
capacités physiques, sensorielles ou mentales réduites
ou manquant d‘expérience
et/ou de connaissances s‘ils
sont surveillés ou instruits
au niveau de l‘utilisation
sûre de l‘appareil et ont
compris les dangers qui en
résultent. L‘appareil n‘est
pas un jouet. Le nettoyage
et l‘entretien de l‘appareil
peuvent être réalisés par des
32
enfants uniquement sous
surveillance.
Les enfants en dessous de
2.
3 ans doivent être tenus
éloignés de l‘appareil ou sur
veiller en permanence.
3.
Les enfants entre 3 et 8 ans
doivent allumer et éteindre
l‘appareil uniquement s‘il
se trouve dans la position
d‘utilisation prévue normalement, qu‘ils sont surveillés
ou qu‘ils ont été instruits au
niveau de l‘utilisation sûre et
ont compris les dangers qui
en résultent. Il est interdit
aux enfants entre 3 et 8 ans
de raccorder l‘appareil, de le
-
Page 33

commander, de le nettoyer
Copyright UNOLD AG | www.unold.de
ou de l‘entretenir.
4. Les enfants doivent être surveillés. Ils ne doivent pas
jouer avec l’appareil.
Ranger l’appareil dans un
5.
endroit inaccessible pour les
enfants.
6. Brancher l’appareil uniquement sur du courant alternatif dont la tension est conforme à celle indiquée sur la
plaque signalétique.
Cet appareil ne doit pas être
7.
utilisé avec une minuterie
externe ni avec un système
de télécommande.
8. Ne plongez en aucun cas
l’appareil ou son cordon
d’alimentation dans l’eau ou
dans tout autre liquide.
9. La robot ménager est exclu
sivement destinée à un
usage domestique ou à des
fins similaires, par exemple
Kitchenettes dans les maga-
sins, les bureaux ou autres
lieux de travail,
Exploitations agricoles,
Pour les clients dans les
hôtels, motels ou autres éta-
blissements d’hébergement,
Dans les gîtes et chambres
d’hôtes privés ou locations
de vacances privées.
10. L’appareil et le cordon
d‘alimentation ne doivent
pas être lavés dans le lavevaisselle.
11. Débrancher la prise mâle
de la prise de secteur avant
de démonter et de nettoyer
l‘appareil, avant de retirer
ou de mettre les différentes
pièces ou avant de placer
l‘appareil à un nouvel end
-
roit.
12.
L‘appareil ne doit pas être
utilisé avec des accessoires
d‘un autres fabricant ou
d‘une autre marque pour éviter toute détérioration.
Après utilisation et avant
13.
nettoyage, débrancher la
prise du secteur. Ne jamais
laisser l‘appareil sans surveillance lorsque la prise de
secteur est branchée.
Vérifiez régulièrement que
14.
l‘appareil, la prise mâle et
le cordon d‘alimentation ne
sont pas usés ni abîmés. Si
le câble de raccordement ou
d’autres pièces sont abîmés,
envoyez l’appareil pour contrôle et réparation à notre
service après-vente. Toute
mauvaise réparation peut
exposer l’utilisateur à
des
dangers considérables et
entraîner l’annulation de la
garantie.
Consignes pour installer et utiliser
l‘appareil
15. L‘appareil est uniquement
destiné à un usage intérieur.
16. Ne jamais toucher l’appareil
ou son cordon d’alimentation
avec les mains mouillées.
17. Pour des raisons de sécurité,
ne mettez jamais l‘appareil
sur des surfaces chaudes, ni
sur une étagère métallique
ni sur un support humide.
L’appareil ou le cordon
d‘alimentation ne doivent
33
Page 34

pas être utilisés à proximité
Copyright UNOLD AG | www.unold.de
de flammes.
18. Utilisez le robot ménager
toujours sur une surface
dégagée, plane et anti-dérapante.
Veillez à ce que le cordon
19.
d‘alimentation ne pende pas
sur un rebord de la surface
de travail car cela peut provoquer des accidents, par
exemple si un petit enfant
tire sur le câble.
N‘enroulez pas le cordon
20.
d‘alimentation autour de
l‘appareil et évitez de le plier
pour ne pas l‘abîmer.
21. Le cordon d‘alimentation
doit être placé de telle sorte
que personne ne puisse tirer
dessus ni trébucher dessus.
22. Ne poussez pas l‘appareil
pendant qu‘il fonctionne
pour éviter toute blessure.
23. N‘utilisez aucun liquide
chaud. Veillez à ce que les
ingrédients utilisés soient
au maximum à température
ambiante.
24. Les accessoires de coupe
sont très coupants ! Veillez
à ne pas vous blesser en
mettant ou en retirant les
disques à râper et à émincer.
25. Le hachoir est également
très coupant. Maintenez tou
jours le hachoir par le bord
supérieur, et jamais par sa
lame, lorsque vous le placez
dans l‘appareil et lorsque
vous le nettoyez.
Ne tirez pas l‘appareil vers
26.
le haut au niveau de la poig-
née du réservoir lorsque le
réservoir est verrouillé dans
l‘appareil car l‘appareil ou la
poignée pourrait se casser.
Ne pas trop remplir le réser-
27.
voir. La quantité maximale
de remplissage d‘ingrédients
est de max. 0,5
l. Si vous
mettez plus d‘ingrédients,
l‘appareil risque d‘être
abîmé.
28. N‘utilisez pas l‘appareil si le
support à disques est défectueux pour éviter d‘abîmer
l‘appareil ou de vous blesser.
N‘allumez pas l‘appareil si le
29.
réservoir est vide.a
30. Utilisez toujours le bouchon
de remplissage pour rajouter des ingrédients. Ne pas
pousser ni retirer des ingrédients avec la main !
Ne jamais introduire
31.
d‘ingrédients tels que des
os ou des objets tels qu‘une
cuillère par l‘entonnoir de
remplissage. Risque de blessure.
Si des ingrédients attachent
32.
à l‘intérieur du réservoir,
éteignez l‘appareil, débranchez la prise de secteur et
retirer ces ingrédients seulement après ces opérations à
l‘aide d‘une spatule à pâte.
La durée de fonctionnement
33.
bref est de 1 minute. Laissez ensuite l‘appareil refroidir quelques instants avant
de continuer à travailler
pour éviter de surchauffer le
moteur
.
34
Page 35

34. Prudence : Evitez tout con-
Copyright UNOLD AG | www.unold.de
tact avec les pièces mobiles
de l‘appareil lorsque celui-ci
fonctionne. V
eillez à ne pas
avoir les mains, les cheveux
ou d‘autres objets à proximité de l‘appareil ! Risque
de blessure !
Si vous souhaitez vider le bol
35.
jours par retirer le hachoir ou
le disque.
36.
Eteignez l‘appareil et atten-
dez que l‘entraînement soit
immobilisé avant de retirer
le couvercle.
Nettoyez l‘appareil après uti-
37.
lisation.
mélangeur, commencez tou-
Ne touchez jamais aux pièces qui tournent de l‘appareil et ne
mettez pas d‘objets ni la main dans l‘appareil qui fonctionne
pour éviter les blessures.
Prudence ! Les disques à râper et à émincer ainsi que le hachoir
sont très coupants - Risque de blessure !
Ne pas mettre la main dans l‘appareil qui fonctionne, ni un objet
- Risque de blessure !
Ne pas ouvrir le boîtier de l‘appareil. Risque d‘électrocution.
Le fabricant n’est nullement responsable en cas de montage non conforme, d‘utilisation irrégulière ou non
conforme ou suite à l’exécution de réparations par des tiers non autorisés.
AVANT LA PREMIÈRE UTILISATION
1. Retirez tous les matériaux d‘emballage et
les sécurités de transport. Conserver les
éléments d‘emballage hors de portée des
enfants - Risque d‘asphyxie !
2. Nettoyez toutes les pièces amovibles
conformément à l‘explication du chapitre
Nettoyer et Entretenir.
METTRE ET RETIRER LE BOL MÉLANGEUR
1. Mettez le bol mélangeur sur la base de
l‘appareil. Veillez à ce que la poignée du
réservoir soit positionné un peu vers l‘arrière,
puis tournez le réservoir au niveau de la
poignée dans le sens des aiguilles d‘une
montre et conformément à la flèche dans
le sens „fermé“ sur la base de l‘appareil
jusqu‘à ce que le réservoir s‘enclenche. La
flèche sur le rebord inférieur du réservoir
Attention : Le hachoir et les différents
disques sont très coupants. Risque de
blessure ! Manipulez ces appareils de
travail avec beaucoup de précaution.
doit être exactement sur le repère en forme
de cercle sur la base de l‘appareil.
2. Choisissez l‘accessoire que vous souhaitez
et mettez-le dans le bol mélangeur. Vous
trouverez plus bas des explications pour
mettre correctement les différents accessoires.
3. Le bol mélangeur et l‘accessoire mélangeur ou éminceur doivent toujours être en
35
Page 36

place avant de mettre les ingrédients dans
Copyright UNOLD AG | www.unold.de
le réservoir.
4. Mettez le couvercle sur le bol mélangeur.
L‘ouverture de remplissage du couvercle doit d‘abord être positionnée de telle
sorte que le petit nez qui se trouve sous
l‘ouverture de remplissage soit devant le rail
de guidage sur la base de l‘appareil.
5. Tournez ensuite le couvercle dans le sens
des aiguilles d‘une montre jusqu‘à ce que ce
nez s‘enclenche dans la base de l‘appareil.
Vous entendez un clic nettement audible.
La flèche sur le rebord supérieur du réser-
voir doit être exactement sur le repère en
forme de cercle sur le couvercle.
6. Pour retirer le couvercle, maintenez le réservoir avec une main au niveau de la poignée
et tournez le couvercle dans le sens contraire des aiguilles d‘une montre jusqu‘à
ce que le nez glisse en dehors du rail de
guidage. Retirez le couvercle de l‘appareil
par le haut.
7. Pour retirer le réservoir, tournez-le dans le
sens de la flèche sur „Ouvert“ jusqu‘à ce
qu‘il se retire de la base de l‘appareil au
niveau de la poignée.
COMMUTATEUR DE SÉCURITÉ
L‘appareil est doté d‘un commutateur de sécurité qui empêche que l‘appareil puisse être remis en
marche s‘il n‘est pas correctement assemblé. Ce n‘est que lorsque toutes les pièces sont montées
correctement que l‘appareil peut être allumé.
TRAVAILLER AVEC LE HACHOIR
Pour hacher
Les légumes, les fruits, le pain en panure, la viande, le chocolat, les noix
et noisettes.
Vous obtiendrez de très bons résultats en coupant les ingrédients au
préalable en dés de 2 centimètres environ.
Pétrir la pâte
Utilisez une matière grasse sortant du réfrigérateur et ne pétrissez pas la
pâte trop longtemps. Avant de continuer à travailler la pâte après pétrissage,
vous devez la pétrir une nouvelle fois à la main sur la surface de travail.
1. Attention : N‘allumez pas l‘appareil sans
avoir mis des ingrédients car sinon le
moteur pourrait être endommagé.
2. Faites fonctionner l‘appareil au maximum
une minute à la fois. Après une minute,
laissez refroidir l‘appareil quelques instants
avant de continuer à travailler.
3. La quantité maximale de remplissage
d‘ingrédients est de max. 0,5 l. Ne dépassez pas cette quantité pour éviter d‘abîmer
l‘appareil. Veuillez également tenir compte
du fait que de nombreux aliments tels que
36
la viande, augmentent de volume lorsqu‘ils
sont hachés.
4. Assurez-vous que le bol mélangeur est correctement positionné sur sa base.
5. Retirez la protection des lames du hachoir.
Ne prenez le hachoir que par la tige du
haut car les lames sont très coupantes. Risque de blessure.
6. Mettez avec prudence le hachoir sur l‘arbre
dans le bol mélangeur.
Page 37

7. Attention : l‘arbre dans l‘appareil et
Copyright UNOLD AG | www.unold.de
l‘intérieur des accessoires disposent d‘un
côté aplati. Tous les accessoires ne peuvent
s‘emboîter que si les deux côtés plats sont
l‘un sur l‘autre. (photo)
8. Mettez les ingrédients souhaités dans le bol
mélangeur. Veillez à ce que le bol ne soit
pas trop rempli.
9. Attention : Si vous souhaitez pétrir une
pâte, veuillez commencer par mettre tous
les ingrédients secs dans le bol. Puis mettez
le liquide nécessaire par l‘ouverture de rem-
plissage pendant que l‘appareil mélange.
10. Remettez le couvercle et verrouillez-le.
11. Branchez la prise mâle sur la prise de cou-
rant.
12. Allumez l‘appareil avec le bouton „On“.
Le hachoir commence à tourner. Mais vous
pouvez également appuyer sur le bouton
„Off/Impuls“ pour que l‘appareil travaille
par à-coups puissants. Veuillez utiliser le
bouton Impuls uniquement par intervalles.
Pour travailler plus de 5 minutes, utilisez la
fonction longue.
13. Si des ingrédients attachent à l‘intérieur du
réservoir, éteignez l‘appareil, débranchez la
prise de secteur et retirer ces ingrédients
seulement après ces opérations à l‘aide
d‘une spatule à pâte.
14. Lorsque les ingrédients ont la consistance
que vous souhaitez, éteignez l‘appareil avec
le bouton „Off/Impuls“ et débranchez la
prise de secteur.
15. Attendez que la lame du hachoir soit immobilisée.
16. Retirez le couvercle.
17. Retirez avec prudence le hachoir du bol. Ne
prenez le hachoir que par la tige du haut
car les lames sont très coupantes. Risque
de blessure.
18. Visez les ingrédients du bol mélangeur.
19. Dès que toutes les pièces sont nettoyées,
fixez, pour des raisons de sécurité, de nouveau la protection des lames sur le hachoir.
TRAVAILLER AVEC LE FOUET
Pour mélanger ou fouetter
de la crème Chantilly, des œufs en neige et de la pâte à génoise. Si vous
utilisez de la crème UHT, veuillez la mettre au préalable pendant quelques
heures au réfrigérateur.
1. Veuillez suivre les indications de préparation présentées au chapitre „Travailler avec
le hachoir“.
2. Mettez avec prudence le mélangeur sur
l‘arbre dans le bol mélangeur.
3. Attention : l‘arbre dans l‘appareil et
l‘intérieur des outils disposent d‘un côté
aplati. Tous les accessoires ne peuvent
s‘emboîter que si les deux côtés plats sont
l‘un sur l‘autre.
4. Mettez les ingrédients souhaités dans le bol
mélangeur. Veillez à ce que le bol ne soit
pas trop rempli.
5. Remettez le couvercle et verrouillez-le.
6. Branchez la prise mâle sur la prise de courant.
37
Page 38

7. Allumez l‘appareil avec le bouton „On“. Le
Copyright UNOLD AG | www.unold.de
mélangeur commence à tourner. Mais vous
pouvez également appuyer sur le bouton
„Off/Impuls“ pour que l‘appareil travaille
par à-coups puissants. Veuillez utiliser le
bouton Impuls uniquement par intervalles
de 5 à 10 secondes.
8. Si des ingrédients attachent à l‘intérieur du
réservoir, éteignez l‘appareil, débranchez la
prise de secteur et retirer ces ingrédients
seulement après ces opérations à l‘aide
d‘une spatule à pâte.
9. Lorsque les ingrédients ont la consistance
que vous souhaitez, éteignez l‘appareil avec
le bouton „Off/Impuls“ et débranchez la
prise de secteur.
10. Attendez que le mélangeur soit immobilisé.
11. Retirez le couvercle.
12. Retirez avec prudence le mélangeur du bol.
13. Visez les ingrédients du bol mélangeur.
TRAVAILLER AVEC LES DISQUES À RÂPER ET À ÉMINCER
Pour émincer et râper
vdes légumes, fruits, pain pour chapelure, fro-
mage, parmesan, herbes, chocolat
Notez que le plastique peut se colorer lorsqu‘on travaille des carottes par exemple. Vous pouvez
facilement éliminer cette coloration avec de la matière grasse (du beurre par exemple).
Pour les ingrédients qui peuvent fondre (tels que le chocolat ou le fromage dur), veiller à un temps de
travail le plus court possible pour éviter que les ingrédients se réchauffent de trop. Faites fonctionner
l‘appareil au maximum une minute à la fois. Après une minute, laissez refroidir l‘appareil quelques
instants avant de continuer à travailler.
1. Veuillez suivre les indications de prépara-
tion présentées au chapitre „Travailler avec
le hachoir“.
2. Insérez avec prudence le disque souhaité sur
le support à disques. Les disques s‘insèrent
depuis le haut dans l‘ouverture du support
à disques. Veillez à ce que le côté plat du
disque s‘adapte au côté plat de l‘ouverture.
Condition indispensable pour que le disque
s‘emboîte. Vérifiez que le disque est bien
fixé avant de poursuivre.
Attention : Les lames des disques sont
très coupantes - Risque de blessure !
3. Mettez ensuite le support à disques sur
l‘arbre dans le bol mélangeur.
4. Attention : l‘arbre dans l‘appareil et
l‘intérieur des outils disposent d‘un côté
aplati. Tous les accessoires ne peuvent
38
s‘emboîter que si les deux côtés plats sont
l‘un sur l‘autre.
5. Remettez le couvercle.
6. Allumez l‘appareil avec le bouton „On“. Le
mélangeur commence à tourner. Mais vous
pouvez également appuyer sur le bouton
„Off/Impuls“ pour que l‘appareil travaille
par à-coups puissants. Veuillez utiliser le
bouton Impuls uniquement par intervalles
de 5 à 10 secondes.
7. Mettez les ingrédients dans l‘entonnoir de
remplissage. Si les ingrédients sont trop
gros, il faut les couper en deux ou en quartiers ou à une taille adaptée à l‘entonnoir de
remplissage.
8. Utilisez toujours le bouchon de remplissage
pour rajouter des ingrédients. Ne pas pousser ni retirer des ingrédients avec la main !
9. Ne jamais introduire d‘ingrédients tels que
des os ou des objets tels qu‘une cuillère
Page 39

par l‘entonnoir de remplissage. Risque de
Copyright UNOLD AG | www.unold.de
blessure.
10. Lorsque vous avez terminé de travailler les
ingrédients, éteignez l‘appareil avec le bouton „Off/Impuls“ et débranchez la prise de
secteur.
11. Attendez que le support à disques soit
immobilisé.
12. Retirez le couvercle.
13. Retirez avec prudence le support à disques
du bol. Le plus facile est de prendre le bol
à sa base et de le remettre un peu décalé
par rapport à sa position d‘origine. Ainsi le
support à disques glisse vers le haut et vous
pouvez le retirer facilement et sûrement.
NETTOYAGE ET ENTRETIEN
14. Les lames des disques sont très coupantes.
Risque de blessure.
15. D‘un point de vue technique, il n‘est pas
possible que des résidus d‘aliments restent
sur le support à disques.
16. Visez les ingrédients du bol mélangeur.
Pour retirer le disque du support à
disques, tournez le support et appuyez
sur le disque vers le bas pour le retirer
du support. Soyez très prudent car
les lames sont coupantes. Risque de
blessure !
Avant de procéder au nettoyage, il
faut toujours éteindre l‘appareil et
débrancher la prise de secteur.
1. Nettoyez l‘appareil après chaque utilisation.
2. La base de l’appareil et le cordon
d‘alimentation ne doivent pas être plongés
dans l‘eau ni dans d‘autres liquides.
3. A l‘exception de la base de l‘appareil, vous
pouvez laver toutes les pièces dans le lave-
vaisselle (panier du haut). Vous pouvez laver
toutes les pièces, à l‘exception de la base
de l‘appareil, également dans l‘eau chaude
avec du produit à vaisselle.
4. Les accessoires de coupe sont très coupants!
Veillez à ne pas vous blesser en lavant les
disques à râper et à émincer ou le hachoir.
5. Ne laissez jamais les accessoires de coupe
dans l‘eau de lavage pour éviter de vous
blesser.
6. Essuyez la base de l‘appareil avec un chiffon humide, puis bien le sécher.
7. N‘utilisez pas de produits abrasifs, ni de
laine d‘acier, ni d‘objets métalliques, ni de
produits désinfectants, ni de produits nettoyants chauds pour éviter d‘abîmer l‘appareil.
8. Pour des raison de sécurité, fixez la protection des lames sur le hachoir dès qu‘il est
nettoyé.
9. Les différents disques à émincer et à râper
se rangent facilement à l‘intérieur du bouchon de remplissage.
10. L‘appareil doit être complètement sec avant
de pouvoir être réutilisé.
11. Rangez le robot ménager complètement sec
dans un endroit sûr et sec pour le protéger
de la poussière, des chocs, de la chaleur et
de l‘humidité.
39
Page 40

RECETTES
Copyright UNOLD AG | www.unold.de
Raifort au pommes
Disque à râper fin
1 pomme rouge, env. 2 cm de raifort (de préférence de la partie supérieure qui est plus tendre), 1 c. à café de crème, 1 pincée de sucre
Râper la pomme et le raifort avec le disque à
râper fin, ajouter la crème et le sucre. Excellent pour accompagner une viande cuite ou un
poisson fumé
Chou-rave à la crème
Disque à râper grosse
1 chou-rave de taille moyenne, 1 c. à soupe de
beurre, 1 c. à soupe de persil haché, 1 c. à soupe de crème sucrée, sel, poivre, muscade
Eplucher le chou-rave, couper en tiges avec le
disque à râper gros. Faire chauffer le beurre
dans une poêle. Faire revenir le chou-rave dans
le beurre pour qu‘il soit croquant. Assaisonner
avec le sel, le poivre et la muscade, ajouter la
crème et saupoudrer de persil.
Gâteau aux poires
Pâte à gâteau pour moule Single, diamètre
20 cm
50 g de beurre, 1 œuf, 50 g de sucre, 1 sachet
de sucre vanillé, 1 c. à soupe d‘Amaretto, 1 c. à
café rase de cacao, 100 g de farine, 1 c. à café
de levure en poudre, 1-2 poires
Mélanger le beurre, l‘œuf, le sucre, le sucre vanillé et l‘Amaretto avec le fouet. Ajouter le cacao
en poudre, la farine et la levure en poudre, et
mélanger avec le bouton à impulsion.
Verser dans un moule à manqué préalablement
graissé. Eplucher les poires, les couper en quartiers, les épépiner, les couper en lamelles et les
enfoncer dans la pâte. Cuire au four pendant 30
minutes environ à 160 °C. Astuce : Préparez la
pâte sans cacao et garnissez-la avec des morceaux de pommes coupés en lamelles ou des
abricots.
Pâte à gaufres
Mélangeur
50 g de beurre fondu, 1 œuf, 50 g de sucre,
1 sachet de sucre vanillé, 1 c. à café de rhum,
100 g de farine, 1/2 c. à café de levure en
poudre
Mélanger le beurre, l‘œuf, le sucre, le sucre vanillé et le Rhum avec le fouet. Ajouter la farine
et la levure en poudre, et mélanger avec le bouton à impulsion. Remplir par portions dans un
appareil à gaufres classique, faire dorer.
Crème Chantilly
Mélangeur
200 ml de crème Fleurette, 1 sachet de sucre
vanillé
Fouetter la crème Fleurette préalablement refroidie et le sucre vanillé avec le fouet pour qu‘elle
soit ferme. Interrompre fréquemment la procédure pour contrôler la fermeté.
Gratin de pommes de terre
Disque à émincer gros
2 pommes de terre, 100 ml de crème sucrée,
1/2 oignon, 1 œuf, 50 g d‘Emmental râpé, sel,
poivre, muscade
Eplucher les pommes de terre, couper en rondelles avec le disque à émincer gros. Eplucher
également l‘oignon et le couper grossièrement
en rondelles.
Superposer en couches les pommes de terre et
les oignons dans un moule à gratin préalablement graissé.
Fouetter la crème avec l‘œuf et l‘assaisonnement,
verser sur les pommes de terre et saupoudrer de
fromage. Cuire au four pendant 30 minutes environ à 160 °C.
40
Page 41

Carottes râpées
Copyright UNOLD AG | www.unold.de
Disque à râper moyen
1 carotte, 1 pomme, 1 c. à soupe de noix, 2 c. à
soupe de jus d‘orange, 1 c. à café d‘huile
Eplucher la carotte, épépiner la pomme et la
couper en quartiers.
Râper la pomme et la carotte avec le disque à
râper moyen, saupoudrer de noix, ajouter le jus
d‘orange et l‘huile et mélanger.
Viande hachée (farce)
Hachoir
150 g escalopes de porc, 1/2 oignon, 1 jaune
d‘œuf, sel, poivre
Hacher finement tous les ingrédients avec le
hachoir.
Le hachoir permet aussi de hacher du chocolat,
des herbes, des noix, des dés de pain sec, du
fromage, du raifort, du gingembre, etc.
Chips de pommes de terre
Disque à émincer fin
2 pommes de terre farineuses, 1 c. à soupe
d’huile, 1 c. à soupe de paprika en poudre
Laver et éplucher les pommes de terre. Couper en fines rondelle avec le disque à émincer
fin. Faire mariner dans l‘huile et le paprika en
poudre.
Recouvrir la plaque à pâtisserie avec du papier
sulfurisé. Y répartir les rondelles de pommes de
terre et faire dorer au four à 180 °C.
Les recettes disponibles dans ce mode d’emploi ont été soigneusement examinées et contrôlées
par leurs auteurs respectifs et par la société UNOLD AG. Notre responsabilité n’est toutefois en
aucun cas engagée. Les auteurs et la société UNOLD AG ainsi que ses représentants déclinent toute
responsabilité en cas de dommages corporels, matériels et pécuniaires.
Leberknödel pour la soupe (boulettes de viande)
Hachoir
150 g de foie de bœuf, 1/2 oignon, 1 petit pain
ramolli et émietté, 2 c. à soupe de chapelure,
1 œuf, sel, poivre, muscade
Hacher finement tous les ingrédients avec le
hachoir. Chauffer 1 L de bouillon de bœuf. Former avec une petite cuillère à café des petites
boules de pâte et les mettre dans le liquide
bouillant, et faire cuire.
41
Page 42

CONDITIONS DE GARANTIE
Copyright UNOLD AG | www.unold.de
En cas d’utilisation conforme et lors de dégâts manifestement dus à des défauts de fabrication, nos appareils sont garantis
24 mois, lors d’utilisation professionnelles 12 mois, à dater de l’achat. Notre garantie n’est valide que pour les appareils
vendus en Allemagne et en Autriche. Dans tout autre pays veuillez contacter l’importateur. Veuillez envoyer à notre adresse
les appareils, pour lesquels vous réclamez une suppression de défauts, avec le bon d’achat montrant la date d’achat, port
payé et proprement emballé. Les coûts de transport seront remboursés en cas de garantie en Allemagne et en Autriche. Les
défauts causés par usure, utilisation incorrecte ou non-respect des instructions de maintenance sont exclus. Notre obligation
de garantie cesse, si de réparations ou des interventions sont accomplies par des tiers. Cette garantie n’affecte pas les droits
du consommateur contre le commerçant.
TRAITEMENT DES DÉCHETS / PROTECTION DE L’ENVIRONNEMENT
Nos appareils sont produits selon un standard élevé de qualité pour une longue durée d’utilisation. Un
entretien régulier et des réparations compétentes par notre service après-vente prolongent cette durée
d’utilisation. Si néanmoins l’appareil est endommagé et ne peut plus être réparé, veuillez suivre les in-
structions suivantes. Ne jamais disposer ce produit avec les dégâts de ménage. Apportez ce produit à une
station de collection pour récupération de produits électriques et électroniques. Par la collection séparée
vous aidez à protéger les ressources naturelles et prenez soin, que le produit est démonté sans risque pour
la santé et l’environnement.
42
Page 43

GEBRUIKSAANWIJZING MODEL 78501
Copyright UNOLD AG | www.unold.de
TECHNISCHE GEGEVENS
Vermogen: 250 Watt, 230 V~, 50 Hz
Afmetingen: Ca. 29,0 x 20,0 x 27,3 cm (l/b/h)
Gewicht: Ca. 1,5 kg
Kabellengte: Ca. 90 cm
Behuizing: Kunststof wit/antraciet
Uitvoering: Compacte keukenmachine, hakmes om fijn te hakken en te kneden, snijmachine
om te raspen en te snijden, garde voor slagroom, eiwit en licht roerdeeg, mengkom
voor de verwerking van ca. 0,5 liter vloeistof, stamper met meetschaal, korte
werkingstijd een minuut
Toebehoren: Hakmes, garde, schijvendrager, 2 snijschijven, 3 raspschijven, gebruiksaanwijzing
Wijzigingen en vergissingen in de uitrustingskenmerken, techniek, kleuren en design voorbehouden
VERKLARING VAN DE SYMBOLEN
Dit symbool wijst op eventuele gevaren die letsel tot gevolg kunnen hebben of tot schade
aan het apparaat leiden.
VOOR UW VEILIGHEID
Lees de volgende aanwijzingen
a.u.b. door en bewaar ze goed.
Algemene veiligheidsinstructies
1. Het apparaat kan door kinderen van 8 jaar en ouder
gebruikt worden en door personen met beperkte fysieke,
sensorische of mentale vaardigheden of met gebrek aan
ervaring en/of kennis, mits
zij onder toezicht staan of
instructies over het gebruik
van dit apparaat hebben
gekregen en de hieruit
resulterende gevaren begrepen hebben.
is geen speelgoed. Het
apparaat mag uitsluitend
door kinderen gereinigd en
Het apparaat
onderhouden worden, indien
deze onder toezicht staan.
Kinderen onder de 3 jaar
2.
moeten verwijderd worden
gehouden van het apparaat
of permanent onder toezicht
staan.
3. Kinderen tussen de 3 en
8 jaar mogen het apparaat
uitsluitend in- en uitscha
kelen, wanneer het apparaat
zich in zijn voorziene, normale bedieningspositie
bevindt, de kinderen onder
toezicht staan of instructies over het gebruik van dit
apparaat hebben gekregen
en de hieruit resulterende
gevaren begrepen hebben.
43
Page 44

Kinderen tussen de 3 en
Copyright UNOLD AG | www.unold.de
8 jaar mogen het apparaat
niet aansluiten, bedienen,
reinigen of onderhouden.
4. Kinderen moeten onder toezicht staan, om ervoor te
zorgen dat ze niet met het
apparaat spelen.
Bewaar het apparaat op een
5.
plaats die ontoegankelijk is
voor kinderen.
6. Sluit het apparaat uitsluitend aan op wisselstroom
met spanning overeenkomstig het typeplaatje.
Dit apparaat mag niet met
7.
een externe tijdklok of met
een afstandsbediening bediend worden.
8. Dompel het apparaat of de
aansluitkabel nooit in water
of andere vloeistoffen.
9. Het apparaat is uitsluitend
bestemd voor huishoudelijk
gebruik of voor soortgelijke
doeleinden, bijv.:
kitchenettes in winkels,
kantoren of op andere werk
-
plaatsen,
landbouwbedrijven,
voor gebruik door gasten
van hotels, motels of andere
overnachtingsbedrijven,
in particuliere pensions of
vakantiehuisjes.
10. Het apparaat en de aansluitkabel mogen niet in de vaatwasser gereinigd worden.
Trek de stekker uit het
11.
stopcontact, voordat u het
apparaat uit elkaar haalt
en reinigt, de afzonderlijke
onderdelen wilt verwijderen
of aan wilt brengen of als u
het apparaat op een andere
plaats wilt neerzetten.
12. Om schade te vermijden,
mag het apparaat niet met
toebehoren van andere fabrikanten of andere merken
worden gebruikt.
Trek de netstekker uit het
13.
stopcontact nadat u het
apparaat heeft gebruikt en
voordat u het gaat reinigen.
Laat het apparaat nooit zonder toezicht achter, als de
netstekker in het stopcontact steekt.
Controleer het apparaat, de
14.
stekker en de aansluitkabel regelmatig op slijtage of
beschadiging. Als de aansluitkabel of andere onderdelen
beschadigd zijn, stuur het
apparaat dan a.u.b. ter controle of reparatie naar onze
klantenservice. Ondeskundige reparaties kunnen ernstige gevaren voor de gebruiker veroorzaken en hebben
uitsluiting van de garantie
tot gevolg.
Aanwijzingen voor het opstellen
en bedienen van het apparaat
Het apparaat is uitsluitend
15.
geschikt voor gebruik binnenshuis.
16.
Raak het apparaat of de
aansluitkabel nooit met
natte handen aan.
17. Zet het apparaat om veiligheidsredenen nooit neer
op hete oppervlakken, een
metalen dienblad of op
44
Page 45

een natte ondergrond. Het
Copyright UNOLD AG | www.unold.de
apparaat en de kabel mogen
niet in de buurt van open
vuur gebruikt worden.
18. Gebruik de keukenmachine
steeds op een vrij, effen en
slipvast oppervlak.
19. Let op dat de aansluitkabel
niet over de rand van het
werkvlak heen hangt, omdat
dit anders ongevallen kan
veroorzaken, als bv. kleine
kinderen aan de kabel trek
-
ken.
20.
Rol de kabel niet om het
apparaat heen en let op dat
de aansluitkabel geen knik
vertoont, om schade aan de
kabel te vermijden.
21. De aansluitkabel moet zoda-
nig gelegd worden, dat niemand eraan kan trekken of
erover kan struikelen.
Om verwondingen te voor-
22.
komen, mag u het apparaat
niet verschuiven, zolang het
in werking is.
Gebruik geen hete vloeistof-
23.
fen. Let erop dat de gebruikte ingrediënten maximaal
op kamertemperatuur zijn.
De snij-accessoires zijn heel
24.
scherp! Let er bij het aanbrengen en verwijderen van
de snij- en raspschijven op
dat u zich niet snijdt.
Het hakmes is ook heel
25.
scherp. Als u het mes in
het apparaat zet of reinigt,
houd het dan steeds aan de
bovenste rand vast en niet
aan het lemmet van het mes.
26. Trek het apparaat niet aan de
greep omhoog, als de kom in
het apparaat vergrendeld is,
omdat het apparaat resp. de
greep anders kan breken.
27. Maak de kom niet te vol.
De max. vulhoeveelheid
bedraagt 0,5 l aan ingrediën
ten. Als u meer ingrediënten in de kom doet, kan het
apparaat beschadigd raken.
28.
Gebruik het apparaat niet,
als de schijvendrager defect
is, om schade aan het
apparaat en verwondingen te
vermijden.
29. Schakel het apparaat niet in,
als de kom leeg is.
30. Maak steeds gebruik van de
vulhulp om naderhand ingre
diënten in de kom te doen.
Nooit ingrediënten met de
hand bijvullen!
31.
Nooit harde ingrediënten
zoals botten of harde voorwerpen zoals pollepels door
de vulschacht duwen. Er
bestaat verwondingsgevaar.
Als er ingrediënten aan de
32.
binnenkant van de kom
vastplakken, schakel het
apparaat dan uit, trek de
stekker uit het stopcontact
en maak deze ingrediënten
daarna pas los met behulp
van een pannenlikker.
33. De korte werkingstijd bedraagt een minuut. Laat het
apparaat na een minuut even
afkoelen en werk daarna pas
verder, om oververhitting van
de motor te vermijden.
45
Page 46

34. Let op: Vermijd het contact
Copyright UNOLD AG | www.unold.de
met de beweeglijke delen
van het apparaat, als het
apparaat in werking is. Houd
uw handen, haren of andere
voorwerpen uit de buurt van
het apparaat; er bestaat verwondingsgevaar!
Als u de mengkom leeg wilt
35.
het hakmes resp. de schijvendrager verwijderen.
36.
Schakel het apparaat uit en
wacht, totdat de aandrijving
tot stilstand is gekomen,
voordat u het deksel verwijdert.
Reinig het apparaat na elk
37.
gebruik.
maken, moet u steeds eerst
Raak de draaiende delen van het apparaat nooit aan en steek
geen voorwerpen of lichaamsdelen in het lopende apparaat, om
verwondingen te vermijden.
Let op! De rasp- en snijschijven en ook het hakmes zijn heel
scherp - er bestaat verwondingsgevaar!
Niet in het lopende apparaat grijpen resp. geen voorwerpen in
het apparaat steken - er bestaat verwondingsgevaar!
Open de behuizing van het apparaat in geen geval. Er bestaat
gevaar voor een elektrische schok.
De fabrikant is niet aansprakelijk, indien het apparaat verkeerd gemonteerd, ondeskundig of foutief
gebruikt of door niet geautoriseerde derden gerepareerd werd.
VÓÓR HET EERSTE GEBRUIK
1. Verwijder alle verpakkingsmaterialen en
transportbeveiligingen. Houd verpakkingsmateriaal uit de buurt van kinderen - gevaar
voor verstikking!
2. Reinig alle afneembare delen, zoals
beschreven in het hoofdstuk „Reiniging en
onderhoud“.
MENGKOM AANBRENGEN EN VERWIJDEREN
1. Plaats de mengkom op de sokkel van het
apparaat. Let er hierbij op dat de greep van
de kom iets naar achteren wijst en draai de
kom vervolgens aan de greep met de klok
mee, dus overeenkomstig de markering van
de pijl, in de richting „Dicht“ („Zu“), totdat
46
Attentie: Het hakmes en de
afzonderlijke schijven zijn heel scherp,
er bestaat verwondingsgevaar. Ga heel
voorzichtig met deze onderdelen om.
de kom vastklikt. De pijl die op de onderste
rand van de kom afgebeeld staat, moet zich
exact boven de kringmarkering op de sokkel
bevinden.
2. Kies het gewenste accessoire en plaats het
in de mengkom. Informatie over het juiste
Page 47

aanbrengen van de afzonderlijke acces-
Copyright UNOLD AG | www.unold.de
soires vindt u hieronder.
3. De mengkom en het betreffende roer- of
snij-accessoire moet steeds aangebracht
zijn, voordat u ingrediënten in de kom doet.
4. Zet het deksel op de mengkom. De vulschacht van het deksel moet zodanig gepositioneerd worden dat de kleine uitstulping
die onder de vulschacht te zien is, voor de
geleidingsrail op de sokkel ligt.
5. Draai het deksel nu zo ver met de klok mee,
totdat deze uitstulping in de sokkel vastklikt. Dit is het geval, als een hard klikgeluid
te horen is. De pijl aan de bovenste rand van
de kom moet exact onder de kringmarkering
op het deksel liggen.
6. Om het deksel te verwijderen, houdt u de
kom met een hand aan de greep vast en
draait u het deksel tegen de klok in, totdat
de uitstulping uit de geleidingsrail glijdt.
Verwijder het deksel naar boven toe van het
apparaat.
7. Om de kom van het apparaat te verwijderen,
draait u de kom in de richting van de pijl
naar „Open“ („Auf“), totdat u de kom aan
de greep van de sokkel kunt verwijderen.
VEILIGHEIDSSCHAKELAAR
Het apparaat is uitgerust met een veiligheidsschakelaar, die voorkomt dat het apparaat in werking
gesteld kan worden, als het niet correct in elkaar gezet werd. Pas als alle delen correct gemonteerd
zijn, kan het apparaat ingeschakeld worden.
WERKEN MET HET HAKMES
Voor het fijnhakken van
groente, vruchten, brood en broodjes voor paneermeel, vlees, chocolade en
noten.
U krijgt een zeer goed resultaat, als u de ingrediënten van tevoren in ca.
twee centimeter grote stukken snijdt.
Deeg kneden
Gebruik boter die de temperatuur van de koelkast heeft en kneed het deeg
niet te lang. Voordat u het deeg na het kneden verder gaat verwerken, moet
u het op een werkvlak leggen en nogmaals met uw handen doorkneden.
1. Attentie: Schakel het apparaat niet in,
zonder eerst levensmiddelen in de kom te
doen, omdat de motor anders beschadigd
kan raken.
2. Laat het apparaat maximaal een minuut
aan een stuk werken. Laat het apparaat na
een minuut even afkoelen, voordat u verder
werkt.
3. De maximale vulhoeveelheid bedraagt 0,5 l
aan ingrediënten. Let op dat u deze hoeveel-
heid niet overschrijdt, om schade aan het
apparaat te vermijden. Houd er hierbij ook
rekening mee dat veel levensmiddelen, bijv.
vlees, door het fijnhakken een groter volume
krijgen.
4. Controleer of de mengkom correct op de
sokkel zit.
5. Verwijder de snijvlakbescherming van het
hakmes.
47
Page 48

Houd het mes uitsluitend aan het
Copyright UNOLD AG | www.unold.de
bovenste gedeelte vast, omdat de
snijvlakken van het mes heel scherp
zijn. Er bestaat verwondingsgevaar.
6. Plaats het hakmes voorzichtig op de as in
de mengkom.
7. Attentie: Zowel de as in het apparaat als het
binnenste van de accessoires hebben een
vlakke kant. Alle accessoires kunnen uitsluitend aangebracht worden, als beide vlakke
kanten tegen elkaar aan liggen. (Foto)
8. Doe de gewenste ingrediënten in de meng-
kom. Let op dat u de kom niet te vol maakt.
9. Attentie: Als u deeg wilt kneden, doe dan
eerst alle droge ingrediënten in de kom.
Voeg daarna de benodigde vloeistof via de
vulschacht toe, terwijl het apparaat aan het
roeren is.
10. Breng het deksel weer aan en vergrendel
het.
11. Steek de stekker in het stopcontact.
12. Schakel het apparaat aan de schakelaar
„AAN“ in. Het mes begint te draaien. U
kunt ook op de toets „Uit/Impuls“ drukken,
dan werkt het apparaat in korte, krachtige
stoten. Gebruik de impuls-schakelaar a.u.b.
uitsluitend als u in korte intervallen werkt;
als u langer dan vijf minuten werkt, moet u
de permanente functie gebruiken.
13. Als er ingrediënten aan de binnenkant van
de kom vastplakken, schakel het apparaat
dan uit, trek de stekker uit het stopcontact
en maak deze ingrediënten daarna pas los
met behulp van een pannenlikker.
14. Als de ingrediënten de door u gewenste consistentie hebben verkregen, schakelt u het
apparaat aan de „Uit/Impuls“-schakelaar
uit en trekt u de stekker uit het stopcontact.
15. Wacht totdat het hakmes tot stilstand gekomen is.
16. Verwijder het deksel.
17. Verwijder het mes voorzichtig uit de kom.
Houd het mes uitsluitend aan het bovenste
gedeelte vast, omdat de snijvlakken van het
mes heel scherp zijn. Er bestaat verwondingsgevaar.
18. Haal de ingrediënten uit de mengkom.
19. Zodra alle delen gereinigd zijn, brengt u om
veiligheidsredenen de snijvlakbescherming
weer aan het hakmes aan.
WERKEN MET DE GARDE
Voor het roeren resp. kloppen
van slagroom, eiwit en biscuitdeeg. Als u ultrahoogverhitte slagroom
gebruikt, laat deze dan a.u.b. van tevoren een paar uur in de koelkast
koelen.
1. Neem de aanwijzingen voor de voorbereiding in acht die in het hoofdstuk „Werken
met het hakmes“ staan.
2. Plaats de garde voorzichtig op de as in de
mengkom.
48
3. Attentie: Zowel de as in het apparaat als het
binnenste van de accessoires hebben een
vlakke kant. Alle accessoires kunnen uitsluitend aangebracht worden, als beide vlakke
kanten tegen elkaar aan liggen.
Page 49

4. Doe de gewenste ingrediënten in de meng-
Copyright UNOLD AG | www.unold.de
kom. Let op dat u de kom niet te vol maakt.
5. Breng het deksel weer aan en vergrendel
het.
6. Steek de stekker in het stopcontact.
7. Schakel het apparaat aan de schakelaar
„AAN“ in. De garde begint te draaien. U
kunt ook op de toets „Uit/Impuls“ drukken,
dan werkt het apparaat in korte, krachtige
stoten. Gebruik de impuls-schakelaar in
intervallen van vijf tot tien seconden.
8. Als er ingrediënten aan de binnenkant van
de kom vastplakken, schakel het apparaat
dan uit, trek de stekker uit het stopcontact
en maak deze ingrediënten daarna pas los
met behulp van een pannenlikker.
9. Als de ingrediënten de door u gewenste consistentie hebben verkregen, schakelt u het
apparaat aan de „Uit/Impuls“-schakelaar
uit en trekt u de stekker uit het stopcontact.
10. Wacht totdat de garde tot stilstand gekomen
is.
11. Verwijder het deksel.
12. Verwijder de garde voorzichtig uit de kom.
13. Haal de ingrediënten uit de mengkom.
WERKEN MET DE RASP- EN SNIJSCHIJVEN
Voor het snijden en raspen
van groente, vruchten, brood voor paneermeel,
kaas, parmezaanse kaas, kruiden, chocolade
Houd er a.u.b. rekening mee dat het kunststof door het verwerken van bijv. wortelen kan verkleuren.
Deze verkleuringen kunnen gemakkelijk met vet (bijv. boter) verwijderd worden.
Denk er bij ingrediënten die kunnen smelten (zoals bijv. chocolade of kaas) aan dat u een korte bewerkingstijd aanhoudt, om te voorkomen dat deze ingrediënten te warm worden.
Laat het apparaat maximaal een minuut aan een stuk werken. Laat het apparaat na een minuut even
afkoelen, voordat u verder werkt.
1. Neem de aanwijzingen voor de voorberei-
ding in acht die in het hoofdstuk „Werken
met het hakmes“ staan.
2. Steek de gewenste schijf voorzichtig op
de schijvendrager. De schijven worden van
bovenaf in de opening van de schijvendrager gestoken. Denk er hierbij aan dat u de
vlakke kant van de schijf tegen de vlakke
kant van de opening aan houdt. Alleen op
die manier kan de schijf vastklikken. Controleer eerst of de schijf stevig vastzit, voordat u verder werkt.
Attentie: De snijvlakken van de
schijven zijn heel scherp, er bestaat
verwondingsgevaar.
3. Plaats de schijvendrager nu voorzichtig op
de as in de mengkom.
4. Attentie: Zowel de as in het apparaat als het
binnenste van de accessoires hebben een
vlakke kant. Alle accessoires kunnen uitsluitend aangebracht worden, als beide vlakke
kanten tegen elkaar aan liggen.
5. Breng het deksel weer aan.
6. Schakel het apparaat aan de schakelaar
„AAN“ in. De schijvendrager begint te
draaien. U kunt ook op de toets „Uit/
Impuls“ drukken, dan werkt het apparaat in
korte, krachtige stoten. Gebruik de impulsschakelaar in intervallen van vijf tot tien
seconden.
7. Doe de ingrediënten via de vultrechter in
de kom. Als de ingrediënten te groot zijn,
moeten deze zodanig in de helft, in vieren
49
Page 50

of in stukken worden gesneden dat ze door
Copyright UNOLD AG | www.unold.de
de vultrechter passen.
8. Maak steeds gebruik van de vulhulp om
naderhand ingrediënten in de kom te doen.
Nooit ingrediënten met de hand bijvullen!
9. Nooit harde ingrediënten zoals botten of
harde voorwerpen zoals pollepels door de
vulschacht duwen. Er bestaat verwondingsgevaar.
10. Als u klaar bent met het verwerken van de
ingrediënten, schakelt u het apparaat aan
de „Uit/Impuls“-schakelaar uit en trekt u de
stekker uit het stopcontact.
11. Wacht totdat de schijvendrager tot stilstand
gekomen is.
12. Verwijder het deksel.
13. Verwijder de schijvendrager voorzichtig uit
de kom. Dit gaat gemakkelijker, als u de kom
van de sokkel haalt en iets verplaatst t.o.v.
REINIGING EN ONDERHOUD
de oorspronkelijke positie weer terugplaatst.
Zo schuift de schijvendrager omhoog en u
kunt hem veilig en gemakkelijk verwijderen.
14. De snijvlakken van de schijven zijn heel
scherp. Er bestaat verwondingsgevaar.
15. Afhankelijk van de techniek is het mogelijk
dat er kleine levensmiddelresten op de schijvendrager achterblijven.
16. Haal de ingrediënten uit de mengkom.
Om de schijf uit de schijvendrager te
verwijderen, draait u de schijvendrager om en drukt u de schijf naar beneden toe uit de schijvendrager. Wees
hierbij a.u.b. heel voorzichtig, omdat
de snijvlakken heel scherp zijn en er
verwondingsgevaar bestaat.
Voordat u het apparaat gaat reinigen,
schakelt u het uit en trekt u de stekker
uit het stopcontact.
1. Reinig het apparaat na elk gebruik.
2. De sokkel en de leiding van het apparaat
mogen niet in water of andere vloeistoffen
gedompeld worden.
3. Met uitzondering van de sokkel kunt u alle
delen in de vaatwasser reinigen (bovenste
korf). Met uitzondering van de sokkel kunt u
alle delen ook in warm water reinigen, waaraan u een beetje afwasmiddel toevoegt.
4. De snij-accessoires zijn heel scherp! Let er bij
het reinigen van de snij- en raspschijven en
van het mes op dat u zich niet snijdt.
5. Laat de snij-accessoires nooit in het afwaswater liggen, om verwondingen te vermijden.
6. De sokkel maakt u met een vochtige doek
schoon en droogt hem vervolgens goed af.
50
7. Gebruik geen scherpe schuurmiddelen,
staalwol, metalen voorwerpen, desinfecterende middelen of hete schoonmaakmiddelen, omdat deze het apparaat kunnen
beschadigen.
8. Breng om veiligheidsredenen de snijvlakbescherming a.u.b. weer aan het hakmes aan,
zodra het mes gereinigd is.
9. De verschillende snij- en raspschijven kunnen goed binnenin de vulhulp opgeborgen
en bewaard worden.
10. Het apparaat moet volkomen droog zijn,
voordat u het weer mag gebruiken.
11. Berg de volledig droge keukenmachine
op een droge en veilige plaats op, om het
apparaat tegen stof, stoten, hitte en vocht
te beschermen.
Page 51

RECEPTEN
Copyright UNOLD AG | www.unold.de
Appelmierik
Raspschijf fijn
1 appel met rode schil ca. 2 cm mierikswortel
(het beste van de kop, omdat de wortel daar
zacht is), 1 tl slagroom, 1 snufje suiker
De appel en mierikswortel met de fijne raspschijf raspen, met slagroom en suiker op smaak
brengen. Smaakt lekker bij gekookt vlees en
gerookte vis.
Roomkoolraap
Raspschijf grof
1 koolraap van gemiddelde grootte, 1 el boter,
1 el fijngehakte peterselie, 1 el slagroom, zout,
peper, nootmuskaat
De koolraap schillen, met de grove raspschijf in
langwerpige stukjes raspen. Boter in een pan
verhitten. Koolraap in de boter beetgaar bakken.
Met zout, peper en nootmuskaat op smaak bren-
gen, de slagroom erdoor mengen en met peterselie bestrooien.
Perentaart
Roerdeeg voor een kleine bakvorm, diameter
20 cm
50 g boter, 1 ei, 50 g suiker, 1 pakje vanillesui-
ker, 1 el amaretto, 1 opgehoopte tl cacao, 100 g
meel, 1 tl bakpoeder, 1–2 peren
Boter, ei, suiker, vanillesuiker en amaretto met
de garde mengen. Cacaopoeder, meel en bakpoeder toevoegen, m.b.v. de impulsschakelaar
erdoor roeren.
Het deeg in een ingevette springvorm doen.
Peren schillen, in vier stukken snijden, van pitten ontdoen, in waaiers snijden en op het deeg
drukken.
In de bakoven ca. 30 minuten op 160 °C bakken.
Tip: Bereid het deeg zonder cacao en beleg het
met in waaiers gesneden stukken appel of abrikozen.
Wafeldeeg
Garde
50 g vloeibare boter, 1 ei, 50 g suiker, 1 pakje
vanillesuiker, 1 tl rum, 100 g meel, 1/2 tl bakpoeder
Boter, ei, suiker, vanillesuiker en rum met de
garde mengen. Meel en bakpoeder toevoegen,
m.b.v. de impulsschakelaar erdoor roeren. Het
deeg in een normaal in de handel verkrijgbaar
wafelijzer doen, goudbruin bakken.
Slagroom
Garde
200 ml slagroom, 1 pakje vanillesuiker
De gekoelde slagroom en de vanillesuiker met
de garde stijf kloppen. Hierbij vaak stoppen en
de vastheid controleren.
Aardappelgratin
Snijschijf grof
2 aardappelen, 100 ml slagroom, 1/2 ui, 1 ei,
50 g geraspte Emmentaler kaas, zout, peper,
nootmuskaat
Aardappels schillen, met de snijschijf in grove
schijven snijden. De ui ook schillen en in grove
schijven snijden.
Aardappelen en ui afwisselend in lagen in een
ingevette ovenschaal leggen.
De slagroom met het ei en de kruiden verroeren,
met de kaas bestooien. In de bakoven ca. 30 minuten op 160 °C bakken.
Wortelsalade
Raspschijf middel
1 wortel, 1 appel, 1 el walnoten, 2 el sinaasappelsap, 1 tl olie
Wortel schillen, appel van klokhuis ontdoen en
in vier stukken snijden.
Appel en wortel met de raspschijf raspen, met
walnoten bestrooien, sinaasappelsap en olie toevoegen en mengen.
51
Page 52

Aardappelchips
Copyright UNOLD AG | www.unold.de
Snijschijf fijn
2 kruimige aardappelen, 1 el olie, 1 el paprikapoeder
Aardappelen wassen en schillen. Met de fijne
snijschijf in dunne schijven snijden. Met olie en
paprikapoeder marineren.
Bakplaat met bakpapier bedekken. De aardappelschijven erop leggen en in de bakoven op
180 °C bruin bakken.
Gehakt (varkensgehakt)
Hakmes
150g varkensschnitzel, 1/2 ui, 1 eidooier, zout,
peper
Alle ingrediënten met het hakmes fijnhakken.
Met dit mes kunt u ook chocolade, kruiden, noten, droge stukjes brood, kaas, mierikswortel,
gember enz. fijnhakken.
Leverknoedels voor in de soep
Hakmes
150 gr runderlever, 1/2 ui, 1 ingeweekt, uitgedrukt broodje, 2 el paneermeel, 1 ei, zout, peper, nootmuskaat
Alle ingrediënten met het hakmes fijnhakken.
1 liter runderbouillon verhitten. Met een kleine
theelepel kleine propjes uit het deeg steken en
in de kokende bouillon doen, gaar laten worden.
GARANTIEVOORWAARDEN
Wij geven op onze apparaten een garantietermijn van 24 maanden (12 maanden bij commerciële gebruik), gerekend vanaf de
dag van aanschaf. Deze garantie geldt voor schade, die bij correct gebruik aantoonbaar is veroorzaakt door een fout in de productie. Binnen de garantietermijn verhelpen wij materiaal- en productiefouten door herstelling of vervanging naar onze keuze.
Onze garantie is slechts geldig voor in Duitsland en Oostenrijk verkopte apparaten. In andere landen a.u.b. de importeur
aanspreken. Apparaaten, waarvoor garantie in aanspraak wordt genomen, moeten ons samen met een kopie van de machineel
gegenereerde kassabon waaruit de koopdatum duidelijk wordt, alsmede een beschrijving van de fout goed verpakt aan onze
klantenservice worden toegezonden, porto betaald. Als er sprake van garantie is, worden de verzendingskosten in Duitsland
en Oostenrijk aan de klant vergoed. De garantie dekt geen schade veroorzaakt door slijtage, onbehoorlijk gebruik/foutieve handelingen en niet-naleving van de onderhouds- en reinigingsaanwijzingen. Het recht op garantie vervalt, wanneer reparaties
of manipulaties aan het apparaat door derden worden doorgevoerd. Eventuele rechten van de eindgebruiker t.o.v. de verkoper
of distributeur worden door deze garantie niet aangetast.
VERWIJDEREN VAN AFVAL / MILIEUBESCHERMING
Onze apparaten zijn geproduceerd met een hoge qualiteit voor een lange gebruik. Regelmatige onderhoud
en vakkundig reparaties door onze klantenservice verlengt de gebruiksduur. Wanneer het apparat defekt is
en kan niet meer gerepareerd worden, let op de volgende instructies. Dit product mag niet samen met het
normale huishoudelijke afval worden afgevoerd. U dient dit product bij een voor het recycleren van elektrische of elektronische apparaten aangewezen verzamelplaats in te leveren. Door het separaat inzamelen
en recycleren van afvalproducten helpt u mee bij het zuinig omgaan met de natuurlijke hulpbronnen en zorgt
u ervoor dat het product op een gezondheids- en milieuvriendelijke manier afgevoerd wordt.
De recepten in deze gebruiksaanwijzing zijn door de auteurs en door UNOLD AG zorgvuldig ontwikkeld
en getest. Een garantie kan er echter niet worden aanvaard. De auteurs en/of UNOLD AG en haar
gemachtigden kunnen in geen geval aansprakelijk worden gesteld voor letsel, materiële schade en
financiële schade.
52
Page 53

ISTRUZIONI PER L’USO MODELLO 78501
Copyright UNOLD AG | www.unold.de
DATI TECNICI
Potenza: 250 Watt, 230 V~, 50 Hz
Misure: 29,0 x 20,0 x 27,3 cm circa (lu./la./h.)
Peso: Circa 1,5 kg
Lunghezza del cavo: Circa 90 cm
Scocca: Plastica bianca/antracite
Dotazioni: Robot da cucina compatto, lama per tritare e impastare, disco per grattugiare
e tagliare, frusta per panna, albumi e paste leggere, recipiente per lavorare
circa 0,5 litri di liquidi, pressino graduato, tempo di funzionamento breve
un minuto
Accessori: Lama, frusta, portadisco, 2 dischi per tagliare, 3 dischi per grattugiare,
istruzioni per l‘uso
Con riserva di modifiche ed errori relativi a caratteristiche delle dotazioni, tecnica, colore e design
SIGNIFICATO DEI SIMBOLI
Questo simbolo segnala possibili pericoli in grado di provocare lesioni a persone o danni
all‘apparecchio.
PER LA VOSTRA SICUREZZA
Si raccomanda di leggere e conservare le presenti istruzioni.
Avvertenze di sicurezza generali
L‘apparecchio può essere
1.
utilizzato da bambini a partire dagli 8 anni di età e
da persone che presentano
ridotte capacità fisiche, sensoriali o mentali o che difettano della necessaria esperienza e/o conoscenze solo
se adeguatamente sorvegliati o addestrati sull‘uso in
sicurezza dell‘apparecchio
se a conoscenza
e
correlati. L‘apparecchio
non è un giocattolo. La
pulizia e la manutenzione
dei rischi
dell‘apparecchio possono
essere effettuate da bambini
soltanto sotto sorveglianza.
2. L‘apparecchio deve essere
tenuto fuori dalla portata
dei bambini di età inferi
ore a 3
anni oppure questi
-
devono essere sorvegliati
costantemente.
3. I bambini di età compresa tra 3 e 8 anni dovrebbero accendere e spegnere l‘apparecchio soltanto
quando questo si trova nella
posizione di comando normalmente prevista, se sono
sorvegliati o se sono stati
istruiti in relazione all‘uso
53
Page 54

sicuro e hanno compreso i
Copyright UNOLD AG | www.unold.de
pericoli risultanti. I bambini di età compresa tra 3 e
8 anni non dovrebbero collegare, manovrare, pulire o
12.
sottoporre a manutenzione
l‘apparecchio.
I bambini devono essere
4.
13. Dopo l’utilizzo, nonché
sorvegliati per accertarsi
che non giochino con
l’apparecchio.
5. Conservare l‘apparecchio
fuori dalla portata dei bambini.
Collegare l’apparecchio sol-
6.
14. Controllare regolarmente
tanto a corrente alternata
con la tensione indicata
nella targhetta.
Questo apparecchio non
7.
deve essere comandato tra-
mite un timer esterno o un
sistema di telecomando.
Non immergere mai
8.
l‘apparecchio o il cavo di ali-
mentazione in acqua o altri
liquidi.
L’apparecchio è progettato
9.
esclusivamente per l’uso
domestico o impieghi similari, ad es.
in aree cucina di negozi,
uffici o altri luoghi di lavoro,
aziende agrituristiche,
per l‘uso da parte degli
Avvertenze per l‘installazione e
l‘uso dell‘apparecchio
15.
16.
ospiti di hotel, motel o altre
strutture ricettive,
in pensioni private o case di
vacanza.
17. Per ragioni di sicurezza
10. L‘apparecchio e il cavo di
alimentazione non possono
essere lavati in lavastoviglie.
11. Prima di disassemblare
e pulire l‘apparecchio, di
smontare o montare sin
goli pezzi o di spostare
l‘apparecchio staccare la
spina dalla presa elettrica.
Per evitare danni, non usare
l’apparecchio con accessori
di altri marchi o produttori.
prima della pulizia, staccare
la spina dalla presa. Mai
lasciare mai l’apparecchio
incustodito quando la spina
è inserita.
l’apparecchio, la spina e il
cavo di alimentazione, per
vedere se vi sono tracce di
usura o danni. Qualora il
cavo di collegamento o altri
componenti siano dann
eggiati inviare l’apparecchio
alla nostra assistenza clienti
per la verifica e la riparazione. Riparazioni non
idonee possono infatti causare
notevoli rischi per l’utente e
comportano il decadere della
garanzia.
L‘apparecchio è idoneo sol-
tanto per l‘uso in interni.
Non toccare mai né
l‘apparecchio né il cavo di
alimentazione con le mani
bagnate.
non appoggiare mai
l’apparecchio su superfici
calde, vassoi metallici o basi
umide. L‘apparecchio e il
cavo di alimentazione non
54
Page 55

devono essere impiegati nei
Copyright UNOLD AG | www.unold.de
pressi di fiamme.
18. Usare il robot da cucina
sempre su una superficie
sgombra, piana e non scivolosa.
Assicurarsi che il cavo di ali-
19.
mentazione non penda dal
piano di lavoro, in quanto
potrebbe causare incidenti,
ad es. se un bambino piccolo dovesse strattonarlo.
Per evitare di danneggiare il
20.
cavo di alimentazione, non
piegarlo e non avvolgerlo
attorno all‘apparecchio.
21. Il cavo di alimentazione deve
essere posato in modo che
non possa essere strattonato
o che non ci si possa inciam-
pare sopra.
Per evitare di ferirsi non
22.
spostare l’apparecchio fin-
ché è in funzione.
Non usare liquidi caldi.
23.
Accertarsi che ingredienti
usati siano al massimo a
temperatura ambiente.
24. Gli utensili di taglio sono
estremamente affilati! Nel
montare e rimuovere i dischi
per tagliare e grattugiare,
fare molta attenzione a non
ferirsi.
25. Anche la lama è estrema
mente affilata. Nell‘inserire
la lama nell‘apparecchio e
durante
la pulizia afferrarla
sempre la lama per la sommità, mai per i taglienti.
Quando il contenitore è
26.
bloccato nell‘apparecchio,
non sollevare quest‘ultimo
per il manico, in quanto
l‘apparecchio o il manico
potrebbero rompersi.
27. Non sovraccaricare il recipiente. Il quantitativo di
riempimento è di max. 0,5
l
di ingredienti. Se si introduce una maggior quantità
di ingredienti, l‘apparecchio
può venir danneggiato.
Per prevenire danni
28.
all‘apparecchio e ferimenti,
non usare l‘apparecchio se il
portadisco è difettoso.
29. Non accendere l‘apparecchio
a recipiente vuoto.
30. Per aggiungere degli ingredienti successivamente,
usare sempre il pressino.
Non introdurre o premere gli
ingredienti con la mano!
Non introdurre mai attra-
31.
verso l‘apertura di riempimento ingredienti duri come
ossa oppure oggetti come
cucchiai. Sussiste il pericolo
di ferirsi!
Qualora degli ingredienti
32.
aderiscano all‘interno
del recipiente, spegnere
l‘apparecchio, staccare la
spina e staccare gli ingredienti con l‘ausilio di una
spatola.
Il tempo di funzionamento
33.
breve è di un minuto. Per
prevenire surriscaldamenti
del motore, dopo un minuto
lasciar raffreddare brevemente l‘apparecchio e soltanto dopo riprendere a
lavorare.
55
Page 56

34. Cautela: Evitare il contatto
Copyright UNOLD AG | www.unold.de
con le parti mobili
dell‘apparecchio quando
questo è in funzione. Non
tenere le mani, i capelli o
altri oggetti nelle vicinanze
Prima di rimuovere il
36.
coperchio spegnere
l‘apparecchio e attendere
che il motore si sia arrestato.
37. Pulire l’apparecchio dopo
ogni utilizzo.
dell‘apparecchio, sussiste il
pericolo di ferirsi!
35. Prima di svuotare il recipiente, rimuovere sempre la
lama o il portadisco.
Per evitare di ferirsi, non toccare mai le parti rotanti
dell‘apparecchio e non inserire né oggetti né parti del corpo
nell‘apparecchio in funzione.
Cautela! I dischi per grattugiare e tagliare nonché la lama sono
estremamente affilati - sussiste il pericolo di ferirsi!
Non mettere parti del corpo o altri oggetti nell‘apparecchio in
funzione - sussiste il pericolo di ferirsi!
Non aprire mai la scocca dell‘apparecchio. Sussiste il pericolo
di scosse elettriche.
Il produttore declina qualunque responsabilità in caso di montaggio errato, utilizzi errati o non idonei o
qualora le riparazioni siano eseguite da terzi non autorizzati.
PRIMA DEL PRIMO UTILIZZO
1. Rimuovere tutti i materiali di imballo e le
protezioni da trasporto. Tenere il materiale
da imballo fuori dalla portata dei bambini –
pericolo di soffocamento!
2. Pulire tutte le parti asportabili come indi-
cato nel capitolo Pulizia e cura.
INSERIMENTO E RIMOZIONE DEL RECIPIENTE
1. Inserire il recipiente sulla base
dell‘apparecchio. Accertarsi che il manico
sia in posizione leggermente arretrata e
quindi girare il recipiente per il manico
in senso orario, nella direzione della
freccia „chiuso“ (Zu) posta sulla base
dell‘apparecchio finché il recipiente si
aggancia in posizione. La freccia sul bordo
inferiore del recipiente deve trovarsi esatta-
56
Attenzione: La lama e i singoli dischi
sono estremamente affilati, pericolo di
ferirsi. Maneggiare questi utensili con
estrema cautela.
mente sopra la marchiatura circolare sulla
base dell‘apparecchio.
2. Scegliere l‘utensile desiderato e montarlo
nel recipiente. Maggiori informazioni sul
corretto inserimento dei singoli utensili sono
fornite qui di seguito.
3. Il recipiente e il rispettivo utensile per
mescolare o tagliare devono essere inseriti
Page 57

sempre prima di versare gli ingredienti nel
Copyright UNOLD AG | www.unold.de
contenitore.
4. Applicare il coperchio sul recipiente. Inizialmente il pozzetto di riempimento del
coperchio deve essere posizionato in modo
che il nasetto visibile sotto al pozzetto si
trovi davanti al binario guida sulla base
dell‘apparecchio.
5. Quindi girare il coperchio in senso orario finché questo nasetto scatta in posizione nella
base dell‘apparecchio. Lo scatto è segnalato
da un clic chiaramente percepibile. La freccia sul bordo superiore del recipiente deve
trovarsi esattamente sotto la marchiatura
circolare sul coperchio.
6. Per rimuovere il coperchio, con una mano
afferrare il recipiente per il manico e girare
il coperchio in senso antiorario finché
il nasetto scorre fuori dal binario guida.
Togliere il coperchio dall‘apparecchio sollevandolo verso l‘alto.
7. Per togliere il recipiente, girarlo nella direzione della freccia „Aperto“ (Auf) finché può
essere rimosso dalla base dell‘apparecchio
tramite il manico.
INTERRUTTORE DI SICUREZZA
L‘apparecchio è dotato di un interruttore di sicurezza che impedisce la messa in funzione
dell‘apparecchio se questo non è stato correttamente assemblato. L‘apparecchio può essere acceso
soltanto quando tutte le parti sono correttamente montate.
LAVORARE CON LA LAMA
Per tritare
verdura, frutta, pane e panini in pangrattato, carne, cioccolato, noci
Un risultato ottimale si ottiene tagliando prima gli ingredienti a dadini di
circa due centimetri.
Preparare impasti
Usare grasso freddo di frigorifero e non impastare troppo a lungo. Prima
di lavorare ulteriormente la pasta dopo la prima impastatura nel robot,
reimpastarla a mano su un piano di lavoro.
1. Attenzione: Non accendere l‘apparecchio
senza aver prima introdotto gli ingredienti,
in quanto ciò può danneggiare il motore.
2. Far funzionare l‘apparecchio per massimo
un minuto alla volta. Dopo un minuto lasciar
raffreddare l‘apparecchio prima di continuare a lavorare.
3. La quantità di riempimento massima è di
0,5 l d‘ingredienti. Per evitare di danneggiare l‘apparecchio non superare tale
quantità. Tenere anche presente che molti
alimenti, come ad es. la carne, aumentano
di volume quando vengono tritati.
4. Assicurarsi che il recipiente sia correttamente montato sulla base dell‘apparecchio.
5. Rimuovere il paralama dalla lama.
Afferrare la lama soltanto per la sommità, i taglienti sono estremamente
affilati. Sussiste il pericolo di ferirsi!
57
Page 58

6. Inserire cautamente la lama sull‘albero del
Copyright UNOLD AG | www.unold.de
recipiente.
7. Attenzione: Sia l‘albero nell‘apparecchio
che l‘interno dell‘utensile hanno un lato
appiattito. Tutti gli utensili possono essere
montati soltanto quando i due lati appiattiti
sono a filo l‘uno con l‘altro.
8. Mettere gli ingredienti desiderati nel recipiente, stando attenti a non riempirlo eccessivamente.
9. Attenzione: Per preparare un impasto, met-
tere nel recipiente prima tutti gli ingredienti
asciutti. Quindi, mentre l‘apparecchio sta
impastando, aggiungere i liquidi richiesti
attraverso il pozzetto di riempimento.
10. Riapplicare il coperchio e bloccarlo.
11. Inserire la spina nella presa.
12. Accendere l‘apparecchio tramite
l‘interruttore „On“. La lama inizia a ruo-
13. Qualora degli ingredienti aderiscano
14. Quando gli ingredienti hanno raggi-
15. Attendere che la lama si sia arrestata.
16. Asportare il coperchio.
17. Rimuovere cautamente la lama dal recipi-
18. Svuotare gli ingredienti dal recipiente.
19. Non appena tutte le parti sono state lavate,
tare. E‘ anche possibile attivare il tasto
„Off/Impulsi“; in questo caso l‘apparecchio
lavora a scatti brevi e potenti. Si raccomanda di usare l‘interruttore impulsi soltanto a intervalli. Se si lavora per più di
cinque minuti usare la funzione continua.
all‘interno del recipiente, spegnere
l‘apparecchio, staccare la spina e staccare
gli ingredienti con l‘ausilio di una spatola.
unto la consistenza desiderata, spegnere
l‘apparecchio tramite l‘interruttore „Off/
Impulsi“ e staccare la spina dalla presa.
ente. Afferrare la lama soltanto per la sommità, i taglienti sono estremamente affilati.
Sussiste il pericolo di ferirsi!
per ragioni di sicurezza si raccomanda di
riapplicare il paralama sulla lama.
LAVORARE CON LA FRUSTA
Per montare
sbattere albumi a neve e preparare il pan di spagna. Se si usa della panna
sottoposta a trattamento UHT, prima lasciarla raffreddare in frigorifero per
alcune ore.
1. Osservare le avvertenze per la preparazione
fornite nel capitolo „Lavorare con la lama“.
2. Inserire cautamente la frusta sull‘albero del
recipiente.
3. Attenzione: Sia l‘albero nell‘apparecchio
che l‘interno dell‘utensile hanno un lato
appiattito. Tutti gli utensili possono essere
58
montati soltanto quando i due lati appiattiti
sono a filo l‘uno con l‘altro.
4. Mettere gli ingredienti desiderati nel recipiente, stando attenti a non riempirlo eccessivamente.
5. Riapplicare il coperchio e bloccarlo.
6. Inserire la spina nella presa.
Page 59

7. Accendere l‘apparecchio tramite
Copyright UNOLD AG | www.unold.de
l‘interruttore „On“. La frusta inizia a girare.
E‘ anche possibile attivare il tasto „Off/
Impulsi“; in questo caso l‘apparecchio
lavora a scatti brevi e potenti. Si raccomanda di usare l‘interruttore impulsi soltanto a intervalli di cinque-dieci secondi.
8. Qualora degli ingredienti aderiscano
all‘interno del recipiente, spegnere
l‘apparecchio, staccare la spina e staccare
gli ingredienti con l‘ausilio di una spatola.
9. Quando gli ingredienti hanno raggiunto la consistenza desiderata, spegnere
l‘apparecchio tramite l‘interruttore „Off/
Impulsi“ e staccare la spina dalla presa.
10. Attendere che la frusta si sia arrestata.
11. Asportare il coperchio.
12. Rimuovere cautamente la frusta dal recipiente.
13. Svuotare gli ingredienti dal recipiente.
LAVORARE CON I DISCHI PER GRATTUGIARE E TAGLIARE
Per tagliare e grattugiare
verdura, frutta, pane per pangrattato, formaggio,
parmigiano, erbe, cioccolato
Si tenga presente che la plastica può macchiarsi ad es. quando si lavorano le carote. Tuttavia queste
macchie possono essere facilmente rimosse con grasso (ad es. burro).
Per gli ingredienti che possono fondere (come ad es. cioccolato o formaggio duro) la durata della
lavorazione deve essere più breve possibile, onde evitare che gli ingredienti si riscaldino molto.
Far funzionare l‘apparecchio per massimo un minuto alla volta. Dopo un minuto lasciar raffreddare
l‘apparecchio prima di continuare a lavorare.
1. Osservare le avvertenze per la preparazione
fornite nel capitolo „Lavorare con la lama“.
2. Montare il disco desiderato sul portadisco
facendo molta attenzione. I dischi devono
essere inseriti nell‘apertura del portadisco dall‘alto. Accertarsi di tenere il lato
piatto del disco a filo con il lato piatto
dell‘apertura. Solo in questo modo è infatti
possibile agganciare il disco in posizione.
Prima di procedere, controllare che il disco
sia saldamente posizionato.
Attenzione: I taglienti dei dischi sono
estremamente affilati, sussiste il
pericolo di ferirsi.
3. Quindi inserire il portadisco sull‘albero del
recipiente.
4. Attenzione: Sia l‘albero nell‘apparecchio
che l‘interno dell‘utensile hanno un lato
appiattito. Tutti gli utensili possono essere
montati soltanto quando i due lati appiattiti
sono a filo l‘uno con l‘altro.
5. Riapplicare il coperchio.
6. Accendere l‘apparecchio tramite
l‘interruttore „On“. La frusta inizia a girare.
E‘ anche possibile attivare il tasto „Off/
Impulsi“; in questo caso l‘apparecchio
lavora a scatti brevi e potenti. Si raccomanda di usare l‘interruttore impulsi soltanto a intervalli di cinque-dieci secondi.
7. Versare gli ingredienti attraverso l‘apertura
di riempimento. Qualora gli ingredienti
fossero troppo grossi, tagliarli a metà o in
59
Page 60

quarti o alle dimensioni dell‘apertura di
Copyright UNOLD AG | www.unold.de
riempimento.
8. Per aggiungere degli ingredienti successivamente, usare sempre il pressino. Non introdurre o premere gli ingredienti con la mano!
9. Non introdurre mai attraverso l‘apertura di
riempimento ingredienti duri come ossa
oppure oggetti come cucchiai. Sussiste il
pericolo di ferirsi!
10. Quando si è finito di lavorare gli ingredienti,
spegnere l‘apparecchio tramite l‘interruttore
„Off/Impulsi“ e staccare la spina dalla
presa.
11. Attendere che il portadisco si sia arrestato.
12. Asportare il coperchio.
13. Rimuovere il portadisco dal recipiente con
grande cautela. Ciò riesce più facile staccando il recipiente dalla base e quindi
riapplicandolo leggermente spostato ris-
PULIZIA E CURA
petto alla posizione originale. In questo
modo il portadisco si sposta verso l‘alto e
può quindi essere rimosso in maniera semplice e sicura.
14. I taglienti delle lame sono estremamente affi-
lati. Sussiste il pericolo di ferirsi!
15. Per motivi tecnici è possibile che piccoli
residui di alimenti rimangano sul portadisco.
16. Svuotare gli ingredienti dal recipiente.
17. Per rimuovere il disco dal portadisco, girare
il portadisco e premere il disco verso il basso
in modo da farlo uscire dal portadisco.
Si raccomanda di fare molta
attenzione, in quanto le lame sono
molto affilate e sussiste il pericolo di
ferirsi.
Prima di procedere alla pulizia
spegnere sempre l’apparecchio e
staccare la spina dalla presa elettrica.
1. Pulire l’apparecchio dopo ogni utilizzo.
2. La base dell‘apparecchio e il cavo di alimen-
tazione non devono essere immersi in acqua
o altri liquidi.
3. Tutte le parti, eccetto la base
dell‘apparecchio, possono essere lavate in
lavastoviglie (cestello superiore). Tutte le
parti, eccetto la base dell‘apparecchio, possono essere lavate anche in acqua calda con
l‘aggiunta di un po‘ di detersivo delicato.
4. Gli utensili di taglio sono estremamente affi-
lati! Nel lavare i dischi per tagliare e grattugiare e la relativa lama, fare molta attenzione
a non ferirsi.
5. Per evitare di ferirsi, non lasciare gli utensili
di taglio in ammollo nell‘acqua.
60
6. Si raccomanda di strofinare la base
dell‘apparecchio con un panno umido e
quindi di asciugarla bene.
7. Non usare prodotti abrasivi, lana d’acciaio,
oggetti metallici, disinfettanti o detergenti
caldi, in quanto possono causare danni.
8. Per ragioni di sicurezza, riapplicare
il paralama sulla lama non appena
quest‘ultima è stata lavata.
9. I diversi dischi per tagliare e grattugiare
possono essere opportunamente conservati
all‘interno del pressino.
10. L‘apparecchio deve essere completamente
asciutto prima di poterlo riutilizzare.
11. Conservare il robot da cucina perfettamente
asciugato in un luogo asciutto e sicuro, al
riparo da polvere, urti, calore e umidità.
Page 61

RICETTE
Copyright UNOLD AG | www.unold.de
Rafano alla mela
Disco per grattugiare fine
1 mela a buccia rossa circa 2 cm di radice di
rafano (meglio la parte della testa, che è più
tenera), 1 cucchiaino di panna, 1 presa di zucchero
Grattugiare la mela e il rafano con il disco
per grattugiare fine, insaporire con la panna e
lo zucchero. Si abbina bene a lessi di carne e
pesce affumicato
Cavolo rapa alla panna
Disco per grattugiare grosso
1 cavolo rapa di media grandezza, 1 cucchiaio di burro, 1 cucchiaio di prezzemolo tritato,
1 cucchiaio di panna dolce, sale, pepe, noce
moscata
Sbucciare il cavolo rapa, grattugiarlo a listarelle
con il disco per grattugiare grosso. Far scaldare
il burro in padella. Rosolare il cavolo rapa nel
burro, lasciandolo però al dente. Aromatizzare
con sale, pepe e noce moscata, amalgamare la
panna e cospargere col prezzemolo.
Torta di pere
Pasta per torta margherita in stampo da single,
diametro 20 cm
50 g di burro, 1 uovo, 50 g di zucchero, 1 bustina di zucchero vanigliato, 1 cucchiaio di
amaretto, 1 cucchiaino ricolmo di cacao, 100 g
di farina, 1 cucchiaino di lievito in polvere,
1-2 pere
Con la frusta mescolare il burro, l‘uovo, lo zucchero, lo zucchero vanigliato e l‘amaretto. Aggiungere il cacao in polvere, la farina e il lievito
in polvere, amalgamarli con l‘interruttore a impulsi.
Versare il composto in uno stampo apribile imburrato.
Sbucciare le pere, tagliarle a quarti, rimuovere i torsoli, tagliarle a ventaglio e ricoprirci
l‘impasto.
Cuocere in forno a 160 °C per circa 30 minuti.
Suggerimento: Preparare l‘impasto senza il cacao e ricoprirlo con pezzi di mele o albicocche
tagliate a ventaglio.
Pasta per cialde
Frusta
50 g di burro fuso, 1 uovo, 50 g di zucchero,
1 bustina di zucchero vanigliato, 1 cucchino di
rum, 100 g di farina, 1/2 cucchiaino di lievito
in polvere
Con la frusta mescolare il burro, l‘uovo, lo zucchero, lo zucchero vanigliato e il rum. Aggiungere la farina e il lievito in polvere, amalgamarli
con l‘interruttore a impulsi. Versare a porzioni in
una comune macchina per cialde, cuocere fino
a doratura.
Panna montata
Frusta
200 ml di panna da montare, 1 bustina di zucchero vanigliato
Con la frusta montare a neve ben salda la panna
e lo zucchero vanigliato. Fermarsi spesso a controllare la consistenza.
Gratin di patate
Disco per tagliare grosso
2 patate, 100 ml di panna dolce, 1/2 cipolla,
1 uovo, 50 g di formaggio Emmental grattugiato
sale, pepe, noce moscata
Sbucciare le patate e tagliarle a fette con il disco per tagliare grosso. Sbucciare anche le cipolle e tagliarle a fette grosse.
Riporre le patate e le cipolle a strati alternati in
uno stampo per sformati imburrato.
Montare la panna con l‘uovo e le spezie, versarla
sulle patate, cospargere con formaggio. Cuocere
in forno a 160 °C per circa 30 minuti.
61
Page 62

Cruditè miste con carota
Copyright UNOLD AG | www.unold.de
Disco per grattugiare medio
1 carota, 1 mela, 1 cucchiaio di noci, 2 cucchiai di succo d‘arancia, 1 cucchiaio d‘olio
Sbucciare la carota, tagliare a quarti la mela ed
eliminarne il torsolo.
Con il disco per grattugiare medio grattugiare la
mela e la carota, cospargere con le noci, aggiungere il succo d‘arancia e l‘olio e mescolare.
Chips di patate al forno
Disco per tagliare fine
2 patate farinose, 1 cucchiaio d‘olio, 1 cucchiaio di paprica in polvere
Lavare e sbucciare le patate. Con il disco per tagliare fine tagliarle a fette sottili. Marinarle con
olio e paprica in polvere.
Rivestire la lamiera del forno con carta da forno.
Distribuirci sopra le patate affettate e cuocerle
in forno a 180 °C fino a doratura.
Le ricette di queste istruzioni per l’uso sono state ideate e verificate dagli autori e da UNOLD AG.
Tuttavia non può essere emessa alcuna garanzia. È esclusa la responsabilità degli autori, di
UNOLD AG e dei rispettivi incaricati per danni provocati a persone, cose o materiali.
„Hackepeter“ (tartare di maiale)
Lama
150g di fettine di maiale, 1/2 cipolla
1 rosso d‘uovo, sale, pepe
Con la lama tritare fini tutti gli ingredienti.
Con la lama è possibile tritare anche cioccolato, erbe, noci, dadini di pane secco, formaggio,
rafano, zenzero ecc.
Gnocchetti di fegato in brodo
Lama
150 di fegato di manzo, 1/2 cipolla, 1 panino
ammollato e strizzato, 2 cucchiai di pangrattato,
1 uovo, sale, pepe, noce moscata
Con la lama tritare fini tutti gli ingredienti.
Riscaldare 1 litro di brodo di manzo. Con un
cucchiaino da tè formare dei piccoli gnocchi
di pasta e buttarli nel brodo bollente, lasciarli
cuocere.
62
Page 63

NORME DIE GARANZIA
Copyright UNOLD AG | www.unold.de
I nostri prodotti sono garantiti per 24 mesi, 12 mesi in caso di uso professionale, dalla data di acquisto per i guasti manifestatisi durante un utilizzo conforme alle disposizioni e attribuibili in modo dimostrabile a difetti di fabbricazione. Nel periodo
di garanzia porremo rimedio ai difetti materiali e di produzione secondo la nostra valutazione, procedendo alla riparazione
o alla sostituzione dell’apparecchio. Le nostre prestazioni di garanzia valgono esclusivamente per gli apparecchi venduti
in Germania e Austria. In tutti gli altri casi rivolgersi all‘importatore. Gli apparecchi per i quali si richiede la riparazione di
guasti ci devono essere inviati con spedizione affrancata e debitamente imballati, unitamente a una copia del documento
di acquisto redatto a macchina dal quale risulti la data di vendita, nonché la descrizione del guasto. In caso di garanzia al
cliente verranno rimborsati i costi di spedizione sostenuti in Germania e Austria. Sono esclusi dalla garanzia i guasti dovuti
all’usura, all’uso inappropriato o al mancato rispetto delle regole di manutenzione. Il diritto di garanzia decade qualora siano
state effettuate riparazioni o interventi da parte di terzi. Eventuali diritti del consumatore finale verso il venditore o negoziante
non vengono limitati dalla presente garanzia.
SMALTIMENTO / TUTELA DELL’AMBIENTE
I nostri apparecchi vengono prodotti rispettando un elevato standard qualitativo per una lunga durata
di utilizzo. Una corretta manutenzione e riparazioni adeguate a cura dal nostro servizio clienti possono
prolungare la durata di utilizzo del prodotto. Se un apparecchio è difettoso e non più riparabile, per il suo
smaltimento si presti attenzione ai punti che seguono. Questo prodotto non deve essere smaltito unitamente
ai comuni rifiuti domestici. Consegnare il prodotto a un centro di raccolta per il riciclaggio dei rifiuti elettrici
o elettronici. Con la raccolta differenziata dei rifiuti e dei prodotti riciclabili è possibile contribuire alla tutela
delle risorse naturali e far smaltire il prodotto nel rispetto dell’ambiente e della salute.
63
Page 64

MANUAL DE INSTRUCCIONES MODELO 78501
Copyright UNOLD AG | www.unold.de
DATOS TÉCNICOS
Potencia: 250 vatios, 230 V~, 50 Hz
Medidas: Aprox. 29,0 x 20,0 x 27,3 cm (L/An/Al)
Peso: Aprox. 1,5 kg
Longitud del cable: Aprox. 90 cm
Carcasa: Plástico blanco/antracita
Equipamiento: Robot de cocina compacto, cuchilla para picar y amasar, picador para
rallar y cortar, agitador para nata, clara de huevo y masas de bizcocho
ligeras, recipiente amasador para trabajar unos 0,5 litros de líquido,
empujador con escala, tiempo de operación breve un minuto
Accesorios: Cuchilla, agitador, soporte de discos, 2 discos para cortar, 3 discos para
rallar, instrucciones de uso
Reservado el derecho de modificaciones y errores en características de equipamiento, técnica, colores
y diseño
EXPLICACIÓN DE SÍMBOLOS
Este símbolo se asocia con riesgos eventuales que pueden provocar lesiones o daños en
el aparato.
PARA SU SEGURIDAD
Lea y conserve las siguientes
instrucciones.
Indicaciones generales de seguridad
Este aparato puede ser
1.
manejado por niños a partir
de 8 años y por personas
con capacidad física,
sensorial o mental reducida
o carentes de experiencia y/o
conocimientos siempre que
estén supervisados o hayan
sido correspondientemente
instruidos en el manejo
seguro de dicho aparato y
comprendan los peligros
que conlleva. Este aparato
no es ningún juguete. Los
64
niños solo pueden llevar
a cabo la limpieza y el
mantenimiento del mismo
si están supervisados por un
adulto.
2. Mantenga vigilados o
alejados del aparato a los
niños menores de 3 años.
3. Los niños de entre 3 y
8 años solo podrán conec
tar y desconectar el aparato
si este se encuentra en su
posición normal de funcio-
namiento
prevista, si están
siendo supervisados o si han
sido correspondientemente
instruidos en el manejo
seguro del mismo y com-
Page 65

prenden los peligros deri-
Copyright UNOLD AG | www.unold.de
vados. Los niños entre 3 y
años no deberán conectar,
8
manejar, limpiar ni realizar
el mantenimiento del aparato.
Se debe vigilar a los niños
4.
para asegurarse de que no
jueguen con el aparato.
5. Guarde el aparato fuera del
alcance de los niños.
6. Conecte el aparato solo a
corriente alterna con una
tensión de acuerdo a la placa
de características.
7. Este aparato no debe utili
zarse con un reloj programador externo ni con un sistema de mando a distancia.
8.
De ninguna manera sumerja
el aparato o el cable de alimentación en agua o en
otros líquidos.
El aparato está diseñado
9.
exclusivamente para un uso
doméstico o para fines de
uso similares, por ejemplo,
cocinas tipo office en
comercios, oficinas u otros
lugares de trabajo,
empresas agrícolas,
para el uso por clientes en
hoteles, moteles u otros
establecimientos de aloja
-
miento colectivo,
en pensiones privadas o
casas vacacionales.
10. El equipo y el cable de alimentación no deben lavarse
en el lavavajillas.
Retire la clavija de la caja de
11.
enchufe antes de desmontar y limpiar el aparato, o si
quiere quitar o colocar piezas individuales o poner el
aparato en otro sitio.
Para evitar daños, no use el
12.
equipo con accesorios de
otros fabricantes o marcas.
13. Después del uso así como
antes de la limpieza, desenchufar la clavija de la caja de
enchufe. Jamás dejar
el apa-
rato sin supervisión cuando
esté enchufada la clavija a la
red eléctrica.
Controle periódicamente
14.
si el aparato, la clavija de
red y el cable de alimentación presentan desgaste o
daños. En caso de daños en
el cable de alimentación o
en otras piezas envíe el aparato para su verificación y/o
reparación a nuestro servicio
de atención al cliente. Las
reparaciones inadecuadas
pueden ocasionar considerables peligros para el usuario
y tienen como consecuencia
la exclusión de la garantía.
Indicaciones sobre la colocación
y el manejo del aparato
El aparato solo es apto para
15.
el uso en interiores.
16. No toque nunca el aparato o
el cable de alimentación con
las manos húmedas.
17. Por razones de seguridad,
jamás coloque el aparato
sobre superficies calientes,
sobre una bandeja metálica
o sobre una base mojada. El
aparato o el cable de alimentación no deben utilizarse
cerca de llamas.
65
Page 66

18. Use siempre el robot de
Copyright UNOLD AG | www.unold.de
cocina sobre una superficie
libre, plana y antideslizante.
19. Asegúrese de que el cable
de alimentación no cuelgue
sobre el borde de la superficie de trabajo, dado que ello
puede conducir a accidentes, si p. ej. los niños pequeños tiran de él.
No enrolle el cable de ali-
20.
mentación alrededor del
aparato y evite pliegues en
el cable para evitar
daños en
el cable de alimentación.
21. El cable de alimentación
debe estar colocado de
forma que no se pueda tirar
de él ni tropezar con él.
22. Para evitar lesiones, no des-
place el aparato mientras
esté en funcionamiento.
No utilice líquidos calientes.
23.
Asegúrese de que los ingre-
dientes utilizados tengan
como máximo la
tempera-
tura ambiente.
¡Las herramientas de corte
24.
son muy agudos! Preste
atención de no lesionarse al
colocar y retirar los discos
para cortar y para rallar.
25. La cuchilla también está
muy afilada. Durante su
colocación en el aparato y
la limpieza del mismo asegure siempre la cuchilla en
el borde superior y no en su
hoja.
No eleve el aparato tomán-
26.
dolo del asa del recipiente
cuando dicho recipiente esté
bloqueado en el aparato ya
que tanto éste como el
asa
podrían romperse.
27. No sobrecargue el recipi-
ente. La cantidad máxima
de llenado es de 0,5
l. Si
introduce ingredientes por
encima de esa medida podría
dañar el aparato.
28. No utilice el aparato cuando
el soporte de discos esté
defectuoso para así evitar
tanto daños en el aparato
como lesiones personales.
29. Conecte el aparato única
mente cuando la tapa esté
colocada.
30.
Utilice siempre la pieza de
llenado para añadir ingredientes con posterioridad.
¡Nunca añada ni introduzca
los ingredientes con la mano!
No introduzca ingredientes
31.
duros como huesos u objetos
como una cuchara de palo
por el embudo de llenado.
Hay peligro de lesiones.
32. Si algunos ingredientes
quedasen adheridos en el
lado interior del recipiente
apague el aparato, desconé
ctelo de la red y retire dichos
ingredientes con la ayuda de
una rasqueta de panadero.
33.
El tiempo de operación breve
es de 1 minuto. Tras un
minuto en funcionamiento
deje que el aparato se enfríe
antes de seguir utilizándolo
para evitar así un sobrecalentamiento del motor.
¡Cuidado! Evite el contacto
34.
con las piezas móviles del
aparato cuando esté en fun-
66
Page 67

cionamiento. Mantenga las
Copyright UNOLD AG | www.unold.de
manos, el cabello u otros
objetos alejados del aparato.
¡Peligro de lesiones!
35. Cuando desee vaciar el recipiente agitador retire en
primer lugar la cuchilla
y el
36. Desconecte el aparato y
espere hasta que el accionamiento se haya detenido
antes de proceder a retira la
tapa.
37.
Limpie el aparato después
de cada uso.
soporte para discos.
Nunca toque las piezas giratorias del aparato ni inserte objetos
o partes del cuerpo en el mismo mientras esté en marcha para
así evitar lesiones.
¡Cuidado! Los discos para rallar y cortar así como las cuchillas
están muy afiladas. ¡Peligro de lesiones!
No toque el interior del aparato ni introduzca objetos en el mismo
mientras esté en marcha. ¡Peligro de lesiones!
No abra la carcasa del aparato en ningún caso. Existe peligro de
descarga eléctrica.
El fabricante no es responsable en caso de montaje erróneo, uso inapropiado o equivocado o después de
haber sido efectuadas reparaciones por terceros no autorizados.
MANEJO
1. Retire todos los materiales de embalaje
y los seguros de transporte. Mantenga el
material de embalaje alejado de los niños.
¡Peligro de asfixia!
2. Limpie todas las piezas desmontables tal y
como se describe en el capítulo „Limpieza
y cuidado“.
COLOCAR Y RETIRAR EL RECIPIENTE AGITADOR
1. Coloque el recipiente agitador en la base
del aparato. Para ello, tenga en cuenta que
el asa del recipiente está situada un poco
atrás. Gire el recipiente por el asa en el
sentido de las agujas del reloj y según la
señal de las flechas en dirección „Cerrar“
sobre la base del aparato hasta que encaje.
La flecha del borde inferior del recipiente
debe quedar exactamente sobre la marca
circular de la base del aparato.
Atención: La cuchillas están muy
afiladas. ¡Peligro de lesiones!. Maneje
este aparato con mucho cuidado.
2. Seleccione la herramienta deseada y coló-
quela en el recipiente amasador. Más abajo
encontrará información adicional sobre la
correcta colocación de las herramientas.
3. El recipiente agitador y la herramienta correspondiente de batir o de corte debe colocarse siempre antes de introducir los ingredientes en el recipiente.
4. Coloque la tapa sobre el recipiente agita-
dor. A continuación deberá colocarse la
67
Page 68

boca de llenado de la tapa de tal forma que
Copyright UNOLD AG | www.unold.de
el pequeño pico que verá bajo dicha boca
quede delante del carril guía de la base del
aparato.
5. Gire la tapa en el sentido de las agujas del
reloj hasta que este pico encaje en la base
del aparato. Sabrá que ha encajado cuando
escuche un „clic“. La flecha del borde
superior del recipiente deberá estar exactamente sobre la marca circular de la tapa.
TRABAJAR CON LA CUCHILLA PARA PICAR
Para picar
Verdura, fruta, pan y bollos para hacer pan rallado, carne, chocolate, nueces
Obtendrá un mejor resultado si previamente corta los ingredientes en dados
de unos dos centímetros.
Amasar la masa
Utilice grasa a temperatura del frigorífico y no amase la masa durante
mucho tiempo. Antes de continuar trabajando la masa tras haberla pasado
por el aparato deberá volver a amasarla con las manos sobre una superficie
de trabajo.
1. Atención: No encienda el aparato sin
haberle introducido algún alimento, ya que
de lo contrario podría dañarse el motor.
2. Mantenga el aparato encendido por el
tiempo máximo de un minuto. Tras un
minuto de funcionamiento déjelo enfriar
antes de continuar trabajando con él.
3. La cantidad máxima de llenado es de 0,5 l
de ingredientes. Para evitar daños en el
aparato no sobrepase esta cantidad. Tenga
en cuenta que muchos alimentos, como la
carne, aumentan de volumen al picarlos.
4. Asegúrese de que el recipiente agitador está
correctamente colocado en la base del aparato.
5. Retire la protección de hoja de la cuchilla
para picar.
Sujete la cuchilla únicamente por la
clavija superior ya que las hojas de
las mismas están muy afiladas. Hay
peligro de lesiones.
68
6. Para poder retirar dicha tapa agarre el recipiente por el asa con una mano y gire la tapa
en sentido contrario a las agujas del reloj
hasta que el pico salga del carril guía. Retire
la tapa del aparato sacándola hacia arriba.
7. Para retirar el recipiente gírelo en el sentido
de la flecha hacia la posición „Abrir“ hasta
que pueda retirarlo de la base del aparato
tomándolo del asa.
6. Coloque cuidadosamente la cuchilla para
picar sobre el eje del recipiente agitador.
7. Atención: tanto el eje del aparato como la
parte interior de la herramienta tienen un
lado plano. Las herramientas solo pueden
colocarse cuando los dos lados planos queden situados uno sobre el otro. Introduzca
los ingredientes deseados en el recipiente
agitador. Tenga en cuenta que el recipiente
no puede rebosar.
8. Atención: Cuando desee amasar una masa
introduzca en el recipiente en primer lugar
Page 69

todos los ingredientes secos. A continuación
Copyright UNOLD AG | www.unold.de
añada los ingredientes líquidos necesarios
a través de la boca de llenado mientras el
aparato está removiendo.
9. Vuelva a colocar la tapa y bloquéela.
10. Enchufe la clavija en una caja de enchufe.
11. Conecte el aparato en el interruptor „Conectar“. La cuchilla comenzará a girar. También puede pulsar la tecla „Desconectar/
Impulso“; de esta forma el aparato funci-
onará con impulsos breves pero potentes.
Utilice el interruptor de impulsos únicamente en pequeños intervalos; si trabaja
durante más de cinco minutos utilice la
función permanente.
12. Si algunos ingredientes quedasen adheridos en el lado interior del recipiente apague
el aparato, desconéctelo de la red y retire
dichos ingredientes con la ayuda de una ras-
queta de panadero.
13. Cuando los ingredientes hayan alcanzado la
consistencia deseada desconecte el aparato
en el interruptor „Desconectar/Impulso“ y
retire el enchufe de la toma de pared.
14. Espere hasta que la cuchilla para picar se
haya detenido.
15. Retire la tapa.
16. Retire cuidadosamente la cuchilla para
picar del recipiente. Sujete la cuchilla únicamente por la clavija superior ya que las
hojas de las mismas están muy afiladas.
Hay peligro de lesiones.
17. Retire los ingredientes del recipiente agitador.
18. Tan pronto como haya limpiado todas las
piezas vuelva a colocar la protección de hoja
en la cuchilla por motivos de seguridad.
INTERRUPTOR DE SEGURIDAD
El aparato está equipado con un interruptor de seguridad que evita que se ponga en funcionamiento
cuando no esté correctamente montado. Cuando todas las piezas estén correctamente montadas
podrá conectar el aparato.
TRABAJAR CON EL AGITADOR
Para batir y montar
nata, batir huevos a punto de nieve y hacer masa de biscuit. Utilice nata
UHT y enfríela durante una hora en el frigorífico antes de utilizarla.
1. Siga las indica-
ciones de preparación
del capítulo „Trabajar con la cuchilla para
picar“.
2. Coloque cuidadosamente el agitador sobre
el eje del recipiente agitador.
3. Atención: tanto el eje del aparato como la
parte interior de la herramienta tienen un
lado plano. Las herramientas solo pueden
colocarse cuando los dos lados planos queden situados uno sobre el otro.
4. Introduzca los ingredientes deseados en el
recipiente agitador. Tenga en cuenta que el
recipiente no puede rebosar.
5. Vuelva a colocar la tapa y bloquéela.
6. Enchufe la clavija en una caja de enchufe.
7. Conecte el aparato en el interruptor „Conectar“. El agitador comenzará a girar. También puede pulsar la tecla „Desconectar/
Impulso“; de esta forma el aparato funci-
onará con impulsos breves pero potentes.
Utilice el interruptor de impulsos única-
69
Page 70

mente en pequeños intervalos de entre
Copyright UNOLD AG | www.unold.de
cinco y diez segundos.
8. Si algunos ingredientes quedasen adheridos en el lado interior del recipiente apague
el aparato, desconéctelo de la red y retire
dichos ingredientes con la ayuda de una rasqueta de panadero.
9. Cuando los ingredientes hayan alcanzado la
consistencia deseada desconecte el aparato
en el interruptor „Desconectar/Impulso“ y
retire el enchufe de la toma de pared.
10. Espere hasta que el agitador se haya detenido.
11. Retire la tapa.
12. Retire cuidadosamente el agitador del recipiente.
13. Retire los ingredientes del recipiente agitador.
TRABAJAR CON LOS DISCOS PARA RALLAR Y CORTAR
Para cortar y rallar
verdura, fruta, pan para pan rallado, queso, parmesano, finas hierbas, chocolate
Tenga en cuenta que el plástico puede adquirir otro color tras la manipulación de, p. ej., zanahorias.
Podrá eliminar fácilmente este color utilizando un poco de grasa (p. ej., mantequilla).
Con aquellos ingredientes que puedan fundirse (como p. ej. chocolate o queso de pasta dura) los
tiempos de procesado deberán ser lo más breves posibles para evitar que se calienten demasiado.
Mantenga el aparato encendido por el tiempo máximo de un minuto. Tras un minuto de funciona-
miento déjelo enfriar antes de continuar trabajando con él.
1. Siga las indicaciones de preparación del
capítulo „Trabajar con la cuchilla para
picar“.
2. Coloque cuidadosamente el disco deseado
en el soporte de discos. Los discos se intro-
ducen desde arriba en el orificio del soporte
de discos. Tenga en cuenta que el lado
plano del disco deberá dar al lado plano
del orificio. Sólo así encajará correctamente
el disco. Compruebe si el disco está bien
fijado y continúe con el proceso.
Atención: Las hojas de los discos
están muy afiladas. Peligro de lesiones.
3. Coloque cuidadosamente el soporte de discos en el eje del recipiente agitador.
4. Atención: tanto el eje del aparato como la
parte interior de la herramienta tienen un
lado plano. Las herramientas solo pueden
colocarse cuando los dos lados planos queden situados uno sobre el otro.
70
5. Coloque de nuevo la tapa.
6. Conecte el aparato en el interruptor „Conectar“. El agitador comenzará a girar. También puede pulsar la tecla „Desconectar/
Impulso“; de esta forma el aparato funci-
onará con impulsos breves pero potentes.
Utilice el interruptor de impulsos únicamente en pequeños intervalos de entre
cinco y diez segundos.
7. Introduzca los ingredientes a través del
embudo de llenado. Si los ingredientes son
demasiado grandes deberán cortarse previamente en dos o en cuatro trozos o en un
tamaño adecuado al embudo de llenado.
8. Utilice siempre la pieza de llenado para
añadir ingredientes con posterioridad.
¡Nunca añada ni introduzca los ingredientes
con la mano!
9. No introduzca ingredientes duros como
huesos u objetos como una cuchara de palo
Page 71

por el embudo de llenado. Hay peligro de
Copyright UNOLD AG | www.unold.de
lesiones.
10. Cuando haya finalizado con la preparación
de los ingredientes desconecte el aparato
en el interruptor „Desconectar/Impulso“ y
retire el enchufe de la toma de pared.
11. Espere hasta que el soporte de discos se
haya detenido.
12. Retire la tapa.
13. Retire cuidadosamente el soporte de discos
del recipiente. Esta acción resulta más sencilla si retira previamente el recipiente de la
base y lo vuelve a colocar en la posición de
origen ligeramente movido. De esta forma el
soporte de discos se desplaza hacia arriba y
LIMPIEZA Y CUIDADO
podrá retirarlo con mayor facilidad y seguridad.
14. Las hojas de las cuchillas están muy afiladas.
Hay peligro de lesiones.
15. Desde un punto de vista técnico es posible
que queden algunos pequeños restos de alimentos en el soporte de discos.
16. Retire los ingredientes del recipiente agitador.
Para retirar el disco del soporte gire dicho soporte y presione el disco hacia abajo para sacarlo de su posición.
Tenga mucho cuidado: las hojas están
muy afiladas y existe peligro de lesiones.
Antes de la limpieza desconectar
siempre el aparato y desenchufar la
clavija de la red de corriente.
1. Limpie el aparato después de cada uso.
2. La base del aparato y el cable de alimenta-
ción no deben sumergirse en agua u otros
líquidos.
3. Excepto la base del aparato, puede meter
todas las demás piezas en el lavavajillas
(cesta superior). Las piezas de la base del
aparato las puede lavar con agua caliente y
un poco de detergente suave.
4. ¡Las herramientas de corte son muy agudos!
Tenga cuidado de no lesionarse durante la limpieza de los discos para cortar y rallar.
5. Para evitar lesiones no deje nunca las herramientas de corte sumergidas en el agua
de limpieza.
6. Limpie la base del aparato con un paño
húmedo y a continuación séquelo bien.
7. No utilice productos de limpieza agresivos,
lana o estopa de acero, objetos metálicos,
desinfectantes ni productos de limpieza
calientes, ya que pueden producir daños.
8. Por motivos de seguridad vuelva a colocar la
protección de la hoja en la cuchilla una vez
que la haya limpiado.
9. Los distintos discos para cortar y rallar pueden guardarse dentro de la pieza de llenado.
10. El aparato deberá estar completamente seco
antes de poder utilizarlo de nuevo.
11. Guarde el robot de cocina completamente
seco en un lugar seco y seguro para protegerlo del polvo, golpes, calor y humedad.
71
Page 72

RECETAS
Copyright UNOLD AG | www.unold.de
Rábano picante con manzana
Disco para rallado fino
1 manzana de piel roja. Trozo de rábano picante
de aprox. 2 cm (preferiblemente de la cabeza,
al ser ésta más tierna), 1 cucharadita de nata,
1 pizca de azúcar
Rallar la manzana y el rábano con el disco de
rallado fino y salpimentar con nata y azúcar. Va
muy bien con carne cocida y pescado ahumado
Colinabo con nata
Disco de rallado grueso
1 colinabo de tamaño mediano, 1 cucharada
de mantequilla, 1 cucharada de perejil picado,
1 cucharada de nata dulce, sal, pimienta, nuez
moscada
Pelar el colinabo y rallarlo en tiras con el disco
de rallado grueso. Calentar la mantequilla en
una sartén. Rehogar el colinabo en la mante-
quilla hasta que quede „al dente“. Condimentar
con sal, pimienta y nuez moscada, añadir lenta-
mente la nata y espolvorear con perejil.
Tarta de pera
Masa de bizcocho para molde de horno individu-
al, 20 cm de diámetro
50 g de mantequilla, 1 huevo, 50 g de azúcar,
1 sobrecito de vainilla azucarada, 1 cucharada
de amaretto, 1 cucharadita colmada de cacao,
100 g de harina, 1 cucharadita de levadura, 1-2
peras
Mezclar la mantequilla, el huevo, el azúcar, la
vainilla azucarada y el Amaretto con el agitador.
Añadir poco a poco el cacao, la harina y la levadura utilizando el interruptor de impulsos.
Verter en un molde previamente engrasado.
Pelar, cortar en cuartos y deshuesar las peras,
cortar en rodajas finas de forma que se obtenga
un abanico y empujarlas sobre la masa. Hornear
en el horno a 160 °C durante aprox. 30 minutos.
Consejo: Preparar la masa sin cacao y cubrirla
con las rodajas de manzana o albaricoque en
forma de abanico.
Masa para gofres
Agitador
50 g de mantequilla líquida, 1 huevo, 50 g de
azúcar, 1 sobrecito de vainilla azucarada, 1 cucharadita de ron, 100 g de harina, 1/2 cucharadita de levadura
Mezclar la mantequilla, el huevo, el azúcar,
la vainilla azucarada y el ron con el agitador.
Añadir la levadura utilizando el interruptor de
impulsos. Verter la masa por porciones en la
gofrera eléctrica y hornearlos hasta que queden
dorados.
Nata para montar
Agitador
200 ml de nata para montar, 1 sobrecito de vainilla azucarada
Batir la nata fría y la vainilla azucarada a punto de nieve con el agitador. Durante el proceso
parar a menudo y comprobar la consistencia.
Gratinado de patatas
Discos para cortar
2 patatas, 100 ml de nata dulce, 1/2 cebolla
1 huevo, 50 g de queso emmental rallado, sal,
pimienta, nuez moscada
Pelar las patatas y cortarlas en rodajas gruesas
con el disco para cortar. Pelar también la cebolla y cortarla en rodajas igualmente gruesas.
Colocar las rodajas en capas en un molde engrasado alternando la patata y la cebolla.
Batir la nata con el huevo y los condimentos,
verterlo sobre las patatas y espolvorear el queso.
Hornear en el horno a 160 °C durante aprox.
30 minutos.
72
Page 73

Ensalada de zanahoria
Copyright UNOLD AG | www.unold.de
Disco de rallado medio
1 zanahoria, 1 manzana, 1 cucharada de nueces, 2 cucharadas de zumo de naranja, 1 cucharadita de aceite
Pelar las zanahorias, deshuesar la manzana y
cortarla en cuartos.
Rallar la manzana y las zanahorias con el disco
de rallado medio, espolvorear las nueces, añadir
el zumo de naranja y el aceite y mezclar.
Patatas chips
Disco de corte fino
2 patatas de pulpa harinosa, 1 cucharada de
aceite, 1 cucharada de pimentón
Lavar y pelar las patatas. Cortar en rodajas finas
con el disco de corte fino. Marinar con aceite y
pimentón.
Cubrir la bandeja de horno con papel de horno.
Distribuir las rodajas de patata sobre ella y hor-
nearlas a 180 °C en el horno hasta que estén
tostadas.
Carne picada (de cerdo)
Cuchilla
150 g de escalope de cerdo, 1/2 cebolla, 1 yema
de huevo, sal, pimienta
Picar todos los ingredientes con la cuchilla
para picar. Con la cuchilla puede picar también
chocolate, finas hierbas, nueces, trozos de pan
seco, queso, rábano picante, jengibre, etc.
Albóndiga de hígado como guarnición para la sopa
Cuchilla
150 hígado de vacuno, 1/2 cebolla, 1 panecillo
humedecido y escurrido, 2 cucharadas de pan
rallado, 1 huevo, sal, pimienta, nuez moscada
Picar muy finos todos los ingredientes con la
cuchilla para picar. Calentar un litro de caldo
de ternera. Con una cucharilla coger pequeñas
porciones de masa e introducirlas en el líquido
hirviendo hasta que estén hechas.
73
Page 74

CONDICIONES DE GARANTIA
Copyright UNOLD AG | www.unold.de
La garantía para nuestros equipos es de 24 meses, y de 12 meses en el caso de uso comercial, a partir de la fecha de
compra, cubriendo los daños que con un uso acorde a lo prescrito pueden atribuirse fehacientemente a defectos de fabricación. Dentro del período de garantía, solucionamos errores de material y de fabricación a consideración nuestra mediante
reparación o cambio. Nuestros servicios de garantía son válidos únicamente para los aparatos que han sido vendidos en
Alemania y Austria. Para todos los demás casos diríjase por favor al importador correspondiente. Aquellos aparatos que se
presentan para eliminar errores, por favor enviarlos junto a una copia del comprobante de compra extendido a máquina, del
cual debe desprenderse la fecha de compra, así como una breve descripción de las deficiencias, apropiadamente embalado
y con los sellos correspondientes a nuestro servicio al cliente. En caso de garantía, los gastos de envío serán restituidos al
cliente solamente en Alemania y Austria. Aquellos daños causados por desgaste están excluidos de la garantía, así como
manipulación incorrecta, e incumplimiento de las condiciones de mantenimiento y cuidado. El derecho a garantía expira si las
reparaciones o mantenimiento son realizadas por terceros. Todo reclamo del consumidor final ante el vendedor, comerciante
no se ve afectado por esta garantía.
DISPOSICIÓN/PROTECCIÓN DEL MEDIO AMBIENTE
Nuestros aparatos se fabrican con un alto nivel de calidad por un largo período de uso. El mantenimiento
regular y las reparaciones de tipo técnico a través de nuestro servicio al cliente pueden prolongar la duración del aparato. Cuando un aparato está defectuoso y ya no puede repararse, por favor considere en la
disposición final los siguientes puntos: Este producto no puede ser eliminado junto a la basura domiciliaria.
Usted debe entregar este producto a un lugar oficial para el reciclaje de aparatos eléctricos o electrónicos.
Mediante la clasificación por separado y el reciclaje de productos residuales, Usted contribuye a proteger
los recursos naturales y asegura que el producto sea eliminado de forma salubre y acorde con el medio
ambiente.
Las recetas del presente manual de instrucciones han sido cuidadosamente seleccionadas y probadas
tanto por sus autores como por UNOLD AG quienes, no obstante, no asumen garantía alguna. Queda
explícitamente excluida cualquier responsabilidad de los autores y UNOLD AG o sus delegados por
daños personales, materiales o financieros.
74
Page 75

NÁVOD K OBSLUZE MODELU 78501
Copyright UNOLD AG | www.unold.de
TECHNICKÉ ÚDAJE
Výkon: 250 W, 230 V~, 50 Hz
Rozměry: Cca 29,0 x 20,0 x 27,3 cm (D/Š/V)
Hmotnost: Cca 1,5 kg
Délka kabelu: Cca 90 cm
Kryt: Plast bílý/antracit
Vybavení: Kompaktní kuchyňský robot, sekací nůž pro rozmělnění a hnětení, krouhací
ústrojí pro strouhání a krouhání, míchadlo na šlehačku, bílek a lehká třená
těsta, míchací nádoba pro zpracování cca 0,5 litru tekutin, nacpavač se
stupnicí, krátká doba provozu jedna minuta
Příslušenství: Sekací nůž, míchadlo, držák nástavců, 2 krouhací nástavce, 3 strouhací
nástavce, návod k použití
Je vyhrazeno právo na omyly a změny vybavení, techniky, barev a designu
VYSVĚTLENÍ SYMBOLŮ
Tento symbol označuje eventuální nebezpečí, která mohou mít za následek zranění nebo
poškození přístroje.
PRO VAŠI BEZPEČNOST
Následující pokyny si přečtěte a
uložte.
Všeobecné bezpečnostní pokyny
1. Přístroj může být používán
dětmi od 8 let a osobami se
sníženými fyzickými, smys-
lovými nebo duševními schopnostmi nebo s nedostatkem
zkušeností a/nebo nedostatkem znalostí, pokud jsou
pod dohledem nebo pokud
byly poučeny o
používání přístroje a
porozuměly z něj vyplývajícím rizikům. Přístroj není
hračka. Čištění a
přístroje smí provádět děti
pouze pod dohledem.
bezpečném
údržbu
2. Děti do 3 let by se neměly k
přístroji přibližovat nebo být
pod trvalým dohledem.
3. Děti mezi 3 a 8 roky by měly
zapínat a vypínat přístroj
pouze tehdy, když se nachází
ve své určené normální
pozici ovládání a když jsou
pod dohledem nebo pokud
byly poučeny o bezpečném
používání přístroje a
porozuměly z něj vyplýva
jícím rizikům. Děti mezi 3 a
8 roky by
neměly přístroj ani
připojovat ani ovládat, čistit
nebo provádět údržbu.
75
-
Page 76

4. Je nutné dohlížet na děti,
Copyright UNOLD AG | www.unold.de
aby bylo zajištěno, že si s
přístrojem nehrají.
5. Uchovávejte přístroj na místě
nepřístupném dětem.
6. Přístroj připojujte pouze na
střídavý proud s napětím
podle typového štítku.
7. Tento přístroj nesmí být
používán s externími
časovými spínacími hodi
nami nebo se systémem pro
dálkové ovládání.
8.
V žádném případě přístroj
nebo jeho přívod neponořujte
do vody nebo do jiné kapaliny.
Přístroj je určen výhradně
9.
pro domácí použití nebo
podobné účely, např.
pro pečení koláčů v obcho-
dech, kancelářích nebo na
podobných pracovištích,
v zemědělských provozech,
pro použití hosty v hotelu,
motelu nebo jiných ubyto-
vacích zařízeních,
v soukromých penziónech
nebo rekreačních objektech.
10. Přístroj a jeho přívod nesmí
být čištěny v myčce.
11. Vytáhněte zástrčku ze
zásuvky dříve, než budete
přístroj rozebírat nebo čistit,
sundávat nebo nasazovat
jednotlivé díly, nebo když
budete přístroj dávat na jiné
místo.
12. Přístroj nesmí být používán
s příslušenstvím jiných
výrobců nebo značek, aby se
předešlo poškození.
13. Po použití i před čištěním
vyndejte síťovou zástrčku ze
zásuvky. Nikdy nenechávejte
přístroj bez dozoru, když je
připojen do sítě.
14. Pravidelně kontro
lujte přístroj, zástrčku a
přívodní kabel, zda
opotřebeny nebo poškozeny.
Při poškození přívodního
-
kabelu nebo jiných dílů
pošlete přístroj na kontrolu
a opravu do našeho servisu.
Neodborné opravy mohou
vést k značnému nebezpečí
pro uživatele a mají za následek ztrátu záruky.
Pokyny k postavení a obsluze
přístroje
Přístroj je vhodný pouze pro
15.
použití ve vnitřních prostorech.
Nikdy se přístroje popř.
16.
jeho přívodu nedotýkejte
mokrýma rukama.
17. Z bezpečnostních důvodů
přístroj nikdy nestavte na
horké povrchy, kovový podnos nebo mokrý podklad.
Přístroj ani přívodní
nesmí být používány v blízkosti plamenů.
Kuchyňského robota vždy
18.
používejte na volném, rovném a neklouzavém podkladu.
Dbejte na to, aby přívodní
19.
kabel nevisel přes okraj
pracovní plochy, protože to
může vést k nehodám, např.
za něj mohou zatáhnout
malé děti.
-
nejsou
kabel
76
Page 77

20. Nenavíjejte přívodní vedení
Copyright UNOLD AG | www.unold.de
kolem přístroje a nepřipusťte
lámání přívodu, abyste zabránili jeho poškození.
Přívod musí být položen tak,
21.
aby bylo vyloučeno zatažení
za něj nebo zakopnutí.
22. Dokud je přístroj v provozu,
neposunujte jej, abyste
předešli zraněním.
23. Nepoužívejte žádné horké
tekutiny. Dbejte na to,
aby použité přísady měly
maximálně pokojovou
teplotu.
24. Řezací nástroje jsou velmi
ostré! Při nasazování a
sundavání krouhacích a
strouhacích nástavců dbejte
na to, abyste se nezranili.
25. Sekací nůž je rovněž velmi
ostrý. Při vkládání do přístroje
a při čištění vždy držte nůž
pevně za horní okraj, nikoli
však za čepel.
26. Netahejte přístroj směrem
nahoru za držadlo nádoby,
když je nádoba v přístroji
zablokována, protože by
mohlo dojít k prasknutí
přístroje popř. držadla.
27. Nepřeplňujte nádobu.
Maximální množství náplně
činí 0,5 l přísad. Když
naplníte větší množství
přísad, může se přístroj
poškodit.
28. Nepoužívejte přístroj, když je
držák nástavců vadný, abyste
předešli poškození přístroje
a zranění.
29. Nezapínejte přístroj, když je
nádoba prázdná.
30. Pro dodatečné přidávání
přísad vždy používejte
nacpavač. Nikdy nestrkejte
přísady do přístroje rukou!
31. Nikdy skrz plnicí trychtýř
nestrkejte tvrdé přísady jako
kosti nebo předměty jako
lžíce. Je nebezpečí zranění.
32. Pokud se přísady přichytí
na vnitřní straně nádoby,
vypněte přístroj, vytáhněte
zástrčku ze sítě a teprve
potom uvolněte tyto přísady
pomocí stěrky.
33. Krátká doba provozu činí
1 minutu. Nechte přístroj
po jedné minutě krátce och
ladit a dále s ním pracujte
až potom, abyste
předešli
přehřátí motoru.
34. Opatrně: Vyvarujte se kontaktu s pohyblivými částmi
přístroje, když je
v provozu.
Udržujte dostatečný odstup
rukou, vlasů nebo jiných
předmětů od přístroje, hrozí
nebezpečí zranění!
35. Když chcete vyprázdnit
míchací nádobu, nejprve
odstraňte sekací nůž, popř.
držák nástavců.
36. Vypněte přístroj a počkejte,
dokud se pohon nezastaví,
než sundáte kryt.
37. Po každém použití přístroj
vyčistěte.
-
77
Page 78

Nikdy se nedotýkejte otáčejících se dílů přístroje a do běžícího
Copyright UNOLD AG | www.unold.de
přístroje nestrkejte ani předměty ani části těla, abyste se
vyvarovali zranění.
Opatrně! Strouhací a krouhací nástavce i sekací nůž jsou velmi
ostré - hrozí nebezpečí zranění!
Nesahejte do běžícího přístroje ani do něj nestrkejte žádné
předměty - hrozí nebezpečí zranění!
V žádném případě těleso přístroje neotevírejte. Je nebezpečí
úderu elektrickým proudem.
Výrobce nepřebírá žádné ručení při chybné montáži, neodborném nebo chybném použití nebo po provedení
opravy neautorizovanými třetími osobami.
PŘED PRVNÍM POUŽITÍM
1. Odstraňte všechny části balení a transportní
pojistky. Materiál balení udržujte mimo
dosah dětí – nebezpečí udušení!
2. Všechny odnímatelné díly vyčistěte, jak je
popsáno v kapitole Čištění a péče.
VLOŽENÍ A VYJMUTÍ MÍCHACÍ NÁDOBY
1. Nasaďte míchací nádobu na základnu
přístroje. Dbejte přitom na to, aby držadlo
nádoby bylo umístěno poněkud vzadu a
potom otočte nádobou za držadlo ve směru
hodinových ručiček a podle označení šipkou
ve směru „Zav“ na základně přístroje, až
nádoba zaskočí. Šipka na spodním okraji
nádoby musí být přesně nad značkou
kroužku na základně přístroje.
2. Zvolte požadovaný nástroj a vložte jej do
míchací nádoby. Informace ke správnému
vložení jednotlivých nástrojů jsou uvedeny
níže.
3. Míchací nádoba a příslušný míchací nebo
krouhací nástroj musí být vždy vloženy dříve,
než začnete nádobu plnit přísadami.
4. Nasaďte kryt na míchací nádobu. Plnicí
otvor krytu by měl být zpočátku umístěn
tak, aby malý výstupek, který je vidět pod
Pozor: Sekací nůž a jednotlivé
nástavce jsou velmi ostré, hrozí
nebezpečí zranění. S těmito díly
manipulujte velmi opatrně.
plnicím otvorem, byl před vodicí lištou na
základně přístroje.
5. Nyní otočte krytem ve směru hodinových
ručiček, dokud tento výstupek nezaskočí
do základny přístroje. To je poznat podle
hlasitého cvaknutí. Šipka na horním okraji
nádoby musí být přesně pod značkou
kroužku na krytu.
6. Pro sundání krytu podržte nádobu jednou
rukou za držadlo a otočte kryt proti směru
hodinových ručiček, až výstupek vyklouzne
z vodicí lišty. Vyjměte kryt směrem nahoru
z přístroje.
7. Pro sundání nádoby s ní otáčejte ve směru
šipky k „Otev“, až je možné ji za držadlo
sundat ze základny přístroje.
78
Page 79

BEZPEČNOSTNÍ SPÍNAČ
Copyright UNOLD AG | www.unold.de
Přístroj je vybaven bezpečnostním spínačem, který brání uvedení přístroje do provozu, pokud není
správně sestaven. Pouze když jsou všechny části správně namontovány, je možné přístroj zapnout.
PRÁCE SE SEKACÍM NOŽEM
Pro sekání
zeleniny, ovoce, chleba a housek na strouhanku, masa, čokolády, ořechů
Velmi dobrý výsledek získáte, když přísady nejprve nakrájíte na cca dva
centimetry velké kostičky.
Hnětení těsta
Používejte vychlazený tuk z ledničky a nenechávejte těsto hníst příliš dlouho.
Dříve, než těsto po hnětení dále zpracujete, měli byste jej na pracovní ploše
ještě jednou prohníst rukama.
1. Pozor: Nezapínejte přístroj, aniž byste
jej naplnili potravinami, protože to může
poškodit motor.
2. Nechte přístroj pracovat maximálně jednu
minutu v kuse. Po jedné minutě nechte
přístroj krátce vychladnout, než s ním
budete pracovat dále.
3. Maximální množství náplně činí 0,5 l přísad.
Toto množství nepřekračujte, abyste se vyvarovali poškození přístroje. Dbejte přitom
také na to, že mnohé potraviny jako např.
maso zvětšují při rozsekání svůj objem.
4. Ujistěte se, že míchací nádoba správně sedí
na základně přístroje.
5. Sundejte ochranu čepele ze sekacího nože.
Nože se dotýkejte pouze za horní
dřík, čepele nože jsou velmi ostré. Je
nebezpečí zranění.
6. Opatrně nasaďte sekací nůž na hřídel v
míchací nádobě.
7. Pozor: Jak hřídel v přístroji tak i vnitřek
nástrojů má jednu stranu zploštělou.
Všechny nástroje je možné nasadit pouze
tehdy, když jsou obě zploštělá místa nad
sebou.
8. Vložte požadované přísady do míchací
nádoby. Dbejte na to, abyste míchací
nádobu nepřeplnili.
9. Pozor: Když chcete hníst těsto, vložte do
nádoby nejprve všechny suché přísady.
Potom plnicím otvorem přilévejte potřebnou
tekutinu, zatímco přístroj míchá.
10. Opět nasaďte kryt a aretujte jej.
11. Zapojte zástrčku do zásuvky.
12. Zapněte přístroj spínačem „ON“. Nůž se
začne otáčet. Můžete také stisknout tlačítko
„OFF/PULSE“, přístroj pak pracuje v krátkých, silných záběrech. Používejte spínač
PULSE pouze v intervalech. Pokud pracu-
jete déle než pět minut, použijte trvalou
funkci.
79
Page 80

13. Pokud se přísady přichytí na vnitřní straně
Copyright UNOLD AG | www.unold.de
nádoby, vypněte přístroj, vytáhněte zástrčku
ze sítě a teprve potom uvolněte tyto přísady
pomocí stěrky.
14. Když přísady získaly požadovanou konzistenci, vypněte přístroj spínačem „OFF/
PULSE“ a vytáhněte zástrčku ze zásuvky.
15. Počkejte, dokud se sekací nůž nezastaví.
16. Sundejte kryt.
PRÁCE S MÍCHADLEM
Pro míchání popř. šlehání
smetany, bílku na sníh a piškotového těsta. Silně ohřátou smetanu několik
hodin předem vychlaďte v ledničce.
17. Opatrně vyjměte sekací nůž z nádoby. Nože
se dotýkejte pouze za horní dřík, čepele
nože jsou velmi ostré. Je nebezpečí zranění.
18. Vyprázdněte přísady z míchací nádoby.
19. Jakmile jsou všechny díly vyčištěny,
upevněte na sekací nůž z bezpečnostních
důvodů opět ochranu čepele.
1. Respektujte pokyny k přípravě v kapitole
„Práce se sekacím nožem“.
2. Opatrně nasaďte míchadlo na hřídel v
míchací nádobě.
3. Pozor: Jak hřídel v přístroji tak i vnitřek
nástrojů má jednu stranu zploštělou.
Všechny nástroje je možné nasadit pouze
tehdy, když jsou obě zploštělá místa nad
sebou.
4. Vložte požadované přísady do míchací
nádoby. Dbejte na to, abyste míchací
nádobu nepřeplnili.
5. Opět nasaďte kryt a aretujte jej.
6. Zapojte zástrčku do zásuvky.
7. Zapněte přístroj spínačem „ON“. Míchadlo
se začne otáčet. Můžete také stisknout
tlačítko „OFF/PULSE“, přístroj pak pracuje
v krátkých, silných záběrech. Používejte
spínač PULSE pouze v intervalech od pěti
do deseti vteřin.
8. Pokud se přísady přichytí na vnitřní straně
nádoby, vypněte přístroj, vytáhněte zástrčku
ze sítě a teprve potom uvolněte tyto přísady
pomocí stěrky.
9. Když přísady získaly požadovanou konzistenci, vypněte přístroj spínačem „OFF/
PULSE“ a vytáhněte zástrčku ze zásuvky.
10. Počkejte, dokud se míchadlo nezastaví.
11. Sundejte kryt.
12. Opatrně vyjměte míchadlo z nádoby.
13. Vyprázdněte přísady z míchací nádoby.
PRÁCE SE STROUHACÍMI A KROUHACÍMI NÁSTAVCI
Pro krájení a strouhání
zeleniny, ovoce, chleba na strouhanku, sýra, par-
mazánu, bylinek, čokolády
Dbejte na to, že plast se může zpracováním např. mrkve zbarvit. Tato zbarvení lze snadno odstranit
tukem (např. máslem).
80
Page 81

U přísad, které se mohou roztéci (např. čokoláda nebo tvrdý sýr), dbejte na co nejkratší dobu zpraco-
Copyright UNOLD AG | www.unold.de
vání, aby se předešlo nadměrnému ohřátí těchto přísad.
Nechte přístroj pracovat maximálně jednu minutu v kuse. Po jedné minutě nechte přístroj krátce
vychladnout, než s ním budete pracovat dále.
1. Respektujte pokyny k přípravě v kapitole
„Práce se sekacím nožem“.
2. Opatrně nasaďte požadovaný nástavec
na držák nástavců. Nástavce se nasazují
seshora do otvoru v držáku nástavců. Dbejte
přitom na to, aby plochá strana nástavce
směřovala k ploché straně otvoru. Jen tak
je možné nástavec aretovat. Zkontrolujte,
zda nástavec pevně sedí a teprve potom
pokračujte.
Pozor: Čepele nástavců jsou velmi
ostré, hrozí nebezpečí zranění.
3. Opatrně nasaďte držák nástavců na hřídel v
míchací nádobě.
4. Pozor: Jak hřídel v přístroji tak i vnitřek
nástrojů má jednu stranu zploštělou.
Všechny nástroje je možné nasadit pouze
tehdy, když jsou obě zploštělá místa nad
sebou.
5. Opět nasaďte kryt.
6. Zapněte přístroj spínačem „ON“. Míchadlo
se začne otáčet. Můžete také stisknout
tlačítko „OFF/PULSE“, přístroj pak pracuje
v krátkých, silných záběrech. Používejte
spínač PULSE pouze v intervalech od pěti
do deseti vteřin.
7. Naplňte přísady skrz plnicí trychtýř. Pokud
by přísady byly příliš velké, je nutné je
pokrájet na poloviny nebo čtvrtiny popř. na
velikost plnicího trychtýře.
8. Pro dodatečné přidávání přísad vždy
používejte nacpavač. Nikdy nestrkejte
přísady do přístroje rukou!
9. Nikdy skrz plnicí trychtýř nestrkejte tvrdé
přísady jako kosti nebo předměty jako lžíce.
Je nebezpečí zranění.
10. Když jste se zpracováním přísad hotovi,
vypněte přístroj spínačem „OFF/PULSE“ a
vytáhněte zástrčku ze zásuvky.
11. Počkejte, dokud se držák nástavců nezastaví.
12. Sundejte kryt.
13. Opatrně vyjměte držák nástavců z nádoby.
To se podaří snáze, když nádobu sundáte ze
základny přístroje a znovu nasadíte s mírným
přesazením vůči původní poloze. Držák
nástavců se tak posune nahoru a můžete jej
pak vyjmout bezpečněji a snadněji.
14. Čepele nástavců jsou velmi ostré. Je nebezpečí
zranění.
15. Technicky podmíněna je možnost, že
malé zbytky potravin zůstanou na držáku
nástavců.
16. Vyprázdněte přísady z míchací nádoby.
17. Pro vyjmutí nástavce z držáku nástavců
otočte držák nástavců a nástavec z držáku
vymáčkněte směrem dolů.
Buďte velmi opatrní, protože čepele
jsou ostré a hrozí nebezpečí zranění.
81
Page 82

ČIŠTĚNÍ A PÉČE
Copyright UNOLD AG | www.unold.de
Před čištěním přístroj vždy vypněte a
vyndejte zástrčku ze zásuvky.
1. Po každém použití přístroj vyčistěte.
2. Základna přístroje ani přívodní kabel nesmí
být ponořovány do vody nebo jiné tekutiny.
3. S výjimkou základny přístroje můžete
všechny části čistit v myčce (v horním koši).
Všechny části kromě základny přístroje
můžete také vyčistit v teplé vodě, do které
přidáte trochu saponátu.
4. Řezací nástroje jsou velmi ostré! Při čištění
krouhacích a strouhacích nástavců a nože
dbejte na to, abyste se nezranili.
5. Nikdy nenechávejte tyto ostré nástroje ve
vodě na mytí, abyste předešli zraněním.
RECEPTY
Jablečný křen
Strouhací nástavec jemný
1 jablko s červenou slupkou, cca 2 cm křenu
(nejlépe od hlavy, protože je jemnější), 1 čajová
lžička smetany, 1 špetka cukru
Jablko a křen rozstrouhejte pomocí jemného
strouhacího nástavce a dochuťte smetanou a
cukrem. Výborně chutná k vařenému masu a
uzené rybě
Dušená kedlubna
Strouhací nástavec hrubý
1 kedlubna střední velikosti, 1 lžíce másla,
1 lžíce nasekané petržele, 1 lžíce sladké smetany, sůl, pepř, muškát
Oloupejte kedlubnu a hrubým strouhacím
nástavcem ji nastrouhejte. Na pánvi nechte
rozehřát máslo. Nechte kedlubnu v másle dusit. Okořeňte solí, pepřem a muškátem, podlijte
smetanou a posypte petrželí.
6. Otřete základnu přístroje vlhkou utěrkou a
potom ji pečlivě osušte.
7. Nepoužívejte abrazivní čisticí prostředky,
drátěnku, kovové předměty, dezinfekční
prostředky ani horké čisticí prostředky,
protože mohou způsobit poškození.
8. Z bezpečnostních důvodů opět upevněte
ochranu čepele na sekací nůž, jakmile je
nůž vyčištěn.
9. Různé krouhací a strouhací nástavce je
možné dobře uložit uvnitř nacpavače.
10. Před opětným použitím přístroje musí být
zcela suchý.
11. Zcela usušený kuchyňský robot uložte na
suché a bezpečné místo, aby byl chráněn
před prachem, nárazy, horkem a vlhkem.
Hruškový koláč
Třené těsto do malé formy, průměr 20 cm
50 g másla, 1 vejce, 50 g cukru, 1 sáček vanilkového cukru, 1 lžíce amaretta, 1 vrchovatá
čajová lžička kakaa, 100 g mouky, 1 čajová
lžička prášku do pečiva, 1–2 hrušky
Máslo, vejce, cukr, vanilkový cukr a amaretto rozmíchejte míchadlem. Přidejte kakaový prášek,
mouku a prášek do pečiva, rozmíchejte pomocí
spínače PULSE. Naplňte formu vymazanou tukem. Oloupejte a rozčtvrťte hrušky, zbavte je
jader, rozkrájejte je do vějíře a přitlačte na těsto.
Pečte v troubě při 160°C cca 30 minut. Tip:
Připravte si těsto bez kakaa a pokryjte jej do
vějíře pokrájenými kousky jablek nebo meruněk.
82
Page 83

Těsto na vafle
Copyright UNOLD AG | www.unold.de
Míchadlo
50 g tekutého másla, 1 vejce, 50 g cukru,
1 sáček vanilkového cukru, 1 čajová lžička
rumu, 100 g mouky, 1/2 čajové lžičky prášku
do pečiva
Máslo, vejce, cukr, vanilkový cukr a rum rozmíchejte míchadlem. Přidejte mouku a prášek
do pečiva, rozmíchejte pomocí spínače PULSE.
Po porcích naplňte běžný automatický vaflovač,
opečte do zlatova.
Šlehačka
Míchadlo
200 ml šlehačky, 1 sáček vanilkového cukru
Vychlazenou smetanu a vanilkový cukr šlehejte
míchadlem do tuha. Občas zastavte a kontrolujte tuhost.
Bramborový gratin
Krouhací nástavec hrubý
2 brambory, 100 ml sladké smetany, 1/2 cibule
1 vejce, 50 g strouhaného ementálu, sůl, pepř,
muškát
Oloupejte brambory a hrubým krouhacím ná-
stavcem je nakrájejte na plátky. Oloupejte
rovněž cibuli a nakrájejte ji na silné plátky.
Brambory a cibuli střídavě vrstvěte do vymazané
formy na zapékání.
Rozmíchejte smetanu s vejcem a kořením a nalijte na brambory, posypte sýrem. Pečte v troubě
při 160°C cca 30 minut.
Pochoutka ze syrové mrkve
Strouhací nástavec střední
1 mrkev, 1 jablko, 1 lžíce vlašských ořechů, 2
lžíce pomerančové šťávy, 1 čajová lžička oleje
Oškrábejte mrkev, jablko zbavte jader a rozkrájejte jej na čtvrtiny.
Jablko a mrkev nastrouhejte středním
strouhacím nástavcem, přisypte vlašské ořechy,
přidejte pomerančovou šťávu a olej a nechte mí-
chat.
Bramborové chipsy
Krouhací nástavec jemný
2 moučné brambory, 1 lžíce oleje, 1 lžíce papriky v prášku
Brambory omyjte a oloupejte. Jemným
krouhacím nástavcem je nakrájejte na jemné
plátky. Nechte je marinovat v oleji a paprice.
Na plech na pečení položte papír na pečení.
Na něj rozprostřete bramborové plátky a pečte v
troubě při 180°C do hněda.
Sekaná
Sekací nůž
150 g vepřového masa, 1/2 cibule, 1 žloutek,
sůl, pepř
Všechny přísady nechte jemně nasekat sekacím
nožem.
S nožem můžete sekat také čokoládu, bylinky,
ořechy, suché kousky chleba, sýr, křen, zázvor
atd.
Játrové knedlíčky do polévky
Sekací nůž
150 g hovězích jater, 1/2 cibule, 1 namočená,
vymačkaná houska, 2 lžíce strouhanky, 1 vejce,
sůl, pepř, muškát
Všechny přísady nechte jemně nasekat sekacím
nožem. Ohřejte 1 litr hovězího vývaru. Malou
čajovou lžičkou vykrájejte z těsta malé noky,
vložte je do vařícího vývaru a nechte povařit.
83
Page 84

ZÁRUČNÍ PODMÍNKY
Copyright UNOLD AG | www.unold.de
Na naše přístroje poskytujeme záruku v trvání 24 měsíců (u průmyslového využití 12 měsíců) od data koupě výrobku, záruka
se vztahuje na poškození, která prokazatelne vznikla při správném použití v důsledku výrobních vad. Po dobu záruky budeme
odstraňovat materiální i výrobní vady opravou nebo výměnou podle našeho uvážení. Poskytnutí záruky výhradně platí pro
zařízení prodány v Německu i Rakousku. V jiných zemích se obrat’te prosím na kompetentní dovozce. Přístroje, na které
bylo uplatňováno odstranění vad, zašlete prosím smechanicky vyhotovenou kopií nákupního dokladu, ze kterého musí být
bezpodmínečně patrný datum nákupu i s popisem vad, přístroj musí být bezpečně zabalen a nafrankován na náš záruční
servis. V připadě opravněné záruky jsou kupujícím vraceny poštovní poplatky v Německu i Rakousku. Tato záruka se nevztahuje
na poškození způsobená opotřebením, nesprávným zacházením a nedodržováním návodů kúdržbě a obsluze. Záruční doba
zaniká, když opravy nebo manipulace s přístrojem byly provedeny třetí osobou. Eventuální nároky zákazníka vůči prodejci/
obchodníku nejsou touhle zárukou omezeny.
LIKVIDACE / OCHRANA ŽIVOTNÉHO PROSTŘEDÍ
Naše vyrobené přístroje mají vysoce kvalitní standard pro zajišt’ění jejich dlouhé životnosti. Pravidel-
né údržby i opravy odborně provedeny naším prodejním servisem mohou mít vliv na prodloužení provozní
životnosti přístroje. Když je přístroj vadný a už ho nelze opravit, neopomeňte prosím: Toto zařízení nepatří do
běžného domovního odpadku, ale musí být předáno do autorizované sběrny pro recyklování elektrických nebo
elektronických zařízení. Separátní sběr a recyklování odpadních produktů umožňuje šetření přírodních zdrojů
a zajišt’uje, aby byly odpady likvidovány způsobem, který je pro zdraví a kologii přijatelný.
Recepty v tomto návodu k použití byly pečlivě zváženy a odzkoušeny autory z firmy UNOLD AG,
přesto není možno za tyto převzít záruku. Poskytnutí záruky na poškození zdraví, věcné a majetkové
škody prostřednictvím autorů popř. firmou UNOLD AG a jí pověřenými osobami je vyloučeno.
84
Page 85

INSTRUKCJA OBSŁUGI MODELU 78501
Copyright UNOLD AG | www.unold.de
DANE TECHNICZNE
Moc: 250 W, 230 V~, 50 Hz
Wymiary: Około 29,0 x 20,0 x 27,3 cm (L/B/H)
Ciężar: Ok. 1,5 kg
Długość przewodu: Ok. 90 cm
Obudowa: Tworzywo sztuczne/antracyt
Wyposażenie: Robot kuchenny kompaktowy, nóż do rozdrabniania i ugniatania, zespół
do tarcia i cięcia, mieszadło do śmietany, białek i rzadkiego ciasta, misa
do mieszania na około 0,5 litra płynu, popychacz z podziałką, krótki czas
pracy - jedna minuta
Akcesoria: Nóż do rozdrabniania, mieszadło, oprawa tarek, 2 tarki do cięcia, 3 tarki
do tarcia, instrukcja obsługi
Zmiany i błędy w opisie wyposażenia, technice, kolorach i konstrukcji są zastrzeżone
OBJAŚNIENIE SYMBOLI
Symbol ten oznacza ewentualne niebezpieczeństwa, które mogą prowadzić do obrażeń
lub uszkodzenia urządzenia.
DLA BEZPIECZEŃSTWA UŻYTKOWNIKA
Prosimy przeczytać poniższe instrukcje i zachować je do użytku
w przyszłości.
Ogólne wskazówki bezpieczeństwa
Urządzenie może być
1.
używane przez dzieci w wieku
powyżej 8 lat lub osoby o
ograniczonej sprawności
fizycznej, sensorycznej
czy umysłowej lub nie
posiadające doświadczenia i/
lub wiedzy, jeśli są one nad
zorowane lub zostały przesz-
kolone w zakresie bezpieczn-
ego użytkowania urządzenia
i zrozumiały wynikające
tego niebezpieczeństwa.
Urządzenie nie jest zabawką.
Dzieci mogą czyścić i
konserwować urządzenie
tylko pod nadzorem.
2. Do urządzenia nie
dopuszczać dzieci w wieku
poniżej 3 lat lub nadzorować
je przez cały czas.
3. Dzieci w wieku od 3 do 8 lat
mogą włączyć i wyłączyć
urządzenie tylko wtedy, gdy
znajduje się w swojej nor
malnej pozycji obsługi, są
-
nadzorowane lub zostały
poinstruowane na temat
bezpiecznego
użytkowania
i zrozumiały wynikającego
z
z tego zagrożenia. Dzieci
w wieku od 3 do 8 lat nie
mogą urządzenia podłączać,
-
85
Page 86

obsługiwać, czyścić ani
Copyright UNOLD AG | www.unold.de
konserwować.
4. Dzieci powinny być pod nadzorem, aby upewnić się, że
nie bawią się urządzeniem.
Urządzenie przechowywać w
5.
miejscu niedostępnym dla
dzieci.
6. Urządzenie podłączać
wyłącznie do prądu zmiennego o napięciu podanym na
tabliczce znamionowej.
Urządzenie nie może
7.
pracować z zewnętrznym
minutnikiem lub systemem
sterowania zdalnego (pilotem).
W żadnym wypadku nie
8.
zanurzać urządzenia lub
przewodu w wodzie lub w
innych płynach.
9. Urządzenie przeznaczone
jest wyłącznie do użycia w
gospodarstwie domowym
lub w podobnych zastosowaniach, np.
aneksach kuchennych
w sklepach, biurach lub
innych zakładach,
zakładach rolnych,
do użycia przez gości w
hotelach, motelach lub
innych noclegowniach,
w prywatnych pensjonatach
lub domach letniskowych.
10. Urządzenia i przewodu nie
wolno czyścić w zmywarce.
11. Wyjąć wtyczkę z gniaz
dka sieciowego przed
rozłożeniem i czyszczeniem
urządzenia,
przed włożeniem
lub wyjęciem poszczególnych części lub gdy przes-
tawia się urządzenie w inne
miejsce.
Urządzenia nie wolno
12.
używać z akcesoriami innych
producentów lub marek, aby
uniknąć szkód.
13. Po użyciu i przed czyszczeniem wyjąć wtyczkę z gniazdka. Urządzenia nigdy nie
pozostawiać bez nadzoru,
wtyczka włożona jest do
gdy
gniazdka sieciowego.
14. Regularnie sprawdzać
urządzenie, wtyczkę i przewód, czy nie ma śladów
zużycia lub uszkodzenia.
przypadku uszkodzenia prze-
wodu zasilającego lub innych
części prosimy odesłać
urządzenie
do sprawdzenia i
naprawy do naszego serwisu.
Niewłaściwe naprawy mogą
stworzyć znaczne zagrożenie
dla użytkownika i powodują
unieważnienie gwarancji.
Wskazówki dla ustawienia i
obsługi urządzenia
15. Urządzenie przeznaczone
jest wyłącznie do używania
wewnątrz pomieszczeń
16. Urządzenia ani przewodu
nigdy nie dotykać mokrymi
dłońmi.
17. Ze względów bezpieczeństwa
nigdy nie stawiać urządzenia
na gorących powierzchniach,
-
blacie metalowym lub na wil-
gotnym podłożu. Urządzenie
ani
przewód nie
znajdować się w pobliżu
płomieni.
W
mogą
86
Page 87

18. Robota kuchennego używać
Copyright UNOLD AG | www.unold.de
zawsze na wolnej, równej i
niepoślizgowej powierzchni.
19. Zwrócić uwagę na to, aby
przewód nie zwisał na brzegu
powierzchni roboczej, gdyż
może to prowadzić do wypadków, gdy n. p. małe dzieci
pociągną za niego.
Nie owijać przewodu wokół
20.
urządzenia i nie zaginać go,
aby uniknąć uszkodzenia
przewodu.
21. Przewód zasilający musi być
tak ułożony, aby zapobiec
pociągnięciu lub potknięciu
się o niego.
22. Nie przesuwać urządzenia
podczas pracy, aby uniknąć
obrażeń.
23. Nie używać gorących płynów.
Zwrócić uwagę na to, aby
stosowane dodatki miały
maksymalnie temperaturę
otoczenia.
24. Tarki tnące są bardzo ostre!
Uważać, aby nie skaleczyć
się podczas nakładania i
zdejmowania tarek do cięcia
i tarcia.
25. Nóż do rozdrabniania jest
także bardzo ostry. Podczas
wkładania do urządzenia
i czyszczenia nóż trzymać
zawsze za górny brzeg, nie
za ostrze noża.
26. Nie ciągnąć urządzenia do
góry za uchwyt misy, gdy
misa jest zablokowana w
urządzeniu, można rozbić
urządzenie lub uchwyt.
27. Nie przeciążać misy. Maksy
malna pojemność dodatków
może wynosić 0,5
l. Jeśli
dołoży się więcej dodatków,
urządzenie można uszkodzić.
28. Nie używać urządzenia, gdy
oprawa tarek jest uszkod-
zona, aby uniknąć uszkodzenia urządzenia i obrażeń.
Nie włączać urządzenia, gdy
29.
misa jest pusta.
30. Używać zawsze popychacza,
gdy dodaje się składniki. Nie
dodawać składników ręcznie!
31. Do podajnika nie wprowadzać
nigdy twardych dodat-
ków, jak kości lub przedmiotów jak łyżka. Istnieje
niebezpieczeństwo obrażeń.
Jeżeli składniki przywarły
32.
wewnątrz misy, wyłączyć
urządzenie, wyjąć wtyczkę
z gniazdka i dopiero wtedy
usunąć je przy pomocy
łopatki do ciasta.
33. Krótki czas pracy wynosi
1 minutę. Po jednej minucie
ochłodzić krótko urządzenie
i dopiero wtedy pracować
dalej, aby uniknąć przegrza
nia silnika.
34.
Ostrożnie: Podczas pracy
urządzenia unikać kontaktu
z ruchomymi częściami
urządzenia. Do urządzenia
nie zbliżać rąk, włosów lub
innych przedmiotów, istnieje
niebezpieczeństwo obrażeń!
35. Gdy chce się opróżnić misę,
zawsze wyjąć nóż lub tarkę.
36. Wyłączyć urządzenie i
odczekać na zatrzymanie się
napędu zanim zdejmie się
pokrywę.
-
37. Myć urządzenie po każdym
użyciu.
-
87
Page 88

Nigdy nie dotykać ruchomych części urządzenia i nie wkładać
Copyright UNOLD AG | www.unold.de
przedmiotów ani części ciała do pracującego urządzenia, aby
uniknąć obrażeń.
Ostrożnie! Tarki do tarcia i cięcia oraz nóż do rozdrabniania są
bardzo ostre - istnieje niebezpieczeństwo obrażeń!
Nie wkładać ręki ani przedmiotów do pracującego urządzenia istnieje niebez-pieczeństwo obrażeń!
W żadnym wypadku nie otwierać obudowy urządzenia. Istnieje
niebezpieczeństwo porażenia prądem elektrycznym.
Výrobce nepřebírá žádné ručení při chybné montáži, neodborném nebo chybném použití nebo po provedení
opravy neautorizovanými třetími osobami.
PRZED PIERWSZYM UŻYCIEM
1. Usunąć całkowicie materiał opakowania i
zabezpieczenia transportowe. Przechowywać
opakowania poza zasięgiem dzieci – ryzyko
uduszenia!
2. Umyć wszystkie wyjęte części zgodnie z
opisem podanym w rozdziale Czyszczenie i
pielęgnacja.
WKŁADANIE I ZDEJMOWANIE MISY DO MIESZANIA
1. Włożyć misę na podstawę urządzenia.
Zwrócić uwagę na to, aby uchwyt misy
znajdował się trochę z tyłu i obrócić
następnie misę trzymając ją za uchwyt w kie-
runku zgodnym z ruchem wskazówek zegara
i odpowiednio do oznaczenia strzałką w kierunku „Zu“ [zamknięcie], aż misa zatrzaśnie
się. Strzałka na dolnym brzegu misy musi
znajdować się dokładnie nad oznakowaniem
kolistym na podstawie urządzenia.
2. Wybrać odpowiednie akcesoria i umieścić
w misie. Informacje na temat właściwego
włożenia poszczególnych noży i tarek
podane są w dalszej części instrukcji.
3. W misie musi być odpowiedni nóż lub
tarka zanim zacznie się napełniać misę
składnikami.
4. Założyć pokrywę na misę. Podajnik pokrywy
musi być tak ustawiony, aby mały nosek
88
widoczny pod podajnikiem znajdował się
przed szyną prowadzącą na podstawie
urządzenia.
5. Obrócić teraz pokrywę w kierunku zgodnym
z ruchem wskazówek zegara, aby ten nosek
zaczepił o podstawę urządzenia. Słychać
wtedy głośne kliknięcie. Strzałka na górnym
brzegu misy musi znajdować się dokładnie
pod oznakowaniem na pokrywie.
6. Aby zdjąć pokrywę przytrzymać misę jedną
ręką za uchwyt i obrócić pokrywę w kierunku
przeciwnym do ruchu wskazówek zegara, aż
nosek wyślizgnie się z szyny prowadzącej.
Zdjąć pokrywę do góry z urządzenia.
7. Aby zdjąć misę, obrócić ją w kierunku
strzałki do „Auf“ [otwarcie], aż można
ją będzie wyjąć za uchwyt z podstawy
urządzenia.
Uwaga: Nóż rozdrabniający i
poszczególne tarki są bardzo
ostre, niebezpieczeństwo obrażeń.
Postępować z tymi częściami bardzo
ostrożnie.
Page 89

WYŁĄCZNIK BEZPIECZEŃSTWA
Copyright UNOLD AG | www.unold.de
Urządzenie wyposażone jest w jeden wyłącznik bezpieczeństwa, który uniemożliwia uruchomienie
urządzenia, gdy nie będzie właściwie złożone. Dopiero po właściwym zamontowaniu wszystkich
części urządzenie można włączyć.
PRACA Z NOŻEM ROZDRABNIAJĄCYM
Do rozdrabniania
warzyw, owoców, chleba i bułek na bułkę tartą, mięsa, czekolady, owoców
Bardzo dobry wynik uzyska się wtedy gdy składniki najpierw potnie się na
kostki o wielkości około dwóch centymetrów.
Ugniatanie ciasta
Użyć tłuszczu wyjętego z lodówki i niezbyt długo ugniatać ciasto. Po wyjęciu
ciasta z robota, ugnieść go jeszcze raz ręcznie na blacie.
1. Uwaga: Nie włączać urządzenia bez dodania
składników, gdyż można uszkodzić silnik.
2. Urządzenie może pracować maksymalnie
jedną minutę. Po jednej minucie krótko
ochłodzić urządzenie przed dalszą praca.
3. Maksymalna pojemność napełnienia wynosi
0,5 l składników. Prosimy nie przekraczać
tej pojemności, aby uniknąć uszkodzenia urządzenia. Uwzględnić fakt, że dużo
środków spożywczych np. mięso powiększa
swoją objętość przez rozdrabnianie.
4. Upewnić się, czy misa jest właściwie osadzona na podstawie urządzenia.
5. Zdjąć osłonę ostrza z noża.
Nóż chwytać tylko za górny kołek,
ostrza noża są bardzo ostre. Istnieje
niebezpieczeństwo obrażeń.
6. Osadzić ostrożnie nóż rozdrabniający na
wale misy.
7. Uwaga: zarówno wał w urządzeniu jak i nóż
od wewnątrz posiadają spłaszczenia. Wszystkie noże nakładać tylko wtedy, gdy obydwie
spłaszczone strony pokrywają się.
8. Dodać odpowiednie składniki do misy.
Uważać, aby nie przepełnić misy.
9. Uwaga: Gdy chce się ugniatać ciasto, dodać
najpierw do misy wszystkie suche składniki.
Następnie podczas mieszania wlać przez
podajnik odpowiednią ilość płynu.
10. Założyć pokrywę i zablokować ją.
11. Włożyć wtyczkę do gniazdka.
12. Włączyć urządzenie przy pomocy włącznika.
Nóż rozpoczyna obracać się. Można również
naciskać przycisk „wyłącznik/włącznik
impulsowy“, wtedy urządzenie pracuje
krótkimi, wydajnymi skokami. Wyłącznika
impulsowego używać tylko okresowo, gdy
pracuje się dłużej niż pięć minut, używać
funkcji pracy ciągłej.
13. Jeżeli składniki przywarły wewnątrz misy,
wyłączyć urządzenie, wyjąć wtyczkę z gniaz-
89
Page 90

dka i dopiero wtedy usunąć je przy pomocy
Copyright UNOLD AG | www.unold.de
łopatki do ciasta.
14. Gdy składniki osiągną wymaganą
konsystencję, wyłączyć urządzenie
„wyłącznikiem/włącznikiem impulsowym“ i
wyjąć wtyczkę z gniazdka zasilającego.
15. Odczekać, aż nóż rozdrabniający zatrzyma
się.
PRACA Z MIESZADŁEM
Do mieszania lub ubijania
śmietany, jajek na pianę z białek i ciasta biszkoptowego. Stosować śmietanę
UHT, schłodzić ją najpierw przez kilka godzin w lodówce.
16. Zdjąć pokrywę.
17. Ostrożnie wyjąć nóż z misy. Nóż chwytać
tylko za górny kołek, ostrza noża są bardzo
ostre. Istnieje niebezpieczeństwo obrażeń.
18. Opróżnić misę ze składników.
19. Po umyciu wszystkich części ze względów
bezpieczeństwa założyć osłonę ostrzy na nóż
rozdrabniający.
1. Przestrzegać wskazówek podanych w rozdzi-
ale „Praca z nożem rozdrabniającym“.
2. Osadzić ostrożnie mieszadło na wale misy.
3. Uwaga: zarówno wał w urządzeniu jak i nóż
od wewnątrz posiadają spłaszczenia. Wszys-
tkie noże nakładać tylko wtedy, gdy obydwie
spłaszczone strony pokrywają się.
4. Dodać odpowiednie składniki do misy.
Uważać, aby nie przepełnić misy.
5. Założyć pokrywę i zablokować ją.
6. Włożyć wtyczkę do gniazdka.
7. Włączyć urządzenie przy pomocy włącznika.
Mieszadło zaczyna obracać się. Można
również naciskać przycisk „wyłącznik/
włącznik impulsowy“, wtedy urządzenie
pracuje krótkimi, wydajnymi skokami.
Wyłącznik impulsowy używać tylko w
odstępach pięciu do dziesięciu sekund.
8. Jeżeli składniki przywarły wewnątrz misy,
wyłączyć urządzenie, wyjąć wtyczkę z gniazdka i dopiero wtedy usunąć je przy pomocy
łopatki do ciasta.
9. Gdy składniki osiągną wymaganą
konsystencję, wyłączyć urządzenie
„wyłącznikiem/włącznikiem impulsowym“ i
wyjąć wtyczkę z gniazdka zasilającego.
10. Odczekać, aż mieszadło zatrzyma się.
11. Zdjąć pokrywę.
12. Ostrożnie wyjąć mieszadło z misy.
13. Opróżnić misę ze składników.
PRACA Z TARKAMI DO TARCIA I CIĘCIA
Do cięcia i tarcia
warzyw, owoców, chleba na tartą bułkę, sera, parmezanu, ziół, czekolady
Zwracamy uwagę na to, że na skutek tarcia np.
marchewki tworzywo może przebarwić się. Przebarwienia te można łatwo usunąć tłuszczem (np.
masłem). W przypadku składników, które mogą topić się (np. czekolady lub twardego sera) stosować
możliwie krótki czas obróbki, aby zapobiec zbytniemu podgrzaniu tych składników.
Urządzenie może pracować maksymalnie jedną minutę. Po jednej minucie krótko ochłodzić
urządzenie przed dalszą pracą.
90
Page 91

1. Przestrzegać wskazówek podanych w rozdzi-
Copyright UNOLD AG | www.unold.de
ale „Praca z nożem rozdrabniającym“.
2. Włożyć ostrożnie odpowiednią tarkę do
oprawy. Tarkę wkłada się od góry w otwór
oprawy. Zwrócić uwagę na to, aby płaska
strona tarki pasowała do płaskiej strony w
otworze. Tylko wtedy tarka może zatrzasnąć
się. Sprawdzić, czy tarka jest dobrze osadzona i dopiero wtedy pracować dalej.
Uwaga: Ostrza tarek są bardzo ostre,
istnieje niebezpieczeństwo obrażeń.
3. Osadzić teraz oprawę tarek na wale misy.
4. Uwaga: zarówno wał w urządzeniu jak i nóż
od wewnątrz posiadają spłaszczenia. Wszystkie noże nakładać tylko wtedy, gdy obydwie
spłaszczone strony pokrywają się.
5. Założyć pokrywę.
6. Włączyć urządzenie przy pomocy włącznika.
Mieszadło zaczyna obracać się. Można
również naciskać przycisk „wyłącznik/
włącznik impulsowy“, wtedy urządzenie
pracuje krótkimi, wydajnymi skokami.
Wyłącznik impulsowy używać tylko w
odstępach pięciu do dziesięciu sekund.
7. Dodać składniki przez podajnik. Jeśli
składniki są za duże, podzielić je na pół lub
na ćwiartki lub przyciąć do wielkości podaj-
nika.
8. Używać zawsze popychacza, gdy dodaje się
składniki. Nie dodawać składników ręcznie!
9. Do podajnika nie wprowadzać nigdy twardych dodatków, jak kości lub przedmiotów jak łyżka. Istnieje niebezpieczeństwo
obrażeń.
10. Po zakończeniu przygotowania składników
wyłączyć urządzenie „wyłącznikiem/impuls“
i wyjąć wtyczkę z gniazdka zasilającego.
11. Zaczekać, aż oprawa tarek zatrzyma się.
12. Zdjąć pokrywę.
13. Ostrożnie wyjąć oprawę tarek z misy. Łatwiej
to zrobić, gdy wyjmie się misę z podstawy,
trochę przestawi w stosunku do pierwotnego
położenia i z powrotem założy. Oprawa tarek
przesunie się wtedy do góry i można ją bezpieczniej i łatwiej wyjąć.
14. Ostrza tarek są bardzo ostre. Istnieje
niebezpieczeństwo obrażeń.
15. Ze względów technicznych możliwe jest,
że na oprawie tarek pozostaną niewielkie
resztki środków spożywczych.
16. Opróżnić misę ze składników.
17. Aby wyjąć tarkę z oprawy należy obrócić
oprawę i wycisnąć tarkę w dół z oprawy.
Prosimy postępować ostrożnie,
gdyż ostrza są ostre i istnieje
niebezpieczeństwo obrażeń.
CZYSZCZENIE I KONSERWACJA
Przed czyszczeniem urządzenie
zawsze wyłączyć i wyjąć wtyczkę z
gniazdka.
1. Myć urządzenie po każdym użyciu.
2. Podstawy urządzenia i przewodu nie wolno
zanurzać do wody ani innego płynu.
3. Z wyjątkiem podstawy urządzenia wszystkie
części można myć w zmywarce (górny kosz).
Wszystkie części z wyjątkiem podstawy
urządzenia można również myć w ciepłej
wodzie z niewielkim dodatkiem łagodnego
środka do zmywania naczyń.
4. Tarki tnące są bardzo ostre! Uważać, aby nie
skaleczyć się podczas mycia tarek do cięcia i
tarcia oraz noża.
5. Nigdy nie pozostawiać części z ostrzami w
wodzie, aby uniknąć obrażeń.
6. Podstawę obudowy przetrzeć wilgotną
ścierką i następnie dobrze wysuszyć.
91
Page 92

7. Nie używać ostrych środków szorujących,
Copyright UNOLD AG | www.unold.de
wełny stalowej, przedmiotów metalowych,
środków dezynfekujących lub gorących
środków czyszczących, ponieważ mogą
spowodować uszkodzenia.
8. Ze względów bezpieczeństwa po umyciu noża rozdrabniającego nałożyć osłonę
ostrza.
PRZEPISY
9. Różne tarki do cięcia i tarcia można dobrze
przechowywać wewnątrz popychacza.
10. Urządzenie musi być całkowicie suche
zanim można je będzie ponownie użyć.
11. Całkowicie suchy robot kuchenny
przechowywać w suchym i bezpiecznym
miejscu, aby ochronić go przez zabrudzeniem, uderzeniem, ciepłem i wilgocią.
Chrzan z jabłkiem
Drobna tarka
1 jabłko z czerwoną skórką korzeń chrzanu ok.
2 cm (najlepiej od główki, gdyż jest delikatniejszy), 1 łyżeczka śmietany, 1 szczypta cukru
Jabłko i chrzan zetrzeć na drobnej tarce,
doprawić do smaku śmietaną i cukrem. Smaku-
je dobrze z gotowanym mięsem i wędzoną rybą
Kalarepa ze śmietaną
Tarka jarzynowa
1 kalarepa średniej wielkości, 1 łyżka masła, 1
łyżka posiekanej naci pietruszki, 1 łyżka słodkiej
śmietany, sól, pieprz, gałka muszkatołowa
Kalarepę obrać, zetrzeć na tarce jarzynowej
na paski. Podgrzać masło na patelni. Kalarepę
lekko poddusić na maśle. Dodać sól, pieprz i
gałkę muszkatołową, wymieszać ze śmietaną i
posypać natką pietruszki.
Ciasto gruszkowe
Rzadkie ciasto na jedną formę o średnicy 20 cm
50 g masła, 1 jajko, 50 g cukru, 1 opakowanie
cukru waniliowego, 1 łyżka Amaretto, 1 czubata
łyżeczka kakao, 100 g mąki, 1 łyżeczka proszku
do pieczenia, 1-2 gruszki
Masło, jajko, cukier, cukier waniliowy i Amaretto wymieszać mieszadłem. Dodać kakao, mąkę
i proszek do pieczenia, wymieszać impulsowo.
Wlać do natłuszczonej tortownicy.
Gruszki obrać, podzielić na ćwiartki, usunąć
pestki, pociąć na wachlarz i włożyć do ciasta.
Piec w piekarniku w 160 °C przez około 30 mi-
nut.
Porada: Przygotować ciasto bez kakao i ułożyć
wachlarz z pociętych jabłek lub moreli.
Ciasto na gofry
Mieszadło
50 g roztopionego masła, 1 jajko, 50 g cukru,
1 opakowanie cukru waniliowego, 1 łyżeczka
rumu, 100 g mąki, 1/2 łyżeczki proszku do pi-
eczenia
Masło, jajko, cukier, cukier waniliowy i rum
wymieszać mieszadłem. Dodać mąkę i proszek
do pieczenia, wymieszać impulsowo. Porcjować
do gofrownicy, upiec na kolor złocisto brązowy.
Bita śmietana
Mieszadło
200 ml śmietany kremówki, 1 opakowanie cukru
waniliowego
Ochłodzoną śmietanę ubić na sztywno z cukrem
waniliowym przy pomocy mieszadła. Często
zatrzymywać i kontrolować stopień ubicia.
Zapiekanka ziemniaczana
Tarka do cięcia w plastry
2 ziemniaki
100 ml słodkiej śmietany, 1/2 cebuli, 1 jajko,
50 g startego sera ementalera, sól, pieprz, gałka
muszkatołowa
Obrać ziemniaki, pociąć na plastry tarką do
cięcia. Cebulę również obrać i pociąć.
92
Page 93

W formie do zapiekanki układać warstwami na
Copyright UNOLD AG | www.unold.de
zmianę ziemniaki i cebulę.
Roztrzepać śmietanę z jajkiem i przyprawami,
wylać na ziemniaki, posypać serem. Piec w piekarniku w 160 °C przez około 30 minut.
Surówka z marchwi
Tarka średnia
1 marchew, 1 jabłko, 1 łyżka orzechów włoskich,
2 łyżki soku pomarańczowego, 1 łyżeczka oleju
Obrać marchew, usunąć pestki z jabłka i
podzielić na ćwiartki.
Jabłko i marchew zetrzeć tarką średnią, posypać
orzechami, dodać sok pomarańczowy, olej i
wymieszać.
Chipsy ziemniaczane
Tarka do cięcia cienkiego
2 mączyste ziemniaki, 1 łyżka oleju, 1 łyżka pa-
pryki w proszku
Ziemniaki umyć i obrać. Pociąć tarką na cienkie
plastry. Zamarynować w oleju z papryką.
Blachę wyłożyć papierem do pieczenia. Plastry
ziemniaków rozłożyć i upiec na brązowo w pie-
karniku w 180 °C.
Befsztyk tatarski z mięsa wieprzowego
Nóż do rozdrabniania
150 g mięsa wieprzowego na sznycel, 1/2 cebuli
1 żółtko, sól, pieprz
Wszystkie składniki dokładnie rozdrobnić
nożem.
Tym nożem można również rozdrabniać
czekoladę, zioła, orzechy, suche kromki chleba,
ser, chrzan, imbir itd.
Klopsiki z wątroby jako wkładka do zupy
Nóż do rozdrabniania
150 g wątroby wołowej, 1/2 cebuli, 1 namoczona, wyciśnięta bułka, 2 łyżki tartej bułki, 1 jajko,
sól, pieprz, gałka muszkatołow
Wszystkie składniki dokładnie rozdrobnić
nożem. Zagotować 1 litr rosołu wołowego. Małą
łyżeczką wrzucać małe porcje masy na wrzący
rosół, czekać do wypłynięcia.
93
Page 94

WARUNKI GWARANCJI
Copyright UNOLD AG | www.unold.de
Udzielamy na nasze produkty 24 miesięcznej gwarancji od daty zakupu (warunkiem jest zachowanie faktury zakupu lub
paragonu) na szkody, które przy użytkowaniu zgodnym z przeznaczeniem wskazują na wadę fabryczną. W czasie trwania
gwarancji usuniemy wady materiałowe bądź fabryczne zgodnie z naszym osądem poprzez naprawę lub wymianę. Gwarancja
udzielana jest na produkty sprzedawane na terenie Niemiec i Austrii. W innych krajach proszę zwrócić się do właściwego
Importera. Urządzenia, w których wymagane jest usunięcie wady, proszę przesłać razem z kopią faktury zakupu, na której musi
być widoczna data zakupu, z załączonym opisem wady, w oryginalnym pudełku, dobrze zapakowane i na własny koszt na adres
serwisu. Gwarancja nie obejmuje szkód wynikających ze zużycia, użytkowania niezgodnie z przeznaczeniem i nieprzestrzegania
wskazówek dotyczących konserwacji i pielęgnacji. Roszczenie gwarancji wygasa, jeżeli naprawa bądź otwarcie przedmiotu
będą przeprowadzone przez stronę trzecią. Ewentualne roszczenia użytkownika końcowego wobec sprzedawcy/dealera nie są
ograniczone tą gwarancją.
UTYLIZACJA / OCHRONA ŚRODOWISKA
Nasze urządzenia wyprodukowane zostały na wysokim poziomie do długiego użytkowania. Regularna kons-
erwacja i fachowe naprawy poprzez nasz serwis mogą wydłużyć pracę urządzenia. W razie kiedy urządzenie
jest uszkodzone i nie nadaje się do naprawy, proszę przestrzegać zaleceń: Ten produkt nie może być zutylizowany razem z normalnymi odpadami domowymi. Muszą Państwo dostarczyć ten produkt do zbiorczego
punktu recyklingowego dla urządzeń elektrycznych i elektronicznych. Poprzez oddzielne zbieranie i recykling
odpadów pomagają Państwo chronić naturalne zasoby i sprawiają, że ten produkt będzie zutylizowany w
sposób bezpieczny dla zdrowia i środowiska naturalnego.
Przepisy podane w tej instrukcji obsługi zostały starannie opracowane i sprawdzone przez autorów
i przedsiębiorstwo UNOLD AG, ale bez gwarancji. Wyklucza się odpowiedzialność autorów lub
przedsiębiorstwa UNOLD AG i ich pełnomocników za szkody osobowe, rzeczowe i majątkowe.
94
Page 95

Copyright UNOLD AG | www.unold.de
95
Page 96

Aus dem Hause
Copyright UNOLD AG | www.unold.de
 Loading...