

Page 1

AUTOMATIKENTSAFTER HURRICANE
Copyright UNOLD AG | www.unold.de
Bedienungsanleitung
Instructions for use | Notice d´utilisation
Gebruiksaanwijzing
Instrucciones de uso
Modell 78220
| Istruzioni per l’uso
| Instrukcja obsługi
Page 2

SERVICE-HOTLINE
Copyright UNOLD AG | www.unold.de
Bei Fragen zu den Rezepten und zum Gebrauch des Gerätes können Sie sich direkt an unsere
Beraterin Frau Blum wenden:
Montag und Dienstag von 8 bis 12 Uhr und 13 bis 17 Uhr
Rufnummer: 0 18 05/94 18 99*
*derzeit 0,14 EUR/Minute aus dem Festnetz der Deutschen Telekom.
Bei Anrufen aus Mobilfunknetzen und aus dem Ausland (+49 18 05/94 18 99) können
abweichende Kosten anfallen. Ab 1.3.2010 Mobilfunkpreis maximal 0,42 EUR/Minute.
Kunden aus Österreich wählen bitte die Nummer (0) 1/8 10 20 39
Impressum:
Bedienungsanleitung Modell 78220
Stand: Oktober 2019 /nr
Copyright ©
Mannheimer Straße 4
68766 Hockenheim
Telefon +49 (0) 62 05/94 18-0
Telefax +49 (0) 62 05/94 18-12
E-Mail info@unold.de
Internet www.unold.de
Page 3
Weitere Informationen zu unserem Sortiment erhalten Sie unter www.unold.de
Copyright UNOLD AG | www.unold.de
Page 4
INHALTSVERZEICHNIS
Copyright UNOLD AG | www.unold.de
Bedienungsanleitung Modell 78220
Technische Daten .................................... 10
Symbolerklärung ...................................... 10
Für Ihre Sicherheit ................................... 10
In Betrieb nehmen ................................... 13
Obst und Gemüse vorbereiten ................... 14
Saft zubereiten ........................................ 14
Auseinanderbauen ................................... 16
Reinigen und Pflegen ............................... 16
Rezepte .................................................. 17
Fehler beheben ....................................... 19
Garantiebestimmungen ............................ 21
Entsorgung / Umweltschutz ...................... 21
Informationen für den Fachhandel ............. 21
Service-Adressen ..................................... 22
Instructions for use Model 78220
Technical Specifications ........................... 23
Explanation of the symbols ....................... 23
For your safety ......................................... 23
Preparing the appliance for operation ........ 26
Preparing fruits and vegetables ................. 26
Preparing juice ........................................ 27
Disassembly ............................................ 28
Cleaning and care .................................... 29
Recipes .................................................. 30
Troubleshooting ...................................... 32
Guarantee Conditions ............................... 33
Waste Disposal / Environmental Protection . 33
Service ................................................... 22
Notice d´utilisation Modèle 78220
Spécification technique ........................... 34
Explication des symboles .......................... 34
Pour votre sécurité ................................... 34
Mise en service........................................ 37
Préparer fruits et légumes ........................ 38
Préparer un jus ........................................ 38
Démontage.............................................. 40
Nettoyage et entretien .............................. 40
Recettes ................................................. 41
Dépannage .............................................. 43
Conditions de Garantie ............................. 45
Traitement des déchets /
Protection de l’environnement ................... 45
Service ................................................... 22
Gebruiksaanwijzing Model 78220
Technische gegevens ............................... 46
Verklaring van de symbolen ....................... 46
Voor uw veiligheid .................................... 46
In gebruik nemen .................................... 49
Fruit en groente voorbereiden .................... 50
Sap maken .............................................. 50
Uit elkaar halen ....................................... 52
Reiniging en onderhoud ........................... 52
Recepten ................................................ 53
Storingen verhelpen ................................. 55
Garantievoorwaarden ................................ 56
Verwijderen van afval/Milieubescherming ... 56
Service ................................................... 22
Page 5
INHALTSVERZEICHNIS
Copyright UNOLD AG | www.unold.de
Istruzioni per l’uso Modello 78220
Dati tecnici ............................................ 57
Significato dei simboli ............................. 57
Per la vostra sicurezza .............................. 57
Messa in funzione .................................... 60
Preparazione di frutta e verdura ................ 61
Preparazione del succo ............................. 61
Smontaggio ............................................. 63
Pulizia e cura .......................................... 63
Ricette ................................................... 64
Diagnostica dei problemi .......................... 66
Norme die garanzia .................................. 67
Smaltimento / Tutela dell’ambiente ........... 67
Service ................................................... 22
Manual de instrucciones Modelo 78220
Datos técnicos ........................................ 68
Explicación de símbolos ........................... 68
Para su seguridad .................................... 68
Poner en servicio ..................................... 71
Preparación de frutas y verduras ............... 72
Preparación del zumo ............................... 72
Desensamblar.......................................... 74
Limpieza y cuidado .................................. 74
Recetas .................................................. 75
Eliminación de fallos ............................... 77
Condiciones de Garantia ........................... 78
Disposición/Protección del
medio ambiente ...................................... 78
Service ................................................... 22
Instrukcja obsługi Modelu 78220
Dane techniczne ..................................... 79
Objaśnienie symboli ................................. 79
Dla bezpieczeństwa użytkownika ............... 79
Uruchomienie.......................................... 82
Przygotowanie owoców i warzyw ................ 83
Przygotowanie soku .................................. 83
Rozłożenie urządzenia na części ................ 84
Czyszczenie i pielęgnacja ......................... 85
Przepisy .................................................. 86
Usuwanie usterek .................................... 88
Warunki gwarancji.................................... 89
Utylizacja / ochrona środowiska ................. 89
Service ................................................... 22
Page 6
EINZELTEILE
Copyright UNOLD AG | www.unold.de
1
2
3
4
9
8
5
6
7
Page 7
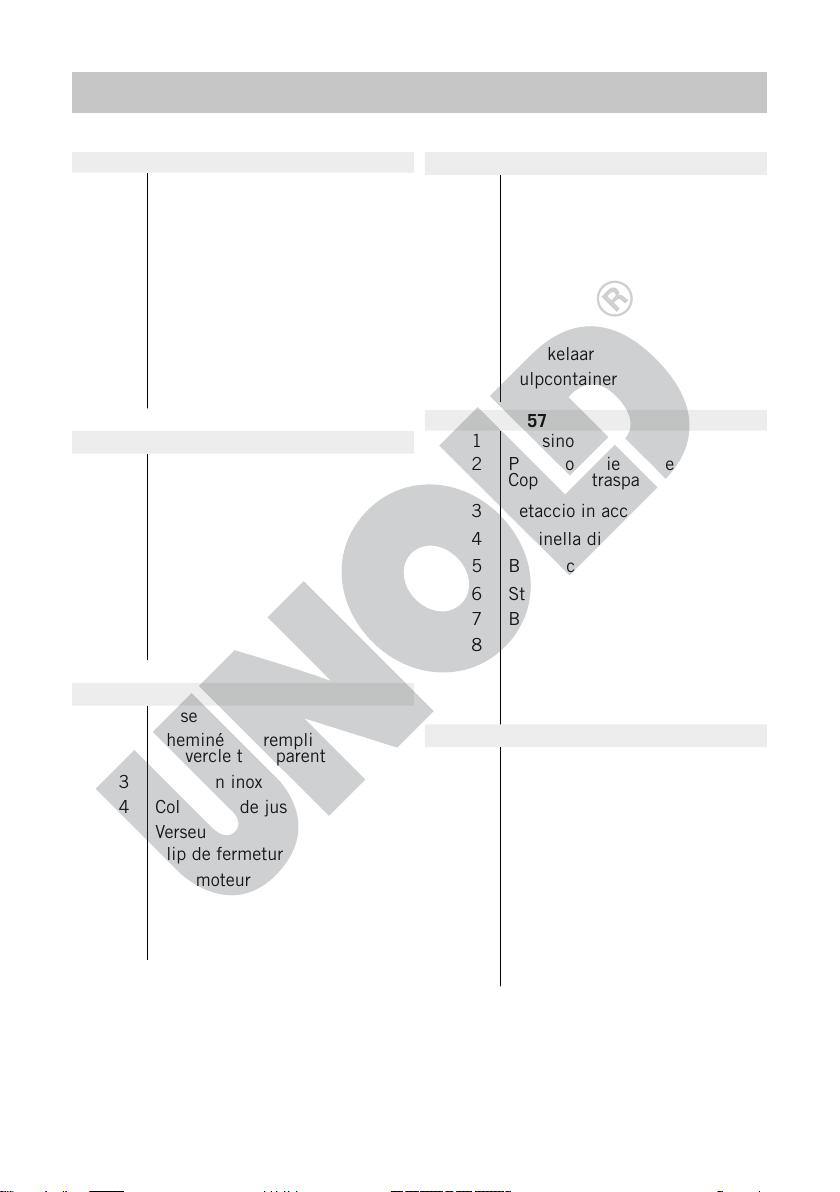
EINZELTEILE
Copyright UNOLD AG | www.unold.de
D Ab Seite 10
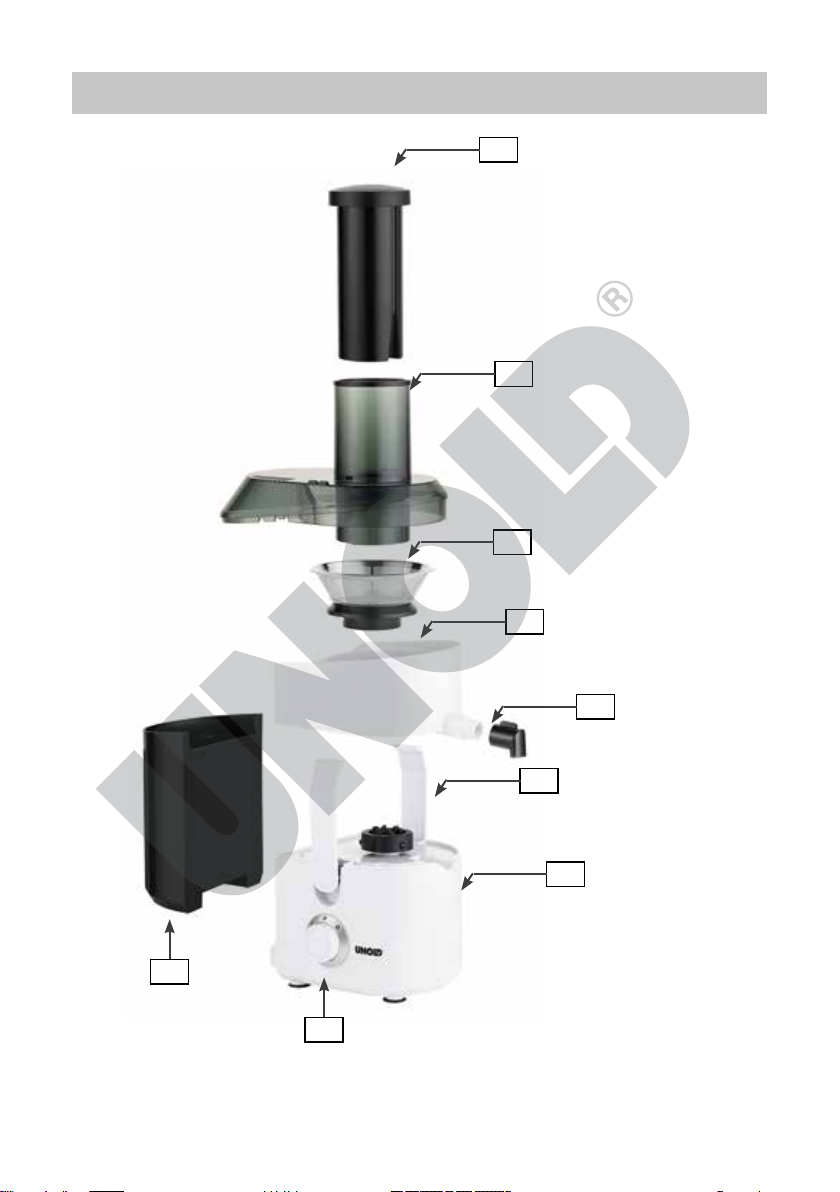
1 Stopfer
2 Einfüllschacht/Transparenter
Deckel
3 Edelstahlsieb
4 Saftauffangschale
5 Ausguss
6 Verschlussbügel
7 Motorblock
8 Schalter
9 Tresterbehälter
GB Page 23
1 Tamper
2 Filling shaft/Transparent lid
3 Stainless steel sieve
4 Juice collection tray
5 Spout
6 Closure bracket
7 Motor block
8 Switch
9 Pomace container
F Page 34
1 Tasseur
2 Cheminée de remplissage/
Couvercle transparent
3 Tamis en inox
4 Collecteur de jus
5 Verseur
6 Clip de fermeture
7 Bloc moteur
8 Interrupteur
9 Collecteur de pulpe
NL Pagina 46
1 Stamper
2 Vulbuis/Doorzichtig deksel
3 Roestvrijstalen zeef
4 Sap-opvangschaal
5 Tuit
6 Sluitbeugel
7 Motorblok
8 Schakelaar
9 Pulpcontainer
I Pagina 57
1 Pressino
2 Pozzetto di riempimento/
Coperchio trasparente
3 Setaccio in acciaio inox
4 Bacinella di raccolta del succo
5 Beccuccio
6 Staffa di chiusura
7 Blocco motore
8 Interruttore
9 Contenitore degli scarti
ES Página 68
1 Embutidor
2 Tubo de llenado/Tapa
transparente
3 Tamiz de acero inoxidable
4 Bandeja colectora de zumo
5 Boquilla
6 Enganches de cierre
7 Bloque de motor
8 Interruptor
9 Depósito de bagazo
Page 8

EINZELTEILE
Copyright UNOLD AG | www.unold.de
1
2
3
4
9
8
5
6
7
Page 9

EINZELTEILE
Copyright UNOLD AG | www.unold.de
PL Strony 79
1 Popychacz
2 Otwór wsadowy/Przezroczysta
pokrywa
3 Sito ze stali szlachetnej
4 Miska na sok
5 Dzióbek
6 Zacisk
7 Blok silnika
8 Przełącznik
9 Pojemnik na miąższ
Page 10
BEDIENUNGSANLEITUNG MODELL 78220
Copyright UNOLD AG | www.unold.de
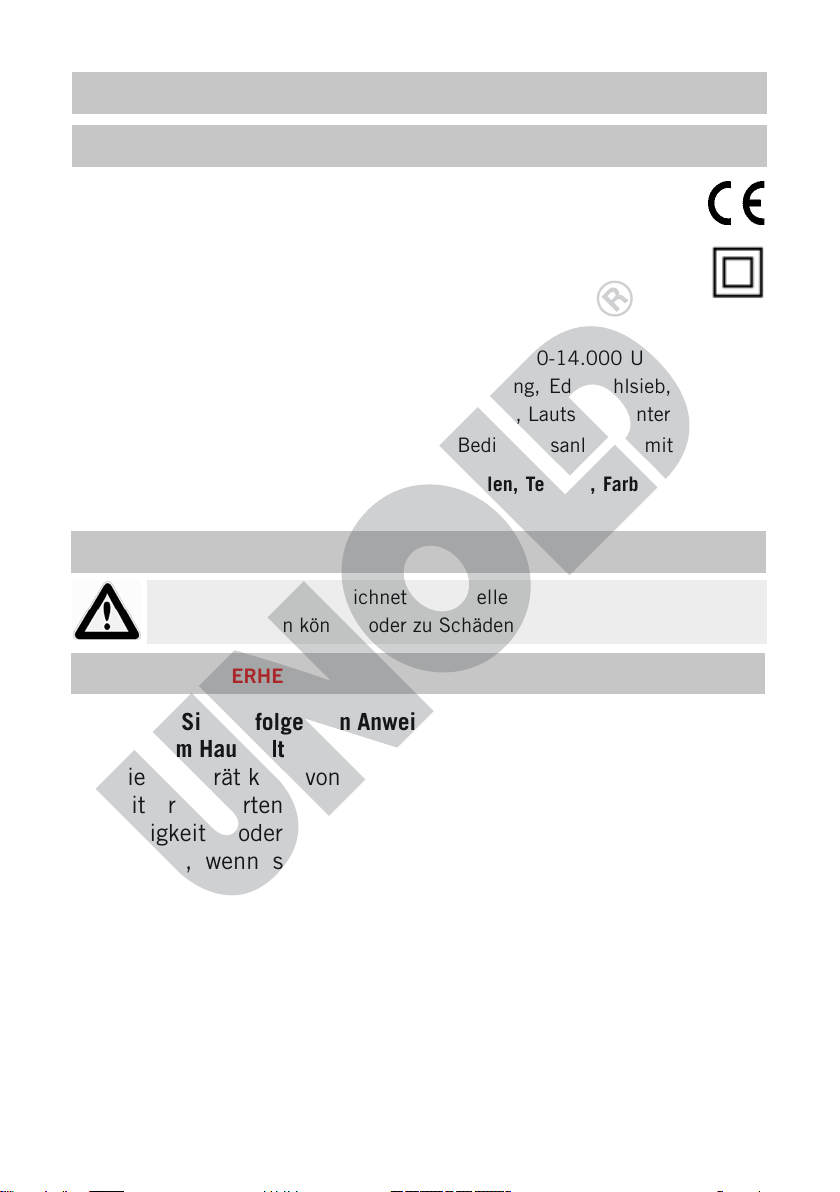
TECHNISCHE DATEN
Leistung: 400 W, 220–240 V~, 50 Hz/60 Hz
Maße: Ca. 34,2 x 18,7 x 39,0 cm (B/T/H)
Kabellänge: Ca. 100 cm
Gewicht: Ca. 2,5 kg
Gehäuse: Kunststoff
Einfüllöffnung: Ca. 7,5 cm Durchmesser
Ausstattung:
Zubehör: Tresterbehälter, Stopfer, Bedienungsanleitung mit Rezepten
Änderungen und Irrtümer in Ausstattungsmerkmalen, Technik, Farben und Design
vorbehalten.
SYMBOLERKLÄRUNG
Dieses Symbol kennzeichnet eventuelle Gefahren, die Verletzungen
nach sich ziehen können oder zu Schäden am Gerät führen.
FÜR IHRE SICHERHEIT
2 Geschwindigkeitsstufen (12.000-14.000 Umdrehungen/
Min.), extra große Einfüllöffnung, Edelstahlsieb, 1,5 Liter
Tresterbehälter, Schutzklasse II, Lautstärke unter 85dB
Bitte lesen Sie die folgenden Anweisungen und bewahren Sie diese auf.
Personen im Haushalt
1. Dieses Gerät kann von Kindern ab 8 Jahren sowie von Personen
mit reduzierten physischen, sensorischen oder mentalen
Fähigkeiten oder Mangel an Erfahrung und/oder Wissen benutzt
werden, wenn sie beaufsichtigt oder bezüglich des sicheren
Gebrauchs des Geräts unterwiesen wurden und die daraus
resultierenden Gefahren verstanden haben.
2. Kinder dürfen nicht mit dem Gerät spielen.
3. Reinigung und benutzerseitige Wartung dürfen nicht von Kindern
durchgeführt werden, es sei denn, sie sind älter als 8 Jahre und
werden beaufsichtigt.
4. Bewahren Sie das Gerät und das Kabel außerhalb der Reich
weite von Kindern unter 8 Jahren auf.
10
-
Page 11
5. Das Gerät ist kein Spielzeug. Das Säubern und die Wartung des
Copyright UNOLD AG | www.unold.de
Geräts dürfen von Kindern nur unter Aufsicht durchgeführt werden.
6.
An einem für Kinder unzugänglichen Ort aufbewahren.
Hinweise zur Gesundheit
7. Das Gerät ist nur zum Verarbeiten von Lebensmitteln bestimmt.
8. Bitte bewahren Sie fertig zubereitete Säfte nicht zu lange auf,
um gesundheitliche Beeinträchtigungen durch verdorbene
Lebensmittel zu vermeiden.
Hinweise zum sicheren Aufstellen und Gebrauch des Gerätes
9. Gerät nur an Wechselstrom mit Spannung gemäß Typenschild
anschließen.
10. Dieses Gerät darf nicht mit einer externen Zeitschaltuhr oder
einem Fernbedienungssystem betrieben werden.
11. Das Gerät ist ausschließlich für den Haushaltsgebrauch oder
ähnliche Verwendungszwecke bestimmt, z. B.
Teeküchen in Geschäften, Büros oder sonstigen Arbeitsstätten,
landwirtschaftlichen Betrieben,
zur Verwendung durch Gäste in Hotels, Motels oder sonstigen
Beherbergungsbetrieben,
in Privatpensionen oder Ferienhäusern.
12. Tauchen Sie das Gerät oder die Zuleitung keinesfalls in Wasser
oder andere Flüssigkeiten ein.
13. Das Gerät und die Zuleitung dürfen nicht in der Spülmaschine
gereinigt werden.
14. Das Gerät bzw. die Zuleitung niemals mit nassen Händen berüh
ren.
15.
Stellen Sie das Gerät aus Sicherheitsgründen niemals auf heiße
Oberflächen, Metalltabletts oder nassen Untergrund.
16. Das Gerät oder die Zuleitung dürfen nicht in der Nähe von Flam
men betrieben werden.
17.
Benutzen Sie den Entsafter stets auf einer freien, ebenen
Oberfläche.
18. Achten Sie darauf, dass die Zuleitung nicht über den Rand der
Arbeitsfläche hängt, da dies zu Unfällen führen kann, wenn z. B.
Kleinkinder daran ziehen.
-
-
11
Page 12
19. Der Entsafter darf nicht im Freien benutzt oder gelagert werden.
Copyright UNOLD AG | www.unold.de
20. Das Gerät ist nur zum Entsaften von Obst oder weichen Gemüsesorten geeignet.
21.
Bewegen Sie das Gerät nur, wenn es ausgeschaltet ist, und aus-
schließlich mit beiden Händen.
22.
Das Gerät darf nur nach ordnungsgemäßem Zusammenbau
benutzt werden. Achten Sie darauf, dass die Verschlussbügel
richtig geschlossen sind.
23. Benutzen Sie zum Einfüllen ausschließlich den mitgelieferten
Stopfer. Achten Sie aus Sicherheitsgründen darauf, dass Hände,
Haare, Kleidungsstücke oder sonstige Werkzeuge nicht in den
Einfüllschacht des Entsafters geraten.
24. Die Schneiden des Edelstahlsiebes sind sehr scharfkantig. Ver
meiden Sie daher, diese zu berühren. Fassen Sie das Sieb nur
am Rand an.
Der Motor muss zum Stillstand gekommen sein, bevor Sie die
25.
beweglichen Teile abnehmen dürfen.
26. Öffnen Sie nie den Deckel, wenn das Gerät noch in Betrieb ist.
27. Das Gerät ist nicht für den Dauerbetrieb geeignet. Lassen Sie
daher das Gerät nicht länger als 3 Minuten laufen, danach muss
es abkühlen.
28. Um Schäden zu vermeiden, darf das Gerät nicht mit Zubehör
anderer Hersteller oder Marken benutzt werden.
29. Falls das Edelstahlsieb beschädigt ist, darf das Gerät nicht
betrieben werden!
30. Nach Gebrauch sowie vor dem Reinigen den Netzstecker aus
der Steckdose ziehen. Das Gerät niemals unbeaufsichtigt las
sen, wenn der Netzstecker eingesteckt ist.
31.
Reinigen Sie das Gerät nach jedem Gebrauch wie im Kapitel
„Reinigen und Pflegen“ beschrieben.
32. Prüfen Sie regelmäßig das Gerät, den Stecker und die Zulei
tung auf Verschleiß oder Beschädigungen. Bei Beschädigung
des Anschlusskabels oder anderer T
bitte zur Überprüfung und Reparatur an unseren Kundendienst.
Unsachgemäße Reparaturen können zu erheblichen Gefahren
für den Benutzer führen und haben den Ausschluss der Garantie
zur Folge.
eile senden Sie das Gerät
-
-
-
12
Page 13
Achtung: Benutzen Sie zum Einfüllen der Zutaten ausschließ-
Copyright UNOLD AG | www.unold.de
lich den mitgelieferten Stopfer. Achten Sie aus Sicherheitsgründen darauf, dass Hände, Haare, Kleidungsstücke oder sonstige
W
erkzeuge nicht in den Einfüllschacht gelangen können.
Der Motor muss zum Stillstand gekommen sein, bevor Sie die
beweglichen T
eile abnehmen dürfen.
Öffnen Sie auf keinen Fall das Gehäuse des Gerätes. Es besteht
die Gefahr eines Stromschlages.
Der Hersteller übernimmt keine Haftung bei fehlerhafter Montage, bei unsachgemäßer oder fehlerhafter
Verwendung oder nach Durchführung von Reparaturen durch nicht autorisierte Dritte.
IN BETRIEB NEHMEN
1. Stellen sie vor der Montage sicher, dass Sie das Gerät auf einem ebenen,
trockenen Untergrund montieren.
2. Entfernen Sie alle Verpackungsmaterialien und Transportsicherungen. Halten Sie Verpackungsmaterial wie z. B. Kunststoffbeutel oder Styropor von
Kleinkindern fern – Erstickungsgefahr!
3. Reinigen Sie alle Teile mit einem feuchten Tuch wie im Kapitel „Reinigen
und Pflegen“ beschrieben.
4. Stellen Sie das Gerät auf eine geeignete, ebene Arbeitsfläche.
5. Stellen Sie sicher, dass der Schalter am Gerät auf „0“ steht.
6. Setzen Sie den Tresterbehälter auf die dafür vorgesehene Seite am Motorblock.
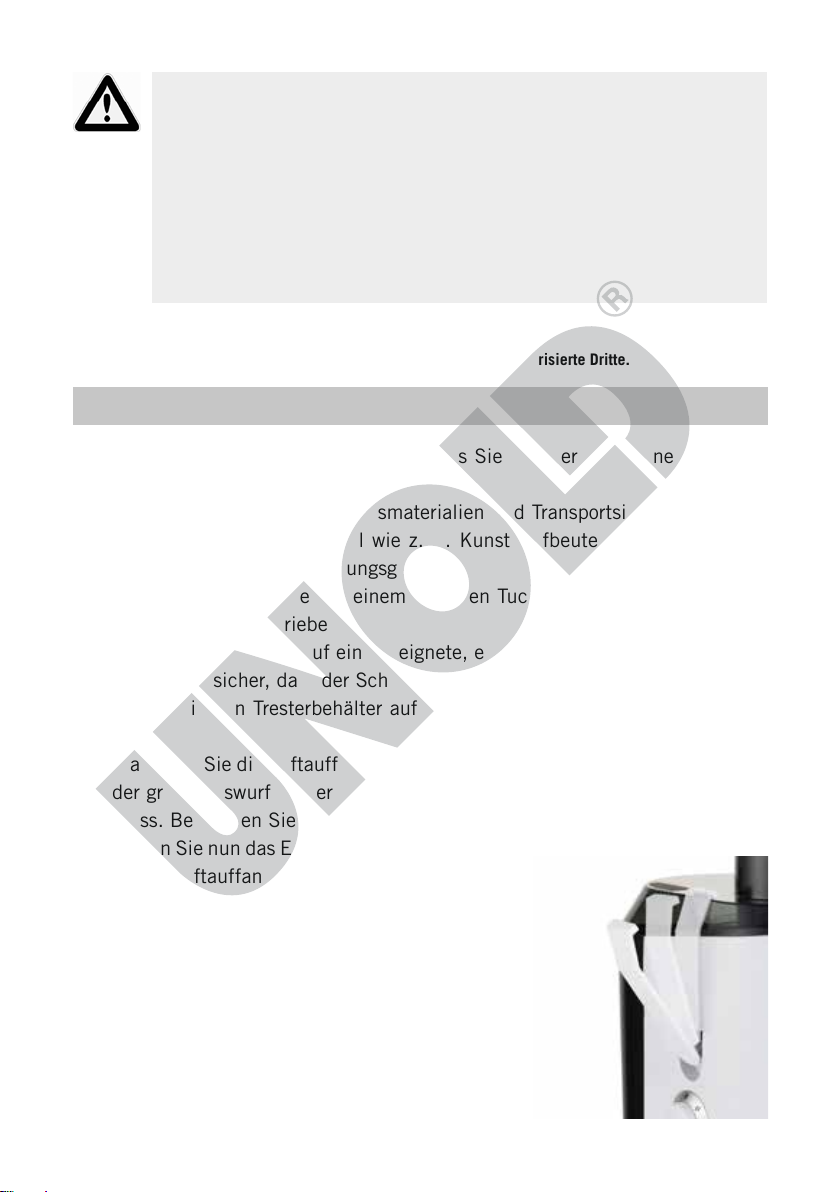
7. Platzieren Sie die Saftauffangschale auf dem Gerät. Achten Sie darauf, dass
der große Auswurf an der Schale in den Tresterbehälter eingehängt werden
muss. Befestigen Sie den Ausguss an der Saftauffangschale.
8. Setzen Sie nun das Edelstahlsieb auf den Antrieb
in der Saftauffangschale. Drücken Sie das Sieb
auf den Antrieb (evtl. um ca. 30 ° etwas drehen).
Das Sieb muss fest einrasten.
9. Platzieren Sie den Deckel mit der Einfüllöffnung
auf der Saftauffangschale und dem Tresterbehälter.
10. Befestigen Sie den Deckel mit den Verschlussbügeln, indem Sie den Verschlussbügel nach oben
klappen. Die Verschlussbügel rasteen hörbar ein.
13
Page 14
11. Stellen Sie ein geeignetes Gefäß oder eine Kanne unter den Saftausguss.
Copyright UNOLD AG | www.unold.de
12. Prüfen Sie, ob alle Teile genau passgerecht zusammengefügt sind, um
Saftspritzer zu vermeiden.
13. Schließen Sie das Gerät mittels Zuleitung an das Stromnetz (Wechselstrom, 220–240 V~, 50 Hz/60 Hz) an.
OBST UND GEMÜSE VORBEREITEN
1. Verwenden Sie nach Möglichkeit nur frisches Obst und Gemüse.
2. Waschen Sie das Obst bzw. Gemüse gründlich und trocknen Sie es gut ab.
3. Wenn Sie Früchte mit harter Schale verarbeiten möchten, müssen Sie die
Schale vorher entfernen. Dies gilt zum Beispiel für Ananas.
4. Früchte mit ungenießbarer Schale wie zum Beispiel Zitrusfrüchte müssen
ebenfalls vorher geschält werden.
5. Das Entsaften von Bananen mit diesem Gerät empfehlen wir nicht, da diese
Früchte in einem Entsafter schlecht verarbeitet werden können.
6. Orangen ergeben im Entsafter einen schaumigen Saft. Bitte schälen Sie die
Orangen vor dem Entsaften, da der Saft sonst bitter werden kann.
7. Wenn Sie Beeren entsaften möchten, fügen Sie bitte pro ca. 200 g Beeren
¼ Apfel mit Schale hinzu.
8. Entfernen Sie eventuell vorhandene große Kerne (wie zum Beispiel in Kirschen oder Pflaumen) sowie Blätter und Stängel. Weintrauben und Johannisbeeren müssen nicht entkernt werden. Die Johannisbeeren können Sie
mit den Stielen entsaften.
9. Schneiden Sie das Obst oder Gemüse in für den Einfüllschacht passende
Stücke. Durch die große Einfüllöffnung ist es möglich, recht große Stück in
das Gerät zu geben.
SAFT ZUBEREITEN
1. Bereiten Sie das Gerät wie unter „In Betrieb nehmen“ beschrieben vor.
2. Nehmen Sie den Stopfer aus der Einfüllöffnung heraus.
3. Wählen Sie am Schalter die gewünschte Geschwindigkeit:
Stufe 1 für weiches Obst und Gemüse wie Weintrauben, Melonen, Birnen
oder Gurken.
Stufe 2 für hartes Obst und Gemüse wie Karotten oder Äpfel.
14
Page 15

4. Geben Sie die Obst- und Gemüsestücke in den Einfüllschacht und drücken
Copyright UNOLD AG | www.unold.de
Sie die Stücke mit dem Stopfer langsam nach unten. Je geringer der ausgeübte Druck ist, desto mehr Saft erhalten Sie.
5. Wir raten dazu, das Gerät maximal eine Minute entsaften zu lassen, und
es dann für eine Minute abkühlen zu lassen, bevor Sie es erneut für eine
Minute laufen lassen. Nach insgesamt drei Zyklen sollte das Gerät für ca.
15 Minuten abkühlen, bevor Sie es erneut in Betrieb nehmen.
Achtung: Fassen Sie nie mit den Fingern oder Fremdkörpern
in den Einfüllschacht, während der Entsafter in Betrieb ist. Es
besteht Verletzungsgefahr!
6. Falls sich Obst- oder Gemüsestücke festgesetzt haben und nicht mit dem
Stopfer gelockert werden können, schalten Sie das Gerät aus. Ziehen Sie
den Netzstecker aus der Steckdose und zerlegen Sie das Gerät, um das
entsprechende Obst- oder Gemüsestück zu entfernen. Bauen Sie dann das
Gerät wieder zusammen und fahren Sie mit dem Zubereiten fort.
7. Der Saft läuft nun aus dem Saftausguss.
8. Achten Sie darauf, dass der Tresterbehälter nicht überfüllt wird. Ist der Tresterbehälter voll, schalten Sie das Gerät aus. Ziehen Sie den Netzstecker aus
der Steckdose und zerlegen Sie das Gerät: zuerst den Deckel abnehmen,
dann das Sieb herausnehmen, dann die Saftauffangschale entfernen und
dann den Tresterbehälter leeren. Bauen Sie dann das Gerät wieder zusammen und fahren Sie mit dem Zubereiten fort.
9. Wenn die Saftkanne oder das Glas voll ist, schalten Sie das Gerät aus,
indem Sie den Schalter auf „0“ stellen, füllen Sie den Saft um und fahren
dann mit dem Entsaften fort.
10. Wenn Sie das Zubereiten von Saft beendet haben, schalten Sie den Schalter
auf „0“ und ziehen Sie den Stecker aus der Steckdose. Wir empfehlen, das
Gerät sofort im Anschluss zu reinigen.
11. Hinweis: Das Gerät verfügt über einen Überhitzungsschutz. Sollte das Gerät
während des Betriebs zu warm werden, schaltet der Überhitzungsschutz das
Gerät aus, um Schäden am Motor zu vermeiden. Ziehen Sie in diesem Fall den
Netzstecker und lassen Sie das Gerät für mindestens 30 Minuten abkühlen.
15
Page 16
AUSEINANDERBAUEN
Copyright UNOLD AG | www.unold.de
Wenn Sie mit dem Entsaften fertig sind, schalten Sie das Gerät aus, indem
Sie den Schalter auf „0“ stellen. Warten Sie, bis kein Saft mehr ausfließt
und sich das Edelstahlsieb nicht mehr dreht.
1. Ziehen Sie den Stecker aus der Steckdose.
2. Ziehen Sie den Stopfer aus dem Einfüllschacht.
3. Öffnen Sie den Verschlussbügel, indem Sie diesen vorsichtig nach oben und
leicht nach vorn vom Gerät weg drücken.
4. Entfernen Sie den Deckel.
5. Entnehmen Sie das Edelstahlsieb. Hierbei müssen Sie leicht an dem Sieb
ziehen. Fassen Sie das Sieb aber nur am Rand an, da an den Klingen im
Sieb Verletzungsgefahr besteht.
6. Entfernen Sie die Saftauffangschale und den Tresterbehälter.
7. Entleeren Sie den Tresterbehälter. Sie können hierzu das flache Ende einer
Spülbürste zu Hilfe nehmen.
8. Entfernen Sie eventuelle Faserreste aus der Saftauffangschale.
REINIGEN UND PFLEGEN
Wir empfehlen, das Gerät sofort nach dem Entsaften zu reinigen. Eingetrocknete
Faserreste lassen sich sonst nur schwer entfernen.
Achtung: Das Edelstahlsieb ist scharf – Verletzungsgefahr!
Schalten Sie das Gerät aus, indem Sie den Schalter auf „0“ stellen. Warten
Sie, bis kein Saft mehr ausfließt und sich das Edelstahlsieb nicht mehr
dreht.
Ziehen Sie den Stecker aus der Steckdose.
1. Zerlegen Sie das Gerät wie unter „Auseinanderbauen“ beschrieben.
2. Entfernen Sie den Trester aus dem Tresterbehälter sowie Faserreste aus der
Saftauffangschale.
3. Reinigen Sie alle Teile (außer dem Motorblock!) in warmem Wasser, dem
Sie etwas Spülmittel zugegeben haben. Das Sieb können Sie mit einer handelsüblichen Spülbürste aus Kunststoff gut reinigen. Fassen Sie das Sieb
jedoch nur am Rand an, um sich nicht an den scharfen Klingen zu schneiden. Achten Sie darauf, das Sieb vollständig von Faserresten zu befreien,
um weiterhin gute Saftergebnisse zu erzielen. Bei Bedarf können Sie das
Sieb auch im Wasser etwas einweichen lassen.
16
Page 17
4. Gelbe Verunreinigungen lassen sich leicht mit einem Stück Küchenpapier,
Copyright UNOLD AG | www.unold.de
das Sie in Speiseöl getränkt haben, abwischen.
5. Wischen Sie den Motorblock mit einem feuchten Tuch ab.
6. Wischen Sie regelmäßig auch den Antrieb mit einem feuchten Tuch ab.
7. Verwenden Sie grundsätzlich keine scharfen Scheuermittel, Stahlwolle,
metallischen Gegenstände, heiße Reinigungsmittel oder Desinfektionsmittel.
8. Gerät und Anschlussstecker müssen vollkommen trocken sein, bevor das
Gerät wieder benutzt werden darf.
9. Bewahren Sie den vollständig getrockneten Entsafter zusammengebaut an
einem trockenen und sicheren Ort auf, um ihn vor Staub, Stoß, Hitze und
Feuchtigkeit zu schützen.
REZEPTE
Allgemeine Hinweise zur Saftherstellung
Säfte sind reine Vitaminbomben. Sie erfrischen zu jeder Jahreszeit. Viele
Vitamine zerfallen an der Luft, daher sollten Sie die frisch gepressten Säfte
immer sofort genießen.
Zahlreiche Vitamine lösen sich erst nach der Zugabe von etwas Fett, Sie können
daher pro Glas Saft 1 Teelöffel süße Sahne oder 2 Tropfen kaltgepresstes Öl
zugeben.
Frisch gepresster Traubensaft eignet sich hervorragend für eine Traubenkur.
Die zubereiteten Säfte lassen sich aber nicht nur frisch genießen, sondern auch
sehr gut zu Suppen, Gelees usw. verarbeiten.
Mit etwas Eiweiß oder kalt löslicher Gelatine vermischt und z. B. in der
®
Unold
Eismaschine zu Sorbet verarbeitet, erhalten Sie eine kalorienarme und
schmackhafte Erfrischung.
17
Page 18

Gemüsesaft
Copyright UNOLD AG | www.unold.de
½ Kohlrabi, 1 gelbe Paprikaschote,
4 Stiele Petersilie, 1 Möhre, 1 Tomate
entsaften.
Dieser Saft lässt sich ohne weitere
Würze genießen, kann aber auch mit
einem Spritzer Tabasco und einigen
Tropfen Ahornsirup verfeinert werden.
Vitaminbombe
400 g Spinat, 2 Möhren, 1 Stange
Sellerie, 1 EL Kresse, 2 Tomaten,
½ Gurke entsaften.
Mit 1 EL Zitronensaft, gehacktem
Schnittlauch und Petersilie, je einer
Prise Pfeffer und Zucker verrühren
und mit ¼ l Milch auffüllen.
Pina Colada, alkoholfrei
1 Ananas (reicht für 2 bis 3 Gläser),
50 ml süße Sahne, 3 EL Kokossirup,
gecrushtes Eis.
Ananas auf Stufe 2 entsaften, Saft
in einen Krug füllen, mit Sahne,
Kokossirup und Eis mischen, in Gläser
füllen, die Gläser mit ¼ Ananasscheibe
und einer Cocktailkirsche verzieren.
Erdbeersaft mit Schuss
250 g Erdbeeren und 1 Apfel
entsaften, 1 TL Honig, 1 EL süße
Sahne und 2 cl Wodka zufügen,
umrühren und servieren.
Apfelgelee
Nicht zu reife Äpfel entsaften, bis Sie
800 ml Saft haben, diese mit 1 kg
Gelierzucker 1:1 mischen und nach
Packungsanweisung zu Gelee kochen.
Vielfruchtgelee
Brombeeren, Johannisbeeren, Himbeeren, Erdbeeren, Stachelbeeren auf
Stufe 1 und 2 Äpfel auf Stufe 2 entsaften, 1 kg Gelierzucker 1:1 zufügen
und nach Packungsanweisung zu Gelee kochen. Natürlich auch mit nur einer Fruchtsorte möglich.
Erfrischende Gurkenkaltschale
1 Salatgurke, ¼ l Buttermilch,
1 Knoblauchzehe, 1 Zwiebel, Salz,
Pfeffer, frischer Dill
¾ der Gurke auf Stufe 2 entsaften,
ebenso Zwiebel und Knoblauch.
Die restliche Gurke in kleine Würfel
schneiden und zusammen mit der
Buttermilch vermengen. Mit Salz und
Pfeffer würzen und mit Dill garnieren.
Fruchtkaltschale
½ l Saft aus Früchten der Saison
herstellen, z. B. aus verschiedenen
Beerensorten oder Äpfeln, Pfirsichen,
Birnen, Aprikosen.
Diesen Saft mit ¼ l Wasser verdünnen,
3 EL vom Saft abnehmen und mit
1 EL Speisestärke verrühren. Den
restlichen Saft mit 2 EL Zucker
erhitzen, Stärke unterrühren, kurz
aufkochen und abkühlen lassen. Vor
dem Servieren mit ein paar Beeren
oder Obststückchen garnieren.
18
Page 19

Kalte Tomatensuppe
Copyright UNOLD AG | www.unold.de
Tomaten mit 1 Zwiebel und
1 Knoblauchzehe auf Stufe 1 entsaften
(ca. ¾ l Saft). Den Saft mit frisch
gemahlenem Pfeffer, etwas Tabasco,
Salz und gehacktem Basilikum würzen
und servieren. Tipp: Mit der Unold®
FEHLER BEHEBEN
Problem Lösung
Eismaschine zaubern Sie aus dem Saft
im Handumdrehen ein erfrischendes
Tomatensorbet.
Das Gerät arbeitet nicht. Prüfen Sie, ob alle Teile korrekt zusammen-
Der Motor bleibt während des
Entsaftens stehen.
gebaut sind. Sofern dies nicht der Fall ist,
verhindert ein Sicherheitssystem, dass das
Gerät eingeschaltet werden kann. Bauen Sie
das Gerät erneut wie im Kapitel „In Betrieb
nehmen“ beschrieben, zusammen.
Schalten Sie das Gerät aus. Ziehen Sie den
Stecker aus der Steckdose.
Zerlegen Sie das Gerät wie im Kapitel „Auseinanderbauen“ beschrieben und prüfen
Sie, ob das Sieb durch Faserstücke verstopft
ist. Reinigen Sie das Sieb unter fließendem
warmem Wasser mit einer Spülbürste aus
Kunststoff, bauen Sie das Gerät wieder zusammen und fahren Sie mit dem Entsaften
fort.
Um zu verhindern, dass das Sieb verstopft,
prüfen Sie, ob die verwendeten Obst oder
Gemüsesorten zu hart oder faserig sind.
Geben Sie das Obst oder Gemüse nicht zu
schnell in den Einfülltrichter und leeren Sie
den Tresterbehälter regelmäßig.
19
Page 20

Problem Lösung
Copyright UNOLD AG | www.unold.de
Das Edelstahlsieb dreht sich
nicht mehr.
Schalten Sie das Gerät aus. Ziehen Sie den
Stecker aus der Steckdose.
Zerlegen Sie das Gerät wie im Kapitel „Auseinanderbauen“ beschrieben und prüfen
Sie, ob das Sieb durch Faserstücke verstopft
ist. Reinigen Sie das Sieb unter fließendem
warmem Wasser mit einer Spülbürste aus
Kunststoff, bauen Sie das Gerät wieder zusammen und fahren Sie mit dem Entsaften
fort.
Um zu verhindern, dass das Sieb verstopft,
prüfen Sie, ob die verwendeten Obst oder
Gemüsesorten zu hart oder faserig sind.
Geben Sie das Obst oder Gemüse nicht zu
schnell in den Einfülltrichter und leeren Sie
den Tresterbehälter regelmäßig.
Zu wenig Saft. Prüfen Sie, ob das Sieb verstopft ist.
Geben Sie die Zutaten langsamer in den
Füllschacht.
Einige Obst- und Gemüsesorten ergeben
grundsätzlich etwas weniger Saft, wie z. B.
Aprikosen.
Die Rezepte in dieser Bedienungsanleitung wurden von den Autoren und von der UNOLD AG
sorgfältig erwogen und geprüft, dennoch kann keine Garantie übernommen werden. Eine Haftung der
Autoren bzw. der UNOLD AG und ihrer Beauftragten für Personen-, Sach- und Vermögensschäden
ist ausgeschlossen.
20
Page 21
GARANTIEBESTIMMUNGEN
Copyright UNOLD AG | www.unold.de
Wir gewähren auf unsere Geräte eine Garantie von 24 Monaten, bei gewerblichem Gebrauch 12
Monate, ab dem Kaufdatum für Schäden, die bei bestimmungsgemäßem Gebrauch nachweislich
auf Werksfehler zurückzuführen sind. Innerhalb der Garantiezeit beheben wir Material- und Herstellungsfehler nach unserem Ermessen durch Reparatur oder Umtausch. Unsere Garantieleistungen
gelten ausschließlich für in Deutschland und Österreich verkaufte Geräte. Bei anderen Ländern wenden Sie sich bitte an den zuständigen Importeur. Geräte, für die eine Mängelbeseitigung beansprucht
wird, senden Sie bitte zusammen mit einer Kopie des maschinell erstellten Kauf belegs, aus dem das
Kaufdatum ersichtlich sein muss, sowie einer Fehlerbeschreibung gut verpackt und freigemacht
an unseren Kundendienst. Im Garantiefall werden dem Kunden in Deutschland und Österreich entstandene Versandkosten zurückerstattet. Von der Garantie ausgeschlossen sind Schäden durch Verschleiß, unsachgemäße Handhabung und Nichteinhaltung der Wartungs- und Pflegeanweisungen.
Der Garantieanspruch erlischt, wenn Reparaturen oder Eingriffe am Gerät von dritter Stelle vorgenommen werden. Eventuelle Ansprüche des Endverbrauchers gegenüber dem Verkäufer oder Händler
werden durch diese Garantie nicht eingeschränkt.
ENTSORGUNG / UMWELTSCHUTZ
Unsere Geräte werden auf hohem Qualitätsniveau für eine lange Nutzungsdauer herge stellt. Regelmäßige Wartung und fachge rechte Reparaturen durch unseren Kundendienst können die Nutzungsdauer des Gerätes verlängern. Wenn ein Gerät defekt und
nicht mehr zu reparieren ist, beachten Sie bitte: Dieses Produkt darf nicht zusammen
mit dem normalen Hausmüll entsorgt werden. Sie müssen dieses Produkt an einer ausgewiesenen Sammelstelle zum Recycling von elektrischen oder elektronischen Geräten
ab liefern. Durch das separate Sammeln und Recyceln von Abfallprodukten helfen Sie
mit, die natürlichen Ressourcen zu schonen und stellen sicher, dass das Produkt in
gesundheits- und umweltverträglicher Weise entsorgt wird.
INFORMATIONEN FÜR DEN FACHHANDEL
Hiermit erklärt die UNOLD AG, dass sich der Entsafter 78220 in Übereinstimmung mit den
grundlegenden Anforderungen der europäischen Richtlinie für elektromagnetische Verträglichkeit
(2014/30/EU) und der Niederspannungsrichtlinie (2014/35/EU) bendet
Hiermit bestätigt die UNOLD AG, dass sowohl das Produkt als auch die eingesetzten Rohstoffe den
Vorschriften des LFBG 2005, § 30+31 und den Empfehlungen des BfR in ihrer jeweils aktuellen
Fassung entspricht. Die gesetzlichen Grenzwerte werden eingehalten.
Die Übereinstimmung mit den Regularien bezieht sich auf den Tag der Erstellung dieser Erklärung.
Hockenheim, 25.7.2019 UNOLD AG, Mannheimer Straße 4, 68766 Hockenheim
21
Page 22

SERVICE-ADRESSEN
Copyright UNOLD AG | www.unold.de
DEUTSCHLAND
Kundendienst
Telefon +49 (0) 62 05/94 18-27
Mannheimer Straße 4
68766 Hockenheim
Sie möchten innerhalb der Garantiezeit ein Gerät zur Reparatur einsenden? Auf unserer
Internetseite www.unold.de/ruecksendung können Sie sich einen Rücksendeschein ausdrucken,
um damit das Paket kostenlos bei der Post abzugeben (nur für Einsendungen aus Deutschland
und Österreich).
SCHWEIZ ÖSTERREICH
Telefax +49 (0) 62 05/94 18-22
E-Mail service@unold.de
Internet www.unold.de
MENAGROS AG
Hauptstr. 23
CH 9517 Mettlen
Telefon +41 (0) 71 6346015
Telefax +41 (0) 71 6346011
E-Mail info@bamix.ch
Internet www.bamix.ch
POLEN
Quadra-Net
Dziadoszanska 10
61-248 Poznań
Internet www.quadra-net.pl
Diese Anleitung kann im Internet unter www.unold.de als pdf-Datei heruntergeladen werden.
DEC
Digital Electronic Center Service GmbH
Kelsenstraße 2
A-1030 Wien
Telefon +43 (0) 1/9616633-0
Telefax +43 (0) 1/9616633-22
E-Mail office@decservice.at
Internet www.decservice.at
22
Page 23

INSTRUCTIONS FOR USE MODEL 78220
Copyright UNOLD AG | www.unold.de
TECHNICAL SPECIFICATIONS
Power: 400 W, 220–240 V~, 50 Hz/60 Hz
Dimensions: Approx. 34.2 x 18.7 x 39.0 cm (L x W/D x H)
Power cord length: Approx. 100 cm
Weight: Approx. 2.5 kg
Housing: Plastic
Fill opening: Approx. 7.5 cm diameter
Features: 2 speed levels (12,000-14,000 rpm), extra large filling
Accessories: Pomace container, tamper, operating instructions with
Equipment features, technology, colours and design are subject to change without
notice. Errors and omissions excepted
EXPLANATION OF THE SYMBOLS
This symbol indicates potential hazards that may result in injury or
damage to the appliance.
FOR YOUR SAFETY
shaft, stainless steel sieve, 1.5 litre pomace container,
degree of protection II, noice level 85 dB
recipes
Please read the following instructions and keep them on hand for later
reference.
Instructions for persons in the household
1. This appliance can be used by children 8 years and older, as
well as by persons with reduced physical, sensory or mental
abilities or with lack of experience and/or knowledge, if they are
supervised or if they have been instructed with regard to safe
use of the appliance and have understood the dangers that can
result from use of the appliance.
2. Children must not play with the appliance.
3. Children are not allowed to perform cleaning and user
maintenance, unless they are 8 years of age or older and are
supervised.
4. Keep the appliance and the power cord out of the reach of
children under 8 years of age.
23
Page 24

5. The appliance is not a toy.
Copyright UNOLD AG | www.unold.de
6. Children should only clean and maintain the appliance under
supervision.
Instructions concerning health
7. The appliance is suitable only for processing of foods.
8. To avoid health impairments due to spoiled food, please do not
store prepared juices too long.
Instructions for safe set-up and use of the appliance
9. Only connect the appliance to an AC power supply with voltage
corresponding to the voltage specified on the rating plate.
10. This appliance must not be operated with an external timer or a
remote control system.
11. The appliance is intended for household use only, or for similar
areas of use, such as,
kitchenettes in businesses, offices or other workplaces,
agricultural enterprises,
for use by guests in hotels, motels or other lodgings,
in private guest houses or holiday homes.
12. Never immerse the appliance or the power cord in water or other
liquids.
13. Do not clean the appliance or power cord in a dishwasher.
14. Never touch the appliance or power cord with wet hands.
15. For safety reasons, never place the appliance on hot surfaces, a
metal trays or a wet surface.
16. Do not place the appliance or power cord near open flames dur
ing operation.
17.
Always use the juicer on a level, uncluttered surface.
18. Ensure that the power cord does not hang over the edge of the
counter top or table, since this can cause accidents, for example
if small children pull on the cord.
19. Do not operate or store the juicer outdoors.
20. The appliance is suitable for extracting the juice from fruit or
soft vegetables.
21. Only move the appliance when it is switched off, and only move
it with both hands.
-
24
Page 25
22. Use the appliance only after it has been properly assembled.
Copyright UNOLD AG | www.unold.de
Ensure that the closure brackets are properly closed.
23. Only use the included tamper to fill the appliance. For safety
reasons, ensure that hands, hair, articles of clothing or other
tools do not get into filling shaft of the juicer.
24. The blades of the stainless steel sieve have very sharp edges.
Therefore, avoid touching them. Grasp the sieve only on the
edge.
25. The motor must come to a complete standstill before you can
take off the moving parts.
26. Never open the lid when the appliance is still in operation.
27. The appliance is not intended for continuous operation. There
fore, do not allow the appliance to operate for more than 3 minutes; thereafter, it must cool down.
28.
To avoid damage, do not use the appliance with accessories of
other manufacturers or brands.
29. Do not operate the appliance if the stainless steel sieve is dam
aged!
30.
Unplug the mains plug from the electrical outlet after use and
before cleaning. Never leave the appliance unattended when the
mains plug is plugged in.
31. Clean the appliance after every use as described in the chapter
“Cleaning and Care”.
32. Check the appliance, the plug and the power cord regularly for
wear or damage. In case of damage to the power cord or other
parts, please send the appliance for inspection and repair
Caution: Only use the included tamper for filling the ingredients.
For safety reasons, ensure that hands, hair, articles of clothing
or other tools cannot get into filling shaft of the juicer.
The motor must come to a complete standstill before you can
take off the moving parts.
Never open the housing of the appliance. This can result in
electric shock.
The manufacturer will not be liable in the event of incorrect assembly, improper or incorrect use or if
repairs are carried out by unauthorized third parties.
25
Page 26

PREPARING THE APPLIANCE FOR OPERATION
Copyright UNOLD AG | www.unold.de
1. Before assembling, ensure that you are assembling the appliance on a level,
dry, substrate.
2. Remove all packaging materials and transport safeguards. Keep the packaging material, such as plastic bags or Styrofoam away from small children
- danger of suffocation!
3. Clean all parts with a damp cloth as described in the chapter “Cleaning and
care”.
4. Place the appliance on a suitable level work surface.
5. Ensure that the switch on the appliance is set to „0“.
6. Place the pomace container side intended for this purpose on the motor
block.
7. Place the juice collection tray on the appliance. Bear in mind that the large
spout on the tray must be hooked into the pomace container. Remove the
spout packaging. Take out the spout and aim it at the juice collection tray
of the funnel.
8. Now place the stainless steel sieve on the drive unit in the juice collection
tray. Press the sieve onto the drive unit (turn approximately 30°). The sieve
must firmly lock in place.
9. Place the lid on the juice collection tray and the pomace container.
10. Fasten the lift with the closure bracket, by flipping the closure bracket
upwards. The closure bracket audibly locks in place.
11. Set a suitable glass or container under the spout on the appliance.
12. Ensure that the switch of the appliance is set to „0“.
13. Connect the appliance via the power cable to the power supply (AC, 220–
240 V~, 50 Hz/60 Hz).
PREPARING FRUITS AND VEGETABLES
1. Use only fresh fruits and vegetables, if possible.
2. Wash the fruit or vegetables thoroughly and dry them effectively.
3. If you wish to extract juice from fruit with a hard skin, you must first remove
the peel. This is the case with pineapple, for example.
4. Fruit with an inedible skin, such as citrus fruit, also must be peeled first.
5. We do not recommend that you use this appliance for bananas, since they
cannot be processed properly in a juicer.
26
Page 27
6. In the juicer, oranges produce a foamy juice. Please peel oranges before
Copyright UNOLD AG | www.unold.de
extracting the juice; otherwise, the juice may be bitter.
7. If you wish to extract juice from berries, add ¼ of an apple with the peel to
about 200 g of berries.
8. Remove any large pits (such as those in cherries or plums) as well as leaves
and stems. Grapes and red currants do not have to have the seeds removed.
Red currants can be processed with the stems.
9. Cut the fruit or vegetables into pieces that will fit into the filling shaft. It is
possible to put quite large pieces through the large fill opening.
PREPARING JUICE
1. Prepare the appliance as described in the section “Preparing the appliance
for operation”.
2. Remove the tamper from the fill opening.
3. Set the selection switch to the desired speed.
Use level 1 for soft fruit, such as grapes, melons, and pears, or soft
vegetables, such as cucumbers.
Use level 2 for hard fruits and vegetables, such as apples and carrots.
4. Place the fruit and vegetable pieces into the filling shaft and push the
pieces slowly down with the tamper. The less pressure you apply, the more
juice you will obtain.
5. We recommend that you have the appliance extract juice for a maximum
time of one minute, and then let it cool for one minute, before running it
again. After a total of three cycles, the appliance should cool for approx.
15 minutes, before you place it in service again.
Caution: Never reach your fingers or put foreign objects into the filling shaft
while the juicer is in operation. Danger of injury!
6. If pieces of fruit or vegetables get jammed and cannot be loosened with the
tamper, switch the appliance off. Unplug the appliance from the power supply and take it apart to remove the piece of fruit or vegetable that is causing
the block. Then reassemble the appliance and continue processing.
7. The juice will now run into the glass or container.
8. Ensure that the pomace container is not over-filled. If the pomace container
is full, switch the appliance off. Unplug the appliance from the power supply
and take the appliance apart: First remove the lid, then take out the sieve;
27
Page 28
then remove the juice collection tray and empty the pomace container. Then
Copyright UNOLD AG | www.unold.de
reassemble the appliance and continue processing.
9. If the glas is full, switch the appliance off by placing the switch on “0”, pour
the juice into another container and then continue processing.
10. When you have finished preparing juice, switch the switch to “0” and unplug
the plug from the electrical outlet. We recommend that you then immediately clean the appliance.
11. Note: The appliance has an overheating protection circuit. If the appliance
should become too warm in operation, the overheating protection circuit
switches the appliance off to prevent the motor from being damaged. In
this case, unplug the power plug and allow the appliance to cool for at least
30 minutes.
DISASSEMBLY
When you have finished extracting juice, switch the appliance off, by
placing the switch on “0”. Wait until juice no longer flows out and the
stainless steel sieve is no longer turning.
Unplug the plug from the electrical outlet.
1. Remove the juice pitcher.
2. Remove the tamper from the filling shaft.
3. Open the closure bracket by carefully pressing it upward and slightly forward
away from the appliance.
4. Remove the transparent lid.
5. Remove the stainless steel sieve. To do this you must pull gently on the
sieve. However, grasp the sieve only on the edge, since the blades in the
sieve are an injury hazard.
6. Remove the juice collection tray and the pomace container.
7. Empty the pomace container. You can use the flat end of a dish brush for
this.
8. Remove any pulp remaining in the juice collection tray.
28
Page 29

CLEANING AND CARE
Copyright UNOLD AG | www.unold.de
We recommend cleaning the appliance immediately after extracting juice.
Otherwise, dried pulp remnants are difficult to remove.
Caution: The stainless steel sieve is sharp - danger of injury!
Switch off the appliance by placing the switch on “0”. Wait until juice no
longer flows out and the stainless steel sieve is no longer turning.
Unplug the plug from the electrical outlet.
1. Disassemble the appliance as described in the section “Disassembly”.
2. Remove the pomace from the pomace container and any pulp remaining in
the juice collection tray.
3. Clean parts (except the motor block) in warm water to which you have added
a little washing-up liquid. The sieve can easily be cleaned using a normal
dish brush made of plastic. However, only grasp the sieve on the edge, to
prevent injuries from the sharp blades. Ensure that you remove all remaining pulp from the sieve to obtain high juice yields the next time you use the
appliance. If necessary, you can also soak the sieve in water before cleaning
it.
4. Yellow contaminants can easily be wiped off with a piece of paper towel
soaked in vegetable oil.
5. Wipe off the motor block with a damp cloth.
6. Wipe the drive unit with a damp cloth regularly, as well.
7. Never use any abrasive scouring agents, steel wool, metal objects, hot cleaning agents or disinfectants.
8. The appliance and power plug must be completely dry before the appliance
can be operated again.
9. When completely dry, store the assembled juicer in a dry, safe place so that
it is protected from dust, impact, heat and moisture.
29
Page 30

RECIPES
Copyright UNOLD AG | www.unold.de
General information about extracting juice
Fruit and vegetable juices are loaded with vitamins. They are refreshing any time
of year. Many vitamins break down when exposed to air; therefore, always drink
freshly pressed juice right away.
Since many vitamins need some fat to make them soluble, you can add 1 teaspoon
of sweet cream or 2 drops of cold-pressed vegetable oil for each glass of juice.
Freshly pressed grape juice is ideal for use in a grape cure.
Besides drinking prepared juice as a fresh beverage, it is also good in soups or
jellies!
For example, try mixing juice with some egg white or cold soluble gelatin and
®
process in the Unold
ice cream machine to make a delicious and refreshing,
low-calorie sorbet.
Power juice beverage
Juice 3 carrots and 1 apple at setting
2; juice 1 orange using a citrus press.
Mix all juices and serve with 2 ice
cubes.
Vegetable juice
Juice ½ kohlrabi, 1 carrot, 1 yellow
bell pepper, 4 sprigs parsley, 1 tomato.
This juice needs no extra seasoning,
but you can add a dash of Tabasco
sauce and a few drops of maple syrup
to enhance the flavor.
Vitamin bomb
Juice 400 g spinach, 2 carrots, 1 stalk
celery, 1 TBSP cress, 2 tomatoes, ½
cucumber.
Mix in 1 TBSP lemon juice, chopped
chives and parsley, a pinch each of
pepper and sugar and add ¼ liter milk.
Pina Colada, nonalcoholic
1 pineapple (enough for 2 to 3 glasses),
50 ml sweet cream, 3 TBSP coconut
syrup, crushed ice.
Juice pineapple on setting 2, pour
juice into a pitcher, mix with cream,
coconut syrup and ice; pour into
glasses, decorate glasses with ¼ pineapple slice and a cocktail cherry.
Strawberry juice with a shot of vodka
Juice 250 g strawberries and 1 apple;
add 1 TSP honey, 1 TBSP sweet cream
and 2 cl vodka; stir and serve.
Apple jelly
Juice enough apples (not too ripe)
until you have 800 ml of juice; mix
juice with 1 kg canning sugar (1:1)
and follow instructions on package to
make jelly.
30
Page 31

Multi-fruit jelly
Copyright UNOLD AG | www.unold.de
Juice blackberries, currant berries,
raspberries, strawberries, gooseberries
on setting 1 and juice 2 apples on
setting 2; add 1 kg canning sugar (1:1)
and follow instructions on package to
make jelly.
Of course, you can also use any
combination of berries.
Refreshing cold cucumber soup
1 salad cucumber, 1 clove garlic, ¼
liter buttermilk, 1 onion, salt, pepper,
fresh dill
Juice ¾ of the cucumber on setting
2, with the onion and garlic. Dice the
remaining cucumber finely and mix
with the buttermilk. Season with salt
and pepper and garnish with dill.
Cold fruit soup
Extract juice from fruits in season,
for example mixed berries or apples,
peaches, pears and apricots, to make
½ liter of juice.
Dilute this juice with ¼ liter water;
remove 3 TBSP of juice and mix
with 1 TBSP food starch. Heat the
remaining juice with 2 TBSP sugar;
stir in starch, bring to a boil and then
allow to cool. Garnish with a few berries
or pieces of fruit before serving.
Cold tomato soup
Juice tomatoes with 1 onion and
1 clove garlic on setting 1 (to make
ca. ¾ liter of juice). Season juice
with freshly ground pepper, a dash of
Tabasco sauce, salt and chopped basil
and serve. Tip: with the Unold® ice
cream machine you can use the juice
to make a refreshing tomato sorbet in
the twinkling of an eye.
The authors have thoroughly considered and tested the recipes included in these operating
instructions. Nevertheless, a guarantee cannot be accepted. The authors, respectively UNOLD AG
and their assignees shall not be liable for personal injuries, material damages and financial loss.
31
Page 32

TROUBLESHOOTING
Copyright UNOLD AG | www.unold.de
Problem Solution
The appliance does not operate. Check to make sure that all parts have been
The motor stops during extraction of juice.
The stainless steel sieve stops
turning.
assembled correctly. If this is not the case,
a safety system prevents the appliance from
being switched on. Assemble the appliance
again as described in the section “Preparing
the appliance for operation”.
Switch the appliance off; unplug it from the
power supply.
Disassemble the appliance as described in
“Disassembly” and check whether the sieve
is jammed by pieces of pulp. Clean the sieve
under warm running water with a plastic
dish brush, reassemble the appliance and
continue processing.
To prevent the sieve from becoming jammed,
do not use fruits or vegetables that are very
hard or stringy. Do not add fruit or vegetables to the filling shaft too quickly and empty the pomace container regularly.
Low juice yield. Check whether the sieve is jammed.
32
Add the ingredients more slowly into the filling shaft.
Some fruits and vegetables yield less juice,
for example apricots.
Page 33

GUARANTEE CONDITIONS
Copyright UNOLD AG | www.unold.de
We grant a 24 months guarantee, and in case of commercial use a 12 months guarantee, starting
from the date of purchase for any damage demonstrably due to manufacturing defects and when the
appliance has been used according to its intended use. Within the warranty period we will remedy
defective materials or workmanship through repair or replacement, at our option. Our warranty
terms apply only to appliances sold in Germany and Austria. For other countries, please contact the
responsible importer. In the event of a claim for remedy of defects, please send the appliance to our
after sales service, properly packaged and postage paid, together with a copy of the automatically
generated sales receipt, which must show the date of purchase, and a description of the defect. If
the defect is covered by the warranty, the customer will be reimbursed for the shipping costs only
in Germany and Austria. The warranty does not cover damage from normal wear, improper handling
and failure to comply with the maintenance and care instructions. The warranty is void if repairs or
modifications are made to the appliance by third parties. Any claims of the end consumer vis-à-vis
the retailer are not limited by this warranty. The warranty does not cover scratches or discoloration of
the container by z. B. herbs. Scratches or discoloration will not affect the function and performance
of the device. The guarantee does not include scratches or discolourations on the container, e.g. due
to herbs. Scratches or discolourations do not impair the function or performance of the appliance. Do
not insert any foreign objects, such as forks, spoons, or knives into the appliance. Knives and foreign
objects can be damaged, and in this case the guarantee claim is invalidated.
WASTE DISPOSAL / ENVIRONMENTAL PROTECTION
Our appliances are produced on a high quality level for a long lifetime. Regular maintenance and expert repairs by our after-sales service can extend the useful life of
the appliance. If an appliance is defective and repair is not possible we ask you to
follow the following instructions for disposal. Do not dispose this appliance together
with your standard household waste. Please bring this product to an approved collection point for recycling of electric and electronic products. By separate collection and
disposal of waste products you help to protect natural resources and ensure, that the
product is disposed in an adequate way to protect health and environment.
The instruction booklet is also available for download: www.unold.de
33
Page 34

NOTICE D´UTILISATION MODÈLE 78220
Copyright UNOLD AG | www.unold.de
SPÉCIFICATION TECHNIQUE
Puissance :
Dimensions : Env. 34,2 x 18,7 x 39,0 cm (Lxl/PxH)
Longueur du
cordon : Env. 100 cm
Poids : Env. 2,5 kg
Boîtier : Plastique
Orifice de
remplissage : Env 7,5 cm de diamètre
Équipement : 2 vitesses (12.000-14.000 rpm), cheminée ultra-large, tamis
Accessoires : Collecteur de pulpe, tasseur, mode d‘emploi avec recettes
Modifications et erreurs des caractéristiques de l‘équipement, de la technique, des
couleurs et du design réservées
EXPLICATION DES SYMBOLES
Ce symbole vous indique des risques possibles qui puissent entraîner
des lésions ou des endommagements de l’appareil.
POUR VOTRE SÉCURITÉ
400 W, 220–240 V~, 50 Hz/60 Hz
en inox, collecteur de pulpe de 1,5 litres, Indice de protection
II
Veuillez lire les indications suivantes et les conserver.
Personnes dans le foyer
1. L’appareil peut être utilisé par des enfants de plus de 8 ans
et par des personnes dont les capacités physiques, sensorielles
ou intellectuelles sont limitées ou dont l’expérience et/ou les
connaissances sont insuffisantes, si ceux-ci sont surveillés ou
s’ils ont été formés à une utilisation sûre de l’appareil et aux
dangers pouvant en résulter.
2. Les enfants ne doivent pas jouer avec l’appareil.
3. Le nettoyage et la maintenance incombant à l’utilisateur ne
doivent pas être effectués par des enfants, à moins qu’ils soient
âgés de plus de 8 ans et qu’ils soient surveillés.
34
Page 35

4. Conserver l’appareil ainsi que le câble hors de portée des enfants
Copyright UNOLD AG | www.unold.de
de moins de 8 ans.
5. L‘appareil n‘est pas un jouet.
6. Le nettoyage et la maintenance de l‘appareil peuvent être exécu
tés par des clients, exclusivement sous surveillance.
Remarques concernant la santé
7.
L‘appareil est exclusivement destiné au traitement de denrées
alimentaires.
8. Veuillez ne pas conserver les jus préparés trop longtemps afin
d‘éviter tout problème sanitaire lié à des denrées avariées.
Remarques relatives à l‘installation et au fonctionnement sécurisé de
l‘appareil
9. Raccorder exclusivement l’appareil au courant alternatif à la
tension se conformant au panneau signalétique.
10. Cet appareil ne doit pas être utilisé avec un minuteur externe ou
un système de commande à distance.
11. L‘appareil est exclusivement destiné à un usage ménager ou à
des fins similaires, par ex.
une kitchenette dans des boutiques, des bureaux ou d‘autres
lieux de travail,
des exploitations agricoles,
à l‘usage des clients dans des hôtels, motels ou autres lieux
d‘hébergement,
dans des pensions privées ou des résidences de vacances.
12. Ne plonger en aucun cas l’appareil ou le câble d‘alimentation
dans de l’eau ou un autre liquide.
13. L‘appareil et le câble d‘alimentation ne doivent pas être nettoyés
au lave-vaisselle.
14. Ne jamais toucher l’appareil ou son cordon d’alimentation avec
les mains mouillées.
15. Pour des raisons de sécurité, l’appareil ne doit jamais être placé
sur des surfaces chaudes, une tablette métallique ou un support
humide.
16. L’appareil ou le câble ne doivent pas être utilisés à proximité de
flammes.
17. Utiliser toujours le presse-fruits sur une surface dégagée et
plane.
-
35
Page 36

18. Veiller à ce que le câble ne pende pas par-dessus le bord du plan
Copyright UNOLD AG | www.unold.de
de travail, cela pouvant provoquer des accidents si un enfant tire
dessus, par exemple.
19. Le presse-fruits ne doit pas être utilisé ou stocké à l’air libre.
20. L‘appareil est exclusivement destiné à presser des fruits ou des
variétés de fruits mous.
21. Déplacer l‘appareil uniquement lorsqu‘il est hors tension et avec
les deux mains.
22. L‘appareil doit exclusivement être utilisé si son assemblage est
conforme. Veiller à ce que le clip de fermeture soit correctement
fermé.
23. Pour le remplissage, utiliser exclusivement le tasseur fourni. Pour
des raisons de sécurité, veiller à ne pas introduire vos mains, vos
cheveux, des morceaux de vêtements ou d‘autres accessoires
dans la cheminée du presse-fruits.
24. Les lames du tamis en inox sont extrêmement coupantes. Il faut
donc éviter de les toucher. Ne toucher le tamis que par le bord.
25. Le moteur doit être arrêté avant que vous puissiez retirer les
pièces mobiles.
26. Ne jamais ouvrir le couvercle si l‘appareil est encore en fonc
tionnement.
27.
L’appareil n‘est pas destiné à un usage prolongé. Ne pas laisser
l‘appareil fonctionner plus de 3 minutes ; après cette durée il
doit refroidir.
28. L’appareil ne doit pas être utilisé avec des accessoires d‘autres
fabricants ou marques, afin d’éviter des détériorations.
29. Si le tamis en inox est endommagé, l‘appareil ne doit pas être
utilisé !
30. Débrancher l’appareil du secteur après utilisation et avant le
nettoyage. Ne jamais laisser l’appareil sans surveillance lorsque
la prise est branchée.
31. Nettoyer l’appareil après chaque utilisation comme décrit au
chapitre « Nettoyage et Entretien ».
32. Vérifier régulièrement l’usure et la détérioration de l’appareil,
de la prise et du câble. Si le câble de raccordement ou d’autres
pièces sont abîmés, envoyer l’appareil pour contrôle et réparation
-
36
Page 37

à notre service après-vente. Toute réparation non-conforme peut
Copyright UNOLD AG | www.unold.de
provoquer des risques importants pour l’utilisateur et entraîner
l’exclusion de la garantie.
Attention : Pour le remplissage des ingrédients, utiliser
exclusivement le tasseur fourni. Pour des raisons de sécurité,
veiller à ne pas introduire vos mains, vos cheveux, des morceaux
de vêtements ou d‘autres accessoires dans la cheminée de
remplissage.
Le moteur doit être arrêté avant que vous puissiez retirer les
pièces mobiles.
Ne pas ouvrir le boîtier de l‘appareil. Risque d‘électrocution.
Le fabricant n’est nullement responsable en cas de montage non conforme, d‘utilisation irrégulière ou non
conforme ou suite à l’exécution de réparations par des tiers non autorisés.
MISE EN SERVICE
1. Avant le montage, s'assurer que l'appareil sera installé sur un support sec
et plat.
2. Retirer tous les matériaux d'emballage et les protections de transport. Tenir
les matériaux d'emballage, comme les sacs en plastique ou le polystyrène,
hors de portée des enfants en bas âge : risque d'asphyxie !
3. Nettoyer toutes les pièces à l’aide d’un chiffon humide, comme décrit dans
le chapitre « Nettoyage et Entretien ».
4. Poser l’appareil sur une surface de travail appropriée et plane.
5. S'assurer que l'interrupteur de l'appareil est sur « 0 ».
6. Positionner le collecteur de pulpe sur la partie du bloc moteur prévue à cet
effet.
7. Placer le collecteur de jus sur l'appareil. Veiller à ce que le grand verseur du
bol soit accroché au collecteur de pulpe. Sortez la
le collecteur de jus.
8. Placer maintenant le tamis en inox sur l'entraînement placé dans le
collecteur de jus. Appuyer sur le tamis pour l'enclencher sur l'entraînement
(tourner de 30 ° env.). Le tamis doit nettement s'encliqueter.
9. Placer le couvercle sur le collecteur de jus et le collecteur de pulpe. Fixer le
couvercle avec le clip de fermeture en rabattant ce dernier vers le haut. À la
fermeture, le clip de fermeture émet un clic audible.
verseur et dirigez-la vers
37
Page 38

10. Placer une carafe à jus sous le verseur de l'appareil.
Copyright UNOLD AG | www.unold.de
11. S'assurer que l'interrupteur de l'appareil est sur « 0 ».
12. Raccorder l’appareil au réseau électrique à l’aide du câble d’alimentation
(courant alternatif, 220–240 V~, 50 Hz/60 Hz).
PRÉPARER FRUITS ET LÉGUMES
1. Dans la mesure du possible, n‘utiliser que des fruits et légumes frais.
2. Laver soigneusement les fruits ou les légumes et bien les sécher.
3. Si vous souhaitez travailler des fruits avec une peau dure, vous devez les
peler au préalable. Ceci est valable pour de l‘ananas par exemple.
4. Les fruits ayant une peau non comestible, comme par exemple les citrons,
doivent également être pelés au préalable.
5. Nous ne vous recommandons pas de presser des bananes avec cet appareil,
car ces fruits sont difficiles à travailler dans un presse-fruits.
6. Dans un presse-fruits, les oranges donnent un jus mousseux. Veuillez peler
les oranges avant de les presser, sans quoi le jus serait amer.
7. Si vous souhaitez presser des baies, ajoutez env. 1/4 de pomme avec sa
peau pour 200 g de baies.
8. Retirer éventuellement les gros pépins (comme par exemple dans les cerises
ou les prunes), ainsi que les feuilles et les tiges. Les raisins et les groseilles
ne doivent pas être épépinés. Vous pouvez presser les groseilles avec les
queues.
9. Découper les fruits ou les légumes en morceaux adaptés pour la cheminée
de remplissage. Le gros orifice de remplissage permet d‘introduire tout droit
de gros morceaux dans l‘appareil.
PRÉPARER UN JUS
1. Préparer l’appareil conformément aux indications du chapitre « Mise en
service ».
2. Retirer le tasseur de l‘orifice de remplissage.
3. Sélectionner la vitesse souhaitée sur le commutateur :
Niveau 1 pour des fruits et légumes mous, comme le raisin, le melon, les
poires ou le concombre.
38
Page 39

Niveau 2 pour des fruits et légumes durs comme des carottes ou des
Copyright UNOLD AG | www.unold.de
pommes.
4. Introduire les morceaux de fruits et de légumes dans la cheminée de
remplissage et presser lentement vers le bas sur les pièces avec le tasseur.
Plus la pression exercée est faible, plus vous obtenez de jus.
5. Nous vous conseillons de laisser l‘appareil presser pendant une minute au
maximum, puis de le laisser refroidir pendant une minute avant de pouvoir
le réutiliser pendant une minute. Après trois cycles au total, l‘appareil doit
refroidir pendant env. 15 minutes avant d‘être à nouveau mis en marche.
Attention : ne jamais pousser avec les doigts ou avec des corps étrangers
dans la cheminée de remplissage alors que le presse-fruits est en
fonctionnement. Risque de blessures !
6. Si des morceaux de fruits ou de légumes sont bloqués et que vous ne pouvez
pas les débloquer avec le tasseur, éteignez l‘appareil. Débrancher la prise
secteur et démonter l‘appareil pour retirer le morceau de fruit ou de légume
concerné. Remonter ensuite l‘appareil et poursuivre votre préparation.
7. Le jus coule maintenant dans la carafe à jus.
8. Veiller à ce que le collecteur de pulpe ne déborde pas. Si le collecteur de
pulpe est plein, éteindre l‘appareil. Débrancher la prise secteur et démonter
l‘appareil : commencer par retirer le couvercle, puis le tamis ; retirer ensuite
le collecteur de jus et vider le collecteur de pulpe. Remonter ensuite
l‘appareil et poursuivre votre préparation.
9. Lorsque la carafe est pleine, éteindre l‘appareil, en réglant le commutateur
sur « 0 », vider le jus dans un récipient et poursuivre l‘opération.
10. Si vous avez terminé la préparation du jus, régler le commutateur sur « 0 » et
débrancher la prise du secteur. Nous recommandons de nettoyer l‘appareil
immédiatement après le pressage.
11. Remarque : L‘appareil est équipé d‘une protection contre la surchauffe.
Si l‘appareil chauffe trop durant le fonctionnement, la protection contre la
surchauffe éteint l‘appareil afin d‘éviter d‘endommager le moteur. Dans ce
cas, débrancher la prise de courant et laisser l‘appareil refroidir pendant au
moins 30 minutes.
39
Page 40

DÉMONTAGE
Copyright UNOLD AG | www.unold.de
Si vous avez terminé de presser, éteindre l‘appareil en réglant le
commutateur sur « 0 ». Patienter jusqu‘à ce qu‘il n‘y ait plus de jus qui
s‘écoule et que le tamis en inox ne tourne plus.
Débrancher la prise.
1. Retirer la carafe à jus.
2. Retirer le tasseur de la cheminée de remplissage.
3. Ouvrir les deux clips de fermeture, en les poussant délicatement vers le haut
et légèrement vers l‘avant.
4. Retirer le couvercle transparent.
5. Retirer le tamis en inox. Cependant, ne toucher le tamis que par le bord, car
un risque de blessure existe avec les lames du tamis.
6. Retirer le collecteur de jus et le collecteur de pulpe.
7. Vider le collecteur de pulpe. Pour cela, vous pouvez vous aider de l‘extrémité
plate d‘une brosse à vaisselle.
8. Retirer éventuellement les résidus de fibres du collecteur de jus.
NETTOYAGE ET ENTRETIEN
Nous recommandons de nettoyer l'appareil immédiatement après le pressage.
Dans le cas contraire, les résidus de fibres séchés sont difficiles à retirer.
Attention : le tamis en inox est coupant - Risque de blessures !
Éteindre l‘appareil en positionnant le commutateur sur « 0 ». Patienter
jusqu‘à ce qu‘il n‘y ait plus de jus qui s‘écoule et que le tamis en inox ne
tourne plus.
Débrancher la prise.
1. Démonter l‘appareil comme décrit au chapitre « Démontage ».
2. Retirer la pulpe du collecteur de pulpe ainsi que les résidus de fibres du
collecteur de jus.
3. Nettoyer toutes les pièces (sauf le bloc moteur !) à l‘eau chaude additionnée
de produit nettoyant. Vous pouvez nettoyer le tamis avec une brosse à
vaisselle en plastique courante. Cependant, ne toucher le tamis que par
le bord, afin de ne pas se couper avec les lames acérées. Veiller à éliminer
totalement les résidus de fibres du tamis afin d‘obtenir de bons résultats
40
Page 41

de pressage par la suite. Au besoin, vous pouvez également laisser le tamis
Copyright UNOLD AG | www.unold.de
tremper dans l‘eau.
4. Les traces jaunes peuvent être éliminées facilement en les essuyant avec un
morceau d‘essuie-tout trempé dans l‘huile alimentaire.
5. Essuyer le bloc moteur avec un torchon humide.
6. Essuyer également régulièrement l‘entraînement avec un torchon humide.
7. En principe, n‘utiliser aucun abrasif puissant, pas de laine de verre, d’objets
métalliques, pas de détergent chaud ou de désinfectant.
8. L’appareil et la prise doivent être intégralement secs avant de pouvoir
réutiliser l’appareil.
9. Conserver le presse-agrumes monté totalement sec dans un endroit sec et
sûr, à l’abri de la poussière, des chocs, de la chaleur et de l’humidité.
RECETTES
Remarques générales pour la préparation de jus
Les jus sont de véritables concentrés vitaminiques. Ils rafraîchissent à tout
moment de l‘année. Beaucoup de vitamines se désintègrent au contact de l‘air,
c‘est pourquoi vous devez toujours savourer immédiatement les jus de fruits
fraîchement pressés.
De nombreuses vitamines ne sont libérées qu‘après l‘ajout de graisse ; vous
pouvez donc ajouter 1 cuillère à café de crème liquide ou 2 gouttes d‘huile
pressée à froid dans un verre de jus.
Le jus de raisin fraîchement pressé convient particulièrement bien à une cure
de raisins.
Cependant, les jus préparés ne se dégustent pas uniquement frais ; ils permettent
également de préparer des soupes, des gelées, etc.!
En mélangeant un peu de blanc d‘oeuf ou de gélatine soluble à froid et en
®
introduisant par ex. dans la glacière Unold
pour réaliser un sorbet, vous obtenez
un délicieux rafraîchissement sans calories.
41
Page 42
Jus Power
Copyright UNOLD AG | www.unold.de
Presser 3 carottes et 1 pomme sur le
niveau 2 ; presser 1 orange avec un
presse-citron. Mélanger tous les jus et
servir avec 2 glaçons.
Jus de légumes
Presser ½ chou-rave, 1 carotte,
1 poivron jaune, 4 branches de persil,
1 tomate. Ce jus se déguste sans
assaisonnement, mais vous pouvez
toutefois l‘améliorer avec une giclée
de Tabasco et quelques gouttes de
sirop d‘érable.
Bombe vitaminée
Presser 400 g d‘épinards, 2 carottes,
1 branche de céleri, 1 cuillère à soupe
de cresson, 2 tomates, 1/2 concombre.
Mélanger avec 1 cs de jus de citron,
de la ci-boulette et du persil hachés,
et une pincée de poivre et de sucre,
puis ajouter 1/4 L. de lait.
Pina Colada, sans alcool
1 ananas (pour 2 ou 3 verres), 50 ml
de crème liquide, 3 cs de sirop de
coco, glace pilée.
Presser l‘ananas sur le niveau 2; mettre
le jus dans un pichet, et le mélanger
avec de la crème, du sirop de coco et
de la glace; remplir les verres puis les
décorer avec 1/4 de tranche d‘ananas
et une cerise cocktail.
liquide et 2 cl de vodka, mélanger et
servir.
Gelée de pommes
Ne pas presser des pommes trop
mûres, une fois que vous avez 800 ml
de jus, les mélanger avec 1 kg de
sucre gélifiant 1:1, puis effectuer la
cuisson conformément aux indications
sur le paquet.
Gelée de fruits variés
Presser des mûres, des groseilles, des
framboises, des fraises et des groseilles
à maquereau sur le niveau 1, ainsi que
des pommes sur le niveau 2; ajouter
1 kg de sucre gélifiant 1:1 et cuisiner
conformément aux indications sur le
paquet.
Naturellement, cette recette est
réalisable avec une seule sorte de
fruits.
Soupe froide de concombre rafraîchissante
1 concombre, 1 oignon, 1 gousse
d‘ail, 1/4 l de babeurre, sel, poivre,
aneth frais
Presser 3/4 du concombre au niveau
2, avec l‘oignon et l‘ail. Couper le
reste du concombre en petits dés
et les mélanger avec le babeurre.
Assaisonner avec du sel et du poivre et
garnir d‘aneth.
Jus de fraises arrosé
Presser 250 g de fraises et 1 pomme;
ajouter 1 cc de miel, 1 cs de crème
42
Soupe de fruits froide
Préparer 1/2 L. de jus de fruits de
saison, par ex. à partir de différentes
Page 43

variétés de baies ou de pommes, de
Copyright UNOLD AG | www.unold.de
pêches, de poires et d‘abricots.
Rallonger ce jus avec 1/4 L. d‘eau;
prendre 3 cs de jus et mélanger avec
1 cs d‘amidon alimentaire. Faire
chauffer le reste de jus avec 2 cs de
sucre, incorporer l‘amidon, faire cuire
brièvement et laisser refroidir. Avant
3/4 L. de jus). Assaisonner le jus avec
du poivre fraîchement moulu, un peu
de tabasco, du sel et du basilic haché,
puis servir.
Conseil: avec la glacière Unold®,
préparez un sorbet à la tomate
rafraîchissant avec ce jus, en un tour
de main.
de servir, décorer avec quelques baies
ou de petits morceaux de fruits.
Soupe de tomates froide
Presser les tomates avec 1 oignon et
1 gousse d‘ail sur le niveau 1 (env.
Les recettes disponibles dans ce mode d’emploi ont été soigneusement examinées et contrôlées
par leurs auteurs respectifs et par la société UNOLD AG. Notre responsabilité n’est toutefois en
aucun cas engagée. Les auteurs et la société UNOLD AG ainsi que ses représentants déclinent toute
responsabilité en cas de dommages corporels, matériels et pécuniaires.
DÉPANNAGE
Problème Solution
L‘appareil ne fonctionne pas. Vérifier si toutes les pièces sont correcte-
ment assemblées. Si ce n‘est pas le cas,
un système de sécurité empêche l‘appareil
d‘être mis en marche. Remonter l‘appareil
comme décrit au chapitre „Mise en service“.
Le moteur reste statique lors du
pressage.
Éteindre l‘appareil. Débrancher la prise.
Démonter l‘appareil comme décrit au chapitre „Demontage“, et vérifier que le tamis
n‘est pas obstrué par des fibres. Nettoyer le
tamis sous l‘eau chaude avec une brosse à
vaisselle en plastique ; remonter l‘appareil
et poursuivre le pressage.
Afin d‘éviter que le tamis s‘obstrue, vérifier
que les fruits ou légumes utilisés ne sont
pas trop durs ou fibreux. Ne pas introduire
les fruits ou les légumes trop rapidement
dans la cheminée de remplissage et vider
régulièrement le collecteur de pulpe.
43
Page 44

Problème Solution
Copyright UNOLD AG | www.unold.de
Le tamis en inox ne tourne plus. Éteindre l‘appareil. Débrancher la prise.
Trop peu de jus. Vérifier si le tamis est obstrué.
Démonter l‘appareil comme décrit au chapitre „Demontage“, et vérifier que le tamis
n‘est pas obstrué par des fibres. Nettoyer le
tamis sous l‘eau chaude avec une brosse à
vaisselle en plastique ; remonter l‘appareil
et poursuivre le pressage.
Afin d‘éviter que le tamis s‘obstrue, vérifier
que les fruits ou légumes utilisés ne sont
pas trop durs ou fibreux. Ne pas introduire
les fruits ou les légumes trop rapidement
dans la cheminée de remplissage et vider
régulièrement le collecteur de pulpe.
Introduire les ingrédients plus lentement
dans la cheminée de remplissage.
Certaines variétés de fruits et légumes
donnent, par principe, moins de jus, comme
par ex. les abricots.
44
Page 45

CONDITIONS DE GARANTIE
Copyright UNOLD AG | www.unold.de
En cas d’utilisation conforme et lors de dégâts manifestement dus à des défauts de fabrication, nos
appareils sont garantis 24 mois, lors d’utilisation professionnelles 12 mois, à dater de l’achat. Notre
garantie n’est valide que pour les appareils vendus en Allemagne et en Autriche. Dans tout autre
pays veuillez contacter l’importateur. Veuillez envoyer à notre adresse les appareils, pour lesquels
vous réclamez une suppression de défauts, avec le bon d’achat montrant la date d’achat, port payé
et proprement emballé. Les coûts de transport seront remboursés en cas de garantie en Allemagne et
en Autriche. Les défauts causés par usure, utilisation incorrecte ou non-respect des instructions de
maintenance sont exclus. Notre obligation de garantie cesse, si de réparations ou des interventions
sont accomplies par des tiers. Cette garantie n’affecte pas les droits du consommateur contre le
commerçant. La garantie ne couvre pas les rayures ou la décoloration du conteneur par z. B. herbes.
Égratignures ou décoloration n‘affectera pas le fonctionnement et les performances de l‘appareil. Ne
pas insérer d‘objets étrangers tels que des fourchettes, des cuillères ou des couteaux de l‘unité. Couteaux et corps étrangers peuvent être endommagées, et annulera la garantie. La garantie ne couvre
pas les rayures ou les décolorations du récipient occasionnées, par ex., par des herbes. Les rayures
ou les décolorations n‘altèrent pas le fonctionnement et les performances de l‘appareil. N‘introduisez
aucun corps étranger, comme une cuillère, une fourchette ou un couteau, dans l‘appareil. La lame et
les corps étrangers pourraient être endommagés et la garantie est caduque dans ce cas.
TRAITEMENT DES DÉCHETS / PROTECTION DE L’ENVIRONNEMENT
Nos appareils sont produits selon un standard élevé de qualité pour une longue durée
d’utilisation. Un entretien régulier et des réparations compétentes par notre service
après-vente prolongent cette durée d’utilisation. Si néanmoins l’appareil est endommagé et ne peut plus être réparé, veuillez suivre les instructions suivantes. Ne jamais
disposer ce produit avec les dégâts de ménage. Apportez ce produit à une station de
collection pour récupération de produits électriques et électroniques. Par la collection
séparée vous aidez à protéger les ressources naturelles et prenez soin, que le produit
est démonté sans risque pour la santé et l’environnement.
45
Page 46

GEBRUIKSAANWIJZING MODEL 78220
Copyright UNOLD AG | www.unold.de
TECHNISCHE GEGEVENS
Vermogen: 400 W, 220–240 V~, 50 Hz/60 Hz
Afmetingen: Ca. 34,2 x 18,7 x 39,0 cm (lxb/dxh)
Snoerlengte: Ca. 100 cm
Gewicht: Ca. 2,5 kg
Behuizing: Plastic
Vulopening: Ca. 7,5 cm diameter
Uitvoering: 2 snelheidsstanden (12.000-14.000 rpm), extra grote
Toebehoren: Pulpcontainer, stamper, gebruiksaanwijzing met recepten
Wijzigingen en vergissingen in de uitrustingskenmerken, techniek, kleuren en
design voorbehouden
VERKLARING VAN DE SYMBOLEN
Dit symbool wijst op eventuele gevaren die letsel tot gevolg kunnen hebben of tot schade aan het apparaat leiden.
VOOR UW VEILIGHEID
vulbuis, roestvrijstalen zeef, 1,5 liter pulpcontainer,
beschermklasse II
Lees de volgende aanwijzingen a.u.b. door en bewaar ze goed.
Personen in het huishouden
1. Dit apparaat kan door kinderen vanaf 8 jaar worden gebruikt
en door personen die over gebrekkige fysieke, sensorische of
geestelijke vaardigheden of gebrek aan ervaring en/of kennis
beschikken, mits zij onder toezicht staan of instructies hebben
gekregen aangaande het veilige gebruik van dit apparaat en de
hieruit resulterende gevaren begrepen hebben.
2. Kinderen mogen niet met het apparaat spelen.
3. Reiniging en onderhoud door de gebruiker mogen niet door
kinderen worden uitgevoerd, tenzij deze ouder dan 8 jaar zijn en
onder toezicht staan.
46
Page 47

4. Berg het apparaat en de kabel op buiten bereik van kinderen
Copyright UNOLD AG | www.unold.de
onder de 8 jaar.
5. Het apparaat is geen speelgoed.
6. Kinderen moeten onder toezicht staan, om ervoor te zorgen dat
ze niet met het apparaat spelen.
Aanwijzingen inzake de gezondheid
7. Het apparaat is uitsluitend bestemd voor het verwerken van
levensmiddelen.
8. Bewaar de bereide sappen niet te lang, om te vermijden dat er
door bedorven levensmiddelen gevaar voor de gezondheid ont
staat.
Instructies voor het veilig opstellen en gebruik van het apparaat
9.
Sluit het apparaat uitsluitend aan op wisselstroom met spanning
overeenkomstig het typeplaatje.
10. Dit apparaat mag niet met een externe tijdklok of met een
afstandsbediening bediend worden.
11. Het apparaat is uitsluitend bestemd voor huishoudelijk gebruik
of voor soortgelijke doeleinden, bijv.:
kitchenettes in winkels, kantoren of op andere werkplaatsen,
landbouwbedrijven,
voor gebruik door gasten van hotels, motels of andere overnach
tingsbedrijven,
in particuliere pensions of vakantiehuisjes.
12. Dompel het apparaat nooit in water of andere vloeistoffen.
13. Het apparaat en de aansluitkabel mogen niet in de vaatwasser
gereinigd worden.
14. Raak het apparaat of het snoer nooit met natte handen aan.
15. Zet het apparaat om veiligheidsredenen nooit neer op hete
oppervlakken, een metalen dienblad of op een natte ondergrond.
16. Het apparaat en het snoer mogen niet in de buurt van open vuur
gebruikt worden.
17. Gebruik de sapcentrifuge steeds op een vrij en effen oppervlak.
18. Let op dat de aansluitkabel niet over de rand van het werkvlak
heen hangt, omdat dit anders ongevallen kan veroorzaken, als
bijv. kleine kinderen aan de kabel trekken.
-
-
47
Page 48

19. De sapcentrifuge mag niet in de open lucht gebruikt of bewaard
Copyright UNOLD AG | www.unold.de
worden.
20. Het apparaat is uitsluitend geschikt om het sap van fruit of van
zachte groentesoorten uit te persen.
21. Beweeg het apparaat uitsluitend, als het uitgeschakeld is en
alleen met beide handen.
22. Het apparaat mag uitsluitend gebruikt worden, nadat het correct
gemonteerd is. Let erop dat de sluitbeugels stevig gesloten zijn.
23. Gebruik uitsluitend de meegeleverde stamper om het fruit of de
groente in de vulbuis omlaag te duwen. Let er om veiligheids
redenen op dat geen haren, kledingstukken, handen of andere
gereedschappen in de vulbuis van de sapcentrifuge terechtkomen.
24.
De mazen van het roestvrijstalen zeef zijn heel scherp. Raak de
mazen daarom niet aan. Pak het zeef uitsluitend aan de rand
vast.
25. De motor moet tot stilstand zijn gekomen, voordat u de bewe
gende delen mag verwijderen.
26.
Open het deksel nooit, zolang het apparaat nog in werking is.
27. Het apparaat is niet geschikt voor continu gebruik. Laat het
apparaat daarom niet langer dan 3 minuten lopen, daarna moet
het afkoelen.
28. Om schade te vermijden, mag het apparaat niet met toebehoren
van andere fabrikanten of andere merken worden gebruikt.
29. Als het rvs zeef beschadigd is, mag het apparaat niet gebruikt
worden!
30. Trek de netstekker uit het stopcontact nadat u het apparaat
heeft gebruikt en voordat u het gaat reinigen. Laat het apparaat
nooit zonder toezicht achter, als de netstekker in het stopcontact
steekt.
31. Reinig het apparaat na elk gebruik, zoals beschreven in het
hoofdstuk „Reiniging en onderhoud“.
32. Controleer het apparaat, de stekker en de aansluitkabel regel
matig op slijtage of beschadiging. Als de aansluitkabel of andere
delen beschadigd zijn, stuur het apparaat dan a.u.b. ter controle
en reparatie
naar onze klantenservice. Ondeskundige reparaties
-
-
-
48
Page 49

kunnen ernstige gevaren voor de gebruiker veroorzaken en heb-
Copyright UNOLD AG | www.unold.de
ben uitsluiting van de garantie tot gevolg.
Attentie: Gebruik uitsluitend de meegeleverde stamper
om de ingrediënten in het apparaat te doen. Let er om
veiligheidsredenen op dat geen handen, haren, kledingstukken
of andere gereedschappen in de vulbuis terecht kunnen komen.
De motor moet tot stilstand zijn gekomen, voordat u de
bewegende delen mag verwijderen.
Open de behuizing van het apparaat in geen geval. Er bestaat
gevaar voor een elektrische schok.
De fabrikant is niet aansprakelijk, indien het apparaat verkeerd gemonteerd, ondeskundig of foutief
gebruikt of door niet geautoriseerde derden gerepareerd werd.
IN GEBRUIK NEMEN
1. Controleer vóór de montage of de ondergrond voor het apparaat effen en
droog is.
2. Verwijder alle verpakkingsmaterialen en transportbeveiligingen. Houd ver-
pakkingsmaterialen, zoals bijv. kunststof zakken of styropor uit de buurt van
kleine kinderen – verstikkingsgevaar!
3. Reinig alle delen met een vochtige doek, zoals beschreven in het hoofdstuk
„Reiniging en onderhoud“.
4. Zet het apparaat op een geschikt, effen werkvlak.
5. Controleer of de schakelaar aan het apparaat op „0“ staat.
6. Plaats de pulpcontainer aan de hiervoor voorziene kant van het motorblok.
7. Plaats de sap-opvangschaal op het apparaat. Denk eraan dat de uitlaatope-
ning van de schaal in de pulpcontainer moet worden gehangen. Haal de
eruit en richt deze op de sap-opvangschaal.
8. Zet nu het roestvrijstalen zeef op de aandrijving in de sap-opvangschaal.
Druk het zeef op de aandrijving (ca. 30 ° draaien). Het zeef moet stevig
vastklikken.
9. Plaats het deksel op de sap-opvangschaal en de pulpcontainer.
10. Bevestig het deksel met de sluitbeugel, door de beugel omhoog te klappen.
De sluitbeugel klikt hoorbaar vast.
tuit
49
Page 50

11. Zet een geschikte sapkan onder de tuit aan het apparaat.
Copyright UNOLD AG | www.unold.de
12. Controleer of de schakelaar van het apparaat op „0“ staat.
13. Sluit het apparaat m.b.v. de aansluitkabel op het stroomnet aan (wissel-
stroom, 220–240 V~, 50/60 Hz).
FRUIT EN GROENTE VOORBEREIDEN
1. Gebruik zo mogelijk uitsluitend vers fruit en verse groente.
2. Was het fruit resp. de groente grondig en droog het goed af.
3. Als u vruchten met een harde schil wilt verwerken, moet u deze van tevoren
schillen. Dit geldt bijvoorbeeld voor ananas.
4. Vruchten met een schil die niet eetbaar is, zoals bijv. de schil van citrus-
vruchten, moeten ook van tevoren geschild worden.
5. Wij raden u aan om geen bananen te persen, omdat deze vruchten heel
slecht in een sapcentrifuge verwerkt kunnen worden.
6. Als u sinaasappels in de sapcentrifuge verwerkt, krijgt u een schuimig sap.
Schil de sinaasappels a.u.b. eerst, voordat u ze in de sapcentrifuge stopt,
omdat het sap anders bitter kan worden.
7. Als u bessen wilt verwerken tot bessensap, voeg dan a.u.b. voor ca. 200 g
bessen ¼ appel met schil eraan toe.
8. Verwijder eventuele grote pitten (zoals bijv. van kersen en pruimen) en ook
bladeren of stengels. Druiven en aalbessen hoeven niet van pitten ontdaan
te worden. Aalbessen kunt u met stengel en al uitpersen.
9. Snijd het fruit of de groente in stukken, zodat ze in de vulbuis passen. Door
de grote vulopening is het mogelijk om tamelijk grote stukken in het apparaat te doen.
SAP MAKEN
1. Bereid het apparaat voor zoals beschreven in het hoofdstuk „In gebruik
nemen“.
2. Neem de stamper uit de vulopening.
3. Stel aan de schakelaar de gewenste snelheid in:
Trap 1 voor zacht fruit en zachte groente, zoals druiven, meloenen, peren
of komkommers.
Trap 2 voor hard fruit en harde groente, zoals wortelen of appels.
50
Page 51

4. Doe de stukken fruit of groente in de vulbuis en duw de stukken met de
Copyright UNOLD AG | www.unold.de
stamper langzaam naar beneden. Hoe minder druk u uitoefent, hoe meer
sap u krijgt.
5. Wij adviseren om het apparaat maximaal één minuut te laten werken en
het daarna één minuut lang te laten afkoelen, voordat u het opnieuw één
minuut laat lopen. Na in totaal drie cycli moet het apparaat ca. 15 minuten
afkoelen, voordat u het opnieuw in gebruik neemt.
Attentie: steek nooit uw vingers of vreemde voorwerpen in de vulbuis, als
de sapcentrifuge in werking is. Er bestaat verwondingsgevaar!
6. Als stukken fruit of groente vast zijn gaan zitten en niet met de stamper los-
gemaakt kunnen worden, schakelt u het apparaat uit. Trek de stekker uit het
stopcontact en haal het apparaat uit elkaar, om het betreffende stuk fruit
of groente te verwijderen. Zet het apparaat dan weer in elkaar en ga verder
met sap uitpersen.
7. Het sap loopt nu in de sapkan.
8. Let op dat de pulpcontainer niet te vol wordt. Als de pulpcontainer vol is,
schakelt u het apparaat uit. Trek de stekker uit het stopcontact en haal
het apparaat uit elkaar: eerst verwijdert u het deksel, daarna het zeef, dan
de sap-opvangschaal en vervolgens maakt u de pulpcontainer leeg. Zet het
apparaat dan weer in elkaar en ga verder met sap uitpersen.
9. Als de sapkan vol is, schakelt u het apparaat uit door het op „0“ te zetten,
vervolgens vult u het sap om in een andere kan of in een glas en daarna gaat
u door met uitpersen.
10. Als u klaar bent met het bereiden van sap, zet u de schakelaar op „O“ en
trekt u de stekker uit het stopcontact. Wij adviseren om het apparaat meteen na het gebruik te reinigen.
11. Aanwijzing: Het apparaat beschikt over een oververhittingsbeveiliging.
Mocht het apparaat tijdens de werking te warm worden, schakelt de oververhittingsbeveiliging het apparaat uit, om schade aan de motor te voorkomen.
Trek in dit geval de netstekker uit en laat het apparaat minstens 30 minuten
afkoelen.
51
Page 52

UIT ELKAAR HALEN
Copyright UNOLD AG | www.unold.de
Als u klaar bent met uitpersen, schakelt u het apparaat uit door de
schakelaar op „0“ te zetten. Wacht totdat er geen sap meer uit het apparaat
komt en het rvs zeef niet meer draait.
Trek de stekker uit het stopcontact.
1. Verwijder de sapkan.
2. Trek de stamper uit de vulbuis.
3. Open de sluitbeugel, door deze voorzichtig naar boven en licht naar voren,
van het apparaat weg, te drukken.
4. Verwijder het doorzichtige deksel.
5. Verwijder het roestvrijstalen zeef. Pak het zeef echter uitsluitend aan de
rand vast, omdat door de messen in het zeef verwondingsgevaar bestaat.
6. Verwijder de sap-opvangschaal en de pulpcontainer.
7. Maak de pulpcontainer leeg. Hiervoor kunt u gebruik maken van een afwas-
borstel.
8. Verwijder eventuele vezelresten uit de sap-opvangschaal.
REINIGING EN ONDERHOUD
Wij raden u aan om het apparaat meteen na het gebruik te reinigen. Ingedroogde
vezelresten laten zich anders maar heel moeilijk verwijderen.
Attentie: Het rvs zeef is scherp – verwondingsgevaar!
Schakel het apparaat uit door de schakelaar op „0“ te zetten. Wacht totdat
er geen sap meer uit het apparaat komt en het rvs zeef niet meer draait.
Trek de stekker uit het stopcontact.
1. Haal het apparaat uit elkaar, zoals beschreven in het hoofdstuk „Uit elkaar
halen“.
2. Verwijder de pulp uit de pulpcontainer en de vezelresten uit de sap-opvang-
schaal.
3. Reinig alle delen (behalve het motorblok) in warm water waaraan u een
beetje afwasmiddel toegevoegd heeft. Het zeef kunt u met een normaal in
de handel verkrijgbare afwasborstel van kunststof goed reinigen. Pak het
zeef echter uitsluitend aan de rand vast, zodat u zich niet aan de scherpe
messen snijdt. Zorg ervoor dat het zeef helemaal vrij wordt gemaakt van
52
Page 53

vezelresten, zodat u ook in de toekomst goed sap kunt maken. Zonodig kunt
Copyright UNOLD AG | www.unold.de
u het zeef ook in water laten weken.
4. Gele verontreinigingen laten zich gemakkelijk afvegen met een stuk keuken-
papier dat u in eetbare olie heeft gedrenkt.
5. Veeg het motorblok af met een vochtige doek.
6. Veeg de aandrijving ook regelmatig met een vochtige doek af.
7. Gebruik nooit scherpe schuurmiddelen, staalwol, metalen voorwerpen, hete
schoonmaakmiddelen of desinfecterende middelen.
8. Het apparaat en de aansluitstekker moeten volkomen droog zijn, voordat het
apparaat weer gebruikt kan worden.
9. Berg de volledig droge en weer in elkaar gezette sapcentrifuge op een droge
en veilige plaats op, om het apparaat tegen stof, stoten, hitte en vocht te
beschermen.
RECEPTEN
Algemene aanwijzingen voor het uitpersen
Sappen zijn een echte vitaminebom Ze zijn een heerlijke verfrissing in elke tijd
van het jaar. Veel vitamines vervliegen in de lucht, daarom moet vers geperst
sap steeds meteen gedronken worden. Talrijke vitamines lossen pas op na de
toevoeging van een beetje vet; daarom kunt u per glas sap 1 theelepel slagroom
of 2 druppels koudgeperste olie toevoegen. Vers geperst druivensap is uitstekend
geschikt voor een druivenkuur. De geperste sappen kunnen echter niet alleen
vers gedronken worden, maar kunnen ook heel goed in soep, gelei enz. worden
verwerkt! Met een beetje eiwit of koud oplosbare gelatine gemengd en bijv. in de
®
Unold
ijsmachine tot een sorbet verwerkt, heeft u een caloriearme en heerlijke
verfrissing.
Power-sap
Het sap van 3 wortelen en 1 appel
op trap 2 uitpersen, het sap van
1 sinaasappel met een citruspers
uitpersen. Alle sappen mengen en met
2 ijsblokjes serveren.
Groentesap
Het sap van ½ koolrabi, 1 wortel,
1 gele paprika, 4 stengels peterselie,
1 tomaat uitpersen. Dit sap heeft
eigenlijk geen andere smaak nodig,
maar kan ook met een beetje tabasco
en een paar druppels ahornsiroop
verfijnd worden.
Vitaminebom
Het sap van 400 g spinazie, 2 wortelen,
1 stengel bleekselderij, 1 el tuinkers,
½ komkommer, 2 tomaten uitpersen.
53
Page 54

Met 1 el citroensap, gehakte bieslook
Copyright UNOLD AG | www.unold.de
en peterselie, een snufje zout en
suiker verroeren en met ¼ liter melk
opvullen.
Pina Colada, alcoholvrij
1 ananas (voldoende voor 2 – 3 glazen),
50 ml slagroom, 3 el kokossiroop,
gecrusht ijs.
Het sap van de ananas op trap
2 uitpersen, het sap in een kan
doen, met slagroom, kokossiroop en
ijs mengen, in glazen omvullen, de
glazen met ¼ ananasschijf en een
cocktailkers de-coreren.
Aardbeiensap met een scheutje alcohol
Het sap van 250 g aardbeien en
1 appel uitpersen, 1 tl honing, 1 el
slagroom en 2 cl wodka toevoegen,
omroeren en serveren.
Appelgelei
Pers het sap van niet te rijpe appels uit,
totdat u ongeveer 800 ml sap heeft, dit
sap met 1 kg geleisuiker 1:1 mengen
en hiervan volgens de aanwijzing op de
verpakking gelei maken.
Vruchtengelei
Het sap van braambessen, aalbessen,
frambozen, aardbeien, kruisbessen,
op trap 1 en het sap van 2 appels op
trap 2 uitpersen, 1 kg geleisuiker 1:1
toevoegen en volgens de aanwijzing op
de verpakking gelei maken.
Natuurlijk ook met slechts een
vruchtensoort mogelijk.
Verfrissende koude komkommersoep
1 komkommer, 1 ui, 1 teentje knoflook,
¼ l karnemelk, zout, peper, verse dille
Het sap van ¾ van de komkommer
op trap 2 uitpersen, samen met de
ui en de knoflook. De rest van de
komkommer in kleine blokjes snijden
en met de karnemelk vermengen. Zout
en peper naar smaak toevoegen en
met dille garneren.
Zoete koude vruchtensoep
Maak ½ liter sap van seizoenvruchten,
bijv. van verschillende soorten bessen
of van appels, perziken, peren,
abrikozen.
Dit sap met ¼ liter water verdunnen,
3 el van het sap apart nemen en met
1 el maïzena verroeren. De rest van
het sap met 2 el suiker verhitten, de
maïzena erdoor roeren, even koken
en laten afkoelen. Voor het serveren
met een paar bessen of stukjes fruit
garneren.
Koude tomatensoep
Tomaten met 1 ui en 1 teentje
knoflook op trap 1 uitpersen (ca.
¾ liter sap). Het sap met vers gemalen
peper, een beetje tabasco, zout en ge-
hakte basilicum op smaak brengen
en serveren. Tip: met de Unold®
ijsmachine maakt u van dit sap in
een handomdraai een heerlijk frisse
tomatensorbet.
54
Page 55

De recepten in deze gebruiksaanwijzing zijn door de auteurs en door UNOLD AG zorgvuldig ontwikkeld
Copyright UNOLD AG | www.unold.de
en getest. Een garantie kan er echter niet worden aanvaard. De auteurs en/of UNOLD AG en haar
gemachtigden kunnen in geen geval aansprakelijk worden gesteld voor letsel, materiële schade en
financiële schade.
STORINGEN VERHELPEN
Probleem Oplossing
Het apparaat werkt niet. Controleer of alle delen correct gemonteerd
zijn. Als dit niet het geval is, zorgt een
veiligheidssysteem ervoor dat het apparaat
niet ingeschakeld kan worden. Zet het
apparaat opnieuw in elkaar, zoals beschreven
in het hoofdstuk „In gebruik nemen“.
De motor staat tijdens het
uitpersen stil.
Schakel het apparaat uit. Trek de stekker uit
het stopcontact.
Haal het apparaat uit elkaar, zoals
beschreven in het hoofdstuk „Uit elkaar
halen“, en controleer of het zeef verstopt
is door stukjes vezel. Reinig het zeef onder
stromend warm water met een afwasborstel
van kunststof, zet het apparaat weer in
elkaar en ga door met uitpersen
Om te voorkomen dat het zeef verstopt
raakt, controleert u of de gebruikte fruit- of
groentesoorten te hard of vezelachtig zijn.
Doe het fruit of de groente niet te snel in
de vultrechter en maak de pulpcontainer
regelmatig leeg.
Het roestvrijstalen zeef draait
niet meer.
Schakel het apparaat uit. Trek de stekker uit
het stopcontact.
Haal het apparaat uit elkaar, zoals
beschreven in het hoofdstuk „Uit elkaar
halen“, en controleer of het zeef verstopt
is door stukjes vezel. Reinig het zeef onder
stromend warm water met een afwasborstel
van kunststof, zet het apparaat weer in
elkaar en ga door met uitpersen
Om te voorkomen dat het zeef verstopt
raakt, controleert u of de gebruikte fruit- of
groentesoorten te hard of vezelachtig zijn.
Doe het fruit of de groente niet te snel in
de vultrechter en maak de pulpcontainer
regelmatig leeg.
Te weinig sap. Controleer of het zeef verstopt is.
Doe de ingrediënten langzamer in de vulbuis.
Sommige fruit- en groentesoorten hebben
altijd minder sap, zoals bijv. abrikozen.
55
Page 56

GARANTIEVOORWAARDEN
Copyright UNOLD AG | www.unold.de
Wij geven op onze apparaten een garantietermijn van 24 maanden (12 maanden bij commerciële gebruik), gerekend vanaf de
dag van aanschaf. Deze garantie geldt voor schade, die bij correct gebruik aantoonbaar is veroorzaakt door een fout in de productie. Binnen de garantietermijn verhelpen wij materiaal- en productiefouten door herstelling of vervanging naar onze keuze.
Onze garantie is slechts geldig voor in Duitsland en Oostenrijk verkopte apparaten. In andere landen a.u.b. de importeur
aanspreken. Apparaaten, waarvoor garantie in aanspraak wordt genomen, moeten ons samen met een kopie van de machineel gegenereerde kassabon waaruit de koopdatum duidelijk wordt, alsmede een beschrijving van de fout goed verpakt
aan onze klantenservice worden toegezonden, porto betaald. Als er sprake van garantie is, worden de verzendingskosten in
Duitsland en Oostenrijk aan de klant vergoed. De garantie dekt geen schade veroorzaakt door slijtage, onbehoorlijk gebruik/
foutieve handelingen en niet-naleving van de onderhouds- en reinigingsaanwijzingen. Het recht op garantie vervalt, wanneer
reparaties of manipulaties aan het apparaat door derden worden doorgevoerd. Eventuele rechten van de eindgebruiker t.o.v.
de verkoper of distributeur worden door deze garantie niet aangetast. De garantie dekt geen krassen of verkleuring van de
container door z.B. kruiden. Krassen of verkleuring heeft geen invloed op de functionaliteit en prestatie van het apparaat.
Steek geen vreemde voorwerpen zoals vorken, lepels of messen in de unit niet worden geplaatst. Messen en buitenlandse
lichaam kan worden beschadigd en vervalt de garantie. In de garantie zijn geen krassen of verkleuringen van de mengbeker
inbegrepen die bijv. door kruiden werden veroorzaakt. Krassen of verkleuringen hebben geen nadelige invloed op de functie en
het prestatievermogen van het apparaat. Steek geen voorwerpen in het apparaat, zoals bijv. vorken, lepels of messen. Messen
en voorwerpen kunnen beschadigd worden, in dit geval komt de aanspraak op garantie te vervallen.
VERWIJDEREN VAN AFVAL / MILIEUBESCHERMING
Onze apparaten zijn geproduceerd met een hoge qualiteit voor een lange gebruik. Regelmatige onderhoud
en vakkundig reparaties door onze klantenservice verlengt de gebruiksduur. Wanneer het apparat defekt is
en kan niet meer gerepareerd worden, let op de volgende instructies. Dit product mag niet samen met het
normale huishoudelijke afval worden afgevoerd. U dient dit product bij een voor het recycleren van elektrische of elektronische apparaten aangewezen verzamelplaats in te leveren. Door het separaat inzamelen en
recycleren van afvalproducten helpt u mee bij het zuinig omgaan met de natuurlijke hulpbronnen en zorgt u
ervoor dat het product op een gezondheids- en milieuvriendelijke manier afgevoerd wordt.
56
Page 57

ISTRUZIONI PER L’USO MODELLO 78220
Copyright UNOLD AG | www.unold.de
DATI TECNICI
Potenza: 400 W, 220–240 V~, 50 Hz/60 Hz
Misure: Circa 34,2 x 18,7 x 39,0 cm
Lunghezza cavo: Circa 100 cm
Peso: Circa 2,5 kg
Scocca: Plastica
Apertura di riempimento: Diametro circa 7,5 cm
Dotazioni: 2 velocità (12.000-14.000 giri/min), pozzetto
Accessori: Contenitore degli scarti, pressino, istruzioni per
Con riserva di modifiche ed errori relativi a caratteristiche delle dotazioni, tecnica,
colore e design
SIGNIFICATO DEI SIMBOLI
Questo simbolo segnala possibili pericoli in grado di provocare lesioni a
persone o danni all‘apparecchio.
PER LA VOSTRA SICUREZZA
(lungh.x largh./prof. x alt.)
di introduzione di grandi dimensioni, setaccio in
acciaio inox, contenitore degli scarti da 1,5 litri,
classe di isolamento II
l‘uso con ricettario
Si raccomanda di leggere e conservare le presenti istruzioni.
Persone in ambito domestico
1. Questo apparecchio può essere utilizzato da bambini a partire
dagli 8 anni di età e da persone che presentano ridotte capacità
fisiche, sensoriali o mentali o che difettano della necessaria
esperienza e/o conoscenze solo se adeguatamente sorvegliati
o addestrati sull’uso in sicurezza dell’apparecchio e se a
conoscenza dei rischi correlati.
2. I bambini non devono giocare con l’apparecchio.
57
Page 58

3. La pulizia e la manutenzione dell’utente non devono essere
Copyright UNOLD AG | www.unold.de
eseguite da bambini, a meno che non abbiano più di 8 anni e
non vengano sorvegliati.
4. Conservare l’apparecchio e il cavo fuori dalla portata dei bambini
di età inferiore agli 8 anni.
5. L‘apparecchio non è un giocattolo.
6. La pulizia e la manutenzione dell‘apparecchio possono essere
effettuate da bambini soltanto sotto sorveglianza.
Avvertenze sanitarie
7. L‘apparecchio è progettato soltanto per lavorare alimenti.
8. Per prevenire rischi sanitari da alimenti avariati si raccomanda di
non conservare troppo a lungo gli succhi di frutta preparati.
Avvertenze per l‘installazione e l‘uso sicuro dell‘apparecchio
9. Collegare l’apparecchio soltanto a corrente alternata con la ten
sione indicata sulla targhetta.
10.
Questo apparecchio non deve essere comandato tramite timer
esterni o sistemi di telecomando.
11. L’apparecchio è progettato esclusivamente per l’uso domestico o
per impieghi similari, ad es.
in aree cucina di negozi, uffici o altri luoghi di lavoro,
aziende agrituristiche,
per l‘uso da parte degli ospiti di hotel, motel o altre strutture
ricettive,
in pensioni private o case di vacanza.
12. Non immergere mai l‘apparecchio o il cavo di alimentazione in
acqua o altri liquidi.
13. L‘apparecchio e il cavo di alimentazione non possono essere lavati
in lavastoviglie.
14. Non toccare mai né l‘apparecchio né il cavo di alimentazione con
le mani bagnate.
15. Per ragioni di sicurezza non appoggiare mai l‘apparecchio su
superfici calde, vassoi metallici o basi umide.
16. L‘apparecchio e il cavo di alimentazione non devono essere impie
gati nei pressi di fiamme.
17.
Usare la centrifuga sempre su una superficie piana sgombra.
-
-
58
Page 59

18. Assicurarsi che il cavo di alimentazione non penda dal piano di
Copyright UNOLD AG | www.unold.de
lavoro, in quanto ciò potrebbe causare infortuni, ad es. se un
bambino piccolo dovesse strattonarlo.
19. La centrifuga non deve essere usata o conservata all’aperto.
20. L‘apparecchio può essere utilizzato esclusivamente per centrifu
gare frutta o varietà di verdura tenere.
21.
Spostare l‘apparecchio soltanto da spento e sempre afferrandolo
con due mani.
22. L‘apparecchio deve essere usato soltanto previo corretto assem
blaggio. Controllare che la staffa di chiusura sono saldamente
scattata in posizione.
23.
Per il riempimento usare esclusivamente il pressino fornito a cor
redo. Per ragioni di sicurezza accertarsi che le mani, i capelli,
capi di abbigliamento o altri utensili non finiscano nel pozzetto di
riempimento della centrifuga.
24.
I taglienti del setaccio in acciaio inox sono estremamente affilati.
Evitare di toccarli. Afferrare il setaccio soltanto per il bordo.
25. Prima di asportare i componenti mobili il motore deve essersi
arrestato.
26. Non aprire mai il coperchio quando l‘apparecchio è ancora in fun
zione.
27.
L‘apparecchio non è idoneo per l‘impiego continuo. Pertanto non
lasciarlo in funzione per più di 3 minuti; dopo di che va lasciato
raffreddare.
28. Per evitare danni, l‘apparecchio non deve essere utilizzato con
accessori di altri produttori o altri marchi.
29. L‘apparecchio non può essere utilizzato se il setaccio in acciaio
inox è danneggiato!
30. Dopo l‘utilizzo e prima della pulizia, staccare la spina della presa
elettrica. Non lasciare mai l’apparecchio incustodito quando la
spina è inserita.
31. Dopo ogni utilizzo pulire l‘apparecchio come illustrato nel capitolo
„Pulizia e cura“.
32. Controllare regolarmente che l’apparecchio, la spina e il cavo di
alimentazione non presentino tracce di usura o danni. Qualora il
cavo di collegamento o altri componenti siano danneggiati inviare
l‘apparecchio alla nostra assistenza clienti per la verifica e la ripa
-
-
-
-
-
59
Page 60

razione. Riparazioni non idonee possono infatti causare notevoli
Copyright UNOLD AG | www.unold.de
pericoli per l‘utente e comportano il decadere della garanzia.
Attenzione: Per introdurre gli ingredienti usare esclusivamente
il pressino fornito a corredo. Per ragioni di sicurezza accertassi
che mani, capelli, capi di abbigliamento o altri utensili non
finiscano nel pozzetto di riempimento.
Prima di asportare i componenti mobili il motore deve essersi
arrestato.
Non aprire mai la scocca dell‘apparecchio. Sussiste il pericolo
di scosse elettriche.
Il produttore declina qualunque responsabilità in caso di montaggio errato, utilizzi errati o non idonei o
qualora le riparazioni siano eseguite da terzi non autorizzati.
MESSA IN FUNZIONE
1. Prima del montaggio accertarsi che l'apparecchio sia montato su un
sottofondo piano e asciutto.
2. Rimuovere tutti i materiali da imballo e le protezioni da trasporto. Tenere
i materiali da imballo, come ad es. sacchetti in plastica o polistirolo, fuori
dalla portata dei bambini – pericolo di soffocamento!
3. Pulire tutte le parti con un panno umido, come descritto nel capitolo "Pulizia
e cura".
4. Appoggiare l’apparecchio su un piano di lavoro orizzontale idoneo.
5. Accertarsi che l'interruttore dell'apparecchio si trovi sullo "0".
6. Mettere il contenitore degli scarti sul lato del blocco motore appositamente
previsto.
7. Posizionare la bacinella di raccolta del succo sull'apparecchio facendo
attenzione che il grosso beccuccio della stessa si agganci al contenitore
degli scarti. Estrarre il
succo.
8. Quindi mettere il setaccio in acciaio inox sull'azionamento nella bacinella di
raccolta del succo. Premere il setaccio sull'azionamento (facendolo ruotare
di circa 30°). Il setaccio deve scattare saldamente in posizione.
9. Posizionare il coperchio sulla bacinella di raccolta del succo e il contenitore
degli scarti.
beccuccio e puntarla verso la bacinella di raccolta del
60
Page 61

10. Fissare il coperchio con la staffa di chiusura tirando quest'ultima verso
Copyright UNOLD AG | www.unold.de
l'alto. La staffa scatta percettibilmente in posizione.
11. Posizionare una brocca adatta sotto al beccuccio dell'apparecchio.
12. Accertarsi che l'interruttore dell'apparecchio si trovi sullo "0".
13. Collegare l’apparecchio alla rete elettrica (corrente alternata, 220–240 V~,
50 Hz/60 Hz) mediante il cavo di alimentazione.
PREPARAZIONE DI FRUTTA E VERDURA
1. Se possibile, usare solo frutta e verdura fresche.
2. Lavare e asciugare accuratamente la frutta e la verdura.
3. Per centrifugare frutta a buccia dura prima è necessario sbucciarla. Ciò vale
ad esempio per l‘ananas.
4. Anche la frutta con buccia non edibile, come per esempio gli agrumi, deve
prima venir pelata.
5. Sconsigliamo di centrifugare banane con questo apparecchio, in quanto
questo tipo di frutta non si presta ad essere centrifugato.
6. Le arance lavorate nella centrifuga danno origine a un succo schiumoso.
Prima della centrifugatura pelare le arance, in quanto altrimenti il succo
può risultare amaro.
7. Per centrifugare piccoli frutti si raccomanda di aggiungere ¼ di mela con la
buccia ogni 200 g di piccoli frutti.
8. Rimuovere gli eventuali noccioli di grandi dimensioni presenti (come per
esempio nelle ciliegie o prugne) nonché foglie e piccioli. Uva e ribes non
devono venir denocciolati. I ribes possono venir centrifugati con i piccioli.
9. Tagliare la frutta o la verdura a pezzi di grandezza idonea a venir introdotti
nel pozzetto dei riempimento. Grazie all‘apertura di riempimento molto
grande è possibile introdurre nell‘apparecchio pezzi molto grossi.
PREPARAZIONE DEL SUCCO
1. Preparare l‘apparecchio come illustrato nel capitolo „Messa in funzione“.
2. Estrarre il pressino dall‘apertura di riempimento.
3. Selezionare la velocità desiderata tramite l‘interruttore.
Livello 1 per frutta e verdura tenere come uva, meloni, pere o cetrioli.
Livello 2 per frutta e verdura dura come carote o mele.
61
Page 62

4. Inserire i pezzi di frutta e verdura nel pozzetto di riempimento e premerli
Copyright UNOLD AG | www.unold.de
lentamente verso il basso con il pressino. Quanto minore è la pressione
esercitata, tanto più succo si ottiene.
5. Consigliamo di centrifugare con l‘apparecchio per massimo un minuto e poi
di lasciarlo raffreddare per un minuto prima di rimetterlo in funzione per
un altro minuto. Dopo un totale di tre cicli l‘apparecchio dovrebbe essere
lasciato raffreddare per circa 15 minuti prima di essere rimesso nuovamente
in funzione.
Attenzione: Quando la centrifuga è in funzione non mettere mai le dita o
corpi estranei nel pozzetto di riempimento. Sussiste il pericolo di lesioni!
6. Se dei pezzi di frutta o verdura si sono bloccati e non si riesce a sbloccarli con
il pressino, spegnere l‘apparecchio. Staccare la spina dalla presa elettrica
e disassemblare l‘apparecchio in modo da rimuovere i pezzi di frutta o
verdura. Riassemblare l‘apparecchio e proseguire con la preparazione.
7. Il succo scorre ora nell‘apposita brocca.
8. Controllare che il contenitore degli scarti non si riempia eccessivamente.
Quando è pieno, spegnere l‘apparecchio. Staccare la spina dalla presa
elettrica e disassemblare l‘apparecchio: innanzitutto togliere il coperchio,
poi rimuovere il setaccio, asportare la bacinella di raccolta del succo e infine
svuotare il contenitore degli scarti. Riassemblare l‘apparecchio e proseguire
con la preparazione.
9. Quando la brocca del succo è piena, spegnere l‘apparecchio portando
l‘interruttore sullo „0“, travasare il succo e solo dopo proseguire con la
centrifugatura.
10. Quando si è finito di preparare il succo portare l‘interruttore sullo „0“ e
staccare la spina dalla presa elettrica. Si consiglia di lavare l‘apparecchio
immediatamente dopo.
11. Avvertenza: L‘apparecchio è dotato di una protezione dai surriscaldamenti.
Nel caso durante il funzionamento diventi troppo caldo, per evitare danni al
motore, la protezione dai surriscaldamenti disattiva l‘apparecchio. In questo
caso staccare la spina dalla presa elettrica e far raffreddare l‘apparecchio
per almeno 30 minuti.
62
Page 63

SMONTAGGIO
Copyright UNOLD AG | www.unold.de
Quando si ha finito di centrifugare, spegnere l‘apparecchio portando l‘interruttore sullo „0“. Attendere che il succo non fuoriesca più e che il setaccio
non giri più.
Staccare la spina dalla presa elettrica.
1. Rimuovere la brocca del succo.
2. Estrarre il pressino dal pozzetto di riempimento.
3. Aprire la staffa di chiusura spingendola cautamente verso l‘alto e legger-
mente in avanti in modo da allontanarla dall‘apparecchio.
4. Rimuovere il coperchio trasparente.
5. Asportare il setaccio in acciaio inox sollevandolo.
6. Afferrare il setaccio soltanto per il bordo in quanto i taglienti comportano il
pericolo di lesioni.
7. Rimuovere la bacinella di raccolta del succo e il contenitore degli scarti.
8. Svuotare il contenitore degli scarti eventualmente servendosl dell‘estremità
piatta di uno spazzolino.
9. Rimuovere eventuali residui di fibre dalla bacinella di raccolta del succo.
PULIZIA E CURA
Si raccomanda di pulire l'apparecchio immediatamente dopo la centrifugatura.
Altrimenti i residui di fibre essiccati risultano difficili da rimuovere.
Attenzione: Il setaccio in acciaio inox è tagliente – pericolo di lesioni!
Spegnere l‘apparecchio portando l‘interruttore sullo „0“. Attendere che il
succo non fuoriesca più e che il setaccio non giri più.
Staccare la spina dalla presa elettrica.
1. Disassemblare l‘apparecchio come descritto nella sezione „Disassemblag-
gio“.
2. Rimuovere gli scarti dall‘apposito contenitore nonché i residui di fibre dalla
bacinella di raccolta del succo.
3. Lavare tutti i componenti (eccetto il blocco motore!) in acqua calda con l‘ag-
giunta di un po‘ di detersivo. Il setaccio può essere agevolmente pulito con
un comune spazzolino in plastica afferrandolo per il bordo, in modo da non
63
Page 64

tagliarsi con i taglienti affilati. Per continuare a ottenere buoni risultati in
Copyright UNOLD AG | www.unold.de
termini di succo, assicurarsi di liberare completamente il setaccio dai residui
di fibre. Se necessario, è anche possibile lasciare il setaccio in ammollo in
acqua.
4. Le impurità gialle possono essere facilmente eliminate con un pezzo di carta
da cucina imbevuto di olio alimentare.
5. Strofinare il blocco motore con un panno umido.
6. Strofinare regolarmente anche l‘azionamento con un panno umido.
7. In linea di principio non bisogna usare prodotti abrasivi, lana d’acciaio,
oggetti metallici, disinfettanti o detergenti caldi.
8. L’apparecchio e la spina di collegamento devono essere perfettamente
asciutti prima di essere riutilizzati.
9. Conservare la centrifuga perfettamente asciugata e assemblata in un luogo
asciutto e al riparo da polvere, urti, calore e umidità.
RICETTE
Avvertenze generali per la preparazione dei succhi
I succhi sono vere e proprie bombe vitaminiche. Rinfrescano ad ogni stagione.
Tuttavia molte vitamine si degradano al contatto con l‘aria. Pertanto i succhi
dovrebbero venir bevuti subito dopo la preparazione.
Diverse vitamine divengono solubili soltanto con l‘aggiunta di un po‘ di grasso;
pertanto a ogni bicchiere di succo è opportuno aggiungere 1 cucchiaino di panna
dolce o 2 gocce d‘olio spremuto a freddo. Il succo d‘uva appena spremuto è
perfetto per la cosiddetta „cura dell‘uva“. I succhi preparati possono non soltanto
essere bevuti freschi, ma anche trasformati in zuppe, gelatine ecc.! Mescolandoli
con un po‘ di albume d‘uovo o gelatina solubile a freddo e trasformandoli in
sorbetti ad es. nella gelatiera Unold
®
, si ottengono snack rinfrescanti gustosi e
ipocalorici.
Succo di verdura
Centrifugare ½ cavolo rapa, 1 carota,
1 peperone giallo, 4 ciuffi di
prezzemolo e 1 pomodoro. Questo
succo può essere bevuto senza
condimenti, ma può anche venir
64
condito con una spruzzata di tabasco
e alcune gocce di sciroppo d‘acero.
Bomba vitaminica
Centrifugare 400 g di spinaci, 2 carote,
1 gambo di sedano, 1 cucchiaio di
crescione, 2 pomodori e ½ cetriolo.
Page 65

Condire con 1 cucchiaio di succo di
Copyright UNOLD AG | www.unold.de
limone, erba cipollina e prezzemolo
tritati, un pizzico di pepe e zucchero e
aggiungere ¼ l di latte.
in gelatina seguendo le istruzioni
fornite sulla confezione. Naturalmente
è possibile usare anche un unico tipo
di frutta.
Pina Colada analcolica
1 ananas (sufficiente per 2 –
3 bicchieri), 50 ml di panna dolce,
3 cucchiai di sciroppo di cocco,
ghiaccio tritato.
Centrifugare l‘ananas al livello 2,
versare il succo in una brocca,
amalgamare la panna, lo sciroppo
di cocco e il ghiaccio, versare nei
bicchieri e decorare questi ultimi con
¼ di fetta d‘ananas e una ciliegina da
cocktail.
Succo di fragola „con il goccio“
Centrifugare 250 g di fragole e 1 mela,
aggiungere 1 cucchiaio di miele,
1 cucchiaio di panna dolce e 2 cl di
vodka, girare e servire.
Gelatina di mela
Centrifugare delle mele non troppo
mature fino a ottenere 800 ml di
succo, mescolarlo con
1 kg di zucchero da gelatina in
rapporto 1:1 e cuocere il tutto fino a
trasformarlo in gelatina seguendo le
istruzioni fornite sulla confezione.
Gelatina multifrutta
Centrifugare more, ribes, lamponi,
fragole e uva spina sul livello 1 e
2 mele sul livello 2, aggiungere 1 kg di
zucchero per gelatine in rapporto 1:1
e cuocere il tutto fino a trasformarlo
Terrina rinfrescante di cetrioli freddi
1 cetriolo da insalata, 1 cipolla,
1 spicchio d‘aglio, ¼ l di latticello,
sale, pepe, aneto fresco
Centrifugare ¾ del cetriolo sul livello
2, come pure la cipolla e l‘aglio.
Tagliare a cubetti il resto del cetriolo
e mescolarlo con il latticello. Condire
con sale e pepe e guarnire con l‘aneto.
Terrina fredda di frutta
Produrre ½ l di succo di frutta di
stagione, ad es. diversi tipi di piccoli
frutti oppure mele, pesche, pere,
albicocche.
Diluire questo succo con ¼ l d‘acqua,
prelevare 3 cucchiai di succo e
mescolarli con 1 cucchiaio di amido.
Scaldare il resto del succo con
2 cucchiai di zucchero, amalgamare
l‘amido, portare a bollore e far
raffreddare. Prima di servire guarnire
con piccoli frutti o pezzetti di frutta.
Zuppa di pomodoro fredda
Centrifugare i pomodori con 1 cipolla
e 1 spicchio d‘aglio sul livello 1 (circa
¾ l di succo). Condire il succo con
pepe appena macinato, un po‘ di
tabasco, sale e basilico tritato e servire.
Suggerimento: Con la macchina per
il ghiaccio Unold® in pochi istanti è
possibile trasformare questo succo in
un rinfrescante sorbetto al pomodoro.
65
Page 66

Le ricette di queste istruzioni per l’uso sono state ideate e verificate dagli autori e da UNOLD AG.
Copyright UNOLD AG | www.unold.de
Tuttavia non può essere emessa alcuna garanzia. È esclusa la responsabilità degli autori, di
UNOLD AG e dei rispettivi incaricati per danni provocati a persone, cose o materiali.
DIAGNOSTICA DEI PROBLEMI
Problema Soluzione
L‘apparecchio non funziona. Controllare che tutti i pezzi siano stati cor-
rettamente assemblati. Altrimenti un sistema di sicurezza impedisce l‘accensione
dell‘apparecchio. Assemblare l‘apparecchio
come illustrato nel capitolo „Messa in funzione“ .
Durante la centrifugatura il motore rimane fermo.
Spegnere l‘apparecchio. Staccare la spina
dalla presa elettrica.
Disassemblare l‘apparecchio come illustrato
nel capitolo „Smontaggio“ e controllare che
il setaccio non sia intasato da pezzetti di fibre. Pulire il setaccio sotto acqua corrente
calda usando uno spazzolino in plastica, riassemblare l‘apparecchio e proseguire con
la centrifugatura.
Per evitare che il setaccio si ostruisca controllare che i tipi di frutta o verdura usati
non siano troppo duri o fibrosi. Non mettere
la frutta o la verdura nell‘apertura di riempimento troppo rapidamente e svuotare regolarmente il contenitore degli scarti.
Il setaccio in acciaio legato non
gira più.
Spegnere l‘apparecchio. Staccare la spina
dalla presa elettrica.
Disassemblare l‘apparecchio come illustrato
nel capitolo „Smontaggio“ e controllare che
il setaccio non sia intasato da pezzetti di fibre. Pulire il setaccio sotto acqua corrente
calda usando uno spazzolino in plastica, riassemblare l‘apparecchio e proseguire con
la centrifugatura.
Per evitare che il setaccio si ostruisca controllare che i tipi di frutta o verdura usati
non siano troppo duri o fibrosi. Non mettere
la frutta o la verdura nell‘apertura di riempimento troppo rapidamente e svuotare regolarmente il contenitore degli scarti.
Troppo poco succo. Controllare che il setaccio non sia intasato.
Mettere gli ingredienti nel pozzetto di riempimento più lentamente.
Alcuni tipi di frutta e verdura, come ad es. le
albicocche, danno un po‘ meno succo.
66
Page 67

NORME DIE GARANZIA
Copyright UNOLD AG | www.unold.de
I nostri prodotti sono garantiti per 24 mesi, 12 mesi in caso di uso professionale, dalla data di acquisto per i guasti manifestatisi durante un utilizzo conforme alle disposizioni e attribuibili in modo
dimostrabile a difetti di fabbricazione. Nel periodo di garanzia porremo rimedio ai difetti materiali e
di produzione secondo la nostra valutazione, procedendo alla riparazione o alla sostituzione dell’apparecchio. Le nostre prestazioni di garanzia valgono esclusivamente per gli apparecchi venduti
in Germania e Austria. In tutti gli altri casi rivolgersi all‘importatore. Gli apparecchi per i quali si
richiede la riparazione di guasti ci devono essere inviati con spedizione affrancata e debitamente
imballati, unitamente a una copia del documento di acquisto redatto a macchina dal quale risulti la
data di vendita, nonché la descrizione del guasto. In caso di garanzia al cliente verranno rimborsati i
costi di spedizione sostenuti in Germania e Austria. Sono esclusi dalla garanzia i guasti dovuti all’usura, all’uso inappropriato o al mancato rispetto delle regole di manutenzione. Il diritto di garanzia
decade qualora siano state effettuate riparazioni o interventi da parte di terzi. Eventuali diritti del
consumatore finale verso il venditore o negoziante non vengono limitati dalla presente garanzia.
La garanzia non copre i graffi o scolorimento del contenitore da z. B. erbe. Graffi o scolorimento
non influiscono sul funzionamento e le prestazioni del dispositivo. Non inserire oggetti estranei
come forchette, cucchiai o coltelli nell‘unità. Coltelli e corpi estranei possono essere danneggiati, e
invalidare la garanzia. La garanzia non copre graffi o alterazioni cromatiche del contenitore dovuti
ad es. ad erbe aromatiche. Graffi e alterazioni cromatiche non pregiudicano il funzionamento e le
prestazioni dell‘apparecchio. Non introdurre nell‘apparecchio corpi estranei come forchette, cucchiai
o coltelli. Coltelli e corpi estranei possono venir danneggiati; inoltre ciò comporta il decadere dei
diritti di garanzia.
SMALTIMENTO / TUTELA DELL’AMBIENTE
I nostri apparecchi vengono prodotti rispettando un elevato standard qualitativo per
una lunga durata di utilizzo. Una corretta manutenzione e riparazioni adeguate a cura
dal nostro servizio clienti possono prolungare la durata di utilizzo del prodotto. Se un
apparecchio è difettoso e non più riparabile, per il suo smaltimento si presti attenzione
ai punti che seguono. Questo prodotto non deve essere smaltito unitamente ai comuni
rifiuti domestici. Consegnare il prodotto a un centro di raccolta per il riciclaggio dei
rifiuti elettrici o elettronici. Con la raccolta differenziata dei rifiuti e dei prodotti riciclabili è possibile contribuire alla tutela delle risorse naturali e far smaltire il prodotto
nel rispetto dell’ambiente e della salute.
67
Page 68

MANUAL DE INSTRUCCIONES MODELO 78220
Copyright UNOLD AG | www.unold.de
DATOS TÉCNICOS
Potencia: 400 W, 220–240 V~, 50 Hz/60 Hz
Medidas: Aprox. 34,2 x 18,7 x 39,0 cm (LxA/PxH)
Longitud del cable: Aprox. 100 cm
Peso: Aprox. 2,5 kg
Carcasa: Plástico
Abertura de llenado: Aprox. 7,5 cm de diámetro
Equipamiento: 2 niveles de velocidad (12.000-14.000 rpm), tubo de
Accesorios: Depósito de bagazo, embutidor, manual de instrucciones
Reservado el derecho de modificaciones y errores en características de
equipamiento, técnica, colores y diseño
EXPLICACIÓN DE SÍMBOLOS
Este símbolo se asocia con riesgos eventuales que pueden provocar
lesiones o daños en el aparato.
PARA SU SEGURIDAD
llenado extra grande, tamiz de acero inoxidable, depósito
de bagazo (1,5 litros), clase de protección: II
con recetas
Lea y conserve las siguientes instrucciones.
Personas en el hogar
1. Este aparato puede ser usado por niños a partir de 8 años, así
como por personas con una capacidad física, mental o sensorial
reducida o carentes de experiencia y/o conocimientos siempre
que estén supervisados o hayan sido correspondientemente
instruidos en el manejo seguro de dicho aparato y comprendan
los peligros que conlleva.
2. El aparato no es un juguete.
3. No está permitido que los niños lleven a cabo la limpieza o el
mantenimiento del usuario a no ser que tengan más de 8 años y
estén supervisados.
68
Page 69

4. Guarde el aparato y el cable fuera del alcance de niños menores
Copyright UNOLD AG | www.unold.de
de 8 años.
5. Este aparato no es ningún juguete.
6. Los niños solo pueden llevar a cabo la limpieza y el manteni
miento del mismo si están supervisados por un adulto.
Indicaciones para la salud
7.
El aparato está destinado exclusivamente para procesar produc-
tos alimenticios.
8.
No guarde los zumos elaborados durante demasiado tiempo para
evitar daños a la salud por productos alimenticios en mal estado.
Indicaciones sobre la colocación segura y el uso del aparato
9. Conecte el aparato solo a corriente alterna con una tensión de
acuerdo con la placa de características.
10. Este aparato no debe utilizarse con un reloj programador externo
ni con un sistema de mando a distancia.
11. El aparato está destinado exclusivamente para el uso doméstico
o fines de uso similares, por ejemplo,
cocinas tipo office en comercios, oficinas u otros lugares de
trabajo,
empresas agrícolas,
para el uso por parte de clientes en hoteles, moteles u otros
establecimientos de alojamiento colectivo,
en pensiones privadas o en casas vacacionales.
12. De ninguna manera sumerja el aparato o el cable de alimenta
ción en agua o en otros líquidos.
13.
El aparato y el cable de alimentación no deben lavarse en el
lavavajillas.
14. No toque nunca el aparato o el cable de alimentación con las
manos húmedas.
15. Por razones de seguridad jamás coloque el aparato sobre super
ficies calientes, sobre bandejas metálicas o sobre una base
mojada.
16.
El aparato o el cable de alimentación no deben utilizarse cerca
de llamas.
17. Use siempre la licuadora sobre una superficie libre y llana.
-
-
-
69
Page 70

18. Preste atención a que el cable de alimentación no cuelgue sobre
Copyright UNOLD AG | www.unold.de
el borde de la superficie de trabajo, dado que ello puede conducir a accidentes, si p. ej. niños pequeños tiran de él.
19.
La licuadora no debe ser usada ni guardada a la intemperie.
20. El aparato solo es apto para exprimir fruta o verduras blandas.
21. Mueva el aparato solo cuando esté apagado utilizando las dos
manos.
22. El aparato solo debe utilizarse una vez que se haya montado
correctamente. Preste atención a que los enganches de cierre
haya cerrado correctamente.
23. Utilice para el llenado exclusivamente el embutidor suminis
trado. Por razones de seguridad, cerciórese de que las manos,
el cabello, las prendas ni ninguna otra herramienta entren en
contacto con el tubo de llenado de la licuadora.
Las hojas del tamiz de acero inoxidable son muy filosas. Evite
24.
por tanto el contacto con las mismas. Sujete el tamiz solo por
el borde.
25. El motor deberá haberse parado antes de que se puedan retirar
las piezas móviles.
26. Nunca abra la tapa, si el aparato aún está en funcionamiento.
27. El equipo no está diseñado para el funcionamiento continuo. Por
tanto, no lo deje en operación por más de 3 minutos, y posterior
mente déjelo enfriar.
28.
Para evitar daños en el aparato, este no debe ser usado con
accesorios de otros fabricantes o marcas.
29. ¡Si el tamiz de acero inoxidable está deteriorado, no debe ope
rarse el aparato!
30.
Después del uso así como antes de la limpieza, desenchufe el
aparato. No deje nunca el aparato sin vigilancia cuando esté
enchufado.
31. Limpie el aparato después de cada uso como se describe en el
capítulo „Limpieza y cuidado“.
32. Controle periódicamente si el aparato, el enchufe y el cable de
alimentación presentan desgaste o daños. En caso de daños en
el cable de alimentación o en otras piezas envíe el aparato para
su verificación y reparación a nuestro servicio de atención al
cliente. Las reparaciones inadecuadas pueden ocasionar consi
-
-
-
-
70
Page 71

derables peligros para el usuario y tienen como consecuencia la
Copyright UNOLD AG | www.unold.de
exclusión de la garantía.
Atención: Utilice para el llenado de los ingredientes
exclusivamente el embutidor suministrado. Por razones de
seguridad, cerciórese de que las manos, el cabello, las prendas
ni ninguna otra herramienta puedan entrar en contacto tubo de
llenado. El motor deberá haberse parado antes de que se puedan
retirar las piezas móviles.
No abra la carcasa del aparato en ningún caso. Existe peligro
de descarga eléctrica.
El fabricante no es responsable en caso de montaje erróneo, uso inapropiado o equivocado o después de
haber sido efectuadas reparaciones por terceros no autorizados.
PONER EN SERVICIO
1. Antes del montaje, asegúrese de montar el aparato sobre una base plana y
seca.
2. Retire todos los materiales de embalaje y los seguros de transporte. Mantenga el material de embalaje como, p. ej., bolsas de plástico o poliestireno
alejado de los niños. ¡Peligro de asfixia!
3. Limpie todas las piezas con un paño húmedo como se describe en el capítulo “Limpieza y cuidado”.
4. Coloque el aparato sobre una superficie de trabajo adecuada y llana.
5. Asegúrese de que el interruptor en el aparato esté en „0“.
6. Coloque el depósito de bagazo sobre el lado previsto para este propósito en
el bloque de motor.
7. Sitúe la bandeja colectora de zumo sobre el aparato. Preste atención a que
la salida grande en la bandeja se debe enganchar en el depósito de bagazo.
Saque la
8. Coloque entonces el tamiz de acero inoxidable sobre el motor en la bandeja
colectora de zumo. Presione el tamiz sobre el accionamiento (girar aprox.
30 °). El tamiz debe encajar firmemente.
9. Coloque la tapa sobre la bandeja colectora de zumo y el depósito de bagazo.
10. Fije la tapa con el enganche de cierre abatiéndolo hacia arriba. El enganche
de cierre encaja audiblemente.
boquilla y apunte a la bandeja colectora de zumo.
71
Page 72

11. Ponga una jarra adecuada debajo de la descarga en el aparato.
Copyright UNOLD AG | www.unold.de
12. Asegúrese de que el interruptor del aparato esté en „0“.
13. Conecte el cable de alimentación a la red eléctrica (corriente alterna, 220–
240 V~, 50 Hz/60 Hz).
PREPARACIÓN DE FRUTAS Y VERDURAS
1. En la medida de lo posible, utilice solamente frutas y verduras frescas.
2. Lave bien la fruta o la verdura y séquela después.
3. Si desea procesar frutas con cáscara dura, deberá quitar primero la cáscara.
Esto pasa por ejemplo con la piña.
4. Las frutas con piel no comestible, como por ejemplo, los frutos cítricos,
deben pelarse también previamente.
5. No recomendamos licuar plátanos con este aparato, ya que estas frutas no
se procesan adecuadamente en una licuadora.
6. Las naranjas dan por resultado un zumo espumoso en la licuadora. Pele las
naranjas antes de licuar dado que de lo contrario el zumo puede resultar
amargo.
7. Si desea exprimir bayas, añada ¼ de manzana con piel por aprox. cada
200 g de bayas.
8. Retire los posibles huesos presentes (por ejemplo en cerezas o ciruelas), así
como las hojas y los tallos. Las uvas y las grosellas no deben deshuesarse.
Las grosellas pueden licuarse con los pedúnculos.
9. Corte la fruta o verdura en trozos adecuados para el tubo de entrada. Gracias
a la gran abertura de llenado es posible añadir trozos bastante grandes en
el aparato.
PREPARACIÓN DEL ZUMO
1. Prepare el aparato como se describe en “Puesta en servicio”.
2. Retire el empujador de la abertura de llenado.
3. Seleccione en el interruptor la velocidad deseada.
Nivel 1 para frutas y verduras blandas como uvas, melones, peras o pepinos.
Nivel 2 para frutas y verduras duras como zanahorias o manzanas.
72
Page 73

4. Introduzca los trozos de frutas y verduras en el tubo de llenado y presióne-
Copyright UNOLD AG | www.unold.de
los con el empujador lentamente hacia abajo. Cuanto menor sea la presión
aplicada, mayor será el zumo que obtenga.
5. Recomendamos dejar licuar el aparato durante máximo un minuto y después
enfriarlo durante un minuto antes de ponerlo de nuevo en marcha durante
un minuto. Después de un total de tres ciclos debe enfriarse el aparato
durante aprox. 15 minutos antes de ponerlo de nuevo en funcionamiento.
Atención: Nunca meta los dedos o cuerpos extraños en el tubo del llenado
con la licuadora en marcha. ¡Peligro de lesiones!
6. En caso de que los trozos de frutas y verduras se hayan atorado y no puedan
ser removidos con el empujador, desconecte el equipo. Retire la clavija de
red del enchufe y desmonte el aparato para quitar el trozo de fruta o verdura
correspondiente. Después ensamble de nuevo el aparato y continúe con la
preparación.
7. El zumo se desplazará hacia la jarra de zumo.
8. Preste atención a que el depósito de bagazo no se sobrellene. Si el depósito de bagazo está lleno, desconecte el equipo. Retire la clavija de red de
la caja de enchufe y desmonte el aparato: primero retire la tapa; después
saque el tamiz; retire entonces la bandeja colectora de zumo y vacíe el
depósito de bagazo. Después ensamble de nuevo el aparato y continúe con
la preparación.
9. Cuando la jarra de zumo está llena, desconecte el aparato poniendo el interruptor a „0“, trasvase el zumo y prosiga con el licuado.
10. Cuando haya terminado con la preparación de zumo, conmute el interruptor
a „0“ y retire el enchufe de la toma de corriente. Recomendamos limpiar el
aparato inmediatamente a continuación.
11. Indicación: El aparato dispone de una protección contra sobrecalentamiento. Si el aparato se calienta demasiado durante el funcionamiento,
la protección contra sobrecalentamiento desconecta el aparato para evitar
daños en el motor. En este caso, desenchufe el aparato y déjelo enfriar
durante mínimo 30 minutos.
73
Page 74

DESENSAMBLAR
Copyright UNOLD AG | www.unold.de
Cuando termine de licuar apague el aparato poniendo el interruptor a „0“.
Espere hasta que no fluya más zumo y el tamiz de acero inoxidable no gire
más.
Retire la clavija de la toma de corriente.
1. Retire la jarra de zumo.
2. Retire el empujador del tubo de llenado.
3. Abra el enganche de cierre, presionándolo cuidadosamente hacia arriba y
ligeramente hacia adelante alejado del aparato.
4. Retire la tapa transparente.
5. Retire el tamiz de acero inoxidable. Sin embargo, sujete el tamiz solo por el
borde dado que existe peligro de lesiones en las hojas del tamiz.
6. Retire la bandeja de descarga del zumo y el depósito de bagazo.
7. Vacíe el depósito de bagazo. Para ello puede ayudarse con el extremo plano
de un cepillo para lavar.
8. Retire los posibles restos de fibras de la bandeja de descarga.
LIMPIEZA Y CUIDADO
Recomendamos limpiar el aparato inmediatamente después de licuar. De otra
forma, los restos de fibras secas serán difíciles de eliminar.
Atención: El tamiz de acero inoxidable está afilado. ¡Peligro de lesiones!
Desconecte el aparato poniendo el interruptor a „0“. Espere hasta que no
fluya más zumo y el tamiz de acero inoxidable no gire más.
Retire la clavija de la toma de corriente.
1. Desensamble el aparato como se describe en „Desensamblar“.
2. Retire el bagazo del depósito de bagazo, así como los restos de fibras de la
bandeja colectora de zumo.
3. Limpie todas las piezas con agua caliente (¡excepto el bloque de motor!),
a la que ha añadido un poco de detergente. Puede limpiar el tamiz con
un cepillo para lavar de plástico asequible comercialmente. Pero sujete el
tamiz sólo por la orilla para no cortarse con las hojas filosas. Preste atención
a que el tamiz esté totalmente libre de restos de fibras para seguir obte-
74
Page 75

niendo buenos resultados en el zumo. En caso necesario también deje un
Copyright UNOLD AG | www.unold.de
tiempo el tamiz remojando en agua.
4. Las impurezas amarillas pueden limpiarse fácilmente con una hoja de papel
de cocina impregnada con aceite comestible.
5. Limpie el bloque de motor con un trapo húmedo.
6. Limpie también regularmente el motor con un trapo húmedo.
7. No utilice productos de limpieza agresivos, lana o estopa de acero, objetos
metálicos, productos de limpieza calientes ni desinfectantes.
8. Tanto el aparato como el enchufe de conexión deberán estar completamente
secos antes de volver a utilizar el aparato.
9. Guarde la licuadora completamente seca en un lugar seco y seguro, para
protegerla contra polvo, golpes, calor y humedad.
RECETAS
Indicaciones generales para la elaboración de zumo
Los zumos son bombas vitamínicas puras. Refrescan en cualquier época del
año. Muchas vitaminas se descomponen al aire, por ello debe siempre consumir
de inmediato los zumos recién exprimidos. Numerosas vitaminas se disuelven
después de la adición de un poco de grasa, por tanto puede añadir 1 cucharada
de crema dulce o 2 gotas de aceite prensado en frío por vaso de zumo. El zumo
de uva recién exprimido es ideal para una cura de uva. ¡Los zumos preparados
no sólo pueden disfrutarse frescos, sino también se procesan muy bien en sopas,
jaleas, etc.! Mezclados con un poco de albúmina o gelatina soluble en frío y
®
procesados en sorbetes, p. ej. en la heladora Unold
, se obtiene un delicioso
refresco bajo en calorías.
Zumo vigorizante
Licuar 3 zanahorias, 1 manzana en
el nivel 2, exprimir 1 naranja con
exprimidor de cítricos. Mezclar todos
los zumos y servir con 2 cubos de
hielo.
Zumo de verduras
Licuar ½ colinabo, 1 zanahoria,
1 pimiento morrón amarillo, 4 tallos
de perejil y 1 tomate. Este zumo puede
disfrutarse sin otros condimentos,
pero puede también mejorarse con un
poco de salsa Tabasco y unas gotas de
jarabe de arce.
Bomba vitamínica
Licuar 400 g de espinacas,
2 zanahorias, 1 tallo de apio,
1 cucharada sopera de berro, 2 tomates, ½ pepino.
Mezclar con 1 cucharada sopera de
jugo de limones, cebollino picado
y perejil, una pizca de sal y otra de
75
Page 76

azúcar, y llenar con ¼ de litro de
Copyright UNOLD AG | www.unold.de
leche.
Piña colada sin alcohol
1 piña (suficiente para 2 - 3 vasos),
50 ml de crema dulce, 3 cucharadas
soperas de jarabe de coco, hielo
triturado.
Licuar la piña en el nivel 2, llenar el
jarro con el zumo, mezclar con crema,
jarabe de coco y hielo, llenar los vasos,
adornar los vasos con ¼ de rebanada
de piña y una cereza de cóctel.
Zumo de fresa con licor
Licuar 250 g de fresas y 1 manzana,
añadir 1 cucharadita de miel,
1 cucharada sopera de crema dulce y
2 cl de Vodka, agitar y servir.
Jalea de manzana
Licuar manzanas no muy maduras
hasta obtener 800 ml de zumo,
que se mezclan 1:1 con 1 kg de
azúcar gelificante y hervir según las
indicaciones del paquete para preparar
jalea.
Jalea multifrutas
Licuar zarzamoras, grosellas, frambuesas, fresas, grosellas espinosas en el
nivel 1, así como 2 manzanas en el nivel 2, añadir 1 kg de azúcar gelificante
1:1 y hervir para preparar jalea según
las instrucciones del paquete.
Por supuesto también es posible con
un solo tipo de fruta.
Gazpacho de pepinos refrescante
Licuar 1 pepino para ensalada,
1 diente de ajo, ¼ l suero de leche,
1 cebolla sal, pimienta, eneldo fresco.
Licuar ¾ del pepino el nivel 2, así
como ajo y cebolla. Cortar el resto del
pepino en pequeños trozos y mezclar
con un poco de suero de leche.
Condimentar con sal y pimienta y
adornar con eneldo.
Gazpacho de frutas
Elaborar ½ l de zumo de frutas de
temporada, p. ej. de diferentes tipos
de bayas o manzanas, melocotones,
peras, albaricoques.
Diluir el zumo con un ¼ l de agua,
quitar 3 cucharadas soperas del jugo
y mezclar con 1 cucharada sopera
de almidón. Calentar el resto del
zumo con 2 cucharadas soperas de
azúcar, mezclar con almidón, hervir
rápidamente y dejar enfriar. Añadir un
par de bayas o trozos de fruta antes
de servir.
Sopa de tomate fría
Licuar tomates con 1 cebolla y
1 diente de ajo en el nivel 1 (aprox.
¾ l de zumo). Condimentar el zumo
con pimienta molida fresca, un poco
de Tabasco, sal y albahaca picada,
y servir. Consejo: con la heladora
Unold® convierta mágicamente en un
abrir y cerrar de ojos el zumo en un
refrescante sorbete.
76
Page 77

Las recetas del presente manual de instrucciones han sido cuidadosamente seleccionadas y probadas
Copyright UNOLD AG | www.unold.de
tanto por sus autores como por UNOLD AG quienes, no obstante, no asumen garantía alguna. Queda
explícitamente excluida cualquier responsabilidad de los autores y UNOLD AG o sus delegados por
daños personales, materiales o financieros.
ELIMINACIÓN DE FALLOS
Problema Solución
El equipo no funciona. Compruebe que todas las piezas se han
montado correctamente. En tanto éste no
sea el caso, un sistema de seguridad evita
que el equipo pueda ser encendido. Monte
el aparato como se describe en “Poner en
servicio”.
El motor permanece detenido
durante el licuado.
Apague el equipo. Desenchufe la clavija de
la caja de enchufe.
Desmonte el equipo como se describe en el
capítulo „Desmontaje“ y compruebe si el
tamiz está tapado con restos de fibras. Limpie el tamiz bajo agua tibia corriente con un
cepillo de trastos de plástico, monte nuevamente el equipo y continúe con el licuado.
Para evitar que el tamiz se tape, compruebe si los tipos de frutas o verduras son muy
duros o fibrosos. No introduzca la fruta o la
verdura demasiado rápido en el embudo de
llenado y vacíe regularmente el depósito de
bagazo.
El tamiz de acero inoxidable no
gira.
Apague el equipo. Desenchufe la clavija de
la caja de enchufe.
Desmonte el equipo como se describe en el
capítulo „Desmontaje“, y compruebe si el
tamiz está tapado con restos de fibras. Limpie el tamiz bajo agua tibia corriente con un
cepillo de trastos de plástico, monte nuevamente el equipo y continúe con el licuado.
Para evitar que el tamiz se tape, compruebe si los tipos de frutas o verduras son muy
duros o fibrosos. No introduzca la fruta o la
verdura demasiado rápido en el embudo de
llenado y vacíe regularmente el depósito de
bagazo.
Muy poco zumo. Compruebe si el tamiz está tapado.
Introduzca más lentamente los ingredientes
en la bandeja de llenado.
Básicamente, algunos tipos de frutas y verduras contienen poco jugo, como p. ej. los
albaricoques.
77
Page 78

CONDICIONES DE GARANTIA
Copyright UNOLD AG | www.unold.de
La garantía para nuestros equipos es de 24 meses, y de 12 meses en el caso de uso comercial, a partir de la fecha de compra, cubriendo los daños que con un uso acorde a lo prescrito pueden atribuirse
fehacientemente a defectos de fabricación. Dentro del período de garantía, solucionamos errores de
material y de fabricación a consideración nuestra mediante reparación o cambio. Nuestros servicios
de garantía son válidos únicamente para los aparatos que han sido vendidos en Alemania y Austria.
Para todos los demás casos diríjase por favor al importador correspondiente. Aquellos aparatos
que se presentan para eliminar errores, por favor enviarlos junto a una copia del comprobante de
compra extendido a máquina, del cual debe desprenderse la fecha de compra, así como una breve
descripción de las deficiencias, apropiadamente embalado y con los sellos correspondientes a nuestro servicio al cliente. En caso de garantía, los gastos de envío serán restituidos al cliente solamente
en Alemania y Austria. Aquellos daños causados por desgaste están excluidos de la garantía, así
como manipulación incorrecta, e incumplimiento de las condiciones de mantenimiento y cuidado.
El derecho a garantía expira si las reparaciones o mantenimiento son realizadas por terceros. Todo
reclamo del consumidor final ante el vendedor, comerciante no se ve afectado por esta garantía. La
garantía no cubre arañazos o decoloraciones del depósito provocadas, por ejemplo, por hierbas. Los
arañazos o decoloraciones no afectan al funcionamiento ni a la potencia del aparato. No introduzca
elementos extraños en el aparato, como cuchillos, cucharas o tenedores. La cuchilla y los elementos
extraños pueden resultar dañados, en cuyo caso se pierde el derecho de garantía.
DISPOSICIÓN/PROTECCIÓN DEL MEDIO AMBIENTE
Nuestros aparatos se fabrican con un alto nivel de calidad por un largo período de
uso. El mantenimiento regular y las reparaciones de tipo técnico a través de nuestro
servicio al cliente pueden prolongar la duración del aparato. Cuando un aparato está
defectuoso y ya no puede repararse, por favor considere en la disposición final los
siguientes puntos: Este producto no puede ser eliminado junto a la basura domiciliaria. Usted debe entregar este producto a un lugar oficial para el reciclaje de aparatos
eléctricos o electrónicos. Mediante la clasificación por separado y el reciclaje de productos residuales, Usted contribuye a proteger los recursos naturales y asegura que el
producto sea eliminado de forma salubre y acorde con el medio ambiente.
78
Page 79

INSTRUKCJA OBSŁUGI MODELU 78220
Copyright UNOLD AG | www.unold.de
DANE TECHNICZNE
Moc: 400 W, 220–240 V~, 50 Hz/60 Hz
Wymiary: Ok. 34,2 x 18,7 x 39,0 cm (dł. x sz. / gł. x wys.)
Długość przewodu: Ok. 100 cm
Ciężar: Ok. 2,5 kg
Obudowa: Plastikowy
Otwór do napełniania: Średnica ok. 7,5 cm
Wyposażenie: 2 prędkości (12.000-14.000 Obr./min), super duży
Akcesoria: Pojemnik na miąższ, popychacz, nstrukcja obsługi z
Zmiany i błędy w opisie wyposażenia, technice, kolorach i konstrukcji są zastrzeżone
OBJAŚNIENIE SYMBOLI
Symbol ten oznacza ewentualne niebezpieczeństwa, które mogą
prowadzić do obrażeń lub uszkodzenia urządzenia.
DLA BEZPIECZEŃSTWA UŻYTKOWNIKA
otwór wsadowy, sito ze stali szlachetnej, pojemnik na
miąższ o pojemności 1,5 l, stopień ochrony II
przepisami
Prosimy przeczytać poniższe instrukcje i zachować je do użytku w
przyszłości.
Wskazówki dotyczące osób w gospodarstwie domowym
1. Urządzenie może być używane przez dzieci w wieku powyżej 8 lat
oraz osoby o ograniczonej sprawności fizycznej, sensorycznej
czy umysłowej lub osoby nie posiadające doświadczenia i/lub
wiedzy, jeśli są one nadzorowane lub zostały przeszkolone w
zakresie bezpiecznego użytkowania i zrozumiały wynikającego z
tego zagrożenia.
2. Nie wolno dzieciom bawić się urządzeniem.
3. Czyszczenia i konserwacji, które powinien wykonać użytkownik,
nie mogą wykonywać dzieci poniżej 8 lat. Dzieci w wieku powyżej
8 lat mogą robić to pod nadzorem.
79
Page 80

4. Urządzenie z przewodem przechowywać w miejscu niedostępnym
Copyright UNOLD AG | www.unold.de
dla dzieci w wieku poniżej 8 lat.
5. Urządzenie nie jest zabawką.
6. Dzieci mogą czyścić i konserwować urządzenie tylko pod nadzo
rem.
Wskazówki dotyczące zdrowia
7.
Urządzenie przeznaczone jest wyłącznie do obróbki produktów
spożywczych.
8. Przygotowanych soki nie należy zbyt długo przechowywać, aby
uniknąć szkody dla organizmu wskutek zepsutych składników.
9. Jeżeli używane są dzikie zioła lub inne, samodzielnie zebrane
składniki, należy zwrócić uwagę na to, aby nie były one trujące.
Wskazówki dotyczące ustawienia i użycia urządzenia
10. Urządzenie należy podłączać wyłącznie do prądu zmiennego o
napięciu podanym na tabliczce znamionowej.
11. Urządzenie nie może pracować z zewnętrznym programatorem
czasowym lub systemem zdalnego sterowania.
12. Urządzenie przeznaczone jest wyłącznie do użycia w gospodar
stwie domowym lub w podobnych zastosowaniach, np.
aneksach kuchennych w sklepach, biurach lub innych zakła-
dach,
zakładach rolnych,
do użycia przez gości w hotelach, motelach lub innych nocle
gowniach,
w prywatnych pensjonatach lub domach letniskowych.
13. W żadnym wypadku nie zanurzać urządzenia lub przewodu w
wodzie lub w innych płynach.
14. Urządzenia i przewodu nie wolno czyścić w zmywarce.
15. Urządzenia ani kabla nie należy nigdy dotykać mokrymi dłońmi.
16. Ze względów bezpieczeństwa nigdy nie stawiać urządzenia na
gorących powierzchniach, metalowym blacie lub na wilgotnym
podłożu.
17. Urządzenie ani kabel nie mogą znajdować się w pobliżu pło
mieni.
18.
Sokowirówkę należy używać zawsze ustawioną na wolnej, równej
powierzchni.
-
-
-
-
80
Page 81

19. Zwrócić uwagę na to, aby przewód nie zwisał na brzegu
Copyright UNOLD AG | www.unold.de
powierzchni roboczej, gdyż może to prowadzić do wypadków, gdy
np. pociągną go dzieci.
20. Sokowirówki nie wolno używać ani składować na zewnątrz.
21. Urządzenie jest przeznaczone do wyciskania soku z owoców lub
miękkich warzyw.
22. Urządzenie należy przesuwać tylko w wyłączonym stanie i tylko
trzymając je dwoma rękami.
23. Urządzenie wolno używać wyłącznie po prawidłowym złożeniu.
Zwrócić uwagę na to, aby zacisk był prawidłowo zamknięty.
24. Do napełniania używać wyłącznie dostarczonego popychacza. Ze
względów bezpieczeństwa uważać, aby do otworu wsadowego nie
dostały się ręce, włosy, części ubrania ani żadne narzędzia.
25. Ostrza sita ze stali szlachetnej są bardzo ostre. Unikać ich doty
kania. Dotykać sito tylko za krawędź.
26.
Silnik musi się zatrzymać, zanim będzie można wyjąć ruchome
części.
27. Nigdy nie otwierać pokrywy pracującego urządzenia.
28. Urządzenie nie jest przeznaczone do pracy w trybie ciągłym.
Urządzenie może pracować przez maksymalnie 3 minuty, po
czym musi się ochłodzić.
29. Aby uniknąć szkód, nie wolno urządzenia używać z akcesoriami
innych producentów lub marek.
30. Jeśli sito ze stali szlachetnej jest uszkodzone, nie wolno używać
urządzenia!
31. Po użyciu i przed czyszczeniem wyjąć wtyczkę z gniazdka. Nigdy
nie pozostawiać urządzenia bez nadzoru, gdy wtyczka włożona
jest do gniazdka sieciowego.
32. Urządzenie należy czyścić po każdym użyciu w sposób opisany w
rozdziale „Czyszczenie i pielęgnacja“.
33. Regularnie sprawdzać urządzenie, wtyczkę i kabel pod kątem
śladów zużycia lub uszkodzenia. Gdy uszkodzony jest kabel
lub inne części, prosimy odesłać urządzenie do sprawdzenia i
naprawy do naszego serwisu klienta. Niewłaściwe naprawy mogą
powodować znaczne niebezpieczeństwo dla użytkownika i unie
ważnienie gwarancji.
-
-
81
Page 82

Uwaga: Do napełniania składników należy używać wyłącznie
Copyright UNOLD AG | www.unold.de
dostarczonego popychacza. Ze względów bezpieczeństwa
uważać, aby do otworu wsadowego nie dostały się ręce, włosy,
części ubrania ani żadne narzędzia.
Silnik musi się zatrzymać, zanim będzie można wyjąć ruchome
części.
W żadnym wypadku nie otwierać obudowy urządzenia. Istnieje
niebezpieczeństwo porażenia prądem elektrycznym.
Výrobce nepřebírá žádné ručení při chybné montáži, neodborném nebo chybném použití nebo po provedení
opravy neautorizovanými třetími osobami.
URUCHOMIENIE
1. Przed montażem należy upewnić się, że urządzenie jest montowane na
równym, suchym podłożu.
2. Usunąć wszystkie materiały opakowaniowe i zabezpieczenia transportowe.
Przechowywać materiał opakowaniowy, np. plastykowe worki lub styropian,
z dala od małych dzieci – niebezpieczeństwo uduszenia!
3. Oczyścić wszystkie części wilgotną ścierką w sposób opisany w rozdziale
"Czyszczenie i pielęgnacja".
4. Postawić urządzenie na odpowiedniej, płaskiej powierzchni.
5. Upewnić się, czy przełącznik na urządzeniu znajduje się w położeniu "0".
6. Włożyć pojemnik na miąższ w przewidziane miejsce przy bloku silnika.
7. Nałożyć na urządzenie miskę na sok. Zwrócić uwagę na to, aby miejsce
spadania miąższu do pojemnika na miąższ zahaczyć w pojemniku na miąższ.
Wyjmij wylot soku i skieruj go na wylot soku z lejka.
8. Włożyć sito ze stali szlachetnej na napęd w misce na sok. Wcisnąć sito na
napęd (przekręcić o ok. 30 °). Sito musi się zatrzasnąć.
9. Umieścić pokrywę na misce na sok i pojemniku na miąższ.
10. Przymocować pokrywę zaciskiem przesuwając go do góry. Zacisk zatrzaskuje
się w słyszalny sposób.
11. Podstawić odpowiednie szkło na sok pod dzióbek urządzenie.
12. Upewnić się, że przełącznik na urządzeniu znajduje się w położeniu "0".
13. Podłączyć urządzenie kablem do sieci (prąd przemienny, 220–240 V~,
50/60 Hz).
82
Page 83

PRZYGOTOWANIE OWOCÓW I WARZYW
Copyright UNOLD AG | www.unold.de
1. Używać w razie możliwości tylko świeżych owoców i warzyw.
2. Umyć dokładnie owoce lub warzywa i dobrze je wysuszyć.
3. Gdy mają być wyciskane owoce z twardą skórką, skórkę należ najpierw obrać.
Dotyczy to na przykład ananasa.
4. Owoce z niesmaczną skórką, jak na przykład owoce cytrusowe, należy
również najpierw obrać.
5. Nie zalecamy wyciskanie soków z bananów, gdyż te owoce się do wyciskania
praktycznie nie nadają.
6. Sok wyciskany z pomarańczy jest spieniony. Przed wyciskaniem soku z
pomarańczy należy je obrać ze skórki, gdyż nadaje ona soku gorzki smak.
7. Gdy wyciskany jest sok z jagód, należy na każde ok. 200 g jagód dodać ¼
jabłka ze skórką.
8. W razie potrzeby usunąć duże pestki (na przykład z wiśni lub śliwek) oraz
liście i ogonki. Winogron i porzeczek nie trzeba drylować. Porzeczki mogą
być wyciskane z gałązkami.
9. Pokroić owoce lub warzywa na cząstki pasujące do otworu wsadowego. Dzięki
temu, że otwór wsadowy jest duży, można do niego wkładać stosunkowo
duże kawałki.
PRZYGOTOWANIE SOKU
1. Przygotować urządzenie zgodnie z opisem podanym w rozdziale
„Uruchomienie“.
2. Wyjąć popychacz z otworu wsadowego.
3. Ustawić przełącznik na żądaną prędkość:
1 dla miękkich owoców i warzyw, takich jak winogrono, melony, gruszki lub
ogórki.
2 dla twardych owoców i warzyw jak na przykład marchewki lub jabłka.
4. Włożyć kawałki owoców i warzyw do otworu wsadowego i powoli wciskać
je popychaczem do środka. Im mniejszy nacisk, tym więcej soku zostaje
wyciśnięte.
5. Zalecamy, aby urządzenie pracowało przez maksymalnie jedną minutę, a
potem chłodziło się przez kolejną minutę, zanim zostanie ponownie włączone
na kolejną minutę. Po ok. trzech cyklach należy urządzenie wyłączyć na ok.
15 minut, zanim ponownie się je uruchomi.
83
Page 84

Uwaga: Podczas pracy sokowirówki nigdy nie wkładać palców ani obcych
Copyright UNOLD AG | www.unold.de
ciał do otworu wsadowego. Istnieje niebezpieczeństwo obrażeń!
6. Jeżeli w sokowirówce zablokują się kawałki owoców lub warzyw i nie da
się ich poluzować popychaczem, należy urządzenie wyłączyć. Wyciągnąć
wtyczkę z gniazdka i rozłożyć urządzenie na części w celu usunięcia cząstek
owoców lub warzyw. Ponownie złożyć urządzenie i kontynuować wyciskanie.
7. Sok spływa do dzbanka na sok.
8. Zwrócić uwagę na to, aby nie przepełniać pojemnika na miąższ. Jeśli
pojemnik na miąższ jest pełny, należy wyłączyć urządzenie. Wyciągnąć
wtyczkę z gniazdka i rozłożyć urządzenie na części: najpierw zdjąć pokrywę,
potem sito, potem miskę na sok, a dopiero potem opróżnić pojemnik na
miąższ. Ponownie złożyć urządzenie i kontynuować wyciskanie.
9. Jeśli dzbanek na sok jest pełny, należy wyłączyć urządzenie przekręcając
przełącznik w położenie „0“, przelać sok do innego pojemnika, po czym
kontynuować wyciskanie.
10. Aby zakończyć wyciskanie soku, należy przełączyć przełącznik na „0“
i wyciągnąć wtyczkę z gniazdka. Zalecamy czyszczenie urządzenia
bezpośrednio po zakończeniu wyciskania soku.
11. Wskazówka: Urządzenie wyposażone jest w zabezpieczenie przed
przegrzaniem. Jeżeli urządzenie za bardzo się nagrzeje podczas pracy,
zabezpieczenie przed przegrzaniem wyłącza urządzenie, aby uniknąć
uszkodzenia silnika. Należy wówczas wyciągnąć wtyczkę z gniazdka i
zaczekać przynajmniej 30 minut do ochłodzenia się urządzenia.
ROZŁOŻENIE URZĄDZENIA NA CZĘŚCI
Gdy przyrządzanie soku jest zakończone, należy wyłączyć urządzenie przekręcając przełącznik w położenie „0“. Zaczekać, aż sok przestanie się
wylewać z dzióbka, a sito ze stali szlachetnej przestanie się obracać.
Wyciągnąć wtyczkę z gniazdka.
1. Odsunąć dzbanek na sok.
2. Wyciągnąć popychacz z otworu wsadowego.
3. Otworzyć zacisk naciskając go ostrożnie do góry i lekko do przodu w kierunku
przeciwnym do urządzenia.
4. Zdjąć przezroczystą pokrywę.
84
Page 85

5. Wyjąć sito ze stali szlachetnej. Lekko przy tym pociągnąć za krawędź sita i
Copyright UNOLD AG | www.unold.de
obrócić je o ok. 30°. Przytrzymywać sito tylko za krawędź, aby nie skaleczyć
się o jego ostrza.
6. Wyjąć miskę na sok i pojemnik na miąższ.
7. Opróżnić pojemnik na miąższ. Do tego można użyć płaskiej strony szczotki
do mycia.
8. W razie potrzeby usunąć ewentualnie resztki włókien z miski na sok.
CZYSZCZENIE I PIELĘGNACJA
Zalecamy czyszczenie urządzenia bezpośrednio po zakończeniu wyciskania soku.
Zaschnięte resztki włókien są trudne do usunięcia.
Uwaga: Sito z stali szlachetnej jest ostre – ryzyko obrażeń ciała!
Wyłączyć urządzenie przekręcając przełącznik w położenie „0“. Zaczekać,
aż sok przestanie się wylewać z dzióbka, a sito ze stali szlachetnej przestanie się obracać.
Wyciągnąć wtyczkę z gniazdka.
1. Rozłożyć urządzenie na części w sposób opisany w rozdziale „Rozłożenie
urządzenia na części“.
2. Usunąć miąższ z pojemnika na miąższ oraz resztki włókien z miski na sok.
3. Umyć wszystkie wyjęte części (za wyjątku bloku silnika) ciepłą wodą z
dodatkiem odrobiny płynu do mycia naczyń. Sito można wyczyścić dostępną
w handlu zwykłą szczotką do mycia z tworzywa sztucznego. Należy przy tym
trzymać sito tylko za krawędź, aby nie skaleczyć się na jego ostrzach. Zwrócić
uwagę na to, aby sito dokładnie oczyścić z resztek włókien, aby następnym
razem również osiągnąć dobry wynik wyciskania. W razie potrzeby można
sito przez chwilę namoczyć w wodzie.
4. Żółte zabrudzenia dają się łatwo usunąć za pomocą ręcznika kuchennego
zanurzonego w oleju spożywczym.
5. Blok silnika należy wycierać wilgotną ścierką.
6. Również napęd należy regularnie wycierać wilgotną ścierką.
7. Zasadniczo nie należy używać ostrych środków szorujących, wełny stalo-
wej, metalowych przedmiotów, gorących środków czyszczących lub środków
dezynfekujących.
8. Urządzenie i wtyczka sieciowa muszą być całkowicie suche zanim można
będzie ponownie użyć urządzenie.
85
Page 86

9. Całkowicie wysuszoną sokowirówkę należy przechowywać w suchym i bez-
Copyright UNOLD AG | www.unold.de
piecznym miejscu, chroniąc ją przed kurzem, uderzeniami, wysoką temperaturą i wilgocią.
PRZEPISY
Ogólne wskazówki dotyczące przyrządzania soku
Soki są bogate w witaminy. Odświeżają przez cały rok. Wiele witamin ulega na
powietrzu rozkładowi, dlatego świeżo przyrządzone soki należy zawsze natychmiast
spożywać.
na szklankę soku można dodać 1 łyżeczkę słodkiej śmietany lub 2 krople oleju
tłoczonego na zimno. Świeżo przyrządzony sok z winogrona doskonale nadaje
się do kuracji winogronowej. Przygotowane soki można spożywać nie tylko
świeże, nadają się one doskonale również do zup, galaretek itp. Po zmieszaniu
z niewielką ilością białka lub żelatyny rozpuszczalnej na zimno można z soku
zrobić np. sorbet w maszynie do lodów firmy Unold® i otrzymać w ten sposób
niskokaloryczny, smaczny i orzeźwiający deser.
Liczne witaminy rozpuszczają się dopiero po dodaniu tłuszczu, dlatego
Sok warzywny
Wycisnąć sok z ½ kalarepy,
1 żółtej papryki, 4 natek pietruszki,
1 marchewki i 1 pomidora.
Ten sok jest wyśmienity bez dodatku
przypraw, ale można go również
doprawić odrobiną Tabasco i kilkoma
kroplami syropu klonowego.
Witaminowa bomba
400 g szpinaku, 2 marchewek, 1 laski
selera, 1 łyżki rzeżuchy, 2 pomidorów
i ½ ogórka.
Zmieszać z 1 łyżką soku z cytryny,
posiekanym szczypiorkiem i
pietruszką, szczyptą pieprzu i cukru,
po czym dolać ¼ l mleka.
86
Pina colada, napój bezalkoholowy
1 ananas (wystarczy na 2 do
3 szklanek), 50 ml słodkiej śmietany,
3 łyżki syropu kokosowego, kruszony
lód.
Wycisnąć sok z ananasa, wlać do
dzbanka, zmieszać ze śmietaną,
syropem kokosowym i lodem, rozlać do
szklanek, szklanki ozdobić ¼ plastra
ananasa i wisienką koktajlową.
Sok truskawkowy z dodatkiem alkoholu
250 g truskawek i 1 jabłka, dodać
1 łyżeczkę miodu, 1 łyżkę słodkiej
śmietany i 2 cl wódki, zmieszać i
podawać.
Page 87

Galaretka z jabłek
Copyright UNOLD AG | www.unold.de
Wycisnąć sok z niezbyt dojrzałych
jabłek aż do uzyskania 800 ml soku,
zmieszać z 1 kg cukru żelującego w
stosunku 1:1 i gotować na galaretkę
według przepisu na opakowaniu.
Galaretka wieloowocowa
Wycisnąć sok z jeżyn, porzeczek,
malin, truskawek, agrestu (prędkość
1) oraz 2 jabłek (prędkość 2), dodać
1 kg cukru żelującego w stosunku
1:1 i gotować na galaretkę według
przepisu na opakowaniu. Oczywiście
galaretkę można także przyrządzić
również z dodatkiem tylko jednego
rodzaju owoców.
Orzeźwiający chłodnik ogórkowy
1 ogórek sałatkowy, ¼ l maślanki,
1 ząbek czosnku, 1 cebula, sól, pieprz,
świeży koperek
Wycisnąć sok z ¾ ogórka (prędkość
2) oraz cebuli i czosnku. Pozostałą
część ogórka pokroić na małe kostki i
zmieszać z maślanką. Dolać sól, pieprz
i posypać koperkiem.
Chłodnik owocowy
½ l soku z owoców sezonowych, np. z
różnych rodzajów owoców jagodowych
lub jabłek, brzoskwiń, gruszek, moreli.
Ten sok rozcieńczyć ¼ l wody, odlać
3 łyżki soku i wymieszać z 1 łyżką
mąki ziemniaczanej. Pozostały sok
podgrzać z 2 łyżkami cukru, stopniowo
dolewać rozprowadzoną mąkę, krótko
zagotować i ochłodzić. Przed podaniem
udekorować kilkoma jagodami lub
cząstkami owoców.
Chłodnik pomidorowy
Wycisnąć sok z pomidorów, 1 cebuli
i 1 ząbka czosnku (ok. ¾ l soku).
Dodać do soku świeżo zmielony pieprz,
trochę Tabasco, sól i posiekaną bazylię
i serwować. Porada: Przy pomocy
maszyny do lodów Unold® można w
mig przerobić sok na odświeżający
sorbet pomidorowy.
Przepisy podane w tej instrukcji obsługi zostały starannie opracowane i sprawdzone przez autorów i
przedsiębiorstwo UNOLD AG, ale bez gwarancji. Wyklucza się odpowiedzialność autorów lub przedsiębiorstwa UNOLD AG i ich pełnomocników za szkody osobowe, rzeczowe i majątkowe.
87
Page 88

USUWANIE USTEREK
Copyright UNOLD AG | www.unold.de
Problem Rozwiązanie
Urządzenie nie pracuje. Sprawdzić, czy wszystkie części są prawidłowo zło-
Silnik zatrzymuje podczas
wyciskania soku.
Sito ze stali szlachetnej
nie obraca się.
żone. Jeżeli tak nie jest, system bezpieczeństwa
uniemożliwia włączenie urządzenia. Złożyć urzą-
dzenie ponownie w sposób opisany w rozdziale
"Uruchomienie" .
Wyłączyć urządzenie. Wyciągnąć wtyczkę z gniazdka.
Rozłożyć urządzenie na części w sposób opisany
w rozdziale „Rozłożenie urządzenia na części“ i
sprawdzić, czy sito nie jest zatkane resztkami włókien. Wyczyścić sito pod bieżącą, ciepłą wodą i
przy użyciu szczotki z tworzywa sztucznego, po
czym złożyć urządzenie ponownie i kontynuować
wyciskanie soku.
Aby zapobiec zatykaniu się sita, należy sprawdzić,
czy używane owoce lub warzywa nie są zbyt twarde lub włókniste. Nie wkładać owoców lub warzyw
zbyt szybko do otworu wsadowego i regularnie
opróżniać pojemnik na miąższ.
Wyłączyć urządzenie. Wyciągnąć wtyczkę z gniazd-
ka.
Rozłożyć urządzenie na części w sposób opisany
w rozdziale „Rozłożenie urządzenia na części“ i
sprawdzić, czy sito nie jest zatkane resztkami włókien. Wyczyścić sito pod bieżącą, ciepłą wodą i
przy użyciu szczotki z tworzywa sztucznego, po
czym złożyć urządzenie ponownie i kontynuować
wyciskanie soku.
Aby zapobiec zatykaniu się sita, należy sprawdzić,
czy używane owoce lub warzywa nie są zbyt twarde lub włókniste. Nie wkładać owoców lub warzyw
zbyt szybko do otworu wsadowego i regularnie
opróżniać pojemnik na miąższ.
Za mało soku Sprawdzić, czy sito nie jest zatkane.
88
Wkładać składniki wolniej do otworu wsadowego.
Z niektórych gatunków owoców i warzyw zasadni-
czo daje się uzyskać mniej soku, np. z moreli.
Page 89

WARUNKI GWARANCJI
Copyright UNOLD AG | www.unold.de
Udzielamy na nasze produkty 24 miesięcznej gwarancji od daty zakupu (warunkiem jest zachowanie faktury zakupu lub
paragonu) na szkody, które przy użytkowaniu zgodnym z przeznaczeniem wskazują na wadę fabryczną. W czasie trwania
gwarancji usuniemy wady materiałowe bądź fabryczne zgodnie z naszym osądem poprzez naprawę lub wymianę. Gwarancja
udzielana jest na produkty sprzedawane na terenie Niemiec i Austrii. W innych krajach proszę zwrócić się do właściwego
Importera. Urządzenia, w których wymagane jest usunięcie wady, proszę przesłać razem z kopią faktury zakupu, na której musi
być widoczna data zakupu, z załączonym opisem wady, w oryginalnym pudełku, dobrze zapakowane i na własny koszt na adres
serwisu. Gwarancja nie obejmuje szkód wynikających ze zużycia, użytkowania niezgodnie z przeznaczeniem i nieprzestrzegania
wskazówek dotyczących konserwacji i pielęgnacji. Roszczenie gwarancji wygasa, jeżeli naprawa bądź otwarcie przedmiotu
będą przeprowadzone przez stronę trzecią. Ewentualne roszczenia użytkownika końcowego wobec sprzedawcy/dealera nie
są ograniczone tą gwarancją. Gwarancja nie obejmuje zarysowań lub przebarwień pojemnika np. ziołami. Zarysowania lub
przebarwienia nie wpływają na działanie i sprawność urządzenia. Nie wkładać do urządzenia żadnych ciał obcych takich jak
np. widelce, łyżki lub noże. Noże i ciała obce mogą ulec uszkodzeniu, w takim przypadku wygasa prawo do roszczeń z tytułu
gwarancji.
UTYLIZACJA / OCHRONA ŚRODOWISKA
Nasze urządzenia wyprodukowane zostały na wysokim poziomie do długiego użytkowania. Regularna kon-
serwacja i fachowe naprawy poprzez nasz serwis mogą wydłużyć pracę urządzenia. W razie kiedy urządzenie
jest uszkodzone i nie nadaje się do naprawy, proszę przestrzegać zaleceń: Ten produkt nie może być zuty-
lizowany razem z normalnymi odpadami domowymi. Muszą Państwo dostarczyć ten produkt do zbiorczego
punktu recyklingowego dla urządzeń elektrycznych i elektronicznych. Poprzez oddzielne zbieranie i recykling
odpadów pomagają Państwo chronić naturalne zasoby i sprawiają, że ten produkt będzie zutylizowany w
sposób bezpieczny dla zdrowia i środowiska naturalnego.
89
Page 90

90
Copyright UNOLD AG | www.unold.de
Page 91

Copyright UNOLD AG | www.unold.de
91
Page 92

Aus dem Hause
Copyright UNOLD AG | www.unold.de
 Loading...