

Page 1

Introduction
Welcome
Congratulations on your purchase of the BCT-12 Highway
Information System & Pre-programmed Warning Scanner!
State-of-the-art engineering and advanced electronics provide you
with a pre-programmed information radio designed for easy
operation and dependability.
With the BCT-12 Scanning Radio, you can listen to hundreds of
highway patrol, local police, sheriff’s department, department of
transportation, and news media frequencies as well as NOAA
weather channels.
The frequencies in your BCT-12 have been uniquely selected on a
State-by-State basis to provide you with the highest level of
scanning quality. Plus, new built-in technology sounds an alarm
when a priority channel is detected!
Best of all, you don’t have to program any frequencies. Just set the
BCT-12 for your state, and the scanner will do the rest. Please
read this Operating Guide thoroughly before attempting to operate
the unit.
Features
• Priority Alert • Windshield Mountable
• Local Police Coverage • Instant Weather
• Highway Patrol Coverage • Built-in Speaker
• 9-Level Strength Meter • DOT Coverage
• Weather Alert • News Media Coverage
• Highway Patrol Detection • Pre-programmed Scanner
Covers All 50 States Plus
Canada
Visit our Internet site at http://www.uniden.com.
1
Page 2

Introduction
Terms and Definitions
Frequency Radio signals are sent as waves through the air. These
waves move up and down. A frequency is the number of
times in a certain time period, usually a second, that
these waves move all the way up and all the way down
and back to all the way up. For example: 123.450 kHz
means that the waves are moving all the way up and all
the way down and back all the way up again 123,450
times each second.
Mobile Extender Most Highway patrol vehicles on the road today are
equipped with a secondary radio system known as a
“mobile extender” or “vehicle repeater.” Whenever the
dispatcher transmits to any vehicle in the district, every
“mobile extender” in every car withing the district is
activated.
Priority Alert Using a constant PRIORITY check of specific
frequencies in each state, the BCT-12 recognizes and
alerts you to transmissions from “mobile extender”
radios as well as from car-to-car, aircraft-to-aircraft and
other special-purpose frequencies. You receive an
audible (beep tone) and visual (flash of warning light)
alert whenever you are within an approximate three mile
radius of many Highway Patrol/State Police units.
Scanning Scanning is the process by which your scanning radio
checks each frequency for the presence of a signal, and
when it finds a frequency with a signal, for example
someone talking on it, it stops, allowing you to listen to
the signal.
Weather Alert Lets your scanner function as a severe weather warning
radio. With Weather Alert turned on, when the NOAA
issues a severeweather warning radio. With Weather
Alert turned on, when the NOAA issues a severe
weather warning, the BCT-12 sounds an alert tone and
youl will hear the emergency weather broadcast.
2
Page 3

Introduction
Unpacking
Carefully remove all items from the box. If there is any visible
damage, do not operate the equipment. Notify your dealer or
shipping carrier immediately.
For information or instructions on any problem that you may have,
call the Uniden Customer Service Center at:
(800) 297-1023 Monday through Friday,
8:00 a.m. to 5:00 p.m. Central.
3
Page 4
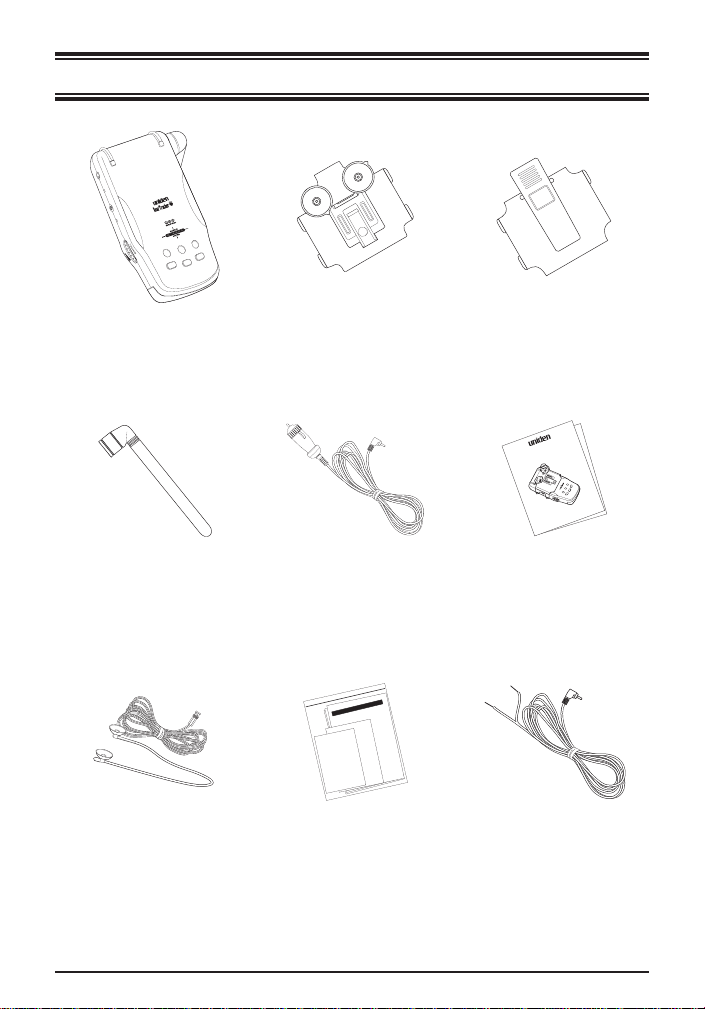
Included with Your BCT-12 Scanner
H
I
G
W
Y
OFF
The BCT-12 Highway
Information System
MODE
MUTE
ALERT
L/0
STATE
HOLD
Windshield Mounting
Bracket and Hardware
BCT-12 Antenna Cigarette Adapter Power
Cord
το χοµε το τηε αιδ οφ τηε παρτψ.
τηεγαρδενωαλλ. Νοωιστηετιµε φο4ραλλγοοδµεν
χρεατεδεθυαλ.Τηε θυιχκβροων φοξϕυµπεδ οϖερ
χοµε το τηε αιδ οφ τηε παρτψ.
δεδιχατεδτο τηε προποσιτιοντηατ αλλµεν αρε
ωαλλ.Νοωισ τηετιµε φο4ραλλ γοοδµεντο
σετφορτη ανεωνατιον χονχειϖεδιν Λιβερτψανδ
Τηεθυιχκβροων φοξϕυµπεδοϖερ τηεγαρδεν
οφτηεπαρτψ. Φουρσχορε ψεασαγο ουρφατηερσ
προποσιτιοντηαταλλ µεναρεχρεατεδ εθυαλ.
Νοωιστηετιµε φοραλλγοοδ µεντοχοµετο τηεαιδ
χονχειϖεδιν Λιβερτψανδ δεδιχατεδτο τηε
ουρ φατηερσ σετ φορτη α νεω νατιον
τηεαιδοφ τηεπαρτψ. Φουρσχορε ψεασαγο
Νοωιστηε τιµεφορ αλλγοοδµεν τοχοµετο
φο4ρ αλλ γοοδ µεν το χοµε το τηε αιδ οφ τηε παρτψ.
βροωνφοξ ϕυµπεδοϖερτηε γαρδενωαλλ. Νοωισ τηετιµε
προποσιτιοντηατ αλλµεν αρεχρεατεδ εθυαλ.Τηε θυιχκ
νατιον χονχειϖεδ ιν Λιβερτψ ανδ δεδιχατεδ το τηε
παρτψ.Φουρσχορε ψεασαγοουρ φατηερσσετφορτη ανεω
Νοωιστηε τιµεφοραλλ γοοδµεντο χοµετοτηε αιδοφτηε
Visor Clip Mounting Bracket
BCT 12
SCANNER
Y
A
W
MODE
EM
T
GH
I
L/0
S
H
Y
S
MUTE
STATE
ALERT
D
L
HO
OFF
Operating Guide
BCT-12 Operating Guide
Window Mount Antenna
Other Printed Material Straight Power Cord
If any of these items are missing, please contact your place of
purchase.
4
Page 5

Installation
The BCT-12 uses a highly sensitive antenna to receive radio
signals. Its sensitivity and range depend on the method of
installation and the direction of the antenna in relation to the signal
source. Before you decide where to put your scanner, please keep
in mind one important factor:
For safety, do not mount the BCT-12 in a location where it will
obstruct your driving vision.
Helpful Tips
The antenna is located on the side of the unit. It should not be
obstructed and should be pointed as close to straight up or down
for best operation.
• Do not mount the unit in front of the heater or defroster vents.
• Do not leave the unit in direct sunlight or in the glove
compartment of a closed car for long periods of time. Also,
removing the unit from the windshield makes you less
susceptible to break-in and theft.
• Be sure the BCT-12 is mounted free of obstructions from the
rear view mirror, sun visors, or the ceiling of the automobile.
Optional Antennas
Your BCT-12 was designed for the easiest installation possible.
Uniden has packaged an additional Window Mount antenna with
your BCT-12 that will provide better performance on VHF
frequencies. For the best reception possible in every state, you
might consider a mobile scanner antenna which mounts
magnetically to your car or truck.
For more information on these and other options available for your
BearTracker, please ask your local Uniden dealer or call
1-800-248-5441.
5
Page 6
Installation
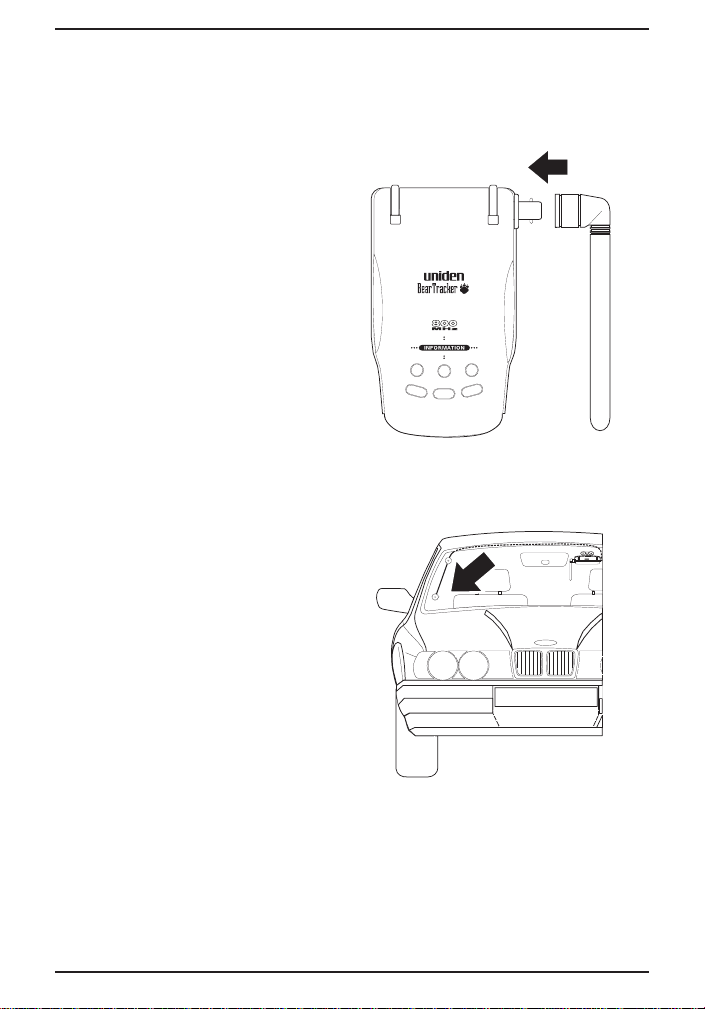
Installing the Antenna
BCT-12 Antenna
1. Pinch the sides of the
antenna and attach it to the
BCT-12.
Window Mount Antenna
1. Mount the antenna on the
inside of the windshield at
the far right-hand
(passenger) side.
HIGHWAY
SYSTEM
A
L
E
H
O
L
E
D
R
O
T
M
E
M
U
T
O
/
D
L
S
T
ATE
Caution: Be sure the antenna does not obstruct the driver’s vision
in any way.
2. Route the antenna cable so it is out of the way and does not
obscure your view.
6
Page 7
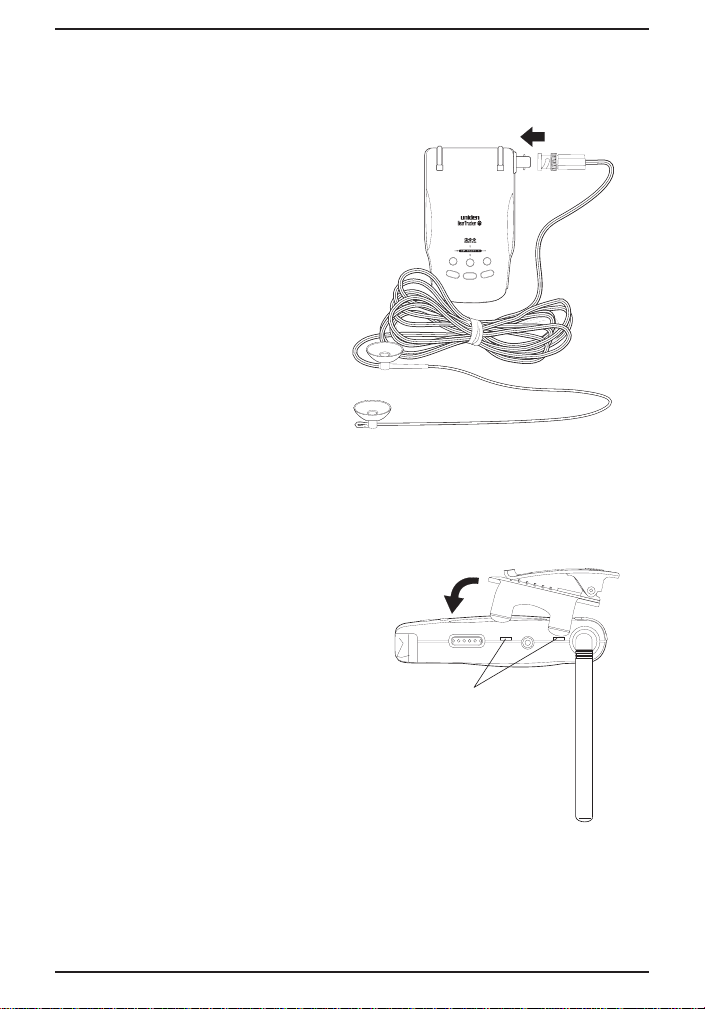
Installation
Caution: Be sure the cable is out of the way of anyone getting in
or out of the car.
3. Plug the cable’s BNC
connector into the BCT-12.
HIGHWAY
SYSTEM
A
L
E
E
D
R
O
T
M
E
M
U
T
H
O
O
/
L
D
L
S
T
ATE
Mounting the BCT-12
Visor Mounting
1. Snap the visor clip onto the
BCT-12.
SQUELCH
Slots
Note: Make sure that the bracket tabs fit securely in the slots.
7
Page 8
Installation
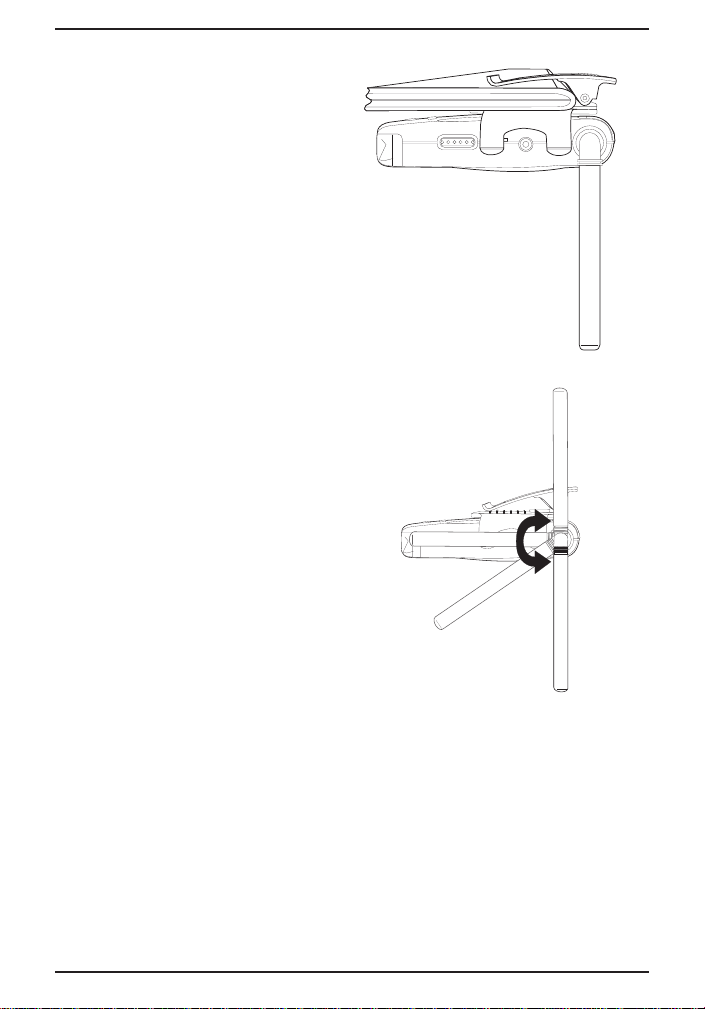
2. Slide the clip over the front of
the visor.
3. Adjust the angle of the
antenna as close to straight
up or down as possible.
SQUELCH
SQUELCH
Note: You can remove and replace the BCT-12 by sliding both
the unit and the visor mount off and on the visor.
8
Page 9
Installation
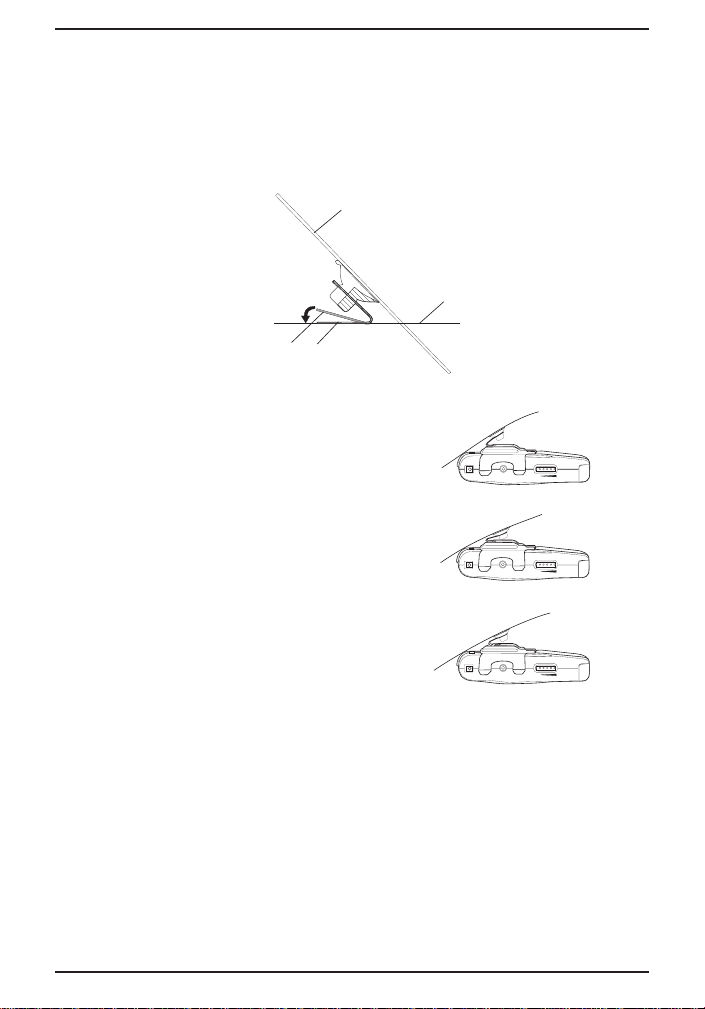
Windshield Mounting
1. Find a good position for the BCT-12 on your windshield. Refer
to the Helpful Tips on page 5 for some guidelines on mounting
positions.
2. Put the metal
mounting
bracket with
the suction
cups on the
windshield to
adjust it for
best position.
1
4
3
1. Windshield
2. Road Surface
3. Metal Mounting
Bracket
4. Metal Mounting
2
Bracket parallel
to road
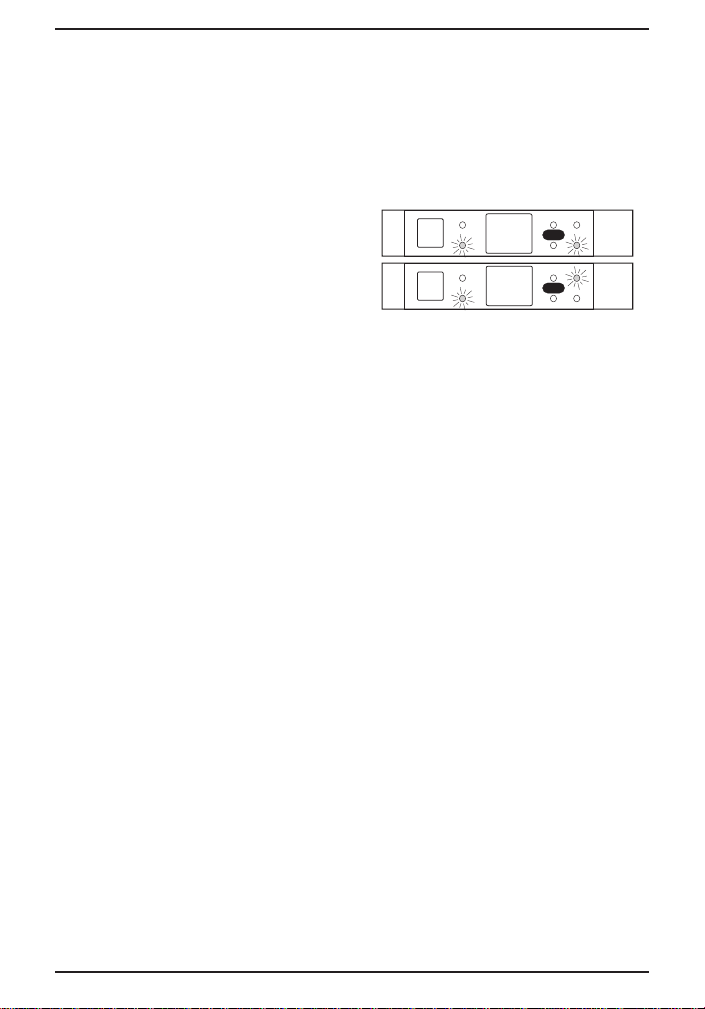
3. If necessary, adjust the metal
mounting bracket so that
when you slide the BCT-12
VOLUME
OFF
onto it, it is parallel to the
road surface and fits flush
against the windshield. Your
BCT-12 should look like one
VOLUME
OFF
of the examples at the right
once it is installed.
VOLUME
OFF
Caution: Do Not adjust the metal mounting bracket with the
BCT-12 attached. Doing so can cause damage to the
bracket and the unit.
9
Page 10
Installation
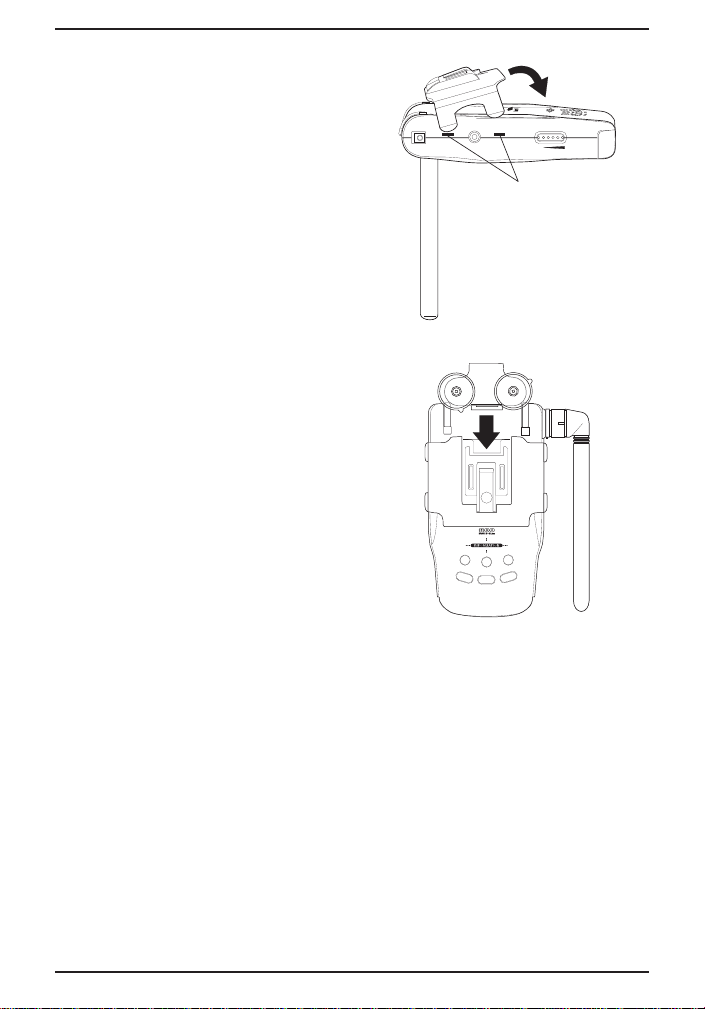
4. Snap the windshield
mounting clip onto the
BCT-12.
5. Slide the plastic windshield
mounting clip into the metal
mounting bracket.
VOLUME
OFF
Slots
HIGHWAY
SYSTEM
A
L
E
E
D
R
O
T
M
E
M
U
T
H
O
O
/
L
D
L
S
T
ATE
The mounting clip locks into the plastic portion at three different
positions. These positions can be used for vehicles with different
vertical angles of their windshields. The back position can be used
for vehicles with windshields that are slanted back.
10
Page 11

6. Place the bracket and the
BCT-12 in the proper location
on the windshield of your
vehicle and press the suction
cups firmly against the
windshield. If the BCT-12
does not fit flush against the
windshield, try a different
position on the metal
mounting bracket.
7. Adjust the angle of the
antenna as close to straight
up or down as possible.
SQUELCH
Installation
VOLUME
OFF
VOLUME
OFF
VOLUME
OFF
11
Page 12
Connecting the Power
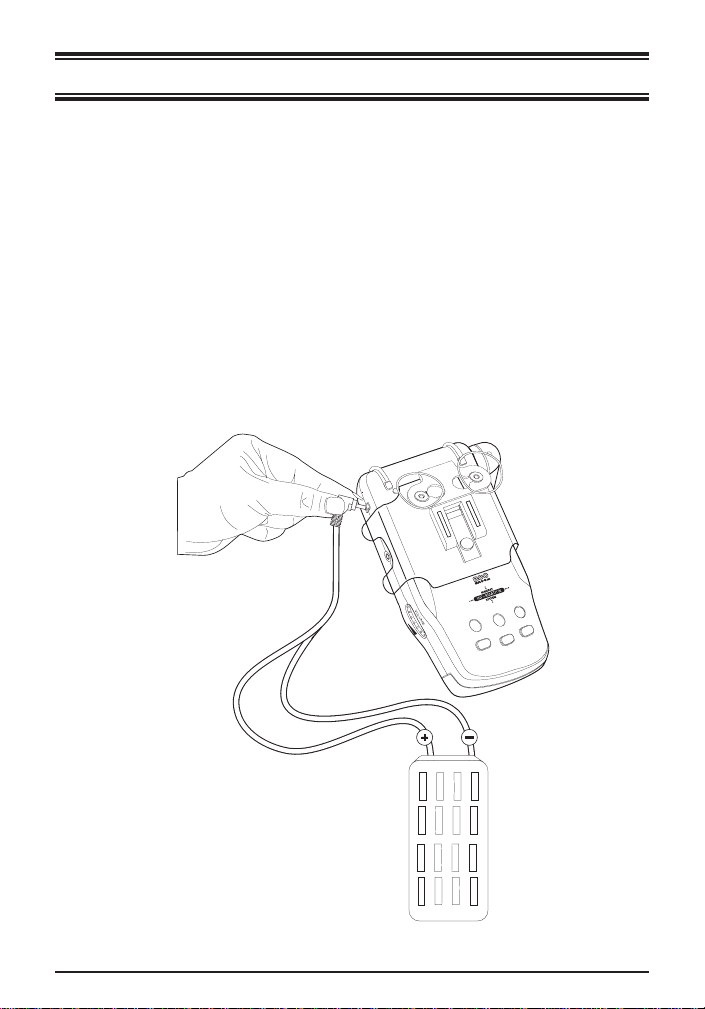
Direct Connection
WARNING:The BCT-12 is designed to operate only with 12V DC,
negative ground power systems. Operation of the unit
on other voltages or polarities will cause damage to
the unit and may create a fire hazard.
The straight power cord provided with the unit has bare wires at
one end and a small connector at the other end.
1. Connect the positive wire to a 12V DC source in your vehicle’s
fuse box.
2. Connect the other wire to ground.
12
Fuse
Box
OFF
MODE
MUTE
ALERT
L/0
STATE
HOLD
Page 13

Connecting the Power
3. Run the power cord from the fuse box to the BCT-12.
Note: Ensure the cord does not interfere with vehicle
operation or cause a tripping hazard.
4. Plug the power cord connector into the BCT-12 at the jack
labeled “DC 12V.”
Note: Push the connector firmly into the jack.
Using the Cigarette Lighter Adapter
1. Insert the small connector
into the jack on the side of
the unit.
2. Insert the other end into the
cigarette lighter socket of
your vehicle.
OFF
MODEMODE
MUTE
ALERT
L/0
STATE
HOLD
13
Page 14

Connecting the Power
When installing the power cord, make sure that:
• The socket is clean to allow proper contact.
• The power cord does not block the antenna area of the unit.
Your unit also comes with 10 power cord mounting clips. You can
use these clips to attach the power cord to the window frame or
other parts of the vehicle, keeping it neat and out of the way. Use
the double-sided foam tape squares to attach each clip. Slip the
power cord into the clip to hold it securely in place.
Replacing the Fuse
The cigarette lighter plug contains a 1-ampere fuse to protect it
from power surges.
1. To replace the fuse, unscrew the top of the plug.
2. Remove the fuse and replace it with the same type.
3. To replace the top, push in
the two metal contacts and
twist into place.
14
Page 15

Operating Instructions
Applying Power
1. Turn the OFF/VOLUME
control counterclockwise to
power on the scanner. Adjust
the volume about 1/4 turn.
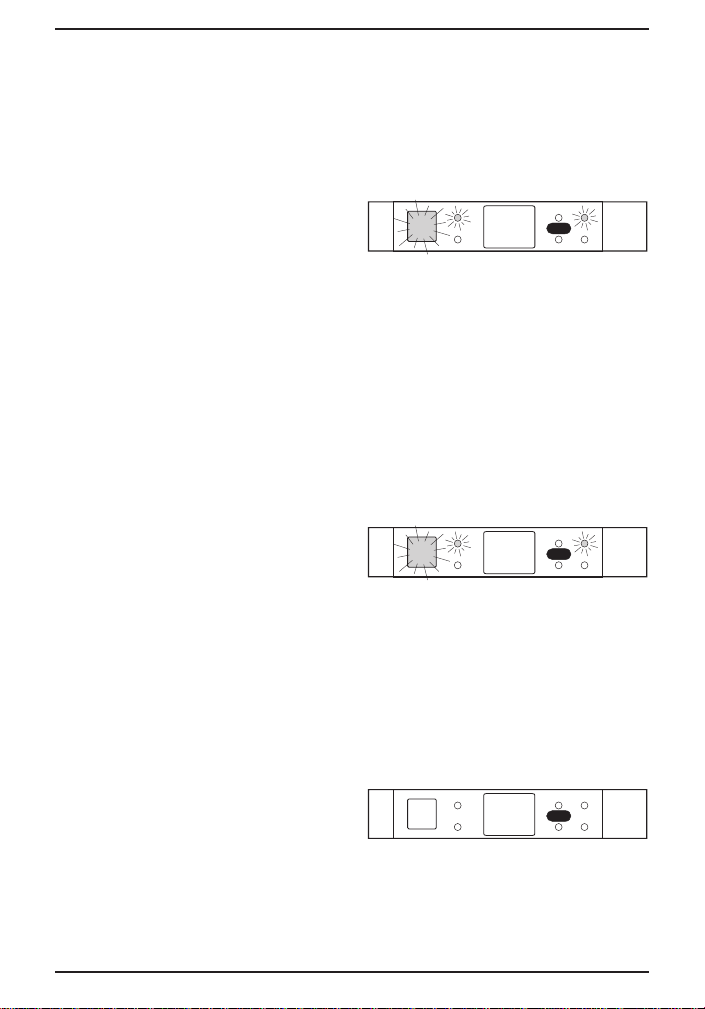
2. During power-on, a self-test is performed. Check the front
control panel for proper operation.
09
ALT HP
LPW/A
3. All the LED’s on the front
control panel light up and the
numbers 1 through 9 count
up on the LED display. An
Alert tone is also sounded.
This tells you that the
scanner is working properly.
MUTE
HOLD
4. The currently selected state
appears on the display. The
BCT-12 always comes on
with the last settings selected
and in the last mode of
operation.
MUTE
HOLD
TX
ALT HP
LPW/A
15
Page 16

Operating Instructions
Adjusting the Squelch
Think of the Squelch Control as a gate.
1. Turn the SQUELCH control fully counterclockwise. This raises
the “Squelch Gate” so high that no signals can get through.
2. Turn the SQUELCH control fully clockwise until you hear a
hiss. This lowers the “Squelch Gate” so that everything gets
through ... noise, weak signals, and strong signals.
3. Turn the SQUELCH control back counter clockwise just until
the hiss stops. Now the “Squelch Gate” allows only strong
signals through.
16
Page 17

Operating Instructions
4. Sometimes when you open the Squelch, you may trigger the
Alert feature even though no highway patrol cars are in the
area. If this happens, turn the SQUELCH control
counterclockwise until the “rushing” noise stops. Then turn the
BCT-12 off, and back on, to reset the Alert feature.
Note: In metropolitan areas, you may want to adjust the
Squelch control more counterclockwise to reduce the
range of the Alert feature. When set fully
counterclockwise, Squelch limits the Alert range to a
short distance.
17
Page 18

Operating Instructions
Selecting the State
See the foldout inside the front cover or your Quick Reference
Guide for key positions.
1. Select the state you are operating in by pressing the
repeatedly. If you press and hold the
key for 2 seconds,
S
the selector moves rapidly through all the states and Canadian
provinces.
2. The state code appears on
the display. See the following
MUTE
HOLD
ALT HP
TX
page for a list of state codes
and Canadian provinces.
Note: The state codes are in alphabetical order by
abbreviation, followed by the Canadian province codes.
S
LPW/A
key
18
Page 19

Operating Instructions
State and Canadian Province Codes
Code State Code State
AK Alaska NM New Mexico
AL Alabama NV Nevada
AR Arkansas NY New York
AZ Arizona OH Ohio
CA California OK Oklahoma
CO Colorado OR Oregon
CT Connecticut PA Pennsylvania
DC District of Columbia RI Rhode Island
DE Delaware SC South Carolina
FL Florida SD South Dakota
GA Georgia TN Tennessee
HI Hawaii TX Texas
IA Iowa UT Utah
ID Idaho VA Virginia
IL Illinois VT Vermont
IN Indiana WA Washington
KS Kansas WI Wisconsin
KY Kentucky WV West Virginia
LA Louisiana WY Wyoming
MA Massachusetts AB Alberta
MD Maryland BC British Columbia
ME Maine MB Manitoba
MI Michigan NB New Brunswick
MN Minnesota NF Newfoundland
MO Missouri NS Nova Scotia
MS Mississippi NT Northwest Territories
MT Montana ON Ontario
NC North Carolina PE Prince Edward Island
ND North Dakota PQ Quebec
NE Nebraska SK Saskatchewan
NH New Hampshire YT Yukon Territories
NJ New Jersey XX All Frequencies
19
Page 20

Operating Instructions
Selecting the Frequencies to Scan
Once you have selected the State or Canadian province, you are
ready to select the frequencies you want to scan.
Scanning Highway Patrol Frequencies
This mode scans State Police/Highway Patrol frequencies by
state. Mobile extender and other enforcement channels are priority
checked for activity.
Note: The priority check can be turned off by pressing and
holding the Alert key for 1.5 seconds.
1. To scan highway patrol
frequencies exclusively,
press theMkey repeatedly
until HP is blinking in the LED
display.
2. The HP LED lights up.
3. While scanning, the BCT-12
displays the state code for
the state you selected. When
the BCT-12 detects an active
frequency, it displays HP in
the LED display and stops for
two seconds before it
resumes scanning.
MUTE
HOLD
MUTE
HOLD
MUTE
HOLD
MUTE
HOLD
HP
HP
TX
HP
ALT HP
LPW/A
ALT HP
LPW/A
ALT HP
LPW/A
ALT HP
LPW/A
20
Page 21

Operating Instructions
Scanning Local Police Frequencies
This mode scans only the local police and county sheriff
frequencies. Mobile extenders and other enforcement channels of
the Highway Patrol are priority checked for alarm activity.
Note: The priority check can be turned off by pressing and
holding the Alert key for two seconds.
LP
ALT HP
LPW/A
1. To scan local police
frequencies, press the
M
MUTE
HOLD
key repeatedly until LP is
blinking in the LED display.
LP
tx
lp
ALT HP
LPW/A
ALT HP
LPW/A
ALT HP
LPW/A
2. The LP LED will light up.
3. While scanning, the BCT-12
displays the state code for
the state you selected. When
the BCT-12 detects an active
frequency, it displays LP in
MUTE
HOLD
MUTE
HOLD
MUTE
HOLD
the LED display. The BCT-12
will stop for two seconds, and
then resume scanning with
the state code displayed in
the LED display.
Scanning All Police Frequencies
This mode scans standard State Police/Highway Patrol
frequencies as well as local police and county sheriff frequencies.
Mobile extenders and other enforcement channels of the Highway
Patrol are priority checked for alarm activity.
Note: The priority check can be turned off by pressing and
holding the Alert key for 1.5 seconds.
21
Page 22

Operating Instructions
HL
ALT HP
LPW/A
1. To scan highway patrol and
local police frequencies,
press the
key repeatedly
M
MUTE
HOLD
until HL is blinking on the
LED display.
HL
TX
LP
HP
ALT HP
LPW/A
ALT HP
LPW/A
ALT HP
LPW/A
ALT HP
LPW/A
2. The LP and HP LED’s will
light up.
3. While scanning, the BCT-12
displays the state code for
the state you selected. When
the BCT-12 detects an active
frequency, it displays either
LP for local police or HP for
highway patrol in the LED
display. The BCT-12 will stop
MUTE
HOLD
MUTE
HOLD
MUTE
HOLD
MUTE
HOLD
for two seconds, and then
resume scanning with the
state code displayed in the
LED display.
Scanning News Media Frequencies
This mode scans radio conversations from traffic reporters, news
reporters, and photographers as they report the slowdowns and
tie-ups on area roads and chase down the news stories of the day.
The news mode also scans the GMRS (General Mobile Radio
Service) frequencies for “Notification Net” radio traffic.
Note: Priority Alert does not work in this mode.
1. To scan news media
frequencies, press the
M
MUTE
HOLD
key repeatedly until NW is
blinking in the LED display.
22
NW
ALT HP
LPW/A
Page 23

Operating Instructions
NW
ALT HP
LPW/A
2. When the BCT-12 detects an
active frequency, it displays
MUTE
HOLD
NW in the LED display. The
BCT-12 will stop for two
seconds, and then resume
scanning with NW blinking in
the LED display.
Scanning Department of Transportation Frequencies
This mode scans the state road repair, snow clearing, and weigh
station crews of the state’s Department of Transportation as well
as Highway Patrol channels. This mode is outstanding for driving
during hazardous or winter weather. Mobile extender and other
enforcement channels are priority checked for activity.
Note: The priority check can be turned off by pressing and
holding the Alert key for 1.5 seconds.
DT
ALT HP
LPW/A
1. To scan DOT frequencies,
press theMkey repeatedly
MUTE
HOLD
until DT is blinking on the
LED display.
2. While scanning, the BCT-12
displays the state code for
the state you selected. When
the BCT-12 detects an active
frequency, it displays DT or
MUTE
HOLD
MUTE
HOLD
TX
DT
ALT HP
LPW/A
ALT HP
LPW/A
HP in the LED display. The
HP
ALT HP
LPW/A
BCT-12 will stop for two
seconds, and then resume
MUTE
HOLD
scanning with the state code
displayed in the LED display.
23
Page 24

Operating Instructions
Scanning All Frequencies
Note: The Weather Alert and Priority Alert features are not
active in this mode.
XX
ALT HP
LPW/A
1. To scan all frequencies
(except Weather), press the
key repeatedly or press
S
and hold the
S
key until
MUTE
HOLD
“XX” is blinking on the LED
display.
2. All frequencies, except weather channels, are scanned for an
active transmission.
XX
ALT HP
LPW/A
3. When the BCT-12 finds an
active frequency, it activates
MUTE
HOLD
a built-in two second delay
before it resumes scanning.
Note: TheMkey does not operate while XX is selected.
Priority Alert
In most cases, when you are
within three miles of a priority
checked channel (see
Priority Alert on page 2) your
BCT-12 will set off a visual
and audible alarm. The signal
strength will be displayed,
and the LED display will
return to HP.The time the
ALARM LED will stay on
depends on the signal
strength.
MUTE
HOLD
MUTE
HOLD
04
HP
ALT HP
LPW/A
ALT HP
LPW/A
24
Page 25

Operating Instructions
Turning Priority Alert On/Off
To turn priority alert off while in HP, LP, HL, or DOT Mode:
HL
ALT HP
LPW/A
Press and Hold theAkey
for 1.5 seconds. A
MUTE
HOLD
confirmation beep sounds
and the ALT LED goes off.
To turn priority alert on while in HP, LP, HL, or DOT Mode:
HL
ALT HP
LPW/A
Press and Hold the
for 1.5 seconds. A
A
key
MUTE
HOLD
confirmation beep sounds
and the ALT LED goes on.
Setting the Highway Patrol Alarm Volume
You can set the Alert Tone volume to either Low, Medium, or High.
To change the Alert Tone volume:
Press the
beep and L (low), M
(medium), or H (high) is
displayed in the LED display.
Key.You hear a
A
MUTE
HOLD
MUTE
HOLD
MUTE
HOLD
L
M
H
ALT HP
LPW/A
ALT HP
LPW/A
ALT HP
LPW/A
25
Page 26
Operating Instructions
Muting the Priority Alert
While in the highway patrol mode you can turn off the alarm tone
during the time you are listening to a frequency or disable the
alarm tone permanently. To disable the alarm tone while listening
to a frequency:
HP
ALT HP
LPW/A
1. While in the highway patrol
mode and after you receive
an alarm tone, press the
m
MUTE
HOLD
key. The MUTE LED flashes.
Note: Only the alarm tone will be disabled. You will still
receive highway patrol and weather alert alarms, but
only the ALARM LED will come on.
2. To enable the Alert Tone again, press themkey again.
Note: When the ALARM LED goes off, the mute mode will no
longer be on.
To disable the alarm tone permanently:
HP
ALT HP
LPW/A
Press and Hold the
m
key
for 1.5 seconds. You hear two
MUTE
HOLD
beeps and the MUTE LED
comes on.
Note: When the MUTE LED is on and not flashing, you can
receive highway patrol alarms, but the alarm tone does
not sound. Turning the BCT-12 off and back on will turn
the alarm back on.
Monitoring Weather Frequencies
WX
ALT HP
LPW/A
1. To monitor weather
frequencies, press the
M
MUTE
HOLD
key repeatedly until WX is
blinking on the LED display.
26
Page 27

Operating Instructions
2. While scanning, the BCT-12
will display WX in the LED
display. When the BCT-12
detects an active frequency, it
displays the weather channel
MUTE
HOLD
MUTE
HOLD
WX
W2
ALT HP
LPW/A
ALT HP
LPW/A
in the LED display and stops
scanning.
3. Press the
key to make the BCT-12 scan for the next
L
weather frequency.
Weather Alert
The Weather Alert feature can be set to operate along with the HP,
HL, LP, or WX modes. An alert tone is sounded when an
emergency weather bulletin is broadcast. In WX mode, there is no
audio until an emergency weather bulletin is broadcast.
Turning Weather Alert On/Off
To turn on Weather Alert:
W2
ALT HP
LPW/A
Put the BCT-12 in WX mode
and press and release the
Key.A confirmation beep
A
sounds and the ALT LED
goes on.
MUTE
HOLD
Note: You can switch back to HP, LP, or HL modes and the
Weather Alert mode will remain on.
To turn off Weather Alert
W2
ALT HP
LPW/A
Put the BCT-12 in WX mode
and press the
A
Key. A
MUTE
HOLD
confirmation beep sounds
and the ALT LED goes off.
27
Page 28

Operating Instructions
Deleting Frequencies
Some frequencies that have been pre-programmed into your
BCT-12 may not be of immediate interest to you, may be
experiencing interference, or are being used as data channels.
You can lock out those frequencies from scanning.
When the scanner stops on the undesired frequency, press
one time. To lock out additional frequencies, repeat this step.
Note: You can delete a maximum of 50 frequencies. Although
it is possible to delete the highway patrol alarm
frequencies, this should never be done unless
absolutely necessary for proper operation of your
BCT-12. This causes the highway patrol alarm feature
to be inactive on that frequency. No further alarms will
be received until the deleted frequencies are restored or
a new state is selected. A frequency deleted in one
state will not be deleted in any other states. The deleted
frequencies are maintained in memory even when your
BCT-12 is turned off.
Caution: When you lock out more than 50 frequencies, the first
locked out frequency is deleted. You cannot lock out all
of the alarm, local police, and highway patrol
frequencies. If you lock out all of the frequencies by
accident, the BCT-12 will sound two short beeps.
L
28
Page 29

Operating Instructions
Restoring Deleted Frequencies
Please note that you can only restore all deleted frequencies at the
same time.
To restore the deleted frequencies:
1. Make sure the BCT-12 is not
scanning. To stop the unit
from scanning, turn the
SQUELCH knob toward the
front of the BCT-12.
2. Press and hold the
deleted frequencies are now restored.
key until you hear two beeps. All
L
29
Page 30
Operating Instructions
Using HOLD to Stay on a Selected Frequency
When scanning stops on a desired frequency, you can lock onto
that frequency for as long as you like.
To monitor only one frequency:
1. When the scanner stops on
the desired frequency, press
the
key. The LED
H
display now indicates the
mode you are monitoring.
MUTE
HOLD
MUTE
HOLD
LP
HP
ALT HP
LPW/A
ALT HP
LPW/A
The scanner remains on that
frequency until you cancel
the Hold mode by
pressing
H
.
2. To resume scanning and reactivate the Alert feature, press the
key.
H
If the BCT-12 stops on an undesired frequency, press the
H
key
twice to force the unit to start scanning again before the end of that
transmission.
BE CAREFUL!!When you are in the Hold mode, there will be no
Alert tones or Warning light, even if you are on
the Alert frequency.
REMEMBER!! When you apply power, the BCT-12 comes on
to exactly the same service and in exactly the
same mode as when last turned off. If you are
monitoring an Alert frequency in the Hold mode
when you turn the BCT-12 off, it will come back
to that Alert frequency in Hold mode when you
turn it back on. The Alert feature will be inactive.
To restore the Alert feature, press the
H
key.
30
Page 31

Operating Instructions
Memory Backup
Your BCT-12 has a memory backup system that remembers your
frequency selections and deletions when you turn off the unit. This
memory lasts permanently without any external power to the unit.
Birdies
There may be situations where your BCT-12 emits strange sounds
through its speaker. This should be a temporary situation that will
change as you drive. If the situation does not change, no matter
what your location, you may consider locking out these channels
with the
sound is heard, press the
key. If your scanner stops during Scan mode and no
L
key twice to resume scanning.
H
Important Operating Tips
Your BCT-12 is not a radar detector. Using a Uniden radar
detector in tandem with your BCT-12 will provide you with an
excellent form of protection on the interstates. The best way to use
your BCT-12 is to rely both on the warning tones as well as on the
regular voice communications heard on the scanner.
The alarm circuit on your BCT-12 provides you with a degree of
protection that varies from state to state. Not all states employ
mobile extenders, but all states do have frequencies that have
been flagged for use by special enforcement teams.
Remember, the warning circuit only works with State Police and
Highway Patrol cars, not with local police. For local police and
county sheriff information, you must listen to the scanner audio to
monitor local police radio traffic.
31
Page 32

Troubleshooting
If your BCT-12 is not performing properly, try the steps listed
below.
PROBLEM POSSIBLE SOLUTION
Scanner is not working properly.
Signal is weak or distorted.
Improper reception.
Scan won’t stop. Check Squelch adjustment.
Incomplete reception. Fringe area of reception.
Weather Search (WX) won’t work. Check Squelch adjustment.
Check power cord and in-line
fuse.
Check the Volume and
Squelch settings.
Check antenna and antenna
connection, or change
antenna.*
Check antenna and antenna
connection, or change
antenna.*
Reposition scanner.
Check antenna and antenna
connection, or change
antenna.*
Check Squelch adjustment.
No active station within range.
* Also see “Helpful Tips” on page 5.
If you still cannot get satisfactory results and you wish to receive
product information or return the unit for service, please call or
write the Uniden Parts and Service Division at:
Uniden America Corporation
4700 Amon Carter Blvd.
Fort Worth, TX 76155
(800) 297-1023 Monday through Friday,
8:00 a.m. to 5:00 p.m. Central
32
Page 33

Optional Accessories
H
I
G
W
Y
The following optional accessories for your BCT-12 are available
from your local Uniden Dealer or through the Uniden Customer
Service Center by calling: (800) 297-1023, 8:00 a.m. to 5:00 p.m.
Central, Monday through Friday.
Windshield Mounting
Bracket and Hardware
Cigarette Adapter Power
Cord
®
Visor Clip Mounting
Bracket
BCT 12
SCANNER
Y
A
W
MODE
EM
T
GH
I
L/0
S
H
Y
S
MUTE
STATE
T
R
E
L
A
HOLD
OFF
Operating Guide
BCT-12 Operating Guide
BCT-12 Antenna
Straight Power Cord
External Speaker Coiled Cigarette Adapter Window Mount Antenna
33
Page 34

Specifications
Size: 76W X 136.5D X 33H
Weight: 180 g
Power: 13.8 VDC
Operating Temperature: -20° C (-4° F) to +60° C (+140°
F)
Antenna: 50Ω impedance
RF Sensitivity:
(FM 12dB signal to noise ratio at 3kHz deviation)
37.02 - 46.02 MHz 0.3µV
138.3450 - 172.0200 MHz
0.4µV
423.0000 - 508.4875 MHz
0.5µV
Frequency Coverage: VHF Low Band
37.02 - 46.02 MHz
VHF High Band
138.3450 - 172.0200 MHz
UHF Band
423.0000 - 508.4875 MHz
806.0125 - 868.9875 MHz
Audio Output: Max 1W
Certified in accordance with FCC Rules and Regulations Part 15
as of date of manufacture.
Specifications are typical and subject to change without notice.
34
Page 35

Color profile: Disabled
Composite Default screen
G:...Bct12 pdf.vp
Wed Dec 03 11:27:46 1997
Page 36

Precautions
Before you use this scanner, please observe the following:
WARNING!
Uniden America Corporation does not represent this unit to be
waterproof. To reduce the risk of fire, electrical shock, or
damage to the unit, do not expose this unit to rain or moisture.
IMPORTANT!
The installation, possession, or use of this scanning radio in a
motor vehicle may be prohibited, regulated, or require a permit
in certain states, cities, and/or local jurisdiction. Your local law
enforcement officials should be able to provide you with
information regarding the laws in your community.
Page 37

Controls and Indicators
H
A. DC Input
B. External
Speaker Out
I
A
J
B
OFF
C
D
E
F
G
ALERT
HOLD
MODE
MUTE
L/0
STATE
1
MUTE
HOLD
345
2
C. On/Off Volume
D. ALERT Key
E. HOLD Key
F. Control Panel
I
I
K
G. STATE Key
L
H. Windshield
M
Bumpers
I. Antenna
J. MUTE Key
K. Squelch Control
L. MODE Key
M. L/O (Lock Out)
Key
ALT HP
LPW/A
A
H
S
m
M
L
678
ALARM LED 5.1. Highway Patrol LED
2. MUTE LED 6. HOLD LED
3. 2-Digit LED Display 7. Weather Alert LED
4. Alert Mode LED 8. Local Police LED
Page 38

CONTENTS
Introduction.............................................................................................1
Welcome..........................................................................................1
Features ..........................................................................................1
Terms and Definitions......................................................................2
Unpacking........................................................................................3
Included with Your BCT-12 Scanner ......................................................4
Installation...............................................................................................5
Helpful Tips......................................................................................5
Optional Antennas...........................................................................5
Installing the Antenna......................................................................6
Mounting the BCT-12 ......................................................................7
Connecting the Power ............................................................................12
Direct Connection............................................................................12
Using the Cigarette Lighter Adapter ................................................13
Replacing the Fuse..........................................................................14
Operating Instructions.............................................................................15
Applying Power................................................................................15
Adjusting the Squelch......................................................................16
Selecting the State ..........................................................................18
State and Canadian Province Codes ..............................................19
Selecting the Frequencies to Scan..................................................20
Priority Alert.....................................................................................24
Weather Alert...................................................................................27
Deleting Frequencies.......................................................................28
Restoring Deleted Frequencies.......................................................29
Using HOLD to Stay on a Selected Frequency ...............................30
Memory Backup...............................................................................31
Birdies..............................................................................................31
Important Operating Tips.................................................................31
Troubleshooting......................................................................................32
Optional Accessories..............................................................................33
Specifications..........................................................................................34
Uniden® and Bearcat® are registered trademarks of Uniden
America Corporation.
Page 39

One Year Limited Warranty
Important: Evidence of original purchase is required for warranty
service.
WARRANTOR: UNIDEN AMERICA CORPORATION (“Uniden”)
ELEMENTS OF WARRANTY: Uniden warrants, for one year, to the original retail
owner, this Uniden Product to be free from defects in materials and craftsmanship
with only the limitations or exclusions set out below.
WARRANTY DURATION: This warranty to the original user shall terminate and be
of no further effect 12 months after the date of original retail sale. The warranty is
invalid if the Product is (A) damaged or not maintained as reasonable or necessary,
(B) modified, altered, or used as part of any conversion kits, subassemblies, or any
configurations not sold by Uniden, (C) improperly installed, (D) serviced or repaired
by someone other than an authorized Uniden service center for a defect or
malfunction covered by this warranty, (E) used in any conjunction with equipment or
parts or as part of any system not manufactured by Uniden, or (F) installed or
programmed by anyone other than as detailed by the Operating Guide for this
product.
STATEMENT OF REMEDY: In the event that the product does not conform to this
warranty at any time while this warranty is in effect, warrantor will repair the defect
and return it to you without charge for parts, service, or any other cost (except
shipping and handling) incurred by warrantor or its representatives in connection
with the performance of this warranty. THE LIMITED WARRANTY SET FORTH
ABOVE IS THE SOLE AND ENTIRE WARRANTY PERTAINING TO THE
PRODUCT AND IS IN LIEU OF AND EXCLUDES ALL OTHER WARRANTIES OF
ANY NATURE WHATSOEVER, WHETHER EXPRESS, IMPLIED OR ARISING BY
OPERATION OF LAW, INCLUDING, BUT NOT LIMITED TO ANY IMPLIED
WARRANTIES OF MERCHANTABILITY OR FITNESS FOR A PARTICULAR
PURPOSE. THIS WARRANTY DOES NOT COVER OR PROVIDE FOR THE
REIMBURSEMENT OR PAYMENT OF INCIDENTAL OR CONSEQUENTIAL
DAMAGES. Some states do not allow this exclusion or limitation of incidental or
consequential damages so the above limitation or exclusion may not apply to you.
LEGAL REMEDIES: This warranty gives you specific legal rights, and you may
also have other rights which vary from state to state. This warranty is void outside
the United States of America.
PROCEDURE FOR OBTAINING PERFORMANCE OF WARRANTY: If, after
following the instructions in this Operating Guide you are certain that the Product is
defective, pack the Product carefully (preferably in its original packaging). Include
evidence of original purchase and a note describing the defect that has caused you
to return it. The Product should be shipped freight prepaid by traceable means, or
delivered, to warrantor at:
Uniden America Corporation
Parts and Service
4700 Amon Carter Blvd.
Fort Worth, TX 76155
(800) 297-1023, 8:00 a.m. to 5:00 p.m. Central, Monday through Friday
Page 40

Color profile: Disabled
Composite Default screen
PAT. UNDER ONE OR MORE OF THE FOLLOWING
U.S. PATENT NUMBERS:
3,883,808, 3,961,261, 3,962,644, 3,974,450
3,974,452, 3,987,400, 3,996,521, 3,996,522
4,000,468, 4,027,251, 4,057,760, 4,092,594
4,100,497, 4,114,103, 4,123,715, 4,153,877
4,156,193, 4,157,505, 4,179,662, 4,219,821
4,270,217, 4,398,304, 4,409,688, 4,455,679
4,461,036, 4,521,915, 4,627,100, 4,888,815
4,932,074, 4,947,456, 5,014,348, DES 253,173
DES 272,737, RE 31,523
©
G:...Bct12 pdf.vp
Wed Dec 03 11:29:05 1997
1996Uniden AmericaCorporation.Allrightsreserved.
PrintedinthePhilippines
 Loading...