


ES9.0 RECUMBENT BIKE SELF GENERATING OWNER’S GUIDE
truefitness.com / 800.426.6570 / 1.636.272.7100
THANK YOU FOR SELECTING TRUE
In 1981, Frank Trulaske launched |
While TRUE has expanded |
|||||
TRUE Fitness®, and began |
|
|
|
|
its line of products, |
|
|
|
|
|
|||
|
|
|
|
|||
manufacturing hand- |
|
|
|
|
intensive quality control |
|
crafted treadmills. |
|
|
|
|
standards guarantee |
|
|
|
|
|
|
excellence in every |
|
His team’s obsession with |
|
|
|
|
phase of production. |
|
quality has propelled |
|
|
|
|
This results in the finest |
|
TRUE to the top of |
|
|
|
|
products available in the |
|
the fitness industry |
|
|
|
|
marketplace. |
|
and has created one of |
|
|
|
|
||
“OUR ORIGINAL |
TRUE is the choice |
|||||
America’s oldest, largest |
GOAL WAS TO BUILD |
|||||
and most respected |
THE WORLD’S BEST |
for workouts among |
||||
fitness equipment |
FITNESS EQUIPMENT, |
beginners, rehab patients |
||||
AND TODAY WE |
||||||
manufacturers. |
and top athletes world- |
|||||
BELIEVE WE’RE |
||||||
|
wide. |
|||||
Over the years, TRUE |
DOING IT!” |
|
|
|||
|
-FRANK TRULASKE |
|
||||
has designed, developed, |
|
Today TRUE Fitness |
||||
patented and fabricated |
|
|
|
|
offers a full line of |
|
many new cutting-edge |
|
|
|
|
premium elliptical |
|
innovations for their products. Such |
trainers, treadmills, upright and |
|||||
advancements include ground- |
recumbent bikes, and flexibility |
|||||
breaking new features, state-of-the- |
equipment. |
|||||
art manufacturing components, and |
|
|
|
|||
technological breakthroughs. |
|
|
|
|
|
|

REVIEW FOR YOUR SAFETY
IMPORTANT SAFETY INSTRUCTIONS
When using this exercise machine, basic precautions should always be followed, which includes the following:
Read and understand all instructions and warnings prior to use.
Obtain a medical exam before beginning any exercise program. If at any time during exercise you feel faint, dizzy, or experience pain, stop and consult your physician.
Obtain proper instruction prior to use.
Inspect the bike for incorrect, worn, or loose components and do not use until corrected, replaced, or tightened prior to use.
Do not wear loose or dangling clothing while using the bike.
Care should be used when mounting or dismounting the bike.
Read, understand, and test the emergency stop procedures before use.
Disconnect all power before servicing the bike.
Do not exceed maximum user weight of 300 lbs.
Keep children and animals away.
All exercise equipment is potentially hazardous. If attention is not paid to the conditions of equipment usage, death or serious injury could occur.
ES9.0 RECUMBENT BIKE OWNER’S GUIDE |
3 |
|

QUICK START
Begin pedaling. The display will start up in WORKOUT SETUP.
QUICK START into a manual workout by pressing  .
.
SELECT A DIFFERENT WORKOUT by pressing the program keys. Press program keys more than once for more programs.
ACCEPT EACH SETTING AND MOVE TO THE NEXT ONE by pressing 

 . Enter your personal data — weight, age, and sex — for best results.
BEGIN YOUR WORKOUT by pressing  at any time.
ADJUST YOUR EXERCISE WORKLOAD by using the  or
or  keys or the numeric keys.
VIEW DIFFERENT DISPLAY DATA by pressing the Change Display key  to alternate between two different sets of data.
CHANGE WORKOUTS on-the-fly by pressing other workout keys.
STARTING UP
DURING YOUR WORKOUT
The bike will retain your workout data for about 15 seconds after |
PAUSING |
you stop pedaling. |
YOUR |
|
WORKOUT |
Specifications/Features/Software are subject to change
ES9.0 RECUMBENT BIKE OWNER’S GUIDE |
4 |
|

|
TABLE OF CONTENTS |
|
|
|
|
Quick Start ................................................................................................ |
4 |
|
1. Introduction........................................................................................... |
6 |
|
2. Riding Your Bike........ ......................................................................... |
10 |
|
Basic operation (except console) |
|
|
3. The Display.......................................................................................... |
17 |
|
Describes each key and data display feature |
|
|
4. Workout Setup.................................................................................... |
23 |
|
5. Manual Control.................................................................................. |
25 |
|
6. Pre-Set Workouts............................................................................... |
27 |
|
Details on basic exercise modes |
|
|
7. Heart Rate Control............................................................................. |
33 |
|
Foolproof heart rate feedback workouts |
|
|
8. Calorie Goal Workout....................................................................... |
42 |
|
9. Designing Your Own Workout........................................................ |
45 |
|
10. Fitness Test........................................................................................ |
50 |
|
11. Medical and Ergometer Mode....................................................... |
56 |
|
12. Other Functions............................................................................... |
59 |
|
13. Creating an Exercise Plan............................................................... |
61 |
|
14. Setup Mode....................................................................................... |
70 |
|
15. Care and Maintenance.................................................................... |
75 |
|
Appendix A.............................................................................................. |
77 |
|
Target Heart Rate Chart |
|
|
Appendix B............................................................................................... |
80 |
|
METS Chart |
|
|
Appendix C.............................................................................................. |
83 |
|
ES9.0 bike controls and exercise intensity |
|
|
Appendix D.............................................................................................. |
86 |
|
American College of Sport Medicine Position on Exercise |
||
Appendix E............................................................................................... |
89 |
|
Specifications |
|
|
Bibliography............................................................................................. |
91 |
|
References and Selected Readings |
|
|
ES9.0 RECUMBENT BIKE OWNER’S GUIDE |
5 |
|

CHAPTER ONE
INTRODUCTION
IN THIS CHAPTER:
TOP FEATURES
FANCY FEATURES
BASIC FEATURES
Chapter 1: Introduction |
Chapter 9: Designing Your Own Workout |
Chapter 2: Riding Your Bike |
Chapter 10: Fitness Test |
Chapter 3: The Display |
Chapter 11: Medical and Ergometer Mode |
Chapter 4: Workout Setup |
Chapter 12: Other Functions |
Chapter 5: Manual Control |
Chapter 13: Creating an Exercise Plan |
Chapter 6: Pre-Set Workouts |
Chapter 14: Setup Mode |
Chapter 7: Heart Rate Control |
Chapter 15: Care and Maintenance |
Chapter 8: Calorie Goal Workout |
|

TOP FEATURES
CHAPTER ONE: INTRODUCTION
Your new ES9.0 bike console is the most sophisticated exercise computer in the fitness industry. Even the simplest operation, Manual Control, works in a special and useful way. But the ES9.0 console is also extremely easy to use; the user can ignore all the fancy stuff and use it with just one or two keystrokes.
Always-available Workout Setup: Switch to this at any time in any workout. Adjust your current workout settings, or set up a whole new workout.
Calorie Goal: Tell the bike how many calories you want to burn and how long you want to work out, and the bike figures out what workloads you need to maintain — including warmup and cool down.
Constant Heart Rate Control: The bike takes you to your target heart rate within five to eight minutes, then keeps you there.
Interval Heart Rate Control: Pick both a work target HR and a rest target HR, and the bike will take you back and forth between those two targets.
Fitness Test: An enhanced version of the YMCA protocol to estimate maximum oxygen uptake (VO2max).
Bicycle Simulation: An accurate simulation of a 21-gear road bike, including precise pedal cadence-to-speed response and body weight compensation.
INTRODUCTION
TOP
FEATURES
ES9.0 RECUMBENT BIKE OWNER’S GUIDE |
7 |
|

|
FANCY FEATURES |
|
|
CHAPTER ONE: INTRODUCTION |
|
Advanced Custom Programming: Create up to three different |
FANCY |
|
program profiles, up to 60 segments long, using any of four |
FEATURES |
|
different programming methods, including a Record mode. |
|
|
Custom Intervals: Choose your own interval workload and duration.
HRC Ultra: Both continuous and interval heart rate control workouts, with gradually increasing target heart rates that replicate real-world maximum-intensity workouts.
Improved Maximum Heart Rate Estimates: Instead of the “220 - age” formula, the ES9.0 console uses a newer, more accurate formula created by exercise physiologists in 1994.
Medical and Ergometer Modes: Feature-restricted modes suitable for rehabilitation and informal testing environments, with userselectable pedal rpm limiting.
Happy Workout: If riders want to think they’re burning lots of calories when they are actually hardly working at all, this workout is for them.
ES9.0 RECUMBENT BIKE OWNER’S GUIDE |
8 |
|

BASIC FEATURES
CHAPTER ONE: INTRODUCTION
Three-mode Manual Control: MET-based, bicycle simulation, or 10-watt increments.
Four Pre-set Workouts: Easy intervals, speed intervals, rolling hills, and one big hill.
CSAFE Power: Supply power to an external audio remote control.
Fully Configurable Setup Mode: Choose default operational mode, metric or U.S. units of measure, maximum workout time, default workout time, pause time, wireless or contact heart rate priority, sound on or off, and default manual workload control.
Multiple Odometers: Miles, hours, total starts, and workout selection counters.
Test Mode: Monitor raw rpm, target vs. actual workload, LCD performance, and keypad function.
ES9.0 RECUMBENT BIKE OWNER’S GUIDE |
9 |
|

CHAPTER TWO
RIDING YOUR BIKE
IN THIS CHAPTER:
WORKOUT BASICS
RIDING FORM
CONTACT HEART RATE
GETTING THE MOST FROM CHR
Chapter 1: Introduction |
Chapter 9: Designing Your Own Workout |
Chapter 2: Riding Your Bike |
Chapter 10: Fitness Test |
Chapter 3: The Display |
Chapter 11: Medical and Ergometer Mode |
Chapter 4: Workout Setup |
Chapter 12: Other Functions |
Chapter 5: Manual Control |
Chapter 13: Creating an Exercise Plan |
Chapter 6: Pre-Set Workouts |
Chapter 14: Setup Mode |
Chapter 7: Heart Rate Control |
Chapter 15: Care and Maintenance |
Chapter 8: Calorie Goal Workout |
|
|
|
WORKOUT BASICS |
|
||||||
|
|
CHAPTER TWO: RIDING YOUR BIKE |
|
||||||
Set your weight before every |
|
|
|
|
|
SETTING |
|||
Variations in human |
|
|
|||||||
workout. This allows the ES9.0 |
|
|
YOUR |
||||||
bike to control your workout more |
exercise efficiency |
|
|
WEIGHT |
|||||
effectively. See the Personal Power |
are another potential |
|
|
|
|||||
section in Chapter 5 for more |
source of error, with |
|
|
|
|||||
information. |
differences of plus or |
|
|
|
|||||
|
|
|
|
minus 10% common in |
|
|
|
||
The body weight setting does |
|
the population. |
|
|
|
||||
not affect the calorie expenditure |
|
|
|
|
|
|
|||
|
|
|
|
|
|
||||
calculation. Unlike treadmills or other weight-bearing exercises, |
|
||||||||
calories burned during exercise biking does not change with |
|
||||||||
different body weights. (See ACSM’s Guidelines, Bibliography.) |
|
||||||||
|
|
|
|
|
|
|
|
|
SEAT |
|
|
|
|
|
|
|
|
|
|
|
|
|
|
|
|
|
|
|
|
|
|
|
|
|
|
|
|
|
|
|
|
|
|
|
|
|
|
|
ADJUSTMENT |
|
|
|
|
|
|
|
|
|
|
|
|
|
|
|
|
|
|
|
|
Adjust the seat so that your knee is slightly bent when your leg is fully extended with your feet on the pedals.
ES9.0 RECUMBENT BIKE OWNER’S GUIDE 11
|
RIDING FORM |
|
||
|
CHAPTER TWO: RIDING YOUR BIKE |
|
||
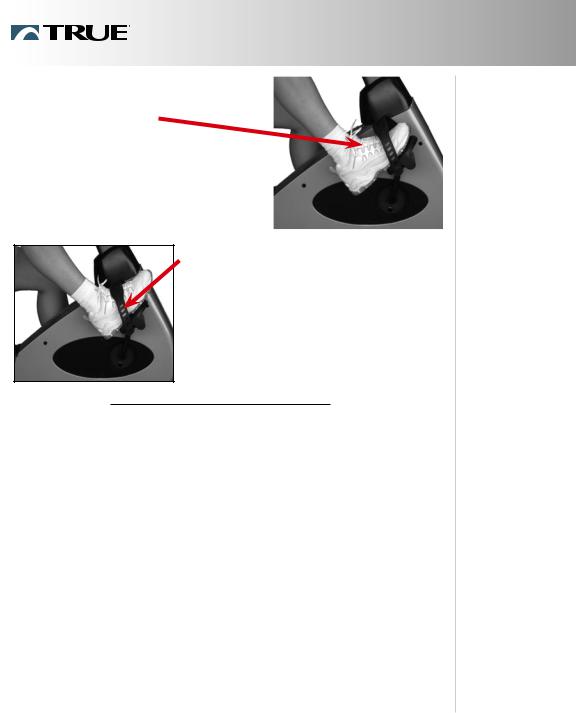
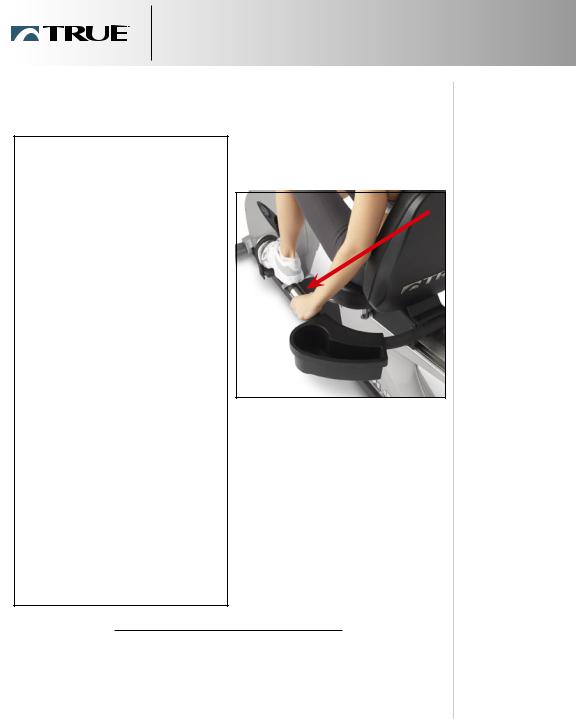
Riders are most efficient if they |
|
|
FOOT |
|
|
|
|||
place the ball of their foot in the |
|
|
POSITION |
|
center of the pedal. |
|
|
|
|
|
|
|
|
|
Other riders are more comfortable if the arch of their foot is against the pedal. Riders are encouraged to be as
efficient as possible, but use your own judgement in the comfort/efficiency tradeoff.
Most riders will find a comfort/efficiency sweet spot at a |
PEDAL |
||
pedal cadence around 80 rpm. More serious riders desiring |
CADENCE |
||
maximum performance typically pedal at around 100 rpm. For |
|
||
electromechanical and safety reasons, the bike will not provide |
|
||
the fully requested workload when your pedal cadence falls |
|
||
below 55 rpm. It will, however, accurately display the workload |
|
||
it does provide. For additional safety, cadence is workload |
|
||
limited. |
|
|
|
Breathe in a regular and relaxed manner. Many exercisers do |
BREATHING |
||
|
|||
not breathe enough, which reduces their exercise capacity and |
|
||
comfort. You might want to try breathing deeper and more |
|
||
frequently to see if it helps your exercise regime. |
|
||
ES9.0 RECUMBENT BIKE OWNER’S GUIDE 12
CONTACT HEART RATE
CHAPTER TWO: RIDING YOUR BIKE
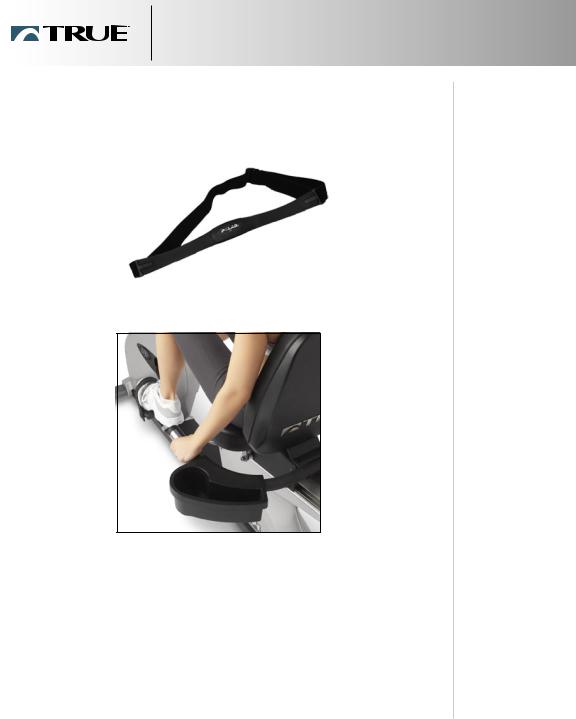
The ES9.0 bike has two ways of monitoring your heart rate:
1. By using a chest strap that transmits your heart rate to the
bike via radio...
2. By using the metal contact heart rate pads on the handlebars.
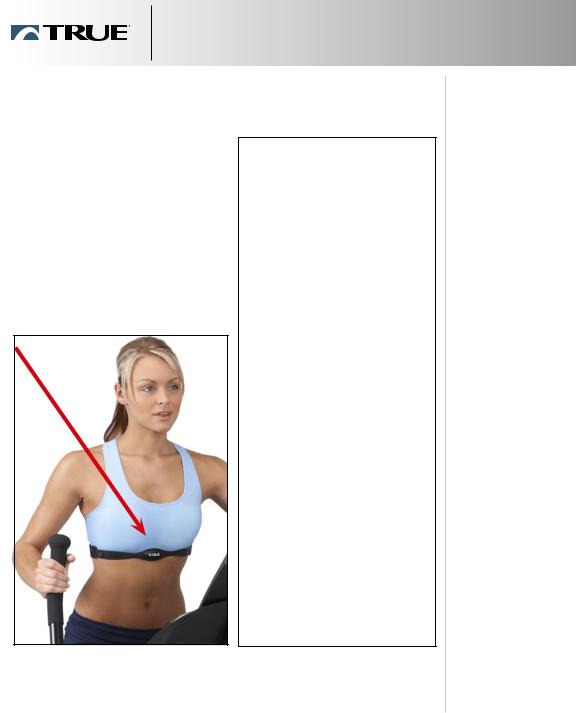
Although your bike functions fine without using the heart rate monitoring feature, this kind of monitoring gives you valuable feedback on your effort level. Chest strap monitoring also allows you to use Heart Rate Control, which is the most advanced exercise control system available.
MONITORING YOUR HEART RATE
ES9.0 RECUMBENT BIKE OWNER’S GUIDE 13
CONTACT HEART RATE
CHAPTER TWO: RIDING YOUR BIKE
CHEST STRAP
HEART RATE
MONITORING
14
CONTACT HEART RATE
CHAPTER TWO: RIDING YOUR BIKE
The contact heart rate system lets you monitor your heart rate without wearing a strap.
A Note on CHR Accuracy
CHR monitoring may be a bit less accurate than a chest strap, since the heart rate signals are much stronger at the chest.
The ES9.0 bike uses the most advanced CHR system available. It converts your heart rate waveform to a digital signal, then analyzes the digitized waveform to pick out the electrocardiogram shape and thus the heart rate.
About 5% of the population cannot be picked up by any CHR system. This is because their heart is positioned in a more up-and-down manner in their chest, as opposed to leaning over to one side.
Gently grasp the contact heart rate pads as shown below.
When the system detects your hands, the heart rate LED will flash in time with your heart beat. During this time, the system is analyzing and locking in your heart rate. Within about 10 seconds, your digital heart rate in beats per minute (bpm) should be displayed.
CONTACT HEART RATE (CHR)
ES9.0 RECUMBENT BIKE OWNER’S GUIDE 15

|
GETTING THE MOST FROM CHR |
|
|
CHAPTER TWO: RIDING YOUR BIKE |
|
1. Exercise with smooth body motions. Avoid excessive body |
FOR BEST |
|
motion, especially in your arms and upper body. |
RESULTS |
|
2.Breathe smoothly and regularly, and avoid talking. (Talking will cause unrepresentative heart rate spikes of 5 to 10 bpm.)
3.Grip the pads lightly, not tightly.
4.Make sure your hands are clean, free of both dirt and hand lotions.
When using a Heart Rate Control (HRC) workout or the Fitness Test, it is best to use chest strap monitoring. These workouts work best with the extra accuracy gained from a chest-contact heart rate monitoring system.
|
|
|
|
A wall transformer external power option is available which |
|
||
gives the ES9.0 bike some additional capabilities: |
EXTERNAL |
||
• The bike’s display is always lit in Attract Mode (see |
POWER |
||
OPTION |
|||
Chapter 13). This can make the bike more friendly and |
|
||
interesting to prospective riders. |
|
||
•Test Mode diagnostics are more versatile (see Chapter
15).
•The bike’s minimum workload is lower, which is required by the Medical and Ergometer modes (see Chapter 11) and recommended for the Fitness Test (see Chapter 10).
ES9.0 RECUMBENT BIKE OWNER’S GUIDE 16

CHAPTER THREE
THE DISPLAY
IN THIS CHAPTER:
KEYPAD LAYOUT
WHAT THE KEYS DO
UPPER CONSOLE
HOW TO READ YOUR DISPLAY
Chapter 1: Introduction |
Chapter 9: Designing Your Own Workout |
Chapter 2: Riding Your Bike |
Chapter 10: Fitness Test |
Chapter 3: The Display |
Chapter 11: Medical and Ergometer Mode |
Chapter 4: Workout Setup |
Chapter 12: Other Functions |
Chapter 5: Manual Control |
Chapter 13: Creating an Exercise Plan |
Chapter 6: Pre-Set Workouts |
Chapter 14: Setup Mode |
Chapter 7: Heart Rate Control |
Chapter 15: Care and Maintenance |
Chapter 8: Calorie Goal Workout |
|
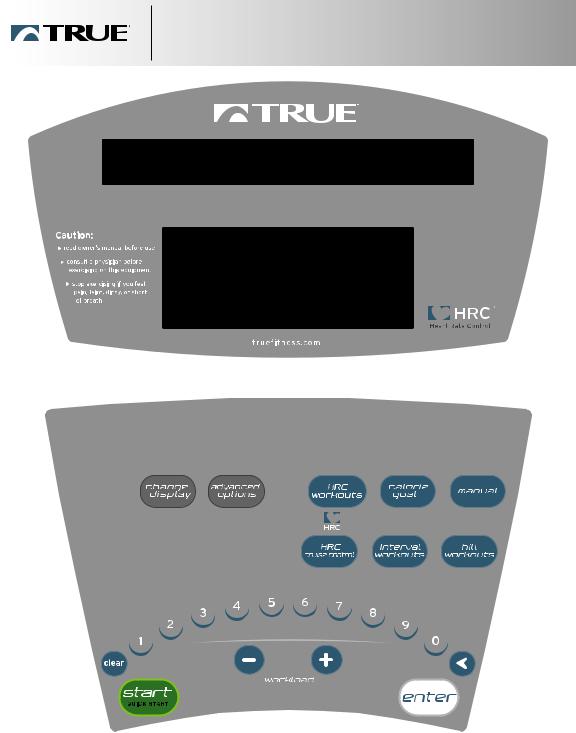
KEYPAD LAYOUT
CHAPTER THREE: THE DISPLAY
ES9.0 RECUMBENT BIKE OWNER’S GUIDE 18

|
WHAT THE KEYS DO |
|
|
CHAPTER THREE: THE DISPLAY |
|
Change Display: Changes data readouts from one set |
THE KEYS |
|
of four to the other set. Press and hold for two seconds to |
|
|
have the sets automatically alternate back and forth every five |
|
|
seconds. |
|
|
 ,
,  Workload: Adjusts workload higher and lower. Keys repeat if held down.
 through
  Numeric Keys: Used for data entry in Workout Setup. During a workout, used to change workload by entering a numeric value and pressing
  .
.
 Backspace: Deletes your last data keystroke, just like your computer keyboard’s backspace key.
 Clear: Zeros-out current data entry. Press and hold to completely clear and reset display.
ES9.0 RECUMBENT BIKE OWNER’S GUIDE 19

WHAT THE KEYS DO
CHAPTER THREE: THE DISPLAY


 HRC Workouts: Cycles through Constant, Interval, HRC Ultra, and HRC Ultra Interval. See Chapter 7.


 Calorie Goal: Selects the Calorie Goal workout. See Chapter 8.
 Interval Workouts: Cycles through Easy, Sport, and Custom. See Chapter 6.
 Hill Workouts: Cycles through Rolling and One Big Hill. See Chapter 6.
 Advanced Options: Cycles through Custom Programs, and Fitness Test. Medical, Ergometer, and Happy modes are accessed through Setup Mode only. See Chapters 9 and 10.
ES9.0 RECUMBENT BIKE OWNER’S GUIDE 20
UPPER CONSOLE
CHAPTER THREE: THE DISPLAY
Distance: An estimate of how far you would have traveled on an outdoor bike.*
Calories: An estimate of your calories burned. This does not include your basal metabolic rate, which is about 72 calories per hour
for a 150-pound person.* Heart Rate: In beats 

 per minutes (bpm).*
Time: The amount of time remaining in your workout. If you press 
 , this becomes elapsed time; how long you have been working out so far.*
METs: Your METs rate.*
RPM: Your pedal cadence.*
Progress Display:
Shows your progress and workload profile through your workout.
Heart Rate: In beats per minutes (bpm).*
Progress Display:
Shows your progress and workload profile through your workout.
*Pressing the “Change Display” key switches the readout from one set of values to the other set of values. If you press and hold the “Change Display” key for one second, the display will enter “Scan Mode” and switch between the two sets of values.
ES9.0 RECUMBENT BIKE OWNER’S GUIDE 21

HOW TO READ YOUR DISPLAY
CHAPTER THREE: THE DISPLAY
Level: In all other workout modes, indicates which workout level is selected. In Bike Mode, indicates which of 21 gears is selected.
Time: Shows the amount of time remaining in your workout. If you press 
 , this becomes elapsed time: how long you’ve been working out so far.
Miles: Shows an estimate of how far you would have traveled on an outdoor road bike.
Calories: Displays an estimate of your calories burned. This doesn’t include your basal metabolic rate, which is about 72 calories per hour for a 150-pound person.
RPM: Shows your pedal cadence.
Watts: The amount of mechanical power the bike is receiving from your exercise. This is not the same as the amount of power your body is using, since the average person is only about 20% efficient at generating mechanical power.
Heart Rate: In beats per minute (bpm).
METs: Your METs rate. See Appendix B.
ES9.0 RECUMBENT BIKE OWNER’S GUIDE 22

CHAPTER FOUR
WORKOUT SETUP
IN THIS CHAPTER:
SETTING UP YOUR WORKOUT
DURING YOUR WORKOUT
Chapter 1: Introduction |
Chapter 9: Designing Your Own Workout |
Chapter 2: Riding Your Bike |
Chapter 10: Fitness Test |
Chapter 3: The Display |
Chapter 11: Medical and Ergometer Mode |
Chapter 4: Workout Setup |
Chapter 12: Other Functions |
Chapter 5: Manual Control |
Chapter 13: Creating an Exercise Plan |
Chapter 6: Pre-Set Programs |
Chapter 14: Setup Mode |
Chapter 7: Heart Rate Control |
Chapter 15: Care and Maintenance |
Chapter 8: Calorie Goal Workout |
|

SETTING UP YOUR WORKOUT
CHAPTER FOUR: WORKOUT SETUP
Workout Setup is available both before and during your workout. In Workout Setup:
•You can easily edit all the available options of each workout.
•You see a Workout Preview graphic with a representation of how your workout progress will look.
•Smart Start makes intelligent suggestions for settings that are useful to most riders, and changes its suggestions to adapt to your own settings.
•Helpful tips are displayed if you get stuck.
Use either the  ,
,  or numeric keys to change settings. Press

 to accept the current parameter and move to the next one. Press

 when you’re done and ready to begin your workout.
The  key deletes your last data keystroke. The
key completely clears out the current entry. If you hold the key down for one second, the default Smart Start settings will be restored.
Compose your workout at your leisure. Your workout begins only when you press  .
.
ES9.0 RECUMBENT BIKE OWNER’S GUIDE 24

CHAPTER FIVE
MANUAL CONTROL
IN THIS CHAPTER:
MANUAL CONTROL OPERATION
Chapter 1: Introduction |
Chapter 9: Designing Your Own Workout |
Chapter 2: Riding Your Bike |
Chapter 10: Fitness Test |
Chapter 3: The Display |
Chapter 11: Medical and Ergometer Mode |
Chapter 4: Workout Setup |
Chapter 12: Other Functions |
Chapter 5: Manual Control |
Chapter 13: Creating an Exercise Plan |
Chapter 6: Pre-Set Workouts |
Chapter 14: Setup Mode |
Chapter 7: Heart Rate Control |
Chapter 15: Care and Maintenance |
Chapter 8: Calorie Goal Workout |
|

MANUAL CONTROL OPERATION
CHAPTER FIVE: MANUAL CONTROL
Manual Control can operate three different ways: Personal Power Fine Control, Bike Mode, and 10-watt mode.
In all modes, change levels either by using the  ,
,  keys, or entering a workload level with the numeric keys and pressing
  .
.
This default manual control has 77 different levels (for a 150-pound rider), allowing you to fine-tune your workout. Since Personal Power is used, the number of levels available decreases for larger riders. This mode uses constant power workload control (see Appendix C).
The second mode is Bike Mode, which simulates a 21-speed road bike, compensating for body weight with Personal Power, simulating air resistance, and computing speed correctly for the selected gear and cadence. The 21 “gears” are like that of a bike that has gearing from 50 to 105 inches.
Bike Mode uses constant torque (see Appendix C), then adds additional workload for the simulations and compensations. The calculations are adapted from the power formulas in Bicycling Science, the leading reference in this field (see Bibliography).
The final mode is a conventional 10-watt increment constant power mode.
INTRODUCTION
PERSONAL POWER FINE CONTROL
BIKE MODE
10-WATT
MODE
ES9.0 RECUMBENT BIKE OWNER’S GUIDE 26

CHAPTER SIX
PRE-SET WORKOUTS
IN THIS CHAPTER:
WORKOUT CHOICES HILL WORKOUT PROFILES INTERVAL WORKOUT PROFILES
HOW WORKOUT AND SEGMENT LEVELS AFFECT METS CUSTOM INTERVALS
Chapter 1: Introduction |
Chapter 9: Designing Your Own Workout |
Chapter 2: Riding Your Bike |
Chapter 10: Fitness Test |
Chapter 3: The Display |
Chapter 11: Medical and Ergometer Mode |
Chapter 4: Workout Setup |
Chapter 12: Other Functions |
Chapter 5: Manual Control |
Chapter 13: Creating an Exercise Plan |
Chapter 6: Pre-Set Workouts |
Chapter 14: Setup Mode |
Chapter 7: Heart Rate Control |
Chapter 15: Care and Maintenance |
Chapter 8: Calorie Goal Workout |
|

PROGRAM CHOICES
CHAPTER SIX: PRE-SET WORKOUTS
Just like manual control, the hill and interval workouts compensate for different body
weights.
The two hill workouts are:
• Rolling Hills, a series of gently changing workloads.
• One Big Hill, with the workload gradually increasing to a maximum at the halfway point, then decreasing gradually to the end.
The two interval workouts are:
• Easy intervals, with a moderate change between work and rest intervals.
• Sport intervals, with a large change between work and rest intervals.
ES9.0 RECUMBENT BIKE OWNER’S GUIDE 28

HILL WORKOUT PROFILES
CHAPTER SIX: PRE-SET WORKOUTS
|
HILL |
HILL AND |
WORKOUT |
INTERVAL |
PROFILES |
WORKOUTS |
|
|
|
ROLLING HILLS
ONE BIG HILL
ES9.0 RECUMBENT BIKE OWNER’S GUIDE 29
 Loading...