


SM-6001
NL |
Gebruikershandleiding |
HR |
Korisnički priručnik |
UK |
User manual |
NO |
Brukermanual |
FR |
Manuel d'utilisation |
BG |
Потребителски наръчник |
DE |
Bedienungsanleitung |
HU |
Kézikönyv |
ES |
Manual de usuario |
DK |
Brugervejledning |
IT |
Manuale utente |
CZ |
Uživatelská příručka |
PT |
Manual de utilizador |
PL |
Instrukcja obsługi |
SE |
Användarhandbok |
RO |
Manual de utilizare |
TR |
Kullanım kılavuzu |
EL |
Εγχειρίδιο χρήστη |
|
|
|
|
|
|
|
|
NL |
Gebruikershandleiding |
11 |
UK |
User manual |
20 |
FR |
Manuel d'utilisation |
29 |
DE |
Bedienungsanleitung |
38 |
ES |
Manual de usuario |
47 |
IT |
Manuale utente |
56 |
PT |
Manual de utilizador |
65 |
SE |
Användarhandbok |
74 |
HR |
Korisnički priručnik |
83 |
NO |
Brukermanual |
92 |
BG |
Потребителски наръчник |
101 |
HU |
Kézikönyv |
110 |
DK |
Brugervejledning |
119 |
CZ |
Uživatelská příručka |
128 |
PL |
Instrukcja obsługi |
137 |
RO |
Manual de utilizare |
146 |
EL |
Εγχειρίδιο χρήστη |
155 |
TR |
Kullanım kılavuzu |
164 |
2
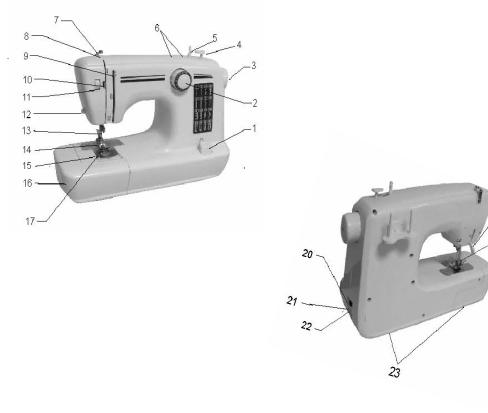
Onderdelenbeschrijving | Parts description | Description des pièces | Teile Beschreibung | Descripción de las partes | Parti descrizione | Peças descrição | Delar beskrivning | Dijelovi opis | Deler beskrivelse | Части описание | Részek leírása | Dele beskrivelse |Části popis | Części opis | Piese descriere | Μέρη περιγραφή | Parçalar açıklaması |
1
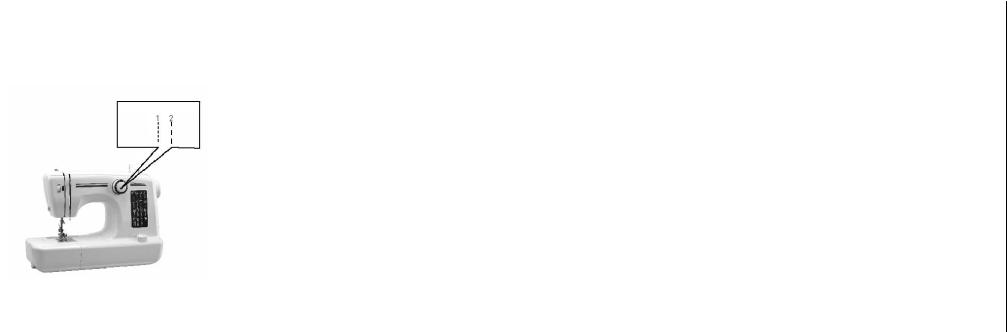
Terugnaaien knop Reverse sewing lever
Levier de couture en marche arrière Hebel zum Rückwärtsnähen Palanca de retroceso
Leva di cucitura al rovescio
Alavanca de costurar invertido (fazer remates) Prekidač za šivanje unazad
Knap til baglæns syning Bakåtsömomkopplare Returknapp
Лостче за шиене в обратна посока
Visszafelé varrás kar Páčka pro zpětný chod šití Dźwignia szycia wstecz
Buton coasere bidirecţională
Μοχλός ανάποδης ραφής
Geri dikiş kolu
3
2 |
3 |
4 |
Patroonselector |
Handwiel |
Spoelstop |
Pattern selector dial |
Hand Wheel |
Bobbin stopper |
Sélecteur de point |
Volant |
Arrêt de la canette |
Musterwahlschalter |
Handrad |
Garnrollenstopper |
Botón selección de puntos |
Volante |
Tope de bobina |
Quadrante di selezione del modello |
Mola a mano |
Tappo della bobina |
Selector de padrão |
Roda manual |
Dispositivo para parar a bobina |
Kotač za izbor boda |
Zamašnjak |
Graničnik namotača konca |
Knap til valg af mønster |
Håndhjul |
Spolestopper |
Sömväljarreglage |
Handhjul |
Spolstopp |
Sømvelgerratt |
Håndhjul |
Spolestopper |
Диск за избор на вида бод |
Ръчно колело |
Стопер на шпулата |
Mintaválasztó tárcsa |
Kézikerék |
Orsóütköző |
Volicí kolečko vzoru |
Ruční kolečko |
Doraz cívky |
Tarcza selektora wzoru |
Ręczne kółko |
Zatyczka szpulki |
Selector modele |
Rotiţă manuală |
Opritor papiotă |
Επιλογέας σχεδίου |
Τροχός Χεριού |
Εμπλοκή μπομπίνας |
Desen seçme kadranı |
Volan |
Masura durdurucu |
5 |
6 |
7 |
Spoelwinder |
Spoelhouder |
Draadgeleider |
Bobbin winder |
Spool pin |
Winding thread guide |
Bobineur de canette |
Broche porte bobine |
Guide du rebobineur du fil |
Garnrollenwickler |
Spulerstift |
Fadenführung |
Devanador de bobina |
Portabobinas |
Guía hilos del devanador |
Roccatrice |
Corpo dell’ago |
Avvolgimento a guidafilo |
Enrolador da bobina |
Pino do carretel |
Guia de enrolar a linha |
Nosač špule |
Stalak za konac |
Vodilica konca |
Spolevinder |
Spolepind |
Trådvindingsstyr |
Spolaxel |
Trådrullshållare |
Trådledare för spolning |
Spoleapparat |
Snellepinne |
Trådleder |
Хаспел за навиване на |
Щифт на макарата |
Водач за навиване на |
шпулата |
|
нишката |
Orsófeltekerő |
Orsócsap |
Feltekerő szálvezető |
Navíječ cívky |
Kolík k nasazení cívky |
Motací vodič nitě |
Nawijacz szpulki |
Bolec szpulki |
Prowadnica nawijania nici |
Înfăşurător papiotă |
Ax pentru mosor |
Reglaj înfăşurare fir |
Σημείο τυλίγματος μπομπίνας |
Υποδοχή καρουλιού |
Οδηγός τυλίγματος κλωστής |
Masura sarıcı |
Makara pimi |
İplik sarma kılavuzu |
4
8 |
9 |
10 |
Bovendraadgeleider |
Draadhendel |
Draadspanningschijf |
Upper thread guide |
Thread take-up lever |
Thread tension release bar |
Guide du fil supérieur fil |
Releveur de fil |
Levier de blocage de tension du |
Obere Fadenführung |
Fadenaufnahmehebel |
Stange zum Lösen der |
|
|
fadenspannung |
Guía hilo superior |
Palanca tensora del hilo |
Barra de destensión del hilo |
Guidafilo superiore |
Leva di avvolgimento filo |
Barra tensione di rilascio filo |
Guia superior da linha |
Alavanca de remover a linha |
Barra de libertação de tensão da |
|
|
linha |
Vodilica gornjeg konca |
Podizač konca |
Poluga za opuštanje konca |
Overtrådsstyr |
Trådopsamler |
Udløser for trådspænding |
Övre trådledare |
Trådupplockarreglage |
Trådspännararm |
Overtrådleder |
Spak for trådopptak |
Oppløser av trådspenning |
Горен водач на нишката |
Лостче за поемане на |
Лостче за освобождаване |
|
нишката |
опъването на нишката |
Felső szálvezető |
Szálfelvevő kar |
Szálfeszesség kioldókar |
Vrchní vodič nitě |
Páčka zvednutí nitě |
Tlačítko uvolnění napětí niti |
Prowadnica górnej nici |
Dźwignia zbierania nici |
Sztabka zwalniająca napięcie nici |
Ghidaj fir superior |
Parghie preluare fir |
Sistem detensionare fir |
Άνω οδηγός κλωστής |
Μοχλός μετατόπισης κλωστής |
Μπάρα απελευθέρωσης έντασης |
|
|
κλωστής |
Üst İplik kılavuzu |
İplik alıcı kolu |
İplik gerginliğini serbest |
|
|
bırakma mili |
11 |
12 |
13 |
Draadspanningselector |
Draadsnijder |
Naaldklemschroef |
Thread tension dial |
Thread cutter |
Needle clamp screw |
Indicateur de tension du fil |
Coupe-fil |
Vis de serrage de l’aiguille |
Schalter für Fadenspannung |
Fadenabschneider |
Nadelbefestigungsschraube |
Regulador de tensión del hilo Cortador de hilo |
Tornillo de sujeción de la aguja |
|
Quadrante tensione filo |
Tranciatore filo |
Vite morsetto dell’ago |
Indicador de tensão da linha |
Cortador de linha |
Parafuso de fixação da agulha |
Regulator napetosti konca |
Rezač konca |
Vijak držača igle |
Trådspændingsdrejeskive |
Trådskærer |
Skrue til nålfastspænding |
Trådspänningsreglage |
Trådskärare |
Klämskruv för nål |
Ratt for trådspenning |
Trådkutter |
Holdeskrue for nål |
Диск за опъна на нишката |
Ножче за рязане на |
Винт на държача на иглата |
|
нишката |
|
Szálfeszítő tárcsa |
Szálvágó |
Tűszorító csavar |
Kolečko napětí niti |
Odstřihovač niti |
Šroubek držáku jehly |
Pokrętło napięcia nici |
Nóż do nici |
Śrubka przycisku igły |
Disc tensiune fir |
Foarfecă pentru fir |
Şurub pentru clema acului |
Ρυθμιστής έντασης κλωστής |
Κόφτης κλωστής |
Βίδα συγκράτησης βελόνας |
İplik gerilim kadranı |
İplik kesici |
İğne kelepçe vidası |
5
14 |
15 |
16 |
Drukvoet |
Naaldplaat |
Naaitafel met schuiflade |
Presser foot |
Needle plate |
Sewing table with tray |
Pied-de-biche |
Plaque à aiguille |
Table de couture avec plateau |
Nähfuß |
Stichplatte |
Nähtisch mit Ablage |
Prensatelas |
Placa de aguja |
Mesa de coser con bandeja |
Pedale premistoffa |
Piatto dell’ago |
Tavola di cucito con appoggio |
Base de pressão |
Chapa da agulha |
Base da máquina de costura |
Nosač stopice |
Ubodna pločica |
Ugrađen prostor za pribor |
Trykfod |
Nåleplade |
Sybord med bakke |
Pressarfot |
Nålplatta |
Sybord med bricka |
Trykkfot |
Nålplate |
Sybord med brett |
Притискащо краче |
Планка на иглата |
Шивашки плот с ваничка |
Nyomótalp |
Tűlemez |
Varróasztal tálcával |
Patka šicího stroje |
Stehová destička |
Šicí deska s přihrádkou |
Stopka naciskania |
Płytka igły |
Stół do szycia z tacką |
Picioruş presor |
Placuţă pentru ac |
Masă de coasere cu tăviţă |
Ποδοπιεστής |
Βάση βελόνας |
Επιφάνεια ραψίματος με θήκη |
Baskı ayağı |
İğne plakası |
Tepsili dikiş tablası |
17 |
18 |
19 |
Stofgeleiders |
Drukvoethendel |
Drukvoethouder |
Feed dogs |
Presser foot lever |
Presser foot holder |
Griffes d’entrainement |
Levier du pied-de-biche |
Tige du pied-de-biche |
Transporteur |
Nähfußhebel |
Nähfußhalterung |
Transporte de dientes |
Palanca del prensatelas |
Soporte del prensatelas |
Griffe |
Leva pedale premistoffa |
Supporto piede premastoffa |
Colocação da linha |
Alavanca da base de pressão Suporte da base de pressão |
|
Utori stopice |
Poluga za podizanje stopice |
Stopica |
Stoffremfører |
Trykfodsarm |
Trykfodsholder |
Frammatare |
Pressarfotsspak |
Pressarfotshållare |
Matefot |
Trykkfotspak |
Trykkfotholder |
Подаващи челюсти |
Лостче на притискащото |
Държач на притискащото краче |
|
краче |
|
Etetővilla |
Nyomótalp karja |
Nyomótalp tartó |
Podavač |
Páčka patky šicího stroje |
Držák patky šicího stroje |
Transportery |
Dźwignia stopki docisku |
Pojemnik stopki docisku |
Clemă alimentare |
Pârghie picioruş presor |
Susţinere picioruş presor |
Τροφοδοσία υφάσματος |
Μοχλός ποδοπιεστή |
Στήριγμα ποδοπιεστή |
Kumaş Dişlileri |
Baskı ayağı kolu |
Baskı ayağı tutucu |
6
20 |
21 |
22 |
|
|
|
|
Aan/uit knop |
Voetpedaal aansluiting |
Stroom aansluiting |
|
24 |
|
25 |
ON/OFF switch |
Foot control receptacle |
Transformer receptacle |
|
|
|
|
Bouton « ON/OFF » |
Boîtier de la pédale |
Boîtier du transformateur |
|
|
|
|
EIN/AUS Schalter |
Anschluss für Fußsteuerung |
Trafoanschluss |
|
|
|
|
Interruptor de ON/OFF |
Receptáculo del pedal de control Receptáculo del transformador |
|
|
|
|
|
Interruttore ON/OFF |
Prolunga controllo pedale |
Prolunga trasformatore |
|
|
|
|
Interruptor ON/OFF |
Receptáculo de controlo |
Receptáculo do |
|
|
26 |
|
|
Do pedal |
transformador |
|
|
|
|
Prekidač za ON/OFF |
Priključak za nožno pokretalo Priključak za adapter |
|
|
|
|
|
|
(pedalu) |
|
|
|
|
|
TÆND/SLUK-kontakt |
Stikforbindelse til fodpedal |
Stikforbindelse til transformer |
|
|
|
|
Strömbrytare |
Anslutning för fotpedal |
Anslutning för transformator |
|
27 |
|
28 |
Av-/På-bryter |
Kontakt for fot |
Strømkontakt |
|
|
|
|
Ключ за включване / |
Контакт за крачния контрол Контакт за трансформатора |
|
|
|
|
|
Изключване |
|
|
|
|
|
|
BE/KI kapcsoló |
Lábpedál aljzata |
Transzformátor aljzata |
|
|
|
|
Vypínač On/Off |
Zásuvka nožního ovládání |
Zásuvka adaptéru |
|
|
|
|
Przycisk WŁ/WYŁ (ON/OFF) |
Gniazdko sterowania stopką |
Gniazdko transformatora |
|
30 |
31 |
32 |
Comutator PORNIT/OPRIT |
Receptor de control picioruş |
Receptor transformator |
|
|
|
|
Διακόπτης ΕΝΕΡΓΟΠΟΙΗΣΗΣ |
Υποδοχή βύσματος πεντάλ |
Υποδοχή μετασχηματιστή |
29 |
|
|
|
/ΑΠΕΝΕΡΓΟΠΟΙΗΣΗΣ |
|
|
|
|
|
|
AÇMA/KAPAMA siviçi |
Ayak kontrolü yuvası |
Transformatör yuvası |
|
|
|
|
23 |
|
|
33 |
34 |
35 |
36 |
|
|
|
|
|
|
|
Behuizing |
|
|
|
|
|
|
Bolster |
|
|
|
|
|
|
Coussinet |
|
|
|
|
|
|
Stütze |
|
|
24 |
25 |
26 |
27 |
Soporte |
|
|
Voetpedaal |
Stroomadaptor |
Naalden (2x) |
Draadbegeleider |
Base |
|
|
Foot control |
Adaptor |
Needles (2x) |
Threadle |
Suporte |
|
|
Pédale |
Adaptateur |
Aiguilles (x2) |
Enfile Aiguille |
Ležište |
|
|
Fußsteuerung |
Netzteil |
Nadeln (2x) |
Einfädler |
Bundramme |
|
|
Pedal de control |
Adaptador |
Agujas (x2) |
Enhebrador |
Underlag |
|
|
Controllo pedale |
Adattatore |
Aghi (2x) |
Filo |
Støtte |
|
|
Pedal |
Adaptador |
Agulhas (2x) |
Linha |
Носеща подложка |
|
|
Nožno pokretalo |
Adapter |
Igle (2x) |
Uvlakač konca |
Gumipárna |
|
|
(pedala) |
|
|
|
Podkladová deska |
|
|
Fodpedal |
Adapter |
Nåle (2x) |
Nåletråder |
Wałek |
|
|
Fotkontroll |
Adapter |
Nålar (2x) |
Nålpåträdare |
Suport |
|
|
Fotkontroll |
Adapter |
Nåler (2 stk.) |
Trådgjennomfører |
Βάση |
|
|
Крачен контрол |
Адаптор |
Игли (2x) |
Приспособление за вдяване |
Destek (altlık) |
|
|
|
|
|
на конеца |
|
|
|
Lábpedál |
Adapter |
Tűk (2x) |
Szálhúzó |
|
|
|
Nožní ovládání |
Adaptér |
Jehly (2x) |
Niť |
|
|
|
Sterowanie stopką |
Adapter |
Igły (2x) |
Nić |
|
|
|
Control picioruş |
Adaptor |
Ace (2x) |
Suveică |
|
|
|
Πεντάλ |
Προσαρμογέας |
Βελόνες (2x) |
Συσκευή για σπειρωμάτων το |
|
|
|
|
|
|
νήμα |
|
|
|
Ayak kontrolü |
Adaptör |
İğneler (2x) |
İplik takıcı |
|
7 |
|
|
|
8 |
|
28 |
29 |
30 |
34 |
35 |
36 |
Duo naald |
Knoop-naaiplaat |
Knoopsgat voet |
Drukvoet |
Zoomsnijder |
Spoelen (4x) |
Twins needle |
Button sewing plate |
Buttonhole foot |
Sewing foot |
Seam ripper |
Bobbins (4x) |
Aiguilles jumelées |
Plaque de boutonnière |
Pied boutonnière |
Pied de Couture |
Découvit |
Canettes (x4) |
Zwillingsnadel |
Knopfannähplatte |
Knopflochfuß |
Nähfuß |
Trennmesser |
Garnrollen (4x) |
Agujas gemelas |
Placa de cosido de botones |
Prensatelas de ojales |
Prensatelas de coser |
Abrecosturas |
Bobinas (x4) |
Aghi gemelli |
Pulsante piatto da cucito |
Pedale occhiello |
Pedale cucitura |
Tagliafilo |
Bobine (4x) |
Agulha gémeas |
Chapa para costurar botões |
Base para costurar casas para |
Base de costura |
Peça para cortar |
Bobinas (4x) |
|
|
botões |
Stopica za šivanje |
Paralica za šavove |
Špulice (4x) |
Dvo-igla |
Stopica za šivanje gumbi |
Stopica za šivanje rupica |
Syfod |
Trensekniv |
Spoler (4x) |
Dobbeltnål |
Bundsyplade |
Bundhulfod |
Syfot |
Sprättare |
Undertrådsspolar (4x) |
Tvillingnål |
Knappsömsplatta |
Knapphålsfot |
Normalfot |
Sprettekniv |
Spoler (4 stk.) |
Tvillingnål |
Knapphullplate |
Knapphullfot |
Пета за шиене |
Инструмент за обрязване |
Шпули (4x) |
Сдвоена игла |
Планка за шиене на копчета Пета за илици за копчета |
|
на шевове |
|
|
Duplatű |
Gombvarró lemez |
Gomblyuk talp |
Varrótalp |
Varrásmetsző |
Orsók (4x) |
Dvojitá jehla |
Deska pro přišívání knoflíků |
Patka k přišívání knoflíků |
Šicí patka |
Páradlo |
Cívky (4x) |
Bliźniacza igła |
Płytka szyjącaprzycisk |
Stopka dziurki pod guzik |
Stopka szyjąca |
Nożyk do szwów |
Szpulki (4x) |
Ace duble |
Plăcuţă coasere nasturi |
Picioruş pentru butonieră |
Picioruş de coasere |
Cuţit cusături |
Papiote (4x) |
Δίδυμη βελόνα |
Πλάκα ραψίματος κουμπιών |
Ποδαράκι για κουμπότρυπες |
Ποδαράκι |
Εργαλείο ανοίγματος ραφών |
Μπομπίνες (4x) |
Çiftli iğne |
Düğme dikme plakası |
İlik ayağı |
Dikiş ayağı |
Dikiş sökme aleti |
Masuralar (4x) |
31 |
32 |
33 |
Schroevendraaier |
Spoelhouder |
Ritsvoet |
Screw driver |
Spool pin |
Zipper foot |
Tournevis |
Broche porte bobine |
Pied de fermeture à glissière |
Schraubenzieher |
Spool pin |
Reißverschlussfuß |
Destornillador |
Pasador de bobina |
Prensatelas de cremalleras |
Conduttore vite |
Bobina ago |
Chiusura pedale |
Aparafusadora |
Pino do carretel |
Base de fechos |
Odvijač |
Nosač konca |
Stopica za šivanje zatvarača |
Skruetrækker |
Spolepind |
Lynlåsfod |
Skruvmejsel |
Trådrullshållare |
Blixtlåsfot |
Skrutrekker |
Snellepinne |
Glidelåsfot |
Отвертка |
Щифт за шпулата |
Пета за ципове |
Csavarhúzó |
Orsócsap |
Zipzár talp |
Šroubovák |
Nastrkovací trn |
Patka k přišívání zipů |
Śrubokręt |
Bolec szpulki |
Stopka zamka |
Şurubelniţă |
Ax pentru mosor |
Picioruş pentru fermoar |
Κατσαβίδι |
Υποδοχή κουβαρίστρας |
Ποδαράκι για φερμουάρ |
Tornavida |
Makara pimi |
Fermuar ayağı |
9 |
10 |
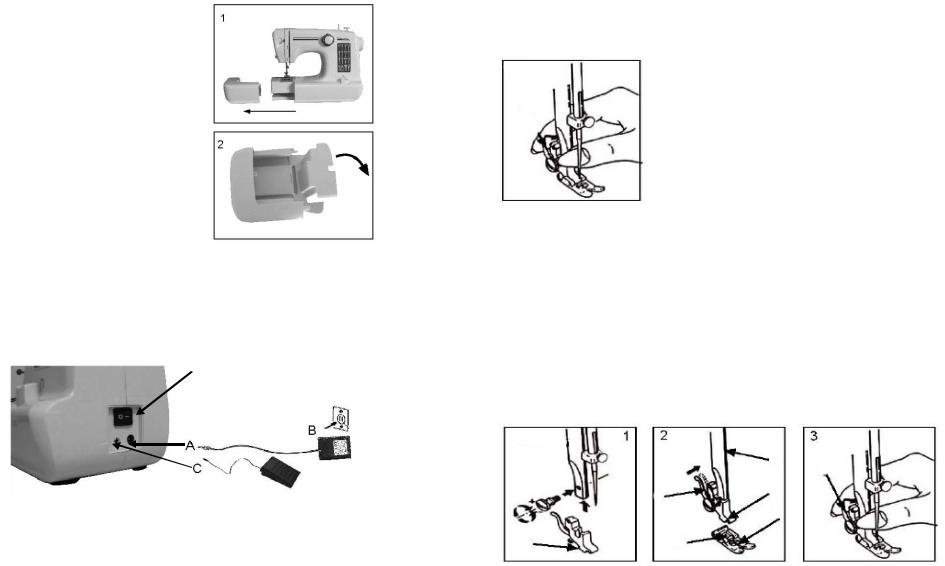
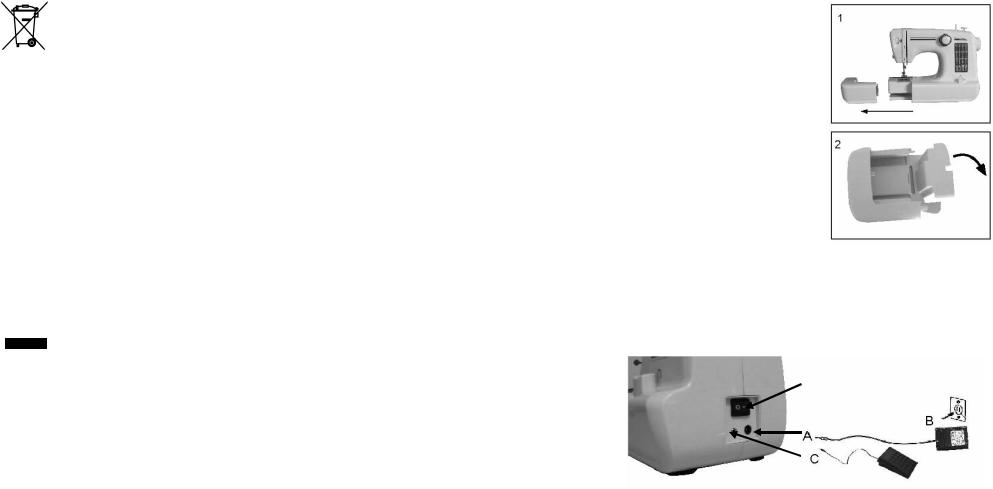
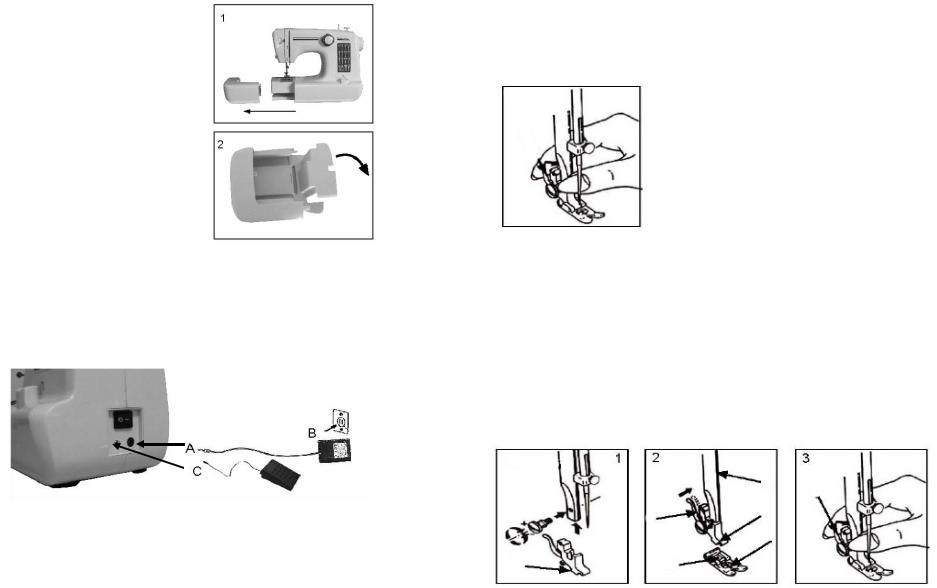
Schuiflade in de naaimachine |
NL |
1.De spoelhouder en het accessoire zakje bevinden zich in de lade.
2.Houd de naaimachine horizontaal en trek de lade uit de naaimachine (foto 1)
3.Schuif het deksel om de lade te openen. (foto 2)
Aansluiten op de netspanning
1.Sluit plug “A” aan op de machine en de stekker “B” in het stopcontact.
2.Zet de schakelaar op “AAN”.
3.Sluit de voetpedaal “C” aan op de machine.
4.Afhankelijk van de druk op het voetpedaal wordt de snelheid van de machine geregeld.
Het lampje gaat aan zodra u de stroomschakelaar op “AAN” zet.
Aan/uit schakelaar
11
Het plaatsen van de naald
Let op!: Om een elektrische schok te voorkomen, moet u de machine uit zetten alvorens u een naald plaatst of verwijdert.
Verwissel regelmatig de naald, zeker wanneer deze tekenen van slijtage vertonen. Plaats de naald als volgt:
Draai naaldklemschroef (nr.13) los.
De vlakke zijde van de naald moet naar achteren wijzen Duw de naald zo ver als mogelijk naar boven en draai de naaldklem schroef weer vast.
 (Naaldklemschroef nr.13)
..
Bevestigen van de drukvoet houder
Bij aankoop is de naaimachine uitgevoerd met de standaard drukvoet, welke gebruikt wordt voor het stikken van stoffen. Voor het naaien van knoopsgaten en ritsen dient u een andere drukvoet op de machine te plaatsen. Zie de onderstaande beschrijving met illustraties hoe u de drukvoet kunt vervangen.
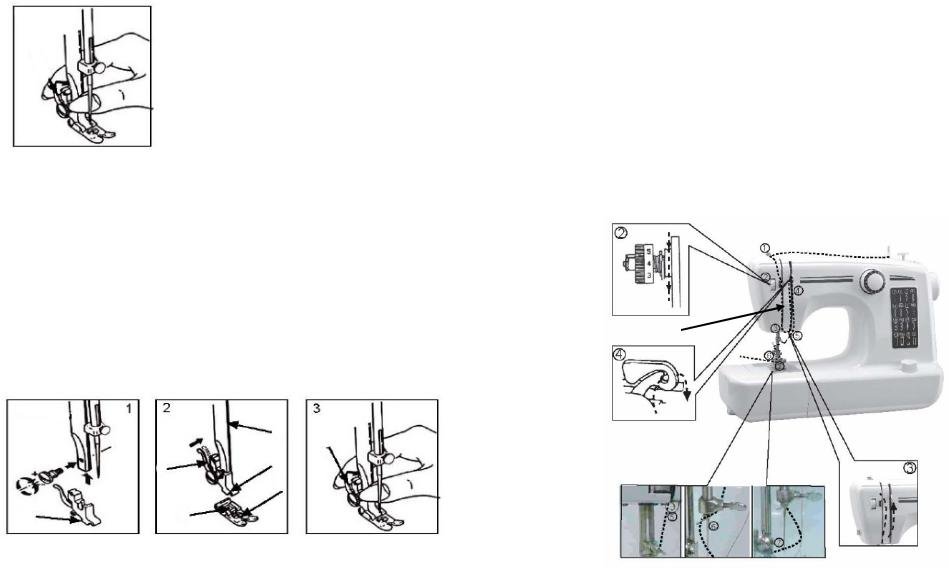
Figuur 1. Zet de drukvoethendel(nr.18) omhoog. Plaats de voetklem (B) op de drukvoethendel en draai schroef A vast.
Figuur 2. Laat de drukvoethendel zakken totdat de uitsparing (C) zich precies boven de pin (D) van de drukvoet bevindt. Druk op hendel E en druk de drukvoet omhoog zodat pin D precies in uitsparing C valt, laat daarna hendel E los.
Figuur 3. Verwijderen van de drukvoet.
Haal de drukvoethendel omhoog Druk op hendel E en de drukvoet valt er af.
Drukvoet hendel(nr.18)
E
A E C
Drukvoet
B D
12

Aanbrengen van de bovendraad
Voor het snel en gemakkelijk aanbrengen van de bovendraad dient u de nummers 1 t/m 7 via de zwarte stippellijn in de tekening te volgen. De zwarte stippellijn is de lijn die de draad over en door de machine volgt. Op de uitvergrotingen treft u een verduidelijking aan van de betreffende stap.
1.Zet de spoel op de spoelwinder en geleid de draad door de draadgeleider van achter naar voren.
2.Druk de draadspanningsschijf naar links en geleid de draad naar beneden en zorg dat de draad tussen de drukplaat zit
3.Ga verder naar beneden met de draad om de vaste draadgeleider van links naar rechts en ga weer omhoog.
4.Geleid de draad door de draadhendel, van linksnaar rechts
5.Ga verder en voer de draad door de draadhendel van voor naar achter.
6.Geleid de draad over de lage geleider van achter naar voor
7.Breng de draad door de draadprotector.
Tenslotte voer de draad door de naald van voor naar achter. Belangrijk!!!
Vaste draadgeleider
13
Aanbrengen van de onderdraad
Indien u de onderste spoel wilt aanbrengen of verwijderen moet de naald zich in de bovenste positie bevinden. Draai daarvoor aan het handwiel(nr.3).Trek de lade uit de naaitafel van de naaimachine en schuif het afdekglaasje naar voren.
Leg de spoel zodanig in de cassette zodat de draad met de klok mee loopt. Breng het afdekglaasje en de lade weer terug op hun plaats.
Pak de bovendraad in uw linkerhand en houd enige spanning op de draad.
Gebruik de rechter hand om het handwiel(nr.3) tegen de klok in te draaien totdat de naald weer in de bovenste stand is.
Als de naald de bodem bereikt zal de bovendraad de onderdraad meenemen. Trek de bovenen onderdraad onder de drukvoet (nr.14) door (ongeveer 10 cm).
 Nr.3
Nr.3
Nr.14
Opwinden van de spoel.
Figuur 1. Plaats een een klosje garen op de spoelhouder(nr.6). Figuur 2. Geleid de draad via de draadgeleider (nr.7) naar lege spoel.
Figuur 3. Wind de draad enkele keren met de klok mee om de lege spoel en plaats deze op de spoelwinder(nr.5, figuur 1).
Figuur 4. Druk de spoel tegen te spoelstop.
Druk op het voetpedaal totdat de spoel vol is.Verwijder de spoel door de draad door te snijden.
Nr.6 |
Nr.7 |
Nr.5
14
Achteruit naaien
Aan het eind van een naad moet u de knop voor achteruit naaien indrukken. Naai een paar steken achteruit om de naad vast te zetten.
De achteruit naad mag niet langer zijn dan 5cm.
Indien u de achteruit naaiknop loslaat zal de machine weer vooruit naaien.
Verwijderen van uw werk.
Draai het handwiel naar u toe en breng de draadhendel(nr.9) in de hoogste positie. Breng de drukvoet omhoog. Druk de draadspannings shijf(nr.10) naar link en verwijder uw werk naar achteren.
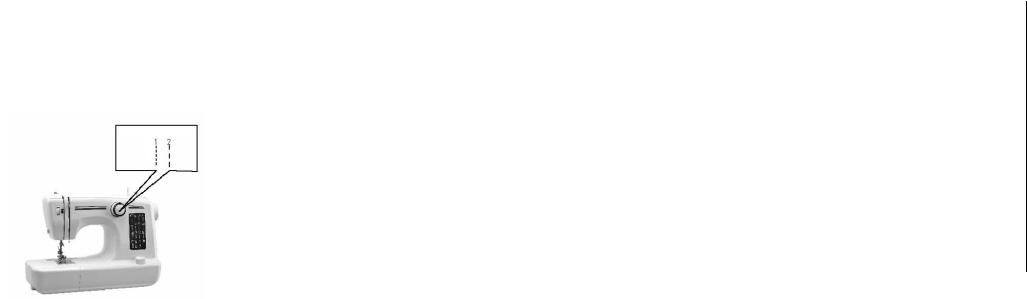
Rechte steek en andere steken
Zorg dat de spoelwinder(nr.5) op “seewing” staat geselecteerd.
Er zijn twee verschillende rechte steken. Selekteer de patroonselector (nr.2) op de steek die u wenst. Zet de naald in de hoogste positie door het handwiel tegen de klok in te draaien.
Trek voorzichtig beide draden (±10 cm) naar achteren. Zet de drukvoet omhoog en breng uw naaiwerk onder de dukvoet en breng deze weer naar beneden.
Druk voorzichtig op het voetpedaal en begin te naaien. Begeleid het naaiwerk met de hand. Stop met de naald in de bovenste positie waardoor de draad eenvoudig kan worden uitgetrokken. Zet de drukvoet omhoog en verwijder uw naaiwerk.
Dit geldt voor alle door u gewenste patronen.
Patroon selector
Opmerking:
1.Als u de patroonselector verdraait, overtuig u er dan van dat de naald zich in de bovenste positie bevindt om verbuigen of beschadiging te voorkomen.
2.Als u het patroon selecteert zet de knop dan op de juiste positie anders beschadigt de naald of u naait een verkeerd patroon.
Knoopsgaten
Voorbereiding
1.Draai de drukvoet omhoog, verwijder de metalen drukvoet en plaats een knopsgat-voet.
2.Meet de diameter van de knoop en voeg 3mm (1/8”) toe voor de speling.
3.Indien u een dikke knoop heeft voeg dan meer mm aan de diameter toe.
4.Markeer de positie en lengte van het knoopsgat op uw naaiwerk.
5.Positioneer het naaiwerk dusdanig dat de naald zich bevindt boven het merkteken dat het verst van u weg is.
6.Trek de knoopsgat-voet zo ver mogelijk naar u toe.
7.Laat de voet zakken.
15
a.) Draai de patroon-selector naar patroonnr.13. Naai met gematigde snelheid totdat u de eindmarkering bereikt.
b.) Draai de patroon-selector naar patroonnr.14. en naai 5-6 speling steken. c.) Draai de patroon-selector naar patroonnr.15 en naai de linkerzijde van het
knoopsgat tot de markering ( begin van het knoopsgat)
d.) Draai de patroon-selector naar patroonnr. 16 en naai de speling steken. Verwijder het naaiwerk van onder de voet. Breng de bovendraad aan de achterkant van het naaiwerk en knoop de bovenen onderdraad.
Snijd de binnenkant van het knoopsgat open met de naad-snijder, pas op dat u niet de steken aan weerszijden open snijdt.
Tips:
1.Reduceer de druk op de bovendraad om betere resultaten te krijgen.
2.Gebruik voor dunne en elastische stoffen een achtergrond materiaal.
NAALD GROOTTE |
STOF |
|
|
9-11(65-75) |
Lichtgewicht dunne katoenen |
|
weefsels, voile, zijde, katoen, |
|
Qiana, tricot, truien, geweven |
|
polyester, shirt & blouses. |
|
|
12(80) |
Midden-gewicht katoenen |
|
weefsels, satijn, kettlecloth, |
|
zeildoek, lichtgewicht wol. |
|
|
14(90) |
wol, terrycloth, jeans |
|
|
16(100) |
Zwaar-gewicht canvas doek, wol, |
|
gewatteerde stoffen, jeans, |
|
stoffering materiaal (licht tot |
|
medium) |
|
|
18(110) |
Genres zware wol, zware stoffen, |
|
meubelstoffen, leer en vinyl. |
|
|
DRAAD
Licht-gewicht garen in katoen, nylon of polyester
De meeste draden zijn medium size en geschikt deze stoffen en naalden. Voor het beste resultaat gebruik polyester garen bij synthetische materialen en katoen voor natuurlijk geweven stoffen. Gebruik altijd dezelfde garen als boven en onderdraad.
Heavy duty garen,tapijt garen,
16

Problemen oplossen
Probleem |
Oorzaak |
Oplossing |
|
|
|
|
|
Bovenste draad breekt |
1. De bovenste draad is niet goed |
1.Voer de bovendraad opnieuw in. |
|
|
aangebracht. |
2. Verminder de spanning van de |
|
|
2. |
De draad spanning is te groot. |
draad (verlaag het getal). |
|
3. |
De draad is te dik voor de |
3. Gebruik een dikkere naald. |
|
naald. |
4. Verwijder en plaats denaald |
|
|
4. |
De naald is niet correct |
opnieuw (platte kant achter). |
|
geplaatst. |
5. Verwijder de spoel en wind hem |
|
|
5. |
De draad is om de spoel |
opnieuw op. |
|
gedraaid |
6.Vervang de naald. |
|
|
6. |
De naald is beschadigd. |
|
|
|
|
|
De onderdraad breekt. |
1. De onderdraad is niet goed |
1.Controleer de onderdraad |
|
|
gepositioneerd. |
nauwkeurig. |
|
|
2. |
De bovenste draad spanning is |
2.Pas de bovenste draad |
|
te laag. |
spanning aan. |
|
|
|
|
|
|
|
|
|
Overgeslagen steken |
1. De naald is niet correct |
1.Verwijder en plaatsde naald |
|
|
geplaatst |
opnieuw (platte kant naar |
|
|
2. |
De naald is beschadigd |
achteren). |
|
3. |
De maat van de naald is onjuist. |
2. Plaats een nieuwe naald. |
|
4. |
De voet is niet goed geplaatst. |
3.Kies een goede naald voor het |
|
|
|
garen en de stof. |
|
|
|
4.Controleren en goed plaatsen. |
|
|
|
|
Naald breekt |
1.De naald is beschadigd |
1. Plaats een nieuwe naald. |
|
|
2.De naald is niet correct |
2.Plaats de naald op de juiste |
|
|
geplaatst. |
manier (platte zijde naar achteren. |
|
|
3.Verkeerde naald voor deze stof |
3. Kies de juiste naald voor deze |
|
|
gebruikt. |
stof. |
|
|
4.De verkeerde voet is geplaatst. |
4. Controleren en goed monteren. |
|
|
|
|
1.Breng de draden op de juiste |
|
1. |
De draden zijn niet goed |
manier aan. |
Losse steken |
aangebracht |
2. De draad goed op de spoel |
|
|
2. |
De spoel is niet goed |
winden. |
|
opgewonden. |
3. Kies een goede naald voor de |
|
|
3. |
De combinatie van naald / sof / |
draad en stof. |
|
draad komen niet overeen. |
4. Corrigeer de draad spanning. |
|
|
4. |
De draad spanning is verkeerd. |
|
|
|
|
|
Gedraaide naad |
1.De naald is te groot voor de stof. |
1.Gebruik een dunnere naald. |
|
|
2. |
De steek lengte is verkeerd |
2.Verander de steeklengte. |
|
ingesteld. |
3.Corrigeer de draad spanning. |
|
|
3. |
De draad spanning is te hoog |
|
|
|
|
|
Ongelijke steken. |
1.De kwaliteit van de draad is |
1.Gebruik een betere kwaliteit |
|
|
slecht. |
draad. |
|
|
2. |
De spoel is verkeerd |
2.Verwijder de spoel en plaats een |
|
opgewonden. |
die beter is opgewonden. |
|
|
|
|
|
|
|
|
|
17
Belangrijke veiligheidsvoorschriften
Lees alle instructies voor gebruik.
Raak geen hete oppervlakken aan. Gebruik handvaten of knoppen.
Om u te beschermen tegen een elektrische schok; snoer, stekker of het apparaat niet onderdompelen in water of een andere vloeistof.
Haal de stekker uit het stopcontact indien het apparaat niet in gebruik is of voor reiniging.
Laat het apparaat afkoelen alvorens onderdelen te verwijderen of te monteren.
Het apparaat niet gebruiken met een beschadigd snoer of stekker of indien het toestel beschadigd is op enigerlei wijze.
Het gebruik van accessoires die niet zijn aanbevolen door de fabrikant van het apparaat kan schade veroorzaken en beëindigt iedere garantie die u heeft.
Gebruik het apparaat niet buitenshuis en op of in de buurt van directe warmtebronnen.
Laat geen snoer over de rand van de tafel hangen tegen hete oppervlakken of in contact komen met het apparaat. Plaats het product niet onder of dicht bij de gordijnen, raambekleding enz.
Dit apparaat is alleen voor huishoudelijk gebruik en voor het doel waar het voor bestemd is.
Het apparaat moet worden geplaatst op een stabiele, vlakke ondergrond.
Dit apparaat mag alleen worden gebruikt onder toezicht van volwassenen.
Dit apparaat is niet bedoeld om gebruikt te worden door personen (waaronder kinderen) met verminderde fysieke, zintuiglijke of mentale capaciteiten of een gebrek aan ervaring en kennis, tenzij zij onder toezicht staan of aanwijzingen hebben gekregen m.b.t. het gebruik van dit apparaat door iemand die verantwoordelijk is voor hun veiligheid.
Om kinderen te beschermen tegen de gevaren van elektrische apparatuur mag u ze nooit zonder toezicht bij het apparaat laten. Selecteer daarom een plek voor uw apparaat op dusdanige wijze dat kinderen er niet bij kunnen. Zorg er voor dat de kabel niet naar beneden hangt.
BEWAAR DEZE INSTRUCTIES VOOR LATERE RAADPLEGING
Garantievoorwaarden en service
Bij schade veroorzaakt door het niet opvolgen van de gebruiksaanwijzing, vervalt het recht op garantie! Voor vervolgschade die hieruit ontstaat zijn wij niet aansprakelijk.
Voor materiële schade of persoonlijk letsel veroorzaakt door ondeskundig gebruik of het niet opvolgen van de veiligheidsvoorschriften zijn wij niet aansprakelijk. In dergelijke gevallen vervalt elke aanspraak op garantie.
Anders dan het schoonmaken, zoals genoemd in deze handleiding, is aan dit apparaat geen ander onderhoud noodzakelijk.
18
Indien er reparaties moeten worden uitgevoerd, mag dit uitsluitend door een geautoriseerd bedrijf gebeuren.
Dit apparaat is alleen bedoeld voor HUISHOUDELIJK gebruik en niet voor commercieel of industrieel gebruik.
Het product mag niet worden gewijzigd of veranderd.
Indien zich problemen zouden voordoen gedurende 2 jaar na aankoopdatum, welke gedekt zijn door de fabrieksgarantie, zal TRISTAR het apparaat repareren of vervangen.
Uitsluitend materiaalen/of fabricagefouten zijn voorbegrepen in deze garantie. TRISTAR is niet verantwoordelijk voor schade:
1)Ten gevolge van een val of ongeluk.
2)Indien het apparaat technisch is gewijzigd door gebruiker of derden.
3)Door oneigenlijk gebruik van het apparaat.
4)Door normale gebruiksslijtage.
Door eventuele reparatie wordt de oorspronkelijke garantieperiode van 2 jaar niet verlengd. Deze garantie is slechts geldig op Europees grondgebied. Deze garantie heft de gebruikersrechten volgens Europese richtlijn 1944/44CE niet op.
Voor vragen of klachten kunt zich melden bij uw verkooppunt.
Bewaar altijd uw aankoopbewijs, zonder dit aankoopbewijs kunt u geen aanspraak maken op enige vorm van garantie.
Aanwijzingen ter bescherming van het milieu
Dit product mag aan het einde van zijn levensduur niet bij het normale huisafval worden gedeponeerd, maar dient bij een speciaal inzamelpunt voor het hergebruik van elektrische en elektronische apparaten te worden aangeboden. Het symbool op artikel, gebruiksaanwijzing en verpakking attendeert u hier op. De gebruikte grondstoffen zijn geschikt voor hergebruik. Met het hergebruik van gebruikte apparaten of grondstoffen levert u een belangrijke bijdrage voor de
bescherming van ons milieu. Informeer bij uw lokale overheid naar het bedoelde inzamelpunt.
Verpakking
Het verpakkingsmateriaal is 100% recyclebaar, lever het verpakkingsmateriaal gescheiden in.
Product
Dit apparaat is voorzien van het merkteken volgens de Europese richtlijn 2002/96/EG Inzake Afgedankte elektrische en elektronische apparaten(AEEA). Door ervoor te zorgen dat dit product op de juiste manier als afval wordt verwerkt, helpt u mogelijk negatieve consequenties voor het milieu en de menselijke gezondheid te voorkomen.
EG-conformiteitsverklaring
Dit apparaat is ontworpen om in contact te komen met levensmiddelen en is ontworpen in overeenstemming met de EG-richtlijn 89/109/EEC
Dit apparaat is ontworpen, vervaardigd en in de handel gebracht in overeenstemming met: de veiligheidsdoeleinden van de “laagspanningsrichtlijn”nr. 73/23/EG, de beschermingsvoorschriften van de EMC-richtlijn 89/336/EG “Electromagnetische compatibiliteit” en de vereiste van richtlijn 93/68/EG
19
Snap-in sewing table |
UK |
1.The bobbin holder and accessory bag are put into the inside of the sewing table
2.Keep the snap-in sewing table horizontal and pull it out from the machine (photo 1)
3.Pull the side cover to open it. (photo 2)
Connecting to the power source
1.Connect plug “A” to the machine and plug “B” into the wall outlet
2.Turn on power switch “ON”.
3.Connect the foot control “C” to the machine.
4.The speed of the machine can be regulated by applying pressure to the foot controller.
Press main switch to “ON” for power and the sewing light on.
On/off switch
20
Inserting the needle
Attention: Turn power to “off” position before inserting the needle, to avoid electrical shock.!~! Change the needle regularly, especialy if it is showing signs of wear and causing problems. Insert the needle as follows:
Loose the needle clamp screw(no.13) and tighten again after inserting the new needle.
The flat side of the needle should be towards the back. Insert the needle as far up as it will go.
 (Needle clamp screw no.13)
Attaching the presser foot holder
The machine has the standard pressure foot, used for sewing of different fabrics. For the sewing of button holes and zippers you have to place another pressure foot on the machine. See the following description with illustrations how to replace the pressure foot.
Figure 1. Put the pressure foot lever (no.18) up. Place the foot clamp (B) on the pressure foot lever and tighten screw A fixed.
Figure 2. Lower the foot lever until the notch (C) is right above the pin (D) of the pressure foot area. Press E and lift the pressure foot so that pin D is exactly C recess, then loose lever E.
Figure 3. Removing the pressure foot.
Lift the pressure foot lever, press lever E and the pressure foot falls off.
Presser foot lever No.18
|
|
E |
A |
E |
C |
|
|
Presser |
B |
D |
foot |
21
Threading the upper thread.
For quick and easy installation of the upper thread follow the numbers 1 to 8 by the black dotted line in the diagram below. The enlargements can be a clarification of the step.
1.Put the bobbin on the bobbin winder (no.5) and guide the thread through the winding thread guide (no.7) from the back to the front.
2.Push thread tension release bar to left, then guide the thread down between the tension disc making sure that the thread has been inserted into the tension disc.
3.Continue to draw the thread down and around the thread pulling bar fixed holder spring from left to right.
4.Draw the thread up, through the take-up lever draw from left to right.
5.Continue to draw the thread down through the thread take-up lever from front to back.
6.Drawing down the thread and through the lower guide from back to front.
7.Continue to draw down the thread through the thread protector.
8.Finally thread the needle from front to back (important !!!!)
Fixed thread holder
22
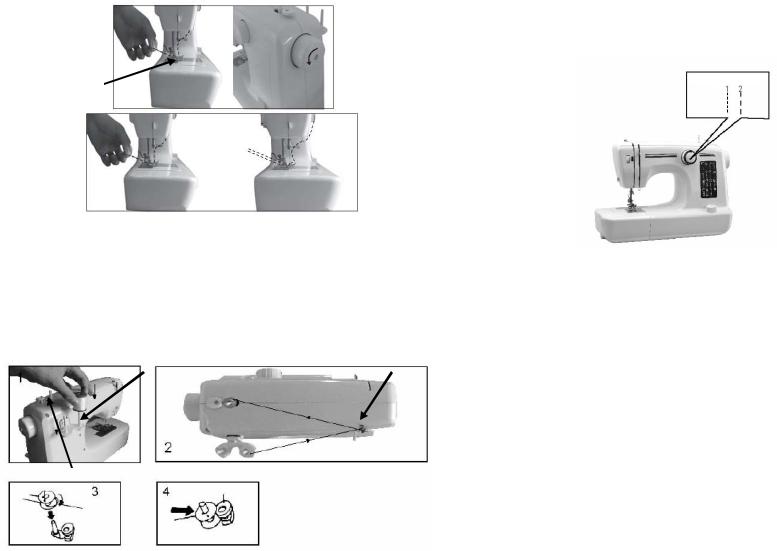
Bring up the lower thread
When inserting or removing the lower bobbin, the needle must be fully raised. Turn the handwheel (no.3). Open the hook cover and pull out the plastic window.
Insert the bobbin in the bobbin case, so that the thread rund in a clockwise direction. Replace the plastic window and the hook cover.
Raise the presser foot, hold the upper thread with the left hand, right hand turn the handwheel anticlockwise until the needle is raised. When the needle reach the bottom, the hook tray will hook the upper thread, rotate the hook tray to pull the lower thread out. Pull the lower and upper thread under presser foot(no.14), pull out 10 cm to the back.
 No.3
No.3
No.14
Winding of the bobine.
Figure 1. Place a yarn pirn on the bobine pin (no.6).
Figure 2. Guide the thread through the winding thread guide (no.7) to the empty bobine. Figure 3. Wind the thread several times clockwise to the empty bobine and place it on the
bobine winder(no. 5 in figure 1).
Figure 4. Press the bobbin against the bobinestopper. Start electric winding by pressing the foot control.
When the bobbin is full, release the foot pedal, cut the thread, then remove bobbin
No.6 |
No.7 |
No.5
Reverse sewing.
At the end of seam, press down reverse sewing lever, sew a few reverse stitches, fix the trace to avoid loosing. The reverse trace shouldn’t beyound 5 cm. Release the lever and the machine will sew forward again.
Straight and other stitching
Make sure the bobbin winder (no.5) is selected on "seewing".
There are two kinds of straight stitch for your choise. Turn the pattern seklector dial to the one you need.wenst. Set the needle at the highest position by turning hand wheel anticlockwise. Gently pull both threads (about 10 cm) towards rear, raise the presser foot, place the fabric under the presser foot.
Gently press down the foot control to start sewing. Guide fabriv gently by hand. Stop the needle in its top position, and thread can be pulled out easily.
Raise the presser foot and remove the fabric. This for aal the patterns of your choise.
Pattern selector
Notice:
1. When turning the pattern selector dial, assure the needle tip is at the upper position, otherwise it will be bent or damaged or fail to sewing.
2. When selecting the pattern dial, set the position correctly, otherwise it will hurt the needle or sew over the the selected stitch trace. It will be different from the selected pattern.
Buttonholes
Preparation
1.Raise the presser foot lever, remove the metallic presser foot and replace a buttonhole foot. (note: before setting buttonhole foot, turn the hand wheel and make sure that the feed dogs is below the needle plate and the needle have to be about 5 mm above the needle plate.)
2.Make sure the diameter of the button and add 3 mm (1/8”) for the bartacks.
3.If you have a very thick button, add more to the diameter measurement.
4.Mark the position and length of the buttohole on the fabric.
5.Position the fabric so that the needle is on the mark that is the furthest from you.
6.Pull the buttonhole foot towards you as far as it will go.
7.Lower the foot.
a)Turn the pattern selector dial to pattern no.13. Sew at moderate speed until you reach the end mark.
b)Turn the pattern selector dial to pattern no. 14 and sew 5-6 bartacks stitches.
c)Turn the pattern selector dial to pattern no. 15 and sew the left side of the buttonhole to the mark that is further from you (beginning of buttohole).
d)Turn the pattern selector dial to pattern no. 16 and sew bartracks stitches.
24
Remove the fabric from under the foot. Draw the upper thread through the backside of the fabric and knot upper and lower threads. Cut the center of the buttonhole with the seam ripper, being careful not to cut the stitches on either side.
Tips:
1.Slightly reduce the upper thread tension to produce better results.
2.Use backing material for fine and stretchy fabrics.
NEEDLE SIZE |
FABRICS |
THREAD |
|
|
|
|
|
9-11(65-75) |
Lightweight fabrics-thin cottons, |
Light-duty thread in cotto, nylon or |
|
|
voile,serge, silk, muslin, Qiana, |
polyester. |
|
|
interlocks, cotton knits, tricots, |
|
|
|
jerseys, crepes, wovenplyester, |
|
|
|
shirt& blouse fabrics. |
|
|
|
|
|
|
12(80) |
Medium weight fabrics-cotton, |
|
|
|
satin, kettlecloth, sailcloth, double |
|
|
|
knits, lightweight woollens. |
Most threads old are medium size |
|
|
|
and suitable for these fabrics and |
|
|
|
needle sizes. Use polyester |
|
14(90) |
Medium weight fabrics-cotton |
||
threads on synthetic materials and |
|||
|
duck, woolen, heavier knits, |
||
|
cotton or natural woven fabrics for |
||
|
terrycloth, denims. |
||
|
best results. Always use the same |
||
|
|
||
|
|
thread on top and bottom. |
|
16(100) |
Heavyweight fabrics-canvas, |
||
|
|||
|
woolens, outdoor tent and quilted |
|
|
|
fabrics, denims, upholstery |
|
|
|
material (light to medium) |
|
|
|
|
|
|
18(110) |
Heavy woollens, overcoat fabrics, |
Heavy duty thread, carpet thread. |
|
|
upholstery fabrics, some leathers |
(use heavy foot pressure-large |
|
|
and vinyls |
numbers). |
|
|
|
|
25
Trouble shooting
Problem |
|
Cause |
|
Correction |
|
|
|
||
Upper thread breaks |
1. The machine is not |
1.Rethread the machine. |
||
|
threaded correctly. |
2. |
Reduce the thread tension |
|
|
2. |
The thread tension is too |
(lower number). |
|
|
tight |
3. |
Select a larger needle. |
|
|
3. |
The thread is too thick for |
4. |
Remove and reinsert the |
|
the needle. |
needle (flat side towards the |
||
|
4. |
The needle is not inserted |
back). |
|
|
correctly. |
5. |
Remove the bobbin and |
|
|
5. |
The thread is round wound |
rewind the bobbin. |
|
|
the spool pin. |
6.Replace the needle. |
||
|
6. |
The needle is damaged. |
|
|
|
|
|
||
Lower thread breaks. |
1. The lower thread is not |
1.Check the threading |
||
|
inserted correctly. |
carefully. |
||
|
2. |
The upper thread tension is |
2.adjust the upper thread |
|
|
too loose. |
tension. |
||
|
|
|
||
|
|
|
||
Skipped stitches |
1. The needlenis not inserted |
1.Remove and reinsert needle |
||
|
correctly. |
(flat side towards the back). |
||
|
2. |
The needle is damaged. |
2. |
Insert a new needle. |
|
3. |
The wrong size needle has |
3.Choose a needle to suit the |
|
|
been used. |
the thread and fabric. |
||
|
4. |
The foot is not attached |
4.Check and attach correctly. |
|
|
correctly. |
|
|
|
|
|
|
|
|
Needle breaks |
1.The needle is damaged. |
1. |
Insert a new needle. |
|
|
2.The needle is not inserted |
2.Insert the needle correctly |
||
|
correctly. |
(flat side towards the back). |
||
|
3.Wrong needle size for the |
3. |
Choose a needle to suit the |
|
|
fabric. |
thread and fabric. |
||
|
4.The wrong foot is attached. |
4. |
Check and attach correctly. |
|
Loose stitches |
1. The machine is not |
1.Check the threading. |
||
|
threated correctly. |
2. |
Thread the bobbin case as |
|
|
2. |
The bobbin case is not |
illustraded. |
|
|
correctly threated. |
3. |
The needle size must suit |
|
|
3. |
Needle/fabric/thread |
the fabric and thread. |
|
|
combination is wrong. |
4. |
Correct the thread tension. |
|
|
4. |
Thread tension wrong. |
|
|
|
|
|
||
Seams puckering |
1.The needle is too large for |
1.Select a finer needle. |
||
|
fabric. |
2.Readjust the stitch length. |
||
|
2. |
The stitch length is wrongly |
3.Loosen the thread tension. |
|
|
adjusted. |
|
|
|
|
3. |
The thread tension is too |
|
|
|
tight. |
|
|
|
|
|
|
|
|
26

IMPORTANT SAFEGUARDS
Read all instructions before use.
Do not touch hot surfaces. Use handles or knobs.
To protect against electric shock, do not immerse cord, plug or appliance in water or any other liquid.
Unplug from outlet when not in use and before cleaning. Allow the device to cool before putting on or taking off parts. Do not operate any appliance with a damaged cord or plug or after the appliance malfunctions, or has been damaged in any manner.
The use of accessory attachments not recommended by the appliance manufacturer may cause injuries and invalidate any warranty you may have.
Do not use outdoors, or on or near direct heat sources
Do not let cord hang over edge of table or counter, or touch hot surfaces or come into contact with the hot parts or allow the product to be situated underneath or close to curtains, window coverings etc.
This appliance is for household use only and only for the purpose it is made for.
The appliance must be placed on a stable, level surface.
This appliance is an attended appliance, and as such should never be left ON or whilst hot without adult supervision.
This appliance is not intended for use by persons (including children) with reduced physical,sensory or mental capabilities,or lack of experience and knowledge,unless they have been given supervision or instruction concerning use of the appliance by a person responsible for their safety.
Children should be supervised to ensure that they do not play with the appliance.
SAVE THESE INSTRUCTIONS FOR FUTURE REFERENCE
Guarantee
The device supplied by our Company is covered by 24 month guarantee starting on the date of purchase (receipt).
During the life of the guarantee any fault of the device or its accessories to material or manufacturing defects will be eliminated free of charge by repairing or, at our discretion, by replacing it. The guarantee services do not entail an extension of the life of the guarantee nor do they give rise to any right to a new guarantee!
Proof of the guarantee is provided by the proof of purchase. Without proof of purchase no free replacement or repair will be carried out.
If you wish to make a claim under the guarantee please return the entire machine in the original packaging to your dealer together with the receipt.
Damage to accessories does not mean automatic free replacement of the whole machine. In such cases please contact our hotline. Broken glass or breakage of plastic parts are always subject to a charge.
Defects to consumables or parts subject to wearing , as well as cleaning, maintenance or the replacement of said parts are not covered by the guarantee and hence are to be paid!
The guarantee lapses in case of unauthorized tampering.
After the expiry of the guarantee repairs can be carried by the competent dealer or repair service against the payment of the ensuing costs.
27
Guidelines for protection of the environment
This appliance should not be put into the domestic garbage at the end of its useful life, but must be disposed of at a central point for recycling of electric and electronic domestic appliances. This symbol on appliance, instruction manual and packaging puts your attention to this important issue. The materials used in this appliance can be recycled. By recycling used domestic appliances you contribute an important push to the protection of our environment. Ask your local authorities for information regarding the point of recollection
Packaging
The packaging is 100% recyclable, return the packaging separated.
Product
This device is equipped with a mark according to European Directive 2002/96/EC
on Waste Electrical and Electronic Equipment (WEEE). By ensuring that the product correctly as waste is processed, it helps you may have adverse consequences for the environment and human health.
EC declaration of conformity
This device is designed, manufactured and marketed in accordance with the safety objectives of the Low Voltage Directive "No 73/23/EEC, the protection requirements of the EMC Directive 89/336/EC "Electromagnetic Compatibility" and the requirement of Directive 93/68/EEC.
28
Mise en place de la boîte à couture |
FR |
1.Le porte canette et la poche des accessoires sont placés à l’intérieur de la table à couture
2.Maintenez la boite à couture à l'horizontale et tirez-la hors de la machine (image 1)
3.Pour l’ouvrir, tirez sur le côté. (image 2)
Branchement à une source d’alimentation
1.Brancher la prise (A) à la machine et la prise (B) à la prise secteur
2.Mettez sous tension en appuyant sur « ON ».
3.Branchez la pédale de commande (C) à la machine.
4.La vitesse de la machine peut être contrôlée en appuyant sur la pédale de commande.
Appuyez sur l’interrupteur principal « ON » pour mettre sous tension et allumer le témoin de couture.
 Bouton « ON/OFF »
29
Insertion de l’aiguille
Attention: Mettez sur la position « OFF » avant d’insérer l’aiguille pour éviter tout choc électrique !!
Remplacer l’aiguille régulièrement, surtout si elle commence à s’user et à poser des problèmes.
Insérer l’aiguille comme indiqué ci-dessous :
Desserrez la vis de serrage de l’aiguille (no.13) et resserrez-la à nouveau après avoir mis nouvelle aiguille.
Le côté plat de l’aiguille devrait être vers l’arrière. Insérez l’aiguille aussi haut que possible.
 (Vis de serrage de l’aiguille no.13)
Installation de la barre du pied de biche
La pression du pied-de-biche a été préréglée afin de coudre des tissus différents. Pour piquer des boutonnières et des fermetures à glissière, il faut mettre un pied différent sur la machine. Voir la description suivante illustrée pour le changement de pied.
Figure 1. Relevez la barre du pied-de-biche (no.18). Mettez la tige de serrage du pied (B) sur la barre du pied de biche et resserrez la vis (A) à fond.
Figure 2. Abaissez la barre du pied de biche jusqu’à ce que le cran (C) soit juste au-dessus de la cheville (D) du pied-de-biche. Appuyez sur (E) et levez le pied-de-biche pour que la cheville
(D) soit exactement en place (C), puis relâchez la barre (E). Figure 3. Retirez le pied-de-biche.
Relevez la barre du pied-de-biche, appuyez la barre (E) et le pied se libère.
Tige du pied-de-biche No.18
|
|
E |
A |
E |
C |
|
|
Pied de |
B |
D |
biche |
30
Enfilage du fil supérieur.
Pour une installation facile et rapide du fil supérieur, suivez les étapes de 1 à 8 près de la ligne pointillée de la figure ci-dessous : Les agrandissements peuvent éclaircir une étape.
1.Placez la bobine sur le porte-bobine (no.5) et faites passer le fil dans le guide fil (no.7) de l'arrière vers l'avant.
2.Poussez le levier de tension du fil vers la gauche, puis faites passer le fil sur le disque de tension tout en s'assurant que le fil ait bien été inséré dans le disque de tension.
3.Continuez de tirer le fil vers le bas et autour du ressort fixe du levier du guide fil de gauche à droite.
4.Tirez le fil vers le haut par le releveur de fil de gauche à droite.
5.Continuez de tirer le fil vers le bas par le releveur de fil de l’avant vers l’arrière.
6.En tirant le fil vers le bas et dans le guide inférieur de l’arrière vers le devant,
7.Continuez de tirer le fil vers le bas à travers le protecteur de fil.
Enfin, enfiler l’aiguille du devant vers l’arrière – IMPORTANT !!!
Cran intégré du fil
31
Remonter le fil inférieur
Pour insérer ou enlever la bobine du bas, l’aiguille doit être complètement remontée.Tournez le volant (no 3). Ouvrez la plaque à repriser et retirez la languette plastique.Placer la bobine dans le boîtier à bobine pour que le fil défile dans le sens d’une montre.Remettez la languette plastique et la plaque à repriser en place.Relevez le pied-de-biche, tenez le fil supérieur de la main gauche, de la main droite, tournez le volant dans le sens contraire d’une montre, jusqu'à ce que l'aiguille soit levée. Quant l’aiguille touche le bas, le fil supérieur s’accrochera à la plaque à repriser, tournez-la pour retirer le fil inférieur. Tirez le fil inférieur et supérieur sous le pied-de-biche (no.14) de 10 cm vers l’arrière.
 No.3
No.3
No.14
Bobinage de la canette.
Figure 1. Mettre une canette de fil sur le bobineur de canette (no.6).
Figure 2. Faire passer le fil dans le guide de bobinage du fil (no. 7) pour vider la bobine. Figure 3. Tournez le fil plusieurs fois dans le sens d'une montre pour vider la bobine et la
mettre dans le bobineur de canette (no. 5 sur la figure 1). Figure 4. Appuyez la bobine contre le porte bobine.
Faire démarrer le bobineur électrique en appuyant sur la pédale.
Lorsque la canette est pleine, relâcher la pédale, couper le fil puis enlever la bobine.
No.6 |
No.7 |
No.5
32
Couture en marche arrière
A la fin de la couture, appuyez sur le levier de couture en marche arrière, piquez quelques points de marche arrière, renforcer la piqûre pour éviter que les points ne lâchent. Le retour en marche arrière ne devrait pas dépasser 5 cm. Relâcher le levier et la machine piquera à nouveau en avant.
Point droit et autres points
S’assurer que le bobineur de canette (no.5) soit mis sur « couture ».
Vous pourrez choisir entre deux sortes de points droits. Tournez le sélecteur de point sur celui que vous désirez. Placez l’aiguille sur le point le plus haut en tournant la molette dans le sens contraire d’une montre. Retirez doucement les deux fils (environ 10 cm) vers l'arrière, relevez le pied-de-biche, mettez le tissu sous ce dernier.
Appuyez doucement la pédale pour commencer à coudre. Guidez doucement le tissu avec la main. Arrêtez l’aiguille sur la position élevée de façon à ce que le fil puisse être tiré facilement. Relevez le pied-de-biche et retirez le tissu.
Ceci pour tous les points de votre choix.
Sélecteur de point |
Avis : |
|
1.En tournant le sélecteur de point, |
|
s’assurer que le bout de l’aiguille |
|
soit à sa position la plus haute, |
|
autrement elle sera pliée ou |
|
endommagée ou ne pourra pas |
|
piquer. |
|
2.Lors de la sélection du point, |
|
réglez la position exacte, |
|
autrement l'aiguille sera |
|
endommagée ou repiquera le |
|
passage de point sélectionné. |
|
Cela sera différent du point choisi. |
Boutonnières
Préparation
1.Relevez le levier du pied-de-biche, enlevez le pied-de-biche métallique et le remplacer par un pied pour boutonnière. (NB : avant de mettre le pied pour boutonnière, tournez le volant et s’assurer que les griffes d’entrainements soient sous la plaque à aiguille et que l’aiguille soit environ 5mm au-dessus de celle-ci.)
2.S’assurer du diamètre du bouton et ajouter 3mm pour les barrettes de renforts.
3.Si le bouton est très épais, augmenter les dimensions du diamètre.
4.Marquez la position et la longueur de la boutonnière sur le tissu.
5.Placez le tissu de sorte que l'aiguille se trouve sur la marque la plus éloignée de vous.
6.Tirez le pied pour boutonnière aussi près de vous que possible.
7.Abaissez le pied.
a)Tournez le sélecteur de point sur le point no.13. Piquez à petite vitesse jusqu’à ce que vous atteigniez la marque finale.
b)Tournez le sélecteur de point sur le point no. 14 et piquez 5 ou 6 points de barrettes de renfort.
33
c)Tournez le sélecteur de point sur le point no. 15 et piquez le côté gauche de la boutonnière jusqu’à la marque finale qui est la plus éloignée de vous (début de la boutonnière).
d)Tournez le sélecteur de point sur le point no. 16 et piquez des points de barrettes de renfort.Retirez le tissu du dessous du pied. Tirez le fil supérieur par l’envers du tissu et faites un nœud aux fils supérieur et inférieur. Coupez le milieu de la boutonnière avec le découvit en faisant attention de ne pas couper les points de chaque côtés.
Astuces :
1Réduisez légèrement la tension du fil supérieur pour obtenir de meilleurs résultats.
2Placez de l’entoilage sous des tissus fins et extensibles.
TAILLE DE |
TISSUS |
L'AIGUILLE |
|
|
|
9-11(65-75) |
Tissus fins – cotons fins, voile, |
|
serge, soie, mousseline, |
|
« Qiana », cache-couture, tricots |
|
en coton, lainages, acrylique, |
|
crêpe, polyester, tissus de chemise |
|
& blouse. |
|
|
12(80) |
Tissus moyens, coton, satin, laine |
|
bouillie, toile à voile, lainages épais |
|
et légers. |
|
|
14(90) |
Tissus moyenstoile à voile, laine |
|
cardée, lainages plus épais, tissu |
|
éponge, denims. |
|
|
16(100) |
Tissus lourds – toile de jute, |
|
lainages, tente de camping et tissu |
|
ouatiné, denims, tissu |
|
d’ameublement (léger à moyen) |
|
|
18(110) |
Lainages épais, étoffe de manteau, |
|
tissu d’ameublement, certains cuirs |
|
et vinyles |
FIL
Fil fin en coton, nylon ou polyester.
La plupart des vieux fils sont de tailles moyennes et conviennent à ces tissus et aux dimensions des aiguilles. Utiliser des fils polyesters sur des tissues synthétiques et en coton ou des tissus d’étoffe naturelle pour de meilleurs résultats.
Fil pour tissu épais, fil pour tapis. (appuyer fortement sur la pédale - chiffres élevés).
34

Dépannage
Problème |
|
Cause |
|
Solution |
|
|
|
|
|
Le fil supérieur se casse |
1. La machine n’est pas bien |
1. |
Enfilez à nouveau la |
|
|
enfilée. |
machine. |
||
|
2. |
La tension du fil est trop |
2. |
Réduisez la tension du fil |
|
forte. |
(chiffre inférieur). |
||
|
3. |
Le fil est trop épais pour |
3. |
Sélectionnez une plus |
|
l’aiguille. |
grande aiguille. |
||
|
4. |
L’aiguille n’est pas bien |
4. |
Enlevez et réinstallez |
|
insérée. |
l’aiguille (côté plat vers |
||
|
5. |
Le fil est enroulé autour de |
l'arrière). |
|
|
la broche porte bobine. |
5. |
Enlevez la bobine et |
|
|
6. |
L’aiguille est endommagée. |
rembobinez la canette. |
|
|
|
|
6. |
Remplacez l’aiguille. |
|
|
|
|
|
Le fil inférieur se casse |
1. Le fil inférieur n’est pas |
1. |
Vérifiez bien l’enfilage. |
|
|
enfilé correctement. |
2. |
Ajustez la tension du fil |
|
|
2. |
La tension du fil supérieur |
supérieur. |
|
|
est trop lâche. |
|
|
|
|
|
|
|
|
|
|
|
|
|
Points sautés |
1. L’aiguille n’est pas bien |
1. |
Enlevez et réinstallez |
|
|
insérée. |
l’aiguille (côté plat vers |
||
|
2. |
L’aiguille est endommagée |
l'arrière). |
|
|
3. |
Taille incorrecte de l’aiguille |
2. |
Insérez une nouvelle |
|
utilisée. |
aiguille. |
||
|
4. |
Le pied n’est bien installé |
3. |
Choisissez une aiguille |
|
|
|
adaptée au fil et au tissu. |
|
|
|
|
4. |
Vérifiez et bien installer. |
|
|
|
|
|
L’aiguille se casse |
1. L’aiguille est endommagée |
1. |
Insérez une nouvelle |
|
|
2. |
L’aiguille n’est pas bien |
aiguille. |
|
|
insérée. |
2. |
Bien insérer l’aiguille (côté |
|
|
3 Taille de l’aiguille incorrecte |
plat vers l'arrière). |
||
|
pour le tissu. |
3. |
Choisissez une aiguille |
|
|
4. |
Le mauvais pied est |
adaptée au fil et au tissu. |
|
|
installé. |
4. |
Vérifiez et bien installer. |
|
Points Lâches |
1. La machine n’est pas bien |
1. |
Vérifiez l’enfilage. |
|
|
enfilée. |
2. |
Enfilez le boîtier de canette |
|
|
2. |
Le boîtier de la canette |
comme illustré. |
|
|
n’est pas bien inséré. |
3. |
La taille de l’aiguille doit |
|
|
3. |
Mauvaise adéquation |
être adaptée au fil et au tissu. |
|
|
d’aiguille, de tissu, de fil. |
4. |
Corrigez la tension du fil. |
|
|
4. |
La tension du fil est |
|
|
|
incorrecte. |
|
|
|
|
|
|
|
|
Les coutures se froncent |
1. L’aiguille est trop épaisse |
1. |
Choisissez une aiguille plus |
|
|
pour le tissu. |
fine. |
||
|
2. |
La longueur du point est |
2. |
Réajustez la longueur du |
|
mal réglée. |
point. |
||
|
3. |
La tension du fil est trop |
3. |
Relâchez la tension des |
|
forte. |
fils. |
||
|
|
|
|
|
35
MISES EN GARDES IMPORTANTES
Lisez toutes les instructions avant utilisation.
Ne touchez pas les surfaces chaudes, servez-vous des poignées et des boutons.
Pour vous protéger des risques d'électrocution, n'immergez ni le cordon d'alimentation ni l'appareil dans l'eau ou dans tout autre liquide.
Débranchez la prise lorsque vous ne vous en servez pas et avant de procéder au nettoyage. Laissez refroidir l'appareil avant d'en retirer ou d'y ajouter des éléments. N'utilisez jamais un appareil dont le cordon d'alimentation ou la fiche est endommagé, ou bien après qu'il ai subit un dysfonctionnement ou ait été endommage d'une quelconque façon.
L'utilisation d'accessoires non recommandés par le fabriquant de l'appareil est susceptible de provoquer des blessures ainsi que l'annulation de la garantie dont vous bénéficiez.
Ne pas utiliser à l'extérieur ou sur ou à proximité de sources de chaleur.
Ne laissez pas le cordon pendre depuis le rebord d'une table ou d'un plan de travail, ne le laissez pas entrer en contact avec des surfaces chaudes ou avec les éléments de l'appareil qui chauffent durant l'utilisation. Ne placez pas l'appareil sous ou à proximité de rideaux ou des garnitures de fenêtres.
Cet appareil est exclusivement destiné à une utilisation domestique dans le but pour lequel il a été prévu.
L'appareil doit être placé sur une surface stable et plane.
Cet appareil nécessite la présence constante d'un utilisateur adulte lorsqu'il est en marche ou qu'il est chaud.
Cet appareil n'est pas prévu pour être utilisé par des personnes (y compris les enfants) don't les capacities physiques, sensorielles ou mentales sont réduites, oou des personnes dénuées d'expérience ou de connaissance, sauf si elles ont pu bénéficier, par l'intermédiaire d'une personne responsable de leur sécurité, d'une surveillance ou d'instructions préalables concernant l'utilisation de l'appareil.
Il convient de surveiller les enfants pour s'assurer qu'ils ne jouent pas avec l'appareil.
Afin de protéger les enfants des dangers des appareils électriques, ne les laissez jamais sans surveillance à proximité de l’appareil. En conséquence, lorsque vous choisissez l’emplacement de l’appareil, faites-le de telle manière que l’enfant n’aura pas accès à l’appareil. Vérifiez et assurez-vous que les câbles ne pendent pas.
CONSERVEZ CES INSTRUCTIONS POUR REFERENCE ULTERIEURE
Garantie
L'appareil fourni par notre société est couvert par une garantie de 24 mois à compter de la date d'achat (reçu).
Au cours de la période de garantie, tout défaut sur l'appareil ou ses accessoires et tout défaut de fabrication sera gratuitement réparé ou remplacé –à notre discrétionLes interventions couvertes par la garantie ne prolongent pas la durée de la période de garantie et ne donnent droit à aucune nouvelle garantie !
La preuve d'achat fait office de bon de garantie. Sans preuve d'achat aucun remplacement ou réparation gratuite ne sera effectué.
Si vous désirez avoir recours à la garantie, veuillez renvoyer l'appareil dans son emballage d'origine chez votre détaillant, en y joignant votre preuve d'achat.
36

Les dommages subits par les accessoires n'impliquent pas un remplacement automatique de l'ensemble de l'appareil. Dans un tel cas, veuillez contacter notre service d'assistance en ligne. Les éléments en verre ou en plastique qui sont cassés donnent toujours lieu à un échange.
Les défauts concernant les consommables ou les éléments sujets à l'usure ainsi que le nettoyage, l'entretien ou le remplacement de ces éléments ne sont pas couverts par la garantie et sont donc à la charge du client !
La garantie est annulée si des interventions non autorisées sont effectuées sur l'appareil.
Après expiration de la période de garantie, les réparations peuvent être prises en charge contre facturation par un vendeur spécialisé ou un service d'entretien.
Directives pour la préservation de l'environnement
Cet appareil ne doit pas être mis au rebut avec les déchets ménagers lorsqu'il arrive au terme de sa durée de vie. Il doit être mis au rebut dans un centre de collecte pour le recyclage des équipements ménagers électriques et électroniques. Le symbole sur l'appareil, les instructions d'utilisation et sur l'emballage sont là pour vous rappeler ce point important. Les matériaux utilisés pour la fabrication de l'appareil peuvent être recyclés. En recyclant les équipements ménagés usés vous contribuez de façon importante à la protection de notre environnement. Renseignez-vous auprès des autorités
locales pour obtenir des informations concernant les points de collectes des environs.
Emballage
L'emballage est recyclable à 100%, mettez-le au rebut en le séparant des autres déchets.
Produit
Cette appareil est doté d'une marque en fonction de la Directive Européenne 2002.96/EC sur les Déchets d'Equipements Electriques et Electroniques (DEEE). En faisant en sorte que le produit soit traité de façon adéquate lors de sa mise au rebut vous pouvez contribuer à prévenir des effets néfastes pour la santé humaine et l'environnement.
Déclaration de conformité CE
Cet appareil est conçu, fabriqué et distribué en respectant les objectifs de sécurité de la Directive Basse Tension no 73/23/EEC, les exigences de protection de la Directive EMC 89/336/EC "Compatibilité Electromagnétique" et les exigences de la Directive 93/68/EEC.
Aufklappbarer Nähtisch |
DE |
1.Garnrollenhalter und Zubehörtasche werden im Nähtisch aufbewahrt.
2.Den aufklappbaren Nähtisch waagrecht halten und aus der Maschine ziehen. (Foto 1)
3.Zum Öffnen die Seitenabdeckung (Foto 2) abziehen.
Stromanschluss
1.Stecker “A” mit der Maschine und Stecker “B” mit einer Steckdose verbinden.
2.Ein-Ausschalttaste auf “EIN” stellen.
3.Die Fußsteuerung “C” an der Maschine anschließen.
4.Die Maschinengeschwindigkeit kann durch Drücken der Fußsteuerung reguliert werden.
Für Stromversorgung und Einschalten der Nähleuchte den Stromschalter auf “EIN” stellen.
Ein/Aus Schalter
37 |
38 |
Einsetzen der Nadel
Achtung: Vor dem Einsetzen der Nadel, Schalter auf “aus” stellen, um Stromschlag zu vermeiden.!~!
Die Nadel regelmäßig wechseln, insbesondere wenn sie Abnutzungserscheinungen aufweist und Probleme verursacht.
Die Nadel folgendermaßen einsetzen:
Die Nadelbefestigungsschraube (Nr.13) lösen und nach dem
Einsetzen der neuen Nadel wieder fest anziehen.
Die flache Seite der Nadel sollte nach hinten zeigen. Die
Nadel bis zum Anschlag einsetzen.
 (Nadelbefestigungsschraube Nr.13)
Befestigen der Nähfußhalterung
Die Maschine hat einen Standard Nähfuß, der zum Nähen verschiedener Stoffe benutzt wird. Zum Nähen von Knopflöchern und Reißverschlüssen müssen Sie einen anderen Nähfuß an der Maschine einsetzen. Zum Auswechseln des Nähfußes siehe folgende Beschreibung mit Abbildungen.
Abbildung 1. Den Nähfußhebel (Nr.18) nach oben ziehen. Die Fußbefestigung (B) auf den Nähfußhebel setzen und Schraube A festziehen.
Abbildung 2. Den Fußhebel senken, bis die Kerbe (C) genau über dem Stift (D) des Nähfußbereichs liegt. Hebel E drücken und den Nähfuß anheben, bis Stift D genau an Kerbe C angepasst ist, dann Hebel E lösen.
Abbildung 3. Nähfuß entfernen.
Nähfuß anheben, Hebel E drücken und der Nähfuß fällt ab.
Nähfuß- hebel Nr.18
E
A E C
Nähfuß
B D
39
Einfädeln des Oberfadens
Für schnelles und einfaches Installieren des Oberfadens die Schritte 1 bis 8, entsprechend der gestrichelten Linie, auf der unteren Abbildung befolgen. Die Vergrößerungen können die Schritte verdeutlichen.
Einfädeln des Oberfadens
Für schnelles und einfaches Installieren des Oberfadens die Schritte 1 bis 8, entsprechend der gestrichelten Linie, auf der unteren Abbildung befolgen. Die Vergrößerungen können die Schritte verdeutlichen.
1.Die Garnrolle (Nr.5) auf den Garnrollenwickler setzen und den Faden von hinten nach vorne durch die Fadenführung (Nr.7) führen.
2.Die Stange zum Lösen der Fadenspannung nach links drücken, dann den Faden nach unten zwischen die Spannungsscheiben führen und sicherstellen, dass der Faden in die Spannungsscheibe eingesetzt ist.
3.Den Faden weiter nach unten ziehen und, um die an der Fadenzugstange befestigte Haltefeder, von links nach rechts führen.
4.Den Faden durch den Fadenaufnahmehebel von links nach rechts ziehen.
5.Den Faden weiter nach unten durch den Fadenaufnahmehebel von links nach rechts ziehen.
6.Den Faden nach unten und durch die untere Führung von hinten nach vorne ziehen.
7.Den Faden weiter nach unten durch die Fadenschutzvorrichtung ziehen.
Schließlich von vorne nach hinten einfädeln (Wichtig !!!!)
Feststehender Fadenhalter
40
Heraufholen des Unterfadens
Beim Einsetzen oder Entfernen der unteren Garnrolle muss die Nadel komplett angehoben sein.Am Handrad (Nr.3) drehen. Die Hakenabdeckung öffnen und das Plastikfenster herausziehen. Die Garnrolle in die Garnrollenkapsel setzen, so dass der Faden im Uhrzeigersinn läuft. Das Plastikfenster und die Hakenabdeckung wieder einsetzen.
Den Nähfuß anheben, den Oberfaden mit der linken Hand festhalten und mit der rechten Hand das Handrad gegen den Uhrzeigersinn drehen, bis die Nadel angehoben ist. Wenn die Nadel unten angekommen ist, wird der Oberfaden an der Hakenablage eingehakt, die Hakenablage drehen, um den Unterfaden herauszuziehen. Den Unterund Oberfaden unter den Nähfuß (Nr.14), 10 cm nach hinten ziehen.
 Nr.3
Nr.3
Nr.14
Garnspule aufwickeln
Abbildung 1. Eine Garnrolle auf den Garnspulenstift setzen (Nr.6).
Abbildung 2. Den Faden durch die Fadenführung (Nr.7) bis zur leeren Garnrolle führen. Abbildung 3. Den Faden einige Male im Uhrzeigersinn an der leeren Garnrolle aufwickeln und
auf den Garnrollenwickler (Nr. 5 in Abbildung 1) setzen. Abbildung 4.Die Garnrolle gegen den Garnrollenstopper drücken.
Durch Drücken der Fußsteuerung das elektrische Aufwickeln starten. Wenn die Garnrolle voll ist, Fußpedal lösen, Faden abschneiden, dann die Garnrolle entfernen.
Nr.6 |
Nr.7 |
Nr.5
Rückwärtsnähen
Am Nahtende den Hebel zum Rückwärtsnähen nach unten drücken, ein paar Rückwärtsstiche nähen, Lauf fixieren, um eine Lockerung zu vermeiden. Der Rückwärtslauf sollte nicht unter 5 cm liegen. Hebel lösen und die Maschine näht wieder vorwärts.
Gerade und sonstige Stiche
Sicherstellen, dass der Garnrollenwickler (Nr.5) auf "Nähen" steht.
Es stehen zwei Arten von Gerad-Stichen zur Auswahl. Den Musterwahlschalter auf die erforderliche Einstellung stellen. Die Nadel ganz nach oben stellen, indem das Handrad gegen den Uhrzeigersinn gedreht wird. Beide Fäden sanft nach hinten ziehen (ca. 10 cm), Nähfuß anheben, den Stoff unter den Nähfuß legen.
Sanft die Fußsteuerung nach unten drücken, um mit dem Nähen zu beginnen. Den Stoff sanft per Hand führen.
Die Nadel in der oberen Position anhalten und der Faden kann leicht herausgezogen werden. Nähfuß anheben und den Stoff entfernen.
Dies ist für alle Muster Ihrer Wahl gültig.
Musterwahlschalter
Hinweis:
1. Beim Drehen des Musterwahlschalters sicherstellen, dass die Nadelspitze oben sitzt, ansonsten wird sie geknickt oder beschädigt, oder näht nicht mehr.
2. Beim Wählen des Musterschalters die Position korrekt einstellen, ansonsten wird die Nadel beschädigt oder es wird über den ausgewählten Stichlauf hinaus genäht. Es wird sich vom gewählten Muster unterscheiden.
Knopflöcher
Vorbereitung
1.Den Nähfußhebel anheben, den Metallnähfuß entfernen und mit einem Knopflochfuß ersetzen. (Hinweis: vor dem Einsetzen eines Knopflochfußes am Handrad drehen und sicherstellen, dass sich der Transporteur unter der Stichplatte befindet und die Nadel ca. 5 mm über der Stichplatte steht.)
2.Den Durchmesser des Knopfes bestimmen und 3 mm (1/8”) für die Knopflochverriegelung dazurechnen.
3.Bei einem sehr dicken Knopf, mehr zum Durchmesser dazurechnen.
4.Position und Länge des Knopflochs auf dem Stoff markieren.
5.Den Stoff so positionieren, dass die Nadel auf der am weitesten entfernten Markierung steht.
6.Den Knopflochfuß so weit wie möglich herziehen.
7.Den Fuß absenken.
a)Den Musterwahlschalter auf Muster Nr.13 drehen. Mit moderater Geschwindigkeit nähen, bis das Ende der Markierung erreicht ist.
42
b)Den Musterwahlschalter auf Muster Nr.14 drehen und 5-6 Knopflochverriegelungen nähen.
c)Den Musterwahlschalter auf Muster Nr.15 drehen und die linke Seite des Knopflochs bis zu der am weitesten entfernten Markierung nähen (Anfang des Knopflochs).
d)Den Musterwahlschalter auf Nr.16 drehen und Knopflochverriegelungen näheDen Stoff unter dem Fuß entfernen. Den Oberfaden durch die Rückseite des Stoffs ziehen und Oberund Unterfaden verknoten. Die Mitte des Knopflochs mit dem Trennmesser abschneiden; aufpassen, dass die Stiche auf beiden Seiten nicht abgeschnitten werden.
Tipps:
1.Die obere Fadenspannung leicht lösen, um bessere Resultate zu erzielen.
2.Für feine und dehnbare Stoffe eine Unterlage verwenden.
NADELGRÖSSE |
STOFFE |
FADEN |
|
|
|
|
|
9-11(65-75) |
Leichte Stoffe-dünne Baumwolle, |
Feiner Faden für Baumwolle, |
|
|
Voile, Serge, Seide, Musselin, |
Nylon oder Polyester. |
|
|
Qiana, Interlocks, Baumwollstrick, |
|
|
|
Trikots, Jerseys, Krepp, gewebtes |
|
|
|
Polyester, Hemd-& Blusenstoffe. |
|
|
|
|
|
|
12(80) |
Mittelgewichtige Stoffe-Baumwolle, |
|
|
|
Satin, Arbeitskleidung, Segeltuch, |
|
|
|
doppelflächige Stoffe, leichte |
Die meisten Fäden sind von |
|
|
Wolle. |
mittlerer Größe und für diese |
|
|
|
Stoffe und Nadelgrößen geeignet. |
|
14(90) |
Mittelgewichtige Stoffe-, Canvas, |
||
Für Synthetik und Baumwolle oder |
|||
|
Wolle, schwerere Strickwaren, |
||
|
natürlich gewebte Stoffe |
||
|
Frottee, Denim. |
||
|
Polyesterfäden für beste |
||
|
|
||
|
|
Ergebnisse verwenden. Oben und |
|
16(100) |
Schwere Stoffe-Canvas, Wolle, |
||
unten immer den selben Faden |
|||
|
Zeltstoffe und gesteppte Stoffe, |
benutzen. |
|
|
Denim, Möbelstoffe (leicht bis |
|
|
|
mittel.) |
|
|
|
|
|
|
18(110) |
Schwere Wolle, Mantelstoffe, |
Strapazierfähiger Faden, |
|
|
Möbelstoffe, manches Leder und |
Teppichfaden. (starken Fußdruck |
|
|
Vinyl. |
ausüben-große Anzahl). |
|
|
|
|
43
Problembehandlung
Problem |
|
Ursache |
|
Beheben |
|
|
|
||
Oberfaden reißt |
1. Die Maschine ist nicht |
1.Die Maschine neu einfädeln. |
||
|
richtig eingefädelt. |
2. |
Die Fadenspannung |
|
|
2. |
Die Fadenspannung ist zu |
lockern (niedrigere Zahl). |
|
|
fest. |
3. |
Eine größere Nadel |
|
|
3. |
Der Faden ist zu dick für |
wählen. |
|
|
die Nadel. |
4. |
Die Nadel entfernen und |
|
|
4. |
Die Nadel ist nicht richtig |
wieder einsetzen (flache Seite |
|
|
eingesetzt. |
nach hinten). |
||
|
5. |
Der Faden ist rund um den |
5. |
Die Garnrolle entfernen und |
|
Spulenstift gewickelt. |
neu aufwickeln. |
||
|
6. |
Die Nadel ist beschädigt. |
6. |
Die Nadel austauschen. |
|
|
|
||
Unterfaden reißt |
1. Der Unterfaden ist nicht |
1.Das Einfädeln vorsichtig |
||
|
richtig eingesetzt. |
überprüfen. |
||
|
2. |
Die Oberfadenspannung ist |
2. |
Die Oberfadenspannung |
|
zu locker. |
anpassen. |
||
|
|
|
|
|
|
|
|
|
|
Ausgelassene Stiche |
1. Die Nadel ist nicht richtig |
1. |
Die Nadel entfernen und |
|
|
eingesetzt. |
wieder einsetzen (flache Seite |
||
|
2. |
Die Nadel ist beschädigt. |
nach hinten). |
|
|
3. |
Die falsche Nadelgröße |
2. |
Eine neue Nadel einsetzen. |
|
wurde benutzt. |
3. |
Eine Nadel wählen, die für |
|
|
4. |
Der Fuß ist nicht korrekt |
Faden und Stoff geeignet ist. |
|
|
befestigt. |
4. |
Prüfen und korrekt |
|
|
|
|
befestigen. |
|
|
|
|
|
|
Nadel bricht ab |
1. Die Nadel ist beschädigt. |
1. |
Eine neue Nadel einsetzen. |
|
|
2. |
Die Nadel ist nicht richtig |
2. |
Die Nadel korrekt einsetzen |
|
eingesetzt. |
(flache Seite nach hinten). |
||
|
3. |
Falsche Nadelgröße für |
3. |
Eine Nadel wählen, die für |
|
den Stoff. |
Faden und Stoff geeignet ist. |
||
|
4. |
Der falsche Fuß ist |
4. |
Prüfen und korrekt |
|
befestigt. |
befestigen. |
||
Lockere Stiche |
1. |
Die Maschine ist nicht |
1. |
Einfädeln überprüfen. |
|
||||
|
richtig eingefädelt. |
2. |
Garnrollenkapsel wie |
|
|
2. |
Die Garnrollenkapsel ist |
abgebildet einfädeln. |
|
|
nicht richtig eingefädelt. |
3. |
Die Nadelgröße muss für |
|
|
3. |
|
Stoff und Faden geeignet |
|
|
Nadel/Stoff/Fadenkombination |
sein. |
||
|
ist falsch. |
4. |
Fadenspannung |
|
|
4. |
Falsche Fadenspannung. |
korrigieren. |
|
|
|
|
|
|
Naht kräuselt |
1. Die Nadel ist für den Stoff |
1. |
Eine feinere Nadel wählen. |
|
|
zu groß. |
2. |
Die Stichlänge neu |
|
|
2. |
Die Stichlänge ist falsch |
einstellen. |
|
|
eingestellt. |
3. |
Die Fadenspannung |
|
|
3. |
Die Fadenspannung ist zu |
lockern. |
|
|
fest. |
|
|
|
|
|
|
|
|
44

WICHTIGE SICHERHEITSHINWEISE
Lesen Sie alle Anleitungen.
Berühren Sie keine heißen Teile. Benutzen Sie Handgriffe oder Knöpfe.
Zum Schutz vor Stromschlag Gerät, Netzkabel oder Stecker nicht in Wasser oder andere Flüssigkeiten eintauchen.
Ziehen Sie den Netzstecker, wenn das Gerät nicht in Betrieb ist, wenn Zubehörteile ausgewechselt werden oder wenn das Gerät gereinigt wird. Sind Netzstecker oder Netzkabel beschädigt, dann benutzen Sie das Gerät bitte nicht. Das gleiche gilt, wenn das Gerät nicht richtig funktioniert oder in irgendeiner anderen Weise beschädigt ist.
Die Benutzung nicht empfohlener Zubehörteile kann zu Verletzungen führen, außerdem verlieren Sie Ihre Garantieansprüche.
Nicht im Freien oder in unmittelbarer Nähe von Wärmequellen benutzen.
Netzkabel nicht über die Tischkante hängen lassen und von heißen Oberflächen entfernt halten. Betreiben Sie das Gerät nicht unterhalb oder in unmittelbarer Nähe von Vorhängen oder Gardinen.
Dieses Gerät ist nur für die Verwendung im Haushalt bestimmt.
Stellen Sie das Gerät sicher auf einer ebenen Arbeitsfläche auf.
Lassen Sie das Gerät während des Betriebs nicht unbeaufsichtigt.
Dieses Gerät ist nicht für Personen mit körperlich, sensorisch oder geistig eingeschränkten Fähigkeiten, oder für unerfahrene und unwissende Personen geeignet, es sei denn, diese wurden von einer schutzbefohlenen Person in Bezug auf den Gebrauch des Geräts beaufsichtigt oder angeleitet.
Lassen Sie Kinder nicht unbeaufsichtigt mit dem Gerät, um sie vor den Gefahren im Umgang mit elektrischen Geräten zu schützen. Suchen Sie für das Gerät also einen Platz aus, der für Kinder unzugänglich ist. Achten Sie darauf, dass das Kabel nicht
herunterhängt.
BITTE BEWAHREN SIE DIE BEDIENUNGSANLEITUNG FÜR SPÄTERES NACHSCHLAGEN AUF.
Garantie
Dieses Gerät ist für 24 Monate ab Kaufdatum garantiert (bitte Kaufbeleg aufbewahren).
Während der Garantiezeit werden Defekte aufgrund von Materialund Fertigungsfehlern kostenfrei repariert oder das Gerät wird ersetzt. Im Garantiefall verlängert sich die Laufzeit der ursprünglichen Garantie nicht!
Bitte bewahren Sie Ihren Kaufbeleg auf. Ohne Kaufbeleg nehmen wir keine Garantiearbeiten vor.
Im Garantiefall geben Sie das Gerät bitte mit allen Zubehörteilen originalverpackt und mit Kaufbeleg bei Ihrem Fachhändler ab.
Beschädigte Zubehörteile führen nicht automatisch zum Ersatz des gesamten Geräts. Bitte wenden Sie sich in einem solchen Fall an unsere Hotline. Glasund Kunststoffteile unterliegen nicht der Garantie.
Verschleißteile, Reinigung und Wartung sind nicht durch die Garantie abgedeckt und werden berechnet!
Bei unerlaubtem Eingriff Dritter verlieren Sie Ihre Garantieansprüche.
Nach Ablauf der Garantie vereinbaren Sie kostenpflichtige Reparaturen bitte mit
Ihrem Fachhändler oder dem Kundendienst.
45
Hinweise zum Umweltschutz
Das Gerät darf am Ende seiner Gebrauchsfähigkeit nicht über den Hausmüll entsorgt werden. Bitte geben Sie es an einer Sammelstelle für Altgeräte ab. Das Symbol auf Gerät, Bedienungsanleitung und Verpackung gibt Hinweise zur Entsorgung.
Die Materialien sind entsprechend recyclingfähig. Durch Recycling und andere Formen der Wiederverwertung von Altgeräten leisten Sie einen wichtigen Beitrag zum Umweltschutz. Bitte erfragen Sie die nächste Sammelstelle für Altgeräte bei Ihrer örtlichen Verwaltung.
Verpackung
Die Verpackungsmaterialien sind 100% recyclingfähig.
Produkt
Dieses Gerät entspricht der europäischen Richtlinie 2002/96/EC für elektrische und elektronische Altgeräte (EAG). Durch korrekte Wiederverwertung helfen Sie beim Schutz unserer Umwelt.
EU Konformitätserklärung
Dieses Gerät wurde entsprechend der Niederspannungsrichtlinie 73/23/EEC und der EMCRichtlinie 89/336/EC sowie der Richtlinie 93/68/EEC gefertigt und vermarktet.
46
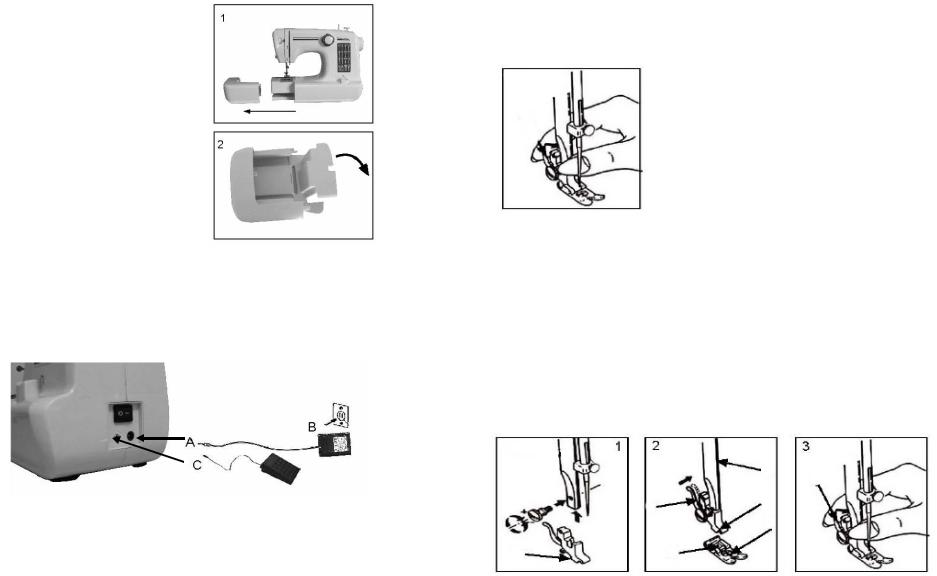
Mesa plana deslizable |
ES |
1.El soporte de la bobina y la bolsa de accesorios se colocan dentro de la base
2.Mantenga la base en posición horizontal y extráigala de la máquina (foto 1)
3.Tire de la cubierta lateral para abrirla. (foto 2)
Conexión a la red
1.Conecte el enchufe “A” a la máquina y el “B” al enchufe de la red en la pared
2.Sitúe el interruptor en la posición de “ENCENDIDO”.
3.Conecte el pedal de control “C” a la máquina.
4.La velocidad de la máquina se puede regular pisando el pedal de control.
Para encender la máquina, sitúe el interruptor en la posición de “ENCENDIDO” , se encenderá la luz de coser.
 Interruptor de encendido/apagado
47
Inserción de la aguja
Atención: ¡Apague la máquina antes de insertar la aguja para evitar el riesgo de electrocución! Cambie la aguja regularmente, sobre todo si muestra señales de desgaste y causa problemas.
Inserte la aguja de la siguiente manera:
Afloje el tornillo que sujeta la aguja (nº 13) y apriételo de nuevo tras insertar la aguja nueva.
La parte plana de la aguja deberá mirar hacia la parte posterior. Inserte la aguja lo más arriba como sea posible.
 (Tornillo que sujeta la aguja nº 13)
Instalación del soporte del prensatelas
La máquina tiene un prensatelas estándar que se utiliza para coser los diferentes tejidos. Para coser ojales y cremalleras deberá colocar otro diferente en la máquina. Para sustituir el prensatelas, véanse las siguientes instrucciones e imágenes:
Figura 1. Levante la palanca del prensatelas (nº 18). Sitúe el tornillo del prensatelas (B) sobre la palanca del mismo y apriete el tornillo A.
Figura 2. Baje la palanca del prensatelas hasta que la muesca (C) esté justo encima del pasador (D) de la zona del prensatelas. Presione E y levante el prensatelas de manera que el pasador D esté exactamente en la hendidura C, a continuación afloje la palanca E.
Figura 3. Quite el prensatelas.
Levante el prensatelas, presione la palanca E de modo que se suelte el prensatelas.
Palanca
del prensatelas Nº 18
E
A E C
Prensatelas
48
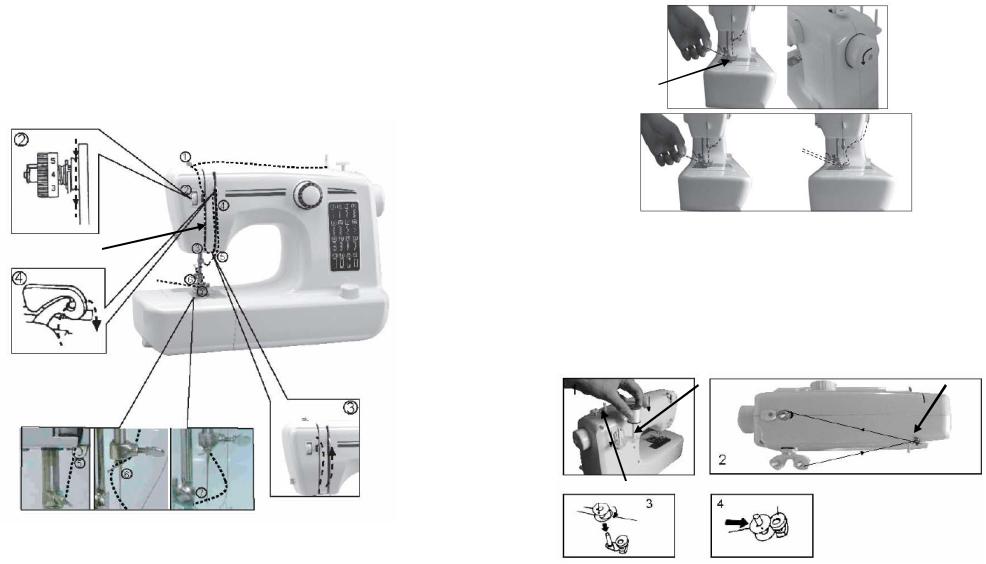
Enhebración del hilo superior.
Para una instalación rápida y sencilla del hilo superior, siga los siguientes pasos del 1 al 8, véase la línea de puntos en el diagrama siguiente. Las ampliaciones servirán a modo de clarificaciones de cada paso.
1.Sitúe la bobina en el devanador (nº 5) y haga pasar el hilo a través de la guía hijo del devanador (nº7) desde la parte posterior a la frontal.
2.Empuje la barra de destensión situada a la izquierda y a continuación guíe el hilo hacia abajo entre el disco de tensión al mismo tiempo que se asegura de insertar dicho hilo en el disco de tensión.
3.Siga tirando del hilo hacia abajo y alrededor del muelle del soporte fijo de barra de hilo de derecha a izquierda.
4.Pase el hilo hacia arriba a través de la palanca tensora y tire de izquierda a derecha.
5.Continúe tirando hacia abajo del hilo y páselo de delante hacia atrás a través de la palanca tensora.
6.Tire hacia abajo del hilo y hágalo pasar a través de la guía inferior desde delante hacia atrás.
7.Siga tirando hacia abajo a través del protector de hilo.
Finalmente enhebre la aguja de delante hacia atrás (¡muy importante!)
Soporte fijo del hilo
49
Elevación del hilo inferior
Al insertar o extraer la bobina inferior, la aguja debe estar completamente levantada.Gire el volante (nº3). Abra la tapa del gancho y extraiga la ventana de plástico.Inserte la bobina en la caja inferior de manera que el hilo gire en la dirección de las agujas del reloj. Vuelva a colocar la ventana de plástico y la tapa del gancho. Eleve el prensatelas, sostenga el hilo superior con la mano izquierda, haga girar el volante con la mano derecha en sentido contrario a las agujas del reloj hasta que la aguja se eleve. Cuando la aguja alcance el panel inferior, la tapa del gancho enganchará el hilo superior; gire esta placa para extraer el hilo inferior. Tire de los hilos superior e inferior bajo el prensatelas (nº 14), y saquélo 10 cm hacia la parte trasera.
 Nº 3
Nº 3
Nº 14
Devanado de la bobina.
Figura 1. Coloque un pasador de hilo sobre el de la bobina (nº 6).
Figura 2. Pase el hilo a través del guía hilos del devanador (nº 7) hasta la bobina vacía. Figura 3. Enrolle el hilo varias veces en el sentido de las agujas del reloj alrededor de la
bobina vacía y sitúelo sobre el devanador de bobinas (nº 5 en la figura 1). Figura 4. Empuje la bobina contra el tope de bobinas.
Comience el bobinado eléctrico pisando el pedal de control.
Cuando la bobina esté llena, suelte el pedal, corte el hilo y a continuación extraiga la bobina.
Nº 6 |
Nº 7 |
Nº 5
50
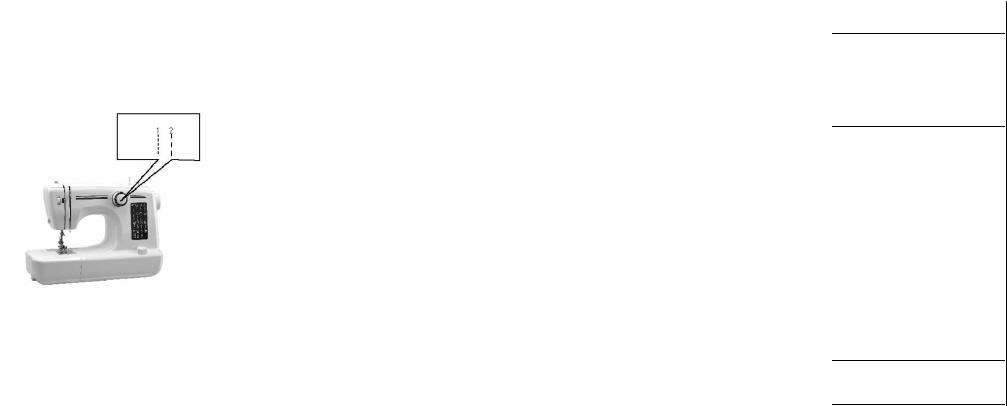
Coser a la inversa.
Al final de una costura, baje la palanca de retroceso, realice varios puntos al revés y fije la costura para evitar que se afloje. La costura inversa no deberá tener más de 5 cm. Libere la palanca y la máquina continuará cosiendo hacia adelante.
Puntos rectos y otros tipos
Asegúrese de que el devanador de bobina (nº 5) está en posición de “coser”.
Puede elegir entre dos tipos de puntos rectos. Gire el botón de selección de puntos a la posición que desee. Sitúe la aguja en su posición más elevada girando el volante en dirección contraria a las agujas del reloj. Tire suavemente de los dos hilos hacia atrás (unos 10 cm), levante el prensatelas, sitúe la tela debajo del mismo.
Presione suavemente el pedal de control para comenzar a coser. Guíe la tela suavemente con sus manos. Detenga la aguja en su posición de parada y así podrá extraer el hilo fácilmente. Levante el prensatelas y aparte la tela.
Este proceso es el mismo para cualquier muestra que elija.
Selector de muestras
Aviso:
1. Al girar el botón de selección de puntos, asegúrese de que la punta de la aguja esté en su posición más elevada, de lo contrario se podría doblar, dañar o no coser.
2. Cuando utilice el botón de selección de puntos, elija la posición correctamente, de lo contrario se puede dañar la aguja o coser sobre la costura elegida. Será diferente de la muestra elegida.
Ojales
Preparación
1.Eleve la palanca del prensatelas, extraiga el prensatelas metálico y sustitúyalo por uno de ojales. (nota: antes de colocar el de ojales, gire el volante y asegúrese de que el transporte de dientes está por debajo de la placa de la aguja y que la aguja está unos 5 mm por encima de la placa).
2.Asegúrese del conocer el diámetro del botón y añada 3 mm (1/8”) para las presillas.
3.Si tiene un botón muy grueso, añada más a la medida del diámetro.
4.Marque la posición y la longitud del ojal sobre la tela.
5.Sitúe la tela de manera que la aguja esté sobre la marca más alejada.
6.Tire del prensatelas de ojales hacia usted tanto como sea posible.
7.Baje el prensatelas.
a)Gire el botón de selección de puntos hasta el patrón nº 13. Cosa a una velocidad moderada hasta que alcance la marca final.
b)Gire el botón de selección de puntos hasta el nº 14 y cosa entre 5 y 6 puntos de presilla.
c)Gire el botón de selección de puntos hasta el nº 15 y cosa la parte izquierda del ojal hasta la marca más alejada (principio del ojal).
51
d)Gire el selector de puntos hasta el nº 16 y cosa unos puntos de presilla.Aparte la tela de debajo del prensatelas. Tire del hilo superior desde la cara posterior de la tela y átelo junto con el hilo inferior. Corte el centro del ojal con el abrecosturas con mucho cuidado para no cortar los puntos de ninguna de las dos partes.
Consejos:
1.Reduzca ligeramente la tensión del hilo superior para obtener mejores resultados.
2.Utilice un tejido de apoyo para telas finas y elásticas.
TAMAÑO DE |
TEJIDOS |
AGUJA |
|
|
|
9-11(65-75) |
Tejidos ligeros como algodón fino, |
|
gasa, sarga, seda, muselina, |
|
Qiana, tela de algodón |
|
entrelazado, algodón tejido, punto |
|
de malla, crepés, mallas, poliéster |
|
entretejido, telas de camisa y de |
|
de blusas. |
12(80) |
Tejidos de grosor medio como |
|
algodón, satén, mezclas de |
|
algodón y poliéster, lona, géneros |
|
de punto doble, lanas ligeras. |
|
|
14(90) |
Tejidos de grosor medio como |
|
lona, géneros de lana, géneros de |
|
puntos más pesados, felpa y tela |
|
vaquera. |
|
|
16(100) |
Materiales resistentes como |
|
lonas, tejidos de lana, lonas de |
|
exterior y tejidos acolchados, |
|
vaqueros y tejidos de tapicería (de |
|
ligeros a medios). |
|
|
18(110) |
Lanas gruesas, tejidos para |
|
abrigos, tejidos de tapicería, algún |
|
tipo de cuero y vinilos. |
HILO
Hilo ligero de algodón, nylon o poliéster.
La mayor parte los hilos tradicionales de tamaño medio son apropiados para estos tejidos y estos tamaños de aguja. Utilice hilos de polyester en materiales sintéticos para obtener resultados mejores. Utilice siempre el mismo hilo en la parte superior y en la inferior.
Hilo robusto, hilo para alfombras. (utilice un prensatelas pesado - números grandes).
52

Resolución de problemas
Problema |
|
Causa |
|
Corrección |
|
|
|
|
|
Se rompe el hilo superior |
1. La máquina no se ha |
1. |
Vuelva a enhebrar la |
|
|
enhebrado correctamente. |
máquina. |
||
|
2. |
La tensión del hilo es |
2. |
Reduzca la tensión del hilo |
|
demasiado elevada. |
(número más bajo). |
||
|
3. |
El hilo es demasiado |
3. |
Seleccione una aguja |
|
grueso para la aguja. |
mayor. |
||
|
4. |
La aguja no se ha insertado |
4. |
Extraiga y vuelva a insertar |
|
correctamente. |
la aguja (con la parte plana |
||
|
5. |
El hilo se ha enredado en |
hacia atrás). |
|
|
el pasador de la bobina. |
5. |
Quite la bobina y vuélvala a |
|
|
6. |
La aguja se ha dañado. |
enrollar. |
|
|
|
|
6. |
Sustituya la aguja. |
|
|
|
|
|
Se rompe el hilo inferior. |
1. El hilo inferior no se ha |
1. |
Compruebe el enhebrado |
|
|
insertado correctamente. |
cuidadosamente. |
||
|
2. |
La tensión del hilo superior |
2. |
Ajuste la tensión del hilo |
|
es demasiado baja. |
superior. |
||
|
|
|
|
|
Se saltan puntos |
1. La aguja no se ha insertado |
1. |
Extraiga y vuelva a insertar |
|
|
correctamente. |
la aguja (con la parte plana |
||
|
2. |
La aguja se ha dañado. |
hacia atrás). |
|
|
3. |
Se ha utilizado una aguja |
2. |
Inserte una aguja nueva. |
|
de tamaño equivocado. |
3. |
Elija una aguja apropiada |
|
|
4. |
El prensatelas no se ha |
para el hilo y el tejido. |
|
|
instalado correctamente. |
4. |
Compruebe e instale |
|
|
|
|
correctamente. |
|
Se rompe la aguja |
1. La aguja se ha dañado. |
1. |
Inserte una aguja nueva. |
|
|
2. |
La aguja no se ha insertado |
2. |
Inserte la aguja |
|
correctamente. |
correctamente (con la parte |
||
|
3. |
Tamaño de aguja |
plana hacia atrás). |
|
|
equivocado para el tejido. |
3. |
Elija una aguja apropiada |
|
|
4. |
Se ha instalado el |
para el hilo y el tejido. |
|
|
prensatelas equivocado. |
4. |
Compruebe e instale |
|
|
|
|
correctamente. |
|
Puntos sueltos |
1. La máquina no se ha |
1. |
Compuebe el enhebrado. |
|
|
enhebrado correctamente. |
2. |
Enhebre la bobina tal y |
|
|
2. |
El portabobina no se ha |
como se ha indicado. |
|
|
enhebrado correctamente. |
3. |
El tamaño de la aguja debe |
|
|
3. |
La combinación de aguja, |
ser apropiado para el tejido y |
|
|
tejido e hilo es incorrecta. |
el hilo. |
||
|
4. |
La tensión del hilo es |
4. |
Corrija la tensión del hilo. |
|
incorrecta. |
|
|
|
|
|
|
|
|
Las costuras se fruncen |
1. La aguja es demasiado |
1. |
Seleccione una aguja más |
|
|
grande para el tejido. |
fina. |
||
|
2. |
La longitud del punto se ha |
2. |
Reajuste la longitud del |
|
ajustado de manera |
punto. |
||
|
incorrecta. |
3. |
Afloje la tensión del hilo. |
|
|
3. |
La tensión del hilo es |
|
|
|
|
|
|
|
|
|
53 |
|
|
NORMAS IMPORTANTES DE SEGURIDAD
Lea todas las instrucciones antes del uso.
No toque las superficies calientes. Use las asas o los mandos.
Para protegerse contra electrocución, no sumerja el cable, el enchufe ni la unidad en agua u otros líquidos.
Desenchufe la unidad de la toma de corriente cuando no esté en uso y antes de limpiarla. Deje enfriar el dispositivo antes de añadir o quitar piezas. No use aparatos con el cable o enchufe dañado, después de que funcionen mal o se hayan dañado de cualquier modo.
El uso de accesorios no recomendados por el fabricante del aparato pueden provocar heridas y anular la garantía que pueda tener.
No lo use en exterior, ni sobre o cerca de fuentes de calor directas.
No deje que el cable cuelgue por el borde de la mesa o encimera, ni toque las superficies calientes o entre en contacto con piezas calientes. No deje que el producto se coloque debajo o cerca de cortinas, persianas, etc.
Este aparato es solamente para uso doméstico, y sólo para su finalidad.
El aparato debe colocarse sobre una superficie estable y nivelada.
Este aparato precisa supervisión, y por lo tanto nunca debe dejarse encendido o cuando esté caliente sin supervisión por un adulto.
El aparato no está diseñado para ser utilizado por personas con disminuciones físicas, sensoriales o mentales, o con falta de experiencia y conocimiento (niños incluidos), a menos que estén supervisados o hayan sido instruidos sobre el uso del aparato por una persona responsable de su seguridad.
Para proteger a los niños de los peligros de los aparatos eléctricos, nunca los deje solos con el aparato sin supervisión. Consecuentemente, al seleccionar el emplazamiento del aparato, piense en un lugar fuera del alcance de los niños. Asegúrese de que el cable no quede colgando.
CONSERVE ESTAS INSTRUCCIONES COMO REFERENCIA EN EL FUTURO
Garantía
El dispositivo proporcionado por nuestra empresa está cubierto por una garantía de 24 meses desde la fecha de compra (recibo).
Durante la duración de la garantía, cualquier avería del dispositivo o sus accesorios debida a defectos de material o fabricación será solucionado sin coste mediante su reparación o, según nuestro criterio, su cambio. El servicio de garantía no implica una ampliación de la duración de la garantía ni da derecho a una nueva garantía.
La prueba de garantía se proporciona mediante la prueba de compra. Sin la prueba de compra no se realizará ningún cambio ni reparación sin coste.
Si desea realizar una reclamación de garantía, devuelva la máquina entera en su embalaje original a su vendedor, junto con el recibo.
Los daños a accesorios no implican el cambio automático gratuito de toda la máquina. En tales casos, contacte con nuestra línea de atención. La rotura de cristales o piezas de plástico siempre tendrán cargo.
Los defectos ds consumibles o piezas susceptibles de desgaste, así como la limpieza, mantenimiento o cambio de dichas piezas, no están cubiertos por la garantía y, por lo tanto, deben pagarse.
La garantía queda anulada en caso de manipulación no autorizada.
54
 Loading...