

TV-IP200/TV-IP200W F.A.Q.
Q: How can I configure my TV-IP200 (w) through the web-based configuration?
Open your web browser and type the IP address of the TV-IP200 in the address bar. The default IP
A:
address is 192.168.0.20.
Q: What is the default IP address of my TV-IP200 (w)?
The default IP address is 192.168.0.20
A:
Q: How can I view the TV-IP200 (w) remotely if it’s behind a router or firewall?
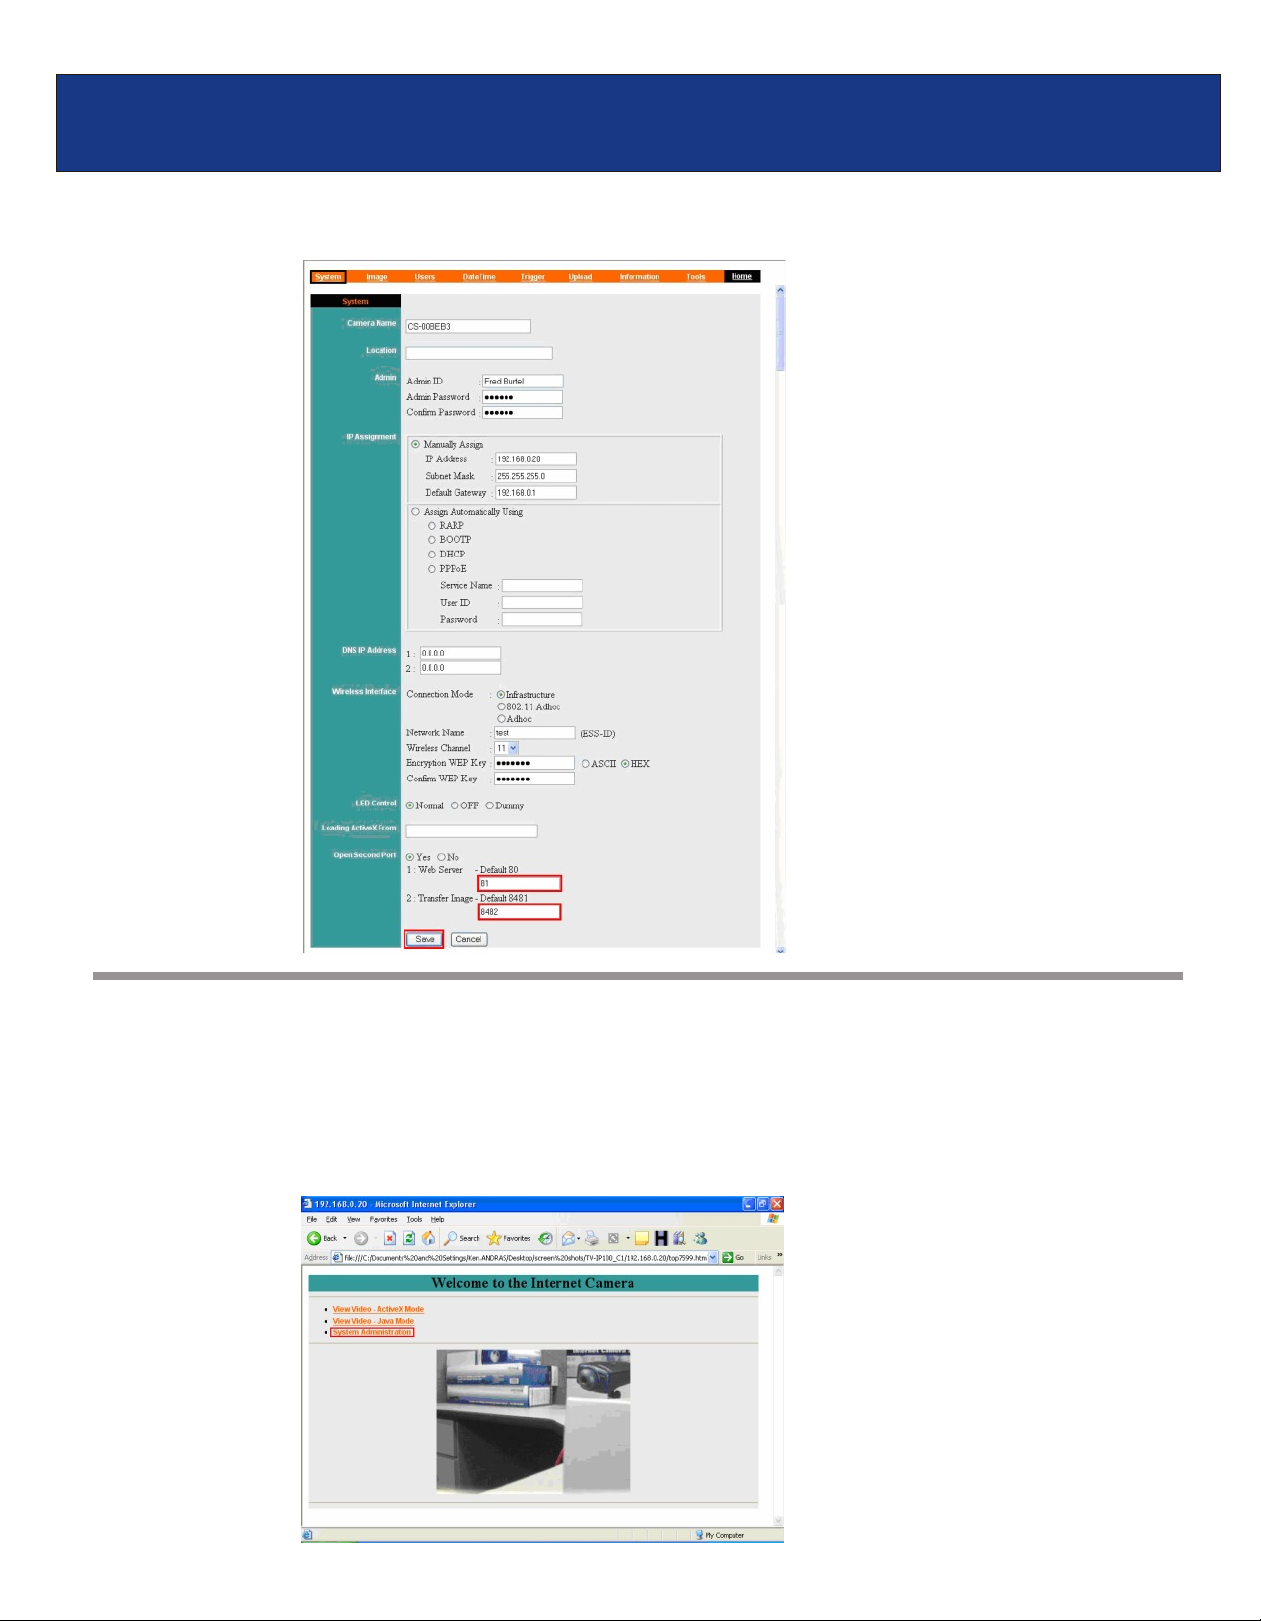
Each camera behind a firewall or router will need one port forwarded for the video streaming. The
A:
default port is: 80 (TCP) HTTP Port.
If you are installing multiple cameras you must change the port on the additional cameras.
Example: Camera 1 is using the default port 80 (TCP). Camera 2 must use a different port. For
example: ports 81 (TCP) and 8482 (TCP).
You can change the port on the camera on the System Administration tab in the web-configuration
page.
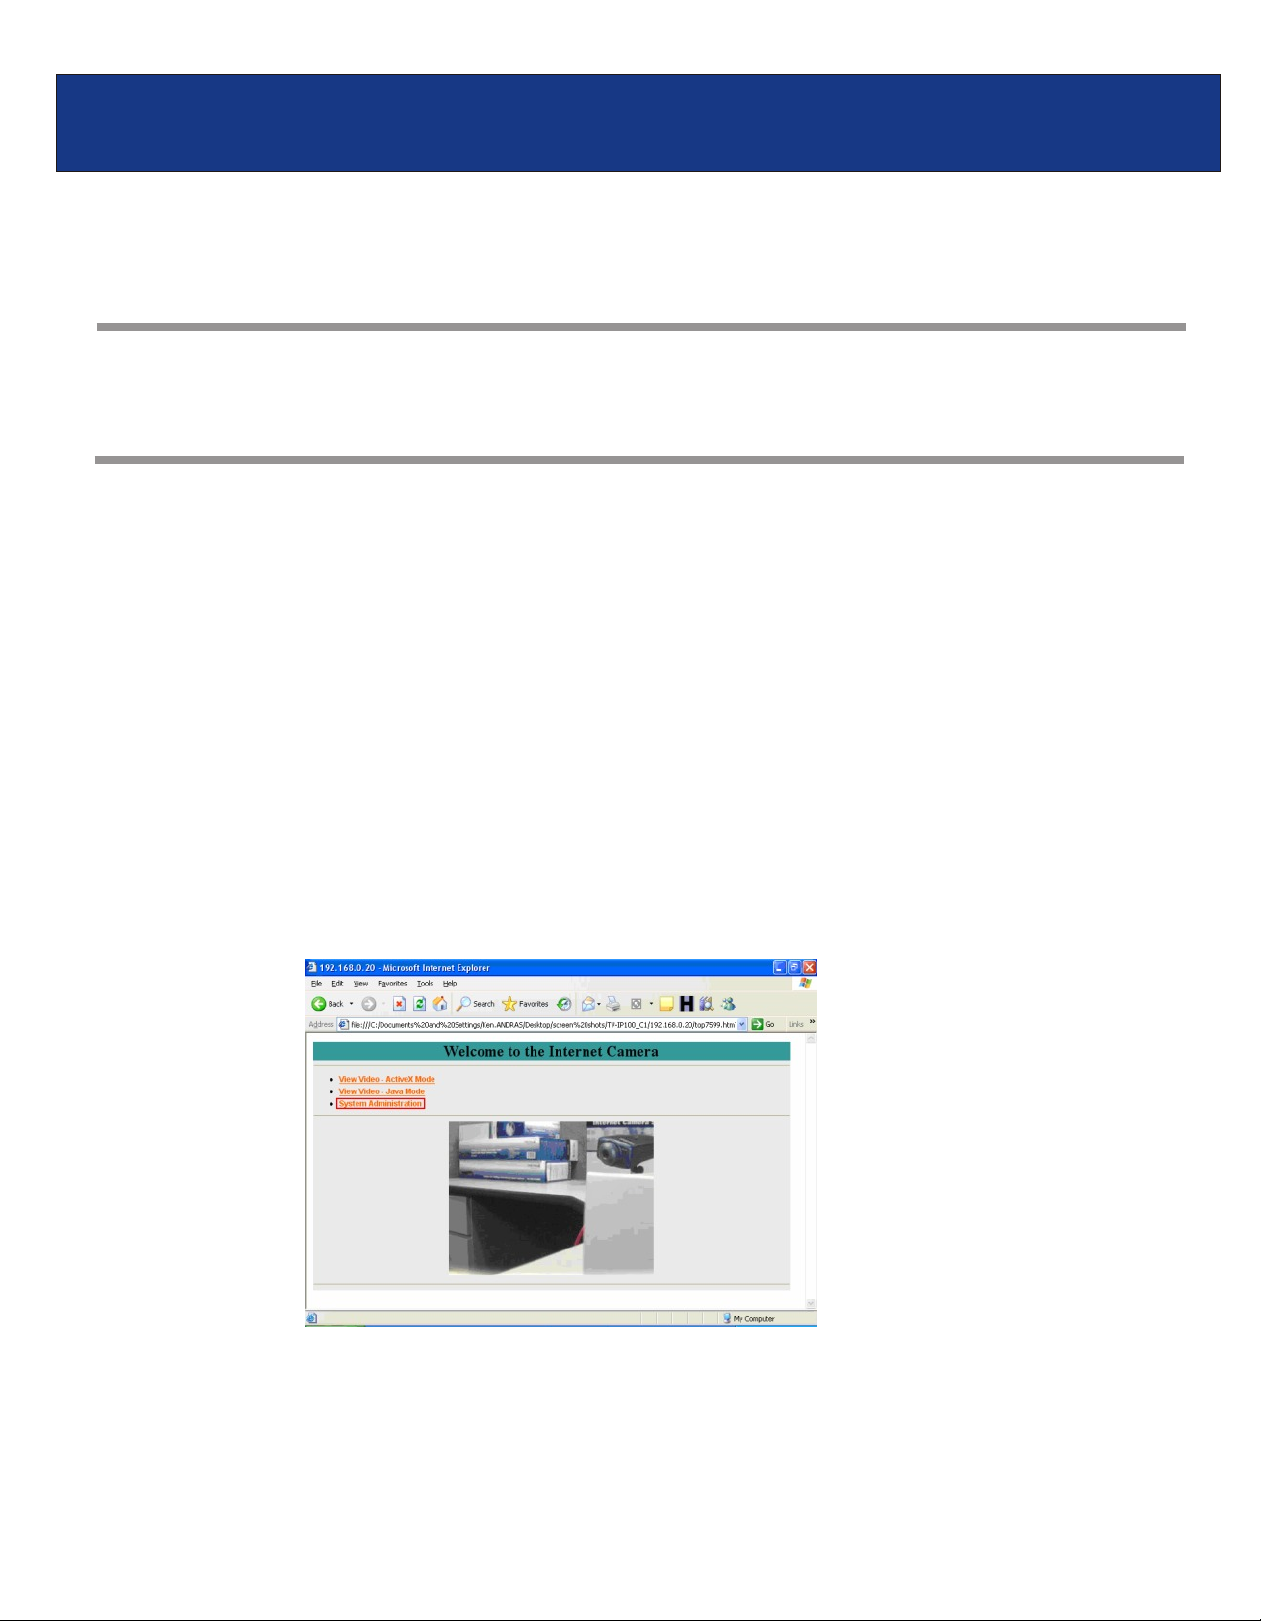
Step 1. Open your web browser and type the IP address of the TV-IP200 (w) in the address
bar. The default IP address is 192.168.0.20.
Step 2. Click on “System Administration”.
TV-IP200/TV-IP200W F.A.Q.
Step 3. Click on the “System" at the top of the page.
Q: How do I make the camera wireless?
Step 1. Open your web browser and type the IP address of the TV-IP200 (w) in the address
A:
bar. The default IP address is 192.168.0.20.
Step 2. Click on “System Administration”.
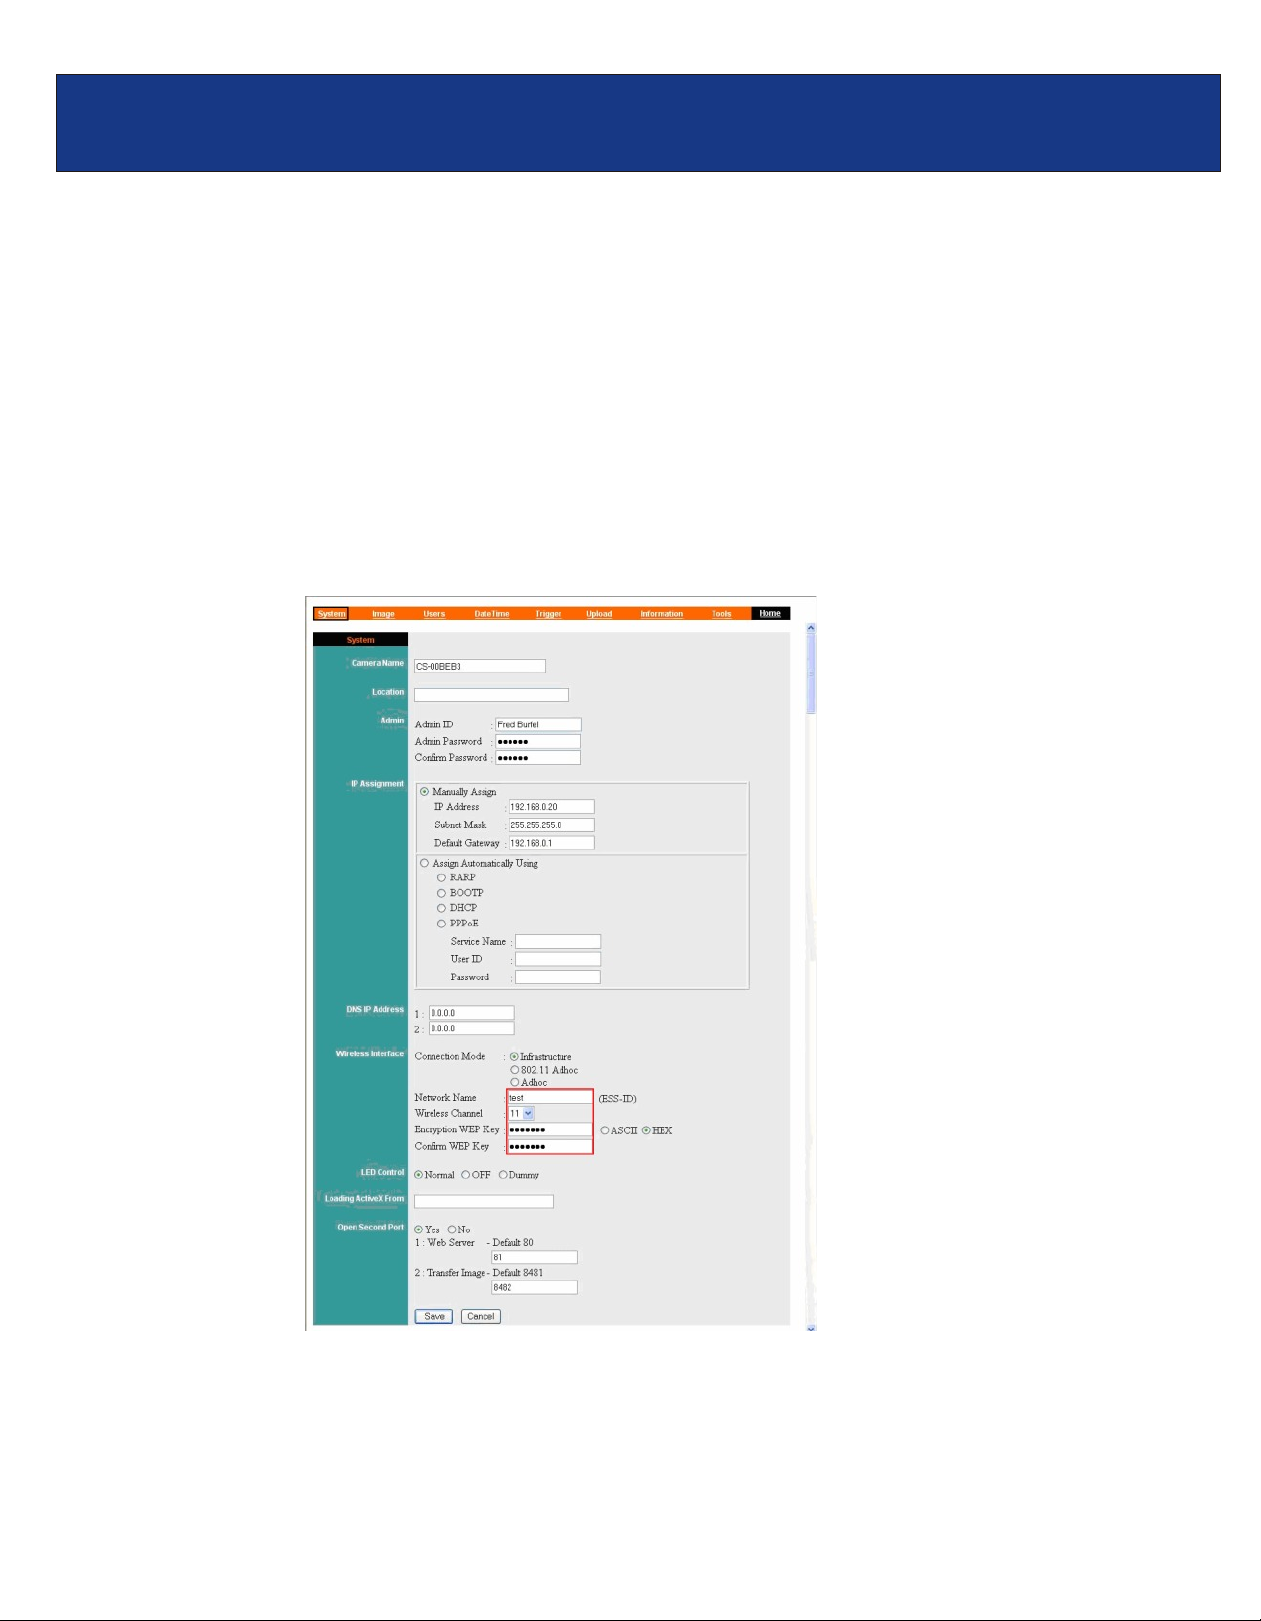
TV-IP200/TV-IP200W F.A.Q.
Step 3. Click on “System” at the top of the screen.
Step 4. Input the ESS-ID, Channel and if you have Encryption setup on our network, you will
need to input that information as well, the click “Save”.
that of your wireless router or access point.
Step 5. After saving the information, unplug the Ethernet cable from the back of the camera,
next, unplug the power from the back of the camera for 10 seconds.
Step 6. Plug the power back into the camera and wait for 30 seconds.
Step 7. Open your web browser and type the IP address of the TV-IP200 (w) in the address bar.
The default IP address is 192.168.0.20.
Note: All information has to match
TV-IP200/TV-IP200W F.A.Q.
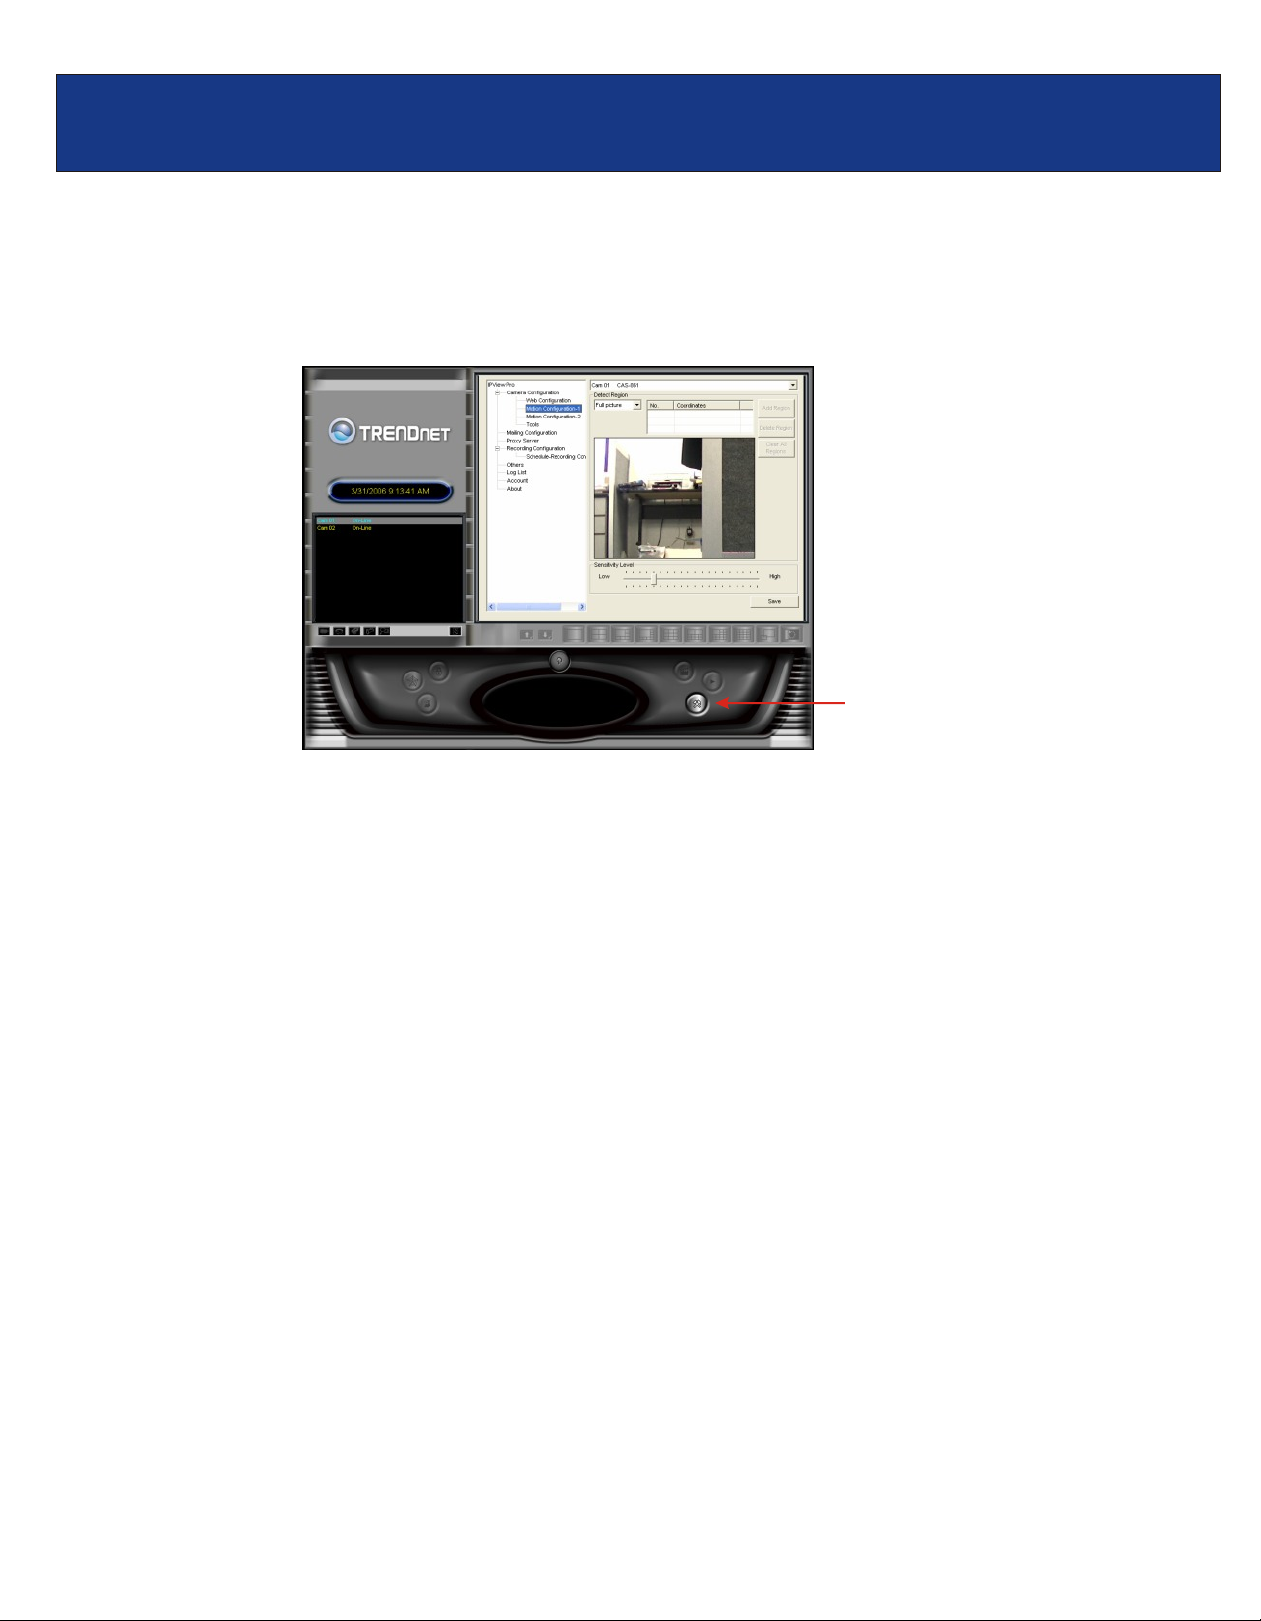
Q: How do I configure the camera to record motion?
Step 1. Start the IPView Pro Program by going to Start>Programs>IPView Pro>IPView Pro.
A:
Step 2. Click on “System Configuration”.
SYSTEM CONFIGURATION
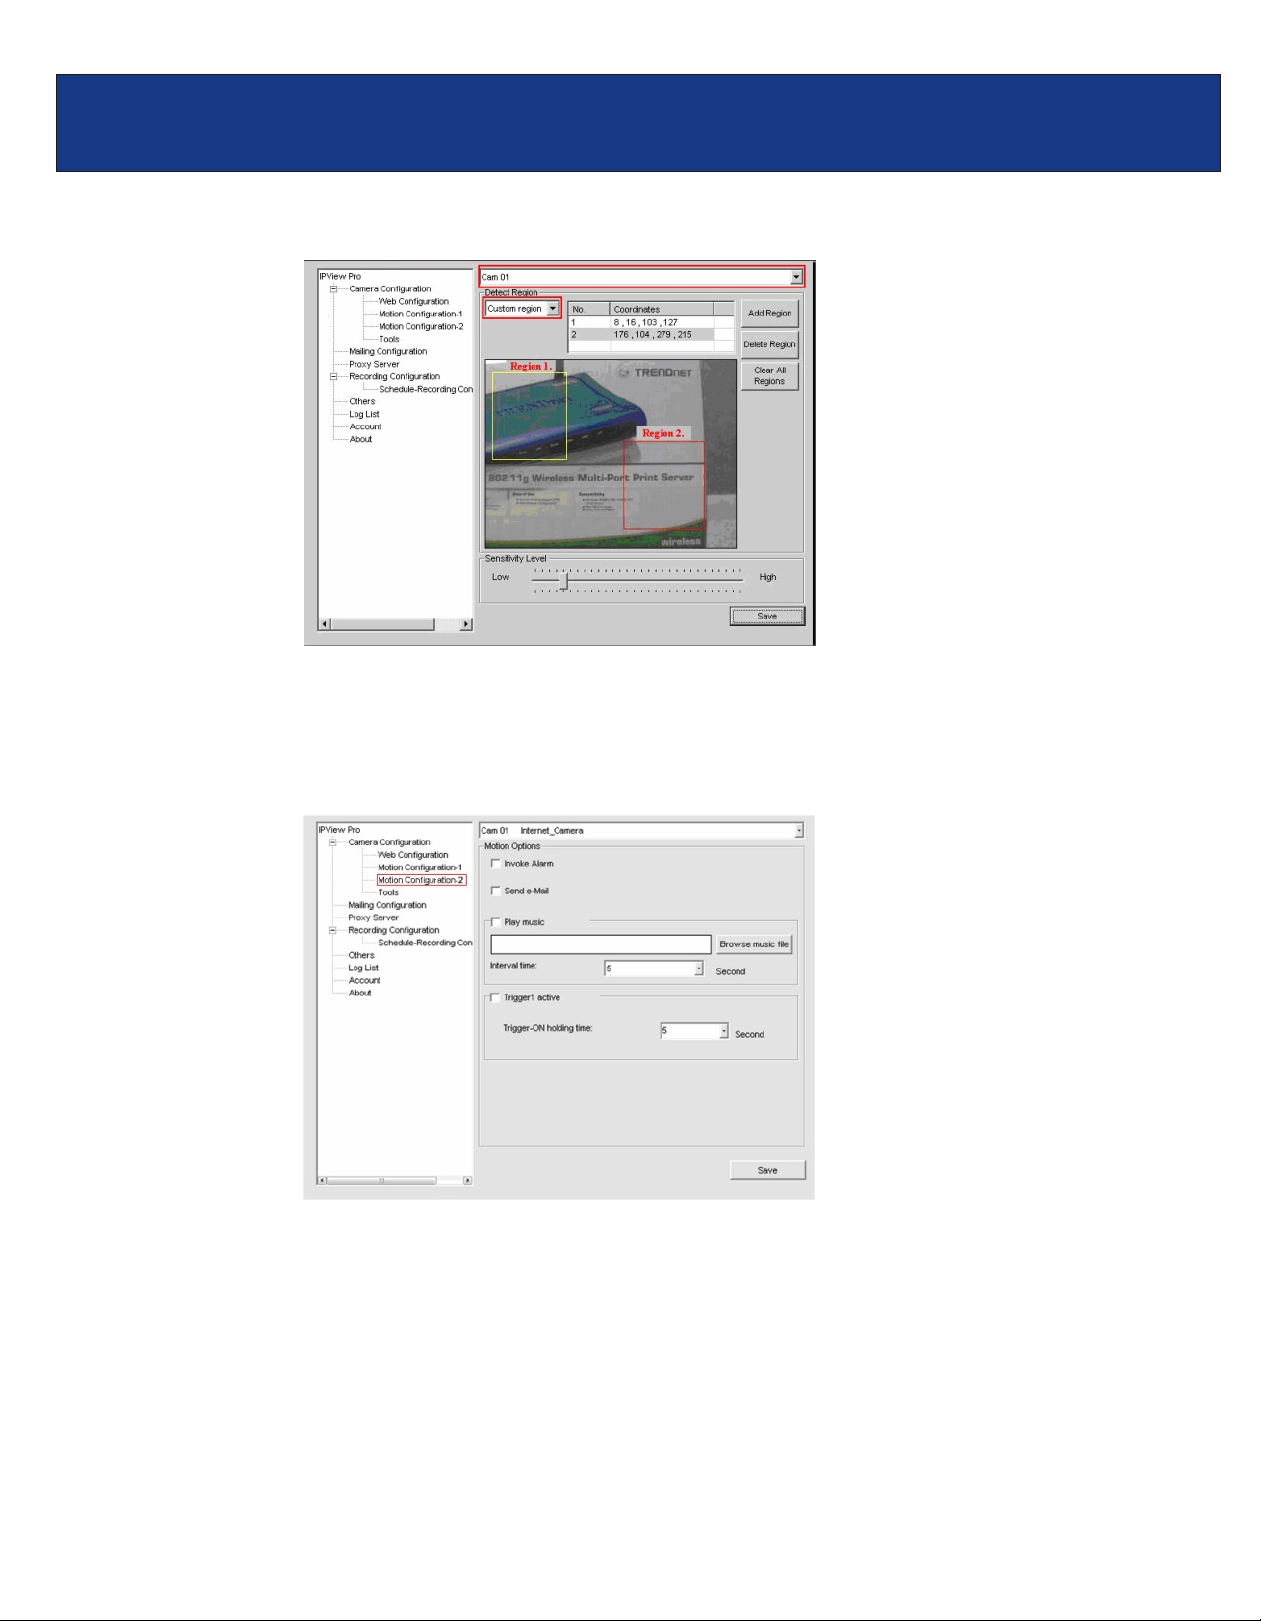
Step 3. Motion Configuration-1
This setting provides the commands for motion detection control. Before configuring,
you should select one camera from the pull-down menu.
Step 4. Detect Region field:
• Full picture – When you select this option, the camera will monitor the whole area.
• Custom region – Click Add Region and then use your mouse to draw an area in the
view screen. When motion is detected within the area, the camera starts recording
automatically. You can set multiple areas in the view screen. Click Delete Region to r
remove the area selected. Click Clear All Regions to remove all areas in the view
screen.
Step 5. Sensitivity Level: Move the slide bar to adjust the sensitivity level for detecting motion to
record video.
Note: The Sensitivity rating determines the amount of motion in the created window(s) to activate
motion. Setting it too high or too low may produce unexpected results. .
TV-IP200/TV-IP200W F.A.Q.
Step 6. Click “Save”.
Motion Configuration-2
The Motion Configuration-2 setting allows you to configure the alarm and e-mail settings.
- Invoke Alarm: Select this option to enable an alarm when motion is detected by the system.
Note: Invoke Alarm requires that you have a trigger installed on the camera.

TV-IP200/TV-IP200W F.A.Q.
Q: How do I configure my email settings?
Step 1. Start the IPView Pro Program by going to Start>Programs>IPView Pro>IPView Pro.
A:
Step 2. Click on “System Configuration”.
SYSTEM CONFIGURATION
Step 3. Click on “Mailing Configuration” and enter in your settings.
Mail Server: Mail Server IP or Name.
Mail From: E-Mail Address of sender.
Mail To: E-Mail Address of receiver.
Subject: Can be any information to high light the message.
User Name: Enter the user name in this field.
Password: Enter the user password in this field to login receiver's mail server.
Interval Time: The time interval to send the next E-Mail.
Then click “Save”.

TV-IP200/TV-IP200W F.A.Q.
Q: How do I upgrade the firmware of my camera?
Step 1. Start the IPView Pro Program by going to Start>Programs>IPView Pro>IPView Pro.
A:
Step 2. Click on “System Administration”.
Step 3. Click “System” then “Tools”.
Step 4. Click “Browse” and locate the firmware file and click open.
Step 5. Click “Upgrade”.
“Warning”: DO NOT upgrade firmware on any TRENDnet product using wireless connection.
Firmware upgrade over wireless connection may damage the product. Please perform firmware
upgrade with "wired" network connection only.
Q: Can my TV-IP200 (w) series camera use Power over Ethernet?
No. However, with the use of a TRENDnet TPE-102S you could power the unit via PoE.
A:
Note: You must have a PoE injector for the TPE-102S. You could use either an existing PoE
switch or a TPE-101I.

TV-IP200/TV-IP200W F.A.Q.
Q: How can I email snapshots based on motion from my camera?
Step 1. Start the IPView Pro Program by going to Start>Programs>IPView Pro>IPView Pro.
A:
Step 2. Click on the “System Configuration” button.
Step 3. Click on “Mailing Configuration”.
SYSTEM CONFIGURATION
Step 4. Enter your mail settings and click “Save”.
Mail Server: Mail Server IP or Name.
Mail From: E-Mail Address of sender.
Mail To: E-Mail Address of receiver.
Subject: Can be any information to high light the message.
User Name: Enter the user name in this field.
Password: Enter the user password in this field to login receiver’s mail server.
Interval Time: The time interval to send the next E-Mail.

TV-IP200/TV-IP200W F.A.Q.
Q: How do I configure my TV-IP200 (w) series cameras to upload snapshots to an
FTP server?
A:
Step 1. Open your web browser and type the IP address of the TV-IP200 (w) in the address
bar. The default IP address is 192.168.0.20.
Step 2. Click on “System Administration”.
Step 3. Click on “Upload” on the top of the screen. Fill in the FTP section and then click
“Save”.

TV-IP200/TV-IP200W F.A.Q.
Step 4. Enter in a schedule or configure a manual upload. To initiate the manual upload do the
following.
a) Open your web browser and type the IP address of the TV-IP200 (w) in the address bar. The
default IP address is 192.168.0.20.
b) Click on either Active X mode or Java mode.
c) To start the manual upload, click “On” next to “Image upload”.

TV-IP200/TV-IP200W F.A.Q.
Q: How do I view the TV-IP200 (w) image using IPView Pro?
A:
Step 1. Start the IPView Pro Program by going to Start>Programs>IPView Pro>IPView Pro.
Step 2. Click on the “System Configuration” button to enter the System Configuration.
SYSTEM CONFIGURATION
If you are not sure of the camera's IP address, you can click “Search” to search the available
camera(s) within the network.
Step 3. Select the camera you want by highlighting it, and then click “Add Camera”.
Q: Which web browsers will allow me to view the video from a TV-IP200 (w)?
Internet Explorer 5.0 and above.
A:

TV-IP200/TV-IP200W F.A.Q.
Q: How do I add user accounts to my TV-IP200 (w)?
A:
Step 1. Open your web browser and type the IP address of the TV-IP200 (w) in the address
bar. The default IP address is 192.168.0.20.
Step 2. Click on “System Administration”.
Step 3. Click on the “Users” link at the top of the page.
Step 4. Enter the desired username and password in the corresponding fields and click “Add”.

TV-IP200/TV-IP200W F.A.Q.
Q: How do I reset my TV-IP200 (w) back to factory defaults?
A:
Step 1. Locate the reset button on the back of the unit.
RESET BUTTON
Step 2. Disconnect the power supply.
Step 3. Press and hold in the reset button.
Step 4. While holding in the reset button; reconnect the power supply.
Step 5. Continue to hold in the reset button for approximately 10 seconds to restore the default
settings.
Q: What do the LED’s on the front of the camera mean?
LED 1 Power LED
A:
The Power LED is positioned on the right side of the Internet Camera’s lens while facing the
Internet Camera. A steady light confirms that the Internet Camera is powered on.
LED 2 Link LED
The Link LED is positioned on the right side of the Internet Camera’s lens while facing the Internet
Camera. It is located right of the Power LED. A steady light confirms that the camera
has good connection to LAN connectivity. Depending on the data traffic the Link LED will begin to
flash to indicate that the Internet Camera is receiving/sending data from/to the network.
BLUE
ORANGE

TV-IP200/TV-IP200W F.A.Q.
Q: How do I set a password on my TV-IP200 (w)?
A:
Step 1. Open your web browser and type the IP address of the TV-IP200 (w) in the address
bar. The default IP address is 192.168.0.20.
Step 2. Click on “System Administration”.
Step 3. Click on the “System” link on the top of the screen.
Step 4. Enter a password into the Admin ID: Field, Enter a password in the Admin password
field then retype it to confirm it. Click “Save”.
 Loading...